

Page 1
Viking Use & Care Manual
Viking Range Corporation
111 Front Street
Greenwood, Mississippi 38930 USA
(662) 455-1200
For product information,
call 1-888-VIKING1 (845-4641)
or visit the Viking Web site at
vikingrange.com
F20517 EN (081508J)
Professional Built-In Gas
Thermal-Convection 36”W. Oven
Page 2

Congratulations
Table of Contents
The purchase of this product attests to the importance you place
upon the quality and performance of the major appliances you use.
With minimal care, as outlined in this guide, this product is designed
to provide you with yearsof dependable service. Please take the few
minutesnecessary to learn the proper and efficient use and care
of this quality product.
Some of the key features of this appliance include:
• Five performance modes–including convection baking and
convection broiling–providing air circulation for shorter cooking
times with even results.
• Convection baking with a dual 15,000 BTU burners provides a fast,
even baking for all your casserole dishes as well as easy cleanup.
• The 1500˚F closed door, infrared broiler allows intense heat to sear
delicate to thick cuts of meat providing that restaurant taste.
Your complete satisfaction is our ultimate goal. If you have any
questions or comments about this product, please contact the dealer
from whom you purchased it, or contact our Consumer Support Center
at 1-888-VIKING1 (845-4641).
We appreciate your choice of a Viking oven and hope that you will
again select our products for your other major appliance needs.
For more information about the complete and growing selection
of Viking products, contact your dealer or visit us online at
vikingrange.com.
Getting Started
Warnings and Important Safety Information _______________________ 4
Before Using Oven ______________________________________________11
Product Controls
Setting the Clock _________________________________________________12
Oven Features____________________________________________________13
Oven Control Panel _______________________________________________ 14
Oven Functions and Settings ______________________________________15
Clocks & Timers __________________________________________________16
Operation
Using Your Oven _________________________________________________19
Rack Positions __________________________________________________ 19
Conventional and Convection Cooking __________________________ 20
Baking ___________________________________________________________22
Bake (Natural Airflow Baking)____________________________________22
Convection Bake _______________________________________________22
Broiling __________________________________________________________27
Broil (Infrared Broil) _____________________________________________ 27
Convection Broil (Infrared Convection Broil) _____________________ 27
Convection Dehydrate ____________________________________________31
Convection Defrost _______________________________________________ 32
Product Care
Cleaning and Maintenance ________________________________________33
Replacing Oven Lights ____________________________________________35
Troubleshooting _________________________________________________36
Service Information ______________________________________________37
Warranty_________________________________________________________38
Page 3
Getting Started
DANGER
WARNING
CAUTION
WARNING
WARNING
WARNING
WARNING
IMPORTANT–
Warning and Important Safety Instructions appearing in this manual
Getting Started
are not meant to cover all possible conditions and situations that
may occur. Common sense, caution, and care must be exercised
when installing, maintaining, or operating the appliance.
ALWAYS contact the manufacturer about problems or conditions you
do not understand.
Recognize Safety Symbols, Words, Labels
Hazards or unsafe practices which WILL result in
severe personal injury or death
Please Read and Follow
IMPORTANT–
If the information in this manual is not followed exactly,
a fire or explosion may result causing property damage,
personal injury or death.
DO NOT store or use gasoline or other flammable vapors and liquids in
the vicinity of this or any appliance.
WHAT TO DO IF YOU SMELL GAS:
• DO NOT try to light any appliance.
• DO NOT touch any electrical switch.
• DO NOT use any phone in your building.
• Immediately call your gas supplier from a neighbor's phone. Follow
the gas supplier's instructions.
• If you cannot reach your gas supplier, call the fire department.
Please Read and Follow
Hazards or unsafe practices which COULD result
in death or severe personal injury
Hazards or unsafe practices which COULD result
in minor personal injury.
All safety messages will identify the hazard, tell you how to
reduce the chance of injury, and tell you what can happen if
the instructions are not followed.
Read and follow all instructions before using this appliance to
prevent the potential risk of fire, electric shock, personal injury or
damage to the appliance as a result of improper usage of the
appliance. Use appliance only for its intended purpose as described
in this manual.
To ensure proper and safe operation: Appliance must be properly
installed and grounded by a qualified technician. DO NOT attempt
to adjust, repair, service, or replace any part of your appliance unless
it is specifically recommended in this manual. All other servicing
should be referred to a qualified servicer. Have the installer show you
the location of the gas shutoff valve and how to shut it off in an
emergency. A certified technician is required for any adjustments or
conversions to Natural or LP gas.
Installation and service must be performed by a qualified installer,
service agency or the gas supplier.
DO NOT use commercial oven cleaners inside the oven. Use of these
cleaners can produce hazardous fumes or can damage the porcelain
finishes.
NEVER cover any slots, holes or passages in the oven bottom or cover
an entire rack with materials such as aluminum foil. Doing so blocks air
flow through the oven and may cause carbon monoxide poisoning.
Aluminum foil linings may also trap heat, causing a fire hazard.
To avoid risk of property damage, personal injury or death;
follow information in this manual exactly to prevent a fire or
explosion.
54
Page 4

IMPORTANT–
Please Read and Follow
IMPORTANT–
Getting Started
Please Read and Follow
To Prevent Fire or Smoke Damage
Getting Started
• Be sure all packing materials are removed from the appliance before
operating it.
• Keep area around appliance clear and free from combustible materials,
gasoline, and other flammable vapors and materials.
• Many aerosol-type spray cans are EXPLOSIVE when exposed to heat and
may be highly flammable. Avoid their use or storage near an appliance.
• Many plastics are vulnerable to heat. Keep plastics away from parts of the
appliance that may become warm or hot.
• Combustible items (paper, plastic, etc.) may ignite and metallic items
may become hot and cause burns.
DO NOT
mushrooms, etc; fire hazard.
leave oven unsupervised when drying herbs, breads,
DO NOT
pour spirits over hot foods.
In Case of Fire
Turn off appliance and ventilating hood to avoid spreading the flame.
Extinguish flame then turn on hood to remove smoke and odor.
• Smother fire or flame by closing the oven door.
DO NOT use water on grease fires. Use baking soda, a dry chemical or
foam-type extinguisher to smother fire or flame.
• GREASE–Grease is flammable and should be handled carefully. Let fat
cool before attempting to handle it.
around the oven or in vents. Wipe up spillovers immediately.
DO NOT
allow grease to collect
Child Safety
• If storage is provided, it should be limited to items which are used
infrequently and which are safely stored in an area subjected to heat from an
appliance. Temperatures may be unsafe for some items, such as volatile
liquids, cleaners or aerosol sprays.
• NEVER leave children alone or unsupervised near the appliance when it is in
use or is still hot.
• NEVER allow children to sit or stand on any part of the appliance as they
could be injured or burned.
• DO NOT store items of interest to children over the unit. Children climbing
to reach items could be seriously injured.
• Children should be taught that an appliance is not a toy. Children should not
be allowed to play with controls or other parts of the appliance.
Cooking Safety
• Use dry, sturdy pot-holders. Damp pot-holders may cause burns from steam.
Dishtowels or other substitutes should NEVER be used as potholders
because they can get caught on appliance parts.
ALWAYS
•
attempting to move or handle.
• Loose-fitting or hanging garments should never be worn while using the
appliance.
items could ignite and cause burns.
•
ALWAYS
oven rack out to add or remove food, using dry, sturdy pot-holders.
ALWAYS
be moved while hot, use a dry pot-holder.
ALWAYS
•
•
DO NOT
the container to explode and result in injury.
• Use care when opening the oven door. Let hot air or steam escape before
moving or replacing food.
• NEVER use aluminum foil to cover oven racks or oven bottom. This could
result in risk of electric shock, fire, or damage to the appliance. Use foil only
as directed in this guide.
• PREPARED FOOD WARNING:
plastic frozen food container and/or its cover distorts, warps, or is otherwise
damaged during cooking, immediately discard the food and its container. The
food could be contaminated
• Once the unit has been installed as outlined in the Installation Instructions,
it is important that the fresh air supply is not obstructed. The use of a gas
cooking appliance results in the production of heat and moisture in the
room in which it is installed. Ensure that the kitchen is well-ventilated. Keep
natural venting holes open or install a mechanical ventilation device.
Prolonged or intensive use of the appliance may call for additional (such as
opening a window) or more effective ventilation (such as increasing the
level of a mechanical ventilation if present).
let quantities of hot fat used for deep fat frying cool before
DO NOT
place oven racks in the desired positions while oven is cool. Slide
avoid reaching into the oven to add or remove food. If a rack must
turn the oven off at the end of cooking.
heat unopened food containers; buildup of pressure may cause
drape towels or materials on oven door handles. These
Follow food manufacturer's instructions. If a
.
Burners
• NEVER touch oven burners, areas near broiler and bake burner, or interior
surfaces of oven.
• Burners may be hot even though they are dark in color. Areas near burners
and interior surfaces of an oven may become hot enough to cause burns.
76
Page 5
CAUTION
IMPORTANT–
WARNING
WARNING
WARNING
WARNING
Please Read and Follow
IMPORTANT–
Getting Started
Please Read and Follow
Burners
Getting Started
• DO NOT TOUCH INTERIOR SURFACES OF OVEN.
(cont.)
Interior surfaces of an oven become hot enough to cause burns. During
and after use, DO NOT touch or let clothing or other flammable materials
contact interior surfaces of oven until they have had sufficient time to cool.
Other surfaces of the oven may become hot enough to cause burns, such
as the oven vent opening, the surface near the vent opening, and the
oven door window.
ELECTRICAL SHOCK HAZARD
DO NOT
the bulb could break. Should the bulb break, disconnect
power to the appliance before removing bulb to avoid
electrical shock.
touch a hot oven light bulb with a damp cloth as
Cleaning Safety
• Turn off all controls and wait for appliance parts to cool before touching or
cleaning them.
• Clean appliance with caution. Use care to avoid steam burns if a wet sponge
or cloth is used to wipe spills on a hot surface. Some cleaners can produce
noxious fumes if applied to a hot surface.
•
DO NOT
should be taken not to rub, damage, or move the gasket.
• No commercial oven cleaner or oven liner protective coating such as
aluminum foil should be used in or around any part of the oven. Improper
oven liners may result in a risk of electric shock or fire. Keep oven free
from grease buildup.
clean door gasket. It is essential for a good tight seal. Care
About Your Appliance
NEVER use appliance as a space heater to heat or warm a room to
prevent potential hazard to the user and damage to the appliance. Also,
DO NOT use the oven as a storage area for food or cooking utensils.
• Avoid touching oven vent area while oven is on and for several minutes after
oven is turned off. When the oven is in use, the vent and surrounding area
become hot enough to cause burns. After oven is turned off, DO NOT touch
the oven vent or surrounding areas until they have had sufficient time to cool.
• The misuse of oven doors (e.g. stepping, sitting, or leaning on them) can
result in potential hazards and/or injuries.
• The appliance must be installed and electrically grounded according to
local codes. Have the installer identify the location and shut-off valve on
the oven so you know where and how to turn off gas if necessary.
KEEP THESE INSTRUCTIONS FOR FUTURE REFERENCE.
To avoid sickness and food waste when using automatic time baking:
• DO NOT use foods that will spoil while waiting for cooking to start,
such as dishes with milk or eggs, cream soups, custards, fish, pork,
poultry, or foods with stuffing.
• Any food that has to wait for cooking to start should be very cold or
frozen before it is placed in the oven.
• DO NOT use foods containing baking powder or yeast when
automatic time baking. They will not rise properly.
• DO NOT allow food to remain in the oven for more than two hours
after the end of the cooking cycle.
• To avoid sickness and food waste, DO NOT allow defrosted food to
remain in the oven for more than two hours.
ELECTRICAL SHOCK HAZARD
Disconnect the electric power at the main fuse or circuit
breaker before replacing bulb.
BURN OR ELECTRICAL SHOCK HAZARD
Make sure all controls are OFF and oven is COOL before
cleaning. Failure to do so can result in burns or electrical
shock.
8
9
Page 6
Getting Started
NOTICE
CAUTION
CAUTION
CAUTION
IMPORTANT–
Getting Started
You must carefully check the food during the dehydration process to
ensure that it does not catch fire.
Please Read and Follow
Before Using Oven
All products are wiped clean with solvents at the factory to remove any
visible signs of dirt, oil, and grease which may have remained from the
manufacturing process. There may be some burn off and odors on first
use of the appliance–this is normal.
Oven
Important! Before first use, wipe interior with soapy water and dry
thoroughly. Then set the oven selector to bake, the thermostat to
DO NOT turn the Temperature Control on during defrosting. Turning
the convection fan on will accelerate the natural defrosting of the food
without the heat.
BURN HAZARD
The oven door, especially the glass, can get hot. Danger of burning:
DO NOT touch the glass!
350°F, and operate for an hour.
• Five performance modes—including convection baking and
convection broiling—providing air circulation for shorter cooking
times with even results.
• Convection baking with dual 15,000 BTU burners provides a fast,
even baking for all your casserole dishes as well as easy cleanup.
• The 1500°F closed door, infrared broiler allows intense heat to
sear delicate cuts of meat providing that restaurant taste.
• Lighted digital display indicates time and temperature.
DO NOT store items of interest to children over the unit. Children
climbing to reach items could be seriously injured.
10
•Porcelain removable bottom and sides for easier cleaning.
• This appliance is certified by Star-K to meet strict regulations in
conjunction with specific instructions found on www.star-k.org.
11
Page 7
OVEN
L
IGHT
O
FF
B
ROIL
C
ANCEL
C
LOCK
T
IMER
COOK
T
IME
BROIL
H
I/LOW
DOWN
B
AKE
TEMP
U
P
B
AKE
C
ONVECTION
B
AKE
C
ONVECTION
B
ROIL
1
2
3
4
5
6
Setting the Clock
CANCELCANCEL
CLOCKCLOCK
TIMERTIMER
COOKCOOK
T
IMETIME
BROILBROIL
H
I/LOWHI/LOW
DOWNDOWN
BAKEBAKE
TEMPTEMP
U
PUP
Digital Display
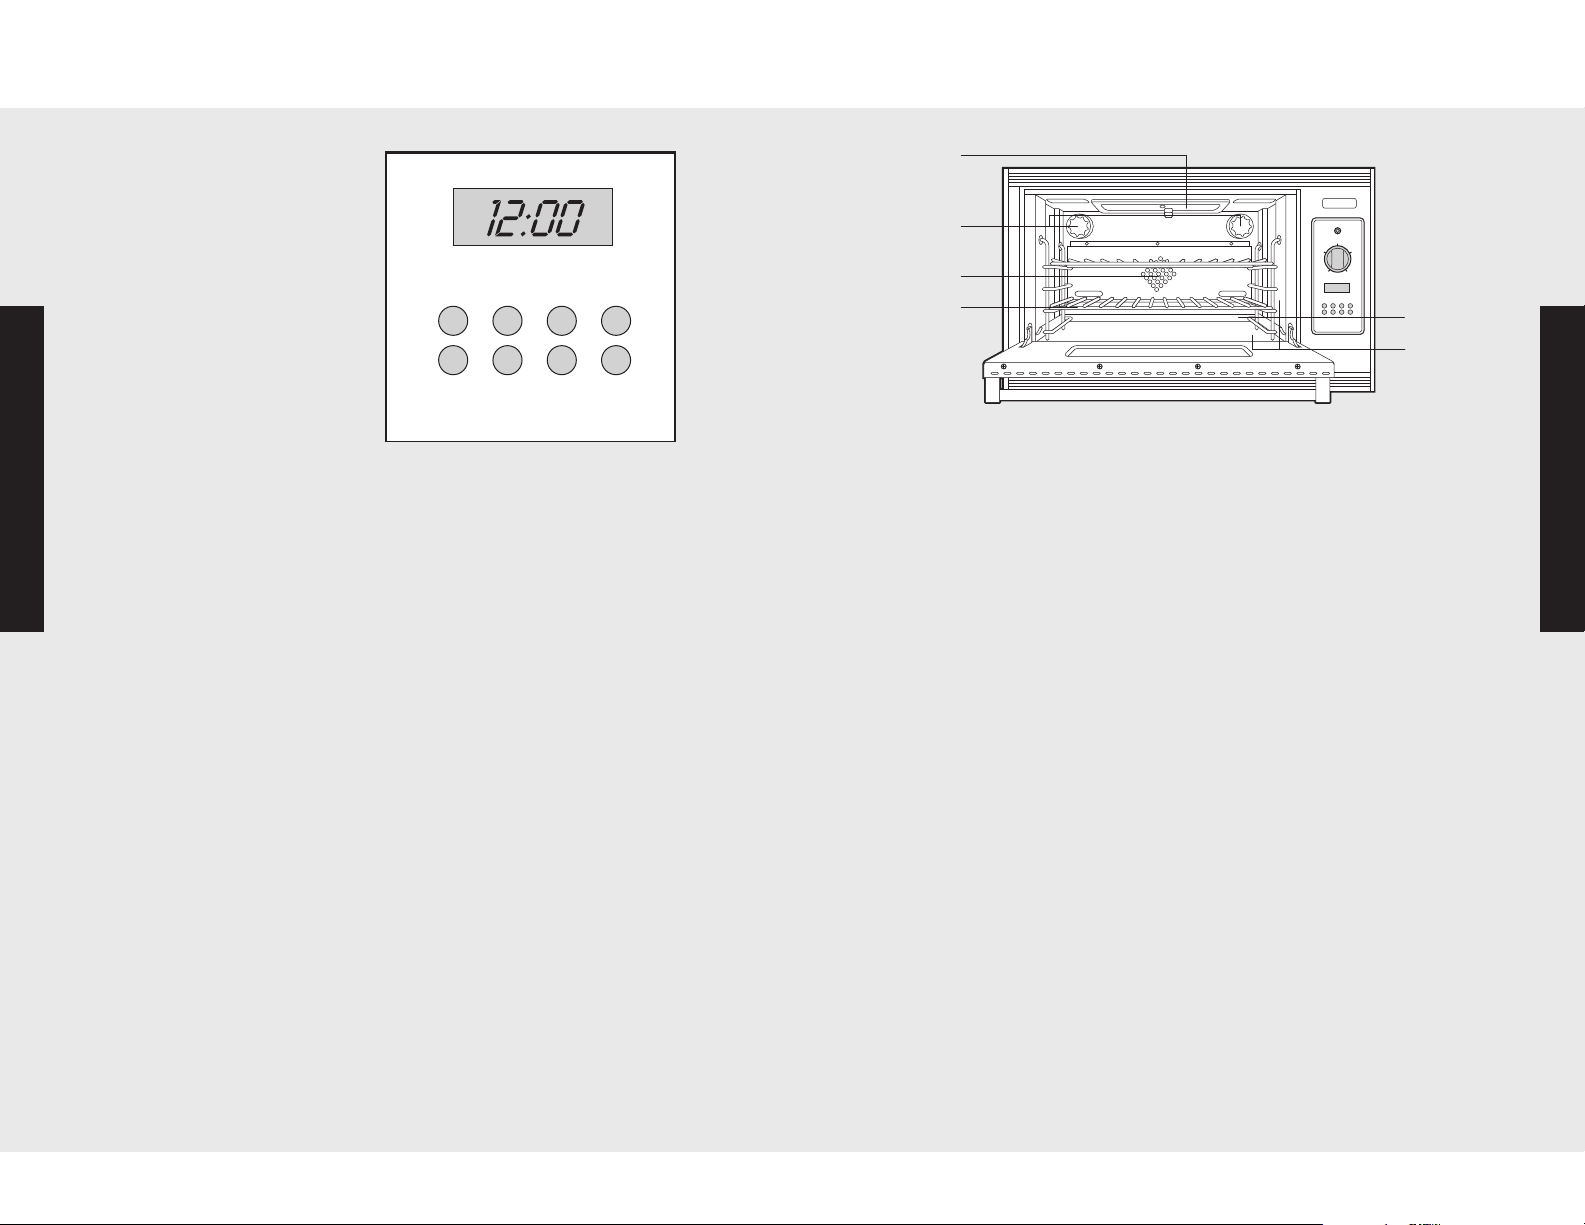
The time-of-day must be set
before any other program can
be used. When your oven is
first connected to the power in
your home, the timer display
will show 12:00.
To program the time-of-day:
Oven Features
1. Press the “CLOCK” button.
Product Controls
A single tone will sound
and the colon will flash
indicating the clock function
has been accessed.
1. Gourmet Glo™
Infrared burner
2. Oven lights (2)
3. Convection fan
Product Controls
2. “UP” and “DOWN” are used to set the time of day. “UP” increases
time; “DOWN” decreases time. “UP/DOWN” will increase or
4. Oven racks (3)
5. Bake burner
6. Removable
bottom and sides
decrease the time in 1-minute increments. When the button is held
down, time will increase or decrease in 5-minute increments until
the next hour is reached, then will continue to increase or decrease
in hour increments.
3. Release the button when the appropriate time has been reached.
4. The clock mode will terminate if the time is not set within 30
seconds of accessing the clock function. The colon will cease
flashing indicating the clock mode has been terminated. Pressing
“CANCEL” once will also terminate the clock mode.
The time-of-day can be changed by following steps 1 through 4. It
cannot be changed while there is a TIMER or COOK TIME cycle
programmed into the timer.
12
13
Page 8
Oven Control Panel
OVENOVEN
LIGHTLIGHT
OFFOFF
BROILBROIL
C
ANCELCANCEL
CLOCKCLOCK
T
IMERTIMER
COOKCOOK
TIMETIME
BROILBROIL
HI/LOWHI/LOW
DOWNDOWN
BAKEBAKE
TEMPTEMP
UPUP
BAKEBAKE
CONVECTIONCONVECTION
BAKEBAKE
CONVECTIONCONVECTION
BROILBROIL
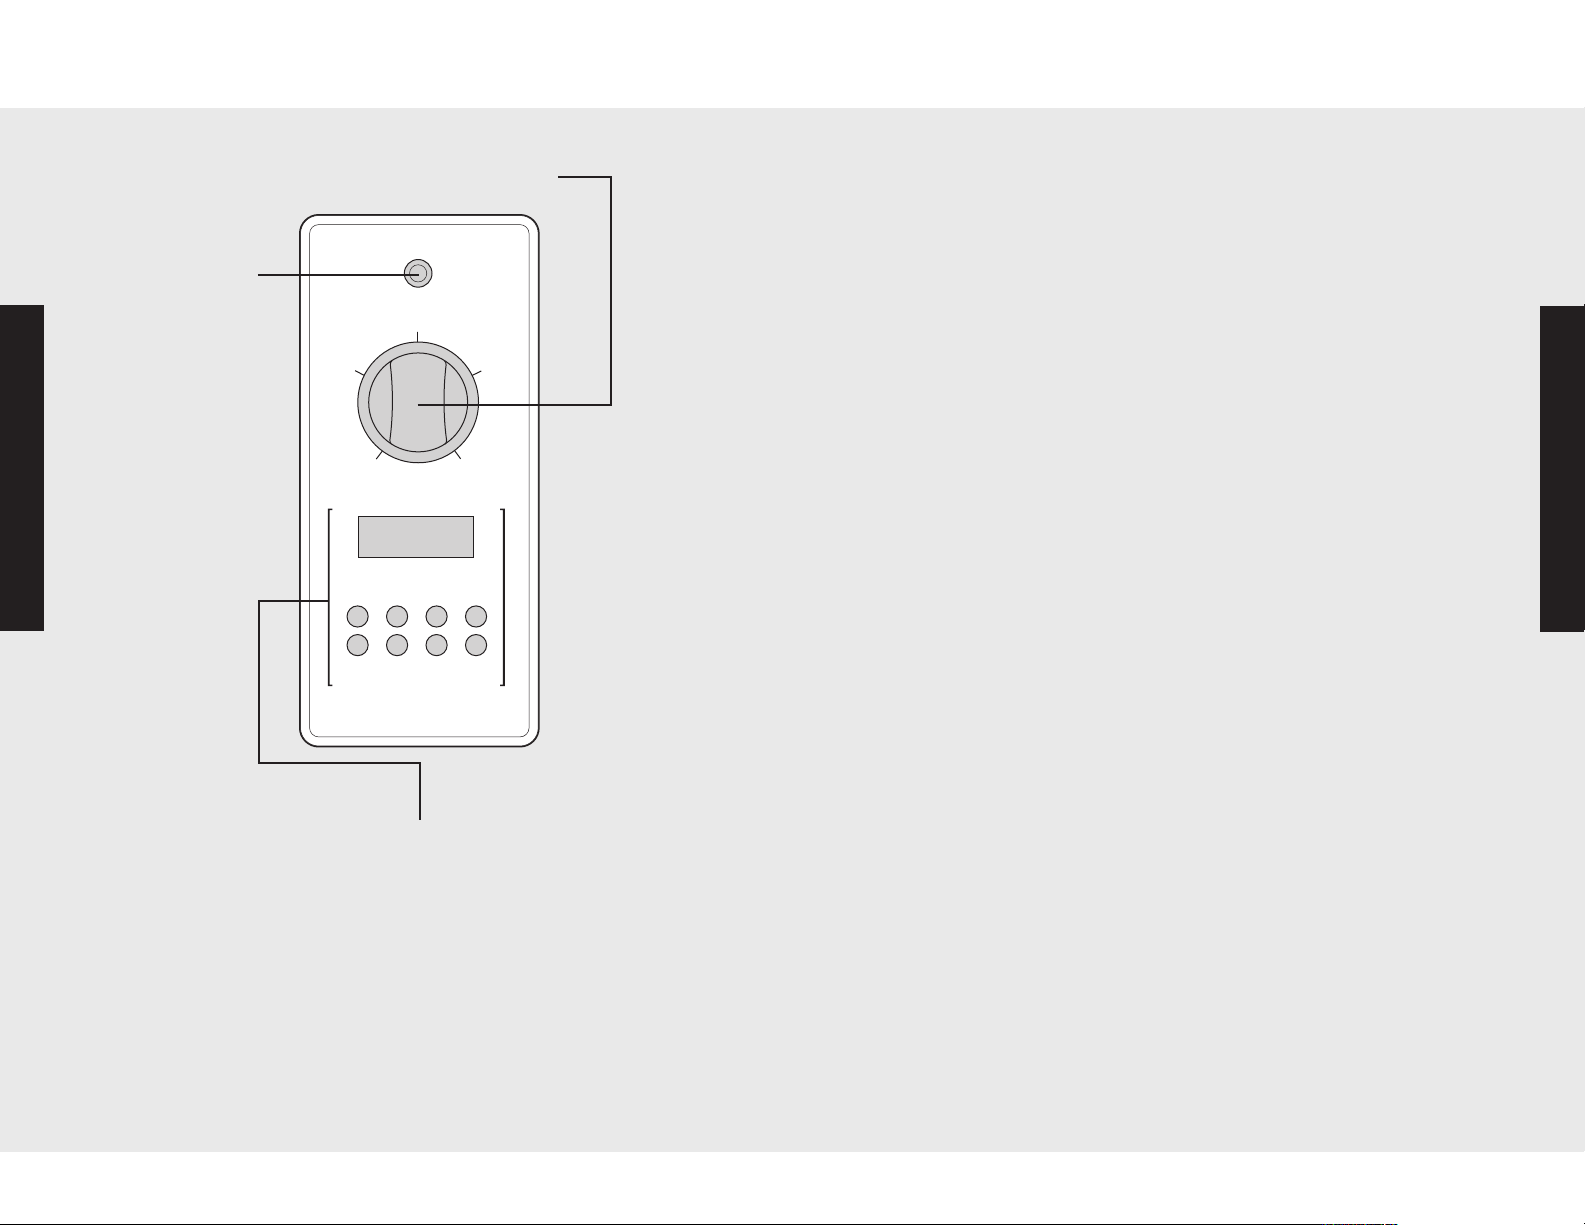
Interior Oven
Light Control
Oven Function Selector
Electronic Timing/Temperature Center
The Electronic Timing/Temperature Center is used to program
and control all timing and temperature functions. Each oven
has a separate temperature control and a separate oven
function selector. The button control can be set at any
temperature from 170˚ F (76.6° C) to 550˚ F (287.8° C) by
pressing “UP” or “DOWN”. There are separate settings for
broiling and HI/LO BROIL. ALWAYS be sure the controls are
in the OFF position when the oven is not in use.
IMPORTANT–The time-of-day must be set before any other
program can be used.
The oven has
interior oven
lights that are
controlled by one
switch on the
control panel.
Push the switch to
turn the interior
oven lights on
and off.
Oven Functions and Settings
BAKE (Natural Airflow Bake)
Use this setting for baking, roasting, and preparing casseroles dishes.
CONVECTION BAKE
Use this setting to bake and roast foods at the same time with minimal
taste transfer.
Product Controls
BROIL (Infrared Broil)
Use this setting for broiling dark meats at 1” thickness or less where
rare or medium doneness is desired.
Product Controls
CONVECTION BROIL (Infrared Convection Broil)
Use this setting to broil thick cuts of meat.
Convection Dehydrate (CONVECTION BAKE)
Use this function to dehydrate fruits and vegetables.
Convection Defrost (CONVECTION BAKE)
Use this function to defrost foods.
Note: For more information on oven functions see “Operation”
section.
14
15
Page 9
Clocks and Timers
CANCELCANCEL
CLOCKCLOCK
TIMERTIMER
COOKCOOK
T
IMETIME
BROILBROIL
H
I/LOWHI/LOW
DOWNDOWN
BAKEBAKE
TEMPTEMP
U
PUP
Clocks and Timers
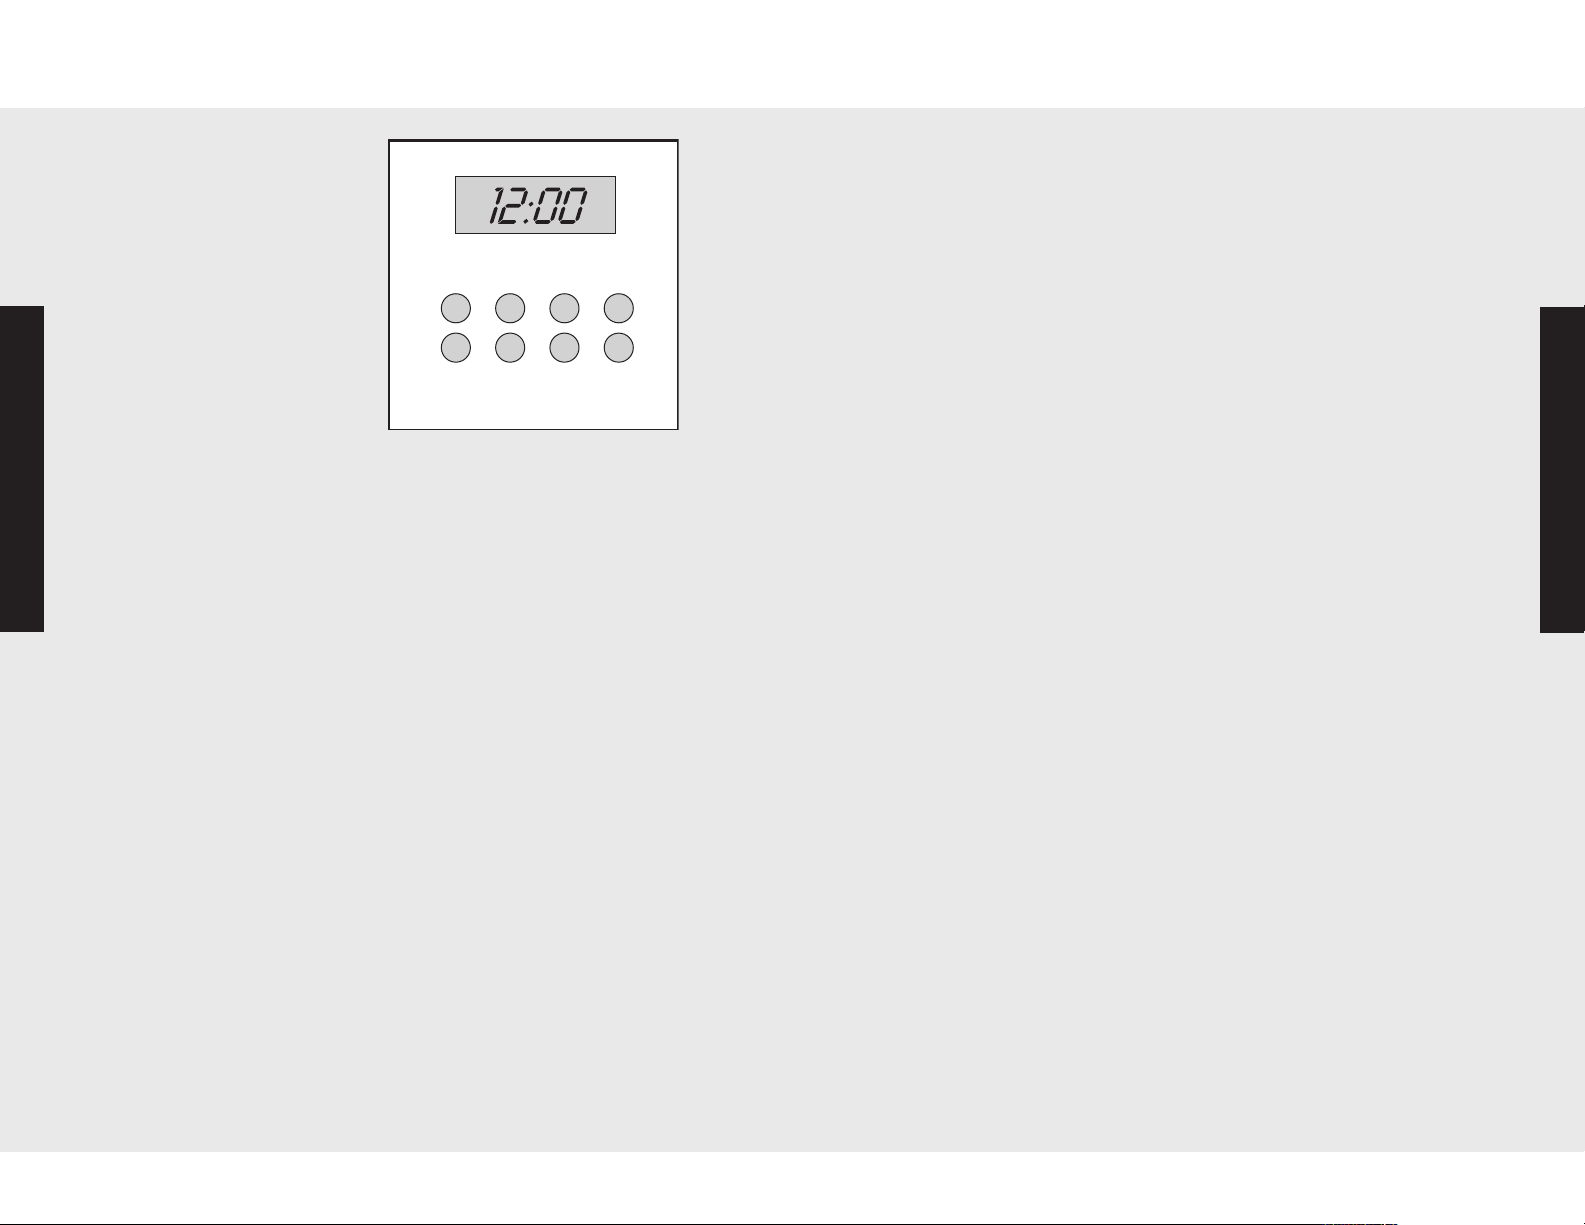
Electronic Timing/
Temperature Center
(Digital Display)
The Electronic Timing/
Temperature Center controls
are used to program timing
Setting Cook Time Program
COOK TIME automatically ends a cooking function. This feature does
not automatically start a cooking function. This program is used for
controlled timing of baked or roasted foods.
1. Press the “COOK TIME” button once to access the timed cook
mode. A single tone will sound and 0:00 will appear on the display.
and temperature functions. It
has eight display buttons and
five programming modes. Both
the Cook Time mode and
Timer mode can be used to
time cooking periods.
2. The “UP” and “DOWN” buttons are used to set the timer. “UP”
increases time; “DOWN” decreases time. Tapping “UP” and
“DOWN” will increase or decrease the time in 1-minute increments.
When the “UP” or “DOWN” is held down, time will increase or
decrease in 5-minute increments until the next hour is reached,
Product Controls
then will continue to increase or decrease in hour increments.
Setting the Min/Hour Timer
The Min/Hour timer is designed for accurate timing of foods. It is ideal
for baking delicate items such as biscuits, cookies, and popovers, and
Product Controls
for precise broiling.
To Program the Min/Hour Timer
1. Press the “TIMER” button. The timer will display :00.
2. Press the “UP” or “DOWN” buttons to increase or decrease time.
The time will change in 1-minute increments. When the button is
held down, time will change in 5-minute increments until the next
hour is reached.
Note: The TIMER mode will lockout changes and begin to count down
if buttons are not pressed for 5 seconds. Pressing “TIMER” once will
allow the timer set time to be changed during the countdown process.
The timer can be set from a minimum time of 1-minute to a maximum
of 11 hours 59 minutes. When the timer counts down to 1-minute a
single tone will sound indicating the timer will time out in 1-minute.
When the timer counts down to 0:00, three tones will sound every 12
seconds until the timer is canceled by pressing the “TIMER” for three
seconds or until ten minutes has elapsed.
3. Release the button when the appropriate time has been reached.
Note: When COOK TIME is set before the bake temperature, the bake
indicator light in the upper left corner and the –:– of the display will
light after 5 seconds prompting the setting of the bake temperature
using the “UP” or “DOWN” buttons. The temperature will default to
350°F when either button is pressed. Tapping the “UP” or “DOWN”
button will increase or decrease the temperature in 5° increments. The
temperature will increase or decrease in 25° increments when the “UP”
or “DOWN” button is pressed and held down. The temperature can
be set from a low of 170°F to a high of 550°F. The oven set
temperature and bake indicator light will be displayed during the
baking process. The BAKE function may be terminated by pressing
“CANCEL” once. Cook time will be terminated and the time of day
displayed if the temperature is not set within 30 seconds. When the
COOK TIME reaches 0:00 three tones will sound every 12 seconds
until the timer is canceled by pressing the “TIMER” button for three
seconds, pressing the “CANCEL” button, or until ten minutes has
elapsed.
Note: To cancel the timer, press and hold the “TIMER” button for three
seconds.
16
17
Page 10
OVEN
LIGHT
O
FF
BROIL
CANCEL
CLOCK
TIMER
COOK
TIME
BROIL
HI/LOW
DOWN
BAKE
T
EMP
UP
B
AKE
CONVECTION
BAKE
CONVECTION
BROIL
Rack Positions
4
3
2
1
Clocks and Timers
Using the Oven
To Set The Bake Temperature
1. Press “BAKE TEMP” once. A single tone will sound, the bake
indicator light in the upper left corner and the bar segments
“---” of the display will light prompting the setting of the bake
temperature using the “UP” or “DOWN” buttons.
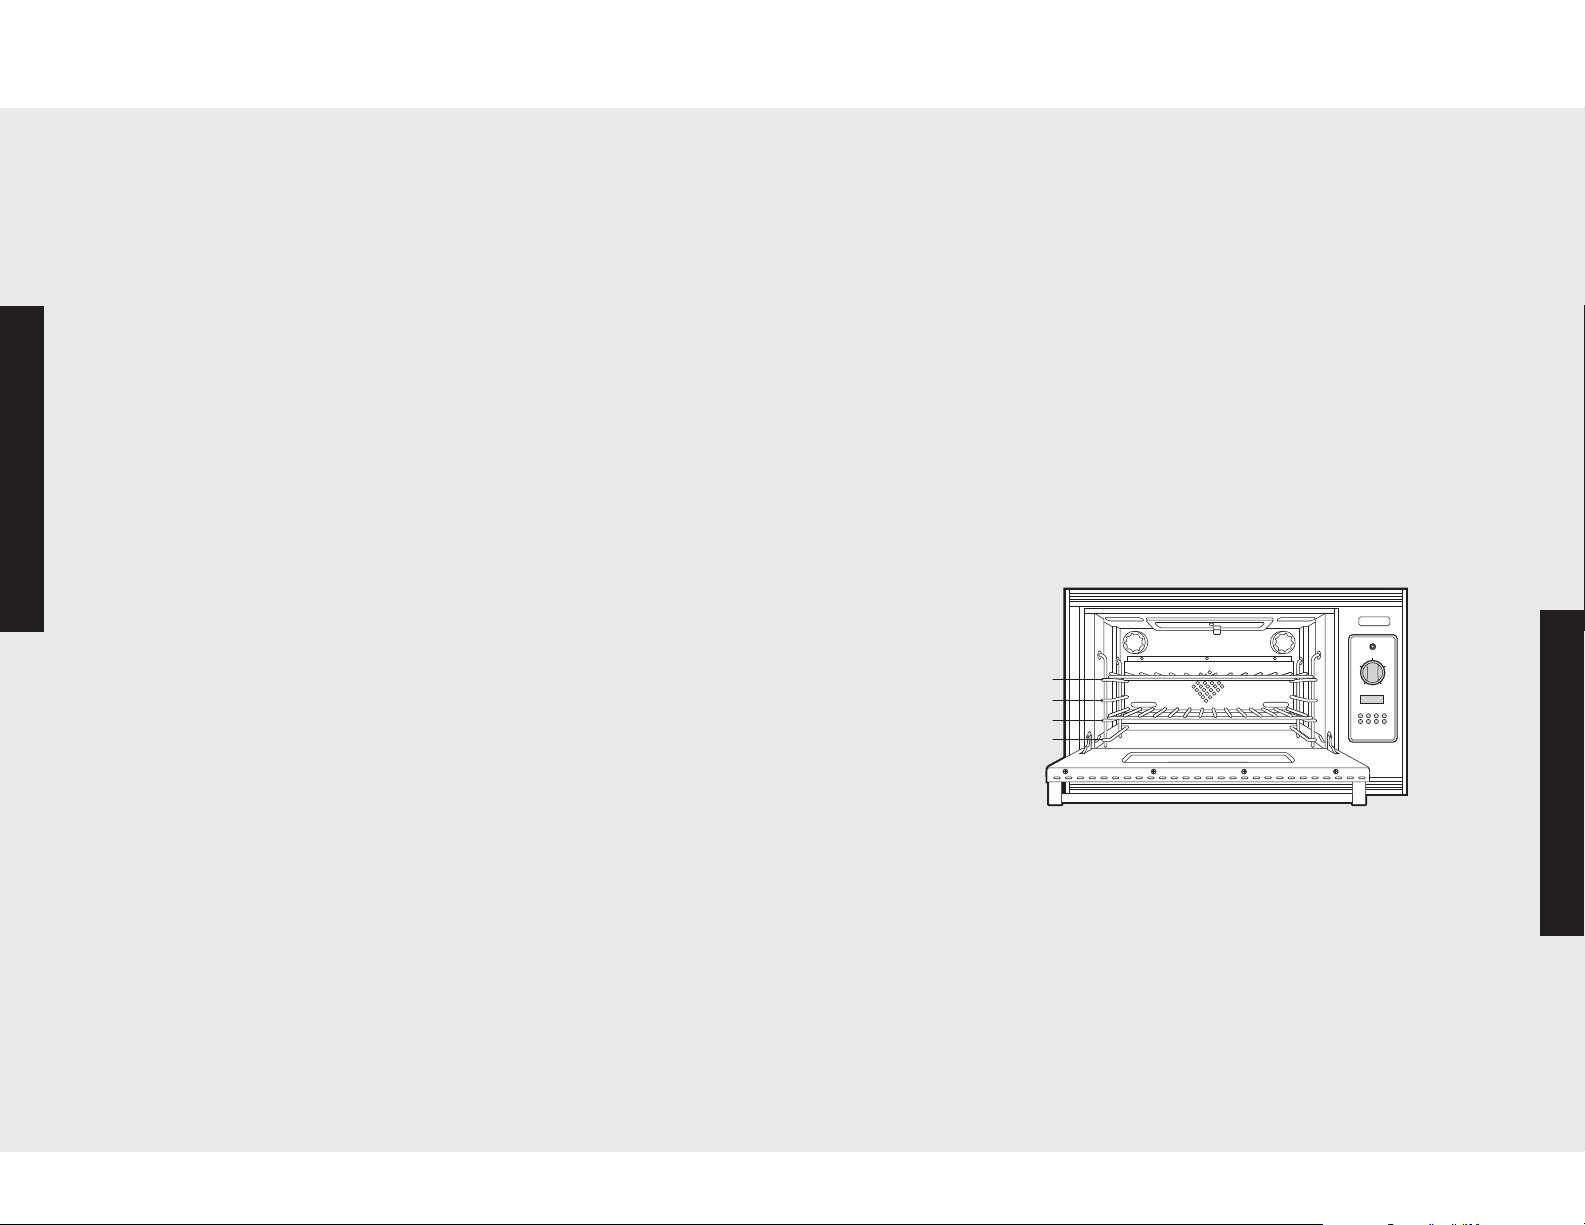
Rack Positions
The convection oven is equipped with three tilt-proof racks and four
rack positions. Position 4 is the farthest from the oven bottom. Position
1 is the closest to the oven bottom. The racks can be easily removed
and arranged at various levels. For best results with conventional
baking, do not use more than one rack at a time. It is recommended
2. The temperature will default to 350°F when either “UP” or
when using two racks to do the following:
“DOWN” button is pressed. Tapping the “UP” or “DOWN” buttons
will increase or decrease the temperature in 5-degree increments.
The temperature will increase or decrease in 25° increments when
the “UP” or “DOWN” buttons are pressed and held down. The
1. Arrange the oven racks in the desired position BEFORE heating
the oven. If cooking on two racks at the same time, use rack
positions 2 and 4.
temperature can be set from a low of 170°F to a high of 550°F.
When the desired temperature has been reached, a tone will sound
2. Turn the function selector to the desired function.
indicating the oven has preheated.
3. Set the temperature control to the desired temperature.
3. Set the Oven Function selector to the desired function – BAKE,
Product Controls
CONVECTION BAKE, BROIL or CONVECTION BROIL.
4. Place the food in the oven after preheating. Preheating is complete
when the tone sounds.
4. BAKE TEMP setting may be terminated by pressing the “CANCEL”
button.
Operation
18
19
Page 11

Using the Oven
Using the Oven
Conventional and Convection Cooking
Because of variations in food density, surface texture and
consistency, some foods may be prepared more successfully using
the conventional bake setting. For this reason, conventional
baking is recommended when preparing baked goods such as
custard. The user may find other foods that are also prepared
more consistently in conventional bake. It is recommended to use
this function for single-rack baking.
Convection Cooking Tips
Convection cooking is a cooking technique which utilizes fanforced air to circulate throughout the entire oven cavity creating
the optimum cooking environment. Cooking with convection is
intended when performing multi-rack baking and for heavier
foods. Below are some tips which will allow you to get the best
results out of your oven when cooking with convection.
• As a general rule, to convert conventional recipes to convection
recipes, reduce the temperature by 25˚ F (10˚ C) when using a
convection cooking function.
• Cooking times for standard baking and convection baking will
be the same. However, if using convection to cook a single item
or smaller load, then it is possible to have 10-15% reduction in
cooking time. (Remember convection cooking is designed for
multi-rack baking or cooking large loads.)
• If cooking items which require longer than 45 minutes, then it is
possible to see a 10-15% reduction in cooking time.
• A major benefit of convection cooking is the ability to prepare
foods in quantity. The uniform air circulation makes this
Operation
possible. Foods that can be prepared on two of three racks at
the same time include: pizza, cakes, cookies, biscuits, muffins,
rolls, and frozen convenience foods.
Convection Cooking Tips (cont.)
• For three-rack baking, use any combination of rack positions 2, 3,
and 4. For two-rack baking, use rack positions 2 and 4. Remember
that the racks are numbered from bottom to top.
• Items cooked in a convection function can be easily over baked. This
being the case, it is usually a good idea to pull items out of the
oven just before they seem to be done. Items will continue to cook
right after they are set out of the oven.
• Some recipes, especially those that are homemade, may require
adjustment and testing when converting from standard to
convection modes. If unsure how to convert a recipe, begin by
preparing the recipe in conventional bake. After achieving
acceptable results, follow the convection guidelines listed for the
similar food type. If the food is not prepared to your satisfaction
during this first convection trial, adjust only one recipe variable at a
time (cooking time, rack position, or temperature) and repeat the
convection test. Continue adjusting one recipe variable at a time
until satisfactory results are achieved.
Operation
20
21
Page 12
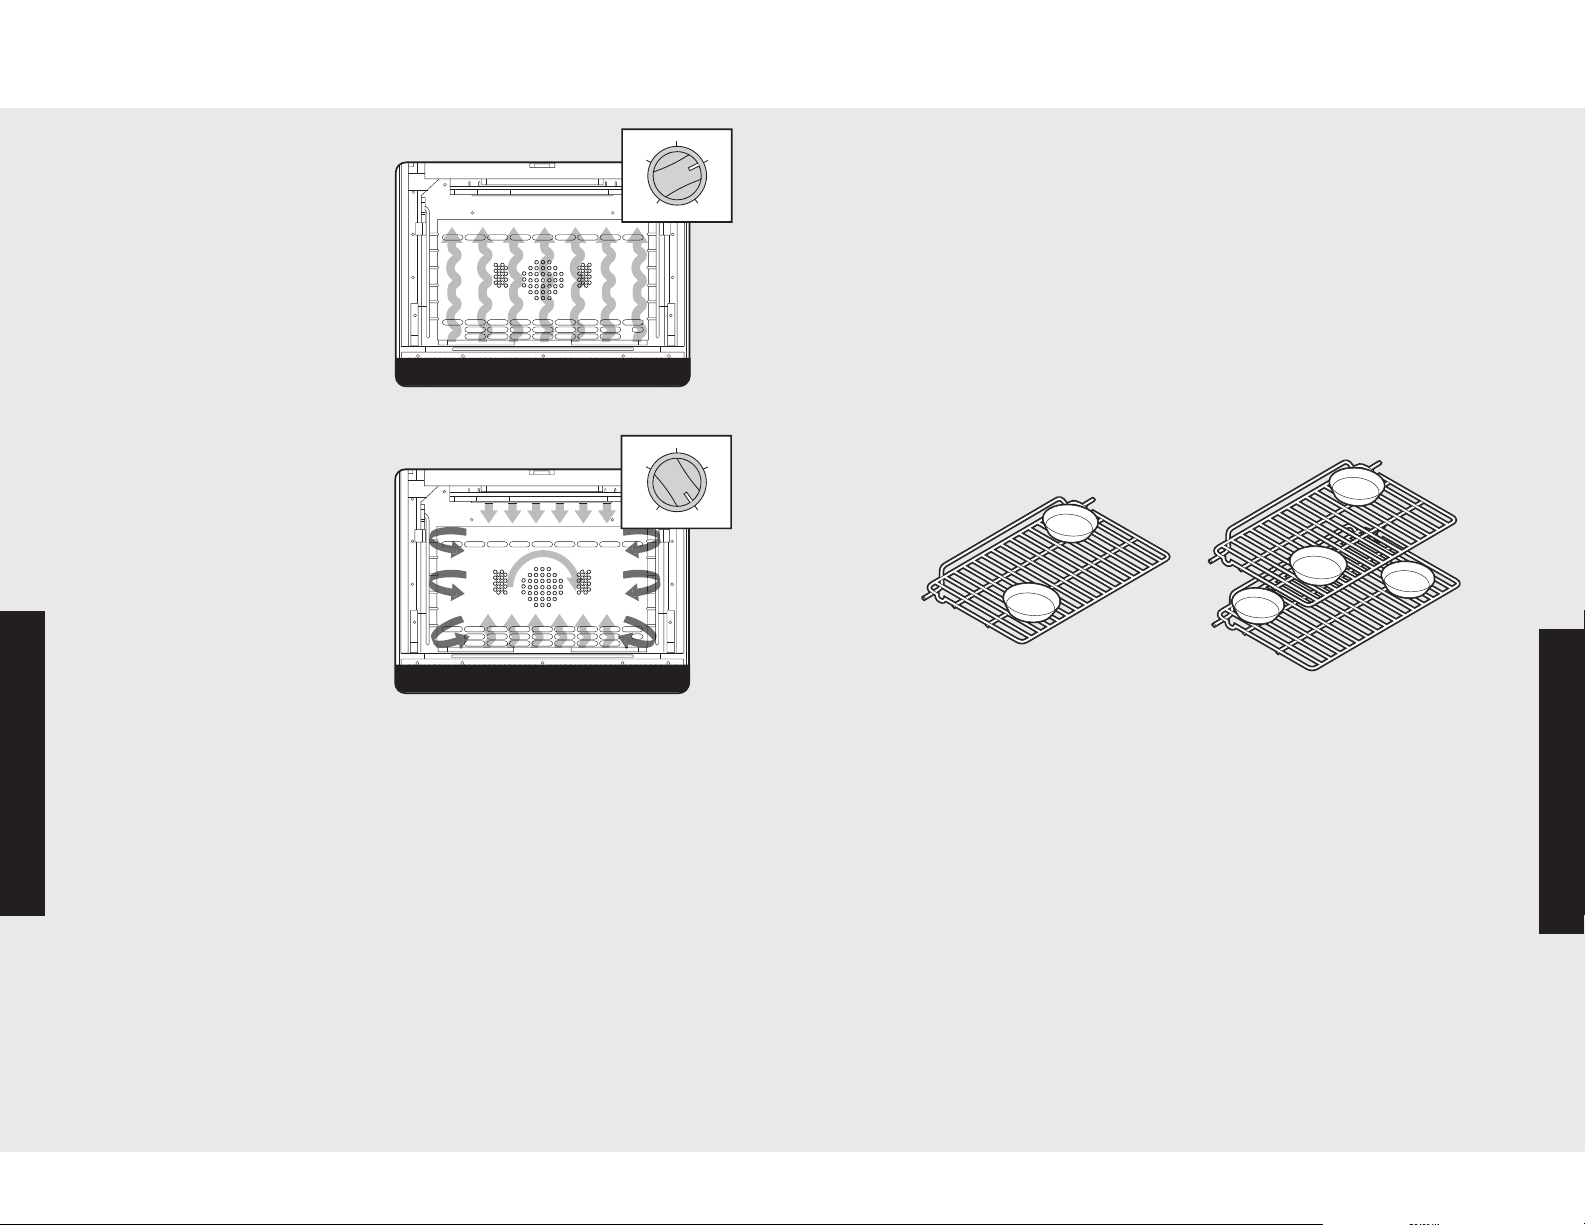
Baking
natural airflow bake
OFF
BROIL
BAKE
C
ONVECTION
BAKE
C
ONVECTION
BROIL
convection bake
OFF
B
ROIL
BAKE
C
ONVECTION
BAKE
C
ONVECTION
BROIL
Baking
BAKE
(Natural Airflow Bake)
Full power heat is radiated from
the two bake burners in the
bottom of the oven cavity and is
circulated with natural airflow.
This function is recommended for
single rack bakings. Many
cookbooks contain recipes to be
cooked in the conventional
Pan Placement Tips
• When using large (15" x 13") flat pans or trays that cover most of
the rack, rack positions 2 or 3 produce the best results.
• When baking on more than one rack, it is recommended to use the
2nd and 4th position for more consistent even baking.
• Stagger pans in opposite directions when two racks and several
pans are used in conventional bake. If possible, no pan should be
directly above another.
• Allow 1 to 2 inches of air space around all sides of each pan for
even air circulation.
manner. Conventional baking is
suitable for dishes that require a high temperature. Use this setting for
baking and casseroles.
Single Rack Pan
Placement
Multiple Rack Pan
Placement
CONVECTION BAKE
Heat is radiated from the bake
burners in the bottom of the oven
cavity. The heated air is circulated
by the motorized fan in the rear of
the oven providing more even heat
distribution. This even circulation
of air equalizes the temperature
throughout the oven cavity and
eliminates the hot and cold spots
found in convection ovens.
Multiple rack use is possible for the largest baking job. When roasting,
cool air is quickly replaced—searing meats on the outside and retaining
more juices and natural flavor on the inside with less shrinkage. This even
Operation
circulation of air equalizes the temperature throughout the oven cavity
and eliminates the hot and cold spots found in conventional ovens.
Operation
Baking Tips
• Make sure the oven racks are in the desired position before you turn
on the oven.
• DO NOT open the door frequently during baking. Look through the
door window to check doneness whenever possible. If you must open
the door, the best time is during the last quarter of the baking time.
• Bake to the shortest time suggested and check for doneness before
adding more time. For baked goods, a stainless steel knife placed in
the center of the product should come out clean when done.
• Use the pan size and type recommended by the recipe to ensure best
results. Cakes, quick breads, muffins, and cookies should be baked in
shiny, reflective pans for light, golden crusts. Avoid the use of old,
darkened pans. Warped, dented, stainless steel and tin-coated pans
heat unevenly and will not give uniform baking results.
22
23
Page 13
Baking Baking
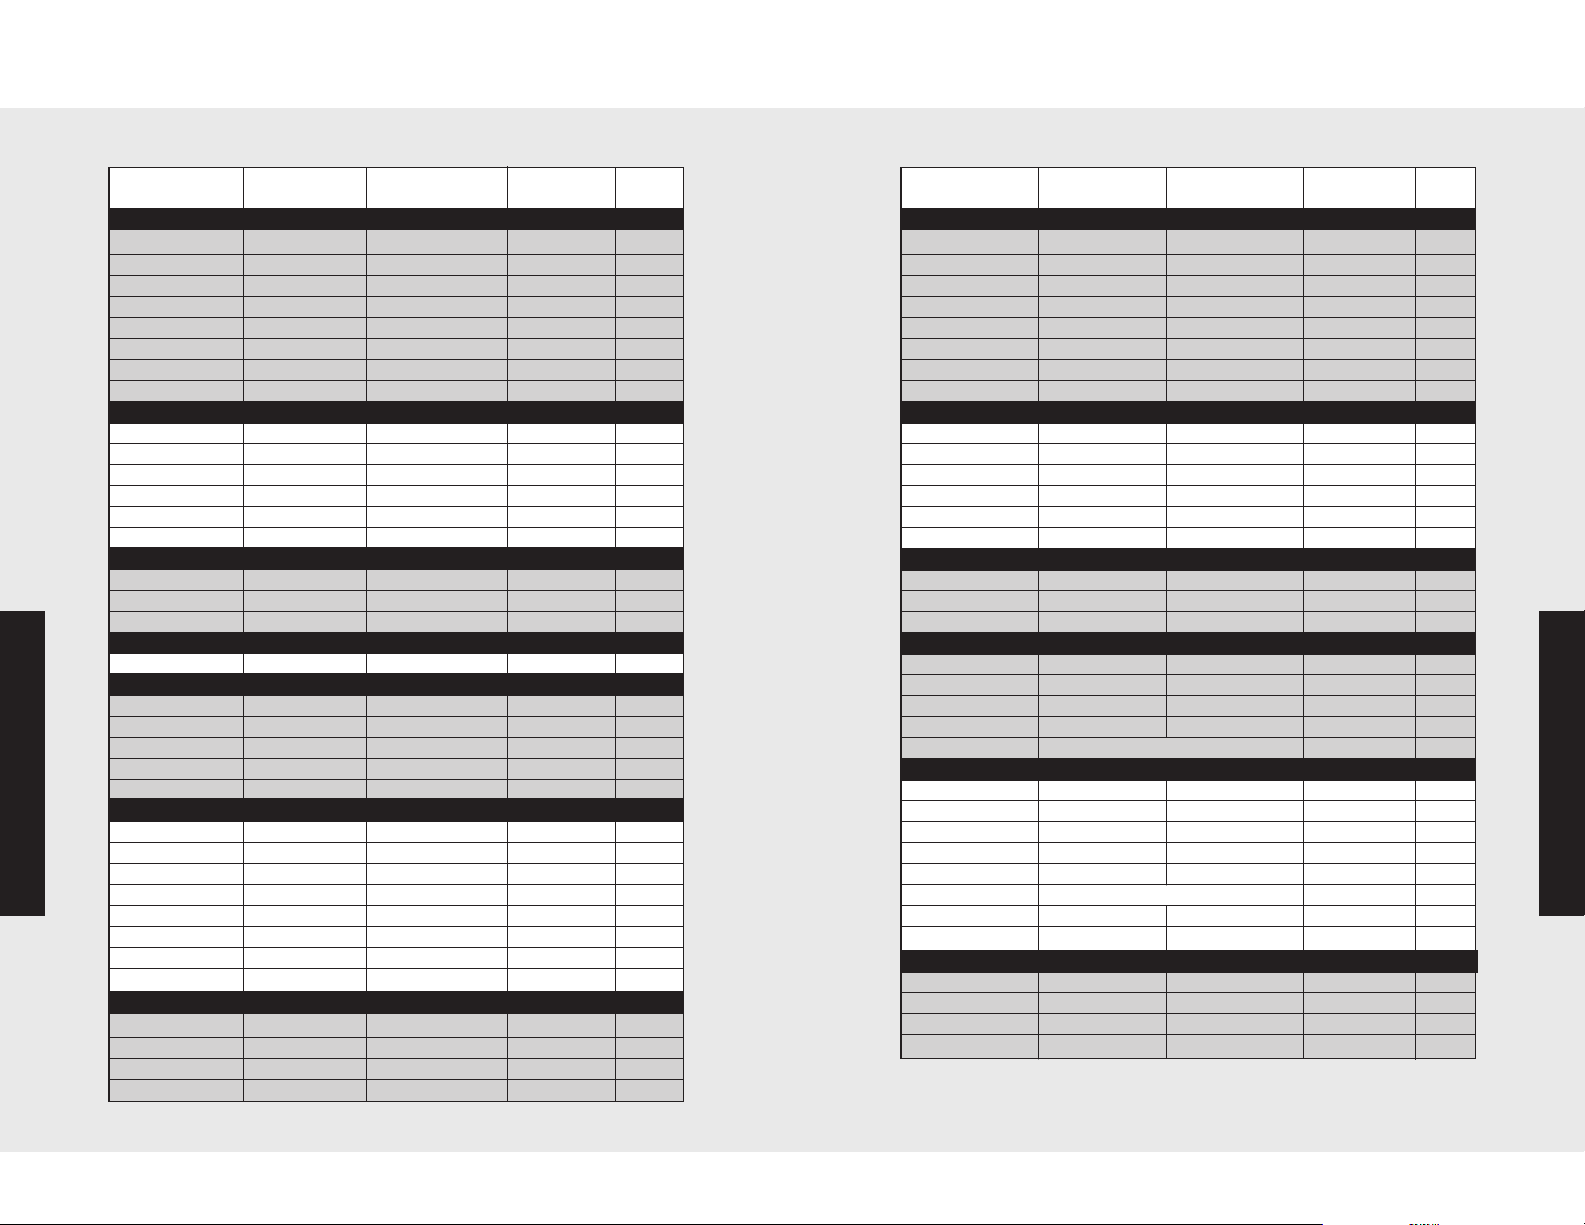
Conventional Baking Chart
Food Pan Size Position Temp
BREADS
Biscuits Cookie sheet 2 or 3 400˚ F (204˚ C) 10 -12
Yeast loaf Loaf pan
Yeast rolls Cookie sheet
Nut bread Loaf pan
Cornbread 8" x 8"
Gingerbread 8" x 8"
Muffins Muffin tin
Corn muffins Muffin tin
CAKES
Angel food Tube pan
Bundt Tube pan
Cupcakes Muffin pan
Layer, sheet 13" x 9"
Layer, two 9" round
Pound Loaf pan
COOKIES
Brownies 13" x 9"
Choc. chip Cookie sheet
Sugar Cookie sheet
PASTRY
Cream puffs Cookie sheet
PIES
Crust, unfilled 9" round
Crust, filled 9" round
Lemon meringue 9" round
Pumpkin 9" round
Operation
Custard 6 - 4 oz cups
ENTREES
Egg rolls Cookie sheet
Fish sticks Cookie sheet
Lasagna, frz Cookie sheet
Pot pie Cookie sheet
Gr. peppers stuffed
Quiche 9" round
Pizza, 12" Cookie sheet
Mac. & cheese, frz
VEGETABLES
Baked potatoes On rack
Spinach souffle 1 qt. casserole
Squash Cookie sheet
French fries Cookie sheet
13" x 9"
Cookie sheet
Single Rack Time
2 or 3
2 or 3
2 or 3
2 or 3
2 or 3
2 or 3
2 or 3
2 or 3
2 or 3
2 or 3
2 or 3
2 or 3
2 or 3
2 or 3
2 or 3
2 or 3
2 or 3
2 or 3
2 or 3
2 or 3
2 or 3
2 or 3
2 or 3
2 or 3
2 or 3
2 or 3
2 or 3
2 or 3
2 or 3
2 or 3
2 or 3
2 or 3
2 or 3
2 or 3
375
˚ F (191˚ C)
400
˚ F (204˚ C)
375
˚ F(191˚ C)
400
˚ F (204˚ C)
350
˚ F (177˚ C)
375
˚ F (191˚ C)
375
˚ F (191˚ C)
375
˚ F (191˚ C)
350
˚ F (177˚ C)
350
˚ F (177˚ C)
350
˚ F (177˚ C)
350
˚ F (177˚ C)
350
˚ F (177˚ C)
350
˚ F (177˚ C)
375
˚ F (191˚ C)
375
˚ F (191˚ C)
400
˚ F (204˚ C)
400
˚ F (204˚ C)
350
˚ F (191˚ C)
350
˚ F (177˚ C)
350
˚ F (177˚ C)
350
˚ F (177˚ C)
400
˚ F (204˚ C)
425
˚ F (218˚ C)
375
˚ F (191˚ C)
400
˚ F (204˚ C)
375
˚ F (191˚ C)
400
˚ F (204˚ C)
400
˚ F (204˚ C)
375
˚ F (191˚ C)
375
˚ F (191˚ C)
350
˚ F (177˚ C)
375
˚ F (191˚ C)
425
˚ F (218˚ C)
(min)
30 - 35
12 - 15
30 - 35
25 - 30
35 - 40
15 - 20
15 - 20
35 - 45
45 - 55
16 - 20
40 - 50
30 - 35
60 - 65
25 - 30
12 - 15
10 - 12
30 - 35
10 - 12
55 - 60
12 - 15
35 - 40
35 - 40
25 - 30
10 - 15
55 - 60
35 - 40
60 - 70
25 - 30
15 - 20
35 - 40
60 - 65
45 - 50
50 - 55
20 - 25
Food Pan Size Position Temp
BREADS
Biscuits Cookie sheet 2 or 3
Yeast loaf Loaf pan 2 or 3
Yeast rolls Cookie sheet 2 or 3
Nut bread Loaf pan 2 or 3
Cornbread 8" x 8" 2 or 3
Gingerbread 8" x 8" 2 or 3
Muffins Muffin tin 2 or 3
Corn muffins Muffin tin 2 or 3
CAKES
Angel food Tube pan
Bundt Tube pan
Cupcakes Muffin pan
Layer, sheet 13" x 9"
Layer, two 9" round
Pound Loaf pan
COOKIES
Brownies 13" x 9"
Choc. chip Cookie sheet
Sugar Cookie sheet
PIES
Crust, unfilled 9" round
Crust, filled 9" round
Lemon meringue 9" round
Pumpkin 9" round
Custard Not recommended
ENTREES
Egg rolls Cookie sheet
Fish sticks Cookie sheet
Lasagna, frz Cookie sheet
Pot pie Cookie sheet
Gr. peppers stuffed
Quiche
Pizza, 12" Cookie sheet
Mac. & cheese, frz
VEGETABLES
Baked potatoes On rack
Spinach souffle 1 qt. casserole
Squash Cookie sheet
French fries Cookie sheet
*Note: The above information is given as a guide only.
Convection Baking Chart
Single Rack Time
2 or 3
2 or 3
2 or 3
2 or 3
2 or 3
2 or 3
2 or 3
2 or 3
2 or 3
2 or 3
2 or 3
2 or 3
2 or 3
2 or 3
2 or 3
2 or 3
2 or 3
13" x 9"
Not recommended
Cookie sheet
2 or 3
2 or 3
2 or 3
2 or 3
2 or 3
2 or 3
2 or 3
375
˚ F (191˚ C) 7 - 9
375
˚ F (191˚ C) 25 - 30
375
˚ F (191˚ C) 11 - 13
350
˚ F (177˚ C) 25 - 30
375
˚ F (191˚ C) 20 - 25
325
˚ F (163˚ C) 30 - 35
350
˚ F (177° C) 12 - 15
350
˚ F (177˚ C) 10 - 12
350
˚ F (177˚ C)
325
˚ F (163˚ C)
325
˚ F (163˚ C)
325
˚ F (163˚ C)
325
˚ F (163˚ C)
325
˚ F (163˚ C)
325
˚ F (163˚ C)
350
˚ F (177˚ C)
350
˚ F (177˚ C)
375
˚ F (191˚ C)
325
˚ F (163˚ C)
325
˚ F (163˚ C)
325
˚ F (163˚ C)
375
˚ F (191˚ C)
400
˚ F (205˚ C)
350
˚ F (177˚ C)
375
˚ F (191˚ C)
350
˚ F (177˚ C)
375
˚ F (191˚ C)
350
˚ F (177˚ C)
350
˚ F (177˚ C)
325
˚ F (163˚ C)
350
˚ F (177˚ C)
400
˚ F (205˚ C)
(min)
35 - 40
35 - 40
15 - 17
30 - 35
25 - 30
45 - 50
20 - 25
7 - 10
7 - 10
7 - 9
50 - 55
10 - 12
45 - 55
15 - 20
8 - 10
45 - 50
35 - 40
45 - 50
15 - 20
25 - 35
50 - 55
35 - 40
40 - 45
15 - 20
Operation
*Note: The above information is given as a guide only.
24
25
Page 14
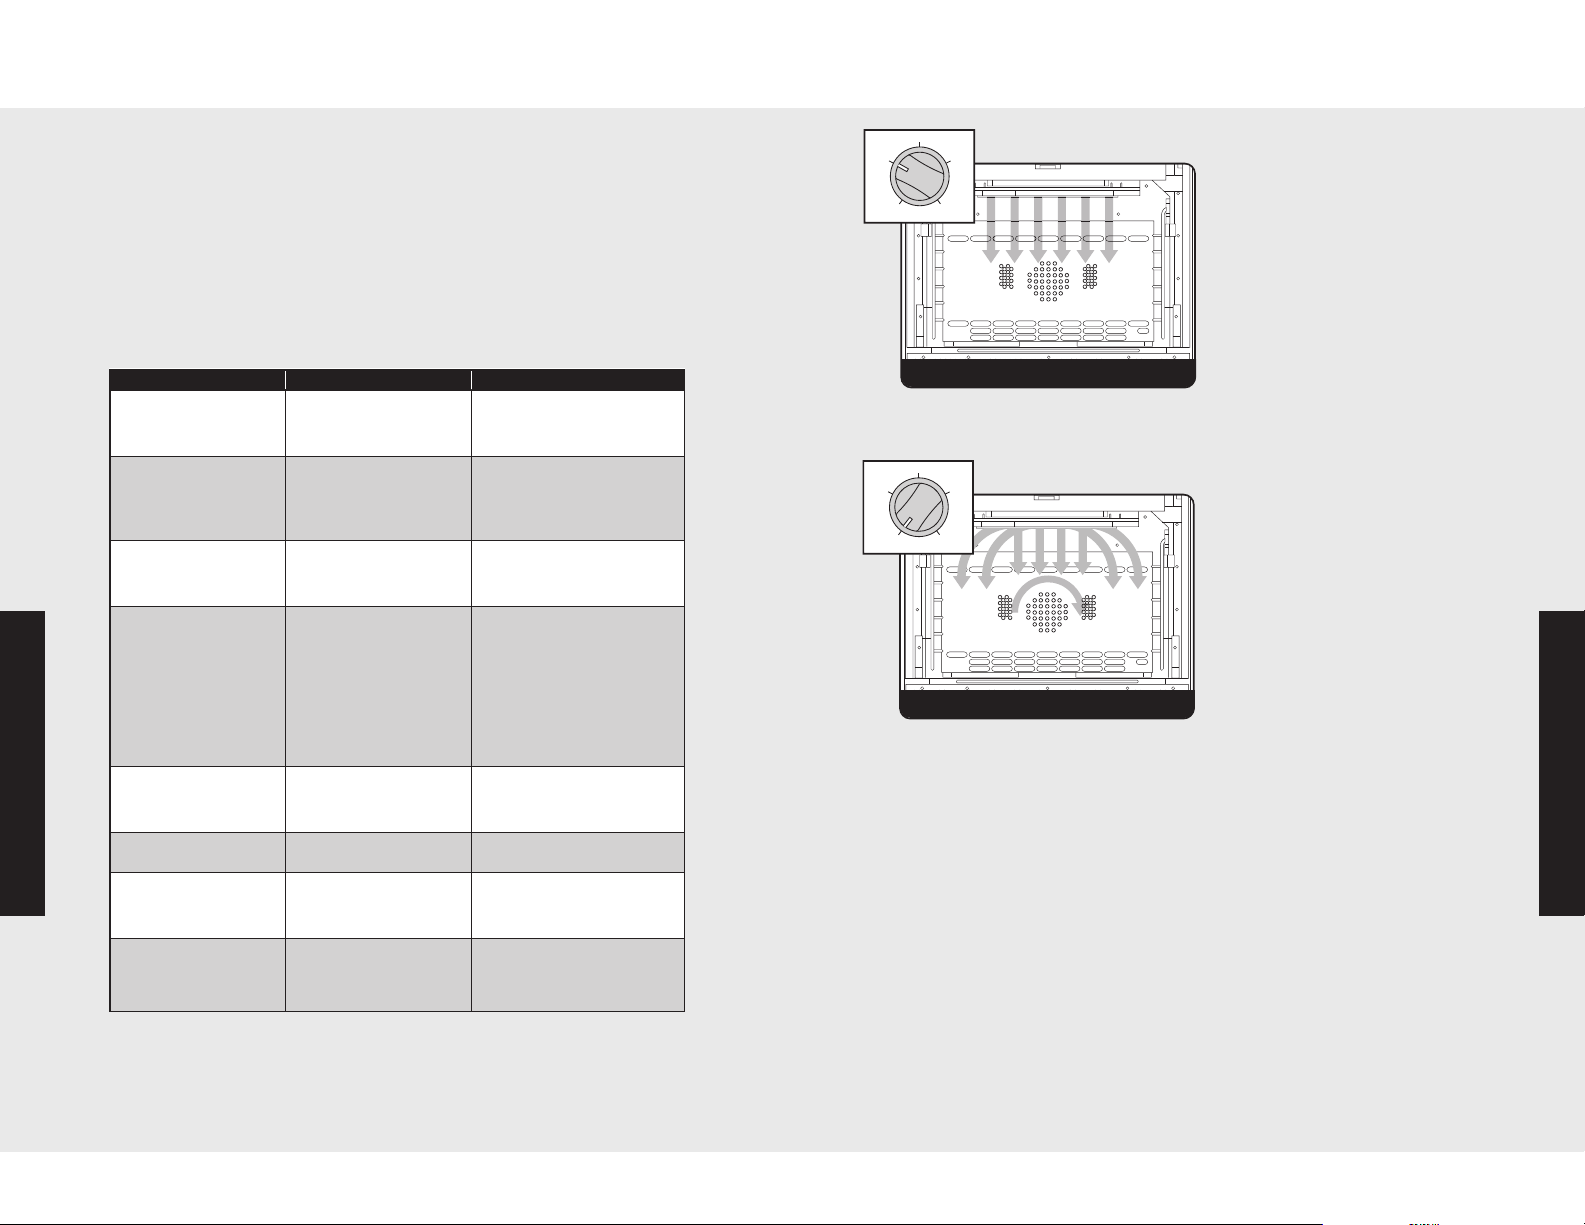
infrared broil
OFF
BROIL
BAKE
CONVECTION
BAKE
C
ONVECTION
BROIL
infrared convection broil
OFF
BROIL
B
AKE
CONVECTION
BAKE
CONVECTION
BROIL
Baking
Broiling
Solving Baking Problems
Baking problems can occur for many reasons. Check the chart below for
the causes and remedies for the most common problems. It is important
to remember that the temperature setting and cooking times you are
accustomed to using with your previous oven may vary slightly from
those required with this oven. If you find this to be true, it is necessary
for you to adjust your recipes and cooking times accordingly.
BROIL (Infrared Broil)
Heat radiates from the Gourmet
Glo™ infrared broiler located at
the top of the oven cavity. The
distance between the foods and
the broil elements determines
broiling speed. For “fast”
broiling, food may be as close
Common Baking Problems/Remedies
Problems Cause Remedy
Cakes burned on the 1. Oven was too hot 1. Reduce temperature
sides or not done
in center
Cakes crack on top 1. Batter too thick 1. Follow recipe
Cakes are not level 1. Batter uneven 1. Distribute batter even
Food too brown on 1. Oven door opened 1. Use door window to
bottom too often check food
Food too brown on 1. Rack position too high 1. Use recom. rack position
Operation
top
Cookies too flat 1. Hot cookie sheet 1. Allow sheet to cool
Pies burned around 1. Oven too hot 1. Reduce temperature
edges
Pies too light on top 1. Oven not hot enough 1. Increase temperature
2. Wrong pan size 2. Use recom. pan size
3. Too many pans 3. Reduce no. of pans
Add liquid
2. Oven too hot 2. Reduce temperature
3. Wrong pan size 3. Use recom. pan size
2. Oven or rack not level 2. Level oven or rack
3. Pan was warped 3. Use proper pan
2. Dark pans being used 2. Use shiny pans
3.
Incorrect rack position3.Use recom. rack position
4. Wrong bake setting 4. Adjust to conventional
5. Pan too large 5. Use proper pan
2. Oven not preheated 2. Allow oven to preheat
3. Sides of pan too high 3. Use proper pans
2. Too many pans used 2. Reduce no. of pans
3. Oven not preheated 3. Allow oven to preheat
2. Too many pans used 2. Reduce no. of pans
3.
Oven not preheated
or convection setting
as needed
between batches
3.
Allow oven to preheat
rare to medium doneness is desired. Use this setting for broiling small
and average cuts of meat.
Broiling Instructions
Broiling is a dry-heat cooking method using direct or radiant heat. It is
used for small, individualized cuts such as steaks, chops, and patties.
Broiling speed is determined by the distance between the food and
the broil element. Choose the rack position based on desired results.
Conventional broiling is most successful for cuts of meat 1-2 inches
thick and is also more suitable for flat pieces of meat.
broiling has the advantage of broiling food slightly quicker than
conventional. Convection broiling of meats produces better results,
especially for thick cuts.
as 2” (5 cm) to the broil element
or on the top rack. “Fast”
broiling is best for meats where
CONVECTION BROIL
(Infrared Convection Broil)
Exactly the same as regular
broiling with the additional
benefit of air circulation by the
motorized fan in the rear of
the oven. Smoke is reduced
since the airflow reduces peak
temperatures on the food. Use
this setting for thick cuts of meat.
Operation
Convection
26
The meat sears on the outside and retains more juices and natural
flavor inside with less shrinkage.
27
Page 15
Broiling
OVEN
L
IGHT
OFF
B
ROIL
CANCEL
CLOCK
TIMER
COOK
TIME
BROIL
HI/LOW
DOWN
BAKE
TEMP
UP
BAKE
CONVECTION
B
AKE
CONVECTION
BROIL
25%
35%
65%
95%
Broiling
To Use Broil
The oven’s broiler features a HI and LO broil function. The LO broil
function should be used for slow broiling since the unit will cycle on
and off frequently. The HI broil function should be used for fast broiling
as the unit will cycle less frequently.
1. Arrange the oven rack in the desired position before turning
broiler on.
Broiling Tips
• ALWAYS use a broiler pan and grid for broiling. They are designed
to provide drainage of excess liquid and fat away from the cooking
surface to help prevent splatter, smoke, and fire.
• To keep meat from curling, slit fatty edge.
• Brush chicken and fish with butter several times as they broil to
prevent drying out. To prevent sticking, lightly grease broiler tray.
• Broil on first side for slightly more than half the recommended time,
2. Center the food on cold broiler pan and grid supplied with your
oven. Place broiler pan in oven.
season, and turn. Season second side just before removing.
• ALWAYS pull rack out to stop position before turning or removing
food.
3. Set the oven function selector to either BROIL or CONVECTION
BROIL. Press “BROIL”. Press the “UP” button for HI broil or the
“DOWN” buton for LO broil. HI will appear if the “UP” button is
pressed; LO will appear if the “DOWN” button is pressed.
• Use tongs or a spatula to turn meats. NEVER pierce meat with a
fork, as this allows the juices to escape.
• Remove the broiler pan from the oven when you remove the food.
Drippings will bake onto the pan if it is left in the heated oven after
broiling. While pan is hot, place damp paper towel over grid. Drizzle
4. Press the “BROIL HI/LO” once. A single tone will sound, the broil
indicator light will appear in the lower left corner and “---”will light
indicating the broil function has been accessed.
with liquid dishwashing detergent and pour water over grid. This will
make cleaning of the pan easier, or the broiler pan can be lined with
aluminum foil to make cleaning easier. Be sure the foil extends up
the side of the pan. Although it is not recommended, the grid can
5. Press the “UP” button for HI broil or the “DOWN” button for LO
broil.
also be covered with foil. Be sure to slit openings to conform with
the openings in the grid so melted fat can drain through to prevent
spattering, smoking, or the possibility of grease fire.
6. BROIL will terminate if the HI/LO BROIL is not selected within 30
seconds. BROIL can also be terminated by pressing the “CANCEL”
button once.
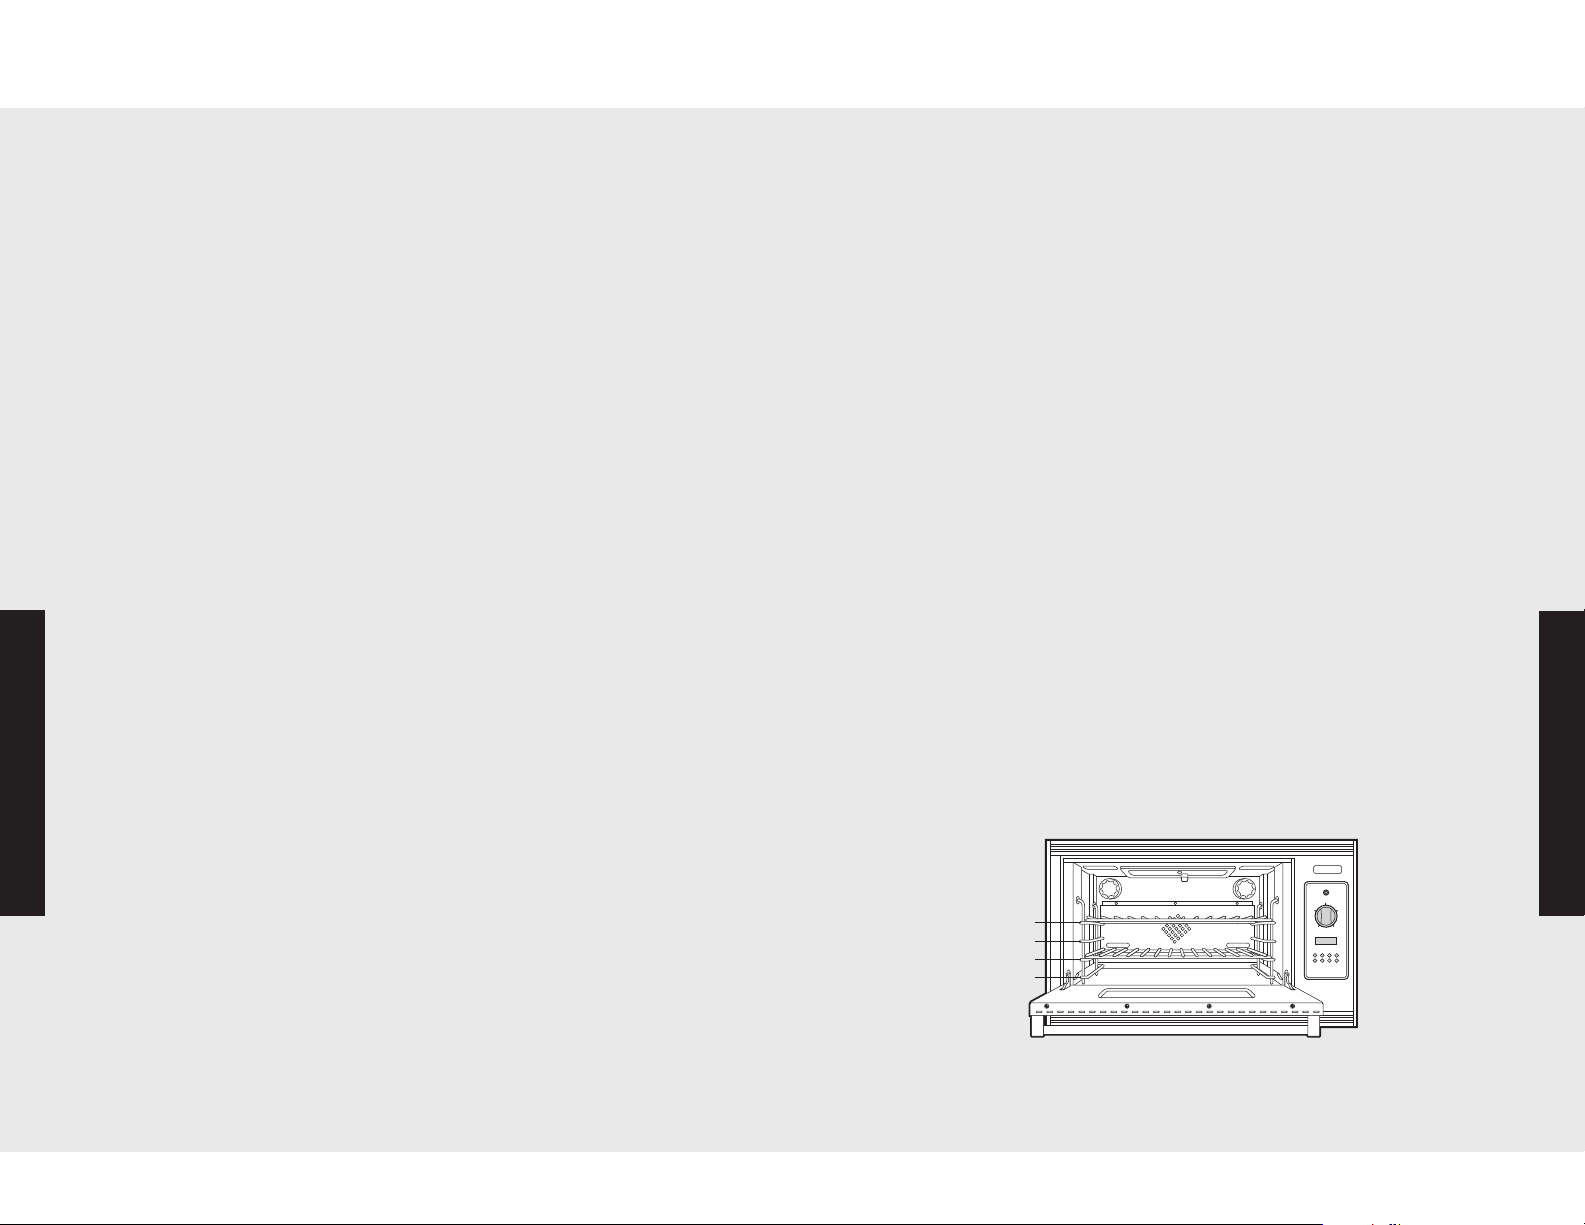
Rack Positions for Broiling
Note: Note the approximate effective cooking areas on the broiler
Operation
grid for each rack position. Position 4 is closest to the broiler with a
25% effective cooking area. Position 1 is closest to the oven bottom
Operation
with 95% effective cooking area.
28
29
Page 16
CAUTION
Broiling
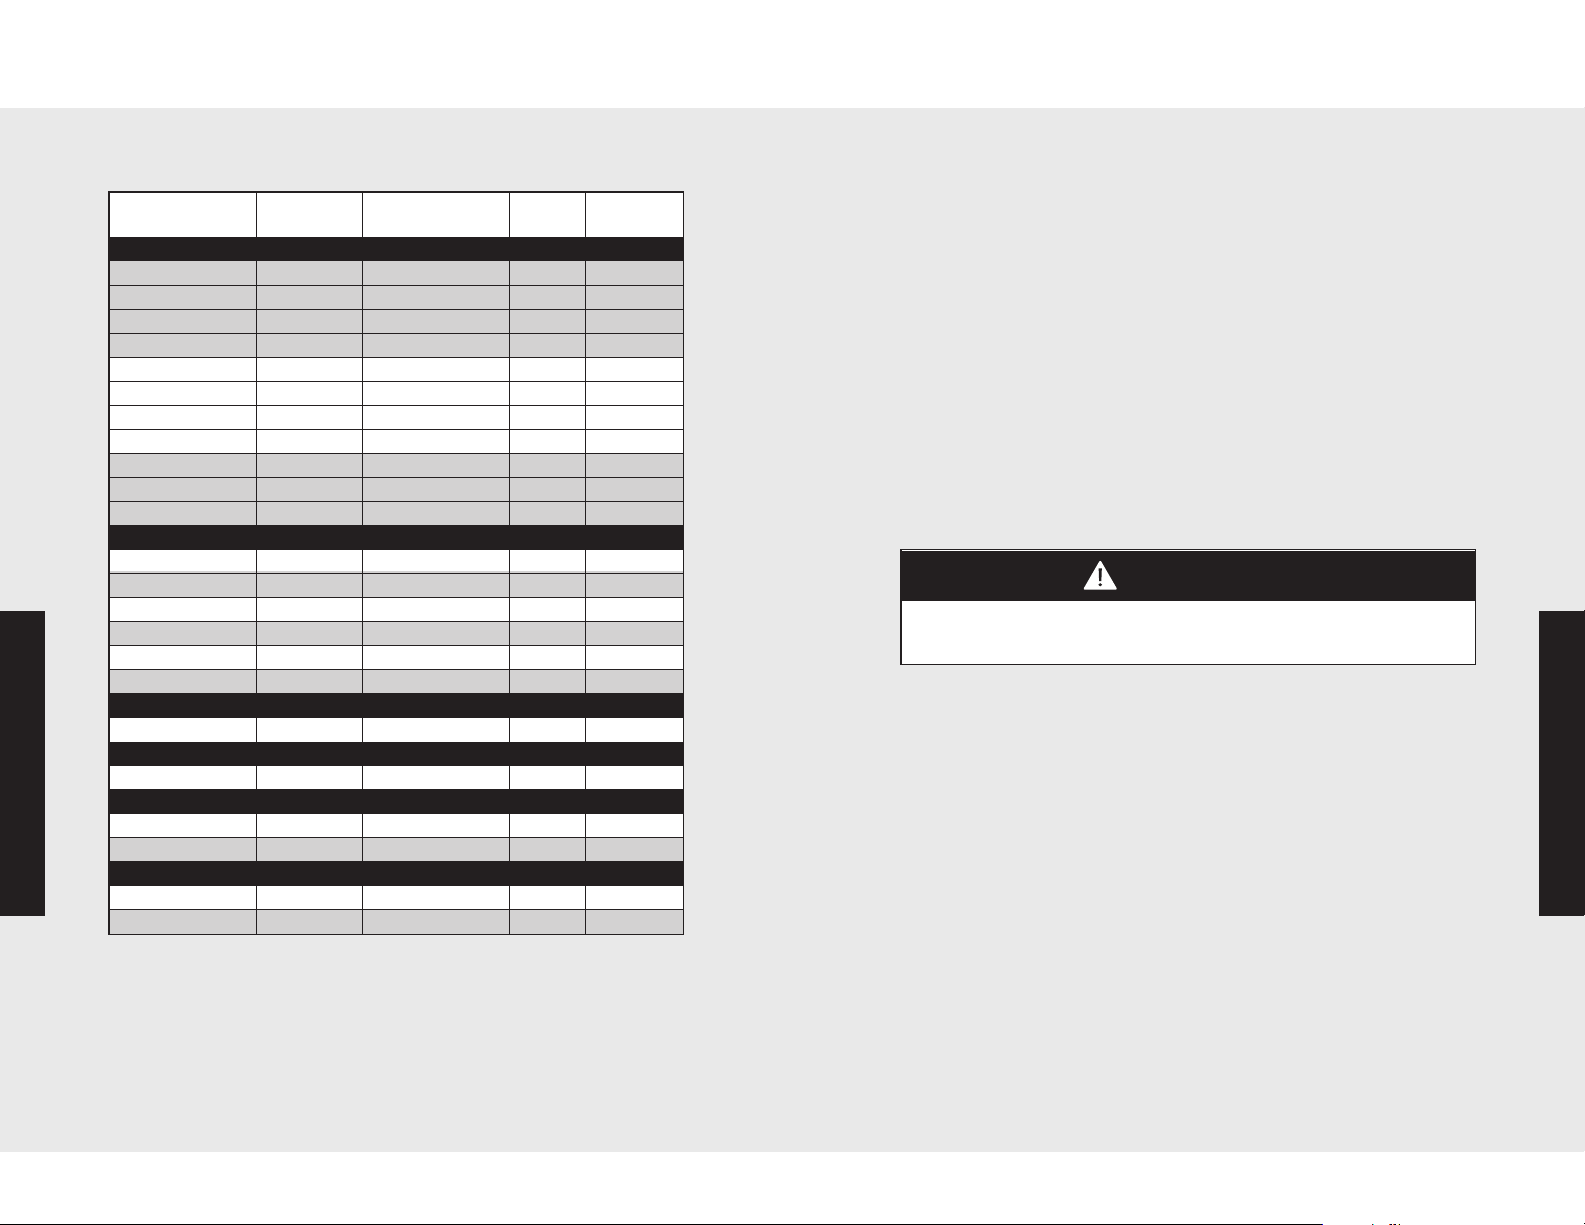
Convection Dehydrate
Broiling Chart
Type and Time
Cut of Meat Weight Setting Rack (min)
BEEF
Sirloin, 1"
Rare 12 oz Broil 37
Medium 12 oz Broil 39
Well done 12 oz Broil 2 12
T-Bone, 3/4"
Rare 10 oz Broil 35
Medium 10 oz Broil 37
Well done 10 oz Broil 2 10
Hamburger, 1/2"
Medium 1/4 lb. Broil 27
Well done 1/4 lb. Broil 2 10
CHICKEN
Bnls breast, 1” 1/2 lb. Broil 2 15
Bnls breast, 1” 1/2 lb. Convection Broil 2 15
Bone-in breast 2 - 3 lbs total Broil 2 22
Bone-in breast 2 - 3 lbs total Convection Broil 2 20
Chicken quarters 2 - 3 lbs total Broil 2 22
Chicken quarters 2 - 3 lbs total Convection Broil 2 20
HAM
Ham slice, 1" 1 lb. Broil 2 10
LAMB
Rib chops, 1" 12 oz. Broil 27
Operation
PORK
Loin chops, 3/4" 1 lb. Convection Broil 2 12
Bacon Broil 26
FISH
Salmon steak 1 lb. Broil 27
Fillets 1 lb. Broil 26
Note: The above information is given as a guide only.
Convection Dehydrate (CONVECTION BAKE)
This oven is designed not only to cook, but also to dehydrate fruits
and vegetables. With the oven function selector set to Convection
Bake and the temperature control on 170° F (76.6° C), warm air is
circulated by a motorized fan in the rear of the oven. Over a period of
time, the water is removed from the food by evaporation. Removal of
water inhibits growth of microorganisms and retards the activity of
enzymes. It is important to remember that dehydration does not
improve the quality, so only fresh, top-quality foods should be used.
1. Prepare the food as recommended.
2. Arrange the food on drying racks (not included with the oven;
contact a local store handling specialty cooking utensils).
3. Set the appropriate low temperature and turn the selector to
“CONVECTON BAKE”.
You must carefully check the food during the dehydration process to
ensure that it does not catch fire.
Operation
30
31
Page 17
Convection Defrost
WARNING
NOTICE
Cleaning and Maintenance
Convection Defrost (CONVECTION BAKE)
With the selector set to Convection Bake and the temperature control
off, air is circulated by a motorized fan in the rear of the oven. The fan
accelerates natural defrosting of the food without heat. To avoid
sickness and food waste, DO NOT allow defrosted food to remain in
the oven for more than two hours.
1. Place the frozen food on a baking sheet.
2. Set the temperature control to “OFF”.
3. Turn the selector to “CONVECTON BAKE”.
To avoid sickness and food waste, DO NOT allow defrosted food to
remain in the oven for more than two hours.
DO NOT turn the Temperature Control on during defrosting. Turning
the convection fan on will accelerate the natural defrosting of the food
without the heat.
Any piece of equipment works better and lasts longer when
maintained properly and kept clean. Cooking equipment is no
exception. Your oven must be kept clean and maintained properly.
Oven Surfaces
Several different finishes have been used in your oven. Cleaning instructions
for each surface are given below. NEVER USE AMMONIA, STEEL WOOL
PADS OR ABRASIVE CLOTHS, CLEANSERS, OVEN CLEANERS, OR
ABRASIVE POWDERS. THEY CAN PERMANENTLY DAMAGE YOUR OVEN.
Control Knobs
MAKE SURE ALL THE CONTROL KNOBS POINT TO THE OFF POSITION
BEFORE REMOVING. Pull the knobs straight off. Wash in detergent and
warm water. Dry completely and replace by pushing firmly onto stem.
DO NOT USE any cleaners containing ammonia or abrasives. They could
remove the graphics from the knob.
Stainless Steel Parts
All stainless steel body parts should be wiped regularly with hot soapy
water at the end of each cooling period and with a liquid cleaner
designed for that material when soapy water will not do the job. DO NOT
use steel wool, abrasive cloths, cleansers, or powders. If necessary, scrape
stainless steel to remove encrusted materials, soak the area with hot
towels to loosen the material, then use a wooden or nylon spatula or
scraper. DO NOT use a metal knife, spatula, or any other metal tool to
scrape stainless steel. DO NOT permit citrus or tomato juice to remain on
stainless steel surface, as citric acid will permanently discolor stainless
steel. Wipe up any spills immediately.
Operation
Product Care
32
33
Page 18
WARNING
WARNING
CAUTION
WARNING
Cleaning and Maintenance
Glass Surfaces
Clean with detergent and warm water. Glass cleaner can be used to
remove fingerprints. If using glass cleaner ammonia, make sure that it
does not run down on exterior door surface.
Brass Parts
All special ordered brass parts are coated with an epoxy coating.
DO NOT USE BRASS CLEANERS OR ABRASIVE CLEANERS ON
ANY BRASS PARTS. All brass body parts should be wiped regularly
with hot soapy water. When hot soapy water will not do the job, use
every day household cleaners that are not abrasive.
Broiler Pan and Grid
Clean with detergent and hot water. For stubborn spots, use a soap-filled
steel wool pad.
Replacing Oven Lights
ELECTRICAL SHOCK HAZARD
Disconnect the electric power at the main fuse or circuit
breaker before replacing bulb.
DO NOT touch bulb with bare hands. Clean off any signs of oil from
the bulb and handle with a soft cloth.
1. Unscrew glass light cover.
2. Use an oven mitt during bulb removal to
protect your hand in case the bulb breaks.
Oven Racks
Clean with detergent and hot water. Stubborn spots can be scoured with a
soap-filled steel wool pad.
BURN OR ELECTRICAL SHOCK HAZARD
Make sure all controls are OFF and oven is COOL
before cleaning. Failure to do so can result in burns
or electrical shock.
3. Replace the bulb with a 120 volt, 40-watt
appliance bulb.
4. Replace the light cover
5. Reconnect power at the main fuse or circuit
breaker.
Power Failure
DO NOT attempt to use during power failure. Unit will not function.
Product Care
Product Care
34
35
Page 19
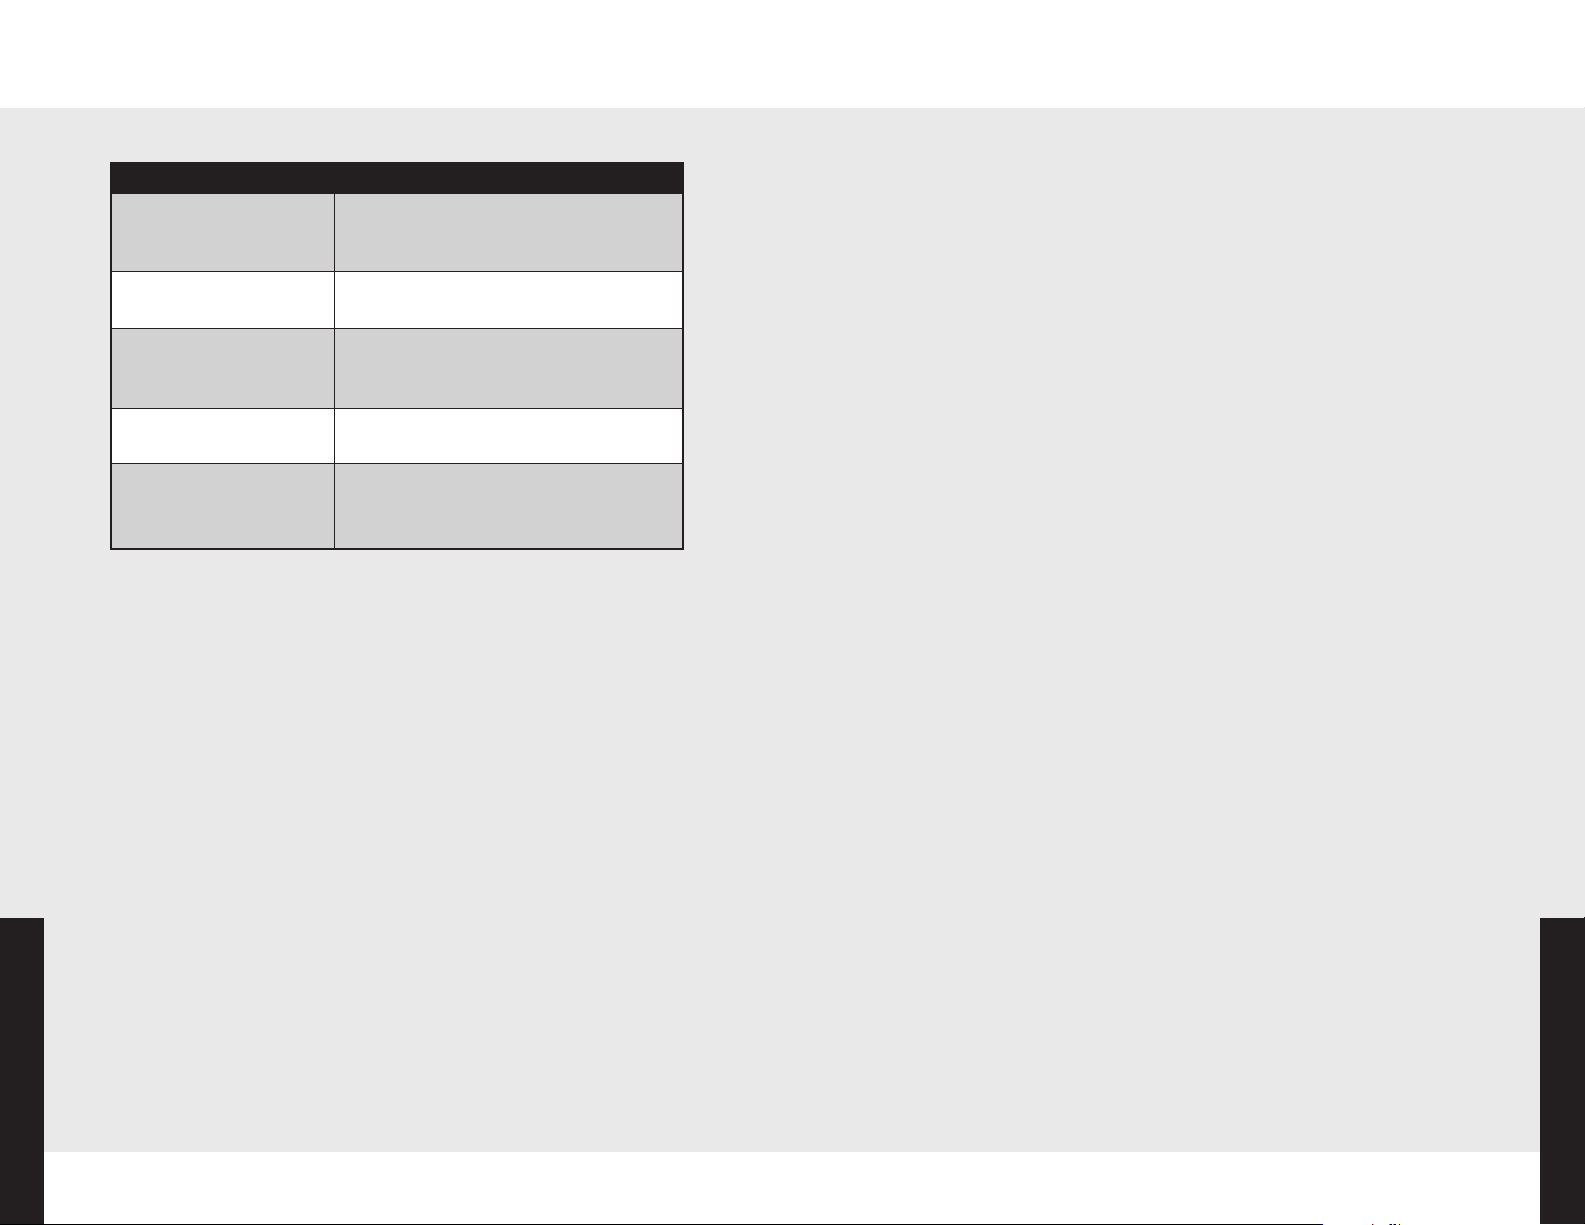
Troubleshooting
Service Information
Problem
Oven will not function. Oven is not connected to electrical power:
Broil does not work.
Oven light will not work.
Service codes appear in
digital display.
Strong odor and/or smoke
is noticed first few times
oven is used.
Possible Cause and/or Remedy
Have electrician check power circuit breaker,
wiring, and fuses.
HI/LO setting has not been set using “UP”
or “DOWN” button.
Light bulb is burned out.
Oven is not connected to power.
Disconnect electrical supply to the oven
and call an authorized servicer.
This is normal burn off of insulation and
protective oils in oven. This will go away
after using oven a few times.
If service is required, call your dealer or authorized service agency.
The name of the authorized service agency can be obtained from the
dealer or distributor in your area.
Have the following information readily available.
• Model number
• Serial number
• Date purchased
• Name of dealer from whom purchased
Clearly describe the problem that you are having. If you are unable to
obtain the name of an authorized service agency, or if you continue
to have service problems, contact Viking Range Corporation at
1-888-VIKING1 (845-4641), or write to:
VIKING RANGE CORPORATION
PREFERRED SERVICE
1803 Hwy 82W
Greenwood, Mississippi 38930 USA
Record the information indicated below. You will need it if service is
ever required. The model and serial number for your range can be
found by opening door and looking under the control panel.
Model no. _____________________ Serial no. ________________________
Date of purchase _______________ Date installed ___________________
Dealer’s name __________________________________________________
Address ________________________________________________________
_______________________________________________________________
If service requires installation of parts, use only authorized parts to
insure protection under the warranty.
KEEP THIS MANUAL FOR FUTURE REFERENCE.
Product Care
36
37
Product Care
Page 20

Warranty
PROFESSIONAL SERIES
UILT-IN GAS OVENS WARRANTY
B
Built-in gas ovens (VGSO Series) and all of their component parts, except as detailed below*, are warranted
to be free from defective materials or workmanship in normal household use for a period of twelve (12)
onths from the date of original retail purchase. Viking Range Corporation, warrantor, agrees to repair or
m
replace, at its option, any part which fails or is found to be defective during the warranty period.
Painted and decorative items are warranted to be free from defective materials or workmanship for a period
*
of ninety (90) days from the date of original retail purchase. ANY DEFECTS MUST BE REPORTED TO THE
SELLING DEALER WITHIN NINETY (90) DAYS FROM DATE OF ORIGINAL RETAIL PURCHASE.
Viking Range Corporation uses the most up-to-date processes and best materials available to produce all
color finishes. However, slight color variation may be noticed because of the inherent differences in painted
arts and porcelain parts as well as differences in kitchen lighting, product locations, and other factors.
p
ny oven tubular burner which fails due to defective materials or workmanship in normal household use
A
during the second through fifth year from the date of original retail purchase will be repaired or replaced,
free of charge for the part itself, with the owner paying all other costs, including labor.
Any porcelain oven or porcelain inner door panel which rusts through due to defective material or
orkmanship in normal household use during the second through the tenth year from the date of original
w
retail purchase will be repaired or replaced, free of charge for the part itself, with the owner paying all
other costs, including labor.
This warranty applies to applications where use of the product extends beyond normal residential use.
Examples are, but not limited to, bed and breakfasts, fire stations, private clubs, churches, etc. This
warranty excludes all commercial locations such as restaurants, food service locations and institiutional
food service locations.
This warranty extends to the original purchaser of the product warranted hereunder and to each
transferee owner of the product during the term of the warranty.
This warranty shall apply to products purchased and located in the United States and Canada. Products
must be purchased in the country where service is requested. Warranty labor shall be performed by an
authorized Viking Range Corporation service agency or representative. Warranty shall not apply to
damage resulting from abuse, accident, natural disaster, loss of electrical power to the product for any
reason, alteration, outdoor use, improper installation, improper operation, or repair or service of the
product by anyone other than an authorized Viking Range Corporation service agency or representative.
This warranty does not apply to commercial usage.
incidental damage whether arising out of breach of warranty, breach of contract, or otherwise. Some
jurisdictions do not allow the exclusion or limitation of incidental of consequential damages, so the
above limitation or exclusion may not apply to you.
Owner shall be responsible for proper installation, providing normal care and maintenance, providing
proof of purchase upon request, and making the appliance reasonably accessible for service. If the
product or one of its component parts contains a defect or malfunction during the warranty period, after
a reasonable number of attempts by the warrantor to remedy the defects or malfunctions, the owner is
entitled to either a refund or replacement of the product or its component part or parts. Warrantor’s
liability on any claim of any kind, with respect to the goods or services covered hereunder, shall in no
case exceed the price of the goods or service or part thereof which gives rise to the claim.
WARRANTY SERVICE: Under the terms of this warranty, service must be performed by a factory
authorized Viking Range Corporation service agent or representative. Service will be provided during
normal business hours, and labor performed at overtime or premium rates shall not be covered by this
warranty. To obtain warranty service, contact the dealer from whom the product was purchased, an
authorized Viking Range Corporation service agent, or Viking Range Corporation. Provide model and
serial number and date of original purchase. For the name of your nearest authorized Viking Range
Corporation service agency, call the dealer from whom the product was purchased or Viking Range
Corporation. IMPORTANT: Retain proof of original purchase to establish warranty period.
The return of the Owner Registration Card is not a condition of warranty coverage.
return the Owner Registration Card so that Viking Range Corporation can contact you should any
question of safety arise which could affect you.
Any implied warranties of merchantability and fitness applicable to the above described oven tubular
burner, porcelain oven, or porcelain inner door panel are limited in duration to the period of coverage of
the applicable express written limited warranties set forth above. Some jurisdictions do not allow
limitations on how long an implied warranty lasts, so the above limitation may not apply to you. This
warranty gives you specific legal rights, and you may also have other rights which may vary from
jurisdiction to jurisdiction.
ONE YEAR FULL WARRANTY
FIVE YEAR LIMITED WARRANTY
TEN YEAR LIMITED WARRANTY
NINETY (90) DAY RESIDENTIAL PLUS WARRANTY
Warrantor is not responsible for consequential or
You should, however,
Notes
_____________________________________________________________________________________________________
____________________________________________________________________________________________________
_
_____________________________________________________________________________________________________
_____________________________________________________________________________________________________
____________________________________________________________________________________________________
_
_____________________________________________________________________________________________________
_____________________________________________________________________________________________________
_____________________________________________________________________________________________________
_____________________________________________________________________________________________________
_____________________________________________________________________________________________________
_____________________________________________________________________________________________________
_____________________________________________________________________________________________________
_____________________________________________________________________________________________________
_____________________________________________________________________________________________________
_____________________________________________________________________________________________________
_____________________________________________________________________________________________________
_____________________________________________________________________________________________________
_____________________________________________________________________________________________________
Product Care
Product Care
111 Front Street • Greenwood, Mississippi 38930 USA • (662) 455-1200
VIKING RANGE CORPORATION
38
39
 Loading...