

Page 1
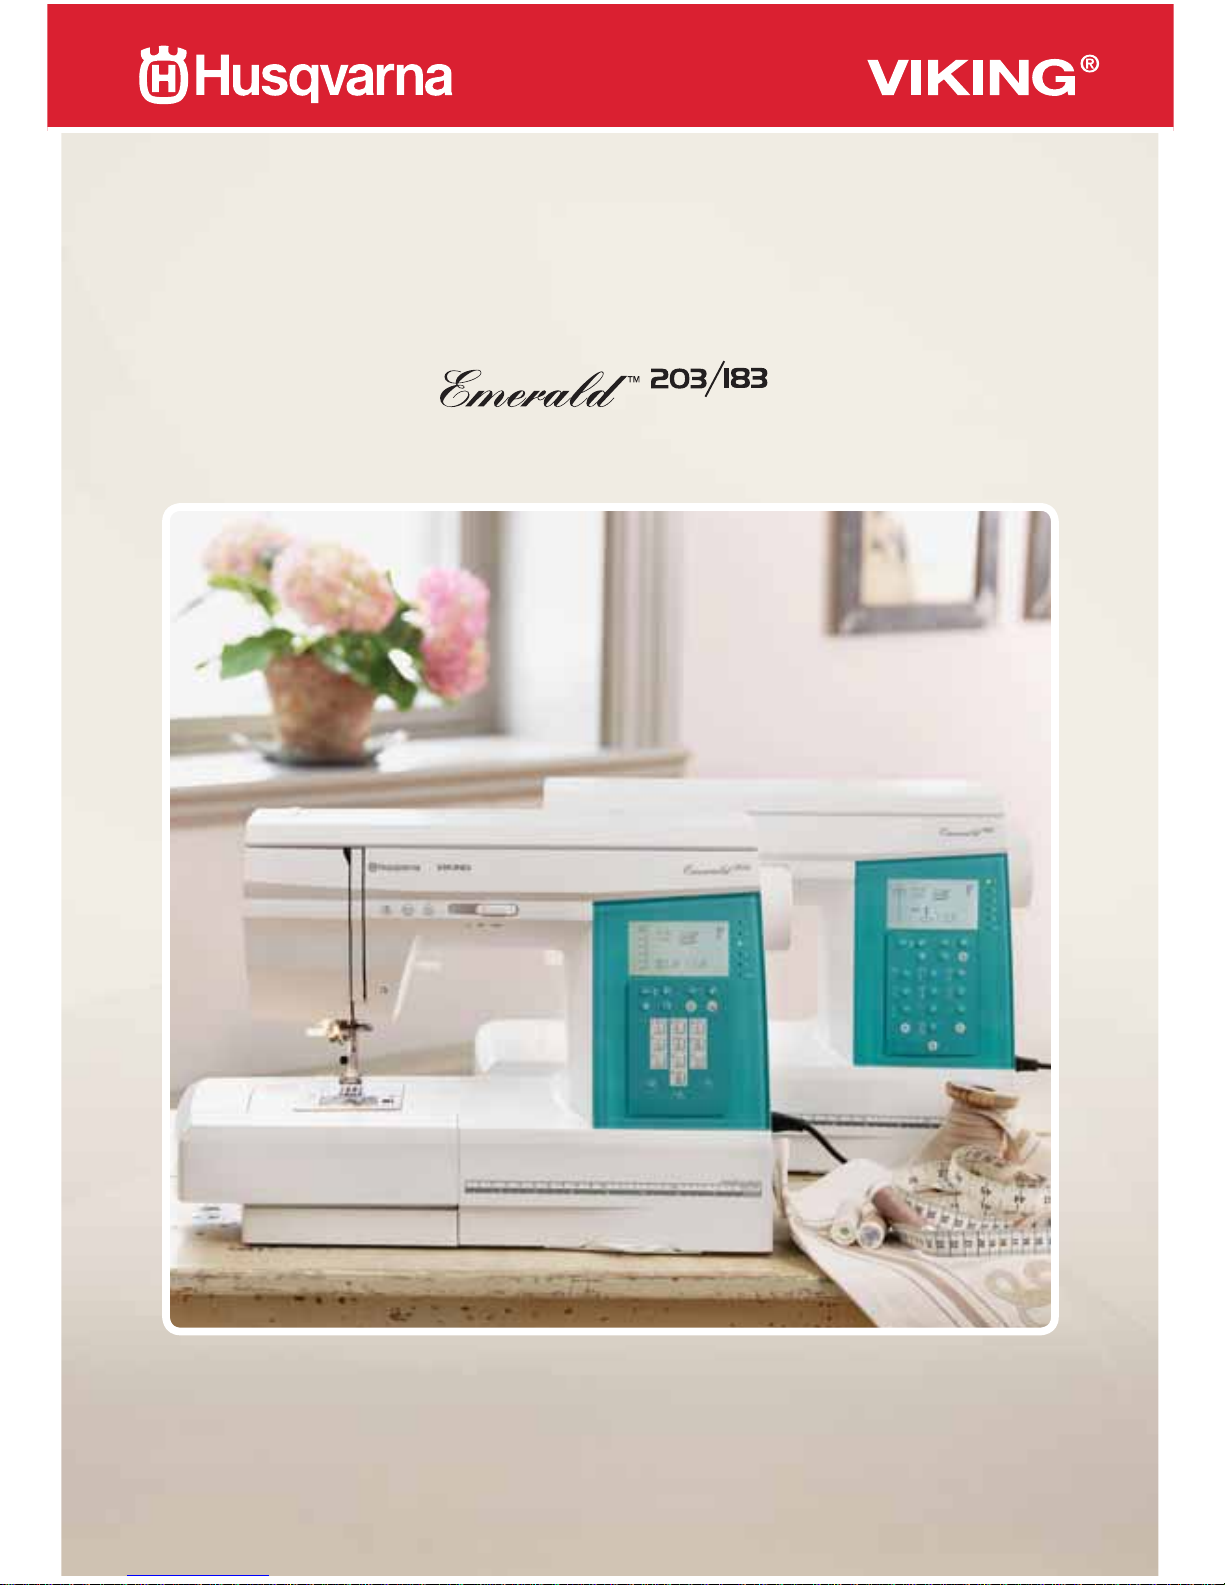
KEEPING THE WORLD SEWING™
User’s Guide
Page 2

This houshold sewing machine is designed to comply with IEC/EN 60335-2-28 and UL1594
IMPORTANT SAFETY INSTRUCTIONS
When using an electrical appliance, basic safety precautions should always be followed, including
the following:
Read all instructions before using this household sewing machine.
DANGER - To reduce the risk of electric shock:
• A sewing machine should never be left unattended when plugged in. Always unplug this
sewing machine from the electric outlet immediately after using and before cleaning.
• Always unplug before relamping. Replace bulb with same type rated 5 Watt.
WARNING - To reduce the risk of burns, fi re, electric
shock, or injury to persons:
• This sewing machine is not intended for use by persons (including children) with reduced
physical, sensory or mental capabilities, or lack of experience and knowledge, unless they
have been given supervision or instruction concerning use of the sewing machine by a
person responsible for their safety.
• Children should be supervised to ensure that they do not play with the sewing machine.
• Use this sewing machine only for its intended use as described in this manual. Use only
attachments recommended by the manufacturer as contained in this manual.
• Never operate this sewing machine if it has a damaged cord or plug, if it is not working
properly, if it has been dropped or damaged, or dropped into water. Return the sewing
machine to the nearest authorized dealer or service center for examination, repair, electrical
or mechanical adjustment.
• Never operate the sewing machine with any air openings blocked. Keep ventilation
openings of the sewing machine and foot controller free from the accumulation of lint,
dust, and loose cloth.
• Keep fi ngers away from all moving parts. Special care is required around the sewing
machine needle.
• Always use the proper needle plate. The wrong plate can cause the needle to break.
• Do not use bent needles.
• Do not pull or push fabric while stitching. It may defl ect the needle causing it to break.
• Wear safety glasses.
• Switch the sewing machine off (“0”) when making any adjustment in the needle area,
such as threading needle, changing needle, threading bobbin, or changing presser foot, etc.
• Always unplug sewing machine from the electrical outlet when removing covers, lubricating,
or when making any other user servicing adjustments mentioned in the instruction manual.
• Never drop or insert any object into any opening.
• Do not use outdoors.
• Do not operate where aerosol (spray) products are being used or where oxygen is being
administrated.
• To disconnect, turn all controls to the off (“0”) position, then remove plug from outlet.
• Do not unplug by pulling on cord. To unplug, grasp the plug, not the cord.
• The sound pressure level under normal operating conditions is ≤75dB(A).
SAVE THESE INSTRUCTIONS
Page 3
CONTENTS
1
Machine Overview 4
Accessories 5
Presser Feet 5
Stitch Overview 7
Unpacking 11
Pack Awa y After Sewing 11
Accessory Box 12
Remove the Accessory Box /
Use the Free Arm 12
ExtensionTable (only EMERALD™ 203) 12
Connect the Foot Control 13
Connect to the Power Supply 13
Sewing Guide Reference Chart 14
Lower the Feed Teeth 15
Changing the Presser Foot 15
Changing the Needle 15
Needles 16
Universal Needles 16
Stretch Needles 16
Denim Needles 16
Spool Pins 17
Threading the Upper Thread 18
Needle Threader 19
Threading for Twin Needle 20
Cutting the Thread 20
Wind the Bobbin 21
Place the Bobbin in the Machine 21
Presser Foot Lifter 22
Thread T ension 22
Machine Functions 23
Speed Control Slide 23
Foot Control 23
Needle Stop Up/Down 24
Stop 24
Fix 24
Reverse 24
Presser Foot Pressure Dial 25
Stitch Balance 25
Function Buttons 26
Direct Stitch Selection buttons 26
Stitch Width 26
Stitch Length 26
Menu Selection 26
Font Menu Selection (only EMERALD™ 203) 26
Mirror Side to Side 27
Stitch Elongation Button 27
Memory Button 27
Edit Button 27
Clear Button 27
Buzzer Sound 27
Display icons 28
Display Icons – Alphabet 28
Display Icons – Elongation 29
Display Icons – Memory 29
Warning Messages 30
The Presser Foot is not Lowered 30
Main Motor Blocked 30
The Buttonhole Lever is not Lowered 30
Buttonhole Lever is not Lifted 30
Bobbin Winding 30
Programming 31
Create a Combination 31
Adding Stitches or Letters in a Sequence 31
Editing Stitches/Letters 32
Removing Stitches/Letters 32
Opening and Sewing a Stitch Memory 32
Stitch Elongation 32
2
3
GET TO KNOW YOUR MACHINE
SET UP
MACHINE FUNCTIONS
Page 4
2
Seam 33
Edge/Quilting Guide 34
Overcast 34
Seam and Overcast 34
Darning and Mending 35
Sewing Hems in Heavy Fabric 35
Blind Hem 36
Sewing Buttonholes 37
Buttonhole Slider Foot C 37
Corded Buttonhole (Stretch fabrics) 38
Sewing on Buttons 38
Sewing Zippers 39
Center Zipper 39
Gathering 40
Dual Feeder (only Emerald™ 203) 40
Cleaning 41
Changing the Light Bulb 41
Clean the Bobbin Area 42
Cleaning Under the Bobbin Area 42
Trouble Shooting 43
4
BASIC SEWING TECHNIQUES
CARE OF YOUR MACHINE
5
Page 5
1. GET TO KNOW YOUR MACHINE
3
1
GET TO KNOW YOUR MACHINE
Page 6
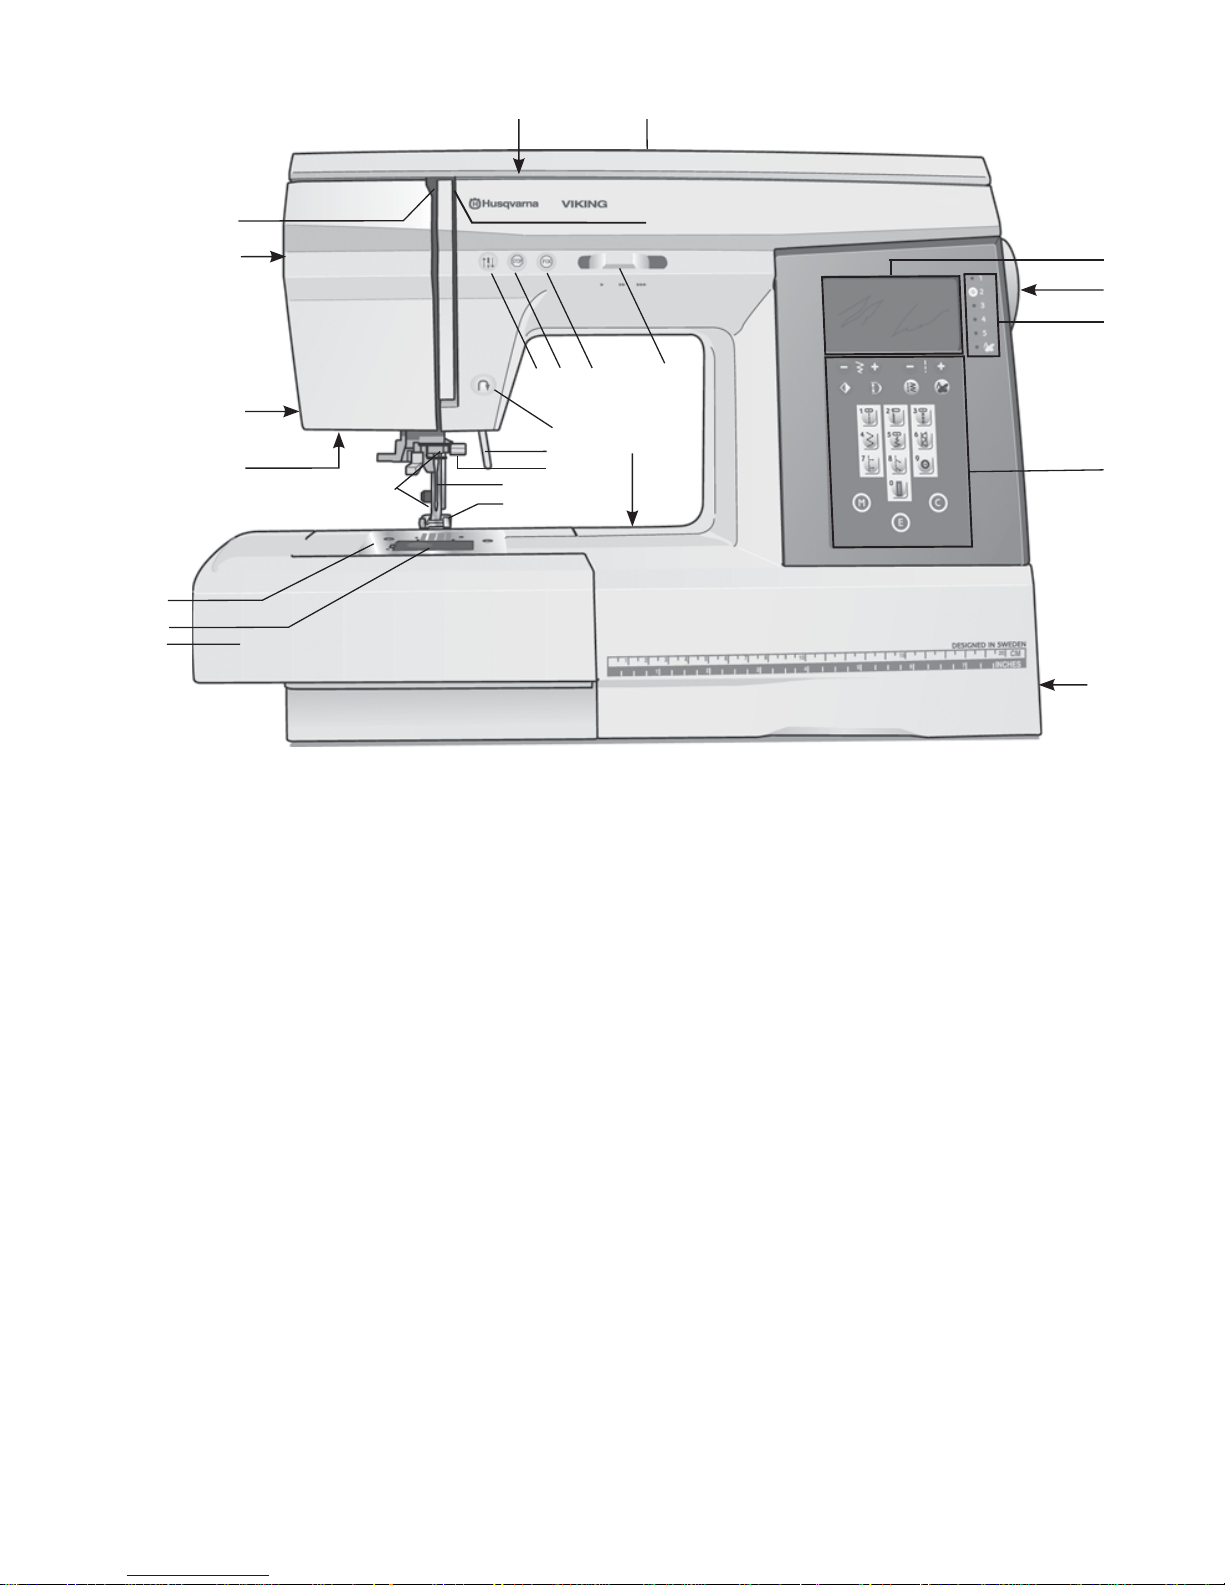
4
1. Thread tension dial
2. Lid
3. InfoDisplay
4. Handwheel
5. Indicator for active menu
6. Function panel
7. Main power switch, connection to power
supply and foot control connection
8. Accessory box
9. Bobbin cover
10. Needle plate
11. Light
12. Thread cutter
13. Presser foot pressure dial
14. Thread take-up lever
15. Presser foot bar and presser foot ankle
16. Presser foot
17. Needle
18. Needle clamp screw
19. Presser foot lever
20. Reverse button
21. Drop feed lever
22. Needle up / down
23. STOP button
24. FIX button
25. Speed control slide
26. Thread tension disks
MACHINE OVERVIEW
17
19
8
9
10
11
21
20
14
26
2
15
16
13
12
1
4
5
3
6
7
2223 24
25
18
Page 7
1. GET TO KNOW YOUR MACHINE
5
2
5
7
8
9
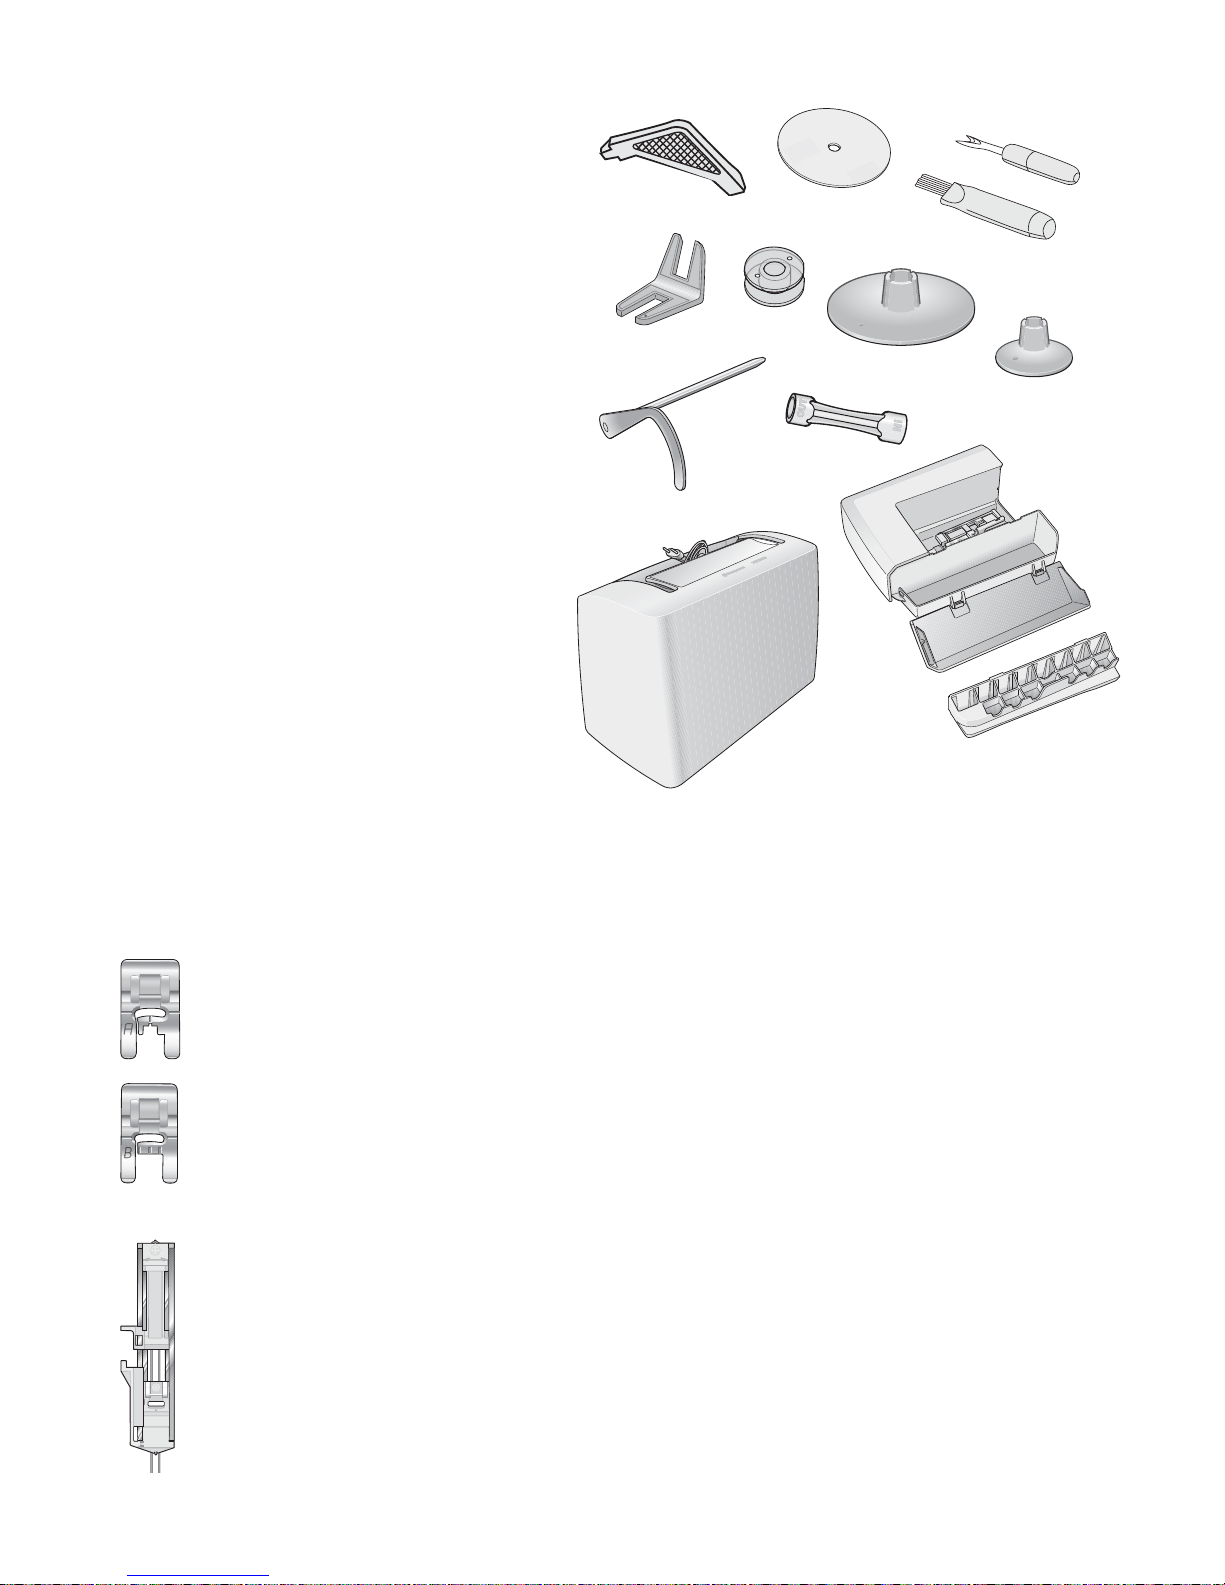
ACCESSORIES
1. Screwdriver
2. Felt pad
3. Seam Ripper/brush
4. Multipurpose tool/Button reed
5. Bobbins
6. Spool cap large
(attached on the machine upon delivery).
7. Spool cap small
(attached on the machine upon delivery)
8. Edge/Quilting guide
9. Light bulb remover
10. Carrying case
11. Accessory box
(attached on the machine upon delivery).
12. Needle pack (not in picture)
13. Foot control and power cord
(not in picture)
14. Extension Table (not in picture)
(only EMERALD™ 203)
11
3
10
1
4
6
PRESSER FEET
7
Utility Foot A
Attached on the machine upon delivery. This foot is used mainly for straight stitching
and zigzag stitching with a stitch length longer than 1.0.
7
Presser Foot B
When sewing short zigzag stitches and satin stitches with less than 1.0 mm stitch
length, other utility stitches or decorative stitches, use this foot. The tunnel on the
underside of the foot is designed to feed smoothly over the stitches.
Buttonhole Slider Foot C
This foot has a space in the back to set the size of the buttonhole. The machine will
sew a buttonhole to fi t that button size.
Page 8
6
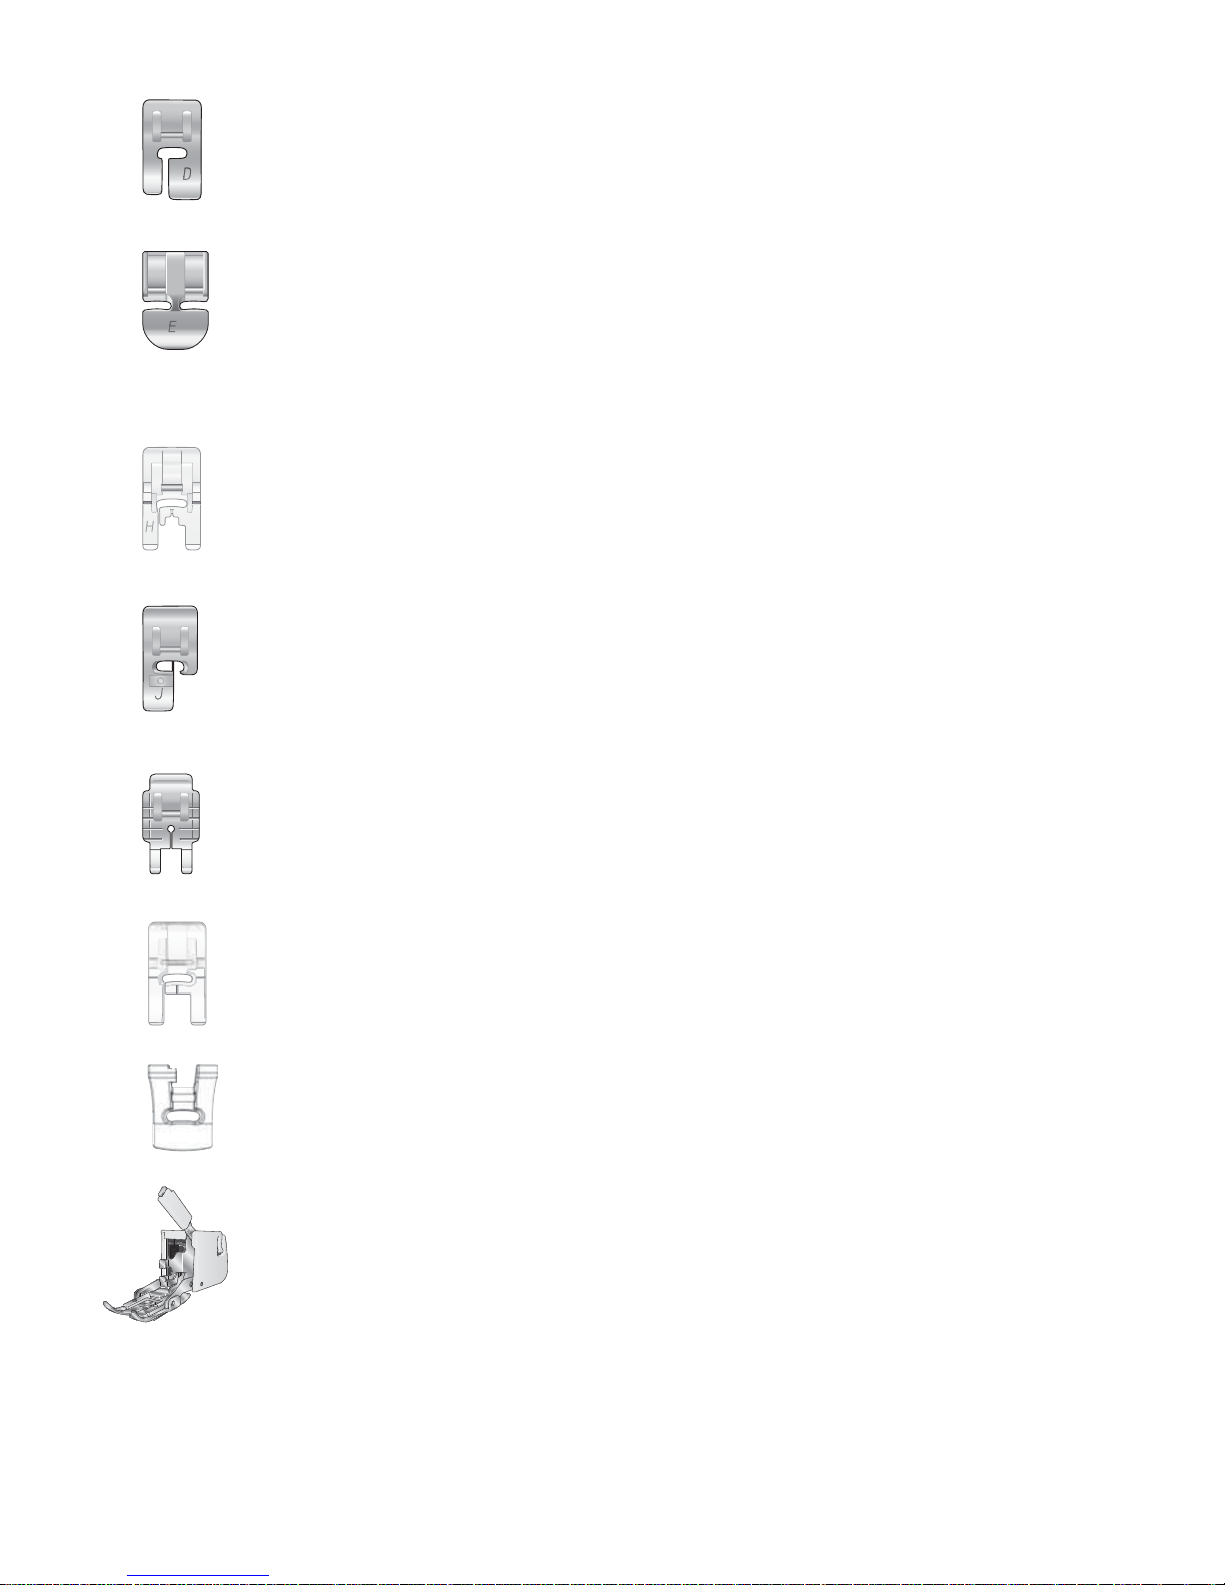
Blind Hem Foot D
This foot is used for blind hem stitches. The inner edge of this foot guides
the fabric. The right toe of the foot is designed to ride along the hem edge.
7
Zipper Foot E
This foot can be snapped on either to the right or to the left of the needle.
This makes it easy to sew close to both sides of the zipper teeth. Move
needle position to right or left to sew closer to zipper teeth or for covering
large cording.
7
Non Stich Glide Foot H
This foot, with a coating underneath, is used when sewing foam, vinyl,
plastic, or leather to minimize the risk of these materials sticking to the foot.
Edging Foot J
This foot is used for overcasting and seam/overcasting, i.e. stitches which
have a stitch width of 5.0 and 5.5 mm. Stitches form over the pin which
prevents puckering at the edge of the fabric.
Quilter’s 1/4” Piecing Foot P
This foot is used when piecing quilt blocks. The foot has seam guide marks
1/4” (6 mm) and 1/8” (3 mm).
7
Transparent Foot B
This foot is used for decorative sewing. The presser foot has the same
underside as presser foot B.
Gathering Foot
This foot is used for gathering fabric or to gather and attach a ruffl e in one
step. The foot is suitable for light to medium weight fabrics.
Dual Feed Foot (only EMERALD™ 203)
This foot equalizes the feeding of the upper and lower layers of fabric which
improves the matching of plaids, stripes and patterns.
Page 9
1. GET TO KNOW YOUR MACHINE
7
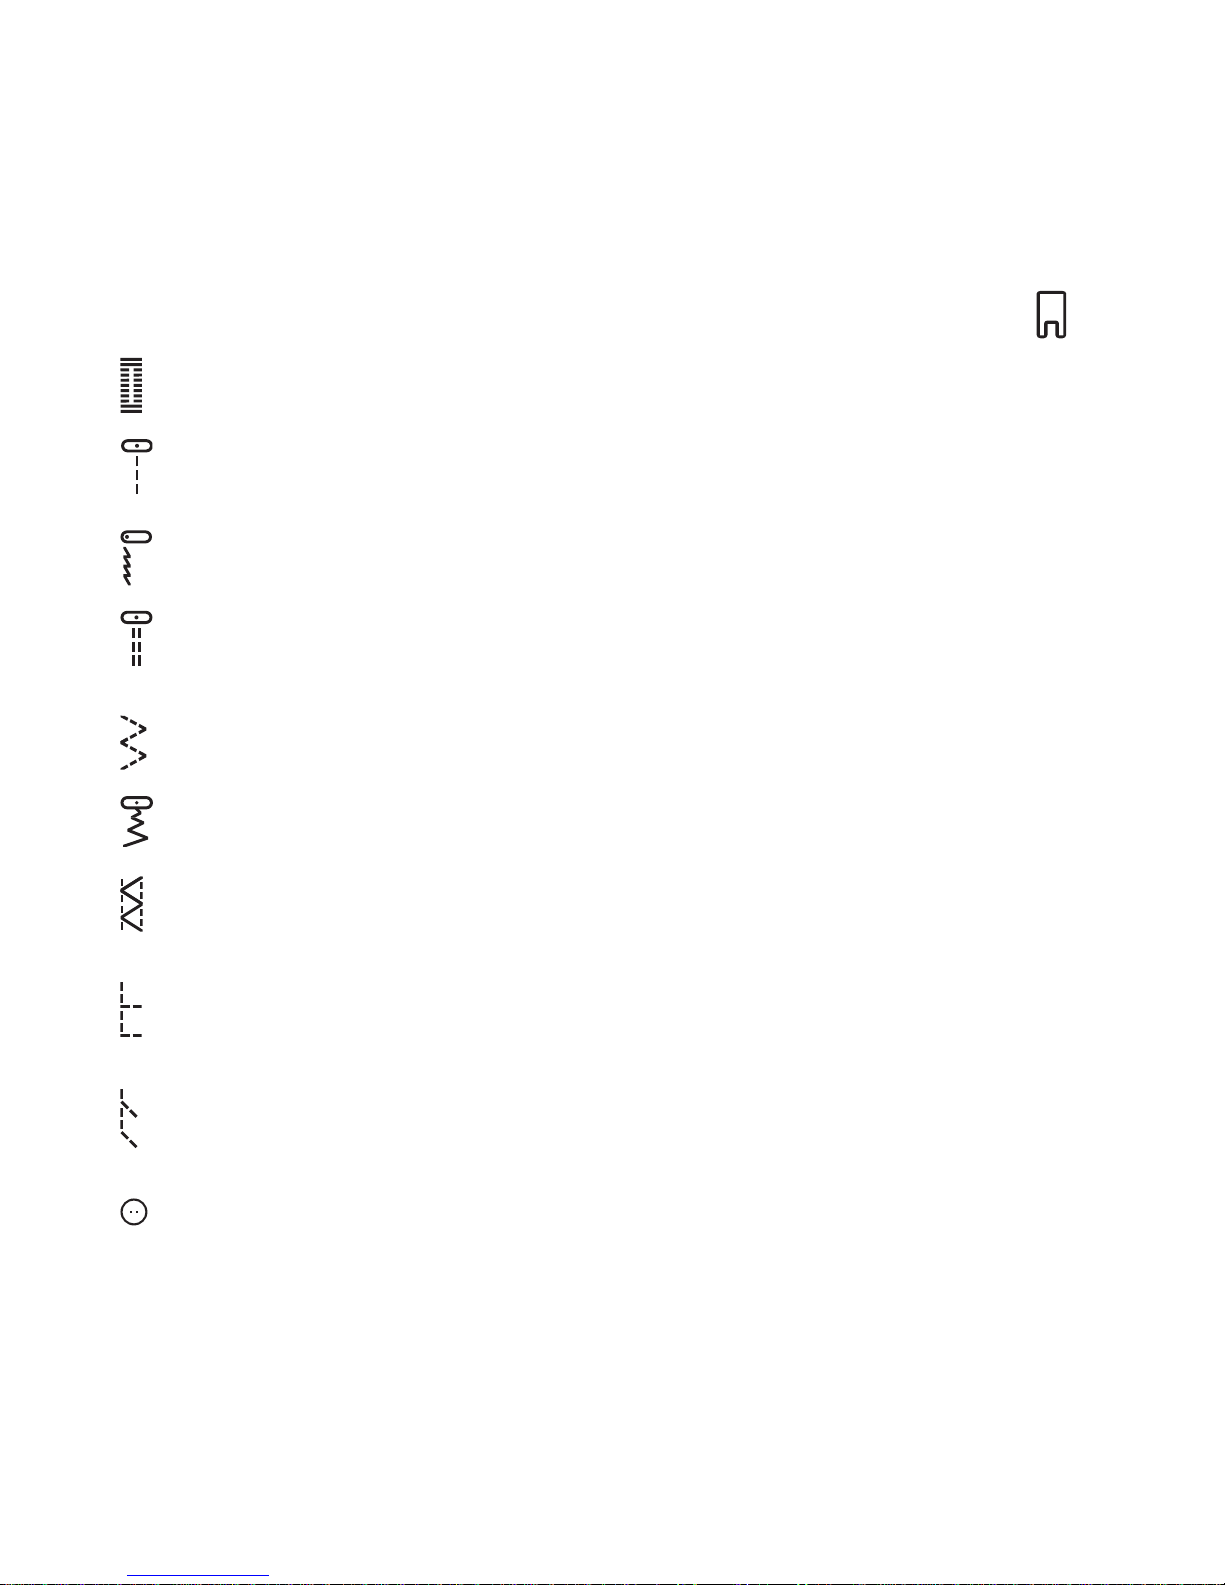
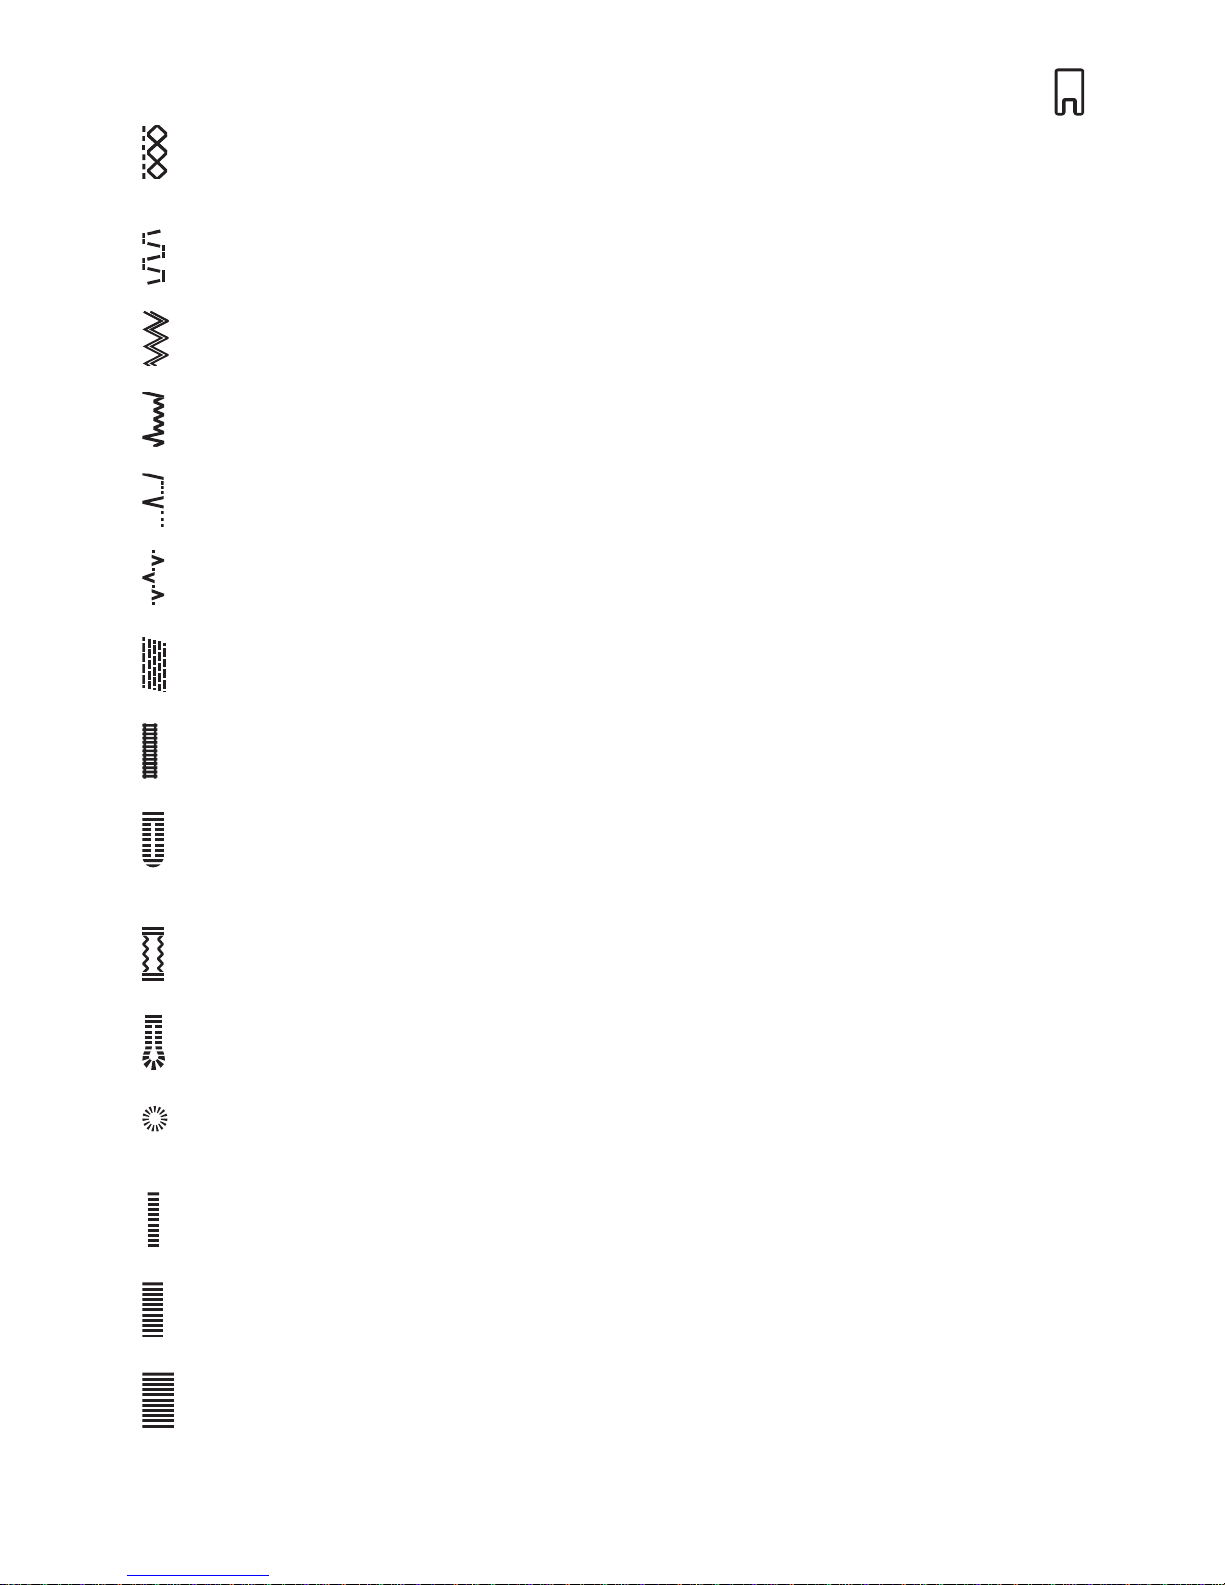
Utility Stitches, Menu 1 & 2
Use those stitches for utility sewing, garment sewing and mending.
1:0 – Buttonhole
Buttonhole for blouses shirts and linen.
C
1:1 – Straight Stitch
For all kinds of sewing in woven fabrics.
A
1:2 – Stretch Stitch
For seams in tricot and stretch fabrics.
A
1:3 – Reinforced Straight Stitch
For seams which are subject to considerable strain. Use to reinforce and topstitch
sportswear and working clothes.
A
1:4 – Three-Step Zigzag
For overcasting, mending, sewing on patches and elastics.
A
1:5 – Zigzag
For lace edging and sewing on bands.
A
1:6 – Flatlock
Decorative hems and overlapped seams, belts and bands. For medium/heavy
stretch fabrics.
B
1:7 – Overcast Stitch
Seam and overcast in one step along the edge or trim later. For light stretch and
non-stretch fabrics.
J
1:8 – Overlock
Seam and overcast in one step along the edge or trim later. For medium and
medium/heavy stretch fabrics.
B
1:9 – Sewing on Button
Sew on buttons with two or four holes.
_
STITCHES
Page 10
8
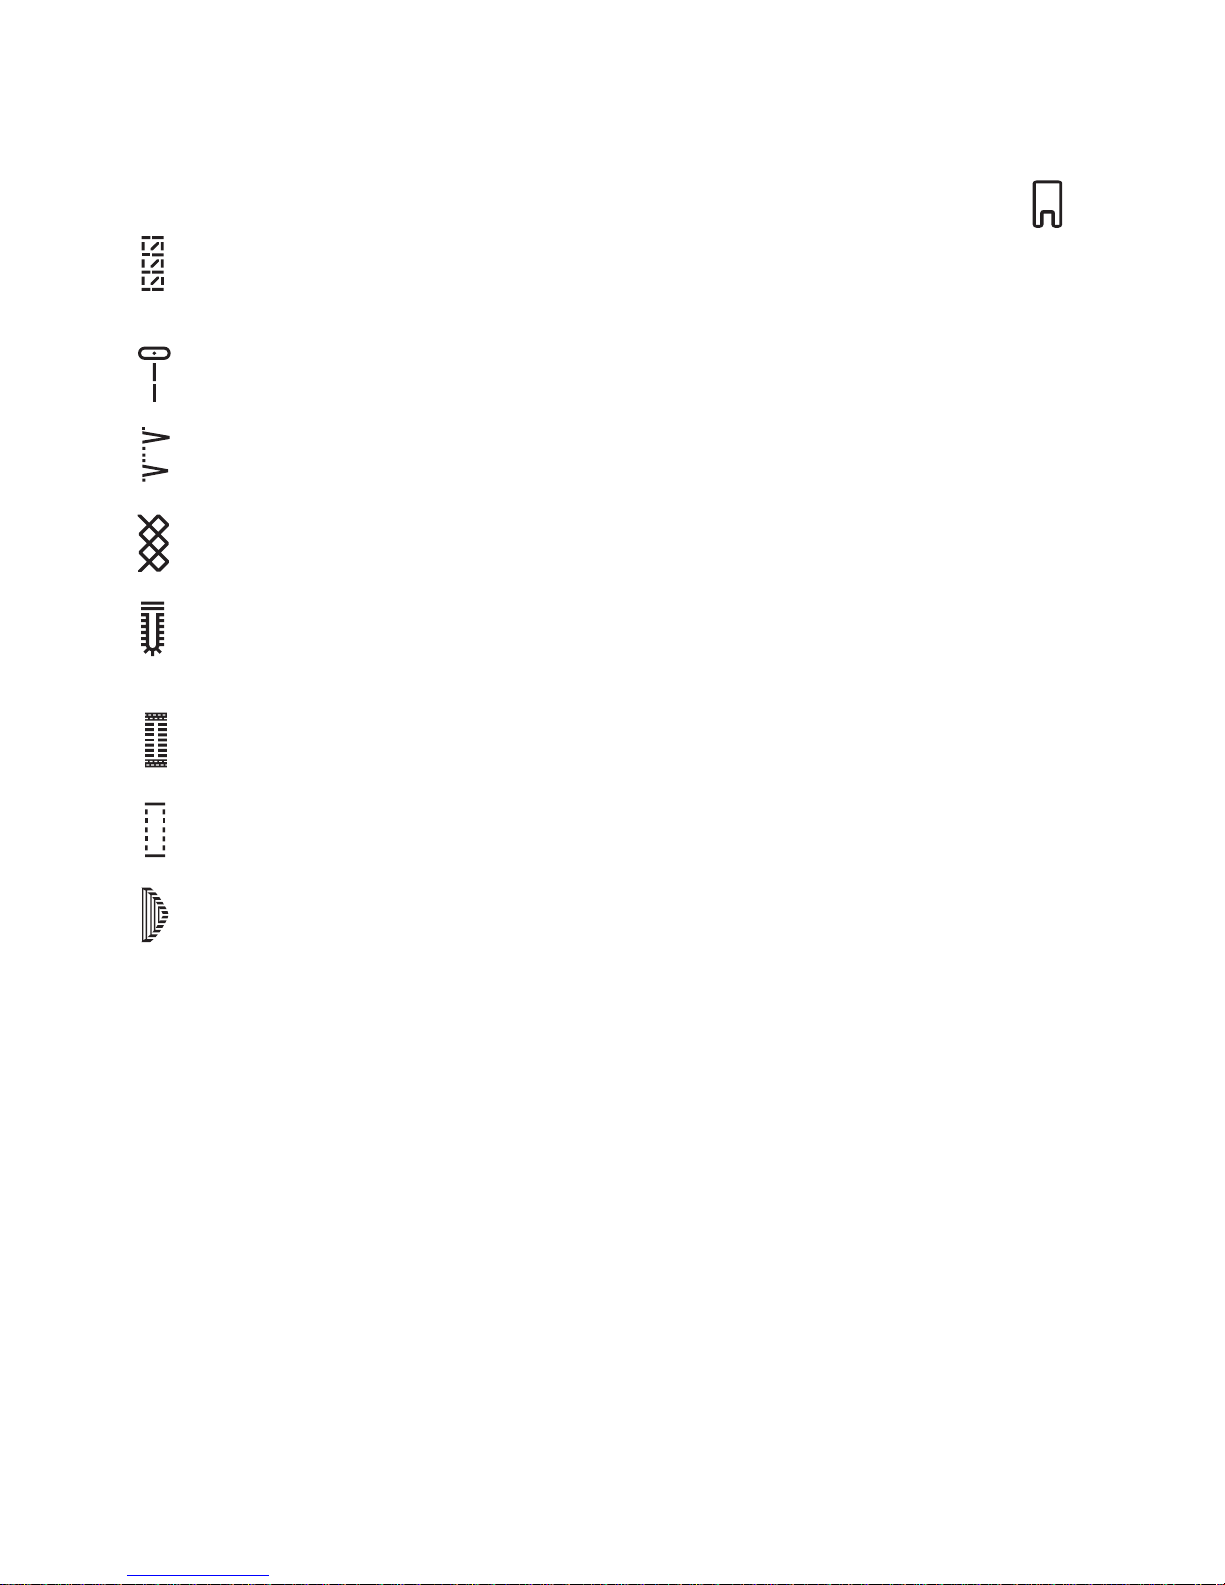
2:01 – Double Overlock
Seam and overcast in one step along the edge or trim later. For heavy stretch
fabrics.
B
2:02 – Darning Stitch
Darn and mend work clothers, jeans, table cloths and towels.
B
2:03 – RicRac Stitch
For joining fabric edge to edge, overlapping leather, or decorative stitching.
B
2:04 – Elastic Blind Hem
Invisible hems in stretch medium and heavy fabrics.
D
2:05 – Woven Blind Hem
Invisble hems in woven fabrics.
D
2:06 – Bridging Stitch
For joining two pieces of fabric with fi nished edges and for elastic shirring.
B
2:07 – Darning Stitch
Darn and mend work clothes, jeans, table cloths and more.
C
2:08 – Bartack Stitch
For applying belt loops and reinforcing pockets.
C
2:09 - Rounded Buttonhole
Heirloom buttonhole for ”hand look” on fi ne and delicate fabrics. Also for lapels
in suit coat.
C
2:10 – Stretch Buttonhole
Heavy reinforced buttonhole for heavy fabrics.
C
2:11 – Keyhole Buttonhole
Keyhole buttonhole with square end for tailored jackets, coats, etc.
C
2:12 – Eyelet
For garments and home textiles.
B
2:13 – Satin Stitch 2mm
For appliqués, rounded edge, sewing on laces and bands.
B
2:14 – Satin Stitch 4mm
For appliqués, rounded edge, sewing on laces and bands.
B
2:15 – Satin Stitch 6mm
For appliqués, rounded edge, sewing on laces and bands.
B
Page 11
1. GET TO KNOW YOUR MACHINE
9
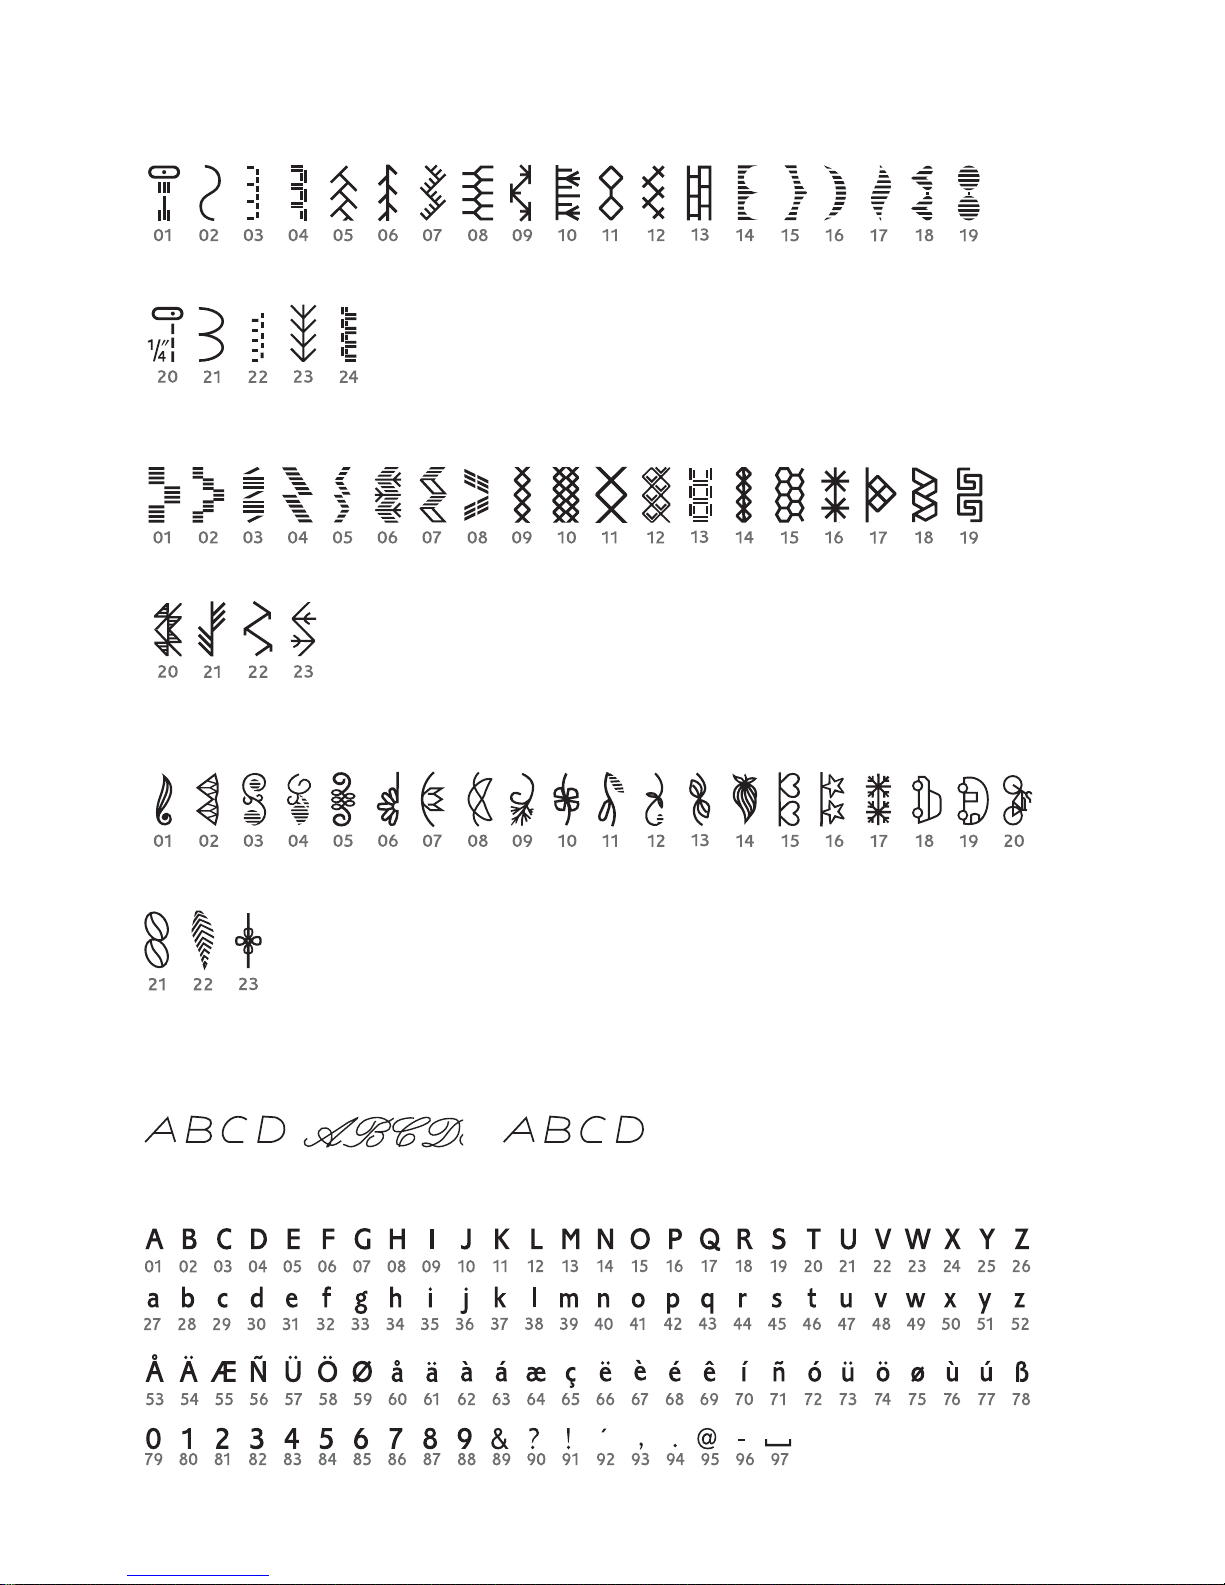
Utility Stitches, Menu 2
only EMERALD™ 203
2:16 – Overlock Stitch
Seam and overcast in one step along the edge or trim later. For medium stretch
fabrics.
B
2:17 - Gathering Stitch
For gathering.
A
2:18 – Shell Edge Stitch
For edgings, sew over the edge on light stretch fabrics, sew woven fabric on bias.
A
2:19 – Elastic or Smocking Stitch
Sew over two rows of elastic thread for elastic shirring.
B
2:20 – Heirloom Buttonhole
For hand look on fi ne and delicate fabrics. Tip: For jeans buttonholes, increase
length and width of the buttonhole. Use thicker thread.
C
2:21 – Heavy Duty Buttonhole
With reinforced bartacks.
C
2:22 – Leather Buttonhole (Straight Stitch)
For leather and suede.
C
2:23 – Scallop Stitch B
Page 12
10
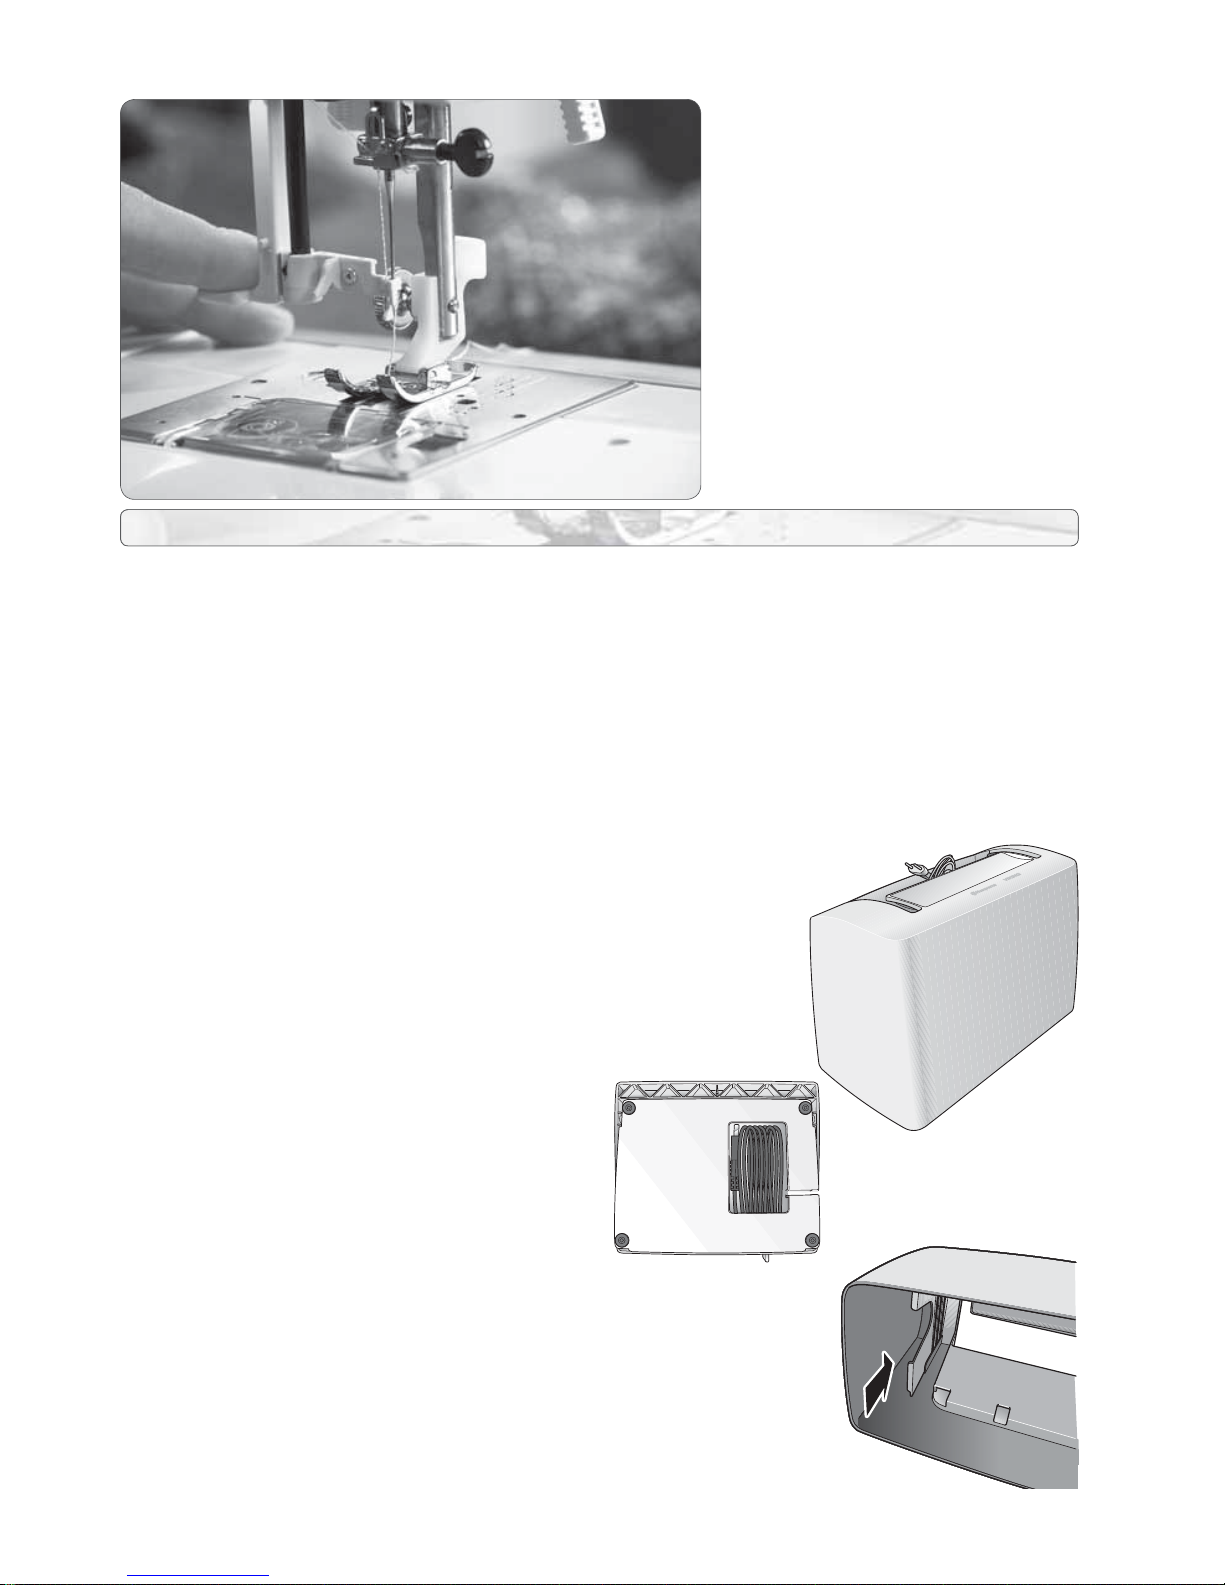
Alphabet Position Table
Decorative Stitches
Menu 3
only EMERALD™ 203
Menu 4
only EMERALD™ 203
Menu 5
only EMERALD™ 203
Alphabet Menu
EMERALD™ 203 EMERALD™ 183
Page 13
2. SET UP
11
UNPACKING
1. Place the machine on a sturdy, fl at surface, remove the packaging and lift off the cover.
2. The machine is delivered with an accessory bag, a main cord and a foot control cord.
3. Wipe the machine, particularly around the needle and needle plate to remove any
oil before sewing.
A
B
C
P ACK A W A Y AFTER SEWING
1. Press the power switch to turn off the
machine.
2 Unplug the cord from the wall socket and
then from the machine.
3 Wind the main cord around your hand and
place the cord in the space in the carrying
case (A).
4 Unplug the foot control cord from the
machine. Wind the foot control cord
around your hand and place it in the space
of the foot control (B).
5 Check to ensure that all accessories are in
the accessory box. Slide the box on to the
machine.
6 Press the foot control together and place it
in the foot control space in your carrying
case (C).
2
SET UP
Page 14
12
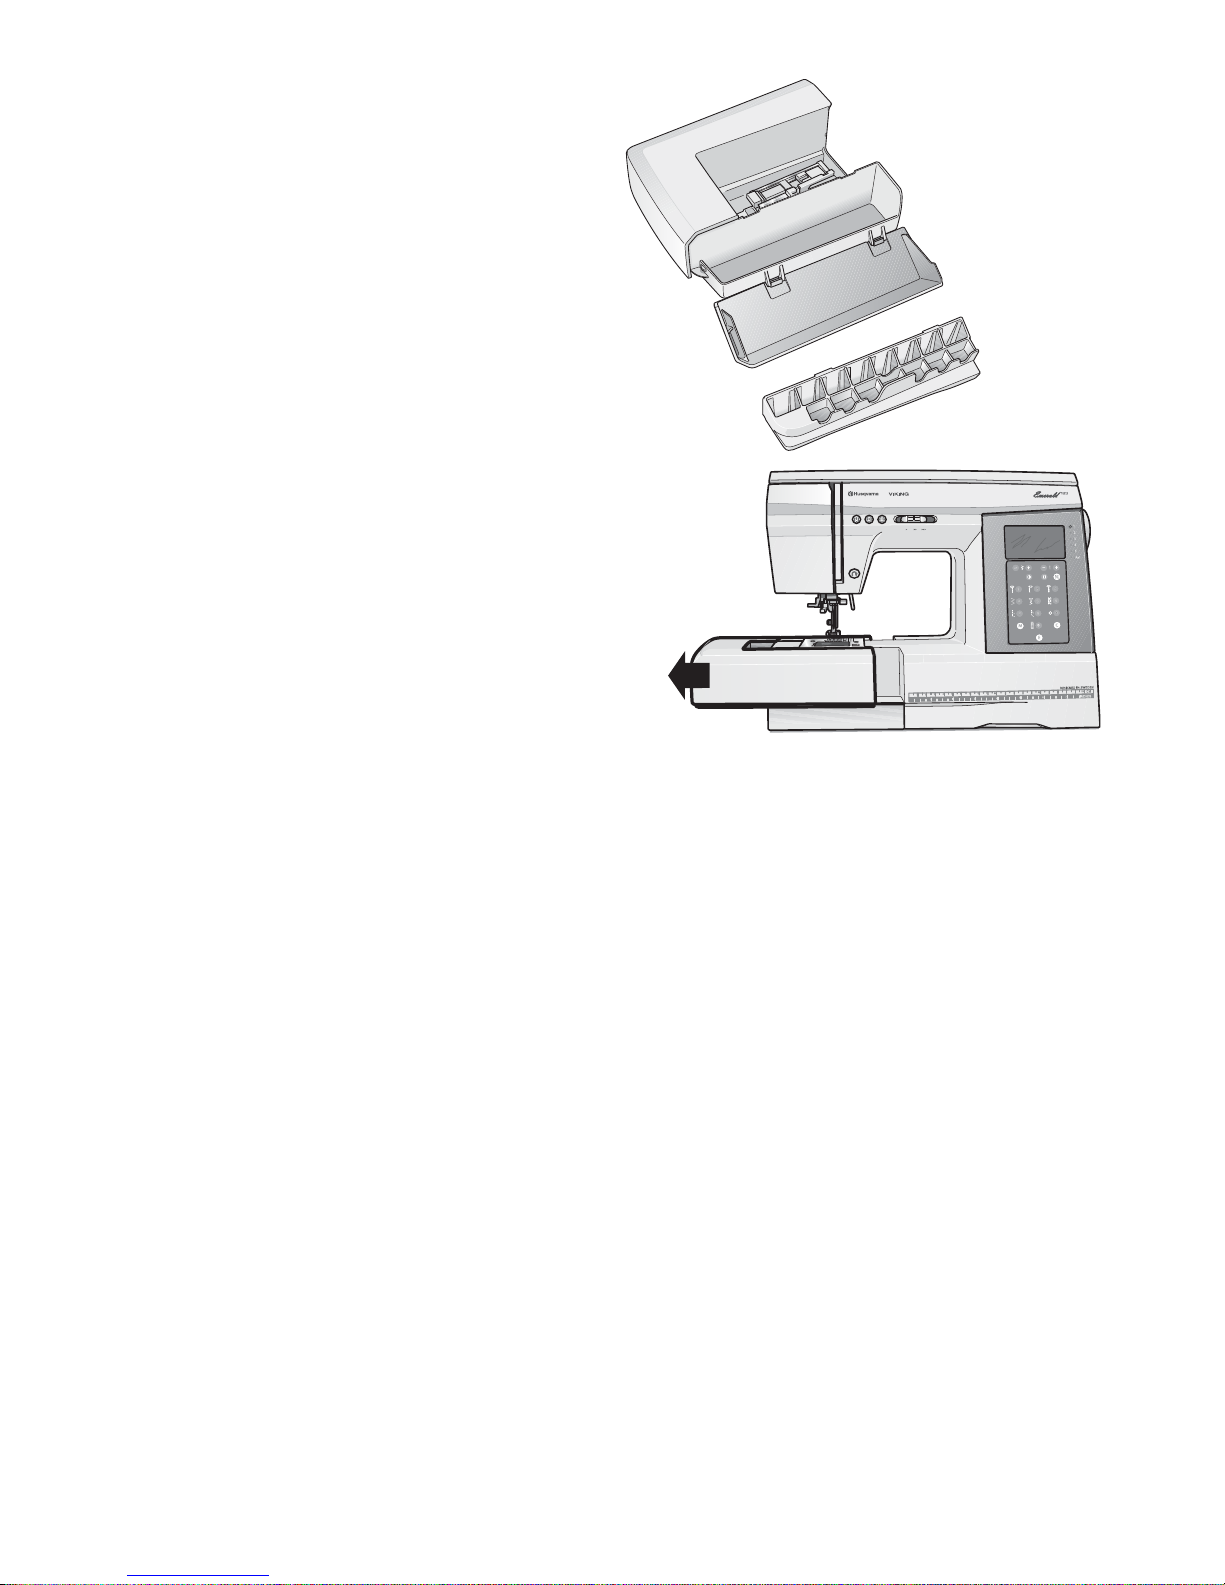
ACCESSORY BOX
In the accessory box there is a special tray
for presser feet and bobbins plus a space for
other accessories.
Store the presser feet and the bobbins in the
tray so they are always easily accessible.
Remove the Accessory Box /
Use the Free arm
Keep the accessory box on the machine to
provide a larger fl at work surface.
Slide the accessory box to the left when you
wish to remove it and use the free arm.
To facilitate sewing trouser legs and sleeve
hems use the free arm.
To replace the Accessory Box, slide it tight
onto the machine until it fi ts in place.
EXTENSION T ABLE
(only EMERALD™ 203)
Use the Extension Table to extend the sewing
surface so you can easily sew large projects
and quilts.
1. Unpack the table and remove the
protective plastic fi lm.
2. Place the table on a fl at suface so that
the holes for the legs are facing upwards.
Mount the legs into the holes.
3. Slide the table onto the free arm of the
machine. If neccessary screw the feet up
or down to adjust the height.
Page 15
2. SET UP
13
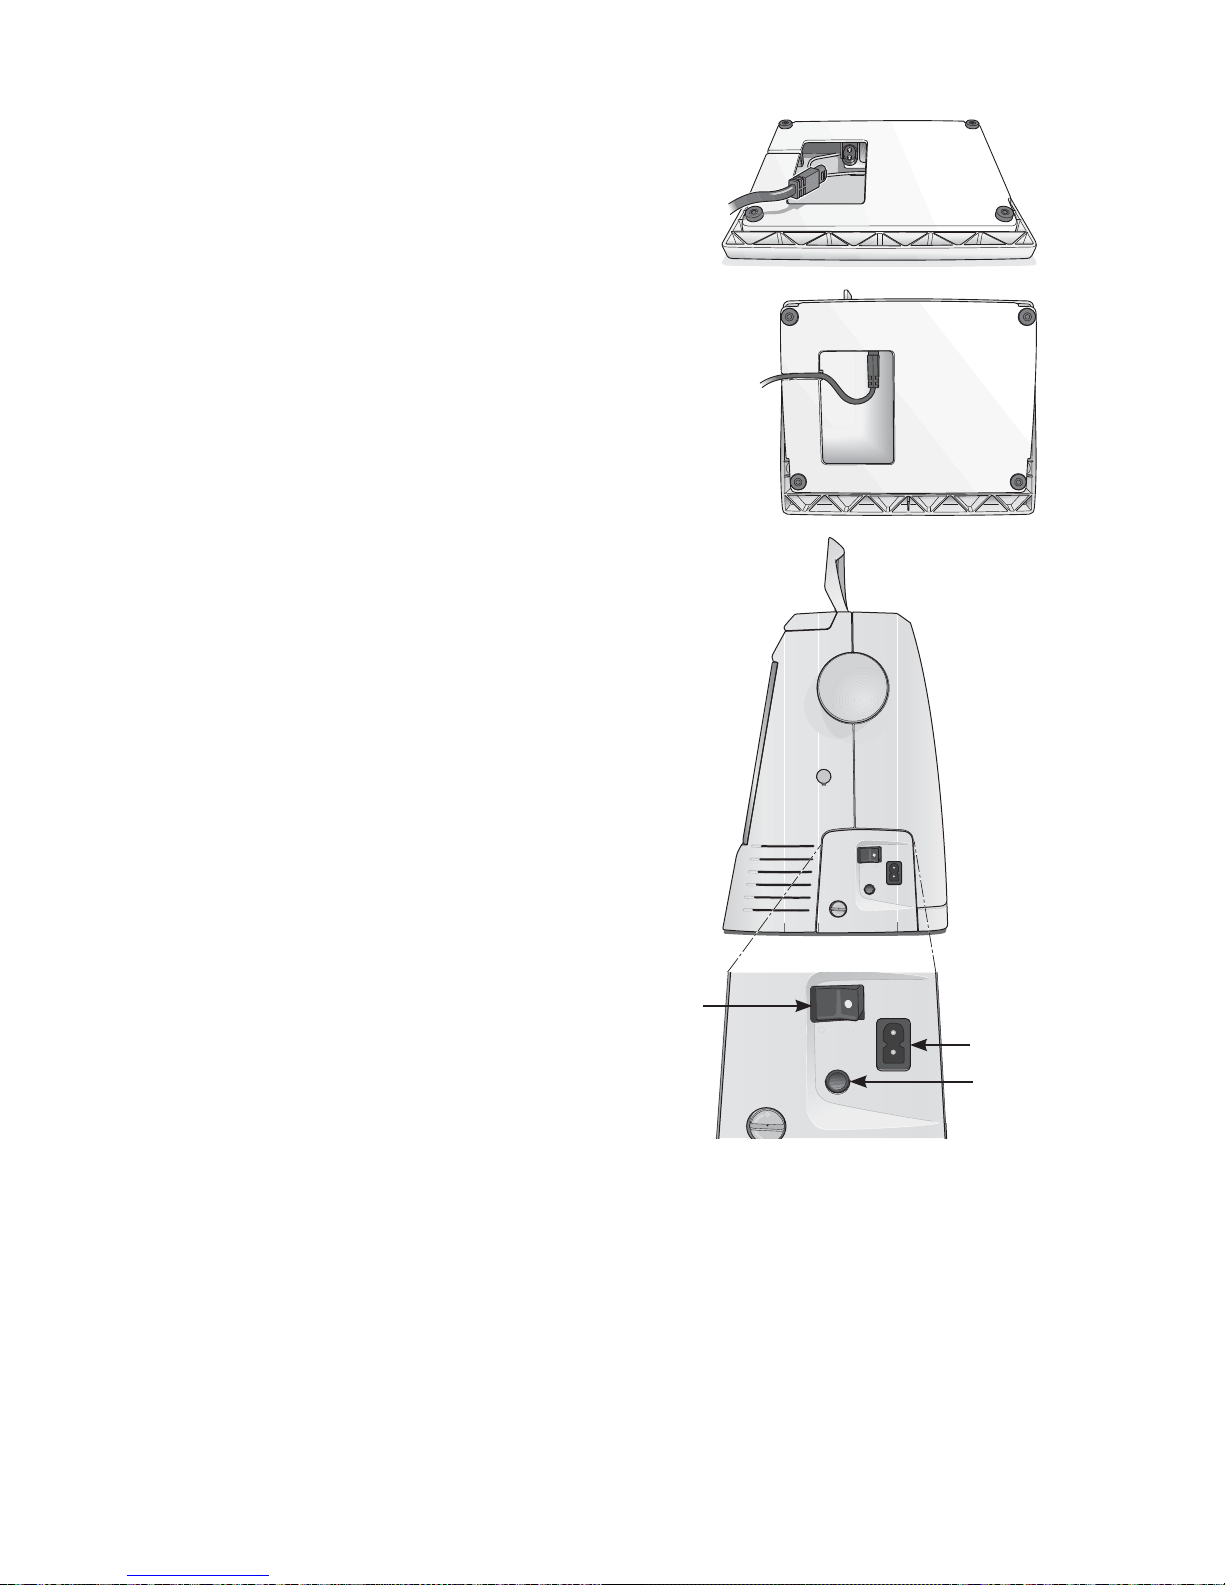
CONNECT THE FOOT CONTROL
Among the accessories you will fi nd the
foot control cord and the main power cord.
Connecting the foot control cord to the foot
control is only necessary the very fi rst time
you are going to use the machine.
1. Take out the foot control cord. Turn the
foot control over. Connect the cord to
the socket inside the space of the foot
control.
2. Push fi rmly to make sure it is properly
connected.
3. Lay the cord into the slot on the
underside of the foot control.
CONNECT TO THE POWER SUPPL Y
On the underside of the machine you will
fi nd information about the power supply (V)
and the frequency (Hz).
Before plugging in the foot control, check
to ensure that it is of type “FR4/FR5” (see
underside of foot control).
1. Connect the foot control cord to the
front socket on the bottom right side of
the machine (A).
2. Connect the power cord to the rear
socket on the bottom right side of the
machine. (B)
3. When you press the power switch to ON
(C), both the machine and the light are
switched on.
Note: Your EMERALD™ sewing machine is
adjusted to provide the best stitch result at normal
room temperature. Extreme hot and cold temperatures
can affect the sewn result.
C
B
A
For USA and Canada
This sewing machine has a polarized plug
(one blade wider than the other). To reduce
the risk of electric shock, this plug is intended
to fi t in a polarized outlet only one way. If the
plug does not fi t fully in the outlet, reverse the
plug. If it still does not fi t, contact a qualifi ed
electrician to install the proper outlet. Do not
modify the plug in any way.
Page 16
14
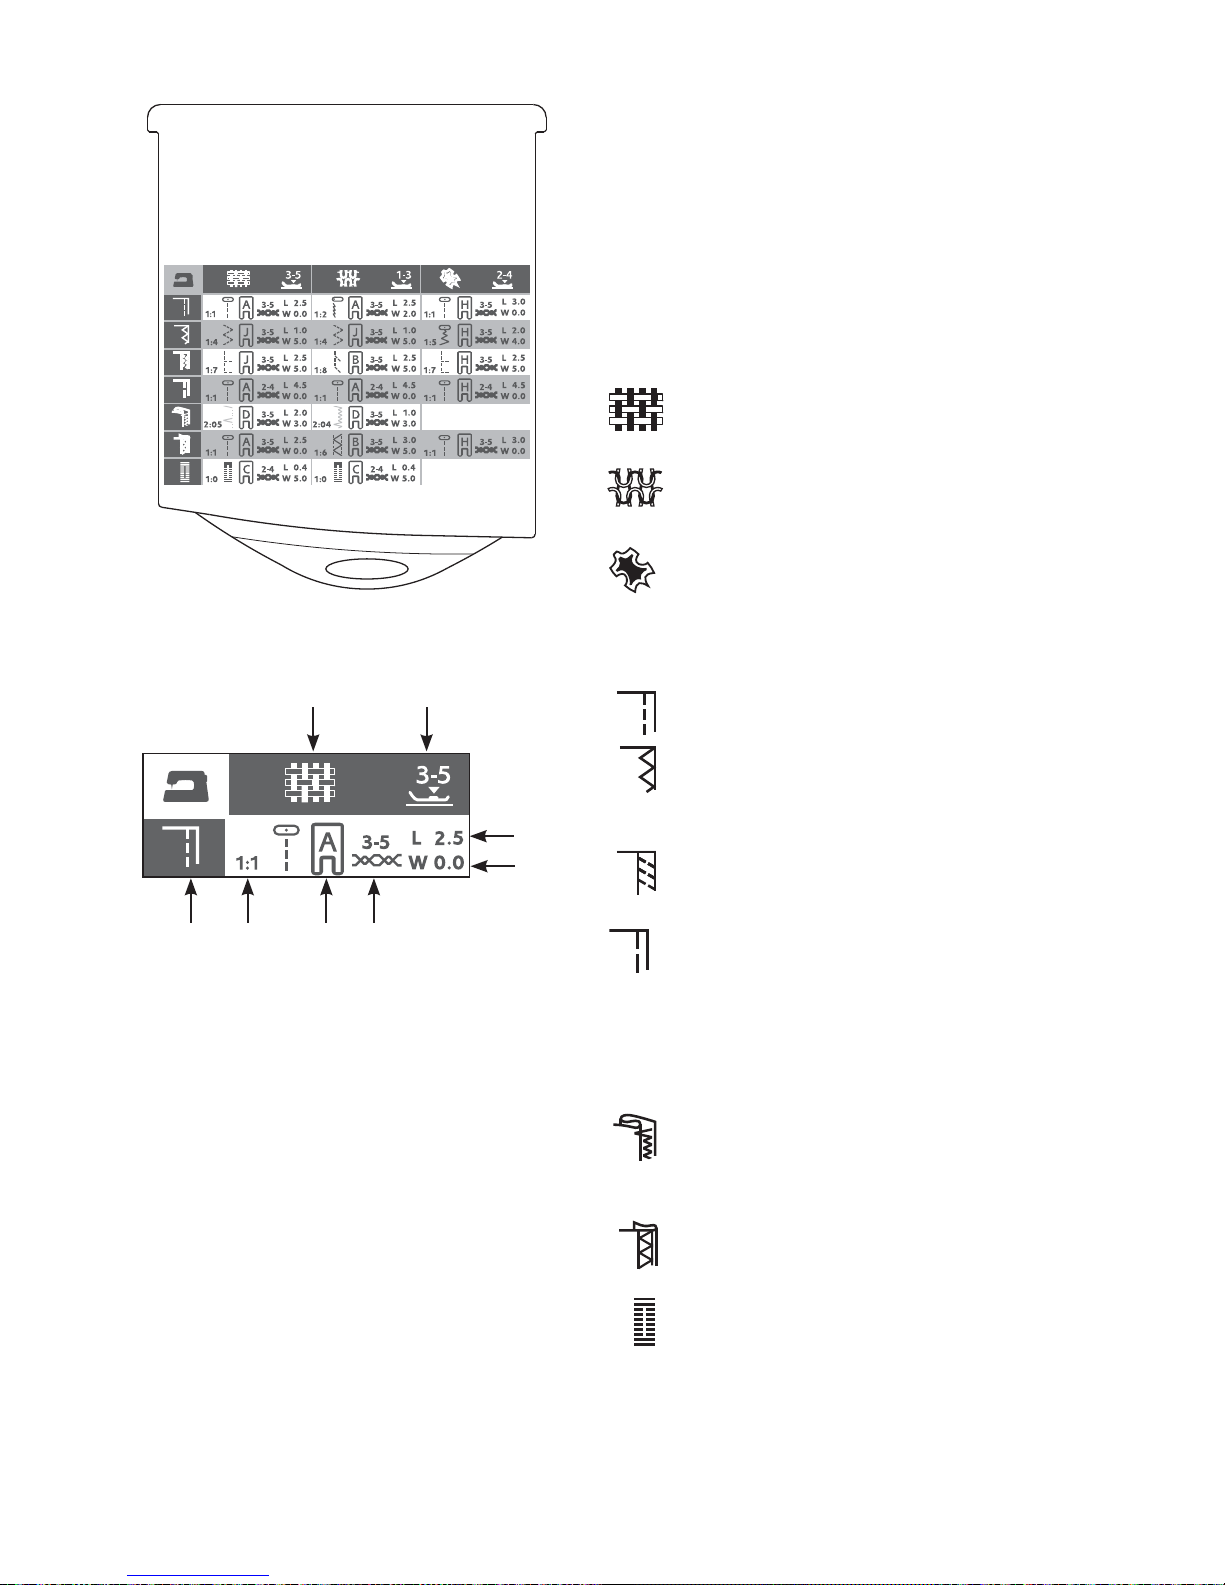
SEWING GUIDE REFERENCE CHART
Consult the Sewing Guide Reference Chart for
the fast easy way to select the best stitch, stitch
length, stitch width, thread tension, presser
foot and presser foot pressure for your sewing
technique and fabric.
Look in the column for your fabric type:
1. Fabric
2. Presser foot pressure
3. Sewing technique
4. Stitch
5. Presser foot
6. Thread tension
7. Stitch length
8. Stitch width
1
2
3 4 5 6
8
7
WO VEN FABRICS: for stable fabrics that have
no stretch. Usually woven.
STRETCH FABRICS: for fabrics that have
stretch. Usually knit.
LEATHER/VINYL: for suede, real leather and
for artifi cial leather and suede.
Select the stitch for the technique you
want to sew:
SEAM: sews two pieces of fabric together.
OVERCAST: overcast fabric edges to prevent
them from fraying and to help them lay
fl at.
SEAM/OVERCAST: sews the seam and
overcasts the edge all at one time.
BASTE: a temporary stitching for fi tting
garments, gathering and marking. Use
maximum stitch length.
Note: Basting will leave permanent holes in
leather and vinyl.
BLIND HEM: creates an invisible hem on
garments. Is not recommended for light
weight fabric or for leather/vinyl.
HEM: sews the best visible or top stitch hem
for your fabric type and weight.
BUTTONHOLE: sews the best buttonhole
possible for your fabric.
Page 17
2. SET UP
15
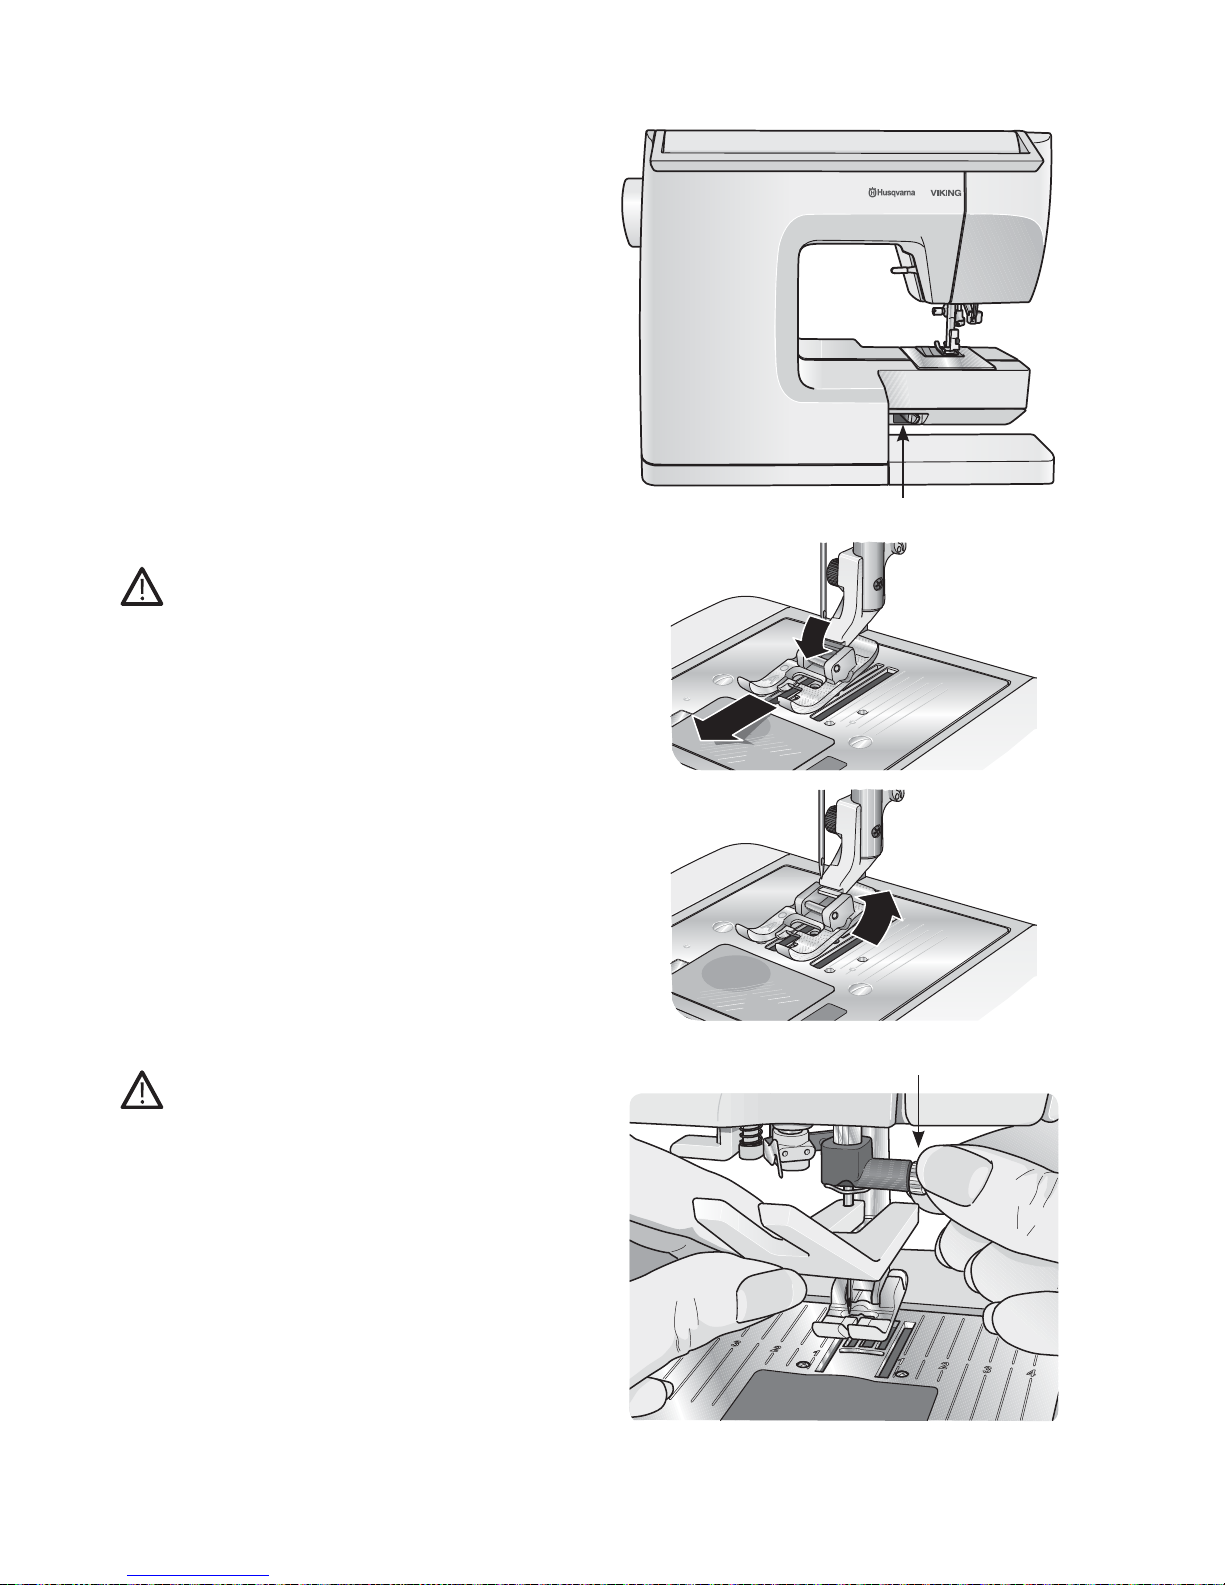
LOWER THE FEED TEETH
To lower the feed teeth you need to remove
the accessory box. The feed teeth lever is
located on the back of the machine at the
base of the free-arm.
Slide the lever (A) to the right to lower the
feed teeth. The feed teeth are raised when you
move the lever (A)to the left. The feed teeth
will come up when you begin to sew or turn
the handwheel towards you. The feed teeth
should be lowered when sewing on buttons.
CHANGING THE PRESSER FOOT
Turn off the main switch
1. Make sure the needle is in the highest
position. Pull the presser foot towards
you.
2. Line up the cross pin on the foot with the
gap in the presser foot ankle. Press back
until the foot snaps into place.
CHANGING THE NEEDLE
Turn off the main switch
1. Use the hole in the multipurpose tool to
hold the needle.
2. Loosen the needle screw (B).
3. Remove the needle.
4. Insert the new needle using the
multipurpose tool. Push the new needle
upwards with the fl at side away from you
until it will go no further.
5. Tighten the needle screw (B).
A
1
2
B
Page 18
16
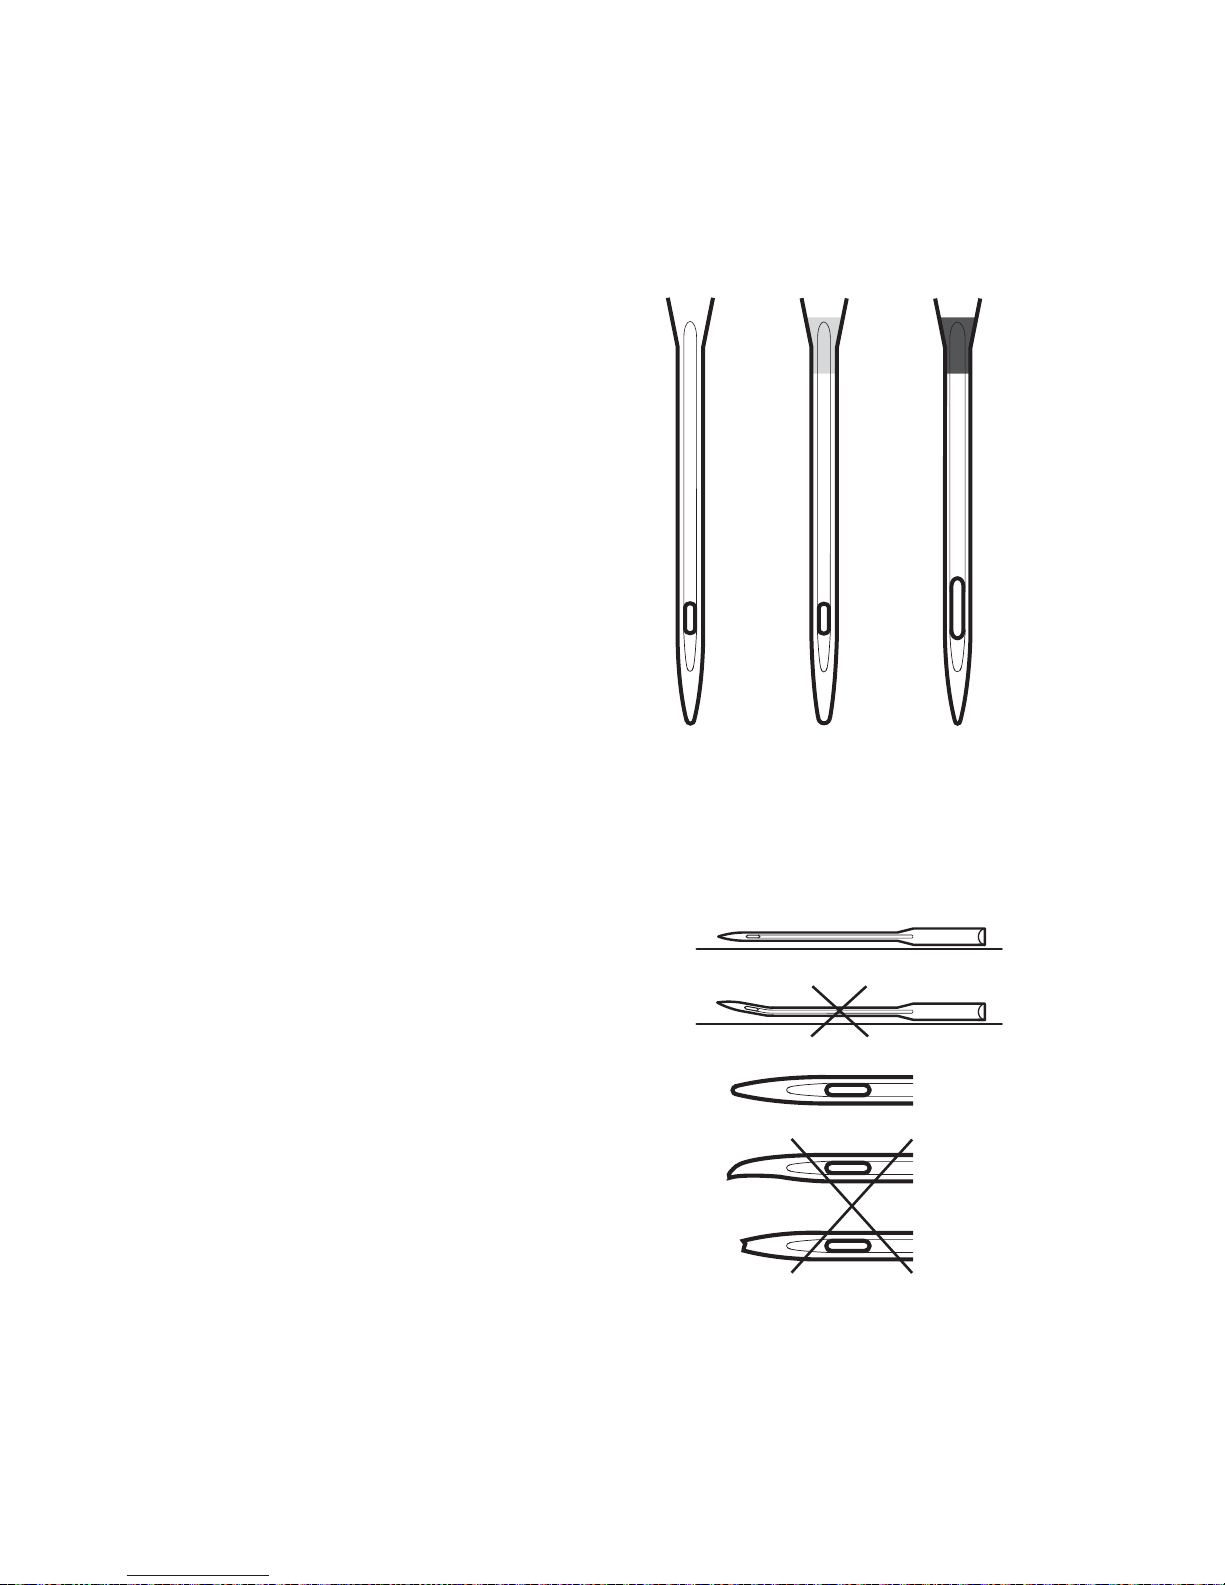
NEEDLES
The sewing machine needle plays an important role in successful sewing. To ensure you will
get a quality needle, we recommend needle system 130/705H. The needle package included
with your machine contains needles of the most popular sizes for sewing on woven and
stretch fabrics.
1
2
AB
C
Universal Needles (A)
Universal needles have a slightly rounded
point and come in a variety of sizes. For
general sewing in a variety of fabric types and
weights.
Stretch Needles (B)
Stretch needles have a special scarf to
eliminate skipped stitches when there is a
fl ex in the fabric. For knits, swimwear, fl eece,
synthetic suedes and leathers. Marked with a
yellow band.
Denim Needles Sizes 90 (C)
Denim needles have a sharp point to
penetrate tightly woven fabrics without
defl ecting the needle. For canvas, denim,
microfi bers. Marked with a blue band.
Note: Change the needle often. Always use a straight
needle with a sharp point (1). A damaged needle
(2) can cause skipped stitches, breakage of needles
or snapping of thread. A damaged needle can also
damage the stitch plate.
Page 19
2. SET UP
17
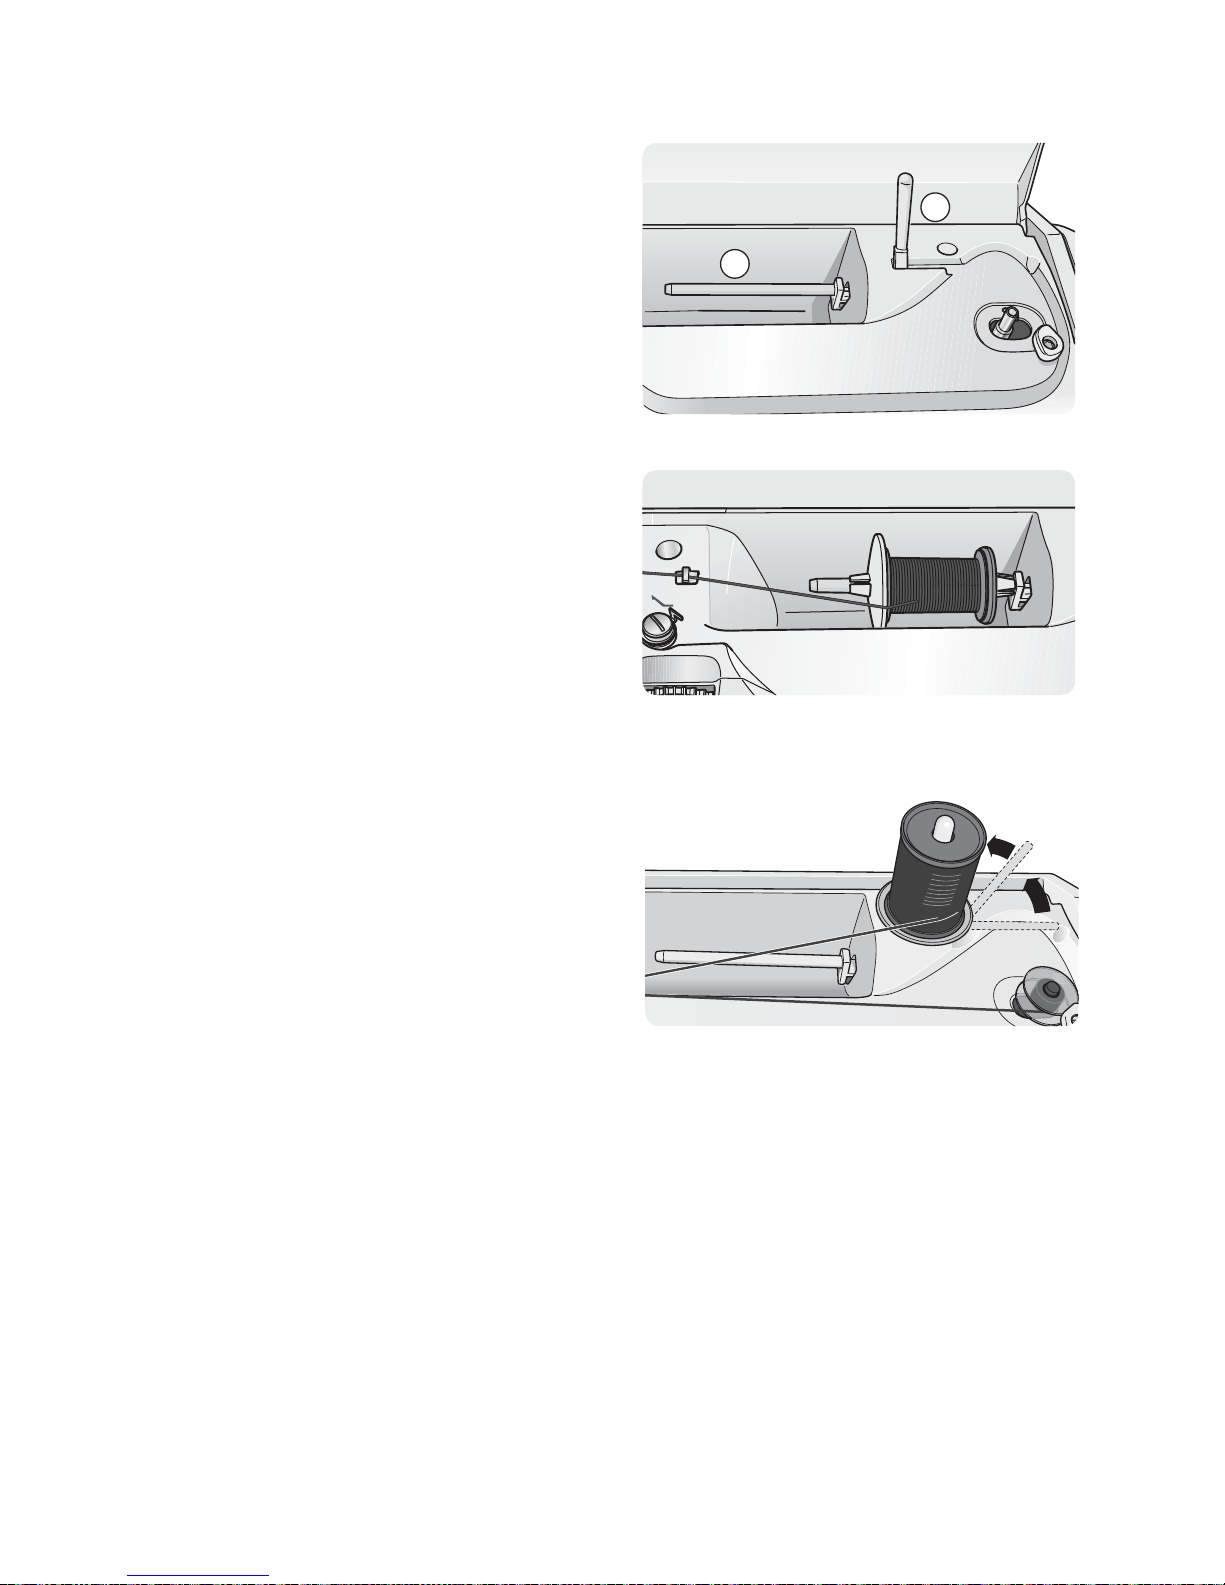
SPOOL PINS
Your sewing machine has two spool pins, a
main spool pin and an auxiliary spool pin.
The main horizontal spool pin (A) is used
for sewing with normal threads. The auxiliary
vertical spool pin (B) can be used for large
spools of thread or specialty threads. Also use
the vertical spool pin for bobbin winding.
Horizontal Position
Place a spool cap and the thread spool on the
spool pin. Make sure that the thread reels over
the top. Slide on a second spool cap, slightly
larger than the thread spool.
The fl at side of the spool cap should be
pressed fi rmly against the spool. There should
be no space between the spool cap and the
thread spool.
Vertical Position
The vertical spool pin is used when winding
a bobbin from a second spool of thread or
for a second spool when sewing with a twin
needle. It can also be used when you are
sewing with specialty threads.
Raise the spool pin to the vertical position.
Slide on the large spool cap and place a felt
pad under the thread spool to prevent the
thread from reeling off too fast. Place thread
spool on the spool pin.
Do not place a spool cap on top of the
vertical spool pin as it may prevent the spool
from rotating.
Note: When the spool pin is used in the vertical
position, the thread tension might need to be adjusted
manually.
A
B
Page 20
18
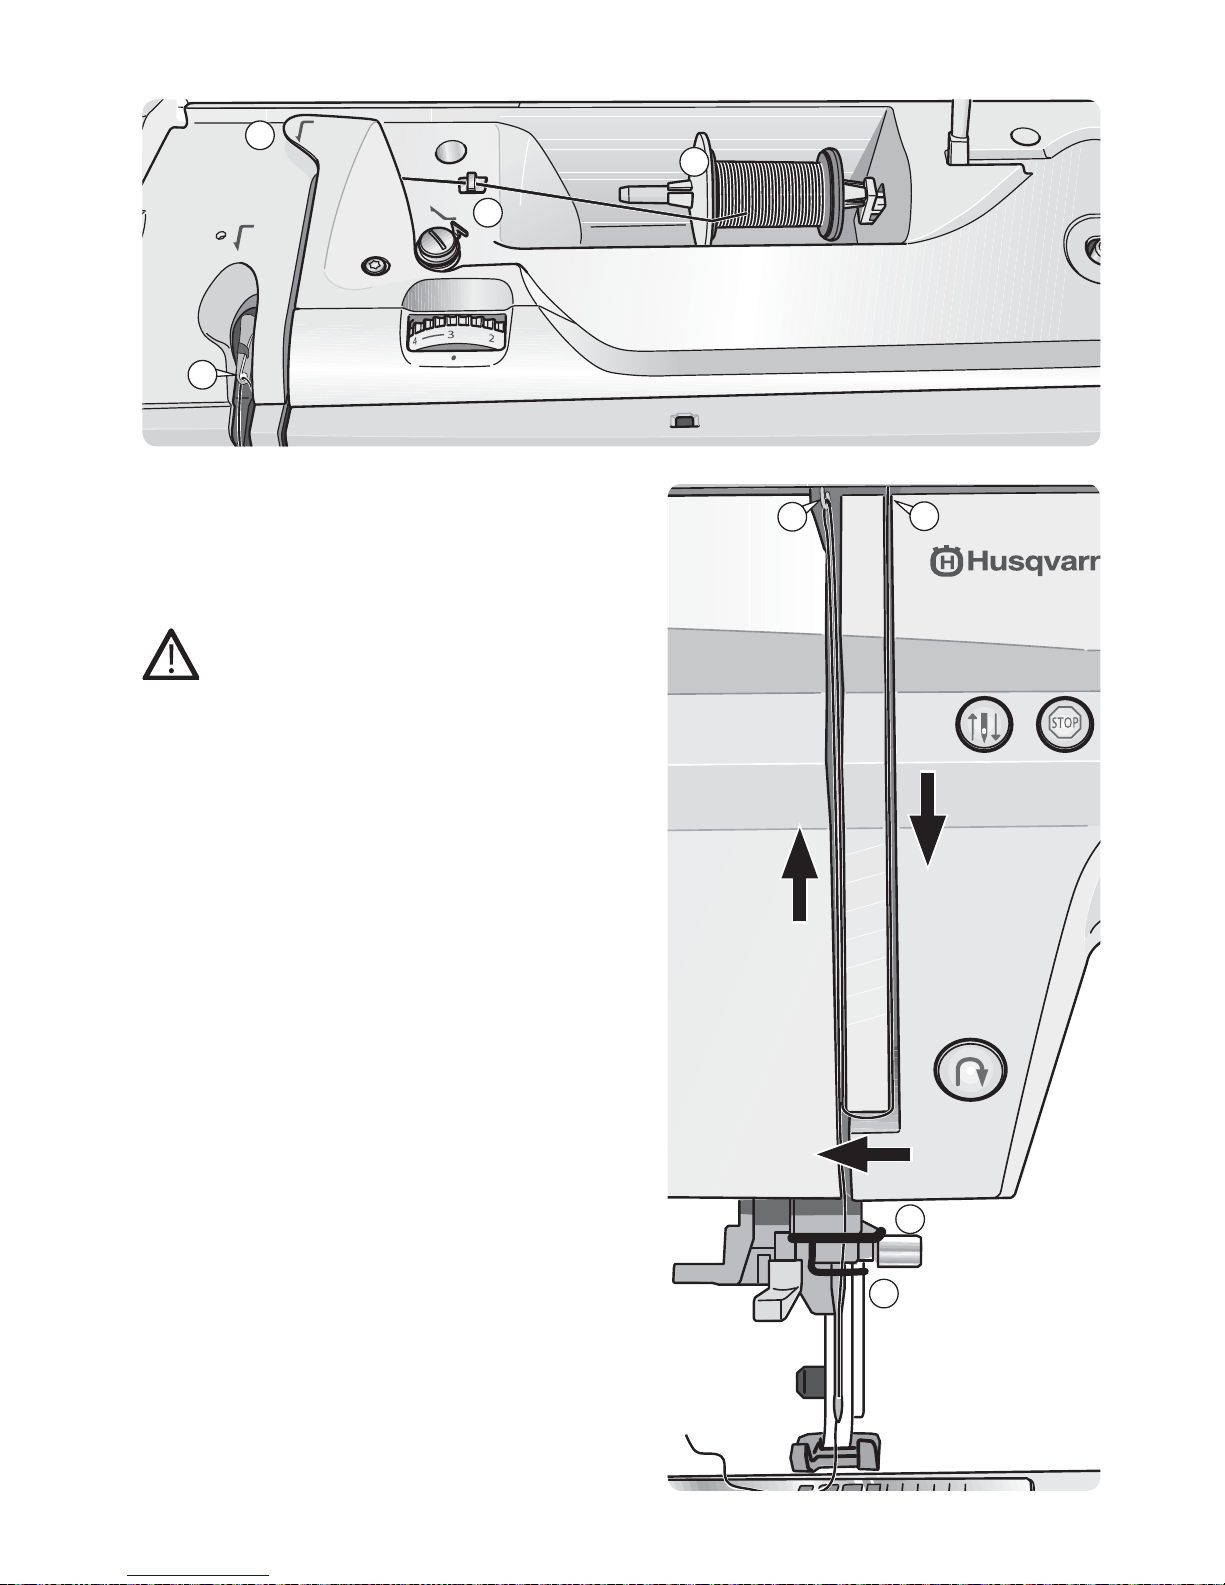
THREADING THE
UPPER THREAD
Make sure the presser foot is raised and the
needle is in the up position.
Turn off the main switch.
1. Pull the spool pin up. Place a spool cap and
then the thread on the spool pin. Place the
second spool cap on the spool pin (A). Push
the spool pin back in.
2. Bring the thread in the direction of the
arrow under the thread guide (B) so that
the thread snaps into place. Then bring the
thread under the second thread guide (C).
3. Bring the thread down between the thread
tension discs (D).
4. Continue threading by drawing the thread up
into the slot on the take-up lever (E) from
the right to the left.
5. There are two thread guides close to the
needle: (F) and (G). Insert the thread into the
two thread guides.
6. The needle is threaded from front to back.
The white on the presser foot ankle makes it
easy to see the eye of the needle. See needle
threader instructions on the next page.
7. Place thread under the presser foot and into
the thread cutter where it is cut.
E
G
F
B
A
C
E
D
Page 21
2. SET UP
19
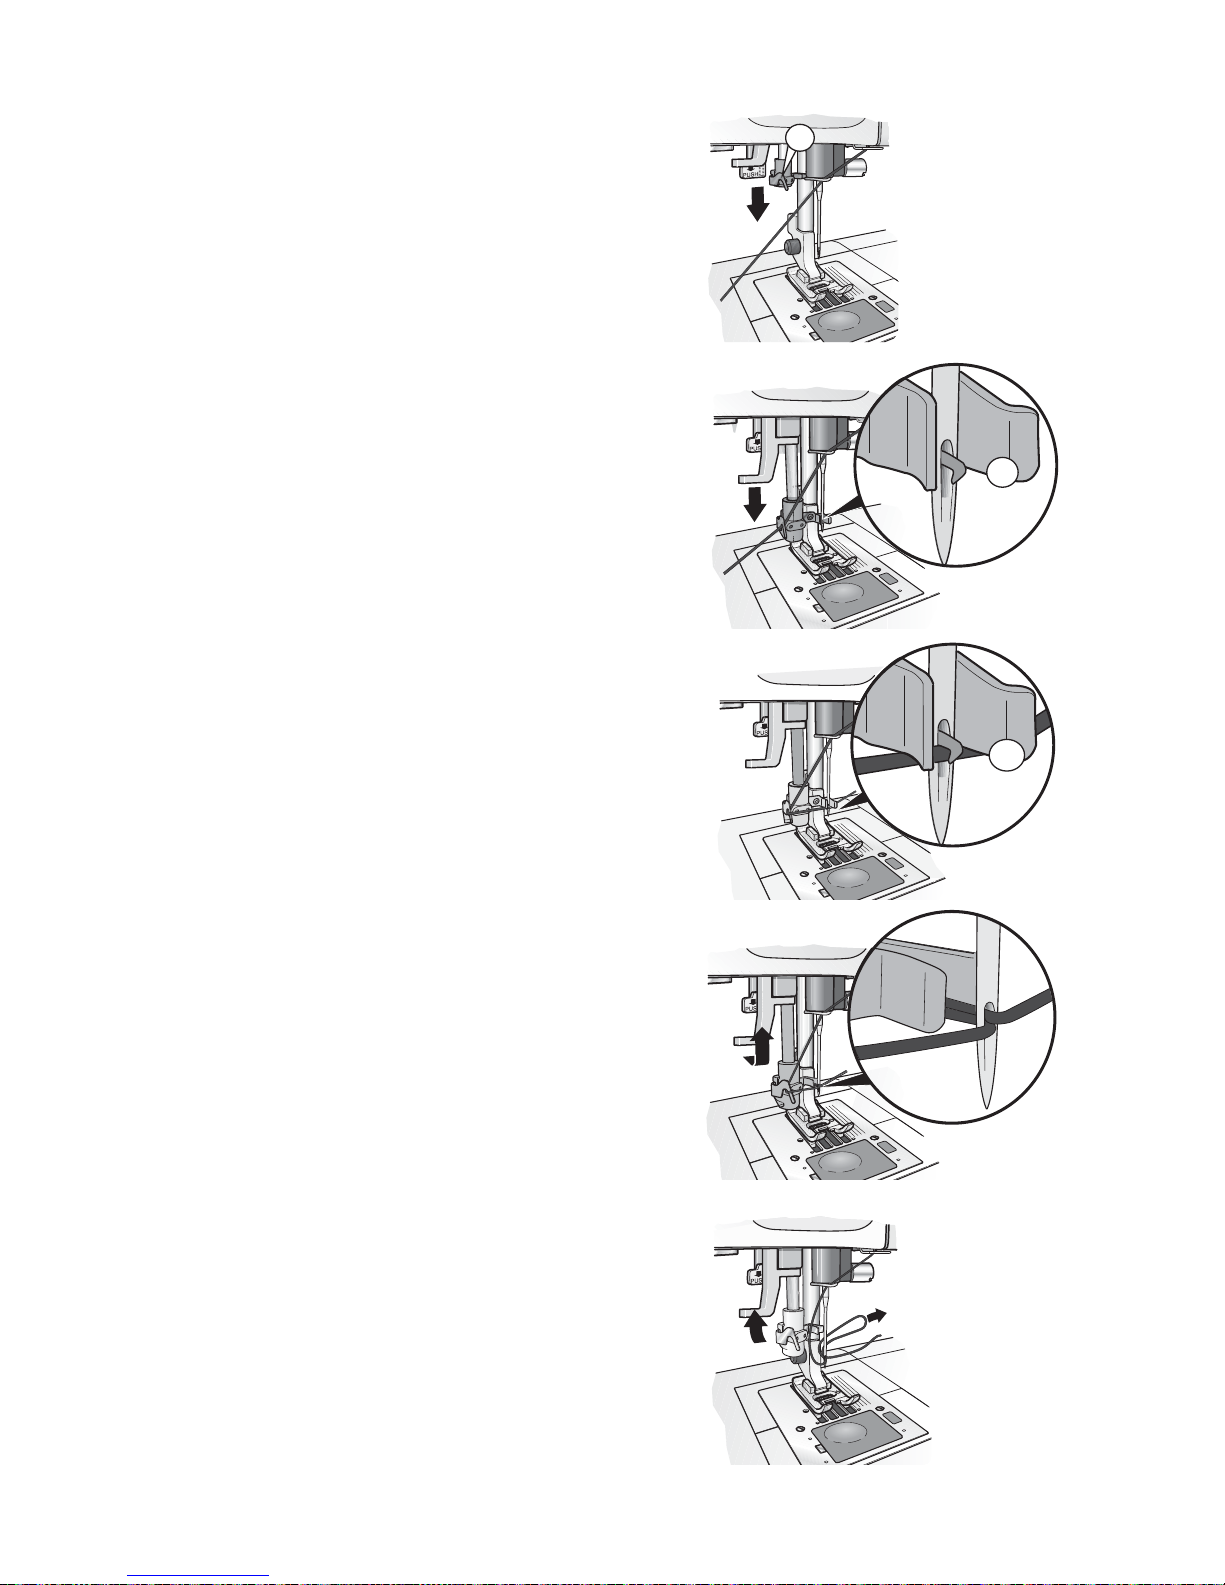
Needle Threader
The needle must be in the up position to use
the built-in needle threader. We also recommend
lowering the presser foot.
1. Use the handle to pull the needle threader
down, catching the thread under the guide
(A).
2. Push the needle threader all the way down
until the metal fl anges cover the needle. A
small hook will pass through the needle eye
(B).
3. Place the thread under the fl anges in front of
the needle, so the thread catches into the small
hook (C).
4. Let the needle threader gently swing back.
The hook pulls the thread through the needle
eye and forms a loop behind the needle.
5. Pull the thread loop out behind the needle.
Place the thread under the presser foot and
cut the thread.
Note: The needle threader is designed to be used for size
70-120 needles. You cannot use the needle threader for size
60 needles or smaller, the wing needle, twin needle or triple
needle. There are also some optional accessories that require
manual threading of the needle.
When threading the needle manually make sure that the
needle is threaded from front to back. The white presser
foot ankle makes it easy to see the eye of the needle.
4.
1.
2.
3.
B
C
5.
A
Page 22
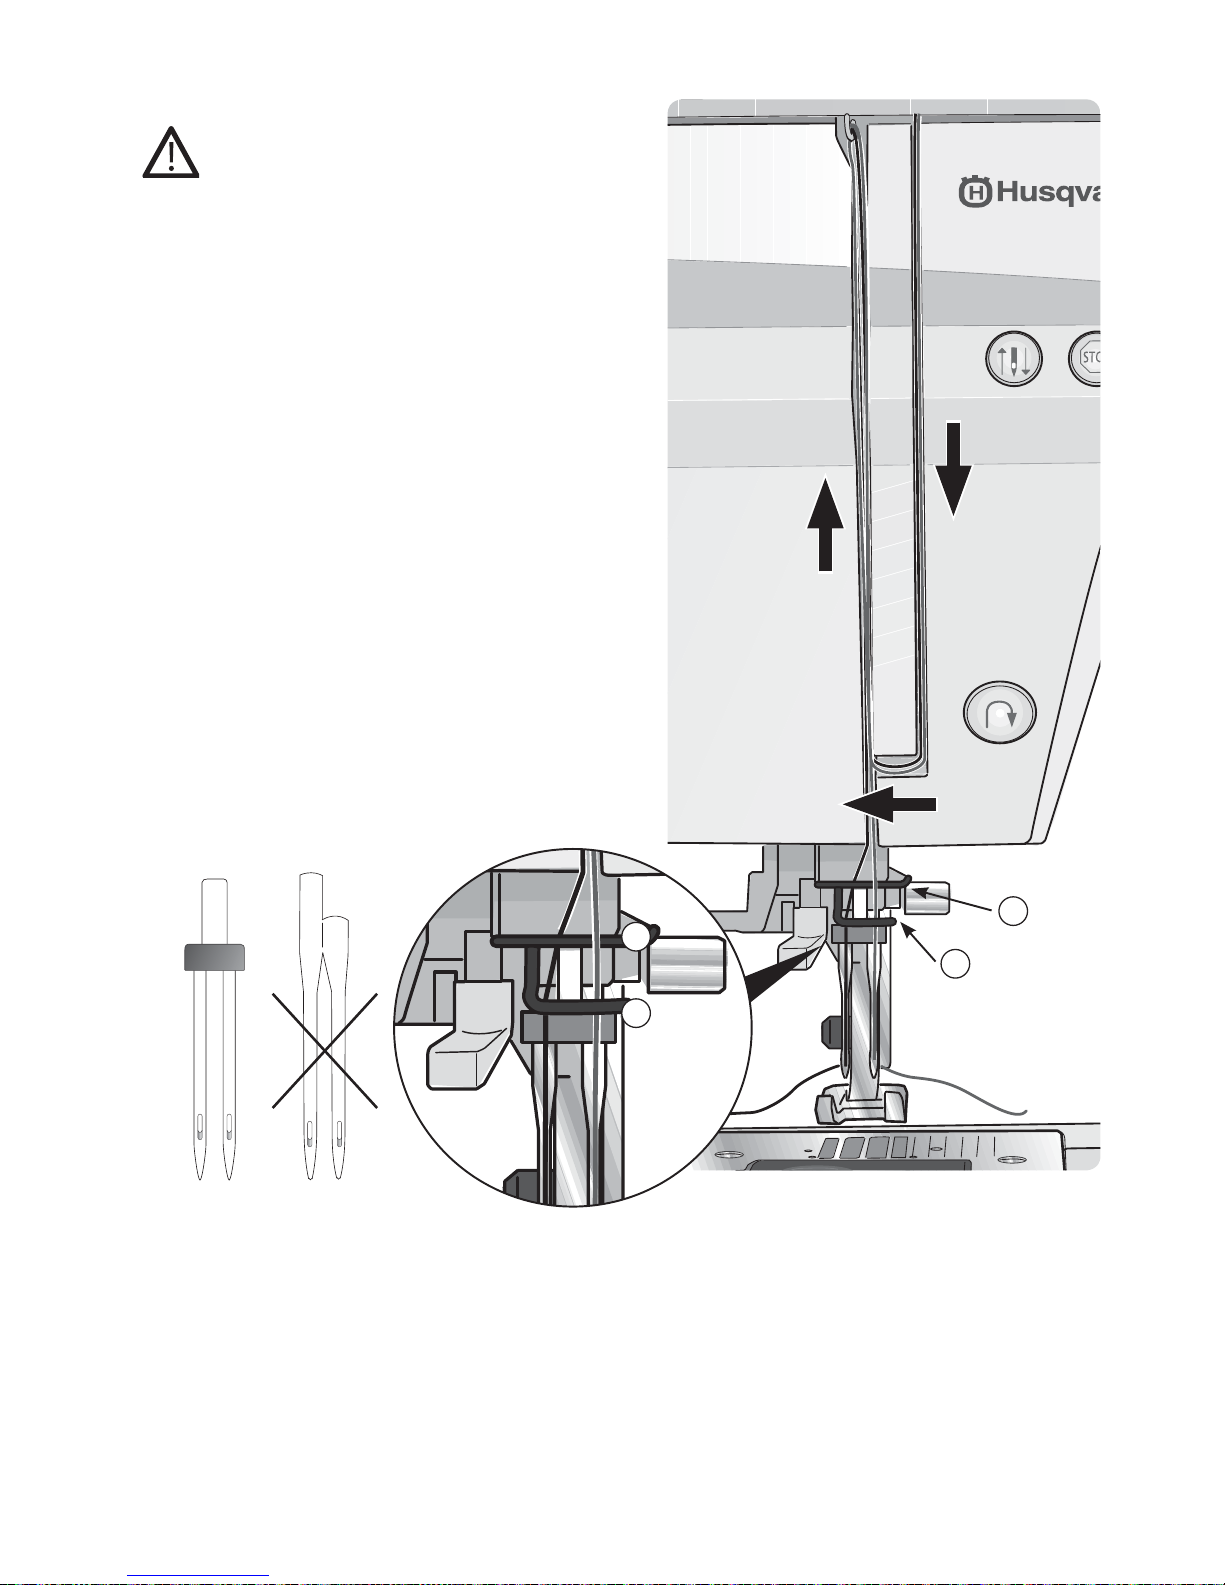
20
Threading for Twin Needle
Turn off the main switch
1. Insert a twin needle.
2.
LEFT NEEDLE: Thread the machine as
explained on page 18 and thread the left
needle.
3. Pull up the vertical spool pin and place a
spool cap on the spool pin. Place a thread
spool or wind a bobbin with the thread
you are going to use as the second upper
thread.
4.
RIGHT NEEDLE: Thread the machine as
before but this thread should lie outside
the upper needle thread guide (A) and
behind the lower needle thread guide (B).
Thread the right needle manually.
Note: The maximum twin needle width to be used on
this machine is 2.5mm.
Note: Only use symmetrical twin needles (C). Do not
use this type of twin needle (D), since it may damage
your sewing machine.
CUTTING THE THREAD
Once you have fi nished sewing you can cut
the thread by raising the presser foot and draw
the threads to the left side of the machine and
cut them using the thread cutter.
A
B
DC
A
B
Page 23
2. SET UP
21
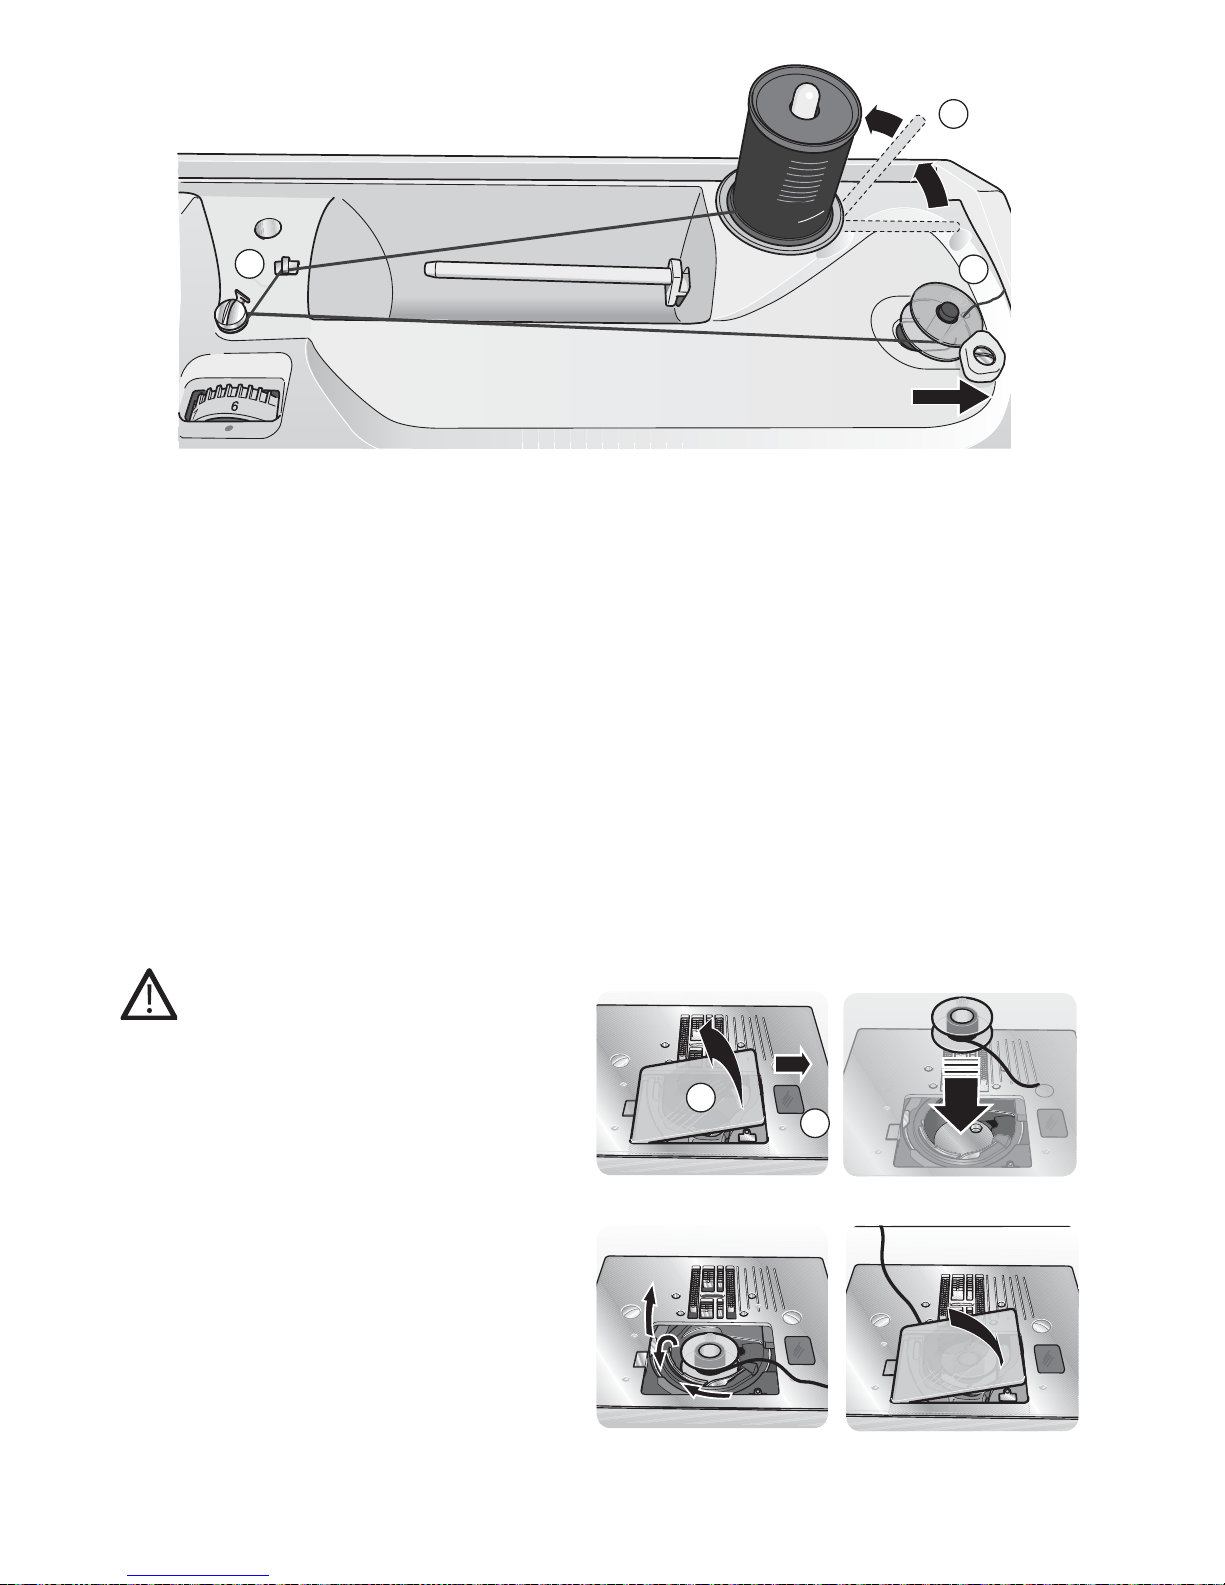
WIND THE BOBBIN
4. Push the bobbin to the right.
5. Hold the thread end and press the foot
control. After a few turns of the bobbin,
cut off the thread end. When the bobbin
is full it will stop rotating. Push the
bobbin winder to the left and remove the
bobbin. Cut off the thread.
Place the Bobbin in the Machine
Turn off the main switch
1. Make sure that the needle is fully
raised before inserting or removing
the bobbin. Open the bobbin cover by
moving the release button to the right
(A). Remove the cover (B).
2. Place the bobbin in the bobbin case
so that the thread is running in a
counterclockwise direction.
3. Pull the thread though the slit and pull it
towards the left into the tension.
4. Pull the thread so that you have about
6 inches (15cm) of thread. Replace the
bobbin cover plate.
1.
4.
3.
2.
B
A
C
B
A
1. Pull the vertical spool pin up (A). Place a
large spool cap on the spool pin and place
the thread on the spool pin.
2. Bring the thread under the thread tension
disk (B) and around clockwise.
3. Insert the thread though the hole in the
bobbin from the inside to the outside.
Place the bobbin on the bobbin winder
spindle with the free end of the thread at
the top.
Page 24
22
PRESSER FOOT LIFTER
The presser foot is lowered or raised with the presser foot lifter. If you are sewing on heavy
fabric or several layers of fabric, the presser foot can be raised higher to make it easier to
place the fabric underneath the presser foot.
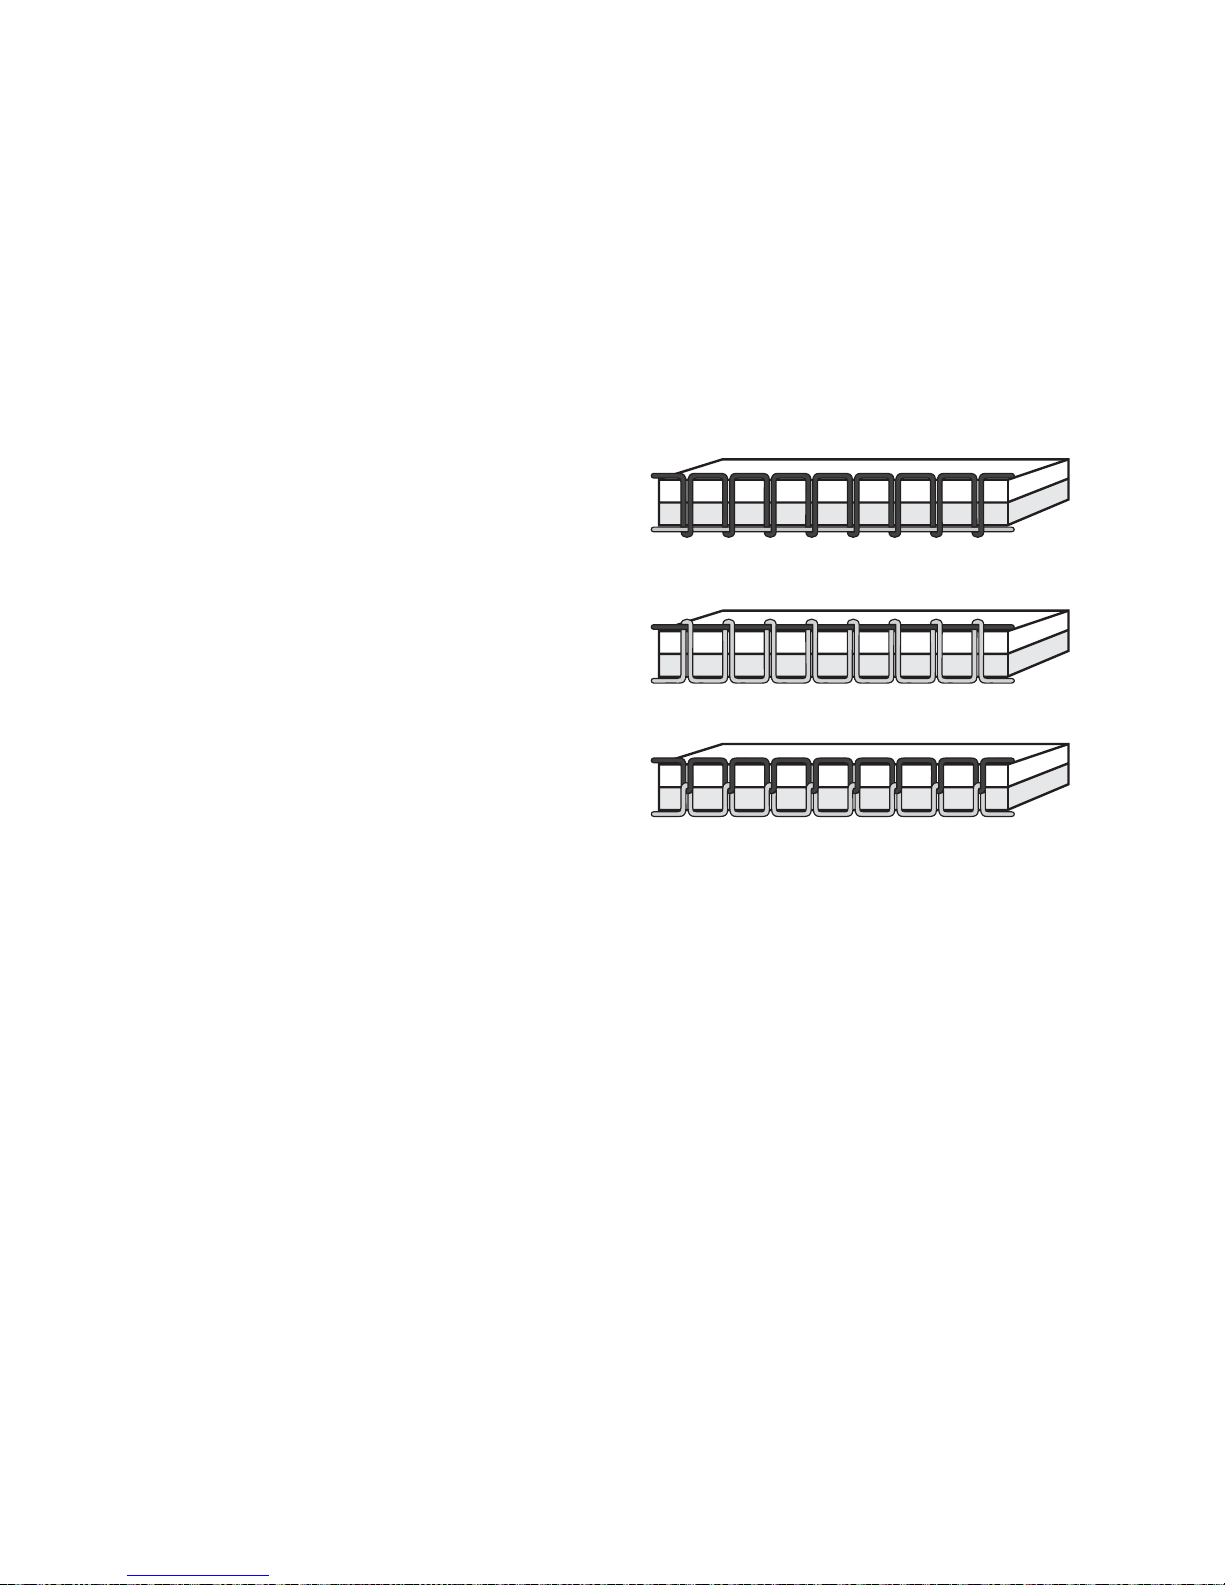
THREAD TENSION
To understand the correct thread tension,
sew a few sample straight stitches at different
settings.
1. Begin with a tension that is too loose,
i.e. set at the lowest number. The bobbin
thread will lie straight and the top thread
will be drawn to the underside of the
fabric.
2. If you set the tension at the highest
number, the top thread might break and
the seam may pucker.
3. The correct thread tension is set when the
threads interlock in the middle of both
fabric layers or, in the case of decorative
stitches, on the underside.
Make a few tests on a scrap piece of the fabric
you are going to sew and check the tension.
Page 25
3. MACHINE FUNCTIONS
23
MACHINE FUNCTIONS
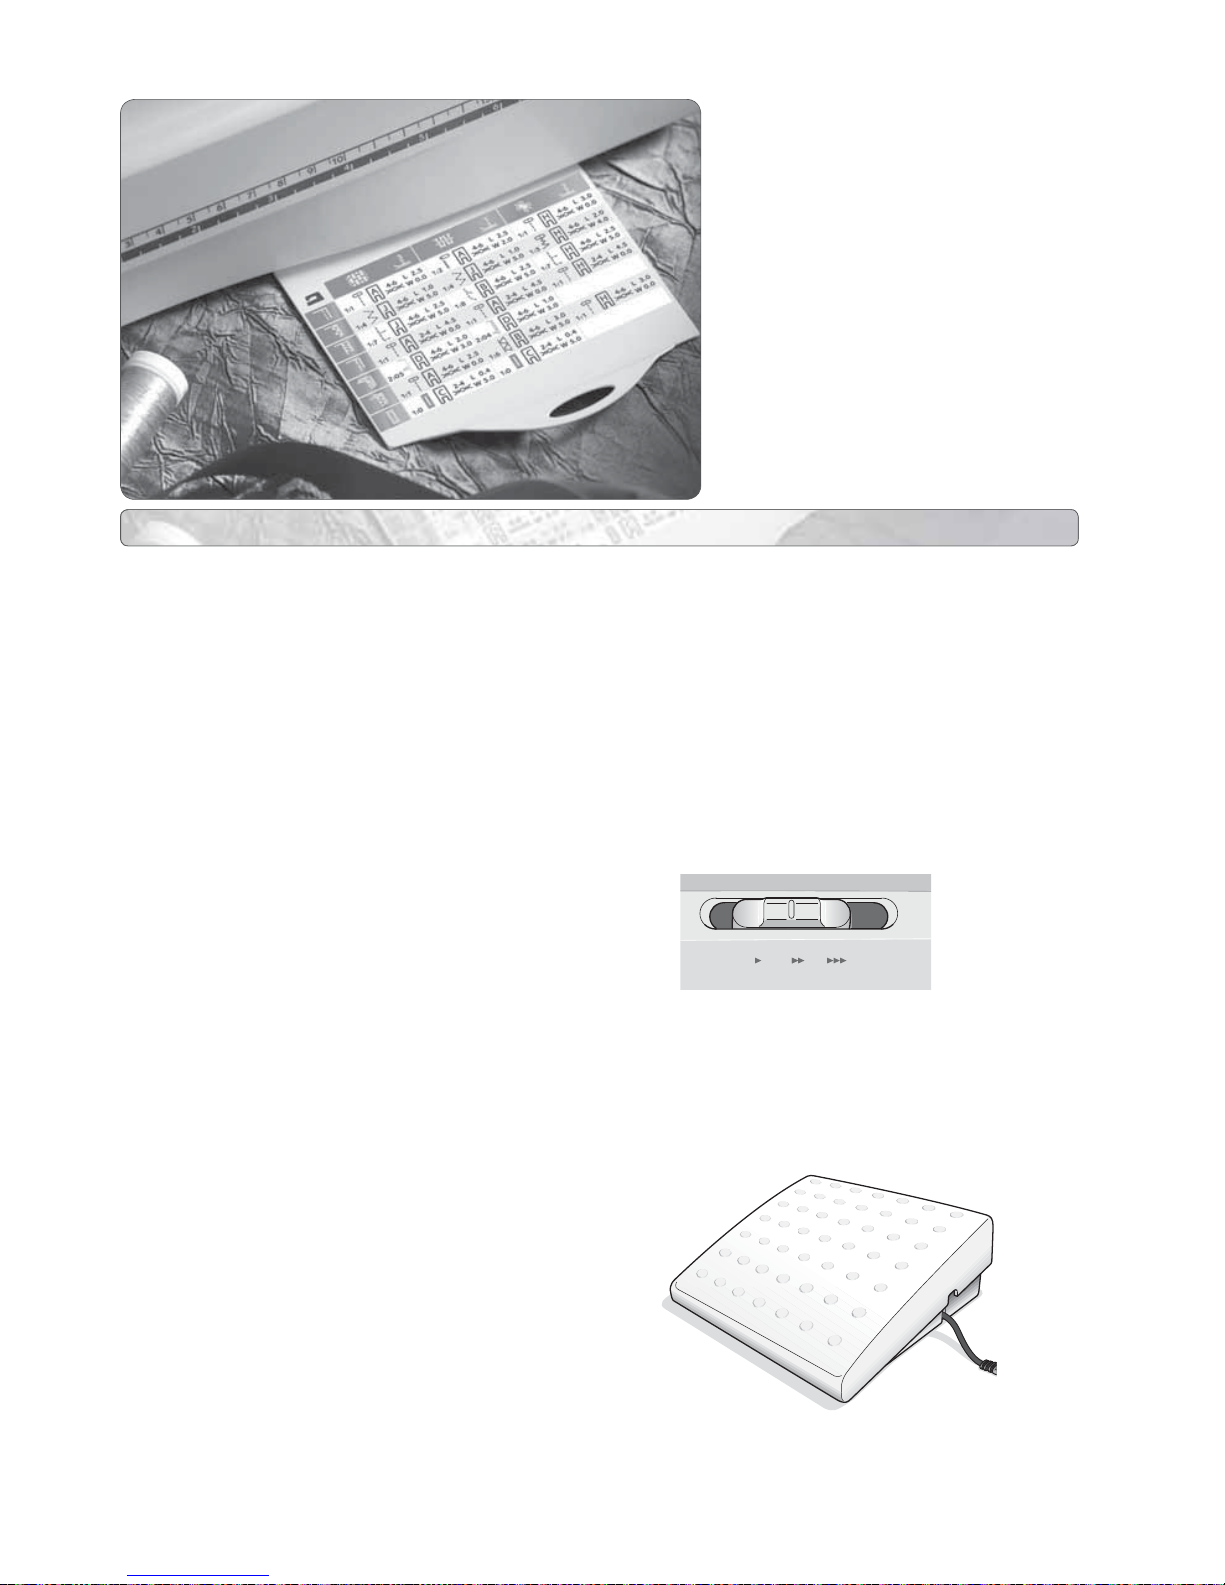
Speed Control Slide
With the speed control slide, you can change
the maximum sewing speed to suit your needs.
The slide limits how fast you can sew.
To increase the sewing speed, slide the bar to
the right.
To reduce the sewing speed, slide the bar to
the left.
Foot Control
You can control the sewing speed by using the
foot control. The harder you press the foot
control, the faster the machine sews.
If you press the foot control all the way, the
machine runs at the maximum speed set by
the speed control slide.
3
MACHINE FUNCTIONS
Page 26
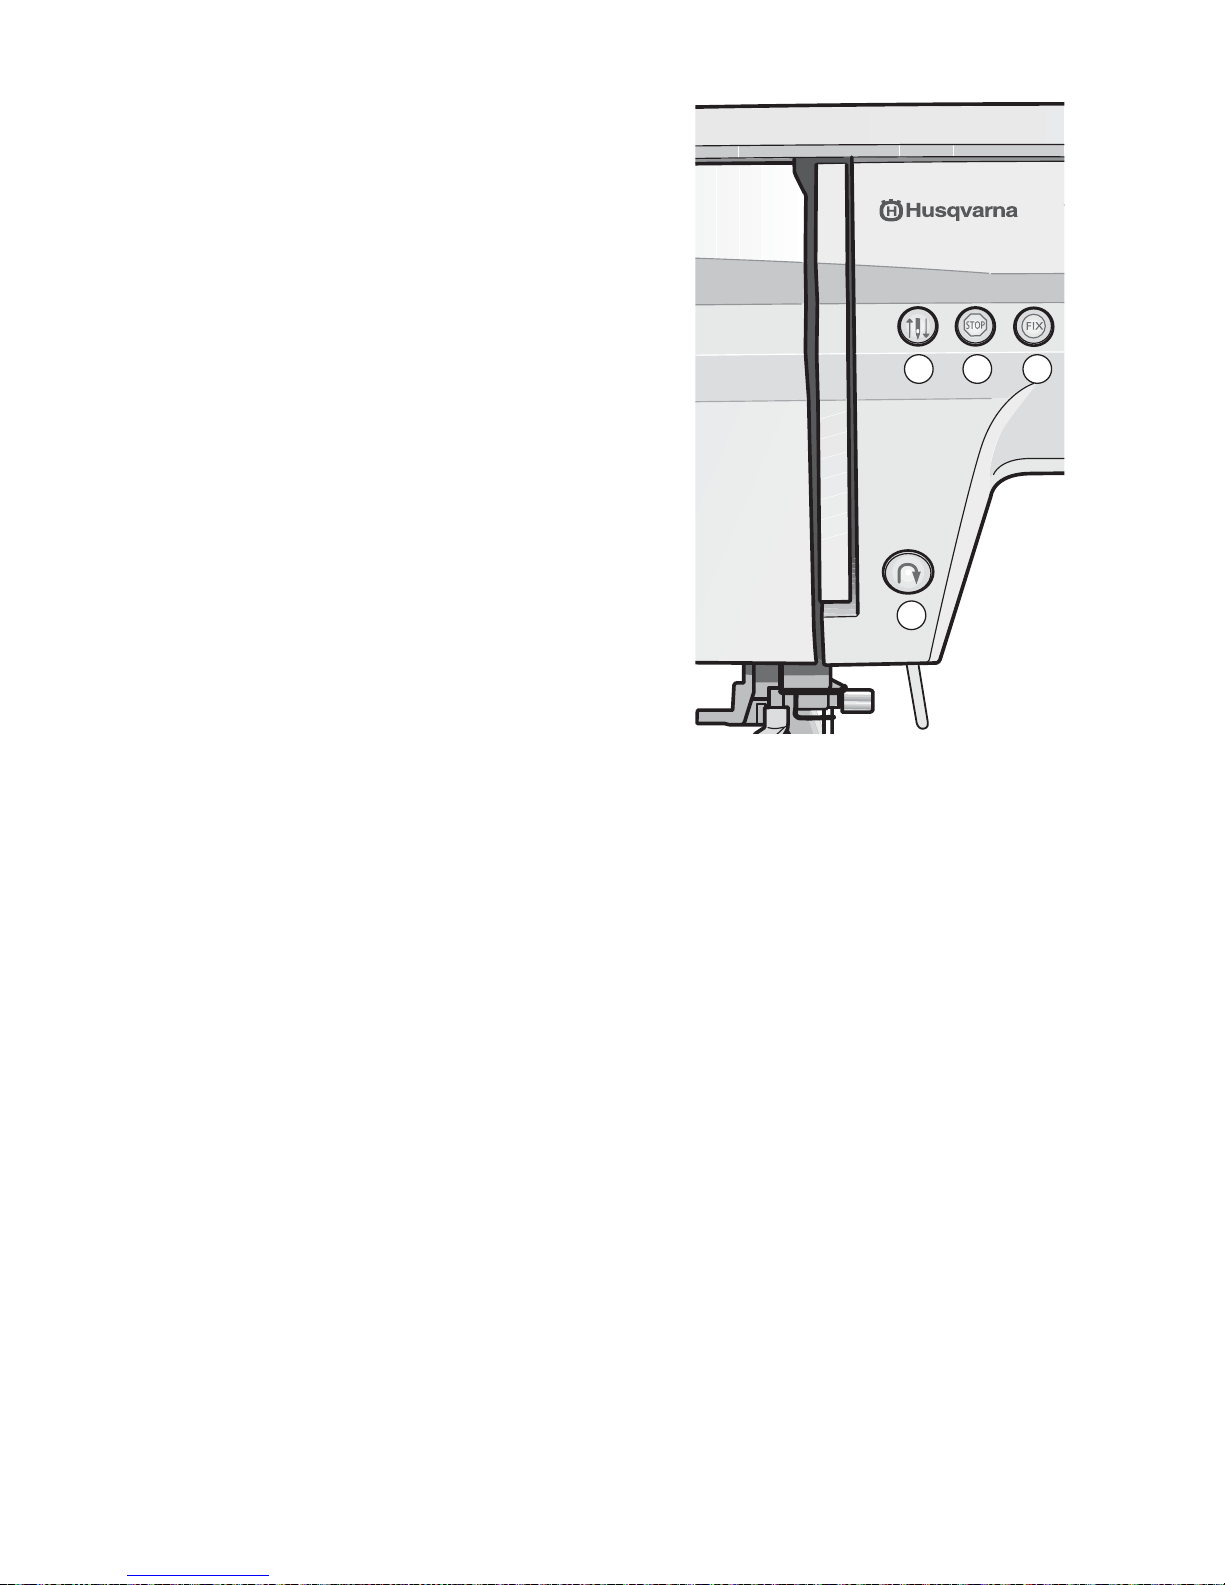
24
Needle Stop Up/Down (A)
Press this button to lower the needle down
or raise up. This function can be useful when
turning a corner on your garment or project.
Stop (B)
STOP is used to conclude a stitch or to
sew just one unit of the stitch. Your sewing
machine ties off the thread and stops
automatically when one stitch unit or stitch
program has been completed. The stop icon
will be lit in the InfoDisplay.
If you touch the STOP-button while the
machine is running, the machine will complete
the stitch unit, make lock stitches and stop.
If you touch the STOP-button while the
machine is standing still, the machine will sew
one stitch unit and then stop.
Fix (C)
By using the FIX button you can tie off a
stitch at the beginning and/or at the end. The
FIX icon on the InfoDisplay is lit when FIX
is activated. Press the FIX button to turn on/
off the function.
If you touch the FIX-button while the
machine is running, the machine will make
lock stitches without completing the stitch
unit. After the completion of the lock stitches
the FIX-function is deactivated and the FIXicon in the InfoDisplay is unlit.
If you touch the FIX button while the
machine is standing still, the machine will
make lock stitches when you press the foot
control and then continue to sew your stitch.
Reverse (D)
Reverse is pressed to sew in reverse. An
arrow will be shown in the InfoDisplay when
the function is active. If you press and hold
the reverse button the machine will sew
backwards until you release the button. If you
press and release the button before starting
to sew, the machine will permanently sew in
reverse. Press the button again to sew forward
again.
The longest reverse stitch length is 3 mm.
BA C
D
Page 27
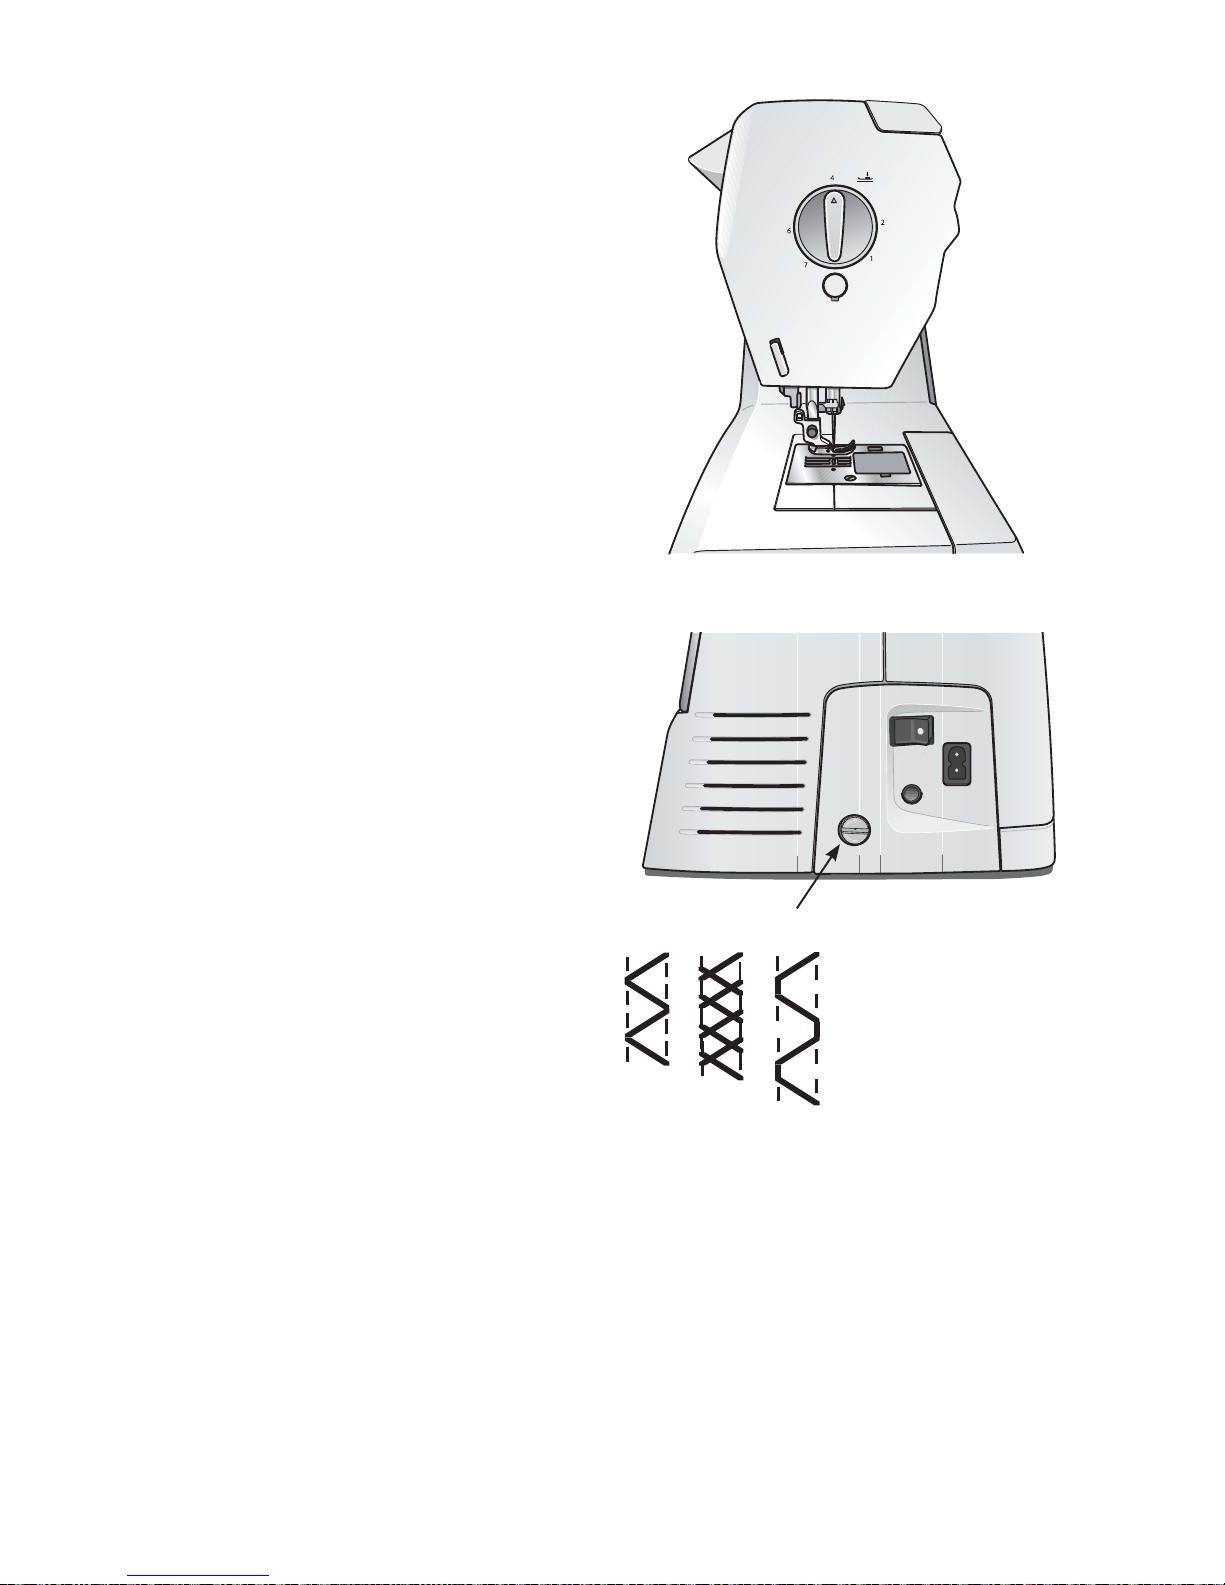
3. MACHINE FUNCTIONS
25
Presser Foot Pressure Dial
Turn the presser foot presser dial to adjust
the pressure of the presser foot on the fabric
when sewing on different thicknesses of
fabric. The pressure dial should be set on 4
for regular sewing. Reduce the pressure to 1-2
for applique, cutwork, stretch fabric, chiffon,
lace, organdy and other fi ne fabric sewing.
Stitch Balance (A)
If you are sewing a manual buttonhole or a
decorative stitch and the stitch is uneven, you
can adjust the stitch with the stitch balance
dial. The dial is located on the side of the
machine (A).
Note: Always place the dial at the neutral position
when you have sewn your stitch.
When a stitch is too tight (B), correct it by
turning the dial counter clockwise.
When a stitch is too loose (C), correct it by
turning the dial clockwise.
5
3
A
BC
Page 28
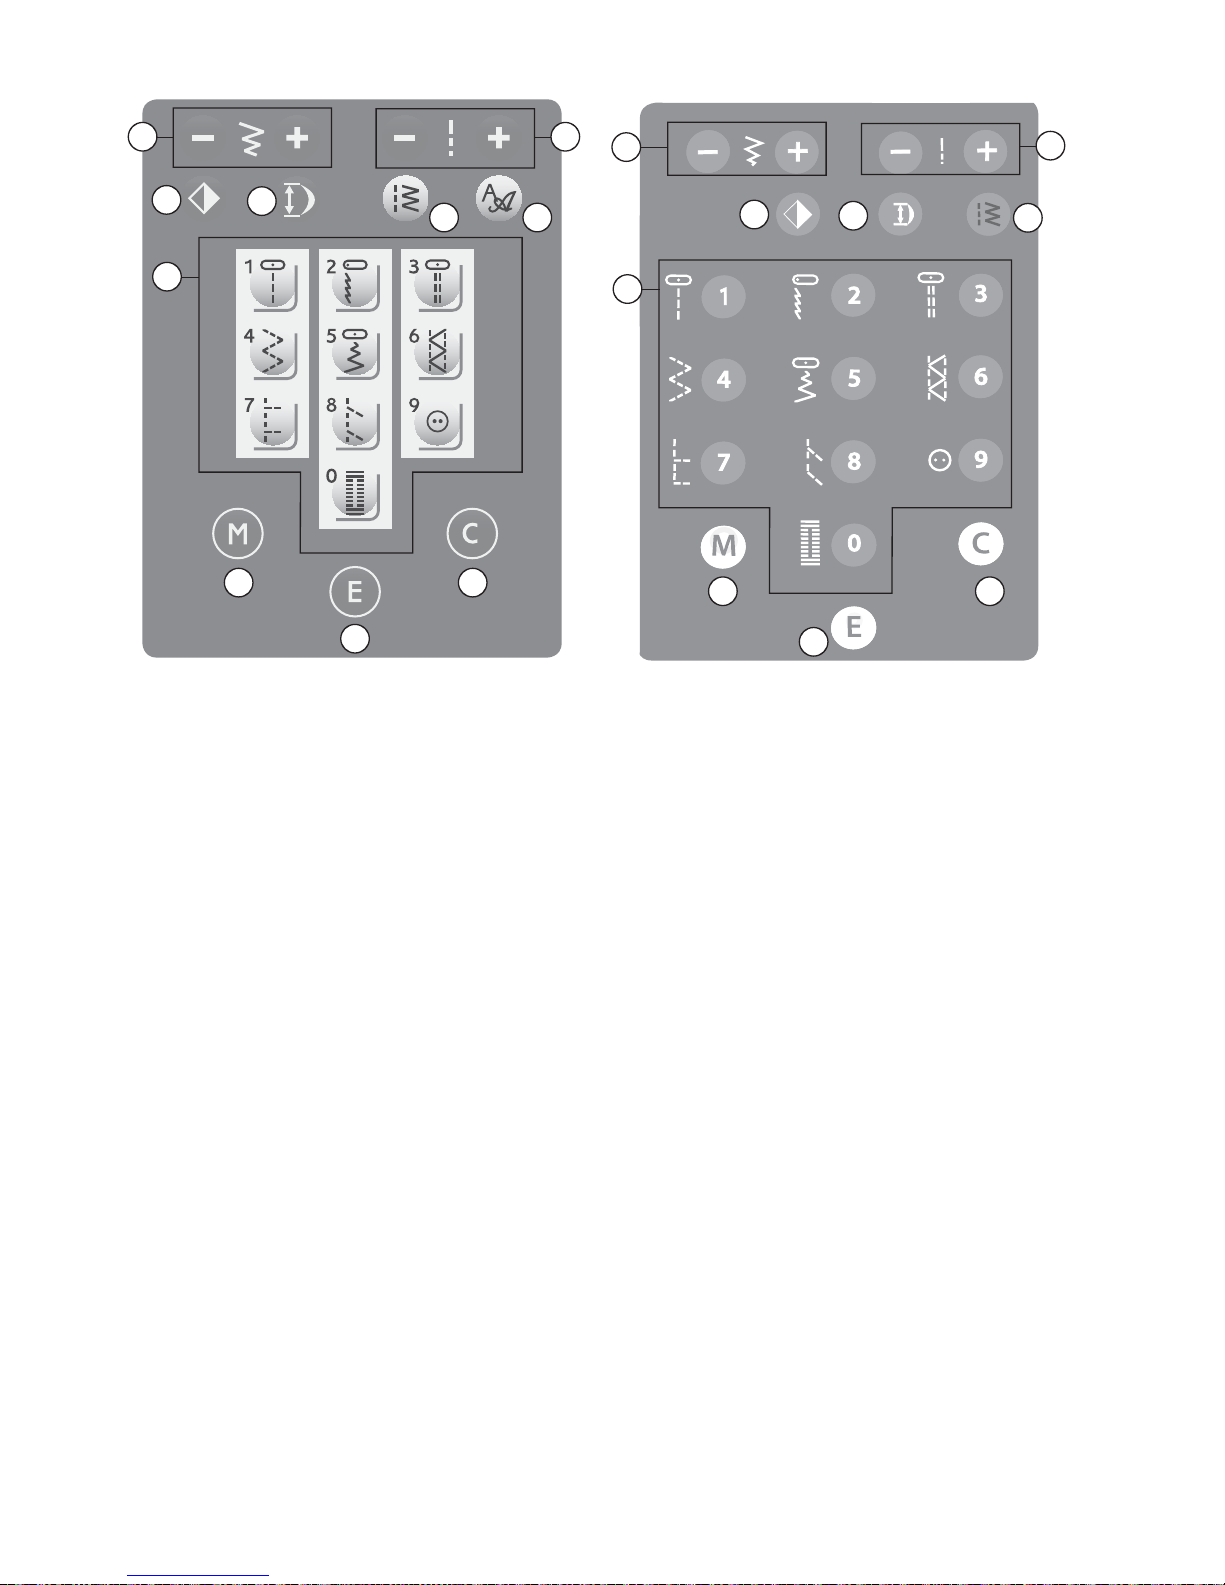
26
FUNCTION BUTTONS
Direct Stitch Selection Buttons (A)
When menu one is activated you can use the
direct stitch selection buttons to choose your
stitch. By pressing any of the 0 to 9 buttons
you select the stitch illustrated on that button
immediately.
Stitch Width (B)
The stitch width is set in the same manner as
the stitch length. The preset width is visible
on the InfoDisplay. The width can be adjusted
between 0 and 7 mm. If a straight stitch is
selected, the width button is used to adjust the
needle position to the left or right.
Stitch Length (C)
When you select a stitch, your machine
automatically sets the best stitch length. The
stitch length is visible on the InfoDisplay. You
can change the stitch length by pressing the +
or – button.
Touch Panel – EMERALD™ 203 Touch Panel – EMERALD™ 183
A
A
B
B
C
C
D E
D
Menu Selection (D)
Press the Menu Selection button to select
different stitch menus. When turning the
machine on, the direct stitch selection mode
(menu one) is always selected.
There are fi ve different stitch menus; two
utility stitch menus and 3 decorative stitch
menus. By looking at the LED lights to the
right of the screen, you will be able to see
which menu you have selected.
There is also an alphabet menu with lower
and uppercase letters and numbers.
For more information about the stitches see
chapter 1.
Font Menu Selection (E)
(only EMERALD™ 203)
Touch this button to toggle between the
two fonts available (Block and Script). The
currently chosen font is highlighted on the
display.
H
I
J
F
G
F
G
H
I
J
Page 29

3. MACHINE FUNCTIONS
27
Mirror Side to Side (F)
Press this button to mirror the selected stitch
side to side. If this button is pressed when
straight stitch with left needle position is
selected, the needle position is changed from
left to right. A stitch in a combination can also
be mirrored. The change will be visible on the
InfoDisplay.
If you touch the Mirror side to side button
while sewing, the machine will fi nish the stitch
and mirror the following stitch.
Stitch Elongation Button (G)
The stitch elongation button can elongate
satin stitches 3:14, 3:15, 3:16, 4:01, 4:02 and
4:04 up to fi ve times its normal size while
maintainig the density. See the change in the
stitch in the InfoDisplay.
Memory Button (H)
Use the memory to store stitch combinations.
The stored combinations will not be lost even
if you turn the sewing machine off.
EMERALD™ 203 have eight memories and
EMERALD™ 183 have four memories in
the machine. Each memory can hold up to
20 different stitches. See page 31 to program
stitches into memories.
Edit Button (I)
To modify the settings of a character or stitch
in the memory mode, use the stitch width or
length + or - buttons to select the stitch to be
modifi ed. Then press the Edit button to set
the selected stitch in the editing mode. Manual
setting of the stitch length, width and mirror
for these memorized stitches is now possible.
Press the edit button again to leave the editing
mode and return to memory mode.
Clear Button (J)
Use this button to erase an incorrect character
or stitch in a combination.The machine erases
the character you have selected. Each press of
the button erases one character, or stitch in a
combination.
BUZZER SOUND
The machine makes a click sound when you
press a button on the machine to let you
know you are selecting that stitch or function.
It also has a warning sound when selecting an
incorrect function.
It is possible to turn off the sound of the
buttonclicks and the warning sounds, press
the “E” button while turning on the machine.
On the InfoDisplay you will see two different
modes. Select between the audio on or off by
touching the width + or - buttons. Touch the
“M” button to return to normal mode.
Page 30
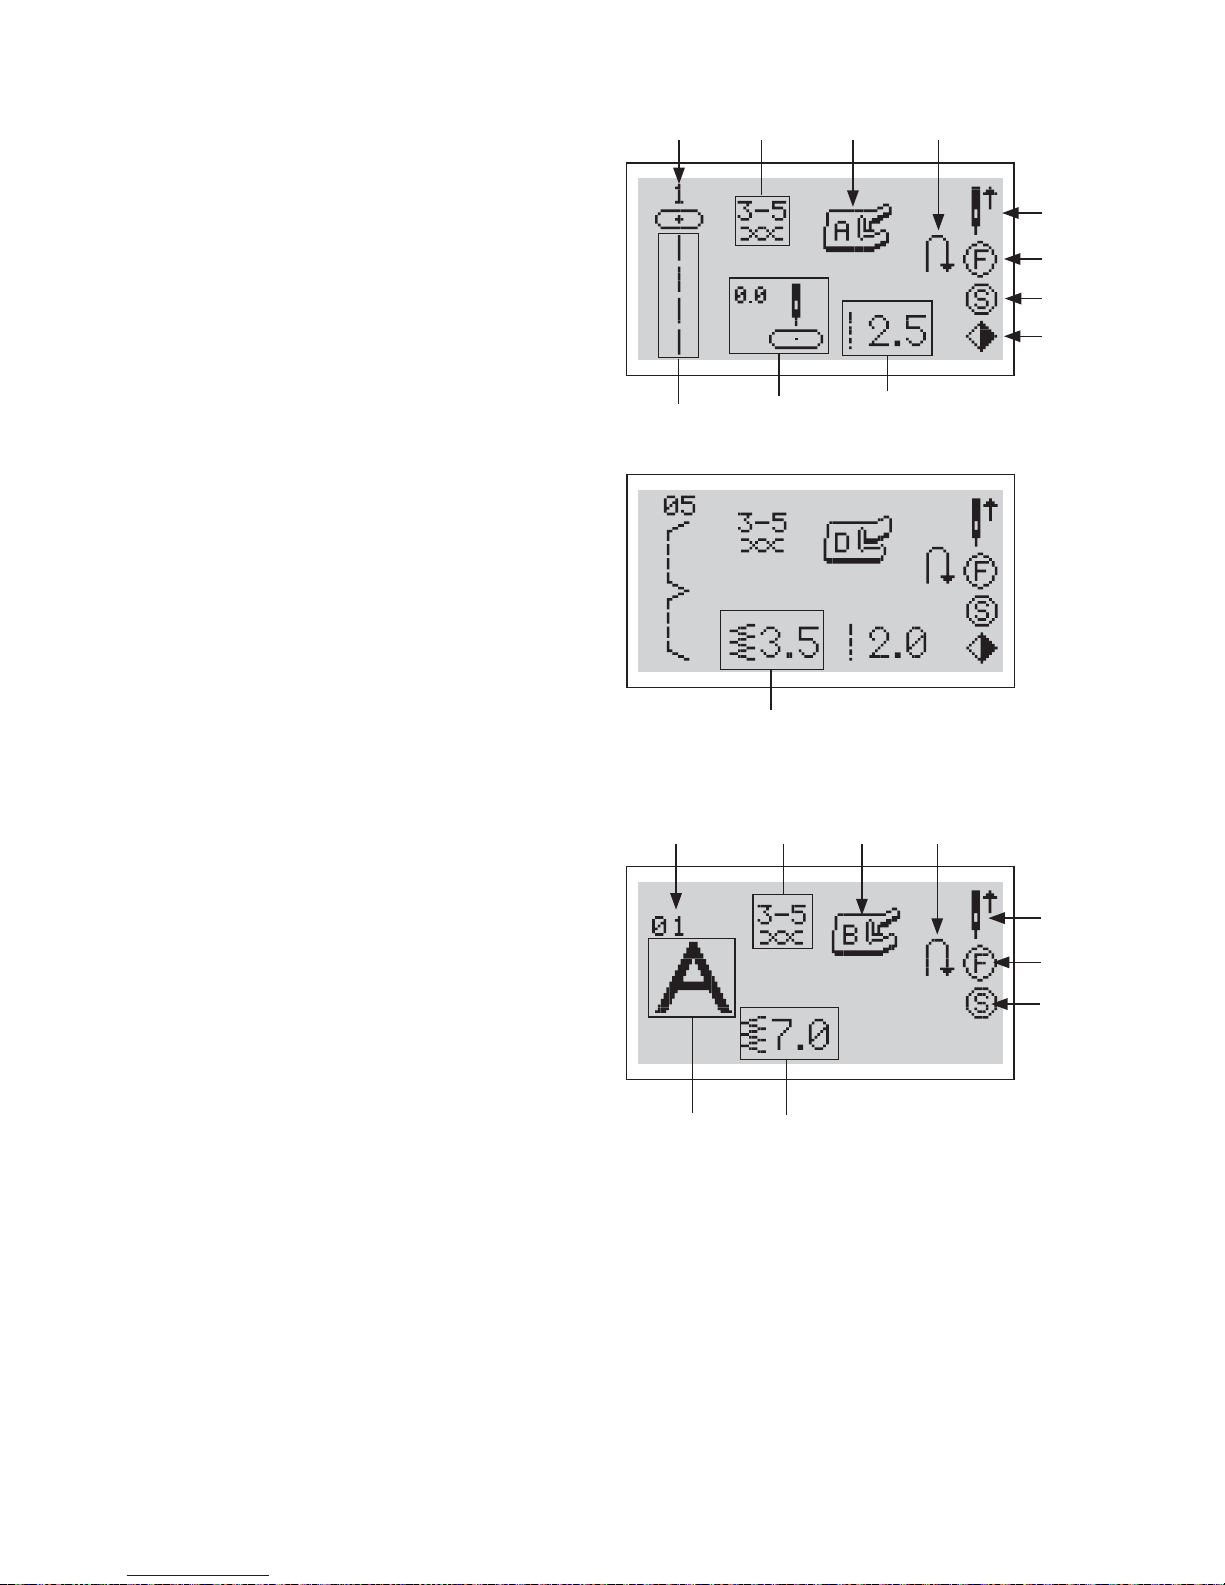
28
AB CD
E
F
G
H
I
J
K
L
M
U
NOP
Q
R
S
T
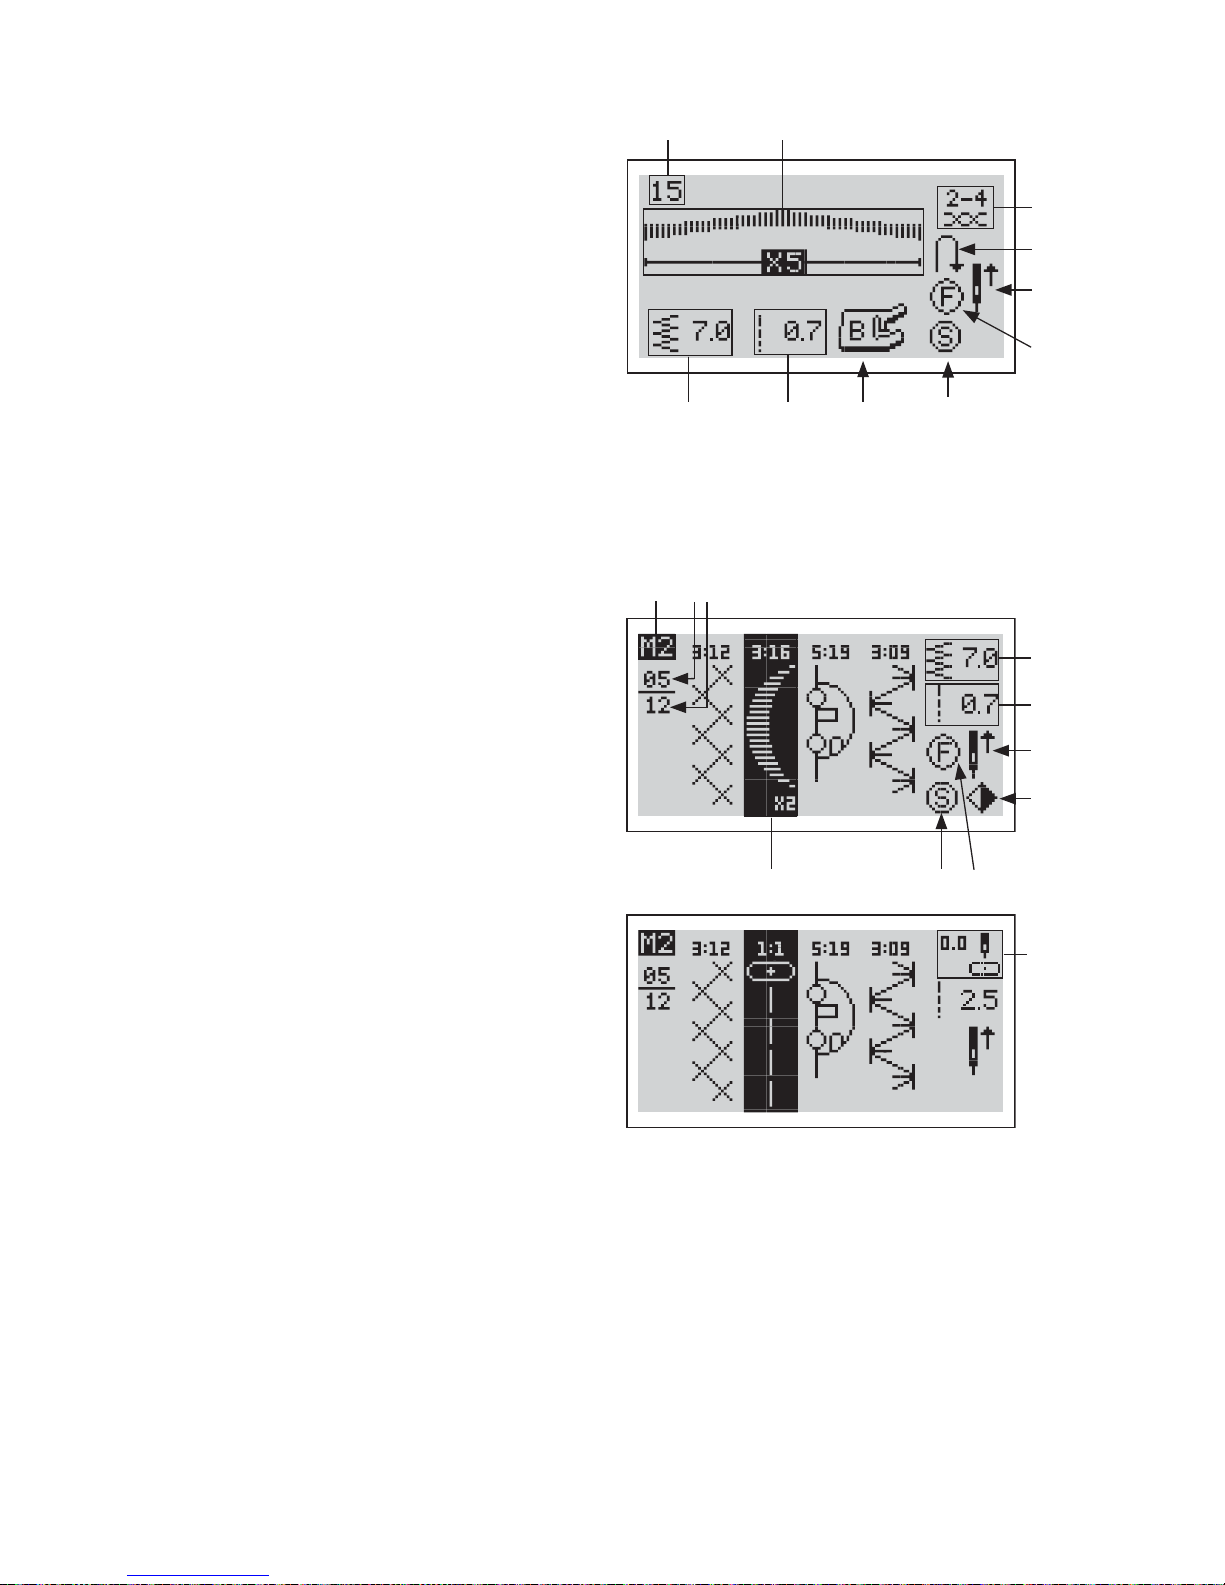
DISPLAY ICONS
A. Stitch number
B. Thread tension recommendation
C. Presser foot recommendation
D. Reverse icon
E. Needle up/down icon
F. FIX icon
G. STOP icon
H. Mirror icon
I. Stitch length
J. Needle position
K. Stitch
L. Stitch width
Display Icons – Alphabet
M. Stitch/Character number
N. Thread tension recommendation
O. Presser foot recommendation
P. Reverse icon
Q. Needle up/down icon
R. FIX icon
S. STOP icon
T. Stitch width
U Stitch
Page 31
3. MACHINE FUNCTIONS
29
WV
edcb
a
Z
Y
X
p
f
gh
i
j
k
l
mno
Display Icons – Elongation
V. Stitch number
W. Stitch elongation
X. Thread tension recommendation
Y. Reverse icon
Z. Needle up/down icon
a. FIX icon
b. STOP icon
c. Presser foot
d. Stitch length
e. Stitch width
Display Icons – Memory
f. Memory number
g. Number of the current unit
h. Total number of units
i. Stitch width
j. Stitch length
k. Needle up/down icon
l. Mirror icon
m. FIX icon
n. STOP icon
o. Stitch to edit
p. Needle position
Page 32
30
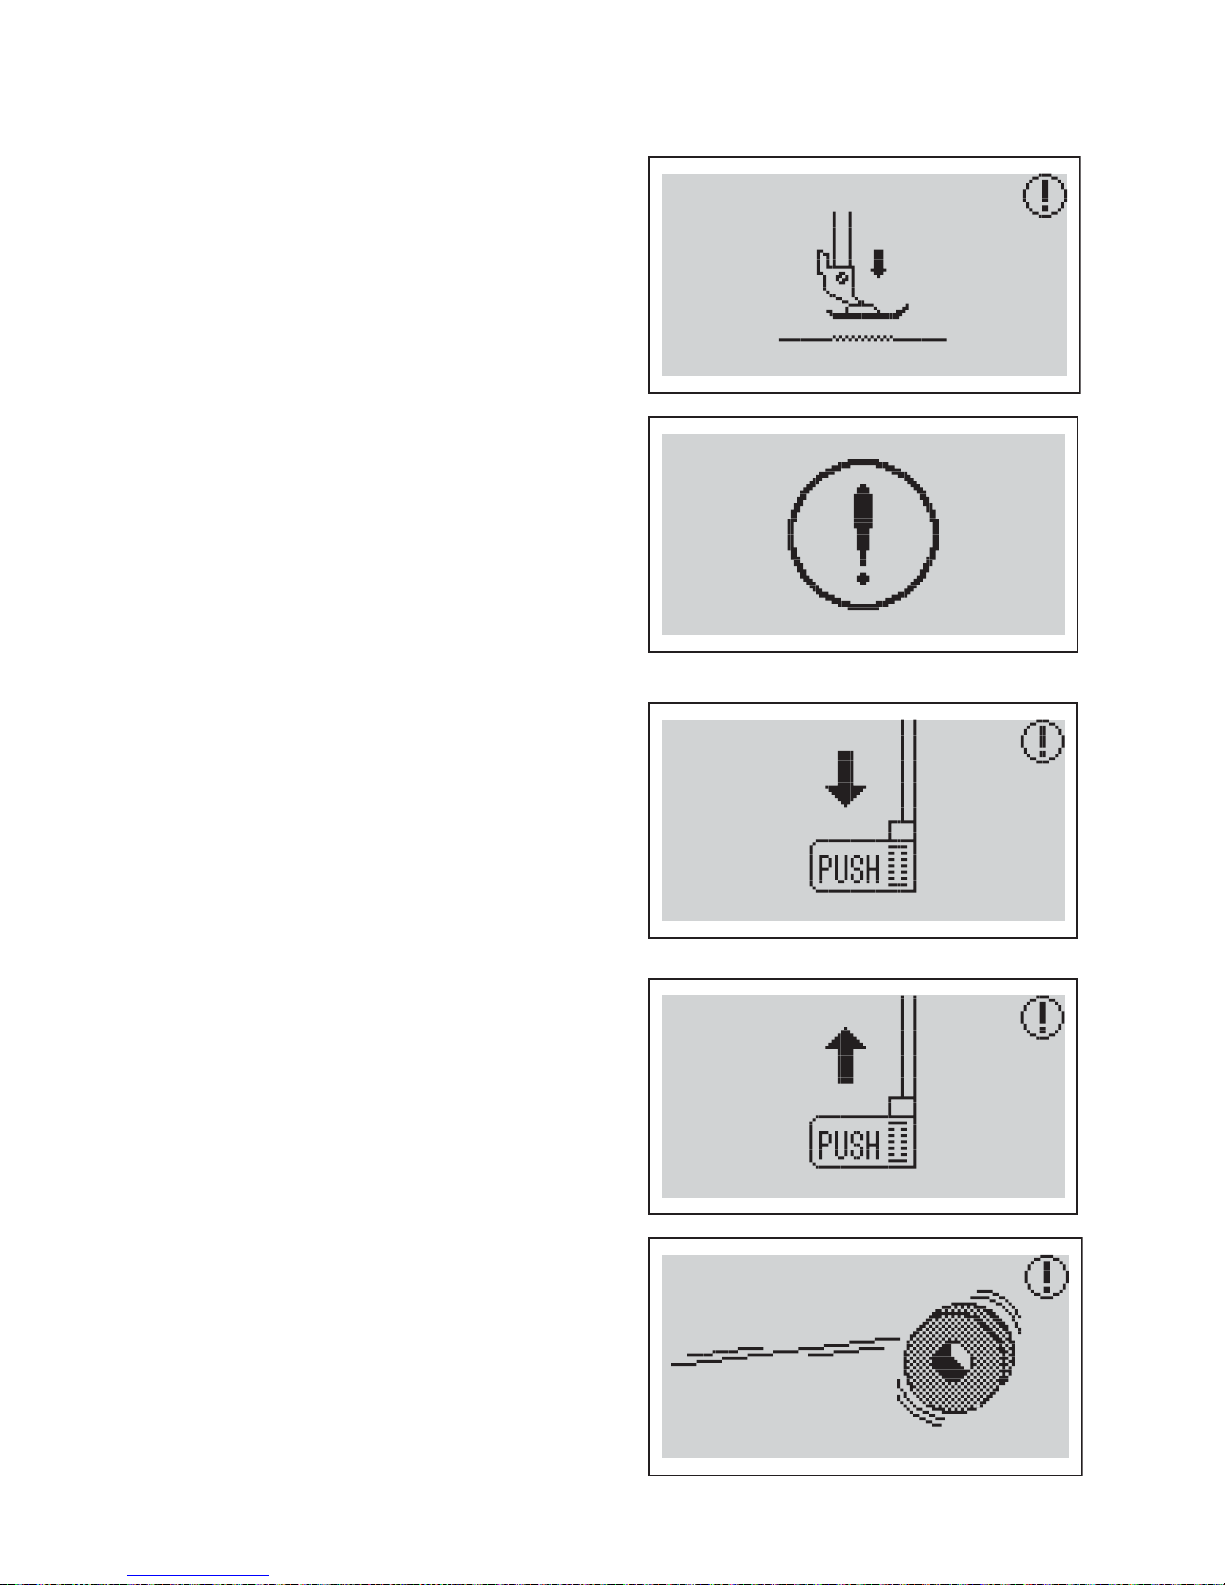
WARNING MESSAGES
The Presser Foot is Not Lowered
If you touch the foot control and the presser
foot is not lowered, the machine will beep and
give you the following message.
Main Motor Blocked
This message means that the thread is twisted
or jammed and the hand wheel motor cannot
move. Look at the trouble shooting guide on
page 43.
The Buttonhole Lever is not Lowered
The buttonhole or darning stich was selected
and the foot control was pressed while the
buttonhole lever was raised.
Buttonhole Lever is not Lifted
A stitch other than the buttonhole or darning
stitch was selected and the foot control was
pressed while the buttonhole lever was down.
Bobbin Winding
The following screen will be shown while you
are winding the bobbin. Once the bobbin is
full and you have pulled the bobbin winder to
the left, the message will disappear.
Page 33
3. MACHINE FUNCTIONS
31
PROGRAMMING
Your sewing machine has a programming function. You can program up to 20 stitches and
characters into the same combination. Combine any stitches except the following: 1:09, 1:00,
2:07, 2:08, 2:09, 2:10, 2:11 and 2:12 (and 2:20, 2:21, 2:22 on EMERALD™ 203). Save the
combination in one of the memories.
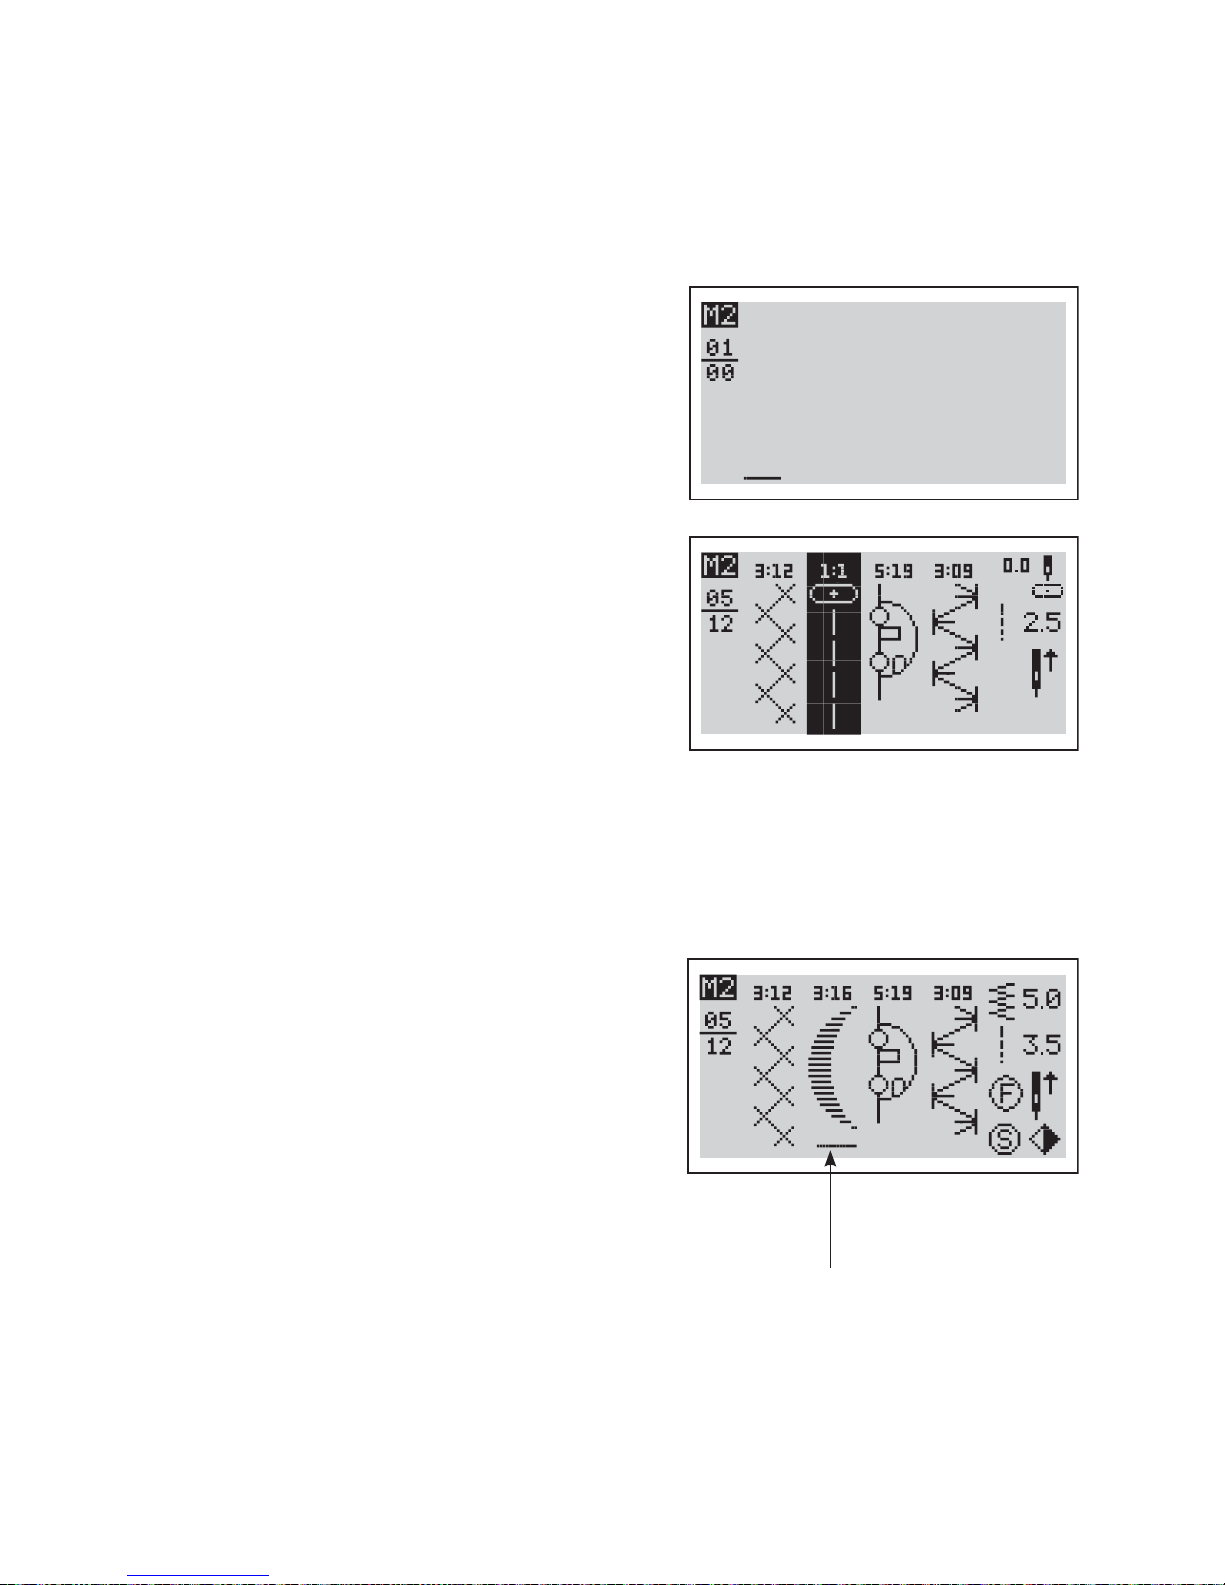
Create a Combination
1. Touch the memory button on your machine. A
pop up appears on your InfoDisplay allowing
you to choose which memory you want to
save your stitches in. Select the number of the
memory.
2. When you are in the memory screen the cursor
fl ashes on the fi rst position.
3. Choose a stitch with the menu selection button
to get to the desired stitch menu and then the
number of the stitch.
4. The stitch you have selected will be shown in
the InfoDisplay and the cursor will move to
the next position. Repeat step 3 to insert more
stitches.
5. Start to sew your sequence.
6. Touch the memory button to leave the
memory mode.
Adding Stitches or Letters in a Sequence
1. To add a stitch or letter in a sequence you
need to place the cursor where you want the
stitch to be placed. The stitch you add will be
inserted where the cursor is (A). By pressing
the stitch width or length + or - buttons you
will move forward and backward in your
sequence.
2. Select the stitch menu of your choice and
choose the number of the stitch you wish to
add.
A
Page 34
32
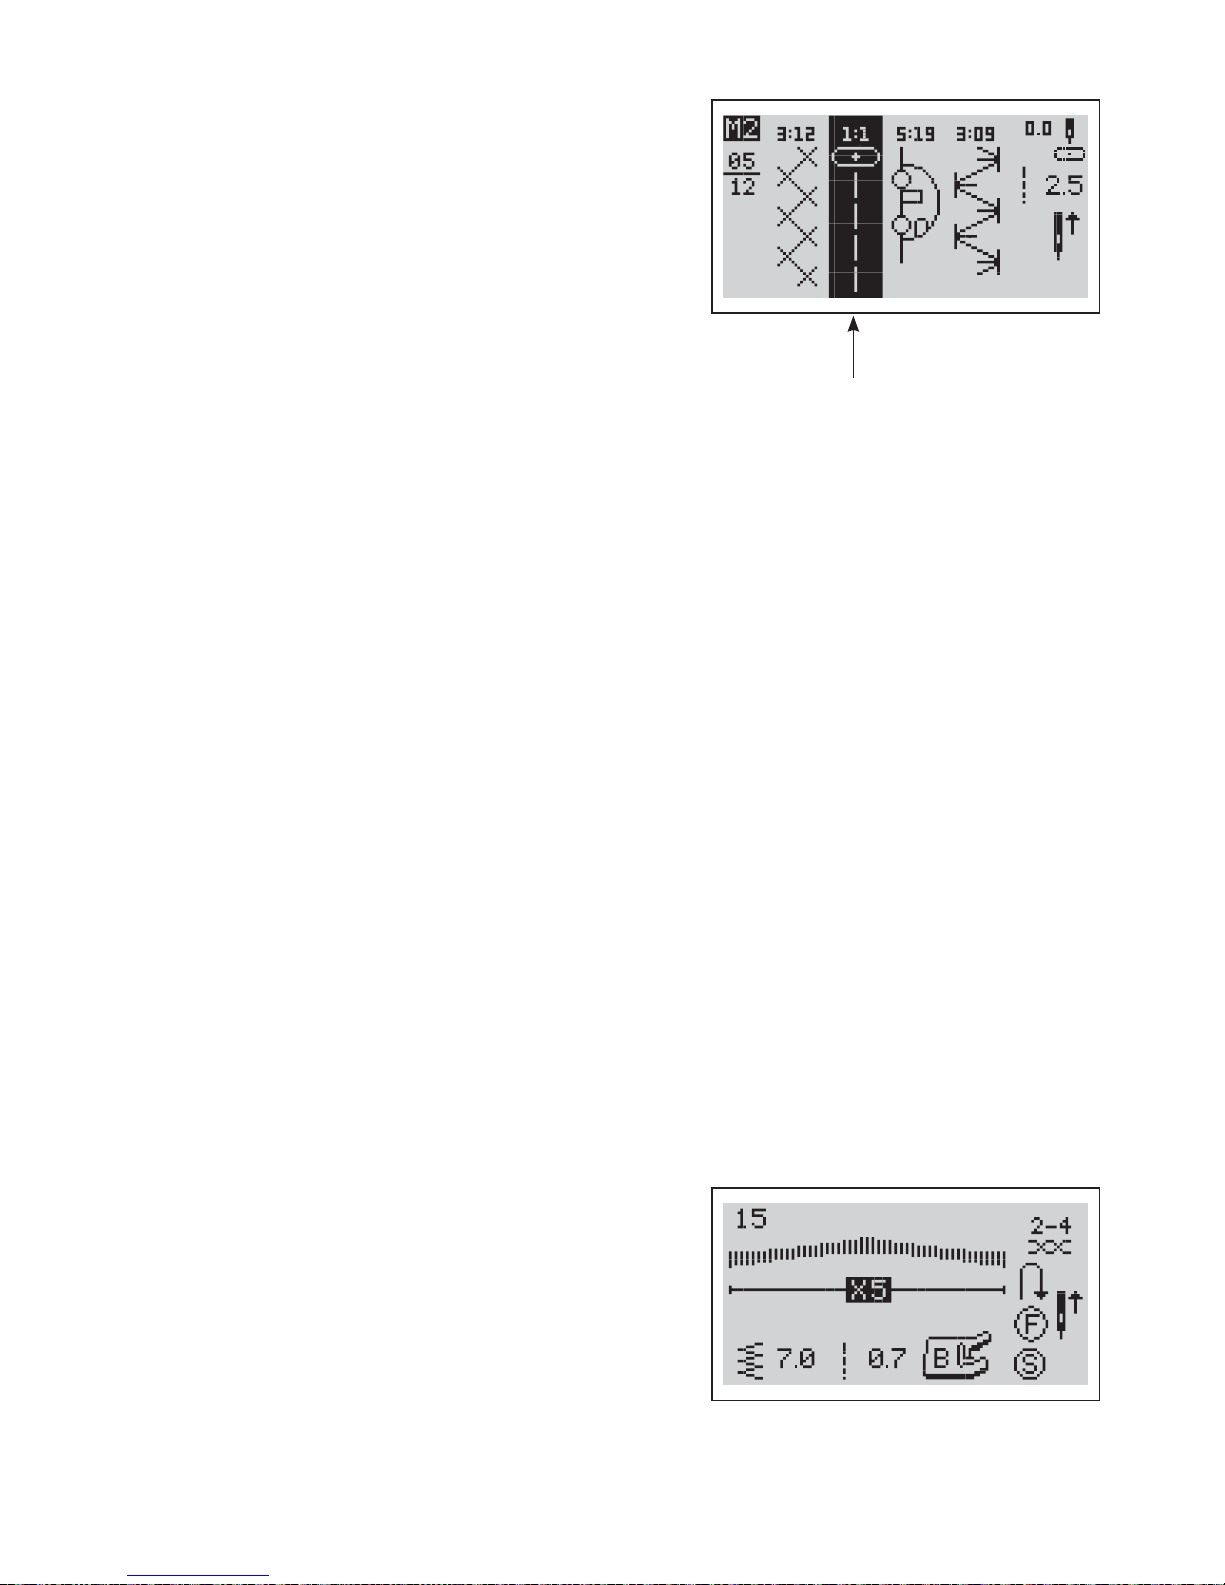
Editing Stitches/Letters
1. In the memory mode, use the stitch width or
length buttons + and - to place the cursor at the
stitch you wish to edit.
2. Touch the “E” button to edit the stitch. The
background of the stitch you wish to edit becomes
black (B). You can adjust the width, length, mirror
the stitch and on some stitches, elongate the stitch.
3. Touch the “E” button again to return to the
memory mode.
Removing Stitches/Letters
1. In the memory mode, use the stitch width or
length buttons to go to the stitch you wish to
delete. The machine will delete the stitch the
cursor is under.
2. Touch the “C” button to delete the stitch that you
have selected. The stitch behind the one that you
have deleted will move forward.
Opening and Sewing a Stitch Memory
1. Go into the memory mode by touching the “M”
button.
2. Choose the number of the memory you wish to
enter and the memory will open.
3. Start to sew by pressing the foot control. The
cursor on the display will move along with the
stitch while sewing.
Note: Once you have reached the end of the sequence the
machine will start over again from the beginning unless you have
programmed a stop. The machine will start to sew the stitch
where the cursor is.
Stitch Elongation
To elongate a stitch means that you make the stitch
longer without changing the stitch density. You can
elongate the following stitches:
3:14, 3:15, 3:16, 4:01, 4:02 and 4:04.
You can elongate the stitch up to fi ve times its normal
length. When you press the stitch elongation button
you will see the following display. The stitch on the
screen will change according to your changes.
B
Page 35
4. BASIC SEWING TECHNIQUES
33
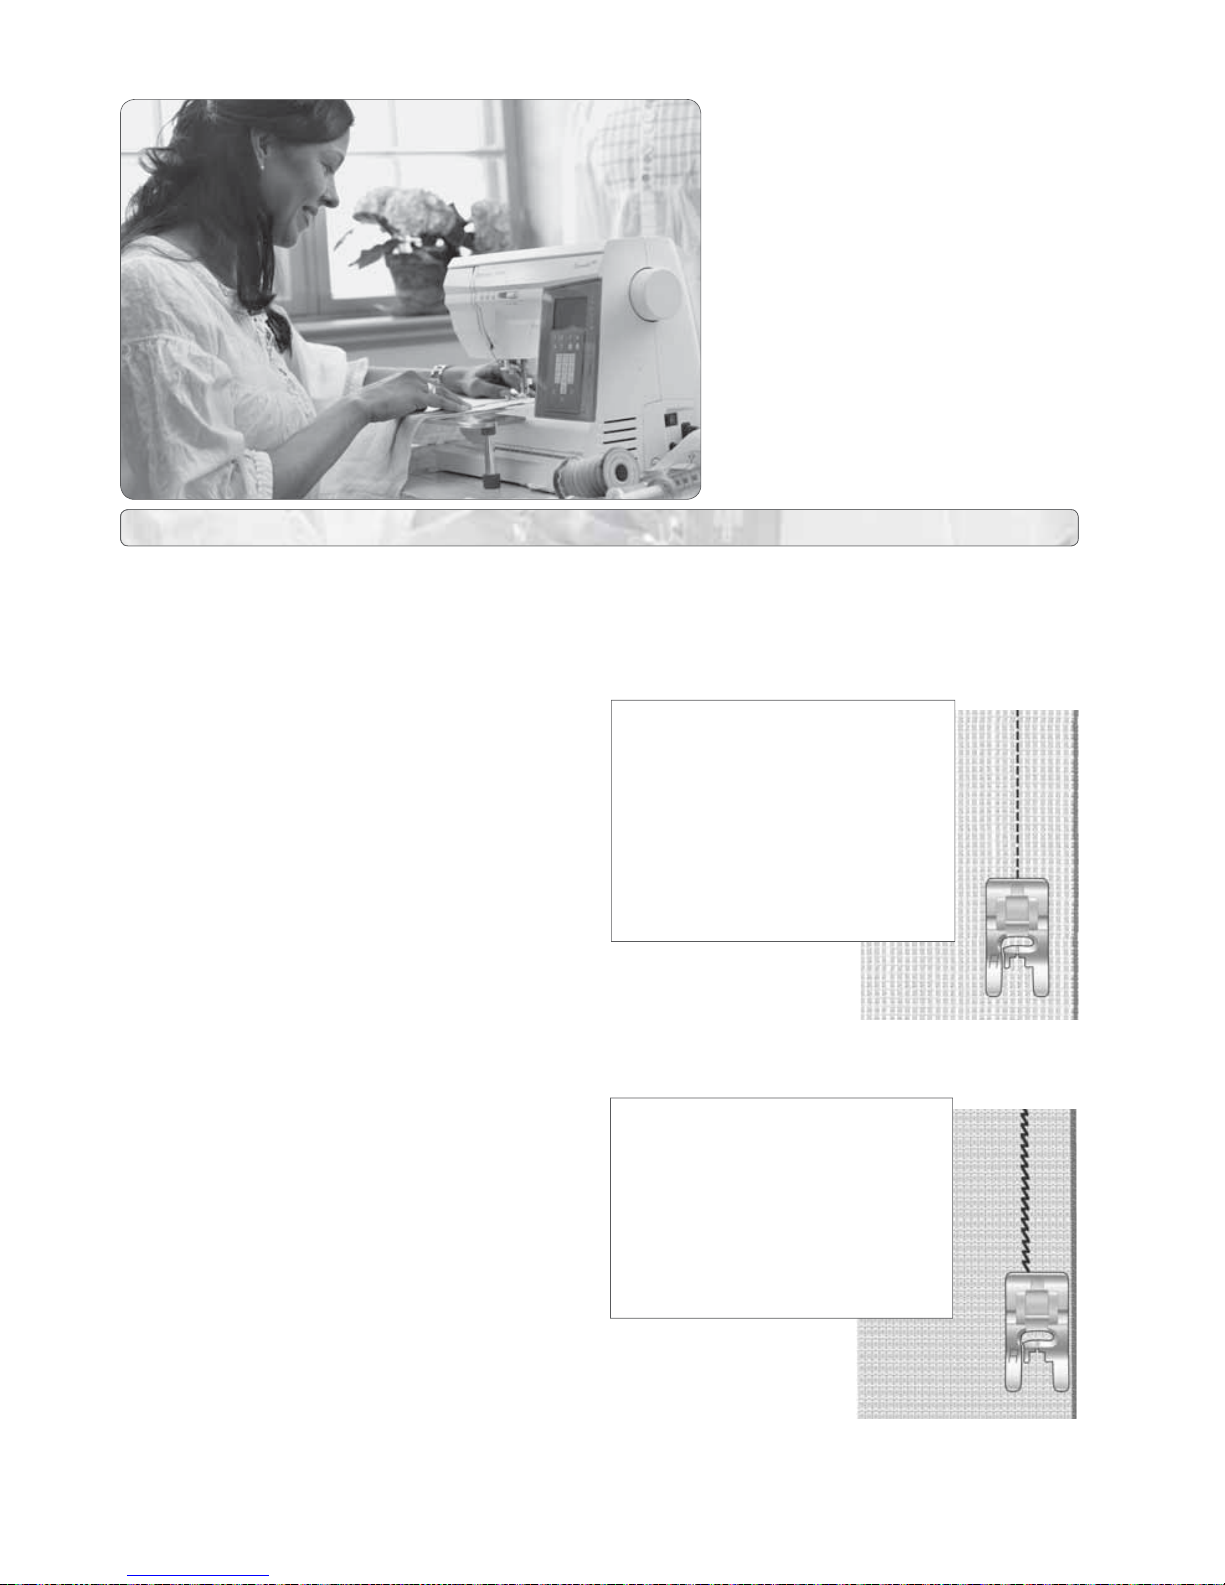
SEAM
A seam sews two pieces of fabric together
with a seam allowance that usually will be
pressed open. In most cases edges of the
seam allowance are fi nished with an overcast
stitch before sewing the seam.
Seams in stretch fabric must stretch with the
fabric. The Stretch Stitch makes a stretchy
seam that is suitable for sewing together
pieces of light stretch fabric.
1:1 Straight Stitch
Fabric: Woven medium, cut in
two.
Use: Presser Foot A and size 80
needle.
Line up the fabric edge with
the 5/8’’ (15 mm) seam guide.
1:2 Stretch Stitch
Fabric: Stretch light, cut in two.
Use: Presser Foot A and size
75 stretch needle.
Line up the fabric edge with
the 3/8’’ (10 mm) seam guide.
4
BASIC SEWING TECHNIQUES
Page 36
34
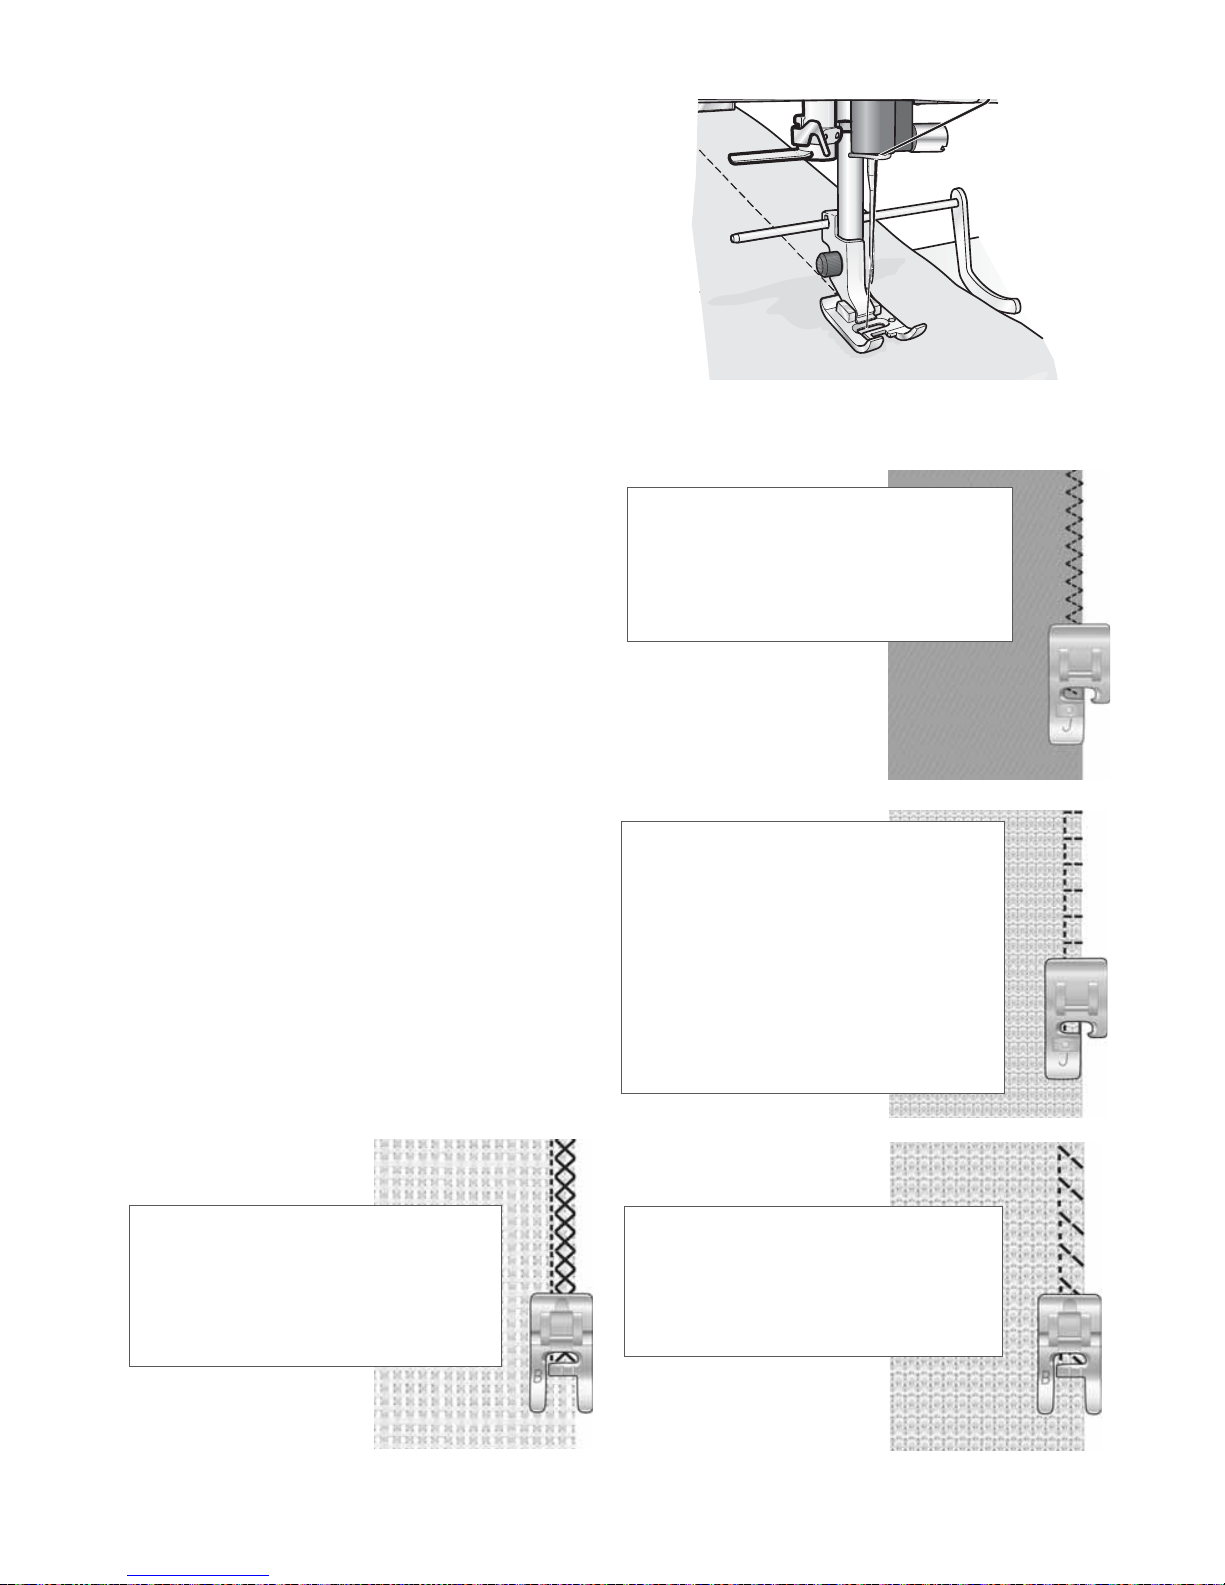
1:7 Overcast Stitch
Fabric: Stretch light or woven
light/medium, cut in two.
Use: Presser Foot J.
Let the toe of the presser foot
guide the fabric as shown in the
picture.
1:8 Stretch Seam Overcast Stitch
Fabric: Stretch heavy, cut in two
Use: Presser Foot B and size 90.
2:1 Double Overlock Stitch
Fabric: Woven heavy, cut in two.
Use: Presser Foot B and size 80.
1:4 Three-Step Zigzag
Fabric: All types of fabric.
Use: Presser Foot J.
EDGE/QUILTING GUIDE
The Edge/Quilting Guide is used for wide
seam allowances, topstitching, or channel
quilting. Slide the guide into the clip on the
ankle. Adjust to the desired position.
OVERCAST
The three-step zigzag, is up to 1/4’’ (7mm)
wide and suitable for all types of fabrics. Use
this stitch for overcasting, butting two edges
together to join them, mending tears and
other special fi nishing.
Use Edging Foot J when overcasting.
SEAM AND O VERCAST
The Seam/Overcast stitch sews the seam and
overcasts the edge all at one time. There are a
number of different Seam/Overcast stitches
on your sewing machine, to give the best
result for your chosen fabric.
Page 37
4. BASIC SEWING TECHNIQUES
35
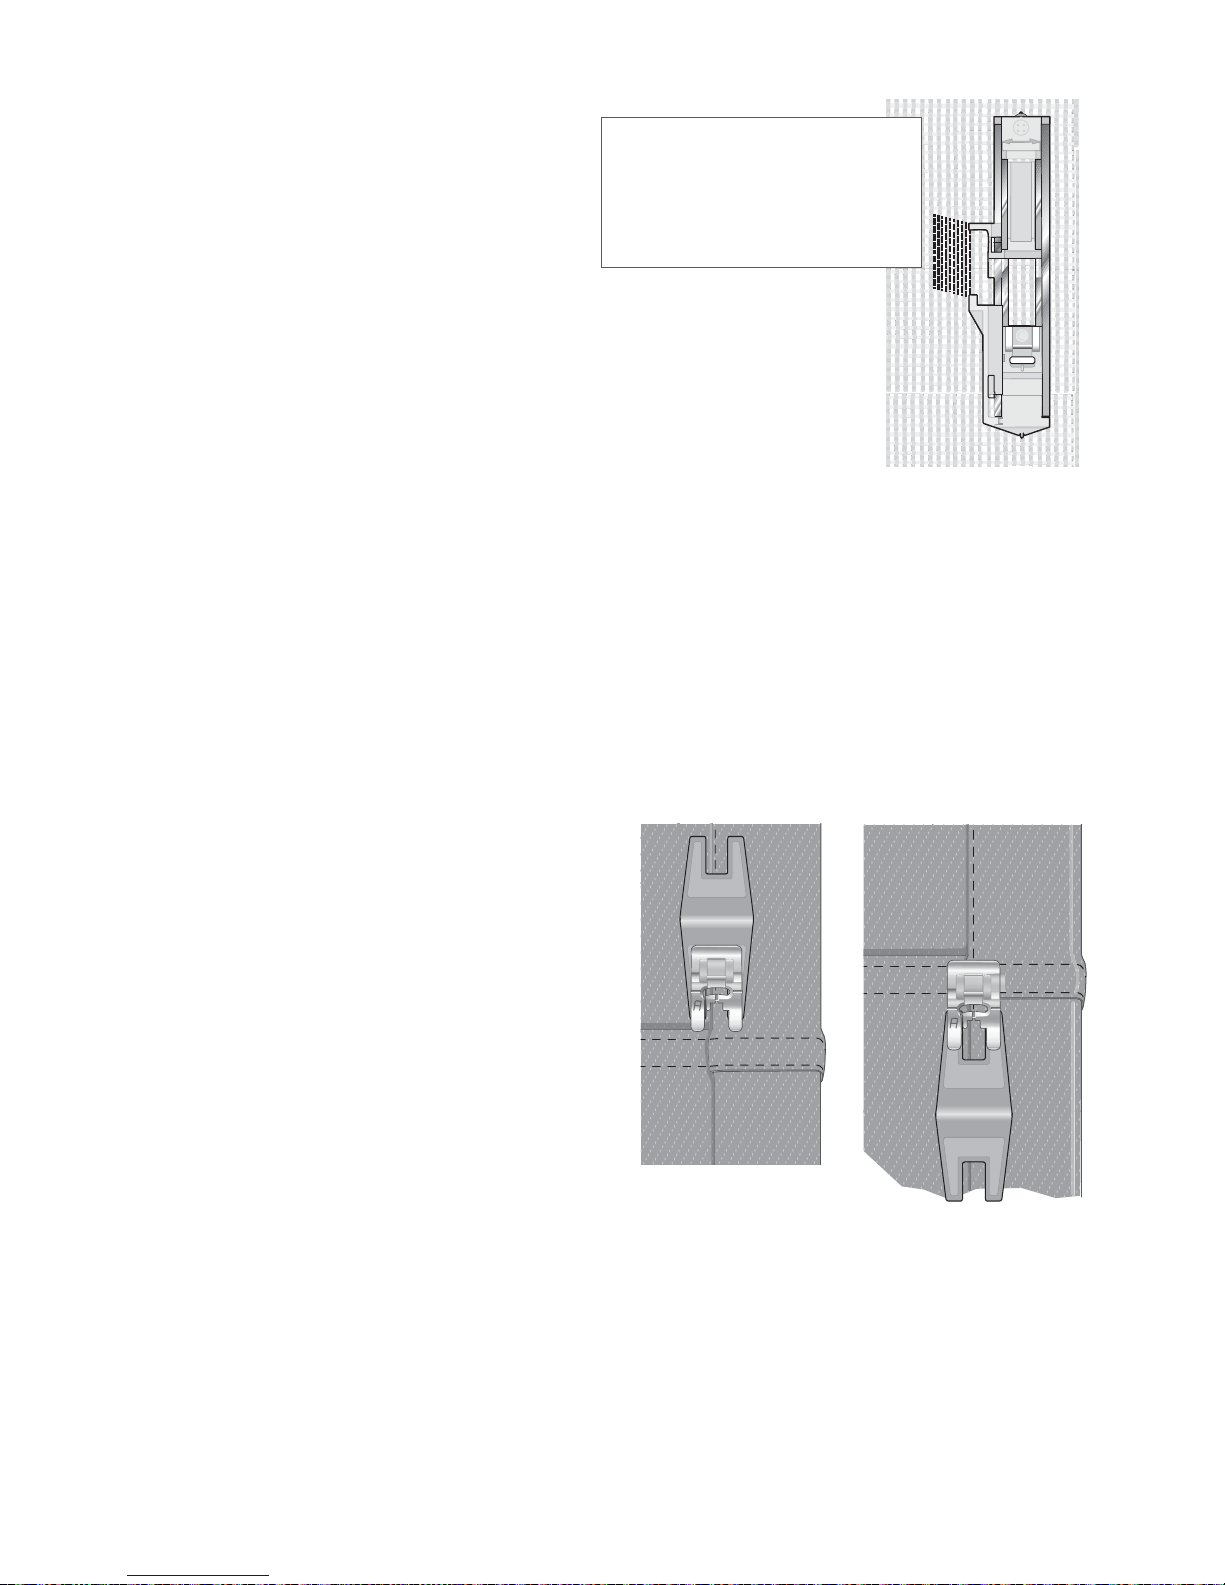
D ARNING AND MENDING
Darning a small hole or a tear before it
becomes larger can save a garment. Choose a
fi ne thread in a color as close to your garment
as possible.
Sew:
• Attach the Buttonhole Slider Foot C and
choose stitch 2:07.
• Place the fabric in position under the
presser foot.
• Lower the presser foot and pull the
button holder to the rear. By pulling the
button guide plate away from you, set the
length of the darningstitch.
• Step on the foot control. Start sewing
above the hole and sew down over it. The
machine will sew back and forth 15 times.
Note: The maximum length of the stitch is 2.6cm
and the maximum width is 7mm.
SEWING HEMS IN HEAVY FABRIC
When sewing over seams in extra heavy
fabric or a blue jeans hem, the foot can tip as
the machine climbs over the seam. Use the
multipurpose tool to balance the height of the
hem as you sew.
One side of the plate is thicker than the other.
Use the side that suits the thickness of the
seam best.
2:07 Darning Stitch
Fabric: All types of fabric.
Use: Buttonhole Slider Foot C .
Page 38
36
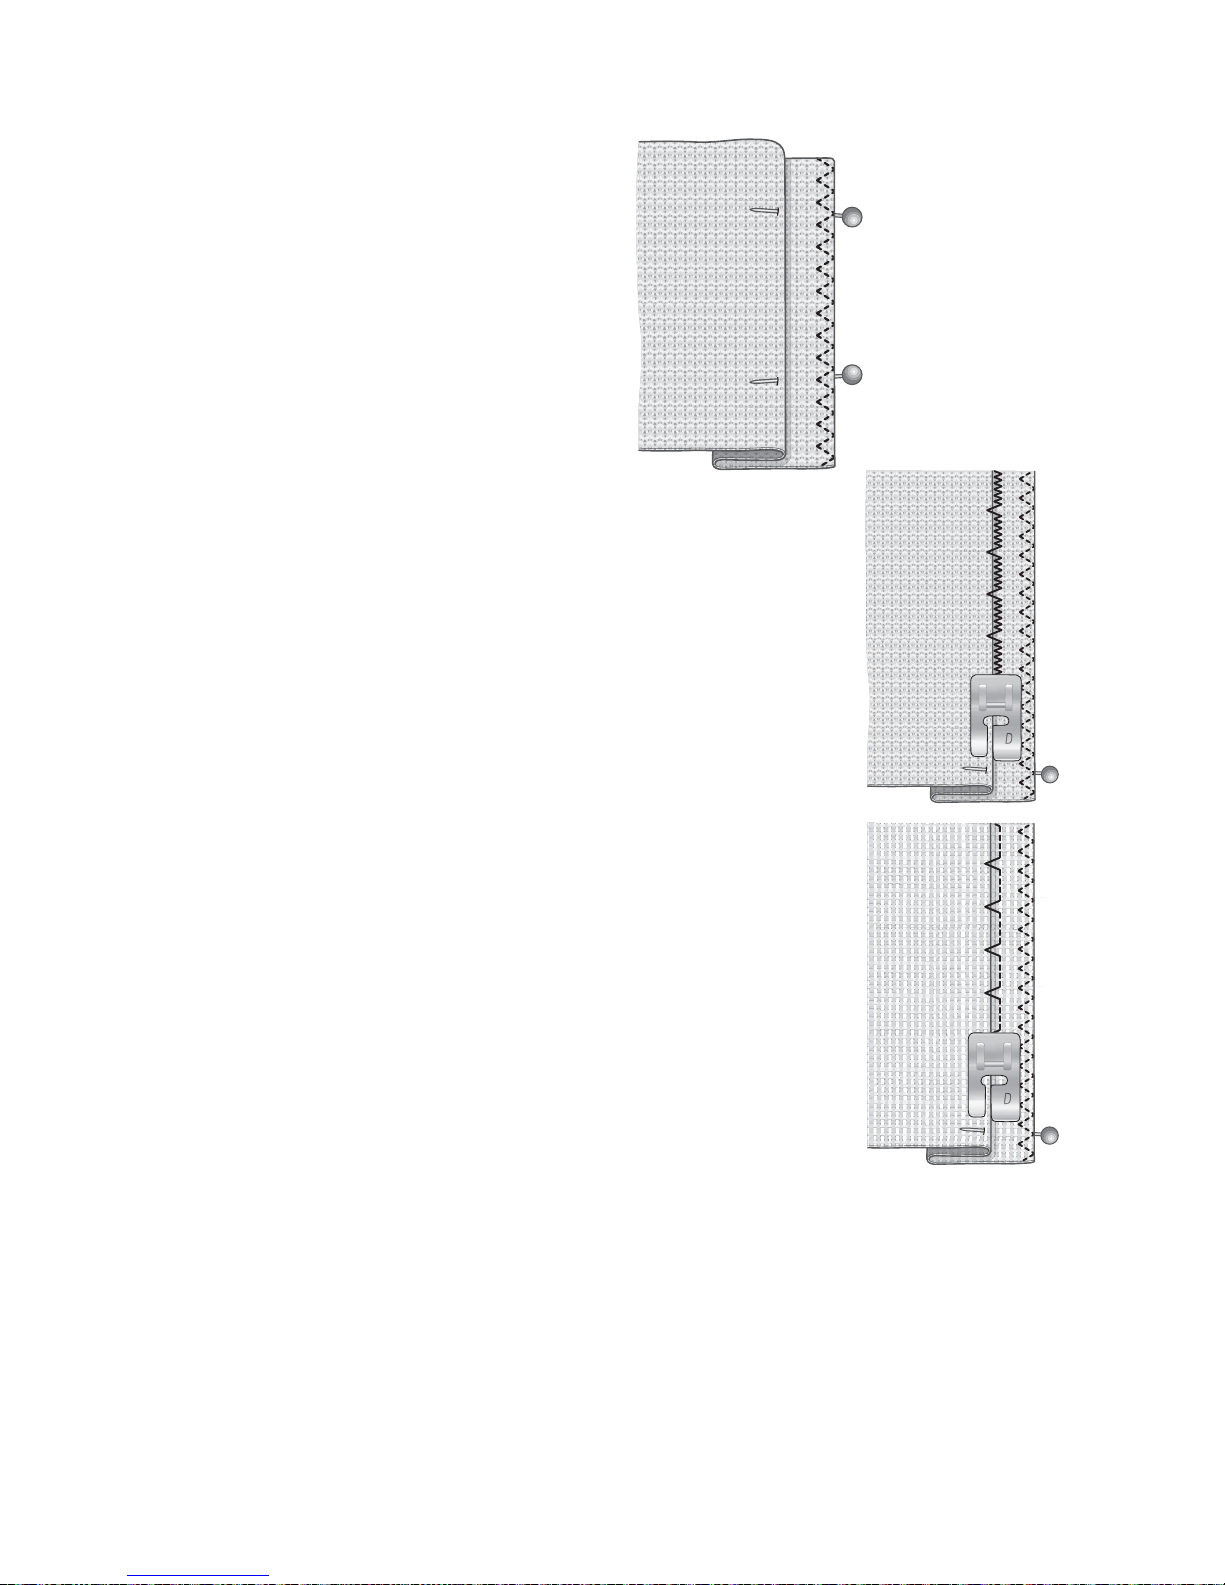
BLIND HEM
The blind hem creates an invisible hem on
garments. There are two types of blind hem;
one is recommended for medium to heavy
woven fabric, the other for medium to heavy
stretch fabric.
Fold the fabric as illustrated. Make sure the
folded edge of the fabric follows the inside of
the right “toe” of Blind Hem Foot D.
Lower the presser foot and step on the foot
control.
The left swing of the needle should just catch
the edge of the folded fabric.
If neccessary, adjust the stitch width as
needed to barely “catch” the fold.
Note: The blind hem technique is not recommended for
light weight fabric.
medium/heavy
woven fabric
medium/heavy
stretch fabric
Page 39
4. BASIC SEWING TECHNIQUES
37
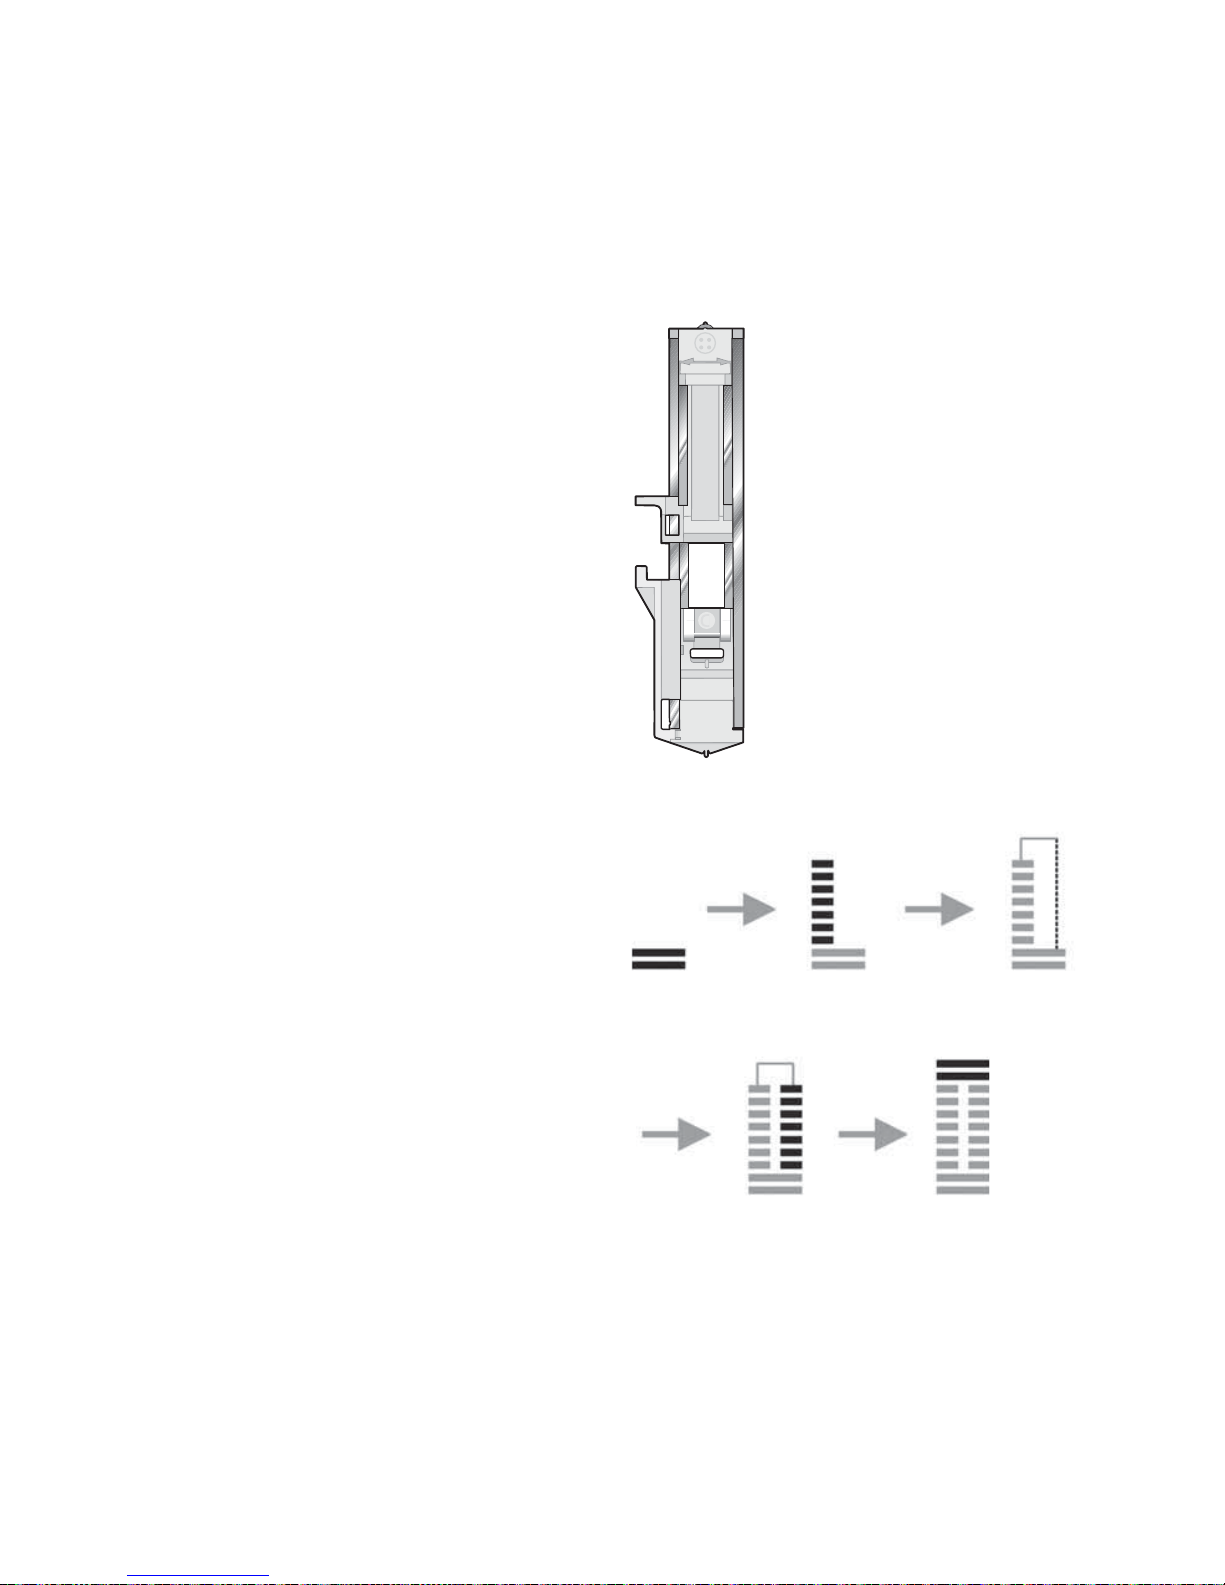
SEWING BUTTONHOLES
The buttonholes in your sewing machine are specially adjusted for different kinds of fabric and
garment. Look at the stitch table on the last pages in this book to fi nd descriptions of each
buttonhole.
Fabric should be interfaced and/or stabilized where buttonholes are to be sewn.
Buttonhole Slider Foot C
1. Make removable marks on fabric where
you want the buttonholes to be placed.
2. Attach the buttonhole slider foot C and
pull out the button holder plate. Insert
the button. The button will determine the
length of the buttonhole.
3. Make sure that the thread is passed
though the hole in the presser foot and
placed under the foot.
4. Select the buttonhole you want to sew and
then adjust the stitch and length that you
desire.
Note: Always sew a test buttonhole on a scrap piece
of fabric.
5. Position the fabric under the presser foot
so that the marking is aligned with the
center of the buttonhole foot.
6. Lower the buttonhole lever, and push it
away from you.
7. Hold the end of the upper thread and
start sewing. The buttonholes are sewn
from the front of the presser foot to the
back.
8. Once the machine has sewn the
buttonhole, raise the presser foot.
Page 40
38
Corded Buttonhole (StretchFabrics)
When sewing buttonholes in stretch fabrics we recommend cording the buttonhole to increase the stability
and to keep the buttonhole from stretching out.
1. Loop a piece of heavy thread or perle cotton over
the fi nger at the back of the Buttonhole Slider
Foot C.
2. Stitch a buttonhole. Do not hold back the cord.
The satin buttonhole columns will stitch over the
cord.
3. When the buttonhole is fi nished, lift the cord off
the fi nger and pull out the slack.
4. Cross the cord in front of the needle and thread
cord ends into a large needle, pull to the wrong
side and knot ends before cutting excess.
5. Use the seam ripper to carefully open the
buttonhole.
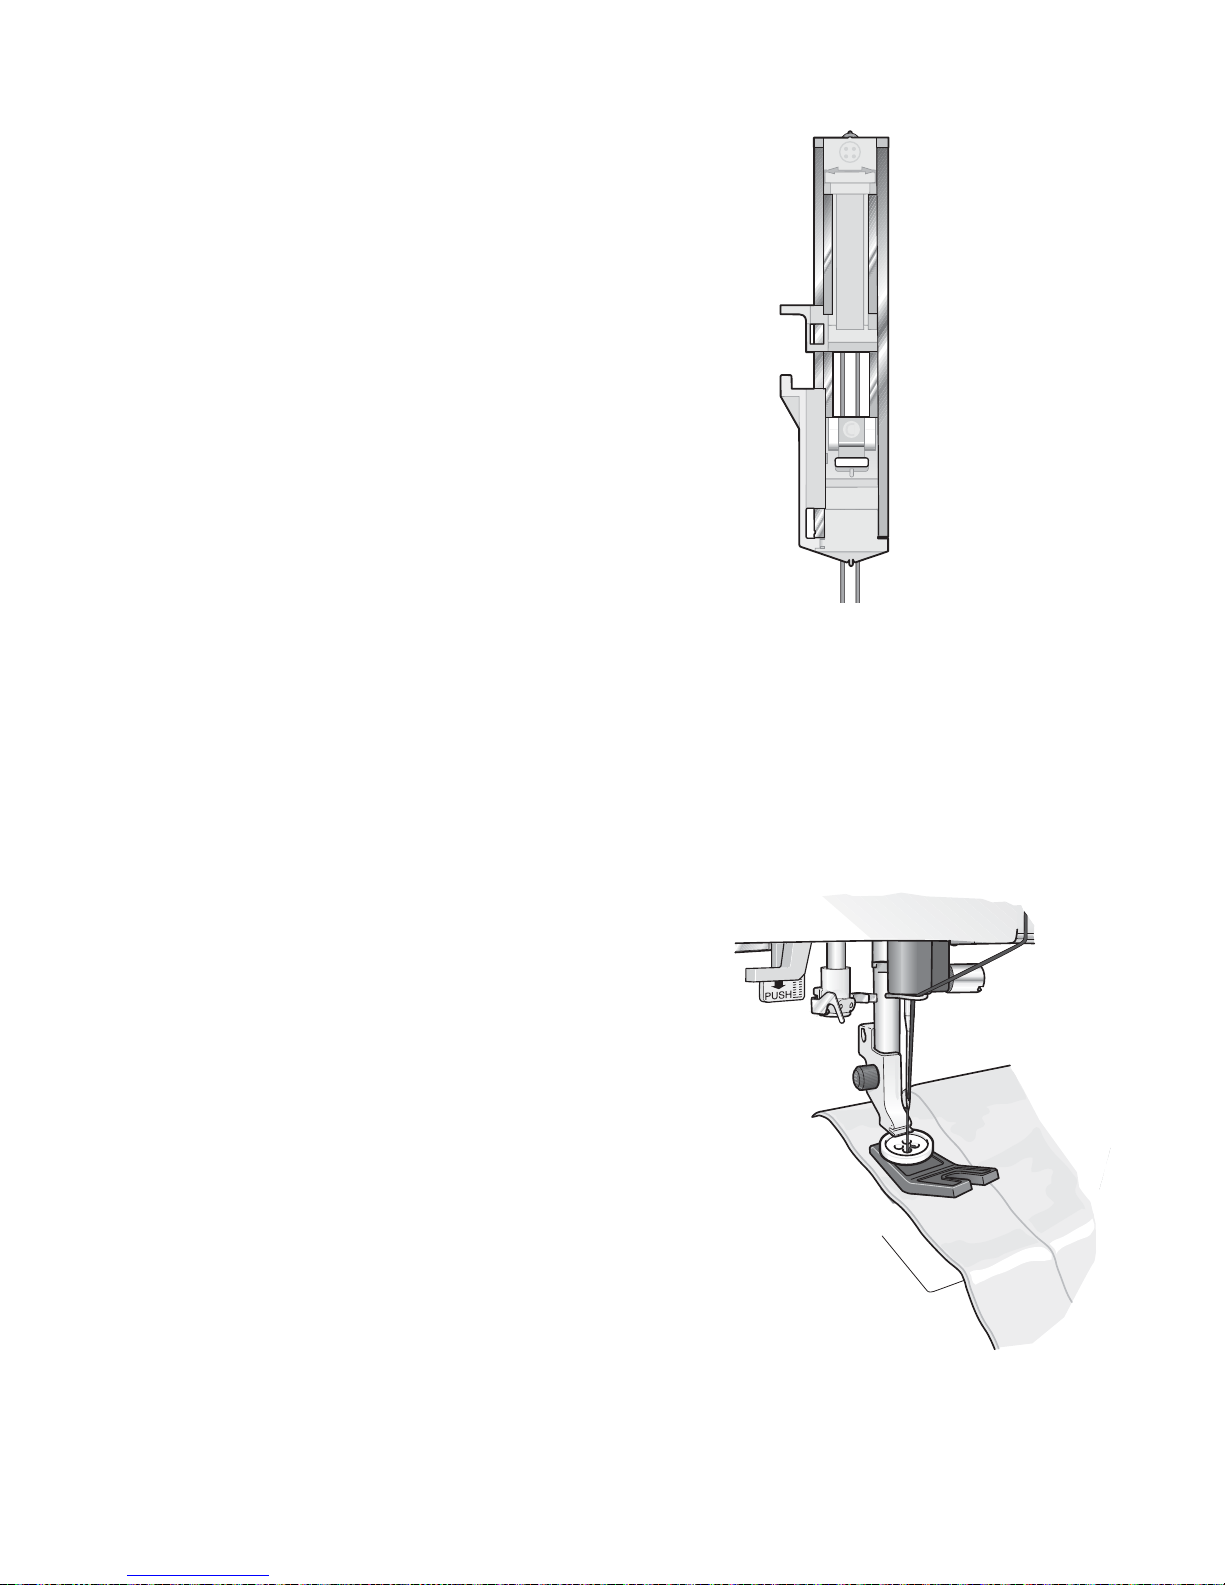
SEWING ON BUTTONS
Sew buttons, snaps, hook and eyes quickly with your
sewing machine. Use the multipurpose tool to create a
thread shank.
1. Select sew-on-button stitch 1:09.
2. Snap off the presser foot and lower the feed teeth.
3. Place the fabric, multipurpose tool and button under
the ankle with the holes in the button lined up with
the swing of the needle. Check the swing of the
needle by turning the handwheel and making sure
that the needle does not hit the button.
Note: The recommended width of 3.0 is set for most buttons. If
you sew a tiny button or a very large coat button, decrease (–) or
increase (+) the stitch width until the swing of the needle sews in
the holes of the button or snap.
4. Press the foot control. The sewing machine will
sew the button in place, make a fi x and then stop.
5. Raise feed teeth and remove the fabric.
Note: Place the thin end of the clearance plate under the button
when sewing on light fabrics. Use the thick end for heavier
fabrics. Hold in place on the fabric with transparent tape.
Page 41
4. BASIC SEWING TECHNIQUES
39
SEWING ZIPPERS
The Zipper Foot E can be snapped on either to the right or to the left of the needle, making
it easy to sew both sides of the zipper from the same direction. To sew the other side of the
zipper, reposition the Zipper Foot.
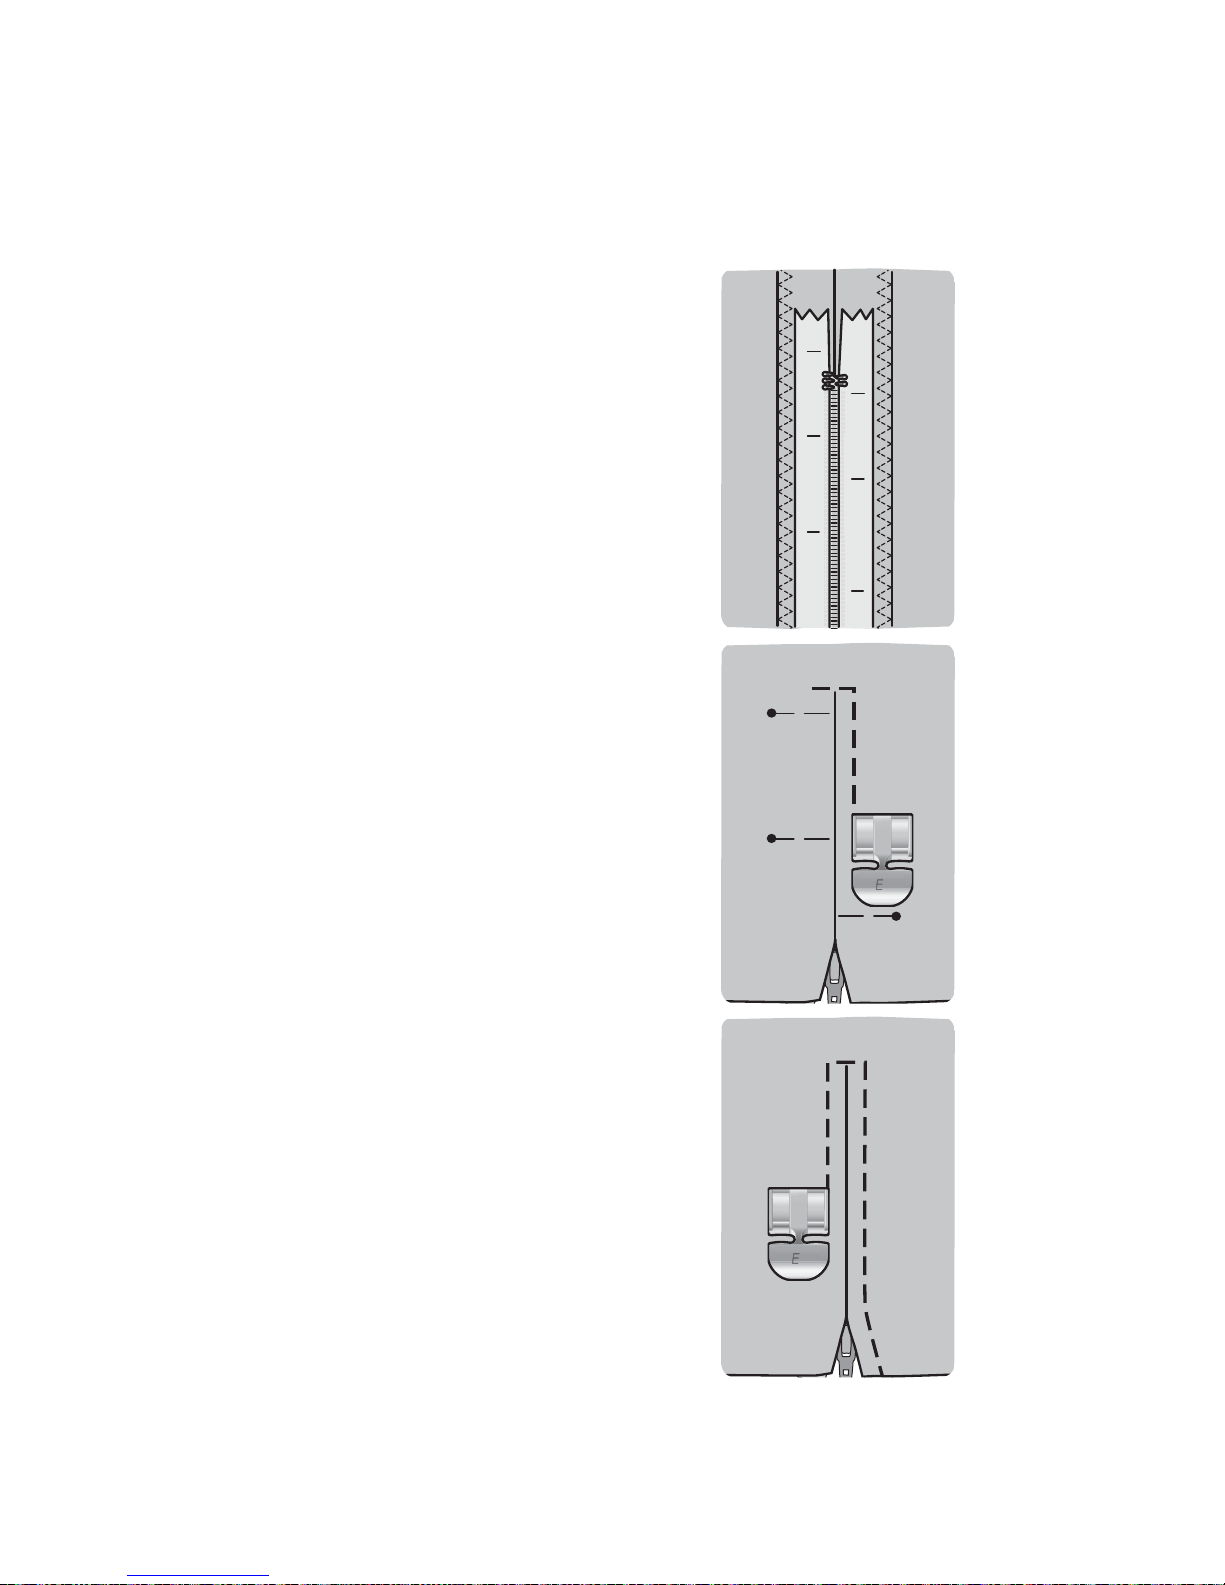
Center Zipper
1. Sew the two fabrics right sides together along
the 5/8’’ (15 mm) seam line, stopping at the
notch for the zipper placement.
2. Baste the remaining seam where the zipper
will be placed. Press the seam open. Place the
zipper right side to the pressed open seam
allowance, placing the zipper stop at the notch.
Pin the zipper on the right side so that it stays
in place.
3. Select straight stitch and move the needle
position to the left. Snap on the Zipper Foot
E so the needle is on the left side of the foot.
Place fabric under the foot right side up with
the zipper foot on the right side of the zipper.
4. Begin stitching across the bottom, turn the
fabric and stitch the right side of the zipper to
the top.
5. To avoid fabric shifting, sew the left side of
the zipper in the same direction. Snap on the
Zipper Foot E so the needle is on the right side
of the foot. Move the needle position to the
right.
6. Begin stitching across the bottom, turn the
fabric and stitch the left side of the zipper
sewing from the bottom to the top.
7. Remove the basting stitches.
Note: To adjust the position of the stitching line, adjust the
needle position.
Page 42
40
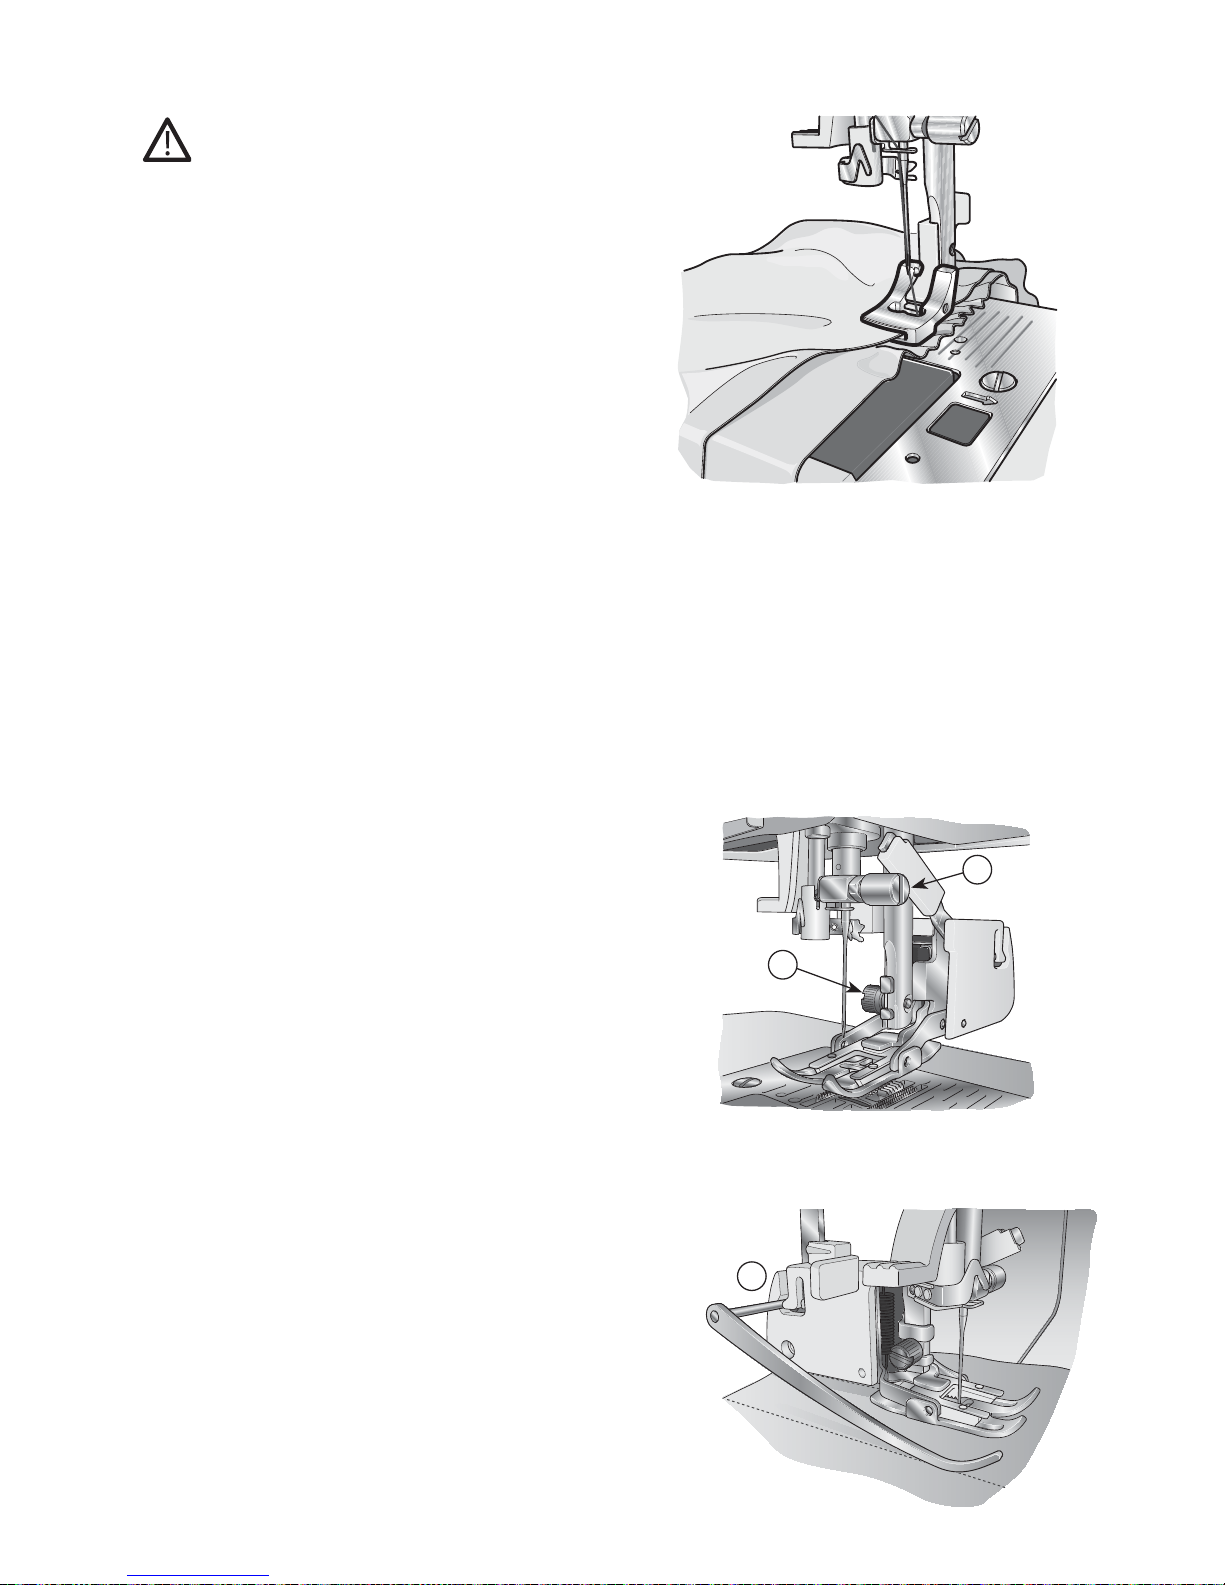
GATHERING
Turn off the main switch.
1. Snap on the gathering foot. Switch on the
sewing machine.
2. If you are only using one piece of fabric,
place it under the presser foot and sew a
straight stitch. The fabric will gather.
3. If you are using two pieces of fabric place
one piece under the presser foot and the other
piece of fabric in between the cut in the foot
(see picture).
4. Start sewing. The bottom layer of fabric will
gather while the top layer stays fl at.
DUAL FEED FOOT
The dual feed presser foot is designed to feed
layers of fabric and/or batting evenly. Perfect
for quilting, sewing velvet, some stretch fabrics,
imitation leathers and fabrics which need careful
pattern matching. It also helps to prevent uneven
feeding of very diffi cult fabrics.
1. Remove the presser foot ankle by unscrewing
the ankle screw.
2. Place the dual feed on your machine from the
back, positioning the lever over the needle
clamp screw (A). Then screw the dual feed
onto the presser foot bar with the black screw
found together with the dual feed foot (B).
3. Make sure both the needle screw (A) and the
attaching screw (B) are tightly secured.
Reduce presser foot pressure to 3.
How to Attach the Guide
The two guides included with the dual feed will
help you sew parallel rows of stitching side by
side as in channel quilting or tucking. There is one
guide for the left side, and one for the right.
• Place the guide into the slot on the back of
the dual feed foot (C) and push it down.
• Adjust the space between the foot and the
guide by pulling it to the left or to the right.
A
B
C
Page 43
5. CARE OF YOUR MACHINE
41
To keep your sewing machine operating well, clean it often. No lubrication (oiling) is needed.
Turn off the main switch.
CLEANING
Wipe the exterior surfaces of your sewing machine with a soft cloth to remove any dust or lint
built up.
CHANGING THE LIGHT BULB
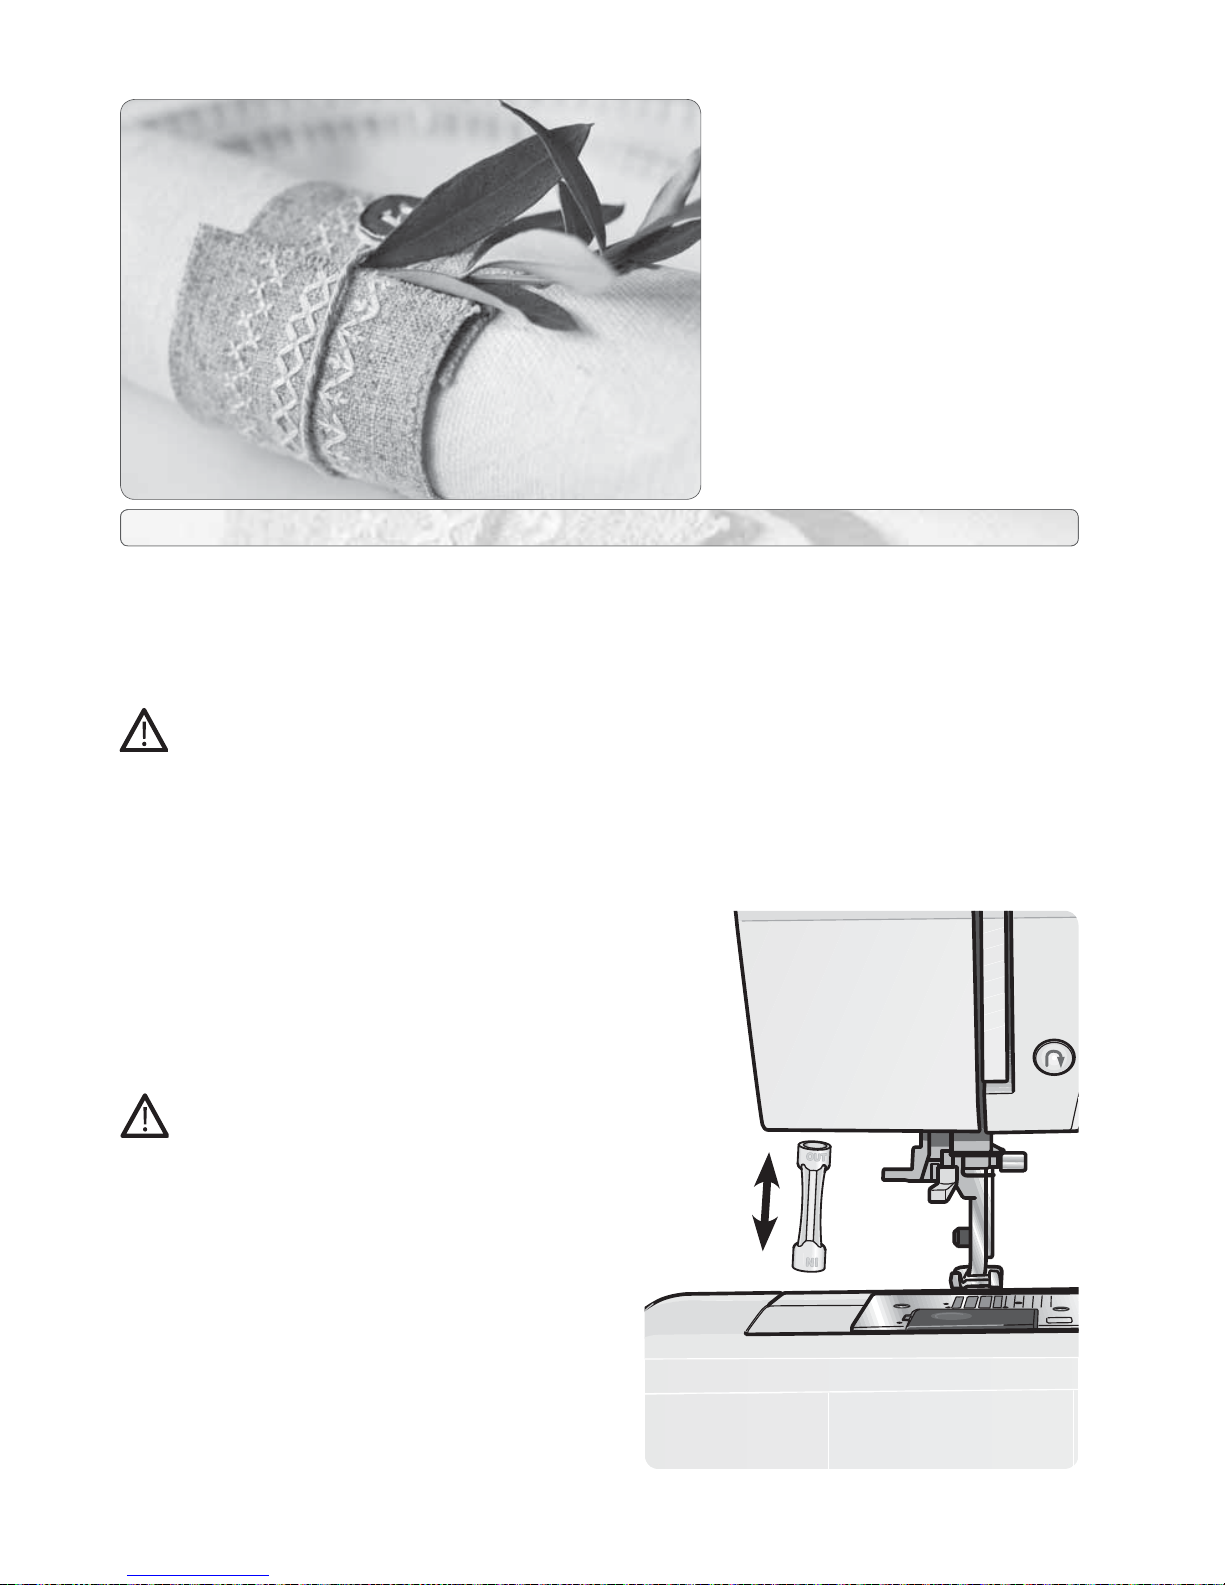
Only use light bulbs of a type as indicated on
the front of the machine (12V, 5W). They are
available at your authorized HUSQVARNA
VIKING® dealer.
Turn off the main switch.
1. Place the light bulb remover with the
deep hole, marked OUT, around the bulb.
Do not turn the bulb, just pull it out to
remove it.
2. When inserting a new light bulb place the
remover with the shallow hole, marked
IN, around the new bulb. Insert the new
bulb by pushing it up.
5
CARE OF YOUR MACHINE
Page 44
42
CLEAN THE BOBBIN AREA
Turn off the main switch
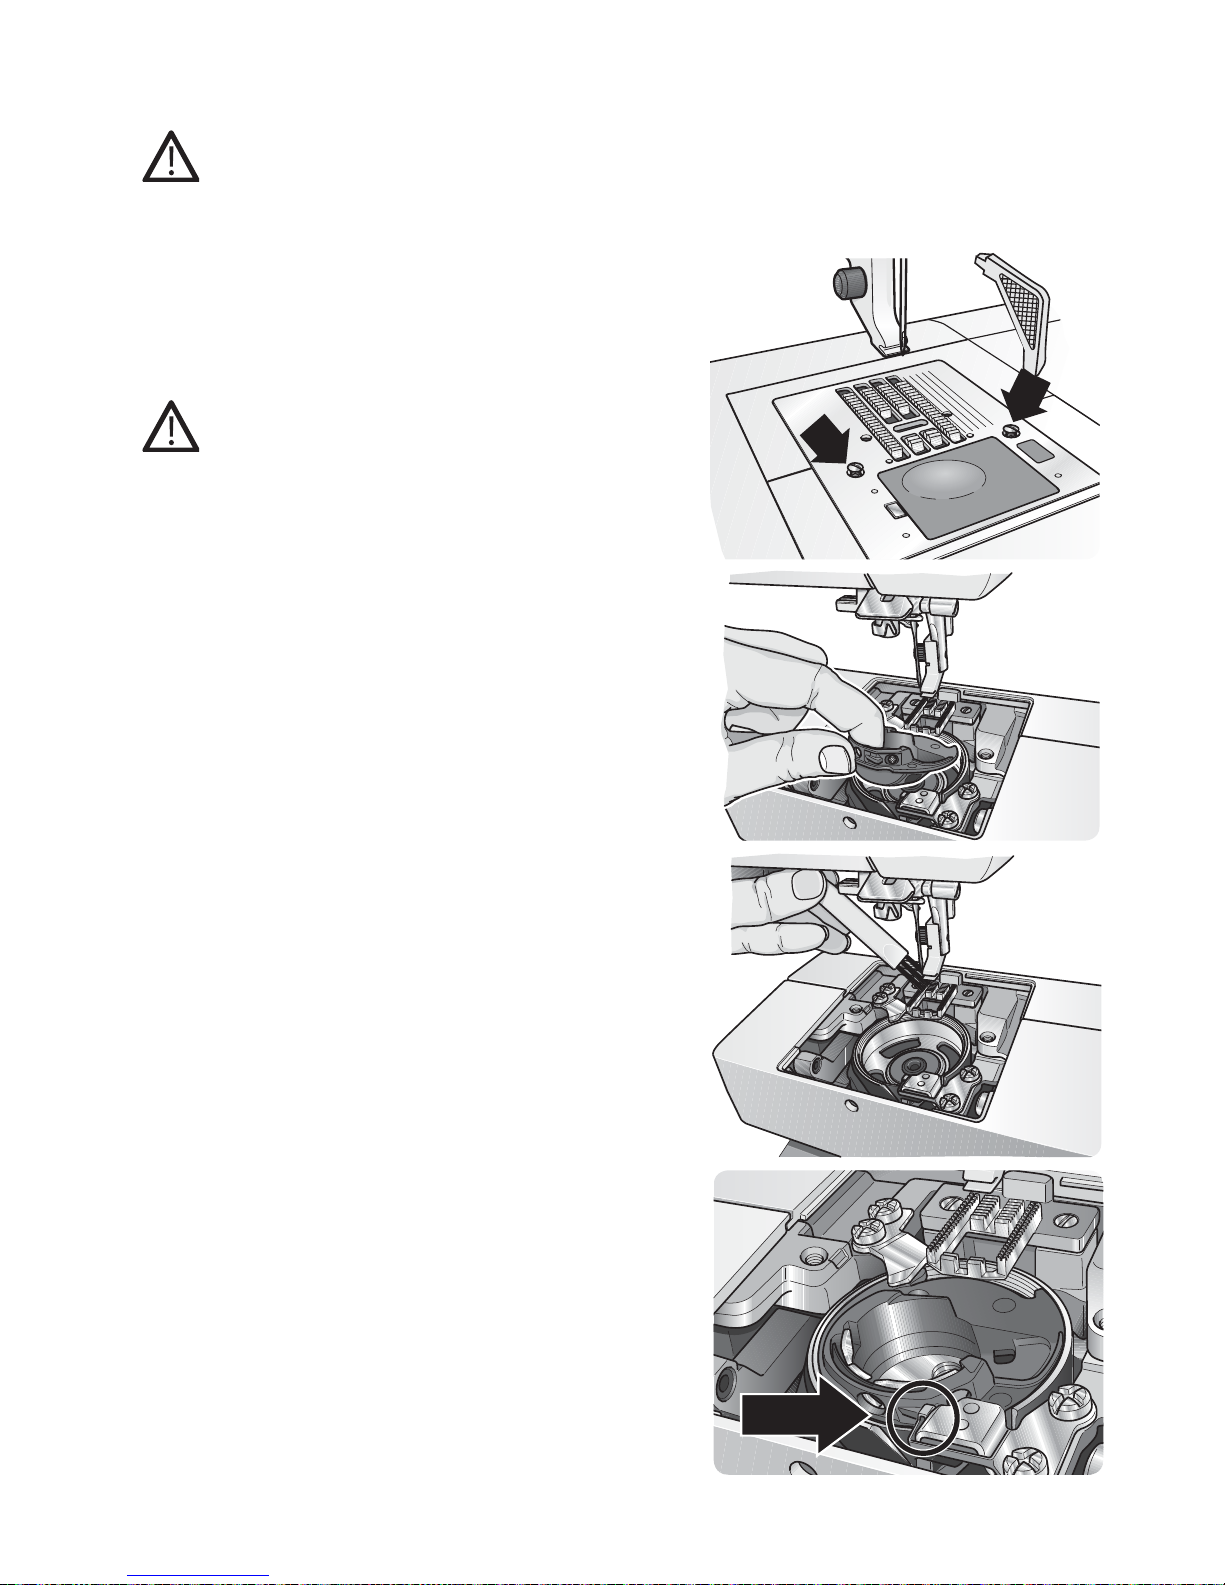
1. Remove the presser foot, the bobbin cover
and bobbin.
2. Clean the feed teeth with the brush.
Cleaning Under the Bobbin Area
Turn off the main switch
After sewing several projects or any time you
notice an accumulation of lint in the bobbin case
area, the area under the bobbin case must be
cleaned.
1. Remove the needle, presser foot, bobbin
cover and bobbin.
2. Remove stitch plate by removing the
two screws in the stitchplate. Lift up the
stitchplate.
3. Lift the bobbin case upwards and remove it.
4. Clean the area with the brush or with a dry
cloth.
5. Put the bobbin case back into the hook race
so that the tip fi ts into the stopper.
Page 45

5. CARE OF YOUR MACHINE
43
Any Time You Experience
a Problem When Sewing:
• Rethread the top and bobbin threads.
• Use different spool pin positions (vertical
or horizontal).
• Use thread nets and quality thread. We
recommend the same sewing thread
on top and bobbin for general sewing.
For decorative sewing we recommend
embroidery thread on top and regular
sewing thread on bobbin.
Fabric Puckers?
• Check needle, it could be damaged.
• Rethread top and bobbin threads.
• Change thread type to match fi ber and
sewing technique.
• Use quality thread
• Shorten stitch length
• Use stabilizer
• Check your thread tension
Skipped Stitches?
• Check needle - it could be damaged.
• Change needle to recommended size and
type.
• Be sure the needle is inserted correctly
and all the way into the clamp.
TROUBLE SHOOTING
Have your Sewing Machine Serviced Regularly
by an Authorized HUSQVARNA VIKING® Dealer!
If you have followed the below trouble shooting information and still are having sewing
problems, take the sewing machine to your authorized dealer. If there is a specifi c problem, it
is a great help to test sew with your thread on a scrap of your sewing fabric and bring it to your
dealer. A sewing sample will often give much better information than words.
Non-Original Parts and Accessories
The warranty does not cover any defect or damage caused by use of non-original accessories or
parts.
• Rethread top and bobbin threads.
• Use recommended presser foot.
• Turn machine off and on to reset.
• Consult your dealer for service.
Needle Breaks?
• Use care not to pull fabric when sewing.
• Insert new needle size and type as
recommended.
• Insert needle correctly as described in the
User’s Guide (page 15).
Poor T ension?
• Rethread top and bobbin - use quality
thread.
• Insert new needle size and type as
recommended.
• Follow recommendations for thread
tension.
Upper Thread Breaks?
• Does thread feed smoothly/not catching?
• Use thread nets and quality thread. For
special threads such as metallic etc please
consult your Accessory User’s Guide for
special needle recommendations.
• Rethread top and bobbin threads - check
for correct threading.
Page 46

44
• Try different spool pin positions
(horizontal or vertical).
• If stitch plate hole is damaged, replace
stitch plate.
• Is the correct spool cap used in front of
the thread?
Fabric Does Not Move?
• Feed teeth up.
• Increase stitch length.
Bobbin Thread Breaks?
• Wind a new bobbin.
• Replace the bobbin in the machine, check
correct threading.
• If stitch plate hole is damaged - replace
stitch plate.
• Clean bobbin area.
Bobbin Winds Irregularly?
• Check threading for bobbin winding.
Wrong Stitch, Irregular or Narrow Stitches?
• Turn machine off and on to reset.
• Change needle, rethread top and bobbin
threads.
• Use stabilizer.
Machine Sews Slowly?
• Check speed
• Remove stitch plate and brush lint from
bobbin and teeth area.
• Have the sewing machine serviced at your
dealer.
Machine Will Not Sew?
• Put bobbin winder spindle up into sewing
position.
• Check plugs are all the way into machine.
• Check wall plug and power to wall plug.
Main Motor Blocked
• Clear out threads in bobbin case area (see
page 42).
• Remove stitch plate and clear out threads
• Re-thread machine - top and bobbin.
Page 47
We reserve the right to change the machine equipment
and the ass ort ment of accessories without prior
notice, or make modifi cations to the performance or
design. Such modifi cations, however, will always be to
the benefi t of the user and the product.
INTELLECTUAL PROPERTY
VIKING, KEEPING THE WORLD SEWING &
Design and EMERALD are trademarks of KSIN
Luxembourg II, S.ar.l.
HUSQVARNA and the “crowned H-mark” are
trademarks of Husqvarna AB. All trademarks are used
under license by VSM Group AB.
This machine is protected by the following patents/
registration RCD 000651369-0001 ; USD 557,291
Please note that on disposal, this product must
be safely recycled in accordance with relevant
National legislation relating to electrical/electronic
products. If in doubt please contact your retailer
for guidance.
CE - Authorised Representative
VSM Group AB, SVP Worldwide
Drottninggatan 2, SE-56184, Huskvarna, SWEDEN
Page 48
www.husqvarnaviking.com
413 24 06-26H • InHouse • © 2012 KSIN Luxembourg II, S.ar.l. • All rights reserved • Printed in Germany on environmentally-friendly paper
 Loading...