

Page 1
Telecommunication Peripheral Products
Technical Practice
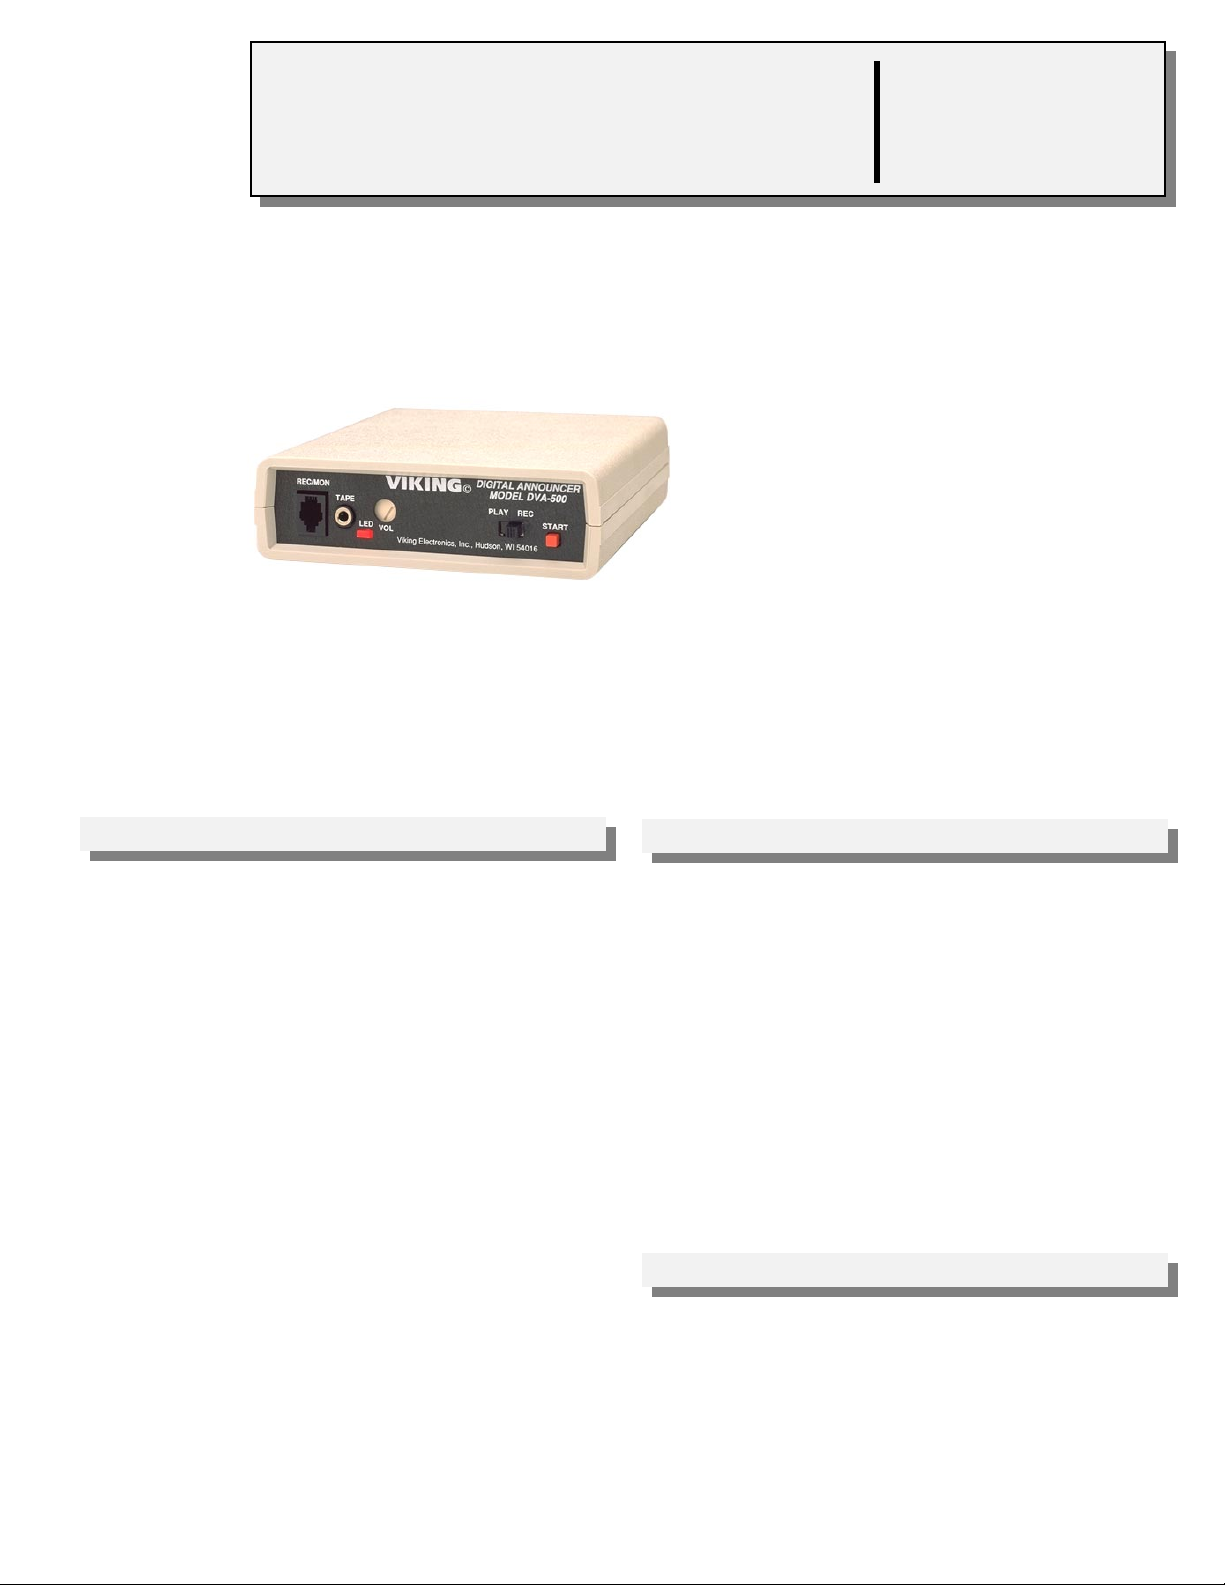
DVA-500
Digital Voice
Announcer/Recorder
October 31, 1997
Digital Voice
Announcer and
Recorder
The DVA-500 provides 16 seconds of record time (expandable to 32 seconds) and is
virtually maintenance-free. There are no moving parts, tapes to replace, or tape heads
to clean.
The DVA-500 is a cost-effective,
professional digital voice announcer
specifically designed for ACD/UCD, hotelmotel wake-up, auto attendant, intercept,
night message and other announcement
functions.
The DVA-500 will increase call processing
capacity by answering on demand or during
the first ring, automatically adjusting the
announce cycle to the message length, and
providing instant ”rewind” for the next
announcement.
http://www.VikingElectronics.com
VIKING©
Features
• Advanced technology allows the DVA-500 to
meet the handshake requirements of virtually
any PABX, Centrex or C.O.
• Record and review announcements using a
standard handset
• Announcements can be down-loaded from a
tape player
• Record level indicator for consistently high quality recordings
• Provides both “ring trip” and 4 wire “E & M”
interface
• Battery back-up option
• 16 seconds of record time (expandable to 32
seconds)
Sales...(715) 386 - 8861
Made in the U.S.A.
Applications
• ACD/UCD announcements
• Intercept announcement
• Announce-only applications
• School closings
• Ski reports
• Night answer
• Wake-up calls
• Bank rates/commodity prices
• Any application where information must be
repeated continuously and may require frequent
updating
• Replace existing tape and drum recorders
Specifications
Power: 120V AC/13.8V AC 1.25 A, UL listed adapter provided
Dimensions: 127mm x 127mm x 38mm (5” x 5” x 1.5”)
Shipping Weight: 1.13 kg (2.5 lbs.)
Environmental: 0°C to 32°C (20°F to 90°F) with 5% to 95% non-
condensing humidity
Battery Back-up: 5 hours of memory
Message Length: 16 seconds, expandable to 32 seconds using
model DRAM-32 memory kit (Fax Back Document 105)
Connections: (1) RJ-11, (1) 4-wire E&M RJ-14, (1) 1/8 audio
jack, (1) handset jack
Page 2
A. Base Unit
Installation
120V AC
Install a heavy duty
J3
R&G-Audio
BK-Start
Y-Busy
W-Grd (+)
Rear View of the DVA-500
9.14 VAC
3 VA
A B
USE ONLY
LISTED
CLASS 2
POWER
SOURCE
12V DC
J3-600 ohms
J2-STD Ring
Trip
9V battery or a
R
rechargeable battery.
Protocol Switch
Four Wire E&M (J3)
R&G
600 Ohm audio
BK
M lead (start)
Y
E lead (busy)
W
Earth Ground
GYR
Six wire modular cable
G
BK
W
Ring Trip (J2)
R&G - Standard C.O. line
or analog PABX/KSU
station
B. Battery Back-Up
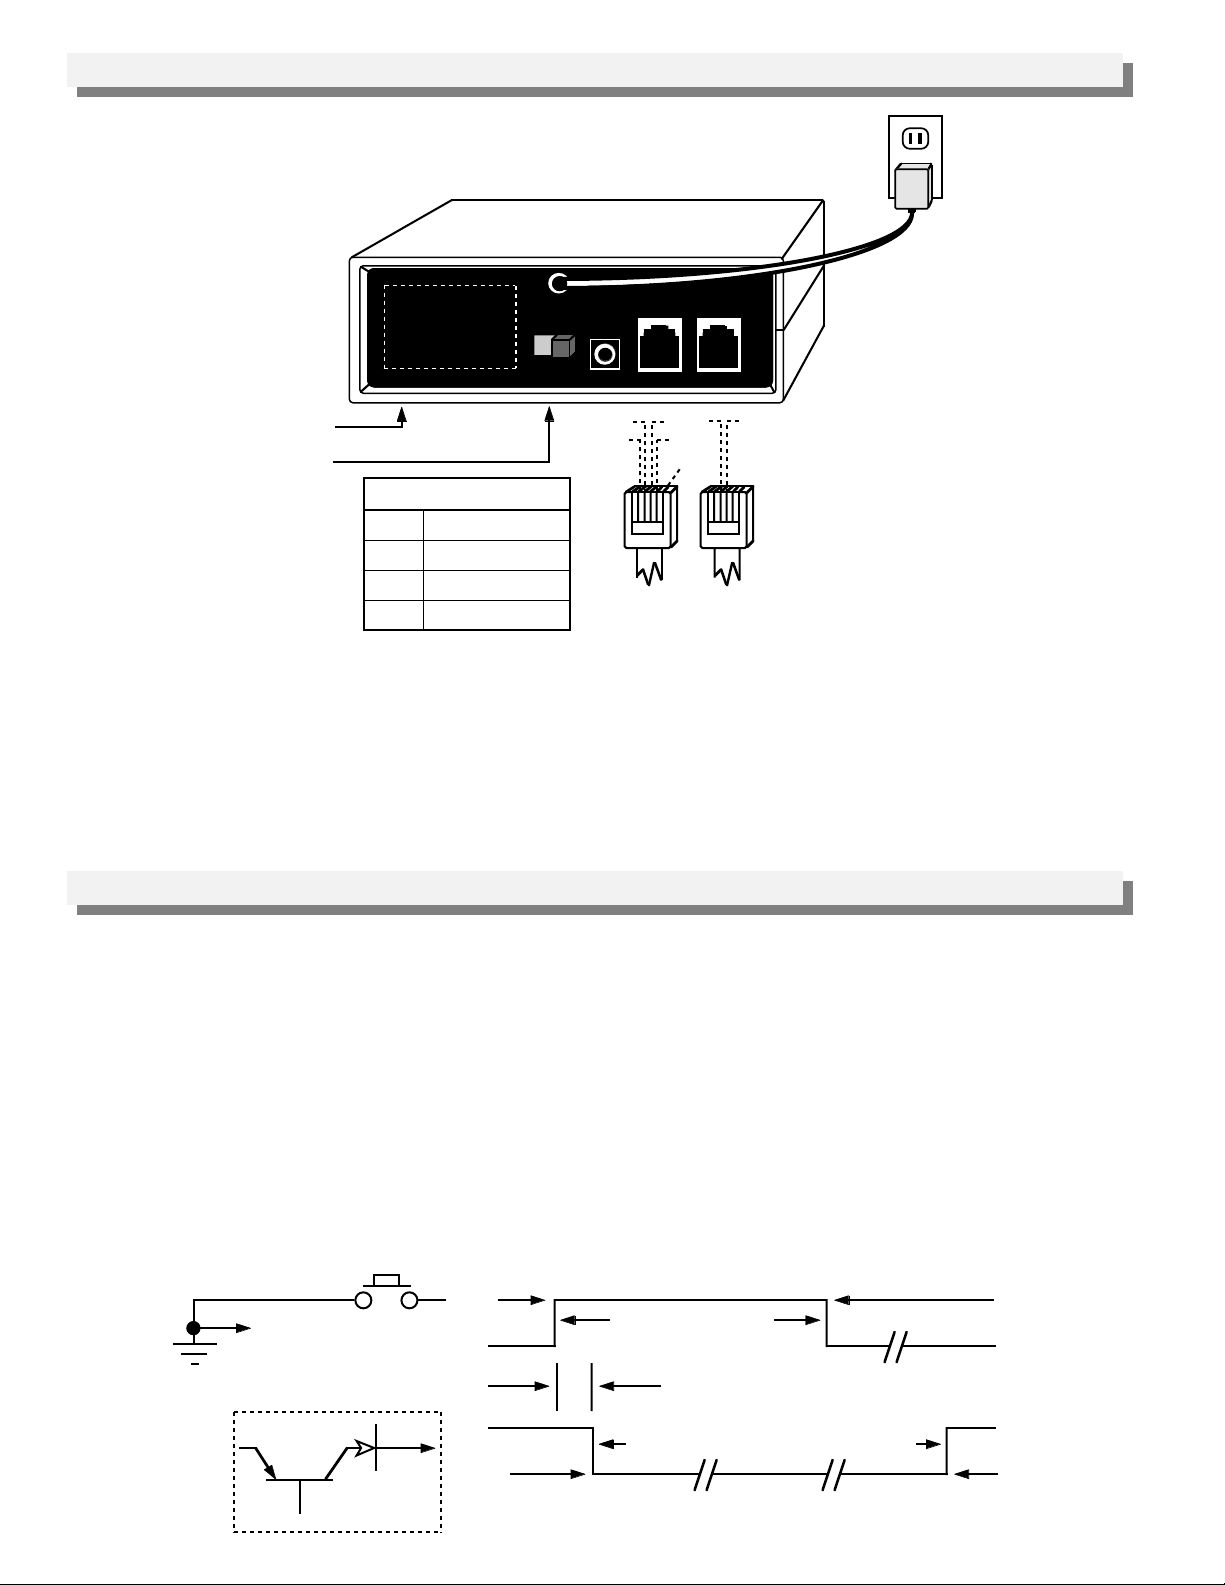
Remove the two screws located on the bottom of the unit. Remove the cover. Install a standard 9V battery in the
right rear battery area. This battery will maintain memory for at least 5 hours during a power failure. If you wish to
use a rechargeable battery, the DVA-500 includes a shunt which is taped to the top of the unit. Install the shunt on
J2 to provide trickle charge current for a 9V NICAD rechargeable battery. Remove the shunt on J2 when used with
a non rechargeable battery.
Warning: Serious damage may be caused by trying to charge a non-rechargeable battery.
Programming
A. Standard Ring Trip 2 Wire
Use J2 only. Set protocol switch to “A.” Any ringing C.O. line or analog PABX/KSU station will be answered, given
a message, released and immediately be available for the next ring.
B. Continuous Play
Use J3 only. Set protocol switch to “A.” Connect Y to BK. The announcement will be repeated continuously on
R&G 600 Ohm output.
C. 600 Ohm 4 Wire E & M Protocols
1. “On Demand”
Use J3 only. Set protocol switch to “A.”
Ground (+)
Black
Open
Ground (+)
Yellow
Open
Earth
Ground
Contact
DVA-500
White Wire
Start
250 MS, Minimum
Idle
250 MS, Maximum
Idle
1 to 32 Second Announcement
In Use
Output From
DVA-500
Page 3
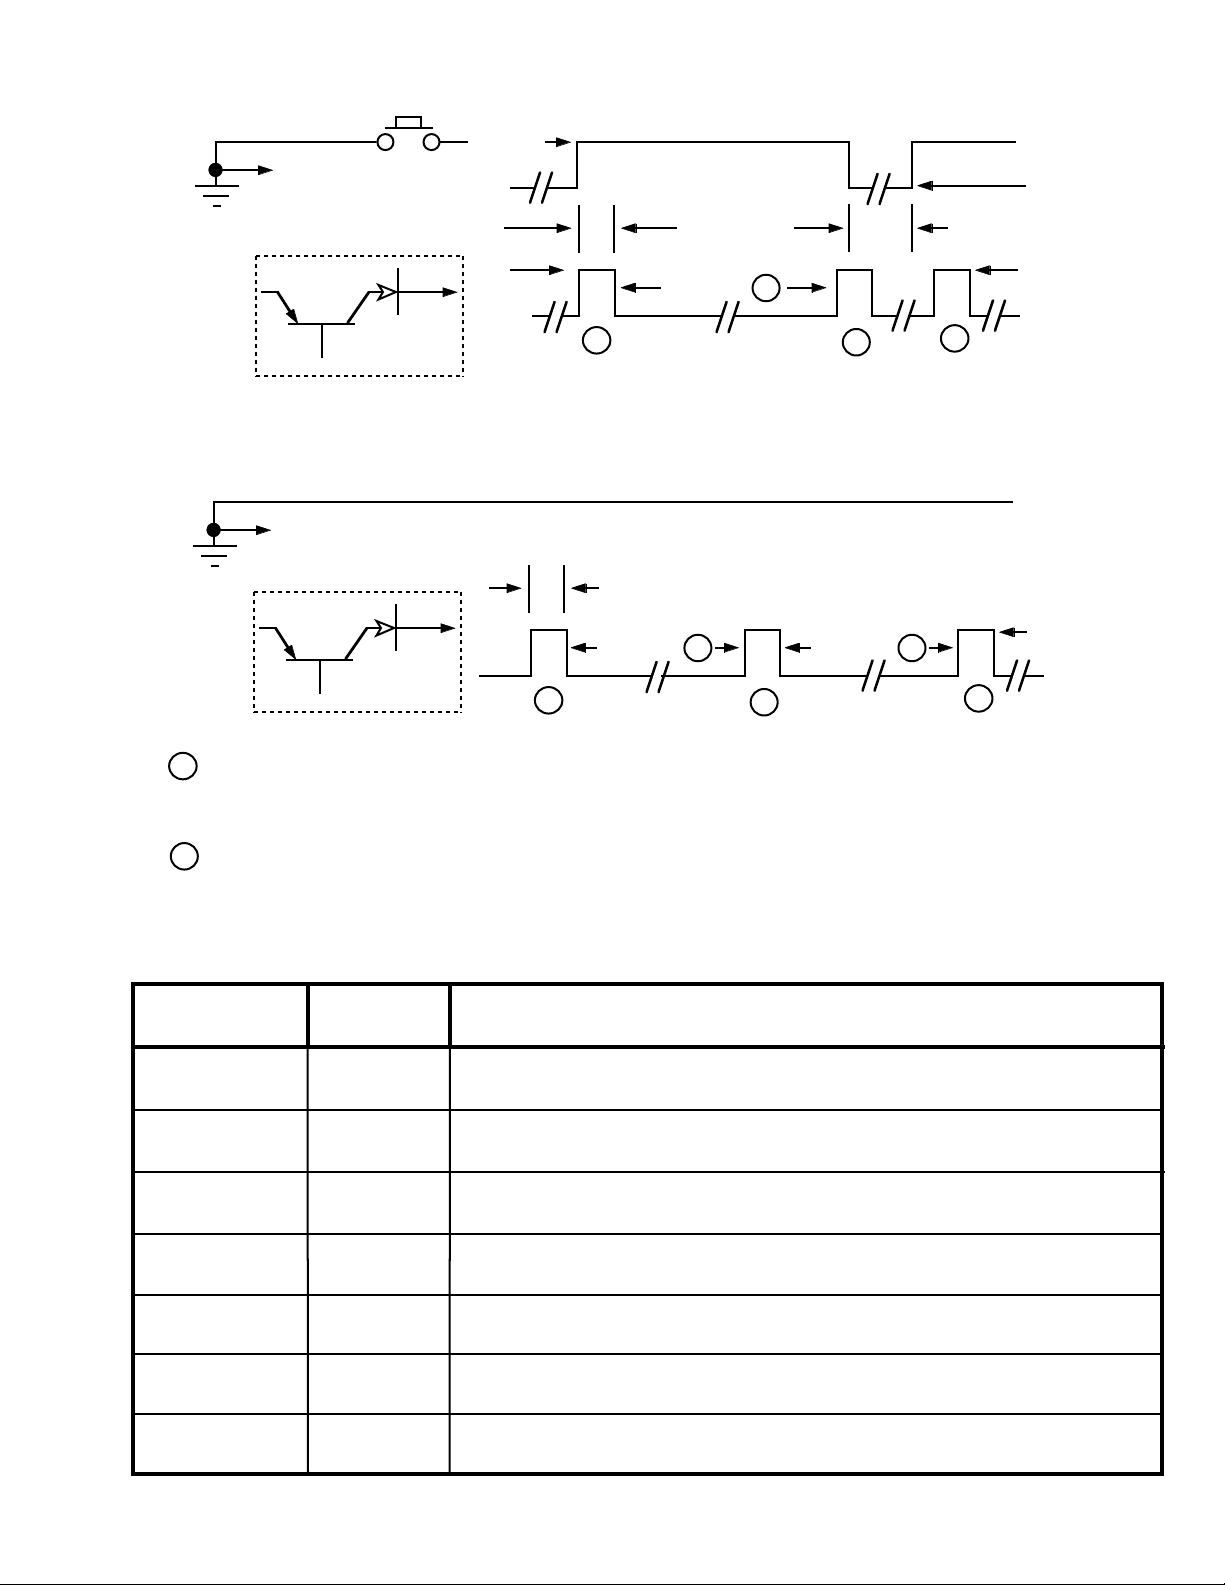
2. Type V E&M, Wink Start
Use J3 only. Set protocol switch to “B.”
Contact
DVA-500
White Wire
Earth
Ground
Output From
DVA-500
3. Drum Recorder Replacement
Use J3 only. Set protocol switch to “A.”
DVA-500
White Wire
Earth
Ground
Output From
DVA-500
Start (M)
Idle
Idle
In Use
B
O
M
1
B
O
M
1
Start
250 MS, Typ
Message
250 MS, Typ
Message
2
2
B
O
M
1
E
O
M
1
Message
100 MS, Minimum
B
O
M
1
2
B
O
M
1
Ground (+)
Black
Open
Ground (+)
Yellow
Open
Ground (+)
Black
Open
Ground (+)
Yellow
Open
BOM = “Beginning of Message” pulse.
1
EOM = “End of Message” pulse.
2
The DVA-500 has 16 seconds (or 32 seconds at a lower fidelity) record time. To expand the record time to
32 seconds, order model DRAM-32 Memory Kit (Fax Back Document 105).
D. Using the DVA-500 with Major PABX’s
PABX
Manufacturer
Mitel (all models) Position A
Rolm (all models) Position A
Jistel (all models) Position A
Siemens (Saturn) Position A or B
Harris (20-20) Position B
Protocol
Switch
Use J2. Connect T&R to green and red (STD Ring Trip)
Use J2. Connect T&R to green and red (STD Ring Trip)
Use J2. Connect T&R to green and red (STD Ring Trip)
Use J3. Connections: 1) T1 and R1 to green and red 2) Earth ground* to both black and white.
3) EA lead to yellow. Program Saturn system message to be minimum of 2 seconds longer than
the actual recording
Use J3. Connections: 1) T1 and R1 to green and red. 2) M to black. 3) E to Yellow 4) Earth
ground* to white.
Notes
N.E.C. (2400) Position B
Northern (SL-1) Position A
Use J3. Connections: 1) T1 and R1 to green and red. 2) M to black. 3) Earth ground* to white.
On the DVA-500 circuit board, cut one lead of diode CR16.
Use J3. Connections to QPC74 Ran Trunk circuit pack: 1) T&R to G&R. 2) CPO to Y. 3)
S/MBO to Bk 4) Earth ground* to white. Set C34 switch as follows: 1) SW1.0-closed 2) SW2.0closed 3) SW3.0-open 4) SW4.0-closed. Programming SL-1: the DVA-500 emulates a cook 201.
* Earth ground is the positive of the PABX system battery.
Page 4
Operation
A. Recording From a Carbon Handset
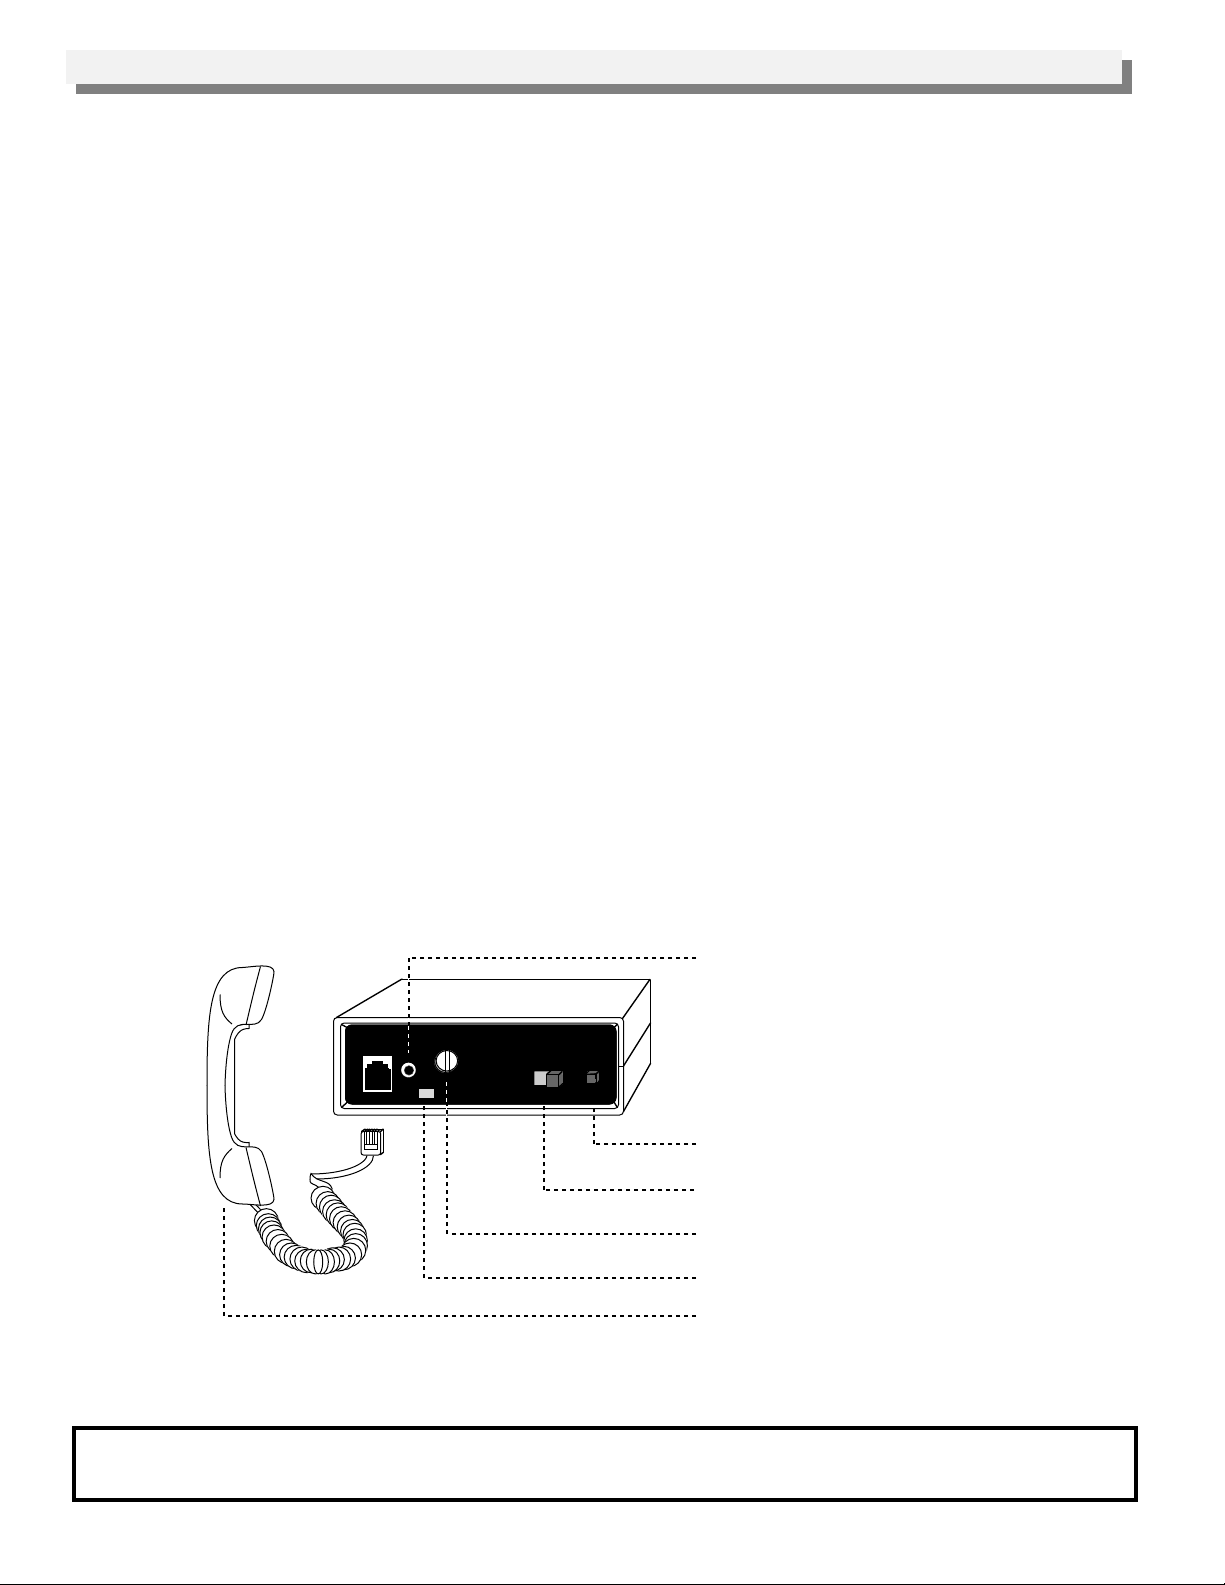
1. Place the PLAY/REC switch in the REC position.
2. Plug a standard carbon handset into the modular REC/MON jack.
3. Press and hold the START switch and begin speaking as if you were talking on the telephone.
4. When finished release the START switch.
5. Place the PLAY/REC switch in the PLAY position.
B. Recording From a Tape Player
1. Place the PLAY/REC switch in the REC position.
2. Insert a 3.5mm (1/8”) audio jack into the TAPE jack.
3. Connect the other end of the cable assembly to the speaker, monitor, earphone, etc. jack of a standard cassette
recorder.
4. Adjust the audio level of the tape player by following a-b.
a. Play the recording but do not push START.
b. Adjust the cassette player volume so that the LED flickers but is not mostly on or off.
5. Press and hold the START switch for the duration of the recording.
6. When finished release the START switch.
7. Place the PLAY/REC switch in the PLAY position.
C. Monitoring From a Carbon Handset
1. Place the PLAY/REC switch in the PLAY position.
2. Plug a standard carbon handset into the modular REC/MON jack.
3. Press and hold the START switch for the duration of the message.
4. When finished release the START switch.
Note: While playing or recording, the “LED” will display a steady light.
REC/MON
VIKING©
TAPE
VOL
LED
Viking Electronics, Inc. Hudson WI 54016
Digital Announcer
Model DVA-500
PLAY REC
START
3.5mm (1/8”) audio jack permits downloading the message from a tape player.
Start Button
Record/Play Selector
Playback Volume Adjustment
“In Use” and “Record Level” Indicator
Standard carbon handset to record and monitor
Note: electrocet handsets will not work.
Product Support Line...(715) 386-8666 Fax Back Line...(715) 386-4345
Due to the dynamic nature of the product design, the information contained in this document is subject to change without notice. Viking
Electronics, its affiliates and/or subsidiaries assume no responsibility for errors and/or omissions contained in this information. Revisions of
this document or new editions of it may be issued to incorporate such changes.
Fax Back Doc # 115
Printed in the U.S.A.
ZF290170 Rev D
 Loading...