

Page 1
DrawerMicro™ Oven
Page 2

Page 3

SERVICE INFORMATION
If service is required:
1. Call your dealer or authorized service agency. The name of the authorized service agency can be obtained from the dealer or distributor in
your area.
2. Have the following information readily available:
a. Model number
b. Serial number
c. Date purchased
d. Name of dealer from whom purchased
3. Clearly describe the problem that you are having.
If you are unable to obtain the name of an authorized service agency, or if
you continue to have a service problem, contact Viking Range Corporation
at (888) 845-4641 or write to:
VIKING RANGE CORPORATION
PREFERRED SERVICE
111 Front Street
Greenwood, Mississippi (MS) 38930 USA
Record the information indicated below. You will need it if service is ever
required. The model and serial number for your oven are located on the left
side of the oven cavity on an identification label.
Model Number __________________________ Serial Number _______________________
Date of Purchase ________________________ Date Installed ________________________
Dealer's Name _______________________________________________________________
Address _____________________________________________________________________
______________________________________________________________________________
If service requires installation of parts, use only authorized parts to ensure
protection under the warranty.
PLEASE RETAIN THIS MANUAL FOR FUTURE REFERENCE
1
E
Page 4

PRECAUTIONS TO AVOID POSSIBLE
EXPOSURE TO EXCESSIVE
MICROWAVE ENERGY
(a) Do not attempt to operate this oven with the door open since open-
door operation can result in harmful exposure to microwave energy.
It is important not to defeat or tamper with the safety interlocks.
(b) Do not place any object between the oven front face and the door
or allow soil or cleaner residue to accumulate on sealing surfaces.
(c) Do not operate the oven if it is damaged. It is particularly important
that the oven door close properly and that there is no damage to
the: (1) door (bent), (2) hinges and latches (broken or loosened),
(3) door seals and sealing surfaces.
(d) The oven should not be adjusted or repaired by anyone except
properly qualified service personnel.
E
2
Page 5

TABLE OF CONTENTS
1 SERVICE INFORMATION
2 PRECAUTIONS TO AVOID
POSSIBL
EXCESSIV
ENERG
E EXPOSURE TO
E MICROWAVE
Y
3 TABLE OF CONTENTS
4-5 IMPORTANT SAFETY
INSTRUCTION
S
6-11 INFORMATION YOU NEED
TO KNO
W
6-7 ABOUT YOUR DrawerMicro Oven
7 ABOUT MICROWAVE COOKING
8-9 ABOUT UTENSILS AND
COVERINGS
9 ABOUT CHILDREN AND THE
MICROWAVE
10 ABOUT SAFET
Y
11 ABOUT FOOD
12-13 PART NAMES
12 DrawerMicro Oven
13 CONTROL PANEL
14-15 BEFORE OPERATING
14 TO SET THE CLOCK
14 TIMER
14 STOP/CLEAR
15 OPEN OR CLOSE DrawerMicro
Oven
16-23 DrawerMicro Oven COOKING
16 TIME COOKING
16 TO SET POWER LEVEL
17-18 SENSOR SETTINGS
18 SENSOR POPCORN /
SENSOR REHEA
T
19-20 SENSOR COOK
21-22 DEFROST
22 MANUAL DEFROST
23 REHEAT
24-27 OTHER FEATURES
24 KEEP WARM
24 MULTIPLE SEQUENCE
COOKING
25 HELP
25 ADD-A-MINUTE
25 MORE OR LESS TIME
ADJUSTMEN
T
25 CONTROL LOCK
26-27 SETUP/HELP
27 DEMONSTRATION MODE
28-29 CLEANING AND CARE
28 EXTERIOR
28 STAINLESS STEEL SURFACE
28 FRONT SIDE OF THE
DRAWE
R
28 TOUCH CONTROL PANEL
28 INTERIOR
28 DrawerMicro Oven GUIDES
29 WAVEGUIDE COVER
29 ODOR REMOVAL
30 BEFORE YOU CALL FOR
SERVIC
E
31 DrawerMicro Oven
WARRANTY
3
E
Page 6

IMPORTANT SAFETY INSTRUCTIONS
When using electrical appliances basic safety precautions should be followed,
including the following:
WARNING - To reduce the risk of burns, electric shock, fire, injury to persons
or exposure to excessive microwave energy:
1. Read all instructions before using the appliance.
2. Read and follow the specific “PRECAUTIONS TO AVOID POSSIBLE
EXPOSURE TO EXCESSIVE MICROWAVE ENERGY” on page 2.
3. This appliance must be properly grounded. See separate Installation
Instructions for grounding instructions.
4. Install or locate this appliance only in accordance with the provided
Installation Manual.
5. Some products such as whole eggs and sealed containers - for example,
closed glass jars—are able to explode and should not be heated in the
appliance.
6. Use this appliance only for its intended use as described in this manual.
Do not use corrosive chemicals or vapors in this appliance. This appliance
is specifically designed to heat, cook or dry food. It is not designed for
industrial or laboratory use.
7. As with any appliance, close supervision is necessary when used by
children.
8. Do not operate this appliance if it has a damaged cord or plug, if it is not
working properly or if it has been damaged or dropped.
9. This appliance should be serviced only by qualified service personnel.
Contact nearest Viking Authorized Servicer for examination, repair or
adjustment.
10. Do not cover or block any openings on the appliance.
11. Do not store or use this appliance outdoors. Do not use this product
near water—for example, near a kitchen sink, in a wet basement, near a
swimming pool or similar locations.
12. Keep cord away from heated surfaces.
13 Do not climb or sit on the appliance.
14. Be sure that fingers or other objects or materials are not around the
appliance opening when the appliance is closed.
15. Do not put fingers or clothes around the drawer guides when the
appliance is opened or closed. They could be caught in the guides when
the appliance is closed.
16. Be sure that the food and container are shorter than the drawer before
closing it. You can refer to the height of the side walls of the drawer.
E
4
Page 7

17. When cleaning appliance sealing surfaces that come together on closing
the drawer, use only mild, nonabrasive soaps or detergents applied with
a sponge or soft cloth. See cleaning instructions on page 28.
18. To reduce the risk of fire in the appliance cavity:
a. Do not overcook food. Carefully attend appliance when paper, plastic
or other combustible materials are placed inside the appliance to
facilitate cooking.
b. Remove wire twist-ties from paper or plastic bags before placing bag
in appliance.
c. If materials inside the appliance ignite, keep appliance door closed,
turn microwave off and shut off power at the fuse or circuit breaker
panel.
d. Do not use the appliance for storage purposes. Do not leave paper
products, cooking utensils, or food in the appliance when not in use.
19. Liquids, such as water, coffee or tea are able to be overheated beyond
the boiling point without appearing to be boiling due to surface tension
of the liquid. Visible bubbling or boiling when the container is removed
from the appliance is not always present. THIS COULD RESULT IN VERY
HOT LIQUIDS SUDDENLY BOILING OVER WHEN A SPOON OR OTHER
UTENSIL IS INSERTED INTO THE LIQUID.
To reduce the risk of injury to persons:
a. Do not overheat the liquid.
b. Stir the liquid both before and halfway through heating it.
c. Do not use straight-sided containers with narrow necks. Use a wide-
mouthed container.
d. After heating, allow the container to stand in the appliance at least
for 20 seconds before removing the container.
e. Use extreme care when inserting a spoon or other utensil into the
container.
20. If the appliance light fails, consult a VIKING AUTHORIZED SERVICER.
SAVE THESE INSTRUCTIONS
5
E
Page 8
INFORMATION YOU NEED TO KNOW
ABOUT UNPACKING AND EXAMINING YOUR
DrawerMicro
1. Remove all packing materials from inside
the DrawerMicro Oven. DO NOT REMOVE THE WAVEGUIDE COVER, which
is located on the top of the DrawerMicro
Oven.
2. Remove the feature sticker, if there is
one. Check the drawer for any damage,
such as misaligned or bent drawer, damaged drawer seals and sealing surfaces,
broken or loose drawer guides and dents
inside the cavity or on the front side of the
drawer. If there is any damage, do not operate the DrawerMicro Oven and contact
your dealer or a VIKING AUTHORIZED
SERVICER.
RADIO OR TV INTERFERENCE
Should there be any interference caused by the DrawerMicro Oven to your
radio or TV, check that the DrawerMicro Oven is on a different electrical
circuit, relocate the radio or TV as far away from the drawer as feasible or
check position and signal of receiving antenna.
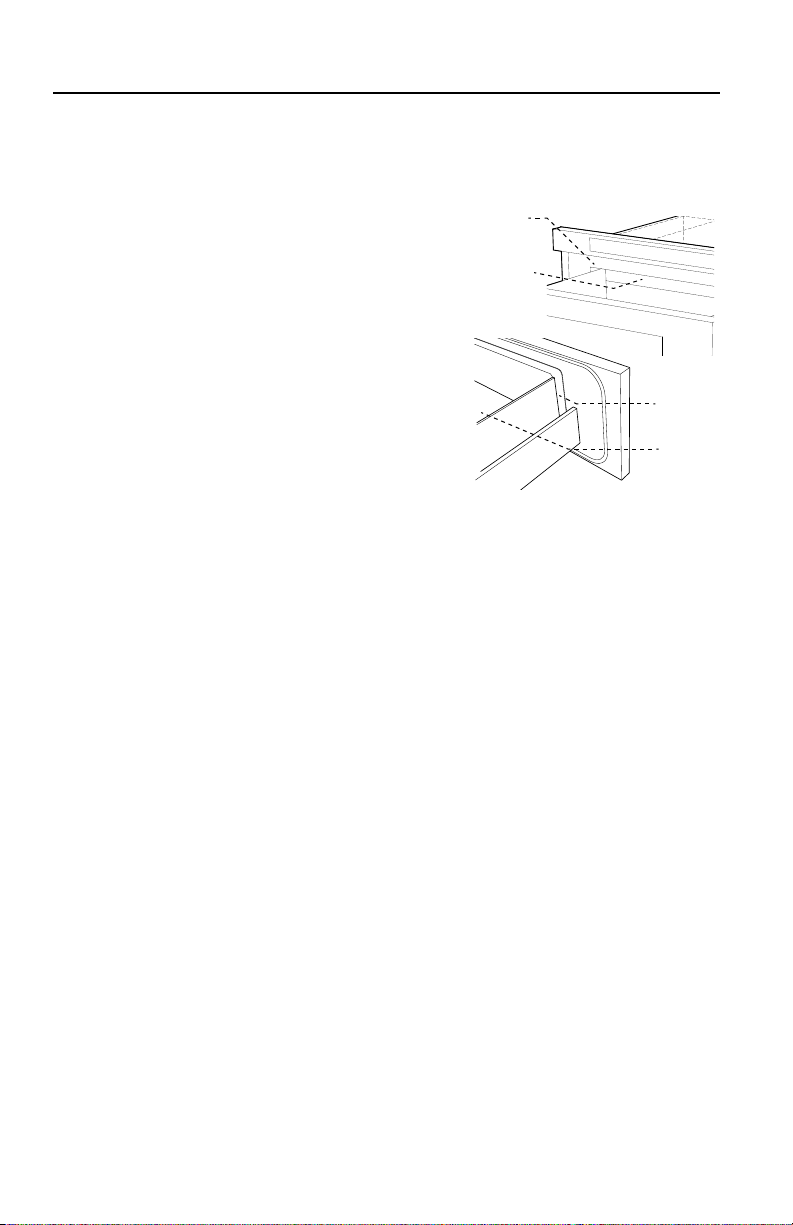
Oven
Sealing
Surface
Waveguide
Cover
Sealing
Surface
Oven
Cavity
ABOUT YOUR DrawerMicro Oven
ALWAYS have food in the DrawerMicro Oven when it is on to absorb the
microwave energy.
The vent under the DrawerMicro Oven must not be blocked. During microwaving, steam may come from the right side of the vent.
When using the DrawerMicro Oven at power levels below 100%, you may
hear the magnetron cycling on and off. It is normal for the exterior of the
DrawerMicro Oven to be warm to the touch when cooking or reheating.
Condensation is a normal part of microwave cooking. Room humidity and
the moisture in food will influence the amount of moisture that condenses
in the DrawerMicro Oven. Generally, covered foods will not cause as much
condensation as uncovered ones.
The DrawerMicro Oven is for food preparation only. It should not be used to
dry clothes or newspapers.
Your DrawerMicro Oven is rated 950 watts by using the IEC Test Procedure.
E
6
Page 9

In using recipes or package directions, check food a minute or two before
the minimum time and add time accordingly.
When opening or closing the DrawerMicro Oven quickly, food in the
DrawerMicro Oven may be spilled. To clean, please refer to the Cleaning
and Care section on page 28.
ABOUT MICROWAVE COOKING
• Arrange food carefully. Place thickest areas towards outside of dish.
• Watch cooking time. Cook for the shortest amount of time indicated and
add more as needed. Food severely overcooked can smoke or ignite.
• Cover foods while cooking. Check recipe or cookbook for suggestions:
paper towels, wax paper, microwave plastic wrap or a lid. Covers prevent
spattering and help foods to cook evenly.
• Shield with small flat pieces of aluminum foil any thin areas of meat or
poultry to prevent overcooking before dense, thick areas are cooked
thoroughly.
• Stir foods from outside to center of dish once or twice during cooking, if
possible.
• Turn foods over once during microwaving to speed cooking of such foods
as chicken and hamburgers. Large items like roasts must be turned over
at least once.
• Rearrange foods such as meatballs halfway through cooking both from
top to bottom and from right to left.
• Add standing time. Remove food from DrawerMicro Oven and stir, if
possible. Cover for standing time which allows the food to finish cooking
without overcooking.
• Check for doneness. Look for signs indicating that cooking temperatures
have been reached.
Doneness signs include:
- Food steams throughout, not just at edge.
- Center bottom of dish is very hot to the touch.
- Poultry thigh joints move easily.
- Meat and poultry show no pinkness.
- Fish is opaque and flakes easily with a fork.
7
E
Page 10

ABOUT UTENSILS AND COVERINGS
It is not necessary to buy all new cookware. Many pieces already in your
kitchen can be used successfully in your new DrawerMicro Oven. Make sure
the utensil does not touch the interior walls during cooking.
Use these utensils for safe microwave cooking and reheating:
• glass ceramic (Pyroceram®), such as Corningware®.
• heat-resistant glass (Pyrex®)
• microwave-safe plastics
• microwave-safe paper plates
• microwave-safe pottery, stoneware and porcelain
• browning dish (Do not exceed recommended preheating time. Follow
manufacturer’s directions.)
These items can be used for short time reheating of foods that have little
fat or sugar in them:
• wood, straw, wicker
DO NOT USE
• metal pans and bakeware
• dishes with metallic trim
• non-heat-resistant glass
• non-microwave-safe plastics (margarine tubs)
• recycled paper products
• brown paper bags
• food storage bags
• metal twist-ties
Should you wish to check if a dish is safe for microwaving, place the empty
dish in the oven and microwave on HIGH for 30 seconds. A dish which becomes very hot should not be used.
The following coverings are ideal:
• Paper towels are good for covering foods for reheating and absorbing
fat while cooking bacon.
• Wax paper can be used for cooking and reheating.
• Plastic wrap that is specially marked for microwave use can be used
for cooking and reheating. DO NOT allow plastic wrap to touch food.
Vent so steam can escape.
• Lids that are microwave-safe are a good choice because heat is kept
near the food to hasten cooking.
E
8
Page 11

• Oven cooking bags are good for large meats or foods that need
tenderizing. DO NOT use metal twist ties. Remember to slit bag so
steam can escape.
How to use aluminum foil in your DrawerMicro Oven:
• Small flat pieces of aluminum foil placed smoothly on the food can
be used to shield areas that are either defrosting or cooking too
quickly.
• Foil should not come closer than one inch to any surface of the
DrawerMicro Oven.
Should you have questions about utensils or coverings, check a good microwave cookbook or follow recipe suggestions.
ACCESSORIES There are many microwave accessories available for purchase.
Evaluate carefully before you purchase so that they meet your needs. A microwave-safe thermometer will assist you in determining correct doneness
and assure you that foods have been cooked to safe temperatures. Viking is
not responsible for any damage to the DrawerMicro Oven when accessories
are used.
ABOUT CHILDREN AND THE MICROWAVE
Children below the age of 7 should use the DrawerMicro Oven with a supervising person very near to them. Between the ages of 7 and 12, the supervising
person should be in the same room. The child must be able to reach the
DrawerMicro Oven comfortably.
At no time should anyone be allowed to lean or swing on the DrawerMicro
Oven.
Children should be taught all safety precautions: use potholders, remove
coverings carefully, pay special attention to packages that crisp food because
they may be extra hot.
Don't assume that because a child has mastered one cooking skill he/she
can cook everything.
Children need to learn that the DrawerMicro Oven is not a toy. See page 25
for Control Lock feature.
9
E
Page 12

ABOUT SAFETY
• Check foods to see that they are cooked to the United States Department
of Agriculture's recommended temperatures.
TEMP FOOD
160˚F (71˚C) For fresh pork, ground meat, boneless white poultry, fish,
seafood, egg dishes and frozen prepared food.
165˚F (74˚C)
For leftover, ready-to-reheat refrigerated, and deli and
carry-out “fresh” food.
170˚F (77˚C)
180˚F (82˚C)
White meat of poultry.
Dark meat of poultry.
To test for doneness, insert a meat thermometer in a thick or dense area
away from fat or bone. NEVER leave the thermometer in the food during
cooking, unless it is approved for microwave use.
• ALWAYS use potholders to prevent burns when handling utensils that are
in contact with hot food. Enough heat from the food can transfer through
utensils to cause skin burns.
• Avoid steam burns by directing steam away from the face and hands. Slowly
lift the farthest edge of a dish’s covering and carefully open popcorn and
oven cooking bags away from the face.
• Stay near the DrawerMicro Oven while it’s in use and check cooking progress frequently so that there is no chance of overcooking food.
• NEVER use the DrawerMicro Oven for storing cookbooks or other items.
• Select, store and handle food carefully to preserve its high quality and
minimize the spread of foodborne bacteria.
• Keep waveguide cover clean. Food residue can cause arcing and/or fires.
See page 29.
E
10
Page 13

ABOUT FOOD
FOOD DO DON'T
Eggs,
sausages,
nuts, seeds,
fruits &
vegetables
• Puncture egg yolks before
cooking to prevent “explosion”.
• Pierce skins of potatoes,
apples, squash, hot dogs
and sausages so that steam
escapes.
Popcorn • Use specially bagged pop-
corn for the microwave.
• Listen while popping corn
for the popping to slow to 1
or 2 seconds or use special
Popcorn pad.
Baby food •
Transfer baby food to small
dish and heat carefully, stirring often. Check temperature before serving.
• Put nipples on bottles after
heating and shake thoroughly. “Wrist” test before
feeding.
• Cook eggs in shells.
• Reheat whole eggs.
• Dry nuts or seeds in
shells.
• Pop popcorn in regular
brown bags or glass
bowls.
• Exceed maximum time
on popcorn package.
• Heat disposable
bottles.
• Heat bottles with
nipples on.
• Heat baby food in
original jars.
General • Cut baked goods with fill-
ing after heating to release
steam and avoid burns.
• Stir liquids briskly before,
during and after heating to
avoid “eruption”.
• Use deep bowl, when cooking liquids or cereals, to
prevent boilovers.
• Food should be shorter
than the DrawerMicro Oven.
Please refer to the height of
side walls of the drawer.
11
• Heat or cook in closed
glass jars or air tight
containers.
• Can in the microwave
as harmful bacteria may
not be destroyed.
• Deep fat fry.
• Dry wood, gourds, herbs
or wet papers.
E
Page 14
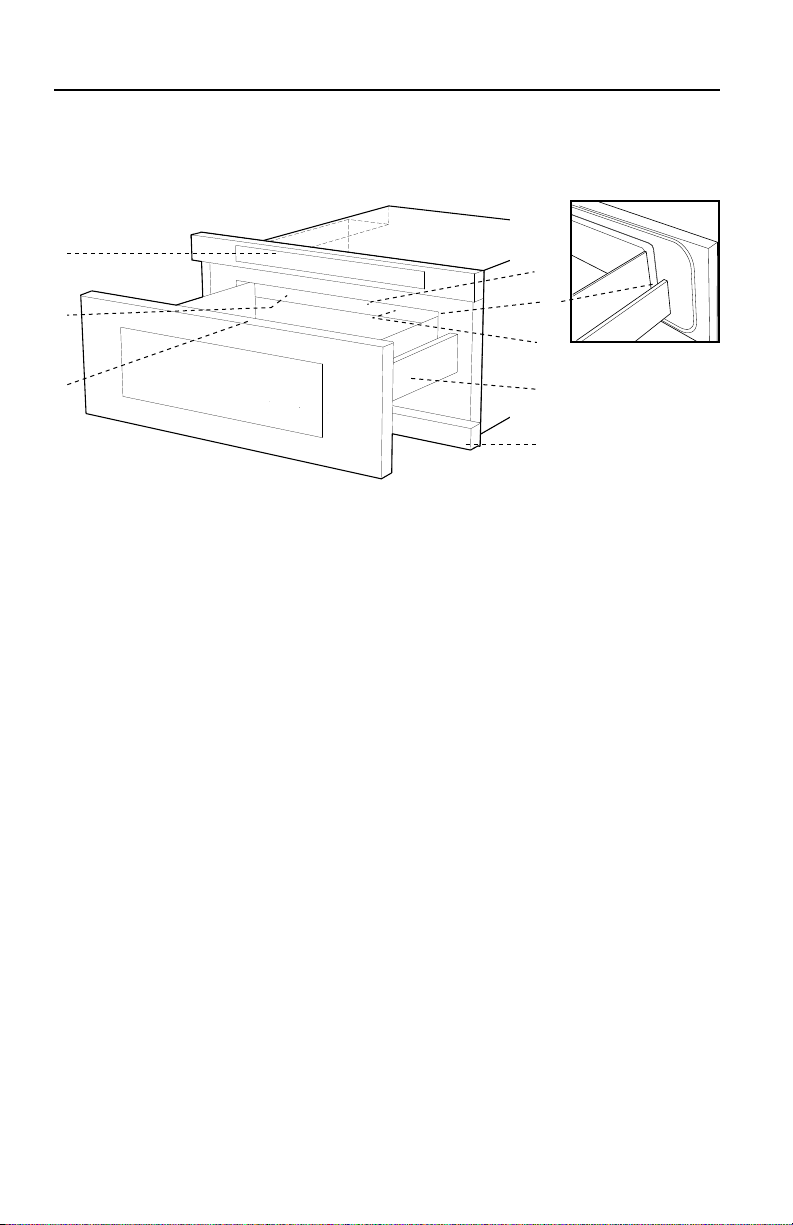
PART NAMES
DrawerMicro Oven
1
2
3
8
4
5
6
7
1. Control panel
2. Waveguide cover DO NOT REMOVE
3. Menu Label
4. Drawer sealing surfaces
5. Drawer light
6. DrawerMicro Oven guides
7. Vent
8. Name plate: open the DrawerMicro Oven fully.
The label is slightly beyond the back wall of the
microwave cavity facing up from the flat surface.
E
12
Page 15

CONTROL PANEL
26-27 18 18 19-20
25 24 21-22 23
25
14 14
15
16
Number next to the control panel illustration indicates pages on which there are
feature descriptions and usage information.
13
E
Page 16
BEFORE OPERATING
Before operating your new DrawerMicro Oven make sure you read and understand this Use and Care Guide completely.
• Before the DrawerMicro Oven can be used, follow these steps:
1. Plug in the DrawerMicro Oven.
CL EAR
AN D TO UCH CL OCK
2. Touch the Stop/Clear pad.
3. Set clock.
TO SET THE CLOCK
1. Touch Timer/Clock pad and number 2.
2. Touch number pads for correct time of day and touch Timer/Clock pad
again.
This is a 12 hour clock. If you attempt to enter an incorrect clock time,
will appear in the display. Touch the Stop/Clear pad and re-enter the time.
• If the electrical power supply to your DrawerMicro Oven should be interrupted, the display will intermittently show
TO UCH CL EAR
this occurs during cooking, the program will be erased. The time of day
will also be erased. Simply touch Stop/Clear pad and reset the clock for
the correct time of day.
Note:
• The DrawerMicro Oven can be programmed with the drawer open except
for Start/Add-A-Minute .
AN D TO UCH CL OCK
EN JOY YO UR MI CRO- WA VE TO UCH
will appear.
will appear.
:
EN JOY YO UR MI CRO- WA VE
after the power is reinstated. If
ER ROR
TIMER
1. Touch Timer/Clock pad and number 1.
2. Enter time.
3. Touch Timer/Clock pad again.
To cancel timer, touch Stop/Clear.
STOP/CLEAR
Touch the Stop/Clear pad to:
1. Erase if you make a mistake during programming.
2. Cancel timer.
3. Stop the DrawerMicro Oven temporarily during timed cooking.
4. Return the time of day to the display.
5. Cancel a program during cooking, touch twice for timed cooking.
E
14
Page 17

OPEN OR CLOSE DrawerMicro Oven
Always Touch the OPEN or CLOSE pad on the control panel to open or close
the DrawerMicro Oven.
Do not push or pull the DrawerMicro Oven by hand, except in case of
emergency, such as a power failure. If necessary, push or pull slowly.
15
E
Page 18

DrawerMicro Oven COOKING
TIME COOKING
Your DrawerMicro Oven can be programmed for 99 minutes 99 seconds
(99.99). Always enter the seconds after the minutes, even if they are both
zeros.
• Suppose you want to cook for 5 minutes at 100%.
1. Enter cooking time 500.
2. To cook at 100% power (High), touch Start/Add-A-Minute pad.
TO SET POWER LEVEL
There are eleven preset power levels.
Using lower power levels increases the cooking time, which is recommended
for foods such as cheese, milk and long slow cooking of meats. Consult a
microwave cookbook or recipes for specific recommendations.
• Suppose you want to defrost for 5 minutes at 30%.
1. Enter defrost time 500.
2. Touch Power Level 8 times.
3. Touch Start/Add-A-Minute.
TOUCH POWER LEVEL PAD
NUMBER OF TIMES FOR
DESIRED POWER
APPROXIMATE
PERCENTAGE
OF POWER
COMMON WORDS
POWER LEVELS
Power Level x 1 100% High
Power Level x 2 90%
Power Level x 3 80%
Power Level x 4 70% Medium High
Power Level x 5 60%
Power Level x 6 50% Medium
Power Level x 7 40%
Power Level x 8 30% Med Low/Defrost
Power Level x 9 20%
Power Level x 10 10% Low
Power Level x 11 0%
E
16
FOR
Page 19

SENSOR SETTINGS
Viking's Sensor is a semi-conductor device that detects the vapor (moisture
and humidity) emitted from the food as it heats. The sensor adjusts the cooking times and power levels for various foods and quantities.
Using Sensor Settings:
1. After the DrawerMicro Oven is plugged in, wait 2 minutes before using
any sensor setting.
2. Be sure the exterior of the cooking container and the interior of the
DrawerMicro Oven are dry. Wipe off any moisture with a dry cloth or paper
towel.
3. The sensor works with foods at normal storage temperature. For example,
popcorn would be at room temperature.
4. Any sensor selection can be programmed with More or Less Time Adjustment. See page 25.
5. More or less food than the quantity listed in the charts should be cooked
following the guidelines in any microwave cookbook.
6. During the first part of sensor use, the food name will appear on the display.
Do not open the DrawerMicro Oven or touch Stop/Clear during this part
of the cycle. The measurement of vapor will be interrupted. If this occurs,
an error message will appear. To continue cooking, touch the Stop/Clear
pad and cook manually.
When the sensor detects the vapor emitted from the food, the remainder
of cooking/reheating time will appear. The DrawerMicro Oven may be
opened when the remaining time appears on the display. At this time,
you may stir or season food, as desired.
7. If the sensor does not detect vapor properly when popping popcorn,
the oven will turn off, and the time of day will be displayed. If the sensor
does not detect vapor properly when cooking other foods,
be displayed, and the microwave will turn off.
8. Check food temperature after cooking. If additional time is needed, continue to cook manually.
9. Each food has a cooking hint. Touch the Setup/Help pad when the HELP
indicator is lighted in the display.
ER ROR
will
Covering Foods:
Some foods work best when covered. Use the cover recommended in the
charts for these foods. You may refer to the hints by touching the Setup/Help
pad. See page 25.
1. Casserole lid.
2. Plastic wrap: Use plastic wrap recommended for microwave cooking.
Cover dish loosely; allow approximately 1/2 inch to remain uncovered to
17
E
Page 20

allow steam to escape. Plastic wrap should not touch food.
3. Wax paper: Cover dish completely; fold excess wrap under dish to secure.
If dish is wider than paper, overlap two pieces at least one inch to cover.
Be careful when removing any covering to allow steam to escape away from
you.
SENSOR POPCORN / SENSOR REHEAT
You can pop popcorn and reheat many foods and don’t need to calculate
cooking time or power level.
Touch Sensor Reheat or Sensor Popcorn and Start/Add-A-Minute pad.
When the sensor detects the vapor emitted from the food, the remainder of
cooking/reheating time will appear.
Note:
• The Sensor Popcorn setting has 2 choices. Follow directions in the display
to choose desired option.
SENSOR POPCORN / SENSOR REHEAT CHART
FOOD AMOUNT PROCEDURE
Sensor
Popcorn
Only 1
package
at a time
2.85 - 3.5 oz.
(Regular/
Regular light)
Use only popcorn packaged for the microwave.
Try several brands to decide which you like. Do
not try to pop unpopped kernels.
Touch Sensor Popcorn pad once.
Sensor
Reheat
E
1.2 - 1.75 oz.
Touch Sensor Popcorn pad twice.
(Mini / Snack)
4 - 36 oz. Place in dish or casserole slightly larger than
amount to be reheated. Flatten, if possible.
Cover with lid, plastic wrap or wax paper. Use
covers such as plastic wrap or lids with larger
quantities of more dense foods such as stews.
After reheating, stir well, if possible. Re-cover
and allow to stand 2 to 3 minutes. Foods should
be very hot. If not, continue to heat with variable power and time.
18
Page 21

SENSOR COOKING
1. Touch Sensor Cook pad once.
2. See Menu Label. Select desired food by touching number pad. Ex: Touch
5 for baked potatoes.
3. Touch Start/Add-A-Minute pad.
Note:
• To heat or cook other foods or foods above or below the quantity allowed
on the SENSOR COOK CHART, cook manually.
SENSOR COOK CHART
FOOD AMOUNT PROCEDURE
1. Fresh vegetables:
soft
Broccoli
Brussels sprouts
Cabbage
Cauliflower:
flowerets
whole
Spinach
Zucchini
Baked apples
.25 - 2.0 lb.
.25 - 2.0 lb.
.25 - 2.0 lb.
.25 - 2.0 lb.
1 med.
.25 - 1.0 lb.
.25 - 2.0 lb.
2 - 4 med.
Wash and place in casserole. Add no
water if vegetables have just been
washed. Cover with lid for tender
vegetables. Use plastic wrap for tender-crisp vegetables. After cooking,
stir, if possible. Let stand, covered, for
2 to 5 minutes.
2. Fresh vegetables:
hard
Carrots, sliced
Corn on the cob
Green beans
Winter squash:
diced
halves
3. Frozen
vegetables
4. Frozen entrees
.25 - 1.5 lb.
2 - 4
.25 - 1.5 lb.
Place in casserole. Add 1-4 tablespoons water. Cover with lid for tender
vegetables. Use plastic wrap cover for
tender-crisp vegetables. After cooking,
stir, if possible. Let stand, covered, for
2 to 5 minutes.
.25 - 1.5 lb.
1 - 2
.25 - 1.25 lb. Add no water. Cover with lid or plastic
wrap. After cooking, stir and let stand,
covered, for 3 minutes.
6 - 17 oz. Use this pad for frozen convenience
foods. It will give satisfactory results
for most brands. You may wish to
try several and choose your favorite.
Remove package from outer wrap-
ping and follow package directions
for covering. After cooking, let stand,
covered, for 1-3 minutes
19
E
Page 22

FOOD AMOUNT PROCEDURE
5. Baked potatoes 1 - 6 med. Pierce. Place on paper-towel-lined
DrawerMicro Oven. After cooking,
remove from microwave, wrap in
aluminum foil and let stand 5 to 10
minutes.
6. Ground meat
7. Fish/seafood
8. Rice
.25 - 2.0 lb. Use this setting to cook ground beef
or turkey as patties or in a casserole
to be added to other ingredients.
Place patties on a microwave-safe
rack and cover with wax paper. Place
ground meat in a casserole and cover
with wax paper or plastic wrap. When
microwave stops, turn patties over or
stir meat in casserole to break up large
pieces. Re-cover and touch Start/AddA-Minute. After cooking, let stand,
covered, for 2 to 3 minutes.
.25 - 2.0 lb. Arrange in ring around shallow glass
dish (roll fillet with edges underneath).
Cover with vented plastic wrap. After cooking, let stand, covered for 3
minutes.
.5 - 2.0 cup Place rice into a deep casserole and
add double quantity of water. Cover
with lid or plastic wrap. After cooking,
stir, cover and let stand 3 to 5 minutes
or until all liquid has been absorbed.
Rice Water Size of casserole
.5 cup 1 cup 1.5 quart
1 cup 2 cups 2 quart
1.5 cups 3 cups 2.5 or 3 quart
2 cups 4 cups 3 quart or larger
E
20
Page 23

DEFROST
Use this feature to defrost the foods shown in the DEFROST CHART on
page 22.
1. Touch Defrost pad.
2. See Menu Label. Select desired food by touching the number pad. Ex:
Touch 2 for steaks/chops.
3. Enter weight by touching number pads.
4. Touch Start/Add-A-Minute pad.
The oven will stop so that the food can be checked.
5. After the first stage, open the DrawerMicro
shield any warm portions. Close the DrawerMicro Oven. Touch Start/AddA-Minute pad.
6. After the second stage, open the DrawerMicro Oven. Shield any warm
portions. Close the DrawerMicro Oven. Touch Start/Add-A-Minute pad.
7. After defrost cycle ends, cover and let stand as indicated in the chart on
page 22.
Note:
• Defrost can be programmed with More or Less Time Adjustment. See
page 25.
• To defrost other foods or foods above or below the weights allowed on
the DEFROST CHART, see MANUAL DEFROST on page 22.
• Check foods when oven signals. After final stage, small sections may still
be icy. Let stand to continue thawing. Do not defrost until all ice crystals
are thawed.
• Shielding prevents cooking from occurring before the center of the food
is defrosted. Use small smooth strips of aluminum foil to cover edges and
thinner sections of the food.
Oven. Turn steak over and
21
E
Page 24

DEFROST CHART
FOOD AMOUNT PROCEDURE
1. Ground
meat
.5 - 2.0 lb Remove any thawed pieces after each audible
signal. Let stand, covered, for 5 to 10 minutes.
2. Steaks/
chops
.5 - 3.0 lb After each audible signal, rearrange and if there
are warm or thawed portions, shield with small
flat pieces of aluminum foil. Remove any meat or
fish that is almost defrosted. Let stand, covered,
for 10 to 20 minutes.
3. Boneless
poultry
.5 - 2.0 lb After each audible signal, if there are warm or
thawed portions, rearrange or remove. Let stand,
covered, for 10 to 20 minutes.
4. Bone-in
poultry
.5 - 3.0 lb After each audible signal, rearrange pieces or
remove portions should they become warm
or thawed. Let stand, covered, for 10 to 20
minutes.
5. Casserole/
soup
1 - 6 cups After each audible signal, break apart and re-
move any defrosted part. At end, stir well and
let stand, covered, for 5 to 10 minutes.
MANUAL DEFROST
If the food that you wish to defrost is not listed on the DEFROST CHART or is
above or below the limits in the AMOUNT column on the DEFROST CHART,
you need to defrost manually.
You can defrost any frozen food, either raw or previously cooked, by using
Power Level at 30%. Follow the exact 3-step procedure found under TO SET
POWER LEVEL on page 16. Estimate defrosting time and Touch Power Level
pad eight times for 30% power.
For either raw or previously cooked frozen food the rule of thumb is approximately 4 minutes per pound. For example, defrost 4 minutes for 1 pound of
frozen spaghetti sauce.
Always stop the oven periodically to remove or separate the portions that
are defrosted. If food is not defrosted at the end of the estimated defrosting
time, program the oven in 1 minute increments on Power Level 30% until
totally defrosted.
When using plastic containers from the freezer, defrost only long enough to
remove from the plastic in order to place in a microwave-safe dish.
E
22
Page 25

REHEAT
Reheat automatically computes the correct warming time and microwave
power level for foods shown in the chart below.
1. Touch Reheat pad once.
2. See Menu Label. Select desired food by touching number pad. Ex: Touch
2 for frozen rolls or muffins.
3. Touch the number pad to select quantity. Ex: Touch 2 for 2 rolls or muffins.
4. Touch Start/Add-A-Minute pad.
Note:
• Reheat can be programmed with More or Less Time Adjustment. See
page 25.
• To reheat other foods or foods above or below the quantity allowed on
the REHEAT CHART, heat manually.
REHEAT CHART
FOOD AMOUNT PROCEDURE
1. Fresh rolls/
muffins
1 - 8 pcs Use this pad to warm rolls, muffins, bis-
cuits, bagels etc. Large items should be
considered as 2 or 3 regular size. Arrange
on plate; cover with paper towel. For
refrigerated rolls or muffins, it may be
necessary to double the entered amount
to ensure the proper serving temperature.
For example, enter quantity of 2 for 1
refrigerated muffin.
2. Frozen rolls/
muffins
3. Beverage
1 - 8 pcs Use this pad to warm frozen rolls, muffins,
biscuits, bagels etc. Large items should be
considered as 2 or 3 regular size. Arrange
on plate; cover with paper towel.
.5 - 2.0 cups This setting is good for restoring cooled
beverage to a better drinking temperature. Stir liquid briskly before and after
heating to avoid "eruption".
23
E
Page 26

OTHER FEATURES
KEEP WARM
Keep Warm allows you to keep food warm up to 30 minutes.
DIRECT USE
1. Touch Keep Warm pad.
2. Enter desired time by touching the number pads. To enter 30 minutes,
touch 3000.
3. Touch Start/Add-A-Minute pad.
The oven will start. The display will show
will be displayed intermittently during the count down.
WA RM
WITH MANUAL COOKING
1. Enter desired cooking time and power level.
2. Touch Keep Warm pad.
3. Enter desired warming time up to 30 minutes.
4. Touch Start/Add-A-Minute pad.
The operation will start. When the cooking time is complete, a long tone
will sound and Keep Warm will start. The display will count down.
will be displayed intermittently during the count down.
WA RM
Note:
• If you attempt to enter more than 30 minutes for Keep Warm, an error
message will appear in the display.
• Keep Warm cannot be programmed with Sensor Popcorn, Sensor Reheat,
Sensor Cook, Defrost or Reheat.
and count down.
30 .00
KE EP
KE EP
MULTIPLE SEQUENCE COOKING
Your DrawerMicro Oven can be programmed for up to 4 automatic cooking sequences, switching from one power level setting to another automatically.
Sometimes cooking directions tell you to start on one power level and then
change to a different power level. Your DrawerMicro Oven can do this automatically.
1. First enter cooking time. Then touch Power Level pad once for 100%
cooking or repeat touching Power Level pad for a lower power level.
2. Enter second cooking time. Repeat touching Power Level pad for desired
level. You can follow this procedure up to 4 times.
3. Touch Start/Add-A-Minute pad.
E
24
Page 27

Note:
• If Power Level pad is touched once,
will be displayed.
HI GH
• If 100% is selected as the final sequence, it is not necessary to touch the
Power Level pad.
• If you wish to know power level during cooking, simply touch the Power
Level pad. As long as your finger is touching the Power Level pad, the
power level will be displayed.
• Keep Warm can be programmed even if 4 cooking sequences have
been set.
HELP
Each setting of Sensor Reheat, Sensor Cook, Sensor Popcorn, Keep Warm,
Reheat and Defrost has a cooking hint. If you wish to check, touch Setup/
Help whenever HELP is lighted in the Interactive Display for these and other
manual operation hints.
ADD-A-MINUTE
Add-A-Minute allows you to cook for a minute at 100% by simply touching the
Add-A-Minute pad. You can also extend cooking time in multiples of 1 minute
by repeatedly touching the Add-A-Minute pad during manual cooking.
Note:
• To use Add-A-Minute, touch pad within 3 minutes after cooking, closing
the door or touching the Stop/Clear pad.
• Add-A-Minute cannot be used with Sensor settings, Reheat or Defrost.
MORE OR LESS TIME ADJUSTMENT
Should you discover that you like any of the Sensor, Reheat or Defrost settings slightly more done, touch the Power Level pad once after touching
your selection. The display will show
MO RE
.
For slightly less done, touch the Power Level pad twice after touching your
selection. The display will show
LE SS
.
CONTROL LOCK
The Control Lock prevents unwanted drawer operation such as by small
children. The DrawerMicro Oven can be set so that the control panel is deactivated or locked.
TO LOCK
Touch Control Lock pad and hold for 3 seconds. The display shows
TO UNLOCK
Touch Control Lock pad and hold for 3 seconds. The display shows
25
LO CK ON
LO CK OF F
.
.
E
Page 28

SETUP/HELP
If the electrical power supply to your DrawerMicro Oven should be
interrupted, the display will intermittently show
WA VE TO UCH CL EAR
AN D TO UCH CL OCK
If this occurs, the Setup/Help option you input will be erased. Simply touch
Stop/Clear pad and reset.
AUDIBLE SIGNAL ELIMINATION
At the end of timed cook, beeps will sound. If you wish to have the appliance
with no audible signals, you can turn the audible signals off.
TO TURN SOUND OFF
1. Touch Setup/Help pad.
2. Touch Setup/Help pad again.
3. Touch Start/Add-A-Minute pad. The display shows
TO RESTORE SOUND
1. Touch Setup/Help pad.
2. Touch Setup/Help pad again.
3. Touch Start/Add-A-Minute pad. The display shows
END OF COOKING REMINDER
At end of timed cooking, the microwave will signal every 10 seconds for
the first minute; then every 3 minutes until Stop/Clear pad is touched, up
to one hour.
EN JOY YO UR MI CRO-
after the power is reinstated.
SO UND OF F
SO UND ON
.
.
TO TURN REMINDER OFF
1. Touch Setup/Help pad three times. The display shows
OF F ? TO UCH
ST ART
.
2. Touch Start/Add-A-Minute pad. The display shows
.
OF F
TO TURN REMINDER SIGNAL BACK ON
1. Touch Setup/Help pad three times. The display shows
ON ?
TO UCH
ST ART
.
2. Touch Start/Add-A-Minute pad. The display shows
.
ON
E
26
RE MIND SI GNAL
RE MIND SI GNAL
RE MIND SI GNAL
RE MIND SI GNAL
Page 29

AUTO START
If you wish to program the DrawerMicro Oven to begin cooking automatically
at a designated time of day, follow this procedure.
1. Touch Setup/Help pad 4 times. The display shows
.
ST ART
AU TO ST ART TO UCH
2. Touch Start/Add-A-Minute pad.
3. Enter start time.
4. Touch Timer/Clock pad.
5. Touch the number pads to enter cooking time. Touch Power Level pad
repeatedly until the desired power level is reached.
6. Touch Start/Add-A-Minute pad.
DEMONSTRATION MODE
TO SELECT DEMO MODE
1. Touch Setup/Help pad five times. The display shows
ST ART 3 SEC
.
2. Hold Start/Add-A-Minute pad for 3 seconds. The display shows
DE MO ON
.
TO CANCEL DEMO MODE
1. Hold Setup/Help pad five times. The display shows
.
ST ART
2. Touch Start/Add-A-Minute pad. The display shows
Note:
• DrawerMicro Oven doesn’t heat in Demo Mode.
• Display counts down quickly.
DE MO ON ? HO LD
DE MO OF F ? TO UCH
DE MO
OF F
.
27
E
Page 30

CLEANING AND CARE
EXTERIOR
The outside surface is precoated metal and plastic. Clean the outside with
mild soap and water; rinse and dry with a soft cloth. Do not use any type of
household or abrasive cleaner.
STAINLESS STEEL SURFACE
The exterior should be wiped often with a soft damp cloth and polished with
a soft dry cloth to maintain its beauty. There are also a variety of products
designed especially for cleaning and shining the stainless exterior of the
oven. We recommend that the cleaner be applied to a soft cloth and then
carefully used on the stainless exterior rather than sprayed directly on to it.
Follow package directions carefully.
FRONT SIDE OF THE DRAWER
Wipe the window on both sides with a soft damp cloth to remove any spills
or spatters. Metal parts will be easier to maintain if wiped frequently with
a soft damp cloth. Avoid the use of spray and other harsh cleaners as they
may stain, streak or dull the door surface.
TOUCH CONTROL PANEL
If desired, the touch pads may be deactivated before cleaning. See the
Control Lock information on page 25 of this manual. Wipe the panel with a
cloth dampened slightly with water only. Dry with a soft cloth. Do not scrub
or use any sort of chemical cleaners. Close door and follow directions on
page 25 for turning Control Lock off. Touch Stop/Clear.
INTERIOR
Cleaning is easy because no heat is generated to the interior surfaces;
therefore, there is no baking and setting of spills or spattering. To clean the
interior surfaces, including drawer sealing surfaces, wipe with a soft damp
cloth. DO NOT USE ABRASIVE OR HARSH CLEANERS OR SCOURING PADS.
For heavier soil, use mild soap; wipe clean with a soft damp cloth. Do not
use any chemical oven cleaners.
DrawerMicro Oven GUIDES
Remove the food crumbs from the DrawerMicro Oven guides. Wipe with a
soft dry cloth in order to keep the DrawerMicro Oven opening and closing
smoothly.
E
28
Page 31

WAVEGUIDE COVER
ATTENTION: The waveguide cover, located on the inside top of the
DrawerMicro Oven area, is made from mica, so it requires special care. Keep
the waveguide cover clean to assure good microwave performance. Carefully
wipe with a soft damp cloth any food spatters from the surface of the cover
immediately after they occur. Built-up splashes may overheat and cause
smoke or possibly catch fire. Do not remove the waveguide cover.
ODOR REMOVAL
Occasionally, a cooking odor may remain in the DrawerMicro Oven. To remove, combine 1 cup water, grated peel and juice of one lemon and several
whole cloves in a 2-cup glass measuring cup. Boil for several minutes using
100% power. Allow to set in the DrawerMicro Oven until cool. Wipe interior
with a soft cloth.
29
E
Page 32

BEFORE YOU CALL FOR SERVICE
Please check the following before calling for service. It may save you time
and expense.
PROBLEM POSSIBLE CAUSE SOLUTION
1. Part or all of
DrawerMicro
Oven does
not
operate.
• Power cord of
DrawerMicro Oven is not
completely
connected to the
electrical outlet.
• Power outage.
• Fuse/circuit breaker at
home doesn’t work.
• DrawerMicro Oven is in
Demo Mode.
• Make sure the power
cord is tightly connected to the outlet.
• Check house lights
to be sure. Call your
local electric company
for service.
• Replace the fuse or reset the circuit breaker.
• See page 27 for
how to cancel Demo
Mode.
2. Food in
DrawerMicro
Oven is not
heated.
3. DrawerMicro
Oven light
does not
work.
4. Touch
controls will
not operate.
5. Display
flashes.
6. Steam from
the vent.
• No power to the
appliance.
• DrawerMicro Oven
controls improperly set.
• See SOLUTION for
PROBLEM 1.
• Check if the controls
have been properly
set.
• DrawerMicro Oven is in
• See page 27.
Demo Mode.
• Light bulb is loose or
• Call for service.
burned out.
• Control Lock is on. • See page 25 to unlock.
• Power failure. • Touch Clear pad and
reset the clock. If the
DrawerMicro Oven
was in use, you must
reset the cooking
function.
• During microwaving,
steam may come from
the right side of the vent.
E
30
Page 33

DrawerMicro Oven WARRANTY
ONE YEAR FULL WARRANTY
Viking DrawerMicro Oven and all of their component parts and accessories, except as detailed below*, are
warranted to be free from defective materials or workmanship in normal household use for a period of twelve
(12) months from the date of original retail purchase. Viking Range Corporation, warrantor, agrees to repair
or replace, at its option, any part which fails or is found to be defective during the warranty period.
*Glass (including light bulbs), painted and decorative items are warranted to be free from defective
materials or workmanship for a period of ninety (90) days from the date of original retail purchase. ANY
DEFECTS MUST BE REPORTED TO THE SELLING DEALER WITHIN NINETY (90) DAYS FROM DATE OF
ORIGINAL RETAIL PURCHASE.
FIVE YEAR LIMITED WARRANTY
If the magnetron tube fails due to defective materials or workmanship in normal household use during
the second through fifth year from the date of original retail purchase it will be repaired or replaced, free
of charge for the part itself, with the owner paying all other costs, including labor.
This warranty extends to the original purchaser of the product warranted hereunder and to each transferee
owner of the product during the term of the warranty.
This warranty shall apply to products purchased and located here in the United States and Canada.
Products must be purchased in the country where service is requested. Warranty labor shall be performed
by an authorized Viking Range Corporation service agency or representative. Warranty shall not apply
to damage resulting from abuse, accident, natural disaster, loss of electrical power to the product for
any reason, alteration, outdoor use, improper installation, improper operation or repair or service of the
product by anyone other than an authorized Viking Range Corporation service agency or representative.
This warranty does not apply to commercial usage. Warrantor is not responsible for consequential or
incidental damage whether arising out of breach of warranty, breach of contract, or otherwise. Some
jurisdictions do not allow the exclusion or limitation of incidental of consequential damages, so the above
limitation or exclusion may not apply to you.
Owner shall be responsible for proper installation, providing normal care and maintenance, providing proof
of purchase upon request, and making the appliance reasonably accessible for service. If the product or
one of its component parts contains a defect or malfunction during the warranty period, after a reasonable
number of attempts by the warrantor to remedy the defects or malfunctions, the owner is entitled to either
a refund or replacement of the product or its component part or parts. Warrantor’s liability on any claim
of any kind, with respect to the goods or services covered hereunder, shall in no case exceed the price of
the goods or service or part thereof which gives rise to the claim.
WARRANTY SERVICE:
Viking Range Corporation service agent or representative. Service will be provided during normal business
hours, and labor performed at overtime or premium rates shall not be covered by this warranty. To obtain
warranty service, contact the dealer from whom the product was purchased, an authorized Viking Range
Corporation service agent, or Viking Range Corporation. Provide model and serial number and date of
original purchase. For the name of your nearest authorized Viking Range Corporation service agency, call
the dealer from whom the product was purchased or Viking Range Corporation.
IMPORTANT: Retain proof of original purchase to establish warranty period.
The return of the Owner Registration Card is not a condition of warranty coverage. You should, however,
return the Owner Registration Card so that Viking Range Corporation can contact you should any question
or safety arise which could affect you.
Any implied warranties of merchantability and fitness applicable to the above described elements or parts
are limited in duration to the period of coverage of the applicable express written limited warranties set
forth above. Some jurisdictions do not allow limitations on how long an implied warranty lasts, so the
above limitation may not apply to you. This warranty gives you specific legal rights, and you may also
have other rights which may vary from jurisdiction to jurisdiction.
Under the terms of this warranty, service must be performed by a factory authorized
Viking Range Corporation
111 Front Street
Greenwood, Mississippi (MS) 38930 USA (888) 845-4641
Specifications subject to change without notice
For more product information, call 1-888-VIKING1 (845-4641)
or visit the Viking Web site at vikingrange.com
31
E
Page 34

Page 35

Horno DrawerMicro
MAN UAL DE US O Y CU ID ADO
™
S
Page 36

INFORMACIÓN DE SERVICIO
Si se necesita servicio:
1. Llame a su distribuidor o agencia de servicio autorizada. Puede obtener el nombre de la agencia de servicio autorizada llamando a su
distribuidor local.
2. Debe tener disponible la siguiente información:
a. Número de modelo
b. Número de serie
c. Fecha de compra
d. Nombre del distribuidor al que le realizó la compra
3. Describa claramente el problema que tiene.
Si no puede obtener el nombre de una agencia de servicio autorizada o si
continúa teniendo un problema de servicio, comuníquese con Viking Range
Corporation al (888) 845-4641 o escriba a:
VIKING RANGE CORPORATION
PREFERRED SERVICE
111 Front Street
Greenwood, Mississippi (MS) 38930 EE.UU.
Coloque la información que se indica a continuación. Será necesaria si alguna vez requiere del servicio. El número de modelo y de serie de su horno
microondas se encuentra en la etiqueta de identificación al lado izquierdo
de la cavidad del horno.
Número de modelo _______________ Número de serie ______________
Fecha de compra _________________ Fecha de instalación ___________
Distribuidor ____________________________________________________
Dirección _____________________________________________________
________________________________________________________________
Si el servicio requiere de instalación de partes, use sólo las partes autorizadas
para garantizar la protección bajo la garantía.
CONSERVE ESTE MANUAL PARA REFERENCIA FUTURA
S
2
Page 37

PRECAUCIONES PARA EVITAR
POSIBLES EXPOSICIONES AL EXCESO
DE ENERGÍA DEL MICROONDAS
(a) No trate de operar este horno con la puerta abierta ya que la operación
puede provocar una exposición perjudicial a la energía del microondas.
No altere o manipule indebidamente los interbloqueos de seguridad.
(b) No coloque ningún objeto entre la parte frontal del horno y la puerta, ni
deje que se acumulen residuos de limpiadores o suciedad en las superficies
del cierre hermético.
(c) No opere el microondas si está dañado. Es particularmente importante
que la puerta del horno cierre apropiadamente y que no hayan daños en:
(1) puerta (inclinación), (2) bisagras y pestillos (rotos o flojos), (3) sellos de
la puerta y superficies de cierre hermético.
(d) El horno sólo debe ser ajustado o reparado por el personal de servicio
calificado apropiado.
3
S
Page 38

TABLA DE CONTENIDO
2 INFORMACIÓN DE SERVICIO
3 PRECAUCIONES PARA EVITAR
POSIBLES EXPOSICIONES AL
EXCESO DE ENERGÍA DEL
MICROONDAS
4 TABLA DE CONTENIDO
5-6 INSTRUCCIONES DE SEGURIDAD
IMPORTANTES
7-12 INFORMACIÓN qUE DEBE
CONOCER
7 SOBRE EL DESEMBALAJE Y LA
VERIFICACIÓN DE SU
DrawerMicro
7 INTERFERENCIA DE RADIO O
TELEVISIÓN
7 SOBRE SU Horno DrawerMicro
8 SOBRE LA COCCIÓN POR
MICROONDAS
9 ACERCA DE LOS UTENSILIOS Y
ENVOLTURAS
10 SOBRE LOS NIÑOS Y EL
MICROONDAS
11 SOBRE SEGURIDAD
12 SOBRE LOS ALIMENTOS
13-14 NOMBRE DE LAS PARTES
13 Horno DrawerMicro
14 PANEL DE CONTROL
15-16 ANTES DE OPERAR
15 PARA CONFIGURAR EL RELOJ
15 TIMER (TEMPORIZADOR)
16 STOP/CLEAR (PARAR/BORRAR)
16 PARA ABRIR O CERRAR EL Horno
DrawerMicro
17-25 COCCIÓN EN EL
Horno DrawerMicro
17 TIEMPO DE COCCIÓN
17 PARA FIJAR EL NIVEL DE
POTENCIA
18 AJUSTES DEL SENSOR
19 SENSOR POPCORN /
SENSOR REHEAT (SENSOR DE
PALOMITAS DE MAÍZ / SENSOR
DE RECALENTAMIENTO
Horno
)
19-20 TABLA SENSOR POPCORN /
SENSOR REHEAT
20 SENSOR COOKING (COCCIÓN
POR SENSOR
20-22 TABLA SENSOR COOK
23 DEFROST (DESCONGELAR)
23-24 TABLA DEFROST
24 DESCONGELAMIENTO
MANUAL
25 REHEAT (RECALENTAMIENTO)
25 TABLA REHEAT
26-29 OTRAS CARACTERÍSTICAS
26 KEEP WARM (CONSERVAR
CALIENTE)
26 COCCIÓN EN SECUENCIAS
MÚLTIPLES
27 HELP (AYUDA)
27 ADD-A-MINUTE
27 MAYOR O MENOR AJUSTE DE
TIEMPO
28 CONTROL LOCK
(BLOQUEO DE CONTRO
28 SETUP (CONFIGURACIÓN)
28 SUPRESIÓN DE LA SEÑAL
AUDIBLE
28 RECORDATORIO DE
FINALIZACIÓN DE COCCIÓ
29 INICIO AUTOMÁTICO
29 MODO DEMOSTRACIÓN
30-31 LIMPIEzA y CUIDADO
30 PARTE EXTERNA
30 SUPERFICIE DE ACERO
INOXIDABLE
30 PARTE FRONTAL DEL CAJÓN
30 PANEL DE CONTROL TÁCTIL
30 PARTE INTERNA
31 GUÍAS DEL Horno DrawerMicro
31 CUBIERTA DE LA GUÍA DE
ONDA
31 ELIMINACIÓN DE OLORES
32-33 ANTES DE SOLICITAR
SERVICIO
34 GARANTÍA DEL
Horno DrawerMicro
)
L)
N
S
4
Page 39

INSTRUCCIONES DE SEGURIDAD
IMPORTANTES
Al usar artefactos eléctricos deben tomarse precauciones de seguridad básicas,
incluyendo las siguientes:
ADVERTENCIA - Para reducir el riesgo de quemaduras, choque eléctrico, incendios, lesiones a personas o exposición al exceso de energía del microondas:
1. Leer todas las instrucciones antes de usar el electrodoméstico.
2. Leer y seguir las “PRECAUCIONES PARA EVITAR LA POSIBLE EXPOSICIÓN A ENERGÍA DE MICROONDAS EXCESIVA” en la página 3.
3. Este artefacto debe ser conectado a tierra adecuadamente. Vea aparte
las Instrucciones de instalación para conexión a tierra.
4. Instale o coloque este artefacto sólo de acuerdo al Manual de instalación
proporcionado.
5. Algunos productos tales como huevos con cascarón y recipientes sellados
— por ejemplo, recipientes de vidrio cerrados — pueden explotar y no
de deben calentarse en este horno microondas.
6. Utilice este electrodoméstico sólo para el uso intencionado que se
describe en este manual. No usar vapores o químicos corrosivos en
este electrodoméstico. Este tipo de horno microondas está diseñado
específicamente para calentar, cocinar o descongelar alimentos. No está
diseñado para uso industrial o de laboratorios.
7. Como con cualquier electrodoméstico, es necesaria una estricta
supervisión al momento de ser operado por menores de edad.
8. No opere este electrodoméstico si tiene un cordón, cable o enchufe
dañado. si el electrodoméstico no está funcionando adecuadamente, o
si ha sido dañado o dejado caer.
9. Este electrodoméstico únicamente debe ser provisto de servicio de
mantenimiento por personal de servicio calificado. Comuníquese con
el Centro de servicio autorizado de Viking más cercano para su análisis
técnico, reparación o ajuste.
10. No cubrir ni bloquear ningún orificio del electrodoméstico.
11. No almacenar ni utilizar este electrodoméstico al aire libre. No utilizar este
producto cerca del agua — por ejemplo, cerca del fregadero de la cocina,
en un sótano húmedo o cerca de una piscina o lugares similares.
12. Mantener alejado el cable de superficies calientes
13. No monte o se siente en el artefacto.
14. Asegúrese que los dedos u otros objetos o materiales no se encuentran
alrededor de la abertura del artefacto cuando esté se encuentre
cerrado.
5
S
Page 40

15. No coloque los dedos o ropa alrededor de las guías del cajón al momento
de abrir o cerrar el artefacto. Éstos podrían quedar atrapados en las guías
al cerrar el artefacto.
16. Asegúrese que los alimentos y recipientes no sobrepasen el tamaño del
cajón antes de cerrarlo. Verifique la altura de las paredes laterales del
cajón.
17. Cuando limpie las superficies de sellado del artefacto que se juntan
al cerrar el cajón, aplique con una esponja o paño suave sólo jabón o
detergente suave no abrasivo. Vea las instrucciones para limpiar en la
página 30.
18. Para reducir el riesgo de incendio en la cavidad del artefacto:
a. No cocine demasiado los alimentos. Esté atento cuando se coloquen
papeles, plástico o cualquier material combustible dentro del artefacto
para facilitar la cocción.
b. Retirar los alambres de amarre de las bolsas plásticas o papel antes
de colocar la bolsa en el horno microondas.
c. Si los materiales en el interior del horno microondas se encienden,
mantener cerrada la puerta del horno microondas, apagar el horno
microondas y desconectar el cable de suministro de energía o cortar
la energía desde el panel de fusibles o cortacircuitos.
d. No use el artefacto para almacenar objetos. No deje productos de papel,
utensilios de cocina o alimentos en el artefacto cuando no lo use.
19. Líquidos, tales como agua, café o té, son propensos a sobrecalentarse
más allá del punto de ebullición sin aparentar que lo están. No siempre
será visible un burbujeo o ebullición al retirar el recipiente del horno
microondas. ESTO PUEDE DAR COMO RESULTADO QUE LÍQUIDOS
MUY CALIENTES EBULLAN REPENTINAMENTE AL INSERTAR UNA
CUCHARA U OTRO UTENSILIO DENTRO DEL LÍQUIDO.
Para reducir el riesgo de lesiones personales:
a. No sobrecalentar el líquido.
b. Revolver el líquido antes y durante el proceso de calentamiento.
c. No utilizar recipientes de lados rectos con cuellos angostos. Utilizar
recipientes de boca ancha.
d. Después de calentar, deje reposar el recipiente dentro del horno
microondas por lo menos 20 segundos antes de removerlo.
e. Tener cuidado extremo al momento de introducir una cuchara u otro
utensilio dentro del recipiente.
20. Si la luz del artefacto no funciona, consulte al PERSONAL DE SERVICIO
AUTORIZADO DE VIKING.
GUARDE ESTAS INSTRUCCIONES
S
6
Page 41

INFORMACIÓN qUE DEBE CONOCER
SOBRE EL DESEMBALAJE Y LA VERIFICACIÓN DE SU
Horno DrawerMicro
1. Retire los materi ales de empaque
que están dentro de la cavidad del
Horno DrawerMicro. NO RETIRE LA CUBIERTA DE LA GUÍA DE ONDA, que se
encuentra en la parte superior del Horno
DrawerMicro.
2. Si hay una etiqueta adhesiva, retírela. Revise que el cajón no tenga daños, como
mal alineamiento o inclinación, sellos del
cajón y superficies de sellado dañados,
guías del cajón rotas o flojas y abolladuras en la cavidad o en la parte frontal del
cajón. Si encuentra algún daño, no opere
el Horno DrawerMicro y comuníquese con
su distribuidor o PERSONAL DE SERVICIO
AUTORIZADO DE VIKING.
INTERFERENCIA DE RADIO O TELEVISIÓN
Si hay interferencia causada por el Horno DrawerMicro, en su radio o TV,
revise que el horno tenga un circuito eléctrico distinto, aleje la radio o TV
del horno microondas lo más que pueda o revise la posición y señal de la
antena de recepción.
Superficie
de sellado
Cubierta de
la guía de
onda
Superficie
de sellado
Cavidad
del horno
SOBRE SU Horno DrawerMicro
SIEMPRE coloque alimentos dentro del Horno DrawerMicro durante su operación para que absorban la energía del microondas.
El orificio de ventilación debajo del Horno DrawerMicro no debe ser bloqueado. Durante la cocción, el vapor debe salir del lado derecho del orificio
de ventilación.
Al usar el Horno DrawerMicro con niveles de potencia por debajo del 100%,
usted podría escuchar que el magnetrón se enciende y apaga. Es normal
que la parte exterior del Horno DrawerMicro esté caliente al tacto cuando
cocina o recalienta.
La condensación es una parte normal de la cocción con microondas. La humedad ambiental y la humedad en la comida influirán en la cantidad de humedad
que se condense en el Horno DrawerMicro. Generalmente, los alimentos
cubiertos no producirán tanta condensación como los no cubiertos.
El uso del Horno DrawerMicro se limita únicamente a la preparación de los
alimentos. No debe usarse para secar ropa o periódicos.
7
S
Page 42

Su Horno DrawerMicro tiene una capacidad de 950 vatios haciendo uso
del Procedimiento de prueba IEC. Al seguir instrucciones de recetas o de
productos envasados, verifique los alimentos uno o dos minutos antes del
tiempo mínimo y aumente tiempo según corresponda.
Al abrir o cerrar el Horno DrawerMicro rápidamente, los alimentos pueden
derramarse en el interior del microondas. Para realizar la limpieza, consulte
la sección Limpieza y cuidado en la página 30.
SOBRE LA COCCIÓN POR MICROONDAS
• Distribuya los alimentos con cuidado. Coloque las áreas más gruesas hacia
la parte exterior del plato.
• Verifique el tiempo de cocción. Cocine durante el período de tiempo
más corto indicado y aumente como sea necesario. Los alimentos que se
cocinan demasiado pueden quemarse o encenderse.
• Cubra los alimentos durante su cocción. Consulte la receta o el libro
de cocina para obtener sugerencias: Toallas de papel, papel encerado,
película plástica para microondas o una tapa. Las cubiertas evitan derrames
y permiten que los alimentos se cocinen de manera uniforme.
• Cubra las áreas delgadas de la carne o carne de ave con piezas pequeñas
y planas de papel de aluminio para evitar que se cocinen demasiado antes
de que las áreas más gruesas se cocinen por completo.
• Revuelva los alimentos desde afuera hacia adentro del plato una o dos
veces durante la cocción, si es posible.
• Voltee los alimentos una vez durante la cocción en microondas para acelerar la cocción de alimentos como pollo y hamburguesas. Los alimentos
grandes como asados deben voltearse al menos una vez.
• Reacomode los alimentos como albóndigas a la mitad de la cocción
desde la parte superior a la inferior y desde el centro del plato hacia el
exterior.
• Deje un tiempo de espera. Retire los alimentos del Horno DrawerMicro
y revuélvalos, si es posible. Cubra durante el tiempo de espera, lo cual
permite que los alimentos se terminen de cocinar sin recocerlos.
• Verifique la cocción. Verifique si hay señales que indiquen que se ha alcanzado la temperatura de cocción.
Las señales de cocción completa incluyen:
- Todo el alimento emana vapor, no sólo en los bordes.
- Temperatura muy caliente de la base central del plato al tacto.
- Fácil movimiento de las uniones de los muslos del ave.
- La carne y la carne de ave no presentan un color rosáceo.
- El pescado está opaco y se desmenuza fácilmente con un tenedor.
S
8
Page 43

ACERCA DE LOS UTENSILIOS Y ENVOLTURAS
No es necesario comprar utensilios nuevos. Usted puede usar la mayoría de
artículos de su cocina en su nuevo Horno DrawerMicro. Asegúrese de que
los utensilios no toquen las paredes internas durante la cocción.
Use estos utensilios para una cocción y un recalentamiento seguros en el
microondas:
• vitrocerámica (Pyroceram®), como Corningware®.
• Vidrio resistente al calor (Pyrex®)
• plásticos resistentes al microondas
• platos de papel
• cerámica, cerámica de gress y porcelana
• fuentes (sin exceder el tiempo de precalentamiento recomendado.
Siga las instrucciones del fabricante.)
Estos artículos pueden ser usados para un corto tiempo de recalentamiento
de alimentos con poca grasa o azúcar:
• madera, paja, mimbre
NO UTILICE
• sartenes y utensilios para hornear de metal
• platos con borde metálico
• vidrio no resistente al calor
• plásticos que no resistan las microondas (recipiente de margarina)
• productos de papel reciclado
• bolsas de papel marrón
• bolsas para conservar alimentos
• sujetadores de metal
• metal twist-ties
Si desea verificar si un plato es seguro para uso en el microondas, coloque
el plato vacío en el horno y hágalo funcionar durante 30 segundos en HIGH.
Si el plato se calienta demasiado no debe ser usado.
Las siguientes envolturas son ideales:
• Las toallas de papeles son ideales para envolver los alimentos al
recalentarlos y absorber la grasa al cocinar tocino.
• El papel encerado puede ser usado para cocinar y recalentar.
• La película plástica que está especialmente diseñada para uso en
microondas puede usarse para la cocción y recalentamiento. NO deje
que la película plástica toque los alimentos. Haga agujeros para que
el vapor pueda salir.
9
S
Page 44

• Las tapas que pueden usarse en el microondas son una buena opción
ya que aíslan el calor de los alimentos para acelerar la cocción.
• Las bolsas para cocción en hornos son apropiadas para piezas grandes
de carne o alimentos que necesitan ablandarse. NO use sujetadores
de alambre. Recuerde perforar la bolsa para que pueda salir el
vapor.
Cómo usar papel aluminio en el Horno DrawerMicro:
• Pedazos planos pequeños de papel aluminio colocados ligeramente
sobre los alimentos pueden ser útiles para proteger áreas que se
estén descongelando o cocinando demasiado rápido.
• El papel aluminio no debe estar a menos de una pulgada de cualquier
superficie del Horno DrawerMicro.
Si tiene preguntas acerca de los utensilios o envolturas, consulte un buen
libro de cocina en microondas o siga las sugerencias de las recetas.
ACCESSORIOS Existen muchos accesorios disponibles para microondas.
Revise cuidadosamente antes de comprarlos para que satisfagan sus necesidades. Un termómetro resistente a las microondas le ayudará a determinar la
cocción correcta y asegurará que sus alimentos se han cocido a temperaturas
seguras. Viking no es responsable de ningún daño al Horno DrawerMicro
causado por el uso de los accesorios.
SOBRE LOS NIÑOS Y EL MICROONDAS
Los niños menores de 7 años deben usar el Horno DrawerMicro bajo la supervisión cercana de un adulto. En el caso de los niños entre 7 y 12 años, la
persona que los supervisa debe estar en la misma habitación. El niño debe
alcanzar el Horno DrawerMicro de manera cómoda; en caso contrario, debe
usar un banco firme.
No se debe permitir nunca que nadie se apoye o se cuelgue del
Horno DrawerMicro.
Los niños deben conocer todas las precauciones de seguridad: usar agarraderas, retirar las cubiertas con cuidado, prestar mucha atención a los paquetes
de alimentos crujientes, ya que podrían estar muy calientes.
No asuma que un niño puede cocinar de todo sólo porque aprendió a cocinar un alimento.
Los niños deben aprender que el Horno DrawerMicro no es un juguete. Vea
la página 28 para consultar la función de Bloqueo de control.
S
10
Page 45

SOBRE SEGURIDAD
• Verifique que la cocción de los alimentos se realice de acuerdo a las
temperaturas recomendadas del Departamento de Agricultura de los
EE.UU.
TEMPERATURA ALIMENTO
160˚F (71˚C) Para platos con cerdo fresco, carne molida, carne blan-
ca de ave deshuesada, pescado, mariscos, huevos y
alimentos preparados congelados.
165˚F (74˚C)
Para sobras, comida refrigerada lista para recalentar y
platos preparados y comida “lista” para llevar.
170˚F (77˚C)
180˚F (82˚C)
Carne blanca de ave.
Carne oscura de ave.
Para verificar la cocción, introduzca un termómetro para carne en un área
gruesa o densa lejos de la grasa y el hueso. NUNCA deje el termómetro en
los alimentos durante la cocción, a menos que sea aprobado para uso en
horno microondas.
• SIEMPRE use una agarradera para prevenir quemaduras al manipular
utensilios que están en contacto con los alimentos calientes. El calor de
los alimentos puede transferirse a través de los utensilios causando quemaduras en la piel.
• Evite las quemaduras causadas por el vapor dirigiéndolo lejos de su rostro y manos. Levante lentamente el borde más alejado de la cubierta de
un plato y abra con cuidado las bolsas de palomitas de maíz y las bolsas
especiales para cocinar en horno apartándolas de su rostro.
• Permanezca cerca del horno mientras esté en uso y verifique con frecuencia el progreso de la cocción para que los alimentos no se cocinen
demasiado.
• NUNCA use la cavidad para guardar libros de cocina u otros artículos.
• Seleccione, almacene y manipule los alimentos con cuidado para conservar
su alta calidad y minimizar la propagación de bacterias.
• Conserve limpia la cubierta de la guía de onda. Los residuos de alimentos
pueden producir arcos eléctricos o incendios.
11
S
Page 46

SOBRE LOS ALIMENTOS
ALIMENTO LO qUE DEBE HACER LO qUE NO DEBE HACER
Huevos,
salchichas,
frutos
secos,
semillas,
frutas y
vegetales
• Perfore las yemas del huevo antes de cocinarlo para evitar una
“explosión”.
• Haga pequeños agujeros en la
piel de las papas, manzanas,
zapallos, hot dogs y salchichas
para liberar el vapor.
• Cocinar los huevos
con cáscara.
• Recalentar los
huevos enteros.
• Deshidratar nueces o
semillas con
cáscara.
Palomitas
de maíz
• Use palomitas de maíz empacadas en una bolsa especial para
horno microondas.
• Escuche mientras las palomitas
revientan para saber si hay una
demora de 1 o 2 segundos o
use una almohadilla especial
para palomitas de maíz.
Alimentos
para
bebés
• Transfiera los alimentos del
bebé a un plato pequeño y
caliéntelos con cuidado, revolviendo con frecuencia. Verifique la
temperatura antes de servir.
• Coloque las tetinas en las
botellas después de calentarlas
y sacúdalas bien. Verifique la
temperatura usted mismo antes
de alimentar al bebé.
General • Corte los alimentos horneados
con relleno después de calentarlos para liberar el vapor y
prevenir las quemaduras.
• Revuelva bien los líquidos antes,
durante y después de calentar
para evitar “erupciones”.
• Use un tazón profundo al cocinar líquidos o cereales para
evitar que rebosen.
• Los alimentos no deben so-
brepasar el tamaño del cajón
para microondas. Verifique la
altura de las paredes laterales
del cajón.
• Cocinar palomitas
de maíz en bolsas de
papel común o en
tazones de vidrio.
• Exceder el tiempo
máximo que indica
el paquete de las
palomitas de maíz.
• Calentar botellas
desechables.
• Calentar las botellas
con las tetinas puestas.
• Calentar los alimentos del bebé en sus
frascos originales.
• Calentar o cocinar en
frascos de vidrio cerrados o en recipientes herméticos.
• Preparar conservas
o mermeladas en el
microondas ya que
las bacterias dañinas podrían no ser
destruidas.
• Freír en aceite.
• Secar madera,
calabazas, hierbas o
papeles húmedos.
S
12
Page 47

NOMBRE DE LAS PARTES
Horno DrawerMicro
1
2
3
8
4
5
6
7
1. Panel de control
2. Cubierta de la guía de onda NO LA RETIRE
3. Etiqueta de menú
4. Superficies de sellado del cajón
5. Iluminación del cajón
6. Guías del Horno DrawerMicro
7. Placa de identificación: Abra el Horno DrawerMicro
por completo. La etiqueta se encuentra ligeramente más allá de la pared posterior de la cavidad
del microondas y con dirección hacia arriba desde
la superficie plana.
13
S
Page 48

PANEL DE CONTROL
27-28 19-20 19-20 20-22
28 26 23-24 25
27
16 15
16
16
El número cerca de la ilustración del panel de control indica las páginas donde
puede encontrar descripciones de las características e información de uso.
S
14
Page 49

ANTES DE OPERAR
Antes de operar su nuevo Horno DrawerMicro, asegúrese de haber leído y
entendido completamente esta Guía de uso y cuidado.
• Antes de usar el Horno DrawerMicro, siga estos pasos:
1. Conecte el Horno DrawerMicro. Aparecerá el mensaje
YO UR MI CRO- WA VE TO UCH CL EAR
2. Presione el botón Stop/Clear.
:
AN D TO UCH CL OCK
aparecerá.
3. Programe el reloj.
PARA CONFIGURAR EL RELOJ
1. Presione Timer/Clock y el botón del número 2.
2. Presione los botones de números para ingresar la hora correcta del día y
presione nuevamente el botón Timer/Clock.
Este es un reloj de 12 horas. Si intenta ingresar una hora incorrecta en el
reloj, la pantalla mostrará el mensaje
y restablezca el reloj.
• Si se interrumpe, el suministro de energía eléctrica del Horno DrawerMicro
el mensaje destellará intermitentemente en pantalla mostrando
YO UR MI CRO- WA VE TO UCH CL EAR
de restablecer la energía. Si esto ocurre durante la cocción, se borrará
el programa. También se borrará la hora del día. Sólo presione el botón
Stop/Clear y restablezca el reloj para ingresar la hora correcta del día.
Nota:
• El Horno DrawerMicro puede programarse con el cajón abierto excepto
para Start/Add-A-Minute.
. Presione el botón Stop/Clear
ER ROR
AN D TO UCH CL OCK
EN JOY
.
EN JOY
luego
TIMER (TEMPORIZADOR)
1. Presione el botón Timer/Clock y el número 1.
2. Ingrese el tiempo.
3. Presione nuevamente el botón Timer/Clock.
Para cancelar el temporizador, presione Stop/Clear.
15
S
Page 50

STOP/CLEAR (PARAR/BORRAR)
Presione el botón Stop/Clear (Parar/Borrar) para:
1. Borrar si comete un error durante la programación.
2. Cancelar el temporizador.
3. Detener el horno temporalmente durante la cocción.
4. Reingresar la hora del día en la pantalla.
5. Cancelar un programa durante la cocción, presionando dos veces.
PARA ABRIR O CERRAR EL Horno DrawerMicro
Siempre presione el botón OPEN o CLOSE en el panel de control para abrir
o cerrar el Horno DrawerMicro.
No presione o tire del manualmente del Horno DrawerMicro, excepto en
caso de emergencia, como una falla eléctrica. Si es necesario presione
o jale lentamente.
S
16
Page 51

COCCIÓN EN EL Horno DrawerMicro
TIEMPO DE COCCIÓN
El Horno DrawerMicro puede ser programado para 99 minutos 99 segundos
(99.99). Siempre ingrese los segundos después de los minutos, aun si ambos
son 0.
• Suponga que desea cocinar por 5 minutos al 100%.
1. Ingrese el tiempo de cocción 500.
2. Para cocinar a una potencia al 100% (Alta), presione el botón Start/AddA-Minute.
PARA FIJAR EL NIVEL DE POTENCIA
Existen once niveles de potencia predeterminados.
Usar los niveles de potencia más bajos aumenta el tiempo de cocción, lo
que es recomendable para alimentos como queso, leche y la cocción lenta
y prolongada de carnes. Consulte el libro de recetas o las recetas para recomendaciones específicas.
• Suponga que desea descongelar durante 5 minutos al 30%.
1. Ingrese el tiempo de descongelamiento 500.
2. Presione Power Level 8 veces.
3. Presione Start/Add-A-Minute.
PRESIONE EL BOTÓN
POWER LEVEL EL NúMERO
DE VECES NECESARIO
PARA ALCANZAR LA
POTENCIA DESEADA
PORCENTAJE
APROXIMADO
DE POTENCIA
PALABRAS COMUNES
PARA LOS NIVELES
DE POTENCIA
Power Level x 1 100% Alto
Power Level x 2 90%
Power Level x 3 80%
Power Level x 4 70% Medio-alto
Power Level x 5 60%
Power Level x 6 50% Medio
Power Level x 7 40%
Power Level x 8 30% Medio bajo/descongelar
Power Level x 9 20%
Power Level x 10 10% Bajo
Power Level x 11 0%
17
S
Page 52

AJUSTES DEL SENSOR
El sensor de Viking es un dispositivo semiconductor que detecta el vapor
(humedad) emitido por los alimentos mientras se calientan. El sensor ajusta
los tiempos de cocción y los niveles de potencia para diversos alimentos y
cantidades.
Uso de los ajustes del sensor:
1. Después de conectar el Horno DrawerMicro, espere 2 minutos antes de
usar los ajustes del sensor.
2. Asegúrese de que el exterior del recipiente de cocción y el interior del
Horno DrawerMicro estén secos. Remueva cualquier rastro de humedad
con un paño seco o toalla de papel.
3. El sensor funciona con alimentos a una temperatura de almacenamiento
normal. Por ejemplo, las palomitas de maíz pueden estar a temperatura
ambiente.
4. Cualquier selección de sensor puede ser programada con mayor o menor
ajuste de tiempo. Vea la página 27.
5. Si la cantidad de alimentos es mayor o menor a la que indica la tabla,
debe ser cocinada siguiendo las pautas de cualquier libro de cocina para
microondas.
6. Durante la primera parte de la cocción por sensor, el nombre de los alimentos aparecerá en la pantalla. No abra la puerta del Horno DrawerMicro
ni presione el botón Stop/Clear (Parar/Borrar) durante esta parte del ciclo.
La medición del vapor será interrumpida. Si esto sucede, en la pantalla
aparecerá un mensaje de error. Para continuar la cocción, presione el
botón Stop/Clear y cocine manualmente.
Cuando el sensor detecte el vapor de los alimentos, aparecerá en la pan-
talla el tiempo de cocción/recalentamiento restante. Puede abrir el Horno
DrawerMicro cuando aparezca en la pantalla el tiempo restante. En este
momento, puede revolver o sazonar los alimentos, como desee.
7. Si el sensor no detecta el vapor apropiadamente al cocinar palomitas de
maíz, el horno se apagará y aparecerá en la pantalla la hora del día. Si el
sensor no detecta el vapor apropiadamente al cocinar otros alimentos,
el mensaje
apagará.
8. Revise la temperatura de los alimentos después de la cocción. De ser
necesario un tiempo adicional, continúe la cocción manualmente.
9. Cada alimento tiene una sugerencia de cocción. Presione el botón Setup/
Help cuando se encienda el indicador HELP en la pantalla.
ER ROR
aparecerá en la pantalla y el horno microondas se
S
18
Page 53

Envoltura de alimentos:
Algunos alimentos se cocinan mejor cuando están cubiertos. Use la envoltura
recomendada en la tabla de alimentos.
1. Tapa de la cacerola.
2. Película plástica: Use la película plástica recomendada para cocción en
microondas. Envuelva los platos de forma suelta; deje un espacio de casi
1/2 pulgada sin cubrir para permitir la salida de vapor. La película plástica
no debe tocar los alimentos.
3. Papel encerado: Cubra el plato completamente; doble el exceso de la envoltura debajo del plato para asegurar. Si el plato es más ancho que el papel,
sobreponga por lo menos una pulgada de dos pedazos para cubrir.
Tenga cuidado al retirar cualquier envoltura para permitir la salida de vapor
lejos de usted.
SENSOR POPCORN / SENSOR REHEAT
(SENSOR DE PALOMITAS DE MAÍZ /
SENSOR DE RECALENTAMIENTO)
Usted tiene la opción de preparar palomitas de maíz y recalentar muchos
alimentos y no necesita calcular el tiempo de cocción o nivel de potencia.
Presione Sensor Reheat o Sensor Popcorn y el botón Start/Add-A-Minute.
Cuando el sensor detecte el vapor de los alimentos, aparecerá en la pantalla
el tiempo de cocción/recalentamiento restante.
Nota:
• El ajuste Sensor Popcorn tiene 2 opciones. Siga las instrucciones en la
pantalla para elegir la opción que desee.
TABLA SENSOR POPCORN / SENSOR REHEAT
ALIMENTO CANTIDAD PROCEDIMIENTO
Sensor
Popcorn
Sólo un
paquete a la vez
2.85 - 3.5 onzas
(Normal/ Ligero)
1.2 - 1.75 onzas
(Pequeño /
Bocadito)
Use palomitas de maíz envasadas especialmente para uso en microondas. Pruebe con
varias marcas para elegir la que prefiera. No
intente cocinar los granos que no reventaron
completamente.
Presione el botón Sensor Popcorn una vez.
Presione el botón Sensor Popcorn dos
veces.
19
S
Page 54

TABLA SENSOR POPCORN / SENSOR REHEAT
ALIMENTO CANTIDAD PROCEDIMIENTO
Sensor
Reheat
4 - 36 onzas Coloque en un plato o cacerola ligeramente
más grande que la cantidad que va a recalentar. Aplane, si es posible. Recubra con una
tapa, película plástica o papel encerado. Use
envolturas como películas plásticas o tapas
para grandes cantidades de alimentos con
mayor densidad como estofados. Después
de recalentar, revuelva bien, si es posible. Recubra y deje que permanezca de 2 a 3 minutos. Los alimentos deben estar muy calientes.
Si no es así, continúe el recalentamiento con
una potencia y tiempo variables.
SENSOR COOkING (COCCIÓN POR SENSOR)
1. Presione el botón Sensor Cook una vez.
2. Vea la Etiqueta de menú. Seleccione el alimento deseado presionando el
botón de número. Ej: Presione 5 para papas al horno.
3. Presione el botón Start/Add-A-Minute.
Nota:
• Para calentar o cocinar otros alimentos o alimentos en cantidades mayores
o menores a las permitidas en la TABLA SENSOR COOK, hágalo manualmente.
TABLA SENSOR COOk
ALIMENTO CANTIDAD PROCEDIMIENTO
1. Vegetales
frescos: suaves
Brócoli
Coles de
Bruselas
Repollo
Coliflor:
flores
pequeñas
entera
Espinaca
Calabacín
Manzanas al
horno
S
.25 - 2.0 libras
.25 - 2.0 libras
.25 - 2.0 libras
.25 - 2.0 libras
1 medianas
.25 - 1.0 libras
.25 - 2.0 libras
2 - 4 medianas
Lave y coloque en una cacerola.
No agregue agua si acaba de lavar
los vegetales. Recubra con la tapa
para vegetales tiernos. Use película
plástica para vegetales tiernos y
crocantes. Después de la cocción,
revuelva si es posible. Deje que los
alimentos reposen cubiertos de 2 a
5 minutos.
20
Page 55

TABLA SENSOR COOk
ALIMENTO CANTIDAD PROCEDIMIENTO
2. Vegetales
frescos: duros
Zanahorias en
tajadas
Maíz en mazorca
Frijol verde
Calabaza:
picada
en mitades
.25 - 1.5 libras
2 - 4
.25 - 1.5 libras
.25 - 1.5 libras
1 - 2
Coloque en una cacerola. Agregue
1-4 cucharadas de agua. Recubra
con la tapa para vegetales tiernos.
Use película plástica para vegetales
tiernos. Después de la cocción,
revuelva si es posible. Deje que los
alimentos reposen cubiertos de 2 a
5 minutos.
3. Vegetales
congelados
.25 - 1.25 libras No agregue agua. Cubra con una
tapa o película plástica. Después de
la cocción, revuelva y déjelos reposar
cubiertos durante 3 minutos.
-
4. Platos de entra
da congelados
6 - 17 onzas Use este botón para congelar conve-
nientemente los alimentos. Obtendrá resultados satisfactorios para la
mayoría de marcas. Si desea puede
probar las diversas marcas y elegir
la que prefiera. Retire la envoltura
externa del paquete y siga las instrucciones del mismo para cubrirlo.
Después de la cocción, deje reposar
cubierto de 1 a 3 minutos.
5. Papas al horno 1 - 6 medianas Haga pequeños agujeros. Colóquelas
sobre el Horno DrawerMicro forrado
con papel toalla. Después de la cocción, retire del microondas, envuelva
en papel aluminio y deje reposar de
5 a 10 minutos.
21
S
Page 56

TABLA SENSOR COOk
ALIMENTO CANTIDAD PROCEDIMIENTO
6. Carne molida .25 - 2.0 libras Use este ajuste para cocinar carne
de res o de pavo picada como
hamburguesas o en cacerolas para
ser agregados a otros ingredientes.
Coloque las hamburguesas en una
rejilla para microondas y recubra con
papel encerado. Coloque la carne
molida en una cacerola y cúbrala
con papel encerado o una película
plástica. Cuando el microondas se
detenga, voltee las hamburguesas
o revuelva la carne en la cacerola
para dividir las piezas grandes. Cubra
nuevamente y presione Start/Add-AMinute. Luego de la cocción, deje
reposar cubierto de 2 a 3 minutos.
7. Pescado/
mariscos
8. Arroz
.25 - 2.0 libras Colóquelo en forma de anillo en un
plato de vidrio hondo (enrolle el filete
ocultando los bordes). Cubra con
una película plástica con agujeros de
ventilación. Después de la cocción,
déjelo reposar cubierto durante 3
minutos.
.5 - 2.0 tazas Coloque el arroz en una cacerola
honda y agregue el doble de cantidad de agua. Cubra con una tapa o
película plástica. Después de la cocción, revuelva, cubra y deje reposar
de 3 a 5 minutos o hasta que absorba
todo el líquido.
Arroz Aqua Tamaño de la
cacerola
0.5 taza 1 taza 1.5 cuartos
1 taza 2 tazas 2 cuartos
1.5 taza 3 tazas 2.5 o 3 cuartos
2 tazas 4 tazas 3 cuartos o más
S
22
Page 57

DEFROST (DESCONGELAR)
Use esta función para descongelar los alimentos mostrados en la TABLA
DEFROST de la página 23-24.
1. Presione el botón Defrost.
2. Vea la Etiqueta de menú. Seleccione el alimento deseado presionando el
botón de número. Ej: Presione 2 para Bistec/chuletas.
3. Ingrese el peso presionando los botones de número.
4. Presione el botón Start/Add-A-Minute.
El horno se detendrá para que pueda revisar el alimento.
5. Después de la primera etapa, abra el Horno DrawerMicro. Dé vuelta al
bistec y cubra las porciones calientes. Cierre el Horno DrawerMicro. Presione el botón Start/Add-A-Minute.
6. Después de la segunda etapa, abra el Horno DrawerMicro. Cubra todas
las partes calientes. Cierre el Horno DrawerMicro. Presione el botón Start/
Add-A-Minute.
7. Al terminar el ciclo de descongelamiento, cubra y deje reposar como se
indica en la tabla de la página 23-24.
Nota:
• La función Defrost puede ser programada con ajuste de mayor o menor
tiempo. Vea la página 27.
• Para descongelar otros alimentos o una cantidad de alimentos por encima
o debajo de los pesos permitidos en la TABLA DEFROST (DESCONGELAMIENTO), vea MANUAL DEFROST (DESCONGELAMIENTO MANUAL) de
la página 24.
• Revise los alimentos a la señal del horno. Después de la etapa final, todavía
pueden quedar partes pequeñas con hielo. Deje reposar para continuar
el descongelamiento. No descongele hasta que se derritan todos los
cristales de hielo.
• Cubrir los alimentos evita la cocción antes de que el centro del alimento
esté descongelado. Use pequeñas tiras de papel aluminio para cubrir los
bordes y las secciones más delgadas del alimento.
TABLA DEFROST
ALIMENTO CANTIDAD PROCEDIMIENTO
1. Carne
molida
.5 - 2.0 libras Retire las partes congeladas después de cada
señal audible. Cubra y deje reposar de 5 a
10 minutos.
23
S
Page 58

ALIMENTO CANTIDAD PROCEDIMIENTO
2. Bistec /
chuletas
.5 - 3.0 libras Después de cada señal audible, reacomode
y si hubiera alguna porción tibia o descongelada, protéjala con piezas pequeñas y
planas de papel aluminio. Retira las porciones de carne o pescado que estén casi
descongeladas. Cubra y deje reposar de 10
a 20 minutos.
3. Carne de
ave deshuesada
.5 - 2.0 libras Después de cada señal audible, reacomode
o retire si hay porciones tibias o descongeladas. Cubra y deje reposar de 10 a 20
minutos.
4. Carne de
ave con
hueso
.5 - 3.0 libras Después de cada señal audible, reacomode
las piezas o retire las porciones que se encuentren calientes o descongeladas. Cubra
y deje reposar de 10 a 20 minutos.
5. Cazuela /
sopa
1 - 6 tazas Después de cada señal audible, desmenuce y
retire cualquier parte descongelada. Al final,
revuelva bien y deje reposar cubierto de 5
a 10 minutos.
DESCONGELAMIENTO MANUAL
Si el alimento que quiere descongelar no aparece en la tabla DEFROST o
si está por encima o debajo de los límites en la columna de CANTIDAD,
deberá descongelar manualmente.
Usted puede descongelar cualquier alimento congelado, crudo o precocido
usando el Nivel de potencia al 30%. Siga exactamente el procedimiento del
paso 3 en Para fijar el nivel de potencia en la página 17. Calcule el tiempo
de descongelamiento y presione ocho veces el botón Power Level para una
potencia del 30%.
Para alimentos crudos o precocidos congelados la regla general indica 4
minutos por libra. Por ejemplo, descongele durante 4 minutos una libra de
salsa para espaguetis congelada.
Siempre detenga el horno continuamente para retirar o separar las porciones que esté descongelando. Si al final del tiempo de descongelamiento
calculado los alimentos no se han descongelado, programe el horno en
incrementos de 1 minuto a un nivel de potencia del 30% hasta que se
descongelen totalmente.
Cuando use recipientes de plástico del congelador, descongele sólo lo
suficiente para retirar el alimento del alimento y colocar el alimento en un
plato para microondas.
S
24
Page 59

REHEAT (RECALENTAMIENTO)
Con Reheat (recalentamiento) puede calcular automáticamente y de manera
correcta el tiempo de cocción y el nivel de potencia del microondas para
los alimentos que se muestran en la siguiente tabla.
1. Presione el botón Reheat (Recalentamiento) una vez.
2. Vea la Etiqueta de menú. Seleccione el alimento deseado presionando
el botón de número. Ej: Presione 2 fpara rosquillas o panecillos congelados.
3. Presione el botón de número para seleccionar la cantidad. Ej: Presione 2
para 2 rosquillas o panecillos.
4. Presione el botón Start/Add-A-Minute.
Nota:
• La función Reheat puede ser programada con ajuste de mayor o menor
tiempo. Vea la página 27.
• Para recalentar otros alimentos o una cantidad de alimentos por encima o
debajo de la cantidad permitida en la TABLA REHEAT, hágalo manualmente.
TABLA REHEAT
ALIMENTO CANTIDAD PROCEDIMIENTO
1. Rosquillas /
panecillos
frescos
1 - 8
unidades
Use este botón para calentar rosquillas,
panecillos, bizcochos, roscas, etc. Las
porciones grandes deben considerarse
como 2 ó 3 de tamaño normal. Colóquelos
en un plato y cubra con toalla de papel.
Para rosquillas o panecillos refrigerados,
puede ser necesario duplicar la cantidad
ingresada para asegurar que la temperatura para servir sea adecuada. Por ejemplo, ingrese una cantidad de 2 para un
panecillo refrigerado.
2. Rosquillas /
panecillos
congelados
3. Bebidas
1 - 8
unidades
Use este botón para calentar rosquillas,
panecillos, bizcochos, roscas congeladas,
etc. Las porciones grandes deben considerarse como 2 ó 3 de tamaño normal.
Colóquelos en un plato y cubra con toalla
de papel.
.5 - 2.0 tazas Este ajuste es adecuado para calentar
una bebida fría a una mejor temperatura
para beber. Revuelva bien los líquidos
antes y después de calentar para evitar
“erupciones”.
25
S
Page 60

OTRAS CARACTERÍSTICAS
kEEP WARM (CONSERVAR CALIENTE)
Con Keep Warm usted puede mantener los alimentos calientes hasta 30
minutos.
USO DIRECTO
1. Presione el botón Keep Warm.
2. Ingrese el tiempo deseado presionando los botones de números. Para
ingresar 30 minutos, presione 3000.
3. Presione el botón Start/Add-A-Minute.
El horno empezará a funcionar. La pantalla mostrará
gresivo. El mensaje
el conteo regresivo.
KE EP WA RM
destellará intermitentemente durante
CON COCCIÓN MANUAL
1. Ingrese el tiempo de cocción y el nivel de potencia deseados.
2. Presione el botón Keep Warm.
3. Ingrese el tiempo de conservación deseado de hasta 30 minutos.
4. Presione el botón Start/Add-A-Minute.
El horno empezará a funcionar. Al completar el tiempo de cocción, se
escuchará un tono largo y se iniciará la función Keep Warm. En la pantalla
aparecerá el conteo regresivo. El mensaje
mitentemente durante el conteo regresivo.
Nota:
• Al tratar de ingresar más de 30 minutos para la función Keep Warm, en la
pantalla aparecerá un mensaje de error.
• La función Keep Warm no puede ser programada con las funciones Sensor
Popcorn, Sensor Reheat, Sensor Cook, Defrost o Reheat.
KE EP WA RM
en conteo re-
30 .00
destellará inter-
COCCIÓN EN SECUENCIAS MúLTIPLES
Su Horno DrawerMicro puede ser programado para 4 secuencias de cocción
automática, cambiando automáticamente de un ajuste de nivel de potencia
a otro.
A veces, las instrucciones de cocción le indican empezar en un nivel de potencia y luego cambiar a un nivel de potencia diferente. Su Horno DrawerMicro
puede hacerlo automáticamente.
1. Primero ingrese el tiempo de cocción. Luego presione el botón Power
Level una vez para cocción al 100% o repita presionando el mismo para
un nivel menor de potencia.
S
26
Page 61

2. Ingrese el segundo tiempo de cocción. Repita presionando el botón Power
Level hasta obtener el nivel deseado. Usted puede realizar este proceso
hasta 4 veces.
3. Presione el botón Start/Add-A-Minute.
Nota:
• Si presionó el botón Power Level una vez, en la pantalla aparecerá el
mensaje
HI GH
.
• Si selecciona 100% como secuencia final, no es necesario presionar el
botón Power Level.
• Si desea saber el nivel de potencia durante la cocción, presione simplemente el botón Power Level. Siempre que presione el botón Power Level,
el nivel de potencia aparecerá en pantalla.
• La función Keep Warm puede ser programada aún si se han ajustado las
4 secuencias de cocción.
HELP (AYUDA)
Cada ajuste de las funciones Sensor Reheat, Sensor Cook, Sensor Popcorn,
Keep Warm, Reheat y Defrost tiene una sugerencia de cocción. Si desea
verificarlas, presione Setup/ Help (Configuración/ayuda) cuando el mensaje
HELP en la Pantalla interactiva para estas sugerencias y otras sugerencias
de operación manual.
ADD-A-MINUTE
La función Add-A-Minute le permite cocinar por un minuto al 100% con
sólo presionar el botón Add-A-Minute. También puede extender el tiempo
de cocción en múltiplos de 1 minuto presionando repetidamente el botón
Add-A-Minute durante la cocción manual.
Nota:
• Para usar la función Add-A-Minute, presione el botón dentro de los 3
minutos posteriores a la cocción, cerrando la puerta o presionando el
botón Stop/Clear.
• La función Add-A-Minute no puede ser usada con las funciones Sensor,
Reheat o Defrost.
MAYOR O MENOR AJUSTE DE TIEMPO
Si prefiere que alguna de las funciones Sensor, Reheat o Defrost sea ligeramente mayor, presione una vez el botón Power Level luego de presionar los
botones de su elección. La pantalla mostrará
Si desea que esté ligeramente menos cocido, presione dos veces el La pantalla mostrará La pantalla mostrará
LE SS
27
.
MO RE
.
S
Page 62

CONTROL LOCk (BLOqUEO DE CONTROL)
Control Lock evita que el microondas en cajón sea operado accidentalmente
por niños pequeños, por ejemplo. El Horno DrawerMicro puede ajustarse
para que el panel de control se desactive o bloquee.
PARA BLOqUEAR
Presione el botón Control Lock durante 3 segundos. En la pantalla aparecerá
LO CK ON
.
PARA DESBLOqUEAR
Presione el botón Control Lock durante 3 segundos. En la pantalla aparecerá
LO CK OF F
.
SETUP (CONFIGURACIÓN)
Si se interrumpe, el suministro de energía eléctrica del cajón con horno microondas el mensaje destellará intermitentemente en pantalla mostrando
EN JOY YO UR MI CRO- WA VE TO UCH CL EAR
luego de restablecer la energía. Si esto ocurre, se cancelará la opción Setup/
Help. Presione el botón Stop/Clear y restablezca.
SUPRESIÓN DE LA SEÑAL AUDIBLE
Al finalizar el tiempo de cocción, se escuchará un sonido. Si desea suprimir la
señal audible del electrodoméstico, puede desactivar las señales audibles.
AN D TO UCH CL OCK
PARA DESACTIVAR EL SONIDO
1. Presione el botón Setup/Help.
2. Presione nuevamente el botón Setup/Help.
3. Presione el botón Start/Add-A-Minute. En la pantalla aparecerá el mensaje
SO UND OF F
PARA RESTAURAR EL SONIDO
.
1. Presione el botón Setup/Help.
2. Presione nuevamente el botón Setup/Help.
3. Presione el botón Start/Add-A-Minute. En la pantalla aparecerá el mensaje
SO UND ON
.
RECORDATORIO DE FINALIZACIÓN DE COCCIÓN
Al finalizar el tiempo de cocción, el microondas emitirá una señal cada 10
segundos durante el primer minuto y luego cada 3 minutos hasta que se
presione el botón Stop/Clear, hasta un máximo de una hora.
PARA DESACTIVAR EL RECORDATORIO
1. Presione tres veces el botón Setup/Help. En la pantalla aparecerá el men-
S
28
Page 63

saje
RE MIND SI GNAL OF F ? TO UCH
ST ART
.
2. Presione el botón Start/Add-A-Minute. En la pantalla aparecerá el mensaje
RE MIND SI GNAL OF F
.
PARA ACTIVAR NUEVAMENTE LA SEÑAL DE RECORDATORIO
1. Presione tres veces el botón Setup/Help . En la pantalla aparecerá el
mensaje
RE MIND SI GNAL ON ? TO UCH
ST ART
.
2. Presione el botón Start/Add-A-Minute. En la pantalla aparecerá el mensaje
RE MIND SI GNAL ON
.
INICIO AUTOMÁTICO
Si desea programar el Horno DrawerMicro para que inicie la cocción automáticamente en una determinada hora del día, siga este procedimiento.
1. Presione 4 veces el botón Setup/Help. En la pantalla aparecerá el mensaje
AU TO ST ART TO UCH ST ART
2. Presione el botón Start/Add-A-Minute.
3. Ingrese la hora de inicio.
4. Presione el botón Timer/Clock.
5. Presione los botones de número para ingresar tiempo de cocción. Pre
sione el botón Power Level en repetidas veces hasta alcanzar el nivel de
potencia deseado.
6. Presione el botón Start/Add-A-Minute.
.
-
MODO DEMOSTRACIÓN
PARA SELECCIONAR MODO DE DEMOSTRACIÓN
1. Presione cinco veces el botón Setup/Help. En la pantalla aparecerá el
mensaje
DE MO ON ? HO LD ST ART 3 SEC
2. Presione el botón Start/Add-A-Minute durante 3 segundos. En la pantalla
aparecerá el mensaje
DE MO ON
.
PARA CANCELAR MODO DE DEMOSTRACIÓN
1. Presione cinco veces el botón Setup/Help. En la pantalla aparecerá el
mensaje
DE MO OF F ? TO UCH ST ART
2. Presione el botón Start/Add-A-Minute. En la pantalla aparecerá el mensaje
DE MO OF F
.
Nota:
• La función Recalentar del Horno DrawerMicro no funciona en Modo demostración.
• El conteo regresivo de la pantalla ocurre rápidamente.
29
.
.
S
Page 64

LIMPIEZA Y CUIDADO
PARTE EXTERNA
La superficie externa cuenta con revestimiento de metal y plástico. Limpie la
parte externa con jabón suave y agua; enjuague y seque con un paño suave.
No use ningún tipo de limpiador doméstico o abrasivo.
SUPERFICIE DE ACERO INOXIDABLE
La parte externa debe ser limpiada con frecuencia con un paño húmedo
y se debe lustrar con un paño suave seco para mantener su belleza. Hay
también una variedad de productos diseñados especialmente para limpiar
y dar brillo al acabado exterior en acero del horno. Recomendamos que
aplique el limpiador en un paño suave y luego lo pase por la parte externa
del horno en lugar de aplicarlo directamente. Siga las instrucciones del
paquete cuidadosamente.
PARTE FRONTAL DEL CAJÓN
Limpie cualquier salpicadura o derrame de la ventana por ambos lados con
un paño húmedo. Las partes de metal son más fáciles de mantener si se
limpian frecuentemente con un paño húmedo. Evite el uso de limpiadores
con atomizadores o ásperos, ya que pueden manchar, vetear u opacar la
superficie de la puerta.
PANEL DE CONTROL TÁCTIL
Si desea, puede desactivar los botones antes de realizar la limpieza. Vea la
información de Bloqueo de control en la página 28 de este manual. Limpie
el panel con un paño humedecido ligeramente sólo con agua. Seque con un
paño suave. No restriegue ni use ningún tipo de limpiador químico. Cierre
la puerta y siga las instrucciones de la página 28 para apagar el Bloqueo de
control. Presione el botón Stop/Clear.
PARTE INTERNA
La limpieza es simple debido a que el calor se genera en las superficies internas; por lo tanto, no hay residuos ni derrames quemados. Para limpiar las
superficies internas, incluyendo las superficies de sellado del cajón, limpie con
un paño suave húmedo. NO USE LIMPIADORES ABRASIVOS O ÁSPEROS O
ESPONJILLAS DE FREGAR. Para suciedad más difícil de eliminar, use jabón
suave; limpie con un paño suave húmedo. No use ningún tipo de limpiador
químico para hornos.
S
30
Page 65

GUÍAS DEL Horno DrawerMicro
Retire los restos de alimentos de las guías del Horno DrawerMicro. Limpie
con un paño suave seco para eliminar restos que puedan obstaculizar al
momento de abrir o cerrar el Horno DrawerMicro.
CUBIERTA DE LA GUÍA DE ONDA
ATENCIÓN: La cubierta de la guía de onda que se encuentra en la parte superior interna del Horno DrawerMicro está hecha de mica por lo que requiere
de un cuidado especial. Conserve limpia la cubierta de la guía de onda para
asegurar un buen rendimiento del microondas. Limpie cuidadosamente con
un paño suave húmedo los restos de comida en la superficie de la cubierta
inmediatamente después de que hayan ocurrido las salpicaduras. Las salpicaduras acumuladas pueden provocar sobrecalentamiento y ocasionar humo o
posiblemente incendiarse. No retire la cubierta de la guía de onda.
ELIMINACIÓN DE OLORES
Ocasionalmente, el olor de la cocción puede permanecer en el Horno
DrawerMicro. Para eliminarlo, mezcle 1 taza de agua, el jugo de un limón y
su cáscara rallada y varios clavos enteros en una taza de medida de vidrio con
capacidad para dos tazas. Hierva por varios minutos utilizando la potencia
al 100%. Deje reposar en el Horno DrawerMicro hasta que se enfríe. Limpie
el interior con un paño suave.
31
S
Page 66

ANTES DE SOLICITAR SERVICIO
Revise la siguiente información antes de solicitar servicio. Esto puede ayudarle
a ahorrar tiempo y dinero.
PROBLEMA POSIBLE CAUSA SOLUCIÓN
1. Un componente
o todo el Horno
DrawerMicro no
funcionan.
• El cable de
alimentación del
Horno DrawerMicro
no está totalmente
conectado al
tomacorriente
eléctrico.
• Corte de energía
eléctrica.
• La caja de fusibles/el
interruptor de circuito
no funciona.
• El Horno DrawerMicro
se encuentra en Modo
demostración.
• Asegúrese de que el
cable de alimentación
está conectado al
tomacorriente.
• Verifique que las
luces de su hogar
funcionen. Solicite
servicio a la compañía
de electricidad de su
localidad.
• Reemplace la caja de
fusibles o restablezca
el interruptor de circuito.
• Vea la página 29 para
cancelar el Modo
demostración.
2. El Horno
DrawerMicro no
recalienta los
alimentos.
3. La luz del Horno
DrawerMicro
no funciona.
4. Los controles
táctiles no
funcionan.
S
• El electrodoméstico
no enciende.
• Los controles del
Horno DrawerMicro no
están correctamente
ajustados.
• El Horno DrawerMicro
se encuentra en Modo
demostración.
• La bombilla no está
bien enroscada o está
quemada.
• El Bloque de control
está encendido.
32
• Vea la SOLUCIÓN
para el PROBLEMA 1.
• Verifique si los controles están correctamente ajustados.
• Vea la página 29.
• Solicite servicio.
• Vea la página 27 para
desbloquear.
Page 67

PROBLEMA POSIBLE CAUSA SOLUCIÓN
5. La pantalla se
enciende y
apaga.
• Falla en el suministro
eléctrico.
• Presione el botón
Clear y restablezca
el reloj. Si el Horno
DrawerMicro está en
uso, debe restablecer
la función cocción.
6. Las ranuras
de ventilación
emiten vapor.
• Durante la cocción,
el vapor debe salir
del lado derecho del
orificio de ventilación.
33
S
Page 68

GARANTÍA DEL Horno DrawerMicro
El Horno DrawerMicro Viking y todas las partes y accesorios del componente, excepto como se detalla a
UN AÑO DE GARANTÍA COMPLETA
continuación*, están garantizadas de no presentar materiales o mano de obra defectuosa en uso doméstico
normal por un periodo de doce (12) meses a partir de la fecha de compra original al por menor. Viking
Range Corporation, garante, se compromete a reparar o reemplazar, a su elección, cualquier parte que
falle o se encuentre defectuosa durante el periodo de garantía.
*Los artículos de vidrio (incluyendo las bombillas), pintados y decorativos están garantizados de no presentar
materiales o mano de obra defectuosa por un periodo de noventa (90) días a partir de la fecha de compra
original al por menor. CUALQUIER DEFECTO DEBE SER INFORMADO AL DISTRIBUIDOR DE VENTA DENTRO
DE LOS NOVENTA (90) DÍAS A PARTIR DE LA FECHA DE COMPRA ORIGINAL AL POR MENOR.
GARANTÍA LIMITADA DE CINCO AÑOS
Si el tubo de magnetrón falla debido a materiales o mano de obra defectuosa en uso doméstico normal durante
el segundo al quinto año a partir de la fecha de compra original al por menor, será reparado o reemplazado,
sin cargo para dicha parte, pagando el propietario todos los demás gastos, incluyendo mano de obra.
Esta garantía se extiende al comprador original del producto que aquí se garantiza y a cada propietario
cesionario del producto durante el plazo de la garantía.
Esta garantía se aplicará a los productos comprados y ubicados aquí en los Estados Unidos y Canadá. Los
productos deberán ser adquiridos en el país donde se solicite el servicio. La mano de obra de garantía debe
ser realizada por una agencia de servicio o representante autorizado de Viking Range Corporation. La garantía
no se aplicará a daños que resulten de abuso, accidente, desastres naturales, pérdida de energía eléctrica para
el producto por cualquier razón, alteración, uso al aire libre, instalación inadecuada, operación, reparación o
servicio inadecuado del producto por alguien ajeno a una agencia de servicio o representante autorizado de
Viking Range Corporation. Esta garantía no se aplica para uso comercial. El garante no se responsabiliza por
daños resultantes o accidentales si surgen como resultado del incumplimiento de la garantía, incumplimiento
del contrato, u otro. Algunas jurisdicciones no aceptan la exclusión o limitación de daños accidentales o
resultantes, de modo que la limitación antes mencionada puede no aplicarse a usted.
El propietario debe ser responsable de una adecuada instalación, proporcionando un cuidado y mantenimiento
normal, proporcionando el Comprobante de compra cuando se le solicite, y haciendo que el electrodoméstico
esté razonablemente accesible para reparación. Si el producto o una de las partes del componente contienen
un defecto o falla durante el periodo de garantía, después de un número razonable de intentos por parte
del garante para remediar los defectos o fallas, el propietario tiene derecho a un reembolso o reemplazo
del producto o de la parte o partes del componente. La responsabilidad el garante en cualquier reclamo
de cualquier tipo, con respecto a los productos o servicios que aquí se cubren, no deberá en ningún caso
exceder el precio de los productos o servicio de dicha parte que origine el reclamo.
SERVICIO DE GARANTÍA:
sentante o agente de servicio de Viking Range Corporation autorizado por la fábrica. Se brindará el servicio
durante las horas normales de oficina, y la mano de obra realizada en horas extras o tarifas premium no
estarán cubiertas por esta garantía. Para obtener el servicio de garantía, comuníquese con el distribuidor
al que le compró el producto, un agente de servicio autorizado de Viking Range Corporation, o con Viking
Range Corporation. Proporcione el modelo y número de serie y la fecha de compra original. Para conocer el
nombre de su agencia de servicio autorizada de Viking Range Corporation más cercana, llame al distribuidor
al que le compró el producto o a Viking Range Corporation.
IMPORTANTE: Conserve el comprobante de compra original para establecer el periodo de garantía.
La devolución de la Tarjeta de registro del propietario no es una condición de cobertura de la garantía. Sin
embargo, debe devolver la Tarjeta de registro del propietario para que Viking Range Corporation pueda
contactarse con usted en caso de surgir alguna pregunta o seguridad que pueda afectarlo.
Cualquier garantía implícita de comerciabilidad y adaptación aplicable a los elementos o partes descritas
anteriormente está limitada en duración al periodo de cobertura de las garantías limitadas escritas expresas
aplicables establecidas anteriormente. Algunas jurisdicciones no permiten limitaciones sobre cuánto tiempo
dura una garantía implícita, de modo que la limitación antes mencionada puede no aplicarse a usted. Esta
garantía le otorga derechos legales específicos y también puede tener otros derechos que pueden variar
de jurisdicción en jurisdicción.
Bajo los términos de esta garantía, el servicio debe ser realizado por un repre-
Viking Range Corporation
111 Front Street
Greenwood, Mississippi (MS) 38930 USA (888) 845-4641
Para más información del producto, llame al 1-888-VIKING1 (845-4641)
Especificaciones sujetas a cambios sin previo aviso.
o visite el sitio Web de Viking en vikingrange.com
S
34
Page 69

Four DrawerMicro
MAN UEL D’U TIL ISATI ON E T D’ENT RET IEN
™
F
Page 70

INFORMATIONS DE DÉPANNAGE
Si du dépannage est requis :
1. Appeler votre revendeur ou une société de dépannage agréée. Ses
coordonnées peuvent être obtenues du revendeur ou distributeur
de votre région.
2. Préparer les informations suivantes à l’avance :
a. Numéro de modèle
b. Numéro de série
c. Date d’achat
d. Nom du revendeur où a eu lieu l’achat
3. Décrire clairement le problème rencontré.
En cas d’impossibilité d’obtention du nom d’une société de dépannage, ou
si les ennuis continuent, contacter directement Viking Range Corporation au
(888) 845-4641 ou écrire à :
VIKING RANGE CORPORATION
PREFERRED SERVICE
111 Front Street
Greenwood, Mississippi (MS) 38930 USA
Enregistrer les informations indiquées ci-dessous. Elles seront nécessaires
si vous avez besoin d’un dépannage. Les numéros de modèle et de série
de votre micro-ondes sont situés sur le côté gauche de sa cavité sur une
étiquette signalétique.
Numéro de modèle. ______ Numéro de série
Date d’achat.____________Date d’installation
Nom du revendeur ____________________________________________________________
Adresse ______________________________________________________________________
______________________________________________________________________________
Si le dépannage demande l’installation de pièces, n’utiliser que des pièces
autorisées pour conserver la protection de la garantie.
VEUILLEZ CONSERVER CE MANUEL COMME RÉFÉRENCE ULTÉRIEURE
F
2
Page 71

PRÉCAUTIONS POUR ÉVITER LE
RISQUE D’UNE EXPOSITION
AUX MICRO-ONDES
(a) Ne pas essayer de faire fonctionner ce four lorsque que la porte est
ouverte, car le fonctionnement avec la porte ouverte pourrait entraîner
une exposition dangereuse aux micro-ondes. Il est important que le
système de fermeture de sûreté ne soit pas désamorcé ou modifié.
(b) Ne placer aucun objet entre le cadre et la porte du four et ne pas
laisser de saleté ou de traces de produits de nettoyage s’accumuler
sur les surfaces d’étanchéité.
(c) Ne pas utiliser le four s’il est endommagé. Il est particulièrement
important que la porte ferme correctement et que les éléments
suivants ne présentent pas de défectuosités : (1) porte (gauchie),
(2) charnières et verrous (brisés ou desserrés), (3) joints et surfaces
d’étanchéité de la porte.
(d) Le four ne doit être réglé ou réparé que par du personnel d’entretien
qualifié.
3
F
Page 72

TABLE DES MATIÈRES
2 INFORMATIONS DE
DÉPANNAGE
3 PRÉCAUTIONS POUR ÉVITER
LE RISQUE D’UNE EXPOSITION
AUX MICRO-ONDE
4 TABLE DES MATIÈRES
5-6 IMPORTANTES CONSIGNESDE
SÉCURIT
7-13 INFORMATIONS
INCONTOURNABLE
7 SUR LE DÉBALLAGE ET
L’ÉVALUATION DE VOTRE
Four DrawerMicro
7-8 À PROPOS DE VOTRE
Four DrawerMicro
8 À PROPOS DE LA CUISSON AU
MICRO-ONDES
9-10 À PROPOS DES USTENSILES ET
DES COUVERTURES
10 À PROPOS DES ENFANTS ET DU
MICRO-ONDES
11 À PROPOS DE LA SÉCURITÉ
12-13 PRÉPARATION DE DIVERS
ALIMENTS
14-15 NOMENCLATURE DES PIÈCES
14 Four DrawerMicro
15 PAVÉ MENU
16-17 AVANT DE FAIRE
FONCTIONNER L’APPAREI
16 POUR RÉGLER L’HEURE
16 TIMER (MINUTEUR)
17 ARRÊT/REMISE À ZÉRO
17 OUVRIR OU FERMER LE
Four DrawerMicro
18-27 CUISSON AU Four DrawerMicro
18 CUISSON MINUTÉE
18 RÉGLER L’ALLURE
19 RÉGLAGES À CAPTEUR
É
S
S
L
20-21 SENSOR POPCORN/
SENSOR REHEAT
(MAÏS SOUFFLÉ À CAPTEUR /
RÉCHAUFFAGE À CAPTEUR)
21-23 SENSOR COOKING
(CUISSON À CAPTEUR)
24-25 DEFROST (DÉGIVRAGE)
26 MANUAL DEFROST
(DÉGIVRAGE MANUEL)
27 REHEAT (RÉCHAUFFAGE)
28 AUTRES
CARACTÉRISTIQUE
28 KEEP WARM
(GARDE AU CHAUD)
28-29 CUISSON À SÉQUENCES
MULTIPLES
29 HELP (AIDE)
29 ADD-A-MINUTE
29 RÉGLAGE PLUS DE TEMPS/
MOINS DE TEMPS
30 CONTROL LOCK
(VERROUILLAGE DES
COMMANDES)
30 SETUP/HELP
32-33 NETTOYAGE ET ENTRETIEN
32 EXTÉRIEUR
32 SURFACE EN ACIER
INOXYDABLE
32 FACE AVANT DU TIROIR
32 TABLEAU DE COMMANDES
32 INTÉRIEUR
33 GLISSIÈRE DU
Four DrawerMicro
33 COUVERCLE DU GUIDE
D’ONDES
33 DÉSODORISATION
34-35 AVANT D’APPELER UN
TECHNICIE
36 GARANTIE DU
Four DrawerMicro
N
S
F
4
Page 73

IMPORTANTES CONSIGNES
DE SÉCURITÉ
Certaines précautions de sécurité devraient toujours être prises lorsqu’on se
sert d’appareils électriques :
AVERTISSEMENT — Pour réduire les risques de brûlures, de chocs électriques, de feu, de blessures ou d’exposition aux micro-ondes :
1. Lisez toutes les instructions avant d’utiliser l’appareil.
2. Lisez et suivez les “PRÉCAUTIONS POUR ÉVITER UNE EXPOSITION
ÉVENTUELLE À UNE ÉNERGIE PAR MICRO-ONDES EXCESSIVE ” à la
page 3.
3. Cet appareil doit être mis à la terre convenablement. Consultez les Instructions d’installation incluses dans l’emballage pour les modalités à
suivre pour la mise à la terre.
4. Installez ou situez l’appareil seulement selon les modalités décrites dans
le Manuel d’installation.
5. Certains produits tels que les œufs entiers et les récipients hermétiquement fermés (par exemple des bocaux en verre) sont aptes à s’exploser
et ne devraient pas être utilisés dans le Four DrawerMicro.
6. N’utilisez cet appareil qu’aux fins prévues telles que décrites dans ce
Manuel. N’utilisez pas de produits chimiques ou de vapeurs corrosifs
dans cet appareil. Ce Four DrawerMicro est spécifiquement conçu pour
la cuisson, le réchauffage et le séchage de la nourriture. Il n’est pas conçu
pour un usage industriel ou de laboratoire.
7. Comme c’est le cas avec tout appareil électroménager, il faut surveiller
les enfants de près quand ils l’utilisent.
8. Ne faites pas fonctionner cet appareil si le cordon ou la fiche en est endommagé, s’il ne marche pas comme il faut, s’il a été endommagé ou
s’il est tombé sur terre.
9. Le service de cet appareil ne devrait être effectué que par un technicien qualifié. Contactez votre agence de service agréée Viking pour
l’évaluation, la réparation ou le réglage de l’appareil.
10. Ne recouvrez ni ne bouchez aucune ouverture ou sortie d’air de
l’appareil.
11. Ne rangez pas cet appareil dehors. N’utilisez pas ce produit auprès de
l’eau, par exemple auprès d’un évier de cuisine, dans un sous-sol humide,
auprès d’une piscine ou dans un milieu semblable.
12. Gardez le cordon éloigné des surfaces chauffées.
13. Ne montez sur ni ne vous asseyez pas sur le Four DrawerMicro.
14. Assurez-vous d’éloigner les doigts et d’autres objets de l’ouverture du
Four DrawerMicro lorsque ce dernier est fermé.
5
F
Page 74

15. Gardez les doigts et les vêtements éloignés des glissières du tiroir en
ouvrant et en fermant le Four DrawerMicro. Sinon, vous risquez de les
attraper dans les glissières lors de fermer le Four DrawerMicro.
16. Avant de fermer le Four DrawerMicro, assurez-vous que l’aliment et le
récipient ne dépassent pas la hauteur du tiroir. Utilisez comme référence
la hauteur des parois du Four DrawerMicro.
17. Lors de nettoyer les surfaces d’étanchéité qui entrent en contact sur la
fermeture du tiroir, utilisez seulement du savon ou un détersif doux non
abrasif et une éponge ou un torchon doux. Consultez les instructions de
nettoyage à la page 32.
18. Pour réduire le risque de feu dans la cavité du Four DrawerMicro:
a. Faites attention à ne pas trop cuire l’aliment. Surveillez de près
l’appareil lorsqu’il y a du papier, du plastique ou d’autres matières
combustibles dans le Four DrawerMicro pour faciliter la cuisson.
b. Enlevez les ligatures en métal des sacs en papier ou en plastique
avant de mettre le sac dans le Four DrawerMicro.
c. Si l’objet dans le Four DrawerMicro prend feu, gardez fermée la porte
du Four DrawerMicro, mettez hors tension le micro-ondes et coupez le
courant à partir du panneau de fusibles ou du boîtier disjoncteurs.
d. N’utilisez pas le Four DrawerMicro aux fins de rangement. Ne lais-
sez pas de produits de papier, d’ustensiles ou d’aliments dans le
Four DrawerMicro quand vous ne l’utilisez pas.
19. Des liquides tels que l’eau, le café ou le thé sont aptes à se surchauffer
au-delà du point d’ébullition sans qu’ils paraissent chauds, à cause de la
tension de surface du liquide. En d’autres mots, on ne voit pas toujours
des bulles ou d’autres signes d’ébullition lors de retirer le récipient du
Four DrawerMicro. IL SE PEUT QUE LE LIQUIDE TRÈS CHAUD DÉBORDE
SOUDAINEMENT LE RÉCIPIENT LORSQUE ON Y INSÈRE UNE CUILLER
OU UN AUTRE USTENSILE.
Pour réduire le risque de blessures personnelles:
a. Ne surchauffez pas le liquide.
b. Remuez le liquide avant la cuisson et à mi-cuisson.
c. N’utilisez pas de récipients droits à col mince. Utilisez un récipient à
col large.
d. Après la cuisson ou le réchauffage, laissez reposer le récipient dans
le Four DrawerMicro pour au moins 20 secondes avant de le retirer
du tiroir.
e. Faites très attention lors d’insérer une cuiller ou un autre ustensile
dans le récipient.
20. Si la lampe du Four DrawerMicro ne marche pas, contactez un AGENT
DE SERVICE AGRÉÉ VIKING.
CONSERVER CE MODE D’EMPLOI
F
6
Page 75

INFORMATIONS INCONTOURNABLES
SUR LE DÉBALLAGE ET L’ÉVALUATION DE VOTRE
Four DrawerMicro
1. Retirez tout le matériau d’emballage
qui se trouve dans le Four DrawerMicro.
N’ENLEVEZ PAS LE COUVERCLE DU
GUIDE D’ONDES, qui se trouve sur le
dessus du Four DrawerMicro.
2. Enlevez l’autocollant descriptif, s’il y
en a un. Vérifiez le tiroir pour des dommages éventuels, tels un mauvais alignement ou un tiroir tordu, des surfaces
d’étanchéité endommagées sur le tiroir
et sur les surfaces, des glissières cassées
ou lâches et des enfoncements dans la
cavité ou sur la face avant du tiroir. En cas de dommages, n’utilisez pas
le Four DrawerMicro : contactez votre AGENT DE SERVICE AGRÉÉ VIKING.
PARASITES À LA RADIO OU À LA TV
Si le Four DrawerMicro provoque des parasites à votre radio ou à votre téléviseur, vérifiez que le Four DrawerMicro est branché sur un circuit électrique
différent et éloignez la radio ou le téléviseur autant que possible du tiroir, ou
bien vérifiez le positionnement et le signal de l’antenne réceptrice.
Surface
d’étanchéité
Couvercle
du guide
d’ondes
Surface
d’étanchéité
Cavité du
four
À PROPOS DE VOTRE Four DrawerMicro
Il faut TOUJOURS avoir un aliment dans le Four DrawerMicro lorsqu’il fonctionne, pour absorber l’énergie par micro-ondes.
Il ne faut pas bloquer la sortie d’air sur le dessous du Four DrawerMicro.
Lorsque le micro-ondes fonctionne, il se peut que de la vapeur échappe du
côté droit de cette sortie d’air.
Lors d’utiliser le Four DrawerMicro à des allures en dessous de 100%, il se
peut que vous entendiez le fonctionnement cyclique du magnétron. Il est
normal que l’extérieur du Four DrawerMicro soit chaud au toucher pendant
la cuisson ou le réchauffage.
La condensation est normale pendant la cuisson au micro-ondes. L’humidité
ambiante et la teneur en humidité de l’aliment influeront sur le niveau de
condensation dans le Four DrawerMicro. En règle générale, les aliments
recouverts produiront moins de condensation que des aliments non
recouverts.
Le Four DrawerMicro est seulement pour préparer des aliments. Il ne faut
pas l’utiliser pour sécher des vêtements ou des journaux.
7
F
Page 76

Votre Four DrawerMicro a une puissance nominale de 950 watts selon la procédure d’épreuve IEC. Quand vous suivez des recettes ou des modes d’emploi sur
l’emballage de l’aliment, vérifiez l’aliment une minute ou deux avant l’échéance
du temps de cuisson minimum, puis ajoutez du temps au besoin.
Si l’on ouvre ou ferme rapidement le Four DrawerMicro, il se peut que
l’aliment soit déversé ou renversé. Pour nettoyer, consultez la section
d’entretien et de nettoyage à la page 33.
À PROPOS DE LA CUISSON AU MICRO-ONDES
• Disposez soigneusement l’aliment à cuire. Les parties les plus épaisses
devraient faire face au pourtour du plat de cuisson.
• Faites très attention au temps de cuisson. Prévoyez le plus court temps
de cuisson indiqué puis ajoutez plus de temps au besoin. Des aliments
trop cuits risquent de prendre feu.
• Recouvrez les aliments pendant la cuisson. Consultez la recette ou un
livre de cuisine pour des astuces: des serviettes en papier, du papier cire,
du film plastique allant au micro-ondes ou bien un couvercle. De telles
couvertures évitent les éclaboussures et assurent une cuisson uniforme.
• Recouvrez de petits morceaux de feuille d’aluminium toute partie mince
de viande ou de volaille pour prévenir une cuisson excessive avant que
la cuisson des parties plus grosses ne s’achève.
• Remuez l’aliment du pourtour vers le centre du plat, une ou deux fois
pendant la cuisson, si possible.
• Pour une cuisson plus rapide d’aliments tels que le poulet ou les galettes
de bœuf, retournez les morceaux une fois pendant la cuisson. Des aliments volumineux, tels les rôtis, doivent être retournés au moins une fois
pendant la cuisson.
• Réarrangez des aliments comme des boules de viande à mi-cuisson : de
fond en comble et de droite à gauche.
• Prévoyez un temps de repos. Retirez l’aliment du Four DrawerMicro et
remuez-le, si possible. Laissez reposer l’aliment à couvert pour permettre
l’achèvement de la cuisson et pour prévenir une cuisson excessive.
• Vérifiez la bonne cuisson. Cherchez des signes qui indiquent que la bonne
température de cuisson a été atteinte.
Des signes d’une bonne cuisson incluent:
- De la vapeur échappe sur tout l’aliment, pas seulement aux bords.
- Le milieu du fond du plat est très chaud au toucher.
- Les articulations de cuisse de la volaille se déplacent librement.
- Il n’y a pas de traces de rose dans la viande ou dans la volaille.
- Le poisson est opaque et s’émiette facilement sous une fourchette.
F
8
Page 77

À PROPOS DES USTENSILES ET DES COUVERTURES
Il n’est pas nécessaire de se procurer toute une batterie de cuisine. En effet, vous pouvez facilement utiliser au Four DrawerMicro des ustensiles qui
se trouvent déjà dans votre batterie de cuisine actuelle. Assurez-vous que
l’ustensile ne touche pas les parois du tiroir pendant la cuisson.
Utilisez les ustensiles suivants pour la cuisson et le réchauffage au microondes:
• vitrocéramique (Pyroceram®), tel que Corningware®.
• verre résistant à la chaleur (Pyrex®)
• plastiques allant au micro-ondes
• assiettes en papier allant au micro-ondes
• poterie, grès et porcelaine allant au micro-ondes
• plat brunisseur (ne dépassez pas le temps de préchauffage recommandé. Suivez les instructions du fabricant.)
Pour réchauffer des aliments pauvres en gras et en sucre, on peut utiliser
pour un court temps les articles suivants:
• bois, paille, osier
N’UTILISEZ PAS
• des plats ou des moules en métal
• des plats ayant une décoration en métal
• du verre qui n’est pas résistant à la chaleur
• des récipients en plastique qui ne vont pas au micro-ondes (pots à
margarine)
• des produits de papier recyclé
• des sacs en papier
• des sacs d’entreposage des aliments
• des ligatures en métal
Si vous voulez vérifier si un plat va au micro-ondes, mettez le plat vide dans
le four à micro-ondes et faites fonctionner le four sur puissance élevée pour
30 secondes. Un plat qui devient très chaud ne devrait pas être utilisé au
micro-ondes.
Les articles suivants sont excellents pour recouvrir les aliments au microondes:
• Les serviettes en papier sont idéales pour recouvrir les aliments pendant le réchauffage et pour absorber le gras quand on prépare du
bacon.
• Le papier cire sert à la cuisson et au réchauffage.
• Le film plastique dont l’emballage indique qu’il va au micro-ondes
9
F
Page 78

peut être utilisé pour la cuisson et le réchauffage. NE PERMETTEZ
PAS au film plastique d’entrer en contact avec l’aliment. Faites des
fentes pour laisser échapper la vapeur.
• Des couvercles allant au micro-ondes sont un bon choix car ils gardent
la chaleur auprès de l’aliment et en accélèrent la cuisson.
• Les sacs de cuisson sont très bons pour de gros morceaux de viande
qui doivent être attendries. N’UTILISEZ PAS de ligatures en métal.
Rappelez qu’il faut faire des fentes dans le sac pour laisser échapper
la vapeur.
L’utilisation de la feuille d’aluminium dans le Four DrawerMicro:
• On peut utiliser de petits morceaux non froissés de feuille d’aluminium,
mis à plat sur l’aliment, pour protéger des parties qui se décongèlent
ou se chauffent trop rapidement.
• La feuille d’aluminium doit être éloignée d’au moins un pouce de
toute surface du Four DrawerMicro.
ACCESSOIRES Il y a beaucoup d’accessoires pour micro-ondes en vente
dans le commerce. Réfléchissez bien avant d’en acheter afin de vous procurer
les meilleurs accessoires pour répondre à vos besoins. Un thermomètre allant au micro-ondes vous aidera à déterminer l’état de cuisson des aliments
et à vous assurer que la bonne température est atteinte. Viking décline
toute responsabilité des dommages éventuels au Four DrawerMicro lors de
l’utilisation de tels accessoires.
À PROPOS DES ENFANTS ET DU MICRO-ONDES
Les enfants de moins de 7 ans devraient utiliser le Four DrawerMicro seulement en présence d’un adulte responsable. Pour les enfants d’entre 7 et 12
ans, il faut y avoir un adulte responsable dans la même pièce. Pour le faire
fonctionner, l’enfant devrait être capable d’atteindre le Four DrawerMicro
sans problème.
En aucun temps on ne devrait permettre aux gens de s’appuyer sur ou de
balancer sur le Four DrawerMicro.
Il faut enseigner aux enfants toutes les précautions de sécurité: utiliser des
poignées, retirer soigneusement les couvercles ou les couvertures, faire très
attention aux emballages qui rendent croustillant l’aliment, car ils peuvent
devenir très chauds.
Ne vous imaginez pas que, puisque l’enfant a maîtrisé un aspect de la cuisson, il ou elle peut tout faire dans la cuisine.
Les enfants doivent apprendre que le Four DrawerMicro n’est pas un jouet.
Consultez la page 30 pour en savoir plus sur la fonction de verrouillage des
commandes.
F
10
Page 79

À PROPOS DE LA SÉCURITÉ
• Vérifiez les aliments pour vous assurer qu’ils ont atteint la température
recommandée par Santé Canada.
TEMP FOOD
160˚F (71˚C) Pour le porc non congelé, la viande hachée, la viande
blanche de la volaille (sans os), le poisson, les fruits
de mer, les plats aux œufs et les mets surgelés prêts à
manger.
165˚F (74˚C)
Pour des restes de repas, des mets réfrigérés prêts à
réchauffer, de la charcuterie et des mets ‘‘frais’’ à emporter.
170˚F (77˚C)
180˚F (82˚C)
Pour la viande blanche de la volaille.
Pour la viande noire de la volaille.
Pour vérifier si un aliment est bien cuit, insérez un thermomètre à viande
dans une partie grosse ou dense, éloignée du gras et des os. Il ne faut JAMAIS laisser le thermomètre dans l’aliment pendant la cuisson, sauf s’il est
approuvé pour une utilisation au micro-ondes.
• Utilisez TOUJOURS des poignées pour éviter de vous faire brûler lors de
manipuler les ustensiles qui entrent en contact avec des aliments chauds.
Assez de chaleur de l’aliment peut passer par les ustensiles pour causer
des brûlures de la peau.
• Évitez de vous faire brûler par de la vapeur en éloignant le visage et les
mains de l’échappement de la vapeur. Soulevez lentement la partie la
plus éloignée du couvercle ou de la couverture et ouvrez soigneusement
les sacs de maïs soufflé et les sacs de cuisson en les tenant éloignés du
visage.
• Surveillez le Four DrawerMicro pendant qu’il fonctionne et vérifiez fréquemment le progrès de la cuisson pour éviter de trop cuire l’aliment.
• N’utilisez JAMAIS le Four DrawerMicro pour ranger des livres de cuisine
ou d’autres articles.
• Sélectionnez, rangez et manipulez prudemment les aliments afin d’en
conserver la qualité et de réduire la propagation de maladies d’origine
alimentaire.
• Gardez propre le couvercle du guide d’ondes. Les résidus alimentaires
peuvent provoquer des décharges disruptives et/ou des incendies.
11
F
Page 80

PRÉPARATION DE DIVERS ALIMENTS
ALIMENT À FAIRE À NE PAS FAIRE
Œufs,
saucisses,
fruits &
légumes
• Percez les jaunes d’œuf
avant la cuisson pour
éviter des “explosions”.
• Percez la peau des
pommes de terre, des
pommes, des courges,
des chiens chauds et des
saucisses pour permettre
à la vapeur d’échapper.
• Faire cuire les œufs
en coque.
• Réchauffer des œufs
entiers.
• Sécher des noix
ou des graines en
coquille.
Maïs soufflé • Utilisez des sacs de maïs
soufflé spécialement faits
pour micro-ondes.
• Écoutez pendant la
cuisson du maïs soufflé :
quand les éclatements
sont espacés de 1 ou 2
secondes, la maïs soufflé
est prêt. Ou bien, utilisez
la touche spéciale Maïs
soufflé à capteur.
Nourriture
pour bébé
• Transférez la nourriture
pour bébé dans un
petit bol et réchauffezla soigneusement en le
remuant souvent. Vérifiez
la température avant de
servir à bébé.
• Remettez les biberons
sur les bouteilles après le
réchauffage et secouez
bien. Faites le ‘test du
poignet’ avant de donner
à bébé.
• Mettre du maïs
soufflé en des sacs
en papier ordinaires
ou en des bols en
verre.
• Dépasser le temps
maximum de
cuisson indiqué sur
l’emballage.
• Réchauffer des
bouteilles jetables.
• Réchauffer des
bouteilles avec le
biberon.
• Réchauffer la
nourriture pour
bébé dans le bocal
original.
F
12
Page 81

ALIMENT À FAIRE À NE PAS FAIRE
Général • Découpez en morceaux
les pâtisseries garnies
après la cuisson pour
laisser échapper la vapeur
et pour éviter les brûlures.
• Remuez énergiquement
les liquides avant et après
la cuisson pour éviter des
“éruptions”.
• Utilisez un bol profond lors
de faire cuire des liquides
et des céréales pour éviter
des déversements.
• L’aliment ne devrait pas
dépasser la hauteur du
Four DrawerMicro. Utilisez
• Réchauffer ou faire
cuire des aliments en
des bocaux fermés
ou en des récipients
hermétiques.
• Faire des conserves
au micro-ondes, car
il se peut que les
bactéries ne soient
pas détruites.
• Faire la grande
friture.
• Sécher du bois, des
courges, des herbes
ou des papiers
humides.
la hauteur des parois du
tiroir comme référence.
13
F
Page 82

NOMENCLATURE DES PIÈCES
Four DrawerMicro
1
2
3
8
4
5
6
7
1. Tableau de commandes
2. Couvercle du guide d’ondes NE PAS ENLEVER
3. Pavé Menu du Four DrawerMicro
4. Surfaces d’étanchéité du tiroir
5. Lampe du tiroir
6. Glissières du Four DrawerMicro
7. Sortie d’air
8. Plaque signalétique : ouvrir complètement le
Four DrawerMicro. L’étiquette se trouve juste
derrière la paroi arrière de la cavité de l’appareil,
face imprimée perpendiculaire à la surface plane.
F
14
Page 83

PAVÉ MENU
29-30 20 20-21 21-23
30 28 24-25 27
25
14 16
17
16
Les numéros à côté de l’illustration du pavé de touches indiquent les pages sur
lesquelles vous trouverez des descriptions et des informations sur l’utilisation.
15
F
Page 84

AVANT DE FAIRE FONCTIONNER L’APPAREIL
Avant de faire fonctionner votre nouveau Four DrawerMicro, assurez-vous
de lire et de comprendre à fond ce manuel d’utilisateur.
• Avant la première utilisation du Four DrawerMicro, procédez comme
suit:
CL OCK
EN JOY
1. Branchez le Four DrawerMicro.
TO UCH CL EAR AN D TO UCH
2. Appuyez sur la touche Stop/Clear.
3. Réglez l’heure.
POUR RÉGLER L’HEURE
1. Appuyez sur la touche Timer/Clock et sur la touche numéro 2.
2. Appuyez sur les touches numériques pour entrer l’heure juste puis appuyez
de nouveau sur la touche Timer/Clock.
Cette horloge utilise un système de 12 heures. Si vous essayez d’entrer une
heure invalide,
de nouveau l’heure juste.
• En cas de panne de courant au Four DrawerMicro,
WA VE TO UCH CL EAR
tence après que le courant sera rétabli. Si cela arrive pendant la cuisson,
le programme de cuisson sera effacé. L’heure sera également effacée.
Appuyez sur la touche Stop/Clear et réglez de nouveau l’heure juste.
Remarque:
• Il est possible de programmer le Four DrawerMicro avec le tiroir ouvert,
excepté la commande Start/Add-A-Minute.
s’affiche. Appuyez sur la touche Stop/Clear et réglez
ER ROR
AN D TO UCH
CL OCK
YO UR
MI CRO-
s’affiche.
s’affiche.
:
EN JOY YO UR
s’affichera par intermit-
MI CRO-
WA VE
TIMER (MINUTEUR)
1. Appuyez sur la touche Timer/Clock et sur la touche numéro 1.
2. Entrez le temps voulu.
3. Appuyez de nouveau sur la touche Timer/Clock.
Pour annuler le minuteur, appuyez sur Stop/Clear.
F
16
Page 85

ARRÊT/REMISE À ZÉRO
Appuyez sur la touche Stop/Clear pour:
1. Effacer un programme en cas d’erreur.
2. Annuler le minuteur.
3. Arrêter temporairement le fonctionnement du tiroir au micro-ondes pen
dant la cuisson minutée.
4. Afficher l’heure.
5. Annuler un programme pendant la cuisson; appuyez deux fois pour la
cuisson minutée.
OUVRIR OU FERMER LE Four DrawerMicro
Il faut toujours appuyer sur les touches OPEN ou CLOSE sur le tableau de
commandes pour ouvrir ou fermer le Four DrawerMicro.
Ne poussez ni ne tirez manuellement le Four DrawerMicro, sauf en cas
d’urgence, tel une panne de courant. S’il s’avère nécessaire, poussez ou
tirez lentement.
-
17
F
Page 86

CUISSON AU Four DrawerMicro
CUISSON MINUTÉE
On peut programmer le Four DrawerMicro pour 99 minutes 99 secondes
(99.99). Entrez toujours les secondes après les minutes, même s’il s’agit de
deux zéros.
• Supposons que vous vouliez faire une cuisson de 5 minutes à 100%.
1. Entrez le temps de cuisson 500.
2. Pour une cuisson à 100% (puissance élevée), appuyez sur la touche Start/
Add-A-Minute.
RÉGLER L’ALLURE
Il y a 11 allures préréglées.
Les allures plus basses exigent un plus long temps de cuisson, recommandé
pour des aliments tels que le fromage, le lait et des rôtis qui exigent une
longue cuisson lente. Consultez un livre de cuisine ou des recettes pour des
recommandations spécifiques.
• Supposons que vous vouliez faire un dégivrage de 5 minutes à 30%.
1. Entrez le temps de dégivrage 500.
2. Appuyez 8 fois sur la touche Power Level.
3. Appuyez sur la touche Start/Add-A-Minute.
APPUYER SUR
LA TOUCHE
POWER LEVEL
POURCENTAGE
APPROXIMATIF DE
LA PUISSANCE
AUXINDICATIONS
DES NIVEAUX DE
PUISSANCE
Power Level x 1 100% Puissance élevée
Power Level x 2 90%
Power Level x 3 80%
Power Level x 4 70% Puissance mi-élevée
Power Level x 5 60%
Power Level x 6 50%
Puissance moyenne
Power Level x 7 40%
Power Level x 8 30% Puissance mi-basse/Dégivrage
Power Level x 9 20%
Power Level x 10 10% Puissance basse
Power Level x 11 0%
F
18
Page 87

RÉGLAGES À CAPTEUR
Le Capteur Viking est un dispositif à semi-conducteur qui détecte la vapeur
(l’humidité) émise par l’aliment pendant la cuisson. Le capteur règle le temps
et l’allure de cuisson en fonction de l’aliment et de la quantité.
Utilisation Des Réglages À Capteur :
1. Après avoir branché le Four DrawerMicro, attendez 2 minutes avant
d’utiliser un des réglages à capteur.
2. Assurez-vous que l’extérieur de l’ustensile de cuisson et l’intérieur du
Four DrawerMicro sont secs. Essuyez les traces d’humidité avec un torchon
sec ou une serviette en papier.
3. Le capteur marche avec des aliments à leur température d’entreposage
normale. Par exemple, le maïs soufflé serait à température ambiante.
4. On peut combiner les réglages à capteur avec les réglages plus de temps/
moins de temps. Consultez la page 29.
5. Pour des quantités en dessous ou en dessus de celles indiquées dans le
tableau, suivez les indications d’un livre de cuisine à micro-ondes.
6. Pendant la première étape de la cuisson à capteur, le nom de l’aliment
s’affichera. N’ouvrez le Four DrawerMicro ni n’appuyez sur Stop/Clear
pendant cette étape du cycle. Sinon, le processus de mesure de vapeur
sera interrompu. Si cela se passe, un message d’erreur s’affichera. Pour
continuer la cuisson, appuyez sur la touche Stop/Clear et poursuivez la
cuisson manuellement.
Lorsque le capteur aura détecté la vapeur émise par l’aliment, le temps
de cuisson/de réchauffage qui reste s’affichera. Il est permissible d’ouvrir
le Four DrawerMicro pendant que ce temps restant s’affiche. Pendant ce
temps, on peut remuer ou assaisonner l’aliment si l’on désire.
7. Si le capteur ne détecte pas de vapeur lors de préparer du maïs soufflé,
le four arrêtera de fonctionner et affichera l’heure. Si le capteur n’arrive
pas à détecter la vapeur pendant la cuisson d’autres aliments,
s’affichera et le four arrêtera de fonctionner.
8. Vérifiez la température de l’aliment après cuisson. S’il faut toujours du
temps supplémentaire, poursuivez la cuisson manuellement.
9. Chaque aliment s’accompagne d’une astuce. Appuyez sur la touche
Setup/Help lorsque le témoin HELP est allumé à l’affichage.
ER ROR
Couvrir Les Aliments :
Pour certains aliments, la cuisson marche mieux si l’on les recouvre. Utilisez
l’article de couverture recommandé dans les tableaux. Vous pouvez accéder
aux astuces en appuyant sur la touche Setup/Help. Consultez la page 26.
1. Couvercle de casserole.
2. Film plastique: utilisez du film plastique recommandé pour utilisation au
19
F
Page 88

micro-ondes. Recouvrez le plat de cuisson de manière pas trop serrée et
laissez environ ½ pouce découvert pour permettre à la vapeur d’échapper.
Le film plastique ne devrait pas entrer en contact avec l’aliment.
3. Papier cire: recouvrez le plat complètement; pliez l’excédent de papier
sous le plat pour le tenir en place. Si le plat est plus large que le papier
et qu’il faille utiliser deux morceaux de papier, prévoyez un recouvrement
d’au maoins un pouce des deux morceaux de papier utilisés.
Faites attention en enlevant les couvercles et les couvertures : faites en sorte
que la vapeur s’échappe au bout le plus éloigné de votre corps.
SENSOR POPCORN/SENSOR REHEAT
(MAÏS SOUFFLÉ À CAPTEUR/
RÉCHAUFFAGE À CAPTEUR)
Il est possible de réchauffer des aliments et de préparer du maïs soufflé sans
avoir à calculer le temps ou l’allure de cuisson.
Appuyez sur la touche Sensor Reheat ou Sensor Popcorn et sur la touche
Start/Add-A-Minute.
Une fois que le capteur aura détecté la vapeur émise par l’aliment, le temps
restant de cuisson ou de réchauffage s’affichera.
Remarque:
• Le réglage de Maïs soufflé à capteur offre 2 choix. Suivez les indications
dans l’affichage pour sélectionner la bonne option.
TABLEAU SENSOR POPCORN/SENSOR REHEAT
ALIMENT QUANTITÉ DÉMARCHE À SUIVRE
Maïs soufflé
à capteur
F
Seulement
un paquet à
la fois
2,85 - 3,5 oz.
(nature/nature
léger)
1.2 - 1.75 oz.
(Mini/Snack)
N’utilisez que du maïs à éclater spécifiquement emballé pour la cuisson au microondes. Essayez plusieurs marques pour
décider laquelle vous préférez. N’essayez
pas de faire éclater les grains qui refusent
d’éclater.
Appuyez une fois sur la touche Sensor
Popcorn.
Appuyez deux fois sur la touche Sensor
Popcorn.
20
Page 89

TABLEAU SENSOR POPCORN/SENSOR REHEAT (suite)
ALIMENT QUANTITÉ DÉMARCHE À SUIVRE
Réchauffage
à capteur
4 - 36 oz. Mettez l’aliment dans un plat ou dans une
casserole un peu plus grand que l’aliment
à réchauffer. Aplatissez l’aliment si possible.
Recouvrez d’un couvercle, de film plastique
ou de papier cire. Utilisez un couvercle ou
du film plastique avec des quantités plus
importantes d’aliments denses tels que les
ragoûts. Après le réchauffage, remuez bien,
si possible. Remettez le couvercle ou le film
plastique et laissez reposer, à couvert, pour
2 à 3 minutes. L’aliment doit être très chaud.
Sinon, continuez le réchauffage avec une
allure variable.
SENSOR COOKING (CUISSON À CAPTEUR)
1. Appuyez une fois sur la touche Sensor Cook.
2. Consultez le pavé Menu. Sélectionnez l’aliment désiré en appuyant sur la
touche numérique. Ex: appuyez sur 5 pour des pommes de terre cuites
au four.
3. Appuyez sur la touche Start/Add-A-Minute.
Remarque:
• Pour faire cuire ou pour réchauffer des quantités en dessous ou en des
sus de celles indiquées sur le TABLEAU SENSOR COOK, faites la cuisson
manuellement.
-
TABLEAU SENSOR COOK
ALIMENT QUANTITÉ DÉMARCHE À SUIVRE
1. Légumes frais:
mous
Brocoli
Choux de Bruxelles
Chou
Chou-fleur :
fleurettes
entier
Épinards
Courgette
Pommes cuites
au four
0,25 - 2,0 lb.
0,25 - 2,0 lb.
0,25 - 2,0 lb.
0,25 - 2,0 lb.
1 med.
0,25 - 1,0 lb.
0,25 - 2,0 lb.
2 - 4 moy.
Rincez et mettez dans un plat de
cuisson. N’ajoutez pas d’eau si
vous venez de rincer les légumes.
Recouvrez d’un couvercle pour des
légumes tendres. Utilisez du film
plastique pour des légumes tendres/croustillants. Après la cuisson,
remuez, si possible. Laissez reposer,
à couvert, pour 2 à 5 minutes.
21
F
Page 90

TABLEAU SENSOR COOK (suite)
ALIMENT QUANTITÉ DÉMARCHE À SUIVRE
2. Légumes: durs
Carottes, rondelles
Maïs en épis
Haricots verts
Courge d’hiver:
moitiés en dés
coupées en
moitié
0,25 - 1,5 lb.
2 - 4
0,25 - 1,5 lb.
0,25 - 1,5 lb.
1 - 2
Mettez dans un plat de cuisson.
Ajoutez 1-4 cuillerées de table d’eau.
Recouvrez d’un couvercle pour des
légumes tendres. Utilisez du film
plastique pour des légumes tendres/croustillants. Après la cuisson,
remuez, si possible. Laissez reposer,
à couvert, pour 2 à 5 minutes.
3. Légumes surgelés
4. Repas surgelés
5. Pommes de terre
cuites au four
0,25 - 1,25
lb.
N’ajoutez pas d’eau. Recouvrez d’un
couvercle ou de film plastique. Après
la cuisson, remuez et laissez reposer,
à couvert, pour 3 minutes.
6 - 17 oz. Utilisez cette touche pour des repas
surgelés prêts à manger. Vous aurez
des résultats satisfaisants avec la
plupart des marques. Vous pourrez
en essayer plusieurs et choisir votre
favorite. Enlevez l’emballage extérieur et suivez le mode d’emploi sur
le paquet pour recouvrir l’aliment.
Après la cuisson, laissez reposer, à
couvert, pour 1-3 minutes.
1 - 6 moy. P erc ez . Me tt ez dans l e Fo ur
DrawerMicro, sur des serviettes en
papier. Après la cuisson, enlevezles du micro-ondes, enrobez-les
de feuille d’aluminium et laissez-les
reposer 5 à 10 minutes.
F
22
Page 91

TABLEAU SENSOR COOK (suite)
ALIMENT QUANTITÉ DÉMARCHE À SUIVRE
6. Viande hachée 0,25 - 2,0 lb. Utilisez ce réglage pour la cuisson
de bœuf ou de dinde haché en
galettes ou dans un plat pour ajouter
à d’autres ingrédients. Mettez les
galettes sur une grille allant au micro-ondes et recouvrez-les de papier
cire. Mettez la viande hachée dans
un plat de cuisson et recouvrez-la
de papier cire ou de film plastique.
Quand le four à micro-ondes arrête
de fonctionner, retournez les galettes
ou remuez la viande dans le plat
pour émietter les gros morceaux.
Recouvrez de nouveau et appuyez
sur Start/Add-A-Minute. Après la
cuisson, laissez reposer, à couvert,
2 à 3 minutes.
7. Poisson/fruits
de mer
0,25 - 2,0 lb. Disposez en un cercle sur un plat en
verre peu profond (roulez les filets de
sorte que le bout soit en dessous).
Recouvrez de film plastique fendu.
Après la cuisson, laissez reposer, à
couvert, pour 3 minutes.
8. Riz
0,5 - 2,0
tasses
Mettez le riz en un plat profond et
ajoutez le double de quantité d’eau.
Recouvrez d’un couvercle ou de film
plastique. Après la cuisson, remuez,
recouvrez et laissez reposer 3 à 5
minutes ou jusqu’à ce que tout le
liquide soit absorbé.
Riz Eau Capacité du plat
0,5 tasse 1 tasse 1,5 litres
1 tasse 2 tasses 2 litres
1,5 tasses 3 tasses 2,5 ou 3 litres
2 tasses 4 tasses 3 litres ou plus
23
F
Page 92

DEFROST (DÉGIVRAGE)
Utilisez cette fonction pour décongeler les aliments indiqués dans le TABLEAU
DEFROST à la page 25.
1. Appuyez sur la touche Defrost.
2. Consultez le pavé Menu. Sélectionnez l’aliment voulu via les touches
numériques. Ex: Appuyez sur 2 pour biftecks/côtelettes.
3. Entrez le poids via les touches numériques.
4. Appuyez sur la touche Start/Add-A-Minute.
Le four s’arrêtera de sorte que vous puissiez vérifier l’état de cuisson.
5. Après la première étape, ouvrez le Four DrawerMicro. Retournez le bifteck
et recouvrez des parties chaudes. Fermez le Four DrawerMicro. Appuyez
sur la touche Start/Add-A-Minute.
6. Après la première étape, ouvrez le Four DrawerMicro. Recouvrez des
parties chaudes. Fermez le Four DrawerMicro. Appuyez sur la touche
Start/Add-A-Minute.
7. À la fin du cycle de dégivrage, recouvrez l’aliment et laissez-le reposer tel
qu’indiqué dans le tableau à la page 25.
Remarque:
• On peut combiner le cycle de dégivrage avec le réglage Plus de temps/
moins de temps. Consultez la page 29.
• Pour décongeler d’autres aliments, ou des quantités en dessous ou
en dessus de celles indiquées dans le TABLEAU DEFROST, consultez
DÉGIVRAGE MANUEL à la page 26.
• Vérifiez l’état de cuisson lorsque le four émet son signal sonore. Après
l’étape finale, il se peut que de petites sections de l’aliment soient toujours
glacées. Laissez reposer l’aliment pour poursuivre le dégivrage. N’essayez
pas d’effectuer un dégivrage qu’après que tous les cristaux de glace se
fondent.
• Le fait de recouvrir des parties de l’aliment empêche que la cuisson
commence avant que le milieu de l’aliment ne soit décongelé. Utilisez
de petites bandes de feuille d’aluminium pour recouvrir les bords et les
parties plus minces de l’aliment.
F
24
Page 93

TABLEAU DEFROST
ALIMENT QUANTITÉ DÉMARCHE À SUIVRE
1. Viande
hachée
0,5 - 2,0 lb Retirez les morceaux décongelés après chaque
signal sonore. Laissez reposer, à couvert, pour
5 à 10 minutes.
2. Biftecks/
côtelettes
3. Volaille
sans os
4. Volaille
avec os
5. Casserole/
soupe
0,5 - 3,0 lb Après chaque signal sonore, réarrangez les
morceaux et, s’il y a des morceaux chauds ou
décongelés, recouvrez-les de petits morceaux
plats de feuille d’aluminium. Retirez de la viande
ou du poisson qui est presque décongelé. Laissez reposer, à couvert, pour 10 à 20 minutes.
0,5 - 2,0 lb Après chaque signal sonore, s’il y a des par-
ties chaudes ou décongelées, réarrangez ou
retirez-les. Laissez reposer, à couvert, pour 10
à 20 minutes.
0,5 - 3,0 lb Après chaque signal sonore, réarrangez les
morceaux et, s’il y a des morceaux chauds
ou décongelés, retirez-les. Laissez reposer, à
couvert, pour 10 à 20 minutes.
1 - 6 tasses Après chaque signal sonore, émiettez et retirez
les morceaux décongelés. En fin de cuisson,
remuez bien et laissez reposer, à couvert, pour
5 à 10 minutes.
25
F
Page 94

MANUAL DEFROST (DÉGIVRAGE MANUEL)
Si l’aliment que vous désirez décongeler ne figure pas dans le TABLEAU
DEFROST ou si la quantité en est en dessous ou en dessus des limites indiquées dans la colonne QUANTITÉ du TABLEAU DEFROST, il faut faire un
dégivrage manuel.
Il est possible de décongeler tout aliment congelé, soit cru, soit cuit
précédemment, sur une allure de 30%. Suivez la démarche exacte indiquée
dans TO SET POWER LEVEL (RÉGLER L’ALLURE) à la page 18. Estimez le
temps de dégivrage et appuyez huit fois sur la touche Power Level pour une
allure de 30%.
Pour des aliments congelés crus ou précédemment cuits, il faut prévoir en
règle générale environ 4 minutes par livre. Par exemple, il faut prévoir un
dégivrage de 4 minutes pour 1 livre de sauce à spaghetti congelée.
Arrêtez toujours le four de temps en temps pour retirer ou pour séparer les
morceaux décongelés. Si l’aliment n’est pas complètement décongelé à
l’échéance du temps de dégivrage estimé, programmez le four par incréments de 1 minute à une allure de 30% jusqu’à ce que le dégivrage s’achève
complètement.
Si vous utilisez des pots en plastique tirés du congélateur, faites un dégivrage
juste assez longtemps pour pouvoir retirer l’aliment du pot et le mettre dans
un plat allant au micro-ondes.
F
26
Page 95

REHEAT (RÉCHAUFFAGE)
Réchauffage calcule automatiquement le temps de réchauffage et l’allure
requis pour les aliments indiqués dans le tableau ci-dessous.
1. Appuyez une fois sur la touche Reheat.
2. Consultez le pavé Menu. Sélectionnez l’aliment voulu via les touches
numériques. Ex: Appuyez sur 2 pour des petits pains ou des muffins
congelés.
3. Sélectionnez la quantité via les touches numériques. Ex: appuyez sur 2
pour 2 petits pains ou 2 muffins.
4. Appuyez sur la touche Start/Add-A-Minute.
Remarque:
• On peut combiner le réchauffage avec le réglage Plus de temps/moins
de temps. Consultez la page 29.
• Pour réchauffer d’autres aliments ou pour des quantités en dessous ou en
dessus de celles indiquées dans le TABLEAU REHEAT, faites un réchauffage
manuel.
TABLEAU REHEAT
ALIMENT QUANTITÉ DÉMARCHE À SUIVRE
1. Petits pains/
muffins non
congelés
1 - 8 mcx Utilisez cette touche pour réchauffer des
petits pains, des muffins, des biscuits, des
bagels etc. Si les morceaux sont particulièrement gros, comptez 2 ou 3. Disposez-les sur
une assiette et recouvrez-les d’une serviette
en papier. Pour des petits pains ou des muffins réfrigérés, il peut s’avérer nécessaire de
doubler la quantité entrée pour assurer une
bonne température de présentation. Par
exemple, entrez une quantité de 2 pour un
muffin réfrigéré.
2. Petits pains/
1 - 8 mcx Utilisez cette touche pour réchauffer des
muffins
congelés
3. Boisson 0,5 - 2,0
tasses
petits pains, des muffins, des biscuits, des
bagels, etc. Si les morceaux sont particulièrement gros, comptez 2 ou 3. Disposez-les sur
une assiette et recouvrez-les d’une serviette
en papier.
Ce réglage sert à réchauffer une boisson
refroidie. Remuez bien le liquide avant et
après cuisson pour éviter une “éruption”
27
F
Page 96

AUTRES CARACTÉRISTIQUES
KEEP WARM (GARDE AU CHAUD)
Garde au chaud permet de garder l’aliment au chaud pour jusqu’à 30 minutes.
EMPLOI DIRECT
1. Appuyez sur la touche Keep Warm.
2. Entrez le temps voulu via les touches numériques. Pour 30 minutes, entrez
3000.
3. Appuyez sur la touche Start/Add-A-Minute.
Le four se mettra en marche.
commence.
rebours.
KE EP WA RM
AVEC LA CUISSON MANUELLE
1. Entrez le temps et l’allure voulus.
2. Appuyez sur la touche Keep Warm.
3. Entrez le temps de garde au chaud, jusqu’à 30 minutes.
4. Appuyez sur la touche Start/Add-A-Minute.
Le four se mettra en marche. En fin de cuisson, un long signal sonore se fait en-
tendre puis Garde au chaud commence. L’affichage fait le compte à rebours.
KE EP WA RM
Remarque:
• Si vous essayez d’entrer plus de 30 minutes pour Garde au chaud, un
message d’erreur s’affichera.
• Garde au chaud ne peut être programmé avec Maïs soufflé à capteur,
Réchauffage à capteur, Cuisson à capteur, Dégivrage ou Réchauffage.
s’affiche par intervalles pendant le compte à rebours.
30 .00
s’affiche puis le compte à rebours
s’affiche par intervalles pendant ce compte à
CUISSON À SÉQUENCES MULTIPLES
On peut programmer le Four DrawerMicro pour jusqu’à 4 séquences de
cuisson automatiques, c’est-à-dire des changements automatiques d’une
allure à une autre.
Parfois les recettes demandent que l’on règle le four initialement sur une
allure, puis change d’allure plus tard. Votre Four DrawerMicro le fera automatiquement.
1. Premièrement, entrez le premier temps de cuisson. Puis appuyez sur
la touche Power Level une fois pour une allure de 100%, ou continuez
d’appuyer sur Power Level pour une allure plus basse.
2. Entrez une deuxième temps de cuisson. Continuez à appuyer sur la touche
F
28
Page 97

Power Level jusqu’à ce que vous arriviez à l’allure désirée. On peut suivre
cette procédure jusqu’à 4 fois.
3. Appuyez sur la touche Start/Add-A-Minute.
Remarque:
• Si l’on appuie une fois sur la touche Power Level,
HI GH
s’affiche.
• Si la dernière séquence requiert une allure de 100%, il n’est pas nécessaire
d’appuyer sur la touche Power Level.
• Si vous désirez connaître l’allure pendant la cuisson, il ne faut qu’appuyer
sur la touche Power Level. L’allure s’affiche aussi longtemps que vous
maintenez une pression sur la touche Power Level.
• Garde au chaud peut toujours être programmé, même si l’on a choisi 4
séquences de cuisson.
HELP (AIDE)
Chaque réglage de Sensor Reheat, Sensor Cook, Sensor Popcorn, Keep
Warm, Reheat et Defrosting s’accompagne d’une astuce. Si vous voulez
accéder à ces astuces, appuyez sur Setup/Help lorsque le témoin HELP est
allumé à l’affichage interactif.
ADD-A-MINUTE
Add-A-Minute permet de faire cuire à 100% pour une minute à l’aide d’une
seule pression sur la touche Add-A-Minute. On peut également prolonger
le temps de cuisson par intervalles de 1 minute en appuyant autant de fois
que de minutes désirées sur la touche Add-A-Minute pendant une cuisson
manuelle.
Remarque:
• Pour utiliser Add-A-Minute, appuyez sur la touche en les 3 minutes suivant la cuisson, la fermeture de la porte ou la pression sur la touche Stop/
Clear.
• Add-A-Minute ne peut pas être utilisé avec les Réglages à capteur, Reheat
ou Defrost.
RÉGLAGE PLUS DE TEMPS/MOINS DE TEMPS
Si vous découvrez que les réglages à capteur, de Réchauffage ou de Dégivrage exigent, pour vos goûts, un peu plus ou un peu moins de temps,
appuyez une fois sur la touche Power Level après avoir appuyé sur votre
sélection.
Pour un temps de cuisson un peu plus court, appuyez deux fois sur la touche
Power Level après avoir fait votre sélection.
MO RE
s’affiche.
29
LE SS
s’affiche.
F
Page 98

CONTROL LOCK (VERROUILLAGE DES COMMANDES)
La fonction de Control Lock prévient une utilisation non autorisée du tiroir
par les enfants. On peut régler le Four DrawerMicro de manière à verrouiller
ou à désactiver le tableau de commandes.
POUR VERROUILLER
Appuyez sur la touche Control Lock pendant 3 secondes.
LO CK ON
s’affiche.
POUR OUVRIR
Appuyez sur la touche Control Lock pendant 3 secondes.
LO CK OF F
s’affiche.
SETUP/HELP
En cas de coupure ou de panne de courant,
TO UCH CL EAR AN D TO UCH CL OCK
EN JOY YO UR
s’affichera par intervalles une fois
que le courant sera rétabli. Si cela se passe, votre option Setup/Help sera
effacée. Appuyez sur la touche Stop/Clear pour régler de nouveau.
ÉLIMINATION DE SIGNAL SONORE
En fin d’une cuisson minutée, des signaux sonores se font entendre. Si vous
préférez ne pas entendre ces signaux sonores, vous pouvez les désactiver.
MI CRO- WA VE
POUR DÉSACTIVER LE SIGNAL
1. Appuyez sur la touche Setup/Help.
2. Appuyez encore sur la touche Setup/Help.
3. Appuyez sur la touche Start/Add-A-Minute.
POUR ACTIVER LE SIGNAL DE NOUVEAU
SO UND OF F
s’affiche
1. Appuyez sur la touche Setup/Help.
2. Appuyez encore sur la touche Setup/Help.
3. Appuyez sur la touche Start/Add-A-Minutes.
SO UND ON
s’affiche
RAPPEL FIN DE CUISSON
À la fin de la cuisson minutée, le micro-ondes émettra un signal sonore
toutes les 10 secondes pour la première minute, puis toutes les trois 3
minutes jusqu’à ce que l’on appuie sur la touche Arrêt/remise à zéro, pour
jusqu’une heure.
POUR DÉSACTIVER LE RAPPEL
1. Appuyez trois fois sur la touche Setup/Help.
TO UCH ST ART
F
s’affiche.
30
RE MIND SI GNAL OF F ?
Page 99

2. Appuyez sur la touche Start/Add-A-Minute.
RE MIND SI GNAL OF F
s’affiche.
POUR ACTIVER LE RAPPEL DE NOUVEAU
1. Appuyez trois fois sur la touche Setup/Help
TO UCH ST ART
s’affiche.
2. Appuyez sur la touche Start/Add-A-Minute.
RE MIND SI GNAL ON ?
RE MIND SI GNAL ON
s’affiche.
MISE EN MARCHE AUTOMATIQUE
Si vous voulez programmer le Four DrawerMicro pour se mettre en marche
automatiquement à une heure spécifique, procédez comme suit.
1. Appuyez quatre fois sur la touche Setup/Help.
s’affiche.
ST ART
AU TO ST ART TO UCH
2. Appuyez sur la touche Start/Add-A-Minute.
3. Entrez l’heure de départ.
4. Appuyez sur la touche Timer/Clock.
5. Entrez le temps de cuisson via les touches numériques. Appuyez plusieurs
fois sur la touche Power Level jusqu’à ce que l’allure voulue s’affiche.
6. Appuyez sur la touche Start/Add-A-Minute.
MODE DE DÉMONSTRATION
POUR SÉLECTIONNER LE MODE DE DÉMONSTRATION
1. Appuyez cinq fois sur la touche Setup/Help.
3 SEC
. s’affiche
DE MO ON ?
HO LD ST ART
2. Maintenez une pression sur la touche Start/Add-A-Minute pour 3 secondes.
DE MO ON
s’affiche.
POUR ANNULER LE MODE DE DÉMONSTRATION
1. Appuyez cinq fois sur la touche Setup/Help.
s’affiche.
ST ART
2. Appuyez sur la touche Start/Add-A-Minute.
DE MO OF F ? TO UCH
DE MO OF F
s’affiche
Remarque:
• En mode de démonstration, le Four DrawerMicro n’émet pas d’énergie
pour la cuisson ou le réchauffage.
• Le compte à rebours se fait rapidement.
31
F
Page 100

NETTOYAGE ET ENTRETIEN
EXTÉRIEUR
La surface extérieure est composée de métal enrobé et de plastique. Nettoyez
l’extérieur avec du savon doux et de l’eau; rincez et essuyez avec un torchon
doux. N’utilisez pas de nettoyant abrasif ni de nettoyant ménager.
SURFACE EN ACIER INOXYDABLE
Il faut essuyer souvent l’extérieur avec un torchon doux et humide, puis le
polir avec un torchon doux et sec pour maintenir la beauté du fini. Il y a
aussi une variété de produits spécifiquement conçus pour nettoyer et polir
les surfaces en acier inoxydable. Nous recommandons d’appliquer l’agent
de nettoyage sur un torchon doux puis d’essuyer la surface en acier inoxydable, plutôt que d’appliquer le nettoyant directement sur la surface du four.
Suivez les indications de l’emballage.
FACE AVANT DU TIROIR
Essuyez les deux faces du hublot avec un torchon doux et humide pour
enlever des déversements ou des éclaboussures. L’entretien des pièces en
métal est d’autant plus facile si l’on les essuie régulièrement avec un torchon
doux et humide. Évitez d’utiliser des pulvérisateurs ou d’autres nettoyants
abrasifs car ils risquent de tâcher, de rayer ou de ternir la surface.
TABLEAU DE COMMANDES
Si désiré, on peut désactiver les touches pour le nettoyage. Consultez la section Verrouillage des commandes à la page 30 du présent manuel. Essuyez
le tableau avec un torchon légèrement humecté d’eau seulement. Essuyez
avec un torchon doux. N’écurez pas; n’utilisez pas de nettoyants chimiques.
Fermez la porte et procédez comme indiqué à la page 30 pour désactiver
le Verrouillage des commandes. Appuyez sur la touche Stop/Clear.
INTÉRIEUR
Le nettoyage en est facile puisque les surfaces intérieures ne sont pas sujettes à la chaleur; de la sorte, il n’y a pas de cuisson ou de solidification des
déversements ou des éclaboussures. Pour nettoyer les surfaces intérieures, y
compris les surfaces d’étanchéité du tiroir, essuyez-les avec un torchon doux
et humide. N’UTILISEZ PAS DE NETTOYANTS ABRASIFS, DE SOLVANTS
NI DE TAMPONS À RÉCURER. Pour des salissures plus importantes, utilisez
du savon doux; essuyez avec un torchon doux et humide. N’utilisez pas de
nettoyants de four à base chimique.
F
32
 Loading...