

Page 1
User’ s Guide
KEEPING THE WORLD SEWING™
Page 2

This household sewing machine is designed to comply with IEC/EN 60335-2-28 and UL1594
IMPORTANT SAFETY INSTRUCTIONS
When using an electrical appliance, basic safety precautions should always be followed, including the following:
Read all instructions before using this household sewing machine.
DANGER – To reduce the risk of electric shock:
• A sewing machine should never be left unattended when plugged in. Always unplug this sewing machine from the
electric outlet immediately after using and before cleaning.
WARNING – To reduce the risk of burns, À re,
electric shock, or injury to person:
• This sewing machine is not intended for use by persons (including children) with reduced physical, sensory or mental
capabilities, or lack of experience and knowledge, unless they have been given supervision or instruction concerning use
of the sewing machine by a person responsible for their safety.
• Children should be supervised to ensure that they do not play with the sewing machine.
• Use this sewing machine only for its intended use as described in this manual. Use only attachments recommended by
the manufacturer as contained in this manual.
• Never operate this sewing machine if it has a damaged cord or plug, if it is not working properly, if it has been dropped
or damaged, or dropped into water. Return the sewing machine to the nearest authorized dealer or service center for
examination, repair, electrical or mechanical adjustment.
• Never operate the sewing machine with any air openings blocked. Keep ventilation openings of the sewing machine and
foot controller free from the accumulation of lint, dust, and loose cloth.
• Keep À ngers away from all moving parts. Special care is required around the sewing machine needle.
• Always use the proper needle plate. The wrong plate can cause the needle to break.
• Do not use bent needles.
• Do not pull or push fabric while stitching. It may deÁ ect the needle causing it to break.
• Wear safety glasses.
• Switch the sewing machine off (“0”) when making any adjustment in the needle area, such as threading needle, changing
needle, threading bobbin, or changing presser foot, etc.
• Always unplug sewing machine from the electrical outlet when removing covers, lubricating, or when making any other
user servicing adjustments mentioned in the instruction manual.
• Never drop or insert any object into any opening.
• Do not use outdoors.
• Do not operate where aerosol (spray) products are being used or where oxygen is being administrated.
• To disconnect, turn all controls to the off (“0”) position, then remove plug from outlet.
• Do not unplug by pulling on cord. To unplug, grasp the plug, not the cord.
• Hold plug when rewinding into cord reel. Do not allow plug to whip when rewinding.
• This sewing machine is provided with double insulation. Use only identical replacement parts.See instructions for
Servicing of Double-Insulated Appliances.
SAVE THESE INSTRUCTIONS
SERVICING OF
DOUBLE INSULATED PRODUCTS
In a double-insulated product, two systems of insulation are provided instead of grounding. No ground means is provided
on a double-insulated product, nor should a means for grounding be added to the product. Servicing of a double-insulated
product requires extreme care and knowledge of the system, and should be done only by qualiÀ ed service personnel.
Replacement parts for a double-insulated product must be identical to those parts in the product. A double-insulated
product is marked with the words ‘DOUBLE INSULATION’ or ‘DOUBLE INSULATED’.
Page 3

TABLE OF CONTENTS
1 Getting to know your machine 1:5
MACHINE OVERVIEW 1:6
Rear Side ...........................................................................1:6
Needle Area ......................................................................1:6
Accessory Tray .................................................................1:7
Parts of the Embroidery Unit .......................................1:7
ACCESSORIES 1:7
Included Accessories ......................................................1:7
Hoops Included ...............................................................1:7
Accessories Included - Not in the Picture ..................1:8
Presser Feet ......................................................................1:8
STITCHES 1:10
2 Set Up 2:1
UNPACKING 2:2
Connect the Power Cord and Foot Control ...............2:2
Pack Away after Sewing .................................................2:2
FREE ARM 2:3
SPOOL PINS 2:3
Horizontal Position .........................................................2:3
Vertical Position ...............................................................2:3
Auxiliary Spool Pin .........................................................2:3
THREADING THE UPPER THREAD 2:4
Needle Threader ..............................................................2:4
Threading for Twin Needle ...........................................2:5
THREAD CUTTER 2:5
THREAD SENSOR 2:5
BOBBIN WINDING 2:6
Bobbin Winding Through the Needle .........................2:6
Bobbin Winding while Embroidering or Sewing .......2:7
INSER TING THE BOBBIN 2:7
CHANGING THE PRESSER FOOT 2:7
CHANGING THE NEEDLE 2:8
NEEDLES 2:8
THREADS 2:9
STABILIZERS 2:9
PICTOGRAM™ PEN 2:9
USB PORTS 2:10
USB embroidery stick ...................................................2:10
Connect to and Remove from the USB Port ............2:10
CONNECTING THE MACHINE T O YOUR COMPUTER 2:11
5D™ Embroidery Software ........................................2:11
Installing your Software ...............................................2:11
Install Hardware Drivers and
Connect the Embroidery Machine ...........................2:11
How to Launch the Programs .....................................2:12
Embroidery Machine Communication module ........2:12
How to Update your Machine .....................................2:12
3 Settings & Functions 3:1
INTERACTIVE COLOR TOUCH SCREEN 3:2
COMMON ICONS/FUNCTIONS 3:2
OK .....................................................................................3:2
Cancel ................................................................................3:2
Touch & Hold ..................................................................3:2
TOOLBAR 3:2
START MENU 3:2
SEWING/EMBROIDERY MODE 3:2
QUICK HELP 3:3
EXTENDED TOOLBAR 3:3
STITCH MENU 3:3
How to Select a Stitch ....................................................3:3
FONT MENU 3:3
Selecting a Font ...............................................................3:3
DESIGN MENU 3:4
Selecting a Design ...........................................................3:4
EMBROIDER Y AD VISOR™ 3:4
FILE MANAGER 3:4
SET MENU 3:5
Stitch Settings .................................................................3:5
Sewing Settings ................................................................3:6
Machine Settings..............................................................3:8
Sound Settings .................................................................3:9
Screen Settings .................................................................3:9
INFORMATION MENU 3:10
FUNCTION BUTTONS 3:11
Speed + and - .................................................................3:11
STOP (Monochrome) ..................................................3:11
FIX (Baste) .....................................................................3:11
Reverse ............................................................................3:11
Selective Thread Cutter ................................................3:12
Needle Stop Up/Down (Trim Position) ...................3:12
Start/Stop .......................................................................3:12
EXCLUSIVE SENSOR SYSTEM™ 3:12
Sensor Foot Up and Extra Lift ...................................3:12
Sensor Foot Down and Pivot ......................................3:12
4 Sewing 4:1
SEWING MODE - OVERVIEW OF ICONS 4:2
EXCLUSIVE SEWING ADVISOR™ 4:3
Fabric Selection ...............................................................4:3
Sewing Techniques ..........................................................4:4
Extended SEWING ADVISOR™ ..............................4:4
SELECT A STITCH 4:4
STITCH SETTINGS 4:5
Stitch Settings in SET Menu ..........................................4:6
FREE-MOTION TECHNIQUE 4:7
RAISE AND LOWER THE PRESSER FOOT 4:7
SEWING TECHNIQUES 4:8
Seam ..................................................................................4:8
Overcast ............................................................................4:9
Seam and Overcast ........................................................4:10
Seam/Overcast for Ribbing ........................................4:10
Baste ...............................................................................4:11
Blind Hem ......................................................................4:11
Hem .................................................................................4:12
Perfectly Balanced Sensor One-Step Buttonhole .....4:13
Manual Buttonhole .......................................................4:14
Embroidered buttonhole .............................................4:14
Programmable Button Sew On ...................................4:14
Bartacks...........................................................................4:15
Manual Bartack ..............................................................4:15
4-way Stitches - Menu S ...............................................4:16
8-Way Stitches – Menu T .............................................4:17
Special Sewing Techniques ..........................................4:18
Taper Satin Stitch ..........................................................4:18
Decorative Tapering Stitches .......................................4:18
SEWING POP-UP MESSAGES 4:19
Page 4

5 Program 5:1
IMPORTANT PROGRAM MODE INFORMATION 5:2
PROGRAM - OVERVIEW OF ICONS 5:2
TO PROGRAM IN SEWING MODE 5:3
TO PROGRAM IN EMBROIDERY EDIT 5:3
EDIT YOUR STITCH OR LETTERING PROGRAM 5:3
Preview..............................................................................5:4
Adjust the Entire Program ............................................5:4
Stitch program commands .............................................5:4
SEWING A STITCH PROGRAM 5:4
TO SAVE A STITCH PROGRAM 5:5
Save to “My Stitches” .....................................................5:5
Save your Program in “My Files” .................................5:5
TO RE-LOAD A STITCH PROGRAM 5:6
PROGRAM POP-UP MESSAGES 5:6
6 Embroidery Set Up 6:1
EMBROIDERY UNIT OVERVIEW 6:2
EMBROIDERY HOOP OVERVIEW 6:2
CONNECT THE EMBROIDERY UNIT 6:2
REMOVE THE EMBROIDERY UNIT 6:3
TO HOOP THE FABRIC 6:3
SLIDE ON THE HOOP 6:4
BUILT-IN DESIGNS 6:4
DESIGNER RUBY™ Sampler Book .........................6:4
GETTING STARTED EMBROIDERING 6:5
7 Embroidery Edit 7:1
MAIN FUNCTIONS IN THE
EXTENDED EMBROIDERY EDIT TOOLBAR 7:2
Load a Stitch ....................................................................7:2
Load a Font ......................................................................7:2
Load a Design ..................................................................7:2
Exclusive EMBROIDERY ADVISOR™ ...................7:2
File Manager.....................................................................7:2
SET Menu ........................................................................7:2
Information Menu ..........................................................7:2
EMBROIDERY EDIT - OVERVIEW OF ICONS 7:3
MY HOOPS 7:3
RESIZE 7:4
Important Resize information .......................................7:5
COLOR EDIT 7:6
Thread Color Change .....................................................7:6
Grid ...................................................................................7:6
2-dimensional/3-dimensional view toggle ..................7:6
EDIT STITCH PROGRAM 7:7
SAVE EDITED DESIGN 7:7
PARK POSITION 7:7
MOVE T O HOOP 7:7
ZOOM 7:7
STITCH-OUT ORDER OF SELECTED DESIGN 7:7
TOUCH FUNCTIONS 7:8
UNDO 7:9
REDO 7:9
MIRROR SIDE-TO-SIDE AND END-TO-END 7:9
DELETE 7:9
DUPLICATE 7:9
HOW TO SELECT DESIGNS 7:10
Advanced selection .......................................................7:10
PROGRAM EMBROIDERY FONTS 7:11
EMBROIDERY EDIT POP-UP MESSAGES 7:12
8 Embroidery Stitch-Out 8:1
TO ENTER EMBROIDERY STITCH-OUT 8:2
EMBROIDERY STITCH-OUT - OVERVIEW OF ICONS 8:2
DESIGN POSITIONING 8:3
How to use Design Positioning ....................................8:4
BASTE IN HOOP 8:6
MOVE HOOP 8:6
FULL SCREEN 8:7
MONOCHROME 8:7
CORNER CHECK 8:7
ZOOM 8:7
REMAINING EMBROIDERY TIME BY COLOR 8:7
THREAD TENSION CONTROL 8:8
STEP STITCH-BY-STITCH CONTROL 8:8
Go to Stitch ......................................................................8:8
RETURN TO EMBROIDERY EDIT 8:8
NUMBER OF STITCHES IN
EMBROIDERY COMBINATION 8:9
NUMBER OF STITCHES IN
CURRENT COLOR BLOCK 8:9
COLOR BLOCK LIST 8:9
FUNCTION BUTTONS IN EMBROIDERY STITCH-OUT 8:10
EMBROIDERY STITCH-OUT POP-UP MESSAGES 8:11
Design Positioning ........................................................8:12
9 File Manager 9:1
FILE MANAGER - OVERVIEW OF ICONS 9:2
AVAILABLE MEMORY 9:2
FILE FORMATS 9:2
BROWSE FILE MANAGER 9:3
List View ...........................................................................9:3
My Designs .......................................................................9:3
My Fonts ..........................................................................9:3
My Files .............................................................................9:3
Built-in designs ................................................................9:3
External Device ...............................................................9:4
Open a Folder ..................................................................9:4
Open a File .......................................................................9:4
Move Up One Folder Level ...........................................9:4
Folder Structure ...............................................................9:4
ORGANIZE 9:5
Create a New Folder .......................................................9:5
Rename a File or Folder .................................................9:5
Move a File or Folder .....................................................9:5
Copy a File or Folder ......................................................9:5
Delete a File or Folder ...................................................9:5
FILE MANAGER POP-UP MESSAGES 9:6
10 Maintenance 10:1
CLEANING THE MACHINE 10:2
TROUBLESHOOTING 10:3
INDEX 10:5
INTELLECTUAL PROPERTY 10:11
Page 5
1
GETTING TO KNOW YOUR MACHINE
Page 6
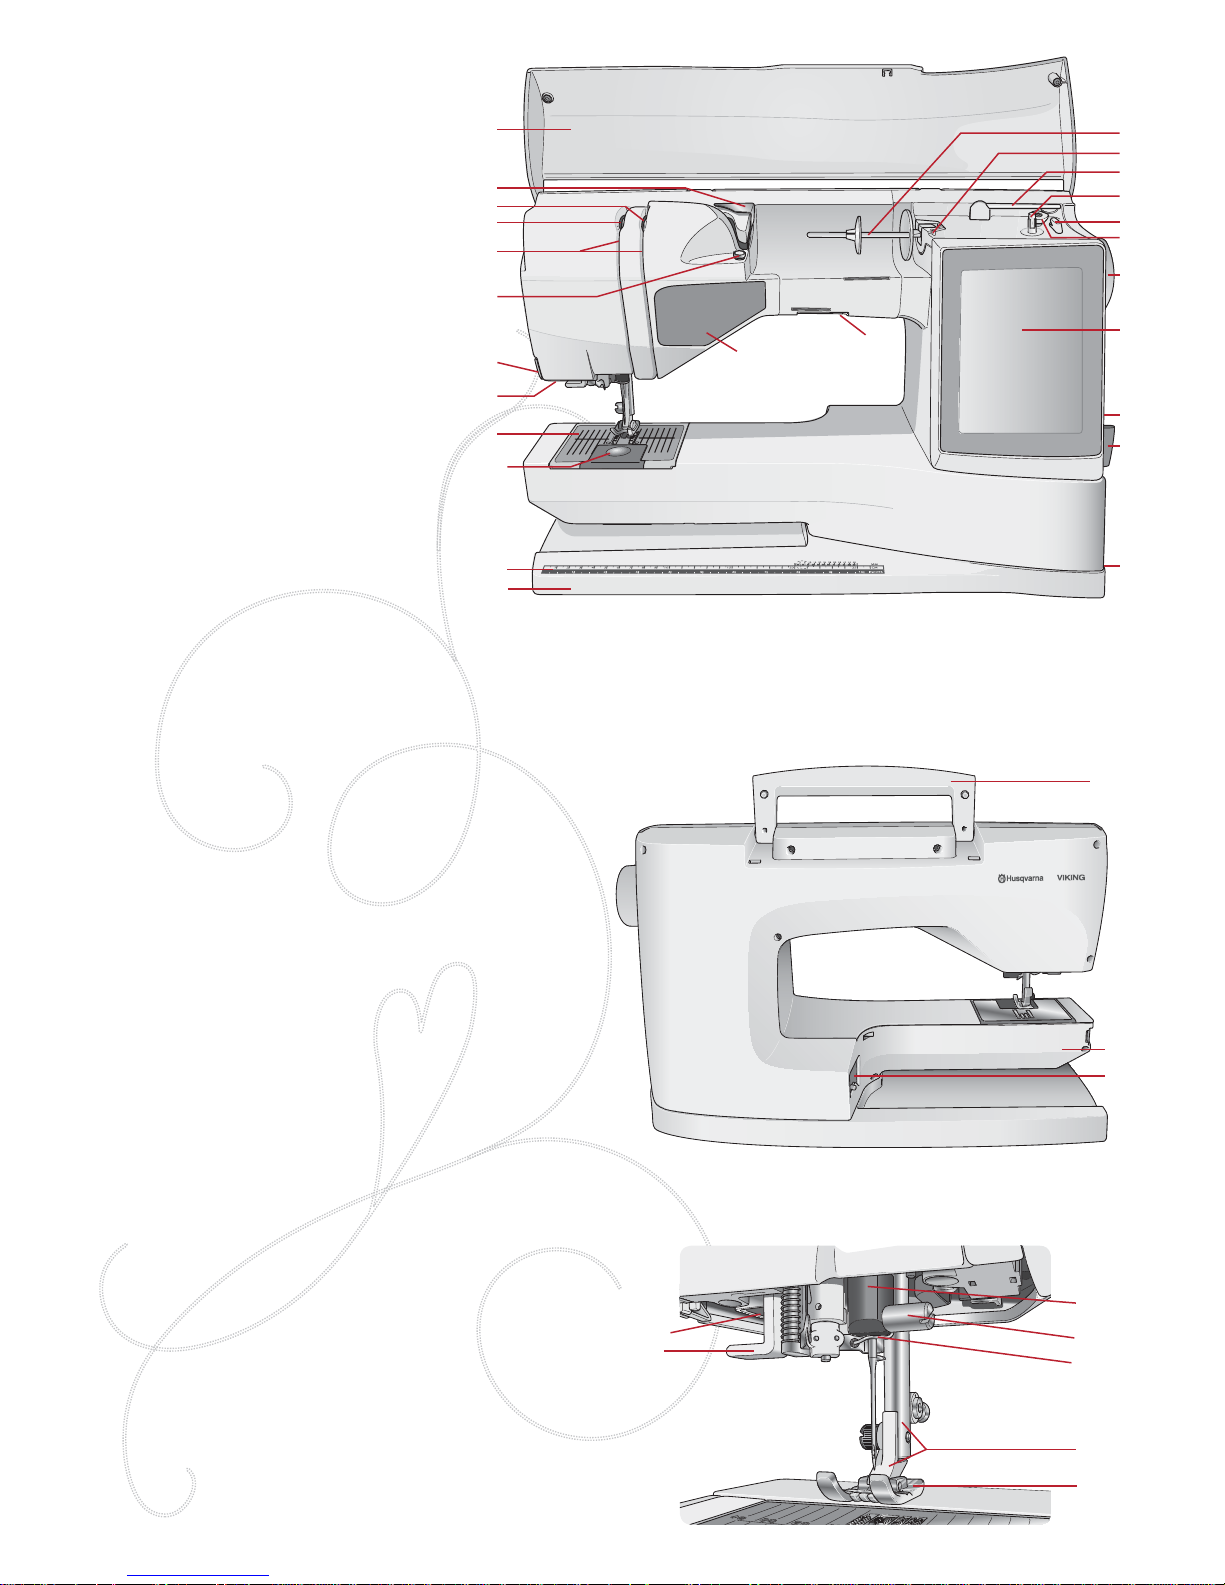
1:6
16
20
24
22
21
23
1
2
5
12
7
3
4
8
10
9
13
6
11
8
17
18
19
14
15
27
26
25
34
33
31
29
32
28
30
1. Lid
2. Pre-Tension Thread guide
3. Thread tension discs
4. Thread take-up lever
5. Thread slots
6. Thread tension disc for bobbin winding
7. Thread cutter
8. LED-lights
9. Needle plate
10. Bobbin cover
11. Button ruler and built-in tape measure
12. Base plate
13. Function button panel
14. Main spool pin
15. Bobbin winding thread guide
16. Auxiliary spool pin
17. Bobbin winder
18. Thread cutter for bobbin winding
19. Bobbin winder lever
20. Handwheel
21. Interactive Color Touch Screen
22. Built-In USB ports
23. Stylus holder
24. ON/OFF switch, connectors for power
cord and foot control
REAR SIDE
25. Handle
26. Free arm
27. Embroidery unit connection socket
NEEDLE AREA
28. Sensor One-Step Buttonhole Foot
socket
29. Built-In needle threader
30. Needle bar
31. Needle clamp
32. Needle thread guide
33. Presser foot bar and presser foot ankle
34. Presser foot
MACHINE OVERVIEW
Page 7
GETTING TO KNOW YOUR MACHINE 1:7
37
38
39
40
41
40
46 47 48 49
43 44 45
50 51 52
53 54 55 56
42
57 58
36
35
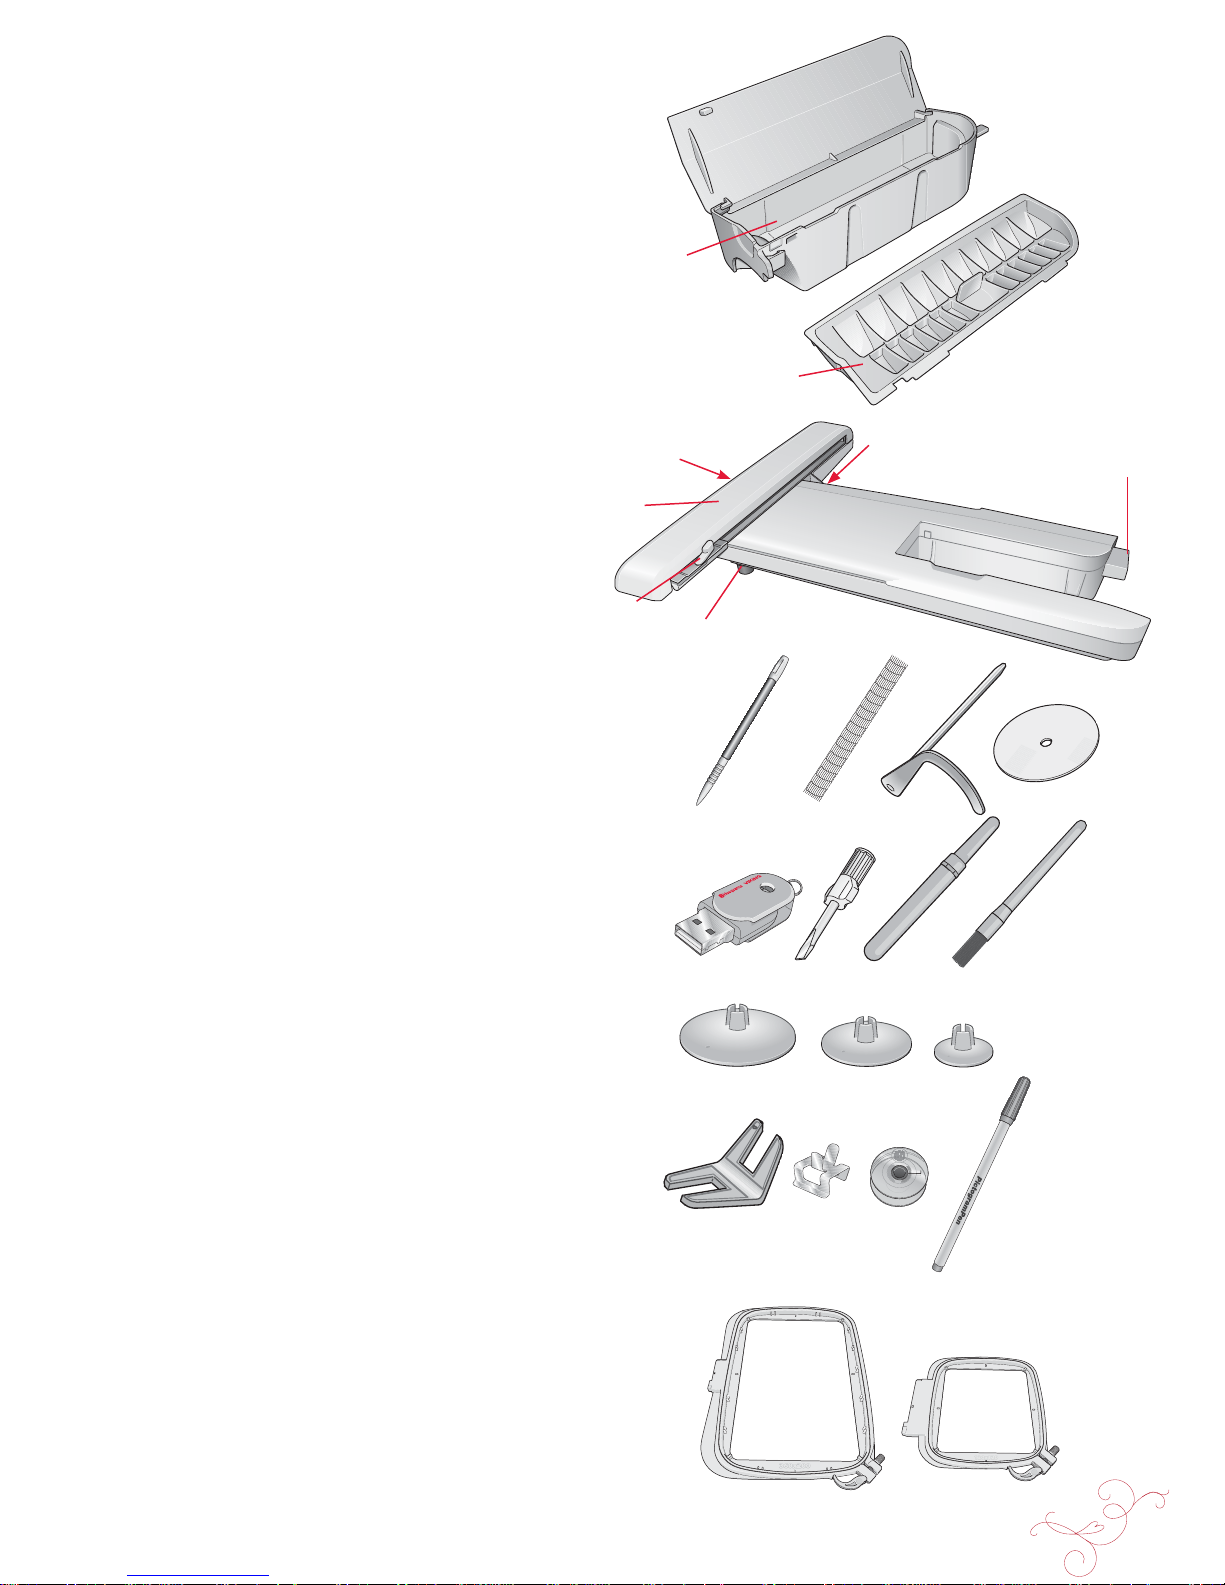
ACCESSOR Y TRA Y
The accessory tray features special compartments for
presser feet and bobbins, plus space for needles and other
accessories. Store the accessories in the tray so that they are
easily accessible.
35. Space for accessories
36. Removable presser feet and bobbin holder
PARTS OF THE EMBROIDERY UNIT
(type BE 18)
37. Embroidery unit release button (underside)
38. Embroidery arm
39. Embroidery hoop attachment
40. Level adjustment feet
41. Embroidery unit socket
ACCESSORIES
INCLUDED ACCESSORIES
42. Stylus
43. Thread net
44. Edge/ Quilting guide
45. Felt pad (2)
46. USB embroidery stick (1 GB)
47. Screwdriver
48. Seam ripper
49. Brush
50. 2 spool caps, large
(1 attached on the machine at delivery)
51. Spool cap, medium
(attached on the machine at delivery)
52. Spool cap, small
53. Multipurpose tool/ Button reed
54. Hoop clips (16)
55. 11 Bobbins (1 in machine at delivery)
56 PICTOGRAM™ Pen
HOOPS INCLUDED
57. DESIGNER™ Royal Hoop (360x200)
58. DESIGNER™ Splendid Square Hoop (120x120)
Page 8
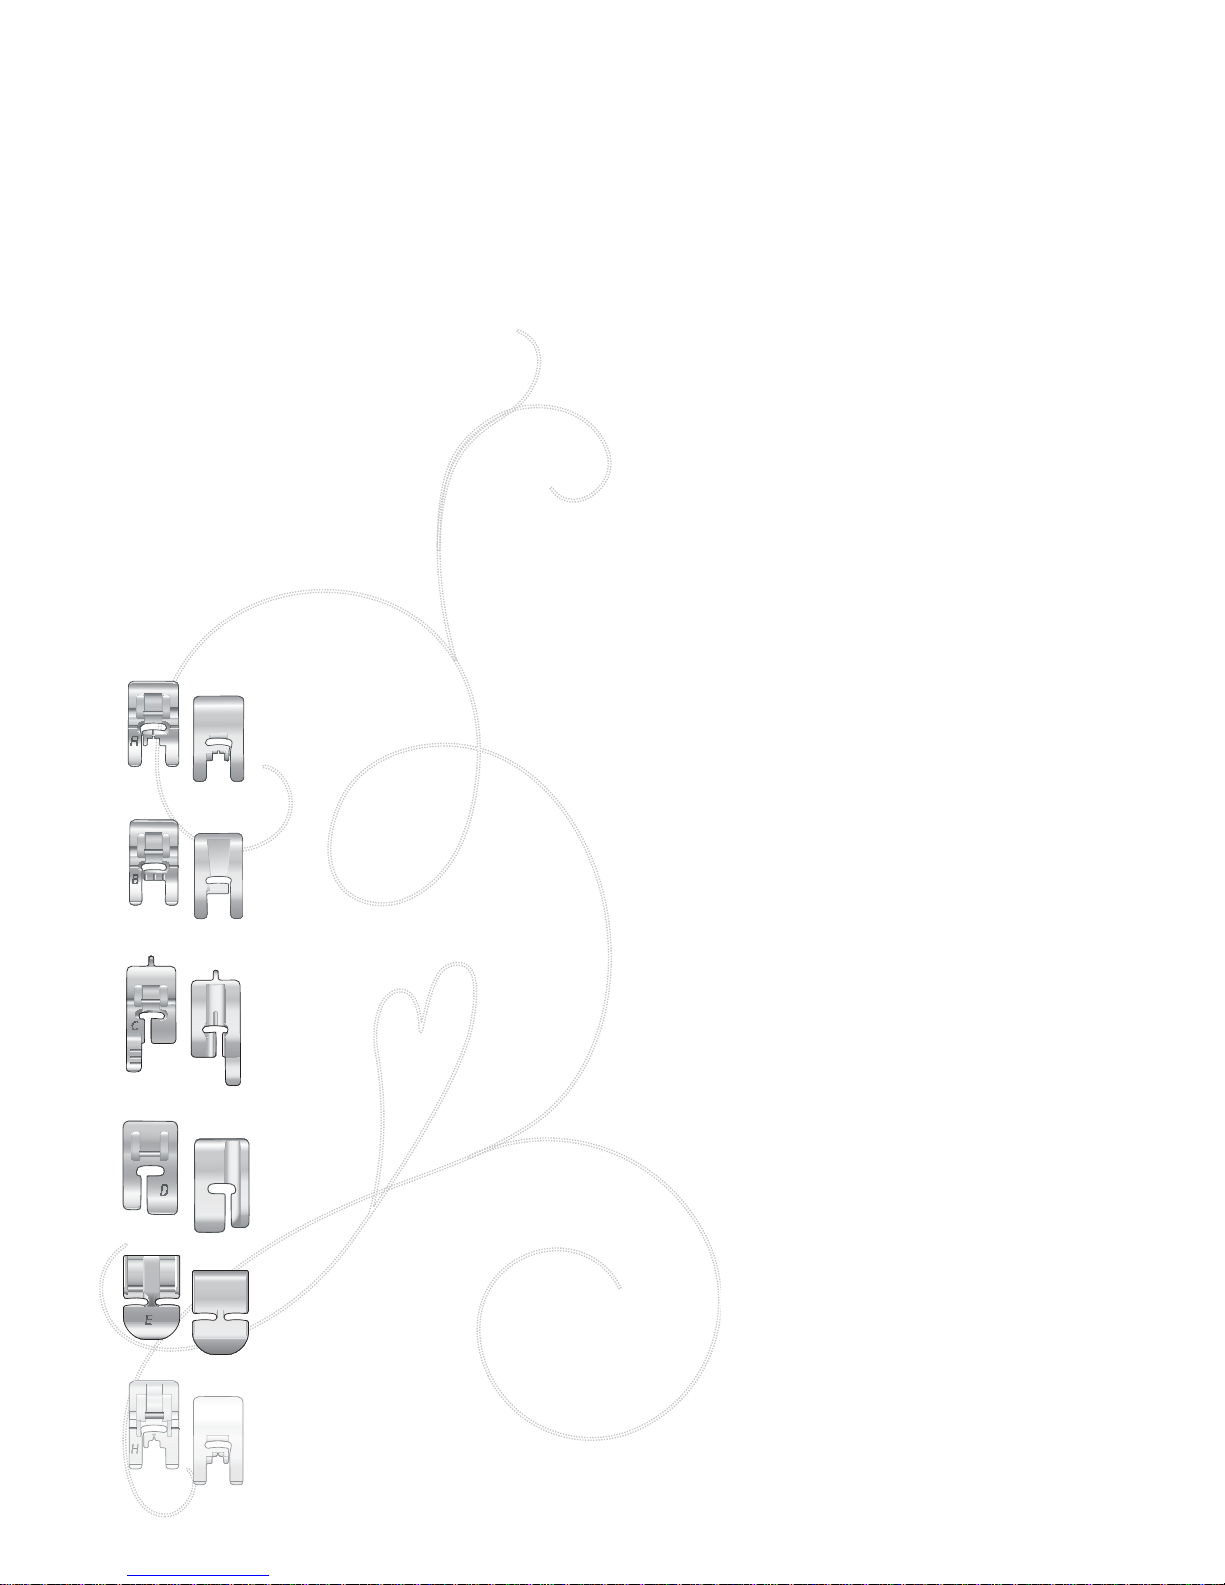
1:8
PRESSER FEET
7
Utility Foot A
Snapped onto the machine upon delivery. This foot is used mainly for straight stitching and
zigzag stitching with a stitch length longer than 1.0.
7
Decorative Stitch Foot B
For sewing close zigzag stitches (satin stitches) with less than 1.0 mm stitch length, other utility
stitches or decorative stitches, use this foot. The tunnel on the underside of the foot is designed
to feed smoothly over the stitches.
7
Buttonhole Foot C
For manual buttonholes. This foot has guide lines to determine buttonhole length. The middle
measures a 5/8'' (15 mm) from the fabric edge. The two tunnels on the underside of the foot
ensure a smooth feed over the buttonhole columns. The À nger on the back of the foot holds
cording for corded buttonholes.
Blindhem Foot D
This foot is used for blindhem stitches. The inner edge of this foot guides the fabric. The right
toe of the foot is designed to ride along the hem edge.
7
Zipper Foot E
This foot can be snapped on either to the right or to the left of the needle. This makes it easy to
sew both sides of the zipper. Move needle position to right or left to sew closer to zipper teeth
or for covering large cording.
7
Non-Stick Glide Foot H
This foot, with a non-stick coating underneath, is used when sewing foam, vinyl, plastic, or
leather to keep these materials from sticking to the foot.
ACCESSORIES INCLUDED - Not in the Picture
• 5D™ Embroidery Machine Communication CD
• Carrying Case (attached on the machine upon delivery)
• Scissors
• Foot control
• Power cord
• USB PC cable
• Needles
• Embroidery thread
• Pieces of fabric and stabilizer
• DESIGNER RUBY™ Sampler book
• User’s Guide
• Warranty card
Page 9
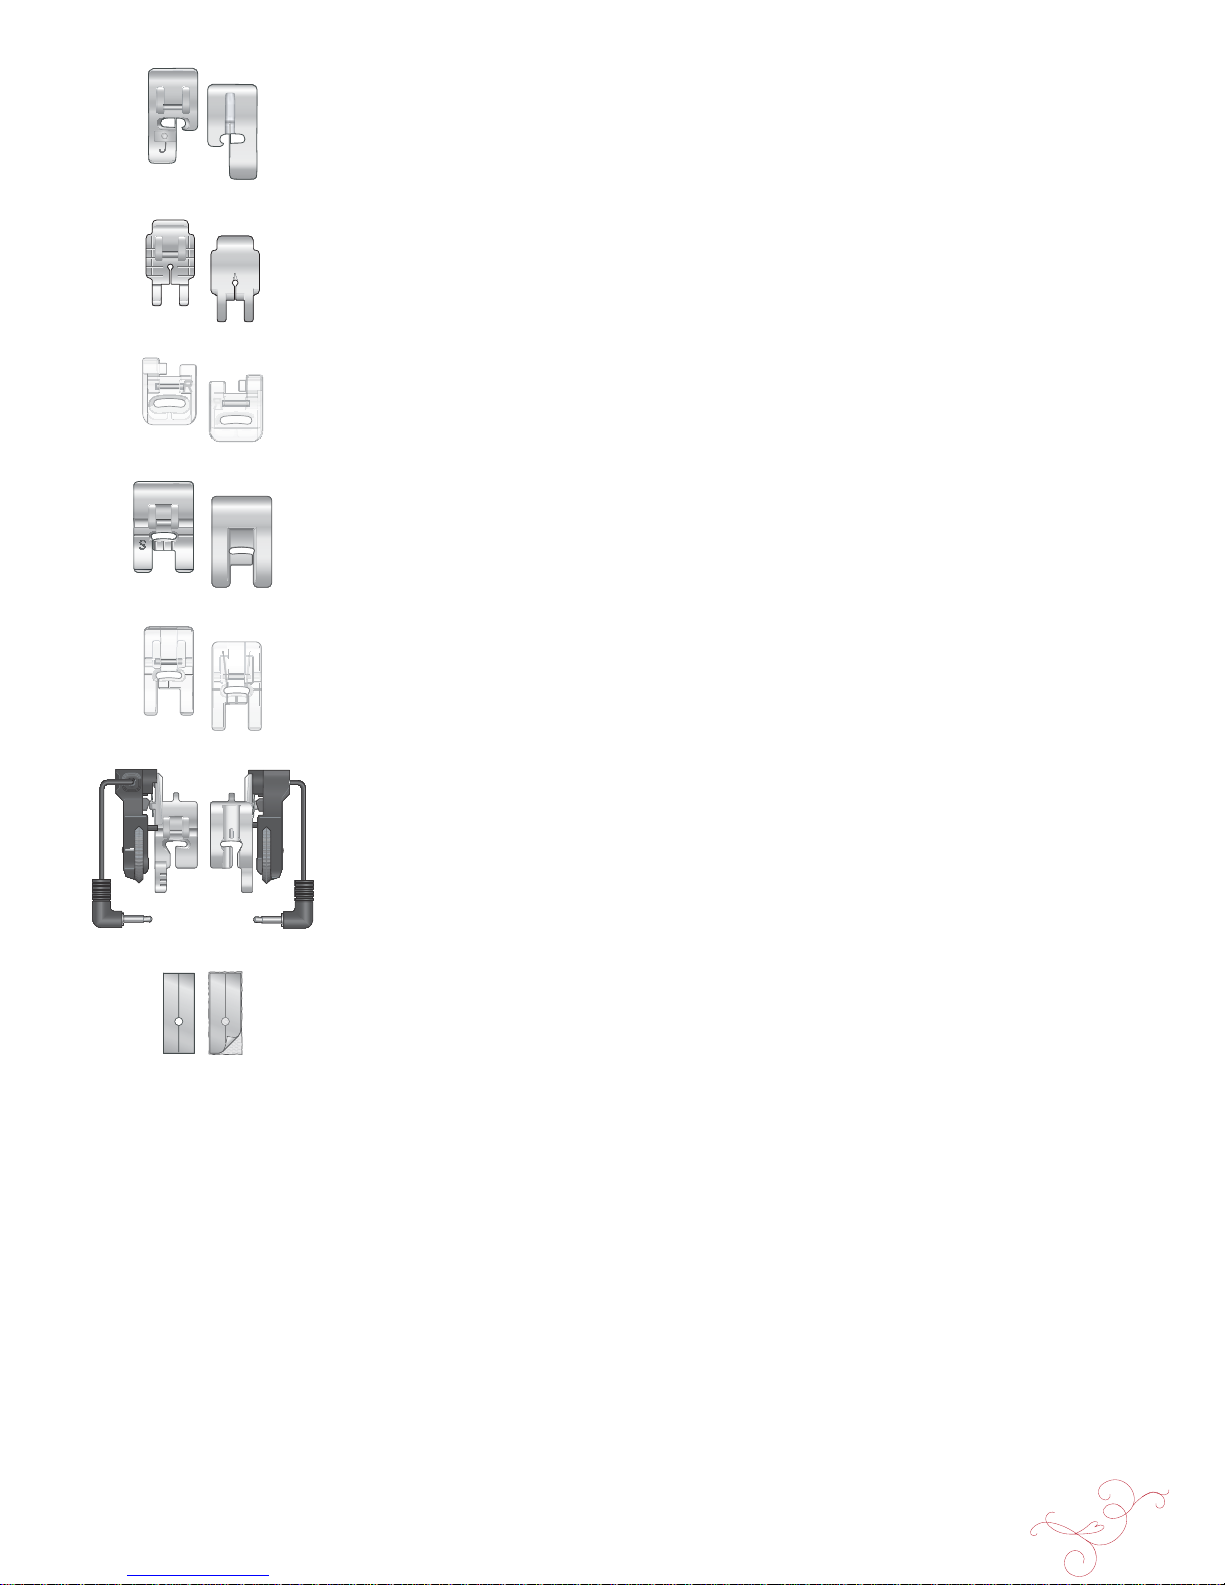
GETTING TO KNOW YOUR MACHINE 1:9
Edging Foot J
This foot is used for overcasting and seam/overcasting, with stitches that have a stitch width
of 5.0 and 5.5 mm. Stitches form over the pin which prevents puckering at the edge of the
fabric.
Quilter’s 1/4” Piecing foot P
This foot is used when piecing quilt blocks. The foot has distance guidelines marks 1/4"
(6 mm) and 1/8" (3 mm) from the needle.
Embroidery/ Darning Foot R
This foot is used for free motion embroidery/quilting/stitching and hoop embroidery.
7
Side Motion Foot S
This foot is used for side-motion/Omnimotion stitches.
7
Decorative Stitch Foot B Transparent
A clear foot for decorative sewing ma kes it easy to match stitches. Same tunnel on the
underside as Presser Foot B.
7
Sensor One-Step Buttonhole Foot
Plug into the machine then enter the desired buttonhole length to sew Sensor One-Step
Buttonholes. The middle mark measures a 5/8" (15 mm) from fabric edge.
Self-Adhesive Glide Plates
Used for Presser Foot C/Sensor One-Step Buttonhole Foot when sewing buttonholes on
plastic-coated fabrics, leather, etc.
Page 10
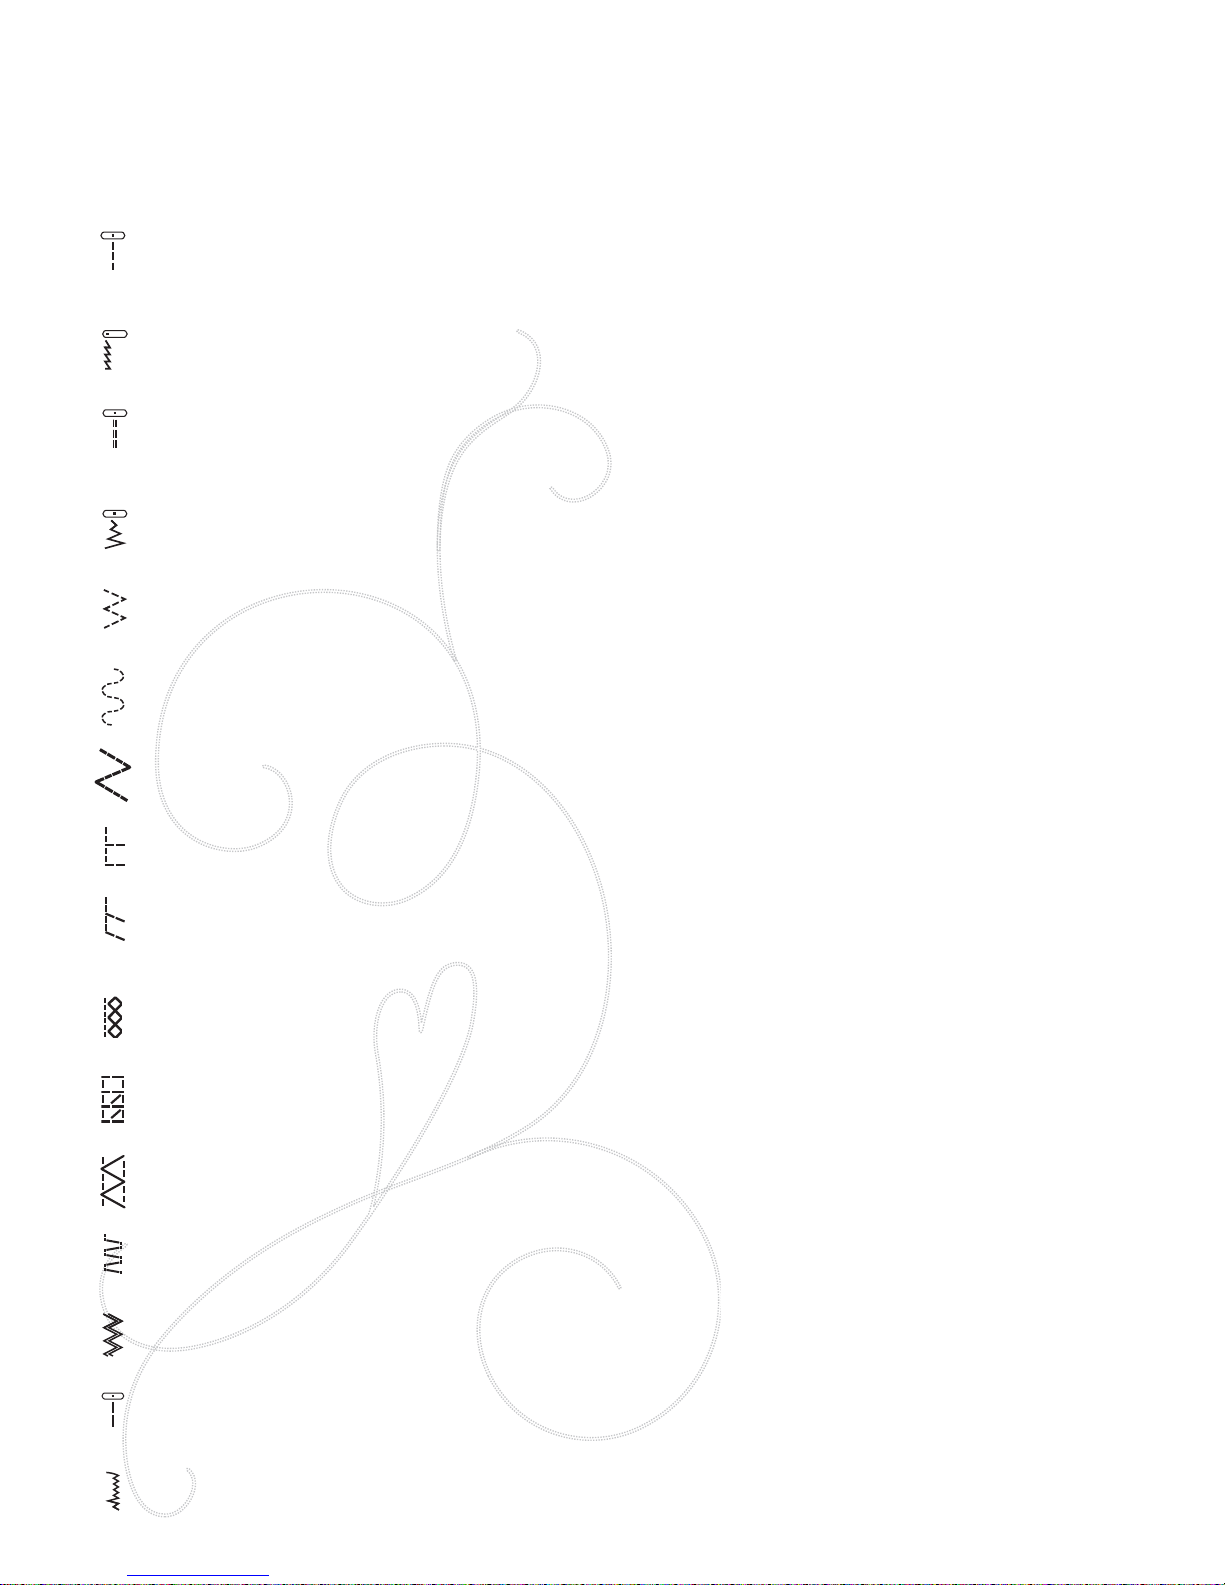
1:10
STITCHES
A – Utility Stitches
Stitches for garment sewing and mending.
Stitch Stitch description
Presser
Foot
A1, A2, A3 – Straight Stitch, left, center and right needle position
For all types of sewing. Touch stitch width and Side-to-Side mirror image to select 29 different needle
positions.
A
A4, A5, A6 – Stretch Stitch, left, center and right needle position
For seams in tricot and stretch fabrics.
A
A7, A8, A9 – Reinforced Straight Stitch, left, center and right needle position
Triple and elastic, for reinforced seams. For topstitch, increase the stitch length. 29 different needle
positions.
A
A10, A11, A12 – Zigzag, left, center and right needle position
For sewing on lace, bands and appliqués.
A
A13 – Three Step Zigzag
For overcasting, mending, sewing on patches and elastic. Suitable for light and medium weight fabrics.
A
A14 – Serpentine Stitch
For mending and elastic applications.
A
A15 – Four-Step Zigzag
For overcasting, mending, sewing on patches and elastics on loosely woven fabrics.
A
A16 – Overcast Stitch
Seam and overcast in one step along the edge or trim later. For light stretch and non-stretch fabrics.
J
A17 – Stretch Seam Overcast Stitch
Seam and overcast in one step along the edge or trim later. For medium and medium/heavy stretch
fabrics.
B
A18 – Double Overlock Stitch
Seam and overcast in one step along the edge or trim later. For heavy stretch and heavy woven fabrics.
B
A19 – Overlock Stitch
Seam and overcast in one step along the edge or trim later. For medium stretch fabrics.
B
A20 – Flatlock Stitch
Decorative hems and overlapped seams, belts and bands. For medium/heavy stretch fabrics.
B
A21 – Elastic/Casing Stitch
For overlapped seams in tricot. To sew casing over narrow elastic.
B
A22 – Reinforced Zigzag Stitch
For joining fabric edge to edge or overlapping in leather. For decorative sewing.
B
A23 – Basting Stitch
For joining two pieces of fabric with a long stitch length and reduced tension.
A
A24 – Stretch Blind Hem Stitch
Blind hems in stretch medium and heavy fabrics.
D
Page 11
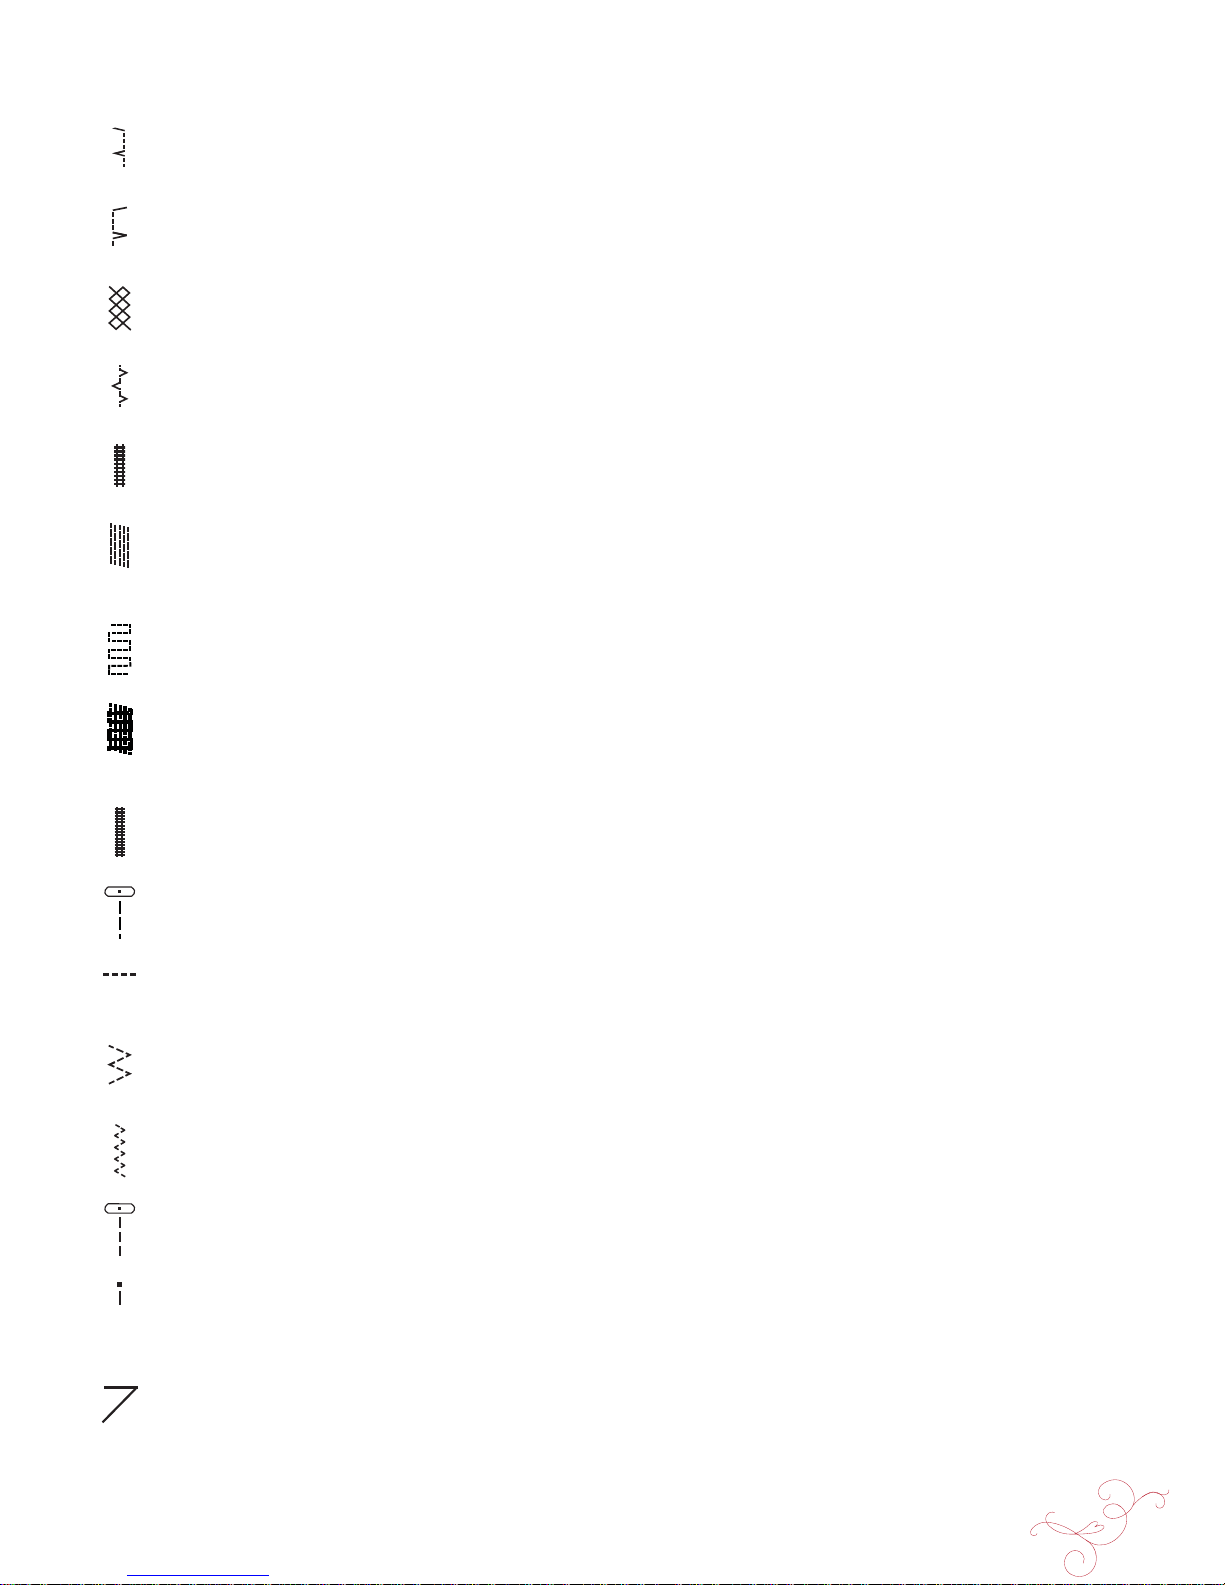
GETTING TO KNOW YOUR MACHINE 1:11
Stitch Stitch description
Presser
Foot
A25 – Woven Blind Hem Stitch
Blind hems in medium and heavy woven fabrics.
D
A26 – Shell Edge Stitch
For edgings, sew over the edge on light stretch fabrics, sew woven fabric on bias.
A
A27 – Elastic or Smocking Stitch
Sew over two rows of elastic thread for elastic shirring.
B
A28 – Bridging Stitch
For joining two pieces of fabric with À nished edges and for elastic shirring.
B
A29 – Bartack Stitch
Reinforce pockets, shirts openings, belt loops as well as at lower end of a zipper.
B
A30 – Darning Stitch (Forward and Backward)
Darn and mend small holes in work clothes, jeans, tablecloths and linen towels. Stitch over hole, touch
reverse for continuous darning and auto stop.
A
A31 – Darning Stitch (Side to Side)
For mending small tears.
A
A32 – Reinforced Darning Stitch
Darn and mend work clothes, jeans, table cloths and linen towels. Stitch over hole, touch reverse for
continuous darning and auto stop.
A
A33 – Bartack, Manual
Reinforce pockets, shirts openings, belt loops as well as at lower end of a zipper.
B
A34 – Gathering Stitch
For gathering.
A
A35 – Belt Loop Stitch
For securing belt loops.
A
A36 – Three-Step Zigzag
For overcasting, mending, sewing on patches and elastic. Suitable for light and medium weight fabrics.
J
A37 – Two-Step Zigzag
For joining two pieces of fabric with À nished edges and for elastic shirring.
A
A38 – Straight stitch with FIX
Begins and ends with forward and reverse sewing.
A
A39 – Straight Basting Stitch
Use together with the foot control to baste pieces of the fabric together. Feed the fabric by moving to
the next baste position when sensor foot lifts. Feed teeth lowered automatically.
A
A40 – Zigzag Basting
Use together with the foot control to baste layers of the fabric by moving to the next baste position
when foot lifts.
A
Page 12
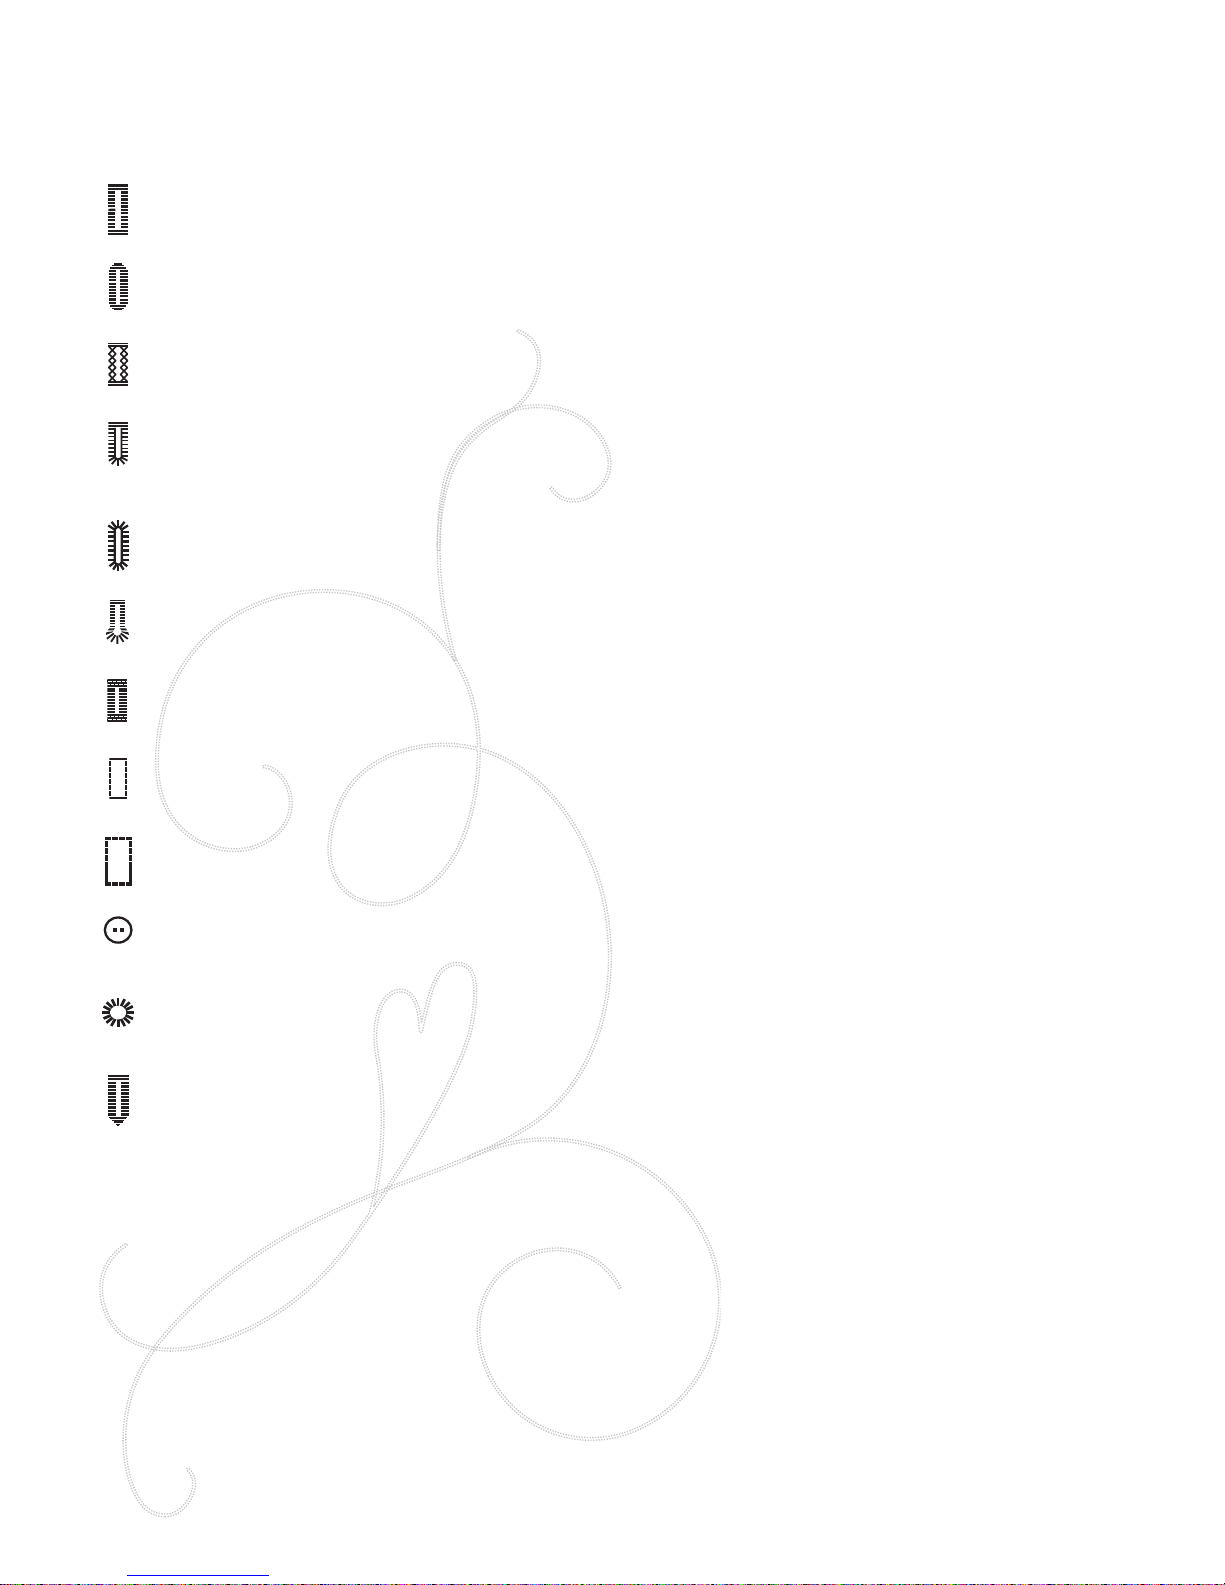
1:12
Stitch Stitch description Presser Foot
B1 – Bartack Buttonhole
For most fabric weights.
Sensor Buttonh.
Foot /C
B2 – Round-End Buttonhole
For blouses and children’s garments.
Sensor Buttonh.
Foot /C
B3 – Medium Reinforced Buttonhole
For medium fabrics.
C
B4 – Heirloom Buttonhole
For hand look on À ne and delicate fabrics.
Tip: For jeans buttonholes, increase length and width of the buttonhole. Use thicker thread.
Sensor Buttonh.
Foot /C
B5 – Rounded Heirloom Buttonhole
For hand look on À ne and delicate fabrics.
Sensor Buttonh.
Foot /C
B6 – Keyhole Buttonhole
Square end for tailored jackets, coats, etc.
Sensor Buttonh.
Foot /C
B7 – Heavy Duty Buttonhole
With reinforced bartacks.
Sensor Buttonh.
Foot /C
B8 – Leather Buttonhole (Straight Stitch)
For leather and suede.
A
B9 – Bound Buttonhole (Straight Stitch)
With extra cutting space for bound buttonholes.
A
B10 – Automatic Button Sewing
For sewing on buttons
-
B11 – Round Eyelet
For belts, laces, etc.
B
B12 – Decorative Fashion Buttonhole
For most fabric weights.
Sensor Buttonh.
Foot /C
B - Buttonhole Stitches
Different styles of buttonholes, eyelets and button sewing.
Page 13
GETTING TO KNOW YOUR MACHINE 1:13
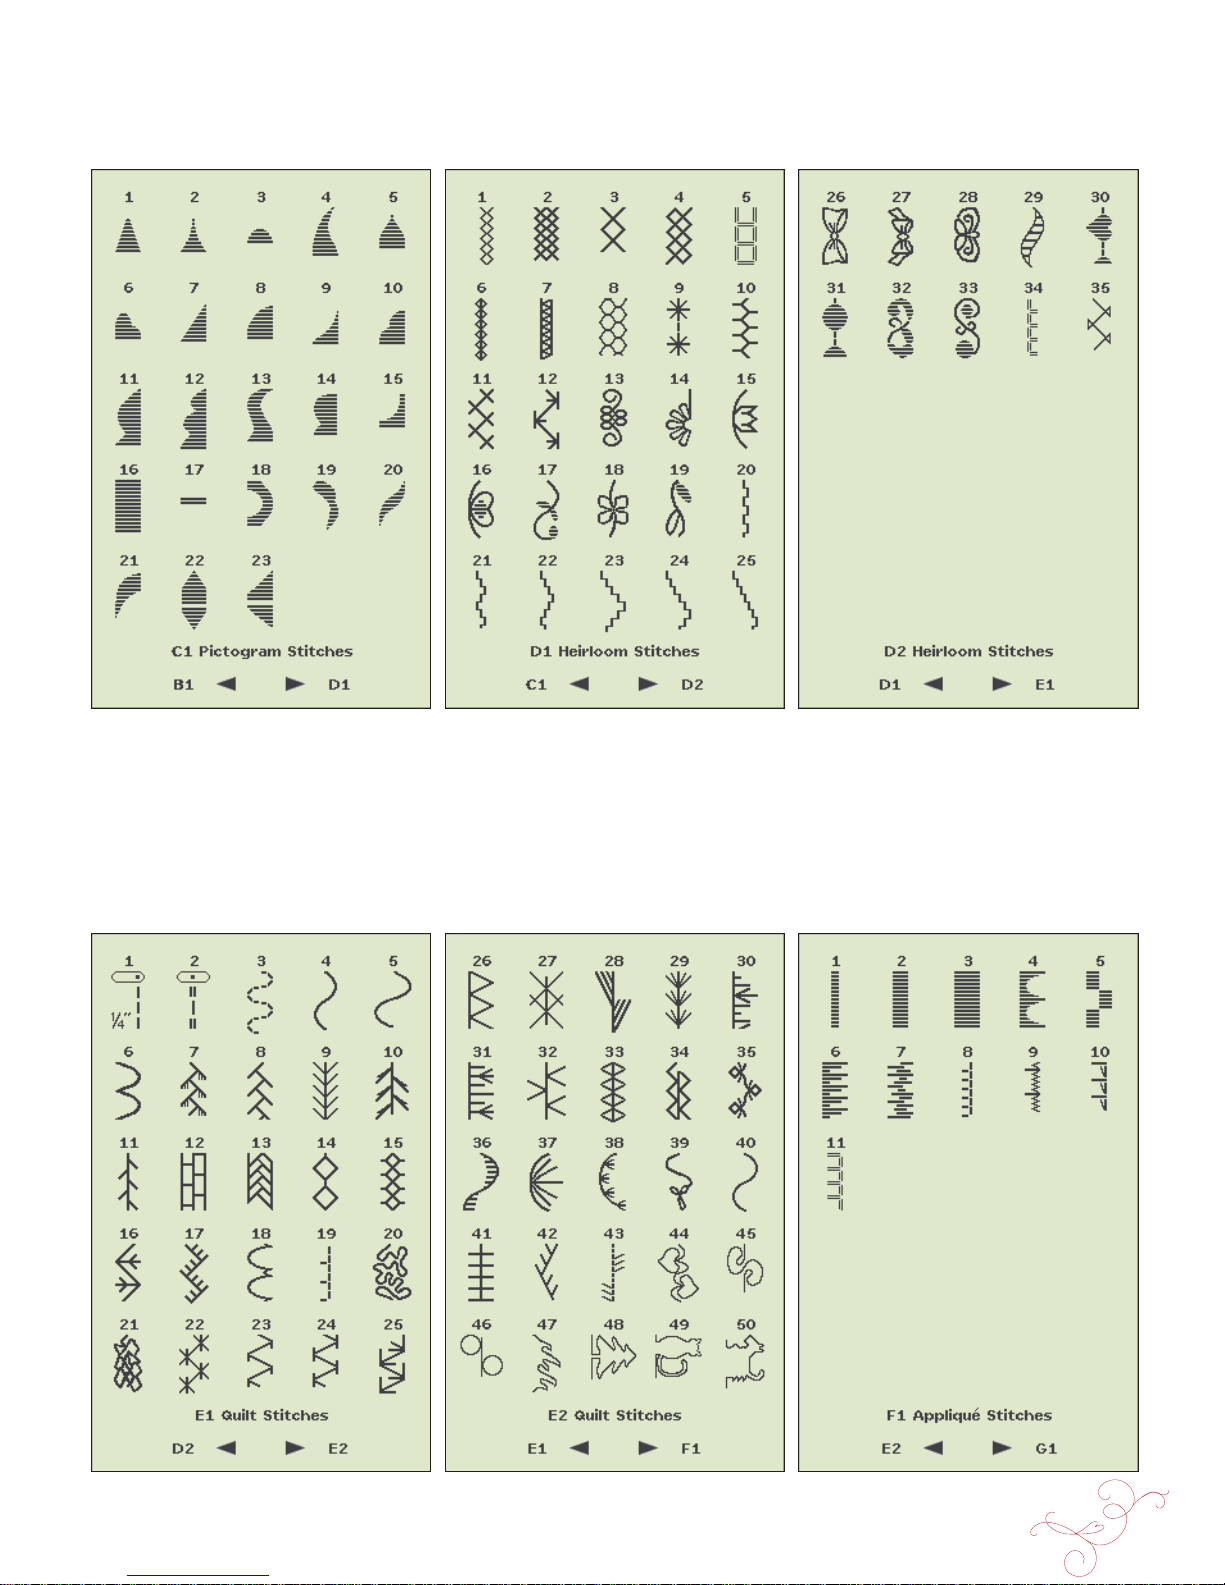
C - Pictogram Stitches
Pictogram satin elements to program
original satin stitch designs.
D - Heirloom Stitches
For hemstitching, smocking and sewing
on lace and trims.
E - Quilt Stitches
Stitches for all types of quilting
techniques.
F - Appliqué Stitches
For sewing appliqués with different
effects.
Page 14
1:14
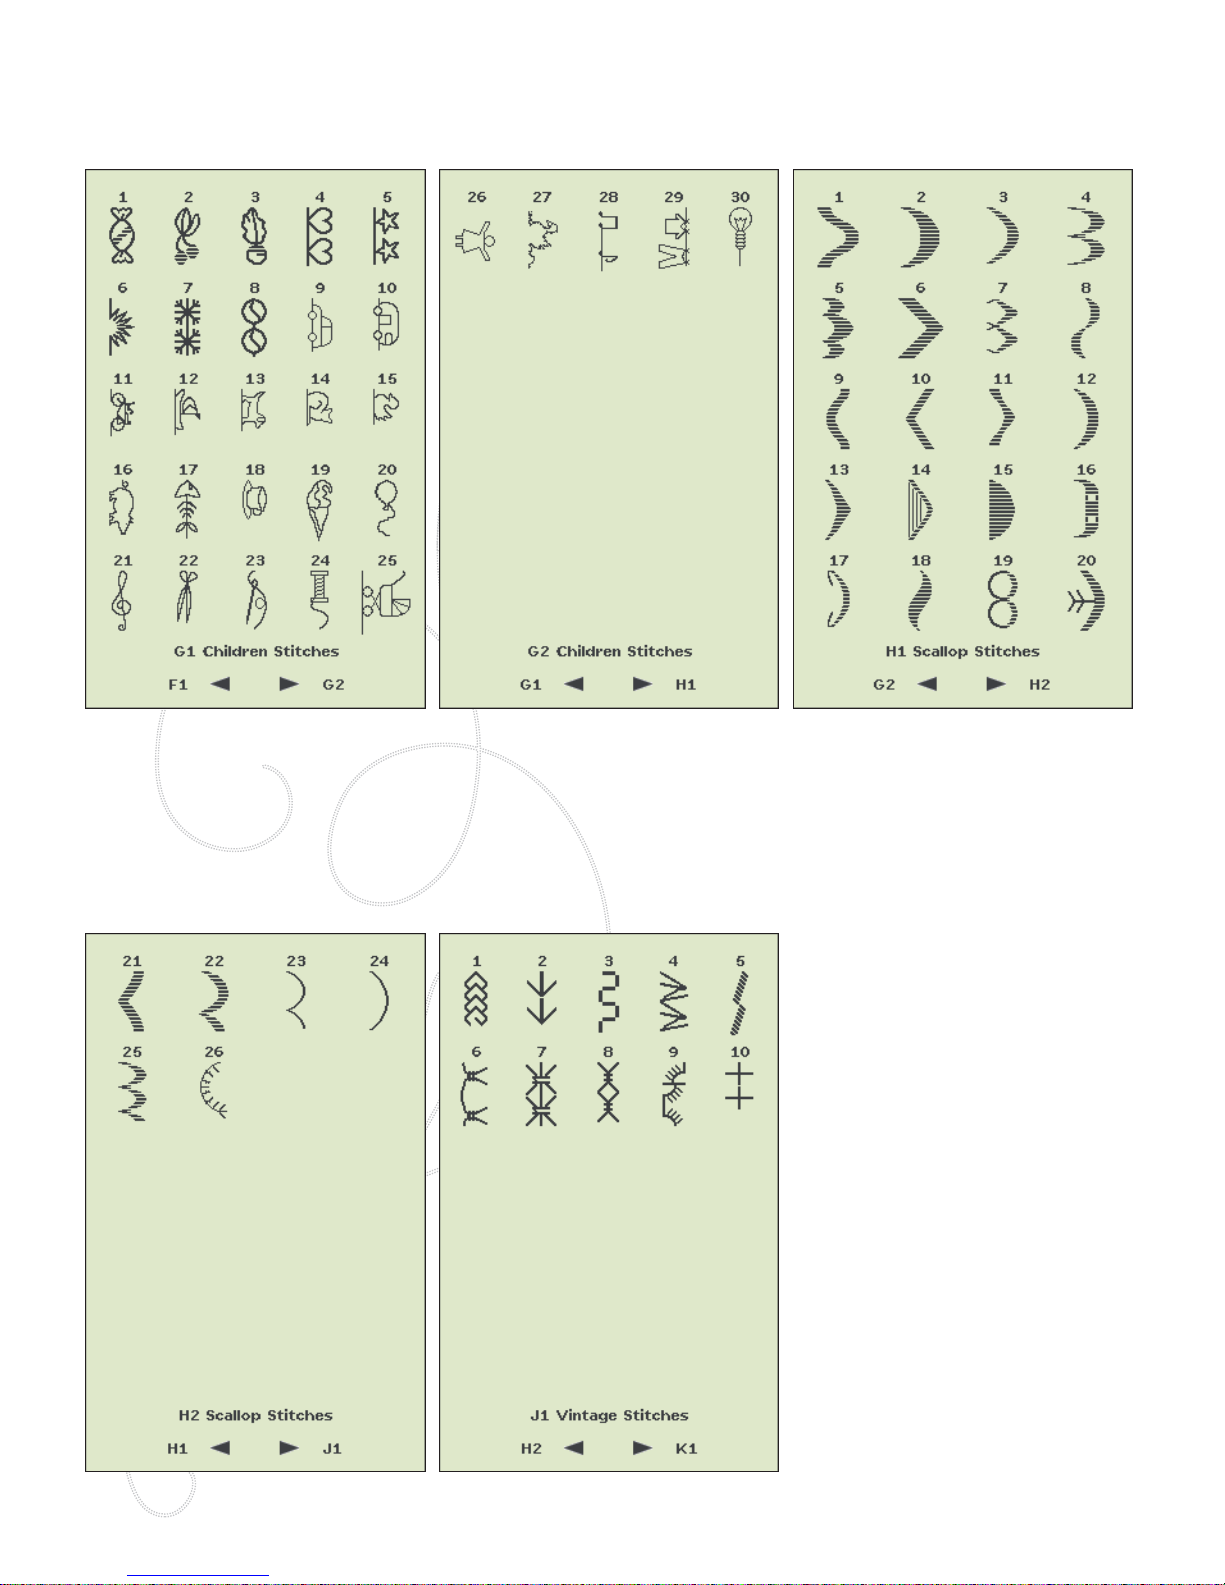
G - Children Stitches
Stitches suitable for sewing on
children’s clothes and projects.
H - Scallop Stitches
Create scallop details and À nish edges
with beautiful scallop stitches.
J - Vintage Stitches
A selection of quilt stitches for crazy
patch quilting and decorative stitching.
Page 15
GETTING TO KNOW YOUR MACHINE 1:15
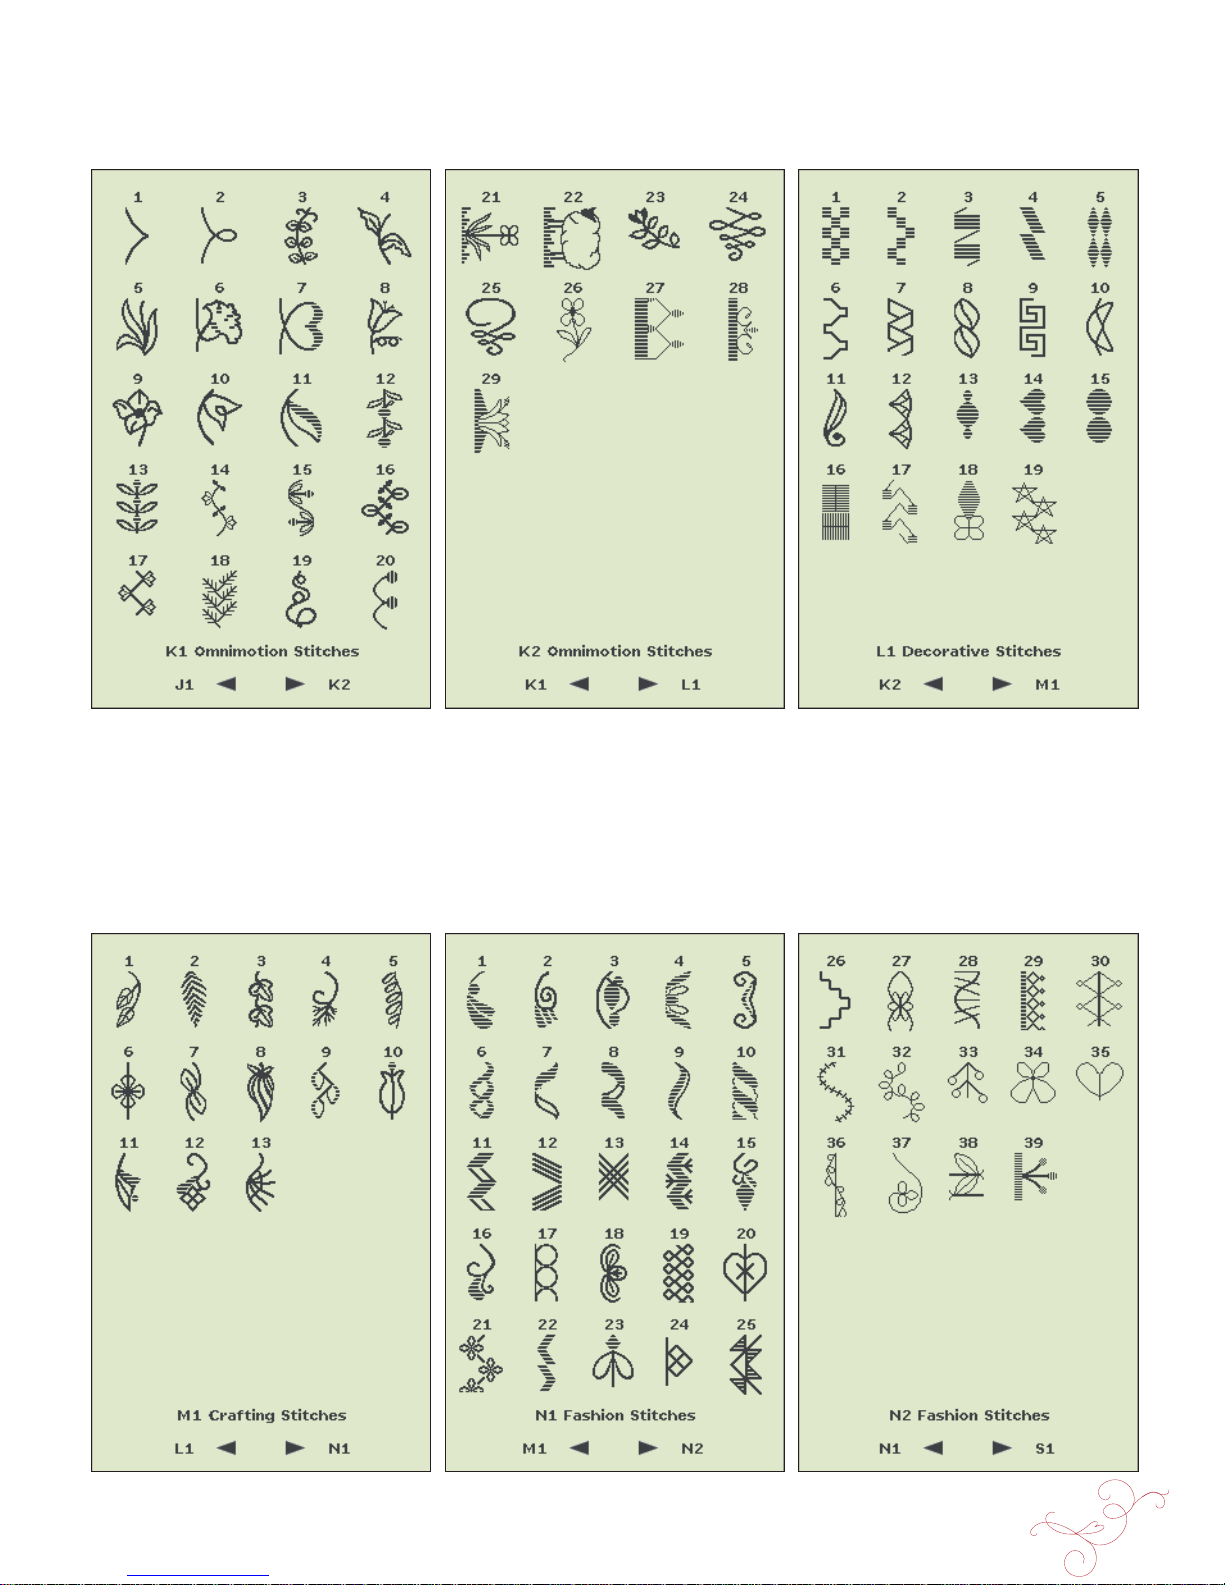
K - Omnimotion Stitches
Program these stitches into an unlimited number of
combinations. Stitches are formed with side motion. The stitch
width can be up to 40 mm wide or more.
L - Decorative Stitches
For decorative sewing.
M - Crafting Stitches
For decorative stitches to embellish
crafts.
N - Fashion Stitches
Fashion stitches to decorate clothing
and accessories.
Page 16
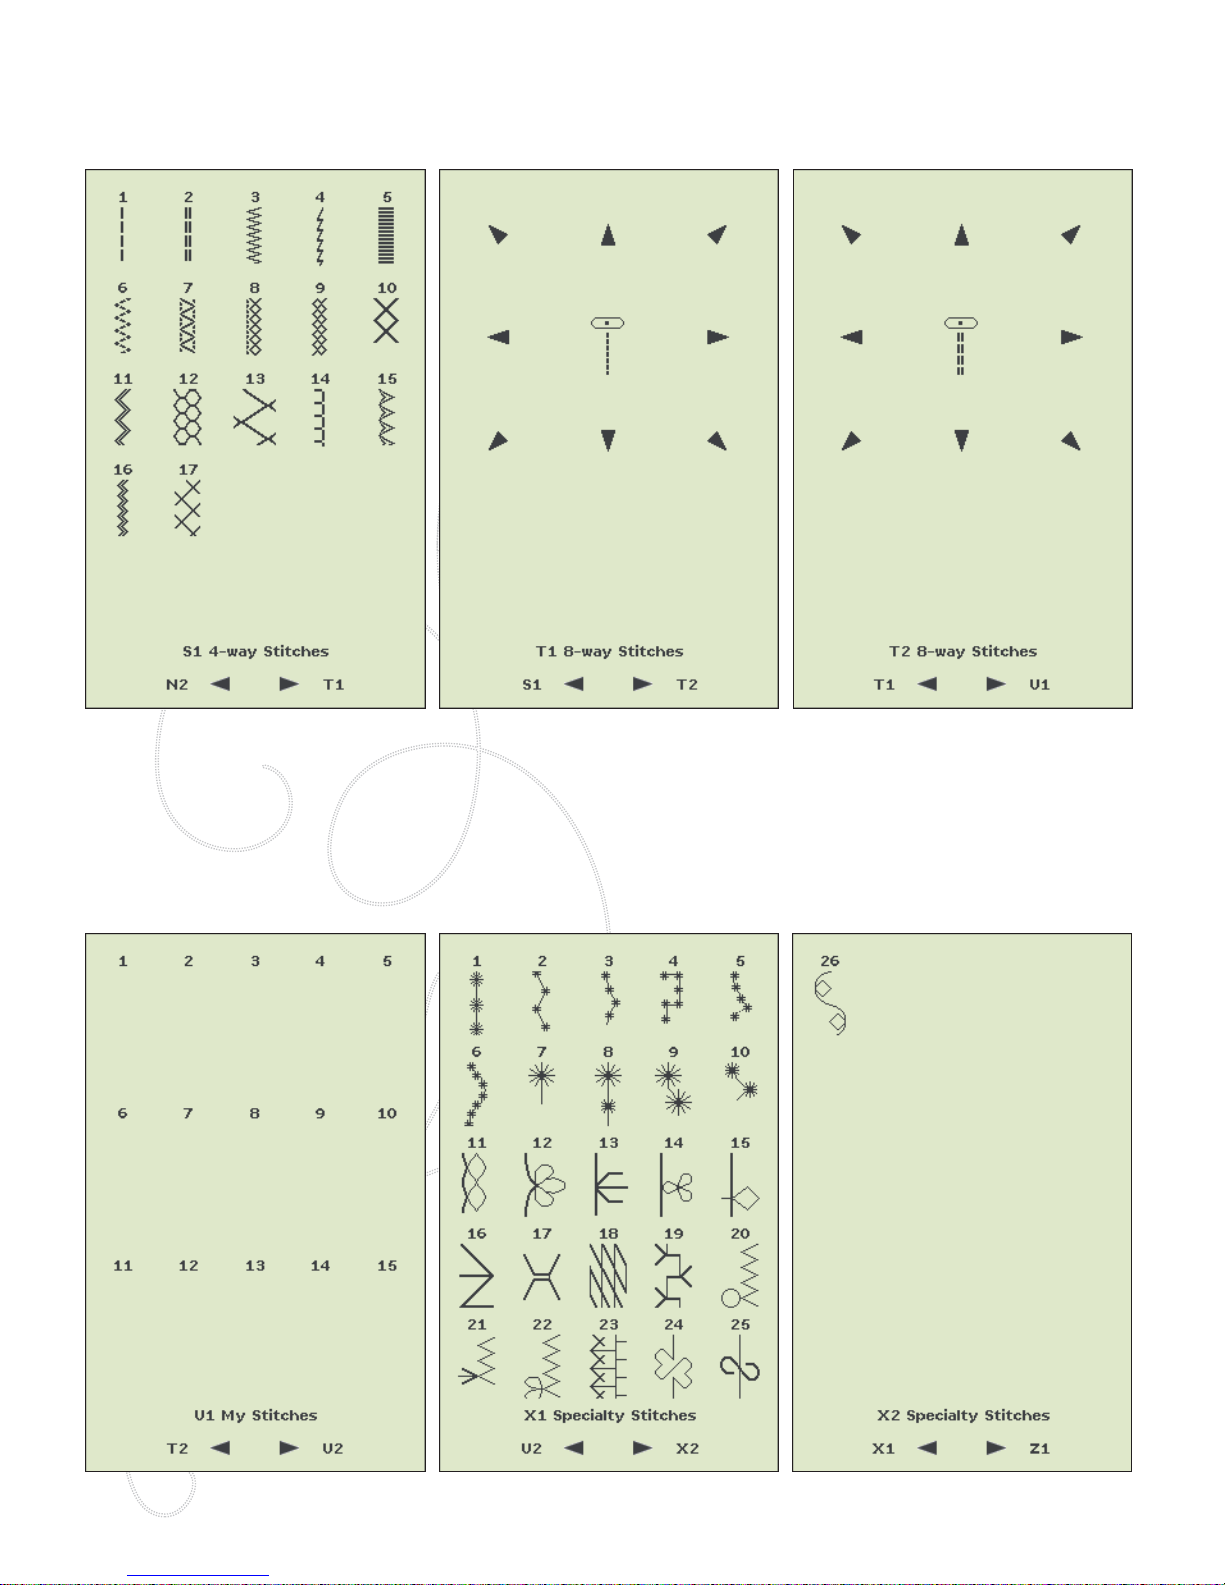
1:16
S - 4-way Stitches
For directional sewing and patching
using the free arm
T - 8-way Stitches
Straight stitch and reinforced straight
stitch in eight different directions
without turning the fabric.
U - My Stitches
Save your own personally adjusted and
favorite stitches and stitch programs.
X - Specialty Stitches
Sew special techniques including candlewicking and edging. Extra accessories
may be needed. Use Quick Help for detailed information
Page 17
GETTING TO KNOW YOUR MACHINE 1:17
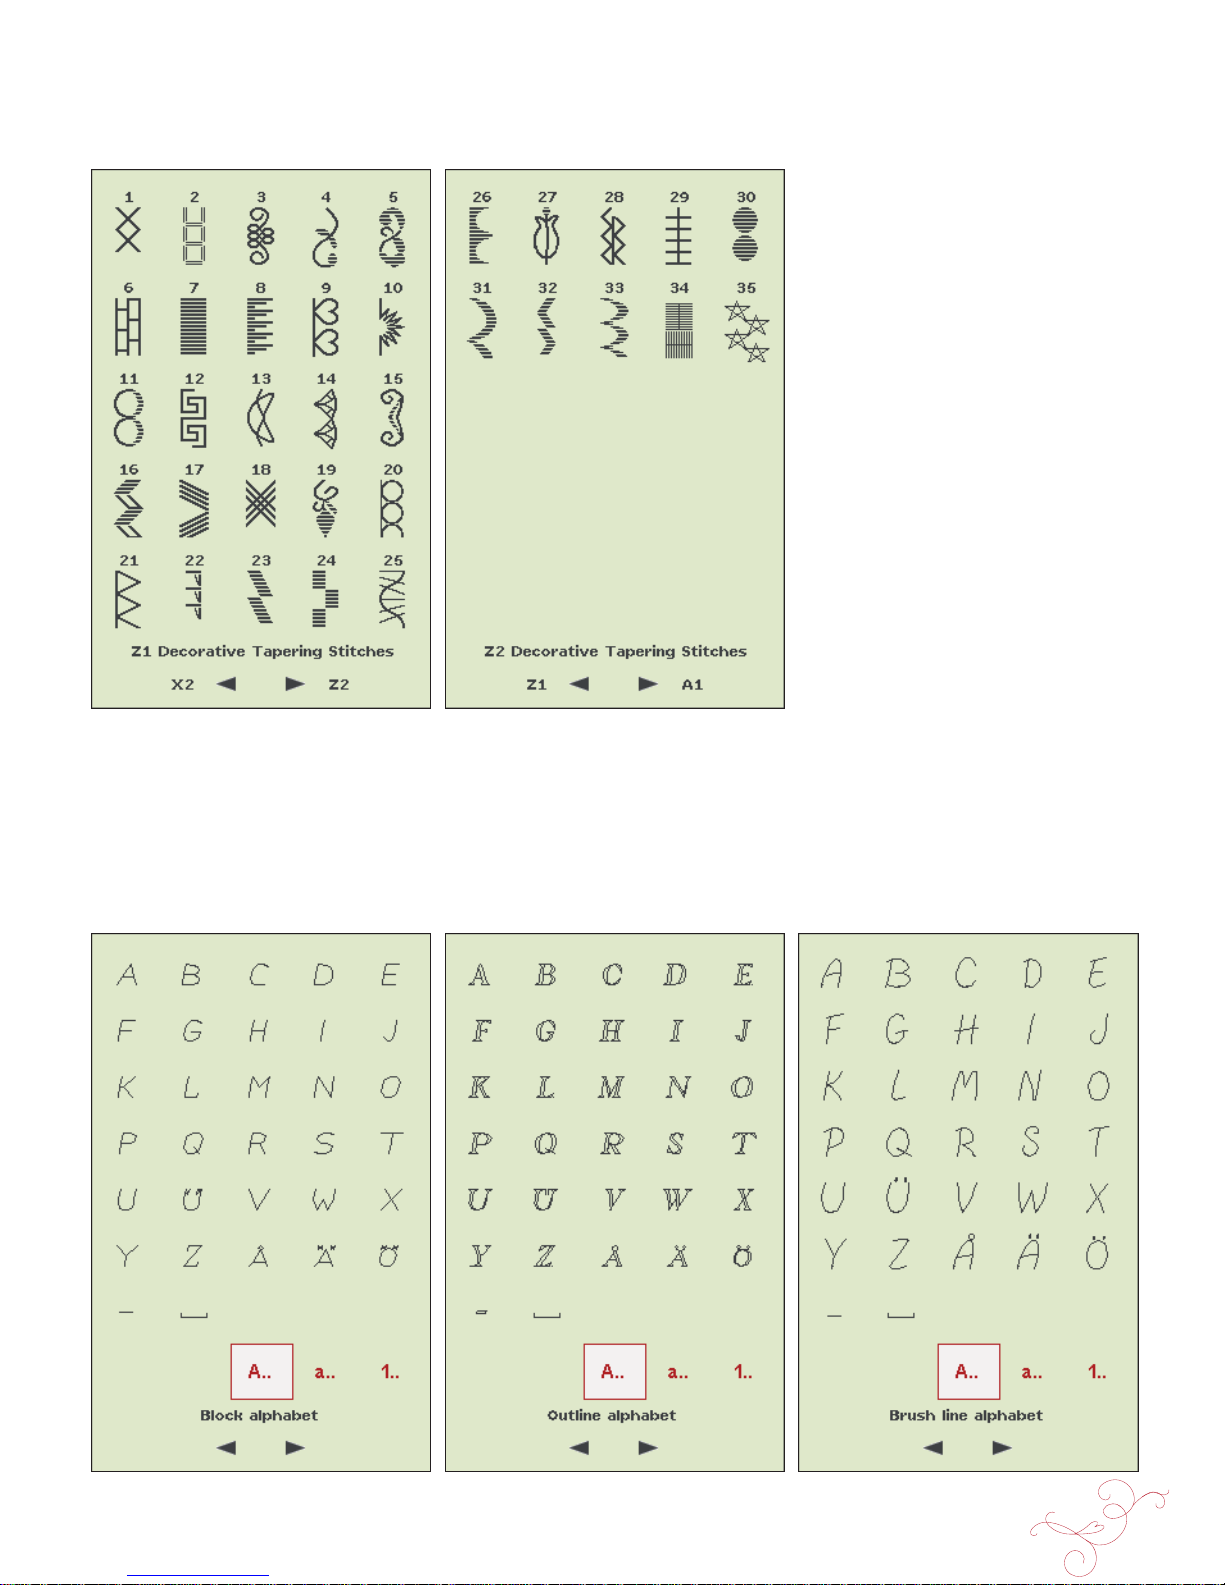
Block Alphabet Outline block Alphabet Brush Line Alphabet
Z - Decorative T apering Stitches
Decorative stitches with tapering.
Page 18
1:18
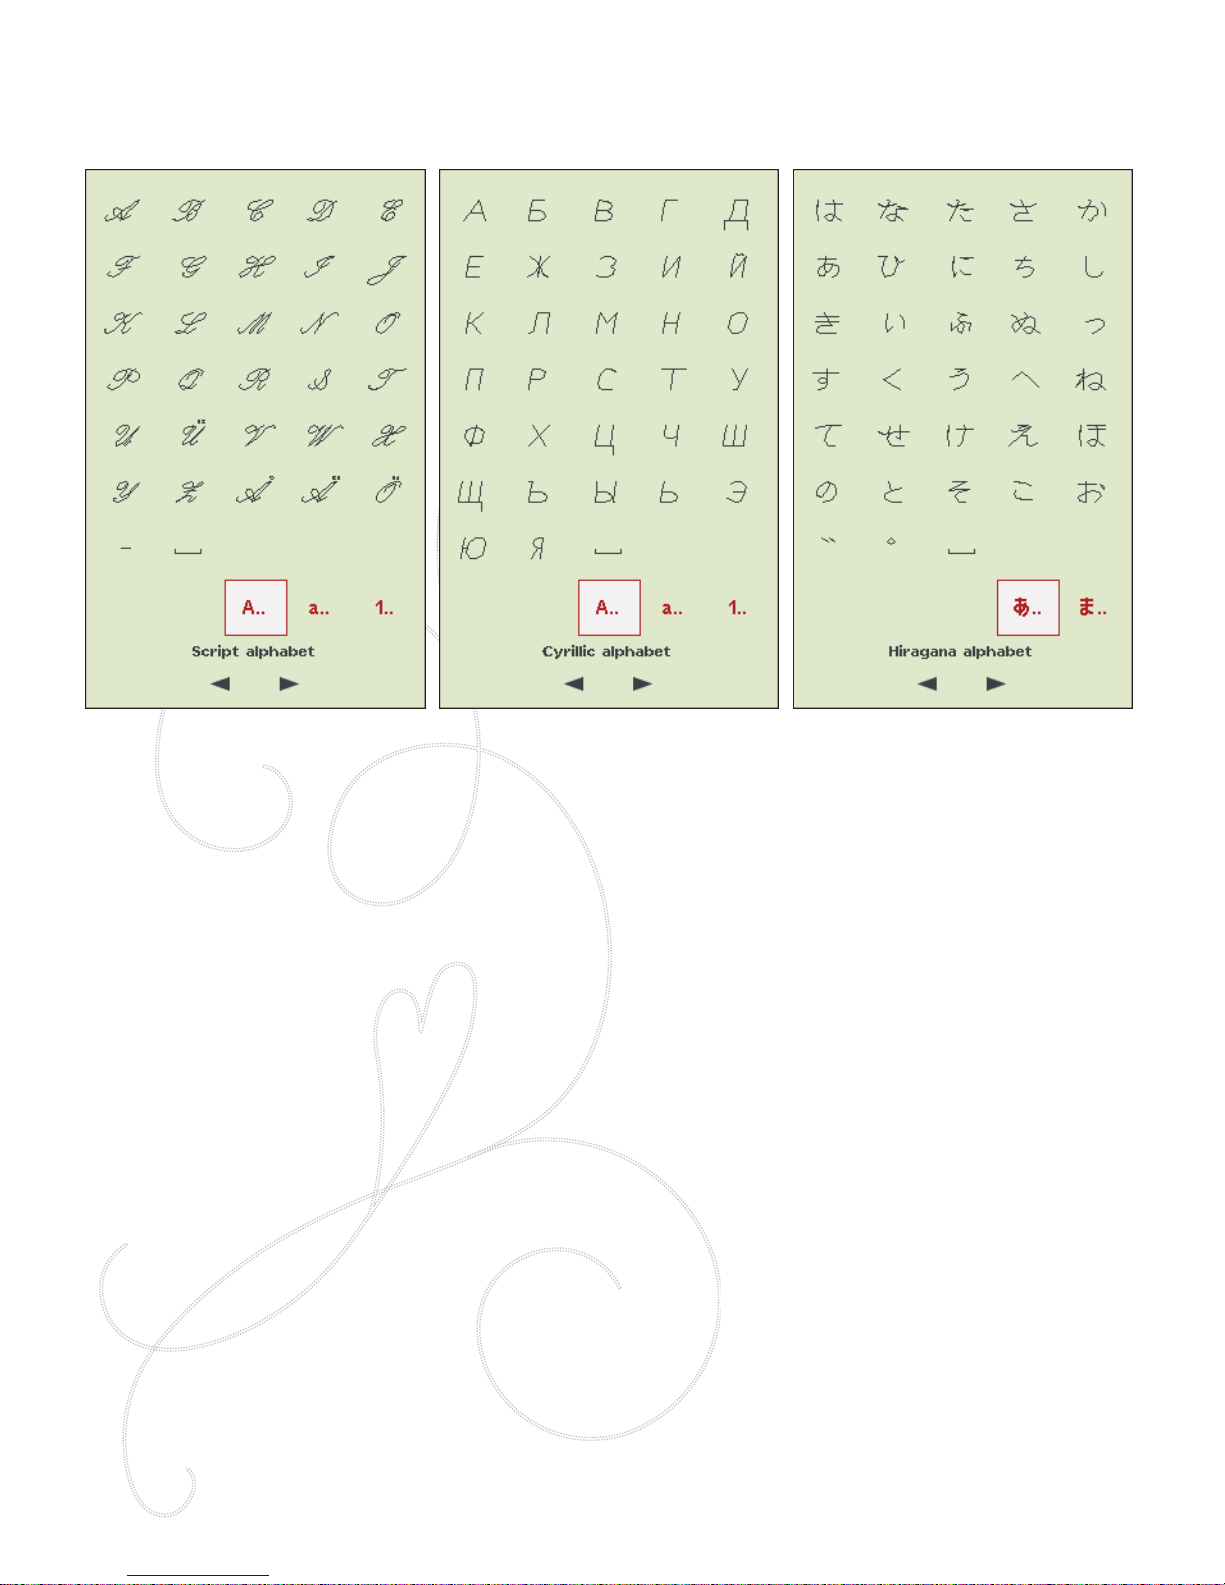
Script Alphabet Cyrillic Alphabet Hiragana Alphabet
Page 19
SET UP
2
Page 20
2:2
OFF
ON
312
UNPACKING
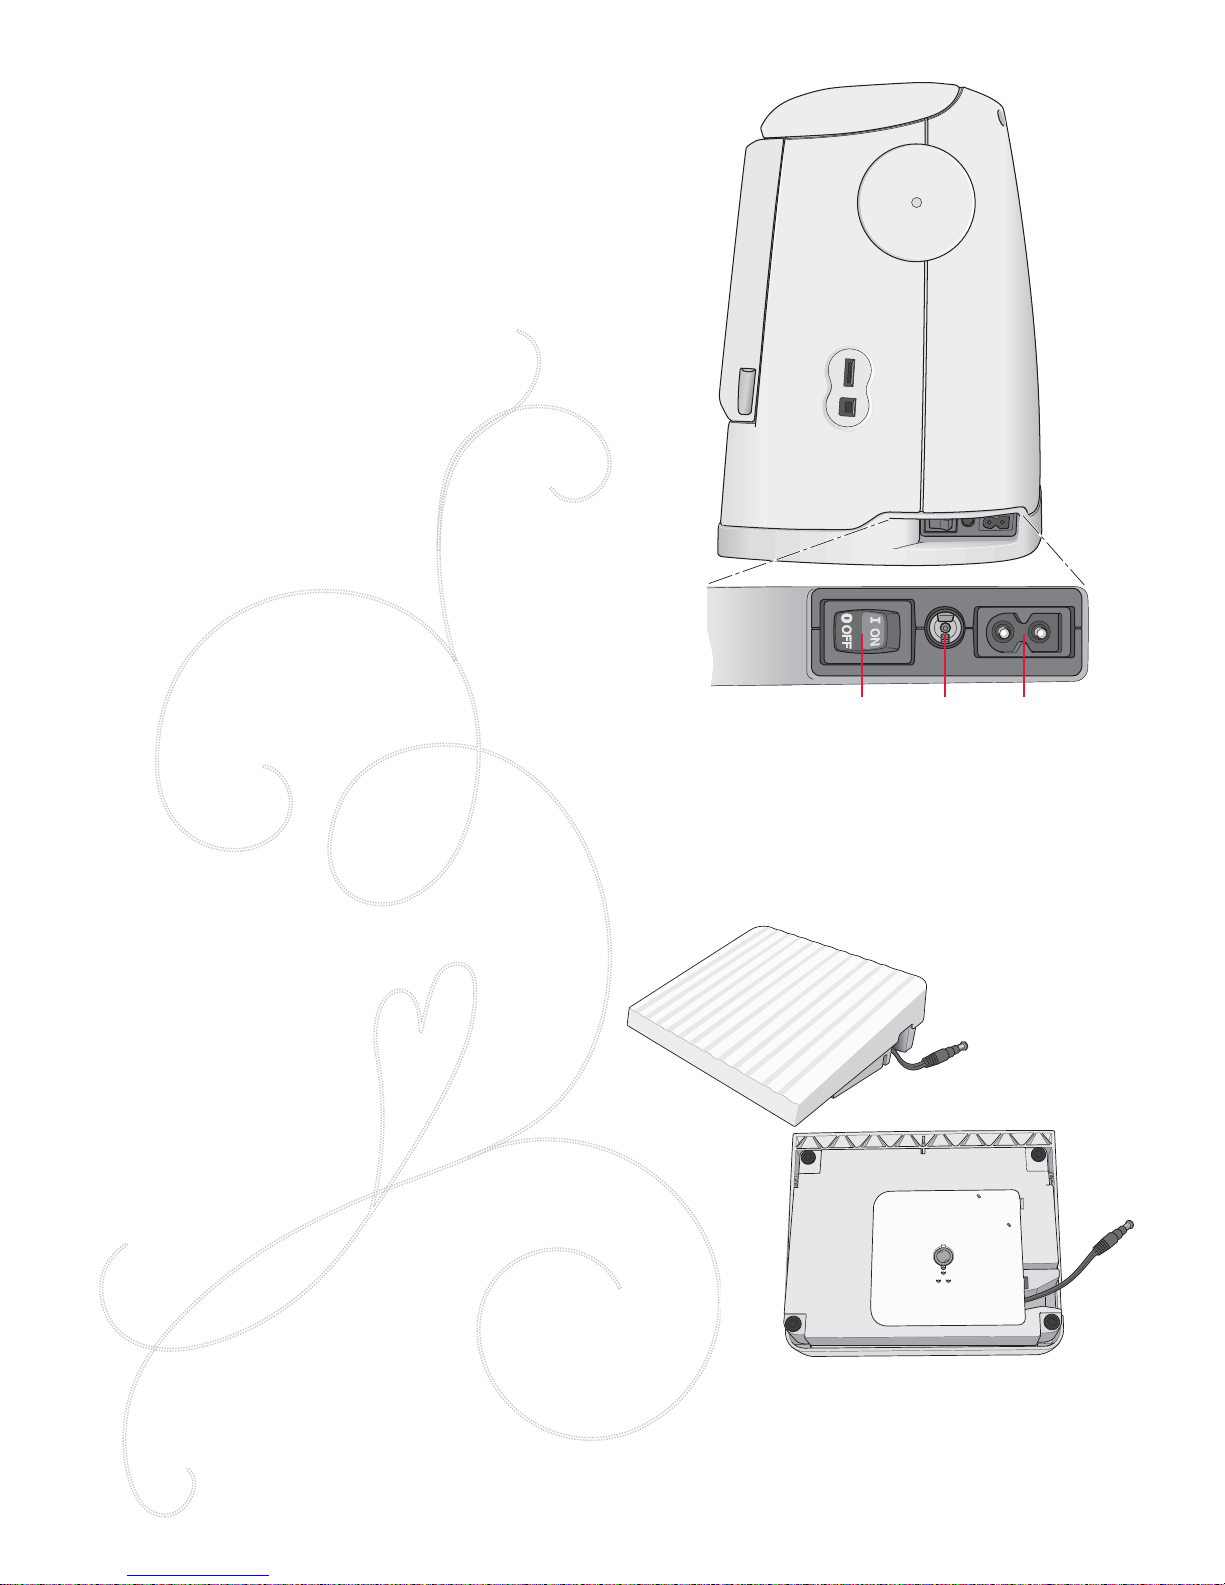
1. Place the box on a steady, Á at surface. Lift off the
machine carrying case. Lift your machine out of the
box and remove the outer packaging.
2. Remove all other packing material and the plastic bag.
CONNECT THE POWER CORD AND FOOT
CONTROL
Among the accessories you will À nd the power cord and
the foot control.
Note: Before plugging in the foot control, check to ensure that it is type
“FR5” (see underside of foot control).
1. Pull out the cord from the foot control. Connect the
foot control cord to the front socket on the bottom
right side of the machine (1).
2. Connect the power cord to the rear socket on the
bottom right side of the machine (2).
3. Press the ON/OFF switch to ON to turn on power
and light (3).
For the USA and Canada
This sewing machine has a polarized plug (one blade wider
than the other). To reduce the risk of electric shock, this
plug is intended to À t in a polarized outlet only one way. If
the plug does not À t fully in the outlet, reverse the plug. If
it still does not À t, contact a qualiÀ ed electrician to install
the proper outlet. Do not modify the plug in any way.
P ACK A W A Y AFTER SEWING
1. Press the ON/OFF (3) switch to OFF.
2. Unplug the cord from the wall socket and then from
the machine (2).
3. Unplug the foot control cord from the machine (1).
Pull the cord gently and release. The cord will retract
itself into the foot control.
4. Place all accessories in the accessory tray. Slide the tray
on to the machine, behind the free arm.
5. Place the foot control in the space above the free arm.
6. Place the hard cover over your machine.
Page 21

SET UP 2:3
FREE ARM
Slide the accessory tray to the left when you wish to
remove it and use the free arm.
Use the free arm to facilitate sewing trouser legs and sleeve
hems.
To replace the accessory tray, slide it onto the machine until
it À ts in place.
SPOOL PINS
Your machine has two spool pins; a main spool pin and
an auxiliary spool pin. The spool pins are designed for all
types of thread. The main spool pin is adjustable and can
be used both in a horizontal position (the thread reels off
the spool) and a vertical position (the thread spool rotates).
Use the horizontal position for regular sewing threads and
the vertical position for specialty threads.
HORIZONTAL POSITION
Place a spool cap and the thread spool on the spool pin.
Make sure that the thread reels over the top. Slide on a
second spool cap, slightly larger than the thread spool.
The Á at side of the spool cap should be pressed À rmly
against the spool. There should be no space between the
spool cap and the thread spool.
VERTICAL POSITION
Lift the spool pin up and all the way to the right. Lock
the spool pin in the vertical position by slightly pressing it
down. Slide on the large spool cap. For spools smaller than
the medium size spool cap or when using specialty threads,
place a felt pad under the thread spool to prevent the
thread from reeling off too fast. For larger spools, the felt
pad is not needed.
Do not place a spool cap on top of the vertical spool pin as
it may prevent the spool from rotating.
Note: When the spool pin is used in the vertical position, the thread
tension might need to be adjusted manually.
AUXILIARY SPOOL PIN
The auxiliary spool pin is used when winding a bobbin
from a second spool of thread or for a second spool when
sewing with a twin needle.
Lift the auxiliary spool pin up and to the left. Slide on
the large spool cap. For spools smaller than the medium
size spool cap, place a felt pad under the thread spool to
prevent the thread from reeling off too fast. For larger
spools, the felt pad shall not be used.
Page 22
2:4
A
B
CD
E
F
G
F
G
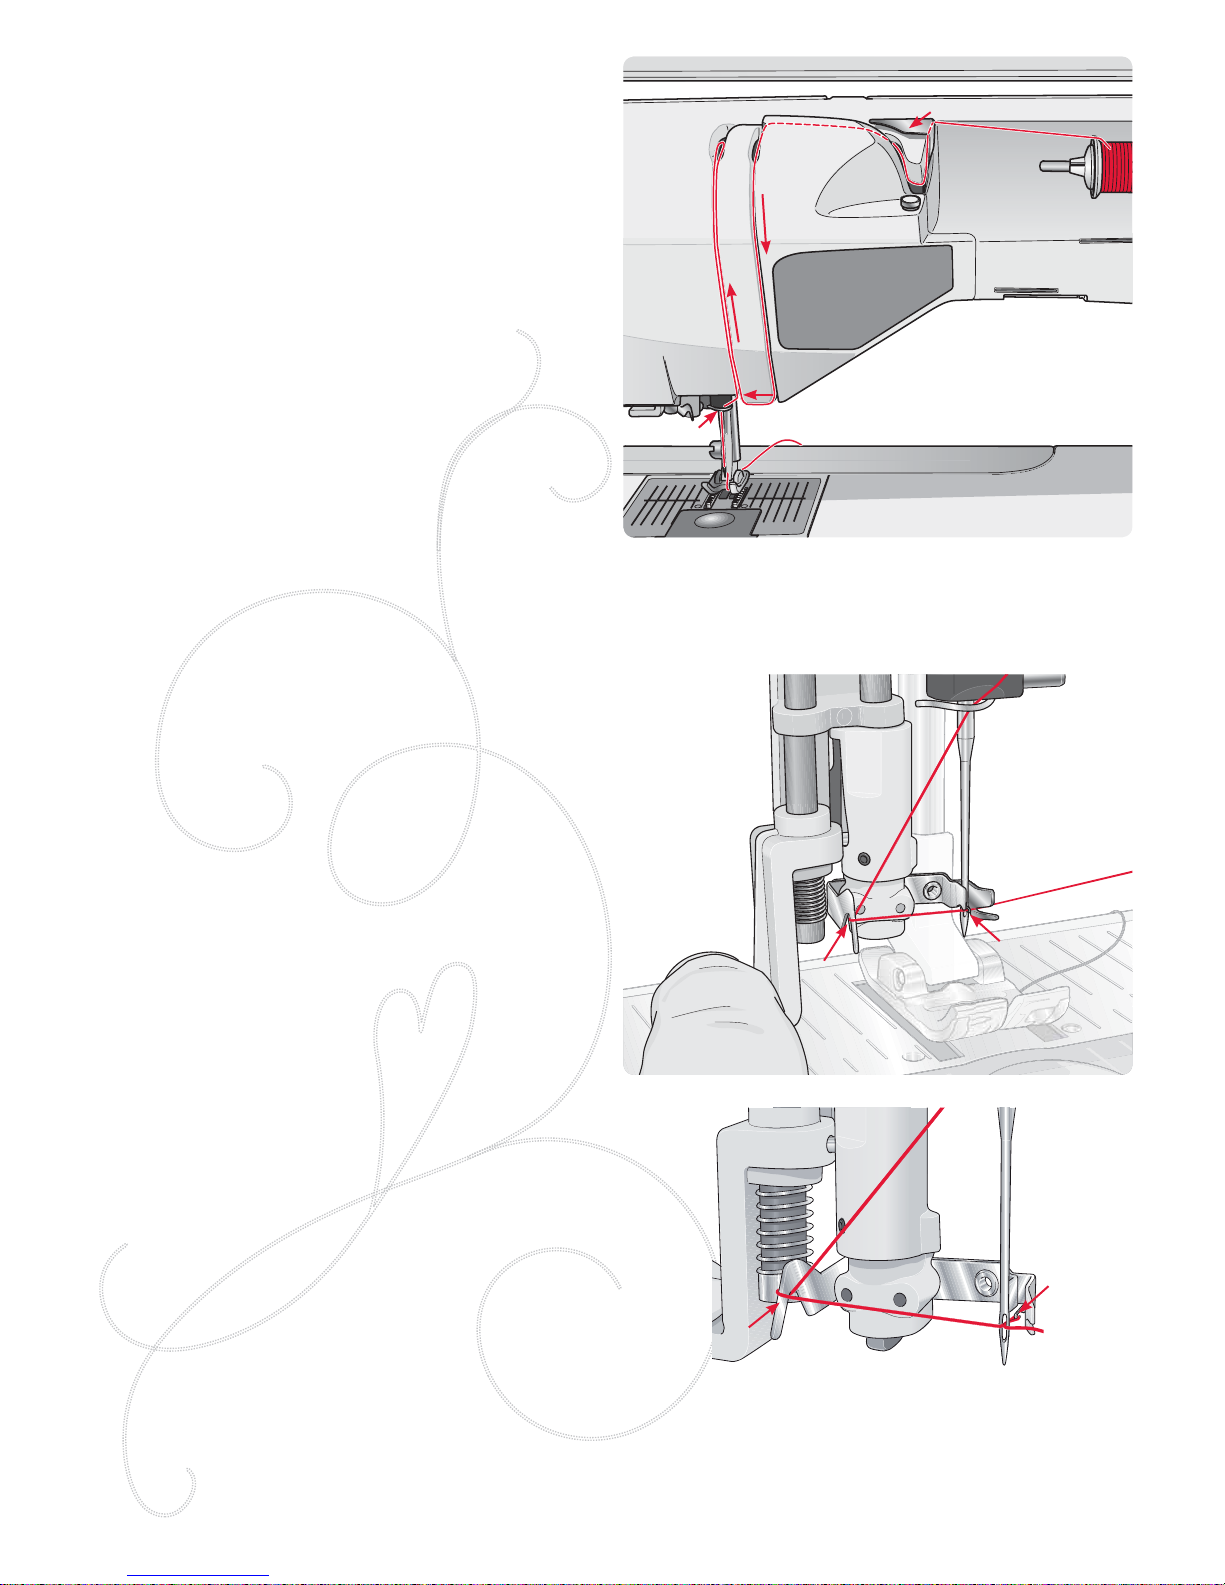
THREADING THE UPPER THREAD
Make sure that the presser foot is raised and the needle is in
the up position.
1. Place the thread on the spool pin and the spool cap on
the spool as described on page 2:3.
2. Spool pin in horizontal position:
Bring the thread over and behind the pre-tension
thread guide (A) and under the thread guide (B).
Spool pin in vertical position:
Instead of bringing the thread into the pre-tension
guide (A), bring it directly under the thread guide (B).
3. Bring the thread down between the thread tension
discs (C).
4. Continue threading in the direction indicated by the
arrows. Bring the thread from the right into the slot on
the take-up lever (D).
5. Take the thread down and behind the last guide just
above the needle (E).
NEEDLE THREADER
The needle threader allows you to thread the needle
automatically. The needle must be in the up position to use
the Built-In needle threader. We also recommend lowering
the presser foot.
1. Use the handle to pull the needle threader all the way
down. The threader hook (G) swivels through the
needle eye.
2. Place the thread from the back over the hook (F) and
under the thread hook (G).
3. Let the needle threader gently swing back. The hook
pulls the thread through the needle eye and forms
a loop behind the needle. Pull the thread loop out
behind the needle.
Note: The needle threader is designed to be used for size 70-120
needles. You cannot use the needle threader for needles size 60 or
smaller, the wing needle, twin needle, triple needle or when the Sensor
One-Step buttonhole foot is attached. There are also some optional
accessories that require manual threading of the needle.
When threading the needle manually, make sure that the needle
is threaded from front to back. The bobbin cover can be used as a
magnifying glass to make threading easier.
Page 23
SET UP 2:5
B
A
C
A
B
THREADING FOR TWIN NEEDLE
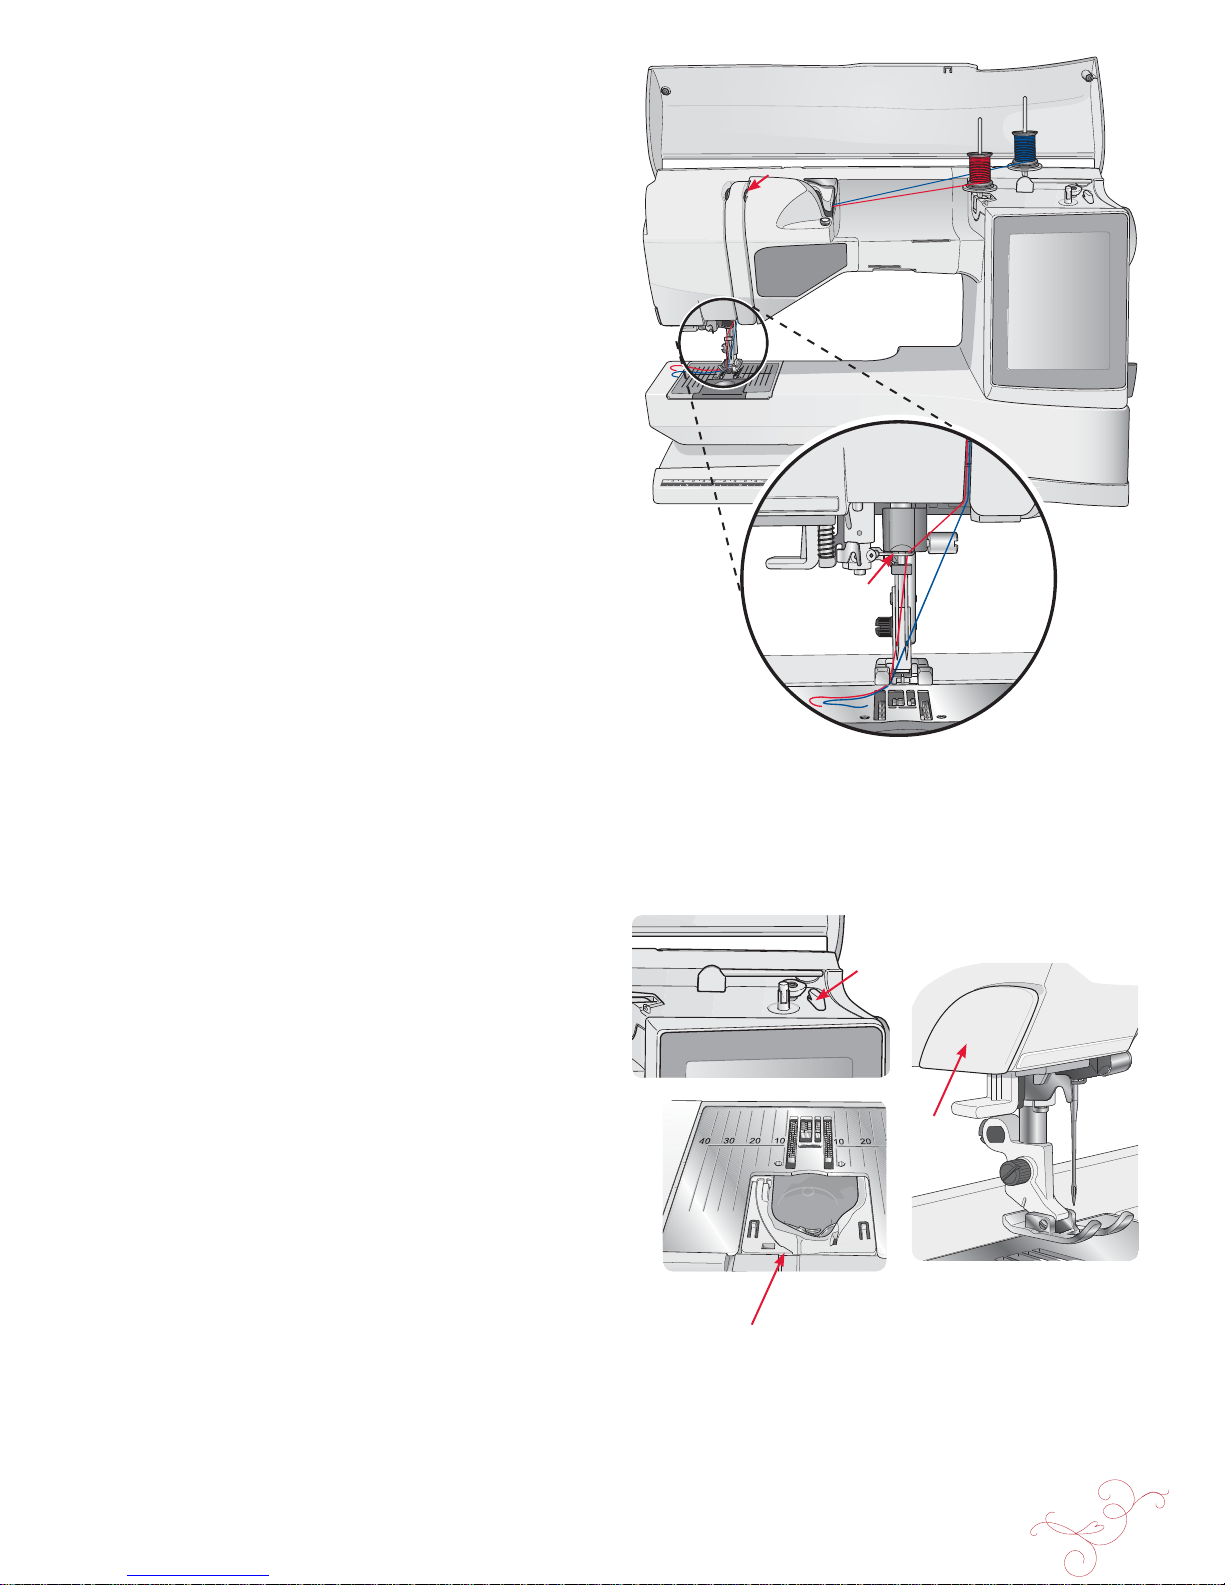
Replace the sewing needle with a twin needle. Make
sure the presser foot is raised and the needle is in the up
position.
1. Lift the spool pin up and all the way to the right.
Lock the spool pin in the vertical position by slightly
pressing it down. Slide on the large spool cap. For
spools smaller than the medium size spool cap, place a
felt pad under the thread spool.
2. Place the À rst thread spool on the spool pin. The
spool should rotate in a clockwise direction when the
thread reels off the spool.
3.
LEFT NEEDLE: Thread the machine as described on page
2:4. Check to ensure that the thread lies between the
left thread tension discs (A). Thread the left needle
manually.
4. Pull out the auxiliary spool pin and slide on the large
spool cap. For spools smaller than the medium size
spool cap, place a felt pad under the thread spool.
5. Place the second thread on the spool pin. The second
spool should rotate in a counterclockwise direction
when the thread reels off the spool.
6.
RIGHT NEEDLE: Thread the machine as before but this
thread should lie between the right thread tension discs
(A) and outside the needle thread guide (B). Thread
the right needle manually.
Note: Activate and choose the correct needle width in Sewing Settings
in SET Menu to prevent damage on the needle or the presser foot.
THREAD CUTTER
There are three thread cutters on your machine. The À rst
one is close to the bobbin winder spindle (A) for cutting
the thread before and after winding. The second one is
next to the bobbin area (B) for cutting the bobbin thread
after placing it in the machine. The third one is on left side
of the machine (C) for manually cutting top and bobbin
threads. Pull both threads into the cutter from the back to
the front and pull down quickly.
THREAD SENSOR
If the upper thread breaks or bobbin thread runs out,
the machine stops and a pop-up message appears on the
screen.
If upper thread breaks: Re-thread the machine and touch
OK on the pop-up message. If bob bin thread runs out,
replace it with a full bobbin and continue sewing.
Page 24
2:6
A
B
C
D
BOBBIN WINDING
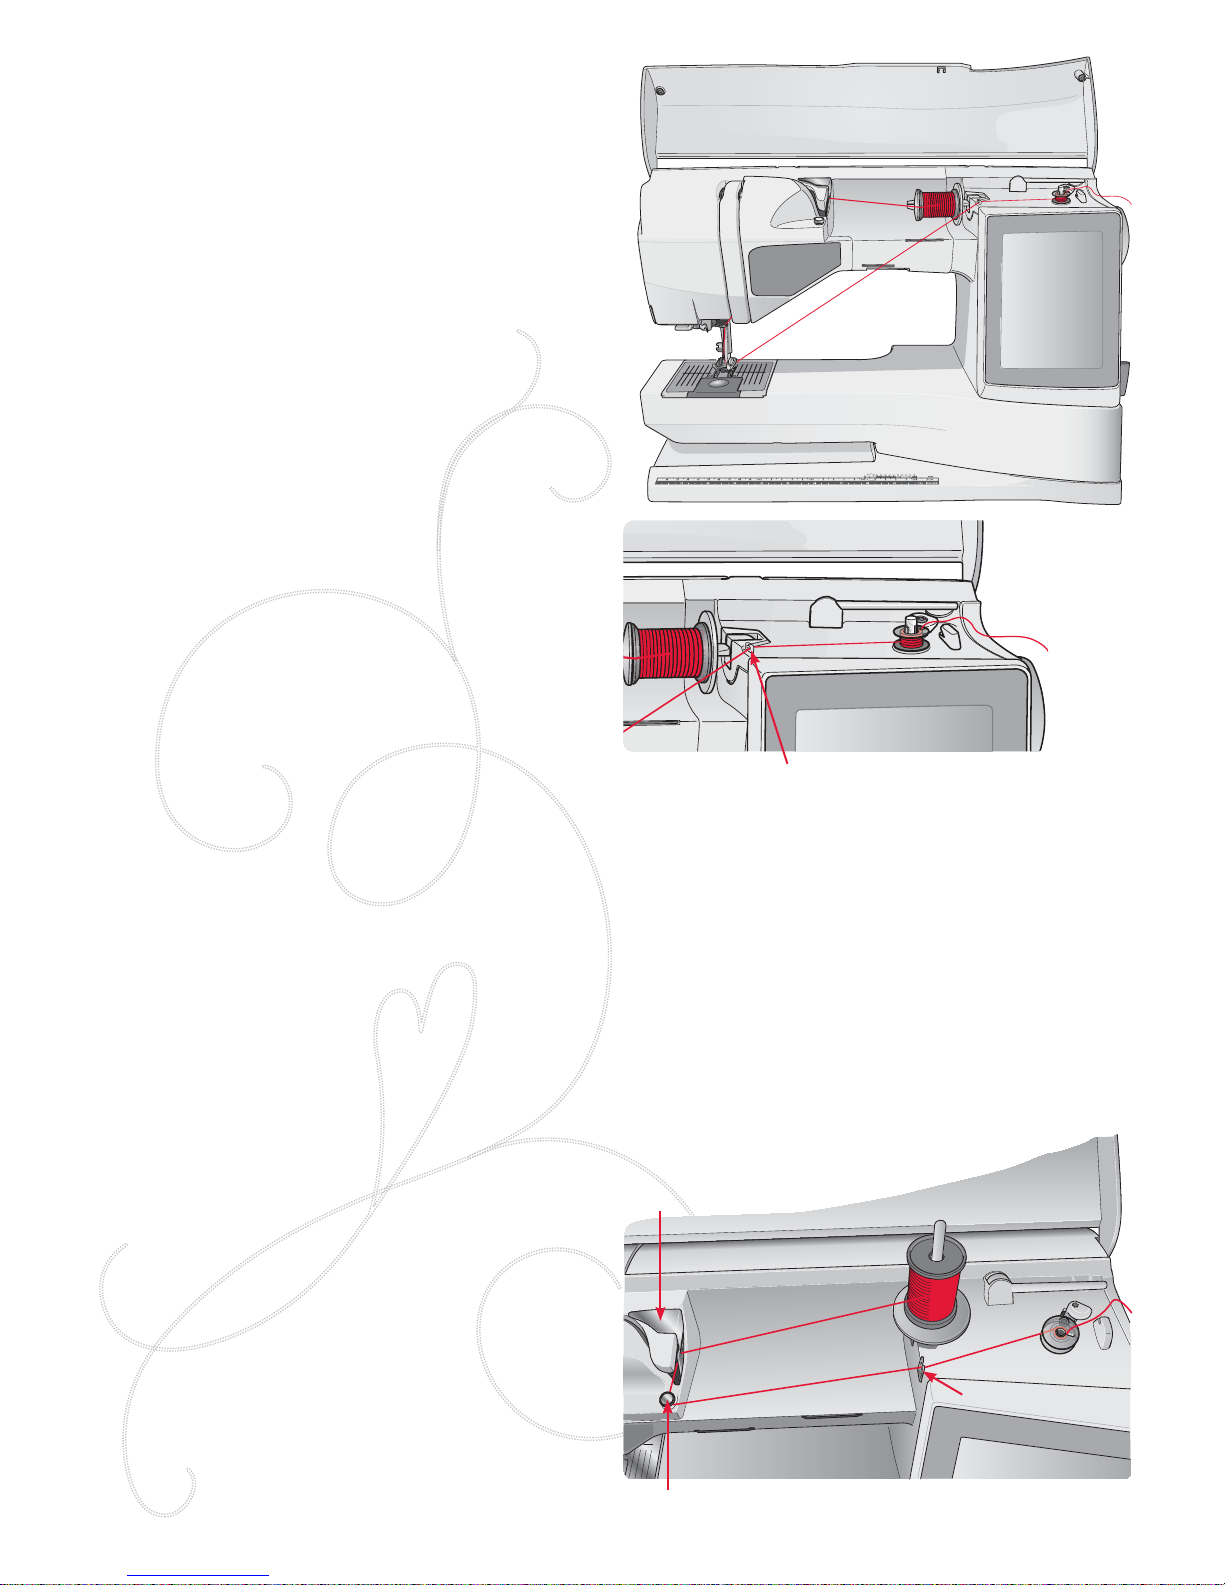
BOBBIN WINDING THR OUGH THE NEEDLE
Make sure that the presser foot and the needle are in the up
position.
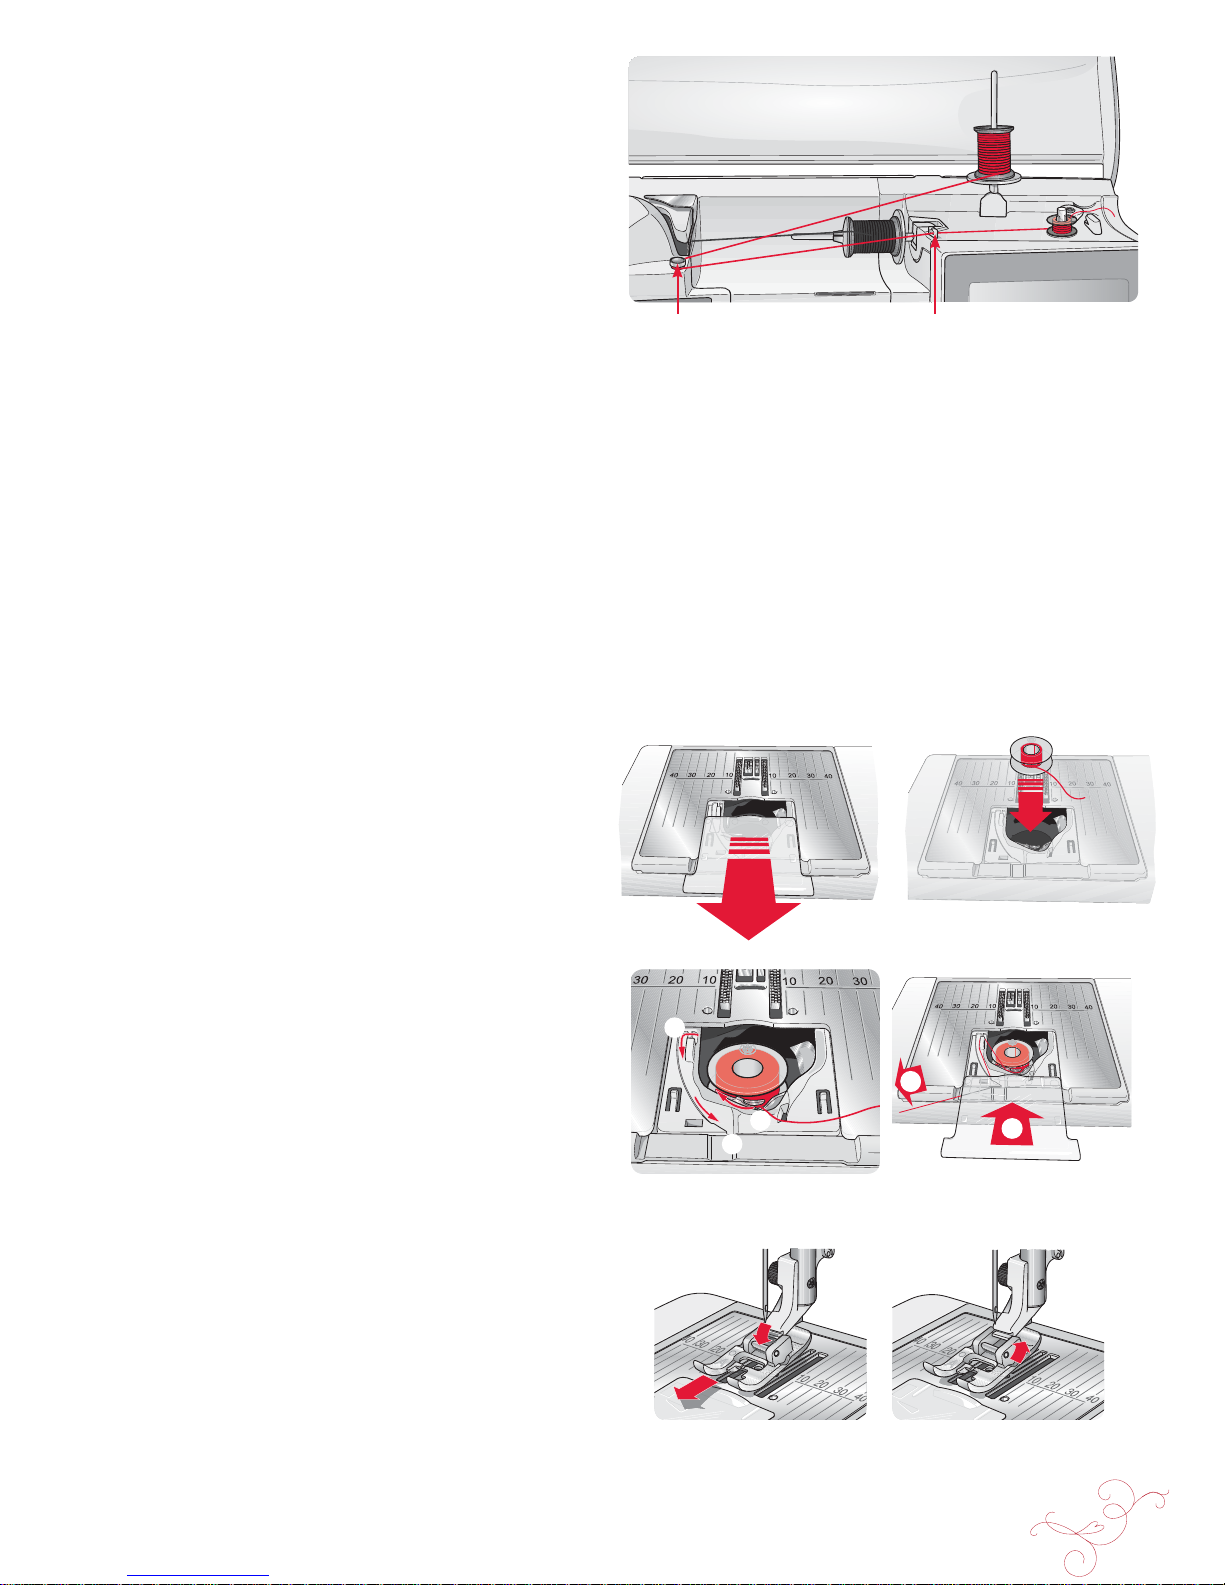
1. Place an empty bobbin on the bobbin spindle on the
top of the machine. The bobbin only À ts on one way,
with the logo facing up. Use only original HUSQVARNA
VIKING® bobbins.
2. Thread the machine with the main spool pin in the
horizontal position.
Note: If the thread spool is too large to be in horizontal
position, wind the bobbin as described under “Winding Specialty
Threads” below.
3. Bring the thread up from the needle, under the presser
foot and up to the right through thread guide (A).
Note: Use a metal presser foot when bob bin winding from the
needle.
4. Guide the thread through the hole in the bobbin from
the inside to the outside.
5. Push the bobbin winder lever towards the bobbin to
wind. A pop-up message appears on screen. To adjust
winding speed drag the arrow on the slider with your
stylus. Stop and start the bobbin winding with the
on-screen buttons. Hold the end of the thread À rmly
when starting to wind. Once the bobbin begins to
wind, cut the excess thread.
Note: It is important that you cut the thread end close to the bobbin.
When the bobbin is full, the bobbin winder lever will
move back and the winding will stop automatically.
The pop-up message closes. Remove the bobbin and
cut the thread using the bobbin winding thread cutter.
Winding Specialty Threads
We do not recommend winding speciality threads such as
“invisible” or other stretchy threads, metallic or Á at metallic
threads through the needle.
Always wind these threads at minimum speed.
1. Place an empty bobbin on the bobbin spindle at the
front of the machine. The bobbin only À ts on one way,
with the logo facing up. Use only original HUSQVARNA
VIKING® bobbins.
2. Place the large spool cap and a felt pad under the
spool on the main spool pin set in the vertical position.
3. Bring the thread over the Pre-Tension Thread guide
(B) and down around the thread tension disc (C), then
through thread guide (D) as illustrated.
4. See Bobbin Winding Through the Needle, step 4-5.
Note: When using earlier version of HUSQVARNA VIKING®
bobbins that do not have a hole, wind several turns of thread on the
bobbin to get started.
Page 25
SET UP 2:7
1
2
43
F
G
AB
C
D
E
BOBBIN WINDING WHILE EMBROIDERING OR
SEWING
1. Raise the auxiliary spool pin. Place the large spool cap,
felt pad and thread spool on the spool pin.
2. Bring the bobbin thread around the thread tension
disc (A) and through the thread guide (B) as illustrated.
3. Guide the thread through the hole in the bobbin from
the inside to the outside.
4. Push the bobbin winder lever towards the bobbin to
wind. A pop-up message appears on screen. To adjust
winding speed drag the arrow on the slider with your
stylus. Stop and start the bobbin winding with the
on-screen buttons. Hold the end of the thread À rmly
when starting to wind.
When the bobbin is full, the bobbin winder lever will
move back and the winding willl stop automatically.
The pop-up message closes. Remove the bobbin and
cut the thread using the bobbin winding thread cutter.
Note: Make sure that the thread does not touch the cap of the
horizontal spool pin when winding the bobbin. If it does, place the cap
and spool higher on the vertical spool pin.
INSER TING THE BOBBIN
1. Remove the bobbin cover by sliding it towards you.
2. Place the bobbin in the bobbin case. It drops in only
one way with the logo facing up. The thread unreels
from the left of the bobbin. The bobbin will then
rotate counter-clockwise when you pull the thread.
3. Place your À nger on the bobbin to keep it from
turning as you pull the thread À rmly to the right and
then to the left into the tension spring (C) until it
“clicks” into place.
4. Continue threading around (D) and to the right of the
thread cutter (E). Slide on the bobbin cover (F). Pull
the thread to the left to cut (G).
CHANGING THE PRESSER FOOT
1. Make sure that the needle is in the highest position.
Pull the presser foot down and towards you.
2. Line up the cross pin on the foot with the gap in the
presser foot ankle.
3. Push the foot into the clip until the foot snaps into
place.
Page 26
2:8
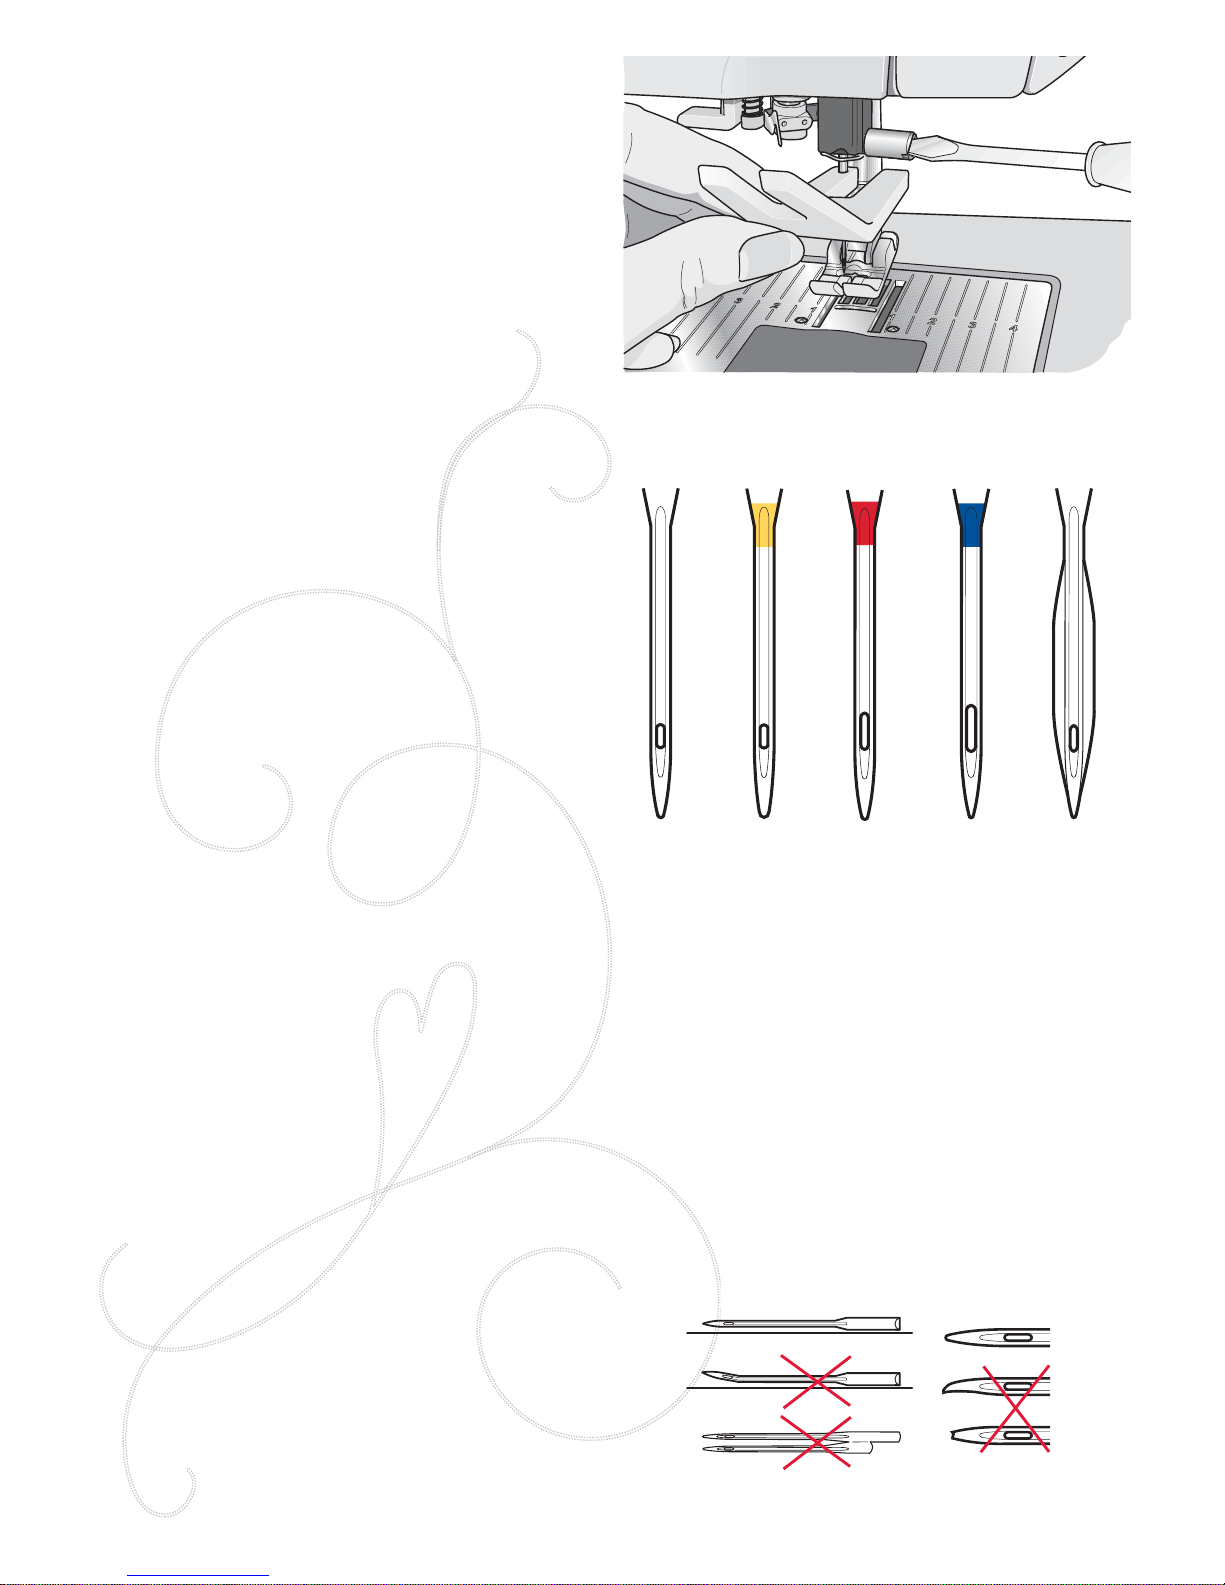
CHANGING THE NEEDLE
1. Use the hole in the multipurpose tool to hold the
needle.
2. Loosen the needle screw.
3. Remove the needle.
4. Insert the new needle using the multipurpose tool.
Push the new needle upwards with the Á at side away
from you until it will go no further.
5. Tighten the needle screw.
NEEDLES
The sewing machine needle plays an important role in
successful sewing. Use only quality needles. We recommend
needles of system 130/705H. The needle package included
with your machine contains needles of the most frequently
used sizes.
Universal Needle (A)
Universal needles have a slightly rounded point and come in
a variety of sizes. For general sewing in a variety of fabric
types and weights.
Stretch Needle (B)
Stretch needles have a special scarf to eliminate skipped
stitches when there is a Á ex in the fabric. For knits,
swimwear, Á eece, synthetic suedes and leathers.
Embroidery Needle (C)
Embroidery needles have a special scarf, a slightly rounded
point and a slightly larger eye to avoid damage to thread
and materials. Use with metallic and other specailty threads
for embroidery and decorative sewing.
Denim Needle (D)
Denim needles have a sharp point to penetrate tightly
woven fabrics without deÁ ecting the needle. For canvas,
denim, microÀ bers.
Wing Needles (E)
The Wing needle has wide wings on the side of the needle
to poke holes in the fabric when sewing entredeux and
other hemstitches on natural À ber fabrics.
Note: Change the needle often. Always use a straight needle with a
sharp point (F).
A damaged needle (G) can cause skipped stitches, breakage
or snapping of thread. A damaged needle can also damage
the needle plate.
Do not use asymmetrical twin needles (H) since they may
damage your sewing machine.
F
G
H
ABC ED
Page 27
SET UP 2:9
THREADS
There are many threads on the market today developed for
different purposes.
All Purpose Sewing Thread
All purpose sewing thread is made of synthetic, cotton or
cotton covered polyester. This type of thread is used for
sewing garments and projects.
Embroidery Thread
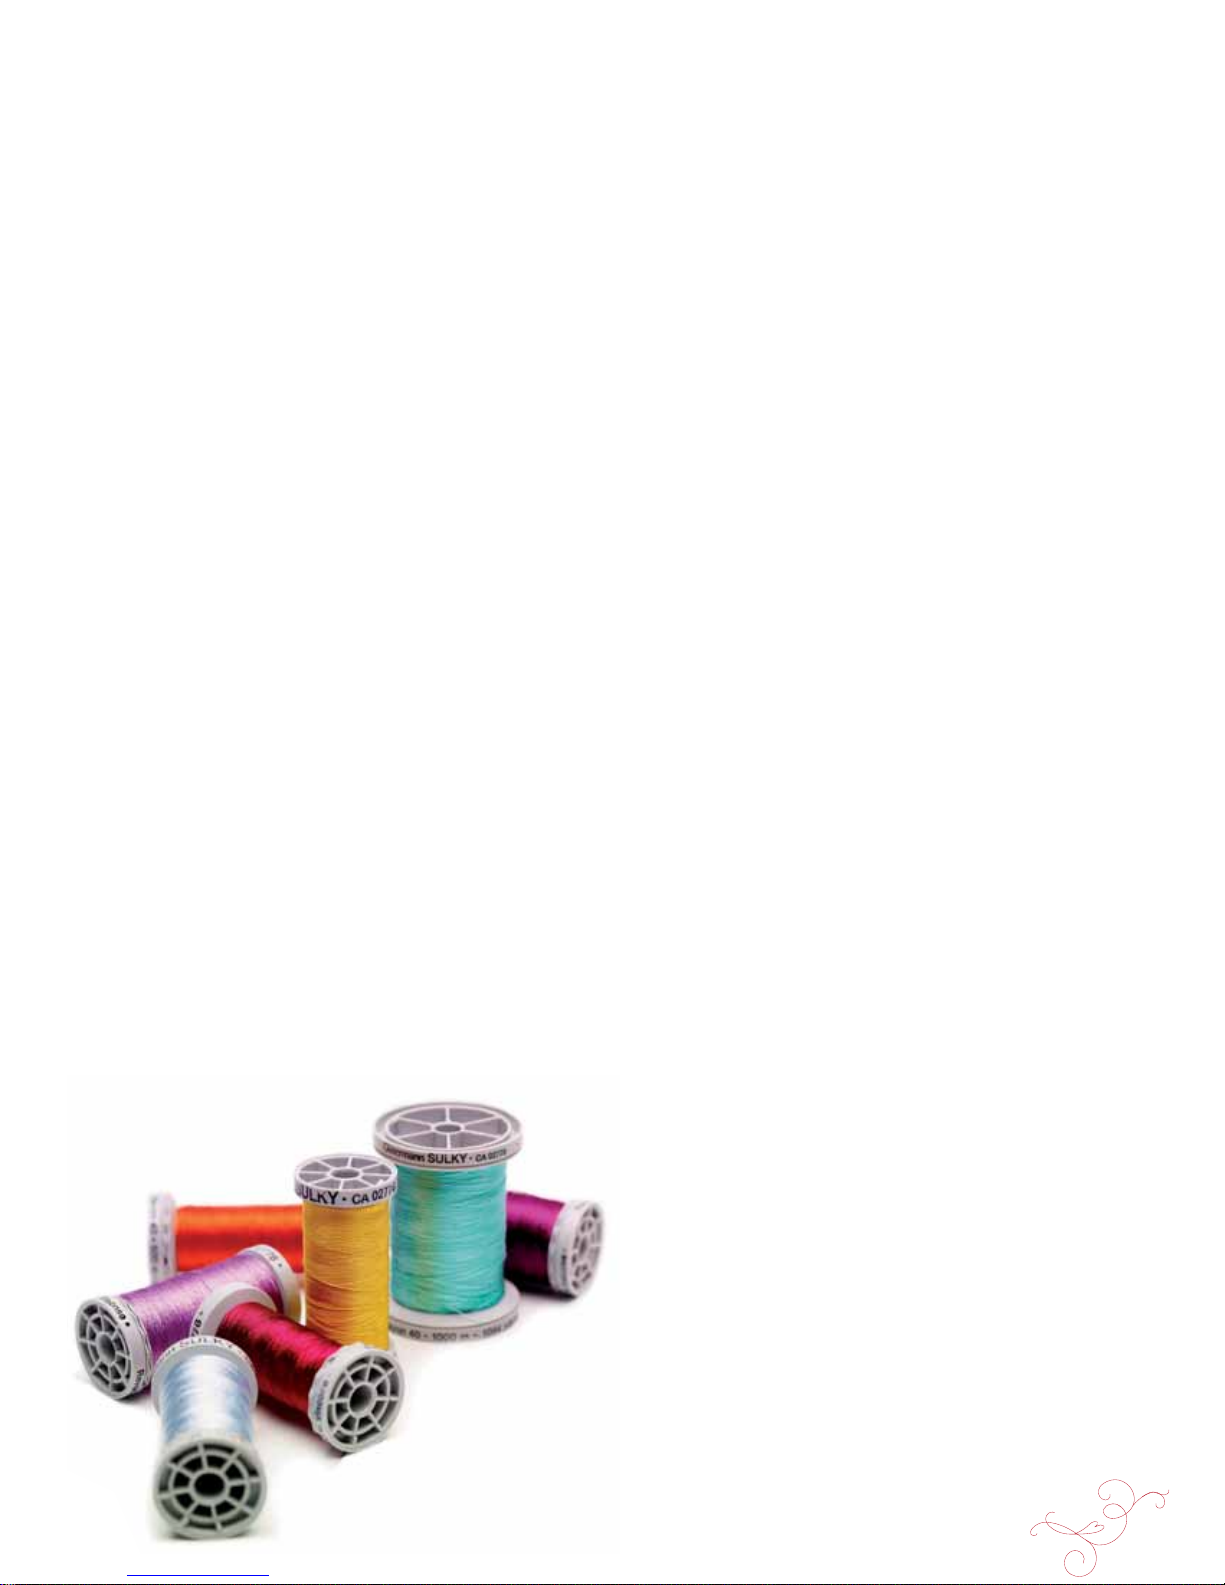
Embroidery thread is made of various À bers: rayon,
polyester, acrylic or metallic. These threads create a smooth
glossy appearance for embroidery and other decorative
stitching.
When embroidering, use embroidery bobbin thread
because it is a À ne weight and will not build up under
embroidery.
Note: When using a metallic or a Á at À lm thread for embroidering,
you may need to use a needle with a larger eye and lower the
embroidery speed. Thread the sewing machine with the spool in the
vertical position.
T ransparent Thread
Transparent thread, also called monoÀ lament thread, is
single clear synthetic thread. It is used for quilting and
other decorative sewing. Thread the sewing machine with
the spool in the vertical position. When winding a bobbin,
wind at slow speed and wind the bobbin half full.
Note:
Some fabrics have excess dye which can cause discoloration on
other fabrics or on your sewing machine. This discoloration may be
very difÀ cult or impossible to remove.
Fleece and denim fabric, especially red and blue, often contain excess
dye.
If you suspect that your fabric/ready-to-wear garment contains a
lot of excess dye, always pre-wash it before sewing/embroidering to
prevent discoloration of your machine.
STABILIZERS
Tear-Away Stabilizers
Tear-away stabilizers are used with stable woven fabrics.
Place underneath fabric for decorative stitching or hoop
with the fabric when embroidering. Tear away excess
stabilizer after stitching.
Iron-on T ear -Awa y
Iron-on tear-away is a totally stable stabilizer that has a slick
side that will iron on to fabric. It is recommended for knits
and all unstable fabrics. Fuse it to the wrong side of the
fabric before decorative stitching or hooping. Tear away
excess stabilizer after stitching.
Cut-Away Stabilizer
Cut-away stabilizer does not tear so the excess has to be cut
away. It is recommended for knits and all unstable fabrics,
especially for hoop embroidery.
Water Soluble Stabilizer
Water soluble stabilizer is placed on top of the fabric when
embellishing/embroidering napped and looped fabrics
such as terry cloth. When embroidering cutwork, use it
underneath the fabric. Place your work in water to dissolve
the excess stabilizer. It is available in different thicknesses.
Disintegrating Stabilizer
Disintegrating stabilizer is a stable, loosely woven fabric
that is used for techniques such as cutwork and to crochet
off the fabric edge. The stabilizer disappears with heat.
Sticky Stabilizer
Sticky stabilizer is used for hoop embroidery when the
fabric is too delicate or too small to be hooped. Hoop the
sticky stabilizer with the paper side up. Remove the paper
and stick the fabric onto the sticky surface. Tear away sticky
stabilizer after stitching.
PICTOGRAM™ PEN
Use an air or water soluble marking pen for embroidery and
Pictograms on all types of fabrics. The color disappears
after a few hours. You can also use cold water to completely
remove the markings. Make sure that all markings are
removed before ironing or washing with soap or detergent.
Page 28
2:10
OFF
ON
USB PORTS
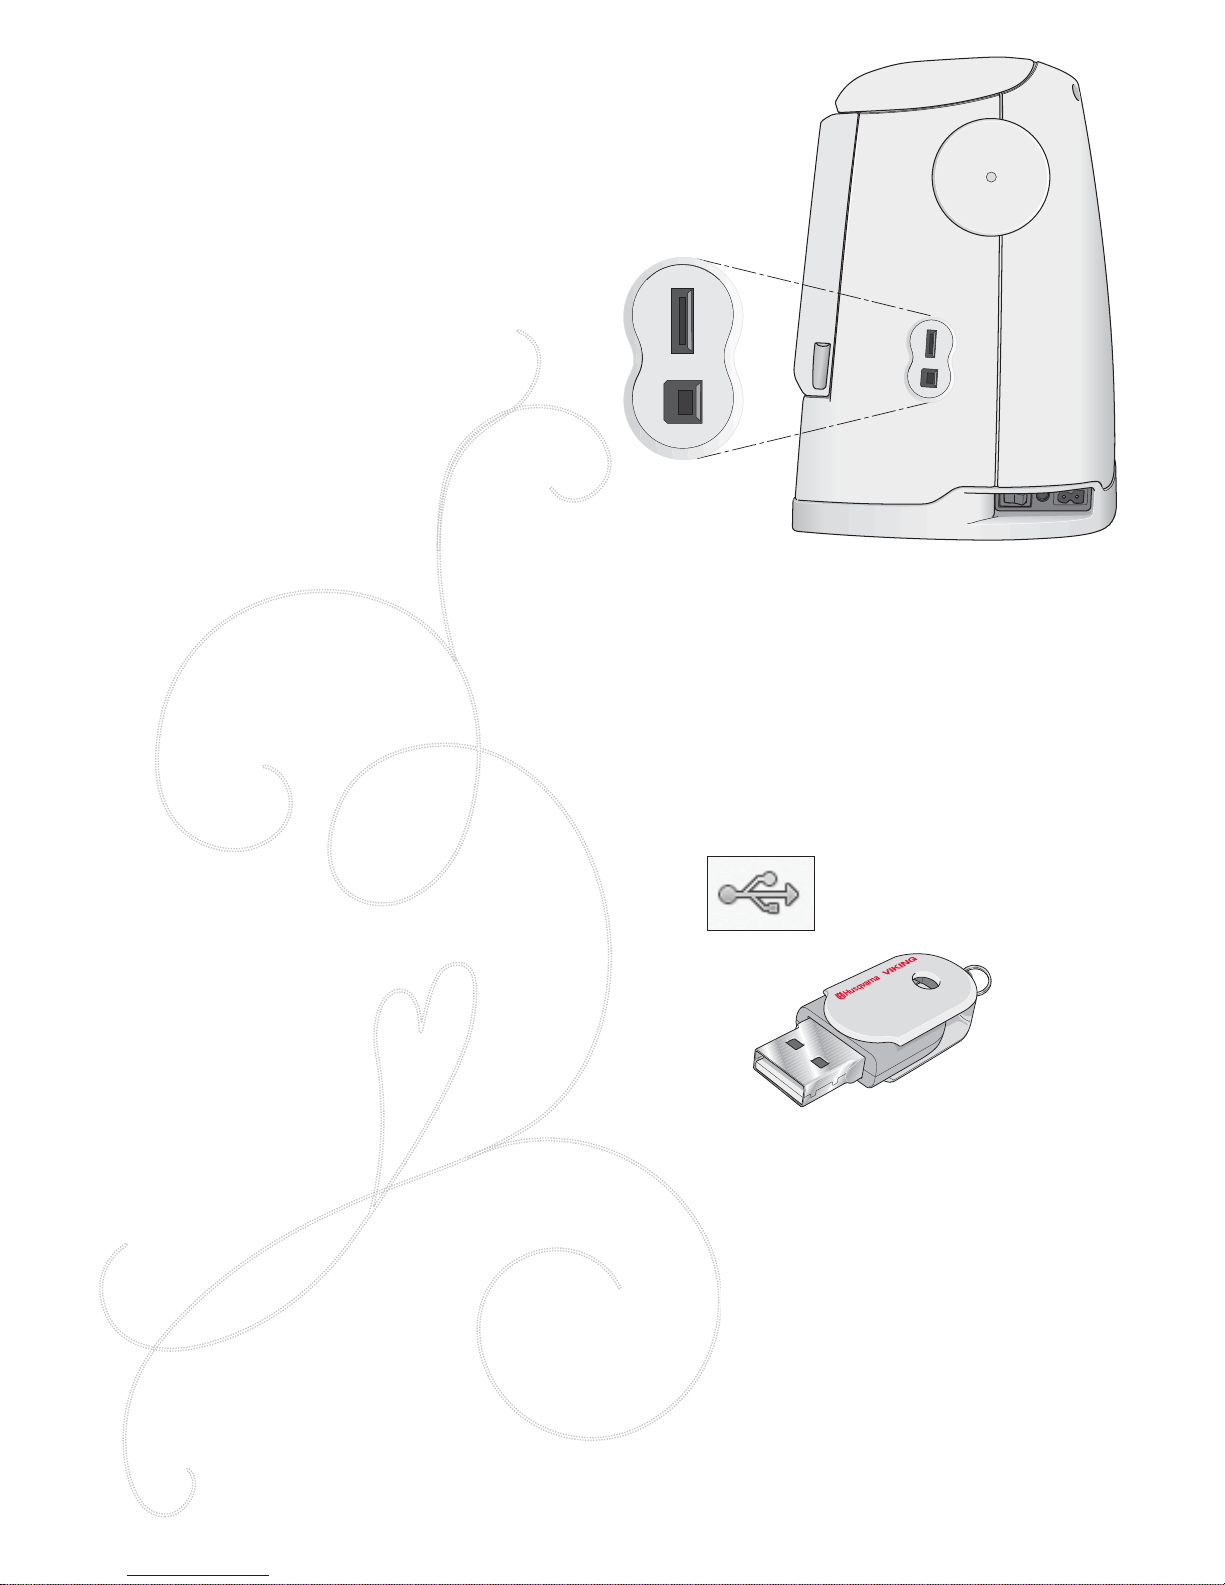
Your machine has two USB ports: one to connect the
sewing machine to your computer, and one to connect
either your USB embroidery stick, optional CD-drive,
optional USB hub or optional mouse.
USB EMBROIDERY STICK
Your machine comes with a USB embroidery stick. Use
the stick to store designs and other À les, or to move À les
between the computer and sewing machine.
CONNECT TO AND REMOVE FROM THE USB
PORT
Insert the USB embroidery stick or other devices in the
upper port. The USB plugs can only be inserted one way –
do not force them into the ports!
The USB PC cable packed with your machine
(P/N:412 62 59-04) plugs in to the lower port. No other
cable should be used in this port. Connect the other end of
the cable to your PC.
Note: Install the Embroidery Machine Communication CD before
connecting the machine to your PC.
To remove, carefully pull the USB embroidery stick or the
plug of the USB cable out straight.
Using the USB embroidery stick
The External Device icon in File Manager is only activate
when a device is connected to the machine USB port.
When loading from or saving to the USB embroidery stick
an hourglass appears on the screen.
Note: Do not remove the USB embroidery stick when the hourglass is
shown on the screen or while the À le manager is shown. Removing the
stick at that time can damage the À les on your USB embroidery stick.
Note: The USB embroidery stick provided with the machine can be
left in the machine when putting on the hard cover. Make sure that the
cover of the USB stick is turned downwards.
External Device icon
Page 29

SET UP 2:11
CONNECTING THE MACHINE
TO YOUR COMPUTER
Your machine comes with an Embroidery Machine
Communication CD (attached inside the back cover of
this User´s Guide). This CD should be installed before the
machine is connected to your computer for the À rst time.
When the software on the CD is installed and the machine
and the computer are connected, via the USB cable, you
can easily move designs or other À les to your machine.
Note: Your computer must be running
Windows® 7/Vista or Windows® XP.
5D™ EMBROIDERY SOFTWARE
Computer Connection
The Embroidery Machine Communication module is
automatically installed. This is required to use the Send
To features in any 5D™ Embroidery System module, and
Send Multiple in 5D™ Organizer.
5D™ QuickFont
Create font À les (.vf3) for your HUSQVARNA VIKING®
DESIGNER RUBY™ sewing and embroidery machine from
most TrueType® or OpenType® fonts on your computer.
5D™ Organizer
Find your designs and pictures easily. Browse them in
different sizes and print selected groups as full worksheets
or thumbnail catalogs. Conv ert your designs between major
embroidery formats , to pictures or desktop w allpaper for y our
computer.
INST ALLING YOUR SOFTWARE
If you own other HUSQVARNA VIKING® 5D™
Embroidery System software, you may need to install
the 5D™ Embroidery System 9.2 (or higher version)
Update instead of installing the Embroidery Machine
Communication Software. Then add the HUSQVARNA
VIKING® DESIGNER RUBY™ sewing and embroidery
machine from the Machine Manager in 5D™ ConÀ gure,
as described in Step 5. Continue with Step 6 to install
hardware drivers.
1. Ensure your embroidery machine is disconnected from
your computer.
2. Ensure you are logged onto your computer with a user
name that is an administrator on the computer, then
install your software from the CD provided.
3. Insert your CD. In Windows® 7/ Vista, an AutoPlay
message may appear, asking what you wish to do with
the CD. Click the option to Run Menu.exe. Select your
desired language, and select the “Install Embroidery
Machine Communication Software” option from the
menu.
4. Follow the instructions in the Installation Wizard.
When asked to enter your Installation Code, enter the
following number: 9200.
5. In the 5D™ ConÀ gure Wizard under MyMachines
select your machine type: HUSQVARNA
VIKING® DESIGNER RUBY™ sewing and
embroidery machine. Under Send I or Send 2 select
HUSQVARNA VIKING® DESIGNER RUBY™
sewing and embroidery machine. It is recommended to
set the Embroidery Machine Communication module
to start automatically when starting Windows.
Note: You can À nd more detailed information about the installation
in the 5D™ Embroidery System Getting Started Guide, in the folder
‘UserGuides’ on the CD.
REGISTER YOUR 5D™ SOFTWARE
After À nishing the software installation, you can select
to register your software by clicking on Register in the
menu. Create an account and enter your details to receive
customized 5D™ newsletters.
Important!
During the registration process you will be given an option
to enter which sewing and embroidery machine(s) you
own. This is NOT a product or warranty registration. The
machine information entered here is only used to customize
5D™ Software newsletters. For product and warranty
registration, go to the HUSQVARNA VIKING® web site
at www. husqvarnaviking. com.
To register later, select the Register button in 5D™
ConÀ gure at any time.
INSTALL HARDWARE DRIVERS AND
CONNECT THE EMBROIDERY MACHINE
Windows® 7/ Vista
6. From the main menu of your CD, click the Install
Drivers option for your version of Windows® 7/
Vista.
If the following User Account Control message appears: ‘A program
needs your permission to continue’, click the Continue button.
7. During the installation process a security message may
appear, asking ‘Would you like to install this device
software?’ Click Install to continue. Click Finish on the
last page.
8. You may now connect your embroidery machine to
your computer. A message will appear and you will be
informed when your embroidery machine is ready to
be used.
Windows® XP
6. From the main menu of your CD, click the Install
Drivers option for Windows® XP.
Drivers are only available for 32-bit Windows® XP.
Page 30
2:12
7. During the installation process, if existing drivers are
found, you will be informed that drivers have been
removed and that the computer must be restarted.
Click OK to restart the computer. Installation will
resume after the computer has restarted.
8. At the end of the installation, you will be prompted
to connect your embroidery machine. Click Finish on
the last page. Leave your 5D™ Embroidery System
software CD in your computer.
9. The Found New Hardware wizard will appear. Select
‘No, not at this time’ on the À rst page, then click
Next. Select ‘Install the software automatically’, then
click Next. A warning will appear that the drivers are
not signed. This is normal and should not be a cause
for concern. Click Continue Anyway, and the driver
installation will complete automatically.
HOW T O LAUNCH THE PR OGRAMS
Shortcuts on the Desktop
1. Double-click on the Shortcut to the 5D™ Embroidery
System program folder. A list of the programs appears.
2. Double-click on 5D™ Organizer, 5D™ QuickFont or
5D™ ConÀ gure to launch it.
Alternatively use the Start Menu to open modules under
Start, All Programs, 5D™ Embroidery System.
EMBROIDERY MACHINE
COMMUNICATION MODULE
The Embroidery Machine Communication module must
be active (
or ) to use your embroidery machine
with your computer. The icons are found in the lower
right corner of your computer screen. If the Embroidery
Machine Communication module is not active, it may be
started from the Send tab of 5D™ ConÀ gure.
Viewing and Printing PDF Guides
To À nd all the Reference and Sample Guides for your 5D™
Embroidery System software, go to Start, All Programs,
5D™ Embroidery System then choose Reference Guides
or Sample Guides. Choose the relevant folder, then select
the desired PDF Guide. Double-click on the desired name
to launch the relevant .pdf À le if you have Adobe Acrobat
installed on your computer. To install the Acrobat Reader,
insert the 5D™ Embroidery System CD and select that
option from the menu that appears.
HOW T O UPDA TE YOUR MACHINE
Be sure to consult the web site at www.husqvarnaviking .com
and/or your local authorized HUSQVARNA VIKING®
dealer for updates and upgrades for your machine and
User’s Guide.
You can update your machine using the USB embroidery
stick or the USB cable packed with your machine (P/N:412
62 59-04).
Updating Instructions
1. Open 5D™ ConÀ gure and connect your machine to
your computer.
2. Follow the instructions on the screen to update your
machine.
Updating using the HUSQVARNA VIKING® USB
Embroidery stick
• Go to the HUSQVARNA VIKING® web site at
www. husqvarnaviking.com to À nd information about
available updates.
• Follow the update wizard to prepare your USB
embroidery stick for the update.
• To set your machine in update mode, press and hold
the Needle Stop Up/Down button and the Sensor
Foot Up button while turning on the machine. Follow
the instructions on the sewing machine screen to
update from your USB Embroidery stick.
• When the update is completed the machine will restart
automatically.
Page 31
SETTINGS & FUNCTIONS
3
Page 32
3:2
Touch &
Hold
Start Menu
Quick Help
Sewing/Embroidery Mode
Sewing Mode Embroidery Mode
TOOLBAR
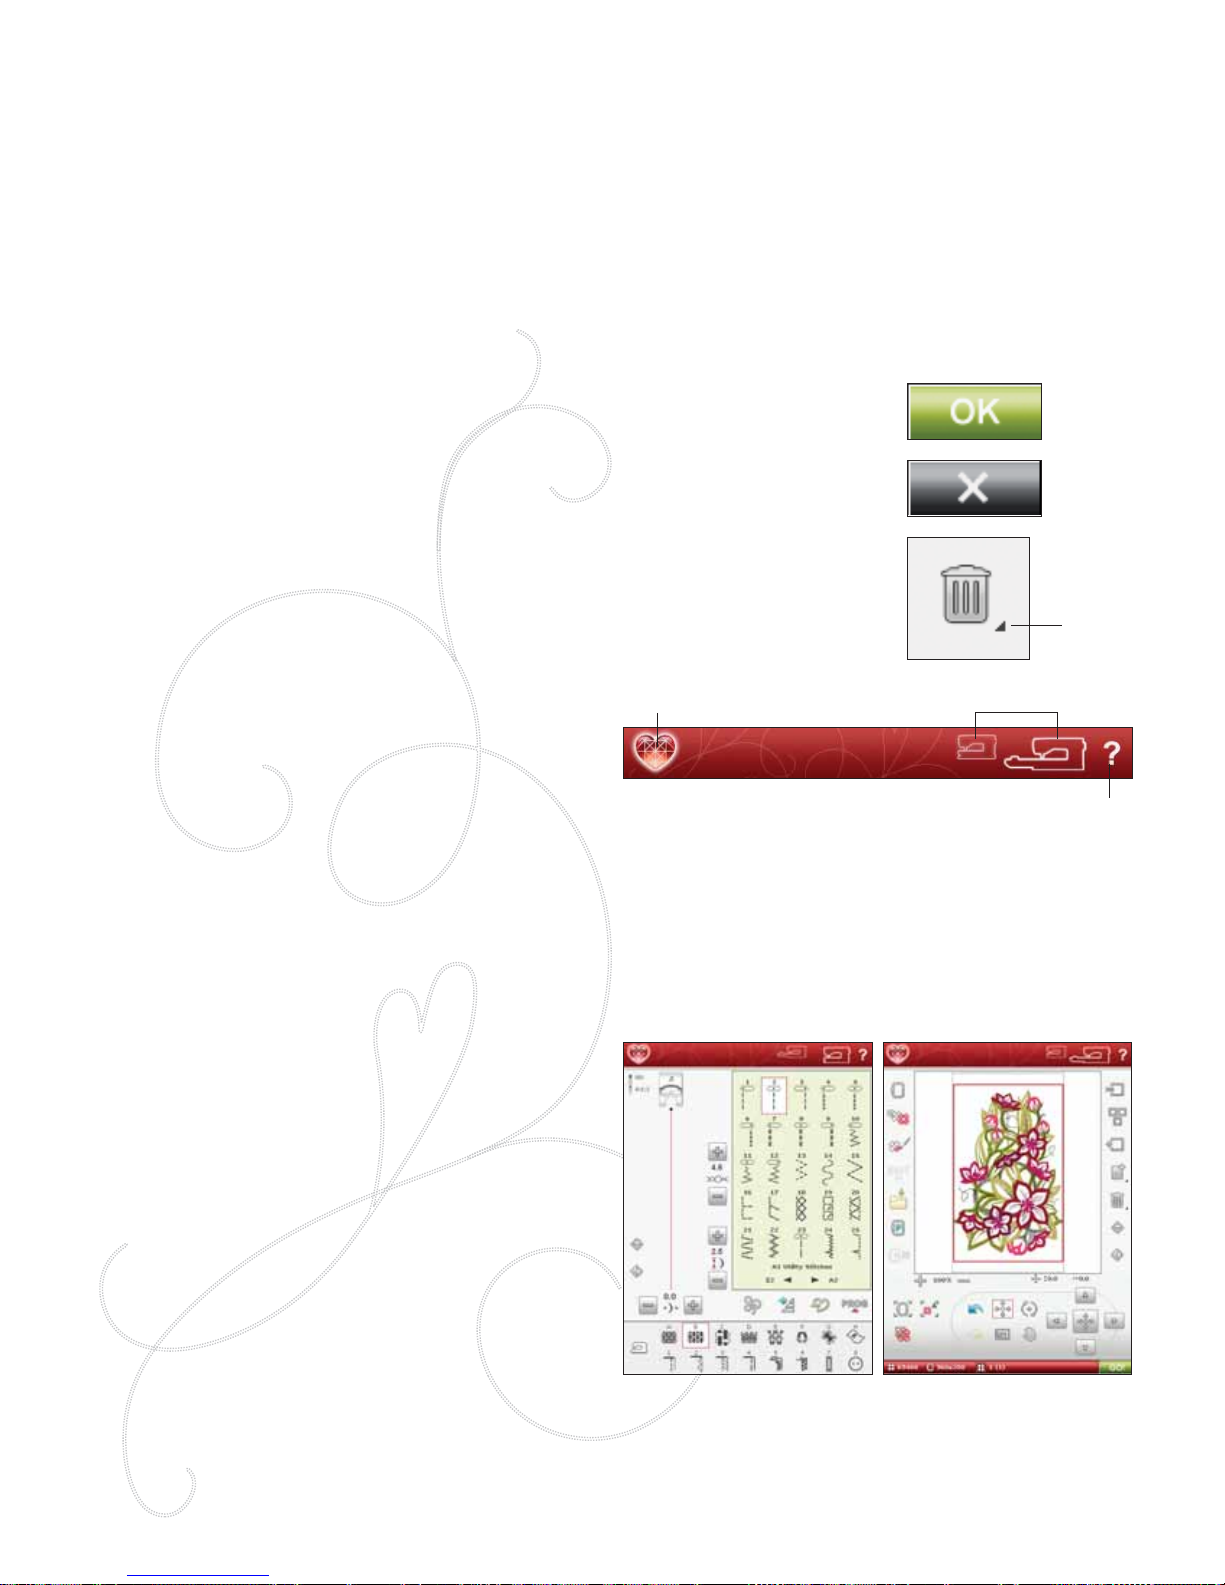
On this toolbar you will À nd the Start Menu icon, Sewing/
Embroidery Mode icon and the Quick Help icon.
START MENU
Touch the Start Menu icon to open the Extended toolbar.
The Extended toolbar is used for selecting and activating
different windows. Read more about the Extended Toolbar
on next page.
SEWING/EMBROIDERY MODE
Toggle between the Sewing Mode and the Embroidery
Mode by touching the Sewing/Embroidery Mode icon. The
icon for the active mode is highlighted and enlarged.
Sewing Mode is used for ordinary sewing (see chaper 4 &
5) and Embroidery Mode for embroidering. When entering
Embroidery Mode, Embroidery Edit will be active. Here
you will be able to change the appearance of your design
(see chapter 7). To embroider your design, change from
Embroidery Edit to Embroidery Stitch-Out by touching
the GO! icon in the lower right corner of the Interactive
Color Touch Screen (see chapter 8).
This section of the User’s Guide will guide you through the basic settings and functions of your machine. Learn how to navigate the functions
and settings on the Interactive Color Touch Screen, and how to use the function buttons on the machine sewing head.
Detailed descriptions of the icons and functions found on the Interactive Color Touch Screen in Sewing Mode, Embroidery Mode and File
Manager are described in separate chapters.
INTERACTIVE COLOR TOUCH SCREEN
The screen is very easy to use - just touch it with your stylus to make your choices.
COMMON ICONS/FUNCTIONS
The following icons and functions on the screen are used frequently.
OK
ConÀ rms settings or changes and returns to previous window.
CANCEL
Cancels settings and changes and returns to previous window.
TOUCH & HOLD
Some icons have additional functions, marked with an arrow at the lower right corner. To
access those functions, Touch & Hold the icon for a few seconds.
Page 33
SETTINGS & FUNCTIONS 3:3
SET Menu
Information
File Manager
Design Menu
Font Menu
Stitch Menu
EMBROIDERY AD VISOR™
Stitch Menus
Stitch Submenus
QUICK HELP
Touch the Quick Help icon in the upper right corner of
the screen. The icon Á ashes indicating that Quick Help
is active. Touch the icon and the area on the screen you
want information about. A pop-up message gives a short
explanation. Touch OK to close the pop-up message and
exit Quick Help.
When a USB mouse is connected, it is even easier to use
the built-in Quick Help. Place the cursor over the icon you
wish to know more about and right click on the mouse.
Quick Help will pop-up instantly.
EXTENDED TOOLBAR
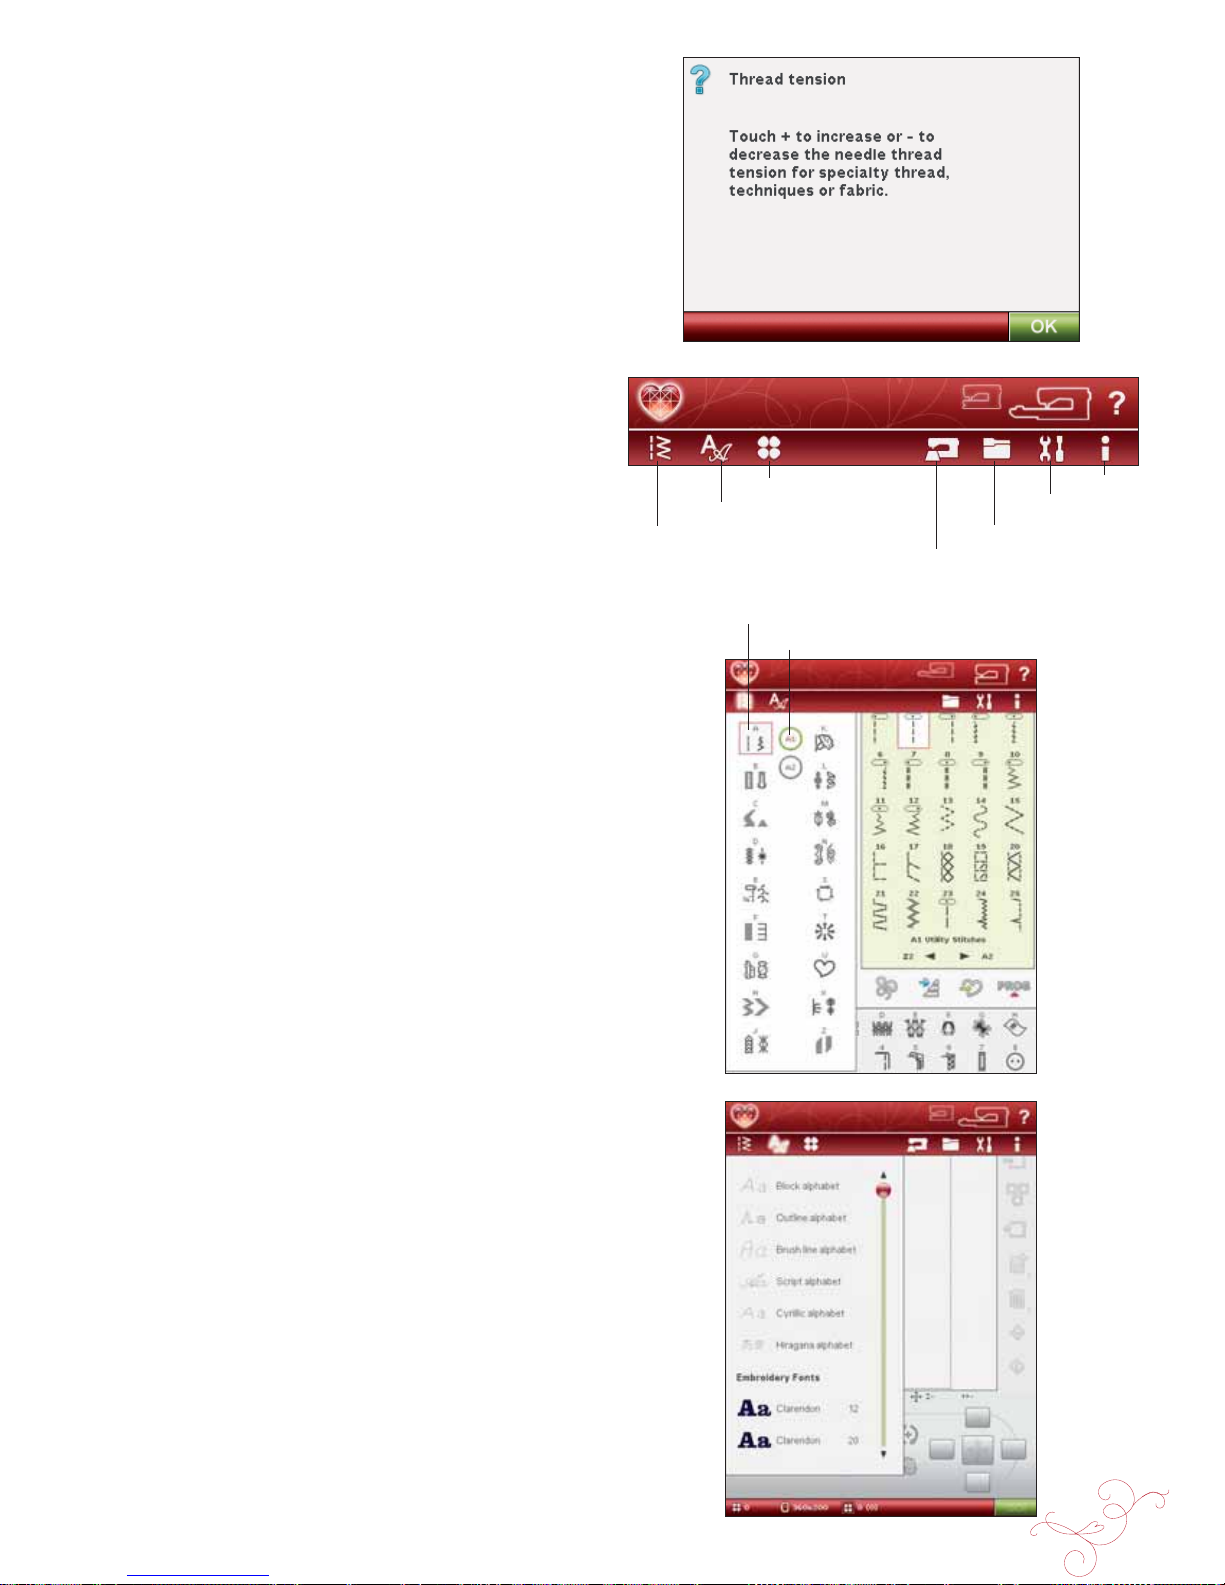
Touch the Start Menu icon to open the Extended toolbar.
When the Extended toolbar is open, you can activate the
different functions. Touch the function you want to activate
and make adjustments.
The look of the Extended toolbar will change depending
on whether Sewing Mode or Embroidery Mode is active
(Design Menu and EMBROIDERY ADVISOR™ are only
available in Embroidery Mode).
STITCH MENU
When opening this menu you will À nd several different
stitch menus in the drop down list (see chapter 1 for stitch
descriptions).
HOW T O SELECT A STITCH
To select a stitch, À rst select a stitch menu. For each menu,
there are one or more submenus. A list of stitches is shown
for each submenu. Select a stitch by touching it.
FONT MENU
SELECTING A FONT
Press the Font Menu icon and the Font Menu drop down
list will appear. Both stitch fonts and embroidery fonts are
visible in Embroidery Mode. Select a font by touching it.
Use the scroll bar to see additional fonts.
When an embroidery font is selected, the Embroidery Text
Editor will open automatically. You can select different
sizes for each font.
When a stitch font is selected, you will automatically enter
the Program mode.
Note: Embroidery fonts are only visible if the Embroidery Mode is
active.
Page 34
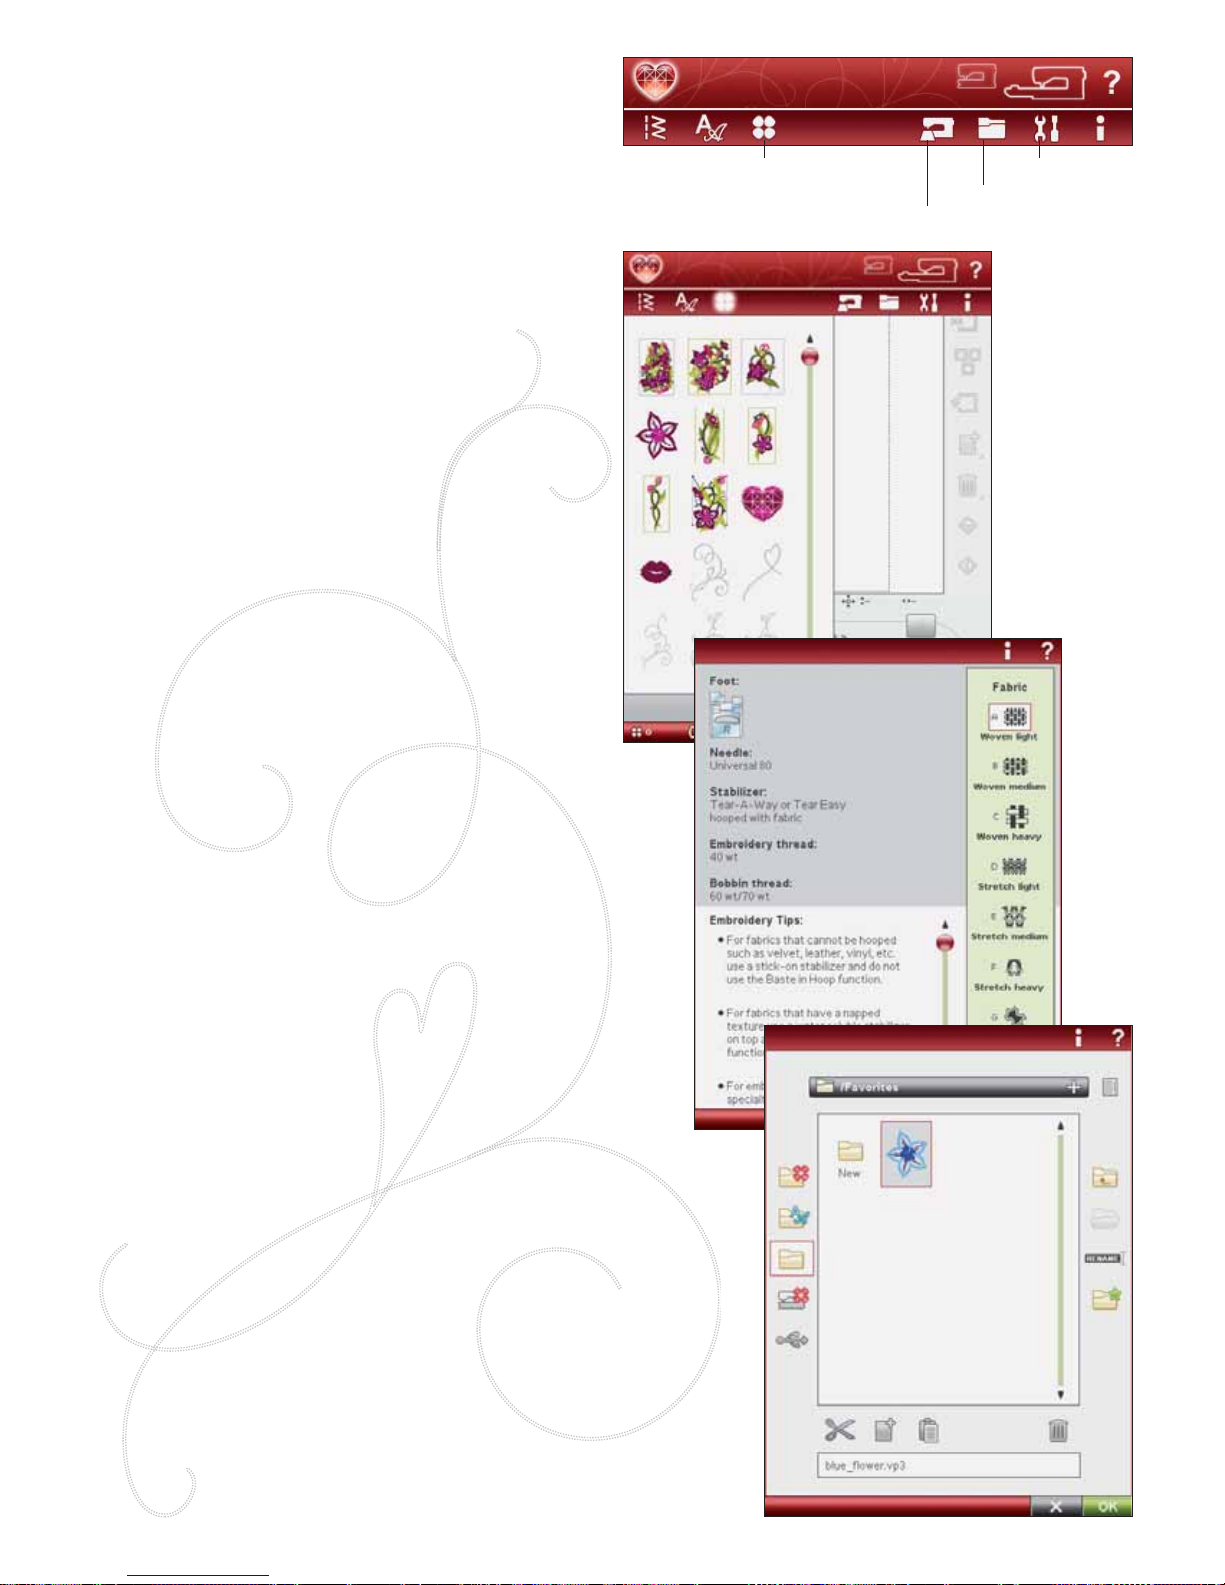
3:4
SET Menu
File Manager
Design Menu
EMBROIDERY AD VISOR™
DESIGN MENU
(Only active in Embroidery Mode)
SELECTING A DESIGN
Open embroideries by selecting the Á ower icon on the
Extended toolbar. Select an embroidery design by touching
it. Use the scroll bar to browse through additional designs.
EMBR OIDER Y ADVISOR™
(Only active in Embroidery Mode)
The EMBROIDERY ADVISOR™ feature recommends
the right needle, stabilizer and thread for your fabric.
Touch the fabric type and weight you want to embroider
on and follow the recommendations. The EMBROIDERY
ADVISOR™ feature also giv es y ou tips when embroidering
on special fabrics or using special threads. Touch OK to
close the EMBROIDERY ADVISOR™ feature.
FILE MANAGER
The File Manager is used to open, organize, add, move,
remove and copy your designs, fonts and stitch À les. Use
either built-in memory or an external device connected to
your machine for storing designs and À les.
You can select several designs at a time. Touch the designs
you want to open, then Touch & Hold (see page 3:2) on the
last selected design. All designs that you have selected will
open in Embroidery Edit.
Learn more about the File Manager in chapter 9.
Page 35
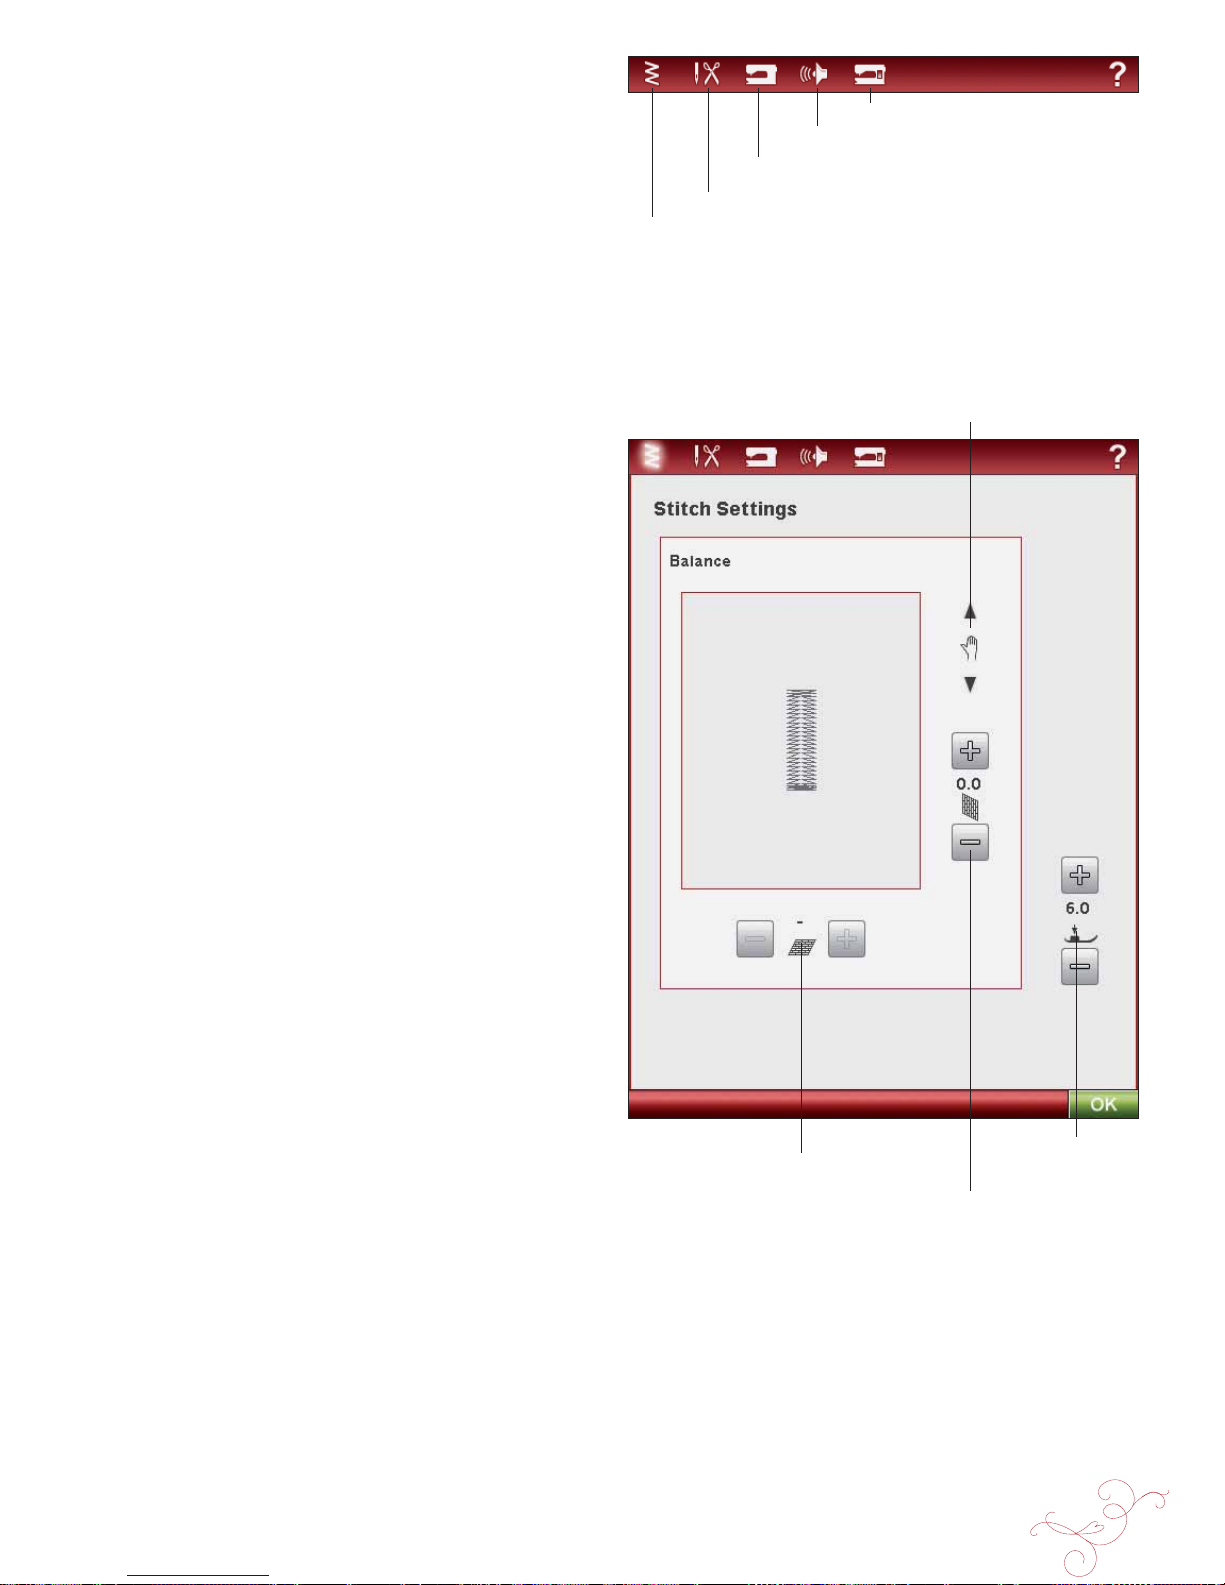
SETTINGS & FUNCTIONS 3:5
Stitch Settings
Machine Settings
Sound Settings
Screen Settings
Sewing Settings
Pan
Balance Length
Balance Width
Sensor Foot
Pressure
SET MENU
In the SET Menu, you can override automatic settings and
make personal adjustments to the Stitch Settings, Sewing
Settings, Machine Settings, Sound Settings and Screen
Settings.
Touch the icons to activate a function or open a list of
choices. When changing the Sewing, Machine, Sound or
Screen Setting, the settings are saved after turning off the
machine, except for Feed Teeth Options in Sewing Settings
which is always set to Auto when turning on the machine
(see Feed Teeth Options, page 3:7). If you make changes to
Stitch Settings, the changes will not be saved after turning
off the machine.
STITCH SETTINGS
(only active in Sewing mode)
In the Stitch Settings screen, you can set the presser foot
pressure and balance a stitch or buttonhole. These settings
will only be valid for the stitch that is currently selected.
If another stitch is selected or the same stitch is selected
again, the stitch value is reset to the default value. Default
number is black.
EXCLUSIVE SENSOR SYSTEM™ Feature - Sensor
Foot Pressure
Thanks to the Sensor Foot Pressure, the machine actually
senses the thickness of the fabric, embroidery or stitching
to sew over it smoothly and evenly with perfect, even fabric
feed.
Touch + to increase or - to decrease the pressure of the
presser foot on the fabric.
Balance Controls
When sewing on special fabrics or doing a specialty
technique, the balance of the stitch may need to be
adjusted.
Start by sewing a stitch on a piece of scrap fabric with
stabilizer underneath. In the SET Menu, select Stitch
Settings. Change the picture of the stitch on the screen to
match your sewn sample, using the + and - icons. Make the
stitch on the screen look like your unbalanced stitch-out.
Now when you sew again on the same fabric, the balance will
be corrected. The machine will balance the stitch for you.
Note: Use the Pan icons. The Pan feature lets you see the whole stitch.
Page 36
3:6
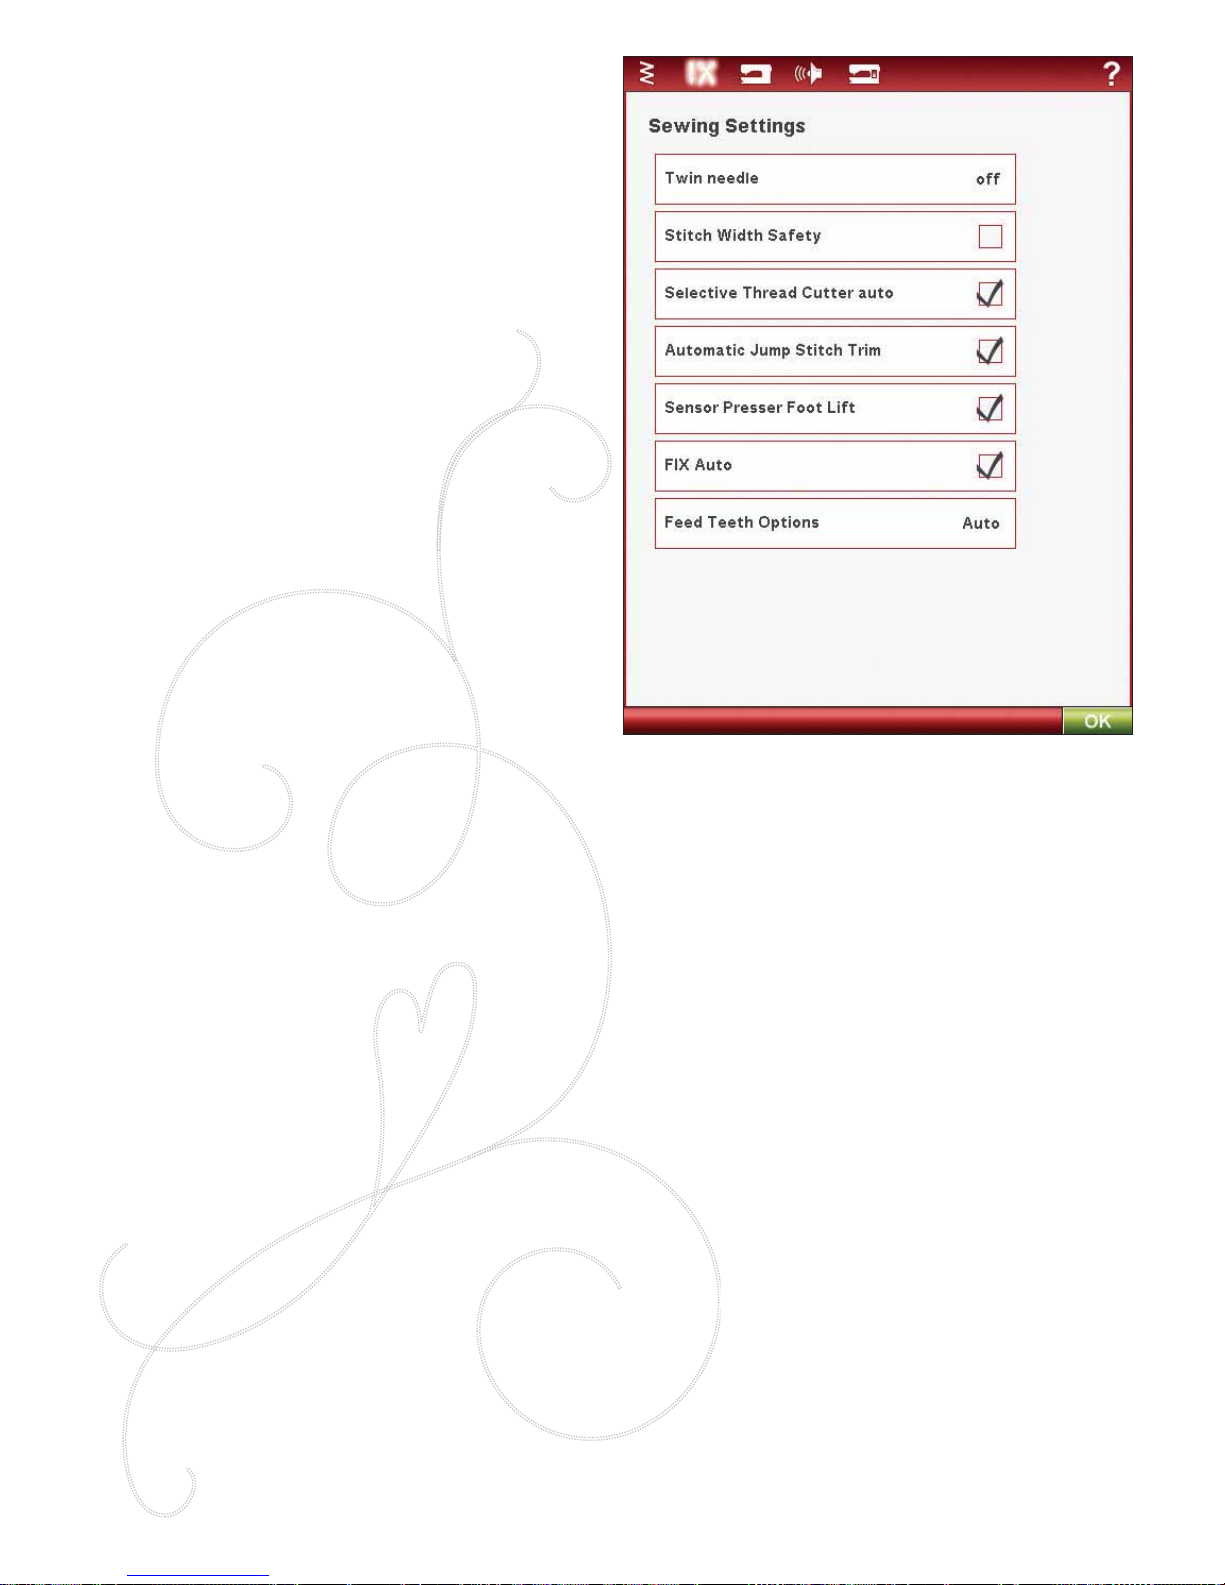
SEWING SETTINGS
Twin Needle
Touch the Twin Needle icon to open a list for twin needle
width selections. When a twin needle size is selected, the
width of all stitches is limited for the selected twin needle
size to prevent needle breakage. The setting is kept until you
deselect the twin needle width.
When a twin needle size is selected, a pop-up message is
shown when turning on your machine. Another warning
pop-up message is shown when selecting a stitch that is too
wide for the selected twin needle size. The stitch width of
those stitches is automatically adjusted to À t the twin needle.
Deselect Twin Needle to go back to normal sewing.
Stitch Width Safety
Select the Stitch Width Safety function when using a straight
stitch needle plate or a straight stitch presser foot. The needle
position is locked to center for all stitches to prevent damage
to the needle, presser foot or needle plate.
When turning on the machine with this setting activated and
for every stitch selection that is not a straight stitch, a pop-up
message informs you that it is set to straight stitch. Deselect
Stitch Width Safety to go back to normal sewing.
Note: Twin Needle and Stitch Width Safety cannot be used at the same
time.
Selective Thread Cutter Auto
To activate the function select the Selective Thread Cutter
Auto in the Sewing Settings. The threads are cut automatically
and the presser foot raises at color changes, when an
embroidery is À nished or when you have completed a
buttonhole. When deselected, no Selective Thread Cutter
Auto will be performed.
Page 37
SETTINGS & FUNCTIONS 3:7
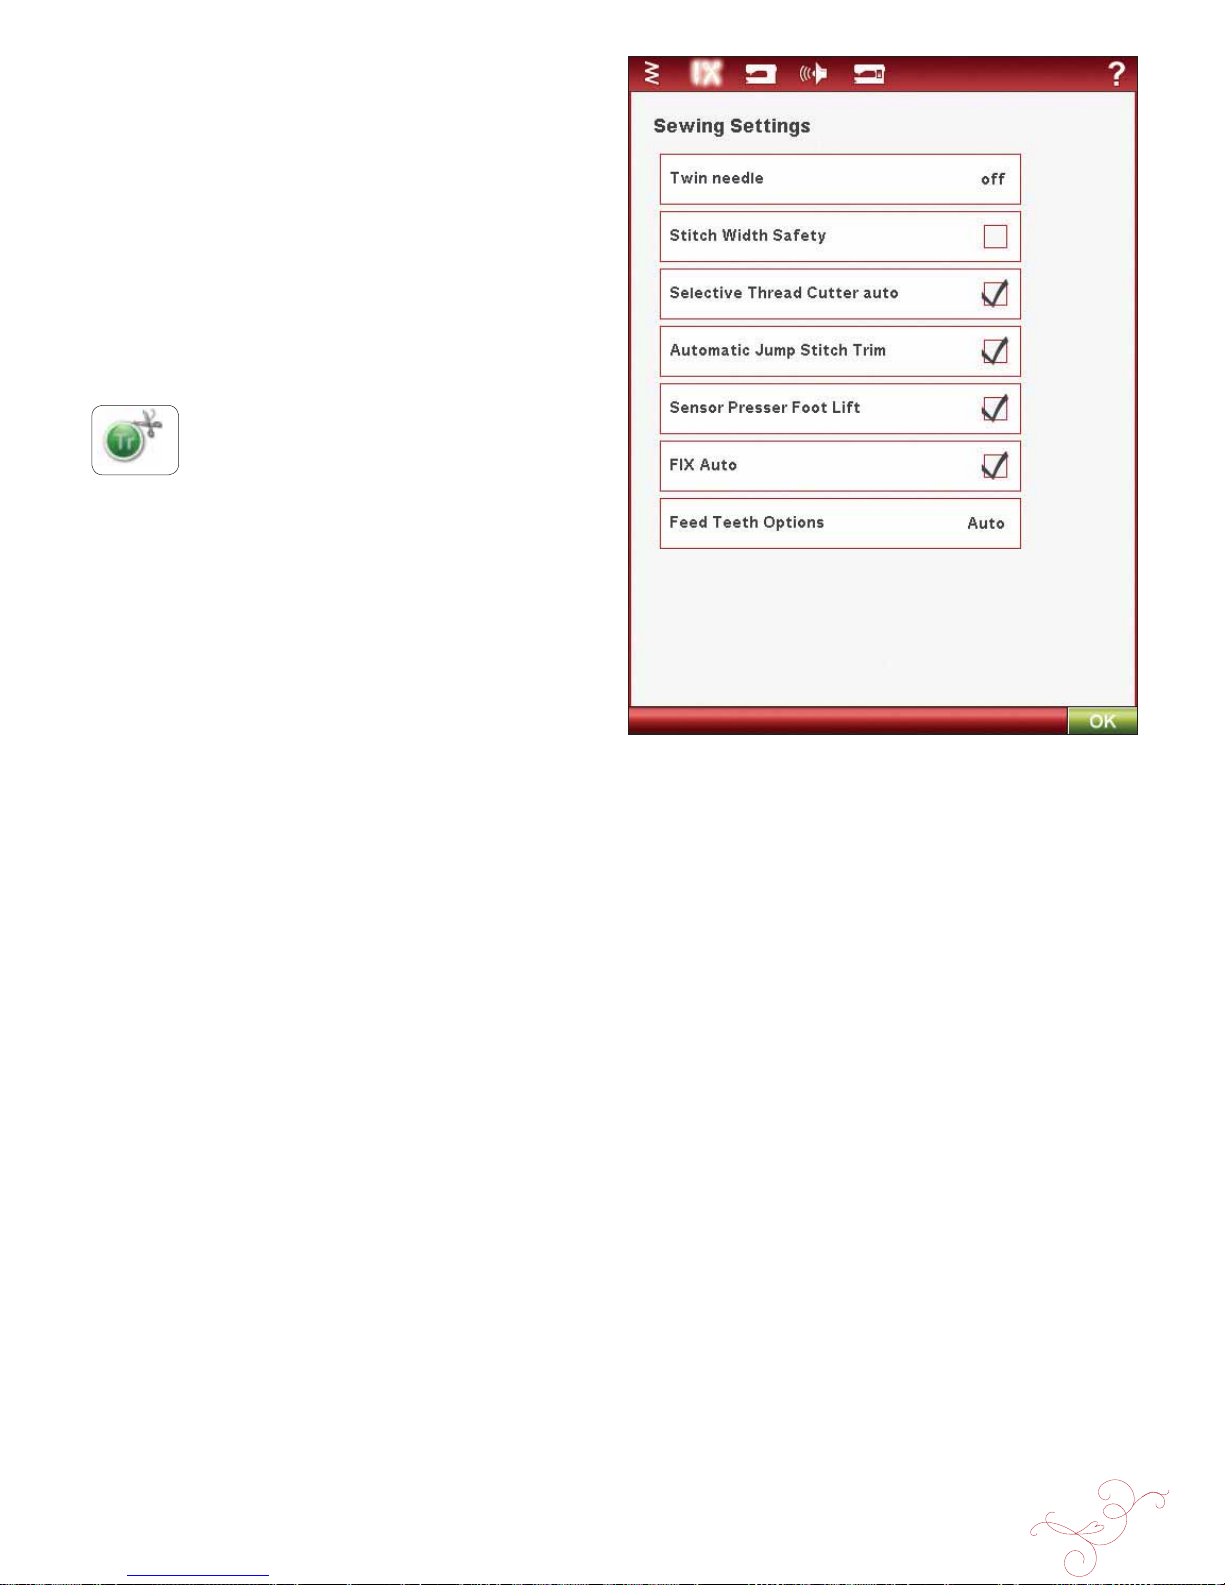
Automatic Jump Stitch Trim
This machine features Automatic Jump Stitch Trim. This
function saves you time trimming after the embroidery is
completed. The default setting is on. As you embroider,
the machine will trim the top jump stitch thread and pull
the thread end to the underside of the fabric.
Note: The machine will also cut the thread after you have changed to
a new color. Hold the thread end when you start embroidering again,
so that you can easily remove the thread end when cut.
Not all designs are programmed for Automatic Jump Stitch
Trim. Jump stitch trim commands can be added to any
design using the 5D™ Software.
Some embroidery designs you purchase may
have trim commands in them. To check if a
design includes trim commands you can open
the design in 5D™ Stitch Editor and look for the trim
command symbol.
Note: If the front and back of your embroidery will be visible, turn
off the Automatic Jump Stitch Trim and cut the threads manually.
Sensor Presser Foot Lift
When selected, the Sensor Presser Foot Lift is activated.
The presser foot will raise to pivot height for example
when stopping to sew with the needle in the down
position. When deselected, the presser foot will stay
lowered even if the machine stops with the needle in down
position or after a thread cut.
FIX Auto
When the FIX Auto is activated, the machine will begin a
stitch with FIX stitches. If it is not activated use the FIX
button on the front of your machine to À x your stitch or
to cancel the FIX at the beginning of a stitch.
Feed T eeth Options
Touch to open a pop-up with three options.
The default setting is Auto (recommended). Auto is always
selected when turning on your machine. Your machine
automatically raises or lowers the feed teeth, depending
on the stitch selected. For example, the feed teeth are
lowered when sewing on buttons, or when doing freemotion sewing and embroidery. The feed teeth are also
lowered automatically when using the Sensor Foot Extra
Lift. When a new stitch is selected, the feed teeth are
automatically raised again when you start sewing.
Select Up to set the feed teeth raised for all sewing.
Select Down to set the feed teeth lowered for all sewing.
Page 38
3:8
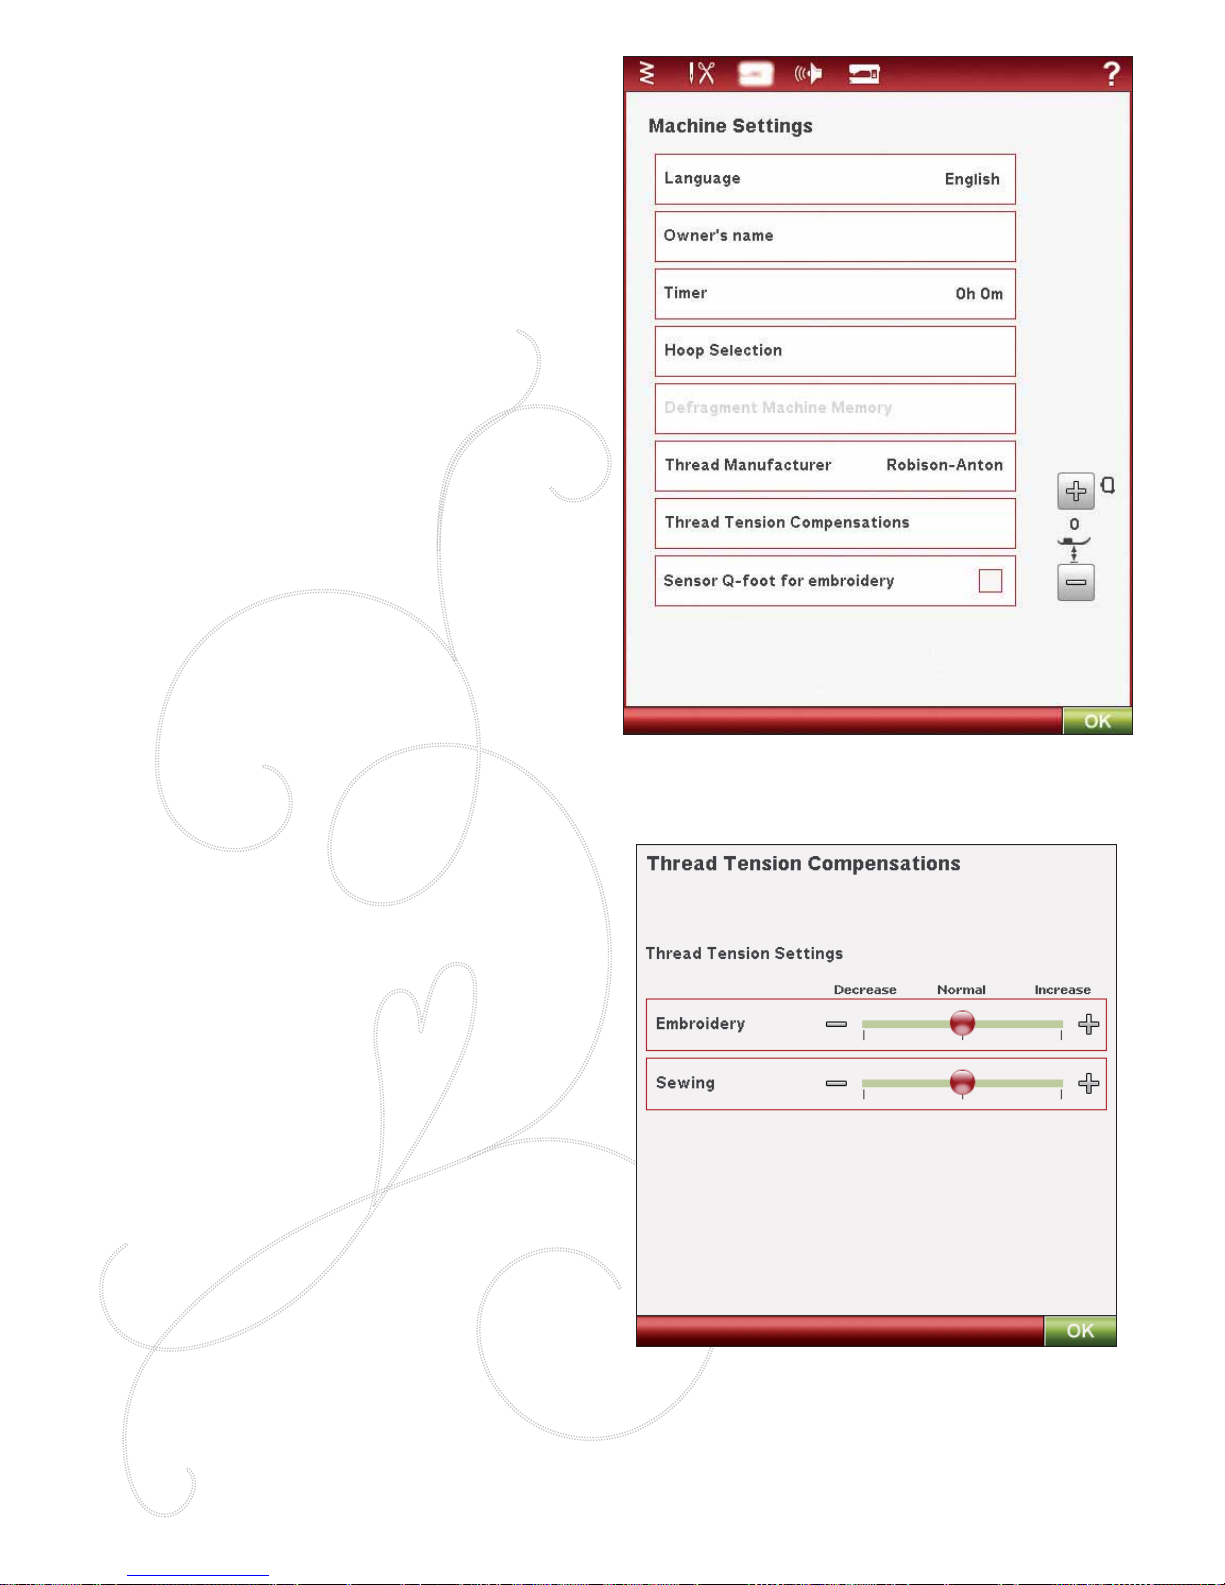
MACHINE SETTINGS
The settings that are made on the screen will be retained
when the machine is turned off.
Language
Touch the Language icon to view the languages. Select your
desired Language by touching it.
Owner’s Name
Touch the Owner’s Name icon to open a screen that allows
you to enter your name.
Timer
The timer displays of the total sewing and embroidery time
of your machine. Touch the icon to reset the timer.
Hoop Selection
Touch the Hoop Selection icon and select the hoops you
own. When you À rst load a design, the machine will select
the most suitable hoop among the ones you have entered in
the Hoop Selection.
Defragment Machine Memory
To optimize sewing and embroidery performance you
sometimes need to do a defragmentation. When that needs
to be done, a pop-up message appears. To defragment your
machine, go to the Machine Settings in the SET Menu, and
click on ”Defragment Machine Memory”.
The defragmentation can take up to 45 minutes to
complete.
Thread Manufacturer
Touch to select preferred thread manufacturer. You can
select between Gütermann Sulky and Robison-Anton.
Color codes from the selected manufacturer will be used
when changing colors in a design, or when creating a new
design from stitches or fonts in your machine.
Note: Changing thread manufacturer setting will not automatically
convert the colors in existing designs from one thread manufacturer to
the other.
Thread T ension Compensations
If you regularly sew or embroider on a special fabric or
use a specialty thread, or if you À nd that the thread tension
needs to be increased or decreased for most stitches or
embroideries, you can change the general thread tension
setting for embroidering and/or sewing.
Touch Thread Tension Compensations. Adjust the slider
bars to generally decrease or increase the thread tension for
all stitches and/or embroidering. Default setting is Normal.
If the general thread tension has been changed in Thread
Tension Compensations, the symbol in the thread tension
control in Sewing mode and Embroidery Stitch-Out will be
red instead of black.
Note: Contact you authorized HUSQVARNA VIKING® dealer
if you experience thread tension problems that cannot be helped with
the Thread Tension Compensations.
Page 39
SETTINGS & FUNCTIONS 3:9
Presser Foot Height
for Embroidery
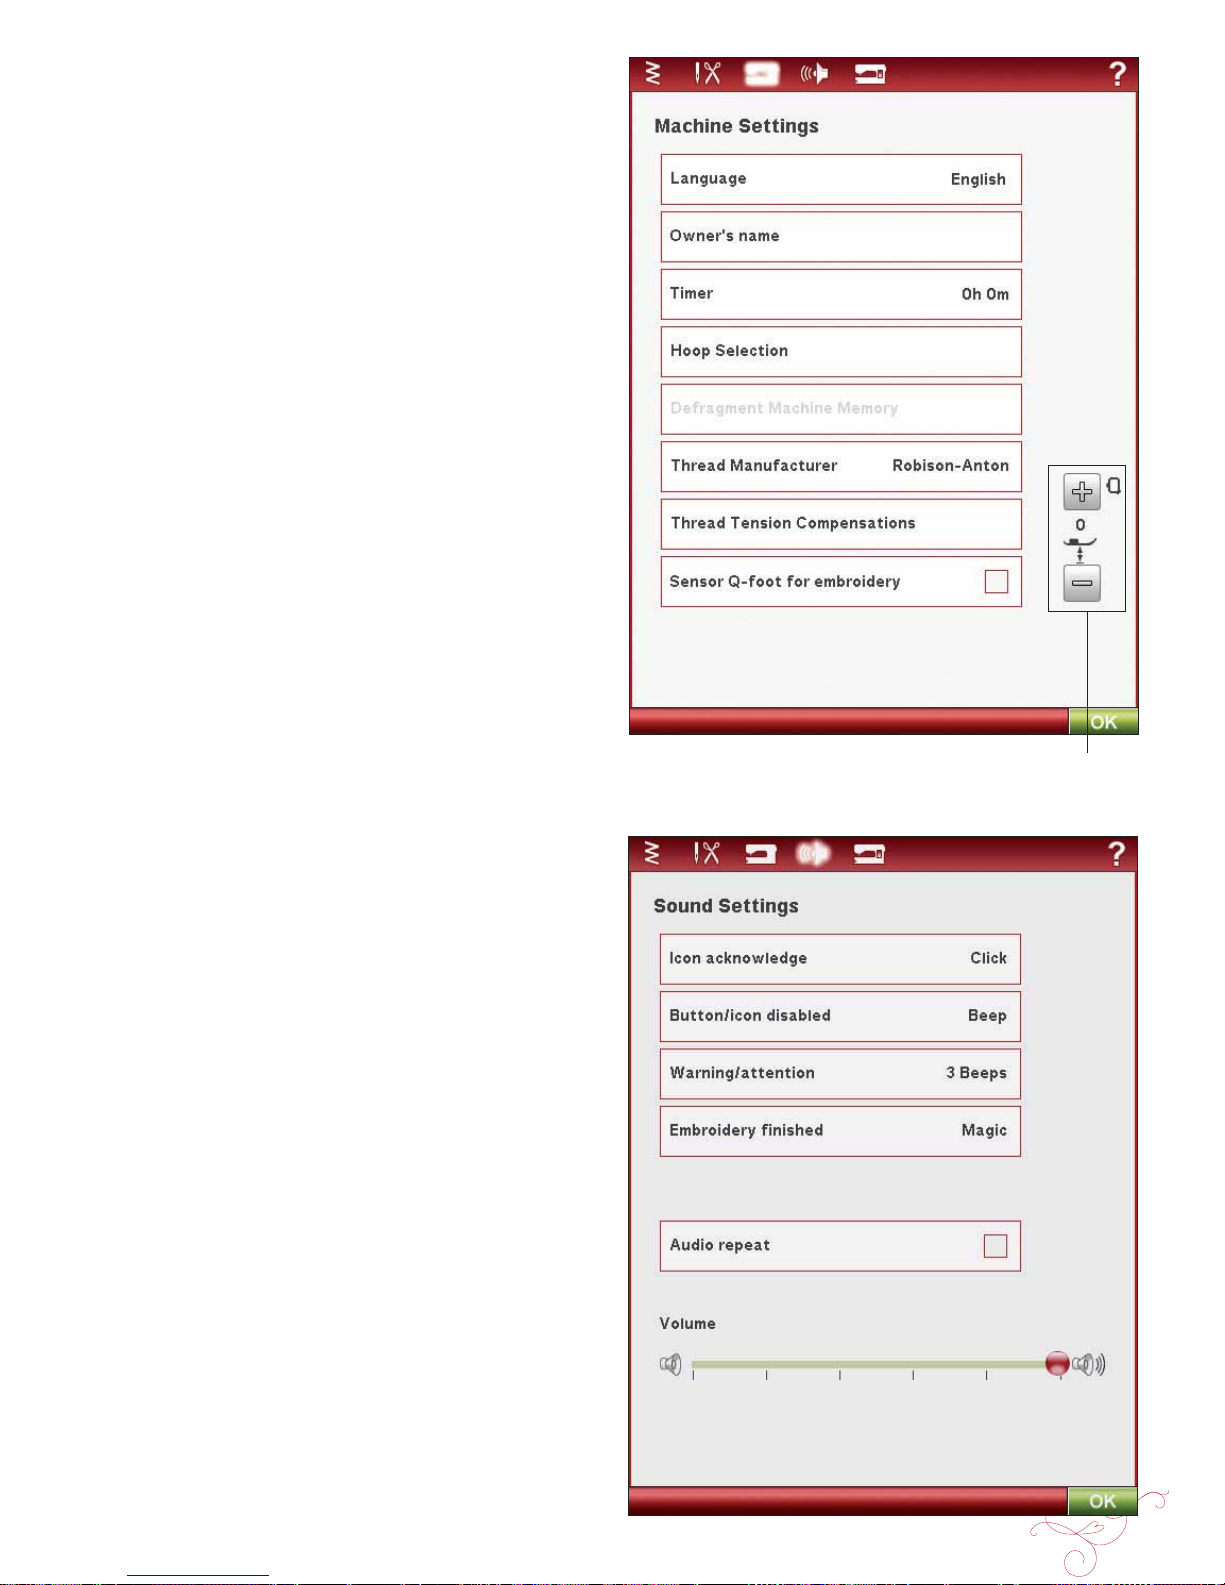
Sensor Q-foot for embroidery
The Sensor Q-foot is always recommended for embroidery.
When using another type of foot, e.g., the R-foot,
deactivate Sensor Q-foot for embroidery.
Presser Foot Height for Embroidery
Adjust the height of the presser foot in embroidery stitchout mode.
Some embroideries may build up under the presser foot.
If there is not enough space between the presser foot and
the embroidery, the top thread will form loops on the
underside of the embroidery. Increase the presser foot
height in small steps until the embroidery moves freely
under the presser foot.
SOUND SETTINGS
You can change the Sound Settings on your machine to
alert you at a variety of situations. Select which sound
function you want to change. Then select the sound you
want to play by touching the icon. You will be able to hear
a preview of the sound when you touch the sound icon.
Each alert function can have a different sound. Close the
pop-up with the OK icon.
Audio Repeat
When active, the signal for some warning alerts or
attention pop-up messages is repeated in intervals until it is
cancelled.
Volume
You can change the volume using the slider bar. All sounds
settings will be affected if the volume setting is changed.
Page 40
3:10
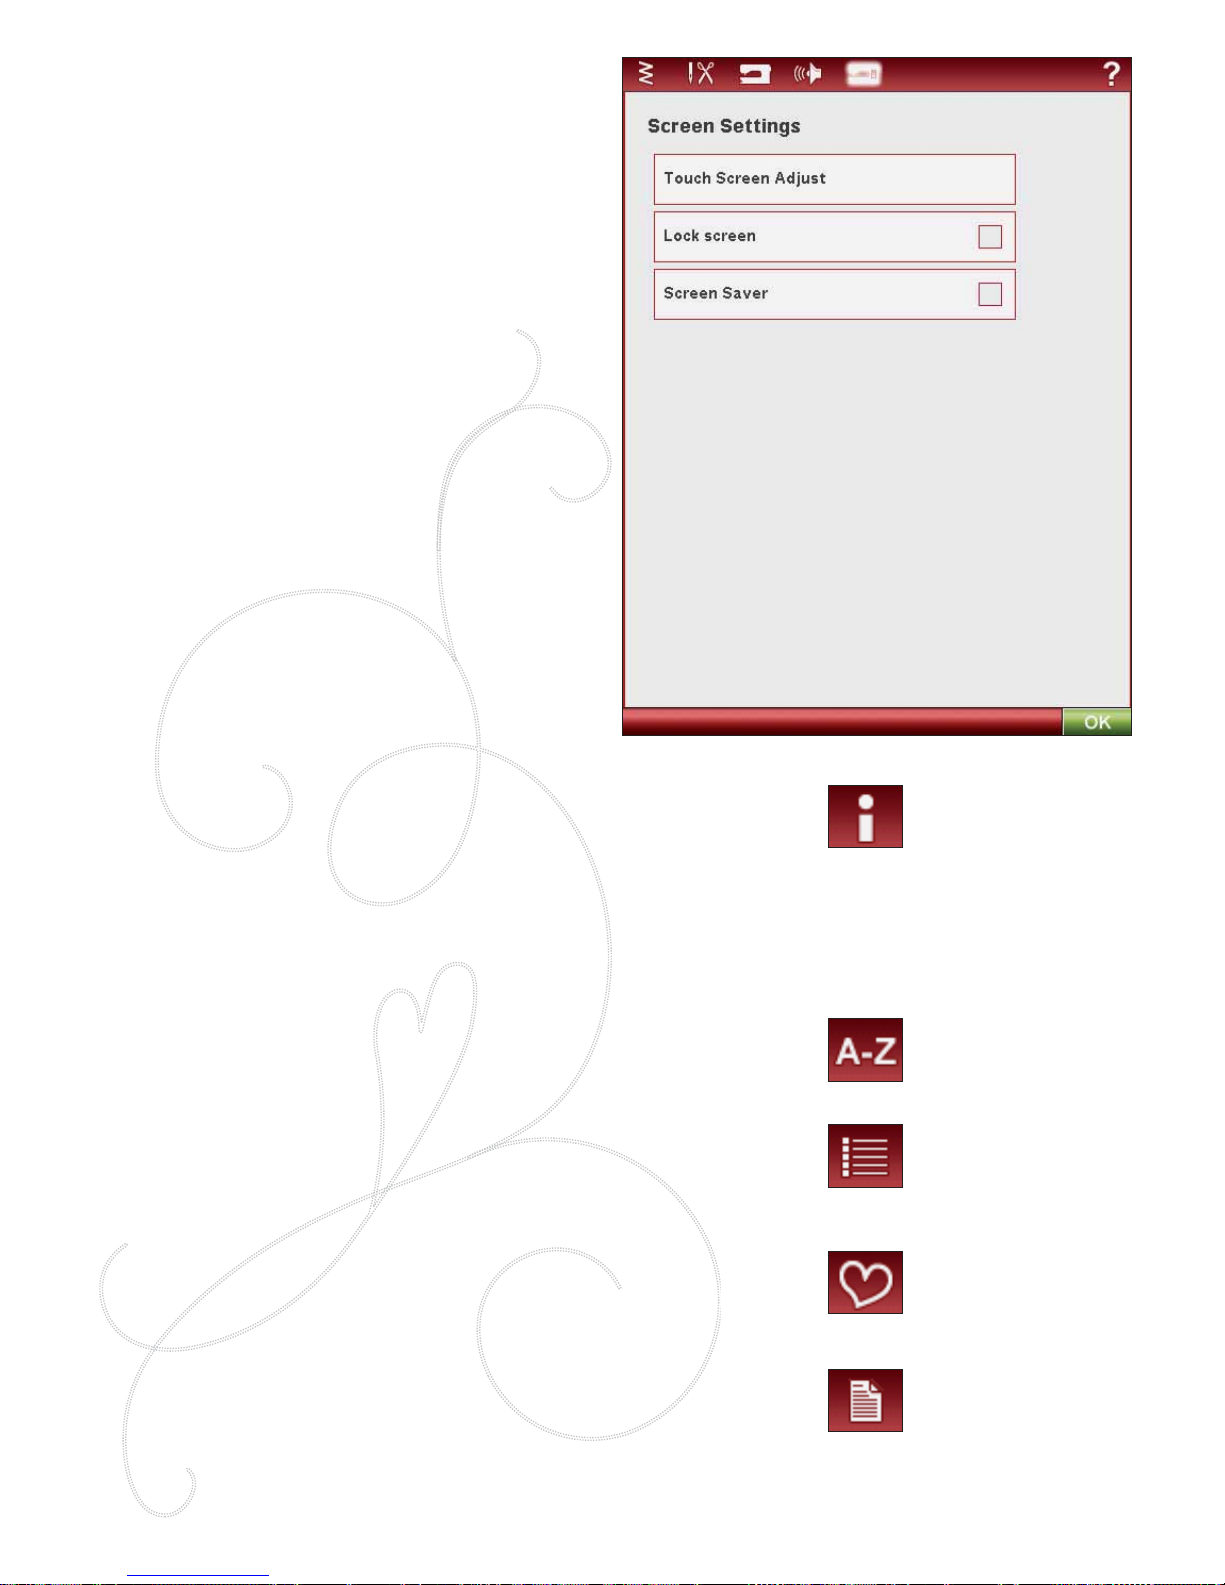
SCREEN SETTINGS
Touch Screen Adjust
When touching the icons on the screen, the screen might need
calibration to adjust to your touch.
Touch to open a view for calibrating the touch screen.
Follow the instructions on the screen to calibrate the screen.
Lock Screen
If there is the possibility of bumping the Interactive Color
Touch Screen and changing the stitch or settings while sewing,
it is easy to lock the screen.
When activated, the screen is automatically locked everytime
it is inactive for ten seconds. A pop-up is shown on the screen
and will remain locked until you touch OK on the pop-up.
Screen Saver
When activated, the screen shows the startup screen ten
minutes after the last touch. Touch the screen or press any
button to activate the screen again.
INFORMATION MENU
Use the Information menu to easily get Help topics and
information. The Info menu is a built-in, abridged version of
the User’s Guide.
When you touch the Info menu icon on the toolbar, you have
four options to select from: Index, Category, My info and Text.
Browse through the topics using your stylus on the slider bar
on the right side of the screen. The left arrow at the lower left
corner of the screen opens the previous page. The right arrow
takes you to the next page (if there is one).
Index
Index shows the Help topics in alphabetical order.
Category
Category shows the Help topics divided into categories
following the structure of the User’s Guide Table of Contents.
My info
My info contains the owner’s name, machine’s software
information and serial number.
Text
You can open and read text and HTML-À les on your machine.
To be able to open a text À le or HTML-À le you need to go to
your File Manager and touch My Files. Touch & Hold on the
À le you wish to open. That À le will then open in Text view. It
will stay there as long as you have the machine on.
Page 41
SETTINGS & FUNCTIONS 3:11
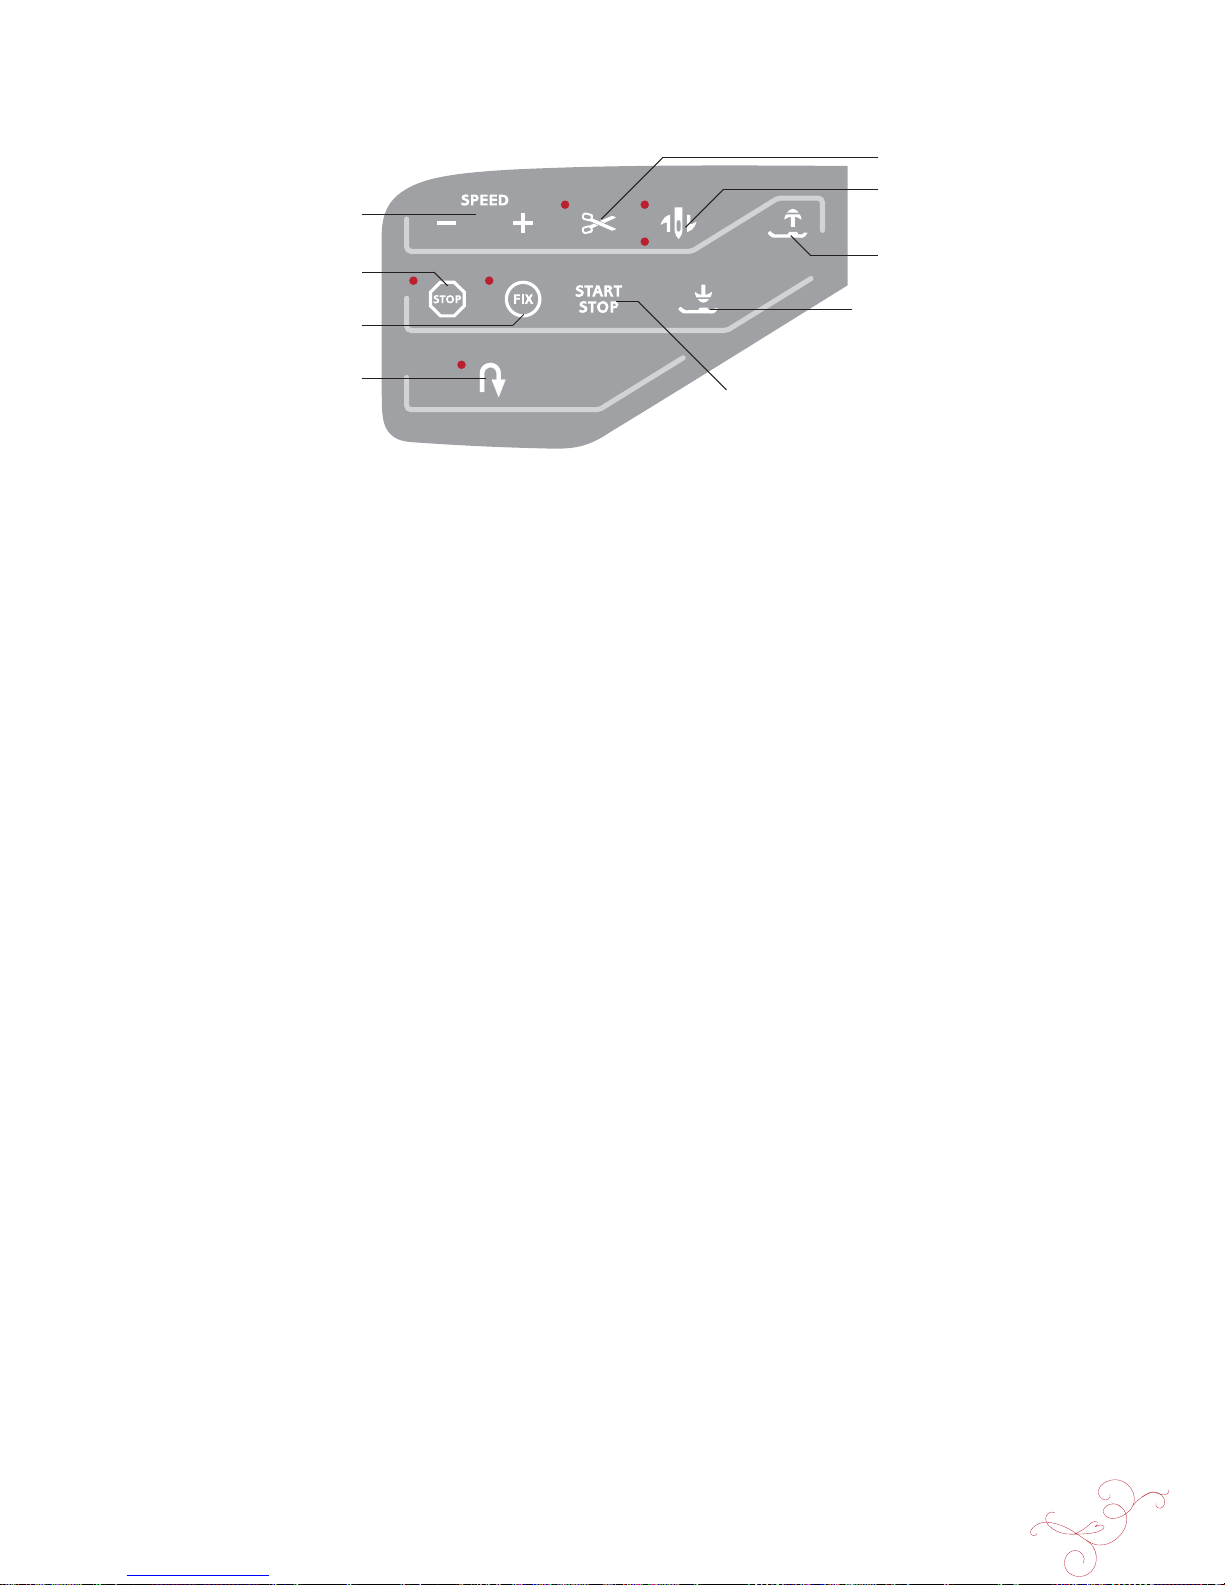
Sensor Foot Up and Extra Lift
Needle Stop Up/Down
(Trim Position)
Speed - and +
STOP
(Monochrome)
FIX
(Baste)
Reverse
Start/Stop
Selective Thread Cutter
Sensor Foot Down and Pivot
SPEED + AND -
All stitches in your machine and each hoop size have a preset, recommended sewing/embroidery speed.
Touch Speed + or Speed - to increase or decrease the
maximum allowed sewing/embroidery speed. When not
sewing/embroidering, touch Speed and a pop-up message
on the screen will indicate the speed set ting. You can set the
speed by touching the slider in the pop-up message. If you
change the speed set ting while sewing/embroidering no
pop-up message will appear.
When sewing with metallic threads, or when sewing on
delicate fabrics, lower the speed for optimal results.
STOP ( MONOCHROME)
Sewing Mode
Select STOP to conclude a stitch. Your machine À xes the
thread and stops automatically when one stitch or stitch
program has been completed. When STOP is selected
only one stitch is displayed on the Interactive Color Touch
Screen. The STOP button lights up when you touch it.
Select STOP again to cancel or by selecting a new stitch.
The STOP button light will go out. The STOP function
can be programmed, see program chapter. The STOP
function is cancelled when the stitch is completed.
Embroidery Stitch-Out
Select STOP to eliminate stops for color changes and
create monochrome embroidery, see Embroidery StitchOut chapter.
FUNCTION BUTTONS (Embroidery Mode functions are in brackets)
FIX ( BASTE)
Sewing Mode
FIX is used to tie off a stitch. FIX is automatically activated
when you select a stitch, use the Selective Thread Cutter ,
select Stitch Re-Start, STOP or by touching FIX while you
are sewing. At the beginning, your mac hine sews a few tie-off
stitches and continues with the selected stitch. Touch FIX
while sewing and your machine sews a few tie-off stitches and
stops automatically. The FIX button lights up when the FIX
function is active. Touch the lit button to turn the function off.
The FIX function can be programmed, see Program chapter.
Note: FIX Auto can be cancelled in the SET Menu, Machine
Settings (see page 3:7). No tie-off stitches will be sewn unless you
select the FIX button on your machine.
Embroidery Stitch-Out
Touch FIX to baste an outline of the embroidery design
area or to baste the fabric to the stabilizer.
REVERSE
For permanent reverse, press the Reverse button once
before starting to sew. The reverse indicator will be lit and
the machine sews in reverse until you press the button
again to cancel. If you press the reverse button while
sewing, the machine will sew in reverse for as long as you
keep the button pressed. The reverse indicator is lit when
the reverse button is pressed.
Reverse is also used when sewing buttonholes, darning
stitches and tapering stitches to step between the parts of
the stitch.
Reverse has no function in Embroidery Mode.
Page 42
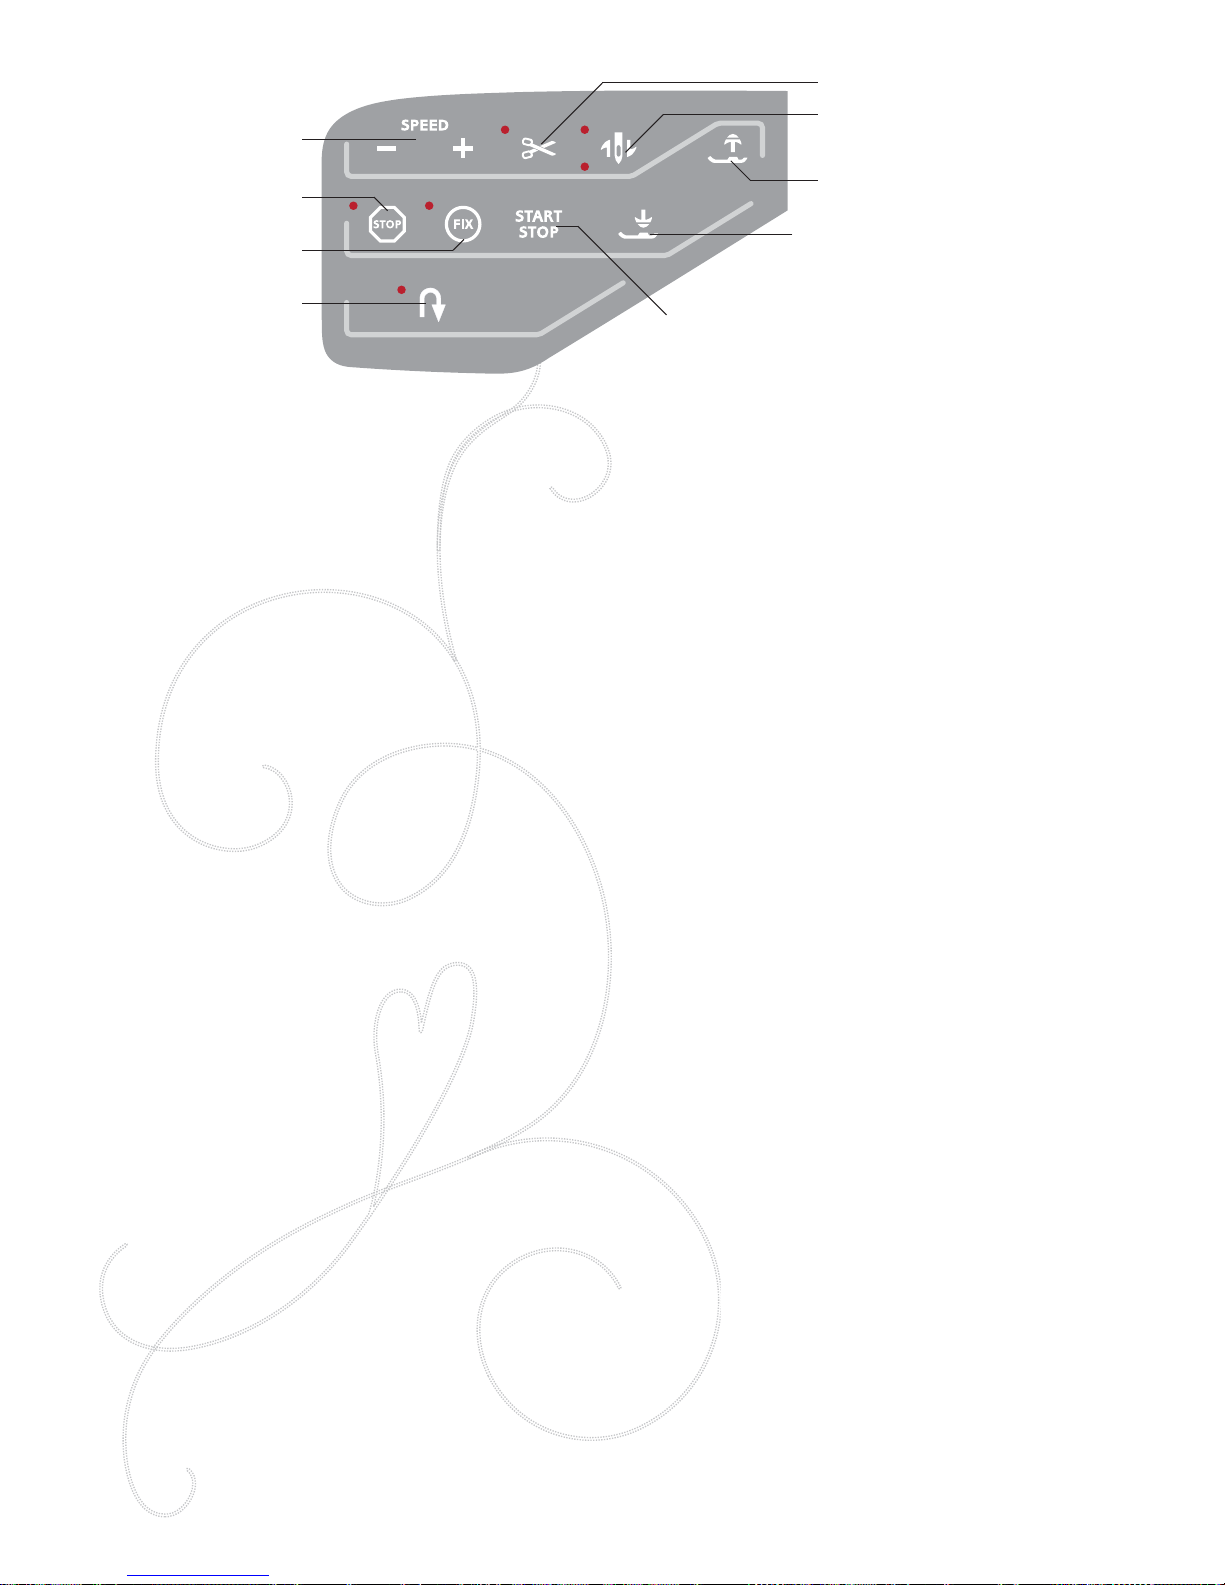
3:12
SELECTIVE THREAD CUTTER
Sewing Mode
Touch the Selective Thread Cutter button and your machine
cuts the top and bobbin threads, raises the presser foot and
the needle, and activates the FIX function for the next start.
To cut threads at the end of a stitch or stitch program, touch
Selective Thread Cutter while sewing . The button starts to
Á ash, indicating that a cut is requested. When the stitch or
stitch program is completed, the upper thread and bobbin
thread will be cut. The Selective Thread Cutter function can
be programmed, see Program chapter.
Note: Your machine cuts the threads automatically after certain
stitches such as completing a Sensor One Step Buttonhole. Automatic
Selective Thread Cutter can be cancelled in the SET Menu, see page
3:6.
Embroidery Stitch-Out
The Selective Thread Cutter automatically cuts the threads
and raises the presser foot. At the end of a color block the
top thread only is cut. When the design is À nished, both
top and bobbin threads are cut automatically.
NEEDLE STOP UP/DOWN ( TRIM POSITION)
Sewing Mode
Touch the Needle Stop Up/Down to move the needle up
or down. The set ting of the needle stop po si tion is changed
at the same time. This function will also set the needle
position up or down when you stop sewing. You can also
tap the foot control to raise or lower needle once you stop
sewing.
Embroidery Stitch-Out
The machine will move the hoop forward, towards you, for
easy thread trimming.
START/STOP
Touch this button to start and stop the machine sewing
or embroidering without using the foot control. Touch
START/STOP to begin and touch again to stop.
EXCLUSIVE SENSOR SYSTEM™
Thanks to the EXCLUSIVE SENSOR SYSTEM™ feature,
the presser foot continuously senses the thickness of fabric,
embroidery or stitching and sews over it smoothly and
evenly with perfect fabric feed.
Go to the SET Menu, Sewing Settings, to see the actual
setting of the Sensor pres ser foot pressure for the selected
fabric and adjust the presser foot pressure.
SENSOR FOOT UP AND EXTRA LIFT
Sewing Mode
Touch Sensor Foot Up to raise the pres ser foot. Touch it
a second time and the pres ser foot will raise to Ex tra Lift,
and the feed teeth are lowered automatically to make it easy
to get thick fabric under the pres ser foot.
Embroidery Mode
Touch the Sensor Foot Up and Extra Lift to lift the presser
foot to Up position. Touch once more and the presser foot
will raise to Extra Lift, to make it easier to insert or remove
the hoop.
SENSOR FOOT DOWN AND PIVOT
The presser foot is lowered automatically when you start
sewing/embroidering.
Sewing Mode
Touch the Sensor Foot Down and Pivot button and the
pres ser foot will be completely lowered. The machine
À rmly holds the fabric. Touch Sensor Foot Down again to
get the Pivot position.
Embroidery Mode
Touch Sensor Foot Down to lower the presser foot into the
Embroidery “Á oat” position.
Sensor Foot Up and Extra Lift
Needle Stop Up/Down
(Trim Position)
Speed - and +
STOP
(Monochrome)
FIX
(Baste)
Reverse
Start/Stop
Selective Thread Cutter
Sensor Foot Down and Pivot
Page 43
SEWING
4
Page 44
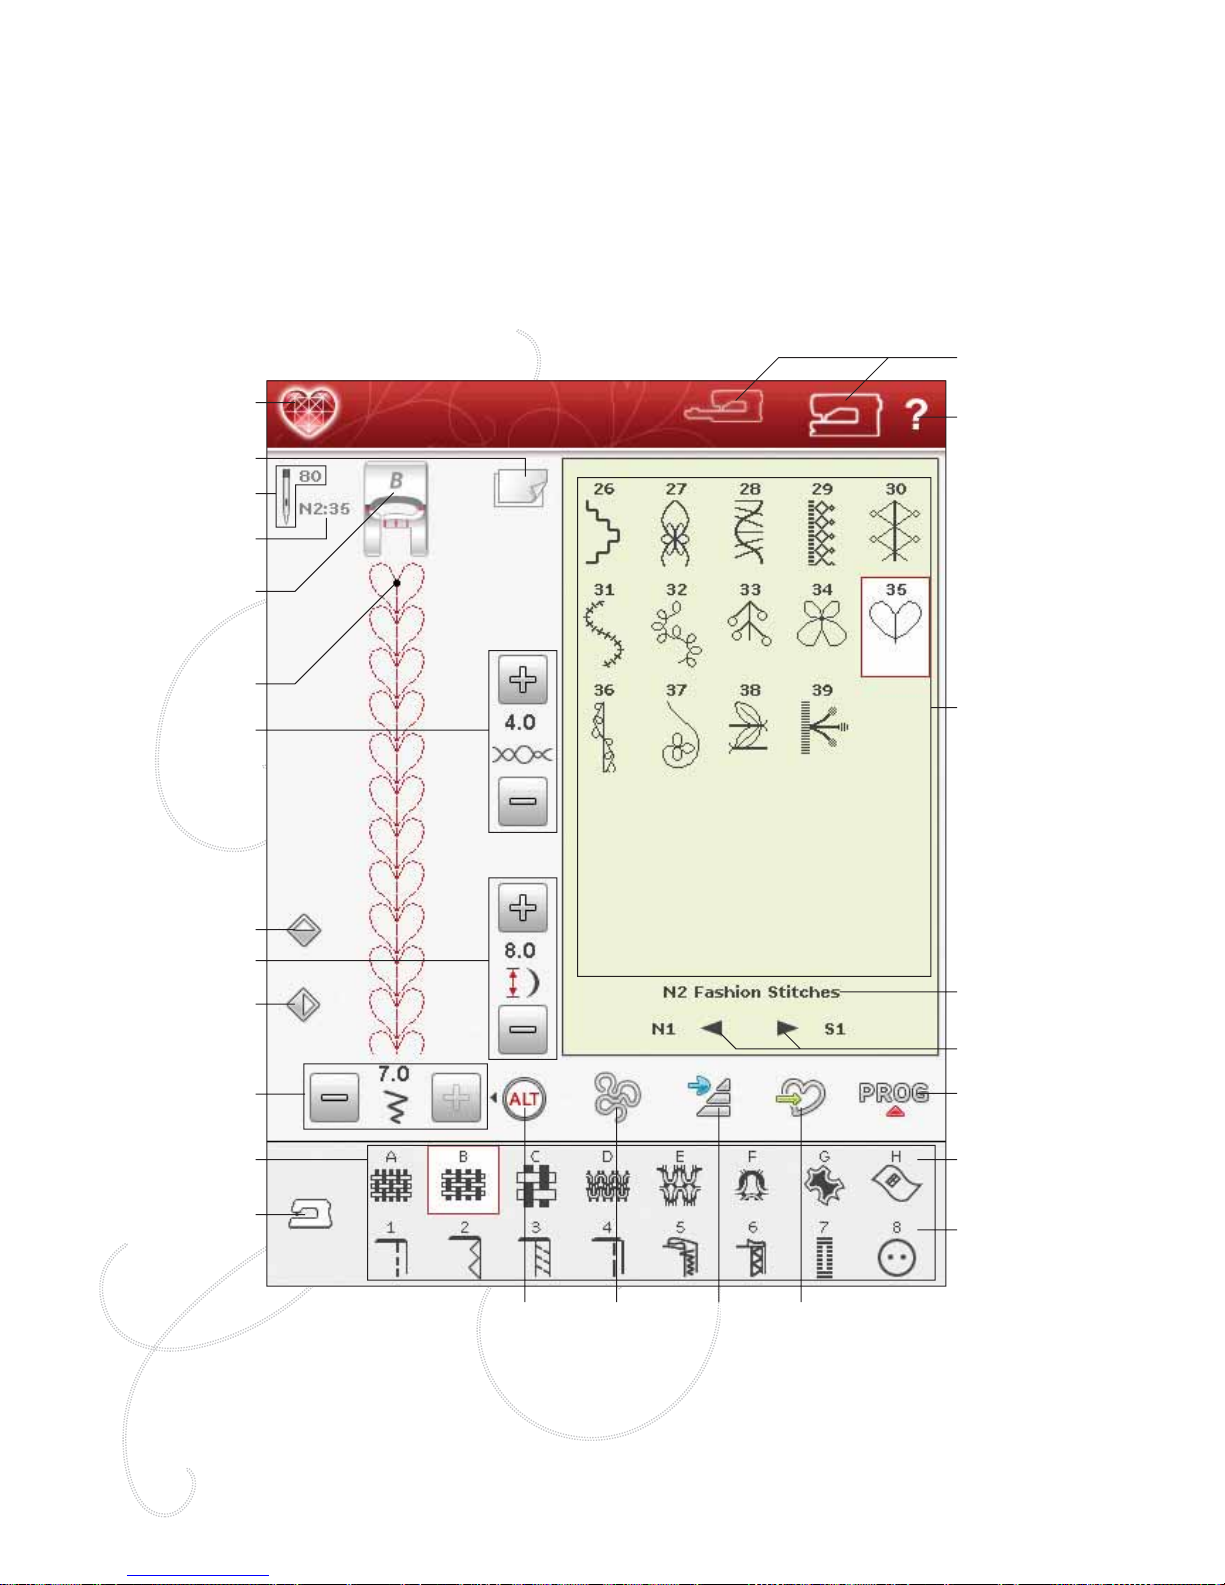
4:2
Free-Motion
Technique
Start Menu
Quick Help
Sewing/Embroidery
Mode
Sewing T echnique
Save to My
Stitches
Program
Fabric
Stitch Menu Name
Stabilizer
Recommendation
Needle Recommendation
Presser foot
recommendation
Mirror End-to-End
Thread T ension
Mirror Side-to-Side
Stitch Width
Stitch Length
Extended
SEWING ADVISOR™
Stitch Selection Area
Scroll Through Menus
ALT icon
Stitch Start
Stitch Selected
Exclusive
SEWING ADVISOR™
Stitch
Re-Start
SEWING MODE
In Sewing Mode you can select stitches, adjust and sew
them. Your selected stitch will be shown in actual size in
the stitch À eld. The recommendations and machine settings
will be shown at the top. You can also go to Program mode
to create your own stitch programs. Read more about how
to program stitches in the Program chapter.
SEWING MODE - OVERVIEW OF ICONS
Page 45
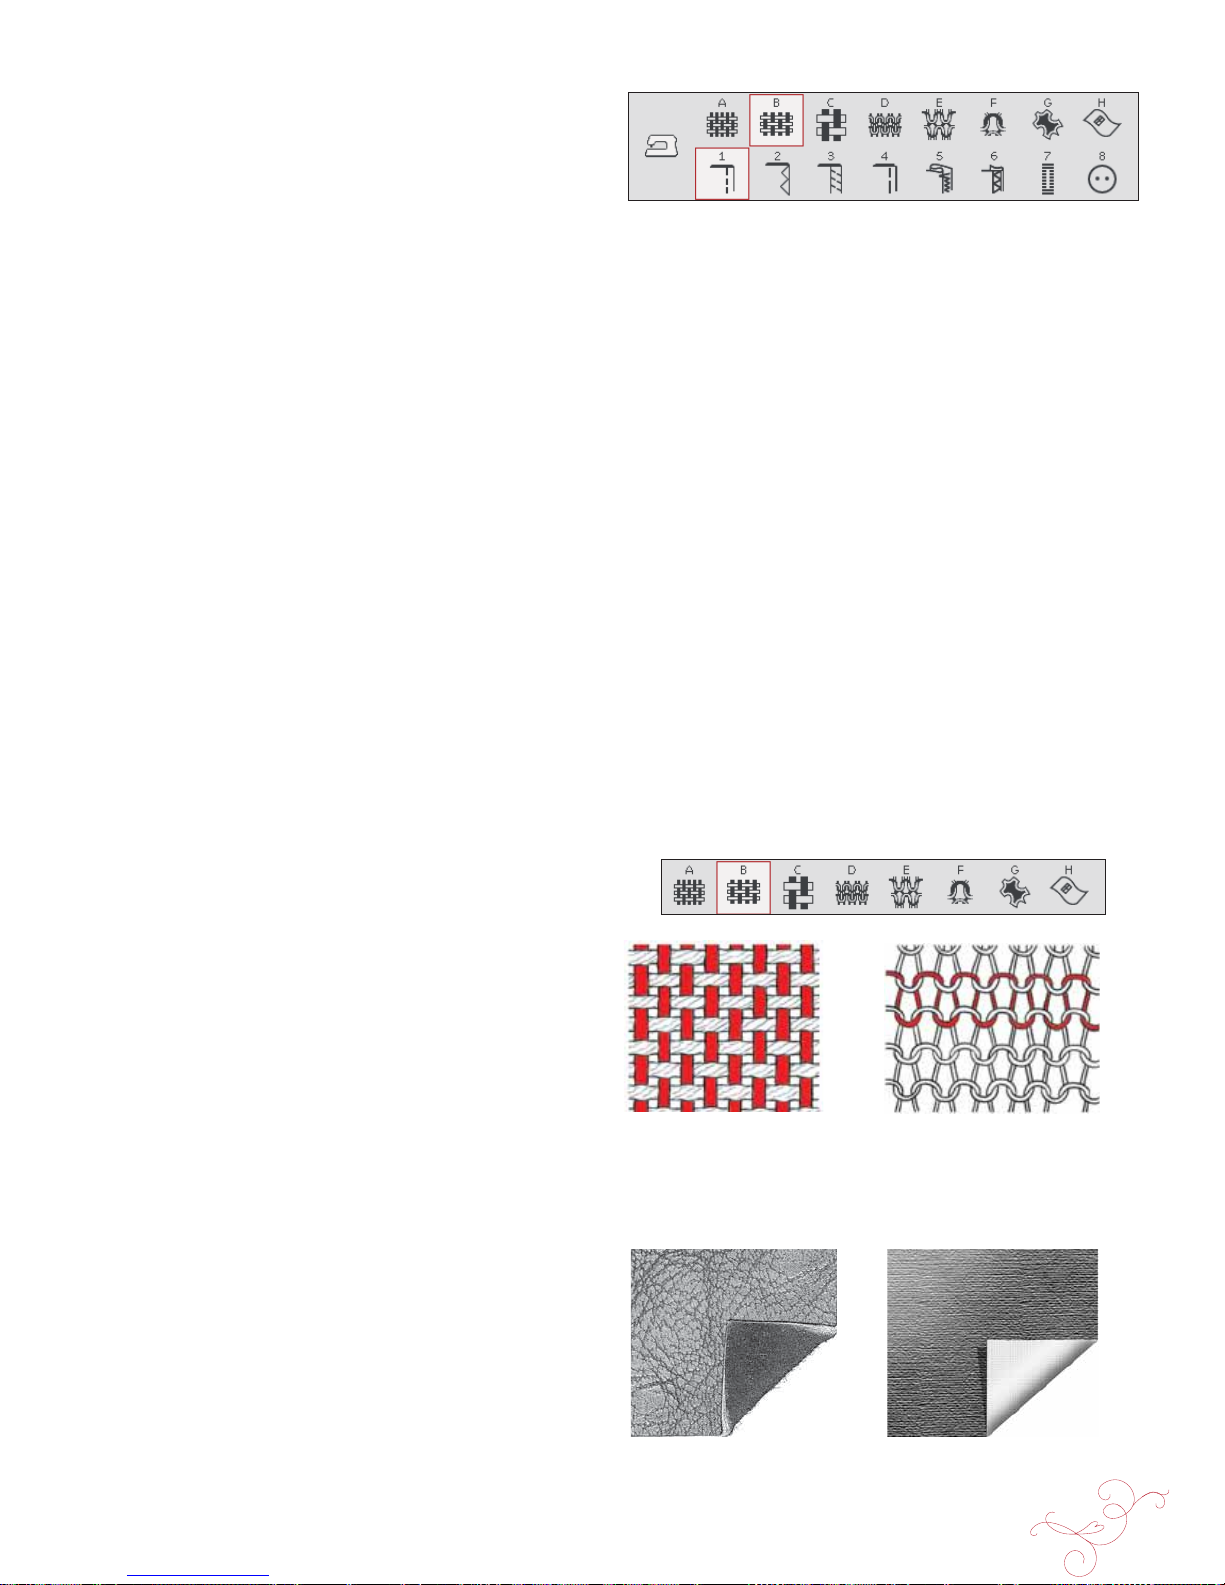
SEWING 4:3
EXCLUSIVE SEWING ADVISOR™
Your new sewing machine has the HUSQVARNA VIKING®
Exclusive SEWING ADVISOR™ feature. It is always active
and is located at the bottom of the Interactive Color Touch Screen.
When beginning a sewing project, touch your fabric type and weight,
then touch the technique you desire.
The Exclusive SEWING ADVISOR™ feature sets the
best stitch, stitch length, stitch width, sewing speed, thread
tension and sensor foot pressure for your project. The
stitch is displayed on screen with presser foot and needle
recommendations.
There is also an Extended SEWING ADVISOR™ feature
with text. Touch the sewing machine icon to open the
Extended SEWING ADVISOR™ feature.
FABRIC SELECTION
Woven or Knit
The difference between woven and knit fabric is the way
the threads are put together. Woven fabrics are made of
two thread systems, warp lengthwise and weft crosswise,
that intersect at right angles. A knit fabric is made of one
thread system with interlaced stitches. A knit fabric usually
has stretch.
As a general rule, enter Woven for stable fabrics that have
no stretch and Stretch for fabrics that have stretch.
Suggested Fabrics
A
WOVEN LIGHT: chiffon, organza, batiste, silk, wool challis, etc.
B
WOVEN MEDIUM: calico, quilting fabrics, wool crepe,
broadcloth, etc.
C
WOVEN HEAVY: denim, wool suiting and coating, canvas,
terrycloth, etc.
D STRETCH LIGHT: charmeuse, nylon, tricot, single knit
jerseys, etc.
E STRETCH MEDIUM: double knit, velour, swimwear, etc.
F
STRETCH HEAVY: sweater knits, Á eece, etc.
Leather and Vinyl
Leather is animal skin with the coat (fur) removed. Leather
can be smooth or sueded and has some give.
G LEATHER: for suede and leather.
Vinyl is a synthetic material which often has a woven wrong
side. Vinyl can be smooth or patterned and some vinyls
have stretch.
H
VINYL: for vinyl and synthetic leather and suede.
Knit fabric
Woven fabric
Leather
Vinyl
Page 46
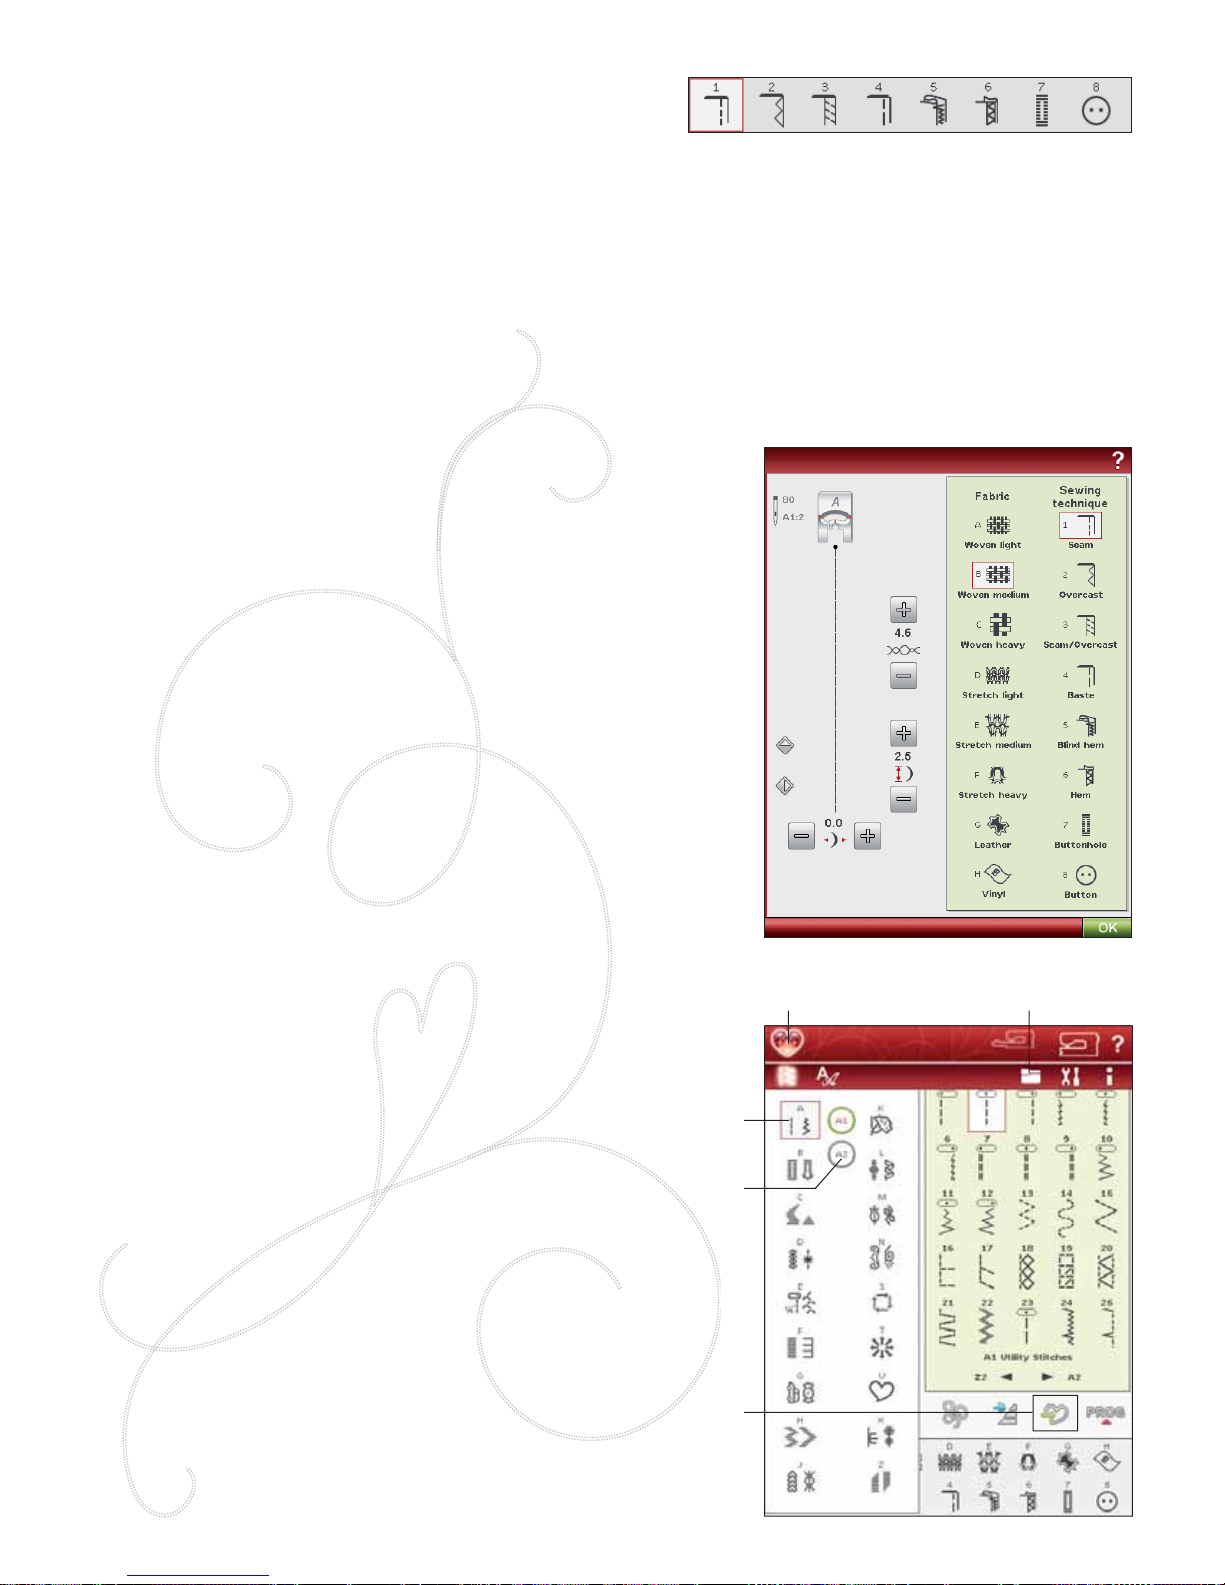
4:4
Stitch Menu
Submenu
File Manager
Save to “My
Stitches”
Start Menu
SEWING TECHNIQUES
1 SEAM: sews two pieces of fabric together.
2 OVERCAST: overcast fabric edges to prevent them from
fraying and to help them lay Á at.
3
SEAM/OVERCAST: sews the seam and overcasts the edge all
at one time.
4
BASTE: a temporary stitching for À tting garments,
gathering and marking.
5 BLIND HEM: creates an invisible hem on garments. Is not
recommended for light weight fabric or for leather/vinyl.
Your machine selects the best stitch possible for the fabric
you select.
6
HEM: selects the best visible or top stitch hem for your
fabric type and weight.
7
BUTTONHOLE: the Exclusive SEWING ADVISOR™
feature selects the best buttonhole possible for your fabric.
8 BUTTON: for sewing on buttons.
Note: If an unsuitable combination is selected (for example woven
light-blind hem), your machine beeps, and the sewing tecniques shall
be unselected. However, the stitch can still be sewn, but it is not
recommended by your machine.
EXTENDED SEWING ADVISOR™
The Extended SEWING ADVISOR™ feature identiÀ es
each icon with text. Open it by touching the Extended
SEWING ADVISOR™ icon. Select your desired fabric
and sewing technique by touching the buttons. The stitch
selected by the Exclusive SEWING ADVISOR™ feature
and its settings are shown to the left, and you can adjust the
width, length and mirror the stitch with the buttons. Touch
OK to return to the stitch view.
SELECT A STITCH
To select a stitch, touch the actual stitch in the stitch
selection area. You can scroll through all the stitches, using
the arrows below the stitches. The name and number of
the actual submenu is shown at the bottom of the stitch
selection area.
To enter a certain menu, touch Start Menu and then the
Stitch Menu icon on the extended toolbar. A foldout
menu will appear allowing you to choose from the different
menus. Some of the menus hav e submen us. Touc h a men u/
submenu button to display the stitches in the stitch selection
area.
My Stitches - Menu U
In menu U you À nd your own stitches and stitch programs.
See Chapter 5 for how to save a program or adjusted stitch
in My Stitches.
Page 47
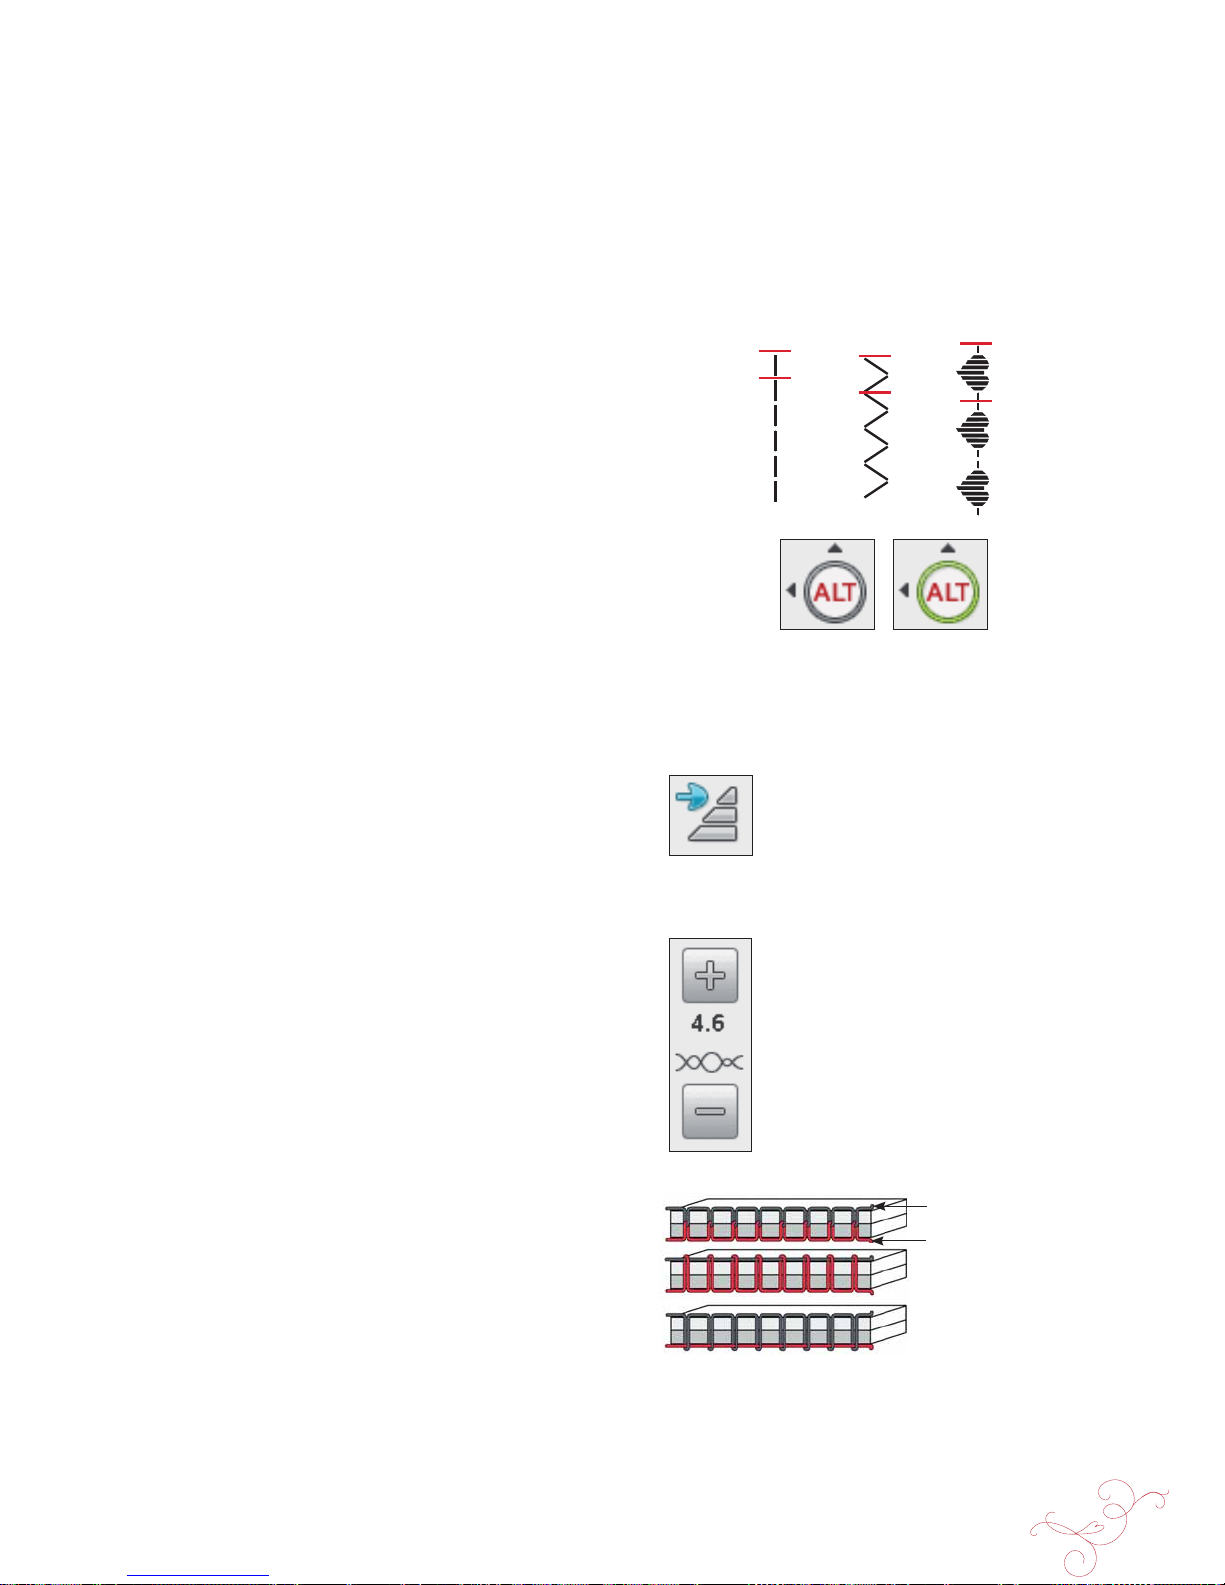
SEWING 4:5
Needle thread
Bobbin thread
What is a Stitch?
A stitch is a single stitch as in straight stitch or two
individual stitches as in a zigzag. A stitch is also the
complete stitch made up of the total individual stitches in
the stitch such as 3 step zigzag, or decorative stitch.
ALT
The controls on your screen can change depending on
what stitch you have chosen. Some stitches have more then
two controls, and in those cases the ALT appears. When
you touch the ALT one or both controls will change. The
arrows beside the ALT will indicate which one. Touch the
ALT again to change back to the original controls. Below
you will À nd a description of the different controls that can
appear when selecting a stitch.
Stitch Re-Start
When you stop sewing in the middle of a stitch, touch
Stitch Re-Start to begin sewing at the beginning of the
stitch. The stitch or stitch program will remember any
special settings you made.
Thread T ension
Touch + to increase, and - to decrease the needle thread
tension.
For the best stitch appearance and durability make sure the
needle thread tension is correctly adjusted, i.e. for general
sewing, the threads evenly meet between the two fabric
layers.
If the bobbin thread is visible on the top side of the fabric,
the needle thread tension is too tight. Reduce the needle
thread tension.
If top thread is visible on the underside of the fabric, the
needle thread tension is too loose. Increase the needle
thread tension.
For decorative stitches and buttonholes the top thread
should be visible on the underside of the fabric.
Note: If the general thread tension for all stitches has been changed in
Thread Tension Compensations in the SET Menu, the symbol in the
thread tension control will be red instead of black. Read more about
Thread Tension Compensations on page 3:8.
Load a Stitch From Another Location
Load stitches that you have saved in File Manager or in other locations. T ouc h the File Manager icon on the extended toolbar.
The File Manager window will open. Locate your stitch and Touch & Hold or touch OK to load it.
STITCH SETTINGS
Your machine will set the best settings for each selected stitch. You can make your own adjustments on the selected stitch.
The changes only affect the selected stitch. Your changed settings will be reset to default when selecting another stitch.
The changed settings are not automatically saved when turning your machine off. You can save the adjusted stitch in My
Stitches (see Chapter 5, Program).
Page 48
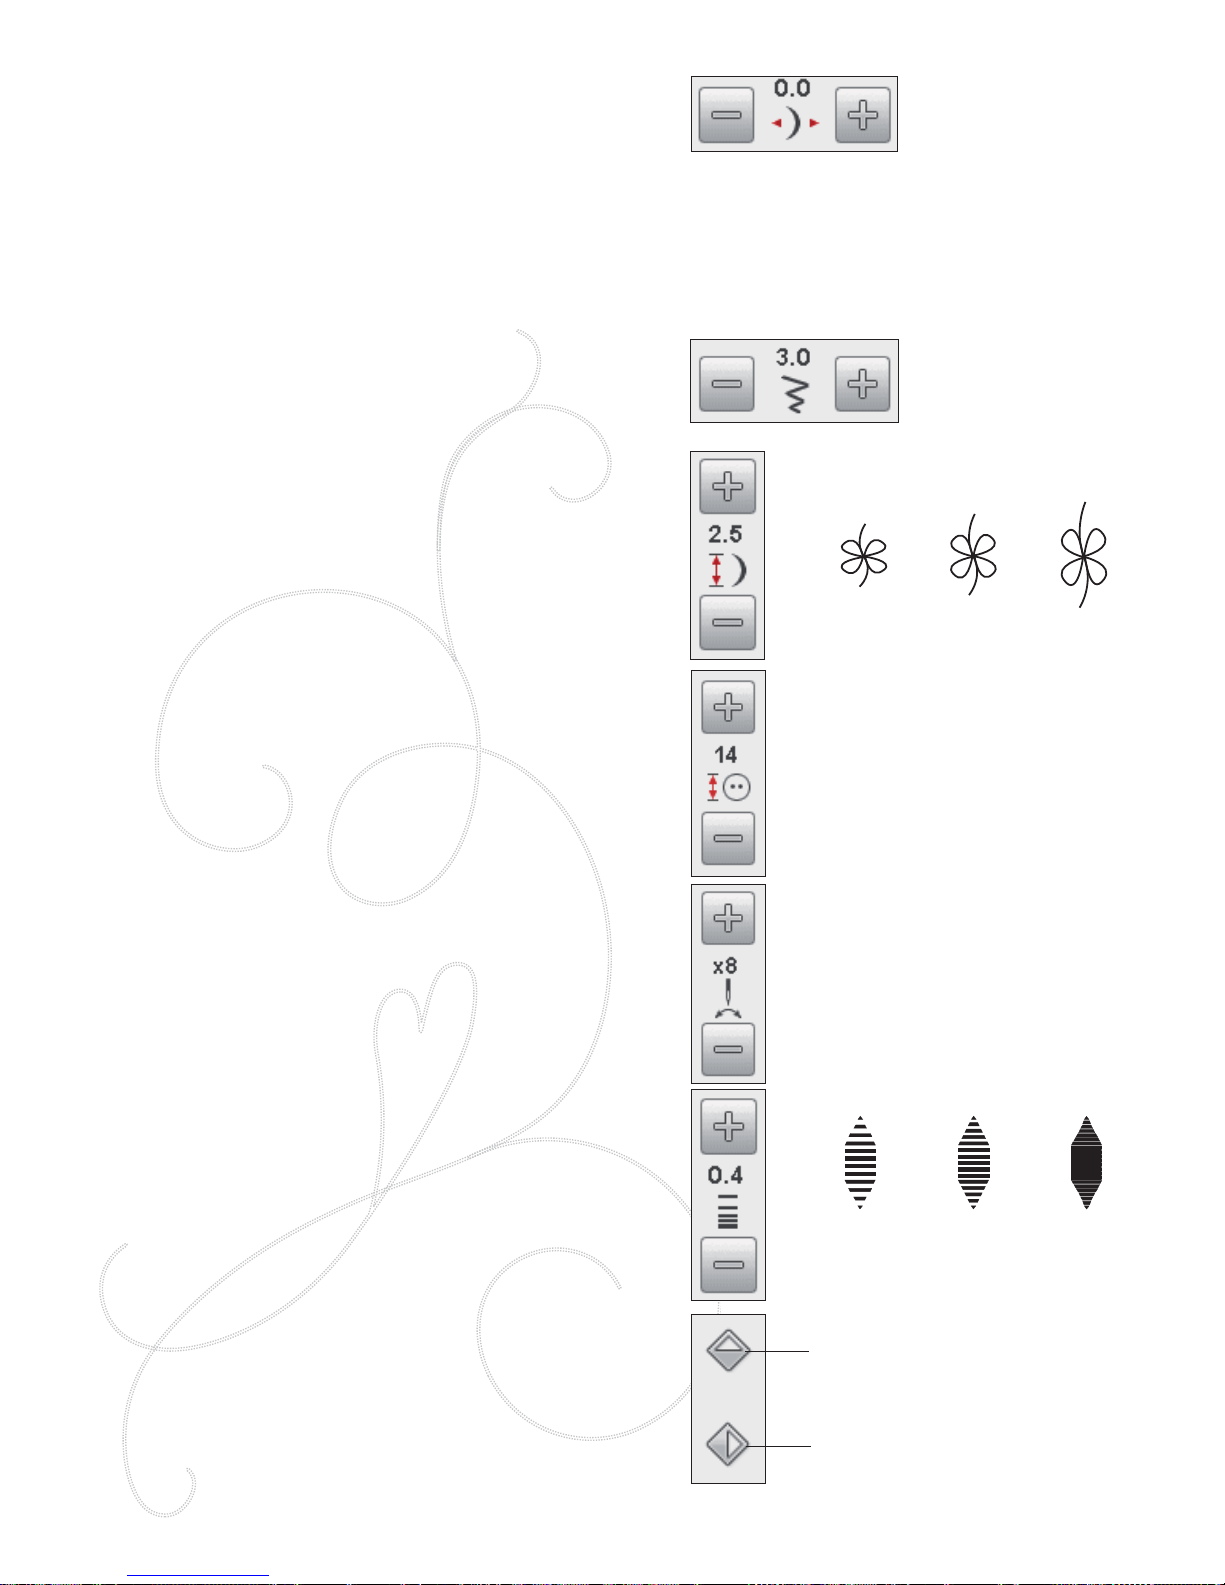
4:6
Stitch length +Stitch length -
Stitch density -Stitch density +
Mirror End-to-End
Mirror Side-to-Side
Stitch Positioning
On certain stitches, for example straight stitch, the stitch width icon
becomes a stitch position icon. Use + to move the stitch to the right
and - to move the stitch to the left when using a straight stitch. The
machine has a maximum of 29 needle positions (for a straight stitch).
When ALT is selected on a stitch that has width the edge position of
the stitch can be moved from right to left.The stitch position can only
be changed to the limit of the maximum stitch width. Changing the
stitch position will also limit the stitch width adjustment.
Stitch Width
Decrease or increase the stitch width using -and +. Default settings are
shown in black numbers , adjusted settings in red.
Stitch Length
Increase or decrease the stitch length using + and -. If lengthening a
zigzag stitch or a decorative stitch, the entire stitch will be longer. If
lengthening a satin stitch where the density can be adjusted, the entire
stitch will be longer but the density will remain the same.
Note: The set stitch width and the stitch length are shown between the + and -.
When trying to exceed minimum or maximum settings for width and length, a
warning sound will be heard.
The default setting is shown in black. Changed settings are shown in red.
Button Size
When sewing a buttonhole with the Sensor One-Step buttonhole
foot, you can set the button size. Measure your button and enter the
button size in the button size control.
Button Sew On
When sewing a button, you can set the number of stitch repeats.
Touch the + or -to increase or decrease the number of stitch repeats
(see 4:14).
Stitch Density
The stitch density control adjusts the density (the distance between
the individual satin stitches that make up the entire stitch). The
density does not affect the actual length of the entire stitch.
Touch + to increase the value. Touch - to decrease the value.
Note: This is often used with specialty threads and when a less dense satin stitch
is desired.
Mirroring
To mirror stitches or stitch programs sidewise touch Mirror Sideto-Side icon. For mirroring the stitch or stitch programs lengthwise
touch Mirror End-to-End icon.
Note: Buttonholes cannot be mirrored.
STITCH SETTINGS IN SET MENU
Balance and presser foot pressure are set in the SET Menu,
see page 3:5.
Page 49
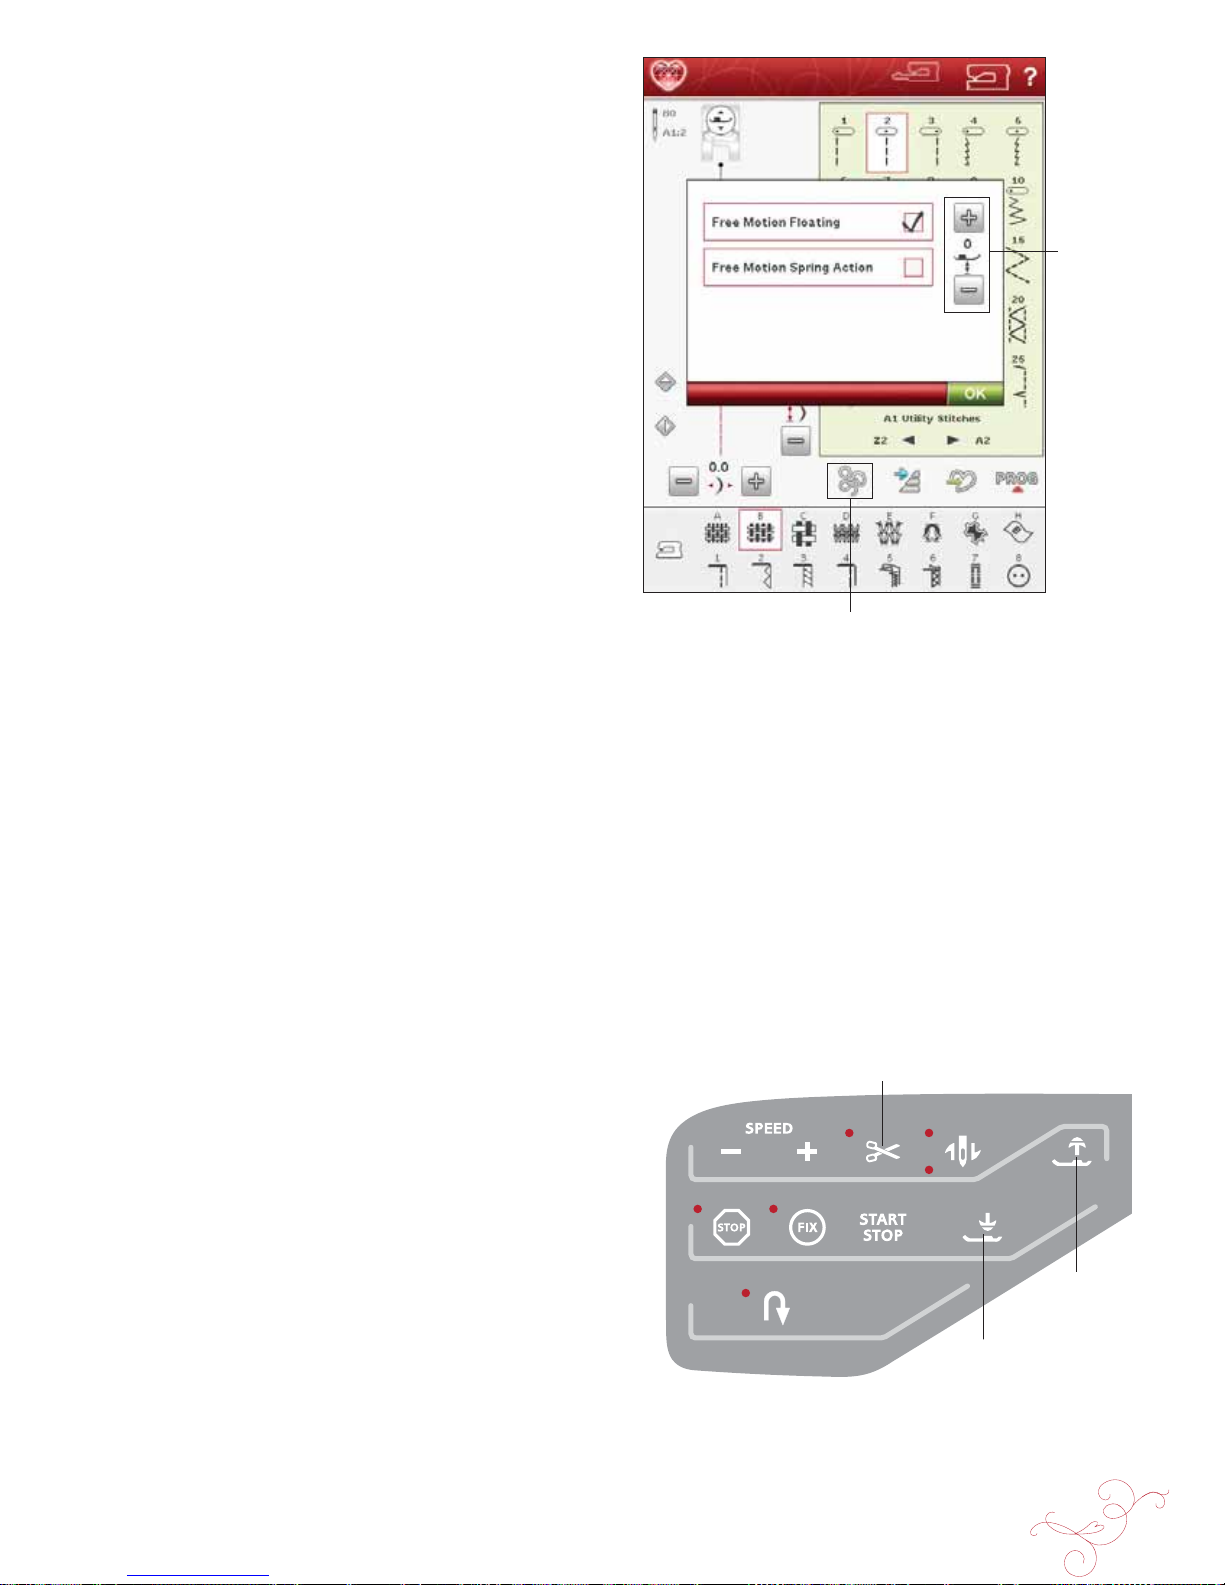
SEWING 4:7
Free-Motion
Technique
Presser Foot
Height
Sensor Foot
Up and Extra
Lift
Sensor Foot Down
and Pivot
Selective Thread Cutter
FREE-MOTION TECHNIQUE
When touching the Free-Motion Technique icon a pop-up
will appear allowing you to choose between two options: Free
Motion Floating and Free Motion Spring Action.
Free-Motion Floating
Activate to set the machine in Free-Motion Floating mode for
presser foot R. The feed teeth will lower automatically.
When sewing free-motion at low speed the presser foot will
raise and lower with each stitch to hold the fabric on the
needle plate while the stitch is being formed. At higher speed,
the presser foot Á oats over the fabric while sewing. The fabric
must be moved manually.
Skipped stitches can occur if your fabric moves up and down
with the needle as you are stitching . Lowering the presser foot
height will reduce the space between the presser foot and the
fabric and eliminate the skipped stitches.
Note: Be careful not to reduce the presser foot height too much. The
fabric must still move freely under the presser foot.
To adjust the presser foot height in Free-Motion Floating
mode, touch the Presser Foot height control to make
adjustments.
Free-Motion Spring Action
Select Free-Motion Spring Action to activate the Free motion
spring action mode. The feed teeth will lower automatically. A
spring action foot will raise and lower with each stitch to hold
the fabric on the needle plate while the stitch is being formed.
The fabric must be moved manually.
If you are using the Sensor Q-foot activate Free-Motion
Spring Action and Stitch Width Safety.
Note: The Open Toe Free-Motion Spring foot and the Sensor Q-foot are
optional and can be purchased at your local authorized dealer. Do not
use if Free-Motion Floating is selected, to prevent damage to the presser
foot.
RAISE AND LOWER THE PRESSER FOOT
The Sensor Foot Up and Extra Lift raises the presser foot.
The Sensor Foot Down and Pivot lowers the presser foot.
To lower the presser foot, place the fabric under the presser
foot and press the Sensor Foot Down and Pivot button or
step on the foot control. To raise the presser foot, press the
Sensor Foot Up and Extra Lift or press the Selective Thread
Cutter to cut needle and bobbin thread and raise the foot.
When the needle stops in the down position, the presser foot
raises to pivot position.
You can also lower the presser foot and the needle with your
foot control. If you tap your foot control once you will lower
the presser foot. If you tap the foot control twice the needle
will be lowered into the fabric.
Note: With Needle Stop Down selected: when you stop sewing and touch
Sensor Foot Up the foot will raise but the needle stays in the fabric.
Touch Sensor Foot Up again to raise the needle.
Page 50
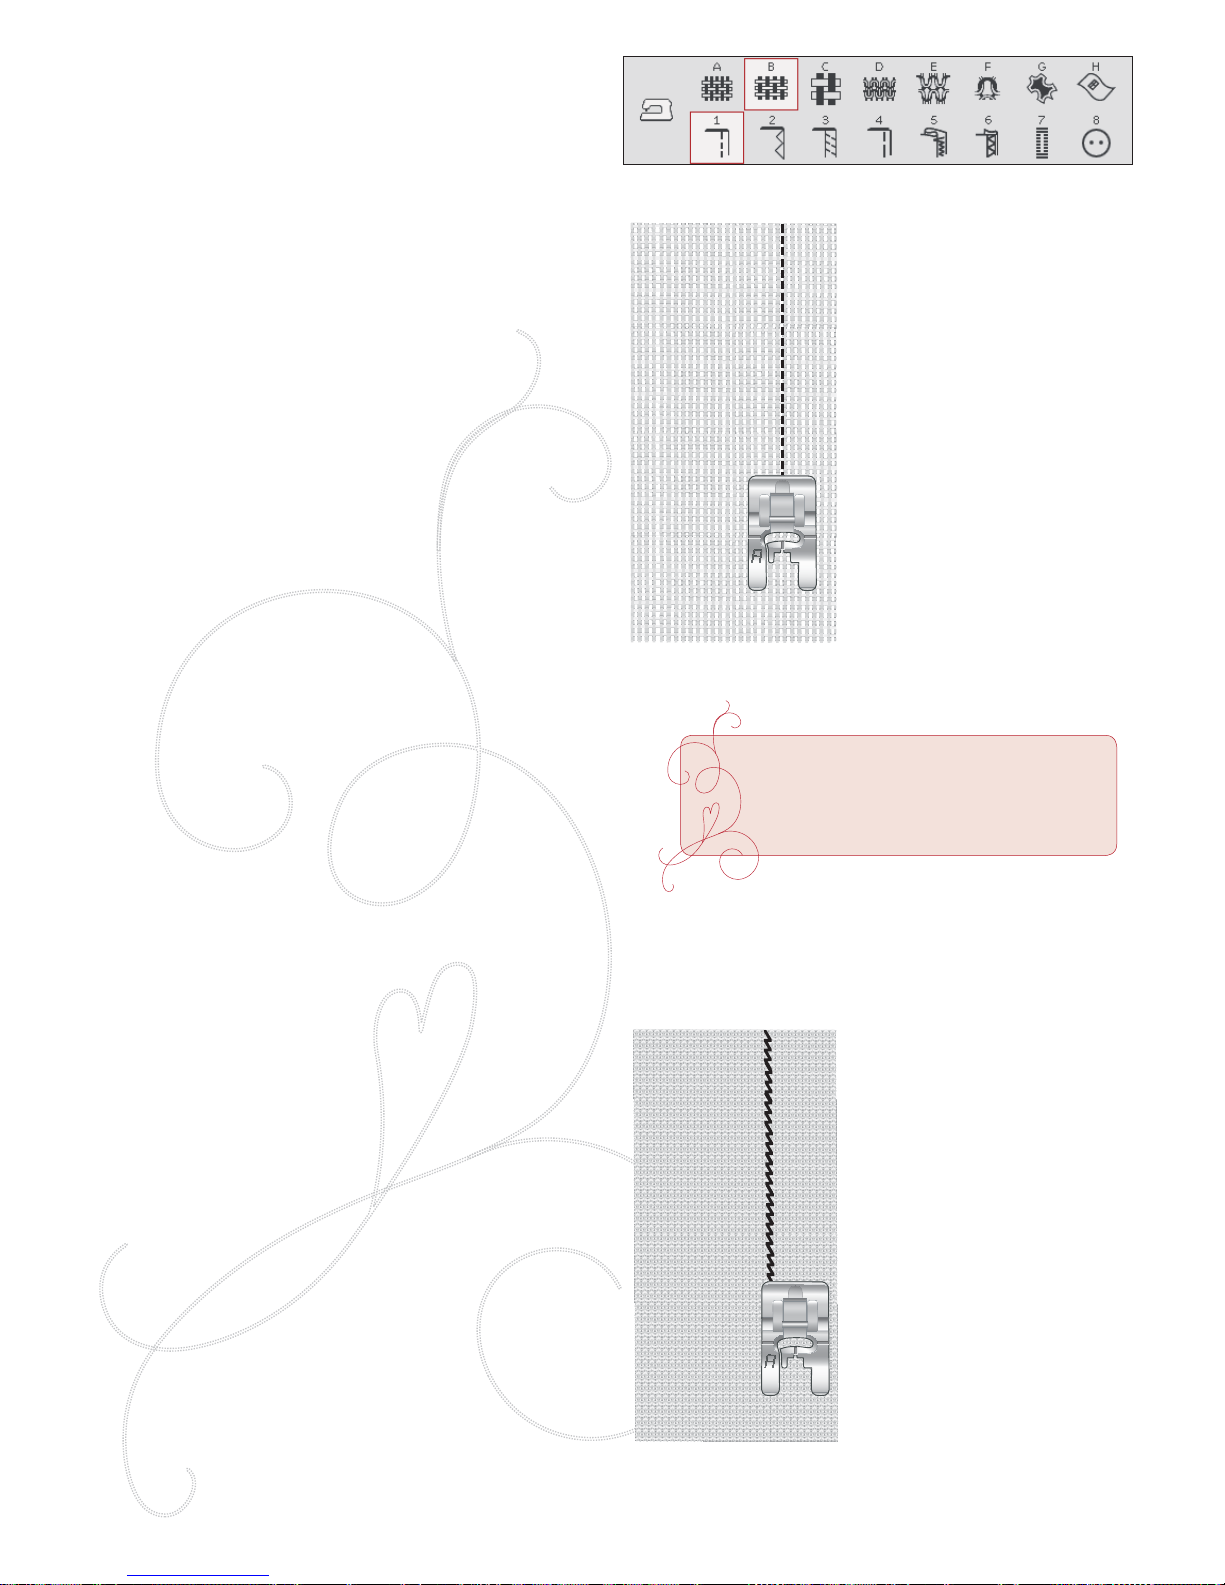
4:8
7
7
SEWING TECHNIQUES
SEAM
A seam sews two pieces of fabric together with a seam
allowance that will usually be pressed open. In most cases,
edges of the seam allowance are À nished with an overcast
stitch before sewing the seam.
Seams in stretch fabric must stretch with the fabric. The
stretch stitch makes a stretchy seam that is suitable for
sewing together pieces of light stretch fabric.
FABRIC: Woven medium, cut in two.
SELECT: Woven medium fabric and Seam technique. (The
Exclusive SEWING ADVISOR™ feature selects a straight
stitch.)
USE: Presser foot A and size 80 needle as recommended.
SEW:
• Place fabrics right sides together. Put the fabric in
position under the presser foot. Line up the edge with
the 5/8'' (15 mm) seam guide.
• Step on the foot control. The presser foot lowers
automatically.
• Sew a seam. When À nished, touch the Selective Thread
Cutter. The Selective Thread Cutter cuts top and
bobbin threads and the presser foot raises so you can
remove your project.
FABRIC: Stretch light, cut in two.
SELECT: Stretch light fabric and Seam technique. (The
Exclusive SEWING ADVISOR™ feature selects a stretch
stitch.)
USE: Presser foot A and size 75 stretch needle as
recommended.
SEW:
• Place fabric pieces right sides together. Put the fabric
in position under the presser foot. Line up the edge
with the 3/8'' (10 mm) seam guide for a 5/8”seam.
• Step on the foot control. The presser foot lowers
automatically.
• Sew a seam. When À nished, touch the Selective Thread
Cutter. The Selective Thread Cutter cuts top and
bobbin threads and the presser foot raises so you can
remove your project.
Straight stitch
Stretch stitch
Straight stitch can also be used for
topstitching. For a more visible
topstitch, lengthen the stitch and use
heavier thread with a larger size needle.
Page 51
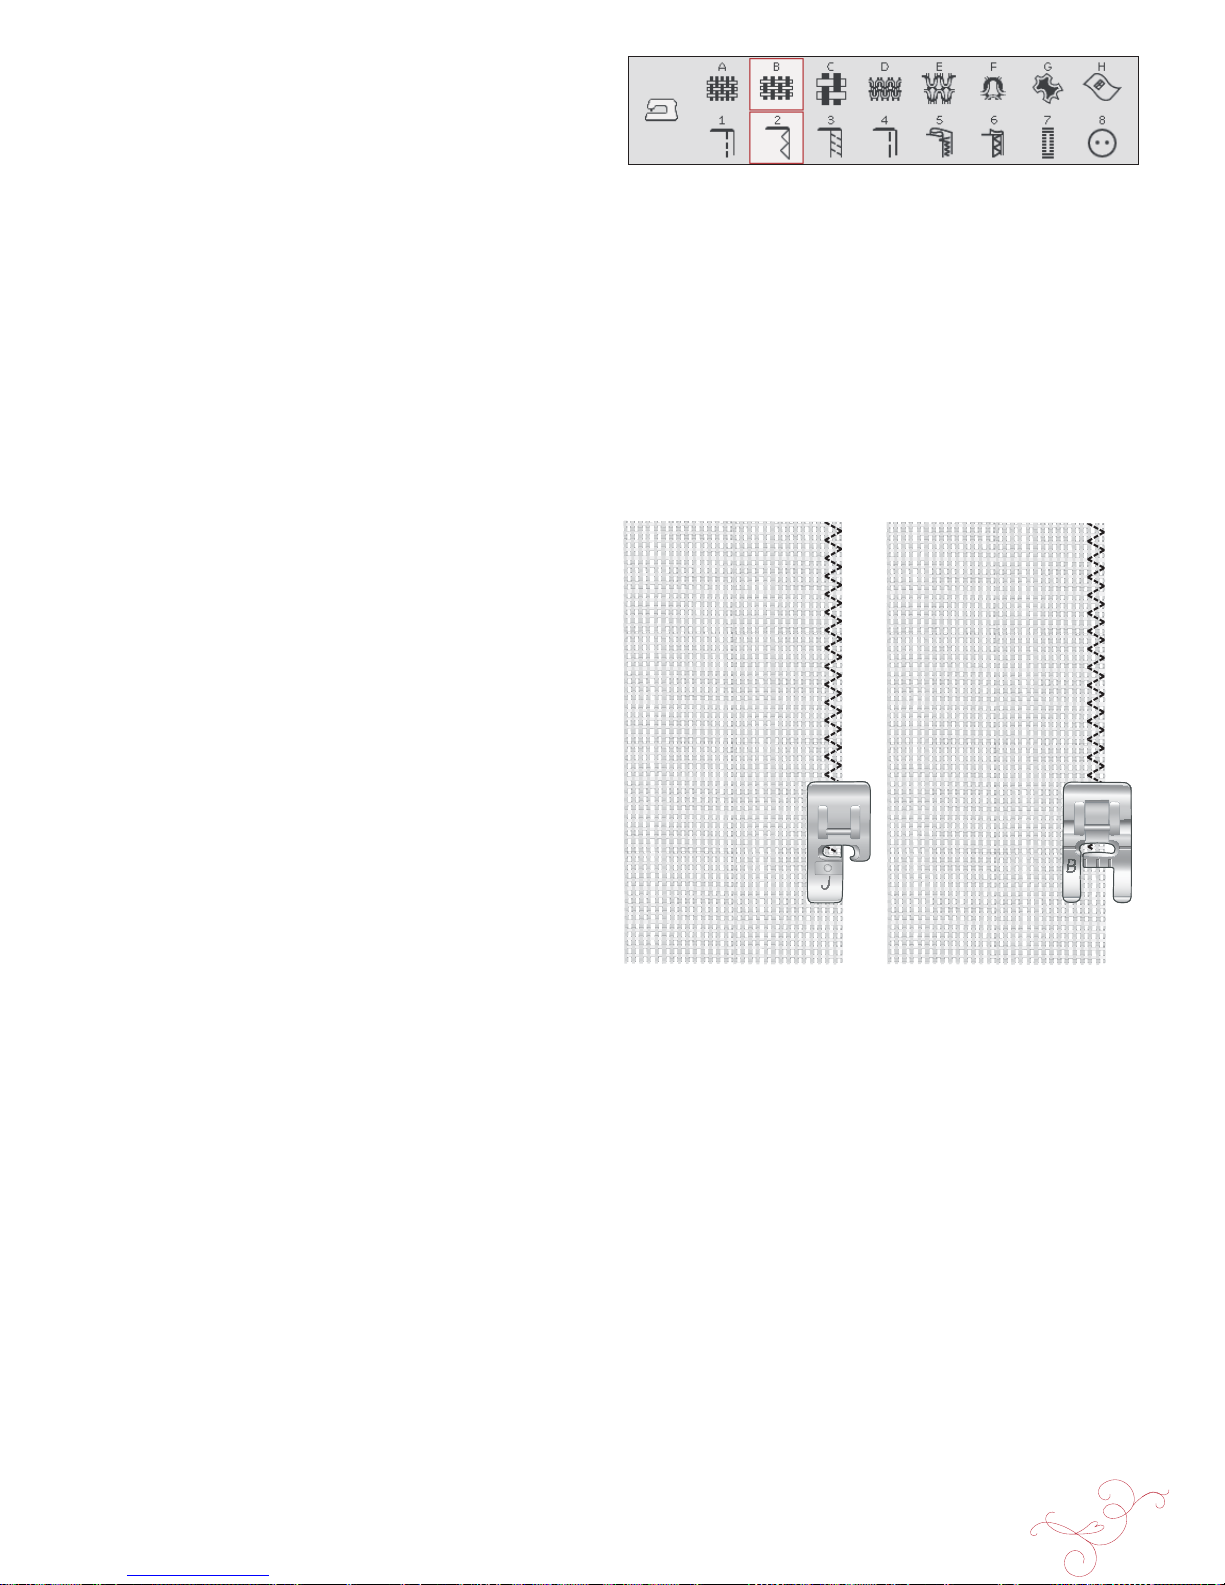
SEWING 4:9
7
OVERCAST
Overcast fabric edges to prevent fraying and to help
them lay Á at. It is easiest to overcast before the garment
is sewn together. Presser foot J is recommended for light
and medium weight fabric to prevent puckering along the
edge. Presser foot B is used for heavy weight fabric. Your
Exclusive SEWING ADVISOR™ feature will select the
best stitch length and stitch width for the fabric weight and
recommend the presser foot and needle.
FABRIC: Woven medium.
SELECT: Woven medium fabric and Overcast technique. (The
Exclusive SEWING ADVISOR™ feature selects a threestep zigzag stitch.)
USE: Presser foot J and size 80 needle as recommended.
Place the edge of a single thickness of fabric under presser
foot J with the wire guide along the edge of the fabric. The
three-step zigzag stitch sews over the wire guide to keep the
edge of the fabric Á at.
SEW:
• Step on the foot control. The presser foot lowers
automatically.
• Sew to overcast the edge of the fabric.
• Touch the Selective Thread Cutter.
Note: It is not necessary to overcast leather or vinyl because they do
not fray. However, the Exclusive SEWING ADVISOR™ feature
allows you to, if desired. Select Leather/Vinyl fabric and Overcast
technique on your Exclusive SEWING ADVISOR™ feature.
(The Exclusive SEWING ADVISOR™ feature selects a zigzag
stitch).
Page 52
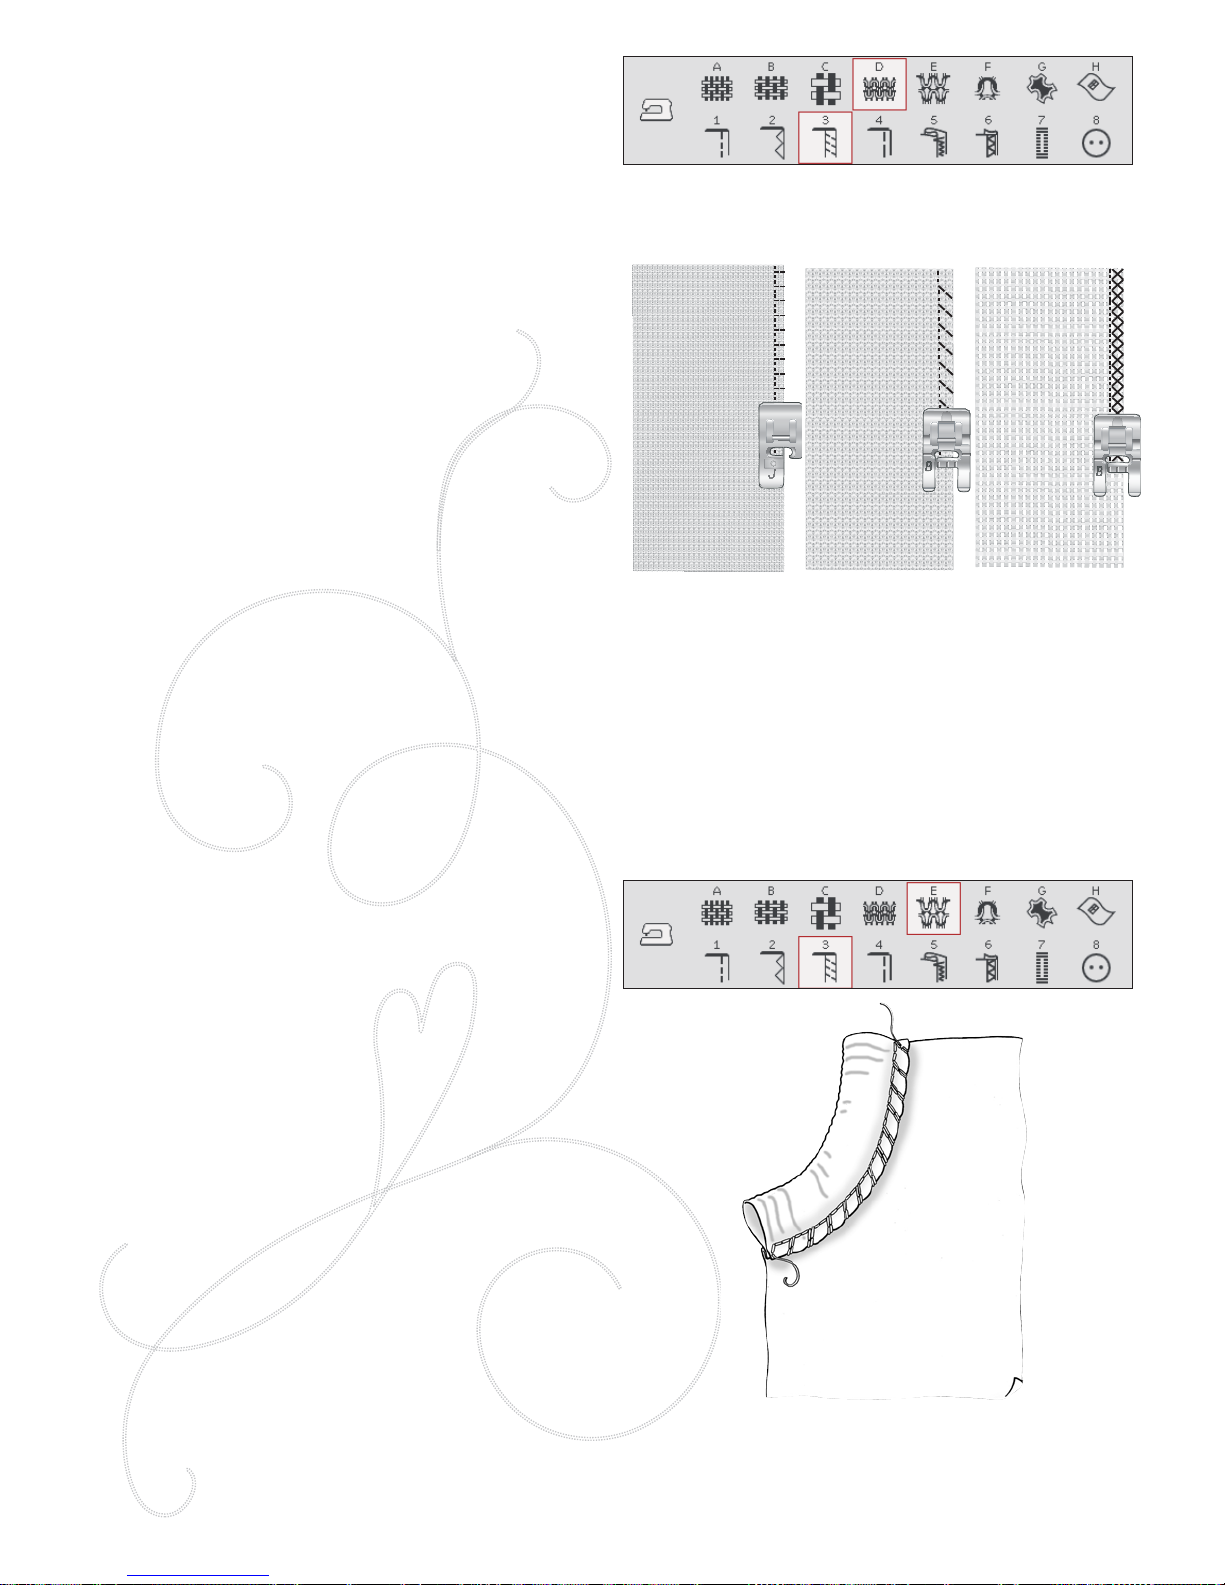
4:10
SEAM/OVERCAST FOR RIBBING
The Seam/Overcast technique is perfect for stitching
ribbed neckbands and cuffs.
FABRIC: Sweatshirt fabric and ribbing strip.
SELECT: Stretch medium and Seam/Overcast.
USE: Presser foot B and size 90 stretch needle as
recommended.
THREAD: Regular sewing thread.
Cut a mock neckline in the stretch fabric. Fold the ribbing
double. Put the sweatshirt material and the ribbing right
sides together. Sew the ribbing to the fabric with a 1/4'' (6
mm) seam allowance. Stretch the ribbing while sewing.
SEAM AND OVERCAST
The Seam/Overcast stitch sews the seam and overcasts
the edges all at one time. There are a number of different
Seam/Overcast stitches on your machine. Your Exclusive
SEWING ADVISOR™ feature will select the best one for
your fabric and make all adjustments automatically.
FABRIC: Stretch light, cut in two.
SELECT: Stretch light and Seam/Overcast on the Exclusive
SEWING ADVISOR™ feature.
USE: Presser foot J and size 75 stretch needle as
recommended.
SEW:
• Place fabric pieces right sides together. Put the fabric
in position under the presser foot with the wire guide
on the foot along the edge of the fabric.
• Step on the foot control. The presser foot lowers
automatically.
• Seam/Overcast along one edge.
• Touch the Selective Thread Cutter.
Repeat the Seam/Overcast technique on stretch heavy
fabric and on woven heavy fabric. Your Exclusive
SEWING ADVISOR™ feature will select the best stitch,
stitch length, stitch width, tension, presser foot pressure
and sewing speed for each fabric type. Follow other
recommendations given on the Interactive Color Touch
Screen.
Page 53
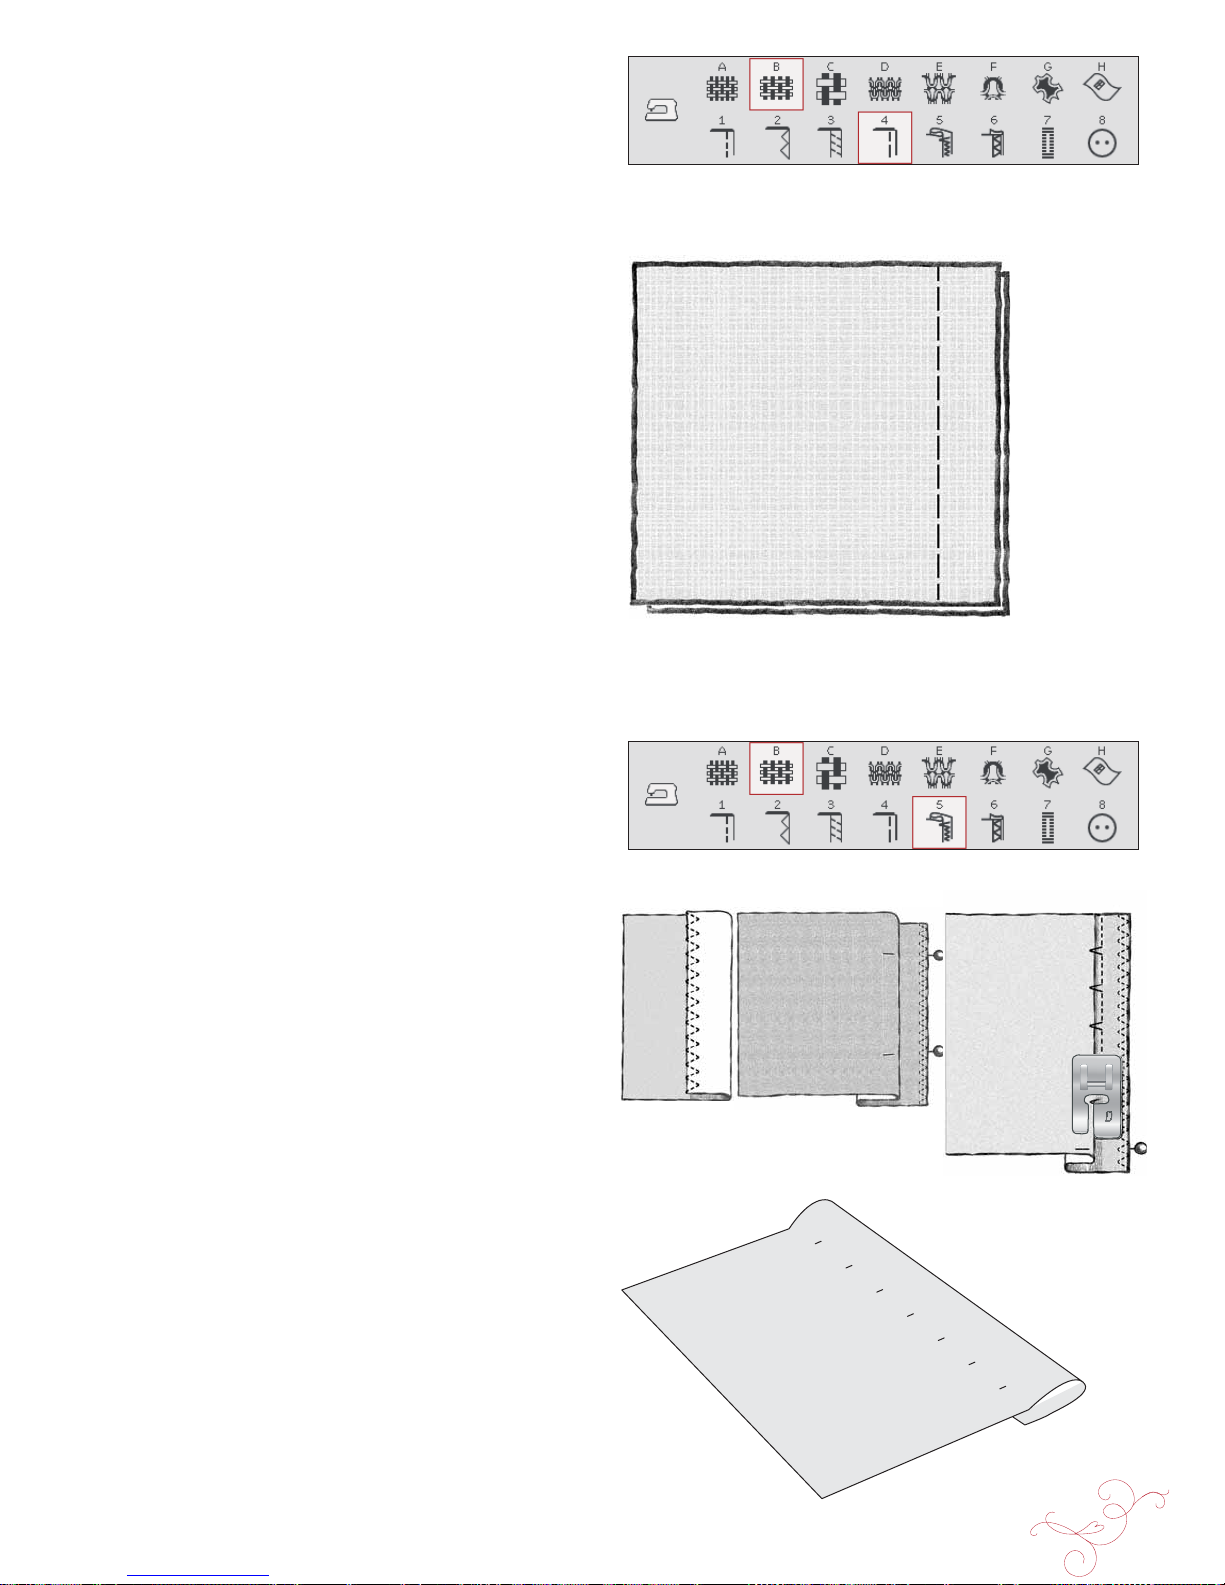
SEWING 4:11
BLIND HEM
The blind hem creates an invisible hem on garments. There
are two types of blind hem; one is recommended for
medium to heavy woven fabrics, the other for stretch.
The blind hem is not suggested for light weight fabric, but
your Exclusive SEWING ADVISOR™ feature will select
the best stitch possible.
FABRIC: Wool or other medium-weight materials.
SELECT: Woven medium and Blind Hem.
USE: Presser foot D and size 80 needle as recommended.
THREAD: Regular sewing thread.
Fold the fabric as illustrated. Make sure the folded edge of
the fabric follows the inside of the right “toe” of presser
foot D.
Step on the foot control. The presser foot lowers
automatically.
The left swing of the needle should just catch the edge of
the folded fabric. If neccessary, adjust the stitch width as
needed to barely “catch” the fold by touching + or î on
the width adjustment icon on your Interactive Color Touch
Screen. After À nishing your seam, touch the Selective
Thread Cutter.
BASTE
Basting is temporary stitching for À tting gar ments, gathe ri ng
and marking.
The SEWING ADVISOR™ feature automatically sets a
long stitch length and reduces the tension so the threads are
easy to remove or to pull for gathering.
FABRIC: Woven medium, cut in two.
SELECT: Woven medium fabric and Baste.
USE: Presser foot A and size 80 needle as recommended.
Place the fabrics right sides together. Put the fabric in
position under the presser foot.
SEAM ALLOWANCE: 5/8'' (15 mm).
SEW:
• Step on the foot control. The presser foot lowers
automatically.
• Stitch along seam line.
• Touch Selective Thread Cutter.
• Pull bobbin thread to remove stitching.
Page 54
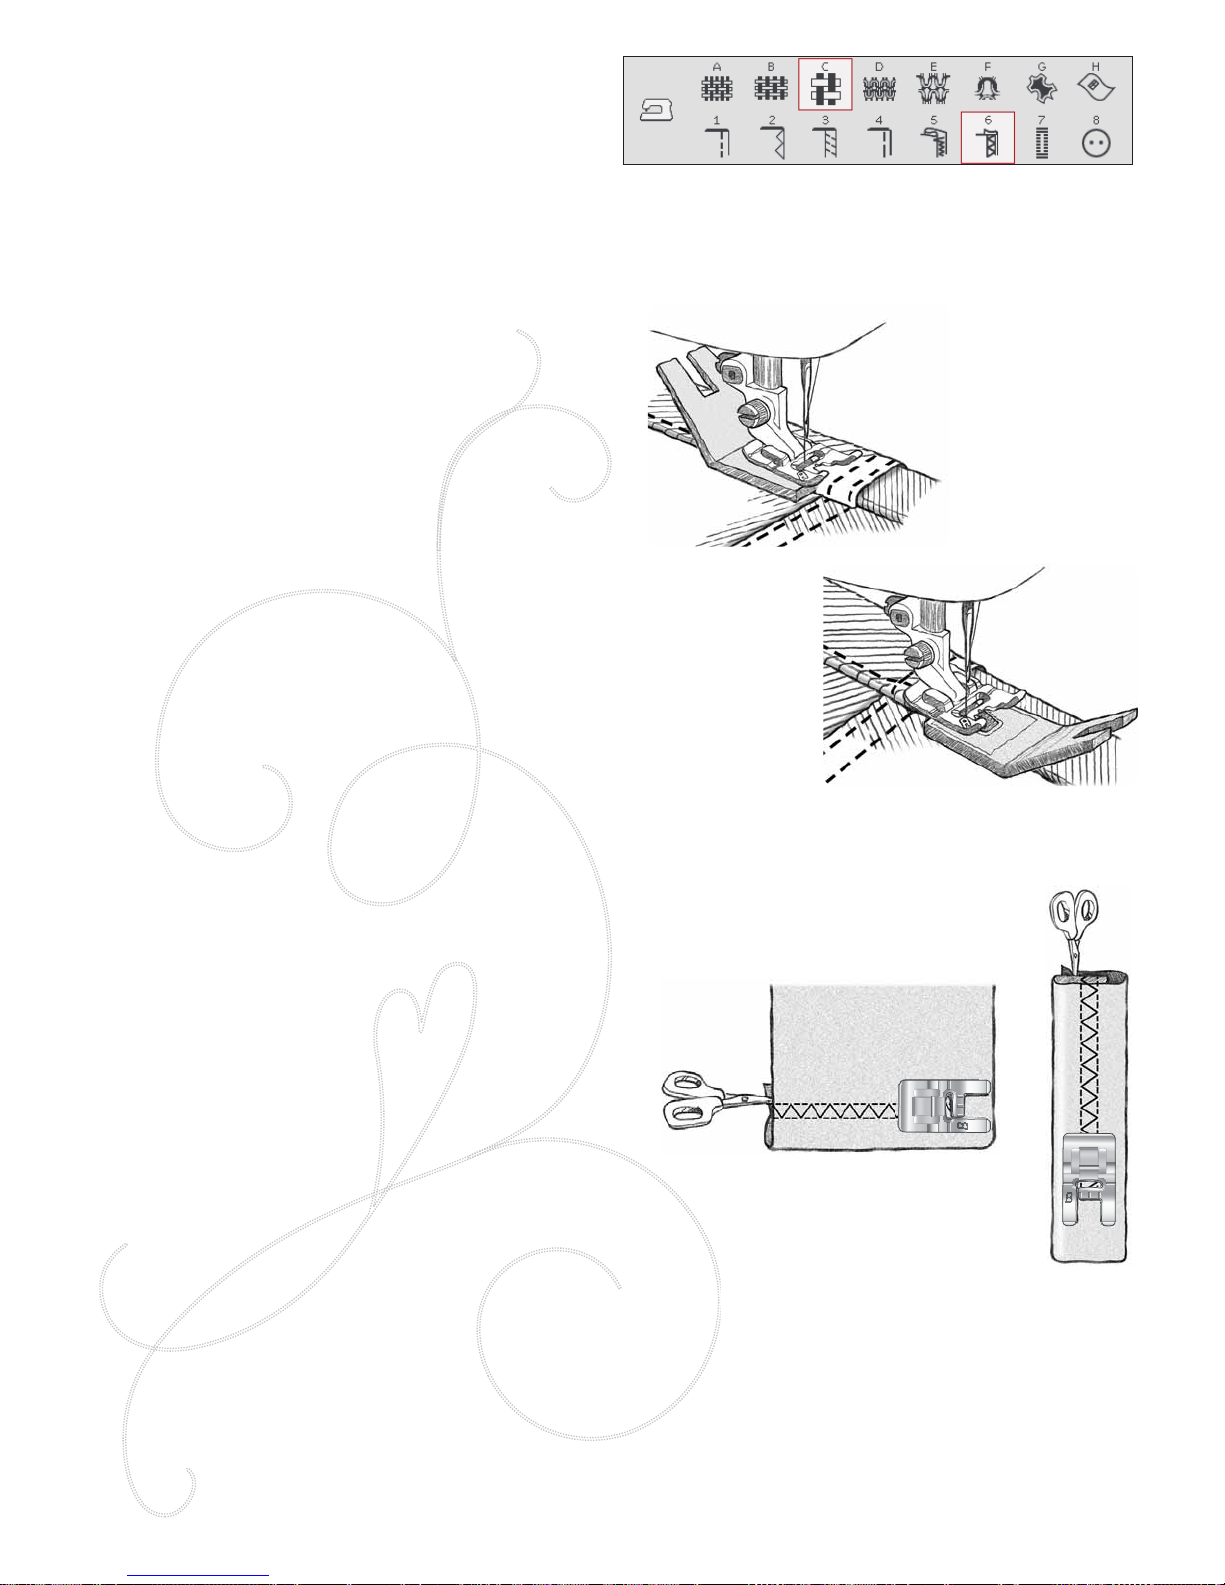
4:12
1.
2.
7
7
Flatlock stitch to hem
stretch fabric and for belt loops
HEM
The Hem technique on your Exclusive SEWING
ADVISOR™ feature will select the visible or topstitch
hem that is best for your fabric weight and type. For woven
fabric and leather and vinyl, a straight stitch is selected. For
stretch fabrics, stitches that stretch are selected.
Jeans Hem
When sewing over seams in extra heavy fabric or a blue
jeans hem, the foot can tip as it rides over the seam.
The needle can hit the tipped foot and break. Use the
multipurpose tool to balance the height of the hem as you
sew.
FABRIC: Denim fabric.
SELECT: Woven heavy and Hem.
USE: Presser foot B as recommended and size 80 jeans
needle.
Touch needle up/down to select the needle down position.
Begin sewing the bottom hem at or near the center back.
As you near the side seam, stop sewing. Your machine stops
with the needle in the fabric and raises the presser foot.
Insert the multipurpose tool from behind.
Both sides of the multipurpose tool are raised. Use the side
which corresponds closest to the thickness of the seam.
Step on the foot control to lower the presser foot and
continue sewing slowly over the thick seam.
Stop sewing again just in front of the seam (notice how the
needle is in the fabric). Remove the multipurpose tool and
re-insert it under the presser foot from the front.
Sew a few stitches until the whole presser foot has passed
the seam and is resting on the multipurpose tool. Stop
sewing once again. The needle is in the fabric, and the
presser foot lifts. Remove the multipurpose tool. Continue
sewing the hem.
Stretch Hem
Select Stretch Medium and the Exclusive SEWING
ADVISOR™ feature selects a Á atlock stitch. Follo w other
recommendations given on the Interactive Color Touch
Screen.
Fold a hem to the wrong side and stitch with Á atlock
stitch from the right side. Trim away excess fabric. Use this
technique for belt loops too.
Page 55
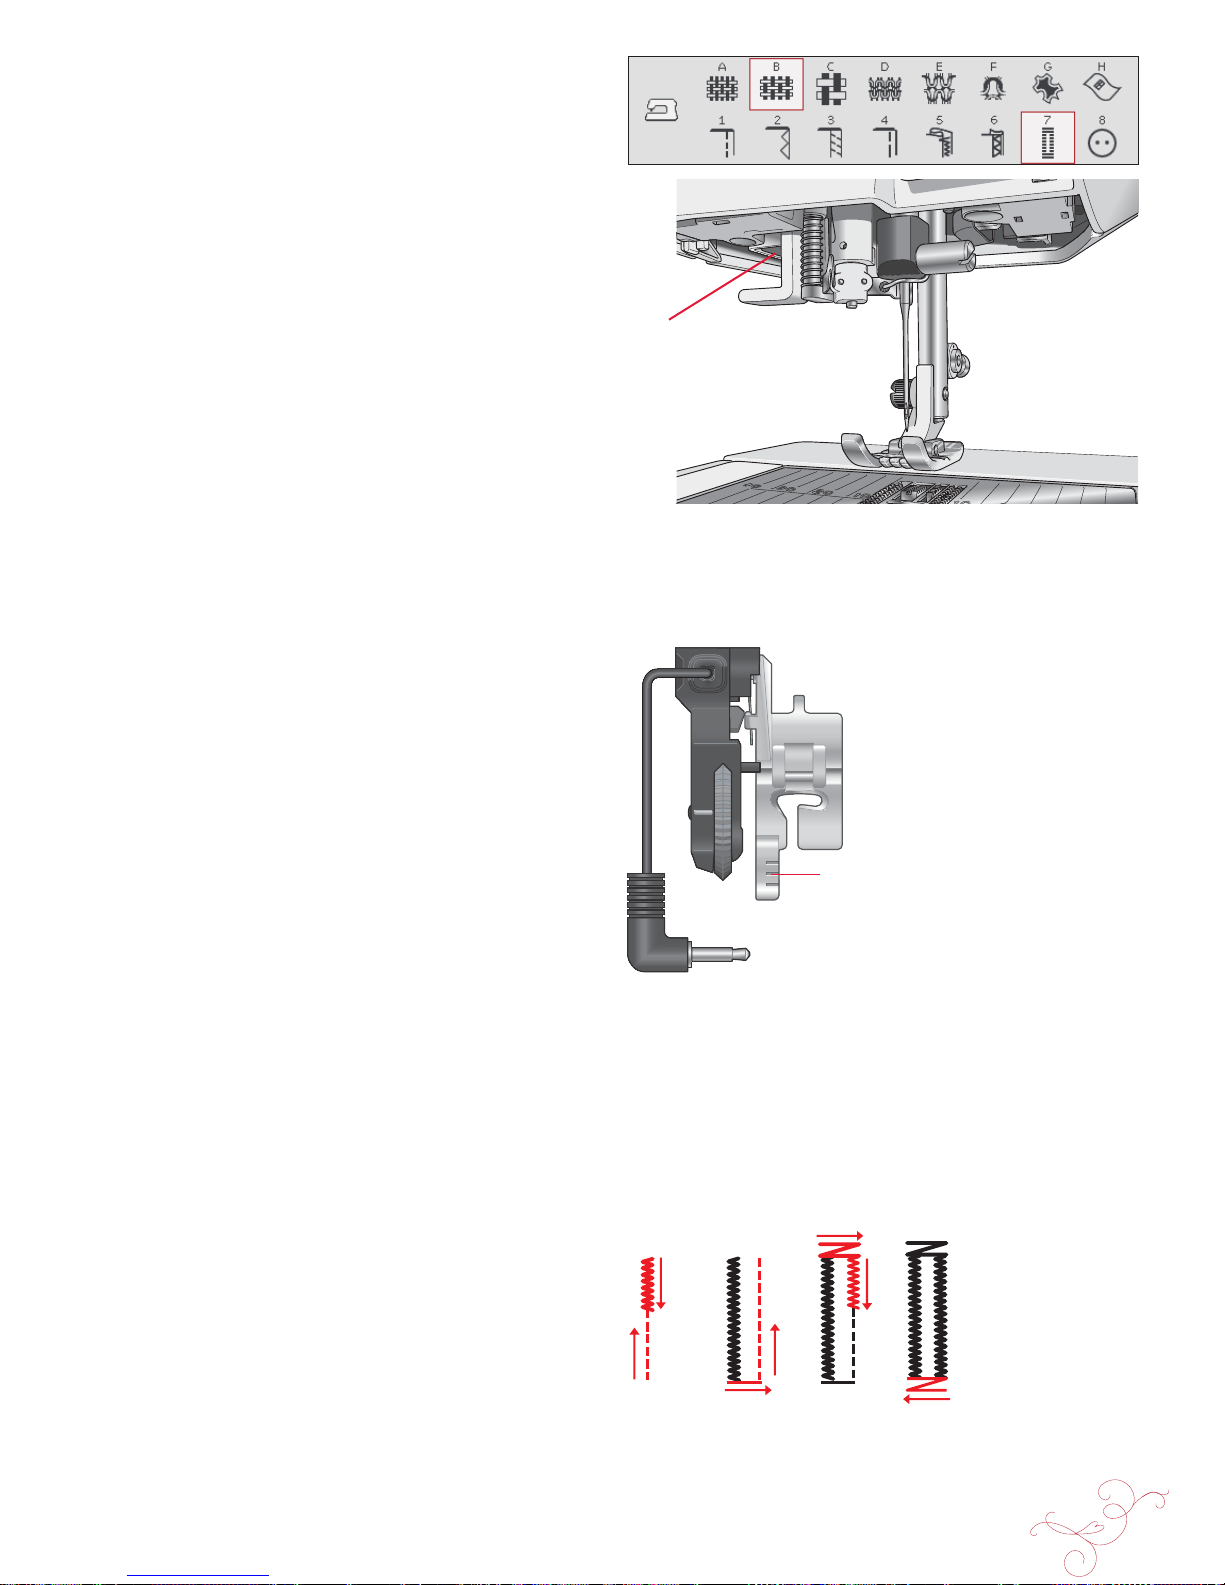
SEWING 4:13
PERFECTLY BALANCED SENSOR
ONE-STEP BUTTONHOLE
The Exclusive SEWING ADVISOR™ feature will select
the best buttonhole and stitch settings for your fabric.
Fabric should be interfaced and/or stabilized where
buttonholes are to be sewn.
You can also select your buttonhole directly from the
Buttonhole Menu B.
FABRIC: Woven medium and stabilizer.
SELECT: Woven medium fabric and Buttonhole.
USE: Size 80 needle as recommended.
1. Snap on the Sensor One-Step Buttonhole Foot.
2. Plug the cord into the socket (A) to the left above the
needle area.
3. Place your button on the buttonhole ruler on the
baseplate.
4. Set the size of the button in mm on your screen.
Before sewing, line up the white area on the side of the
wheel with the white marking line on the foot.
When sewing, your machine automatically sews the
buttonhole long enough to À t the selected button size.
The buttonhole size needed will vary with the thickness and
style of your button. Always stitch a sample buttonhole on
scrap fabric À rst.
Note: For woven heavy and leather, the Exclusive SEWING
ADVISOR™ feature selects buttonholes that should not be sewn
with the Sensor One-Step Buttonhole Foot.
Sew the Buttonhole:
• Fold fabric in two and place stabilizer underneath.
Mark the buttonhole placement on your fabric with
your Pictogram Pen. Set the length of the buttonhole.
• Place fabric under Sensor One-Step Buttonhole Foot.
The measurement wheel can be raised by lifting it,
which makes it easier to place the fabric under the
presser foot.
Note: Use the markings on the left toe of the Sensor One-Step
Buttonhole Foot to position the garment edge. Place the edge of the
garment at the middle mark to have 5/8’’ (15 mm) from the edge to
the buttonhole.
• Step on the foot control. The Sensor One-Step
Buttonhole Foot lowers automatically. A straight stitch
is sewn away from you stabilizing the left buttonhole
column, then the satin column is sewn toward you.
This is repeated for the right column. The bartacks are
automatic (see illustration 1). Keep the foot control
depressed until the Selective Thread Cutter cuts the
threads and the Sensor One-Step Buttonhole Foot is
raised.
Place fabric edge here to place
buttonhole 5/8'' (15 mm) from edge
Sensor One-Step
Buttonhole Foot socket
A
1. Sewing direction for satin stitch buttonholes sewn with
the Sensor One-Step Buttonhole Foot
Page 56
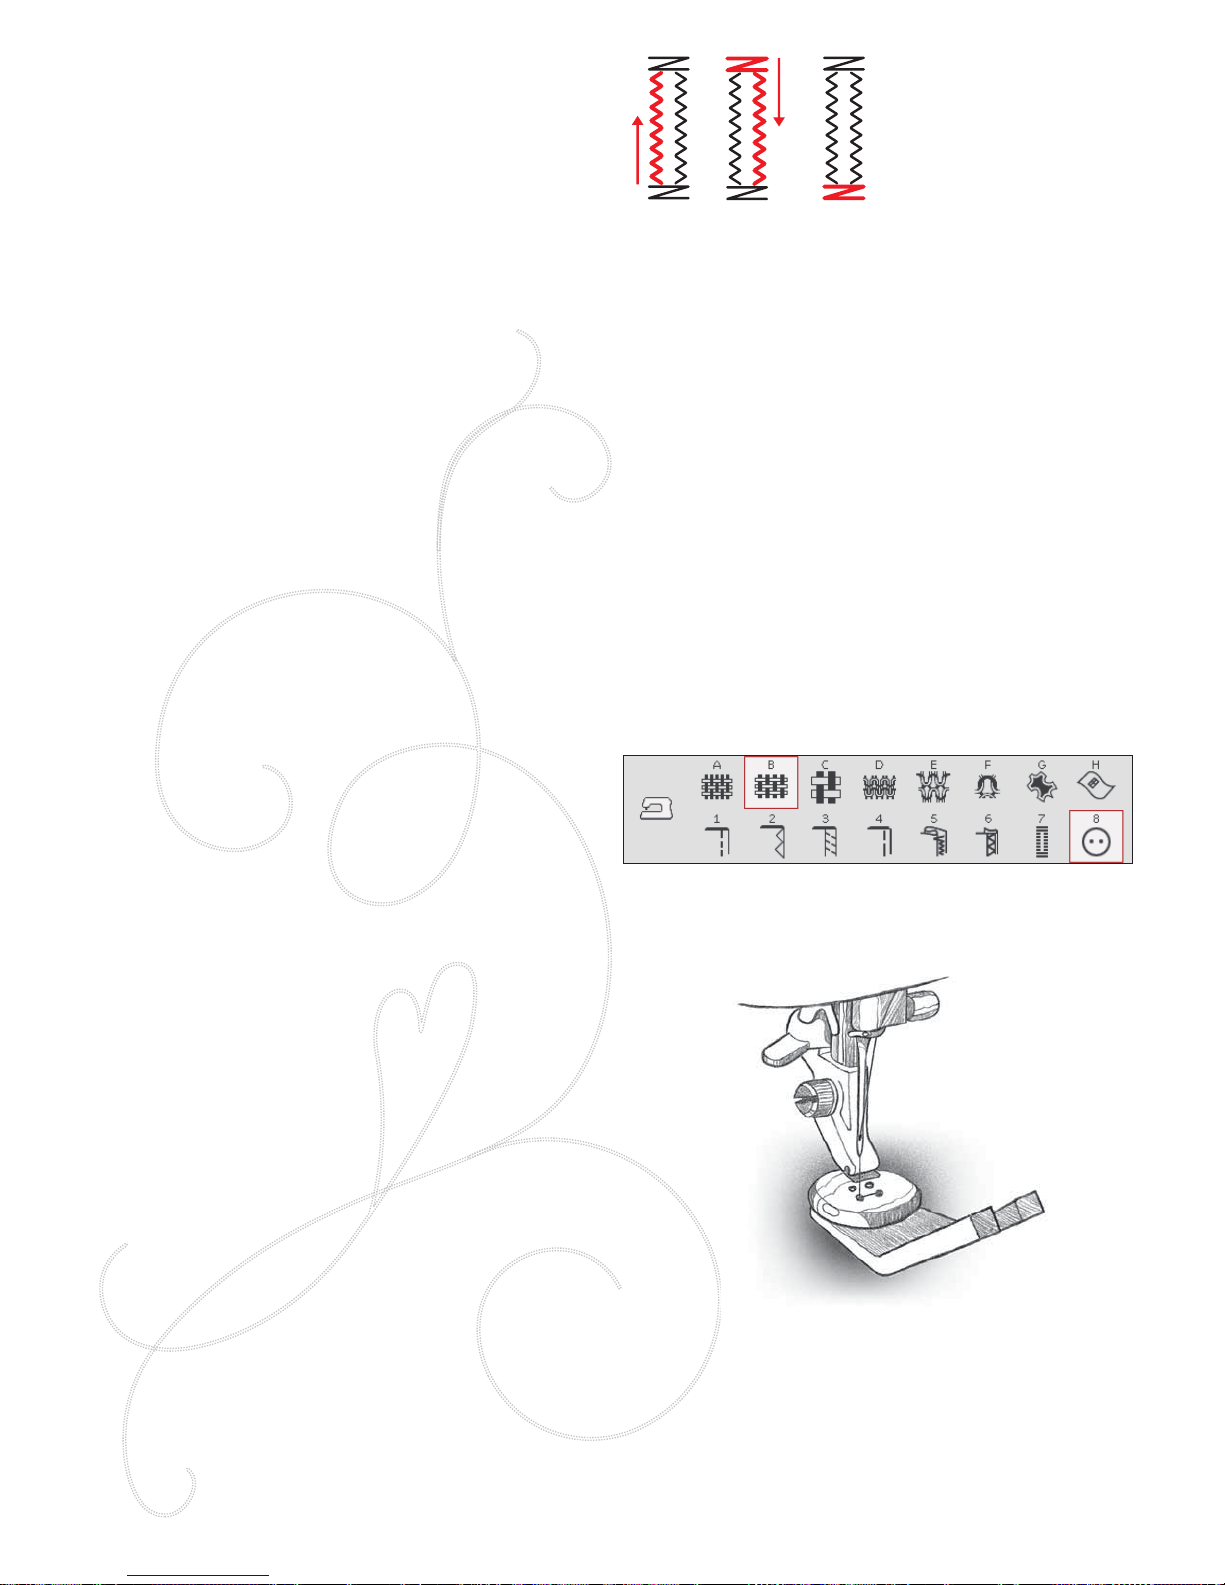
4:14
2. Sewing direction for buttonholes without satin stitches or
satin stitch buttonholes sewn with presser foot C
When sewing buttonholes without satin stitches or when
using presser foot C, the sewing steps are different (there is
no straight stitch step). See illustration 2.
Note: If you are sewing buttonholes in a very narrow area, snap
on the standard foot C and sew your buttonhole according to the
instructions below.
MANUAL BUTTONHOLE
To sew a manual buttonhole, use buttonhole foot C.
• Sew the À rst column as long as you want the
buttonhole to be.
• Touch the reverse button. The machine sews the
bartack and the second column.
• When the columns are aligned, press the reverse
button to sew the second bartack.
EMBROIDERED BUTTONHOLE
Buttonholes can also be stitched out in an embroidery
hoop. See page 7:2.
PROGRAMMABLE BUTTON SEW ON
Sew buttons, snaps, hooks and eyes quickly with your
machine.
FABRIC: Woven medium.
SELECT: Woven medium and Button on the Exclusive
SEWING ADVISOR™ feature. The feed teeth are lowered
automatically.
USE: Size 80 needle and the multipurpose tool to create a
thread shank, as recommended. Snap off presser foot.
SEW:
• Place fabric, multipurpose tool and button under the
ankle with the holes in the button lined up with the
swing of the needle. Check the swing of the needle
using the mirror side-to-side button to be sure the
needle will not hit the button. Adjust stitch width if
needed. Bring the needle down into the hole of the
button.
• Set the number of stitches to sew on the button (see
page 4:6). 6-8 stitches is normal.
• The machine stitches the button and automatically ties
off.
Note: Place the thin end of the multipurpose tool under the button
when sewing on light fabrics. Use the thick end for heavier fabrics.
Hold in place on the fabric with transparent tape.
Note: The recommended width of 3.0 is set for most buttons. If you
sew a tiny button or a very large coat button, decrease (î) or increase
(+) the stitch width until the swing of the needle sews in the holes of
the button or snap.
Page 57
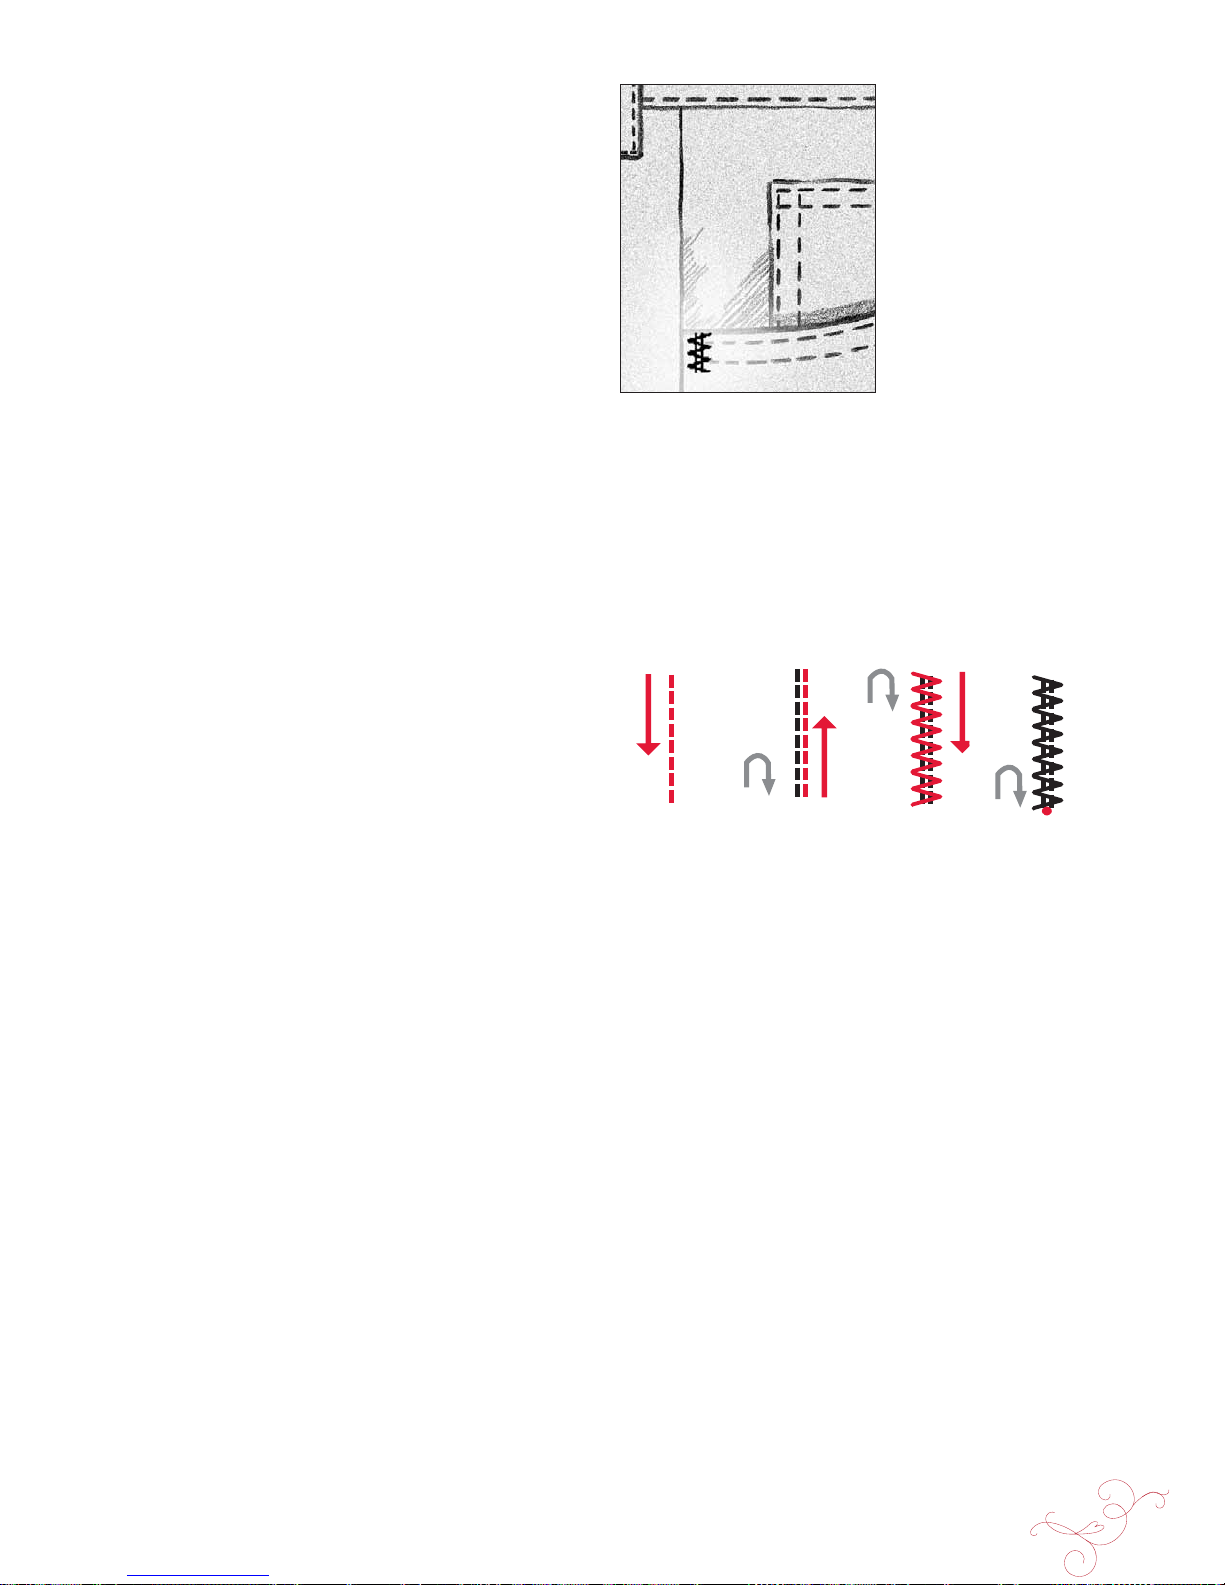
SEWING 4:15
1. 2. 3. 4.
BARTACKS
Secure elastic ends, drapery pleats, belt loops, and pocket
corners with the same look as ready-to-wear.
FABRIC: Woven heavy.
SELECT: Woven heavy, and stitch A2:29.
USE: Presser foot B and size 90 needle as recommended.
SEW:
• Place fabric under the presser foot.
• To lower the presser foot, step on the foot control and
stitch.
• Your machine will stop automatically when the bartack
is completed.
MANUAL BARTACK
Decide the length of your bartack manually with stitch
A2:33.
SEW:
Place fabric under the presser foot. Touch Sensor Foot
Down and Pivot twice and adjust the fabric if necessary.
Step on the foot control, the Sensor Foot lowers
automatically and stitch.
• Your machine will sew a straight stitch until you touch
Reverse .
• Your machine will then sew in reverse until you touch
reverse again.
• Your machine will then sew a zigzag, covering the
straight stitches.
• Touch reverse to automatically tie off and cut the
threads.
Page 58
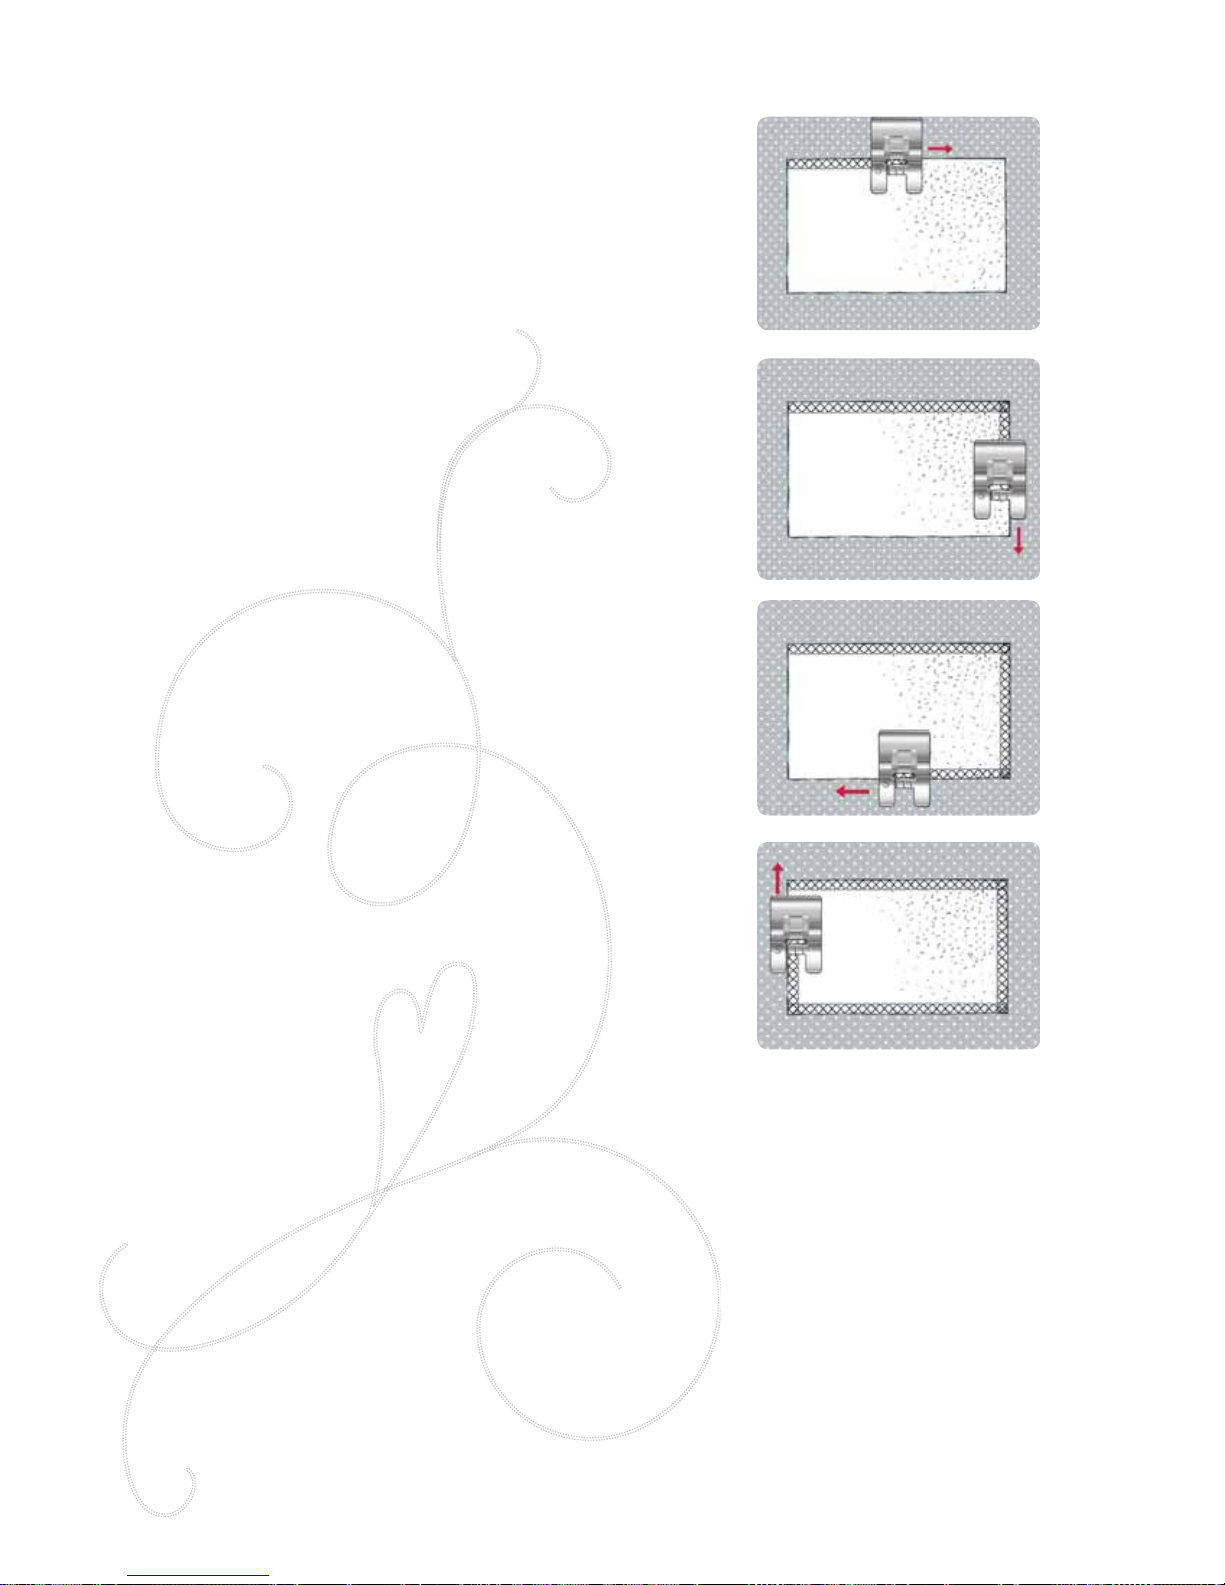
4:16
7
7
7
7
4-WAY STITCHES - MENU S
The 4-way mending stitch allows you to stitc h several sturdy
stitches in four different directions. You have a choice of
17 different 4-way stitches. You can select the one that is
perfect for the weight and type of fabric you are using. This
is especially helpful when patching trouser legs on a free
arm. The 4-way stitches are programmed at a À xed length
and stitch width.
FABRIC: Woven heavy, two pieces, one a patch.
SELECT: Woven heavy on your Exclusive SEWING
ADVISOR™ feature, menu S - 4-way stitches, stitch S1:8.
USE: presser foot S and size 80 needle as recommended.
SEW:
• Place the patch on the larger fabric in position un der
the pres ser foot. The sewing machine will start to sew
across the top of the patch from the top left corner as
shown on the screen.
• Touch reverse or the 4 Direction Sewing icon and
adjust fabric if necessary. Step on the foot control. The
presser foot lowers automatically.
• Sew across the top and touch the 4-way sym bol or
the reverse button to change sewing direction. The
direction of the stitch on the screen will change.
• Sew down the side of the patch. Continue sewing
aro und the patch, touching the 4-way icon or the
reverse button to change sewing direction.
• Touch the Selective Thread Cutter button.
Note: Depending on which stitch you are using, the corners may be
irregular if changing sewing direction without completing the stitch
À rst. To sew beautiful corners with 4-way stitches, press the STOP
button before changing sewing direction. This will complete the current
stitch before changing direction.
Page 59
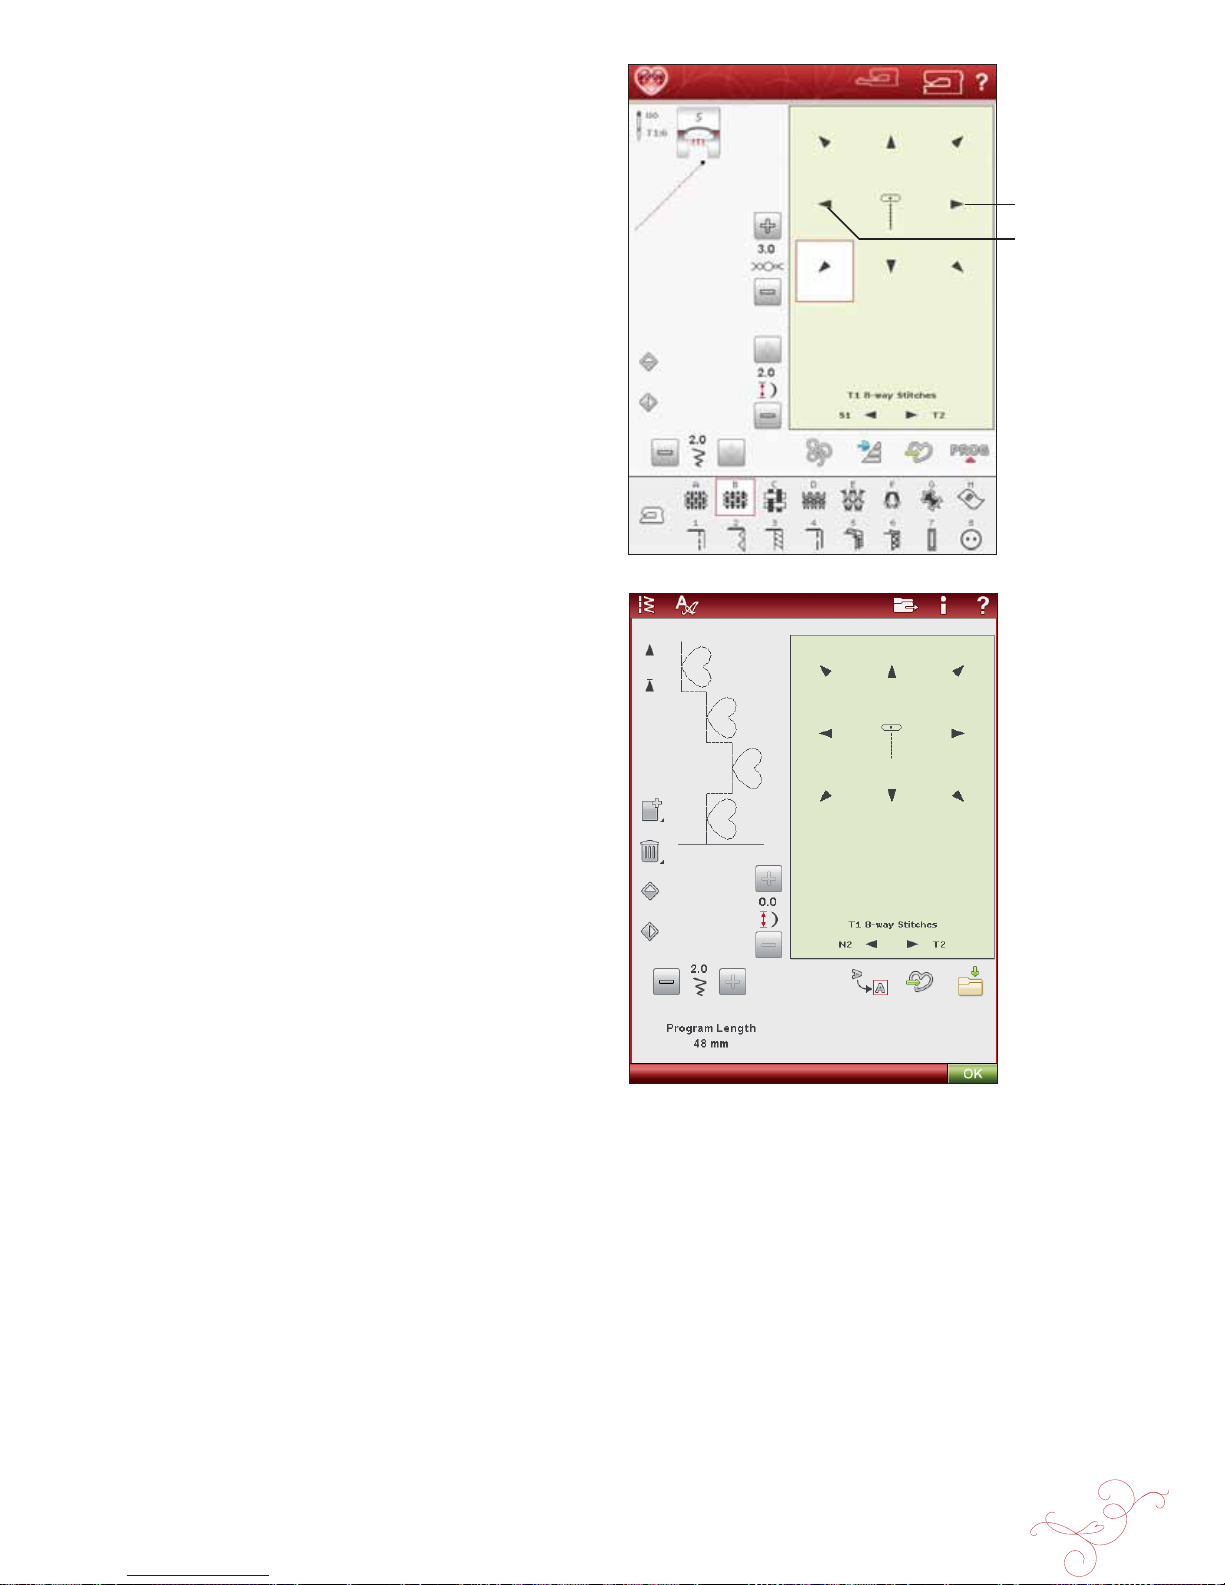
SEWING 4:17
8-WAY STITCHES – MENU T
There are two different stitches, straight and reinforced
straight stitch, in the T menu. Touch the arrows to select
one of the pre-set sewing directions. To À ne tune the
direction of the stitch, use the stitch width and stitch length
icons.
Note: The stitch length and width icons no longer adjust the length
and width of the stitch. In menu T, these icons change the sewing
direction of the stitch.
Program these stitches alone or with decorative stitches
from other menus to create unique stitches or borders.
FABRIC: Woven medium and stabilizer.
SELECT: Woven medium on your Exclusive SEWING
ADVISOR™ feature, menu T - 8-way stitches.
USE: Thread the top thread with embroidery thread, and use
bobbin thread for the bobbin: Use presser foot B and size
80 needle as recommended.
SEW:
• Touch the Program icon.
• Select stitch G1:4.
• Select T1 and click three times on the straight stitch to
the right.
• Select stitch G1:4.
• Select T1 and click three times on the straight stitch to
the right.
• Select stitch G1:4.
• Select T1 and click three times on the straight stitch to
the left.
• Select stitch G1:4.
• Select T1 and click three times on the straight stitch to
the left.
• Touch OK.
• Place the fabric and stabilizer in position under the
presser foot. Press the foot control to lower the
presser foot and start sewing your programmed stitch.
Straight stitch left
Straight stitch
right
Page 60
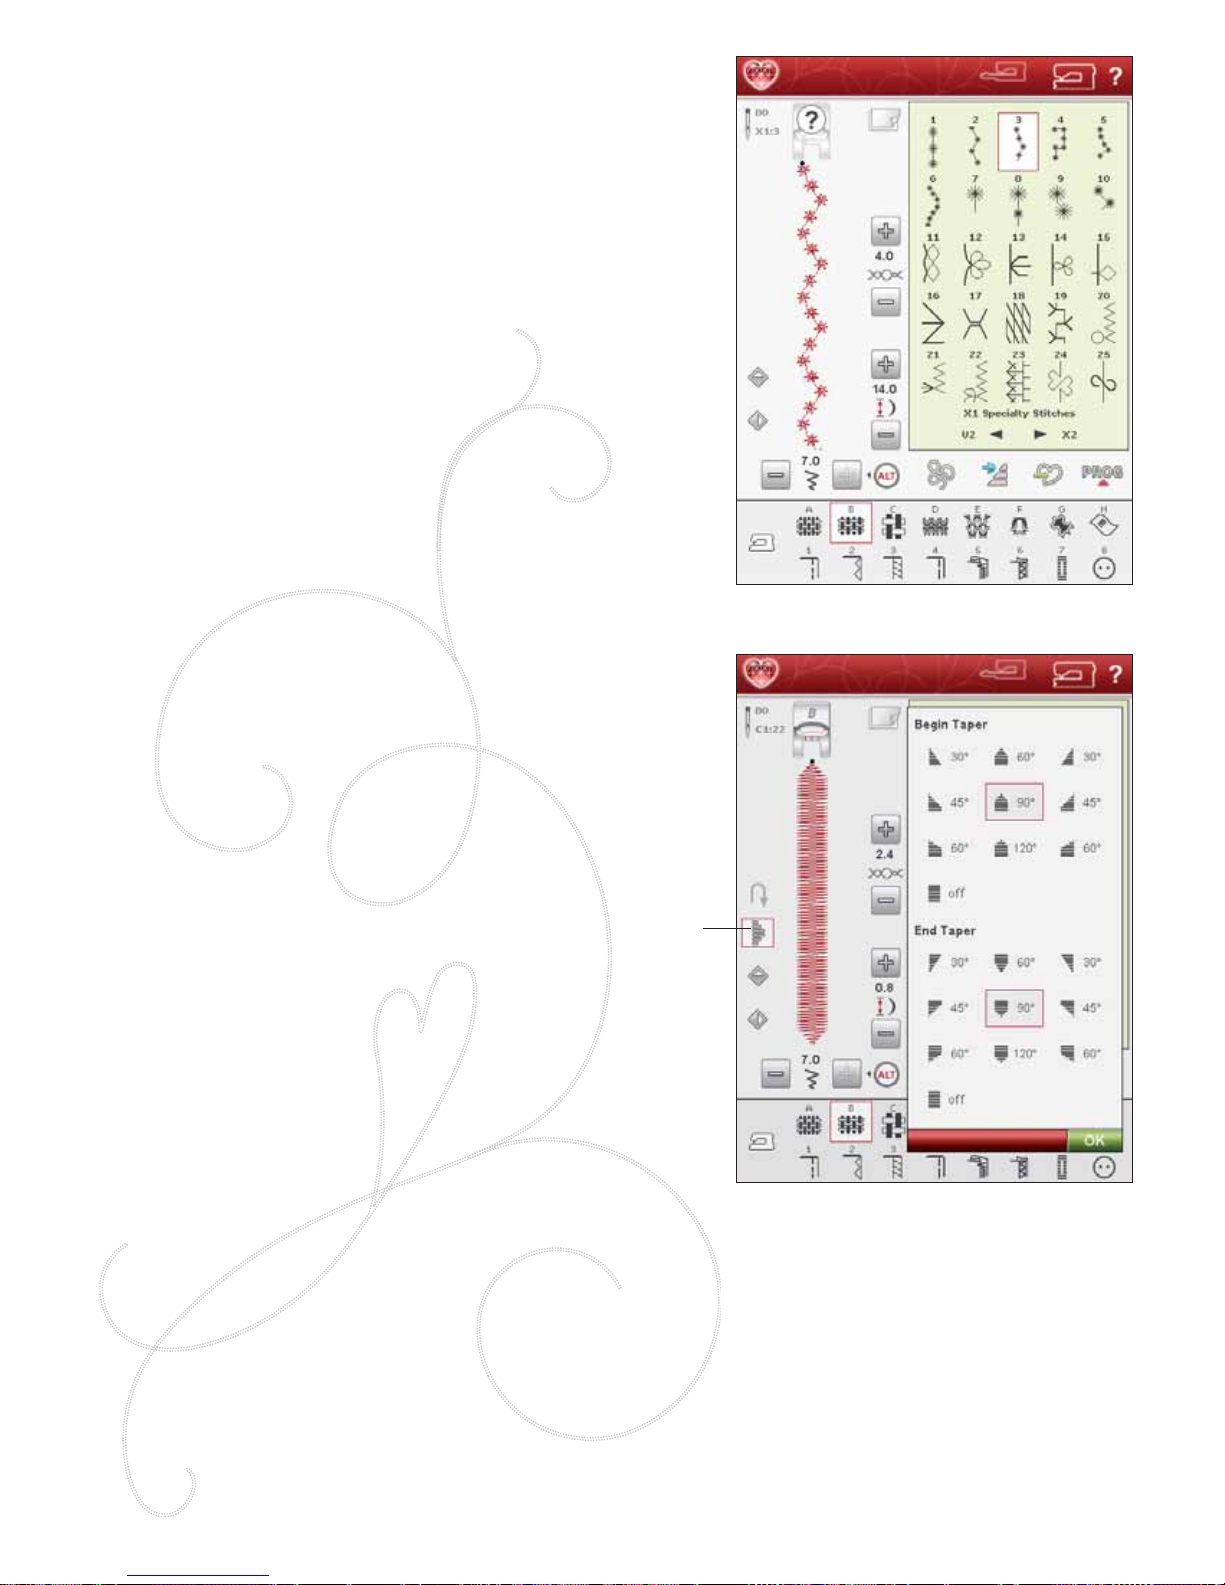
4:18
SPECIAL SEWING TECHNIQUES
The stitch menu X- Specialty Stitches, includes special
sewing technique stitches like candlewicking and edge
stitches. These techniques may require some special presser
feet and accessories. This is indicated by the optional
presser foot icon.
Note: Use the Quick Help to À nd detailed information for each stitch.
TAPER SATIN STITCH
The taper stitch automatically tapers the satin stitch for
corners and points and can be used for satin stitch lettering.
Stitch a diamond of tapered satin stitch on a piece of
stabilized fabric.
SELECT: Menu C, Pictogram Stitches, choose stitch C1:22
USE: Presser Foot B, as recommended.
SEW: The stitch will automatically taper from a point to the
1/4” (6 mm) satin stitch width.
• If you want to change to another angle, touch the
tapering icon. Choose what sort of beginning and end
you wish to have on your stitch.
Note: For narrower satin stitch, adjust the stitch width.
• Start sewing. The machine will sew the tapered point
and then continue with a satin stitch at the selected
width. When the satin is as long as desired, touch the
reverse button. This will start the tapering of the end.
• Once the stitch is À nished, touch the Selective Thread
Cutter button.
• Touch the STOP button to repeat sewing the same
tapered satin stitch automatically.
DECORA TIVE T APERING STITCHES
Menu Z includes decorative stitches that can be tapered.
Touch the tapering icon to change angle. The machine will
sew the beginning tapered point and then continue with the
selected stitch. When it has sewn the desired length, touch
the reverse button. The stitch will taper to the end.
Tapering off
Choose Taper ”off” if you don’t want Tapering at the
beginning or end of the stitch. If you select Taper ”off”
on both the beginning and end then the stitch will be a
regular stitch without tapering.
Tapering
icon
Page 61
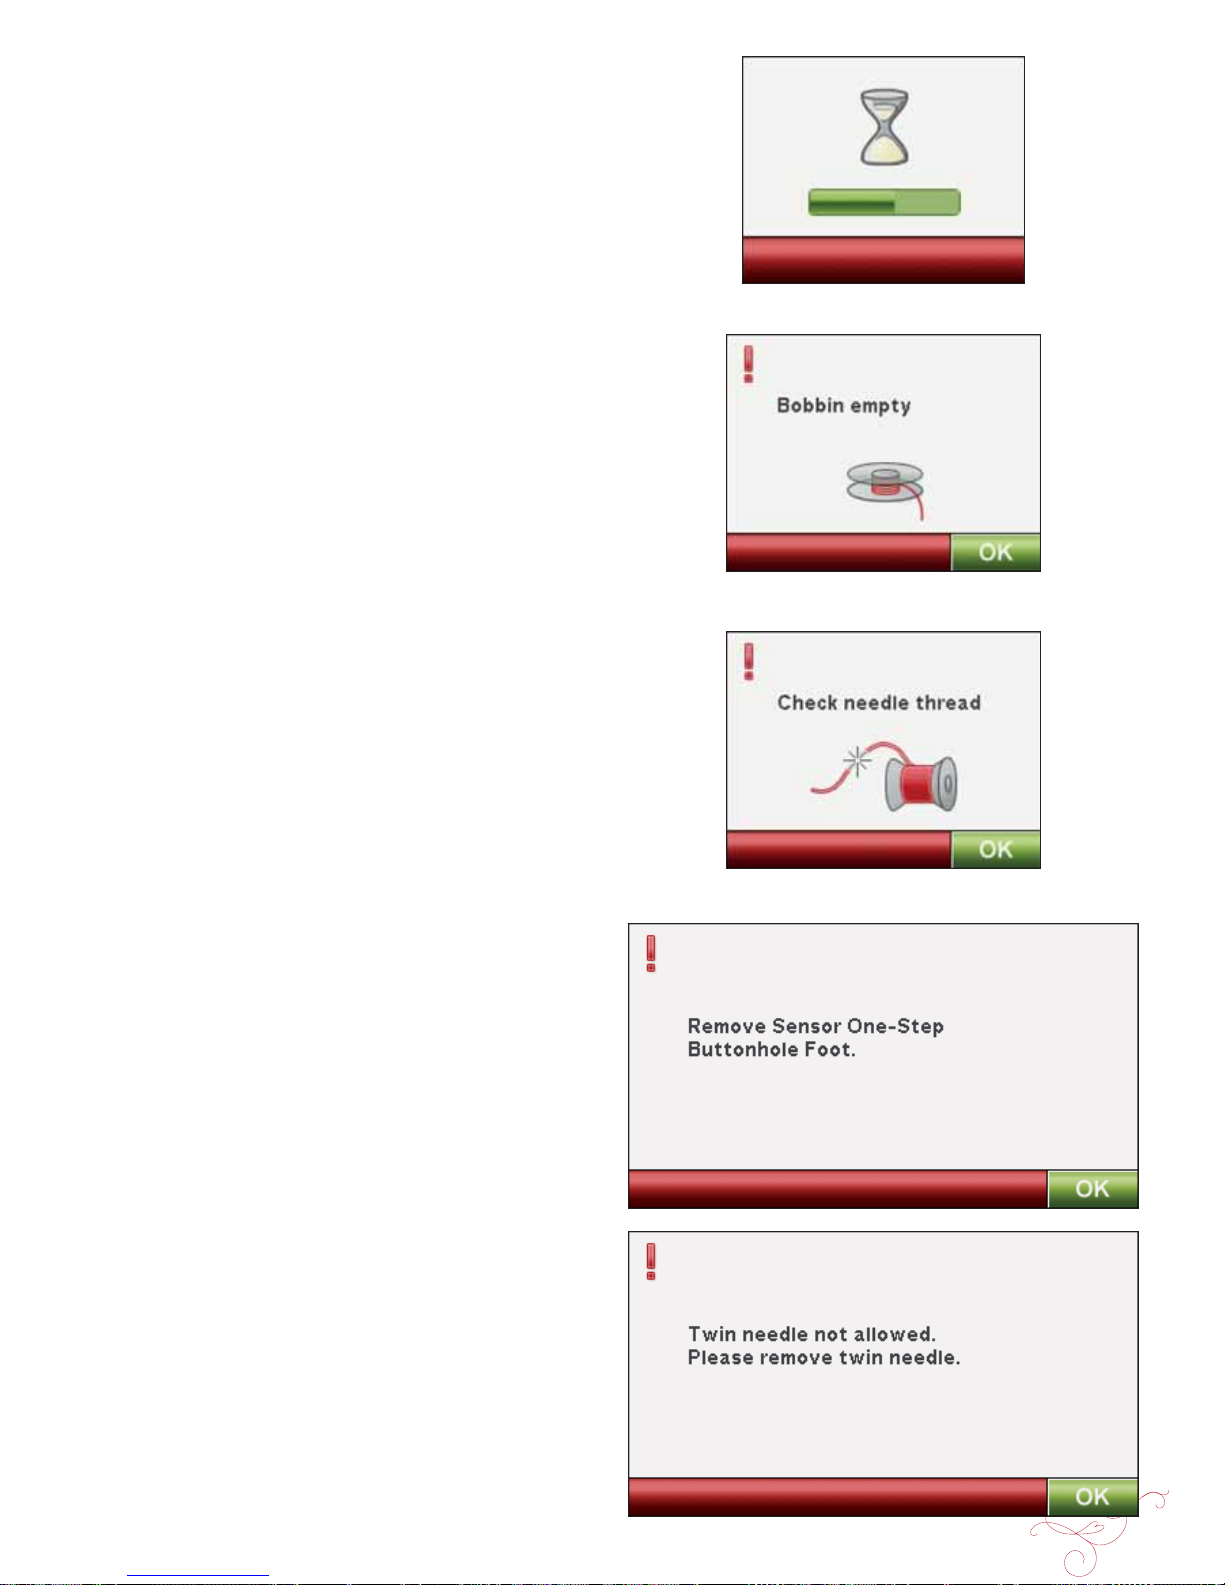
SEWING 4:19
SEWING POP-UP MESSAGES
System Busy
An hour glass is shown when the machine is loading,
saving, moving À les or anything that takes time.
Bobbin Empty
The machine stops automatically and a pop-up message
appears on the screen when the bobbin is almost empty.
Replace the empty bobbin with a full one.
Note: It is possible to sew until the thread has run out. Continue
sewing without closing the pop-up message.
Check Needle Thread
The machine stops automatically if the needle thread runs
out or breaks. Re-thread the needle thread, close the popup message and start sewing again.
Remove Sensor One-Step Buttonhole Foot
The Sensor One-Step buttonhole foot is used only for
buttonholes. A pop-up message will advise you to remove it
for all other sewing.
Twin Needle
The following pop-up message appears when you turn on
the machine and choose a stitch not suitable for twin needle
or you had the Twin Needle activated before turning the
machine off.
Page 62
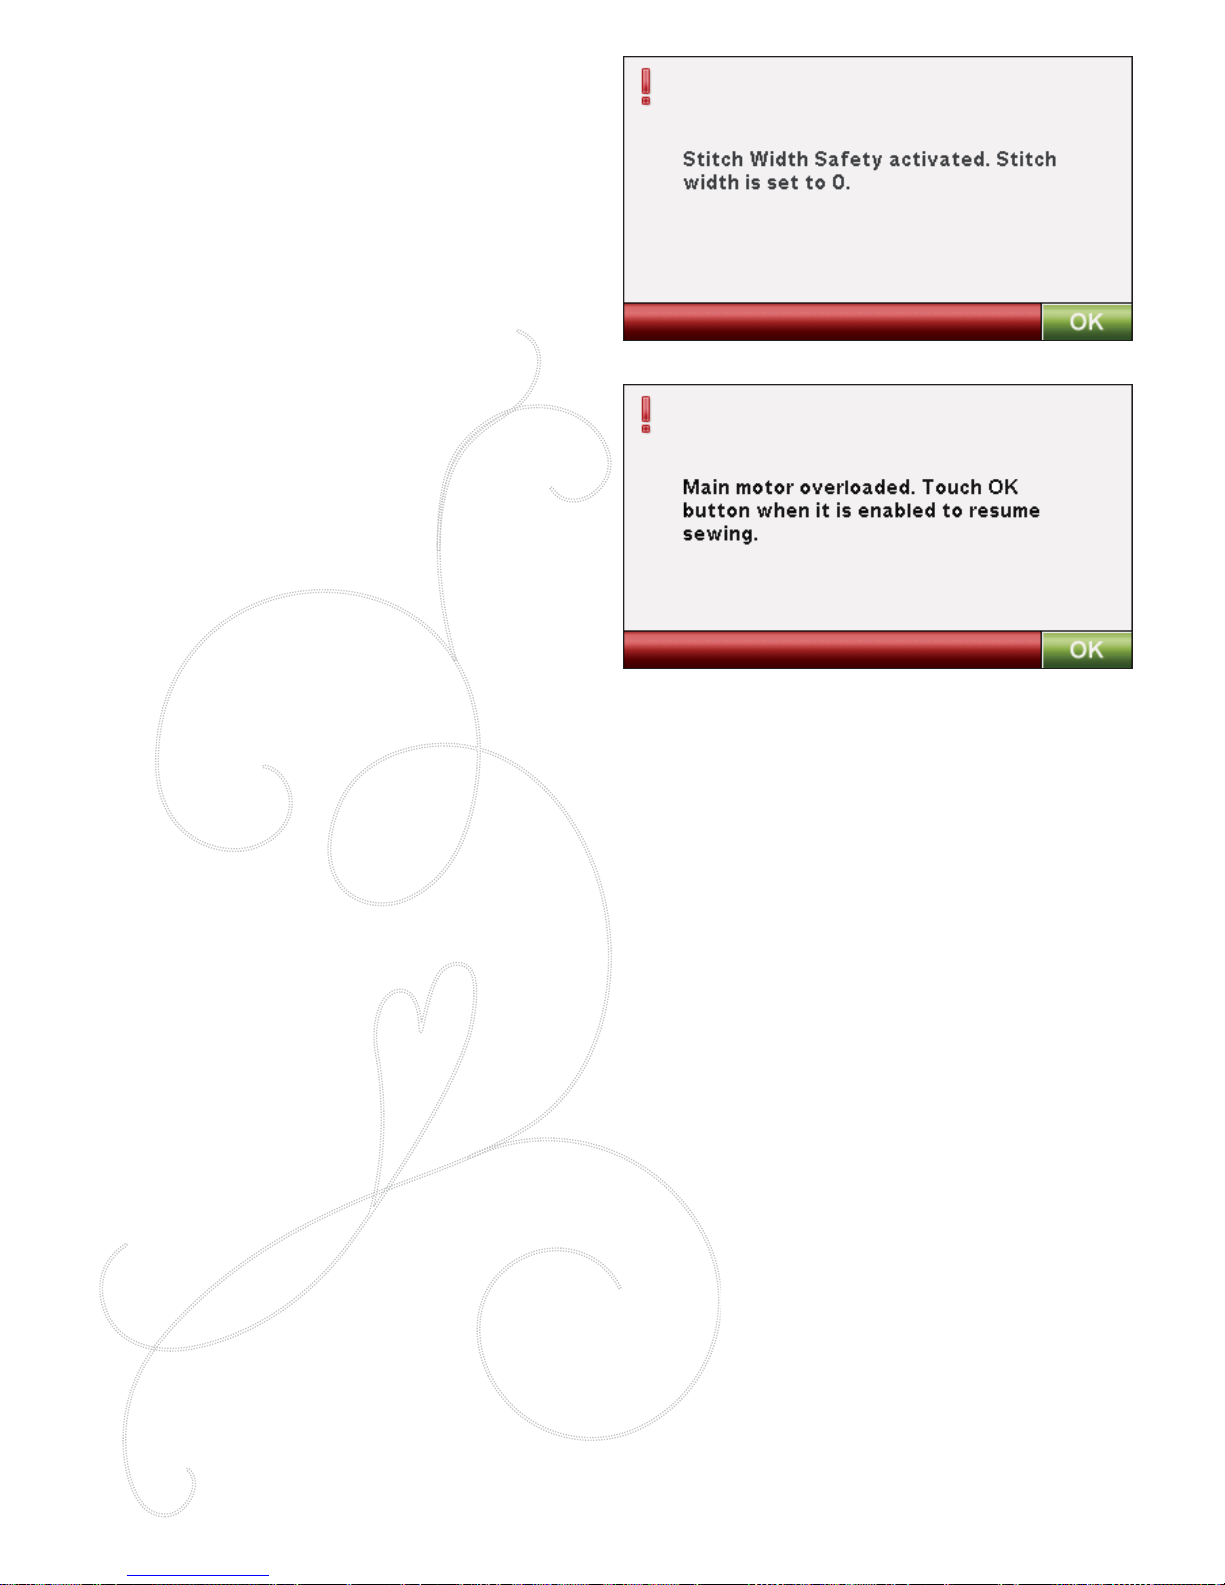
4:20
Stitch Width Safety
When Stitch Width Safety is activated, the following pop-up
message appears when you turn on the machine or choose
a stitch not suitable for Stitch Width Safety.
Main motor overloaded
If you are sewing on very heavy fabric or if the machine is
blocked when sewing, the main motor can get overloaded.
When the main motor and power supply are no longer
overloaded, the OK button will be enabled. Touch OK to
resume sewing.
Page 63
PROGRAM
5
Page 64
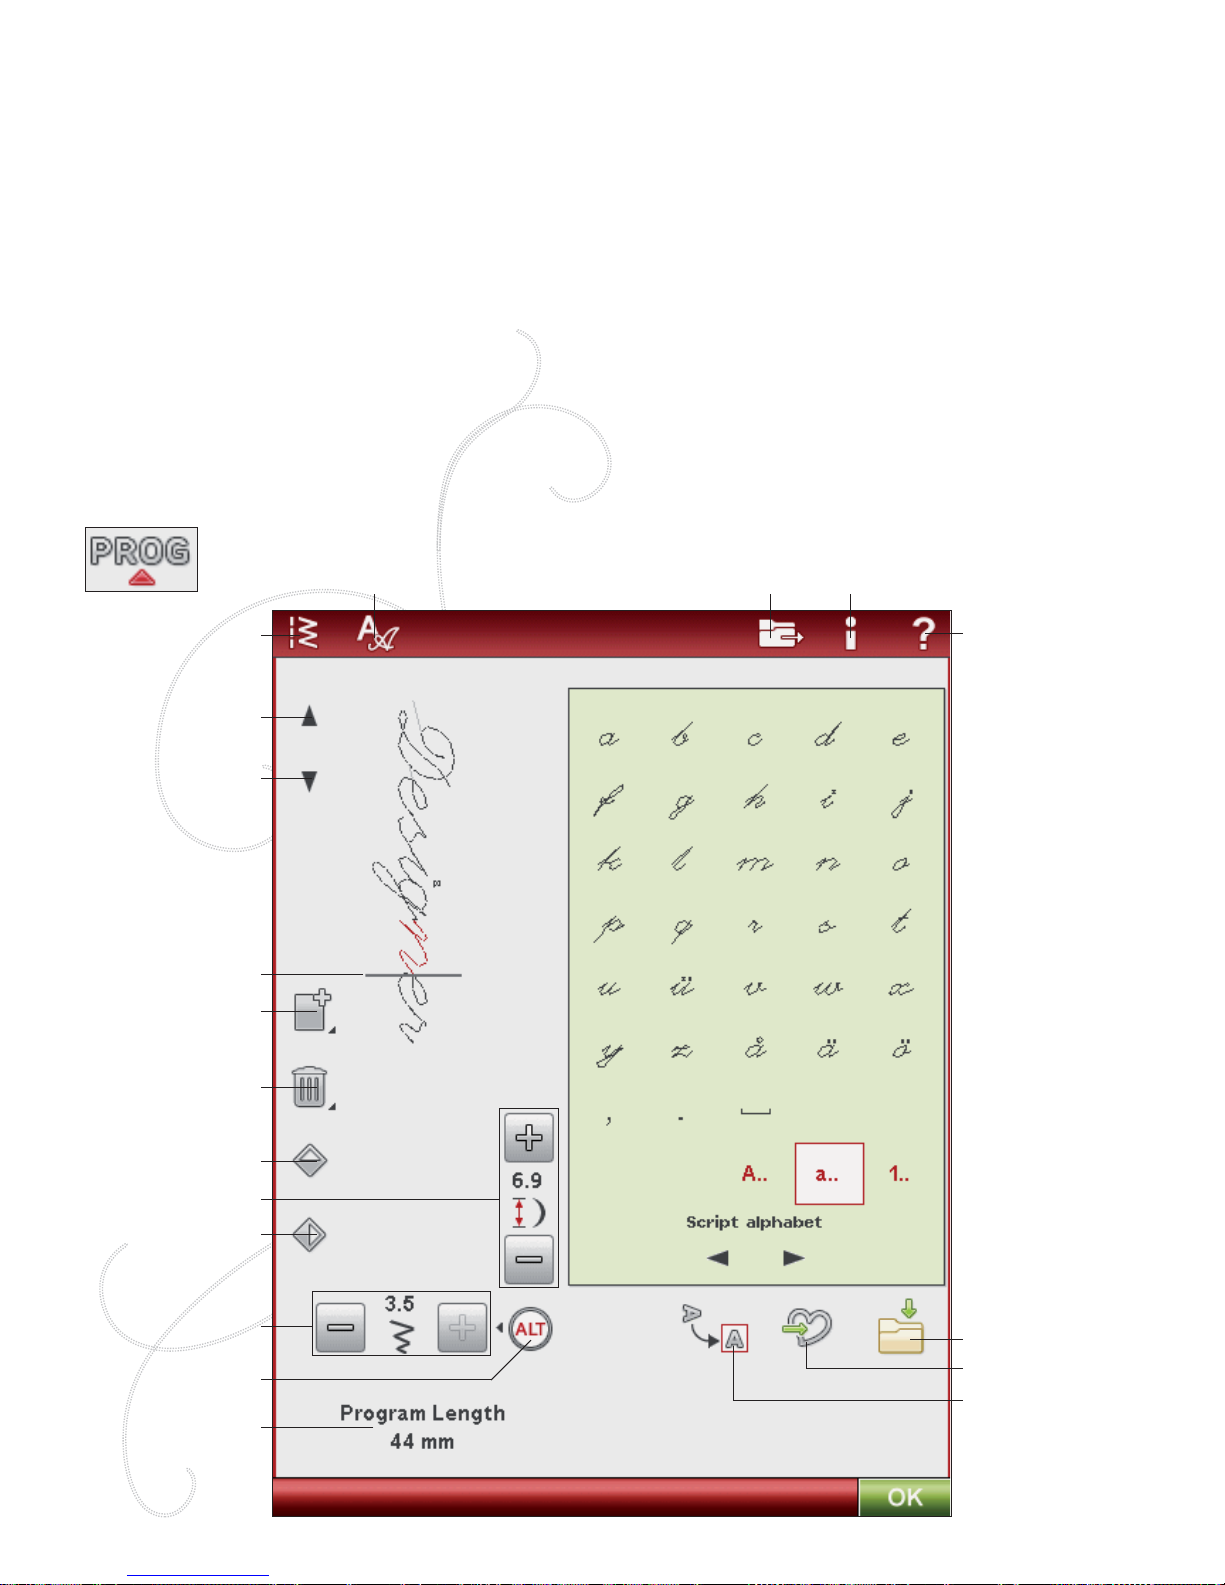
5:2
PROGRAM
You can combine stitches and/or letters and numbers to create stitch programs. Combine various decorative stitches and
stitch fonts from the machine or from an external device.
You can program stitches up to approximately 500mm (20”) long. You can see how long your actual stitch program is at
the bottom of the window.
IMPORTANT PROGRAM MODE INFORMATION
Program can be used in either Sewing Mode or Embroidery Mode. A stitch program created when Embroidery Mode is
active will become an embroidery design when saved and cannot be sewn as a stitch in Sewing Mode.
A stitch program created when Sewing Mode is active will not be available when opening Program mode after activating
Embroidery Mode and vice versa. The created stitch program will not be transferred to the other mode.
Note: If Sewing Mode is active and your stitch program is ready to be sewn, you can also close the active function by pressing the foot control, or
by pressing the Start/Stop button. Not all stitches are available to program. A pop-up message will notify you if you try to select an unavailable
stitch.
Note: A straight line at the point of the Scroll Up or Down icon indicates scroll to beginning or end.
PROGRAM - OVERVIEW OF ICONS
Stitch Menu
Font Menu Load from À le Information
Quick Help
Mirror End-to-End
Mirror Side-to-Side
Stitch Length
Stitch Width
ALT
Horizontal Preview
Save to My Stitches
Duplicate
Delete
Cursor
Scroll Down
Scroll Up
Program Length
Save to My Files
Page 65

PROGRAM 5:3
TO PROGRAM IN SEWING MODE
Enter the Program window, touch the PROG icon.•
Touch the Stitch or Font Menu to open the stitch or a font you wish to use. •
The active position is marked by a cursor and the selected stitch or letter will be marked in red. Inserted stitches will •
be placed at the cursor. Only the selected stitch can be adjusted. Move the cursor through the stitch program using the
scroll.
To close the Program window and sew your programmed stitch, touch the OK icon or just press the foot control.•
TO PROGRAM IN EMBROIDERY EDIT
To enter the Program mode in Embroidery Edit, touch the Start Menu icon to foldout the Extended toolbar.•
Touch the Stitch or Font Menu to open stitch menu or a font you wish to use. •
The active position is marked by a cursor and the selected stitch or letter will be marked in red. Inserted stitches will •
be placed at the cursor. Only the selected stitch can be adjusted. Move the cursor through the stitch program using the
arrows.
To close the Program window and embroider your Stitch program, touch the OK icon.•
To Edit a Programmed Stitch in Embroidery Edit
If you want to edit an already programmed stitch select the stitch and touch the Edit Stitch Program icon and you will
enter the Program window again.
Note: If you have selected tapering in the stitch program, it will be converted to a design when loaded to Embroidery Edit, and cannot be opened
for editing again.
EDIT YOUR STITCH OR LETTERING PROGRAM
Insert a Stitch or Letter
Move the cursor where you want to add a stitch or letter. Select the desired stitch you want to insert. It will be placed at the
cursor.
Adjust Text and Stitches
You can mirror, adjust length and width or change the density of the selected stitch, in the same way as when in Sewing
Mode.
Delete a Stitch or Letter
If you want to delete a stitch, move the cursor to the stitch you want to delete (the selected stitch will be red) and touch the
Delete icon. Use the Touch & Hold function to delete the entire program.
Duplicate a Stitch or Letter
To duplicate a stitch, move the cursor to the stitch you want to duplicate (the selected stitch will be red). Touch the
Duplicate icon to copy the selected stitch.
Note: Make your adjustments on the stitch before duplicating and the copied stitch includes the adjustments.
Use the Touch & Hold function to bring up a pop-up message where you can enter the exact number of copies you want
to insert.
Replace a Stitch or Letter
To replace a stitch, simply select it (using the arrows to select the stitch you wish to replace) and touch Delete. Insert the
new stitch. It will be placed at the cursor.
Zoom to All
If the stitch or stitch program is wider than what can be shown on the screen, you may use the Zoom to All
icon to see the entire width of the stitch program.
Note: Zoom to All is only visible if the stitch or stitch program is wider than the stitch À eld.
Page 66
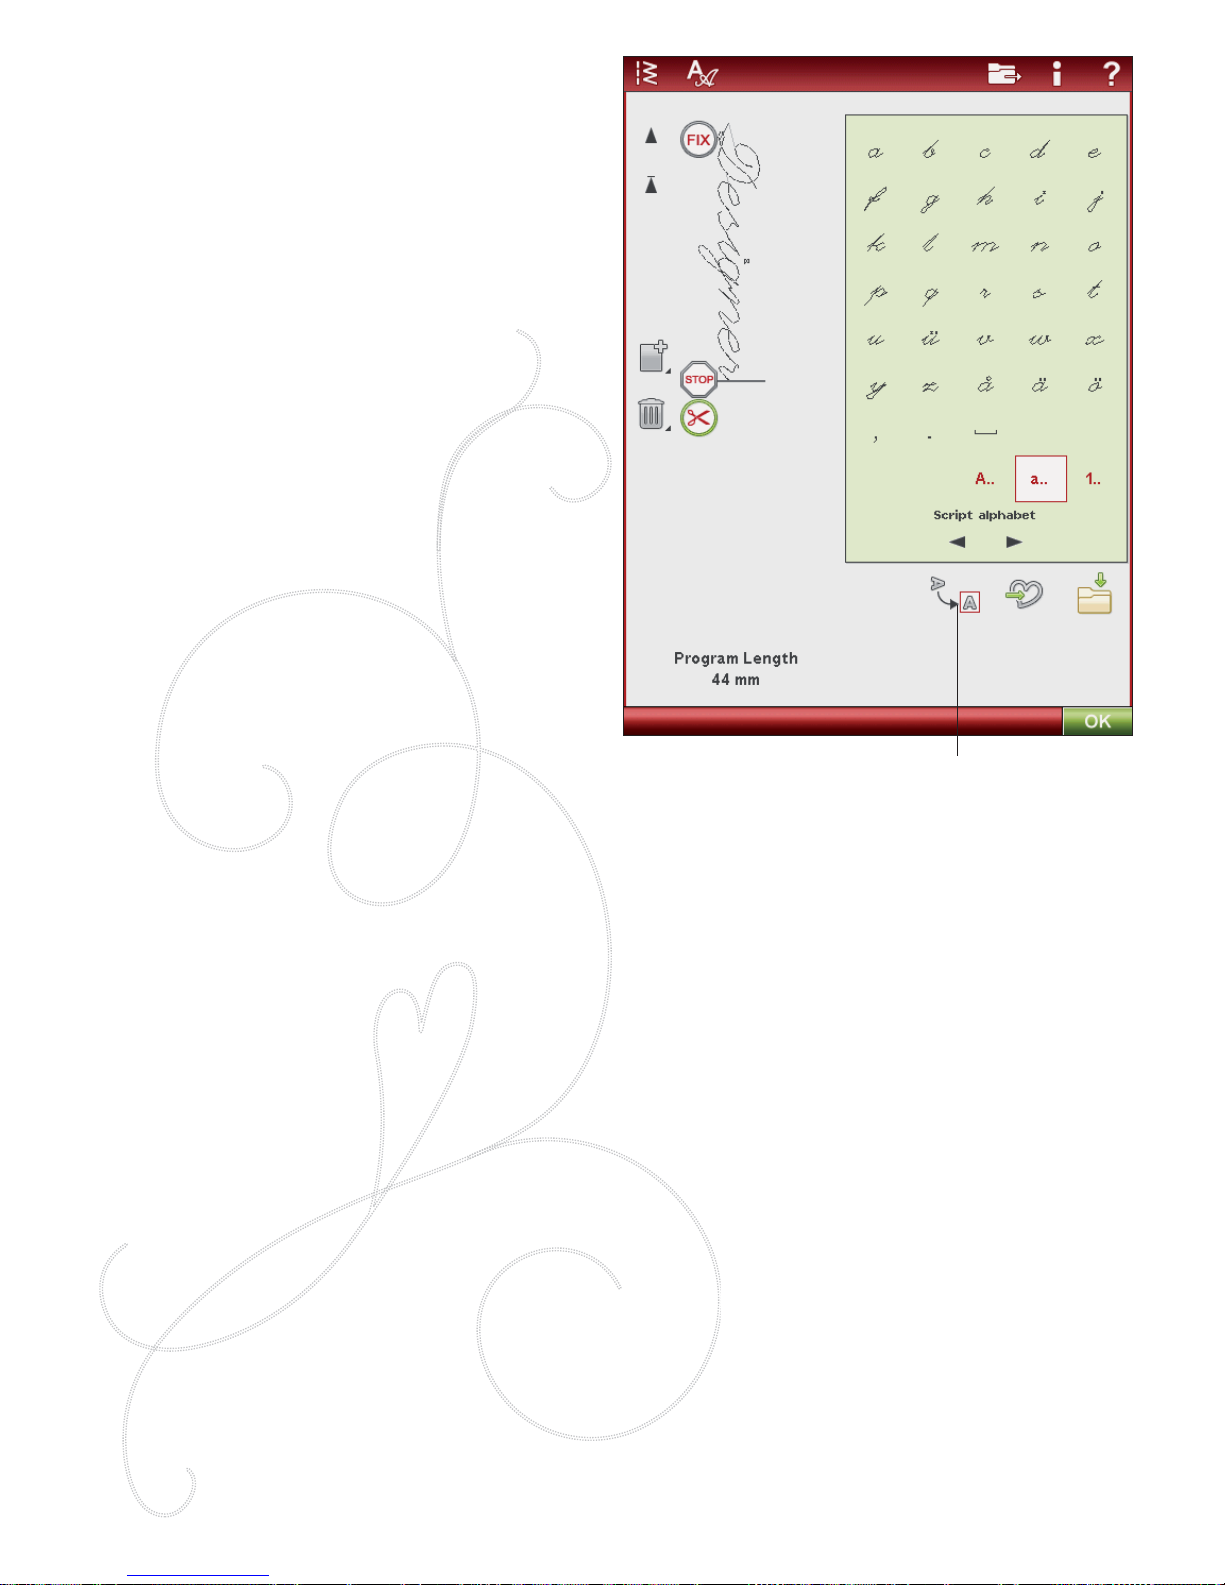
5:4
PREVIEW
View your stitch program horizontally by touching the
Preview icon. A pop-up displays your program in actual
size. If the program is too long to be shown in total, use
the cursor arrows to scroll through the program. To view
the whole program, touch the Zoom to All icon. Touch
OK to close the window.
ADJUST THE ENTIRE PROGRAM
To adjust the entire program, return to the stitch view by
touching the OK icon. Adjustments made here will affect
the whole program.
STITCH PROGRAM COMMANDS
You can insert FIX, STOP and thread cut commands into
the stitch program. These commands will be included in
the stitch program and will always be performed when
sewing it.
Note: If creating a stitch program in Embroidery Mode, tie-offs will
be added automatically at the beginning and end, allowing you to
create a stitch program in between. The commands can be removed.
Insert a STOP by touching the STOP button on your
machine, if you want the machine to stop at a certain place
in your programmed stitch. This is useful for example at
the end of the stitch program if you want to sew it only
once or to create a stitch program in several rows.
Insert the thread cut if you want the machine to tie-off and
cut the threads and raise the presser foot.
Move the cursor to the position where you want to add a
command. Touch the button and an icon will be added into
the programmed stitch. This conÀ rms that the command
is inserted and it also shows where the command will be
performed in the stitch program.
Note: The commands will appear on the screen in the order you
program them.
SEWING A STITCH PROGRAM
To sew the stitch program, return to Sewing Mode or
Embroidery Edit. Close Program mode by touching the
OK icon.
Adjustments made in Sewing Mode or Embroidery Mode
will affect the entire programmed stitch. However, these
changes will not be saved if you return to Program mode.
If you make changes while in Embroidery Edit, and you
save them, these changes will be saved as a design and can
only be edited again in Embroidery Edit.
However, you can always open a stitch program made in
Sewing Mode, in Embroidery Mode.
Preview
Page 67
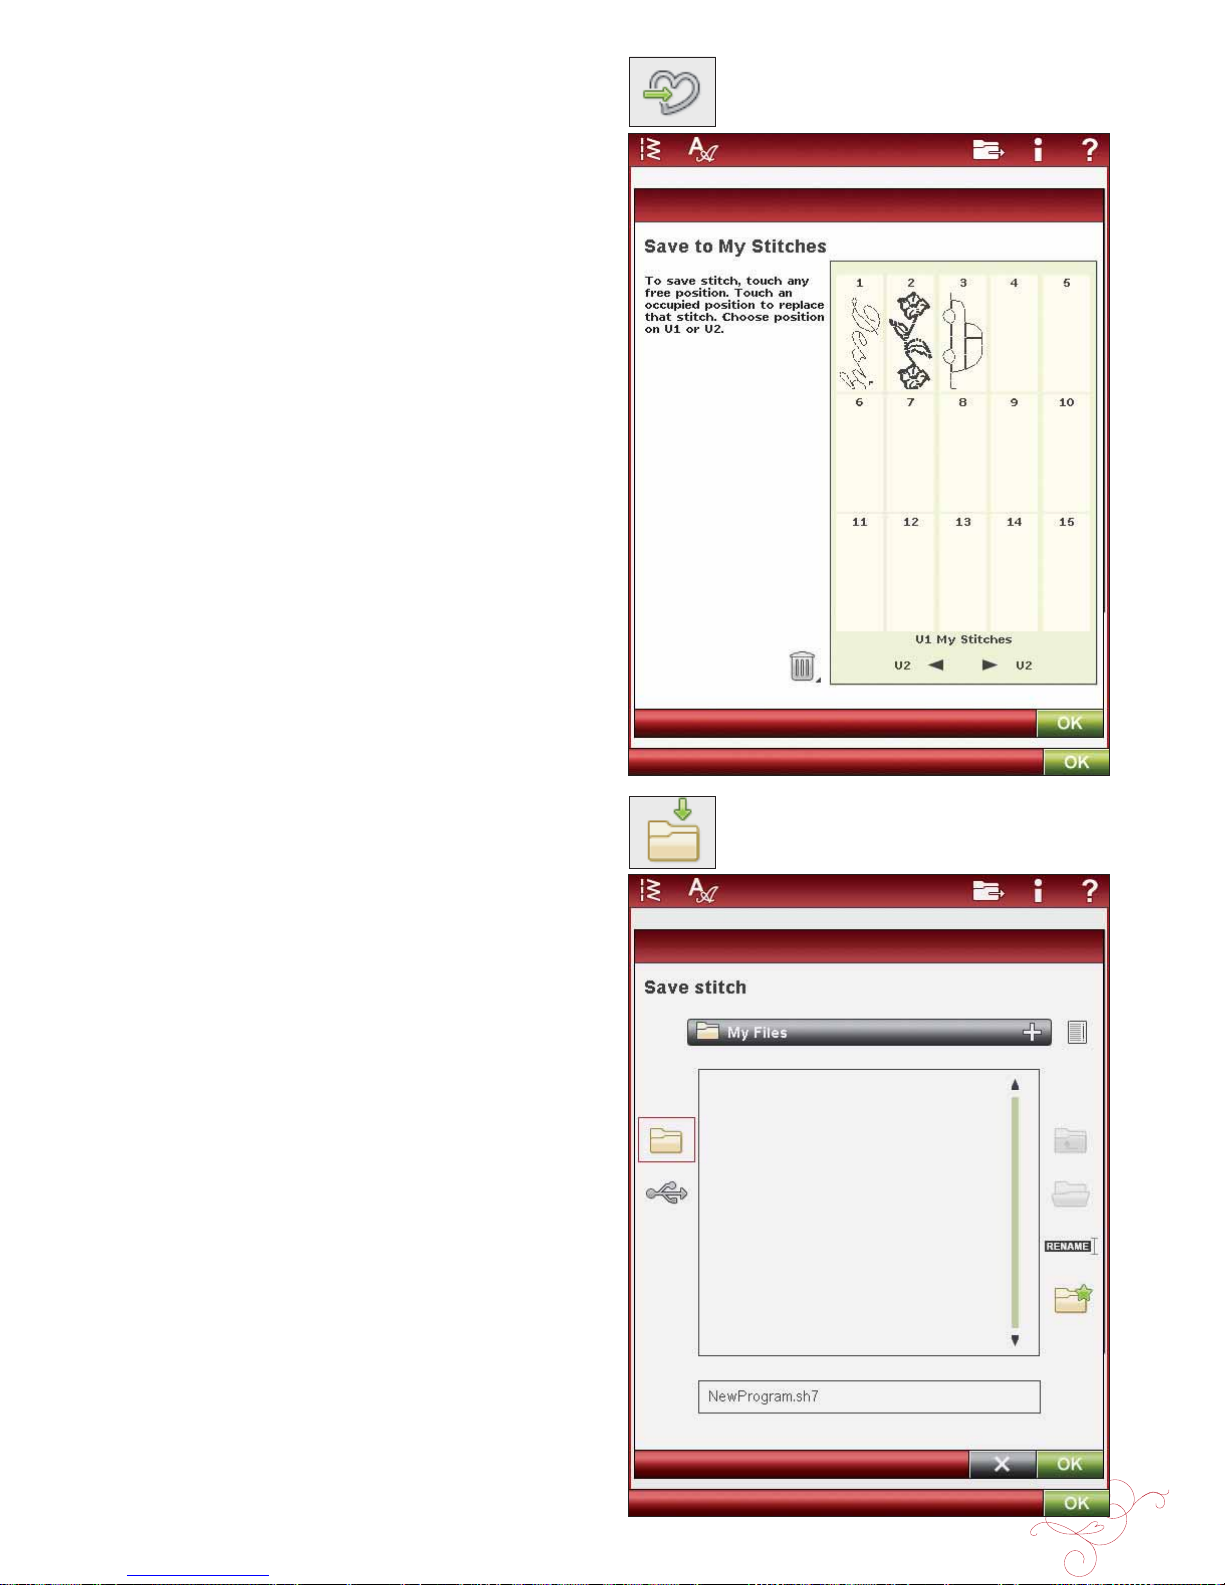
PROGRAM 5:5
Save to “My Stitches”
Save to “My Files”
TO SAVE A STITCH PROGRAM
If Sewing Mode is active, you can save your stitch program
in My Files. If Embroidery Mode is active, your stitch
program will be loaded to Embroidery Edit, and can then
be saved as a design. A stitch program created in Sewing
Mode can be loaded manually into Embroidery Edit.
SA VE TO “MY STITCHES”
Touch the Save to My Stitches icon to open the dialogue
for saving a stitch program or an adjusted stitch in “My
Stitches”, the U menu. There are two U menus, which you
can step between using the arrows at the bottom of the
screen.
Save on Free Position
Previously saved stitches or stitch programs are shown in
the U-menu. The new stitch or program can be saved at
any free position. Simply touch a free position, and your
stitch or stitch program is stored there.
Save on Occupied Position
Touch an occupied position and a pop-up message will ask
you to conÀ rm the overwriting of the old stitch. Touch OK
to replace the old stitch with the new one. Touch Cancel
to close the pop-up message, and choose another saving
position.
Cancel Save Process
To cancel the save process, close the window with OK
instead of touching any storing position. The saving
window will close, and you return to the previous screen.
Delete Saved Stitch or Program
To delete a saved stitch or program, touch the Delete icon .
The Delete icon is active until a program is selected and
deleted or until it is touched again. If a stitch is selected
to be deleted a pop-up message will ask you to conÀ m the
deletion.
Note: If you Touch & Hold on the Delete icon, you can delete all
your stitches in My Stitches.
SAVE YOUR PROGRAM IN “MY FILES”
You can also save your program as a stitch À le in the “My
Files” folder or on a USB device.
In Program mode, touch the Save to My Files icon to open
the Save Stitch window. The machine will give you a default
name. If you want to change the name touch the Rename
icon.
Select which folder to save in with the Touch & Hold
function. Touch OK and your À le is saved in that location
(see File Manager, chapter 9).
Page 68
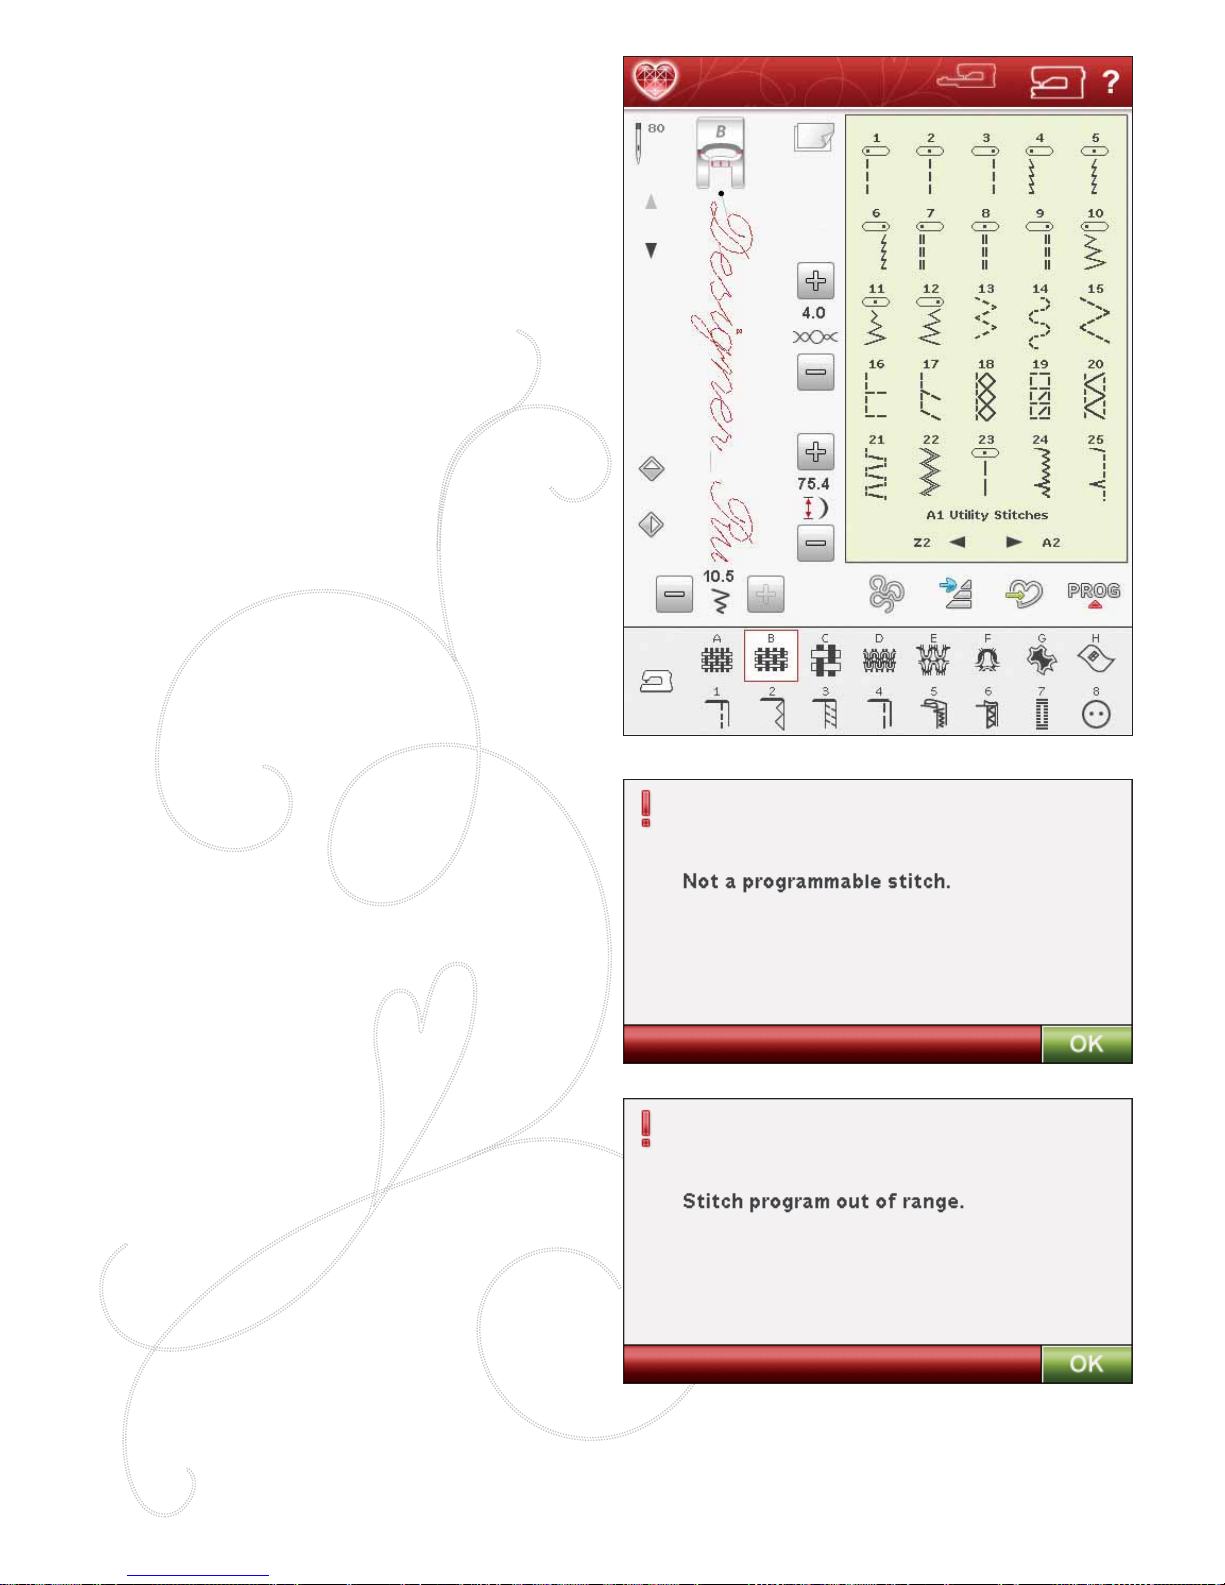
5:6
TO RE-LOAD A STITCH PROGRAM
If Sewing Mode is active when closing the Program mode,
your stitch program will be loaded to Sewing Mode and
is ready to be sewn. If selecting another stitch in Sewing
Mode and then re-opening the Program mode, your stitch
program will remain unchanged. Every time Program
mode is closed, the stitch program will be loaded to Sewing
Mode.
If Embroidery Mode is active, your stitch program will be
loaded to Embroidery Edit as a design. If you want to Edit
your Stitch, touch the Edit Stitch icon.
PROGRAM POP-UP MESSAGES
Not a Programmable Stitch
Some stitches are not possible to insert in a stitch program,
for example buttonholes and four direction stitches.
Stitch Program Out of Range
The stitch you are trying to add will make the stitch
program too long.
Your stitch program can be up to approximately 500mm
(20”) long and contain up to 99 stitches. If the stitch
program exceeds the maximum length this pop-up message
will let you know.
Page 69
EMBROIDERY SET UP
6
Page 70
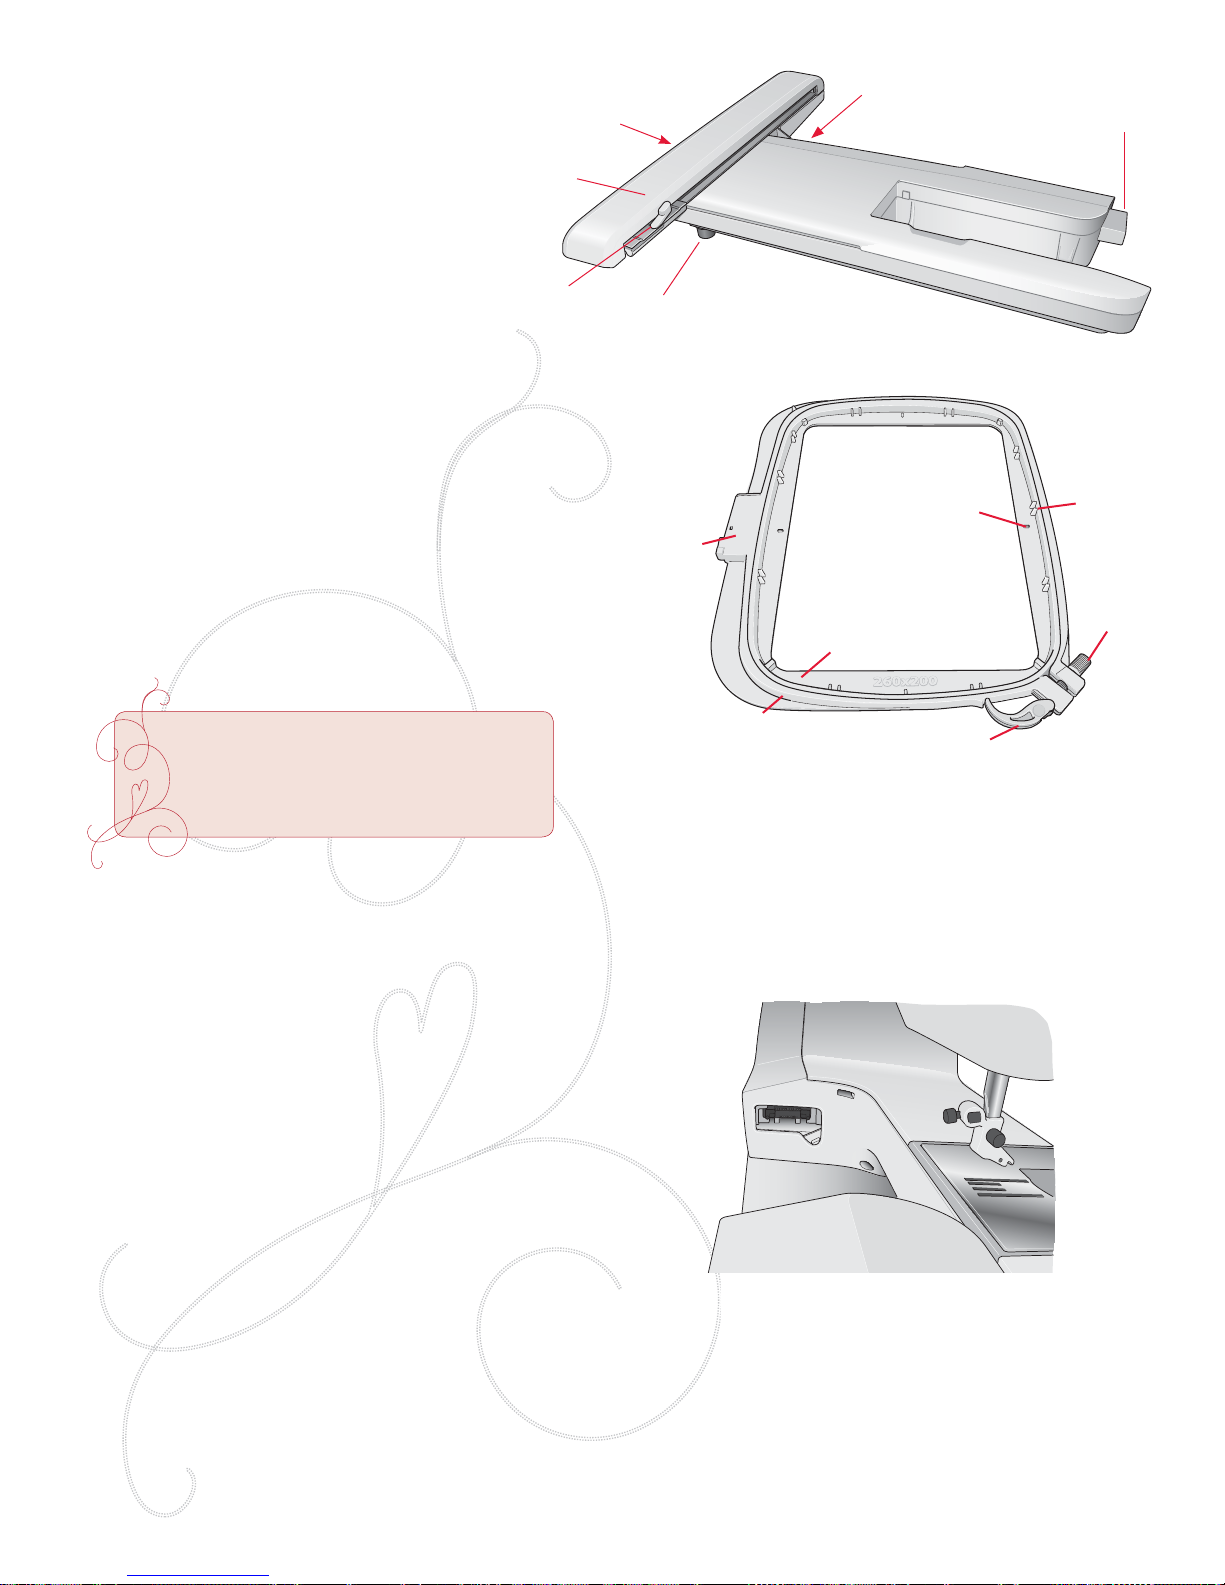
6:2
37
38
39
40
41
40
A
B
C
D
F
E
G
EMBROIDERY UNIT OVERVIEW
(type BE18)
37. Embroidery unit release button (underside)
38. Embroidery arm
39. Embroidery hoop attachment
40. Level adjustment feet
41. Embroidery unit socket
EMBROIDERY HOOP OVERVIEW
A Embroidery hoop connector
B Outer hoop
C Inner hoop
D Quick release
E Retaining screw
F Ribs for À tting the clips
G Center marks
When removing the embroidery unit
from the box for the À rst time, be sure
the shipping brace on the underside of
the embroidery unit has been removed.
CONNECT THE EMBROIDERY UNIT
1. Slide the sewing accessory tray off.
2. There is a covered socket at the back of the machine.
Turn the cover to the right to open it. The embroidery
unit plugs into the socket.
3. Slide the embroidery unit onto the free arm of the
machine until it plugs À rmly into the socket. If needed,
use the level adjusting feet so that the machine and
embroidery unit are even. If the machine is turned off,
turn it on.
4. A pop-up message tells you to clear the embroidery
arm and remove the hoop for positioning. Touch OK.
The machine will calibrate and the embroidery arm will
move to the ready position.
Note: DO NOT calibrate the machine with the embroidery hoop
attached as this can damage the needle, presser foot, hoop and/or
the embroidery unit. Be sure to clear all materials from around the
machine before calibrating so that the embroidery arm does not bump
into anything while calibrating.
Page 71
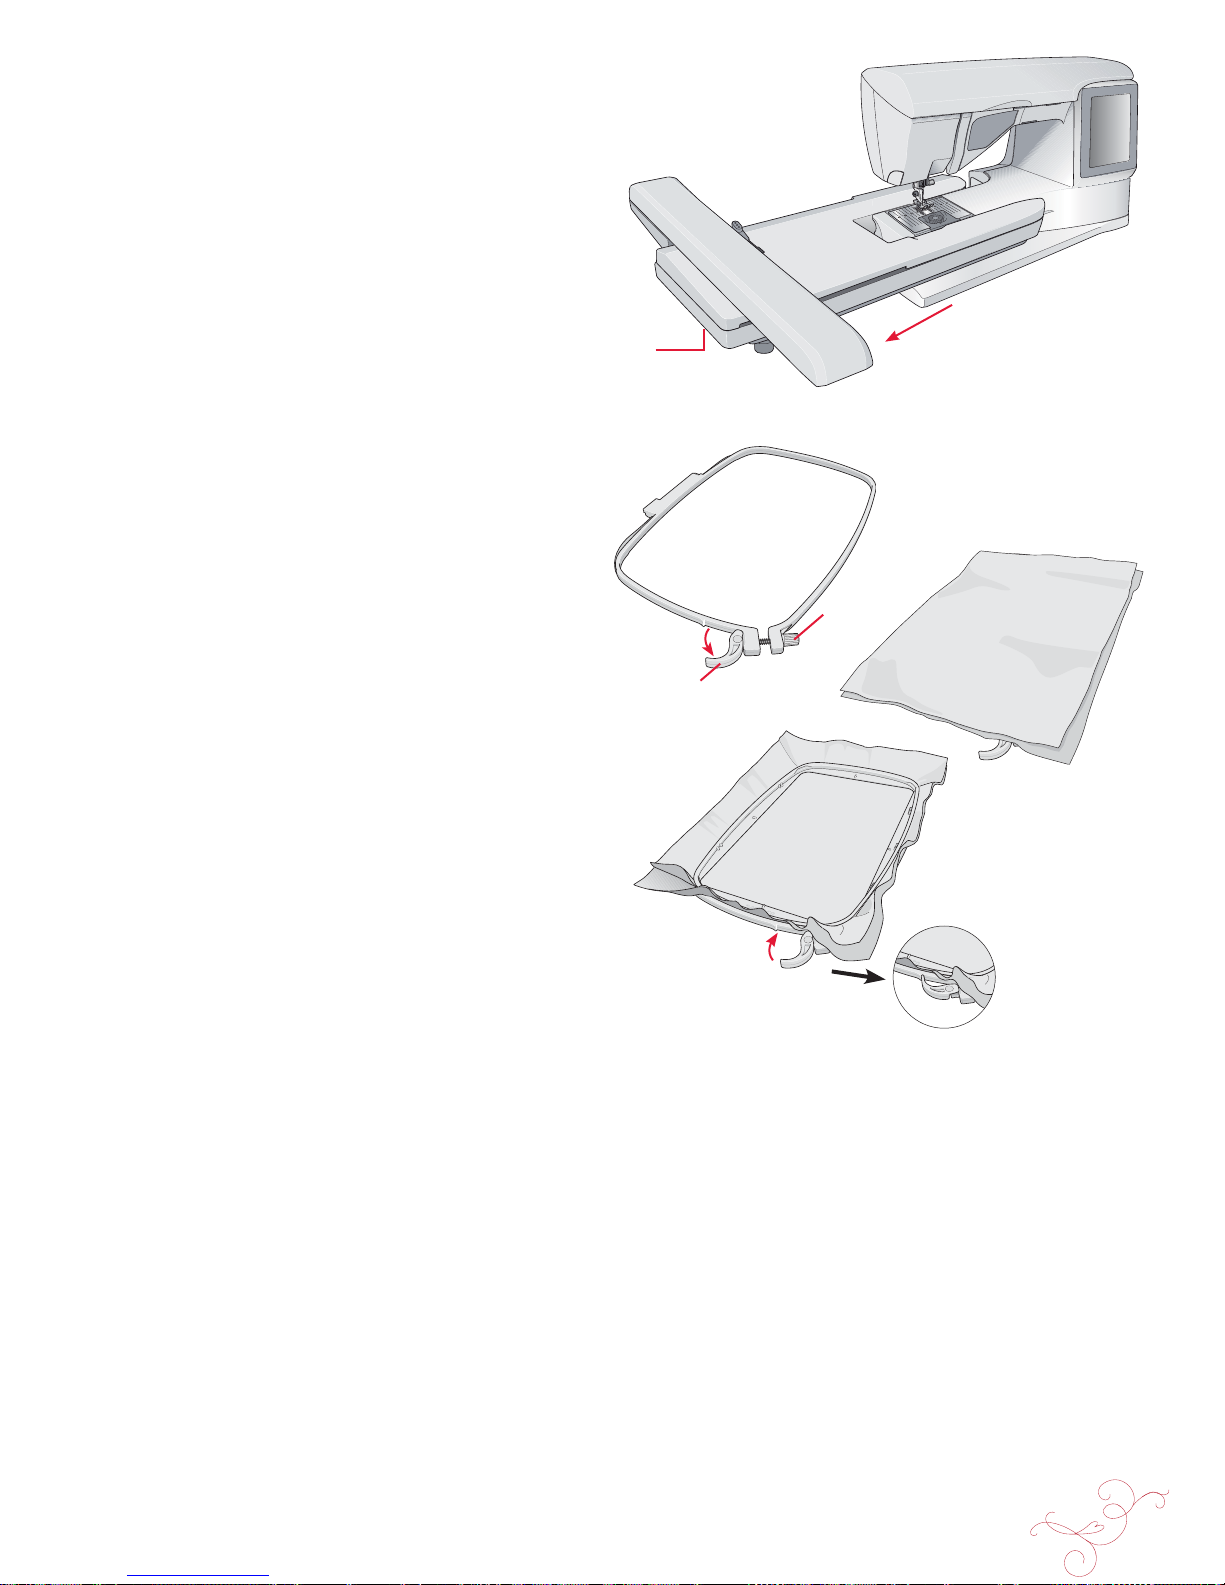
EMBROIDERY SET UP 6:3
A
B
C
REMOVE THE EMBROIDERY UNIT
1. To store the embroidery unit in the embroidery case,
move the embroidery arm to Park Position by selecting
Park Position on the screen in either Embroidery Edit
or Embroidery Stitch-Out.
2. Press the button at the left, underneath the embroidery
unit (A) and slide the unit to the left to remove it.
TO HOOP THE FABRIC
For the best embroidery results, place a layer of stabilizer
beneath the fabric. When hooping stabilizer and fabric
make sure that they are smooth and securely hooped.
1. Open the Quick Release (B) on the outer hoop and
loosen the screw (C). Remove the inner hoop. Place
the outer hoop on a À rm Á at surface with the screw on
the lower right. There is a small arrow in the center of
the lower edge of the hoop which will line up with a
small arrow on the inner hoop.
2. Place the stabilizer and fabric, with the right sides
facing up, on top of the outer hoop. Place the inner
hoop on top of the fabr i c w it h t h e s m a l l a rrow at the
bottom edge.
3. Push the inner hoop À rmly into the outer hoop.
4. Close the Quick Release (B). Adjust the pressure of
the outer hoop by turning the retaining screw (C). The
fabric should be taut in the hoop for the best results.
Note: When embroidering additional designs on the same fabric, open
the quick release, move the hoop to the new position on the fabric and
close the quick release. When changing type of fabric, you might need
to adjust the pressure using the retaining screw. Do not force the quick
release.
Page 72
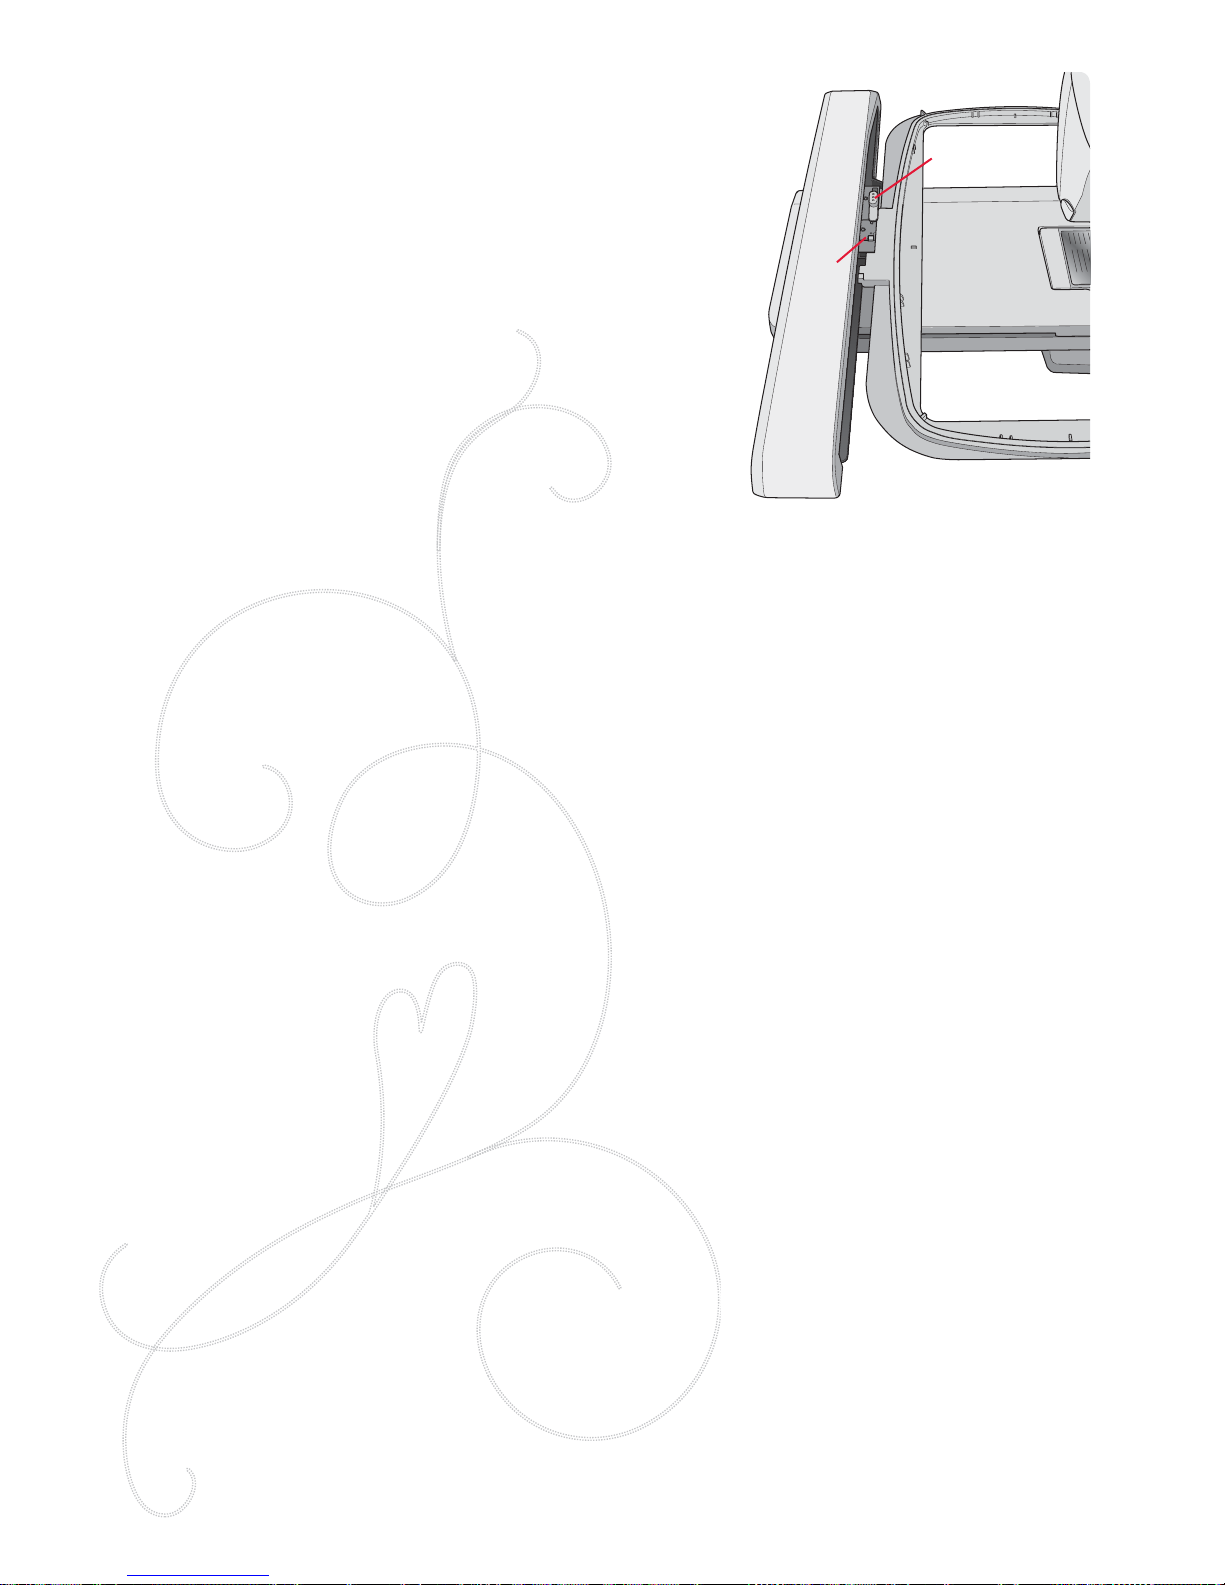
6:4
D
C
SLIDE ON THE HOOP
Slide the hoop connector into the hoop attachment (C)
from front to back until it clicks into place.
To remove the hoop from the embroidery arm, press the
grey button (D) on the hoop attachment and slide the hoop
towards you.
BUILT-IN DESIGNS
147 designs and 4 embroidery fonts are included in the
memory in your machine and some designs are stored on
your USB embroidery stick.
DESIGNER RUBY™ SAMPLER BOOK
Page through the DESIGNER RUBY™ Sampler book for
designs and fonts.
The design number, stitch count (number of stitches in
the design) and the design size are displayed next to each
design. The suggested thread color for each color block is
shown.
Page 73
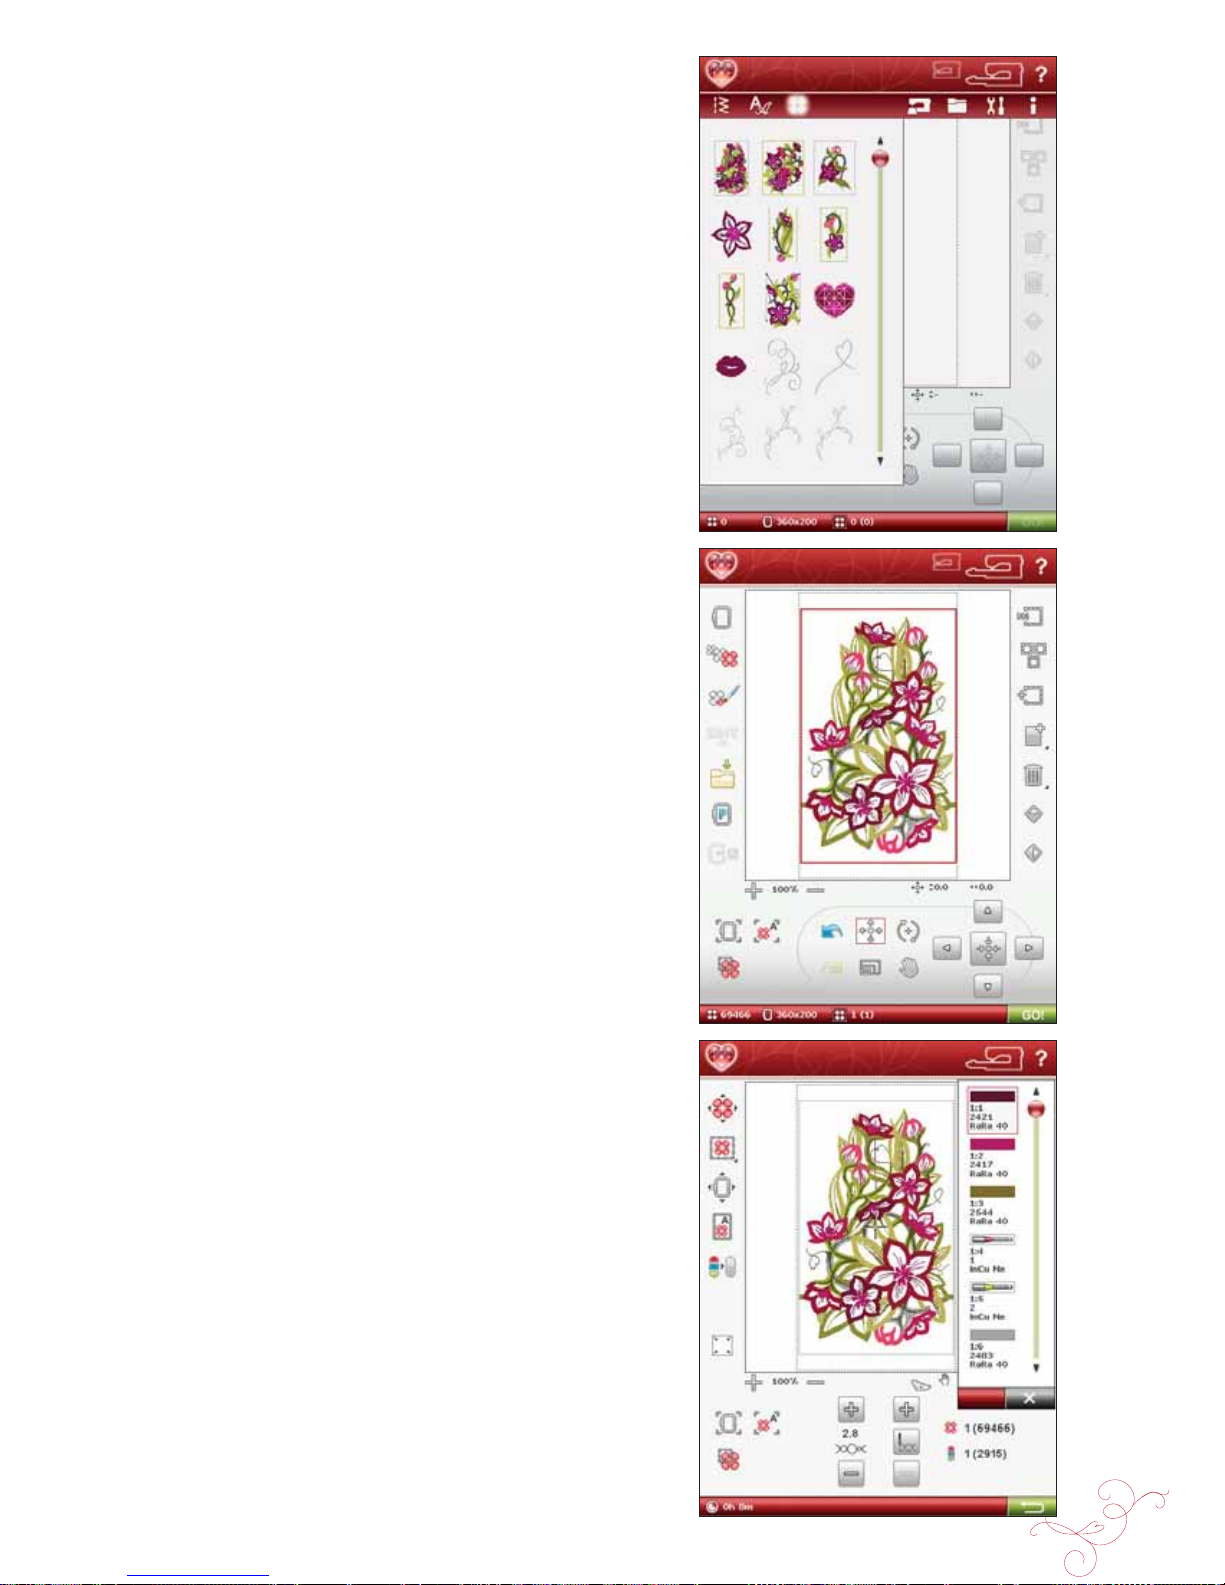
EMBROIDERY SET UP 6:5
GETTING STARTED EMBROIDERING
1. After attaching the embroidery unit and embroidery
foot, insert a bobbin with bobbin thread.
2. Touch the Start Menu. The Design Menu opens to
select a design. Touch the design you want to stitch out
and it will load to Embroidery Edit.
3. Hoop a piece of fabric and slide the hoop onto the
embroidery arm.
4. When you are ready to embroider, switch from
Embroidery Edit to Embroidery Stitch-Out by
touching the GO! icon on the task bar.
5. Thread the machine with the À rst color in the Color
Block list.
Page 74
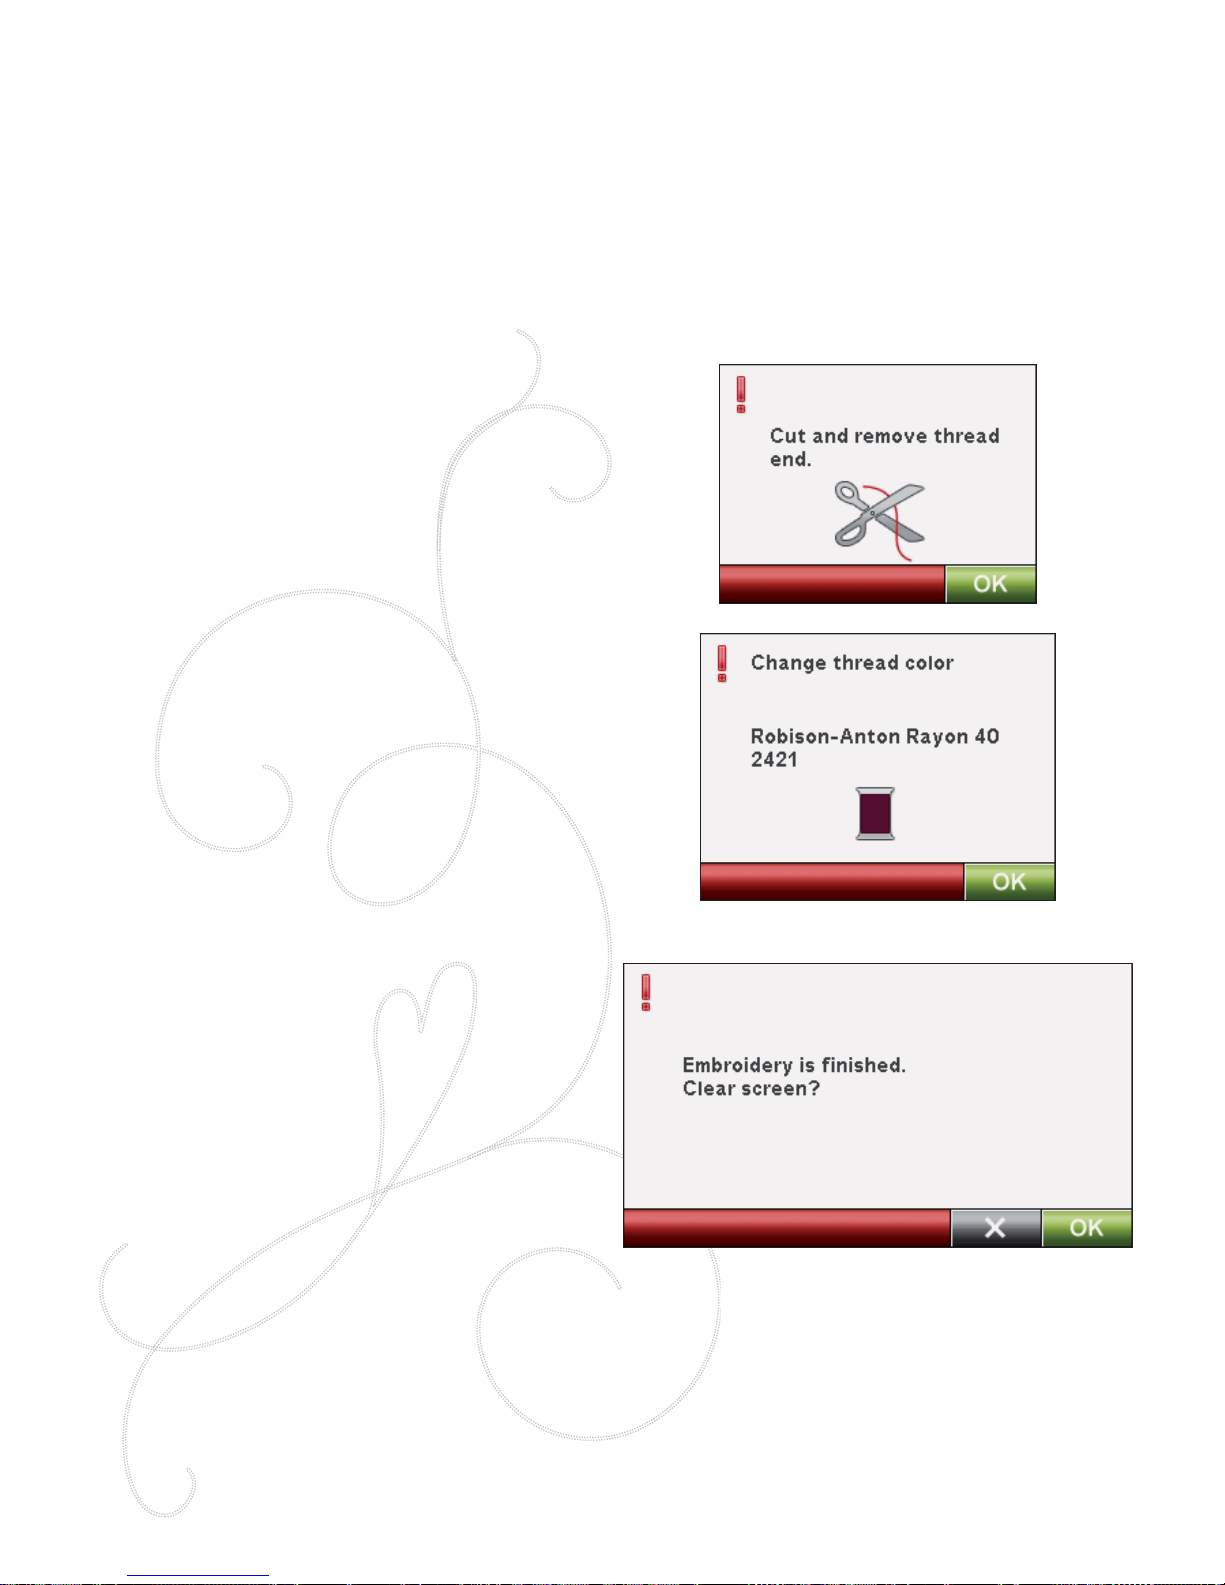
6:6
6. Clear sufÀ cient space around the machine to
accommodate movement of the embroidery arm and
the hoop. Hold the needle thread and touch the Start/
Stop button or the foot control. The machine starts
embroidering.
Note: This machine features Automatic Jump Stitch Trim. When
activated the machine trims the top jump stitch threads and pulls the
thread ends to the underside of the fabric. The default setting is on.
To turn it off, go to the SET Menu, Sewing Settings and deselect
Automatic Jump Stitch Trim. Read more about Automatic Jump
Stitch Trim in chapter 3.
If Automatic Jump Stitch Trim is not activated the machine
will stop after stitching a few stitches. A pop-up message
will appear on the screen asking you to cut the thread
end. Cut the thread and press Start/Stop to continue
embroidering.
7. When the À rst color is completed, your machine cuts
the thread end and stops. A pop-up message appears
asking you to change thread color. Re-thread with the
next color and continue embroidering by pressing
Start/Stop. Hold the thread end. The machine will trim
the top thread end and pull the thread to the underside
of the fabric.
At the end of each color block, the thread is tied off
and the needle thread is cut.
8. When the embroidery is completed, your machine
cuts the top thread and bobbin thread and stops. The
needle and presser foot raise automatically for easy
removal of the hoop.
A pop-up message and sound informs you that your
embroidery is À nished. Touch OK to clear your design
from the screen and return to Embroidery Edit. Touch
Cancel (X) to keep the design loaded and stay in
Embroidery Stitch-Out.
Page 75
7
EMBROIDERY EDIT
Page 76
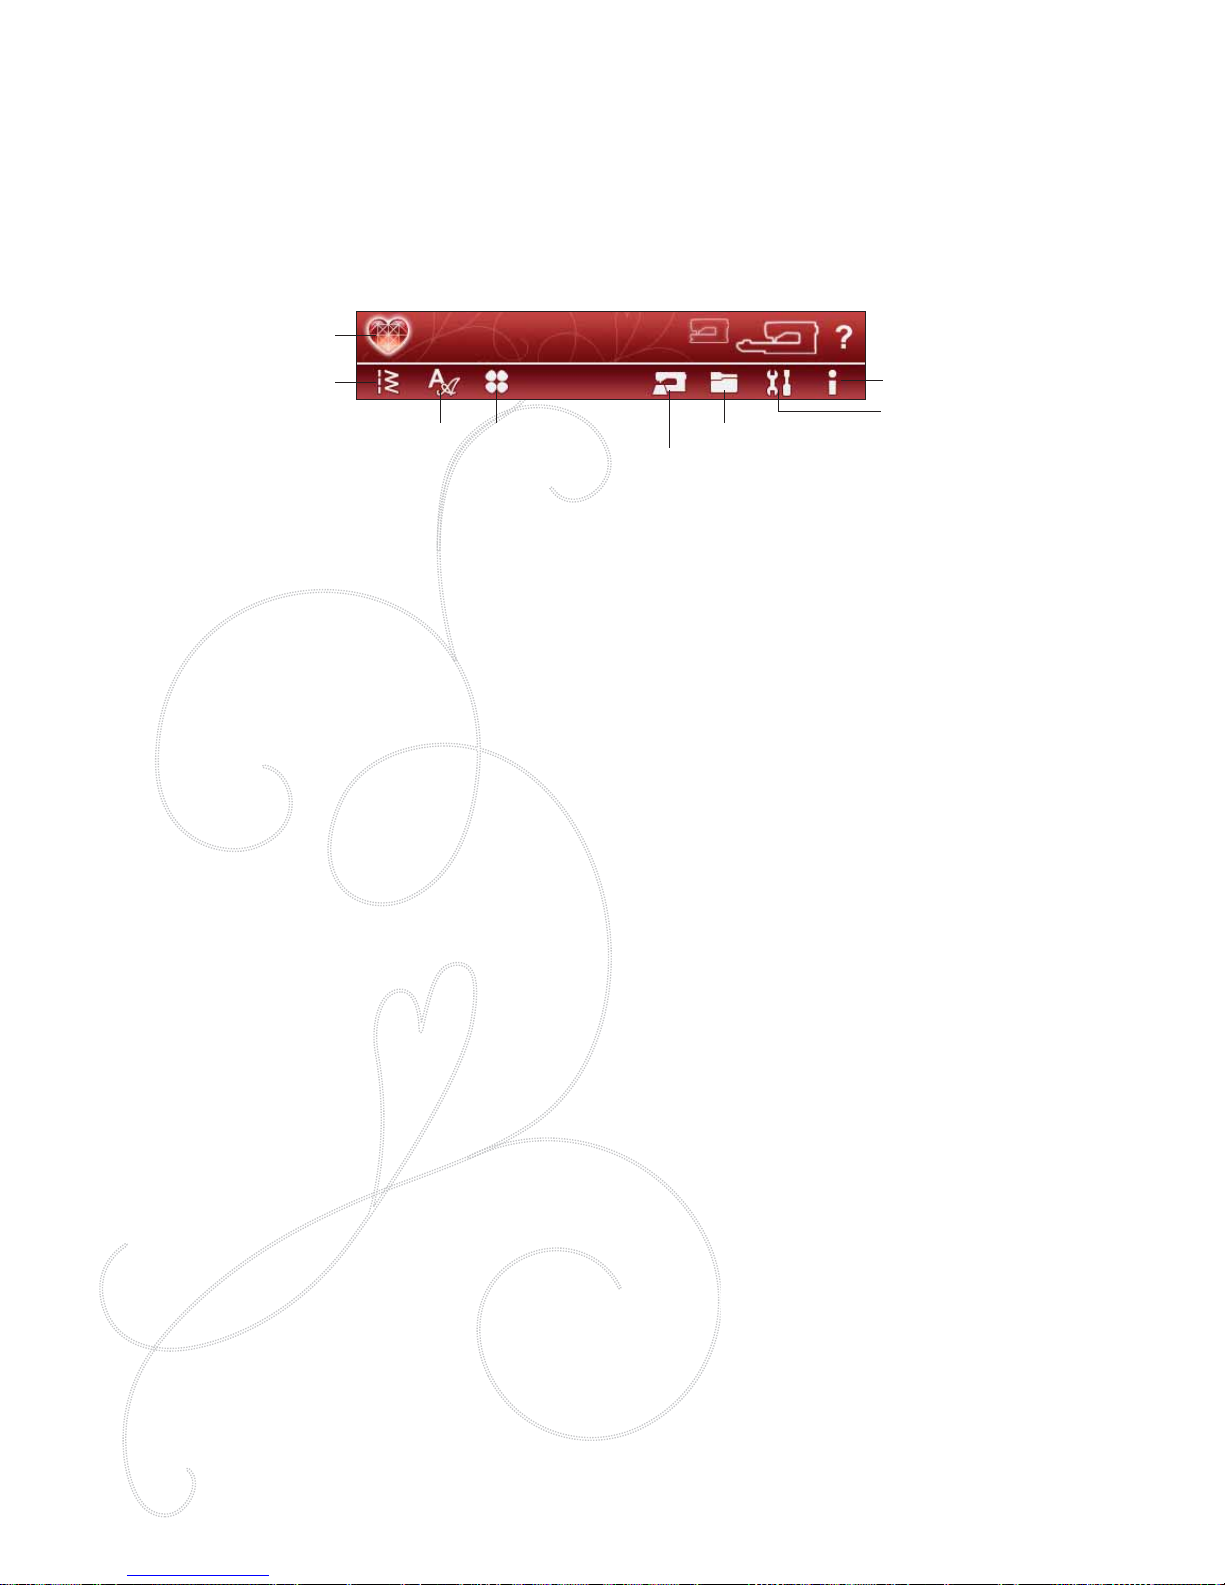
7:2
EMBROIDERY EDIT
When you touch the Sewing/Embroidery Mode on the toolbar to activate Embroidery Mode or turn the machine on with
the embroidery unit attached, Embroidery Edit will be opened. In Embroidery Edit you can adjust, combine, save and
delete designs. You do not need to have the embroidery unit connected to your machine to edit your design(s). The loaded
design(s) are shown in the Embroidery À eld. We will go through the icons, starting on the upper left hand side.
MAIN FUNCTIONS IN THE EXTENDED EMBROIDERY EDIT TOOLBAR
Touch the Start Menu icon to open the Extended toolbar.
FILE MANAGER
The File Manager helps you add, move, remove and copy
designs, fonts and stitch À les in an easy way. Touch the File
Manager icon to open File Manager to save to the machine
memory or external devices connected to the USB-ports,
such as your computer or the HUSQVARNA VIKING®
USB embroidery stick. Select the place you want to save
your design. Touch a folder to select it and Touch & Hold it
to open it. Read more about File Manager in chapter 9.
SET MENU
In the SET Menu, you can override automatic settings and
make manual adjustments to the Sewing Settings, Machine
Settings, Sound Settings, and Screen Settings.
Touch the icons to activate a function or open a list of
choices. Read more about the SET Menu in chapter 3.
INFORMATION MENU
Use the Information menu to easily get Help topics and
information. The Info menu is a built-in, abridged version
of the User’s Guide. Read more about the Information
menu on page 3:10.
LOAD A STITCH
To load a stitch, touch the Stitch Menu icon on the
Extended toolbar. Select a menu and the Program window
will open. Touch your desired stitch/stitch program and
touch OK to load to Embroidery Edit. Read more about
how to make a stitch program in chapter 5.
Load a buttonhole
Buttonholes can be embroidered in a hoop. Touch the
Stitch Menu icon on the Extended toolbar and select menu
B. Select desired buttonhole in the window that opens, and
set the buttonhole stitch length, width and density. Touch
OK to load the buttonhole to the embroidery area.
LOAD A FONT
Text can be created both with embroidery fonts and stitch
fonts. Load a font by selecting the Font Menu from the
extended toolbar and touch your desired font on the screen.
Embroidery fonts will be loaded into the Embroidery Font
Edit window. Stitch fonts will be loaded to Program. The
text created will then be loaded into Embroidery Edit.
Note: You can also load designs, fonts and stitches from File Manager.
LOAD A DESIGN
To load a design, touch the Start Menu icon to
automatically open the dropdown list. Select designs from
the dropdown list. Your personal designs will be shown in
the menu. To load a design, touch it on the screen and it
will be loaded into Embroidery Edit.
EXCLUSIVE EMBR OIDER Y ADVISOR™
The Exclusive EMBROIDERY ADVISOR™ feature
recommends the best needle, stabilizer and thread
recommendation for your fabric. Select the fabric you want
to embroider on and follow the recommendations. Touch
OK to close the EMBROIDERY ADVISOR™ feature.
SET Menu
Information
File ManagerDesign MenuFont Menu
Stitch Menu
Start Menu icon
EMBROIDERY AD VISOR™
Page 77
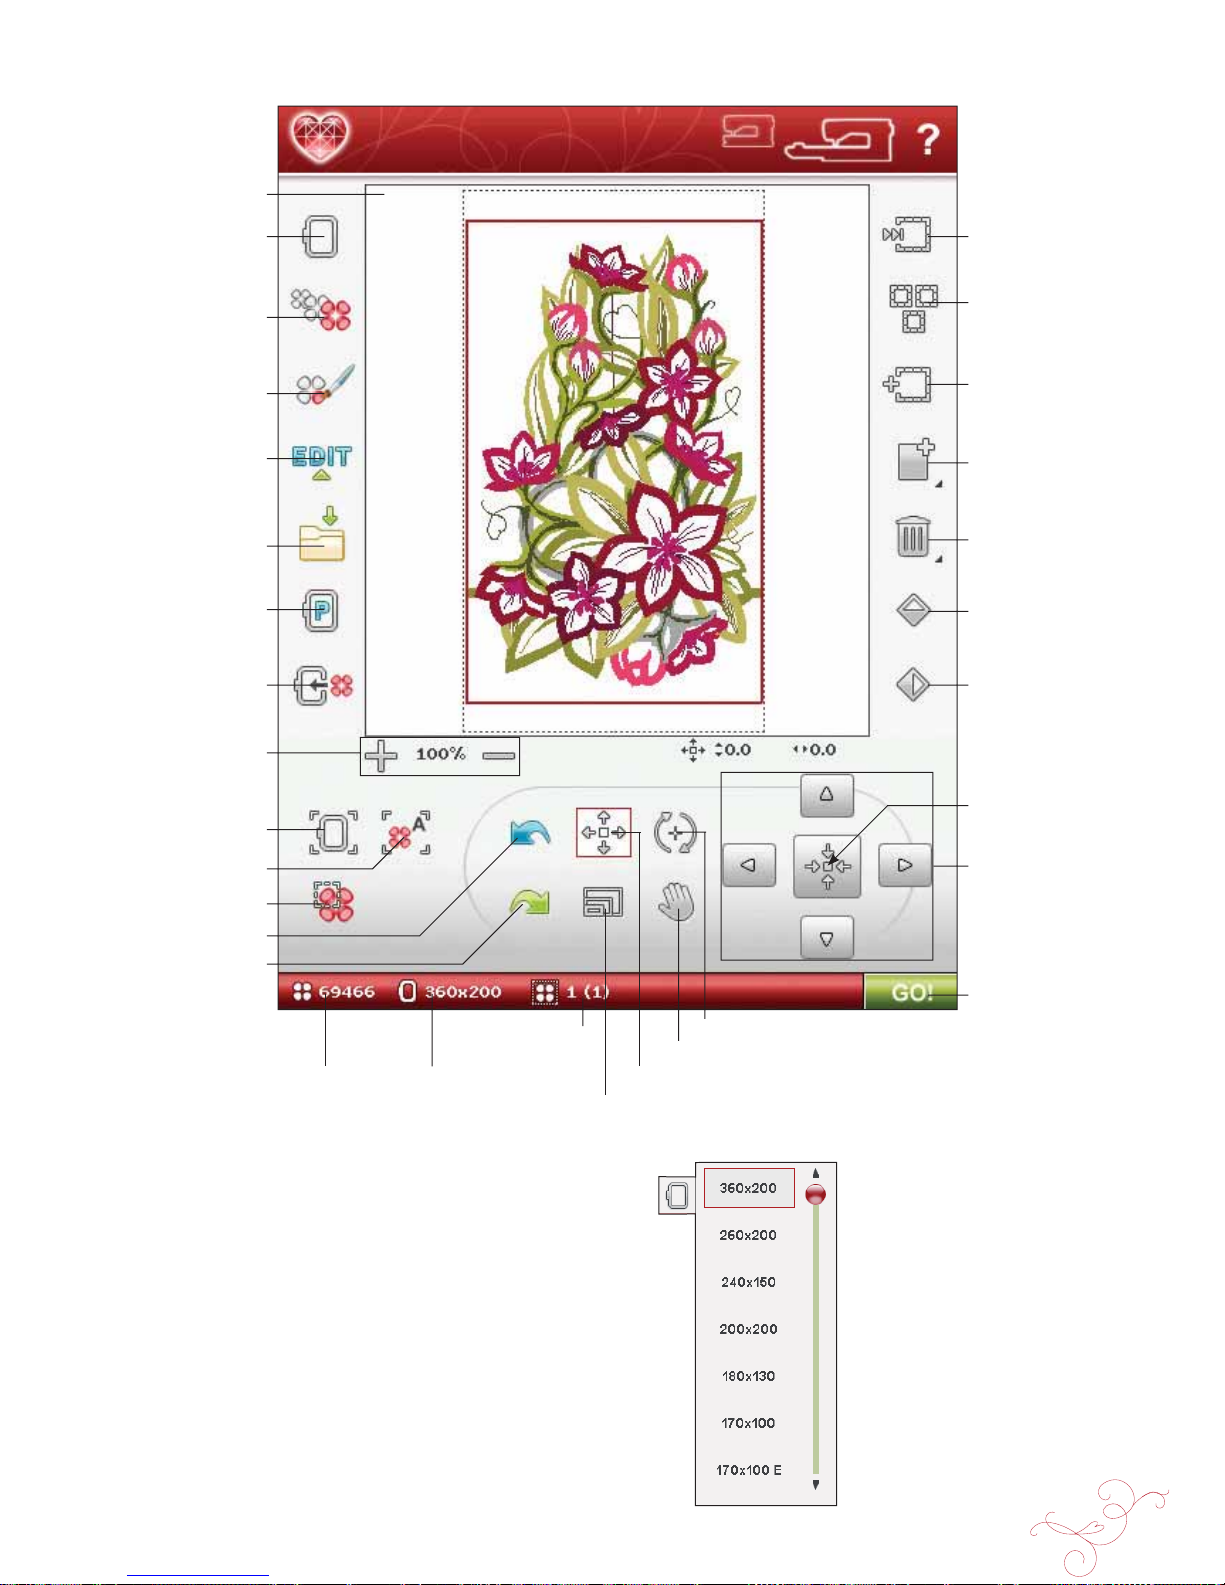
EMBROIDERY EDIT 7:3
Undo
Redo
EMBROIDERY EDIT - OVERVIEW OF ICONS
MY HOOPS
To select the correct hoop size, touch the My Hoops icon.
A pop-up will appear with the hoop choices, including
hoops that are available to purchase from your authorized
HUSQVARNA VIKING® dealer.
After selecting your hoop size, the pop-up message will
close automatically.
Pan
Total number of stitches
in design combination
Selected hoop
Stitch-out order of
selected design
Embroidery À eld
My Hoops
Resize
Color Edit
Edit Stitch Program
Save to My Designs
Zoom In/
Zoom Out
Zoom to Hoop
Zoom to Box
Zoom to All
Step Through
Designs
Select All
Add/Remove
Selection
Duplicate
Delete
Mirror End-to-End
Mirror Side-to-Side
Park Position
Move to Hoop
Control
Control center
Position
Scale
Rotate
Embroidery
Stitch-Out
Page 78
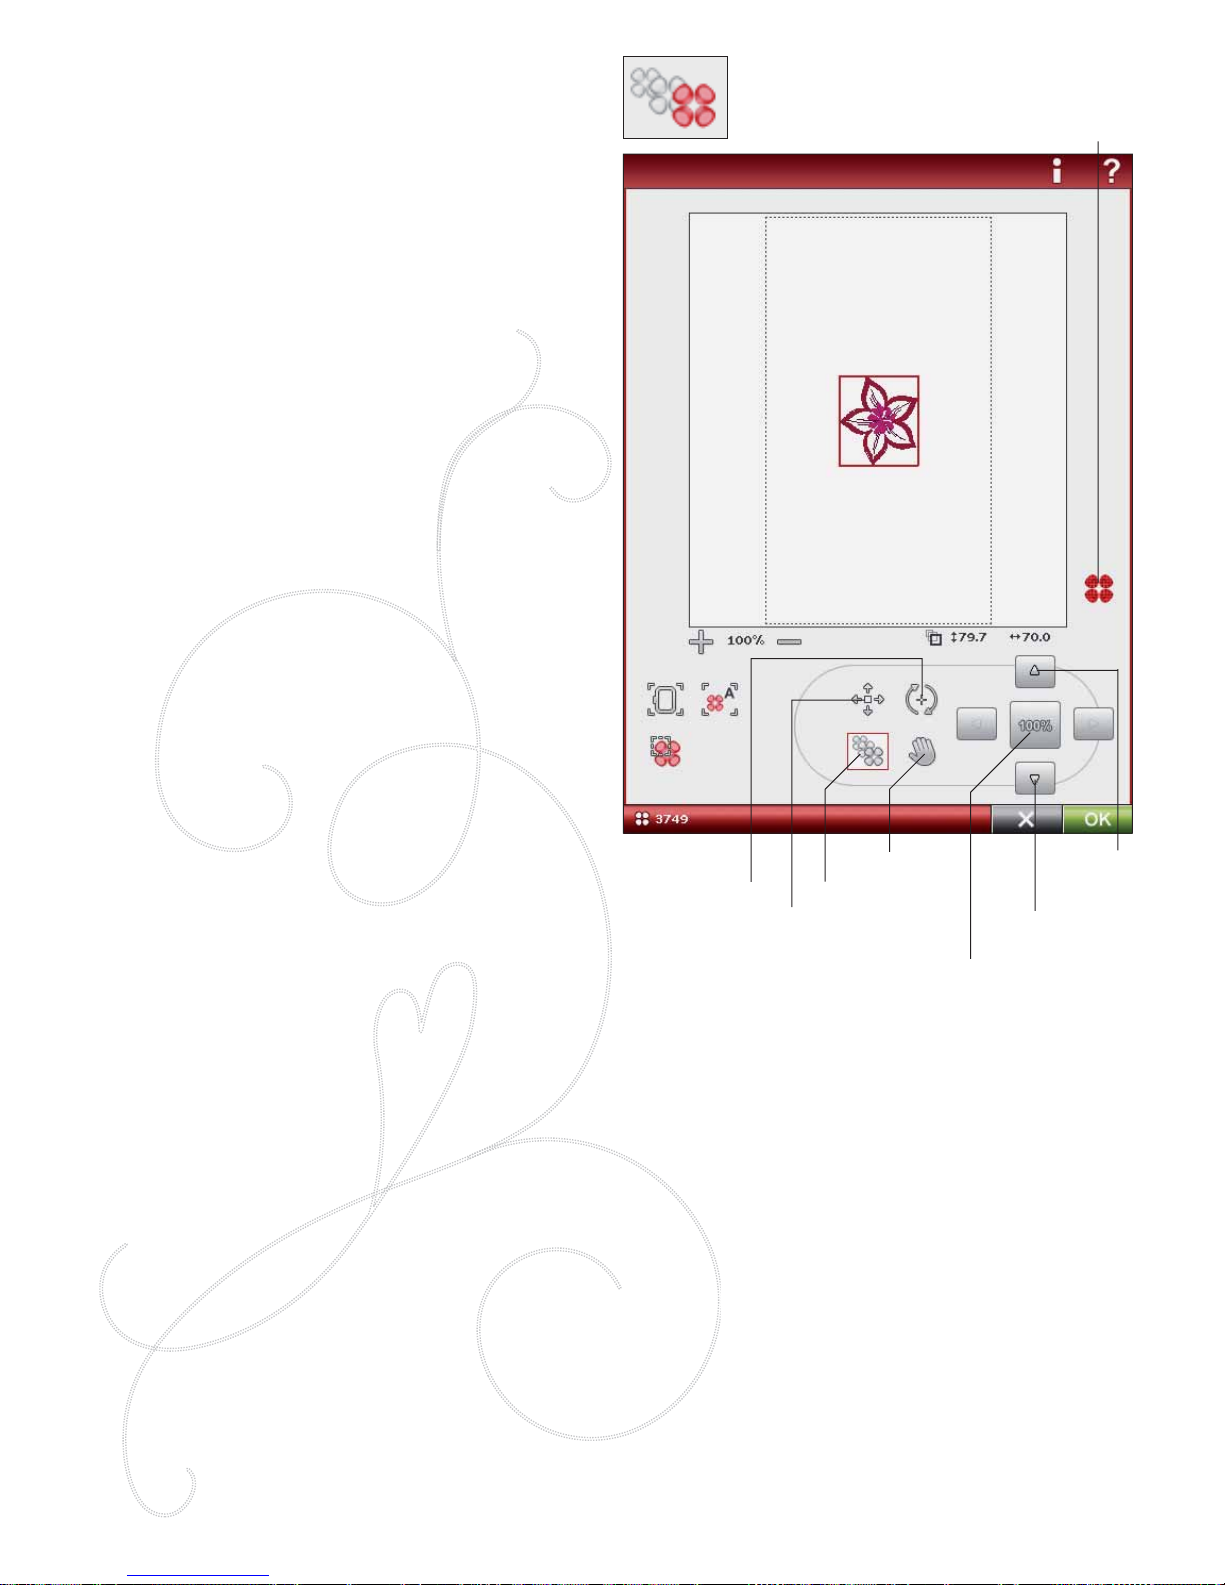
7:4
RESIZE
Resize can reduce an embroidery design up to À ve times
smaller than the original design or increase it up to
eight times larger than the original design. The machine
recalculates the number of stitches in the design so the
original stitch density remains.
Note: To reduce or increase the design less than 20%, use Scale
function. The Scale function does not change the stitch count.
Resize Adjustments
Select the design you want to resize. Open the Resize
window. Adjust the design size by touching and dragging
on the screen or by using the Control. The size of the
design is shown in millimeters above the Control. To return
to the original size, touch the Control center icon. Adjust
the placement of the design in the hoop using Position and
Rotate.
Retain Fill Type
All À ll areas in an embroidery design are made in a speciÀ c
type to get the best effect. When enlarging or reducing a
design, the stitches in the À ll area will be affected.
There are two ways to handle the À ll type and style in the
design to be resized.
1. The default setting will not retain À ll type. This is the
fastest way to resize a design. However, the À ll areas in
the design may look different than the original.
2. When Retain Fill Type is selected, it will take longer to
resize but the process will retain the À ll types and styles
within the design areas. If greatly enlarging a design,
Retain Fill Type is recommended for best results.
To Start Resizing
When you are satisÀ ed with the design size and position,
touch OK to close the window and start resizing. An
hourglass on the screen shows that it is working. When
À nished, the resize window will close.
Touch Cancel to return to Embroidery Edit without
resizing.
Note: Stitches and stitch programs cannot be resized.
Retain Fill Type
Reduce
design
Enlarge
design
Control
center
Position
Rotate
Resize
Pan
Page 79

EMBROIDERY EDIT 7:5
IMPORTANT RESIZE INFORMATION
Since designs are digitized for a speciÀ c design size, it is important to
consider the following information about Resize. Always embroider a
test sample of your resized design before embroidering on a project.
• Resize is always proportional. If you reduce a design
30%, it will be 30% smaller in both length and width.
If the design is very detailed, some of it may be lost or
distorted, and/or it can be very dense. Some designs
should not be reduced more than 25% if they have too
many details.
• Designs can be increased larger than the hoop, so be
sure that the design À ts in the hoop. If the design is
larger than hoop size, the machine will not be able to
embroider it.
• If you are enlarging a design too much, you may see
stitch irregularities. Press the Control Center to return
to 100% and resize to a smaller percentage for a better
result. Depending on the memory left in the machine,
you may À nd some designs too complex to resize in
the machine. Please use 5D™ Embroidery Software to
resize very large and complex designs. It is available to
purchase from your local authorized dealer.
• Always start with the original design when resizing.
This is to ensure the best possible stitch quality. If a
resized design is saved, and then resized again, it can
cause stitch irregularities. For the best resize result,
always start with a design in original size.
• Depending on how much you resize a design and
how many stitches it contains, the resize process time
will vary. Resizing a very large or complex design may
take a few minutes. Once you touch OK, you cannot
cancel. You will need to wait for the process to be
À nished.
• It does not matter in which order you select functions
to adjust the size, rotation, mirroring etc. When you
touch OK, your machine always resizes À rst and then
adds the rotation, mirroring etc.
• It is recommended that you scale instead of resize to
change a design less than 20% and also for designs
digitized with single or triple stitches, such as cross
stitch embroideries. In this case, you do not want to
add stitches to the design, you only want to make the
design larger or smaller by making each original stitch
larger or smaller.
Page 80
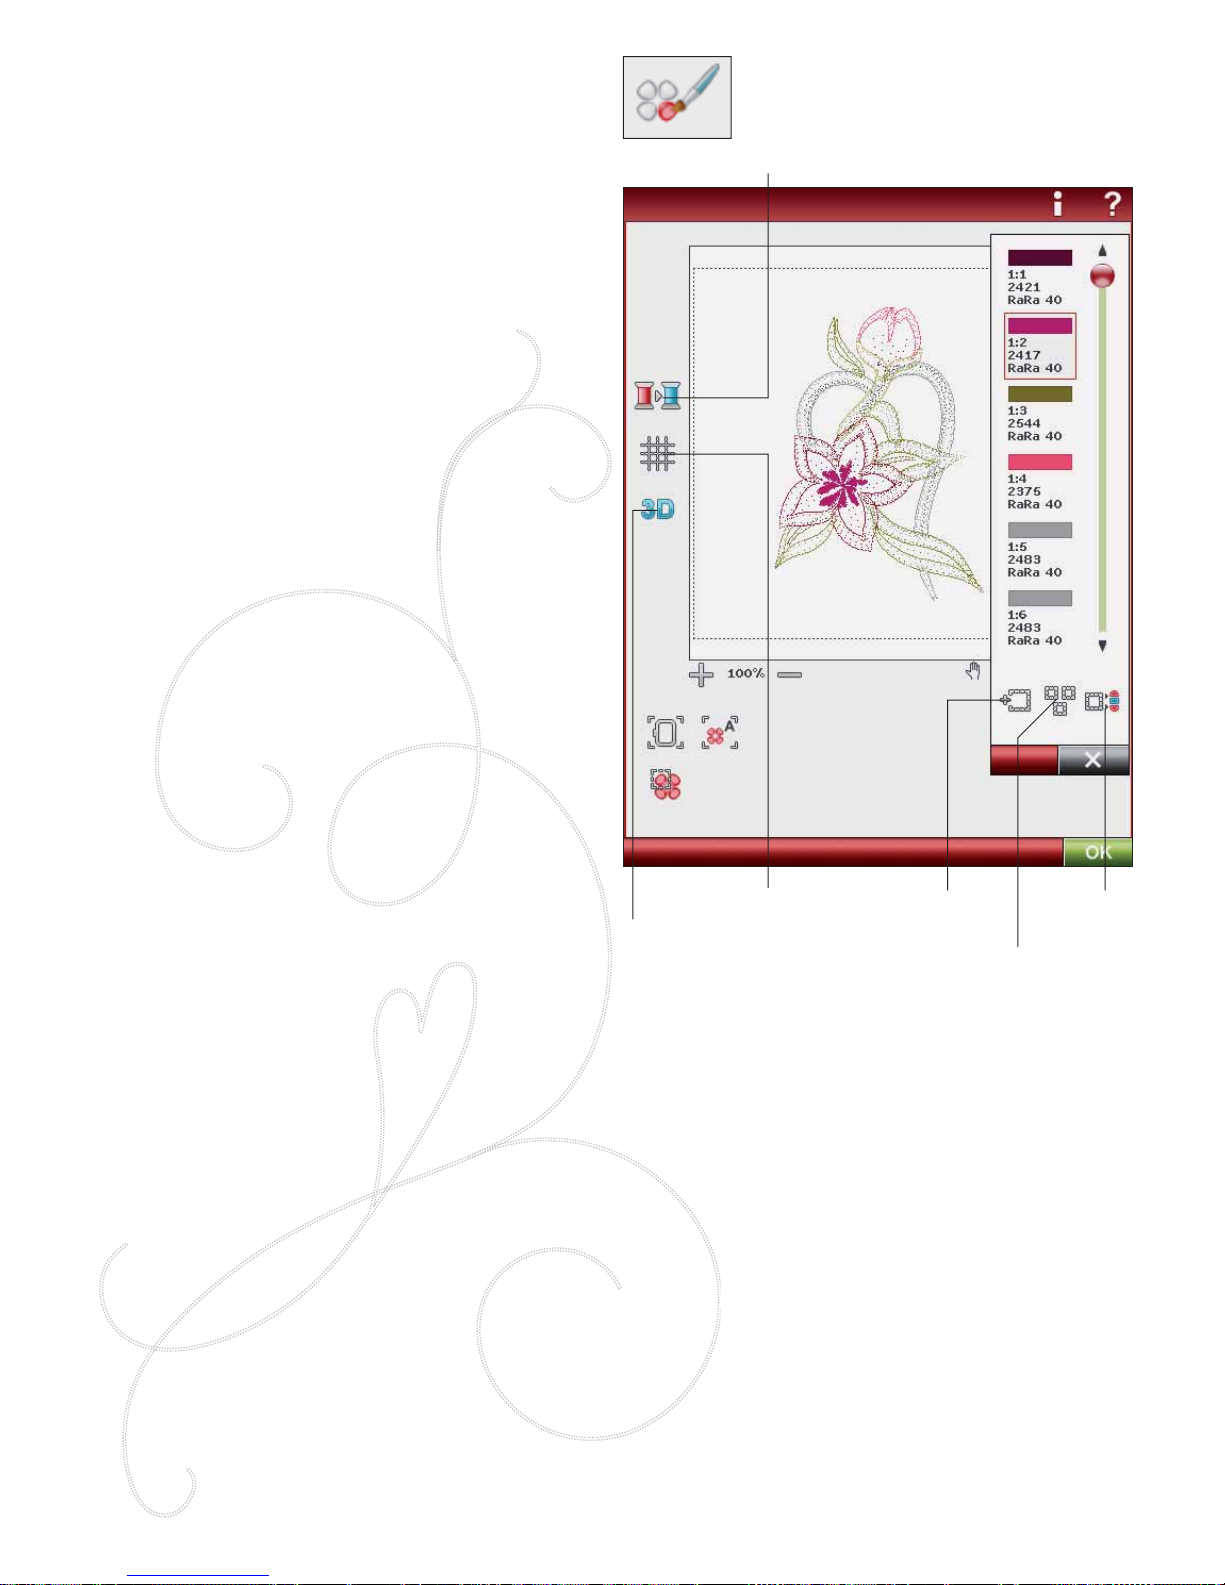
7:6
COLOR EDIT
Touch Color Edit icon to enter the Color Edit Screen.
THREAD COLOR CHANGE
In Thread Color Change you can edit the colors in your
design. Each color block is described in the Color Block list
on the right hand side of the screen.
Example: 1:2, thread number 2343, RaRa 40, 1:2 means the
second thread color in the À rst loaded design is Robison-Anton Rayon
40 weight.
In the Color Block List, touch the color block that you
want to change. Touch the Thread Color Change icon to
open a window with 64 different color choices. Touch your
new color to select it and touch OK. The window will close
and your new color will be applied in the Color Block List
and to the design.
Select more than one color block
To change more than one color block at a time, touch the
Add/Remove Color Selection icon, then touch the color
blocks you want to select/deselect.
Touch the Select All icon to make changes to all color
blocks at one time. Add/Remove Color Selection is
automatically activated. To deselect a color block, just
touch it in the list. Touch Add/Remove Color Selection to
deactivate the function and deselect all color blocks.
Use Select Equal to change all the same color blocks at one
time. Touch the color block you want to change, then touch
Select Equal to select all identical color blocks in the color
block list. Add/Remove Color Selection is automatically
activated. If two or more different color blocks are
selected, Select Equal will select all identical color blocks of
all selected colors.
On-screen display of selected and non-selected
color blocks
Selected color blocks are shown in 2-dimensional or
3-dimensional view (see “2-dimensional/3-dimensional
view toggle” on this page). Color blocks that are not
selected are shown as colored dots on the screen, making it
easy to see which color areas in the design will be changed.
GRID
Touch the Grid icon to activate/deactivate a grid on
the embroidery À eld. The grid is used as a guide when
combining or placing designs. The distance between the
grid lines equals a maximum of 20 mm. As you zoom in
on the embroidery À eld, the distance between these lines
reduces to 10mm and 5mm, indicated with lighter lines.
Thread Color Change
Grid Add/Remove
Color Selection
Select All
Select Equal
2-dimensional/
3-dimensional
view toggle
2-DIMENSIONAL/3-DIMENSIONAL VIEW
TOGGLE
In 2-dimensional view, the designs load faster on the
screen and it is easier to see the color blocks in the design.
3-dimensional view gives a more realistic view of the
designs, with added shadows and depth.
Touch the ”3D” icon to change to 3-dimensional view. The
icon becomes selected. Touch again to deselect and return
to 2-dimensional view.
Page 81
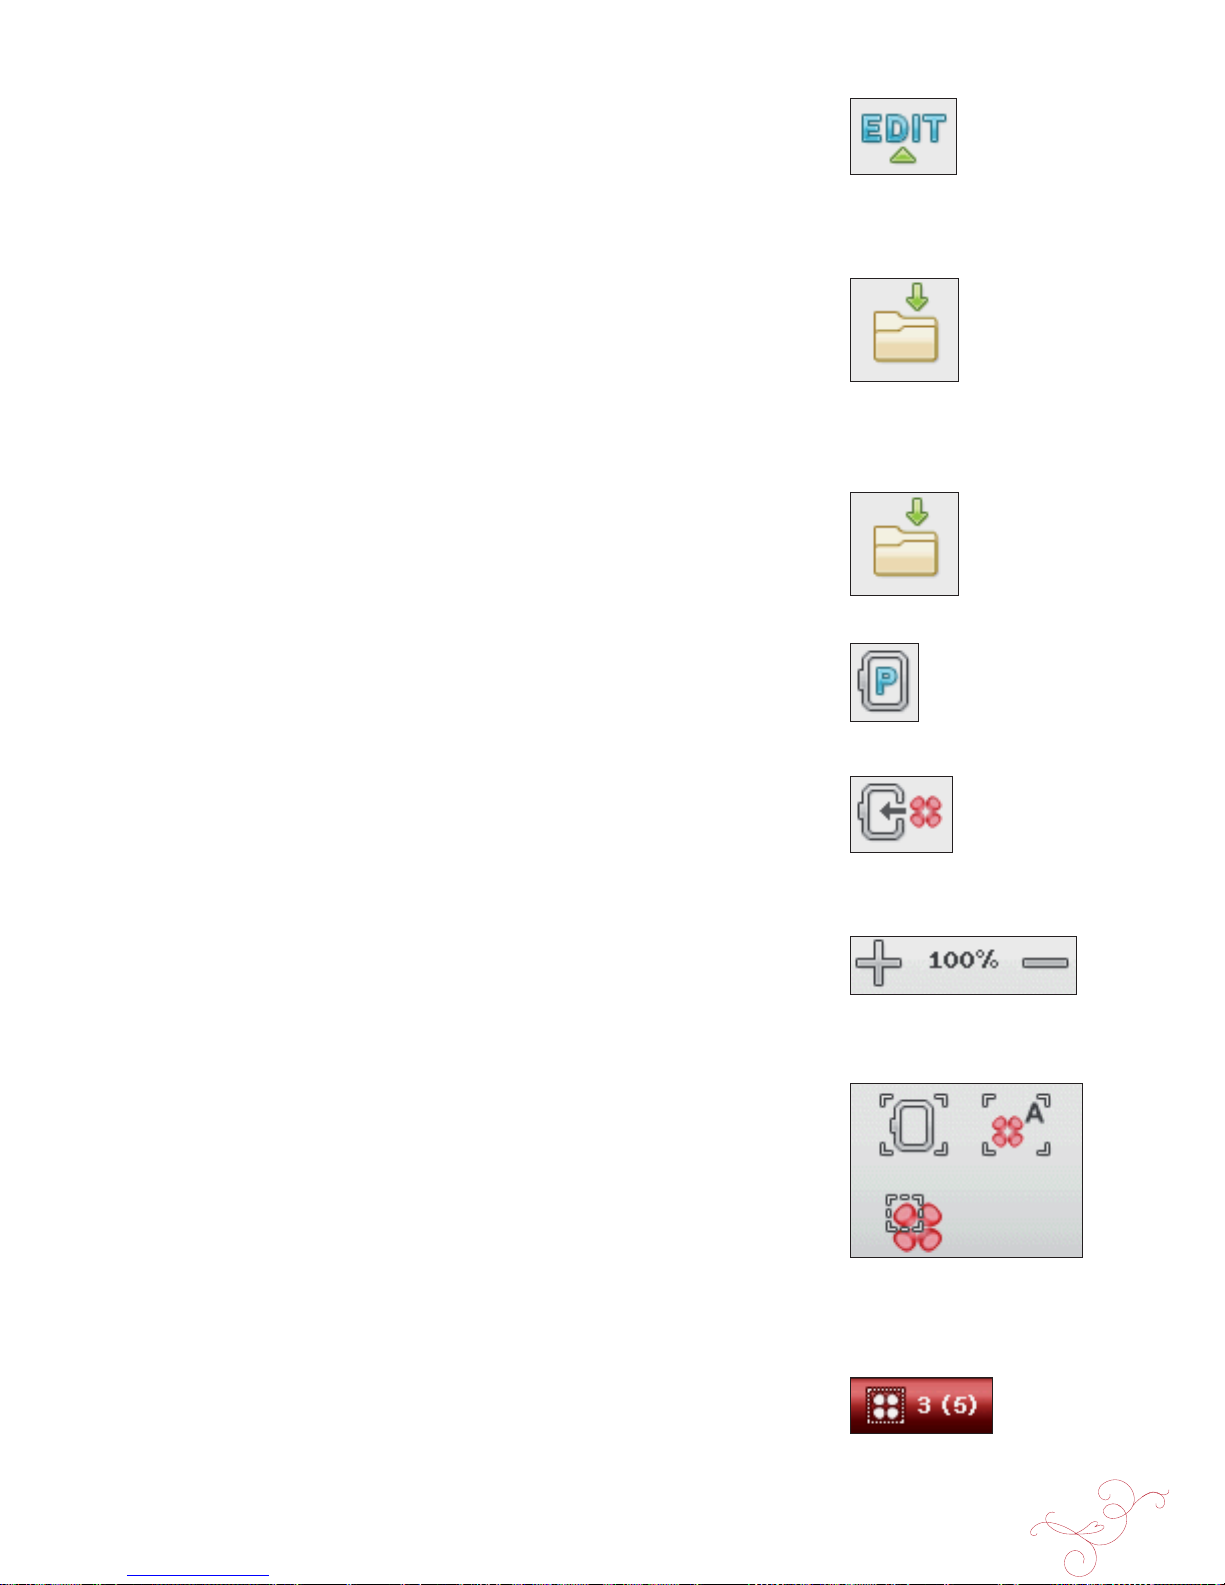
EMBROIDERY EDIT 7:7
EDIT STITCH PROGRAM
If you touch the Edit Stitch Program icon, a window will open so you can
edit a stitch program that you have created. You can insert new stitches or
delete stitches. If you have programmed stitches in Embroidery Mode, you
can save the stitches as a part of a design, and they can only be stitched in
embroidery mode.
To Save a Stitch Program in Embroidery Mode
Touch the Start Menu, touch the Stitch Menu. Program your stitch and
touch OK in the lower right corner of the screen. You will now go back
to Embroidery Edit. Touch the Save to My Designs icon to save the stitch
program in My Designs. A stitch program made in Embroidery Mode will not
be able to open in the sewing mode.
Read more about how to program a stitch in chapter 5.
SAVE EDITED DESIGN
Touch the Save to My Designs icon to save your edited design or design
combination. In the window that opens, select where you want to save the
design. Select My Designs, My Files or an external device. Designs saved in
My Designs are available through the Designs menu on the Extended Toolbar.
PARK POSITION
Touch the Park Position icon to move the embroidery arm to Park Position
for storing the embroidery unit.
MOVE T O HOOP
Touch Move to Hoop to move any design that is outside the hoop area into
the hoop area. The design will be placed at the outer most edge of the hoop.
ZOOM
Zoom in/Zoom out
Zoom in or out of the embroidery À eld. Use Zoom In (+) to get a close-up
of an area within the embroidery design. Use (-) to Zoom Out.
Zoom to Hoop
Zoom to Hoop will adjust the embroidery À eld to À t the selected hoop.
Zoom to All
Zoom to All will show all the design(s) in the embroidery combination.
Zoom to Box
Touch and drag your stylus in the embroidery À eld on the screen to create a
box. The screen zooms to show that speciÀ c area.
Note: As you Zoom In your design gets very large. To locate a speciÀ c part of your design
touch Pan. Touch and drag or use the control arrows to À nd the part you wish to work with.
STITCH-OUT ORDER OF SELECTED DESIGN
Designs are stitched out in the order they are loaded to Embroidery edit.
When working with several designs at a time it can be useful to know in which
order they will be stitched out. Select a design by touching it to see which
stitch out number it has. 3 (5) for example means that the selected design is
the third out of À ve designs to be stitched out.
Zoom to
Hoop
Zoom to
All
Zoom to
Box
Page 82
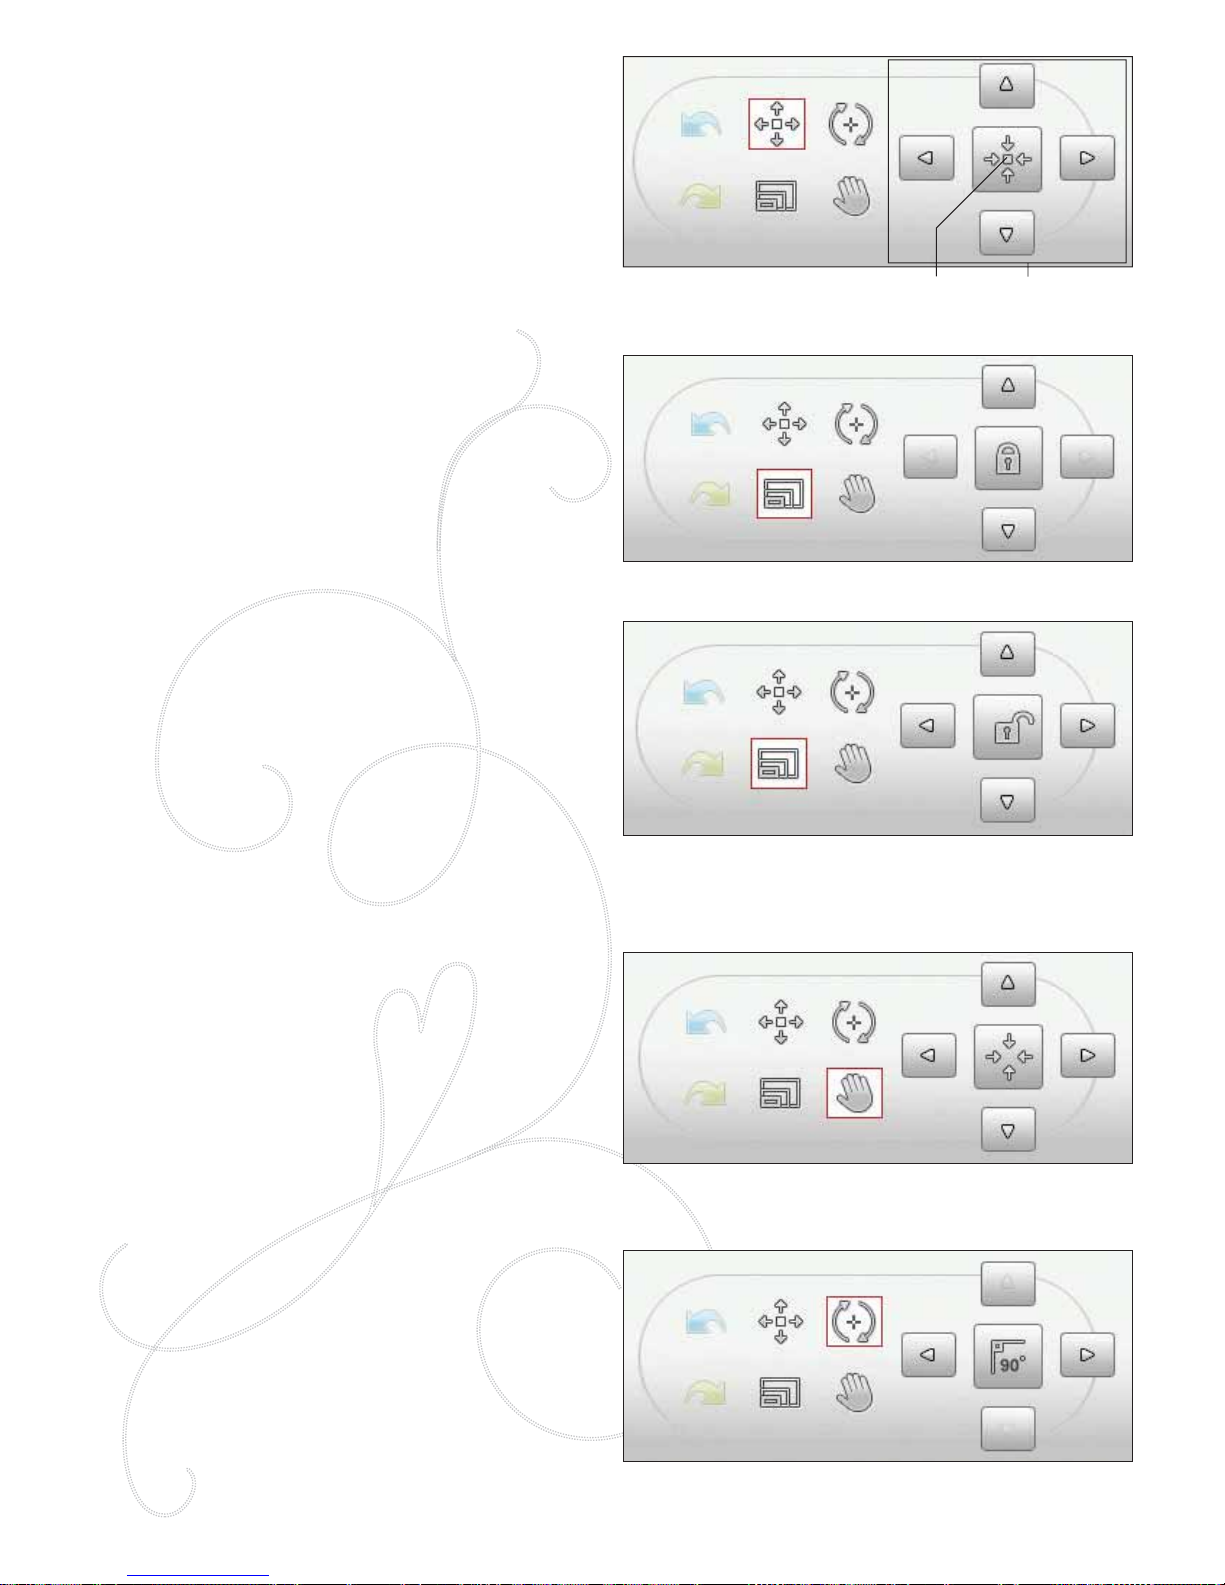
7:8
TOUCH FUNCTIONS
A selected design has a red box around it. A selected
embroidery font text has a blue box around it. T o select a
design touch it on the screen. You can use your stylus to make
adjustments directly on screen by touching and dragging in
the embroidery À eld. You can Pan, Position, R otate and Scale,
depending on which touch function is active . You can also use
the arrows in the Control to À ne tune.
Position
When Position is activ e , y ou can move the selected design(s)
anywhere in the embroidery À eld. The numbers above the
Control show, in millimeters, the designs current horizontal
and vertical position from the center of the hoop.
Touch the Control Center icon and the design(s) will be
moved to the center of the hoop.
Scale
When Scale is active, you can increase or decrease the
selected design or a group of designs by 20%. By default,
the proportions are locked. This is indicated with a closed
padlock in the Control Center icon. To unlock, just touch
the padlock. Height and width can now be changed
individually.
If you move the stylus on the screen towards the center of
the selected design(s), the size will decrease. If you move
the stylus from the center of the selected design(s), the size
will increase. Use the Control to À ne tune.
Note: To increase or decrease a design more than 20%, use the Resize
function.
Pan
When Pan is active, you can pan the embroidery À eld in the
zoomed view.
Touch the Control Center icon to center the view over the
hoop.
Rotate
When Rotate is active, the selected design(s) will be rotated
around the center point of the selected design(s).
Use the arrows in the Control to rotate the design(s) in one
degree increments. Each touch of the Control Center icon
will rotate the design(s) 90 degrees clockwise.
Above the Control you can see the angle in degrees that the
design(s) has rotated from its original position.
Position
Scale
Pan
Rotate
Control
Center
Control
Page 83
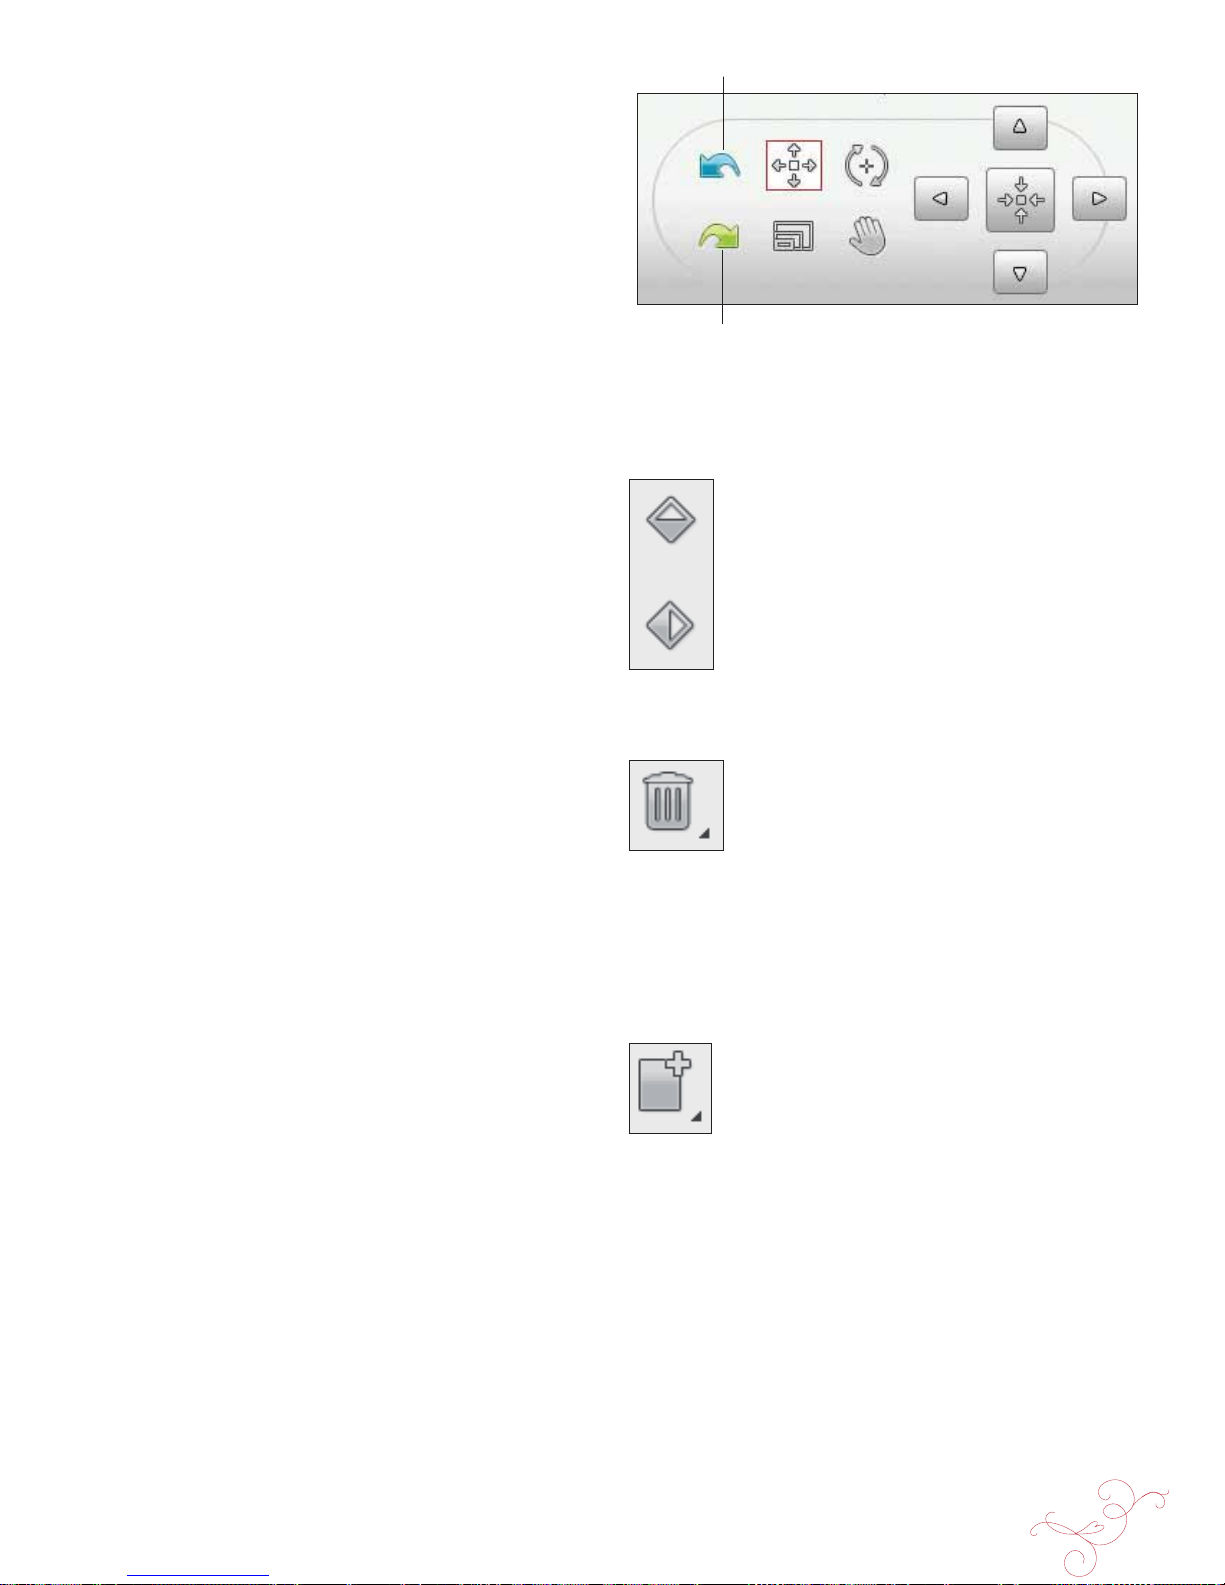
EMBROIDERY EDIT 7:9
Undo
Redo
UNDO
Touch the arrow pointing left to undo your latest design
adjustment. Touch repeatedly to step back through your
adjustments.
Note: Not all adjustments can be undone. The arrows will be greyed
out if undo is not possible.
REDO
Redo is activated when Undo is touched, so you can step
forward again through your adjustments.
MIRROR SIDE-TO-SIDE
AND END-TO-END
To mirror a design horizontally, touch the Mirror Side-toSide icon. To mirror vertically, touch the Mirror End-toEnd icon.
DELETE
When you touch the Delete icon, the selected design(s) will
be deleted from the embroidery À eld. If more than one
design is selected, a pop-up message will ask you to conÀ rm
the deletion.
Touch & Hold the Delete icon to delete all the designs in
the embroidery À eld. A pop-up message to conÀ rm the
delete all designs will appear.
DUPLICATE
Touch the Duplicate icon to make a copy of the selected
design(s).
If you want more than one copy, Touch & Hold the icon
and a pop-up message will open where you can enter the
desired number of copies.
See 7:10-7:11 for information about selecting and
deselecting designs.
Mirror Side-to-Side
Mirror End-to-End
Page 84
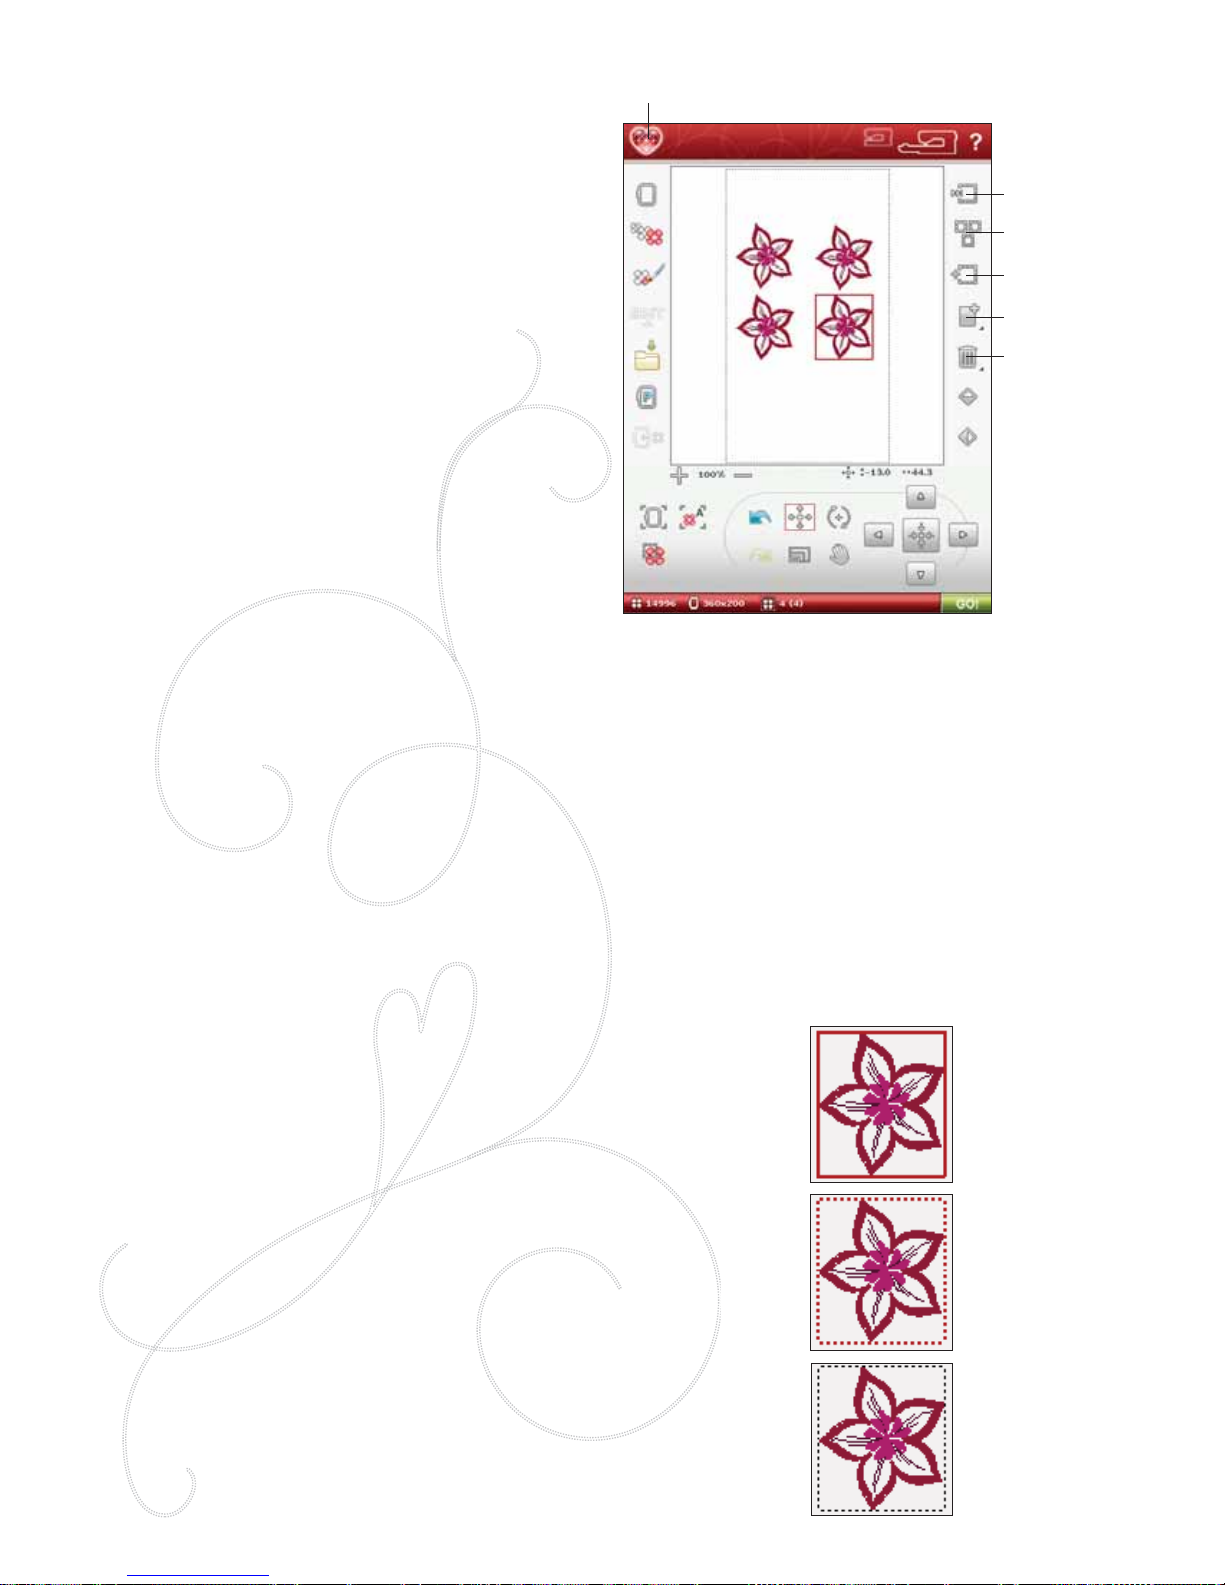
7:10
HOW T O SELECT DESIGNS
When loading designs into Embroidery Edit, the last design
loaded is selected by default. A selected design has a red
box around it. A selected embroidery font text has a blue
box around it.
Select one Design
To select one design you can either touch the design on
the screen or touch the Step Through Designs icon. The
Step Through Designs icon allows you to select one of the
designs on your screen if you wish to alter it in some way.
Every time you touch the Step Through Designs icon, you
will select the next design in the order in which they were
loaded.
1. In Embroidery Edit, touch Start on the toolbar to
open the Extended toolbar. The Design Menu will
open.
2. Select a design from the dropdown list by touching it.
3. Touch the Duplicate icon three times. The last design
will have a red box around it which means that it is
selected.
4. If you want to select the À rst design you inserted,
touch the Step Through Designs icon. Every time you
touch that icon, you will move to the next design in the
order they have been loaded.
5. Once you have selected the design you want, you can
delete, duplicate, position, scale, mirror, resize, and/
or rotate it. Only the design that is selected that will be
affected by your changes.
Select All
6. If you want to select all designs, simply touch the
Select All icon. All the designs on your screen will
be selected. You can now move, delete, duplicate,
position, scale, mirror, resize and or rotate them.
1. Selected
Design(s) have a
red box around
them.
2. Marked and
Selected Design(s)
have a red dotted
box around them.
3. A black dotted
box around a
design means it is
marked and not
active.
Step Through
Designs
Select All
Add/Remove
Selection
Start Menu
Duplicate
Delete
ADVANCED SELECTION
Selection Modes
There are three different ways a design can be chosen on the screen. This gives you
the opportunity to select a subset of the loaded designs and apply changes only to
those designs.
1. Selected design (1) - The design is marked with a solid red line. You can make
changes to the design(s). You can scale, rotate, resize and edit the selected
design.
2. Marked and Selected - The design is marked with a dotted red line. You are
able to make changes to the marked and selected design. You can remove this
design from the selected designs by pressing the Add/Remove Selection icon.
3. Marked design - When two or more designs are on your screen, you are able to
mark a design. The design is marked by a dotted black line.
It will not be affected by changes such as scale and rotation. When you select
the Add/Remove Selections icon, the black dotted box turns red. Your design
is now marked and selected.
Page 85
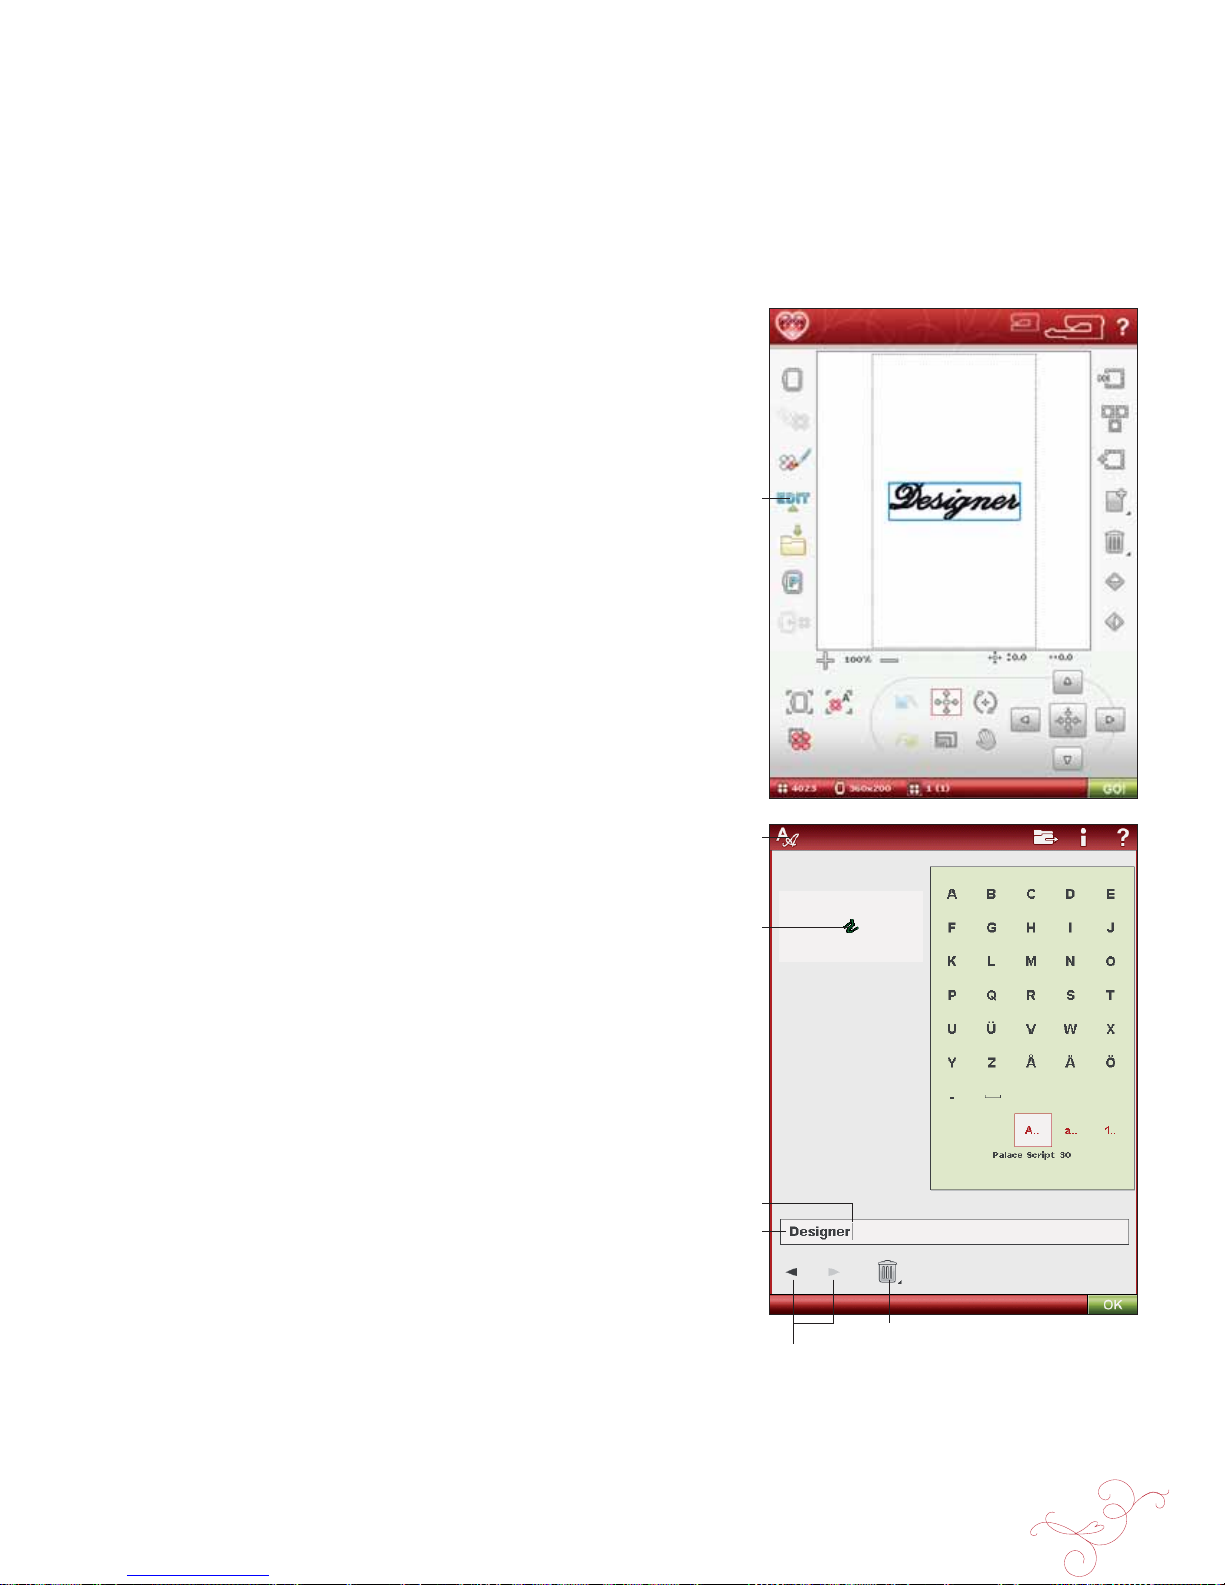
EMBROIDERY EDIT 7:11
Delete
Arrows
Add/Remove Selection
If you have loaded several designs and want to change only
a few of them, you can use the Add/Remove Selection
function. Touch the Add/Remove Selection icon to activate
the function. Mark the designs by touching them to add
them to the selection.
You can also use this function after the Select All function
to remove one or several designs from a group. Then mark
the designs you want to remove and click on Add/Remove
Selection to remove them from the selection.
PROGRAM EMBROIDERY FONTS
To open an embroidery font, go to Embroidery Edit and
touch the Start menu. The Embroidery fonts are below the
stitch fonts.
Choose the Font menu on the Extended Toolbar and
select an embroidery font from the list. When selecting
an embroidery font in Embroidery fonts list, the Program
Embroidery Font window will open automatically. You can
also open this window if you want to adjust an existing text
already in Embroidery Edit. In that case, select the text and
touch the Edit Stitch icon.
Note: If the text is created of stitch fonts, the Program window will
open instead.
To use the Editor
Use the stylus and touch the letters you want to add to
the text. The text is shown in the text area with the cursor
at the active letter. Use the arrows to step forward and
backward.
You can change the font and the size of the entire text by
touching the Change Font icon. Select a different font/
font size and the entire text you have written will change to
the new font/font size. A preview of the selected font is
shown in the Font Preview area.
Add a Letter into a Text
Use the arrows to move the cursor to where you want to
add a letter. Touch the letter and it will be inserted at the
cursor position.
Delete a Letter
To delete one letter, place the cursor after the letter to be
deleted. Touch the Delete icon. If you want to delete all the
text you have written, Touch & Hold on the Delete icon. A
pop-up message will ask you to conÀ rm the deletion.
Edit Stitch
Program
Change Font
Font Preview
Text area
Cursor
Page 86
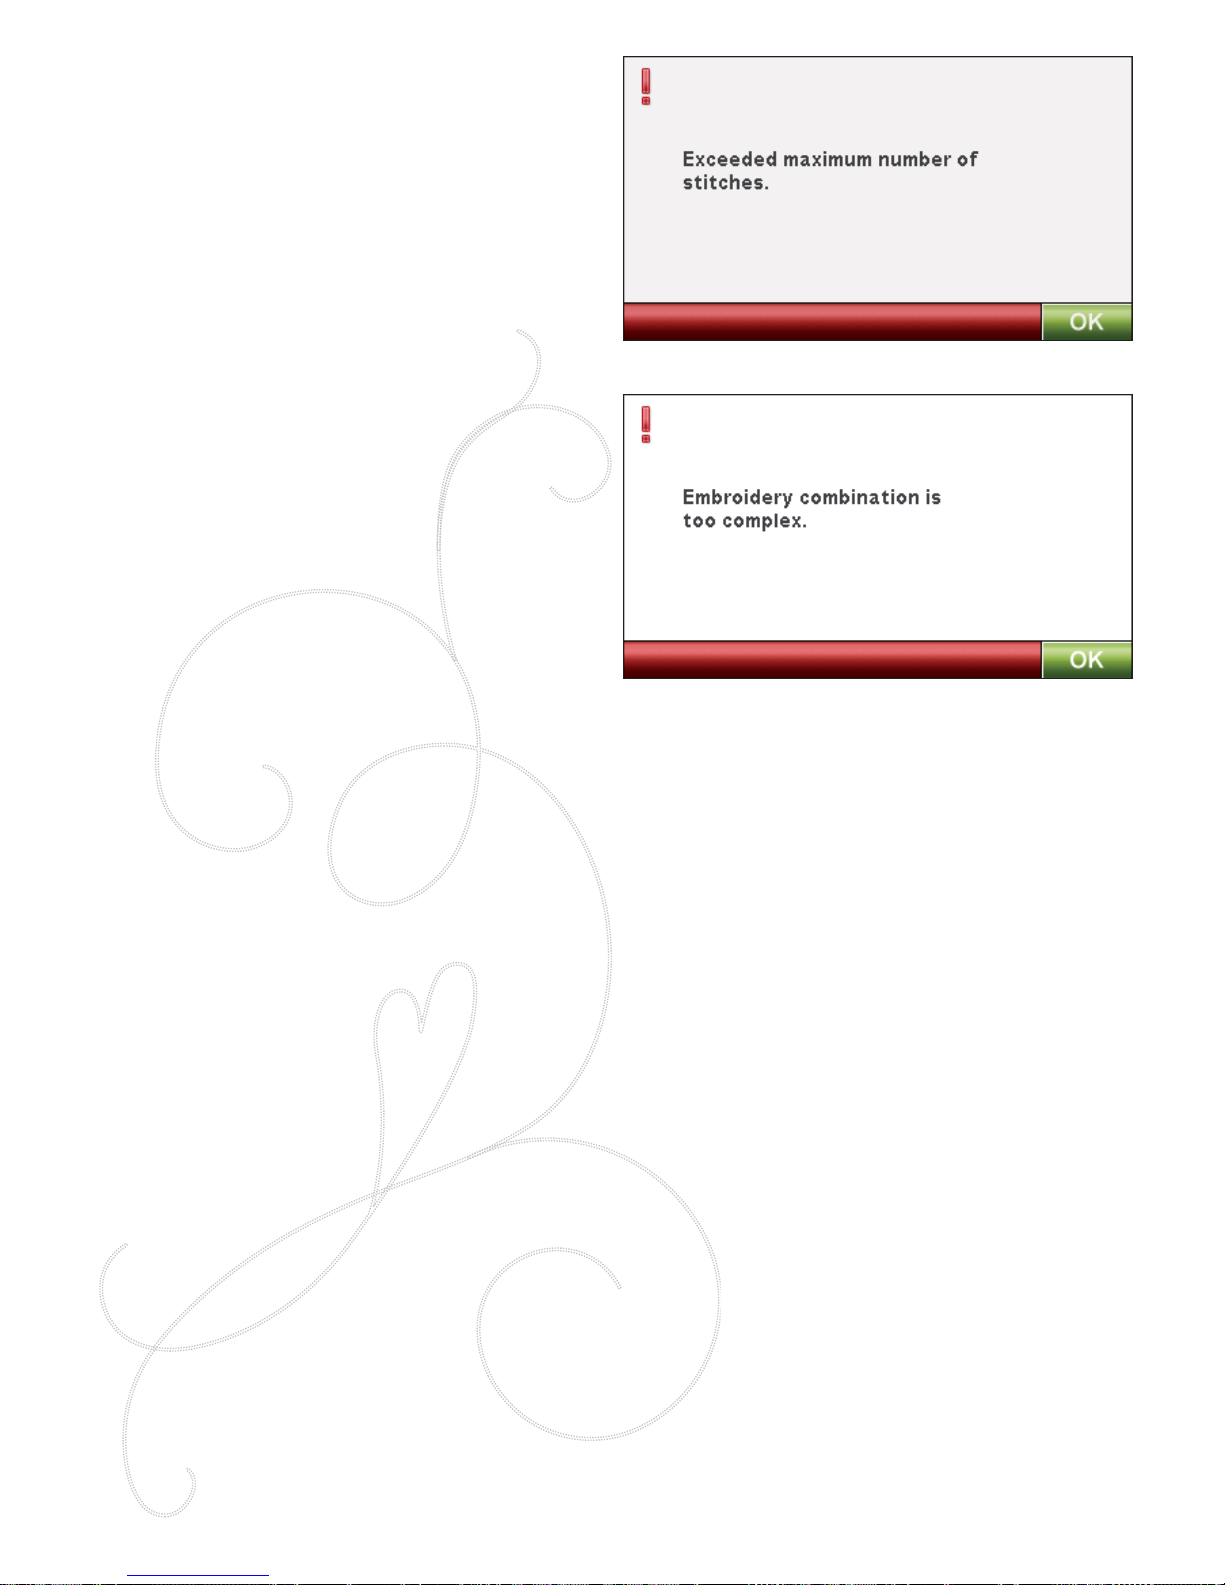
7:12
EMBROIDERY EDIT POP-UP MESSAGES
Exceeded maximum number of stitches
The design combination you are trying to make contains
too many stitches. Your design combination can have a
maximum of approximately 500,000 stitches.
Embroidery combination is too complex
This pop-up message appears for one of the following
reasons:
• The design combination contains too many color
blocks.
• There are too many designs in the combination.
Page 87
EMBROIDERY STITCH-OUT
8
Page 88
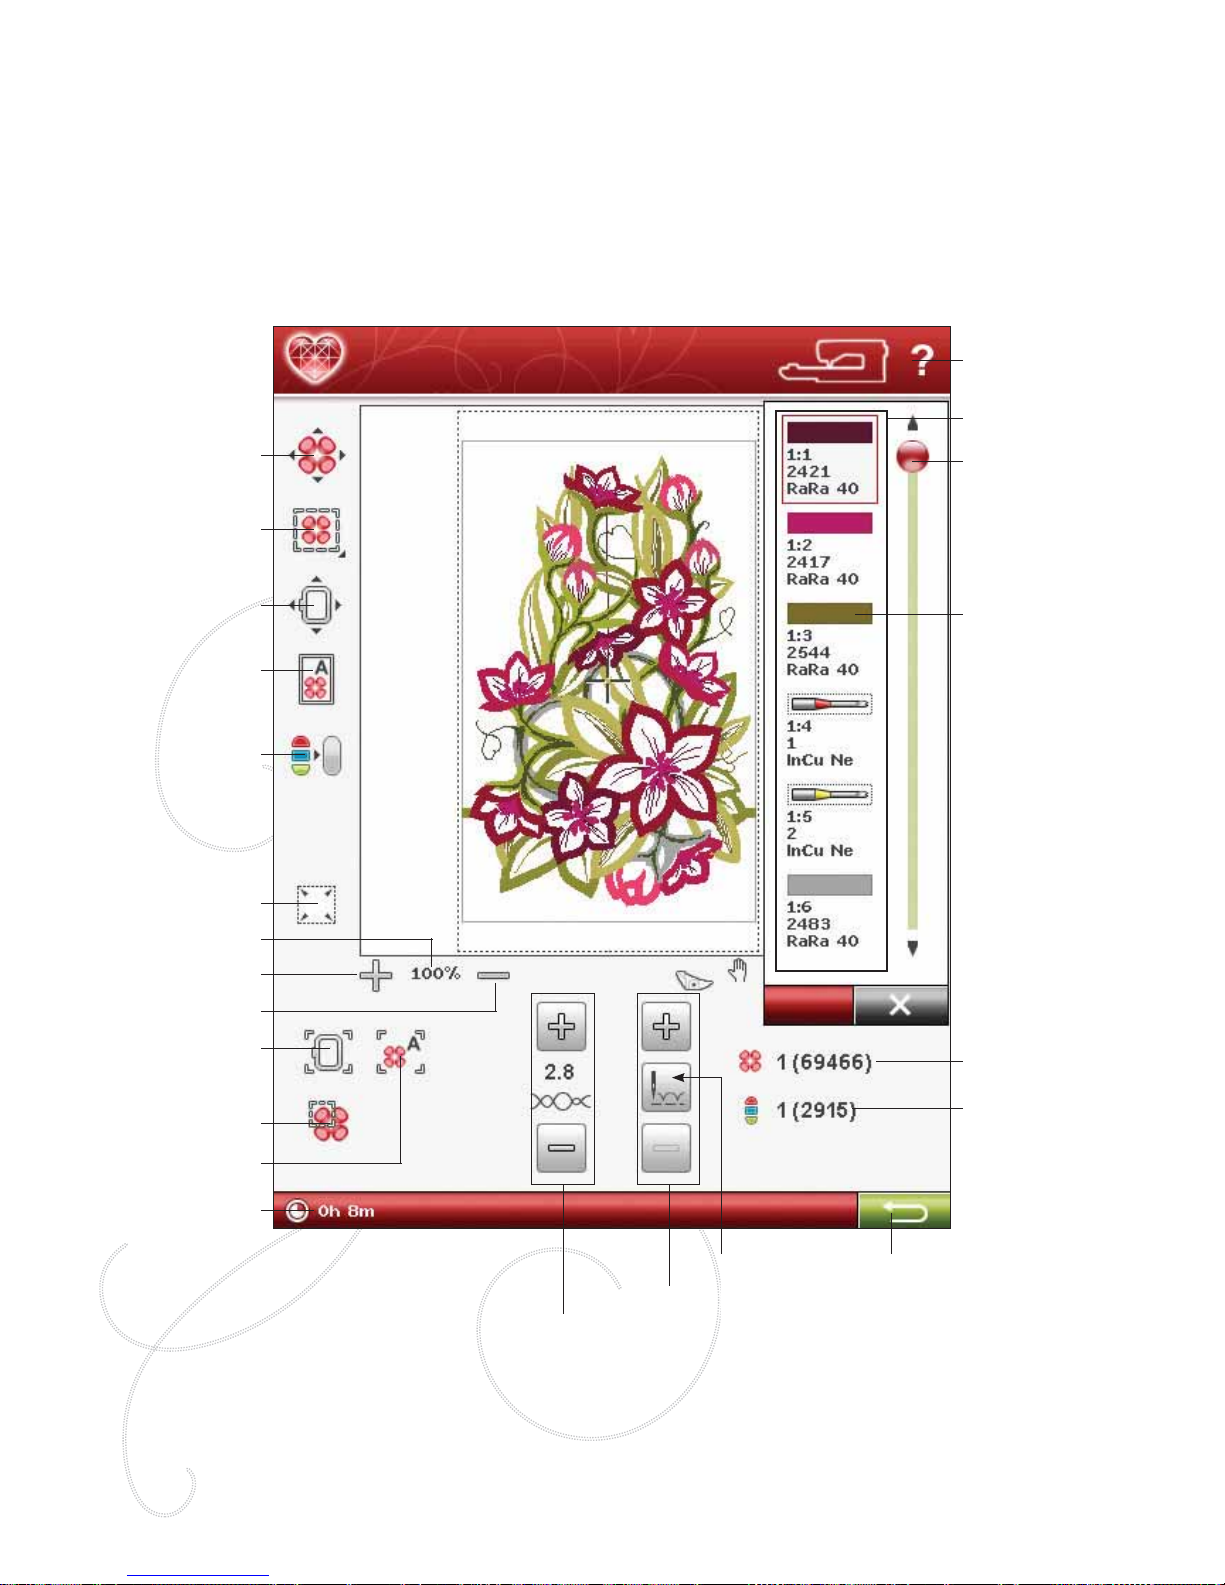
8:2
EMBROIDERY STITCH-OUT - OVERVIEW OF ICONS
TO ENTER EMBROIDERY STITCH-OUT
To embroider your design(s), enter Embroidery Stitch-Out by touching the GO icon in the lower right corner of the
Embroidery Edit window. The embroidery unit must be connected and the correct hoop attached when the machine
enters Embroidery Stitch-Out.
Design Positioning
Monochrome
Move Hoop
Full screen
Corner Check
Baste in Hoop
Quick Help
Scroll bar
Number of stitches
in current Color
Block
Number of stitches
in embroidery
combination
Color Block
Zoom Out
Zoom In
Zoom to Hoop
Zoom to All
Zoom to Box
Return to
Embroidery Edit
Thread T ension
Step Stitch-by-Stitch
Time left in Color
Block
Color Block List
Current Zoom
Go to Stitch
Page 89
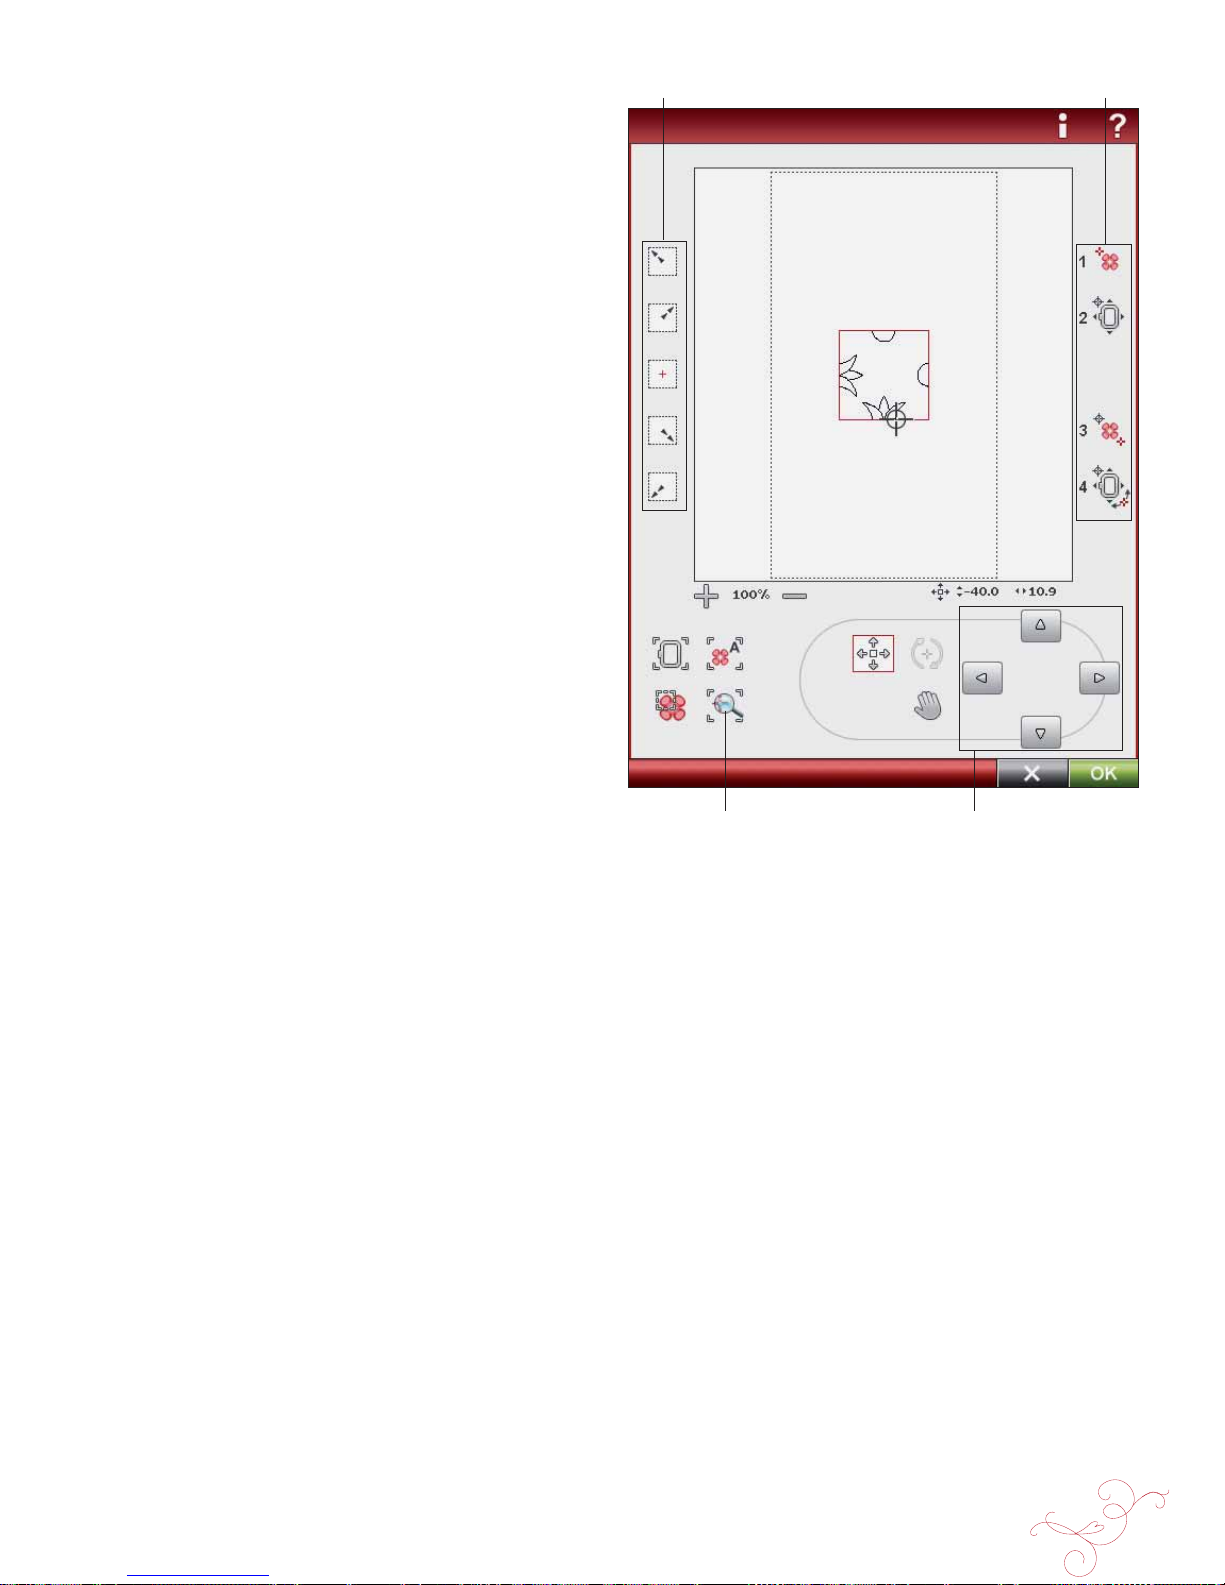
EMBROIDERY STITCH-OUT 8:3
Set needle
point icons
ControlZoom to cursor
Design Positioning
Wizard – Steps 1-4
DESIGN POSITIONING
Touch the Design Positioning icon to open the Design
Positioning screen. Design Positioning allows you to place
a design on an exact location on your fabric. When adding
one design to a previously embroidered design, or when
matching a design to a patterned fabric, Design Positioning
is very useful.
Note: If you just want to move your embroidery in Embroidery
Stitch-Out, open the Design Positioning window and move your design
using the Control or your stylus.
Use Zoom and Pan to be sure that you are placing the
design exactly where you want it. Fine tune with the arrows
in the Control.
Zoom to Cursor
Maximizes the zoom and pans the embroidery area so the
cursor position is centered on the screen.
Set needle point
Move the needle point to any of the selected corners or the
center of the designs. Set needle point can be used to trace
the design À eld by touching each of the four corner icons.
Page 90
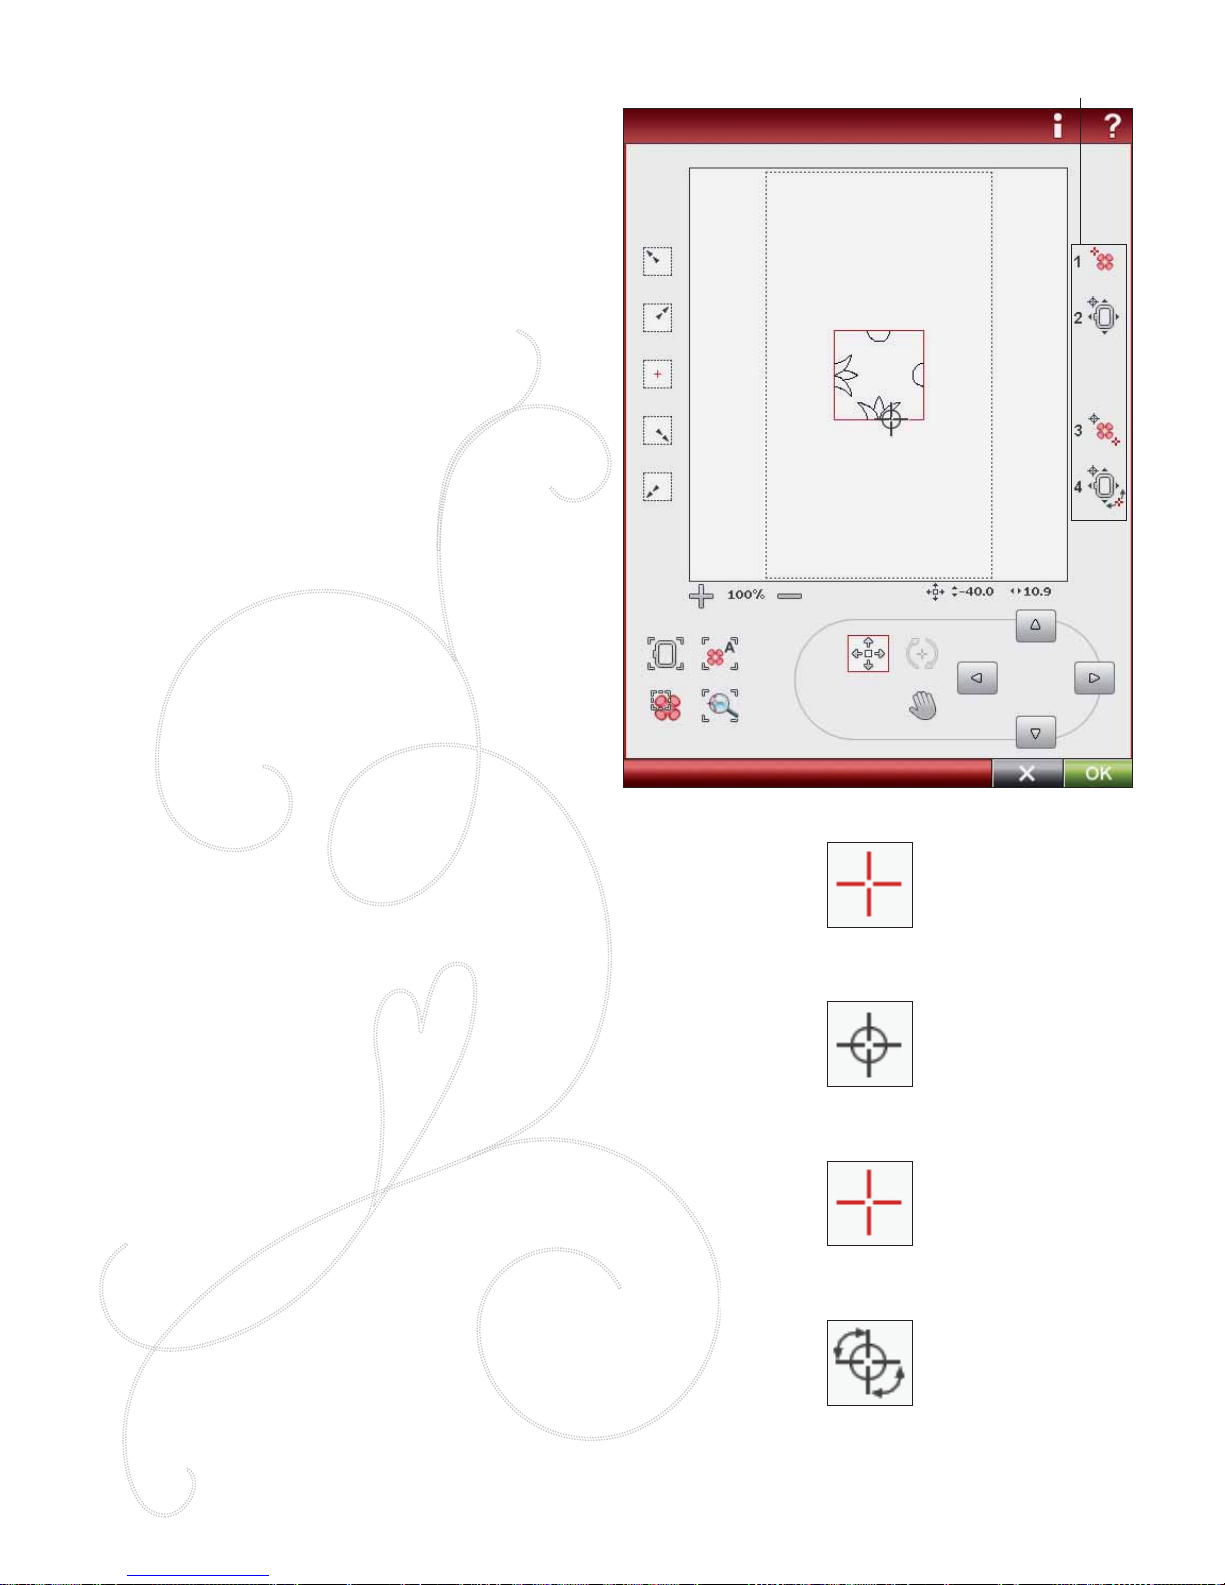
8:4
1
4
3
2
HOW TO USE DESIGN POSITIONING
Stitch out design DR_053.vp3 in a large hoop. When
embroidery is À nished, touch X to keep design on the
screen. Touch Design Positioning icon to position the next
design.
Design Positioning Wizard
Touch the numbered Design Positioning icons to position
your design step by step. For information about a step,
touch Quick Help and the numbered icon.
1. To select a Locking Point on Screen
Touch number 1 to select a locking point. Place the red
cursor where you would like the locking point to be in your
embroidery.
2. Move Locked Point on Fabric
Touch number 2. The red cursor will be locked on the
screen. It will change color from red to grey with a ring
around the center of the locking point. Now you can place
the design exactly where you want it on the fabric by using
the stylus or the Control. Watch the hoop as it moves when
you use the arrows to get the design placed exactly where
you want it. The position of the needle will show where the
locking point will be placed on the fabric. Use the Control
to À ne tune.
Note: If you are happy with the placement of your design, touch OK
in the bottom right corner. If you also need to adjust the angle of the
design, continue with step 3.
3. Set Matching Point on Screen
Touch number 3 to activate the matching point. You can
to check a second position within the design to make
sure your design is lined up properly and make further
adjustments if necessary.
Watch the cursor on the screen to select a matching point.
Place the red cursor where you would like the matching
point to be in your embroidery. The hoop will move,
so that the needle indicates the matching point. Use the
Control to À ne tune.
4. Rotate Design on Fabric
Touch number 4. The rotate function is automatically
selected. Use the stylus or Control to rotate the design
around the locking point. Look at your fabric and rotate
the design until the needle is exactly where you want the
matching point. Touch OK.
Design Positioning
Wizard – Steps 1-4
Page 91
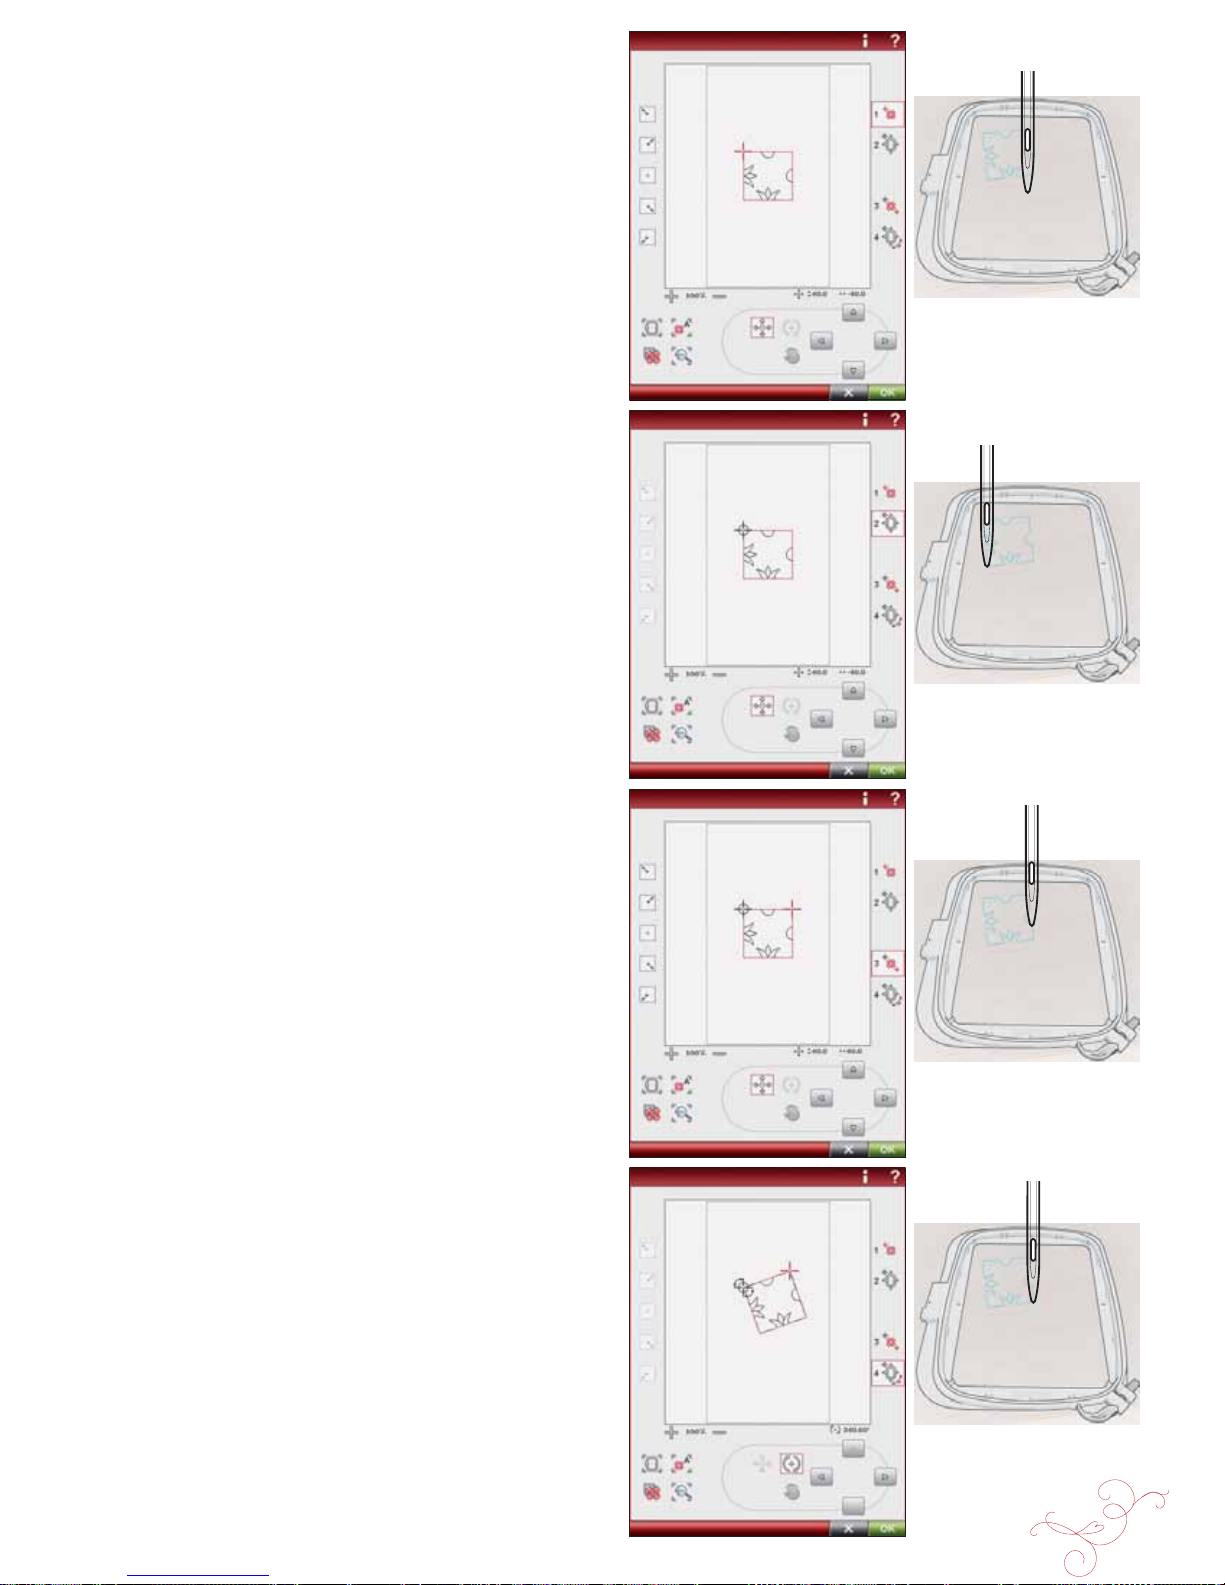
EMBROIDERY STITCH-OUT 8:5
DESIGN POSITIONING EXERCISE
1. Select Design DR_053.vp3 and embroider one in the
upper left corner of the hoop. Touch number 1. Use
the stylus or Control Arrows to move the cursor to
the upper left corner of the design. Touch Zoom to
Cursor to maximize the zoom so that you will be able
to place the cursor accurately on the design. Select Pan
to move the design on the screen without moving the
cursor. Reselect Position when you want to move the
cursor.
2. Touch number 2. The cursor is now locked. Move
the locked point to the upper left corner of the
embroidered design. Use the Position function and
the Control to move the cursor. Watch the hoop
move until the needle is exactly above the point where
you want the embroideries to connect. Once you are
satisÀ ed, touch OK to close the Design Positioning
window and start embroidering.
3. If you want to line up the design with the previously
embroidered design, you can select a second matching
point. Touch number 3 and move the red cursor to a
point where you want the second matching point to be.
Watch the screen and zoom in as much as you can so
that you will be able to place the cursor accurately.
4. Touch number 4 to rotate the design so that it lines up
with the previously embroidered design on your fabric.
Check that the needle is in the exact position on the
fabric.
5. Touch OK to close Design Positioning and start
embroidering.
Page 92
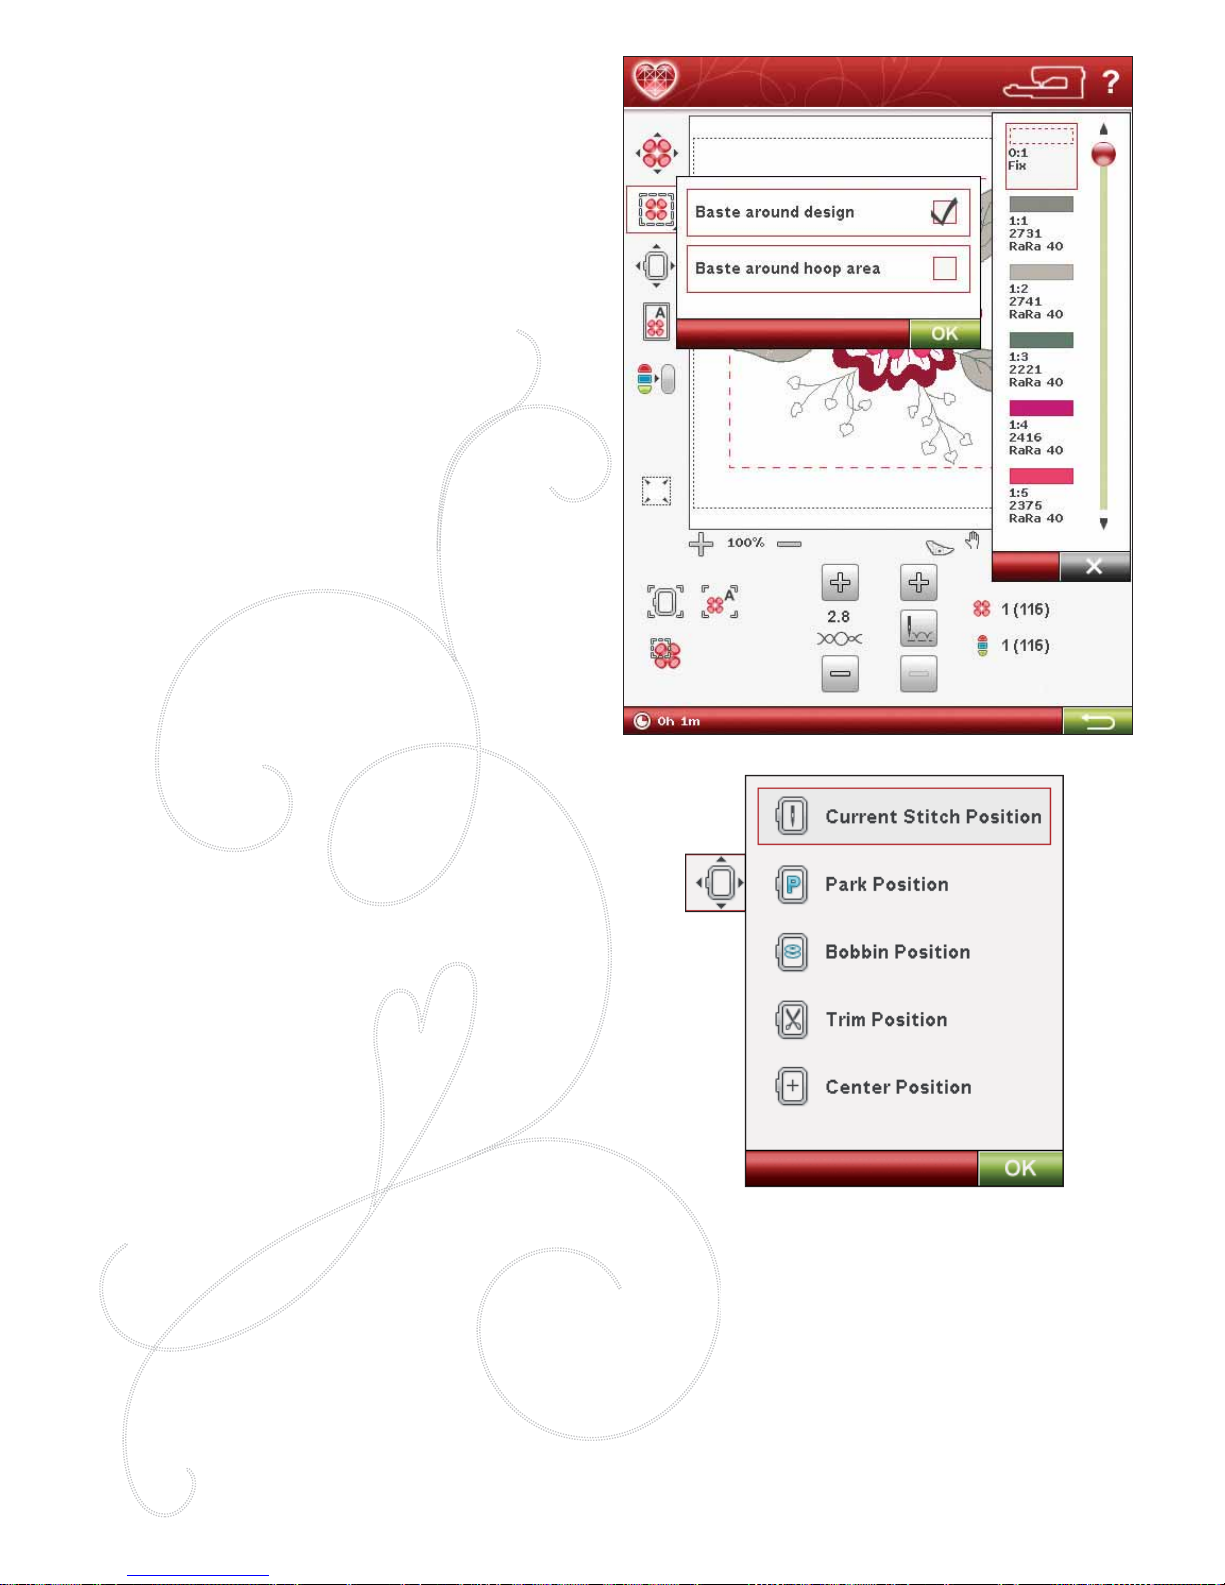
8:6
BASTE IN HOOP
Basting enables you to secure your fabric to a hooped
stabilizer. It is especially useful when the fabric to be
embroidered cannot be hooped. Basting provides support
for stretchy fabrics.
Touch the Baste in hoop icon to add a basting stitch around
the design. Touch and hold to open the embroidery basting
window.
Baste around design
Select Baste around design to add a basting stitch around
the design, outlining the area where the design will be
placed on the fabric.
Baste around hoop area
Select Baste around hoop area to add a basting stitch
around the inside edge of the hoop.
You can select both basting options to add additional hold
for certain fabrics and techniques.
Note: The baste stitches will be added in the color block list, with the
possibility to step stitch by stitch and step in and out of the baste color
block/s. The baste color block/s will disappear from the color block
list when stitched out.
Note: Basting can only be enabled when positioned at the À rst stitch in
the embroidery.
Note: Touch the FIX button on your machine to activate or deactivate
the selected basting techniques.
MOVE HOOP
Use the Move Hoop functions to move the embroidery
arm to different positions.
Current Stitch Position
When you want to return to the current stitch position
and continue embroidering where the embroidery was
interrupted, touch the Current Stitch Position icon. You
can also press the Start/Stop button once to return to the
current stitch position and start to embroider.
Park Position
When you have À nished your embroidery, remove the
hoop and select Park Position. The embroidery arm will be
placed in the correct position for storage.
Use the Park Position when you want to move the
embroidery arm out of the way for sewing.
Note: It is important that the hoop is removed before selecting Park
Position to prevent damage.
Bobbin Position
To make it easier to change the bobbin, touch Bobbin
Position. The hoop will move away from you, allowing you
to open the bobbin cover and replace the bobbin.
Trim Position
Trim Position will move the hoop towards you making
it easier to trim your jump stitches and trim fabric for
specialty techniques.
Note: You can also touch the Needle Stop Up/Down button on your
machine to move the hoop to trim position.
Center Position
Use the Center Position if you want to check where the
center position of the design will be placed on the fabric.
Page 93
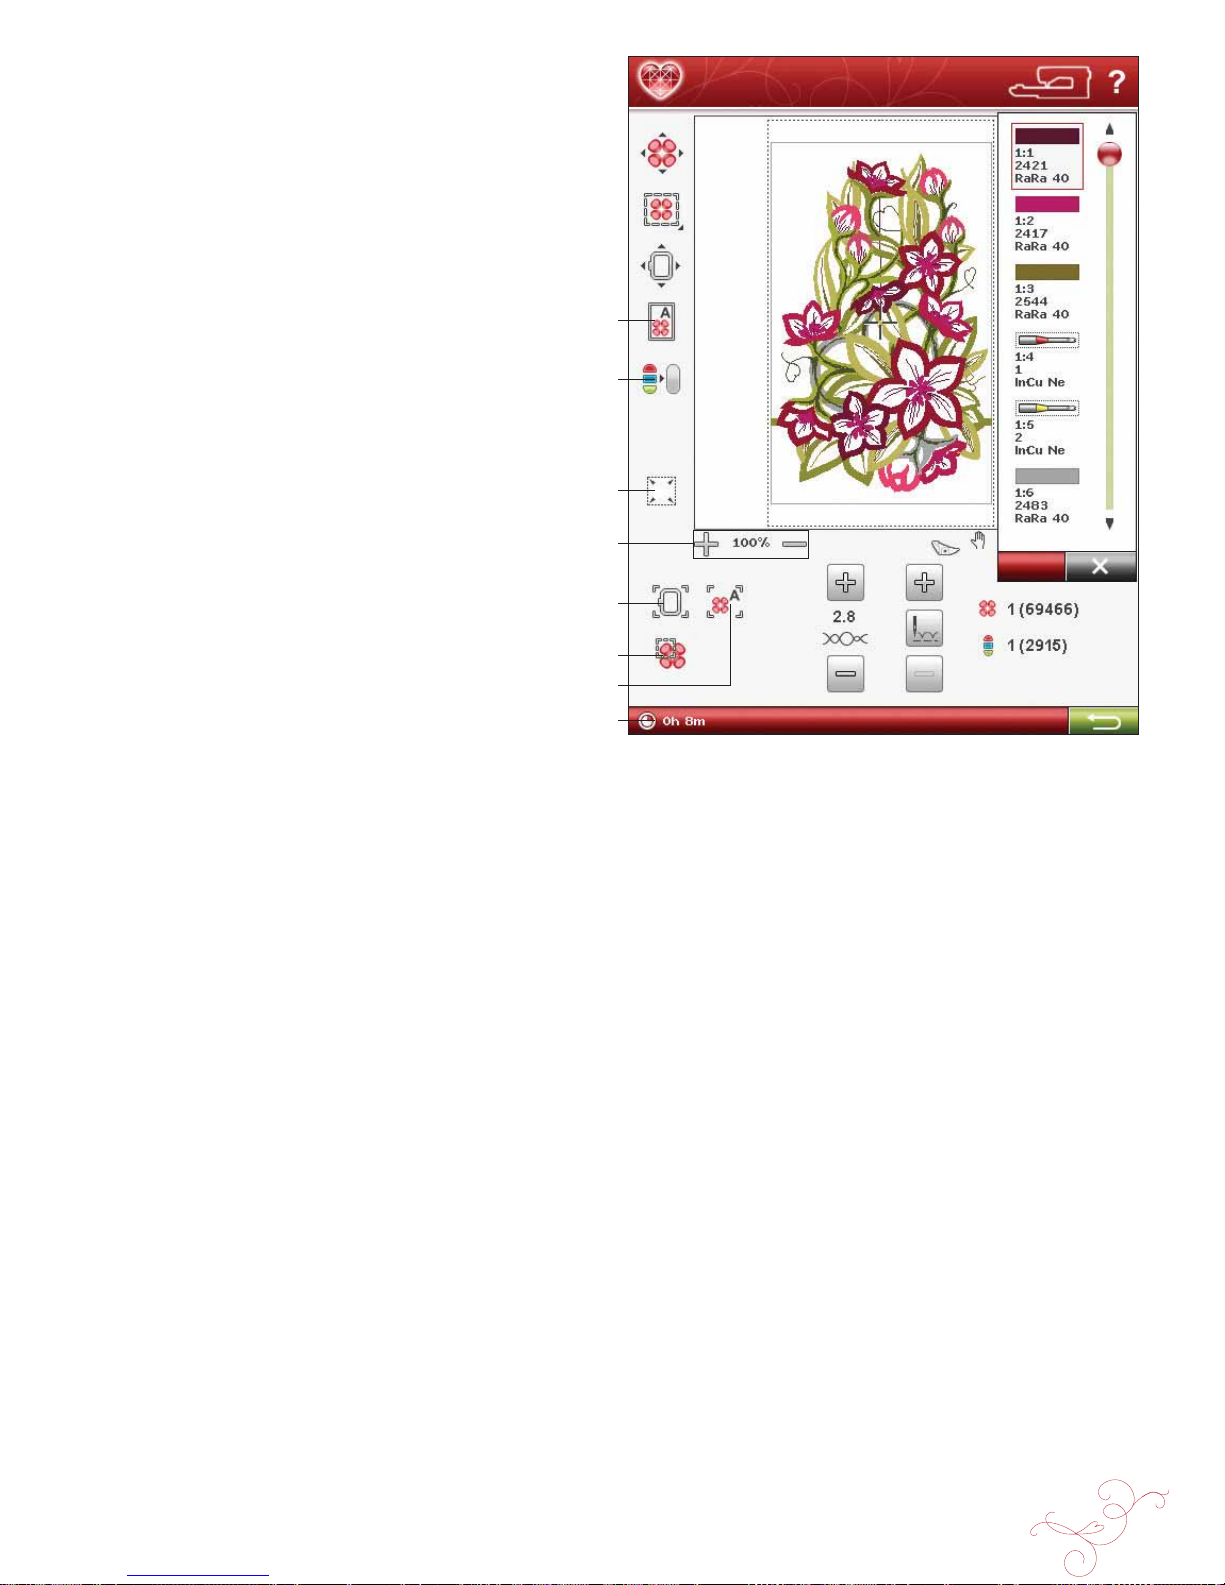
EMBROIDERY STITCH-OUT 8:7
FULL SCREEN
To view your design as large as possible, use the full screen
function. The embroidery will À ll the whole screen. To
close, touch the screen once.
MONOCHROME
Touch the icon to activate monochrome embroidery. All
designs are shown in a grey color and the machine does not
stop for color block changes. To deactivate monochrome
embroidery, touch the icon again.
Note: If the Automatic Jump Stitch Trim function is selected in the
SET Menu it will still be active between the color blocks.
Note: You can also touch the STOP button on your machine to stitch
out your design in one color.
CORNER CHECK
Corner Check can be used to trace the four corners of the
design so that you can see where the design will be on the
fabric. Touch the corner check icon. Each time you touch
the icon it will move the hoop in the following order: upper
left, upper right, lower right, lower left and then go back to
the current stitch position.
Full screen
Monochrome
Corner check
Zoom In/Out
Zoom to Hoop
Zoom to Box
Zoom to All
Remaining embroidery time
by color
ZOOM
Zoom In/Out
Use to zoom in or out of the embroidery À eld. Use Zoom In
(+) to get a close-up view of an area within the embroidery
design. Use (-) to Zoom Out to view the entire design.
Zoom to Hoop
Zoom to Hoop will adjust the embroidery À eld to À t the
selected hoop.
Zoom to All
Zoom to All will show all the design(s) in the embroidery
combination.
Zoom to Box
Touch and drag your stylus in the embroidery À eld on the
screen to create a box. The screen zooms to show that
speciÀ c area.
REMAINING EMBROIDERY TIME BY
COLOR
An estimation of the remaining embroidery time for the
current color block is displayed in hours and minutes in the
lower left corner of the screen. If Monochrome is activated
(see above), the estimated remaining embroidery time for the
whole embroidery is displayed.
Page 94
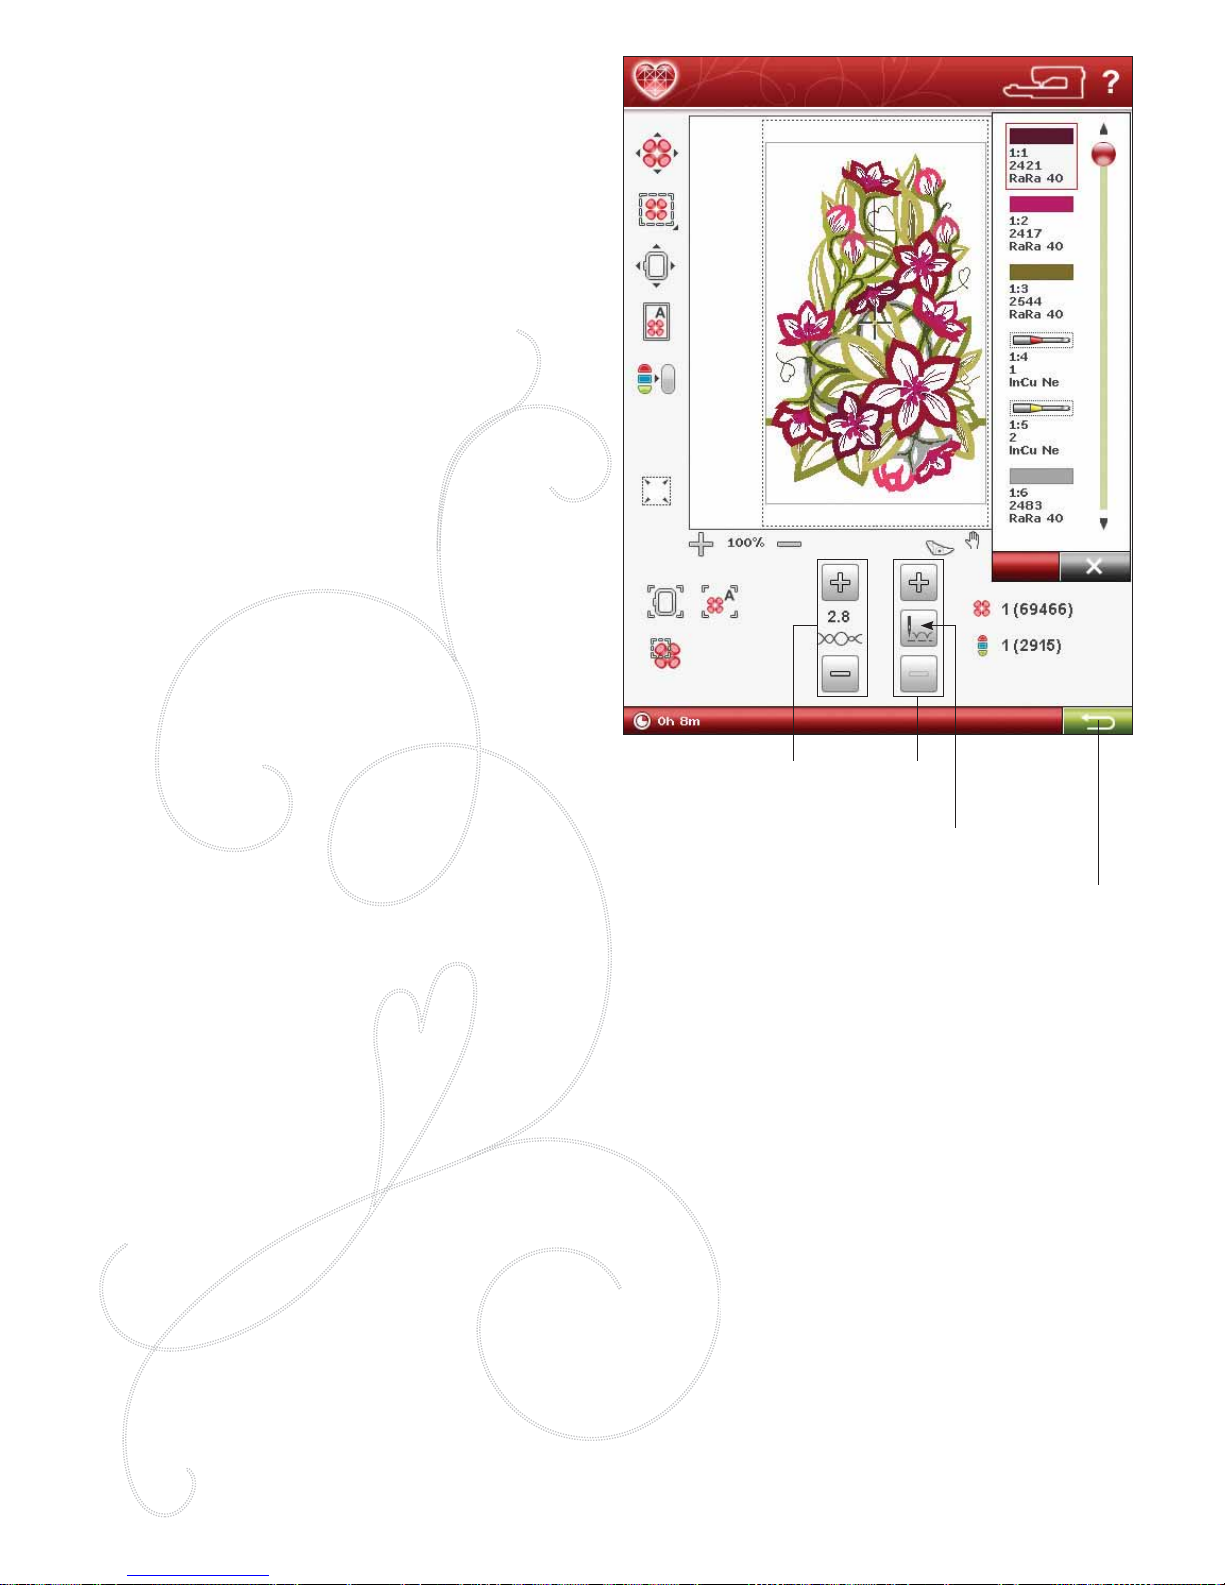
8:8
THREAD TENSION CONTROL
When embroidering with specialty thread or fabric you may
need to adjust the thread tension to achieve the best result.
Thread tension can be adjusted up or down using the + and
the - on the thread tension control.
STEP STITCH-BY-STITCH CONTROL
Touch + to step forward and - to step backwards stitch by
stitch. Use the - icon to move backwards a few steps after
the needle thread breaks or runs out. Touch & Hold to
move through the stitches more quickly. The cursor on the
screen will follow the stitches in the embroidery À eld.
GO TO STITCH
To go to a particular stitch within the color block, touch in
the center of the Step Stitch-by-Stitch control. A pop-up
message will appear, where you can enter the stitch number.
Step Stitch-by-Stich will then move to that stitch number.
If the number entered is too large, the machine will move
to the last stitch in the color block.
RETURN TO EMBROIDERY EDIT
Touch this icon to return to Embroidery Edit and
make adjustments to your design(s) before you start
embroidering. A pop-up message will appear asking if you
want to return to Embroidery Edit because any changes
made in Embroidery Stitch-Out will be lost.
Thread tension
Step stitch-
by-stitch
Return to
Embroidery
Edit
Go to stitch
Page 95
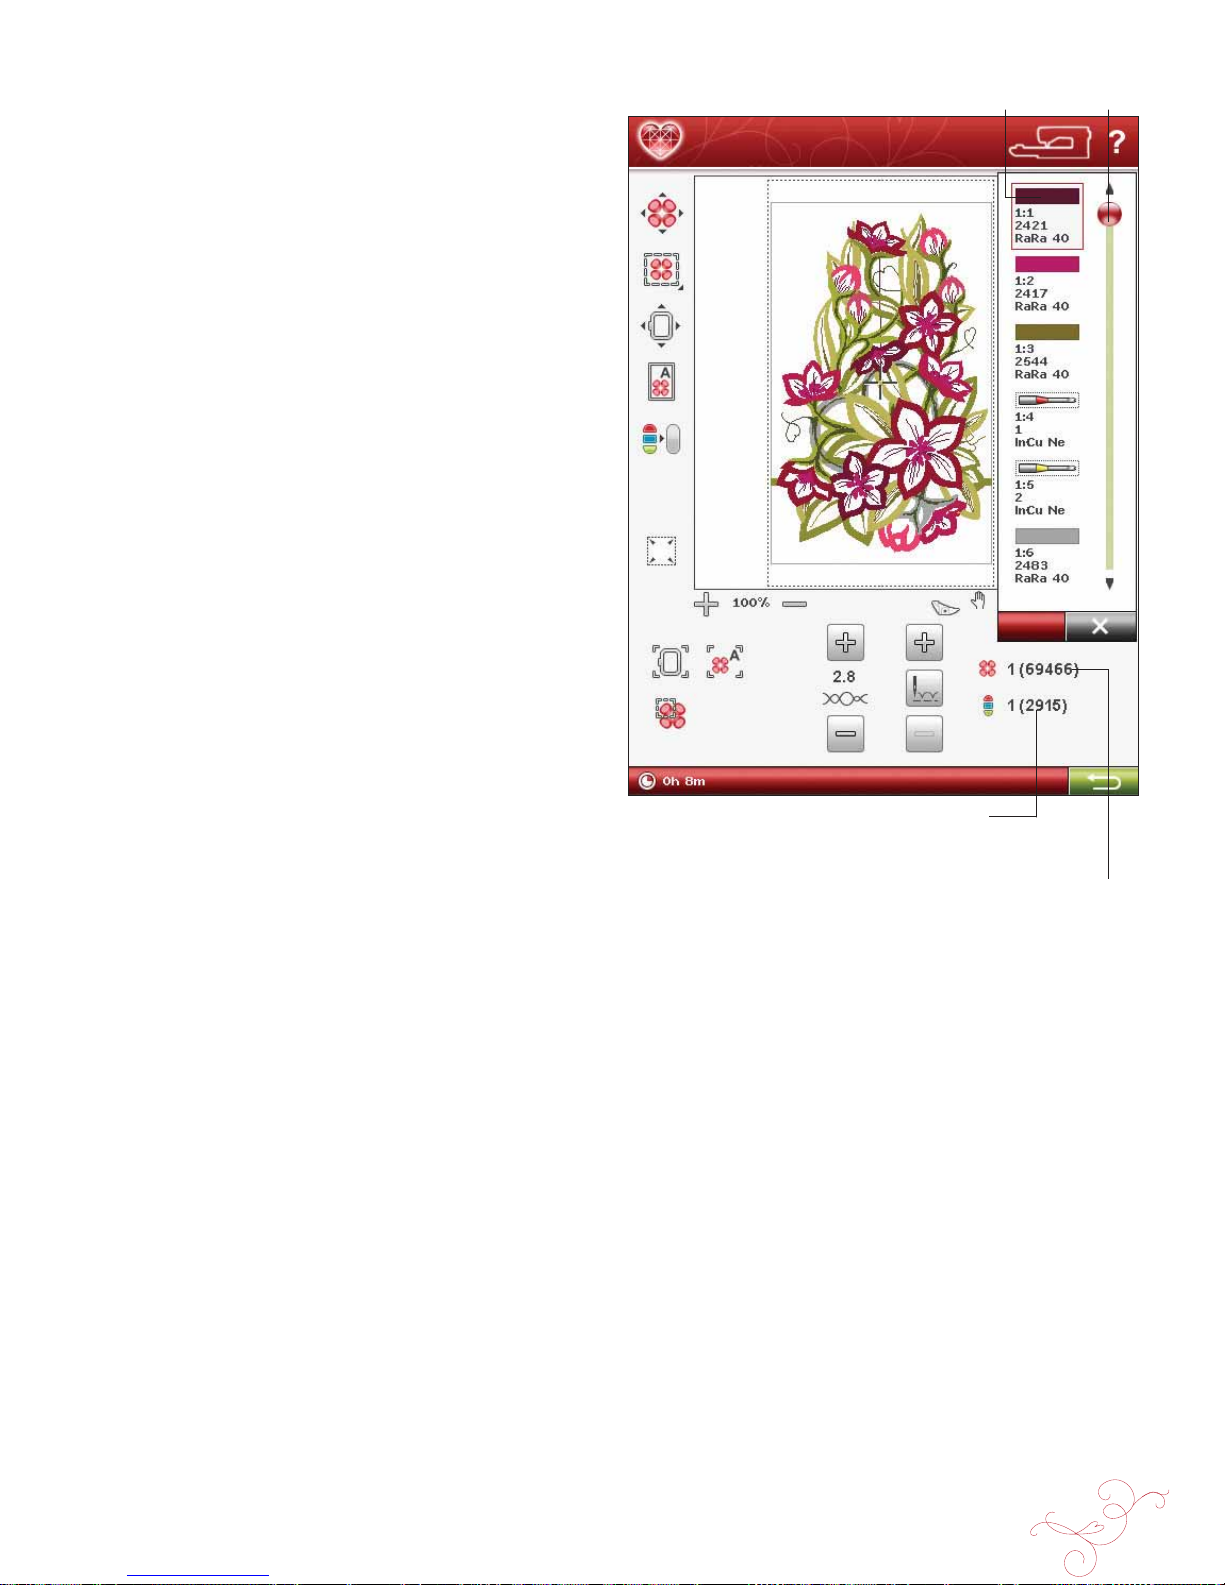
EMBROIDERY STITCH-OUT 8:9
Current
color block
Scroll bar
Number of stitches in current
color block
Number of stitches in
embroidery combination
NUMBER OF STITCHES IN
EMBROIDERY COMBINATION
The current stitch position in the design or combination is
shown next to the Á ower. The number in brackets shows
the total number of stitches in the design or combination.
NUMBER OF STITCHES IN CURRENT
COLOR BLOCK
The current stitch position in the current color block is
shown next to the Color Block picture. The number in
brackets shows the total number of stitches in the current
color block.
COLOR BLOCK LIST
All colors in the loaded design(s) are shown in the order
they will be embroidered. Each listed color shows color
order and number. Also sho wn are the thread manufacturer,
thread weight and color number. Use the scroll bar to see
all of the colors in the list. To go to another color block,
just touch it in the Color Block List.
Thread manufacturer and thread number are displayed for
designs in .VP3 and .VIP-format. If changing thread color,
some thread information may be lost.
Example: 1:2, 2343 RaRa 40, means the second thread color in the
À rst design loaded is thread number 2343 of Robison-Anton Rayon
40 weight. If you have questions about other abbreviations of thread
manufacturers, go to your 5D™ Embroidery Software ConÀ gure
program (installed with your Machine Communication program) and
enter the Thread Manager. There you can À nd information about
thread manufacturers and thread type abbreviations.
To make changes to the Color Block List, return to
Embroidery Edit.
Page 96
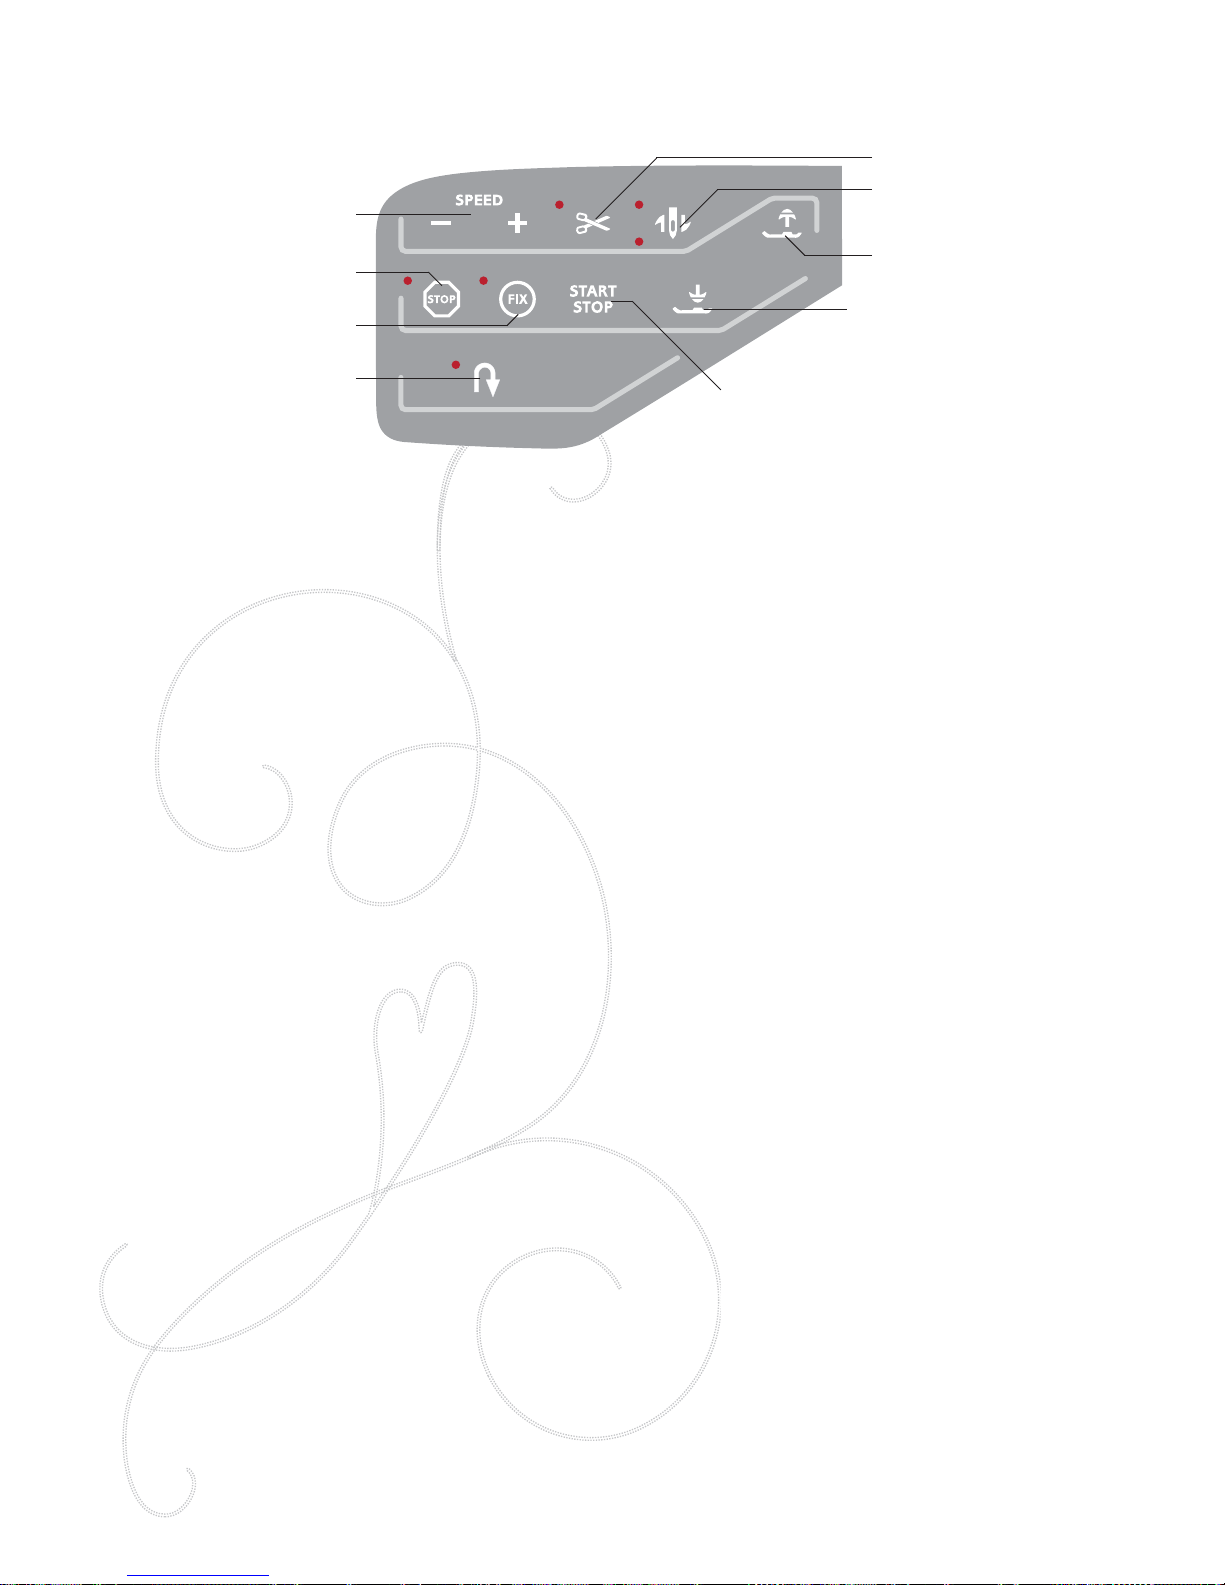
8:10
Sensor Foot Up and Extra Lift
Needle Stop Up/Down
(Trim Position)
Speed - and +
STOP
(Monochrome)
FIX
(Baste)
Reverse
Start/Stop
Selective Thread Cutter
Sensor Foot Down and Pivot
SPEED + AND -
All stitches in your machine and each hoop size have a preset, recommended sewing/embroidery speed.
Touch Speed + or Speed - to increase or decrease the
maximum allowed sewing/embroidery speed. When not
sewing/embroidering, touch Speed and a pop-up message
on the screen will indicate the speed set ting. You can set the
speed by touching the slider in the pop-up message. If you
change the speed set ting while sewing/embroidering no
pop-up message will appear.
When sewing with metallic threads, or when sewing on
delicate fabrics, lower the speed for optimal results.
STOP ( MONOCHROME)
Touch STOP to eliminate stops for color changes to create
monochrome embroidery.
FIX ( BASTE)
Touch FIX to baste an outline of the embroidery design
area to baste the fabric to the stabilizer.
REVERSE
Reverse has no function in Embroidery Mode.
SELECTIVE THREAD CUTTER
The Selective Thread Cutter automatically cuts the threads
and raises the presser foot. At the end of a color block the
top thread only is cut. When the design is À nished, both
top and bobbin threads are cut automatically.
NEEDLE STOP UP/DOWN ( TRIM POSITION)
The machine will move the hoop forward, towards you, for
easy thread trimming.
START/STOP
Touch this button to start and stop the machine sewing
or embroidering without using the foot control. Touch
START/STOP to begin and touch again to stop.
SENSOR FOOT UP AND EXTRA LIFT
Touch the Sensor Foot Up and Extra Lift to lift the presser
foot to Up position. Touch once more and the presser foot
will raise to Extra Lift, to make it easier to insert or remove
the hoop.
SENSOR FOOT DOWN AND PIVOT
The presser foot is lowered automatically when you start
sewing/embroidering.
Touch Sensor Foot Down to lower the presser foot into the
Embroidery “Á oat” position.
FUNCTION BUTTONS IN EMBROIDERY STITCH-OUT
Page 97
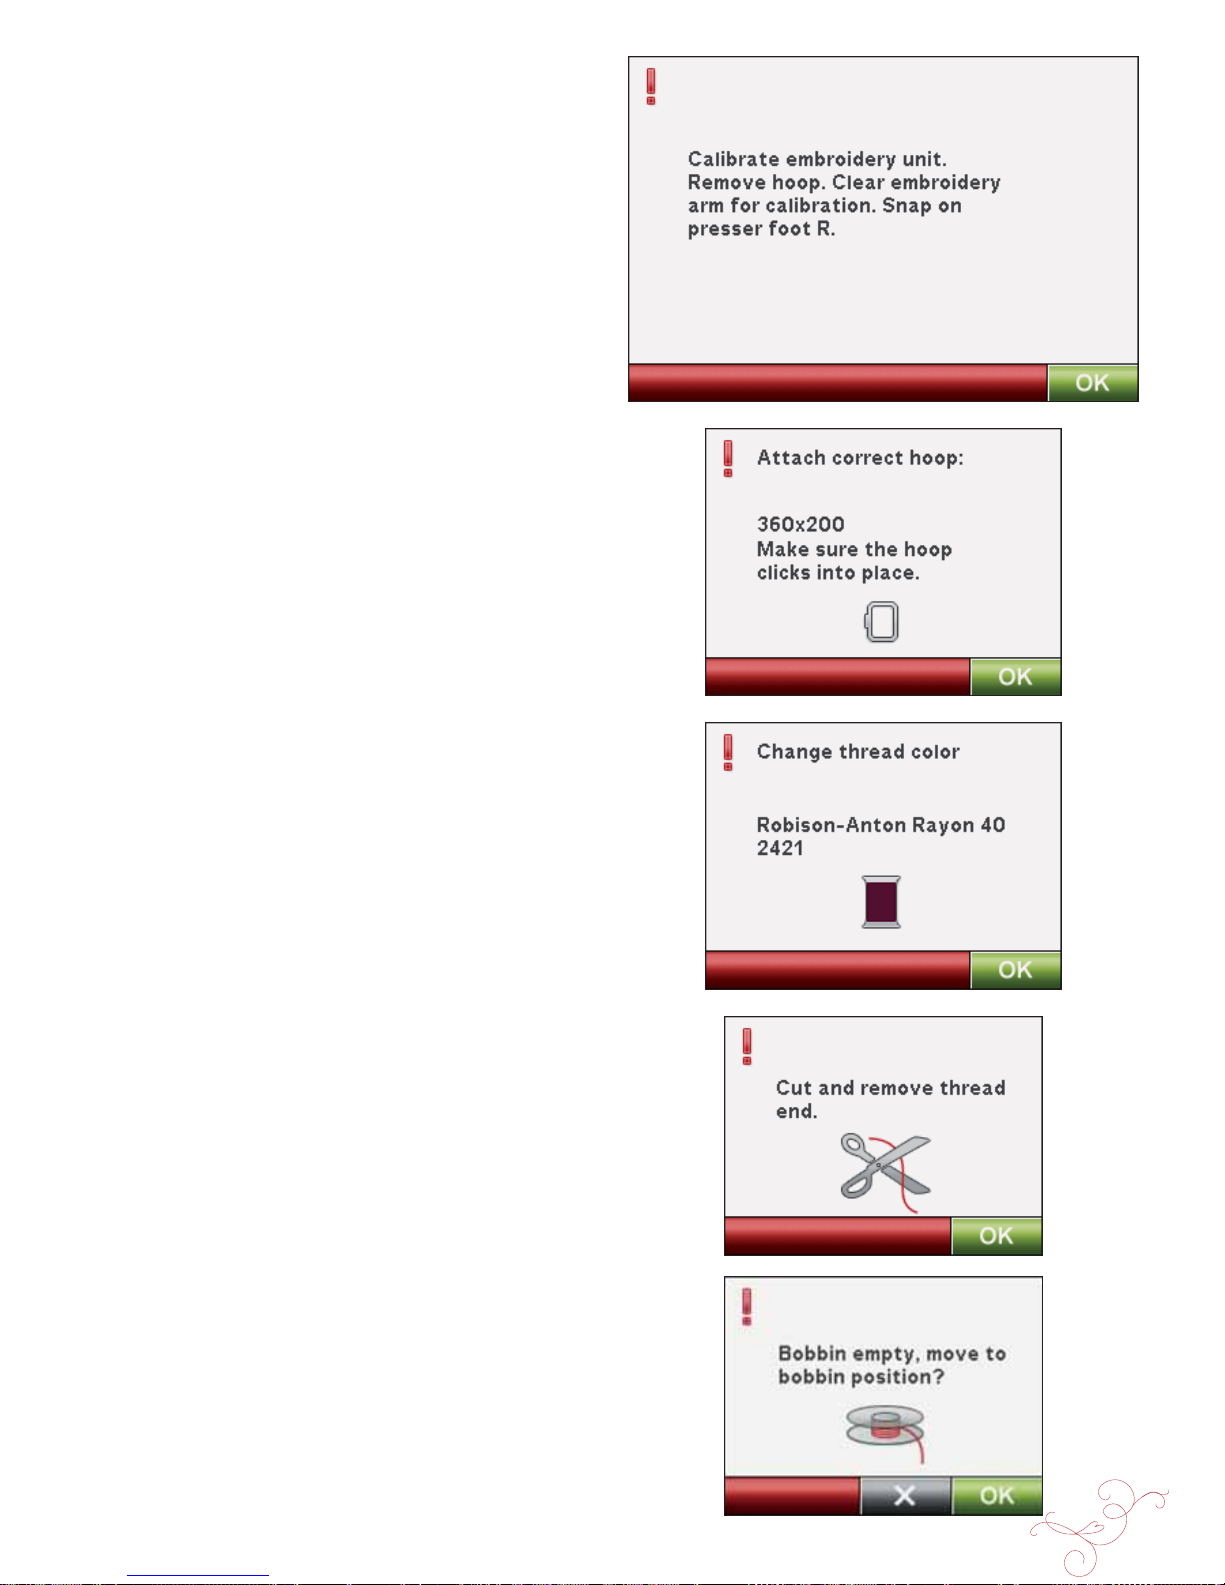
EMBROIDERY STITCH-OUT 8:11
EMBROIDERY STITCH-OUT POP-UP
MESSAGES
Embroidery Unit Calibration
When the embroidery unit is attached, a pop-up message
asks you to slide off the hoop and clear the machine area for
calibrating the embroidery arm. You will also be reminded to
snap on the embroidery presser foot R.
Note: It is very important to remove the hoop, otherwise the hoop or the
embroidery unit may be damaged while calibrating.
Attach Correct Hoop
If the size of the hoop attached to the machine does not
match the size displayed on screen, the machine will not
embroider. You must change the hoop to the displayed size or
change the hoop setting to match the hoop size attached.
The hoop needs to be inserted properly for the machine to
detect it. Slide the hoop connector into the hoop attachment
from front to back until it clicks into place.
You will not be able to go to Embroidery Stitch-Out without
the selected hoop attached properly.
Change Thread Color
When it is time to change the needle thread, the machine stops
and the upper thread is cut. Change the spool of thread and
re-thread the machine. The next recommended color number
is shown in the pop-up message.
Cut Thread End
After changing the thread, the machine will sew a few stitches
and then stop so you can cut the thread end.
Note: When Automatic Jump Stitch Trim is selected in the SET menu,
the thread end will be cut automatically. Simply remove the thread tail
that has been cut.
Bobbin Empty, move to Bobbin Position?
When the bobbin is almost empty, the machine stops
automatically and a pop-up message appears on the screen.
Touch OK to move to Bobbin Position. The hoop will move
away from you, allowing you to open the bobbin cover and
replace the bobbin. Replace the empty bobbin with a full
one and pull back excess needle thread. When the bobbin is
replaced, press the Start/Stop button to move the hoop back
and start embroidering where the embroidery stopped.
Note: If you want to move the hoop back to where the embroidery stopped
without starting to embroider directly, touch Current Stitch Position after
replacing the bobbin. When ready, start embroidering again by pressing
the Start/Stop button or the foot control.
Note: It is possible to embroider until the thread has completely run out.
Press the Start/Stop button to continue embroidering without closing the
bobbin empty pop-up message.
Page 98
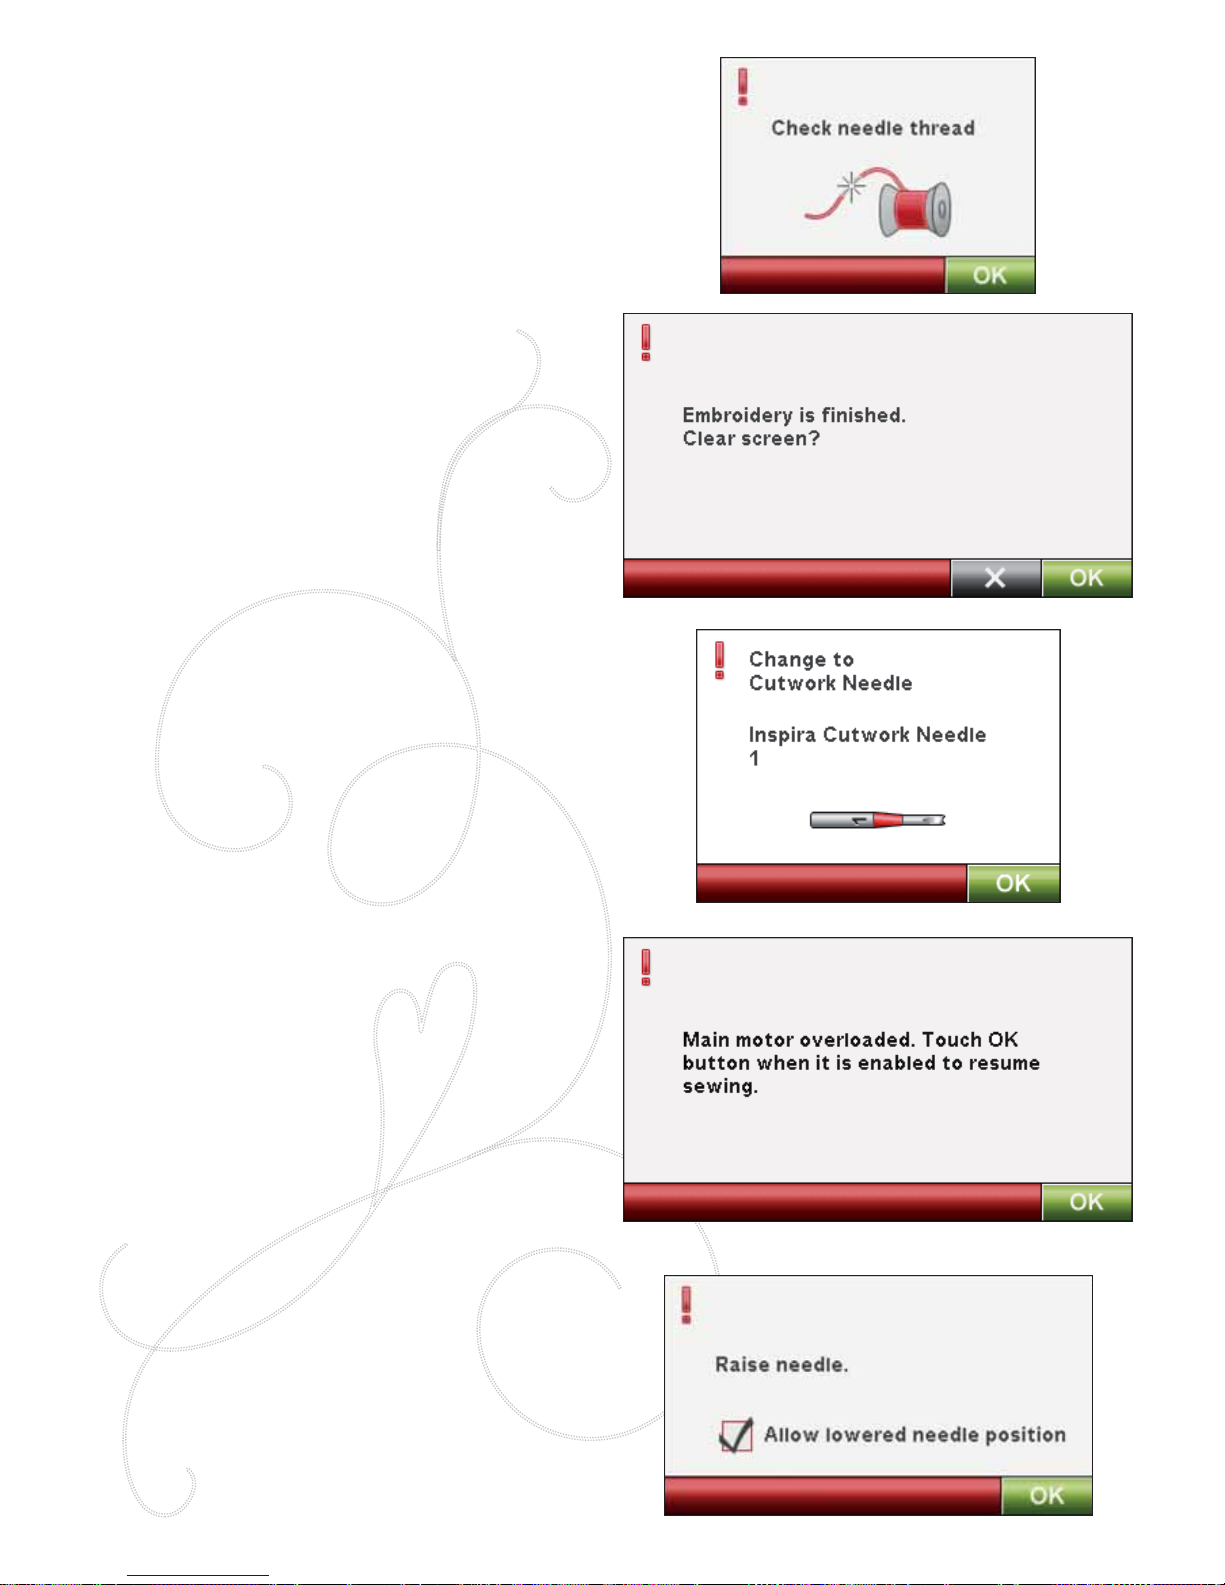
8:12
Check Needle Thread
The machine stops automatically if the needle thread runs
out or breaks. Re-thread the needle thread, close the popup message, go back a few stitches using the Step Stitch-byStitch control and start embroidering again.
Embroidery Is Finished - Clear Screen?
When the embroidery is À nished, the machine will ask
you if you want to clear the screen. If you touch OK, the
designs will be deleted and you will go back to Embroidery
Edit. Touch Cancel to get back to your design and stay in
Embroidery Stitch-Out.
Change to Cutwork Needle (optional accessory)
Some cutwork designs can be stitched out using the
optional accessory HUSQVARNA VIKING® Embroidery
Cutwork Needle Kit, (P/N 920268-096). These designs are
marked with a cutwork needle symbol in the DESIGNER
RUBY™ Sampler Book. When the machine stops and
this pop-up message is shown, insert the corresponding
cutwork needle. Touch OK and press the Start/Stop button
to resume.
Note: These cutwork designs can also be stitched out without the
cutwork needles, but will then have to be cut manually.
Main motor overloaded
If the machine is blocked when embroidering, the main
motor can get overloaded. When the main motor and
power supply are no longer overloaded, the OK button will
be enabled. Touch OK to resume embroidering.
DESIGN POSITIONING
Raise needle
When the needle is lowered with the handwheel to check the
needle position on the fabric, a pop-up message is displayed
when trying to adjust the hoop position. Check the box to be
able to À ne tune the hoop position with the needle lowered.
Note: Make sure the needle is above the fabric to prevent damage to
the needle and fabric.
Note: The warning cannot be disabled when the needle is below the
stitch plate.
Page 99
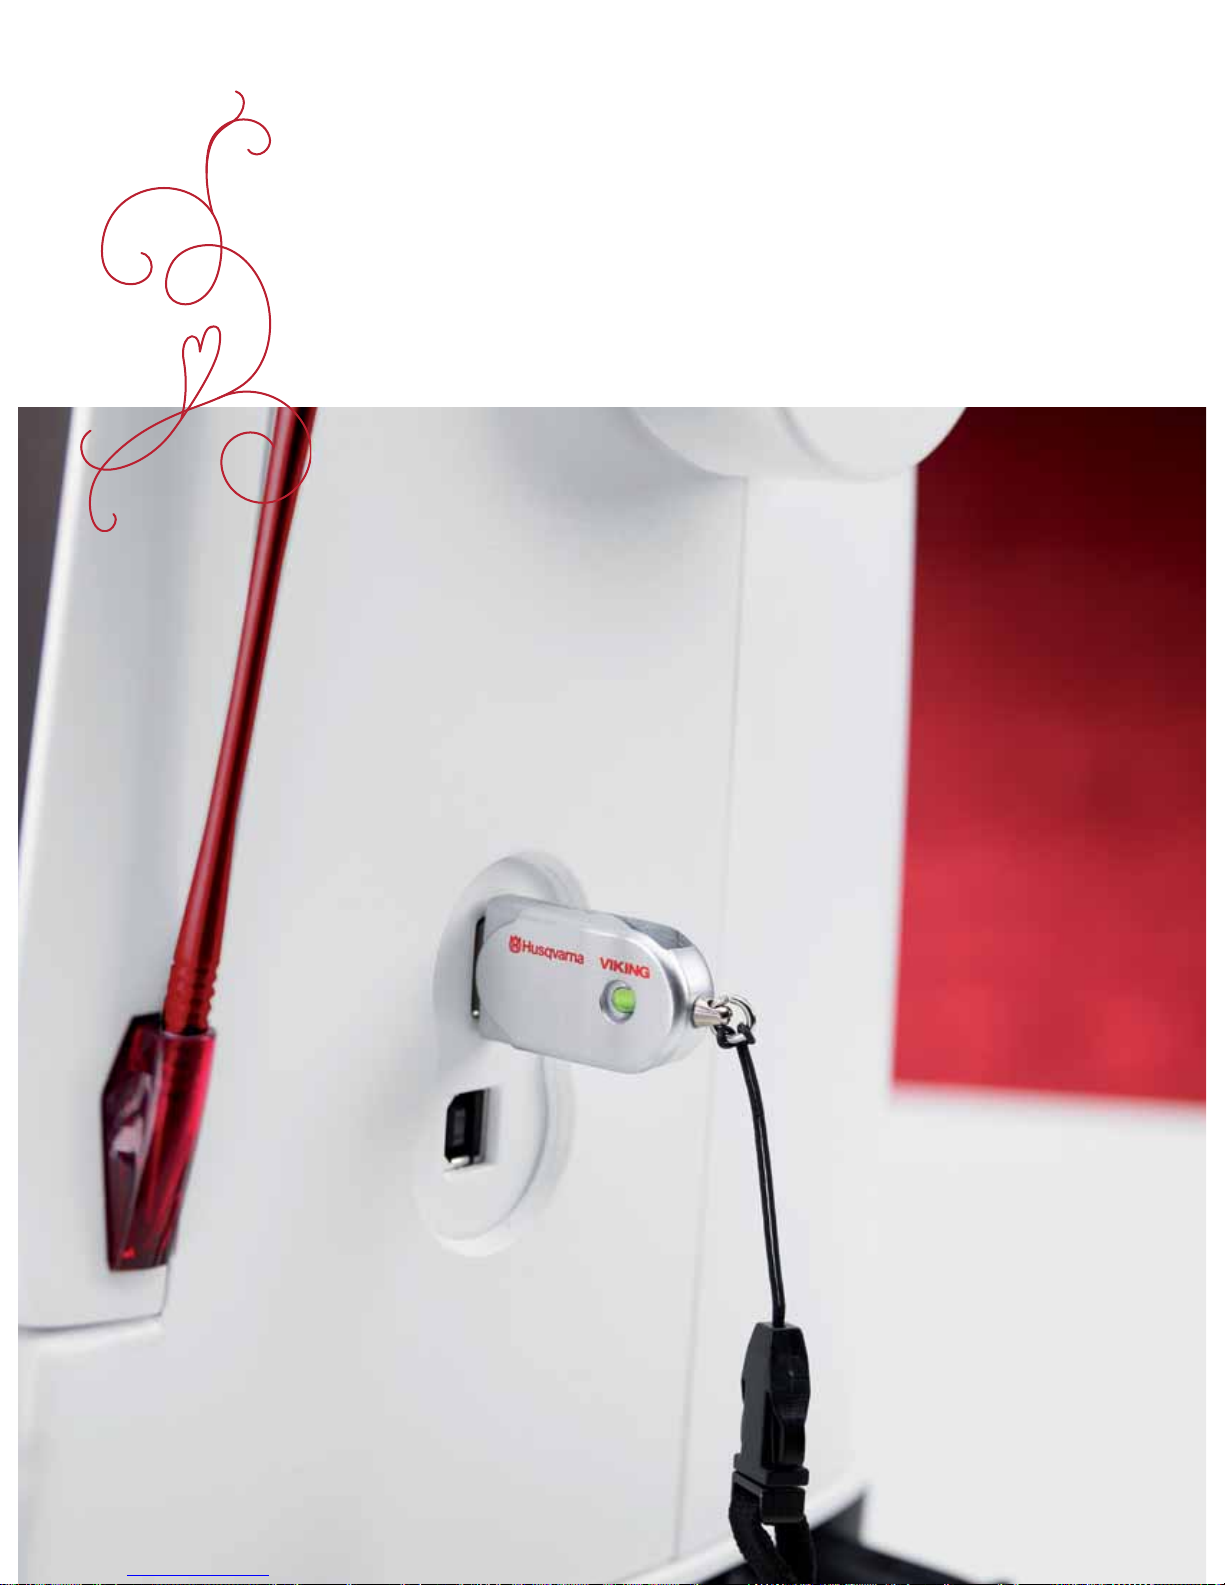
FILE MANAGER
9
Page 100
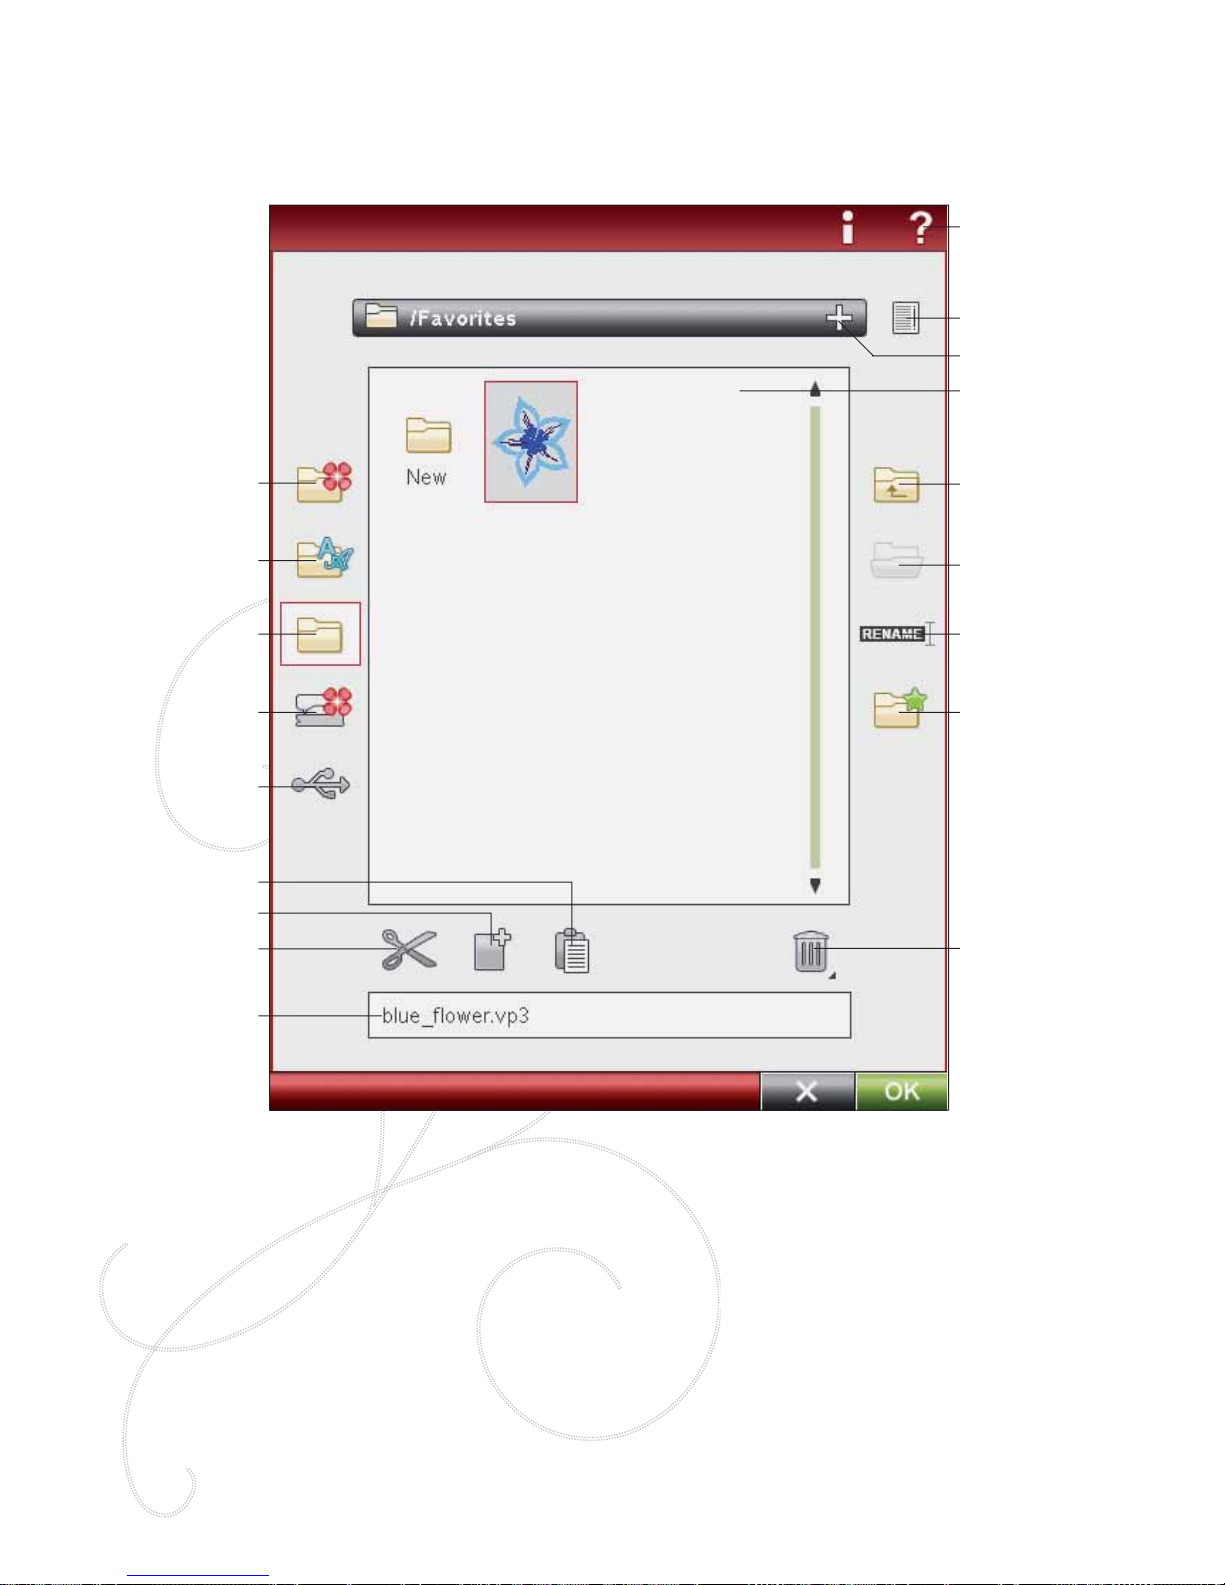
9:2
AVAILABLE MEMORY
The built-in memory can store designs, fonts, stitches and other À les. To check how much memory is still available in the
built-in memory, go into File Manager, touch Quick Help and then touch either My Designs, My Fonts or My Files. A popup message shows how much memory is available.
FILE MANAGER
The File Manager is used to open, organize, add, move, remove and copy your designs, fonts and stitch À les. Use either
built-in memory or an external device connected to your machine for storing designs and À les.
My Files
My Fonts
My Designs
Built-in Designs
External Devices
Cut
Copy
Paste
Delete
Move up one folder
Open folder
Rename À le or folder
level
Create new folder
Name of selected À le
Drop down menu
List view
Quick Help
Selection Area
FILE MANAGER - OVERVIEW OF ICONS
FILE FORMATS
Your machine can load the following À le for mats:
• .SHV, .DHV, .VP3, .VIP, .HUS, .PEC, .PES, .PCS, .XXX, .SEW, .JEF,
.EXP, .10* and .DST (embroidery À les)
• .SH7 (stitch À les),
• .VF3 (embroidery font À les)
• and also .TXT and .HTM/HTML-À les.
Note: If the À le type or À le version is not supported by your machine, or the À le is
damaged, it is shown in the selection area as an unrecognized À le.
 Loading...