

Page 1
User’s Guide
KEEPING THE WORLD SEWING
Page 2

This houshold sewing machine is designed to comply with IEC/EN 60335-2-28 and UL1594
IMPORTANT SAFETY INSTRUCTIONS
When using an electrical appliance, basic safety precautions should always be followed, including the following:
Read all instructions before using this household Sewing machine.
DANGER – To reduce the risk of electric shock:
• A sewing machine should never be left unattended when plugged in. Always unplug this sewing machine
from the electric outlet immediately after using and before cleaning.
• Always unplug before relamping. Replace bulb with same type rated 5 Watt.
WARNING – To reduce the risk of burns, fi re,
electric shock, or injury to person:
• Do not allow to be used as a toy. Close attention is necessary when this sewing machine is used by or
near children or infi rm persons.
• Use this sewing machine only for its intended use as described in this manual. Use only attachments
recommended by the manufacturer as contained in this manual.
• Never operate this sewing machine if it has a damaged cord or plug, if it is not working properly, if it has
been dropped or damaged, or dropped into water. Return the sewing machine to the nearest authorised
dealer or service center for examination, repair, electrical or mechanical adjustment.
• Never operate the sewing machine with any air openings blocked. Keep ventilation openings of the
Sewing machine and foot controller free from the accumulation of lint, dust, and loose cloth.
• Keep fi ngers away from all moving parts. Special care is required around the Sewing machine needle.
• Always use the proper needle plate. The wrong plate can cause the needle to break.
• Do not use bent needles.
• Do not pull or push fabric while stitching. It may defl ect the needle causing it to break.
• Switch the Sewing machine off (“0”) when making any adjustment in the needle area, such as threading
needle, changing needle, threading bobbin, or changing presser foot, etc.
• Always unplug Sewing machine from the electrical outlet when removing covers, lubricating, or when
making any other user servicing adjustments mentioned in the instruction manual.
• Never drop or insert any object into any opening.
• Do not use outdoors.
• Do not operate where aerosol (spray) products are being used or where oxygen is being administrated.
• To disconnect, turn all controls to the off (“0”) position, then remove plug from outlet.
• Do not unplug by pulling on cord. To unplug, grasp the plug, not the cord.
• Hold plug when rewinding into cord reel. Do not allow plug to whip when rewinding.
• This sewing machine is provided with double insulation. Use only identical replacement parts.
See instructions for Servicing of Double-Insulated Appliances.
SAVE THESE INSTRUCTIONS
SERVICING OF DOUBLE INSULATED
PRODUCTS
In a double-insulated product, two systems of insulation are provided instead of grounding. No ground means is provided on a double-insulated product, nor should a means for grounding be added to the product.
Servicing of a double-insulated product requires extreme care and knowledge of the system, and should be
done only by qualifi ed service personnel. Replacement parts for a double-insulated product must be identical
to those parts in the product. A double-insulated product is marked with the words ‘DOUBLE INSULATION’
or ‘DOUBLE INSULATED’.
Page 3
Care of your
Designer 1
Page 109 - 113
Care of your
Designer 1
Page 109 - 113
Heirloom
Sewing
Page 101 - 108
Quilting
Page 95 - 100
Decorative/
Crafting
Page 83 - 94
Embroidery
Page 63 - 82
Utility/Garment
Sewing
Page 39 - 62
Learn your
Designer 1
Page 4 - 38
Embroidery
Page 63 - 82
Learn your
Designer 1
Page 4 - 38
Utility/Garment
Sewing
Page 39 - 62
Quilting
Page 95 - 100
Heirloom
Sewing
Page 101 - 108
Decorative/
Crafting
Page 83 - 94
Table of contents
Learn your Designer I 4-38
Overview 4-5
Unpack, Connect, Pack away 6
Accessory Tray/Sewing surface 7
Spool pin 8
Threading 8-10
Bobbin winding 10-11
Function buttons 12
Sensor Foot 13
Changing the presser foot 13
Presser feet 14-15
Feed teeth 15
Changing the needle, Needles 16
Color Touch Screen 17-38
Main Menu 18
Sewing Advisor – The easy
way to sew 19
Speciality Stitch Menus 20-26
Starting to sew 27
Thread tension 27
Finish the sewing 27
ADJUST Menu 28
SET Menu 29-32
Pop Up Menus 33
HELP Menu 34
Programming 35-38
Utility/Garment Sewing 39-62
Sewing Advisor 40-50
Fabric Selection, Thread 40-41
Seam 42-43
Overcast, Three-step zigzag 44
Seam and Overcast 45
Baste 46
Blind Hem, Hem 47-48
Buttonhole 49-50
Button 50
Menu B – Buttonhole 51-53
Corded Buttonhole 52
Step by Step buttonhole 52
Buttonhole Balance 52
Buttonhole Density 53
Cutting Buttonholes 53
Bound Buttonhole 53
Menu A – Utility Stitches 54-61
Straight Stitch 54
Lightning Stitch 54
Gathering 54
Twenty-fi ve Needle positions 55
Zipper 56
Reinforced Straight Stitch 57
Multiple Zigzag Stitches 58
Darning and Mending 59
Bartacks, Belt loops 60
Stitch Table – Menu A 61
Menu S – 4-Way Stitches 62
Embroidery 63-82
Embroidery Unit, Connect,
Remove 64-65
Built-in Disk Drive 65
Vertical spoolpin,
felt spool pad 65
Embroidery Booklet 65
Hoop, Template 66-67
Getting started 69
Embroidery Screen Menus 70-71
SET in embroidery 71
ADJUST in Embroidery 72
Embroidery colors, features 73
Pop-up menus in Embroidery 74
Start embroidering, thread cut 75
Customizing Design 76-81
Built-in Stitches in the hoop 82
Decorative/Crafting 83-94
Decorative/Crafting 84-88
Appliqué 84-85
Taper Satin Stitch 86
“Handlook” Heirloom Appliqué 87
Appliqué Embroidery 88
Decorative Stitches 89-91
Cross Stitches 92
Lettering 93-94
Quilting 95-100
Quilting 96
Quilting and Piecing Quilts 96
Decorative stitch tie Quilting 96
Crazy Quilting 97
Handlook Quilting 97
Stipple Quilting 98
Channel Quilting 98
Edge/Quilting Guide 99
Quilt Embroidery 99
Heirloom Sewing 101-108
Heirloom Sewing 102
Entredeux 102
Lace Insertion 102
Bridging Stitch 103
Hemstitching/Wing needle 103
Scallop Stitching 104
Smocking 105
Cutwork Embroidery 106
Pictogram 107
Care of your Designer I 109-113
Care of your Designer I 110-111
Trouble Shooting 112-113
How to update
Designer I 113
Index 114-115
Page 4
4
Learn your Designer I
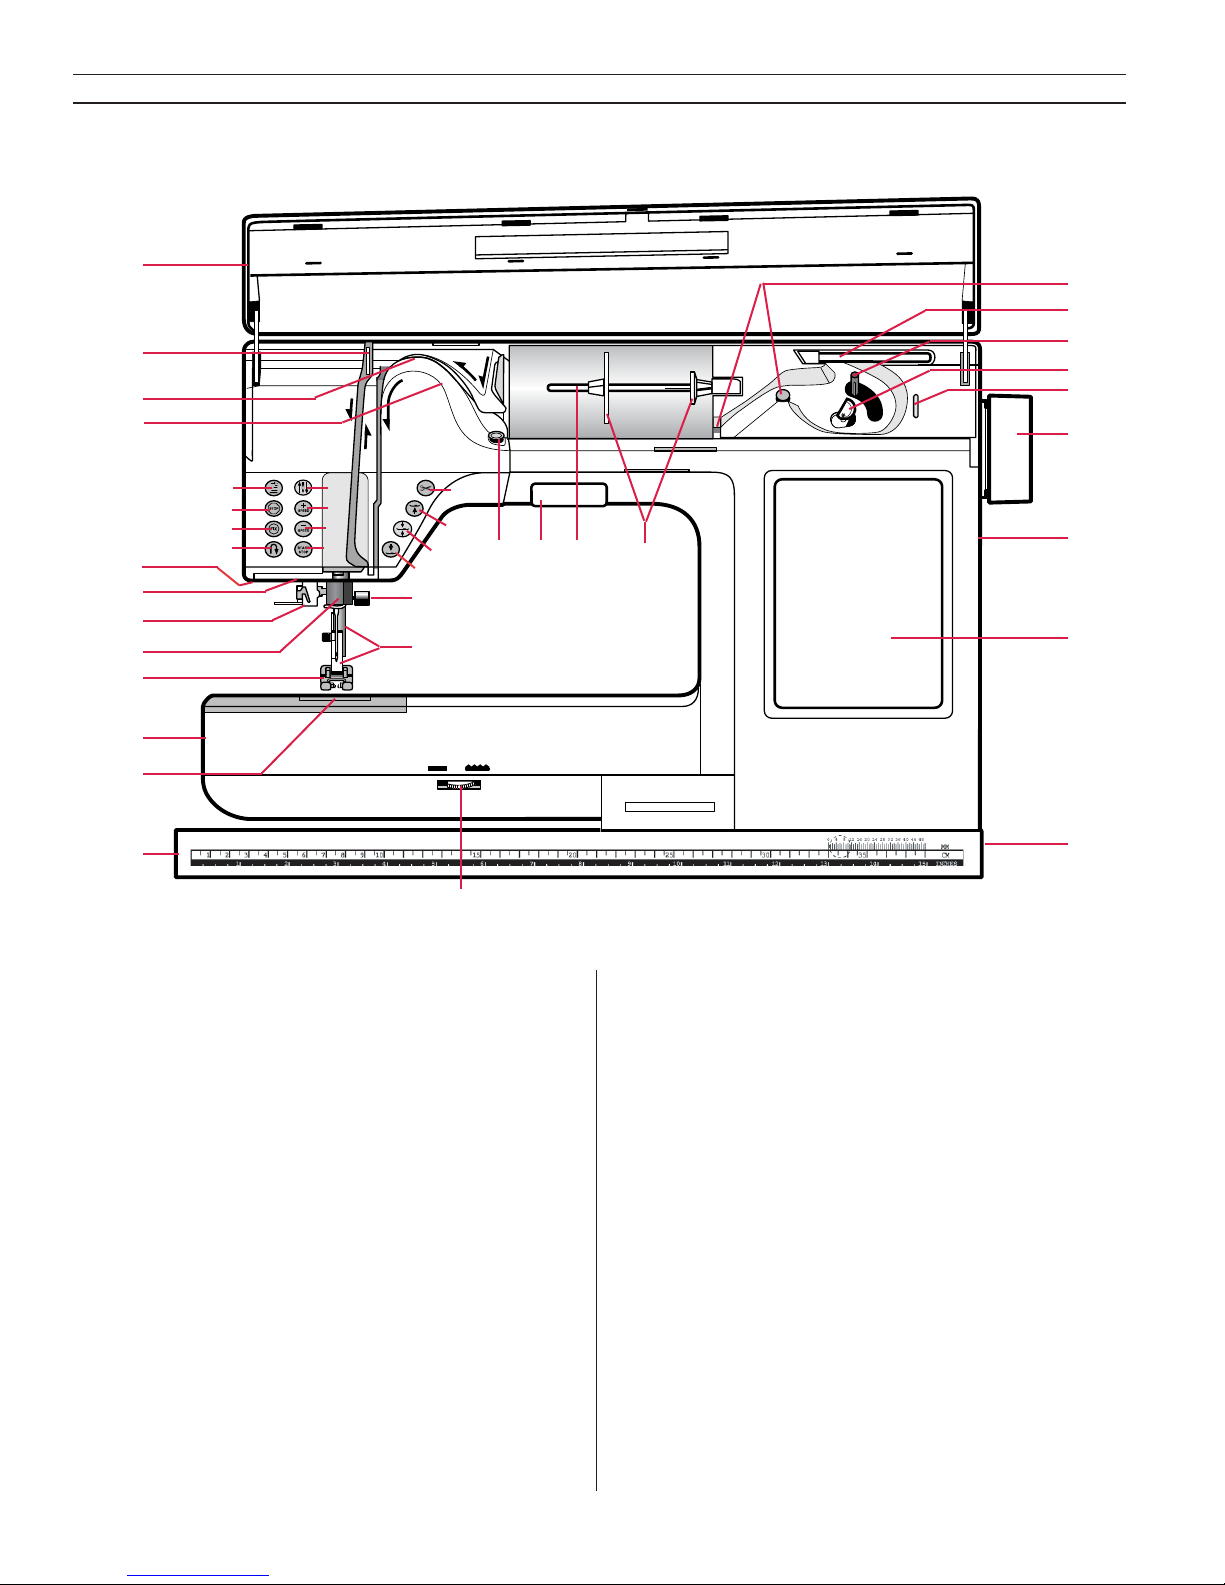
Overview – Front side
1. Door/Lid
2. Thread take-up lever
3. Thread tension
4. Pre-tension disc
5. Stitch Re-Start button
6. Needle stop up/down button
7. Finishing Stop button
8. Sewing speed button – faster
9. FIX button
10. Sewing speed button – slower
11. Reverse button
12. Start/Stop button
13. Sensor Buttonhole Foot socket
14. Light
15. Needle threader
16. Needle bar
17. Presser foot
18. Free arm
19. Bobbin cover
20. Baseplate
21. Drop feed dial
22. Presser foot bar and Presser foot ankle
23. Needle clamp screw
24. Sensor foot lift down button
25. Sensor foot lift pivot button
26. Sensor foot lift up/extra lift button
27. Thread cutter button
28. Thread tension for bobbin winding – vertical
spool pin
29. Horizontal spool pin
30. Spool holders
31. Bobbin winding guides
32. Vertical spool pin
33. Bobbin winder spindle
34. Bobbin stop
35. Thread cutter for bobbin winding
36. Handwheel
37. Built-in disk drive
38. Color Touch Screen
39. Main power switch, Connection to power
supply
1
12345678910111213
INCHES
2 3 4 5 6 7 8 9 10 15 20 25 30
CM
1.
2.
9.
6.
5.
10.
11.
12.
14.
15.
14.
32.
33.
34.
35.
37.
3.
16.
17.
18.
19.
20.
21.
22.
23.
24.
25.
26.
27.
28. 29. 30.
38.
36.
39.
8.
13.
7.
4.
Learn your Designer I
31.
Page 5
5
Learn your Designer I
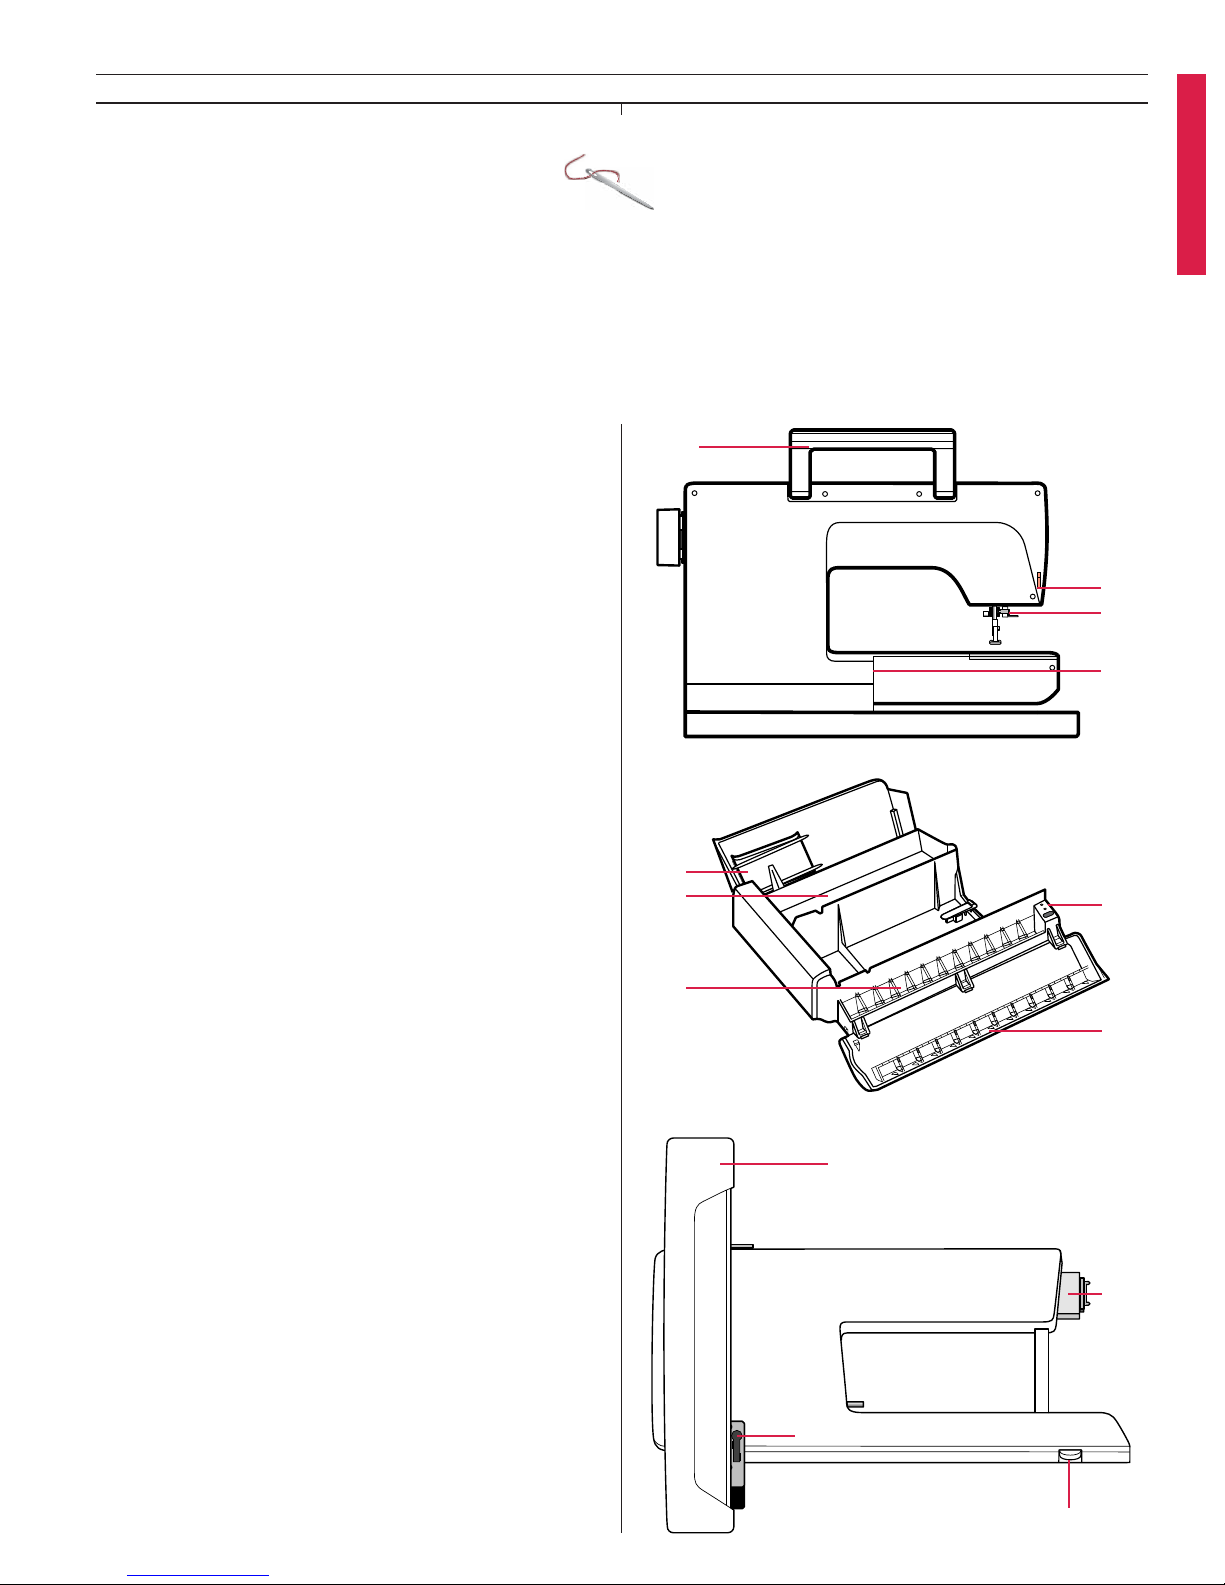
Accessory Tray
44. Flat bed extension
45. Space for other accessories
46. Space for presser feet
47. Space for bobbins
48. Space for needles
Embroidery unit
49. Embroidery arm
50. Embroidery Hoop attachment
51. Embroidery unit socket
52. Release button
40.
41.
42.
47.
48.
52.
51.
50.
46.
49.
43.
44.
45.
Rear side
40. Handle
41. Thread cutter
42. Needle threader
43. Embroidery unit connection socket
Some fabrics have a lot of excess dye which can cause discoloration on other fabric but also
on your sewing machine. This discoloring may be very diffi cult or impossible to remove.
Fleece and denim fabric in especially red and blue often contain a lot of excess dye.
If you suspect that your fabric/ready-to-wear garment contains a lot of excess dye, always
pre-wash it before sewing/embroidering to avoid the discoloring.
Page 6
6
Learn your Designer I
Unpacking
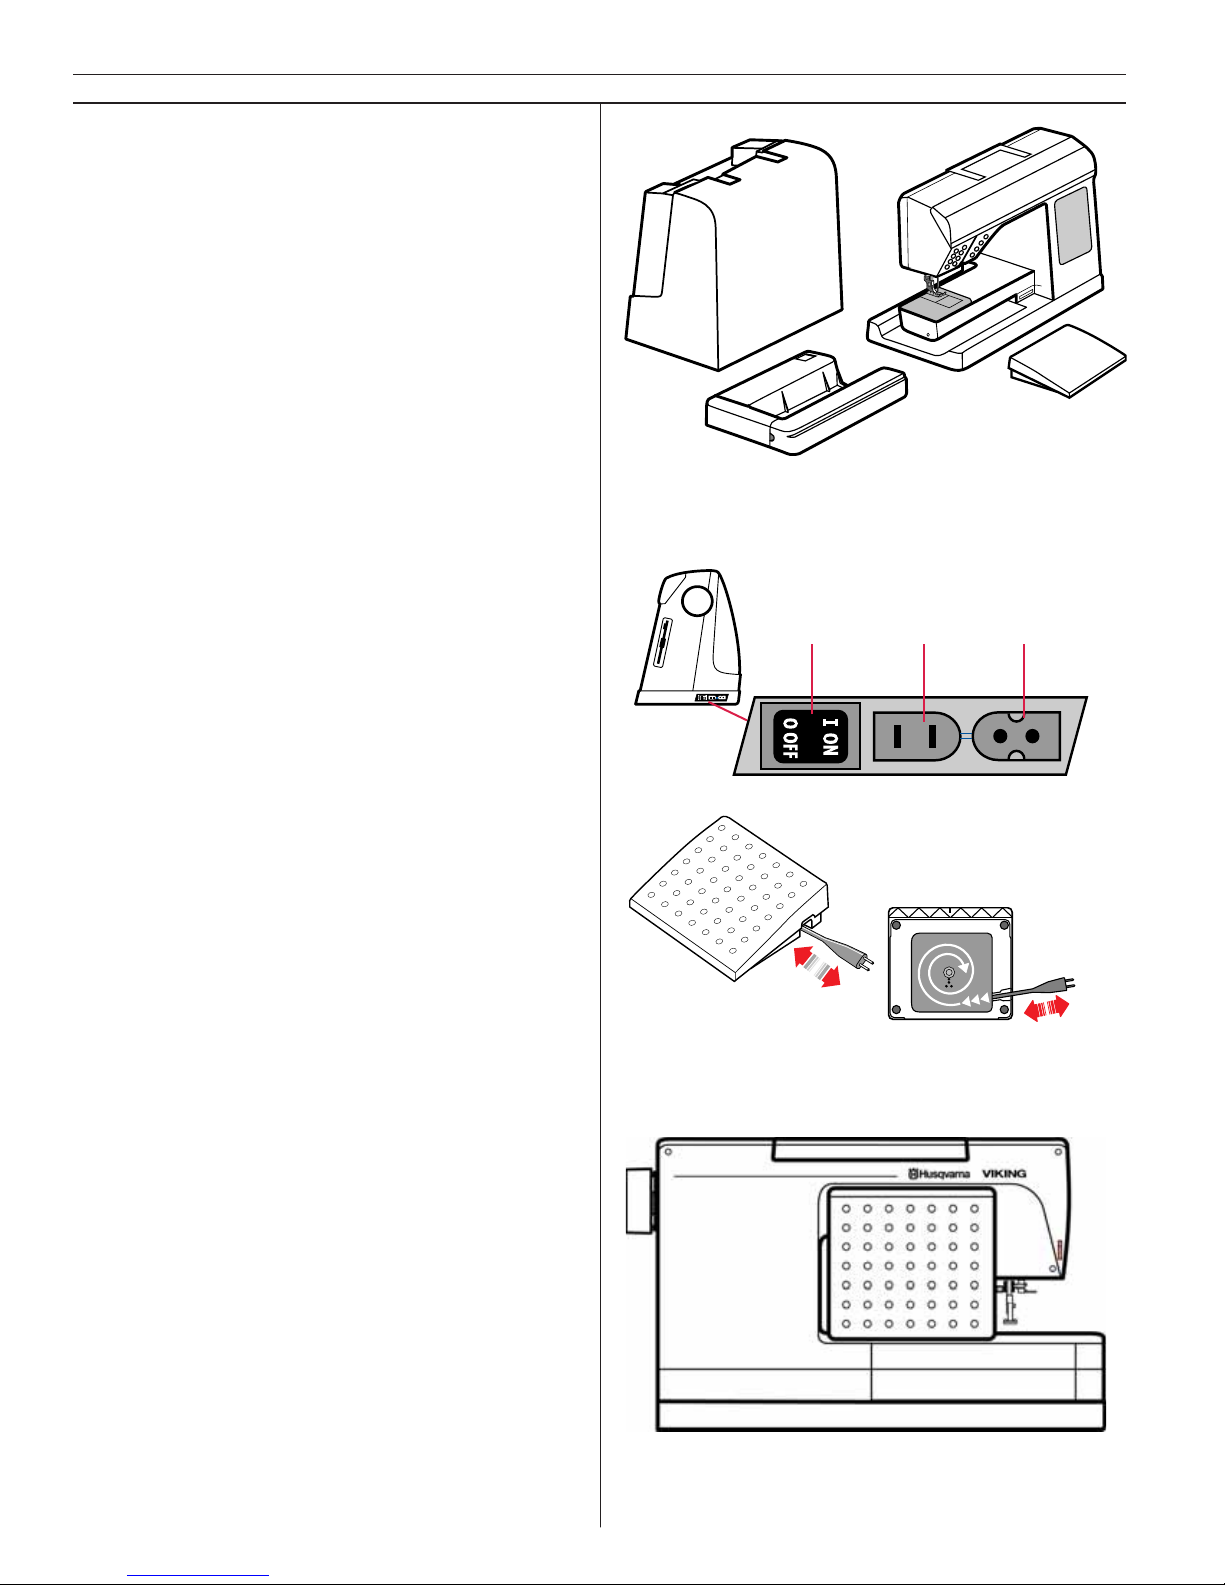
1. Place the machine on the table or cab i net, re-
move the packaging and lift off the cov er.
2. Remove the packing material, the foot control
and fi nally the protection cover.
3. The machine is delivered with an ac ces so ry bag
and a main cord. The foot control is equipped
with a cord reel.
4. Wipe the machine, particularly around the nee-
dle and needle plate to remove any soil be fore
sewing.
Packing away after sewing
1. Press the main switch to turn off the machine.
2. Unplug the cord from the wall socket and the
machine.
3. Wind the main cord around your hand and
place the cord in the pocket of the cover.
There is also space for the User’s Guide.
4. Unplug the foot control cord from the ma-
chine. Pull the cord gently and release - the
cord will be wound into the foot control.
5. Check to ensure that all accessories are in the
accessory tray. Slide the tray on to the ma chine
around the free arm.
6. Place the foot control, underside towards you,
fi tting into the recess of the accessory tray at
the rear side of the machine.
Connecting to the power supply
Among the accessories you will fi nd the main
cord. On the underside of the machine you will
fi nd information about the power supply (V) and
the frequency (Hz).
For USA and Canada
This sewing machine has a polarized plug (one
blade wider than the other). To reduce the risk of
electric shock, this plug is intended to fi t in a polarized outlet only one way. If the plug does not fi t
fully in the outlet, reverse the plug. If it still does
not fi t, contact a qualifi ed electrician to install the
proper outlet. Do not modify the plug in any way.
Before plugging in, check to ensure that the
foot control is of “type FR3”.
1. Pull out the cord from the foot control. Con-
nect the foot control cord to the front socket
(1) on the bottom right side of the machine.
2. Connect the main cord to the back socket (2)
on the bottom right side of the machine.
3. When you press the power switch to ON (3),
both the machine and the lights are switched on.
3.
1.
2.
Page 7
7
Learn your Designer I
Accessory Tray / Sewing surface
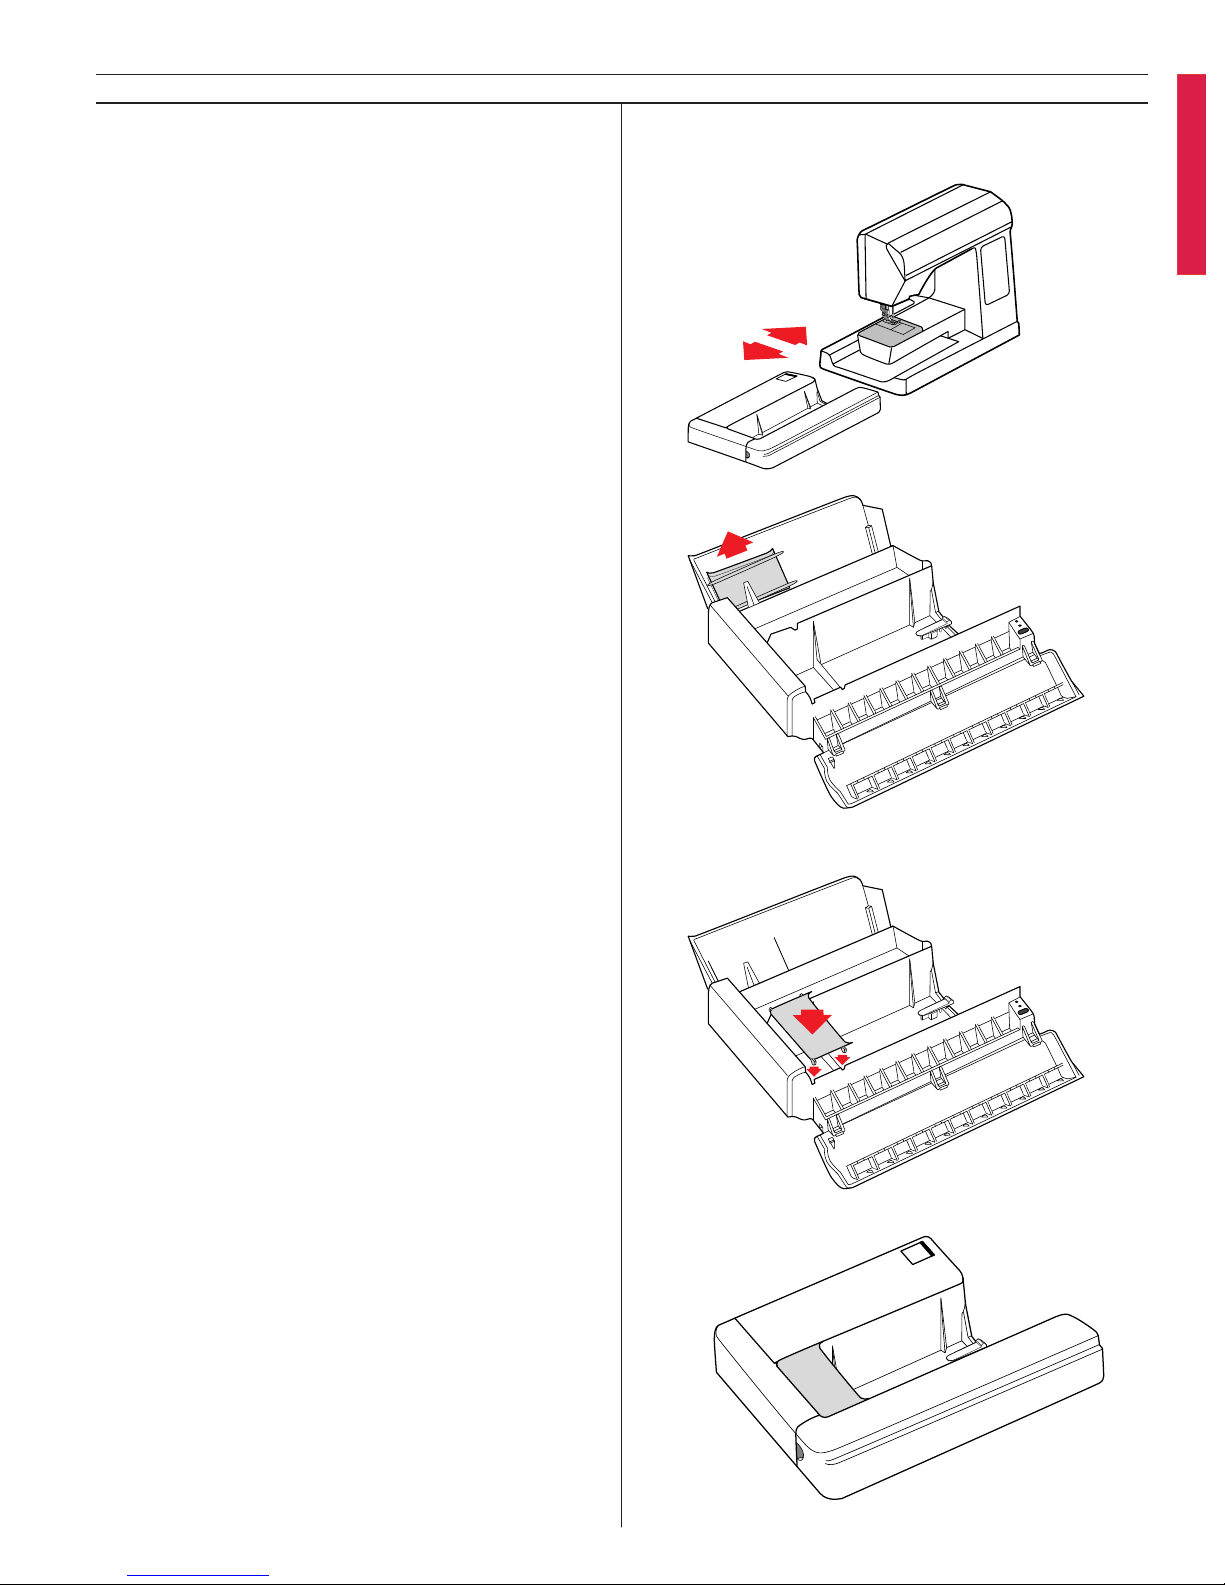
In the Accessory Tray there are special pockets
for presser feet, bobbins and needles plus space
for other accessories. Store the accessories in the
tray so they are easily accessible.
Slide the Accessory Tray on to the machine to
provide a larger work surface. Slide the Accessory
Tray to the left, passing the stop po si tion and remove it if you wish to use the free arm.
A work surface extension is stored inside the
rear cover of the tray.
1. Slide the Accessory Tray to the left until you
have just passed the stop position.
2. Place the work surface extension into the
space that appears between the tray and the
machine and push the tray back.
Page 8
8
Learn your Designer I
1.
2.
3.
4.
Spool pins
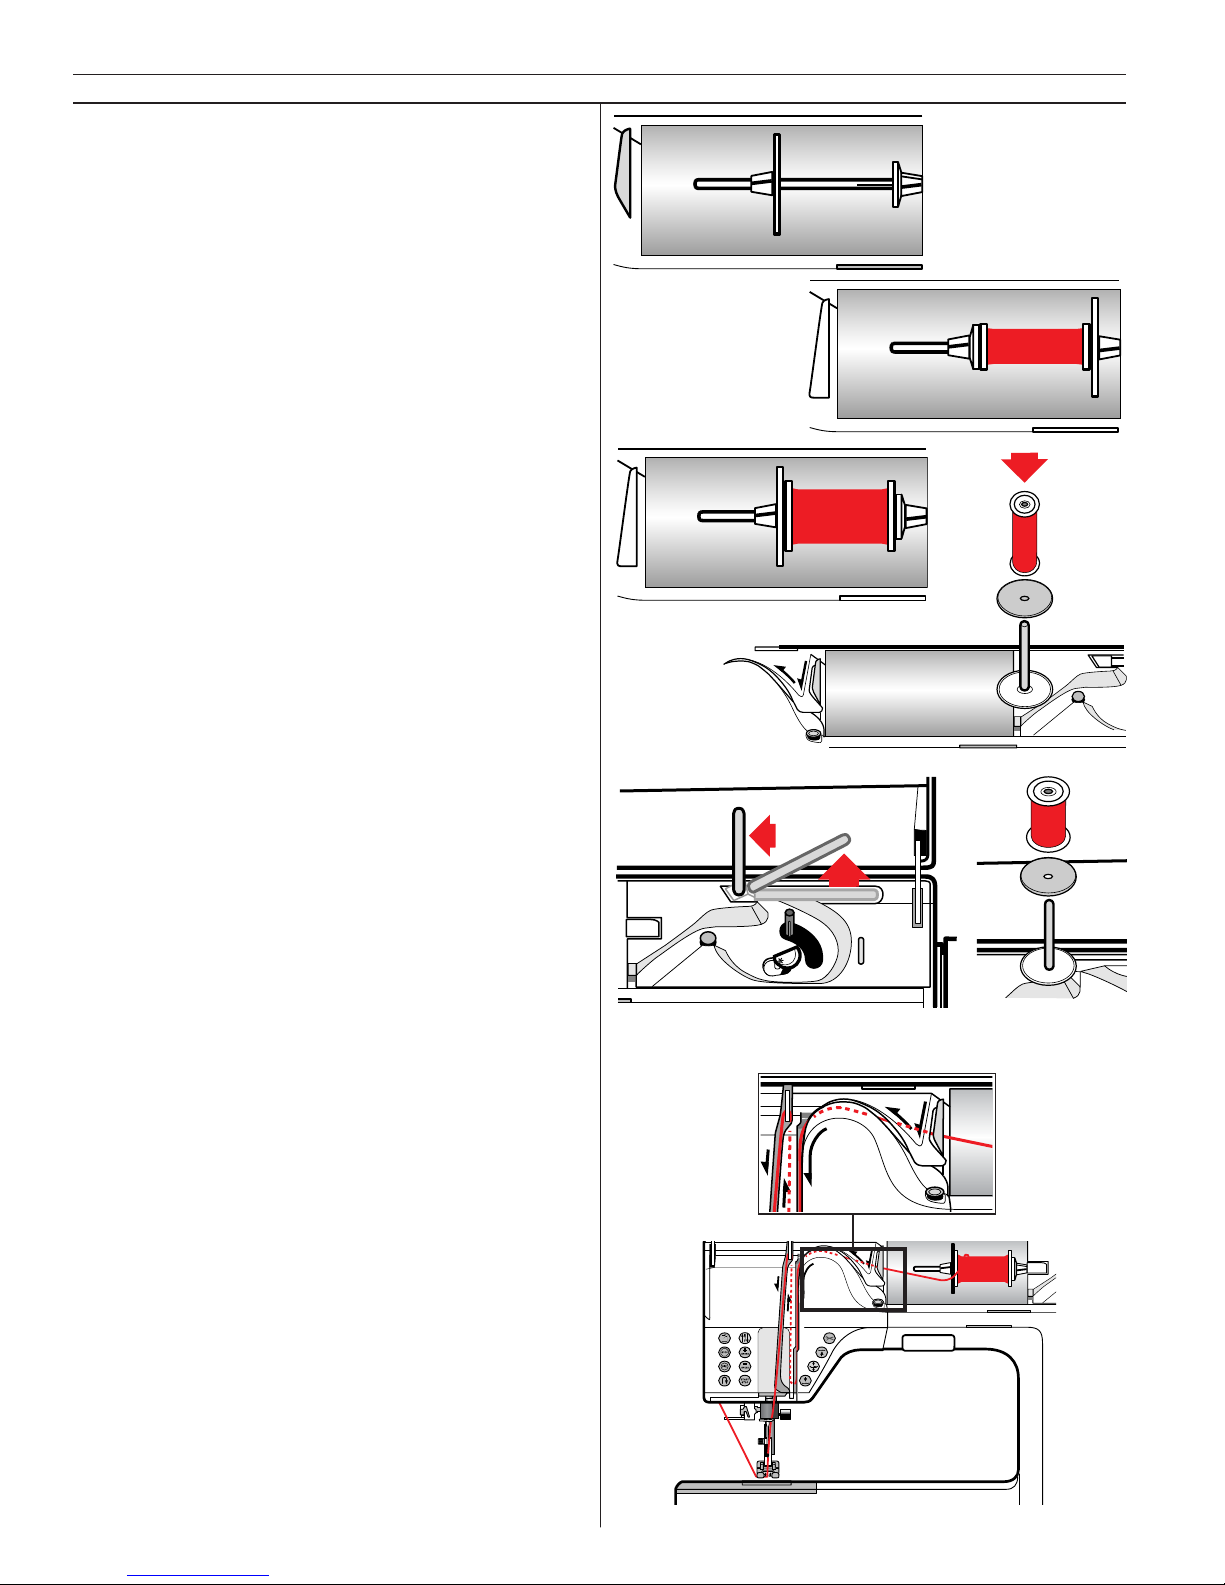
Your Designer I has spool pins suitable for all
types of thread. The main spool pin (a) is adjustable and can be used in horizontal po si tion for
normal threads or in vertical position for extra
large spools or threads with special char acte ris tics.
Horizontal position
Place the spool so that the thread reels counterclockwise. There are two spool hold ers on the
spool pin. For narrow thread spools, the small
holder (b) is placed in front of the thread. If you
use large thread spools, the large holder (c) is
placed in front of the thread.
Slide the correct size spool holder in place so
the fl at side is pressed fi rmly against the spool,
with no space between spool holder and spool.
Vertical position
To use the spool pin in its vertical position, pull
the spool pin out towards you. Slide on the large spool holder and place a felt pad under the
thread spool. This is to prevent the thread from
reeling off too fast.
Fold up Spool pin
There is also an additional, fold up/down spool
pin (d).
The large spool holder (c) is placed under the
thread. This spool pin is used when winding a
bob bin from a second spool of thread or for a
second spool when sewing with a twin needle.
Threading the upper thread
Make sure the presser foot is raised and the
needle is in the up position.
Horizontal spool pin
1. Pull the spool pin out. Place the spool on the
spool pin The thread shall reel counter-clockwise. Push the spool pin back in. Hold the
thread near the spool using your right hand.
Use your left hand to bring the end of the
thread in the direction of the arrow.
2. Bring the thread over the pre-tension thread
guide (a) and under the thread guide (b).
Bring the thread over the thread tension discs
(c).
a
b
c
c
small holder
large holder
a
b
c
d
Page 9
9
Learn your Designer I
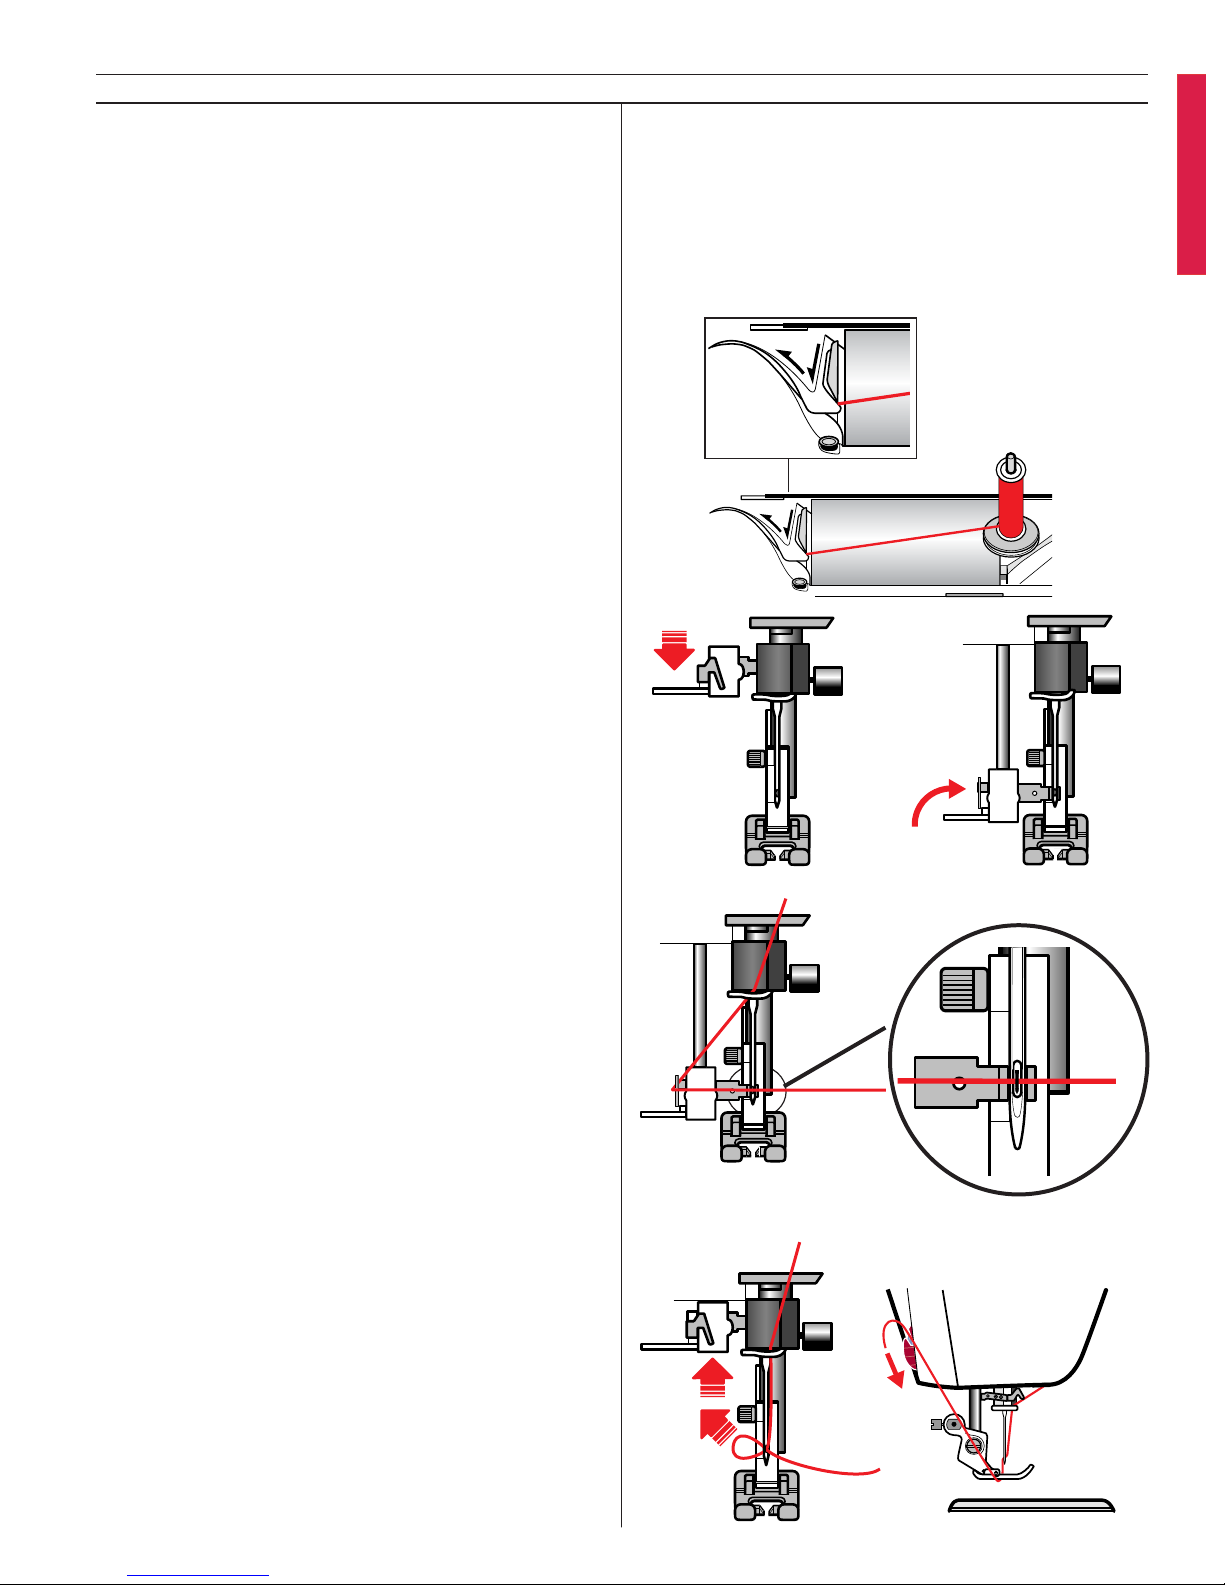
3. Continue threading in the direction indicated
by the arrows. Bring the thread from the right
when threading into the slot on the take-up
lever.
4. Take the thread down to the last guide just
above the needle.
Vertical spool pin
1. Pull the spool pin out. Place the spool on the
spool pin (follow the instructions on previous
page).
2. Thread the machine according to the instruc-
tions with one exception. Instead of bringing
the thread into the pre-tension guide, bring it
directly under the thread guide (b).
Needle threader
The needle must be in the up position to use
the needle threader. We also recommend that
you lower the presser foot.
1. Pull the needle threader all the way down,
behind the needle.
2. Bring it forward until the metal fl anges cover
the needle. A small hook will pass through
the eye.
3. Place the thread around guide (a) and under
the fl anges in front of the needle, so it catches into the small hook.
4. Let the needle threader gently swing back,
the hook pulls the thread through the needle
eye and forms a loop behind the needle. Pull
the thread loop out behind the needle.
5. Place thread under the presser foot and cut
the thread.
Note: You can not use the Needle threader for the
wing needle, twin needle, triple needle, a needle
smaller than size 70 or when the Buttonhole Sensor Foot is on. The needle is threaded from front to
back. The white on the pres ser foot ankle makes it
easy to see the eye of the needle.
Thread warning
If the upper thread breaks or bobbin thread runs
out, the machine stops. Upper thread or bobbin
sym bol appears on a Pop-up Menu on the Color
Touch Screen. If upper thread breaks: Re-thread
the machine and touch OK on the Pop-Up Menu.
The Pop-up disappears. If bob bin thread runs
out: Rem ove your work and the bobbin. Fill the
bobbin. Replace the bob bin and sew.
1.
2.
3.
4.
5.
a
b
Page 10
10
Learn your Designer I
e
d
c
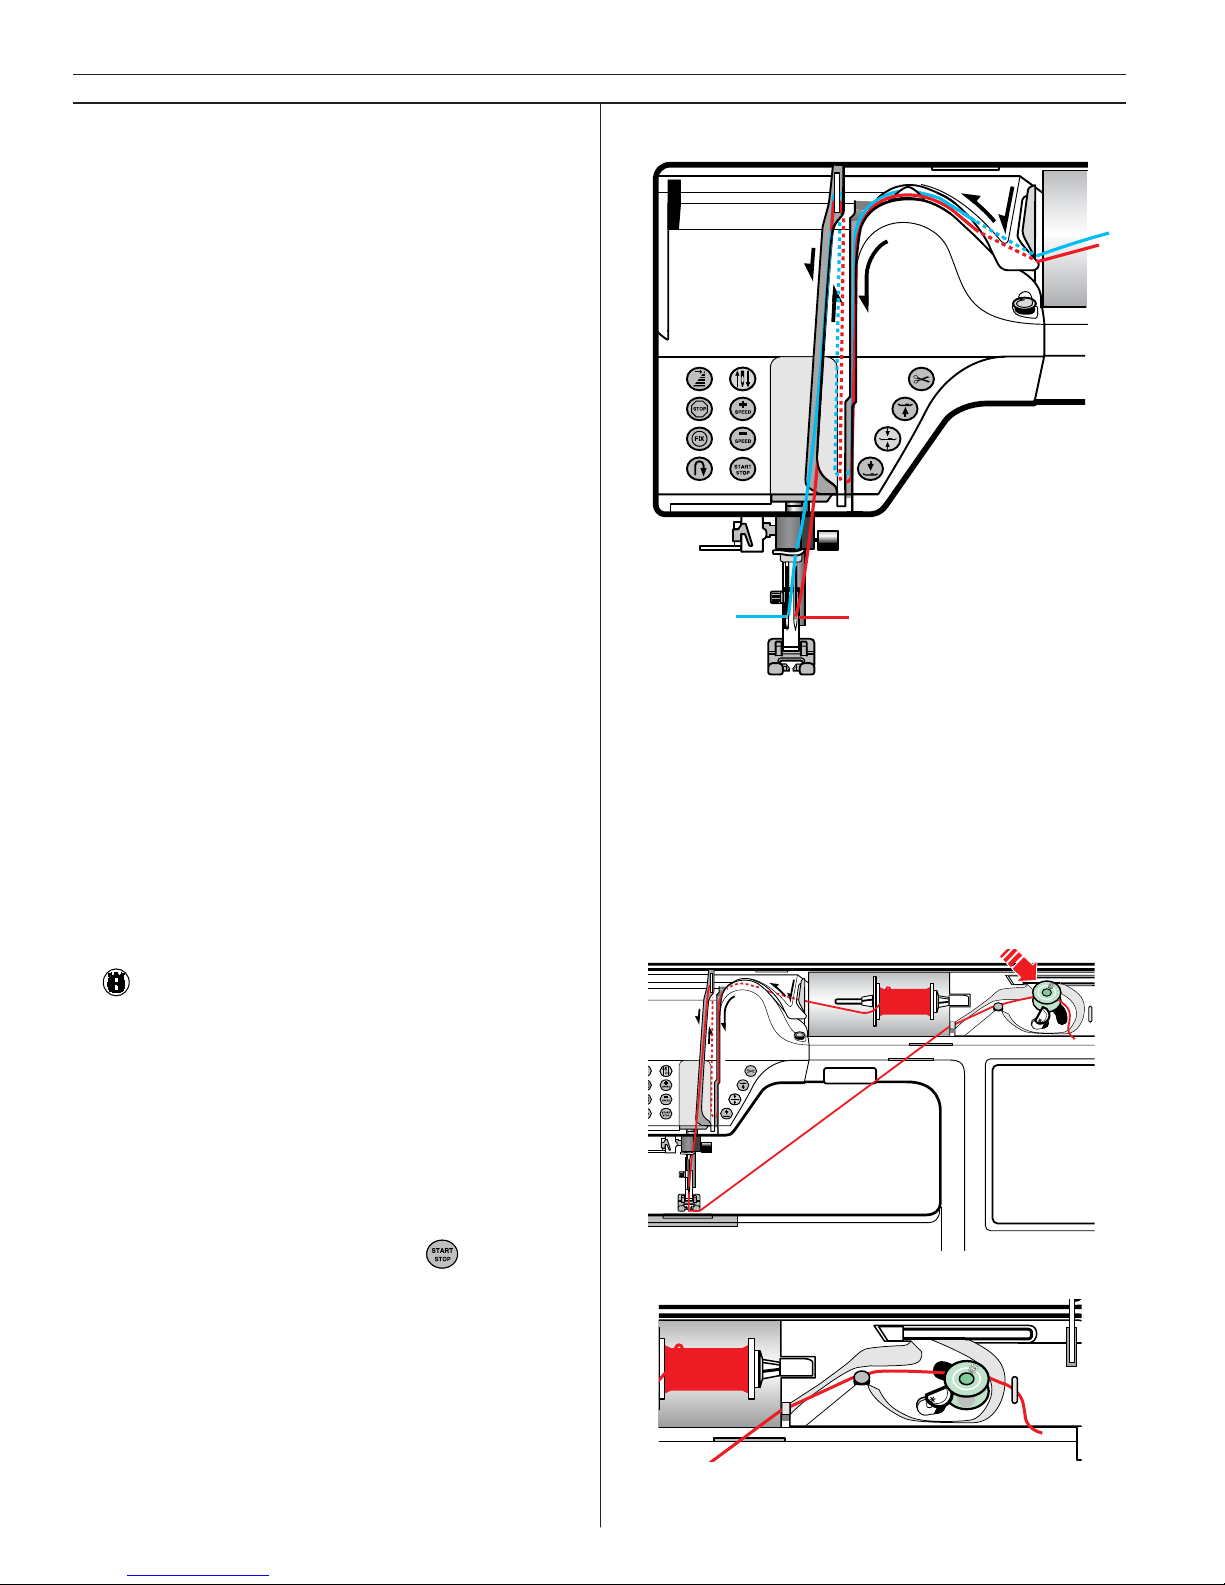
Threading for twin needle
1. Insert a twin needle. See page 16 “Changing
the needle”.
2. Use a second thread spool or wind a bobbin
with the thread you are going to use as the
second upper thread.
3. Left needle (blue). Thread the machine as
explained on page 9 (Vertical spol pin) and
check to ensure that thread lies between the
inner thread tension discs, inside the last
thread guide. Thread left needle.
4. Right needle (red). Pull up the extra spool
pin.
5. Place a spool holder and a felt pad under the
bobbin with the second thread on the spool
pin.
6. Thread the machine as before but this thread
should lie between the outer thread tension
discs, outside the last thread guide. Thread
right needle.
Bobbin winding with the machine
threaded
Make sure that the presser foot and the needle
are in the up position. Use only the original
Husqvarna Viking green bobbins with your
Designer I.
Only use a metal presser foot when bob bin
winding from the needle.
1. Place your empty bobbin with the small mark
out on the bobbin spindle on the front of
the machine. Bring the bobbin spindle down.
A Pop-up menu on the Color Touch Screen
reminds you that bobbin winding is engaged.
2. Pull the thread from the needle under the
presser foot and to the right under the thread
guide (c) and over (d).
3. Start from above and wind a few turns of
thread clockwise around the bobbin. Cut off
the thread on the thread cutter (e).
4. Press the foot control or touch . When
the bobbin is fi lled, the winding will stop automatically. Remove the bobbin, cut off the
thread (e) and bring the bobbin spindle up.
Note: We do not recommend winding specialty
threads such as invisible or other stretchy threads
through the needle. Instead see “Bobbin winding
– vertical spool pin”.
Page 11
11
Learn your Designer I
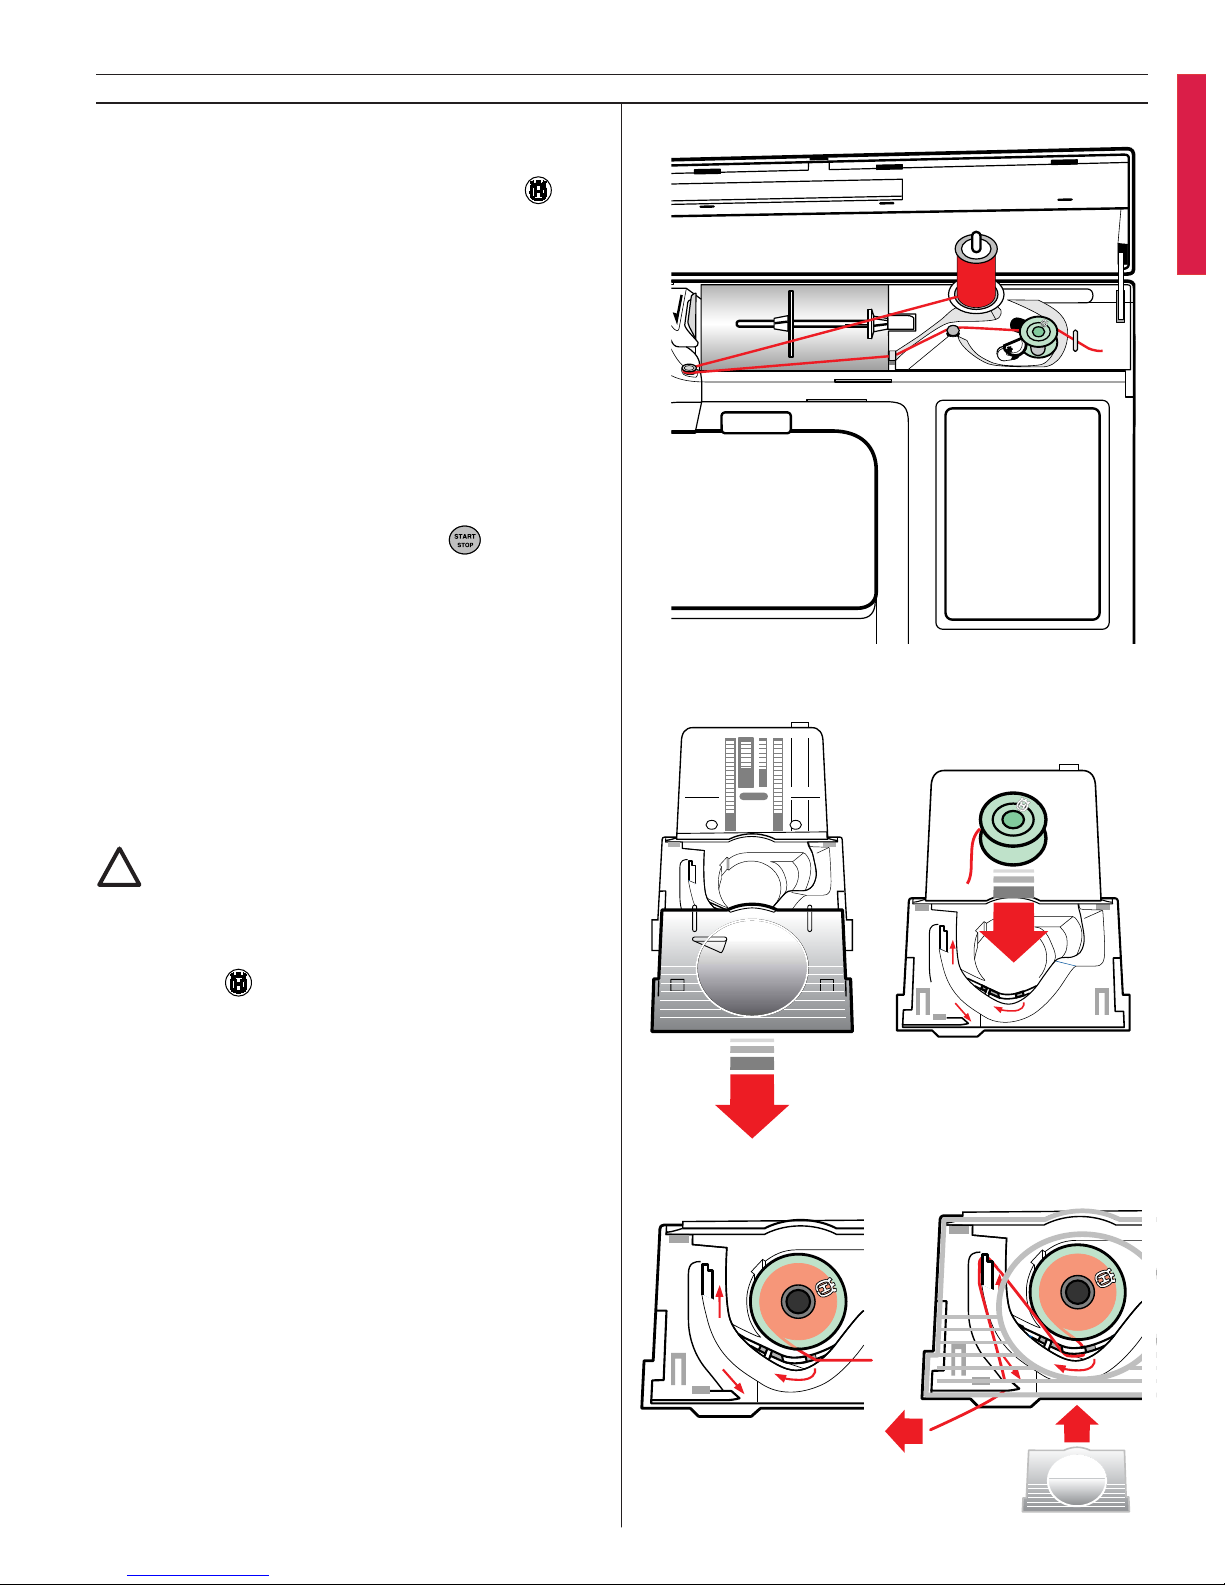
Bobbin winding –
vertical spool pin
1. Place an empty bobbin with the mark out
on the bobbin spindle on the front of the machine. Bring the bobbin spindle down. A Popup menu on the Color Touch Screen reminds
you that bobbin winding is engaged.
2. Place the large spool holder under the thread
on the spool pin.
3. Bring the thread around thread guide (b),
then under thread guide (c) and over (d) as
illustrated.
4. From above wind a few turns of thread clock-
wise around the bobbin and into the thread
cutter (e).
5. Press the foot control or touch . When
the bobbin is fi lled, the winding will stop automatically. Remove the bobbin, cut off the
thread (e) and bring the bobbin spindle up.
Note: Depending on the quality of the thread you
can wind the thread one or two times around the
threadguide (b) in order to get the right thread tension.
Placing the bobbin
in the machine
!
Turn off the main switch.
1. Open the cover by sliding it towards you and
remove it.
2. Place the bobbin in the bobbin case with
the mark
facing up and the thread to the
left of the bobbin. The bobbin will then rotate counter clockwise while pulling out the
thread.
3. Place your fi nger on the bobbin to keep it
from turning as you pull the thread fi rmly to
the right and then to the left into the tension
spring (a) until it “clicks” into place.
4. Continue threading around (b) and to the
right of the thread cutter (c). Replace the cover with the lines to the front and slide it into
10 15
1.
2.
4.3.
b
c
e
d
a
b
1
2
b
c
Page 12
12
Learn your Designer I
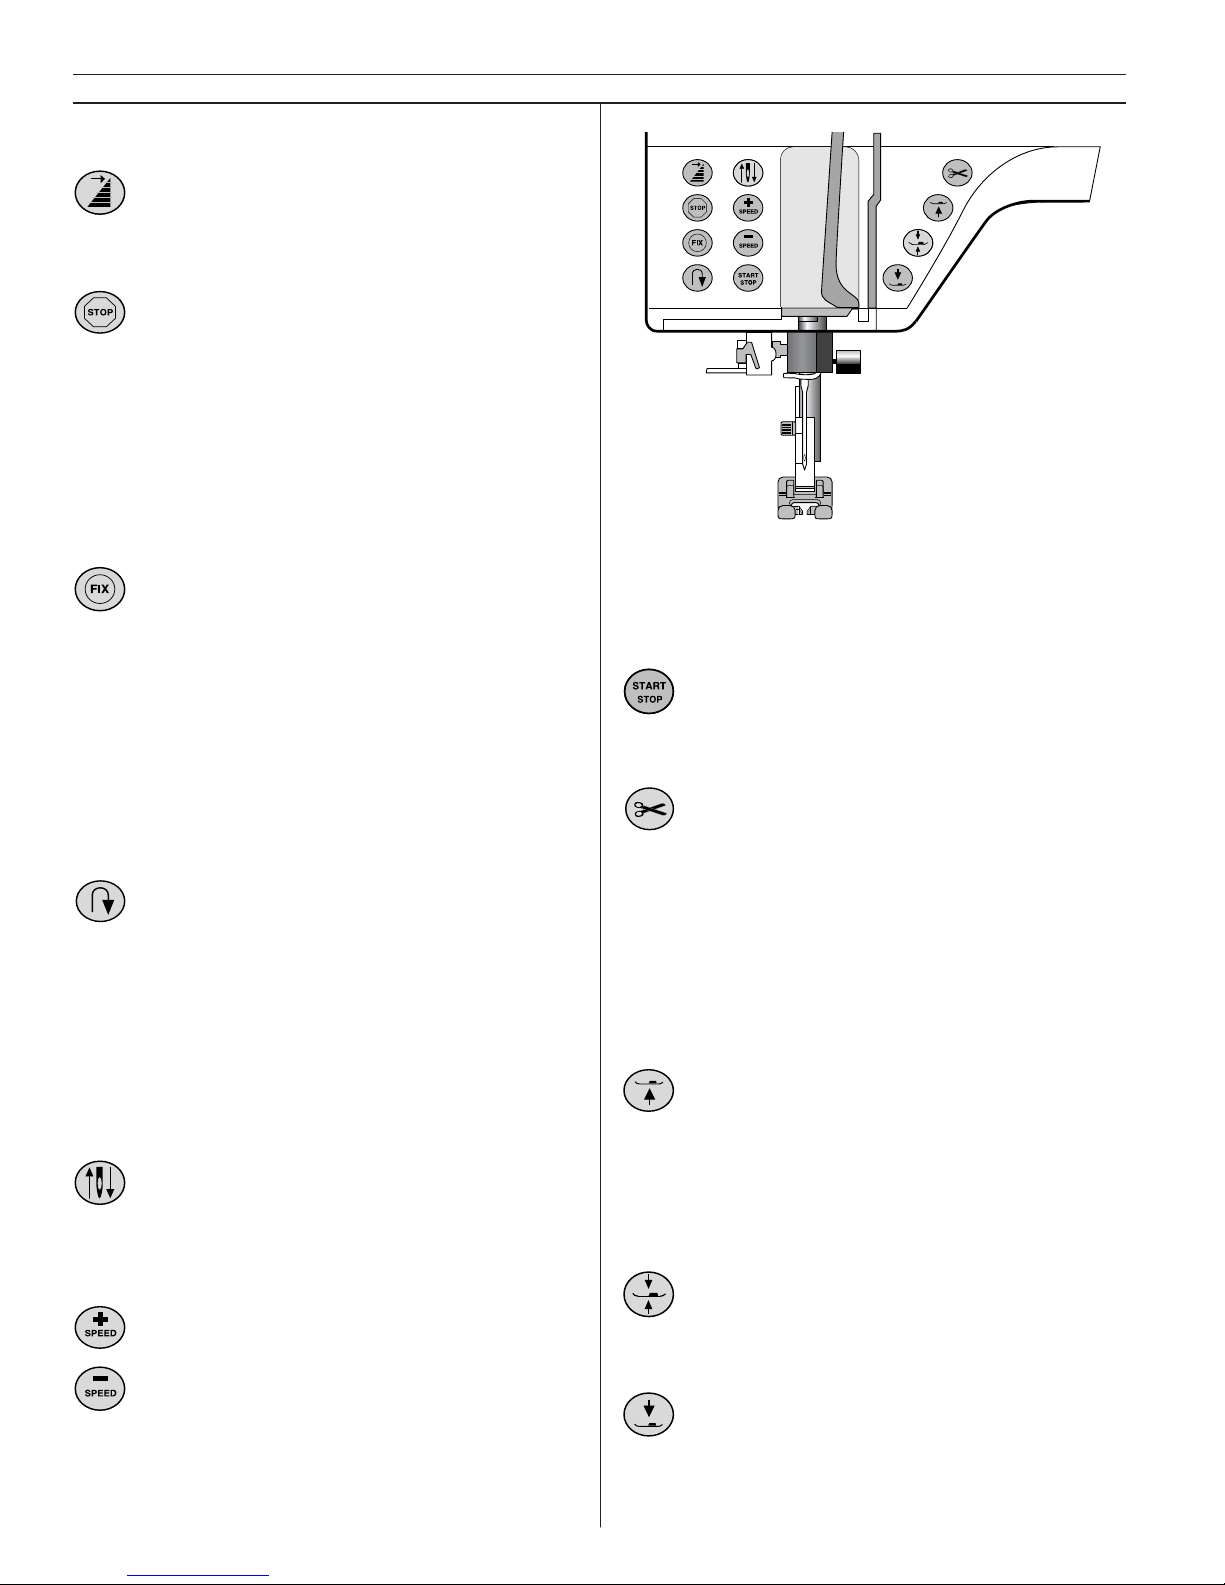
Stitch Re-start. To start sewing your selected stitch at the beginning of the stitch
without having to re-set any special settings you have made.
STOP is used to conclude a stitch. Your
De sig ner I fastens the thread and stops
automatically when one stitch sequence
has been completed. The button lights
up when you touch it. STOP is cancelled
when you touch the button again or by
selecting a new stitch. The button light
will go out. The STOP function can be
programmed. It can also be used for one
color embroidery.
FIX is automatically activated when a
stitch is selected or when Thread Cutter
has been used. The button lights up while
FIX function is active. By touching the
lighted button the function can be turned
off. At the beginning – De sig ner I sews a
few tie off stitches and goes on with the
selected stitch. Touch FIX while sewing
– De sig ner I sews a few tie off stitches
and stops automatically. The FIX function
can be programmed.
Reverse – your Designer I sews in reverse
when this button is touched. The button
lights up. De sig ner I sews forwards when
the button is released and the light goes
out. The longest reverse stitch length is
3mm. For permanent reverse, touch the
button twice in quick succession before
starting to sew. The button will be lit up
and the De sig ner I sews in reverse until
you touch the button again to cancel.
Needle stop up/down. Touch this button
to move the needle down or up. The set ting of the needle stop po si tion is changed
at the same time. You can also tap the
foot control to raise or lower needle.
Touch + SPEED or - SPEED to increase or
decrease the sewing speed. Touch when
not sewing and a Pop-up menu on the
Color Touch Screen indicates the speed
set ting. Touch OK or start sewing and
the pop up goes out. You can change the
speed set ting while sewing but no Pop-up
will appear. All stitches in De sig ner I have
Function buttons
a pre-set, recommended sewing speed.
When you select a stitch, De sig ner I automatically sets the correct sewing speed.
START/STOP. Touch this button to run
and stop the machine without the foot
control. Touch START/STOP to begin and
touch again to stop sewing.
Selective Thread Cutter. Touch the
button and De sig ner I cuts the top and
bobbin threads, raises the presser foot
and the needle to the up po si tion and
activates the FIX function. To cut before
the needle moves to the start position of
next stitch, touch Thread Cutter while the
machine is running. A fl ashing STOP will
indicate that a cut is requested. The Thread cutter function can be programmed.
Sensor Foot Lift up and extra lift.
Touch this button and the pres ser foot
and the needle will be lifted to up po si tion. Touch the button once more and
the pres ser and foot will raise to ex tra lift
to make it easy to get thick fabric under
the pres ser foot.
Sensor Foot Lift pivot. To simplify placing the fabric, touch this button. The
pres ser foot will be lowered to pivot po si tion.
Sensor Foot Lift down. Touch this button and the pres ser foot will be completely lowered and De sig ner I is fi rmly holding your work.
Page 13
13
Learn your Designer I
Sensor Foot Pressure
When selecting different fabric weights on the
Sewing Advisor, the pressure will be adjusted
automatically. Thanks to the Sensor Foot Pressure, the presser foot actually senses the thickness
of fabric or embroidery or stitching to sew over
it smoothly and evenly.
Touch
on the Color Touch Screen and you
will see the actual setting of the pres ser foot
pressure for the selected fabric.
You can adjust the presser foot pressure by
pres sing the buttons (+) or (-) on the
menu.
The higher the number the more pressure on
the fabric.
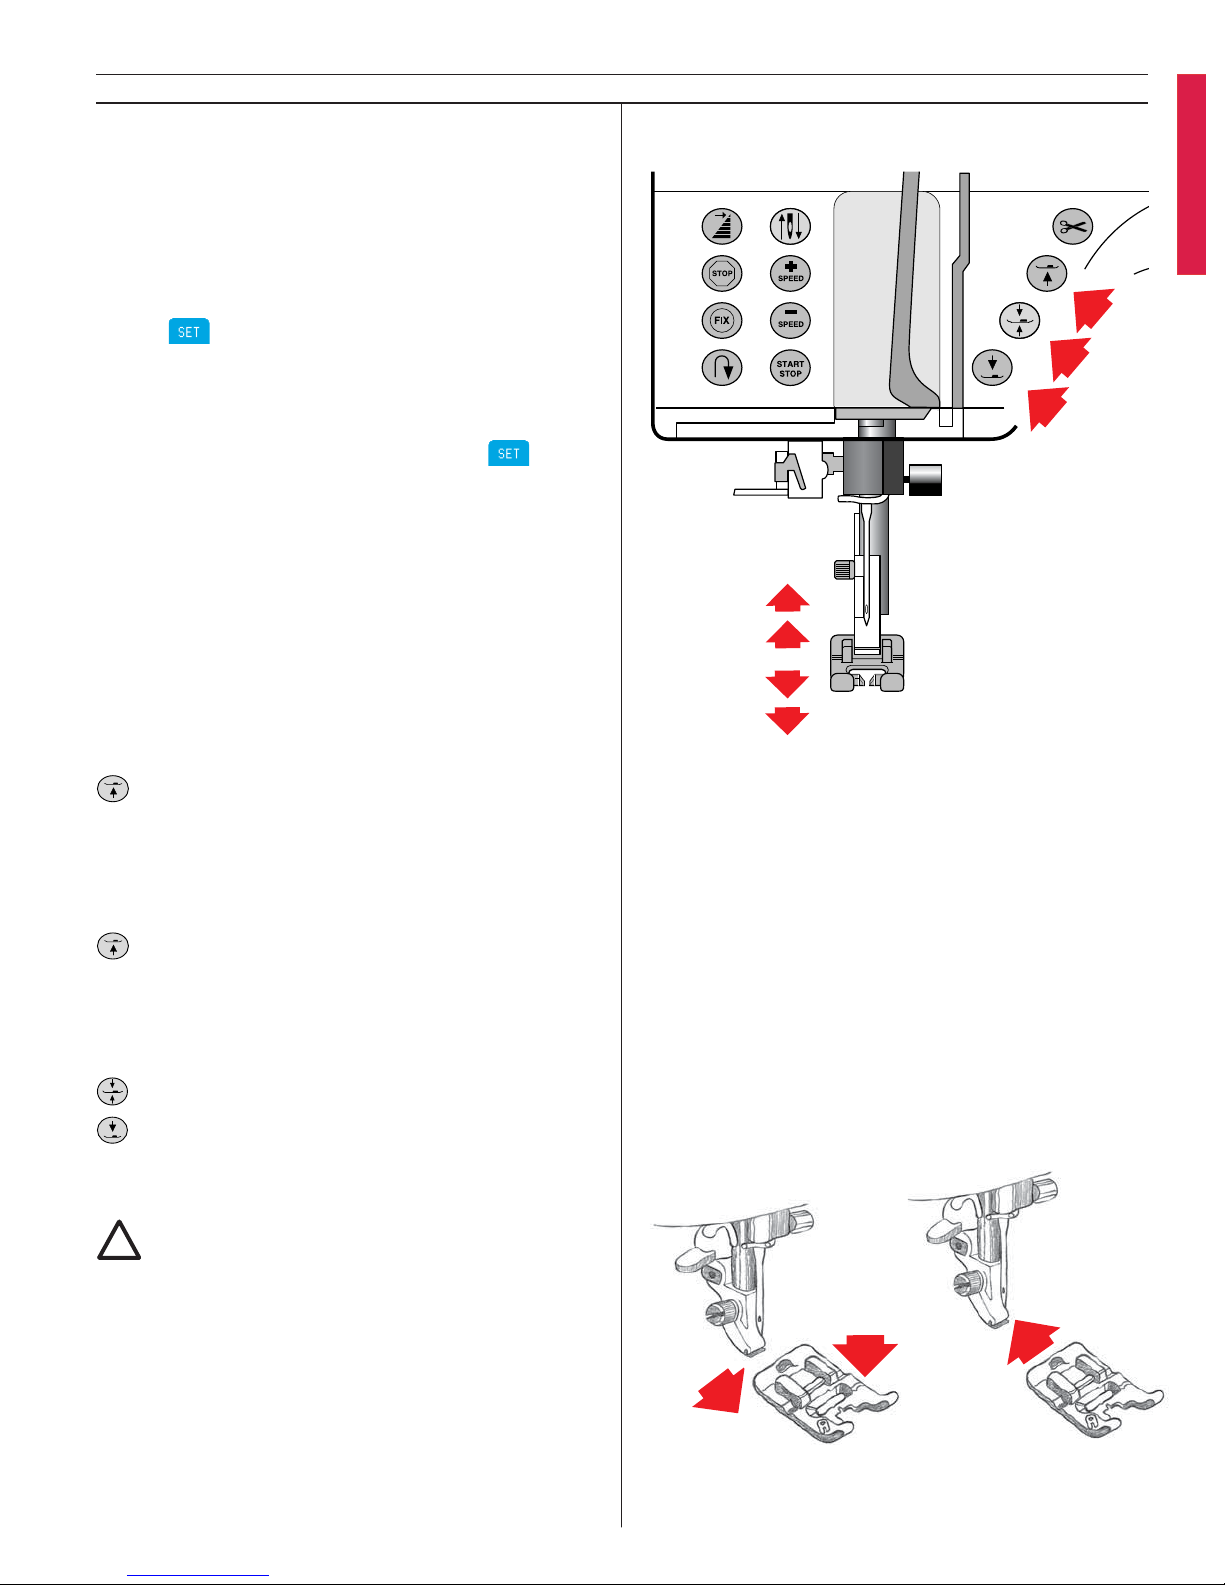
Sensor Foot Lift
The presser foot is automatically lowered when
you start your sewing.
When you stop with the needle in the down
position, the pres ser foot is automatically lifted
to pivot position.
If you have selected Needle stop up:
UP – Raises the pres ser foot and the needle
to up po si tion. Touch twice for ex tra lift. Makes
it easier to get thick garments under the pres ser
foot.
If you have selected Needle stop down:
UP – Raises the presser foot to up position
but the needle stays down in the fabric. Touch
twice – the needle raises to up po si tion and the
pres ser foot to the extra lift for easy removal of
fabric.
PIVOT – Sets foot to pivot position.
DOWN – Lowers the presser foot.
Changing the presser foot
!
Turn off the main switch.
1. Make sure that the needle is in the highest
position. Pull the presser foot towards you.
2. Line up the cross pin on the foot between the
spring and the presser foot ankle. Press back
until the foot snaps into place.
Page 14
14
Learn your Designer I
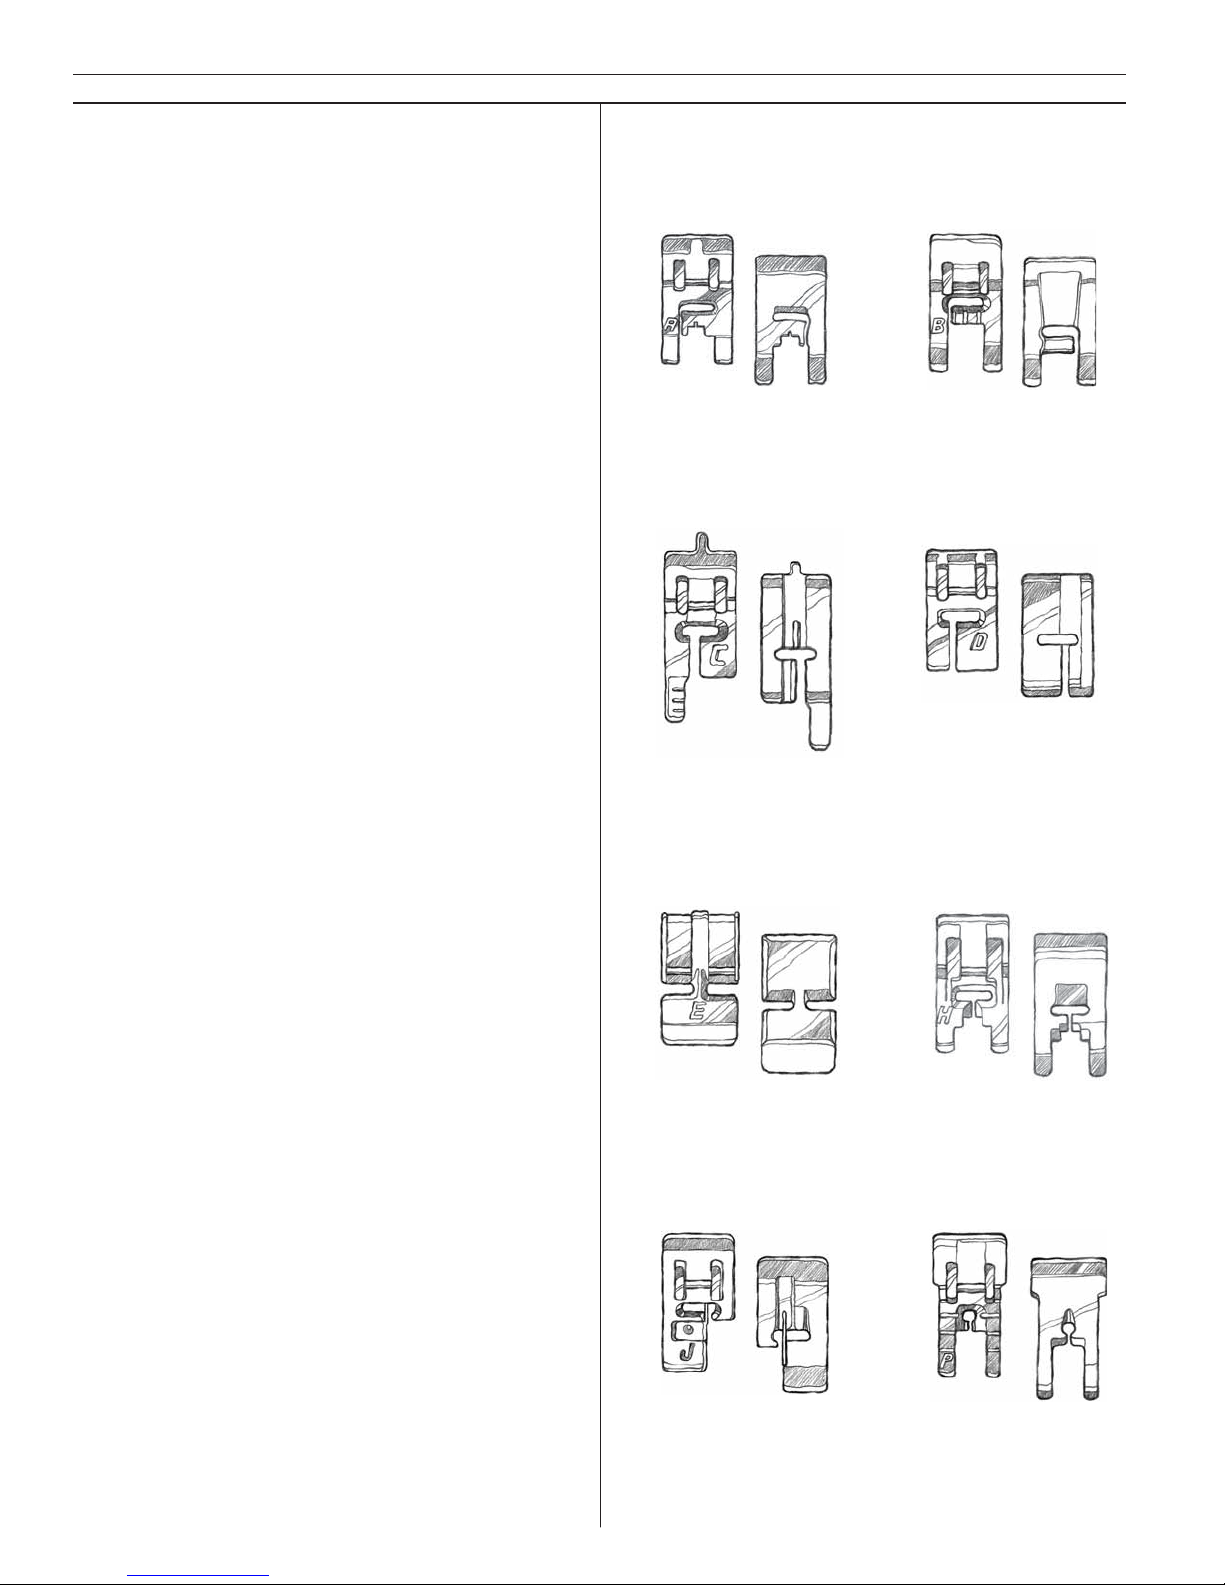
Presser feet
Among the accessories there are a number of
pres ser feet for different purposes.
Presser foot A
Fitted on the machine upon delivery. This foot is
used mainly for straight stitching and zigzag stitching with a stitch length longer than 1.0.
Presser foot B
When sewing close zigzag stitches with less than
1.0 stitch length; other utility stitches or decorative stitches use this foot. The tunnel on the
bottom of the foot is de sig ned to feed smoothly
over the stitches.
Presser foot C
This buttonhole foot has guide lines to determine buttonhole length. The end of the short toe
is 3/8" from needle and end of long toe is 3/4"
from needle. The two tunnels on the bot tom of
the foot feed smoothly and straight over the buttonhole columns.
Presser foot D
This foot is used for blind hem stitches. The in ner edge of this foot guides the fabric. The bot tom of the foot is de sig ned to ride along the
hem edge.
Presser foot E
This is the zipper foot and can be snapped on
either to the right or to the left of the needle,
making it easy to sew both sides of the zipper.
Presser foot H
This foot is made of plastic with exception of a
glide plate underneath. The foot is used when
sewing foam, plastic, or leather, minimizing the
risk of these materials sticking to the foot. Same
as Presser foot A.
Presser foot J
This foot is used for overcasting, seam and over cas ting, i.e. stitches which have a stitch width of
5.0 and 5.5 mm. The pin prevents pucke ring at
the edge of the fabric.
Presser foot P
This foot is used when piecing quilt blocks.
The foot has distance marks 1/4" (6 mm) and
1/8" (3 mm).
A
B
CD
EH
JP
Page 15
15
Learn your Designer I
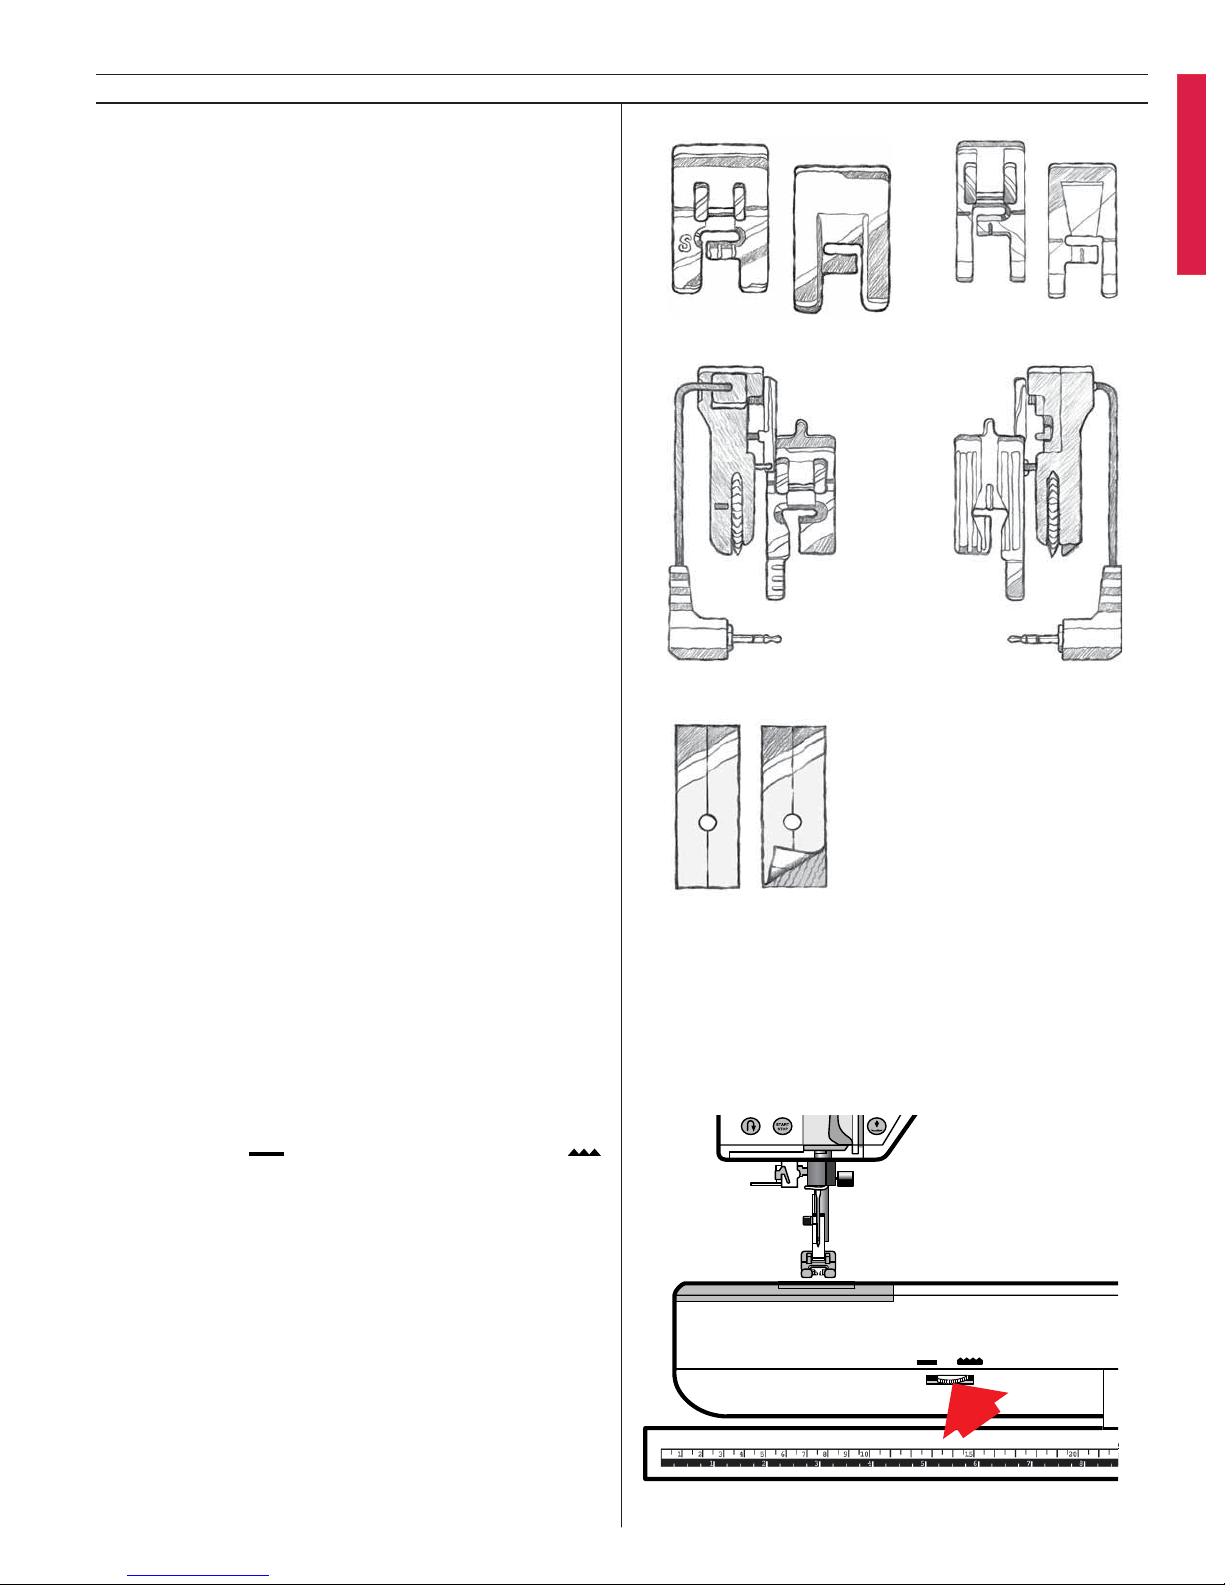
Presser foot S
This foot is used for side-motion stitches.
Transparent presser foot
For decorative sewing. Ma kes it easy to match
patterns. Same as Presser foot B.
Sensor Buttonhole Foot
When connected to the machine it measures buttonhole length and sews the buttonhole size that
has been entered into the machine. The end of
the short toe is 3/8" from needle and end of
long toe is 3/4" from needle
Self-adhesive glide plates
Used for the presser foot C/Sensor Buttonhole Foot
when sewing plastic-coated fabrics, leather etc.
Lowering the feed teeth
The feed teeth are lowered when you turn the
dial to the left . Turn the dial to the right
if you wish to raise the feed teeth. The feed teeth will raise as you begin to sew.
The feed teeth should be lowered for sewing on
buttons and for free-motion work.
Tip: By lowering the feed teeth it is easier to get
thick fabrics like terry cloth under the pres ser
foot. Raise the feed teeth before star ting to sew.
Note: The feed teeth are lowered automatically
when the embroidery unit is put in place. When remo ving the embroidery unit, the feed teeth will raise
as you start to sew.
S
1
1234567
2345678910 15
2
Page 16
16
Learn your Designer I
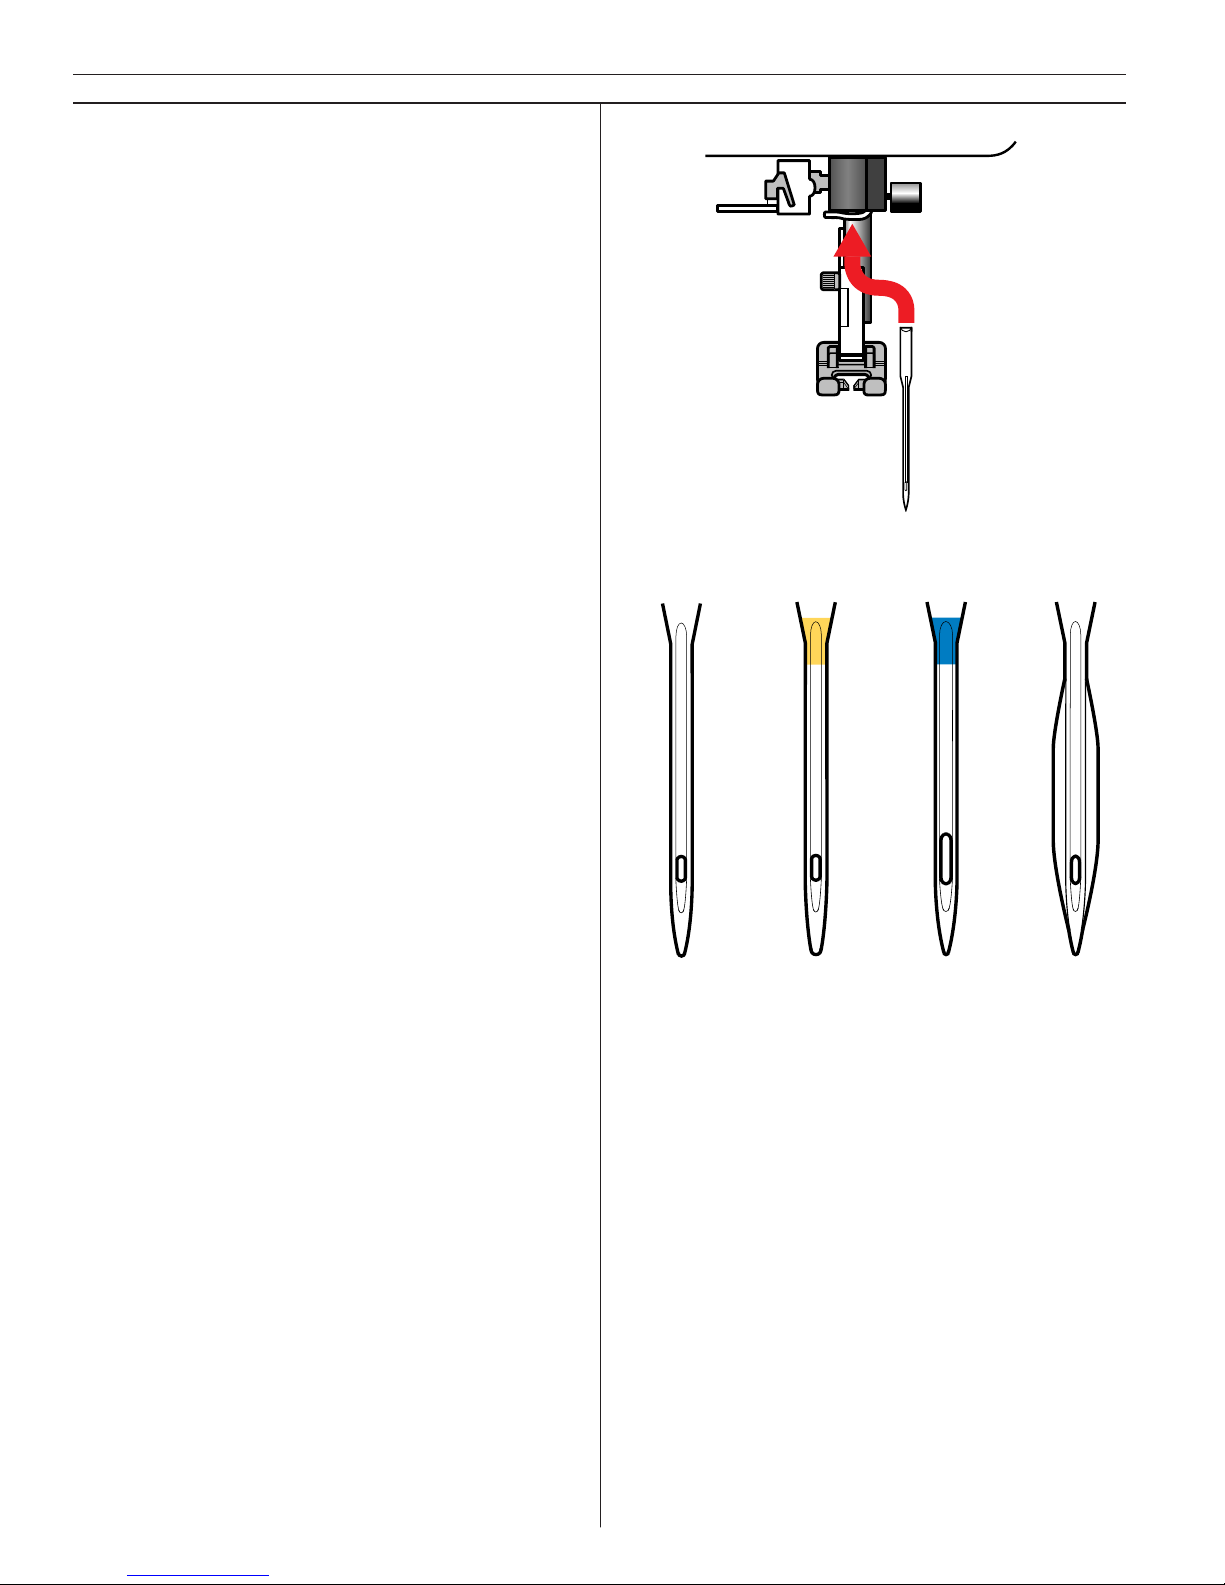
Changing the needle
1. Loosen the screw in the needle clamp by us-
ing a screw driver or screw grip.
2. Remove the needle.
3. Push up the new needle with the fl at side
away from you until it will go no further.
4. Use the screwdriver or screw grip to tighten
the screw properly.
Needles
The sewing machine needle plays an important
role in successful sewing. To ensure you will get
a quality needle, we recommend Schmetz brand
needles of sys tem 130/705H.
The needle case contains needles of the most
used size for sewing woven and stretch fabrics.
A Standard needles 70, 80, 90
These needles are used for sewing all woven
fabrics. The needle point is designed to penetrate between the threads of the fabric so the
fabric will not be damaged.
B Stretch needles 75, 90
These needles are used for sewing knit-
ted and stretch fabrics. The stretch needle is
marked yellow and has a rounded point.
C Jeans needles 90, 100
These needles are used for sewing woven
heavy fabrics, for example denim, canvas fabric. The jeans needle is marked blue and has
an extremely sharp point to facilitate the penetrating of the fabric.
D Wing needle 100
The wing needle is used for hemstitching
in natural fi ber woven fabrics with special
stitches on the Heirloom Stitches Menu. The
needle has “wings” to push the threads of the
fabric aside forming holes where the needle
penetrates the fabric.
A
BC D
Page 17
Color Touch Screen
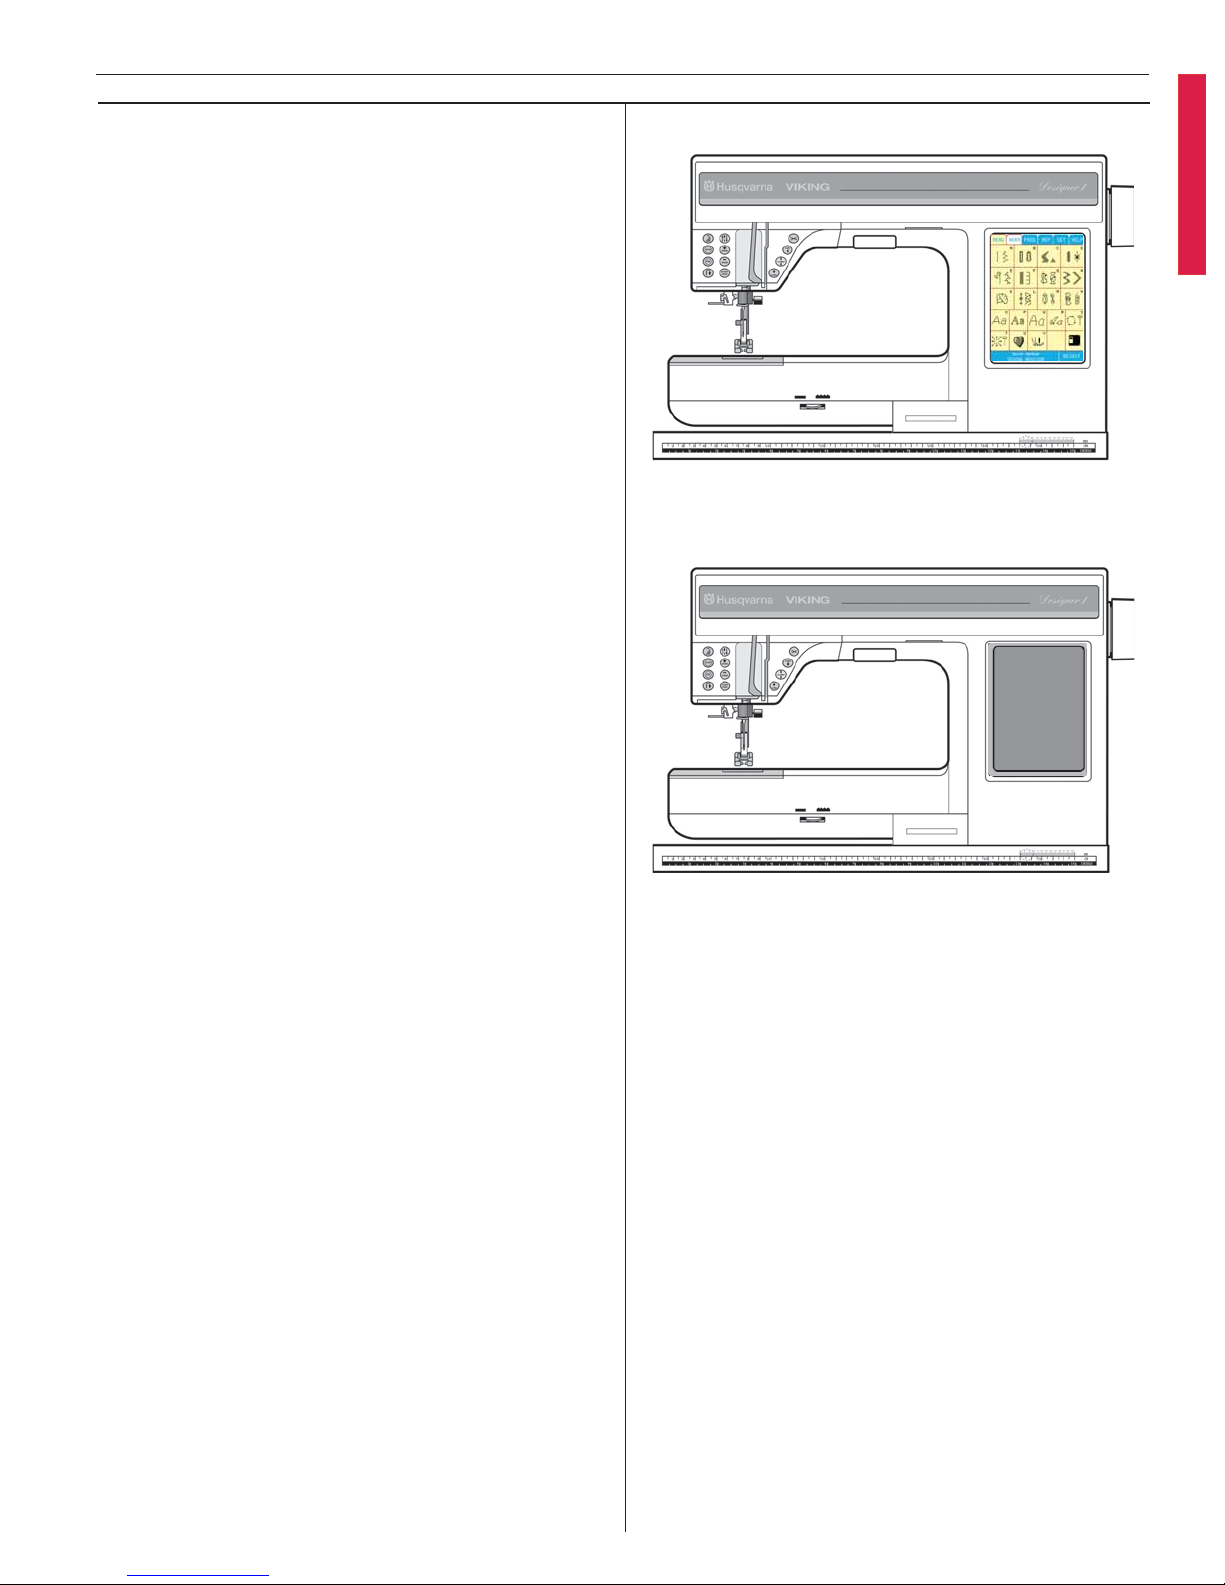
Designer I features an LCD Color Touch Screen
at the front right of the machine.
The Color Touch Screen is very easy to work
with. Just touch it with your fi nger tip to select a
stitch menu or function tab.
On/Off
When Designer I is off the screen will be dark
grey.
When it is turned on you will fi rst see a Welcome Screen, then the Main Menu will appear.
Screen Saver
Your Color Touch Screen can be left on all the
time. If you prefer you can set a screen saver
to come on after 9 minutes. See Screen Saver,
page 30.
17
Learn your Designer I
Page 18
Main Menu
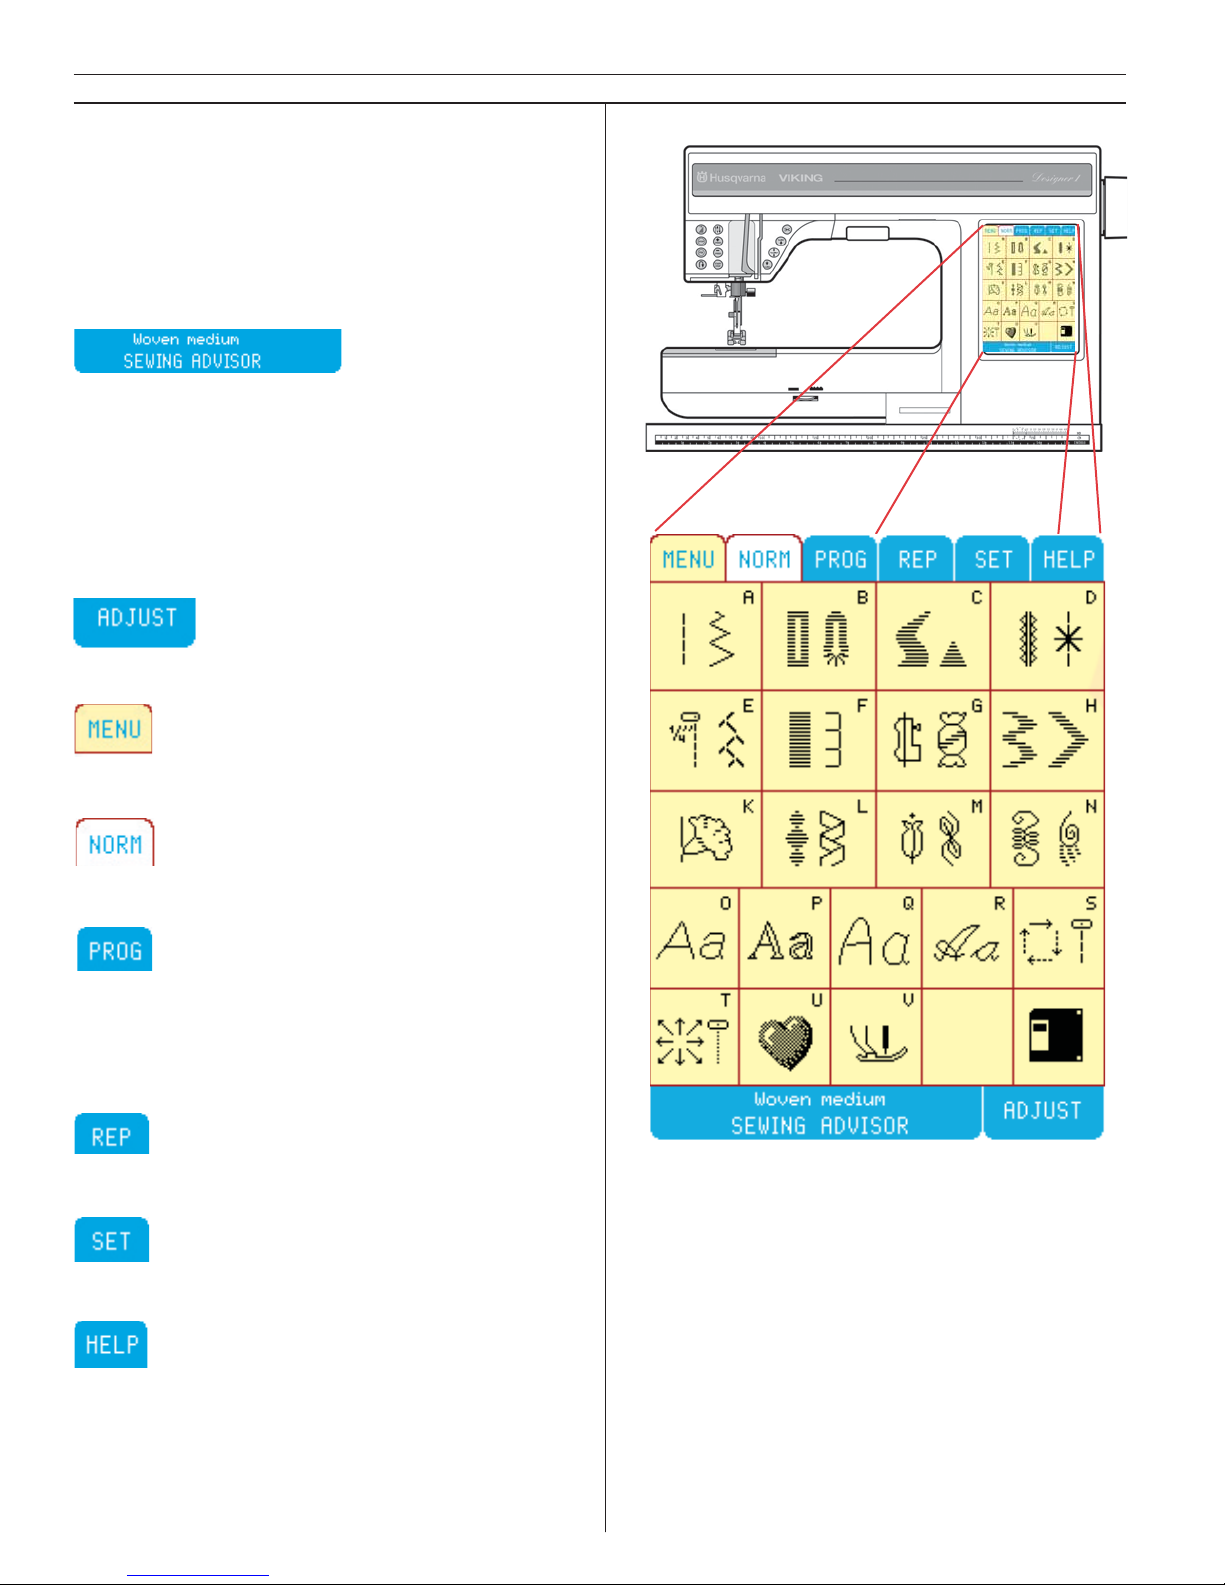
The Main Menu displays 21 Specialty Stitch menus and functions. There are 8 function tabs,
SEWING ADVISOR, ADJUST, MENU, NORM,
PROG, REP, SET and HELP. When you touch a
function tab it becomes active.The MENU tab is
yellow when active, other tabs turn white.
The easy way to get started, see page 27.
Simply select fabric and sewing technique, then
Designer I selects the best stitch, length, width,
tension, presser foot, presser foot pressure and
sewing speed. Your fabric choice in the
Sewing Advisor is shown in the touch area. The
Sewing Advisor is active when sewing all techniques except embroidery.
ADJUST stitch length and stitch width, elongation and mirror image.
Touch MENU to select from 21 menus. Touch
the disk icon to view or load the embroideries.
NORM is used for all sewing and embroidery
except programming and sewing programs.
PROG is used to program stitches such as Pictograms, letters and decorative combinations.
When the Embroidery Unit is connected touch
PROG to customize embroideries and/or lettering.
REP is used to sew out the stitch combinations
and embroideries programmed in PROG.
Touch SET to change current settings and functions. See page 29.
Recommends needle size and type, when to lower feed teeth, stabilize fabric, cord buttonholes
etc. When the embroidery unit is connected, you
can access the embroidery color menu.
18
Learn your Designer I
Page 19
Sewing Advisor –
The easy way to sew
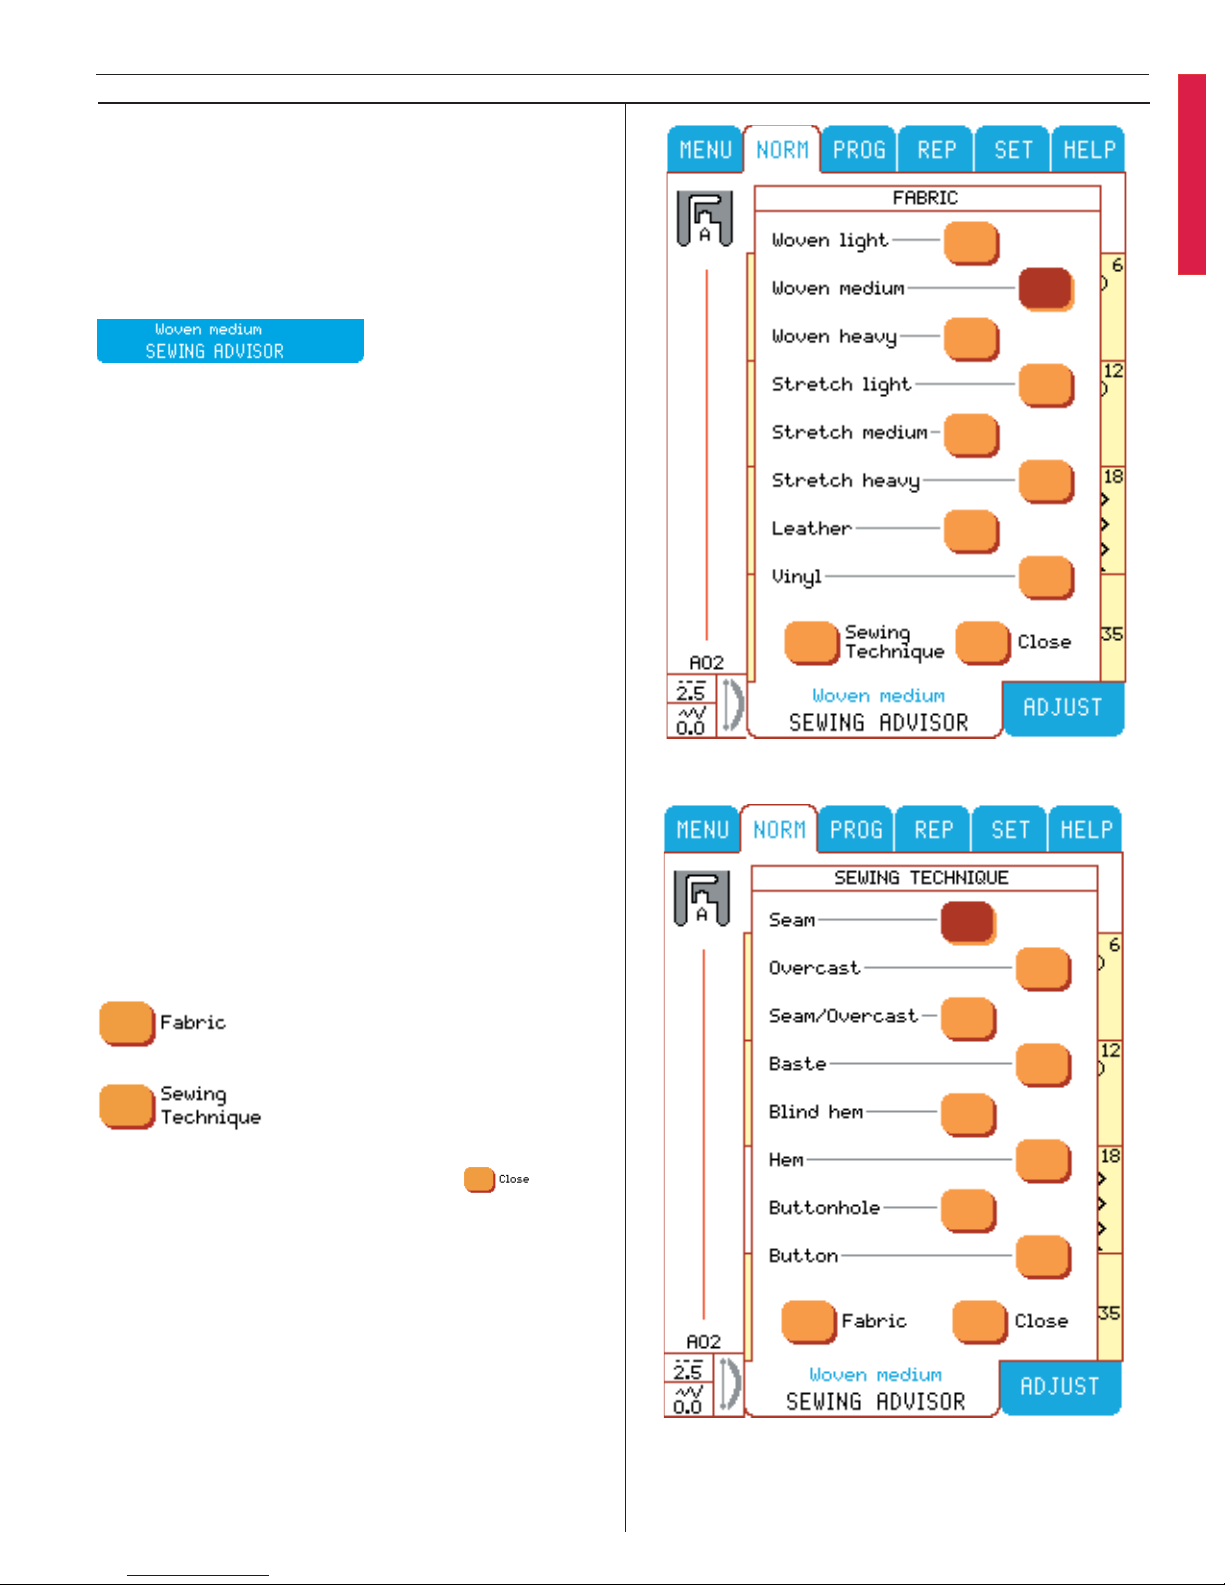
The Sewing Advisor is always active, until the
Embroidery Unit is connected or when you start
to program.
To bring up Sewing Advisor touch
The Sewing Advisor has two different menus,
Fabric and Sewing Technique.
Fabric
In the Fabric menu you select from 8 different
fabric types and weights. Select fabric, the fabric
button turns red and immediately the Sewing
Technique menu appears.
Sewing Technique
Select from 8 different sewing techniques. Your
Designer I immediately selects the best stitch,
thread tension, stitch length, stitch width, sewing
speed, presser foot and presser foot pressure for
your project. The button turns red to indicate the
technique you have chosen. If you want to select a new Sewing Technique just touch an other
technique button.
Move between the Fabric and Sewing Technique
menus by using the following buttons at the bot tom of the screen.
To close the Sewing Advisor touch
19
Learn your Designer I
Page 20
Specialty Stitch Menus
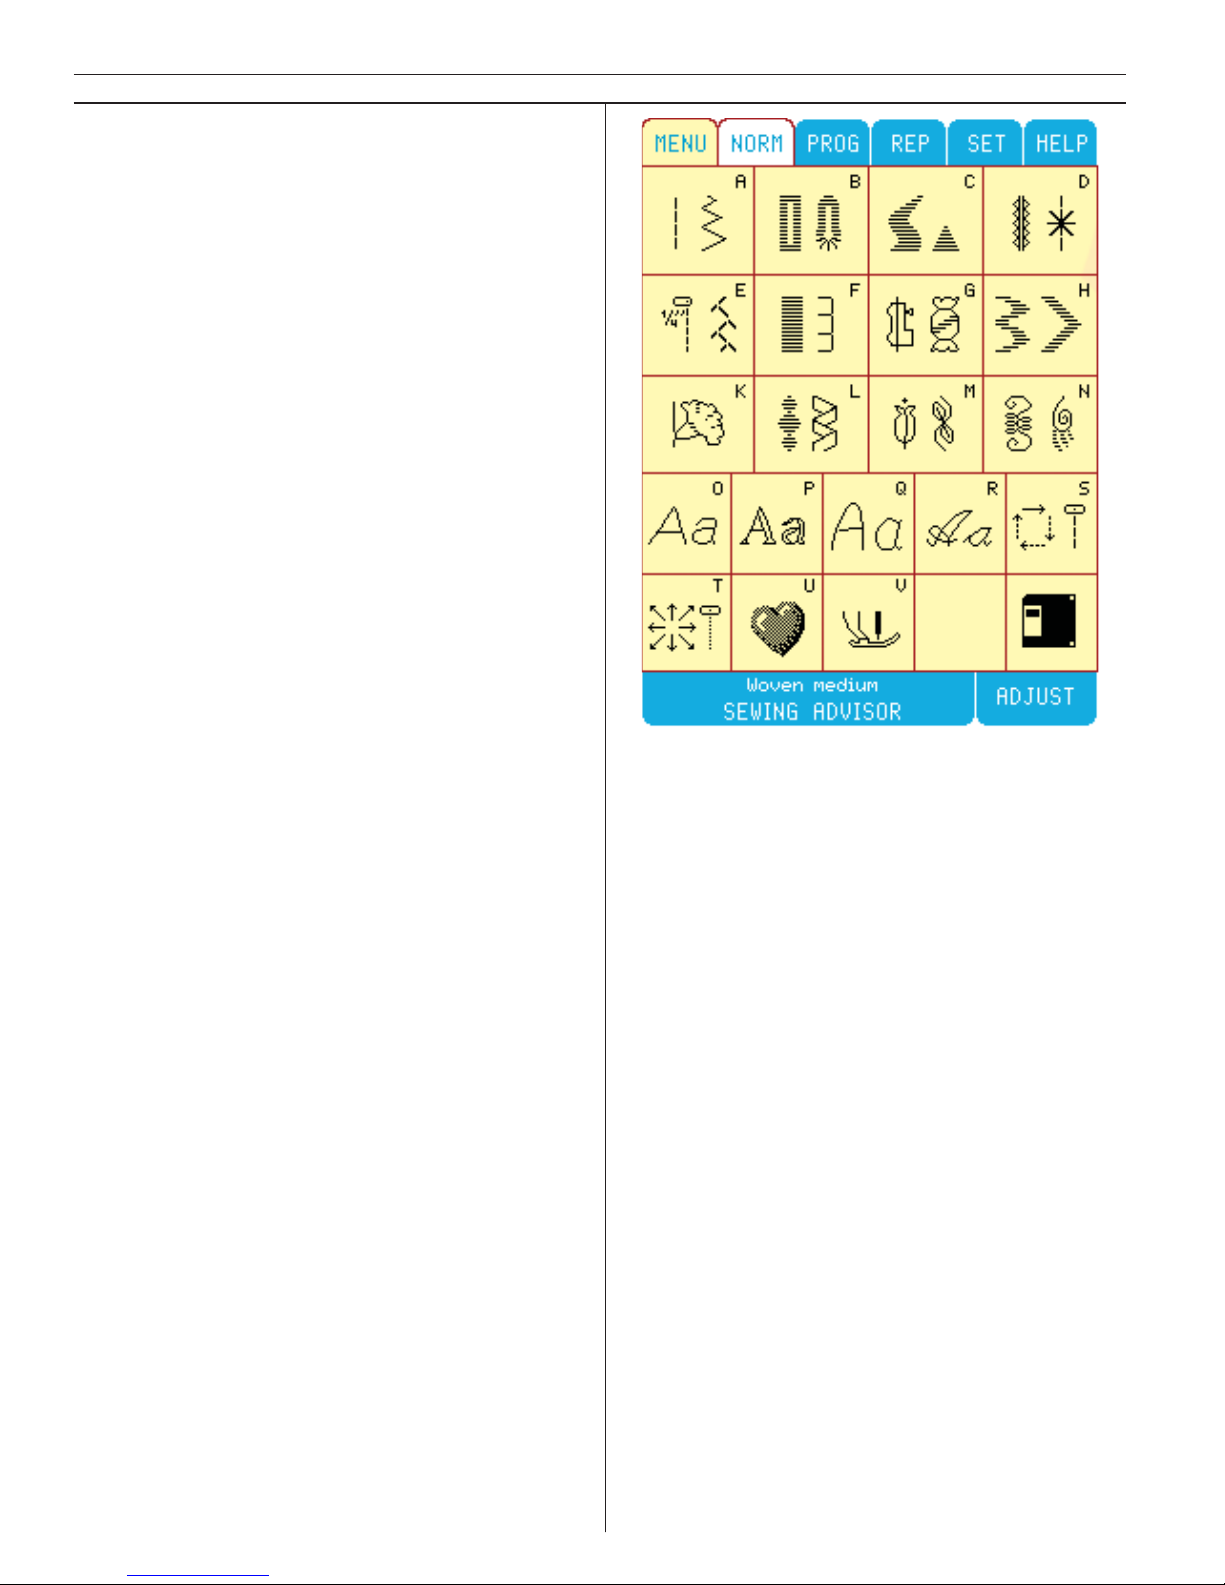
In the Main Menu there are 21 choices, 20 stitch
menus and one disk icon.
Utility Stitches
Menu A features stitches for your garment
sewing, mending and darning.
Buttonholes
Menu B features different styles of buttonholes,
eyelets and button sewing. For best result use
the Sensor Buttonhole Foot.
Decorative Menus
Beautiful stitches for your creative sewing on
stitch menus C -N.
Letters and Numbers
Choose from 4 different types of letters and
numbers. Block, Menu O, Outline block, Menu P,
Brush line, Menu Q (9 mm) and Menu R Script.
Each lettering menu has 3 menus for upper case
and lower case letters and numbers.
4-Way Stitches
Menu S is used to sew stitches in 4 different directions. Stitches are fi xed in length and width.
The arrow indicates sewing direction of stitches.
8-Way Stitches
Menu T is used to sew in 8 different directions.
There are 2 different types of stitches, straight
and reinforced straight.
My Stitches
Use Menu U (My Stitches) to save favorite stitches or special settings to a stitch. Adjustments
made in the ADJUST menu and settings as tension, balance and presser foot pressure in the
SET menu will be saved together with the stitch.
Special Stitches
Menu V includes 4 different types of “free mo tion technique” stitches. When you are using this
menu the feed teeth should be lowered.
Embroidery Disk Icon
View and load embroideries with your Designer
I by sliding an embroidery disk into your
Built-in disk drive. Touch the disk icon. This
allows you to view the embroideries. To load
an embroidery, your embroidery unit must be
attached to your Designer I.
20
Learn your Designer I
Page 21
Stitch Menus
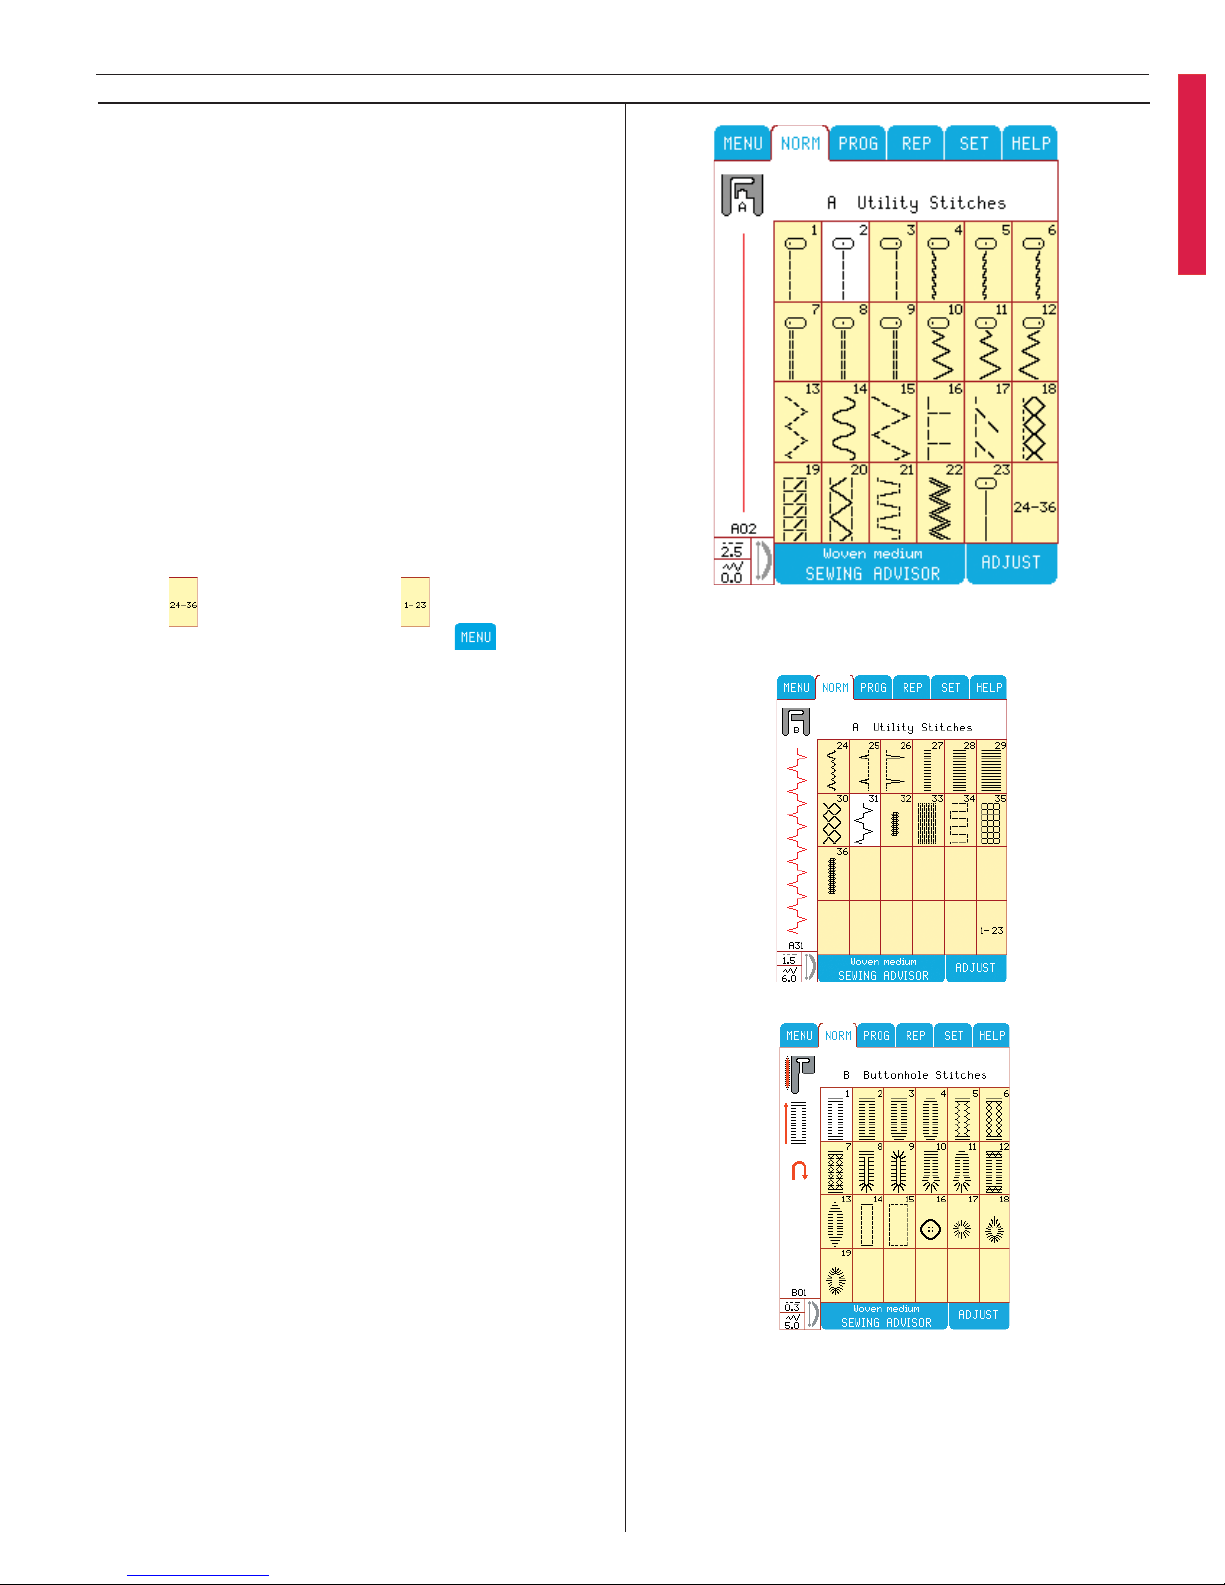
Touch Menu A in the Main Menu. Menu
“A Utility Stitches” appears on the Color Touch
Screen. To the left on the screen, your Designer
I displays a selected stitch and a recommended
presser foot, in this case presser foot A. The
number of the stitch (A02) is shown below the
stitch. This is the Designer I default stitch. To
select an other stitch, touch the picture of the
stitch. De sig ner I will always confi rm your choice by highlighting the selected stitch in white,
otherwise it has yellow background.
If there is a submenu, you will fi nd a picture
with a number combination on, in the lower
right corner.
Select stitches number 24-36, submenu.
Touch
. To go back touch .
Return to Main Menu by touching
.
Utility Stitches
For Utility Stitches touch Menu A in the Main
Menu. On Menu A you can fi nd several stitches
used for utility sewing. For example you can
fi nd different kinds of straight stitch and zig-zag
(stitch number 15 is a 4 step zigzag with max i mum width of 9 mm). There are also overlock
(A16-17) and fl atlock (A20) stitches. Stitches
A33-36 are perfect for darning and mending.
Buttonhole Stitches
For Buttonhole stitches touch Menu B.
Stitch number 16 is used to sew buttons and
17-19 are used to sew eyelets. The red wheel to
the left of the presser foot indicates the Sensor
Buttonhole Foot. For buttonhole B6 and B7,
De sig ner I recommends presser foot C. When
sewing buttonhole B14 to B15, Designer I recommends presser foot A. When using the A or
C presser foot, the symbol of the reverse button
is visible on the screen. This indicates that you
have to press the reverse button when the buttonhole has reached the desired length. The red
arrow next to the buttonhole indicates the sewing direction.
21
Learn your Designer I
Page 22
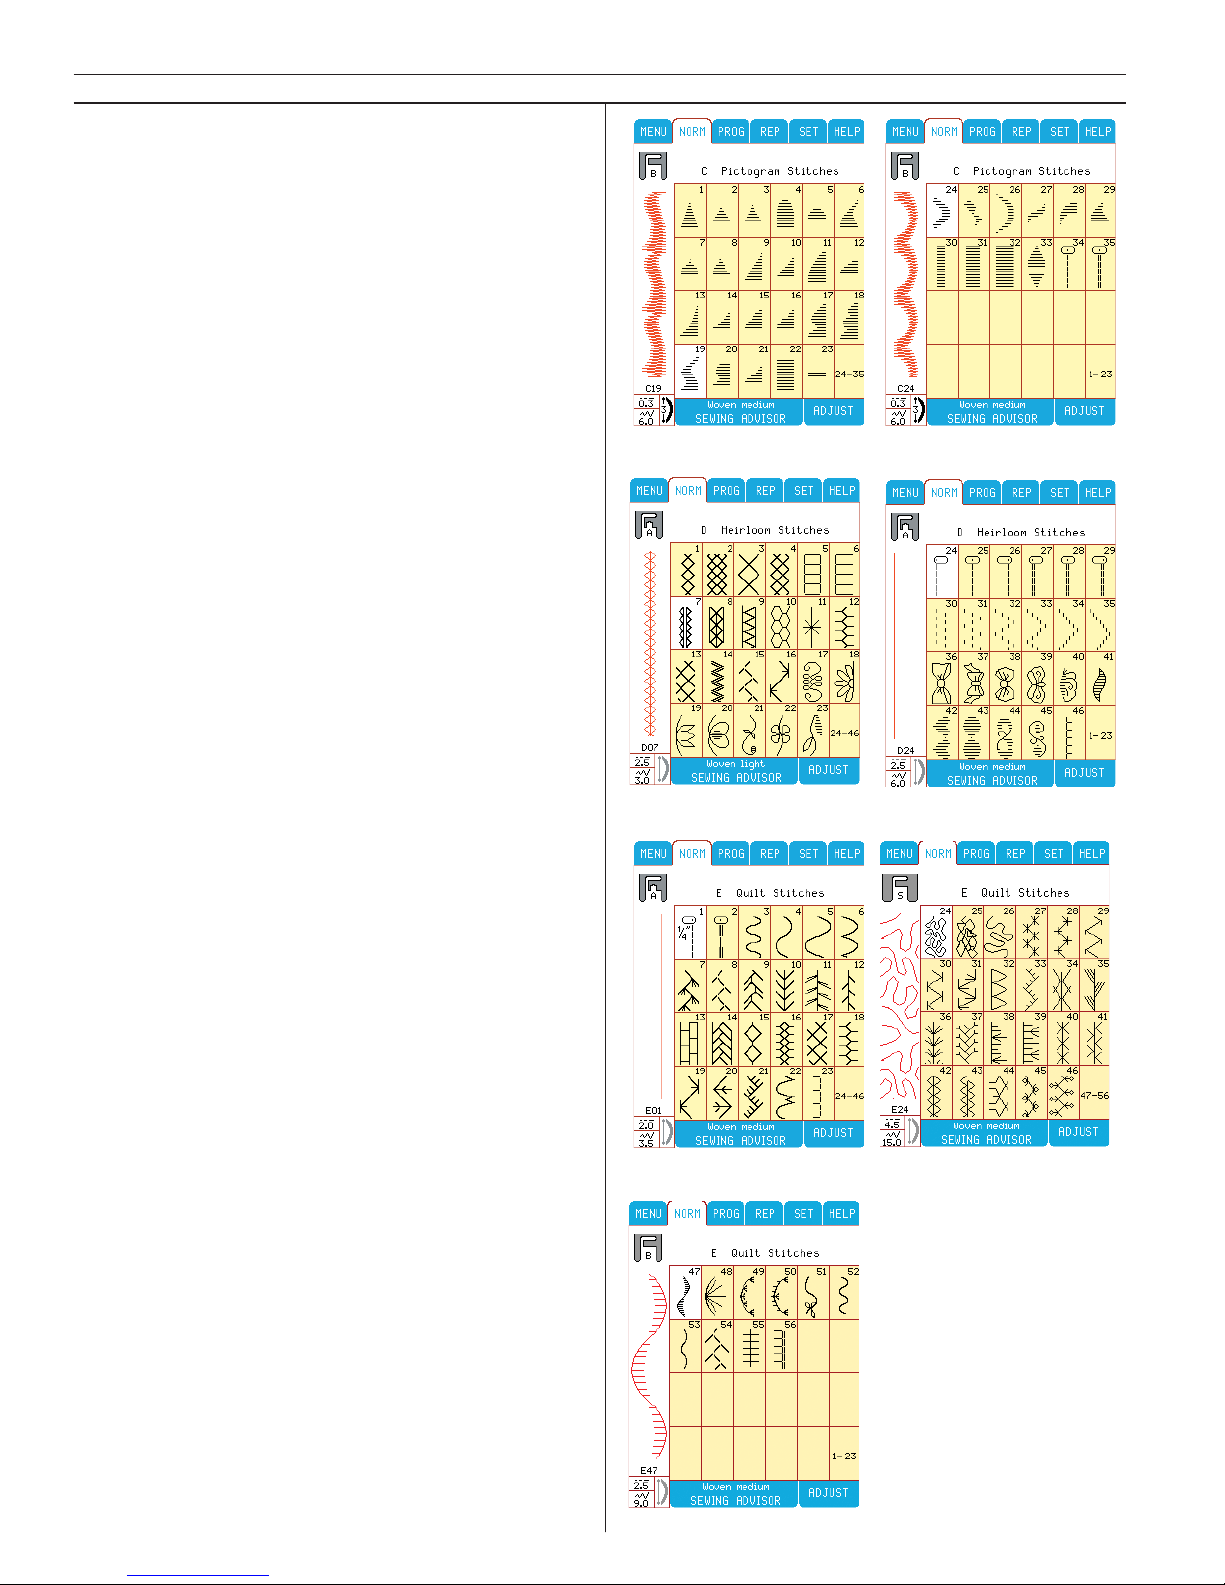
Pictogram Stitches
For Pictogram Stitches, touch Menu C in the
Main Menu. Pictogram elements are generally
programmed to create original satin stitch designs.
Heirloom Stitches
For Heirloom Stitches, touch Menu D in the
Main Menu.
If you are using a wing needle together with the
stitches D4-10 and D12, you can attain beautiful
hemstitches. The stitches D30-35 are used for
smocking and stitch D46 is a pin stitch.
Quilt Stitches
For Quilt Stitches, touch Menu E.
Stitch E1 sews the stitch 1/4" from the right edge
of the presser foot. If you want a handlook quilting stitch, you can use stitch E2. Use stitch E2426 for stippling sewing. There are also stitches
that can be used for Crazy Quilting. The feather
stitches (E7-12) are very typical for quilting.
Stitches E3-6 are 6-9 mm wide and can be used
when channel quilting.
22
Learn your Designer I
Page 23
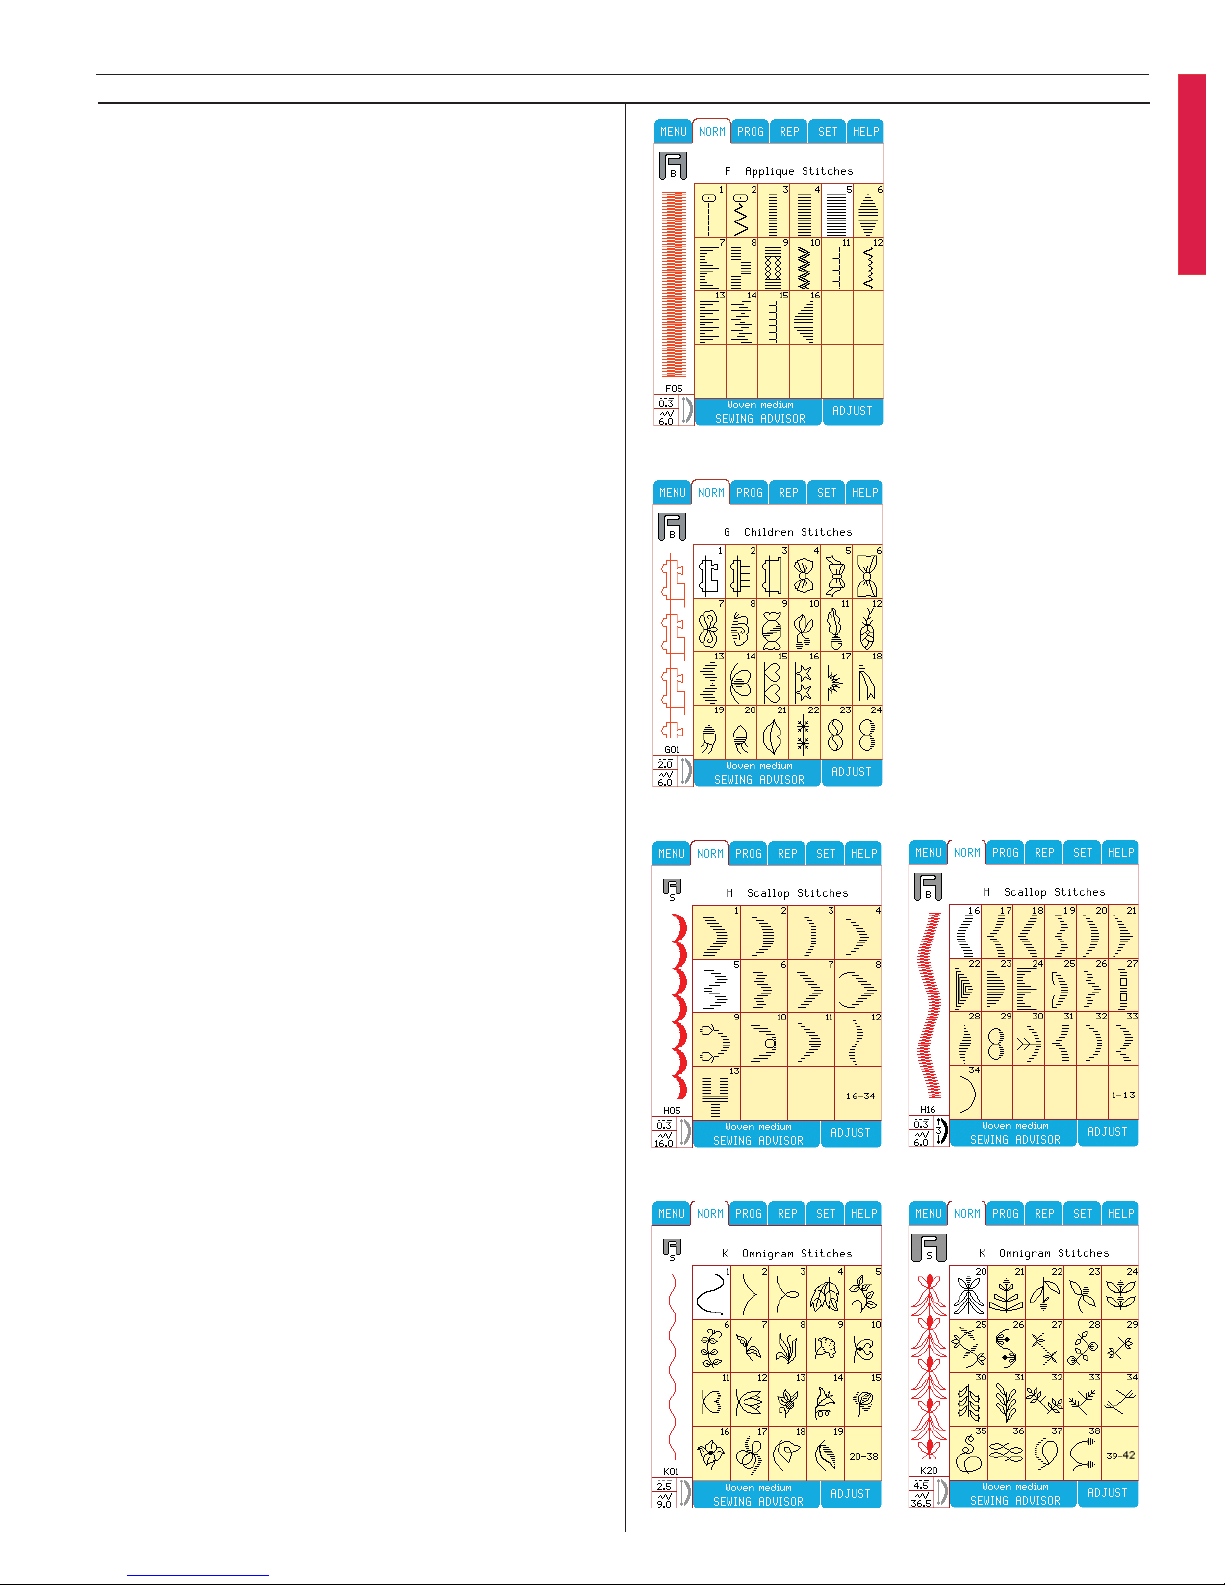
Children Stitches
For Children Stitches touch Menu G in the Main
Menu.
Scallop Stitches
For Scallop Stitches touch Menu H in the Main
Menu.
The scallops 1-13 are Omnimotion scallops and
sew up to 25 mm wide. Scallops 16-34 are up to
9mm wide.
Omnigram Stitches
For Omnigram Stitches touch the Menu K in the
Main Menu.
These stitches are possible to combine with each
other into an unlimited number of sequences.
Applique Stitches
Applique Stitches are in Menu F in the Main
Menu.
Stitch F11 can be used when you want to imitate
the look of appliqué stitched by hand. When
sewing with stitch F13 and F14 you will get a
beautiful shadow effect. Stitch F15 is used for
precision applique and F16 is a mitered frame
stitch.
23
Learn your Designer I
Page 24
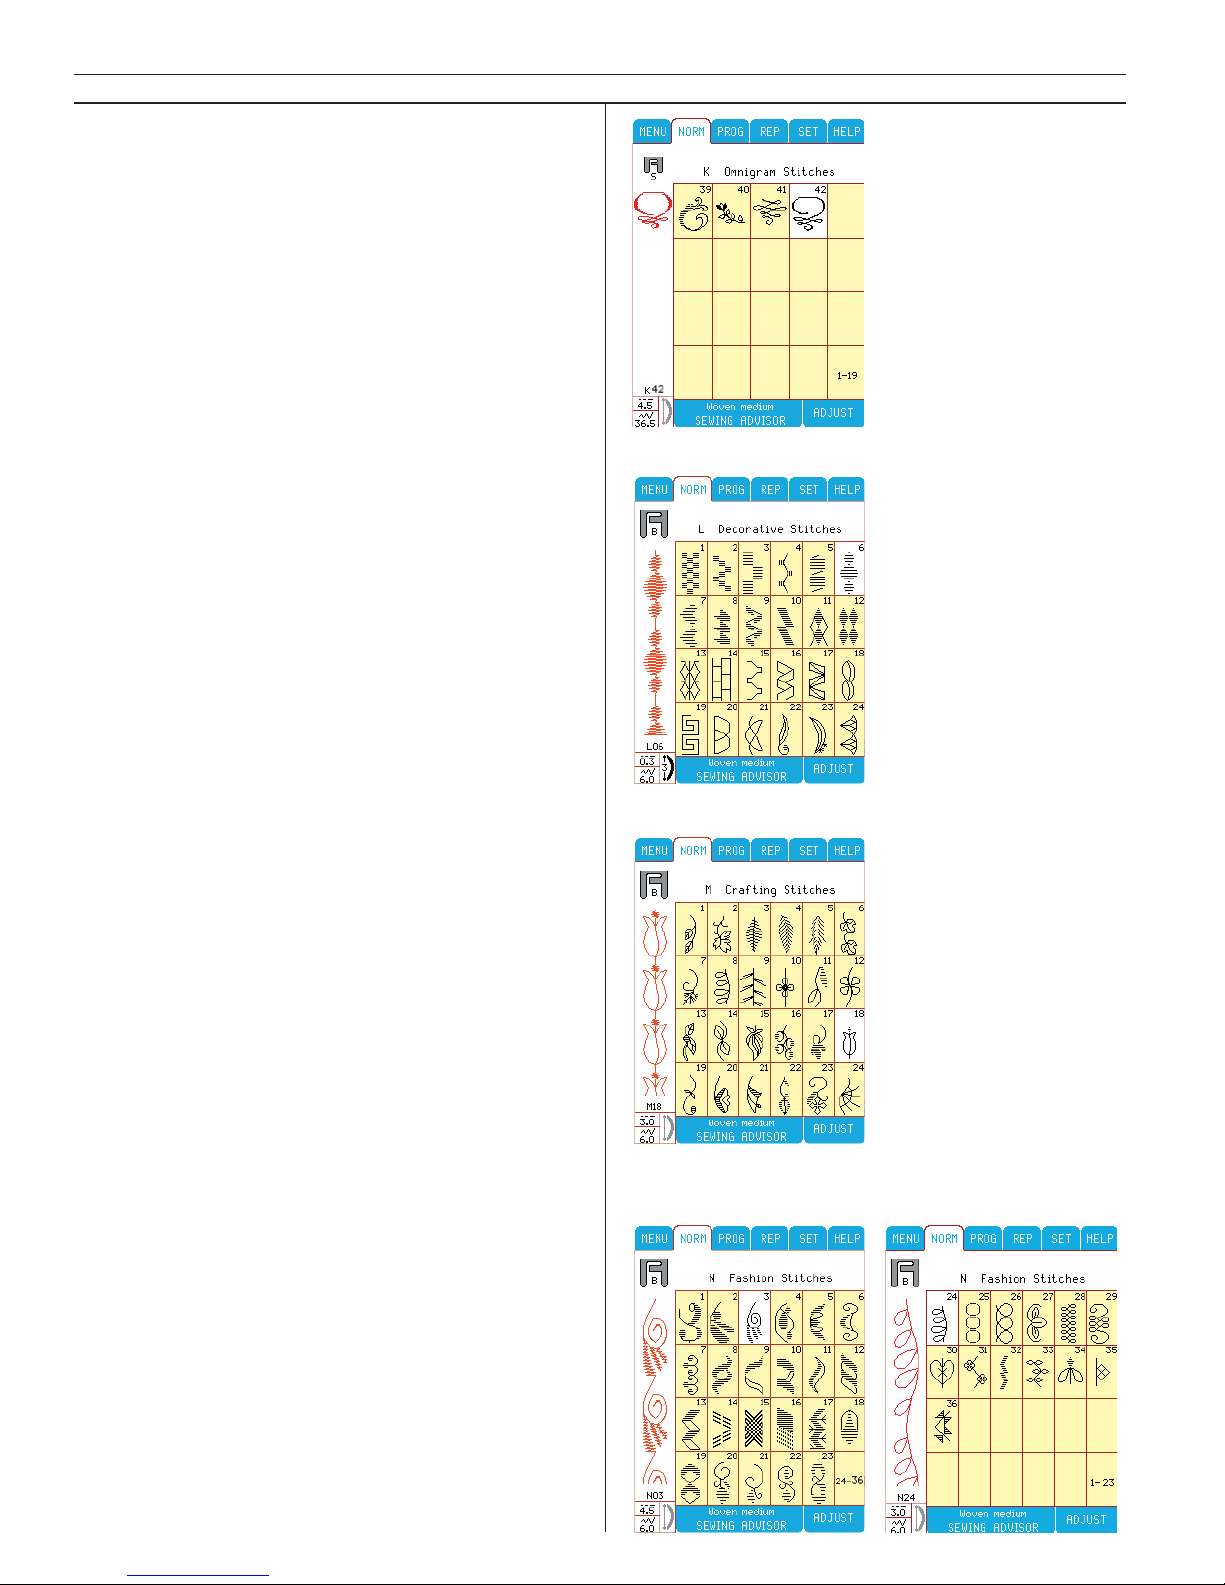
Crafting Stitches
For Crafting Stitches touch Menu M in the Main
Menu.
The width of the stitches varies from 6-9 mm.
Decorative Stitches
For De co ra ti ve Stit ches touch Menu L in the
Main Menu.
Fashion Stitches
For Fashion Stitches touch Menu N in the Main
Menu.
Stitches 39-42 are sewn as a single pattern. After
sewing one pattern your Designer I will fi x the
stitch and then stop.
24
Learn your Designer I
Page 25
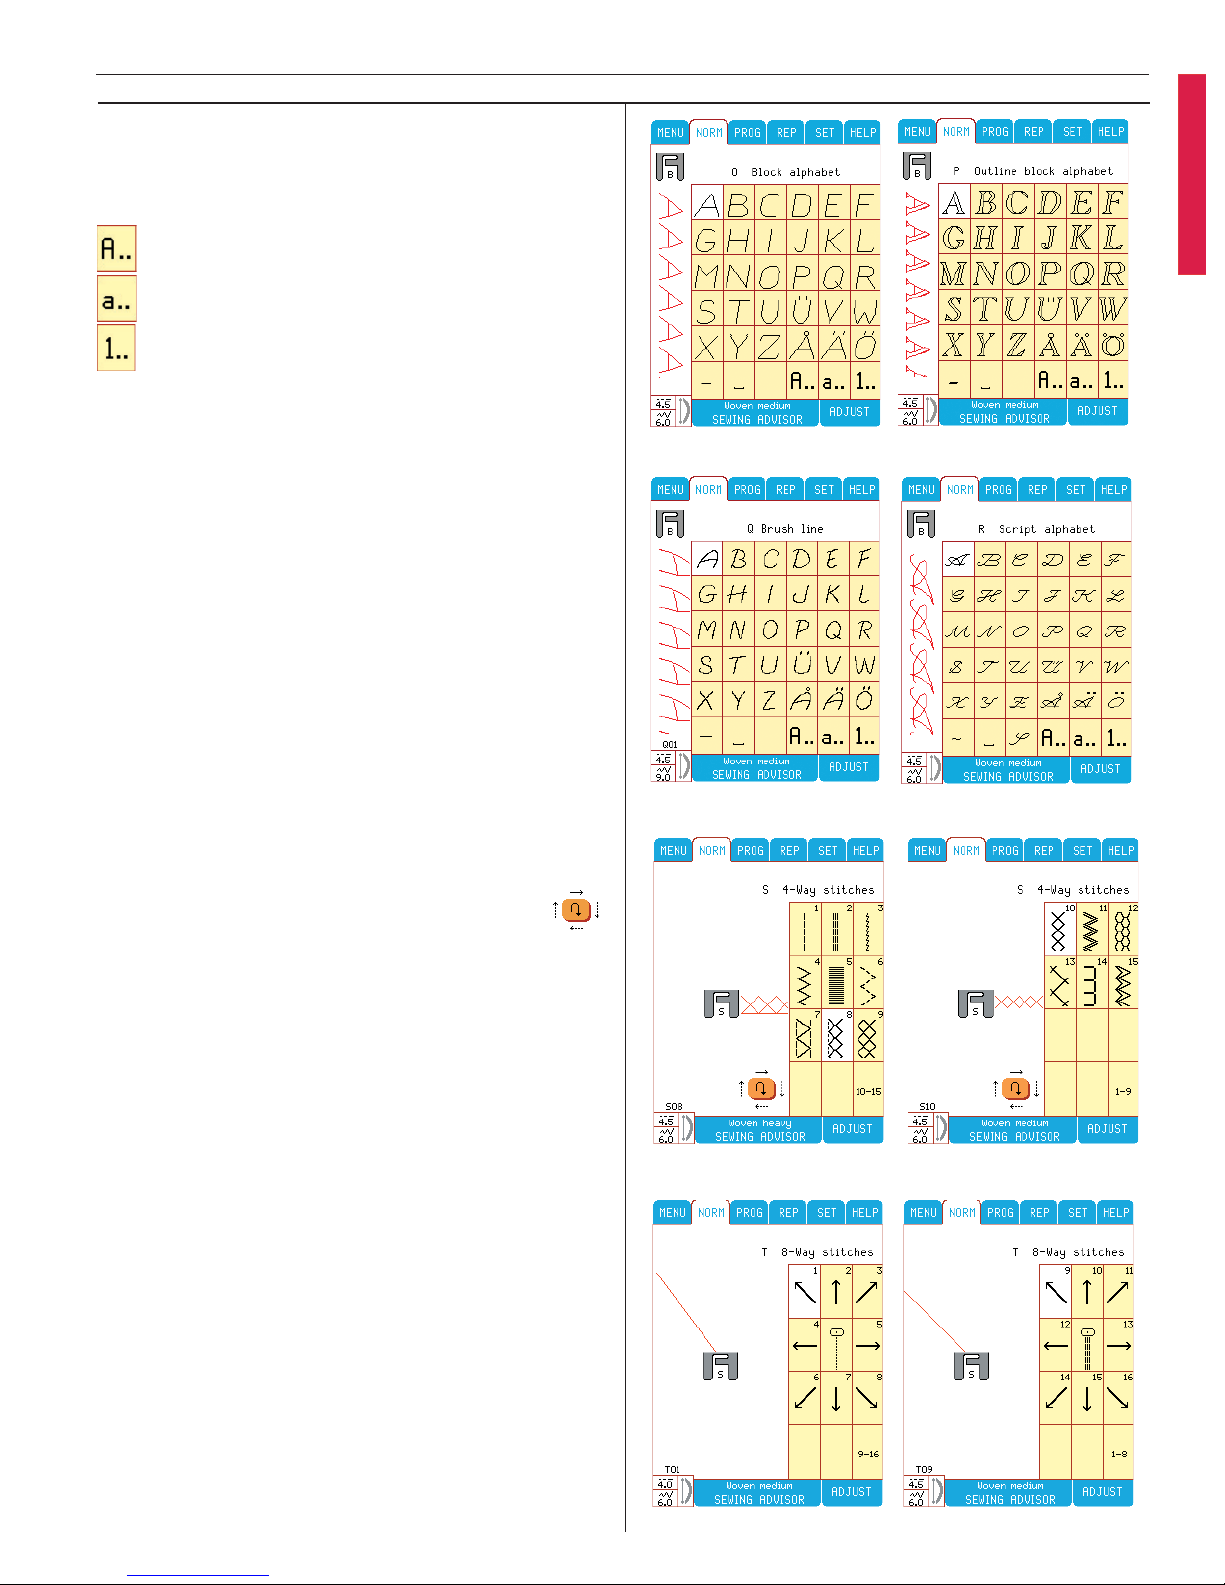
4-Way stitches
Find 4-Way stitches in Menu S in the Main Menu.
4-Way stitches is mainly used to sew one fabric
to another using the free arm. The stitches are
pro gram med at a fi xed width and length.
The selected stitch direction is visible in the
screen beside the presser foot.
If you look at the 4-Way stitch direction icon,
you see 4 different arrows. Each time you touch
the button, the sewing direction changes. You
can also use the reverse button to change sewing direction. Your Designer I always starts sewing in direction from left to right.
8-Way stitches
Find 8-Way stitches in Menu T in the Main
Menu. There are 2 different stitches, straight and
re-inforced straight stitch.
The 8-Way stitch touch buttons display 8 dif fe rent directional arrows. The selected sewing
direction arrow is highlighted in white. Touch
another direction arrow button to change the
sewing direction.
Note: By changing the stitch length, and/or stitch
width for a selected stitch, you also chan ges the
sewing angle. Thereby you have the possibility to
sew in whatever direction you want.
Block, Outline block, Brush line and Script
alphabet
Touch Menu O, P, Q or R for letters and numbers. There are 3 different menus. Touch
for upper case.
for lower case.
for numbers and special letters.
To change the style menu, simply touch the
desired style button above.
25
Learn your Designer I
Page 26
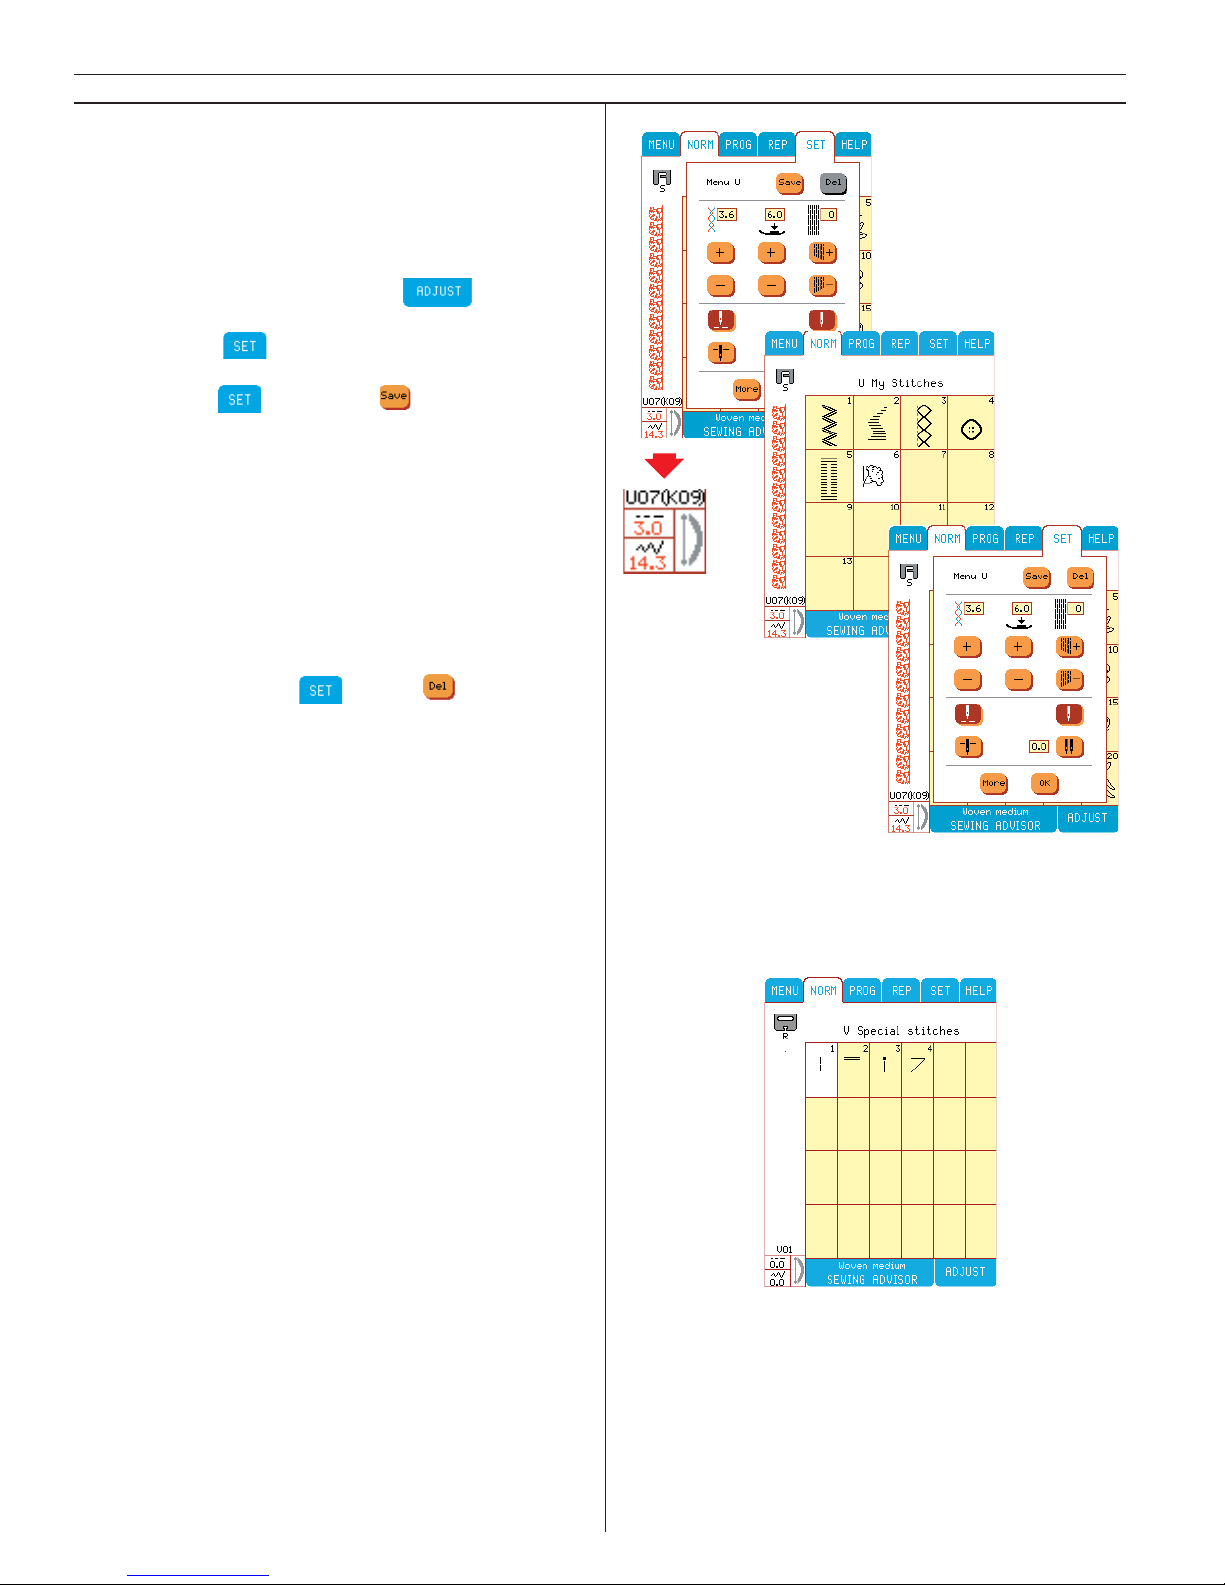
My Stitches
On Menu U, you can customize a favorite stitch
menu, saving your own personal settings for a
stitch. This menu is called “My Stitches” (Menu
U) and is shown on the Main Menu with a heart
symbol. On “My Stitches” you can save 30 stitches with adjustments made in
(length,
width, elongation and mirroring) and with settings made in (tension, balance and pres ser foot pressure). To save your favorite stitch/
setting, go to and select . Menu U will
pop-up. Touch the desired position for your
stitch. The original stitch number is shown in
brackets after the U stitch number.
Note: Stitches from Menu S and Menu T cannot be
saved on Menu U.
When there are no free positions available or if
you want to replace a stitch, touch an occupied
position and its stitch will be replaced by the
new one. To delete a stitch from Menu U, select
the stitch then access . Press and the
active stitch will be deleted. The next stitch will
be selected instead (You can see the selected
stitch to the left on the screen). You can repeat
the procedure until all stitches are deleted. When
Menu U is empty, straight stitch (A02) will be
selected automatically.
Special Stitches
For free motion sewing, darning, quilting, bas ting and free hand embroidery touch Menu V.
There are four stitch types available, V01, straight
stitch, V02, zigzag and V03 and V04, basting stitches. Lower the feed teeth and for V01 and V02
snap on the R foot or one of the optional free
motion feet. When free motion (free hand) sewing at slow speed (less than 200 rpm) the pressser foot moves up and down. The foot is down
when the needle is down to hold the fabric in
place while the stitch is formed. The foot is raised with the needle so the fabric can be moved
without the risk of ben ding the needle. At faster
sewing speeds (over 200 rpm) the foot stays in
the glide (pivot) po si tion so the fabric can be
moved easily for free motion sewing. Use stitch
V03 and V04 together with the foot control. If
STOP button is canceled you will have automatic
timing. Step on foot control and feed the fabric
manually while the presser foot is up. V03 is a
straight stitch and stitch V04 moves sideways.
26
Learn your Designer I
Page 27
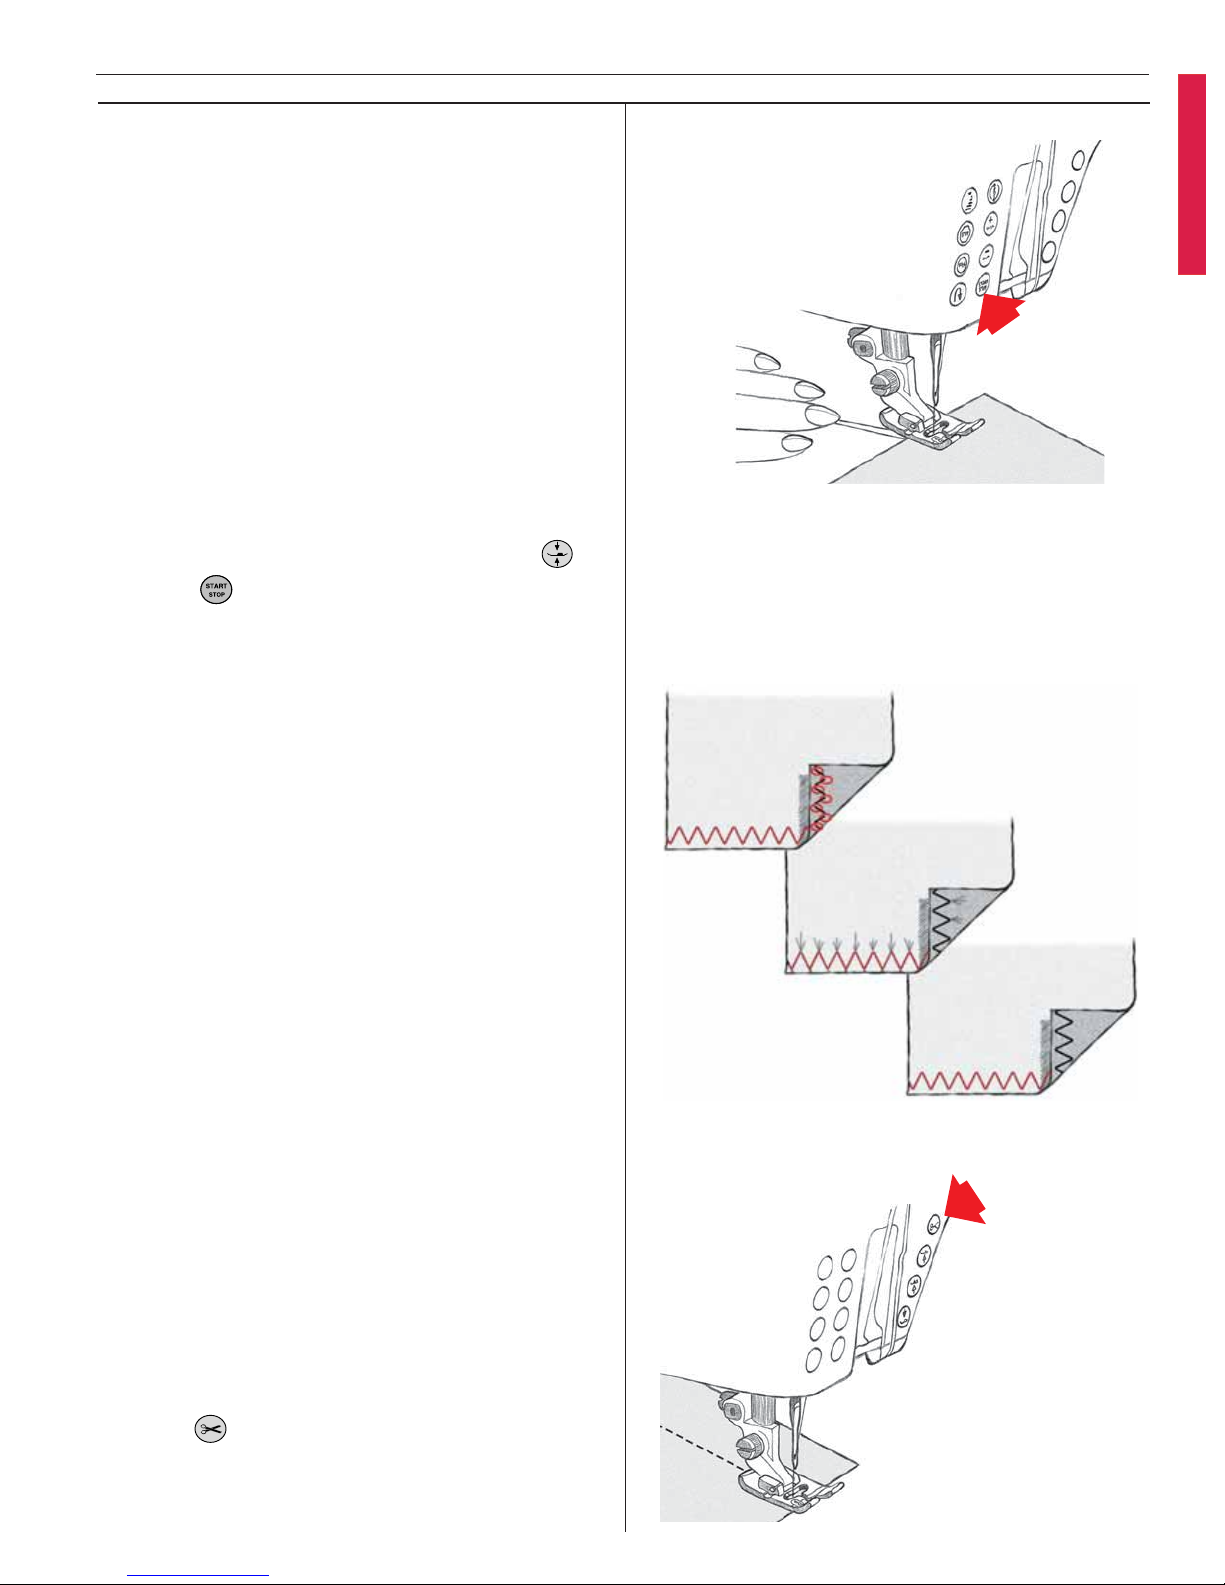
Starting to sew
• Touch Sewing Advisor on the Color Touch
Screen. Enter the type and weight of fabric
you are sewing. Select the desired sewing
technique from the Sewing Advisor or select a
stitch from one of the menus.
• Place top and bobbin thread under the pres ser foot and to the back. For best results
when beginning at the edge of the fabric,
pla ce a fi ng er on the threads to hold them in
place as you begin.
• Place fabric in position under the presser foot.
• Step on the foot control and begin sewing.
The pres ser foot is lowered automatically.
• If you need to adjust fabric, touch Pivot
.
Note: Use to start and stop the machine wit hout
using the foot control.
Thread tension
The Sewing Advisor will automatically set the
thread ten sion for the fabric and sewing technique selected. To adjust the ten sion for unusual
fabric or thread, see page 29.
To understand the correct thread tension, sew a
few sample zigzag stitches at different settings.
1. Begin with a tension that is too loose, i.e.
set at the lowest number. The lower thread
will lie straight and the up per thread will be
drawn down on the un der si de.
2. If you set the tension at the highest number,
the opposite will occur, and the seam may
pucker.
3. The correct thread tension is provided when
the threads interlock in the middle of both
layers of material or, in the case of decorative
stitches, on the underside.
Make a few tests on a scrap piece of the fabric
you are going to sew and check the tension.
Finish the sewing
• Lift your foot from the foot control.
• Touch
. Designer I cuts the top and bob bin threads. The presser foot and the needle
are raised to the up position automatically.
27
Learn your Designer I
Page 28
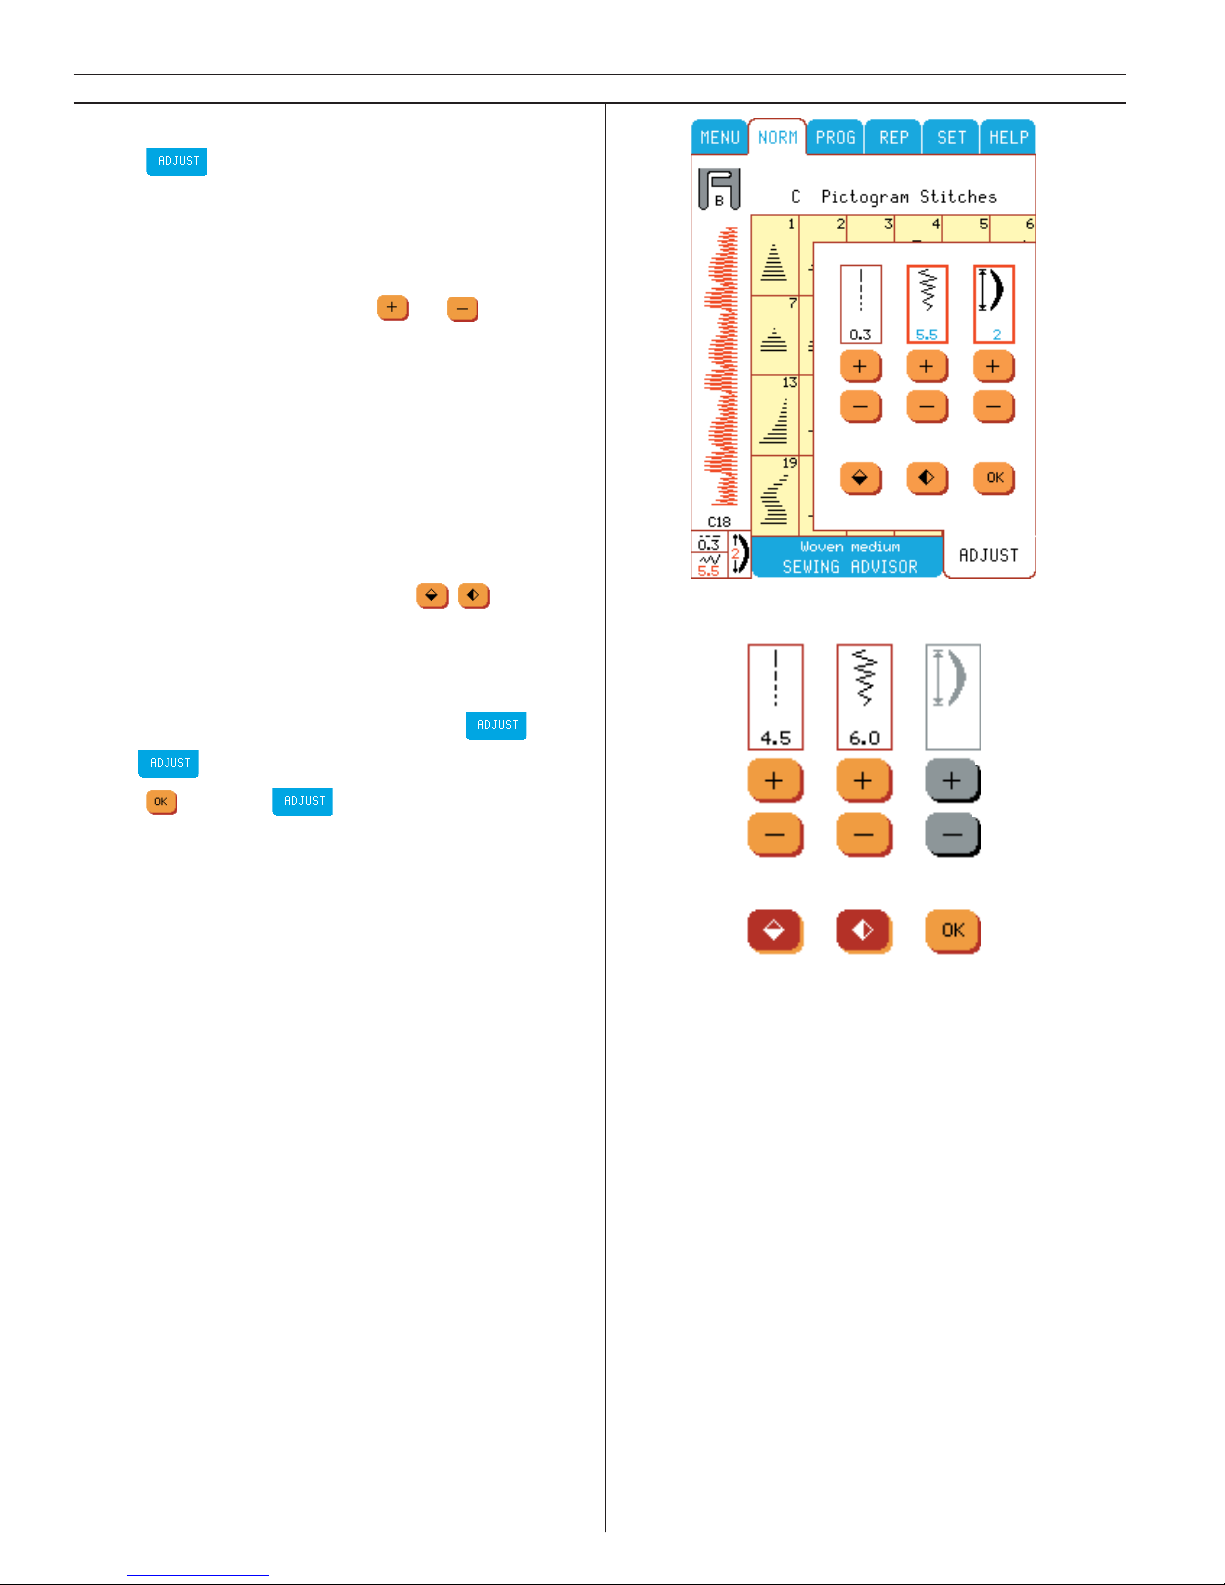
Adjust Menu
Touch to override automatic settings and
make manual adjustments in stitch length, stitch
width and elongation.You can also mirror image
stitches side to side and end to end.
The stitch length, stitch width and elongation
can be changed by touching
or .
You are able to use elongation when you are
sewing satin stitches.
When a setting has been changed, it is indicated
by a bold red frame around the numbers in the
ADJUST menu, and with red numbers in the lower left corner of the Stitch Menu.
Minimum and maximum settings are indicated
with an audible “beep” signal.
Touch buttons for mirror image,
, are
highlighted in brown when selected.
Settings that are not available are colored grey
and can not be selected.
You are able to sew while you are in
.
Close
if you wish to select another stitch.
Touch
to close .
Note: The SET, HELP and ADJUST menus can be
selected at any time and will close automatically.
28
Learn your Designer I
Page 29
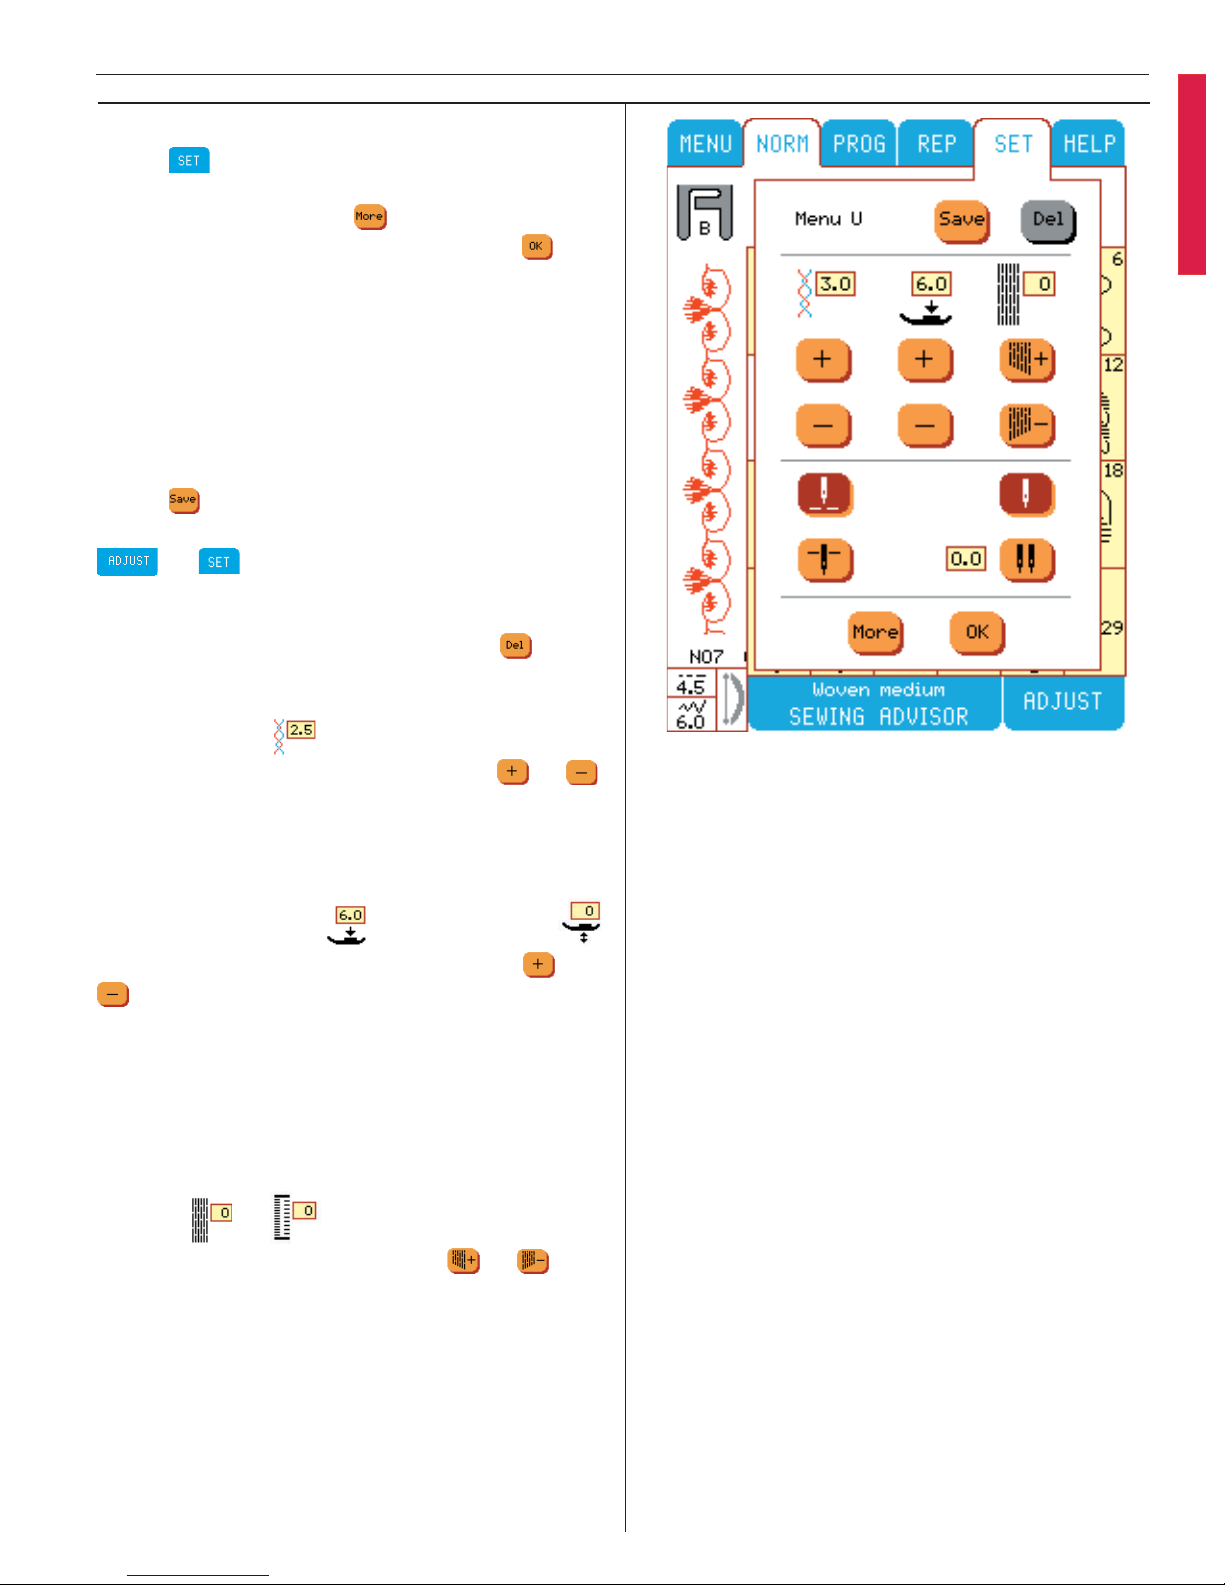
Set Menu
Touch to override automatic setting and
make manual adjustments. There are four dif fe rent set menus. Touch
if you want to jump
between them. To close Set menu touch
When you have made changes in standard settings for thread tension, presser foot pressure,
and balance, the frame around the setting will be
highlighted in red. The changed settings will affect all stitches and the settings remains until the
Designer I is turned off.
Menu U
Touch
to save a favorite stitch on the ”My
Stitches” menu. Any personal settings from
or (including tension, presser foot
pressure, balance) will be saved together with
the stitch.
To delete a stitch from Menu U, touch
. (For
more information see page 26).
Thread tension
Adjust top thread tension by touching
or .
The numbers in the window above indicates the
tension setting. The higher the number the more
tension on the thread.
Presser foot pressure or Pivot position
Adjust presser foot pressure by touching
or
. The number in the window above indicates
the pressure setting. The higher the number the
more pressure the foot puts on the fabric.
When settings changed on stitches in the V Menu
or when embroidering, the height of the pivot
po si tion is set instead of the presser foot pressure.
Balance
or
Adjust stitch balance by touching
or . The
number in the window above indicates the balance setting.
When a buttonhole is selected, the balance buttons will adjust the density of the right column of
the buttonhole. See page 52, Buttonhole Balance.
29
Learn your Designer I
Page 30
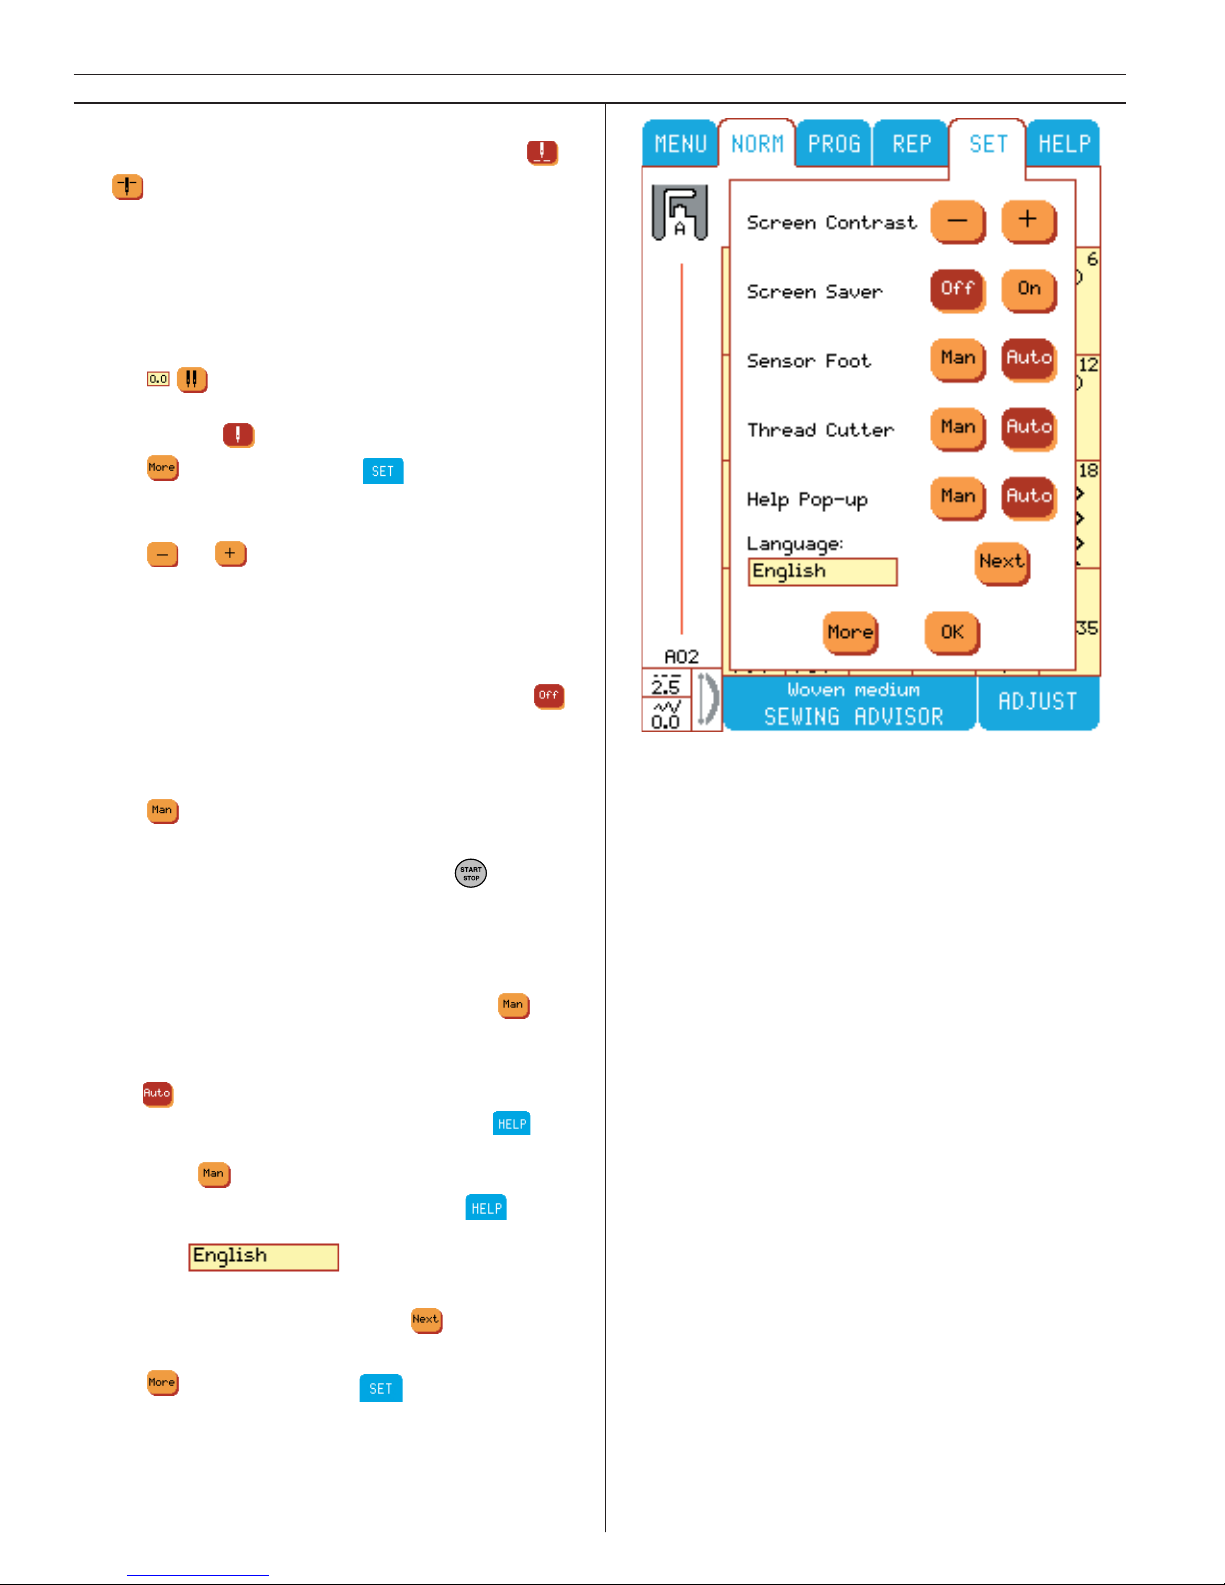
Needle stop position
Needle stop up or down is set by touching
or . The function button (page 12) on the
machine is another option to set needle stop up
or down.
Twin needle safety
When you are going to use a twin needle, enter the size (the distance between the needles).
Touch
step by step until correct value is
dis play ed in the window. For standard single
needle, touch .
Touch
to move to next menu.
Screen Contrast
Touch
or to reduce or increase con trast.
Screen Saver
The screen saver will save the screen by switching off the light if you have not touched the
machine for aproximately 9 minutes. Touch
if you wish to cancel the screen saver.
Sensor Foot
Touch
to cancel the automatic lowering and
pivot position of presser foot, when stepping on
foot control. You can also touch the function
button.
Selective Thread Cutter
If you prefer to activate the selective thread cutter
manually with the function button, touch
.
Help Pop-up menu
When
is selected a Help pop-up will appear
with recommendations for your sewing.
only appears if a sewing circumstance has changed. Touch if you want to bring up help
menu when you need it by touching .
Language
If you want to change language of text on the
Color Touch Screen, then touch
until your
language choice is indicated.
Touch
to move to next menu.
30
Learn your Designer I
Page 31
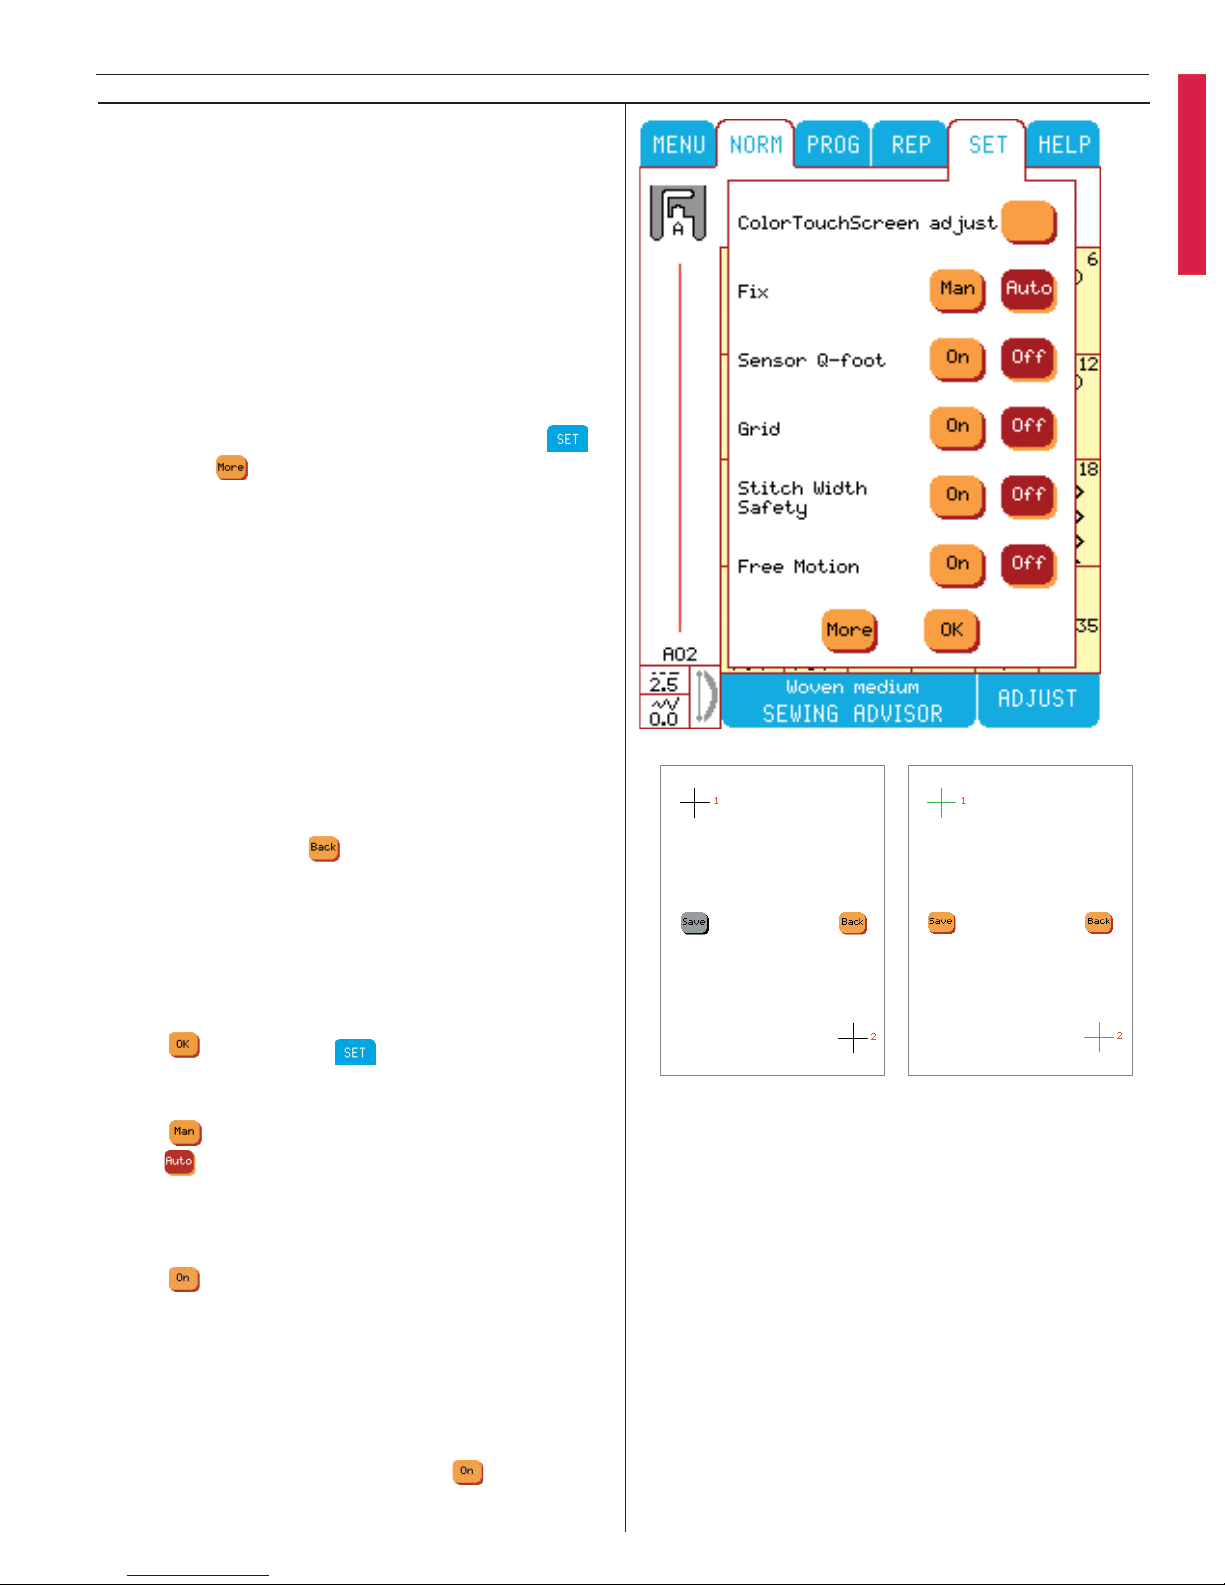
Calibration of the Color Touch Screen
If you touch a function tab or stitch picture on
the Color Touch Screen but it does not respond
or the function next to it is activated instead, the
screen has to be calibrated. The Color Touch
Screen is calibrated at the Husqvarna Viking factory, but the settings may be affected when the
machine is shipped and transported. You only
need to calibrate the Color Touch Screen if there
is a precision problem when touching the function tabs or stitch pictures.
To calibrate the Color Touch Screen, touch ,
then touch
twice. Select “Color Touch Screen
adjust” in the third menu and the calibration
screen appears.
1. Touch in the center of cross 1 (the up per left
corner of the screen). This is best done with a
pointed but not sharp object (for in stan ce the
blunt plug end of the Sensor Buttonhole foot).
When the cross changes from black to green
the fi rst point is set.
2. Touch in the center of cross 2 (lower right
corner of the screen) to set the second point.
Touch Save to store the new setting.
The calibration is now completed.
You can always use
to leave the Calibration
screen without saving any changes.
Note: When calibrating the screen, be sure to touch
the cross areas only, as recommended. If other areas
are touched, the screen can be miscalibrated. A mis ca li bra ted screen may require an adjustment by an
authorized technician.
Touch to close the menu.
Fix
Touch
if you want to decide when to use
“FIX”. automatically activates Fix at stitch selection and after thread cut.
Sensor Q-foot
Touch
to set the Sensor System to operate
the optional Sensor Q-foot.
Grid
The 20x20mm grid function is very useful when
you are going to customize several designs together (see Customizing designs). Align your
designs by using the grids. Touch
to activate
the grid function.
31
Learn your Designer I
Page 32
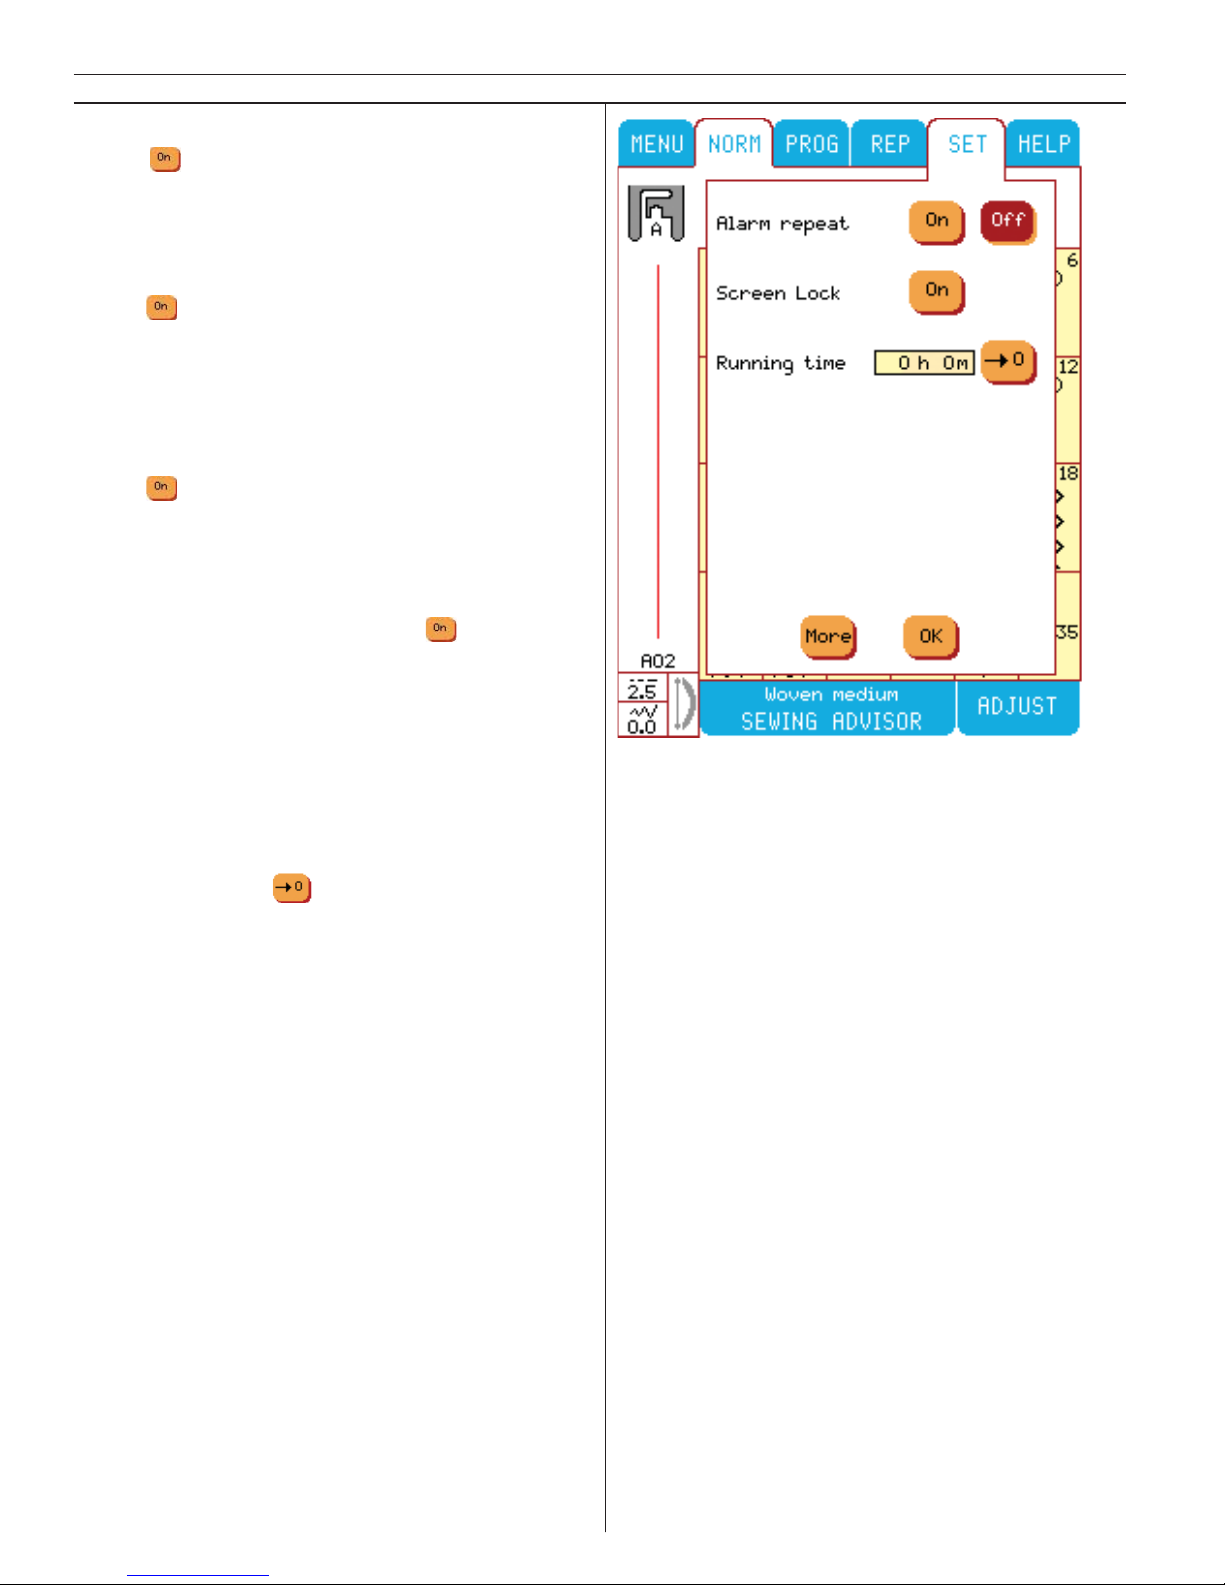
Stitch Width Safety
Touch if you want to lock the needle side
movements when using a straight stitch plate, a
straight stitch foot or a 1/4" piecing foot P.
Free motion
Touch
to turn all the stiches into free motion
stitches.
Note: When using the free motion function, the feed
teeth should be lowered.
Alarm repeat
Touch
to select a repeated alarm. Your Designer I will then repeat the signal for alarm pop
ups while the machine is sewing.
Screen lock
To activate the screen lock, press
. When the
screen lock is activated, the stitch selection buttons are not active. To unlock the screen lock,
touch the key image in the upper right corner of
the color touch screen.
Running time
In the set menu there is a stopwatch that will
mesure the machines running time. To reset the
stoppwatch, touch
.
32
Learn your Designer I
Page 33
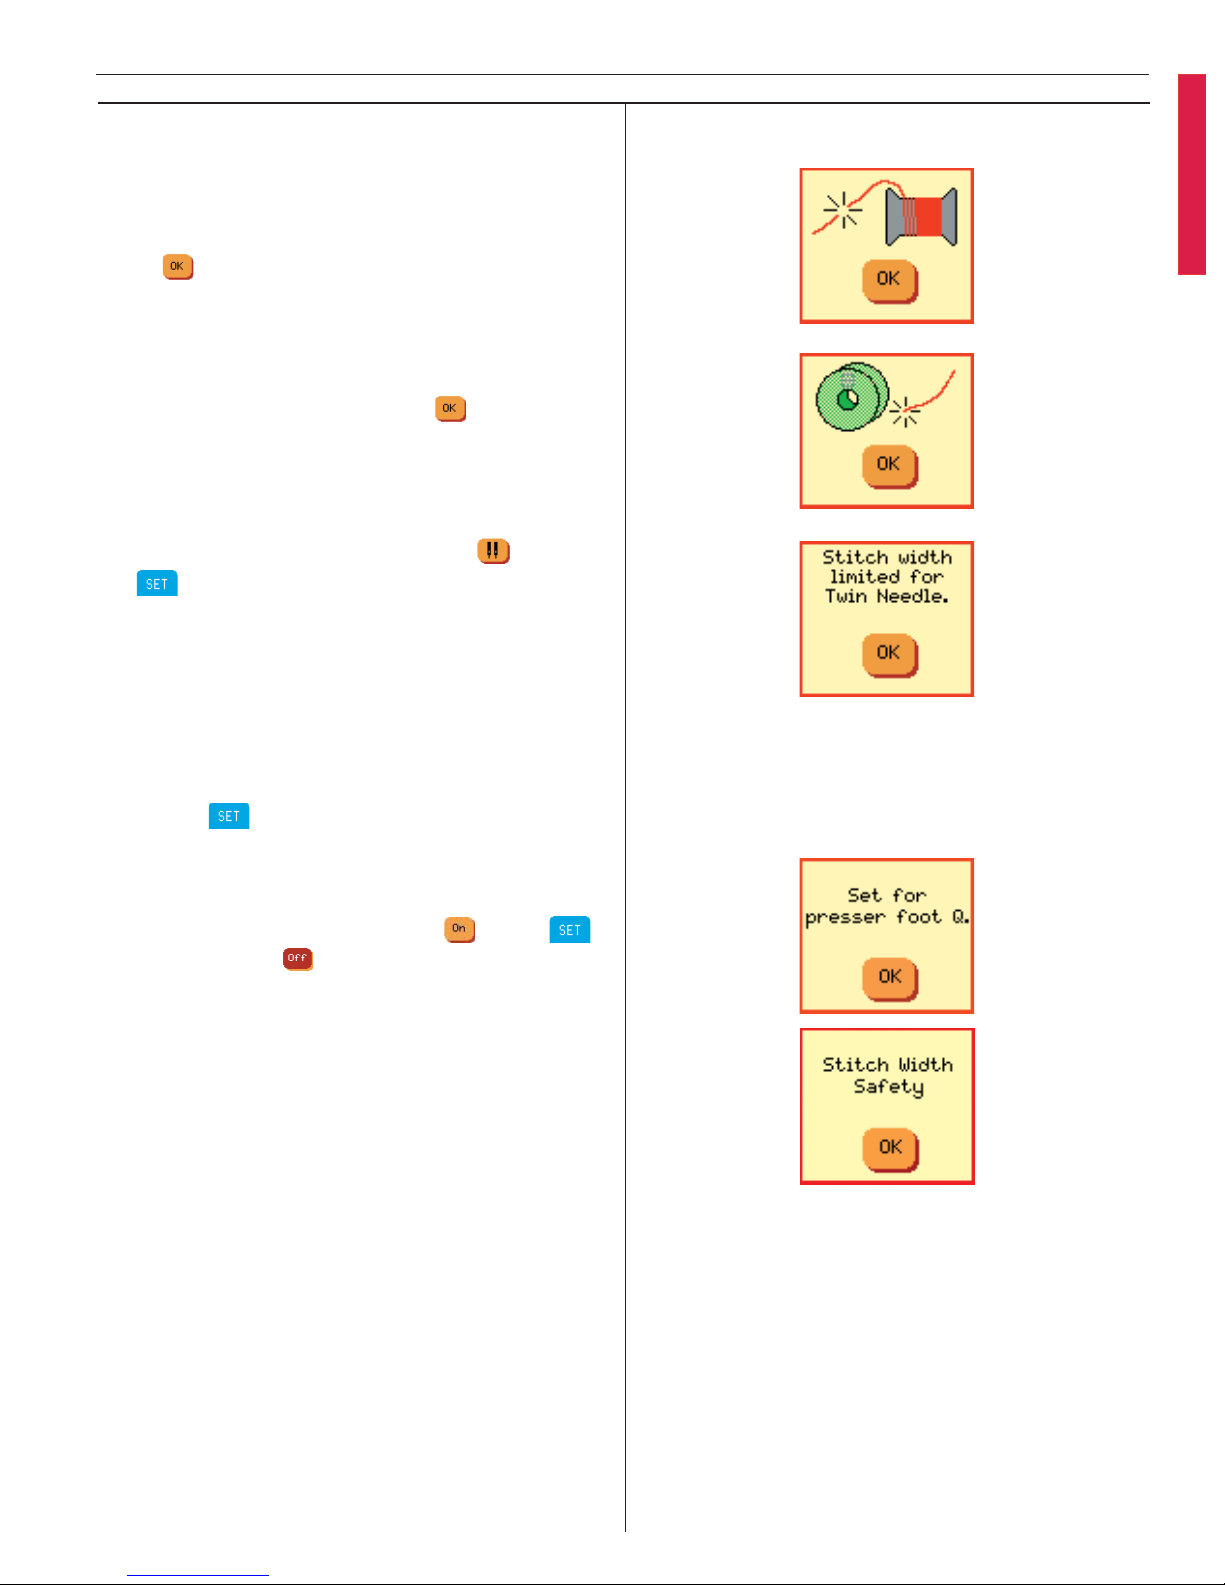
Pop-up menus
Top Thread Break
Your Designer I stops automatically if the top thread runs out or breaks. Rethread the top thread,
touch .
Empty Bobbin
Your Designer I stops automatically when the
bobbin thread is almost empty. Replace the empty bobbin with a full one, touch
.
Note: It is possible to continue sewing un til all
thread on the bobbin has run out.
Twin needle
When the twin needle safety button
is set in
the menu, the width of the stitches is
limited. If you select a stitch that is too wide the
twin needle pop-up appears. The stitch width of
the selected stitch is adjusted automatically to fi t
the twin needle setting.
The twin needle pop-up also appears if the twin
needle safety button is set when the machine is
turned on.
Touch the
-tab and touch the single needle
button to cancel the twin needle safety.
Sensor foot Q
Sensor Q-foot (optional) is set to
in the
menu. Change to to cancel.
Stitch Width Safety
If you have been using a straight stitch plate (optional) or the P-foot and have set the stitch width
safety, the Designer I alerts you when turning on
the machine or when selecting a stitch that has
stitch width more than 0.0.
33
Learn your Designer I
Page 34
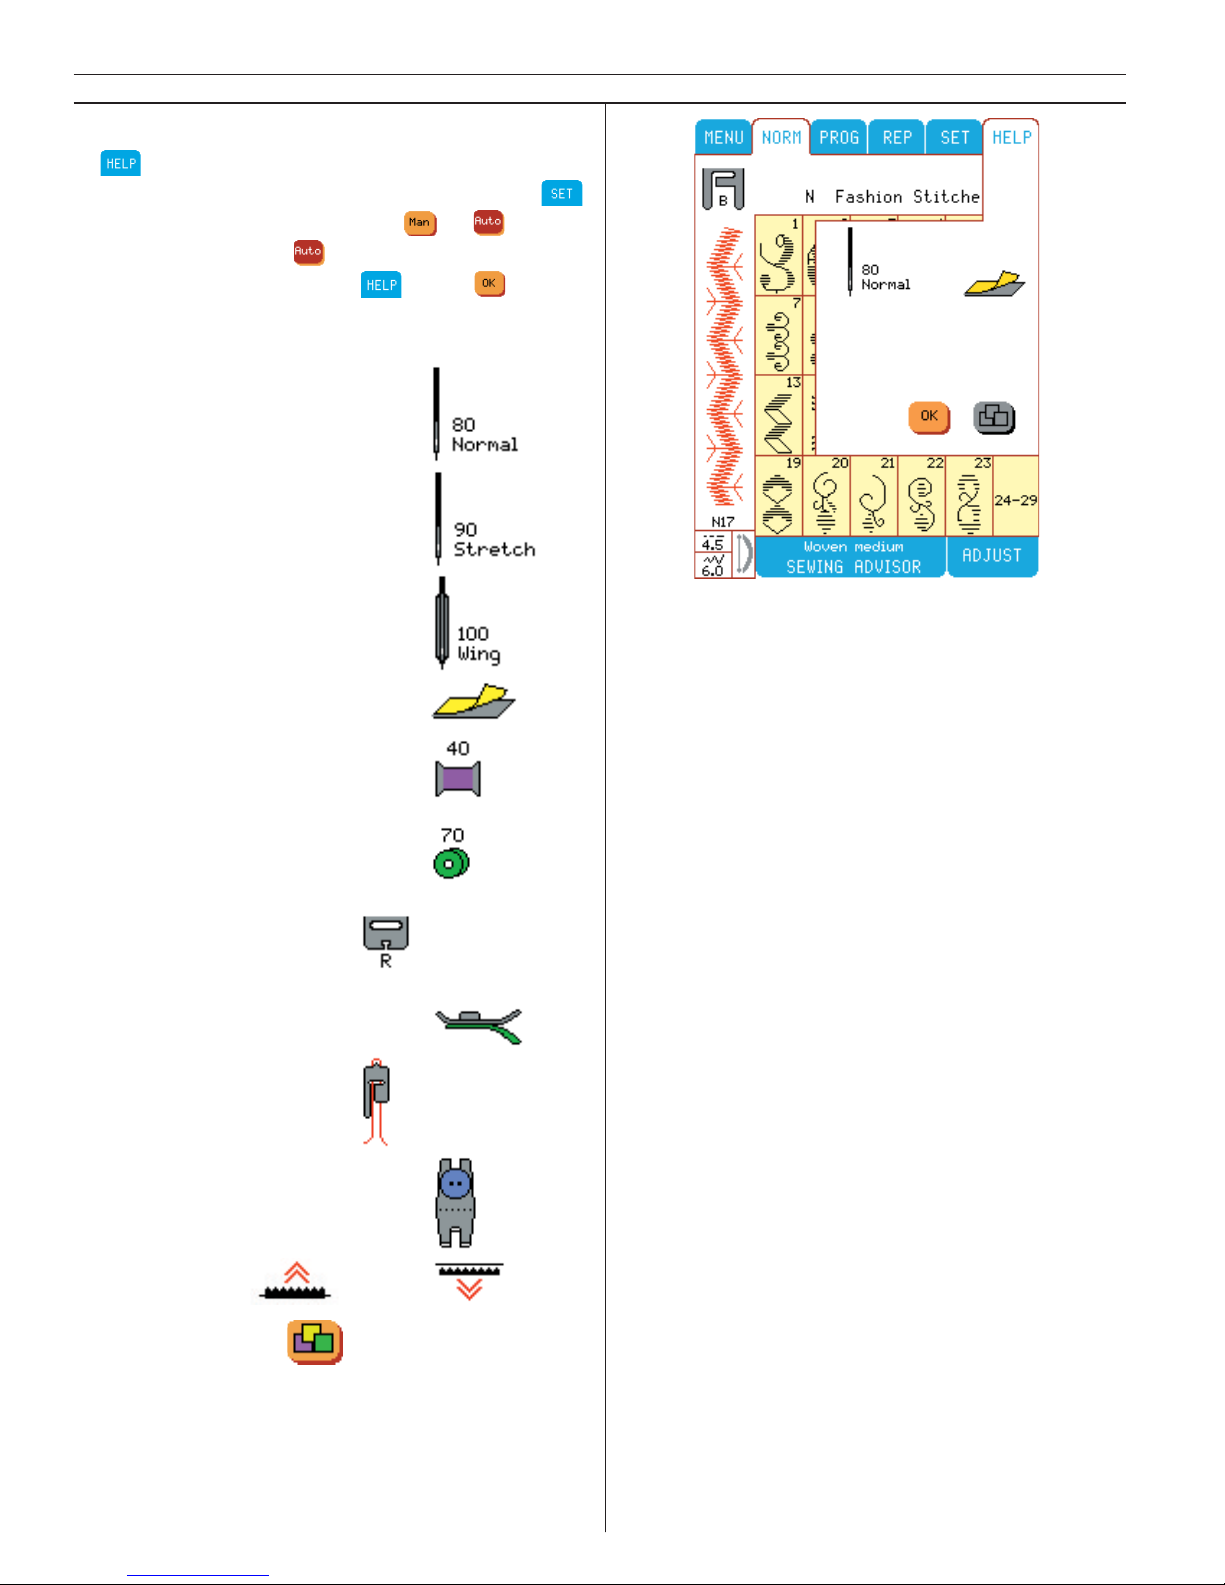
HELP menu
In you are able to get information about
type of needle, presser foot, stabilizer etc. In
menu you can choose between
or on the
HELP menu. Set it to
when you want it to
open automatically. To exit
touch
Examples on symbols in the HELP menu:
Normal needle
Stretch needle
Wing needle
Stabilizer
Top thread, size 40
Bobbin thread, size 70
Presser foot R
Attach Self-adhesive glide plate
Cord the buttonhole
Clearance Plate
Feed teeth up
down
Color Menu icon
34
Learn your Designer I
Page 35
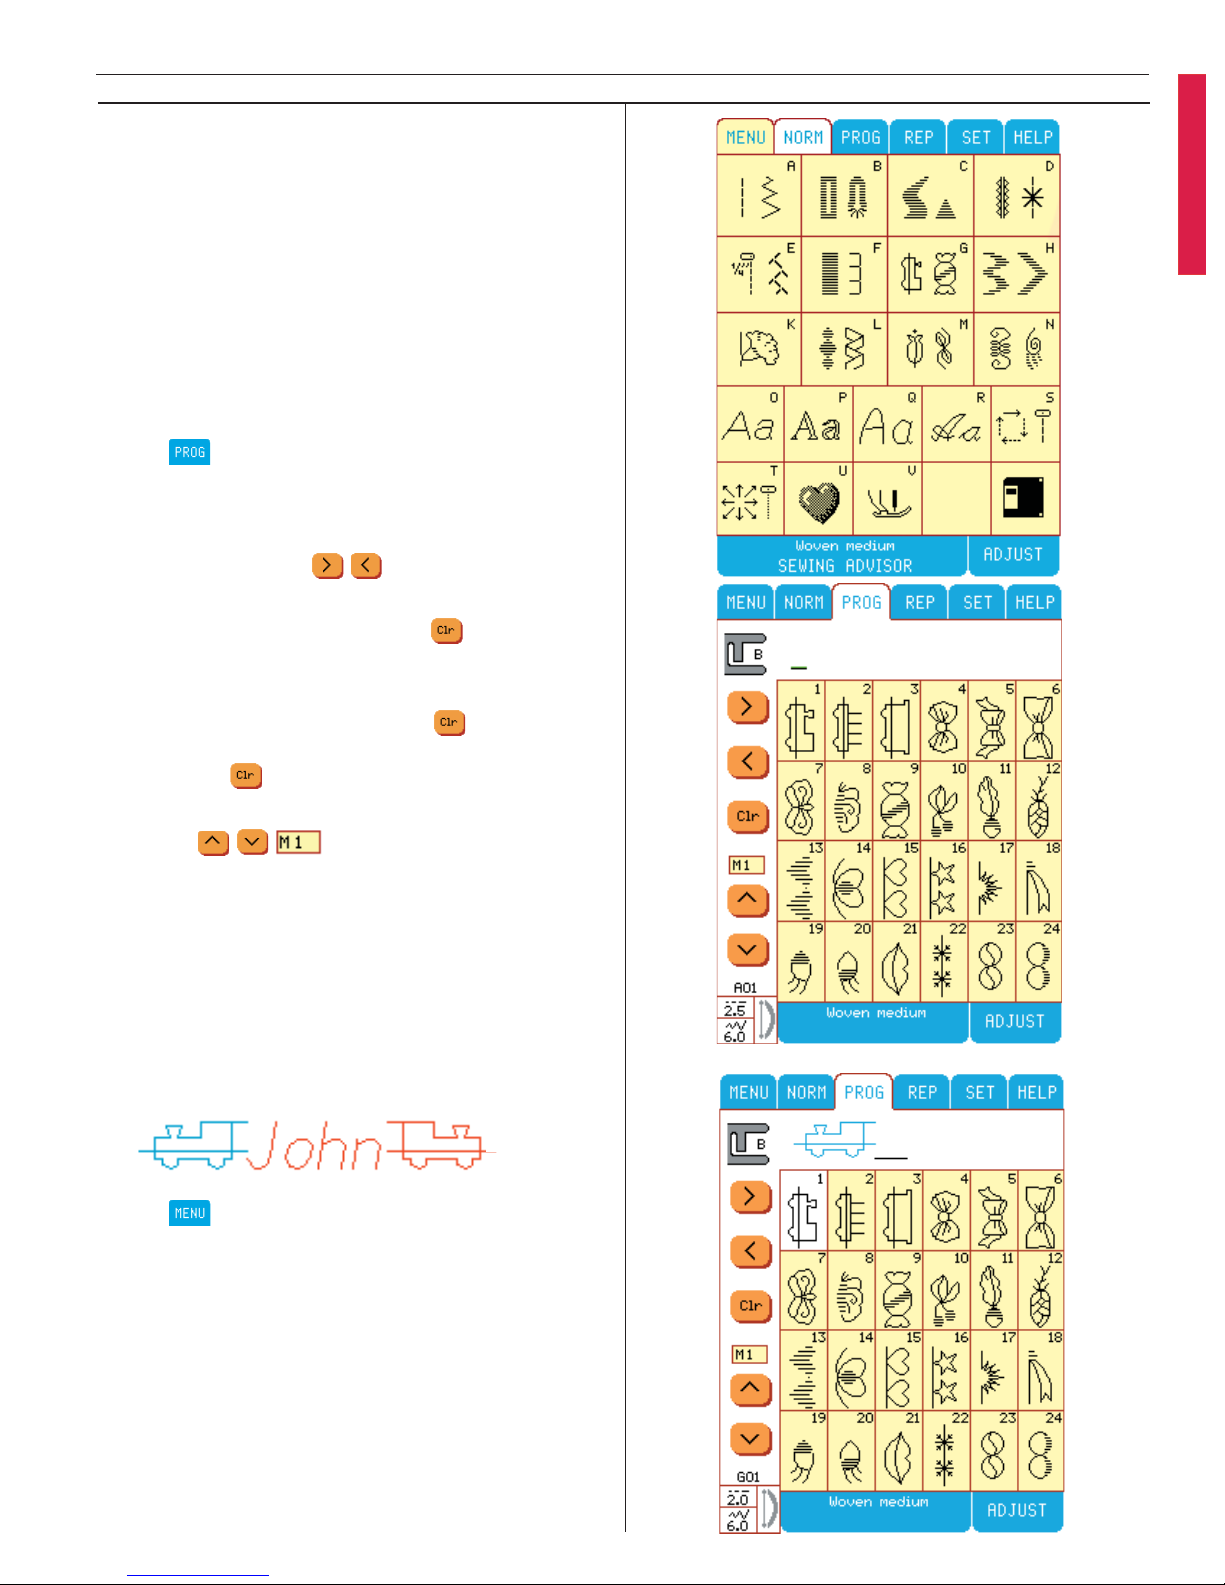
Programming
Select your fabric type in the Sewing Advisor
before programming.
Program stitches, letters, and numbers into memory. Your Designer I has 15 permanent memories. This means you can pro gram a stitch combination into memory and when you turn off the
machine it is retained in the memory. Each of
the 15 permanent memories holds up to 62 stitches which means you can program and save up
to 930 stitches and letters at one time.
Touch
. It will change from the blue color to
white because it is now active.
Presentation of PROG menu
Moving the cursor
Use arrows to move sideways step by step.
Deleting stitches or program
If there is a stitch or letter combination already
in memory displayed across the top of the screen
in the programming area, touch to clear the
memory. You are able to reload deleted program
if you touch
again before you enter new stit-
ches.
Memory
Use the up and down arrows to select memory.
The yellow box displays the memory numbers
from M1-M15 (memories 1 to 15). A cursor appears in the program area ready to accept a
stitch or letter.
How to program stitches and letters
We are going to program the sequence shown
below, combining letters and decorative stitches:
Touch
to go back to the Main Menu.
Touch Menu G, Children stitches are displayed.
Touch stitch number 1, locomotive.
It appears at the top of the screen in the programming area in a blue color which indicates it
is entered as the fi rst stitch in the pro gram.
The cursor moves automatically to the next po si tion ready to accept the next stitch.
35
Learn your Designer I
Page 36
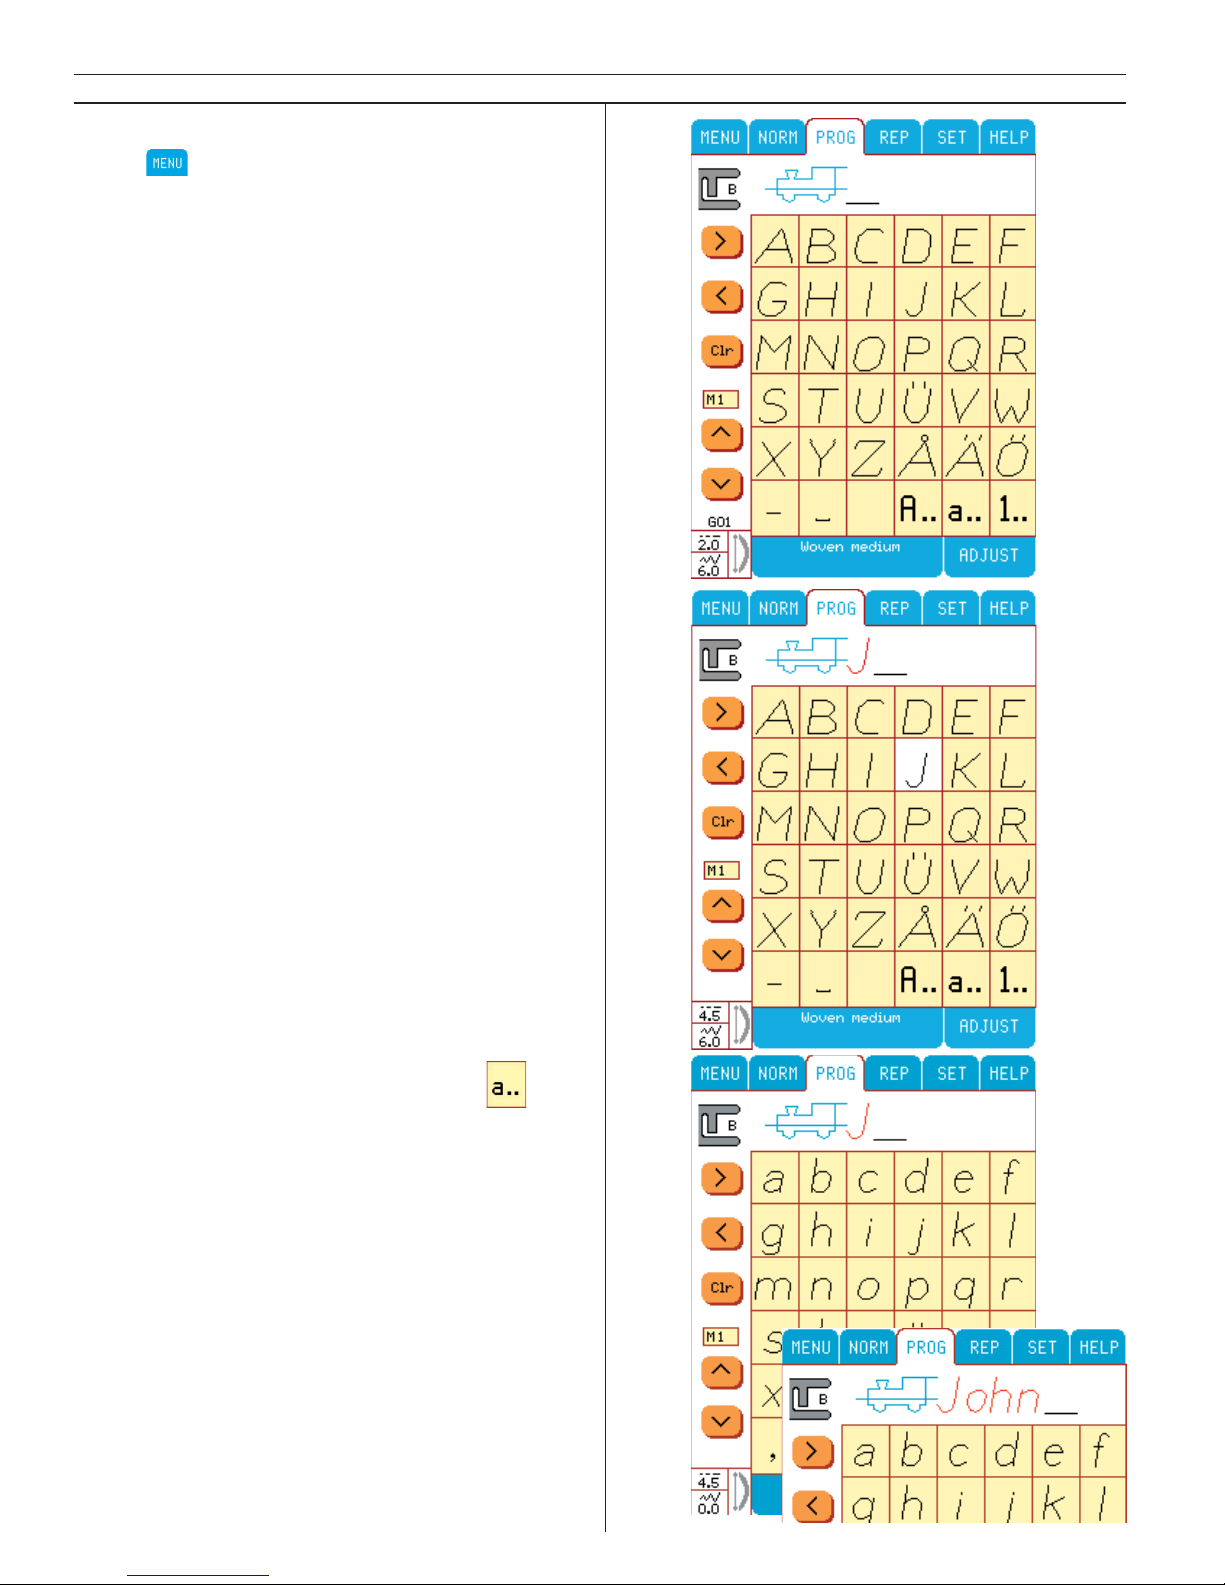
To program “J” in upper case letters.
Touch
, touch Menu O.
Touch “J” and “J” appears on the screen.
To program “ohn” in lower case, touch
in
the lower right corner of the alphabet screen.
The lower case submenu will appear.
Touch o, the letter appears and the cursor moves to the next position. Continue to enter the
letters: h, n.
36
Learn your Designer I
Page 37
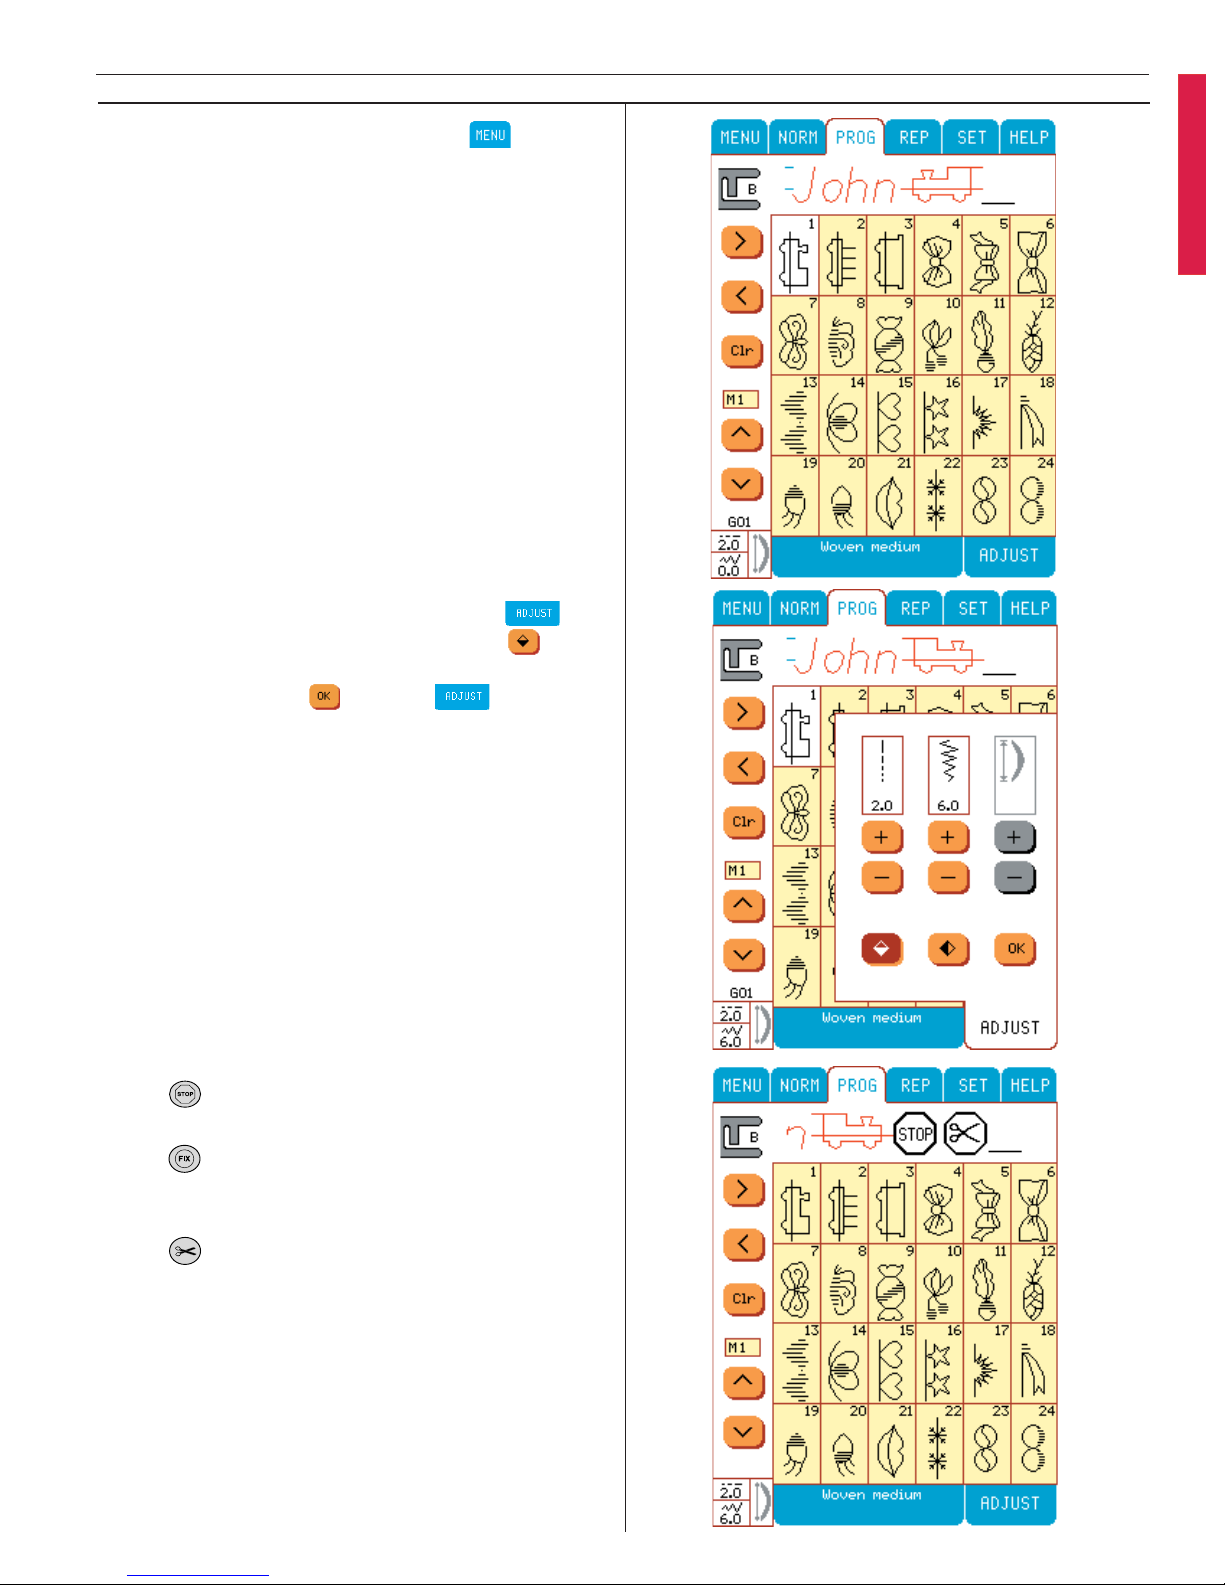
To enter a new locomotive. Touch .
Touch Menu G.
Touch stitch number 1.
To mirror image the locomotive, touch
.
Touch end to end mirror image button . The
locomotive changes and the mirror image button
turns brown. Touch to close .
Touch function button on the machine to
sew only one sequence of your program.
Touch
function button if you want to add a
tie off in your programmed sequence. It is also
possible to add several fi xes one after another.
Touch
function button to add a cut in your
sequence to make your Designer I cut the thread
when it has fi nished sewing.
37
Learn your Designer I
Page 38
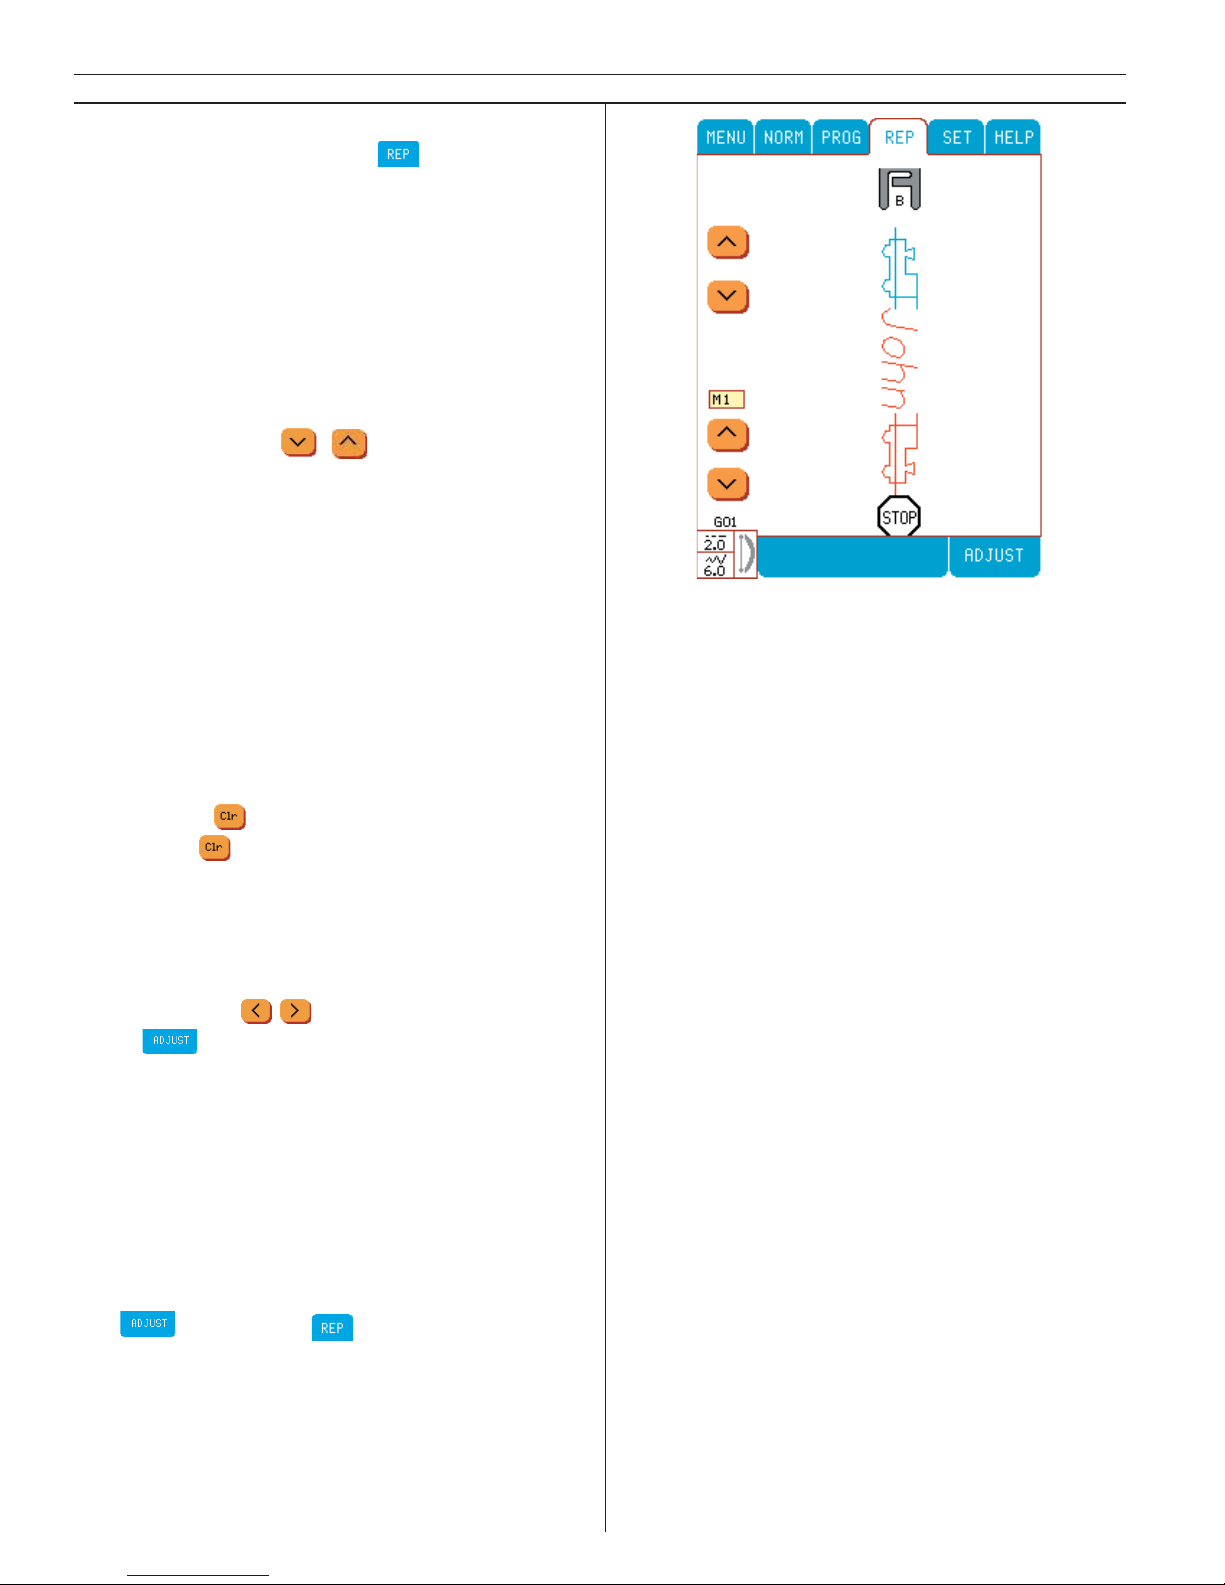
Sew
To sew your program, touch
. It will change
color from blue to white. Your stitch pro gram
will appear on the screen in the direction it will
sew. The presser foot is recommended. The fi rst
stitch in the program is shown in blue. The others are red. A stop is indicated by a stop sign
symbol.
If you have programmed a stitch sequence
that is too long to be seen on the Color Touch
Screen, you can step forwards/backwards in the
sequence using the icons.
Sew your program on a stabilized piece of
fabric.
Change a stitch or letter
Any stitch or letter can be changed in the mode
when the cursor is under the stitch or letter. It is
active and green in color: Simply touch the correct stitch or letter, to change it.
Add a stitch or letter
To add a stitch or letter in the mode, move the
cursor to the stitch where you wish to add a
stitch. Touch
. Touch the stitch you wish to
add. Touch to bring up the rest of the pro gram again.
Adjust stitches in program
If you want to adjust stitches in the programmed
sequence, you can move the cursor back and
forth using the
icons. You can use any
of the functions: stitch length and width,
mirror image and elongation. A stitch is adjustable when the cursor is positioned underneath it
(the stitch is highlighted in green). The last programmed stitch can be adjusted even though the
cursor is positioned after the stitch.
The changes will be remembered in the per ma nent memory.
Adjust entire stitch program
Use
functions in mode to change
stitch length, stitch width and mirror image. If
you have programmed satin stitches only, you
are able to do changes in elongation too.
38
Learn your Designer I
Page 39
39
Utility Garment Sewing
Page 40
40
Utility/Garment Sewing
Sewing Advisor
Your Designer I sewing machine features the exclusive Husqvarna Viking Sewing Advisor.
When beginning a sewing project, touch Sewing
Advisor. The fabric menu will appear on the Color Touch Screen. Touch your fabric type and
weight and the sewing technique menu will appear. Touch the technique you desire to sew. The
Sewing Advisor immediately sets the best stitch,
stitch length, width, tension, presser foot pressure and sewing speed for your project. What a
timesaver!
Your Husqvarna Viking Sewing Advisor is always
active when sewing from a stitch menu or before
programming or until you have connected the
Embroidery Unit, simply enter the fabric weight
and type for your project. The Sewing Advisor
does the rest, setting your stitch choices for your
project.
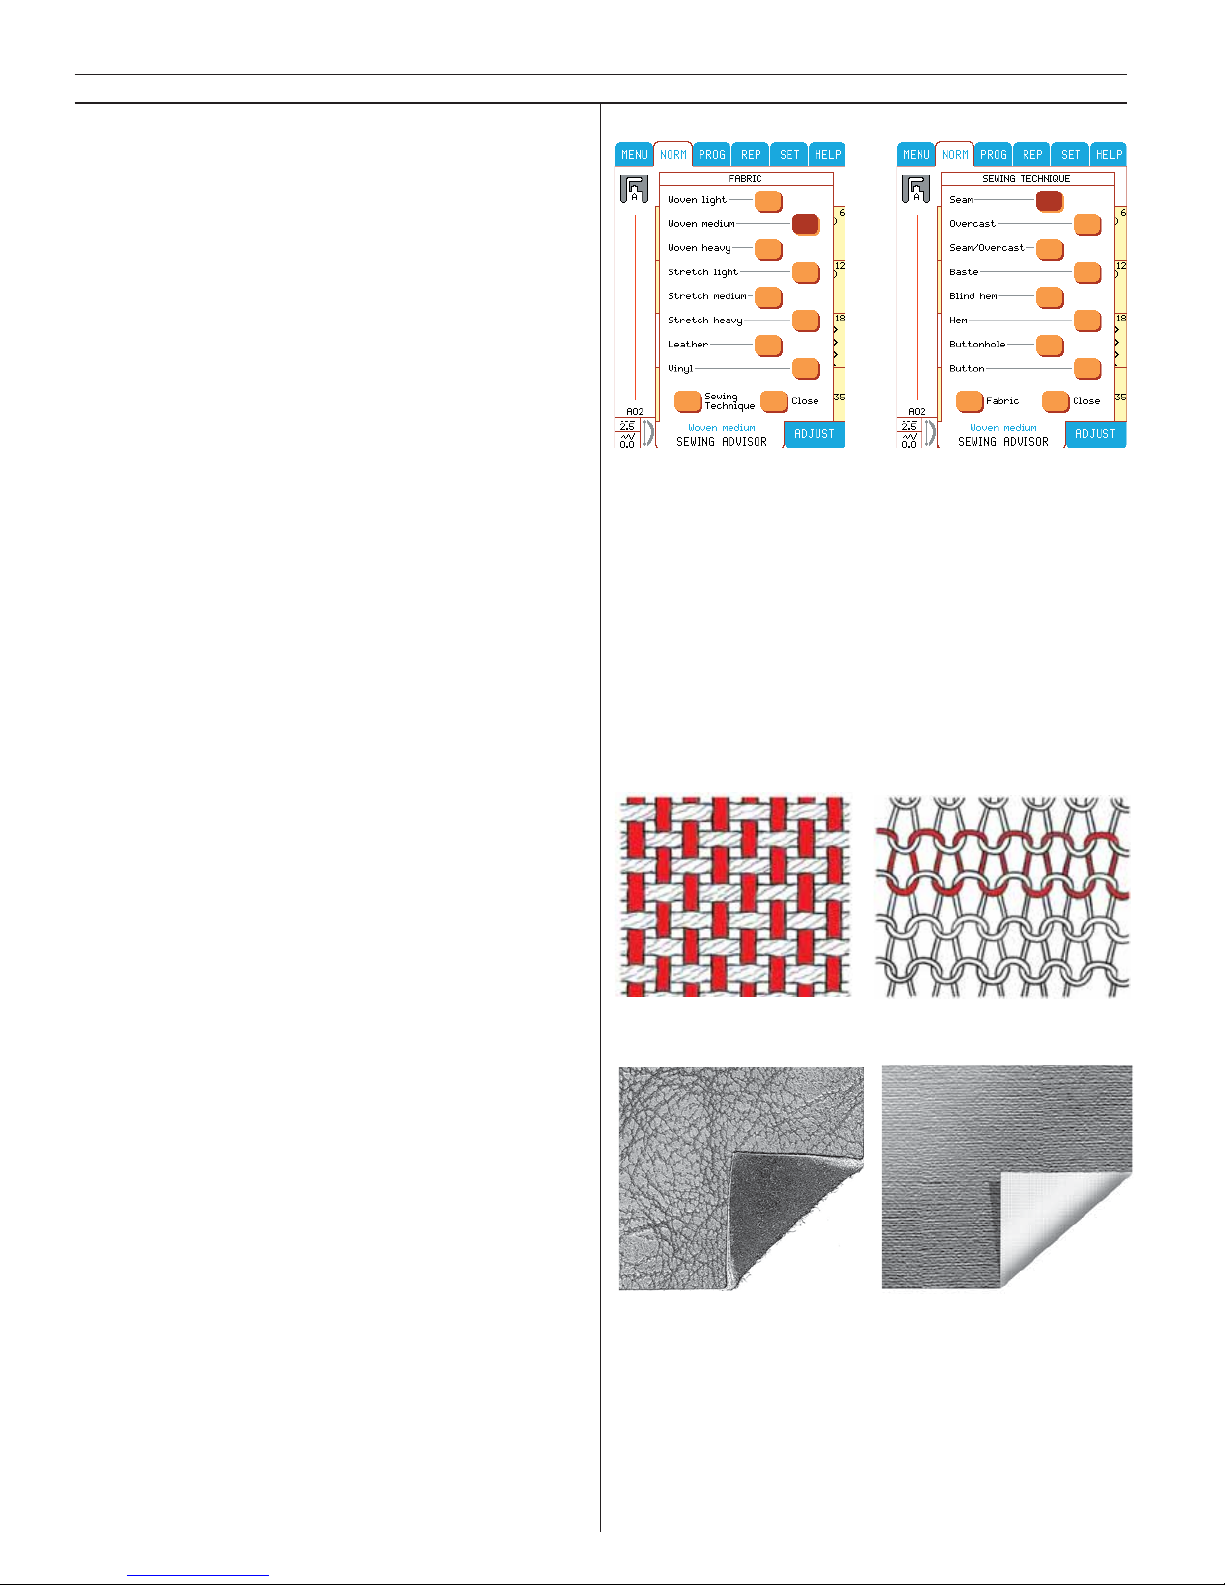
Fabric Selection
Woven or Knit:
The difference is the way the threads are put
together. Woven fabrics are made of two thread
systems, warp lengthwise and weft crosswise
that intersect at right angles. A knit fabric is
made of one thread system with interlaced stitches. A knit fabric is elastic. As a ge ne ral rule,
enter Woven for stable fabrics that have no
stretch and Stretch for fabrics that are elastic.
Leather
Leather is animal skin with the coat (fur) remo ved. Leather can be smooth or sueded and has
some give.
Vinyl
Vinyl is a synthetic material which often has a
woven wrong side. Vinyl can be smooth or patterned and some vinyl has give.
Knit fabric
Woven fabric
Leather Vinyl
Page 41
41
Utility/Garment Sewing
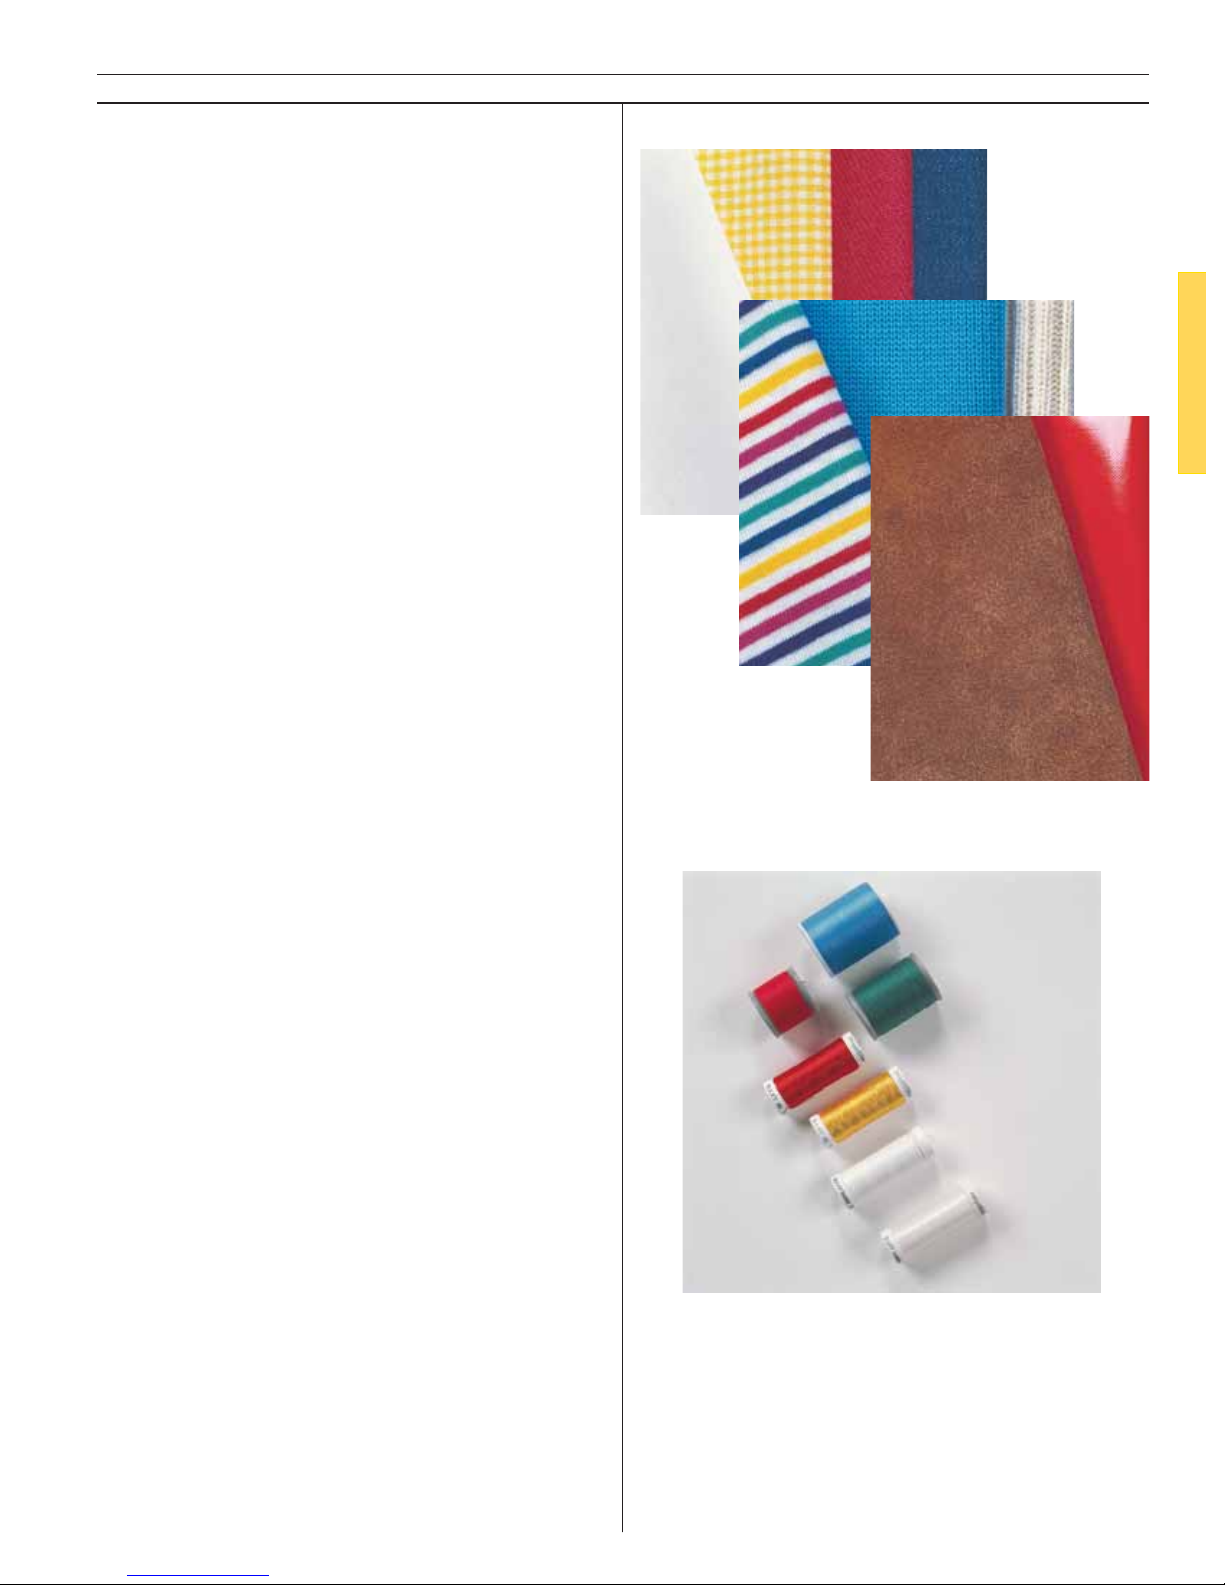
Selecting Fabric on Sewing Advisor
• Woven light: for chiffon, organza, batiste,
silkies, wool challis, etc.
• Woven medium: for calico, quilting fabrics,
wool crepe, and broadcloth, etc.
• Woven heavy: for denim, wool suiting, coa-
ting, can vas, etc.
• Stretch light: for charmeuse nylon, sing le
knit jerseys, etc.
• Stretch medium: for double knit, plush,
swimwear, slinky, etc.
• Stretch heavy: for sweater knits, fl eece, etc.
• Leather: for suede and real leather.
• Vinyl: for artifi cial leather and suede.
Thread
All purpose sewing thread
Made of synthetic, cotton or cotton covered
po ly es ter. Used for sewing garments and textiles.
Embroidery thread
Made of various fi bers, rayon, cotton, acrylic.
This thread creates a smooth glossy appearance
for embroidery and other decorative stitching.
Note: When using a metallic thread for embroidering, you may need to use a needle with a larger eye
and lower the embroidery speed.
Embroidery bobbin thread
Fine weight synthetic or cotton thread to reduce
build-up on the wrong side.
Invisible thread
Single clear synthetic thread. Used for quilting
and oth er decorative sewing.
As you read the following instructions, sew the
step by step exercises to learn your Husqvarna
Viking Designer I sewing machine to the full est.
The Husqvarna Viking Sewing Advisor will save
you hours of sewing time! It always knows the
best stitch and settings for your fabric type, fabric
weight and sewing technique. The following exercises will teach you how to use it.
Page 42
42
Utility/Garment Sewing
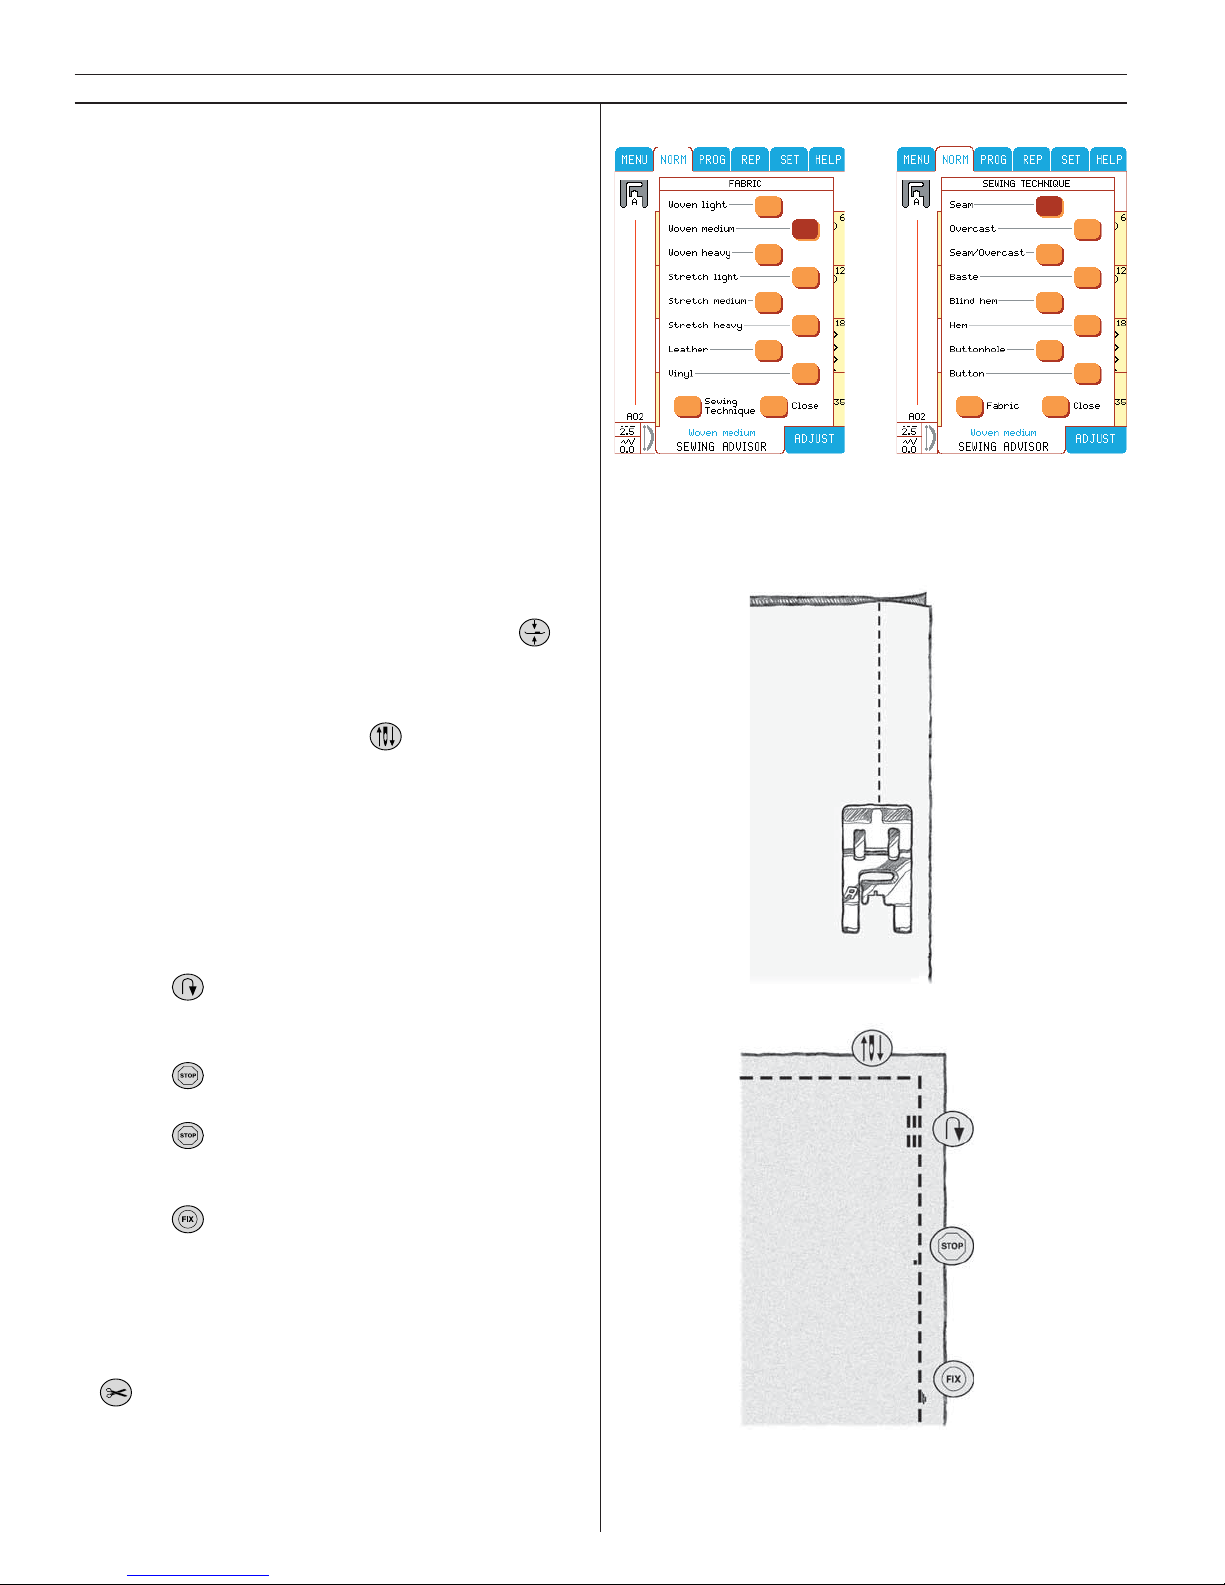
Seam
A seam sews two pieces of fabric together with
a seam allowance that will usually be pressed
open. In most cases edges of the seam allowance are fi nished with an overcast stitch before
sewing the seam.
Fabric: Woven medium, cut in two.
Touch: Sewing Advisor on the Color Touch
Screen.
Enter: Woven medium on the Fabric screen.
Seam on the Technique screen. (The Sewing
Advisor selects a straight stitch.)
Snap on: Presser foot A as recommended.
Use: Size 80 needle as recommended.
Sew:
• Place fabrics right sides together. Put the fa-
bric in po si tion under the presser foot. Line
up edge with the 5/8" (15mm) seam guide.
• If you need to adjust fabric, touch Pivot
.
• Step on foot control. The Sensor Foot lowers
automatically. Stitch a seam halfway down the
fabric.
• Touch Needle stop down .
• Stop sewing 5/8" (15mm) from the end. The
Sen sor Foot raises to the pi vot po si tion with
the needle in the fabric. Pivot fabric. Step on
the foot control, the Sensor Foot lowers automatically. Sew along the edge following the
instructions below.
Reverse
• Touch
to lock stitch.
STOP
• Touch
to fi nish a stitch and automatically
sew a few stitches in place to tie off and stop.
Touch again to cancel it.
FIX
• Touch
to lock the stitches with tiny
straight stitches that sew back and forth slightly.
Thread cutter
• After having fi nished the seam, touch
. The top thread is taken to the back of the
fabric. The thread cutter cuts top and bobbin
threads. The pres ser foot raises to remove fabric.
Page 43
43
Utility/Garment Sewing
Seam
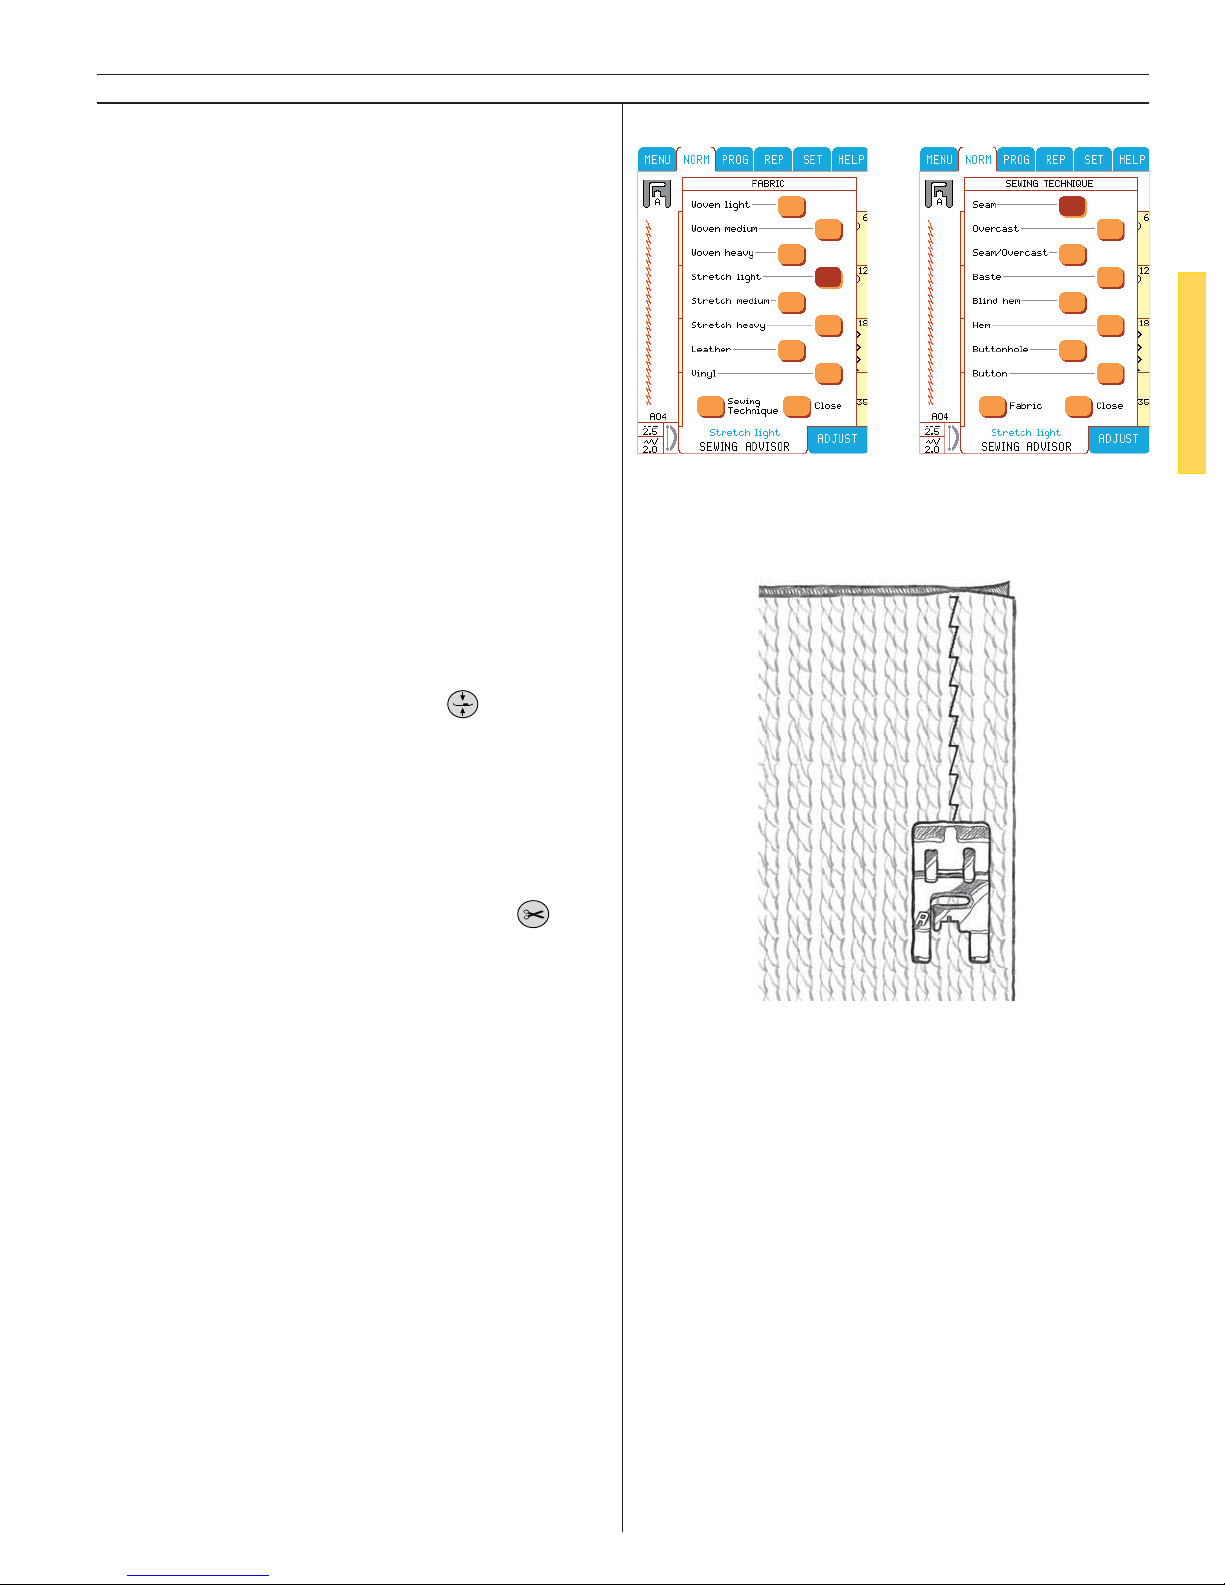
Seams in stretch fabric must stretch with the fabric. The Lightning Stitch (Stretch Stitch) ma kes
a stretchy seam that is suitable for sewing together pieces of light stretch fabric.
The Lightning Stitch is ideal for topstitching in
light stretch fabrics. The Sewing Advisor will
select the best stitch, stitch length and width,
tension, presser foot pressure and sewing speed
according to the fabric type and weight.
Fabric: Stretch light, cut in two.
Touch: Sewing Advisor on the Color Touch
Screen, Stretch light on the fabric screen, Seam
on the technique screen. (The Sewing Advisor
selects a lightning stitch.)
Snap on: Presser foot A as recommended.
Use: Size 75 stretch needle as recommended.
Place fabric pieces right sides together. Put the
fabric in position under the presser foot. If you
need to adjust fabric, touch Pivot
.
Sew:
• Step on foot control. The Sen sor Foot lowers
automatically.
• Stitch a seam along the 3/8" (10mm) seam
gui de.
• After having fi nished the seam, touch .
Page 44
44
Utility/Garment Sewing
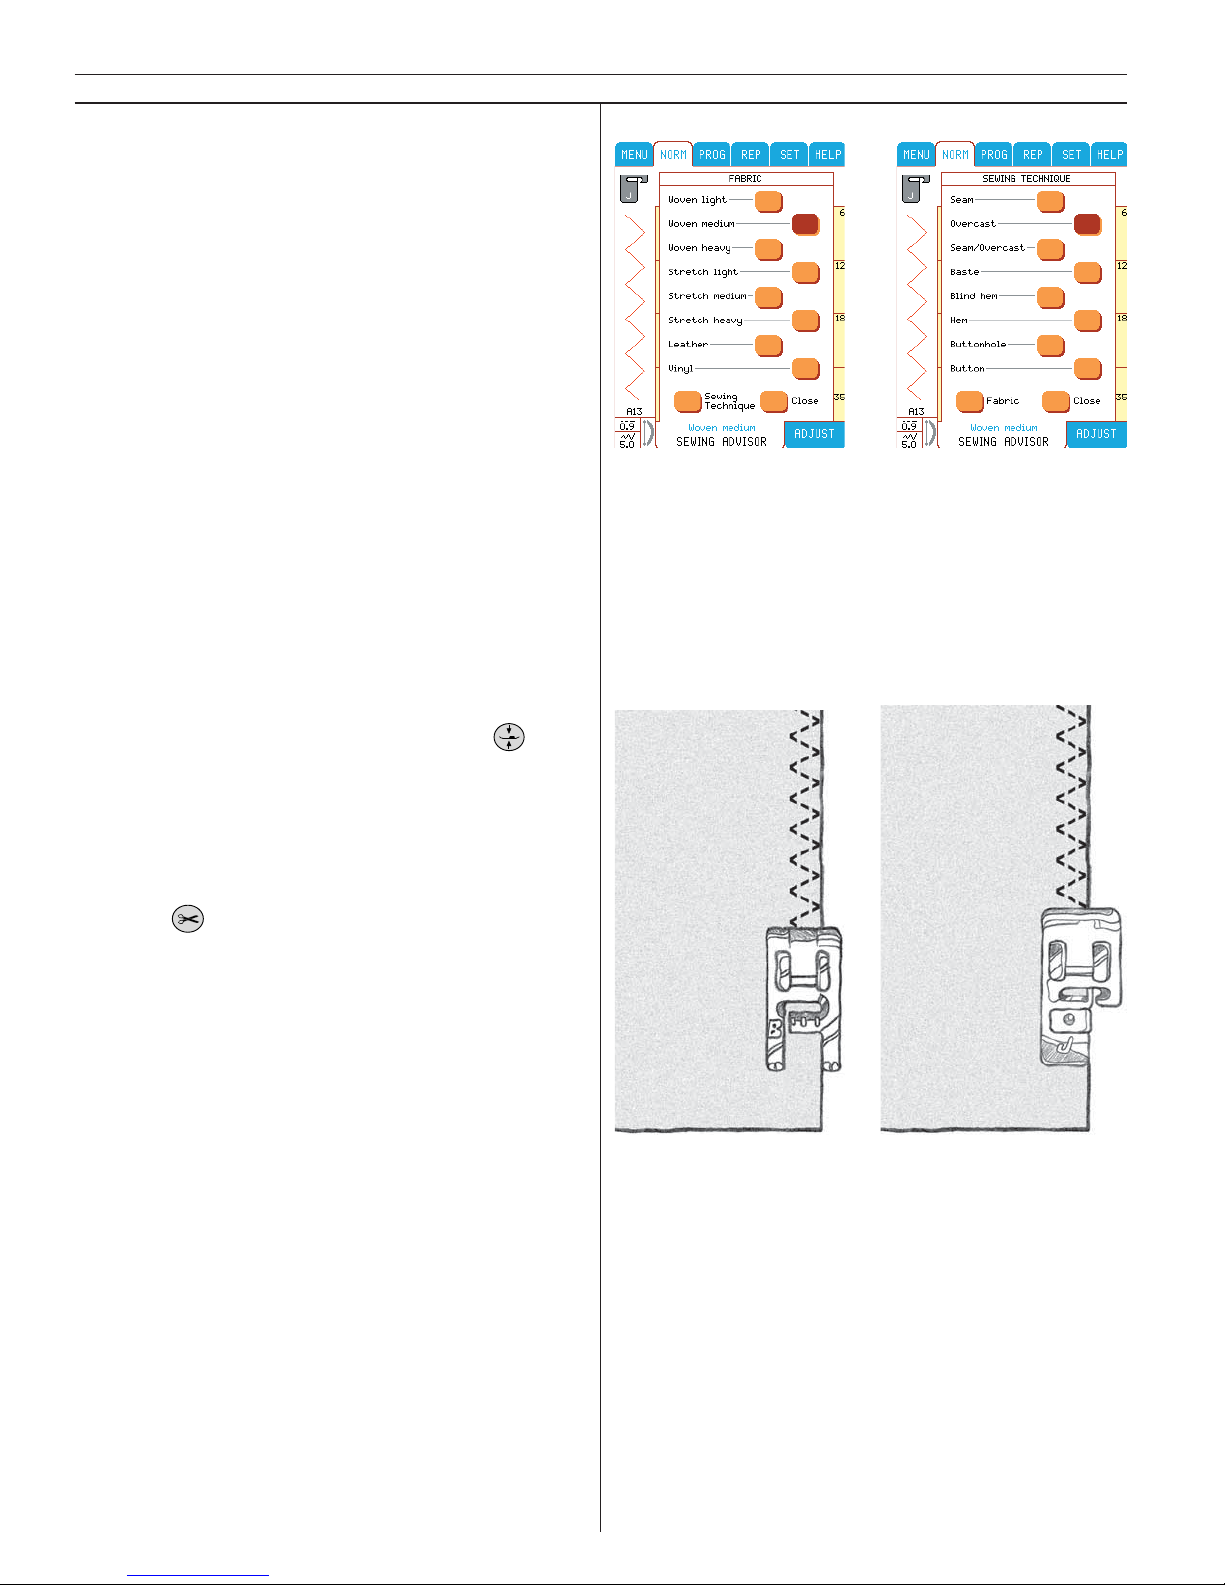
Overcast
Overcast fabric edges to prevent fraying and to
help them lay fl at. It is easiest to overcast before
the garment is sewn together. The J pres ser foot
is recommended for light and medium weight
fabric to pre vent puckering along the edge. The
B pres ser foot for heavy weight fabric. Your
Sewing Advisor will select the best length and
width for the fabric weight.
Fabric: Woven medium
Touch: Woven medium on your Sewing
Advisor,Overcast on the technique screen. (The
Sewing Advisor selects a 3-step zigzag stitch.)
Snap on: Presser foot J as recommended.
Use: Size 80 needle as recommended.
Place the edge of a single thickness of fabric un der presser foot J with the pin on the foot along
the edge of the fabric. The 3 step zigzag stitch
sews over the pin to keep the edge of the fabric
fl at.
If you need to adjust fabric, touch Pivot
.
Sew:
• Step on foot control. The Sensor Foot lowers
automatically.
• Sew to overcast the edge of the fabric.
• Touch
.
Note: It is not necessary to overcast leather or vinyl,
but the Sewing Advisor gives you the possibility.
Touch Leather or Vi nyl on your Sewing Advisor,
Overcast on the technique screen. (The Sewing Advisor selects a zigzag stitch).
Page 45
45
Utility/Garment Sewing
Seam/Overcast for ribbing
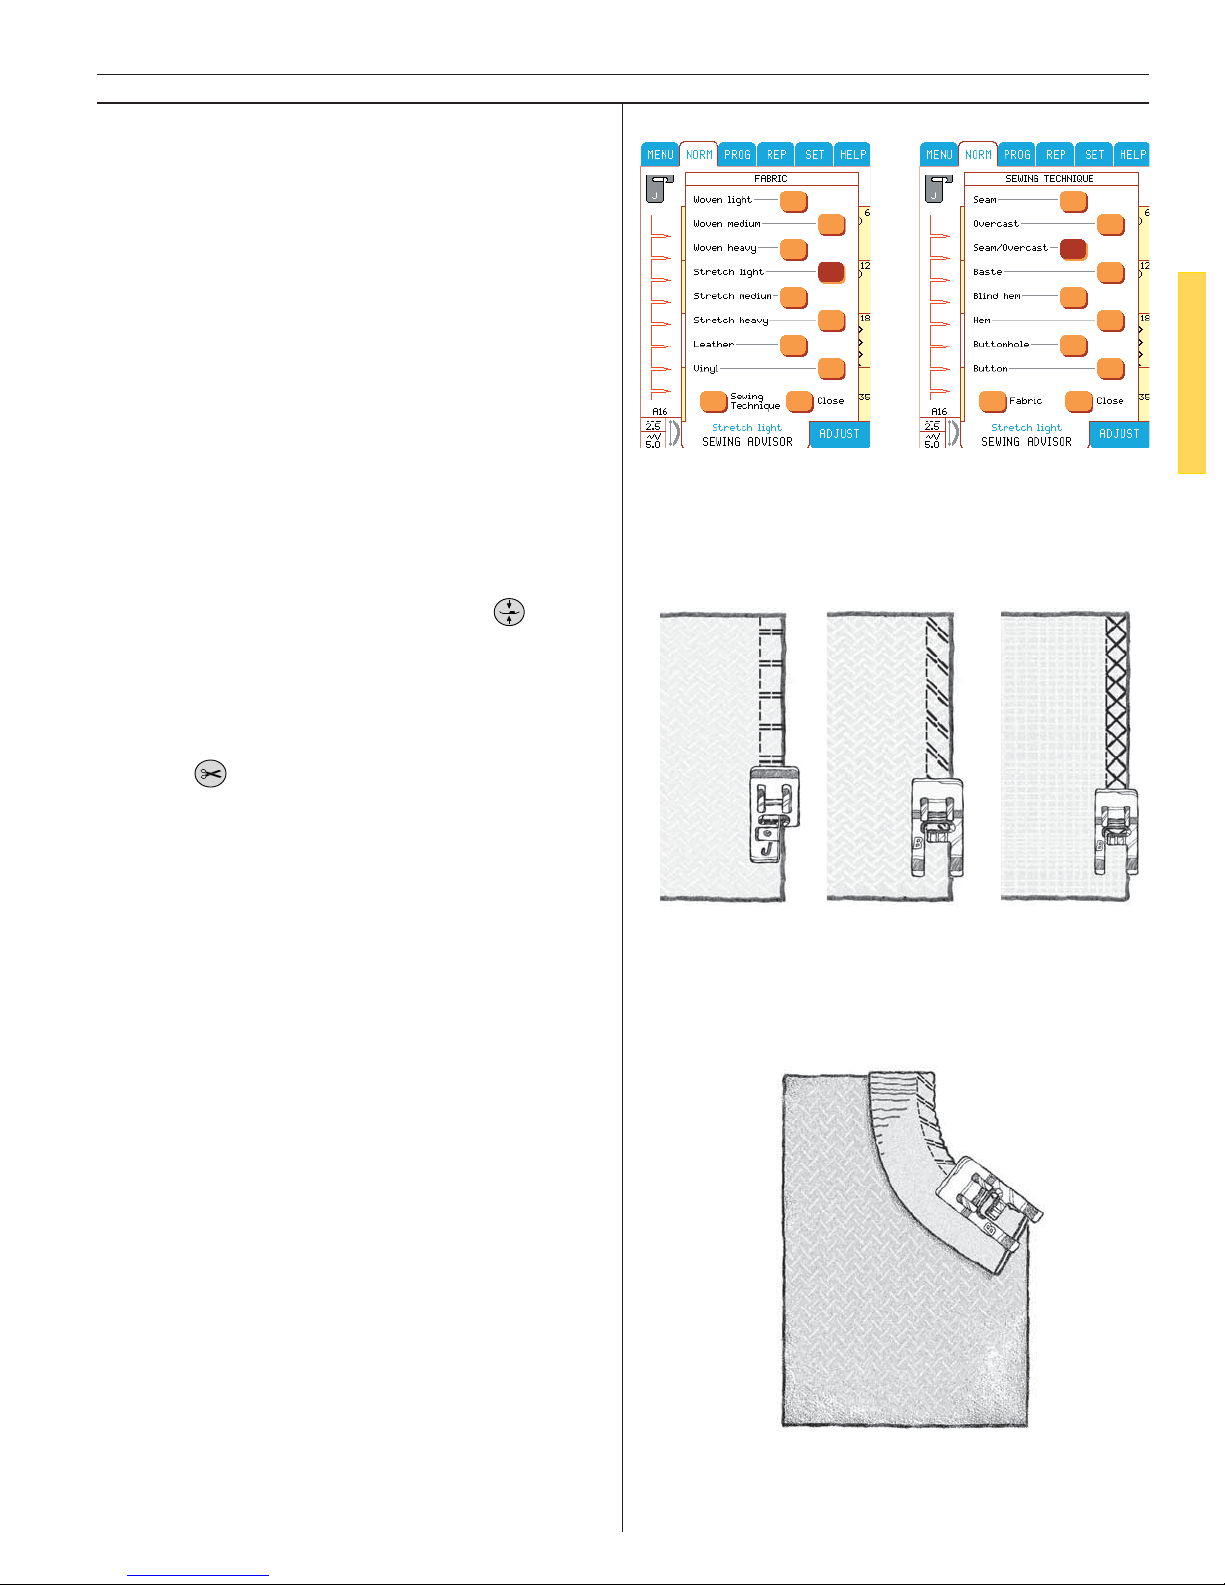
The Seam/Overcast technique is perfect for stitching ribbed neckbands and cuffs. Cut a mock
neckline in a Stretch medium fabric, touch
Stretch medium and Seam/Overcast in the Sewing Advisor and sew a piece of ribbing to the
mock neckline with a 1/4" (6mm) seam allowance, stretch ribbing as you sew.
Seam and Overcast
The Seam/Overcast stitch sews the seam and
overcasts the edge all at one time. This saves
time. There are a number of different Seam/
Overcast stitches on your Designer I. Your Sewing Advisor will select the best one for your
fabric and make all adjustments automatically.
Fabric: Stretch light, cut in two
Touch: Stretch light on the Sewing Advisor fa-
bric screen. Seam/Overcast on the technique
screen (A).
Snap on: Presser foot J as recommended.
Use: Size 75 stretch needle as recommended.
Pla ce fabric pieces right sides together. Put the
fabric in position under the presser foot with the
pin on the foot along the edge of the fabric. If
you need to adjust fabric, touch Pivot
.
Sew:
• Step on foot control. The Sensor Foot lowers
automatically.
• Seam/Overcast along one edge
• Touch
.
Repeat the Seam/Overcast technique on Stretch
heavy fabric (B) and on Woven heavy fabric (C).
Your Sewing Advisor will select the best stitch,
length, width, tension, pres ser foot pressure and
sewing speed for each fabric type. Follow other
recommendations given on the Color Touch
Screen.
AB
C
Page 46
46
Utility/Garment Sewing
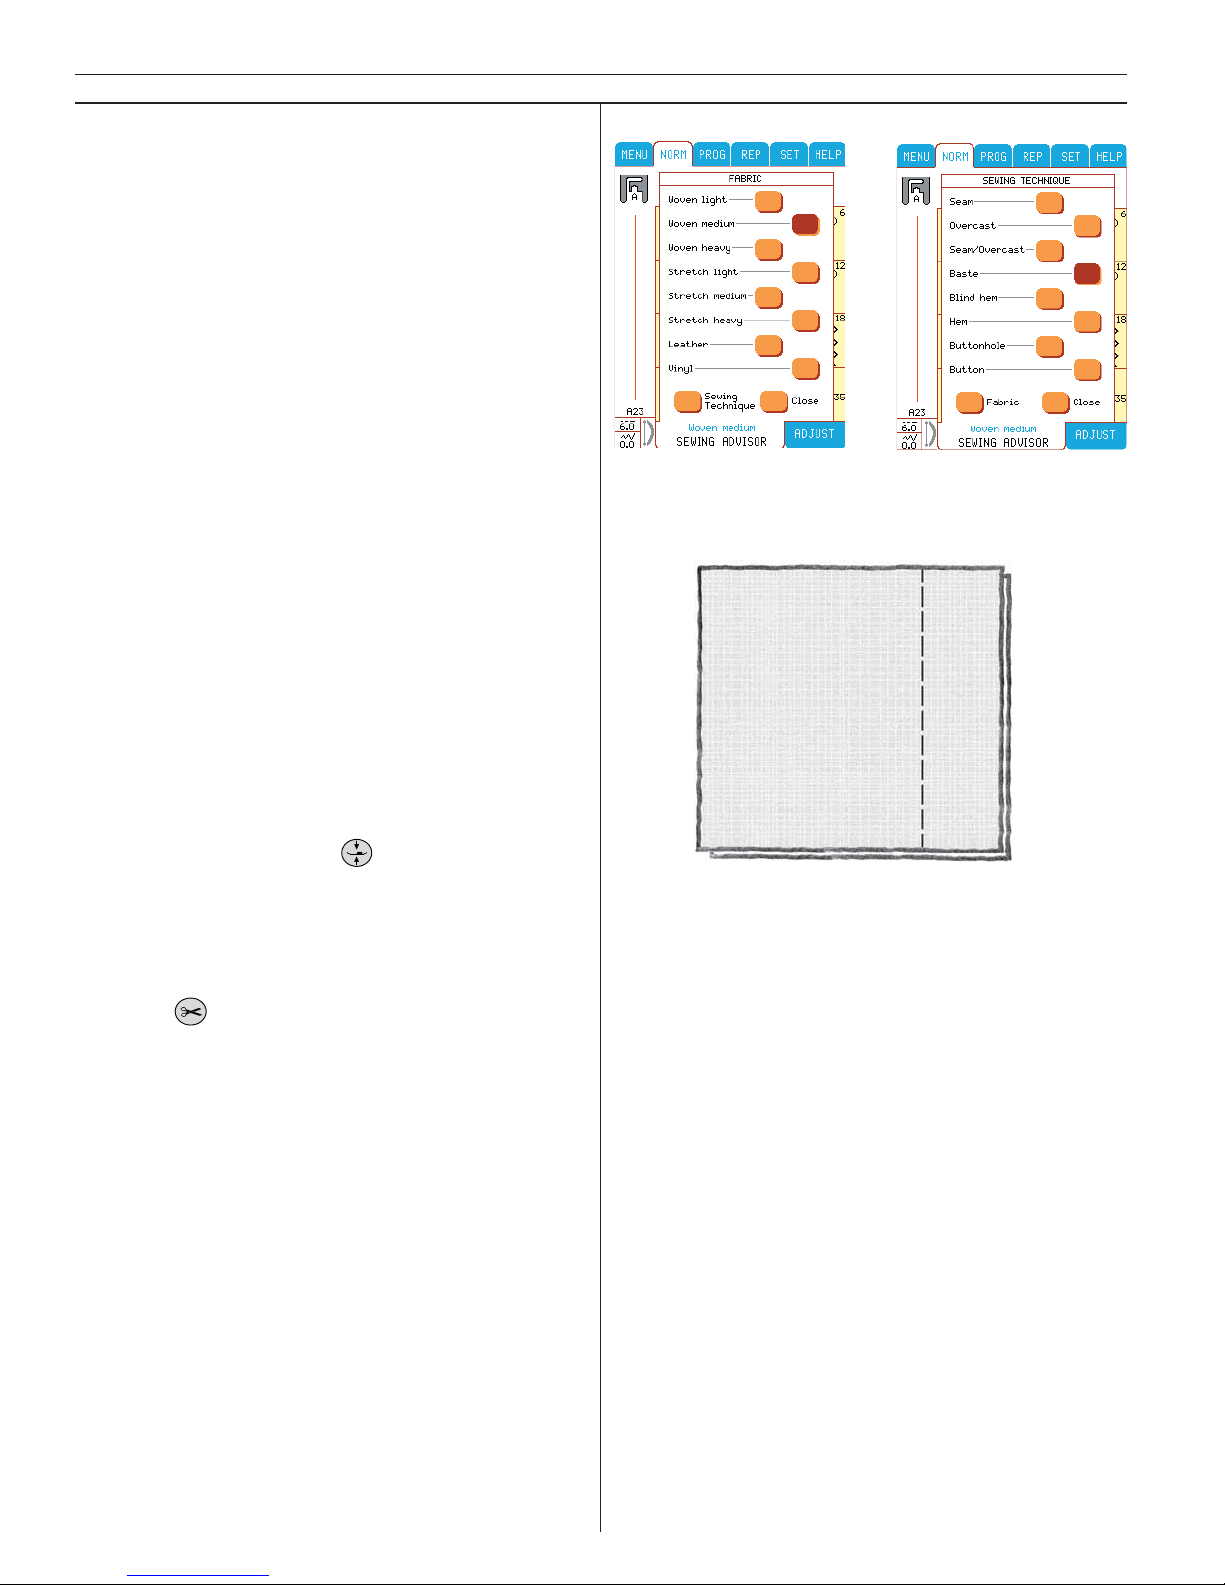
Baste
Basting is temporary stitching for fi tting garments, gathering and marking. Your Sewing Advisor automatically sets a long stitch length and
reduces the tension so the threads are easy to
remove or to pull for gathering.
Fabric: Woven medium, cut in two.
Touch: Woven medium on the Sewing Advisor
fabric screen and Baste on the technique screen.
Snap on: Presser foot A as recommended.
Use: Size 80 needle as recommended.
Place the fabrics right sides together. Put the fabric in position under the presser foot.
Seam allowance: 5/8" (15mm). If you need to
adjust fabric, touch Pivot
.
Sew:
• Step on foot control. The Sensor Foot lowers
automatically.
• Stitch along seam line.
• Touch
.
• Pull bobbin thread to remove stitching.
Page 47
47
Utility/Garment Sewing
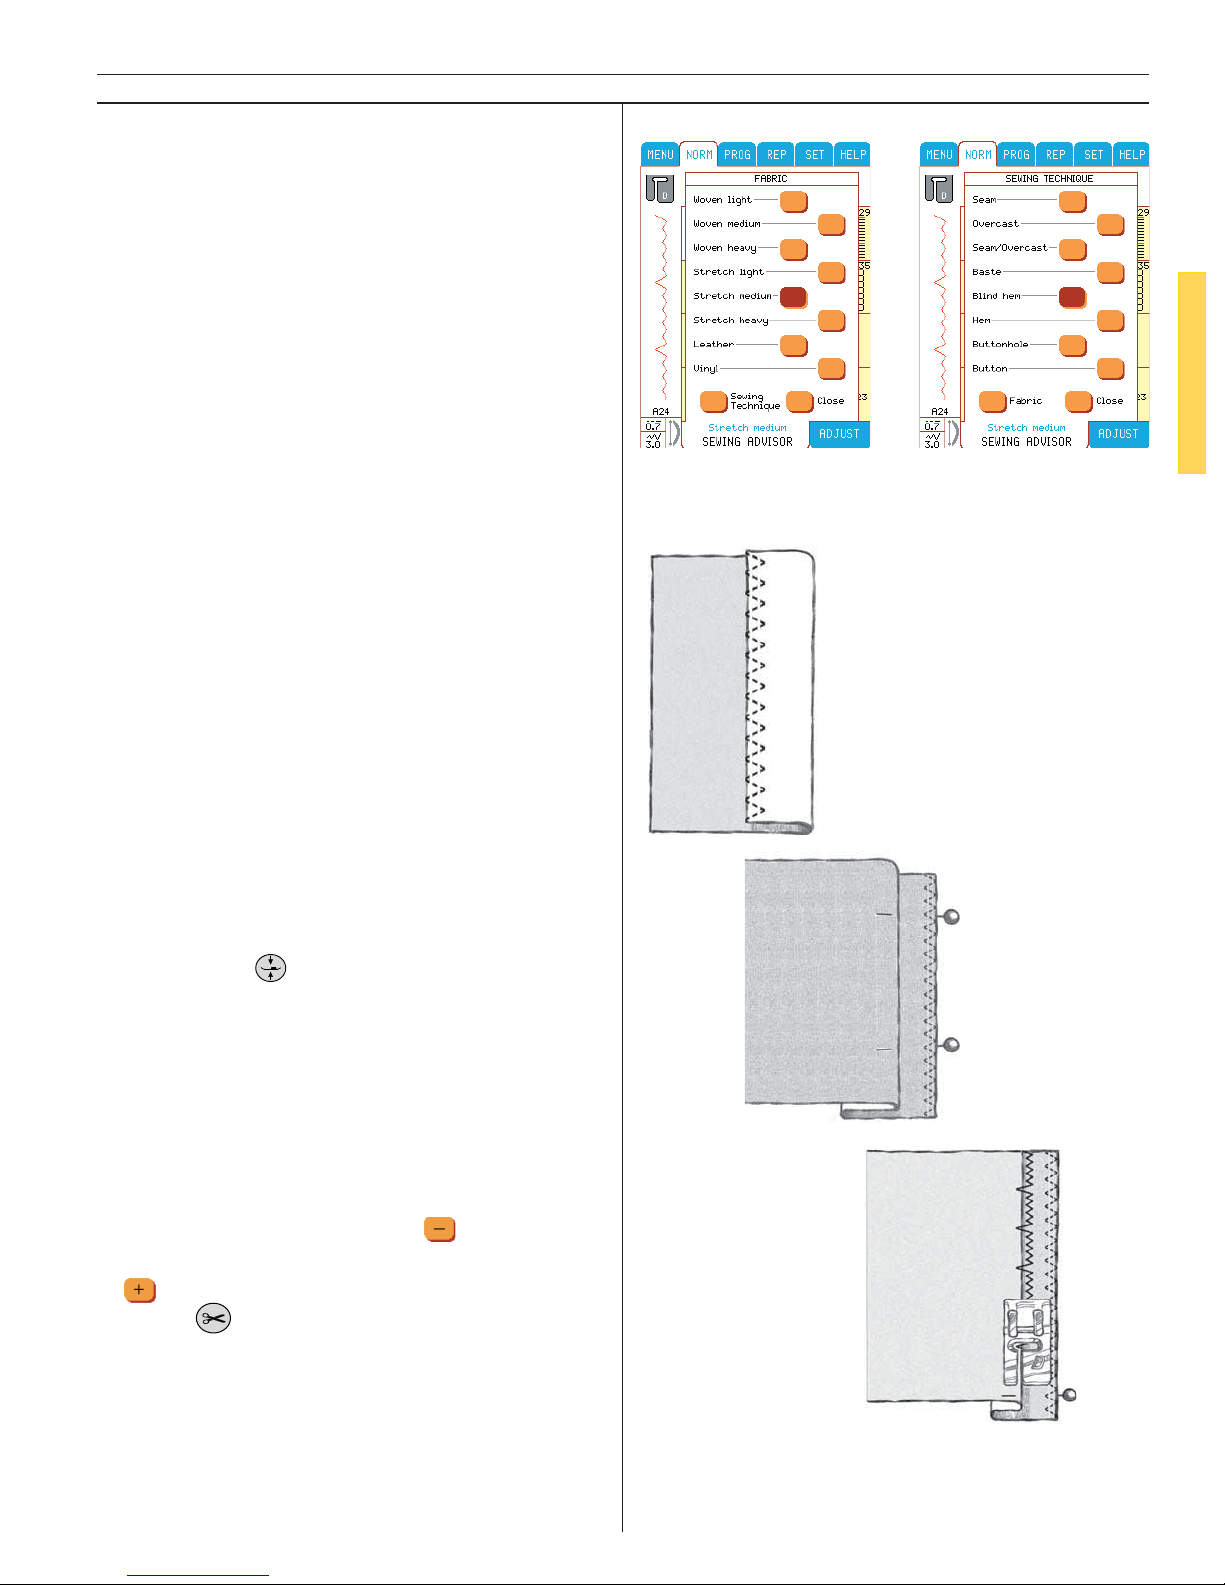
Blind Hem
The blind hem creates an invisible hem on garments. There are two types of blind hem, one is
recommended for medium to heavy woven fabrics, the other for stretch. The blind hem is not
suggested for light weight fabric, but your Sewing Advisor will select the best stitch possible.
Fabric: Stretch medium
Touch: Stretch medium on fabric screen and
Blind Hem on technique screen in the Sewing
Advisor.
Snap on: Presser foot D as recommended.
Use: Size 90 stretch needle as recommended.
Fold a 2" (50mm) hem along one fabric edge
pla ce pins in place perpendicular to the hem
with the hem to fi rst entry of the pin about 1/4’’
(6mm) from the hem edge.
Hold the fabric wrong side up with the hem to
the right.
Fold the hem under to the right side, leaving
about 1/4" (6mm) of the hem extending to the
right. You will sew on this extension.
Sew:
• Place the fabric under presser foot D with the
folded edge against the right toe of the foot.
• Touch Pivot
and adjust fabric if necessary.
Be sure to remove the pins before you sew
over them. Do not try to sew over pins. Step
on the foot control. The Sen sor foot lowers
automatically.
• As the large zigzag swings to the left, it should
barely catch the fold. Generally the Sewing
Advisor will choose the correct width. Adjust
the stitch width if necessary.
If too much fabric is caught,
narrow the
width. If the zigzag is not catching the fold,
widen the width.
• Touch
.
Page 48
48
Utility/Garment Sewing
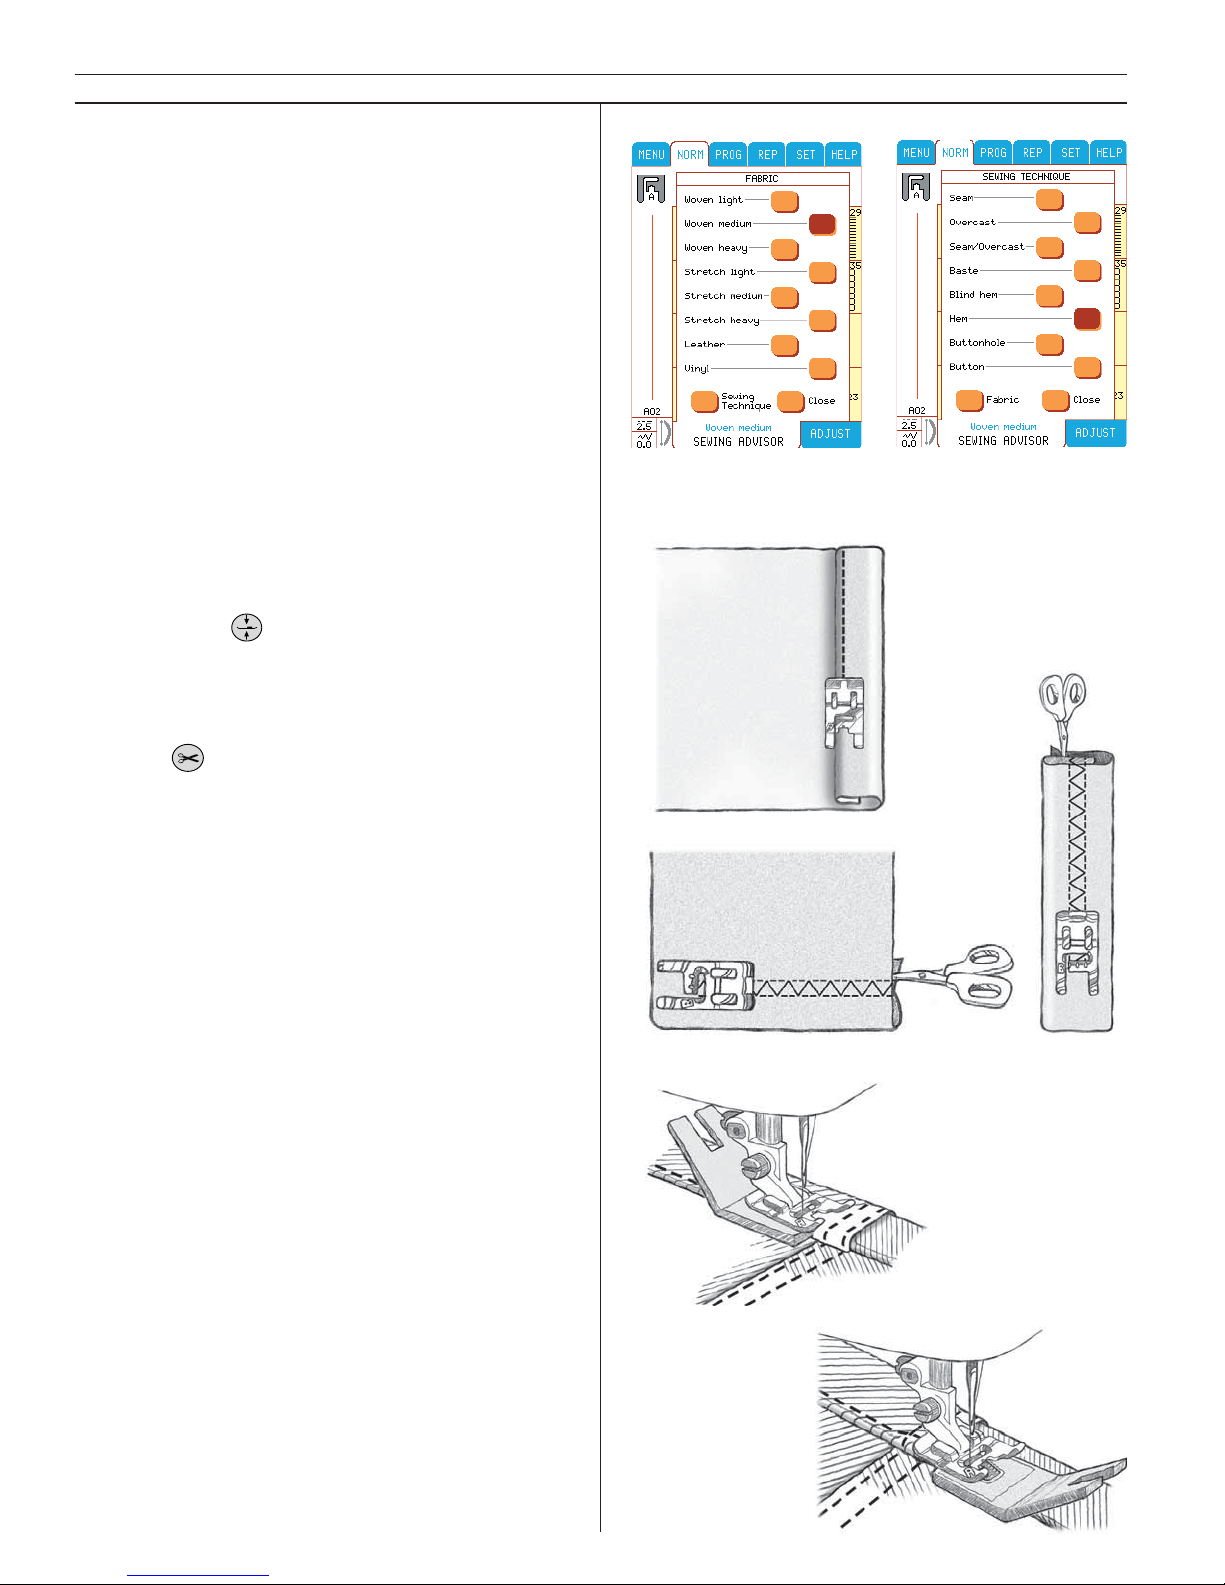
Hem
The Hem technique on your Sewing Advisor
will select the visible or topstitch hem that is
best for your fabric weight and type. For woven fabric, leather and vinyl, a straight stitch is
selected. For stretch fabrics, elastic stitches are
selected.
Fabric: Woven medium.
Touch: Woven medium on the Sewing Advisor
fabric screen and Hem on the technique screen.
Snap on: Presser foot A as recommended.
Use: Size 80 needle as recommended.
Sew:
• Fold and press a 3/8" (10mm) hem fold and
press another 3/4" (20mm) hem. Put the fabric in po si tion un der the presser foot.
• Touch Pivot
and adjust fabric if necessary.
Step on the foot control. The Sen sor Foot lowers automatically.
• Sew along the hem edge.
• Touch
.
Repeat this technique on a Stretch medium fabric. The Sewing Advisor selects a fl atlock stitch.
Follow other recommendations given on the Color Touch Screen.
Fold a hem to the wrong side and stitch with
fl at lock stitch on the right side. Trim away ex cess fabric.
Use this technique for belt loops too.
Tip: When sewing over seams in extra heavy
fabric or a blue jeans hem, the foot can tip as
the machine climbs over the seam. The needle
can hit the tipped foot and break. In this case,
use the clearance plate to balance the height of
the hem as you sew.
Place it behind the foot as you ap proach the
hem and in front of the foot as you sew over
the hem thickness. Remove the clearance plate
before sewing in to it.
Page 49
49
Utility/Garment Sewing
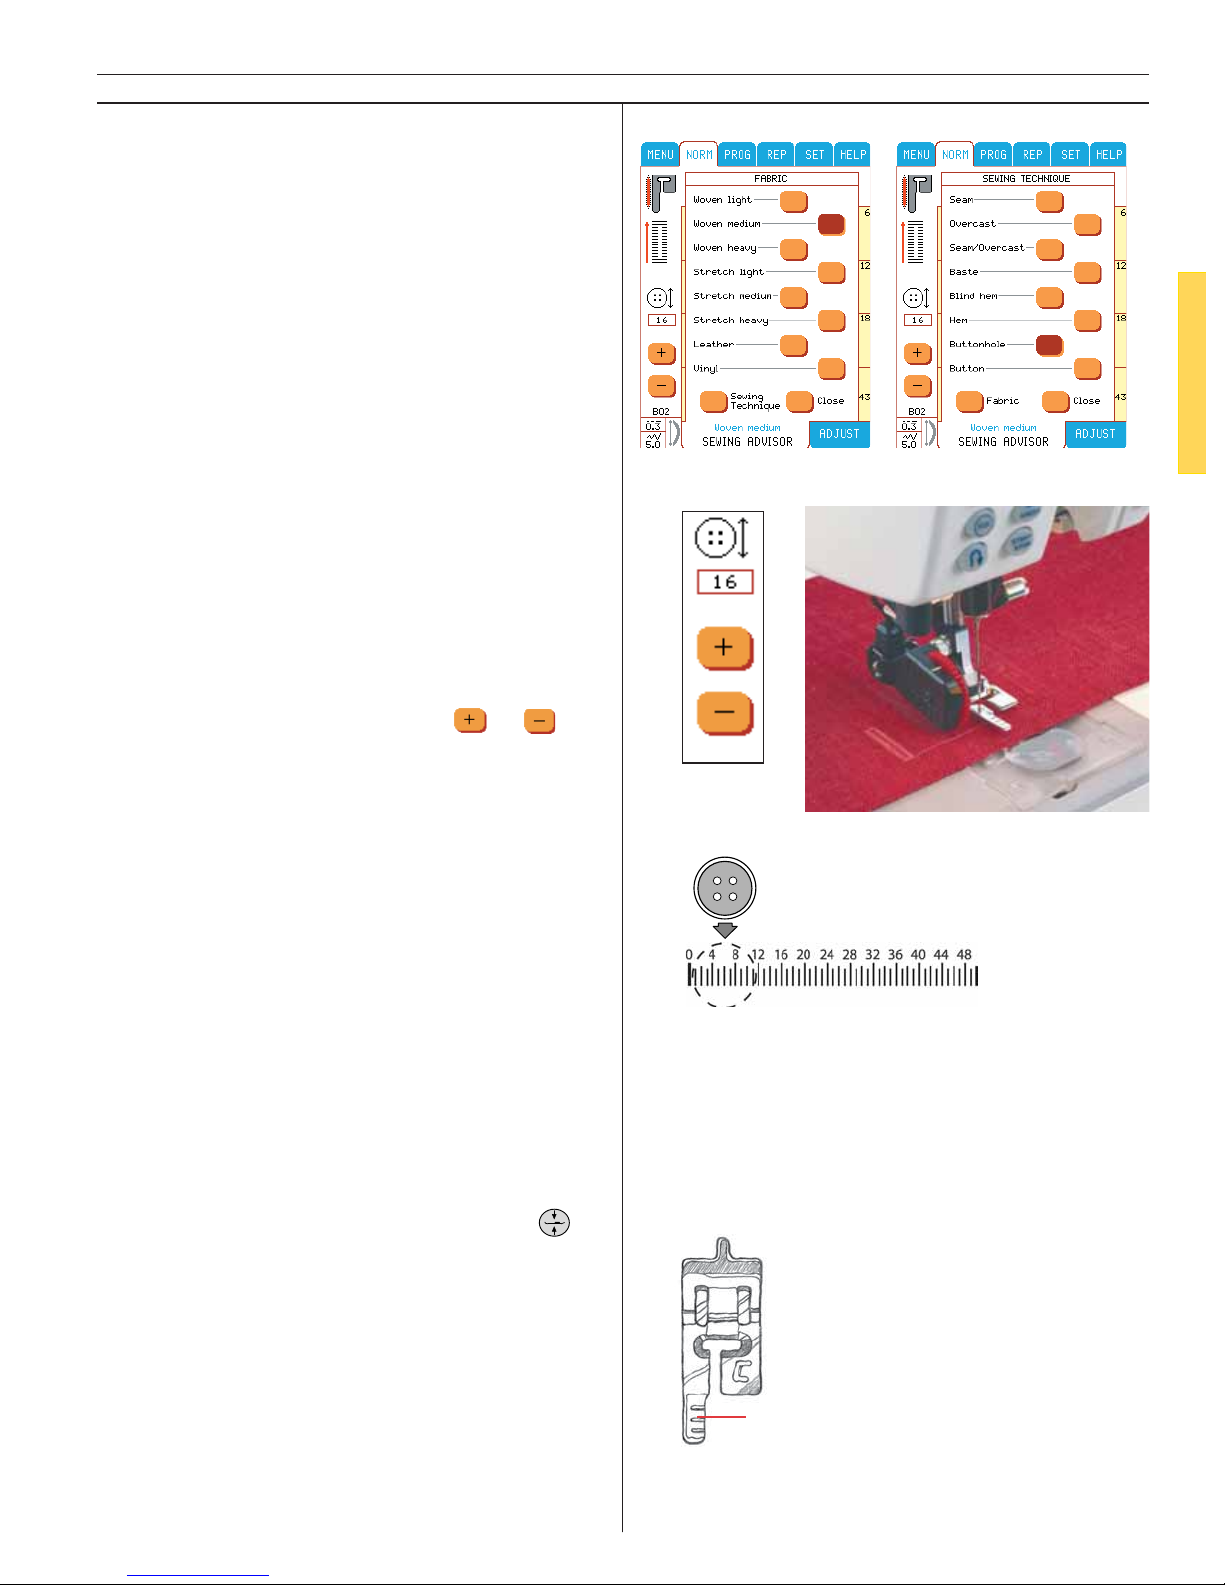
Buttonhole
The Sewing Advisor will select the best buttonhole and stitch settings for your fabric. Fabric
should be interfaced and/or stabilized where
buttonholes are to be sewn.
Mark the buttonhole placement on your fabric
with your Pictogram pen™.
You can also select your buttonhole from the
Buttonhole Menu B.
Fabric: Woven medium and stabilizer
Touch: Woven medium on Sewing Advisor fa-
bric screen. Buttonhole on technique screen.
Snap on: Sensor Buttonhole Foot as indicated
on the Color Touch Screen by the red wheel
next to the foot. Plug the cord into the socket in
the left front un der si de corner of the machine.
Line up the white range on the side of the wheel
with the white marking line on the foot.
Use: Size 80 needle as recomended.
Enter the buttonhole size with the
or
button. Average buttonhole sizes are:
5/8"=16mm, 3/4"=20mm, 1"=25 mm. Maximum
size: 2"=50mm.
Many button packages list the size of the button. Otherwise use the Buttonhole Ruler which
is positioned on the baseplate on your Designer
I. The buttonhole size needed will vary with the
thickness and style of your button. Always stitch
a sample buttonhole on scraps fi rst.
Sew:
• Fold fabric in two and place stabilizer under-
neath.
• Place under Sensor Buttonhole Foot. The
measurement wheel can be raised to a stop,
which makes it easier to place the fabric un der the presser foot.
• If you need to adjust fabric, touch Pivot
.
Use the markings on the left toe of the Sensor
Buttonhole Foot to position the garment edge.
The middle mark gives a 5/8" (15 mm) distance
to fabric edge.
Buttonhole Ruler
5/8" (15 mm)
Page 50
50
Utility/Garment Sewing
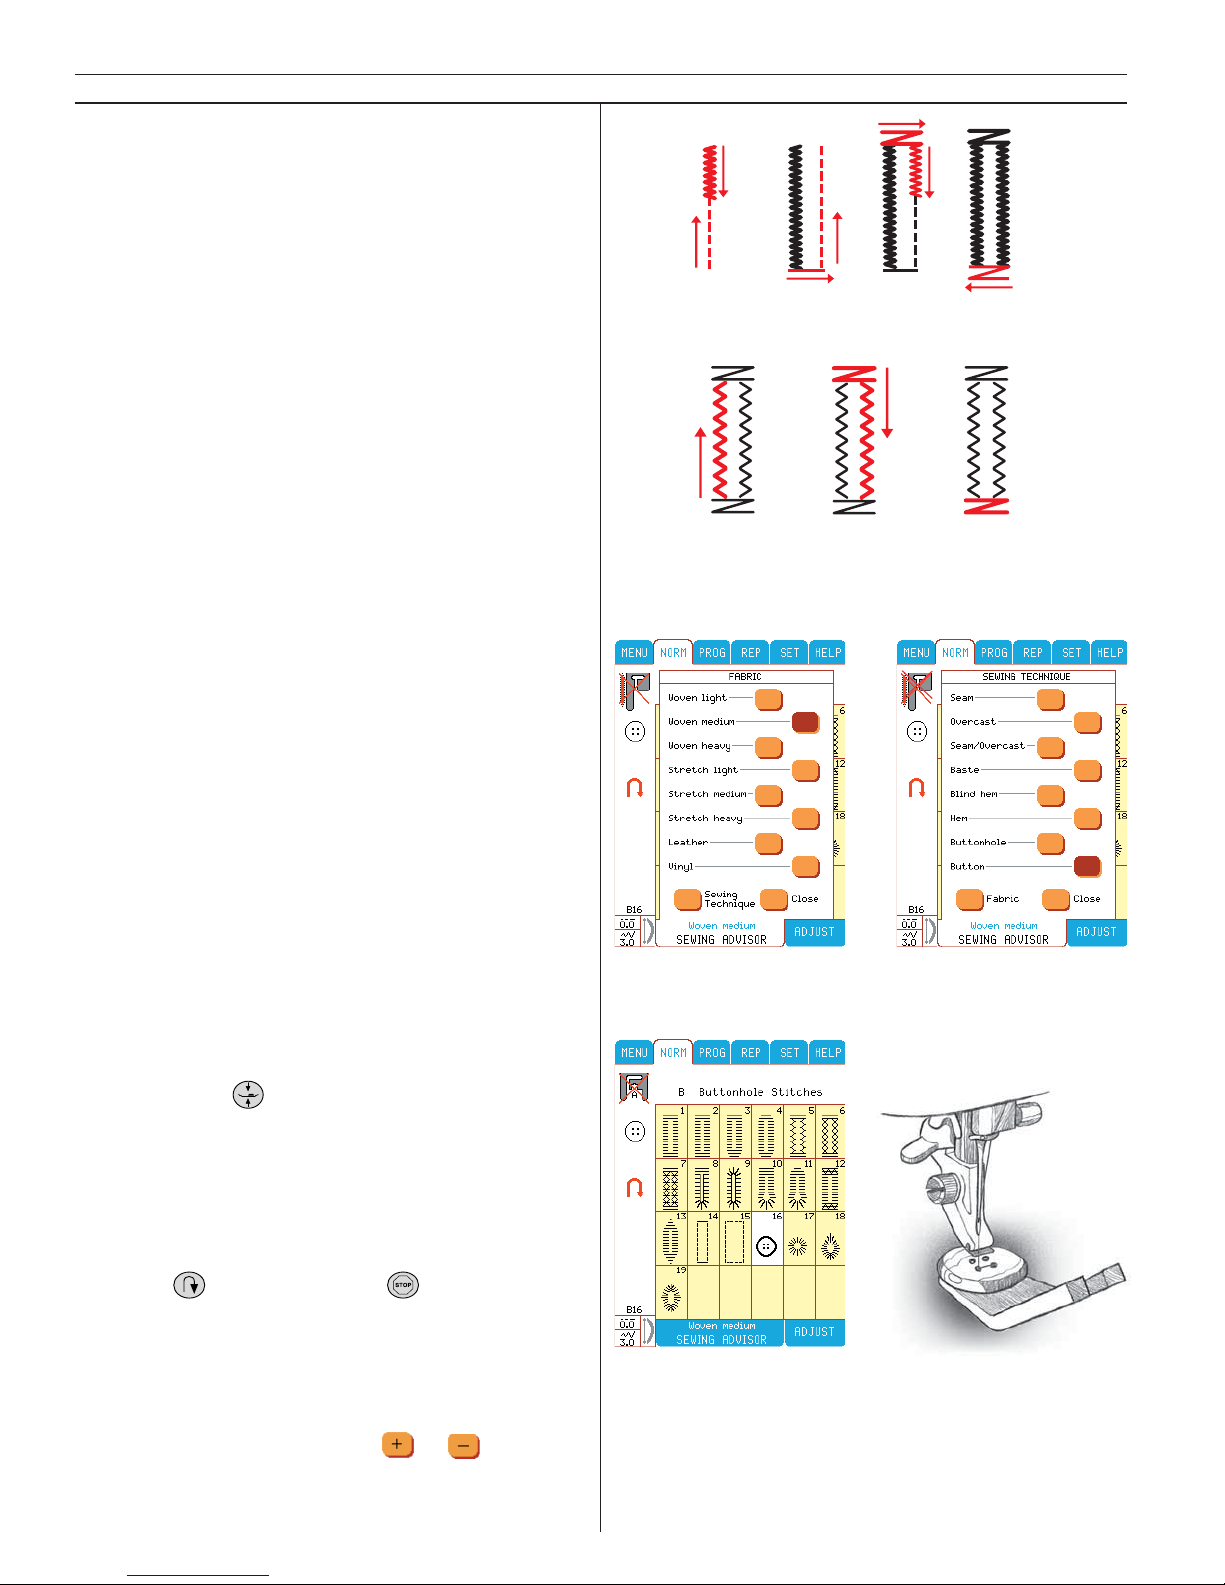
• Step on the foot control, the Sensor Buttonhole Foot lowers automatically. A straight stitch
is sewn away from you indicating the left
button-hole column, then the satin column
is sewn toward you. This is repeated for the
right column. The bartacks are automatic (Illustration 1). Keep the foot control depressed
until the Thread Cutter cuts the threads and
the Sensor Button-hole Foot is raised. When
sewing buttonholes without sa tin stitches or
when using presser foot C, the sewing steps
are different (there is no straight stitch step).
See Illustration 2.
Note: If you are sewing buttonholes on a very
narrow area, snap on the stan dard foot C and follow
the step by step buttonhole instructions on page 52.
Button
Sew buttons, snaps, hook and eyes quickly with
your Designer I.
Fabric: Woven medium
Touch: Woven medium on the Sewing Advisor
fabric screen. Button on the technique screen.
Use: Size 80 needle and the clearance plate as
recommended. Snap off pres ser foot. Lower the
feed teeth as recomended by the Pop-up.
Sew:
• Place the thin end of the clearance plate un der button when sewing on light fabrics. Hold
in place with transparent tape. Use the thick
end for heavier fabrics.
• Place under ankle with the holes in the button lined up with the swing of the needle.
Touch Pivot
. Check the swing by turning
the hand wheel by hand to be sure the needle will not hit the button.
Bring the needle down into the hole of the
button.
• Zigzag button in place with 6 to 8 stitches.
• Touch
to tie off. Touch to repeat next
button.
• Raise feed teeth.
Note: The width of the zigzag is set for most
buttons. If you sew a tiny button or a very large
coat button, touch ADJUST and
or the stitch
width until the swing of the needle sews in the holes
of the button or snap.
1. Sewing direction for satin stitch buttonholes
sewn with the Sensor Buttonhole Foot
2. Sewing direction for buttonholes without satin stitches or satin stitch buttonholes sewn
with presser foot C
Page 51
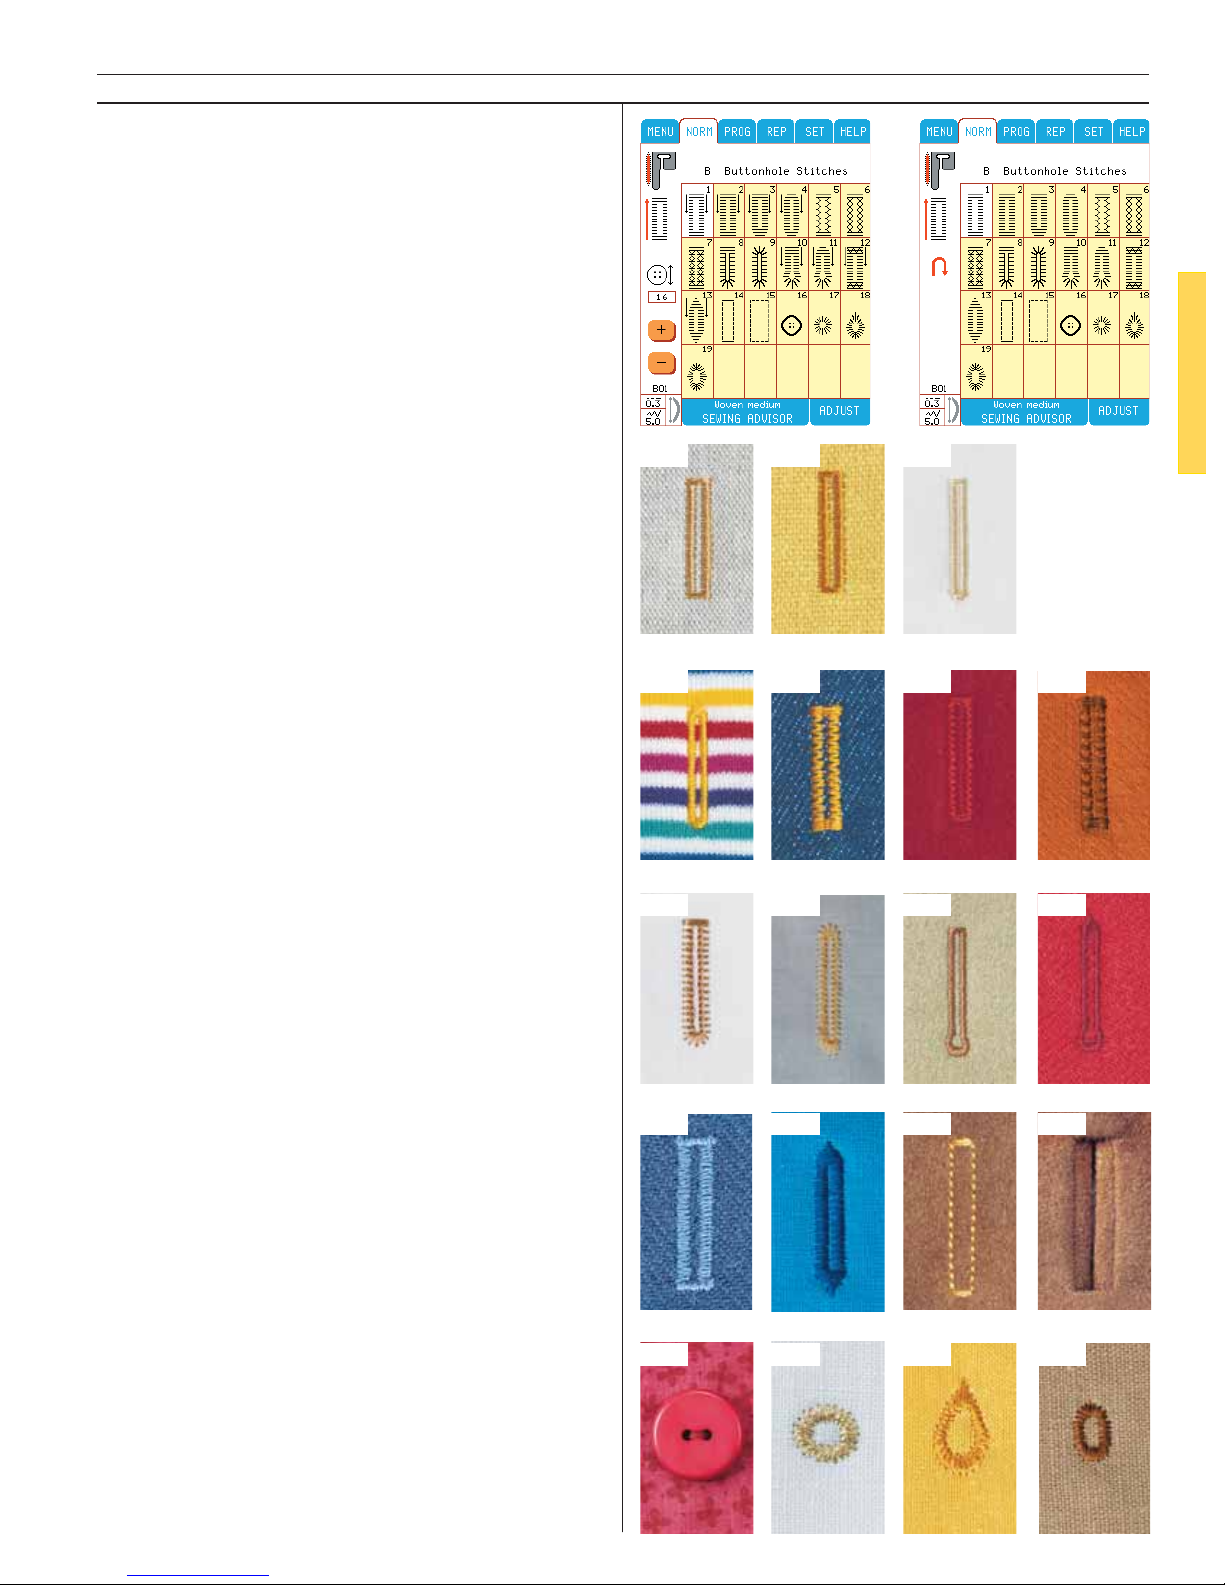
51
Utility/Garment Sewing
Menu B
Buttonhole
On your Designer I, select from 15 different buttonhole styles. There is one for every type of fabric
and garment. Because the Sen sor Buttonhole
Foot measures as it sews, every buttonhole will be
the same size. The buttonhole styles on your Designer I are listed below:
B1 B2 B3
B14B13
B9 B10 B11
B6
B18B17B16
B4 B5 B7
B8
B12
B19
B15
B4 Round End Buttonhole for blouses and
children’s garments.
B5 Heavy Reinforced Buttonhole for utility and
heavy fabrics.
B6 Medium Reinforced Buttonhole for me di um
wool and Tyrolean jackets.
B7 Medium Reinforced Decorative Buttonhole
for me di um wool.
B8, B9 Heirloom Buttonhole for ”hand look” on
fi ne and delicate fabrics.
B10 Keyhole Buttonhole with square end for
tailored jackets, coats, etc.
B11 Keyhole Buttonhole with tapered end for
tailored garments.
B12 Heavy Duty buttonhole with reinforced bartacks.
B13 Decorative Fashion Buttonhole for most fabric weights.
B14 Straight Stitch Buttonhole for leather and
suede.
B15 Straight Stitch Buttonhole with extra cutting
space for bound buttonholes.
B16 For sewing buttons
B17 Round eyelet for belts, laces, etc.
B18 Teardrop eyelet for laces, embellishments.
B19 Oval eyelet for laces, embellishments.
B1 Bartack Buttonhole for medium and heavy
fabrics with extra cutting space.
B2 Bartack Buttonhole for most fabric
weights.
B3 Round End Buttonhole for light weight
fabrics.
Page 52
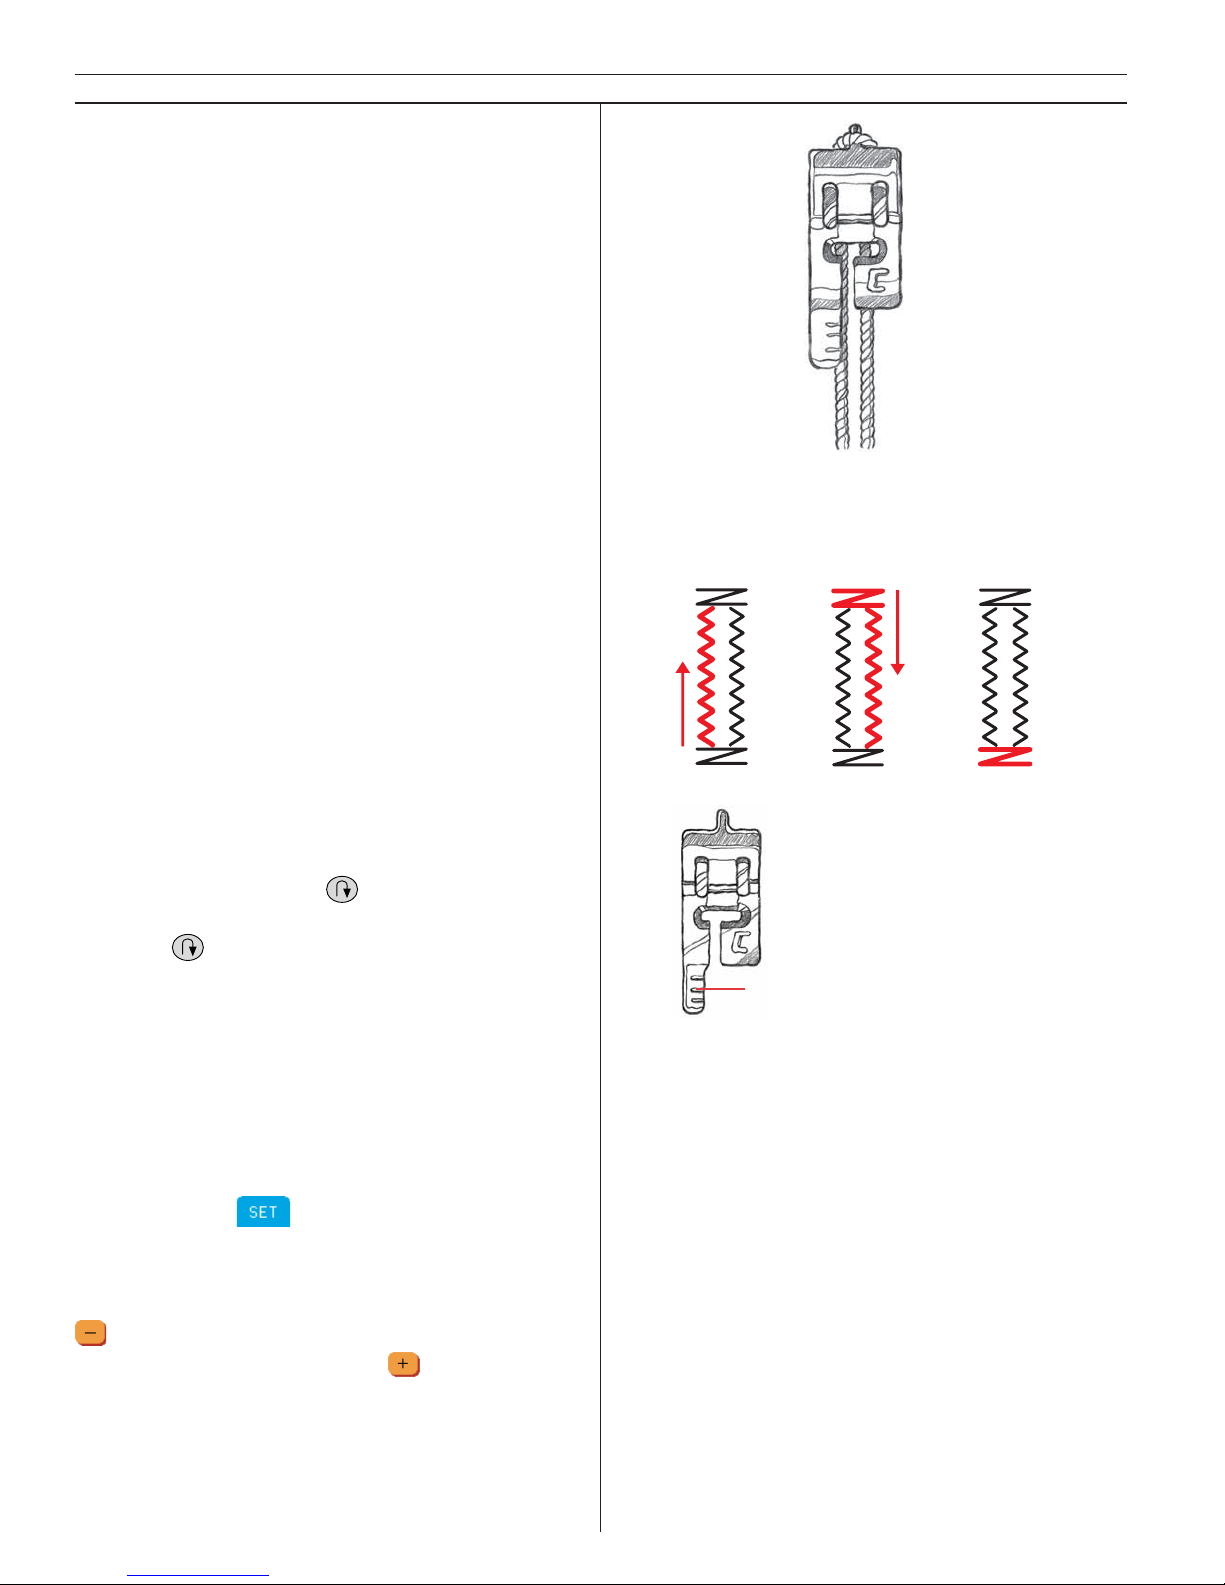
52
Utility/Garment Sewing
Corded Buttonhole (Stretch fa-
brics)
• Loop a piece of heavy thread or perle cotton
over the fi nger at the back of the Sensor Buttonhole Foot or the C presser foot
• Stitch a buttonhole. Do not hold back the
cord. The satin buttonhole columns will stitch
over the cord.
• Stop sewing before the last end of the buttonhole is sewn and lift the cord off the fi nger
and pull out the slack.
• Cross the cord in front of the needle and
stitch the end of the buttonhole over the cord.
• Thread cord ends into a large needle, pull to
the wrong side and knot ends before cutting
excess.
Step by step buttonhole
• Select buttonhole. and snap on Presser Foot C
• Begin sewing buttonhole, the machine will
sew the left column in reverse. The buttonhole foot has guide lines to determine the
buttonhole length. Use the markings on the
left toe of the Buttonhole Foot to position the
garment edge. When the buttonhole is the
desired length, touch
. The machine will
bar tack the end and stitch the right side.
• Touch
to bar tack and tie off. Keep the
foot control depressed until the machine ties
off and stops sewing. The Thread Cutter cuts
the threads automatically when the buttonhole is completed.
Buttonhole balance
To balance the stitch dens ity of the right buttonhole column to the left, when a buttonhole is
selected, touch . The balance icon is now a
buttonhole.
Note: Only the right side stitch column will be
adjusted. Balance it to match the left stitch column.
will make the stitches in the right column
closer together (more dense). will make the
stitches further apart (less dense).
The set ting will be re tai ned until the De sig ner I
is turned off.
To change the stitch density of both columns,
see Buttonhole Density.
5/8" (15 mm)
Page 53
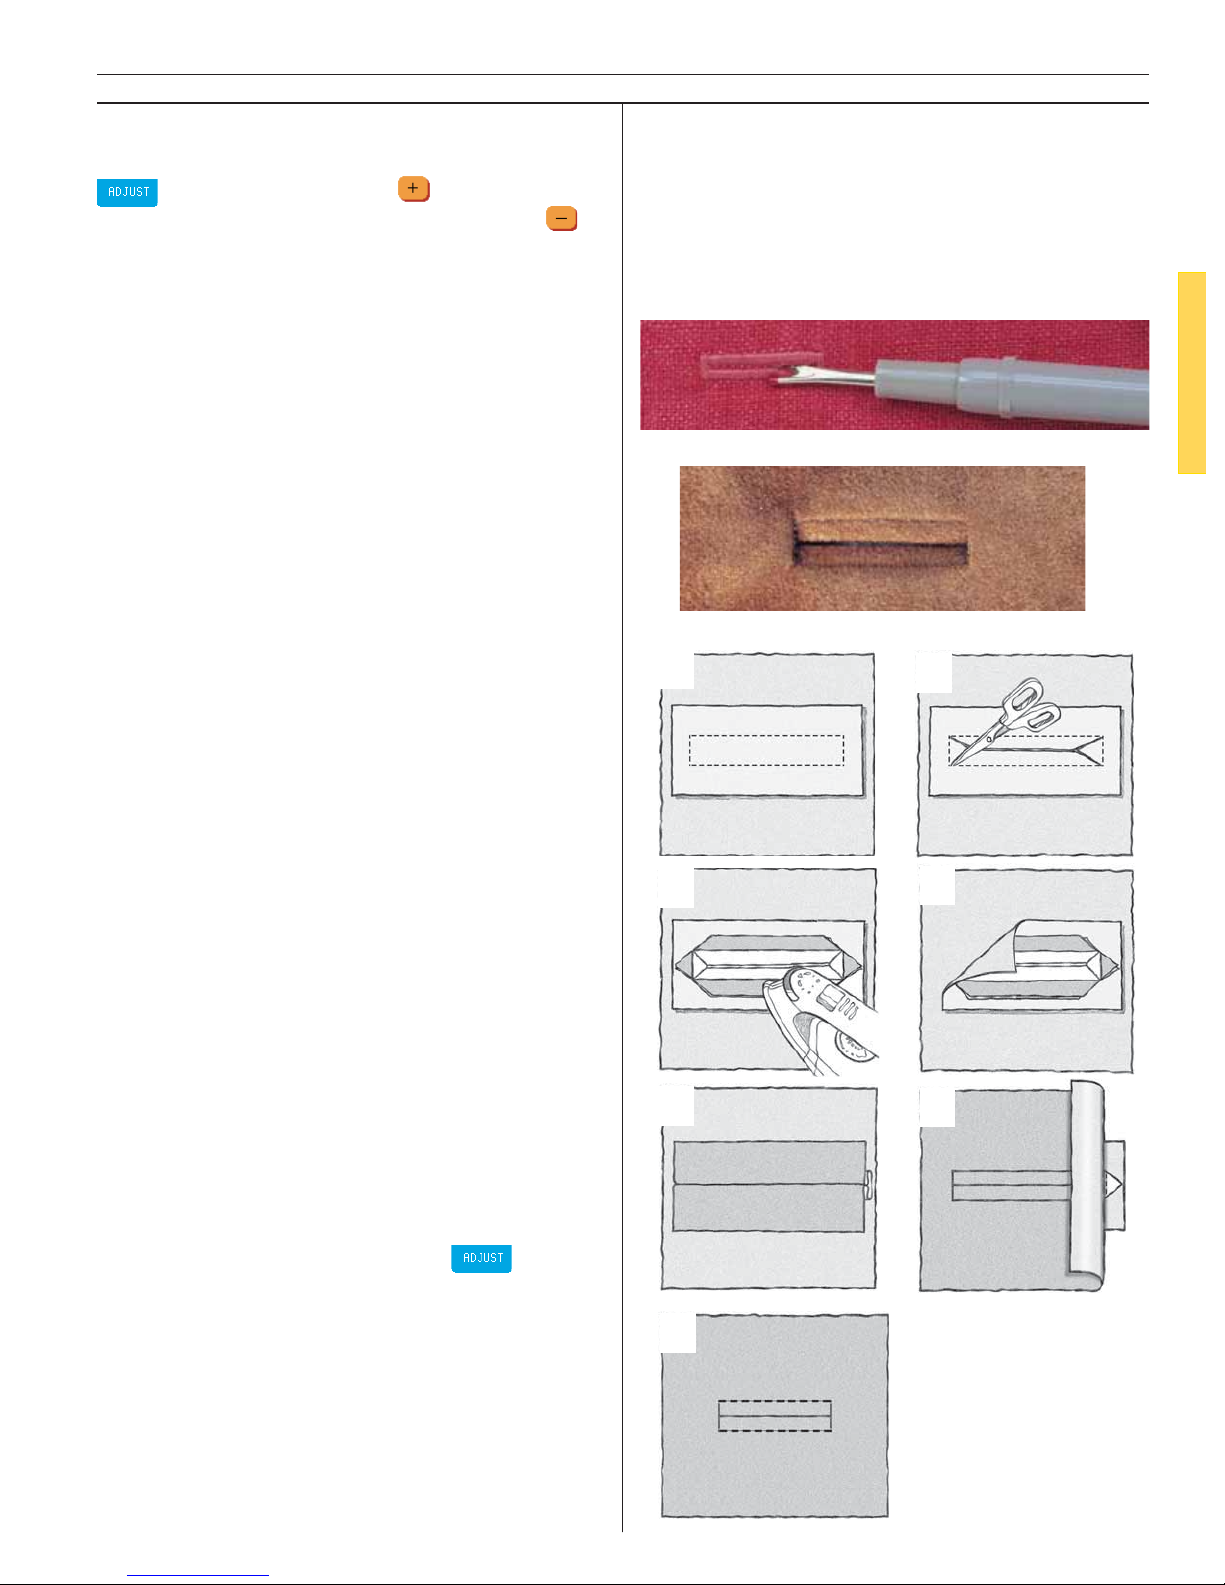
53
Utility/Garment Sewing
1
2
3
4
5
6
7
Buttonhole Density
To adjust the density of the buttonhole, touch
. Increase stitch length to make stitch
columns less dense. Decrease stitch length
to
make stitch columns more dense. Both columns
will be adjusted.
Cutting Buttonholes
Cut buttonhole open with the seam ripper.
Tip: Place a straight pin across the end you are
cutting toward to avoid cutting too far!
Bound buttonhole
For all types of fabrics.
Fabric: 1 piece Chino and Broadcloth. Cut a
patch of broadcloth 2’’x 3’’(50mm x 80mm) for
the buttonhole.
Touch: Woven medium on Sewing Advisor. Buttonhole Menu B, Buttonhole B15.
Snap on: Presser foot A as recommended.
Use: Size 80 needle as recommended.
Sew:
Place Broadcloth piece and Chino fabric right
sides together.
1. Stitch Buttonhole B11.
2. Cut the buttonhole down the center to 1/4’’
(6mm) from each end. Cut to the corners at
each end to form a triangle as illustrated.
3. Press the end triangles away from the button-
hole.
4. Pull the broadcloth through the buttonhole
opening to the wrong side. Fold the broadcloth so the edges of the buttonhole are formed and meet at the center of the buttonhole
opening, forming a pleat at each end on the
wrong side.
5. From the right side fold back the end of the
buttonhole to expose a triangle.
6. Touch straight stitch A2. Touch
, stitch
length 1.5 and stitch across the base of the
triangle catching the pleat of the rectangle to
secure it.
7. Topstitch the buttonhole from the right side
“in the ditch”.
The wrong side of a bound buttonhole is fi nis hed when the garment facing or lining is slit and
hand stitched to the wrong side of the opening.
Page 54
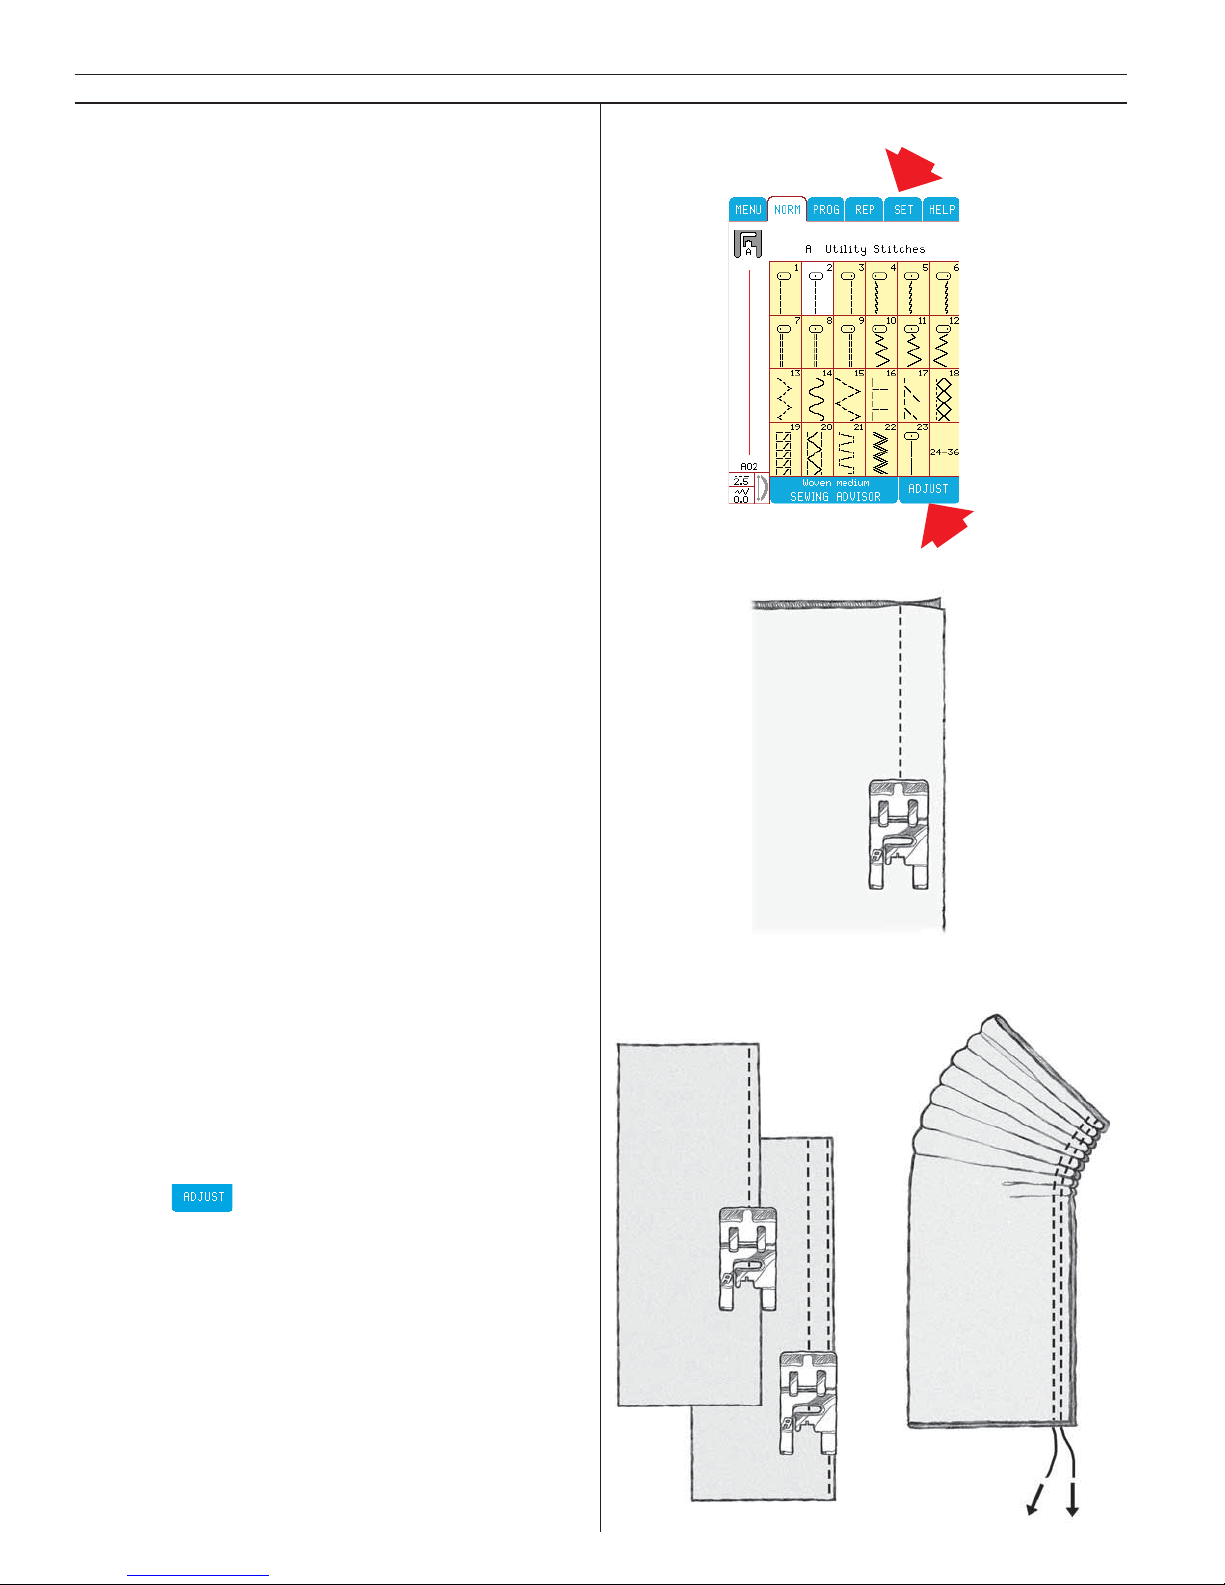
54
Utility/Garment Sewing
Menu A
Utility Stitches
Menu A includes the stitches selected by the Sewing Advisor and a row of additional stitches
which are described below. Touch the picture of
the stitch to select it.
You can, if needed, make adjustments in stitch
length and width in the ADJUST Menu and adjustments in thread tension and presser foot pressure in the SET Menu.
Straight Stitch
Touch: Woven medium in the Sewing Advisor,
and Menu A – Utility Stitches on the Main Menu.
Select: Straight Stitch, A2.
Your Designer I will automatically make the
stan dard settings. The Color Touch Screen will
show you all in for ma tion you need to get the
best result.
Lightning Stitch (Stretch Stitch)
Touch: Stretch light in the Sewing Advisor and
Menu A – Utility Stitches on the Main Menu. Se-
lect: Stretch Stitch A5. Your De sig ner I will automatically make the stan dard settings. The Color
Touch Screen will show you all in for ma tion you
need to get the best result.
Gathering
A basting stitch is also used for gathering.
• Touch
to select stitch length of 3.5 to
6.0 for gathering. Use shorter stitch length for
lighter weight fabrics.
• Place a single thickness of fabric under pres ser foot and stitch.
• Stitch a second row next to the fi rst.
• Pull both bobbin threads to gather fabric. Be
ca re ful not to pull them out.
Page 55
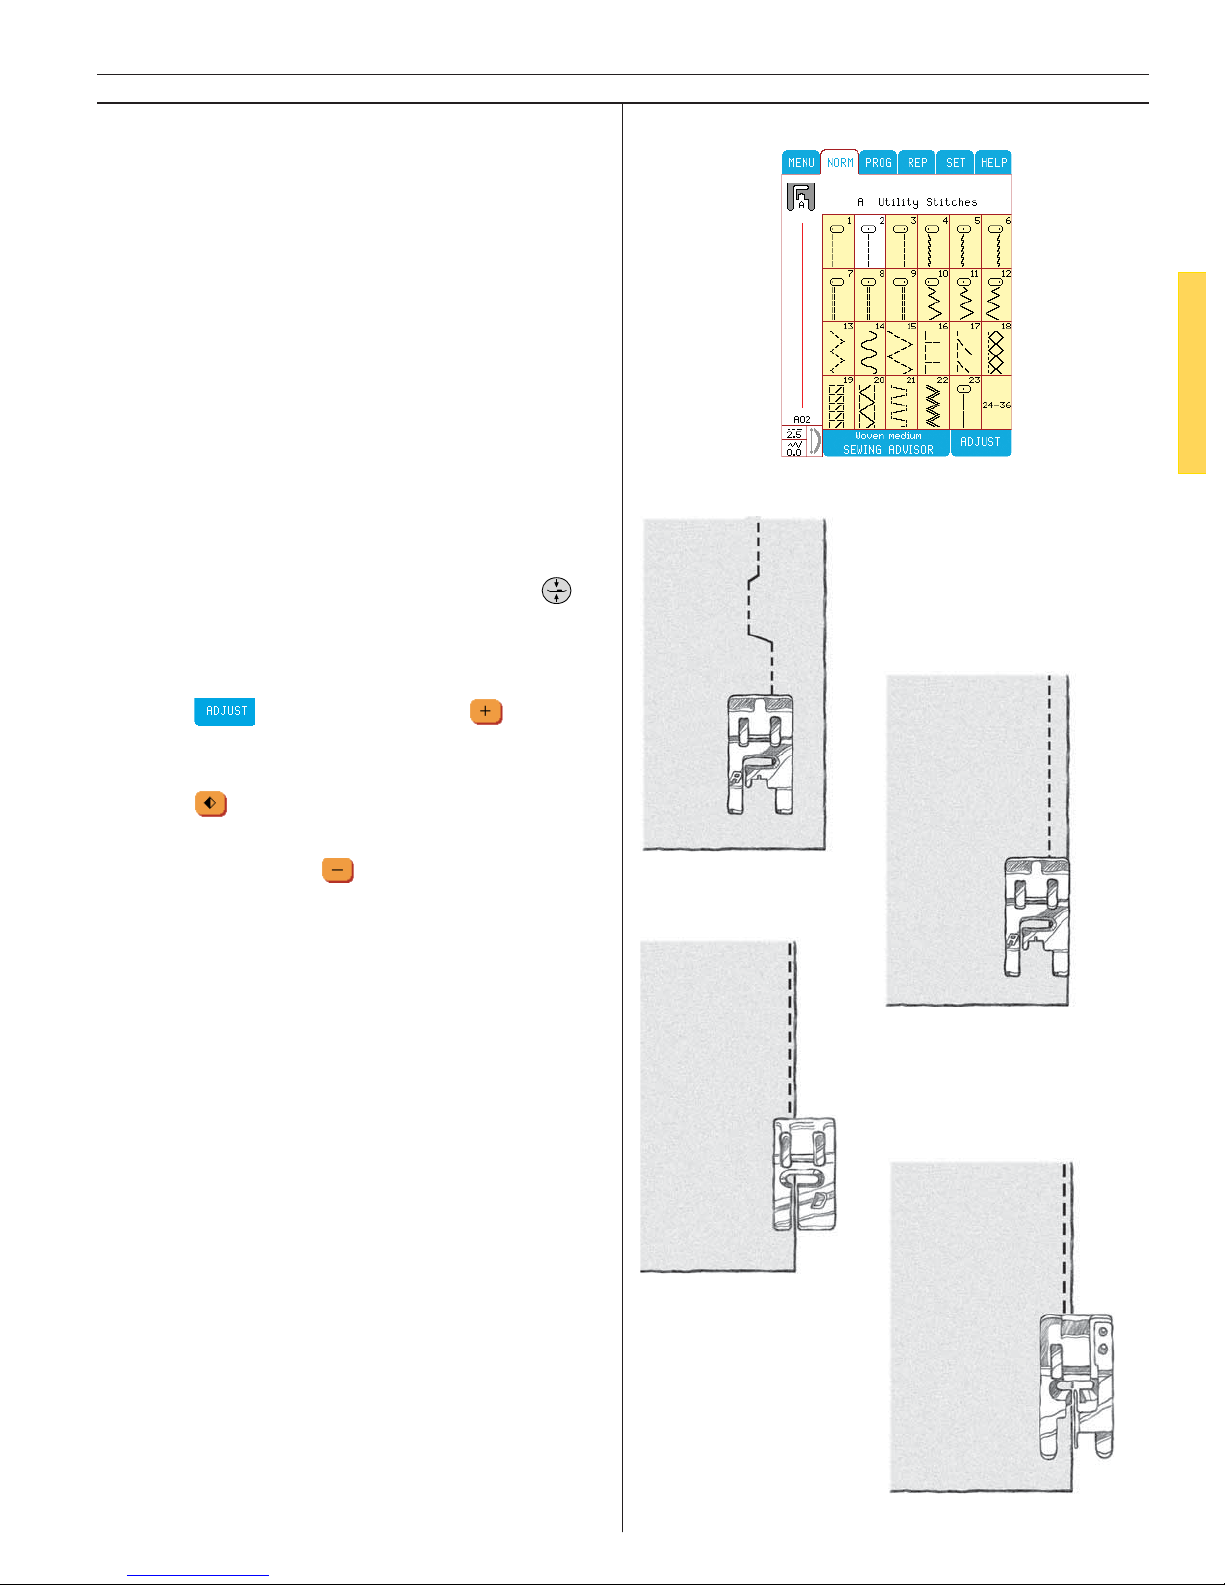
55
Utility/Garment Sewing
Twenty-fi ve Needle positions
Your Designer I has twenty-fi ve different needle
positions for the most accurate seaming and topstitching ever. When sewing straight stitch or reinforced straight stitch, the needle positions can
be adjusted in steps. To edge stitch, you should
take advantage of the dif fe rent needle positions.
Fabric: Woven medium
Touch: Woven medium on the Sewing Advisor,
and Stitch A2 on the Utility Menu A.
Use: Presser foot A and size 80 needle as recommended.
Sew:
• Fold fabric in two and put it in position under
the presser foot.
• If you need to adjust fabric, touch Pivot
.
Step on foot control. The Sensor Foot lowers
automatically. Stitch with center needle po si tion.
• Touch
. Touch stitch width to move
needle 12 steps to 6 left needle position
= Stitch A1.
Touch
to move needle 12 steps to 6 right
needle position = Stitch A3.
Touch stitch width
to move needle back
to center position.
1. To sew about 1/4" (6mm) from the edge, use
presser foot A and set the needle to 6 right
po si tion. To get the maximum feeding when
edge stitching close to the edge, place the
edge of the fabric so that it follows the outside right edge of the presser foot and sew.
2. To get the maximum feeding when edge stit-
ching close to the edge, place the fabric and
sew with left needle po si tion so that the edge
follows the in si de right edge of the pres ser
foot D, or the fi rst mark of the left edge of the
pres ser foot A.
Use presser foot A when sewing light fabrics and
presser foot D for other fabrics.
.
.
.
Tip: Snap on the optional Edge Stitching Foot or
Edge Joining Foot for topstitching with dif fe rent
needle positions.
1
2
Page 56
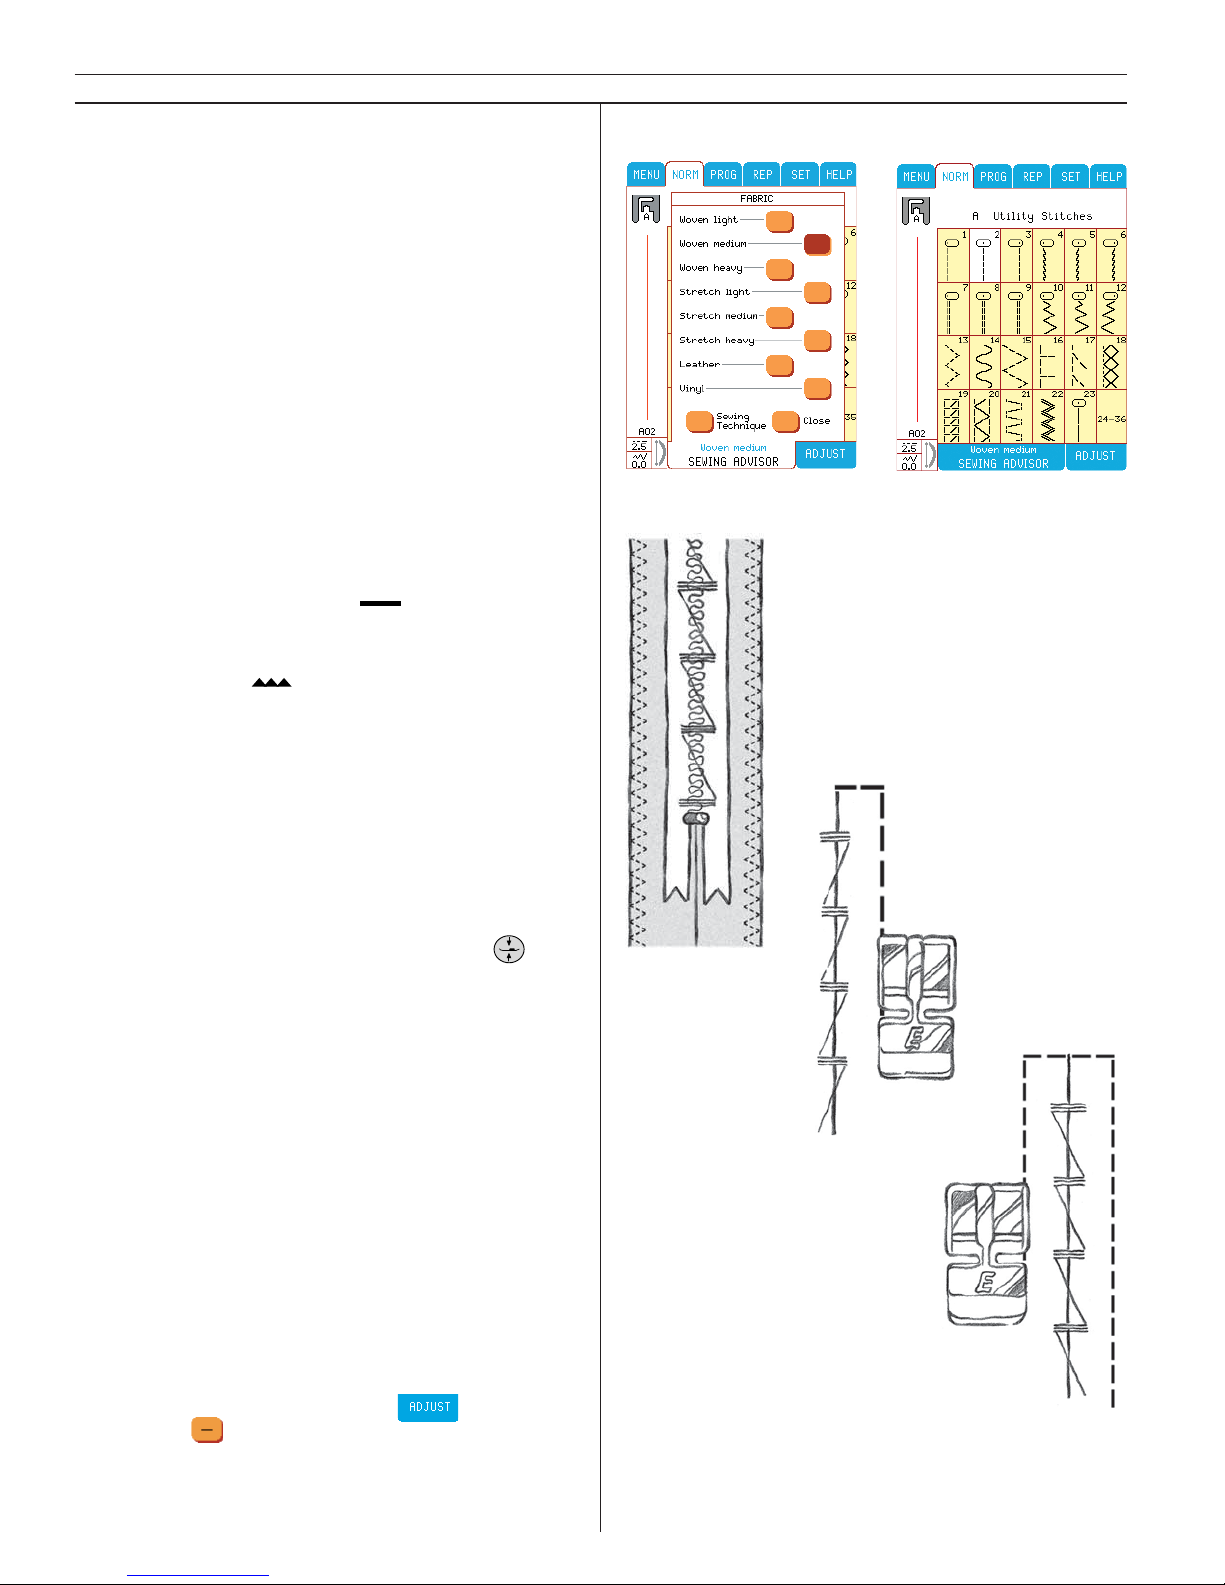
56
Utility/Garment Sewing
Center zipper
Fabric: Woven medium
Touch: Woven medium on the Sewing Advisor
Use: Size 80 needle.
Touch: Seam on the Sewing Advisor and sew
the two fabrics together along the 5/8’’ (15mm)
seam line up to the notch at the zipper pla ce ment.
Touch: Baste on the Sewing Advisor and baste
the zipper area of the seam together. Press the
seam open. Pla ce the zipper right side to the
pres sed open seam allowance. Close the Sewing
Advisor.
Touch: Menu V. To bar tack baste zipper in
pla ce, touch Zigzag stitch V2. Lower the feed
teeth by turning the dial to
. Move the fabric to stitch a series of bar tacks over the zipper
to hold it in place. Turn the feed teeth dial to
sewing position .
Touch: Menu A, A1 for left needle position
straight stitch.
Snap on: Zipper foot E. Snap it on so the needle is on the left side of the foot. There are two
bars on the foot so you can snap on the foot to
the right or left of the needle. Place fabric under
the foot right side up with the zipper foot to on
the right side of the zipper.
If you need to adjust fabric, touch Pivot
.
Sew:
• Step on the foot control. The Sensor Foot lo-
wers automatically.
• Begin stitching across the bottom, turn and
stitch the right side of the zipper to the top.
• To avoid fabric shifting, sew the left side of
the zipper in the same direction, touch A3
for right needle position straight stitch. Snap
on zipper foot E so the needle is on the right
side of the foot.
• Begin stitching across the bottom, turn and
stitch the left side of the zipper sewing from
the bottom to the top.
• Remove bartacks and basting stitch.
Note: To adjust the position of the stitching line,
adjust the needle position. Touch
, Touch
stitch width
to move the needle towards the
cen ter position.
Page 57
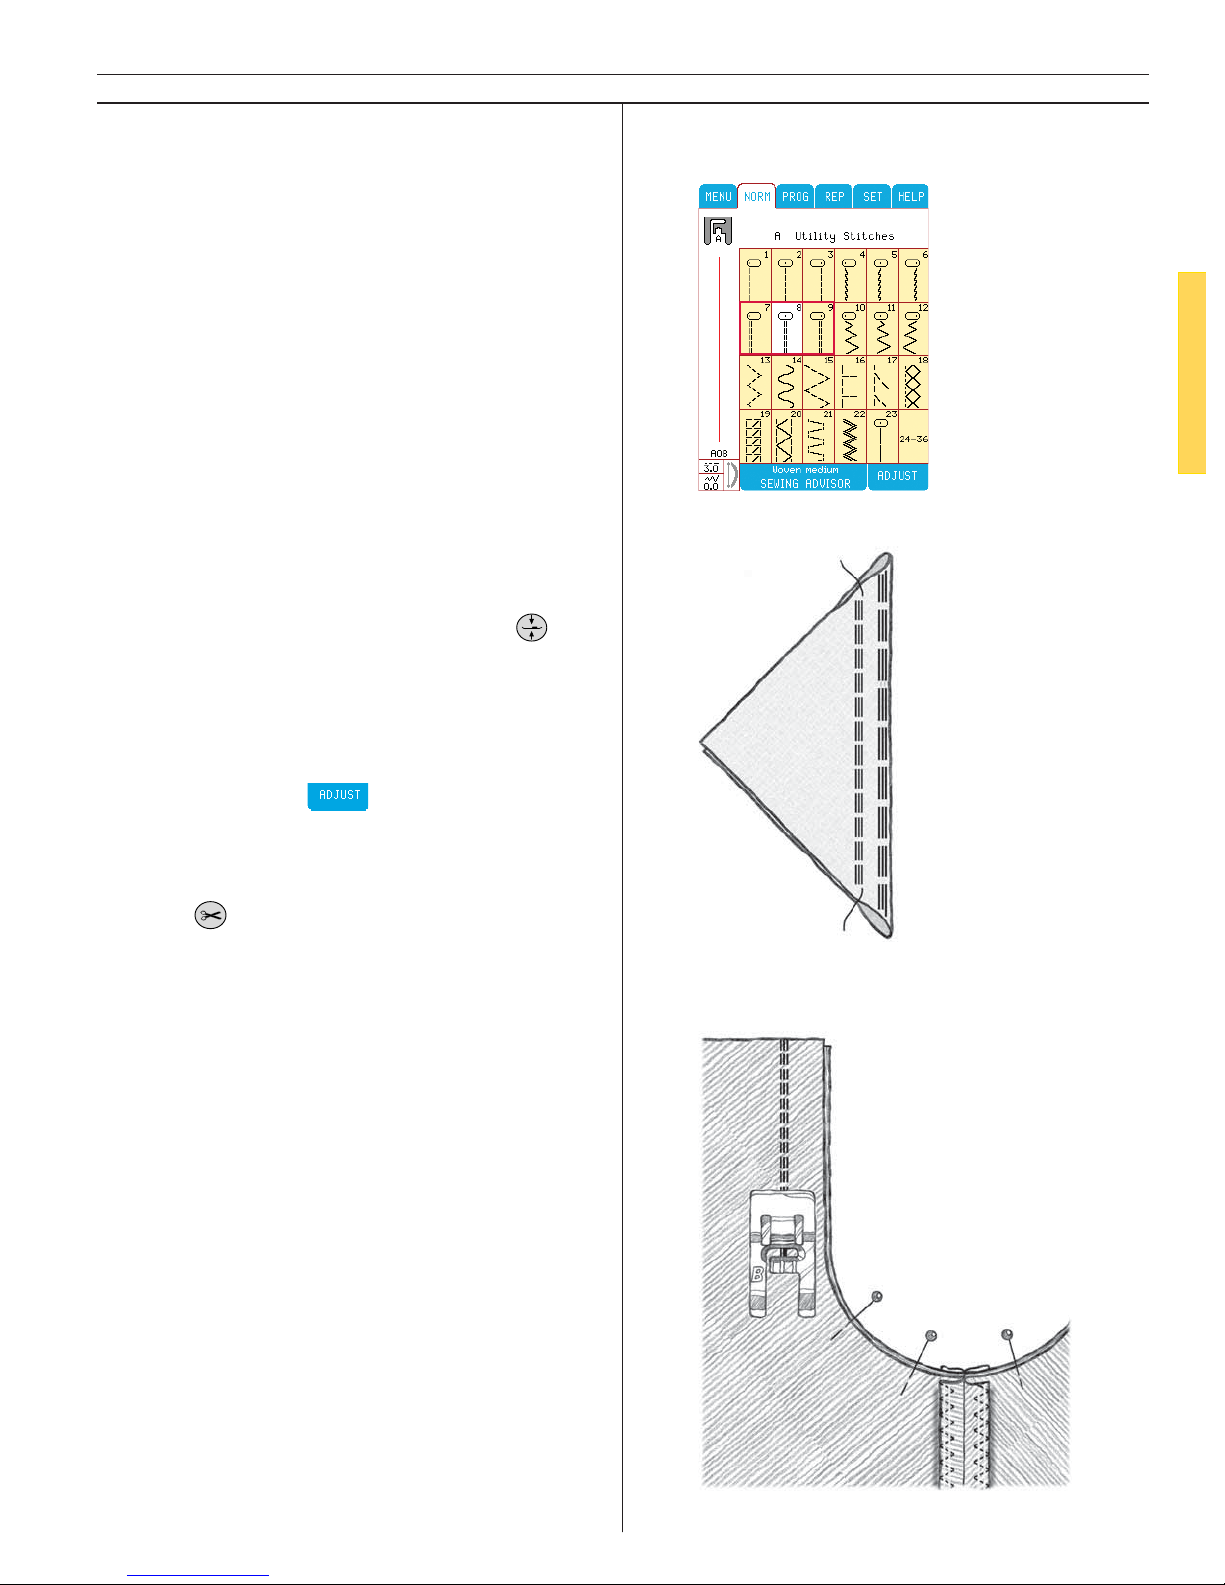
57
Utility/Garment Sewing
Reinforced Straight Stitch
The Reinforced Straight Stitch is stronger than
ordinary straight stitch, due to the fact that it is a
triple and elastic stitch. The Reinforced Straight
Stitch can be used for for all heavy fabrics, for
crotch seams that are subject to considerable
strain and for topstitching on heavy fabrics.
Repair garment seams in stress areas with this
stitch.
Fabric: Woven heavy
Touch: Woven heavy on the fabric screen on
the Sewing Advisor and Stitch A8 on the Utility
Stitch Menu.
Snap on: Presser foot B as recommended.
Use: Size 80 needle as recommended. Put the
fabric in position under the presser foot.
If you need to adjust fabric, touch Pivot
.
Sew:
• Step on foot control. The Sen sor Foot lowers
automatically.
• Stitch 5/8" (15mm) from the bias fold edge.
• Touch A7. Touch
and increase stitch
length to 4.5. You may use presser foot D and
sew a row of topstitching along the edge of
the fold.
• Touch
.
Note: Increase the stitch length on the Reinforced
Straight Stitch for impressive topstitching.
Page 58
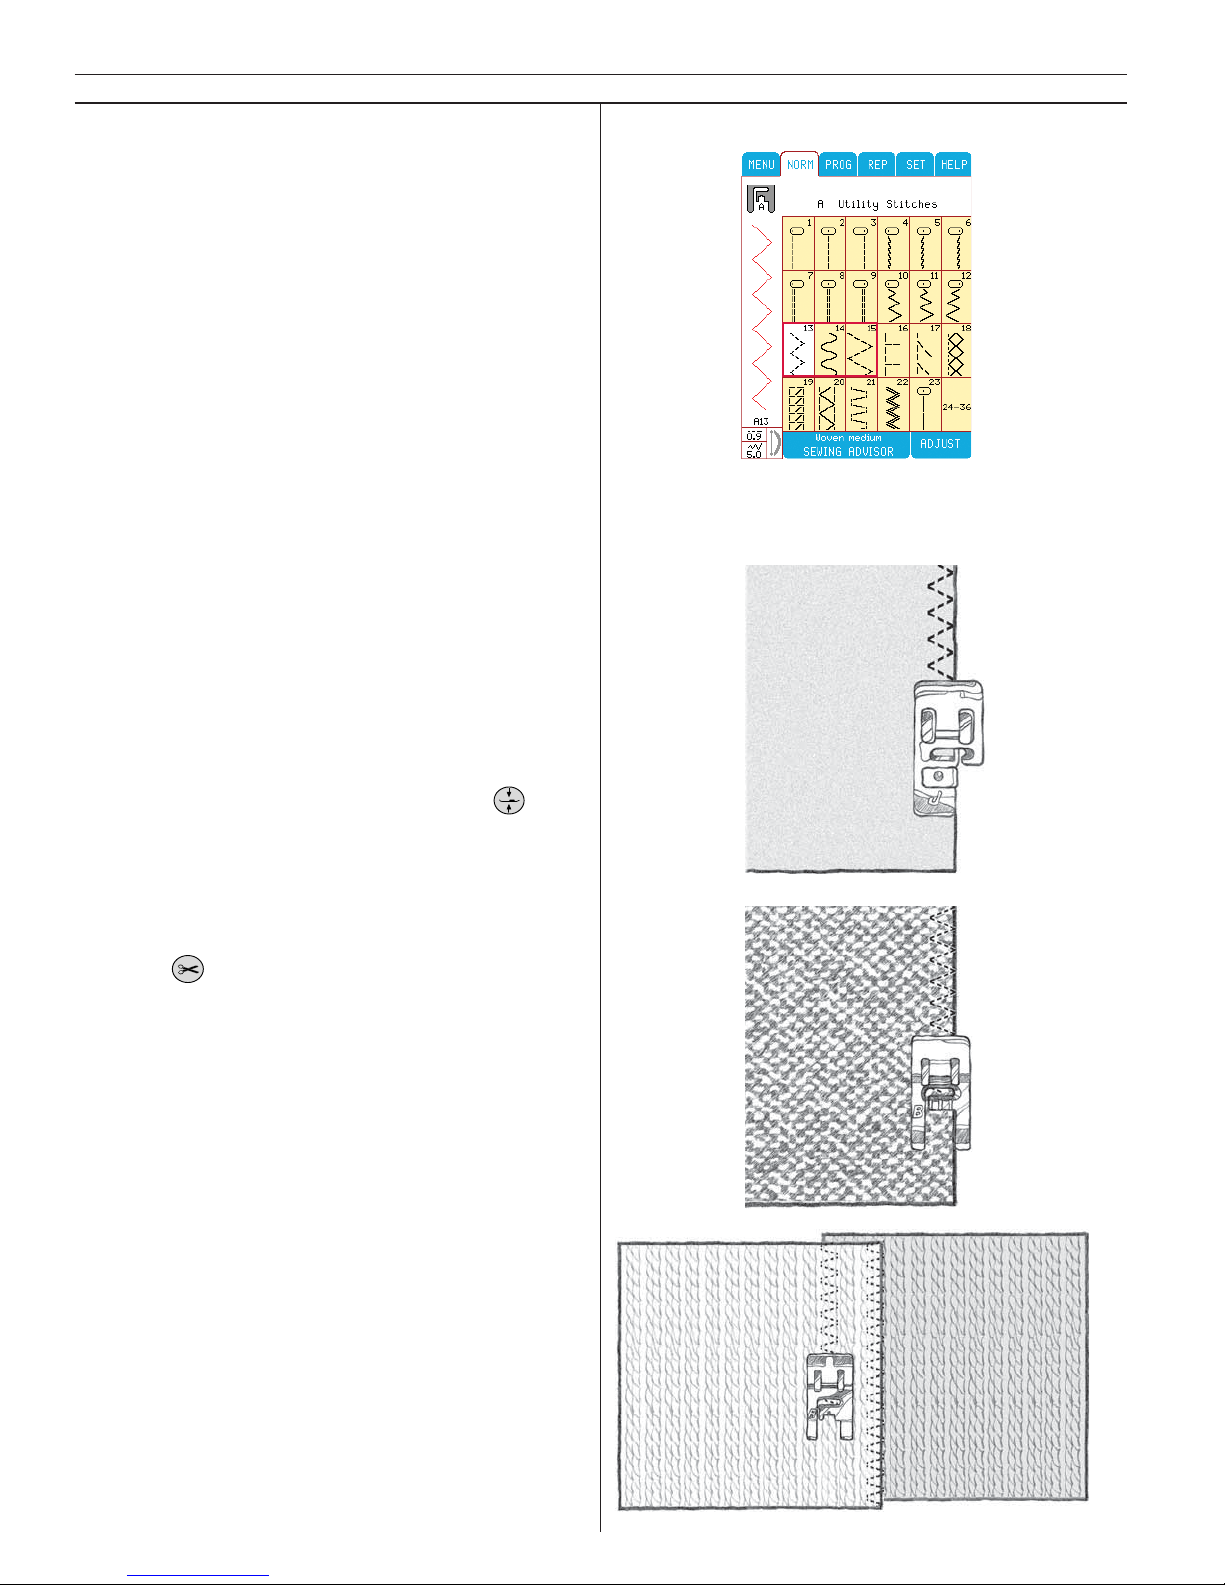
58
Utility/Garment Sewing
Multiple ZigZag Stitches
The multiple zigzag stitches on the Utility Menu
A look like a zigzag stitch with straight stitches
in the “zig” and the “zag” of the stitch. Stitch
A13 – three-step zigzag – is up to 1/4" (6 mm)
wide and suitable for light and medium fabrics.
Stitch A15 is a 7/16" (9 mm) wide multiple zigzag, used for loosely woven and heavy fabrics.
Use these stitches for over cas ting, butting two
edges together to join them, men ding tears and
other special fi nishing.
Stitch A14 is a serpentine stitch used for men ding and darning stretch fabrics.
Touch: Woven-Medium in the Sewing Advisor
and Menu A – Utility Stitches on the Main Menu.
Select: Three-step zigzag stitch A13. Your De sig ner I will automatically make the stan dard
settings. The Color Touch Screen will show you
all in for ma tion you need to get the best result.
Snap on: Presser foot J or A as recommended.
Use: Size 80 needle as recommended.
Put the fabric in position under the presser foot.
If you need to adjust fabric, touch Pivot
.
Sew:
• Step on foot control. The Sensor Foot lowers
automatically.
• Sew to overcast the edge of fabric.
• Touch
.
Stitch A15 is used for loosely woven and heavy
fabrics.
Stitch A14 – the serpentine stitch – used to sew
an overlapped seam and for men ding and darning stretch fabrics.
Page 59
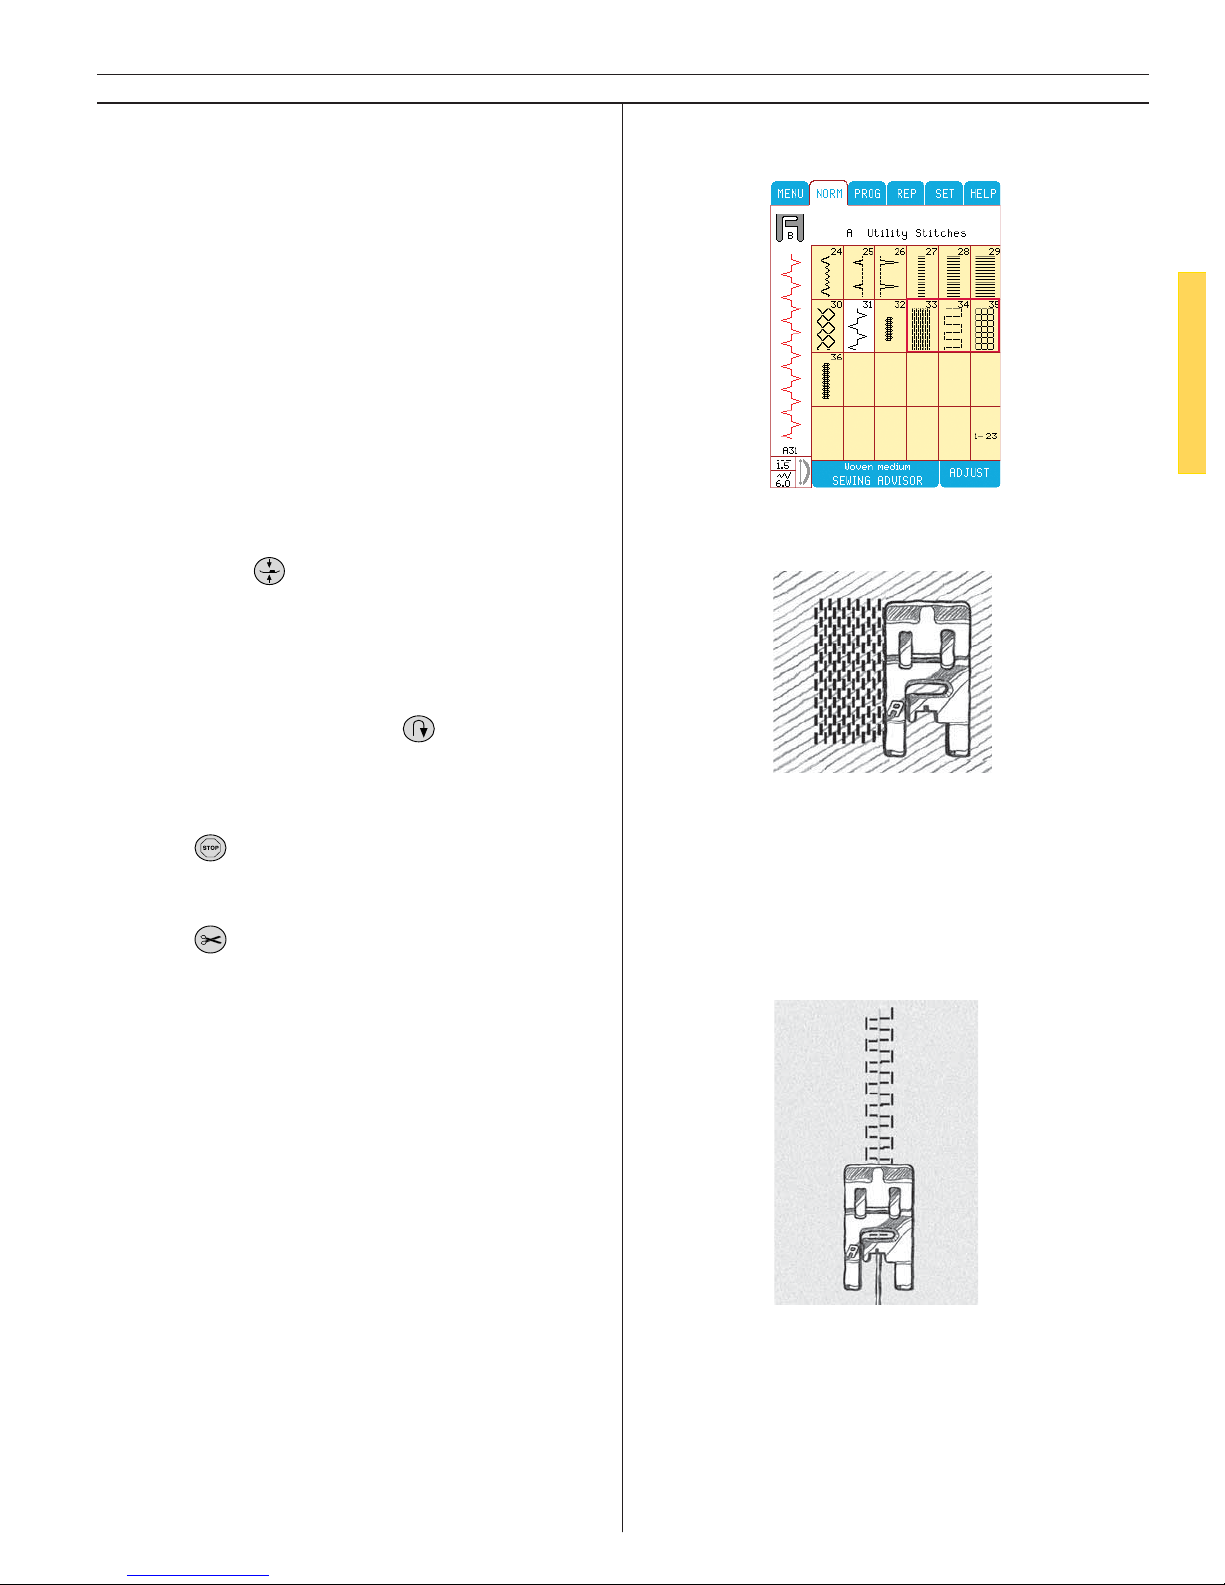
59
Utility/Garment Sewing
Darning and Mending
Stitches A33-35
Darning a small hole or a tear before it becomes
larger can save a garment. Choose the fi nest thread in the closest color match possible.
Fabric: Woven heavy
Touch: Woven heavy on the Sewing Advisor.
Poke a small hole to darn. Touch Menu A, Utility
Stitches, Touch Darning Stitch A33.
Snap on: Presser foot A as recommended.
Use: Size 80 needle as recommended.
Sew:
• Place fabric in position under the presser foot.
• Touch Pivot
and adjust fabric if necessary.
Step on the foot control, The Sen sor foot lowers automatically.
• Begin sewing above the hole and sew down
over it.
• Once over the hole, touch
. Continue sewing. The machine will sew back and forth
across the hole 12 times to darn the hole closed.
• Touch
. The stitch will now repeat in suc ces sion and the machine will stop automatically when the stitch is completed.
• Touch
.
Patching and tears
Stitch 34 will effi ciently mend a tear.
• Touch Stitch 34, which is a mending stitch.
Stitch over the tear to mend it. Begin at the
top of the tear and sew to the edge of the fabric.
Page 60
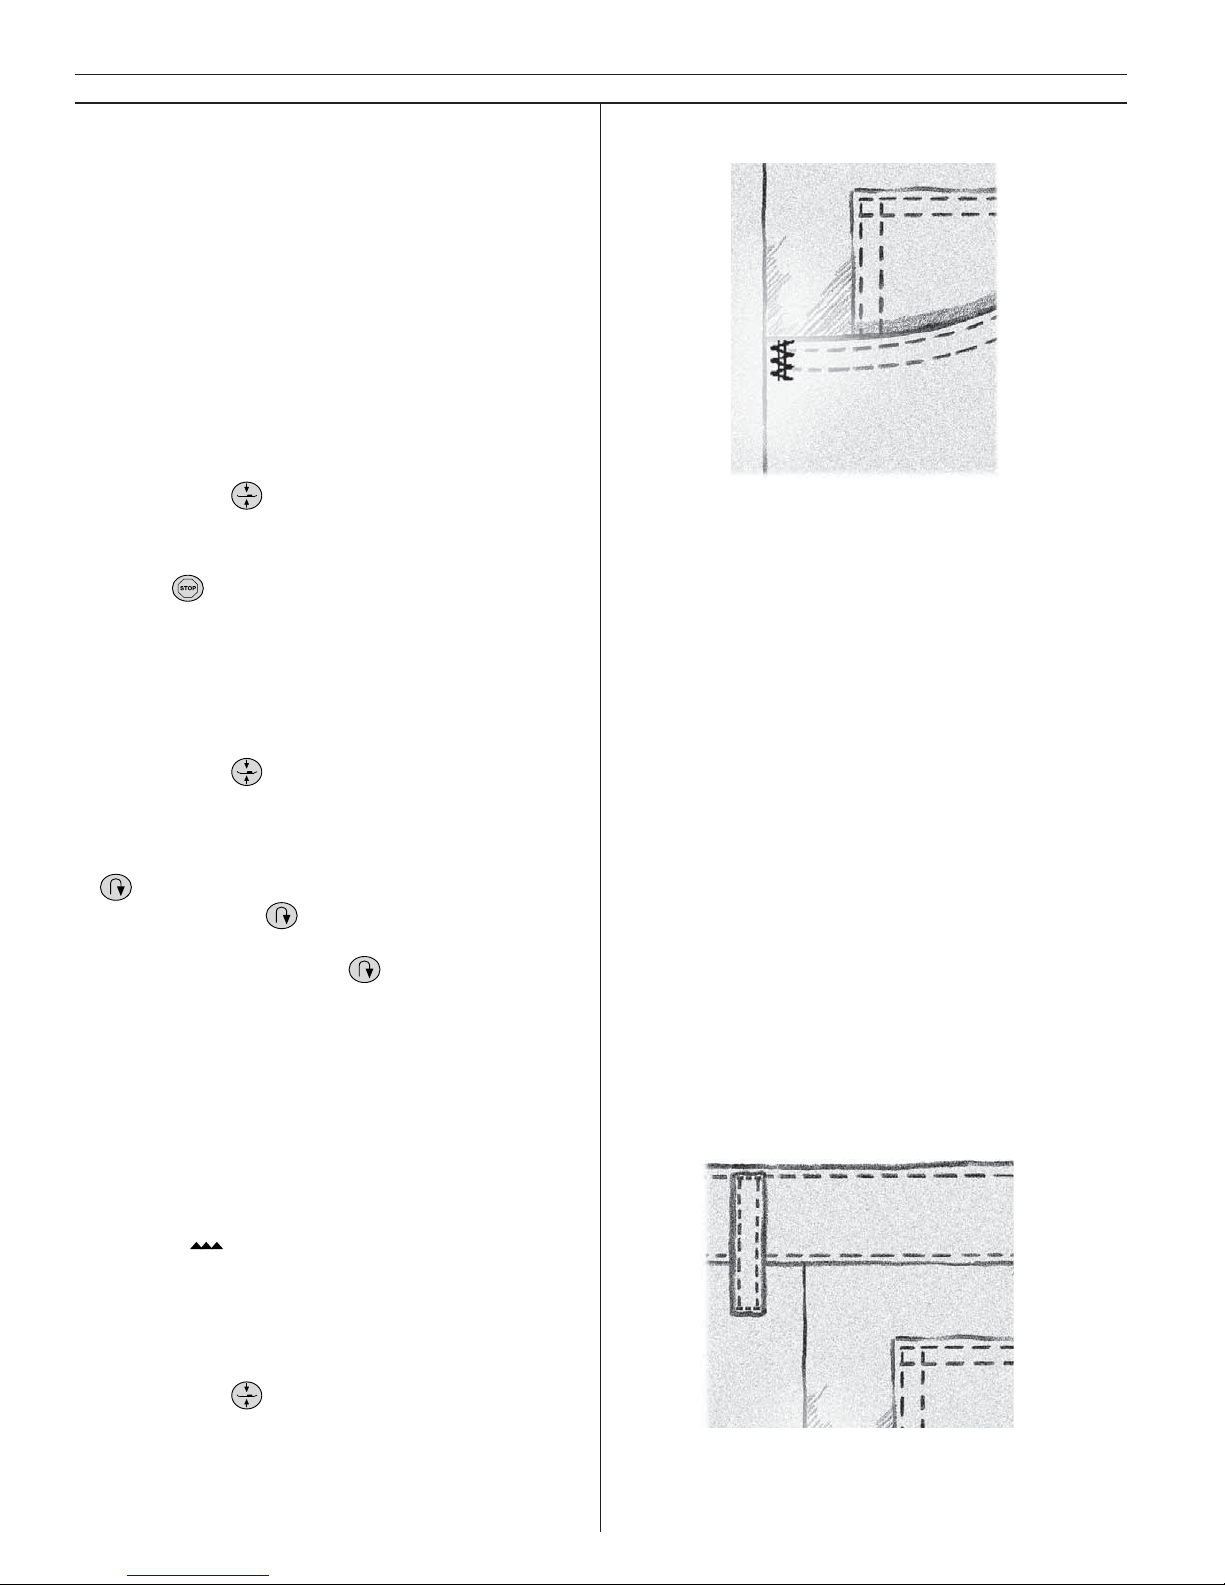
60
Utility/Garment Sewing
Bartacks
Secure elastic ends, drapery pleats, belt loops,
and pocket corners with the same look as
ready-to-wear.
Fabric: Woven heavy
Touch: Woven heavy, Menu A, Utility Stitches,
Touch Stitch A32 / A36.
Snap on: Presser Foot B as recommended.
Use: Size 80 needle as recommended
Sew, A32:
• Place fabric in position under presser foot
• Touch Pivot
and adjust fabric if necessary.
Step on the foot control, the Sensor Foot
lowers automatically, and stitch.
• Touch
. The machine will stop
automatically when the stitch is completed.
The machine will automatically tie-off and cut
the threads.
Sew, A36:
• Place fabric in position under presser foot
• Touch Pivot
and adjust fabric if necessary.
Step on the foot control, the Sen sor Foot
lowers automatically, and stich. The machine
will sew a straight stitch until you touch
. Your Designer I will then sew in reverse
until you touch again. Your Designer I
will then sew a zig zag, covering the stratight
stitches until you touch .
• The machine will automatically tie-off and cut
the threads.
Belt Loops
Touch: Woven heavy, Menu A, Utility Stitches,
Touch Stitch A13 Three-step zigzag.
Snap on: Presser Foot B as recommended.
Use: Size 80 needle as recommended. Lower the
feed teeth
.
Sew:
• Fold in about 3/8" (10mm) on the short ends.
• Place the belt loop on the garment and under
the presser foot.
• Touch Pivot
and adjust fabric if necessary.
• Sew a bartack from the outer edge to the cen-
ter of the loop, move the fabric and sew a
new bartack.
Page 61

61
Utility/Garment Sewing
20 Flatlock
Decorative hems and overlapped seams, belts
and bands. For medium/heavy stretch fabrics.
21 Elastic/Casing stitch
For overlapped seams in tricot. To sew casing
over narrow elastic.
22 Reinforced zigzag
For joining fabric edge to edge or overlapping in
leather.
23 Baste stitch
For joining two pieces of fabric with long a stitch
length and reduced thread tension.
24 Elastic blind hem
Invisible hems in stretch medium and heavy
fabrics.
25 Woven blind hem
Invisible hems in woven fabrics.
26 Shell rolled hem
For edgings. Sew over the edge. For light stretch
fabric. Sew woven fabric on bias.
27-29 Satin stitch
For appliqués, rounded edge, sewing on laces
and bands.
30 Elastic stitch
Sew over two rows of elastic thread for shirring.
31 Bridging stitch
For joining two pieces of fabric with fi nished edges and for elastic shirring.
32, 36 Bartack
Reinforce pockets, shirts openings, belt loops as
well as at lower end of a zipper.
33-35 Darning stitches
Darn and mend work clothes, jeans, tablecloths and linen towels.
1-3 Straight stitch
For all kinds of sewing in woven fabrics, 25 dif fe rent needle positions.
4-6 Stretch stitch
For seams in tricot and stretch fabrics.
7-9 Reinforced straight stitch
For seams which are subject to considerable
strain. Use to reinforce and topstitch sportswear
and working clothes. 25 needle positions.
10-12 Zigzag
For lace edging and sewing on bands.
13 Three-step zigzag
For overcasting, mending, sewing on patches
and elastics.
14 Serpentine stitch
For mending and darning and elastic applications.
15 Four-step zigzag, 9 mm
For overcasting, mending, sewing on patches
and elastics in loosely woven fabrics.
16 Overcast stitch
Seam and overcast in one step along the edge
or trim later. For light stretch and non-stretch
fabrics.
17 Overlock
Seam and overcast in one step along the edge
or trim later. For me di um and medium/heavy
stretch fabrics.
18 Double overlock
Seam and overcast in one step along the edge or
trim later. For heavy stretch fabrics.
19 Overlock stitch
Seam and overcast in one step along the edge
or trim later. For medium stretch fabrics.
Stitch table – Menu A
Page 62
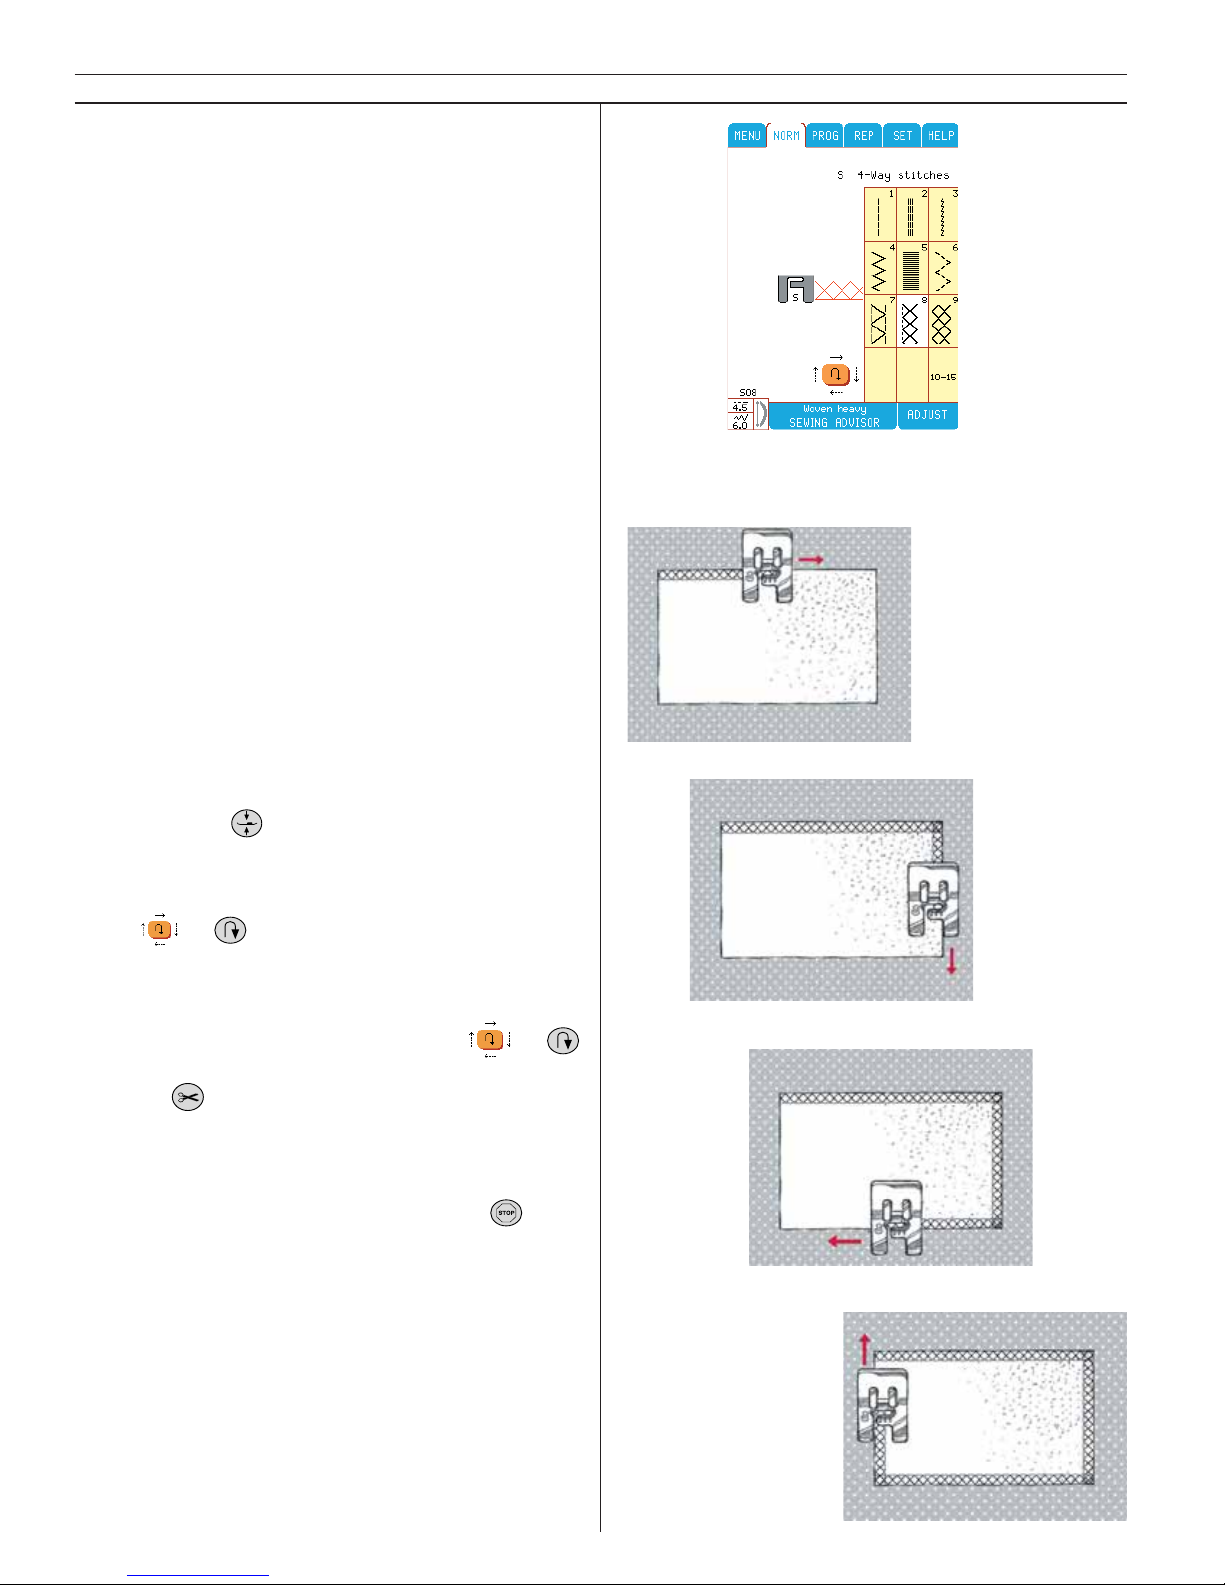
62
Utility/Garment Sewing
Menu S
4-Way Stitches
The four way mending stitch allows you to
stitch several sturdy stitches in four different
directions. You have a choice of 15 different 4way stitches. You can select the one that is perfect for the weight and type of fabric. This is especially helpful when patching pant legs on the
free arm. The 4-Way stitches are pro gram med at
a fi xed length and width.
Fabric: Woven heavy, two pieces, one a patch
Touch: Woven heavy on your Sewing Advisor,
Menu S - 4-way stitches, Stitch S8.
Snap on: Presser foor S as recommended.
Use: Size 80 needle as recommended.
Sew:
• Place the patch on the larger fabric in position
un der the pres ser foot.
• The machine begins to sew across the top of
the patch from the top left corner. A stitch
will appear on the Color Touch Screen to indicate sewing direction.
• Touch Pivot
and adjust fabric if necessary.
Step on the foot control. The Sen sor Foot lowers automatically.
• Sew across the top and touch the 4-way sym bol or to change sewing direction.
The direction of the stitch on the screen will
change.
• Sew down the side of the patch. Continue
sewing aro und the patch, touching or
to change sewing direction
• Touch .
Note: Depending on which stitch you are using,
the corners may be irregular if changing sewing
direction without completing the stitch fi rst. To sew
beautiful corners with 4-way stitches, press
before changing sewing direction. This will complete the current stitch before changing direction.
Another alternative is to change the sewing direction
without stopping the sewing machine.
Page 63
63
Embroidery
Page 64
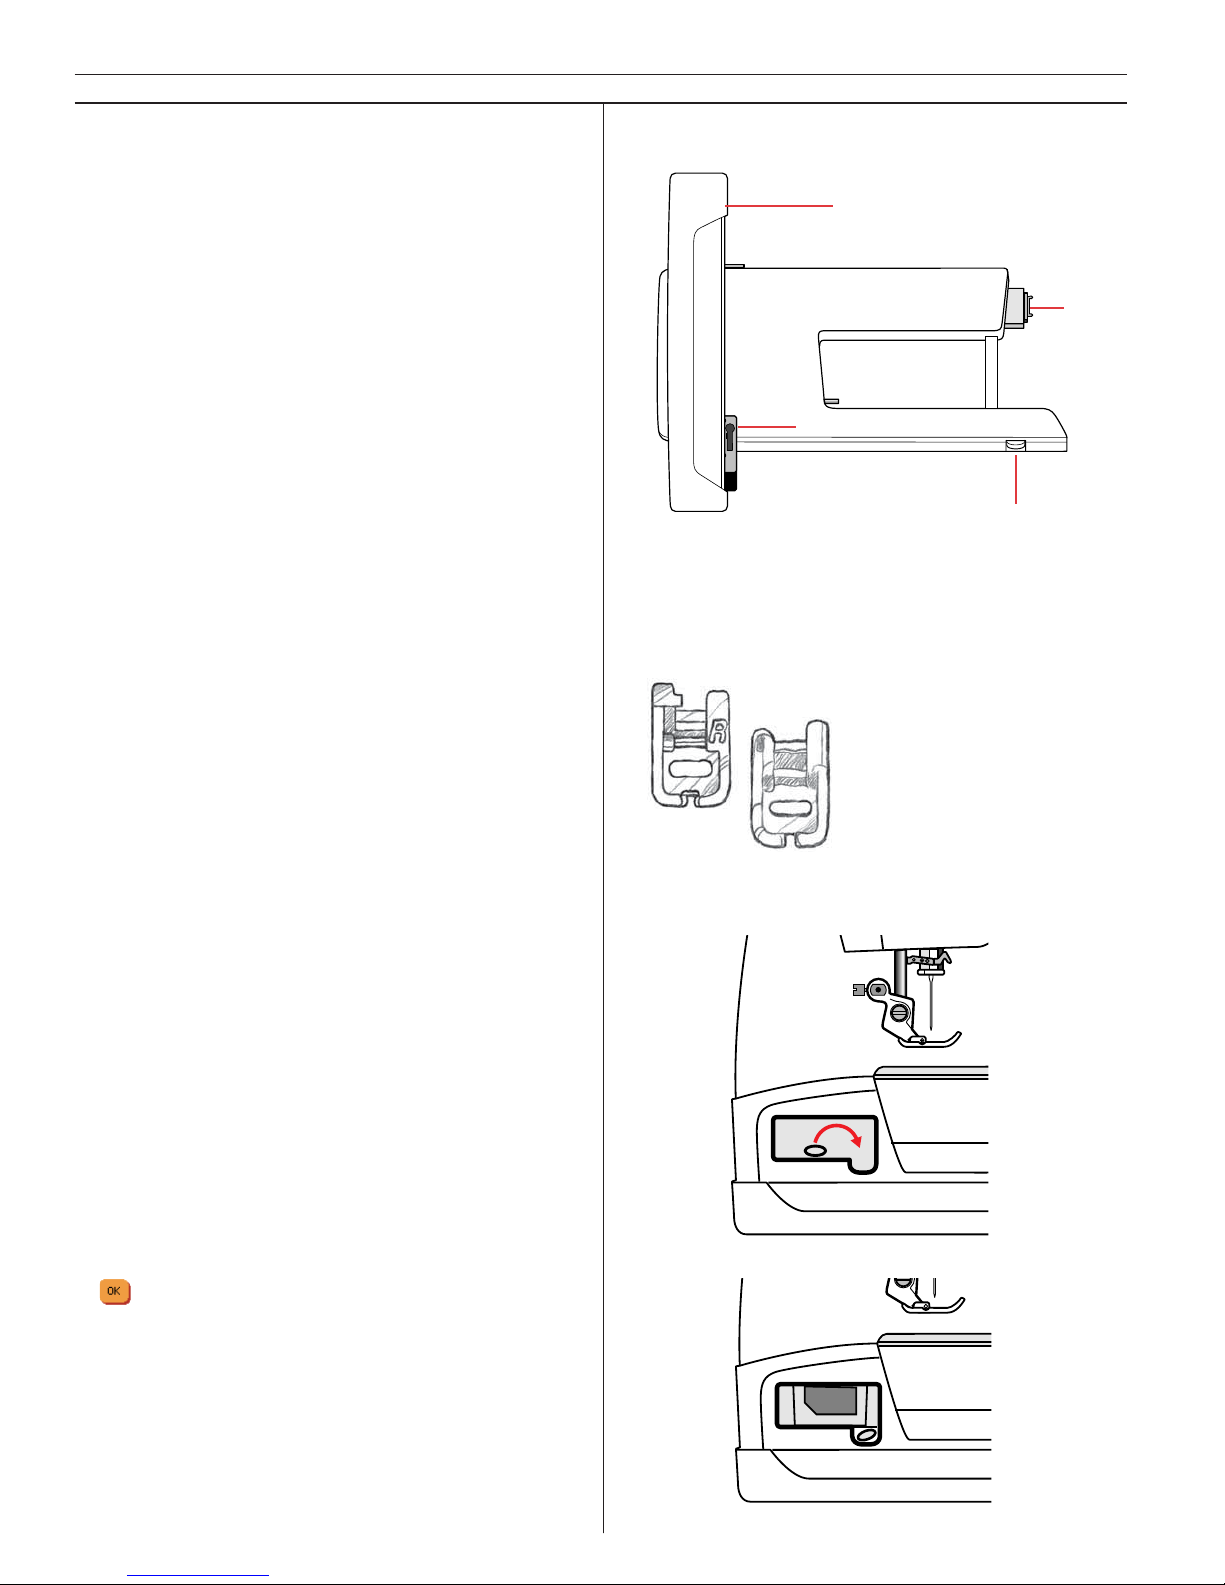
64
Embroidery
Embroidery
Creative Embroidery from
Husqvarna Viking
Down through the ages, people all over the world
have enjoyed stitching embroidery designs to
personalize and embellish clothing, table linens
and special heirlooms. Early embroideries were
stitched by hand. Today your Husqvarna Viking
Designer I embroiders your design effortlessly.
Embroidery unit
1. Embroidery unit socket
2. Embroidery arm
3. Embroidery hoop attachment
4. Embroidery unit release button
Embroidery Unit Carrying Case
The carrying case contains embroidery unit,
2 embroidery hoops; standard and large, embroidery Presser foot R, embroidery booklet,
2 embroidery templates; standard and large, a
template pencil, Sampler 100 embroidery disks:
1 disk of designs and 3 font disks, a pair of scissors, two thread nets, 1 felt holder and a test kit.
Store your embroidery accessories in the carrying case to prevent misplacing them.
Connecting the Embroidery unit
1. Slide off the accessory tray.
2. There is a covered socket at the back of the
machine. Turn the cover to the right to open
it. The embroidery unit plugs into this socket.
3. Slide the embroidery unit on the free arm
of the machine until it plugs fi rmly into the
socket. Switch on the machine.
4. A Pop-up menu tells you to clear the area
and remove the hoop for calibration. Touch
. The machine will calibrate and the em broi dery arm will move to the ready po si tion.
Calibration will set your em broi dery func tions
each time you sli de on the em broi dery unit.
5. The feed teeth are lo we red automatically
when the embroidery unit is connected and
are raised when it is removed.
4.
1.
3.
2.
Presser foot R
Page 65
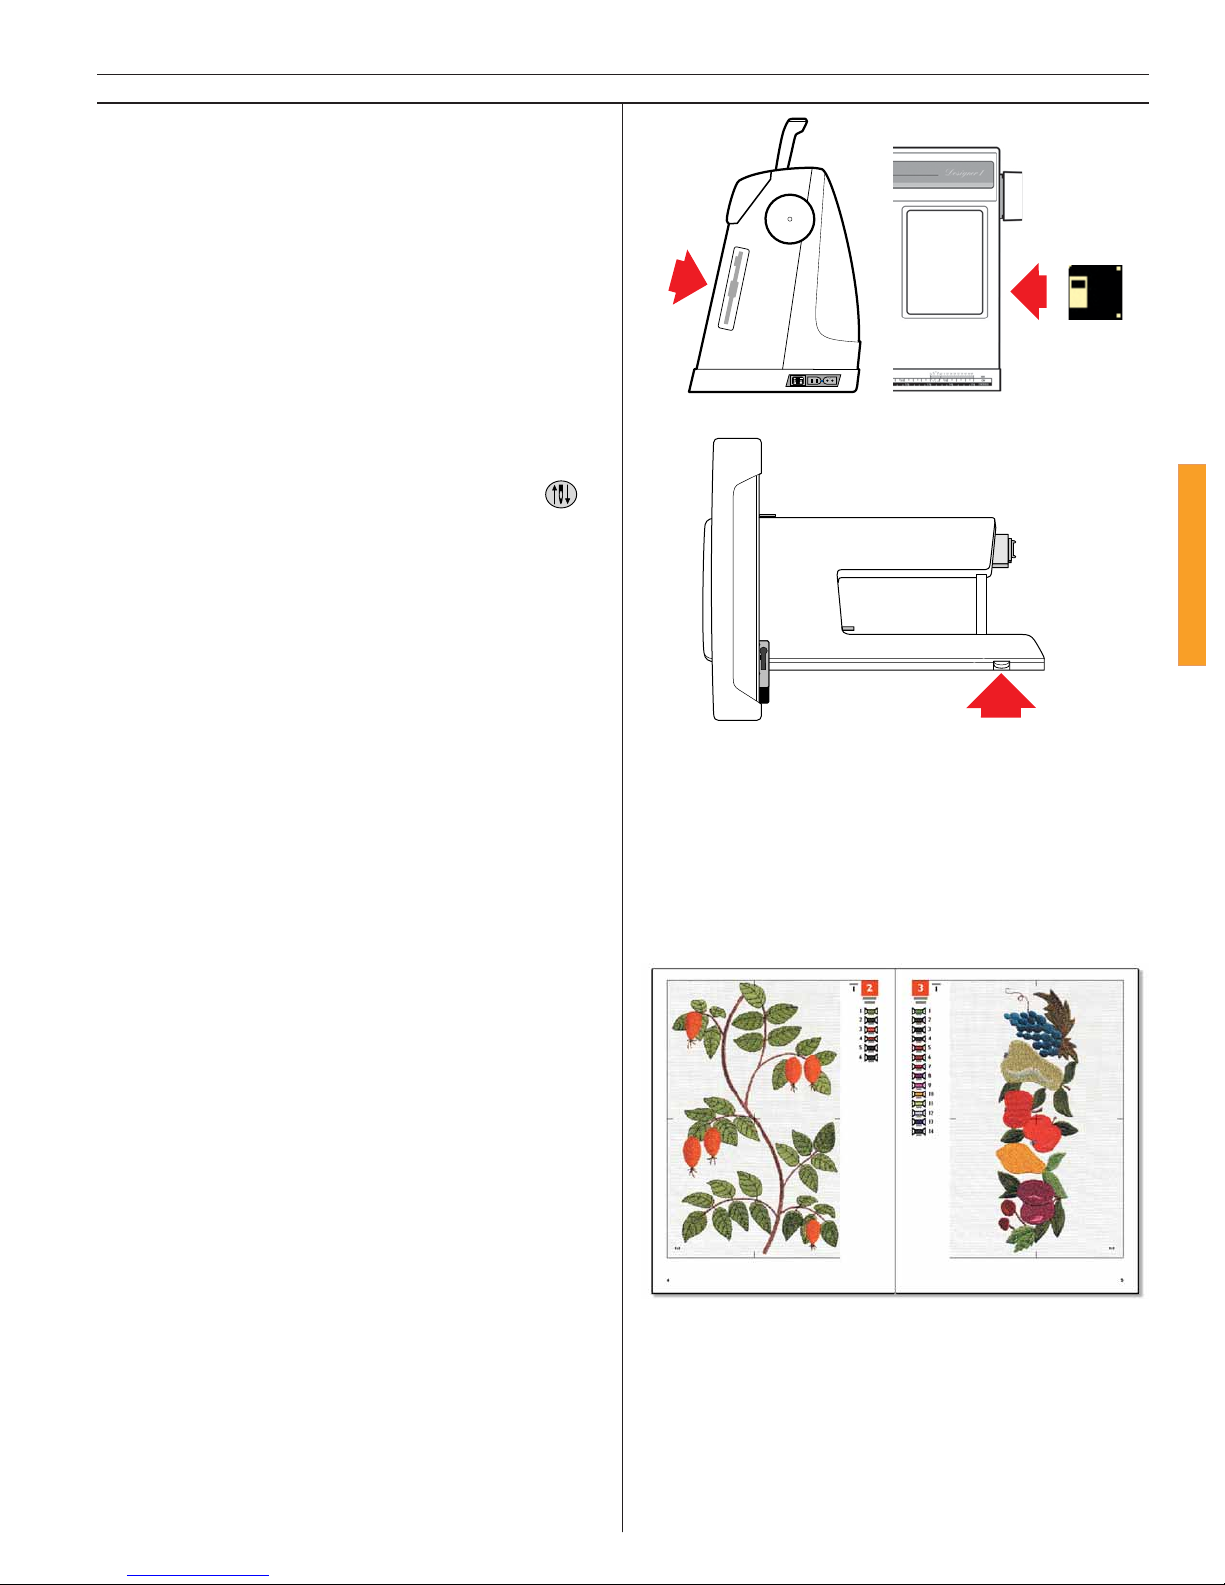
65
Embroidery
Built-in Disk Drive
Insert: Slide the embroidery disk into the builtin disk drive on the side of the machine.
Eject: Push the but ton on the side of the mach i ne to eject the disk.
Removing the Embroidery unit
1. To put the embroidery arm in the rest po si tion
to store it in the embroidery case, touch
(the needle up/down function button). The
embroidery arm will move to the rest po si tion.
Switch off the machine.
2. To release the unit, raise the large button at
the right front of the unit and slide the unit to
the left.
3. Close the cover on the socket.
Threading the machine
See page 8.
Embroidery booklet
Page through the Embroidery Booklet for Sampler 100 designs and fonts. All embroidery designs are pictured actual size. The center point
and placement markings on all sides are marked
for easy placement in the hoop.
The menu number (in black), design number (in
red), and stitch count (number of stitches in the
design) are next to each design.
The thread spools show the suggested thread
colors for each color number and give the thread color number for 40 weight Rayon embroidery thread.
Page 66
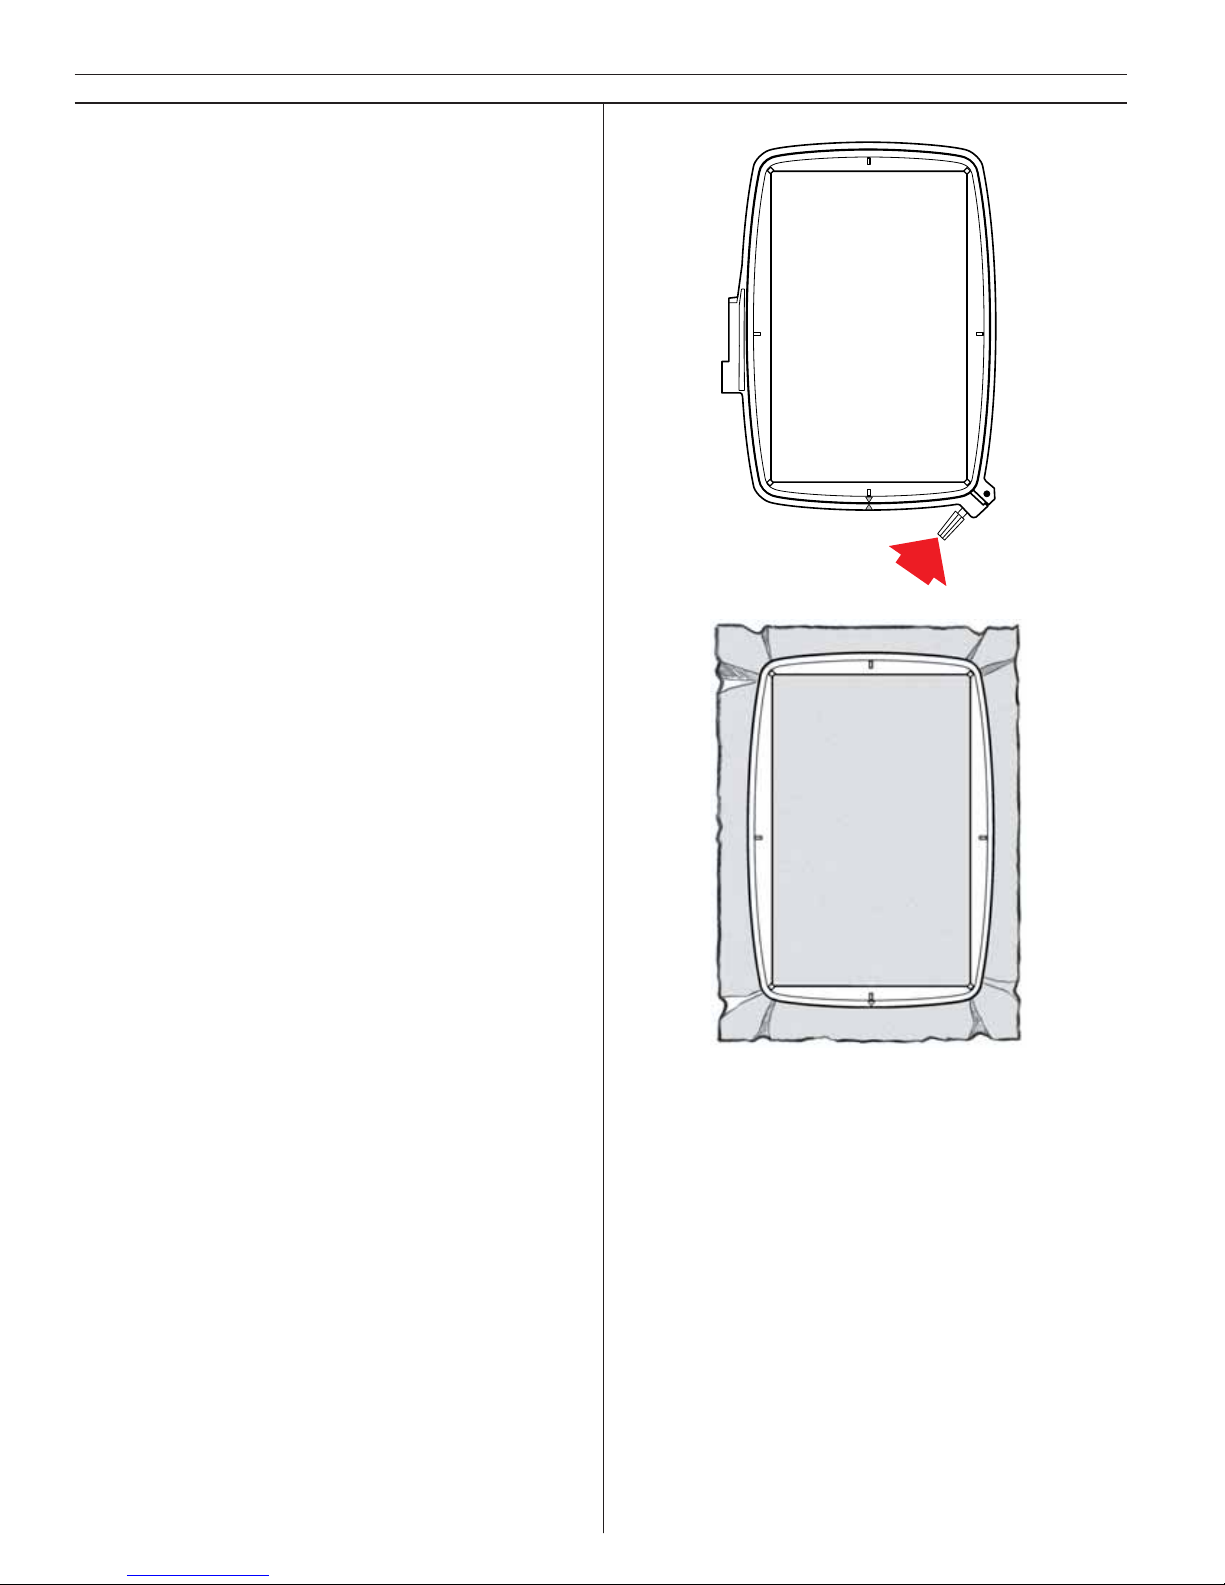
66
Embroidery
Hoop the fabric
1. Select Large Hoop 150x240 mm (6x9,6"), Stan-
dard Hoop 100x100 mm (4x4") or Mega Hoop
360x150 mm (14,4x6") depending on the size
of your de sign. Always use the size that is
shown on the embroidery screen menu.
2. Loosen the screw on the larger outer hoop.
Place the hoop on a fi rm fl at surface with the
screw on the lower right. There is a small
arrow in the center of the lower edge of the
hoop which will line up with a small arrow on
the inner hoop.
3. Place the stabilizer and the fabric on top of
the outer hoop and place the inner hoop on
top of the fabric with the small arrow at the
bottom edge.
4. Push fi rmly on the inner hoop to push it into
the outer hoop. Hint: Be sure to loosen the
hoop screw enough for the fabric and stabilizer thickness, so you can push the inner hoop
in place. Push in on the sides of the large
hoop.
5. Tighten the hoop screw. The fabric should be
very taut in the hoop for the best results.
Page 67
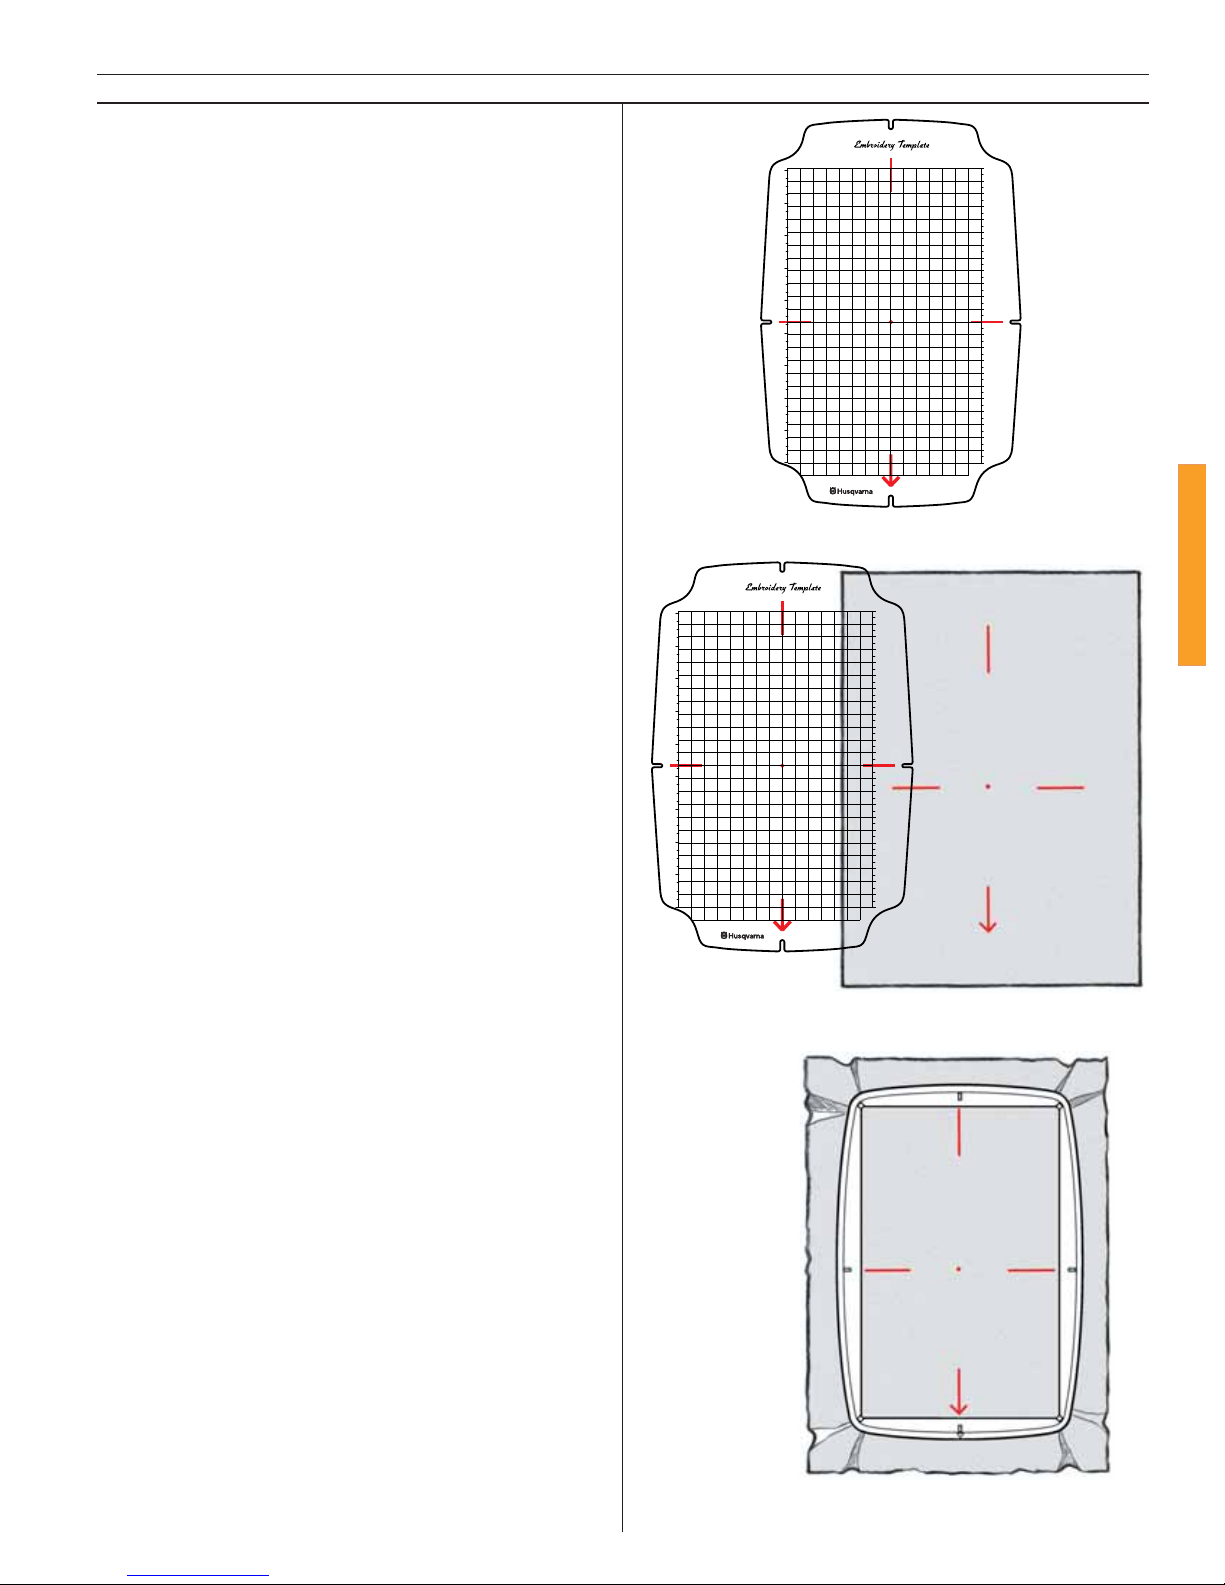
67
Embroidery
Embroidery Template
Because the embroidery designs are pictured
actual size in the Embroidery Booklet it is easy
to place the embroidery on your garment or
project. Use the embroidery template size that
corresponds with hoop size.
1. Place the template over the picture of the
selected design in the Embroidery Booklet.
2. Use the template pencil to trace the outline of
the design onto the template.
3. Place the template on the project to be em-
broidered and mark the center point, side,
and top and bottom markings through the
holes in the template. Use the Pictogram Pen.
4. Open the screw on the outer hoop. Place it
on a fi rm surface. Put the stabilizer and the
project to be embroidered on top of the outer
hoop and set the inner hoop on top matching the side, top and bottom markings on
the hoops with the Pictogram Pen markings
on the project. Take the time to be sure the
marks are all aligned.
5. Push the inner hoop into the outer hoop and
tighten the screw.
Slide the hoop onto the machine.
The marked center point should match the star ting point of the needle. If minor adjustment is
needed, touch the positioning buttons on the
embroidery screen submenu.
Note: Read more about Stabilizer and Hoops in the
Accessory User’s Guide.
cm
123456789
Inch
123456789
10 11
12
13 14 15 16 17 18 19 20 21 22 23
cm
123456789
Inch
123456789
10 11
12
13 14 15 16 17 18 19 20 21 22 23
Page 68
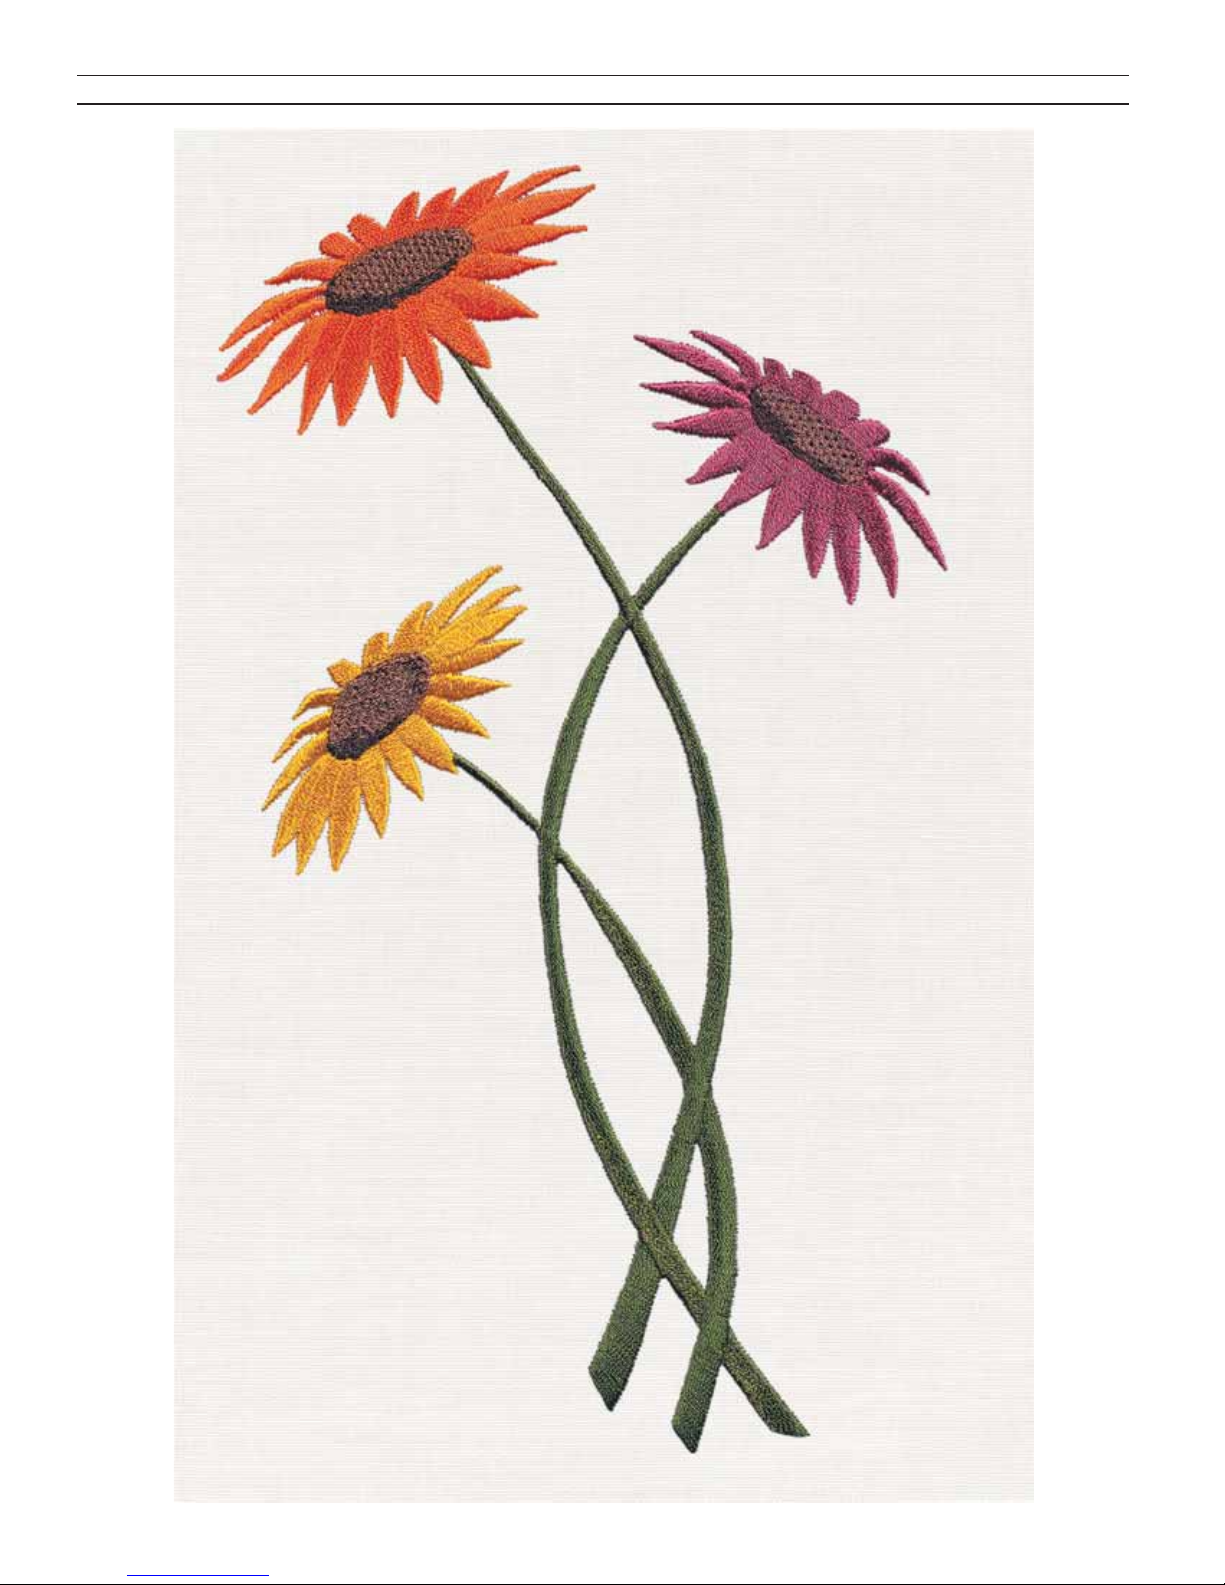
68
Embroidery
Page 69
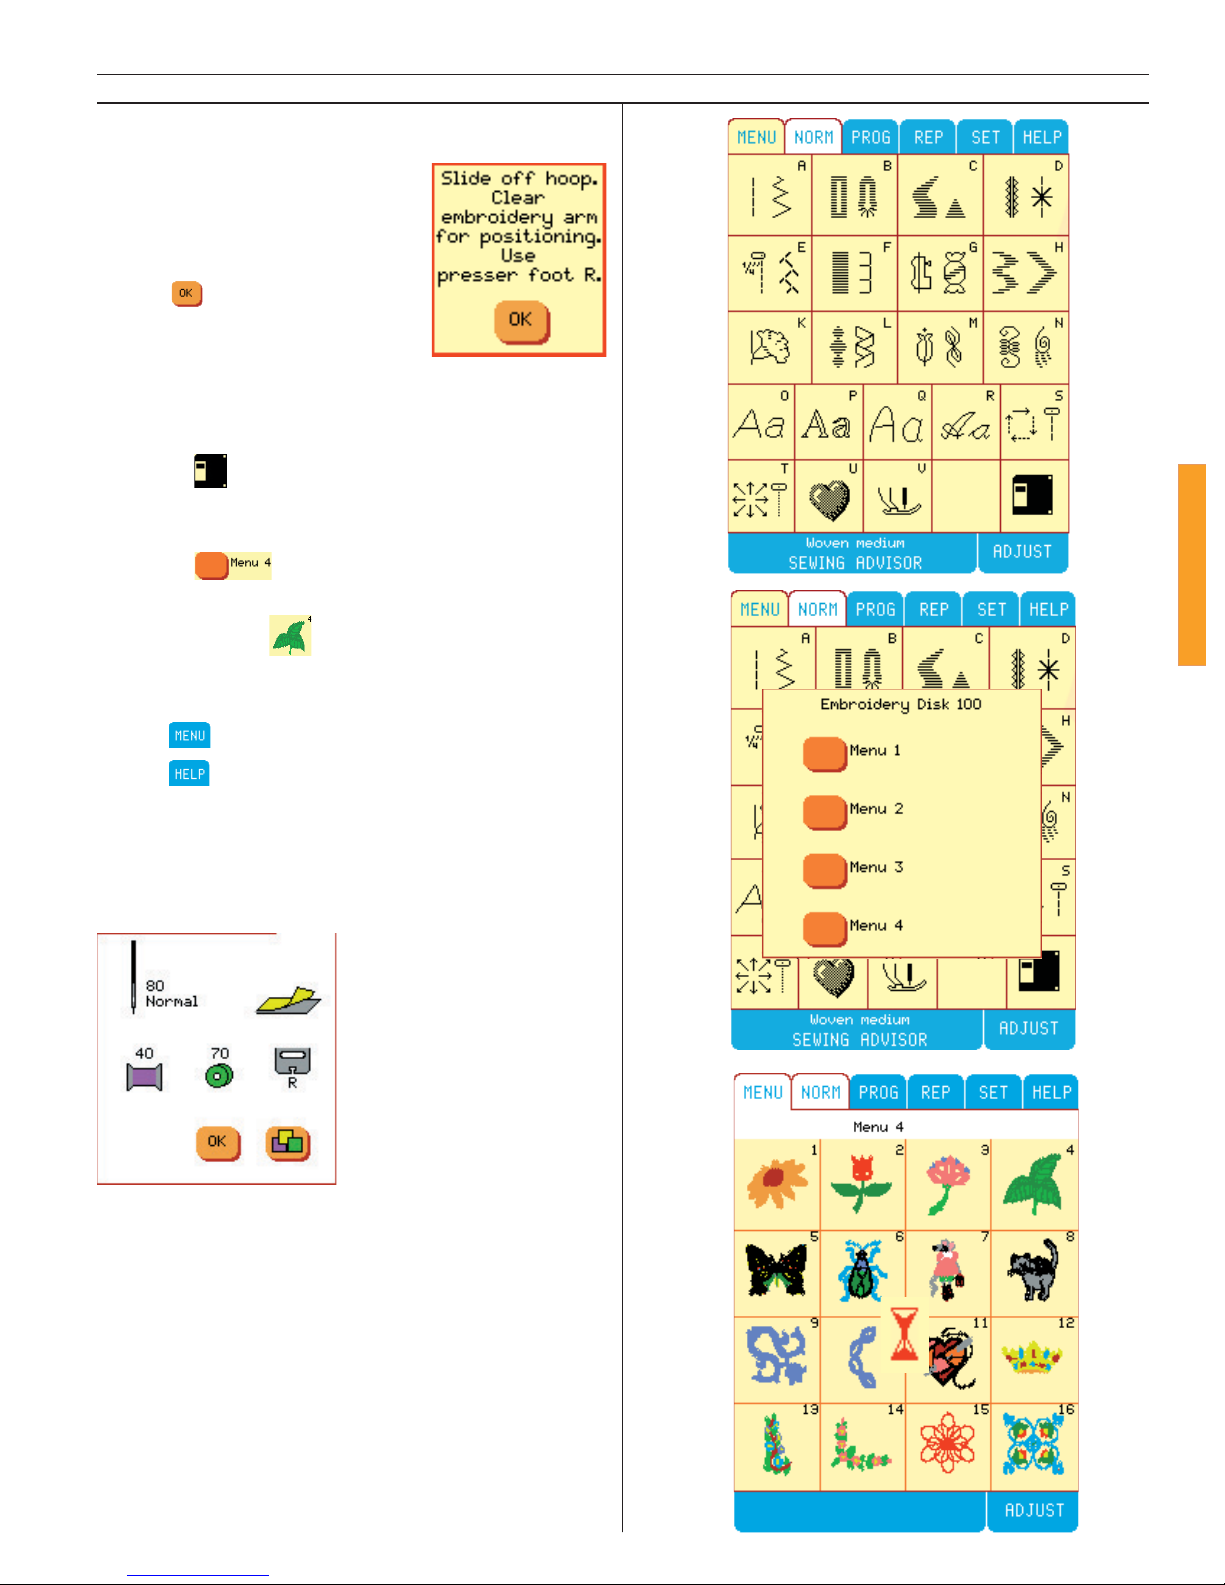
69
Embroidery
Getting Started
1. Slide on the Embroidery
Unit.
2. Turn on Designer I.
3. Calibrate the unit by pres-
sing
on the pop-up
menu.
4. Slide Sampler Disk 100--
disk 1(4) (embroidery designs) into the Built-in Disk Drive on the right
side of the machine.
5. Touch
. An hourglass appears on the
screen as the de sign menus are brought up on
the screen.
6. Touch
. An hourglass appears as the
designs are brought up on the screen.
7. Touch design
. An hourglass appears as
the design comes up on the screen.
Select a different embroidery at any time.
Touch
to return to the design choices.
Touch
. A Pop-up appears with recommendations about needle size and type, stabilizer, 40
weight embroidery top thread, 70 weight bobbin
thread, presser foot R and an icon to bring up a
color menu.
Page 70
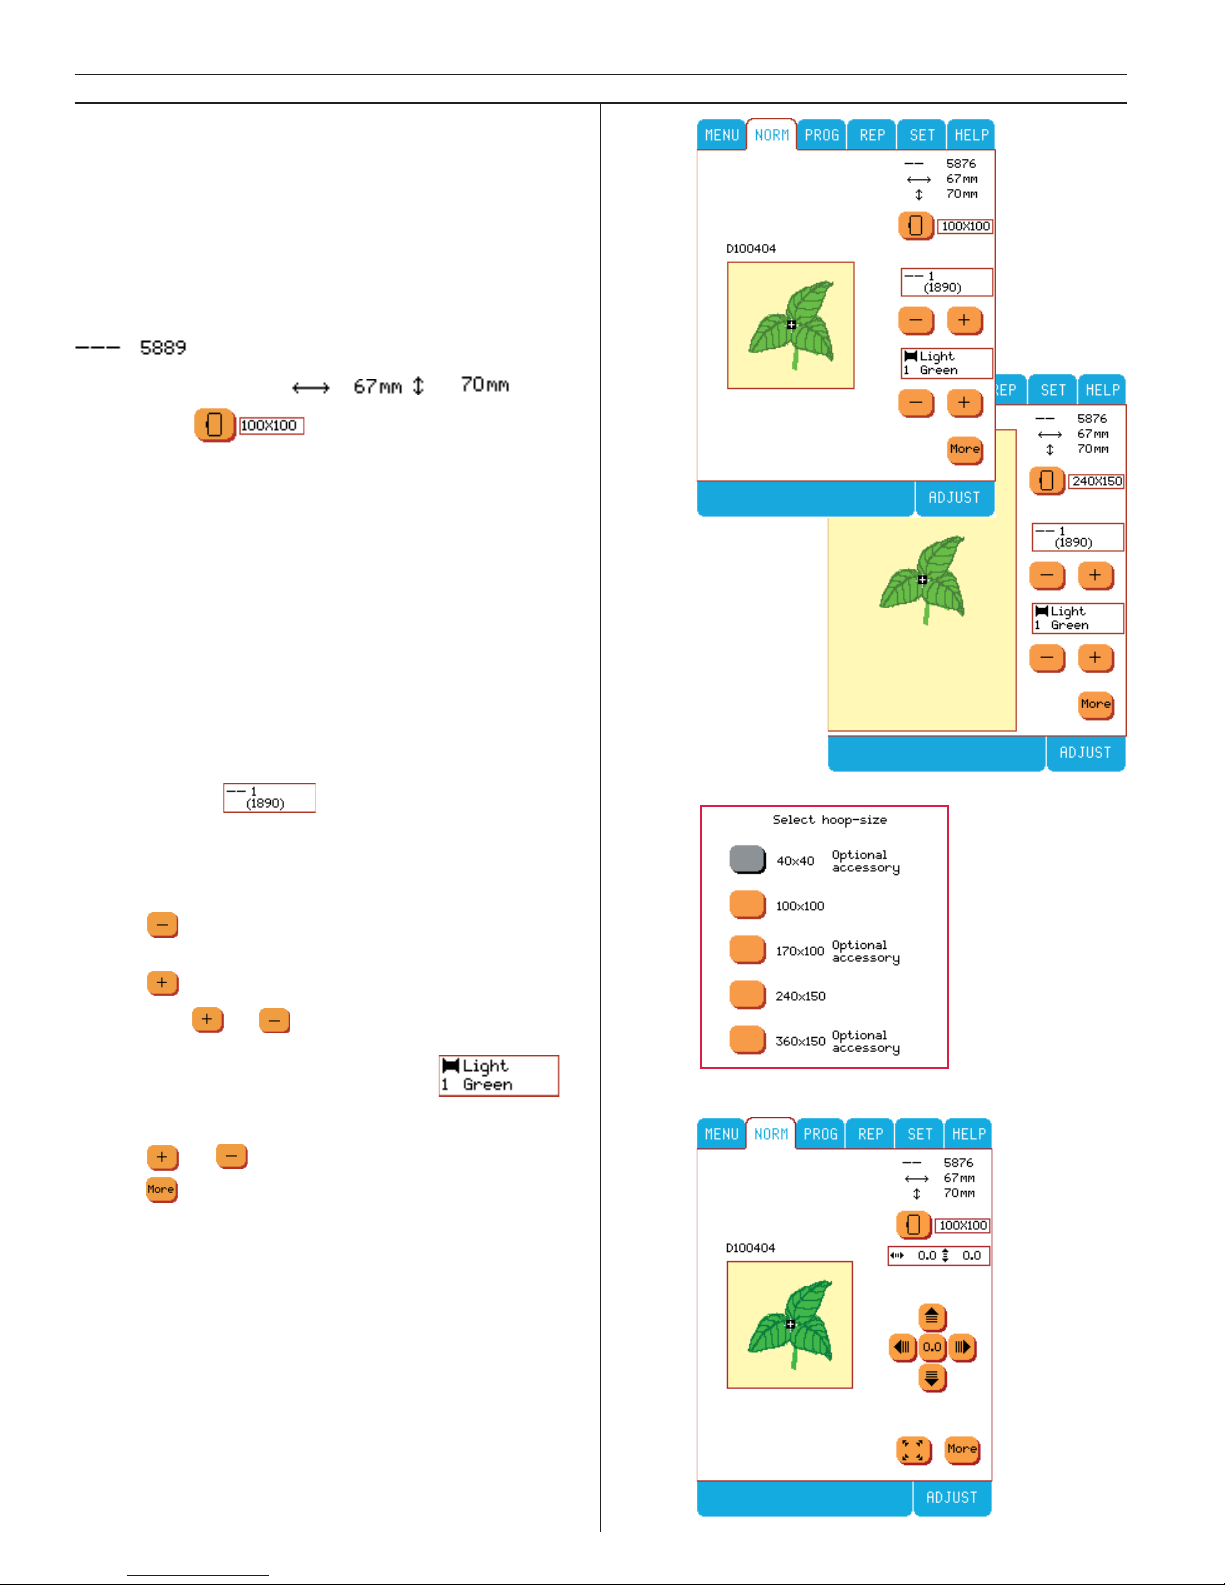
70
Embroidery
Embroidery Screen Menus
The embroidery screen menus give information
and options for the design you have selected.
Embroidery name/number D100 4 04
D100 is the disk, 4 is the menu number, 04 is
the design number.
Total number of stitches
Embroidery size
Hoop-size
Use the standard hoop as recommended.
You can select a different hoop size from the
orange buttons. The grey buttons are not available because the design would be too large for
the hoop. Select the size of the hoop before
sliding the hoop onto the embroidery arm. Be
sure to use the selected hoop size as displayed
on the screen. A sensor in the embroidery arm
checks the size of the hoop so you will never
make a mistake. The 40x40 “Mini Hoop” and
170x100 “MidSize Hoop” are optional accessories.
Stitch count
The stitch count will return to 1 with each color
change and count the stitches for that color.
To Step forward or backward stitch by stitch.
Touch
to step backward a few stitches if top
thread has run out or broken.
Touch
to step forward stitch by stitch.
Note: If the or button is kept depressed, the
speed accelerates.
Thread color recommendation
To Step forward or backward color by color.
Touch
or .
Touch
to bring up the embroidery screen
submenu.The embroidery screen submenu also
displays the embroidery name/number, stitch
count, embroidery size, and hoop size.
Page 71
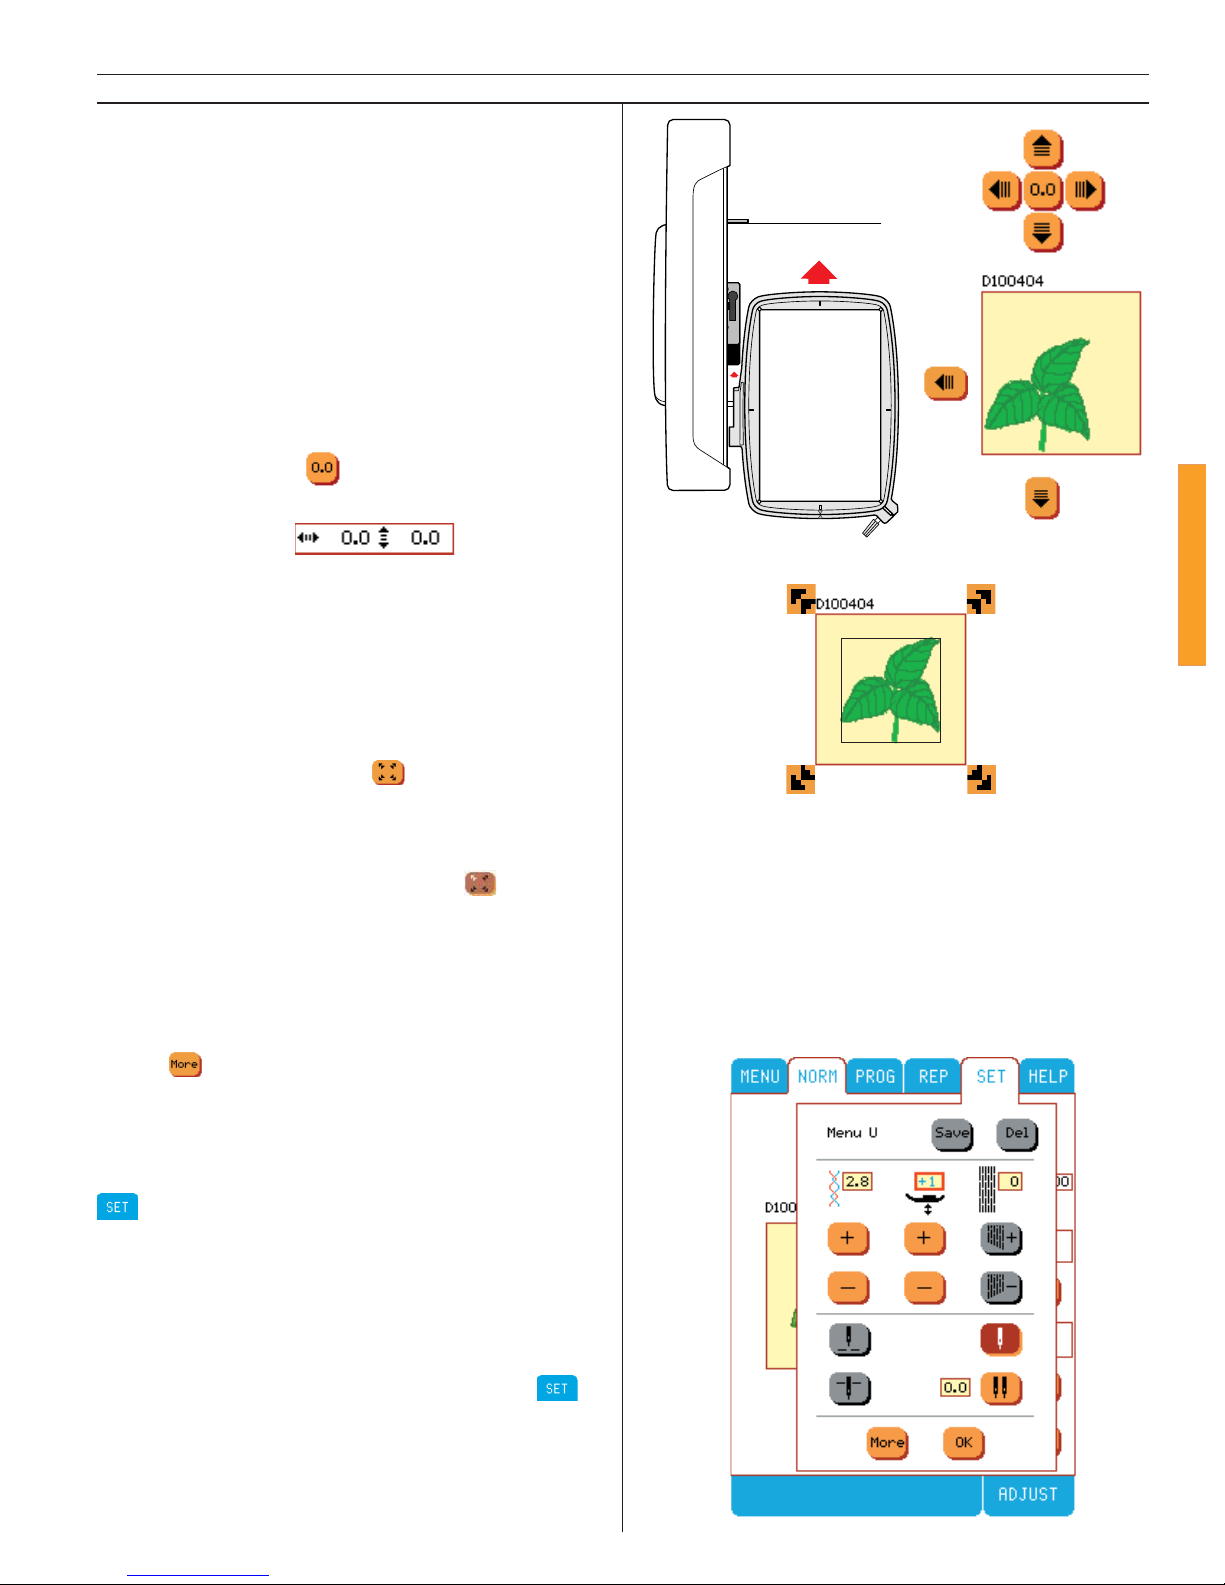
71
Embroidery
Slide the hoop onto the embroidery arm until it
clicks into place. Press the purple button on the
embroidery clip to release the hoop and slide it
toward you.
Use the move design buttons to move the design to a different place in the hoop area. This
is especially helpful when the fabric is hooped
and the marked center starting position is not
in the center of the hoop. Touch the arrows to
move the hoop until the needle lines up with
the mar ked starting point. An audible beep will
advise you of the limits. If you want to get back
to the center, touch
.
Starting position
The numbers indicates starting position of the de sign, in mm, from origin. When changed plus (+)
indicates right and up, minus (-) down and left.
Tip: If you need to turn off your Designer I while stitching large embroidery, make notes of starting position, stitch number and color number.
Then you can continue from where you left off.
Use the check size button
to check the size
and the outline area of the de sign on your fabric. When the check size button has been activated, it becomes dark brown with a white arrow indicating the current position .
When you select an embroidery the hoop is positioned so the needle will begin at the center
of the hoop. However, if you select a design to
make a sequence of embroidy, the needle will
begin where the last embroidery was fi nished.
Touch
to go back .
SET in Embroidery
If neccessary, for example when embroidering
on unusual fabrics, set the thread tension in the
menu.
When embroidering on very thick fabrics or bat ting, you can raise the height of the presser foot.
This is to allow the foot to glide over thicker fabric.
Manual adjustments of the thread tension and
of the presser foot height are made in the
menu.
Page 72
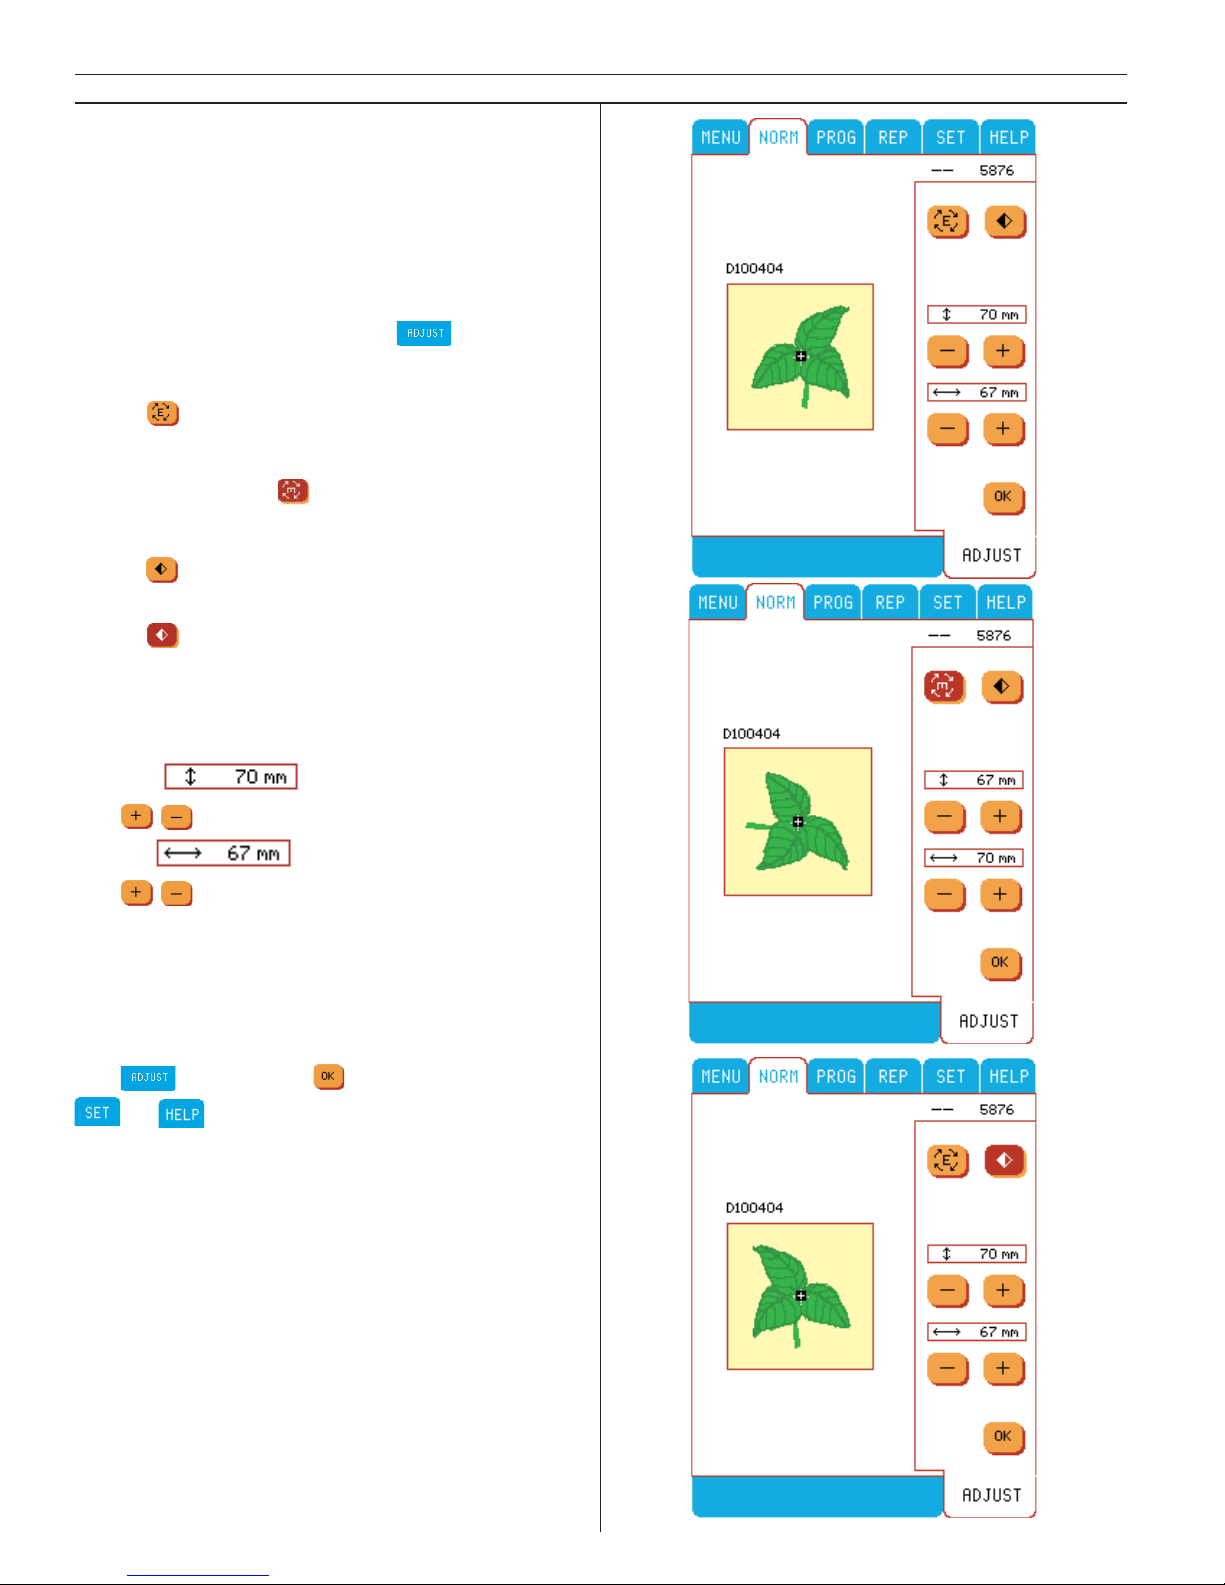
72
Embroidery
Adjust in Embroidery
There are many options to adjust your design.
Always adjust fi rst, before using any of the buttons on the embroidery screen menus (step
through stitches, check parameters of de sign,
move design in hoop, etc.) and before beginning to sew.
To activate Adjust menu touch
.
Rotate embroidery
Touch
to rotate the embroidery in 90 degree
steps. See it on the color touch screen. When an
embroidery has been rotated, the button will be
indicated in brown .
Mirror image side to side
Touch
and the leaf will fl ip side to side. The
mirror image button will be indicated in brown.
Touch
to return to normal image
Size
Scale embroidery size up or down (up to 20%).
An audible beep will advise you of the limits.
Height
Use
.
Width
Use
.
You can increase the width and height independently to create long and thin or short and wide
designs. When enlarging or reducing the size
of the embroidery, experiment with dif fe rent
weights of embroidery thread.
Exit
by touching or by accessing the
or menu.
Page 73
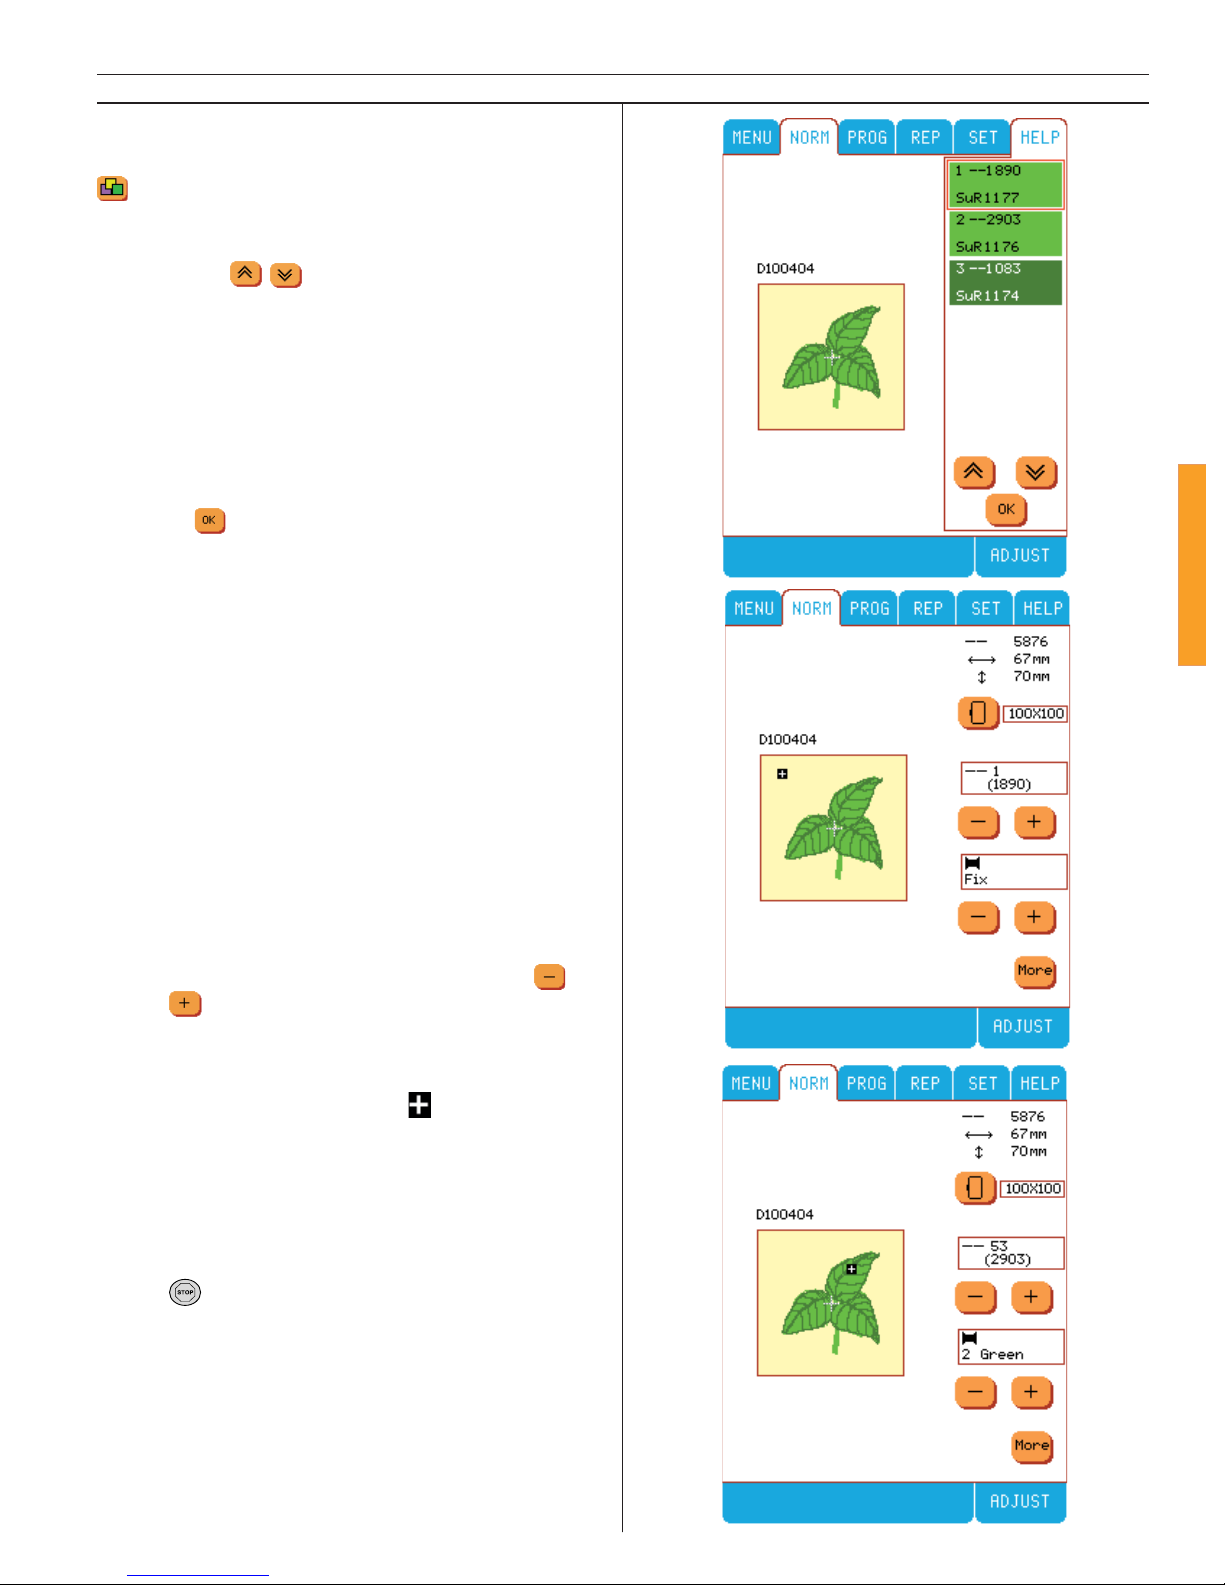
73
Embroidery
View embroidery colors
The view color icon appears on the HELP menu
. It is grey when not active. When it is colored and active, touch the icon to view the colors
in an embroidery. You can scroll through the
colors using
.
The menu shows color number, stitch count and
color name. The currrent color is highlighted
with a red frame. If the embroidery disk has color chart numbers included those will be shown
instead of color names.
The color menu will stay open when the
Designer I is sewing. Close the color menu by
touching
.
Embroidery features
FIX
Touch FIX in embroidery to baste an outline aro und the embroidery area. This is helpful when
embroidering on fabrics that should not be hooped tightly. The FIX function can also be used
to baste fabric to the stabilizer. This bas ting also
indicates placement of embroidery.
When the FIX function is active, you cannot
step forward or backward color by color, instead FIX is shown in the thread color recommendation fi eld.
If the top thread has run out or broken, you can
step backward a few stitches by touching
.
Touch to step forwards stitch by stitch in the
basting stitch.
Cursor
When embroidering, a cursor
indicates the
needle position in the embroidery. The cursor follows the needle through the embroidery
when sewing or when stepping through stitches
or colors.
One Color Embroidery
Touch
( the light goes out) to cancel the color stops if you want to sew a design in one color only.
Page 74
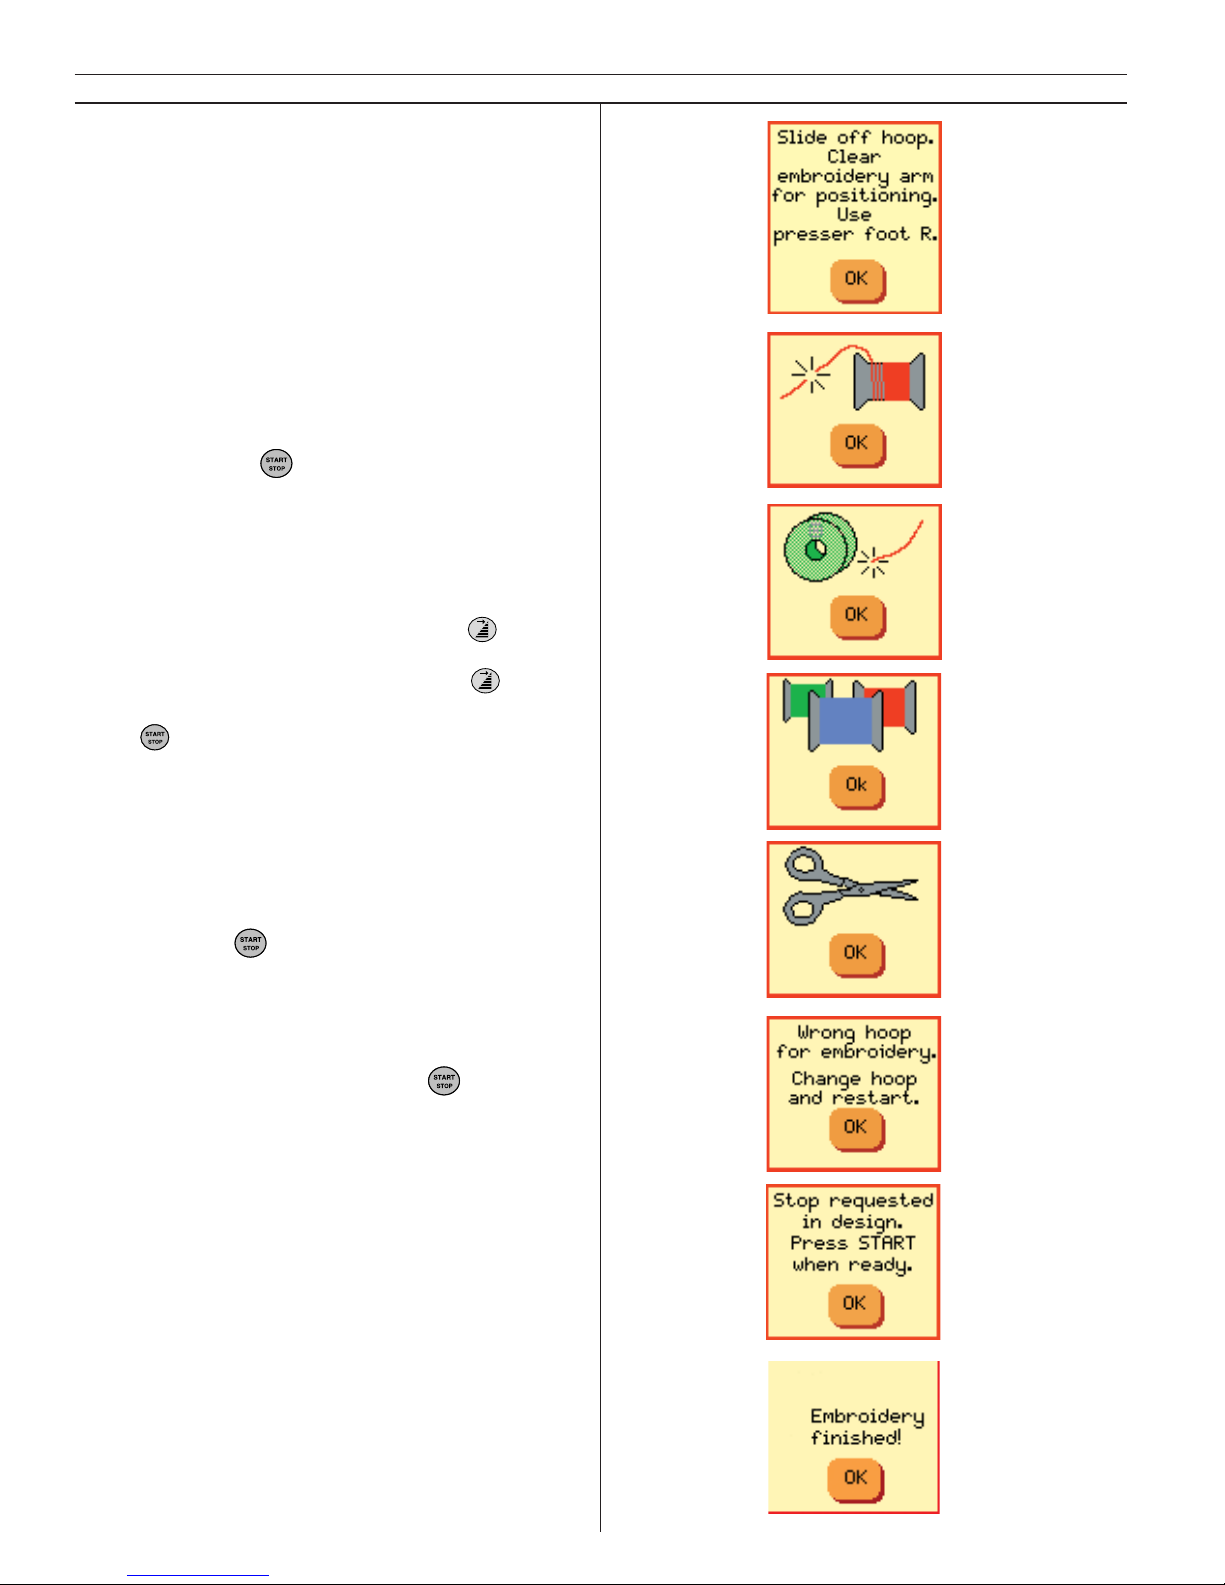
74
Embroidery
Pop-up menus in Embroidery
Embroidery Start Up Calibration
As the embroidery unit is connected to the machine, a Pop-up menu prompts you to slide off the
hoop, and clear the machine area for positioning
of the embroidery arm. Touch OK to calibrate
the embroidery unit and to position the arm.
This menu also reminds you to use the R foot.
Top Thread Break
Your Designer I stops automatically if the top thread runs out or breaks. Rethread the top thread,
touch OK. Touch
to continue.
Empty Bobbin
Your Designer I stops when the bobbin is almost
empty. Replace the empty bobbin with a full
one, touch OK (bobbin winding, see page 10).
Note: When changing the bobbin, touch and the
hoop will move away for easy access to the bobbin
case. Once the bobbin is replaced, touch
again to
move the hoop back to where em broi dery stopped.
Touch
to resume the embroidery.
Color Change
Your Designer I stops automatically and the top
thread only is cut at the color change. Remove
the spool and rethread the top with the recommended color shown in the color menu of the
color touch screen or in the Embroidery Booklet.
Touch OK and
to resume embroidering.
Cut Embroidery Top Thread Tail
Your Designer I stops automatically a few stitches after you begin embroidering. Cut the
star ting thread tail, touch OK and
to resume
embroidering.
Wrong hoop for embroidery
When the size of the hoop on the machine does
not match the size displayed on the screen, your
Designer I will not sew. Change the hoop to the
size displayed on the screen.
Stop requested in design
Designer I stops when you are supposed to do a
cut work, applique etc. See explanation for each
design in the Embroidery Booklet.
Embroidery fi nished
When your embroidery is complete a pop-up
menu will appear. Touch OK to get back to your
embroidery.
Page 75
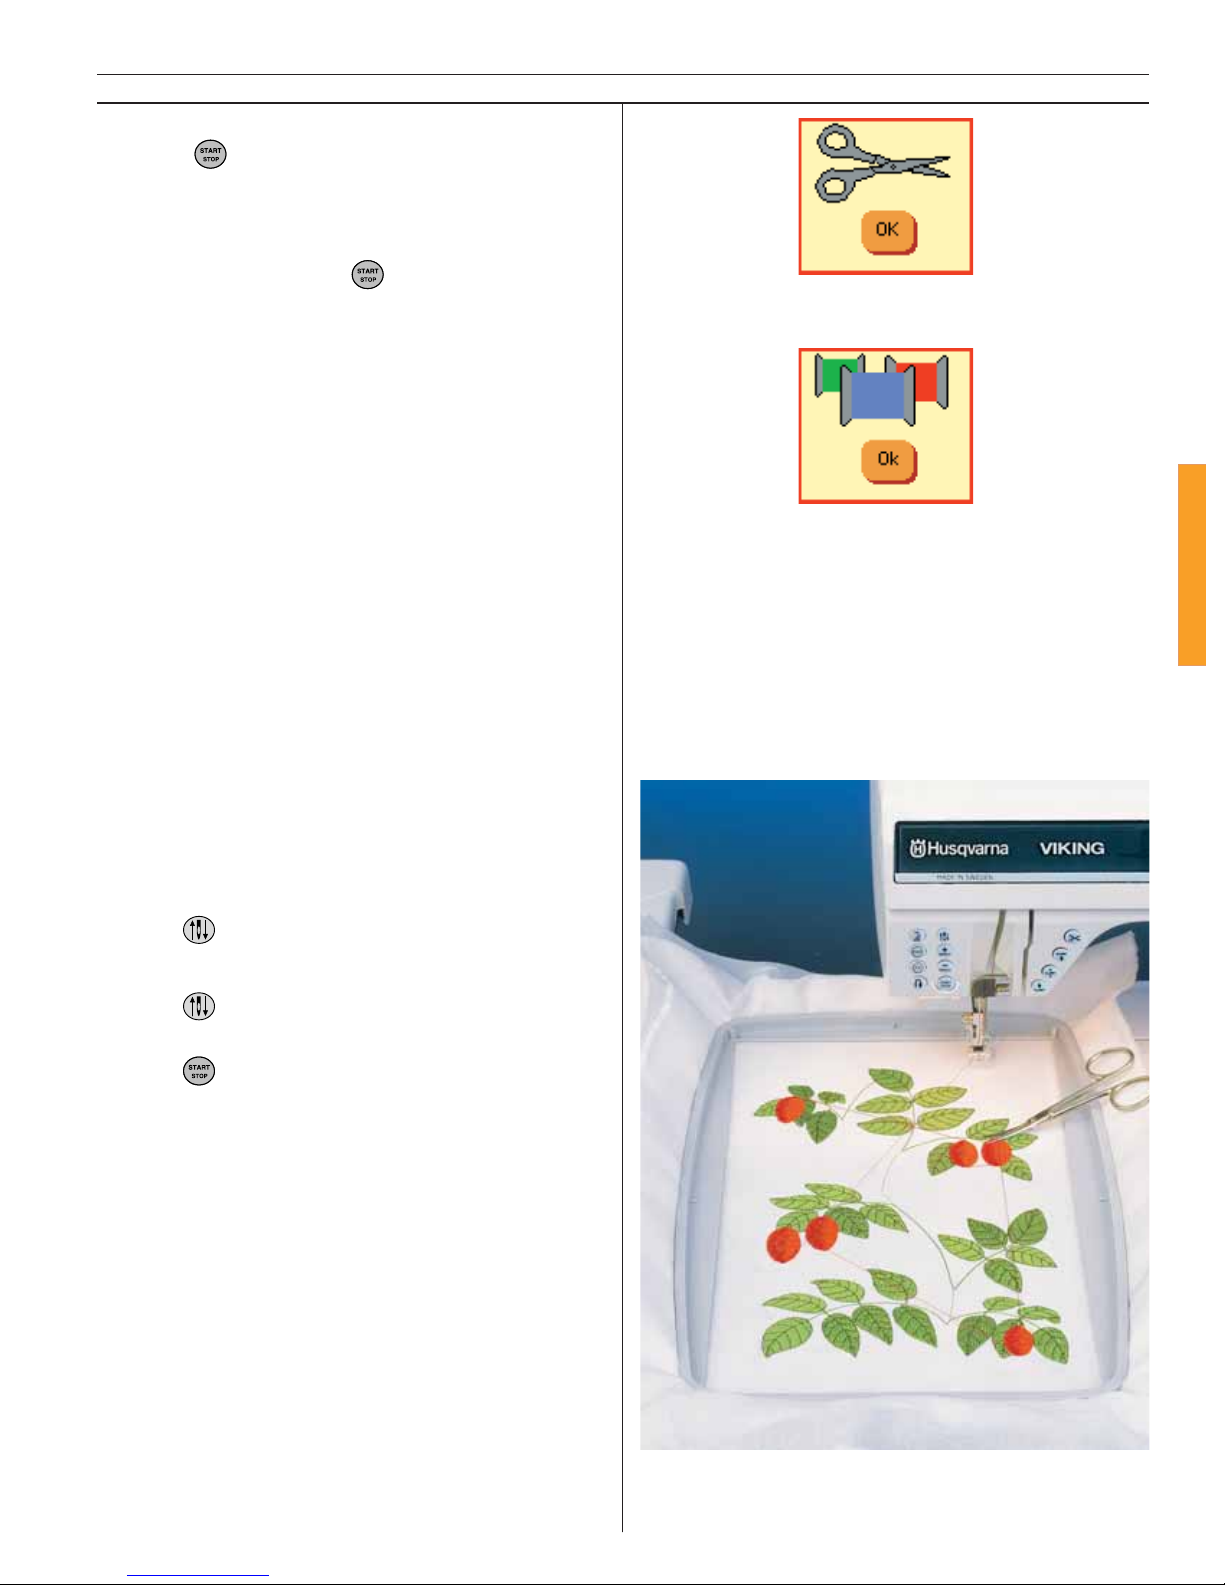
75
Embroidery
Start embroidering
1. Touch to begin embroidering. The
presser foot is lowered automatically.
2. After a few stitches a Pop-up menu will
prompt you to cut the starting thread tail. Cut
the thread tail. Touch
to resume embroi-
dering.
3. Your Designer I will stop embroidering and a
Pop-up menu will prompt you when the top
thread color should be changed.
4. When your embroidery is complete, your De-
signer I will stop sewing, the top and bob bin
thread are cut automatically, and the presser
foot is raised to the extra lift position to make
it easy to slide off the hoop.
To move the hoop forward for
easy cutting
When changing from one thread to another, it is
best to cut the long ”jump” stitches that are
created when the hoop is moving. This will
make the thread cutting easier when the
embroidery is fi nished.
1. Press
. The hoop moves towards you.
2. Cut the threads.
3. Press
again and the hoop moves back to
its ready po si tion.
4. Press
to resume the embroidery.
Page 76
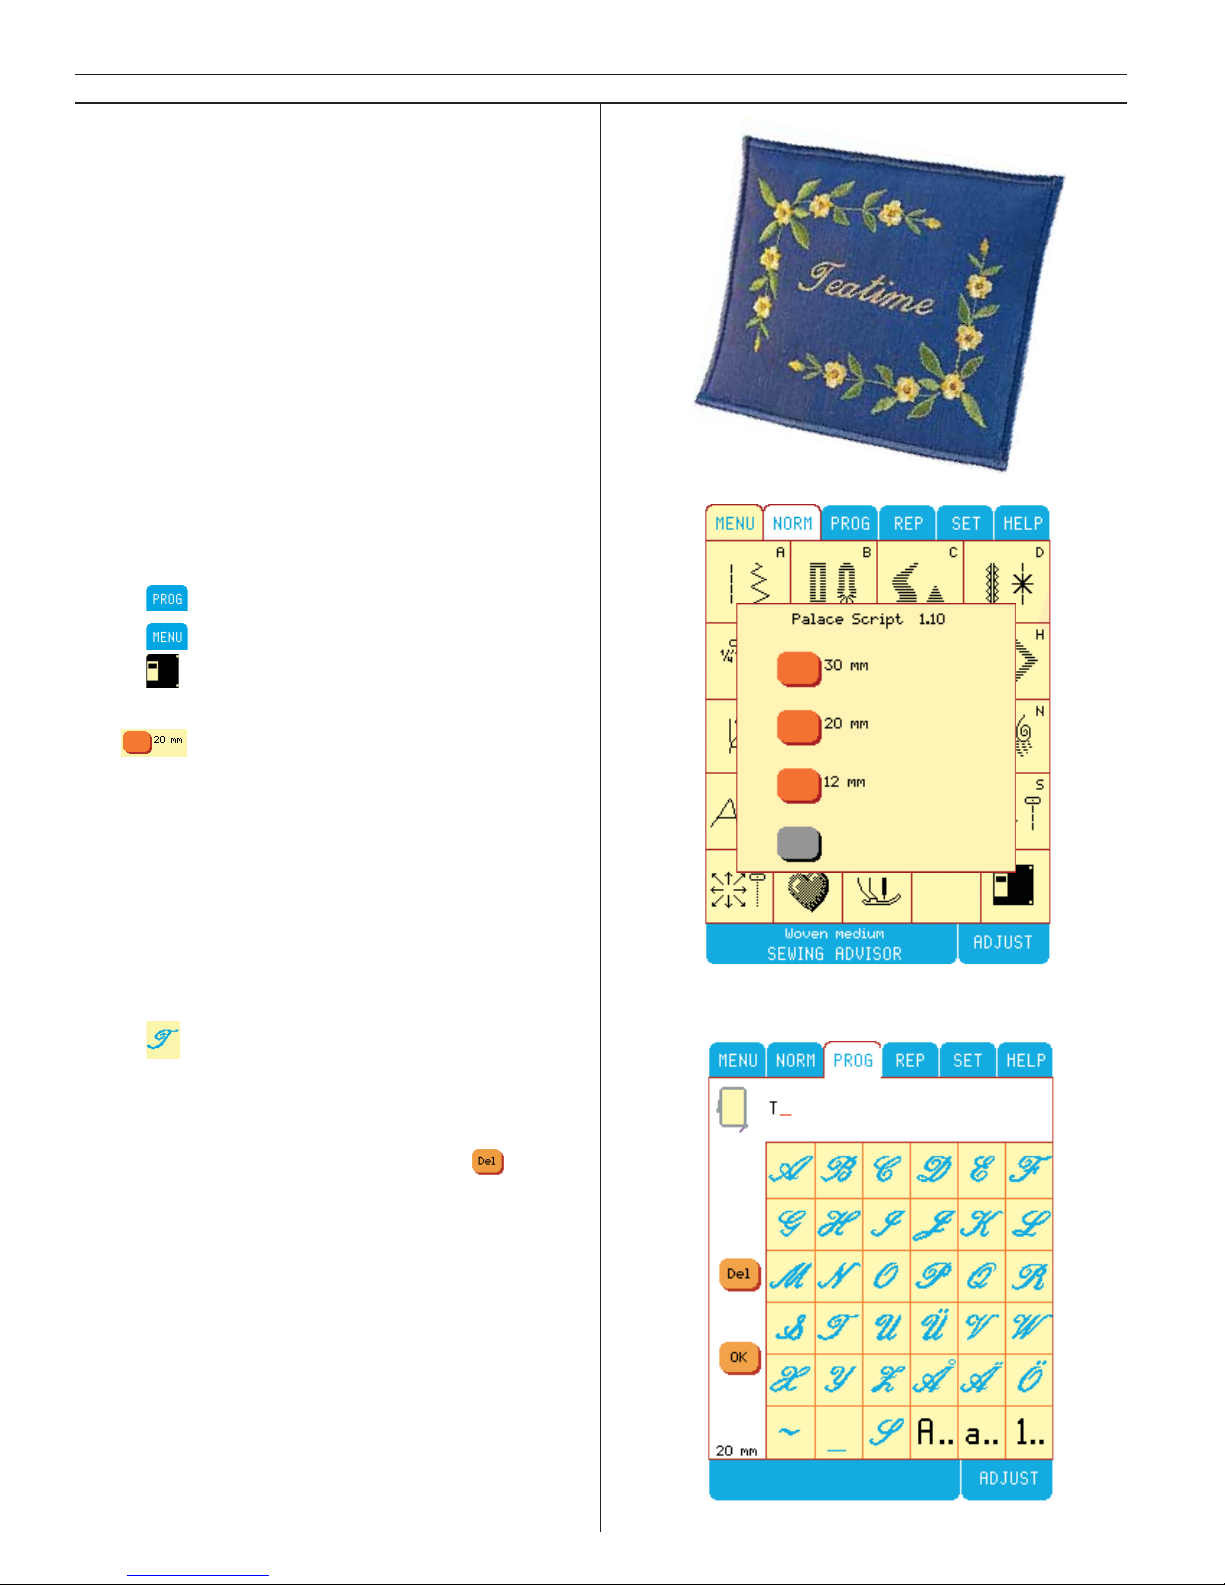
76
Embroidery
Customizing Designs
Designer I has Built-In customizing. You are
able to combine a number of designs and/or
lettering programs on the Color Touch Screen to
create customized embroidery.
Customize “Teatime and fl owers”. Slide on the
embroidery unit, see page 64. Turn on Designer
I, and Main menu appears.
How to program ”Teatime”
Slide in the Palace Script Disk.
Touch
.
Touch
.
Touch
.
There are three sizes to choose between. Select
size
.
Touch
. The capital letter T appears on the
top of the Color Touch Screen in the programming area. The cursor line moves to the right
ready for the next letter to be entered.
Note: If you have to correct spelling, use . This
button erases your programmed letters backwards
step by step.
Page 77
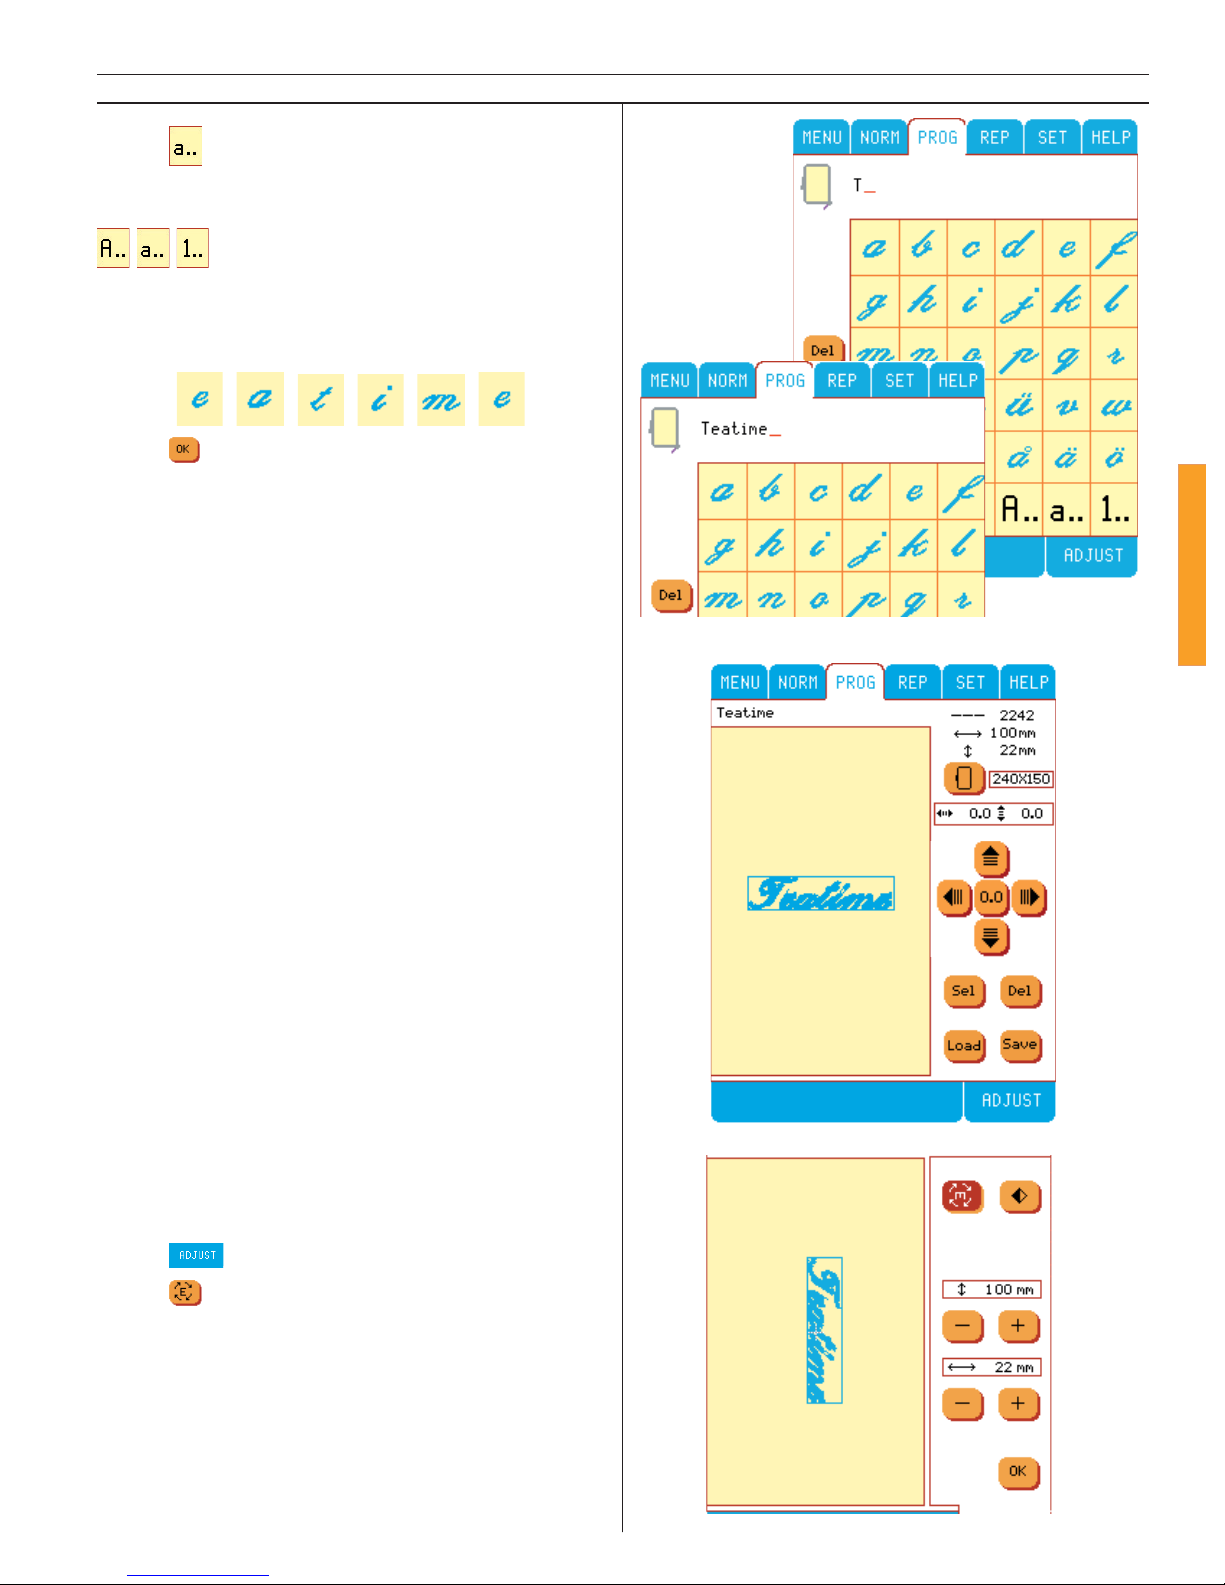
77
Embroidery
Touch . Now you have opened the lowercase menu. You are able to jump between upper
case, lower case and numbers by touching
.
Touch , , , , , .
Touch
and the letters have been pro-
gram med.
The combination you created is now visible on
the Color Touch Screen.
Slide out the Palace Script disk.
Now you should rotate “Teatime” to fi t in with
the following “fl ower designs”.
Touch
.
Touch
once.
Page 78
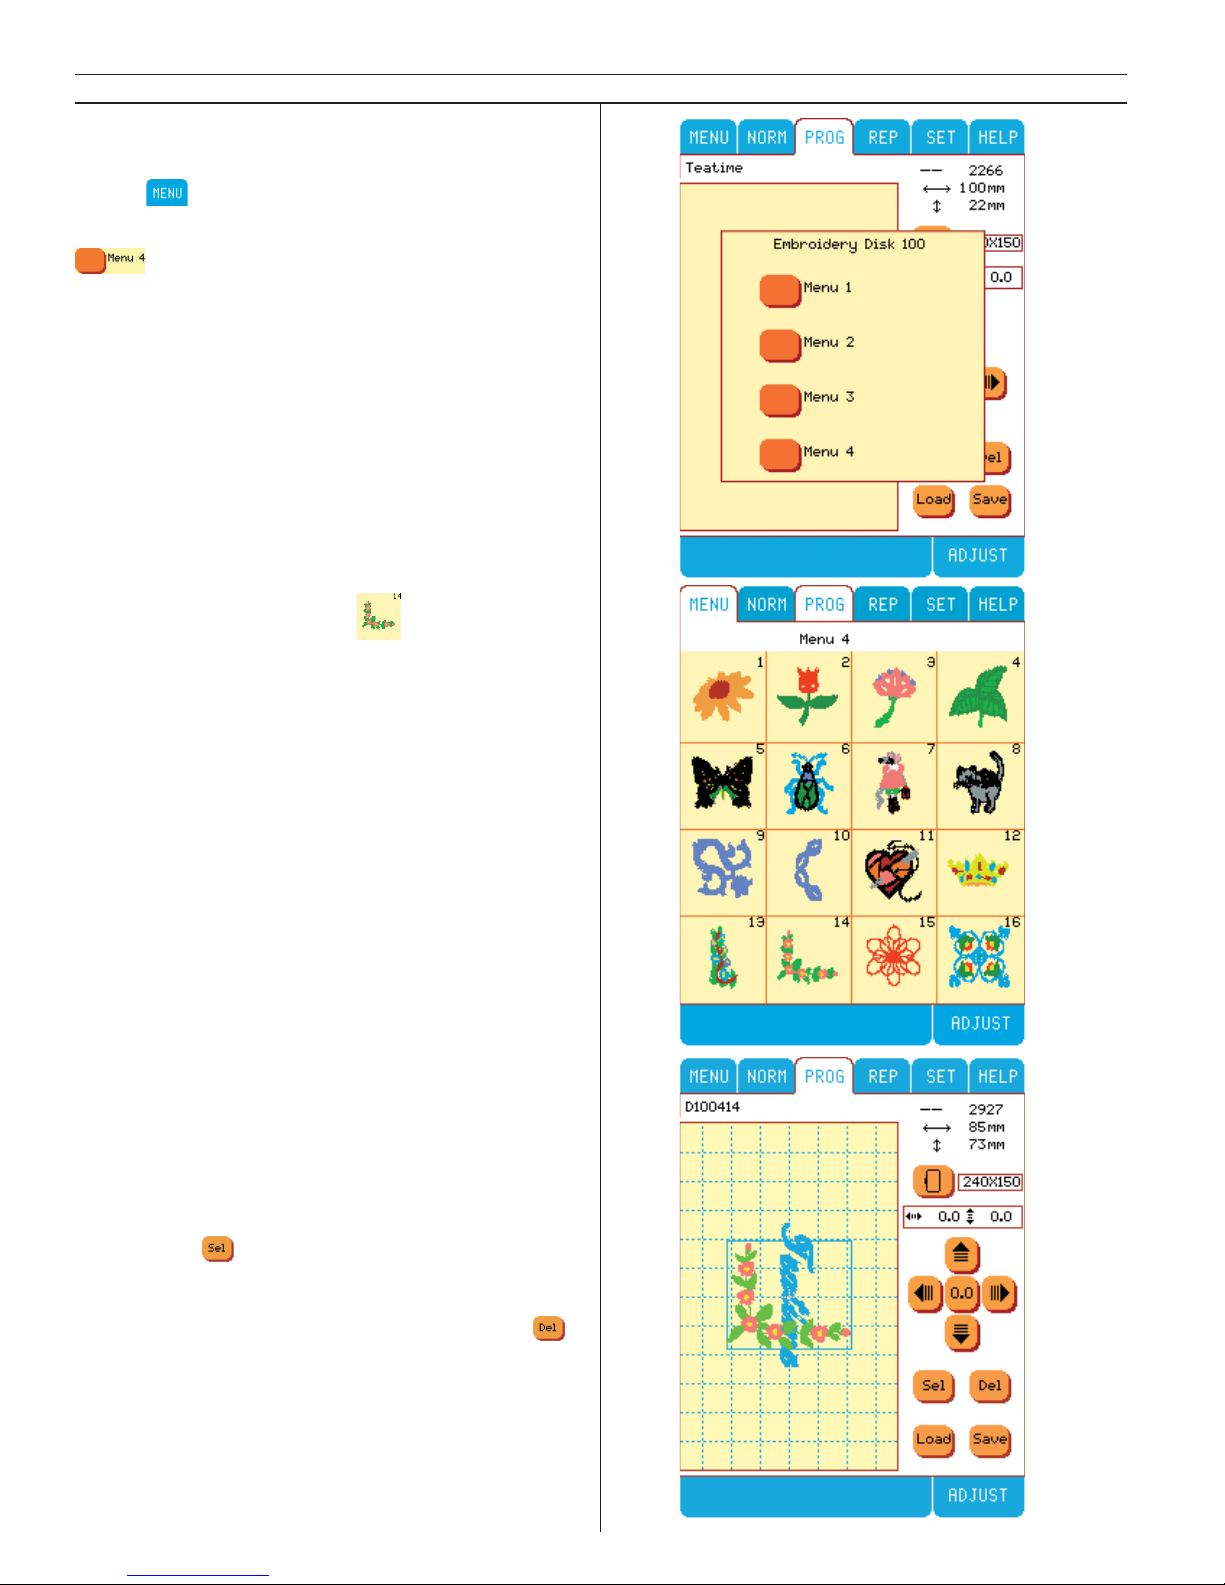
78
Embroidery
Select your design. Touch .
The fl ower design is now visible on the screen.
A box around the design indicates it is selected
and can be worked with.
If you want to use 20x20mm grid, go to SET sub
menu 3 and touch Grid ON.
Note: Touch to select a part of the customized
design. When a part is selected, it is indicated by a
box around it. The selected part can be moved or
adjusted, but you can also delete it by touching
.
If you want to bring up a design, or a customized design from a disk memory, see page 81.
Combine the word with designs
Slide in the Designer Sampler Disk 100.
Touch
.
There are four menus to choose between. Touch
.
Page 79
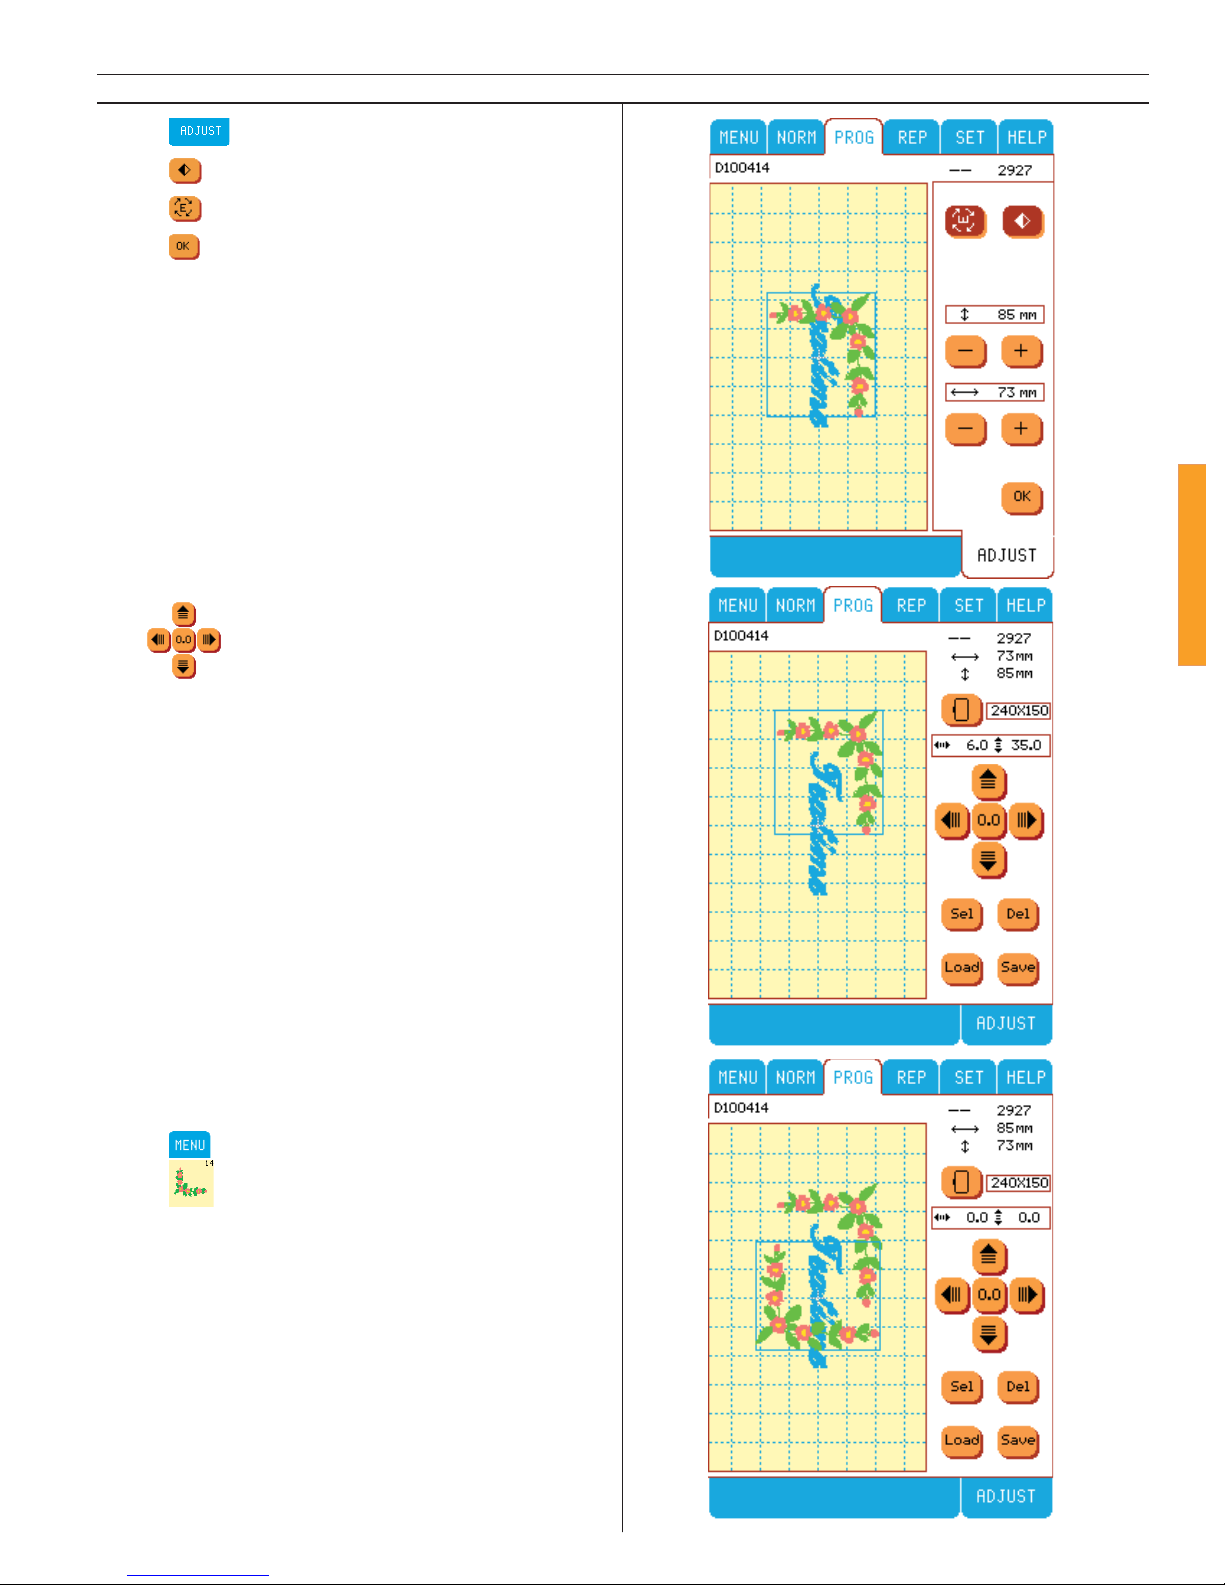
79
Embroidery
Use to move the design to your selected position on the Color Touch Screen.
Touch
to select your second design.
Touch
. A new fl ower design is now visible
on the screen. The box around the design indicates it is selected and can be worked with.
Touch .
Touch
.
Touch
three times.
Touch
.
Page 80
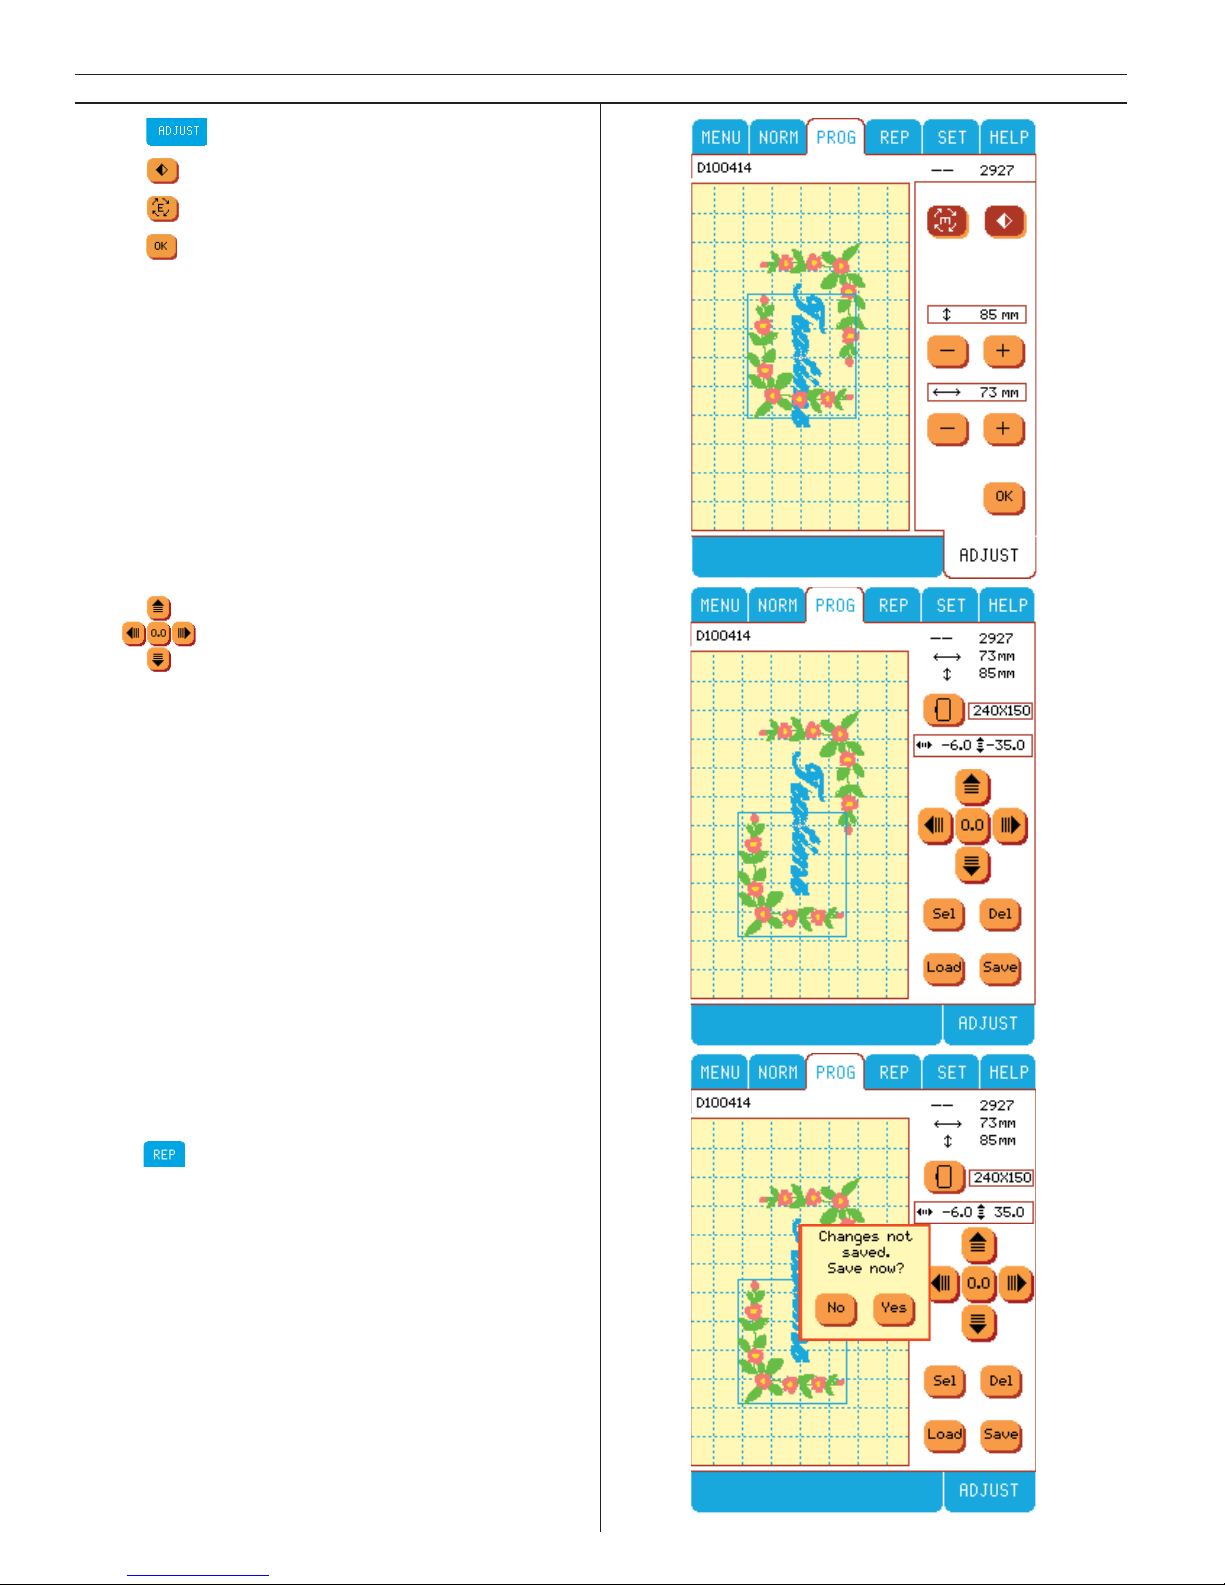
80
Embroidery
Use to move the design to your selected position on the Color Touch Screen.
Save your customized design
Touch
. A Pop-up menu appears. Changes
not saved! Save now? Enter No or Yes.
If you select No you are still able to sew your
design.
If you wish to save your design for future sewing,
slide in a PC-formatted disk and select Yes.
Touch .
Touch
.
Touch
once.
Touch
.
Page 81
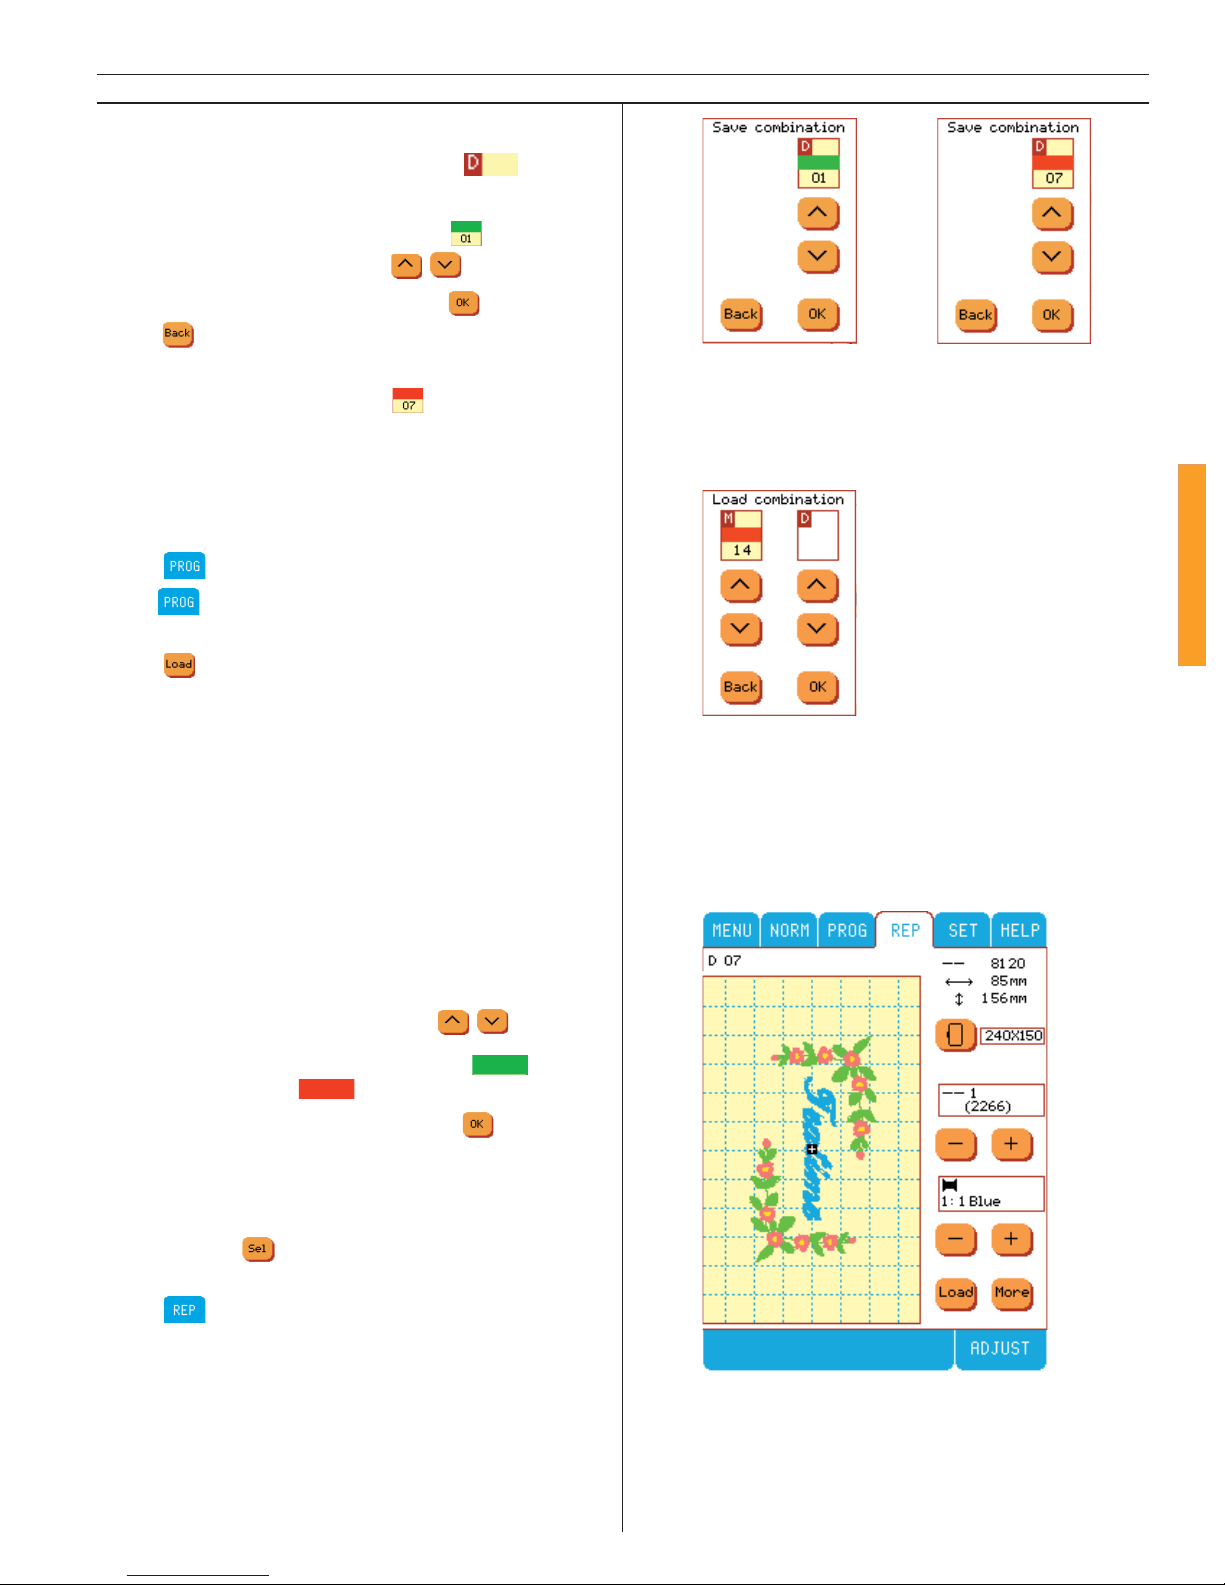
81
Embroidery
A new Pop-up menu appears.
The disk memory is indicated with
.
Empty memories are indicated with green color,
in this case memory D1 is empty,
.
Step memory numbers with
.
If you wish to save design, touch
, if not
touch .
Full memories are indicated with red color, in
this case memory D7 is full,
.
Loading your saved designs from fl oppy disc
Turn on your Designer I or select Menu to re turn to Main menu.
Select .
Note: can only be selected when the Main
menu is displayed on the Color Touch Screen.
Select . A pop-up menu appears. “Load combination” with two boxes to select from.
M allows you to select programmed built-in stitches, and lettering, from one of the 15 memories that have been programmed from the stitch
menus in the machine, by stepping through the
memories.
D allows you to select from the memories on
the disk. These are embroideries and lettering
from disks that you have programmed in Built-In
Color Customizing and saved to a fl oppy disk.
There are 15 memories to select from.
Step through the memories with
.
Empty memories are indicated with
, and
full memories with .
Select the memory required, touch
.
The saved combination will appear on the Color
Touch Screen. A box appears around the fi rst
design in the combination, indicating it can be
worked with.
will select other designs in the
combination allowing for further adjustments.
Select
to stitch out the saved combination.
Page 82
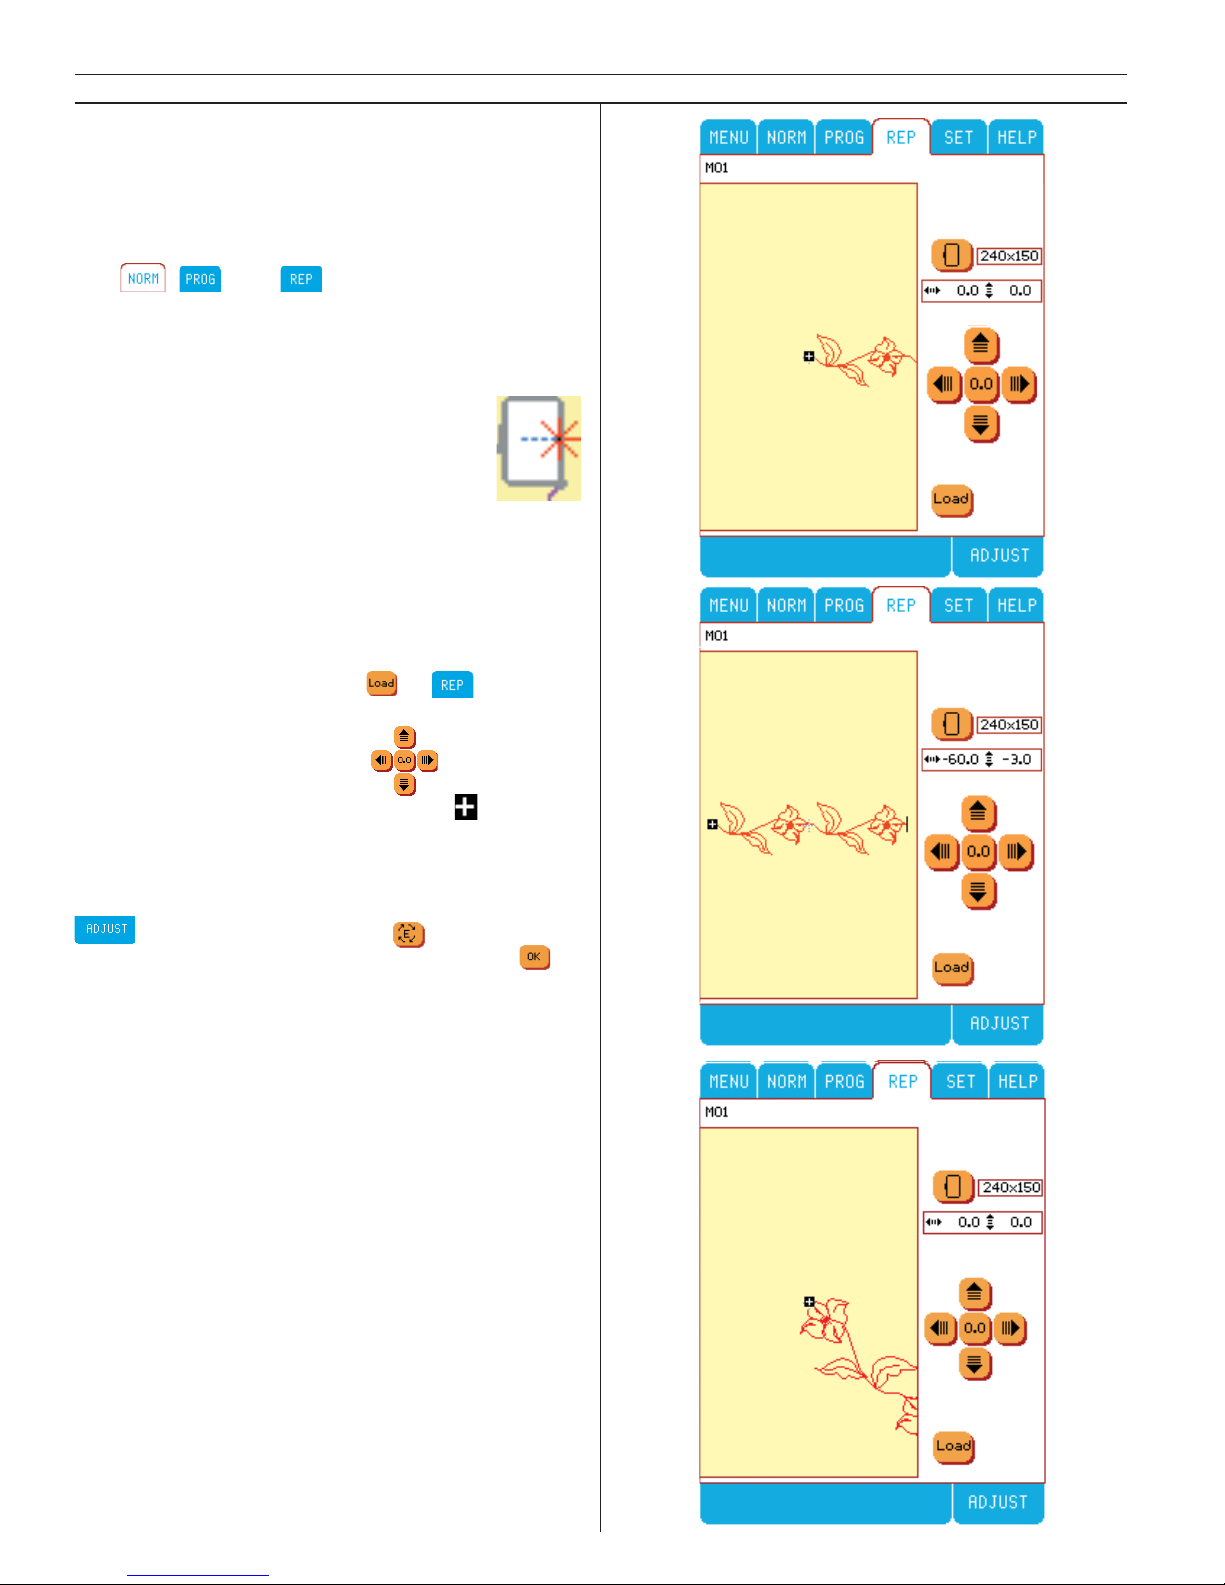
82
Embroidery
Built-in stitches in the hoop
Sew built in stitches (except stitches from B, S,
U and V menus and stitches where the reverse
button is used) within the hoop. Also combinations from memories M1-M15 can be sewn.
Use
, , and for built in stitches in
embroidery mode. The stitch number or memory number for the built in stitches are shown
above the stitch area.
The Designer I will stop automatically
when the sewn stitches reach the
edge of the hoop, and you will also
see a pop-up menu.
If a stitch is parallel to an edge but
too close, the touch screen will dis play only the
stitches that can be sewn out.
How to sew built-in stitches
To sew, select a stitch or a stitch pro gram. To
access the memories, touch in , and select desired memory.
Use the positioning arrows to po si tion
the star ting point. The starting point
and sewing direction will be dis play ed on the Color
Touch Screen.
To change stitch direction, stop sewing, touch
, touch the ro ta tion icon . The built-in
stitches can be rotated in 45° steps. Touch to
see the stitch direction dis play ed.
This feature makes it easy to stitch, for example,
a beautiful frame of stitches around an embroidery.
Page 83
83
Decorative / Crafting
Page 84
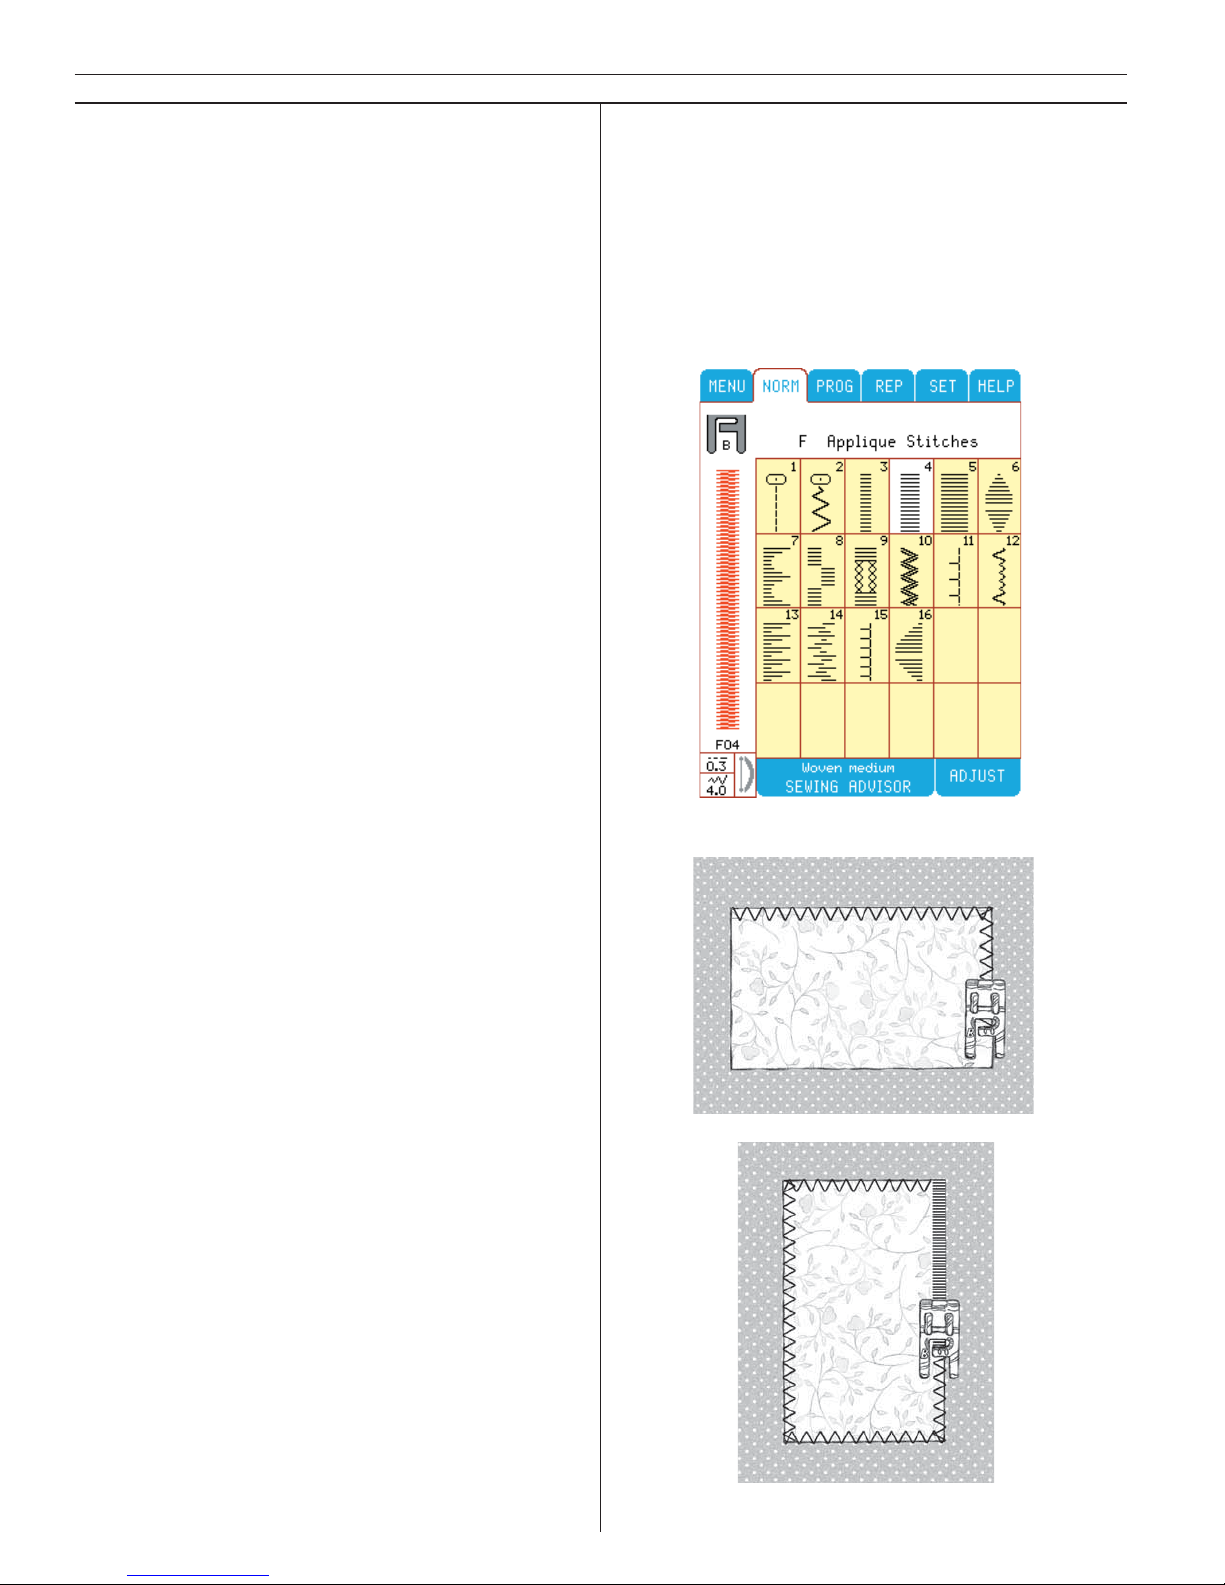
84
Decorative/Crafting
Decorative / Crafting
Your Husqvarna Viking Designer I is unsurpassed for creative options.
Stitch your way through the next pages to learn
the basics for a few of the favorite creative techniques.
Appliqué
One of the most exciting and time saving features on your Designer I is the automatic sa tin
stitch programs on Menu F, Applique Stitches.
The pre-programmed satin stitch: 2mm stitch
width F3, 4mm stitch width F4, 6mm stitch
width F5. The top ten sion is reduced automatically for satin stitch.
Fabric: Quilting fabric, Husqvarna Viking TearA-Way stabilizer, Cotton scrap for applique.
Thread: Embroidery thread on top and embroidery weight bobbin thread.
Touch: Woven medium on the Sewing Advisor.
Touch: Menu F, Applique Stitches, Stitch F4.
Snap on: Presser foot B as recommended.
Sew:
• Cut a small square for the applique from the
cotton scrap.
• To baste applique square to the quilt fabric,
touch A11 to zigzag stitch or use fusible web.
• Place Tear-A-Way stabilizer under the quilt
fabric.
• Place the fabric under the presser foot.
• Satin stitch around the square with the out-
side swing of the needle sewing off the edge
of the applique.
Page 85
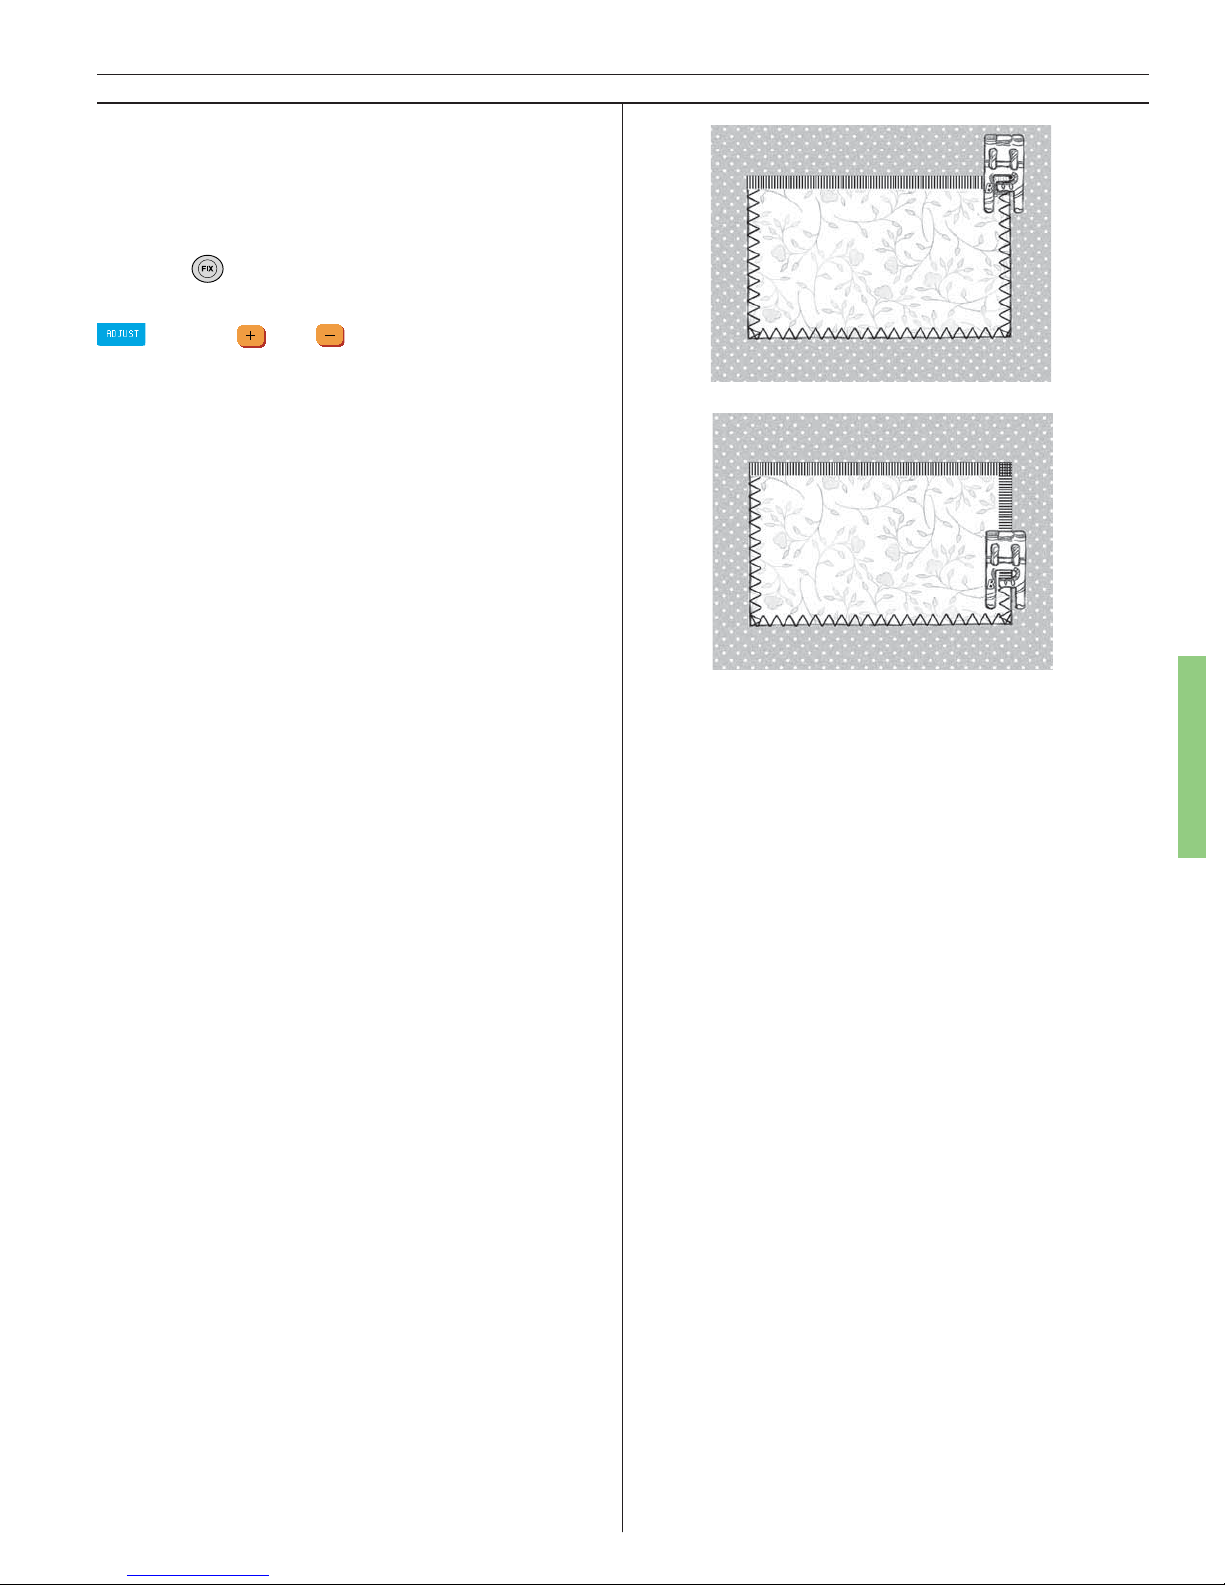
85
Decorative/Crafting
• To turn outside corners, touch needle stop
down or tap the needle down with the foot
control to pivot with the needle on the outside of the applique. The Sensor Foot Lift pi vot
po si tion makes it easy!
• Touch
to secure the stitches.
Note: To adjust the satin stitch length or width, touch
. Use the and buttons to fi ne tune the
stitch length or width.
Tip: Snap on the transparent presser foot B with
red lines for greater visibility.
Optional: The optional open toe applique foot
is completely open in front for greater visibility
and features a red guideline for satin stitching.
Page 86
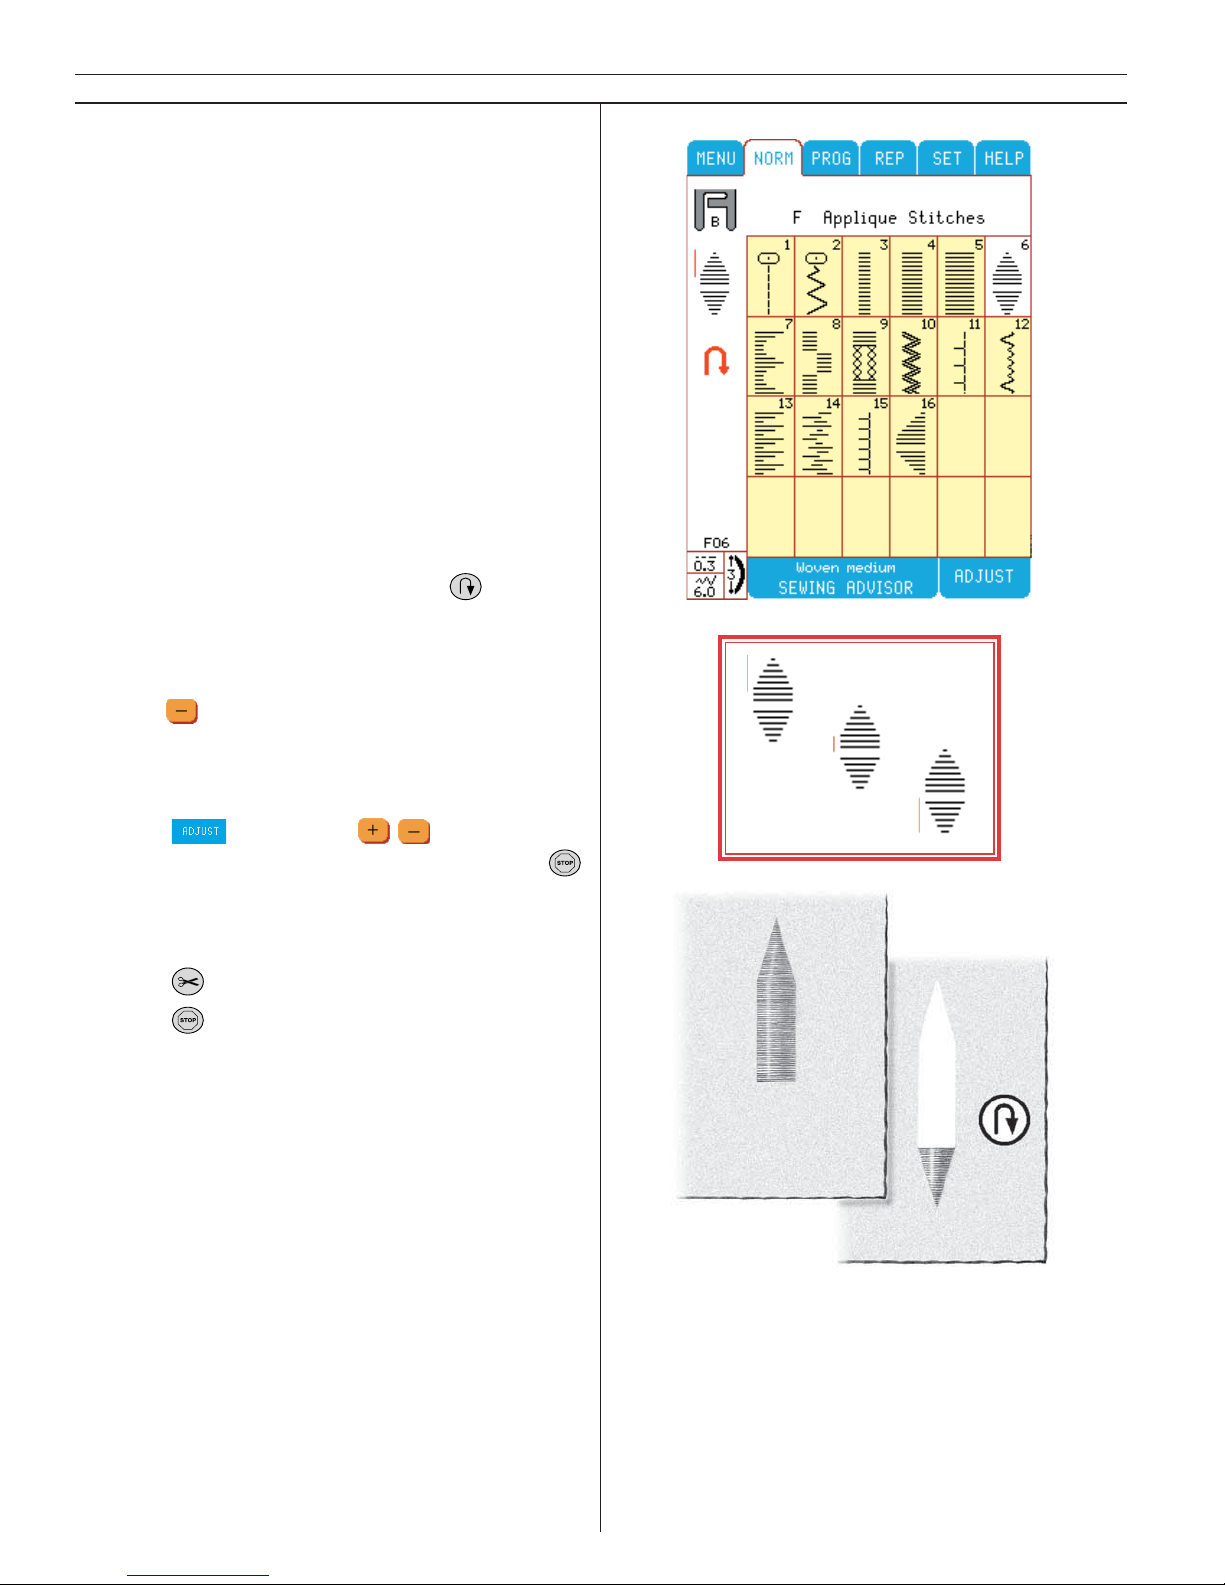
86
Decorative/Crafting
Taper Satin Stitch
The taper stitch on Menu F, Applique Stitches,
stitch F6 automatically tapers the satin stitch for
corners and points and can be used for satin
stitch lettering. On the same piece of stabilized
fabric, stitch a diamond of tapered satin stitch.
Touch: Menu F, Applique Stitches, Touch Stitch
F6.
Snap on: Presser foot B as recommended
Sew:
The stitch will automatically taper from a point
to the 1/4" (6mm) satin stitch width.
Note: The red line on the left side of the stitch indicates what part of the sewing sequence De sig ner I is
sewing at the moment.
• Stitch about 1/2" (13 mm). Touch . The satin stitch will taper to a point and tie off automatically.
• For a narrower satin stitch, adjust the stitch
width
.
• To begin with a fl at end satin stitch, touch
stitch F6, touch reverse before beginning
to sew. To make the tapered points longer,
Touch
, Elongation .
• When you have the result you wish, touch
. The stitch will now repeat in succession and
the machine will stop automatically when the
stitch is completed.
• Touch
.
• Touch
to repeat.
Page 87
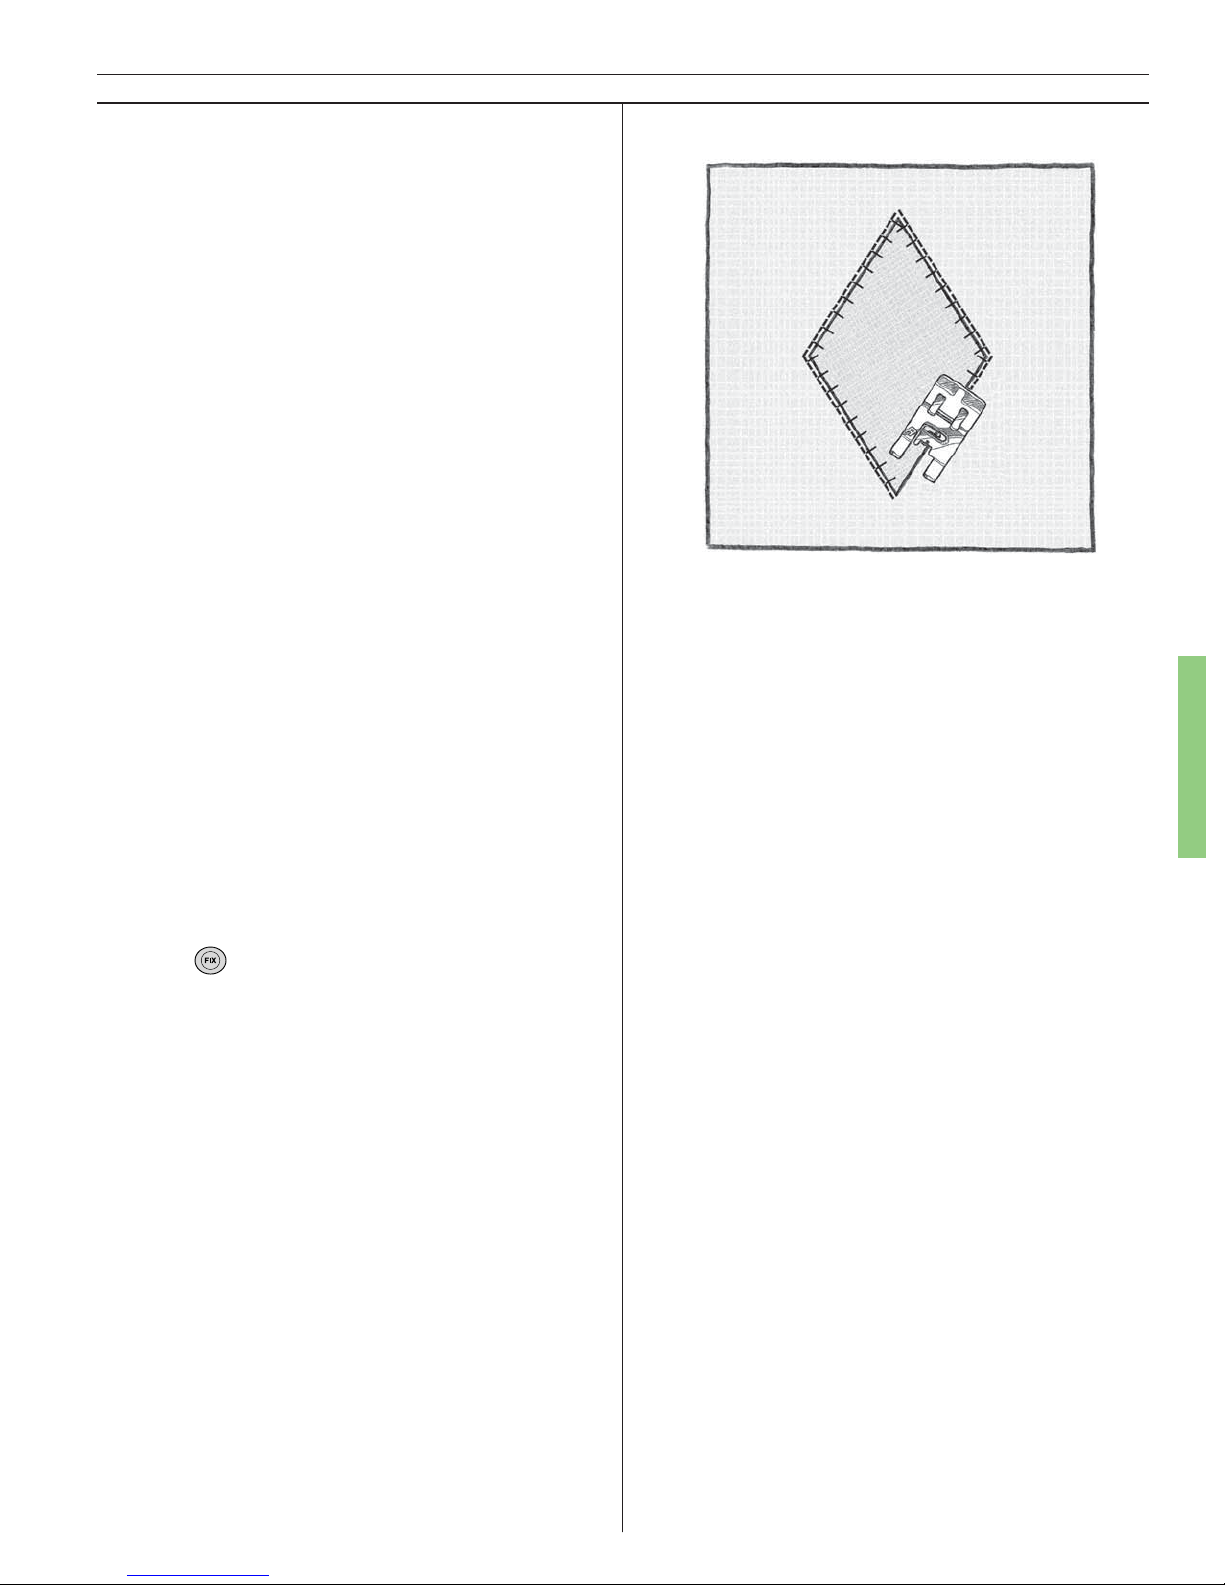
87
Decorative/Crafting
“Handlook” Heirloom Appliqué
Imitate the look of appliqué stitched by hand
with the heirloom appliqué stitch. This stitch is
also used for fi nishing bindings and trims with
a hand stitched look and resembles the hand
sewn buttonhole stitch.
Fabric: Broadcloth or chino, Husqvarna Viking
Tear-A-Way, Cotton scrap for appliqué.
Touch: Woven medium on the Sewing Advisor.
Touch Menu F, Appliqué Stitches, Stitch F11.
Snap on: Presser foot A as recommended.
• Thread the bobbin with embroidery weight
bobbin thread. It is your choice for the top.
For invisible appliqué, thread with invisible
thread. For a decorative “hand look”, thread
with embroidery thread and for a Folk Art
appliqué effect, thread with black thread.
• Fuse or stick fusible web to wrong side of
cotton scrap.
• Cut an appliqué shape from the scrap.
• Fuse the appliqué to the broadcloth and place
Tear-A-Way underneath.
• Place under the presser foot and stitch aro und
the outside of the appliqué with the straight
stitch at the edge “in the ditch” of the appliqué and the side stitch sewing into the appliqué.
• Touch
to tie off at the end.
Page 88
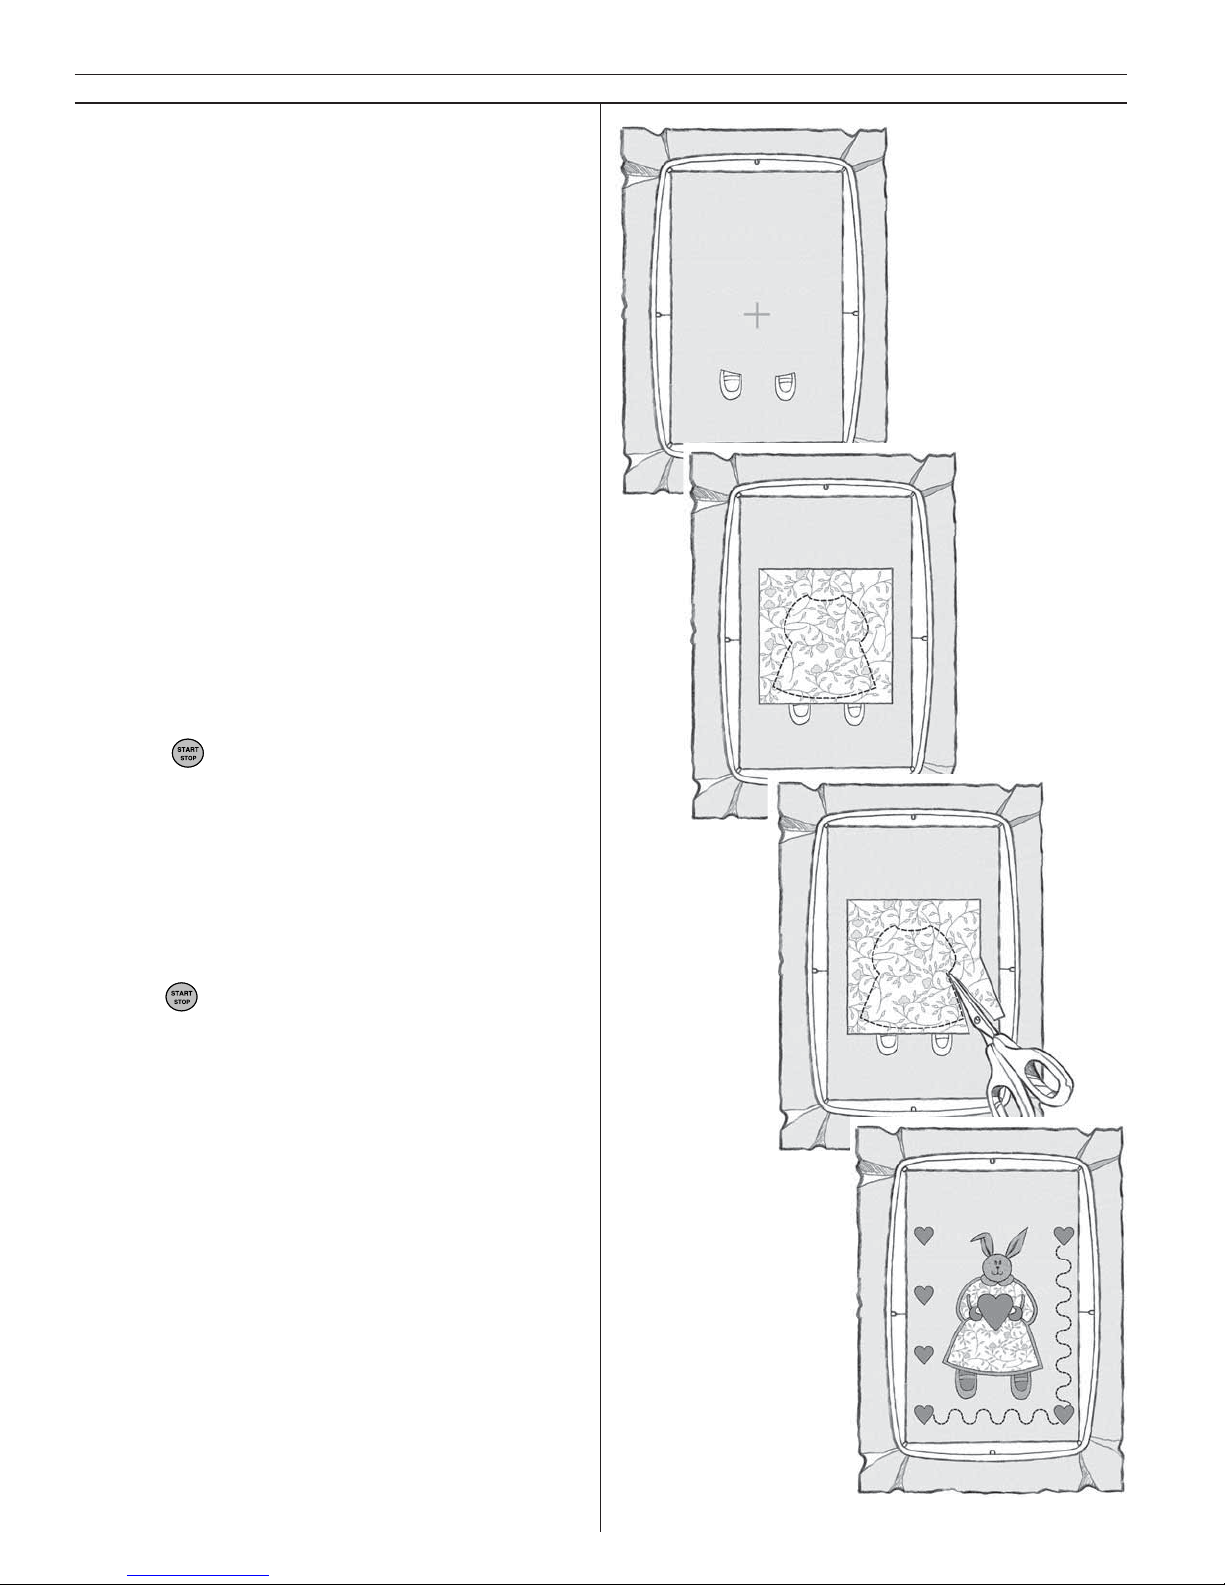
88
Decorative/Crafting
Appliqué Embroidery
Your Husqvarna Viking Designer I features a
va rie ty of embroidery options for appliqué. Page
through the Husqvarna Embroidery Collection.
Husqvarna Viking Embroidery Disk 27 designed
exclusively for Husqvarna Viking by appliqué
ex pert Mary Mulari of the USA, stitches appliqué
embroideries.
• Set your machine for embroidery, see page 64.
• Place Husqvarna Viking Tear-A-Way stabilizer
under the fabric, and hoop.
• Slide in Designer Embroidery Sampler Disk
100, Touch Menu 3 Stitch 3 Applique Bunny.
Embroider:
• Slide the hoop on the embroidery unit. Embroider the feet and shoes. Position applique
fabric on top for the bunny dress outline.
Tip: Hold appliqué fabric in place with tem-
porary spray adhesive. (Optional)
• Touch
. A straight stitch outline around
the appliqué section of the design is stitched
automatically.
• When the machine stops, slide the hoop off
but do not take the fabric out of the hoop.
Trim away the appliqué fabric from outside
the straight stitch outline.
• Slide the hoop onto the embroidery unit and
touch
. The Designer I will satin stitch aro-
und the appliqué automatically.
• Finish stitching appliqué bunny design.
Page 89
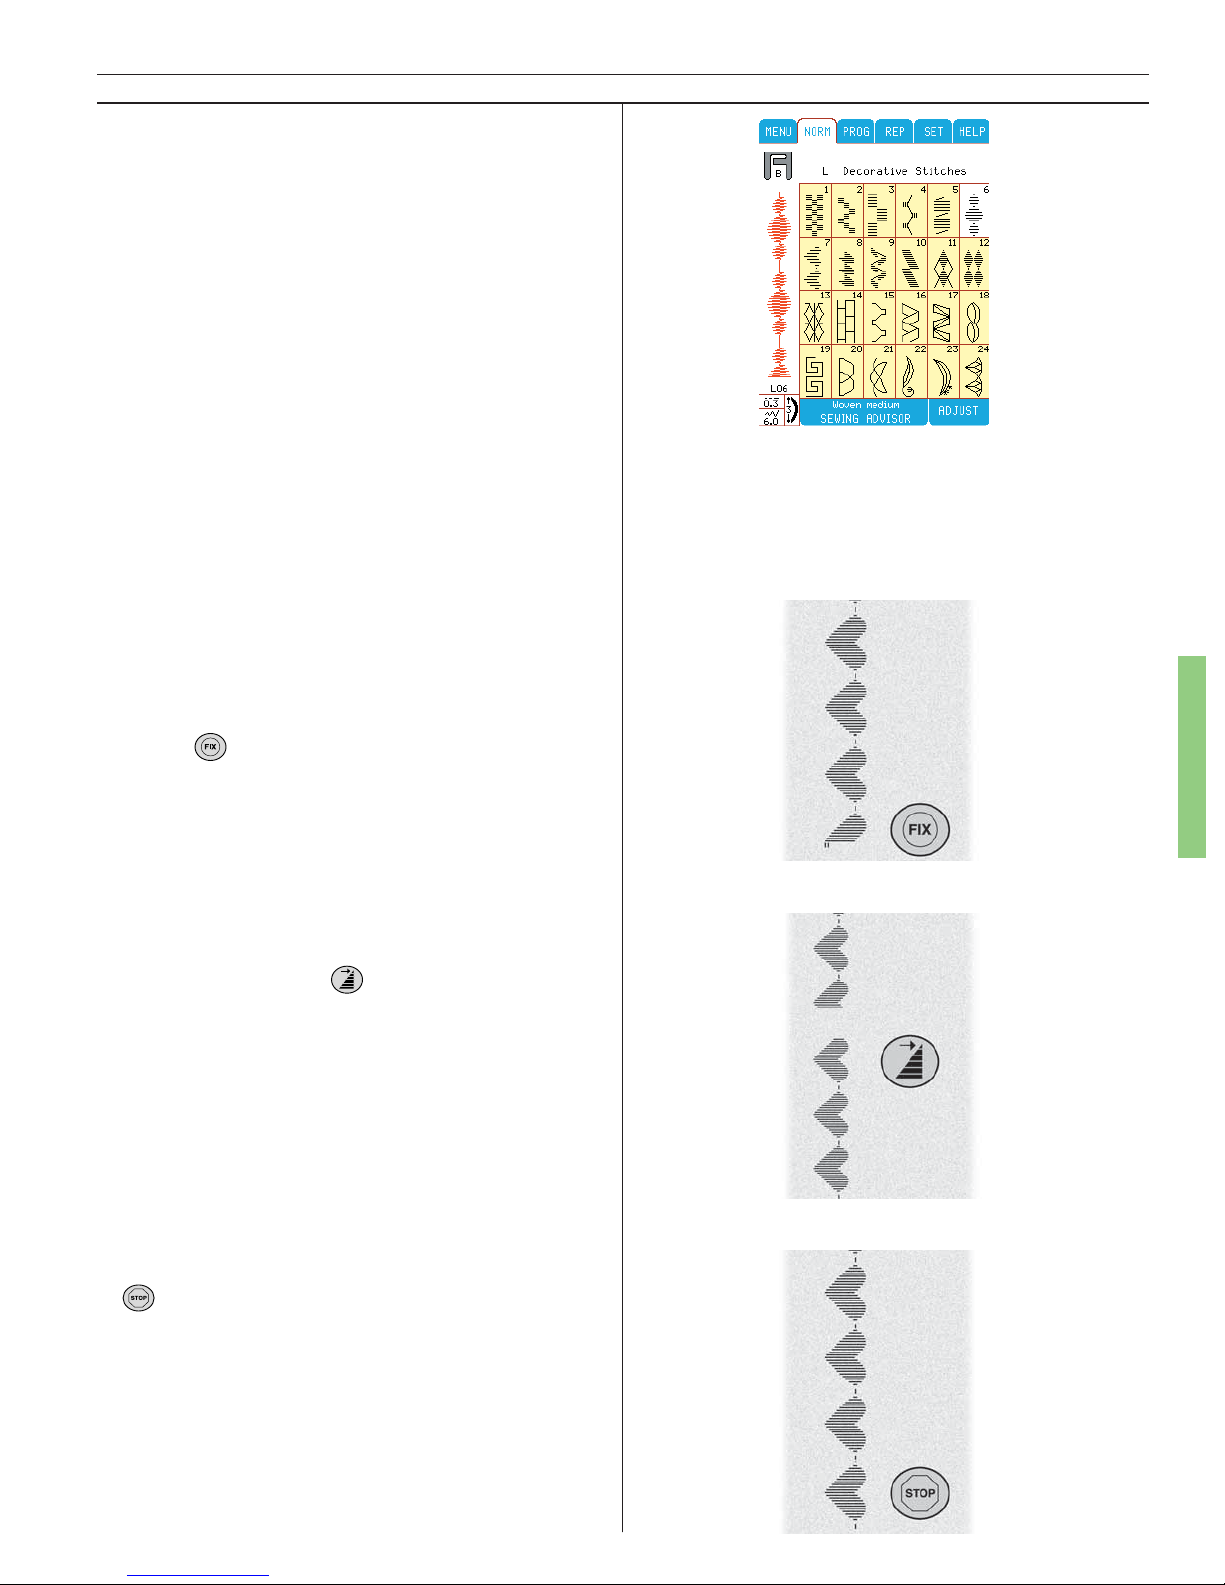
89
Decorative/Crafting
Decorative Stitches
Your creativity is unlimited with the Husqvarna
Vi king Designer I. It has a myriad of stitches for
creative sewing and embellishment and programming possibilities. Touch the picture of the stitch
on the Color Touch Screen and sew. The stitch is
dis play ed in the direction it will be sewn.
Fabric: Broadcloth or chino, Husqvarna Viking
Tear-A-Way stabilizer.
Touch: Woven medium on the Sewing Advisor,
Decorative Stitches Menu L, Stitch L7.
Thread with: 30 weight embroidery thread on
top and embroidery weight bob bin thread.
Snap on: Transparent presser foot B.
Sew:
• Place stabilizer under fabric.
• Sew several heart stitches.
FIX
• Touch
at the middle of a heart, the machine stops sewing and locks the stitches with
several tiny straight stitches.
Stitch Re-start
Touch stitch re-start to begin at the fi rst stitch of
the decorative stitch. If you have altered a stitch
width, length, elongation, it will be remembered.
• Touch stitch re-start
.
• Stitching begins at the start of the heart.
STOP
The STOP button is used to conclude a stitch,
i.e. the machine fastens the thread and stops
automatically when the sewing of the stitch has
been completed. STOP is cancelled when you
press the button again or by selecting a new
stitch.
• As you begin stitching the next heart, touch
to tie off in place at the end of the heart.
Page 90
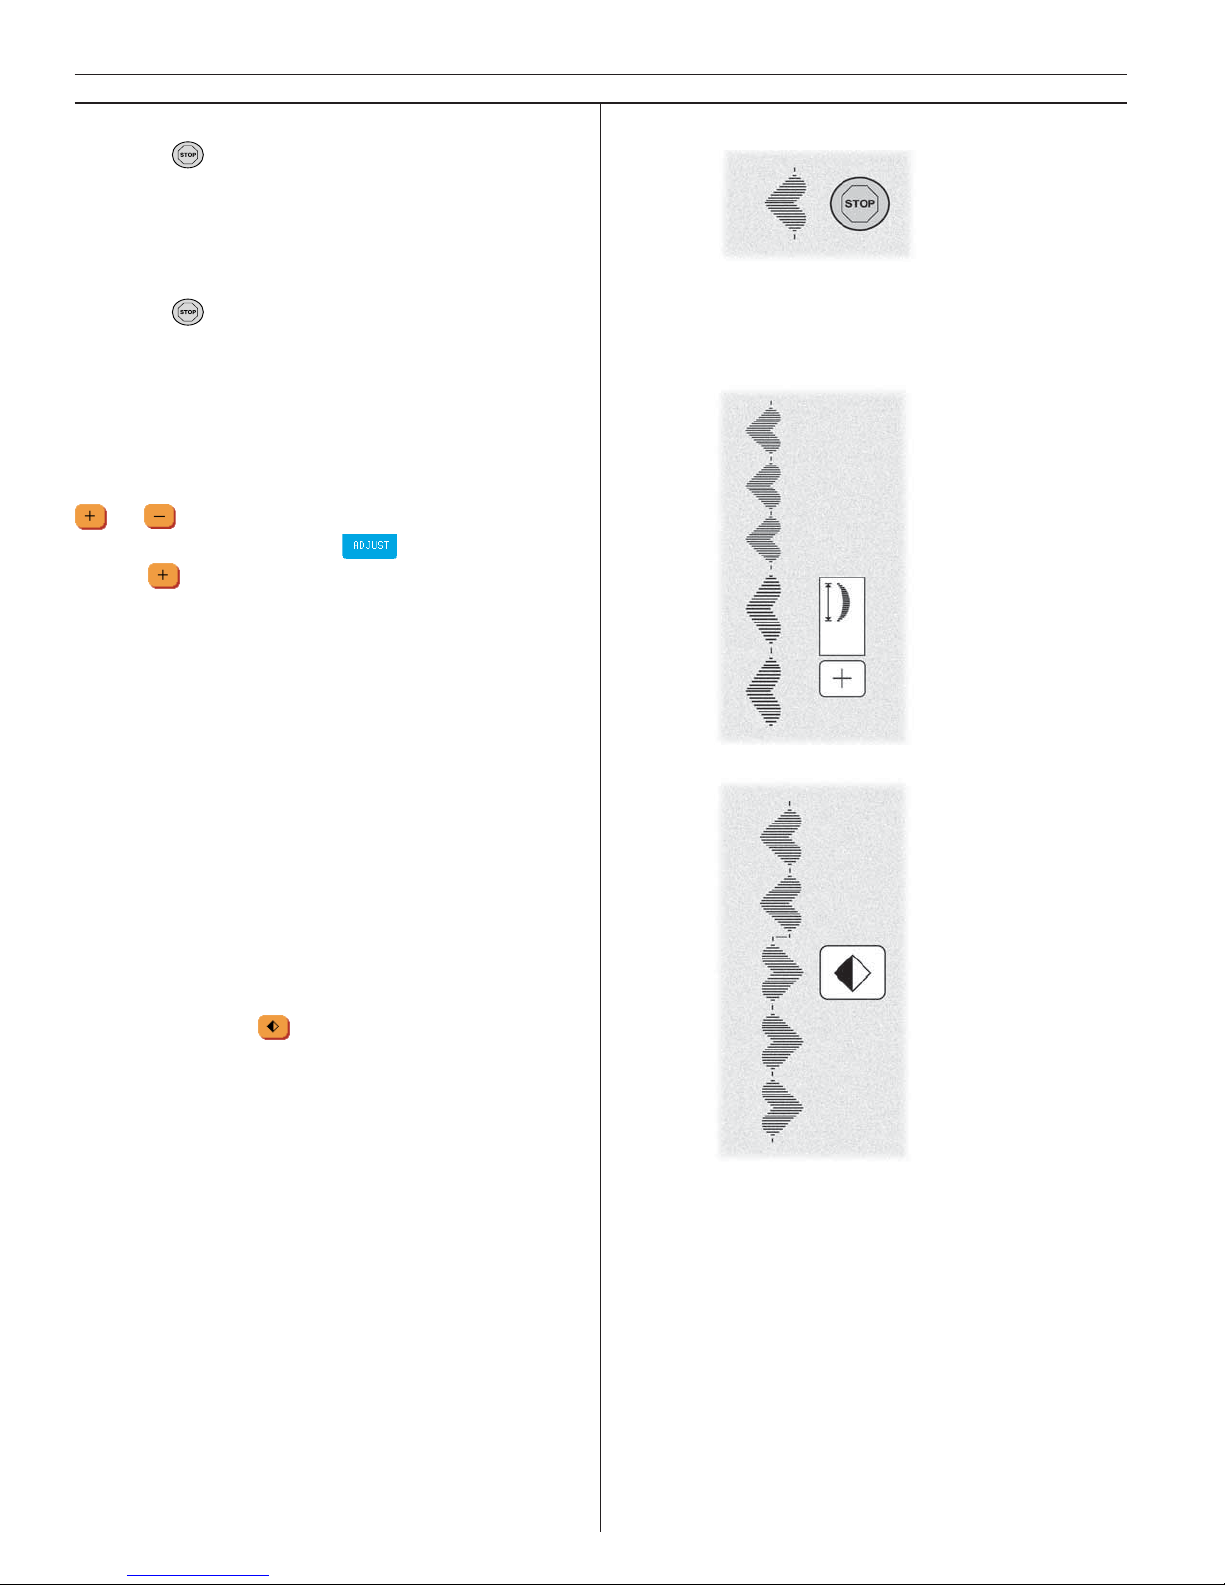
90
Decorative/Crafting
Single Stitch
• Touch
before beginning to sew or while
sewing a decorative stitch to sew only one
stitch pattern.
• Sew a heart. The machine stops and ties off in
place automatically.
• Touch
again to cancel it.
Elongation
You can alter the size of any decorative stitches
with length and width settings. To alter the size
of a satin stitch decorative stitch without changing the density of the satin stitch, use elongation
or .
• Touch stitch L7, Touch
, Touch Elongation to make the hearts larger. See the
altered stitch on the Color Touch Screen.
• Sew a row of stitches.
Mirror Image
Mirror image changes the direction of the decorative stitch pattern. See the stitch on the Color
Touch Screen as it will sew.
Side to Side Mirror Image
Flip the stitch patterns from left to right. This
often eliminates the need to feed the bulk of the
fabric into the arm of the machine.
• Touch L7.
• Stitch two pattern repeats. Touch mirror image side to side
. Watch the stitch change
on the Color Touch Screen. The stitch will
face the opposite direction.
• Stitch a few more stitch patterns.
Page 91
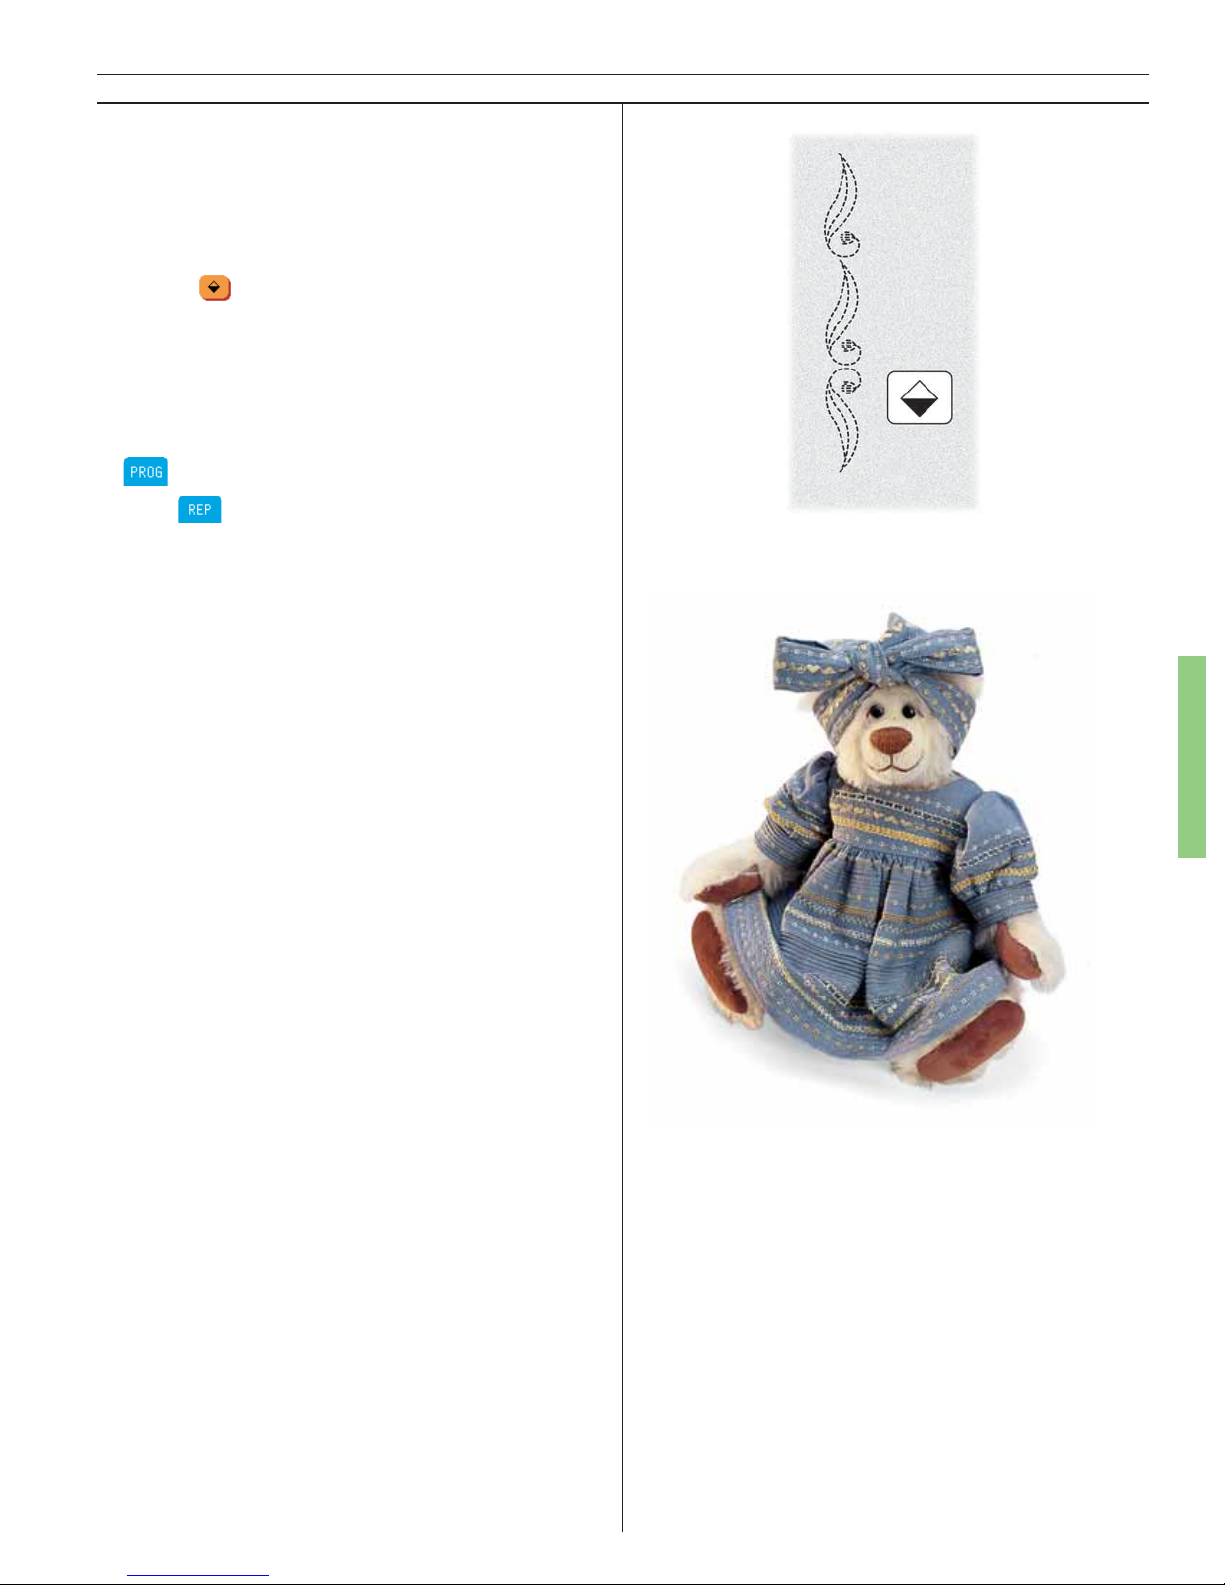
91
Decorative/Crafting
End to End Mirror Image
Flip the stitch patterns from front to back. This
doubles the creative possibilities.
• Touch L22.
• Stitch a few patterns. Touch mirror image end
to end
. Watch the stitch change on the
Color Touch Screen.
• Stitch a few more patterns.
Note: Program stitches with side to side and/or end
to end mirror image or mirror image entire stitch programs for unlimited creative stitch possibilities.
In
you can mirror image each one of the stit-
ches. In
mode you can mir ror ima ge your entire
program.
Page 92
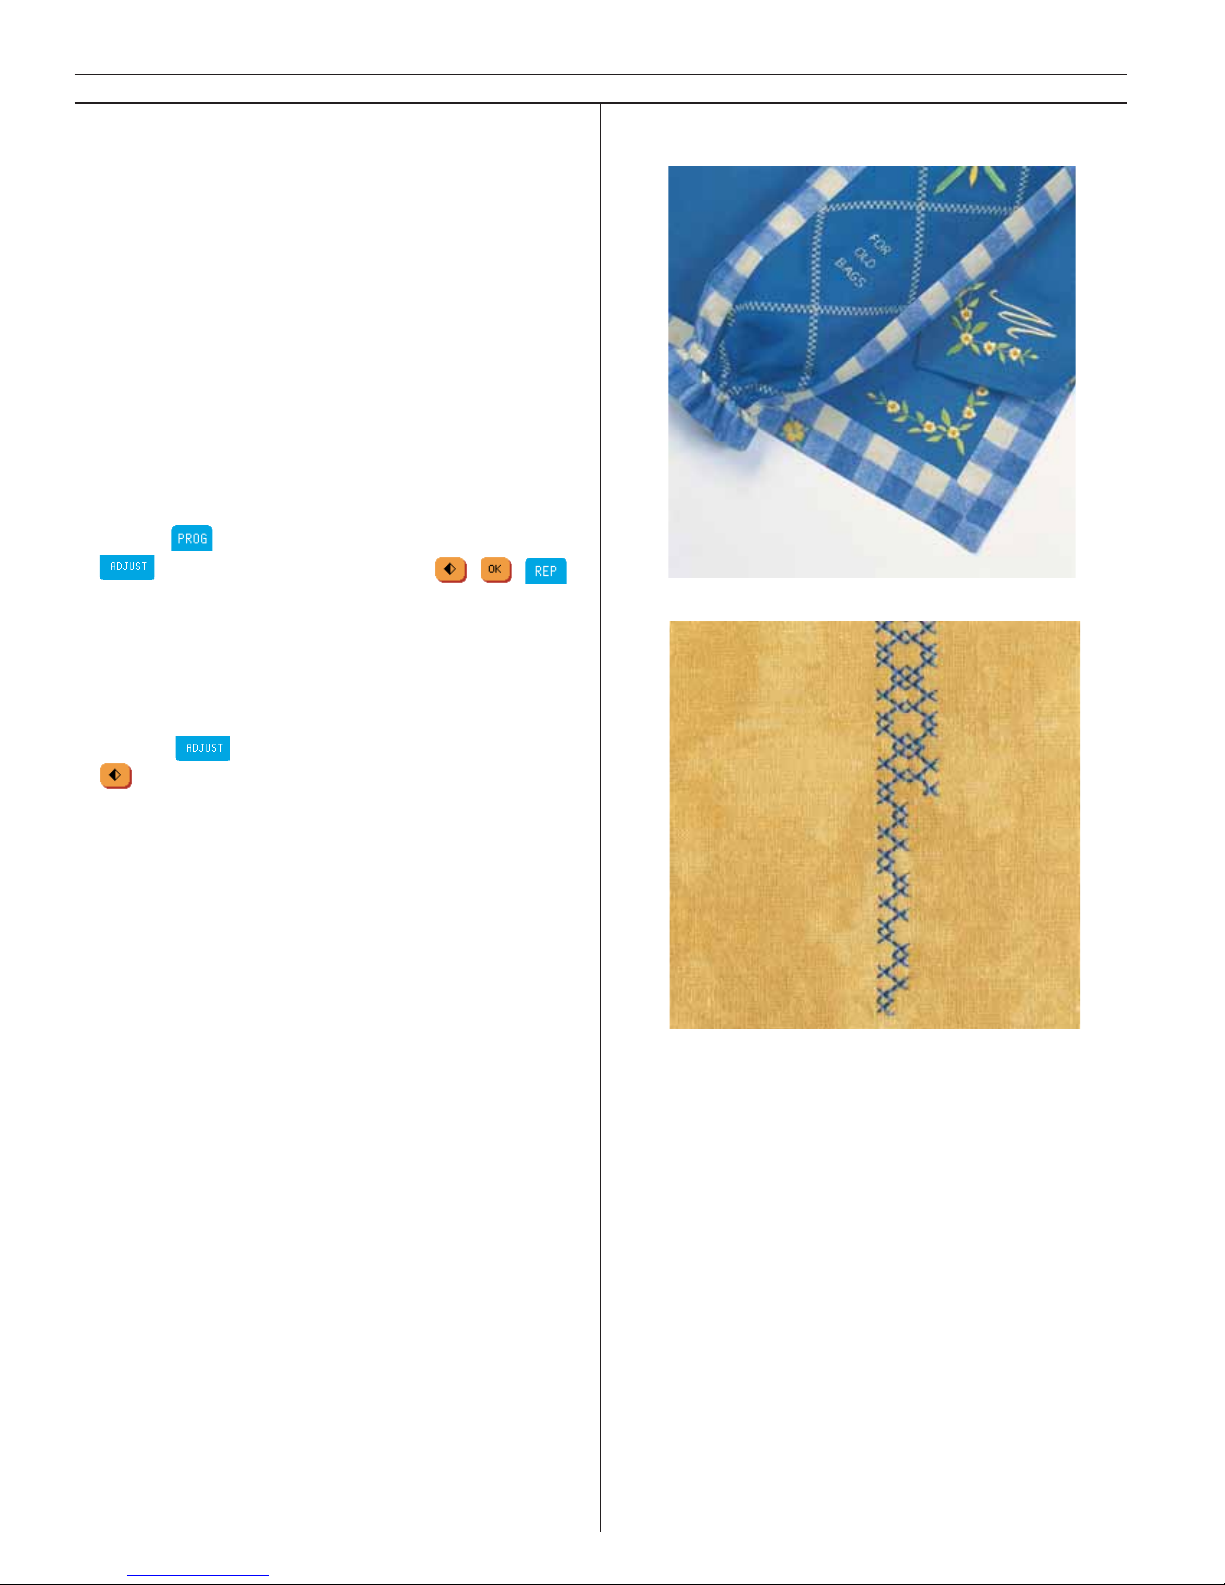
92
Decorative/Crafting
Cross Stitches
Program the cross stitch patterns to create bord ers, monograms and motifs.
Fabric: Woven medium Husqvarna Viking TearA-Way stabilizer
Touch: Woven medium on the Sewing Advisor
Snap on: Transparent presser foot B
Thread: Top thread with embroidery thread and
bobbin with embroidery weight bobbin thread.
Program:
• Touch Menu D, Heirloom Stitches.
• Touch
, Touch stitch D13 (2 times), D13,
, side to side mirror image , , .
• Preview your cross stitch pro gram on the Color Touch Screen.
• Place Tear-A-Way stabilizer under the fabric.
• Sew a row of cross stitch program.
• Touch
, touch side to side mirror ima ge
.
• Begin sewing at exactly the same place as the
fi rst row and match a second row of cross
stitch program next to the fi rst.
Page 93
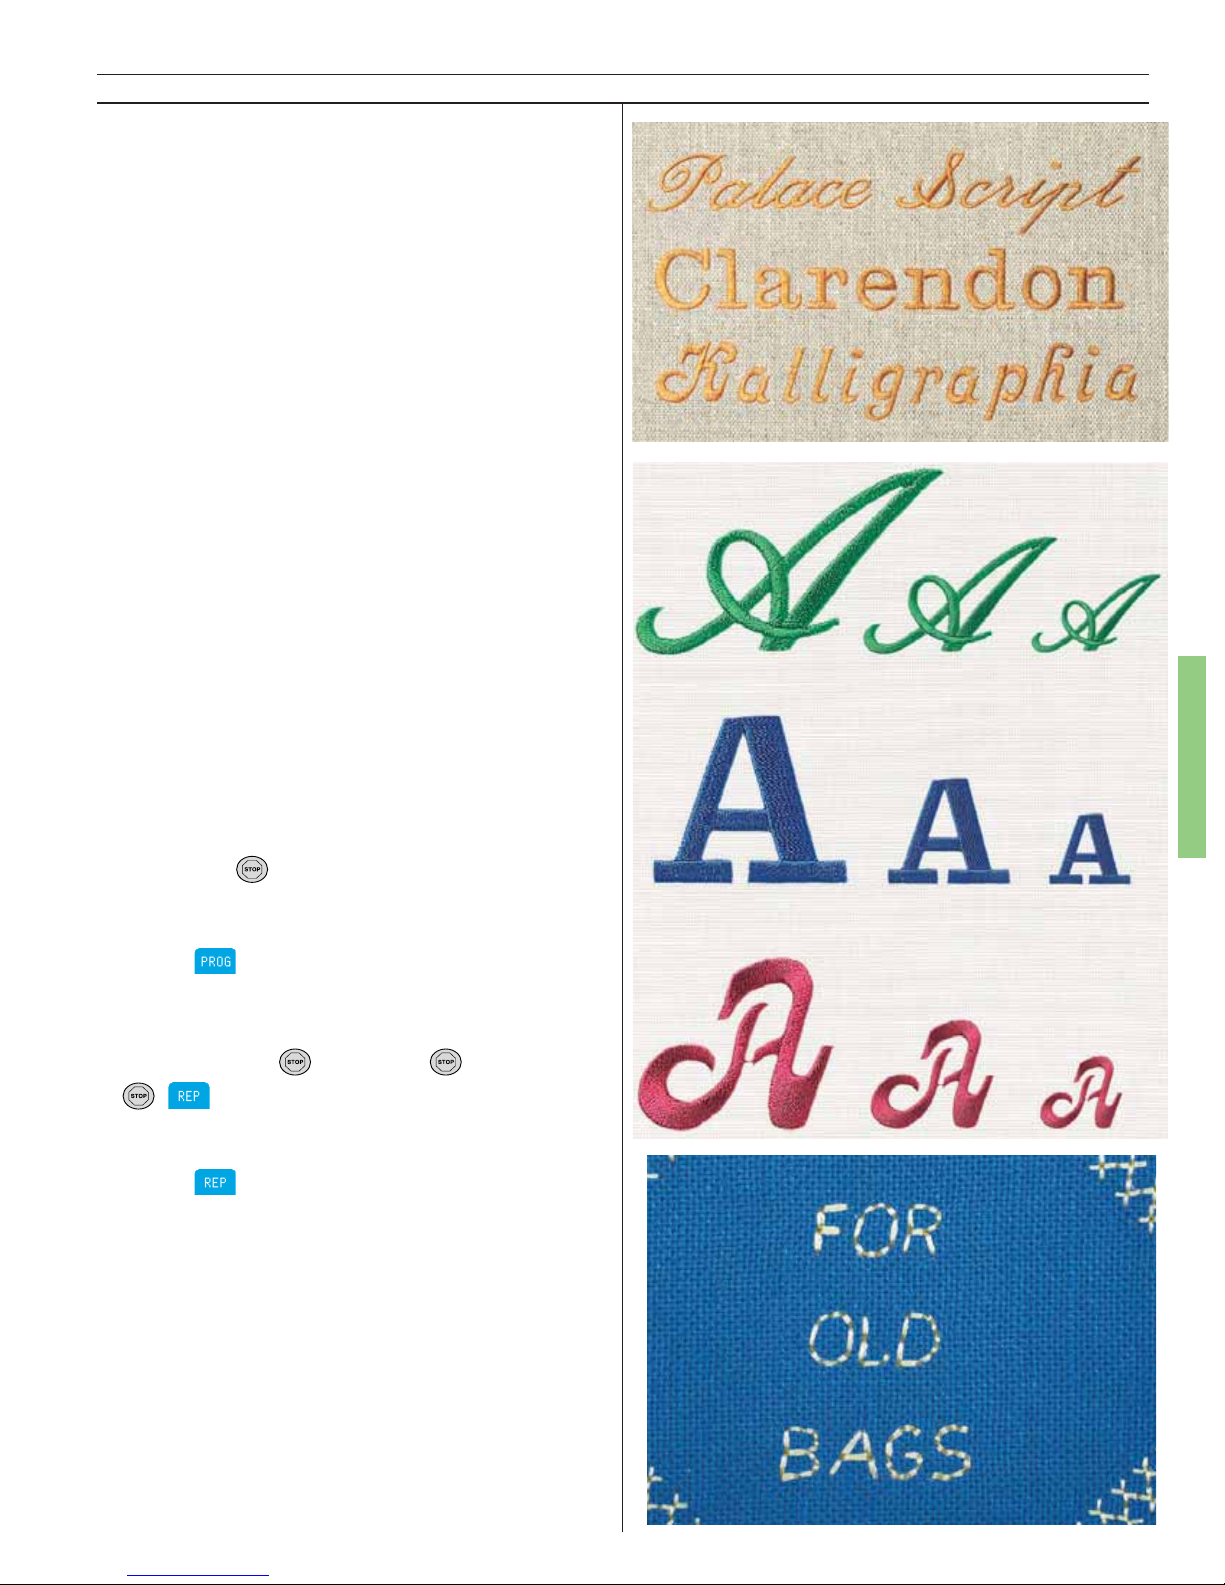
93
Decorative/Crafting
Lettering
Your Designer I sewing machine features builtin letters and numbers, Menu O, Block al pha bet,
Menu P, Outline block, menu Q, Brush line and
Menu R, Script alphabet.
Together with Designer I you also received 3
disks containing Palace Script, Clarendon and
Kalligraphia. If you look at the pictures you can
see the different designs. The picture with A lett ers shows actual size. Programming from disk,
see page 76.
Use the lette ring for monograms, gift items, to label and date quilts and other end less possibilities.
Program built-in letters
Fabric: Broadcloth or chino, Husqvarna Viking
Tear-A-Way stabilizer.
Touch: Woven medium on the Sewing Advisor
Snap on: presser foot B as recommended.
Thread top with embroidery weight thread, embroidery weight bobbin thread
Program:
• Program the phrase “for old bags” to put on
your bag keeper project.
• Program a
whenever you want the lette ring to stop sewing. We sewed our phrase on
three lines.
• Touch
, use a clear memory.
• Touch Menu O, Block Alphabet on the Color
Touch Screen.
• Touch F, O, R,
, O , L , D, , B, A, G, S,
, . In the pro gram mode the lette ring
appears at the top of the Menu in the direction you read it.
• Touch
. Your program appears on the Co-
lor Touch Screen in the direction it will sew.
Sew:
• Stabilize fabric and stitch: FOR
OLD
BAGS
Page 94
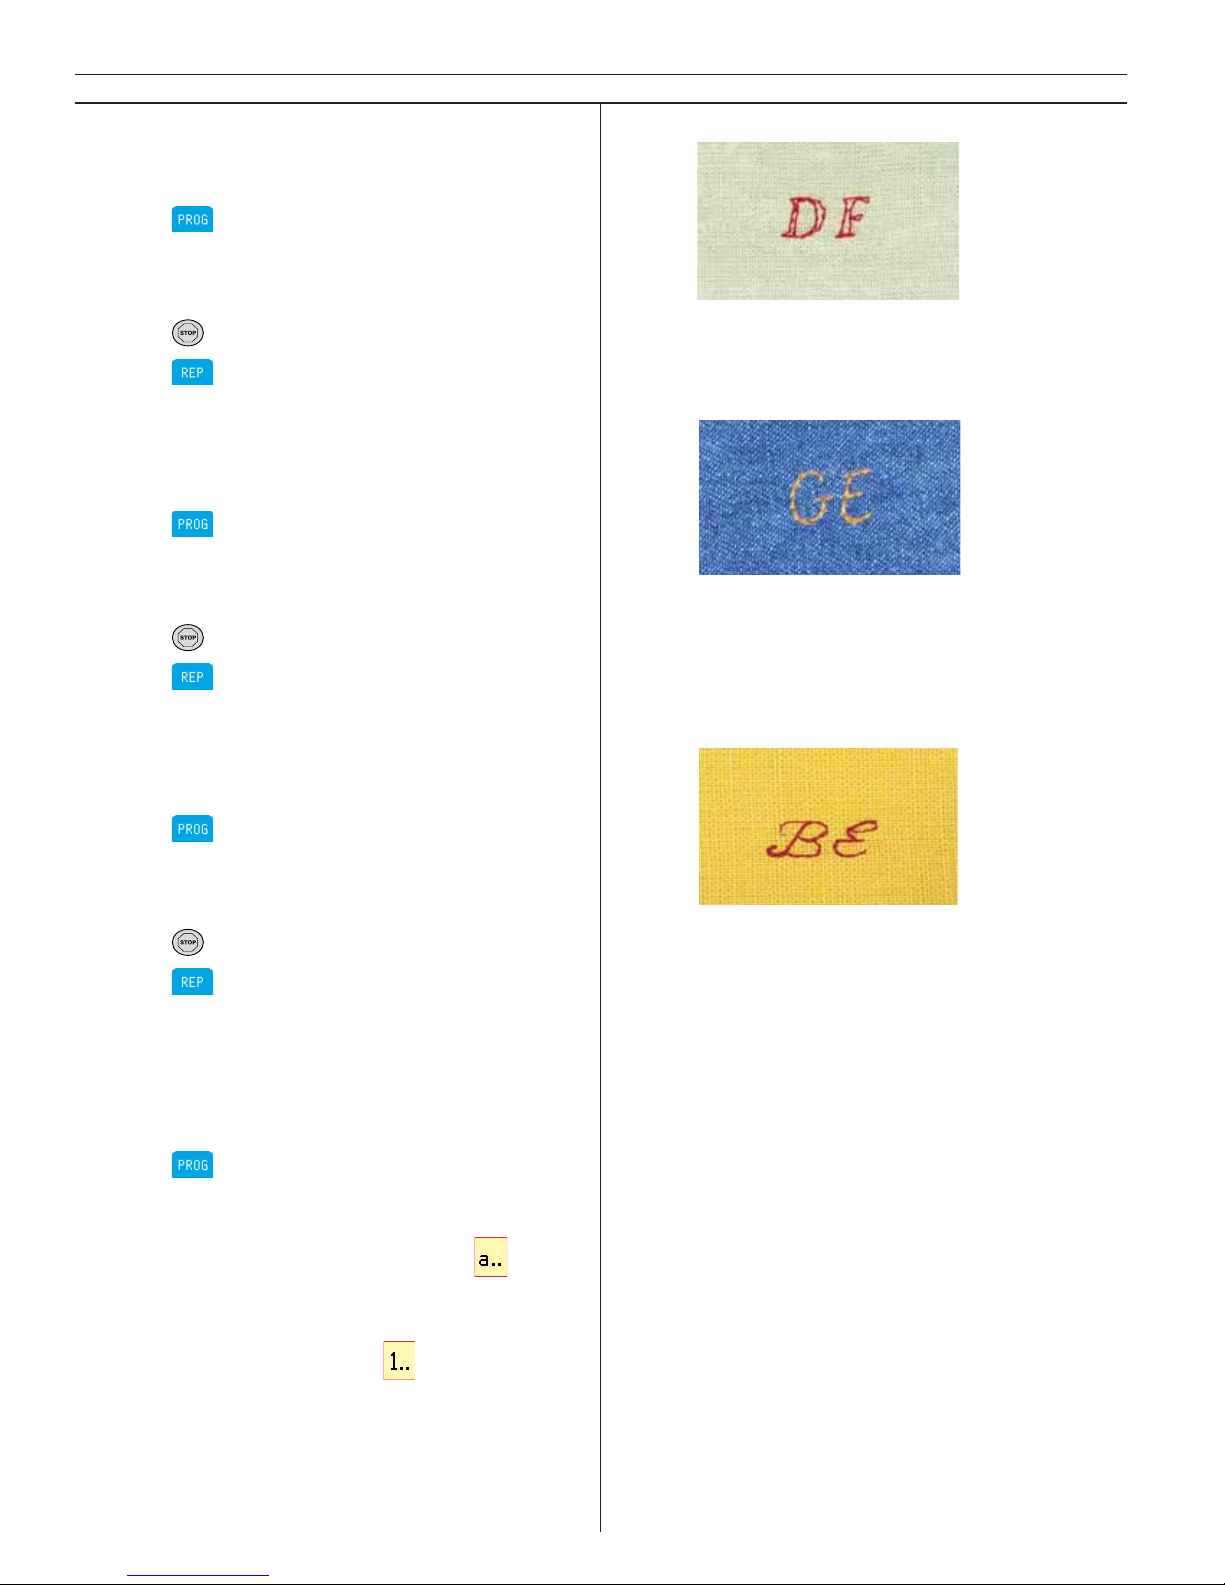
94
Decorative/Crafting
Outline block Monogram
Program your fi rst and last initial in Block lette ring.
• Touch
, use a clear memory
• Touch Menu P, Outline block Alphabet
• Touch your initials.
• Touch
.
• Touch
and sew.
Brush line Monogram
Program your fi rst and last initial in Brush line
lettering.
• Touch
, use a clear memory
• Touch Menu Q, Brush line Alphabet
• Touch your initials.
• Touch
.
• Touch
and sew.
Script Monogram
Program your fi rst and last initial in Script lette ring.
• Touch
, use a clear memory
• Touch Menu R, Script Alphabet
• Touch your initials.
• Touch
.
• Touch
and sew.
Upper and lower case lettering and numbers
Program your fi rst name with upper and lower
case letters and the date.
Program:
• Touch
, use a clear memory.
• Select the outline block lettering style.
• Touch the fi rst letter of your
name. Touch the lower case button
.
• Touch the rest of your fi rst name in lower
case.
• Touch the numbers button
.
• Touch the date.
Stitch on your sample fabric.
Note: Program smaller letter sizes with the stitch
length and stitch width adjustments.
Page 95
95
Quilting
Page 96
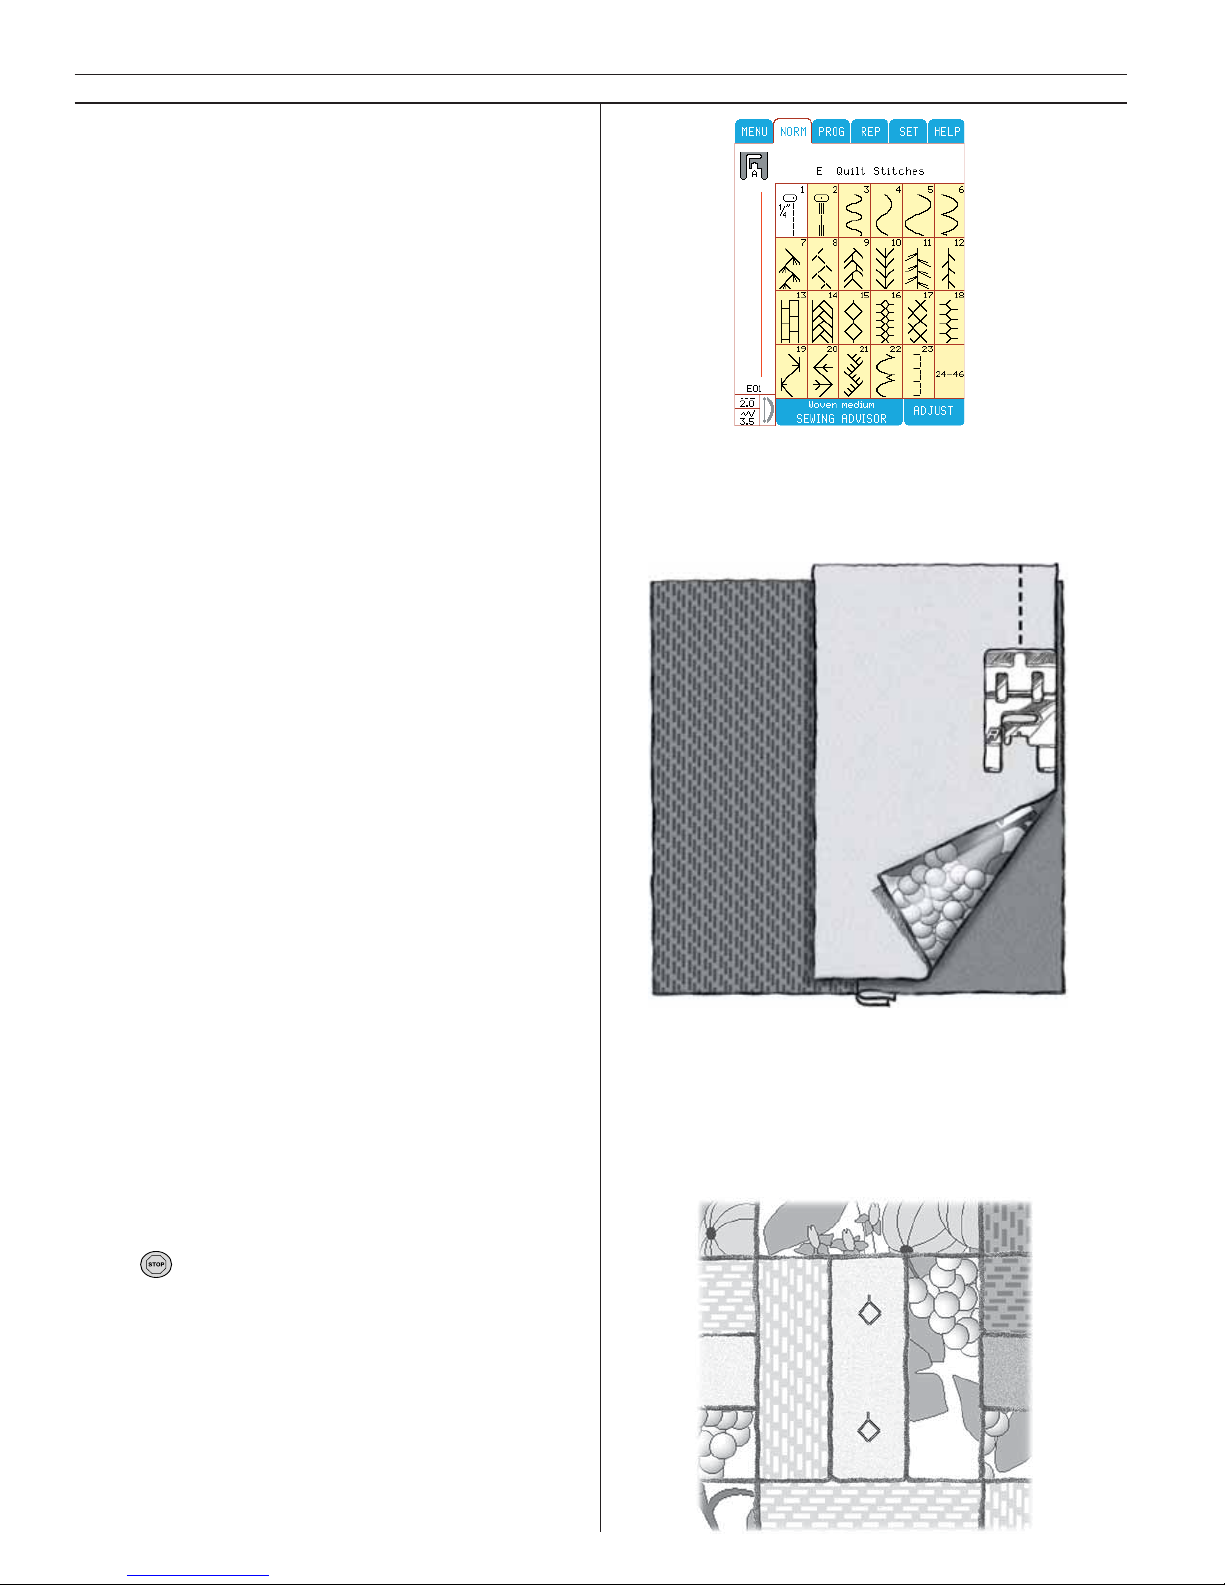
96
Quilting
Quilting
No one really knows when quilting began. Many
Eu ro pe an immigrants brought the technique to
Ame ri ca where patchwork quilting fl ourished.
The English aristocracy pieced scraps of ele gant
fabrics with beautiful hand embroidery for
Cra zy Quilting. Quilts were functional and commemorative.
Today we quilt with our Husqvarna Viking to
create beautiful quilts and quilted garments in a
fraction of the time.
Quilting and piecing quilts
Your Husqvarna Viking Designer I will sew
beautiful and functional quilting techniques
quickly and easily.
Piecing
Stitch blocks together quickly and easily with
the pre-programmed scant 1/4" (6mm) quilter’s
piecing stitch.
Fabric: Woven medium cut in two
Touch: Menu E, Quilt Stitches, Stitch E1.
Snap on: Presser foot A as recommended
Sew:
• Stitch the two fabric pieces with the edges
along the edge of the A foot. Quilters call this
piecing the quilt block.
Tip: Snap on the optional Edge Stitching accessory foot with the fl ange on the right side. The
edge of the fabric is guided by the fl ange.
Decorative stitch tie Quilting
Tie a quilt with a single decorative stitch.
Touch: Menu E, Quilting Stitches, stitch E15 and
touch
.
• Stitch several diamond stitches about 1"
(25mm) apart to “tie” the quilt sample.
Page 97
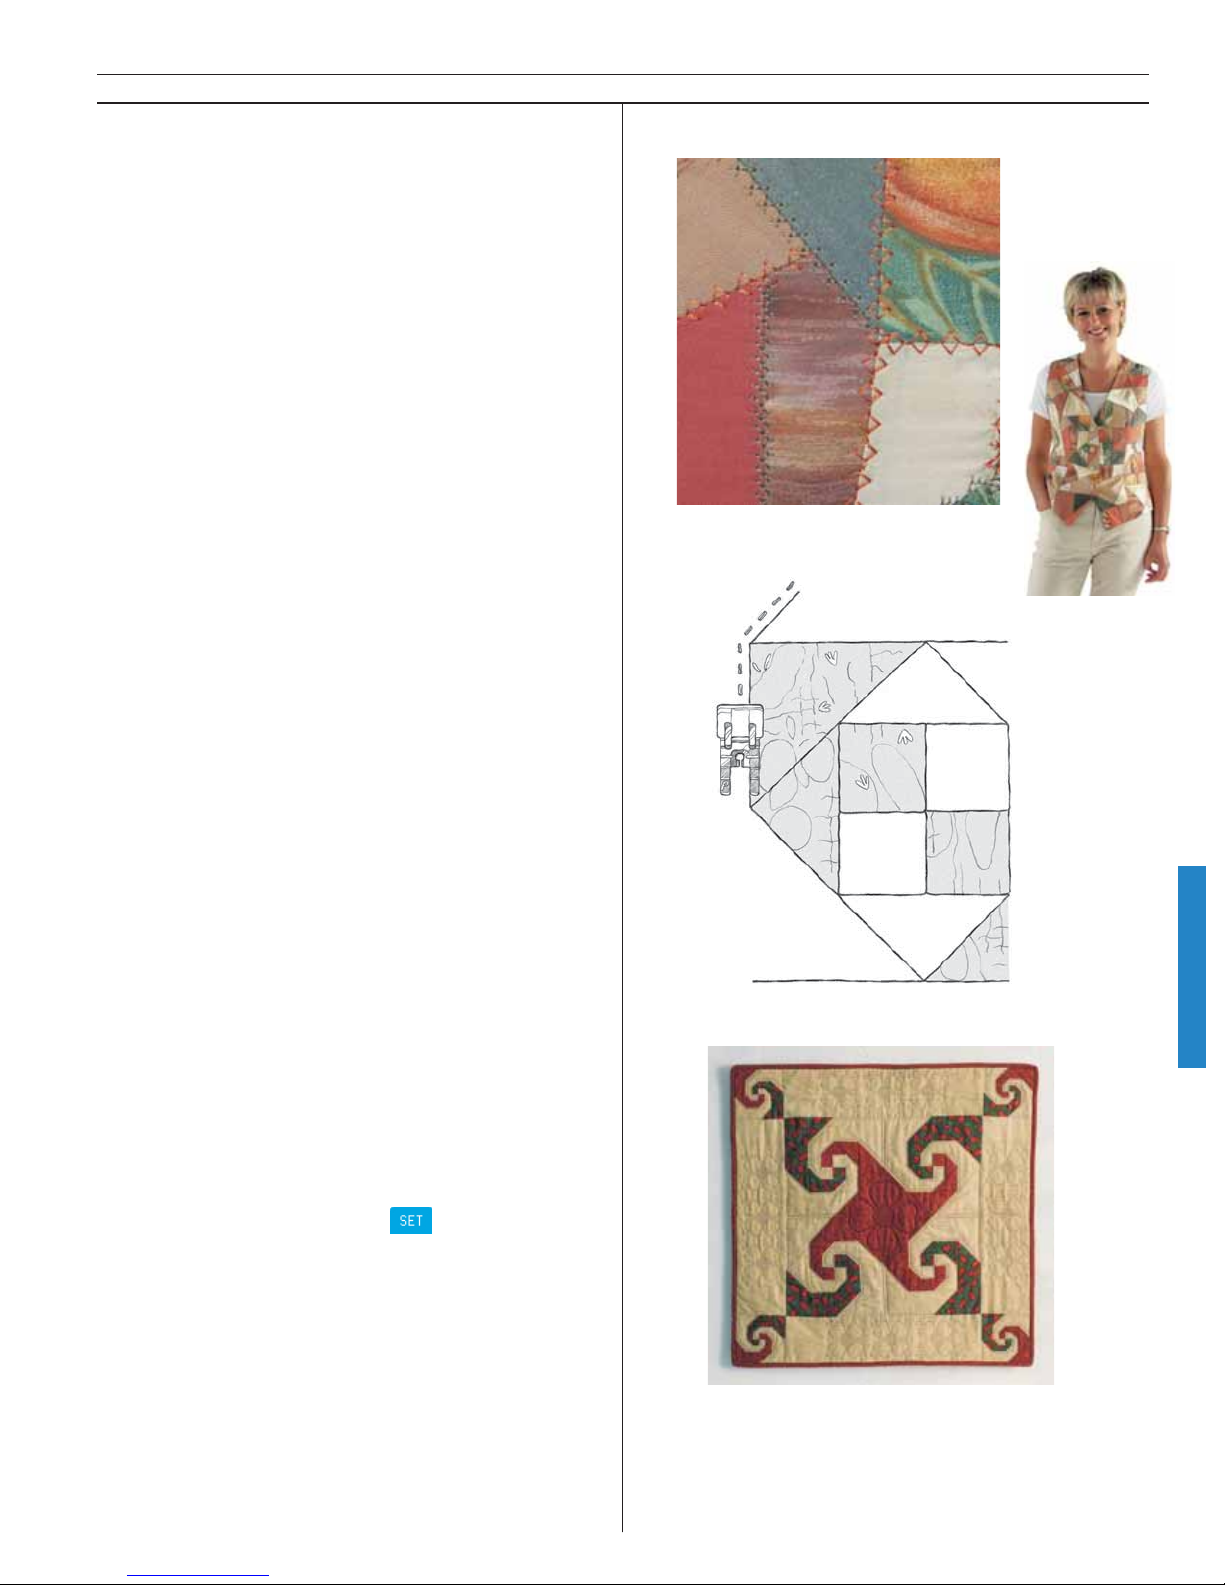
97
Quilting
Crazy Quilting
Traditionally crazy quilting was stitched by hand.
Today your Husqvarna Viking Designer I sewing
machine sews the same stitches in a fraction of
the time.
Touch: Menu E, Quilting Stitches, Stitch E21.
Snap on: Presser foot B or the transparent foot.
Sew:
• Stitch randomly on sample fabric.
• Touch E15, E17, and/or E20 or the stitches of
your choice and sew additional styles of crazy
quilt stitches on the sample fabric.
Designer I Sensor Foot Pressure makes quilting
easy.
Hand-look Quilting
Simulate the look of the hand quilting stitch with
invisible thread and a special computer stitch.
Touch: Menu E, Quilting Stitches, Stitch E2.
Snap on: Presser foot P as recommended.
• Thread the needle with clear invisible thread
and the bobbin with a color of thread that coordinates with your fabric.
Sew:
• Stitch along one of the marked rows on your
sample fabric. The inner edge of the presser
foot P is 1/8’’(3mm), the outer edges is 1/4"
(6mm).
Note: When sewing the hand-look quilting stitch E2,
the re sult depends on what fabric, batting and
thread you are using. The thread ten sion is set for
se wing a quilt using cotton fa bric, cot ton bat ting and
40 weight thread in the bob bin and in vi sible thread
on top. When se wing a quilt using oth er fa brics/
bat tings/th reads, be sure to try the stitch on a sam ple
fi rst. Set the thread ten sion in
menu as needed
for your project.
Page 98
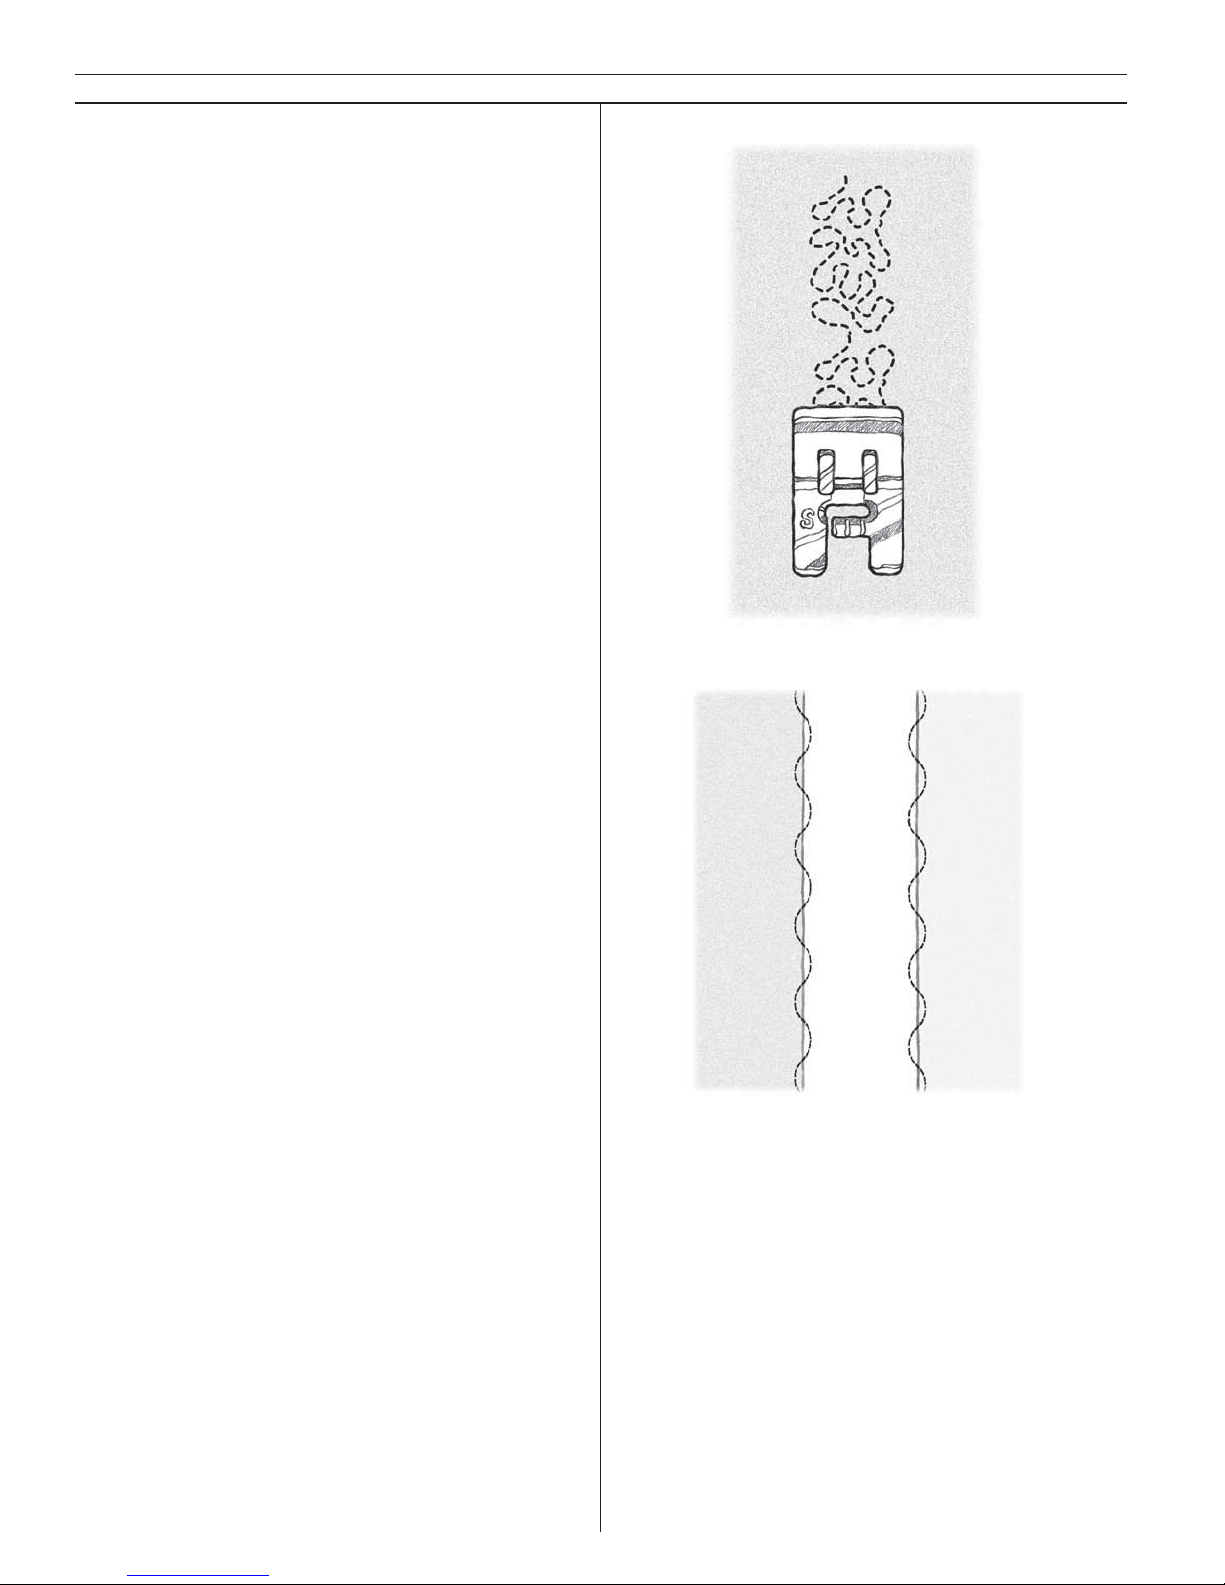
98
Quilting
Stipple Quilting
Sew stippling fast and easy with the pro gram med stipple stitch.
Touch: Menu E, Quilt Stitches, stitch E24.
Snap on: Presser foot S as recommended.
• Thread the needle with clear invisible thread
and bobbin with a thread color that matches
the quilt back.
Sew:
• Stipple quilt on the sample fabric.
Channel Quilting
Fabric: Two 12" (30 cm) squares of cotton woven medium fabric and one of bat ting to sew
the following machine quilting techniques.
Touch: Woven heavy on the Sewing Advisor
and choose Stitch E4
Snap on: Presser foot B as recommended.
• Thread top and bobbin with embroidery thread for decorative quilting techniques
• Mark three straight lines 1" (25mm) apart
along one fabric edge.
• Place the batting between the quilting fabrics.
• Channel Quilt along marked lines. Sensor
Foot Pressure makes quilting several layers
easy.
Page 99
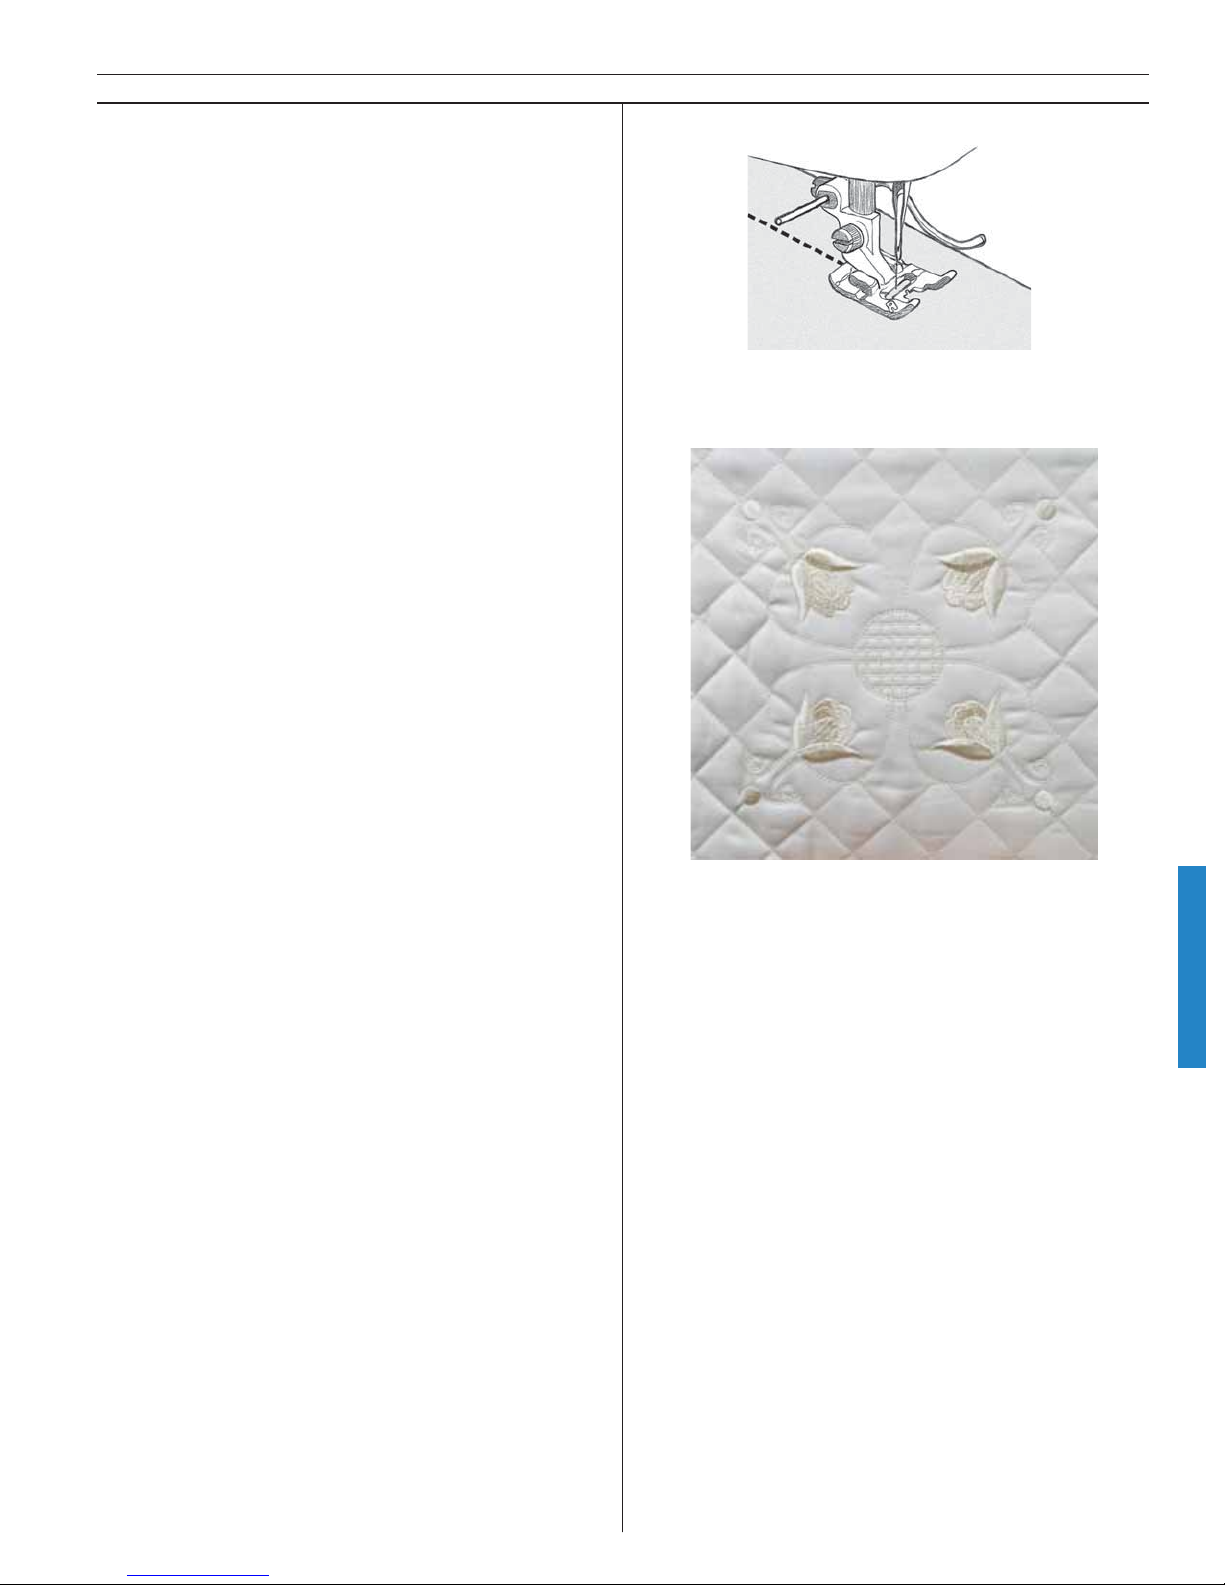
99
Quilting
Edge/Quilting Guide
The Edge/Quilting guide is used for wide seam
allowances, topstitching, or channel quilting.
Slide the guide into the clip on the ankle. Adjust
from side to side to the correct position.
Quilt Embroidery
Your Husqvarna Viking Designer I features a va rie ty of beautiful embroidery options for quilting.
Page through the Husqvarna Viking Embroidery
Collection to choose one for your next quilt. Husqvarna Embroidery De sig ner Disk 101 by Kerstin
Widell stitches ex tra large quilting embroideries.
• Slide on the embroidery unit and set your
machine for embroidery – see page 69.
• Place batting behind fabric to be quilted and
hoop all layers.
• Slide in Designer Embroidery Sampler Disk
100, Embroidery Menu 2, Design 3.
Quilt:
• Slide the hoop on the embroidery unit. Touch
Start. The quilting is stitched automatically.
Stitch a second quilt embroidery if you desire.
• Use the edge guide to sew the squares.
Page 100

100
Quilting
 Loading...