

Viking Designer DEDO127TSS, Designer DEDO527, Designer DEDO130, Designer DEDO205, Designer DEDO527T User Manual
...
F20366B
(102407J)
Viking Range Corporation
111 Front Street
Greenwood, Mississippi 38930 USA
(662) 455-1200
For product information
call 1-888-VIKING1 (845-4641)
or visit the Viking Web Site at
vikingrange.com
Viking Use & Care Manual
Built-In Electric
Touch Control Ovens
3
Warnings
2
Congratulations
Your purchase of this product attests to the importance you
place upon the quality and performance of the major
appliances you use. With minimal care, as outlined in this
guide, this product is designed to provide you with years of
dependable service. Please take the few minutes necessary to
learn the proper and efficient use and care of this quality
product.
Some key features of this appliance include:
• 14 different cooking modes to make even your most
challenging baking projects a success.
• Split baking and broiling elements, reducing your
preheating time and heating your food more evenly.
• An extra-large reversing fan, allowing you to cook even
large quantities of food more quickly and evenly.
• Four convection modes, offering greater air circulation to
shorten cooking times and cook foods more evenly.
• Dual broiling elements, producing intense radiant heat for
faster broiling and a larger coverage area.
• Three broiling modes, including a special low-broil mode for
delicate broiling and top-browning.
• A profiled, hidden bake element for easier cleaning.
• Six adjustable rack positions with the largest usable baking
space available in this class.
Your complete satisfaction is our ultimate goal. If you have
any questions or comments about this product, please
contact the dealer from whom you purchased this product, or
contact our consumer support center at 1-888-VIKING1.
We appreciate your choosing a Viking® Range Corporation
product and hope that you will again select our products for
your other major appliance needs. For more information
about the complete selection of Viking products, contact your
dealer or go to www.vikingrange.com.
WARNING
Iftheinformationin this manualis not followed exactly, a fireor
explosionmay resultcausing property damage, personal injury
or death.
WARNING
NEVER use this appliance as a space heater to heat or warm
the room. Doing so may result in carbonmonoxide poisoning
and overheating of the oven.
WARNING
Do not use commercial oven cleaners inside the oven. Use of
these cleaners can produce hazardous fumes or can damage
the porcelain finishes.
WARNING
NEVER cover any slots, holes or passages in the oven bottom
or cover an entire rack with materials such as aluminum foil.
Doing so blocks air flow through the oven and may cause
carbon monoxide poisoning. Aluminum foil linings may also
trap heat, causing a firehazard.
WARNING
To avoid sickness and food waste when using automatic time
baking:
• Do not use foods that will spoil while waiting for cooking to
start,such as disheswith milkor eggs, creamsoups,custards,
fish,pork, poultry, or foods with stuffing.
• Any food thathas to wait for cooking to start should be very
cold or frozen beforeit is placedin the oven.
• Do not use foods containing baking powder or yeast when
automatic time baking.They willnot riseproperly.
• Do not allow food to remain in the oven for more than two
hours after the end of the cooking cycle.
WARNING
To avoidsickness and food waste, do not allow defrosted food
to remain in the oven for more than two hours.

4 5
Cooking Tips
RackPositions______________________________________39
PanPlacementTips_________________________________ 40
BakingTips ________________________________________ 40
MultipleRackBaking _______________________________41
Conventional Baking Chart__________________________42
ConvectionBakingChart____________________________43
SolvingBakingProblems____________________________44
Broiling Tips________________________________________45
Broiling Chart ______________________________________46
Roasting Tips_______________________________________47
Conventional RoastingChart ________________________48
ConvectionRoasting Chart__________________________49
Product Care
Cleaningand Maintenance__________________________50
Self-CleanCycle _______________________________53
Replacing Light_____________________________________54
TroubleShooting ___________________________________55
Error Handling______________________________________55
ServiceInformation _________________________________56
Warranty ___________________________________________57
Getting Started
Important Safety Instrutions ________________________6
Product Controls
OvenControl Panel________________________________8
Built-In ElectricOven Features______________________ 10
Touch Pad Functions_______________________________ 11
Programming Modes
ClocksandTimers
Settingthe Clock _____________________________ 16
Settingthe Timer _____________________________17
CookTime andStop Time ____________________18
Oven Settings
Brightness____________________________________20
Degree Format(Fahrenheit or Celsius) _________ 20
Tones ________________________________________21
Tone Volume _________________________________ 23
Timeouts ____________________________________23
Clock Format (12-houror 24-hour) _____________24
SabbathMode _______________________________25
Showroom Mode __________________________________25
Lockand Unlock ______________________________26
Interior OvenLights___________________________26
RecipeFunction ___________________________________27
WarmingModes __________________________________29
BakeModes ______________________________________ 30
Broil Modes ______________________________________33
Roast Modes______________________________________35
MeatProbe _______________________________________37
Table of Contents Table of Contents

6 7
Getting Started
Getting Started
• Do not heat unopened food containers; build-up of pressure
may cause the container to explode and result in injury.
• Always position oven racks in desired location while oven is
cool. If rack must be moved while oven is hot, do not let
potholder contact hot heating element in oven.
• Use care when opening oven door. Let hot air or steam
escape before removing or replacing food. Hot air or steam
can cause burns to hands, face and/or eyes.
• Keep oven vents unobstructed. The oven vent is located at
the front of the oven and vents into the room.
• Do not clean door gasket. It is essential for a good tight
seal. Care should be taken not to rub, damage, or move
the gasket.
• No commercial oven cleaner or oven liner protective
coating such as aluminum foil should be used in or around
any part of the oven. Improper oven liners may result in a
risk of electric shock or fire. Keep oven free from grease
buildup.
• Before self-cleaning the oven, remove broiler pan, broiler
grid, oven racks, and other utensils. Do not use your oven
to clean other parts. A fan noise should be heard during
the cleaning cycle. If not, call service before self-cleaning
again.
• DO NOT TOUCH HEATING ELEMENTS OR INTERIOR
SURFACES OF OVEN. Heating elements may be hot even
though they are dark in color. Interior surfaces of an oven
become hot enough to cause burns. During and after use,
do not touch or let clothing or other flammable materials
contact heating elements or interior surfaces of oven until
they have had sufficient time to cool. Other surfaces of the
oven may become hot enough to cause burns, such as the
oven vent opening, the surface near the vent opening, and
the oven door window.
• Use this appliance only for its intended use as described in
this manual. Never use your appliance for warming or
heating the room. This is based on safety considerations.
• Your unit should be installed by a qualified technician. The
appliance must be installed and electrically grounded
according to local codes.
• Do not attempt to repair or replace any part of this
appliance unless specifically recommended in this manual.
All servicing should be referred to a qualified technician.
Warranty service must be performed by an authorized
service agency.
• Children should not be left alone in the kitchen while the
oven is in use.
CAUTION: Do not store items of interest to children over
the unit. Children climbing to reach items could be seriously
injured.
• GREASE - Grease is flammable and should be handled
carefully. Do not use water on grease fires. Flaming grease
can be extinguished with baking soda or, if available, a
multipurpose dry chemical or foam-type extinguisher. Let fat
cool before attempting to handle it. Do not allow grease to
collect around the oven or in vents. Wipe up spillovers
immediately.
• Loose-fitting or hanging garments should never be worn
while using the appliance. Do not drape towels or materials
on oven door handles. These items could ignite and cause
burns.
• Use only dry potholders. Moist or damp potholders on
hot surfaces may result in burns from steam. Do not let
potholder touch hot surface areas. Do not use a towel or
other bulky cloth.
• Keep area clean and free from combustible materials,
gasoline, and other flammable liquids. Never use your oven
as a storage space. Combustible items (paper, plastic, etc.)
may ignite, and metallic items may become hot and cause
burns.
Important Safety Instructions
Important Safety Instructions
98
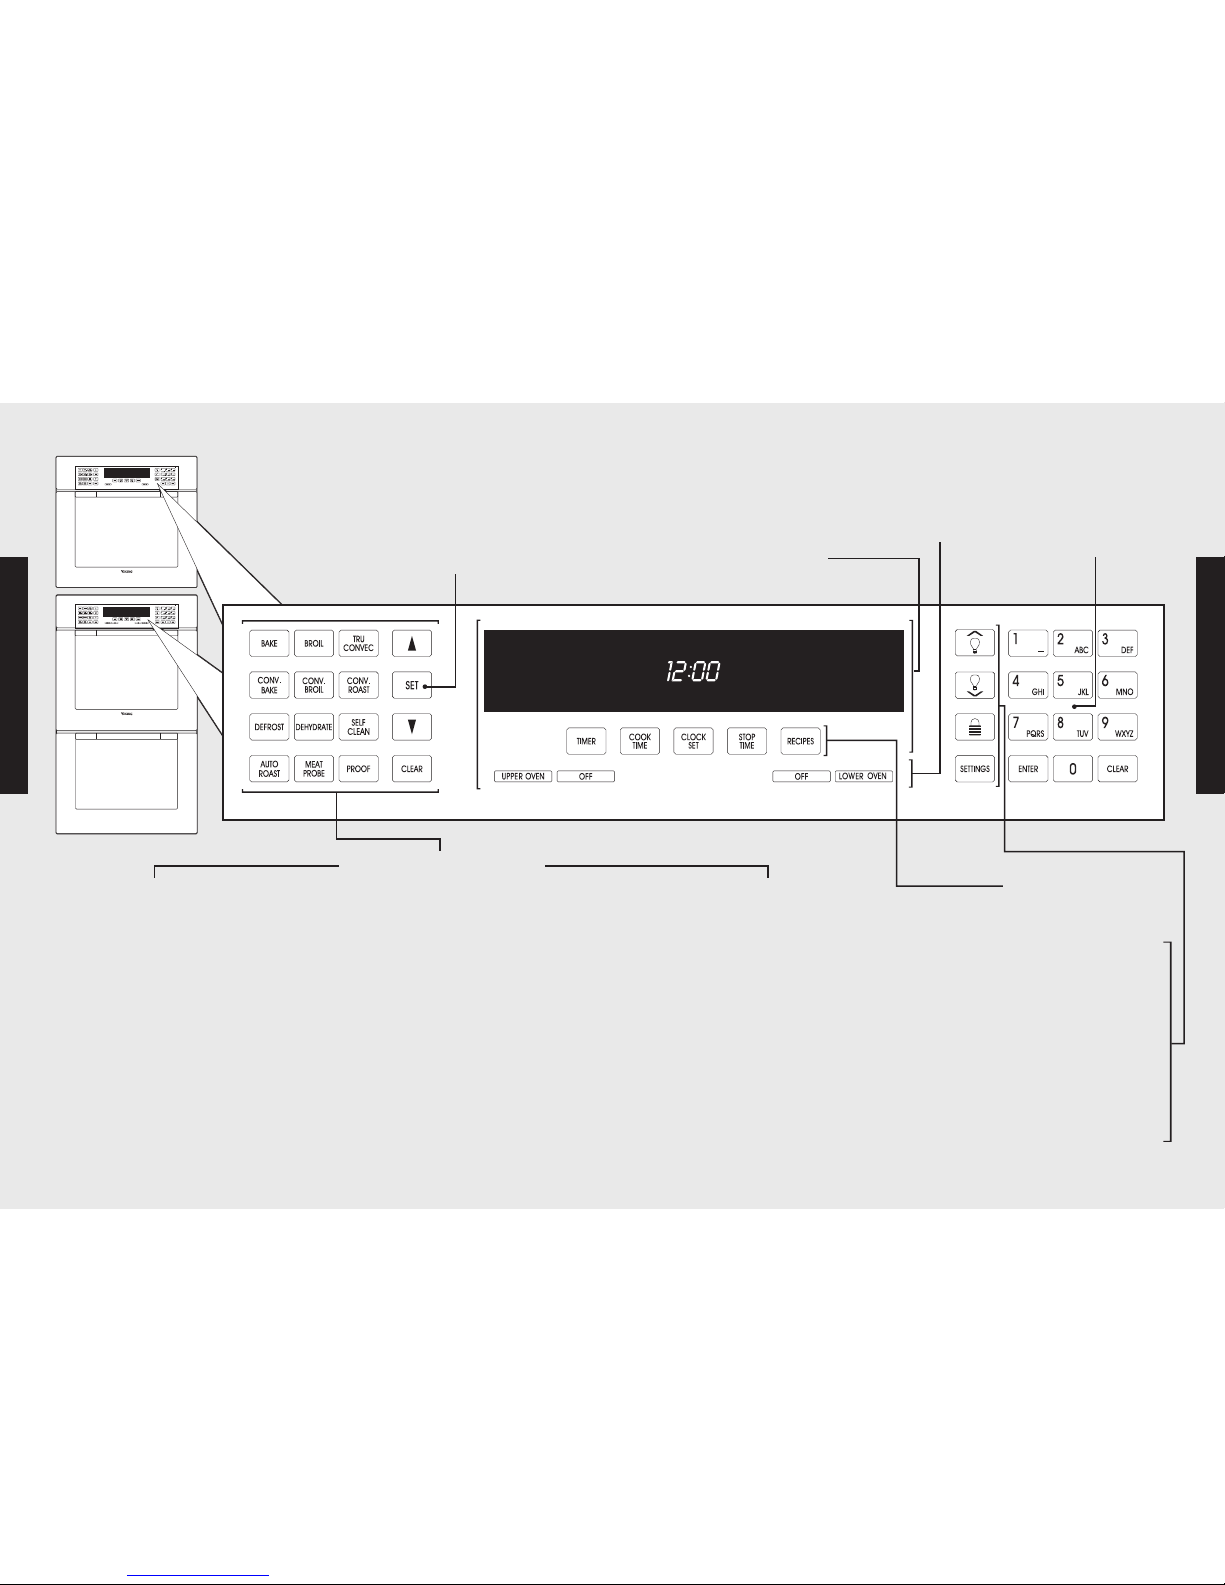
OvenControl Panel
Product Controls
Product Controls
*Note: Premiere model controlpanelandfeatures are shown.
Oven Functionand
TemperatureControls
Eachoven functionhas a separate setting.
(Seedescriptions)
TheSET control up and downarrows can be
usedto set any temperaturefrom
150°F (65.6°C) to550° F (287.8° C).
Electronic Timing Center
TheElectronicTiming Center is
usedto program andcontrolall
timingfunctions.
IMPORTANT–Thetime-of-day
mustbe set before any other
programcan be used.
Electronic Keypad
Entry
TheElectronicKeypad
Entry is usedto program
andcontrol all oven
functions.
Bake
Conventional, single-rackbaking
(breads, cakes, cookies,pastry, pies,
entrees, vegetables)
Convection Bake
Multi-rackbakingfor heavier or frozen
foods (e.g., frozen pies, pizzas,entrees,
vegetables)
Defrost
Naturaldefrosting of foodusing fan
withoutheat
Auto Roast*
Automatic searingof the outside of
meats;simplifiesroasting
TruConvec
TM
Multi-rackbakingfor breads, cakes,
cookies(up to 6 racks of cookiesat
once)
Convection Roast
Roasting wholeturkeys, whole chickens,
hams, etc.
Self-Clean
A self-cleaning cycleusinghigh heatto
burnoff soilsand deposits
Proof*
Createsan optimal environmentfor the
risingof yeast in manykinds of dough
Recipes*
Accesses, programs, andsaves cooking
cyclesfrom favoriterecipes
Oven LightControls
Controls the interiorlightsin the upper
andlower ovens
Oven Lock
Childproofingfeature preventing the
controls frombeingactivatedwhenthe
ovenis not in use
Settings
Accesses custom featuressuch as display
brightness,Sabbath/Showroommodes,
andtones
Broil
Three conventional broilsettingsfor cuts of
flatpiecesof meat or meat1-2 inchesthick
Convection Broil
Fasterthanregular broiling withless smoke
generationfor thicker meats
Dehydrate
Using the convectionfan over a
periodof time, wateris removed
from foodby evaporation
Meat Probe*
Automatically turnsthe ovenoff whenthe
internaltemperature ofthemeat being
roastedis reached
Oven Selector Options
Oven Selector
Controls
TheOven SelectorControls
areused to turntheupper or
lower ovenon and off.
OvenControl Panel
10
Built-In Electric Oven Features
11
Touch Pad Functions
TemperatureControl
Bothovenssharethe temperature control. To usethisfeature, selectthe
upper or loweroven,and then set thedesired temperature.The controls
canbe set at any temperature from 150°F (65.6°C) to 550° F (287.8° C).
Electronic Keypad Entry
Bothovenssharethe electronic keypad entry. The alphanumerickeys can
be usedto program and controlall ovenfunctions.
Oven FunctionSelector Control
Bothovensoffer14 separate cookingmodes from whichyou can choose
theone that bestmeetsyour cooking needs.
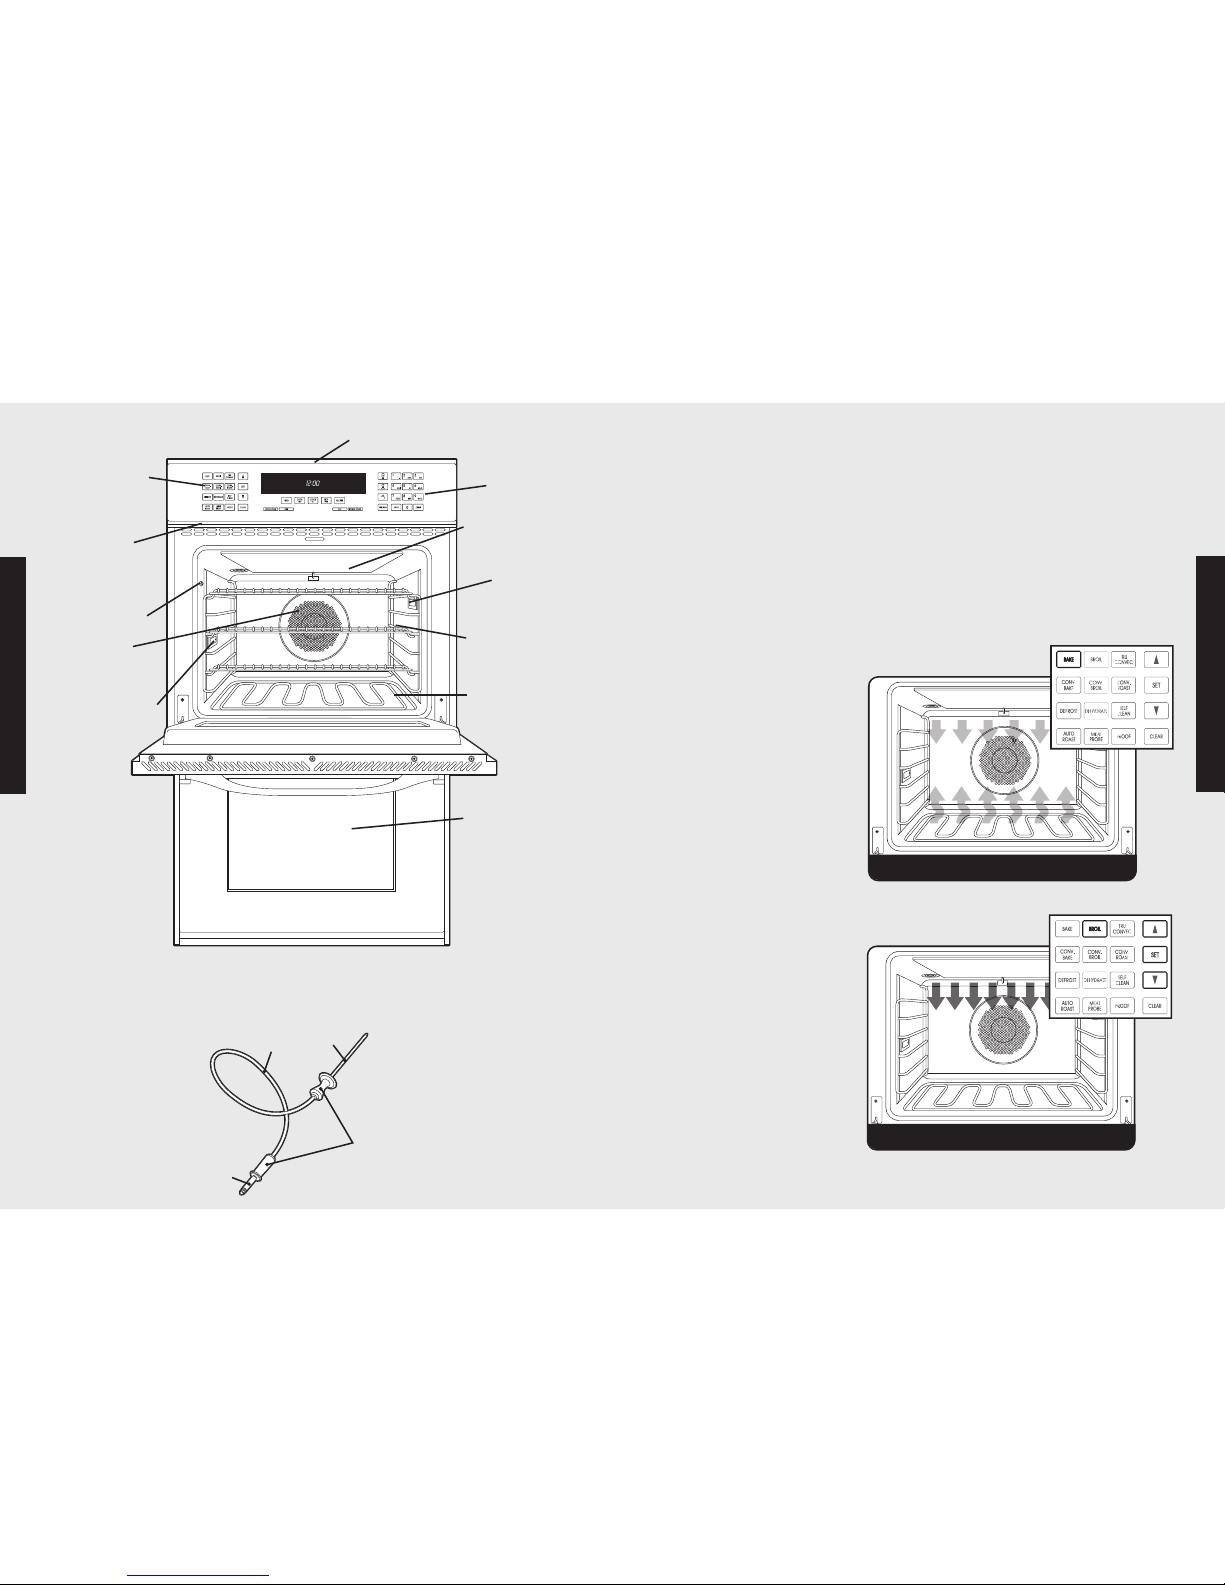
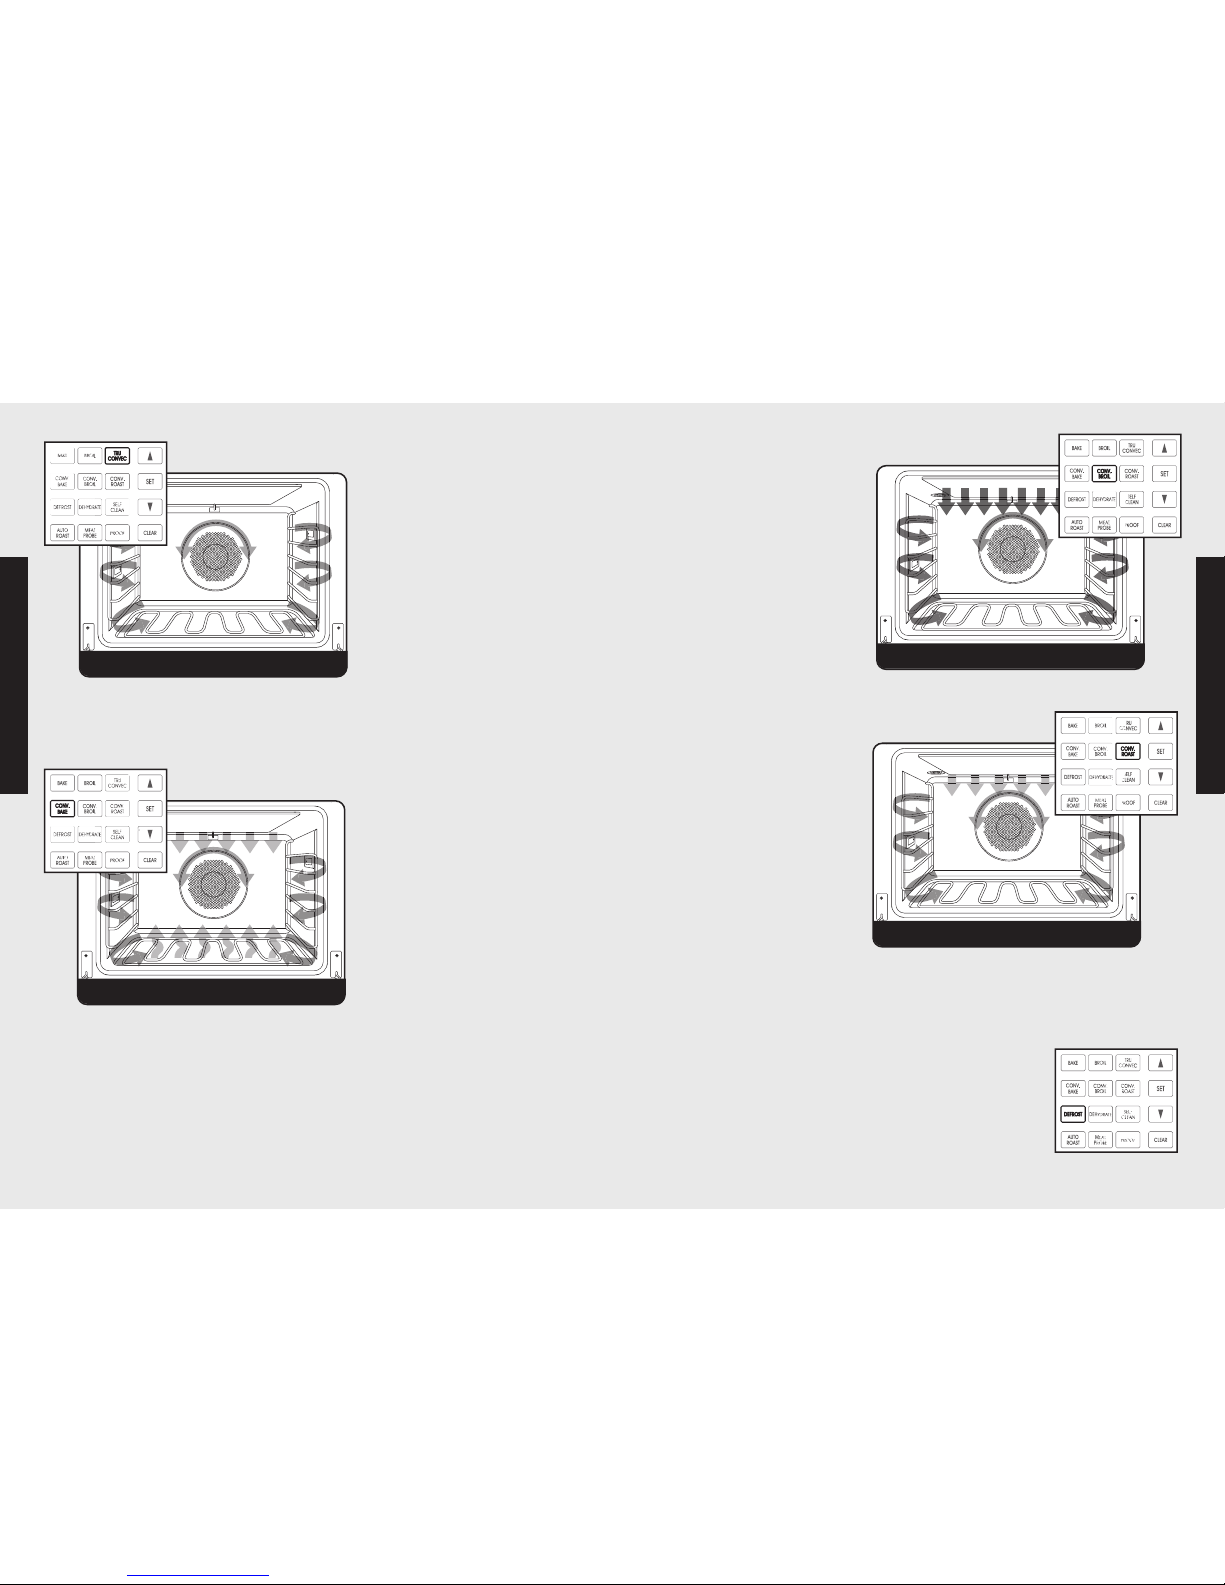
Bake
Whenusingthis function,
full-powerheat is radiated
from the bakeelement in
thebottomof the oven
cavity, whilesupplemental
heatis radiated from the
broil element.This function
is recommendedfor singlerackbaking. Use thissetting
forbaking,roasting,and
casseroles.
Broil
Thisfunctionis a dry-heat
cookingmethod, using
director radiantheat on
three differentsettings:low,
mediumandhigh. The
distance between the
foods and thebroil
elementsdetermines
broiling speed. This
functionis recommended
forsmall,individualized
cuts, suchas steaks,chops,
andpatties.
Bake
Product Controls
Product Controls
Premiere Designer double ovenis shown above.
Broil Element
Interior
Oven Light
Oven Racks
(3/upper oven;
3/lower oven)
Bake Element
Lower Oven
Model/Serial
Number Plate
(under control
panel)
TruConvec™
Element
(behind baffle)
Interior Oven Light
Oven Function
and Temperature
Controls
Broil
Oven Control Panel
Electronic Key
Pad Entry
Meat Probe (availableon Premieremodels)
Plug
Cable
Probe
Handles
Meat Probe Jack
12
TruConvec™
Withthis function,only the rear
element operatesat full power.
There isno directheatfrom the
bottom or top elements, and
themotorized fan in the rear of
the oven circulates for even
heating. Use this setting for
foods that require gentle
cooking, such as pastries,
soufflés, yeast breads, quick
breads, and cakes. This setting
produces breads, cookies, and
other baked goods with an even texture and golden crusts. No special
bakeware is required. Use this function for single-rack baking, multiple-rack
baking, roasting, and preparation of complete meals. This setting is also
recommended whenpreparinglargequantitiesof baked goods at one time.
Convection Bake
With this function, the bottom
element operatesat full power,
and the top broil element
operates at supplemental
power. The motorizedfan inthe
rear of the oven circulates
heated air, providing a more
even heat distribution. This
evencirculation of airequalizes
the temperature throughout
the oven cavity and eliminates
thehot and coldspotsfoundin
conventional ovens. A major benefit of convection baking is the ability to
prepare foodin largerquantitiesusingmultipleracks.Whenroastingusingthis
setting, coolair is quicklyreplaced,searingmeatson the outsideand retaining
more juices and natural flavor on the inside with less shrinkage. With this
heating method, foods can be baked and roasted at the same time with
minimaltaste transfer, even when different dishes are involved,such as cakes,
fish, or meat.The hot airsystemis especiallyeconomicalwhen thawingfrozen
food. Use thissetting for baking androasting.
13
Touch Pad Functions Touch Pad Functions
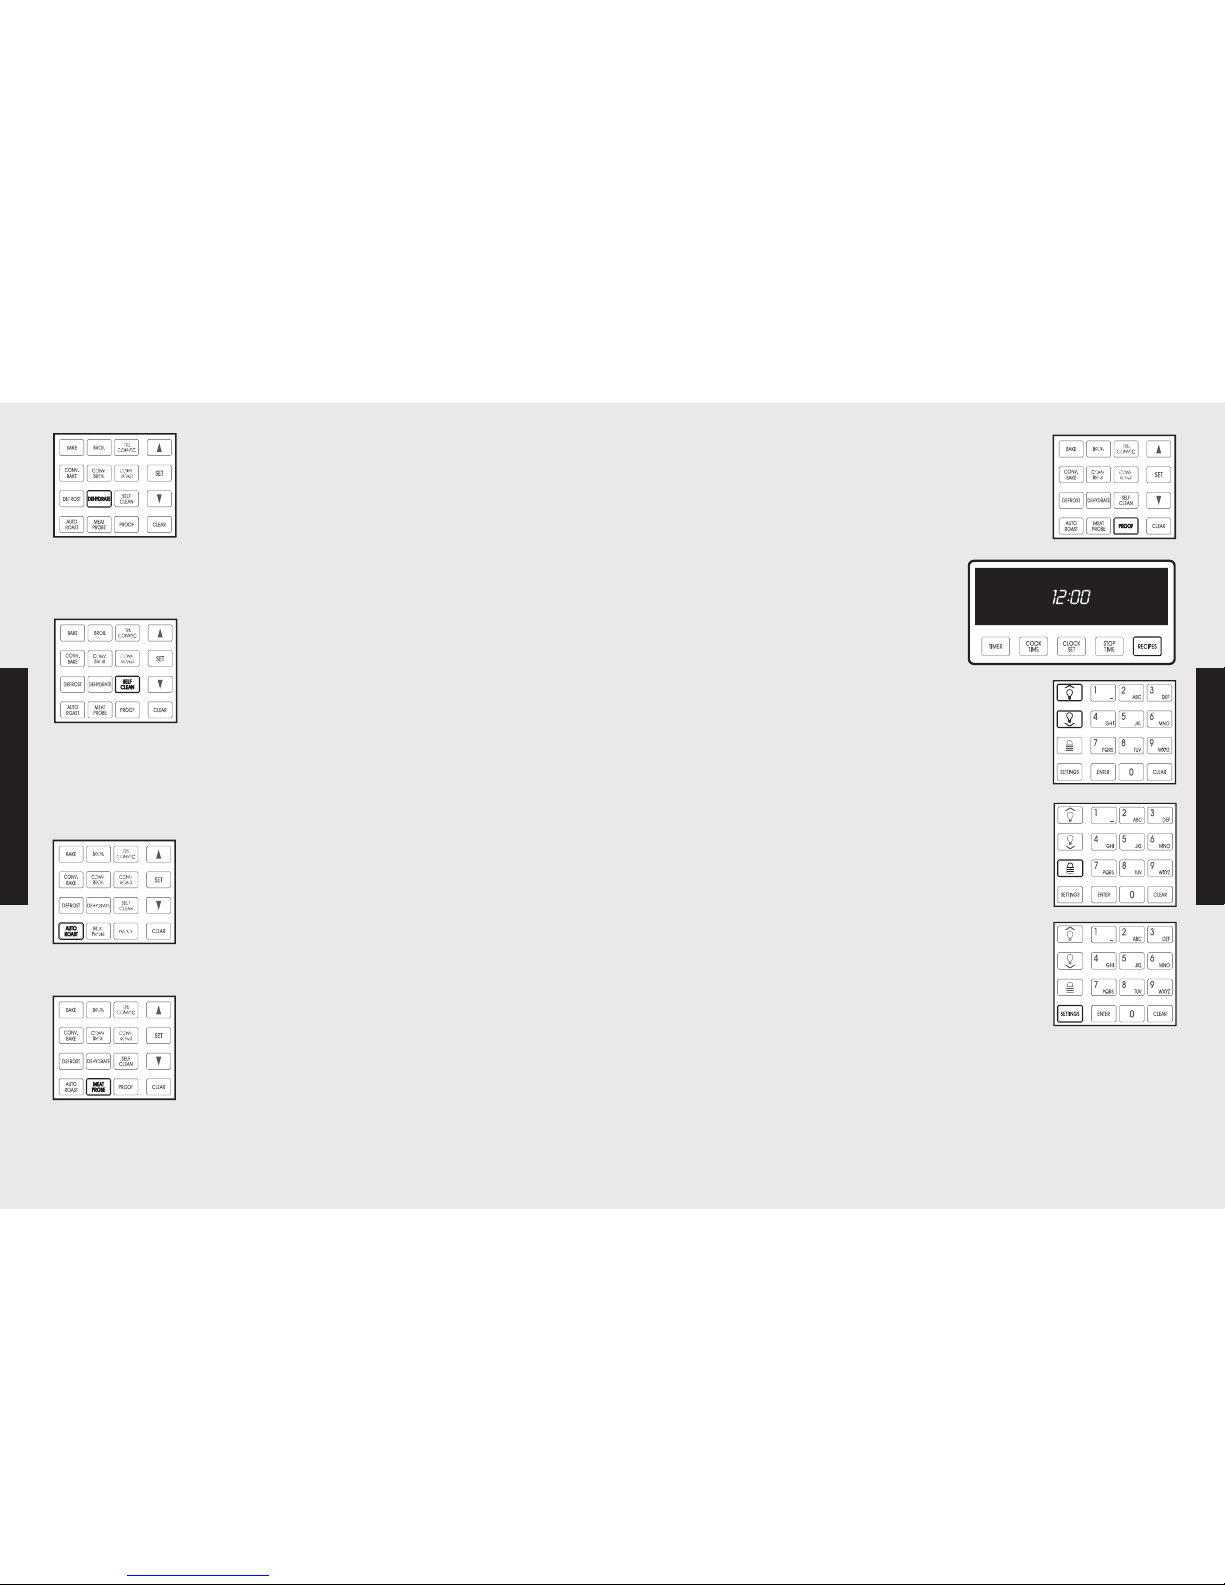
Convection Broil
Using thisfunction,the top
elementoperates at full
power. Thisfunctionis
exactlythe same as regular
broiling withthe additional
benefitof air circulationby
themotorizedfan in the
rear of the oven.Smokeis
reducedsincethe airflow
alsoreduces peak
temperatures on the food.
Usethis setting forbroiling
thick cutsof meat.
Convection Roast
Withthis function,the
convectionelementruns in
conjunctionwith theinner
andouter broil elements.
Thereversibleconvection
fanruns at a higherspeed
in eachdirection, allowing
themoisture to be sealed
insidelarge cutsof meat,
suchas roasts. Thissaves
timewhen compared with
singlefanconvectionroast
modes.Usethis setting for
whole turkeys,whole
chickens, androasts.
NOTE: Because this function uses a high-speed convection fan for
optimum cooking performance, some noise may be noticed from this
high fan speed. This is normal.
Defrost
Withthe temperature control off,a motorizedfan in the
rear of the ovencirculatesair. Thisfan acceleratesnatural
defrostingof thefood withoutheat.
NOTE: To avoid sickness and food waste, do not allow
defrosted food to remain in the oven for more than
two hours.
TruConvec
T
M
convection bake
Product Controls
Product Controls
convection broil
convection roast
1514
Touch Pad Functions
Touch Pad Functions
Proof*
Thisfunctionusesa low temperature to createan optimal
environment for the yeast to risein many typesof dough.
Recipes*
Thissetting accesses, programs, and saves
cookingcyclesfrom favoriterecipes.
Interior Oven LightControls
Theupper andlower ovens haveinterior ovenlights
controlledby the righttouch pad.Push thelight button to
turnthe interioroven lightson and off.
Oven Lock
Thischildprotectionfunctionprevents theoven controls
from beingactivatedwhen the ovenis not in use.
Settings
Usethis functionto access,program,and customize
specialfeaturesof your oven.Special features include
tones,timeouts, displaybrightness, and theSabbath
mode.
*Note:TheAUTO-ROAST, PROOF, RECIPE and PROBE functions are
includedon the Premiere models.
Product Controls
Product Controls
Dehydrate
Withthis function,a motorizedfan in the rear of theoven
circulateswarm air. Overa periodof time, thewater is
removedfromthe food by evaporation.Removal of water
inhibitsgrowth of microorganismsand retards theactivity
of enzymes.It is importantto remember thatdehydration
doesnot improvequality; onlyfresh,top-quality foods
shouldbe dehydratedin your oven.
Self-Clean
Theself-cleaningcycle is designedto eliminatethe need
forscrubbingand scouring foodbakedontothe oven
interior. During thiscycle,the oven useshigh
temperatures to burnoff soilsand deposits.An integral
smoke eliminator reducesodorsassociatedwith the soil
burn-off. A powderash residueis left in the bottom of the
ovenaftercompletionof the self-clean cycle. Whenthe
ovenhas cooled, removeany ash fromoven surfaceswith
a dampspongeor cloth.
Auto Roast*
Thisfunctionfurthersimplifiesroastingby automatically
searingthe outside of meats, raisingthe pre-set
temperature by 100° F for a shorttime to searthe outside
of themeat. Thetemperature thenreturnsto the pre-set
temperature in the standardconvection roastmode.
Meat Probe*
Theprobetemperature functionis used to automatically
turnthe oven offwhen the internaltemperature of meat
being cooked is reached.
17
16
Clocks and Timers
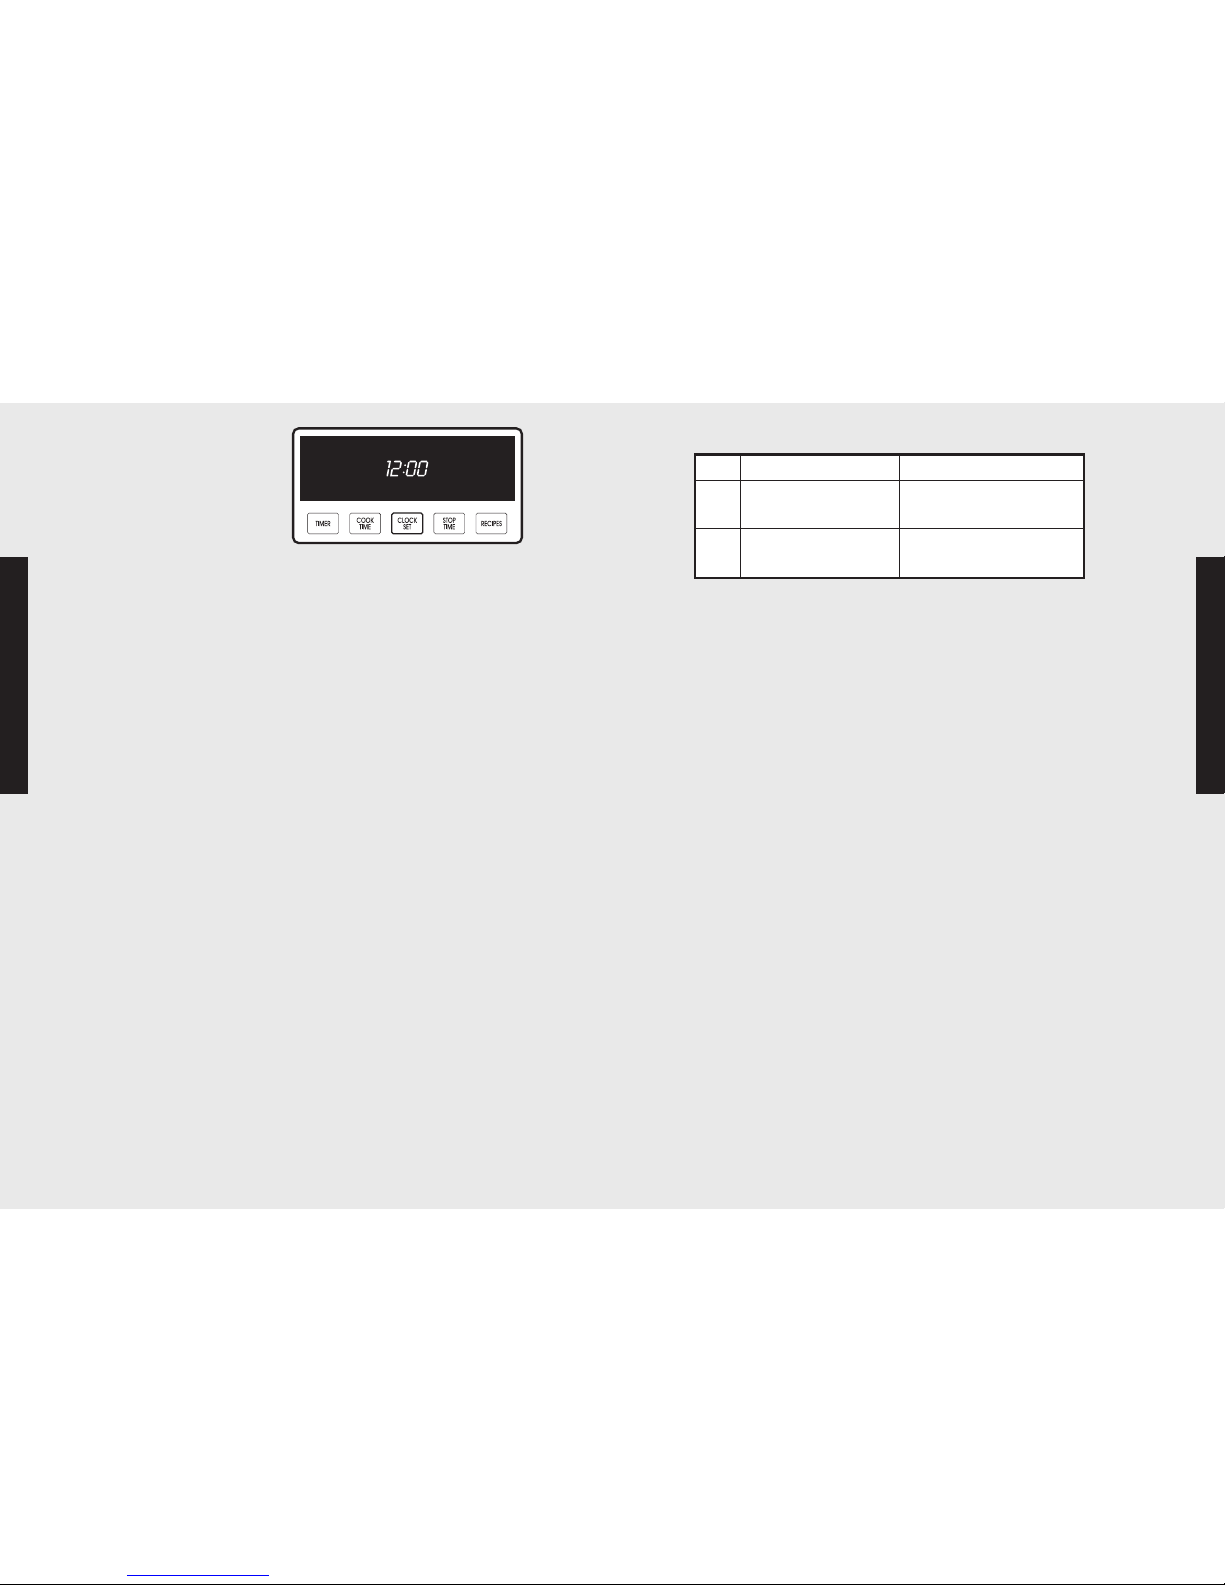
Electronic
TimingCenter
TheElectronicTiming
Centeris usedto
programand control
alltimingfunctionson
yourVikingappliance.
It hasfour display andprogramming modesthat areactivatedby
thefour pushbuttons. Both theTimer andthe Cook Time/Stop
TimeModescan be used to timecookingperiods. These
features can evenbe used at the sametime whenboth ovensare
in use. Forexample, youcantime-bakea casserolein theupper
ovenusingthe Cook Time/Stop TimeMode,while broiling in the
lower ovenusing theTimer. One ovencan alsobe cleanedwhile
timingfoods in the other ovenusing thetimer.
Timer Alarm
• At the end of a program,the alarm willconsist of three beeps,
followedby two beepsevery10 secondsuntilthe “CLEAR”
buttonis pressed.
• Whenevera valid functionkey is pressedor when a control
functionstarts automatically, one beepwill sound.
• Whenan invalid functionkey is pressed,two beepswillsound.
Setting the Clock
Thetime-of-day mustbe setbefore any other programcan be
used. When youroven is firstconnectedto the powerin your
home, the timer displaywillshow 12:00.
To Programthe Time-Of-Day:
1. Presseitherthe “UPPEROVEN” or “LOWEROVEN” button.
2. Pressthe “CLOCK SET”button.The clockwill begin to flash.
Theword “CLOCK”will be lit on the display.
3. Typein the correct timeon the electronic number keypad.
4. Pressthe “CLOCK SET”buttonagain. Theclock is now set.
Alternate Method:
1. Presseitherthe “UPPEROVEN”or “LOWEROVEN”button.
2. Press the “CLOCK SET”button. The clock willbegin to flash.
Theword “CLOCK”will be lit on the display.
Programming Modes
Programming Modes
3. Usethe up and down arrowsto changethe currenttime.
4. Press the “SET” button on the temperaturecontrol or the
“CLOCKSET”buttonon the electronic timing center. The
clock is now set.
Note: The time-of-day cannot be changed while there is a
Bake Hours or Start Time cycle programmed into the timer.
Setting the Timer
Thetimer is designedfor accuratetimingand is idealfor baking
delicateitemssuch as biscuits,cookies,and popovers,and for
precisebroiling.The timercan be usedfortimingup to 12 hours.
Whensetting the timer, thetime displayedwill decrease in 1
minuteincrements.When thetimer counts downto 1 minute,the
timer alarmwill giveone shortbeep and thedisplaywill change
to seconds.When thetimer reaches0:00,the alarm willgive one
longbeep.
To SettheTimer:
1. Press the “TIMER”button.The timerwill display“0:00”and
theword “TIMER.”
2. Typein the desired durationtime on theelectronicnumber
keypad.
3. The timer willstart automatically. (To cancelthe entry, pressthe
“CLEAR”buttonon the left sideof the control panel before
thecount downbeginsand the timeis still flashing.)
4. The timeris now set.
Alternate Method:
1. Press the “TIMER”button. Thetimerwill display “0:00” and
theword “TIMER”will be lit on the display.
Press and Release Press and Hold
s
Time increases by one
minute
Time increases by 10
minutes
t
Time decreases by one
minute
Time decreases by
10 minutes
Clocks and Timers

19
18
Programming Modes
Programming Modes
Clocks and Timers
2. Use theup anddown arrowsto set the timer.
3. Press “SET”or “TIMER” to programthetimer. (To cancelthe
entry, press the“CLEAR”buttonon the leftside of the control
panel.)
4. The timer is now set.
Cook Time and Stop Time
Withthe Vikingoven,you can choosewhat times you needto
start and stopcooking yourfood. TheCook Timeand Stop Time
functions allow you to programyour preferences.
Here’s howit works:
It is 2:00PM and you wouldlike to haveyour dinner ready at 6:00
PM.By programming youroven witha two-hour cooktime and a
6:00PM stop time, youroven will delay cookinguntil 3:50PM. At
3:50, the ovenwill begin preheating.At 4:00 PM, the ovenwill
begin its two-hourcook time.
CookTime and StopTime Facts:
Bothovenscan be set individuallyfor Cook Timeand StopTime
functions.
To Set Cook Time:
1. Select UPPER OVENor LOWEROVEN.
2. Select an ovenfunction andtemperature before settingCook
Timeand StopTime functions.
3. Press “COOKTIME”and the display willflash“0:00”and
“COOK TIME”will be litbelow.
4. Usenumerickeyboardto enterthe amountof time needed for
cooking.
5. After the timeis entered, thedisplaywill show“COOKTIME”
under the timer field. (To cancelthe entry, press the“CLEAR”
buttonon theleft sideof thecontrol panel.)
6. Press “SET” or “ENTER” if the cooktime is correct.Cooktime
is set.
NOTE: To cancel cooktime during its cycle, press “COOK TIME”
andthen pressthe “CLEAR” button on the leftside of the oven
control. Cookingwill continueif theoven is on.
To Set Stop Time:
1. SetCook Time,followingthe stepsprovided in theprevious
section.
2. Press “STOP TIME”and “STOPTIME”will be lit on the display.
3. Usenumerickeyboardto enter thetimeyou wantto stop for
cooking.
4. After the timeis entered,thedisplaywill flash the time. (To
cancelstoptime,pressthe “CLEAR” button on the leftside of
thecontrol panel.)
5.Press “SET” or “STOPTIME”if thestop timeis correct.Stop
timeis set and willbegin whenthe ovenis preheated.
NOTE: Display will show Cook Time and Stop Time. If you
have entered a time incorrectly, you will hear a long beep
and the display will not change.
NOTE: To cancel stoptime during its cycle, press “STOP TIME”
andthen pressthe “CLEAR”buttonon theleft sideof the oven
control. Cookingwill continueif theoven is on.
WhenStop Timehas beenreached:
1. Youroven willsound three beeps, and“HOLD”will appear on
thedisplay.
• The oven willstay at 150ºF inhold modefor two hours.
• Aftertwo hours,the oven willsoundfour longbeeps and
shutoff.
2. Press “OFF” to turn offthe oven manually.
Clocks and Timers
Press and Release Press and Hold
s
Time increases by one
minute
Time increases by 10
minutes
t
Time decreases by one
minute
Time decreases by
10 minutes

2120
Programming Modes
Programming Modes
These functions allowyou to customizecontrolsto suit your
specifictastes.
Brightness
Thismode offersusers theabilityto decreaseor increasethe
intensity of the brightnessof theelectronic display panel. Users
maychoosebetweenfour levels of brightness:25%, 50%,75%,
and100%.
To customize brightnesslevel:
1. Press“SETTINGS.” Settingsmenu willappearin display.
2. Pressthe up or down arrowsuntil “BRIGHTNESS:100%”
appearsin the display. (The% shown is the current
brightnesslevel.)
3. Press“ENTER” to change brightness level. Currentvalue
willflash.
4. Move up anddown arrows to select desired brightness
level.
5. Press“ENTER” to confirm brightness level.
6. To exit the Settingsmenu,press“SETTINGS.”
Degree Format
Theoven has beenpresetto the Fahrenheit temperaturescale.
Withthis feature,userscan switchto the Celsius temperature
scale.
To changedegreeformatto Celsius:
1. Press“SETTINGS.” Settingsmenu willappearin display.
2. Pressthe up or down arrowsuntil “DEGREES:
FAHRENHEIT” appearsin the display.
3. Press“ENTER” to change degree format. Currentvalue
willflash.
4. Use arrow keysto select“CELSIUS.”
5. Press“ENTER” againto set degree format.
6. To exit the Settingsmenu,press“SETTINGS.”
Oven Settings
Tones
Thisfunctionallowsyou to definethe duration of tones and the
numberof tones for differentevents.Your ovenis programmed
withdifferent audible tones as demonstratedby the following
chart:
Oven Settings
Description
of Tone
Used in…
Number
of Tones
Duration
(measured
in seconds)
1 Minute Left
Min/Sec or Cook
Timer
1 1
Autostart
Cooking mode or
timer starts without
pressing Set or
Enter
2 0.1
End of Hold
Cook Time/Stop
Time
4 1
Timer Expired
Min/Sec or Cook
Timer
3 1
Failure
RTD error/Latch
error
5 1
Invalid Entry
Error in
programming
3 0.1
Periodic
Reminder
After cooking mode
finishes or during
programming to
prompt action by
user
1 0.1
Key Press Information Entry 1 0.1
Invalid Key Information Entry 3 0.1
Repeat Key Information Entry 0 0
Oven Light
Off
Turning light off 2 0.1
Oven Light
On
Turning light on 1 0.1

23
22
Programming Modes
Programming Modes
Oven Settings
Oven Settings
To changethe frequencyand/orduration of anyof theabove
tonesignals:
1. Press“SETTINGS.” Settingsmenu willappearin display.
2. Pressthe up or down arrowsuntil “TONES…”appears in the
display.
3. Press“ENTER,”and “RESTORE FACTORY DEFAULTS: NO”
appearson the display.
4. Scroll up or downusing thearrow keysto find the Tone you
would liketo changeand press“ENTER.” Displaywill flash
andappearas follows:
5. Press“ENTER,”and the “1 x 1 SEC”valuewill flash.
6. Usingthe numeric keyboard, enter the number andthe
duration of tonesdesired.Thenumberof tones canbe a
value from0 to9. The duration of tones is measured in tenths
of a second. You canenter a numberfrom0.0 to 9.0.
7. Press“ENTER” whenfinished.The tone is customized to your
preference. At thispoint theoven playsthe new tone.If you
do notlike it, return to Step10 to adjustthe tone.
8. To exitthe Settings menu, press“SETTINGS.”
Tone Volume
To change the TONE volume setting,
1. Press "SETTINGS." Settings menu will appear on display.
2. Press the up or down arrows until "TONES ..." appears on
the display.
3. Press "ENTER," and "RESTORE FACTORY DEFAULTS:
NO" appears on the display.
4. Press the down arrow until "VOLUME: HIGH" appears on
the display.
5. Press "ENTER" to change volume level. The current value
will flash.
6. Use up and down arrows to select the desired volume
level. Setting options are “HIGH”, “LOW” and “OFF.”
7. Press "ENTER" to confirm volume level setting.
8. To exit the Settings menu, press "SETTINGS.”
Timeouts
Youroven is programmedwith 4 presettimeouts thatallowthe
uservarying amountsof time to key in entriesto theoven control
display. The amountof time allowedthe user to respondto a
programming prompt is called a timeout. If theuser failsto make
an entry during the timeoutperiod,the ovenwill default to its
previous mode.
If youfind thattheamountof time allowed forprogramming does
notmeet yourneeds,you can redefinethe limitsof any of the
fourtimeouts.The chartbelow definesthe 4 timeouts, their
duration, andwhen they’re used:
Description
of Timeout
Used in…
Duration
of
Timeout
1 Short Entry
Cycle setpoint, meat probe
setpoint, and setting the
minute/second timer
5 seconds
2 Medium Entry
Entering cook/stop times,
setting time, selecting
functions and settings
10 seconds
3 Long Entry
Selecting, editing, and
entering Recipes
30 seconds
4
Lock Key
Hold Time
Locking the Oven 3 seconds
Description
of Tone
Used in…
Number
of Tones
Duration
(measured
in seconds)
Panel is
Locked
Information Entry 3 0.1
Setpoint
Reached
Cooking Modes 1 1
Meat Probe Roasting Modes 3 1
Meat Probe
within 10
degrees
Roasting Modes 2 1
Searing Time
Reached
Roasting Modes 3 1
Start Time
Reached
Various Cooking
Modes
1 1
Panel is
Unlocked
Information Entry 2 0.1
“Short Key Entry: 5 sec”
Timeout
Name
Duration of
Timeout

25
Programming Modes
Sabbath Mode
This mode offers users belonging to religions with “no work”
restrictions to program their ovens to comply with the Sabbath
requirement. When the oven door is opened in Sabbath mode,
the oven light stays off while the convection fan and heating
elements remain on.
To program the Sabbath mode:
1. Press “SETTINGS”. Settings menu will appear in display.
2. Press up or down arrows until “SABBATH: NO” appears
in the display.
3. Press “ENTER,” and “NO” will flash on display.
4. Use arrow keys to choose “YES” or “NO.”
5. Press “ENTER” again to accept Sabbath mode.
6. To exit the Settings menu, press “SETTINGS.”
Showroom Mode
This mode allows the oven to be hooked up to a 120 volt
electrical supply for display or showroom mode purposes. In this
mode, the electronic display/controls and oven lights will function
but the heating elements and convection fan will NOT function.
To program the Showroom mode:
1. Press “SETTINGS”. Settings menu will appear in display.
2 Use the down arrow to scroll to “TIMEOUTS”.
3. At “TIMEOUTS” mode, hold the down arrow for 5 seconds.
4. Use the down arrow to scroll to “SHOWROOM”.
5. Push “SET” button.
6. Use the up arrow to toggle between “YES” and “NO”.
7. Select “YES” and push “SET” button.
8
. To exit the “SETTINGS” menu, press “SETTINGS”.
Oven Settings
24
Programming Modes
To change the duration of a Timeout:
1. Press “SETTINGS”. Settings menu will appear in display.
2. Press the up or down arrows until “TIMEOUTS…” appears
in the display.
3. Press “ENTER” and “RESTORE FACTORY DEFAULTS”:
NO” will appear on the display.
4. Scroll up or down using the arrow keys to find the timeout
you would like to change and press “ENTER.” Display will
flash and appear as follows:
5. Using the numeric keyboard, enter the number of seconds
desired.
6. Press “ENTER” when finished. Timeout is customized to
your preference.
7. To exit the Settings menu, press “SETTINGS.”
Clock Format
This feature allows users to choose a 12-hour or 24-hour
format for the clock display.
To program the clock format:
1. Press “SETTINGS.” Settings menu will appear in
display.
2. Press up and down arrows until “12 or 24 HOURS: 12”
appears in the display.
3. Press “ENTER” and the current setting will flash in the
display.
4. Use arrow keys to choose “12” or “24.”
5. Press “ENTER” again to accept desired clock format.
6. To exit the Settings menu, press “SETTINGS.”
5. Push “SET” button.
6. Use the up arrow to toggle between “YES” and “NO”.
7. Select “YES” and push “SET” button.
8
. To exit the “SETTINGS” menu, press “SETTINGS”.
Oven Settings
“1 Minute Left: 1 X 1 sec”
Tone Name
Number of
Tones
Duration of Tones
(in seconds)

2726
Programming Modes
Programming Modes
OvenSettings
Recipe Function
(PremiereModel Only)
Lock and Unlock
Thisfeature prevents thecontrolpads from beingactivatedwhile
theovens arenot beingused.
To lock the ovens:
1. Press on the right sideof your oven control
panel.Displayshows“HOLD FORLOCK.”
2. When locked,threeshort beeps willsound andthe display
willshow “PANEL ISLOCKED.”
3. Tounlockthe oven,pressand hold “UPPEROVEN”or
“LOWEROVEN”for 3 seconds. Whenunlocked,two short
beeps willsound andthe display willshow “PANELIS
UNLOCKED.”
Interior Oven Lights (Two Pads)
Eachoven hasan interior light thatcan be turnedoff and on
using the designatedbuttonson the oven controlpanel.
Press or to turn on the lightin the upperor lower
oven. (Youwill heara beepto signalthat thelight is on.)
Press or again to turn offthe lightin the upperor
lower oven.(You willhear two beeps to signal thatthe lightis off.)
Entering Recipe Name
This function programs and
saves up to 100 cooking
cycles from favorite recipes.
Recipe names are entered on
the numeric keypad on the
right side of the keyboard.
When a key with several letters is pressed for the first time, the
first letter is entered. If the same key is pressed a second time,
the second letter is entered, and so on. For example, if the key
“2 ABC” is pressed once, the letter ‘A’ is entered. If the key is
pressed 2 times, the letter ‘B’ is entered. If the key is pressed 3
times, the letter ‘C’ is entered. If the key is pressed 4 times, the
digit ‘2’ is entered. Then lower case ‘a’, then ‘b’, then ‘c’, then
‘A’ again, and so on.
If nothing is pressed within 2 seconds, the cursor moves to the
next position. To return to the previous position use the right
“CLEAR” key. Pressing the ‘1’ key will also move the cursor to
the next position as well as entering a space.
When subsequent characters are entered, the case and type of
the character matches the previous character. For example, if
the previous character is a digit, then pressing the “2 ABC” key
once would result in the digit ‘2’. If the previous character is a
lower case letter, then pressing the “2 ABC” key once would
result in the letter ‘a’.
“Amy’sOatmeal Cookies”

29
Programming Modes
Warming Modes
Dehydrate
Thisoven is designednot onlyto cook,but also to dehydrate
fruitsandvegetables. Hereare sometips for usingyour Viking
oven’s dehydratefeature:
1. Prepare the foodas recommended.
2. Choose andpress“UPPEROVEN” or “LOWER OVEN.”
3.Arrangethe food on drying racks (notincluded withthe oven,
butavailablefrom specialtycooking dealers).
4. Select “DEHYDRATE” fromthe oven functioncontrolpanel.
5. Press “SET”or “ENTER.”Dehydrate modewill begin
immediately.
Defrost
Thisoven candefrost frozen food.Touse the defrostfunction,
takethe followingsteps:
1. Placethe frozen foodon a bakingsheet.
2. Choose and press “UPPER OVEN” or “LOWER OVEN.”
3. Select “DEFROST” fromthe oven functioncontrolpanel.
4. Press “SET”or “ENTER” to begindefrosting.The defrost
modewill begin and thedefrosttemperaturewill be displayed.
Proof
Thisfunctionusesa low temperature between90º and 110ºF to
createan optimalenvironmentforthe yeastto rise in many types
of dough. To usethe prooffunction,take the following steps:
1. Placethe doughon a bakingsheet.
2. Choose and press “UPPER OVEN” or “LOWER OVEN.”
3. Select “PROOF”from the ovenfunction controlpanel.
4. Press “SET”or “ENTER” to beginproofing.
Oven Off
Theoven willcontinue operatinguntilyou pressthe “OFF”
buttonforthe oven youare using.For example,if you are
cookingin the “UPPEROVEN,”pressthe “OFF”buttonnearest
thisbuttonon the controlpanel.
28
Recipe Function(PremiereModel Only)
Entering a new recipe
1. Hit “RECIPES” twice.
2. “NAME”shouldbe flashing.
3. Entera recipe nameusingnumerickeypad.
4. Hit a Bake functionkey.
5. Use arrowor numerickeypad to set the temperature.
6. If needed,hit “COOK TIME” key to entercook time.
7. Hit “SET” or “ENTER” to save the recipe.
Editing a recipe
1. In the recipelist mode, hit “RECIPES.”
2. Recipename shouldbe flashing.
3. Use the followinginstructionsto make changes:
• Tochange recipe name,use numerickeypad.
• Tochange cycle, pressa Cycle key.
• Tochange temperature,press an arrowkey.
• Tochange cooktime, pressthe “COOK TIME” key.
4. Hit “SET”or “ENTER”to savethe recipe.
Using a recipe
1. To use a programmed recipe, scroll through the list and press
“ENTER” or “SET”to selectand start the program.
Deleting a recipe
1. In the recipelist mode, hit “RECIPES.”
2. Recipename shouldbe flashing.
3. Use right“CLEAR”key to erasethe name.
4. Hit “SET”or “ENTER.”
Programming Modes
WARNING
To avoidsickness and food waste, do not allow defrosted food
to remain in the oven for more than two hours.

3130
Programming Modes
Programming Modes
Convection Bake
Thisfunctionis recommendedfor multi-rack baking.Foods canbe
baked and roastedat the same timewith minimaltaste transfer,
evenwhen differentdishesare involved,such as cakes, fish,or
meat. To use convectionbake, takethe followingsteps:
1. Arrangethe oven racksin the desiredpositions beforeheating
theoven.
2. Select “UPPER OVEN”or “LOWEROVEN.”
3. Set theOven FunctionSelector to “CONV. BAKE.”
Temperaturedisplay flashesa presettemperature of 325ºF.
4. Set thetemperature usingone of the following two methods:
a. Confirmpresettemperature andpress“SET” or “ENTER.”
Theoven willbegin Conv. Bake Preheatimmediately.
OR
b. Change thetemperature by typing the desiredtemperature
on thenumerickeypador usingthe up and down arrow
keys. Press “SET”or “ENTER” whenfinished. Theoven will
begin Conv. Bake Preheatimmediately.
DuringConvection Bake Preheat
Thedisplaywill alternate between showingthe set baking
temperature and the actualpreheattemperatureevery 5 seconds.
Whenthe set baking temperatureis reached,one long beepwill
sound and thedisplaywill show“CONV. BAKE.” Open oven
doorand put foodin oven.
To changeset temperature duringpreheatstage:
BakeModes
Press and Release
s
Temperature increases by 5º F (or 2º C)
t
Temperature decreases by 5º F (or 2º C)
Bake
Thisfunctionis recommendedfor single-rackbaking.Use this
settingfor baking, roasting, andcasseroles. To bake,followthese
steps:
1. Arrangethe oven racksin the desiredpositions beforeheating
theoven.
2. Select “UPPER OVEN” or “LOWEROVEN.”
3. Set theOven FunctionSelector to “BAKE.”Temperature
displayflashes a presettemperatureof 350º F.
4. Set thetemperature usingone of the following two methods:
a. Confirm preset temperature and press “SET”or “ENTER.”
Theoven willbegin BakePreheat immediately.
OR
b. Change thetemperature by typing the desiredtemperature
on thenumerickeypador usingthe up and down arrow
keys. Press “SET”or “ENTER” whenfinished. Theoven will
begin BakePreheat immediately.
DuringBakePreheat
Thedisplaywill alternate between showingthe set baking
temperature and the actualpreheattemperatureevery 5 seconds.
Whenthe set baking temperatureis reached,one long beepwill
sound and thedisplaywill show“BAKE.” Open ovendoor and
putfood in oven.
To changeset temperature duringpreheatstage:
BakeModes
Press and Release
s
Temperature increases by 5º F (or 2º C)
t
Temperature decreases by 5º F (or 2º C)

3332
Programming Modes
Programming Modes
Conventional broilingis most successfulforcuts of meatone to
twoinchesthick,and is also suitablefor flatpiecesof meat.
High Broil
Withthis setting,heat radiatesat full powerfromboth broil
elements, locatedin the top of the ovencavity. The distance
betweenthe foodsand the broilelementsdeterminesbroiling
speed.Forfast broiling, placefood as close as two inches from
thebroilelement, or on the top rack. Fast broilingis best for
meats where "rare to medium" donenessis desired.Use this
settingfor broilingsmall andaveragecuts of meat.
MediumBroil
Withthis setting,innerandouter broil elementspulseon and off
to produceless heatfor slow broiling.Forslow broiling, allow
about fourinchesbetweenthe top surfaceof your foodand the
broil element.Slow broiling is bestfor chicken and ham.Use this
settingfor broilingsmall andaveragecuts of meat.
LowBroil
Thismode usesonly a fractionof theoven’s availablepowerto
theinner broil elementto producedelicatetop-browningin only
three to fourminutes on itemssuch as meringue.
To Use Broil:
1.Arrangethe oven rackin the desiredposition before
turningthe broiler on.
2.Place the foodin the centerof the coldbroiler pan and grid
suppliedwithyouroven,and then place the broilerpan in the
oven.
3.Select“UPPEROVEN” or “LOWER OVEN.”
4.Setthe Oven FunctionSelectorto “BROIL.”Display willshow
“BROILHIGH” and “ON”will flash. Medium andlow displays
willshow “CONV BROILM” and “CONVBROILL.”
5.Choosepower levelfor BROIL:
a. For“HIGHBROIL,”press“SET.”
b. For“MEDIUMBROIL,” pressdownarrow keyonce. Display
willchangeto MED, thenpress“SET.”
c. For “LOWBROIL,” press downarrowkeytwice.Displaywill
changeto LO,then press“SET.”
6.Close the doorto the oven.With closed-door broiling, thebroil
elementmightcycle on and offif an extended broilingtime is
required.A built-in smoke"eliminator"in the top of the oven
willhelp reducesmoke andodors.
7.Whencooking is complete,pressthe “OFF”buttonfor the
selectedoven.
TruConvec™
Thisfunctionis ideal for foods thatrequire gentle cooking,singlerackbaking, multiple-rack baking,roasting,and preparation of
complete meals. Thissettingis also recommendedwhen
preparinglarge quantitiesof bakedgoods at one time. To use
TruConvec™,take the following steps:
1. Arrangethe oven racksin the desiredpositions beforeheating
theoven.
2. Select “UPPER OVEN” or “LOWEROVEN.”
3. Set theOven FunctionSelector to “TRUCONVEC.”
Temperaturedisplay flashesa presettemperature of 325ºF.
4. Set thetemperature usingone of the following two methods:
a. Confirm preset temperature and press “SET”or “ENTER.”
Theoven willbegin TruConvec™ Preheatimmediately.
OR
b. Change thetemperature by typing the desiredtemperature
on thenumerickeypador usingthe up and down arrow
keys. Press “SET”or “ENTER” whenfinished. Theoven will
begin TruConvec™ Preheatimmediately.
DuringTruConvec™Preheat
Thedisplaywill alternate between showingthe set baking
temperature and the actualpreheattemperatureevery 5 seconds.
Whenthe set baking temperatureis reached,one long beepwill
sound and thedisplaywill show“TRUCONVEC.” Openoven
doorand put foodin oven.
To changeset temperature duringpreheatstage:
BakeModes
Press and Release
s
Temperature increases by 5º F (or 2º C)
t
Temperature decreases by 5º F (or 2º C)
Broil Modes

35
34
Programming Modes
Programming Modes
Convection Roast
Usethis functionwhen roastingtendercuts of meator poultryof
anysize. To useConvectionRoast,followthesesteps:
1.Arrangethe oven racks in the desiredpositionsbeforeheating
theoven.
2.Select“UPPEROVEN” or “LOWER OVEN.”
3.Setthe Oven FunctionSelectorto “CONV. ROAST.”
Temperaturedisplay flashesa presettemperature of 325ºF.
4.Setthe temperature using oneof thefollowingtwo methods:
a.Confirmpresettemperature andpress“SET” or “ENTER.”
Theoven willbegin Convection Roast Preheatimmediately.
OR
b. Change thetemperature by typing the desiredtemperature
on thenumerickeypador usingthe up and down arrow
keys. Press “SET”or “ENTER” whenfinished. Theoven will
begin Convection Roast Preheatimmediately.
DuringConvection Roast Preheat
Thedisplaywill alternate between showingthe set temperature
andthe actualpreheat temperatureevery5 seconds. Whenthe
settemperature is reached,one longbeep willsound and the
displaywill show“CONV. ROAST.” Open ovendoor and put
foodin oven.
To changeset temperature duringpreheatstage:
Roast Modes
Press and Release
s
Temperature increases by 5º F (or 2º C)
t
Temperature decreases by 5º F (or 2º C)
Convection Broil
Convectionbroiling hasthe advantageof broiling foodslightly
more quickly thanconventional.Convectionbroilingof meats also
produces better results,especially for thick cuts.This is because
meatsearson the outside and retainsmore juices andnatural
flavorinsidewith less shrinkage.
To Use Convection Broil:
1.Arrangethe oven rackin the desiredposition before turning
thebroiler on.
2.Place the foodin the centerof the coldbroiler pan and grid
suppliedwithyouroven,and then place the broilerpan in the
oven.
3.Select“UPPEROVEN” or “LOWER OVEN.”
4.Setthe Oven FunctionSelectorto “CONV. BROIL.”Display will
show“CONVBROILH” and “ON”will flash.Mediumand low
displayswillshow“CONVBROILM” and “CONVBROILL.”
5.Choosepower levelfor CONVECTION BROIL:
a. For“HIGHCONVECTIONBROIL,” press “SET.”
b. For“MEDIUMCONVECTIONBROIL,”pressdown arrow
keyonce. Displaywill change to MED,then press“SET.”
c. For “LOWCONVECTIONBROIL,”pressdownarrowkey
twice.
d. Displaywill change to LO, thenpress“SET.”
6.Close the doorto the oven.With closed-door broiling, thebroil
elementmightcycle on and offif an extended broilingtime is
required.A built-in smoke"eliminator"in the top of the oven
willhelp reducesmoke andodors.
7.Whencooking is complete,pressthe “OFF”buttonfor the
selected oven.
Oven Off
Theoven willcontinue operatinguntilyou pressthe “OFF”
buttonforthe oven youare using.For example,if you are
cookingin the “UPPEROVEN,”pressthe “OFF”button
nearest this button on the controlpanel.
Broil Modes (cont.)

3736
Programming Modes
Programming Modes
The meat probe takes the guesswork out
of roasting by cooking foods to the ideal
internaltemperature. Theprobesettingis
used to automatically turn the oven off
when meat reaches its optimal internal
temperature. Your Viking oven’s built-in
probewillhelpyou prepare meatsexactly
as youwant them.
Meat Probe UseandCare
• Use of probesother thanthe one providedwith youroven
mayresultin damageto the probe.
• Use thehandlesof the probeand plugwhen insertingand
removing themfrom themeat and outlet.
• To avoiddamagingyour probe, neveruse tongsto pull on the
cable whenremoving.
• To avoidbreakingthe probe, makesure foodis completely
defrosted before inserting.
• To preventpossible burns, do not unplug the probe fromthe
outletuntil the ovenhas cooled.
• Neverleavethe probeinsidethe oven during a self-cleaning
cycle.
• Neverstorethe probeinsidethe oven.
To Insert the Meat Probe:
After preparing the meatand placing it on the broilerpan, follow
these stepsfor proper probe placement:
1.Laythe probeon the outside of the meatalongthe top or
sideand use yourfingerto mark where the edgeof the meat
meets the probe.The pointwhere theymeet should rest in
thecenterof the thickest,meatiest partof the roast.
2.Insertthe probecompletelyinto the meat. It should not touch
thebone, fat,or gristle.
• Forroastswith no bone, insert the probe intothe meatiest
partof the roast.
• Forbone-in ham or lamb,insertthe probe intothe center
of thelowestlargemuscleor joint.
• Witha wholeturkey, insertthe probeinto the meatiestpart
of theinner thigh frombelow andparallel to the leg.
Plug
Cable
Probe
Handles
Auto Roast
Usethis functionto simplify roastingby automaticallysearing the
outsideof roasts. To use AutoRoast:
1.Arrangethe oven racks in the desiredpositionsbeforeheating
theoven.
2.Select“UPPEROVEN” or “LOWER OVEN.”
3.Setthe Oven FunctionSelectorto “AUTO ROAST.”
Temperaturedisplay flashesa presettemperature of 325ºF.
4.Setthe temperature using oneof thefollowingtwo methods:
a. Confirm presettemperature, press “SET” or
“ENTER.” The ovenwill beginTruConvec™Preheat
immediately.
OR
b. Change thetemperature by typing the desired
temperature on the numerickeypador usingthe up
anddown arrowkeys.Press“SET” or “ENTER”when
finished. Theoven will begin TruConvec™ Preheat
immediately.
DuringAutoRoast Preheat
Thedisplaywill alternate between showingthe set roasting
temperature and the actualpreheattemperatureevery 5 seconds.
When Set Auto RoastTemperature Is Reached
Onelong beepwill soundand the displaywillshow “SEARING.”
Theoven willremainat searingtemperature(set temperatureplus
100ºF) for 30 minutes.If set, the CookTime timer willbegin.
To TurnOff Oven:
Press the“OFF” button on the controlpaneldisplayfor the oven
youare using.One beepwill soundand the ovenwill turnoff.
Roast Modes
MeatProbe(Available on Premiere Models)

3938
Cooking Tips
Rack Positions
Eachoven is equippedwith three tilt-proofracks.Premiere
modelshavetwo standardtilt-proof racksand one TruGlide™
rack. With theTruGlide™ rack, the bottom sectionremains in the
ovenand the topsectionsmoothly glides outwardwhen pulled.
Thisreduces thechancesof spillsfrom items thatcontainjuiceor
liquid.This rackcan be used in any of thesixrack positions.
Allovens havesix rackpositions.Position 6 is the farthestfrom the
ovenbottom. Position1 isthe closest to the ovenbottom. The
racks can be easily removedand arrangedat variouslevels. For
bestresults withconventionalbaking,do not use morethan one
rackat a time.It isalso recommended,whenusing two racks,to
bakewith theracks in positions 2 and 4 or positions3 and5.
1. Arrange theoven racksin the desired positions BEFORE
heatingthe oven.If cookingon two racksat the same time,
userack positions2 and 4 orpositions3 and5.
2. Turn theOvenFunctionselector to desiredfunction. Cooking
startsimmediatelyand stopswhen theOven Functionselector
is turned to OFF.
3. Set the TemperatureControl to thedesiredtemperature.
4. Placefood in the ovenafterthe Oven indicator lightgoes out.
SETSET
Position 6
Position 1
Position 2
Position 3
Position 4
Position 5
To Set the Meat ProbeFunction:
• A cooking modemust be selectedbeforesettingmeatprobe.
• Bake,Convection Bake,ConvectionRoast,TruConvec™, and
ConvectionBroilare the cooking modes thatcan be used with
themeat probefunction.
• Set theinternaltemperatureabout 10°F lowerthan the
actualdesiredinternal temperature. The meatwill continueto
cookwhen removedfromthe oven and willreachdesired
internaltemperature while “standing.”
1.Insertprobe intothe meatand slideintooven.Doubleoven
modelshavea meat probein the upperoven only.
2.Plugthe probe intothe outletlocated on the leftinterior wallof
theoven and close the ovendoor.
3.Press the“MEATPROBE”button on the control panel.The
displaywill show“SET PROBE”andflashing preset
temperature.
4.Thepresettemperature of160ºF or a stored temperature will
be displayed on the electronictimingcenter. If youdesire this
temperature, theprobe modewill begin after10 seconds.
5.To setanother temperature,use the keypad to enter the
desiredtemperatureand press“SET” or “ENTER.”
• Thetemperature mustbe withinthe rangeof 120ºto 190ºF.
• Displayalternatesbetween cookmode and probe
temperature.
• Probetemperature displaysLO until 100ºF isreached, then
displays actual temperature.
6.Whenthe probe is within10º F of setpoint,two long beepswill
sound.Whenthe setpointis reached, three longbeepswill
sound and theoven willturn off. Thedisplaywill alternate
betweencook modeand “DONE.” One short beepwill sound
every minute untilthe probe functionis closed.
7.Press anykey to close theprobefunction.
MeatProbe(Available on Premiere Models)
Cooking Tips
Programming Modes

4140
Cooking Tips
Cooking Tips
Cooking Tips
PanPlacement Tips
• Whenusing large (15"x 13") flatpans or traysthat cover
mostof the rack,rack positions 2 or 3 produce the best
results.
• Whenbakingon more thanone rack,we recommendusing
oneof the convectionmodesand the 2nd and 4thposition
or the3rd and 5th positionfor moreeven baking.When
bakingon three racks, useany combination of positions2, 3,
4, and5 formore consistentresults.
• Stagger pansin opposite directionswhen two racks and
severalpans areused in ConventionalBake Mode. If
possible, no pan shouldbe directly aboveanother.
• Allow1 to2 inchesof air spacearoundall sidesof each pan
foreven air circulation.
BakingTips
Becauseof variationsin food density, surface texture,and
consistency, some foods may be prepared moresuccessfullyusing
theConventional Bakesetting. For thisreason, conventional
bakingis recommendedwhenpreparingbaked goods, suchas
custard. Youmay findthat otherfoodsalso turn outbest when
cookedin Conventional BakeMode.
• As a generalrule,to convertconventionalrecipes to convection
recipes, reduce thetemperature by 25° F (-3.9°C) and the
cookingtime by approximately 10 to 15%.
• Somerecipesmay requireadjustmentand testingwhen
convertingfrom standardto convection modes. If unsurehow
to converta recipe, beginby preparingthe recipe in
Conventional Bake. After achieving acceptable results, follow
theconvectionguidelineslistedfor the similarfood type. If the
foodis not preparedto your satisfaction during thisfirst
convectiontrial,adjustonly one recipevariable at a time
(cooking time,rack position, or temperature)and repeat the
convectiontest. Continueadjustingonerecipevariable at a
timeuntilyou achieve the resultsyou are lookingfor.
• Makesure the ovenracksare in the desiredposition before you
turnon the oven.
• Do not openthe door frequentlyduringbaking. Look through
thedoor window to checkdoneness wheneverpossible. If you
mustopen thedoor, the besttime is during thelast quarter of
thebakingtime.
• Baketo theshortesttime suggestedand checkfor doneness
beforeaddingmore time. For bakedgoods,a stainlesssteel
knife placed in the center of theproductshouldcome outclean
whenthe bakeditem is done.
• Use thepansize and typerecommended by therecipeto
ensurebest results. Cakes,quick breads,muffins,and cookies
shouldbe baked in shiny, reflective pansfor light,goldencrusts.
Avoid theuse of old, darkenedpans. Warped,dented, stainless
steel and tin-coatedpans heatunevenly and willnot give
uniformbakingresults.
Multiple Rack Baking
Onemajor benefitof convectioncooking is the abilityto prepare
foods in larger quantities.The uniform air circulationmakesthis
possible. Foodsthat can be prepared on two or three racksat
thesame timeinclude: pizza, cakes, cookies,biscuits,muffins,
rolls,and frozen conveniencefoods.
Forthree-rackbaking, use anycombination of rack positions two,
three,four, andfive. For two-rackbaking,use rackpositionstwo
andfour or positionsthreeand five. Rememberthattheracks are
numbered frombottomto top.
Cooking Tips
Single Rack Pan Placement
Multiple Rack Pan Placement

4342
Cooking Tips
Cooking Tips
Conventional Baking Chart
Single Rack Time
Food Pan Size Position Temp
(minutes)
BREADS
Biscuits Cookie Sheet 3 or 4 400°F (204.4° C) 8 - 10
YeastLoaf LoafPan 3 or 4 375°
F (190.6°C)
30 - 35
YeastRolls Cookie Sheet 3 or4 400°
F (204.4°C)
12 - 15
NutBread Loaf Pan 3or 4 375°F(
190.6° C)
30 - 35
Cornbread 8"x 8" 3 or 4 400°
F (204.4°C)
20 - 25
Gingerbread 8" x 8" 3 or 4 350°
F (176.7°C)
35 - 40
Muffins MuffinTin 3or 4 375°
F (190.6°C)
15 - 20
CornMuffins Muffin Tin 3 or 4 375
° F (190.6°C)
15 - 20
CAKES
Angel food Tubepan 3 or 4 375°
F (190.6°C)
35 - 45
Bundt Tubepan 3 or 4 350°
F (176.7°C)
45 - 55
Cupcakes Muffinpan 3 or 4 350°
F (176.7°C)
16 - 20
Layer, Sheet 13"x 9" 3or 4 350°
F (176.7°C)
40 - 50
Layer, Two 9" round 3 or 4 350°
F (176.7°C)
30 - 35
Pound Loafpan 3 or 4 350°
F (176.7°C)
60 - 65
COOKIES
Brownies 13"x 9" 3or 4 350°
F (176.7°C)
25 - 30
Choc. Chip Cookie Sheet 3or 4 375°
F (190.6°C)
12 - 15
Sugar Cookie Sheet 3 or4 350°
F (176.7°C)
10 - 12
PASTRY
Cream Puffs Cookie Sheet 3or 4 400°
F (204.4°C)
30 - 35
PIES
Crust, Unfilled 9" Round 3 or 4 425°
F (218.3°C)
10 - 12
Crust, Filled 9" Round 3 or 4 375°
F (190.6°C)
55 - 60
Lemon Meringue 9" Round 3 or4 350°
F (176.7°C)
12 - 15
Pumpkin 9" Round 3 or 4 350°
F (176.7°C)
40 - 45
Custard 6 - 4 oz cups 3 or 4 350°
F (176.7°C)
35 - 40
ENTREES
EggRolls CookieSheet 3 or 4 400°
F (204.4°C)
12 - 15
FishSticks CookieSheet 3 or 4 425°
F (218.3°C)
18 - 21
Lasagna,frz Cookie Sheet 3 or4 375°
F (190.6°C)
65 - 70
PotPie Cookie Sheet 3 or4 400°
F (204.4°C)
35 - 40
Gr. PeppersStuffed
13"x 9" 3or 4 375°
F (190.6°C)
65 - 70
Quiche 9" Round 3 or 4 400°
F (204.4°C)
25 - 30
Pizza, 12" Cookie Sheet 3 or4 400°
F (204.4°C)
15 - 20
Mac.& Cheese, frz
Cookie Sheet 3 or4 375°
F (190.6°C)
60 - 65
VEGETABLES
Baked Potatoes On Rack 3 or 4 375°
F (190.6°C)
60 - 65
SpinachSouffle 1 qt. Casserole 3 or 4 350°
F (176.7°C)
45 - 50
Squash CookieSheet 3 or 4 375°
F (190.6°C)
50 - 55
FrenchFries CookieSheet 3 or 4 425°
F (218.3°C)
15 - 20
Convection Baking Chart
Single Rack Time
Food Pan Size Position Temp
(minutes)
BREADS
Biscuits CookieSheet 2 & 4
375°
F (190.6 C) 7 - 9
YeastLoaf Loaf Pan 2 & 4
350°
F (176.7°C) 20 - 25
YeastRolls Cookie Sheet 2 & 4
375°
F (190.6°C) 11 - 13
NutBread Loaf Pan 2 & 4
350°
F (176.7°C) 20 - 25
Cornbread 8" x 8" 2 & 4
375°
F (190.6°C) 15 - 20
Gingerbread 8" x 8" 2 & 4
325°
F (162.8°C) 30 - 35
Muffins MuffinTin 2 & 4
350°
F (176.7°C) 12 - 15
CornMuffins Muffin Tin 2 & 4
350°
F (176.7°C) 0 - 12
CAKES
Angel food Tubepan 3 or 4 325°
F (162.8°C)
30 - 35
Bundt Tubepan 3 or 4 325°
F (162.8°C)
35 - 40
Cupcakes Muffinpan 2 & 4 325°
F (162.8°C)
15 - 17
Layer, Sheet 13"x 9" 2 & 4 325°
F (162.8°C)
30 - 32
Layer, Two 9" round 2 & 4 325°
F (162.8°C)
25 - 30
Pound Loafpan 2 & 4 325°
F (162.8°C)
5 - 50
COOKIES
Brownies 13"x 9" 2 & 4 325°
F (162.8°C)
20 -25
Choc. Chip Cookie Sheet 2,3,& 4 350°
F (176.7°C)
7 -10
Sugar Cookie Sheet 2,3,&4 325°
F (162.8°C)
9-10
PASTRY
Cream Puffs Cookie Sheet 2 & 4 375°
F (190.6°C)
4 - 27
PIES
Crust, Unfilled 9" Round 2 & 4 400°
F (204.4°C)
7 - 9
Crust, Filled 9" Round 2 & 4 350°
F (176.7°C)
50 - 55
Lemon Meringue 9" Round 2 & 4 325°
F (162.8°C)
4 - 5
Pumpkin 9" Round 2 & 4 325°
F (162.8°C)
35 - 45
Custard 6 - 4oz cups 2& 4 325°
F (162.8°C)
30 - 35
ENTREES
EggRolls CookieSheet 2& 4 375°
F (190.6°C)
8 - 10
FishSticks CookieSheet 2 & 4 400°
F (204.4°C)
13 -16
Lasagna,frz Cookie Sheet 2 & 4 350°
F (176.7°C)
60 - 65
PotPie Cookie Sheet 2 & 4 375°
F (190.6°C)
10 - 12
Gr. PeppersStuffed
13"x 9" 2 & 4 350°
F (176.7°C)
45 - 50
Quiche 9" Round 2 & 4 375°
F (190.6°C)
20 - 25
Pizza, 12" Cookie Sheet 2 & 4 375°
F (190.6°C)
10 - 12
Mac.& Cheese, frz
Cookie Sheet 3 or4 350°
F (176.7°C)
45 - 50
VEGETABLES
Baked Potatoes On Rack 3 or 4 350°
F (176.7°C)
45 - 50
SpinachSouffle 1 qt.Casserole 3 or 4 325°
F (162.8°C)
35 - 40
Squash CookieSheet 3 or 4 350°
F (176.7°C)
40 - 45
FrenchFries CookieSheet 3 or 4 400°
F (204.4°C)
10 - 15

4544
Cooking Tips
Solving Baking Problems
Bakingproblems can occur for manyreasons. It is importantto remember
thatthe temperaturesettingand cookingtimes you areaccustomedto
using withyour previousoven mayvary slightlyfrom thoserequiredwith
yournew Viking oven.Youmay findthat you needto make some
adjustments.
PROBLEM CAUSE REMEDY
Cakes burned on the 1. Oven wastoo hot 1. Reduce temperature
sides or not done
2. Wrongpan size 2. Use recommendedpansize
in center
3. Toomany pans 3. Reducenumberof pans
Cakes crackon top 1. Battertoo thick 1. Follow recipe;Add liquid
2. Oven too hot 2. Reduce temperature
3. Wrongpan size 3. Userecom.pan size
Cakes arenot level 1. Batteruneven 1. Distributebatter evenly
2. Oven or racknot level 2. Leveloven or rack
3. Pan was warped 3. Use properpan
Foodtoo brown on 1. Ovendooropened 1. Use door windowto
bottom toooften checkfood
2. Dark pansbeingused 2. Useshiny pans
3.
Incorrect rack position3.Userecom.rackposition
4. Wrongbake setting 4. Adjust to conventional
or convectionsetting
as needed
5. Pan too large 5. Useproperpan
Foodtoo brown on 1. Rack positiontoo high 1. Use recom. rack position
top
2. Oven not preheated 2. Allowoven to preheat
3. Sides of pan too high 3. Useproperpans
Cookiestoo flat 1. Hot cookiesheet 1. Allow sheet to cool
betweenbatches
Piesburnedaround 1. Oven toohot 1. Reducetemperature
edges
2. Toomany pans used 2. Reduce no.of pans
3. Oven not preheated 3. Allowovento preheat
Piestoo light on top 1. Ovennot hot enough 1. Increasetemperature
2. Toomany pans used 2. Reduce no.of pans
3.
Ovennot preheated3.Allow ovento preheat
COMMONBAKING PROBLEMS ANDREMEDIES
Cooking Tips
Broiling Tips
• Always usea broiler pan andgridfor broiling. Theyare
designedto provide drainageof excessliquidand fat away
from the cookingsurfaceto help preventsplatter, smoke,and
fire.
• To keepmeatfrom curling,slit fattyedges.
• Brush chickenandfish withbutterseveraltimesas they broilto
preventdryingout.
• To preventsticking,lightly grease broilertray.
• Broil on firstsideforslightly morethan halfthe recommended
time, season,and then turn.Seasonthe secondside justbefore
removing fromthe oven.
• Always pullthe rackout to “STOP”position before turningor
removing food.
• Usetongs or a spatula to turn meats. Never pierce meatwith a
fork, as thisallowsthe juicesto escape.
• Remove thebroiler pan fromthe ovenwhen you removethe
food. Otherwise, drippings willbake ontothe pan.
• Whilethe pan is hot, placea damp papertowelover the
grid. Drizzlewith liquiddishwashing detergentandpour
water overthe grid.This willmake cleaningeasier.
• Youcan alsoline the broilerpan with aluminumfoil to
makecleaningeasier. Be sure thefoil extendsup the
sideof the pan.
• Althoughit isn’trecommended, thegrid can alsobe covered
withfoil.Be sure to slitopenings to conform withthe openings
in thegrid so that melted fatcan drainthrough. Thiswill prevent
spattering,smoking,or thepossibilityof grease fire.

46 47
Cooking Tips
Cooking Tips
Broiling Chart
Type and Time
Cut of Meat Weight Setting Rack (minutes)
Te
BEEF
Sirloin, 1"
Rare 12 oz Conventional Broil 57
Medium 12 oz Conventional Broil 59
Welldone 12 oz ConventionalBroil 5 11
T-Bone,3/4"
Rare 10 oz Conventional Broil 55
Medium 10 oz Conventional Broil 57
Welldone 10 oz ConventionalBroil 59
Hamburger, 1/2"
Rare 1/4 lb. ConvectionBroil 54
Medium 1/4lb. ConvectionBroil 57
Welldone 1/4 lb. ConvectionBroil 59
CHICKEN
BnlsBreast 1lb. Convection Broil 4 18
Bone-inBreast 2- 2 1/2 lb. Conventional Broil 4 20
Chickenpieces 2 -21/2 lb. Convection Broil 4 18 (min/lb)
HAM
Hamslice,1" 1 lb. ConventionalBroil 4 22
LAMB
RibChops,1" 12 oz. ConvectionBroil 57
Shoulder 1 lb. Convection Broil 56
PORK
LoinChops,3/4" 1 lb. Convection Broil 4 14
Bacon ConventionalBroil 4 6
FISH
Salmon Steak 1 lb. ConvectionBroil 57
Fillets 1lb. Convection Broil 56
Roasting Tips
• Alwaysuse the broiler panand grid suppliedwith eachoven,
becausethe hot air mustbe allowedto circulatearound the
itembeingroasted.
• Do notcover whatis beingroasted; convection roasting sealsin
juicesquicklyfor a moist,tenderproduct. Poultry willhave a
light,crispyskin and meatswill be browned, not dry or burned.
• Cookmeatsand poultry directlyfromthe refrigerator. There is
no needfor meator poultryto stand at roomtemperature.
• As a general rule, to convert conventional recipesto convection
recipes, reduce thetemperature by 25° F (-3.9°C) and the
cookingtime by approximately 10 to 15%.
• Alwaysroastmeats fat sideup in a shallowpan, using a roasting
rack. No basting is requiredwhen thefat side is up.
• Do notadd waterto thepan, as thiswill cause a steamed
effect. Roasting is a dry-heat process.
• Poultryshouldbe placedbreastside up on a rack in a shallow
pan. Brush poultrywith melted butter, margarine,or oil before
andduringroasting.
• Forconvectionroasting,do not use panswith tallsides,as this
willinterferewith thecirculation of heated air overthe food.
• Whenusinga meat thermometer, insertthe probehalfway into
thecenterof the thickest portionof the meat. (Forpoultry,
insertthethermometerprobebetween the bodyand leg into
thethickest partof the innerthigh.) To ensurean accurate
reading, the tipof the probeshouldnot touchbone, fat,or
gristle.
• Checkthemeattemperaturehalfway throughthe recommended
roasting time.
• Afterreading thethermometeronce,insertit 1¼to 2 inches
(1.3cm) further intothe meat,then takea secondreading. If
thesecondtemperature registers below the first, continue
cookingthe meat.
• Roastingtimes always varyaccordingto the size,shape,and
qualityof meats andpoultry. Less tender cutsof meat arebest
prepared in theconventional bakesettingand may require
moist cookingtechniques.
• Remove roastedmeats fromthe ovenwhen the thermometer
registers5° F (-15° C) to 10° F (-12.2°C)lower thanthe desired
doneness. Thisis becausethe meatwill continueto cook after
removalfromthe oven.
• Allowroaststo stand15 to 20 minutes aftertakingthem outof
theoven to makecarvingeasier.
• If usinga cookingbag,foiltent,or other cover, usethe
conventional bakesettingratherthan either convectionsetting.

48 49
Cooking Tips
Cooking Tips
Time
Internal
Food Weight Temp (min/lb) Temp
BEEF
RibRoast
Rare 4 - 6 lbs 325°F (162.8° C) 25 140°F (60.0°C)
Medium 4 - 6 lbs 325°F (162.8°C) 30 155°F (68.3°C)
Welldone 4 - 6 lbs 325°F (162.8° C) 40 170°F (76.7°C)
RumpRoast
Medium 4 - 6 lbs 325°F (162.8°C) 25 155°F (68.3°C)
Welldone 4 - 6 lbs 325°F (162.8° C) 30 170°F (76.7°C)
TipRoast
Medium 3 - 4 lbs 325°F (162.8°C) 35 155°F (68.3°C)
Welldone 3 - 4 lbs 325°F (162.8° C) 40 170°F (76.7°C)
LAMB
LambLeg 3 - 5 lbs 325°F (162.8°C) 30 180°F (82.2°C)
PORK
PorkLoin 3 - 5 lbs 325°F (162.8°C) 35 180° F (82.2° C)
PorkChops 1-1 1/4lbs 350° F (176.7° C) 55- 60 N/A
1" thick
total time
Ham,fully 5 lbs 325° F (162.8° C) 18 130° F (54.4°C)
Cooked
POULTRY
Chicken,Whole 3 - 4 lbs 375°F (190.6°C) 30 180°F (82.2°C)
Turkey, 12 - 16 lbs 325° F (162.8°C) 16 - 20 180° F (82.2°C)
Unstuffed
Turkey 20 - 24 lbs 325° F (162.8°C) 16 - 20 180° F (82.2°C)
Turkey, Stuffed 12- 16lbs 325° F (162.8° C) 17 - 21 180°F (82.2°C)
Turkey, Stuffed 20- 24lbs 325° F (162.8° C) 17 - 21 180°F (82.2°C)
Turkey Breast 4- 6 lbs 325° F (162.8° C) 20 180°F (82.2°C)
Conventional Roasting Chart
Convection Roasting Chart
Time
Internal
Food Weight Temp (min/lb) Temp
BEEF
RibRoast
Rare 4 - 6 lbs 325°F (162.8°C) 25 140° F (60.0°C)
Medium 4 - 6 lbs 325° F (162.8°C) 24 155° F (68.3°C)
Welldone 4 - 6 lbs 325°F (162.8°C) 30 170° F (76.7°C)
RumpRoast
Medium 4 - 6 lbs 325° F (162.8°C) 20 155° F (68.3°C)
Welldone 4 - 6 lbs 325°F (162.8°C) 24 170° F (76.7°C)
TipRoast
Medium 3 - 4 lbs 325° F (162.8°C) 30 155° F (68.3°C)
Welldone 3 - 4 lbs 325°F (162.8°C) 35 170° F (76.7°C)
LAMB
LambLeg 3 - 5 lbs 325° F (162.8°C) 30 180° F (82.2° C)
PORK
PorkLoin 3 - 5 lbs 325° F (162.8° C) 30 180°F (82.2°C)
PorkChops 1 -11/4lbs 325°F (162.8°C) 45- 50 N/A
1" thick
total time
Ham,fully 5 lbs 325°F (162.8°C) 15 130° F (54.4° C)
Cooked
POULTRY
Chicken,Whole 3-4 lbs 350°F (176.7°C) 25 180°F (82.2°C)
Turkey, 12 - 16lbs 325° F (162.8°C) 11 180° F (82.2° C)
Unstuffed
Turkey 20 - 24lbs 325°F (162.8°C) 11 180°F (82.2°C)
Turkey, Stuffed 12 - 16 lbs 325° F (162.8° C) 9 - 10 180° F (82.2° C)
Turkey, Stuffed 20 - 24 lbs 325° F (162.8° C) 9 - 10 180° F (82.2° C)
Turkey Breast 4 - 6 lbs 325° F (162.8° C) 20 180° F (82.2° C)

50 51
Product Care
Anypiece of equipment worksbetterand lastslongerwhen
maintainedproperly andkept clean. Cooking equipment is no
exception.Yournew Viking ovenmust be kept clean and
maintainedproperly in order to giveyou the yearsof cooking
enjoyment forwhich it is designed.
Severaldifferent finishes havebeen usedin your electricoven.
Cleaning instructionsfor each surfaceare givenbelow. (Your oven
features a Self-Cleancyclefor the oveninterior. Seepage 50 for
complete interiorcleaning instructions.)
General Cleaning
NOTE: NEVERUSE AMMONIA,STEELWOOLPADS OR
ABRASIVE CLOTHS, CLEANSERS,OVEN CLEANERS,OR
ABRASIVE POWDERS ON ANYPARTOF YOUR VIKING OVEN.
THEYCAN CAUSEPERMANENTDAMAGE.
Cleaning and Maintenance
Surface or
Feature
Cleaning Recommendation
Brass Parts • Clean the broiler pan and grid with detergent
and hot water. For stubborn spots, use a
soap-filled, steel wool pad.
• Clean the oven racks with detergent and hot
water. Stubborn spots can be scoured with a
soap-filled, steel wool pad.
Broiler Pan
and Grid
• Clean the broiler pan and grid with detergent
and hot water.
• Scour stubborn spots with a soap-filled, steel
wool pad.
Product Care
Cleaning and Maintenance
Surface or
Feature
Cleaning Recommendation
Meat Probe
• Cool the probe before cleaning.
• The meat probe may be cleaned with soap
and water or with a soap-filled scouring pad.
• Scour stubborn spots with the soap-filled
scouring pad. Rinse and dry.
• Do not immerse the meat probe in water.
• Do not store the probe inside the oven.
Oven Control
Panel
• The panel and its individual TouchSensor™
panels should be cleaned regularly.
• Wipe clean with a soft cloth and any glass
cleaner or mild detergent.
Stainless
Steel Parts
• All stainless steel body parts should be wiped
regularly with hot, soapy water at the end of
each cooling period, and with a liquid cleaner
designed for steel when soapy water will not
do the job.
• Do not use steel wool, abrasive cloths,
cleansers, or powders.
• If necessary, soak the area with hot towels to
loosen encrusted material, then use a wooden
or nylon spatula or scraper. Do not use a
metal knife, spatula, or any other metal tool to
scrape stainless steel.
• Do not permit citrus or tomato juice to remain
on any stainless steel surface, because citric
acid will permanently discolor stainless steel.
Wipe up any spills.
CAUTION
Allspecialorderedbrasspartsarecoatedwithan epoxycoating.
DONOTUSEBRASSCLEANERSORABRASIVECLEANERSON
ANY BRASS PARTS. All brass body parts should be wiped
regularly with hot soapy water. When hot soapy water will not
do the job, use every day household cleaners that are not
abrasive.

5352
Product Care
Product Care
Cleaning and Maintenance
Cleaning the InteriorOven
YourVikingoven featuresan automatic, self-cleaning cycle.
Duringthiscycle,the ovenreaches elevatedtemperaturesin
order to burnoff soil anddeposits.An integralsmokeeliminator
helps reduce odors associated withthe soil burn-off. A powder
ashresidue is leftin thebottomof the ovenafter completion of
theSelf-CleanCycle.
Thedoor latchis automaticallyactivatedafter selecting the SelfClean setting.The latchensures thatthe door cannot be opened
while the oveninterior is at cleantemperatures.
Before Usingthe Self-Clean Cycle:
• Removethe ovenracks and anyother items/utensilsfrom
theoven. Thehigh heatgenerated during thecleaning cycle
candiscolor, warp, anddamagethese items.
• Donot use foilor linersin the oven during theSelf-Clean
Cycle.
• Wipeoff anylargespillsfrom the ovenbottomand sides.
• Neveruse oven cleanersinsidea self-cleaningoven or on
raisedportions of the ovendoor.
• Some areas of the ovenmust be cleanedby handbefore the
cycle begins.Soils in theseareaswill be bakedon and very
difficultto clean if not removedfirst.
• Cleanthe door up to the gasket,the door frame, and up to
twoinchesinsidethe framewith detergent and hotwater.
Rinse thoroughlyand dry.
Using the Self-Clean Cycle
1. Close thedoor completely.
2. Select“UPPEROVEN”or “LOWEROVEN.”“SELECT
MODE” willappearin the display for theselected oven.
3. Press“SELF CLEAN”from the ovenfunction controlpanel.
4. Press“SET” or “ENTER.”At this time, “SELFCLEAN”will
appearin thedisplay. The doorlock indicatorlightwill
remainon until theSelf-Cleanis completed or interrupted
andthe oven temperaturedropsto a safe temperature.
A completecycle takes approximately 3 1/2 hours, withan
additional30 minutesneededfor the ovento cool down
enoughforthe door latch to disengage.
NOTE: A whirring fannoise willbe heardduringthe SelfClean Cycleand willcontinue to run forthe3 1/2hour
durationof the Self-Clean Cycle.
5. Thetimerwill countdown from4 hours.When the cycleis
completed,pressthe “OFF” buttonforthe selected oven.
6. When the ovenhas completely cooled,open the doorand
removeany ash fromthe oven surfaceswith a dampcloth.
7. To cancelor interruptthe self-cleaningcycle,pressthe
“OFF” button for theselected oven.
Cleaning and Maintenance
CAUTION
Donot touchtheexteriorportionsof the ovenafterself-cleaning
cycle hasbegun,sincesome partsbecome extremely hotto the
touch!Duringthefirstfewtimesthe self-cleaningfeatureis used,
there may be some odor and smoking from the curing of the
binderin the high-densityinsulation usedin the oven.Whenthe
insulation is thoroughly cured, this odor will disappear. During
subsequent self-cleaning cycles, you may sense an odor
characteristic of high temperatures. Keep the kitchen wellventedduringthe self-cleaningcycle.
WARNING
Burnor Electrical Shock Hazard
Make sure all controls are OFF and oven is COOL before
cleaning. Failureto do so can resultin burns or electricalshock.

5554
Product Care
Product Care
Replacing Light
PROBLEM POSSIBLE CAUSEAND/ORREMEDY
1. Oven willnot function. Oven is notconnectedto electricalpower.
Haveelectrician check powercircuitbreaker,
wiring and fuses.
2. Oven doesnot Door is not shuttight enoughfor
operatein self-cleanmode. automatic door latchto lock.
3. Door willnot open. Oven is stillin Self-Clean Mode. If oven is
hot,doorlatch will releasewhen a safe
temperatureis reached.
4. Oven lightwill not work. Light bulbis burnedout.
Ovenis not connected to power.
Trouble Shooting
Error Message Problem Correction
MODEL ERROR
Anincorrect
modelnumberhas
beeninstalled.
Callyour Viking dealer or
authorizedserviceagency.
RTDERROR
RTDis open or
shorted.
Callyour Viking dealer or
authorizedserviceagency.
PROBE ERROR The meat
probe is open
or shorted.
Themeat probemay not be
pluggedin. If it isn't,plug it in to
theoven. Press theOFF key to
exitand clearthe errormessage.
If themeat probeis plugged
in andthe Errormessageis still
displayed,call yourVikingdealer
or authorizedserviceagency.
LATCHERROR
Thecontrol is
unableto lock
or unlock the
doorlatch.
Callyour Viking dealer or
authorizedserviceagency.
KEYBOARD
ERROR
No connection
existsbetween
thekeyboard
andcontrol.
Callyour Viking dealer or
authorizedserviceagency.
Error Handling
In theevent thatyou make an error whileprogrammingyour Viking oven,
youwill heara longbeep followedby the appearance of an error message
on thedisplay. Use the following key to helpyou correct these common
programming errors:
ReplacingInterior Halogen Oven Lights
Do not touch bulb withbare hands. Clean off any signs of oil
from the bulb and handle witha soft cloth.
Power Failure
Do not attempt to use during a power failure. Unit will not
function.
CAUTION
DISCONNECTTHE ELECTRICPOWERATTHEMAIN FUSEOR
CIRCUITBREAKER BEFORE REPLACINGBULB.
1. Unsnap glass light cover
using a screwdriver in the
access groove.
2. Firmly grasp light bulb and
pull out.
3. Replace with halogen bulb
using volt and wattage
requirements listed on glass
cover.
4. Replace the light cover by
snapping glass cover onto
metal box.
5. Reconnect power at the main
fuse or circuit breaker.
access
groove
light
bulb
glass light
cover

5756
Warranty
B
UILT-IN ELECTRIC OVENS WARRANTY
ONEYEAR FULL WARRANTY
Built-in electricovens and all of theircomponent parts and accessories, exceptas detailedbelow*, are warranted
tobefreefromdefectivematerialsor workmanshipinnormalhouseholdusefora periodof twelve(12) monthsfrom
thedateof originalretailpurchase. Viking Range Corporation,warrantor, agreesto repairor replace,at its option,
a
ny part whichfailsor is found to be defectiveduringthe warranty period.
*
Glass(including light bulbs), painted and decorative items are warranted to be free from defective materials or
workmanshipfor a periodof ninety (90) days from the date of originalretailpurchase. ANY DEFECTSMUST BE
REPORTED TO THE SELLING DEALER WITHIN NINETY (90) DAYS FROM DATE OF ORIGINAL RETAIL
P
URCHASE.
V
iking Range Corporation uses the most up-to-date processes and best materials available to produce all color
finishes. However,slightcolorvariationmay be noticedbecause of the inherentdifferences in paintedpartsand
porcelainpartsas wellas differencesin kitchenlighting,productlocations,andotherfactors.
FIVEYEARLIMITED WARRANTY
A
nybakeelement,broilelement,or convectioncookelementwhichfailsdueto defectivematerialsorworkmanship
in normal household use during the second through fifth year from the date of original retail purchase will be
repairedor replaced,freeof chargeforthe part itself,with the ownerpaying all other costs,includinglabor.
TENYEAR LIMITEDWARRANTY
A
nyporcelainovenor porcelaininner doorpanelwhich ruststhroughdueto defectivematerialsorworkmanshipin
normalhousehold use during the second throughthe tenth year from the date of originalretailpurchase will be
repairedor replaced,freeof chargeforthe part itself,with the ownerpaying all other costs,includinglabor.
NINETY(90) DAYRESIDENTIALPLUSWARRANTY This warrantyappliesto applicationswhereuse of theproduct
extends beyondnormalresidential use. Examplesare,butnotlimitedto, bed andbreakfasts,fire stations,private
clubs,churches,etc. Thiswarrantyexcludesallcommerciallocationssuchas restaurants,food servicelocationsand
institiutionalfoodservice locations.
Thiswarranty extendsto the originalpurchaserof the productwarrantedhereunderand to each transfereeowner
of the productduring the term of the warranty.
Thiswarranty shall apply to productspurchased and located in the UnitedStates and Canada. Products must be
purchasedin the countrywhere service is requested. Warrantylaborshallbe performedby an authorized Viking
RangeCorporation serviceagency or representative. Warranty shall not apply to damage resultingfrom abuse,
accident,naturaldisaster, loss of electricalpowerto the productfor any reason,alteration,outdoor use, improper
installation,improperoperation,orrepairorserviceofthe productby anyoneotherthanan authorizedVikingRange
Corporationserviceagency or representative. Thiswarrantydoesnotapplyto commercial usage. Warrantorisnot
responsible for consequential or incidentaldamagewhether arisingout of breach of warranty,breach of contract,
or otherwise. Some jurisdictionsdo not allowthe exclusion or limitation of incidentalor consequentialdamages,
so the above limitationor exclusionmay not applytoyou.
Owner shall be responsible for proper installation, providing normal care and maintenance, providing proof of
purchase upon request,and making the appliance reasonably accessiblefor service. If the product or one of its
component parts contains a defect or malfunction during the warranty period, after a reasonable number of
attempts by the warrantor to remedy the defects or malfunctions, the owner is entitled to either a refund or
replacementoftheproductor its componentpartor parts. Warrantor’s liabilityonanyclaimofanykind,withrespect
tothegoodsor servicescoveredhereunder,shallinnocaseexceedtheprice of thegoodsor serviceorpartthereof
whichgives rise to theclaim.
WARRANTYSERVICE: Underthetermsof this warranty, servicemustbeperformedbya factoryauthorizedViking
RangeCorporation serviceagent or representative. Servicewill be provided during normal business hours, and
laborperformed at overtime or premiumratesshallnot be covered by this warranty. Toobtainwarranty service,
contact the dealerfromwhomthe productwas purchased,an authorizedVikingRange Corporationserviceagent,
or Viking Range Corporation. Provide model and serialnumberand date of originalpurchase. For the nameof
your nearest authorized Viking Range Corporation service agency, call the dealer from whom the product was
purchased or Viking Range Corporation. IMPORTANT: Retain proof of original purchase to establish warranty
period.
Thereturnof theOwnerRegistrationCardis notaconditionofwarrantycoverage. Youshould,however,returnthe
Owner Registration Card so that Viking Range Corporationcan contact you should any question of safety arise
whichcould affectyou.
Any implied warranties of merchantability and fitness applicable to the above described bake element, broil
element, convection cook element, porcelainoven, or porcelain inner door panel are limitedin duration to the
periodof coverage of the applicableexpresswrittenlimitedwarrantiesset forthabove. Some jurisdictionsdo not
allowlimitationsonhowlongan impliedwarrantylasts,so the abovelimitationmay not applytoyou. Thiswarranty
givesyou specific legalrights, and you may alsohaveotherrights which may vary from jurisdictiontojurisdiction.
Service Information
If youroven should failto operate, check to see whetherthe
circuitbreaker is openor the fuse is blown.
If serviceis required,call yourVikingdealeror authorizedservice
agency. Thename of theauthorizedserviceagencycan be
obtained fromthe Vikingdealeror distributor in yourarea.
Whenyou callfor service, havethe followinginformation readily
available:
• Modelnumber
• Serialnumber
• Date of purchase
• Name of dealer fromwhom purchased
Be ready to clearlydescribe the problemthat you arehavingwith
yourVikingoven.
If youare unableto obtainthe nameof anauthorizedservice
agency, orif you continue to haveservice problems, contact
Viking at (888) 845-4641or write to:
VIKING PREFERRED SERVICE
111FrontStreet
Greenwood,Mississippi 38930USA
Recordthe followinginformationindicatedbelow. You willneed
it if serviceis ever required. The serial number andmodel
numberforyour ovenare located on the identificationplate
mountedon the bottomleft sideof the oven dooropening.
Model Number _______________SerialNumber____________
Dateof Purchase______________Date Installed ____________
Dealer's Name_________________________________________
Address _______________________________________________
_______________________________________________________
If servicerequiresinstallation of parts, use onlyauthorized partsto
ensureprotectionunderthe warranty.
Thismanualshouldremain withthe oven forfuturereference.
Product Care

5958
 Loading...