

Viking Designer DEDO127TSS, Designer DEDO527, Designer DEDO130, Designer DEDO205, Designer DEDO527T User Manual
...
F20366B
(102407J)
Viking Range Corporation
111 Front Street
Greenwood, Mississippi 38930 USA
(662) 455-1200
For product information
call 1-888-VIKING1 (845-4641)
or visit the Viking Web Site at
vikingrange.com
Viking Use & Care Manual
Built-In Electric
Touch Control Ovens
3
Warnings
2
Congratulations
Your purchase of this product attests to the importance you
place upon the quality and performance of the major
appliances you use. With minimal care, as outlined in this
guide, this product is designed to provide you with years of
dependable service. Please take the few minutes necessary to
learn the proper and efficient use and care of this quality
product.
Some key features of this appliance include:
• 14 different cooking modes to make even your most
challenging baking projects a success.
• Split baking and broiling elements, reducing your
preheating time and heating your food more evenly.
• An extra-large reversing fan, allowing you to cook even
large quantities of food more quickly and evenly.
• Four convection modes, offering greater air circulation to
shorten cooking times and cook foods more evenly.
• Dual broiling elements, producing intense radiant heat for
faster broiling and a larger coverage area.
• Three broiling modes, including a special low-broil mode for
delicate broiling and top-browning.
• A profiled, hidden bake element for easier cleaning.
• Six adjustable rack positions with the largest usable baking
space available in this class.
Your complete satisfaction is our ultimate goal. If you have
any questions or comments about this product, please
contact the dealer from whom you purchased this product, or
contact our consumer support center at 1-888-VIKING1.
We appreciate your choosing a Viking® Range Corporation
product and hope that you will again select our products for
your other major appliance needs. For more information
about the complete selection of Viking products, contact your
dealer or go to www.vikingrange.com.
WARNING
Iftheinformationin this manualis not followed exactly, a fireor
explosionmay resultcausing property damage, personal injury
or death.
WARNING
NEVER use this appliance as a space heater to heat or warm
the room. Doing so may result in carbonmonoxide poisoning
and overheating of the oven.
WARNING
Do not use commercial oven cleaners inside the oven. Use of
these cleaners can produce hazardous fumes or can damage
the porcelain finishes.
WARNING
NEVER cover any slots, holes or passages in the oven bottom
or cover an entire rack with materials such as aluminum foil.
Doing so blocks air flow through the oven and may cause
carbon monoxide poisoning. Aluminum foil linings may also
trap heat, causing a firehazard.
WARNING
To avoid sickness and food waste when using automatic time
baking:
• Do not use foods that will spoil while waiting for cooking to
start,such as disheswith milkor eggs, creamsoups,custards,
fish,pork, poultry, or foods with stuffing.
• Any food thathas to wait for cooking to start should be very
cold or frozen beforeit is placedin the oven.
• Do not use foods containing baking powder or yeast when
automatic time baking.They willnot riseproperly.
• Do not allow food to remain in the oven for more than two
hours after the end of the cooking cycle.
WARNING
To avoidsickness and food waste, do not allow defrosted food
to remain in the oven for more than two hours.

4 5
Cooking Tips
RackPositions______________________________________39
PanPlacementTips_________________________________ 40
BakingTips ________________________________________ 40
MultipleRackBaking _______________________________41
Conventional Baking Chart__________________________42
ConvectionBakingChart____________________________43
SolvingBakingProblems____________________________44
Broiling Tips________________________________________45
Broiling Chart ______________________________________46
Roasting Tips_______________________________________47
Conventional RoastingChart ________________________48
ConvectionRoasting Chart__________________________49
Product Care
Cleaningand Maintenance__________________________50
Self-CleanCycle _______________________________53
Replacing Light_____________________________________54
TroubleShooting ___________________________________55
Error Handling______________________________________55
ServiceInformation _________________________________56
Warranty ___________________________________________57
Getting Started
Important Safety Instrutions ________________________6
Product Controls
OvenControl Panel________________________________8
Built-In ElectricOven Features______________________ 10
Touch Pad Functions_______________________________ 11
Programming Modes
ClocksandTimers
Settingthe Clock _____________________________ 16
Settingthe Timer _____________________________17
CookTime andStop Time ____________________18
Oven Settings
Brightness____________________________________20
Degree Format(Fahrenheit or Celsius) _________ 20
Tones ________________________________________21
Tone Volume _________________________________ 23
Timeouts ____________________________________23
Clock Format (12-houror 24-hour) _____________24
SabbathMode _______________________________25
Showroom Mode __________________________________25
Lockand Unlock ______________________________26
Interior OvenLights___________________________26
RecipeFunction ___________________________________27
WarmingModes __________________________________29
BakeModes ______________________________________ 30
Broil Modes ______________________________________33
Roast Modes______________________________________35
MeatProbe _______________________________________37
Table of Contents Table of Contents

6 7
Getting Started
Getting Started
• Do not heat unopened food containers; build-up of pressure
may cause the container to explode and result in injury.
• Always position oven racks in desired location while oven is
cool. If rack must be moved while oven is hot, do not let
potholder contact hot heating element in oven.
• Use care when opening oven door. Let hot air or steam
escape before removing or replacing food. Hot air or steam
can cause burns to hands, face and/or eyes.
• Keep oven vents unobstructed. The oven vent is located at
the front of the oven and vents into the room.
• Do not clean door gasket. It is essential for a good tight
seal. Care should be taken not to rub, damage, or move
the gasket.
• No commercial oven cleaner or oven liner protective
coating such as aluminum foil should be used in or around
any part of the oven. Improper oven liners may result in a
risk of electric shock or fire. Keep oven free from grease
buildup.
• Before self-cleaning the oven, remove broiler pan, broiler
grid, oven racks, and other utensils. Do not use your oven
to clean other parts. A fan noise should be heard during
the cleaning cycle. If not, call service before self-cleaning
again.
• DO NOT TOUCH HEATING ELEMENTS OR INTERIOR
SURFACES OF OVEN. Heating elements may be hot even
though they are dark in color. Interior surfaces of an oven
become hot enough to cause burns. During and after use,
do not touch or let clothing or other flammable materials
contact heating elements or interior surfaces of oven until
they have had sufficient time to cool. Other surfaces of the
oven may become hot enough to cause burns, such as the
oven vent opening, the surface near the vent opening, and
the oven door window.
• Use this appliance only for its intended use as described in
this manual. Never use your appliance for warming or
heating the room. This is based on safety considerations.
• Your unit should be installed by a qualified technician. The
appliance must be installed and electrically grounded
according to local codes.
• Do not attempt to repair or replace any part of this
appliance unless specifically recommended in this manual.
All servicing should be referred to a qualified technician.
Warranty service must be performed by an authorized
service agency.
• Children should not be left alone in the kitchen while the
oven is in use.
CAUTION: Do not store items of interest to children over
the unit. Children climbing to reach items could be seriously
injured.
• GREASE - Grease is flammable and should be handled
carefully. Do not use water on grease fires. Flaming grease
can be extinguished with baking soda or, if available, a
multipurpose dry chemical or foam-type extinguisher. Let fat
cool before attempting to handle it. Do not allow grease to
collect around the oven or in vents. Wipe up spillovers
immediately.
• Loose-fitting or hanging garments should never be worn
while using the appliance. Do not drape towels or materials
on oven door handles. These items could ignite and cause
burns.
• Use only dry potholders. Moist or damp potholders on
hot surfaces may result in burns from steam. Do not let
potholder touch hot surface areas. Do not use a towel or
other bulky cloth.
• Keep area clean and free from combustible materials,
gasoline, and other flammable liquids. Never use your oven
as a storage space. Combustible items (paper, plastic, etc.)
may ignite, and metallic items may become hot and cause
burns.
Important Safety Instructions
Important Safety Instructions
98
OvenControl Panel
Product Controls
Product Controls
*Note: Premiere model controlpanelandfeatures are shown.
Oven Functionand
TemperatureControls
Eachoven functionhas a separate setting.
(Seedescriptions)
TheSET control up and downarrows can be
usedto set any temperaturefrom
150°F (65.6°C) to550° F (287.8° C).
Electronic Timing Center
TheElectronicTiming Center is
usedto program andcontrolall
timingfunctions.
IMPORTANT–Thetime-of-day
mustbe set before any other
programcan be used.
Electronic Keypad
Entry
TheElectronicKeypad
Entry is usedto program
andcontrol all oven
functions.
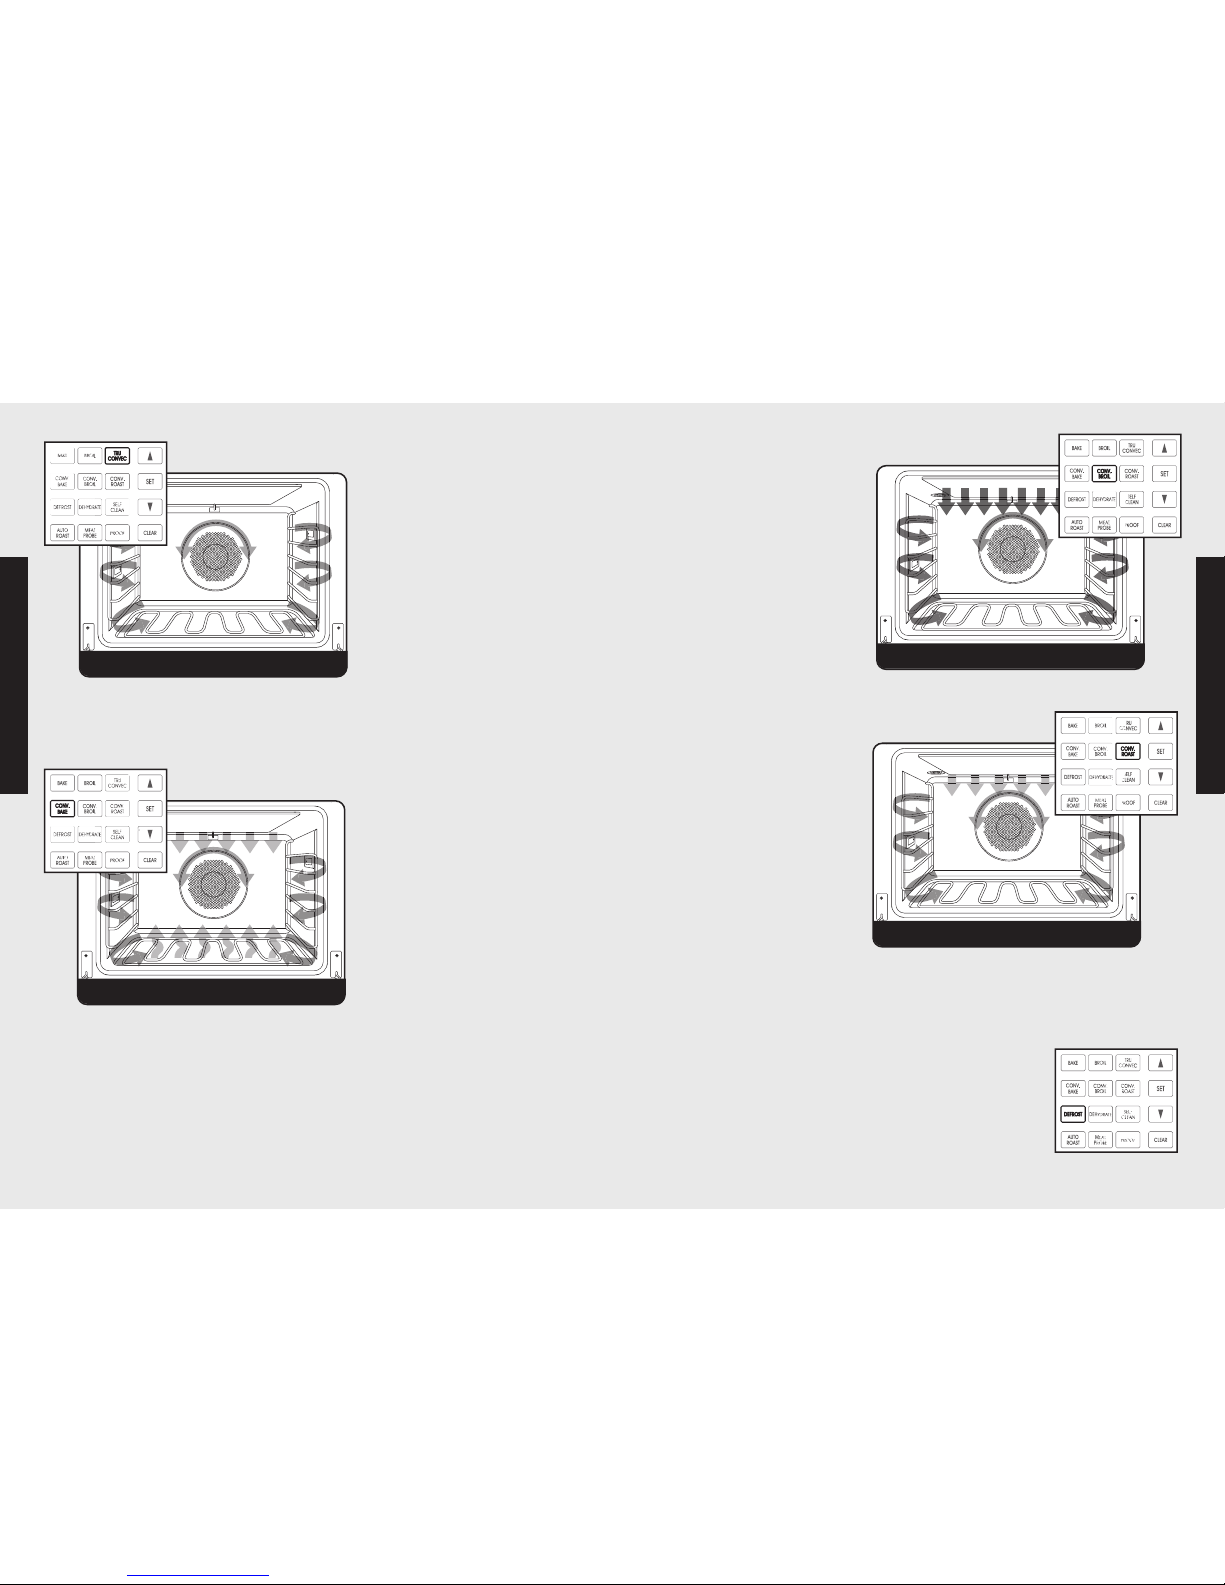
Bake
Conventional, single-rackbaking
(breads, cakes, cookies,pastry, pies,
entrees, vegetables)
Convection Bake
Multi-rackbakingfor heavier or frozen
foods (e.g., frozen pies, pizzas,entrees,
vegetables)
Defrost
Naturaldefrosting of foodusing fan
withoutheat
Auto Roast*
Automatic searingof the outside of
meats;simplifiesroasting
TruConvec
TM
Multi-rackbakingfor breads, cakes,
cookies(up to 6 racks of cookiesat
once)
Convection Roast
Roasting wholeturkeys, whole chickens,
hams, etc.
Self-Clean
A self-cleaning cycleusinghigh heatto
burnoff soilsand deposits
Proof*
Createsan optimal environmentfor the
risingof yeast in manykinds of dough
Recipes*
Accesses, programs, andsaves cooking
cyclesfrom favoriterecipes
Oven LightControls
Controls the interiorlightsin the upper
andlower ovens
Oven Lock
Childproofingfeature preventing the
controls frombeingactivatedwhenthe
ovenis not in use
Settings
Accesses custom featuressuch as display
brightness,Sabbath/Showroommodes,
andtones
Broil
Three conventional broilsettingsfor cuts of
flatpiecesof meat or meat1-2 inchesthick
Convection Broil
Fasterthanregular broiling withless smoke
generationfor thicker meats
Dehydrate
Using the convectionfan over a
periodof time, wateris removed
from foodby evaporation
Meat Probe*
Automatically turnsthe ovenoff whenthe
internaltemperature ofthemeat being
roastedis reached
Oven Selector Options
Oven Selector
Controls
TheOven SelectorControls
areused to turntheupper or
lower ovenon and off.
OvenControl Panel
10
Built-In Electric Oven Features
11
Touch Pad Functions
TemperatureControl
Bothovenssharethe temperature control. To usethisfeature, selectthe
upper or loweroven,and then set thedesired temperature.The controls
canbe set at any temperature from 150°F (65.6°C) to 550° F (287.8° C).
Electronic Keypad Entry
Bothovenssharethe electronic keypad entry. The alphanumerickeys can
be usedto program and controlall ovenfunctions.
Oven FunctionSelector Control
Bothovensoffer14 separate cookingmodes from whichyou can choose
theone that bestmeetsyour cooking needs.
Bake
Whenusingthis function,
full-powerheat is radiated
from the bakeelement in
thebottomof the oven
cavity, whilesupplemental
heatis radiated from the
broil element.This function
is recommendedfor singlerackbaking. Use thissetting
forbaking,roasting,and
casseroles.
Broil
Thisfunctionis a dry-heat
cookingmethod, using
director radiantheat on
three differentsettings:low,
mediumandhigh. The
distance between the
foods and thebroil
elementsdetermines
broiling speed. This
functionis recommended
forsmall,individualized
cuts, suchas steaks,chops,
andpatties.
Bake
Product Controls
Product Controls
Premiere Designer double ovenis shown above.
Broil Element
Interior
Oven Light
Oven Racks
(3/upper oven;
3/lower oven)
Bake Element
Lower Oven
Model/Serial
Number Plate
(under control
panel)
TruConvec™
Element
(behind baffle)
Interior Oven Light
Oven Function
and Temperature
Controls
Broil
Oven Control Panel
Electronic Key
Pad Entry
Meat Probe (availableon Premieremodels)
Plug
Cable
Probe
Handles
Meat Probe Jack
12
TruConvec™
Withthis function,only the rear
element operatesat full power.
There isno directheatfrom the
bottom or top elements, and
themotorized fan in the rear of
the oven circulates for even
heating. Use this setting for
foods that require gentle
cooking, such as pastries,
soufflés, yeast breads, quick
breads, and cakes. This setting
produces breads, cookies, and
other baked goods with an even texture and golden crusts. No special
bakeware is required. Use this function for single-rack baking, multiple-rack
baking, roasting, and preparation of complete meals. This setting is also
recommended whenpreparinglargequantitiesof baked goods at one time.
Convection Bake
With this function, the bottom
element operatesat full power,
and the top broil element
operates at supplemental
power. The motorizedfan inthe
rear of the oven circulates
heated air, providing a more
even heat distribution. This
evencirculation of airequalizes
the temperature throughout
the oven cavity and eliminates
thehot and coldspotsfoundin
conventional ovens. A major benefit of convection baking is the ability to
prepare foodin largerquantitiesusingmultipleracks.Whenroastingusingthis
setting, coolair is quicklyreplaced,searingmeatson the outsideand retaining
more juices and natural flavor on the inside with less shrinkage. With this
heating method, foods can be baked and roasted at the same time with
minimaltaste transfer, even when different dishes are involved,such as cakes,
fish, or meat.The hot airsystemis especiallyeconomicalwhen thawingfrozen
food. Use thissetting for baking androasting.
13
Touch Pad Functions Touch Pad Functions
Convection Broil
Using thisfunction,the top
elementoperates at full
power. Thisfunctionis
exactlythe same as regular
broiling withthe additional
benefitof air circulationby
themotorizedfan in the
rear of the oven.Smokeis
reducedsincethe airflow
alsoreduces peak
temperatures on the food.
Usethis setting forbroiling
thick cutsof meat.
Convection Roast
Withthis function,the
convectionelementruns in
conjunctionwith theinner
andouter broil elements.
Thereversibleconvection
fanruns at a higherspeed
in eachdirection, allowing
themoisture to be sealed
insidelarge cutsof meat,
suchas roasts. Thissaves
timewhen compared with
singlefanconvectionroast
modes.Usethis setting for
whole turkeys,whole
chickens, androasts.
NOTE: Because this function uses a high-speed convection fan for
optimum cooking performance, some noise may be noticed from this
high fan speed. This is normal.
Defrost
Withthe temperature control off,a motorizedfan in the
rear of the ovencirculatesair. Thisfan acceleratesnatural
defrostingof thefood withoutheat.
NOTE: To avoid sickness and food waste, do not allow
defrosted food to remain in the oven for more than
two hours.
TruConvec
T
M
convection bake
Product Controls
Product Controls
convection broil
convection roast
1514
Touch Pad Functions
Touch Pad Functions
Proof*
Thisfunctionusesa low temperature to createan optimal
environment for the yeast to risein many typesof dough.
Recipes*
Thissetting accesses, programs, and saves
cookingcyclesfrom favoriterecipes.
Interior Oven LightControls
Theupper andlower ovens haveinterior ovenlights
controlledby the righttouch pad.Push thelight button to
turnthe interioroven lightson and off.
Oven Lock
Thischildprotectionfunctionprevents theoven controls
from beingactivatedwhen the ovenis not in use.
Settings
Usethis functionto access,program,and customize
specialfeaturesof your oven.Special features include
tones,timeouts, displaybrightness, and theSabbath
mode.
*Note:TheAUTO-ROAST, PROOF, RECIPE and PROBE functions are
includedon the Premiere models.
Product Controls
Product Controls
Dehydrate
Withthis function,a motorizedfan in the rear of theoven
circulateswarm air. Overa periodof time, thewater is
removedfromthe food by evaporation.Removal of water
inhibitsgrowth of microorganismsand retards theactivity
of enzymes.It is importantto remember thatdehydration
doesnot improvequality; onlyfresh,top-quality foods
shouldbe dehydratedin your oven.
Self-Clean
Theself-cleaningcycle is designedto eliminatethe need
forscrubbingand scouring foodbakedontothe oven
interior. During thiscycle,the oven useshigh
temperatures to burnoff soilsand deposits.An integral
smoke eliminator reducesodorsassociatedwith the soil
burn-off. A powderash residueis left in the bottom of the
ovenaftercompletionof the self-clean cycle. Whenthe
ovenhas cooled, removeany ash fromoven surfaceswith
a dampspongeor cloth.
Auto Roast*
Thisfunctionfurthersimplifiesroastingby automatically
searingthe outside of meats, raisingthe pre-set
temperature by 100° F for a shorttime to searthe outside
of themeat. Thetemperature thenreturnsto the pre-set
temperature in the standardconvection roastmode.
Meat Probe*
Theprobetemperature functionis used to automatically
turnthe oven offwhen the internaltemperature of meat
being cooked is reached.
17
16
Clocks and Timers
Electronic
TimingCenter
TheElectronicTiming
Centeris usedto
programand control
alltimingfunctionson
yourVikingappliance.
It hasfour display andprogramming modesthat areactivatedby
thefour pushbuttons. Both theTimer andthe Cook Time/Stop
TimeModescan be used to timecookingperiods. These
features can evenbe used at the sametime whenboth ovensare
in use. Forexample, youcantime-bakea casserolein theupper
ovenusingthe Cook Time/Stop TimeMode,while broiling in the
lower ovenusing theTimer. One ovencan alsobe cleanedwhile
timingfoods in the other ovenusing thetimer.
Timer Alarm
• At the end of a program,the alarm willconsist of three beeps,
followedby two beepsevery10 secondsuntilthe “CLEAR”
buttonis pressed.
• Whenevera valid functionkey is pressedor when a control
functionstarts automatically, one beepwill sound.
• Whenan invalid functionkey is pressed,two beepswillsound.
Setting the Clock
Thetime-of-day mustbe setbefore any other programcan be
used. When youroven is firstconnectedto the powerin your
home, the timer displaywillshow 12:00.
To Programthe Time-Of-Day:
1. Presseitherthe “UPPEROVEN” or “LOWEROVEN” button.
2. Pressthe “CLOCK SET”button.The clockwill begin to flash.
Theword “CLOCK”will be lit on the display.
3. Typein the correct timeon the electronic number keypad.
4. Pressthe “CLOCK SET”buttonagain. Theclock is now set.
Alternate Method:
1. Presseitherthe “UPPEROVEN”or “LOWEROVEN”button.
2. Press the “CLOCK SET”button. The clock willbegin to flash.
Theword “CLOCK”will be lit on the display.
Programming Modes
Programming Modes
3. Usethe up and down arrowsto changethe currenttime.
4. Press the “SET” button on the temperaturecontrol or the
“CLOCKSET”buttonon the electronic timing center. The
clock is now set.
Note: The time-of-day cannot be changed while there is a
Bake Hours or Start Time cycle programmed into the timer.
Setting the Timer
Thetimer is designedfor accuratetimingand is idealfor baking
delicateitemssuch as biscuits,cookies,and popovers,and for
precisebroiling.The timercan be usedfortimingup to 12 hours.
Whensetting the timer, thetime displayedwill decrease in 1
minuteincrements.When thetimer counts downto 1 minute,the
timer alarmwill giveone shortbeep and thedisplaywill change
to seconds.When thetimer reaches0:00,the alarm willgive one
longbeep.
To SettheTimer:
1. Press the “TIMER”button.The timerwill display“0:00”and
theword “TIMER.”
2. Typein the desired durationtime on theelectronicnumber
keypad.
3. The timer willstart automatically. (To cancelthe entry, pressthe
“CLEAR”buttonon the left sideof the control panel before
thecount downbeginsand the timeis still flashing.)
4. The timeris now set.
Alternate Method:
1. Press the “TIMER”button. Thetimerwill display “0:00” and
theword “TIMER”will be lit on the display.
Press and Release Press and Hold
s
Time increases by one
minute
Time increases by 10
minutes
t
Time decreases by one
minute
Time decreases by
10 minutes
Clocks and Timers
 Loading...