

Viking Designer DDRB304, Designer DDFB364, Designer DDRB364, Professional VCRB304, Professional VCRB364 Installation Manual
...
Viking Installation Guide
Viking Range Corporation
111 Front Street
Greenwood, Mississippi 38930 USA
Freestanding Bottom-Mount/
French Door Bottom-Mount
Refrigerator/Freezer
Listed

2
IIMMPPOORRTTAANNTT SSAAFFEETTYY IINNSSTTRRUUCCTTIIOONNSS
YYoouurr ssaaffeettyy aanndd tthhee ssaaffeettyy ooff ootthheerrss iiss vveerryy iimmppoorrttaanntt..
We have provided many important safety messages in this manual and on your appliance. Always read and obey all safety messages.
This is the safety alert symbol. This symbol alerts you to hazards that can kill or hurt you and others. All safety messages will be
preceded by the safety alert symbol and the word “DANGER” , “WARNING” or “CAUTION”.
These words mean:
All safety messages will identify the hazard, tell you how to reduce the chance of injury, and tell you what can happen if the instructions
are not followed.
Immediate hazards which
WWIILLLL
result in severe personal injury or death
Hazards or unsafe practices which
CCOOUULLDD
result in severe personal injury or death.
DANGER
WARNING
To reduce the risk of fire, electric shock, serious injury or death when using your refrigerator, follow these basic
precautions, including the following:
Hazards or unsafe practices which
CCOOUULLDD
result in minor personal injury or property damage.
CAUTION
WARNING
•Read all instructions before using the refrigerator.
•Observe all local codes and ordinances. Install refrigerator according to Installation Instructions. All connections for
water, electrical power and grounding must comply with local codes and be made by licensed personnel when
required.
•Do not modify plug on power cord. If plug does not fit electrical outlet, have proper outlet installed by a qualified
technician. Replace worn power cords and/or loose plugs.
•Do not ground to a gas line or cold-water pipe.
•Do not remove warning tag from power cord
•Refrigerator is designed to operate on a separate 115 volt, 15 amp., 60 cycle line.
•Do not tamper with refrigerator controls.
•Do not service or replace any part of refrigerator unless specifically recommended in Use & Care or Installation
Instructions. Do not attempt service if instructions are not understood or if they are beyond personal skill level.
•Always disconnect refrigerator from electrical supply before attempting to change light bulbs, clean, or service the
refrigerator. Disconnect the power cord by grasping the plug, not the cord.
•Always read and follow manufacturer’s storage and ideal environment instructions for items being stored in refrigerator.
•Never allow children to operate, play with, crawl inside or stand on any part the refrigerator.
•Never clean refrigerator parts with flammable fluids. The fumes can create a fire hazard or explosion.
•Clean up spills or water leakage associated with water installation.
•Keep your refrigerator in good condition. Bumping or dropping refrigerator can damage refrigerator or cause
refrigerator to malfunction or leak. If damage occurs, have refrigerator checked by qualified service technician.
--SSAAVVEE TTHHEESSEE IINNSSTTRRUUCCTTIIOONNSS--
GGEENNEERRAALL IINNFFOORRMMAATTIIOONN
IIMMPPOORRTTAANNTT -- PPLLEEAASSEE RREEAADD AANNDD FFOOLLLLOOWW
Make sure that incoming voltage is the same as unit rating. An electric rating plate specifying voltage, frequency, and
amperage is attached to the product.
To reduce the risk of fire, electric shock, or injury to persons, installation work and electrical wiring must be done by qualified
people in accordance with all applicable codes and standards, including fire-rated construction.
The installer should leave these instructions with the consumer who should retain them for local inspector’s use and for
future reference.
3
BBAASSIICC SSPPEECCIIFFIICCAATTIIOONNSS AANNDD DDIIMMEENNSSIIOONNSS
FFrreeeessttaannddiinngg BBoottttoomm MMoouunntt//FFrreenncchh DDoooorr BBoottttoomm MMoouunntt
DDEESSCCRRIIPPTTIIOONN VVCC//DDDDBBFF//VVCC//DDDDFFFF
Overall Width 35 5/8” (90.5 cm)
Addition of side panels: 35 7/8” (91.1 cm)
Overall Height from Bottom 70 1/8” (178.1 cm)
Addition of tops/grilles: 71 7/8” (182.6 cm)
Overall Depth from Rear To front of door: 26 3/4” (67.9 cm)
Cutout Width 36” (91.4 cm)
Cutout Height 70 1/2” (179.0 cm)
Addition of tops/grilles 72” (182.9 cm)
Cutout Depth 24” (61.0 cm)
Electrical Requirements 115 volt, 60 Hz, 15 amp dedicated circuit; 3-wire cord with grounded 3-prong
plug attached to product.
Maximum Amp Usage 7.9 amps
Inlet Water Requirements 1/4” copper tubing inlet waterline; minimum 35 psi; maximum 100 psi
Overall Interior Capacities Bottom Mount
French Door Bottom Mount
•Refrigerator 14.4 cu. ft. (407 liters) 14.1 cu. ft. (399 liters)
•Freezer 5.5 cu. ft. (156 liters) 5.5 cu. ft. (156 liters)
•Total Capacity 19.9 cu. ft. (563 liters) 19.6 cu. ft. (555 liters)
Approximate Shipping Weight 327 lbs. (148.7 kg)
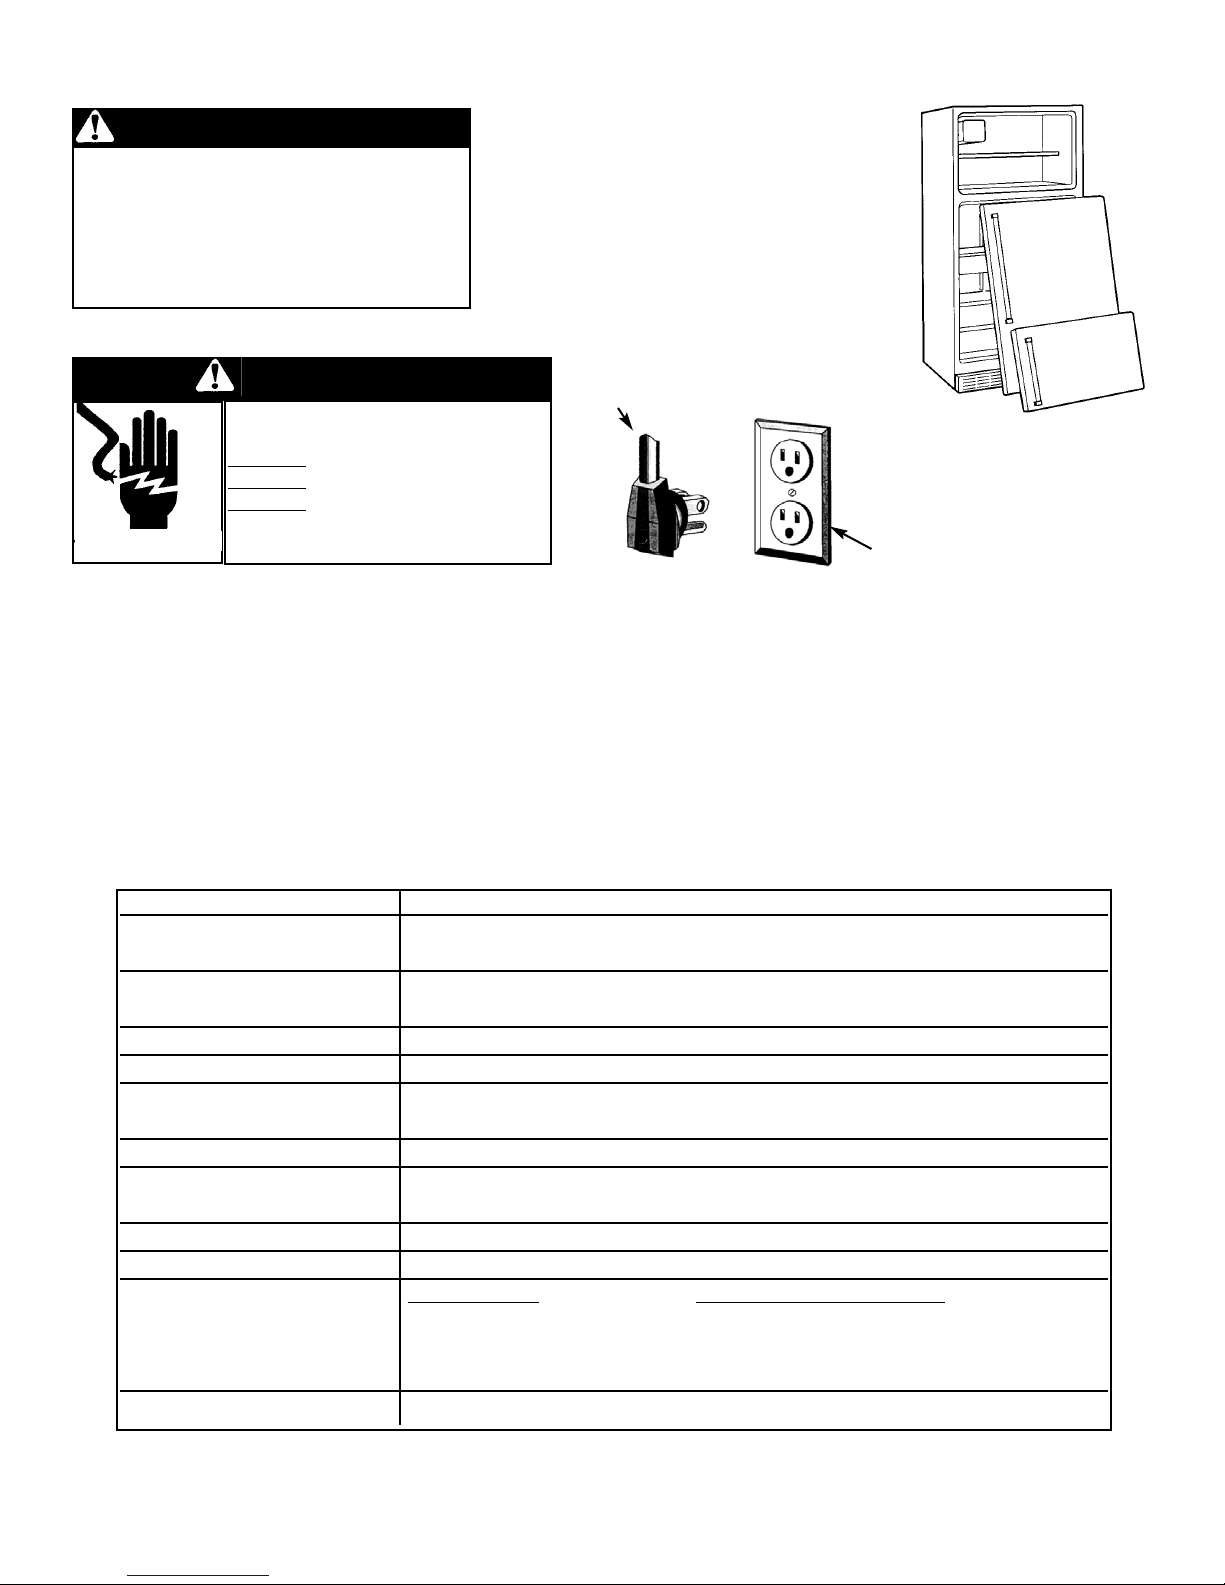
DANGER
RRiisskk ooff CChhiilldd EEnnttrraappmmeenntt
BBEEFFOORREE YYOOUU TTHHRROOWW AAWWAAYY YYOOUURR OOLLDD
RREEFFRRIIGGEERRAATTOORR OORR FFRREEEEZZEERR::
•Take off the doors.
•Leave the shelves in place so that children
may not easily climb inside.
IIMMPPOORRTTAANNTT::
Child entrapment and
suffocation are not problems of the past.
Junked or abandoned refrigerators are still
dangerous... even if they will sit for “just a few
days.”
IItt iiss tthhee ccuussttoommeerr’’ss rreessppoonnssiibbiilliittyy ttoo::
•contact a qualified electrical installer.
•assure that the electrical installation is adequate and in conformance with the National Electrical Code, ANSI/NFPA
70-latest edition or Canadian Electrical Code C22.1-1998 and C22.2 No. 0-M91 (or latest edition), and all local codes
and ordinances. (115 volt, 60-Hz, 15 amp, fused, electrical supply is required. It is required that a separate circuit
serving only this appliance be provided. This appliance is equipped with a power supply cord having a 3-prong
grounding plug. To minimize possible shock hazard, the cord must be plugged into a mating 3-prong, groundingtype wall receptacle. If a 2-prong receptacle is encountered, the customer must contact a qualified electrical installer
to have it replaced with a properly grounded 3-prong receptacle. Do not use an extension cord or adapter plug.)
EELLEECCTTRRIICCAALL SSHHOOCCKK HHAAZZAARRDD
PPlluugg iinnttoo aa ggrroouunnddeedd 33--pprroonngg oouuttlleett..
DDOO NNOOTT rreemmoovvee ggrroouunndd pplluugg..
DDOO NNOOTT uussee aann aaddaapptteerr..
DDOO NNOOTT uussee aann eexxtteennssiioonn ccoorrdd..
FFaaiilluurree ttoo ffoollllooww tthheessee iinnssttrruuccttiioonnss
ccoouulldd rreessuulltt iinn ffiirree oorr eelleeccttrriiccaall sshhoocckk..
WARNING
Power cord with 3-prong
grounding plug
Grounding-type wall
receptacle
**WWhheenn iinnssttaalllliinngg iinnttoo aa ccuuttoouutt,, tthhee eeddggee ooff tthhee ddoooorr mmuusstt bbee 22 77//88”” ((77..33 ccmm)) ffrroomm tthhee aaddjjaacceenntt ccoouunntteerrttoopp ccaabbiinneett..
4
IINNSSTTAALLLLAATTIIOONN
Your refrigerator was packed carefully for shipment. Remove and discard all packaging and tape. Do not remove the
model/serial number label.
LLooccaattiioonn
•Do not install refrigerator near oven, radiator or other heat source. If not possible, shield refrigerator with cabinet
material.
•Do not install where the temperature falls below 55oF (13oC) or rises above 110oF (43oC). Malfunction may occur at
these temperatures.
•Refrigerator is designed for indoor household application only.
MMeeaassuurriinngg tthhee OOppeenniinngg
When installing your refrigerator, measure carefully. Allow 1/2” (1.3 cm) space at top and 1/2” (1.3 cm) behind the
machine compartment cover (located in the rear) for proper air circulation. Sub-flooring or floor coverings (i.e. carpet,
tile, wood floors, rugs) may make your opening smaller than anticipated. Some clearance may be gained by using the
leveling procedure under “LEVELING”.
TTrraannssppoorrttiinngg YYoouurr RReeffrriiggeerraattoorr
•
NNEEVVEERR
transport refrigerator on its side. If an upright position is not possible, lay refrigerator on its back. Allow
refrigerator to sit upright for approximately 30 minutes before plugging it in to assure oil returns to the compressor.
Plugging the refrigerator in immediately may cause damage to internal parts.
•Use an appliance dolly when moving refrigerator.
AALLWWAAYYSS
truck refrigerator from its side or back -
NNEEVVEERR
from its
front.
•Protect outside finish of refrigerator during transport by wrapping cabinet in blankets or inserting padding between
the refrigerator and dolly.
•Secure refrigerator to dolly firmly with straps or bungee cords. Thread straps through handles when possible. Do not
overtighten. Overtightening restraints may dent or damage outside finish.
DDoooorr aanndd DDrraawweerr RReemmoovvaall
Some installations require door/drawer removal to transport the refrigerator to its final location.
DANGER
To avoid electrical shock which can cause severe personal injury or
death, observe the following:
•Disconnect power to refrigerator before removing doors or drawer.
Connect power only after replacing doors or drawer.
•Green ground wire must be attached to top hinge while performing
door removal and replacement.
•Tape decorative panels (select models) securely into place before
removing door handles.
CAUTION
To avoid damage to walls and flooring observe
the following:
•Protect vinyl or other flooring with cardboard,
rugs or other protective material, prior to
moving refrigerator.
•
DDoo NNoott
adjust refrigerator to be any shorter
than 68 1/2” tall (minus hinge and cap). Doing
so may damage underside components.
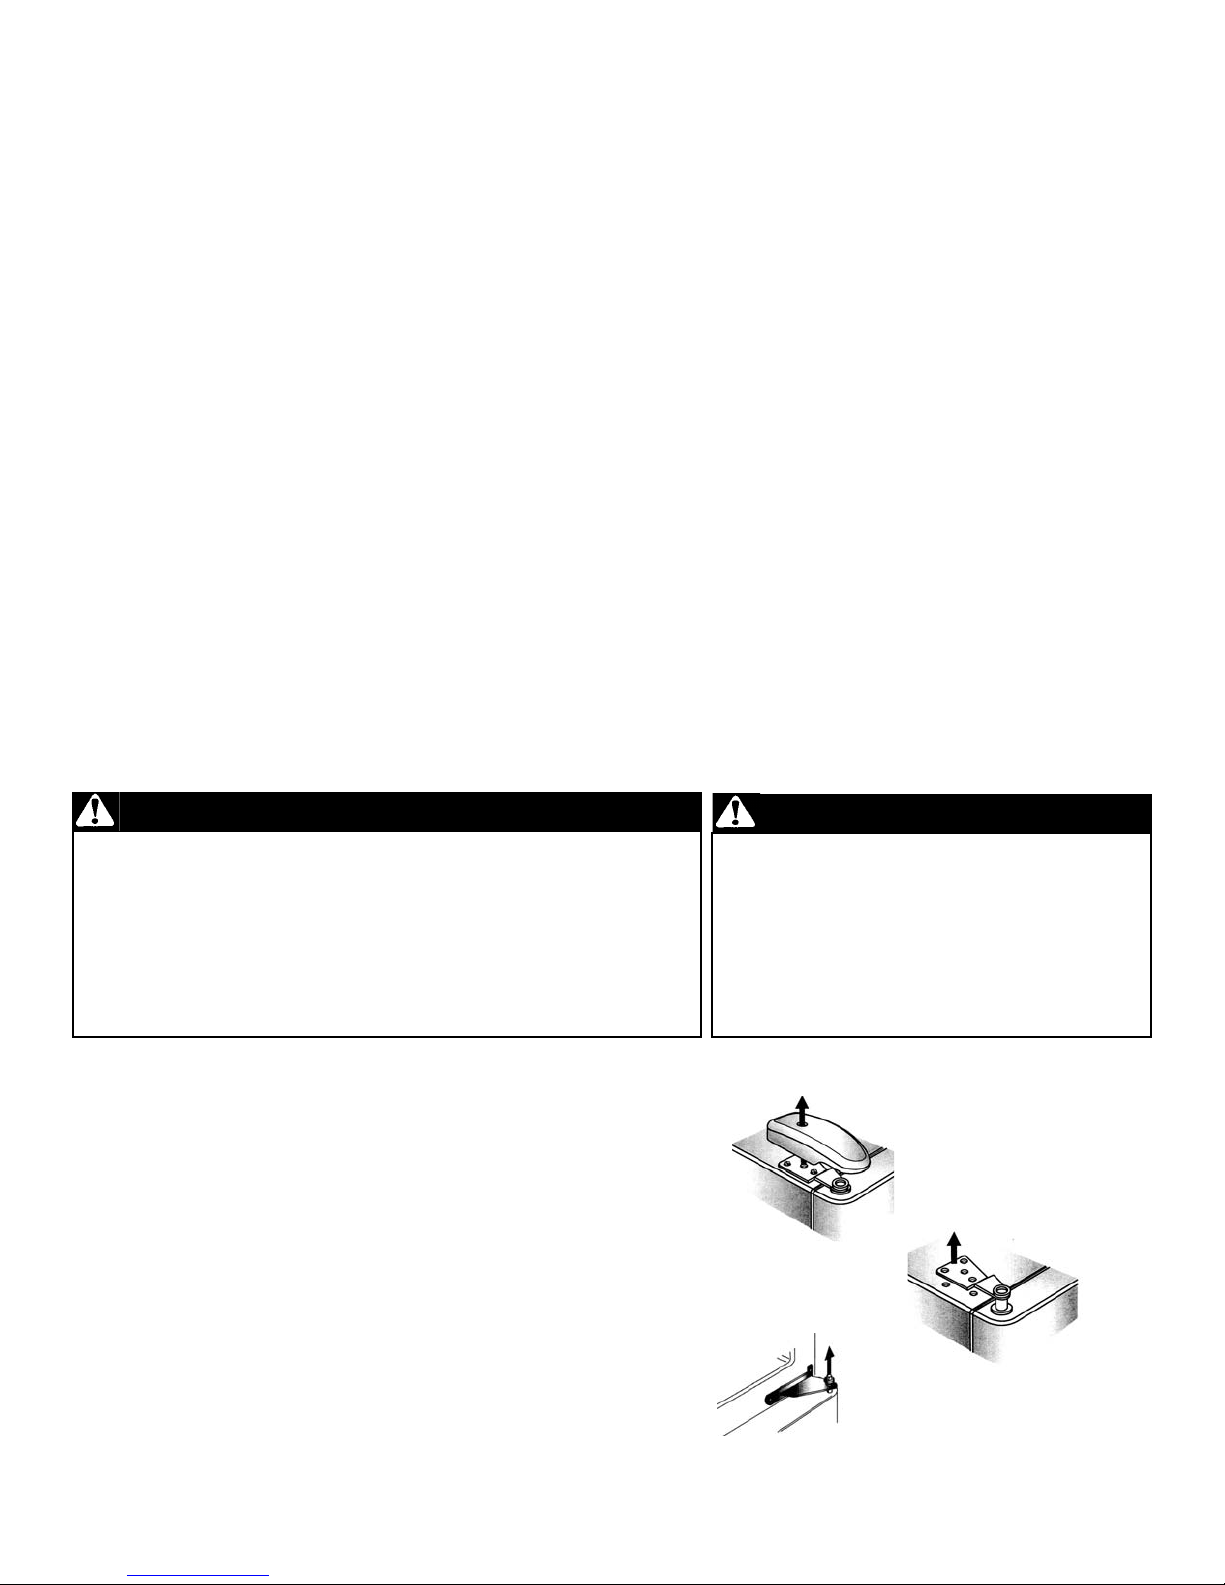
BBoottttoomm MMoouunntt DDoooorr RReemmoovvaall
1. Unplug power cord from power source.
2. Remove toe grille.
3. Remove top hinge cover from refrigerator door by removing
Phillips screw and retain screw and cover for later use.
4. Unscrew 5/16” hex head screws from top hinge to remove hinge
and retain all screws for later use.
5. Lift refrigerator door from center hinge pin.
6. Remove plastic sleeve, if present.
7. See page 6 for drawer removal instructions
5
FFrreenncchh--DDoooorr BBoottttoomm MMoouunntt DDoooorr RReemmoovvaall
1. Unplug power cord from power source.
2. Remove toe grille.
3. Remove top hinge covers from refrigerator
doors by removing Phillips screw and retain
screw and cover for later use.
4. Unscrew 5/16” hex head screws from top hinge
to remove hinge and retain all screws for later
use.
5. Lift right side refrigerator door from center hinge
pin. Remove door closure from center hinge pin
on the right side and retain for later use.
6. Disconnect wire harness on top of left side
refrigerator door top hinge. Release two-pin
connector by pressing junction point with a flat
blade screwdriver or fingernail. Green ground
wire remains attached to the hinge.
7. Unscrew 5/16” hex head screws from top
hinge to remove hinge and retain all screws
for later use. Lift left side refrigerator door,
along with top hinge, from center hinge pin.
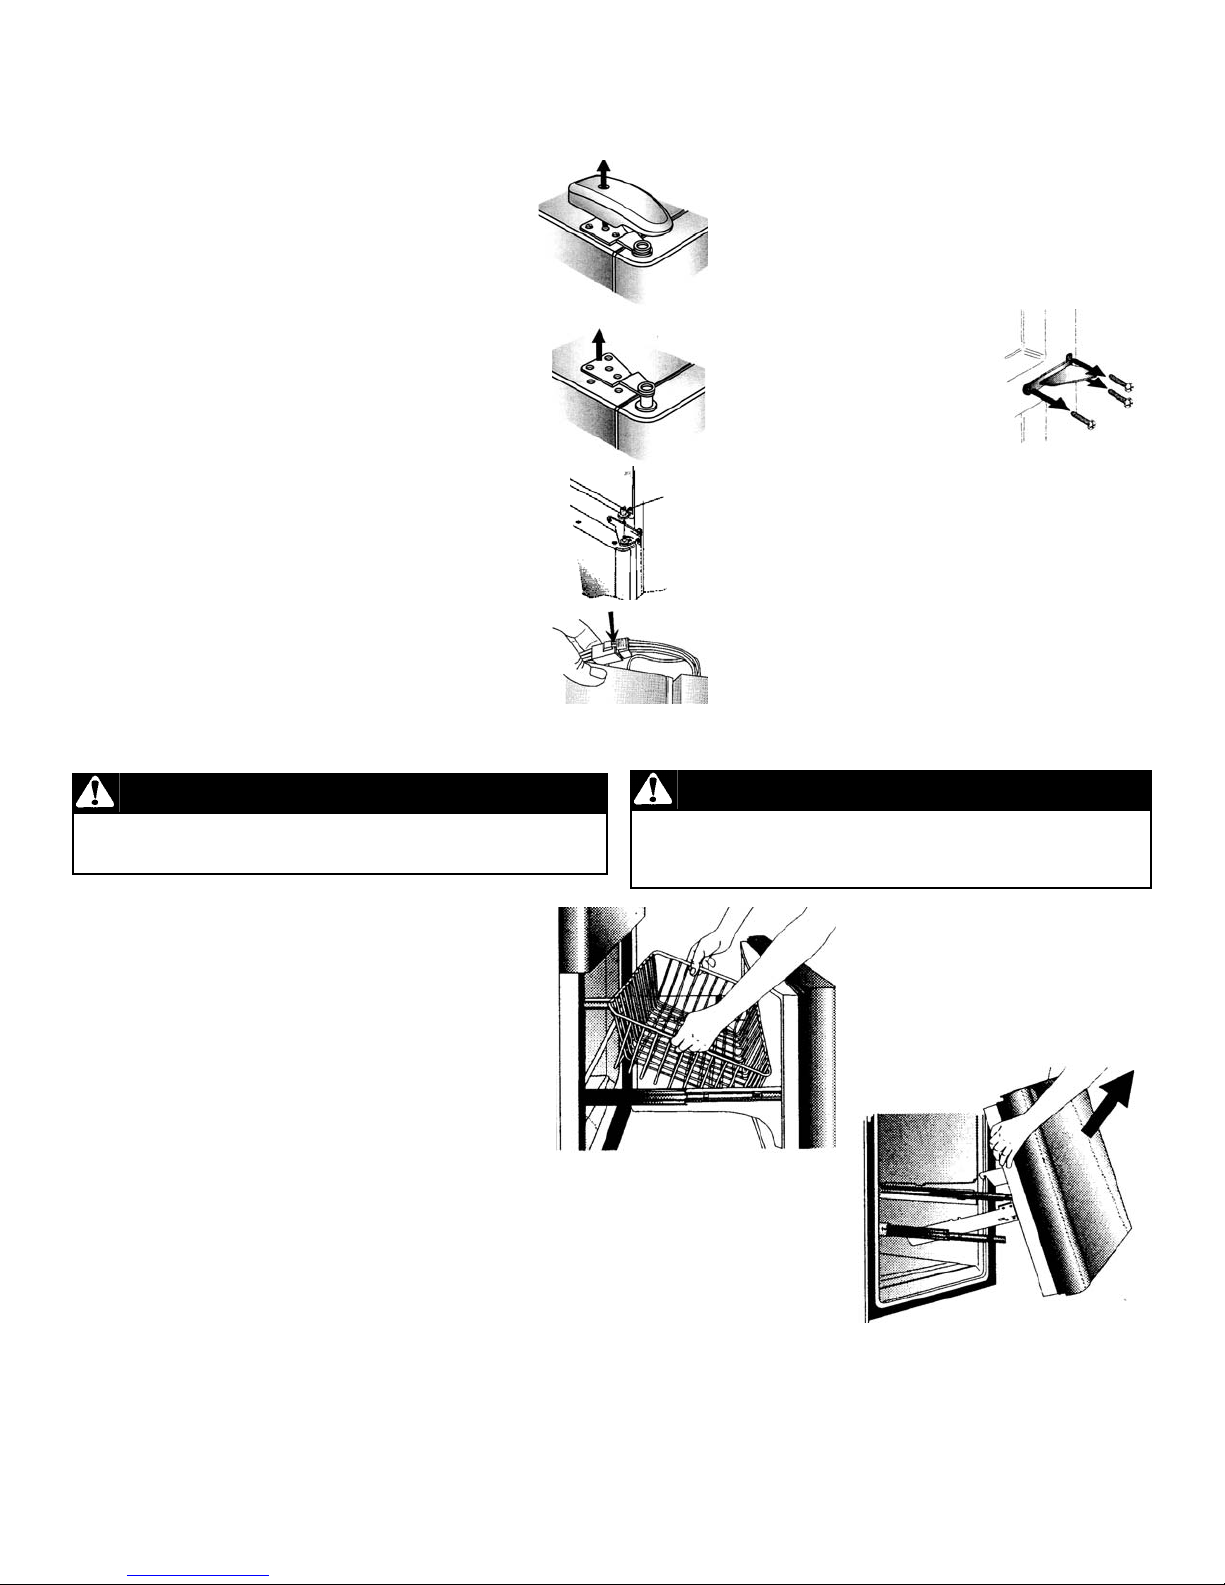
8. Remove phillips screws to remove right and
left hinges and retain
all screws for later
use.
Right
side
door
closure
IINNSSTTAALLLLAATTIIOONN
PPuulllloouutt FFrreeeezzeerr DDrraawweerr RReemmoovvaall
DANGER
To prevent accidental child entrapment or suffocation risk,
do not remove the divider in the top freezer basket.
CAUTION
To avoid possible injury, product, or property damage,
you will need two people to perform the following
instructions.
1. Pull drawer open to full extension.
2. Tilt the lower basket forward and lift to remove.
3. Lift top of drawer front to unhook the drawer
from the slides. Lift door front out to remove
 Loading...