

Service
Manual
This manual is to be used by qualied appliance technicians only.
Viking does not assume any responsibility for property damage
or personal injury for improper service procedures done by an
unqualied person.
Electric Touch
Control Ovens
This Base Manual covers general and
specic information including, but not
limited to the following models:
DEDO127 T
DEDO130T
DEDO527T
DEDO530T
DESO127T
DESO13 0T
DESO527T
DESO530T
VEDO127 T
VEDO130T
VEDO527T
VEDO530T
VESO127T
VESO13 0T
VESO527T
VESO530T
SMC-0004
July 2008
Important Information
SAVE THESE INSTRUCTIONS
REVIEW ALL SERVICE INFORMATION IN THE APPROPRIATE SERVICE MANUAL AND TECHNICAL SHEETS
BEFORE BEGINNING REPAIRS.
Pride and workmanship go into every product to provide our customers with quality appliances. It is possible,
however, that during the lifetime of a product service maybe require. Products should be serviced only by a qualified
authorized service technician who is familiar with the safety procedures required to perform the repair and is equipped
with the proper tools, parts, testing instruments, and the appropriate service manual.
Safety Information
We have provided many important safety messages
throughout this manual and on the product. Always
read and obey all safety statements. To properly
identify a safety statements look for the following
safety alert symbol.
This symbol alerts personnel to hazards that can
many different types of altering messages. All safety
messages will be preceded by a safety alert symbol
and the word “DANGER”, “WARNING” or
“CAUTION”.
DANGER
Immediate hazards which WILL result in severe
personal injury or death.
WARNING
Hazards or unsafe practices which COULD result
in severe personal injury or death.
CAUTION
Hazards or unsafe practices which COULD result
in minor personal injury, product or property
damage.
All safety messages will identify the hazard, tell you
how to reduce the chance of injury, and inform you
what can happen if the instructions are not followed.
WARNING
To avoid risk of serious injury or death, repairs
should not be attempted by unauthorized
personnel.
CAUTION
VIKING will not be responsible for any injury or
property damage from improper service
procedures. If performing service on your own
product, you must assume responsibility for any
personal injury or property damage which may
result.
To locate an authorized service agent, call:
Viking Customer Service
Phone No. 1-888-845-4641
Address your written correspondence to:
Viking Preferred Service
1803 HWY 82 West
Greenwood, MS 38930
© 2008 Viking Preferred Service
2

Warranty Information
Professional Series Built-In Electric Ovens Warranty
One Year Full Warranty
Built-in electric ovens and all of their component parts and accessories, except as detailed below*, are warranted to
be free from defective materials or workmanship in normal household use for a period of twelve (12) months from the
date of original retail purchase. Viking Range Corporation, warrantor, agrees to repair or replace, at its option, any
part which fails or is found to be defective during the warranty period.
*Glass (including light bulbs), painted and decorative items are warranted to be free from defective materials or
workmanship for a period of ninety (90) days from the date of original retail purchase. ANY DEFECTS MUST BE
REPORTED TO THE SELLING DEALER WITHIN NINETY (90) DAYS FROM DATE OF ORIGINAL RETAIL
PURCHASE.
Viking Range Corporation uses the most up-to-date processes and best materials available to produce all color finishes.
However, slight color variation may be noticed because of the inherent differences in painted parts and porcelain parts as
well as differences in kitchen lighting, product locations, and other factors.
Five Year Limited Warranty
Any bake element, broil element, or convection cook element which fails due to defective materials or workmanship in
normal household use during the second through the fifth year from the date of original retail purchase will be repaired
or replaced, free of charge for the part itself, with the owner paying all other costs, including labor.
Ten Year Limited Warranty
Any porcelain oven or porcelain inner door panel which rusts through due to defective materials or workmanship in
normal household use during the second through the tenth year from the date of original retail purchase will be repaired
or replaced, free of charge for the part itself, with the owner paying all other costs, including labor.
This warranty extends to the original purchaser of the product warranted hereunder and to each transferee owner of
the product during the term of the warranty.
This warranty shall apply to products purchased and located in the United States and Canada. Products must be
purchased in the country where service is requested. Warranty labor shall be performed by an authorized Viking Range
Corporation service agency or representative. Warranty shall not apply to damage resulting from abuse, accident,
natural disaster, lose of electrical power to the product for any reason, alteration, outdoor use, improper installation,
improper operation, or repair or service of the product by anyone other than an authorized Viking Range Corporation
service agency or representative. This warranty does not apply to commercial usage. Warrantor is not responsible for
consequential or incidental damage whether arising out of breach of contract, or otherwise. Some jurisdictions do not
allow the exclusion or limitation of incidental of consequential damages, so the above limitation or exclusion may not
apply to you.
Owner shall be responsible for proper installation, providing normal care and maintenance, providing proof of purchase
upon request, and making the appliance reasonably accessible for service. If the product or one of its component parts
contain a defect or malfunction during warranty period, after a reasonable number of attempts by the warrantor to
remedy the defects or malfunction, the owner is entitled to either a refund or replacement of the product or its
component part or parts. Warrantor’s liability on any claim of any kind, with respect to the goods or services covered
hereunder, shall in no case exceed the price of the goods or service or part thereof which gives rise to the claim.
WARRANTY SERVICE: Under the terms of this warranty, service must be performed by a factory authorized Viking
Range Corporation service agent or representative. Service will be provided during normal business hours, and labor
performed at overtime or premium rates shall not be covered by this warranty. To obtain warranty service, contact the
dealer from whom the product was purchased, an authorized Viking Range Corporation service agent, or Viking Range
Corporation. Provide model and serial number and date of original purchase. For the name of your nearest authorized
Viking Range Corporation service agency, call the dealer from whom the product was purchased or Viking Range
Corporation. IMPORTANT: Retain proof of original purchase to establish warranty period.
The return of the Owner Registration Card is not a condition of warranty coverage.
Owner Registration Card so the Viking Range Corporation can contact you should any question of safety arise which
could affect you.
Any implied warranties of merchantability and fitness applicable to the above described bake element, broil element,
convection cook element, porcelain oven, or porcelain inner door panel are limited in duration to the period of
coverage of the applicable express written limited warranties set forth above. Some jurisdictions do not allow
limitations on how long an implied warranty lasts, so the above limitation may not apply to you. This warranty gives
specific legal rights, and you may also have other rights which may vary from jurisdiction to jurisdiction.
You should, however, return the
111 Front Street, Greenwood, Mississippi (MS) 38930 USA 662-455-1200
Specifications are subject to change without notice.
For more product information, call 1-888-VIKING1 (845-4641), or visit our web
© 2008 Viking Preferred Service
VIKING RANGE CORPORATION
site at http://www.vikingrange.com
3

Warranty Information
WARRANTY SERVICE
Under the terms of this warranty, service must be performed by a factory authorized Viking Range Corporation service agent
or representative. Service will be provided during normal business hours, and labor performed at overtime or premium rates
shall not be covered by this warranty. To obtain warranty service, contact the dealer from whom the serial number and date
were originally purchased. For the name of your nearest authorized Viking Range Corporation service agency, call the
dealer from whom the product was purchased or Viking Range Corporation. IMPORTANT: Retain proof of original purchase
to establish warranty period
The return of the Owner Registration Card is not a condition of warranty coverage
Registration Card so that Viking Range Corporation can contact you should any question of safety arise which could affect
you. Any implied warranties of merchantability and fitness applicable to the above described nylon racks, motor/pump
assembly, water distribution system, stainless steel tank, or stainless steel inner door liner are limited in duration to the
period of coverage of the applicable express written limited warranties set forth above. Some jurisdictions do not allow
limitations on how long an implied warranty lasts, so the above limitation may not apply to you. This warranty gives you
specific legal rights, and you may also have other rights which may vary from jurisdiction to jurisdiction.
VIKING RANGE CORPORATION
111 Front Street • Greenwood, Mississippi 38930 USA
(662) 455-1200
www.vikingrange.com
Specification subject to change without notice
. You should, however, return the Owner
© 2008 Viking Preferred Service
4

Table of Contents
Description Page
Important Information…………………………… 1
Safety Information………………....................... 2
WARRANTY INFORMATION
Warranty Information……................................. 3
Warranty Service Information.......................... 4
Table of Contents………………........................ 5
GENERAL INFORMATION
Specifications …...………………........................ 6
Heating element technical information ….…...... 7
Control header Molex plug information ….…..... 7
Model –Serial Number matrix …...………….... 8
OPERATION
Oven operation main panel .............................. 9
Sabbath Mode and Lock and Unlock …...…. 10
Bake, Broil TruConvect™ and Conv Bake…… 11
Conv Broil, Conv Roast, Defrost, Dehydrate…. 12
Meat probe - Auto Roast - Proof cycle
and Recipe feature…………………………. 13
DIAGNOSTICS
Built-In error codes ……………………………. 14
Accessing the diagnostic program ……………. 15
Running the diagnostic programs - Run all Tests
Product Information Test description………….. 16
Individual Display Test – Individual Upper and
Lower Test description………………………… 17
Individual Keyboard Test - Run all Upper and
Lower test description………………………… 18
Run all keyboard Test description……………… 19
TEST PROCEDURES
1. Run all Tests……………………………… 20- 22
2. Product Information Test ………………. 22
3. Individual Display Tests…………………. 23
4. Individual Upper Oven Tests…………… 24
5. Individual Lower Oven Tests…………… 25
6. Individual Keyboard Tests…………….. 26
7. Run all Upper Oven Tests…………… .. 27
8. Run all Lower Oven Tests……………… 28
9. Individual Keyboard Tests……………. 29
CYCLE CHARTS
Bake………………………………………… 30
Broil………………………………………… 31
TruConvec™……………………………………… 31
Description Page
Convection Bake – Convection Broil………… 32
Convection Roast – Defrost……………… 33
Dehydrate – Proof………..……………… 33
Auto Roast………………….……………… 34
Self Clean……………..…….……………… 34
SERVICE DIAGNOSTICS AND PROCEDURES
Service Situation Chart………………………. 35
Parts location – upper plenum…………………. 36
Parts location – upper plenum…………………. 36
Parts location – Rear upper and lower oven…. 37
Parts location – Center plenum - lower oven…. 38
Door removal……………………………………… 39
Component Testing Chart –RTD Chart………. 40
Component Troubleshooting Guide…………41-43
Cooling Motor testing …………………… 44
Hall Effect Sensor testing ………………... 45
RTD Temperature sensor testing… …………….. 46
Oven Lock Motor testing ………………. .… 47-48
Oven cavity light testing …………………… 49
High Limiter testing ……………………………49-50
Convection Fan Motor testing …………….. 51-54
Main Control – Keyboard testing………. ……… 55
Main Control – Display testing…………………. 56
Relay board and Main Control connection ….. 57
Relay board – Bake element inner……............. 58
Relay board – Outer Bake – Inner Broil……........ 59
Relay board – Outer Broil – Convection……....... 60
Door Interlock Switch…………………………… 61
WIRING AND SCHEMATIC DIAGRAMS
Wiring Diagram – Premiere Model - Single oven
and double upper section……………………… 62
Wiring Diagram – Select Model - Single oven
and double upper section……………………. 63
Wiring Diagram – Select Model – Lower….... 64
Wiring Diagram – Premiere Model - Lower… 65
Schematic – Single Oven - Select model……. 66
Schematic – Single Oven –Premiere model… 67
Schematic – Double Oven - Select model…… 68
Schematic – Double Oven –Premiere model… 69
© 2008 Viking Preferred Service
5
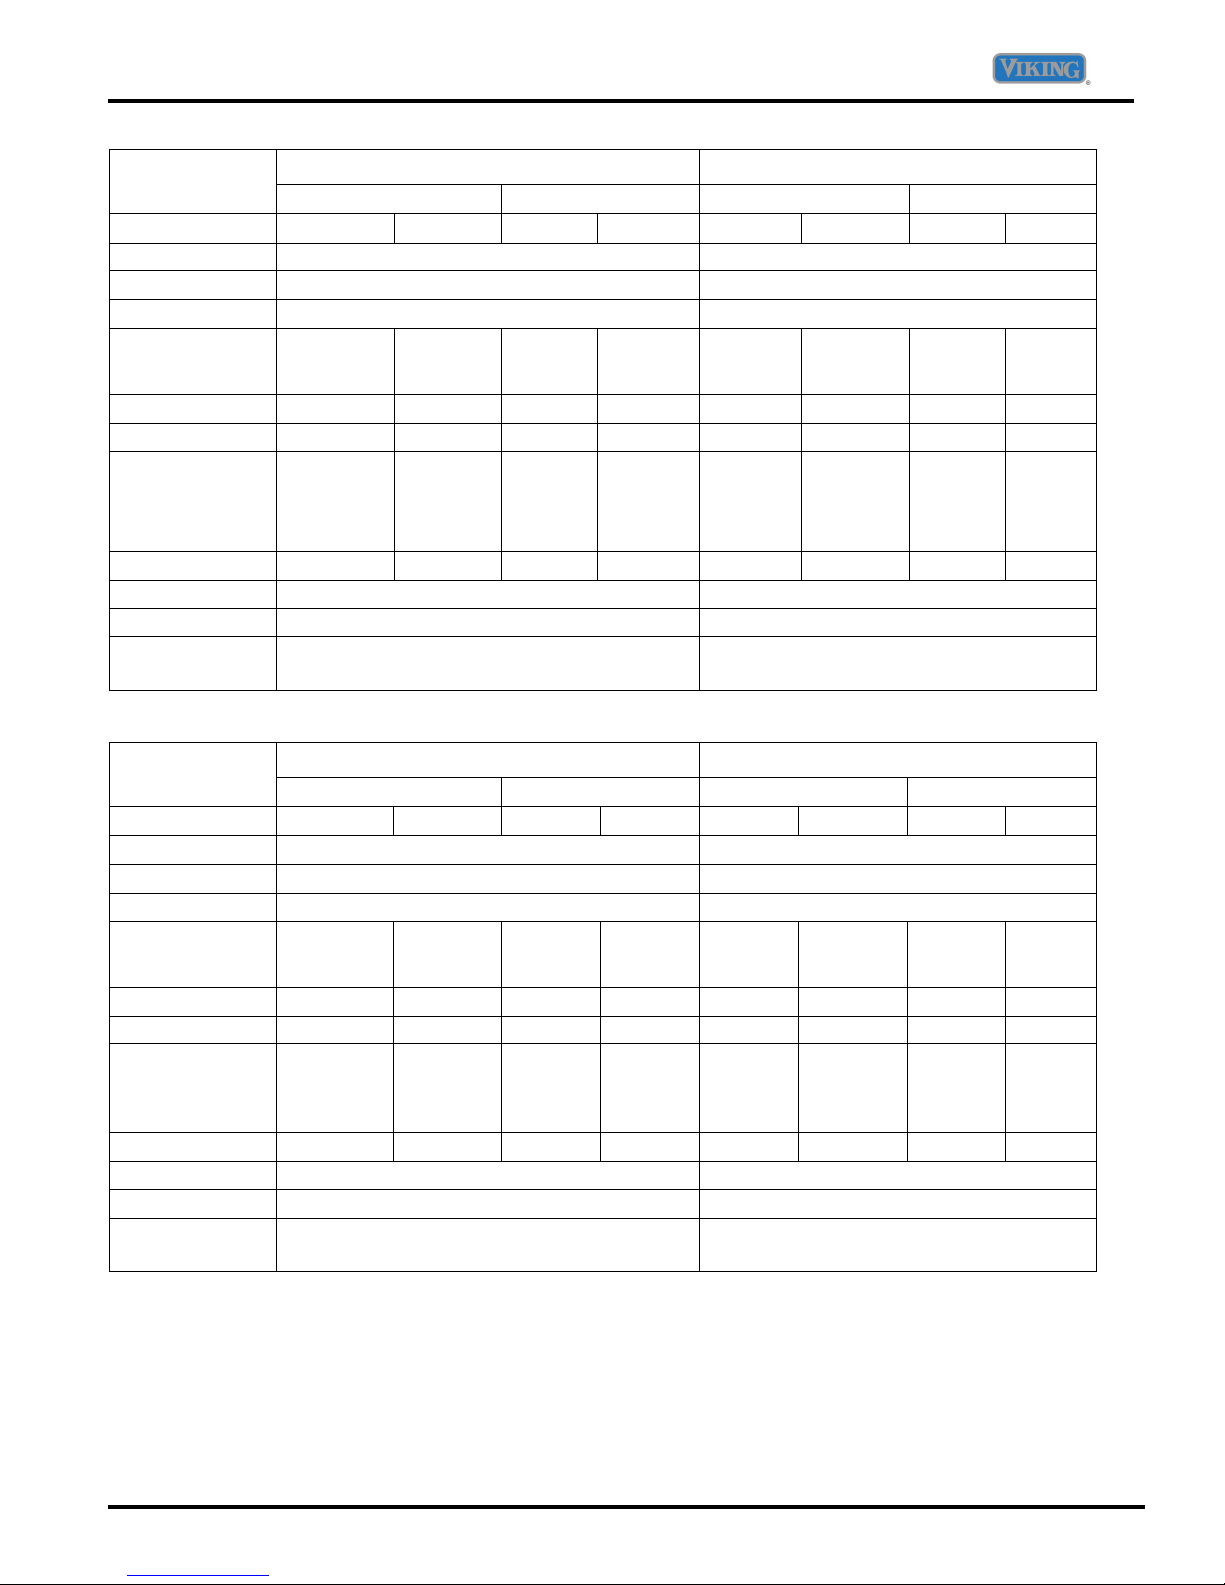
Table of Contents
Specifications
Select Premiere Professional
Touch
Model Number
Clock
Bake Element
Broiler
Convection
System
Oven Light
Meat Probe
Electrical
Requirements
27" Wide 30" Wide 27" Wide 30" Wide
VESO127T VEDO127T VESO130T VEDO130T VESO527T VEDO527T VESO530T VEDO530T
Digital Digital
10-Pass Concealed Element 10-Pass Concealed Element
10-Pass Tubular Electric Infrared Glass Enclosed
2-Speed 2-Speed
One One One One Three Three Three Three
No No No No Yes Yes Yes Yes
4-Wire
w/ground,
30 Amp.
Connection
(upper only)
4-Wire
w/ground,
50 Amp.
Connection
2-Speed 2-Speed
4-Wire
w/ground,
30 Amp.
Connection
(upper only)
4-Wire
w/ground,
50 Amp.
Connection
2-Speed 2-Speed
4-Wire
w/ground,
30 Amp.
Connection
(both ovens)
4-Wire
w/ground,
50 Amp.
Connection
2-Speed 2-Speed
4-Wire
w/ground,
30 Amp.
Connection
(both
ovens)
4-Wire
w/ground,
50 Amp.
Connection
Max Amp. Usage
Bake Rating
Broil Rating
TruConvec
Rating
Touch
Model Number
Clock
Bake Element
Broiler
Convection
System
Oven Light
Meat Probe
Electrical
Requirements
Max Amp. Usage
Bake Rating
Broil Rating
TruConvec
Rating
24 40 24 40 24 40 24 40
3000 Watts 3000 Watts
4000 Watts 3500 Watts
3000 Watts 3000 Watts
Select Premiere Designer
27" Wide 30" Wide 27" Wide 30" Wide
DESO127T DEDO127T DESO130T DEDO130T DESO527T DEDO527T DESO530T DEDO530T
Digital Digital
10-Pass Concealed Element 10-Pass Concealed Element
10-Pass Tubular Electric Infrared Glass Enclosed
2-Speed 2-Speed
One One One One Three Three Three Three
No No No No Yes Yes Yes Yes
4-Wire
w/ground,
30 Amp.
Connection
24 40 24 40 24 40 24 40
(upper only)
4-Wire
w/ground,
50 Amp.
Connection
3000 Watts 3000 Watts
4000 Watts 3500 Watts
3000 Watts 3000 Watts
2-Speed 2-Speed
4-Wire
w/ground,
30 Amp.
Connection
(upper only)
4-Wire
w/ground,
50 Amp.
Connection
2-Speed 2-Speed
4-Wire
w/ground,
30 Amp.
Connection
(both ovens)
4-Wire
w/ground,
50 Amp.
Connection
2-Speed 2-Speed
4-Wire
w/ground,
30 Amp.
Connection
(both
ovens)
4-Wire
w/ground,
50 Amp.
Connection
Heating element information
© 2008 Viking Preferred Service
6
General information
Volts 240 240 240 240 240
Inner Bake Outer Bake Inner Broil Outer Broil Convection
Amps 6.25 6.25 10.60 6.00 12.50
Watts 1,500 1,500 2,550 1,450 3,000
Ohms 38.00 38.00 22.50 40.00 19.50
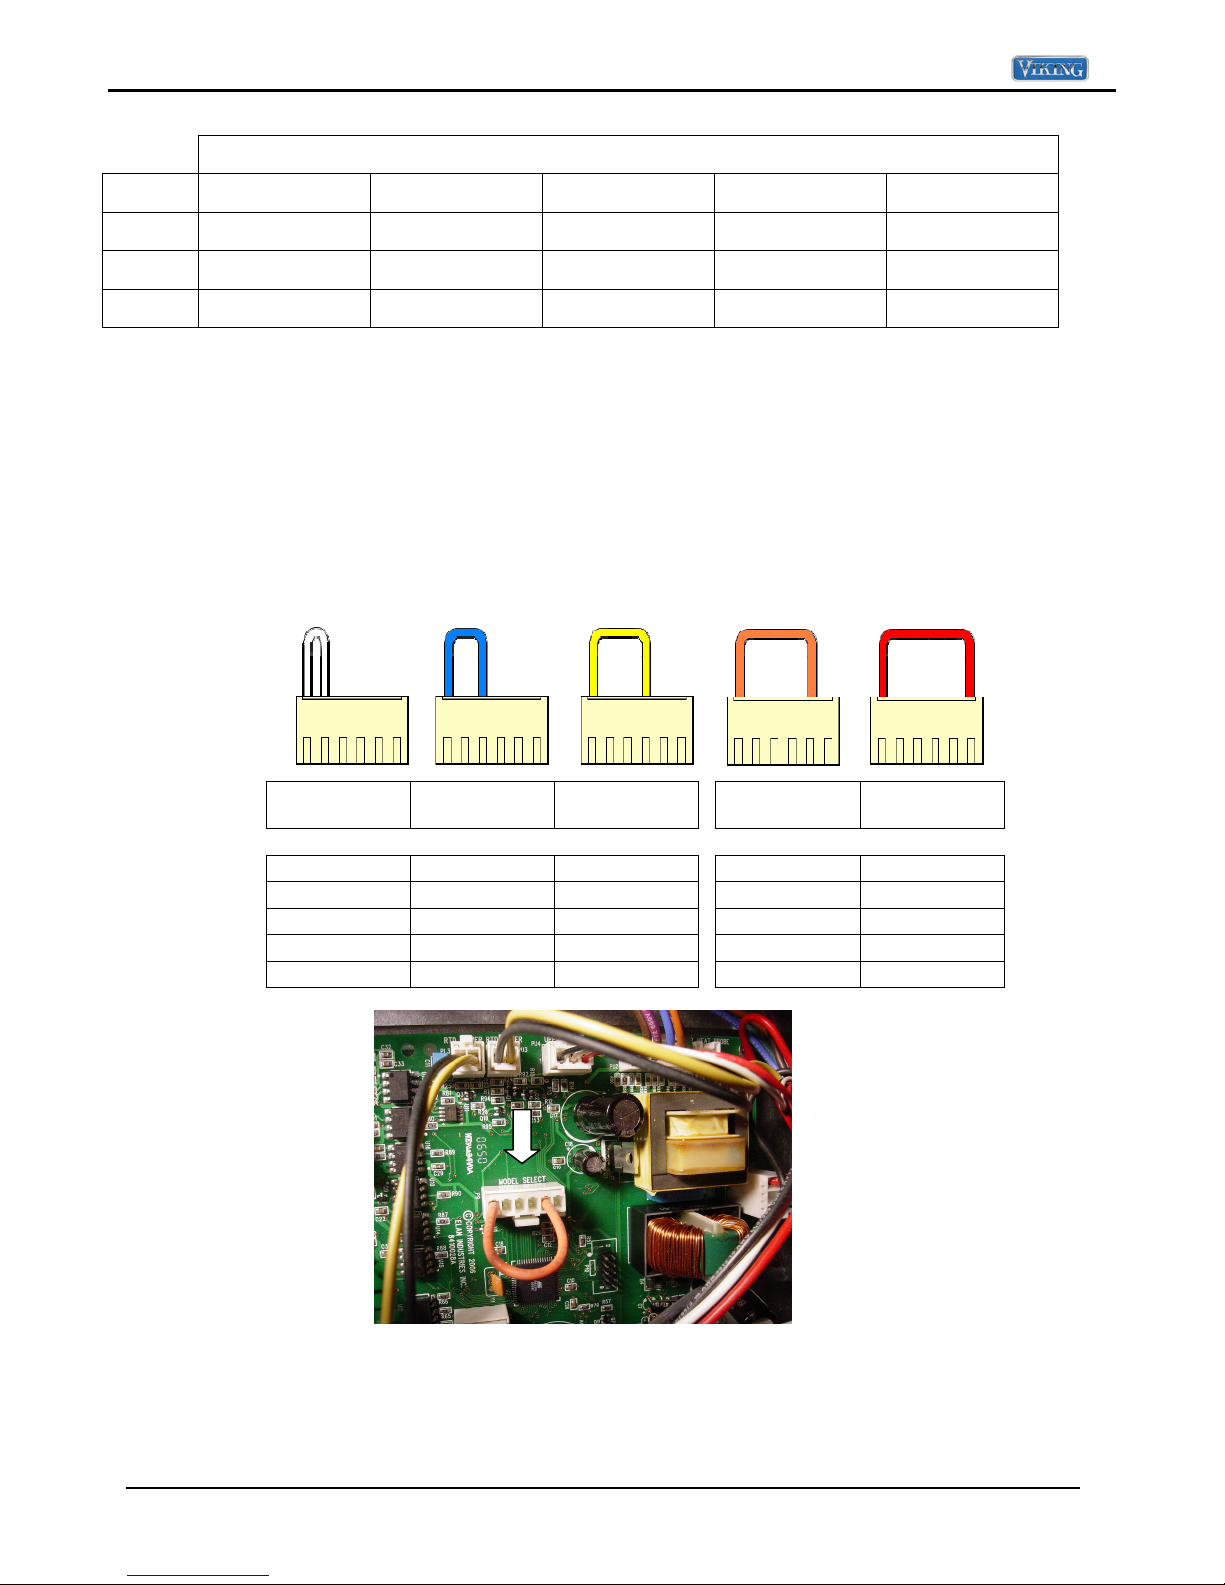
Control board headers
The T series wall ovens all use the same main control board. Each board is programmed to the
specific model by the use of a control board model select connector (Header). Each connector has
a color coded wire Molex plug which connects to the P9 connector of the main control board.
Fig A shows the different Molex header plugs along with the models that each goes with. Models
DEDO530T, VEDO530T and VESO530T DO NOT have a header plug. If you change the main
control board you must make sure that the header is removed from the old board and placed on
the new one. Failure to do so will cause improper operation of the oven. Fig B shows the location
of the control header.
FIG A
PE070763
White
Models Models Models
DEDO 527T DESO 530T DEDO 130T
VEDO 527T DESO 527T VEDO 130T
VESO 527T
PE070794
Blue
PE070795
Yellow
PE070796
Orange
Models Models
DEDO 127T DESO 130T
VEDO 127T DESO 127T
VESO 130T VESO 127T
PE070887
Red
FIG B
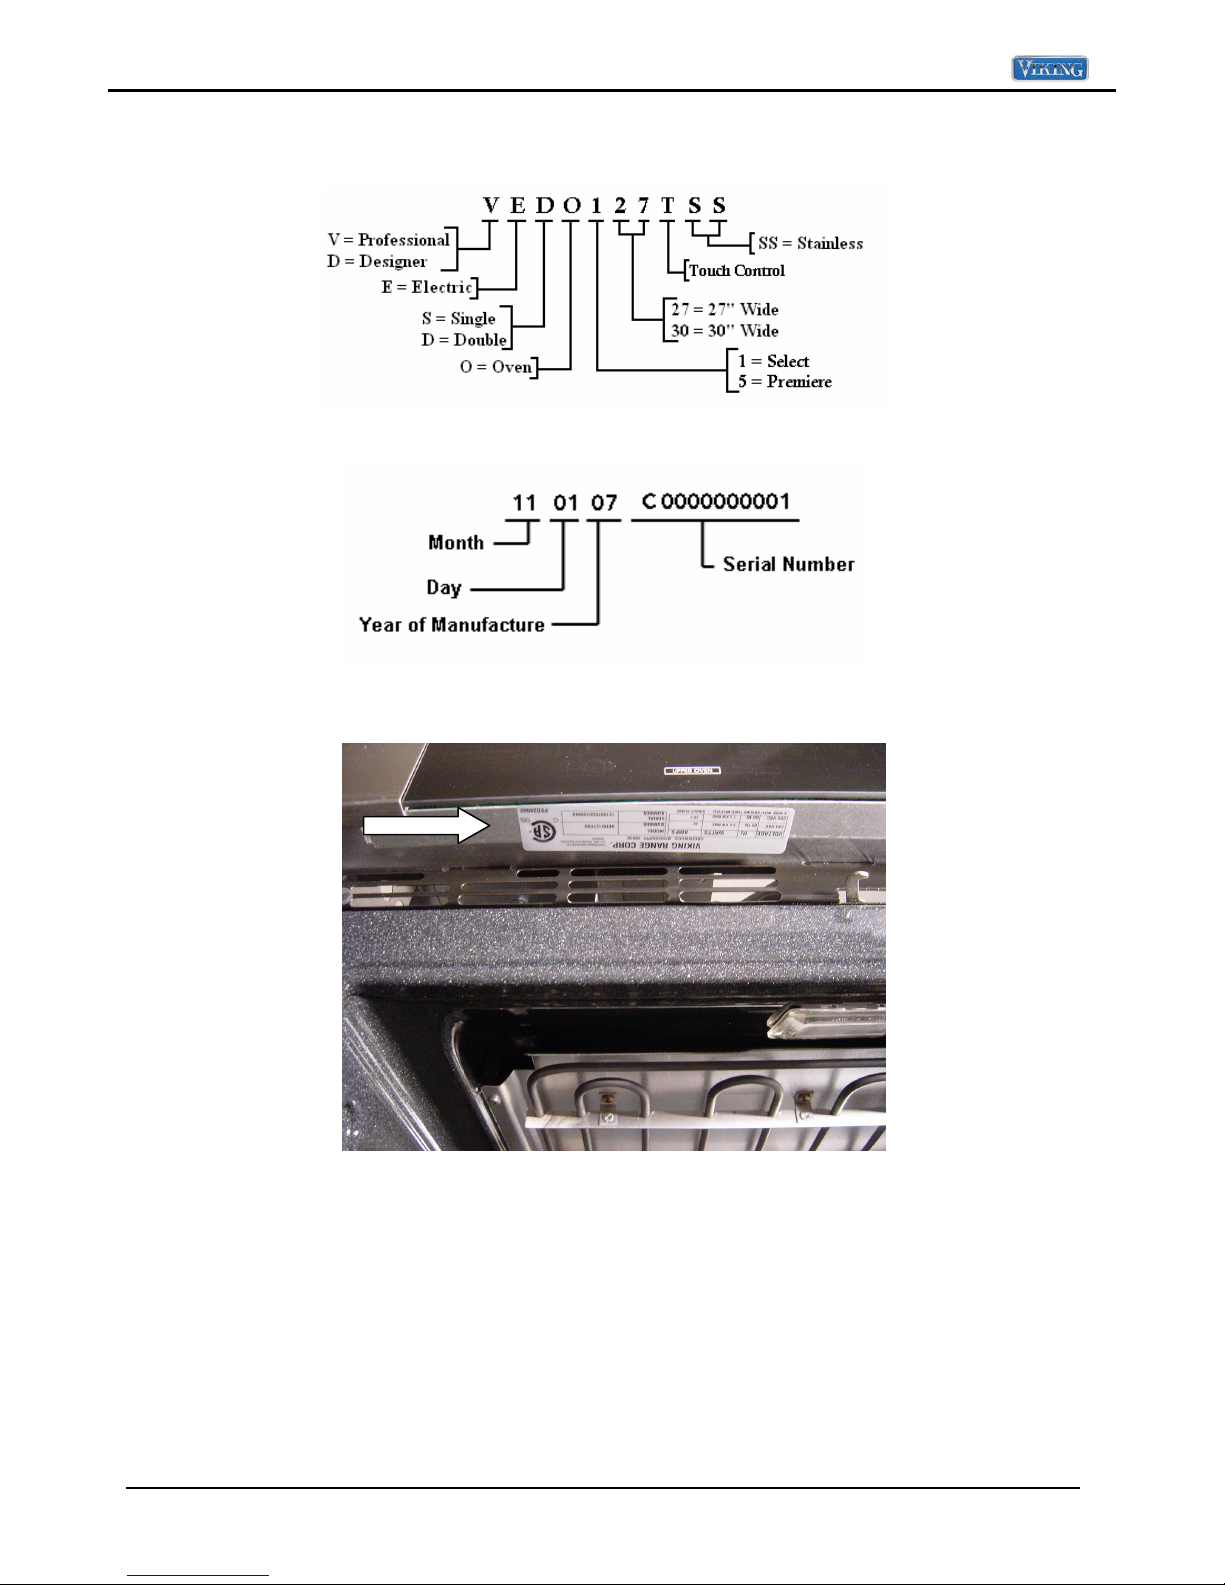
Model - Serial number matrix
The model number and serial number are located on the data plate. The data plate is located on the top left
side of the oven cavity under the control panel.
© 2008 Viking Preferred Service
The board shown here is
configured for a model
DEDO – VEDO 127T.
7
General information
Model Numbers
Serial numbers
The model and serial number tag is located on the underside of the control panel. FIG A shows the location.
FIG A
© 2008 Viking Preferred Service
8

Operation
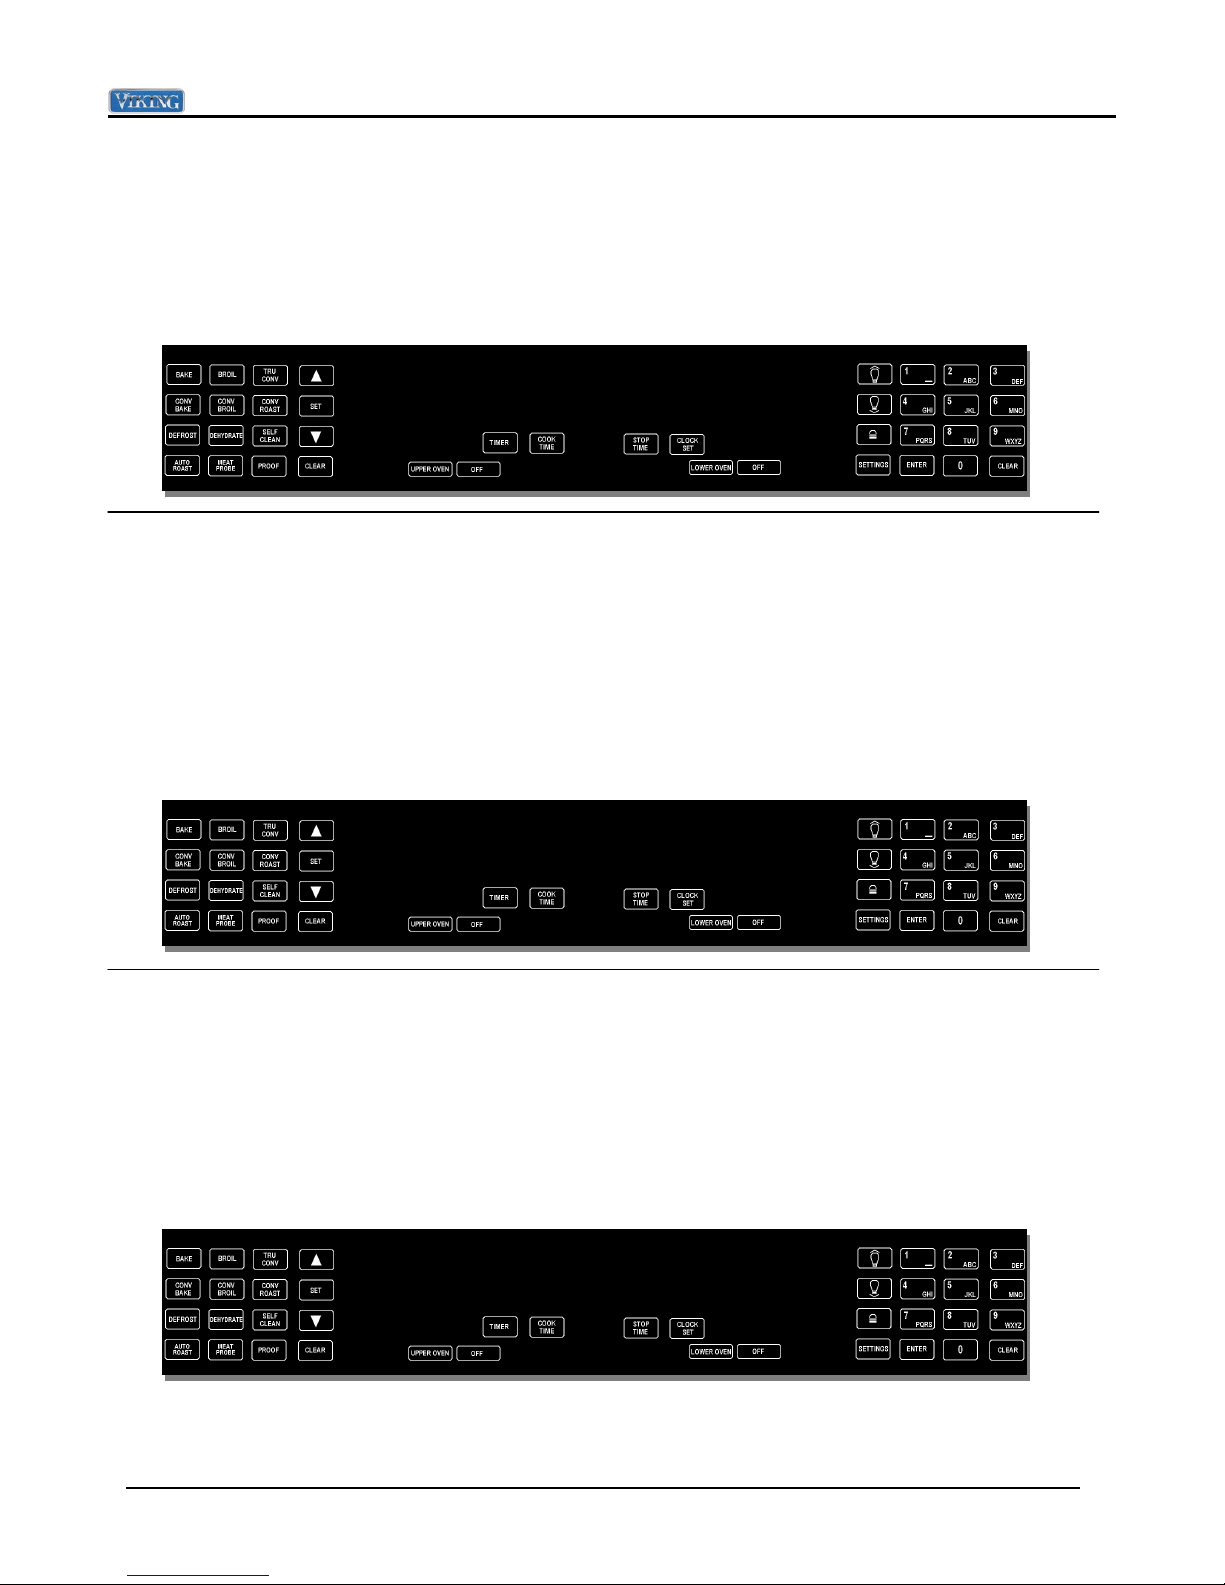
Control Panel
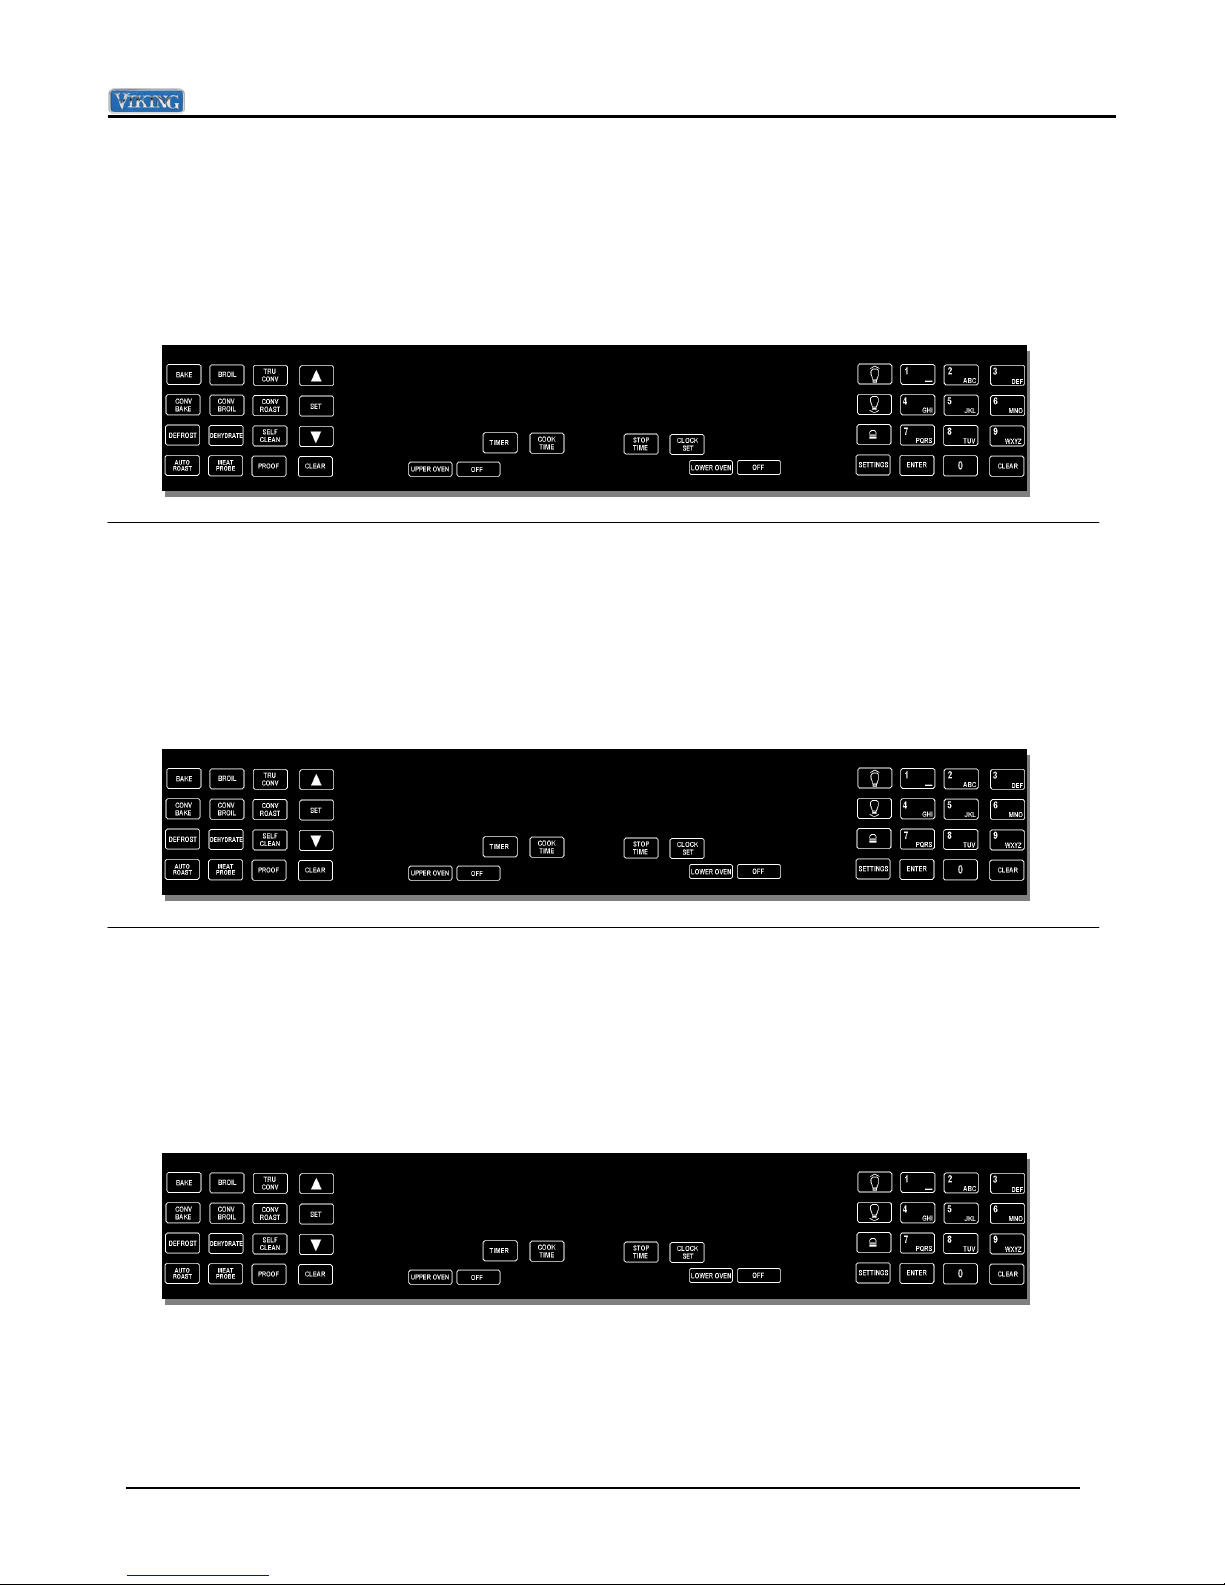
Below is the control panel in its OFF state. In order to operate the oven you need to select either upper or
lower (Double oven models). In order to operate the oven, touch either the upper or lower oven touch pad.
The Viking Built-In Touch Control wall oven is available in two versions. The Select and Premiere ovens
are identical with the exception of optional functions on the Premiere model. Below are both the Select and
the Premiere double oven models.
The Select model has Bake, Broil, True Convection, Convection Bake, Convection Broil, Convection Roast,
Defrost, Dehydrate and Self Clean.
The Premiere model has all the features as the Select model with the addition of an Auto Roast and Proof
cycles, Meat probe capabilities and a RECIPES function built in. Also, the Premiere model has 3 oven lights in
each cavity and both the upper and lower ovens (Double cell models) have the Convection Feature
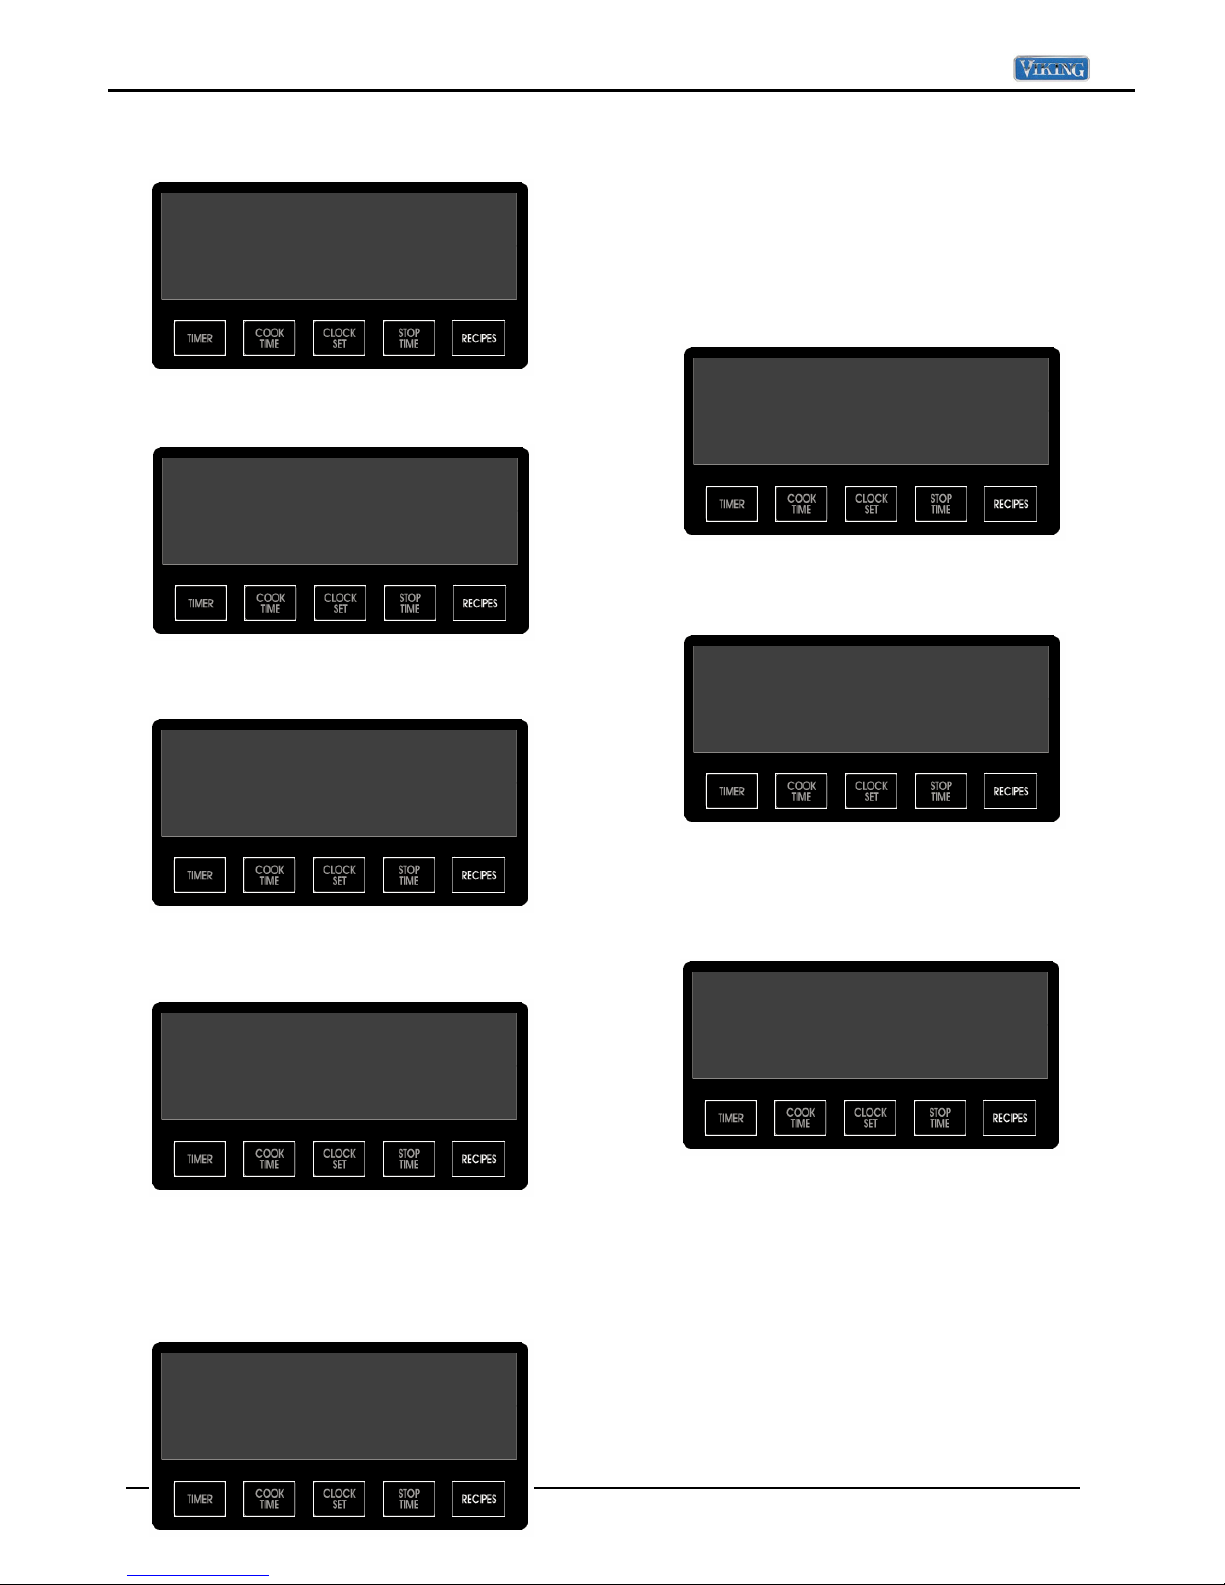
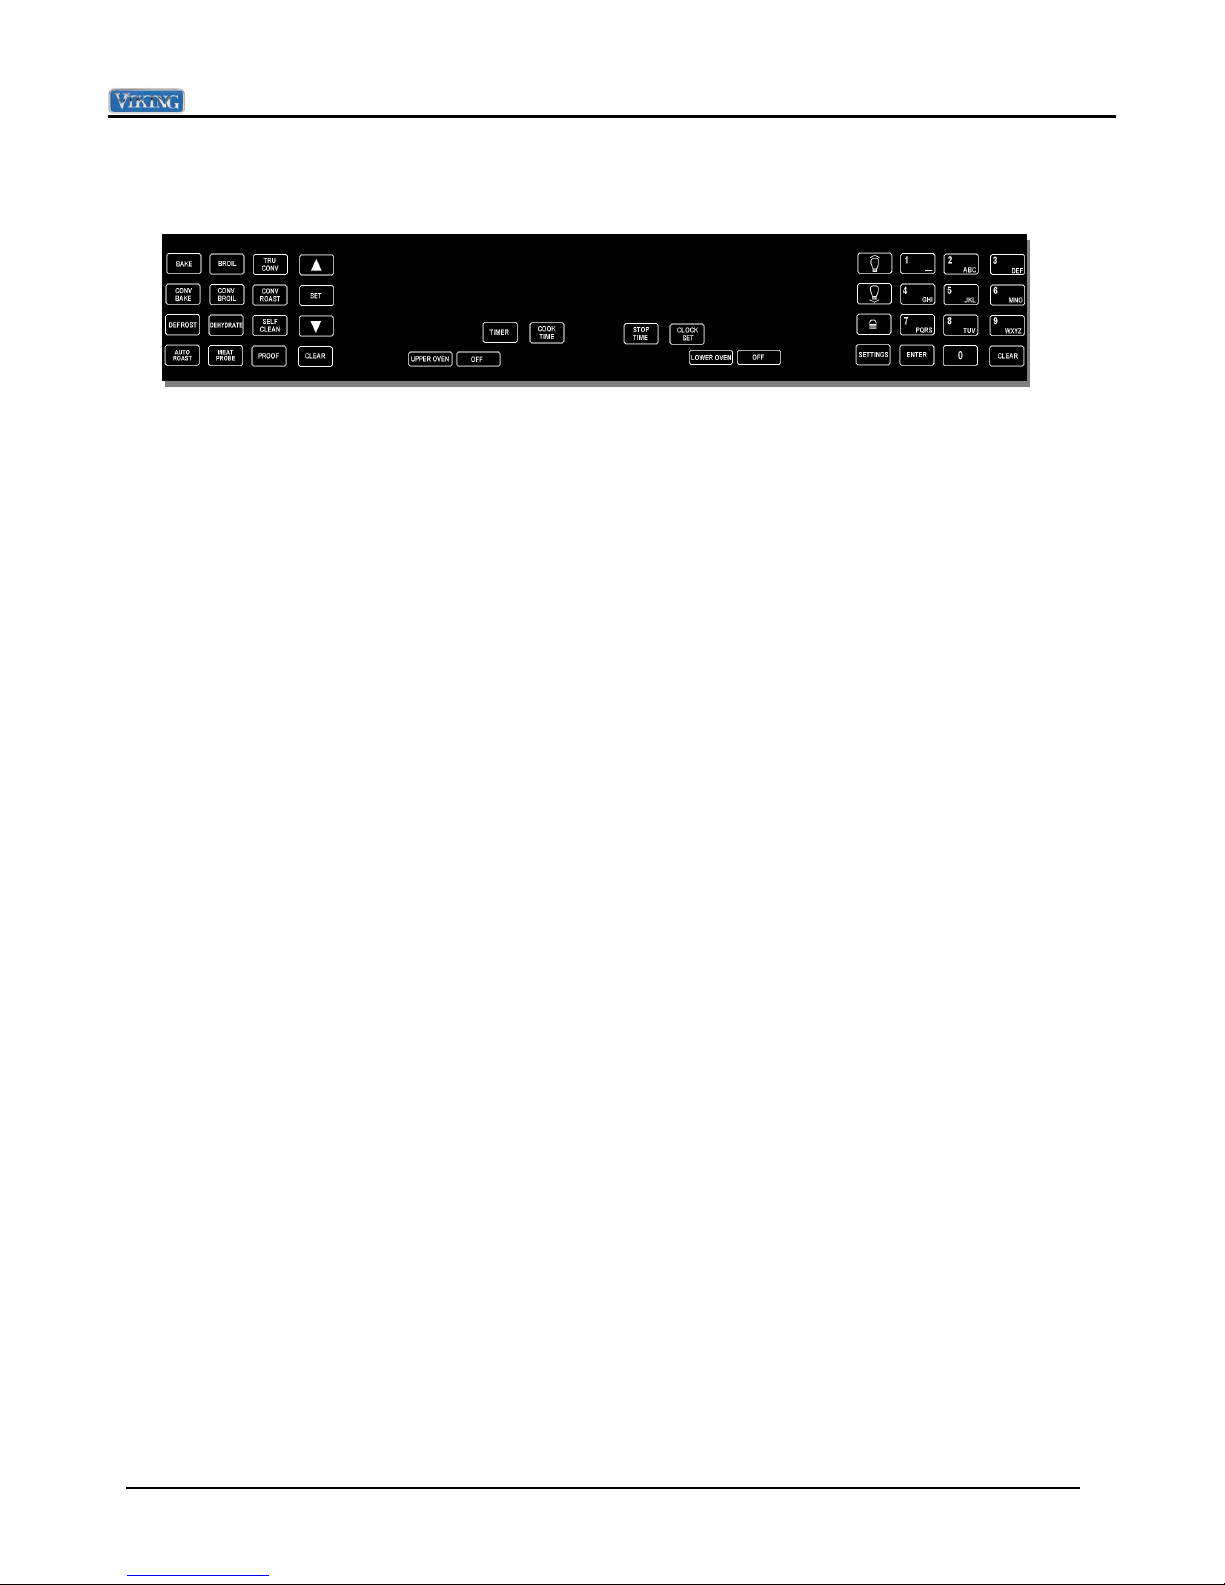
Clock Displays
When the control panel is activated on both the Premiere and Select models, there is a slight
variation in the panel readout. FIG A is the Premiere version and FIG B is the Select version.
FIG A FIG B
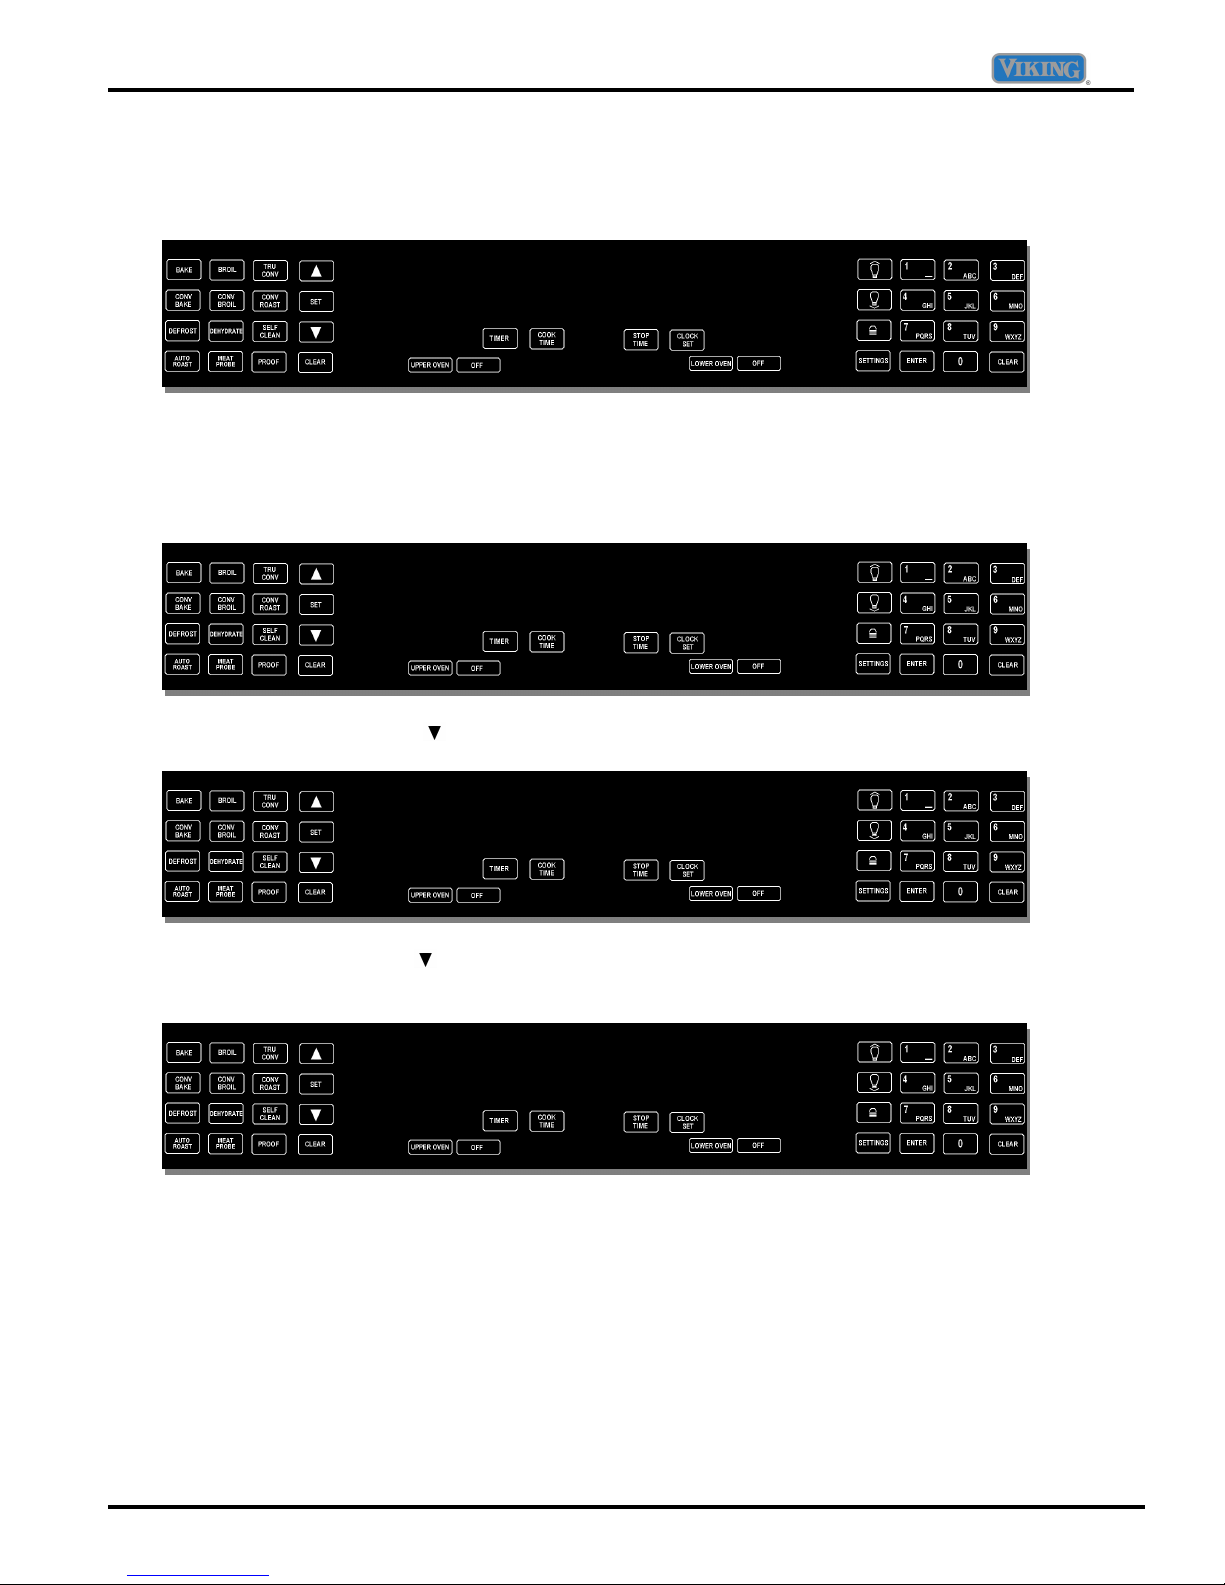
Sabbath Mode
Select model (Double oven shown)
Premiere model (Double oven shown)
© 2008 Viking Preferred Service
9

Operation
Both versions of the Touch control wall oven include a Sabbath mode function. When set to the Sabbath mode,
the oven light stays off while the heating elements and the convection fan (in selected convection modes) will
stay on whenever the door is opened.
To program:
1. Press “SETTINGS”. Settings menu will appear in the display
2. Press the down arrow until “SABBATH: NO” appears in the display
3. Press “ENTER” or “SET” and “NO” will flash in the display.
4. Use the arrow keys to choose “YES” or “NO.”
5. Press “ENTER” or “SET” again to accept your selection
6. To exit the Settings menu, press “SETTINGS” or “CLEAR”.
In order to disable the Sabbath function, following the procedures outlined above and select “SABBATH: NO”.
This will disengage the Sabbath feature.
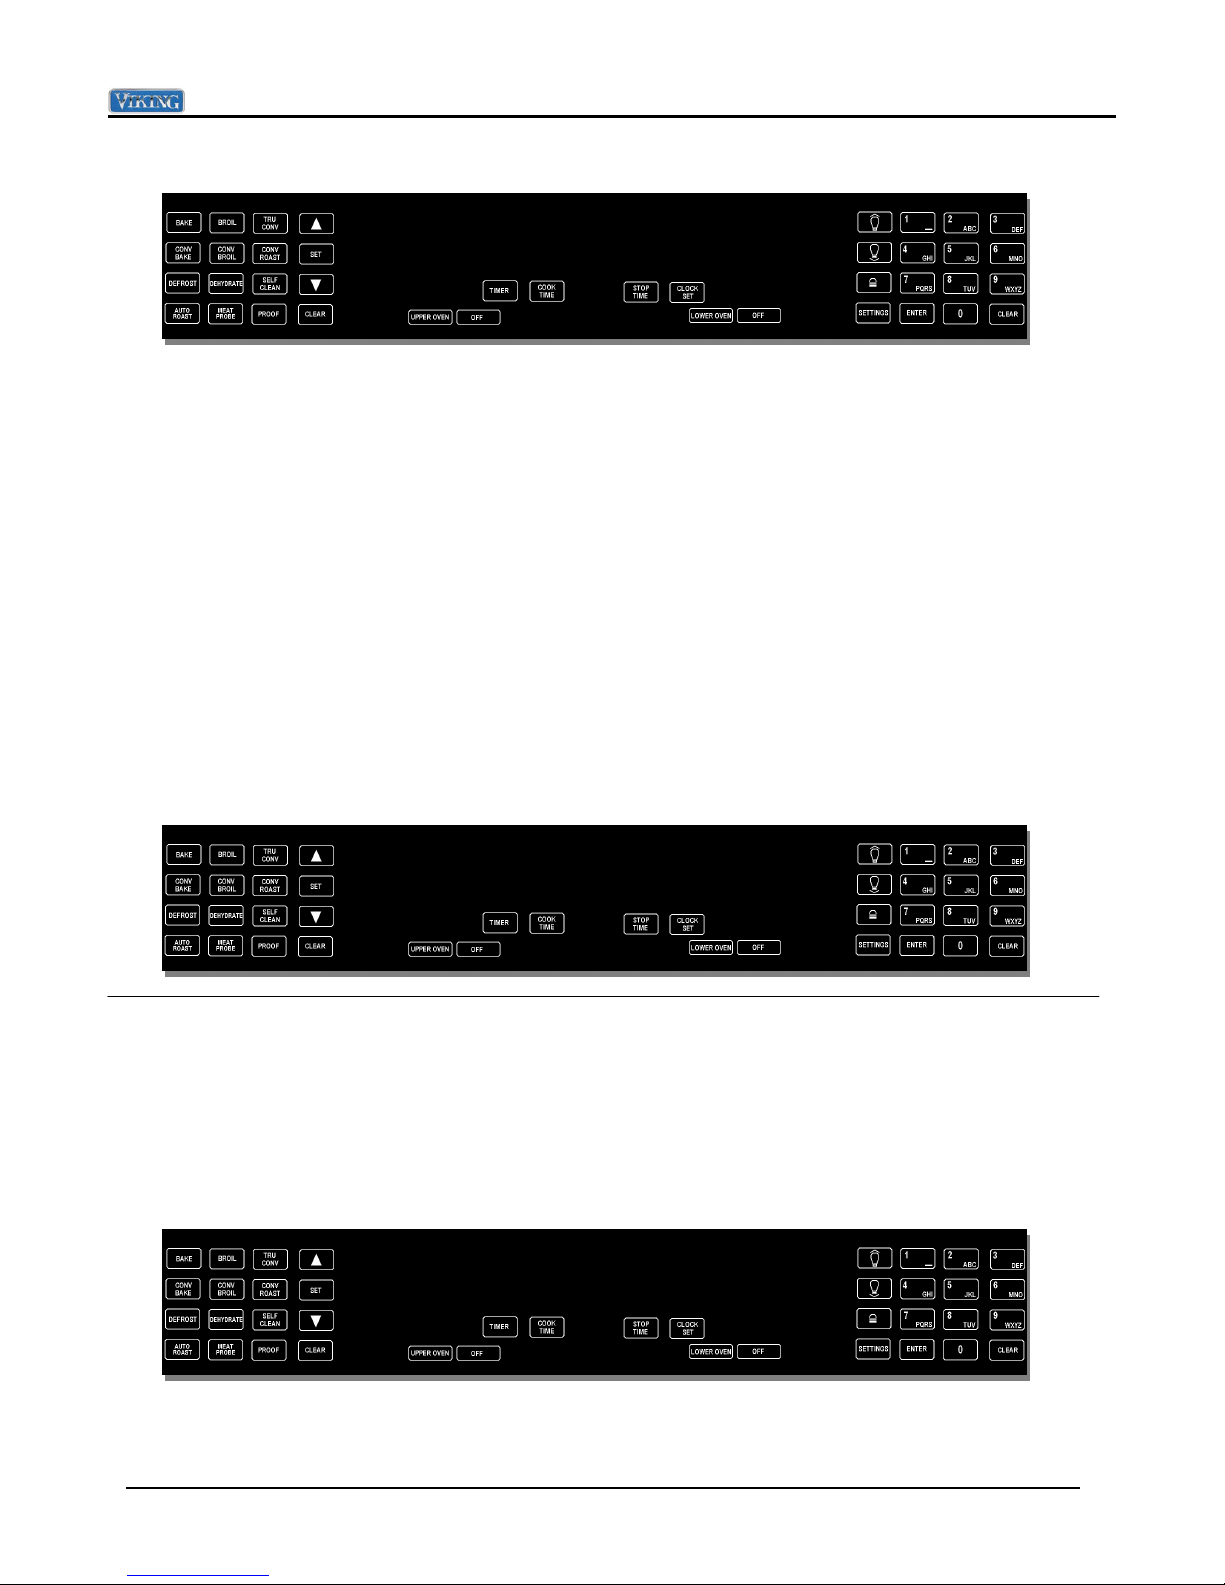
Lock and Unlock
Both versions of the Touch Control wall oven include a panel lock-out function. This way the oven cannot be
activated accidentally or by others not authorized to use the oven.
To activate panel lock:
1. Activate the control panel by either selecting the Upper or Lower oven pads
2. Press and hold the lock Key pad (
3. Hold this pad for 3 seconds until the display reads “PANEL IS LOCKED”
4. You will hear 3 short beeps. The control panel will now be locked.
To deactivate panel lock:
1. Press and hold either the UPPER or LOWER oven pads for 3 seconds.
2. You will hear 2 short beeps and the display will read “PANEL IS UNLOCKED”
) and the display will display “HOLD FOR LOCK”.
© 2008 Viking Preferred Service
10
Operation
Oven Settings and Functions
The Select and Premiere models both have the
followings cook cycles:
Bake, Broil, TruConvec™, Convection Bake,
Convection Broil, Convection Roast, Defrost,
Dehydrate and Self Clean. The Premiere model
Also features an Auto Roast and a Proof Cycle,
along with a Meat Probe feature on both the single
and double premiere models.
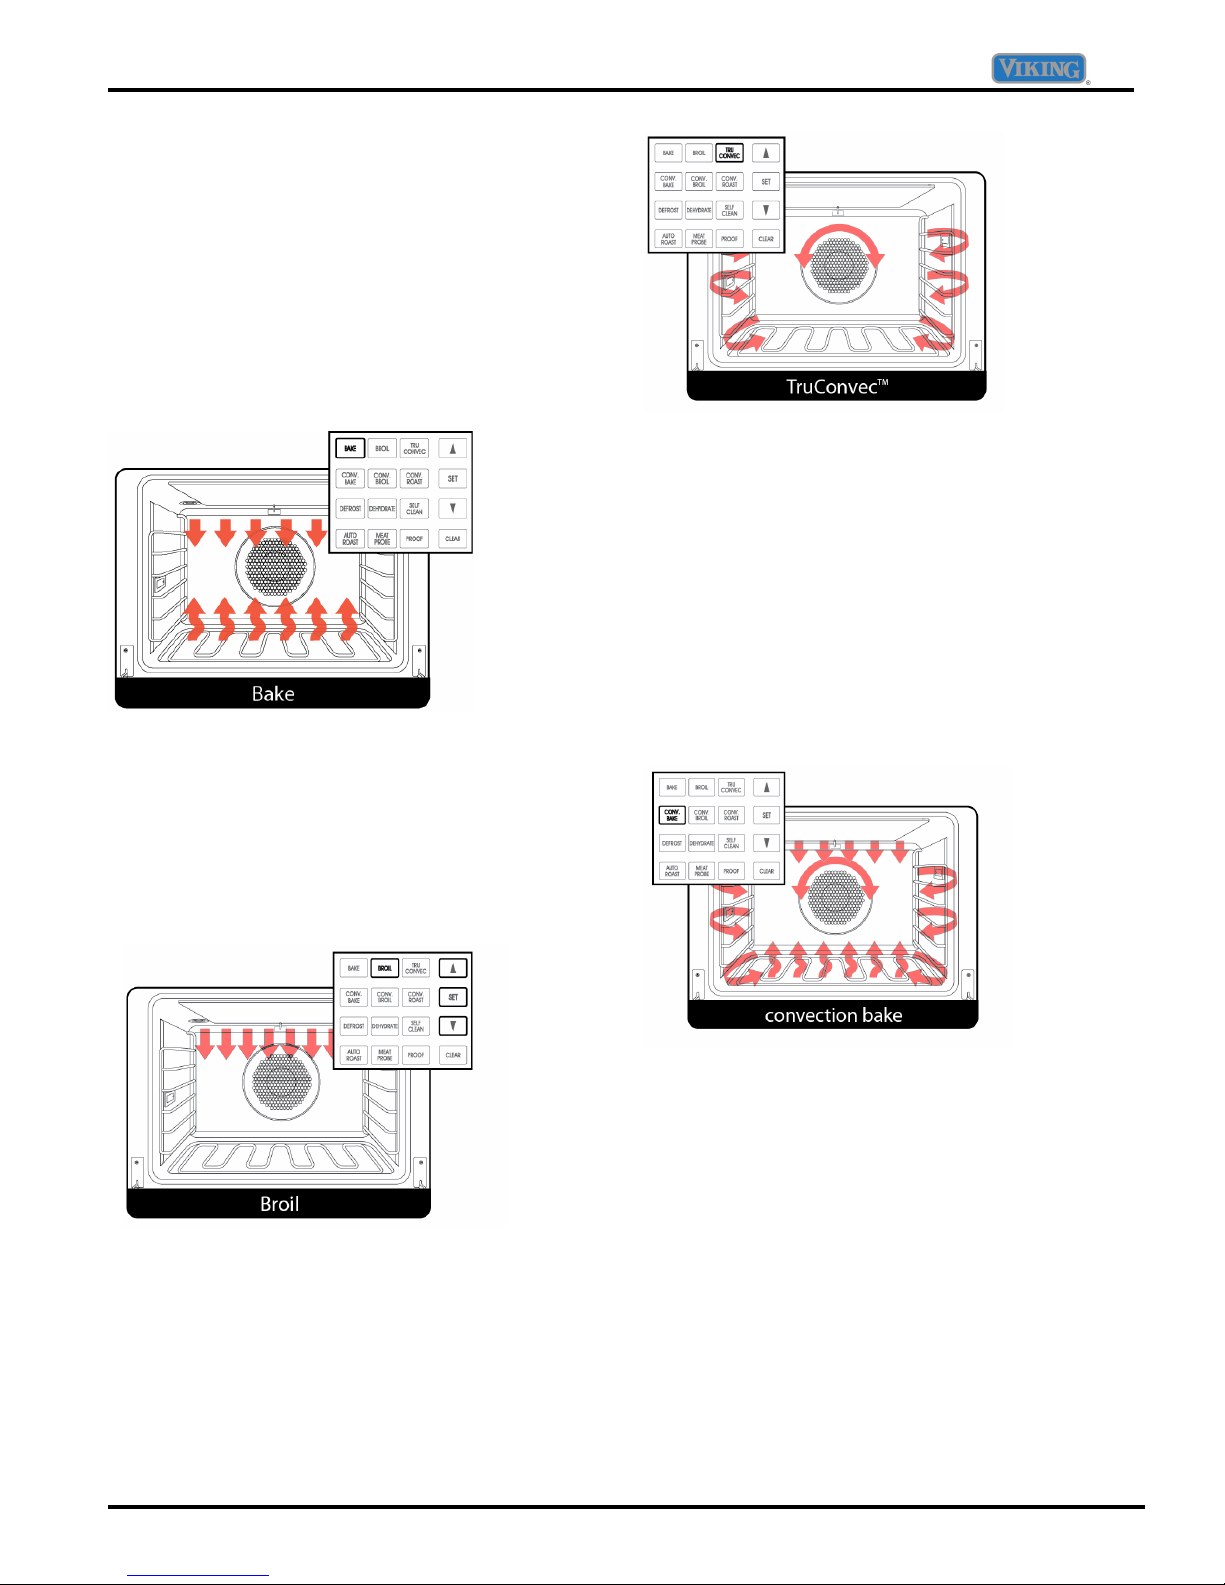
Bake
The Bake cycle utilizes both the inner and outer
concealed elements in the floor and the inner and
outer broil elements during the bake cycle. The
main control board will operate the individual relays
on the relay board to control both the preheat cycle
as well as the cook cycles. Please refer to the
operating matrix on page 30.
Broil
The Broil cycle utilizes both the inner and outer
broil elements in the oven cavity during the broil
cycle. The main control board will operate the
individual relays on the relay board to control both
the preheat cycle as well as the cook cycles.
Please refer to the operating matrix on page 31.
TruConvec™
The TruConvect ™ cycle utilizes the outer bake
element, as well the inner broil and outer broil
elements to assist the convection element during
the preheat cycle up to 250˚ F. Once this
temperature has been achieved, the oven will
operate the rear convection element only to provide
True Convection. The convection fan will run at
LOW speed and changes direction throughout the
cycle. The main control board will operate the
individual relays on the relay board to control both
the preheat cycle as well as the cook cycles.
Please refer to the operating matrix on page 31.
Convection Bake
The Convection Bake cycle utilizes the outer bake
element, the inner broil and outer broil elements
and the convection element during the preheat
cycle up to the selected temperature. Once the
desired temperature has been achieved, the oven
will operate both the inner and outer bake elements
and the rear convection element during the cook
cycle. The convection fan will run at LOW speed
and changes direction throughout the cycle. The
main control board will operate the individual relays
on the relay board to control both the preheat cycle
as well as the cook cycles. Please refer to the
operating matrix on page 32.
© 2008 Viking Preferred Service
11
Operation
Oven Settings and Functions (Cont)
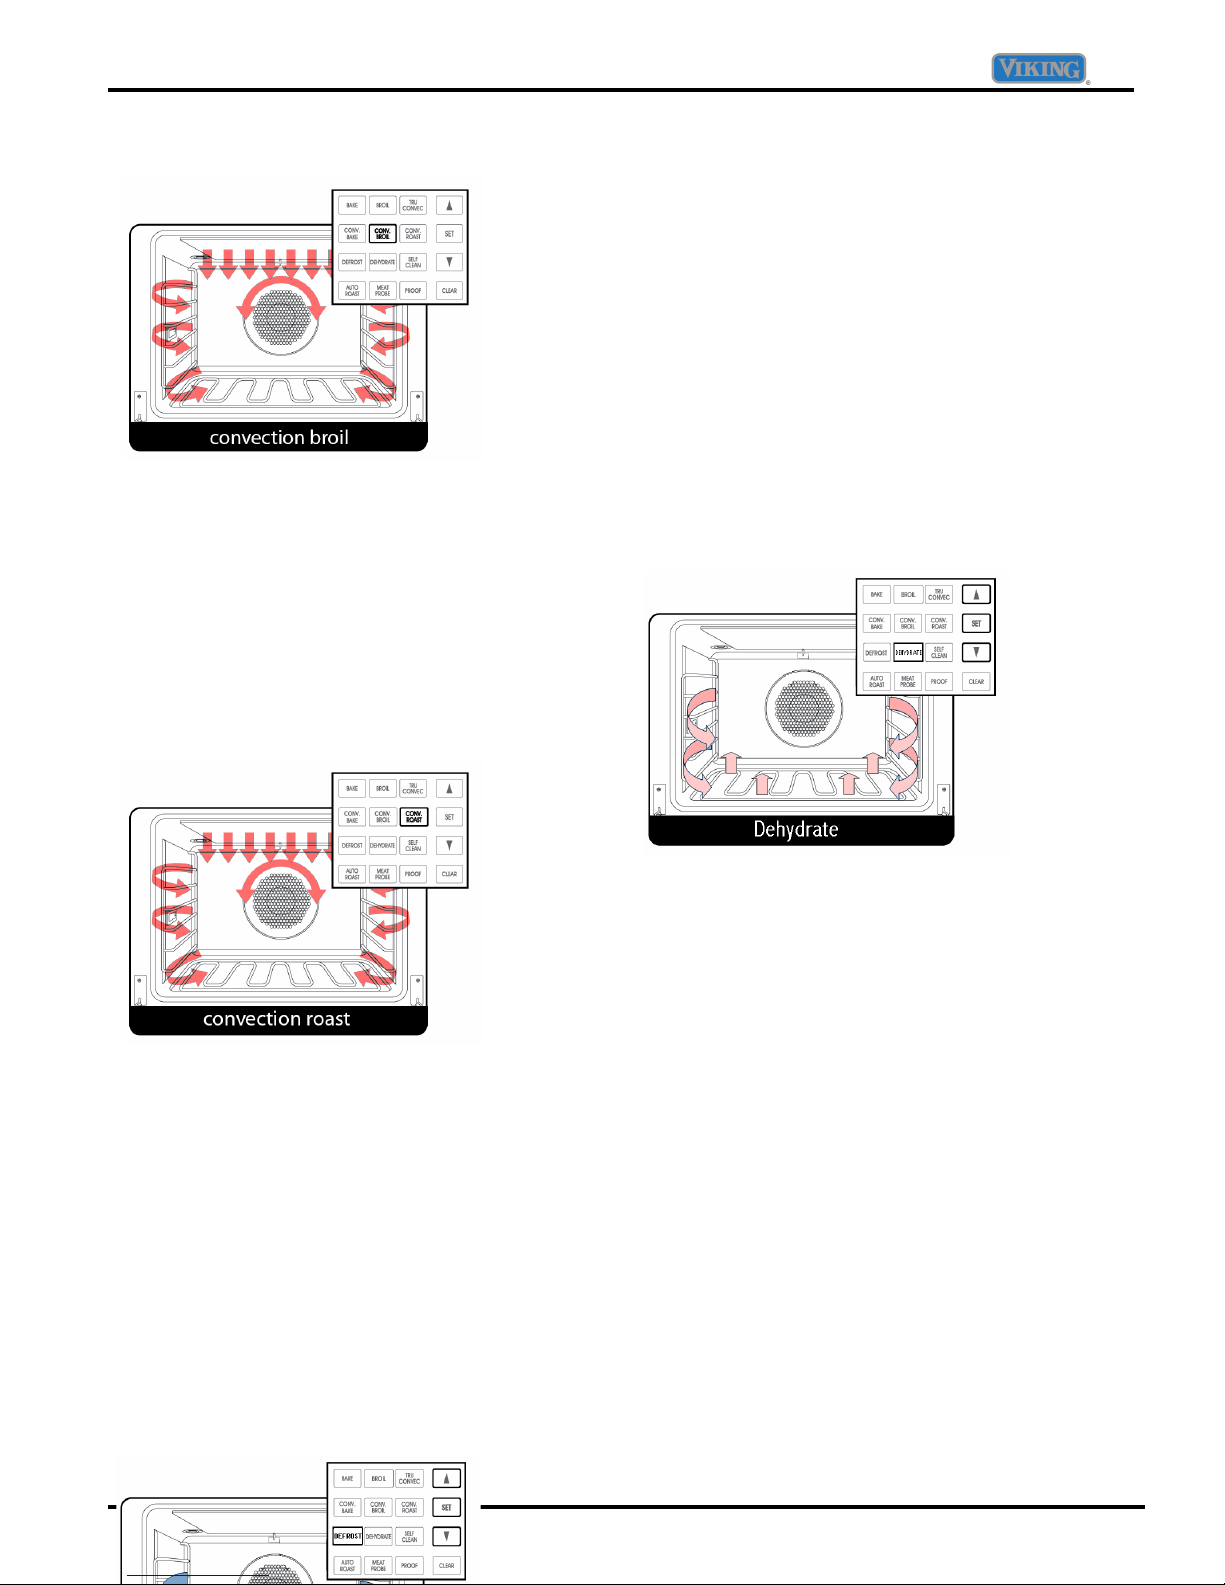
Convection Broil
The Convection Broil cycle gives you three possible
broil settings: LOW, MED and HIGH broil.
The LOW broil utilizes the inner broil element only
up to 350˚ F. The MED broil utilizes both the inner
and outer elements up to 450˚ F and the HIGH broil
uses the same two elements but heats up to 550˚
Fahrenheit. The convection fan will run at HIGH
speed and changes direction throughout the cycle.
The main control board will operate the individual
relays on the relay board to control both the
preheat cycle as well as the cook cycles. Please
refer to the operating matrix on page 32.
Convection Roast
The Convection Roast cycle utilizes the inner broil
and outer broil elements and the convection
element during the preheat cycle up to the selected
temperature. Once the desired temperature has
been achieved, the oven will operate on the rear
convection element 95% of the cook cycle and the
inner and outer broil element will operate 5% of the
time.
The convection fan will run at HIGH speed and
changes direction throughout the cycle. The main
control board will operate the individual relays on
the relay board to control both the preheat cycle as
well as the cook cycles. Please refer to the
operating matrix on page 33.
Defrost
© 2008 Viking Preferred Service
The defrost cycle does not utilize any of the heating
elements. It simple circulates the ambient air inside
the cook cavity. The convection fan will run at LOW
speed and changes direction throughout the cycle.
The main control board will operate the convection
fan relays on the relay board throughout the cycle.
Please refer to the operating matrix on page 33.
Dehydrate
The Dehydrate cycle utilizes the Inner bake
element only. It simple circulates the heated air
inside the cook cavity to a maximum temperature of
90˚ Fahrenheit. The convection fan will run at HIGH
speed and changes direction throughout the cycle.
The main control board will operate the convection
fan relays and inner bake element on the relay
board throughout the cycle. Please refer to the
operating matrix on page 33.
12
Operation
Oven Settings and Functions (Cont)
The following functions are available on the
Premiere models only
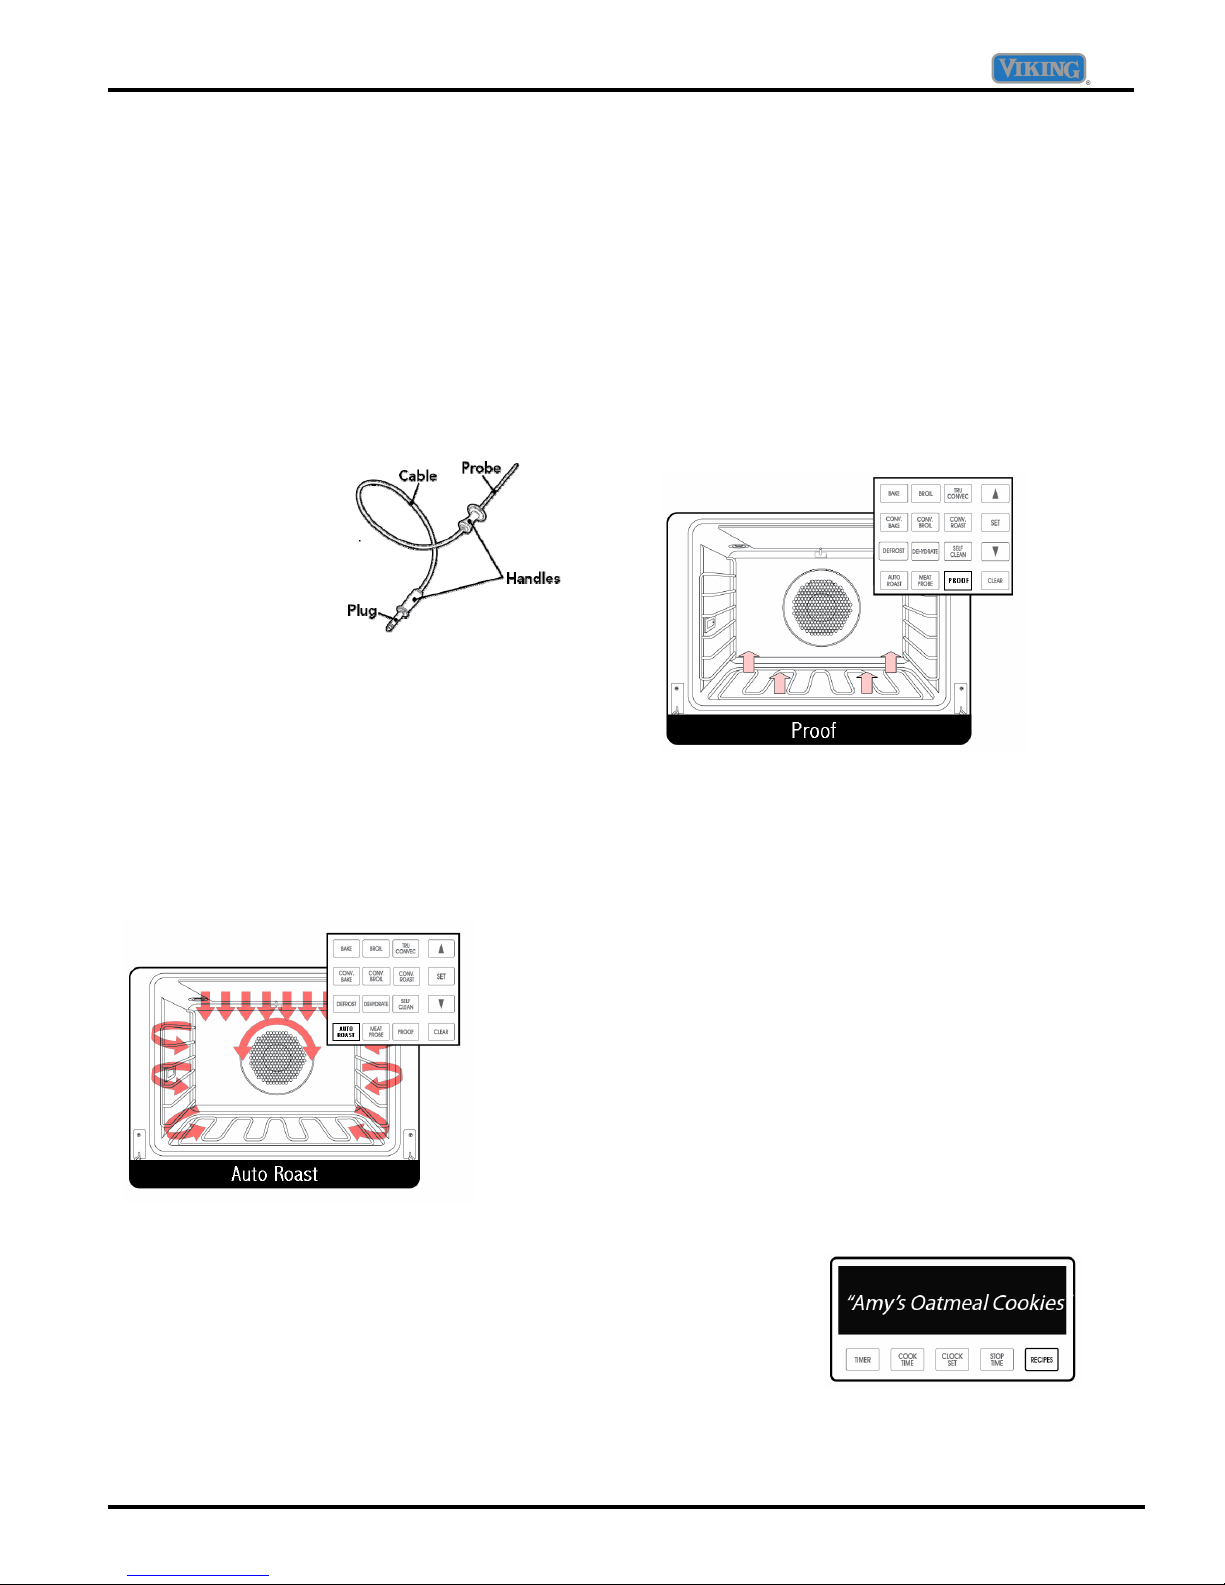
Meat Probe
The meat probe is designed to turn off the oven
when the food product reaches its optimal
temperature. The meat probe works with the
following settings: Bake, Convection Bake,
Convection Roast, TruConvec™ and Convection
broil. In the Premiere double ovens it is available in
the top oven only!
Insert the probe into
the socket on the left
side wall. Depress the
MEAT PROBE button
on the left control panel.
The display will show
“Set Probe” and flashing a preset temperature.
If the preset temperature is not adjusted within 10
seconds, the unit will begin heating. The adjustable
temperature range is between 120˚ F and 190˚ F.
Use the keypad to select a desired temperature
then select “SET”. The unit will begin to heat and
the display will show “LO” until the internal
temperature of the food reaches 100˚ F.
When the temperature is within 10˚ of set
temperature, two long beeps will sound. When the
setpoint temperature has been reached, three long
beeps will sound.
Auto Roast
The Auto Roast cycle is similar to the Convection
Roast cycle in all functions with the exception of a
SEARING cycle added to the program. The Auto
Roast cycle utilizes the inner broil and outer broil
elements and the convection element during the
preheat cycle up to the selected temperature.
© 2008 Viking Preferred Service
Once the desired temperature has been achieved,
the oven will operate on the rear convection
element 95% during the cook cycle and a 5% cycle
of the inner and outer broil element. During the
SEARING cycle, the inner and outer broil elements
are the only elements in operation and are on for
45 seconds of each 60 second cycle.
The convection fan will run at HIGH speed and
changes direction throughout the cycle. The main
control board will operate the individual relays on
the relay board to control both the preheat cycle as
well as the cook cycles. Please refer to the
operating matrix on page 34.
Proof
The Proof cycle is similar to the Dehydrate cycle
with the exception that the convection fan is not
operated during the Proof cycle. The Proof cycle
utilizes the Inner bake element only. The radiant
heat rises from the floor of the oven cavity
circulates the heated air inside the cook cavity to a
maximum temperature of 90˚ Fahrenheit.
The main control board will operate the individual
relays on the relay board to control both the
preheat cycle as well as the cook cycles. Please
refer to the operating matrix on page 33.
Recipe Function
The Premiere model also has the ability to program
and store up to 100 of your recipes. Recipes names
are entered on the numeric keypad on the right side
of the keyboard. Please refer to the Use and Care
manual for further information on this function.
Error Screens
The T Series oven will display any errors detected
by the microprocessor. There are 8 built in error
codes. When activated, the oven will NOT function.
13
Diagnostics
1. MODEL ERROR
An incorrect model number has been installed.
MODEL ERROR
12:10 PM
2. RTD ERROR
12:10 PM
RTD ERROR
An RTD is open or shorted.
3. PROBE ERROR
PROBE ERROR
12:10 PM
The meat probe is open or shorted.
4. LATCH ERROR
12:10 PM
LATCH ERROR
The control is unable to lock or unlock
the door latch.
5. KEYBOARD ERROR
KEYBOARD ERROR
12:10 PM
© 2008 Viking Preferred Service
No connection exists between the keyboard
and the control.
6. HIGH LIMIT ERROR
12:10 PM
HIGH LIMIT ERROR
High Limit switch has tripped.
7. COOLING ERROR
12:10 PM
COOLING ERROR
The cooling fan RPM is below minimum speed
8. RELAY ERROR
RELAY ERROR
12:10 PM
No relay board connection
14
Diagnostics
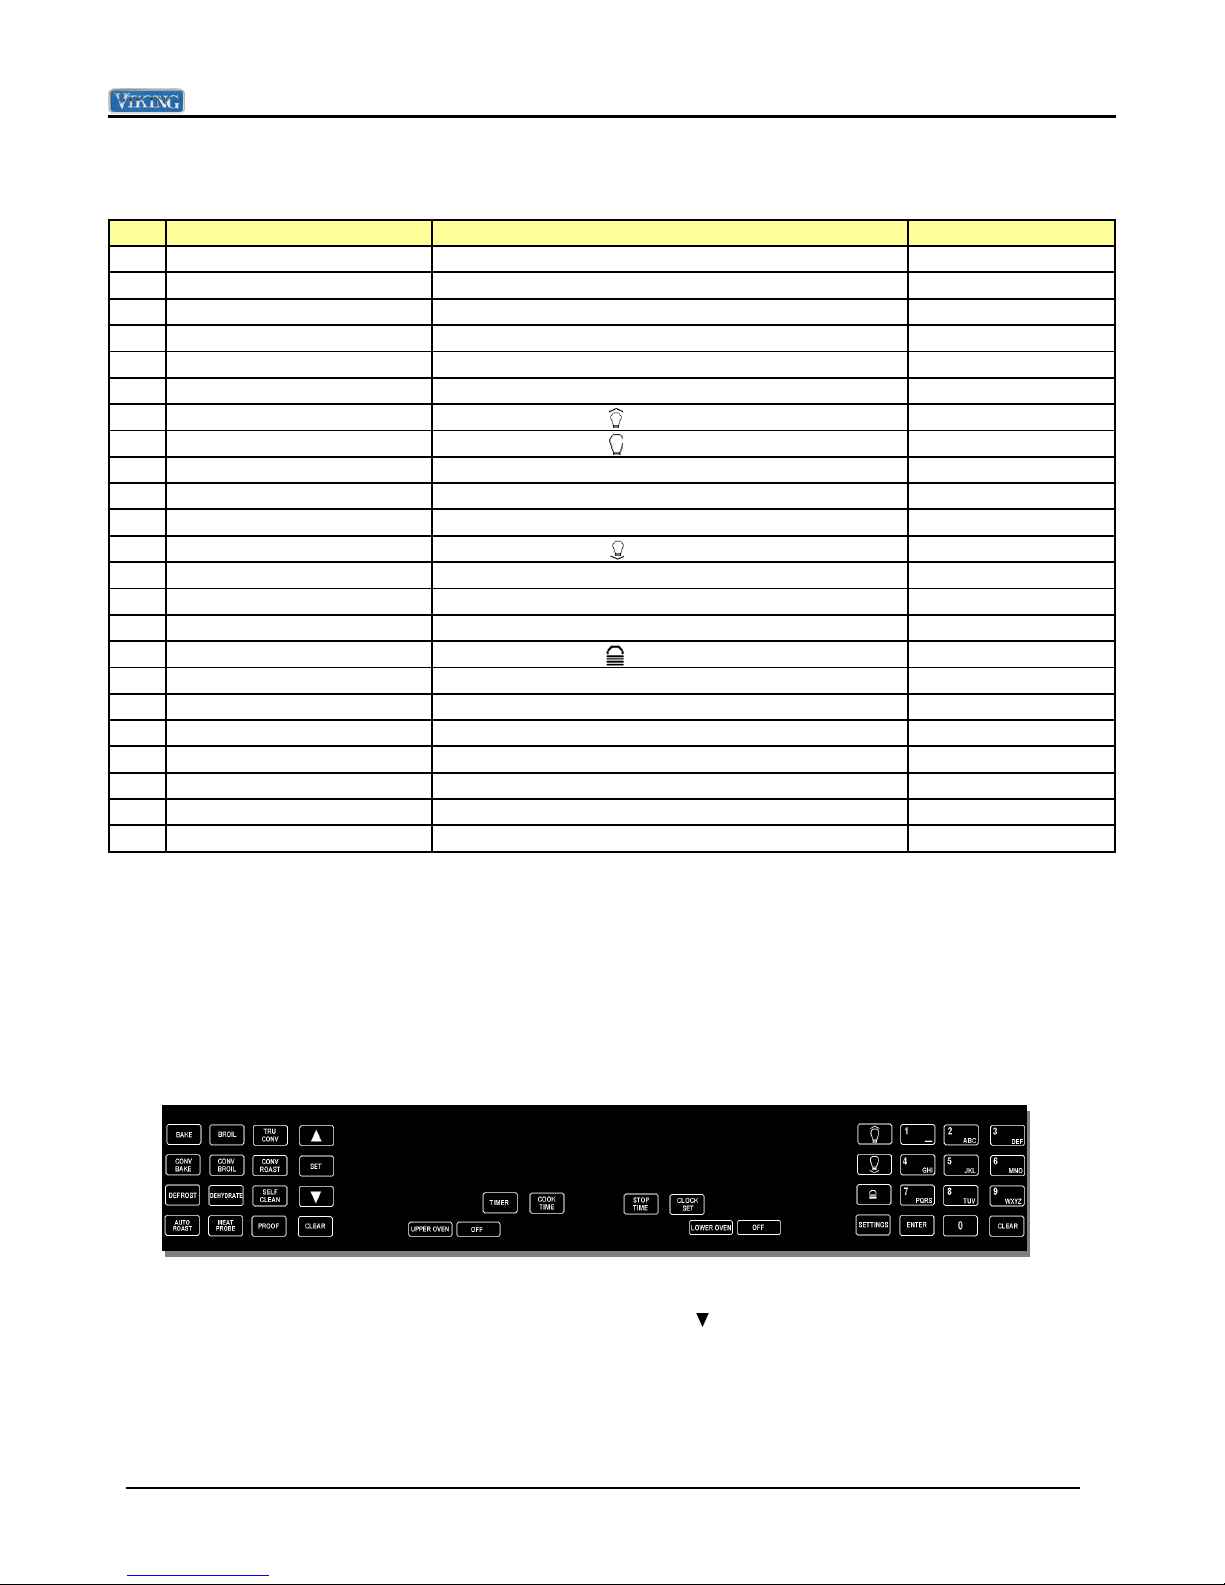
Accessing the diagnostic program
1. Activate the main control panel by selecting either the Upper or Lower oven touch pad. Below
is the screen you will see when the Upper oven is selected.
UPPER OVEN
12:02
SELECT MODE
CLOCK
2. Depress the “SETTINGS button on the control panel. You will see he word
“SETTINGS” in the upper left corner of the screen and the Brightness parameter
SETTINGS
BRIGHTNESS: 100 %
3. Using the DOWN arrow (
), scroll down until you see “TIMEOUTS… in the display.
SETTINGS
TIMEOUTS · · ·
4. Touch the Down arrow (
) for 5 seconds (you will here 3 tones) until the display changes
from “Timeouts…” to “TESTS…”
SETTINGS
TESTS · · ·
5. Now, depress the “ENTER” key. The word TESTS will begin to flash. While flashing, enter
in the following code: 8 – 4 – 5 – 4 – 6 – 4 (V-I-K-I-N-G). When you have successfully
entered in the code, the display will change and read “RUN ALL TESTS”. You are now in
the diagnostic mode.
© 2008 Viking Preferred Service
15
Diagnostics
Running the diagnostic programs
SETTINGS: TESTS
Run all Tests
When you have entered the diagnostic mode, you will be able to run the following nine main test
programs:
1. Run all tests
2. Product Information
3. Individual display tests
4. Individual upper oven tests
5. Individual lower oven tests
6. Individual keyboard tests
7. Run all upper oven tests
8. Run all lower oven tests
9. Run all keyboard test
1. Run all test
This test will allow you to check the entire oven, including all the components, display elements and
keyboard test. Hit “SET” button to run this test. Please turn to page 20 for the test procedure.
Use the Down arrow to access the next test (Product Information)
SETTINGS: TESTS
Run all Tests
2. Product Information
This test will allow you to view the information page, which contains the software version and
microprocessor serial number. Hit the “SET” button to view this information. Please turn to
page 22 for the test procedure.
Use the Down arrow to access the next test (Individual display test) or the UP arrow to access the
previous test (Run all tests).
SETTINGS: TESTS
Product information
© 2008 Viking Preferred Service
16
Diagnostics
3. Individual display tests
This test will allow you to check the display LED. Hit the “SET” button to test the display. Please turn
to page 23 for the test procedure.
Use the Down arrow to access the next test (Individual upper oven test) or the UP arrow to access
the previous test (Product Information).
SETTINGS: TESTS
Individual display tests
4. Individual upper oven tests
This test will allow you to access and test all the upper oven components, including all the elements,
cooling fan and speeds (Select models), convection fan, speeds (Select models) and direction, RTD,
Meat probe (Select models), door switch, oven lights, door lock and door lock position switches. Hit
the “SET” button to test these individual components. Please turn to page 24 for the test procedure.
Use the Down arrow to access the next test (Individual lower oven test) or the UP arrow to access the
previous test (Individual display).
SETTINGS: TESTS
Individual upper oven tests
5. Individual lower oven tests
This test will allow you to access and test all the lower oven components, including all the elements,
cooling fan and speeds (Select models), convection fan, speeds and direction (Select models), RTD,
Meat probe (Select models), door switch, oven lights, door lock and door lock position switches. Hit
the “SET” button to test these individual components. Please turn to page 25 for the test procedure.
Use the Down arrow to access the next test (Individual keyboard tests) or the UP arrow to access the
previous test (Individual upper oven tests).
SETTINGS: TESTS
Individual lower oven tests
6. Individual keyboard tests
© 2008 Viking Preferred Service
17
Diagnostics
This test will allow you to check a specific touch sensor pad on the control panel. There are 40 pads
in total, depending on your model. Hit the “SET” button to begin this test. Please turn to page 26
for the test procedure.
Use the Down arrow to access the next test (Run all upper oven tests) or the UP arrow to access the
previous test (Individual lower oven tests).
SETTINGS: TESTS
Individual keyboard tests
7. Run all upper oven tests
This test will check all the upper oven components in succession. Hit the “SET” button to begin this
test. Please turn to page 27 for the test procedure.
Use the Down arrow to access the next test (Run all lower oven tests) or the UP arrow to access the
previous test (Individual keyboard tests).
SETTINGS: TESTS
Run all upper oven tests
8. Run all lower oven tests
This test will check all the lower oven components in succession. Hit the “SET” button to begin this
test. Please turn to page 28 for the test procedure.
Use the Down arrow to access the next test (Run all keyboard tests) or the UP arrow to access the
previous test (Run all upper oven tests).
SETTINGS: TESTS
Run all lower oven tests
9. Run all keyboard tests
© 2008 Viking Preferred Service
18
Diagnostics
This test will allow check the entire touch sensor pad on the control panel. There are 40 pads in total.
Hit the “SET” button to begin this test. Please turn to page 29 for the test procedure.
Use the UP arrow to access the previous test (Run all lower oven tests).
SETTINGS: TESTS
Run all keyboard tests
© 2008 Viking Preferred Service
19

Diagnostics
TEST CATEGORIES
1. Run all tests
When you have selected this test, the first screen you will see will be the one below.
This test will cycle the entire upper and lower (Double oven model) elements, fans, lights, door
interlock switches and door lock motors. It will also test all the individual touch pads on the control
panel. To begin the test, select either the SET or ENTER key. Once the test has begun, use the
ENTER key, UP arrow ( ) or Down arrow (
the CLEAR key.
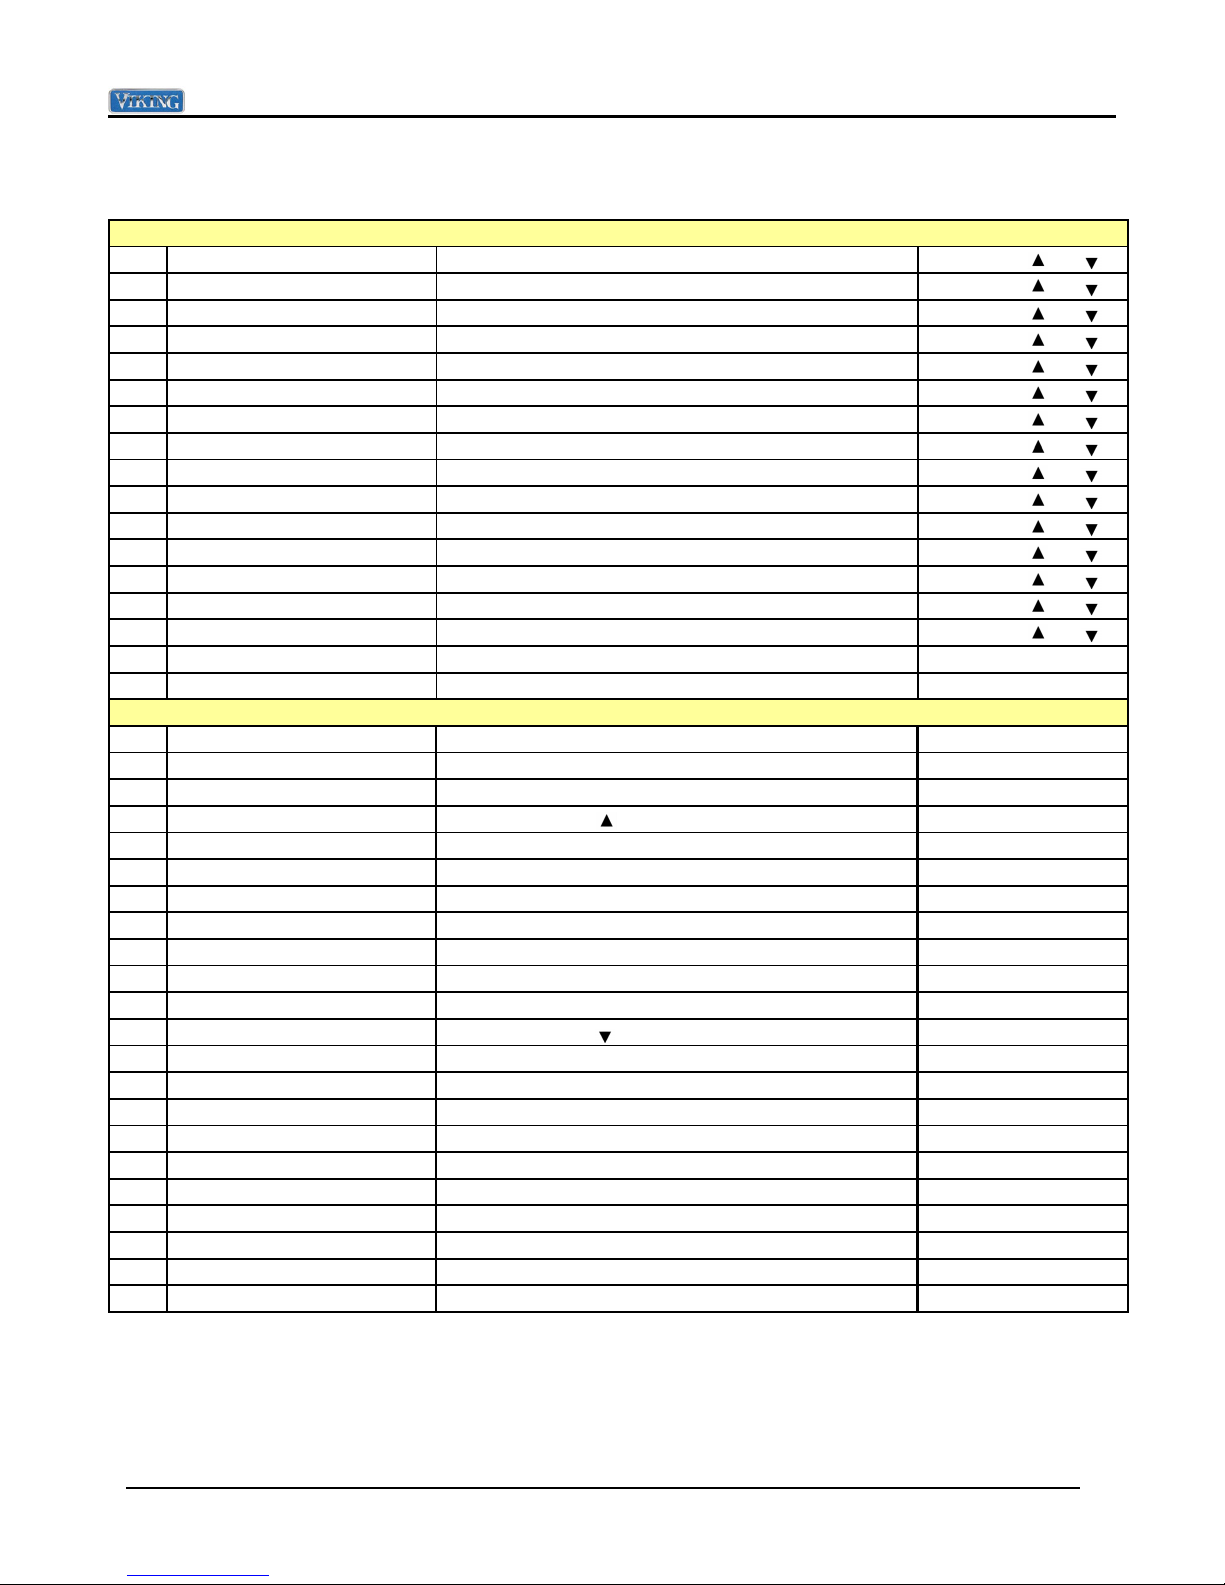
STEP TEST RESU LT TO CH A N GE TEST
1 Product information Display will show model, serial and version number of t he software ENTER, or
2 Display all dots and segments All digits in the display will light up ENTER, or
3 Clear screen All d igits in t he display will ext inguish ENTER, or
4 Upper Inner bake element Run inner bake element ENTER, or
5 Upper Out er b ake element Run out er bake element ENTER, or
6 Up per Inner bro il element Run inner broil element ENTER, or
7 Up per Out er broil element Run outer b roil element ENTER, or
8 Upp er Convection element Run convection element ENTER, o r
9 Upp er Oven Temperature Display upper oven temp ENTER, o r
10 Upper Meat probe
11 Up per Cooling Fan - High Speed Run cooling fan at HIGH speed ENTER, or
12 Upper Cooling Fan - Low Speed Run cooli ng fan at Low speed ENTER, or
13 Upper Convection Fan - High speed Run convection fan at HIGH speed ENTER, or
14 Up per Convectio n Fan - Low speed Run convection fan at LOW speed ENTER, o r
15 Upper Conv Fan - Low Speed reverse Run cooling fan at Low speed reverse ENTER, or
16 Upp er Conv Fan - High Speed reverse Run cooling fan at HIGH speed reverse ENTER, or
17 Upper Door Switch Check door int erlock ENTER, or
18 Upper Oven lights Check upper cavity lights ENTER, or
19 Upp er Doo r Lock Door lock moto r is advanced Door must lo ck to advance
20 Upper Door Unlock Engage door lock to UNLOCK door Door must unlock t o advance
* On Premiere models only!
Continued on page 21
SETTINGS: TESTS
Run all Tests
) key to cycle through the tests. To end the test, select
Display meat probe temp
*
ENTER, or
© 2008 Viking Preferred Service
20
Diagnostics
Run all tests (Continued)
LO W ER O VEN
21 Lower Inner bake element Run inner bake element ENTER, or
22 Lower Out er bake element Run outer bake element ENTER, or
23 Lower Inner b roil element Run i nner broil element ENTER, or
24 Lower O uter bro il element Run outer broil element ENTER, or
25 Lower Convectio n element Run convection element ENTER, or
26 Lower O ven Temperatur e Display upp er oven t emp ENTER, or
Display meat probe temp
27 Lower Meat probe
28 Lower Cooling Fan - High Speed Run cooling fan at HIGH speed ENTER, or
29 Lower Cooling Fan - Low Speed Run cooling fan at Low speed ENTER, or
30 Lower Convection Fan - High speed
31 Lower Convection Fan - Low speed
32 Lower Conv Fan - Low Speed reverse
33 Lower Conv Fan - High Speed reverse
34 Lower Door Switch Check door int erlock ENTER, or
35 Lower Oven light s Check upper cavity lights ENTER, or
36 Lower Door Lock Door lock motor is advanced D oor must lock t o advance
37 Lower Door Unlock Engage door lock to UNLOCK door Door must unlock t o advance
*
Run convectio n fan at HIGH speed
*
Run convectio n fan at LOW speed
*
Run convectio n fan at Low speed reverse
*
Run convectio n fan at HIGH speed reverse
*
KEYBOARD TEST NOTES
38 Press the BAKE key Pressing the Bake key will advance to next test All mo dels
39 Press the BROIL key Pressing the Broil key will advance to next test All models
40 Press the TRU CONVEC key Pressing the Tru Convec key will advance to next t est All mod els
41 Press the UP key Pressing t he key will advance to t he next test All models
42 Press the CON V BAKE key Pressing the Conv Bake key will advance to next t est All models
43 Press the CONV BRO IL key Pressing the Conv Broil key will advance to next t est All mod els
44 Press the CON V ROAST key Pressing t he Conv Roast key will advance to next test A ll models
45 Press the SET key Pressing the SET key will advance to next t est All models
46 Press t he DEFROST key Pressing the Defrost key will advance to next test All models
47 Press the DEHRDRATE key Pressing the Dehydrate key will advance to next test All models
48 Press the SELF CLEAN key Pressing the Self Clean key will advance to next test All models
49 Press the DO WN key Pressing t he key will advance to t he next test All models
50 Press the AUTO ROAST key Pressing the Auto Roast key will advance to next test PREM IERE MO DELS
51 Pree the M EAT PROBE key Pressing the M eat Prob e key will advance to next test PREM IERE M OD ELS
52 Pree the PROO F key Pressing the Proof key will advance to next test PREMIERE M OD ELS
53 Press the CLEAR key Pressing the Clear key will advance to next test All models
54 Press the TIMER key Pressing the Timer key will advance to next test All models
55 Press the COO K TIME key Pressing the Cook Time key will advance to next test All mod els
56 Press the CLOCK key Pressing the Clo ck key will advance to next t est PREM IERE MO DELS
57 Press the STOP TIME key Pressing the Stop Time key will advance to next test All models
58 Press the RECIPES key Pressing the Recipes key will advance to next test PREMIERE M OD ELS
59 Press the CLOCK key Pressing the Clo ck key will advance to next t est SELE CT M O D EL S
* On Premiere models only!
Continued on page 22
© 2008 Viking Preferred Service
ENTER, or
ENTER, or
ENTER, or
ENTER, or
ENTER, or
21
Diagnostics
Run all tests (Continued)
KEYBOARD - CONTIN UED
60 Press the UPPER OVEN key Pressing the Upper Oven key will advance to next test DOUBLE OVEN MODEL
61 Press the OFF key Pressing t he Off key will advance to next test DOUBLE OVEN MODEL
62 Press the O VEN ON key Pressing t he Oven On key will advance to next t est SI N GL E O VEN M O D EL
63 Press the O VEN OFF key Pressing t he Oven Off key will ad vance to next t est SIN G LE O VEN MO D EL
64 Press the LOWER OVEN key Pressing the Lower Oven key will advance to next test DOUBLE OVEN MODEL
65 Press the OFF key Pressing t he Off key will advance to next test DOUBLE OVEN MODEL
66 Pr ess t he UPPER LIGHTS k ey Pressi ng th e ke y w i ll a d vance t o nex t t est DOUBLE OVEN MODEL
67 Press the LIGHTS key Pressing the key will advance to next test SIN G LE O VEN MO D EL
68 Press the 1 key Press the 1 key will advance to next t est All mo dels
69 Press the 2 key Press the 2 key will advance to next t est All mo dels
70 Press the 3 key Press the 3 key will advance to next t est All mo dels
71 Press the LOWER LIGHTS key Pressing t he key will ad vance to next t est DOUBLE OVEN MODEL
72 Press the 4 key Press the 4 key will advance to next t est All mo dels
73 Press the 5 key Press the 5 key will advance to next t est All mo dels
74 Press the 6 key Press the 6 key will advance to next t est All mo dels
75 Press the LOCK Pressing the key will advance to next test All models
76 Press the 7 key Press the 7 key will advance to next t est All mo dels
77 Press the 8 key Press the 8 key will advance to next t est All mo dels
78 Press the 9 key Press the 9 key will advance to next t est All mo dels
79 Press the SETTINGS key Press the Settings key will advance to next test All models
80 Press the ENTER key Press the Enter key will advance to next test All models
81 Press the 0 key Press the 0 key will advance to next t est All mo dels
82 Press the CLEAR key Press the Clear key will advance to END All models
2. Product Information
When you have selected this test, the first screen you will see will be the one below.
Model = 4 Version = 36 S/N = 859014568
Press the Enter key to go to the next test
In this screen you will see the model, version and serial number of the microprocessor.
To exit this test, select the ENTER, CLEAR or Down arrow (
© 2008 Viking Preferred Service
) key.
22
 Loading...