

Page 1

VIISAN OfficeCam
USER MANUAL
Windows Edition v1.8
COPYRIGHT © BEIJING VIISAN TECHNOLOGY CO., LTD. ALL RIGHTS RESERVED. WWW.VIISAN.COM
Page 2

Index
Copyright ......................................................................................................................................... 2
Trademarks ..................................................................................................................................... 2
Disclaimer ....................................................................................................................................... 2
Introduction ..................................................................................................................................... 3
System Requirements ................................................................................................................... 4
Installing the Software ................................................................................................................... 5
Getting Started ............................................................................................................................... 6
Main Window .......................................................................................................................... 6
Control Panel .......................................................................................................................... 8
Photo Mode Settings ........................................................................................................... 17
Scanning Using Photo Mode ..................................................................................................... 18
Apply Video Filters ............................................................................................................... 18
Enter to Full Screen Mode .................................................................................................. 19
Document Mode Settings ................................................................................................... 20
Scanning Using Document Mode .............................................................................................. 22
Manual Cropping ......................................................................................................................... 24
Scanning by Using Book mode ................................................................................................. 25
The Scan Settings of Book Mode ...................................................................................... 28
The Special Feature of Book Scan Mode ................................................................................ 30
Finger Removal Function ................................................................................................... 30
Auto Scan Function ............................................................................................................. 35
Setting Front and Back Cover Images .............................................................................. 36
Usage Example ............................................................................................................................ 37
How to Take a Nice Snapshot? .......................................................................................... 37
How to Scan a Color Document Well? ............................................................................. 38
Scanning a document and saving it as a PDF file .......................................................... 39
Scanning a Multi-Page Document into a PDF file ........................................................... 40
Using the Crop Feature to Scan Multiple Images at the Same Time ........................... 42
Scanning a High-Quality Image of a Business Card ...................................................... 43
Scanning a Multi-Page Document into a Word File ........................................................ 44
How to scan barcodes and save the result in an EXCEL file? ...................................... 45
How to scan QR barcode and open URL? ....................................................................... 46
Combining Multiple Image Files into One PDF File ........................................................ 47
Comparing Multiple Image Files in One Window ............................................................ 48
How to use Visualizer feature in the classroom? ............................................................ 49
How to convert batch documents with the embedded OCR function? ........................ 50
How to generate MP3 or WAV (Text to speech) audio files? ......................................... 51
The Text to speech function is only available for specific models. ............................... 52
Adding a Watermark in Scanned Document File ............................................................ 55
Configuring the PDF Settings ............................................................................................ 56
Supported OCR Languages ....................................................................................................... 57
FAQs (Freq uently Asked Questions) ........................................................................................ 59
1
Page 3

Copyright
All rights reserved by Beijing VIISAN Technology Co., Ltd. No part of the materials shall
be reproduced in any form or by any means without prior written permission.
Trademarks
Windows is a registered trademark of Microsoft Corporation in the United States and other
countries. All other products mentioned in this document are trademarks or registered
trademarks of their respective owners.
Disclaimer
• The screenshots in this user's manual were made with Windows 10. If you are
using other Windows system, your screen will look somewhat different but still
function the same.
• Specifications of this software and contents of this user manual are subject to
change without notice. Any modification, error correction, or feature updates made
in the actual software may have not been timely updated in this user manual. User
may refer to the actual software itself for more accurate detail. Any misprints,
translation errors, or inconsistencies with existing software, will be updated as soon
as possible.
Disposal of Waste Equipment by Users in Private
Households in the European Union
This symbol on the product or on its packaging indicates that this product must not be
disposed of with your other household waste. Instead, it is your responsibility to dispose of
your waste equipment by handing it over to a designated collection point for the recycling
of waste electrical and electronic equipment.
2
Page 4

Introduction
VIISAN OfficeCam is a robust scanning solution engineered specifically for VIISAN document
camera scanners. It offers rapid and efficient scanning of various document types, ranging from
business cards to books, converting them into high-quality image formats. The software
supports multiple functionalities, including photo and document scanning, book digitization,
barcode recognition, and video recording. With the integrated OCR (Optical Character
Recognition) feature, scanned images can be effortlessly converted into searchable PDF files
or editable Word, Excel, ePub, and Text formats.
For book scanning, VIISAN OfficeCam delivers exceptional results through advanced image
processing features. It can automatically flatten curved book pages, digitally remove finger
artifacts from scans, repair damaged or frayed document edges, align pages according to text
orientation, and split dual-page book scans into separate images with precision.
Note: This software is distributed exclusively with VIISAN document camera scanners of
specific model numbers. Full functionality, including advanced book scanning capabilities, is
only guaranteed when paired with compatible VIISAN hardware. When used with non-approved
book scanners, certain features may be limited or unavailable.
3
Page 5

System Requirements
To e ns ur e t he p er fo rm a nc e o f t hi s scanner, the following hardware system requirement are
necessary:
CPU Intel® Core™ i5 or higher
RAM 8GB RAM minimum, 16GB RAM recommended.
GPU Iris Plus Graphics or higher Graphics cards
The installation and operation of the program requires 1G
Hard Disk
disk space. You can scan more images if the disk space
is bigger. The recommended storage is 20G.
Operating
System
Windows 7 / Windows 8.1 / Windows 10 / Windows 11
USB USB port
NOTE: The system requirements and compatibility can change over time,
depending on the operating system and updates from Windows.
4
Page 6
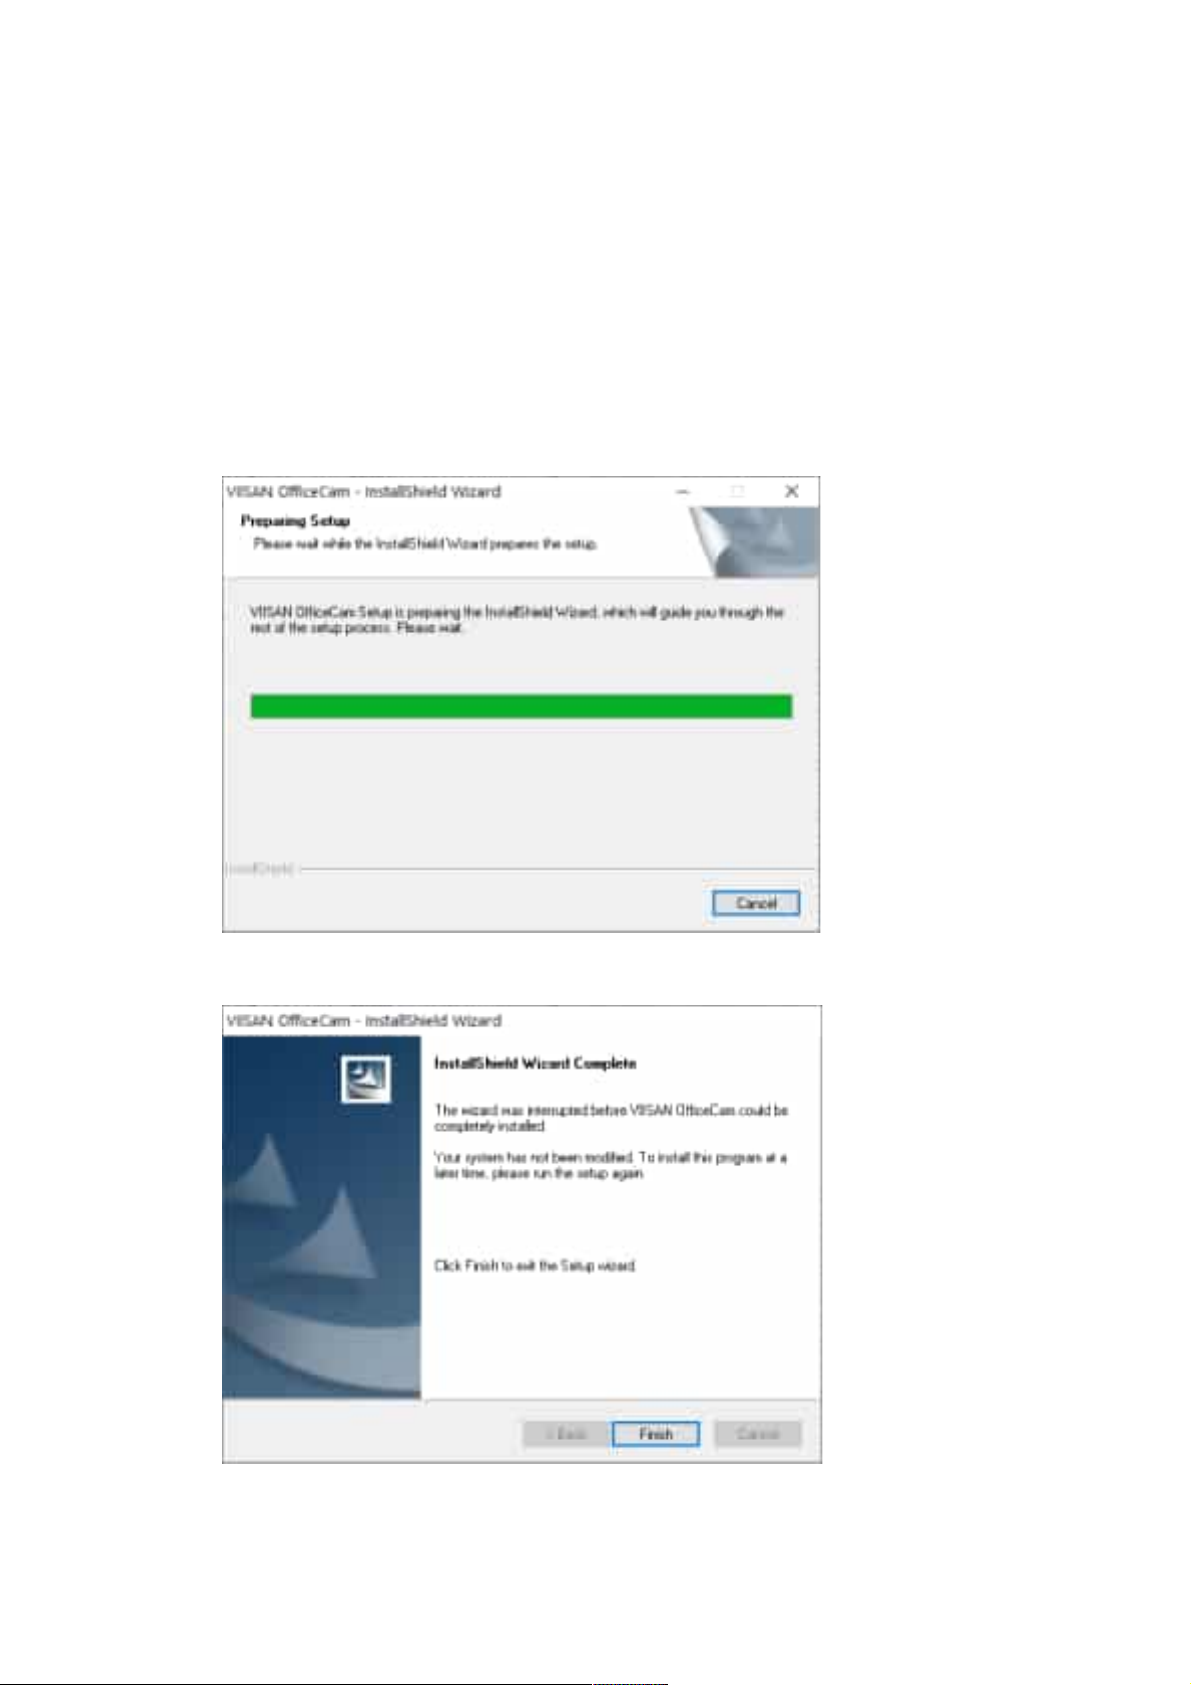
Installing the Software
NOTE: Before installing this application software, it is recommended to close any
antivirus programs or security software running on your system.
If you are installing this software from a downloaded file, please double-click on the
setup.exe file to start the installation process.
1. Once the installation process has started, please follow the on-screen instructions.
2. Click [Finish] to finish the installation program.
5
Page 7
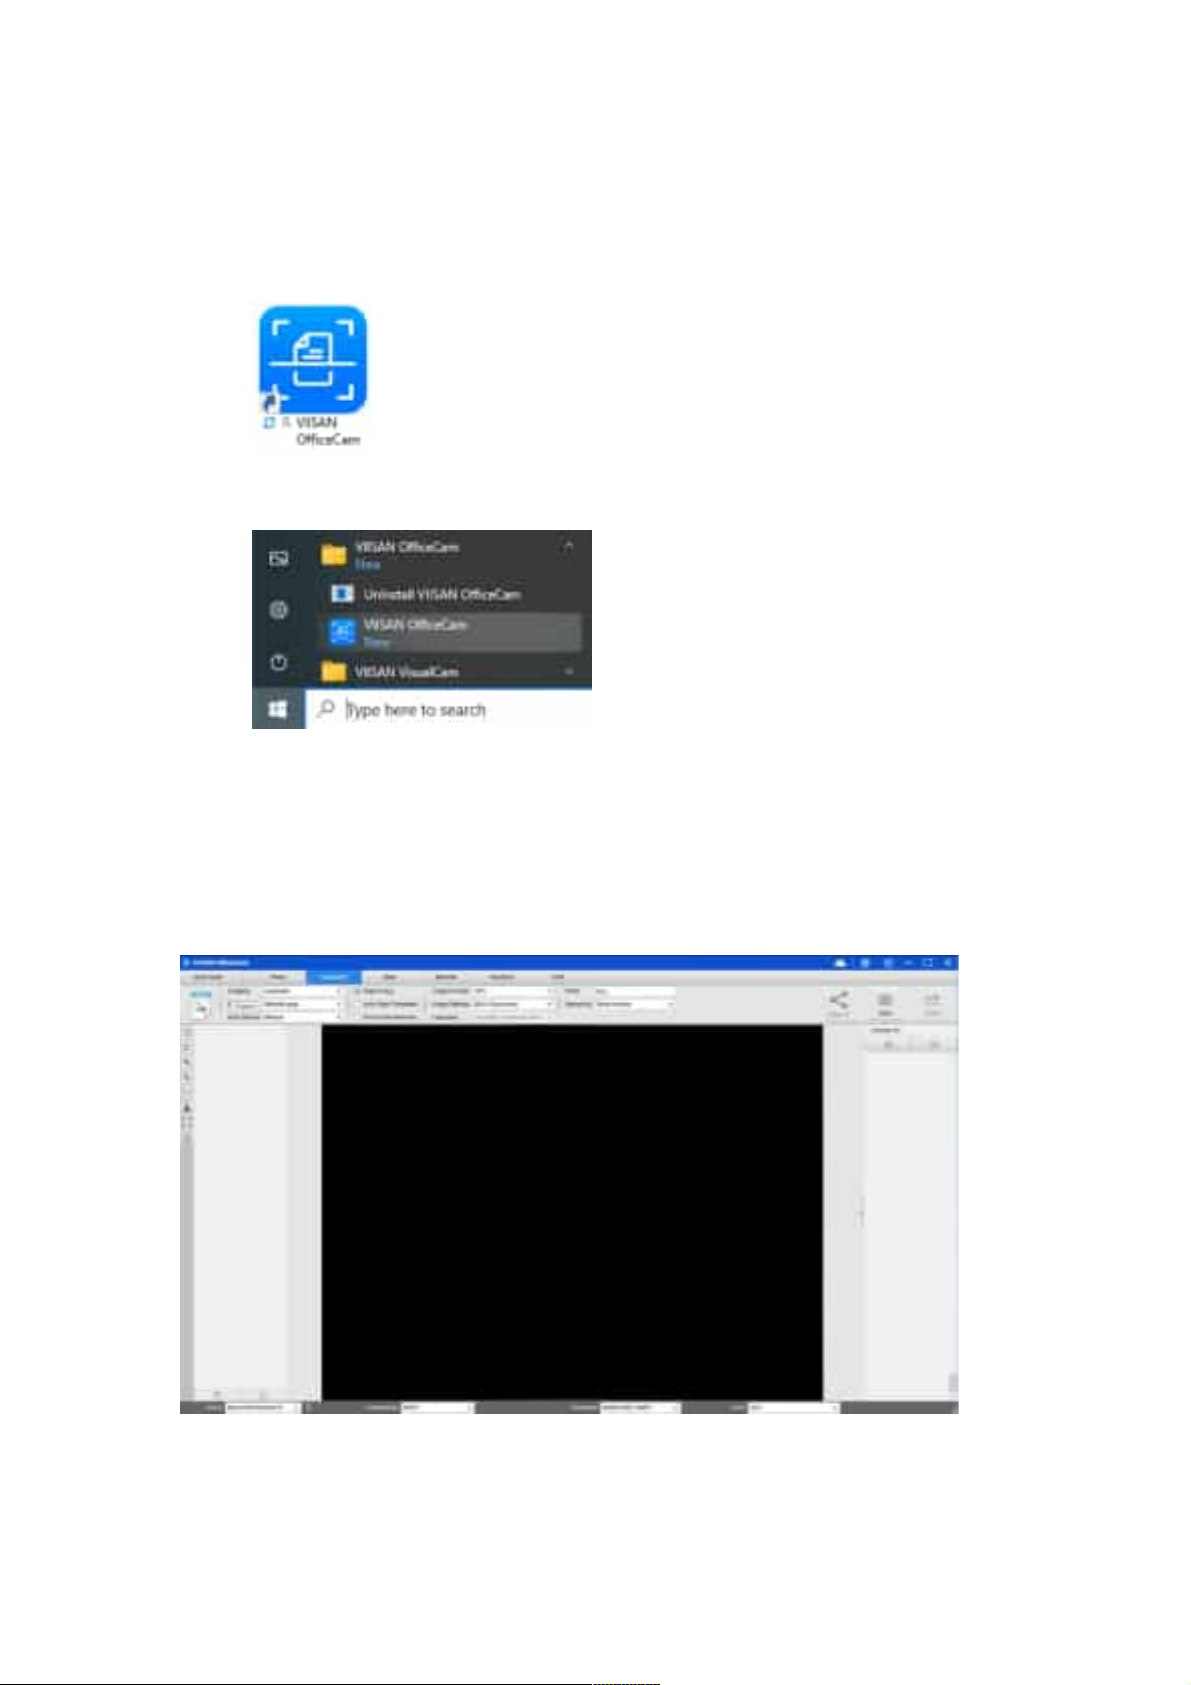
Getting Started
• To s ta r t t h e p ro gr am , p le a se d ou b le c li c k o n t he VIISAN OfficeCam icon on the
desktop or start VIISAN OfficeCam from the Windows Programs list.
• Click the Windows Start Menu > All Programs > VIISAN OfficeCam folder > VIISAN
OfficeCam.
Main Window
When the software is launched, you should see the main window appears as shown below.
In the middle of the main window, you should be able to see the real-time preview video
from the camera device.
Note: If you do not see the real-time video preview from the camera device and the
message “[Detecting devices…]” is displayed in the main window as shown below,
please verify the following steps:
6
Page 8
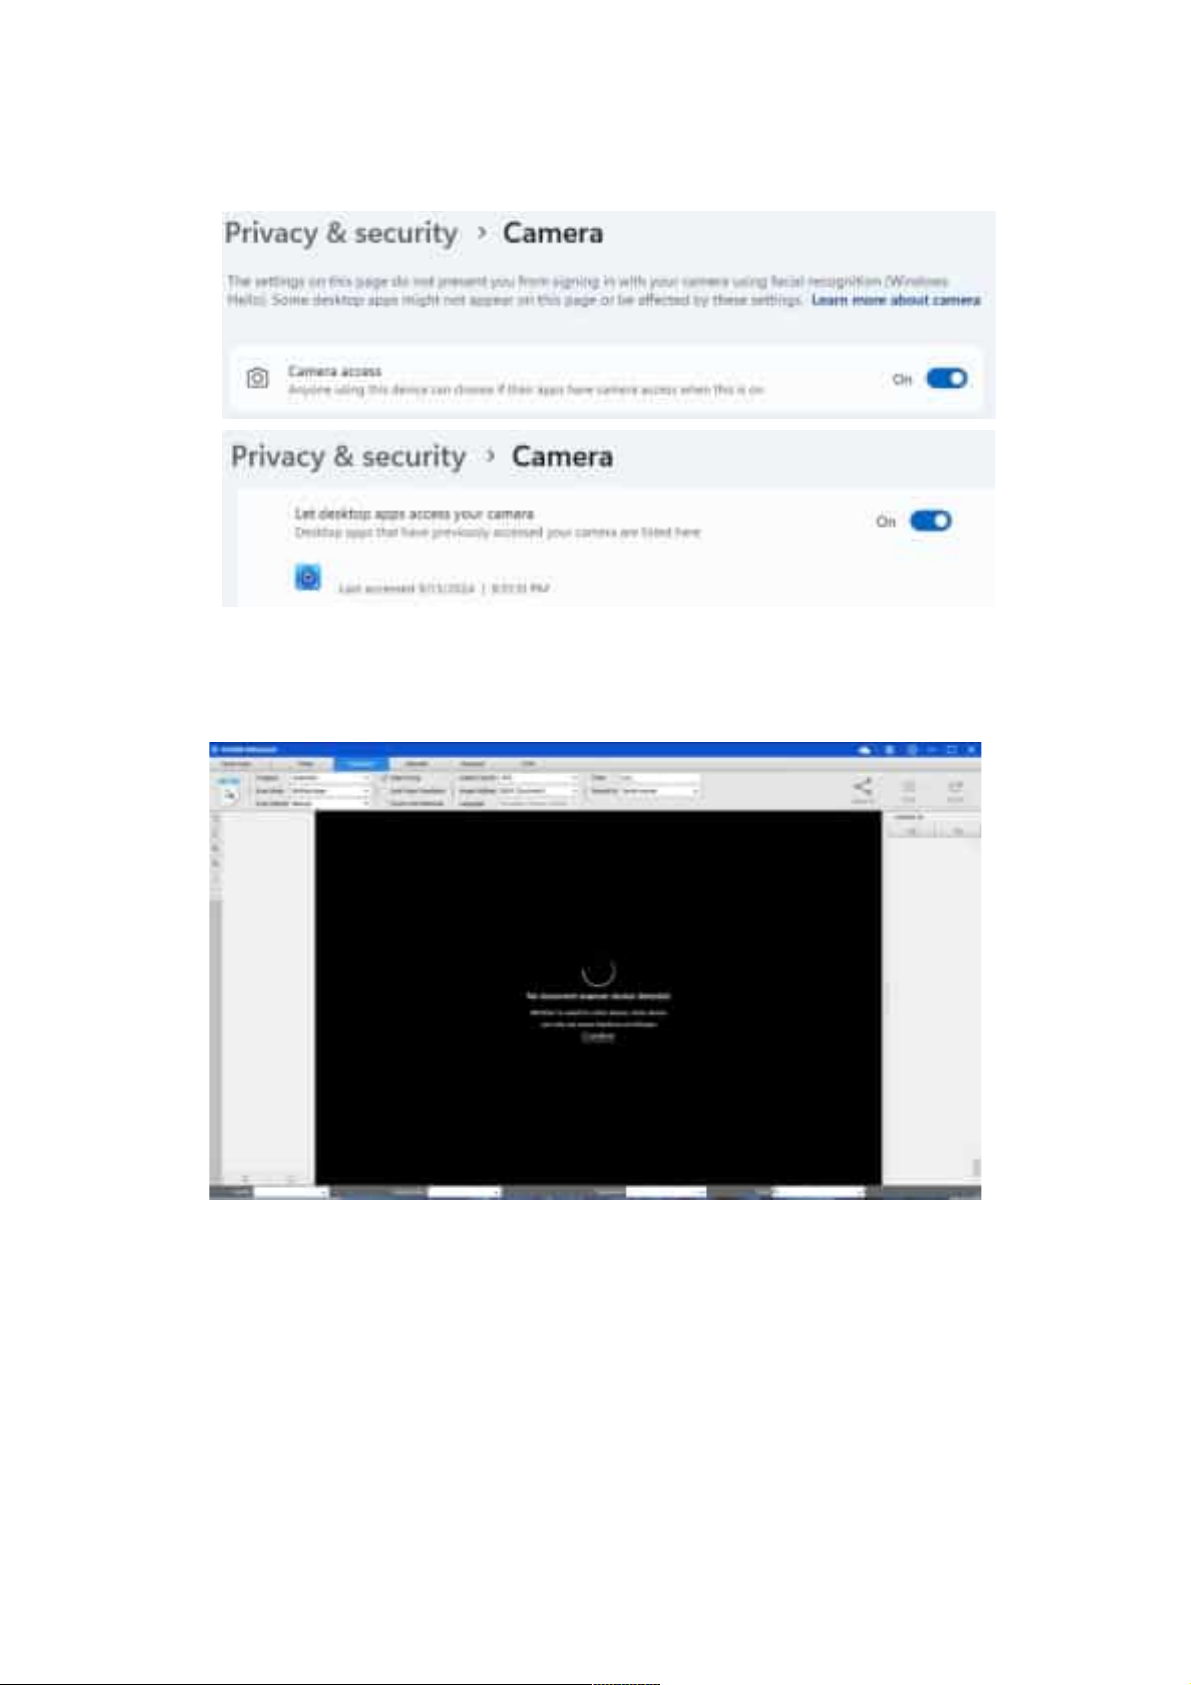
1. Ensure that you have enabled the OfficeCam app’s permission to access the camera
in your Windows privacy & security settings.
2. Confirm that your hardware device is properly connected to your PC via a USB cable.
3. Ensure that the camera arm has unfolded. If the camera arm is closed, the video feed
may appear completely black, even if the camera is functioning correctly.
4. Try connecting the USB cable to a different USB port or restart your PC.
7
Page 9
Control Panel
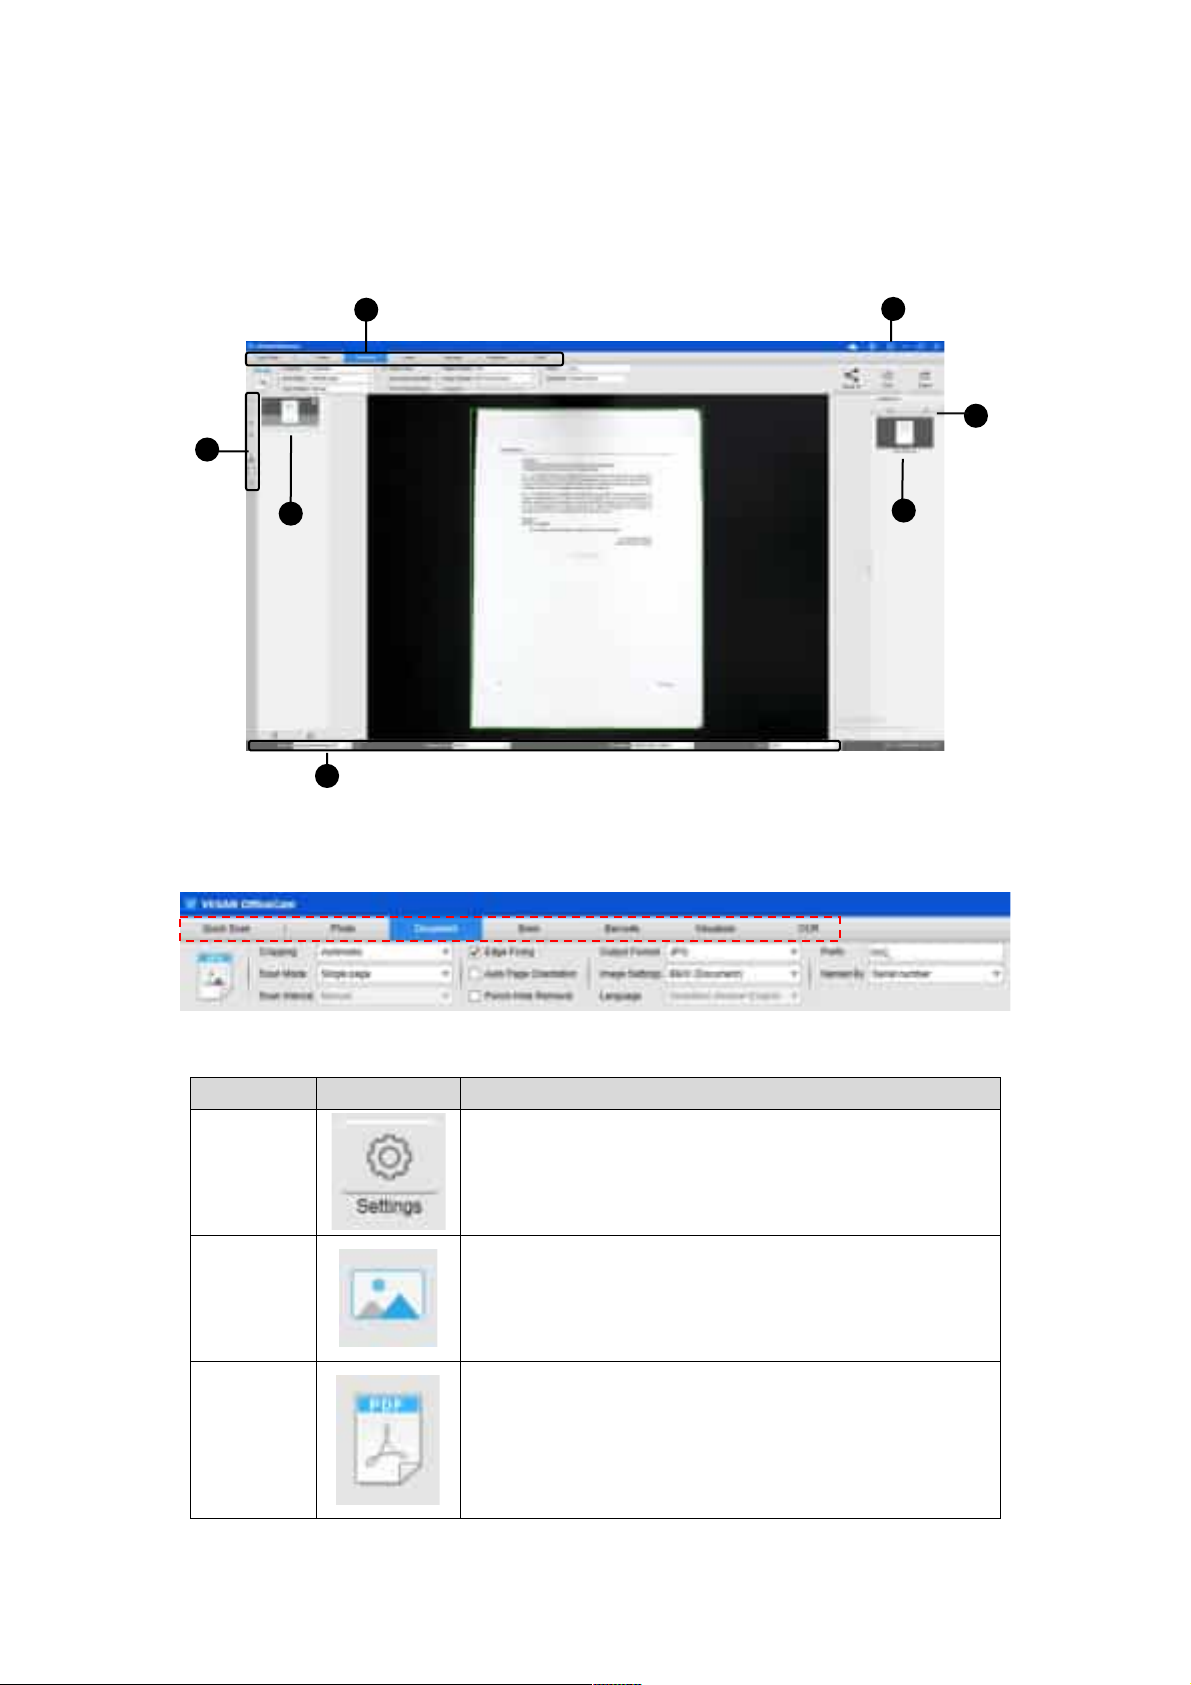
Here is the software control panel of VIISAN OfficeCam. You can easily modify the settings
using the options provided below.
3
1 1
2
5
7
6
4
(1) Function Tabs
The VIISAN OfficeCam software offers various scanning modules that you can choose from.
To s e le ct a f un ct i on mo d e, s i mp l y cl i ck on t h e m en u t ab .
Mode icons Description
Quick Scan
Photo
Document
The quick scan function allows setting a quick scan button with a
specific function.
The photo mode function allows you to take a snapshot by using
the camera scanner device and save them into a BMP, JPG, PNG,
or TIFF file format.
The Document Mode is designed for scanning documents,
business cards, ID cards, or any paper sheets. This function tab
includes a powerful image processing algorithm, such as repairing
damaged document edges and rotating pages based on text
orientation. It allows you to scan directly into image formats like
8
Page 10
Book
JPG, PNG, BMP, and TIFF, also supports OCR for converting
scanned files into editable PDF, Word, Text, or Excel formats.
The book mode is used to scan books or magazines. This function
embedded a powerful image processing, such as automatic
scanning, such as automatically scanning, flattening curved
pages, erasing finger images, purify background, and split page.
(Note: The book scan mode is only enabled when detected the
external shutter button is connected.)
Barcode
The Barcode mode is for scanning and recognizing the barcode
or QR code then saving results into JPEG/Text/Excel /PDF.
The visualizer function allows recording video tutorials or
Visualizer
projecting your laptop screen with connected a projector plus
using the embedded whiteboard tool function during the meeting.
The OCR function allows to convert a batch scanned images into
OCR
a searchable PDF or editable Word, Excel, and Text formats, it
supports more than 130+ different languages.
NOTE:
1) Each of these Function Modes have different feature options and settings.
2) Each of these Function Modes has its own file-saving-directory.
For example: Document mode can scan images into different file directories.
(2) Settings
At the top of the main window, there are two control buttons available:
Buttons Explanations Note
Cloud
Storage
Language Language settings for software UI
Set up OneDrive and Dropbox cloud drive accounts.
9
Page 11
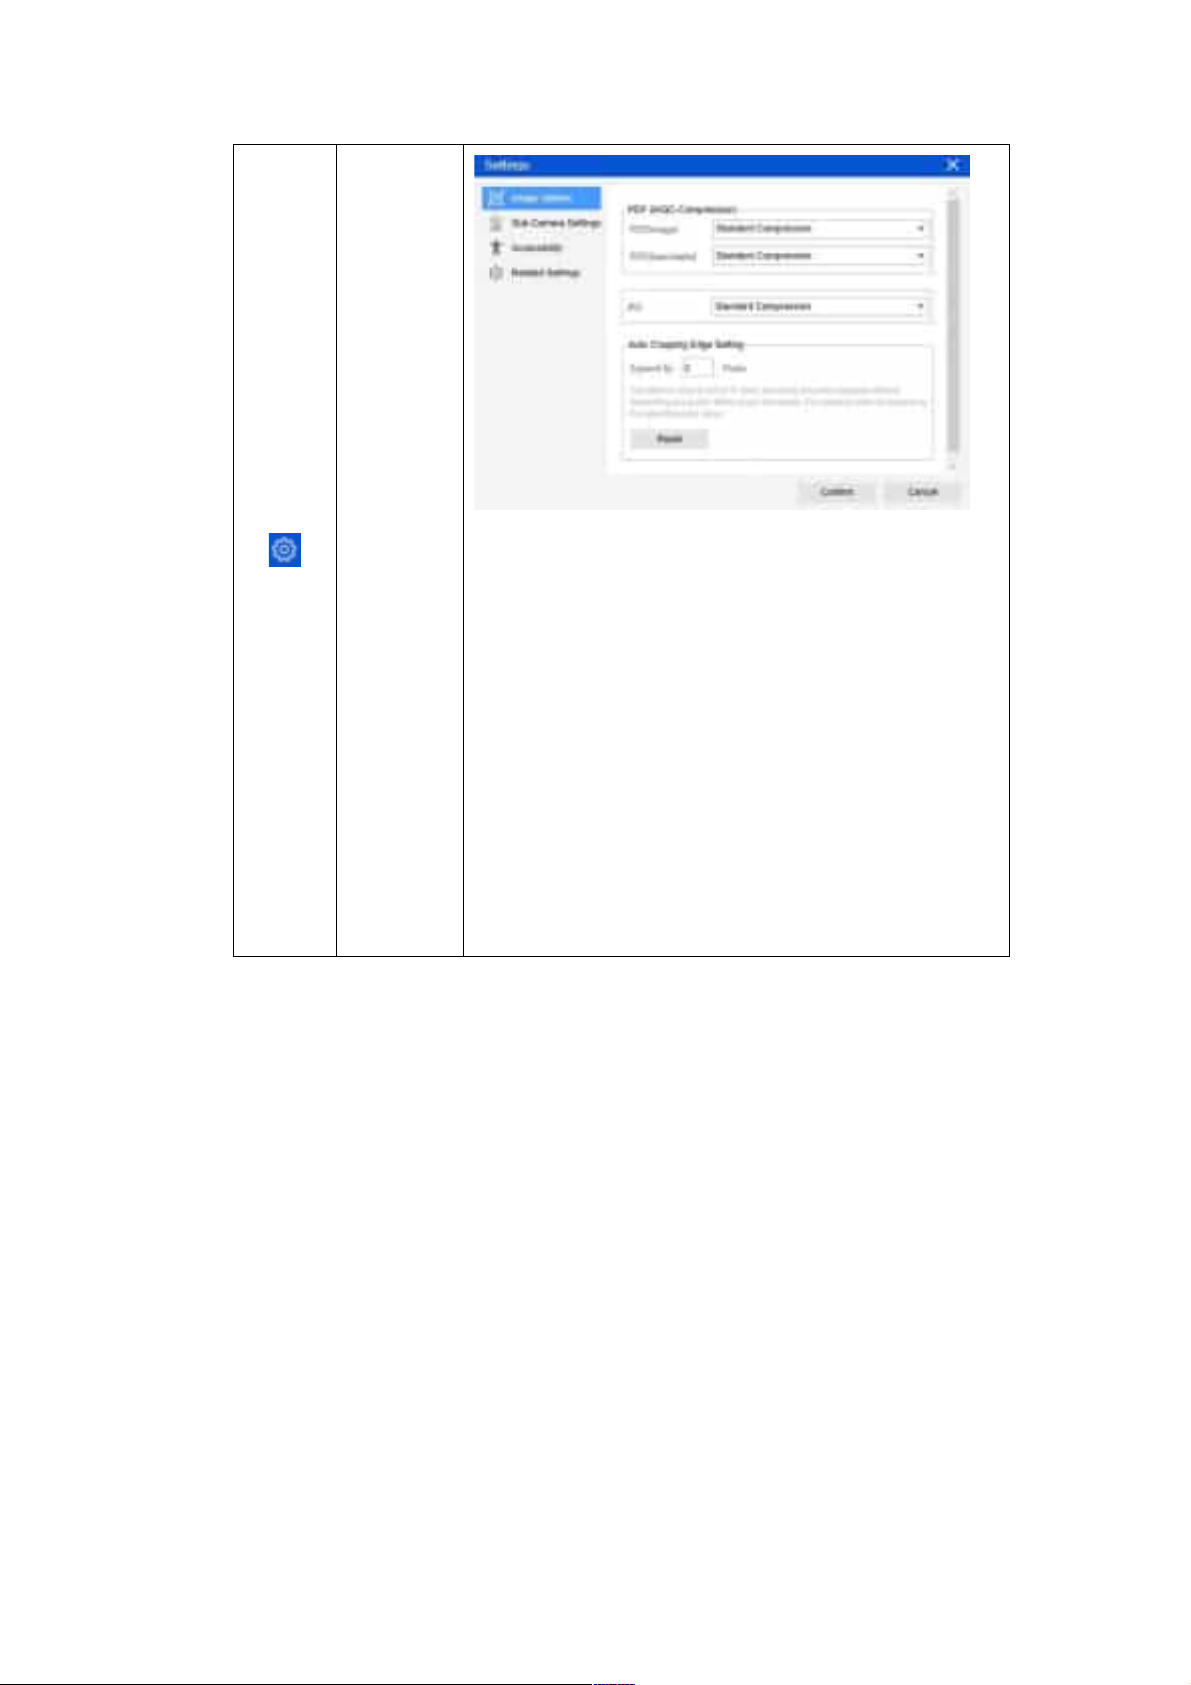
Settings Menu: The settings menu features four tabs that allow
you to:
Image Options: Adjust PDF or JPG compression settings and
modify auto-cropping settings to manage the edges of your
scanned images.
Sub-Camera Settings: Choose a location to merge the sub-camera
image.
Accessibility: Enable tooltips or activate accessibility feature for
screen reading.
Related Settings: Set the camera sleep time and configure the
email client.
Help: Connect to the online support center.
About: Display software information.
Export Log: Export the log file.
Settings
10
Page 12
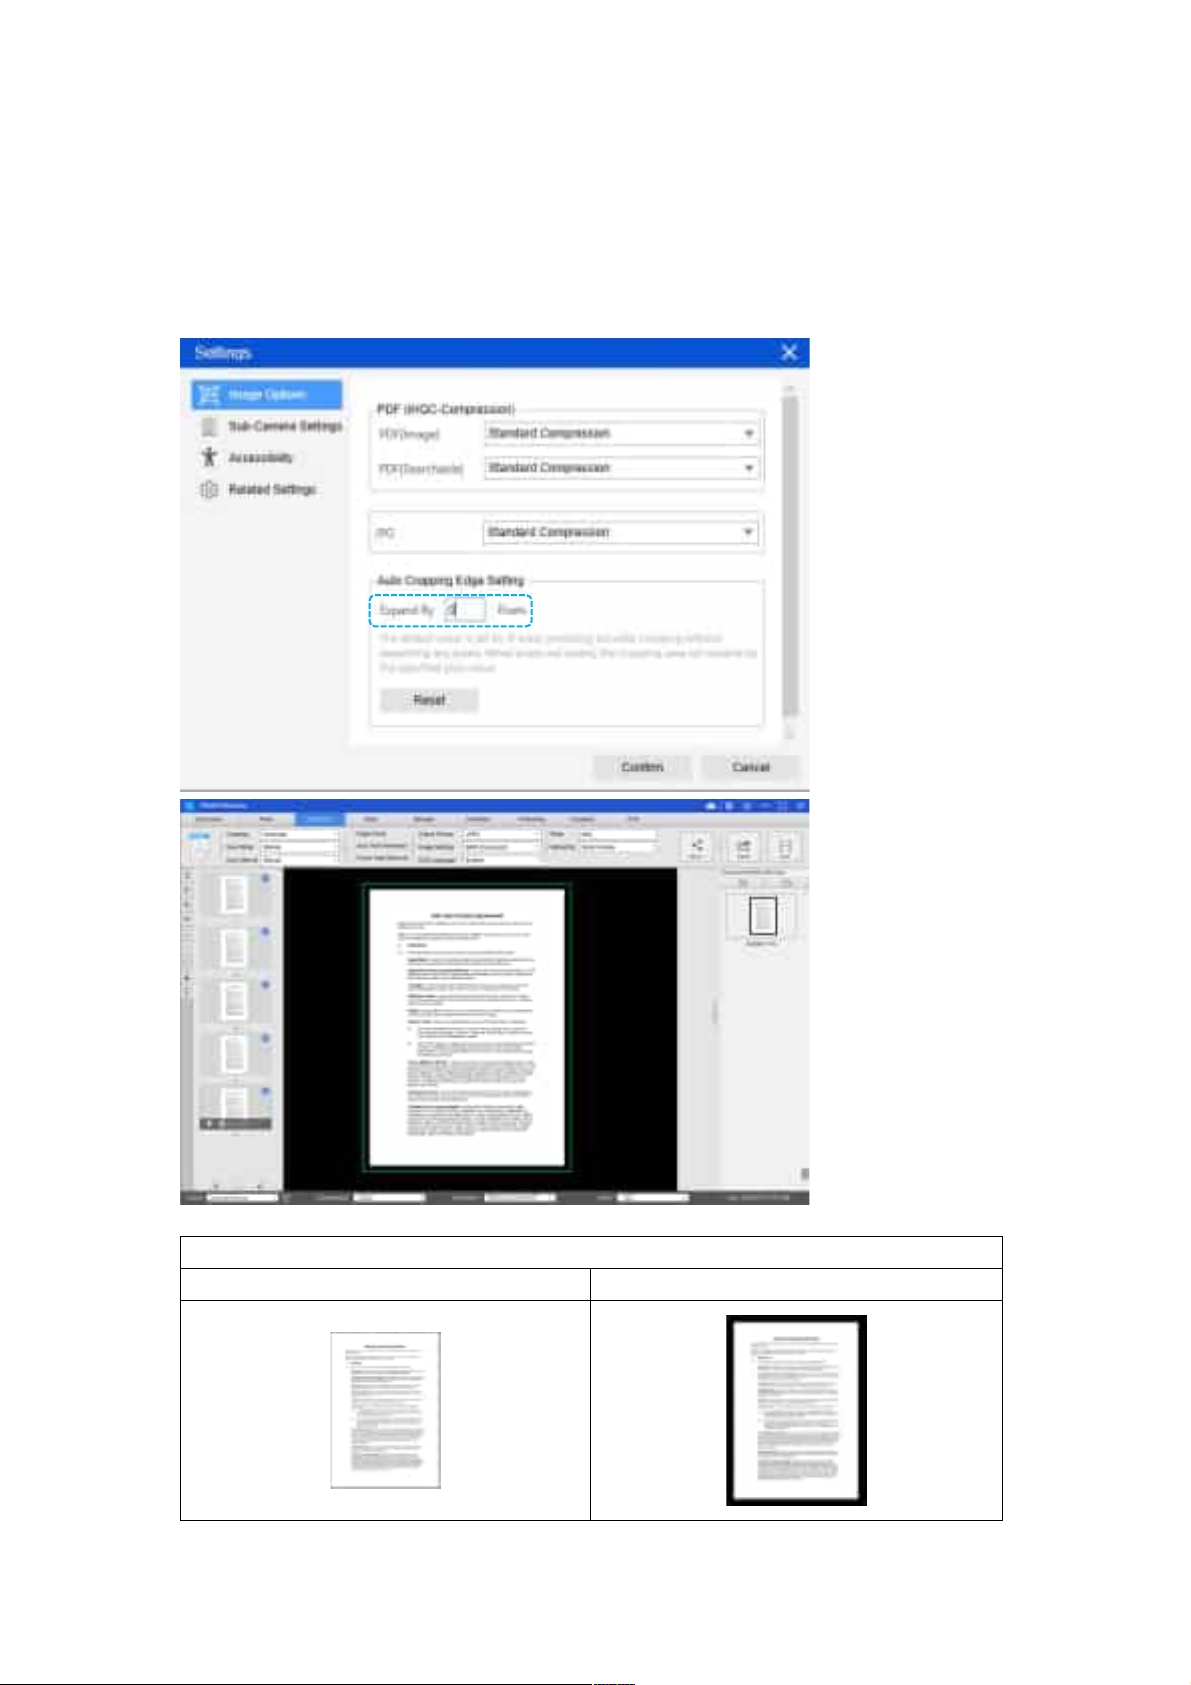
Image Options:
In the Image Options tab, you can adjust the PDF and JPG compression settings. Additionally, you can
configure the auto-cropping feature by entering a pixel value between 0 and 500. The default value is
set to “0” pixels, ensuring precise cropping without enlarging any pixels. When you increase the pixel
value, the cropping area will expand by the specified amount. To reset the value to 0, simply press the
‘Reset’ button.
Auto Cropping Edge Setting Example
Expand By 0 Pixels (Default) Expand By 20 Pixels
11
Page 13
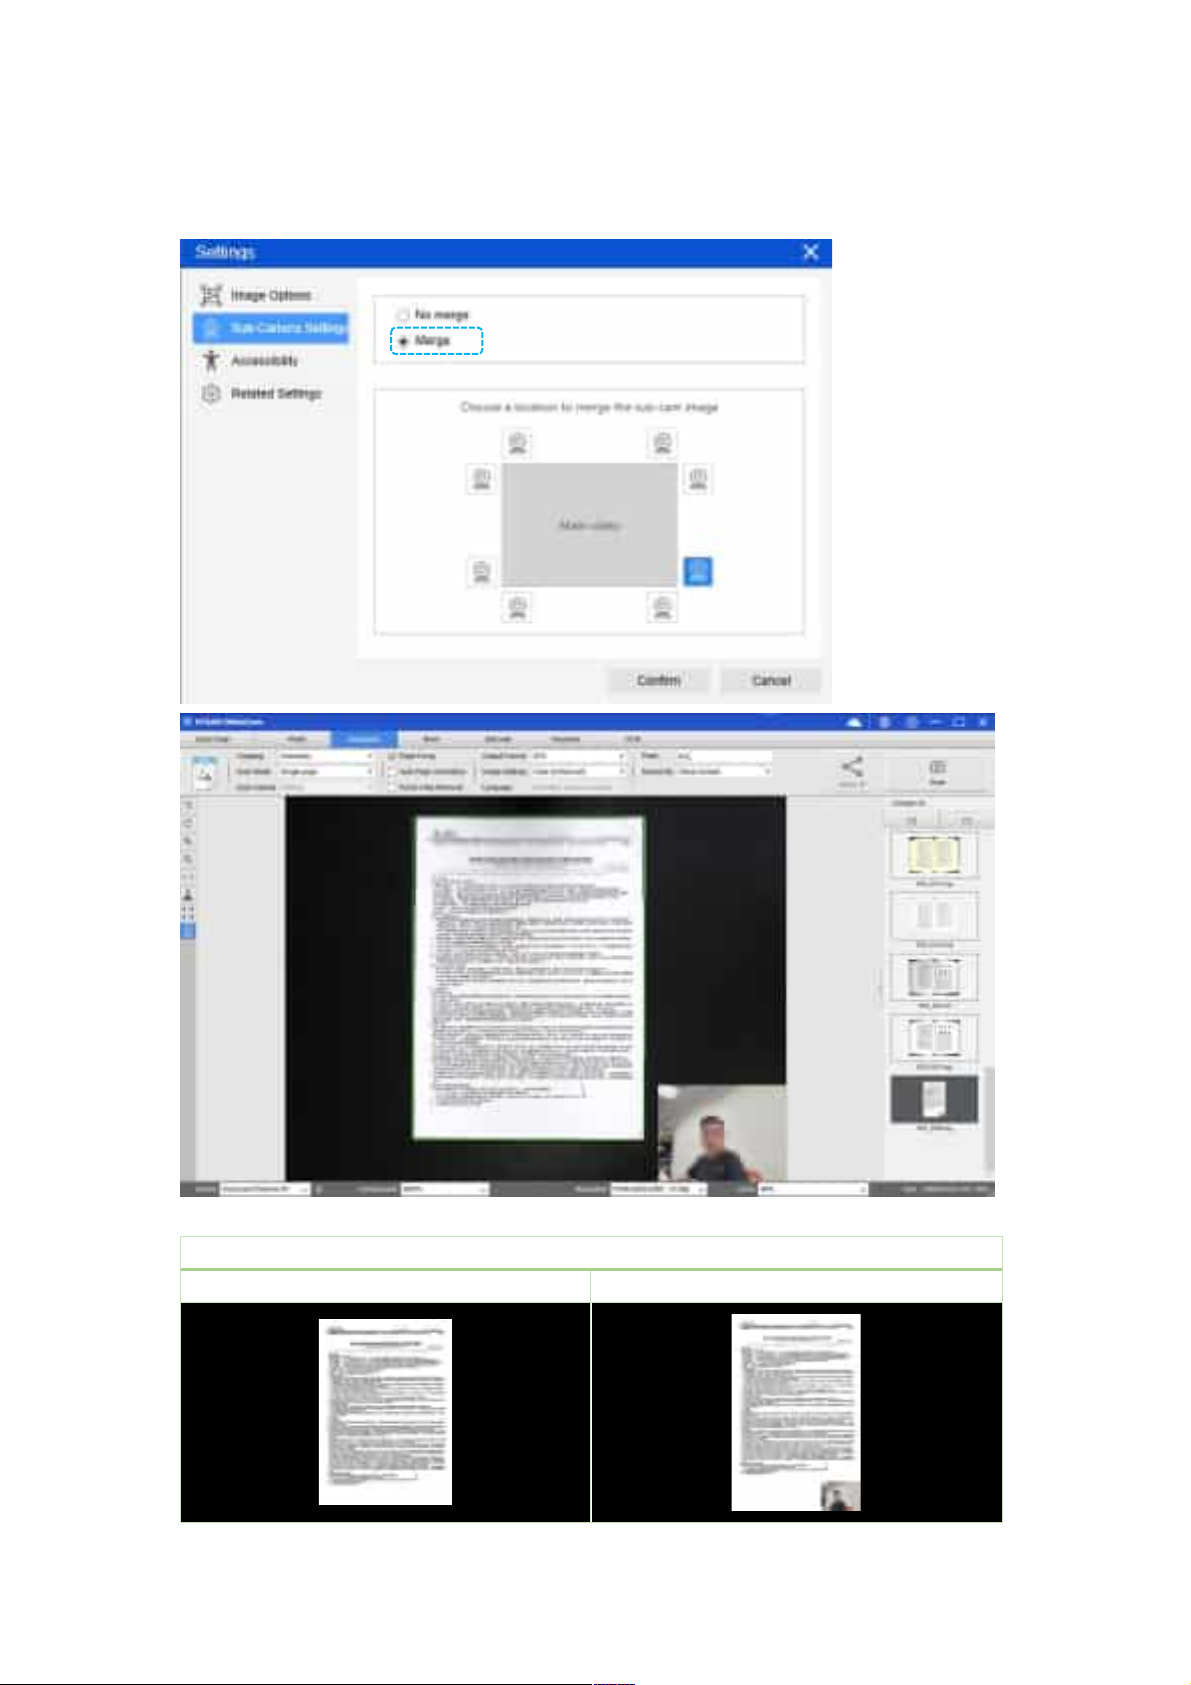
Sub-Camera Settings:
In the Image Sub-Camera setting tab, you can select a location to merge the sub-camera image with the
second camera or webcam (Note: The sub-camera merge is only supported during single-sheet scanning.)
Image Sub-Camera Setting Example
Without Merge Merge Sub-camera image
12
Page 14
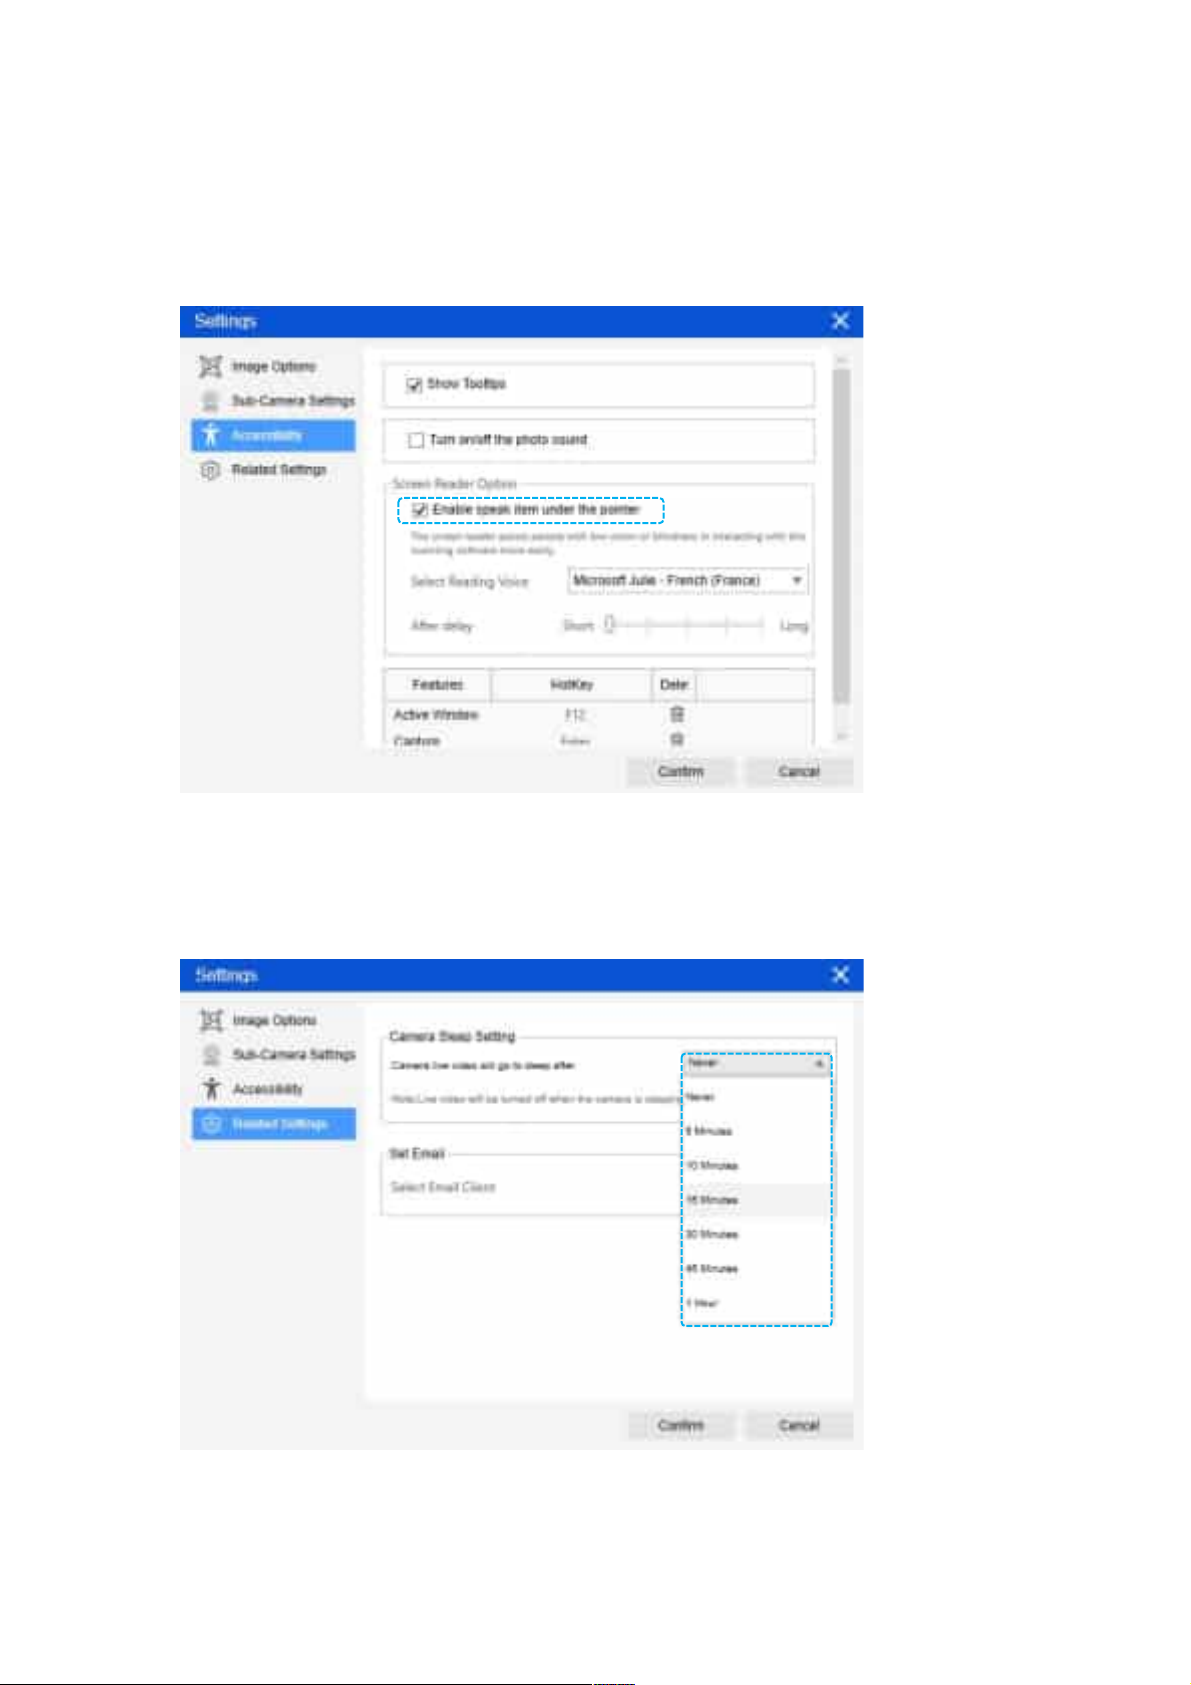
Accessibility:
In the Accessibility tab, you can enable tooltips, toggle capture sound on or off, and set hotkeys.
Additionally, you can activate the screen reader feature, which assists individuals with low vision or
blindness in interacting with the scanning software more easily.
Related Settings:
In the Related Settings tab, you can configure the camera’s sleep time to 5, 10, 15, 30, 45 minutes, or 1
hour for energy saving, and set up the email client to share email attachments.
13
Page 15
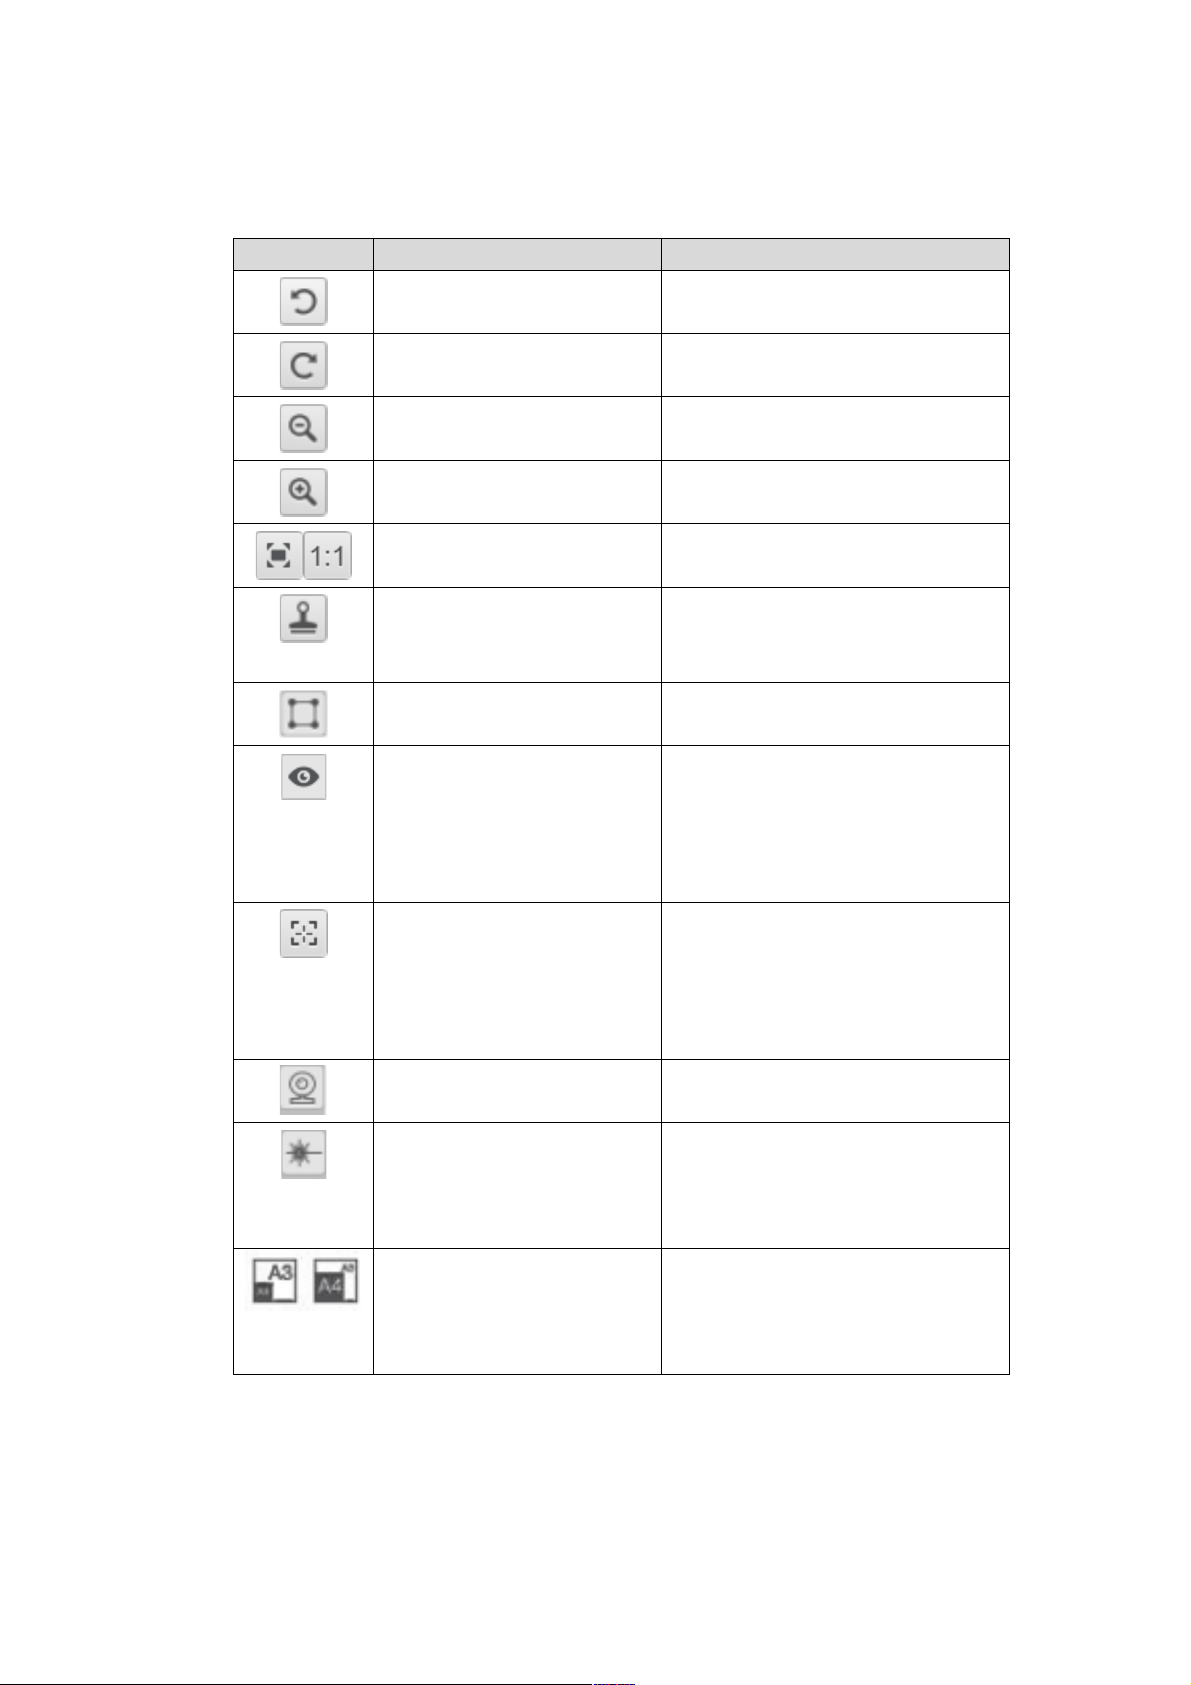
(2) To o l b a r
Buttons Explanations Note
NOTE:
On the left side toolbar, there are many useful control tools available:
Rotate Left 90 Degrees
Rotate Right 90 Degrees
Zoom Out
Zoom In
Fit Screen / 1:1 Display
Watermark Add watermark on images,
(Note: Only available for some of
the Function Tab s)
Manual Cropping Manual cropping for a scanning
area
Video Filters Switch Preview Window with Video
Filter Effects
(Note: This function is available in
Photo mode and other specific
modes.)
Focus Auto-Focus Image with Triggered
Auto-Focus Action
(Note: This function is only
available for Document Cameras
that support the AF lens feature.)
Web Camera Only available when detected a
web camera is connected
Laser Switch Turn on / off the laser assist
(Note: This feature is only enabled
on the device that supports the
laser assist feature)
A3/A4 Switch Switch the A3 and A4 lens
(Note: This feature is only enabled
on the device that supports the
dual-lens function)
The “Focus” button may appear if and only if you have a book scanner that can
support the Auto-Focus features. By clicking on this button, user can manually
trigger the camera to adjust the lens focus again automatically.
14
Page 16
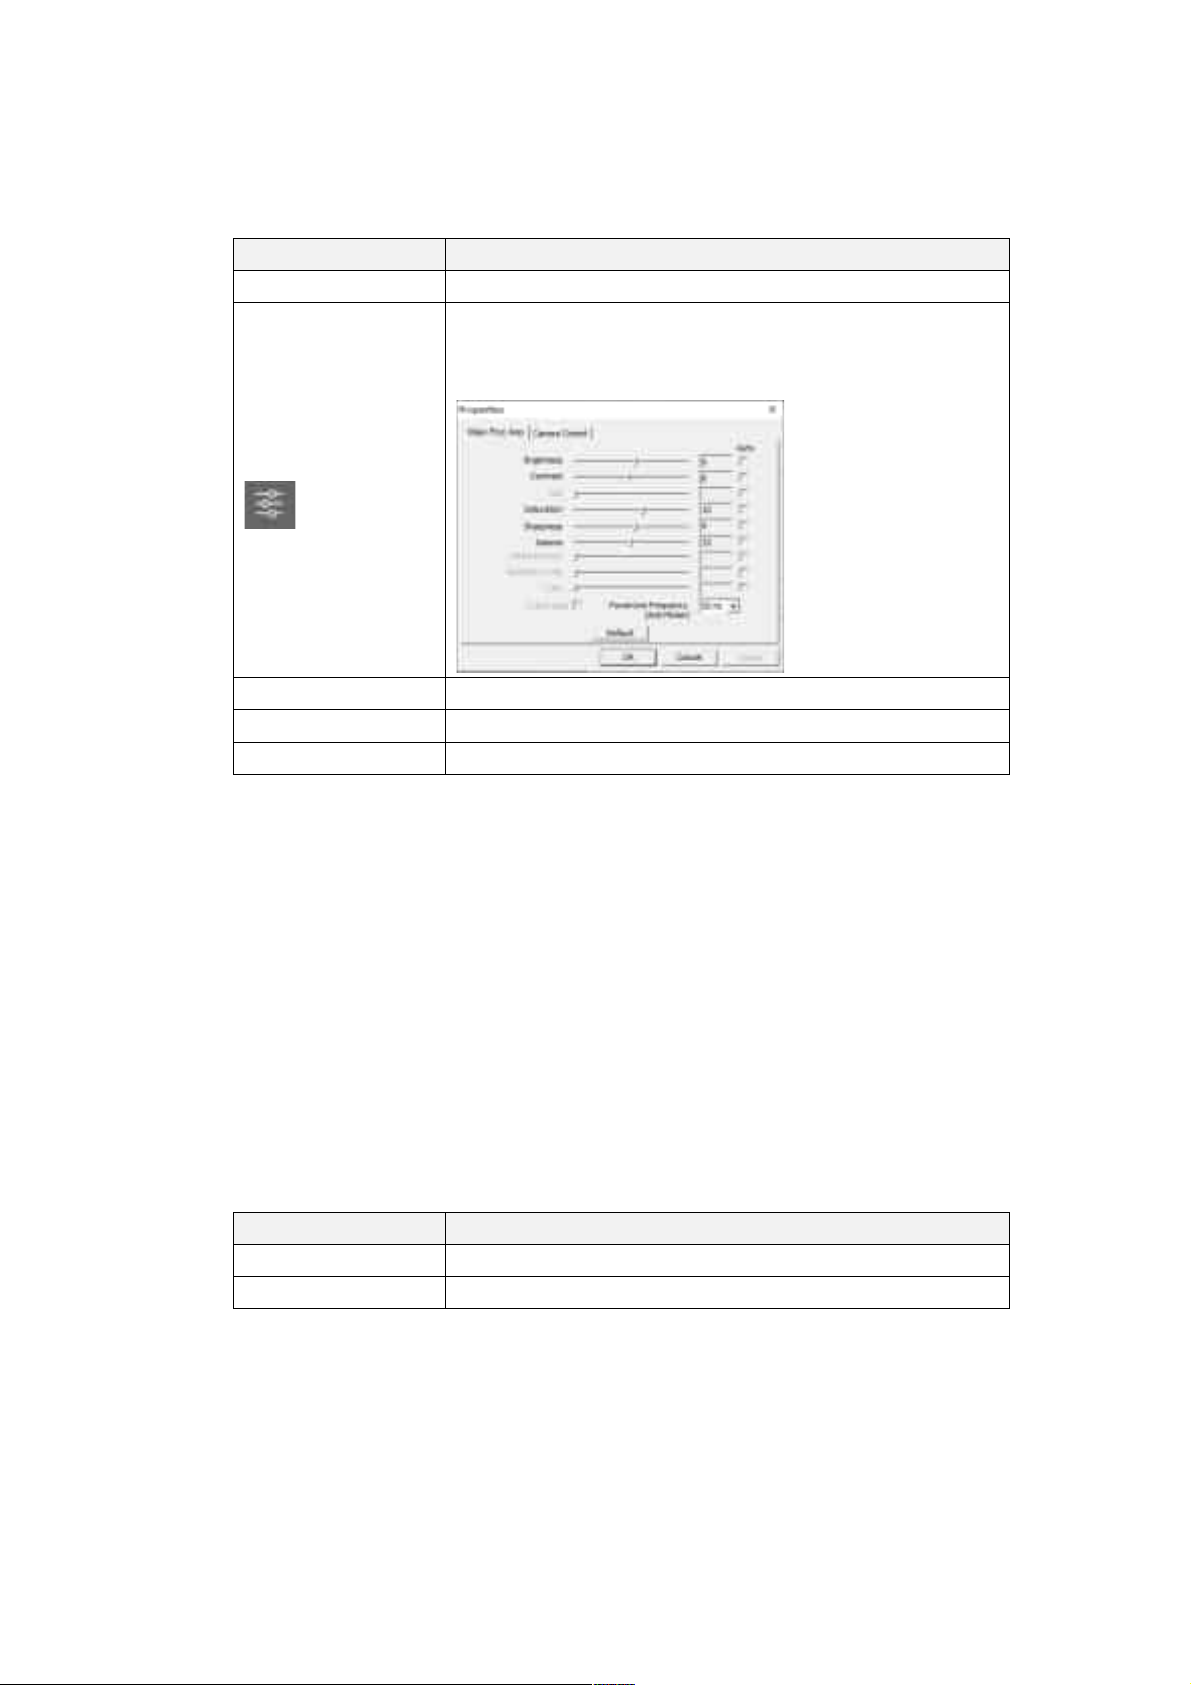
(3) Device Settings
At the bottom of the main window, there are some control settings for the camera
device:
Functions Explanations
Device Select the camera device.
The video settings allow you to adjust the brightness,
contrast, saturation, sharpness, and Gamma of your
device.
Video Settings
Compression Select the video compression of the camera device.
Resolution Select the resolution of the camera device.
Zoom In/Out Zoom in and out of the Window.
NOTE:
• In the [Format] options, there are typically two choices: MJPEG or YUY2
compressed video formats. MJPEG is a compressed video format and selecting it
will allow for a higher video frame rate compared to the YUY2 format.
• In the [Resolution] options, selecting higher resolutions will cause a lower video
frame rate. If you are capturing a still image or scanning a document, please select
the highest resolution available. If you are using this device as a visual presenter,
then selecting a lower resolution may bring a smoother video experience.
(4) File Save Path Settings
On the right-hand side of the main window, there are options for setting the
directory for saving files:
Button Explanations
Select Select file save destination
Open Open the current file location
NOTE:
• Each Function Mode has its own file save destination. For example, the user can
set and change the save destination to different destination.
• Even though each Function Mode has its own separate file save destination, all
these Function Modes have the same default file-saving-directory destination
after this software is installed.
15
Page 17
(5) File Compare & Convert Settings
By right click on the image files shown in the file fetching column on the right-
hand side of the main window, you will see the following options:
Right Click Options Explanations
Open Open an image file
Copy Copy a file
Rename Rename a file
Delete Delete a file
Compare Compare multiple images in one window
Convert into PDF Convert or merge multiple images files into one PDF file
Convert into TIF Convert or merge multiple images files into one TIF file
Convert into Text Convert or merge multiple images files into one Text file
Convert into Word Convert or merge multiple images files into one Word file
Convert into Excel Convert or merge multiple images files into one Excel file
Convert into EPUB Convert or merge multiple images files into one EPUB file
Email Send an image file as an email attachment
Print Send an image file to a printer
Upload to Dropbox Upload the scanned files to Dropbox storage
Upload to OneDrive Upload the scanned files to OneDrive storage
Property Show the property window
NOTE:
• The “Compare” and “Convert” functions can work on one or more image files at the same time. User can use the
“shift key” or “Ctrl key” on the keyboard to help select multiple image files.
• When using the “Email” function, please make sure your computer has an email software installed, such as
Microsoft Outlook.
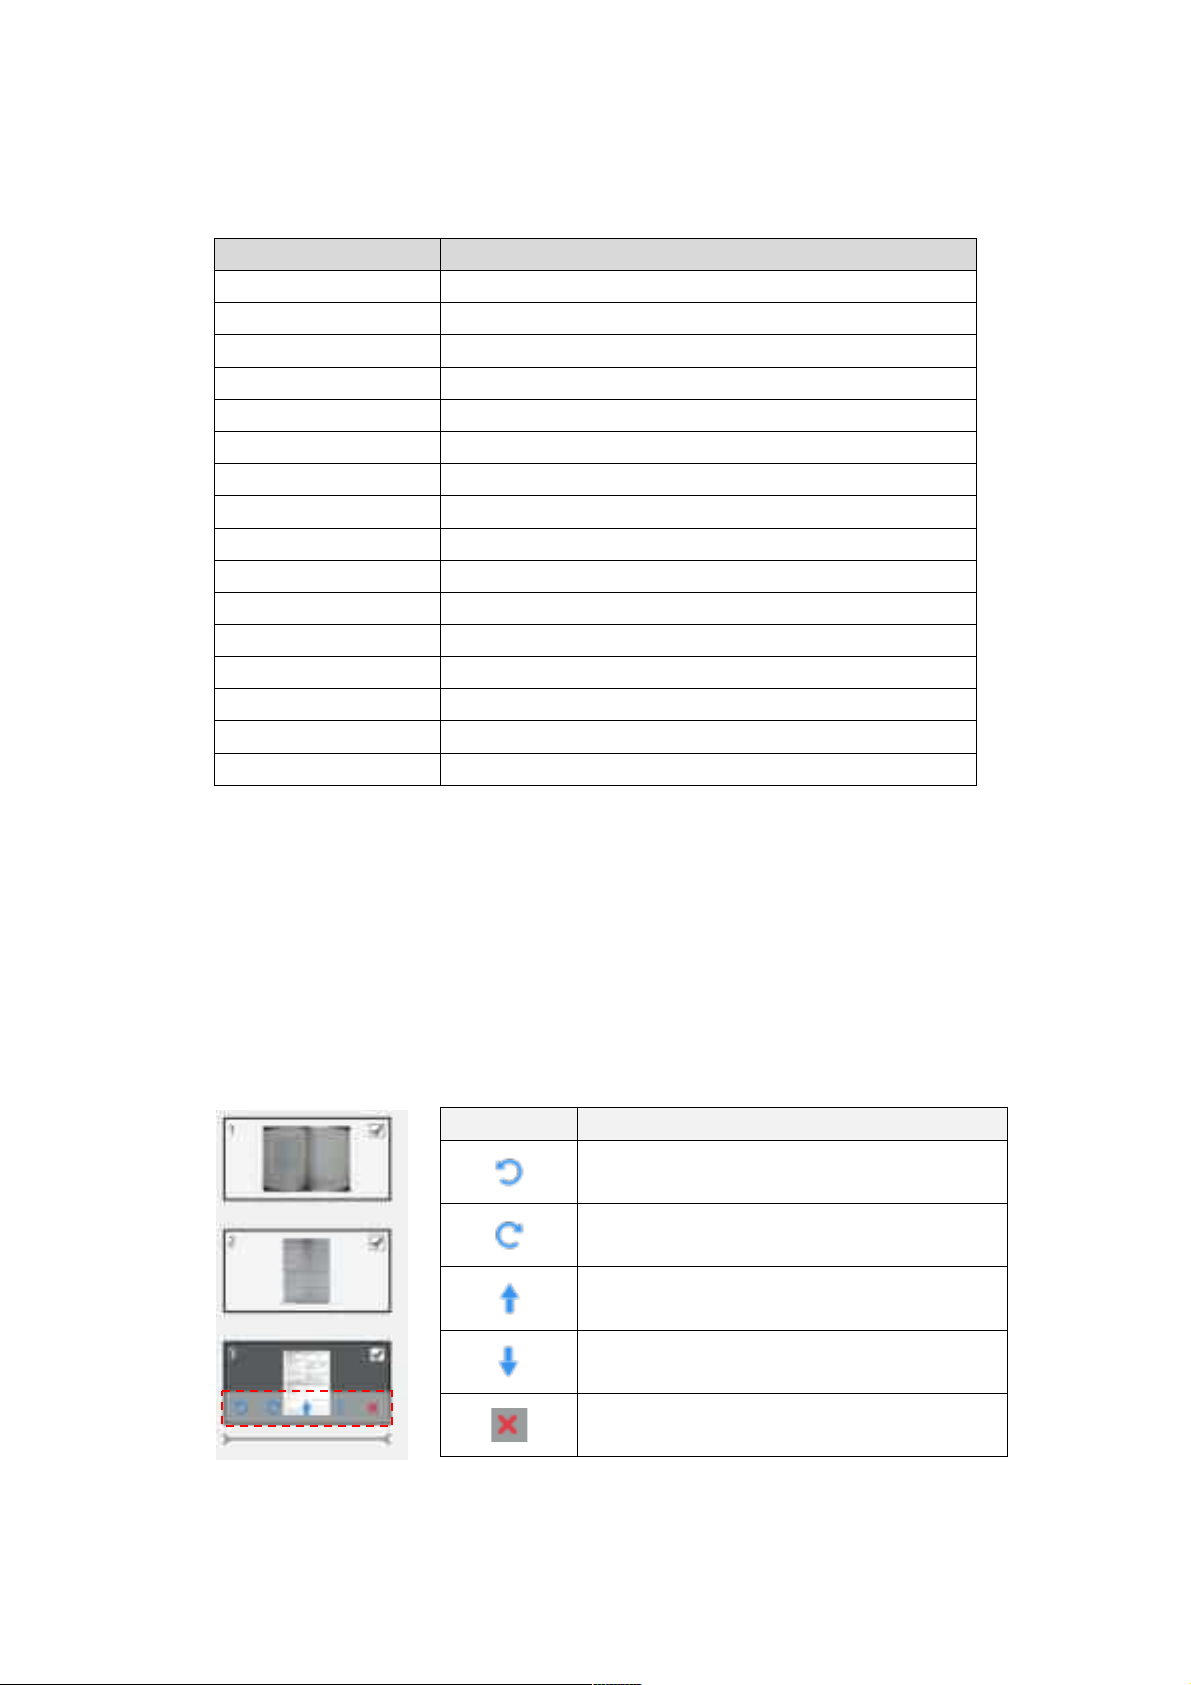
(6) Preview Window
In the left-hand side preview window, you can use the following tools available on each thumbnail
image to rotate the scanned image, change the image order, or delete it. You can also double-click
on a thumbnail image to enter Document Page Editor mode.
Button Explanations
Rotate Left 90 Degrees
Rotate Right 90 Degrees
Move image up
Move image down
Delete image
NOTE: The left side preview window is only available when the Scan Mode setting is set to “Multiple Image”.
16
Page 18
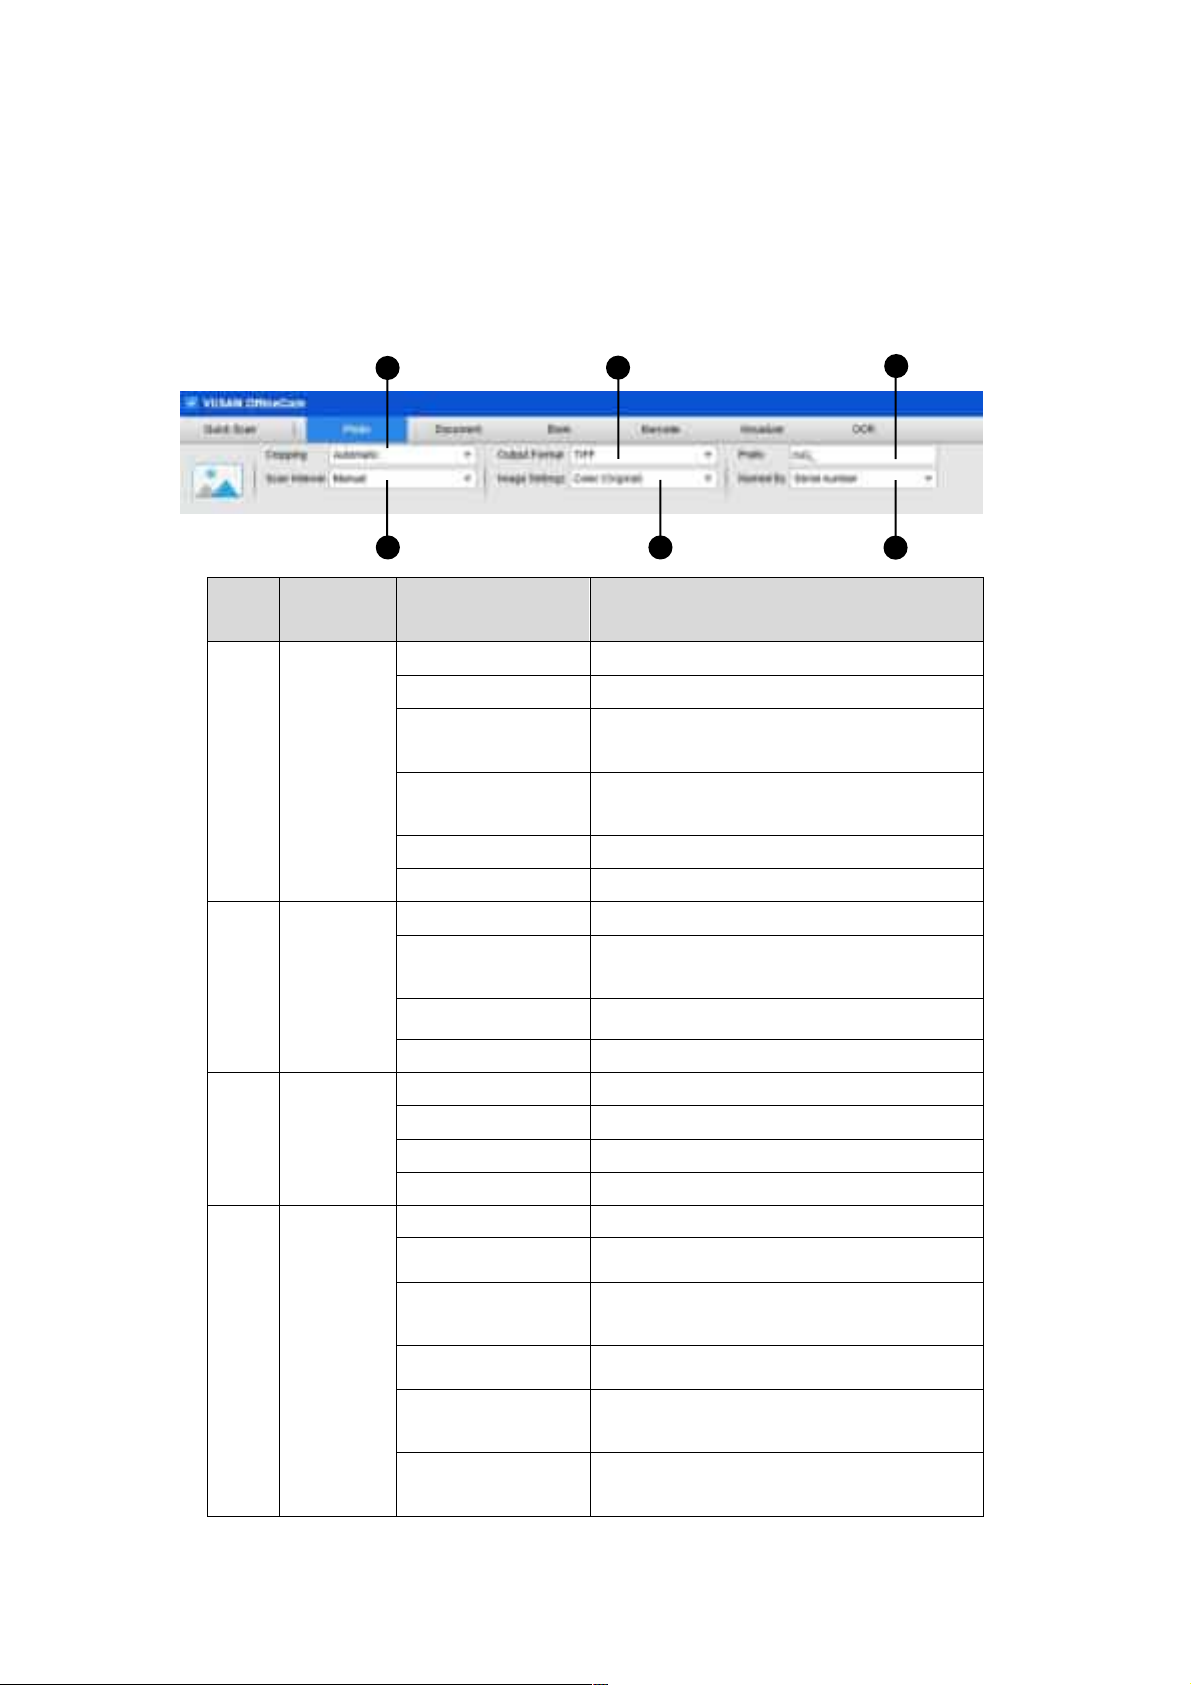
Photo Mode Settings
VIISAN OfficeCam software offers various powerful scanning functions, with each mode providing
different customizable settings.
For example, in [Photo] mode, you can adjust the following settings to optimize your scans:
2
1
2 4
3
8
5
6
Item Feature
Settings
1 Cropping
Scan
2
Interval
Output
3
Format
Setting Options Explanations
Automatic Automatic crop for a single image
Automatic (Multiple) Automatic crop for multiple images
Crop w/o scan pad Crop a single image automatically without
using a scan mat.
Crop w/o scan pad
(Multiple)
Self-Defined Manual crop for a single object
No Cropping Scan without cropping
Manual Manual scan by clicking the [Capture] button
Automatic Automatically scan when the camera detects a
Repeat (5sec) Automatic scanning by a 5-second countdown
Repeat (7sec) Automatic scanning by a 7-second countdown
BMP Save as BMP file
JPG Save as JPEG file
PNG Save as PNG file
TFF Save as TIFF file
Color (Original) Output image in original color
Color (Enhanced) Output image with color enhanced
Crop multiple images automatically without
using a scan mat.
page is turned
Cold Blue Produces the output image with a cool, blue-
4
Image
Settings
Grayscale Output image in grayscale
Mosaic Applies a mosaic effect to a selected area of
Negative Output image adds a vintage tone to the
toned effect
the image, pixelating the specified section.
image, evoking a sense of warmth and
17
Page 19
nostalgia.
Nostalgic Applies a vintage tone to the output image,
giving it a classic, nostalgic feel.
Painterly Create image with a brushstroke effect,
mimicking the style of a traditional painting.
Sketch Create image with pencil-drawn sketch,
highlighting edges and outlines style.
10 Prefix
11 Name By
Add prefix for the file name
Serial Name by serial number
Date & Time Name by date and time
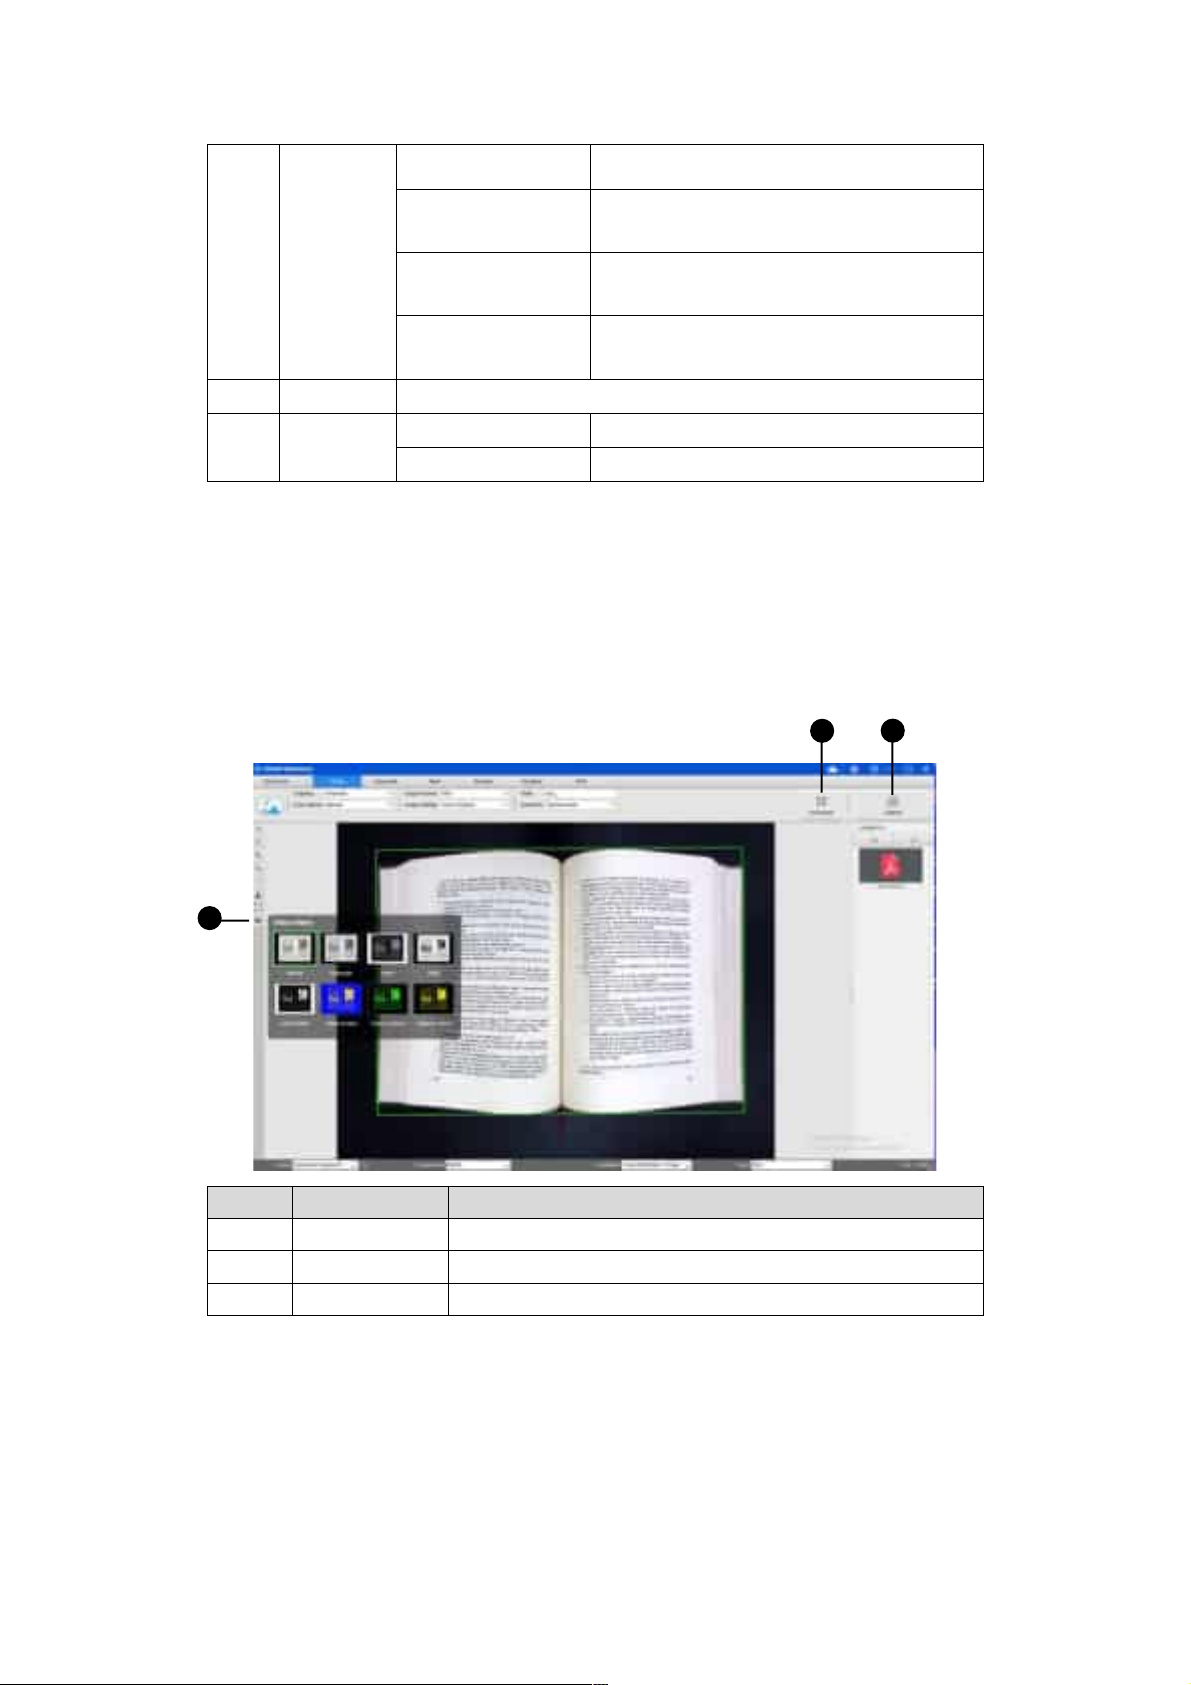
Scanning Using Photo Mode
In Photo mode, you can capture snapshots of your photos, cards, or any paper materials in JPG,
PNG, BMP, and TIF formats. Additionally, you can switch the preview window with apply various
useful video filter effects.
1 2
3
8
Item Feature Descriptions
1 Capture Capture and export the image with the current cropping.
2 Full Screen Entry the User Interface into Full Screen mode.
3 Video Filters Switch the Preview Window while applying video filter effects.
Apply Video Filters
The video filters feature helps low-vision users enhance visibility. The filter settings provide options
for Invert, B&W, Invert (B&W), Yellow on Blue, Green on Black, and Yellow on Black.
18
Page 20
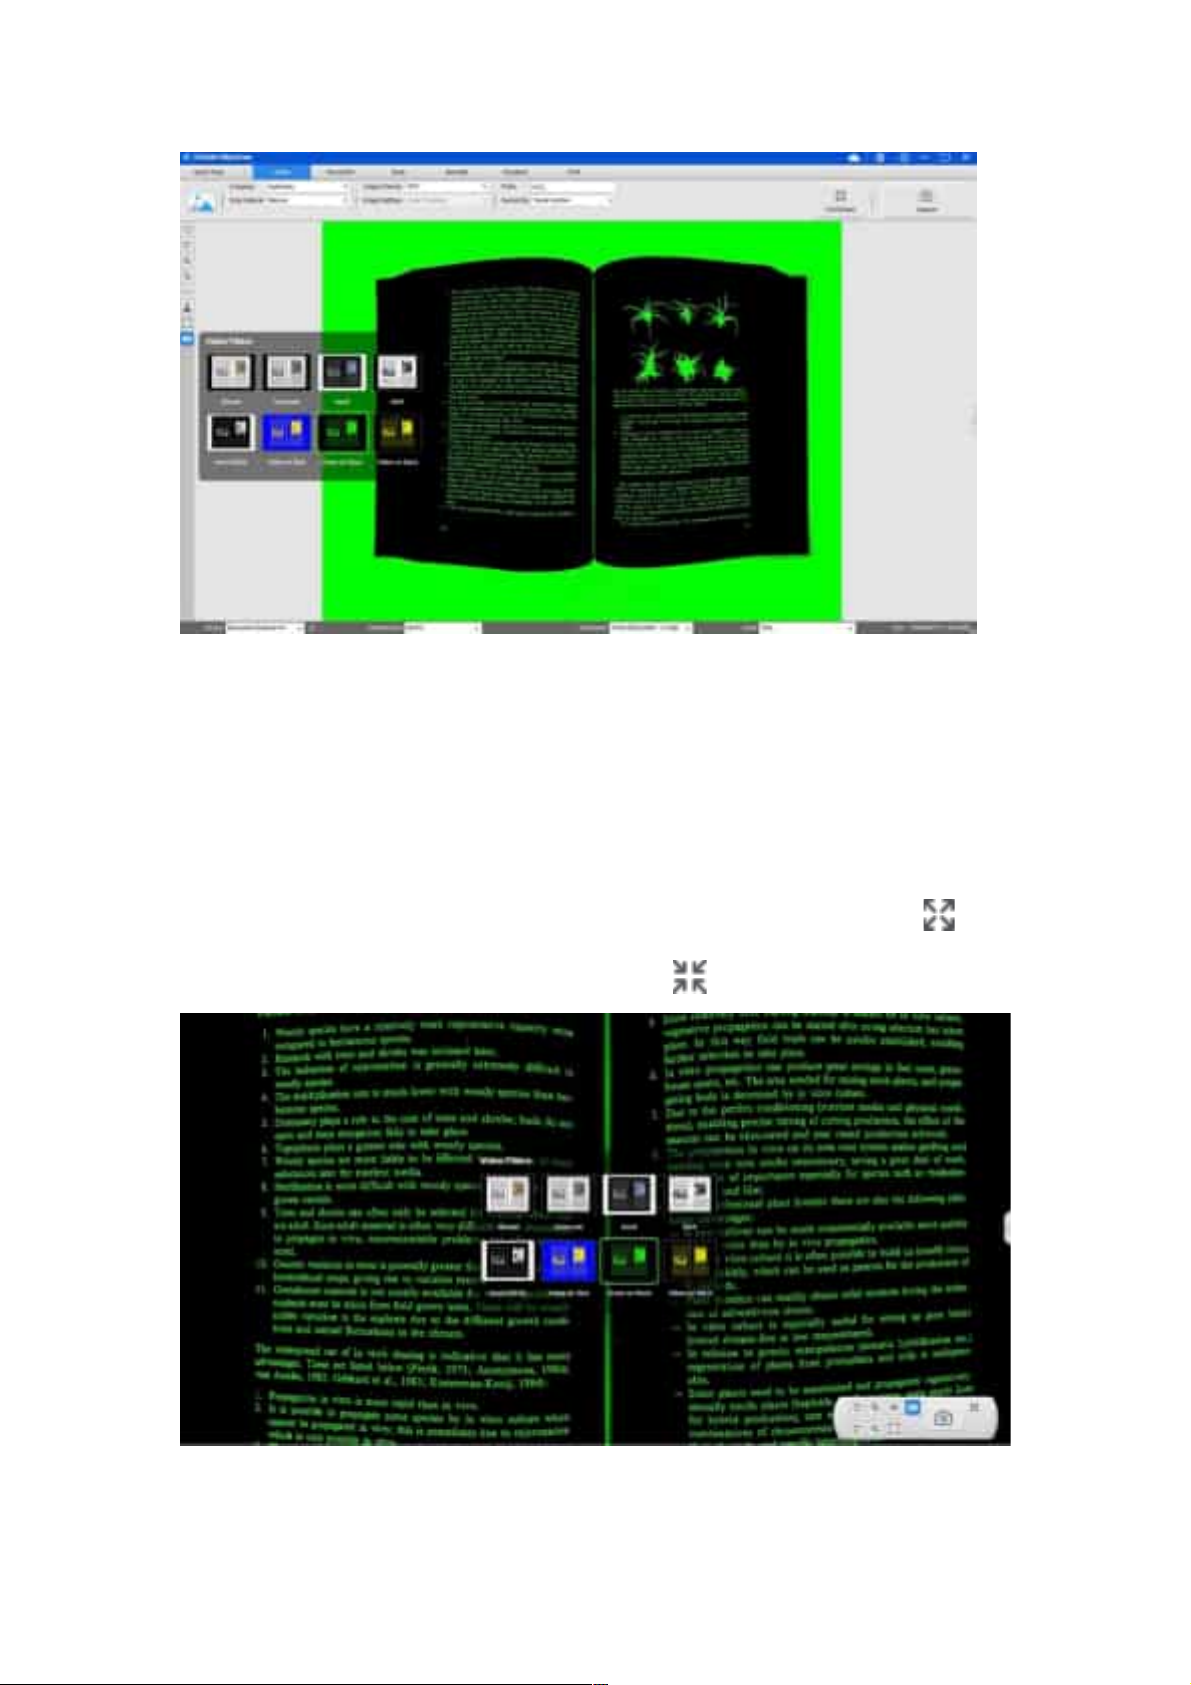
Note:
1. When a filter is applied, the preview window will immediately change to reflect the currently
selected filter effect, and the captured output image will also follow this filter effect.
2. While applying video filters, the “Image Settings” option will be disabled, and all captured
output images will adhere to this filter effect.
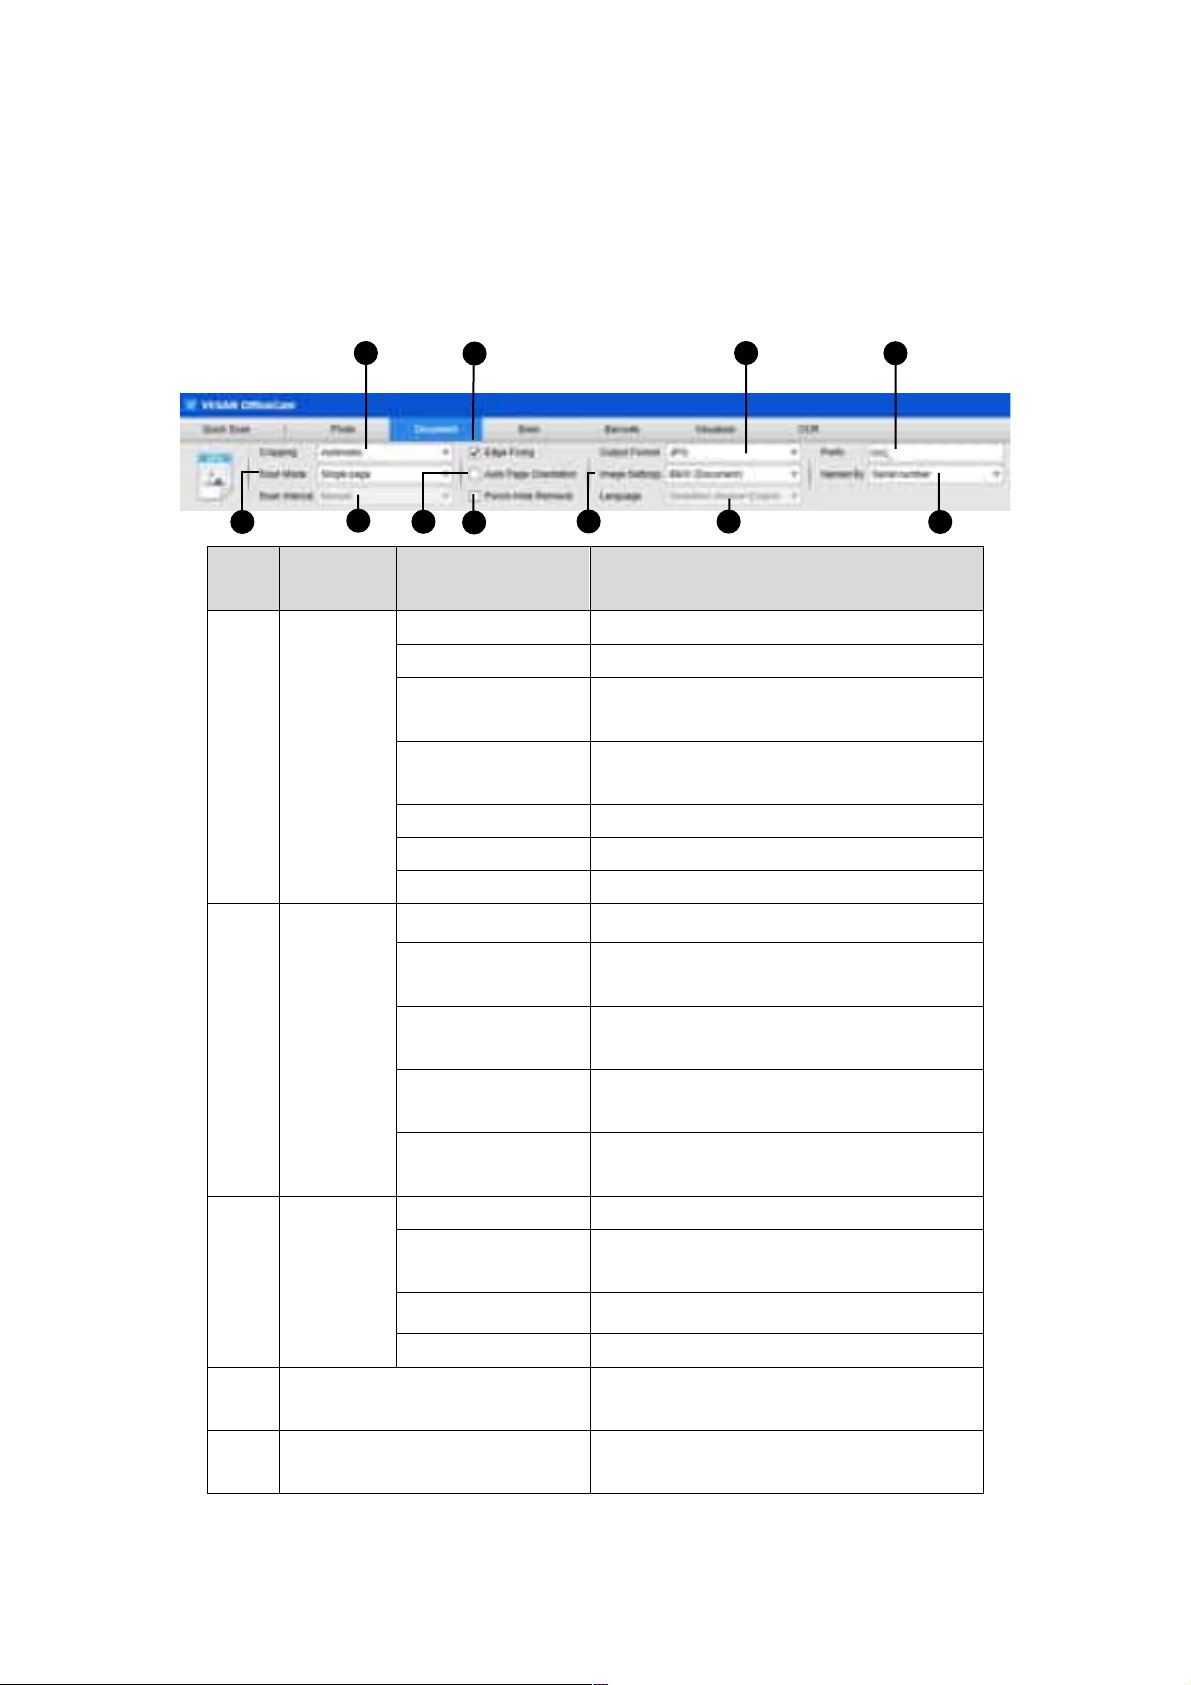
Enter to Full Screen Mode
In Photo mode, you can enter full-screen mode for a larger viewing area by clicking the “Full-
Screen” button. To exit full-screen mode, simply click the button again.
19
Page 21
Document Mode Settings
VIISAN OfficeCam software offers various powerful scanning functions, with each mode providing
different customizable settings.
For example, in [Document] mode, you can adjust the following settings to optimize your scans:
1
4
7
10
2 3
Item Feature
1 Cropping
2 Scan Mode
3
Settings
Scan
Interval
5
6
8
9
11
Setting Options Explanations
Automatic Automatic crop for a single image
Automatic (Multiple) Automatic crop for multiple images
Crop w/o scan pad Crop a single image automatically without
using a scan mat.
Crop w/o scan pad
(Multiple)
Scan old-even pages Scan and crop for odd and even pages.
Self-Defined Manual crop for a single object
No Cropping Scan without cropping
Single Page Scan a single page for a document
Multiple Page Scan multiple pages of a document using
Merge Horizontally Scan both sides of a document with left and
Merge Vertically Scan both sides of a document with tops and
Scan ID Cards Scan both sides of an ID card with tops and
Manual Manual scan by clicking the [Scan] button
Automatic Automatically scan when the camera detects a
Repeat (5sec) Automatic scanning by a 5-second countdown
Crop multiple images automatically without
using a scan mat.
continuous scanning
right sides merged
bottoms merged
bottoms merged
page is turned
4 Edge Fixing
5 Auto Page Rotation
Repeat (7sec) Automatic scanning by a 7-second countdown
Automatically crop a document and repair the
damaged edges
Automatically rotate pages based on text
orientation
20
Page 22

6 Punch Hole Removal
Output
7
Format
This function can remove the round-shaped
punch holes around the edges of the originals.
The punch holes around the edges are
replaced with the color closest to the originals.
NOTE: Punch holes may not be removed if
the originals are fed skewed, or the punch
holes are not along the edges of the
document.
NOTE: The shape of punch holes that is not
round cannot be removed.
NOTE: Punch holes may not be removed if
the holes overlap the text, lines or graphics.
BMP Save as BMP file
JPG Save as JPEG file
PNG Save as PNG file
TFF Save as TIFF file
TFF (Multiple) Save as multiple-page TIFF file
PDF(Image) Save as image-based PDF file
PDF(Searchable) Convert image into searchable PDF file
PDF(Text) Convert image into editable Text PDF file
Te xt Convert image into editable Text file
Word Convert image into editable Word file
Excel Convert image into editable Excel file
MP3 (Text to speech) Convert document text into MP3 audio file.
NOTE: This function is only enabled on specific
models.
WAV (Text to speech) Convert document text into WAV audio file.
NOTE: This function is only enabled on
specific models.
Color (Original) Output image in original color
Color (Enhanced) Output image with color enhanced
8
9 Language
10 Prefix
11 Name By
Image
Settings
Grayscale Output image in grayscale
B&W (Document) Output image in Black & White and whiten
background
B&W (Red Stamp) Output image in Black & White and keep any
red stamp
Select OCR language
Note: Make sure to select the correct language of the original text from
the drop-down menu to perform text recognition.
Add prefix for the file name
Serial Name by serial number
Date & Time Name by date and time
21
Page 23
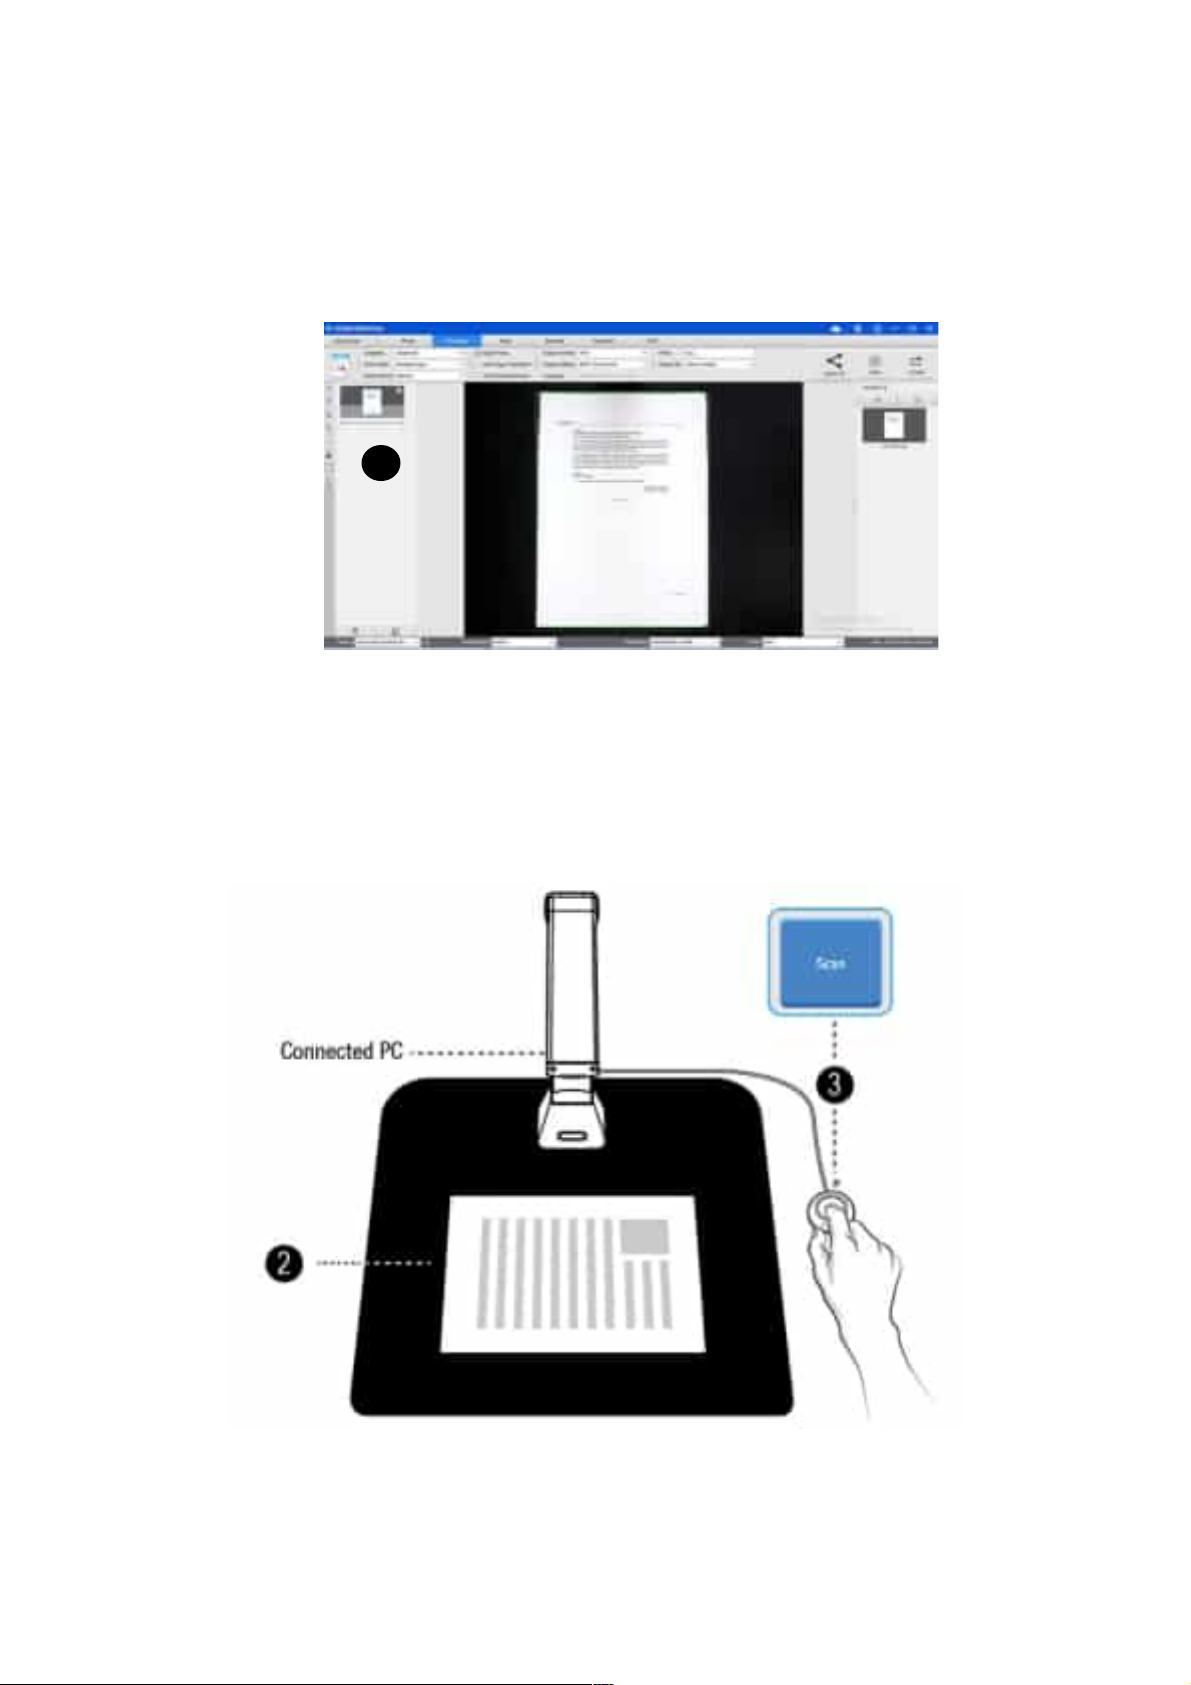
Scanning Using Document Mode
1) To s ca n d oc u me n t m ate ri al s, pl e as e cl ic k th e t o p f un ct i on ta b i nt o [ D oc u men t]
mode and make settings for your original in this option menu as necessary.
1
2) Place a document face up on the center of the scan mat.
3) Set the cropping to [Automatic] and click [Scan] button in the upper right corner of
the scanning software to scan an image, additionally you may also press the
external shutter button to initiate scanning.
NOTE: To continue scanning additional pages, click [Scan] button and repeat this
step to scan additional images.
When scanning and exporting are complete, the scanned thumbnail will appear in
the output list. You can double-click the thumbnail image to view the scanned result.
22
Page 24
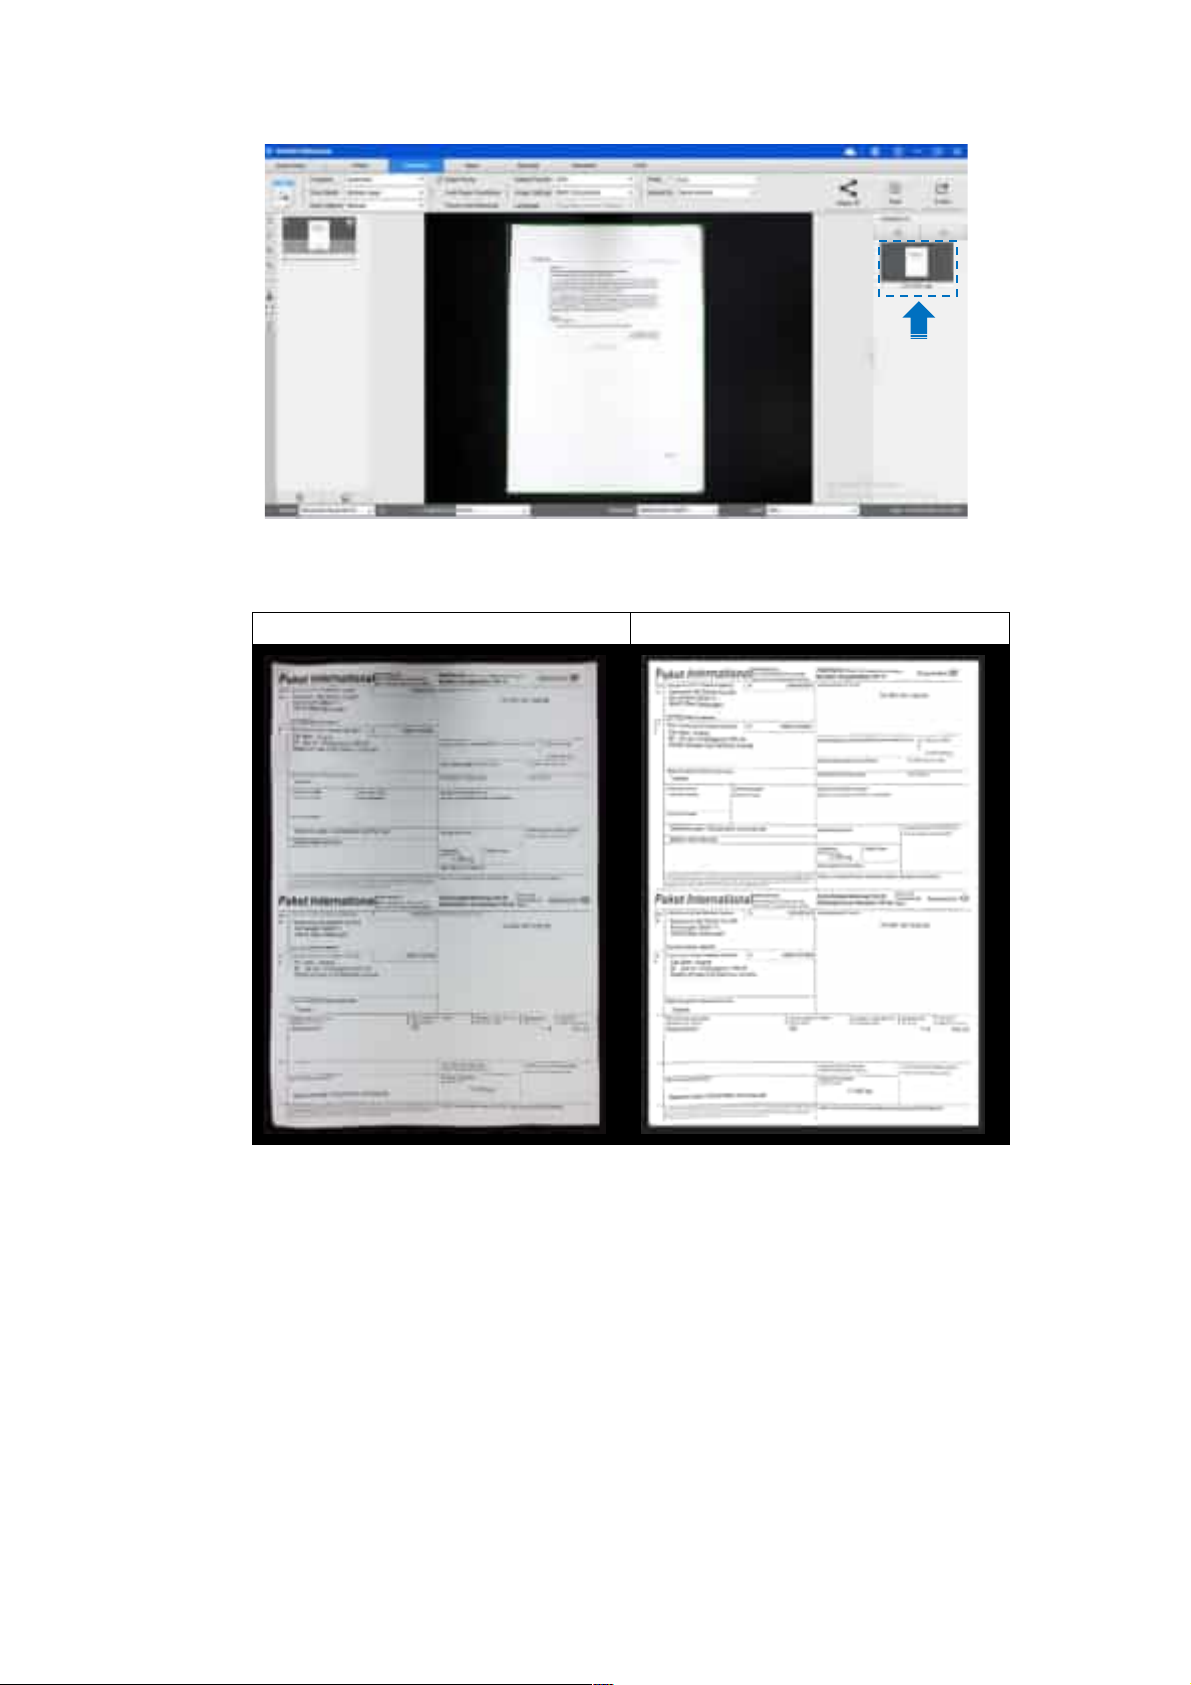
The following is an example for a scan in the B&W (Document) mode.
Original Output Result
23
Page 25
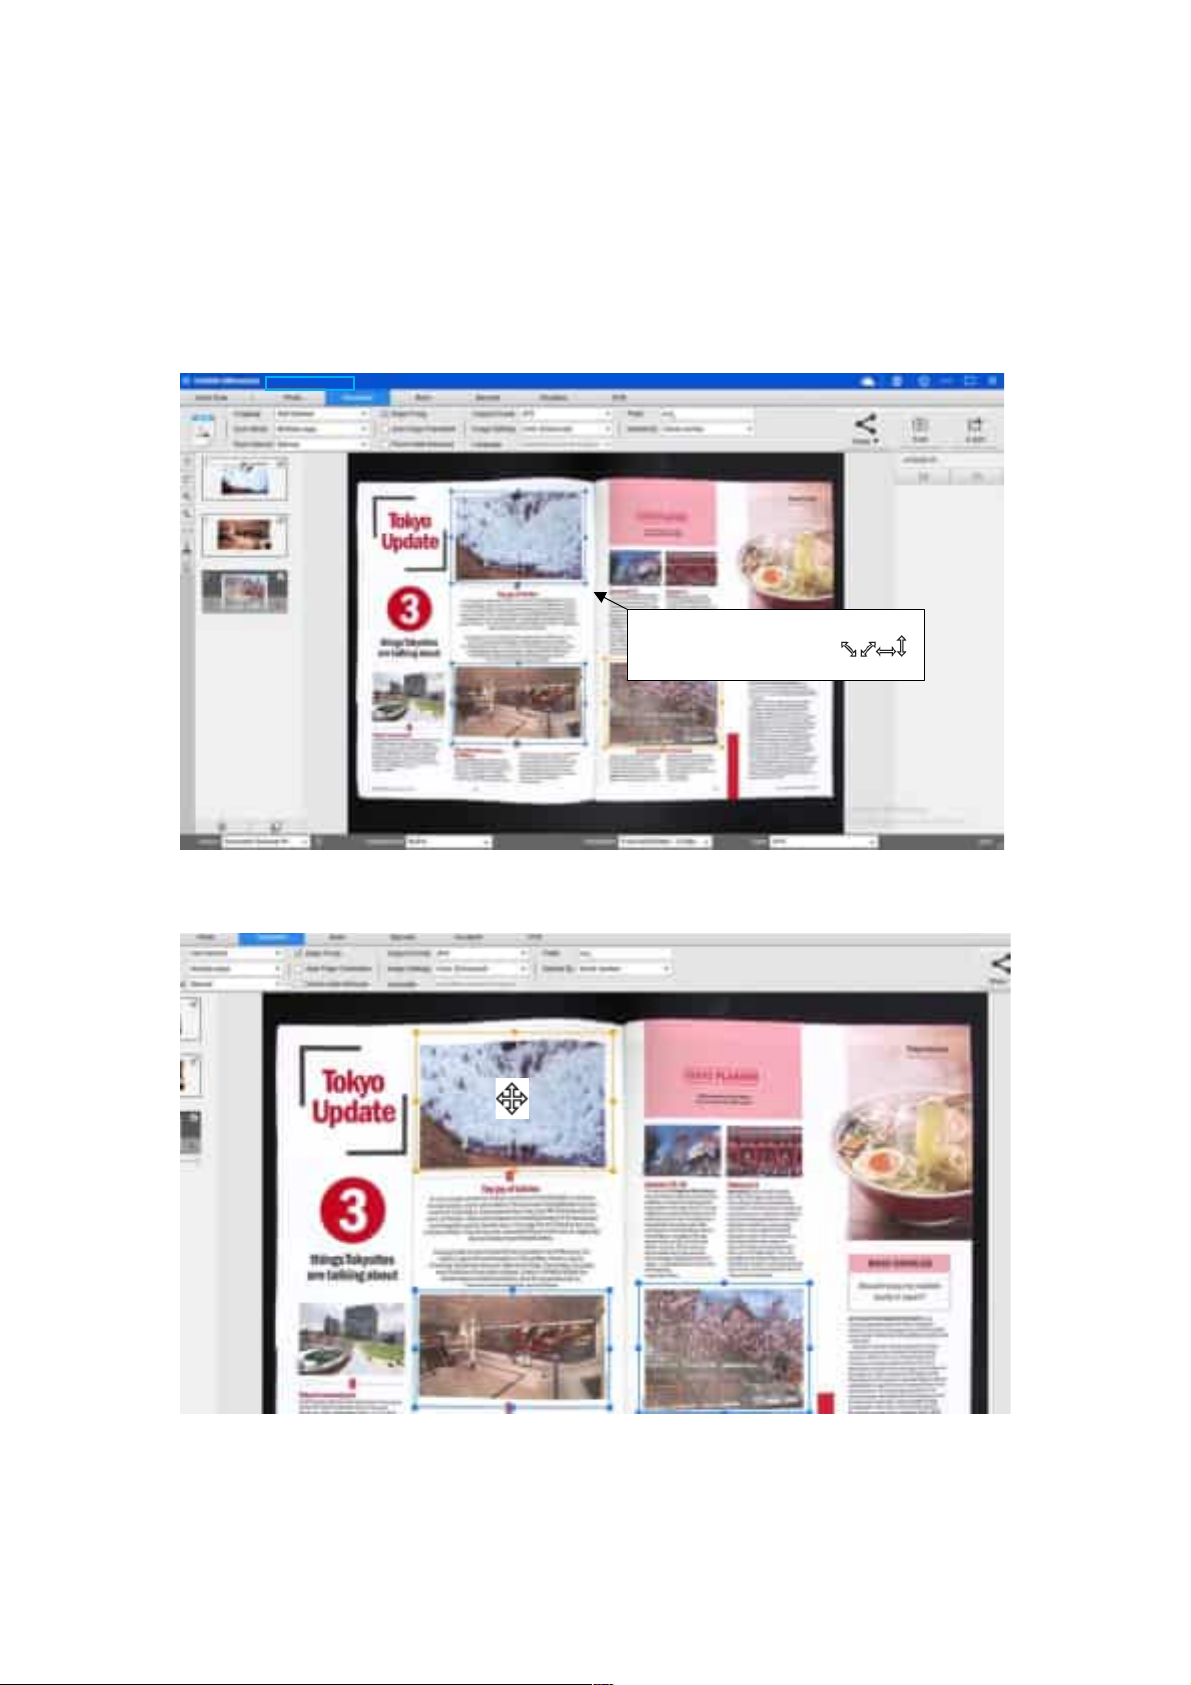
Manual Cropping
This software allows users to manually crop multiple areas before scanning the final image.
To a d jus t the c ro p pi ng fr a me , fo ll ow th e s te ps be l ow :
1) Set the cropping mode to “Self-Defined.”
2) Click the left mouse button to manually select the area you want to scan.
Click and drag the edge of the cropping frame to adjust its size.
Enlarge/shrink cursor
3) Move the cursor within the cropping frame (the cursor will change accordingly).
Click and drag the cursor to reposition the entire cropping frame to the desired area.
24
Page 26
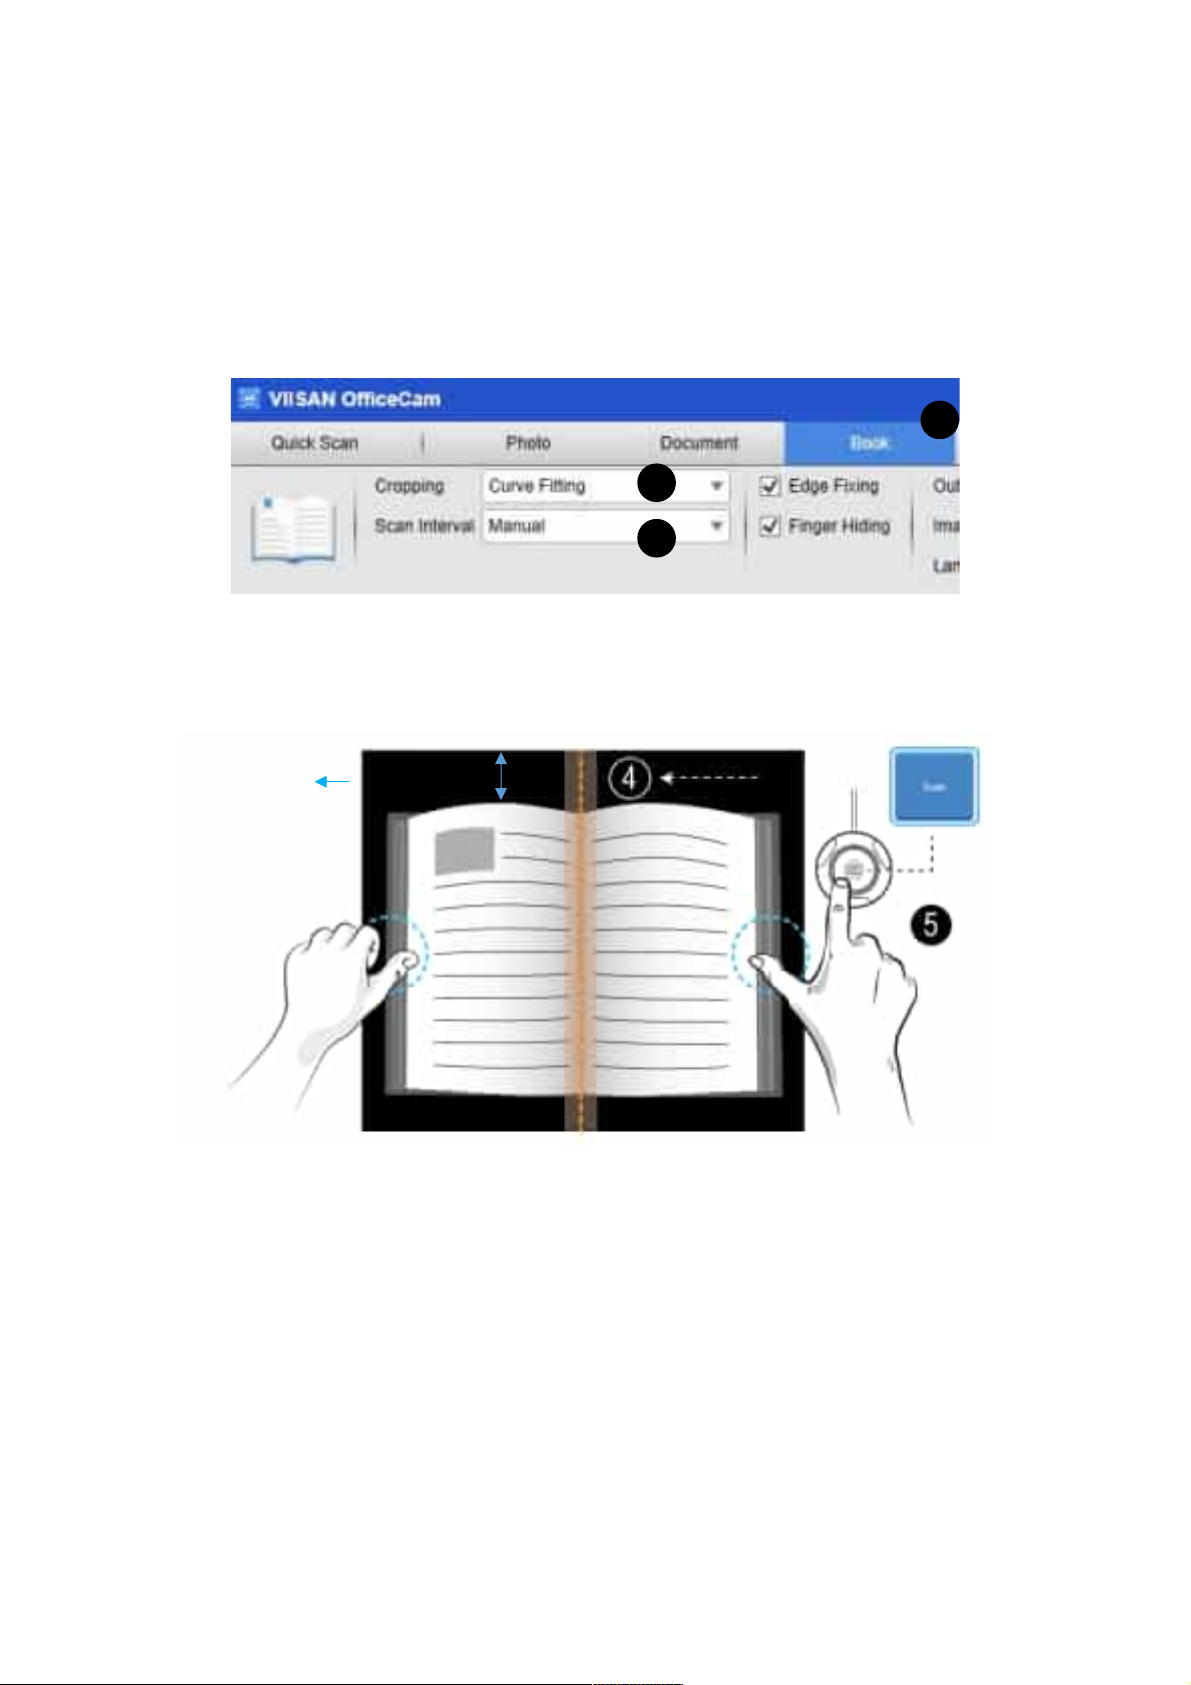
Scanning by Using Book mode
1. To sc an a book or booklet, set the top function tab to [Book] mode.
2. According to the thickness of the book, select scanning with “Curve Fitting” or
“Straight Fitting” from the drop-down menu of Cropping
3. Set the Scan
4. Place an opened book face up on the black scan mat and then align the center of the
opened book with the vertical orange line on the screen.
5. Press your fingers against on the both-side of the opened book and then press the
[Scan] button to perform a scan as show below.
Interval to “Manual”. Check the “Finger Hiding” feature. (If necessary)
2
3
1
Background
NOTE:
Margin
Margin
1. The book must be placed within the scanning area with enough margin space
on the top and bottom of the background, because very narrow background
margin will affect the page flattening algorithm performance.
2. The book scan mode is only enabled when detected the external shutter
button is connected.
25
Page 27
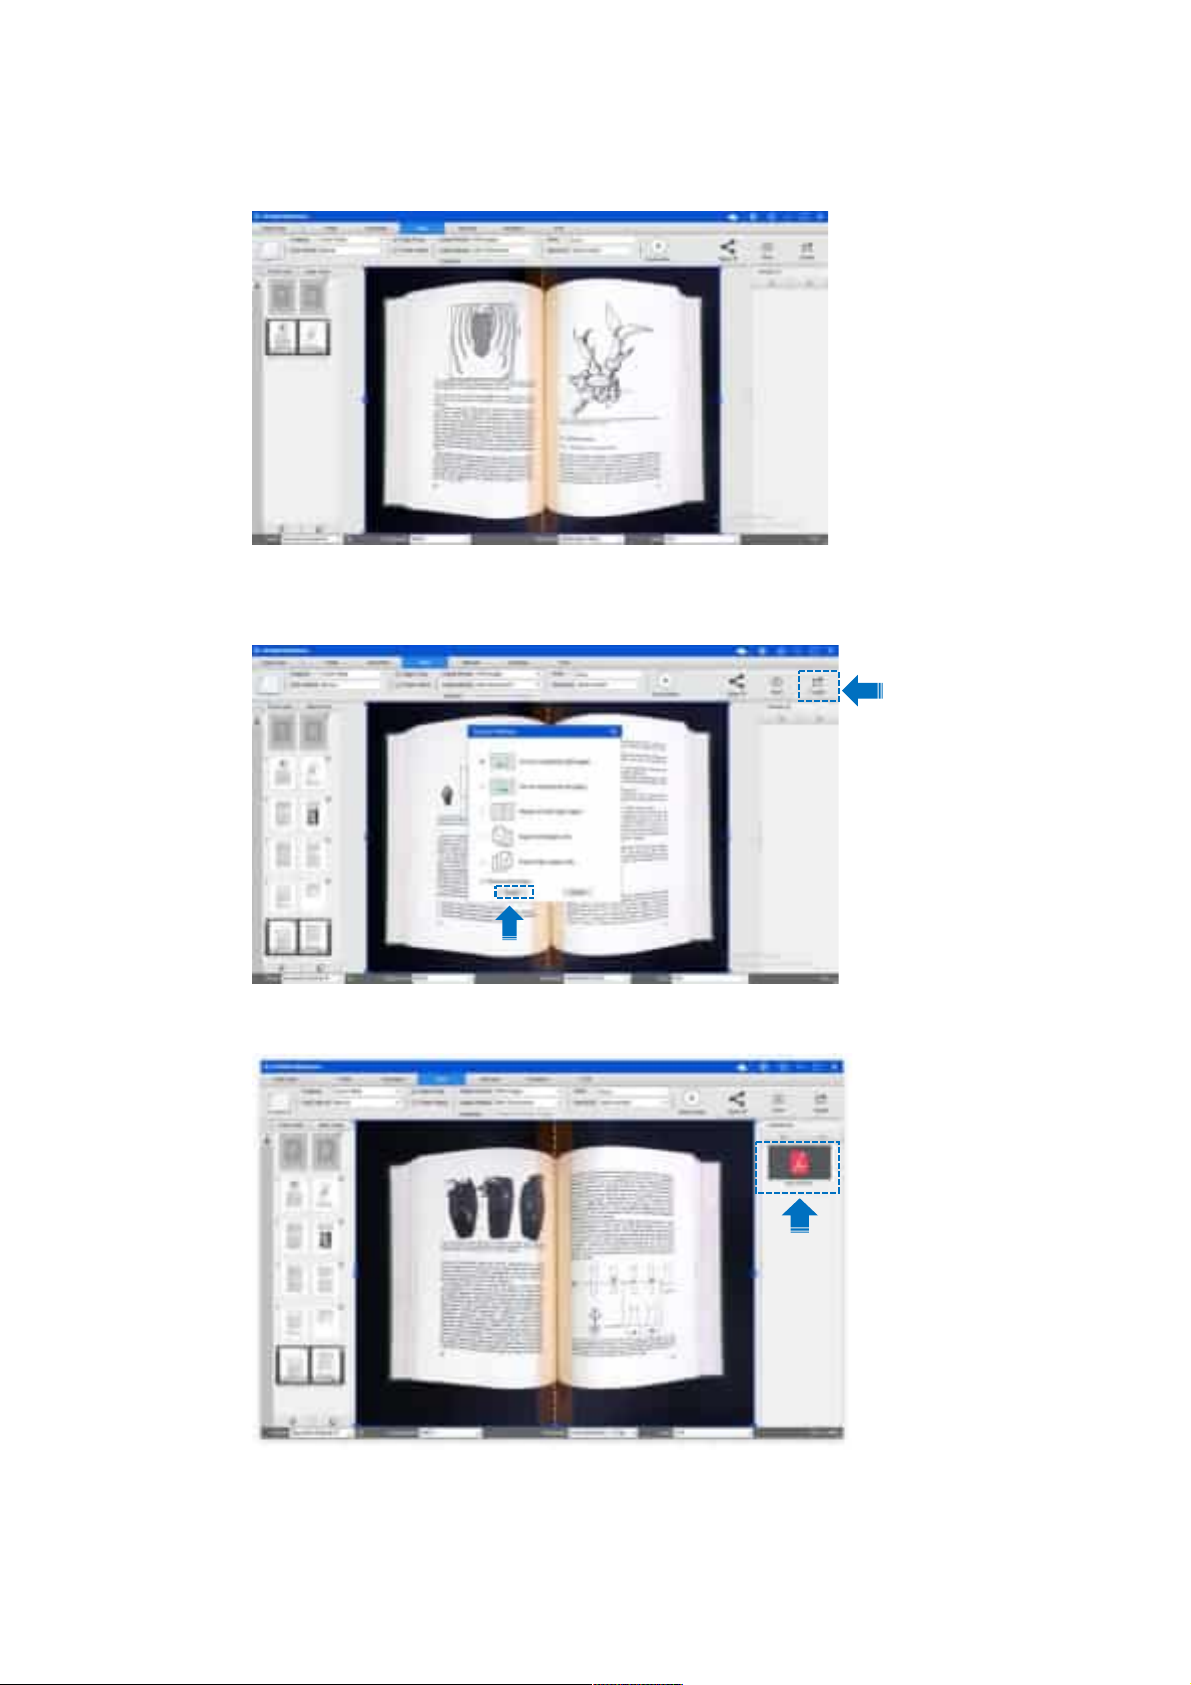
1. After scanning, the software will automatically flatten curved page and split them
into two separate images, then display in the left-hand side preview window.
2. To ex p or t t he sc a nn e d i ma ge s , p re s s the [Export] button in the upper right corner
to open the Export Settings menu.
3. Select a format and then click [Export] button to output your scanned images.
4. After exporting, the file will be shown in the right-hand side output window, there
you can double-click on the file icon to open the scanned result.
26
Page 28
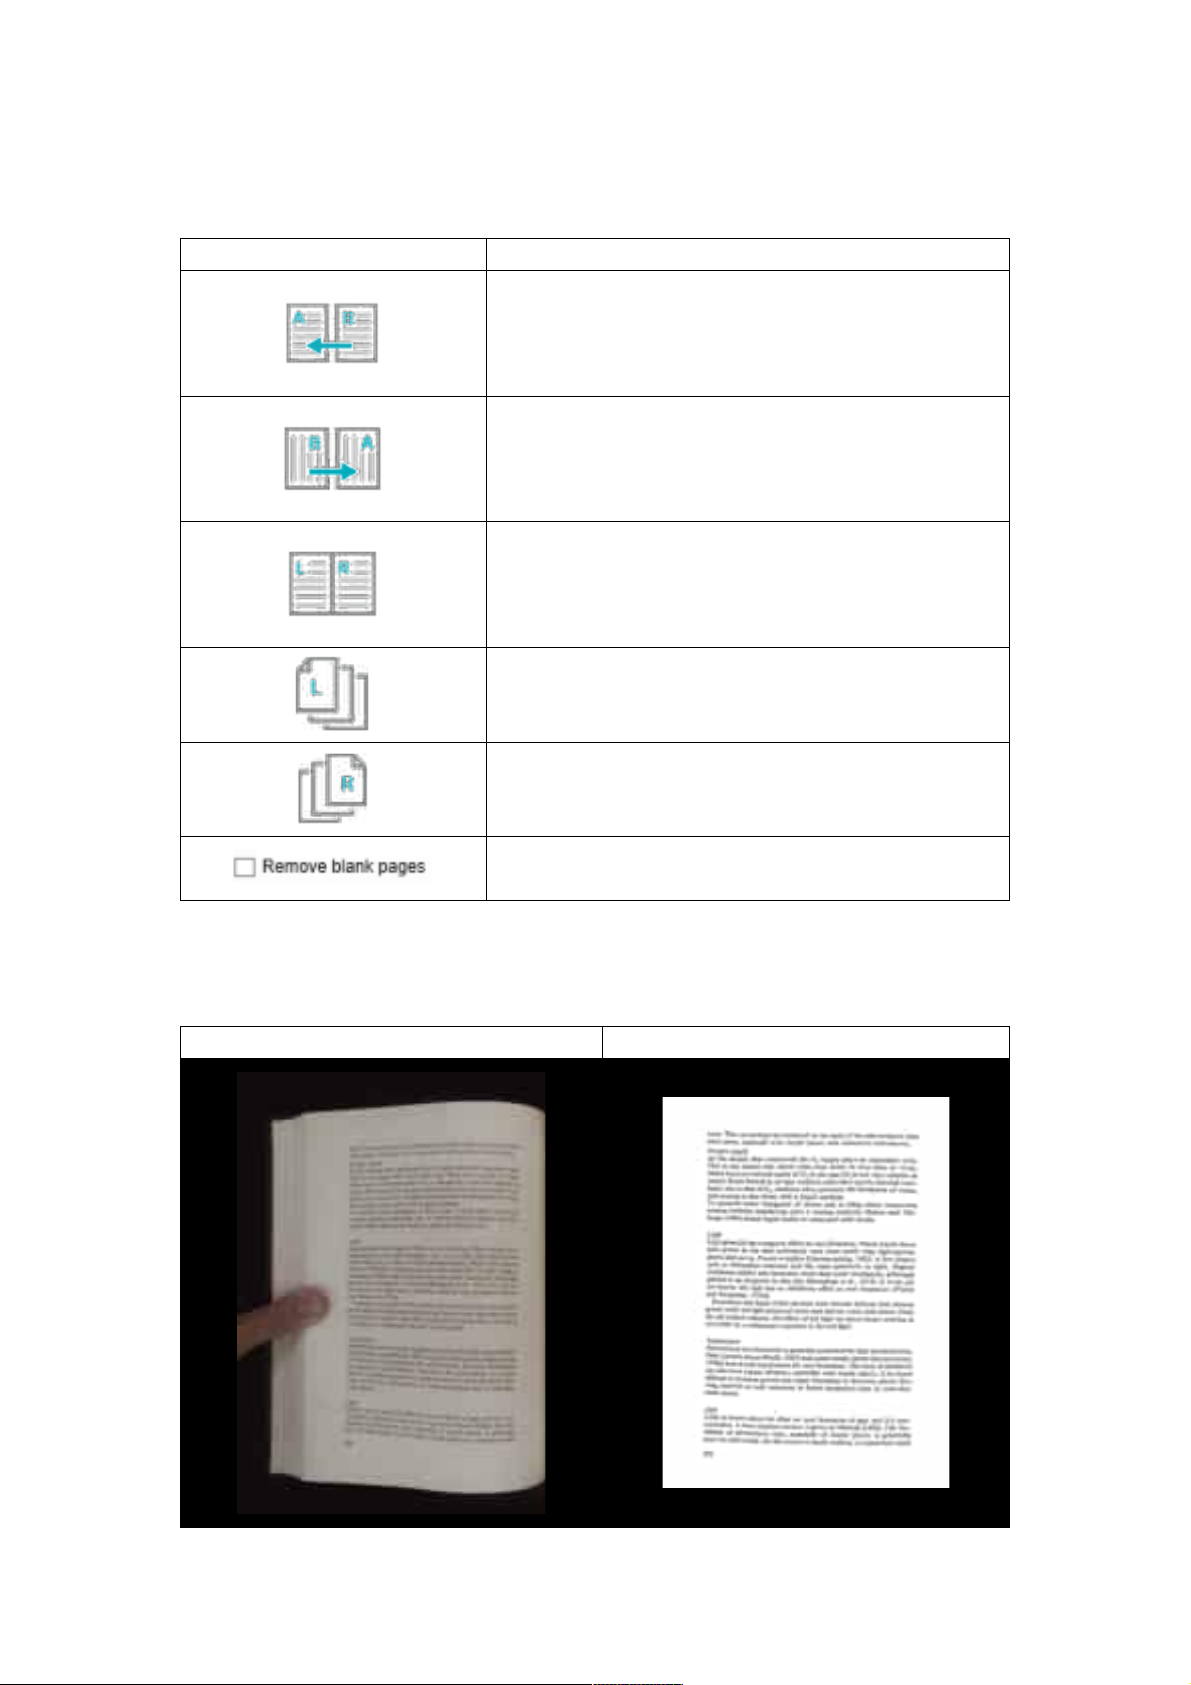
Export Settings:
Here are some options for exporting the scanned page.
Page Export Settings Descriptions
Export without merging.
This is for flip-right style books
Export without merging.
This is for flip-left style books
Export with merged left and right pages.
Export left pages only.
Export right pages only.
Blank page removal.
NOTE: Export Settings are only available for the Book scan mode; the following is an
example of automatic curved page flattening and finger erasing in [Book] scan mode.
Original Output Result
27
Page 29
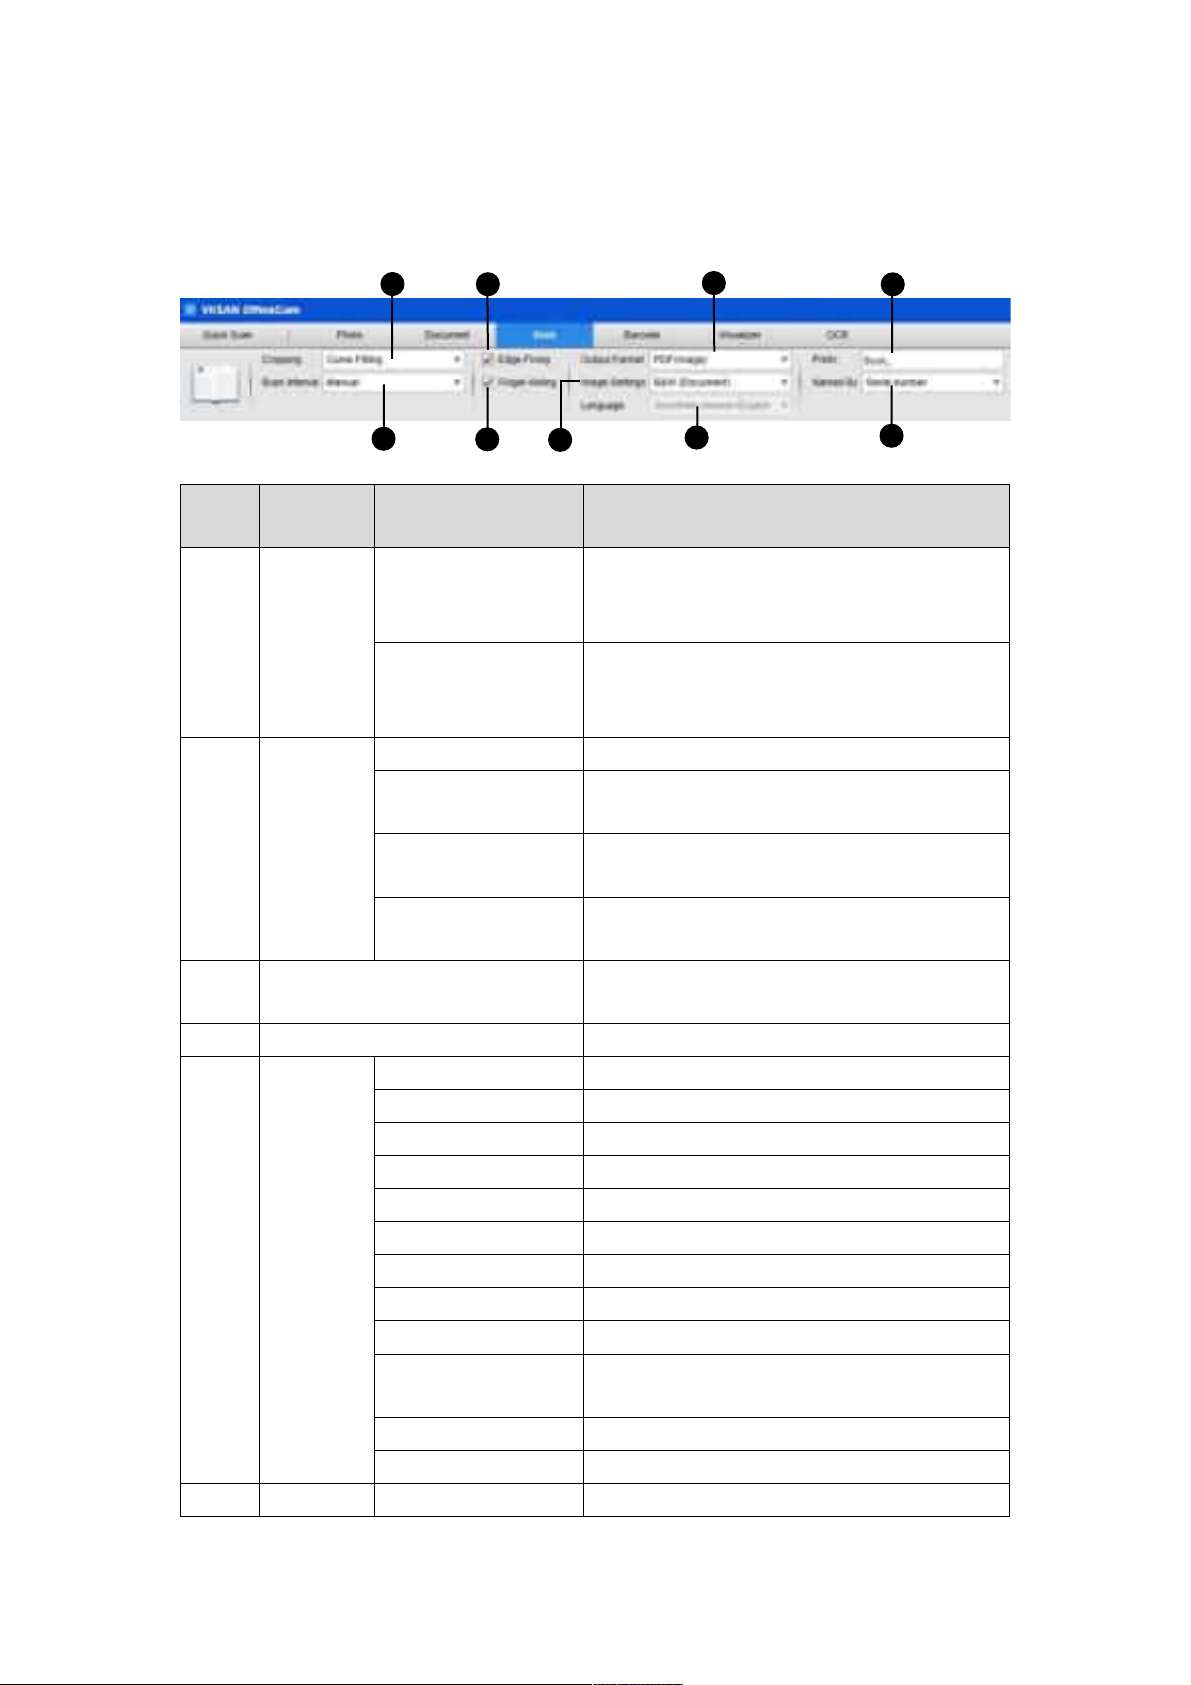
The Scan Settings of Book Mode
In Book function mode, you can utilize the following feature settings:
1
2
Item Feature
Setting Options Explanations
Settings
Curve Fitting Automatic curved page flattening
1 Cropping
Straight Fitting Automatic straight page flattening
Manual Manual scan by clicking [Scan] button
Auto Automatically scans when the camera
Scan
2
Interval
Repeat (5sec) Automatic scanning by a 5-second
Repeat (7sec) Automatic scanning by a 7-second
3 Edge Fixing
4 Finger Hiding Automatically erases fingers
BMP Save scanned image to BMP file
JPG Save scanned image to JPG file
PNG Save scanned image to PNG file
TIFF Save scanned image to TIFF file
TIFF (Multi) Save scanned image to a Multipage TIFF file
PDF(Image) Save as an image-based PDF file
Output
5
Format
PDF(Searchable) Convert image into searchable PDF file
PDF(Text) Convert image into editable text PDF file
JPEG Save as JPEG file
EPUB Convert image into an Electronic Publication
Te xt Convert image into editable Text file
Word Convert image into editable Word file
MP3 (Text to Convert scans into text-to-speech in MP3
3
4
6
5
7
NOTE: This is used for scanning thicker
books with curved surfaces
NOTE: This is used for scanning thinner
booklets with straight surfaces
detects a page is turned
countdown
countdown
Automatically crops a document and repairs
the damaged edges
E-Book file
8
9
28
Page 30

6
7
8 Prefix
9 Name By
speech) format
WAV (Text to
speech)
B&W (Document) Output image in Black & White and whiten
B&W (Binarized) Output image in Black & White
Image
Settings
Language Select OCR language.
B&W (Red Stamp) Output image in Black & White while keeping
Color (Original) Output image in original color
Color (Enhanced) Output image with color enhanced
Gray Output image in grayscale
Note: Make sure to select the correct language of the original text
from the drop-down menu to perform text recognition.
Add prefix for the file name
Serial Name by serial number
Date & Time Name by date and time
Convert scans into text-to-speech in WAV
format
background
red stamps
29
Page 31
The Special Feature of Book Scan Mode
Finger Removal Function
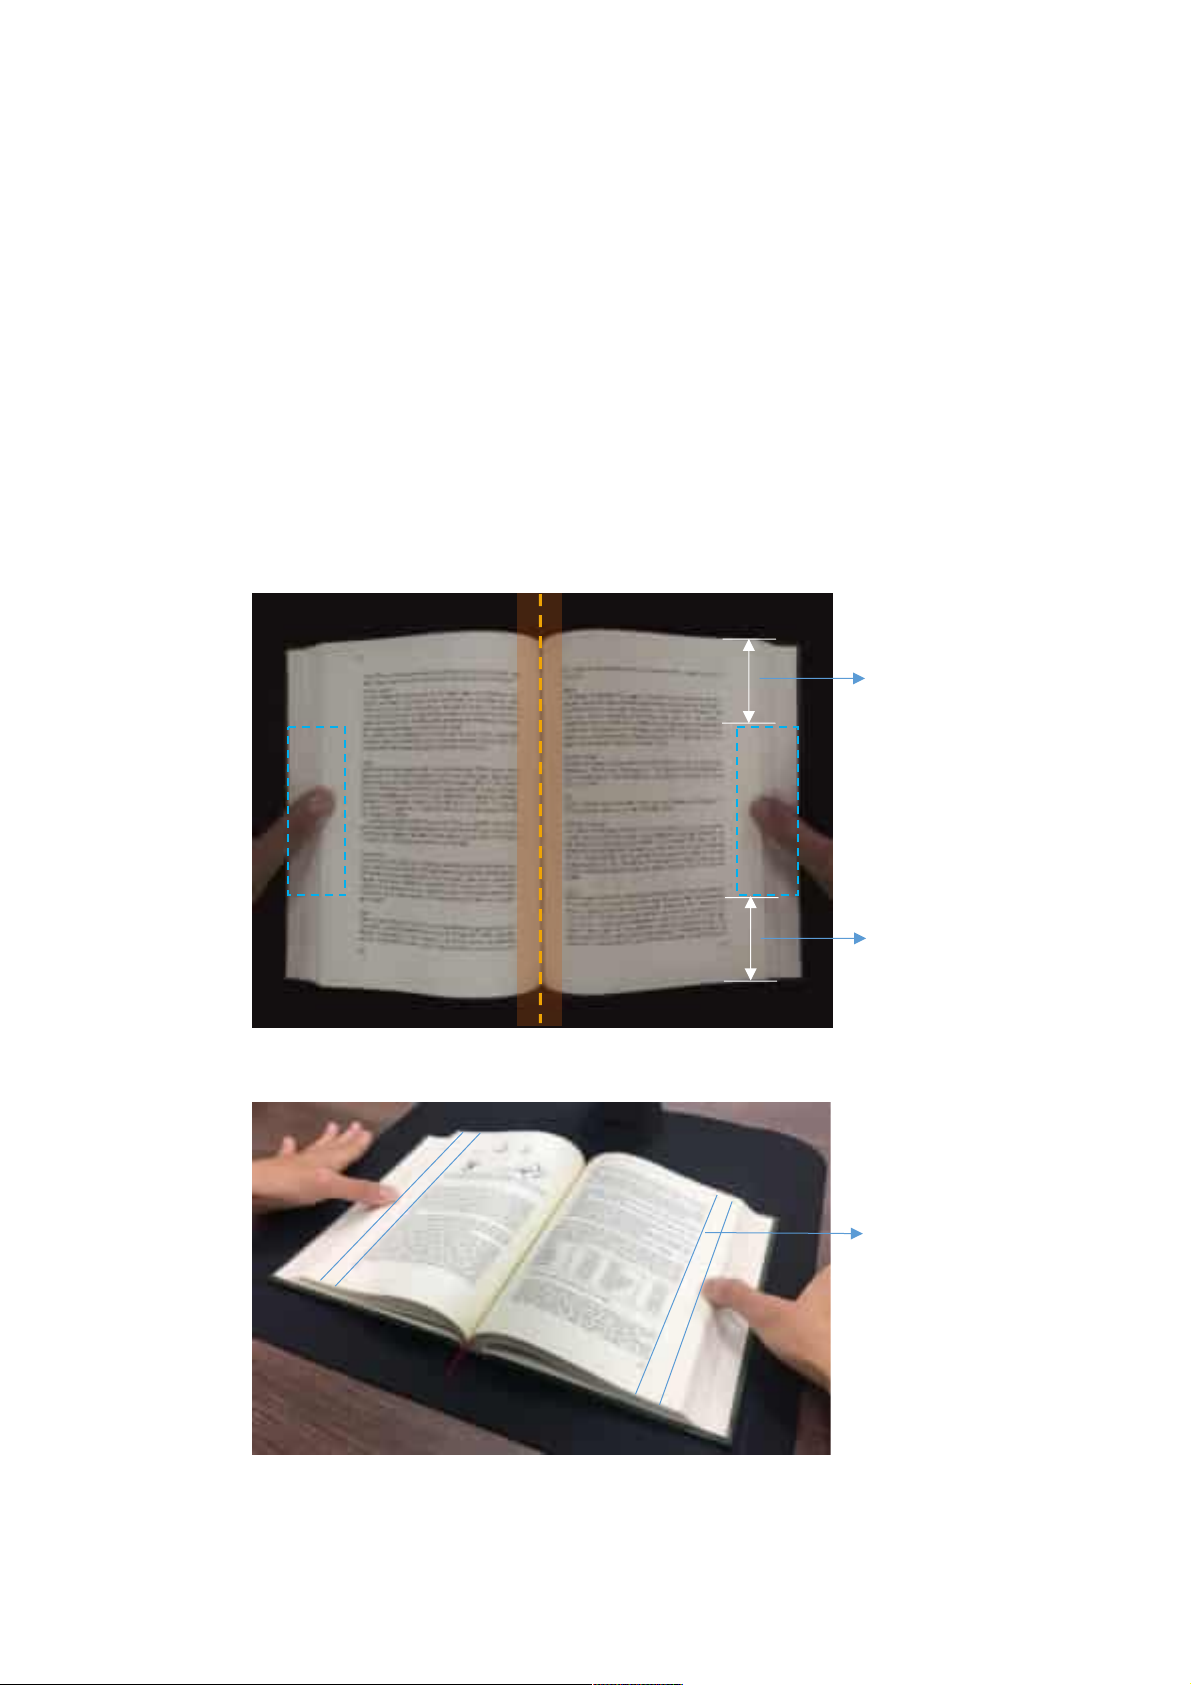
The VIISAN OfficeCam offers a very useful function which detects fingers at the margin of
books and erases them from the scanned image. The following requirements must be
fulfilled before using the “Finger removal” function properly.
1. Ensure that you have selected the [Finger Hiding] function in the software.
2. Place an opened book face up on the black scan mat.
3. The center of the book must be aligned with the vertical orange line on the screen.
4. The fingers should be placed in the middle of the edges of the opened book.
1/4
A quar ter space
of book length.
1/4
A quar ter space
of book length
5. The fingers should be positioned with a similar distance to the text elements in the
book as the following picture shows.
Keep a
distance at
least 10 mm
between text
and finger
NOTE: If the distance is too small, the finger removal function may not correctly remove
the fingers from the scanned image.
30
Page 32
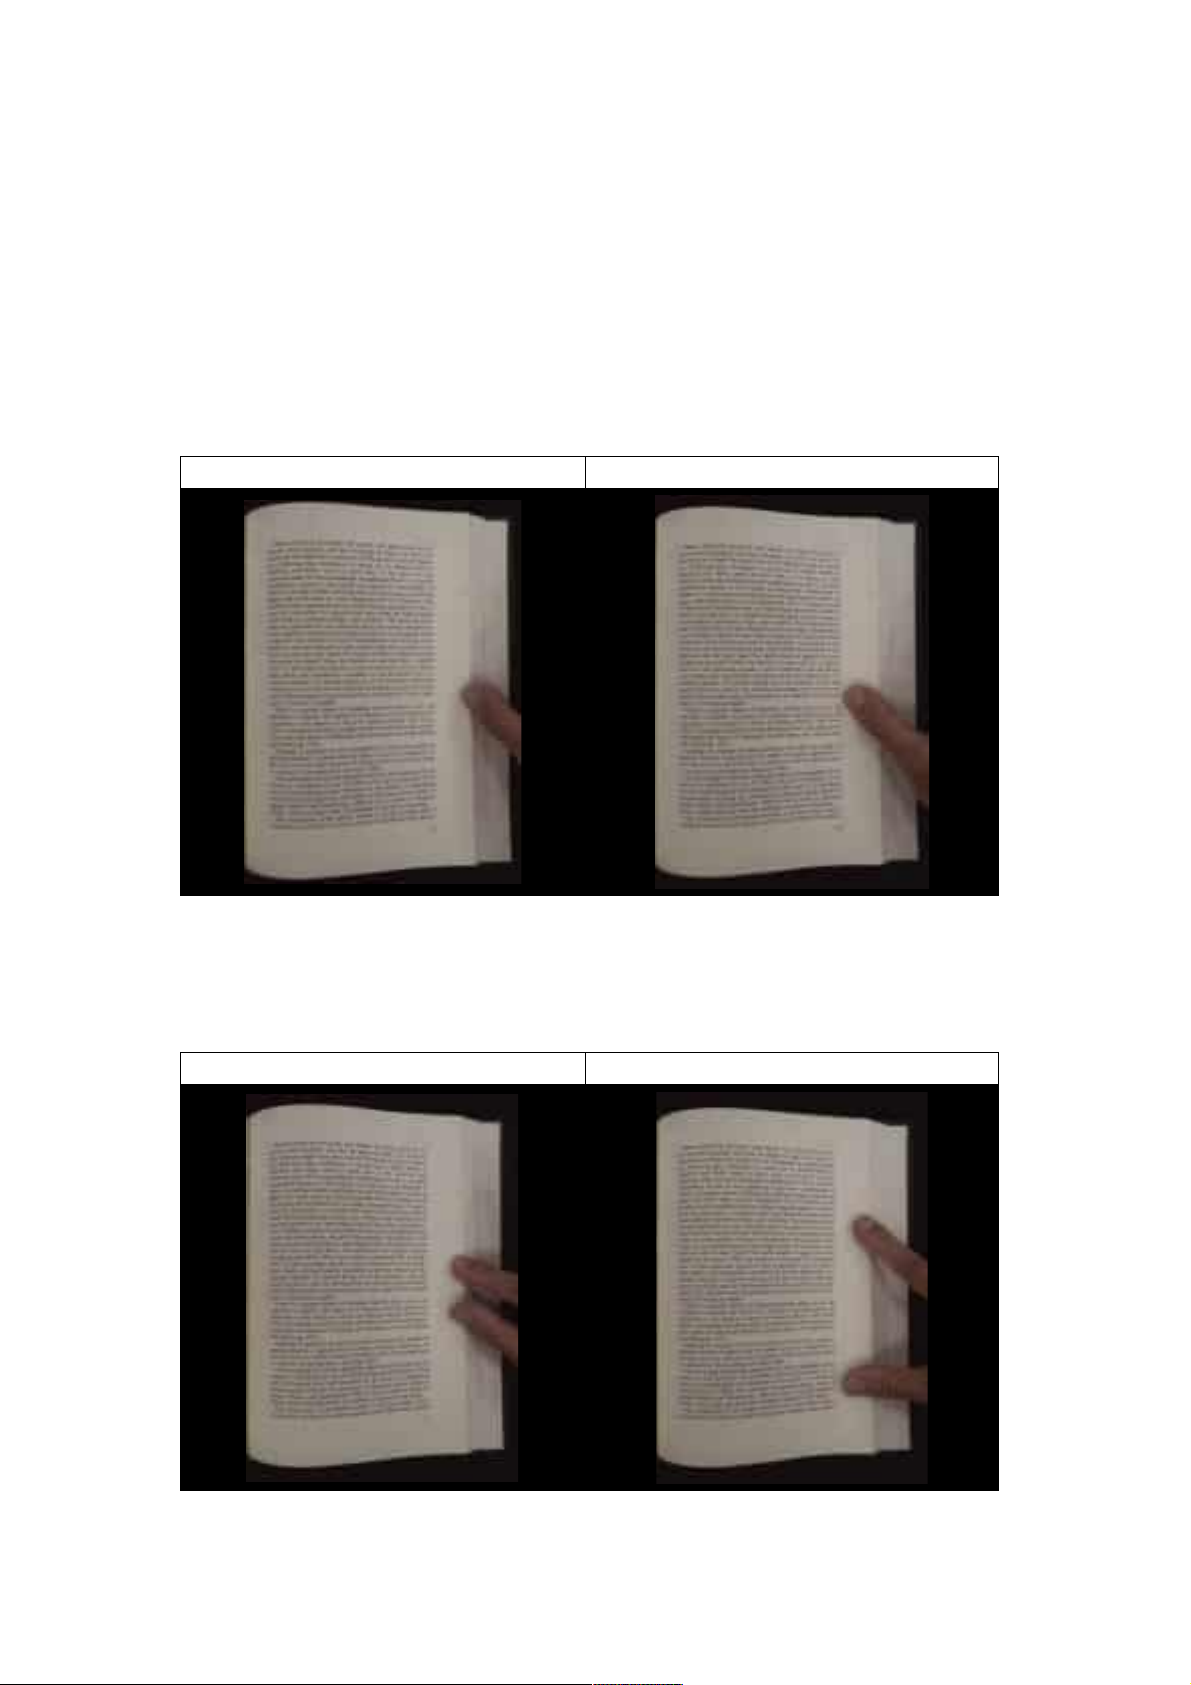
Correct Finger Position
There are some finger positions that can cause a malfunction of the "Finger Removal"
function.
The following are a few examples of correct and incorrect finger positions.
Distance too small
The fingers should be positioned at a distance to the text elements in the book as shown
in the picture example. Do not place fingers too close to the text of the book.
Correct Incorrect
Multiple fingers hold the book
When using multiple fingers to hold down the book, place your fingers together in the
middle of the edge of the book. Do not spread your fingers too far apart.
Correct Incorrect
31
Page 33
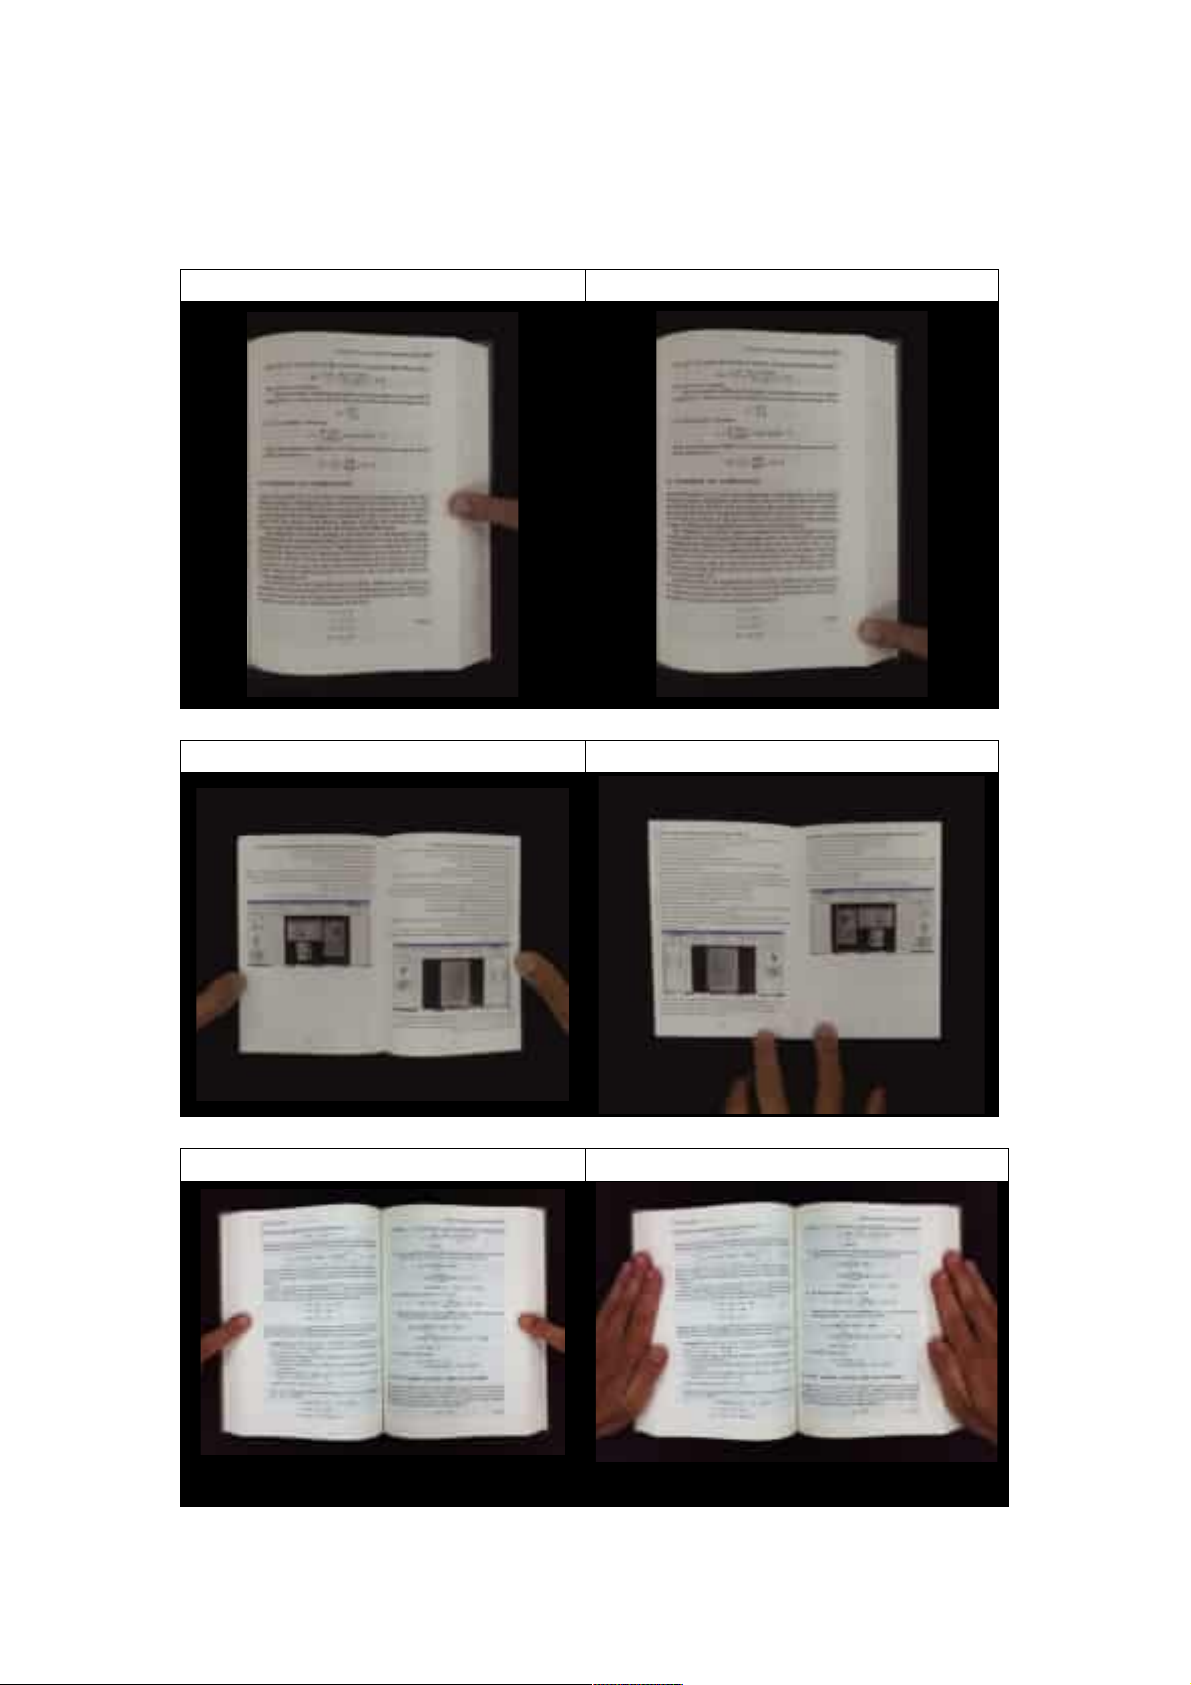
Single Finger Position
Always keep your finger straight and placed on the middle section of the opened book.
Do not place your finger on the top or bottom of the opened book.
Correct Incorrect
Correct Incorrect
Correct Incorrect
32
Page 34
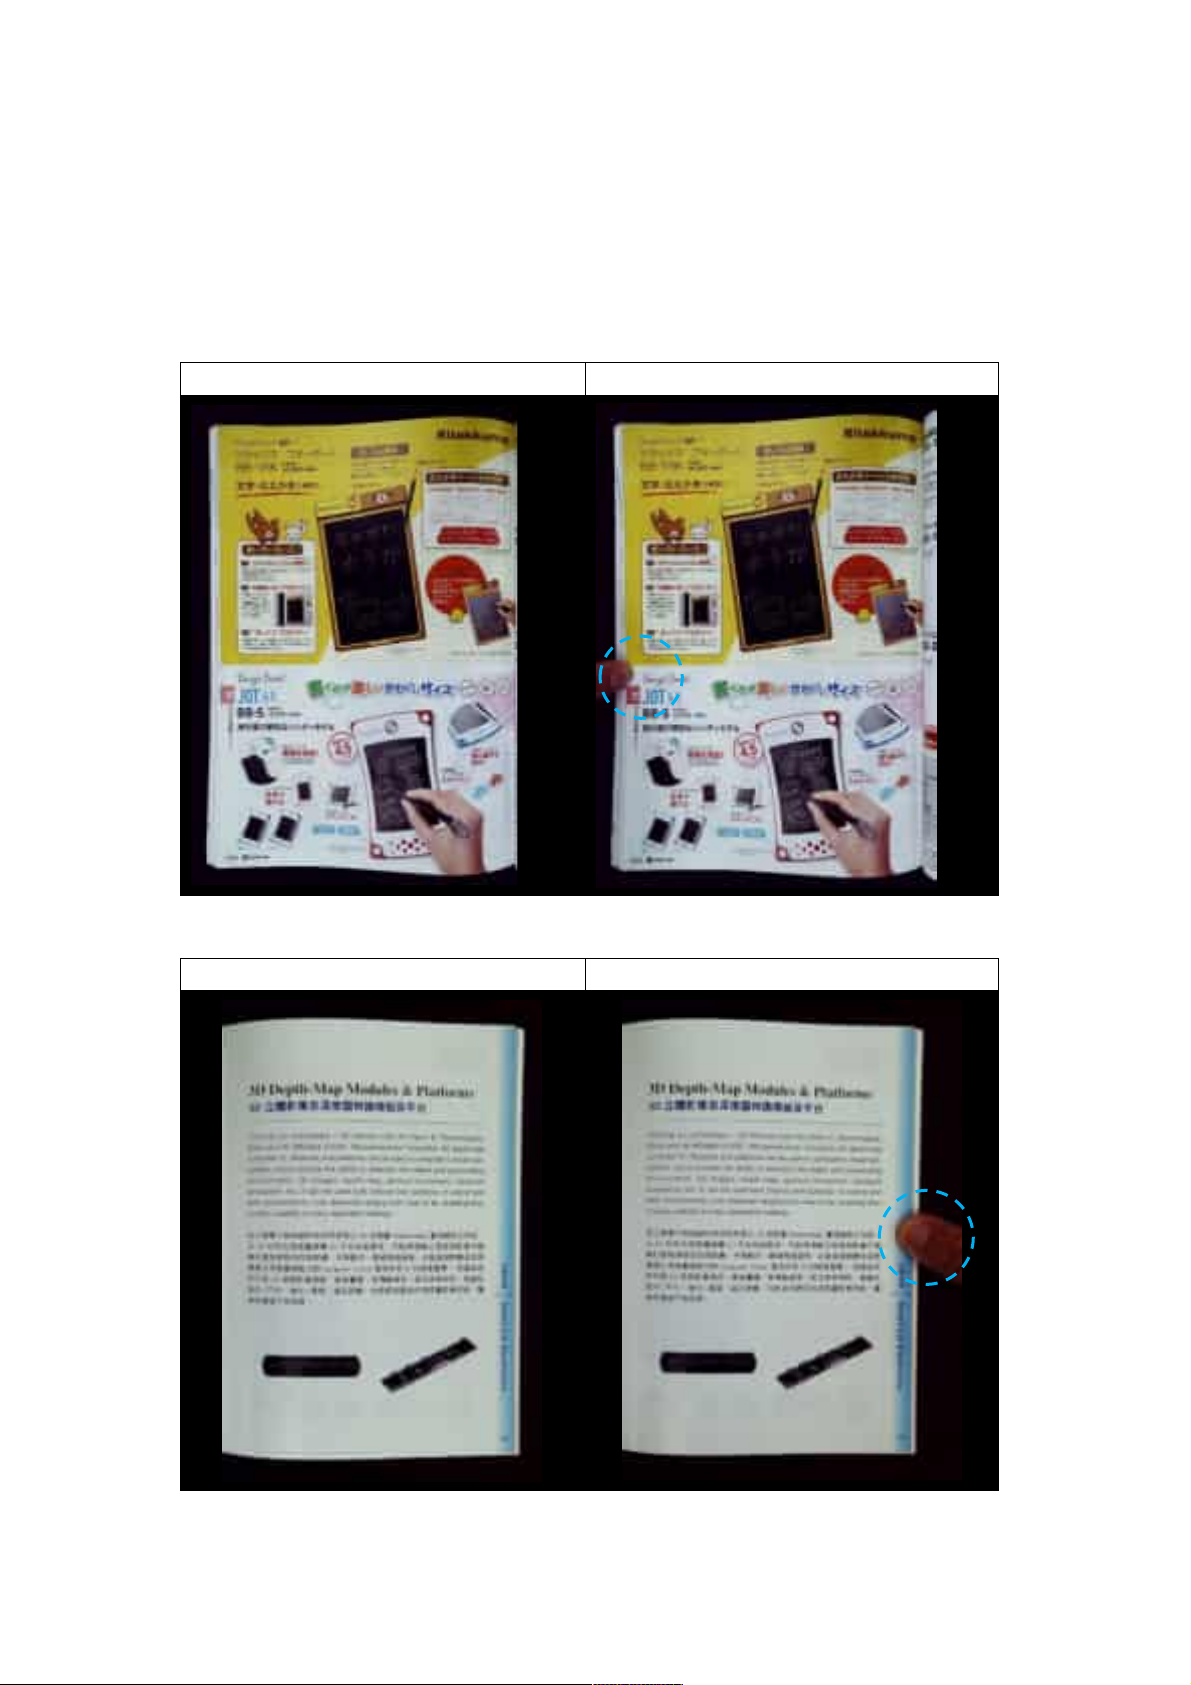
Mixed Patterns and Colors
To sc an a f la t , color magazine or catalog, we recommend turning-off the “Finger Hiding”
function in the scan settings, as the finger removal function may cause malfunction, the
reason being that the analyzing algorithm will detect an area of mixed patterns and colors
at the border of the image.
Do not place your finger on the book’s edge if mixed patterns are present.
Correct Incorrect
Do not place your finger on a book edge with color printing.
Correct Incorrect
33
Page 35
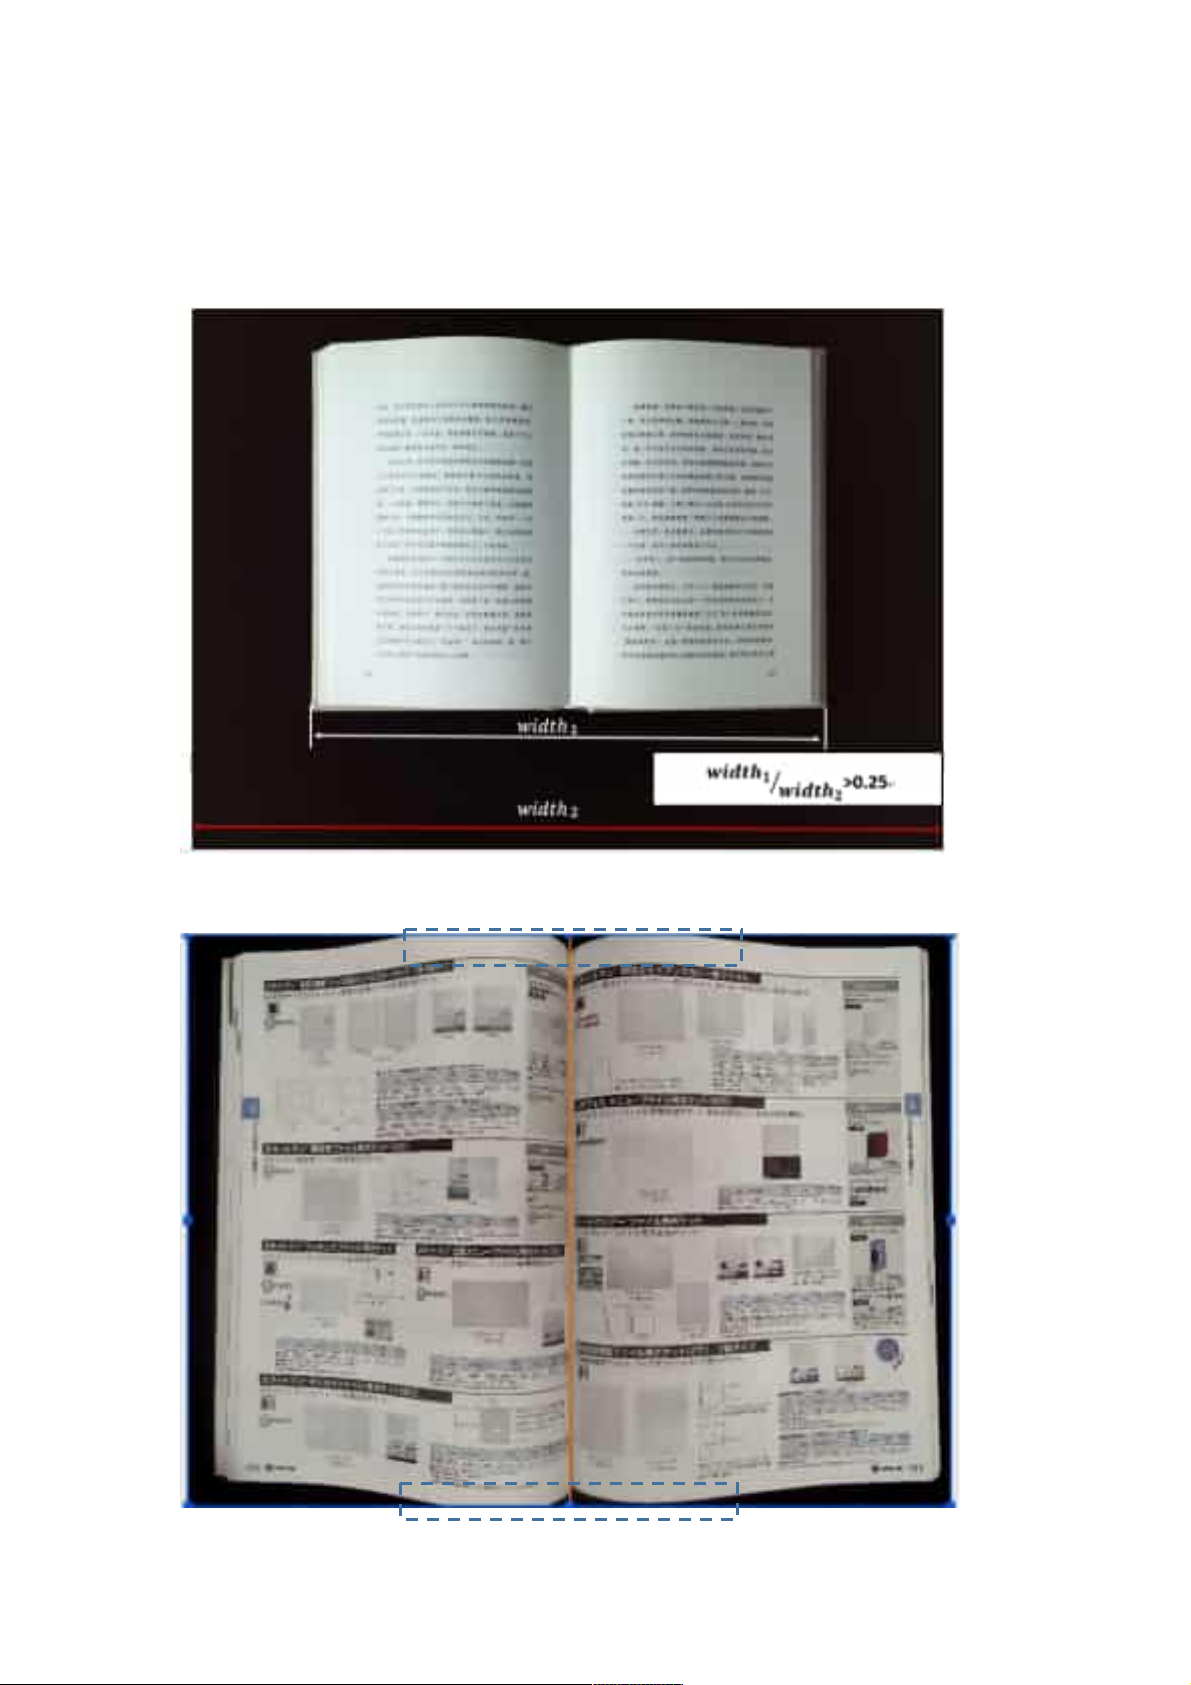
Scan Size Limitations
An opened book can’t occupy less than one-half the width of the scanning area.
If scanning with a book that is too small, the finger removal function may not correctly
remove the fingers from the scanned image
.
Do not place the book outside the scanning area.
34
Page 36
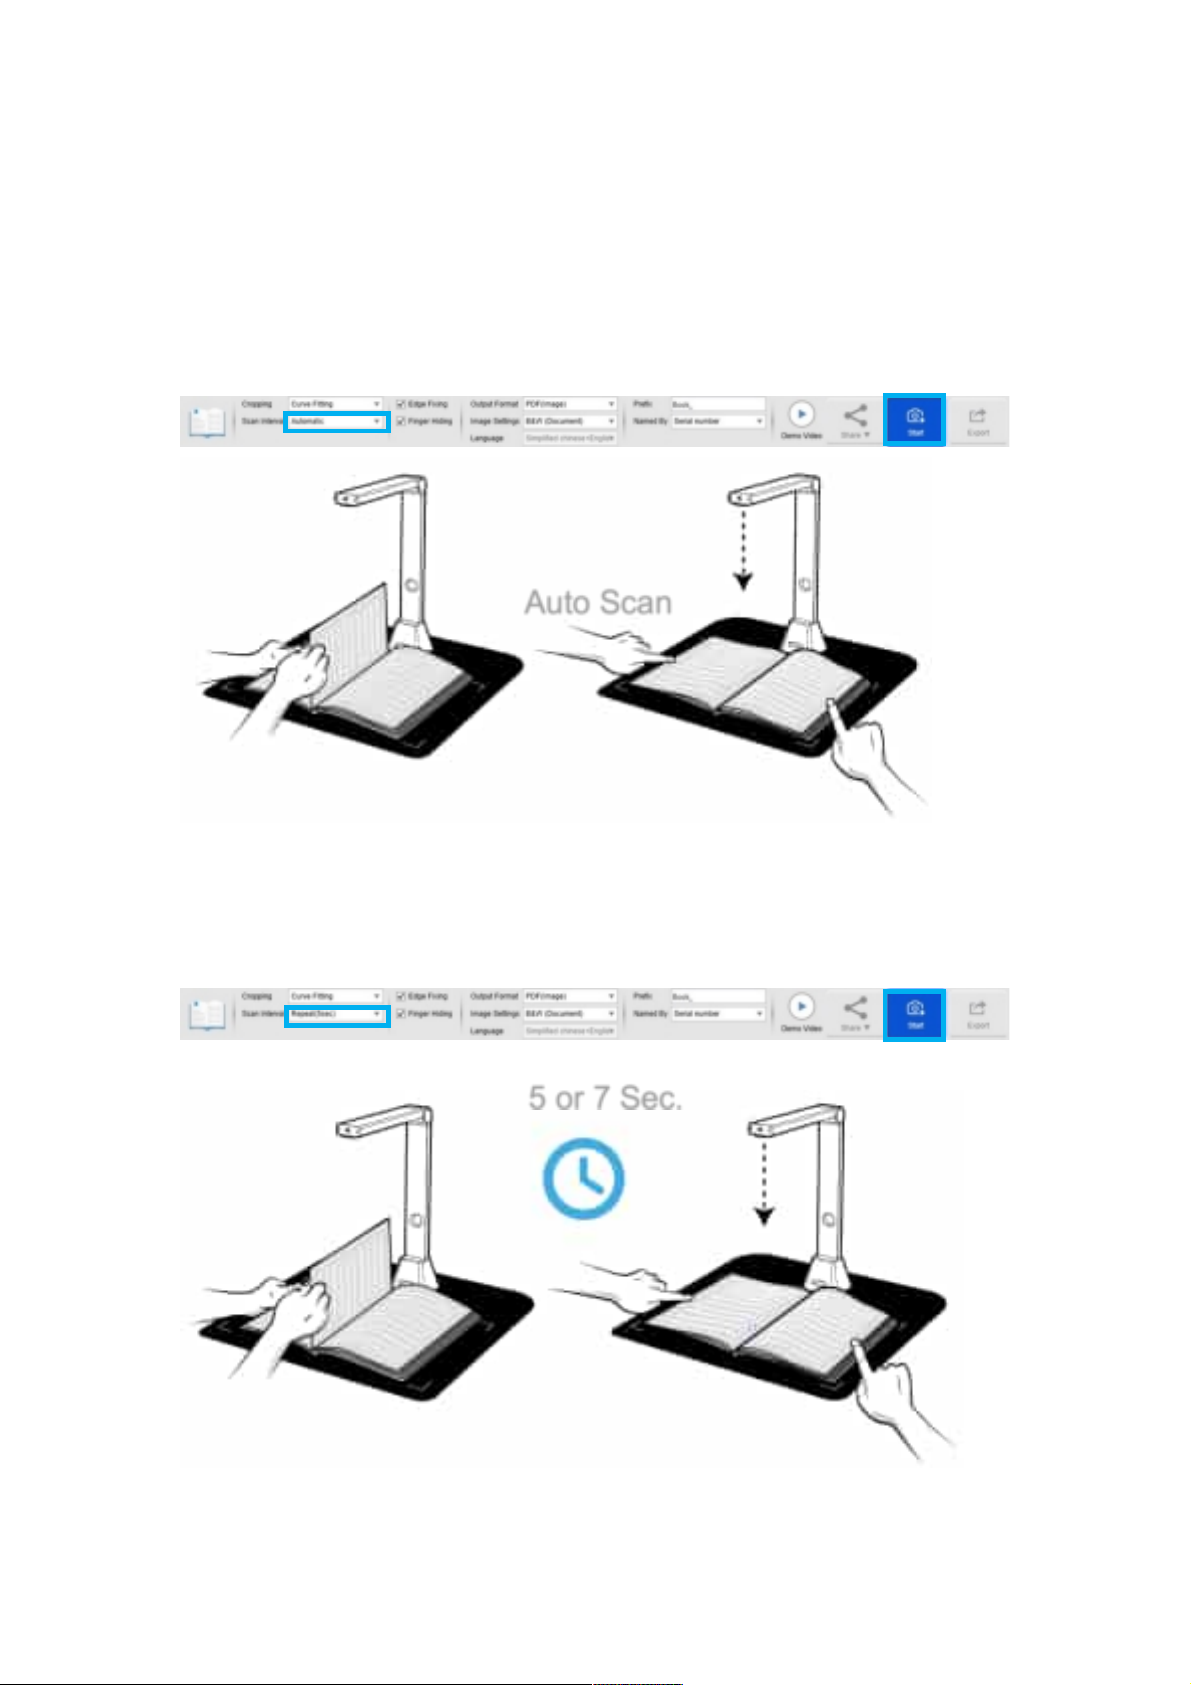
Auto Scan Function
This VIISAN OfficeCam scanner software offers a very useful automatic scan function.
When the scanner device detects a page is turned, the software will automatically start
continuous scanning. To use the Auto Scan function, please set the Scan Interval to
“Automatic” from the top setting panel and then press “Start” button to start auto scanning,
to stop scanning, press the “Stop” button.
Auto Scan
Detect page turning
Auto scans and removes fingers
from the scanned image.
Scan Interval
You ca n al so s et t he s pe ci fi ed time interval to continue scanning for an extra page.
5 or 7 Sec.
The book scanner automatically activates after the specified time-period passes.
35
Page 37
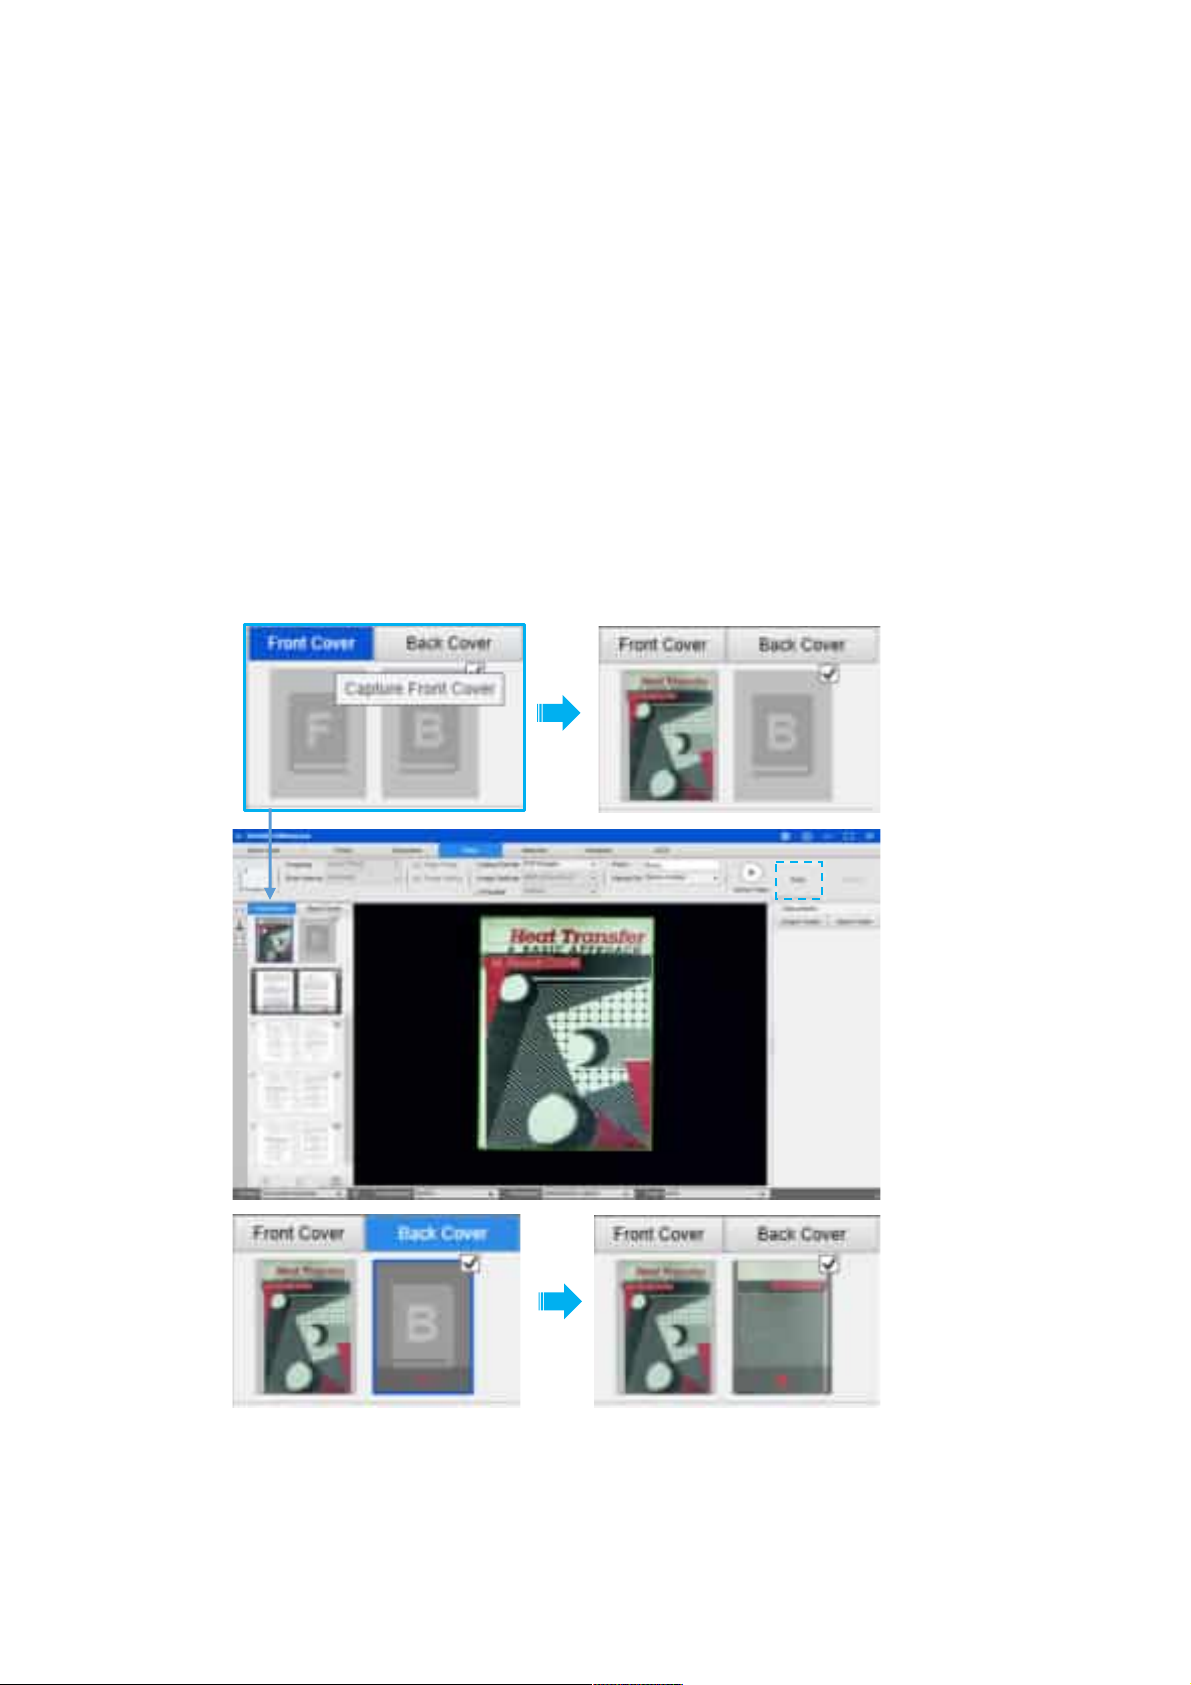
Setting Front and Back Cover Images
To scan the front and back cover images of your book, you can follow the below steps.
Click on the "Front Cover" button on the left-hand side.
1) Place the book front-cover (face up) at the center of the scan mat.
2) Set the [Image Settings] feature option to “Color (Original).” Highly recommended!
3) Press the [Scan] button to scan the front cover image.
NOTE: When entering the cover scan mode, the software will automatically activate the
auto-cropping function.
4) After scanning, the book cover thumbnail will be automatically displayed in the left
side preview window as in the example below.
5) To sc a n the back-cover image, click the "Back Cover" button and turn the book to
the back-side (face up) at the center of the scan mat, then press the [Scan] button
to scan the back-cover image.
NOTE: Yo u can click “X” icon on the thumbnail to remove the cover image and rescan a
new image if necessary.
36
Page 38
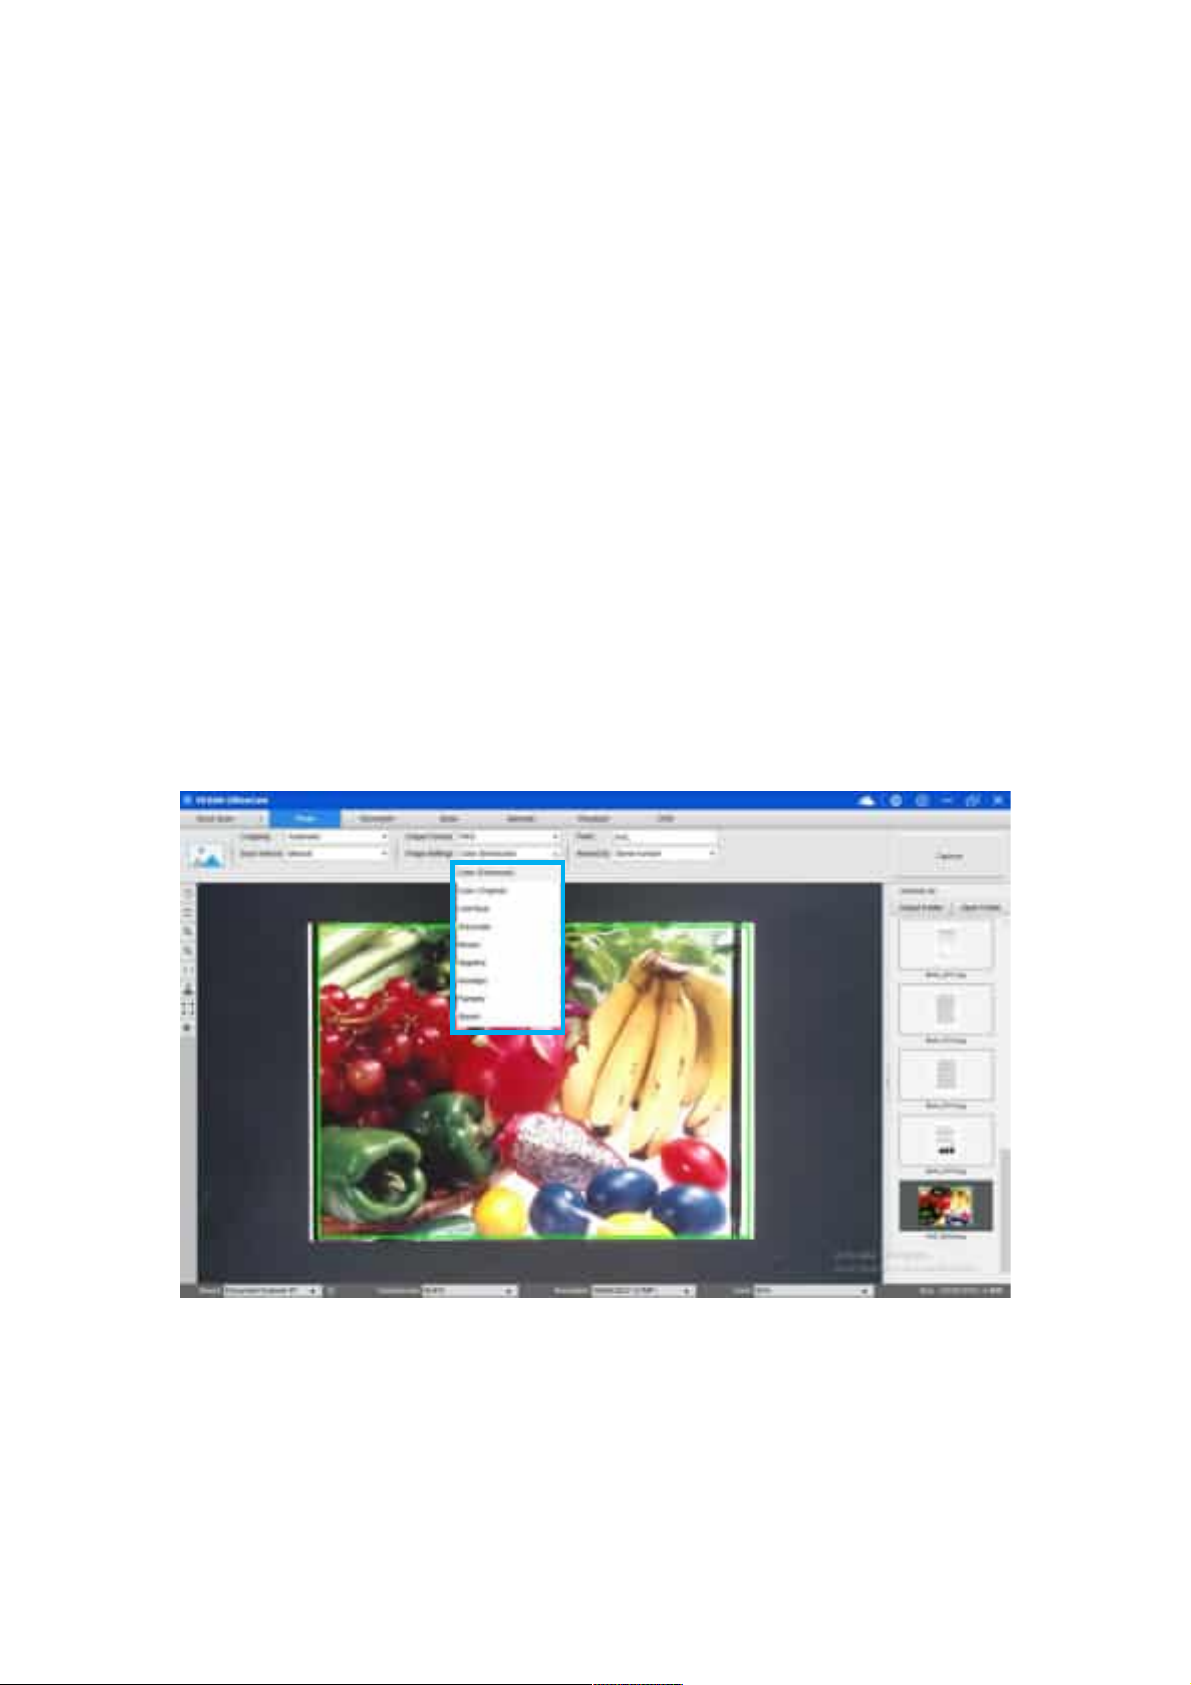
Usage Example
How to Take a Nice Snapshot?
To s c an a nice snapshot well, you can follow the below steps.
1) Click on the [Photo] function tab in the top menu bar.
2) Set the [Cropping] feature option to “Automatic”.
3) Set the [Scan Mode] feature option to “Single Page”, this will instruct the software
to only capture one side of the object.
4) Set the [Name By] feature option to “Serial” or “Date & Time”.
5) Set the [Image Settings] feature option to “Color (Enhanced)”, this will instruct the
software to improve the color quality of the output image. If can also choose other
color filter features like Mosaic, Negative, Nostalgic, Patently, and the Sketch to
capture your photo. Set the [Output Format] feature option to “JPEG”, this will
instruct the software to output the image file in the JPEG format.
6) Click on the [Capture] button in the upper right corner, then you should see in the
file column on the right side that a JPEG file has been created.
37
Page 39
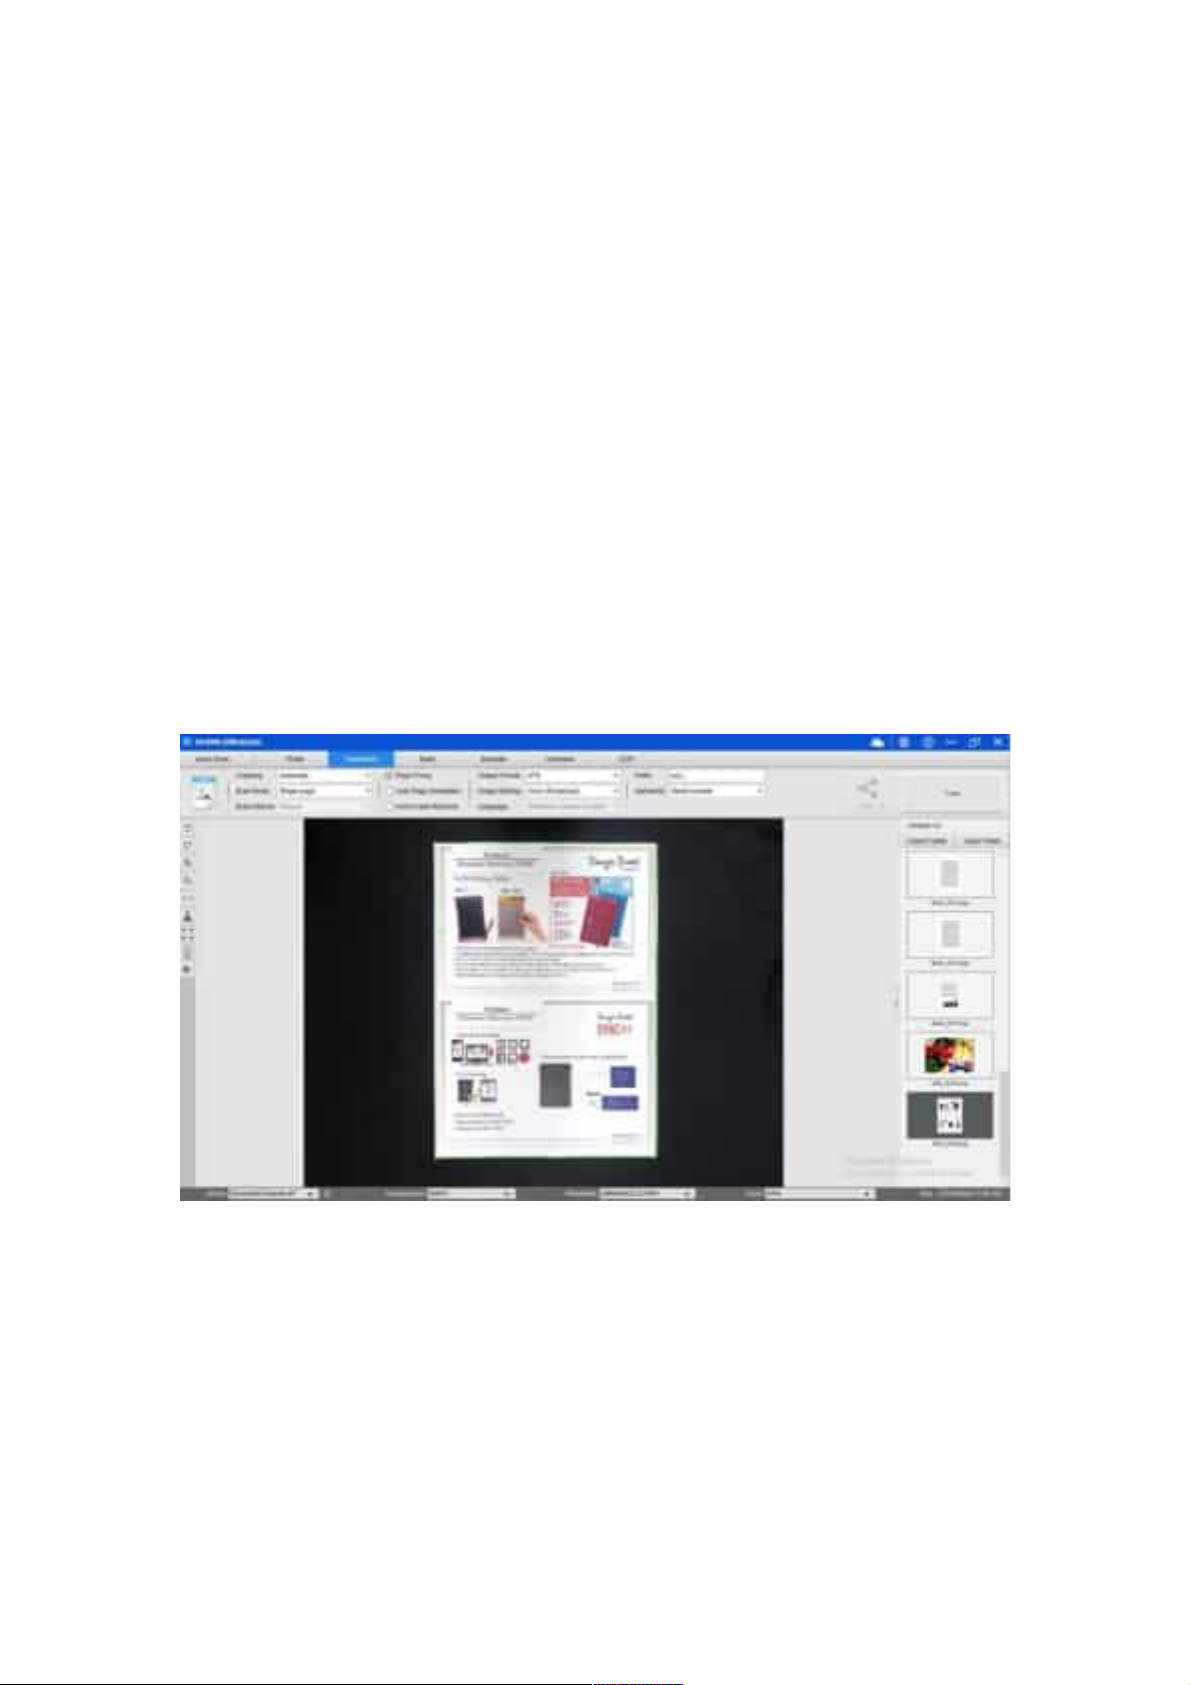
How to Scan a Color Document Well?
To s c an a color document well, you can follow the below steps.
7) Click on the [Document] function in the top menu bar.
8) Set the [Cropping] feature option to “Automatic”.
9) Set the [Scan Mode] feature option to “Single Page”, this will instruct the software
to only capture one side of the object. (You can also select “
to scan both sides of an object and merge them into one image. This is useful
when you want to scan both sides of an object, for example business cards, and
merge them into one image file.)
10) Set the [Name By] feature option to “Serial” or “Date & Time”.
11) Set the [Image Settings] feature option to “Color (Enhanced)”, this will instruct the
software to improve the color quality of the output image.
12) Set the [Output Format] feature option to “JPEG”, this will instruct the software to
output the image file in the JPEG format.
13) Click on the [Scan] button in the upper right corner, then you should see in the file
column on the right side that a JPEG file has been created.
Merge Horizontally”
NOTE: Avoid scanning documents in places near window or other environments with
strong lighting. Excessively bright ambient lighting will affect image saturation and thus
affect scanning results.
38
Page 40
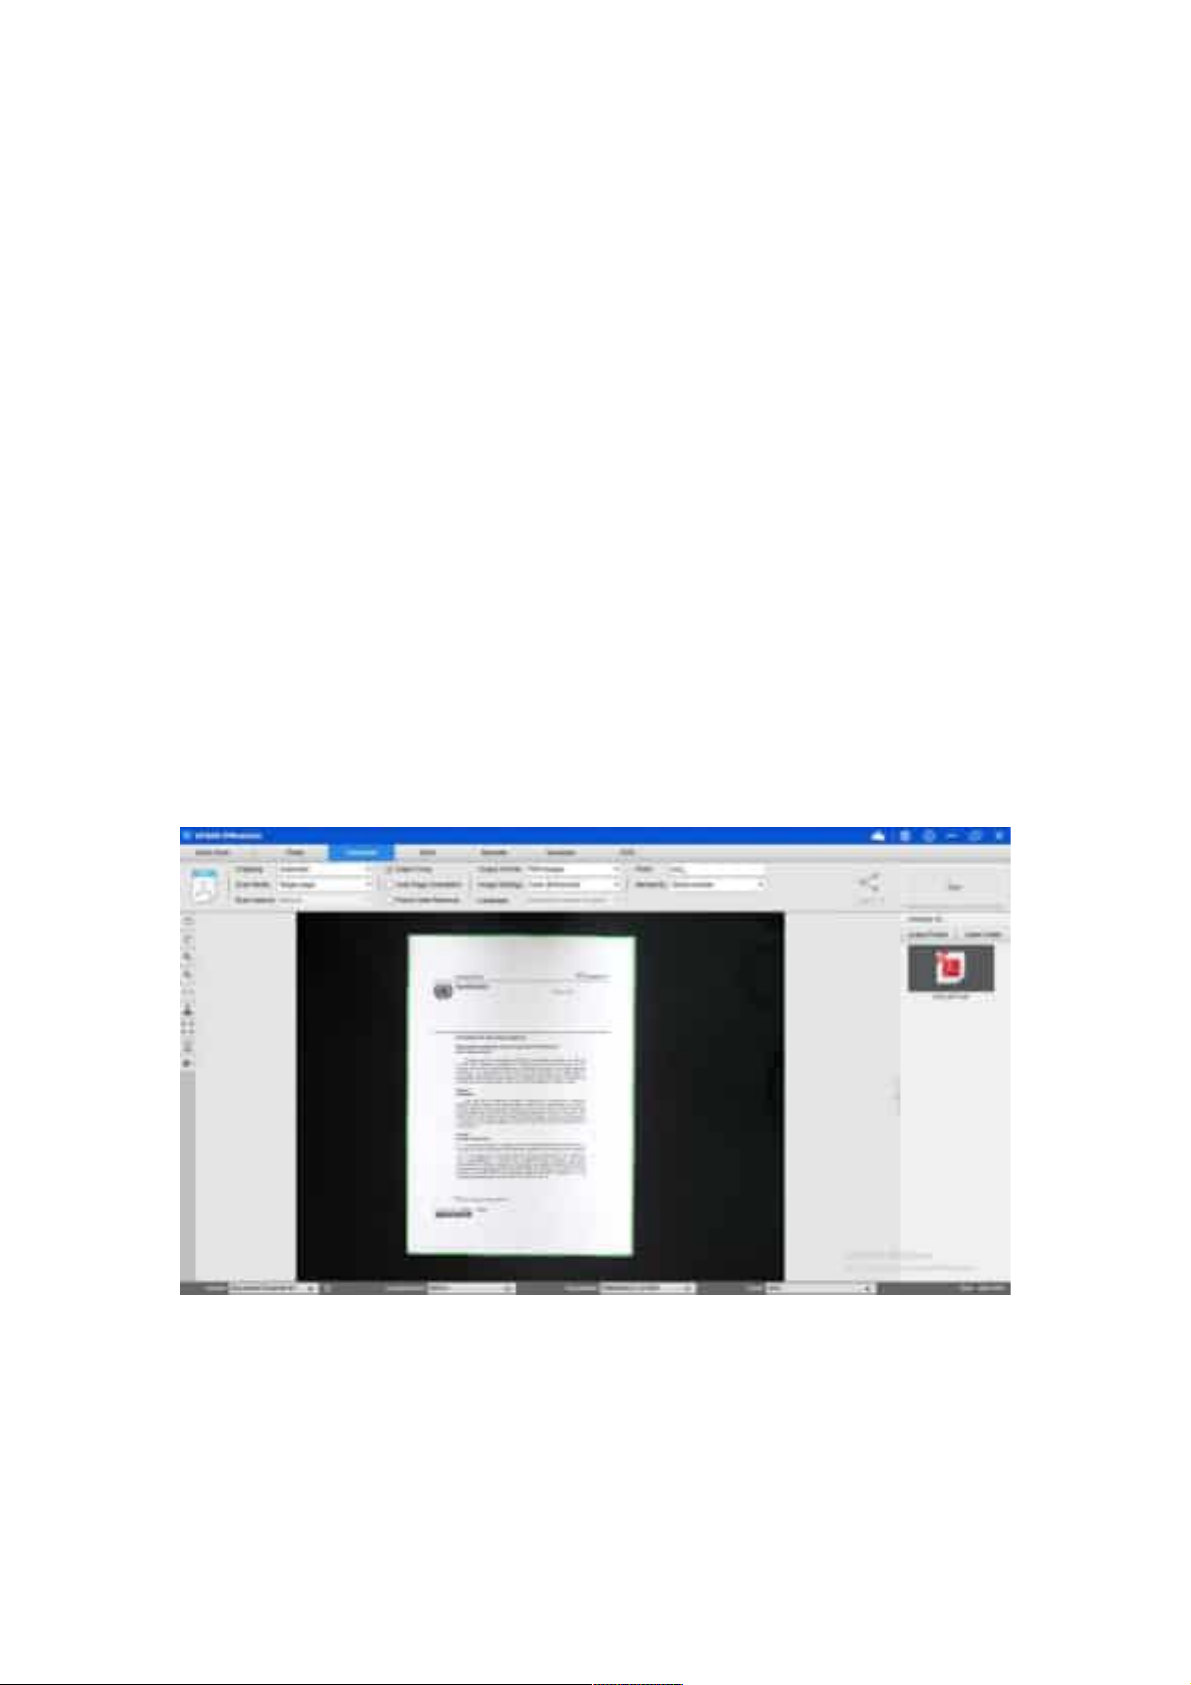
Scanning a document and saving it as a PDF file
To s c an a si n gl e p ag e d o cum en t a nd sa ve it as a PDF file, you can follow the below
steps.
1) Click on the [Document] function in the top menu bar.
2) Set the [Cropping] feature option to “Automatic”, this will instruct the software to
search for a single suitable document in the preview window and crop out a good
image. Once this object is detected, you will see a green color box drawn around the
object in the preview window.
3) Set the [Scan Mode] feature option to “Single page”, this will instruct the software to
only capture one page of the document.
4) Set the [Scan Interval] feature option to “Manual”.
5) Check “Edge Fixing” and “Text Orientation” on the menu bar if necessary.
6) Set the [Output] feature option to “PDF (Image)”, this will instruct the software to
output the image file in the PDF format.
7) Set the [Scan Settings] feature option to “B&W (Document),” this will instruct the
software to output the image file in the B&W style and remove undesired shadows.
8) Click on the [Scan] button in the upper right corner, then you should see a PDF file
has been created in the file column on the right side.
39
Page 41
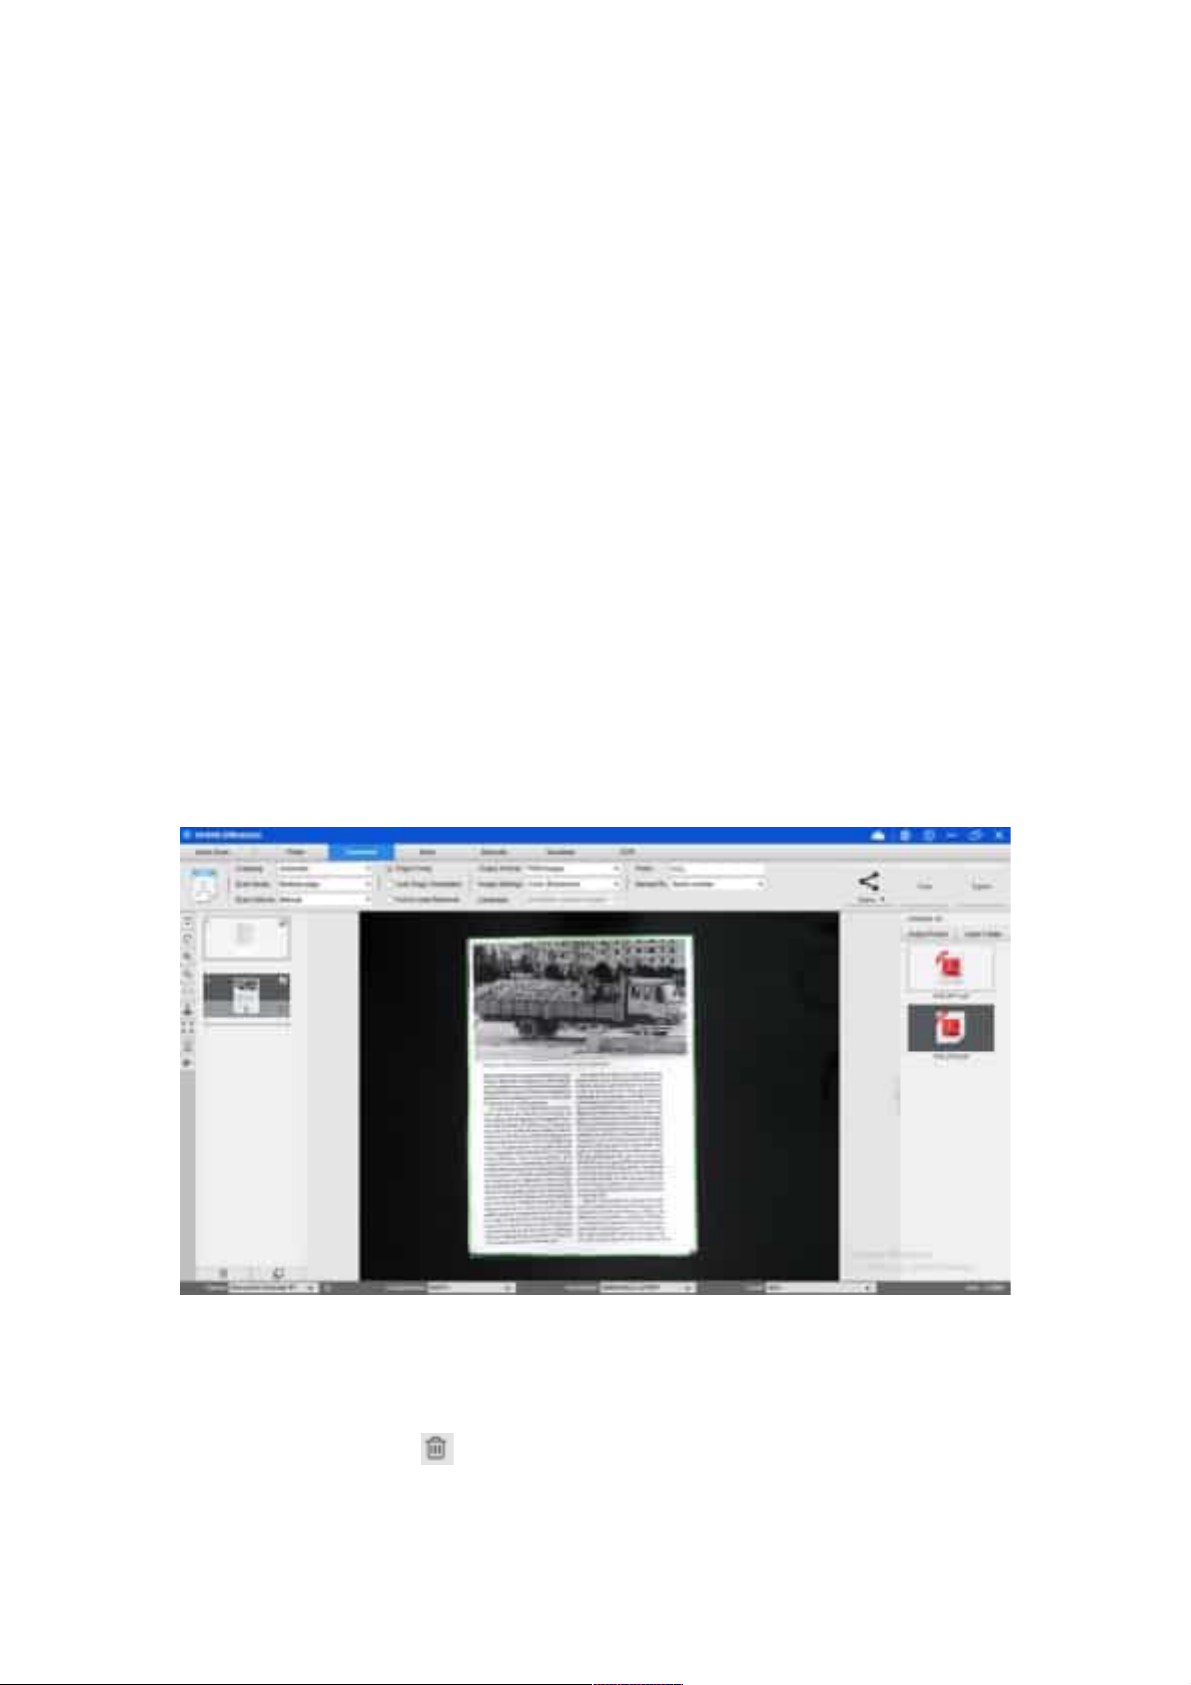
Scanning a Multi-Page Document into a PDF file
To s c an a mu l ti pl e p a ge do cu m en t i n to a PD F fi le , you can follow the below steps.
1) Click on the [Document] function in the top menu bar.
2) Set the [Cropping] feature option to “Automatic”
3) Set the [Scan Mode] feature option to “Multiple page”, this will instruct the software to
capture multiple pages of the document.
4) Set the [Scan Interval] feature to “Manual”, this will instruct the software to wait for a
user capture command for each capture. (You can also select “Automatic” options to
let the software self-detect the page flipping process, or use “Repeat (5/7 sec)”
options to let the software repeatedly scan images after 5 or 7 seconds.)
5) Set the [Name By] feature option to “Serial” or “Date & Time”.
6) Set the [Image Settings] feature option to “B&W (Document)”.
7) Set the [Output Format] feature option to “PDF (Image)”.
8) Click on the [Scan] button to scan one page, then you should see a new page has
been added on the left-hand side in the preview column.
9) After all desired pages have been scanned, click [Export] next to the [Scan] button in
the upper right corner of the main window, then you should see a new PDF file has
been created in the file column on the right-hand side.
NOTE: During the image scan process, you can manipulate the temporary images in the
preview column on left-hand side, such as rotating the image, moving an image up or
down the list, deleting the image, or inserting a new image.
You ca n al so c li ck o n th e [Clear] button to delete all images when you are done.
40
Page 42
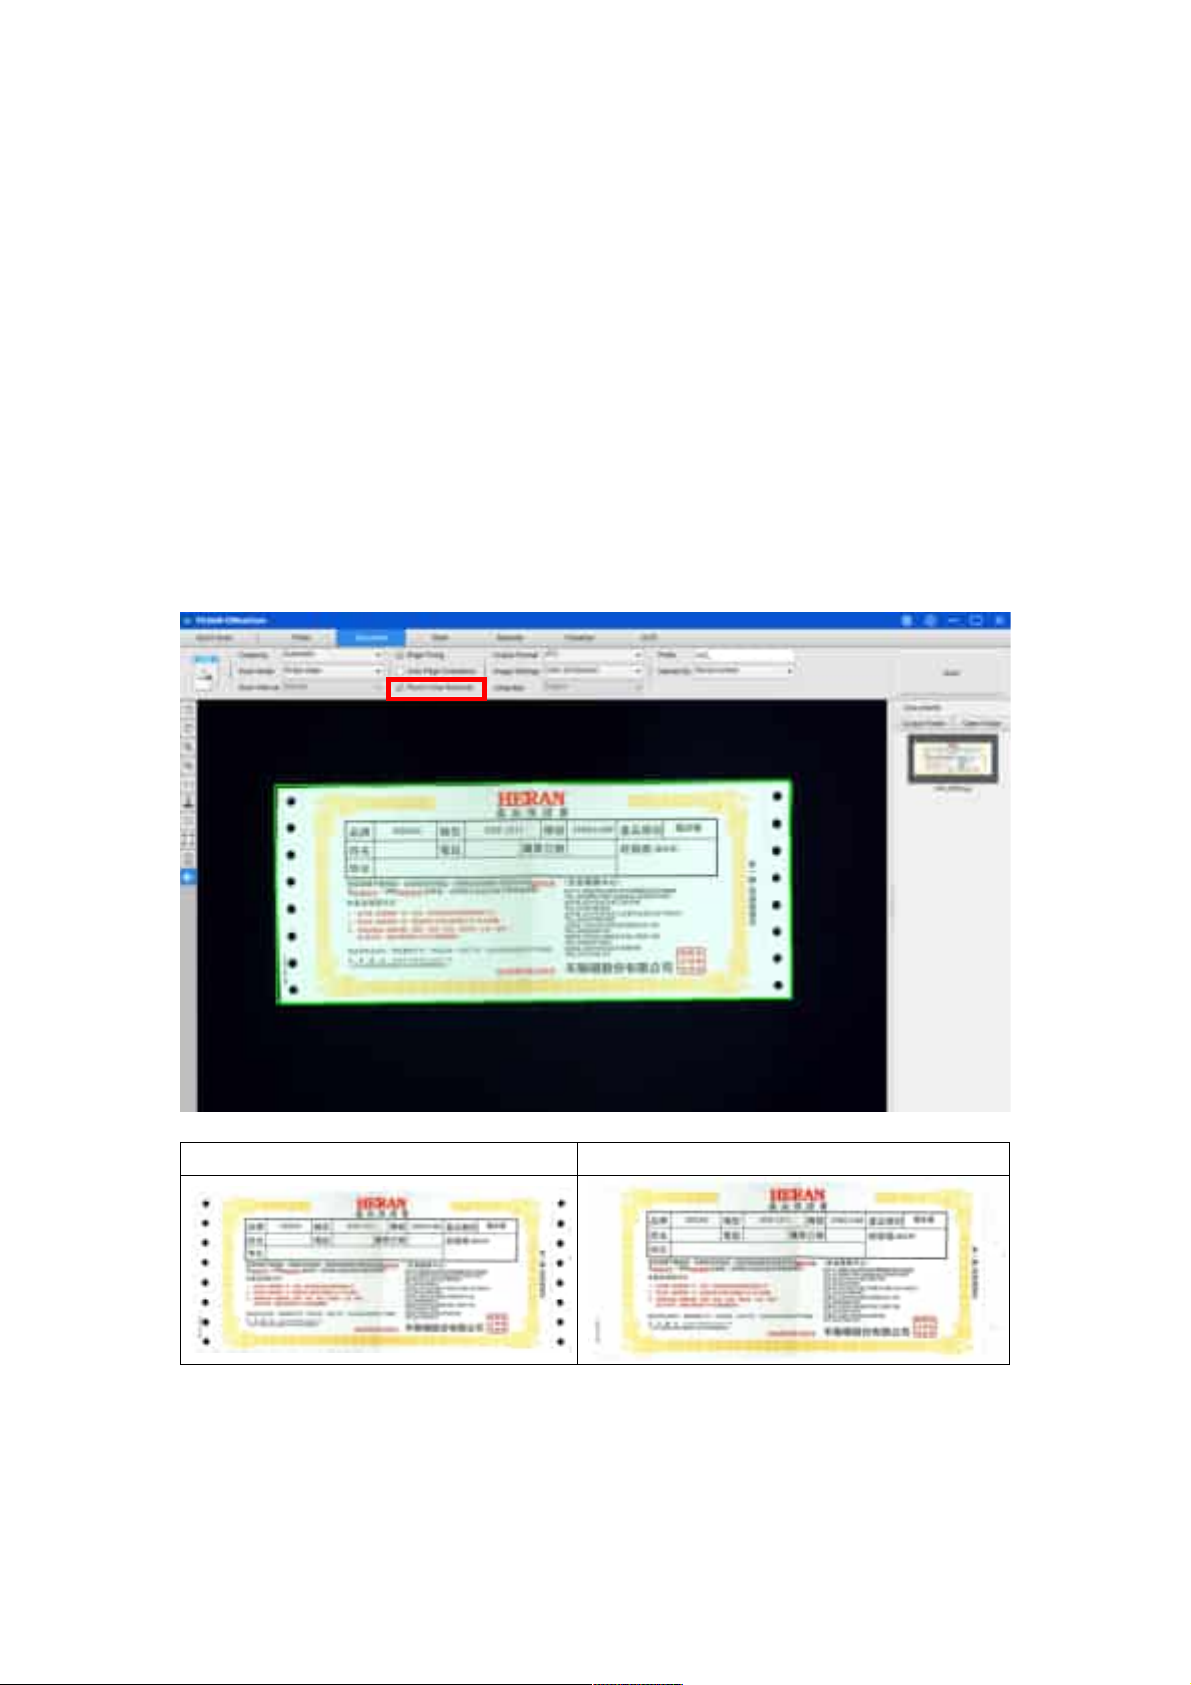
How to remove the punch holes from a scanned
document?
To remove the punch holes from a scanned document, you can follow the below steps.
1) Click on the [Document] function in the top menu bar.
2) Set the [Cropping] feature option to “Automatic”.
3) Check the “Punch Hole Removal” feature.
4) Select the output format.
5) Click on the [Scan] button in the upper right corner to scan the punch hole
document.
6) After scanning, the OffiiceCam software will automatically remove the punch holes
around the edges of the document and fill the holes with the color closest to the
originals.
Original Punch holes removed
NOTE:
• Punch holes may not be removed if the originals are fed skewed, or the punch
holes are not along the edges of the document.
• The shape of punch holes that is not round cannot be removed.
• Punch holes may not be removed if the holes overlap the text, lines or graphics.
41
Page 43
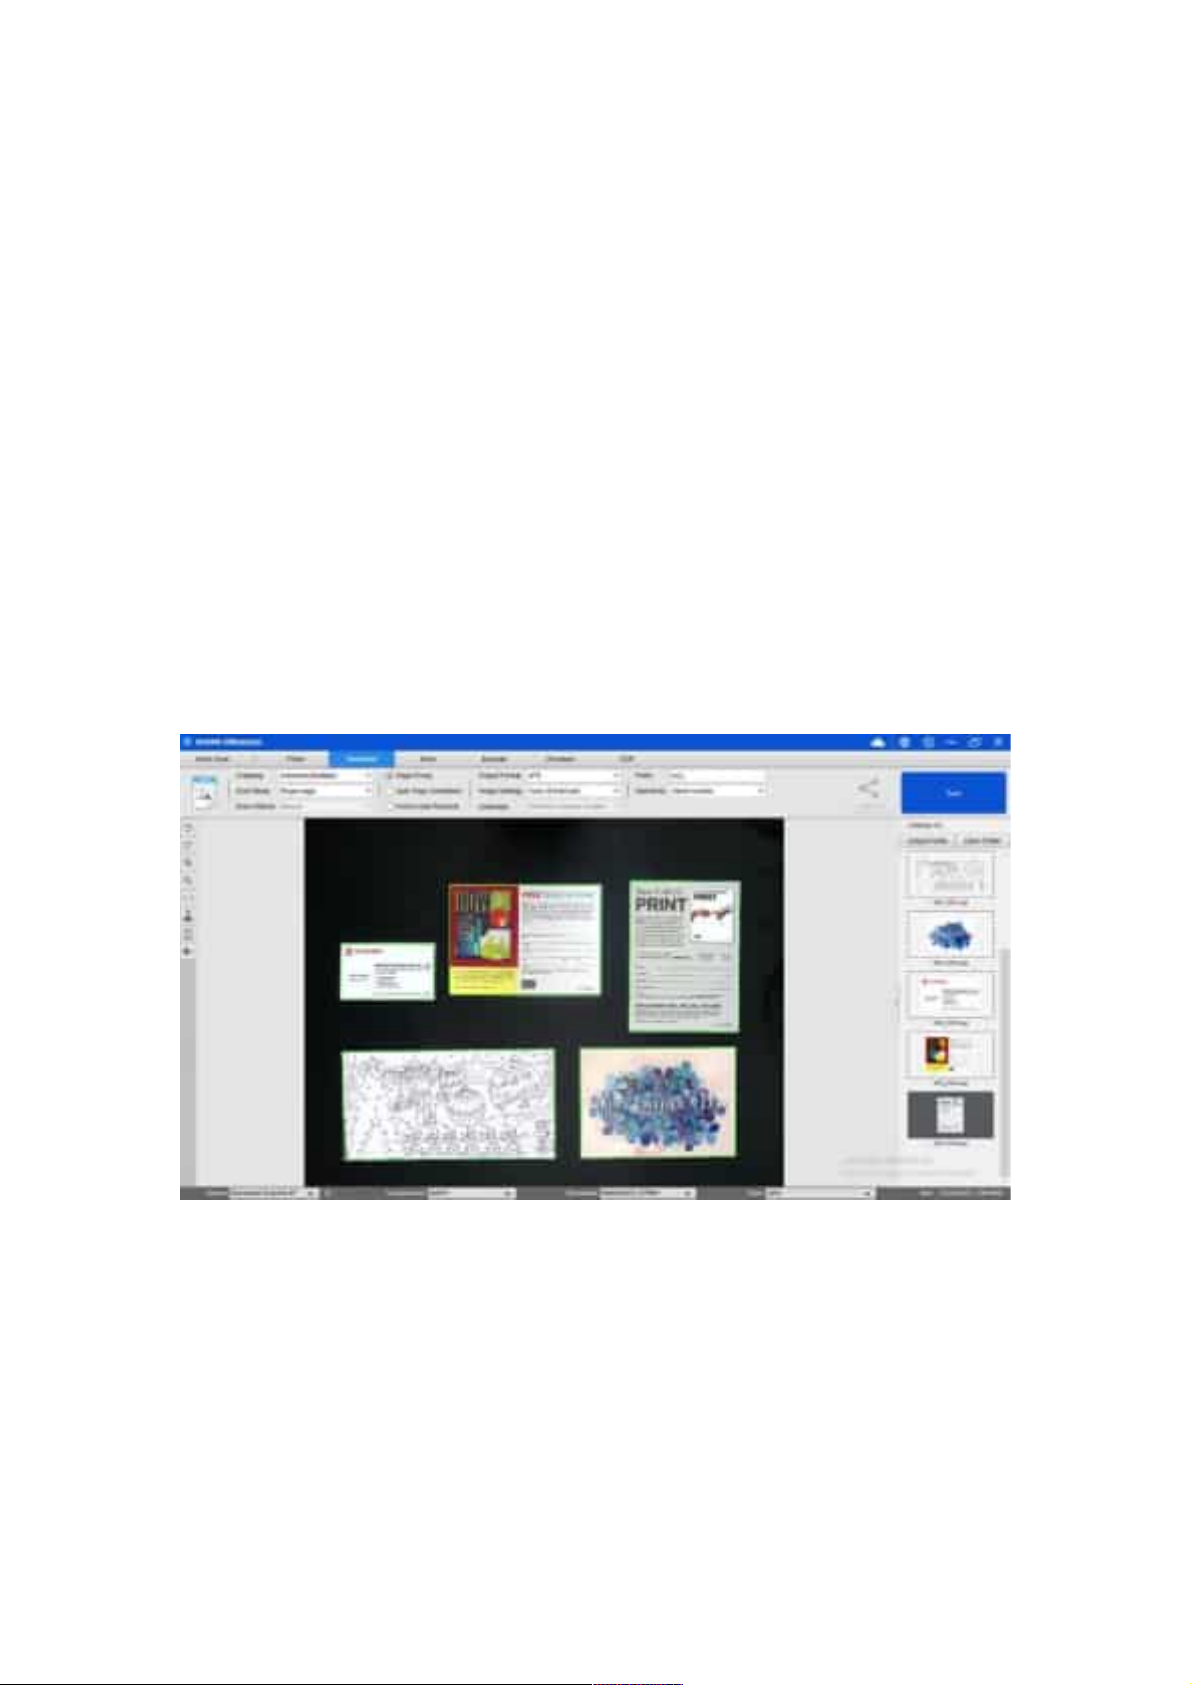
Using the Crop Feature to Scan Multiple Images
at the Same Time
To u s e the crop feature to scan multiple images at the same time, you can follow the
below steps.
1) Click on the [Document] function in the top menu bar.
2) Set the [Cropping] feature option to “Automatic (Multiple)”, this will instruct the
software to search for multiple objects in the preview window and crop out as many
images as possible. A green color box will be drawn around any meaningful objects
that have been found in the preview window.
3) Set the [Scan Mode] feature option to “Single Page”.
4) Set the [Scan Interval] feature to “Manual”.
5) Set the [Output] feature option to “JPEG”.
6) Click [Scan], then you should see multiple image files been created.
42
Page 44
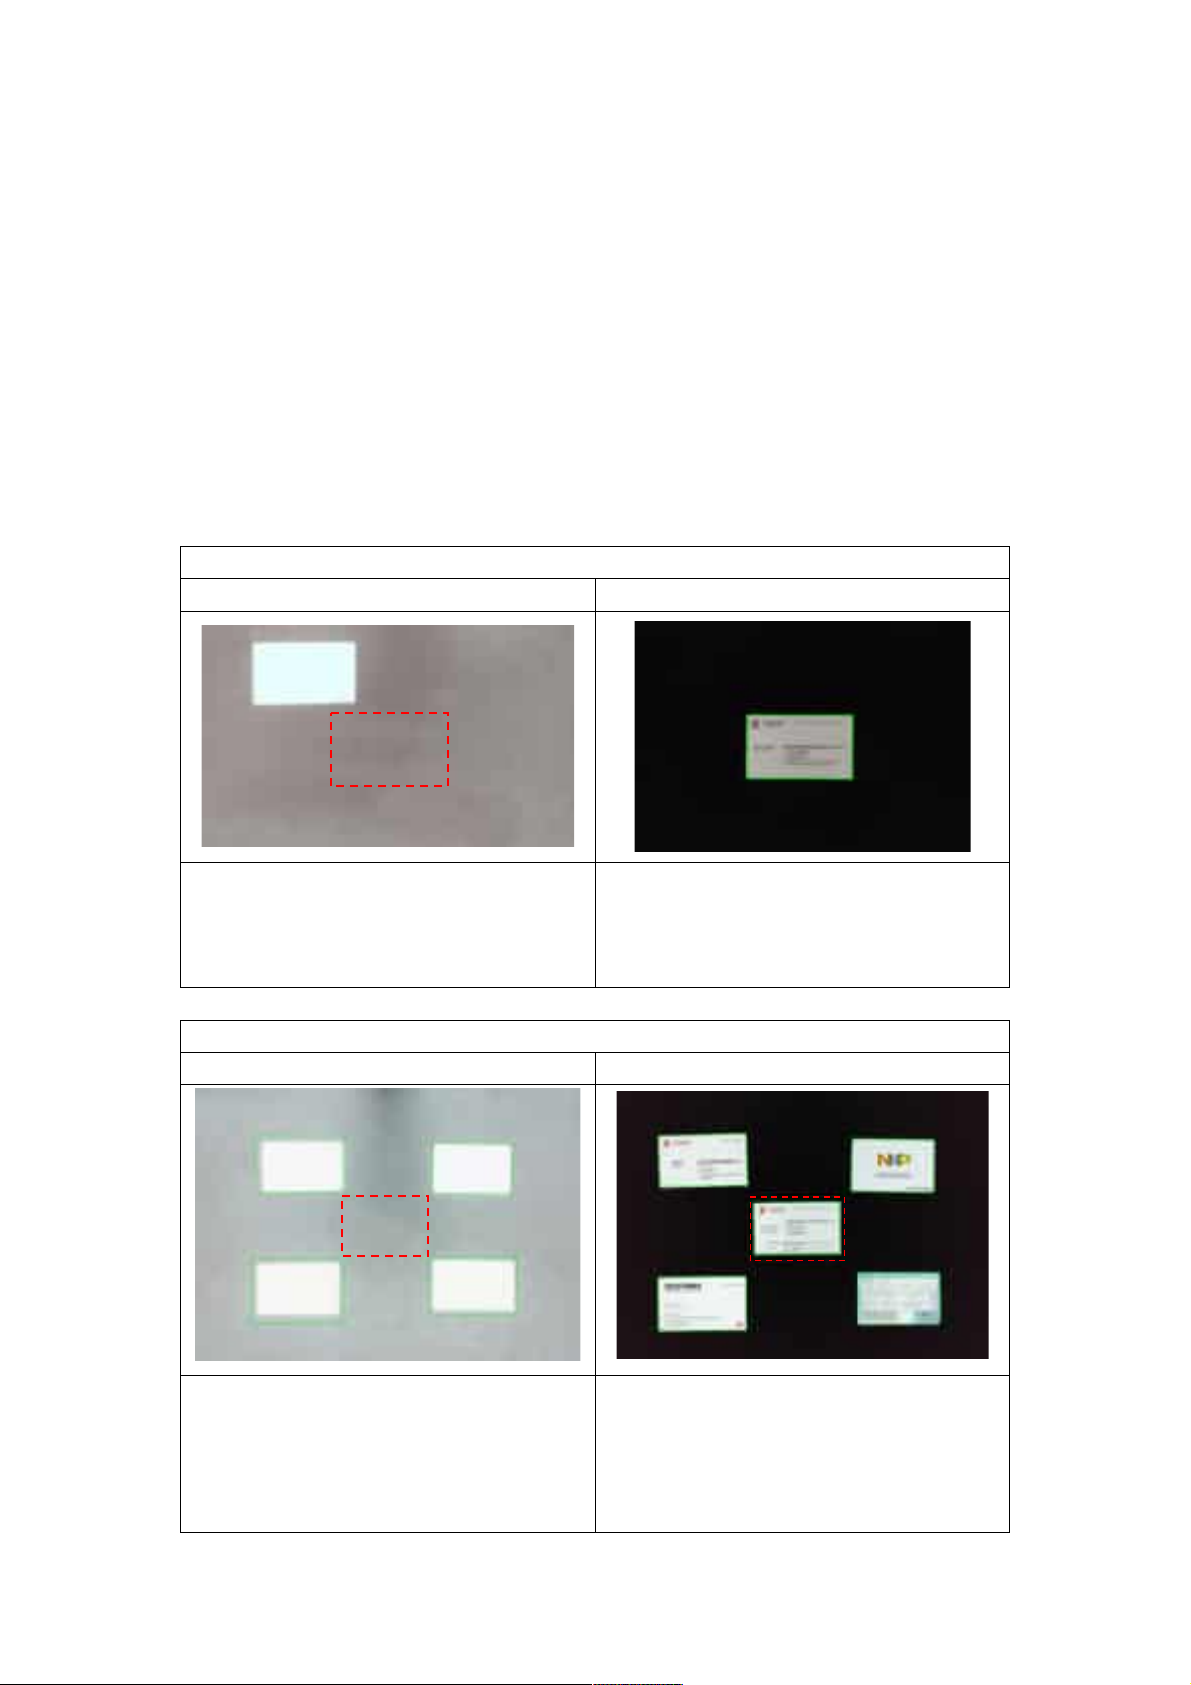
Scanning a High-Quality Image of a Business
Card
1) Click on the [Document] function in the top menu bar.
2) Set the [Cropping] feature option to “Automatic” for scanning a single card or
“Automatic (Multiple)” to scan with multiple cards.
3) In order to get a better image quality, please place the name card in the middle of
the scanning area. This will ensure the AE (Auto-Exposure) algorithm will not
over-expose the photo during the capturing process and thus cause the image to
be too bright.
Scanning Single Business Card
Incorrect Position Correct Position
Do not place the business card without
aligning to the center of the scanning
area.
Scanning Multiple Business Cards
Incorrect Position Correct Position
Do not leave a space in the center of
scanning area when scannign with
multiple business cards like the above
example.
To s c an individual business cards, please
place the business card close to the
position mark in the center of scanning
area.
To s c an mu lt i pl e business cards, please
place at least one name card in the center
of the scanning area. Otherwise the
image will be over-exposed.
43
Page 45
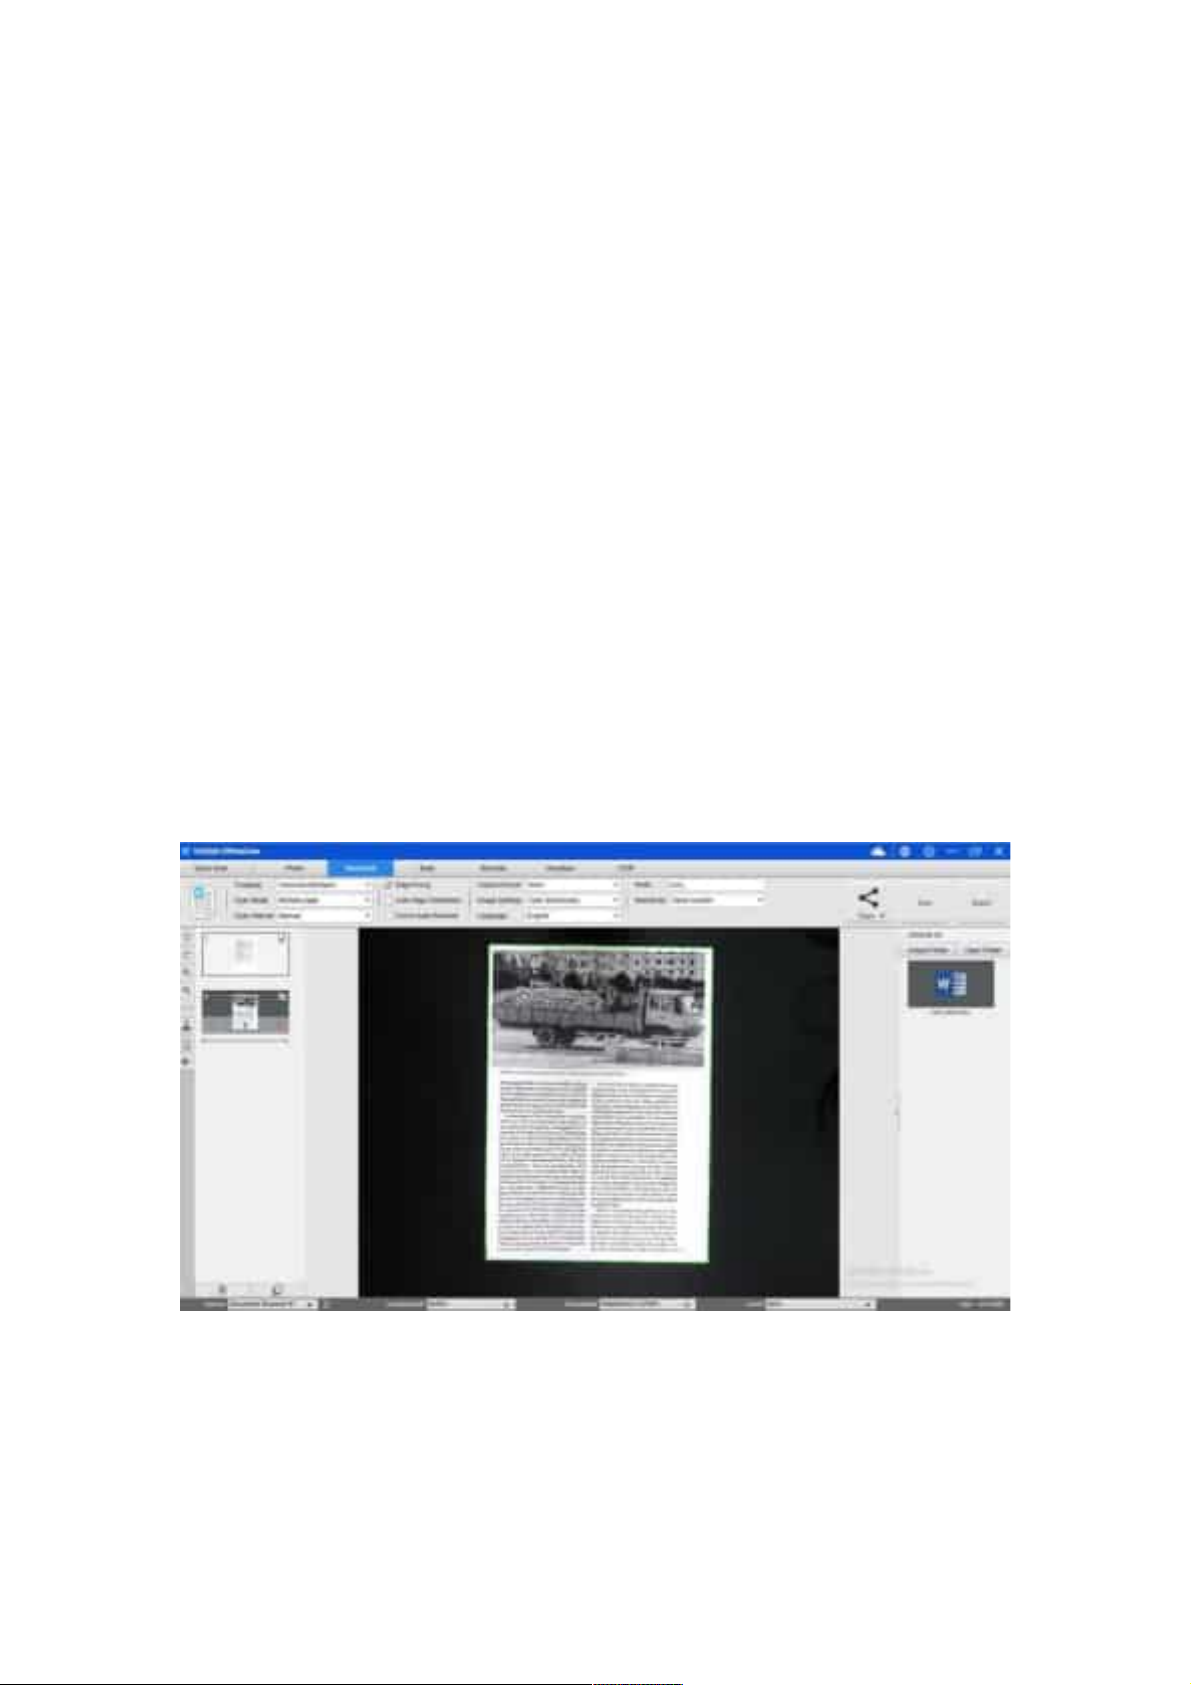
Scanning a Multi-Page Document into a Word
File
To s c an a mu l ti-page document and create OCR to then put into a Word file, you can
follow the below steps.
7) Click on the [Document] function in the top menu bar.
8) Set the [Cropping] feature option to “Automatic”.
9) Set the [Scan Mode] feature option to “Multiple page”.
10) Set the [Scan Interval] feature option to “Manual”.
11) Set the [Output Format] feature option to “Word”, this will instruct the software to
output the scanned result in a Word file.
12) Based on the content of the document, select Recognize Language from the
[Language] feature option.
13) Set the [Name By] feature option to “Serial” or “Date & Time”;
14) Click on the [Scan] button in the upper right corner to scan multiple pages.
15) After all pages have been scanned, click [Export] next to the [Scan] button in the
upper right corner of the main window, then you should see a new Word file has
been created in the file column on the right-hand side.
44
Page 46
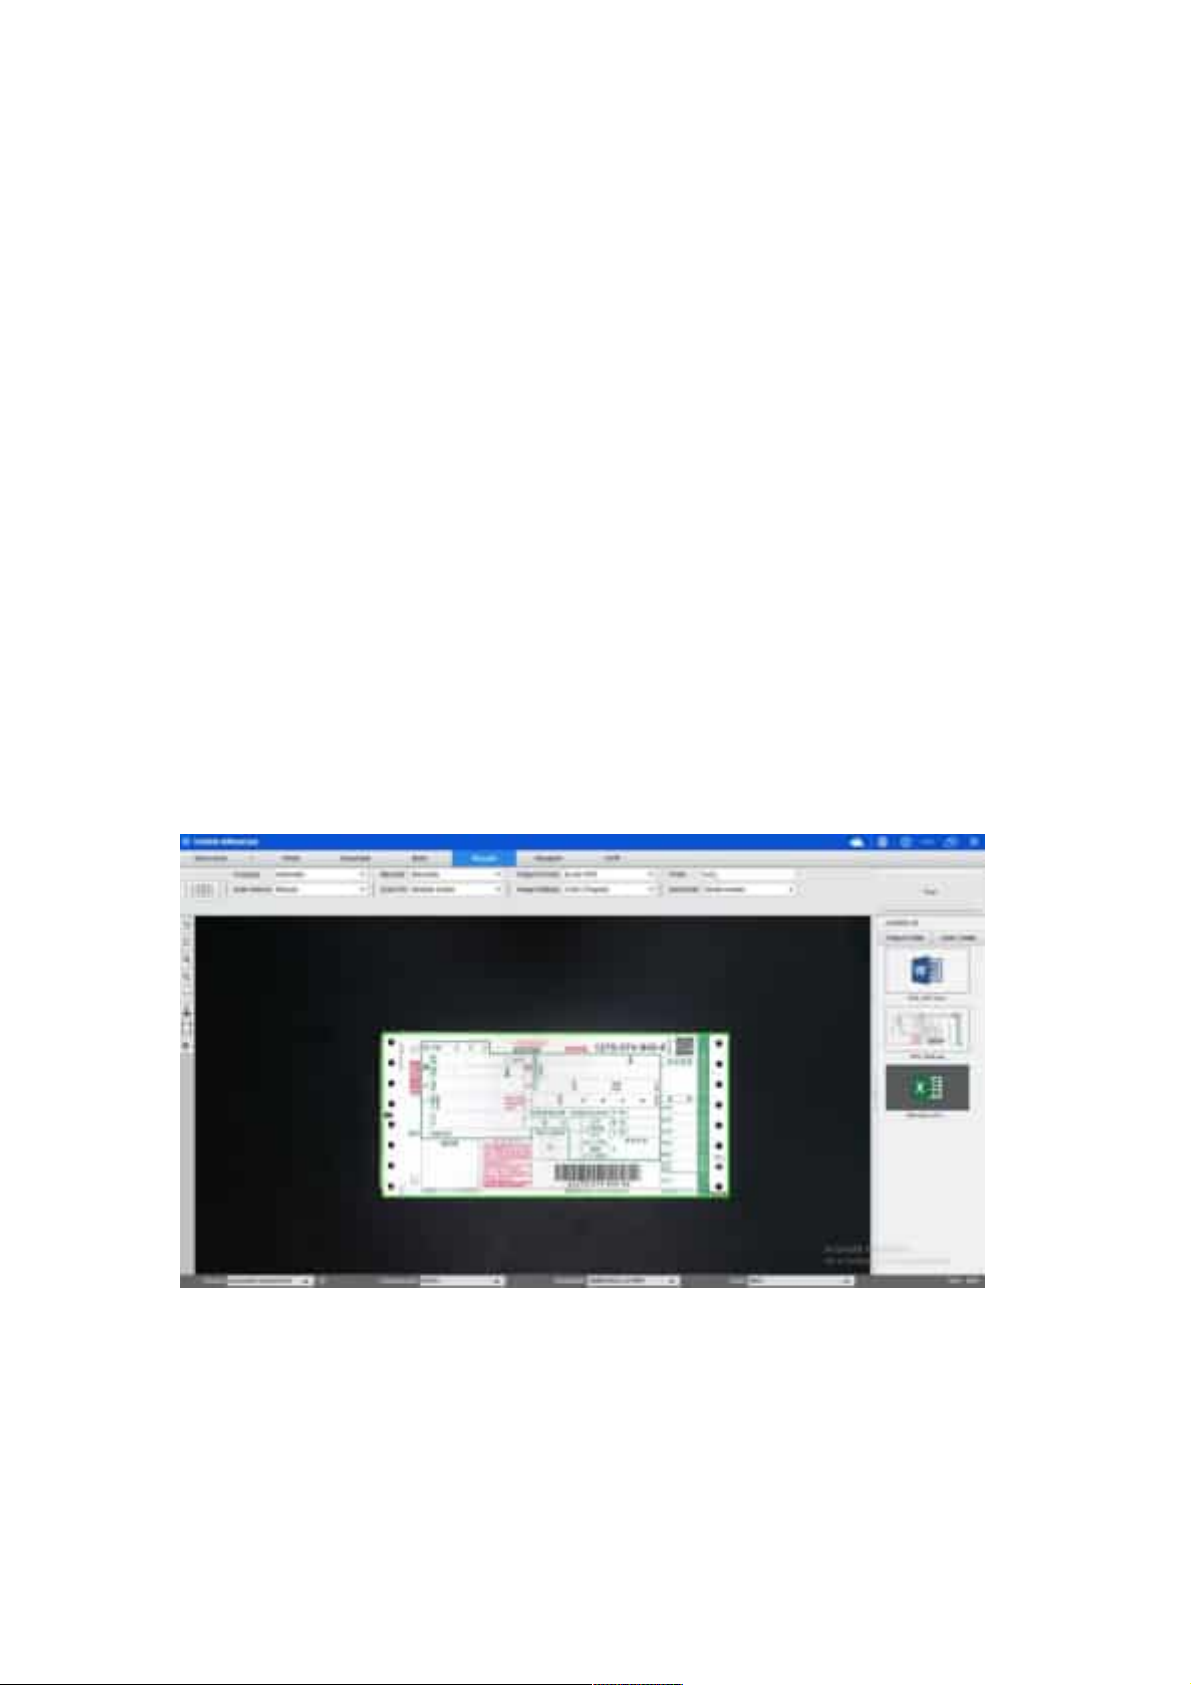
How to scan barcodes and save the result in an
EXCEL file?
To s c an ba rc o des a nd sa ve th e r e sul t in a n E X CE L fi l e, you can follow the below steps.
1) Click on the [Barcode] function on the top menu bar.
2) Set the [Cropping] feature option to “Automatic”.
3) Set the [Scan Interval] feature option to “Manual”.
4) Based on the barcode type to select Barcodes or QR Code from the Barcode feature
option.
5) Set the [Scan Settings] feature option to “Color (Original)”.
6) Set the [Output format] feature option to “Excel + JPEG”, this will instruct the
software to output scanned barcode in an EXCEL file and keep an image file, (you
can also select “Text + JPEG” options to output the scan result into a text file with
keep an image).
7) Set the [Name By] feature option to “Barcode”, this will instruct the software to save
the image file and name it with the barcode number scanned from this image.
8) Click on the [Scan] button on the upper right corner, then you should see an EXCEL
file pop out with scanned barcode value stored in it.
45
Page 47
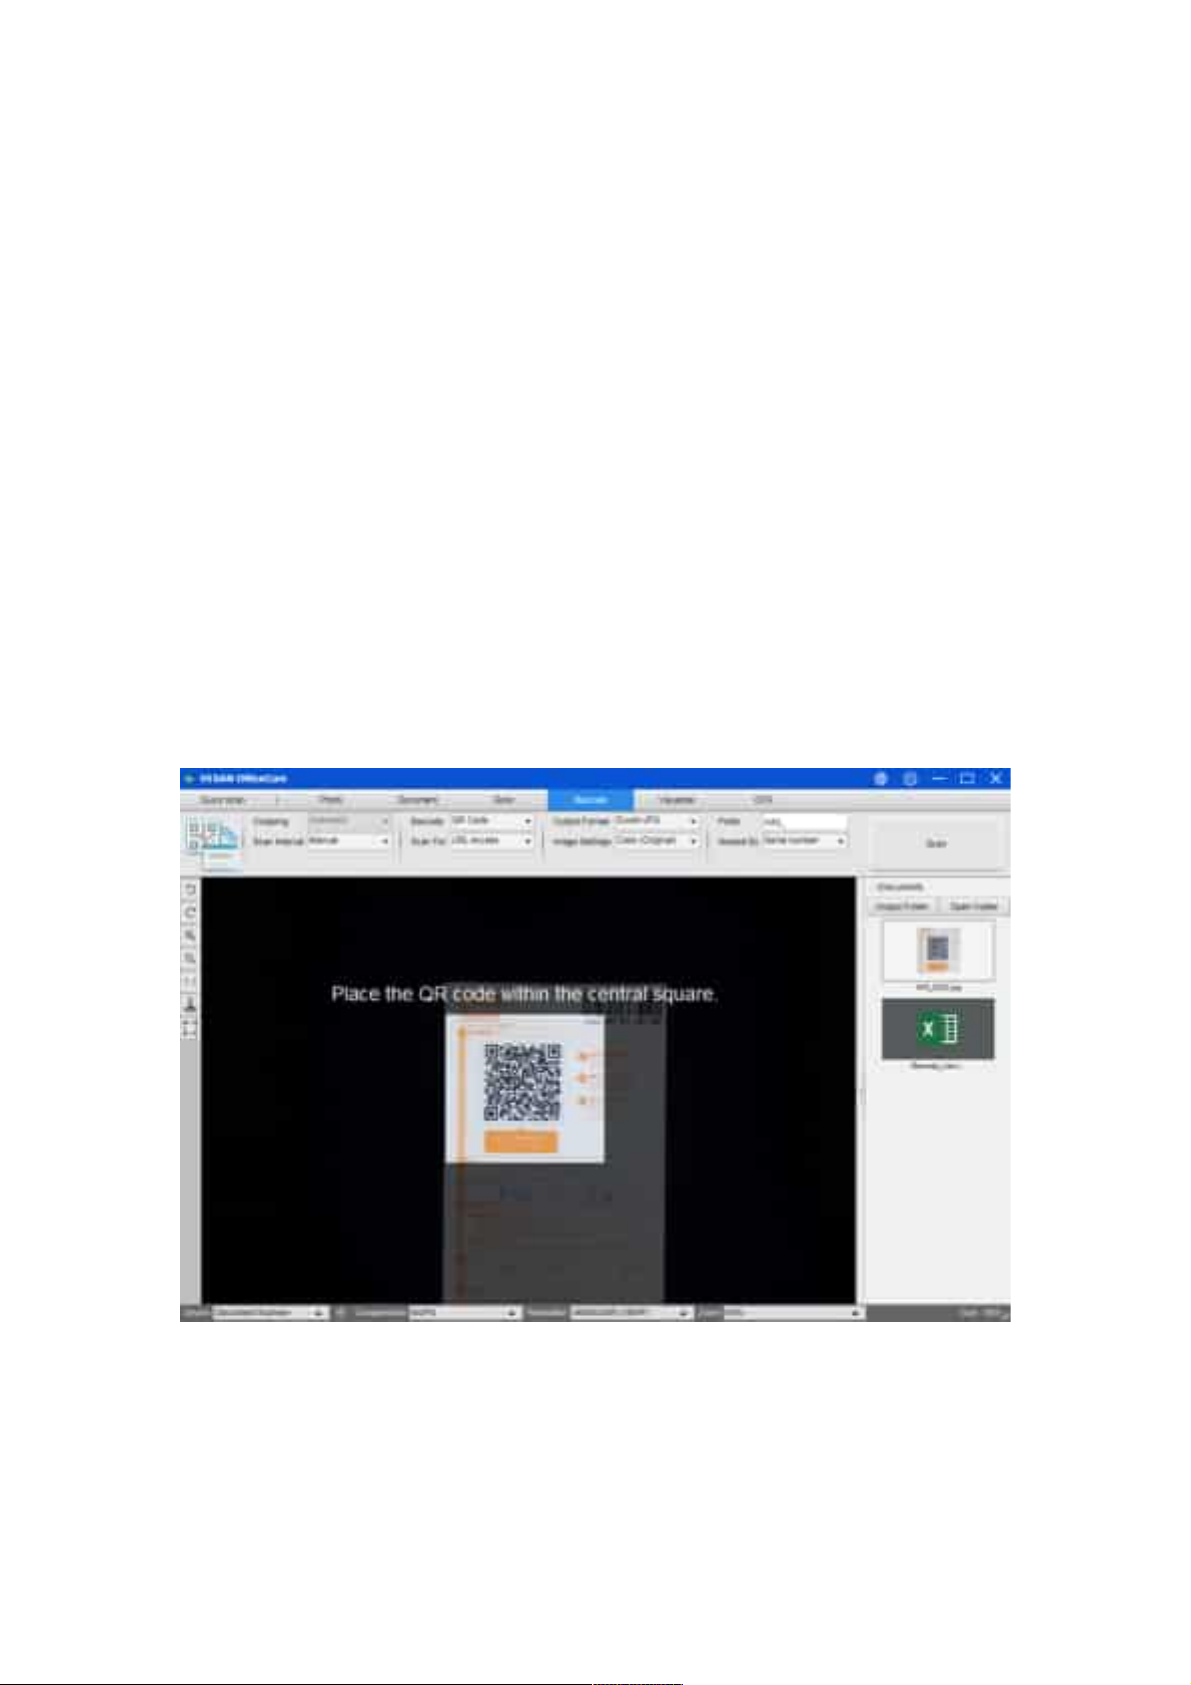
How to scan QR barcode and open URL?
To s c an QR code and automatically execute URL after scanning, you can follow the
below steps.
1) Click on the [Barcode] function on the top menu bar
2) Set the [Cropping] feature option to “Automatic”.
3) Set the [Scan Interval] feature option to “Manual”.
4) Select the [Barcode] feature option to “QR Code”.
5) Set the [Scan for] feature option to “URL Access”.
6) Set the [Output format] feature option to “Excel + JPEG”, this will instruct the
software to output scanned barcode in an EXCEL file and keep an image file,
(you can also select “Text + JPEG” options to output the scan result into a text file
with keep an image).
7) Set the [Image Settings] to “Color (Original)”.
8) Place the QR code within the central square.
9) Click on the [Scan] button on the upper right corner, then the software will
automatically execute URL after scanning.
46
Page 48
Combining Multiple Image Files into One PDF
File
If you have captured multiple images in your file directory, you can easily combine them
into one PDF file.
1) In the file directory column shown on the right-hand side of the main control window,
you can press and hold the “Shift” key or the “Ctrl” key while you use your mouse to
click and select multiple JPEG image files.
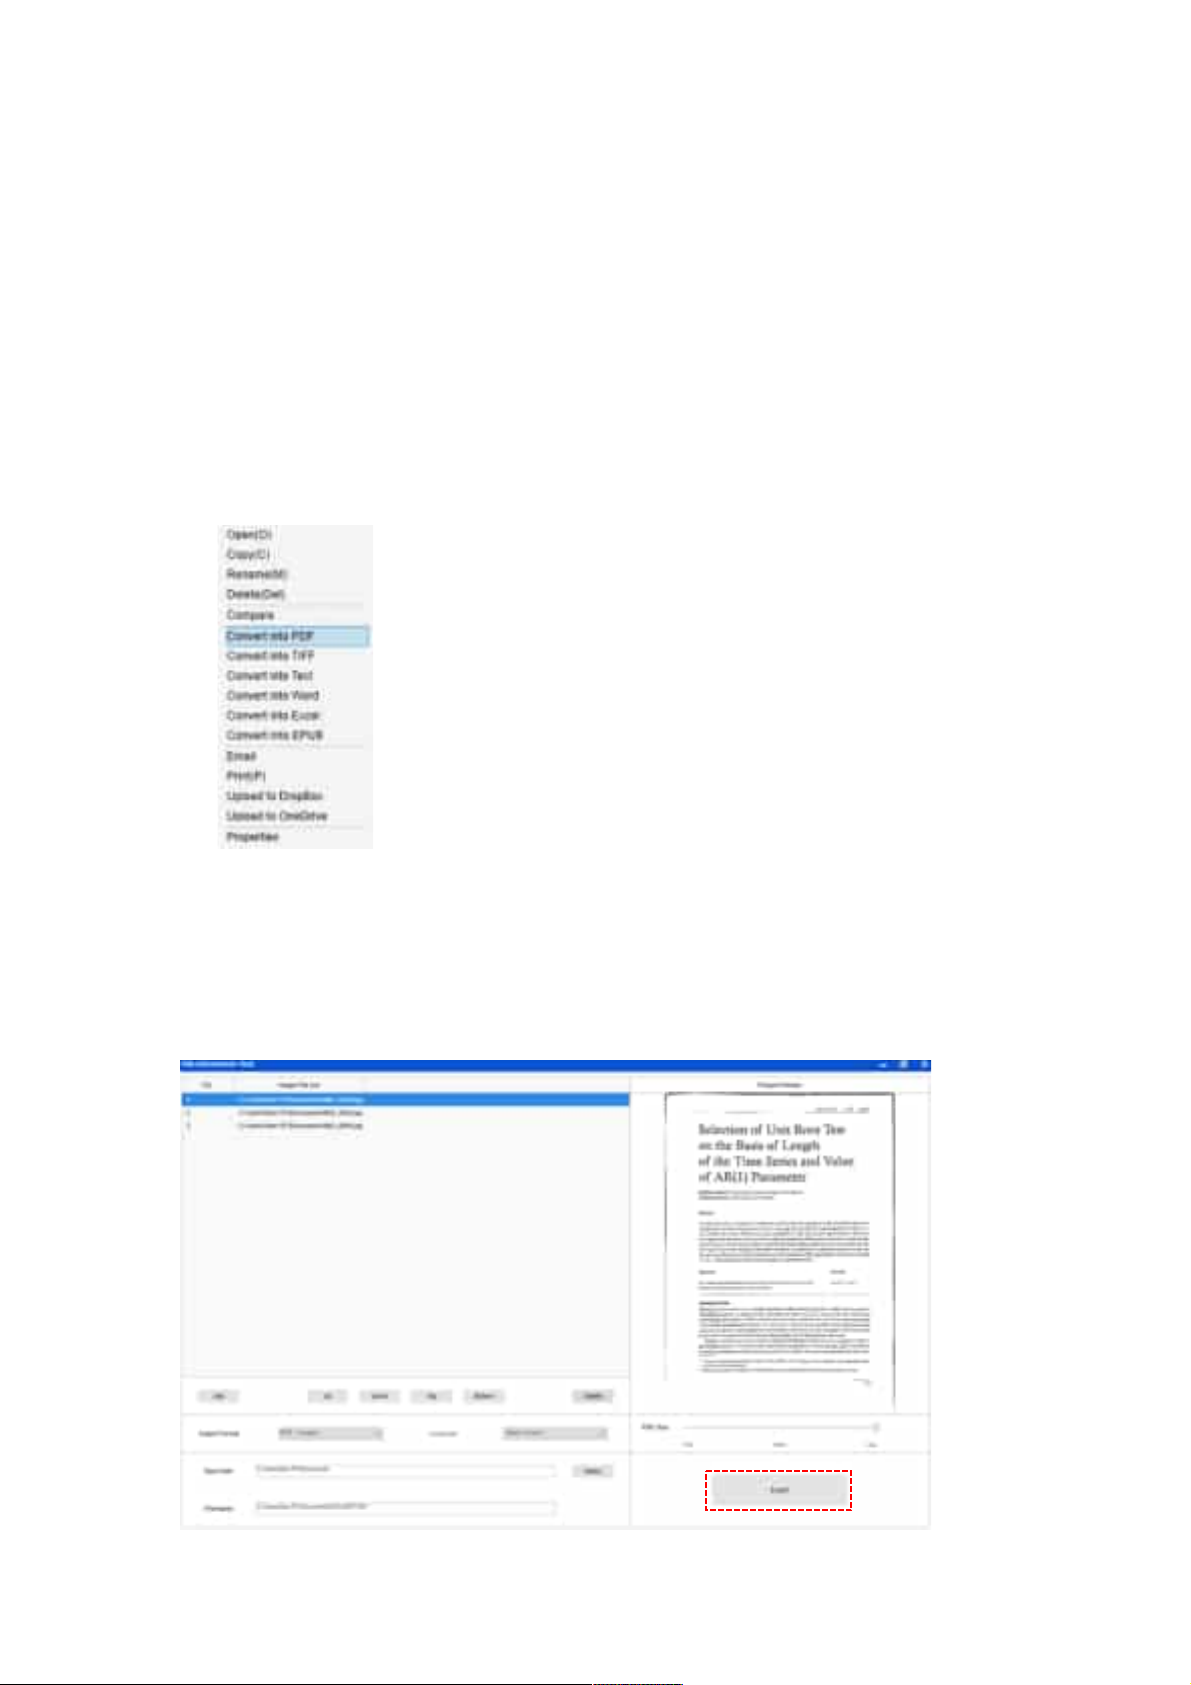
2) Right click on these selected image files, and then you should see a pop-up window
with multiple options.
3) Please select the [Convert into PDF] option, then the PDF Creating Tool window will
appear.
4) In the PDF Creating Tool window, you can Add, Delete, Move Up, or Move Down an
image, or you can adjust PDF file size and name the File Name for the targeted
output PDF file.
5) When you are ready, please click on the [Export] button to create the PDF file.
47
Page 49
Comparing Multiple Image Files in One Window
If you have captured multiple images in your file directory, you can easily compare them
side-by-side by using the Image Comparing feature:
1) In the file directory column shown on the right-hand side of the main control window,
you can press and hold the “Shift” key or the “Ctrl” key while you use your mouse to
click and select multiple JPEG image files.
2) Right click on these selected image files, and then you should see a pop-up window
with multiple options.
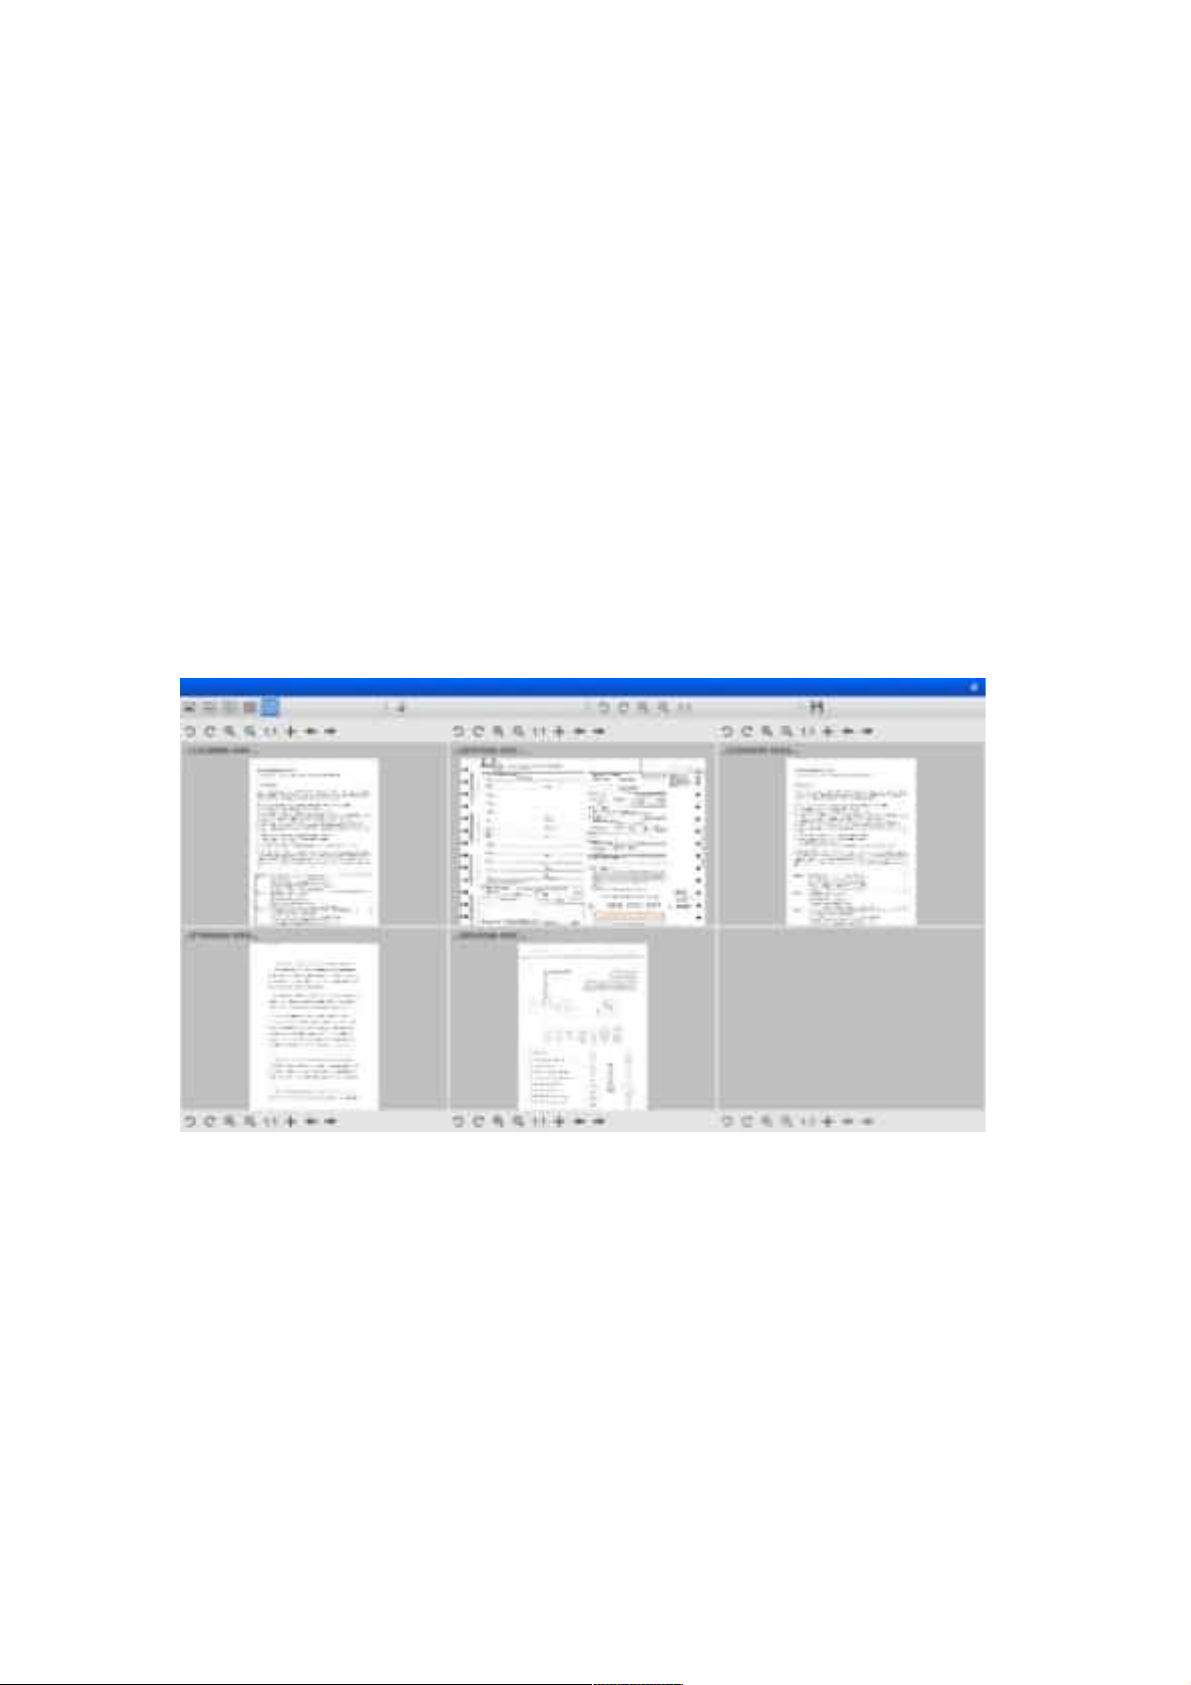
3) Please select the “Compare” option, then the Image Comparison window will appear;
4) You ca n se le ct u p to 6 i ma ge s an d com pa re them in the same widow.
5) Using the “Lock/Unlock” option, you can rotate or zoom in on each individual image
or apply these functions to all images.
48
Page 50
How to use Visualizer feature in the classroom?
You ca n us e th is s of tw ar e al on g wi th a document camera as a powerful Visualizer.
First, you will need to connect your Notebook PC to a projector, and project your
computer screen onto the projector. Then launch this document camera software, and
follow the following procedures:
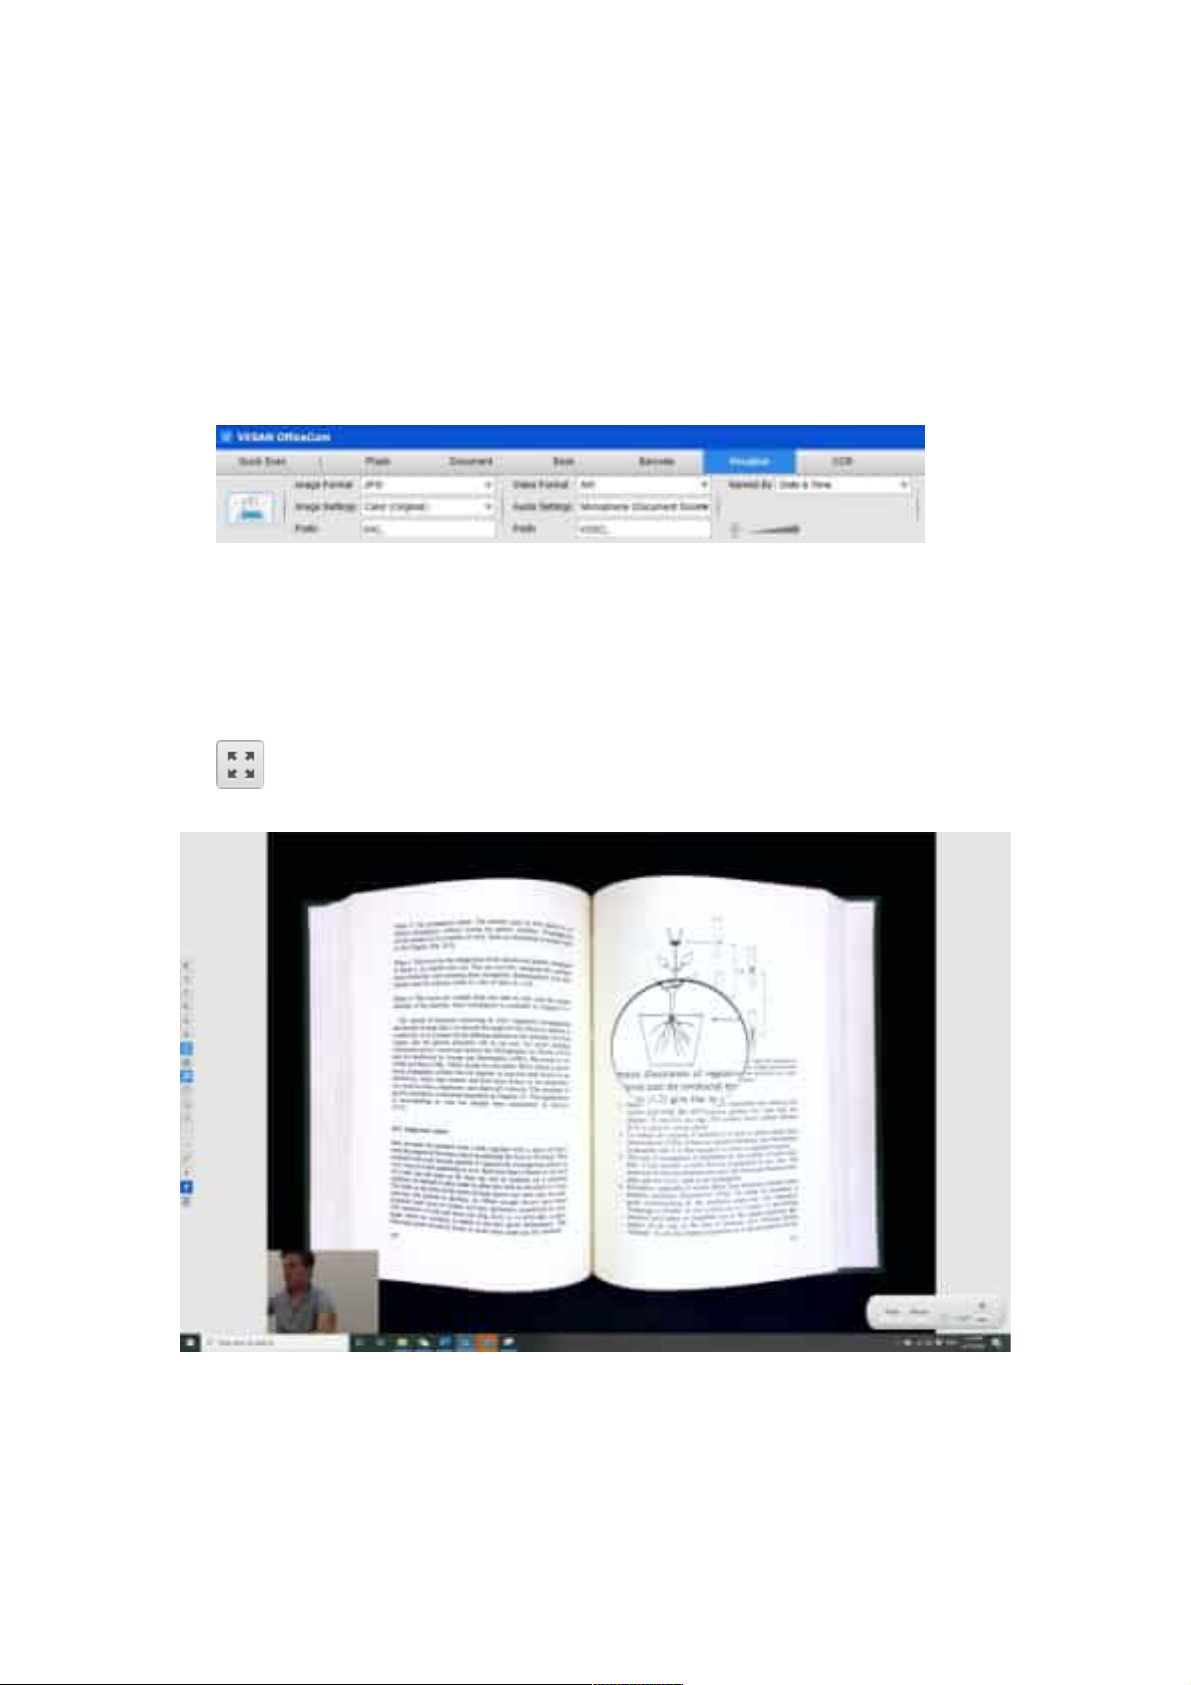
1) Click on the [Visualizer] function on the top menu bar.
2) Set the output format from the [Output Format] feature option.
3) Set the audio input from the [Audio] feature option.
4) Set the [Name By] feature option to “Serial” or ”Date & Time”.
5) Click on the [Resolution] button on the bottom of the main window and select a
desired resolution value. (Note: higher resolution will cause lower frame rate).
6) Click on the [Full Screen] button to enter the Full Screen mode.
7) Yo u ca n al so u se t he R ot at io n an d Zo om b ut tons to control the preview video.
NOTE:
1) This [Full Screen] display button only available under the [Visualizer] function mode.
2) Yo u ca n al so u se t hi s [Visualizer] function to create a video tutorial.
49
Page 51
How to convert batch documents with
the embedded OCR function?
You ca n us e embedded Optical Character Recognition (OCR) function to convert a batch
scanned images into searchable PDF and editable Word, Excel, and Text formats, it
supports more than 100 different languages.
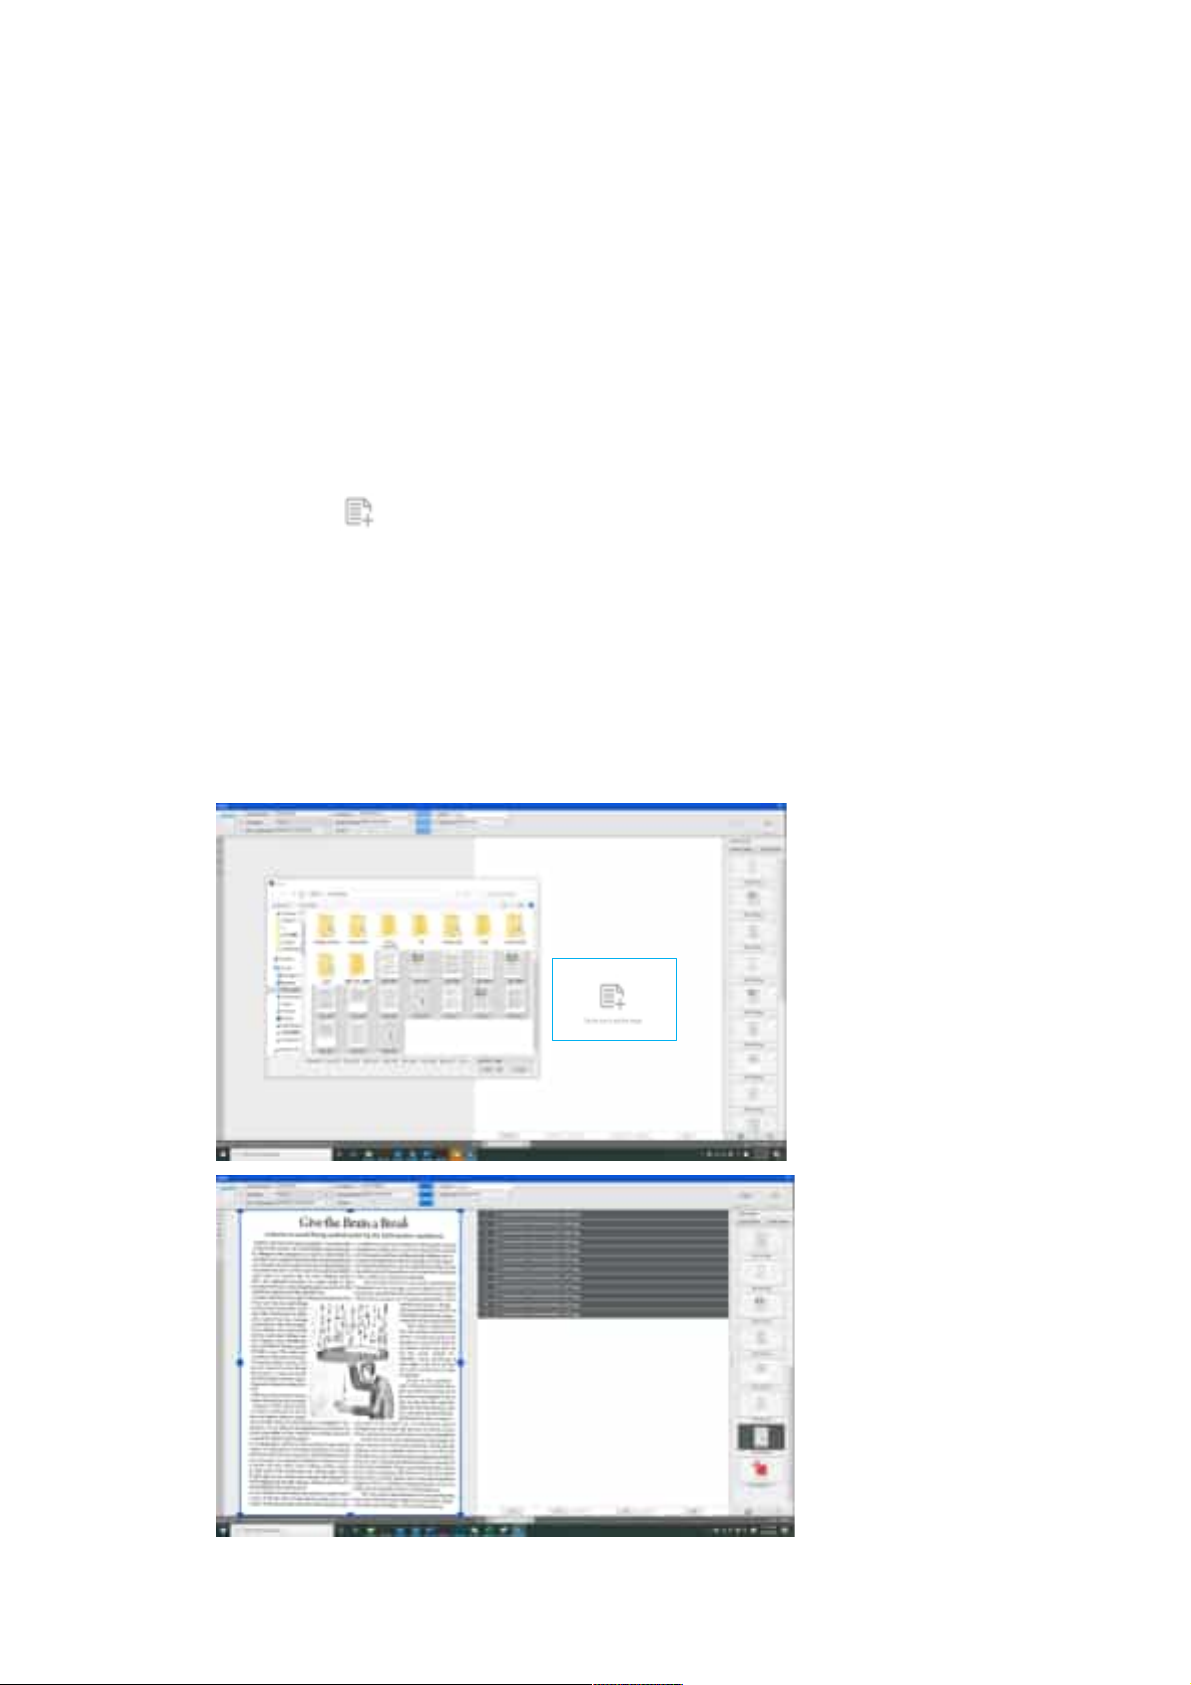
1) Click on the [OCR] function tab on the top menu bar.
2) Ta b th e i co n to load the images to convert OCR.
3) Set the [Output Format] feature option to output the scanned images into an editable
Word, Excel, Text files or searchable PDF.
4) Based on the content of the document, select Recognize Language from the
[Language] feature option.
5) Set the [Name By] feature option to “Serial” or “Date & Time”.
6) After all the images have been added, click [Export] button in the upper right corner
of the main window to convert the files, then you should see a new export file that
has been created in the file column on the right-hand side.
50
Page 52
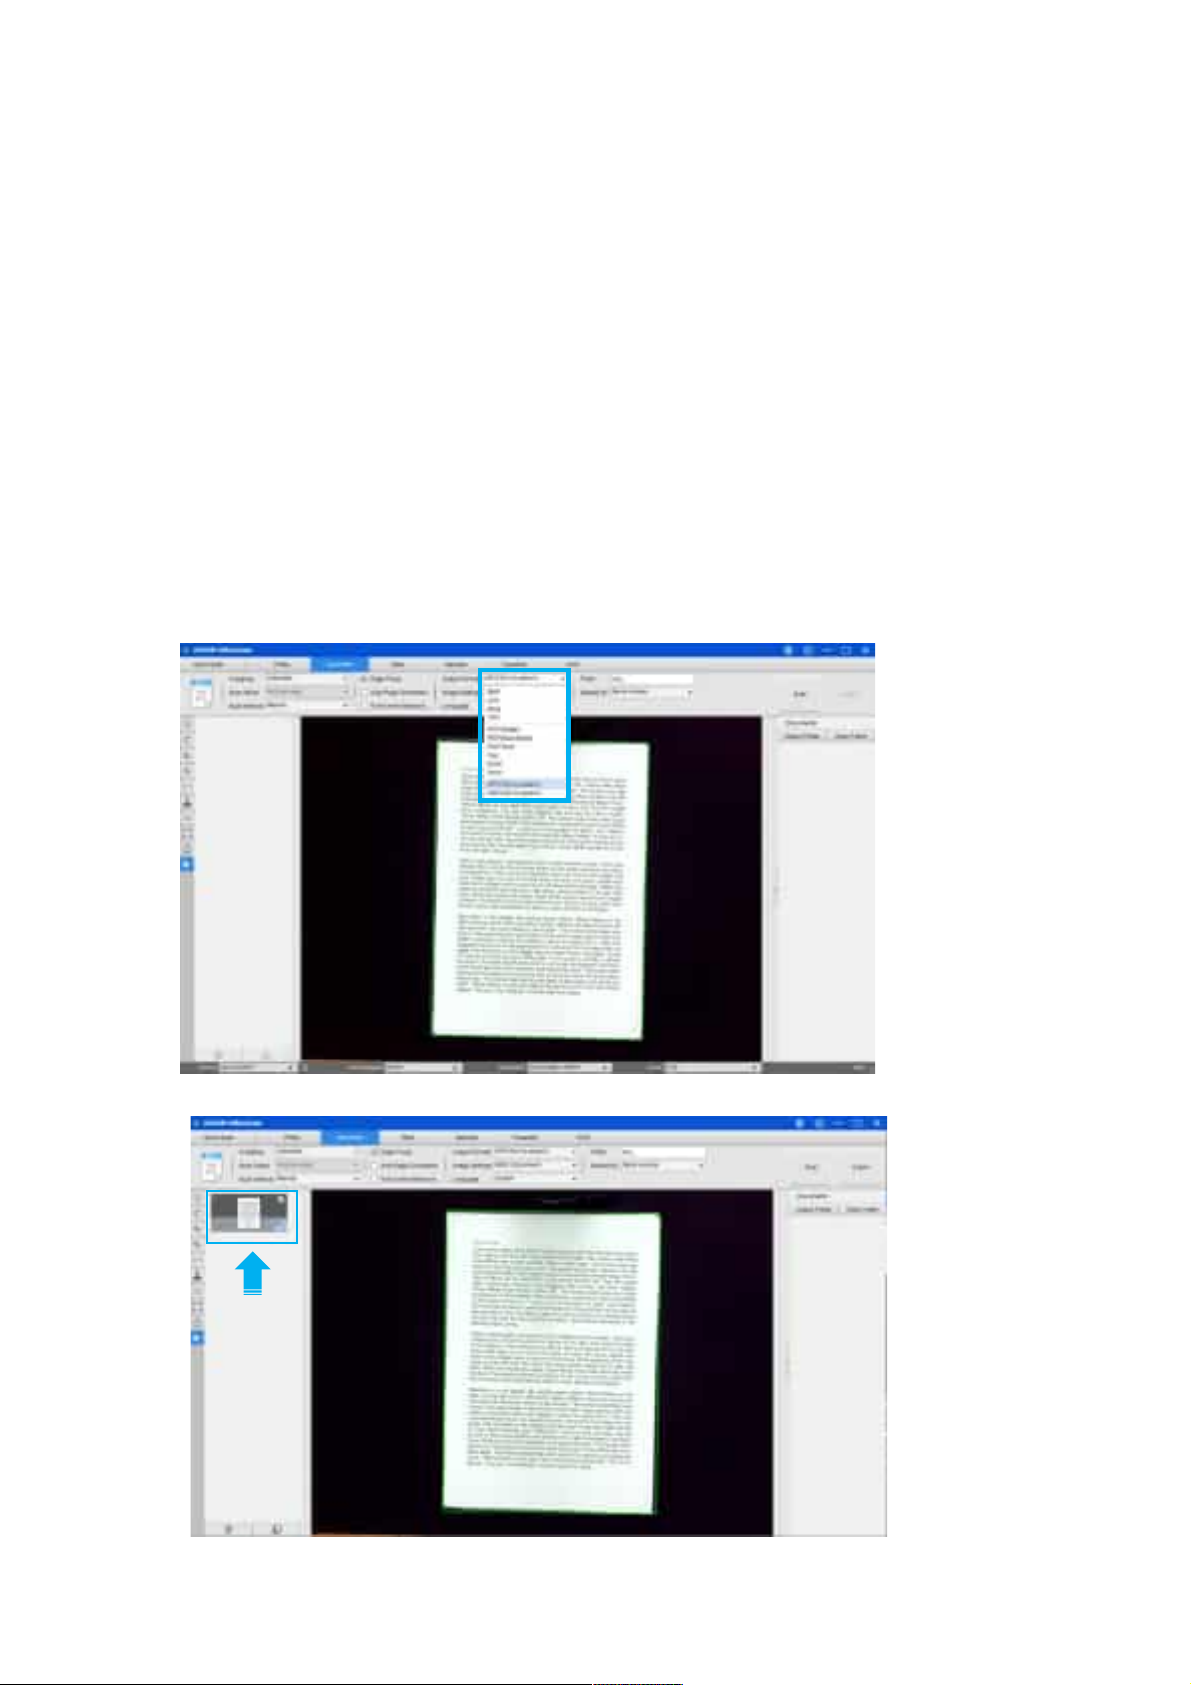
How to generate MP3 or WAV (Text to speech)
audio files?
To s c an an d g ene ra te MP 3 o r WAV (Te x t To S p ee c h) aud io fi le s, you can follow the below
steps.
16) Click on the [Document] function in the top menu bar.
17) Set the [Cropping] feature option to “Automatic”.
18) Set the [Output Format] feature option to “MP3 (Text to speech) or MAV (Text to
speech), this will instruct the software to output the scanned result in an audio format
file.
19) Set the [Language] feature for text speech based on the content.
20) Set the [Name By] feature option to “Serial” or “Date & Time”.
21) Click on the [Scan] button in the upper right corner to scan multiple pages.
22) After scanning, double-click on the left side thumbnail to enter edit mode.
51
Page 53
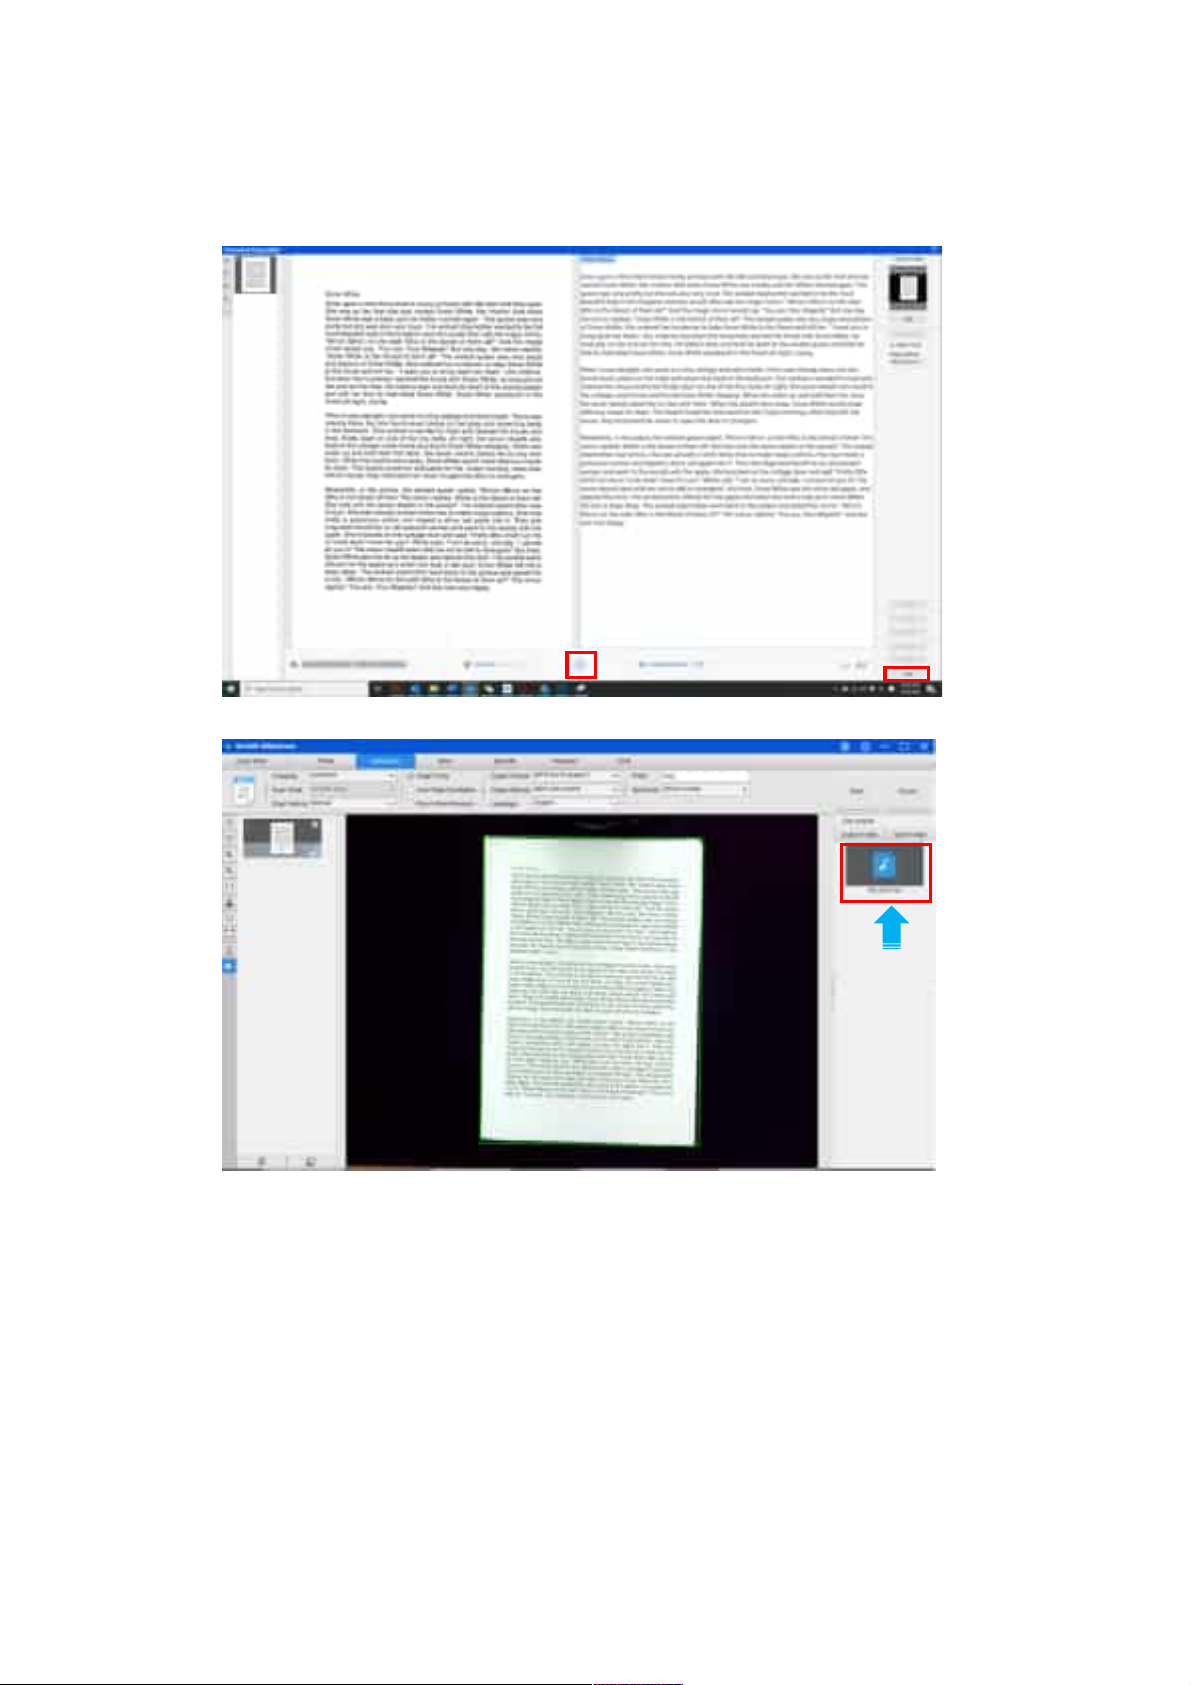
23) Within the edit mode, you can modify the text in the right side window and click the
play icon to the pre-test voice. If everything is correct, click the Exit button to exit the
edit mode.
24) Click the “Export” icon to output the audio (MP3/WAV) format file.
NOTE:
• The Text to speech function is only available for specific models.
• The OfficeCam is using Windows TTS (Text To Speech) embedded engine to
generate audio MP3 or WAV files from the recognized text in OfficeCam software.
Windows is by default configured to have “Voice” that corresponds to the GUI user
interface language of Windows. For example, if your using Win10 English, the
OfficeCam will be able to generate English output MP3 or WAV files. Besides, if
you want to generate other languages into an audio MP3 or WAV files such as
French from a paper document on your English Windows, this is by default not
possible because no French voice is installed.
52
Page 54
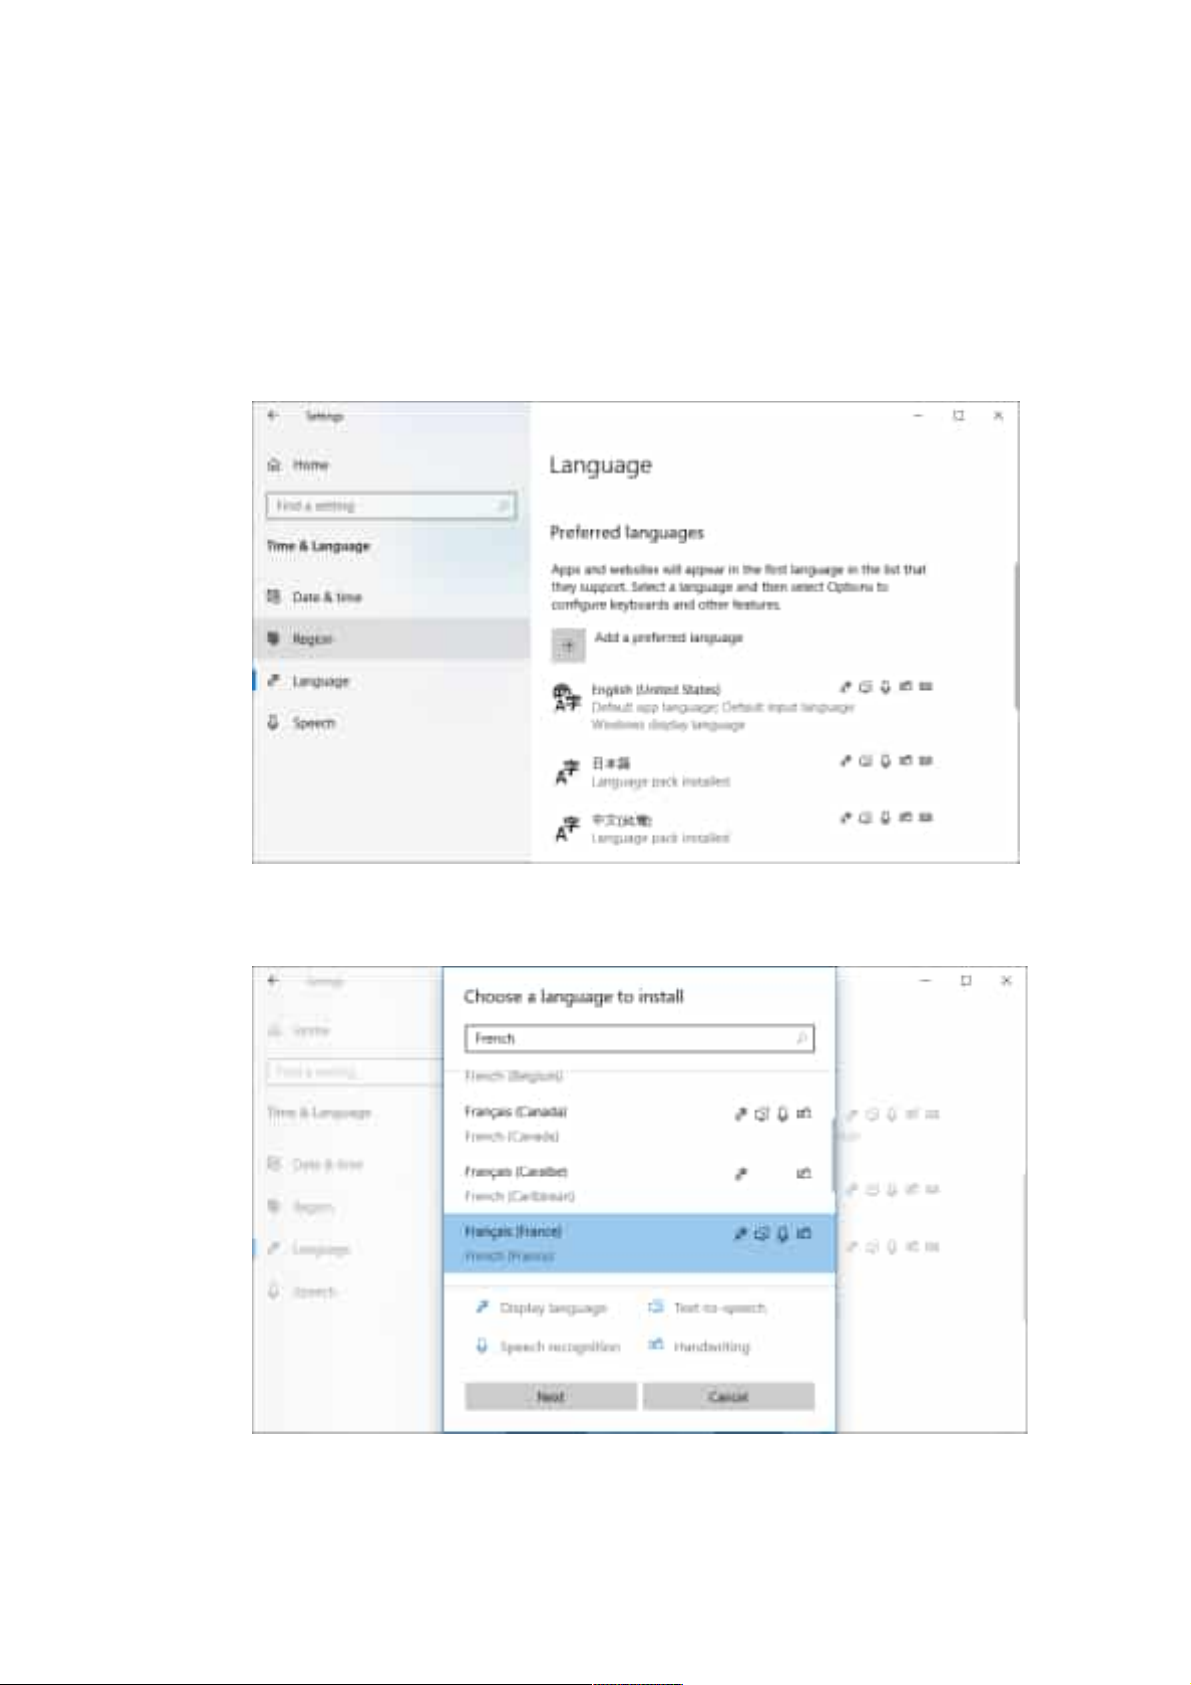
How to add the localized voices in Windows?
To a d d th e lo c al i zed v oi c es and use them in OfficeCam TTS (Text To Speech) output, you
can follow the below steps.
1) In Windows 10 Settings -> Time & Language -> Language -> select “Add a
language”
2) For example, select “Francais (France)” than click “Next” button.
53
Page 55
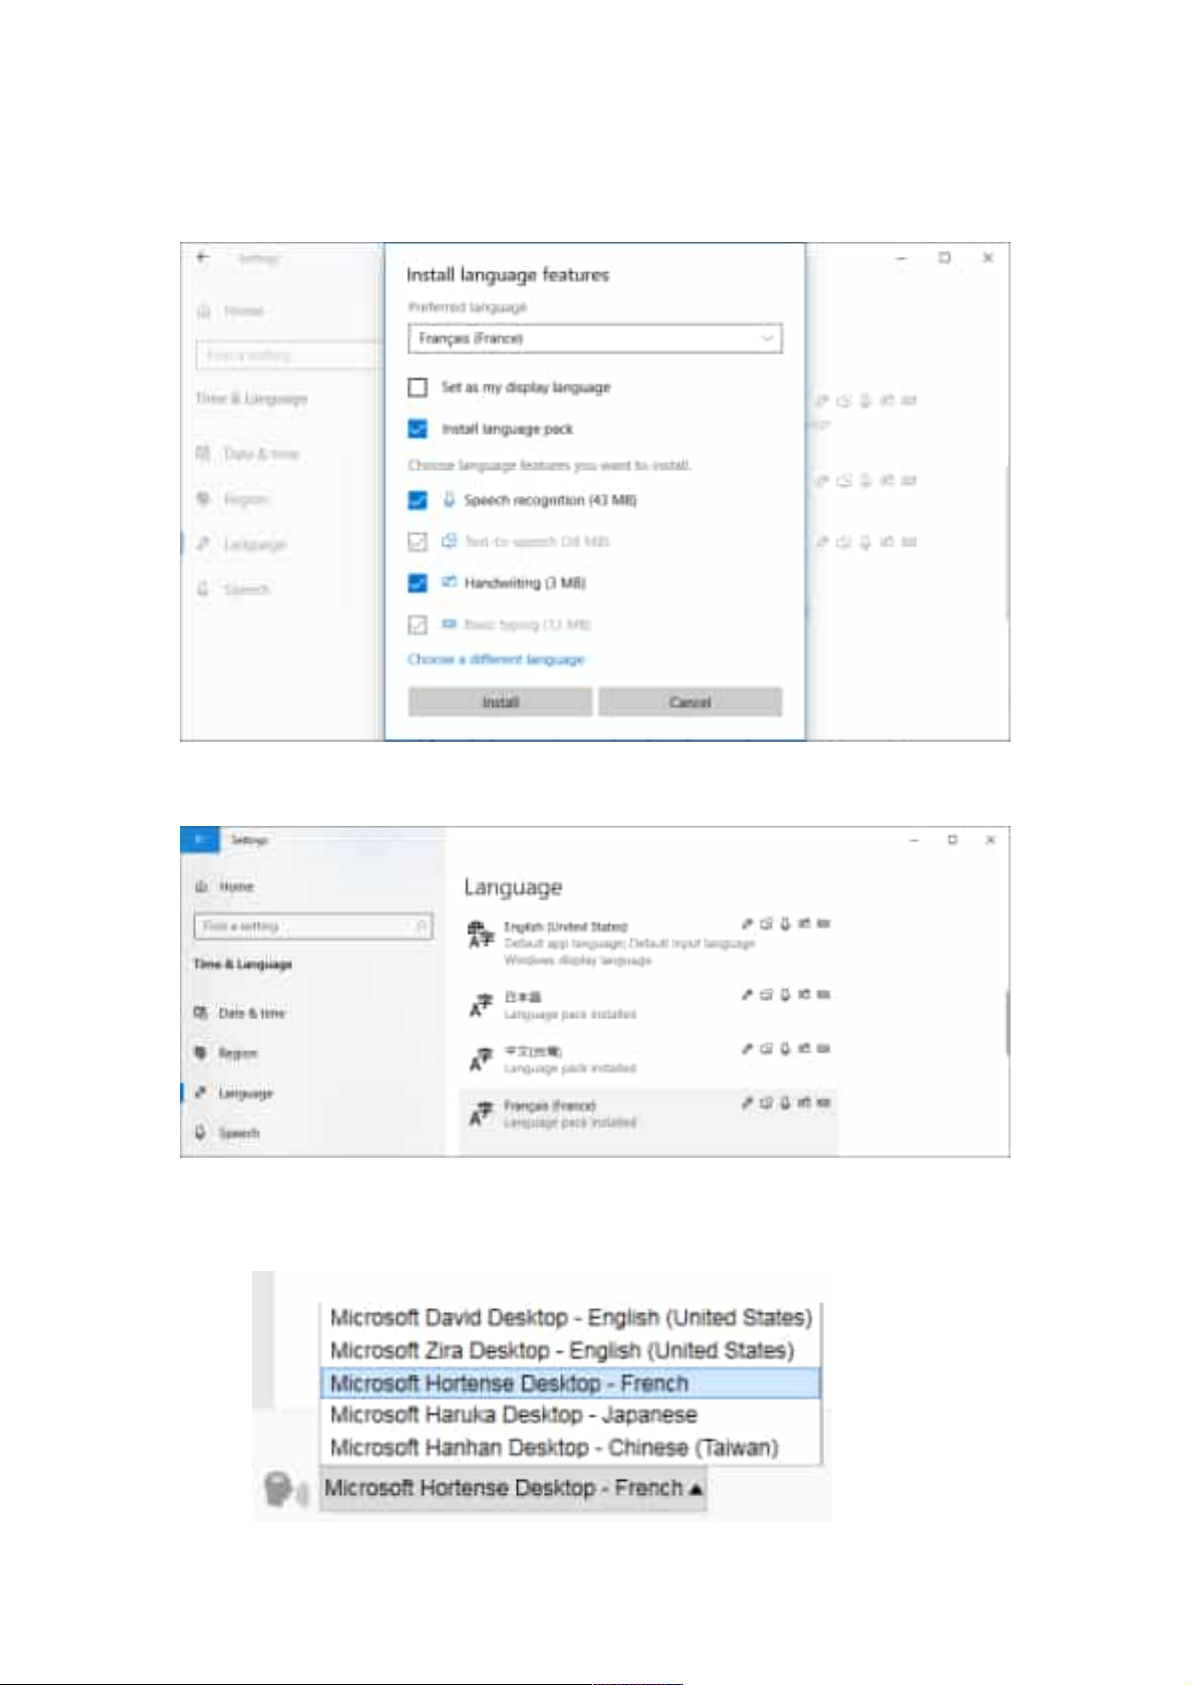
3) Check the “Speech Recognition” option and then click the “Install” button to
download the Speech pack.
4) Once the Francais (France) speech recognition pack is installed, you will see the
“Francais (France)” option appear on the Language setting menu.
5) Restart the OfficeCam software and select output format to “MP3 (Text to speech)”
to scan a France document then double-click on the left side thumbnail to enter
edit mode, you are now able to select a matching French voice ( “Hortense” here)
54
Page 56
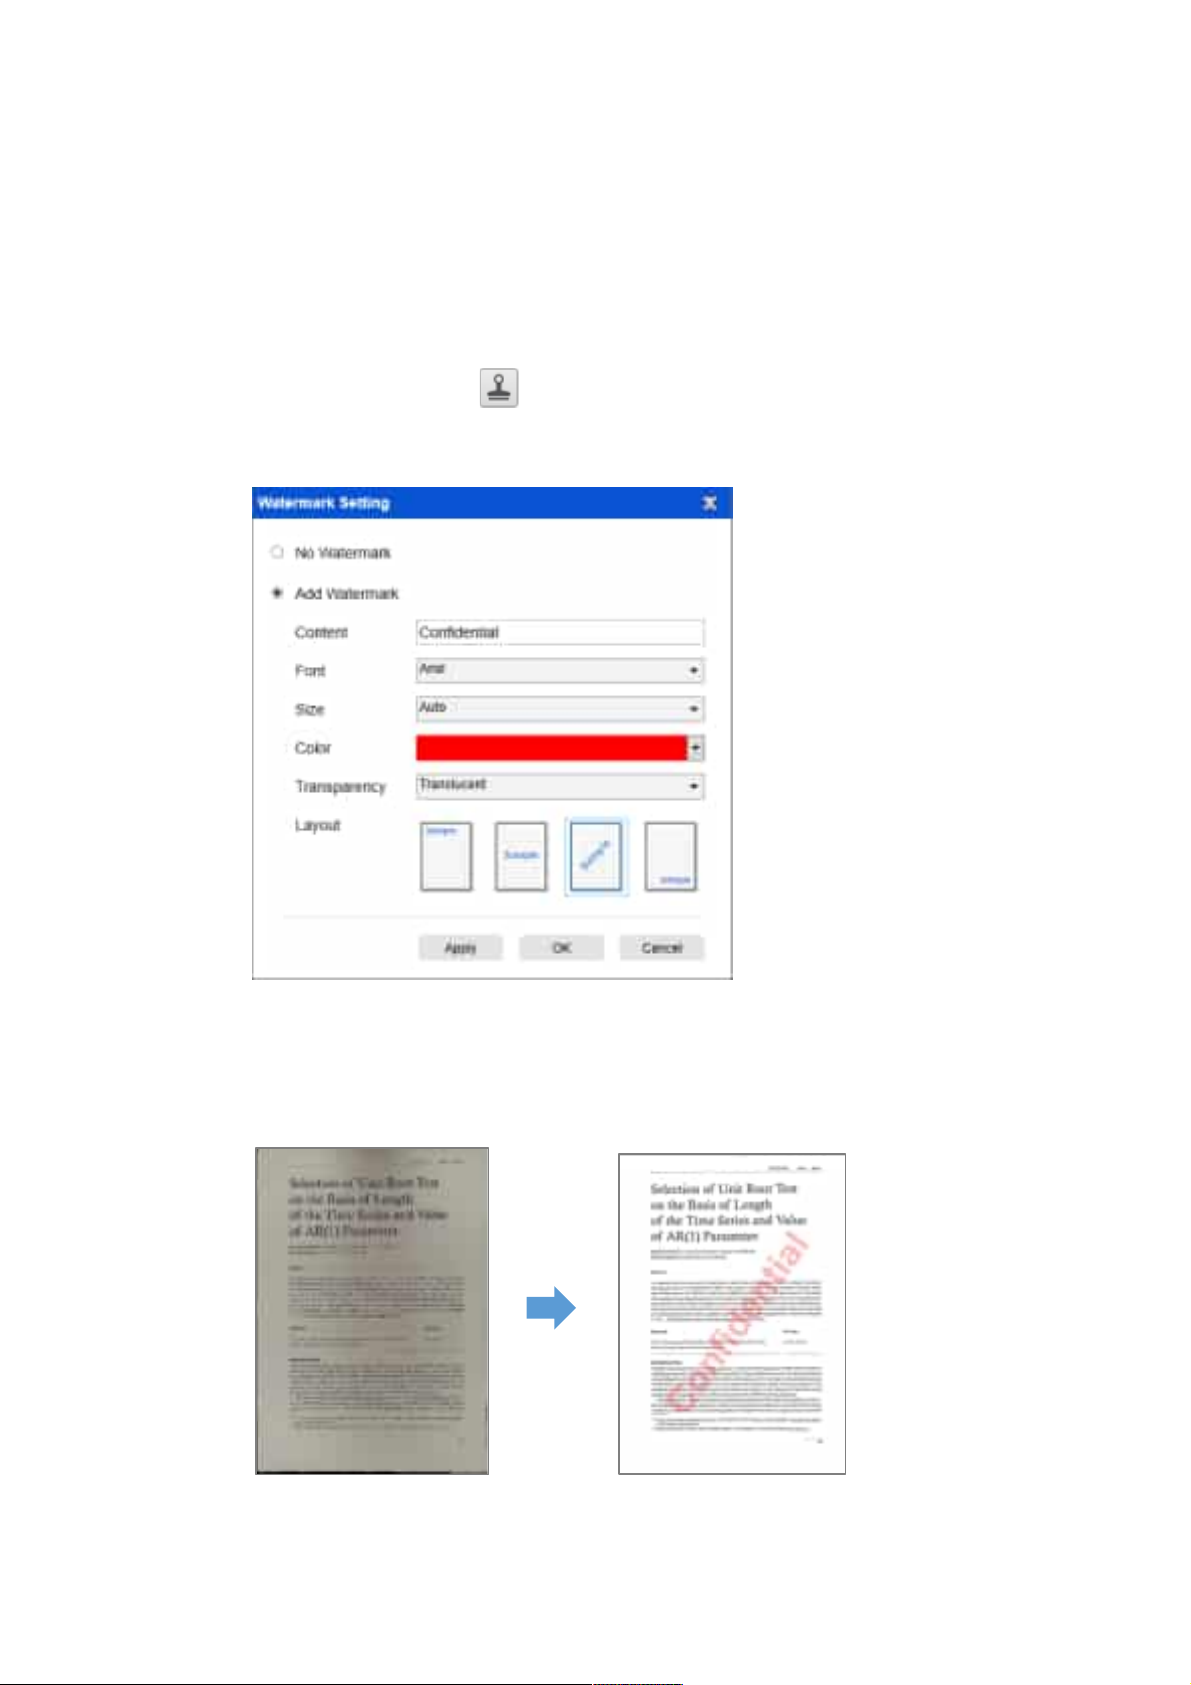
Adding a Watermark in Scanned Document File
To a d d a c om m on wat er ma r k su c h a s D RA F T o r C ON F ID E NT I AL t o yo u r s ca n ned
document, you can follow the following procedures:
1) Click on the [Document] function in the top menu bar.
2) Click on the Watermark icon in the left-hand side toolbar to bring up the
Watermark setting dialog.
3) In the Watermark setting dialog, select [Add Watermark].
4) Type your watermark te xt in the Content box. You can try different fonts, size,
colors, transparency, and choose a layout while you’re at it.
5) Click [OK] to apply the Watermark settings to your document. Now you can try to
scan a document with the added Watermark.
(Original)
(Added Watermark)
55
Page 57
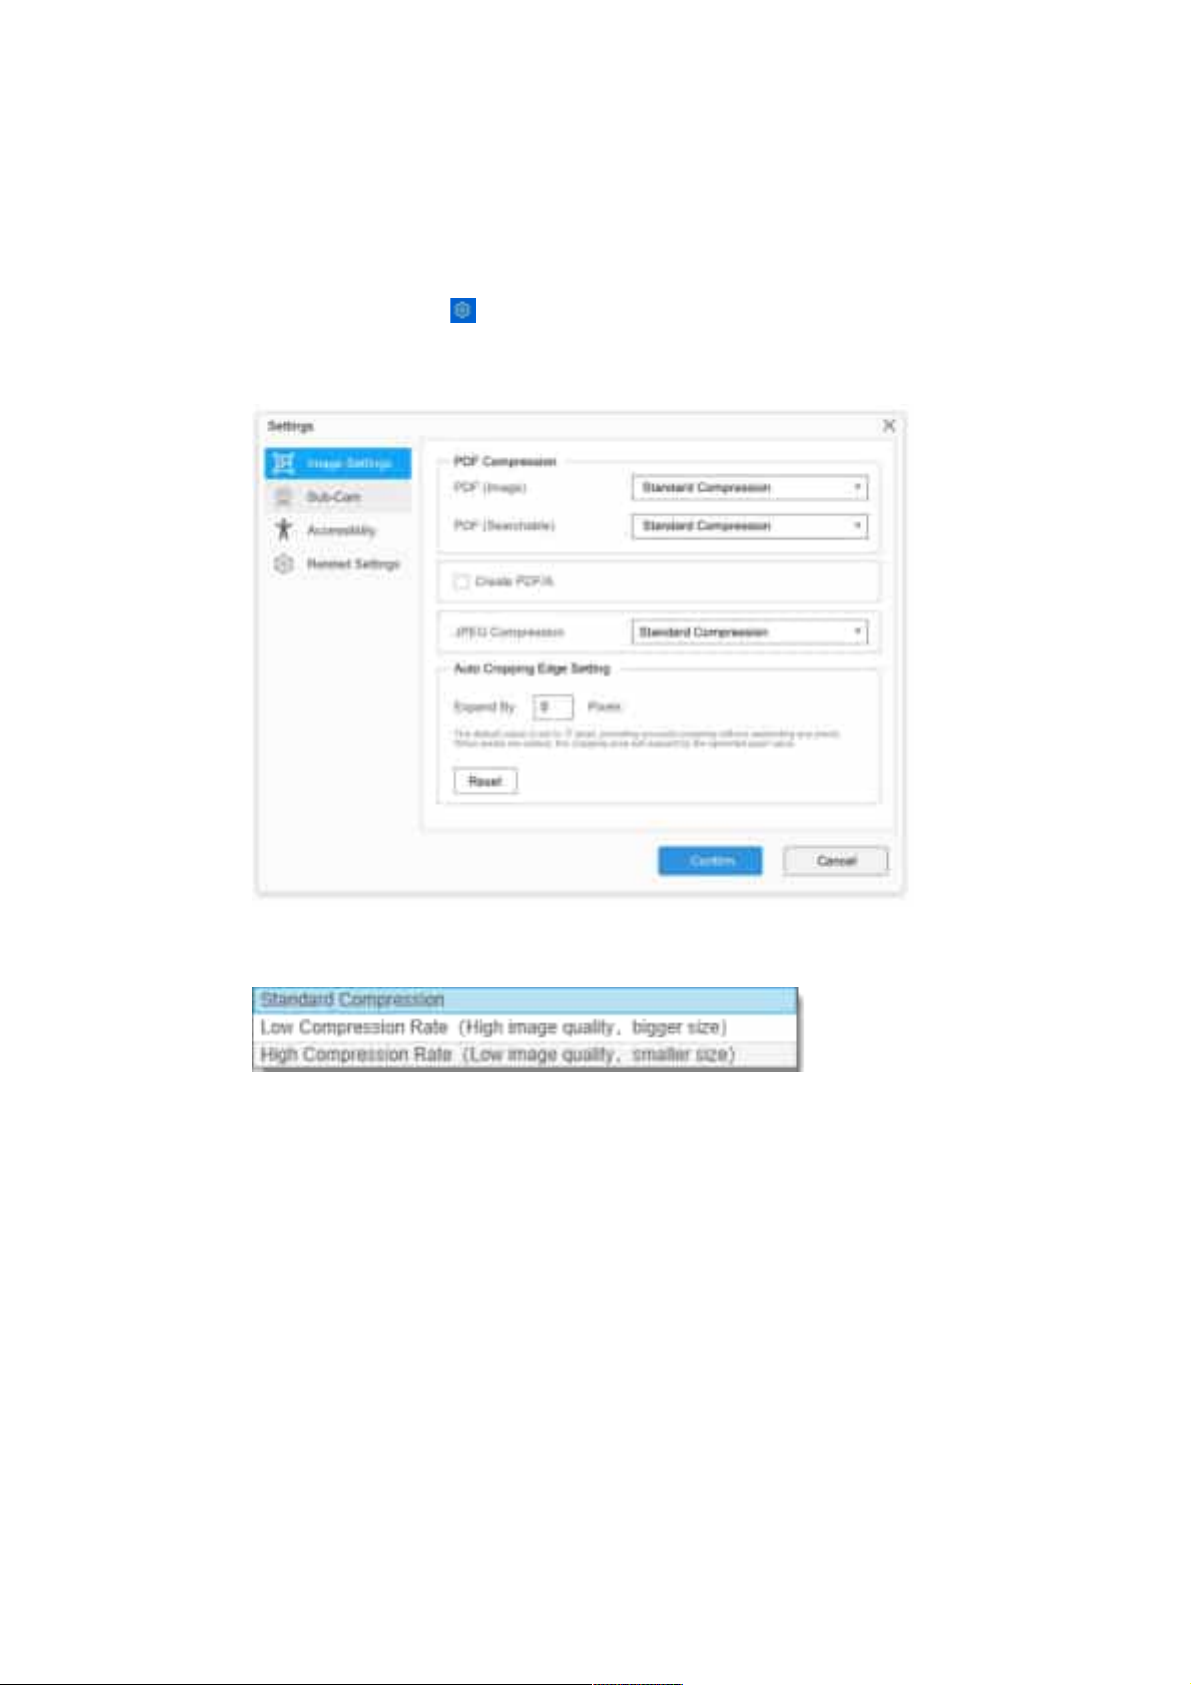
Configuring the PDF Settings
The documents you process with this software can be saved as PDF with differing
settings. The following steps can guide you in settings the detail options of a PDF file.
1) Click on the settings icon in the upper right-hand side of the main window
and select “Setting” from the drop-down list.
2) Choose the “PDF Settings” tab.
3) In the PDF Settings dialog, you can set the file compression as low, standard, or
high in the drop-down list of each type of PDF format.
4)
5) Click [Confirm] to apply these PDF settings to your document.
PDF (Image)
When you select this file type, this software cannot perform text recognition in your
document. Your PDF file will not be text-searchable, as it only contains the image of your
original document.
PDF (Searchable)
This file type is most commonly used. It contains two layers: the recognized text, and the
original image on top of the text. This way, you have both access to the recognized text -
*-and you still see the original image.
56
Page 58

Supported OCR Languages
The VIISAN OfficeCam software is embedded with a powerful OCR engine, which allows scan
documents and converts them into a searchable PDF, editable Word, Text, or Excel file. The OCR
function supports the following languages.
English German French
Spanish Italian Polish
Swedish Danish Norwegian
Dutch Portuguese Brazilian
Galician Icelandic Greek
Czech Hungarian Romanian
Slovak Croatian Serbian
Slovenian Luxembourgish Finnish
Russian Belarusian Ukrainian
Macedonian Bulgarian Estonian
Lithuanian Afrikaans Albanian
Catalan Irish Gaelic Scottish Gaelic
Basque Breton Corsican
Frisian Norwegian Nynorsk Indonesian
Malay Swahili Tagalog
Japanese Korean Simplified Chinese
Traditional Chinese Quechua Aymara
Faroese Friulian Greenlandic
Haitian Creole Rhaeto Romance Sardinian
Kurdish Cebuano Bemba
Chamorro Fijian Ganda
Hani Ido Interlingua
Kikongo Kinyarwanda Malagasy
Ori Mayan Minangkabau
Nahuatl Nyanja Rundi
Samoan Sotho Sundanese
Ta hi t ia n To ng an Ts w an a
Wolof Xhosa Zapotec
Javanese Nigerian Pidgin Occitan
Manx To k Pisin Bislama
Hiligaynon Kapampangan Balinese
Bikol Ilocano Madurese
Waray Serbian Latin Latin
Latvian Hebrew Numeric
Esperanto Maltese Zulu
Afaan Oromo Asturian Azeri (Latin)
57
Page 59

Luba Papiamento Ta t ar (Latin)
Turkmen (Latin) Welsh Arabic
Farsi Mexican Spanish Bosnian (Latin)
Bosnian (Cyrillic) Moldovan German (Switzerland)
Te tu m Kazakh (Cyrillic) Mongolian (Cyrillic)
Uzbek (Latin) Simplified Chinese+English Traditional
Chinese+English
Japanese+English Turkey
NOTE:
1) In order to correctly utilize the built-in OCR feature, when using the OCR function,
please set [Image Settings] option to “B&W (Document)” or “B&W (Red Stamp)”, this
will help to speed up the OCR recognition process.
2) If the document is placed in landscape, please check the “Auto Page Orientation”
function in the top menu bar, this function will help rotate the pages based on the text
orientation.
58
Page 60

FAQs (Frequently Asked Questions)
Q1: Why am I seeing the video from the Webcam instead of the book scanner?
A1: Please select the correct camera device by clicking on the [Device] setting in the
lower left corner of the main window, and then select the correct book scanner
device.
Q2: Why are there some noises (black dots) on my scanned document?
A2: When scanning a black and white document, please choose the “B&W (Red
Stamp)” option from [Image Settings] feature settings for better image quality.
Q3: Why are there shadows on my scanned document?
A3: Please choose the “B&W (Red Stamp)” option from [Image Setting] feature
settings and try again.
Q4: How can I merge multiple documents into one PDF?
A4: Please choose the “Multiple” option in [Page] feature settings, and please choose
the “PDF” option from [Output] feature settings.
Q5: Why can’t the document be detected?
A5: Please make sure the document is on the black soft mat or try to restart the
software.
Q6: Why does the image appear to be over-exposed? The text can’t be seen.
A6: Please place document in the center of scanning window.
Q7: After capture, where are images been stored?
A7: Please click the “Open” button on the right-hand side of the software’ main
window. The default destination is “My Documents”, but you can also change the
storage destination by clicking the [Select] button.
59
Page 61

If the device cannot be detected for a long time, you can try the following.
- Change the USB port.
Try to re con nect th e U SB devi ce with ano ther US B p ort, an d t hen re sta rt the sca nner and tr y a gai n.
-For Windows 10 computer
Go to "Settings Privacy Camera" to check whether the permission is allowed.
-Disable anti-virus software
If you have installed anti-virus software, please manually add the VIISAN client to the whitelist of
the anti-virus software.
-Watch our video tutorial
if the problem cannot be solved with the above methods, click to view the video tutorials at
https://www.viisan.com/en/video/type1.html
-Contact customer service
if you still need assistance, please contact our customer service at [email protected]
, We would be answered your email questions within 24 hours on business days.
60
 Loading...