

Page 1

VisualCam
USER MANUAL
Windows Edition V1.3
COPYRIGHT © ALL RIGHTS RESERVED.
Page 2

Index
Copyright ...................................................................................................................... 2
Trademarks .................................................................................................................. 2
Disclaimer ..................................................................................................................... 2
Introduction ................................................................................................................... 3
System Requirements ................................................................................................ 4
Installing the software ................................................................................................. 5
Uninstalling VIISAN VisualCam ................................................................................ 6
Getting Started ............................................................................................................. 7
Operation Interface Description .............................................................................. 10
1. Function Tabs ....................................................................................................... 10
2. Select Connection ................................................................................................ 11
3. Left Toolbar ........................................................................................................... 11
4. Image Adjustment Menu ..................................................................................... 13
5. Capture Button Settings ...................................................................................... 14
6. Thumbnail List ...................................................................................................... 14
7. File Save Path Settings ....................................................................................... 15
8. Settings menu ....................................................................................................... 15
Visualizer Mode Description .................................................................................... 18
Image Adjustment Menu .................................................................................. 22
Select Capture Mode ........................................................................................ 24
Split-Screen Mode Description ............................................................................... 26
The action buttons of split-screen mode ....................................................... 26
Compare with two live screens ....................................................................... 27
Compare images ............................................................................................... 28
Change the display layout ............................................................................... 29
Whiteboard Mode Description ................................................................................. 30
Whiteboard Toolbar Description ..................................................................... 30
Add a whiteboard page .................................................................................... 33
Troubleshooting ......................................................................................................... 34
1
Page 3

Copyright
All rights reserved by Beijing VIISAN Technology Co., Ltd. No part of the
materials shall be reproduced in any form or by any means without prior
written permission.
Trademarks
• The VisualCam™ is a trademark of Beijing VIISAN Technology Co.,
Ltd. registered in the U.S. and other countries.
• Windows® is a registered trademark of Microsoft Corporation in the United
States and other countries. All other products mentioned in this document are
trademarks or registered trademarks of their respective owners.
Disclaimer
• The screenshots in this user's manual were made with Windows 10. If you
are using other Windows system, your screen will look somewhat different but
still function the same. !
• Specifications of this software and contents of this user manual are subject to
change without notice. Any modification, error correction, or feature updates
made in the actual software may have not been timely updated in this user
manual. User may refer to the actual software itself for more accurate detail.
Any misprints, translation errors, or inconsistencies with existing software, will
be updated as soon as possible. !
2
Page 4

Introduction
The VisualCam is a multi-functional education visualizer software specially
designed for visualizers, it provides a full-screen window and various
annotation functions that allows you directly add annotations on the live
window by using the free-hand drawing tools, enable the mask or spotlight
modes, zoom, and rotate the image, freeze the live video, change the
resolution, and adjust brightness. With this powerful visualizer software, you
can easily present or pre-record any teaching materials in various ways, like
taking snapshots, recording videos by enabling picture-in-picture, scanning
documents, creating stop motion videos, comparing images by split-screen, or
using the interactive whiteboard function.
WARNING:
This visualizer software ONLY works with specific document camera models.
If you are using 3rd party products this software may NOT work.
3
Page 5

System Requirements
To ensure the performance of your document camera, the following hardware
system requirement is needed.
CPU Intel® Core™ i5 or higher
RAM 8GB RAM minimum, 16GB RAM recommended.
GPU Intel® Iris Plus Graphics series or higher
The installation and operation of the program requires 1G
Hard Disk
disk space. You can scan more images if the disk space is
bigger. The recommended storage is 20G.
Operating
Windows 10 / Windows 11
System
USB USB port
NOTE: The system requirements and compatibility can change over time,
depending on the operating system and updates from Windows.
4
Page 6
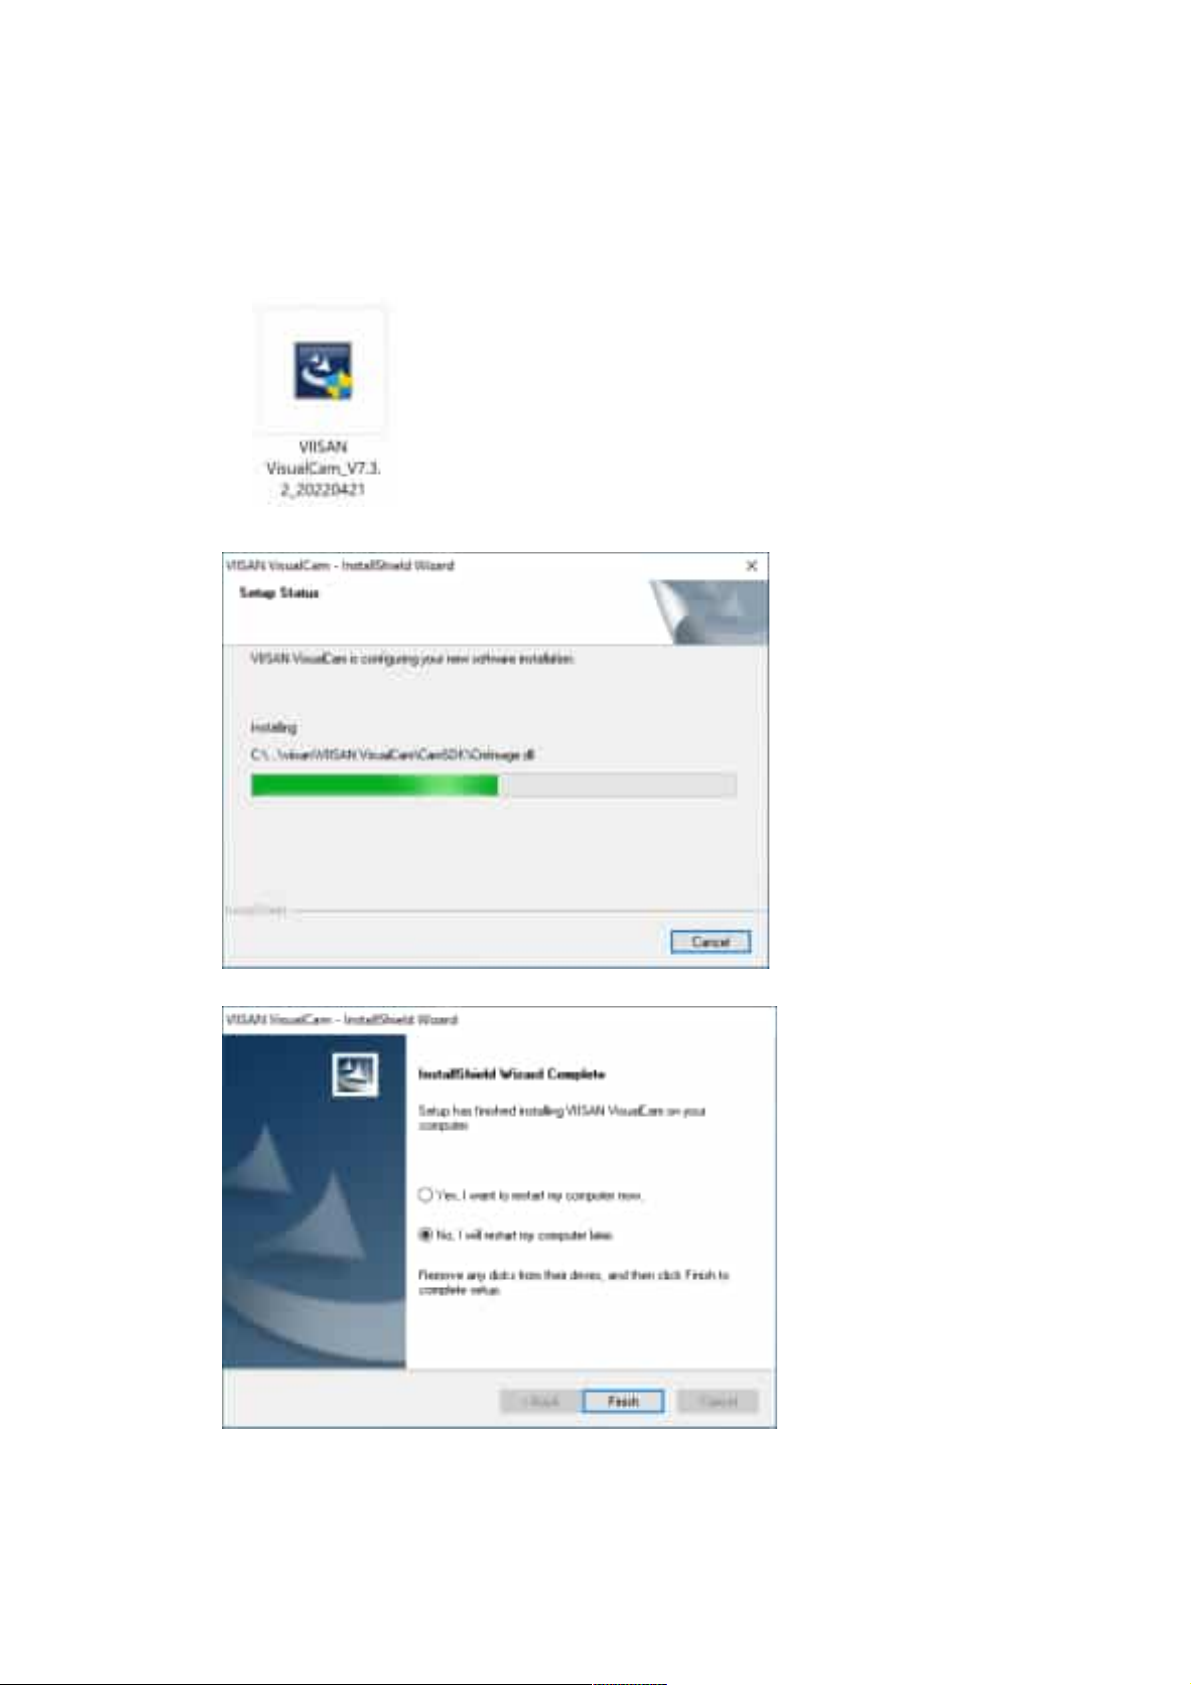
Installing the software
1. Double click the VIISAN VisualCam.exe file to install the software.
2. Follow the onscreen instructions to complete the installation.
3. Click [Finish] to finish the installation program.
5
Page 7
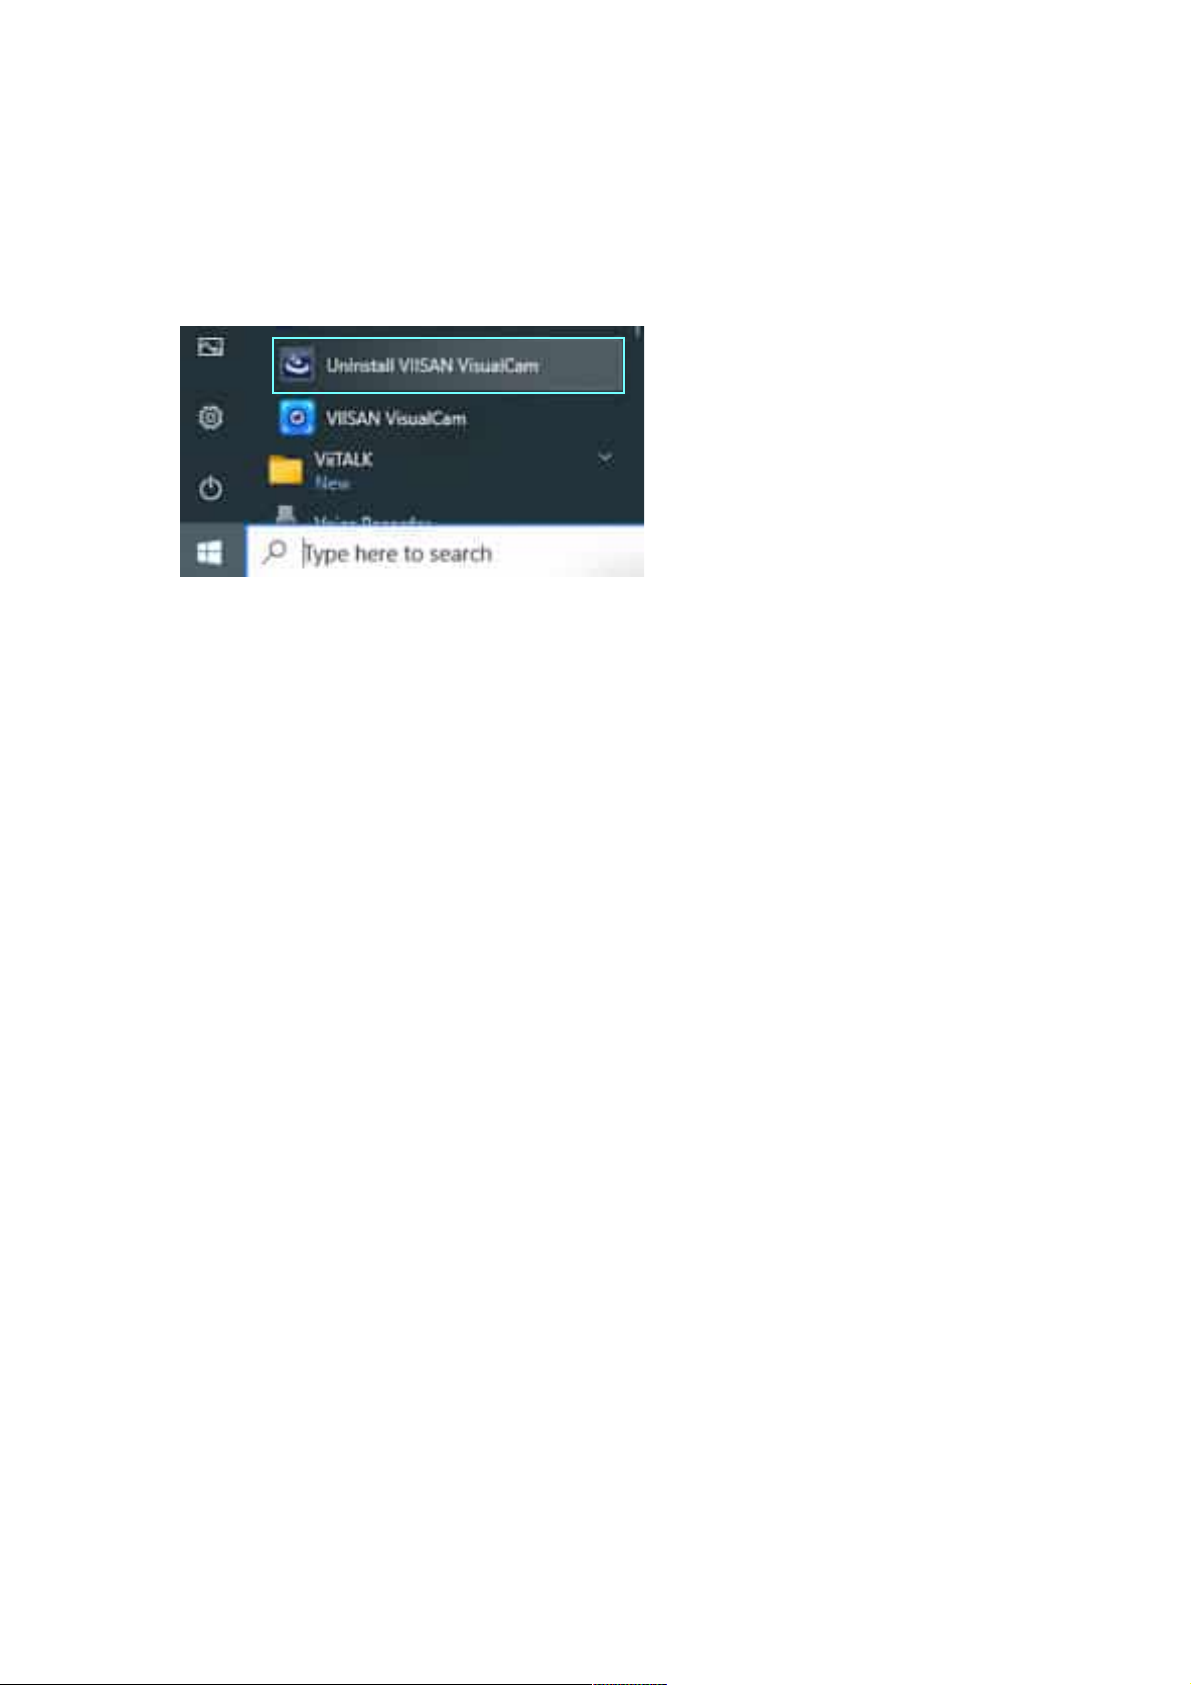
Uninstalling VIISAN VisualCam
To r e mo v e VIISAN VisualCam from your Windows. Click the Windows Start Menu > All
Programs > VIISAN VisualCam folder > UnInstall VIISAN VisualCam
6
Page 8
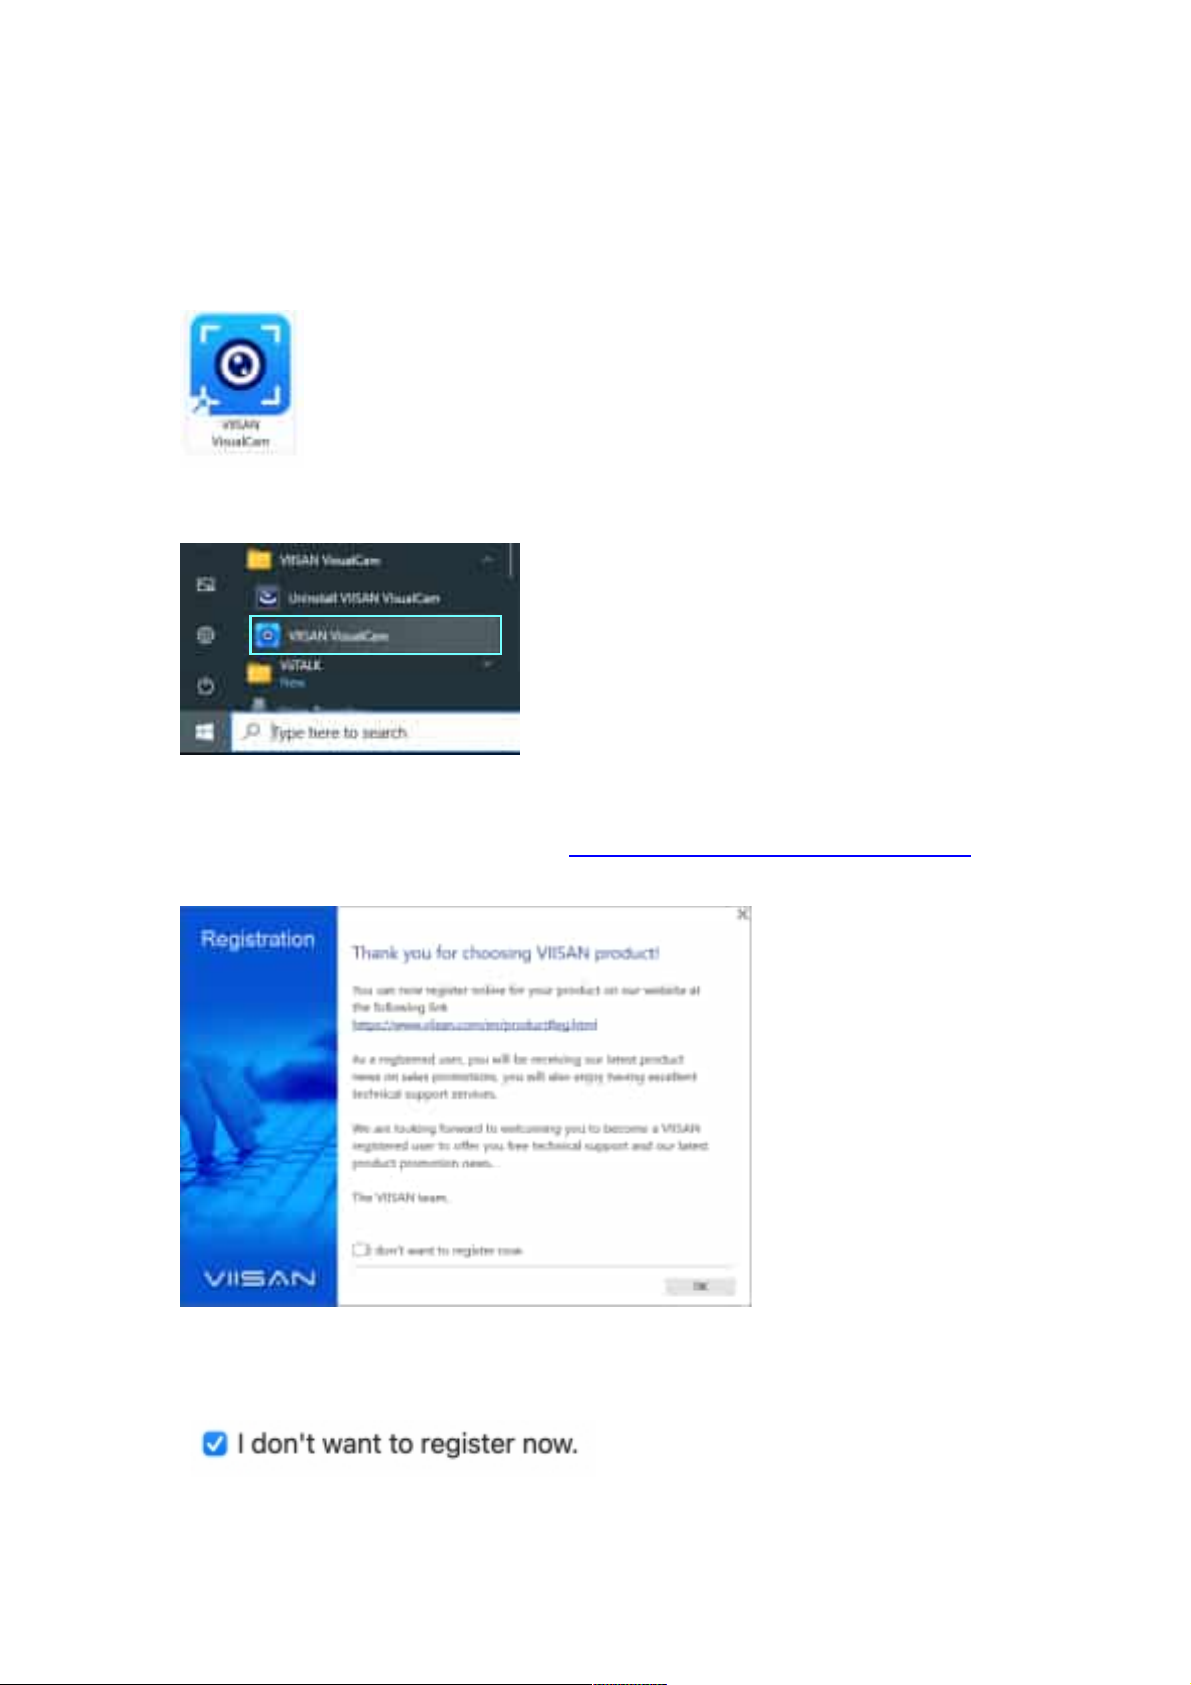
Getting Started
To start the program, please double click on the VIISAN VisualCam icon on the desktop or
start VIISAN VisualCam from the Windows Programs list.
Click the Windows Start Menu > All Programs > VIISAN VisualCam folder > VIISAN
VisualCam.
When VIISAN VisualCam app is launched the first time, you should see a registration
menu appears and you can click the URL https://www.viisan.com/en/productReg.html
to register your product or click ‘OK’ to enter the app.
NOTE: If you don't want to see the registration window every time you launch the app,
you can click below checkbox.
7
Page 9
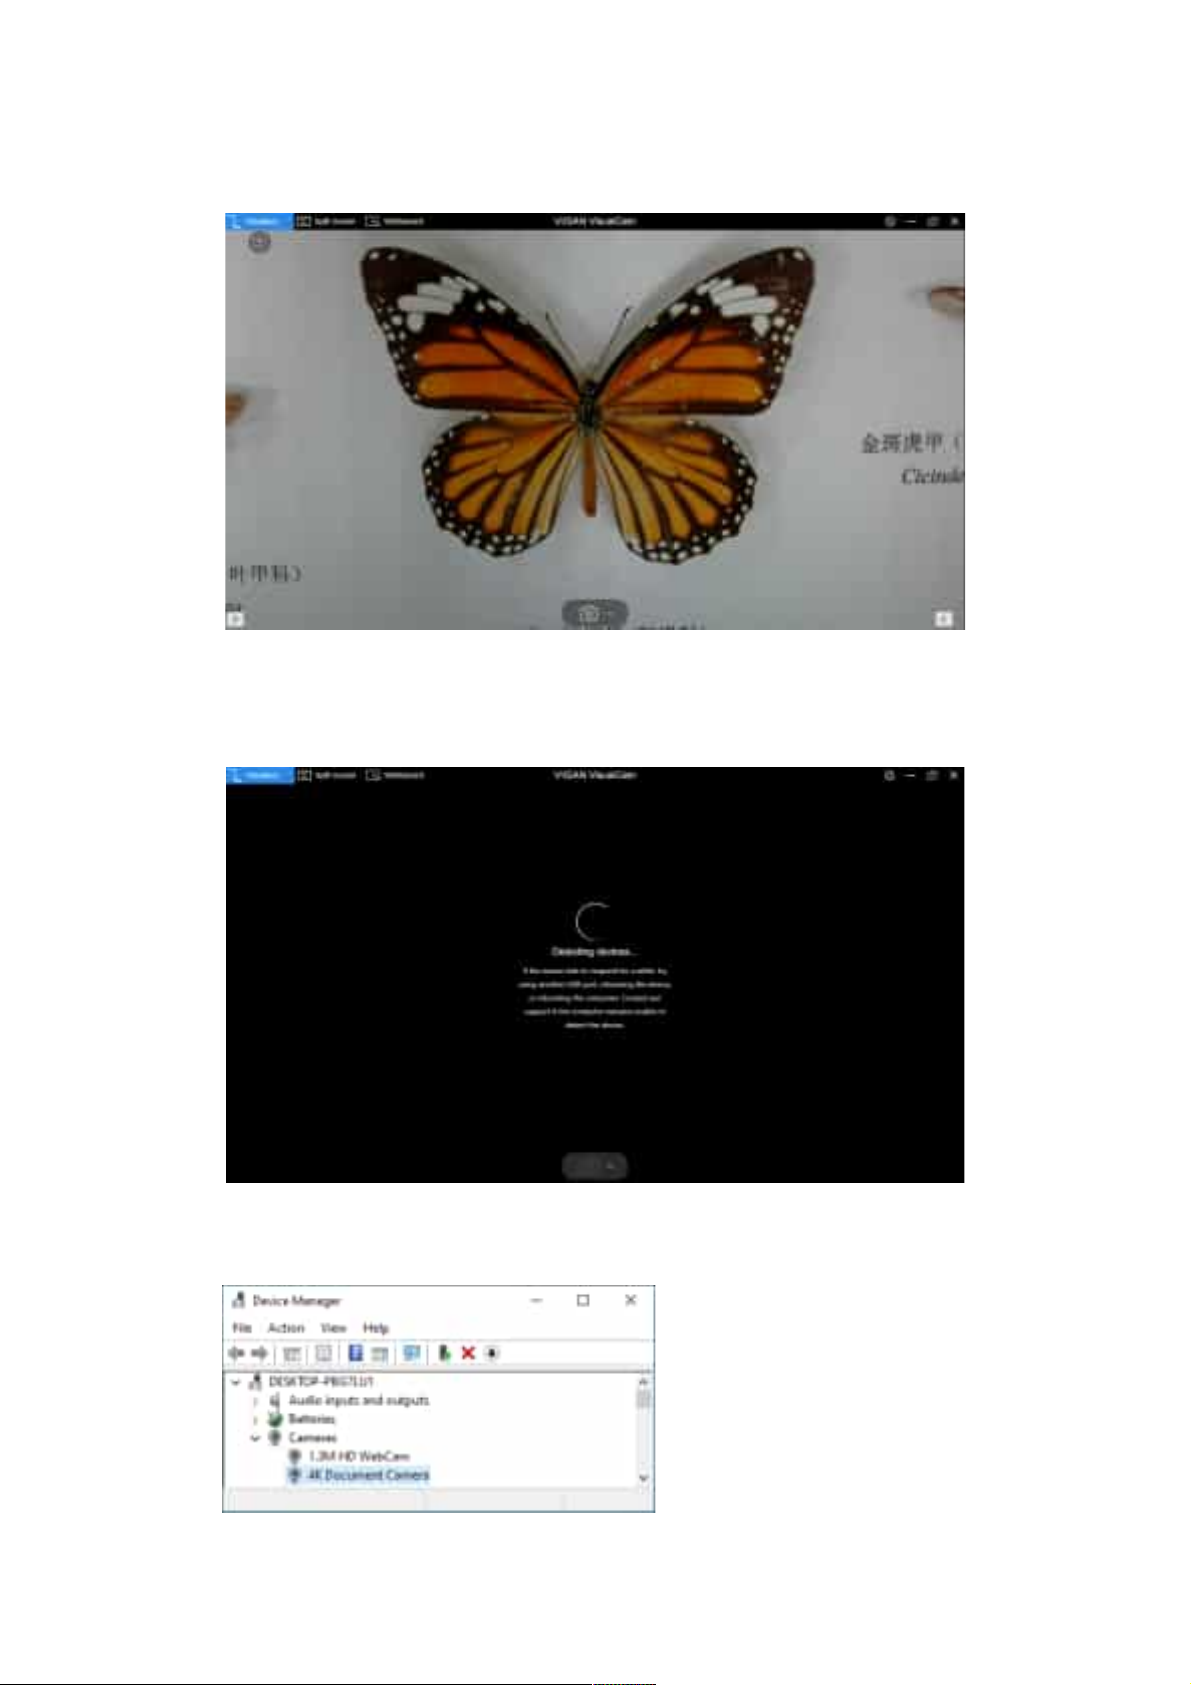
When the document camera is connected to the desktop/laptop, it automatically goes to
Visualizer live video mode.
NOTE: If you don’t see the real-time preview video from the camera device and a
[Detecting devices…] message is displayed in the middle of the main window as below,
please double check the following items sequentially.
- Check the USB connation
Ensure the Windows has recognized the device under the Cameras in the Windows Device
Manager menu. If the device is not be detected, please try to contact with other USB port.
8
Page 10
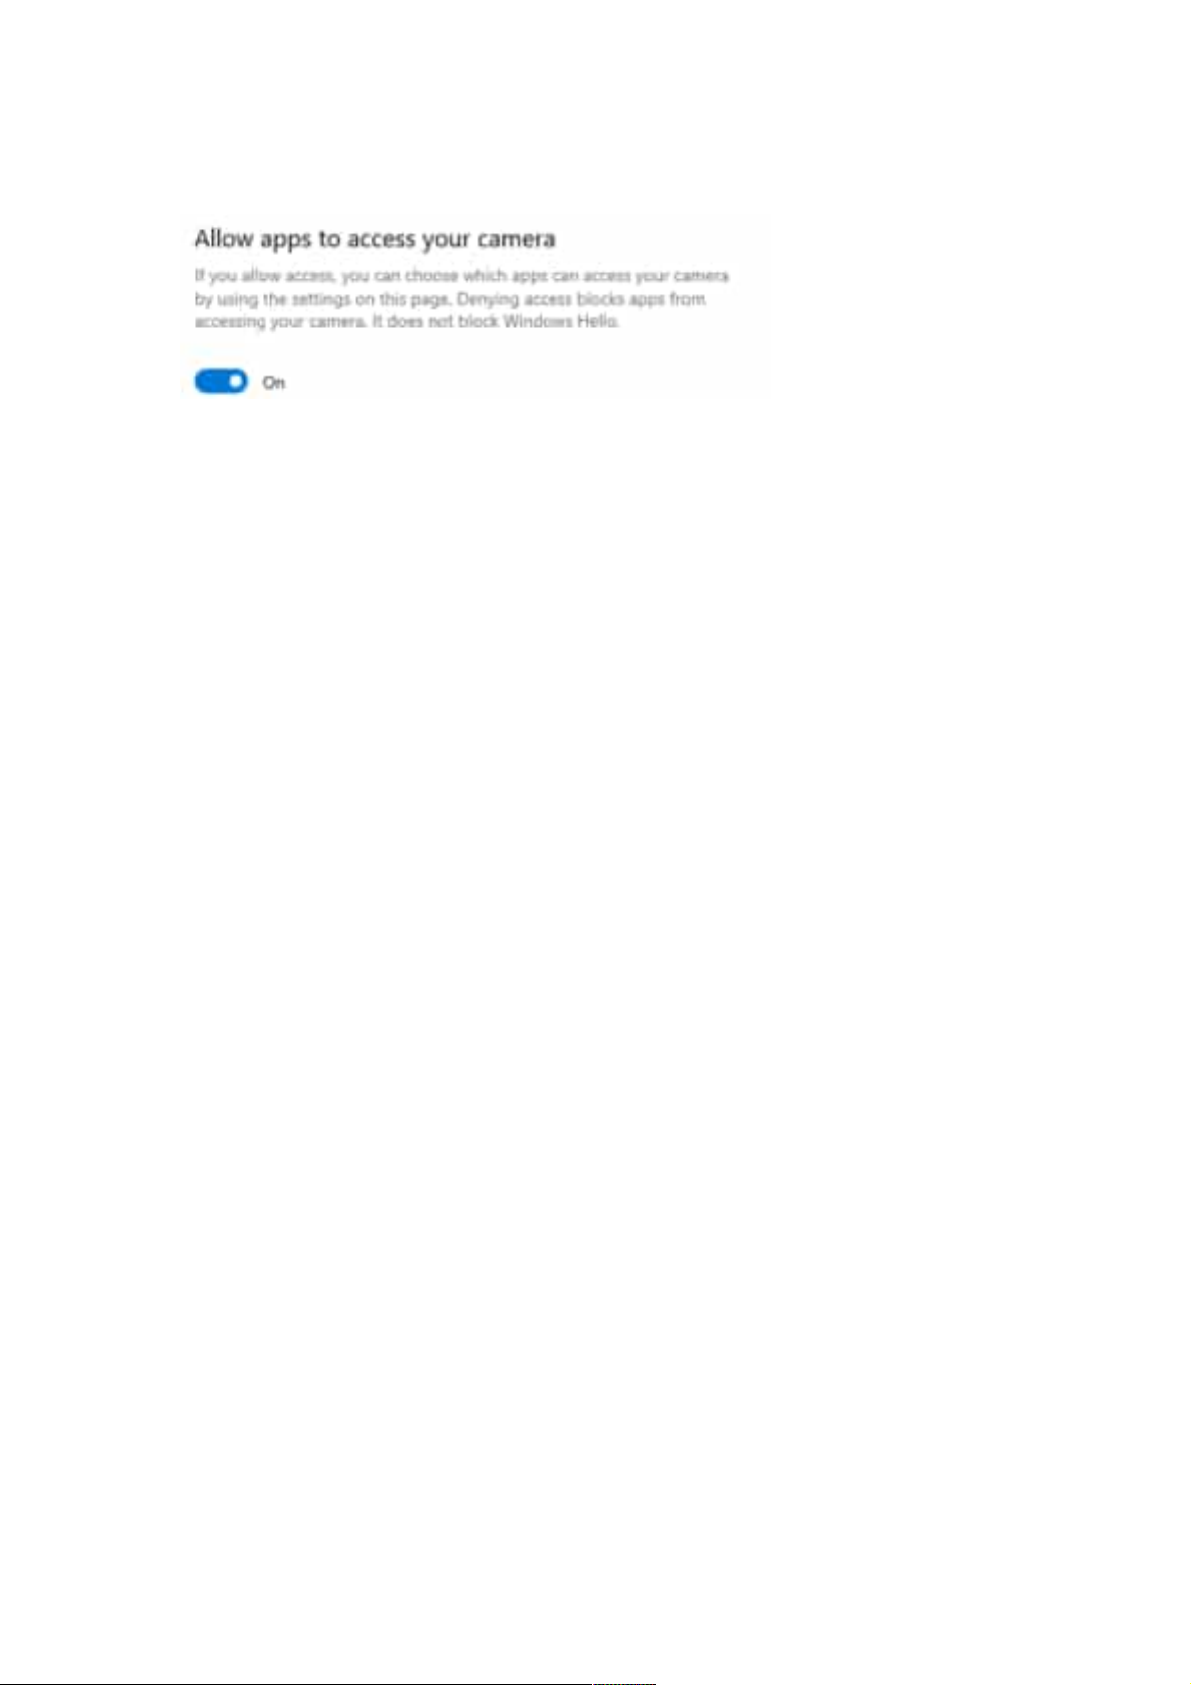
- For Windows 10 computer
Go to "Settings Privacy Camera" to check whether the permission is allowed
- Disable Anti-Virus software
If you have installed anti-virus software, please manually add the VIISAN VisualCam client to
the whitelist of the anti-virus software.
9
Page 11
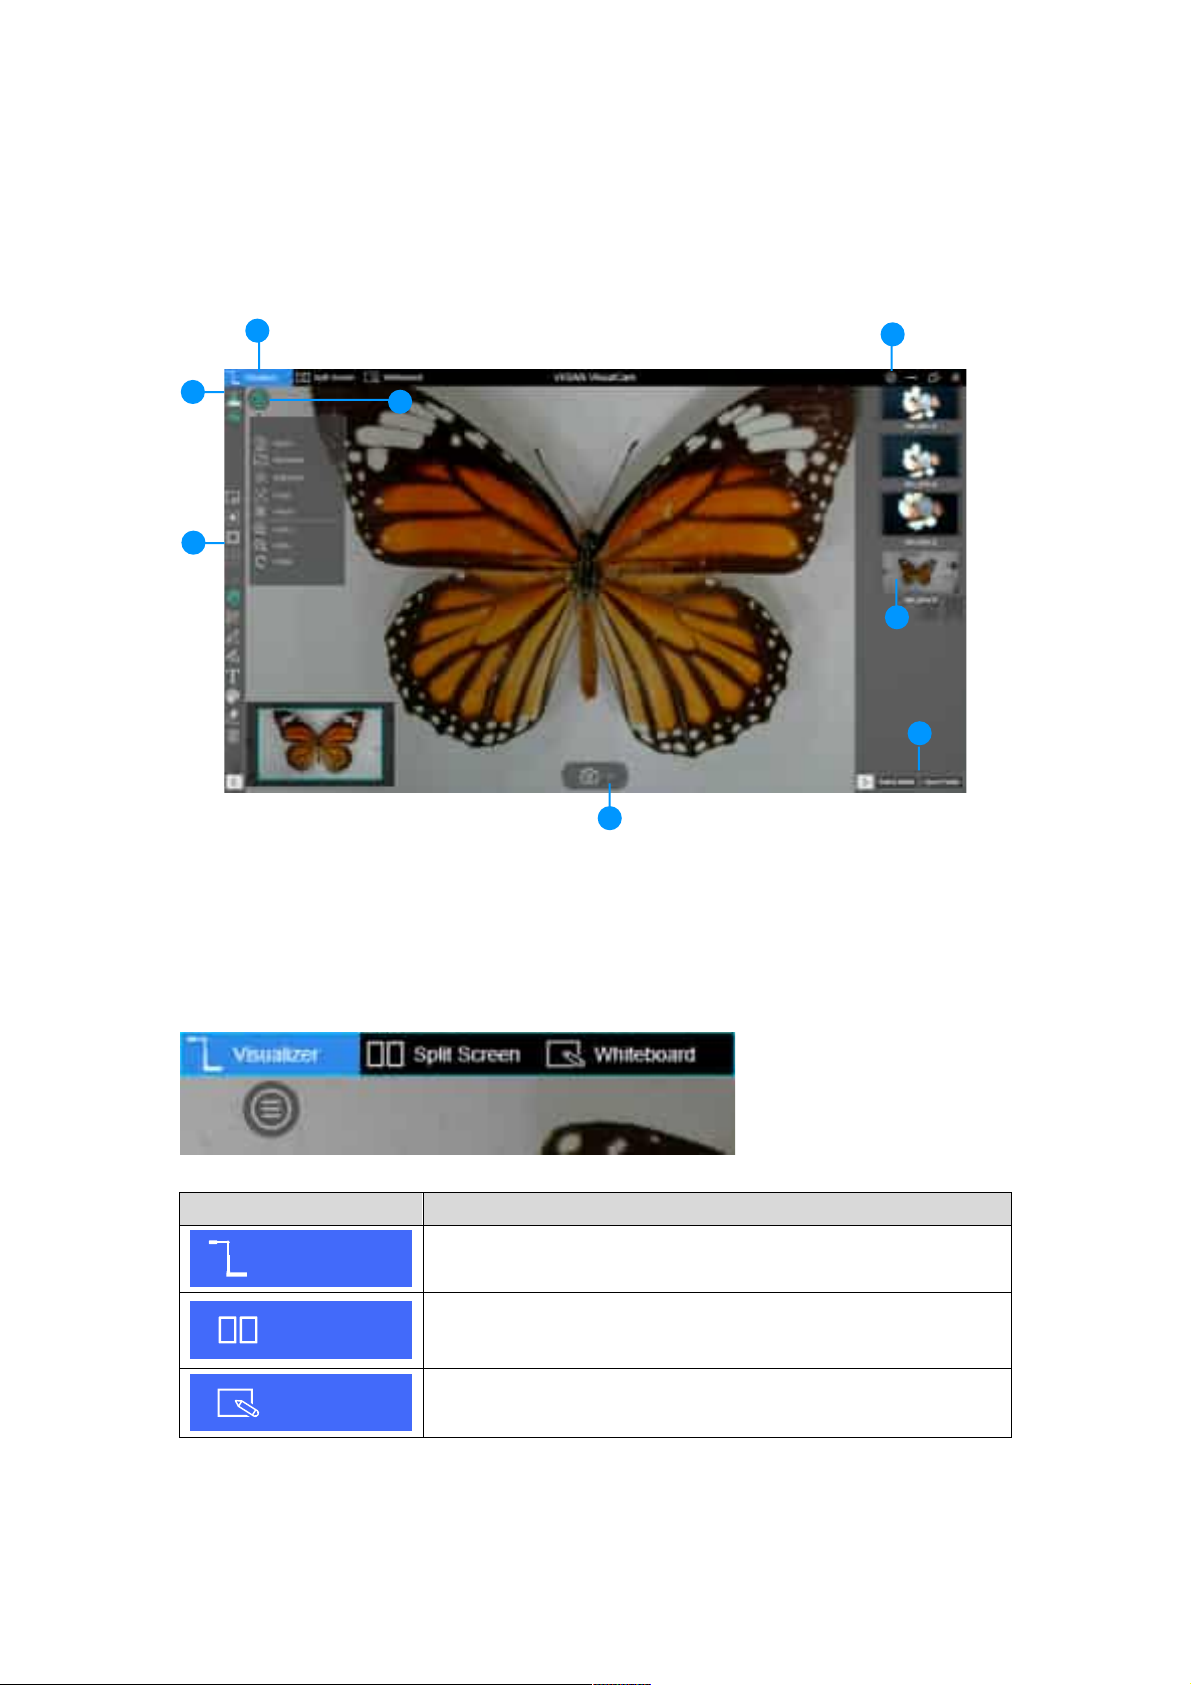
Operation Interface Description
The following is the description of the VisualCam software operation interface.
1
8
2
3
4
1. Function Tabs
6
7
5
VIISAN VisualCam software integrates three major functions. You can switch each
function by clicking on the tab.
Mode Descriptions
Visualizer
Split Screen
Whiteboard
Showing the live video perceived by the document camera.
With the Split-Screen, you can connect two document
cameras on your computer and present them split-screen.
Allows you to draw and annotate anything on an interactive
whiteboard.
10
Page 12
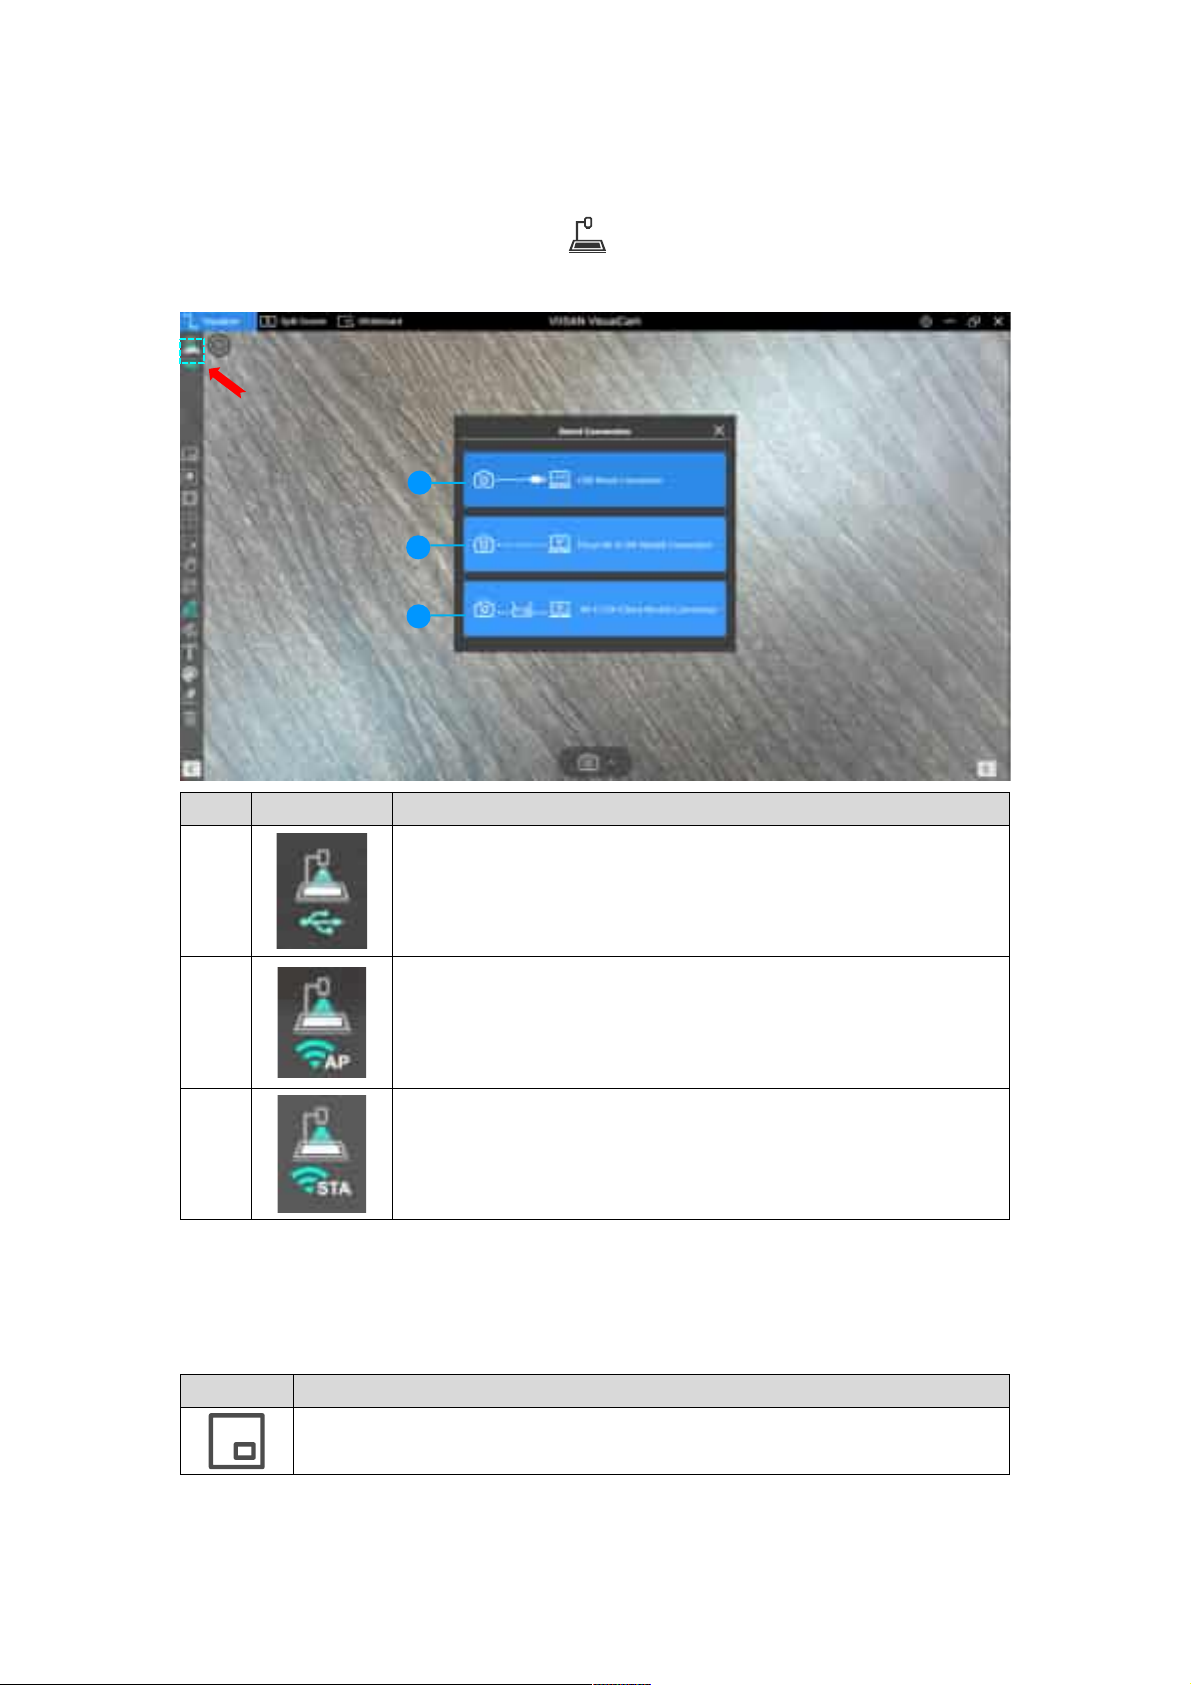
2. Select Connection
In the upper left corner, you can click the icon to choose the device connection
method.
1
2
3
Item Icon Status Descriptions
USB mode connection. (Default)
1
2
3
This mode allows you to connect the document camera by USB
wired connection.
Wi-Fi p2p (AP Mode) connection.
This mode allows you to connect the document camera directly
without an internet connection.,
NOTE: This connection only available for the Wi-Fi model.
Wi-Fi STA (Client Mode) connection.
This mode allows you to connect the document camera through
a router.
NOTE: This connection only available for the Wi-Fi model.
3. Left Toolbar
On the left side toolbar, there are many useful control tools available.
Icons Descriptions
Picture-in-Picture
Enable picture-in-picture mode
11
Page 13
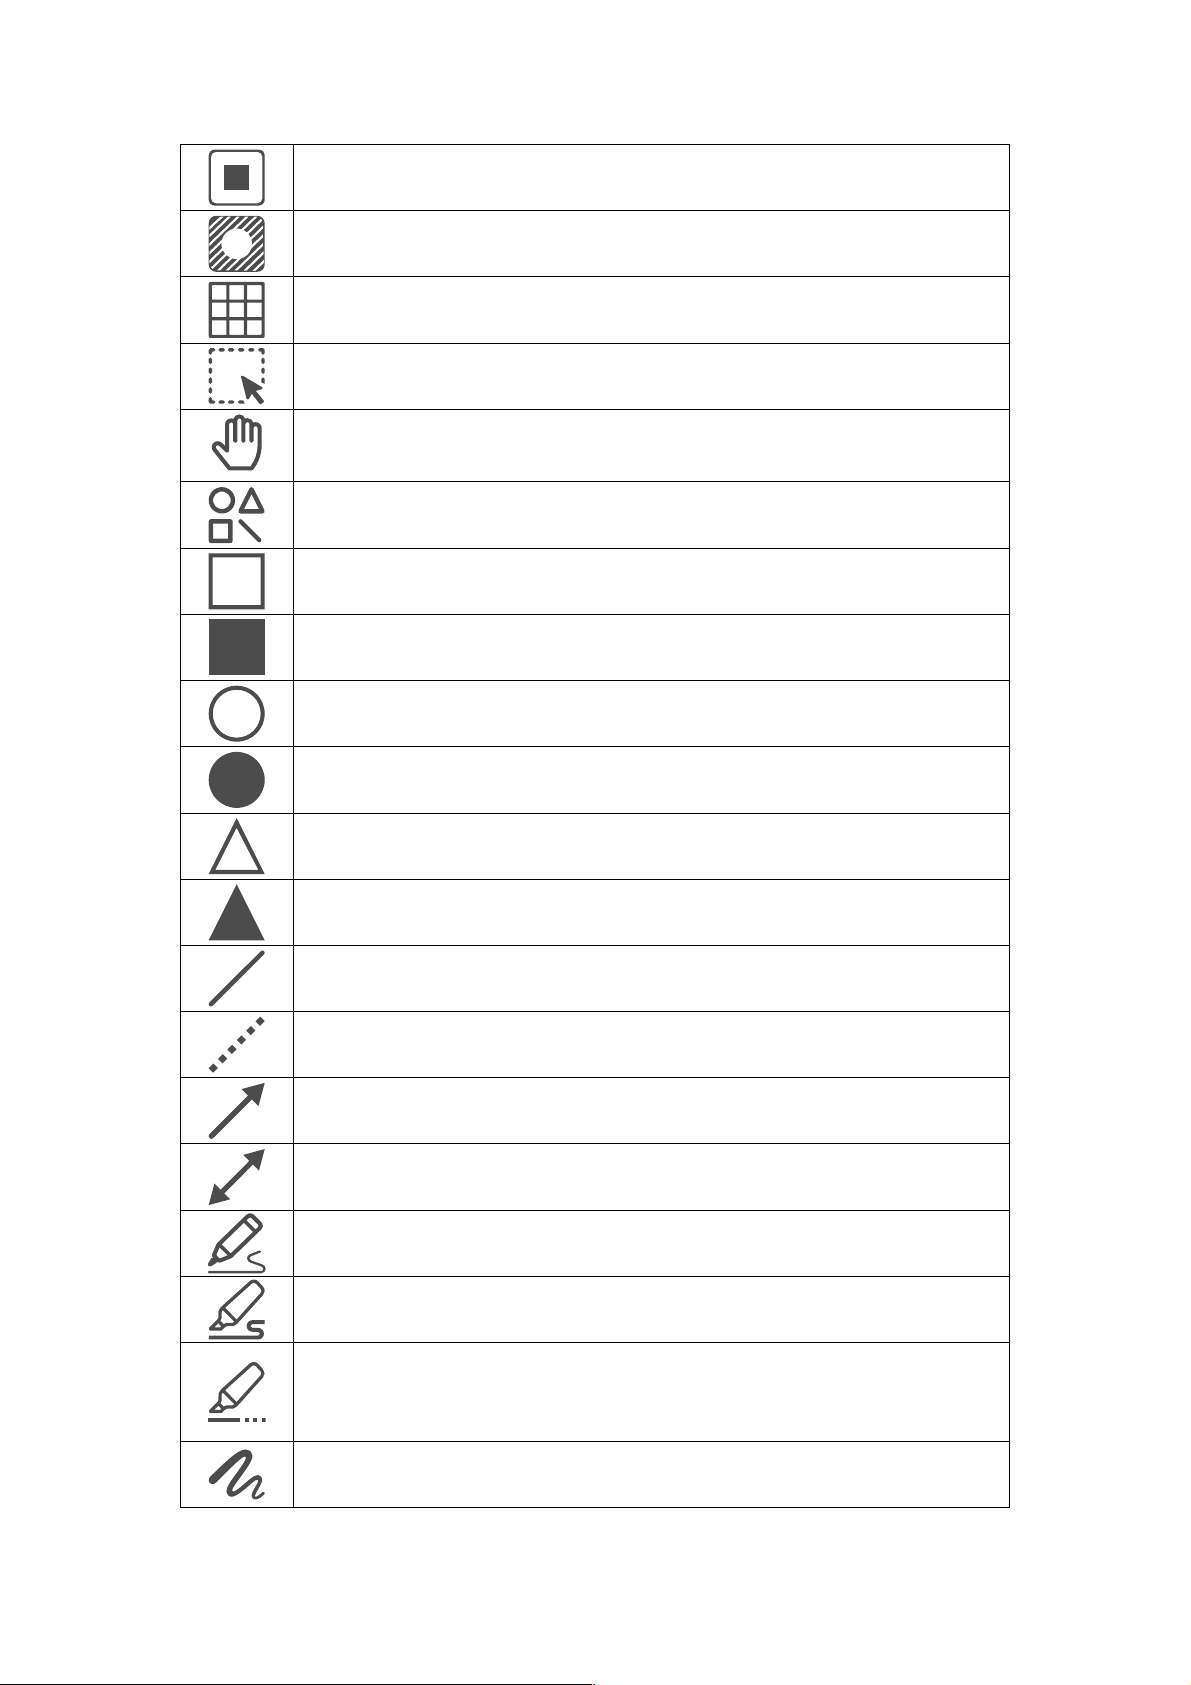
Mask
Enable the mask mode in solid or translucent style
Spotlight
Show spotlight by using the rectangle or ellipse style
Gridlines
Show gridlines on screen
Select
Select the annotation or object on the screen
Move
Move the screen
Shape Tool
Add the shapes
Rectangle Tool
Draw a rectangle
Draw a rectangle in solid style
Ellipse Tool
Draw an ellipse
Draw an ellipse in solid style
Triangle Tool
Draw a triangle
Draw a triangle in solid style
Line
Draw a line
Dotted line
Draw a dotted line
Single arrow
Draw a single arrow
Double arrow
Draw a double arrow
Smooth Pen
Draw and write by using the Smooth Pen
Highlighter Pen
Draw and write by using the Highlighter Pen
Disappearing Pen
Draw and write by using the Disappearing Pen
NOTE: It allows to set the disappearing time (3, 5, 10, 20 seconds)
Line Option
Set the line thickness of annotation.
12
Page 14
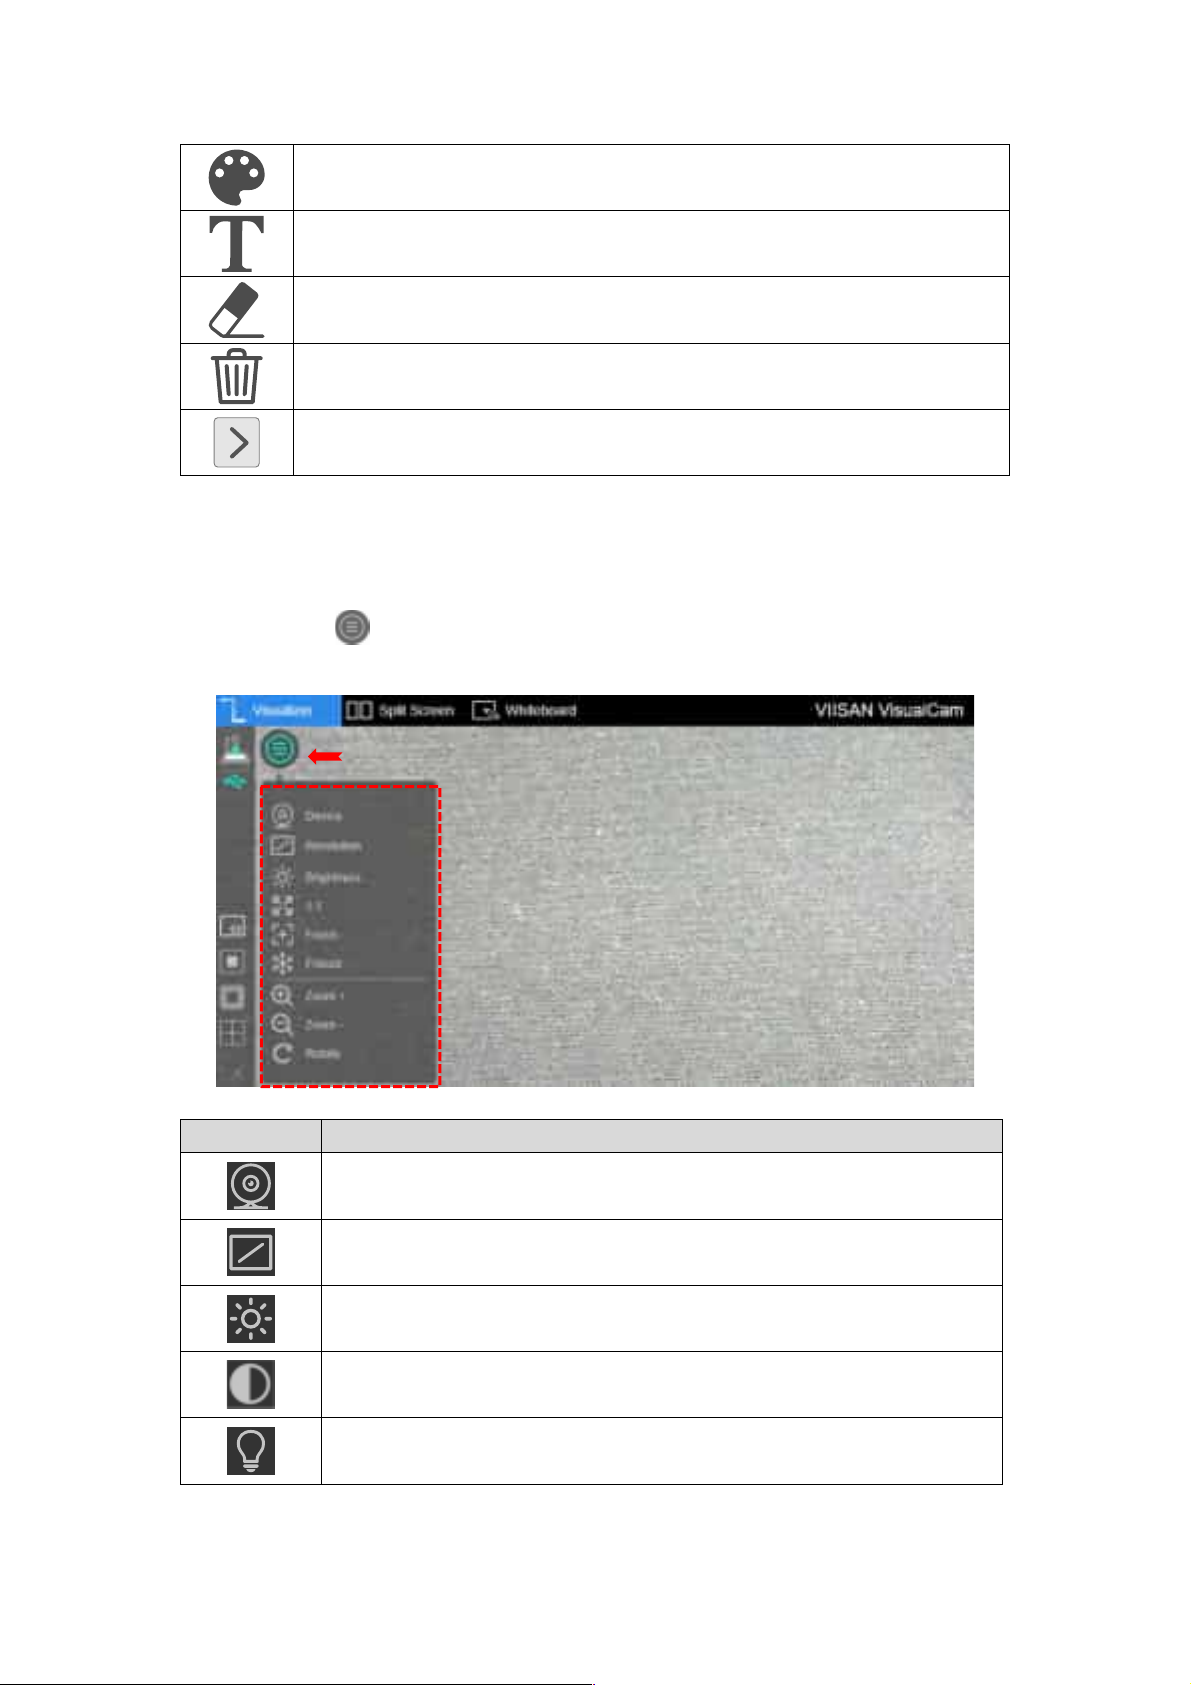
Color Option
Choose the color of annotation, shape, and text tools.
Text Tool
Add the texts
Eraser
Erase annotation on the screen
Clear All
Clear all annotations on the screen
Show/Hide
Show and hide toolbar
4. Image Adjustment Menu
Click on the icon to expand the image adjustment menu, you can use the
following tool to adjust the live video on the preview window.
Icons Descriptions
Select the device and switch power frequency (50/60Hz)
Set the resolution
Adjust brightness
Adjust backlight NOTE: This Function only available on specific model
Turn on/off the lamp in 3-level (Leve1, Leve 2, Level 3)
NOTE: This Function only available on specific model
13
Page 15
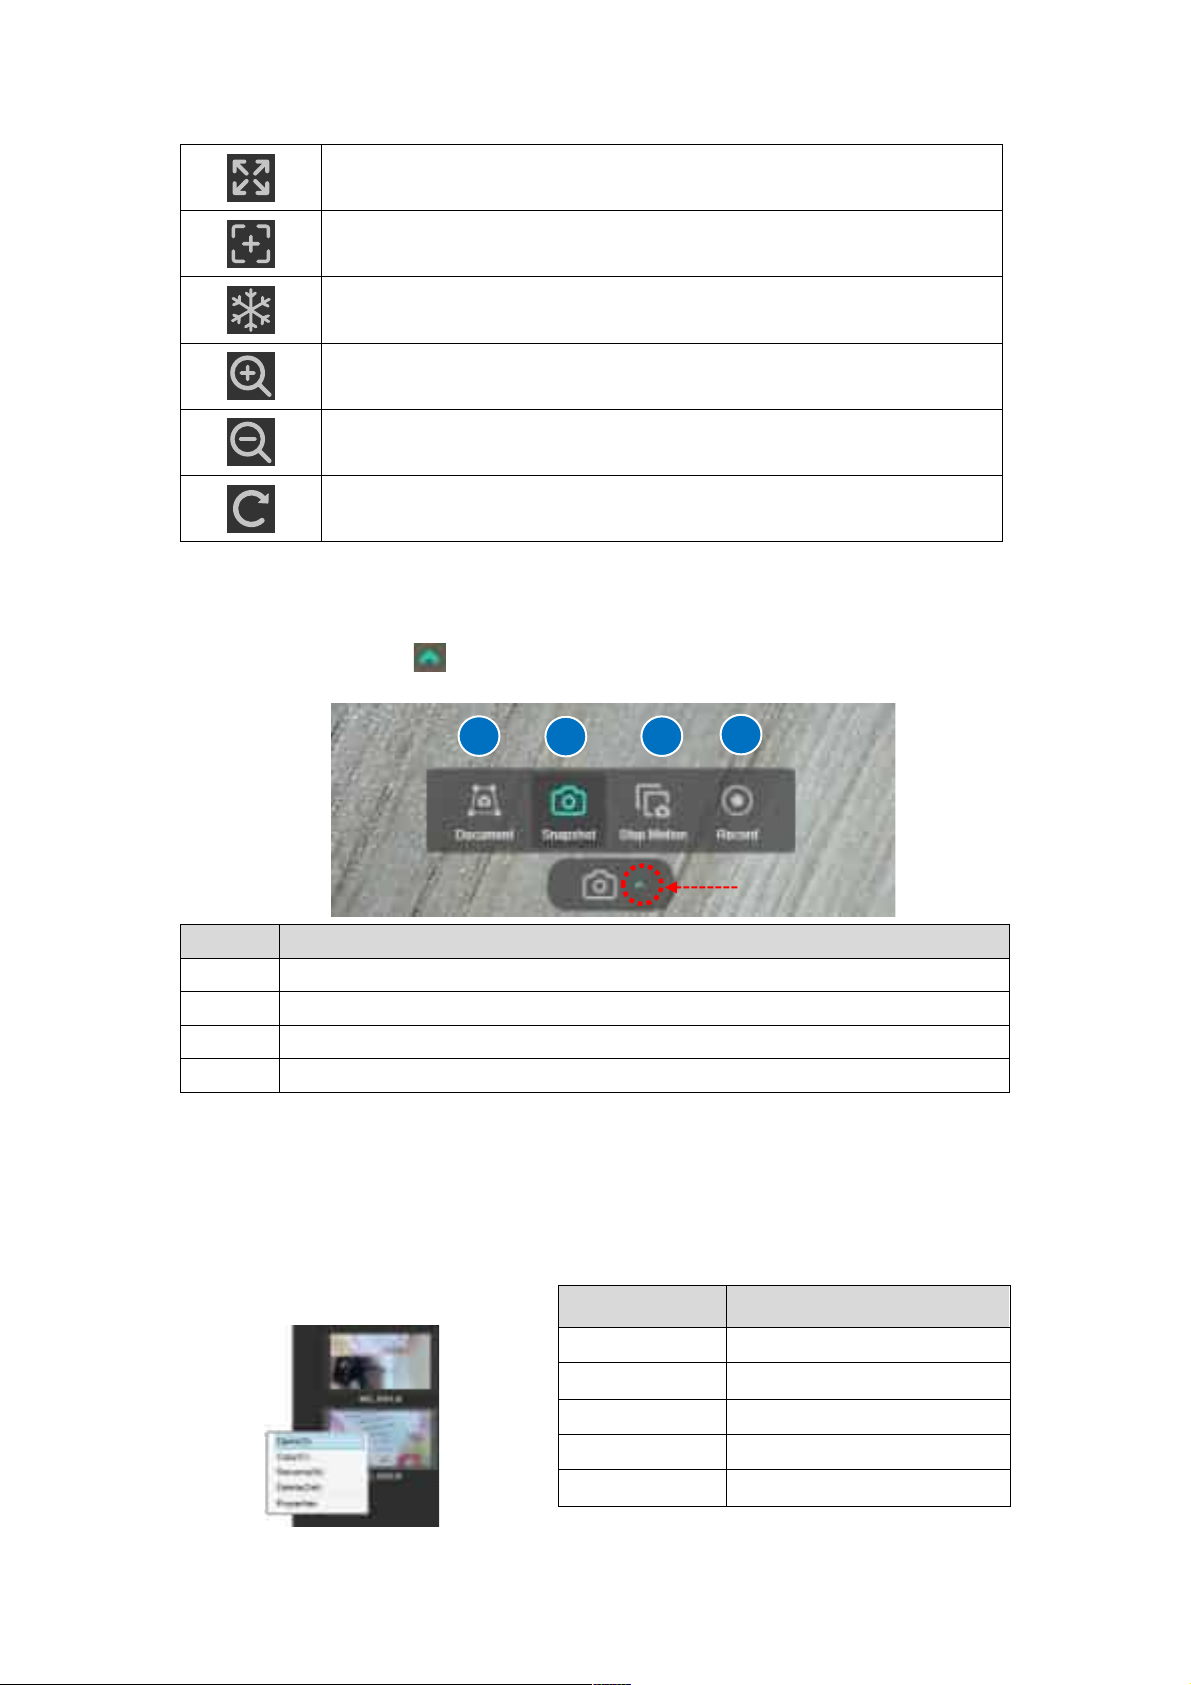
Show 1:1 image / Fit Screen
Auto Focus
Adjust the best focal length.
Freeze video
Zoom in image
Zoom out image
Rotate image by 0°, 90°, 180°, 270°, Flip or Mirror
5. Capture Button Settings
Click on the up-arrow icon at the middle lower button to switch the capture mode.
1
2
3
4
Mode Descriptions
1 Scan & Cropping Documents
2 Take Snapshot (Default selection)
3 Create Stop Motion Video
4 Record Video
6. Thumbnail List
Right click on a thumbnail on the right-side output listing of the main window, you will see
the following options.
Right Click Options Explanations
Open Open file
Copy Duplicate file
Rename Rename of file
Delete Delete a file
Properties Show file information
14
Page 16
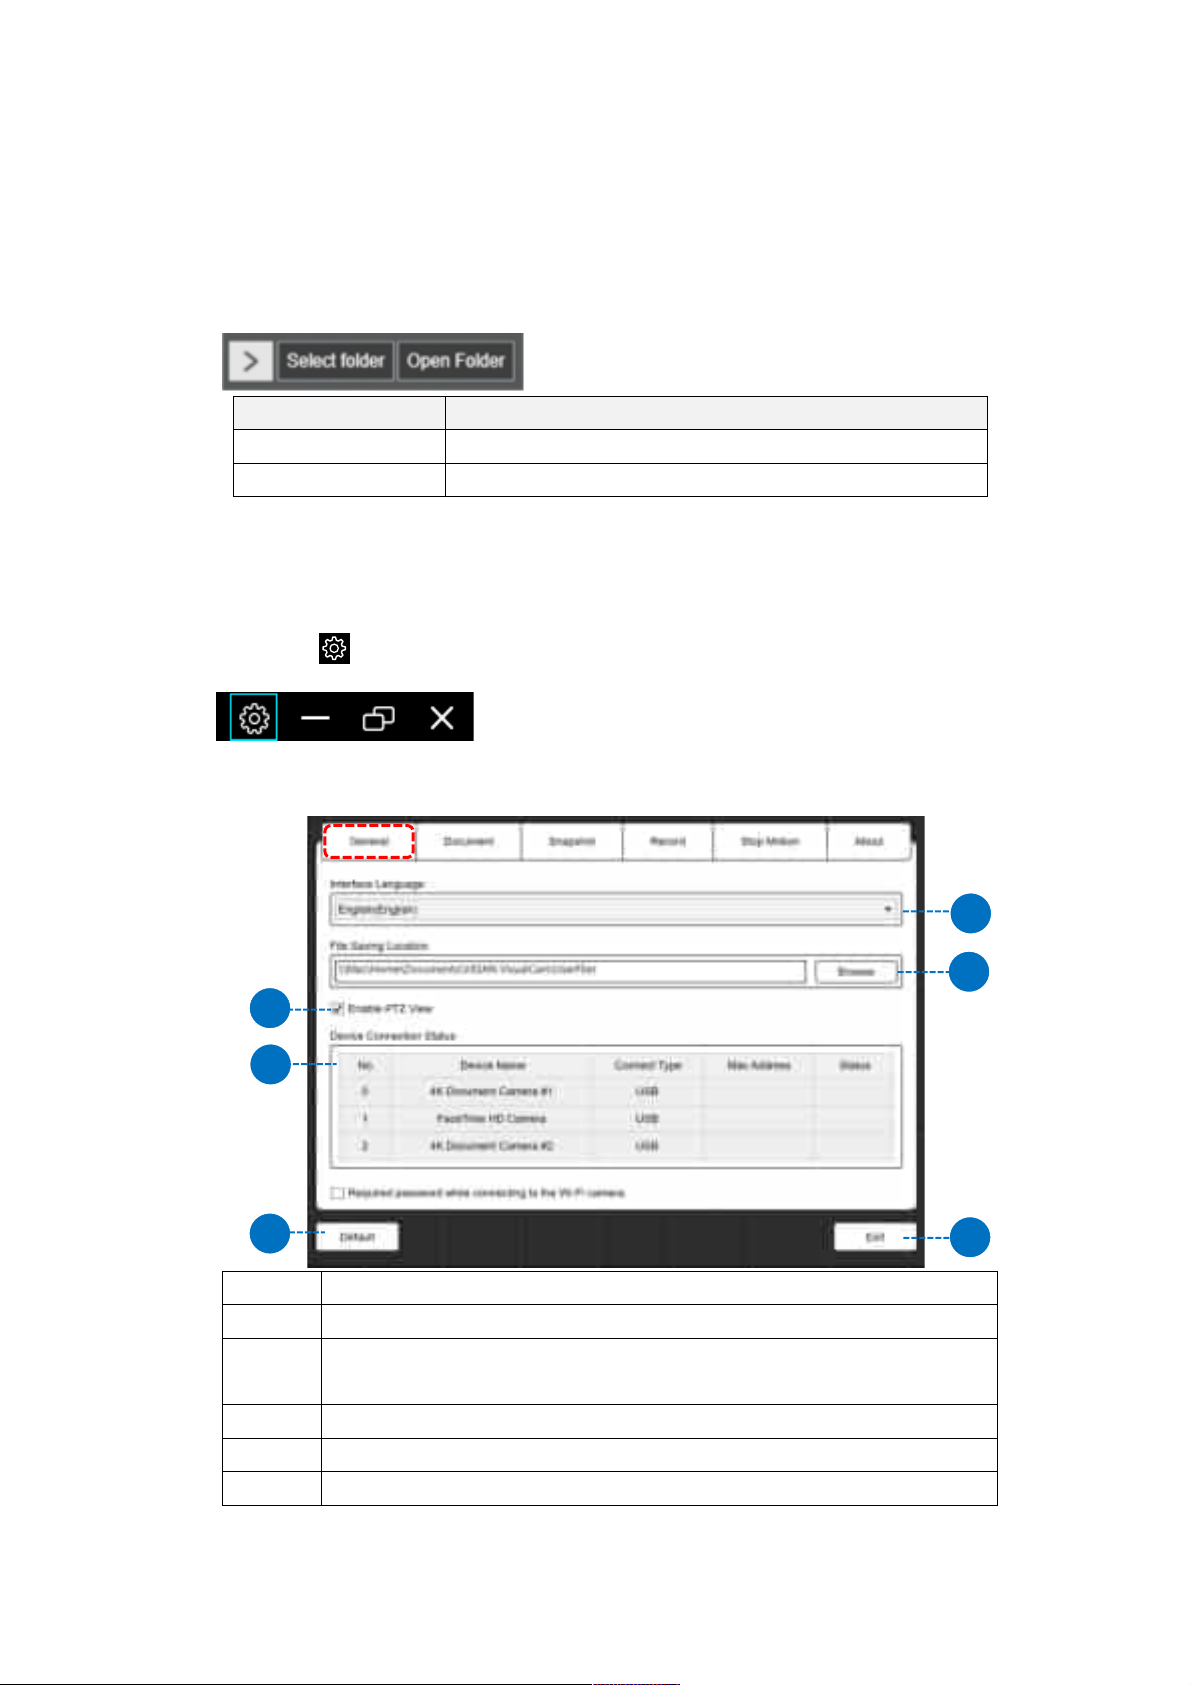
7. File Save Path Settings
On the bottom right of the main window, there are options for setting the directory for
saving files:
Button Explanations
Select Folder Select file save destination
Open Folder Open the file location
8. Settings menu
General Settings:
Click the icon on the upper right corner to entry to the settings page.
General Settings:
3
4
5
1 Switch interface language
2 Set the file saving location
3 Enable PTZ view
NOTE: The PTZ navigation view only appears when zooming in on the video.
4 Display the current device connection status
5 Restore to default value
6 Exit the settings page
1
2
6
15
Page 17
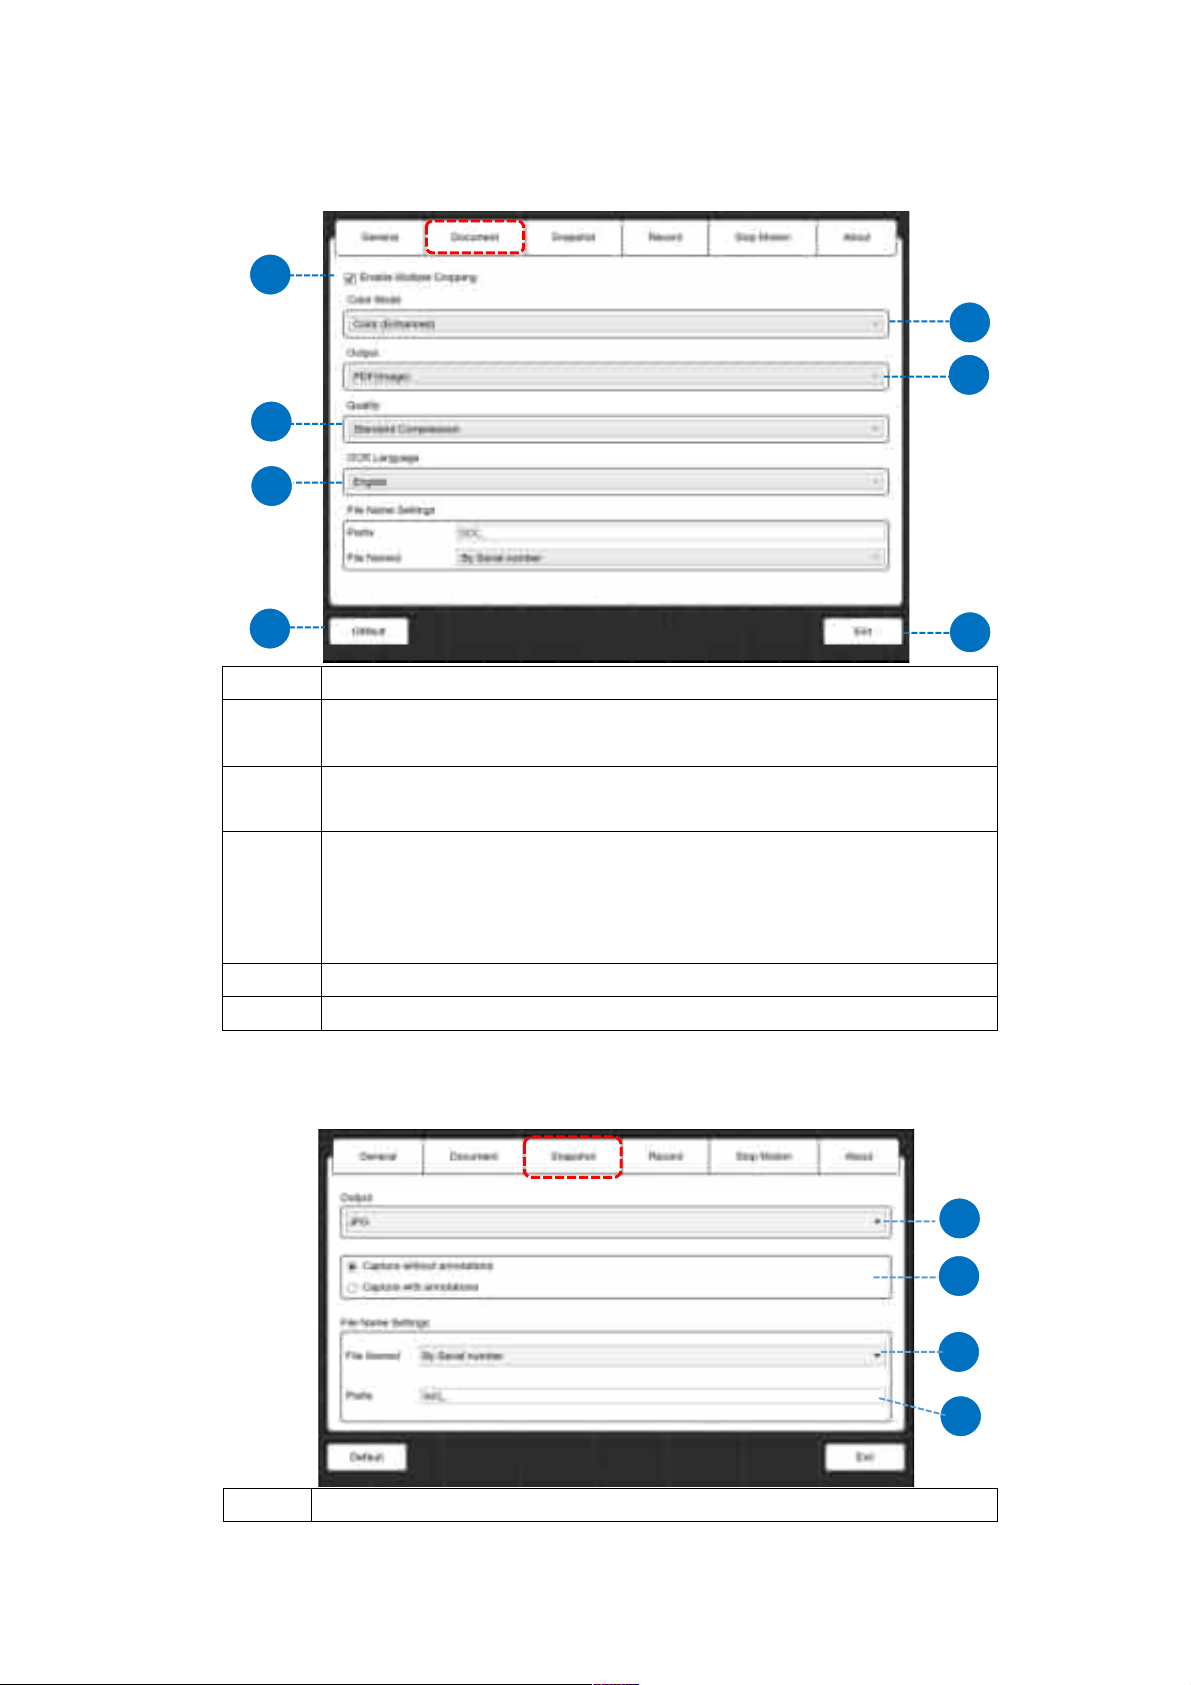
Document Settings:
1
4
5
2
3
5
1 Enable or disable the ability to copy multiple documents.
2 Choose the color mode for scanning documents: Color, Color (Enhanced),
Grayscale, B/W, B/W (Document).
3 Choose the output format for the scanned document: JPEG, PDF (Image), PDF
(Searchable), PDF (Text).
4 Choose the language for Optical Character Recognition (OCR) in scanned
documents.
Note: Please note that the OCR feature is only available when the output format is set to PDF
(Searchable) or PDF (Text).
5 Restore to default value
6 Exit the settings page
Snapshot Settings:
6
1 Set the image file output format (JPG, BMP, PNG, TIF)
16
1
2
3
4
Page 18
2 Select take snapshot with or without showing the annotation
3 Set the file name for format by serial number or by date & time
4 Set the prefix of file name
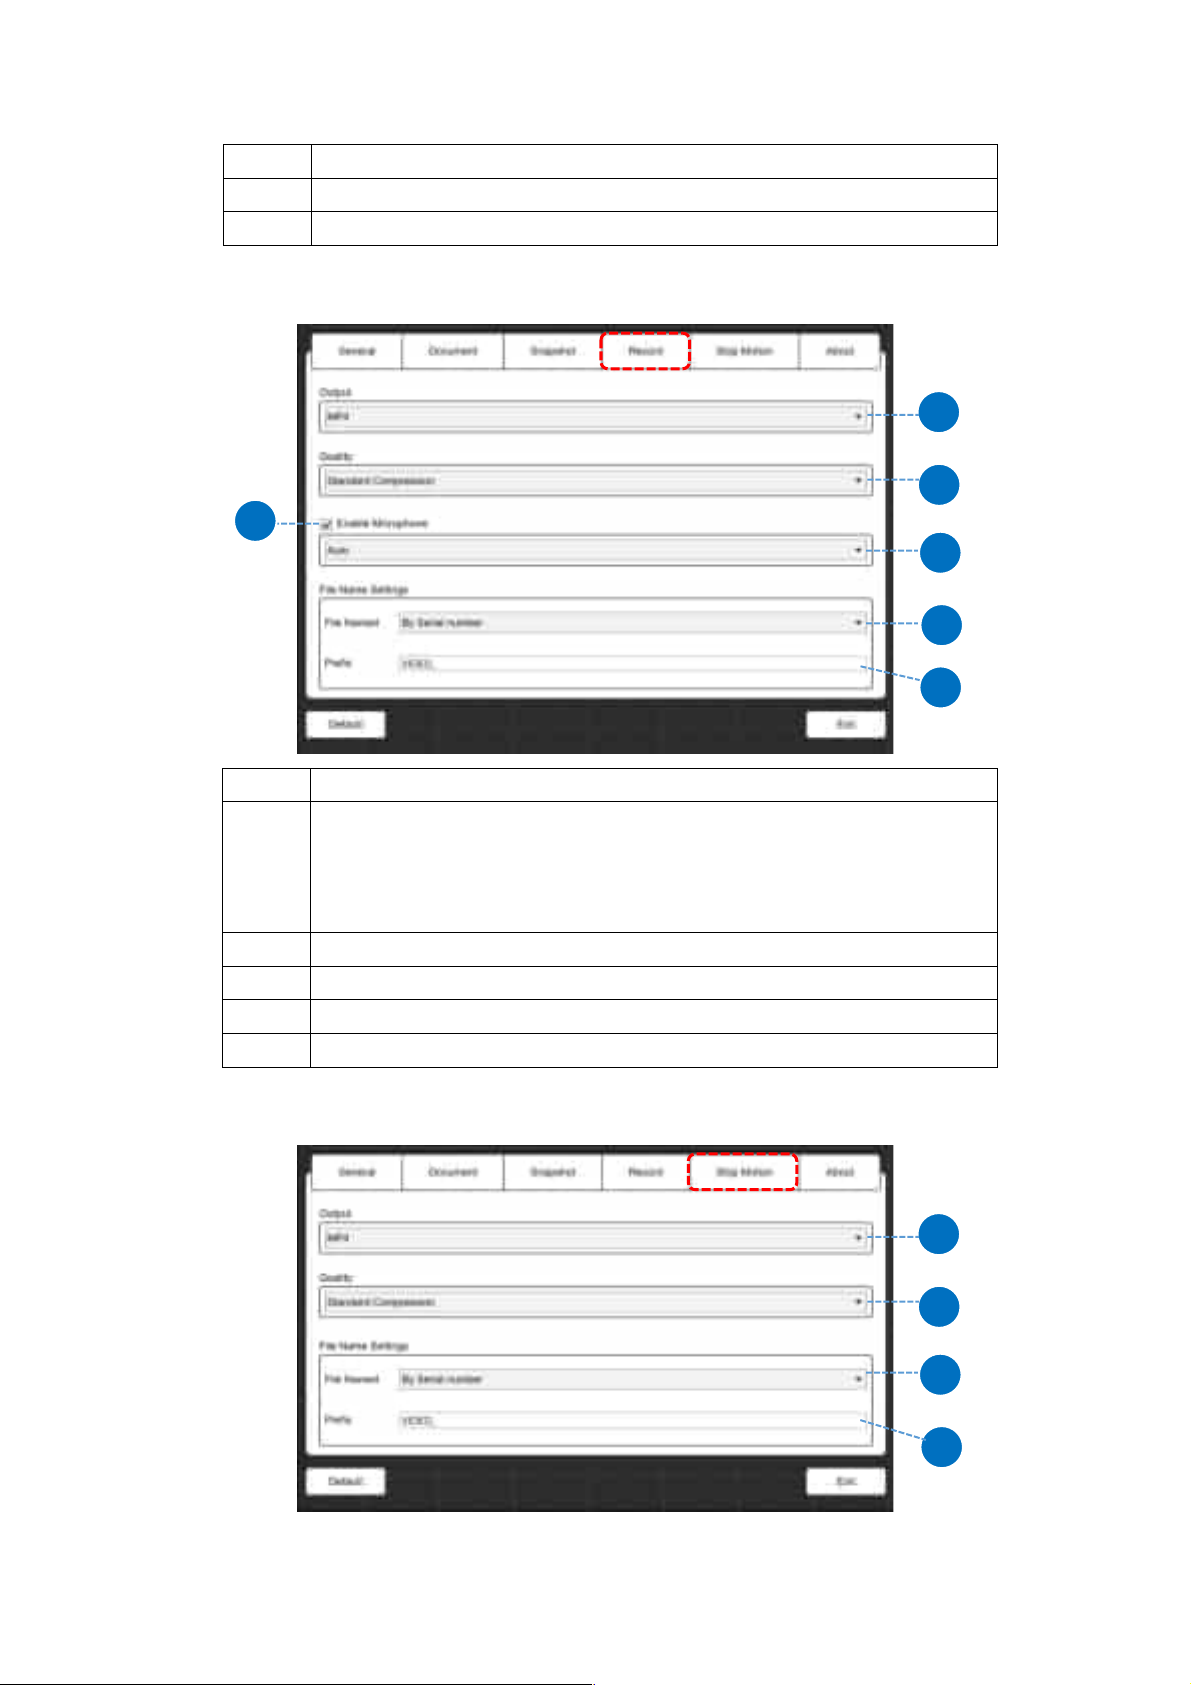
Record Settings:
3
1
2
4
5
6
1 Set the video file output format (AVI, MP4, FLV)
2 Set the video compression quality
• Standard Compression
• Low Compression Rate (High image quality, bigger size)
• High Compression Rate (Low image quality, smaller size)
3 Enable microphone
4 Select microphone
5 Set the file name for format by serial number or by date & time
6 Set the prefix of file name
Stop Motion Settings:
1
2
17
3
4
Page 19
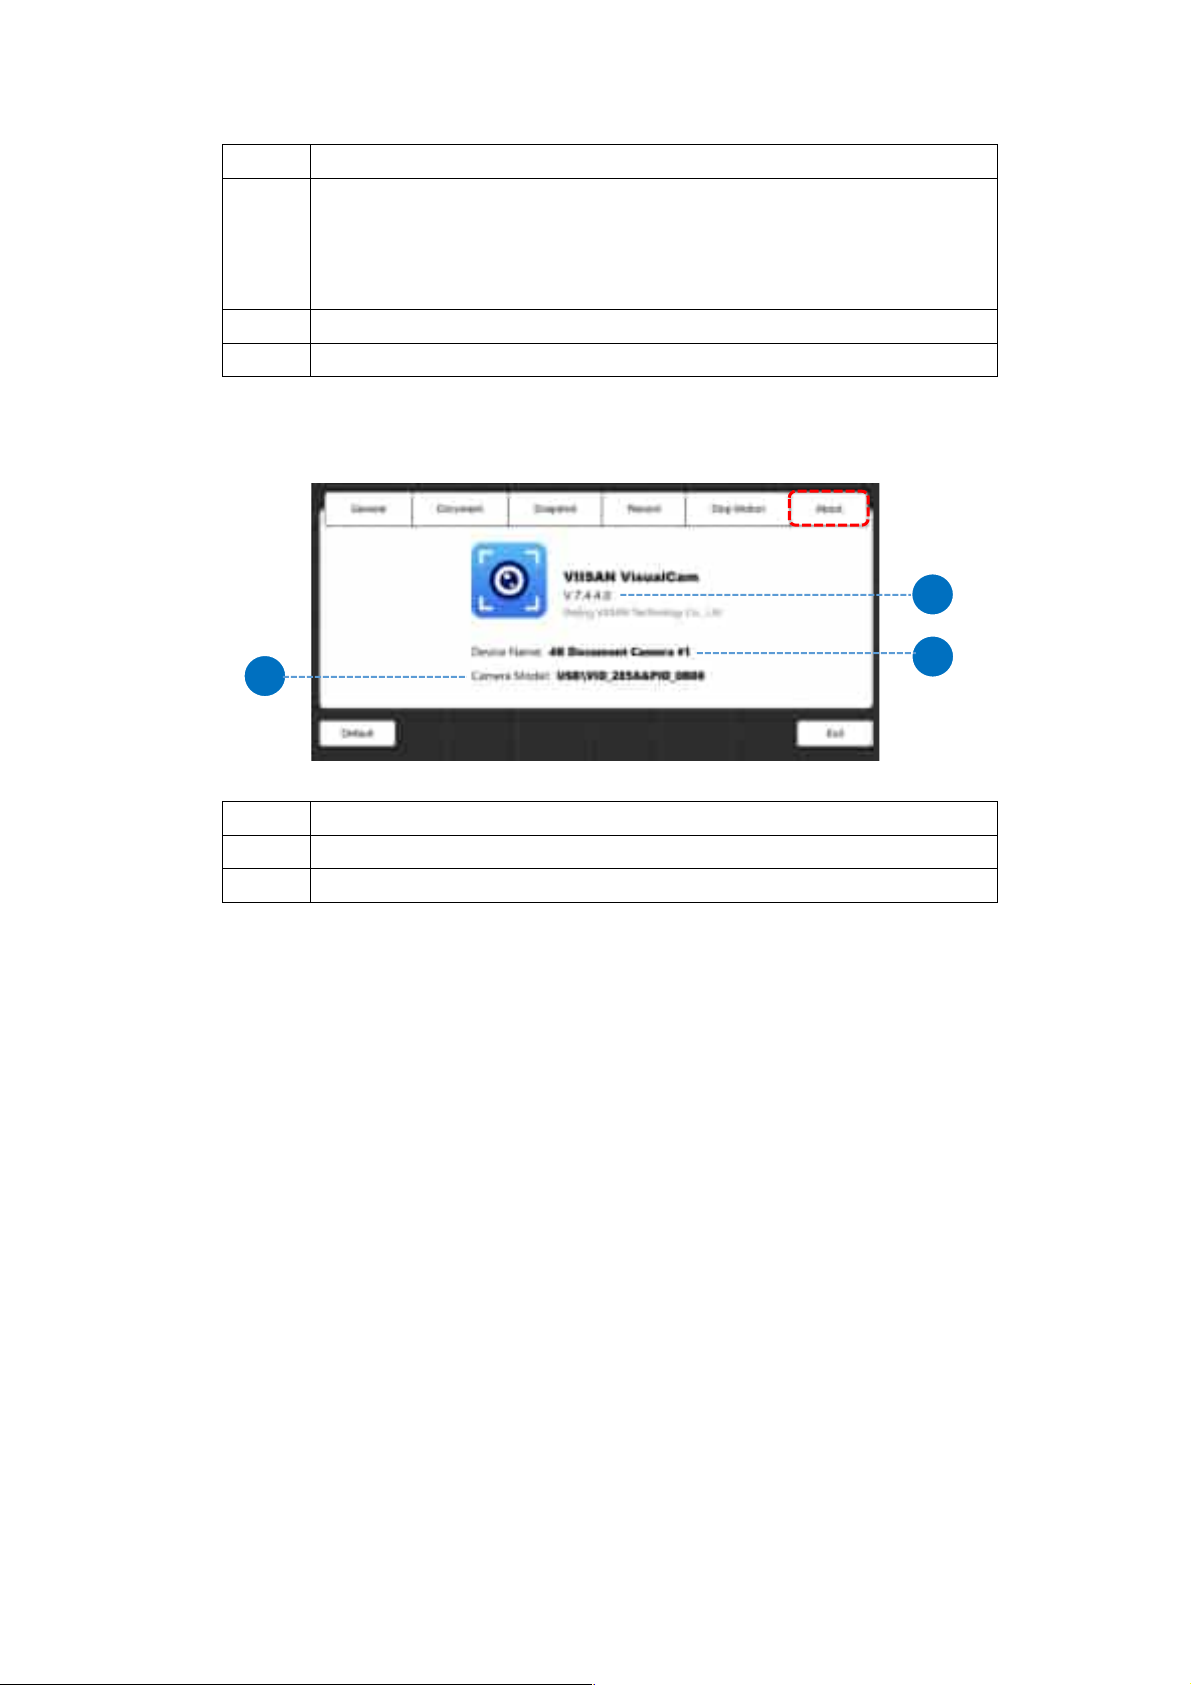
1 Set the video file output format (AVI, MP4, FLV)
2 Set the video compression quality.
5 Set the file name for format by serial number or by date & time
6 Set the prefix of file name
About page:
3
• Standard Compression
• Low Compression Rate (High image quality, bigger size)
• High Compression Rate (Low image quality, smaller size)
1
2
1 Display software version
2 Display current connected device name
3 Display the connected device hardware ID
Visualizer Mode Description
The visualizer mode allows presenting the live view by the document camera. There are
many useful functions available listed on the left toolbar. All of them can enhance your
presentation!
18
Page 20
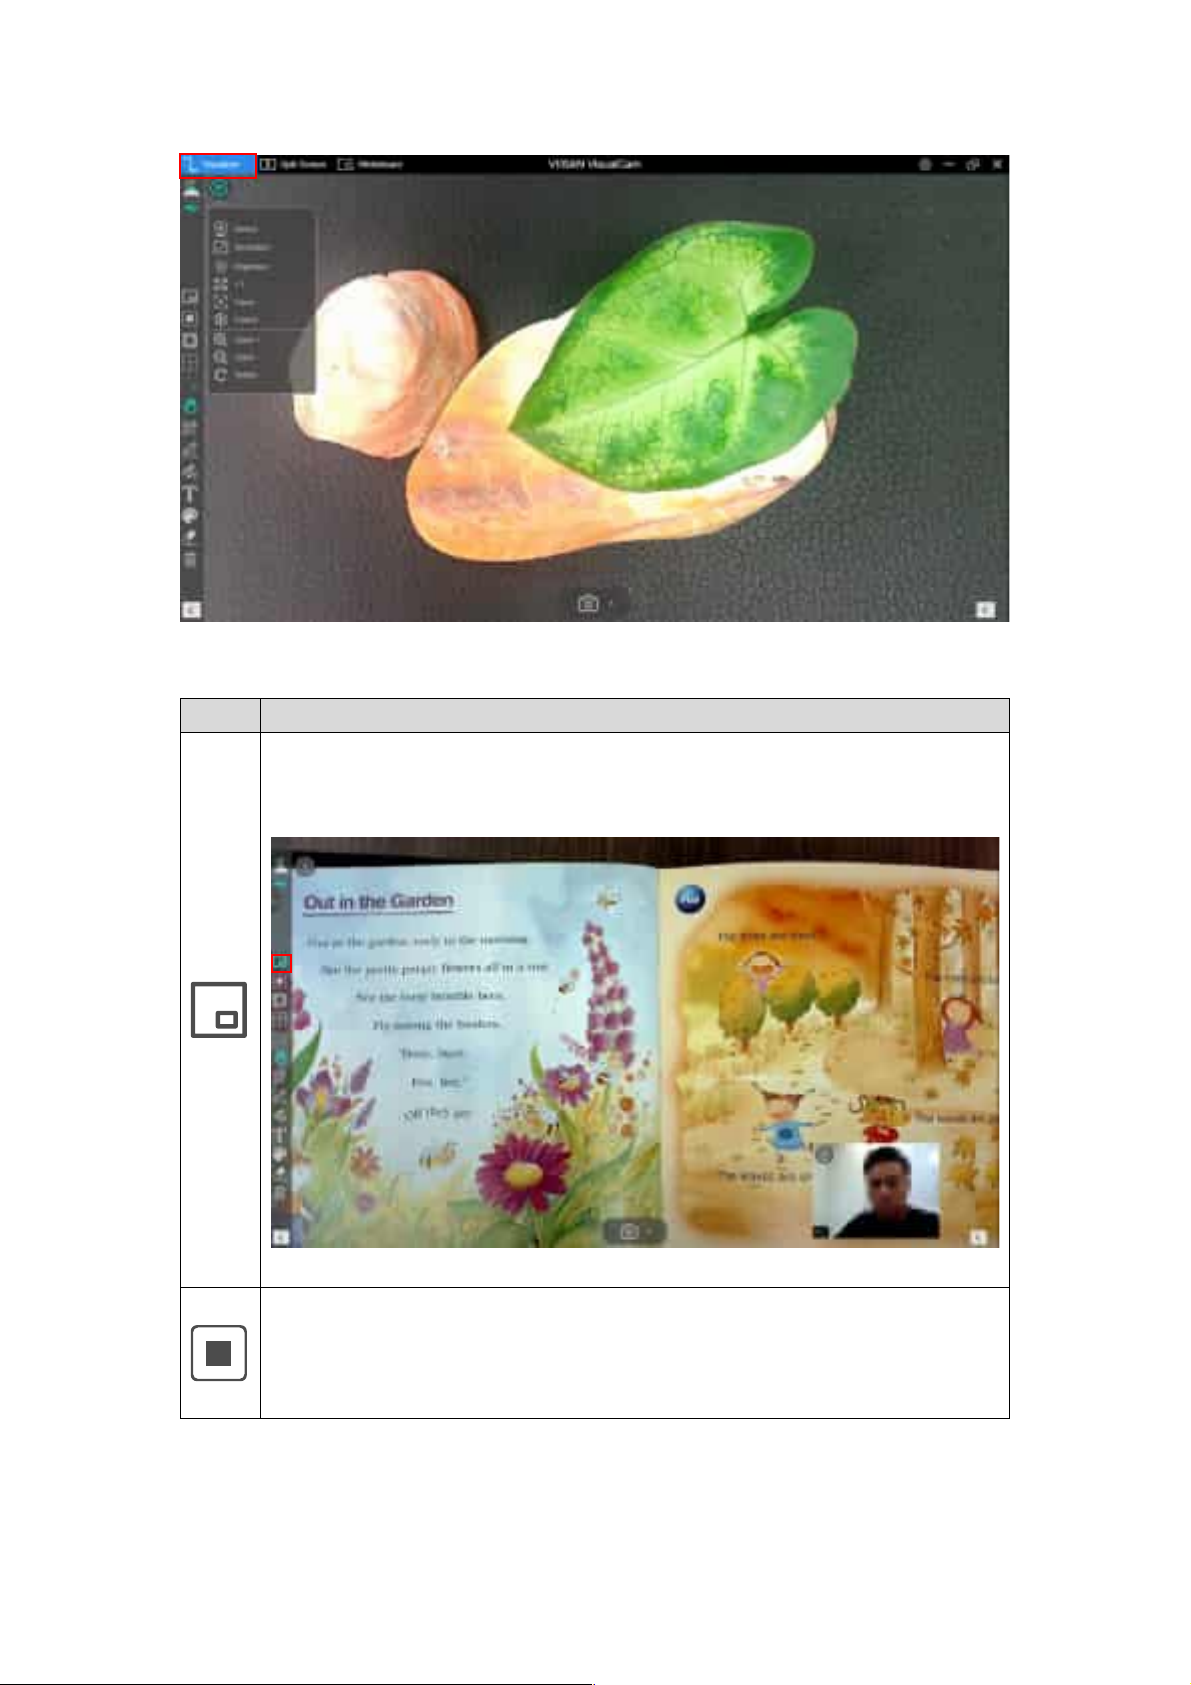
Left-side toolbar function
Icons Descriptions
Picture-in-Picture
Click on the PIP icon at the left-side toolbar to enable picture-in-picture mode,
you can move the sub-screen window location or resize of the frame.
NOTE: This function only available on a built-in webcam laptop/desktop.
Mask
Click on Mask to enable the mask mode in black (Opaque) or translucent
style, you can drag the cursor to enlarge or shrink the Mask area to the
desired size.
19
Page 21
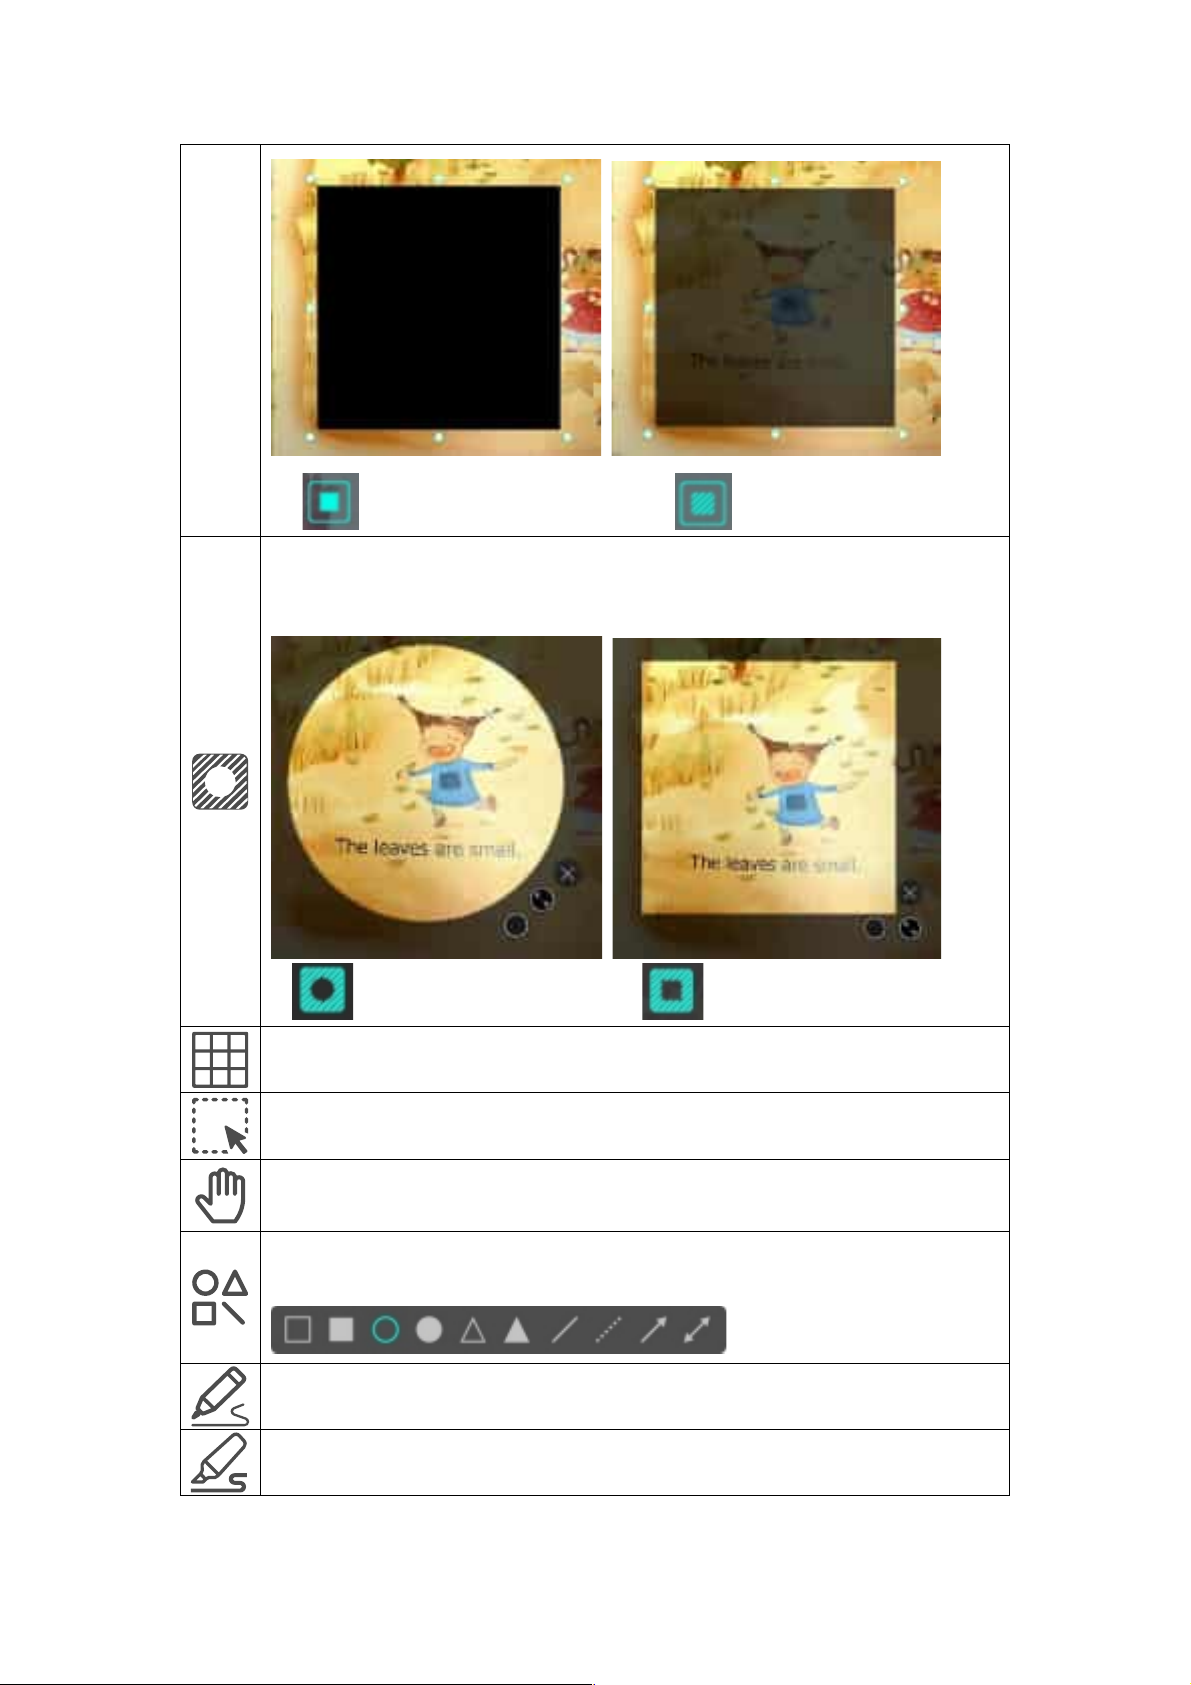
Black (Opaque) style. Translucent style
Spotlight
Enable spotlight in rectangle or ellipse style, you can adjust the size and
change the spotlight in black (Opaque) or translucent style.
Ellipse style Rectangle style
Gridlines
Show gridlines on screen
Select
Select the annotation or object on the screen
Move
Move the screen
Shape Tool
Add the shapes
Smooth Pen
Draw and write by using the Smooth Pen
Highlighter Pen
Draw and write by using the Highlighter Pen
20
Page 22
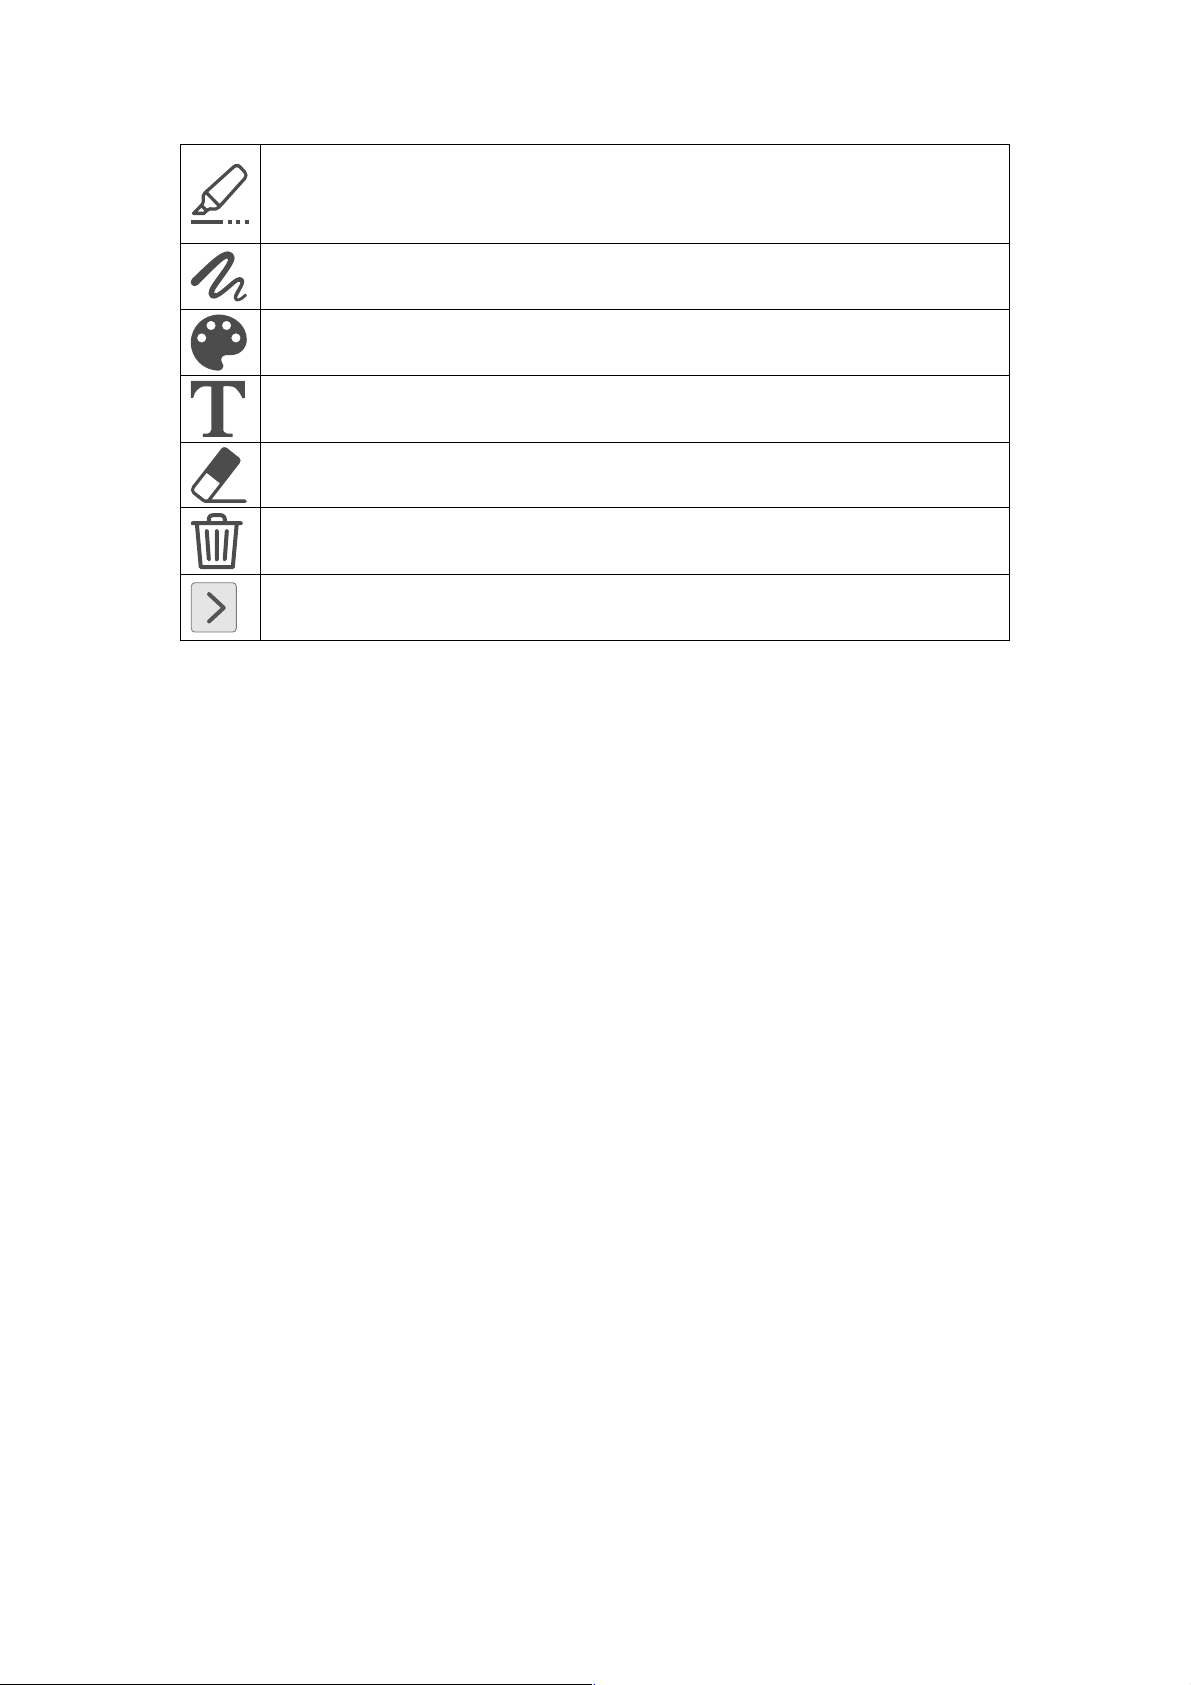
Disappearing Pen
Draw and write by using the Disappearing Pen
NOTE: It allows to set the disappearing time (3, 5, 10, 20 seconds)
Line Option
Set the line thickness of annotation.
Color Option
Choose the color of annotation, shape, and text tools.
Text Tool
Add the texts
Eraser
Erase annotation on the screen
Clear All
Clear all annotations on the screen
Show/Hide
Show and hide toolbar
21
Page 23
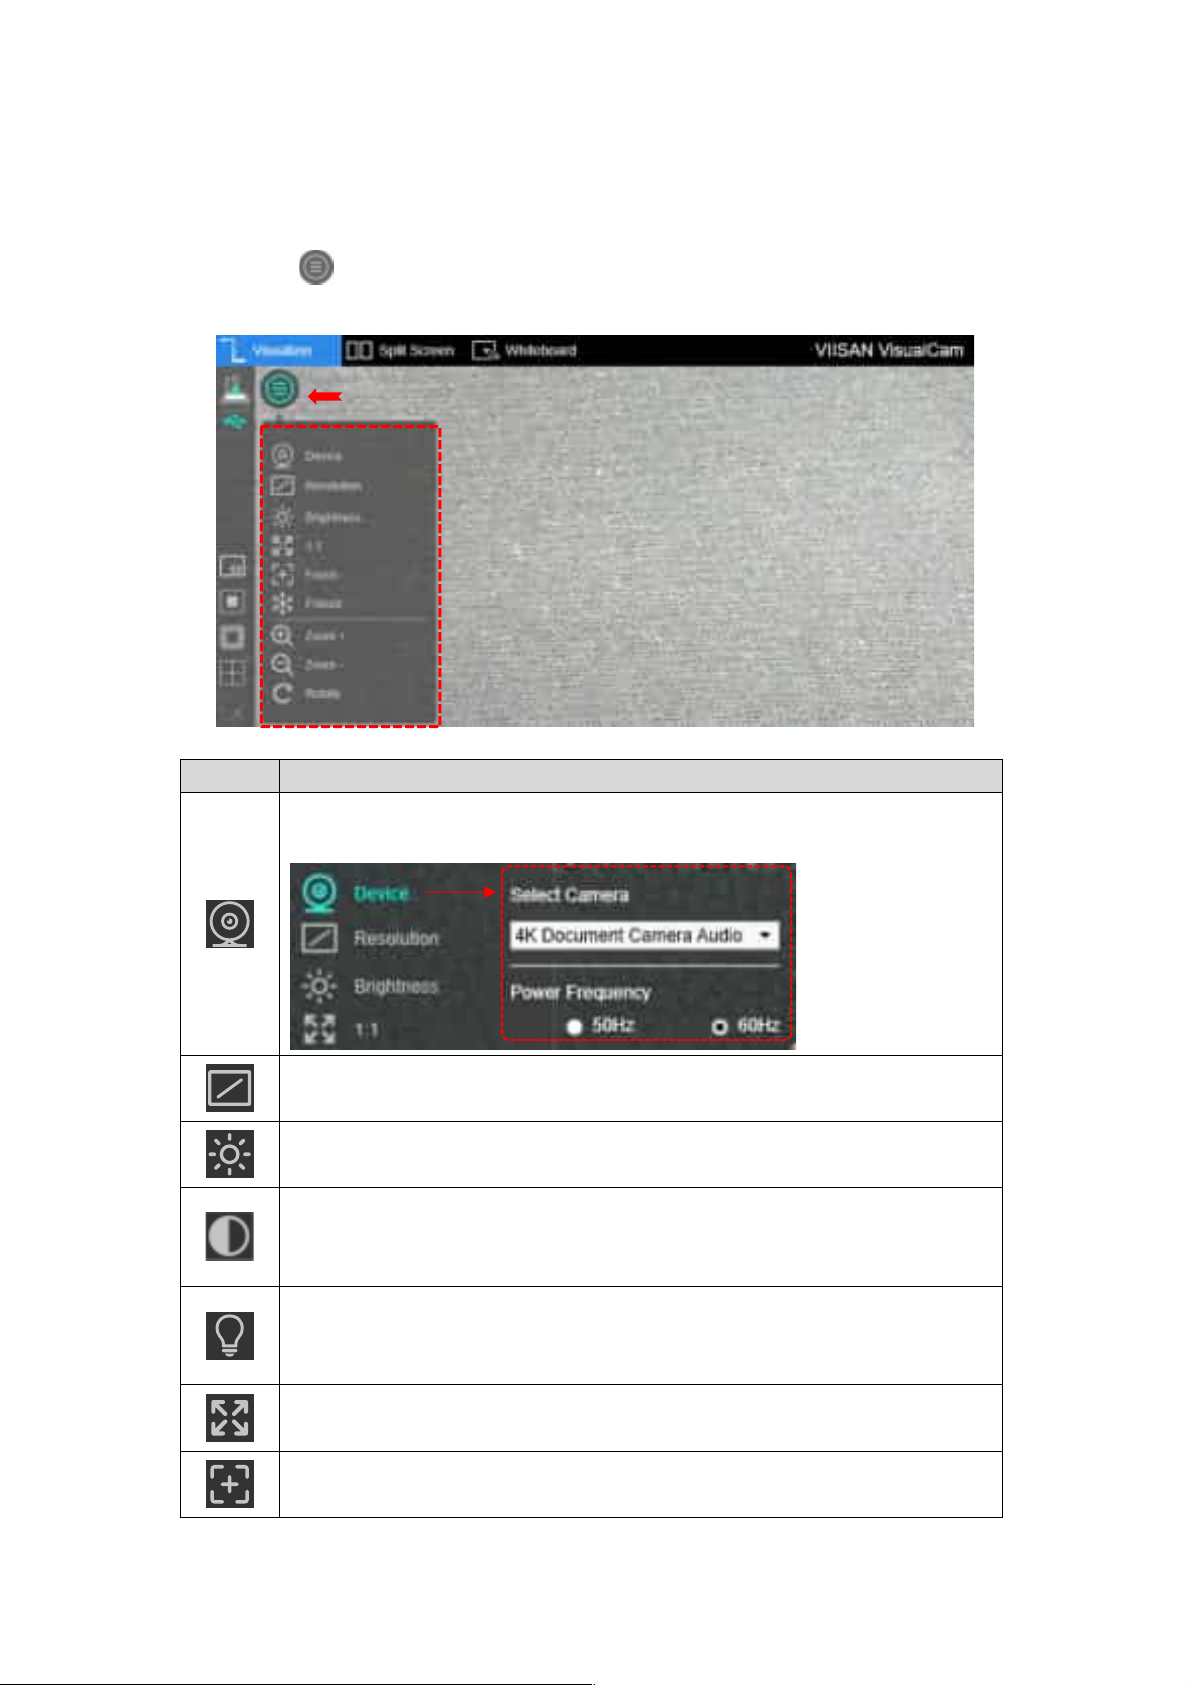
Image Adjustment Menu
Click on the
tool to adjust the live video on the preview window.
Icons Descriptions
icon to expand the image adjustment menu, you can use the following
Device
Select the device and switch power frequency (50/60Hz)
Resolution
Set the resolution
Brightness
Adjust the brightness
Backlight
Adjust the backlight.
NOTE: This Function only available on specific model
Lamp
Turn on/off the lamp in 3-level (Leve1, Leve 2, Level 3)
NOTE: This Function only available on specific model
Display 1:1 image / Fit Screen
Auto Focus
Click once to autofocus
22
Page 24
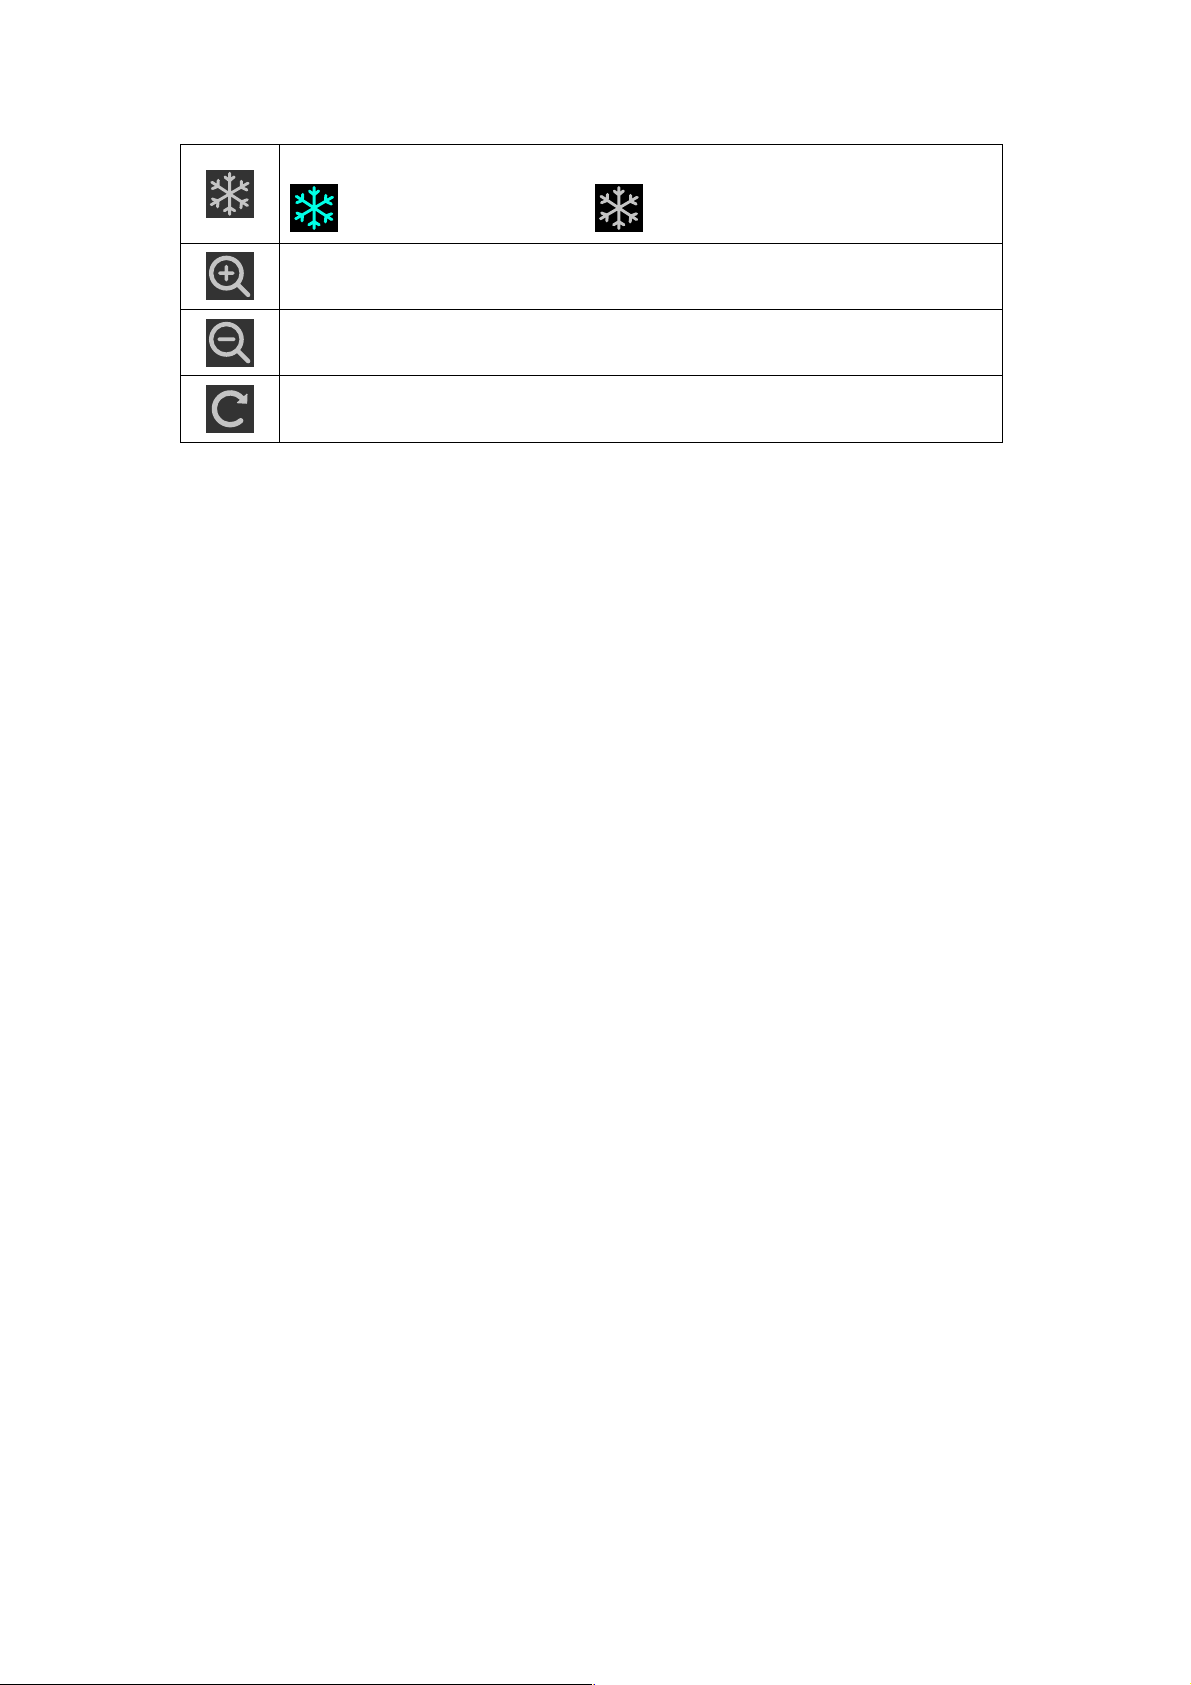
Freeze video
Click to freeze the video / Click again to unfreeze the video
Zoom in image
Zoom out image
Rotate image by 0°, 90°, 180°, 270°, Flip or Mirror
23
Page 25
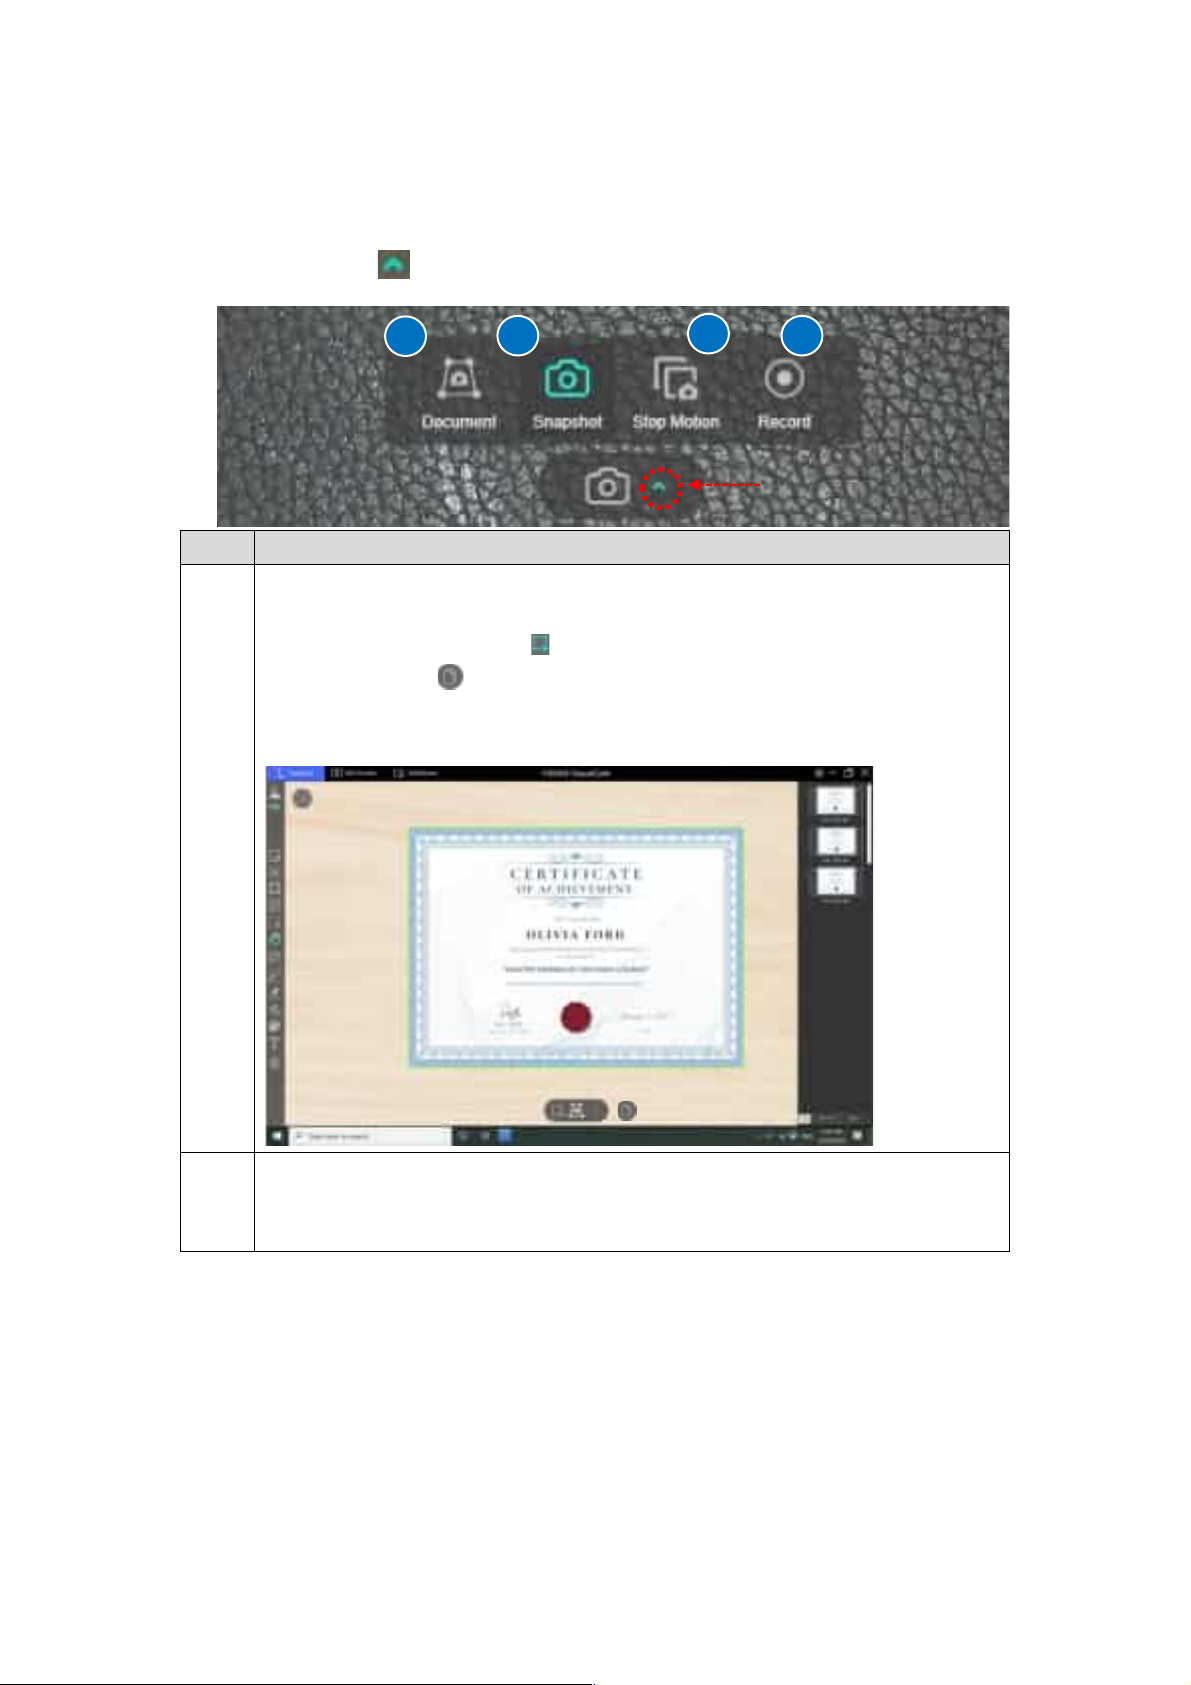
Select Capture Mode
Click on the up-arrow icon at the middle lower button to switch the capture mode.
Mode Descriptions
The Document mode offers auto-detection and cropping features for scanning
single or multiple documents. You can also manually select the desired
capture area by clicking the icon. Additionally, enable multiple-page
scanning with the icon. This document scan mode includes a multilanguage OCR function, allowing you to extract text from documents in various
languages.
1
1
2
3 4
The snapshot mode allows you to take photo with annotation or w/o
2
annotation, you can save the scanned image in JPG, BMP, PNG, or TIF
format.
24
Page 26
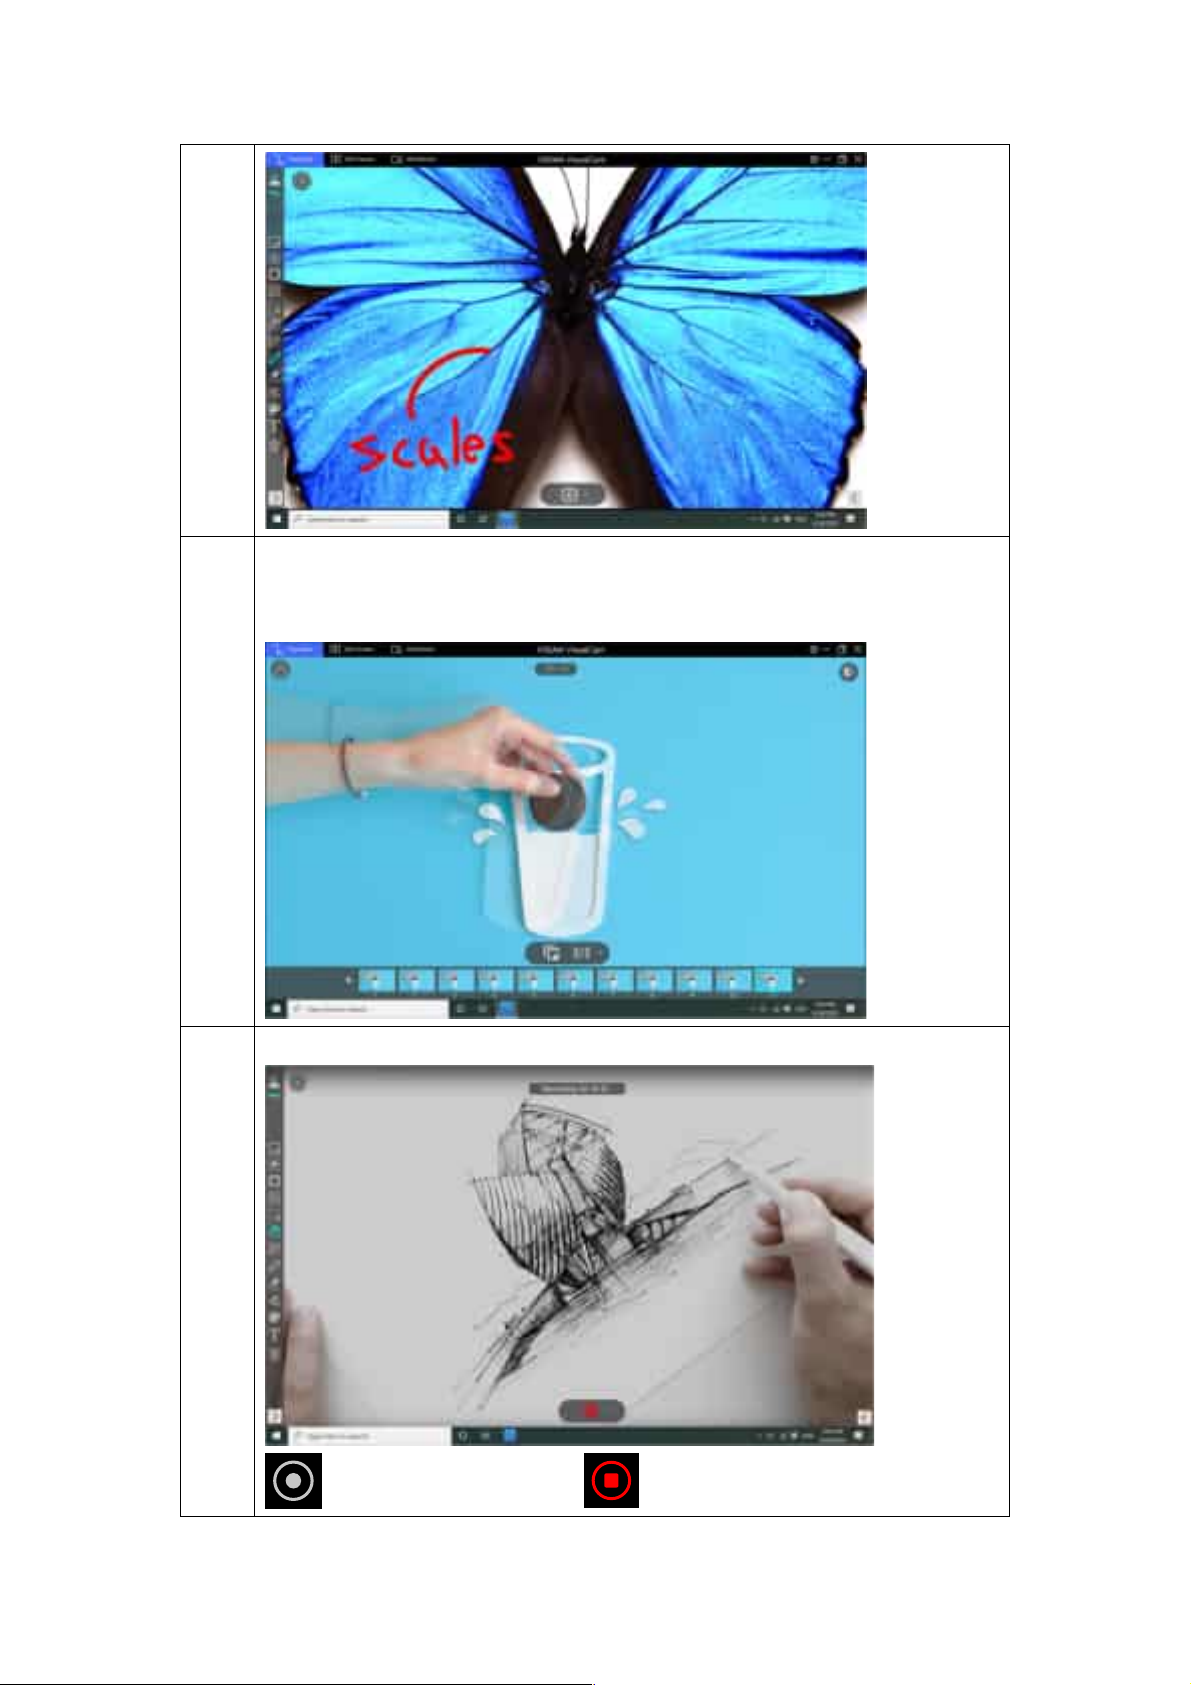
The stop-motion video feature provides a live preview with a semi-transparent
ghost image overlay that allows you to see the next shot and make even the
tiniest of adjustments before capturing the frame.
3
The Video mode provides record with high-quality video in MP4, AVI, or FLV format.
4
Click once to start recoding Click again to stop recoding
25
Page 27
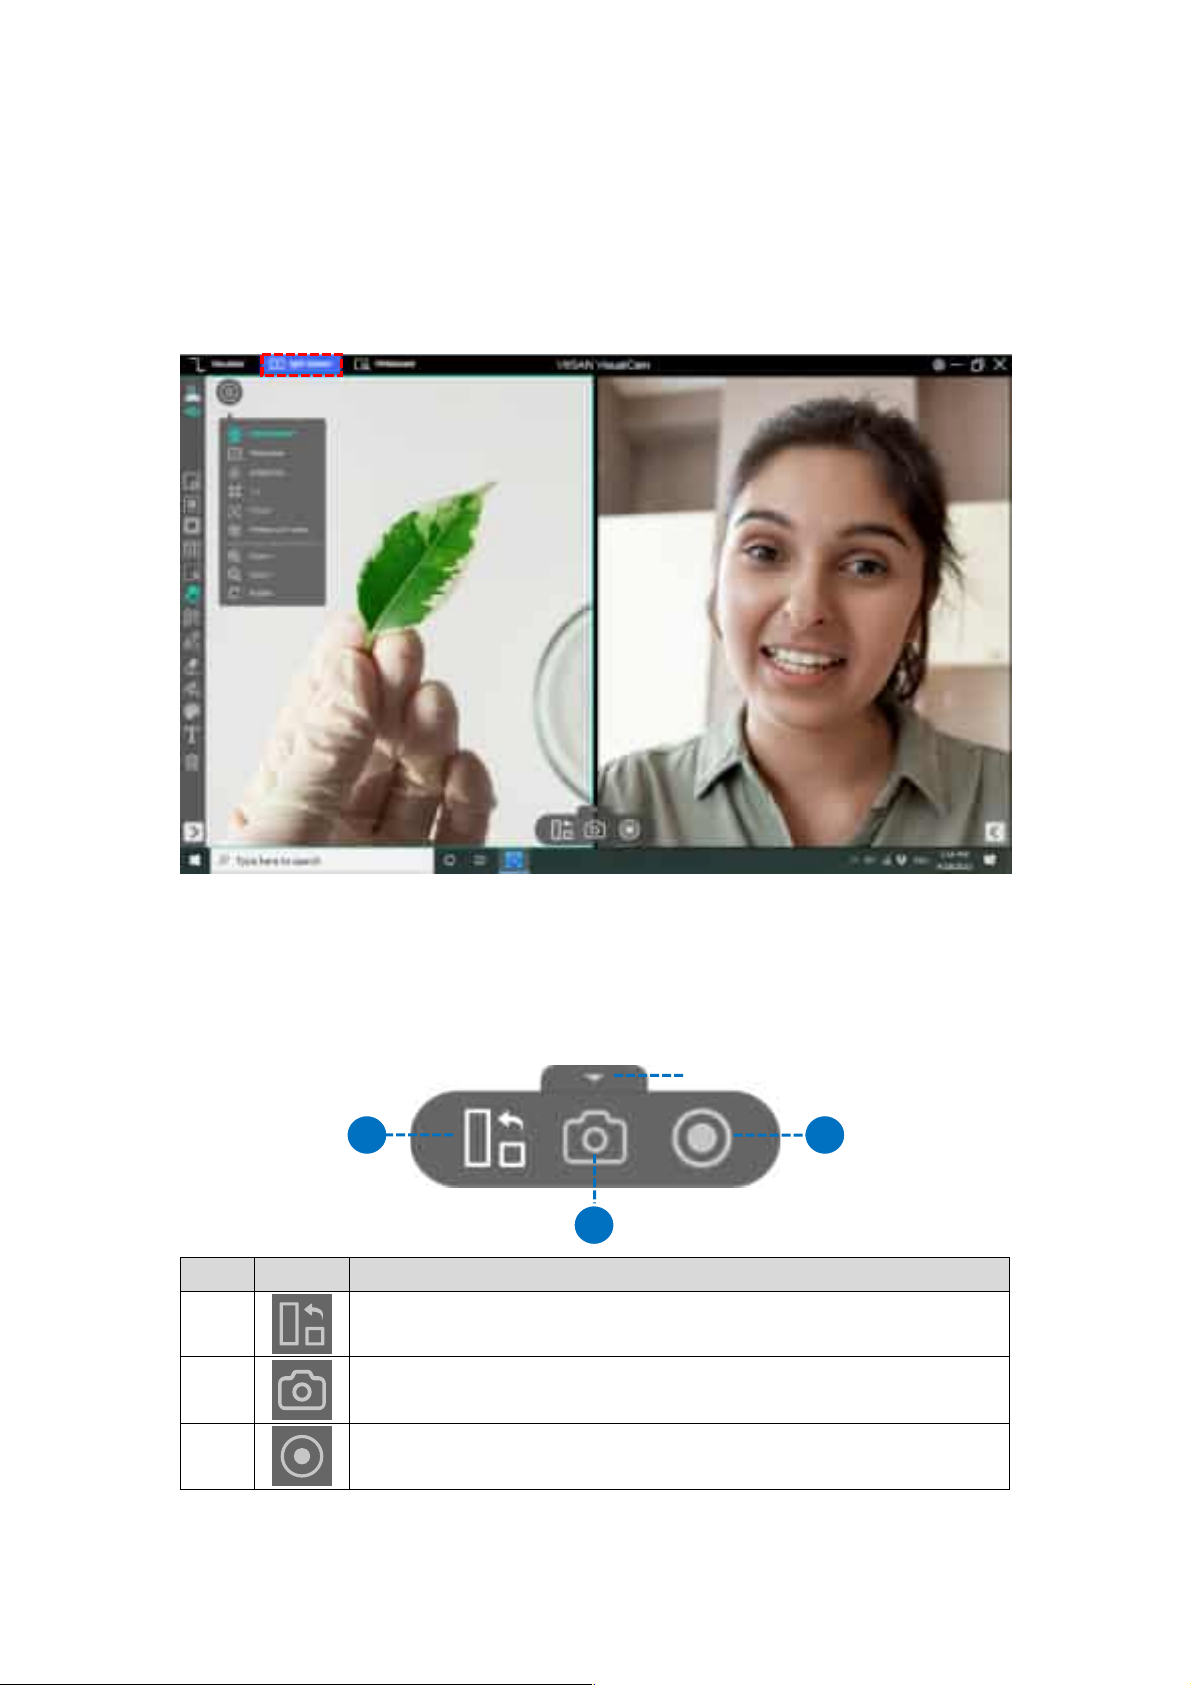
Split-Screen Mode Description
With the Split-Screen function, you can connect two document cameras to your computer
and present them by splitting two live screens and you can even compare still image with
live video.
The action buttons of split-screen mode
The split-screen provides three action buttons for taking screenshots, recording screens, and
changing the display layout.
Hide toolbar
1
item icon Descriptions
1
2
3
Shuffle
Change the display layout
Screen Capture
Take the screenshot of split-screen
Screen Recording
Take the screen recording of split-screen
2
3
26
Page 28
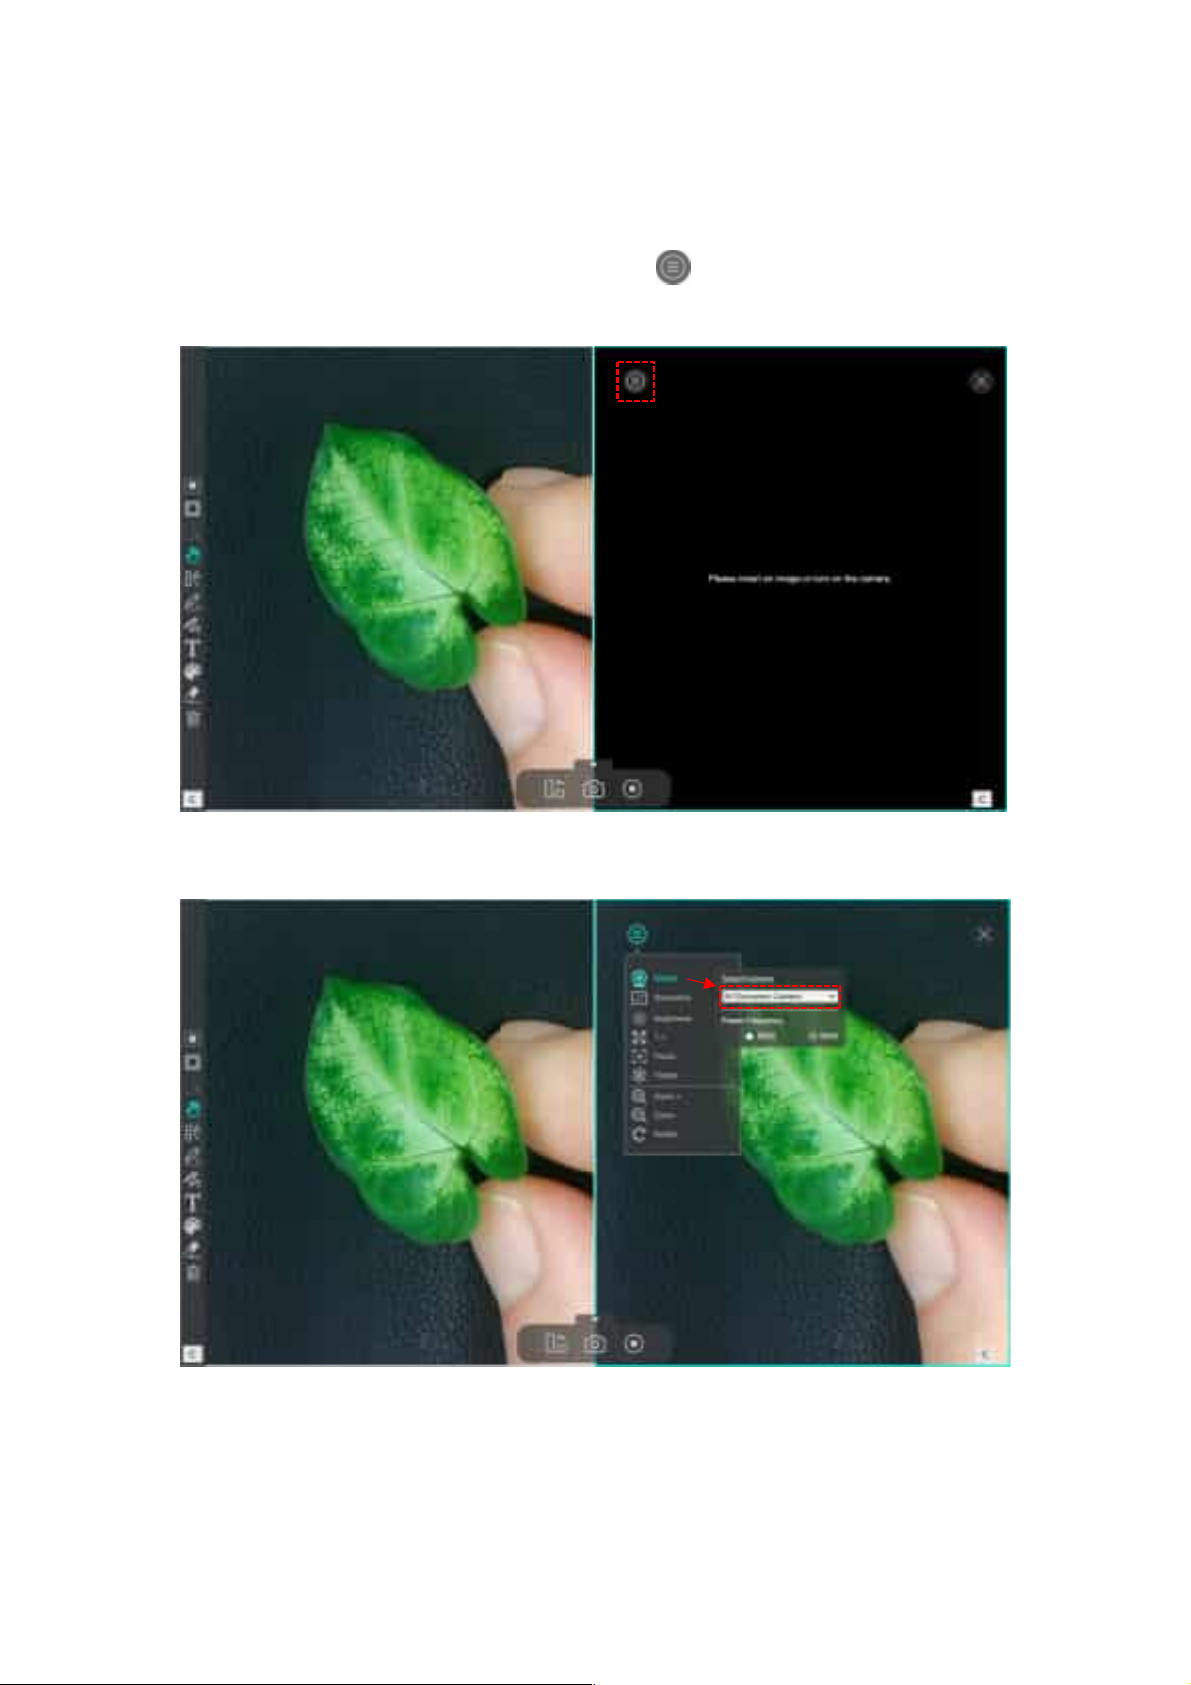
Compare with two live screens
To compare with two live screens, please click the icon on the right-side window to
expand the image adjustment menu then select the “Device” option.
Select camera source to your document camera, in this function you can freeze the one-
side video and keep the other side in live status.
You can also connect 2nd document camera to your computer one camera facing your
face, another camera facing down to your demo object.
27
Page 29
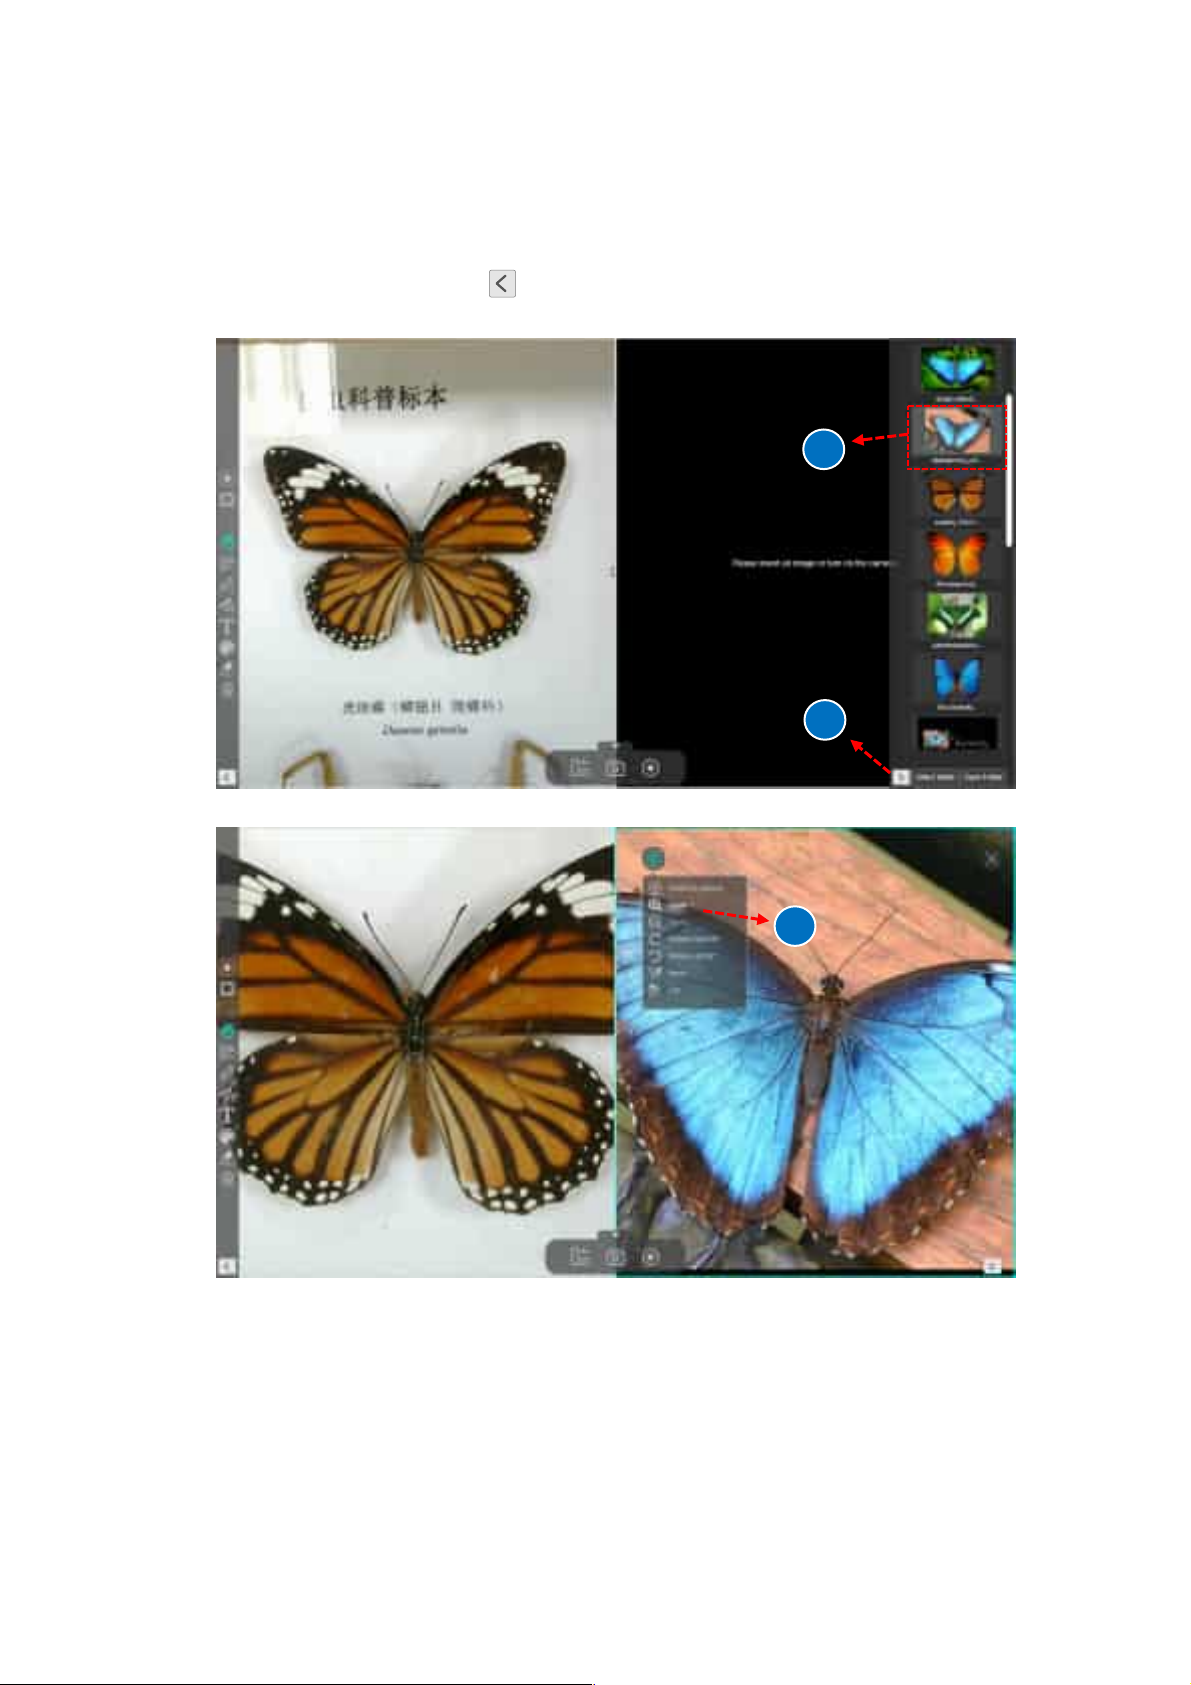
Compare images
Split screen mode allows you to compare multiple images on one screen.
1. Click on the bottom right icon to expand file output list.
2. Drag an image from the output list and insert it into the compare window.
2
1
3. You can zoom in/out or rotate the image for the best view.
3
NOTE: The maximum split-screen can only compare with 4 images.
28
Page 30
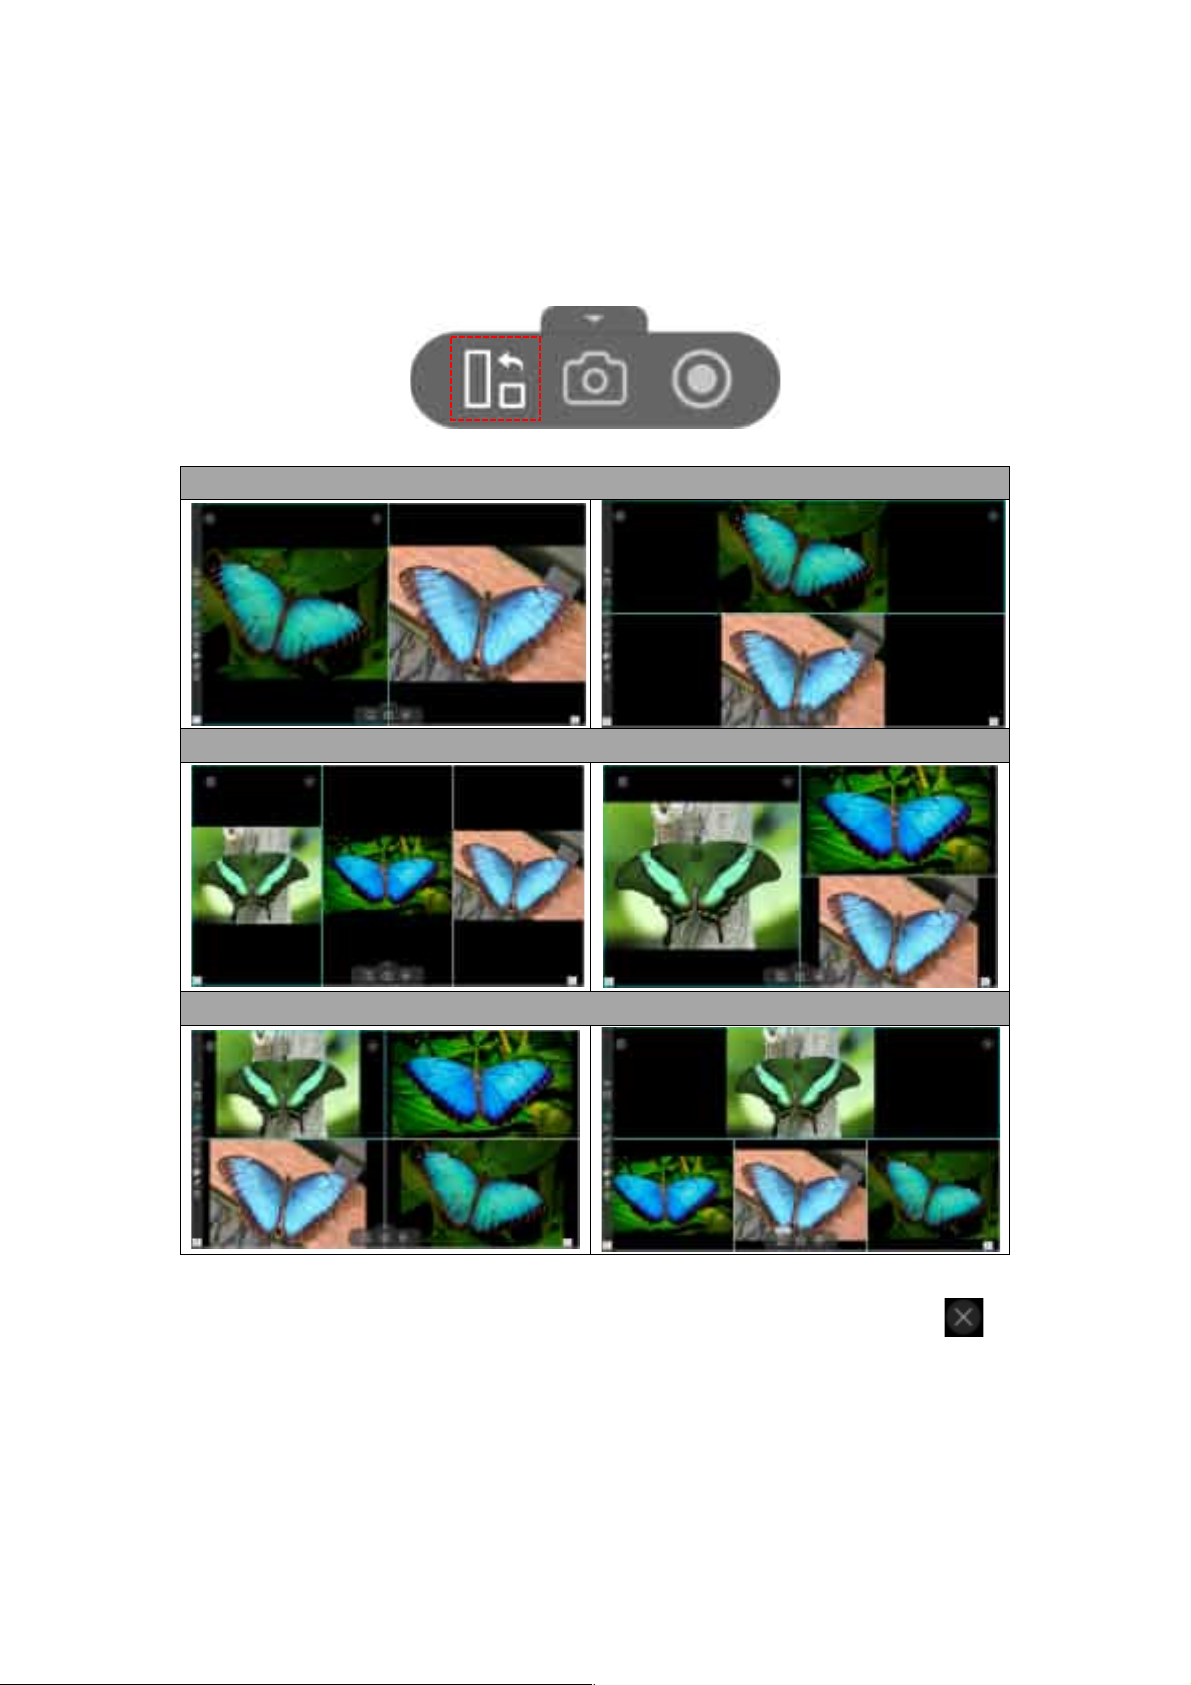
Change the display layout
The split-screen allows you to change the display layout by clicking of the shuffle button.
Two-split display states
Three-split display status
Quarter-split display status
NOTE: If you want to remove one of the split windows, you can direct click on the
icon at the top right corner of each split window.
29
Page 31
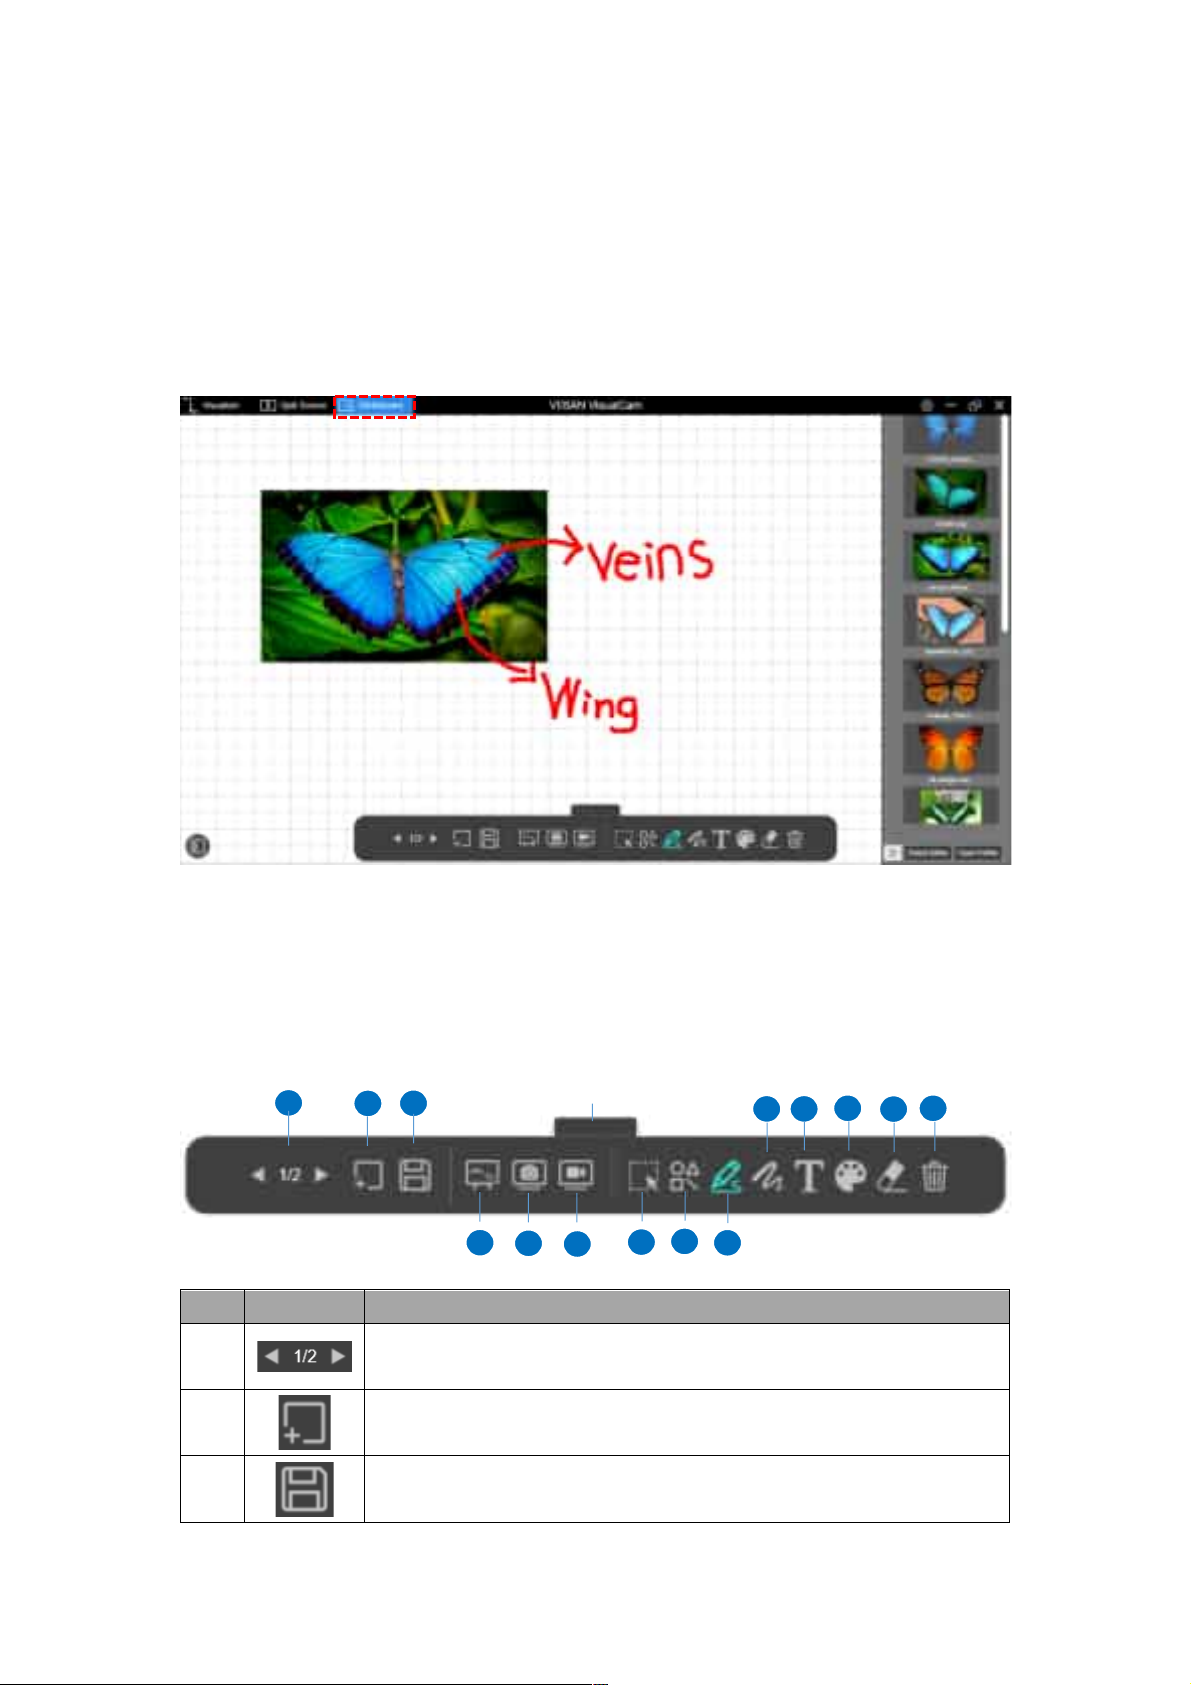
Whiteboard Mode Description
The whiteboard mode allows you to draw and annotate anything on the interactive
whiteboard, in this whiteboard function you can drag and drop selected images from the
right-side file list to the whiteboard and add annotations to increase your class
interactivity.
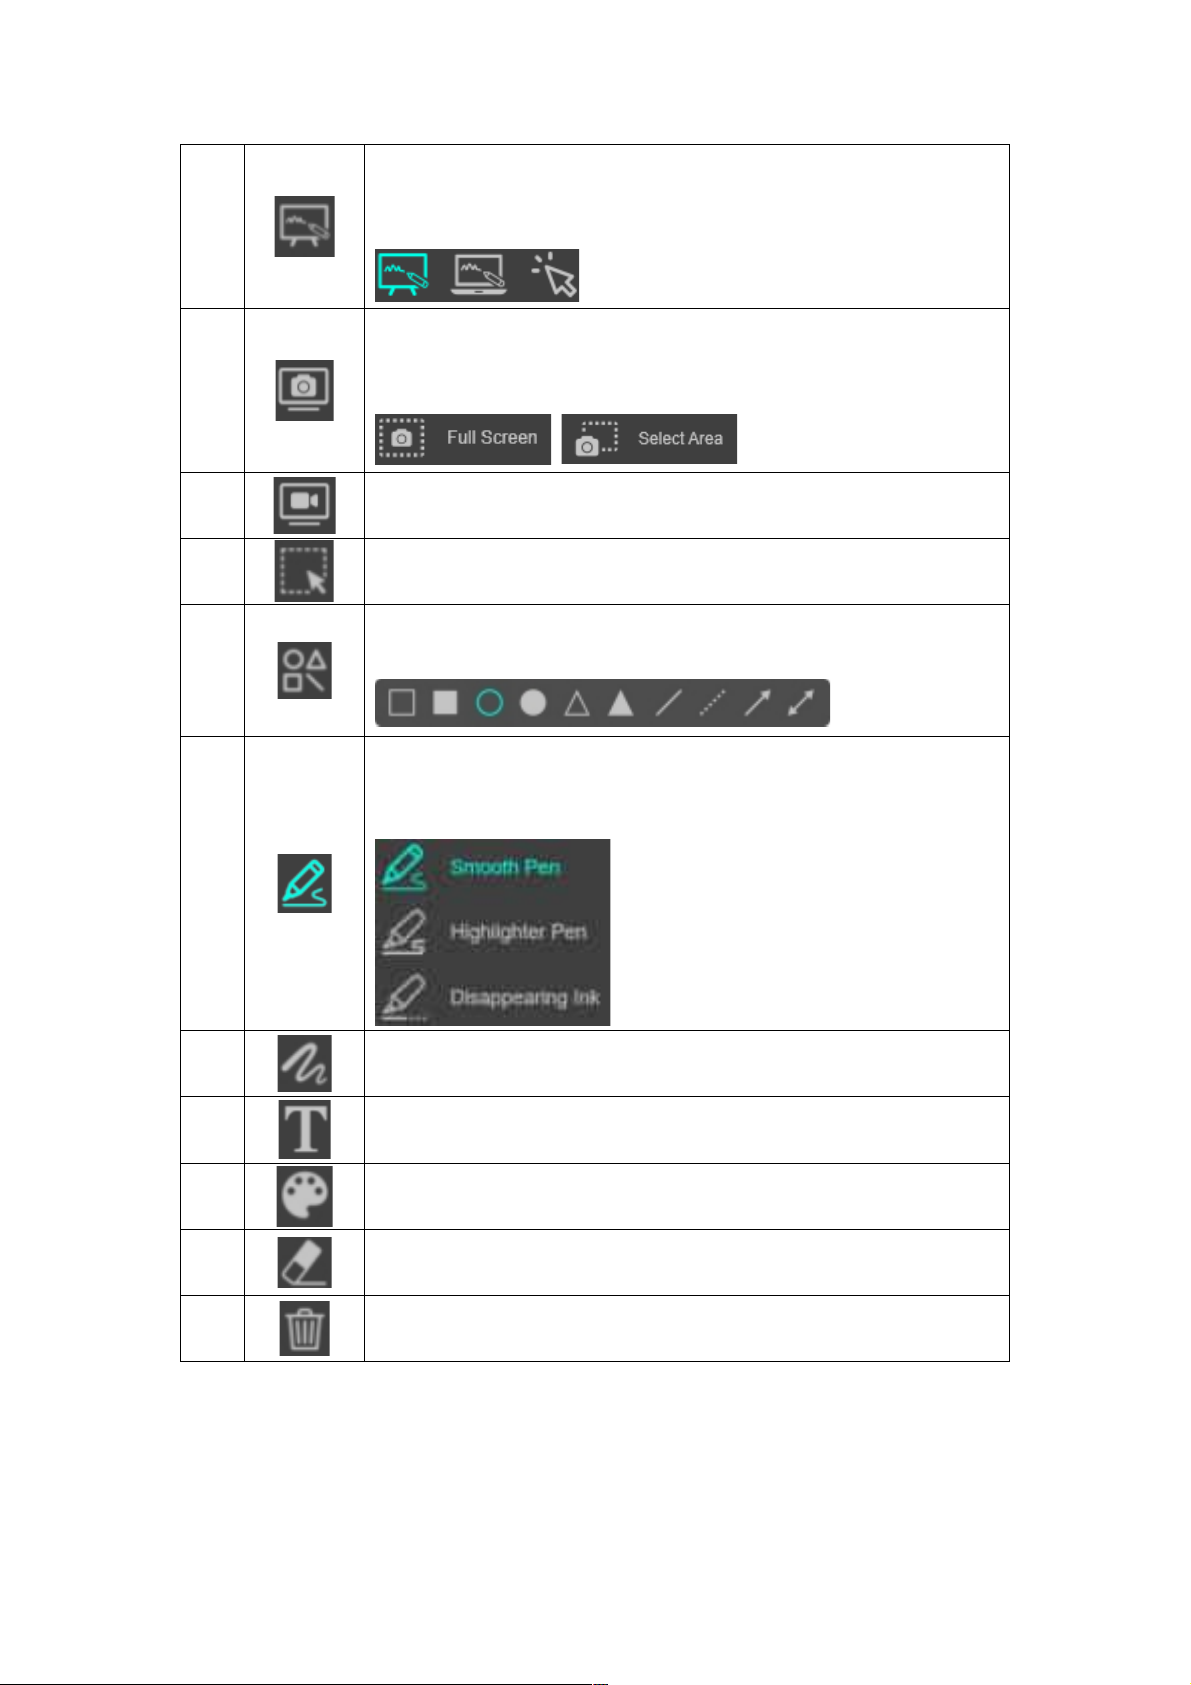
Whiteboard Toolbar Description
Whiteboard mode gives you a multi-page plane with all the drawing tools you need.
1
2
3
Item Icons Descriptions
1
Page up and down
Switch your whiteboard page.
Add a page
2
Add a whiteboard page with a different color background.
Save
3
Save your current whiteboard pages in a PDF file.
4
Hide toolbar
5
6
13
14
10 11
8
9
12
30
Page 32
4
5
6
7
8
Switch the background
In this option, you can switch the whiteboard background to the
computer desktop or switch to mouse mode.
Screenshot
In the screenshot option, you can choose to take a full screenshot
or select to capture with an area.
Screen recording
Record your whiteboard screen.
Select
Select the annotation or object on the whiteboard.
Shape Tool
Add the shapes.
Freehand Tool
In the freehand tool option, you can select a brush style to draw
and write on the whiteboard.
9
10
11
12
13
14
Line Option
Set the line thickness of annotation.
Text Tool
Add the texts.
Color Option
Choose the color of annotation, shape, and text tools.
Eraser
Erase annotation on the screen
Clear All
Clear all annotations on the screen.
31
Page 33
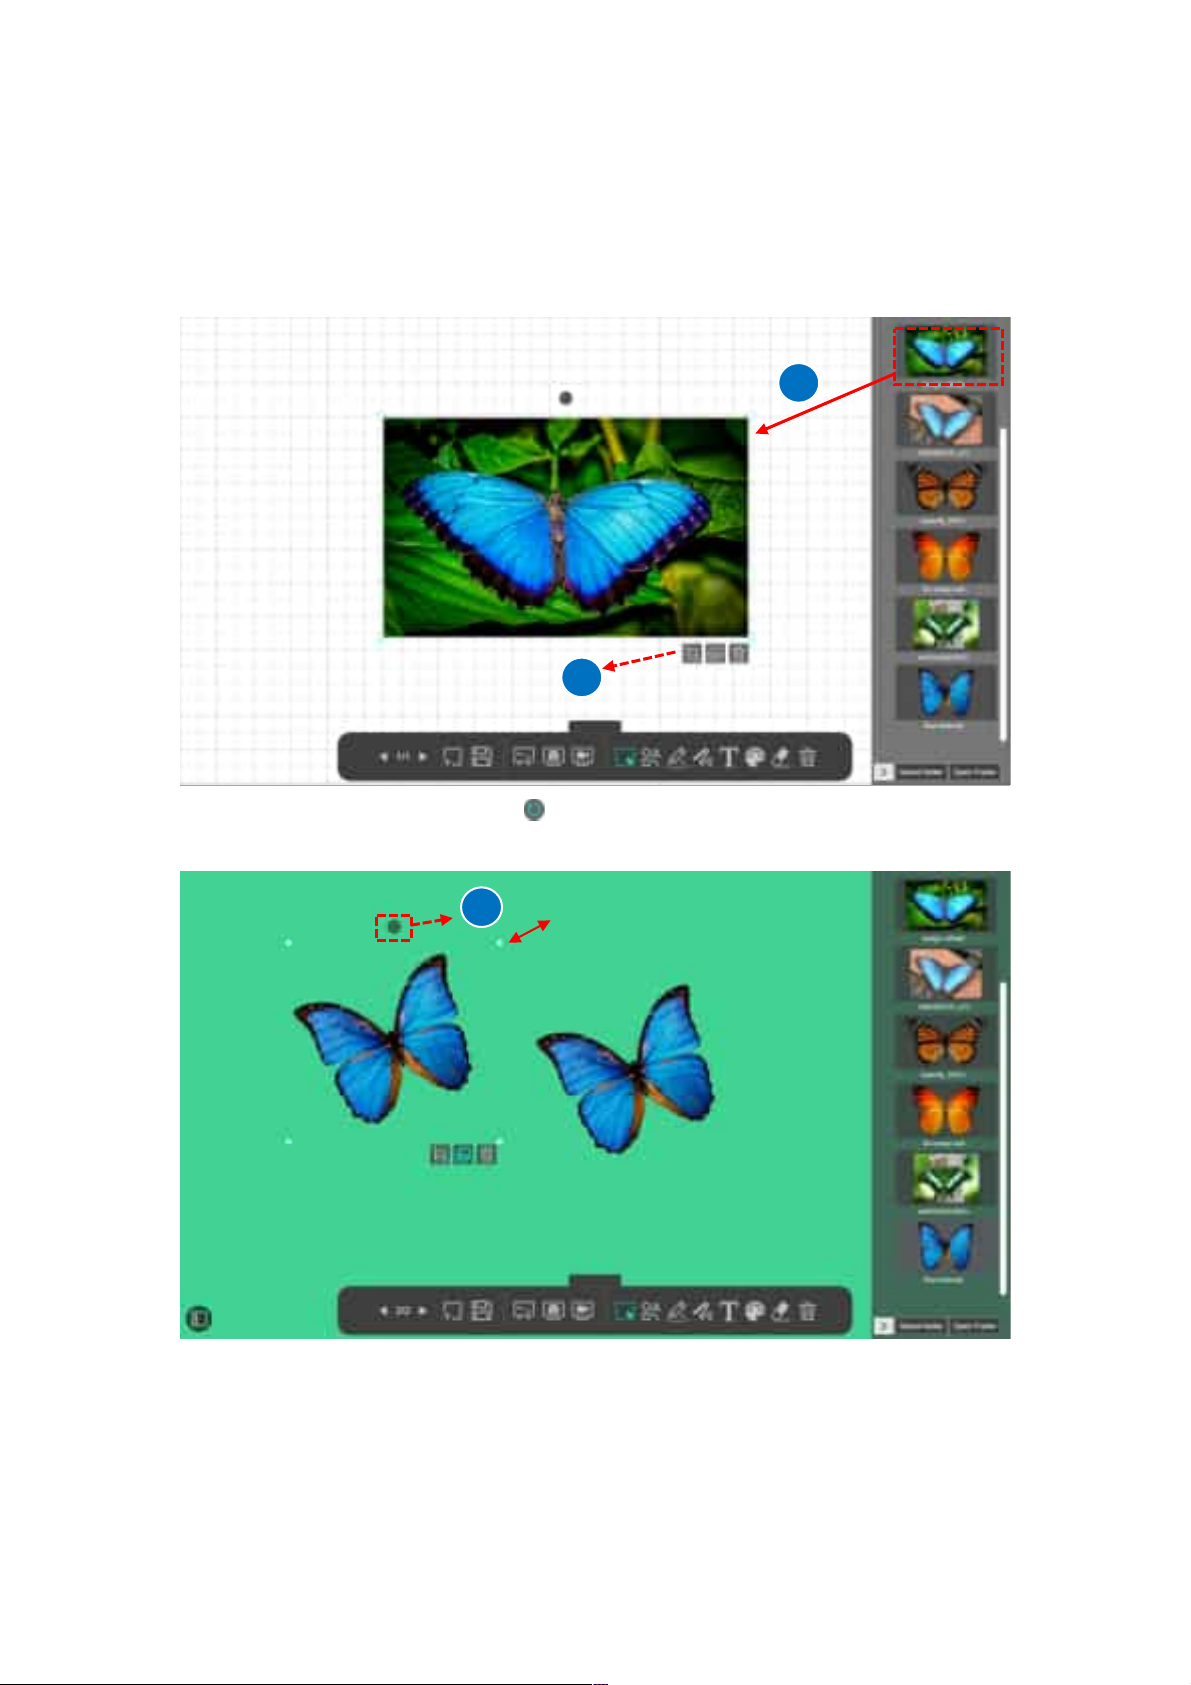
Add an image to the whiteboard
The whiteboard mode allows you to inset the images into the whiteboard.
1. Drag an image from the output list and insert it into the whiteboard.
2. You can crop, duplicate, or remove the image by using editing tools.
1
2
1
3. You also can place and hold the icon to rotate the image or click the cursor to
adjust the size
3
32
Page 34
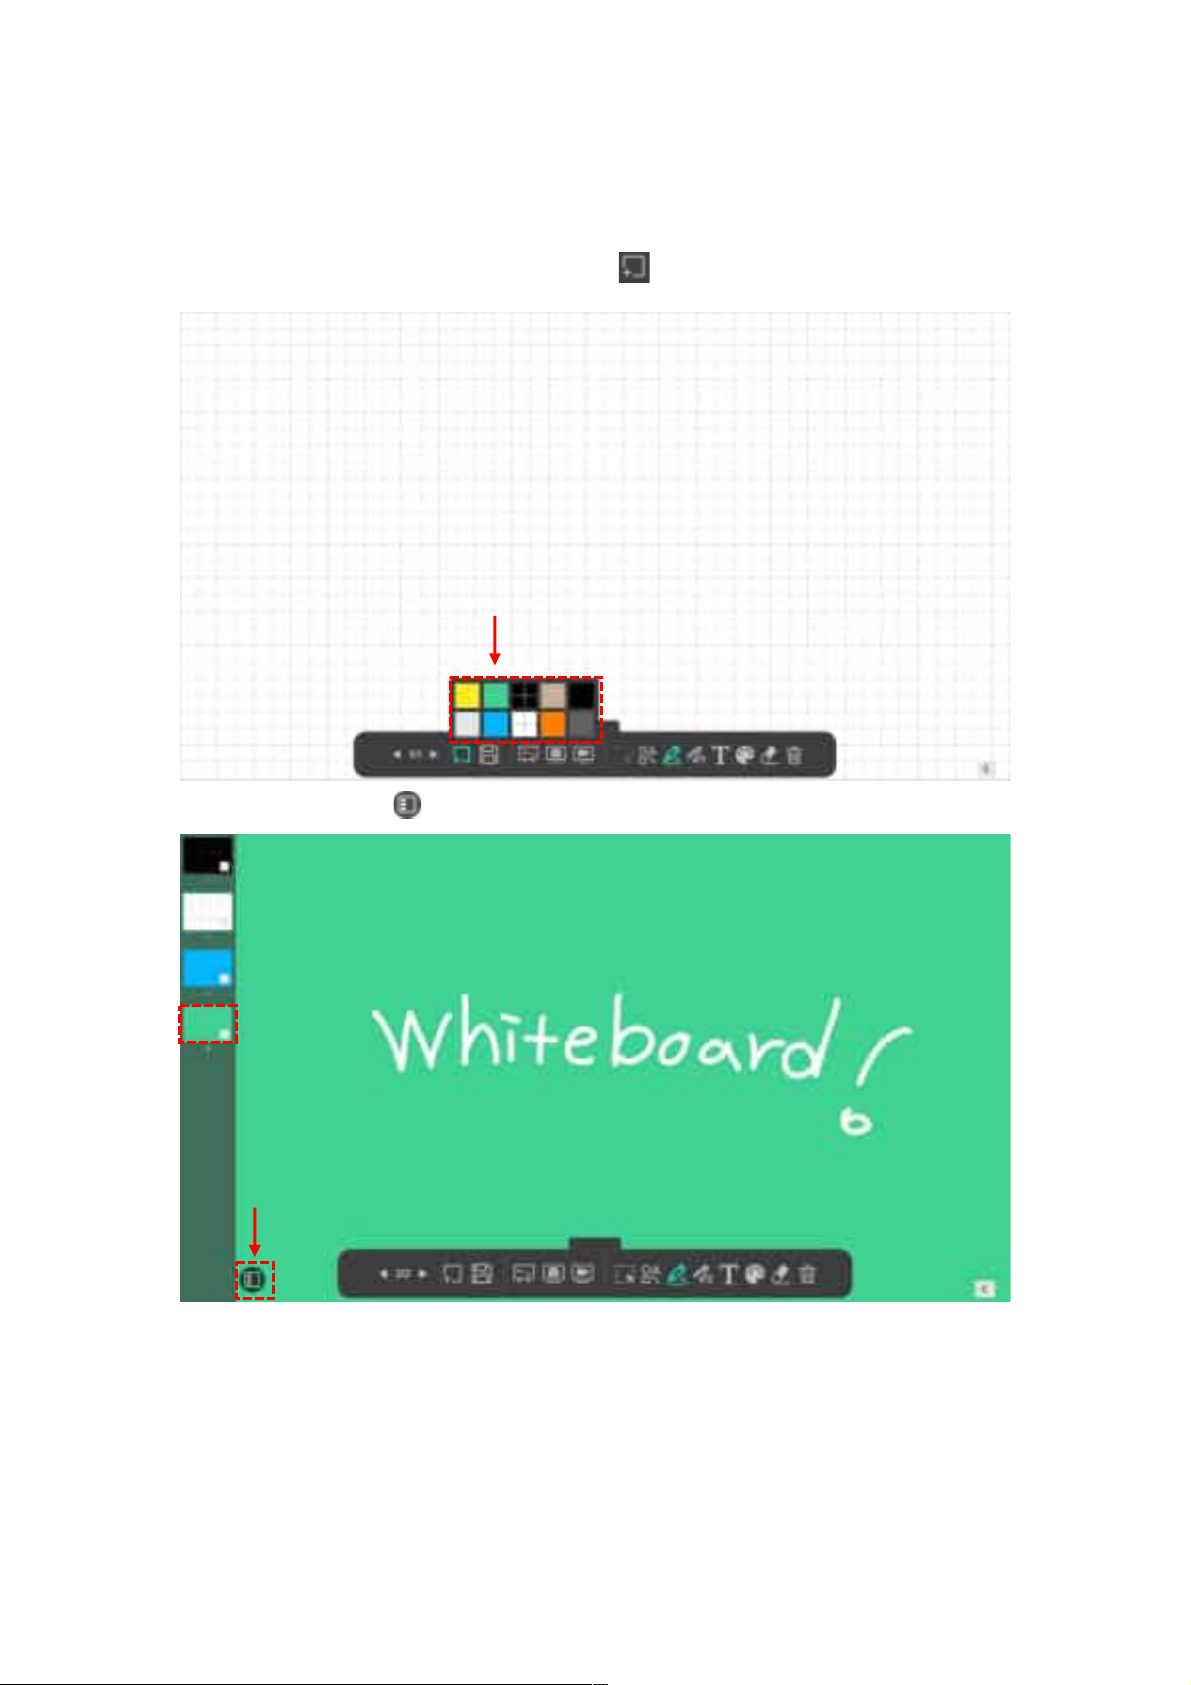
Add a whiteboard page
To add a whiteboard page, please click on the icon and choose a background color.
You can also click the icon to expand the thumbnail navigation bar.
33
Page 35

Troubleshooting
If the device cannot be detected for a long time, you can try the following.
Problem or Issue Potential Cause Possible Solutions
Cannot be
powered on
No image output
after connecting
The USB cable may not be
properly connected to the
computer, or the computer
may have encountered a
system crash.
The document camera is not
correctly connected to the
computer.
Software is not installed on
the computer.
Application software is
incompatible with the
document camera.
Re-connect the USB cable with the Document
Camera.
Restart the computer.
Re-connect the USB cable with the Document
Camera.
Install the bundled software on the computer.
Use the bundled software to operate the
Document Camera.
The device is not
being detected
Make sure you are using a
supported VIISAN model
camera device.
Check if the camera is
opened by other applications.
The VisualCam application is exclusively
compatible with VIISAN visualizer model
cameras. If you are using a third-party
document camera, certain features of this
software may not function properly.
Check the Windows/macOS program, if the
camera has been occupied by other
applications, please exit the application and try
again.
34
Page 36
Turn off the virtual machine
(macOs).
Check the USB connection
(Windows).
For Windows 10 / 11 system
If your Mac has an installed Windows virtual
machine such as “Parallels Desktop”, please
turn it off and connect the device again.
Ensure Windows has recognized the device
under the Cameras in Windows Device
Manager menu. If the device is not detected,
please try to connect with another USB port.
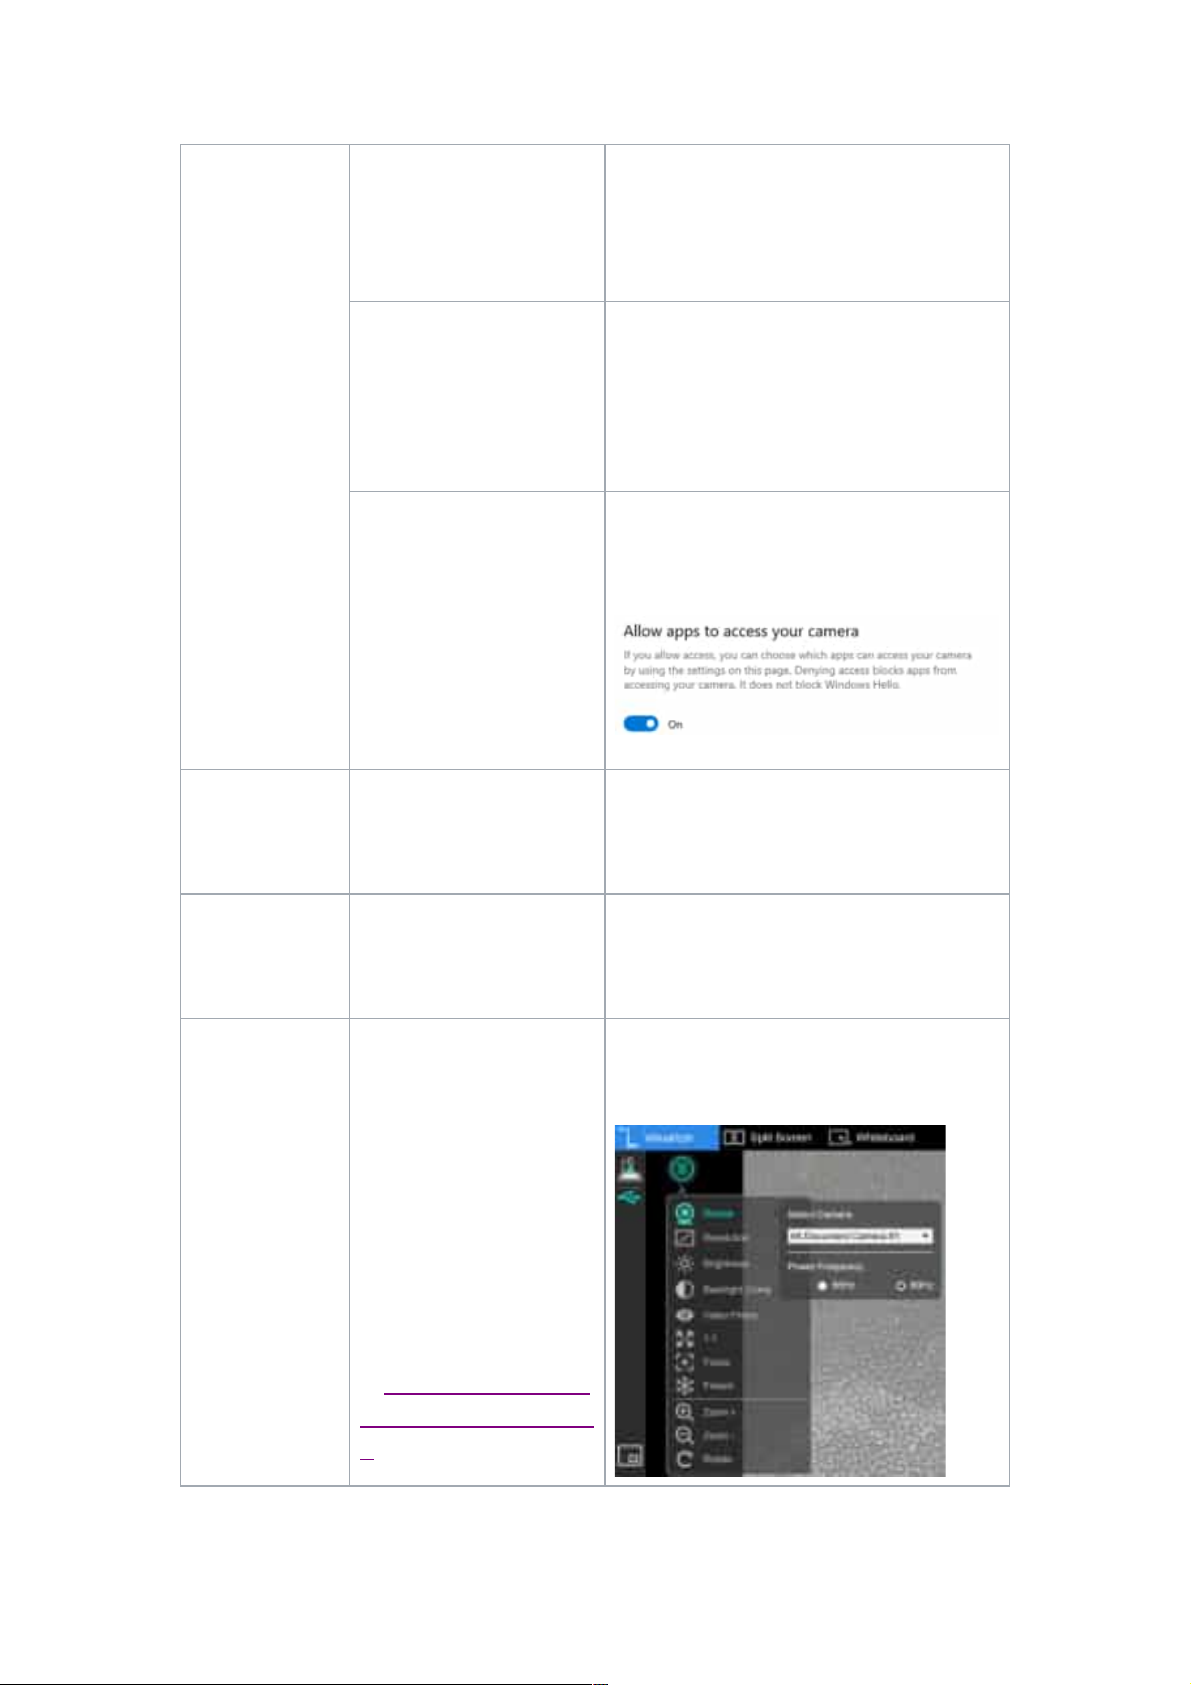
Go to: Settings > Privacy > Camera to check
whether the permission is allowed.
The image is
fuzzy
The image does
not move
There is camera
flickering
The distance of the object is
possibly too close to the lens.
The computer or application
software may have crashed.
Camera flickering problems
usually occur when there is a
difference between the
camera refresh rate setting
and the artificial lighting
refresh rate of the
environment.
NOTE: Learn more about
each country’s mains
electricity
at: https://en.wikipedia.org/wi
ki/Mains_electricity_by_count
ry
Press the AF button to auto focus.
Restart the computer or application software.
Use the VisualCam software “Device setup” to
change the camera’s Power Frequency (refresh
rate).
35
 Loading...