

Page 1

1
&KDSWHU2YHUYLHZ
Introduction
This manual describes the Viglen N440BX motherboard inside your computer. The
motherboard is the most important part of your computer. It contains all of the CPU,
memory and graphics circuitry that makes the computer work.
The motherboard contains the very latest CPU design, the Intel Pentium II
processor, which includes Intel’s MMX technology. MMX technology adds a total of
57 new instructions to the CPU, all of which are designed to vastly improve both
multimedia and communications on your PC. The combination of the Intel Pentium II
processor, MMX technology and Viglen expertise make this a formidable computer.
This manual contains technical information about the Viglen N440BX motherboard
and other hardware components inside your computer. If you are new to computers
we recommend that you read the user guide first. If you are an experienced
computer user this manual should provide all the information you will need to
perform simple upgrades and maintenance.
We hope that this manual is both readable and informative. If you have any
comments or suggestions about ho w we could imp rove the f orma t then p lease fill o ut
the form at the back of the manual and send it to us.
Above all we hope that you enjoy using your Viglen computer.
Page 2
2
1%;0RWKHUERDUG6SHFLILFDWLRQ
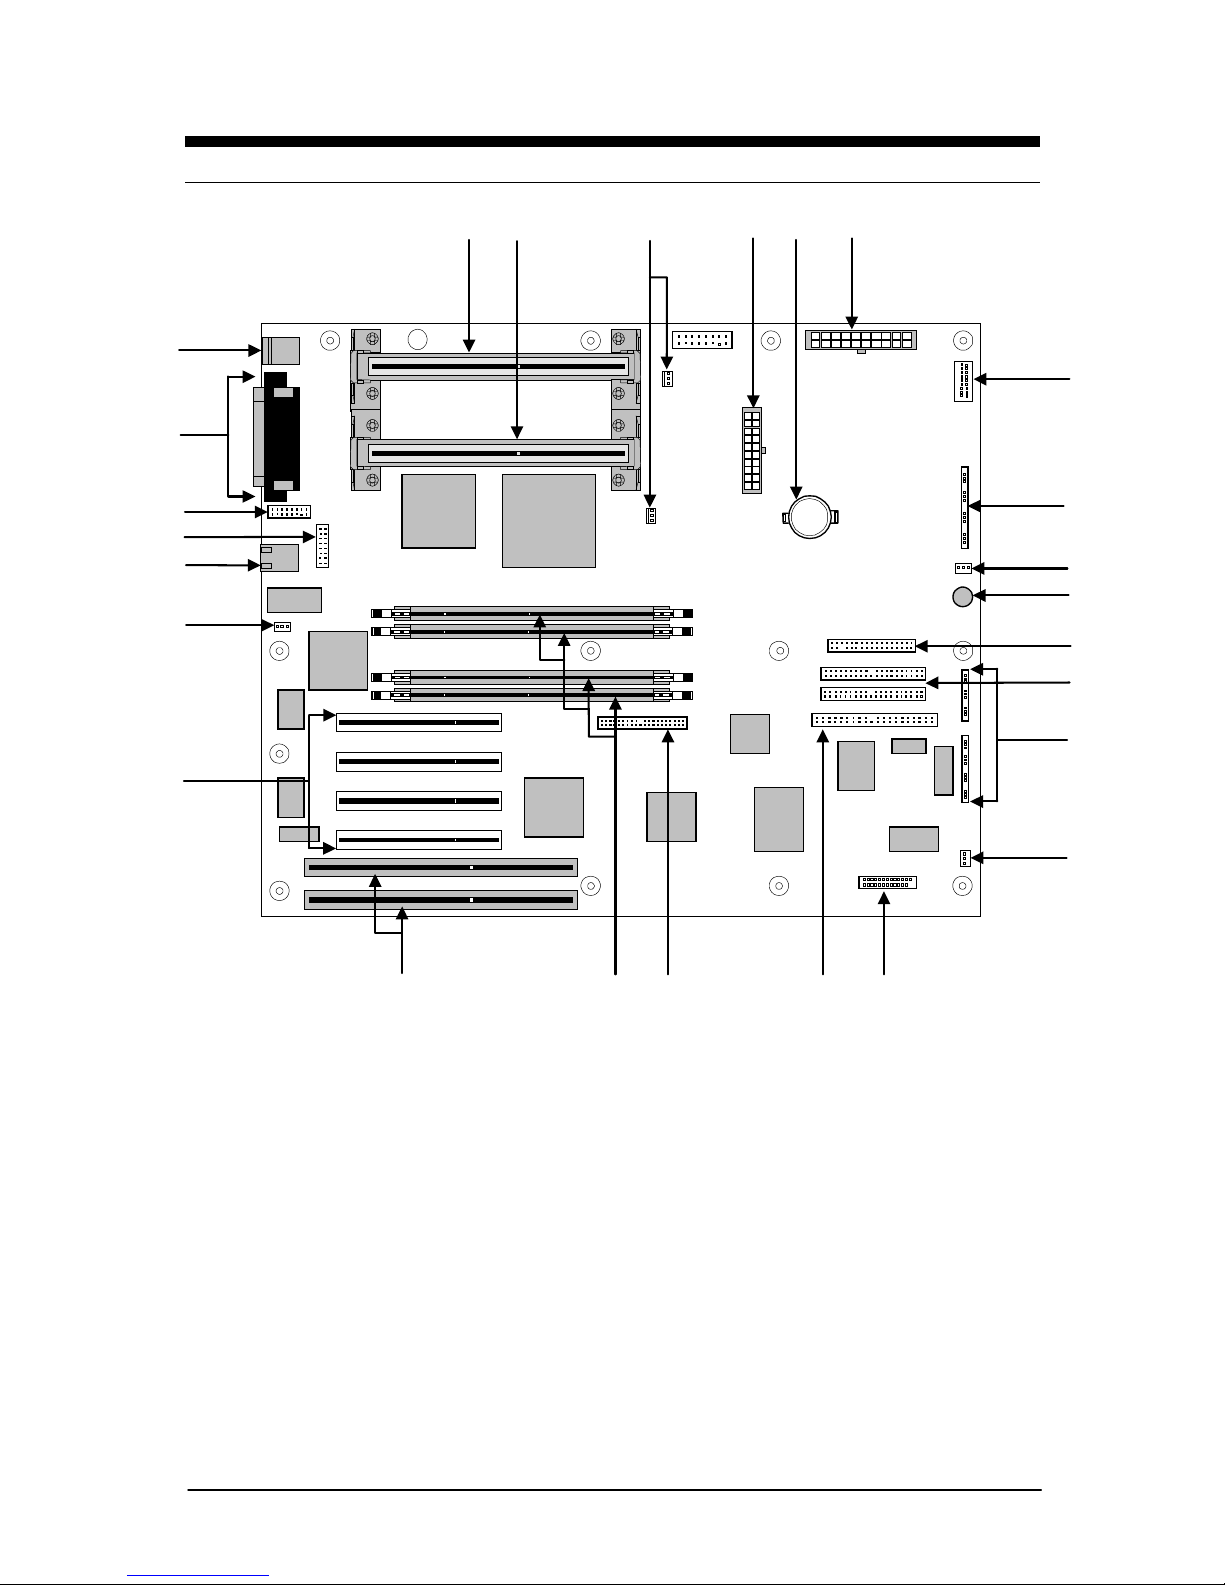
Figure 1
System Board Components
A Secondary processor connector
(SEC)
N System fan connector
B Primary processor connector (SEC) O Server monitor module connector
C Heatsink fan connectors P Narrow SCSI connector
D ATX power connector Q Wide SCSI connector
E Battery R DIMM Memory sockets (4)
F Main power connector S ISA expansion slots (2)
G Front panel connector, 16 pin T PCI expansion slots (4)
H AT front panel connector U Chassis intrusion header
I System fan connector V RJ-45 network controller
J Speaker W USB connector
K Diskette drive connector X Serial port B header (COM 2)
L IDE connectors Y I/O connections (VGA, Serial, etc.)
M Configuration jumper blocks Z PS/2 keyboard and Mouse ports
A B
C
D E
G
F
H
I
J
K
L
Pri.
Sec.
M
N
OPQR
S
T
U
V
W
X
Z
Y
Page 3
3
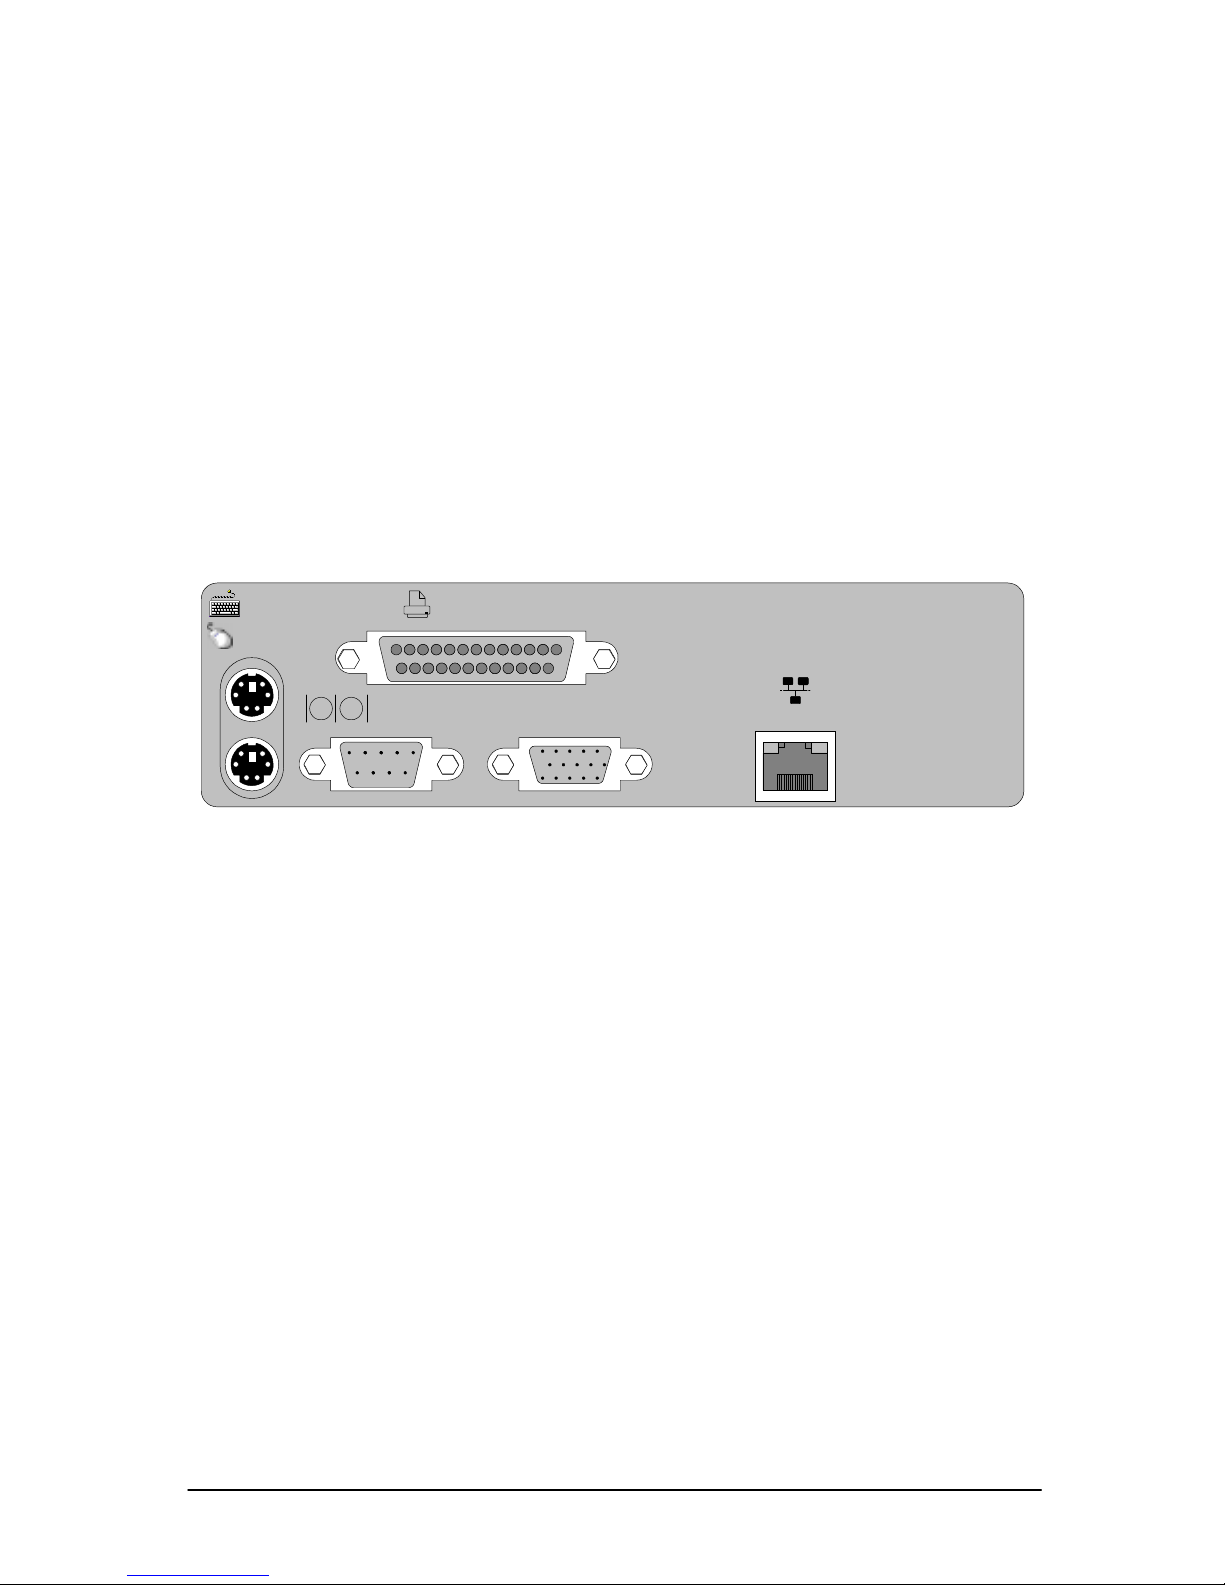
Back Panel Connectors
The motherboard external IO connectors are attached to a metallic I/O shield.
This shield serves several purposes:
• It protects the sensitive motherboard from any external EMC problems.
• It stops the computer from interfering with other electrical devices.
• It allows the motherboard to be easily upgraded in the future without having to
resort to buying a whole new case. Simply change the I/O shield to match the
motherboard.
The I/O shield provides external access to PS/2 keyboard and mouse connectors as
well as one serial port, one parallel port, the VGA port and a RJ45 Local Area
Network (LAN) connection.
Figure 2
NOTE:
The mouse and keyboard can be plugged into either of the PS/2 connectors. Power to the
computer should be turned off before a keyboard or mouse is connected or disconnected.
NETWORK
SERIAL 1
PRINTER
MOUSE
KEYBOARD
VGA
Page 4

4
Feature Summary
The N440BX motherboard supports two Intel Pentium ® II processors with second –
level cache integrated in a Single Edge Contact (SEC) cartridge operating at 233,
266, 300, 333, 350, 400MHz and beyond.
The motherboard featur es:
Form factor
• ATX form factor of 12 x 13 inches.
Processor
• Dual Pentium II processor.
• 66 or 100 MHz Front Side Bus speed.
• 512 KB second-level cache on the substrate in the Single Edge Contact
(SEC) cartridge.
• 2 * Slot 1 connector’s.
Main memory
• Four 168-pin DIMM sockets.
• Support for up to 1 GB of 100MHz synchronous Double-ba nked SDRAM or
512 MB of 100MHz Synchronous Single-banked SDRAM.
• ECC 3.3V memory only.
Intel 440BX PCI/IDE Interface.
• Intel 82443BX PCI/AGP controller (PAC).
-
Integrated PCI bus mastering controller.
• Intel 82371EB PCI/ISA IDE Xcelerator (PIIX4).
-
Supports up to four IDE drives or devices. PIO mode 4 and DMA
-
Transfer rates up to 22MB/sec.
-
DMA controller.
-
Two fast IDE interfaces.
Page 5

5
I/O features.
• The 87309 devices supports two FIFO serial ports, one Multi-mode Parallel
port, floppy disk drive, PS/2 keyboard and mouse and an integrated Real
Time Clock (RTC).
Symbios SYM53C876 controller Interface.
• Support for 8 or 16 bit fast SCSI.
• Up to 15 devices.
• Max data transfer 40MB/sec.
Integrated Network Interface.
• Intel 82558 PCI LAN adapter.
• For 10 or 100 Mbps TX fast Ethernet networks.
Integrated PCI Video.
• CL-GD5480 64-bit VGA.
• 1MB RAM video memory.
• Support for resolutions up to 1280 x 1024 and support for 16.7 M colors in
certain resolutions.
Expansion slots.
• Two ISA slot one shared.
• Four PCI slots one shared.
Additional features.
• Intel/Phoenix BIOS that supports Plug and Play, advanced IDE features, and
password security
• Plug and Play compatible.
Page 6

6
Microprocessor
The motherboard supports dual Pentium II processor’s. The processor’s VID pins
automatically program the voltage regulator on the motherboard to the required
processor voltage. The motherboard currently supports processor’s that run
internally at
233, 266, 300, 333, 350 and 400MHz
all with 512 KB second-level
cache. The processor’s implements MMX ™technology and maintains full backward
compatibility with the 8086, 80286, Intel386 ™, Intel486 ™, Pentium, and Pentium
Pro processors. The processor’s numeric coprocessor significantly increases the
speed of floating-point operations and complies with ANSI/IEEE standard 754-1985.
Microprocessor Packaging
The Pentium II processor is a Single Edge Contact (SEC) Cartridge that connects to
the motherboard through Slot 1, a 242-pin edge connector. The Pentium II
processor S.E.C. Cartridge consists of:
• Processor card including the processor core and the second-level cache:
burst pipelined synchronous static RAM (BSRAM)
• Thermal plate
• Back cover
When the Pentium II processor’s are mounted into the Slot 1 conne ctors, they are
secured by a retention mechanism attached to the motherboard.
Second Level Cache
The second-level cache is located on the substrate of the SEC cartridge. The cache
includes burst pipelined synchronous static RAM (BSRAM). There are four BSRAM
components totaling 512 KB in size. All supported onboard memory can be cached.
Processor Upgrades
The motherboard can be upgraded with Pentium II processors that run at higher
speeds. When upgrading the processor the USER must manually configure the
processor speed’s.
Page 7

7
Memory
Main Memory
The motherboard has four dual inline memory module (DIMM) sockets. Min imum
memory size is 16 MB; maximum memory size is 512 MB with 1 GB being available
in the future with the use of double-banked DIMMs. The BIOS automatically detects
memory type, size, and speed.
The motherboard supports the following memory features:
• 168-pin DIMMS with gold-plated contacts.
• 100 MHz PC/100 SDRAM only.
• ECC (72-bit) 3.3 V memory only.
• Single or double-banked DIMMs in the following sizes:
Table 1
DIMM Size ECC Configuration
16 MB 2 Mbit x 72
32 MB 4 Mbit x 72
64 MB 8 Mbit x 72
128 MB 16 Mbit x 72
256 MB 32 Mbit x 72
Memory can be installed in one, two, three or four sockets. Memory size can vary
between the sockets.
SDRAM
Synchronous DRAM (SDRAM) improves memory performance through memory
access that is synchronous with the memory clock. This simplifies the timing design
and increases memory speed because all timing is dependent on the number of
memory clock cycles.
NOTE:
To function properly, SDRAM DIMMS must meet the PC/100, 100 MHz, and unbuffered
SDRAM specification for 72-bit SDRAM.
ECC Memory
Error checking and correcting (ECC) memory detects multiple-bit errors and corrects
single-bit errors.
Page 8

8
Chipset
The Intel 440BX chipset is the latest generation of Intel’s PCI set and is designed for
the Pentium II processor. It consists of the Intel 82443BX PCI/A.G.P. controller
(PAC) and the Intel 82371EB PCI/ISA/IDE controller (PIIX4) bridge chip.
Intel 82443BX PCI/A.G.P. Controller (PAC)
The PAC provides bus-control signals, address paths, and data paths for transfers
between the processor’s host bus, PCI bus, and main memory. The PAC comes in a
492-pin BGA package and features:
• Processor interface control
Processor host bus speed of 100 MHz or 66 MHz
32-bit addressing
GTL+ compliant host bus
• Integrated DRAM c ontroller
Support for synchronous DRAM (SDRAM)
72-bit non-interleaved path-to-memory
Auto detection of memory type
Support for Mbit DRAM devices
Symmetrical and asymmetrical DRAM addressi ng
Support for 3.3 V DRAM only
• Fully-synchronous PCI bus interface
Compliance with PCI specification
PCI-to-DRAM access greater than 100 MB/sec
Support for five PCI bus masters.
Delayed transactions
PCI parity checking and generation support
• Data Buffering
Host-to-DRAM, PCI-to-DRAM, and A.G.P.-to-DRAM read buffers
Write-combining for host-to-PCI burst writes
Supports concurrent host, PCI, and A.G.P. transactions to main memory
• Support for system management mode (SMM)
Intel 82371EB PCI ISA IDE controller (PIIX4)
The PIIX4 is a multifunction PCI device implementing the PCI-to-ISA Bridge, and PCI
IDE functionality. The PIIX4 comes in a 324-pin MBGA package that features:
• Multifunction PCI-to-ISA bridge
Support for the PCI bus at 33 MHz
Compliance with PCI specification
Full ISA bus support
• Integrated dual-channel enhanced IDE interface
Support for up to four IDE devices
Page 9

9
PIO Mode 4 transfers at up to 16 MB/sec
Support for Ultra DMA/33 synchronous DMA mode transfers up to 33
MB/sec
Bus master mode with an 8 x 32-bit buffer for bus master PCI IDE burst
transfers
• Enhanced DMA controller
Two 8237-based DMA controllers
Support for PCI DMA with three PC/PCI channels and distributed DMA
protocols
• Interrupt controller based on 82C59
Support for 15 interrupts
Programmable for edge/level sensitivity
• 16-bit counters/timers based on 82C54
• Real-time Clock
256-Byte battery-backed CMOS SRAM
Includes date alarm
IDE Support
The motherboard has two independent bus-mastering PCI IDE interfaces. These
interfaces support PIO Mode 3, PIO Mode 4, ATAPI devices (e.g., CD-ROM), and
DMA mode transfers. The BIOS supports logical block addressing (LBA) and
cylinder head sector (CHS) translation modes. The BIOS automatically detects the
IDE device transfer rate and translation mode.
Programmed I/O operations usually require a substantial amount of processor
bandwidth. However, in multitasking operating systems, the bandwidth freed by bus
mastering IDE can be devoted to other tasks while disk transfers are occurring.
LS-120 Support
LS-120 MB Diskette technology enables you to store 120MB of data on a single, 3.5”
removable diskette. LS-120 technology is backward (both read and write)
compatible with 1.44MB and 720KB DOS-formatted diskette and is supported by the
Windows NT operating system.
The N440BX board allows connection of an LS-120 compatible drive and a standard
3½” floppy drive. The LS-120 drive can be configured as a boot device before a
floppy drive, if selected in the BIOS setup utility.
NOTE
:
If you connect an LS-120 drive to an IDE connector and configure it as the “A” drive and
configure a standard 3.5” floppy as “B” drive, the standard floppy must be connected to the
floppy drive cable’s “A” connector (the connector at the end of the cable).
The BIOS setup utility can be configured to boot firstly from either the LS120 or standard 3½
“ floppy drive.
Page 10

10
Real-time Clock, CMOS SRAM, and Battery
The real-time clock is compatible with DS1287 and MC146818 components. The
clock provides a time-of-day clock and a multicentury calendar with alarm features
and century rollover. The real-time clock supports 256 bytes of battery-backed
CMOS SRAM in two banks that are reserved for BIOS use.
The time, date, and CMOS values can be specified in the Setup program. The
CMOS values can be returned to their defaults by using the Setup program.
An external coin-cell battery powers the real-time clock and CMOS memory. When
the computer is not plugged into a wall socket, the battery has an estimated life of
three years. When the computer is plugged in, the 3.3-V standby current from the
power supply extends the life of the battery. The clock is accurate to ± 13
minutes/year at 25 ºC with 3.3 V applied.
Super I/O Controller
The PC87309 Super I/O Controller from National Semiconductor is an ISA Plug and
Play compatible, multifunction I/O device that provides the following features:
• Serial ports
Two 16450/16550A-software compatible UARTs
Internal send/receive 16-byte FIFO buffer
Four internal 8-bit DMA options for the UART with SIR support (USI)
• Multimode bidirectional par al lel por t
Standard mode: IBM and Centronics compatible
Enhanced parallel port (EPP) mode with BIOS and driver support
High-speed extended capabilities port (ECP) mode
• Floppy disk controller
DP8473 and N82077 compatible
16-byte FIFO
PS/2 diagnostic-register support
High-performance digital data separator (DDS)
PC-AT and PS/2 drive-mode support
• Keyboard and mouse controller
Industry standard 8042A compatible
General-purpose microcontroller
8-bit internal data bus
By default, the I/O controller interfaces are automatically configured during boot up.
The I/O controller can also be manually configured in the Setup program
.
Serial Ports
Two 9-pin D-Sub serial port connectors, one is located on the back panel and the
other connected to a 10pin header and is relocatable.
Page 11

11
Parallel Port
The connector for the multimode bidirectional parallel port is a 25-pin D-Sub
connector located on the back panel. In the Setup program, the parallel port can be
configured for the following:
• Compatible (standard mode)
• Bidirectional (PS/2 compatible)
• Extended Parallel Port (EPP)
• Enhanced Capabilities Port (ECP)
Floppy Controller
In the Setup program, the floppy interface can be configured for the following floppy
drive capacities and sizes:
• 360 KB, 5.25-inch
• 1.2 MB, 5.25-inch
• 720 KB, 3.5-inch
• 1.2 MB, 3.5-inch (driver required)
• 1.25/1.44 MB, 3.5-inch
• 2.88 MB, 3.5-inch
Keyboard and Mouse Interface
PS/2 keyboard and mouse connectors are located on the back panel. The 5 V lines
to these connectors are protected with a PolySwitch circuit that, like a self-healing
fuse, re-establishes the connection after an over-current condition is removed.
The keyboard controller contains the AMI Megakey keyboard and mouse controller
code, which provides the keyboard and mouse control functions, and supports
password protection for power on/reset. A power on/reset password can be
specified in Setup.
The keyboard controller also supports the hot-key sequence <Ctrl><Alt><Del> for a
software reset. This key sequence resets the computer’s software by jumping to the
beginning of the BIOS code and running the Power-On Self Test (POST).
Page 12

12
System BIOS
The system BIOS, from Phoenix Technology, provides ISA and PCI compatibility.
The BIOS is contained in a flash memory device on the system board. The BIOS
provides the power-on self-test (POST), the system Set-up program, a PCI and IDE
auto-configuration utility, and BIOS recovery code.
DMI (Desktop Management Interface)
DMI is a new PC Management system designed for networked PC’s. It allows
connected computers, running the appropriate software to control functions on
designated computers on the network. This motherboard adheres to Levels 0 & 1 of
DMI, which are outlined below.
Table 2
LEVEL 0
Operating System embedded
support functions
BIOS has embedded support for Windows
95 and NT operating systems
LEVEL 1
Full Level 0 Management Incorporates Management Level 0
ECC on Memory Memory has Error correcting technology
DMTF Compliant Software The system has an option to be supplied
with LANDesk® Client Manager 3.0
DMI Compatible BIOS Lowers the cost of ownership through
simplified system manageability
Chassis Security Header (reserved for future use)
The management extension hardware supports an optional chassis security feature
that detects if the chassis is opened while the computer is powered on. The security
feature uses a mechanical switch on the chassis that is attached to an optional 1 x 3pin header (J4A1). The mechanical switch is closed for normal computer operation.
Server Management
All server management functionality formerly distributed between 3 controllers is now
concentrated in the Baseboard Management Controller (BMC). The primary
functions of the BMC it to autonomously monitor system platform management
events, and log their occurrence in the non-volatile SEL. These include events such
as fan failure, chassis intrusion and over-temperature. The BMC provides an ISA
host interface to SDRR information so software running on the server ca n poll and
retrieve the current status of the platform. A shared register interface is defined for
this purpose.
SEL contents can be retrieved after system failure, for analysis by using system
management tools such as Intel LANDesk® Server Manager. Using the built in EMP
feature or an Emergency Management Card such as the Intel LANDesk® SMM card,
the information in the SEL can be obtained from a remote location via a LAN or
telephone line.
Page 13

13
Emergency Management Port (EMP)
The COM2 serial port on your N440BX server can be configured for use as an
Emergency Management Port. EMP provides a level of system management during
power-down, pre-boot and post-boot situations. It can be achieved via a point-topoint RS-232 connection or an external modem. EMP provides access to these
basic management features:
• System Power up
• System power down (Not available when in restricted mode)
• System reset (Not available when in restricted mode)
• Access to the System Event Log, FRU and Sensor Data Records
• Access to BIOS console Redirection
• Password protection
The EMP is intended for use only in a secure environment. A simple password can
be configured to provide a rudimentary level of security.
The COM2 port on the N440BX can be used for three different purposes:
• Normal serial communications port
• Console Redirection
• EMP
When the port is being used fo r EMP purposes a nd the Acce ss Mode ha s been set
to always active in the BIOS, then it is unavailable for any other use.
PCI Auto Configuration
The PCI auto-configuration utility works in conjunction with the Set-up program to
support PCI add-in boards in the system. When you turn on the system power after
installing a PCI board, the BIOS automatically configures interrupts, DMA channels,
I/O space, and so on. The PCI auto-configuration program complies with version 2.1
of the PCI BIOS specification.
IDE Auto Configuration
If you install an IDE drive in the system, the IDE auto-configuration utility
automatically detects and configures the drive for operation in the system. This
utility eliminates the need to enter the Set-up program after you install an IDE drive.
Expansion Slots
The system has two 16-bit ISA/AT-compatible and four PCI-compatible expansion
slots. One ISA and one PCI slot are shared so this provides system expansion of up
to five add-in cards.
Page 14

14
&KDSWHU6\VWHP%R DU G2SWLRQV
The N440BX motherboard is capable of accepting 233, 266, 300, 333, 350MHz, and
400MHz, Pentium II CPU's. RAM can be upgraded to a maximum of 1GB using
double-banked ECC SDRAM DIMMs.
WARNING
Unplug the system before carrying out the procedures described in this
chapter. Failure to disconnect power before you open the system can result
in personal injury or equipment damage. Hazardous voltage, current, and
energy levels are present in this product. Power switch terminals can have
hazardous Voltages present even when the power switch is off.
The procedures assume familiarity with the general terminology associated
with personal computers and with the safety practices and regulatory
compliance required for using and modifying electronic equipment.
Do not operate the system with the cover removed. Always replace the cover
before turning on the system.
As the colours of the wires in the mains lead of this computer may not correspond with the
coloured markings identifying the terminals in your plug proceed as follows:
The wire which is coloured green-and-yellow must be connected to the terminal in the plug
which is marked by the letter E or by the safety Earth symbol
or coloured green or green-
and-yellow.
The wire which is coloured blue must be connected to the terminal which is marked with the
letter N or coloured black.
The wire which is coloured brown must be connected to the terminal which is marked with
the letter L or coloured red.
Page 15

15
Make sure you are earthed and free of static charge before you open the computer
case. If you are unsure about upgrading your computer, return it to Viglen so a
qualified engineer can perform the upgrade.
STEPS TO TAKE TO PREVENT STATIC DISCHARGE:
1. The best way to prevent static discharge is to buy an anti-static strap from your
local electrical shop. While you are wearing the strap and it is earthed, static
charge will be harmlessly bled to gro und.
2. Do not remove the component from its anti-static protective packaging until you
are about to install it.
3. Hold boards by the edges - try not to touch components / interface strips etc.
NOTE:
We recommend that you return your computer to the service department for upgrading. Any
work carried out is fully guaranteed. Upgrades should only be carried out by persons who
are familiar with handling IC's, as incorrect installation will invalidate the guarantee.
CAUTION!
The Viglen N440BX motherboard
and associated components are
sensitive electronic devices. A small
static shock from your body can
cause expensive damage to your
equipment.
Page 16

16
Overview of Jumper Settings
The system motherboard inside your computer contains a block of twenty-one pins
and seven plastic jumpers. Different pins and jumper configurations make it possible
to change how the computer functions. This section of the manual should give you
all the information you will require making any changes.
Changes you can make, in this way, are as follows:
• Reset the CMOS RAM settings to the default values.
• Clear the system password.
• Recover from a corrupted BIOS during a BIOS upgrade.
• Write Protect Boot Block.
• Enable/Disable FRB timer.
• Bypass the chassis intrusion detection.
CAUTION!
Never remove jumpers using large pliers as this can damage the pins. The best way
to remove a jumper is to use a small pair of tweezers or fine needle-nosed pliers.
Never remove a jumper when the computer is switch on. Always switch the
computer off first.
Page 17

17
Jumper Settings
Each set of 3 pins requires one jumper, and has two options. The following figure
shows the position of the jumpers on the motherboard, and also the standard
position of the jumpers (two white pins).
Figure 3
CAUTION!
Do not move the jumper with the power on. Always turn off the power and
unplug the power cord from the computer before changing the jumper
.
Pri.
Sec.
BMC Forced
Update mode
Chassis Intrusion
Detection
FRB Timer
J2J1
J3J2
CMOS clear
Password
Clear
Recovery Boot
Boot block
write protect
Page 18

18
Table 3 Configuration Jumper Settings
Function Jumper
J2J1
(Default
options in bold)
Configuration
Clear CMOS 1-2 Preserve contents of NVRAM.
2-3 Replace contents of NVRAM with default
settings.
Clear system
password.
5-6 Maintain current system password.
6-7 Clear password
Recover from
corrupted
BIOS
9-10 System boots using BIOS stored in the flash
memory.
10-11 BIOS attempts to load BIOS code from a floppy
into the flash memory. Typically used when
BIOS code has been corrupted.
Write Protect
Boot Block
13-14 BIOS boot block is write protected.
14-15 BIOS boot block is erasable and
programmable.
CAUTION:
Programming the boot block incorrectly will prevent
the system from booting
Function Jumper
J3J2
(Default
options in bold)
Configuration
FRB timer. 1-2 FRB operation is enabled (system will boot
from processor 1 if processor 0 fails).
2-3 FRB is disabled.
Chassis
intrusion
detection.
5-6 Switch installed on chassis indicates when the
cover has been removed.
6-7 Chassis switch is bypassed.
Page 19

19
Motherboard Connectors
There are connectors on the motherboard for Floppy drives, IDE devices, Fans,
Power, Serial Port’s, SCSI, and Front Panel Connectors. The location and/or details
of these connections are shown below.
Fig 4 Motherboard connectors.
31
33125
Fan
Connector
13
ATX power
Floppy
Drive
connector
CPU Fan
Connector
1
3
1
210
9
COM port B
Header
Main power
11
24
1
12
11
20
1
10
68
2
1
SCA SCSI connector
67
391
40202
PCI IDE Connector x2
1
2
25
26
Server Monitor
Module Connection
1 2
10
9
USB port
Header
49
1
5026
2
Narrow SCSI connector
Chassis
Intrusion
Header
13
Front Panel I/O
Connector Header
Reset
Pwr LED
HD LED
Pwr On
SPK
Page 20

20
Front Panel Connectors
The following are all connectors situated along the front edge of the motherboard.
They are often connected to buttons and LED’s situated on the front panel.
Fig 4.1 Front panel connectors.
Reset - Reset switch connector
When these pins are shorted, it will cause the computer to perform a cold reboot.
PWR LED - Power L.E.D.
This attaches to the power L.E.D on the front panel, to display if the computer is active or
not.
SPK – PC speaker Connector
Not used. On-board speaker is present.
HD LED - Hard Disk L.E.D. Connector
This goes to the Hard Disk L.E.D. on the front panel, which lights up when the IDE Hard Disk
is in use.
PWR on - Remote On/Off
When these pins are shorted it turns the computer on and off.
Front Panel I/O Connector Header
Reset Pwr LED HD LED
Pwr On
SPK
Page 21

21
Upgrading the Pentium II CPU
CAUTION!
Allow time for the processor and heatsink to cool before touching either of them.
The Pentium II processor together with Level 2 cache chips are housed in a
protective cartridge called a SEC module. The SEC module is attached to the
computer using a slot 1 interface. Vertical supports, retention pillars, are used to
keep the module fixed into place. The Pentium II processor is attached to the
heatsink with special connectors called Rivscrews. These are used to protect the
delicate components inside the SEC module and to ensure the correct thermal
contact between the two. If you buy a new SEC module without a heatsink
attached,
under NO circumstances use normal screws to attach them
. This
could cause serious and permanent damage to your computer.
The design of the N440BX computer makes it a simple job to replace or upgrade the
processors. To do so please refer to figures 1 and 5 and follow the instructions
below.
1. Read the warnings at the start of this chapter and ensure a static free
environment.
2. Remove the lid from the computer by removing the screws at the rear of the case.
3. Locate the SEC module(s) by referring to figure 1 if necessary.
4. Locate the retention clips at the side of the SEC module. These are marked ‘A’ in
figure 5.
5. Gently push both clips towards the SEC module at the same time.
6. Pull the SEC module Vertically upwards until it is clear of the retention bracket.
7. You can now fit the replacement SEC module and heatsink into the slot 1
interface.
If the replacement Pentium II processor is of a different speed (MHz) to the previous
one you will now have to configure the Processor speed in the BIOS see page 45
(BIOS setup Program).
If the new processor has a different Front Side Bus speed (66 or 100MHz) to the
previous processor, then the N440BX board will automatically detect this and change
to the relevant FSB setting.
Page 22

22
Pentium II shown without Heatsink fitted.
Figure 5
Page 23

23
Installing & Removing Dual In-line Memory Modules DIMMs
Installing Memory
You can install from 16MB to 1GB of memory in the motherboard DIMM sockets.
The board has DIMM sockets arranged as banks 1, 2, 3, and 4. The motherboard
supports the following memory features:
• 168-pin 3.3 V DIMMs with gold-plated contacts
• 100 MHz unbuffered SDRAM
• Single or double-banked DIMMs
• ECC (72-bit) memory
• 16 MB, 32 MB, 64 MB, 128 MB and 256 MB modules
When addin g m emory, follow these guidelines:
• You must install DIMMs in bank 1 first, then bank 2 and so on.
• You can use different size DIMMs in the any of the banks.
• The BIOS detects the size and type of installed memory.
•
All the memory must be ECC.
NOTE:
DIMMS MUST MEET THE INTEL PC100 SPECIFICATIONS FOR 72-BIT SDRAM.
Location of the DIMM sockets.
Figure 6
Pri.
Sec.
Bank 1
Bank 2
Bank 3
Bank 4
Page 24

24
To install DIMMs, follow these steps:
Figure 6.1
1. Observe the precautions in “Before You Begin” Turn off all peripheral
devices connected to the computer. Turn off the computer.
2. Remove the computer cover and locate the DIMM sockets.
3. Holding the DIMM by the edges, remove it from its antistatic package.
4. Make sure the clips at either end of the socket are pushed away from the
socket.
Pri.
Sec.
Ensure DIMM Notches
Locations match exactly
with DIMM scoket Keys
Notches
1 1
2
2
Page 25

25
5. Position the DIMM above the socket. Align the two small notches in the
bottom edge of the DIMM with the keys in the socket.
6. Insert the bottom edge of the DIMM into the socket.
7. When the DIMM is seated, push down on the top edge of the DIMM until the
retaining clips at the ends of the socket snap into place. Make sure the clips
are firmly in place.
8. Reinstall and reconnect any parts you removed or disconnected to reach the
DIMM sockets
9. Replace the computer cover.
Removing Memory
To remove a DIMM, follow these steps:
1. Observe the precautions in "Before You Begin" .
2. Turn off all peripheral devices connected to the computer. Turn off the
computer.
3. Remove the computer cover.
4. Gently spread the retaining clips at each end of the socket. The DIMM pops
out of the socket.
5. Hold the DIMM by the edges, lift it away from the socket, and store it in an
antistatic package.
6.
Reinstall and reconnect any parts you removed or disconnected to reach the
DIMM sockets.
Figure 6.2
Page 26

26
Replacing the Clock/CMOS RAM Battery
A lithium battery is installed in a socket on the system board.
The battery has an estimated life expectancy of seven years. When the battery
starts to weaken, it loses voltage; when the voltage drops below a certain level, the
system settings stored in CMOS RAM (for example, the date and time) may be
wrong.
If the battery fails, you will need to replace it with a
Panasonic CR2032
battery or an
equivalent. As long as local ordinance permits, you may dispose of individual
batteries as normal rubbish. Do not expose batteries to excessive heat or any naked
flame. Keep all batteries away from children.
CAUTION!
Danger of explosion if the battery is incorrectly replaced. Replace only with the
same or equivalent type recommended by Viglen. Discard used batteries according
to manufacturer’s instructions.
The battery is listed as board component ‘E’ on the diagram on page 2.
It is located near to the ATX power connector (component ‘D’ on the motherboard
diagram).
To replace the battery, carry out the following:
1. Observe the precautions in “Before You Begin.”
2. Turn off all peripheral devices connected to the system.
3. Turn off the system.
4. Figure 1 shows the battery location on the motherboard.
5. Remove any components that are blocking access to the battery.
6. Gently pry the battery free from its socket, taking care to note the "+" and "-"
orientation of the battery (F ig ur e 7).
7. Install the new battery in the socket.
Figure 7
1
+
+
2
Page 27

27
&KDSWHU6ROYLQJ3UREOHPV
The first part of this chapter helps you identify and solve problems that might occur
when the system is in use. The second part lists error code messages that might be
displayed.
Viglen Technical Support can be reached in the following ways:
Telephone: 0181 758 7050
Fax: 0181 758 7080
Email: technical@viglen.co.uk
You can also look for support information on our web site:
http://www.viglen.co.uk
Device drivers and various useful utilities can be downloaded from our ftp site:
ftp://ftp.viglen.co.uk
Please remember that if you cannot solve the problem by yourself then you should
contact Viglen’s Technical Support for further assistance.
Resetting the System
Table 4
To do the following Press
Soft boot: Clear the system
memory and reload the operating
system (also called warm reset).
<Ctrl + Alt + Del>
Cold boot: Clear the system
memory, halt power to all
peripherals, restart POST, and
reload the operating system.
Power off/on or reset button
(at front of the system)
Page 28

28
Troubleshooting Procedure
This section provides a step-by-step troubleshooting procedure to identify a problem
and locate its source.
CAUTION!
1. Turn off the system and any peripheral devices before you disconnect peripheral
cables from the system. Otherwise, you can permanently damage the system or
the peripheral devices.
2. Make sure the system is plugged into a properly grounded power outlet.
3. Make sure your video display and keyboard are correctly connected to the
system. Turn on the video display, and turn up its brightness and contrast
controls to at least two-thirds of the maximum (refer to the documentation supplied
with the video display).
4. If the operating system normally loads from the hard disk drive, make sure there is
no diskette in the diskette drive. If the operating system normally loads from a
diskette, insert the operating system diskette into the drive.
5. Turn on the system. If the power indicator does not light, but the system seems
to be operating normally, the indicator is probably defective. Monitor the power-on
self test (POST) execution. Each time you turn on the system, the POST checks
the system board, memory, keyboard, and certain peripheral devices.
NOTE:
If the POST does not detect any errors, the system beeps once and boots up.
Errors that do not prevent the boot process (non-fatal errors) display a message that looks
similar to the following:
Error Message Line 1
Error Message Line 2
Press <F2> for Set-up, <F1> to Boot
You can note the error and press <F1> to resume the boot-up process, or <F2> to
enter Set-up.
Errors that prevent the boot process from continuing (fatal errors), are communicated by a
series of audible beeps. If this type of error occurs, refer to the error codes and messages
listed at the end of this chapter.
6. Confirm that the operating system has loaded.
Page 29

29
Problems and Suggestions
Table 5
What happens What to do
Application
software
problems
Make sure all cables are installed correctly.
Verify that the system board jumpers are set
properly.
Verify that your system hardware configuration is
set correctly. In Setup, check the values against
the system settings you recorded previously. If an
error is evident (wrong type of drive specified, for
example), make the change in Setup and reboot
the system. Record your change.
Make sure the software is properly configured for
the system. Refer to the software documentation
for information.
Try a different copy of the software to see if the
problem is with the copy you are using.
If other software runs correctly on the system,
contact the vendor of the software that fails.
If you check all of the above with no success, try
clearing CMOS RAM and reconfiguring the
system. Make sure you have your list of system
settings available to re-enter, because clearing
CMOS RAM sets the options to their default
values.
Characters onscreen are
distorted or
incorrect
Make sure the brightness and contrast controls
are properly adjusted on the monitor.
Make sure the video signal cable and power
cables are properly installed.
Make sure your monitor is compatible with the
video mode you have selected.
Page 30

30
Table 5 continued
What happens What to do
Characters do not
appear on screen
Make sure the video display is plugged in and
turned on.
Check that the brightness and contrast controls
are properly adjusted.
Check that the video signal cable is properly
installed.
Make sure a video board is installed, enabled,
and the jumpers are positioned correctly.
Reboot the system.
CMOS RAM
settings are
wrong
If system settings stored in CMOS RAM change
for no apparent reason (for example, the time of
day develops an error), the backup battery may
no longer have enough power to maintain the
settings. Replace the battery (Chapter 2).
Diskette drive
light does not go
on when drive is
in use or is tested
by POST
Make sure the power and signal cables for the
drive are properly installed.
Check that the drive is properly configured and
enabled in Setup.
Hard drive light
does not go on
when drive is in
use or is tested by
POST
Make sure the power and signal cables for the
drive are properly installed.
Make sure the front panel connector is securely
attached to the system board headers.
Check that the drive is properly configured and
enabled in Setup.
Check the drive manufacturer's manual for proper
configuration for remote hard disk drive activity.
Power-on light
does not go on
If the system is operating normally, check the
connector between the system board and the
front panel. If OK, the light may be defective.
Prompt doesn't
appear after
system boots
A serious fault may have occurred consult your
dealer service department / Technical Support.
Page 31

31
Table 5 continued
What happens What to do
Setup, can't
enter
If you can't enter Setup to make changes, clear
CMOS RAM to the default values and reconfigure
the system in Setup.
System halts
before
completing
POST
This indicates a fatal system error that requires
immediate service attention. Note the screen
display and write down any beep code emitted.
Provide this information to your dealer service
department / Technical Support.
Page 32

32
Error and Information Messages
The rest of this chapter describes beep codes, and error messages that you might
see or hear when you start up the system:
BIOS Error Messages
Table 6 BIOS Error Messages
Error Message Explanation
Diskette drive A error or
Diskette drive B error
Drive A: or B: is present but fails the POST
diskette tests. Check that the drive is defined with
the proper diskette type in Setup and that the
diskette drive is installed correctly.
Extended RAM Failed at
offset:
nnnn
Extended memory not working or not configured
properly at offset
nnnn
.
Failing Bits:
nnnn
The hex number nnnn is a map of the bits at the
RAM address (System, Extended, or Shadow
memory) that failed the memory test. Each 1 in
the map indicates a failed bit.
Fixed Disk 0 Failure or
Fixed Disk 1 Failure or
Fixed Disk Controller
Failure
Fixed disk is not working or not configured
properly. Check to see if fixed disk is installed
properly. Run Setup to be sure the fixed-disk type
is correctly identified.
Incorrect Drive A type run SETUP
Type of floppy drive for drive A: not correctly
identified in Setup.
Incorrect Drive B type run SETUP
Type of floppy drive for drive B: not correctly
identified in Setup.
Invalid NVRAM media
type
Problem with NVRAM (CMOS) access.
Keyboard controller
error
The keyboard controller failed test. Try replacing
the keyboard.
Keyboard error Keyboard not working.
Keyboard error nn BIOS discovered a stuck key and displays the
scan code nn for the stuck key.
Monitor type does not
match CMOS - Run
SETUP
Monitor type not correctly identified in Setup.
Operating system not
found
Operating system cannot be located on either drive
A: or drive C:. Enter Setup and see if fixed disk
and drive A: are properly identified.
Page 33

33
Table 6 BIOS Error Messages (continued)
Error Message Explanation
Parity Check 1 Parity error found in the system bus. BIOS
attempts to locate the address and display it on the
screen. If it cannot locate the address, it displays
????.
Parity Check 2 Parity error found in the I/O bus. BIOS attempts to
locate the address and display it on the screen. If
it cannot locate the address, it displays ????.
Press <F1> to resume,
<F2> to Setup
Displayed after any recoverable error message.
Press <F1> to start the boot process or <F2> to
enter Setup and change any settings.
Real time clock error Real-time clock fails BIOS test. May require
motherboard repair.
Shadow RAM Failed at
offset:
nnnn
Shadow RAM failed at offset
nnnn
of the 64 KB
block at which the error was detected.
System battery is dead
– Replace and run
SETUP
The CMOS clock battery indicator shows the
battery is dead. Replace the battery and run Setup
to reconfigure the system.
System cache error –
Cache disabled
RAM cache failed the BIOS test. BIOS disabled
the cache.
System CMOS
checksum bad - run
SETUP
System CMOS RAM has been corrupted or
modified incorrectly, perhaps by an application
program that changes data stored in CMOS. Run
Setup and reconfigure the system either by getting
the default values and/or making your own
selections.
System RAM Failed at
offset:
nnnn
System RAM failed at offset
nnnn
of the 64 KB
block at which the error was detected.
System timer error The timer test failed. Requires repair of system
motherboard.
Page 34

34
BIOS Beep Codes
If a hardware problem occurs the computer may emit a number of beeps from the
speaker. These are known as beep codes. The pitch and duration of the beep
codes may vary but there will always be a set number of beeps. These beeps stem
from the BIOS’s initial check on the system and will normally occur in the first few
seconds of power on.
Beeps codes represent a terminal error. If the BIOS detects a terminal error
condition, it outputs an error beep code, halts the POST, and attempts to display a
port 80h code on a POST card’s LED display.
Table 7 Beep Codes
Beeps Description
1 One short beep before boot
1-2 Search for opt ion ROM’s. One long, two short beeps on
checksum failure
1-2-2-3 BIOS ROM checksum
1-3-1-1 Test DRAM refresh, problem with memory on baseboard
1-3-1-3 Test 8742 keyboard controller
1-3-4-1 Memory error at address line XXXX
1-3-4-3 RAM failure on data bits XXXX of low byte of memory bus
1-4-1-1 RAM failure on data bits XXXX of high byte of memory bus
2-1-2-3 ROM copyright notice failure
2-2-3-1 Test for unexpected interrupt
Page 35

35
&KDSWHU6\VWHP%,26
What is the BIOS ?
The BIOS (Basic Input Output System) is an important piece of software which is
stored in a ROM (Read Only Memory) chip inside the computer. It consists of the
basic instructions for controlling the disk drives, hard disk, keyboard and
serial/parallel ports. The BIOS also keeps a list of the specifications of the computer
in battery-backed RAM (also known as the CMOS RAM) and provides a special
Setup program to change this information.
The BIOS in your Viglen computer is guaranteed to be fully compatible with the IBM
BIOS. Phoenix Technology Ltd., an industrial leader in the field of BIOS software,
has written it.
The Power-on sequence
When the computer is first switched on, certain instructions in the BIOS are executed
to test various parts of the machine. This is known as the POST (Power-On Self
Test) routine. When you switch the computer on (or when you press the Reset
button or press
<ctrl>+<alt>+<delete>
keys, which has the same effect) you can
see on the monitor that it counts through the memory, testing it. The floppy disk
drives are then accessed and tested, and the various interfaces are checked. If there
are any errors, a message is displayed on the screen.
Having passed all the tests, and if you have activated the password facility, the BIOS
then asks you to enter the boot password to continue. The following section
describes how to do this. The BIOS then loads the operating system, either - MS
DOS, Windows 95, OS/2 or NetWare, etc. - from the hard disk (or floppy disk if one
is inserted in Drive A:). The computer is then ready for use.
Page 36

36
INTEL/PHOENIX BIOS
Overview of BIOS Features
Introduction
The motherboard uses an Intel/Phoenix BIOS, which is stored in flash memory and
can be upgraded using a disk-based program. In addition to the BIOS, the flash
memory contains the Setup program, Power-On Self Test (POST), the PCI autoconfiguration utility, and is Windows 95-ready Plug and Play. This motherboard
supports system BIOS shadowing, allowing the BIOS to execute from 64-bit onboard
write-protected DRAM.
The BIOS displays a message during POST identifying the type of BIOS and the
revision code.
BIOS Upgrades
A new version of the BIOS can be upgraded from a diskette using the iFLASH.EXE
utility that is available from Intel. This utility does BIOS upgrades as follows:
• Updates the flash BIOS from a file on a disk
• Updates the language section of the BIOS
• Makes sure that the upgrade BIOS matches the target system to prevent
accidentally installing a BIOS for a different type of system.
BIOS upgrades and the iFLASH.EXE utility may be available from your system
supplier.
NOTE:
Please review the instructions distributed with the upgrade utility before attempting a BIOS
upgrade.
Page 37

37
Plug and Play: PCI Auto-configuration
The BIOS automatically configures PCI devices and Plug and Play devices. PCI
devices may be onboard or add-in cards. Plug and Play devices are ISA add-in
cards built to meet the Plug and Play specification. Auto-configuration lets a user
insert or remove PCI or Plug and Play cards without having to configure the system.
When a user turns on t he s ystem af t er ad d in g a PCI o r P lu g and P la y ca rd, th e BIO S
automatically configures interrupts, the I/O space, and other system resources. Any
interrupts set to Available in Setup are considered to be available for use by the addin card.
PCI interrupts are distributed to available ISA interrupts that have not been assigned
to an ISA card or to system resources. The assignment of PCI interrupts to ISA
IRQ’s is non-deterministic. PCI devices can share an interrupt, but an ISA device
cannot share an interrupt allocated to PCI or to another ISA device. Autoconfiguration information is stored in the extended system configuration data (ESCD)
format.
PCI IDE Support
If Auto is selected as a primary or secondary IDE device in Setup, the BIOS
automatically sets up the two local-bus IDE connectors with independent I/O channel
support. The IDE interface supports hard drives up to PIO Mode 4 and recognises
any ATAPI devices, including CD-ROM drives and tape drives. The BIOS
determines the capabilities of each drive and configures them so as to optimise
capacity and performance. To take advantage of the high-capacity storage devices,
hard drives are automatically configured for logical block addressing (LBA) and to
PIO Mode 3 or 4, depending on the capability of the drive. To override the autoconfiguration options, use the specific IDE device options in Setup. The ATAPI
specification recommends that ATAPI devices be configured as shown in Table 8.
Table 8 Recommendations for Configuring an ATAPI Device
Primary Cable Secondary
Cable
Configuration Drive 0 Drive 1 Drive 0 Drive 1
Normal, no ATAPI ATA
Disk and CD-ROM for enhanced
IDE systems
ATA ATAPI
Legacy IDE system with only one
cable
ATA ATAPI
Enhanced IDE with a tape and CDROM or two CD-ROMs
ATA ATAPI ATAPI
Page 38

38
ISA Plug and Play
If Plug and Play operating system is selected in Setup, the BIOS auto-configures
only ISA Plug and Play cards that are required for booting (IPL devices). If Plug and
Play operating system is not selected in Setup, the BIOS auto-configures all Plug
and Play ISA cards.
Desktop Management Interface (DMI)
Desktop Management Interface (DMI) is an interface for managing computers in an
enterprise environment. The main component of DMI is the management
information format (MIF) database, which contains information about the computing
system and its components. Using DMI, a system administrator can obtain the
system types, capabilities, operational status, and installation dates for system
components. The MIF database defines the data and provides the method for
accessing this information. The BIOS enables applications such as Intel LANDesk®
Server Manager to use DMI. The BIOS stores and reports the following DMI
information:
• BIOS data, such as the BIOS revision level
• Fixed-system data, such as peripherals, serial numbers, and asset tags
• Resource data, such as memory size, cache size, and processor speed
• Dynamic data, such as event detection and error logging
Language Support
The Setup program and help messages can be supported in 32 languages. The
default language is American English, which is present unless another language is
programmed into the BIOS using the flash memory update utility.
Boot Options
In the Setup program, the user can choose to boot from a floppy drive, hard drive,
CD-ROM, or the network. The default setting is for the floppy drive to be the primary
boot device and the hard drive to be the secondary boot device.
Booting from CD-ROM is supported in compliance to the El Torito bootable CD-ROM
format specification. Under the Boot menu in the Setup program, CD-ROM is listed
as a boot device. Boot devices are defined in priority order. A network can be
selected as a boot device, this allows booting from a network add-in card with a
remote boot ROM installed
.
OEM Logo or Scan Area
A 4KB flash-memory user area at memory location FFFF8000h-FFFF8FFFh is for
displaying a custom OEM logo during POST.
BIOS Setup Access
Access to the Setup program can be restricted using passwords. User and
supervisor passwords can be set using the Security menu in Setup. The default is
no passwords enabled.
Page 39

39
Recovering BIOS Data
Some types of failure can destroy the BIOS. For example, the data can be lost if a
power outage occurs while the BIOS is being updated in flash memory. The BIOS
can be recovered from a diskette with recovery files using the BIOS recovery Jumper
See Recovering the BIOS later in the chapter.
Page 40

40
Configuring the Motherboard
Before You Begin
!
CAUTION!
• Always follow the steps in each procedure in the correct order.
• Set up a log to record information about your computer, such as model,
serial numbers, installed options, and configuration information.
•
Use an anti-static wrist strap and a conductive foam pad when working on
the motherboard
.
!
WARNINGS
The procedures in this chapter assume familiarity with the general terminology
associated with personal computers and with the safety practices and
regulatory compliance required for using and modifying electronic equipment.
Disconnect the computer from its power source and from any
telecommunications links, networks, or modems before performing any of the
procedures described in this chapter. Failure to disconnect power,
telecommunications links, networks, or modems before you open the computer
or perform any procedures can result in personal injury or equipment damage.
Some circuitry on the motherboard may continue to operate even though the
front panel power button is off.
!
CAUTION!
Electrostatic discharge (ESD) can damage components. Perform the
procedures described in this chapter only at an ESD workstation. If such a
station is not available, you can provide some ESD protection by wearing an
anti-static wrist strap and attaching it to a metal part of the computer chassis.
Page 41

41
Changing Jumper Settings
Below is a list of actions to take to change the jumper setting for the Clear CMOS
option. Most of the actions below refer to all of the jumpers that you might wish to
change. Any differences for the changing of each jumper are listed in a table.
Clearing the CMOS
NOTE
:
Clearing the CMOS will load the Manufacture default settings in to the NVRAM.
Figure 3 shows the location of the CMOS clear header on the motherboard. The
jumper is usually set to pins 1-2 (Preserve contents of CMOS).
Figure 8
NOTE:
A jumper is a small plastic conductor that slips over two header pins. To change a setting,
remove the jumper from the pins and slide it onto the new pins for the desired setting.
!
CAUTION!
To avoid bending or breaking pins, use caution when removing or installing a
jumper.
This procedure assumes that the motherboard is installed in the computer and the
configuration header (J2J1) has the jumper’s set to the defaults.
1. Observe the precautions in “Before You Begin”.
2. Turn off all peripheral devices connected to the computer. Turn off the computer.
3. Remove the computer cover.
4.
Locate the Jumper header.
5. On the header (J2J1), move the first jumper to pins 2-3 as shown below to set the
clear CMOS mode.
Figure 8.1
6. Replace the cover, turn on the computer, and allow it to boot.
7. Turn off the computer.
8. Remove the computer cover.
CMOS Clear Jumper
J2J1 (1-3)
1 2 3
CMOS Clear Jumper
J2J1 (1-3)
1 2 3
Page 42

42
9. On the header (J2J1), move the first jumper back to pins 1-2 to restore normal
operation as shown below.
Figure 8.2
10. Replace the cover and turn on the computer.
For all the below actions after the operation is complete replace the jumper back to its
original position unless otherwise stated.
Table 9 Jumper Changes
Jumper changed from factory default Users actions
Clear CMOS As listed above
Clear System Password When this jumper has been set all system
passwords are cleared from the BIOS. You
can then enter the BIOS and set new
passwords.
Recover from corrupt boot Start the machine and insert the DISK
containing the BIOS. The system will then
attempt to boot up using the BIOS on the disk.
You must then upgrade the BIOS using the
IFLASH.EXE program see page 74
Write Protect boot block Chang ing this jum per will allow prog r am’s
such as Virus Killers to write to the boot block.
It will also allow Viruses to be put on the boot
block. Use with caution.
FRB timer This operation need’s no other actions. The
system is now set to boot from the second
processor if the first one fails. No need to
replace jumper to its original position.
Chassis intrusion detection This operation need’s no other actions. The
system will now work with of without the case
on. No need to replace jumper to its original
position.
CMOS Clear Jumper
J2J1 (1-3)
1 2 3
 Loading...