

Page 1
User’s Guide
for
(December 2007)
Page 2

COPYRIGHTS AND TRADEMARKS
Please note
The material in this manual is subject to change without notice.
Trademarks
Microsoft, Windows, Windows NT, MS-DOS,Windows 95,Windows 98,
Windows ME, Windows 2000 Pro, Windows XP Pro and Windows Vista are
registered trademarks of Microsoft Corporation. IBM PC, XT, AT and PS/2 are
trademarks of International Business Machines Corporation. Pentium and
Pentium Pro are registered trademarks of Intel Corporation. AMI BIOS is a
registered trademark of American Megatrends. All other trademarks are
acknowledged. JAC-UP, Genie, Contender, Dossier, Vig, Viglen, and Envy are
trademarks of Viglen Limited.
Copyright and Patents
This manual and all accompanying software and documentation are copyrighted
and all rights reserved. This product, including software and documentation,
may not, in whole or in part, be copied, photocopied, translated or reduced to any
electronic or machine-readable form, without prior written consent except for
copies retained by the purchaser for backup.
© Copyright 2007 Viglen Limited
All Rights Reserved
Dossier L50 Manual Version 1.0
Printed in the United Kingdom
Liability
No warranty or representation, either expressed or implied, is made with respect
to this documentation, its quality, performance, merchantability or fitness for a
particular purpose. As a result the documentation is licensed as is, and you, the
licensee, are assuming the entire risk as to its quality and performance. The
vendor reserves the right to revise this operation manual and all accompanying
software and documentation and to make changes in the content without
obligation to notify any person or organisation of the revision or change.
In no event will the vendor be liable for direct, indirect, special, incidental or
consequential damages arising out of the use or inability to use this product or
documentation, even if advised of the possibility of such damages. In particular,
the vendor shall not have liability for any hardware, software or data stored or
used with the product, including the costs of repairing, replacing or recovering
such hardware, software or data.
Page 3

i
Table of Contents
Preface ........................................................................................ v
Notational Conventions.......................................................vi
Chapter 1 Getting Started...................................................1-1
Getting the Computer Running ............................................ 1-2
Unpacking ........................................................................ 1-2
Connecting to AC Power ................................................. 1-2
Opening the Cover ........................................................... 1-4
Turning On and Off the Computer................................... 1-4
Taking a Look at the Computer............................................ 1-6
Right-Side Components ................................................... 1-6
Left-Side Components ..................................................... 1-7
Rear Components............................................................. 1-8
Bottom Components......................................................... 1-9
Top-open Components................................................... 1-10
Where to Go from Here...................................................... 1-12
Chapter 2 Operating Your Computer.................................2-1
Starting and Stopping the Computer .................................... 2-2
Starting the Computer ...................................................... 2-2
Stopping the Computer .................................................... 2-2
Using the Easy Start Buttons................................................ 2-4
Using the Keyboard.............................................................. 2-5
Typewriter Keys............................................................... 2-5
Cursor-Control Keys ........................................................ 2-6
Numeric Keypad .............................................................. 2-8
Euro Symbol..................................................................... 2-8
Windows Keys ................................................................. 2-9
Page 4

ii
Function Keys .................................................................. 2-9
Fn Key.............................................................................. 2-9
Hot Keys ........................................................................ 2-10
Using the Touchpad ........................................................... 2-11
Configuring the Touchpad ............................................. 2-13
Using the DVD Drive......................................................... 2-14
Inserting and Removing a Disc ...................................... 2-15
Using the Video Features ................................................... 2-16
Configuring the Display Modes..................................... 2-16
Using the Audio Features................................................... 2-17
Connecting Audio Devices ............................................ 2-18
Using the Communication Features ................................... 2-19
Using the Modem (Optional) ......................................... 2-19
Using the LAN ............................................................... 2-20
Using the Wireless LAN (Optional) .............................. 2-21
Chapter 3 Managing Power ................................................3-1
AC Adapter .......................................................................... 3-2
Battery Pack ......................................................................... 3-3
Charging the Battery Pack ............................................... 3-3
Initializing the Battery Pack............................................. 3-4
Checking the Battery Level.............................................. 3-4
Replacing the Battery Pack .............................................. 3-5
Battery Low Signals and Actions..................................... 3-7
Power Management.............................................................. 3-8
Hibernation....................................................................... 3-9
Power-Saving Tips ............................................................. 3-10
Chapter 4 Expanding Your Computer ...............................4-1
Connecting an External Monitor .......................................... 4-2
Connecting a USB Device.................................................... 4-3
Using ExpressCards ............................................................. 4-4
ExpressCard Type ............................................................ 4-4
Inserting and Removing an ExpressCard......................... 4-5
Page 5

iii
Internal Components Upgrade ............................................. 4-6
Chapter 5 Using BIOS Setup ..............................................5-1
When and How to Use BIOS Setup ..................................... 5-2
When to Use..................................................................... 5-2
Starting BIOS Setup......................................................... 5-2
Moving Around and Making Selections .......................... 5-4
Main Menu ........................................................................... 5-5
Advanced Menu ................................................................... 5-6
Boot Menu............................................................................ 5-8
Exit Menu........................................................................... 5-10
Chapter 6 Installing Software Drivers................................6-1
How to Use the Driver Disc ................................................. 6-2
Installing Drivers.................................................................. 6-2
P1 Quick Launch Key Utility........................................... 6-3
Chapter 7 Caring for the Computer ...................................7-1
Protecting the Computer ...................................................... 7-2
Using the Windows Security Center................................ 7-2
Using the Cable Lock....................................................... 7-3
Taking Care of the Computer............................................... 7-4
Location Guidelines ......................................................... 7-4
General Guidelines........................................................... 7-4
Cleaning Guidelines......................................................... 7-5
Battery Pack Guidelines................................................... 7-5
When Traveling.................................................................... 7-6
Chapter 8 Troubleshooting.................................................8-1
Preliminary Checklist........................................................... 8-2
Solving Common Problems.................................................. 8-3
Battery Problems.............................................................. 8-4
DVD Drive Problems....................................................... 8-4
Display Problems ............................................................. 8-5
ExpressCard Problems ..................................................... 8-6
Page 6

iv
Hardware Device Problems.............................................. 8-7
Hard Disk Drive Problems............................................... 8-7
Keyboard, Mouse, and Touchpad Problems .................... 8-7
LAN Problems ................................................................. 8-8
WLAN Problems.............................................................. 8-8
Modem Problems ........................................................... 8-10
Power Management Problems........................................ 8-10
Software Problems ......................................................... 8-11
Sound Problems ............................................................. 8-11
Startup Problems ............................................................ 8-12
Other Problems .............................................................. 8-13
Resetting the Computer...................................................... 8-14
Appendix A Specifications ................................................... A-1
Appendix B Regulatory Information .................................... B-1
On the Use of the System.....................................................B-2
Class B Regulations .........................................................B-2
Safety Notices ..................................................................B-3
On the Use of the RF Device ...............................................B-6
USA and Canada Safety Requirements and Notices .......B-6
European Union CE Marking and Compliance Notices ..B-9
电子信息产品有毒有害物质或元素名称及含量标示...B-13
Index .........................................................................................I-1
Page 7

v
Preface
This manual contains information that will help you operate the
computer. It is divided into 8 chapters, 2 appendices, and an index.
Chapter 1, Getting Started, takes you through the process of setting
up the computer and identifying its external components.
Chapter 2, Operating Your Computer, tells you how to use the
computer’s components and features.
Chapter 3, Managing Power, provides information on power.
Chapter 4, Expanding Your Computer, provides information on
installing and using peripheral devices.
Chapter 5, Using BIOS Setup, describes the BIOS Setup program
that configures the computer’s BIOS settings.
Chapter 6, Installing Software Drivers, describes how to install the
drivers and utilities supplied with the computer.
Chapter 7, Caring for the Computer, gives you tips in care and
maintenance.
Chapter 8, Troubleshooting, gives solutions to common problems
you may encounter when using the computer.
Appendix A, Specifications, gives a brief specification of the
computer.
Appendix B, Regulatory Information, provides regulatory
statements and safety notices on your computer.
Page 8

vi
Notational Conventions
Throughout this manual, the following conventions are used to
distinguish elements of text.
NOTE: identifies additional information that requires special attention.
CAUTION: identifies important information that, if not followed, may result in loss of
data or damage to the computer.
Keyboard keys are shown in a bold typeset. For example:
Press the Enter key to complete.
When keys are joined by a plus sign (+), press the first key, and, while
keeping the first key down, press the remaining keys, finally release all
the keys. When necessary, keys are also shown in graphics.
A title, command, setup item, or button that you can see on the screen is
shown in boldface. A value or an option that you can select for a setup
item is shown in italic. For example:
Select When I press the power button, set it to Shut down, and
then click the Save changes button.
Page 9

Getting Started 1-1
Chapter 1
Getting Started
Congratulations on purchasing this computer.
Your computer incorporates desktop computer capabilities into a
compact notebook-sized package. It can greatly enhance your
productivity either in the office or at home. And, of course, wherever you
need it, the computer is ready and easy “to go.”
This chapter first tells you step by step how to get the computer up and
running. You will find instructions for these procedures:
Unpacking
Connecting to AC power
Opening the cover
Turning on the computer
Turning off the computer
Then, you will find a section briefly introducing the external components
of the computer. And the last section navigates you to the information
you may need after the computer is ready for use.
CHAPTER
Page 10

Getting Started 1-2
Getting the Computer Running
This section guides you through the procedures for getting the computer
ready for operation.
Unpacking
After unpacking the shipping carton, you should find these standard
items:
Notebook computer
Accessories:
AC adapter
AC power cord
Driver disc (Optional)
Inspect all the items. If any item is damaged or missing, notify your
dealer immediately.
Keep the shipping carton and packing materials in case you need to ship
or store the computer in the future.
Connecting to AC Power
The computer operates either on the external AC power or internal
battery power. It is suggested that you use AC power when you start up
the computer for the very first time.
CAUTION: Use only the AC adapter included with your computer. Using other AC
adapters may damage the computer.
1. Make sure that the computer is turned off.
2. Plug the DC cord of the AC adapter to the power connector of the
computer ().
Page 11

Getting Started 1-3
3. Plug the female end of the AC power cord to the AC adapter and the
male end to an electrical outlet ().
4. When the AC adapter is connected, power is being supplied from the
electrical outlet to the AC adapter and onto your computer. Now, you
are ready to turn on the computer.
CAUTION:
When you disconnect the AC adapter, disconnect from the electrical outlet first and
then from the computer. A reverse procedure may damage the AC adapter or the
computer.
When unplugging the connector, always hold the plug head. Never pull on the cord.
NOTE: When the AC adapter is connected, it also charges the battery pack. For
information on using battery power, see Chapter 3.
Page 12
Getting Started 1-4
Opening the Cover
CAUTION: Be gentle when opening and closing the cover. Opening it vigorously or
slamming it shut could damage the computer.
Open the top cover by sliding the cover latch toward the right () and
lifting up the cover (). You can tilt the cover forward or backward for
optimal viewing clarity.
Turning On and Off the Computer
Turning On
1. Make sure that the computer is connected to AC power.
Page 13
Getting Started 1-5
2. Press the power button.
3. Each time the computer is turned on, it performs a Power-On Self
Test (POST), and the operating system such as Windows should
start.
Turning Off
To turn off the computer power, use the “Shut Down” command of your
operating system.
NOTE: There are other ways you can stop the computer so that you will be back to
where you left off when you next turn on the computer. (See “Stopping the Computer” in
Chapter 2 for information.)
CAUTION: If you have to turn the computer on again immediately after turning it off,
wait for at least five seconds. Turning the computer off and on rapidly can damage it.
Page 14

Getting Started 1-6
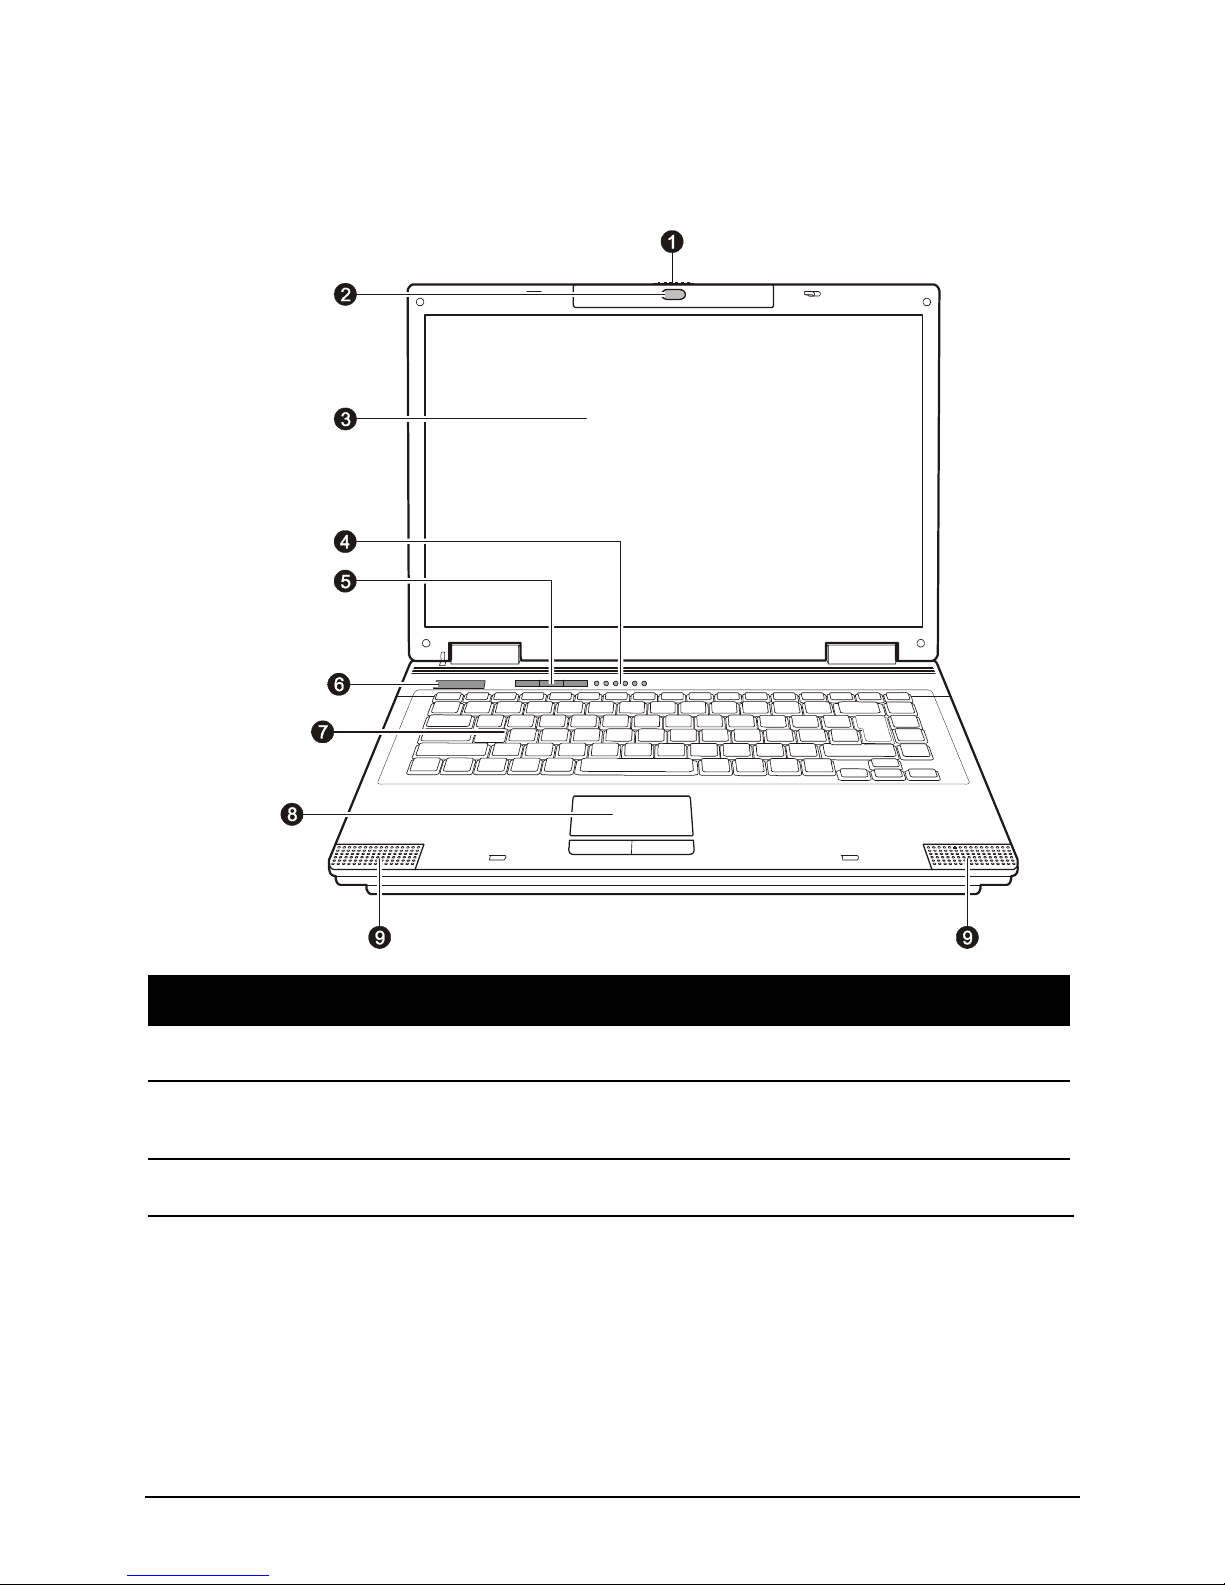
Taking a Look at the Computer
This section identifies the external components of the computer and
briefly describes the function of each component.
NOTE: Depending on the model you purchased, the appearance of your computer may
not be exactly the same as those shown in this manual.
Right-Side Components
Ref Component Description See Also
Combo Drive/
DVD Dual Drive/
Super Multi Drive
Accepts a compact disc for installing or
loading software, accessing data, and playing
music/video.
P. 2-14
Page 15

Getting Started 1-7
Left-Side Components
Ref Component Description See Also
Power Connector
Connects the AC adapter. P. 1-2
USB Port
Connects a USB device, such as a USB flash
disk, printer, digital camera, joystick, and
more.
P. 4-3
Audio Output
Connector
Connects a set of headphones, external
speakers with amplifier, or an audio recording
device.
P. 2-18
Microphone
Connector
Connects an external microphone. P. 2-18
ExpressCard Slot
Accepts an ExpressCard for additional
functions.
P. 4-5
Page 16

Getting Started 1-8
Rear Components
Ref Component Description See Also
USB Ports
Connect a USB device, such as a USB flash
disk, printer, digital camera, joystick, and
more.
P. 4-3
Kensington Lock
Locks the computer to a stationery object for
security.
P. 7-3
RJ-11 Connector
Connects the telephone line.
NOTE: Depending on your model, this connector
may not have any function.
P. 2-19
RJ-45 Connector
Connects the LAN cable. P. 2-20
VGA Port
Connects an external monitor. P. 4-2
Page 17
Getting Started 1-9
Bottom Components
Ref Component Description See Also
Battery Pack
Supplies power to your computer when
external power is not connected.
P. 3-3
WLAN Card Slot
Inside is the optional Mini PCI-E WLAN
card.
P. 2-21
Memory Slot
Inside is the memory slot for expanding the
memory size.
CPU Socket
Inside is the CPU.
Hard Disk Drive
Compartment
Inside is the hard disk drive.
Page 18
Getting Started 1-10
Top-open Components
Ref Component Description See Also
Top Cover Latch
Locks the top cover.
CMOS Camera
Lens (Optional)
Allows you to use your computer’s optional
camera function.
LCD Screen
Displays the output of the computer. P. 2-16
Page 19
Getting Started 1-11
Ref Component Description See Also
Indicators
Show the current status of the computer’s
devices.
WLAN
indicator
Glows in green when the
WLAN radio is on.
P. 2-22
Power status
indicator
Glows in green when the
computer is turned on.
Blinks green the computer is in
Sleep mode.
Battery
Charge
indicator
Glows in green when the
battery is fully charged and
connected to AC power.
P. 2-6
Glows in amber when the
battery is being charged.
Blinks amber when the battery
is almost completely
discharged.
Caps Lock indicator P. 2-6
Num Lock indicator P. 2-6
DVD drive / Hard disk drive in-use indicator P. 2-22
Easy Start
Buttons
Provide a quick way to launch programs.
Starts Internet Explorer. P. 2-4
Starts Microsoft®Outlook. P. 2-4
P1 P1 (Program 1 – user customized) quick
launch key.
P. 6-3
Power Button
Turns the computer power ON and OFF. P. 1-4
Keyboard
Serves as the data input device of the
computer.
P. 2-4
Touchpad
Serves as the pointing device of the computer. P. 2-11
Stereo Speaker
Sends out sound and voice from the computer. P. 2-17
Page 20

Getting Started 1-12
Where to Go from Here
As your computer is ready for operation, you may want to do any of the
following now:
For this purpose... Do this...
To know more about the computer... Go on to the next chapter.
To install the operating system if your
dealer has not already done so...
See the operating system manual.
To know more about the operating
system...
Read the operating system manual.
To install the drivers if your dealer has
not already done so...
See Chapter 6.
To set a power-on password... Read the operating system manual.
To charge the battery pack for the first
time...
See “Charging the Battery Pack” in
Chapter 3.
Page 21

Operating Your Computer 2-1
Chapter 2
Operating Your Computer
This chapter provides information about the use of the computer.
If you are new to computers, reading this chapter will help you learn the
operating basics. If you are already a computer user but are new to
notebook computers, you may choose to read only the parts containing
information unique to your computer.
Described in this chapter are the operating basics of these components:
Keyboard
Touchpad
DVD drive
And these features:
Starting and stopping the computer
Video features
Audio features
Communication features
CHAPTER
Page 22

Operating Your Computer 2-2
Starting and Stopping the Computer
There are a number of ways to start and stop the computer.
Starting the Computer
You always start the computer using the power button.
A computer starts up with an operating system (OS) existing on the
storage device such as the hard disk and optical disc. The computer will
automatically load the OS after you turn it on. This process is called
booting.
NOTE: An operating system is the platform for all your software application programs to
run on. Your computer uses the Microsoft Windows Vista operating system.
Stopping the Computer
When you finish a working session, you can stop the computer by turning
off the power or leaving the computer in Sleep or Hibernation mode:
To stop in
this mode...
Do this... To start up or
resume again
Off Follow the shutdown procedure of your
operating system. This can prevent loss of
unsaved data or damage to your software
programs.
If the system is locked up because of
hardware or software problems, press the
power button to turn off the computer.
Press the power
button.
Sleep Depending on your settings in Windows,
you can place the computer in Sleep mode
by:
Closing the display cover
Pressing the Fn+F12 hot key
Pressing the power button
Press any key.
Page 23

Operating Your Computer 2-3
To stop in
this mode...
Do this... To start up or
resume again
Hibernation Depending on your settings in Windows,
you can place the computer in
Hibernation mode by:
Closing the display cover
Pressing the power button
Press the power
button.
If you choose to stop in Sleep or Hibernation mode, you can return to
where you left off the next time you start up the computer. (See “Power
Management” in Chapter 3 for more information.)
Page 24
Operating Your Computer 2-4
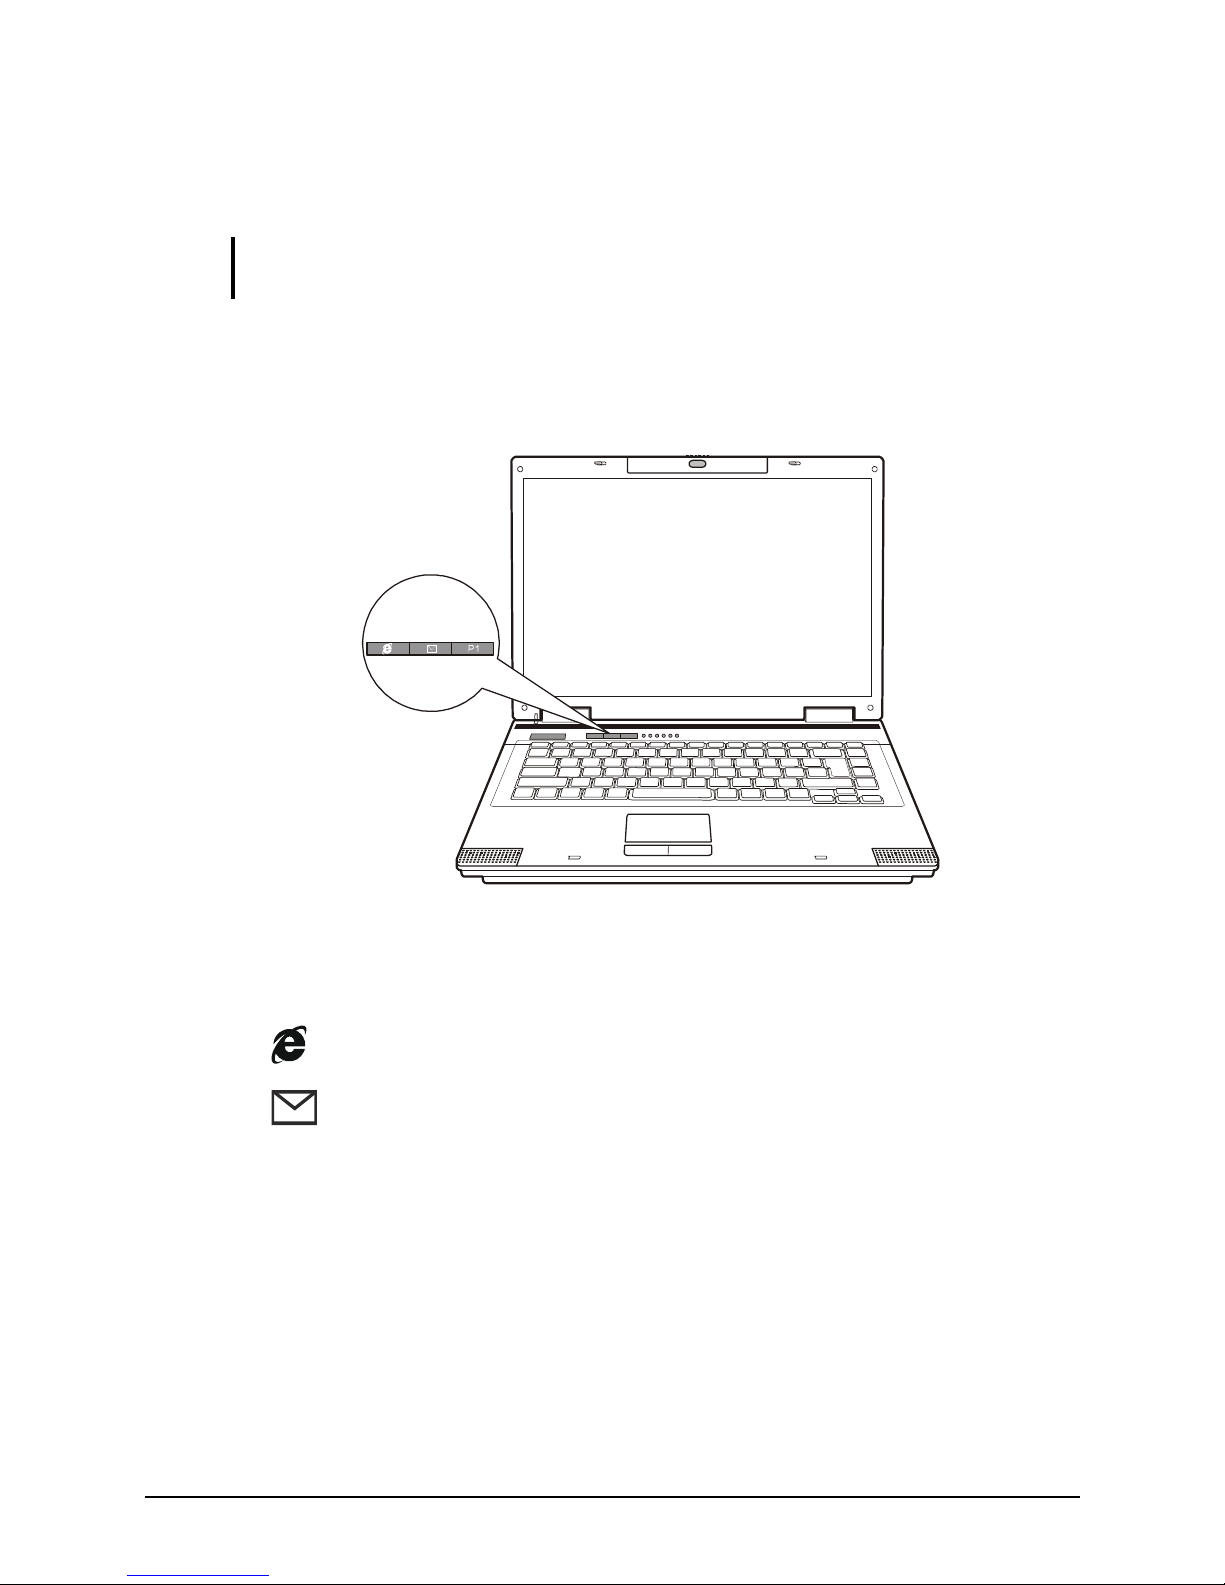
Using the Easy Start Buttons
NOTE: To take advantage of the Easy Start buttons feature, the ESB driver supplied
with your computer must be installed. (See chapter 6 for details.)
The Easy Start buttons are three pre-defined buttons located on the left
above the keyboard.
The Easy Start buttons allow you to start the frequently-used programs
with one single press of a button (from left to right):
Internet Explorer
Microsoft® Outlook
P1 P1 (Program 1 – user customized) quick launch key
(see chapter 6 for details)
Page 25
Operating Your Computer 2-5
Using the Keyboard
Your keyboard has all the standard functions of a full-sized computer
keyboard plus an Fn key added for specific functions.
The standard functions of the keyboard can be further divided into four
major categories:
Typewriter keys
Cursor-control keys
Numeric keys
Function keys
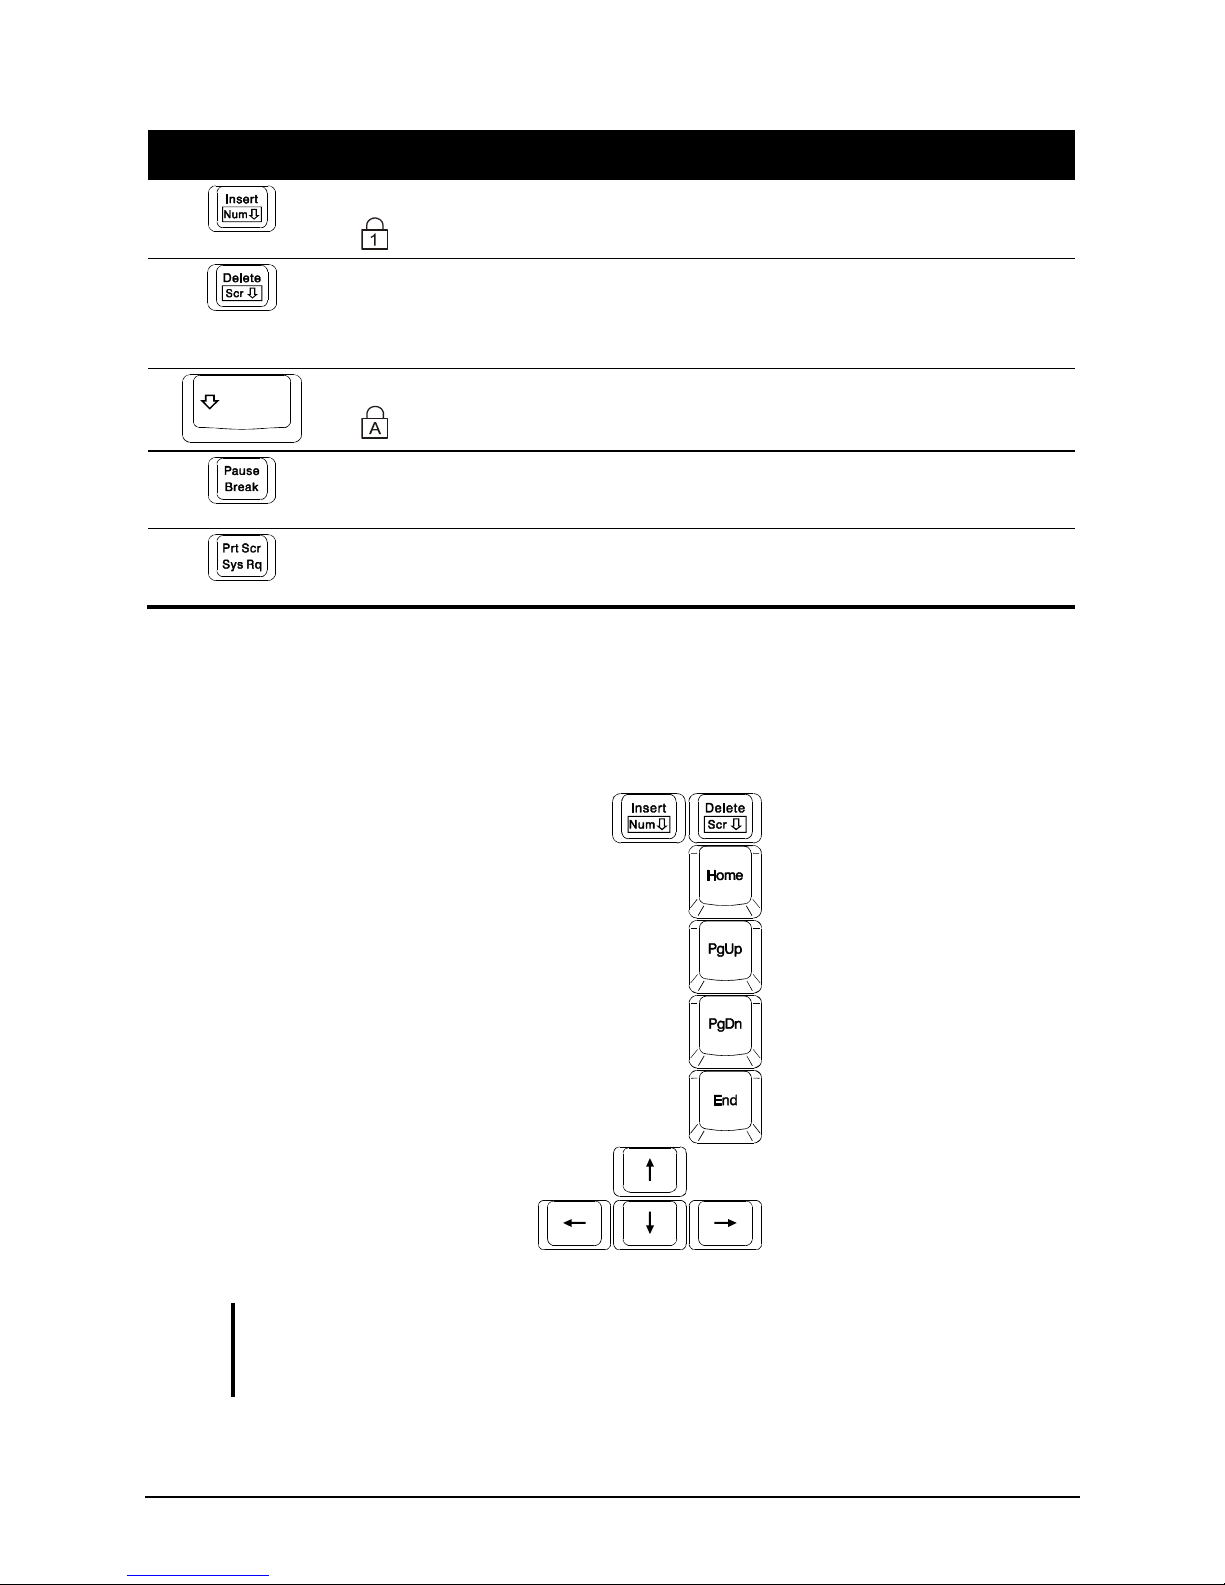
Typewriter Keys
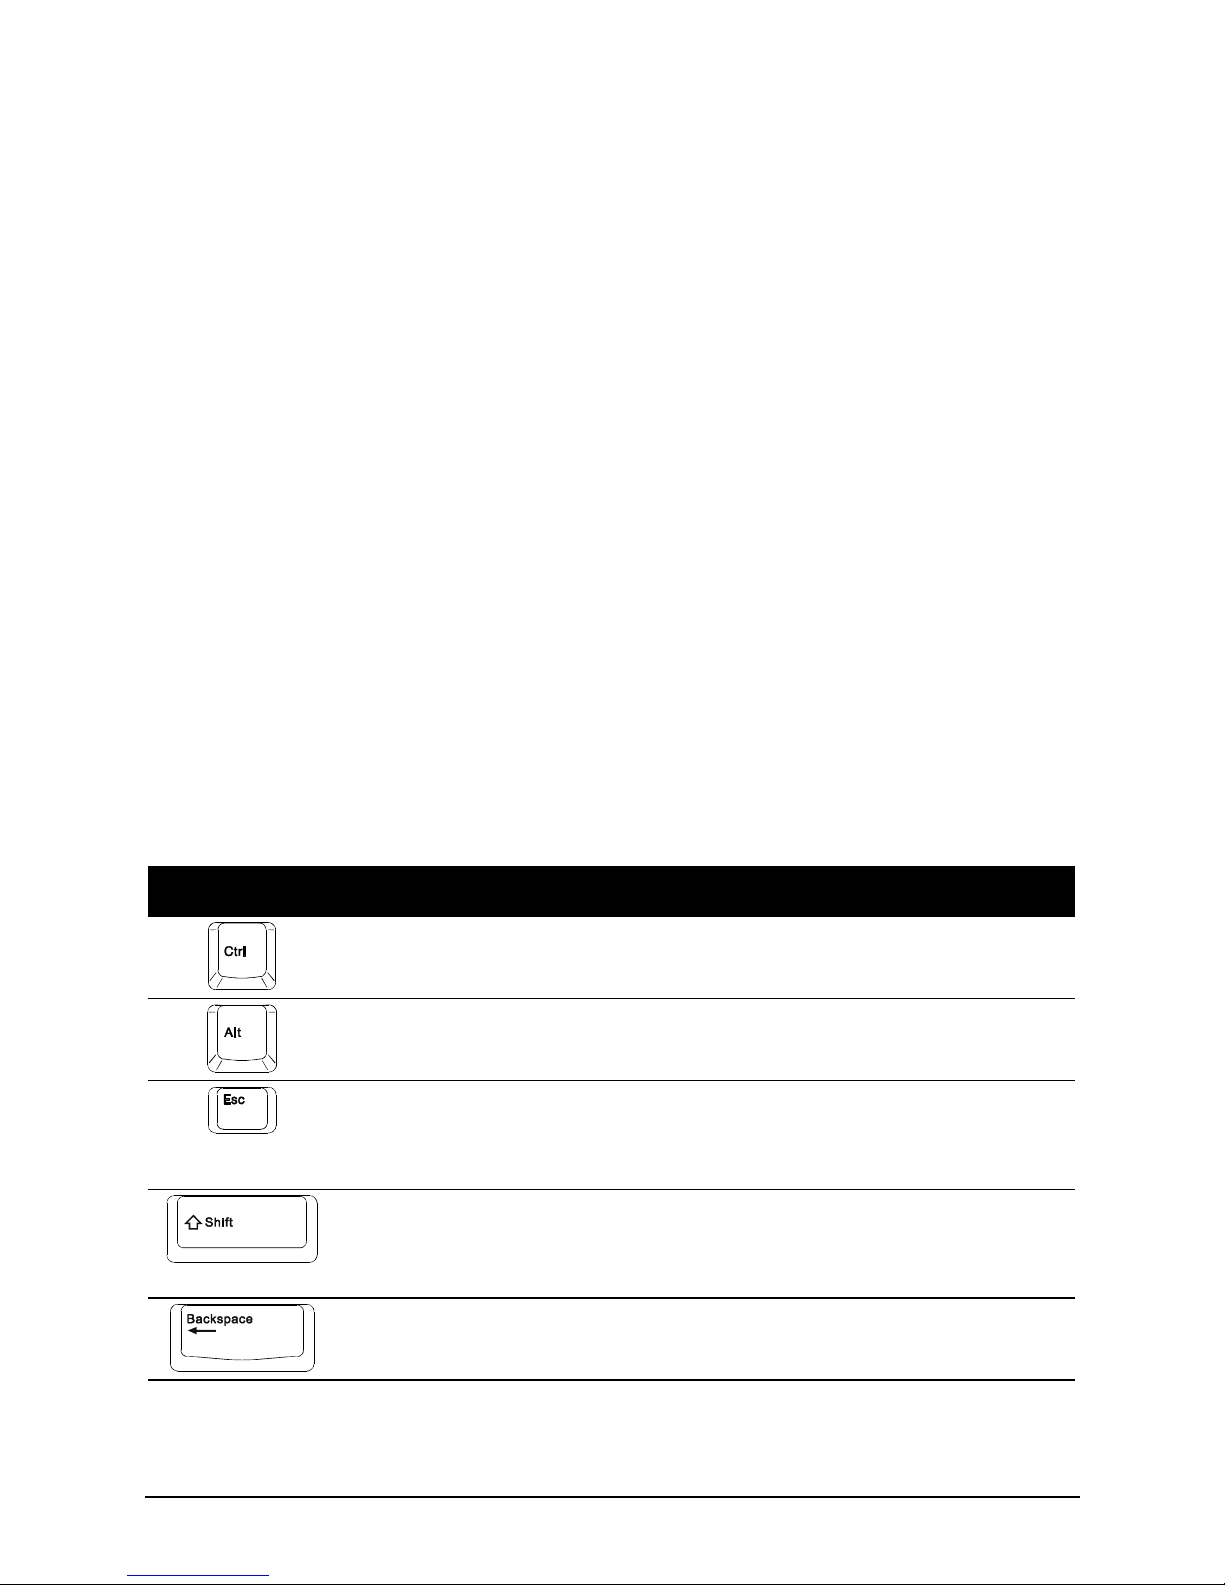
Typewriter keys are similar to the keys on a typewriter. Several keys are
added, such as the Ctrl, Alt, Esc keys and lock keys, for special purposes.
When the lock keys are pressed, their corresponding indicators light up.
Key Description
The Control key is normally used in combination with other keys for
program-specific functions.
The Alternate key is normally used in combination with other keys
for program-specific functions.
The Escape key is usually used for stopping a process. Examples are
exiting a program and canceling a command. The function depends
on the program you are using.
The Shift key is used with alphabet letter keys to produce uppercase
letters when typing. It is also used in combination with other keys for
program-specific functions.
The Backspace key moves the cursor left one space and deletes the
character in that space.
Page 26
Operating Your Computer 2-6
Key Description
Pressing Fn and this key toggles the Num Lock on and off. When on
( light on), the Num Lock activates the numeric keys.
Pressing Fn and this key toggle Scroll Lock on and off. When on the
screen moves one line up or down when you press or arrow key.
Scroll Lock does not work for all programs.
Pressing this key toggles the Caps Lock on and off. When on
( light on), the Caps Lock keeps the letter keys in uppercase.
The Pause key temporarily stops screen scrolling. Scroll Lock does
not work for all programs.
The Print Screen key prints the displayed screen. Print screen does
not work for all programs.
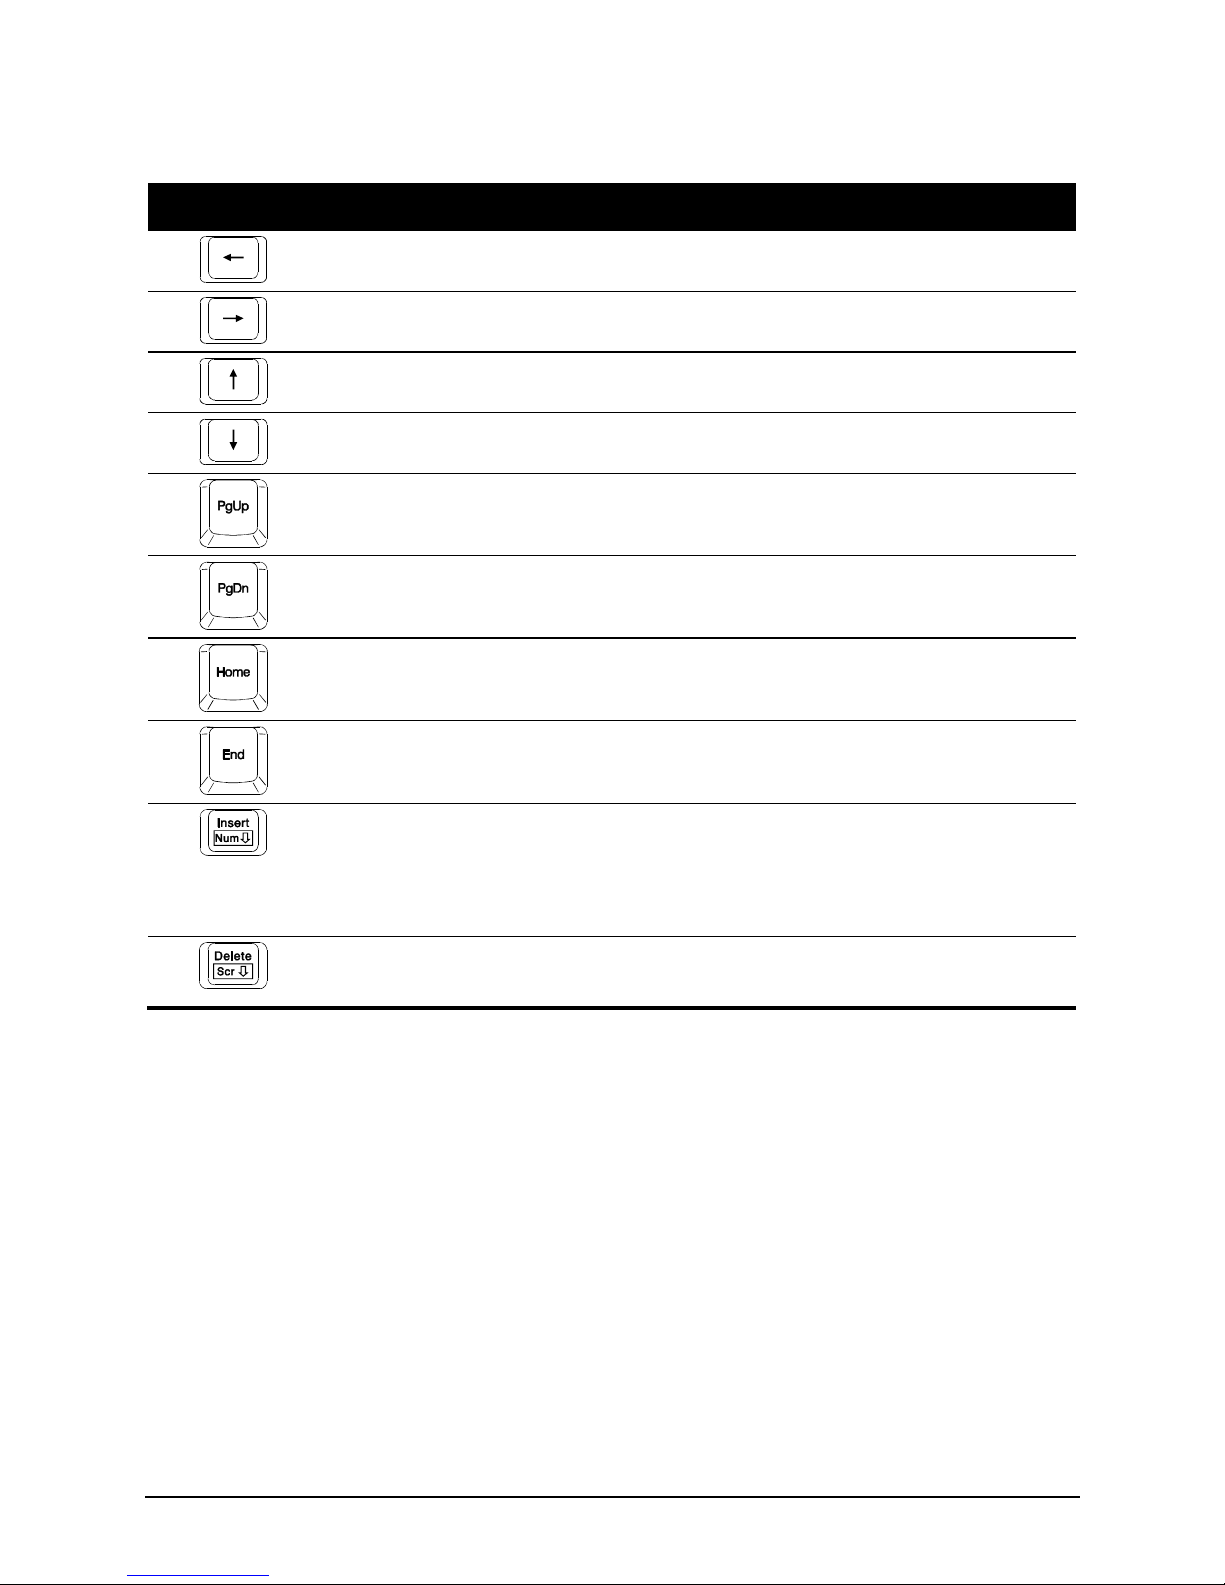
Cursor-Control Keys
NOTE: The word “cursor” refers to the indicator on the screen that lets you know exactly
where on your screen anything you type will appear. It can take the form of a vertical or
horizontal line, a block, or one of many other shapes.
Page 27
Operating Your Computer 2-7
Cursor-control keys are generally used for editing purposes. They are:
Key Description
Moves the cursor left one space.
Moves the cursor right one space.
Moves the cursor up one line.
Moves the cursor down one line.
Moves the page up.
Moves the page down.
Moves the cursor to the beginning of the line or document.
Moves the cursor to the end of the line or document.
Switches typing between insert and overtype modes. Insert mode
means any character typed will be inserted to the current cursor
position; overtype mode means any character typed will overwrite the
text in the current cursor position.
Deletes the character to the right of the cursor and moves the following
text left one space.
Page 28
Operating Your Computer 2-8
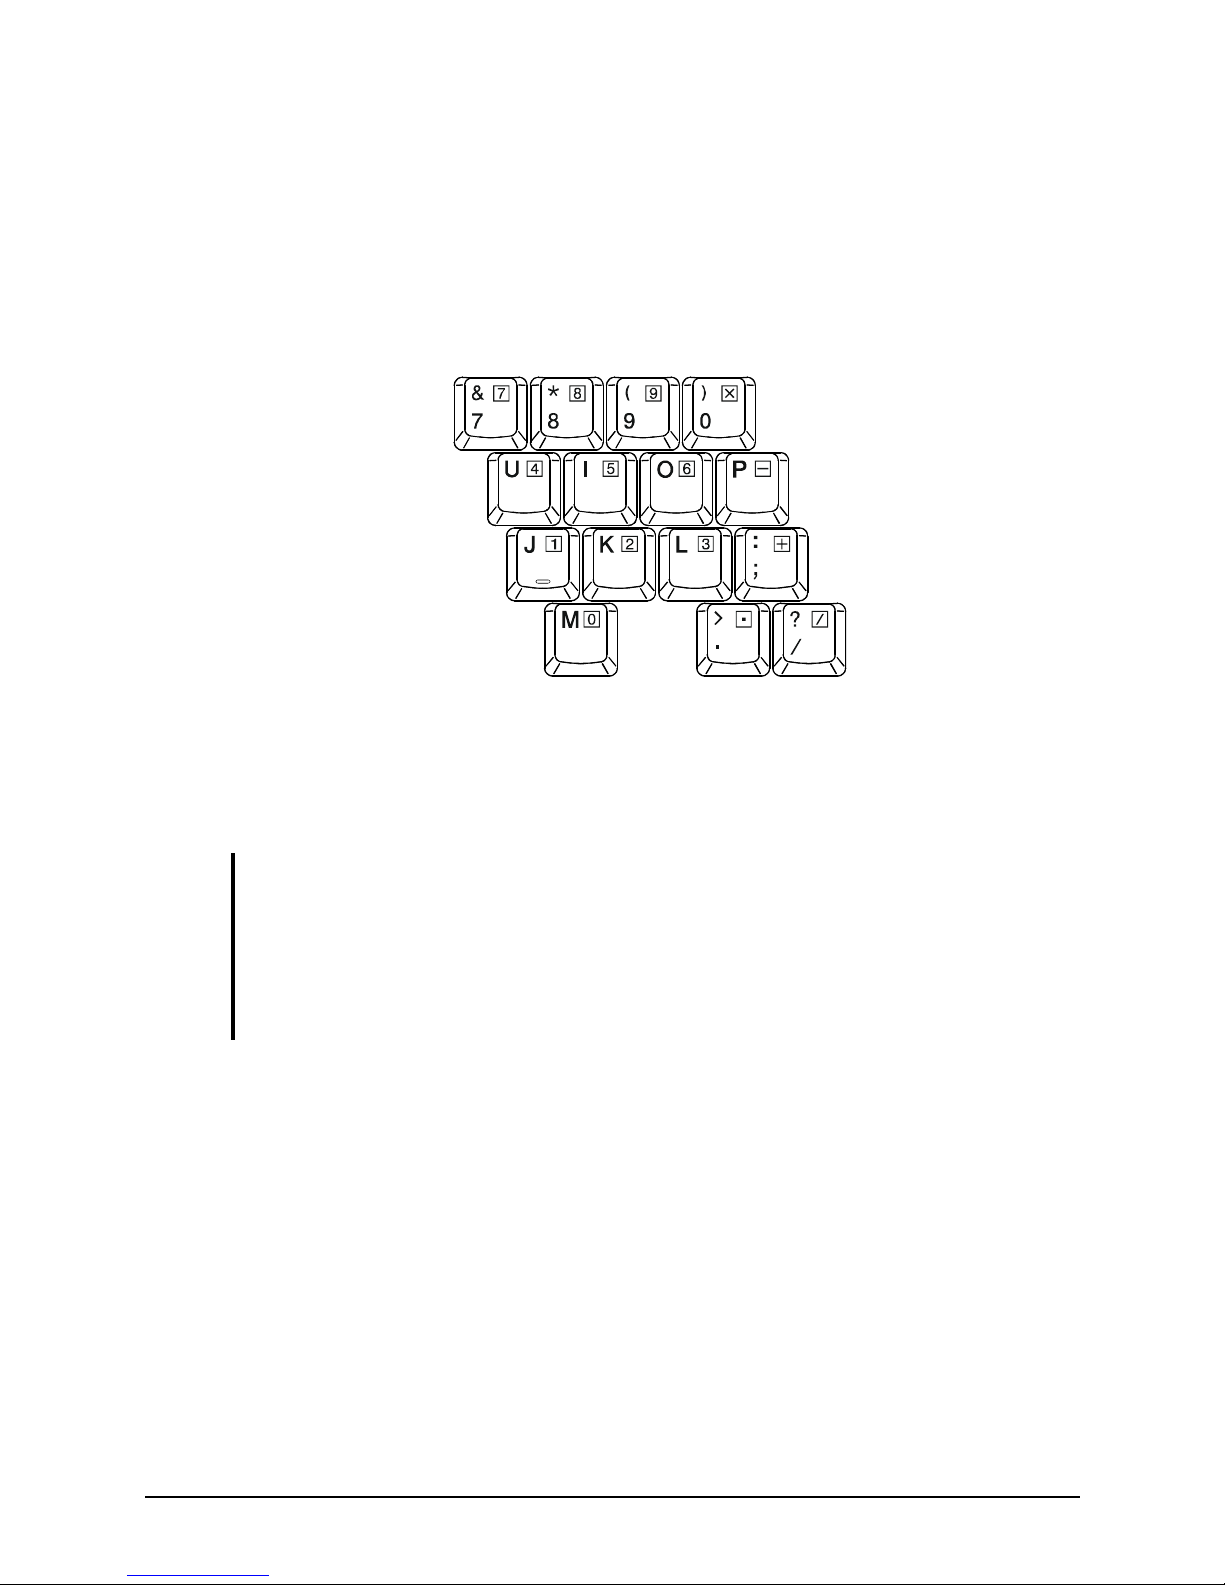
Numeric Keypad
A 15-key numeric keypad is embedded in the typewriter keys as shown
next:
Numeric keys facilitate entering of numbers and calculations. When Num
Lock is on, the numeric keys are activated, which means you can use
these keys to enter numerals.
NOTE:
When the numeric keypad is activated and you need to type the English letter in the
keypad area, you can either turn Num Lock off or you can press the Fn key and then
the letter key without turning Num Lock off.
Some software may not be able to use the numeric keypad on the computer. If so,
use the numeric keypad on an external keyboard instead.
Euro Symbol
Windows supports the Euro dollar sign€, you can press the sign on the
US and UK keyboards.
To press the Euro sign on a United States-International keyboard,
hold down either of the Alt keys and press 5 (which has a Euro sign on
it).
Page 29

Operating Your Computer 2-9
To press the Euro sign on a United States 101 keyboard, hold down
either of the Alt keys and type 0128 on the numeric keypad of your
keyboard.
To press the Euro sign on an UK keyboard, hold down the Alt Gr key
and press 4 (which has a Euro sign on it).
Windows Keys
The keyboard has two keys that perform Windows-specific functions:
Windows Logo key and Application key.
The Windows Logo key opens the Start menu and performs
software-specific functions when used in combination with other keys.
The Application key usually has the same effect as a right mouse
click. (See your Windows manual for more information.)
Function Keys
On the top row of the keys are the function keys: F1 to F12. Function keys
are multi-purpose keys that perform functions defined by individual
programs.
Hot key functions are assigned to the F1, F3, F4, F5, F6, F7, F10, F11, and F12
keys by your computer. (See “Hot Keys” later in this chapter for
information.)
Fn Key
The Fn key, at the lower left corner of the keyboard, is used with another
key to perform the alternative function of a key. The letter “Fn” and the
alternative functions are identified by the color of blue on the keytop. To
perform a desired function, first press and hold the Fn key, then press the
other key.
Page 30
Operating Your Computer 2-10
Hot Keys
Hot keys refer to a combination of keys that can be pressed any time to
activate special functions of the computer. Most hot keys operate in a
cyclic way. Each time a hot key combination is pressed, it shifts the
corresponding function to the other or next choice.
You can easily identify the hot keys with the icons imprinted on the
keytop. The hot keys are described next.
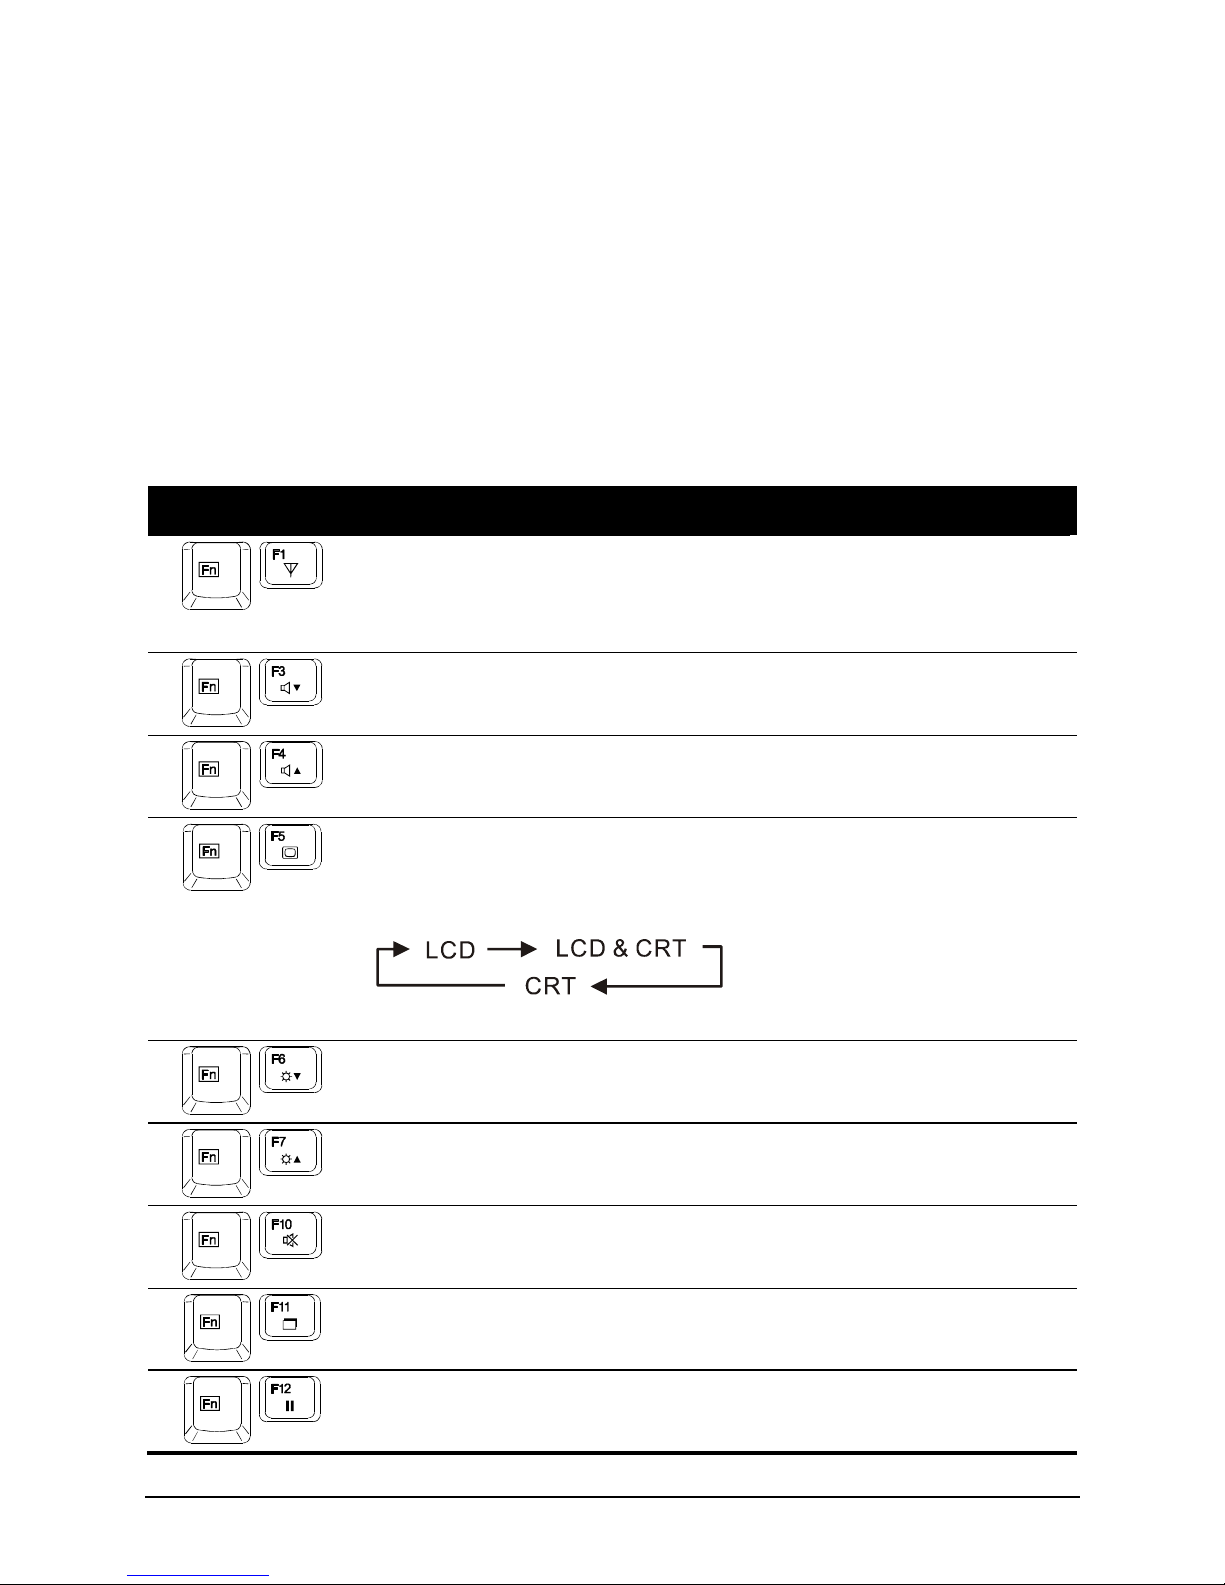
Key Description
Switches the wireless LAN radio on and off.
NOTE: This function works only if an optional mini PCI-E
wireless LAN card is installed.
Decreases the sound volume.
Increases the sound volume.
Switches the display output to one of the following when external
devices are connected.
Upon booting the system with CRT:
NOTE: This function only applies to Plug & Play display devices.
Decreases the LCD brightness (8 levels).
Increases the LCD brightness (8 levels).
Switches the system sound output off (mute) and on.
Switches the display on and off.
Serves as the sleep button that you can define with Windows’
Power Options. (See the “Power Management” in Chapter 3.)
Page 31

Operating Your Computer 2-11
Using the Touchpad
CAUTION: Do not use a sharp object such as a pen on the touchpad. Doing so may
damage the touchpad surface.
NOTE: For optimal performance of the touchpad, keep your fingers and the pads clean
and dry. When tapping on the pad, tap lightly. Do not use excessive force.
The touchpad is a pointing device that allows you to communicate with
the computer by controlling the location of the pointer on the screen and
making selection with the buttons.
The touchpad consists of a rectangular pad and a left and right buttons.
To use the touchpad, place your forefinger or thumb on the pad. The
rectangular pad acts like a miniature duplicate of your display. As you
slide your fingertip across the pad, the pointer (also called cursor) on the
screen moves accordingly. When your finger reaches the edge of the pad,
simply relocate yourself by lifting the finger and placing it on the other
side of the pad.
Page 32

Operating Your Computer 2-12
Here are some common terms that you should know when using the
touchpad:
Term Action
Point Move your finger on the pad until the cursor points to the
selection on the screen.
Click Press and release the left button.
–or–
Tap gently anywhere on the pad.
Double-click Press and release the left button twice in quick succession.
–or–
Tap twice on the pad rapidly.
Drag and
drop
Press and hold the left button, then move your finger until
you reach your destination (drag). Finally, release the
button (drop) when you finish dragging your selection to
the destination. The object will drop into the new location.
–or–
Gently tap twice on the pad and on the second tap, keep
your finger in contact with the pad. Then, move your finger
across the pad to drag the selected object to your
destination. When you lift your finger from the pad, the
selected object will drop into place.
Scroll To scroll is to move up and down or left and right in the
working area on the screen.
To move vertically, place your finger on the right or left
edge of the pad and slide your finger up and down along the
edge. To move horizontally, place your finger on the top or
bottom edge of the pad and slide your finger left and right.
This function works only after you install the touchpad
driver supplied with the computer and it may not work for
all applications.
TABLE NOTE: If you swap the left and right buttons, “tapping” on the touchpad as
an alternative method of pressing the left button will no longer be valid.
Page 33

Operating Your Computer 2-13
Configuring the Touchpad
You may want to configure the touchpad to suit your needs. For example,
if you are a left-handed user, you can swap the two buttons so that you
can use the right button as the left button and vice versa. You can also
change the size of the on-screen pointer, the speed of the pointer, and so
on.
To configure the touchpad, go to Control Panel Hardware and Sounds
Mouse Properties. However, you can install the touchpad driver
supplied with your computer to take advantage of more powerful
features. (For information on installing the driver, see “How to Use the
Driver Disc” in Chapter 6.)
Page 34

Operating Your Computer 2-14
Using the DVD Drive
Your computer comes with a DVD drive, usually configured as drive D.
Depending on the model, your drive is one of the following:
Combo drive can work both as a DVD drive (reading DVD discs in
addition to CDs, audio CDs and CD-R/-RW discs), and also as a CD
recorder (writing to CD-R/-RW discs).
DVD Dual drive besides the Combo drive function, can write to
DVD+R/+RW/-R/-RW discs.
Super Multi drive besides the Combo drive function, can write to
DVD+R/+RW/-R/-RW and DVD-RAM discs.
CAUTION:
When inserting a disc, do not use force.
Make sure that the disc is correctly inserted into the tray, and then close the tray.
Do not leave the DVD tray open. Also, avoid touching the lens in the tray with your
hand. If the lens becomes dirty, the DVD drive may malfunction.
Do not wipe the lens using materials with rough surface (such as paper towel).
Instead, use a cotton swab to gently wipe the lens.
FDA regulations require the following statement for all laser-based devices:
“Caution, Use of controls or adjustments or performance of procedures other than
those specified herein may result in hazardous radiation exposure.”
NOTE: The DVD drive is classified as a Class 1 laser product. This label is located on
the DVD drive.
NOTE: For DVD and Combo drives only.
This product incorporates copyright protection technology that is protected by method
claims of certain U.S. patents and other intellectual property rights owned by
Macrovision Corporation and other rights owners. Use of this copyright protection
technology must be authorized by Macrovision Corporation, and is intended for home
and other limited viewing uses only unless otherwise authorized by Macrovision
Corporation. Reverse engineering or disassembly is prohibited.
Page 35

Operating Your Computer 2-15
Inserting and Removing a Disc
Follow this procedure to insert or remove a disc:
1. Turn on the computer.
2. Press the eject button and the DVD tray will slide out partially.
Gently pull on it until it is fully extended.
3. To insert a disc, place down the disc in the tray with its label facing
up. Slightly press the center of the disc until it clicks into place.
To remove a disc, hold the disc by its outer edge and lift it up from
the tray.
4. Gently push the tray back into the drive.
NOTE: In the unlikely event that you are unable to release the DVD tray by pressing the
eject button, you can manually release the disc. (See “DVD Drive Problems” in Chapter
8.)
Eject Button
Page 36

Operating Your Computer 2-16
Using the Video Features
The video subsystem of your computer features:
15.4-inch TFT (Thin-Film Transistor) color LCD display with
1280×800 WXGA resolution
Multi-display capability, which allows you to expand your desktop
on the screen to another display device so that you have more desktop
space to work on.
Power Management
NOTE:
Before using the multi-display capability or taking advantage of the enhanced video
capabilities, the video driver supplied with your computer must be installed. (See
chapter 6 for details.)
The computer enters the Sleep or Hibernation mode when the LCD is closed. If you
want to use the computer with the LCD closed, set Do Nothing to the “When I Close
the lid” option in the Power Options System Settings Properties. Thus the
computer does not enter the Sleep or Hibernation mode when the LCD is closed.
Configuring the Display Modes
NOTE: When using an external CRT monitor, the resolution depends on the CRT
monitor’s supported resolution.
Your computer has been set to a default resolution and number of colors
before shipment. You can view and change display settings through your
operating system. See your operating system documentation or online
help for specific information.
For displaying in higher resolutions, you can connect an external monitor
that supports higher resolutions. (See “Connecting an External Monitor”
in Chapter 4 for more information.)
Page 37

Operating Your Computer 2-17
Using the Audio Features
NOTE:
To take advantage of the enhanced audio capabilities, the audio driver supplied
with your computer must be installed. (See chapter 6 for details.)
If you experience interference while recording, try lowering the microphone
recording volume.
The audio subsystem of your computer features:
External audio connectors () and
Set of speakers ()
Ways of playing and recording sound vary with the operating system
used. See your operating system documentation or online help for
specific information.
Page 38

Operating Your Computer 2-18
Connecting Audio Devices
For higher audio quality, you can send or receive sound through external
audio devices.
NOTE: After connecting an external audio device, make sure that you specify the use
of the correct audio device in Windows.
Audio Output Connector ( ) can be connected to speakers,
headphones, or earphone set.
Microphone Connector ( ) can be connected to an external
microphone for recording voice or sound.
NOTE: When using the external speakers/headphones or microphone, you cannot use
the internal one.
Page 39

Operating Your Computer 2-19
Using the Communication Features
Using the Modem (Optional)
NOTE:
Depending on your model, the RJ-11 connector may not have any function.
To take advantage of the modem feature, the modem driver supplied with your
computer must be installed. (See chapter 6 for details.)
The optional internal 56 K fax/data modem allows you to use the
telephone line to communicate with others by fax, email, or connect to an
online service or bulletin board.
To connect the telephone line to the modem, connect one end of the
modem cable to the RJ-11 connector on the computer and the other end to
the telephone line.
NOTE:
When using the communication software, you may have to disable power
management.
Set the COM port of the modem to COM3.
Set parameters such as modem speed (baud rate) and line type (pulse dialing or
tone dialing).
Do not enter the Sleep mode when using the communication software.
Page 40

Operating Your Computer 2-20
Using the LAN
NOTE: To take advantage of the LAN feature, the LAN driver supplied with your
computer must be installed. (See chapter 6 for details.)
The internal 10/100 Mbps LAN (Local Area Network) module allows
you to connect your computer to a network. It supports data transfer rate
up to 100 Mbps.
To connect the network cable to the LAN module, connect one end of the
LAN cable to the RJ-45 connector on the computer and the other end to
the network hub.
Page 41

Operating Your Computer 2-21
Using the Wireless LAN (Optional)
Depending on your model, an internal mini PCI-E wireless LAN
(WLAN) card may have been pre-installed by your computer
manufacturer at the factory. This card allows you to access corporate
networks or the Internet in a wireless environment.
The WLAN features include:
Peer-to-Peer (Ad-Hoc) and Access Point (Infrastructure) modes
support
WEP (Wired Equivalent Privacy) 64/128-bit data encryption
IEEE 802.11a/b/g or 802.11b/g standard compliance
Technology 802.11a 802.11b 802.11g
Stated Maximum
Throughput (Mbps)
54 11 54
Data Rates (Mbps) 54, 48, 36, 24, 18,
12, 9, 6
11, 5.5, 2, 1 54, 36, 18, 9
Band (GHz) 5.15 ~ 5.35 2.412 ~ 2.462 2.4
Modulation
Technology
OFDM (Orthogonal
Frequency Division
Multiplexing)
DSSS (Direct
Sequence Spread
Spectrum)
OFDM (Orthogonal
Frequency Division
Multiplexing)
NOTE: 802.11g mode is backward compatible with 802.11b mode.
To take advantage of the WLAN feature, make sure that the WLAN
driver is installed correctly. (See chapter 6 for details.) If your WLAN
card was provided by your dealer instead of the computer manufacturer,
contact your dealer for the correct driver to use.
Page 42

Operating Your Computer 2-22
Turning Off/On the WLAN Radio
NOTE: The FAA (Federal Aviation Agency) has deemed it unsafe to operate wireless
devices in aircraft as this may interfere with flight safety. Remember to turn off wireless
LAN when using your computer in the airplane.
Your computer has a built-in Fn+F1 WLAN hot key to switch the WLAN
on/off (see “Hot Keys” in Chapter 2).
If you need to temporarily turn off the radio, press Fn+F1. To resume
network connection, press Fn+F1 again.
It takes approximately 30 seconds for your computer to make a successful
WLAN connection and approximately 10 seconds to disconnect.
Page 43

Operating Your Computer 2-23
Connecting to a Wireless Network
1. Make sure that the WLAN radio is on.
2. Right-click the Wireless Network Connection icon located on the
Windows system tray and select Connect to a network.
3. If any wireless network is detected, the following window appears on
screen. Click the Show drop down menu and select Wireless.
4. Select a wireless network to connect to by clicking a selection, then
click Connect.
5. Depending on the settings, you may be asked to enter a WEP key
(refer to your Windows online help for more information on setting a
wireless network connection).
Page 44

Managing Power 3-1
Chapter 3
Managing Power
Your computer operates either on external AC power or on internal
battery power.
This chapter tells you how you can effectively manage power. To
maintain optimal battery performance, it is important that you use the
battery in the proper way.
The topics in this chapter include:
What is an AC adapter
How to charge the battery pack
When and how to initialize the battery pack
How to check the battery level
How to replace the battery pack
What happens when the battery is low and what actions to take
What is Power Management
How to save power
CHAPTER
Page 45

Managing Power 3-2
AC Adapter
CAUTION:
The AC adapter is designed for use with your computer only. Connecting the AC
adapter to another device can damage the adapter.
The AC power cord supplied with your computer is for use in the country where you
purchased your computer. If you plan to go overseas with the computer, consult
your dealer for the appropriate power cord.
When you disconnect the AC adapter, disconnect from the electrical outlet first and
then from the computer. A reverse procedure may damage the AC adapter or
computer.
When unplugging the connector, always hold the plug head. Never pull on the cord.
The AC adapter serves as a converter from AC (Alternating Current) to
DC (Direct Current) power because your computer runs on DC power,
but an electrical outlet usually provides AC power. It also charges the
battery pack when connected to AC power.
The adapter operates on any voltage in the range of 100~240 V AC.
Page 46

Managing Power 3-3
Battery Pack
The battery pack is the internal power source for the computer. It is
rechargeable using the AC adapter.
The operating time of a fully charged battery pack depends on how you
are using the computer. When your applications often access peripherals,
you will experience a shorter operating time.
NOTE: Care and maintenance information for the battery is provided in the “Battery
Pack Guidelines” section in Chapter 7.
Charging the Battery Pack
NOTE:
Charging will not start if the battery’s temperature is below 0 C (32 F) or above
45 C (113 F).
The charging process will stop and the Battery Charge Indicator flashes red when
the battery’s temperature gets above 60 C (140 F). If this happens, the battery
pack may be damaged. Please contact your dealer.
During charging, do not disconnect the AC adapter before the battery has been fully
charged; otherwise you will get a prematurely charged battery.
To charge the battery pack, connect the AC adapter to the computer and
an electrical outlet. The Battery Charge Indicator ( ) on the computer
glows amber to indicate that charging is in progress. You are advised to
keep the computer power off while the battery is being charged. When
the battery is fully charged, the Battery Charge Indicator glows green.
The charging times are as follows:
Battery Type
Charging Time
Computer is Off Computer is On and
in Idle State
4-cell
(2200 mAH)
1.7 hours 2.7 hours
6-cell
(4400 mAH)
3.0 hours 5.3 hours
Page 47

Managing Power 3-4
CAUTION: After the computer has been fully recharged, do not immediately disconnect
and reconnect the AC adapter to charge it again. Doing so may damage the battery.
NOTE: The battery level may automatically lessen due to the self-discharge process
(0.21 %per day), even when the battery pack is fully charged (100 %). This happens no
matter if the battery pack is installed in the computer.
Initializing the Battery Pack
You need to initialize a new battery pack before using it for the first time
or when the actual operating time of a battery pack is much less than
expected.
Initializing is the process of fully charging, discharging, and then
charging. It can take several hours.
1. Make sure that the computer power is turned off. Connect the AC
adapter to fully charge the battery pack.
2. After the battery pack is fully charged, turn on the computer. When
the message “Click mouse or press Enter for Menu” appears,
click the touchpad’s left button or press the Enter key to invoke the
program.
3. A small window appears, select “Launch BIOS Setup.”
4. Disconnect the AC adapter and leave the computer on until the
battery is fully discharged. The computer will shut down
automatically.
5. Connect the AC adapter to fully charge the battery pack.
Checking the Battery Level
NOTE: Any battery level indication is an estimated result. The actual operating time can
be different from the estimated time, depending on how you are using the computer.
You can check the approximate battery level using the battery meter
function of the operating system. To read the battery level in Windows,
click the icon on the system tray.
Page 48

Managing Power 3-5
Replacing the Battery Pack
CAUTION:
There is danger of explosion if the battery is incorrectly replaced. Replace the
battery only with the computer manufacturer’s optional battery packs. Discard used
batteries according to the dealer’s instructions.
Do not attempt to disassemble the battery pack.
If you often rely on battery power for a long period of time while
traveling, you may consider the purchase of an additional battery pack
from your dealer and keep it with you in a fully charged state as a backup.
To replace the battery pack, follow these steps:
1. Make sure that the computer is not turned on or connected to AC
power.
2. Place the computer upside down.
3. Press the two battery release levers inward and lift it up to remove the
battery pack off the computer.
Page 49

Managing Power 3-6
4. Align the side of a spare battery pack with the side of the battery
compartment and gently push the battery pack into place. The two
battery release levers would click into position.
Page 50

Managing Power 3-7
Battery Low Signals and Actions
The battery icon changes appearance to display the current state of the
battery so that you can see how much charge remains (Windows default
setting). When the battery charge is above 25 % the battery icon is green.
When the battery charge reaches 25 % a yellow triangle with an
exclamation point (!) appears above the green battery icon. When the
charge reaches the low battery level a red circle with a white “X” appears
above the green icon. The computer’s Battery Charge Indicator ( )
blinks red to alert you to take actions.
Immediately save your data upon Battery Low. The remaining operating
time depends on how you are using the computer. If you are using the
audio subsystem, ExpressCard, hard or USB flash disk, the battery might
run out of charge very quickly.
Always respond to Battery Low by placing your computer on
Hibernation mode, turning off the computer, or connecting the AC
adapter.
CAUTION:
If you are using an ExpressCard, do not access the card during battery low periods.
This is because the access may take longer than the time it takes the battery to run
out of charge, thus making your access to the card unsuccessful.
If you fail to save your data when the battery completely runs out of charge, then
you lose your data.
Page 51

Managing Power 3-8
Power Management
Your computer supports ACPI (Advanced Configuration and Power
Interface) for power management. The power management feature allows
you to reduce the power consumption for energy saving.
With an ACPI-compliant operating system such as Windows Vista,
power supply to different computer components is controlled on an
as-needed basis. This allows maximum power conservation and
performance at the same time.
In general, Windows’ power management works in this way:
What... When...
Power to the hard disk is turned off When the hard disk has been idle for a
set period.
Power to the display is turned off When the display has been idle for a
set period.
The computer enters the Sleep mode.
The hard disk and display are turned
off and the entire system consumes
less power.
When the entire system has been idle
for a set period.
When you press the Fn+F12 hot key. *
When you close the cover. *
When you press the power button. *
The computer enters the Hibernation
mode. (See the next subsection for
more information.)
When the entire system has been idle
for a set period.
When you press the Fn+F12 hot key. *
When you close the cover. *
When you press the power button. *
* Depends on your settings in Windows.
For detailed information on power management, see Windows’ Help.
Page 52

Managing Power 3-9
Hibernation
NOTE: Make sure that the hibernation feature is enabled in the “When I press the
power button,” “When I press the sleep button,” and “When I close the lid” of the Power
Options System Settings Properties from the Control Panel Mobile PC in
Windows Vista.
Hibernation is a very useful feature. People frequently open many
applications when they use computers. It takes some time to get all these
applications open and running, and normally they all have to be closed
before the computer can be turned off.
When you use the hibernation feature, you do not have to close the
applications. The computer stores the state of your computer to a file on
the hard disk and then shuts down. The next time you turn on your
computer, you return to exactly where you left off.
Page 53

Managing Power 3-10
Power-Saving Tips
Aside from enabling your computer’s power saving mode (see previous
section), you can do your part to maximize the battery’s operating time
by following these suggestions.
Do not disable Power Management. Choose a Windows power plan
that saves power. A power plan is a collection of hardware and
system settings that control how your computer manages power.
Decrease the LCD brightness to the lowest comfortable level.
Shorten the length of time before Windows turn off the display.
Many USB devices use power just by being connected. If you use a
USB mouse, you can save power by disconnecting the mouse and
using the touchpad. If you use a USB flash drive, unplug it when you
are not using it.
If you work with an application that uses an ExpressCard, exit the
application when you finish using it.
If you have an ExpressCard installed, remove it when not in use.
Some ExpressCards drain power even while they are inactive.
Deactivate the WLAN function if you are not using it. (See “Turning
Off/On the WLAN Radio” in Chapter 2.)
Turn off the computer when you are not using it.
Page 54

Expanding Your Computer 4-1
Chapter 4
Expanding Your Computer
You can expand the capabilities of your computer by connecting other
peripheral devices. When using a device, be sure to read the instructions
accompanying the device together with the relevant section in this
chapter.
This chapter gives guidelines on installing and using these devices:
External monitor
USB device
ExpressCard
CHAPTER
Page 55

Expanding Your Computer 4-2
Connecting an External Monitor
If you want the benefits of a larger display screen with higher resolution,
you can connect an external CRT monitor to your computer. Follow this
procedure to connect an external monitor:
1. Make sure that the computer is not turned on.
2. Plug the monitor’s signal connector to the computer’s VGA
connector.
3. Plug one end of the monitor’s power cord into the power socket on
the monitor and the other end to an electrical outlet.
4. To use the monitor, turn on the monitor before turning on the
computer.
5. The monitor should respond by default. If not, you can switch the
display to the monitor or to both (simultaneous display), or to
multi-display by pressing the Fn+F5 hot key. In Windows, you can
also change the display through the Display Settings Properties.
6. You can change display settings through your operating system. See
your operating system documentation or online help for specific
information.
CAUTION: Do not disconnect the external monitor while the computer is in Sleep or
Hibernation mode. If no external monitor is connected when the computer resumes, the
LCD might not display properly.
NOTE: Make sure that the VGA driver is installed correctly.
Page 56

Expanding Your Computer 4-3
Connecting a USB Device
Your computer has four USB ports for connecting USB devices, such as a
digital camera, scanner, printer, modem, and mouse.
USB (Universal Serial Bus) is specified to be an industry standard
extension to the PC architecture. It supports “Plug-and-Play” technology
so you can install and remove USB devices without turning off the
computer. With its multiple connection capability, up to 127 devices can
be connected in a daisy-chain configuration. In addition, you can use a
USB hub that converts a single USB connector into multiple ports where
USB devices can be connected.
The USB ports support transfer rates up to 12 MB/s for USB 1.1 devices
and 480 MB/s for USB 2.0 devices.
To connect a USB device, simply plug the device cable to one of the USB
ports.
Page 57

Expanding Your Computer 4-4
Using ExpressCards
NOTE: The ExpressCard interface is not compatible with the PC card interface. You
need optional adapters for using PC cards on your computer.
Your computer has an ExpressCard slot.
ExpressCard supports the PCI Express and USB 2.0 serial data interfaces
(supporting speeds of up to 2.5 Gbps and 480 Mbps respectively),
improving speed in data transfer while conserving power usage.
ExpressCard Type
The ExpressCard slot can accommodate a 54 mm (ExpressCard/54) or
34 mm (ExpressCard/34) wide ExpressCard. Typical ExpressCards
support a very extensive range of applications including memory, wired
and wireless communication cards, and security devices.
Shown next are the appearances of ExpressCards for your reference.
ExpressCard/54 ExpressCard/34
Page 58

Expanding Your Computer 4-5
Inserting and Removing an ExpressCard
To insert an ExpressCard:
1. Locate the ExpressCard slot on the left side of the computer.
2. Slide the ExpressCard, with its label facing up, all the way into the
slot until the rear connectors click into place.
3. When a new card is seated, the computer will detect it and try to
install the appropriate driver. Follow the on-screen instructions to
complete the process.
To remove an ExpressCard:
1. Double-click the Safely Remove Hardware icon found on the
Windows system tray and the Safely Remove Hardware window
appears on screen.
2. Select (highlight) the ExpressCard from the list to disable the card.
3. Push the ExpressCard slightly to release the card.
4. Pull the card out of the slot.
Page 59

Expanding Your Computer 4-6
Internal Components Upgrade
You can upgrade your computer by changing the CPU and hard disk or
adding memory. However, to avoid damage during the installation
procedure, please ask your dealer for help. Do not install an internal
component by yourself.
Page 60

Using BIOS Setup 5-1
Chapter 5
Using BIOS Setup
BIOS Setup Utility is a program for configuring the BIOS (Basic Input/
Output System) settings of the computer.
BIOS is a layer of software, called firmware, that translates instructions
from other layers of software into instructions that the computer
hardware can understand. The BIOS settings are needed by your
computer to identify the types of installed devices and establish special
features.
This chapter tells you how to use the BIOS Setup program.
CHAPTER
Page 61

Using BIOS Setup 5-2
When and How to Use BIOS Setup
When to Use
You need to run BIOS Setup Utility when:
You see an error message on the screen requesting you to run BIOS
Setup Utility.
You want to restore the factory default settings.
You want to modify some specific settings according to the
hardware.
You want to modify some specific settings to optimize the system
performance.
Starting BIOS Setup
NOTE:
The BIOS Setup Utility screens shown in this chapter are for your reference only.
The actual items or settings on your computer may differ.
The BIOS Setup Utility program may have been updated after the publication of this
manual.
The settings you select in your operating system might override similar settings in
BIOS Setup Utility.
To run BIOS Setup Utility, press the Enter key or click the left touchpad
button when the prompt appears on the screen during system startup. The
prompt shows up on the screen for only a few seconds. You must press
the Enter key or click the left touchpad button quickly. A small window
appears, select Launch BIOS Setup. The BIOS Setup Utility main screen
appears as shown next.
Page 62

Using BIOS Setup 5-3
The BIOS Setup Utility screen can be divided into four areas:
On the top is the menu bar containing the titles of the available
menus. Each menu title brings a specific menu.
The center column of the menu displays the current configuration
information of the system, devices, and memory items.
The right column of the menu provides more detailed information
when a menu item is highlighted.
On the bottom keyboard keys are displayed for navigating the screen.
Page 63

Using BIOS Setup 5-4
Moving Around and Making Selections
In most cases, you must go through two levels to complete the setting for
an item: menu title and submenu.
Use the keyboard to move around and make selections. A brief
description of keyboard usage is listed next:
Key Function
,
Selects a menu title.
,
Selects an item or option.
+, – Changes the value.
Enter 1) Brings up the sub-menu when available.
2) Opens or closes the option window when an item is selected.
Esc 1) Displays the Exit menu.
2) Closes the option window if one is open.
F1 Displays help information.
F9 Changes the values to the setup defaults.
F10 Saves and exit the BIOS Setup Utility.
Page 64

Using BIOS Setup 5-5
Main Menu
The Main menu contains the system date and time settings of the system.
System Time sets the system time.
System Date sets the system date.
Page 65

Using BIOS Setup 5-6
Advanced Menu
The Advanced menu contains the various system settings.
Frame Buffer Size sets the shared memory size of the video controller.
The options are 64MB, 128MB, and 256MB. Default setting is 64MB.
NOTE:
This item is for Legacy VGA and SVGA mode only. When under Windows mode,
the frame buffer size is allocated directly by the VGA driver based on the size of
your system memory.
Increasing the frame buffer size may improve the video subsystem’s performance,
however it may decrease your system memory.
Battery Low Warning Beep sets if the system will beep once every 4
seconds to warn you against a low battery situation (capacity below
10 %). Not applicable when system is in POST (Power-On Self Test)
stage or in BIOS Setup. The options are Enabled and Disabled. Default
setting is Disabled.
POST Beep enables or disables the beep sound when POST (Power-On
Self-Test) finishes. The options are Enabled and Disabled. Default
setting is Disabled.
Page 66

Using BIOS Setup 5-7
Legacy USB Support enables the system's support for Legacy USB
device (e.g., mouse, flash disk, except keyboard) in DOS mode. The
options are Enabled and Disabled. Default is Enabled.
Page 67

Using BIOS Setup 5-8
Boot Menu
The Boot menu sets the sequence of the devices to be searched for the
operating system.
The bootable devices will be automatically detected during POST and
shown here, allowing you to set the sequence that the BIOS use to look
for a boot device from which to load the operating system.
A brief description of keyboard usage is listed next:
Key Function
,
Selects (highlight) a boot device.
+, – Changes the boot sequence.
1 to 4 Loads the four default boot sequence.
X Moves the highlighted boot device from the “Boot priority order”
list to the “Excluded from boot order” list, and vice versa.
Page 68

Using BIOS Setup 5-9
Key Function
Shift + 1
Deactivates/activates the highlighted boot device on the “Boot
priority order” list. When a device has been deactivated, an “!”
(exclamation) symbol appears beside the item and system will
bypass it when detecting boot device during POST.
Page 69

Using BIOS Setup 5-10
Exit Menu
The Exit menu displays ways of exiting BIOS Setup Utility. After
finishing with your settings, you must save and exit so that the changes
can take effect.
Exit Saving Changes saves the changes you have made and exits BIOS
Setup Utility.
Exit Discarding Changes exits BIOS Setup Utility without saving the
changes you have made.
Load Setup Defaults loads the factory default values for all the items.
Discard Changes restores the previous values for all the items.
Save Changes saves the changes you have made.
Page 70

Installing Software Drivers 6-1
Chapter 6
Installing Software Drivers
To take full advantage of the unique features of your computer, some
operating systems require custom software, known as drivers, to be
installed.
If you purchased the computer with Windows pre-installed, all the device
drivers are pre-installed. All device drivers are also stored on the hard
disk drive under directory called C:\UTILS for future reference.
Drivers can also be installed from the optional driver cd. For Latest
driver visit http://www.viglen.co.uk/
This chapter describes how to install the drivers as well as using the P1
Quick Launch Key Utility.
CHAPTER
Page 71

Installing Software Drivers 6-2
How to Use the Driver Disc
NOTE:
The drivers may have been updated after this manual was published. For driver
upgrade, please visit Viglen web site at :
http://www.viglen.co.uk/viglen/support/ftpnotebook.aspx.
This disc supports Windows XP and Windows Vista.
The available items may differ according to your computer model.
Do not remove the driver disc when installing the driver.
To install the intended driver, click on the particular item and installation
will start. The drivers are described next:
Name Description
Chipset Install the chipset first.
VGA Installs the video driver that allows you to select
high-resolution displays with richer colors.
Audio Installs the audio driver that allows you to take full advantage
of the audio subsystem.
Modem
(Optional)
Installs the modem driver that allows you to use the modem
function of the computer.
LAN Installs the LAN driver that allows you to use the network
function of the computer.
Touchpad Installs the touchpad driver that allows you to take full
advantage of the touchpad features.
WLAN
(Optional)
Installs the WLAN driver and application program that allows
you to use the computer’s internal mini PCI-E WLAN card’s
network function.
NOTE: The Windows Plug-and-Play capability may automatically
detect the new device (mini PCI-E WLAN card) and display the wizard
requesting for drivers. Click Cancel to bypass the wizard screen(s).
CCD
(Optional)
Installs the web camera driver that allows you to use the
computer’s built-in camera function.
ESB Installs the ESB driver that allows you to use the three Easy
Start buttons to start three frequently-used programs.
Page 72

Installing Software Drivers 6-3
P1 Quick Launch Key Utility
The quick launch key utility allows you to define the “P1” quick launch
key.
To start the utility, right-click the ESB icon and select “Open” on the
Windows system tray. The “ESB” window appears as shown next.
Box
Cancel Open
Page 73

Installing Software Drivers 6-4
Defining the buttons:
The box in the window represents the user-definable button.
To assign a program to a button, click the Open icon under the box to
pop up the Select a File to Open dialog box as shown next and select the
desired program. Then, click Open to complete the process.
The appropriate icon will then appear in the box as shown next. To
launch the program, press the P1 quick launch key, or, if the ESB window
is open, click the box containing the icon.
If you want to cancel the assignment of a program, click the Cancel
icon under the box.
Page 74

Caring for the Computer 7-1
Chapter 7
Caring for the Computer
Taking good care of your computer will ensure a trouble-free operation
and reduce the risk of damage to your computer.
This chapter gives you guidelines covering these areas of maintenance:
How to protect the computer
What to note when using and storing the computer
How to clean the computer
What to note when using the battery pack
What to note when traveling with the computer
CHAPTER
Page 75

Caring for the Computer 7-2
Protecting the Computer
To safeguard the integrity of your computer data as well as the computer
itself, you can protect the computer in several ways as described in this
section.
Using the Windows Security Center
Windows Security Center protects your computer against intrusion.
Page 76

Caring for the Computer 7-3
Windows Security Center alerts you to take action on the following
security essentials:
Windows Firewall
Windows Update
Malware Protection (anti-virus, anti-spyware)
Others (Internet security, user account control)
For detailed information on Windows Security Center, see Windows’
Help.
Using the Cable Lock
You can use a Kensington-type cable lock to protect your computer
against theft. The cable lock is available in most computer stores.
To use the lock, loop the lock cable around a stationary object such as a
table. Insert the lock to the Kensington lock hole and turn the key to
secure the lock. Store the key in a safe place.
Page 77

Caring for the Computer 7-4
Taking Care of the Computer
Location Guidelines
Use the computer where the temperature is between 10 C (50 F)
and 35 C (95 F).
Avoid placing the computer in a location subject to high humidity,
extreme temperatures, mechanical vibration, direct sunlight, or
heavy dust.
Do not cover or block any ventilation openings on the computer. For
example, do not place the computer on a bed, sofa, rug, or other
similar surface. Otherwise, overheating may occur that results in
damage to the computer.
Keep the computer at least 13 cm (5 inches) away from electrical
appliances that can generate a strong magnetic field such as a TV,
refrigerator, motor, or a large audio speaker.
Do not move the computer abruptly from a cold to a warm place.
A temperature difference of more than 10 C (18 F) will cause
condensation inside the unit, which may damage the storage media.
Do not place the computer on an unsteady surface.
General Guidelines
Do not place heavy objects on top of the computer when it is closed
as this may damage the display.
The screen surface is easily scratched. Do not use paper towels to
clean the display. Avoid touching it with your fingers, pen, or pencil.
To maximize the life of the backlight in the display, allow the
backlight to automatically turn off as a result of power management.
Avoid using a screen saver or other software that prevents the power
management from working.
Page 78

Caring for the Computer 7-5
Cleaning Guidelines
Never clean the computer with its power on.
Use a soft cloth moistened with water or a non-alkaline detergent to
wipe the exterior of the computer.
Gently wipe the display with a soft, lint-free cloth. Do not use
alcohol or detergent on the display.
Dust or grease on the touchpad can affect its sensitivity. Clean the
pad by using adhesive tape to remove the dust and grease on its
surface.
Battery Pack Guidelines
Recharge the battery pack when it is nearly discharged. When
recharging, make sure that the battery pack is fully charged. Doing so
may avoid harm to the battery pack.
Operate the computer with the battery pack installed even when
using external power. This ensures that the battery is fully charged.
If you will not be using the computer for a long period of time (more
than two weeks), remove the battery pack from the computer.
If you remove the battery pack, make sure that the battery terminals
do not contact any conductors such as metal objects or water.
Otherwise, the battery may become unusable as a result of a short
circuit.
If you need to store the battery pack, store it in a cool, dry place.
Never allow the temperature to exceed 60 C (140 F).
Do not leave the battery pack in storage for more than six months
without recharging it.
Page 79

Caring for the Computer 7-6
When Traveling
Before traveling with your computer, make a backup of your hard
disk data into flash disks or other storage devices. As an added
precaution, bring along an extra copy of your important data.
Make sure that the battery pack is fully charged.
Make sure that the computer is turned off and the top cover is
securely closed.
Do not leave objects in between the keyboard and closed display.
Disconnect the AC adapter from the computer and take it with you.
Use the AC adapter as the power source and as a battery-charger.
Hand-carry the computer. Do not check it in as luggage.
If you need to leave the computer in the car, put it in the trunk of the
car to avoid exposing the computer to excessive heat.
When going through airport security, it is recommended that you
send the computer and flash disks through the X-ray machine (the
device you set your bags on). Avoid the magnetic detector (the device
you walk through) or the magnetic wand (the handheld device used
by security personnel).
If you plan to travel abroad with your computer, consult your dealer
for the appropriate AC power cord for use in your country of
destination.
Page 80

Troubleshooting 8-1
Chapter 8
Troubleshooting
Computer problems can be caused by hardware, software, or both. When
you encounter any problem, it might be a typical problem that can easily
be solved.
This chapter tells you what actions to take when solving common
computer problems. It is divided into three sections:
Preliminary checklist
Solving common problems
Resetting the computer
CHAPTER
Page 81

Troubleshooting 8-2
Preliminary Checklist
Here are helpful hints to follow before you take further actions when you
encounter any problem:
Try to isolate which part of the computer is causing the problem.
Make sure that you turn on all peripheral devices before turning on
the computer.
If an external device has a problem, make sure that the cable
connections are correct and secure.
Make sure that the configuration information is properly set in the
BIOS Setup program.
Make sure that all the device drivers are correctly installed.
Make notes of your observations. Are there any messages on the
screen? Do any indicators light? Do you hear any beeps? Detailed
descriptions are useful to the service personnel when you need to
consult one for assistance.
If any problem persists after you follow the instructions in this chapter,
contact an authorized dealer for help.
Page 82

Troubleshooting 8-3
Solving Common Problems
For easy reference, the problems are divided into these categories.
Problem Type Go to
Battery Problems P. 8-4
DVD Drive Problems P. 8-4
Display Problems P. 8-5
ExpressCard Problems P. 8-6
Hardware Device Problems P. 8-6
Hard Disk Drive Problems P. 8-7
Keyboard, Mouse, and Touchpad Problems P. 8-7
LAN Problems P. 8-8
WLAN Problems P. 8-8
Modem Problems P. 8-8
Power Management Problems P. 8-10
Software Problems P. 8-11
Sound Problems P. 8-11
Startup Problems P. 8-12
Other Problems P. 8-13
Page 83

Troubleshooting 8-4
Battery Problems
The battery does not charge (Battery Charge indicator does not light
amber).
Make sure that the AC adapter is properly connected.
Make sure that the battery is not too hot or cold. Allow time for the
battery pack to return to room temperature.
Make sure that the battery pack is installed correctly.
Make sure that the battery terminals are clean.
The operating time of a fully charged battery becomes shorter.
If you often partially recharge and discharge, the battery might not be
charged to its full potential. Initialize the battery to solve the
problem. (See “Initializing the Battery Pack” in Chapter 3 for
instructions.)
The battery operating time indicated by the battery meter does not
match the actual operating time.
The actual operating time can be different from the estimated time,
depending on how you are using the computer. If the actual operating
time is much less than the estimated time, initialize the battery. (See
“Initializing the Battery Pack” in Chapter 3 for instructions.)
DVD Drive Problems
The DVD drive cannot read a disc.
Make sure that the disc is correctly seated in the tray, with the label
facing up.
Make sure that the disc is not dirty. Clean the disc with a disc
cleaning kit, available in most computer stores.
Make sure that the DVD drive driver is installed correctly.
Make sure that the computer supports the disc or the files contained.
Page 84

Troubleshooting 8-5
You cannot eject a disc.
The disc is not properly seated in the drive. Manually release the disc
following the method described next:
1. Turn off the computer.
2. Insert a small rod, such as a straightened paperclip, into the
drive’s manual eject hole and push firmly to release the tray.
3. Pull the tray out until fully extended, and then remove the disc.
Display Problems
Nothing appears on the screen.
During operation, the screen may automatically turn off as a result of
power management. Press any key to see if the screen comes back.
The brightness level might be too low. Increase brightness by
pressing the Fn+F7 hot key.
The display output might be set to an external device. To switch the
display back to the LCD, press the Fn+F5 hot key or change the
display through the settings in Display Settings Properties.
The characters on the screen are dim.
Adjust the brightness and/or contrast.
Page 85

Troubleshooting 8-6
Bad dots appear on the display at all times.
A small number of missing, discolored, or bright dots on the screen
are an intrinsic characteristic of TFT LCD technology. It is not
regarded as a LCD defect.
Resolution cannot be adjusted to desired setting.
Make sure that the video driver is installed correctly.
The external monitor displays nothing.
Make sure that the monitor is turned on.
Make sure that the monitor’s signal cable is properly connected.
Switch the display to the monitor by pressing the Fn+F5 hot key or
change the display through the settings in Display Settings Properties.
Simultaneous display/multi-display does not work.
Make sure that you turn on the external monitor before turning on the
computer.
Press the Fn+F5 hot key to toggle through the display options or
change the settings in Display Settings Properties in Windows.
ExpressCard Problems
The ExpressCard does not work.
Make sure that the ExpressCard is correctly seated.
If the card requires an IRQ (Interrupt ReQuest), make sure that there
is one available.
The ExpressCard stops communicating properly.
The application may have been reset when the computer is turned off
or in Sleep mode. Exit and restart the application.
Page 86

Troubleshooting 8-7
Hardware Device Problems
The computer does not recognize a newly installed device.
The device may not be correctly configured in the BIOS Setup
program. Run the BIOS Setup program to identify the new type.
Make sure if any device driver needs to be installed. (Refer to the
documentation that came with the device.)
Make sure if the device needs any jumper or switch settings. (Refer
to the documentation that came with the device.)
Check the cables or power cords for correct connections.
For an external device that has its own power switch, make sure that
the power is turned on.
Hard Disk Drive Problems
The hard disk drive error message appears on the screen.
The hard disk drive has defects. Ask your dealer for help.
The hard disk drive operations seem slow.
The data files stored on the hard disk drive may be fragmented. Use a
tool such as Window’s Disk Defragmenter to defragment the files.
The hard disk drive in-use indicator glows without blinking.
The data files stored on the hard disk drive may be fragmented. Use a
tool such as Window’s Disk Defragmenter to defragment the files.
Keyboard, Mouse, and Touchpad Problems
The keyboard does not respond.
Try connecting an external keyboard. If it works, contact an
authorized dealer, as the internal keyboard cable might be loose.
Page 87

Troubleshooting 8-8
The numeric keypad is disabled.
Make sure that the Num Lock is switched on. (Check if the Num Lock
Indicator glows or not.)
The external keyboard does not work.
Make sure that the keyboard cable is properly connected.
The USB mouse does not work.
Make sure that the mouse cable is properly connected.
The touchpad does not work, or the pointer is difficult to control
with the touchpad.
Make sure that the touchpad driver is correctly installed.
Make sure that the touchpad is clean.
LAN Problems
I cannot access the network.
Make sure that the LAN driver is correctly installed.
Make sure that the LAN cable is properly connected to the RJ-45
connector and the network hub.
Make sure that the network configuration is appropriate.
Make sure that the user name or password is correct.
WLAN Problems
I cannot use the WLAN feature.
Make sure that the mini PCI-E WLAN card is correctly installed.
Make sure that the necessary driver(s) is correctly installed.
Make sure that the WLAN feature is turned on.
Page 88

Troubleshooting 8-9
Transmission quality is poor.
Your computer may be in an out-of-range situation. Move your
computer closer to the Access Point or another WLAN device it is
associated with.
Check if there is high interference around the environment and solve
the problem as described next.
Radio interference exists.
Move your computer away from the device causing the radio
interference such as microwave oven and large metal objects.
Plug your computer into an outlet on a different branch circuit from
that used by the affecting device.
Consult your dealer or an experienced radio technician for help.
I cannot connect to another WLAN device.
Make sure that the WLAN feature is turned on.
Make sure that the SSID setting is the same for every WLAN device
in the network.
Your computer is not recognizing changes. Restart the computer.
Make sure that the IP address or subnet mask setting is correct.
I cannot communicate with the computer in the network when
Infrastructure mode is configured.
Make sure that the Access Point your computer is associated with is
powered on and all the LEDs are working properly.
If the operating radio channel is in poor quality, change the Access
Point and all the wireless station(s) within the BSSID to another
radio channel.
Your computer may be in an out-of-range situation. Move your
computer closer to the Access Point it is associated with.
Make sure that your computer is configured with the same security
option (encryption) to the Access Point.
Page 89

Troubleshooting 8-10
Use the Web Manager/Telnet of the Access Point to check whether it
is connected to the network.
Reconfigure and reset the Access Point.
I cannot access the network.
Make sure that the necessary driver(s) is correctly installed.
Make sure that the network configuration is appropriate.
Make sure that the user name or password is correct.
You have moved out of range of the network.
Turn off power management.
Modem Problems
The modem does not work.
Make sure that your model comes with the modem function.
Make sure that the modem driver is correctly installed.
Make sure that the telephone line is properly connected.
Make sure that the COM port in the communication software is
correctly set.
Turn off power management.
Power Management Problems
The computer does not enter Sleep or Hibernation mode
automatically.
If you have a connection to another computer, the computer does not
enter Sleep or Hibernation mode if the connection is actively in use.
Make sure that the Sleep or Hibernation time-out is enabled.
Page 90

Troubleshooting 8-11
The computer does not enter Sleep or Hibernation mode
immediately.
If the computer is performing an operation, it normally waits for the
operation to finish.
The computer does not resume from Sleep or Hibernation mode.
The computer automatically enters Sleep or Hibernation mode when
the battery pack is empty. Do any one of the following:
Connect the AC adapter to the computer.
Replace the empty battery pack with a fully charged one.
The computer does not enter Sleep or Hibernation mode with the
Fn+F12 hot keys.
Make sure that the Sleep or Hibernate function is specified for the
sleep button.
You might be using an ExpressCard that prevents the computer from
entering Sleep mode. To enter the mode, stop the communication
program and then remove the card or stop the card.
Software Problems
An application program does not work correctly.
Make sure that the software is correctly installed.
If an error message appears on the screen, consult the software
program’s documentation for further information.
If you are sure the operation has stop, reset the computer. (See
“Resetting the Computer” later in this chapter.)
Sound Problems
No sound is produced.
Make sure that the volume control is not set too low.
Page 91

Troubleshooting 8-12
Make sure that the audio driver is correctly installed.
Make sure that the computer is not in Sleep mode.
If using an external speaker, make sure that the speaker is properly
connected.
Distorted sound is produced.
Make sure that the volume control is not set too high or too low. In
most cases, a high setting can cause the audio electronics to distort
the sound.
The sound system does not record.
Adjust the playback or recording sound levels.
The external microphone or audio device does not work.
Make sure that the microphone is connected to the proper connector
on the computer.
Make sure that your computer is equipped with the driver needed.
Click the speaker symbol on the system tray and check the Windows
volume control.
Check the volume control of your computer.
Startup Problems
When you turn on the computer, it does not respond and the Power
Status Indicator does not light green.
If you are using an external AC power, make sure that the AC adapter
is correctly and securely connected. If so, make sure that the
electrical outlet works properly.
If you are using the battery power, make sure that the battery is not
discharged.
When you turn on the computer, it stops after POST.
Restart your computer.
Page 92

Troubleshooting 8-13
The message “Operating system not found” appears on the
screen after you turn on the computer.
If this message appears when you are booting from the hard disk,
insert a bootable disc in the DVD drive and check the condition of the
hard disk.
The message “Invalid system disk” or “Disk error” appears
on the screen after you turn on the computer.
If you are deliberately trying to boot from a disc, replace the disc with
a bootable one and press any key to continue booting.
If this message appears when you are booting from the hard disk,
insert a bootable disc in the DVD drive and check the condition of the
hard disk.
Other Problems
The date/time is incorrect.
Correct the date and time via the operating system or BIOS Setup
program.
After you have performed everything as described above and still
have the incorrect date and time every time you turn on the computer,
the RTC (Real-Time Clock) battery is at the end of its life. Call an
authorized dealer to replace the RTC battery.
Page 93

Troubleshooting 8-14
Resetting the Computer
You may have to reset (reboot) your computer on some occasions when
an error occurs and the program you are using hangs up.
If the computer operation seems to hang up, first wait. It is possible that
the computer is processing data. Periodically check the hard disk drive
in-use indicator, if it flashes irregularly, the program may be accessing
data and preventing you from using the keyboard. If you are sure the
operation has stopped and you cannot use the “restart” function of the
operating system, reset the computer.
Reset the computer by any one of these methods:
Press Ctrl+Alt+Del.
If the above action does not work, turn off the computer. Wait for at
least five seconds and turn it on again.
CAUTION: Resetting will cause any unsaved data to be lost.
Page 94

Specifications A-1
Appendix A
Specifications
NOTE: Specifications are subject to change without any prior notice.
Parts Specifications
CPU Intel® Pentium-M / Celeron-M processor (Santa Rosa Merom core),
667 MHz FSB (Front Side Bus)
ROM BIOS 512 KB EEPROM
RAM System 2 × 200-pin DDRII 667 MHz SO-DIMM sockets 1.25-inch height
Display Panel 15.4-inch TFT, resolution up to 1280×800 WXGA
Video controller UMA
Video ports VGA port
Video memory 64 MB shared system memory (default), supports up to 256 MB
Audio Controller Azalia
Ports Two audio ports for Line-out / Mic-in
Speakers 1 W stereo × 2
Keyboard Standard keys, numeric keypad, 12 function keys, a special Fn
(Function) key and Windows keys
Pointing device PS/2-compatible touchpad with two buttons
Storage
device
Hard disk drive SATA interface 2.5-inch diameter (9.5 mm height), 4200/5400 RPM
Optical drive Combo/DVD Dual/Super Multi (12.7 mm height)
ExpressCard/54 Type II ExpressCard/34 / ExpressCard/54 support
I/O ports Four USB 2.0 ports, RJ-11 port, RJ-45 port
Modem (Optional) 56 Kbps V.90 MDC internal fax modem, Azalia interface
LAN 10/100 Mbps
Wireless LAN (Optional) One mini PCI-E slot for wireless LAN card, compliant with
IEEE 802.11a/b/g or 802.11b/g (pre-installed in selected models)
Power AC adapter Universal AC adapter 65 W; Input 100-240 V, Output 19 V
Battery 4-cell Li-ion battery 2200 mAH / 14.8 V
6-cell Li-ion battery 4400 mAH / 11.1 V
AP
PENDIX
Page 95

Specifications A-2
Parts Specifications
Dimension (W×D×H) 358×263×20~36.6 mm (14.1×10.4×0.8~1.4 inch)
Weight 2.9 kg (6.4 lb)
Environment Temperature
Operating: 0 C (32 F) to 35 C (95 F)
Storage: –20 C (–4 F) to 60 C (140 F)
Humidity Operating: 10 % to 90 % non-condensing
Storage: 5 % to 95 % non-condensing
Regulation EMC CE
Safety CB
Green Product
Coverage
RoHS 6 European Union RoHS banned materials
Others 12 universal GP product banned materials
Page 96

Regulatory Information B-1
Appendix B
Regulatory Information
This appendix provides regulatory statements and safety notices on your
computer.
NOTE: Marking labels located on the exterior of your computer indicate the regulations
that your model complies with. Please check the marking labels and refer to the
corresponding statements in this appendix. Some notices apply to specific models only.
APPENDIX
Page 97

Regulatory Information B-2
On the Use of the System
Class B Regulations
USA
Federal Communications Commission Radio Frequency Interference
Statement
NOTE:
This equipment has been tested and found to comply with the limits for a
Class B digital device pursuant to Part 15 of the FCC Rules. These limits
are designed to provide reasonable protection against harmful
interference in a residential installation. This equipment generates, uses,
and can radiate radio frequency energy and, if not installed and used in
accordance with the instructions, may cause harmful interference to radio
communications. However, there is no guarantee that interference will
not occur in a particular installation. If this equipment does cause harmful
interference to radio or television reception, which can be determined by
turning the equipment off and on, the user is encouraged to try to correct
the interference by one or more of the following measures:
Reorient or relocate the receiving antenna.
Increase the separation between the equipment and receiver.
Connect the equipment into an outlet on a circuit different from that
to which the receiver is connected.
Consult the dealer or an experienced radio/TV technician for help.
Any changes or modifications not expressly approved by the
manufacturer could void the user’s authority to operate the equipment.
Please note:
The use of a non-shielded interface cable with this equipment is
prohibited.
Page 98

Regulatory Information B-3
Canada
Canadian Department of Communications
Radio Interference Regulations Class B Compliance Notice
This Class B digital apparatus meets all requirements of the Canada
Interference-Causing equipment regulations.
Cet appareil numérique de Classe B respecte toutes les exigences du
Règlement Canadien sur le matériel brouileur.
This digital apparatus does not exceed the Class B limits for radio noise
emissions from digital apparatus set out in the Radio Interference
Regulations of the Canadian Department of Communications.
Le présent appareil numérique n’émet pas de bruits radioélectriques
dépassant les limites applicables aux appareils numériques de la classe B
prescrites dans le Règlement sur le brouillage radioélectrique édicté par
le ministère des Communications du Canada.
Safety Notices
About the Battery
Caution Texts Concerning Lithium Batteries
DANISH
ADVARSEL! Lithiumbatteri – Eksplosionsfare ved fejlagtig håndtering. Udskiftning må
kun ske med batteri af samme fabrikat og type. Levér det brugte batteri tilbage til
leverandøren.
NORWEGIAN
ADVARSEL: Eksplosjonsfare ved feilaktig skifte av batteri. Benytt samme batteritype
eller en tilsvarende type anbefalt av apparatfabrikanten. Brukte batterier kasseres i
henhold til fabrikantens instruksjoner.
SWEDISH
VARNING: Explosionsfara vid felaktigt batteribyte. Använd samma batterityp eller en
ekvivalent typ som rekommenderas av apparattillverkaren. Kassera använt batteri enligt
fabrikantens instruktion.
FINNISH
VAROITUS: Paristo voi räjähtää, jos se on virheellisesti asennettu. Vaihda paristo
ainoastaan valmistajan suosittelemaan tyyppiin. Hävitä käytetty paristo valmistajan
ohjeiden mukaisesti.
Page 99

Regulatory Information B-4
ENGLISH
CAUTION: Danger of explosion if battery is incorrectly replaced. Replace only with the
same or equivalent type recommended by the equipment manufacturer. Discard used
batteries according to manufacturer's instructions.
DEUTSCH
VORSICHT: Explosionsgefahr bei unsachgemäßem Austausch der Batterie. Ersatz nur
durch denselben oder einen vom Hersteller empfohlenen gleich-wertigen Typ.
Entsorgung gebrauchter Batterien nach Angaben des Herstellers.
FRENCH
ATTENTION: II y a danger d’explosion s’il y a remplacement incorrect de la batterie.
Remplacer uniquement avec une batterie du même type ou d’un type équivalent
recommandé par le constructeur. Mettre au rebut les batteries usagées conformément aux
instructions du fabricant.
Attention (for USA Users)
The product that you have purchased contains a rechargeable battery.
The battery is recyclable. At the end of its useful life, under various state
and local laws, it may be illegal to dispose of this battery into the
municipal waste stream. Check with your local solid waste officials for
details in your area for recycling options or proper disposal.
About the AC Adapter
Use only the AC adapter supplied with your computer. Use of
another type of AC adapter will result in malfunction and/or danger.
Do not use the adapter in a high moisture environment. Never touch
the adapter when your hands or feet are wet.
Allow adequate ventilation around the adapter when using it to
operate the device or charge the battery. Do not cover the AC adapter
with paper or other objects that will reduce cooling. Do not use the
AC adapter while it is inside a carrying case.
Connect the adapter to a proper power source. The voltage
requirements are found on the product case and/or packaging.
Do not use the adapter if the cord becomes damaged.
Do not attempt to service the unit. There are no serviceable parts
inside. Replace the unit if it is damaged or exposed to excess
moisture.
Page 100

Regulatory Information B-5
About the Modem
Caution
Never install telephone wiring during a lightning storm.
Never install telephone jacks in wet locations unless the jack is
specifically designed for wet locations.
Never touch non-insulated telephone wires or terminals unless the
telephone line has been disconnected at the network interface.
Use caution when installing or modifying telephone lines.
Avoid using the telephone function (other than a cordless type)
during an electrical storm. There may be a remote risk of electric
shock from lightning.
Do not use the telephone function to report a gas leak in the vicinity
of the leak.
Do not use this product near water, for example near a bathtub, wash
bowl, kitchen sink or laundry tub, in a wet basement or near a
swimming pool.
Caution (for USA Users)
To reduce the risk of fire, use only No.26 AWG or larger
telecommunication line cord.
 Loading...