

Page 1

1
Version 1.00
V-Switch 3 User Guide
Instruction manual and user’s guide
This manual explains features and provides basic information about how to set up and operate the
V-Switch 3 User, including instructions on how to install and use the PWGUser. The manual also
includes warnings and precautions for the safe and proper use of the product.
Page 2

3
Version 1.00
Table of contents
Warning ................................................................................................................................................ 2
Important Notices regarding the use of V-Switch 3 ........................................................................ 2
Important Notices regarding the contents of this guide ................................................................. 2
Regulatory Information .................................................................................................................... 2
Precautions .......................................................................................................................................... 5
Safety................................................................................................................................................ 5
Use and handling .............................................................................................................................. 5
LCD Screen ....................................................................................................................................... 6
WEEE Directive ................................................................................................................................. 6
Cleaning ............................................................................................................................................ 6
Checking the package content ............................................................................................................. 7
Product overview ................................................................................................................................. 8
Front side of the tool ....................................................................................................................... 8
Upper side of the tool ...................................................................................................................... 8
Using the menus .............................................................................................................................. 9
Main menu ................................................................................................................................... 9
Setup sub menu .......................................................................................................................... 10
Diagnosis sub menu .................................................................................................................... 10
Preparation ........................................................................................................................................ 11
Configuring V-Switch 3 for use ...................................................................................................... 11
How to select the language ....................................................................................................... 11
How to set the screen brightness .............................................................................................. 11
How to rotate the screen 180° .................................................................................................. 11
How to calibrate the screen ....................................................................................................... 11
How to display the information about your device ................................................................... 11
Operating Procedures ........................................................................................................................ 13
Reading the original file ................................................................................................................. 13
Writing a modified file ................................................................................................................... 13
Clearing DTC codes on your vehicle ............................................................................................... 13
Clearing DTC codes on another vehicle ......................................................................................... 13
File and Device Management ............................................................................................................ 15
Installing PWGUser software ......................................................................................................... 15
Page 3

4
Version 1.00
Main window of the software ........................................................................................................ 16
Downloading the original file ......................................................................................................... 17
Uploading the modified file ........................................................................................................... 17
Erasing data from your device ....................................................................................................... 17
Downloading your LOG file ............................................................................................................ 17
Displaying vehicles supported ....................................................................................................... 18
Page 4

5
Version 1.00
Precautions
Before using this product, carefully read this manual and retain it for future
reference.
Safety
This product has been designed with the highest concern for safety. However, any electrical
device, if used improperly, has the potential for causing fire, electrical shock or personal injury. To
help ensure accident-free operation, follow these guidelines:
•
Observe all warnings, precautions and instructions.
•
Stop use, unplug the USB cable from the PC and disconnect any other cables immediately if the
device functions in an abnormal manner, produces unusual sounds or smells, or becomes too
hot to touch.
•
Never disassemble the product or accessories. Use the V-Switch 3
and accessories according
to the instructions and guidelines provided in the user’s guide. No authorization for the analysis
or modification of the product, or the analysis or modification of the PWGUser software, or the
analysis of its circuit configuration, is provided. Disassembling will void the product warranty
and may be dangerous
Use and handling
•
Do not use the tool near water.
•
Use only cables supplied by Viezu, its subsidiaries and affiliates or by an authorized
dealer.
•
Do not expose the tool or accessories to high temperatures, high humidity, or direct sunlight.
•
Do not leave the product or accessories in a car with the windows closed (particularly in
summer).
•
Do not expose the product or accessories to dust, smoke, or steam.
•
Do not allow liquid or small particles to get into the product or accessories.
•
Do not place the product or accessories on surfaces that are tilted, unstable or subject to
vibration.
•
Do not drop or step on the product or accessories, and do not subject the device to strong
physical shock.
•
Do not put heavy objects on the product or accessories.
•
Do not touch or insert foreign objects into the connectors of the tool or accessories.
Page 5

6
Version 1.00
LCD Screen
•
The LCD screen is made of glass and may crack if subjected to excessive force.
•
Pixels that are not lit or are continuously lit may appear in certain locations on the LCD screen.
The possible occurrence of such spots is a normal occurrence associated with LCD screens and
is not a sign of a malfunction.
•
Direct exposure to sunlight may damage the product’s LCD screen.
•
When using the product in a cold environment, you may notice shadows on the graphics or the
screen may appear darker than usual. This is not a malfunction, and the screen will return to
normal when the temperature goes up.
WEEE Directive
Cleaning
•
Cleaning the exterior surface excluding the LCD screen: Wipe gently with a soft cloth. Do not
use solvents or other chemicals to clear the exterior surface of the V-Switch 3.
•
Cleaning the LCD screen: Wipe gently with a soft cloth.
•
Cleaning the connectors: Do not use the product if the connectors are not clean. Remove the
dirt with a dry cloth.
This symbol on the product or its packaging indicates that this product shall not be
treated as household waste. In line with EU Directive 2002/96/EC for waste electrical
and electronic equipment (WEEE), this product must not be disposed of as unsorted
municipal waste. Please dispose of this product by returning it to the point of sale or to
your local municipal collection point for recycling
Pre-Service Instructions
NOTE: If your vehicle is to be taken into a main dealer to be worked upon please ensure that
the Original file has been put back on the car. Main dealers may perform an ECU update on the
vehicle which may lock you out of your V-Switch device if the car has not been reverted back to
the Original tune beforehand.
Page 6
7
Version 1.00
Checking the package content
The basic kit supplied with V-Switch 3 includes:
□
V-Switch 3 tool
□
1 USB cable
□
OBDII cable
If any items are missing, contact [email protected] providing your serial number.
Always keep the original packaging. In case of required servicing of the product, the tool must
be returned with all accessories.
Page 7
8
Version 1.00
Product overview
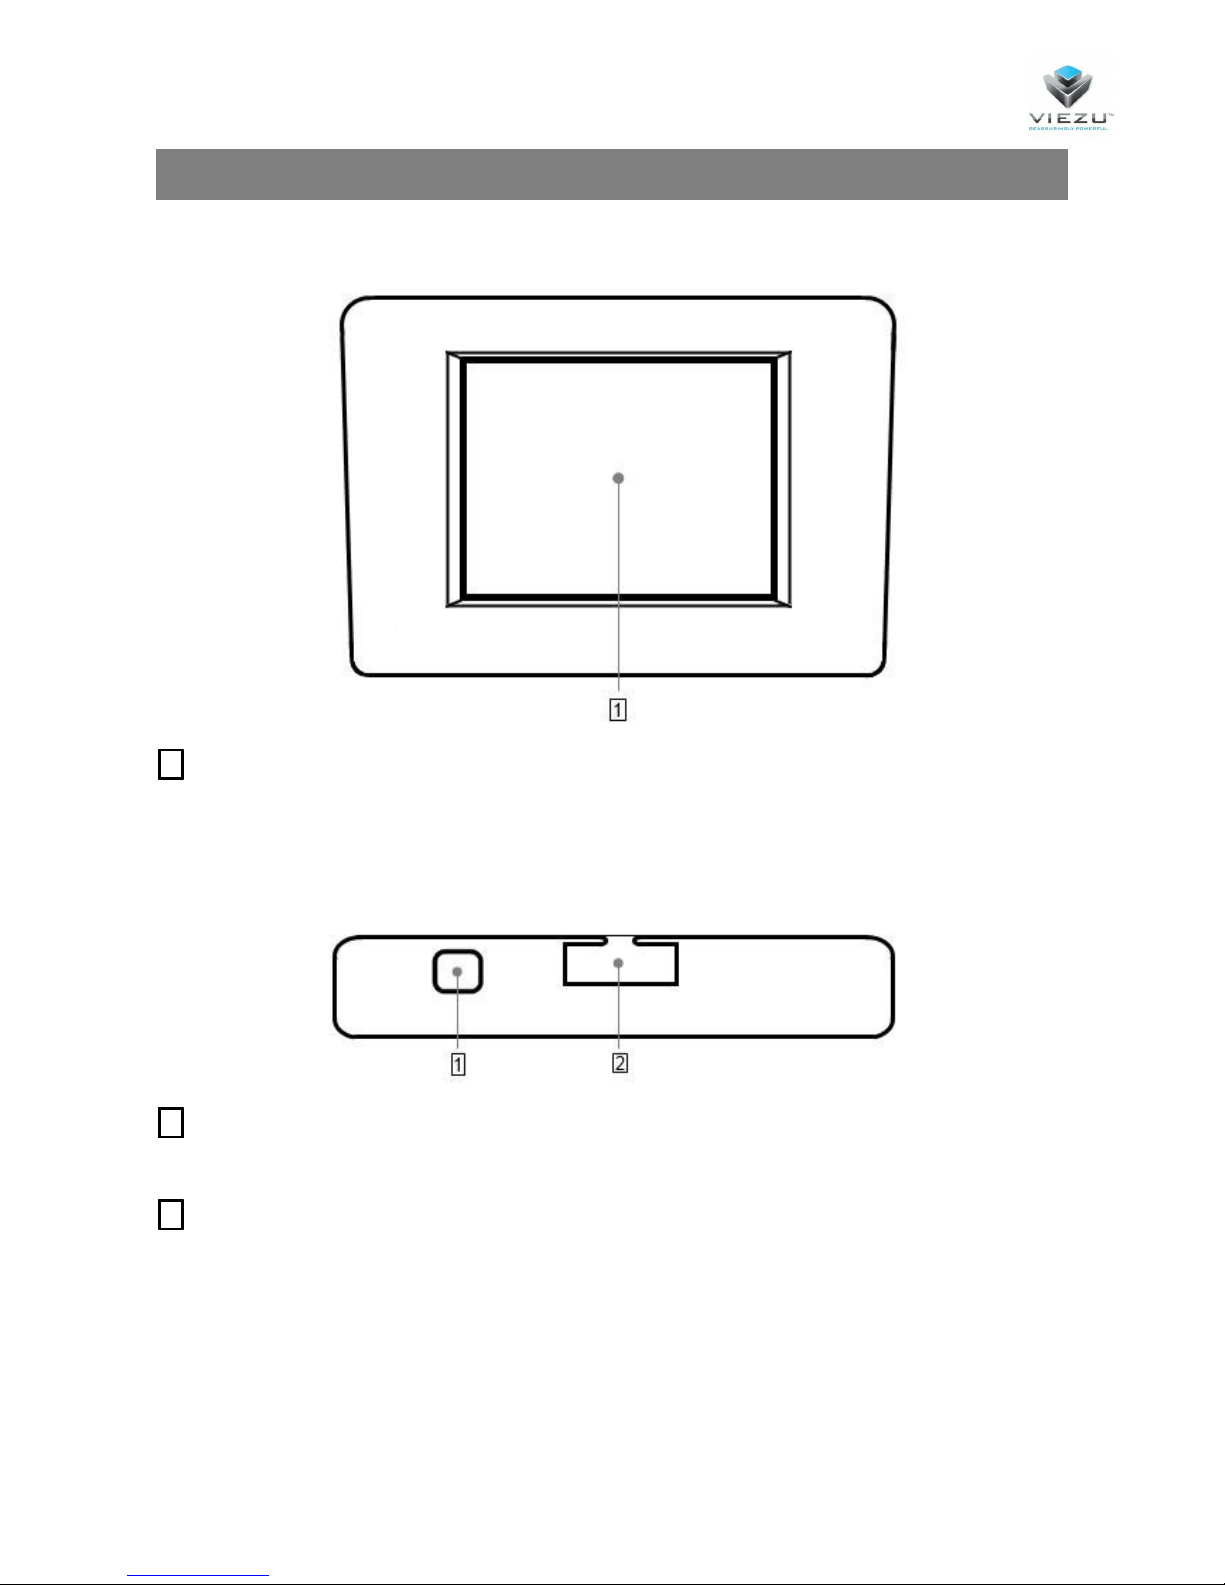
Front side of the tool
1 LCD Display
Touch screen display to use the software embedded in the tool.
Upper side of the tool
1 USB connector
Connect the tool to the computer.
2 Cable connector
Connect the cable supplied with the tool.
Page 8
9
Version 1.00
Using the menus
To use V-Switch 3 you need to connect the tool to your vehicle using the OBDII cable supplied.
You interact with V-Switch 3 using your fingers to tap menu icons on the touch screen.
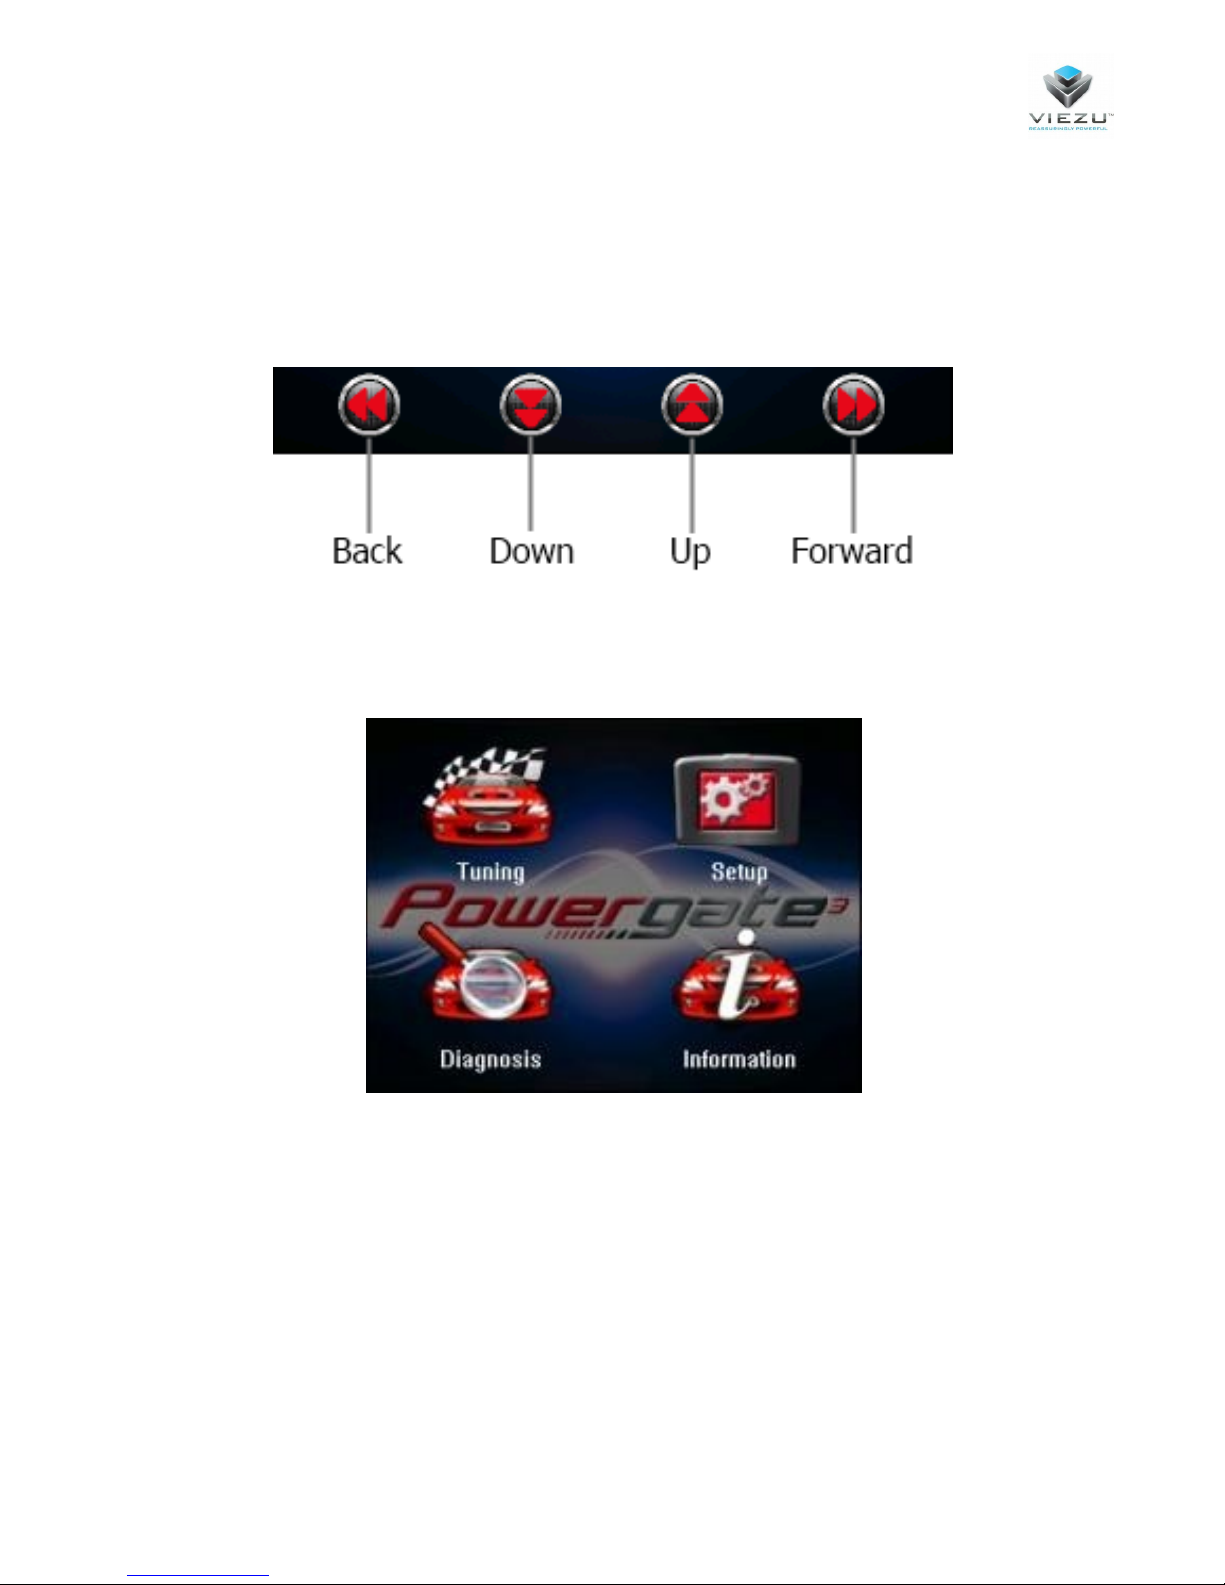
Use the navigation arrows to move through the menus:
Main menu
Tuning: To select and read your vehicle the first time you use your V-Switch 3, and write the
modified file the next time.
Setup: To enter the Setup menu.
Diagnosis: To perform a diagnosis of the vehicle.
Information: To display the info about your device (for ex. Serial Number, Hardware and Software
version) and, in case you’ve already read a vehicle, the info about the ECU.
Page 9
10
Version 1.00
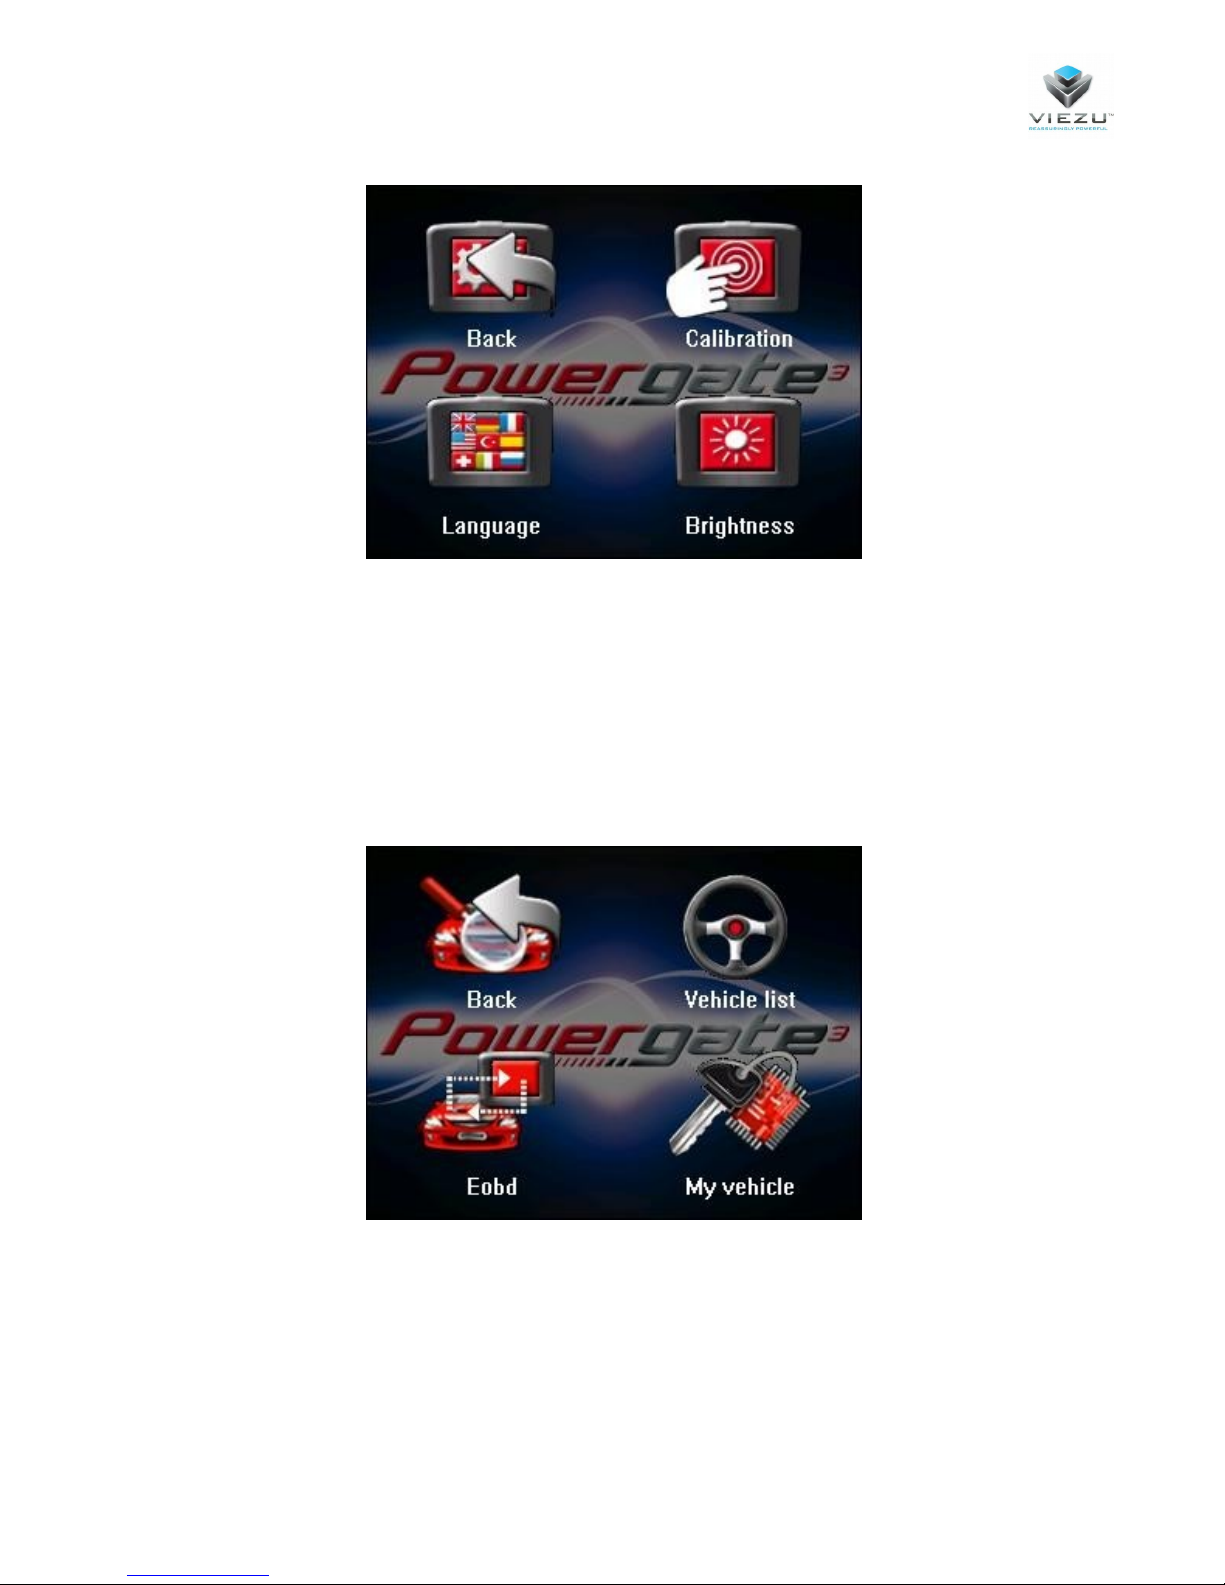
Setup sub menu
Back: To go back to Main menu.
Calibration: To calibrate the touch display.
Language: To set the language of the tool.
Feature: To set the back light of the display and rotate the screen 180°.
Diagnosis sub menu
Back: To go back to Main menu.
Vehicle list: To display the vehicle list and choose a vehicle other than yours to perform a
diagnostic check and erase DTC codes.
EOBD: To perform a generic diagnostic check in Scan Tool mode. Function currently not available.
My vehicle: To perform a diagnostic check on your vehicle and erase DTC codes.
Page 10

11
Version 1.00
Preparation
Configuring V-Switch 3 for use
How to select the language
1. Tap Setup.
2. Tap Language and select the language for the screen texts.
3. Go back to the Setup sub menu using the navigation arrows.
How to set the screen brightness
1. Tap Setup.
2. Tap Feature.
3. Tap Brightness and then tap on the double arrows to continue.
4. Increase or decrease the brightness of the screen until you get the brightness you desire.
5. Tap Yes to confirm or No to go back to the Setup sub menu
How to rotate the screen 180°
1. Tap Setup.
2. Tap Feature.
3. Tap Screen Rotation and then tap on the double arrows to apply the change and go
back to the Setup sub menu
How to calibrate the screen
1. Tap Setup.
2. Tap Calibration.
3. Tap on the box to calibrate, and repeat as the box moves.
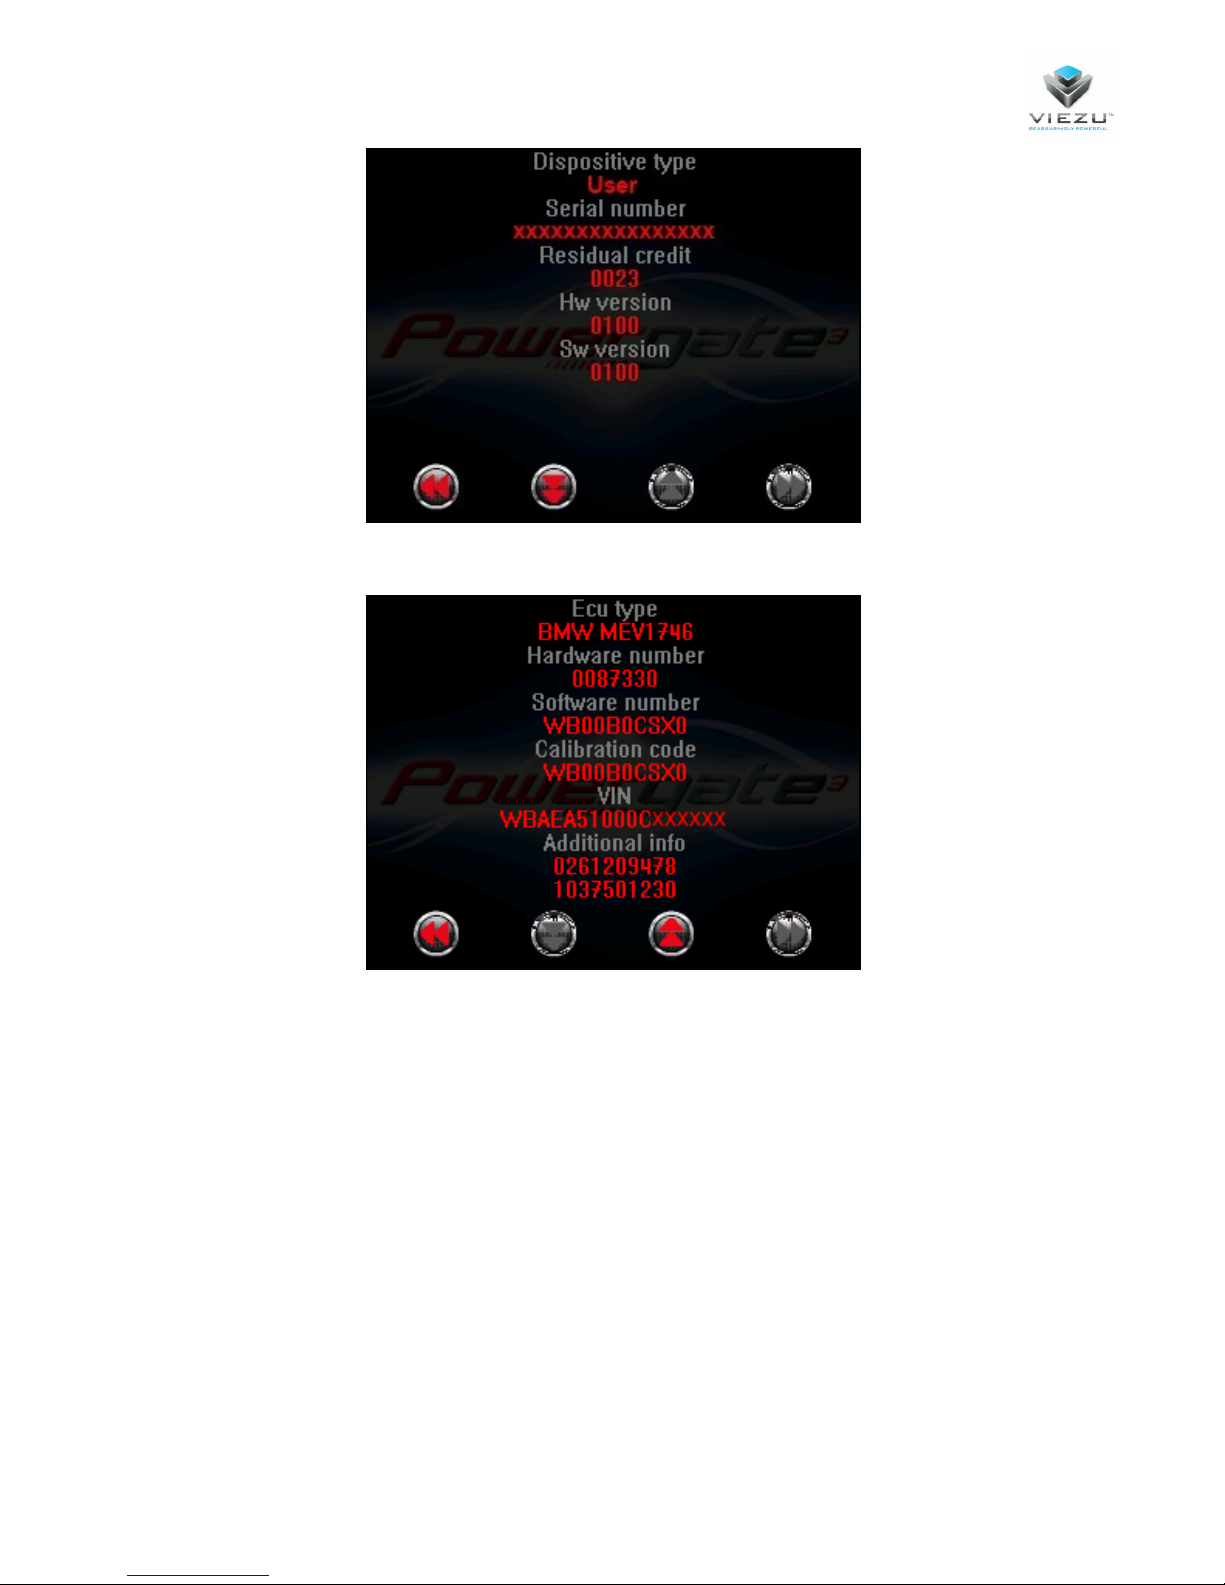
How to display the information about your device
Tap Information to display the information about your device:
Page 11
12
Version 1.00
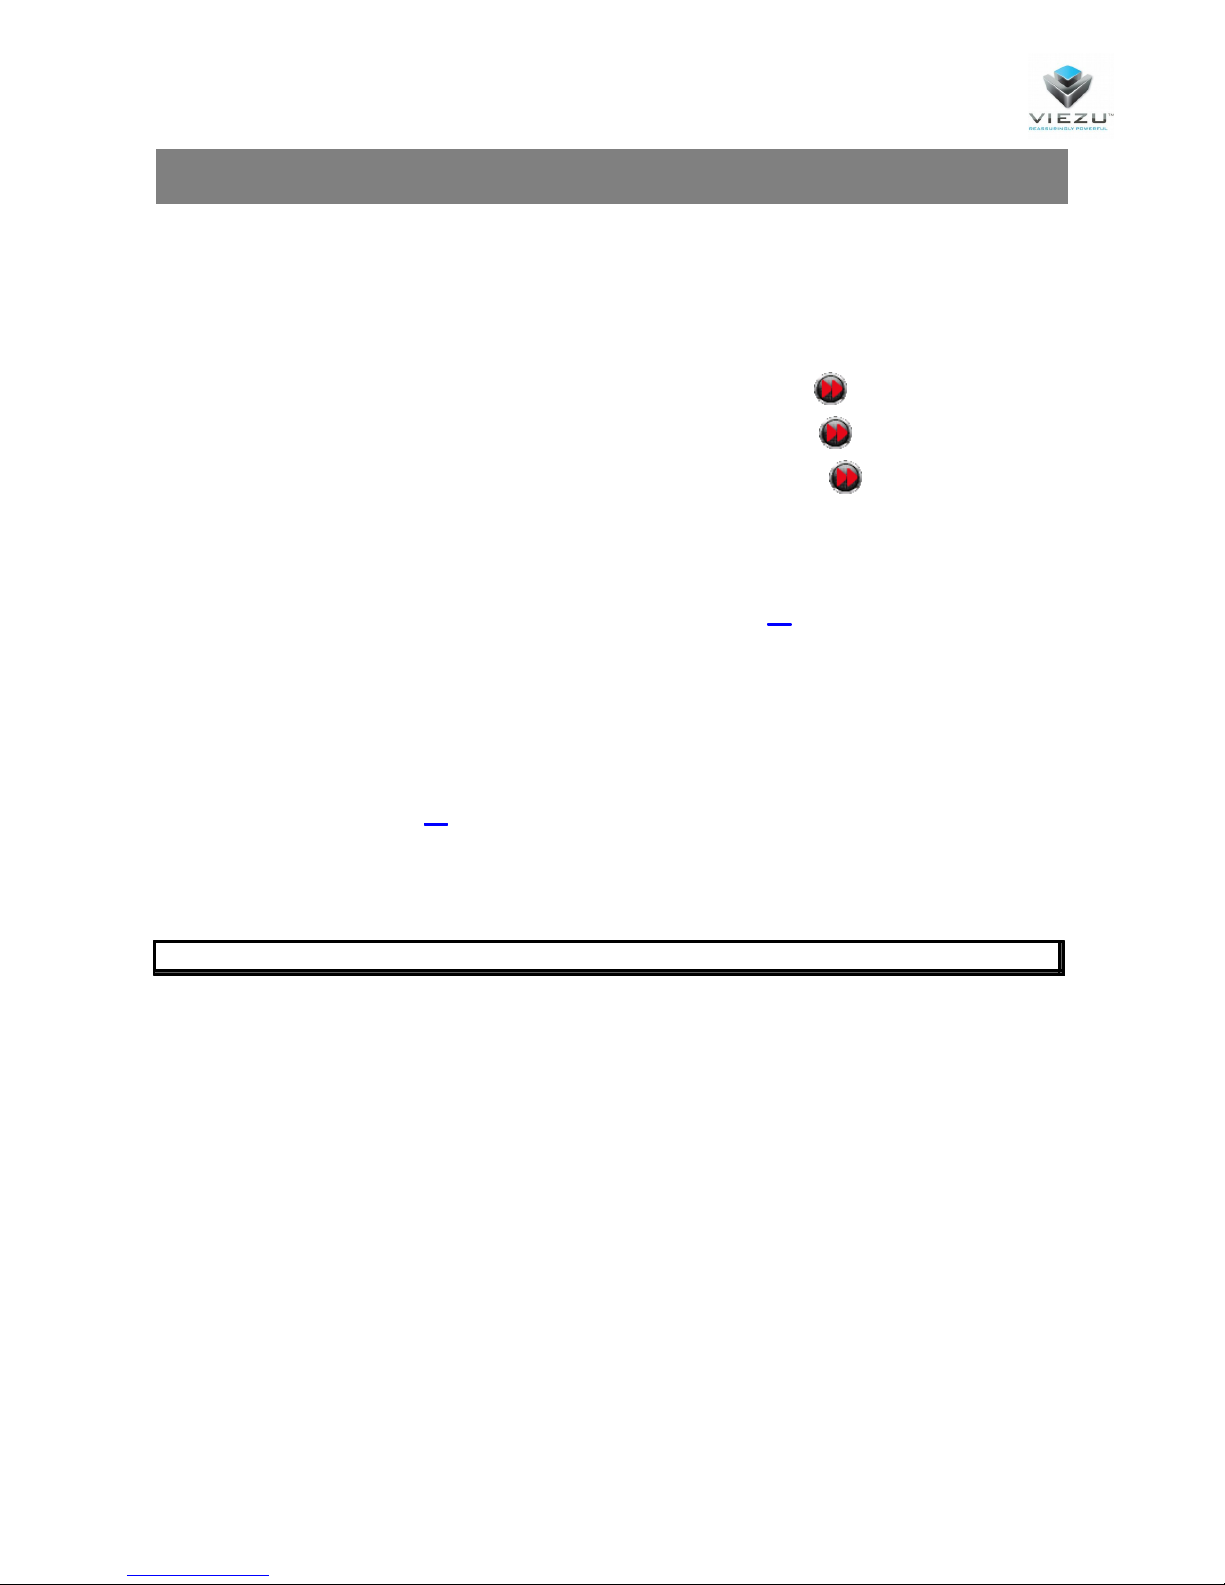
If you’ve already read a vehicle, in the next screen you can see the ECU info:
Page 12
13
Version 1.00
Operating Procedures
Reading the original file
To read the original file from your vehicle:
1. Tap on Tuning.
2. Select the Brand of your car and then tap on the double arrows to continue.
3. Select the Model of your car and then tap on the double arrows to continue.
4. Select the Version of your car and then tap on the double arrows to continue.
5. Follow the onscreen instructions to read the stock original file from your vehicle.
(Stock file not present. Do you want to start the read operation?)
6. Use the PWGUser software to download this file from your V-Switch 3 and send it your
Decoder (see section File and Device Management – page 15).
Writing a modified file
To write a modified file on your vehicle:
1. Upload the tuning file in your V-Switch 3 using the PWGUser (see section File and Device
Management – page 15).
2. Tap on Tuning.
3. Follow the onscreen instructions to write the tuning file on your vehicle.
Notice: The file marked with * is the one currently stocked on the ECU.
Picking your tune file
Viezu Technologies can offer a range of different files to ensure you have the perfect file you
And your vehicle. We can offer the following files (dependent on vehicle):
1. CLASSICME – This is your Original file
2. ECOME – Reward yourself by saving on the cost of fuel. Get more miles with less fuel.
3. FUSIONME – Blended – The perfect blend of ECOME and EXCITEME. The best of both worlds
4. EXCITEME – Enhanced performance – More BHP, More Torque
5. THRILLME – Pure Performance unleashed – Track day only for a pure adrenaline rush!
6. PARKME – Reduced Speed – Valet mode.
Page 13

14
Version 1.00
3. Select the Brand of your car and then tap on the double arrows to continue.
4. Select the Model of your car and then tap on the double arrows to continue.
5. Select the Version of your car and then tap on the double arrows to continue.
6. Follow the onscreen instructions.
7. If DTC codes are found, tap Yes if you want to delete them or No to go back to the
Diagnosis submenu.
Clearing DTC codes on your vehicle
1. Tap on Diagnosis.
2. Tap on My vehicle and then tap on the double arrows to continue.
3. Follow the onscreen instructions.
4. If DTC codes are found, tap Yes if you want to delete them or No to go back to the
Diagnosis submenu.
Clearing DTC codes on another vehicle
1. Tap on Diagnosis.
2. Tap on Vehicle List.
Page 14
15
Version 1.00
File and Device Management
Installing PWGUser software
1. Save the file setupv-switch3.zip which can be found in the Downloads section of our website..
You may need to temporary disable your anti-virus or anti-spam software, in case it
prevents the installation of drivers.
2. Extract the setupv-switch3.zip file and then double click on the SetupV-Switch3.exe to
install the software.
Notice: When the security warning saying it is not possible to verify the authenticity of
the software or drivers is displayed, please click on Install.
3. Follow the on-screen instructions and wait for the installation to complete.
4. Connect the V-Switch 3 to your computer using the USB cable provided.
After the installation has completed, PWGUser will start automatically.
Page 15
16
Version 1.00
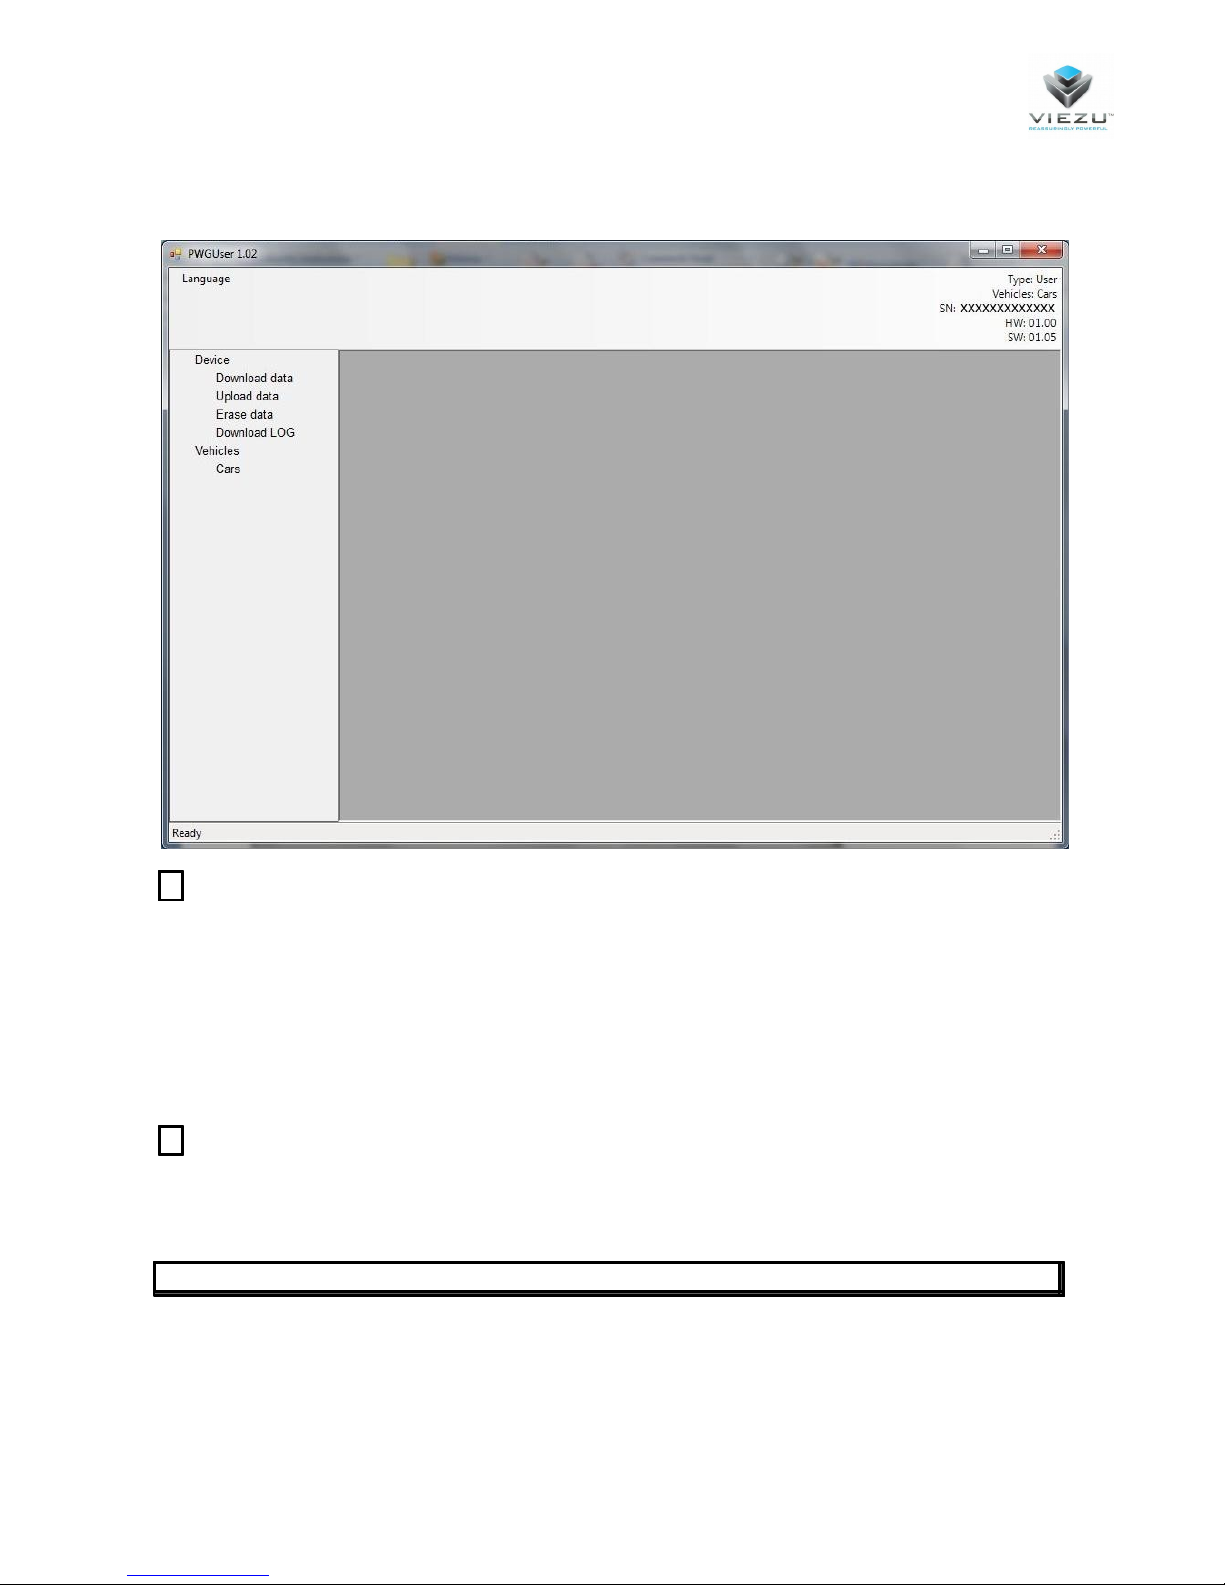
Main window of the software
1 Device
Download data - To save on your computer the original file read from your vehicle.
Upload data - To save on your device the modified file(s) received from your Decoder.
Erase data - To.
Download LOG - To download the LOG with .
2 Vehicles
Cars - To display a complete list of all cars supported by V-Switch 3.
To make best use of PWGUser, we suggest you to hit the maximize button in the titlebar.
Page 16

17
Version 1.00
Downloading the original file
To download the stock original file read from your vehicle:
1. Click on Download data.
2. Click on Start.
3. Click on Browse to choose a folder where to save your file.
Uploading the modified file
To upload the modified file received from your Decoder in your V-Switch 3:
1. Click on Upload data.
2. Click on Start.
3. Click on Browse to select the folder where you saved the file received from your Decoder.
Erasing data from your device
To erase all data in your V-Switch 3 so that you can use it on another vehicle:
1. Click on Erase data.
2. Click on Start.
Notice: This operation is allowed only if you’ve restored the original file on your vehicle.
Downloading your LOG file
1. Click on Download LOG.
2. Click on Start to save the LOG file of your device on your computer.
Picking your tune file
Viezu Technologies can offer a range of different files to ensure you have the perfect file you
And your vehicle. We can offer the following files (dependent on vehicle):
1. CLASSICME – This is your Original file
2. ECOME – Reward yourself by saving on the cost of fuel. Get more miles with less fuel.
3. FUSIONME – Blended – The perfect blend of ECOME and EXCITEME. The best of both worlds
4. EXCITEME – Enhanced performance – More BHP, More Torque
5. THRILLME – Pure Performance unleashed – Track day only for a pure adrenaline rush!
6. PARKME – Reduced Speed – Valet mode.
Page 17
18
Version 1.00
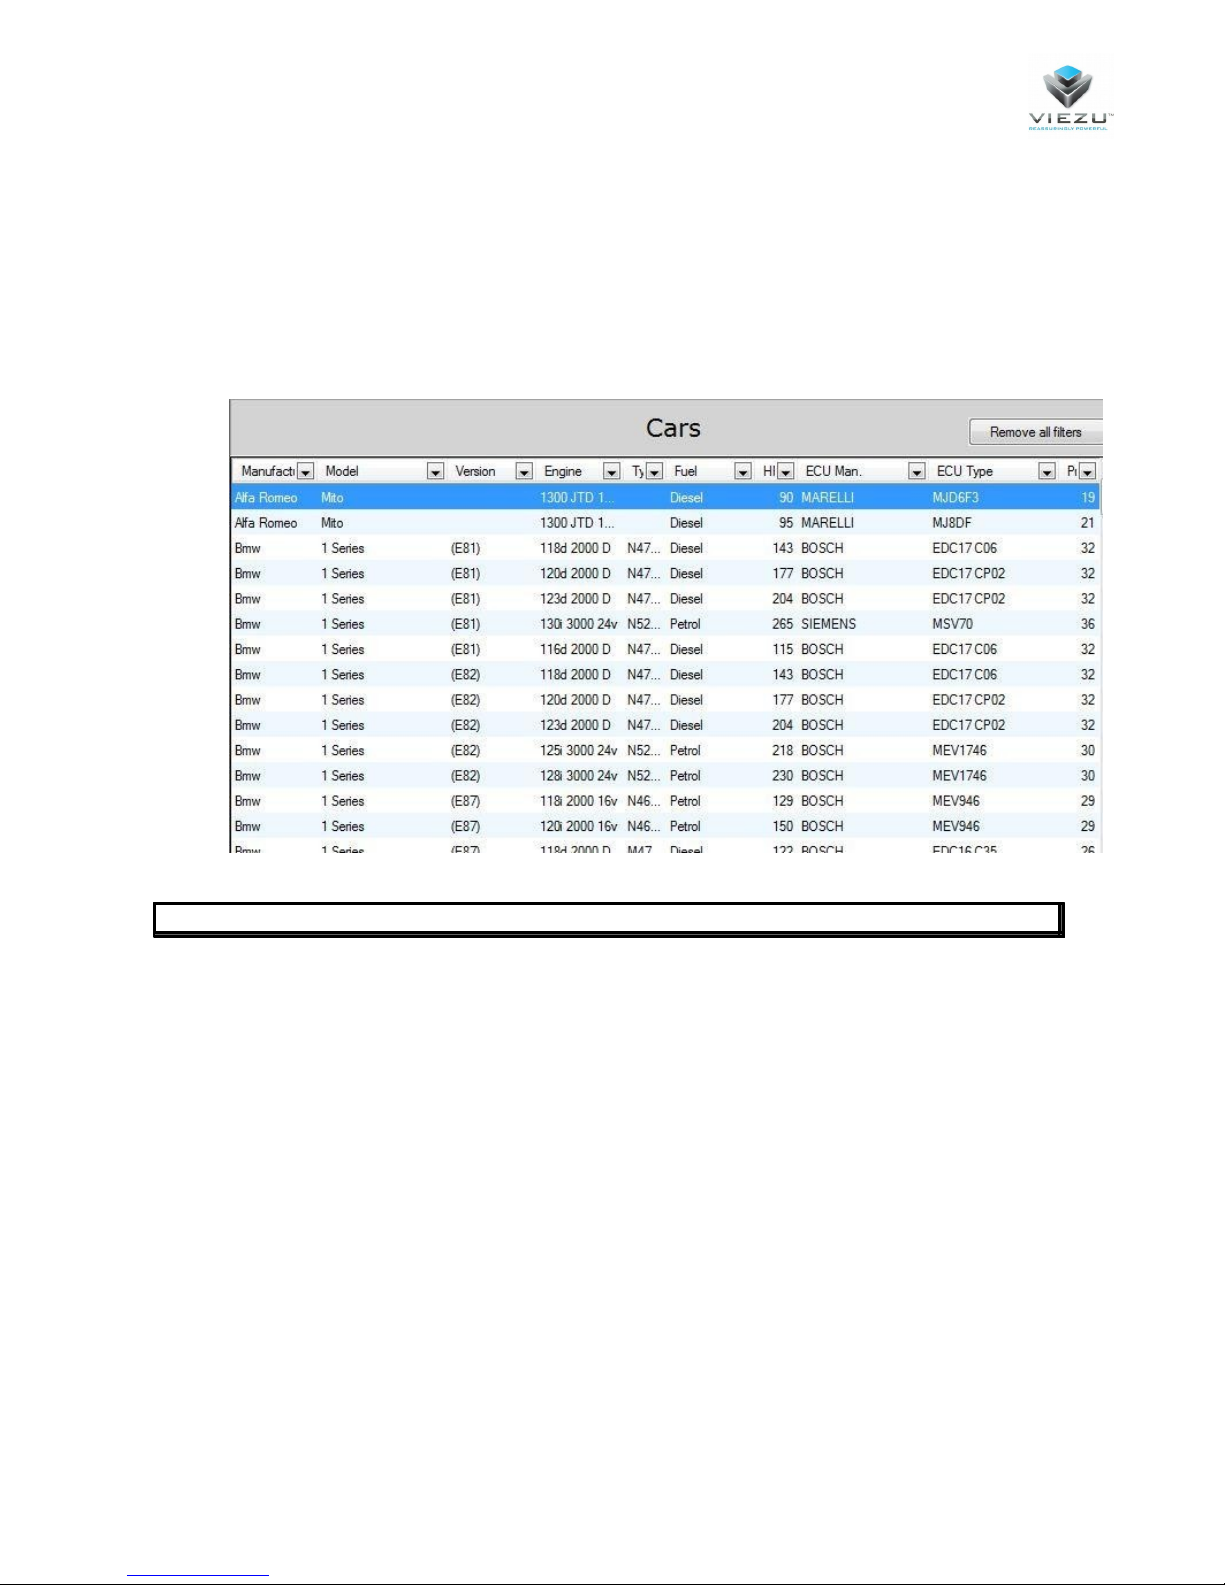
Displaying vehicles supported
Click on Cars to display the list of all cars supported by V-Switch 3.
You can filter the information as in Excel.
We remind you that an active Internet connection is needed to display the list.
You can sort the content of the table by clicking on the column-title box.
 Loading...