

Page 1
ContentsContents
Chapter 1:Know your tablet PC
Chapter 1:Know your tablet PC
Front View
Left/Right View
Top/Down View
Chapter 2:Use the tablet PC
User GuideUser Guide
Dear customer:
Thank you for choosing this product!
2
3
4
Your computer has powerful information processing capabilities
and mobile characteristic. Wherever you are,in office,home,or
traveling, it is your effective assistant, which accompanies you all
the time.
The following text will help you master the methods and the
techniques of using the product.
On/Off the tablet PC
Charging and power
Chapter 3:Set up of BIOS and Install Driver
Set up BIOS
Install the Driver program
Chapter 4:Control Center Functions
Use the control Center
Note : The appearance, color, features, and pictures in the
manual are for reference only; if any difference, please see
the actual products.
The company reserves the right to update the products and the
manual without prior notice.
Warning: According to ERC RECOMMENDATION 70-03, Frequency
2400-2483.5 MHz can be used in EU member states and EFTA
countries except France.
1
5
5
Chapter 1:Know your tablet PC
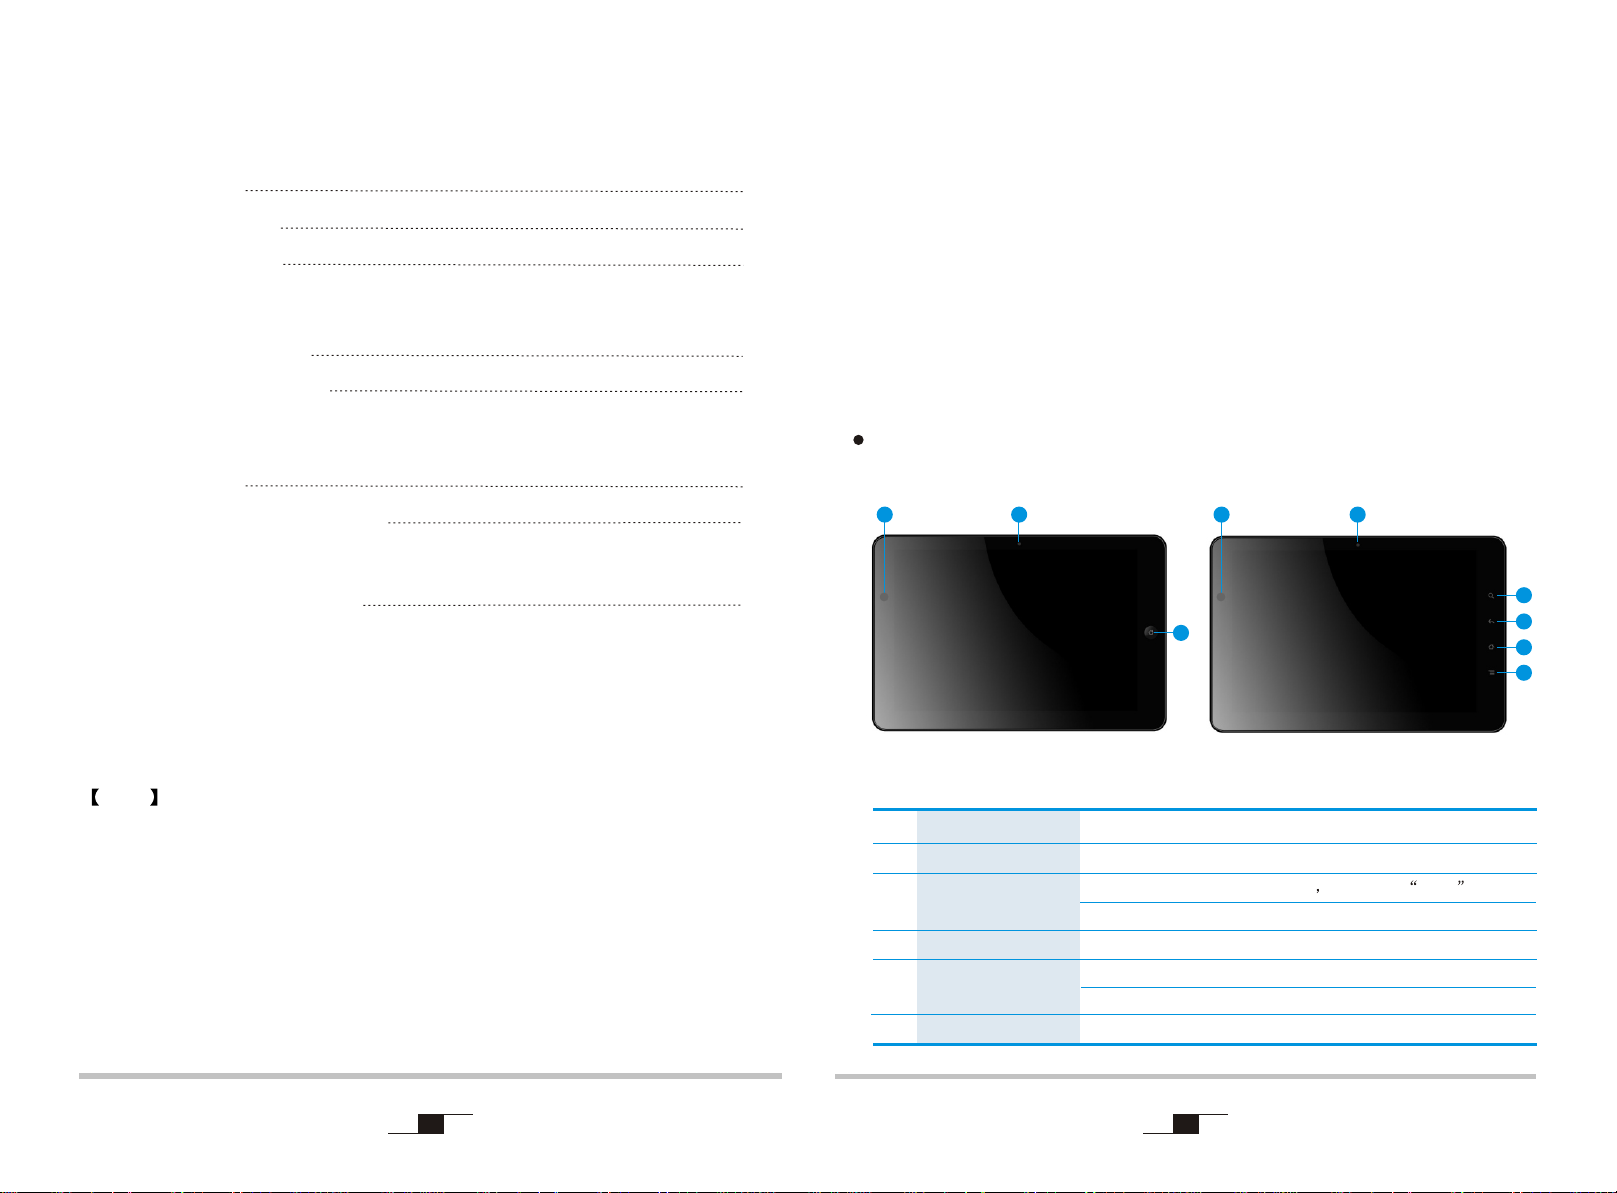
NO.1.1 Front View
The model you are buying, has appearances A and B. Please choose the
actual physical corresponding icon for related reference.
5
8
21 1
9
3
2
4
5
3
6
Appearances A Appearances B
1
Light sensor
2
Camera
Home key
3
Search Key
4
Back key
5
Control Center Key
6
Automatically adjust the backlight
Taking pictures or recording video
Back to the desk top in Windows or used as Enter key in the
DOS.
Open IE in Window , Move the cursor up in DOS.
Back to the previous interface from the current interface in Window,
move the cursor down in Dos.
Open control center
2
Page 2
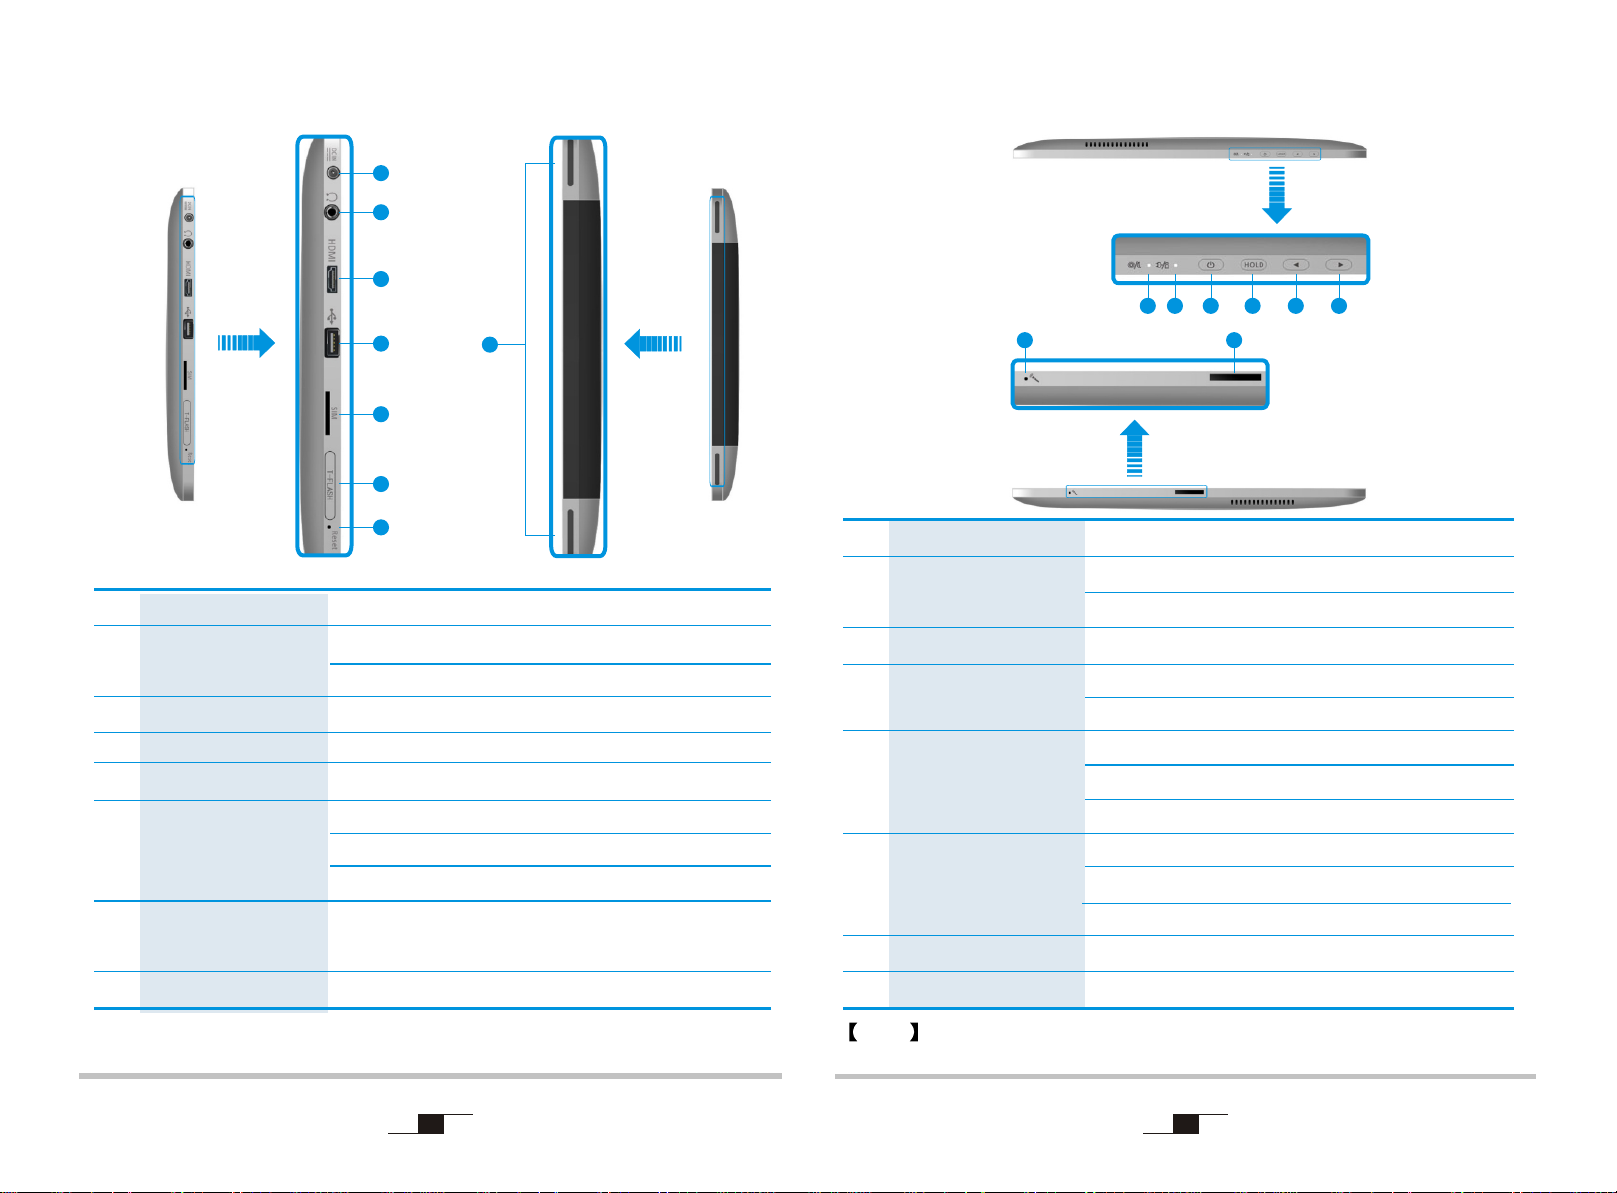
NO.1.2 Left/Right View
7
8
9
NO.1.2 Top/Down View
9
15 16 17 18
20
19
7
DC-In Jack
Microphone-in and
8
Headphone-out Jack
Mini-HDMI Port
9
USB Port
10
SIM Slot
11
TF Slot
12
Cut power
13
Built-in speaker
14
10
11
12
13
Connect to the DC power supply
3.5mm standard Microphone-in and Headphone-out combo jack
or standard headset Jack
External mini high-definition Multimedia monitor interface
Connect USB devices, such as: printer Digital Camera etc
I
nsert SIM card, 3G internet can be connected. (optional )
Insert TF memory card to extend the tablet PC storage.
(You should use simple tool to easy insert or pull out the TF
memory card. such as pencil.)
14
Forced off with needle insert the reset hole, you can't turn of f the
tablet PC by press power button 4S, when the system stuck
Sound output
21 22
Power indicator
15
The battery and charging
16
status indicator
Power button
17
Hold Button
18
Decrease the volume
19
Button
Increase the volume
20
Button
nternal Microphone
I
21
Docking port
22
Note Your tablet PC may not have all the interface above according to the
specific type, please check with the real model.
Blue light flashing means into sleep appearance
If the light being amber means the battery is charging,
if the light being blue means it's been fully charged.
Power On/ OFF
P
ress it On/OFF backlight and touch panel; Long press it can
open Ttask Manager
(Appearance A)Decrease the volume in Window,move the curson
down in Dos .(Appearance B)Decrease the volume in Window,move
the curson left in Dos interface.
(Appearance A)Increase the volume in Window,move the curson top
in Dos .(Appearance B)Increase the volume in Window,move the
curson right in Dos.
Sound recording
o expand tablet PC functions
T
3
4
Page 3
Chapter 2: Use the tablet PC
NO.2.1 On / Off the tablet PC
Press the power button to turn on the tablet PC.
If system hang up, press the power button more than four seconds to turn
off the tablet PC force. Then press the power button to boot OS.
Note Please calibrate the touch panel by the tablet PC driver CD. Because
the touch panel have some deviation, when the PC is first used or it is
re-assemble.
NO.2.2 Charging and power
Please let the battery power run out after you bought the product,then
charge. Charging time is about four hours.
If tablet PC is withlow battery, the screen will flash low battery indicator
and charging light will flash orange light on Windows 7. You should
charge intime.
There will be having minor heat when it is charging. It's
normal, which could be accepted.
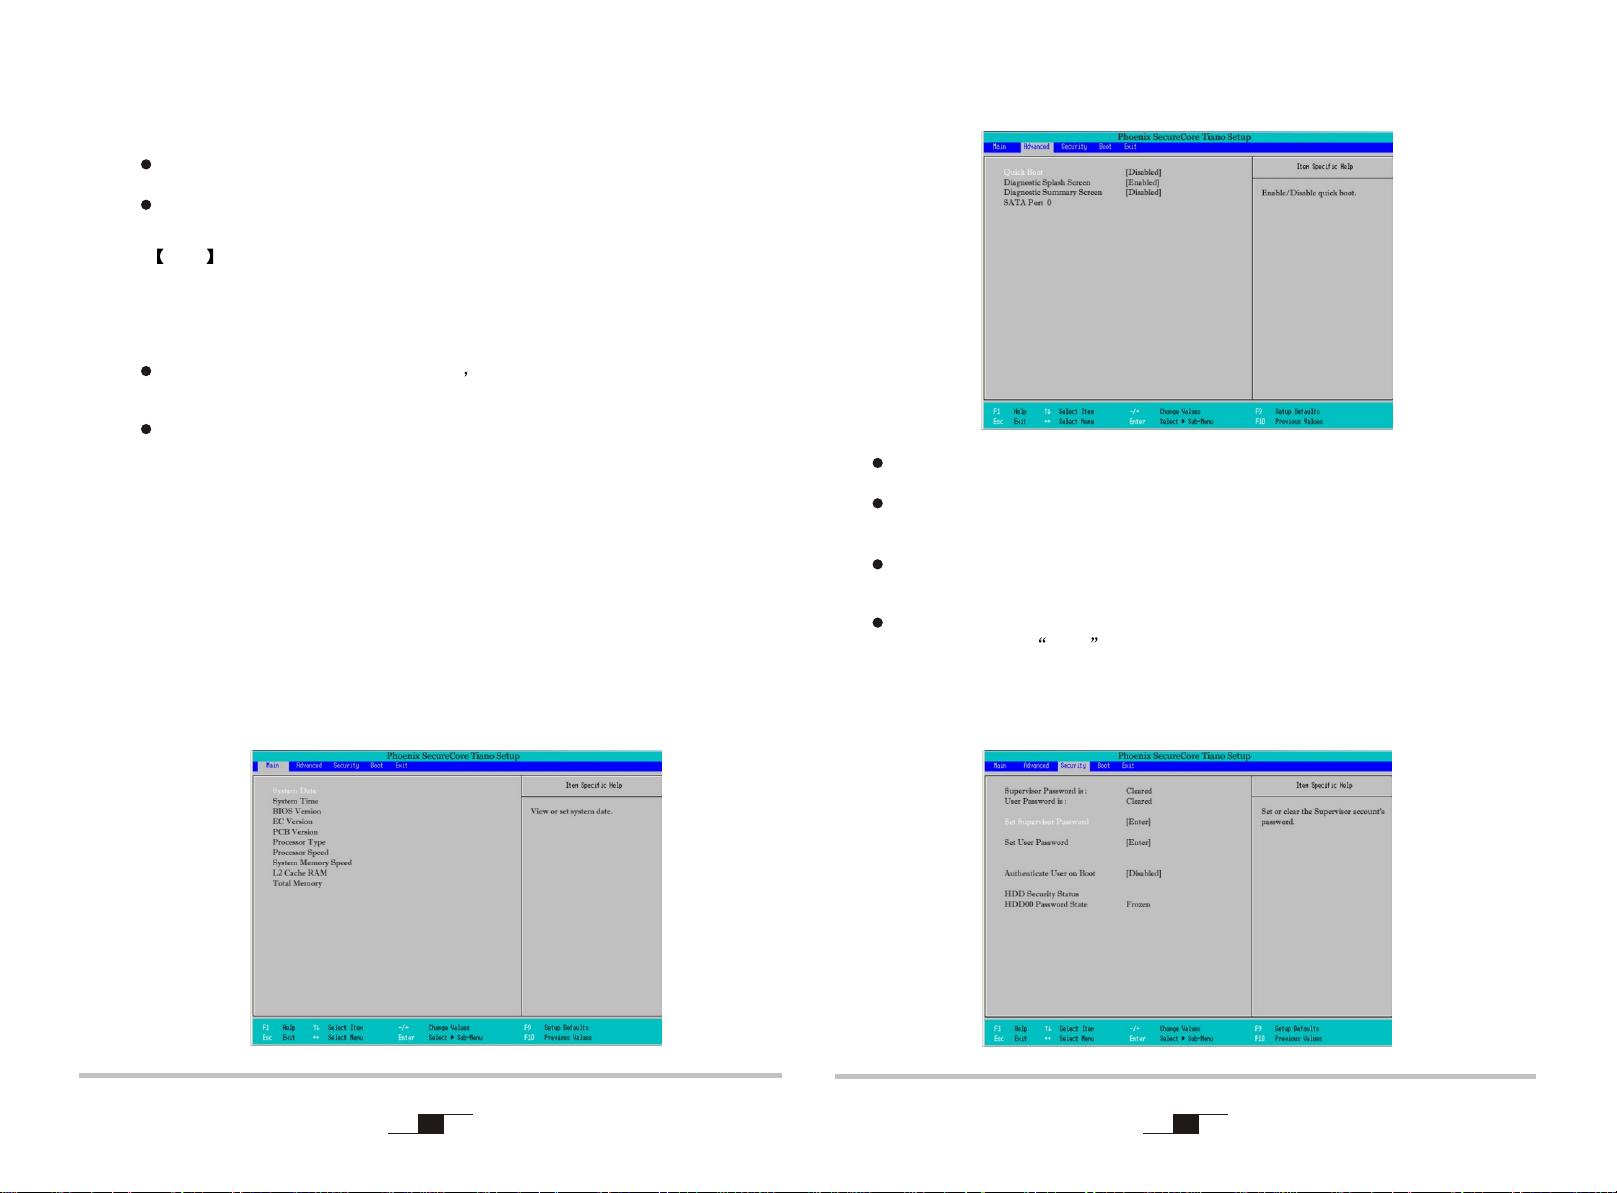
Advanced menu: Conduct the following superior settings.
Quick boot:setup quick boot or not
Diagnostic Splash Screen: to set the image mode or the text mode in
the POST.
Chapter 3:Set up BIOS and Install Driver
No.3.1Set up BIOS
Main menu: Set system time and date, check the related information such
as: CPU ID, CPU, BIOS, EC, MB version, System Memory, etc.
5
Diagnostic Summary screen: to set to display the system configuration
or not during boot process.
SATA Port: current sata device information.
Turn on the tablet PC,press F2 to enter BIOS setting page as the illustrator.
You can refer to Help for your guide to set it.
Security menu: the security setting to enter the system.
6
Page 4

Supervisor password is: to display whether has settings when entering
the Setup utility; set for with pre-setting and clear for none.
User password is: to display whether has settings when entering the
Setup utility; set for with pre-setting and clear for none.
Set supervisor Password: set the password to enter Setup utility,
authority higher than User password.
Set User Password: set the password to enter Setup utility.
Authenticate User on boot: enable it ,you will ask to input password when
turn on the PC.
HDD Password State: set the password for HDD.
Warning Please remember the password you set, otherwise
it will cause inconvenience.
Exit menu: exit the BIOS Setup after completed the relevant setup.
Boot menu:Set the boot device priority.
Press [ ]or [ ]on the keyboard to choose Boot, and press[ + ] or [ - ] to set up
the priority when cheeked a device.
Exit Saving Changes save the data and exit.
Exit Discarding Changes: unsave the data and exit.
Load Setup Defaults restore the factory defaults.
Discard Changes: cancel this setting, and return to the last setting.
Save Changes save the settings.
NO.3.3 Install the Driver program
Please use the CD attached with the machine to operate in accordance with
the CD operation interface.
Option 1: Computer-specific driver.
Option 2: Application Software.
Choose the driver you need to install is according to the screen instruction.
System will install the driver program automatically; during the installation,
the system will need to restart.
7 8
Page 5

Chapter 4:Control Center Functions
NO.4 Use the Control Center
You check some system information,and set some setting easy in this
Control center.
Note Click the drop-down menu on the lower right corner to view
more information.
Battery
Click the battery mark on the home-page of the control center to view the
system power supply information and auto-warning settings.
as the picture below:
Note If you will use the Control center, please install it from the
computer attached data driver CD.
Control center s interface and function might be modificated after
'
manual printed; if there any difference , please base on the actual
product, this picture just for reference.
System Information
Click the system information mark on the home-page of control center so
that you can see the system basic information, as the following picture:
9
10
Page 6

Thermal Condition
Click the cooling control mark on the home-page of the control center to
view the relevant CPU and fan information.as the picture below:
Environment
Click the profile icon on the home-page of the control center so that you can
set the different power cases by yourself according to the need.
Display
Click the display mark on the home-page of the control center to carry out
the display settings and adjust the lightness of the LCD black light.
as the picture below:
The method to adjust the display device is that when it connects the external monitors
such as CRT, click CRT display mark first, click the switch to the selected display
device button which will transmit the image to the corresponding display.
Note : It maximum allows two display devices to display simultaneously.
Device Controller
You can turn ON / OFF the device by clicking the Disable/Enable .
The icon will show "X" when the device was turn off.
as the picture below:
Note Based on different models, the picture you see may be different from
the real model; please base on the actual product.
11
12
Page 7

This device complies with part 15 of the FCC Rules. Operation is subject to the following
two conditions:
(1) This device may not cause harmful interference, and
(2) this device must accept any interference received, including interference that may
cause undesired operation.
Changes or modifications not expressly approved by the party responsible for compliance
could void the user's authority to operate the equipment.
NOTE: This equipment has been tested and found to comply with the limits for a Class B
digital device, pursuant to Part 15 of the FCC Rules. These limits are designed to
provide reasonable protection against harmful interference in a residential installation.
This equipment generates, uses and can radiate radio frequency energy and, if not
installed and used in accordance with the instructions, may cause harmful interference
to radio communications. However, there is no guarantee that interference will not
occur in a particular installation. If this equipment does cause harmful interference to
radio or television reception, which can be determined by turning the equipment off
and on, the user is encouraged to try to correct the interference by one or more of the
following measures:
-- Reorient or relocate the receiving antenna.
-- Increase the separation between the equipment and receiver.
-- Connect the equipment into an outlet on a circuit different
from that to which the receiver is connected.
-- Consult the dealer or an experienced radio/TV technician for help.
RF warning statement:
The device has been evaluated to meet general RF exposure requirement. The
device can be used in portable exposure condition without restriction.
Your WCDMA and WIFI is a radio transmitter and receiver. It is designed
and manufactured not to exceed the emission limits for exposure to
radiofrequency (RF) energy set by the Federal Communications
Commission of the U.S. Government. These limits are part of
comprehensive guidelines and establish permitted levels of RF energy
for the general population. The guidelines are based on standards that
were developed by independent scientific organizations through periodic
and thorough evaluation of scientific studies. The standards include a
substantial safety margin designed to assure the safety of all persons,
regardless of age and health. The exposure standard for wireless mobile
employs a unit of measurement known as the Specific Absorption Rate,
or SAR. The SAR limit set by the FCC is 1.6 W/kg. Tests for SAR are
conducted with the WCDMA AND WIFI transmitting at its highest
Page 8

certified power level in all tested frequency bands. Although the SAR is
determined at the highest certified power level, the actual SAR level of
the WCDMA AND WIFI while operating can be well below the maximum
value. This is because the WCDMA AND WIFI is designed to operate at
multiple power levels so as to use only the power required to reach the
network. In general, the closer you are to a wireless base station
antenna, the lower the power output. Before a WCDMA and WIFI model
is available for sale to the public, it must be tested and certified to the
FCC that it does not exceed the limit established by the government
adopted requirement for safe exposure. The tests are performed in
positions and locations (e.g., at the ear and worn on the body) as
required by the FCC for each model. The highest SAR value for this
model WCDMA AND WIFI when tested for use at the body is 0.716
W/Kg (WCDMA Band II), 0.578W/Kg(WCDMA Band V), 0.493W/Kg
(WIFI). While there may be differences between the SAR levels of
various WCDMA AND WIFI and at various positions, they all meet the
model WCDMA AND WIFI when tested for use at the body is 0.716
W/Kg While there may be differences between the SAR levels of various
WCDMA AND WIFI and at various positions, they all meet the
government requirement for safe exposure. The FCC has granted an
Equipment Authorization for this model WCDMA AND WIFI with all
reported SAR levels evaluated as in compliance with the FCC RF
exposure guidelines. SAR information on this model WCDMA AND WIFI
is on file with the FCC and can be found under the Display Grant section
of http://www.fcc.gov/ oet/fccid after searching on FCC ID:
GSS-VS14140. Additional information on Specific Absorption Rates
(SAR) can be found on the Cellular Telecommunications Industry
Asso-ciation (CTIA) web-site at http://www.wow-com.com. * In the
United States and Canada, the SAR limit for mobile WCDMA AND WIFI
used by the public is 1.6 watts/kg (W/kg) averaged over one gram of
tissue. The standard incorporates a sub-stantial margin of safety to give
additional protection for the public and to account for any variations in
measurements.
 Loading...