


ViewPhone 3
User Guide
Model No. VS14032

Compliance Information
FCC NOTICE
The following statement applies to all products that have received FCC approval.
Applicable products bear the FCC logo, and/or an FCC ID in the format FCC ID: GSSVS14032 on the product label.This device complies with part 15 of the FCC Rules.
Operation is subject to the following two conditions: (1) This device may not cause
harmful interference, and (2) This device must accept any interference received,
including interference that may cause undesired operation. This mobiledevice has
been tested and found to comply with the limits for a Class B digital device, pursuant
to Part 15 of the FCC Rules. These limits are designed to provide reasonable
protection against harmful interference in a residential installation. This equipment
generates, uses and can radiate radio frequencyenergy and, if not installed and used
in accordance with the instructions, may cause harmful interferenceto radio
communications.
However, there is no guarantee that interference will not occur in a particular
installation. If this equipment does cause harmful interference to radio or television
reception, which can be determined by turning the equipment off and on, the user is
encouraged to try to correct the interference by one or more of the following measures
• Reorient or relocate the receiving antenna.
• Increase the separation between the equipment and receiver.
• Connect the equipment into an outlet on a circuit different from that to which the
receiver is connected.
• onsult the dealer or an experienced radio/TV technician for help.
Changes or modifications not expressly approved by the party responsible for
compliance could void theuser’s authority to operate the equipment. The antenna(s)
used for this transmitter must not be colocated or operating in conjunction with any
otherantenna or transmitter.
RF EXPOSURE INFORMATION (FCC SAR)
THIS MOBILE DEVICE MEETS THE GOVERNMENT’S REQUIREMENT FOR
EXPOSURE TO RADIO WAVES.
This phone is designed and manufactured not to exceed the emission limits for
exposure to radio frequency (RF) energy set by the Federal Communications
Commission of the U.S. Government.
The exposure standard for wireless mobile phones employs a unit of measurement
known as the Specific Absorption Rate, or SAR. The SAR limit set by the FCC is
1.6W/kg. *Tests for SAR are conducted using standard operating positions accepted
by the FCC with the phone transmitting at its highest certified power level in all tested
frequency bands.
Although the SAR is determined at the highest certified power level, the actual SAR
level of the phone while operating can be well below the maximum value. This is
because the phone is designed to operate at multiple power levels so as to use only
the power required to reach the network. In general, the closer you are to a wireless
base station antenna, the lower the power output.
The highest SAR value for the model phone as reported to the FCC when tested for
use at the ear is 0.664 W/kg and when worn on the body, as described in this user
guide, is 0.999 W/kg (Body-worn measurements differ among phone models,
depending upon available accessories and FCC requirements.)
i

While there may be differences between the SAR levels of various phones and at
various positions, they all meet the government requirements.
The FCC has granted an Equipment Authorization for this model phone with all
reported SAR levels evaluated as in compliance with the FCC RF exposure
guidelines. SAR information on this model phone is on file with the FCC and can be
found under the Display Grant section of www.fcc.gov/oet/ea/fccid after searching on
FCC ID: GSS-VS14032.
For body-worn operation, this phone has been tested and meets the FCC RF
exposure guidelines for use with an accessory that contains no metal and positions
the handset a minimum of 1.0 cm from the body. Use of other accessories may not
ensure compliance with FCC RF exposure guidelines. If you do no t use a body-worn
accessory and are not holding the phone at the ear, position the handset a minimum
of 1.0 cm from your body when the phone is switched on.
CE SAR Information
THIS MOBILE DEVICE MEETS GUIDELINES FOR EXPOSURE TO RADIO WAVES.
Your mobile device is a radio transmitter and receiver. It is designed not to exceed the
limits for exposure to radio waves recommended by international guidelines. These
guidelines were developed by the independent scientific organization ICNIRP and
include safety margins designed to assure the protection of all persons, regardless of
age and health.
The exposure guidelines for mobile devices employ a unit of measurement known as
the Specific Absorption Rate or SAR. The SAR limit st ated in the ICNIRP guidelines is
2.0 W/kg averaged over 10 grams of tissue. Test for body worn SAR, the positions of
the device are at a minimum of 1.5 cm from the body with the device transmitting at its
highest certified power level in all tested frequency bands. The actual SAR level of an
operating device can be below the maximum value because the device is designed to
use only the power required to reach the network. That amount changes depending
on a number of factors such as how close you are to a network base station. The
highest SAR value under the ICNIRP guidelines for use of the device at the body is
0.525 W/kg. Use of device accessories and enhancements may result in different
SAR values. SAR values may vary depending on national reporting and testing
requirements and the network band.
CE Conformity for European Countries
The device complies with the EMC Directive 2004/108/EC and Low Volt age Directive 2006/95/EC, R&TTE Directive 1999/5/EC.
Following information is only for EU-member states:
The mark shown to the right is in compliance with the Waste Electrical and
Electronic Equipment Directive 2002/96/EC (WEEE).
The mark indicates the requirement NOT to dispose the equipment as
unsorted municipal waste, but use the return and collection systems according
to local law.
If the batteries, accumulators and button cells included with this equipment,
display the chemical symbol Hg, Cd, or Pb, then it means that the battery has a
heavy metal content of more than 0.0005% Mercury, or more than 0.002%
Cadmium, or more than 0.004% Lead.
ii
European Union Regulatory Conformance
The equipment complies with the RF Exposure Requirement 1999/519/EC, Council
Recommendation of 12 July 1999 on the limitation of exposure of the general public to
electromagnetic fields (0–300 GHz).
This equipment meets the following conformance standards: EN62209-1/2,
EN60950-1, IEC60950-1, EN50332-1/2, EN301489-1, EN301489-3,
EN301489-7, EN301489-17, EN301489-24, EN301511, EN301908-1/2,
EN300328, EN300440-1/2, EN55022, EN55024.
For the device which is tested in accordance to EN60950-1:2006, it is mandatory to
perform audio tests for EN50332. The device has been tested to comply with the
Sound Pressure Level requirement laid down in the applicable EN 50332-1 and EN
50332-2 standards. Permanent hearing loss may occur if earphones or headphones
are used at high volume for prolonged periods of time.
A pleine puissance, l’écoute prolongée du baladeur peut endommager l’oreille de
l’utilisateur.
The conformity assessment procedure has been followed with the involvement of the
following Notified Body:
PHOENIX TESTLAB
Identification mark: CE0700 (Notified Body) CE
This equipment may be operated in:
AT BE BG CH CY CZ DE DK
EE ES FI FR GB GR HU IE
IT IS LI LT LU LV MT NL
NO PL PT RO SE SI SK TR
0700
We, hereby, declare that this cellular, Wi-Fi, & Bluetooth radio is in compliance with the essential requirements and other relevant provisions of Directive 1999/5/EC.
Products with 2.4-GHz Wireless LAN Devices France
For 2.4-GHz wireless LAN operation of this product, certain restrictions apply. This
equipment may use the entire-2400-MHz to 2483.5-MHz frequency band (channels 1
through 13) for indoor applications. For outdoor use, only 2400-2454 MHz frequency
band (channels 1-9) may be used. For the latest requirements, see http://www.arttelecom.fr.
iii

Guarantee of Provision of Operating Instructions
This company hereby guarantees that all large-screen smartphones sold (or
manufactured) by it (including their LP RF electric devices or modules) (brand:
ViewSonic, model number: VS14032) shall have operating instructions inside the
packaging when they are made available on the market. The instructions or external
packaging of the products shall contain: (1) a warning that reads, “Use properly to
reduce the effect of electromagnetic waves”; (2) a measured value of SAR 0.43 W/Kg;
(3) instructions on the safe use of batteries/electric power; (4) a warning that reads,
“Without permission, companies, stores or users shall not arbitrarily change or amplify
the power or modify the features and functions of the original design of this LP RF
electric device, which has obtained an LP approval certificate”; and (5) a warning that
reads, “Use of LP RF electric devices shall not impact flight safety or interfere with
legitimate telecommunication. If interference is found, use of the device shall be
immediately terminated, and usage shall not resume until the interference is
eliminated. Legitimate telecommunication refers to wireless telecommunication
conducted as per the Telecommunications Act. LP RF electric devices must endure
the interference caused by electrical waves sent out or radiation produced by
legitimate telecommunication or industrial, scientific and medical devices.” If this
company contravenes its guarantee, it shall unconditionally accept revocation of the
approval certificate issued to it, be held legally responsible, and pay for all losses
suffered by the users.
iv

Important Safety Instructions
1. DO NOT place objects on top of the device, as objects may scratch the screen.
2. DO NOT expose the device to dirty or dusty environments.
3. DO NOT place the device on an uneven or unstable surface.
4. DO NOT insert any foreign objects into the device.
5. DO NOT expose the device to strong magnetic or electrical field.
6. DO NOT expose the device to direct sunlight as it can damage the LCD Screen. Keep it away from heat sources.
7. Do not store your device in temperatures higher than 47°C (116°F). The operating
temperature for this device is from 0°C (32°F) to 47°C (117°F).
8. DO NOT use the device in the rain.
9. Please check with your Local Authority or retailer for proper disposal of electronic products.
10. The device and the adapter may produce some heat during normal operation or charging. DO NOT leave the device on your lap to prevent discomfort or injury from heat exposure.
11. POWER INPUT RATING: Refer to the rating label on the device and be sure that the power adapter complies with the rating. Only use accessories specified by the manufacturer.
12. DO NOT use a pen or any sharp object to tap the screen.
13. Clean the touch screen with a soft cloth. If needed, dampen the cloth slightly before cleaning. Never use abrasives or cleaning solutions.
14. Always power off the device to install or remove external devices that do not support hot-plug.
15. Disconnect the device from an electrical outlet and power off before cleaning the device.
16. DO NOT disassemble the device, only a certified service technician should perform repair.
17. The device has apertures to disperse heat. DO NOT block the device ventilation, the device may become hot and malfunction as a result.
18. Risk of explosion if battery replaced aced by an incorrect type. Dispose of used batteries according to the instructions.
19. Users have to use the connection to USB interfaces with USB 2.0 version or higher.
20. PLUGGABLE EQUIPMENT, the socket-outlet shell be installed near the equipment and shall be easily accessible.
v
Declaration of RoHS Compliance
This product has been designed and manufactured in compliance with Directive 2002/
95/EC of the European Parliament and the Council on restriction of the use of certain
hazardous substances in electrical and electronic equipment (RoHS Directive) and is
deemed to comply with the maximum concentration values issued by the European
Technical Adaptation Committee (TAC) as shown below:
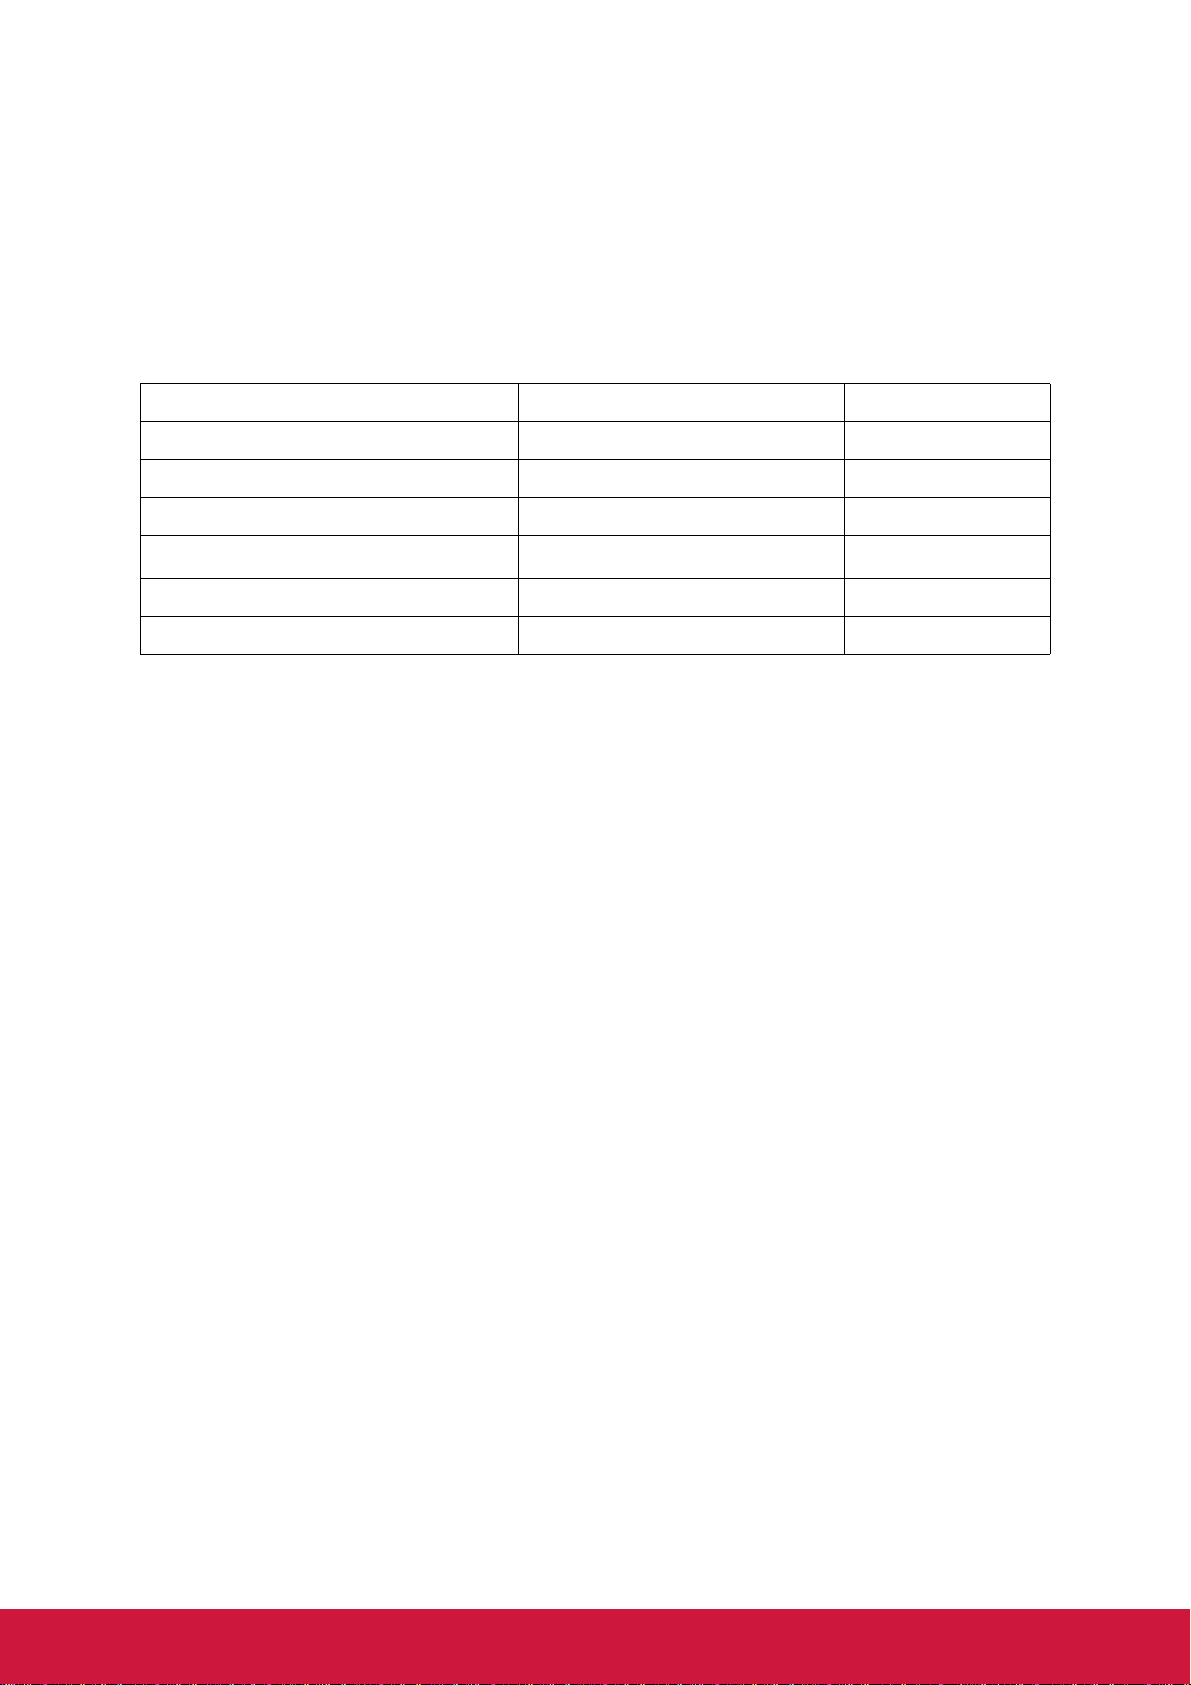
Substance Proposed Maximum Concentration Actual Concentration
Lead (Pb) 0.1% < 0.1%
Mercury (Hg) 0.1% < 0.1%
Cadmium (Cd) 0.01% < 0.01%
Hexavalent Chromium (Cr
Polybrominated biphenyls (PBB) 0.1% < 0.1%
Polybrominated diphenyl ethers (PBDE) 0.1% < 0.1%
6+
)
0.1% < 0.1%
Certain components of products as stated above are exempted under the Annex of the RoHS Directives as noted below:
Examples of exempted components are:
1. Mercury in compact fluorescent lamps not exceeding 5 mg per lamp and in other lamps not specifically mentioned in the Annex of RoHS Directive.
2. Lead in glass of cathode ray tubes, electronic components, fluorescent tubes, and electronic ceramic parts (e.g. piezoelectronic devices).
3. Lead in high temperature type solders (i.e. lead-based alloys containing 85% by weight or more lead).
4. Lead as an allotting element in steel containing up to 0.35% lead by weight, aluminium containing up to 0.4% lead by weight and as a cooper alloy containing up to 4% lead by weight.
vi

Copyright Information
Copyright © ViewSonic® Corporation, 2012. All rights reserved.
Android is a trademark of Google Inc. Use of this trademark is subject to Google
Permissions.
This product has an Android™ platform based on Linux, which can be expanded by a
variety of JME-based application SW.
All products used in this device and trademarks mentioned herein are trademarks or
registered trademarks of their respective owners.
Google™, the Google logo, Android™, the Android logo and Gmail™ are trademarks
of Google Inc. Use of this trademark is subject to Google Permissions.
Wi-Fi and the Wi-Fi CERTIFIED logo are registered trademarks of the Wireless
Fidelity Alliance.
microSD™ is a trademark of SD Card Association.
Bluetooth and the Bluetooth logo are trademarks owned by Bluetooth SIG, Inc.
Java, JME and all other Java-based marks are trademarks or registered trademarks
of Sun Microsystems, Inc. in the United States and other countries.
The prediction engine of the input method is TOUCHPAL, provided by COOTEK.
DataViz and RoadSync are registered trademarks of DataViz, Inc. All rights reserved.
DataViz and Documents To Go are trademarks or registered trademarks of DataViz,
Inc. All rights reserved.
Word To Go™, Sheet To Go®, Slideshow To Go®, PDF To Go® and icons are
trademarks or registered trademarks of DataViz, Inc. All rights reserved.
Disclaimer: ViewSonic Corporation shall not be liable for technical or editorial errors or
omissions contained herein; nor for incidental or consequential damages resulting
from furnishing this material, or the performance or use of this product.
In the interest of continuing product improvement, ViewSonic Corporation reserves
the right to change product specifications without notice. Information in this document
may change without notice.
No part of this document may be copied, reproduced, or transmitted by any means, for
any purpose without prior written permission from ViewSonic Corporation.
Intellectual Property Right Information
Right to all technologies and products that comprise this device are the property of
their respective owners:
This product has an Android platform based on Linux, which can be expanded by a
variety of Java-Script-based application SW.
Google, the Google logo, Android, the Android logo, Gmail, and YouTube are
trademarks of Google Inc.
Bluetooth and the Bluetooth logo are trademarks owned by Bluetooth SIG, Inc.
Java, JME and all other Java-based marks are trademarks or registered trademarks
of Sun Microsystems, Inc. in the United States and other countries.
microSD is a trademark of SD Card Association.
The prediction engine of the input method is TOUCHPAL, provided by COOTEK.
vii

Product Registration
To meet your future needs, and to receive any additional product information as it becomes available, please register your product on the Internet at: www.viewsonic.com.
For Your Records
Product Name:
Model Number:
Document Number:
Serial Number:
Purchase Date:
Product disposal at end of product life
ViewSonic respects the environment and is committed to working and living green.
Thank you for being part of Smarter, Greener Computing. Please visit ViewSonic
website to learn more.
USA & Canada: http://www.viewsonic.com/company/green/recycle-program/
Europe: http://www.viewsoniceurope.com/uk/support/recycling-information/
Taiwan: http://recycle.epa.gov.tw/recycle/index2.aspx
ViewPhone 3
VS14032
ViewPhone 3_UG_ENG Rev. 1A 12-13-11
_________________________________
_________________________________
viii

Table of Contents
Chapter 5: Getting Started.................................................................... 1
1.1 Your Device.................................................................................................. 1
Front............................................................................................................ 1
Back ............................................................................................................ 1
Top .............................................................................................................. 2
Side ............................................................................................................. 2
1.2 Accessories................................................................................................. 2
1.3 Installing SIM Cards, Battery and Memory Card...................................... 3
SIM card...................................................................................................... 3
Memory card ............................................................................................... 3
Battery......................................................................................................... 4
1.4 Charging the Battery................................................................................... 5
1.5 Turning the Device On or Off..................................................................... 5
Turn Device On or Off ................................................................................. 5
Set Device to Airplane Mode....................................................................... 5
Set Device to Silent Mode........................................................................... 6
Set Device to Sleep Mode........................................................................... 6
1.6 Locking and Unlocking the Screen ........................................................... 6
1.7 Using the Headset....................................................................................... 6
1.8 Adjusting the Volume ................................................................................. 7
Chapter 6: The Basics........................................................................... 8
2.1 Home Screen ............................................................................................... 8
Status Bar ................................................................................................... 9
Notifications Panel .................................................................................... 10
2.2 Customizing Home Screen....................................................................... 10
Adding Widgets ......................................................................................... 11
Shortcut Icons ........................................................................................... 12
Adding Folders .......................................................................................... 13
Changing Wallpaper.................................................................................. 13
Adding Panel............................................................................................. 14
Managing Home Screen Panels ............................................................... 14
2.3 3D Carousel ............................................................................................... 14
2.4 Applications............................................................................................... 15
Open Applications ..................................................................................... 15
View Recently-Used Applications ............................................................. 15
Create Application Shortcuts..................................................................... 15
ix

2.5 Text Entry................................................................................................... 16
On-Screen Keyboard ................................................................................ 16
Configure Keyboard Settings .................................................................... 17
Edit Text .................................................................................................... 17
Chapter 7: Contacts............................................................................ 19
3.1 Opening Contacts ..................................................................................... 19
3.2 Adding Contacts........................................................................................ 19
3.3 Copying Contacts...................................................................................... 20
3.4 Importing and Exporting Contacts.......................................................... 20
Import From Memory Card........................................................................ 20
Back Up Contacts ..................................................................................... 21
3.5 Communicating with Contacts................................................................. 21
Call Contacts............................................................................................. 21
Text Contacts ............................................................................................ 21
Email Contacts .......................................................................................... 22
3.6 Managing Contacts................................................................................... 22
Edit Contacts............................................................................................. 22
Delete Contacts......................................................................................... 22
Send Contact Information ......................................................................... 22
Assign Contact Ringtone........................................................................... 23
Divert Calls to Voicemail ........................................................................... 23
3.7 Favorite Contacts...................................................................................... 23
View Favorites........................................................................................... 23
Add to Favorites ........................................................................................ 24
Remove from Favorites............................................................................. 24
3.8 Displaying Options.................................................................................... 24
3.9 Searching for Contacts............................................................................. 25
3.10 Synchronizing Contacts......................................................................... 25
Enable Sync .............................................................................................. 25
Add Accounts to Sync ............................................................................... 25
Chapter 8: Using the Phone............................................................... 26
4.1 Making a Call ............................................................................................. 26
4.2 Answering a call........................................................................................ 27
4.3 Ending a call.............................................................................................. 27
4.4 In-Call Options........................................................................................... 28
4.5 Call Log...................................................................................................... 28
Chapter 9: Email & Messaging........................................................... 29
5.1 Text Message............................................................................................. 29
Create and Send Text Messages.............................................................. 29
x

Receive and Manage Messages............................................................... 30
5.2 Multimedia Message ................................................................................. 32
Create and Send MMS Messages ............................................................ 32
5.3 Voice Message........................................................................................... 33
5.4 Customizing Message Settings ............................................................... 34
5.5 Email Accounts ......................................................................................... 34
Set Up Email Account ............................................................................... 34
Add More Email Accounts......................................................................... 35
Select Email Accounts .............................................................................. 35
Delete Email Accounts .............................................................................. 36
5.6 Using Email................................................................................................ 36
Compose and Send Emails....................................................................... 36
Receive Emails ......................................................................................... 37
Read and Reply to Emails......................................................................... 38
Manage Email Folders .............................................................................. 38
Customize Email Settings ......................................................................... 39
Chapter 10: Using Internet ................................................................. 40
6.1 Connecting to Internet.............................................................................. 40
Wi-Fi.......................................................................................................... 40
Cellular Data Network ............................................................................... 42
Starting a Data Connection ....................................................................... 42
6.2 Browsing a Web Page............................................................................... 43
Manage Web Page ................................................................................... 43
6.3 Google Search........................................................................................... 44
6.4 Voice Search.............................................................................................. 45
Chapter 11: Using Bluetooth.............................................................. 46
7.1 Connecting to Bluetooth Devices............................................................ 46
Chapter 12: Multimedia Applications................................................ 47
8.1 Videos and Photos.................................................................................... 47
Record Videos........................................................................................... 47
Take Photos .............................................................................................. 47
Review Videos .......................................................................................... 48
Review Photos .......................................................................................... 48
Configure Camera Settings....................................................................... 49
8.2 Viewing Videos & Photos......................................................................... 50
Play Videos in the Album .......................................................................... 50
View Photos in the Album ......................................................................... 50
8.3 Using Music Player ................................................................................... 51
Music Screen ............................................................................................ 51
xi

Play Music................................................................................................. 52
Change Playback Options......................................................................... 52
Create Playlists ......................................................................................... 53
Chapter 13: Programs......................................................................... 54
9.1 Backup & Restore ..................................................................................... 56
9.2 Browser...................................................................................................... 56
9.3 Calculator................................................................................................... 56
9.4 Calendar..................................................................................................... 57
9.5 Camcorder ................................................................................................. 57
9.6 Camera....................................................................................................... 57
9.7 Clock........................................................................................................... 57
9.8 Contacts..................................................................................................... 57
9.9 Downloads................................................................................................. 58
9.10 Email......................................................................................................... 58
9.11 File Browser............................................................................................. 58
9.12 FM Radio.................................................................................................. 59
9.13 Gmail ........................................................................................................ 60
9.14 Google Search......................................................................................... 60
9.15 Google+.................................................................................................... 60
9.16 iRadio ....................................................................................................... 61
9.17 Latitude .................................................................................................... 61
9.18 Maps......................................................................................................... 62
9.19 Market....................................................................................................... 63
9.20 Messaging................................................................................................ 63
9.21 Messenger................................................................................................ 63
9.22 Music........................................................................................................ 63
9.23 My Gallery................................................................................................ 64
9.24 Navigation................................................................................................ 64
9.25 Nero Mobile Sync.................................................................................... 65
9.26 News & Weather...................................................................................... 65
9.27 Note Pad................................................................................................... 66
9.28 Phone ....................................................................................................... 66
9.29 Places....................................................................................................... 66
9.30 RSS Reader.............................................................................................. 67
9.31 Settings.................................................................................................... 67
9.32 SIM Tool Kit.............................................................................................. 67
9.33 Talk........................................................................................................... 68
9.34 Videos....................................................................................................... 68
9.35 ViewApps................................................................................................. 69
xii

9.36 Voice Dialer.............................................................................................. 69
9.37 Voice Note................................................................................................ 70
9.38 Voice Search............................................................................................ 70
9.39 YouTube................................................................................................... 70
Chapter 14: Managing Your Phone.................................................... 71
10.1 Device Settings........................................................................................ 71
Dual Sim Settings...................................................................................... 71
Wireless & networks.................................................................................. 71
Call settings............................................................................................... 72
Sound........................................................................................................ 72
Display ...................................................................................................... 72
Location & security.................................................................................... 73
Applications............................................................................................... 73
Accounts & sync........................................................................................ 74
Privacy ...................................................................................................... 74
Storage...................................................................................................... 74
Language & keyboard ............................................................................... 74
Voice input & output .................................................................................. 74
Accessibility............................................................................................... 75
Date & time ............................................................................................... 75
About phone.............................................................................................. 75
10.2 Changing Basic Settings........................................................................ 76
Date and Time........................................................................................... 76
Alarms ....................................................................................................... 76
Display Settings ........................................................................................ 76
Ring Settings............................................................................................. 77
10.3 Using Wireless & networks.................................................................... 77
10.4 Protecting Your Phone ........................................................................... 78
Enable SIM Card Lock .............................................................................. 78
Enable Screen Lock Protection................................................................. 78
10.5 Resetting the Device............................................................................... 78
Chapter 15: Specifications................................................................. 79
xiii
Chapter 1: Getting Started
Chapter 1: Getting Started
1.1 Your Device
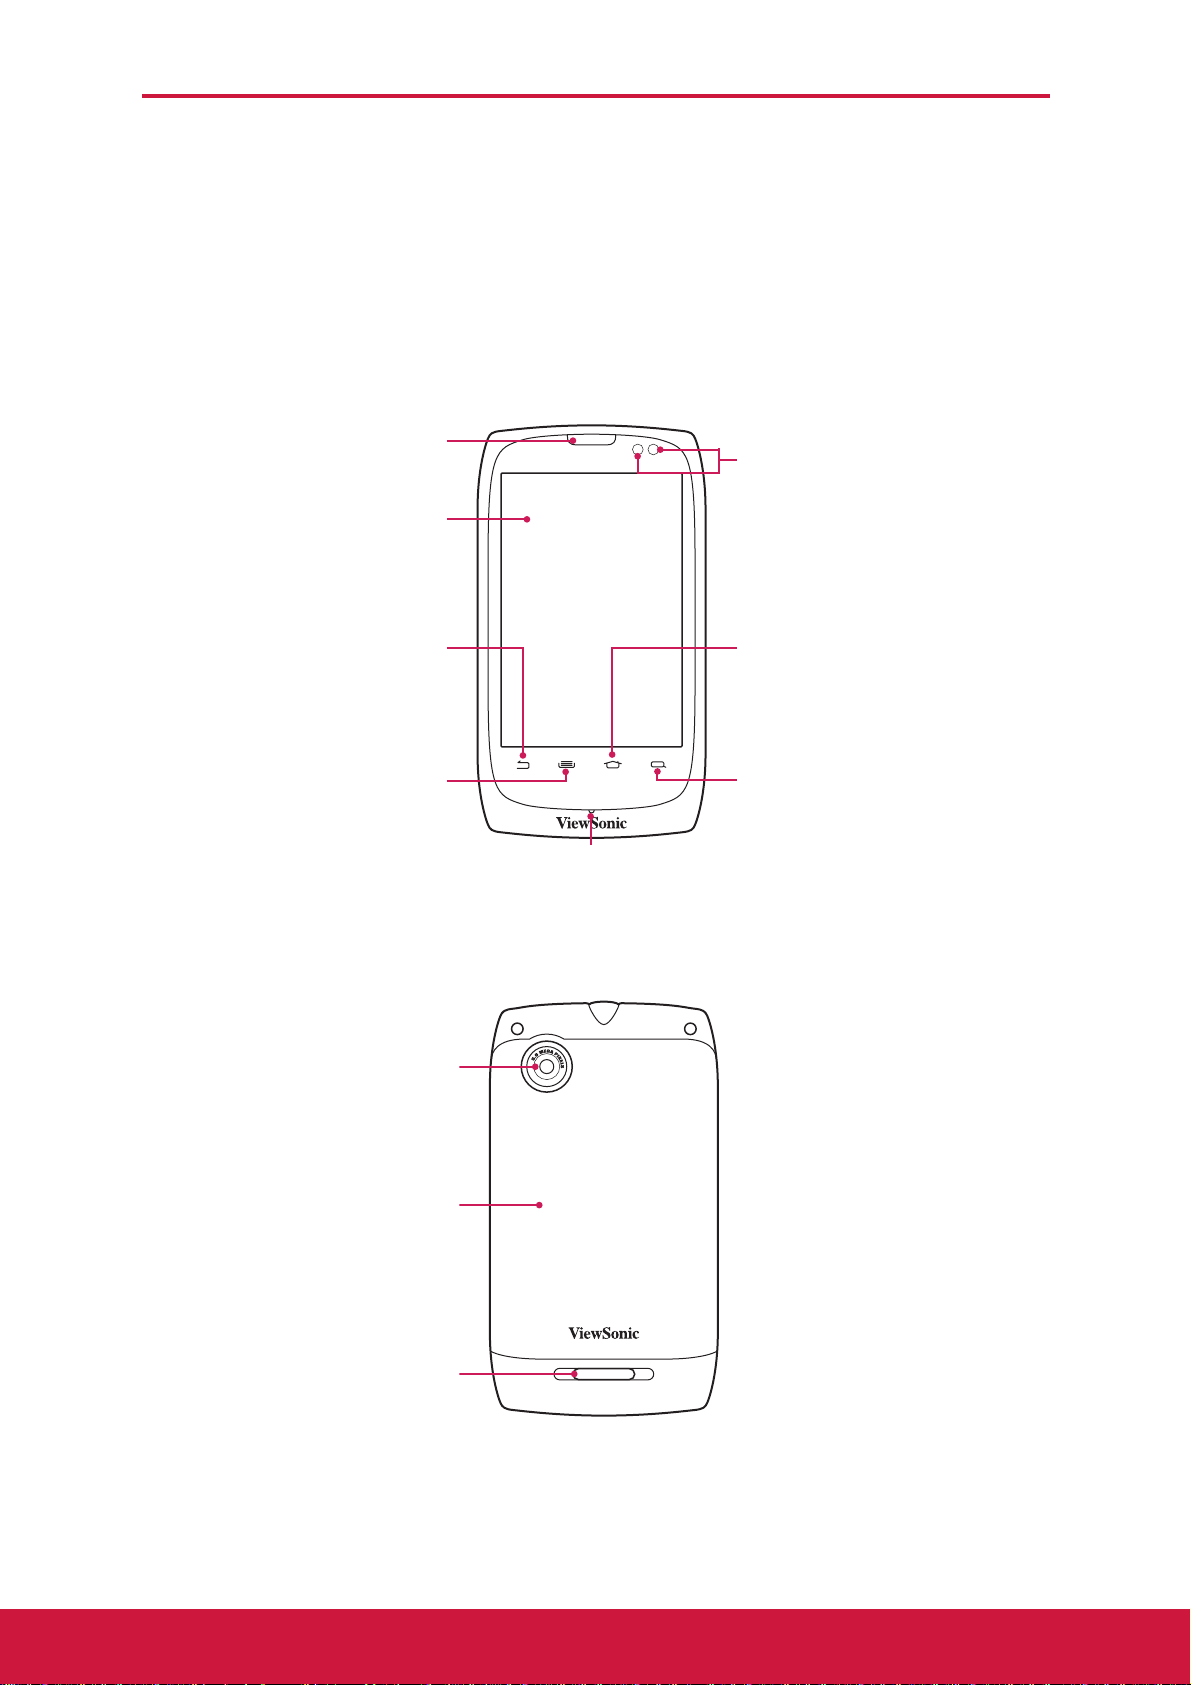
Front
Earpiece
Sensors
Touch screen
Back:
Press to return to the
previous screen.
Menu:
Press to view menu
options.
Back
5 Megapixels camera:
See “Videos and Photos” on
page 47.
Back cover
Home:
Press to return to Home
screen.
Search:
Press to search for items on
the phone or the Internet.
Microphone
Speaker
1
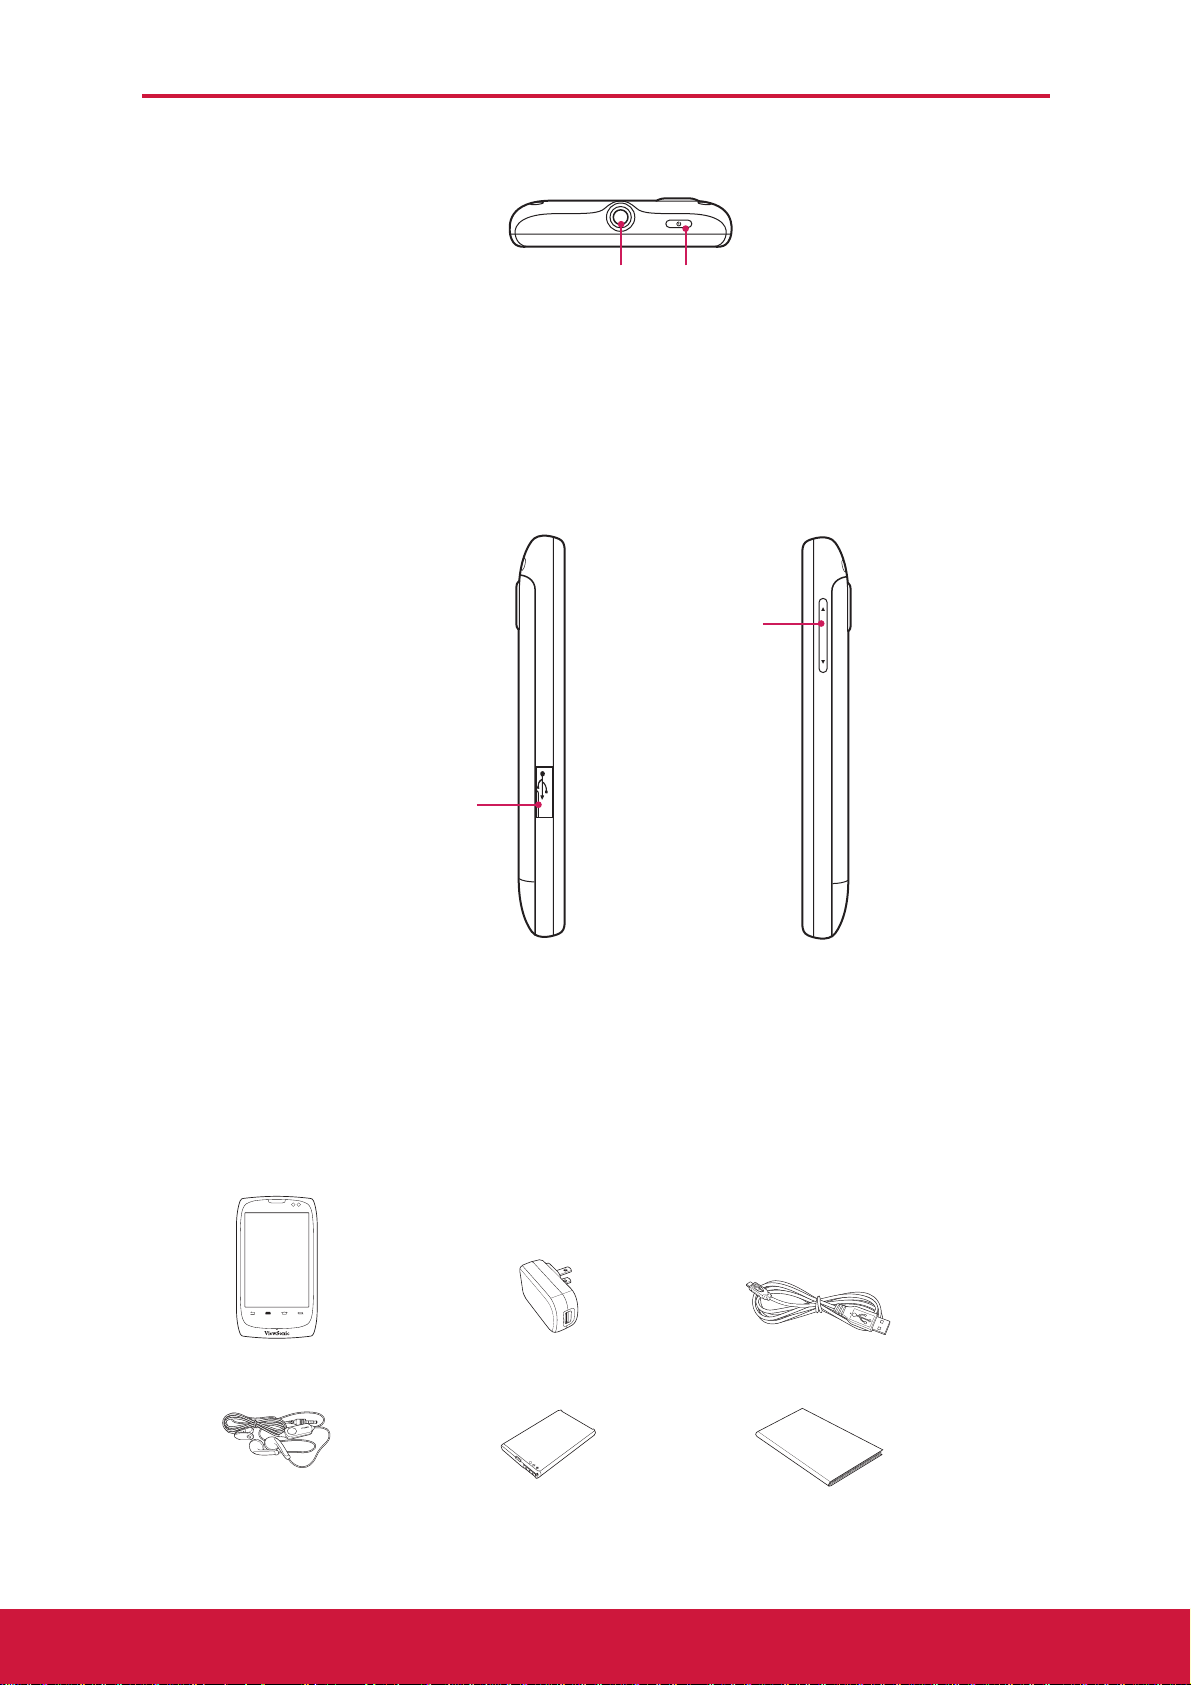
Top
n
Side
Chapter 1: Getting Started
Headset jack Power:
• Press and hold for 5 seconds to tur
the device on or off.
• Press to turn the screen on or off.
Volume:
Press to adjust
the volume.
Micro USB connector
1.2 Accessories
Your package comes with the following items. If any of them is missing, please contact your retailer.
Smartphone AC adapter USB cable
L
R
Headset Battery Quick start guide
2
Chapter 1: Getting Started
SIM2
SIM1
SIM2
SIM1
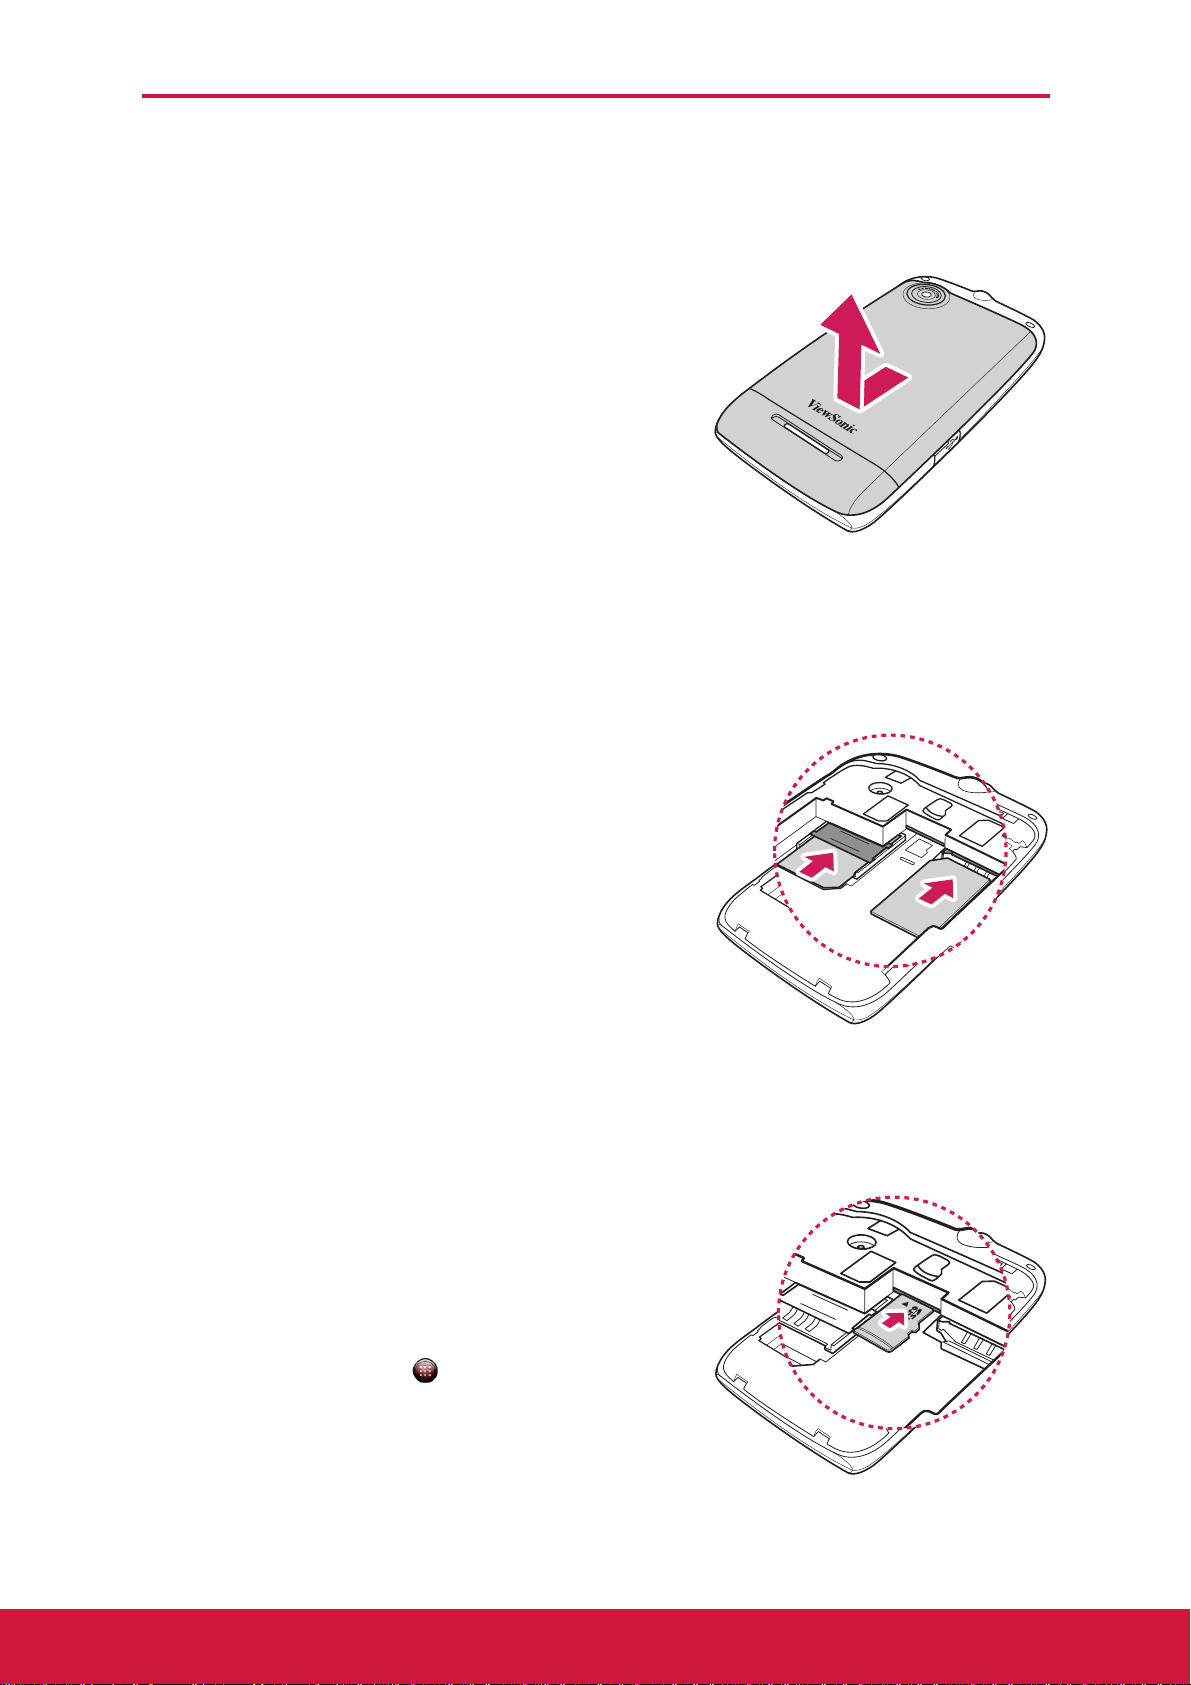
1.3 Installing SIM Cards, Battery and Memory Card
Remove the back cover
1. Turn the device off.
2. Lift to open the back cover.
SIM card
The device has two SIM card slots. This dual-SIM technology allows you to switch between two network operators simultaneously.
SIM1
SIM2
Install the SIM cards
With the gold contacts facing down, insert the SIM cards into the card slots as shown.
Remove the SIM cards
Slide to remove the SIM cards from the card slots.
Memory card
You need a microSD® card to store photos, music, videos and other data.
Install the memory card
Insert the memory card with the gold contacts facing down.
SIM1
SIM1
SIM2
SIM2
Remove the memory card
1. For safe removal, tap > Settings > Storage > Unmount SD card.
2. Slide the memory card out from the slot.
3
Chapter 1: Getting Started
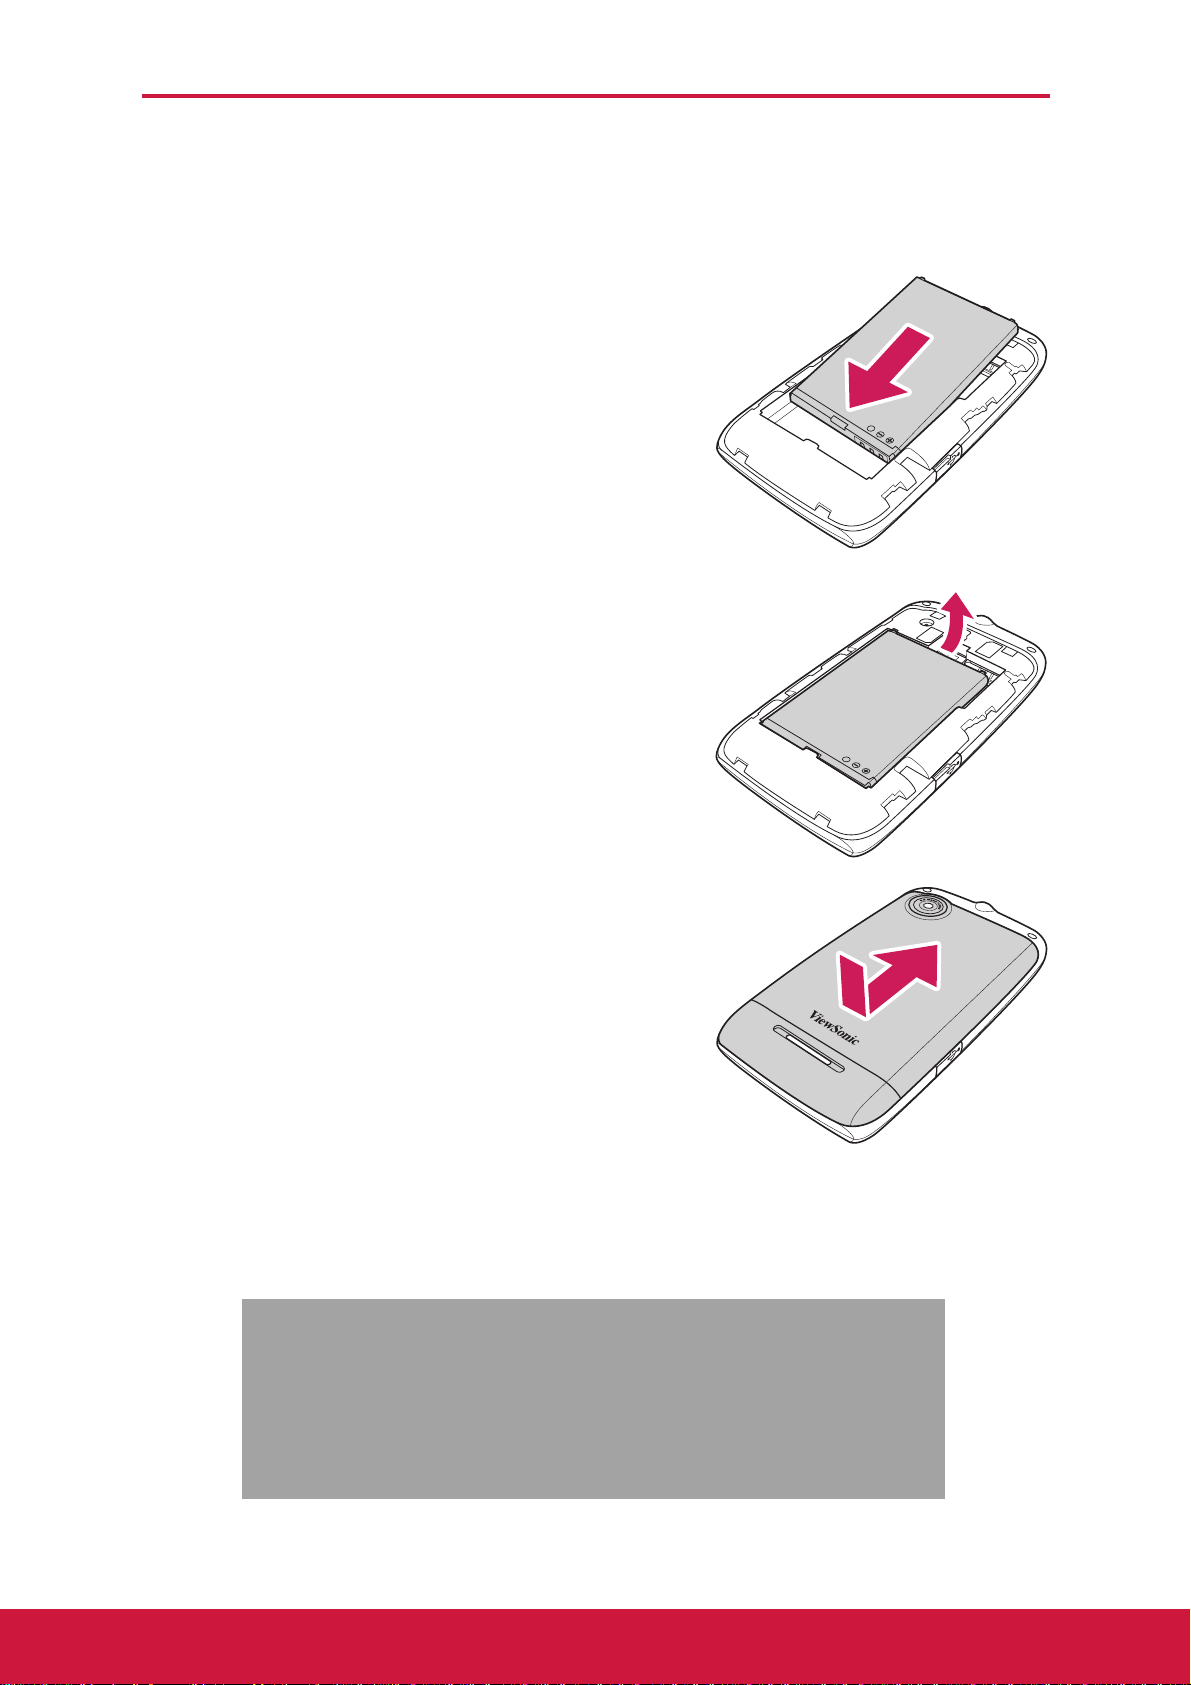
Battery
Your device comes with a rechargeable Li-ion battery. Battery life varies depending on the network, opened applications, and the type of connections used by the device.
Install the battery
Insert the battery. Make sure the contacts of the battery are aligned with the connectors on the battery slot.
Remove battery
Use your fingertip to lift and remove the battery.
Replace the back cover
Secure the hooks on the back cover with the designated holes on the device, then close the back cover.
SIM1
SIM1
SIM1
SIM2
SIM2
SIM2
NOTE: To ensure battery performance and avoid the risk of fire:
• Use only original batteries designated for the device.
• Do not store the battery in temperatures below -10°C or higher than 45°C.
CAUTION
RISK OF EXPLOSION IF BATTERY IS REPLACED
BY AN INCORRECT TYPE.
DISPOSED OF USED BATTERIES ACCORDING
TO THE INSTRUCTIONS.
4

Chapter 1: Getting Started
1.4 Charging the Battery
The battery that came with the device is only partially charged.
Charge the battery
1. Connect one end of the AC adaptor to the micro USB connector of the device.
2. Plug the other end of the AC adaptor to the wall outlet to start charging.
When the battery is charging and the device is
turned on, the icon is displayed on the
status bar.
When the battery is fully charged and the
device is turned on, the icon is displayed
on the status bar.
SIM1
SIM2
NOTE:
• The battery can also be charged by connecting the device to a computer
using a USB cable.
• Battery life varies depending on network, applications, and ambient
temperature.
1.5 Turning the Device On or Off
After installing the SIM cards and charging the battery, the device is ready to be turned on.
Turn Device On or Off
Turn on the device
Press and hold the Power button until the device
vibrates.
Turn off the device
1. Press and hold the Power button for 5 seconds.
2. A pop-up window appears, tap Power off.
3. Tap OK to confirm.
Set Device to Airplane Mode
1. Press and hold the Power button for 5 seconds.
2. On the options menu, tap Airplane mode.
5

Chapter 1: Getting Started
Set Device to Silent Mode
1. Press and hold the Power button for 5 seconds.
2. On the options menu, tap Silent mode.
Set Device to Sleep Mode
To set the device to sleep mode, press the Power button. This turns the display off.
To turn the display on, press the Power button again.
1.6 Locking and Unlocking the Screen
Lock the screen to prevent it from accidentally being touched. By default, the screen locks after being idle for a period of time (see “Display Settings” on page 76).
Lock the screen
To manually lock the screen and turn off the display,
press the Power button.
Unlock the screen
1. If the display is turned off, press the Power button.
2. Slide to the center of the screen to unlock the screen.
1.7 Using the Headset
For hands-free conversation or listening to music, plug a headset to the headset jack.
NOTE:
• When using a headset, your ability to hear outside sounds may be limited.
Do not use a headset if it will endanger you.
• Do not set the headset volume to its maximum as it may damage your
hearing.
6

Chapter 1: Getting Started
1.8 Adjusting the Volume
The device features four types of volume which can be adjusted separately:
• Ringer volume: Set the volume for incoming calls
and notifications.
• In-call volume: Set the volume during a call.
• Media volume: Set the volume for music and
videos.
•Alarm volume: Set the volume for alarms.
Adjust ringer volume
1. Tap > Settings > Sound.
2. Tap Volume.
3. To adjust the ringtone volume, do either of the following:
a. Drag the volume slider to adjust the volume.
b. Press the volume button to adjust the volume.
NOTE: If you want to use the same incoming call
volume level for notification, tap Use
incoming call volume for notifications check box and the
“Notification” volume bar will be disabled.
4. Tap to exit the menu.
NOTE: When the device is set to silent mode, the
“Volume” settings will be disabled.
Adjust in-call volume
During a phone call, press the volume button to adjust the volume.
Adjust media/alarm volume
1. Tap > Settings > Sound.
2. Tap Volume.
3. Drag the media/alarm volume slider to adjust the volume.
7
Chapter 2: The Basics
Chapter 2: The Basics
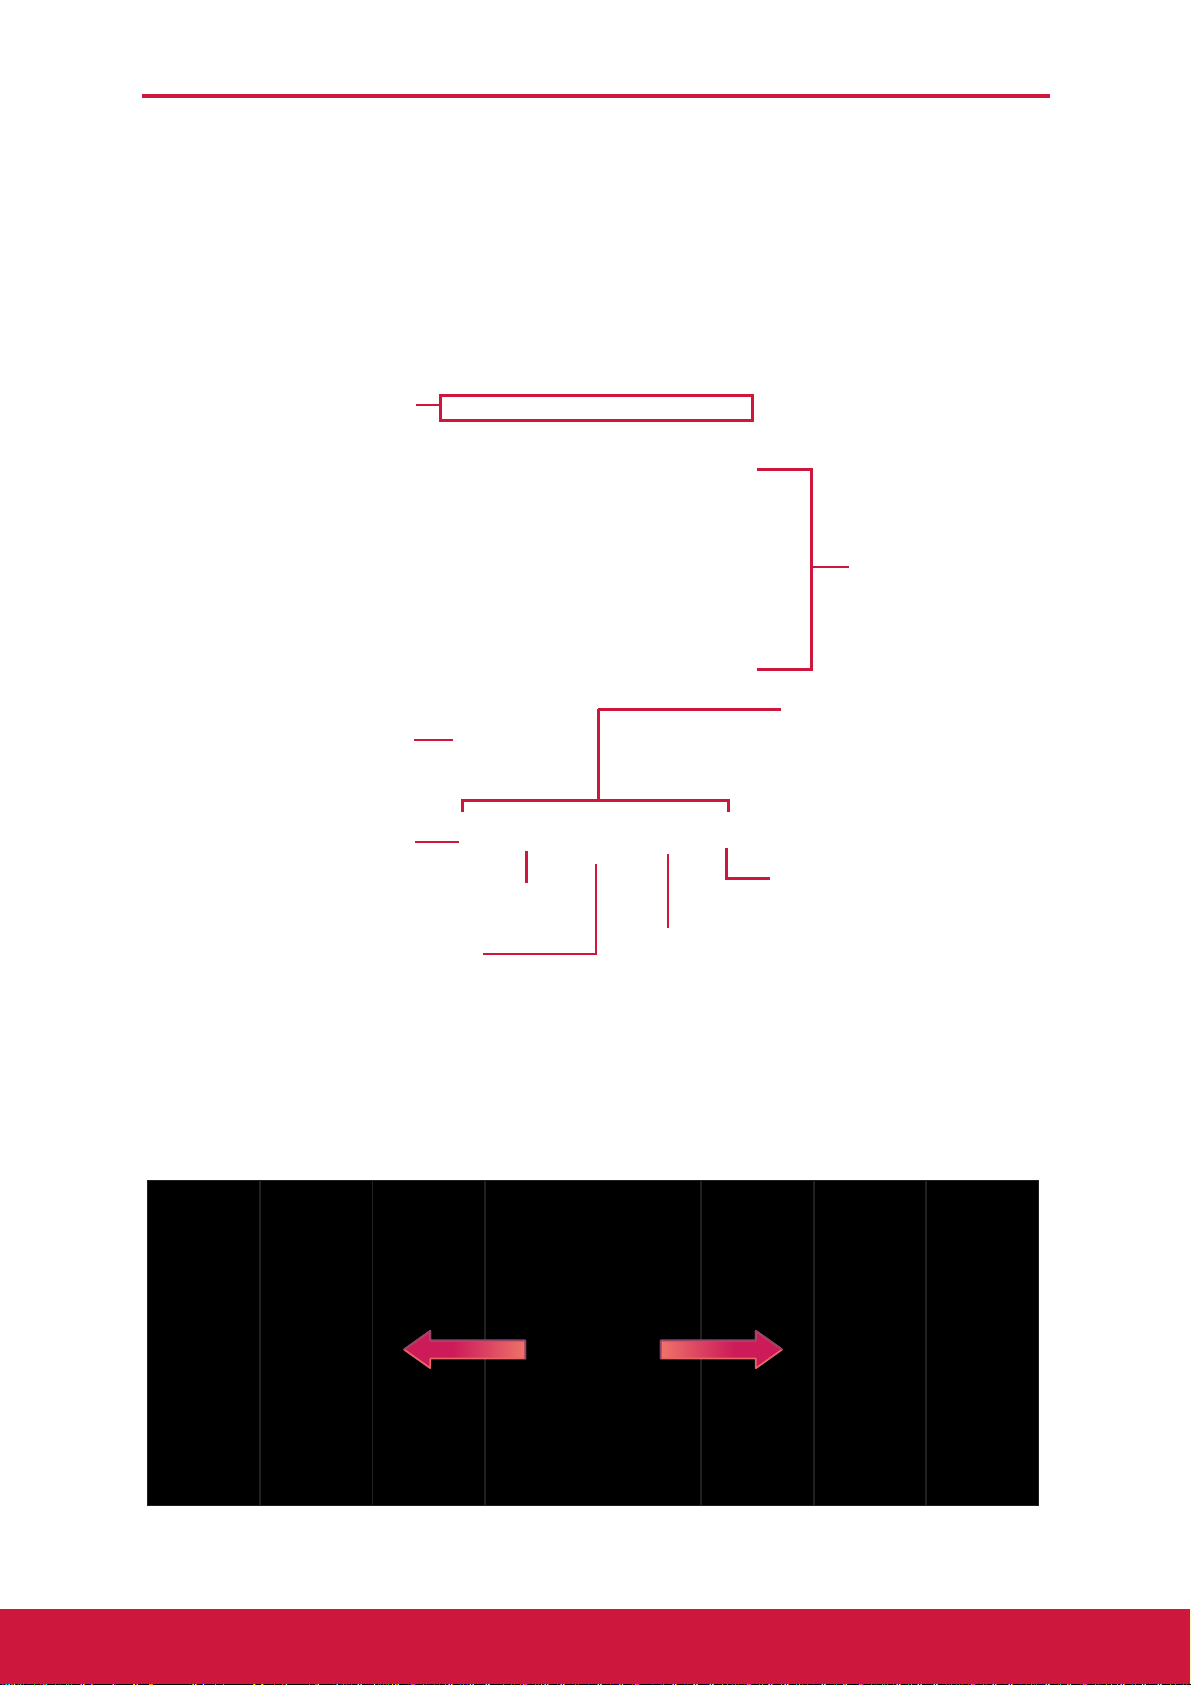
2.1 Home Screen
From the Home screen, you can quickly access common features and view notifications of missed calls, received messages, check battery, and connection status.
Status bar
Displays status and
notification icons
and clock.
Widgets
Panel Indicator
Shortcut Icon
Phone
Tap to open Phone.
Messaging
Tap to open Messaging.
3D carousel
Tap to open 3D carousel.
Extended Home Screen
Swipe your finger to the left or to the right across the Home screen.
The two extensions to the left and to the right of the Home screen provide more space
for widgets, shortcuts, and other items.
Browser
Tap to open Browser.
Indicates the number or
available panels to the
right or to the left of the
current screen.
Application Menu
Tap to view all applications.
8
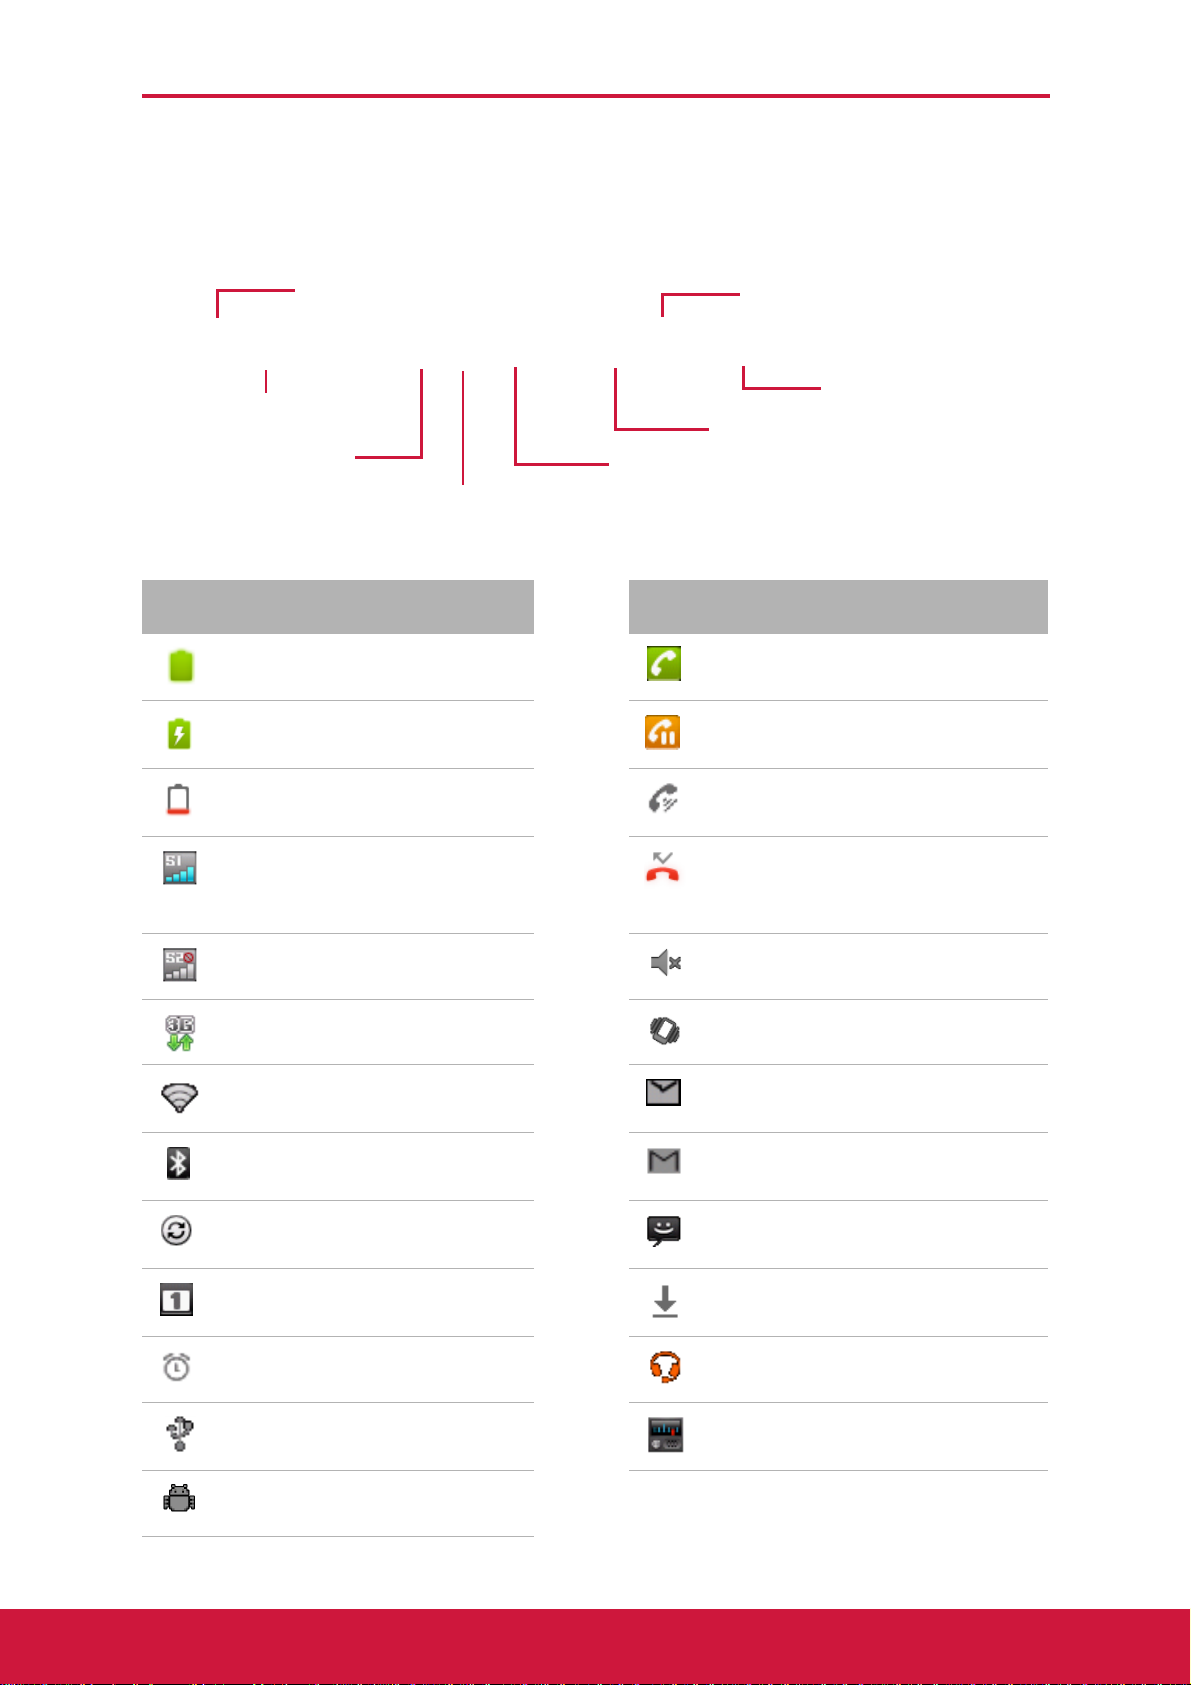
Status Bar
Status bar icons indicate different types of information.
The icons on the status bar indicate the following information:
Chapter 2: The Basics
USB connection icon
Battery icon
Current time
USB debuggging icon
Network icon
Bluetooth icon
Wi-Fi icon
Mute icon
Icon Description Icon Description
Battery is full. Call is in progress.
Battery is charging. Call is on hold.
Battery is completely discharged.
Maximum signal strength. Fewer bars indicate lower signal strength.
Speakerphone is on.
Missed call notification.
No network signal. Sound is off.
3G data connection is active. Vibrate mode is activated.
WiFi is connected. New email notification.
Bluetooth connection is
active.
Synchronization is in
progress.
You have calendar
notifications.
An alarm is set.
Device is connected to PC via USB connector.
USB debugging is enabled.
New Gmail notification.
New text message notification.
File has been downloaded.
A headset is connected.
FM Radio is turned on.
9

Notifications Panel
The notifications panel displays the device activities, details of status or other notifications.
Open the notifications panel
Tap and slide the status bar downwards.
To open related applications, touch a notification.
Close the notifications panel
Tap and hold the bottom of the panel, then slide upwards to close the notifications panel.
Chapter 2: The Basics
2.2 Customizing Home Screen
Home screen is an extended panel user interface that gives you up-to-date
information at a glance, such as time, weather, calendar, upcoming appointments,
next alarm, new messages, missed calls, new emails, and new voicemail. It also has a
fully customizable layout where you can add your own favorite apps, folders, and
widgets for one-tap access.
The Home key ( ) is the only way to launch
ViewScene 3D. There is no app icon of ViewScene 3D
in the apps list. In case you had to close ViewSceneTM
3D and go back to your stock launcher for any reason,
you can relaunch Shell 3D from Settings >
Applications > Manage applications > All >
ViewScene 3D > Clear defaults. Then tap to view
the launcher selecting menu. In the launcher selecting
menu, check the "use by default for this action" check
box and select ViewScene 3D.
From the Home screen, tap , to view the available options.
10

Chapter 2: The Basics
Adding Widgets
Widgets put at-a-glance important information and media content on your Home
screen. Some of ViewScene 3D widgets are already added to your Home screen for
your convenience. A wide selection of ViewScene 3D and Android widgets is available
for you to choose from, such as wireless switcher, weather, world time, sound profile,
call log, and more.
Add a widget
You may add and customize the Widgets on the Home screen as you like.
1. Tap and hold a blank area on the Home screen.
Or, tap > Add to display the options menu.
2. Tap ViewScene 3D Widget or Android Widget.
A list of available widgets is displayed.
3. Tap to select the widget you want to appear on the Home screen.
Move a widget
1. Tap and hold the widget until it enlarges.
2. Drag the widget to the desired area on the Home screen.
Pause at the left or right edge of the screen to drag the item into another Home screen panel.
3. When you are done, tap the icon to exit the editing mode.
Remove a widget
1. Tap and hold the widget until it enlarges. The icon appears at the bottom of the Home screen.
2. Drag the widget to to delete.
3. When you are done, tap the icon to exit the editing mode.
NOTE: Most ViewScene 3D Widgets are available in a variety of designs and sizes to
suit your needs. Tap the icon at the top right of the widget to view the
different styles, and then tap the icon to exit the editing mode.
11

Chapter 2: The Basics
Shortcut Icons
Shortcut icons allow you to access an application directly from the Home screen.
Add a shortcut icon
1. Tap and hold a blank area on the Home screen.
Or, tap > Add to display the options menu.
2. Tap Application or Android Shortcut to display
the list of applications.
3. Tap to add the items that you want to appear on the Home screen.
Move a shortcut icon
1. Tap and hold the shortcut icon until it enlarges.
2. Drag the shortcut icon to the desired area on the Home screen.
Pause at the left or right edge of the screen to drag the item into another Home screen panel.
3. When you are done, tap the icon to exit the editing mode.
Remove a shortcut icon
1. Tap and hold the desired shortcut icon until the icon
enlarges. The icon appears at the bottom of
the Home screen.
2. Drag the icon to to delete.
3. When you are done, tap the icon to exit the editing mode.
12

Chapter 2: The Basics
Adding Folders
Use folders to group related applications and other shortcuts to keep your Home screen tidy and organized.
1. Tap and hold a blank area on the Home screen.
2. Tap Folder or ViewScene 3D Widget.
Favorite contacts and bookmarks folders can be found in ViewScene 3D Widgets menu.
3. If you add a folder, tap and hold on the new Folder to activate the editing mode.
4. Drag the application icon or shortcut and drop it on top of the folder.
5. By default folders will be automatically renamed according to their content.
To change its name manually, tap the open folder
button in editing mode and then tap on the folder
title bar. Uncheck the “Automatic naming” check
box, enter the new folder name, and tap OK.
To remove an item from folder, tap the open folder button in editing mode and then drag and drop the item out of the folder area.
Changing Wallpaper
You can customize the wallpaper of your Home screen with a default wallpaper or with pictures taken with the device.
Set wallpaper from My Gallery
You can use pictures taken by the phone camera or pictures saved on the microSD card as the wallpaper
1. Tap > Wallpaper to display the options menu.
2. On the options menu, tap My Gallery.
3. Thumbnails of pictures saved in the microSD card appear. Tap to select a picture.
4. Drag your finger to select the crop area.
5. Tap Save to set the picture as the wallpaper.
Set wallpaper from Wallpaper gallery
1. Tap > Wallpaper to display the options menu.
2. On the options menu, tap Wallpapers.
3. All system wallpapers are displayed. Swipe your finger to the left or to the right to view the available wallpapers.
4. Tap to preview the wallpaper.
5. Tap Set wallpaper to apply your selection.
13

Chapter 2: The Basics
Adding Panel
Tap and then select Add > Empty Panel if you want to add an extra panel to your
Home screen. Please note that the maximum number of panels is 15.
Managing Home Screen Panels
In the Manage panels screen, you can add, remove, and rearrange the panels.
1. Tap and then tap Manage panels.
2. Drag and drop to add, remove, and rearrange the panels.
NOTE: The preset panels such as weather, time,
and calendar cannot be removed
permanently, they will stay on the panel’s
floor.
3. Tap the icon to exit the editing mode.
2.3 3D Carousel
The 3D Carousel shows Home screen panels bundled with all the features in a simple and intuitive 3D model. The carousel brings your entire phone features at one glance.
Tap in Home screen to open 3D carousel.
Use left or right gesture to move panels.
Tap a panel to select.
If you left the carousel idle for a few seconds, the Magic Animations of panels and widgets will be activated. An overview of installed widgets and apps will be played to explore device features.
Once you tap the screen intending to rotate the carousel or select a panel, the Magic Animation is terminated and your tap is processed immediately.
You can rearrange, add, or remove carousel panels.
Tap the icon in carousel screen to open the 3D
panels management screen.
14

Chapter 2: The Basics
2.4 Applications
The Application Menu contains all the applications installed on the device. On the
Home screen, tap Application Menu to display all applications.
Indicates the current application
has been added on the Home
screen panel.
TIP: Swipe your finger up or down to view more applications.
Open Applications
Tap an icon to open the application.
View Recently-Used Applications
Tap and hold . The recently-used applications are displayed.
Create Application Shortcuts
To easily access frequently-used applications, add the shortcut icon to the Home screen.
1. Tap and hold an application icon until the Home screen is displayed.
2. Drag the icon to the desired area to place the shortcut.
15
Chapter 2: The Basics
2.5 Text Entry
On-Screen Keyboard
Use the on-screen keyboard to enter text, numbers, and symbols.
Open and close the keyboard
• Tap a text field to activate the keyboard.
• Tap or to close the keyboard.
Using the on-screen keyboard
Keyboard settings
Tap to customize
keyboard settings.
CAPs lock
Tap to toggle keyboard.
Dictionary
Tap to enable dictionary.
Lower case keyboard
(default)
Input method
Tap to choose input method.
Upper case keyboard Numbers and symbols
• Tap the keys to enter characters as you would on a computer keyboard.
• To toggle keyboard between upper case, lower case, or lock the upper case
keyboard, tap .
• To display the numbers and symbols keyboard, tap . Tap to toggle back.
• To display smileys, tap and hold .
16
 Loading...