

Page 1

VEB620 / VEB625
eBook
- User Guide
- Guide de l’utilisateur
- Bedienungsanleitung
- Guida dell’utente
- Guía del usuario
- Gebruikshandleiding
- Guia do usuário
- Käyttöopas
- Kullanιcι kιlavuzu
- Οδηγός χρηστών
- 使用手冊 ( 繁中 )
-
使用手冊 ( 簡中 )
Model No: VS13392
VS13394
Page 2

Copyright Information
Copyright © ViewSonic® Corporation, 2010. All rights
reserved.
ViewSonic, the three birds logo, OnView, ViewMatch,
and ViewMeter are registered trademarks of
ViewSonic Corporation.
Disclaimer:ViewSonic Corporation shall not be
liable for technical or editorial errors or omissions
contained herein; nor for incidental or consequential
damages resulting from furnishing this material, or the
performance or use of this product.
In the interest of continuing product improvement,
ViewSonic Corporation reserves the right to change
product specifications without notice. Information in
this document may change without notice.
No part of this document may be copied, reproduced,
or transmitted by any means, for any purpose without
prior written permission from ViewSonic Corporation.
Page 3

For Your Records
Product Name:
Model Number:
Document Number:
Serial Number:
Purchase Date:
VEB620 / VEB625
ViewSonic eBook
VS13392 / VS13394
VEB620_VEB625_UG_ENG
Rev. 1A 04-23-10
_________________________
_________________________
Product disposal at end of product life
ViewSonic is concerned about the preservation of our
environment. Please dispose of this product properly
at the end of its useful life. Your local waste disposal
company may provide information about proper
disposal.
Page 4

Compliance Information
FCC Statement
This device complies with part 15 of FCC Rules.
Operation is subject to the following two conditions: (1)
this device may not cause harmful interference, and
(2) this device must accept any interference received,
including interference that may cause undesired
operation.
This equipment has been tested and found to
comply with the limits for a Class B digital device,
pursuant to part 15 of the FCC Rules. These limits
are designed to provide reasonable protection against
harmful interference in a residential installation. This
equipment generates, uses, and can radiate radio
frequency energy, and if not installed and used in
accordance with the instructions, may cause harmful
interference to radio communications. However, there
is no guarantee that interference will not occur in a
particular installation. If this equipment does cause
harmful interference to radio or television reception,
Page 5

which can be determined by turning the equipment
off and on, the user is encouraged to try to correct the
interference by one or more of the following measures:
Reorient or relocate the receiving antenna.
•
Increase the separation between the equipment and
•
receiver.
Connect the equipment into an outlet on a
•
circuit different from that to which the receiver is
connected.
Consult the dealer or an experienced radio/TV
•
technician for help.
Warning: You are cautioned that changes or
modifications not expressly approved by the party
responsible for compliance could void your authority to
operate the equipment.
For Canada
This Class B digital apparatus complies with
•
Canadian ICES-003.
Cet appareil numérique de la classe B est conforme
•
à la norme NMB-003 du Canada.
Page 6
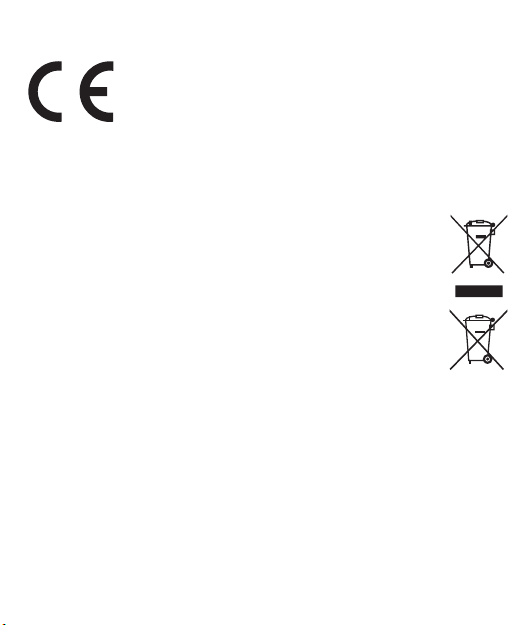
CE Conformity for European Countries
The device complies with the EMC
Directive 2004/108/EC and Low Voltage
Directive 2006/95/EC.
Following information is only for EU-member
states:
The mark is in compliance with the Waste
Electrical and Electronic Equipment Directive
2002/96/EC (WEEE).
The mark indicates the requirement NOT to
dispose the equipment including any spent
or discarded batteries or accumulators as
unsorted municipal waste, but use the return and
collection systems available.
If the batteries, accumulators and button cells included
with this equipment, display the chemical symbol Hg, Cd,
or Pb, then it means that the battery has a heavy metal
content of more than 0.0005% Mercury or more than,
0.002% Cadmium, or more than 0.004% Lead.
Page 7

Declaration of RoHS
Compliance
This product has been designed and manufactured
in compliance with Directive 2002/95/EC of the
European Parliament and the Council on restriction of
the use of certain hazardous substances in electrical
and electronic equipment (RoHS Directive) and is
deemed to comply with the maximum concentration
values issued by the European Technical Adaptation
Committee (TAC) as shown below:
Proposed
Substance
Lead (Pb) 0.1% < 0.1%
Mercury (Hg) 0.1% < 0.1%
Cadmium (Cd) 0.01% < 0.01%
Hexavalent Chromium
(Cr6+)
Maximum
Concentration
0.1% < 0.1%
Actual
Concentration
Page 8

Polybrominated
biphenyls (PBB)
Polybrominated
diphenyl ethers (PBDE)
0.1% < 0.1%
0.1% < 0.1%
Certain components of products as stated above are
exempted under the Annex of the RoHS Directives as
noted below:
Examples of exempted components are:
Mercury in compact fluorescent lamps not
1.
exceeding 5 mg per lamp and in other lamps
not specifically mentioned in the Annex of RoHS
Directive.
Lead in glass of cathode ray tubes, electronic
2.
components, fluorescent tubes, and electronic
ceramic parts (e.g. piezoelectronic devices).
Lead in high temperature type solders (i.e. lead-
3.
based alloys containing 85% by weight or more
lead).
Lead as an allotting element in steel containing
4.
up to 0.35% lead by weight, aluminium containing
up to 0.4% lead by weight and as a cooper alloy
containing up to 4% lead by weight.
Page 9

FCC Radiation Exposure Statement
This equipment should be installed and operated with
minimum distance 20cm between the radiator & your
body.
FCCID: TX2-RTL8191SU
Industry Canada Notice: This wireless module
device complies with Canadian RSS-210.To prevent
radio interference to the licensed service, this device
is intended to be operated indoors and away from
windows to provide maximum shielding. Equipment
(or its transmitting antenna) that is installed outdoors
is subject to licensing. The installer of this radio
equipment must ensure that the antenna is located or
pointed such that it does not emit RF field in excess
of Health Canada limits for the general population;
consult Safety Code 6, obtainable from Health
Canada’s web site www.hc-sc.gc.ca/rpb.
Page 10

R&TTE Compliance Statement
This wireless module device complies with the
Essential Requirements of the R&TTE Directive of the
European Union (1999/5/EC). This equipment meets
the following conformance standards:
EN300 328 V1.7.1
EN301 489-1 V1.6.1
EN301 489-17 V1.2.1
Page 11

Contents
Introduction to the eBook Models ....................... 14
VEB620 ................................................................ 15
VEB625 ................................................................ 16
Chapter 1 Getting Started with Your eBook ........ 17
Charging the Device ............................................ 17
File Transferring ................................................... 20
Tuning on the Device ........................................... 21
Chapter 2 Getting to Know the Device ................ 22
Features and Functions ....................................... 22
Top View .......................................................... 24
Bottom View ..................................................... 25
Back View......................................................... 26
Reset ................................................................ 27
Using the Buttons................................................. 28
Using the Touch Screen ...................................... 30
Page 12

Chapter 3 Getting to Know the Main Features .... 31
Home Screen ....................................................... 31
Book Library ......................................................... 35
Reading on eBook ...............................................37
Using the Options Menu ...................................... 38
Options Menu....................................................... 39
Using Go to Page................................................. 41
Jumping to a Page ............................................... 42
Displaying Table of Content ................................. 43
Adding Bookmarks ............................................... 44
Viewing My Bookmarks........................................ 46
Using Search ....................................................... 47
Adjusting the Font Size ........................................ 49
Viewing Bookmarks and Notes ............................ 50
Adding Notes .......................................................51
Deleting Notes .....................................................52
Playing Music ....................................................... 53
Networking Service .............................................. 54
WiFi Setting.......................................................... 55
Connect to Available Networks ............................ 56
Using a Network Neighbor ................................... 57
Page 13

Setting .................................................................. 59
Firmware Upgrade ............................................... 60
Safety and Hardware ........................................... 61
Format limitation ................................................... 63
Troubleshooting ................................................... 64
Customer Support ................................................. 65
Limited Warranty ................................................... 69
Page 14
Introduction to the eBook
Models
There are two models of the eBook devices that
depends on which models you purchased.
The following table shows a summary of each model.
Model Description Touch Network
Generic version
VEB620
VEB625
Non Touch & Network
connectivity
WiFi / Touch
With touch control
screen and WiFi
connectivity
-- --
Page 15
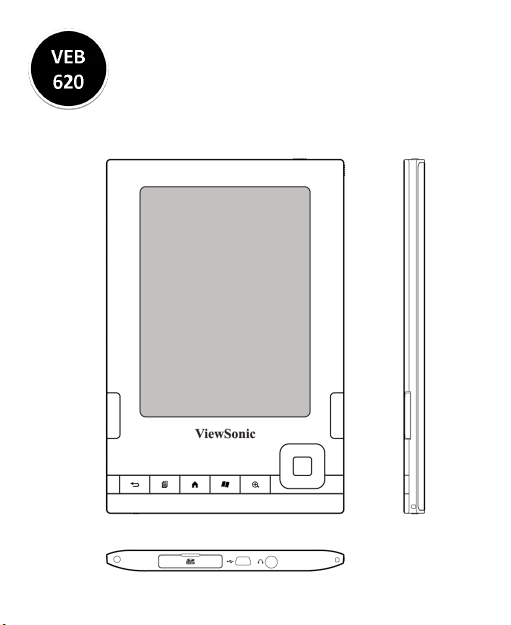
VEB620
Generic Version
Non Touch & Network connectivity
Page 16
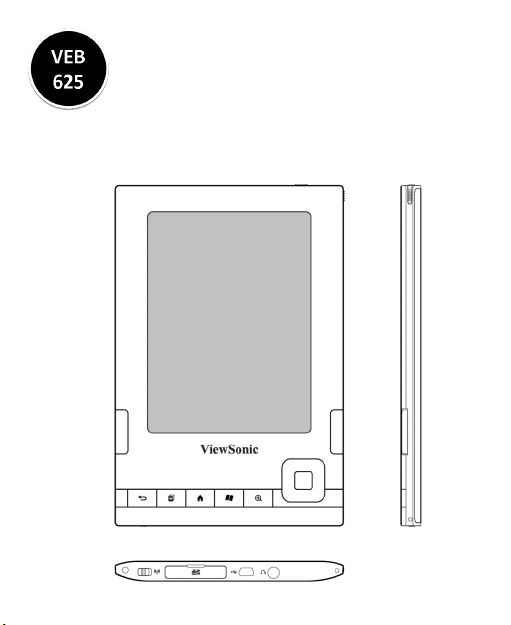
VEB625
WiFi with Touch Control
With touch control screen and WiFi
connectivity
Page 17

Chapter 1
Getting Started with Your
eBook
Charging the Device
Use the power adapter to fully charge your eBook
device while using it for the first time. The battery is
built in and cannot be removed.
To charge your eBook device by power adapter:
Locate the power adapter that came packed with your
1.
device.
Find the USB port on the bottom of your device.
2.
Plug the power adapter into an electrical outlet, then
3.
connect the other end to the adapter port on your eBook.
Check to make sure that the charge indicator light has
4.
turned on to indicate charging.
Page 18
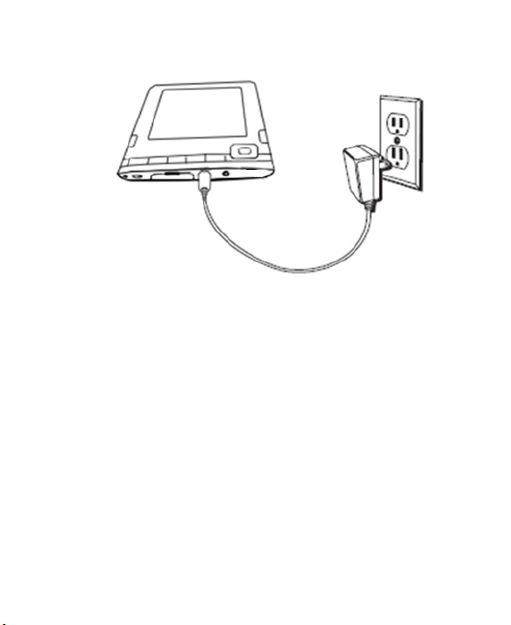
Charging the Device (continued)
Keep your device connected to the power adapter
•
for up to two hours to fully charge the battery for the
first time.
When charging is complete, disconnect the power
•
adapter.
You can now use your eBook device anywhere.
•
If the charge indicator light does not light up, make
•
sure that the power adapter tip is fully inserted. If
device still is not charging, try another electrical
outlet.
Page 19

Charging the Device (continued)
The charging status light will turn red, indicating that
the battery is charging. a green light indicates that the
battery is fully charged.
Page 20

File Transferring
To transfer content between your computer and your
device, connect the provided USB cable to the device
and to the computer’s USB port. If your computer’s
USB port or powered USB hub provides power, your
device will charge over USB.
Page 21
Tuning on the Device
Slide the Power switch to turn on the device
Slide the switch to turn on the device.
While the device is turned on. Slide the switch to enter
sleep mode or slide and hold the switch for 4 sec to
turn off the device.
Your eBook will also go to sleep by itself after a few
minutes if you are not using it.
Page 22

Chapter 2
Getting to Know the Device
Features and Functions
Locating the Controls
You can navigate the eBook using the 5-way
controller; the Home, Menu, Back, and Next / Previous
Page buttons; and the touch screen control*:
* Stylus Pen only for VEB625 model
* Touch screen only for VEB625 model
Page 23

Features and Functions (continued)
Previous Page Button
1.
Back Button
2.
Menu Button
3.
Home Button
4.
Bookmark Button
5.
Text Size Button
6.
5-Way Controller Vol.
7.
Up / Dwn
Next Page Button
8.
Stylus Pen
9.
Page 24

Features and Functions (continued)
Top View
The top of your eBook contains the power indicator
light and a power Switch Bottom.
Leather Case
Hook
Charge Indicator
Light
* Stylus Pen only for VEB625 model
Power
Switch
Stylus
Pen
Page 25

Features and Functions (continued)
Bottom View
The SD card slot is located on the bottom of your
eBook device. Open the cover tab and fold it back to
use this port.
Leather
Case Hook
Network (WiFi)
Switch (for VEB625)
WiFi (for
VEB625)
Plug in your USB cable here
SD Card Slot
Reset Button Included
Headphone Jack
USB/Power Port
* Network switch (WiFi) only for VEB625 model.
Page 26

Features and Functions (continued)
Back View
The back of your eBook contains a speaker for
sharing audio content.
Page 27

Features and Functions (continued)
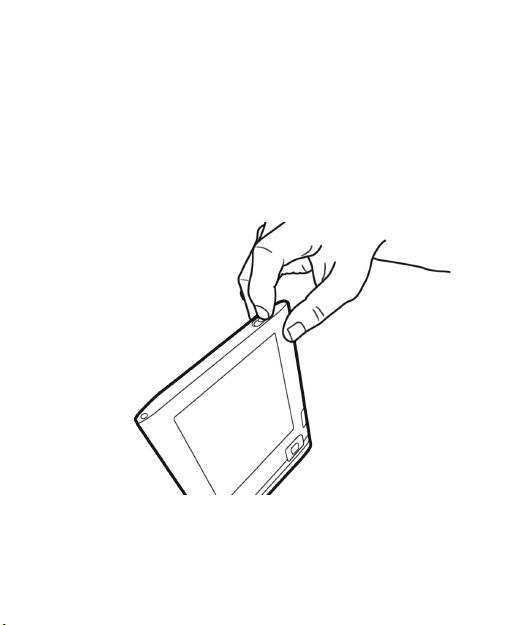
Reset
If your eBook does not power on or is unresponsive
during use, try resetting the device by disconnecting
your eBook from any power source, and then sliding
and holding the power switch for 4 seconds before
releasing, or reset the system using the Reset button
(location indicated below) and a suitable instrument.
Page 28

Using the Buttons
The hardware keys offer basic functions allowing easy
operation of this device.
Name Function
Power Switch
Switch the system on and off
Home Button
Return to home screen
Back Button
Retraces your steps on the eBook
Page up Button
Takes you to the next page in your reading
material.
Page down Button
Takes you to the previous page in your reading
material.
Page 29

Zoom Button
Changes the size of the text while you are
reading
Bookmark Button
Quickly bookmark
Menu Button
Displays application and navigation choices that
are related to the screen you are viewing.
5-way Button
Selects an item or action when pressed. Moves
the on-screen highlight or cursor Up, Down, Left
or Right according to the corresponding button
press.
Volume Control
Move the 5-way controller to control the
headphone or speaker volume for audio books
and music.
Page 30

Only for this model
Using the Touch Screen
a. To move to the previous
page, slide your finger across
the screen from left to right
b. To move to the next page,
slide your finger across the
screen from right to left.
Page 31

Chapter 3
Getting to Know the Main
Features
Home Screen
The sample screen below shows the Home
Screen and the applications. The Home
Screen is displayed with various options in which user
can choose the desired options on Book Library,
Bookmarks & Notes, Network Service, Settings
and More.
Page 32

Page 33

Home Screen (continued)
The following table shows a summary of
each feature.
ICON Description
Book Library
Opens the eBook content in available
formats, including ePub, PDF, RTF and
TXT.
Bookmark & Notes (Notes is for VEB625
only)
Allows management of bookmarks and
notes made or created while reading.
Music Library
Allows playback of audio files stored in the
eBook.
Page 34

Network Service (WiFi - VEB625, 3G VEB630)
You can use wireless or 3G function to
download content and share data to your
friends.
Setting
Takes you to the Settings screen.
User Manual
On screen user manual
Page 35

Book Library
Tap [Book Library] on Home Screen to
search and open a book, once you get
into the Book Library, you can see your five last
accessed books on the first page, press Total menu
to see all of the other books in the library.
Indicates
different
type of
format
Title name
Author name
Total book amount
Book name
Percentage
read
Page 36

Book Library (continued)
Screen Features
Title name The name of your place
Title The name of the book
Author or
Date
Selection
indicator
Format
Indicator
Book
Number
for books, the author of the item is listed.
For periodicals and feeds, the date is listed.
Indicates the item you have selected
The label indicates the book format
Indicates the number of books in this device
Page 37

Bookmark
Reading on eBook
The following is a sample display of a
typical eBook.
Book Name
Network Status
(for VEB625)
Page Info Battery Status
Page 38

Using the Options Menu
When you read a book, you can press the
Menu button to open the Options Menu,
it will allow additional relevant functions as indicated
below.
Page 39

Options Menu
Press to access options for optimizing
your reading experience:
To the first page
Go to the first page of current book.
Jumps to a selected page
Allows jumping to any page of the current
book.
Table of contents
Takes you to the Table of Contents for the
item you are reading.
Adds a bookmark
Bookmark current page
My Bookmarks
Shows bookmarks for the book.
Page 40

Search
Displays the Search line at the bottom of the
screen, searches and lists a key word within
the book.
Font Size
Change displayed font size.
Page 41

Using Go to Page
When you read a book, press Options
Menu, tap To first page, you will go to the
first page in this book.
Page 42

Jumping to a Page
When you choose Jump to page system
will popup soft number buttons. that allows
you to enter a page number to jump to a specific page
you wish to read in the book.
Page 43

Displaying Table of Content
The Table of Contents (TOC) for the eBook
device shows you all of the topics covered
in this book.
You can get there by selecting “Table of Contents”
from the Options Menu when you read a book.
This features is available only when the book contains
a TOC created with hyperlinks.
Page 44

Adding Bookmarks
You can add a bookmark on the current
page of the book. The top-left corner of
the page will be marked by to indicate that it is
bookmarked
Press
menu when you read a book to add a bookmark to
the current page. Your bookmarks will be stored in My
Bookmarks for further reference.
button or by selecting Bookmark in Option
Page 45

Bookmark Indicator
* You can add total 8 Bookmarks on a book. The new
one will replace old
Page 46

Viewing My Bookmarks
You can look up the bookmarks for the
book by selecting My Bookmark from the
Options Menu. A list of pages with bookmarks will be
shown on the screen, tap any bookmarks to resume
reading at that bookmarked page.
Book Name
Page 47

Using Search
To search the book content, you can use
Search menu and enter your criteria to
display the search results as shown in the example
below.
Step 1 Step 2
Page 48

* You can press Ru/En on
soft keyboard to switch the
keyboard type for Cyrillic text
search.
Search Result
Page 49

Adjusting the Font Size
To pick the text size that you want to use
while reading. You have a choice of five
sizes for reading content on the device. Tap or move
5-way control to adjust the displayed font size.
Step 1 Step 2
Page 50

Viewing Bookmarks and Notes
To view all the bookmarks or notes, open Bookmarks
and Notes on the Home Screen. All the bookmarks
and notes are shown as a list of pages as the
following sample screen. Select any listed items to
show details.
Bookmark / note info
(for VEB625)
(for VEB625)
Page 51

Adding Notes
You can add a note for further
reference. Press Menu to display
Only for this model
Select [add New] note then enter words by tapping
the letter buttons on the soft keyboard. When you are
done, tap [Save] button to confirm inputs.
* You can add up to 20 notes under this mode.
Options menu for the bookmark/
note list.
Page 52

Deleting Notes
While in bookmark/notes mode,
press Menu to display the Option
Only for this model
* Bookmarks cannot be deleted.
Menu, select Delete to remove the
records from the page.
Page 53

Playing Music
To enter Music mode, open Music Library on the
Home Screen.
Use 5 way control to play your music files (MP3).
To browse the audio list use up/down key, Enter
•
for play, Left/Right for volume control.
To stop playing the file, press Enter again.
•
During audio playback, you can still read a book.
•
Now playing Icon
To play music files in the
device, you need to
upload music to your
device.
Page 54

Networking Service
Select Network Service to
configure network connection/
Only for this model
Network service is not available on the VEB620.
Network Neighbor from Home
Screen.
Page 55

Only for this model
WiFi Switch
WiFi Setting
To establish an WiFi connection,
you need to configure the network
settings.
Switch to turn on/off
WiFi. The device will
scan for available
wireless networks.
The discovered network
name (SSID) are shown
as a list.
Page 56

Connect to Available
Networks
Only for this model
If you select a secure network, you will be prompted
for the password. Use the soft keyboard to enter the
password to establish the connection.
Select a network name to establish
a connection.
Page 57

Using a Network Neighbor
Select Network Neighbor to
connect to and download shared
Only for this model
Select one of the PC listed on the page to access
1.
its sharing folder.
Enter the User name & password.
2.
Select files to download to your eBook.
3.
files on the network.
Page 58

Available PC list
USN & PSW
Page 59

Setting
Language, Power Management, Gesture Setting,
System Info.(About) and Advanced Setting are
categories of Setting. Touch Screen Calibration,
G-Sensor Calibration, Firmware Upgrade and Restore
Defaults setting are categories in the Advanced
settings.
Select Settings from Home Screen.
1.
Use 5 way control to navigate and configure the
2.
setting items.
Press Back key to return to the previous window.
3.
Page 60

Firmware Upgrade
By downloading and installing the system firmware
update will upgrade your eBook’s firmware and
software to the latest version. This will improve your
eBook’s operational performance, fix software bugs,
repair software errors and add more features and
more value to your eBook!
Please check our online web page (www.viewsonic.
com) from time to time for system firmware update:
Page 61

Safety and Hardware
Important Safety Instructions
When using your ViewSonic eBook device, you should
always follow basic safety instructions to reduce the
risk of fire, electric shock and injury to persons:
Do not use the eBook device near water; for
1.
example: near a bathtub, washbowl, kitchen
sink or laundry tub, in a wet basement or near a
swimming pool.
Avoid using the eBook device during an electrical
2.
storm. There may be a remote risk of electric
shock from lightning.
Use only the power adapter included with your
3.
eBook device. Do not dispose of your eBook
device in a fire. The internal rechargeable battery
may explode. Check local codes for possible
special disposal instructions.
Page 62

CAUTION: To reduce the risk of fire, use only the
4.
enclosed DC 5V adaptor or USB cord.
CAUTION: Do not remove the cover (or back).
5.
There are no user-serviceable parts inside. Refer
servicing to qualified service personnel.
CAUTION: To ensure reliable operation and to
6.
prevent overheating, provide adequate ventilation
for your eBook device and keep it away from heat
sources. Do not locate it near heat registers or
other heat-producing equipment. Provide for free
air flow around the eBook device and its power
supply.
Page 63

Format limitation
Format limitation
General
PDF
ePub
FB2 Support up to version 2.1.
HTML
TXT Support Unicode only.
RTF Support up to RTF 1.8
MP3
Maximum file size and resolution limited to
format specific and system resource.
Up to Version 9. Password protected PDF is
not supported..
Support up to ePub 2.0 files. Can’t support
ePub feature that is not defined in official spec
Can’t support non-standard tag. For example,
JavaScript, AJAX, RSS, Adobe flash, self
defined tag, etc.
Support up to 256kbits/s bitrate, 48 kHz
sampling frequencies, stereo mode.
Maximum 500 songs are allowable in playlist.
Page 64

Troubleshooting
Problem Solution
System stop
response
User can’ t power
on the device when
she/he hadn’t used
the device for
several days.
Bookmark is not
current or not able
to parsing any
books.
The screen
displays garbled
code while open an
e-Book.
Short press the reset hole which
located beside the SD slot.
Power on the device.
It’s possible that it’s low battery
status. Please use AC adapter to
charge the device for more than
one hours. Then short press the
power switch to power-on the
device.
Please restore default under
setting menu.
The content could be encoded by
using “local code,” not “Unicode
code” supported by the system.
Please transfer the file into
“Unicode code” and try again.
Page 65

Customer Support
For technical support or product service, see the table
below or contact your reseller.
Note: You will need the product serial number.
Country/Region
Web Site
Australia/New Zealand
www.viewsonic.com.au
Canada
www.viewsonic.com
Europe
www.viewsoniceurope.
com
Hong Kong
www.hk.viewsonic.com
T=Telephone
F=Fax
E-mail
AUS=1800 880 818
NZ=0800 008 822
service@au.viewsonic.com
T (Toll-Free)= 1-866-463-4775
T (Toll)= 1-424-233-2533
F= 1-909-468-3757
service.ca@viewsonic.com
www.viewsoniceurope.com/uk/
support/call-desk/
T= 852 3102 2900
service@hk.viewsonic.com
Page 66

India
www.in.viewsonic.com
T= 1800 11 9999
service@in.viewsonic.com
Ireland (Eire)
www.viewsoniceurope.
com/uk/
Korea
www.kr.viewsonic.com
Latin America
(Argentina)
www.viewsonic.com/la/
Latin America (Chile)
www.viewsonic.com/la/
Latin America
(Columbia)
www.viewsonic.com/la/
www.viewsoniceurope.com/uk/
support/call-desk/
service_ie@viewsoniceurope.
com
T= 080 333 2131
service@kr.viewsonic.com
T= 0800-4441185
soporte@viewsonic.com
T=1230-020-7975
soporte@viewsonic.com
T= 01800-9-157235
soporte@viewsonic.com
Page 67

Latin America
(Mexico)
www.viewsonic.com/la/
Renta y Datos, 29 SUR 721, COL. LA PAZ, 72160
PUEBLA, PUE. Tel: 01.222.891.55.77 CON 10 LINEAS
Electroser, Av Reforma No. 403Gx39 y 41, 97000 Merida,
Yucatan. Tel: 01.999.925.19.16
Other places please refer to http://www.viewsonic.com/la/
soporte/index.htm#Mexico
T= 001-8882328722
soporte@viewsonic.com
Latin America (Peru)
www.viewsonic.com/la/
Macau
www.hk.viewsonic.com
Middle East
ap.viewsonic.com/me/
Puerto Rico & Virgin
Islands
www.viewsonic.com
T= 0800-54565
soporte@viewsonic.com
T= 853 2870 0303
service@hk.viewsonic.com
Contact your reseller
service@ap.viewsonic.com
T= 1-800-688-6688 (English)
T= 1-866-379-1304 (Spanish)
F= 1-909-468-3757
service.us@viewsonic.com
soporte@viewsonic.com
Page 68

Singapore/Malaysia/
Thailand
www.viewsonic.com.sg
T= 65 6461 6044
service@sg.viewsonic.com
South Africa
ap.viewsonic.com/za/
United Kingdom
www.viewsoniceurope.
com/uk/
United States
www.viewsonic.com
Contact your reseller
service@ap.viewsonic.com
www.viewsoniceurope.com/uk/
support/call-desk/
service_gb@viewsoniceurope.
com
T (Toll-Free)= 1-800-688-6688
T (Toll)= 1-424-233-2530
F= 1-909-468-3757
service.us@viewsonic.com
Page 69

Limited Warranty
VIEWSONIC® eBook
What the warranty covers:
ViewSonic warrants its products to be free from
defects in material and workmanship, under normal
use, during the warranty period. If a product proves
to be defective in material or workmanship during
the warranty period, ViewSonic will, at its sole
option, repair or replace the product with a like
product. Replacement product or parts may include
remanufactured or refurbished parts or components.
How long the warranty is effective:
ViewSonic eBook are warranted for 1 year for labor
from the date of the first customer purchase.
Who the warranty protects:
This warranty is valid only for the first consumer
purchaser.
Page 70

What the warranty does not cover:
Any product on which the serial number has been
1.
defaced, modified or removed.
Damage, deterioration or malfunction resulting
2.
from:
Accident, misuse, neglect, fire, water,
a.
lightning, or other acts of nature, unauthorized
product modification, or failure to follow
instructions supplied with the product.
Repair or attempted repair by anyone not
b.
authorized by ViewSonic.
Causes external to the product, such as
c.
electric power fluctuations or failure.
Use of supplies or parts not meeting
d.
ViewSonic’s specifications.
Normal wear and tear.
e.
Any other cause which does not relate to a
f.
product defect.
Any product exhibiting a condition commonly
3.
known as “image burn-in” which results when a
static image is displayed on the product for an
extended period of time.
Page 71

How to get service:
For information about receiving service under
1.
warranty, contact ViewSonic Customer Support
(please refer to Customer Support page). You will
need to provide your product’s serial number.
To obtain warranted service, you will be required
2.
to provide (a) the original dated sales slip, (b) your
name, (c) your address, (d) a description of the
problem, and (e) the serial number of the product.
Take or ship the product freight prepaid in the
3.
original container to an authorized ViewSonic
service center or ViewSonic.
For additional information or the name of the
4.
nearest ViewSonic service center, contact
ViewSonic.
Limitation of implied warranties:
There are no warranties, express or implied, which
extend beyond the description contained herein
including the implied warranty of merchantability and
fitness for a particular purpose.
Page 72

Exclusion of damages:
ViewSonic’s liability is limited to the cost of repair or
replacement of the product. ViewSonic shall not be
liable for:
Damage to other property caused by any
1.
defects in the product, damages based upon
inconvenience, loss of use of the product, loss of
time, loss of profits, loss of business opportunity,
loss of goodwill, interference with business
relationships, or other commercial loss, even if
advised of the possibility of such damages.
Any other damages, whether incidental,
2.
consequential or otherwise.
Any claim against the customer by any other
3.
party.
4.3: ViewSonic eBook Warranty eBook_LW01 Rev. 1A 06-20-08
Page 73

 Loading...