

ViewSonic VNB104, VS13342 User Manual

- User Guide
VNB104
NetBook
ViewSonic
®
Model No. : VS13342

ViewSonic VNB104 i
Important Safety Instructions
DO NOT press or touch the LCD Screen. DO NOT place notebook PC with small items,
they may scratch LCD Screen or penetrate the vents of notebook PC.
DO NOT expose notebook PC to dirty or dusty environment. Keep the environment clean
and dry.
DO NOT place notebook PC on uneven or unstable work surface.
DO NOT place or drop objects on the top of notebook PC. DO NOT shove any foreign
objects into notebook PC. DO NOT close with force the LCD Screen lid.
DO NOT expose notebook PC to strong magnetic or electrical elds; DO NOT place oppy
disks near or on notebook PC as this may cause the loss of data on the oppy disks.
DO NOT leave notebook PC facing the sun as it can damage the LCD Screen, especially
when in a car.
SAFE TEMPERATURE: This notebook PC should only be used in environments with
ambient temperatures between 5°C (41°F) and 35°C(95°F).
DO NOT expose notebook PC to or use near liquids, rain, or moisture.
Caution: there is a risk of explosion if the battery is replaced by an incorrect type. Dispose
of used batteries according to the instructions.
DO NOT throw notebook PC in municipal waste. Check local regulations for disposal of
electronic products. Please recycle the Battery Pack, and check with your Local Authority
or retailer for an advice on recycling.
Notebook PC and its power adapter may produce some heat during operation or charging
of its internal battery. DO NOT leave notebook PC on your lap or any part of your body in
order to prevent discomfort or injury from heat exposure.
INPUT RATING: Refer to the rating label on notebook PC and make sure that the Power
Adapter complies with that rating. Only use accessories recommended by ViewSonic.
Check the connections between the main unit and attached devices before turning on your
notebook PC.
DO NOT use notebook PC during eating to avoid dirtying your notebook PC.
DO NOT insert anything into notebook PC that may result in short circuit or can damage
the electronic circuits.
Power off your notebook PC, if you want to install or remove some external devices, which
do not support hot-plugging-in.
Disconnect your notebook PC from the electrical outlet and remove any installed batteries
before cleaning the notebook PC. Keep your notebook PC away from children.
DO NOT disassemble notebook PC. Only a certied service technician should perform
repairs on your computer.
Use only the Battery Packs approved by ViewSonic.
Notebook PC has vents to disperse heat. DO NOT place notebook PC on soft objects
(e.g.: bed, sofa, your lap) as this can block the air ow from those vents and cause system
halt due to overheating.
1.
2.
3.
4.
5.
6.
7.
8.
9.
10.
11.
12.
13.
14.
15.
16.
17.
18.
19.
20.
ViewSonic VNB104
ii
Declaration of RoHS Compliance
This product has been designed and manufactured in compliance with Directive 2002/95/EC
of the European Parliament and the Council on restriction of the use of certain hazardous
substances in electrical and electronic equipment (RoHS Directive) and is deemed to comply
with the maximum concentration values issued by the European Technical Adaptation
Committee (TAC) as shown below:
Substance
Proposed Maximum
Concentration
Actual Concentration
Lead (Pb) 0,1% < 0,1%
Mercury (Hg) 0,1% < 0,1%
Cadmium (Cd)
0,01% < 0,01%
Hexavalent Chromium (Cr6+)
0,1% < 0,1%
Polybrominated biphenyls (PBB)
0,1% < 0,1%
Polybrominated diphenyl ethers (PBDE)
0,1% < 0,1%
Certain components of products as stated above are exempted under the Annex of the RoHS
Directives as noted below:
Examples of exempted components are:
1. Mercury in compact uorescent lamps not exceeding 5 mg per lamp and in other lamps not
specically mentioned in the Annex of RoHS Directive.
2. Lead in glass of cathode ray tubes, electronic components, uorescent tubes, and
electronic ceramic parts (e.g. piezoelectronic devices).
3. Lead in high temperature type solders (i.e. lead-based alloys containing 85% by weight or
more lead).
4. Lead as an allotting element in steel containing up to 0.35% lead by weight, aluminium
containing up to 0.4% lead by weight and as a cooper alloy containing up to 4% lead by
weight.

ViewSonic VNB104 iii
Copyright Information
Copyright © ViewSonic® Corporation, 2010. All rights reserved.
Microsoft®, Windows®, Windows NT®, and the Windows® logo are registered trademarks of
Microsoft
®
Corporation in the United States and other countries.
ViewSonic®, the three birds logo, OnView®, ViewMatch™, and ViewMeter® are registered
trademarks of ViewSonic
®
Corporation.
Intel®, Pentium®, and Atom™ are registered trademarks of Intel Corporation.
Disclaimer: ViewSonic® Corporation shall not be liable for technical or editorial errors or
omissions contained herein; nor for incidental or consequential damages resulting from
furnishing this material, or the performance or use of this product.
In the interest of continuing product improvement, ViewSonic
®
Corporation reserves the right
to change product specications without notice. Information in this document may change
without notice.
No part of this document may be copied, reproduced, or transmitted by any means, for any
purpose without prior written permission from ViewSonic
®
Corporation.
Product Registration
To meet your future needs, and to receive any additional product information as it becomes
available, please register your product on the Internet at:
www.viewsonic.com. The ViewSonic® Wizard CD-ROM also provides an opportunity for you to
print the registration form, which you may mail or fax to ViewSonic®.
For Your Records
Product Name:
Model Number:
Document Number:
Serial Number:
Purchase Date:
VNB104
ViewSonic NetBook
VS13342
VNB104-1_UG_ENG Rev. 1A 03-02-10
Product disposal at end of product life
ViewSonic
®
is concerned about the preservation of our environment. Please dispose of this
product properly at the end of its useful life. For the recycling information, please refer to our
website:
1. USA: www.viewsonic.com/company/green/recycle-program/
2. Europe: www.viewsoniceurope.com/uk/support/recycling-information/
3. Taiwan: recycle.epa.gov.tw

ViewSonic
VNB104 iv
Contents
1. Introduction to each part ............................................................................................. 1
(1) Top components ................................................................................................. 2
(2) Bottom components ............................................................................................ 4
(3) Left components.................................................................................................. 6
(4) Right components ............................................................................................... 7
2. BIOS Setup................................................................................................................. 8
3. First use ....................................................................................................................15
Power supply system.............................................................................................. 16
Using Keyboard ...................................................................................................... 22
Using touchpad....................................................................................................... 24
Memory Devices..................................................................................................... 25
Network Connections ............................................................................................. 27
Appendix....................................................................................................................... 28
Operating system and software .............................................................................. 28
Frequently asked questions.................................................................................... 29
Glossary and Brachylogy........................................................................................ 32
ViewSonic
VNB104 1
1. Introduction to each part
Top components
Bottom components
Right components
Left components
Back components
Note: The pictures and icons in this manual are just for reference, which may differ
from the product you bought.
ViewSonic
VNB104 2
(1) Top components
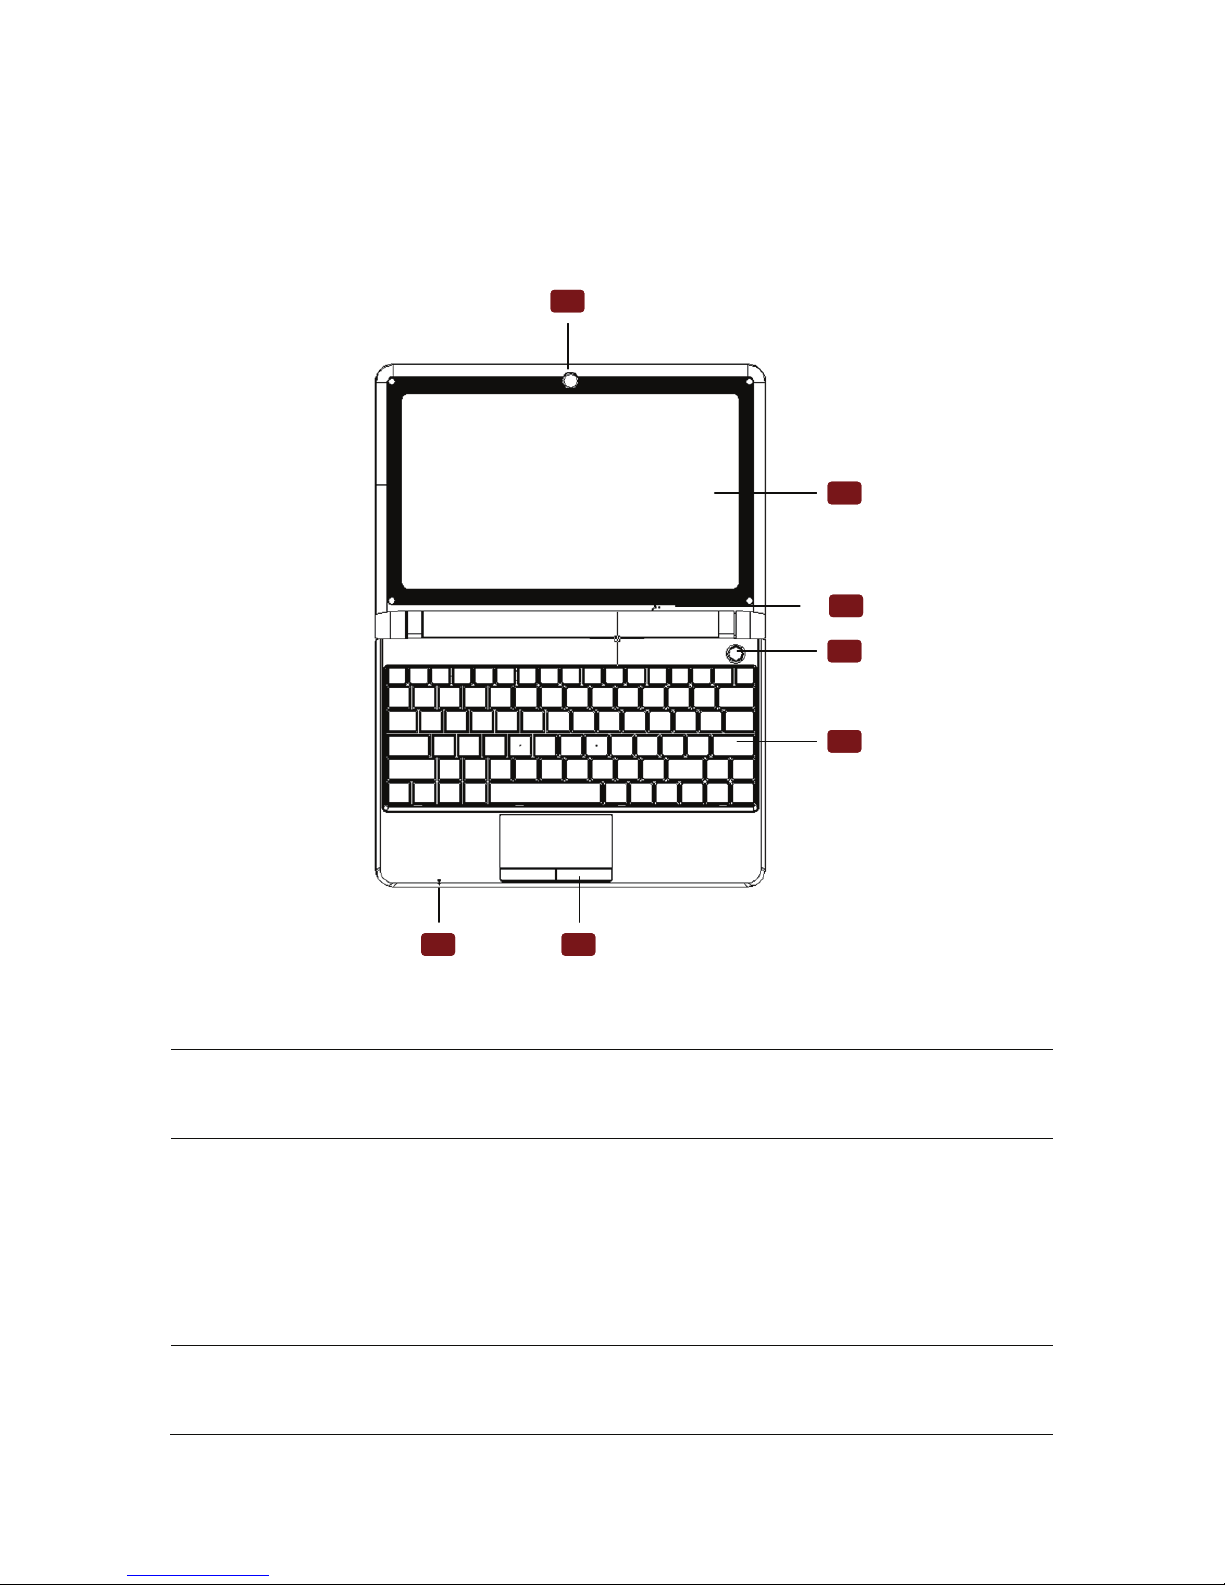
Please identify top components according to the icon below.
1
6
3
5
4
2
7
1
6
3
5
4
2
7
Components and Buttons
1
Camera (optional pc type)
Built-in camera can take photographs or screen a video, and compatible with other
equipment, it can be used to hold video conference.
2 Display screen
The display is similar to that of desk computer. Notebook use dynamic matrix
TFTLCD, which can supply excellent menu the same as desk computer. LCD
differs from desk computer displays because it will not bring any eradiate or glittery
menu, thus it will not do harm to eyes comparatively. Please wipe the display
screen with soft cloth that doesn’t contain chemical liquid . You can add a little
water necessarily.
3 Microphone (built-in)
The built-in single track microphone can use to convene video conference、oral
record or simple audio record.

ViewSonic
VNB104 3
4 Power indicator
Indicates when PC is powered on.
5 Keyboard
The keyboard of notebook is standard size; you can put your both hands on it,
making using more comfortable. There are two Windows function buttons; it is
easier to browse Windows operation system.
6 Touchpad
Touchpad and buttons are finger operation device, supplying the same function as
the mouse of computer.
7 LED
Power LED
Note: Different countries or areas may have different keyboards
ViewSonic
VNB104 4
(2) Bottom components
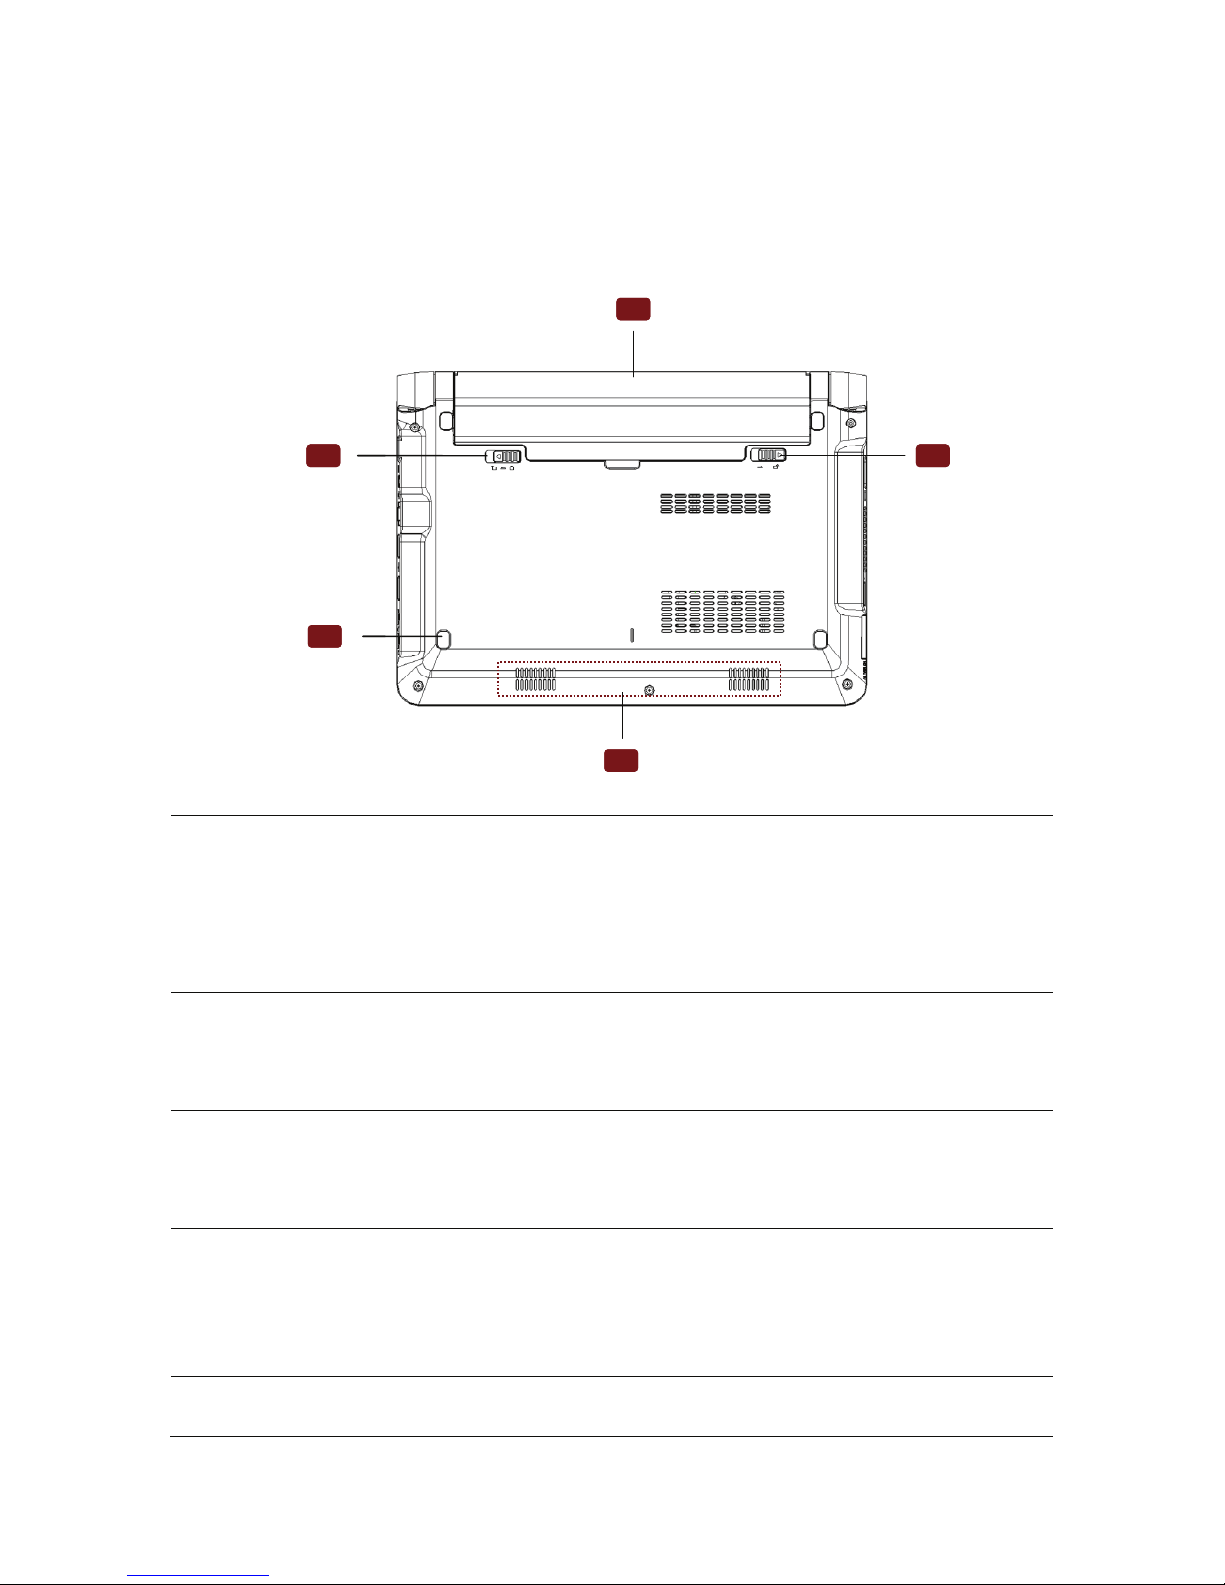
Please identify the components of notebook referring to the icon below.
1
2
4
3
5
1
2
4
3
5
1 Battery
Battery will charge automatically when plugging AC power, while cutting off the Ac
power, the notebook will be supplied by battery. Thus, no matter where and when
you can use it. Battery life will be different because of usage and specification.
Please do not disassemble battery series privately; the battery can be replaced by
warrant manufacture as single discreteness.
2 Battery lock-spring
Battery lock-spring will make the battery firmed. It will lock automatically after install
the battery. If you want to remove the battery, you need to move the battery
lock-spring to the unlock location.
3 Battery lock button--manual
Spring battery lock button protect the fastness of battery series. Put manual lock
button into the unlock position, in order to putting battery series, put it back after
finished.
4 Speaker
Speaker is located at the bottom of the computer, with each one on the both sides,
which is the difference between laptop and desktop. A laptop always equipped with
speaker, therefore users don’t have to buy additional audio and can make use of it
conveniently.
5 Cushion
Cushion is used to avoid the abrasion between back lid and desk surface.

ViewSonic
VNB104 5
Warning! The PC bottom will become very hot when using .So you should be careful
while the notebook is using or has been used just now. It is natural that the notebook
becomes hot when using or charging. Do not lay it on the soft surface like bed or sofa,
or else heat of notebook will spread out abnormally. To prevent scalding, please don’t
lay the notebook on legs or other part of your body.
Importance! If End-user dismantles the CPU or hard disk of notebook privately, the
quality of products will be lost.
ViewSonic
VNB104 6
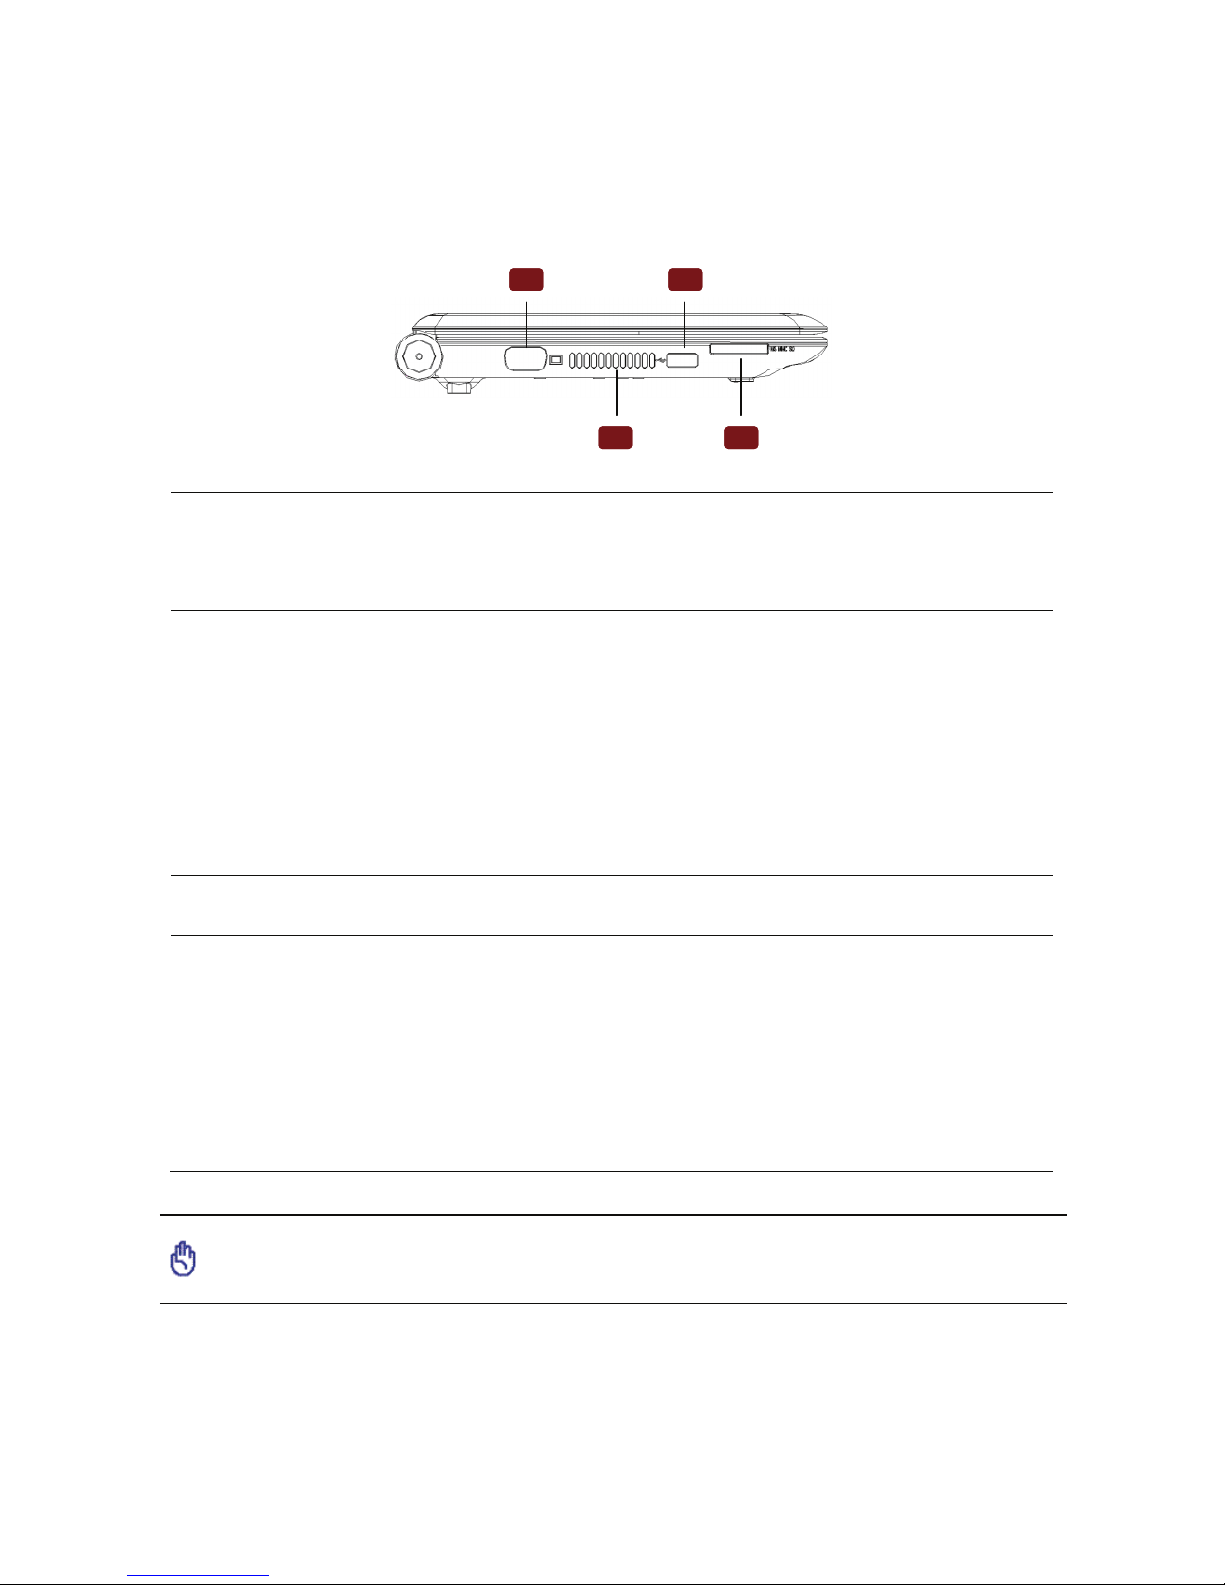
(3) Left components
Please consult the icon below to identify left components of the computer.
1 2
3 4
1 2
3 4
1
Output of the external display
Display port named D-sub with 15 feet supports equipment which is compatible
with standard of VGA, such as display or projection facility and so on; people can
look on through a larger external screen.
2 USB port (2.0/1.1)
Universal serial bus is compatible with USB 2.0 or 1.1 device, for example
keyboard, index device, camera, Hard Disk Drive, printer as well as scanner.
Transmission speed of USB 1.1 can reach 12Mbps,whereas USB2.0 is
480Mbps.USB port sustains several USB devices to connect to one pc at the same
time, some peripheral devices such as USB keyboard or new-style display are also
equipped with USB sockets, which is of the same use with USB Hub. Majority of
peripheral devices can connect or disconnect without rebooting notebook because
USB sustains hot-switch.
3 Intake
Intake can let cold air afflux and hot air effuse the notebook.
4 Multifunctional card reader slot
Generally memory card is read from digital camera, MP3 Player, phone, PDA and
the other equipment and one have to buy a special PCMCIA or USB memory
card-reader. This computer is equipped with internal memory card-reader. Detailed
introduction has been introduced in the following chapters. This internal memory
card-reader is more convenient and faster for reading than most of the same type,
because it is equipped with PCI bus which is of high bandwidth. This computer can
read three kinds of cards that are MS, SD and MMC.
Importance! Please make sure papers, books, clothing, cables or other materials do
not block the intake, or it may lead the notebook too hot.
ViewSonic
VNB104 7
(4) Right components
Please consult the icon below to identify right components of the computer.
65421 3 65421 3
1
Microphone input jack
Single voice microhpone jack (1/8inch) can be connected with external microhpones or
output signal from audio device.Internal microhpone will automatically stop by using the
jack.The function can be used in video meeting, oral record or simple audio record.
2 Earphone input jack
Dimensional sound earphone jack (1/8inch) is used to connect audio output signal to
dimensional sound box or earphone. Internal sound box will automatically stop by using
the jack.
3 USB port (2.0/1.1)
Universal serial bus is compatible with USB 2.0 or USB1.1, such as keyboard, index
equipment, camera, hard disk, printer and scanner, serial transmission speed of USB
1.1 can reach 12Mbps, while USB2.0 can reach 480Mbps.
USB port supports several USB facilities in connection with a computer at the same
time, some USB keyboards or new displays or other external facilities are equipped
with USB jack which has the same use as USB Hub. Because USB supports hot switch
of equipment, most external facilities can link directly or interrupt the link instead of
restarting the computer.
4 LAN Port
RJ-45LAN port has 8pin is bigger than RJ-11 modem port, which sustain to connect
normal Ethernet cable of local network. One can use conveniently built-in port without
extra adaptor.
5 DC power input
Concomitant power adapter can change AC to DC. Power adapter supply power to
notebook through this jack, and provide power charging for battery. To avoid damaging
notebook and battery series, please make sure using the concomitant power adapter.
Caution: power adapter will get hot during using. Please don’t cover the adapter, and
don’t let the adapter be close to your body.
6 Security lock cable connector
Connect the device security cable lock option.
Importance! Built-in modem doesn’t sustain the voltage in digital phone system, so
don’t connect them, otherwise it will damage notebook.
Security cable lock is used as a precautionary measure only and should not prevent
the use of improper or stolen equipment.
ViewSonic
VNB104 8
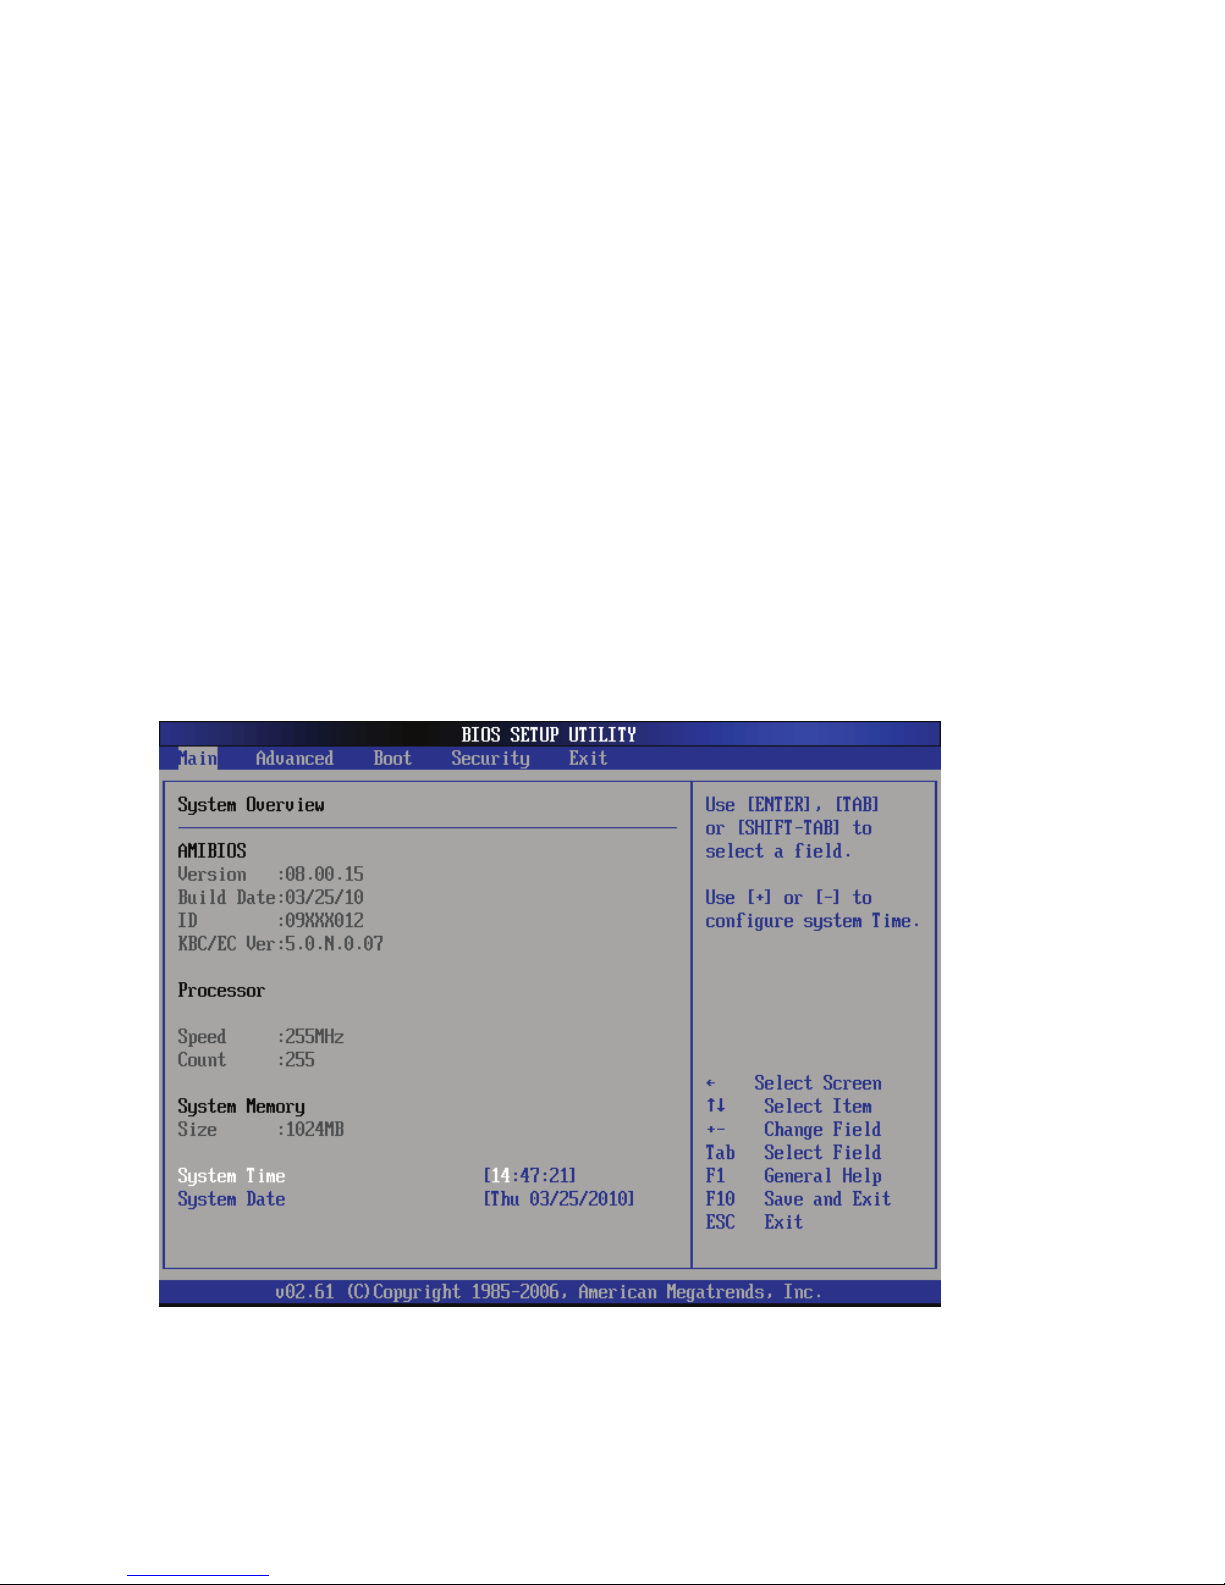
2. BIOS Setup
This chapter provides a description of the BIOS setup utility. The BIOS setup menus
and available selections may vary from those of your product. For specific information on
the BIOS for your product, please contact ViewSonic®.
The BIOS setup utility provides a built-in Setup program, which allows the user to
modify the basic system configuration and hardware parameters. The modified data will be
stored in a battery-backed CMOS, so that data will be retained even when the power is
turned off. In general, the information saved in the CMOS RAM will not need to be changed
unless there is a configuration change in the system, such as a hard drive replacement or
when a device is added. It is possible for the CMOS battery to fail, which will cause data
loss in the CMOS only. If this happens you will need to reconfigure your BIOS settings.
Main Menu
The BIOS Setup is accessed by pressing the <Delete> button after the Power-On Self-Test
(POST) memory test begins and before the operating system boot begins. Once you enter
the BIOS Setup Utility, the Main Menu will appear on the screen. The Main Menu provides
System Overview information and allows you to set the System Time and Date. Use the
“←” and “→” cursor keys to navigate between menu screens.
► System Date
<weekday><month><date> <year> format.
Day—weekday from Sun. to Sat., this message is automatically displayed by BIOS (Read
Only).
Month—month from 1 to 12.
 Loading...