

Page 1
Page 2

Copyright © ViewSonic Corporation, 2006. All rights reserved.
ViewSonic and the three birds logo are registered trademarks of ViewSonic Corporation.
Microsoft, Windows, Windows CE, Windows CE Inbox, Explorer and Internet Explorer, Pocket
Word, Microsoft Word, ActiveSync, MSN, Excel, Windows RDP, Microsoft Windows CE for Smart
Displays, .NET Compact Framework, and the Windows logo are trademarks of Microsoft
Corporation in the United States and other countries.
Citrix, WindView, and ICA are registered trademarks of Citrix Systems, Inc. MetaFrame
is a
trademark of Citrix Systems, Inc.
Intel and X Scale are registered trademarks of Intel Corporation.
VESA is a registered trademark of the Video Electronics Standards Association.
CompactFlash is a trademark of the CompactFlash Association.
E
NERGY STAR
As an E
E
NERGY STAR
Disclaimer: ViewSonic
®
is a registered trademark of the U.S. Environmental Protection Agency (EPA).
NERGY STAR
®
guidelines for energy efficiency.
®
partner , V i ewSonic Corporation has determine d that this product me ets the
Corporation is not liable for technical or editorial errors or omissions
contained herein; nor for incidental or consequential damages resulting from furnishing this
material, or the performance or use of this product.
In the interest of continuing product improvement, ViewSonic Corporation reserves the right to
change product specifications without notice. Information in this document may change without
notice.
No part of this document may be copied, reproduced, or transmitted by any means, for any
purpose without prior written permission from ViewSonic Corporation.
Product Registration
To meet your future needs, and to receive any additional product information as it becomes
available, please register your product on the Internet at: www.viewsonic.com. The ViewSonic
CD also provides an opportunity for you to print the registration form that you can mail or fax to
ViewSonic.
For Your Records
Product Name:
Model Number:
Document Number:
Serial Number:
Purchase Date:
Product disposal at end of product life
ViewSonic V212/V212x
VS11297
V212/V212x_UG_ENG_Rev1B 24-July-2006
_______________
_______________
ViewSonic is concerned about the preservation of our environment. Please dispose of this
product properly at the end of its useful life. Your local waste disposal company may provide
information about proper disposal.
ViewSonic Wireless Tablet Client i
Page 3

Contents
Introduction
Package Contents ......................................................................................... 1
Precautions .................................................................................................... 1
Features ........................................................................................................ 2
Front Control Buttons & Features ............................................................. 2
Rear Connection Ports & Panels .............................................................. 3
Basic Setup (depending on model)
Basic Software Included ................................................................................ 4
Charging the Battery ...................................................................................... 5
Using the AC/DC Power Converter ............................................................... 5
Using the V212/V212x
The Buttons ................................................................................................... 6
Using the Stylus ............................................................................................. 7
Calibrating the Touch Screen ..................................................................... 8
Adjusting the Stylus Double-tap Rate ........................................................ 8
Battery & Power Properties ........................................................................... 9
Battery Power Status ................................................................................. 10
Changing the Battery - with an AC Power source ..................................... 11
Changing the Battery - without an AC Power source .................................11
Antenna Signal Properties ............................................................................. 12
Wireless Connection Signal Status ............................................................ 12
Connection Information .............................................................................. 13
Network Settings ........................................................................................... 14
Make New Connection Settings ................................................................. 14
PCI-ISLP21 Settings .................................................................................. 15
Resetting the V212/V212x ............................................................................. 16
Soft Reset .................................................................................................. 16
Hard Reset ................................................................................................. 16
Firmware Image Upgrade .......................................................................... 16
Compact Flash (CF) Cards ............................................................................ 17
Using a CF Card ....................................................................................... 17
Optional Accessories
The Docking Station ...................................................................................... 18
Commercially Available Accessories ............................................................. 19
Appendix
Cleaning & Maintenance ...............................................................................20
Customer Support ......................................................................................... 20
Compliance & Safety Notices ........................................................................21
Specifications ................................................................................................ 24
Limited Warranty ........................................................................................... 26
ViewSonic Wireless Tablet Client ii
Page 4
INTRODUCTION
IMPORTANT! Be sure to charge the battery overnight before using the V212/
V212x. For more information, see the Basic Setup section.
PACKAGE CONTENTS
This user guide helps you setup your V212/V212x and introduces you to its many features.
Important: Save the original box and all packing material for future shipping needs.
Your V212/V212x package includes:
AC Adapter
Blue USB Setup Cable
(USB Mini-B to A)
Power Cord
Go to the Help and Support Center on your PC for details on using Microsoft software.
This manual only covers using the ViewSonic V212/V212x hardware.
V212/V212x
Battery
PRECAUTIONS
• For best viewing conditions view the screen from a
distance of 15" to 18".
• NEVER REMOVE THE REAR COVER. Your V212/
V212x contains high voltage parts. You may suffer
serious injury if you touch these parts.
• Avoid exposing the screen to direct sunlight or another
heat source. The screen should be facing away from
direct sunlight to reduce glare.
• Always handle your V212/V212x with care; dropping
your V212/V212x could void the warranty.
Stylus (2) with Stylus Tether (1)
Quick Start Guide
ViewSonic CD
with Hardware
User Guide &
USB driver
• Do not operate your V212/V212x outside in a wet,
damp or extremely cold environment.
• Do not place heavy objects on the screen, video
cable, or power cord.
• If smoke, abnormal noise, or strange odor is
present, immediately switch the V212/V212x off and
call your dealer or ViewSonic.
• Use only the AC/DC power adapter supplied with
your V212/V212x.
Quick Start Guide
ViewSonic Wireless Tablet Client 1
Page 5
FEATURES
FRONT CONTROL BUTTONS & FEATURES
1
2
3
4
10
Figure 1: Front of V212/V212x
Features, Lights, and Buttons
1. Antenna Activity Indicator Light
2. Speaker
3. Mouse Button - Right Click
4. Mouse Button - Left Click
5. Power On/Off Indicator Light
6. On/Off Switch
7. Input Panel On/Off Switch
8. Web Browser Button - Log On/Off to the Internet
9. Cursor Navigation Button
10. Microphone
5
6
7
8
9
ViewSonic Wireless Tablet Client 2
Page 6
REAR CONNECTION PORTS & PANELS
5 6
1
2
3
4
7 8 9 10
18
18
17
Figure 2: Back of V212/V212x
Ports, Buttons, Slots, Jacks, & Switches
1. Microphone Jack
2. Headphone Jack
3. DC Power Jack
4. Main Battery Compartment
5. Stylus in Storage Slot
6. Stylus Tether Port
7. USB Ports (Two) - for Keyboard and Mouse
8. Reset Button
9. CF Card Eject Button
10. CF Card Slot
11. Consumer Infra Red (CIR)
12. Standard VGA Port
13. USB Mini-B Port
14. Security Lock Port (Kensington Compatible)
15. Docking Port
16. Main Battery Latch
17. Backup Battery
18. VESA Mount Screw Holes (4) (75 mm)
16
15
11
18
18
12
13
14
ViewSonic Wireless Tablet Client 3
Page 7

BASIC SETUP (DEPENDING ON MODEL)
This section explains the ports, cables, connections and hardware used to get you started. More
details and connection options are explained in the next section, Using the V212/V212x.
BASIC SOFTWARE INCLUDED
The following software comes with the V212/V212x:
®
Windows CE
Internet Explorer
Windows Explorer
Media Player
MS WordPad
Solitaire
Microsoft Inbox
®
Citrix
Client
5.0
Microsoft ActiveSync
Microsoft File Viewers
MS Excel Viewer
MS Image Viewer
MS PDF Viewer
MS PowerPoint Viewer
MS Word Viewer
ViewSonic Wireless Tablet Client V212/V212x
ViewSonic Wireless Tablet Client 4
Page 8
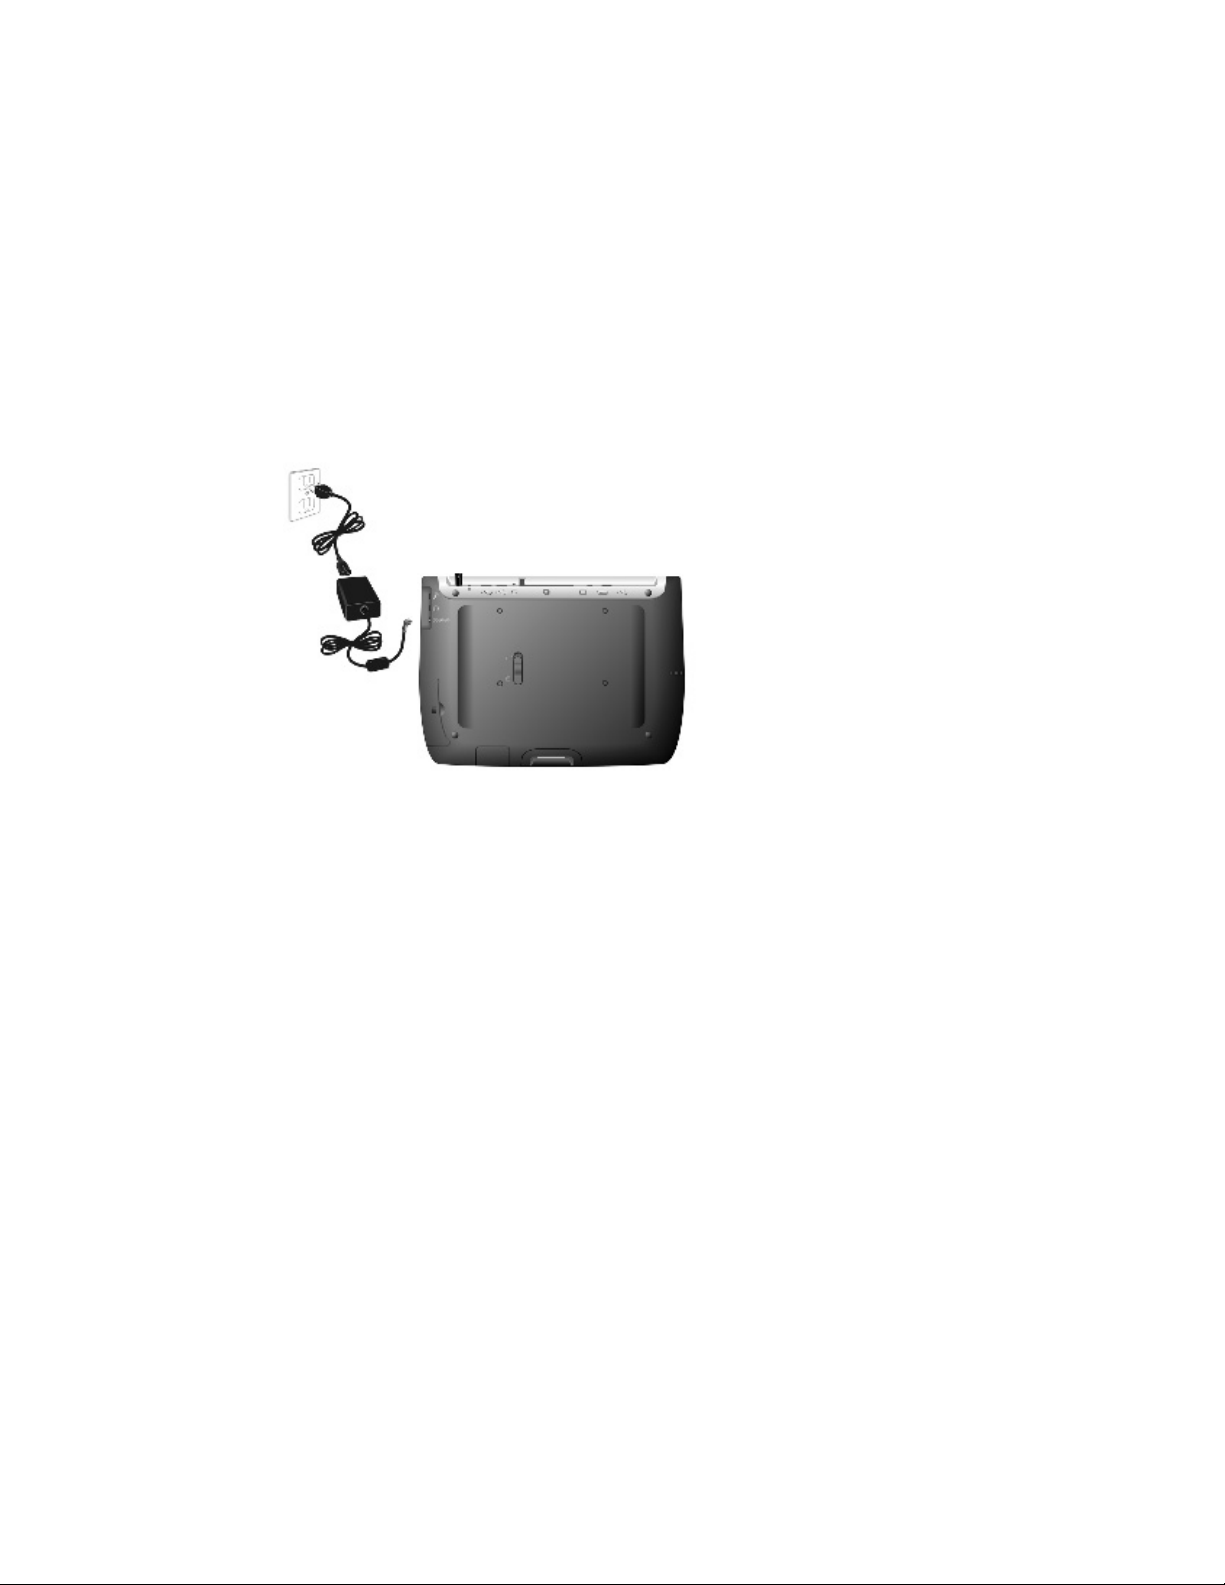
CHARGING THE BATTERY
USING THE AC/DC POWER CONVERTER
Before using the V212/V212x for the first time, charge the battery for at least 5 hours. You may
charge, recharge, and/or operate your V212/V212x with available AC power using the AC/DC
power converter. Use the AC/DC power converter as shown in the figure below.
Caution: Use only the power converter supplied with your V212/V212x.
1
Plug the AC/DC
cable into the V212/
V212x.
2 Connect the power
cord to the AC/DC
adapter.
3 Plug the power cord
into an AC outlet.
Figure 3: Using the AC/DC Power Converter
An optional V212/V212x docking station, described later in this manual, may also be used to
charge, recharge, and/or operate your V212/V212x.
For additional information on battery charging and operation, please review th e Batter y Power &
Properties section of this guide.
ViewSonic Wireless Tablet Client 5
Page 9
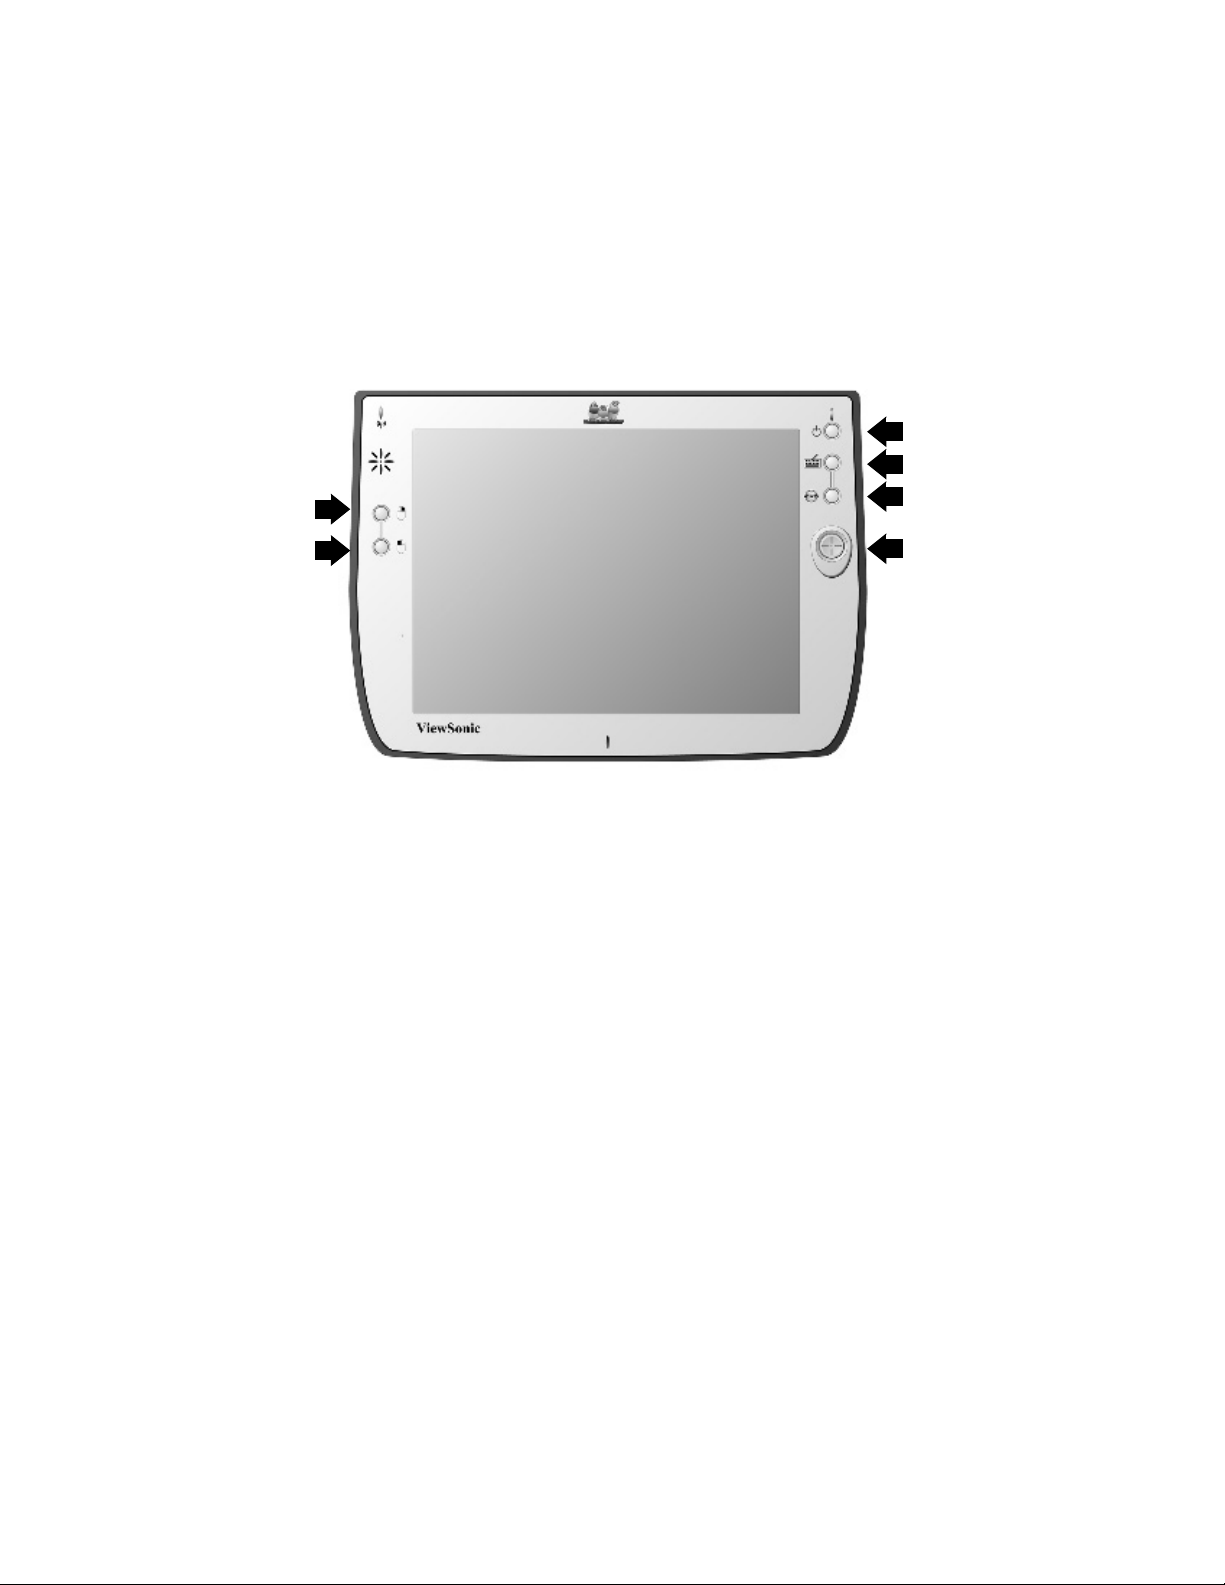
USING THE V212/V212X
THE BUTTONS
The buttons on the right and left side of the V212/V212x screen give you quick access to utilities
and provide navigational control.
3
4
1
5
2
Figure 4: The V212/V212x Buttons
1. Right-click Button - Simulates the right-click button on a mouse.
2. Left-click Button - Simulates the left-click button on a mouse.
3. Power Button - Cycles the unit between On and Stand-by modes.
4. Input Panel Button - Toggles the on-screen virtual Keyboard On/Off enabling data input
using the stylus.
5. Web Browser Button - Launches the V212/V212x web browser application.
6
6. Cursor Control Button - Allows you to move the cursor without having to use the stylus or a
mouse.
ViewSonic Wireless Tablet Client 6
Page 10
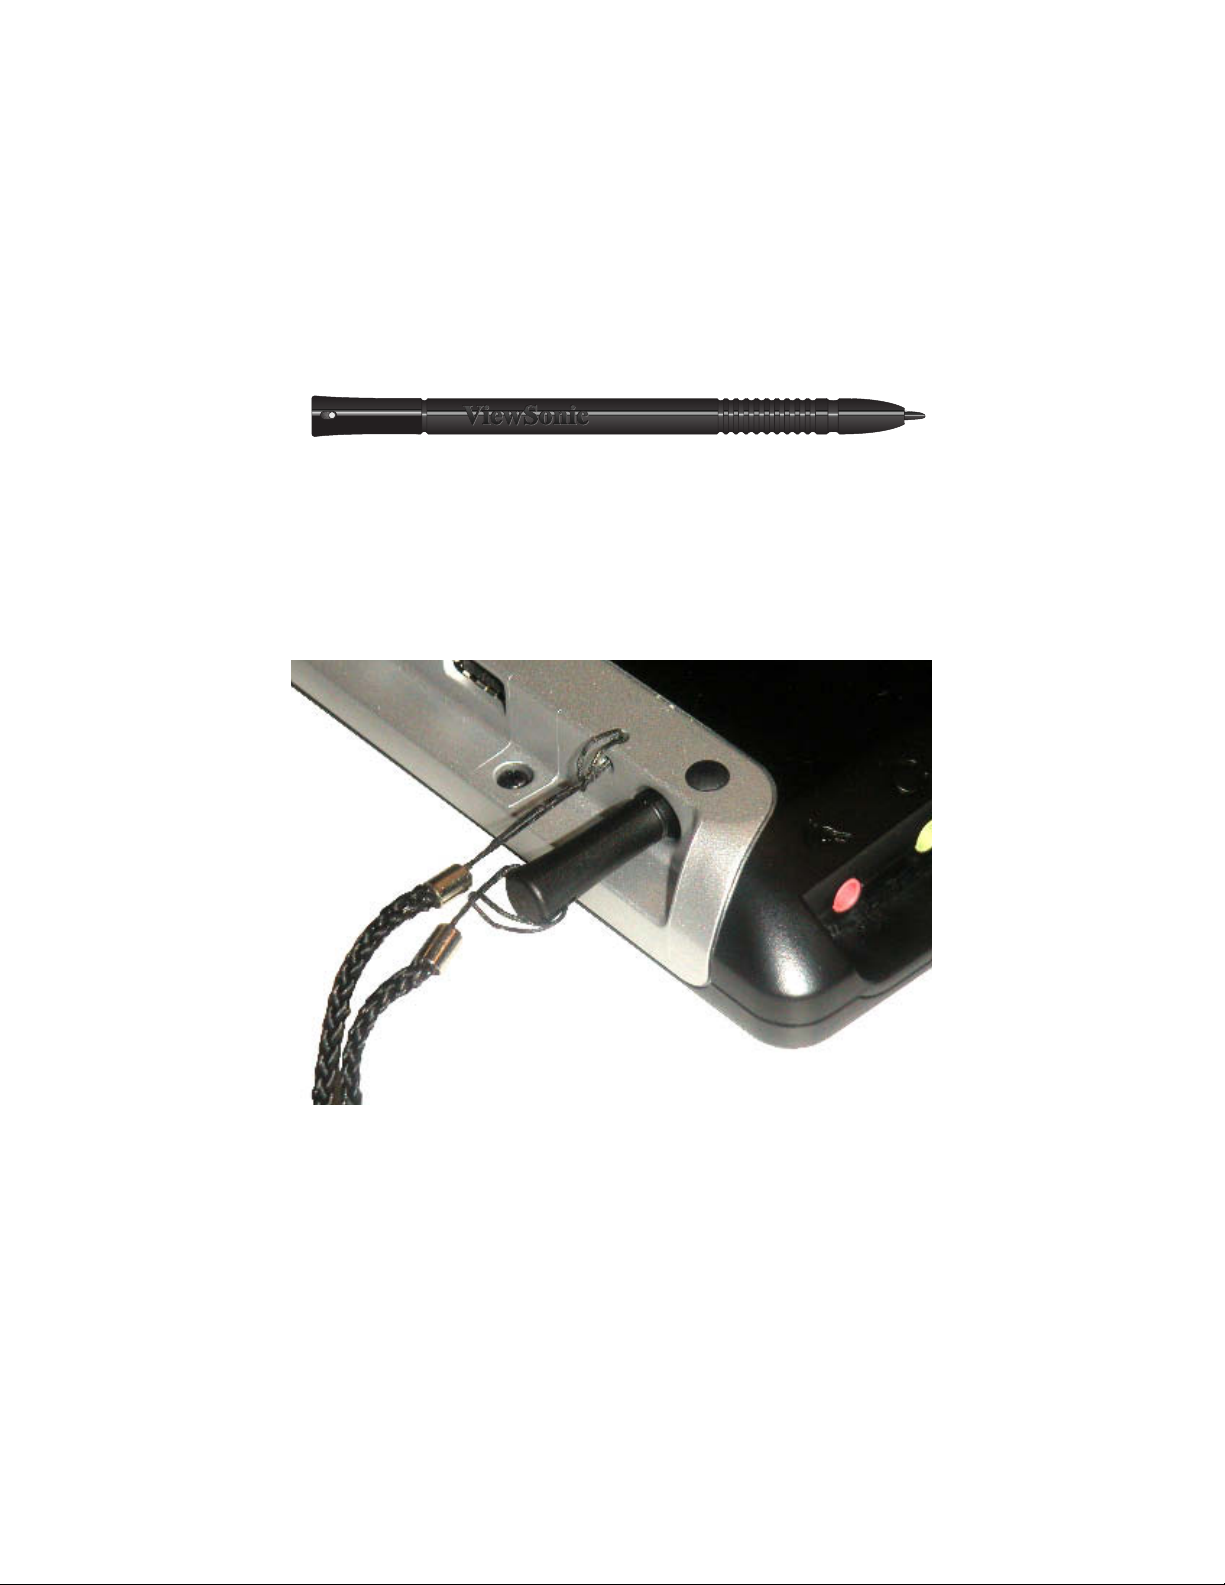
USING THE STYLUS
Use the stylus to “tap” or “double-tap” on an application icon and to select items on the menu.
The stylus is also used to “type” on the Input Panel. The two styli that are supplied with your
V212/V212x are designed for your screen. Using other sharp pointers could damage your
screen.
Figure 5: Stylus
When not in use, you can conveniently place your stylus in the storage slot located on the top
edge of your V212/V212x. A Stylus Tether has been provided to allow you to attach the stylus to
the V212/V212x so it will not become lost or misplaced.
Figure 6: Stylus with Tether
ViewSonic Wireless Tablet Client 7
Page 11

CALIBRATING THE TOUCH SCREEN
If your touch screen is not responding accurately to taps with the stylus, you may need to
recalibrate the screen. To do so:
1. Tap on the control panel’s Settings button - the Settings window will open
2. Tap on the General Tab
3. Tap on the Realign Button in the Stylus section
4. Follow the on-screen instructions
5. When finished, tap the screen - the re-calibration is complete
The instructions will ask you to place the stylus on a series of cross-hair target symbols. When
doing so, rather than just tapping the screen, hold the stylus in place for a second or two as
directed until the program responds.
ADJUSTING THE STYLUS DOUBLE-TAP RATE
The double-tap rate can be set in the Settings window:
1. Tap on the control panel’s Settings button - the Settings window will open
2. Tap on the General Tab
3. Double-tap on the checkerboard graphic to set your double tap rate
4. Close the Settings window
To save your user and wireless settings, power-down the unit then resume.
ViewSonic Wireless Tablet Client 8
Page 12

BATTERY & POWER PROPERTIES
Your V212/V212x has two power sources, AC (using the AC/DC converter) or battery. To run
your V212/V212x from an AC outlet, use the supplied AC/DC adapter cable.
It takes the V212/V212x approximately three (3) to four (4) hours to recharge while not in use
and five (5) hours while in use. In normal operation (when not connected to an AC outlet), the
V212/V212x operates on battery power alone. A fully charged battery can last up to six (6) hours
depending on power consumption factors such as the screen’s brightness setting. The use of
optional CF card accessory will also affect battery life.
CAUTION: Replace only with a V212/V212x series battery:
Part Number BAT-004
Initial Charging: Failure to fully charge the battery for 5 hours before turning on the
!
V212/V212x for the first time may reduce the overall service life of the battery.
If the battery is left unattended too long, it may discharge completely. Complete discharge may
damage the battery’s ability to recharge properly.
Storage: If you are not using the V212/V212x on a daily basis, store the unit by plugging
!
it into an AC outlet using the AC Adapter. For extended storage, remove the battery
completely .
Battery Removal
To remove the battery, slide the Battery Latch then slide the battery out.
CAUTION: Removing the battery can cause the loss of content not saved in the Persistent
Storage folder. Before removing the battery, we strongly recommend that you:
• Drag any changed files that you want to protect to the V212/V212x’s Persistent Storage
folder (under My Computer), then press the Power button (to enter Suspend Mode) before
removing the old battery. Or,
• Plug the AC Adapter into the V212/V212x before
disruptive interruption of power. Or,
• Press the Power button to put the V212/V212x in Suspend Mode, remove the old battery,
and insert the replacement battery quickly. The backup battery (permanently installed) will
prevent an interruption of power, providing a maximum of five (5) minutes of power while in
Suspend Mode.
removing the old battery to prevent a
ViewSonic Wireless Tablet Client 9
Page 13

BATTERY POWER STATUS
The Power Level Icon
To determine the Main battery’s current charge level, double-tap the Power icon in the Control
Panel window under My Computer. The Power Properties window will open to Battery Status.
Battery St atus displays the pe rcentag e of power lef t in your Main battery. The Status section also
rates the quality of your External power connection and Backup battery as either Good, Low, or
Very Low.
The Power Status LED
The Power Status LED at the upper right corner of the V212/V212x also displays useful
information in the battery’s current status and charge level.
In normal battery powered operation:
• Off - the device is powered off
• Solid Green - power level OK
• Solid Yellow - power level low
• Blinking Yellow - power level critically low
When using the AC Power Adapter:
• Solid Green - AC powered, battery charged
• Blinking Green - AC powered, battery charging
When using the optional docking station (described later in the manual):
• Solid Green - AC powered, battery charged
• Blinking Green - AC powered, battery charging
ViewSonic Wireless Tablet Client 10
Page 14

CHANGING THE BATTERY - WITH AN AC POWER SOURCE
1. Attach the AC Power Adapter to
protect changed files from
power outage.
1
3
4
2
5
into the unlocked position.
3. Slide out the old battery.
4. Slide in the replacement battery.
2. Slide the Battery Latch upward
IMPORTANT! If the replacement battery is not fully
charged, be sure to keep the power cable connected until
the Power LED is Solid Green. If the unit is in Off Mode,
this will take three (3) to four (4) hours, and will take
Figure 7: Battery Removal and Insertion
HANGING THE BATTERY - WITHOUT AN AC POWER SOURCE
C
5. Slide the Battery Latch into the
locked position.
In order to swap batteries without loosing your stored content, follow this procedure. If you do not
have access to an AC Power source and/or if you do not currently have the AC Power Adapter,
do the following:
IMPORTANT! The replacement battery should be fully charged.
1. Press the Power button to put the unit in
Suspend Mode (not shown in
illustration).
2. Slide the Battery Latch upward into the
unlock position.
2
3
4
5
3. Slide out the old battery.
4. Slide in the fully charged replacement
battery.
5. Slide the Battery Latch into the locked
position.
ViewSonic Wireless Tablet Client 11
Page 15

ANTENNA SIGNAL PROPERTIES
Your V212/V212x can use a wireless radio signal standard called Wi-Fi (802.11b/g) to
communicate with a local Wi-Fi network connected to a network. The quality of your radio
connection signal can be weakened by excessive distance and by intervening materials such as
walls and furnishings. If the wireless connection seems to work intermittently, check the quality of
your wireless connection.
WIRELESS CONNECTION SIGNAL STATUS
The Antenna Status LED
The Antenna Status LED at the upper left corner of the V212/V212x also displays useful
information on the wireless signal connection:
• Off - no signal, no connection
• Solid Green - good signal level
• Solid Yellow - poor signal level
• Blinking Yellow - very poor signal level
ViewSonic Wireless Tablet Client 12
Page 16

CONNECTION INFORMATION
Accessed from the Task Bar by double-tapping the Nethood icon . The PCI\ISLP21
information window opens displaying three tabs:
IP Information Tab - Displays current IP settings
IPv6 Information Tab - Displays additional current settings
Wireless Information Tab - Automatic IP address assignment
PVI \ ISLP21
Wireless Information
Select a network and press connect or right-click for more
options. To add a new network, double-click ‘Add New’.
Add New...
[V212/V212x]
Status: Connected to V212/V212x
Signal Strength: High
Notify me when new wireless networks are available
✔
Advanced
OK
X
View Log...Connect
The Wireless Information tab window lists all Wi-Fi networks available to the V212/V212x,
allowing you to choose a connection. It also allows you to alter and control connections to
available networks:
• Add New - opens the Wireless Network Properties window allowing you to set up a new
network and provides settings for network name, encryption type, and authentication
options.
• Advanced - Allows you to set a hierarchy of connections in order of preference. Should one
connection become unavailable, the device automatically cycles down the list to the next
connection on the list.
• View Log - opens the Wireless Network Log window which displays the success or failure
of the most recent made attempts to connect to available networks.
NOTE: If you are not thoroughly familiar with network types, you should avoid making changes to
your Advanced settings without first seeking assistance from your IT Administrator.
ViewSonic Wireless Tablet Client 13
Page 17

NETWORK SETTINGS
MAKE NEW CONNECTION SETTINGS
Accessed by from Start on the Task Bar by selecting Settings, Control Panel, then Network and
Dial-up Connections. This panel allows you to add, name, and configure five types of conn ection
options to your V212/V212x:
Next
OK
X
Make New Connection
My Connection
Dial-up Connection
Direct Connection
Virtual Private Connection (PPTP)
Virtual Private Connection (L2TP)
Virtual Private Connection (PPPoE)
• Dial-up Connection - through modem (not currently supported)
• Direct Connection - through cable
• Virtual Private Network (PPTP) - through host or IP address
• Virtual Private Network (L2TP) - through host or IP address
• Virtual Private Network (PPPoE) - through host or IP address
• Each connection type has options for Security and TCP/IP settings accessed by taping the
Next button. The Dial-up and Direct connections have additional options for the
configuration of port settings and connection preferences.
ViewSonic Wireless Tablet Client 14
Page 18

PCI-ISLP21 SETTINGS
Accessed from Start on the Task Bar by selecting Settings, Control Panel, then Network and
Dial-up Connections. This panel allows you to assign IP server address and Domain Name
server address for your V212/V212x.
ISP Address Tab - Allows you to chose between an automatically set IP address (DHCP) or a
specified IP (user filled-in) address.
PC Card Network Settings
IP Address
Obtain an Address via DHCP
Specify an IP Address
ddress
IP A
Subnet Mask
ateway
Default G
OK
X
• Obtain an IP Address via DHCP - Prompts device to chose an automatically set IP address
(DHCP) rather than a specified IP (user filled-in) address.
• Specify an IP Address - Pro mpts the device to select th e DNS server address entered rather
than relying on the network to automatically assign one.
Name (Domain) Servers Tab - DNS assignment, if DHCP is enabled
PC Card Network Settings
Name Server
OK
X
Primary DNS
Secondary DNS
Primary WINS
Secondary WINS
• Primary/Secondary DNS - Allows you to enter DNS preferences.
• Primary/Secondary WINS - Allows you to enter WINS preferences.
NOTE: If you are not thoroughly familiar with IP and DNS settings, you should avoid making
changes here without first seeking assistance from your IT Administrator.
ViewSonic Wireless Tablet Client 15
Page 19

RESETTING THE V212/V212X
SOFT RESET
Should your V212/V212x lock up or fail to respond to the stylus, it may be restarted without
turning off the power.
1. Locate the reset button on the top of your V212/V212x.
2. Use the tip of your stylus to press the reset button to restart your V212/V212x.
Figure 8: The Soft Reset Button
HARD RESET
A hard reset may be required on rare occasions where your V212/V212x completely locks up
and the soft reset described above does not help.
You can perform a power interrupt type hard reset by detaching the both the battery and the AC
power adapter while the device is On.
NOTE: Soft or Hard resetting will cause you to loose all customization in DRAM (such as files,
programs, and settings).
As a precaution, we recommend that you drag any changed files that you want to protect to the
V212/V212x’s Permanent Storage folder before removing the battery.
FIRMWARE IMAGE UPGRADE
From time to time ViewSonic may offer a firmware image upgrade. For current information visit
our web site at viewsonic.com or check with your IT Administrator.
ViewSonic Wireless Tablet Client 16
Page 20

COMPACT FLASH (CF) CARDS
A CF card can extend the functionality of your V212/V212x by providing added feat ures such as
extra storage.
USING A CF CARD
CF Card
Figure 9: CF Card
1. Insert CF card carefully into
the slot on the top side of the
V212/V212x until it snaps into
place.
2. Push the release button
before removing.
CAUTION: Make sure the card is
oriented correctly before
inserting. Do not force the card in
or out. It should be easy to insert
or remove.
ViewSonic Wireless Tablet Client 17
Page 21

OPTIONAL ACCESSORIES
THE DOCKING STATION
The optional V212/V212x Dock permits easy connectivity to an external mouse, a keyboard, and
an AC power source. The dock offers a USB mini Type B port and two Type A USB ports.
Device in the Dock
Rear Ports
A DC Power Port
A B C
Figure 10: Dock and Ports
NOTE: When mounted in the Dock, the V212/V212x’s external USB ports become inactive.
B Ethernet Port
C USB Type A Ports (Two)
ViewSonic Wireless Tablet Client 18
Page 22

COMMERCIALLY AVAILABLE ACCESSORIES
External USB Keyboard
You can attach a USB external keyboard using any one of the two USB ports on the top side of
the V212/V212x as indicated by the arrow in the figure below (or by using the optional Dock
shown previously).
Figure 11: The USB Keyboard/Mouse Ports
External USB Mouse
An optional external USB mouse can be connected to the keyboard or connected directly into
any one of the V212/V212x’s two USB type-A ports.
External Headphone Set
You can enhance your audio experience and more fully enjoy music with an audio headset. Plug
your headset into the Headset port on the back of the V212/V212x.
External Microphone
You can use an external microphone to improve the quality of your voice recordings. Plug your
microphone into the Microphone port on the back of the V212/V212x.
NOTE: For an up-to-date list of commercially available compatible Modems and Card Readers,
please visit http://www.microsoft.com/windows/Embedded/ce.NET/evaluation/hardware/hcl.asp.
ViewSonic Wireless Tablet Client 19
Page 23

APPENDIX
CLEANING & MAINTENANCE
• Make sure the V212/V212x is turned off.
• Never spray or pour any liquid directly onto the screen or case.
• Never immerse the V212/V212x in any liquid.
To clean the screen:
1. Wipe the screen with a clean, soft, lint-free cloth. This removes dust and other particles.
2. If still not clean, apply a small amount of non-ammonia
a clean, soft, lint-free cloth, and wipe the screen.
DISCLAIMER
ViewSonic
V212/V212x screen or case. Some chemical cleaners have been reported to damage the screen
and/or case of the V212/V212x. ViewSonic will not be liable for damage resulting from use of any
ammonia or alcohol-based cleaners.
®
does not recommend the use of any ammonia or alcohol-based cleaners on the
, non-alcohol based glass cleaner onto
CUSTOMER SUPPORT
For the nearest ViewSonic® service provider, see the table below or contact your reseller.
You will need the product’s serial number on-hand when you call.
Country/Region Website
(for email address also)
United States viewsonic.com T: (800) 688-6688
T = Telephone
F = FAX
F: (909) 468-1202
Canada viewsonic.com T: (866) 463-4775
F: (909) 468-5814
ViewSonic Wireless Tablet Client 20
Page 24

COMPLIANCE & SAFETY NOTICES
Mercury warning
This product contains mercury. Dispose of in accordance to local, state and federal laws.
Power supply safety notice
The power supply provided with this device is for use with this device only. Replace only with the
same or equivalent type power supply as recommended by the manufacturer.
Radio frequency interference (RFI) compliance
United States compliance notice:
This equipment has been tested and found to comply with the limits for a Class B digital device,
pursuant to Part 15 of the Federal Communications Commission (FCC) Rules. These limits are
designed to provide reasonable protection against harmful interference in a residential
installation. This equipment generates, uses, and can radiate radio frequency energy and, if not
installed and used in accordance with the instructions, may cause harmful interference to radio
communications. However, there is no guarantee that interference will not occur in a particular
installation. If this equipment does cause harmful interference to radio or television reception,
which can be determined by turning the equipment off and on, the user is encouraged to try to
correct the interference by one or more of the following measures:
• Reorient or relocate the receiving antenna.
• Increase the separation (distance) between the equipment and the receiver.
• Connect the equipment into an outlet on a different circuit than what the receiver is
connected to.
• Consult the dealer or an experienced radio or television technician for help.
CAUTION: The Part 15 radio device operates on a non-interference basis with other devices
operating at its frequency. Any changes or modification to said product not expressly approved
could void the user’s authority to operate this device.
FCC CAUTION: Any changes or modifications not expressly approved by the party responsible
for compliance could void the user's authority to operate this equipment.
This device complies with Part 15 of the FCC Rules. Operation is subject to the following two
conditions: (1) This device may not cause harmful interference, and (2) this device must accept
any interference received, including interference that may cause undesired operation.
The antenna(s) used for this transmitter must not be co-located or operating in conjunction with
any other antenna or transmitter.
ViewSonic Wireless Tablet Client 21
Page 25

IMPORTANT NOTE: FCC Radiation Exposure Statement:
This equipment complies with FCC radiation exposure limits set forth for an uncontrolled
environment. This equipment should be installed and operated with a minimum distance of
2.5cm between the equipment and your body.
Proper operation of this radio according to the instructions found in this user’s guide will result in
user exposure that is substantially below the FCC recommended limits.
• Do not touch or move antenna while the unit is transmitting or receiving.
• Do not hold any component containing the radio such that the antenna is very close or
touching any exposed parts of the body, especially the face or eyes, while transmitting.
• Do not operate a portable transmitter near unshielded blasting caps or in an explosive
environment unless it is a type especially qualified for such use.
• Do not operate the radio or attempt to transmit data unless the antenna is connected: if not,
the radio may be damaged.
WARNING FOR LAPTOP USERS: In order to comply with the FCC RF exposure limits, it is
recommended, when using a laptop with a wireless Ethernet adapter, that the adapter’s
integrated antenna should not be positioned closer than 2 inches (5 cm) from the user. It is
recommended that user exposure time be limited.
Canadian compliance notice:
English: This digital apparatus does not exceed the Canada ICES-003 Class B limits for radio
noise emissions from digital apparatus as set out in the radio interference regulations of the
Canadian Department of Communications.
French: Le present appareil numerique nemet pas de bruits radioelectriques depassant les limites
applicables aux appareils numeriques de Canada ICES-003 Class B prescrites dans le reglement
sur le brouillage radioelectrique edicte par le Ministere des Communications du Canada.
European compliance notice
Products with the CE Marking comply with both the EMC Directive
(89/336/EEC) and the Low Voltage Directive (73/23/EEC) issued by
the Commission of the European Community. Compliance with these
directives implies conformity to the following European Norms:
• EN55022 (CISPR 22) Radio Frequency Interference
• EN55024 (IEC61000-4-2, -4-4, -4-5, -4-6, -4-11)
• EN60950 (IEC950) Product Safety
RoHS compliance notice
This product is RoHS compliant.
ViewSonic Wireless Tablet Client 22
Page 26

Battery safety notice
• The battery pack is intended to be used only with this device.
• Do not disassemble the pack.
• Do not dispose of the battery pack in fire or water.
• To avoid risk of fire, burns, or damage to your battery pack, do not allow a metal object to
touch the battery contacts.
• Handle a damaged or leaking battery with extreme care. If you come in contact with the
electrolyte, wash the exposed area with soap and water. If it contacts the eye, flush the eye
with water for 15 minutes and seek medical attention.
• Do not charge the battery pack if the ambient temperature exceeds 113 degrees Fahrenheit
(45 degrees Celsius).
• To obtain a replacement battery, contact your local dealer.
• Do not expose the battery pack to high storage temperatures (above 140 degrees
Fahrenheit, 60 degrees Celsius).
• When discarding a battery pack, contact your local waste disposal provider regarding local
restrictions on the disposal or recycling of batteries.
Lithium battery notice
The V38r has two batteries: one is under the back cover which you can replace yourself but the
other is inside the device itself. DO NOT A TTEMP T T O REMOVE THE INTERNAL BATTERY as
this will void the warranty.
There is also danger of explosion if the device is not used, handled, or disposed of correctly, or if
the batteries are replaced incorrectly. Replace batteries only with the same or equivalent type
battery as recommended in the Battery and Power properties section of this guide. Discard
used batteries according to the manufacturer’s instructions or local laws.
Infrared LED safety notice
If this device contains an infrared networking or peripheral connection capability, or if one is
added to the device, the following precautions are recommended:
• Do not attempt to view the infrared LED beam with any type of optical device.
• Do not attempt to make any adjustment of the unit.
• If the unit requires service, contact an authorized service center.
• Avoid direct eye exposure to the infrared LED beam. Be aware that the beam is invisible
light that cannot be seen.
ViewSonic Wireless Tablet Client 23
Page 27

SPECIFICATIONS
Processor
Memory RAM: PC 133MHz SDRAM, 128MB
Display 10.4" TFT Active Matrix 6-bit LCD Color Display
Touch Screen 4-wire Resistive Touch Panel/12 bit A/D
Software Base
Wireless Standard IEEE802.11b/g (Wi-Fi)
Audio Support Speaker: Mono 1 Watt 8 ohm 500Hz-16kHz+/- 6db
Expansion CF Slot 1 Type II CF Card Slot, Hot Insertion/Removal
External Ports 2 Universal Serial Bus (USB) Type A Ports
IrDA CIR
®
Intel
520 MHz X-Scale PXA27X
Flash ROM: Intel Strata Flash 64 bit UDI
RGB Vertical Stripe, Anti-Glare Screen
V212: 800 x 600 Video Resolution
V212x: 1024 x 768 Video Resolution
Microsoft
2.400-2.4835 GHz, 11/13 channels USA-Canada/Europe
Indoor: 50m (164’)@11 Mbps, 80m (262’)@5.5 Mbps
Outdoor: 150m (491’)@11 Mbps, 300m (984’)@5.5 Mbps
Built-in Microphone: 100-4 kHz, +/-6db
1 Universal Serial Bus (USB) Mini Type B Port
Microphone and Headphone Jacks
22-pin Docking Port Connector
®
Windows® CE 5.0 (included)
Battery
Backup Battery
AC/DC
Power Adapter
Environmental
Envelope
Weight Net: 1.2 kg (2.64 lbs)
Dimensions Physical: 292 mm x 213 mm x 25.4 mm (W x H x D)
Standards
Compliance
Rechargeable Lithium Ion 3S2P
Up to 6 hours life (depending on use and configuration)
3900mAh (fast charging), 10.8 V (nominal voltage)
7.2V 40mAh Ni-MH
100~240 VAC 50/60 Hz
19 VDC Output Voltage @ 2.64A
Operation: 32° F - 104° (0° C - 40° C), 10% - 85%
non-condensing humidity, 0 - 3,000 meters
Storage: -4° F - 140° F (-20° C - 60° C), 10% - 85%
non-condensing humidity, 0 - 12,000 meters
11.5 in. x 8.4 in. x 1 in. (W x H x D)
Package: 357 mm x 286 mm x 161 mm (W x H x D)
14.1 in. x 11.3 in. x 6.3 in. (W x H x D)
EMC & Safety: ETL/cETL, CE, FCC-15B
RF Module: FCC-15C, RSS-210, RTTE
Environmental: EPA-Energy Star
ViewSonic Wireless Tablet Client 24
Page 28

Package
Contents
In the Package:
Wireless Tablet Client V212/V212x
Quick Start Guide
V212/V212x Battery
AC/DC Power Adapter with Power Cord
Stylus (2) and Stylus Tether (1)
USB Mini-B to A Setup Cable (Blue)
V212/V212x CD (with the User Guide, USB Driver)
Basic Software Bundle:
Windows CE
®
5.0
Internet Explorer
Windows Explorer
Media Player
MS WordPad
Solitaire
Citrix Client
Microsoft ActiveSync
Microsoft Inbox
Microsoft File Viewers
MS Excel Viewer
MS Image Viewer
MS PDF Viewer
MS PowerPoint Viewer
MS Word Viewer
ViewSonic Wireless Tablet Client 25
Page 29

LIMITED WARRANTY
ViewSonic® Limited Warranty Terms and Conditions
(Current Production Models. U.S.A. and Canada Only)
How the Viewsoni c Standard Limited Warranty works:
ViewSonic Corporation (“ViewSonic”) warrants its products to be free from defects in material and workmanship during
a specified length of time, or “Warranty Period”, as indicated below. If a product proves to be defective in material or
workmanship during the Warranty Period, ViewSonic will, at its sole option, repair or replace the product with a similar
product. Replacement products or parts may include remanufactured or refurbished parts or components. The
replacement product will be covered by the balance of the time remaining on the customer's original ViewSonic
Limited Warranty. This warranty does not cover any software included with the product.
ViewSonic products are manufactured using new materials or new and used materials equivalent to new in
performance and reliability. Spare parts may be new or equivalent to new. Spare parts are warranted to be free from
defects in material or workmanship for the remainder of the Limited Warranty Period under proper and/or normal use
of the ViewSonic Product in which they are installed.
During the Limited Warranty Period, ViewSonic will, at its sole discretion, repair or replace the defective component
parts or the ViewSonic product. All component parts or hardware products removed under this Limited Warranty
become the property of ViewSonic. In the unlikely event that your ViewSonic Product has a recurring failure,
ViewSonic will, at its sole discretion, provide you with a replacement unit of ViewSonic's choosing that is similar or
equivalent to your ViewSonic originally purchased product in hardware and/or performance.
How long the warranty is effective:
ViewSonic warrants that its hardware will be free from defects in workmanship and materials, under proper normal
use, and as set forth below:
• Hardware and Power Supplies: One (1) Year
• Accessories, spare parts, and spare kits: Ninety (90) days
The Warranty Period will begin on the date of purchase, and remain effective as specified above. Proof of purchase
and/or receipt will be required for all claims purposes.
Exclusions of Warranty:
The following will immediately and automatically render any and all warranties and/or guarantees, including but not
limited to the ViewSonic Limited Warranty, as void:
1. Any product on which the serial number has been defaced, modified or removed.
2. Accident, misuse, neglect, fire, water, lightning, or other acts of nature, unauthorized product modification, and/or
failure to follow instructions as prescribed by ViewSonic.
3. Repair or attempted repair by someone other than a ViewSonic Licensed Technician.
4. Any damage resulting from shipments not made and/or insured by ViewSonic, and/or shipments made by
ViewSonic for which recipient failed to notify ViewSonic of the damage claim within 48 hours upon receipt.
5. Removal and/or installation of any components not intended or prescribed by ViewSonic.
6. Causes external to the product, such as electric power fluc tuations and/or failure.
7. Normal wear and tear.
8. Damage to, or abuse of, the coating on the surface of the display, including but not limited to cosmetic defects
that do not affect functionality.
ViewSonic Wireless Tablet Client 26
Page 30

9. Any other cause which is not related to a manufacturer’s defect.
10. Loss of, or damage to, the covered product due to mishandling, improper packaging by you, alteration, accident,
electrical current fluctuations or failure to follow operating, maintenance or environmental instructions prescribed
in the covered product's User Manual. In the event that ViewSonic determines, in its sole discretion, that the
return product is damaged due to one or more of these excluded causes, the customer will be billed for the cost
of repairs.
11. ViewSonic will not be responsible for any damage to, loss of, or consequenti al loss from the inability to use, any
programs, data or other information stored on any media or any part of any Product serviced hereunder.
ViewSonic makes no representations or warranties whatsoever to keep confidential or secure any data stored on
any media or any part of any Product serviced hereunder. ViewSonic will not be responsible for and hereby
disclaims any and all liability for damage or loss to software, data, Programs, removable media, consumables,
portable docking stations, carrying cases, or non-ViewSonic-branded products such as joysticks, printers, and/or
scanners, that may occur as a result of repairs to, and/or by the replacement of any defective product. In order to
avoid any and such losses or damages, please make a back-up of any and/or all data(s) and Programs before
returning your product to ViewSonic for replacement and/or repair(s).
12. Image burn-in and/or defective pixels/sub-pixels are not considered a manufacturer’s defect. For a complete
review of the details regarding the industry standard methodology ViewSonic uses to determine defective pixels/
sub-pixels please visit our on-line Customer Support database at
http://www.viewsonic.com/support/qa.cfm?topic=lcd&question=01
Limitation of Implied Warranties
THERE ARE NO WARRANTIES, EXPRESS OR IMPLIED, WHICH EXTEND BEYOND THE DESCRIPTION
CONTAINED HEREIN INCLUDING THE IMPLIED WARRANTY OF MERCHANTABILITY AND FITNESS FOR A
PARTICULAR PURPOSE.
.
Limitations of Liability:
VIEWSONIC'S LIABILITY IS LIMITED TO THE COST OF REPAIR OR REPLACEMENT OF THE PRODUCT.
VIEWSONIC EXPRESSLY DISCLAIMS ANY AND ALL LIABILITY FOR DELAYS IN SHIPPING AND/OR ANY
RESULTING DAMAGE(S) DUE TO LOSS OF USE FOR ANY AND ALL REASONS. IN NO EVENT WILL
VIEWSONIC CORPORATION, AND ANY AND ALL OF ITS PRESENT, FORMER AND FUTURE
REPRESENTATIVES BE LIABLE FOR SPECIAL INDIRECT, INCIDENTAL OR CONSEQUENTIAL DAMAGES
RELATING DIRECTLY OR INDIRECTLY TO THIS AGREEMENT. FURTHER, VIEWSONIC WILL NOT BE LIABLE
FOR LOSS OF THE USE OF PRODUCT, LOSS OF DATA, LOSS OF TIME, LOSS OF PROFITS, LOSS OF
BUSINESS OPPORTUNITY, LOSS OF GOODWILL, INTERFERENCE WITH BUSINESS RELATIONSHIPS OR
OTHER COMMERCIAL LOSS, REGARDLESS OF WHETHER ADVISE VIEWSONIC IS ADVISED OF OR SHOULD
HAVE KNOWN ABOUT THE POSSIBILITY OF SUCH DAMAGES.
How to get service:
1. For information on obtaining warranty service, call your ViewSonic dealer/reseller.
2. To obtain warranty service, please contact ViewSonic Customer Support for a Return Authorization
number (RMA). You will be required to provide
A. A copy of the dated sales slip.
B. Your name.
C. Your address.
D. The serial number of the product.
E. A description of the problem.
F. Mobile and wireless products, customer should prov ide th e use r nam e an d the password or
disable password protections in order to a llow ViewSoni c access to the device for the performance
of warranty service.
ViewSonic Wireless Tablet Client 27
Page 31

3. Bring or ship the product prepaid in the original container, with the associated accessories, to
ViewSonic or any ViewSonic authorized service center.
4. For additional information or the name of the nearest ViewSonic service center, contact your
ViewSonic dealer/reseller or ViewSonic.
NOTE: ViewSonic is not responsible for any returned product without an assigned RMA.
Sales outside the U.S.A. and Canada:
For ViewSonic products sold outside the U.S. and Canada, contact your ViewSonic dealer/reseller
Effect of state law:
This warranty gives you specific legal rights, and you may also have other rights which vary from state to state. Some
states do not allow limitations on implied warranties and/or do not allow the exclusion of incidental or consequential
damages, so the above limitations and exclusions may not apply to you.
4.19: ASET Generic Limited Warranty, v. 1a Release Date: 05-01-06
ViewSonic Wireless Tablet Client 28
Page 32

 Loading...