

Page 1

ViewSonic
N2060w
LCD TV
®
- User Guide
- Guide de l’utilisateur
- Bedienungsanleitung
- Guía del usuario
- Guida dell’utente
- Användarhandbok
- Käyttöopas
- Руководство пользователя
-
ﻞﻴﻠﺪ ﻢﺪ ﺨ ﺘ ﺴﻤ ﻠا
Model No. : VS11287-1E
Page 2

CONTENTS
Compliance information ------------------------------------------------1
Important Safety Instructions ----------------------------------------- 2
Copyright Information -------------------------------------------------- 3
Product Registration ----------------------------------------------------
3
Antenna Installation Instructions-------------------------------------
4
Clean the LCD display--------------------------------------------------
4
GETTING START
Package Contents-------------------------------------------------------
5
Front view of Product --------------------------------------------------- 6
Rear View of Product --------------------------------------------------
6
Assembly ---------------------------------------------------------------- 6
How to connect SCART ------------------------------------------------8
How to connect HEADPHONE----------------------------------------9
How to connect PC-----------------------------------------------------Notes on the Remote control----------------------------------------
11
Remote control Battery installation--------------------------------- 13
Preparation of beginning to watch TV-----------------------------
14
OSD FUNCTION
To use the menus------------------------------------------------------
15
Audio mode OSD adjust ---------------------------------------------
15
PC mode OSD adjust ------------------------------------------------
22
Appendix
TIPS ----------------------------------------------------------------------- 23
Product specification-------------------------------------------------- 24
Support timing table(D-SUB/HDMI)------------------------------- 26
Troubleshooting-------------------------------------------------------- 27
Customer Support----------------------------------------------------- 28
Limited Warranty------------------------------------------------------- 29
9
Page 3
ViewSonic 1 N2060w
Page 4

Important Safety Instructions
1. Read these instructions completely before using the equipment.
2. Keep these instructions in a safe place.
3. Heed all warnings.
4. Follow all instructions.
5. Do not use this equipment near water. Warning: To reduce the risk of fire or electric
shock, do not expose this apparatus to rain or moisture.
6. Clean with a soft, dry cloth. If further cleaning is required, see “Cleaning the LCD TV”
in this guide for further instructions.
7. Do not block any ventilation openings. Install the equipment in accordance with the
manufacturer’s instructions.
8. Do not install near any heat sources such as radiators, heat registers, stoves, or other
devices (including amplifiers) that produce heat.
9. Do not attempt to circumvent the safety provisions of the polarized or grounding-type
plug. A polarized plug has two blades with one wider than the other. A grounding type
plug has two blades and a third grounding prong. The wide blade and the third prong are
provided for your safety. If the plug does not fit into your outlet, consult an electrician for
replacement of the outlet.
10. Protect the power cord from being tread upon or pinched, particularly at the plug, and the
point where if emerges from the equipment. Be sure that the power outlet is located near
the equipment so that it is easily accessible.
11. Only use attachments/accessories specified by the manufacturer.
12.
Use only with a cart, stand, tripod, bracket, or table specified by th
manufacturer
,
or sold with the apparatus. When a cart is used, use caution when
e
moving the cart/apparatus
combination to avoid injury from tip-ove
r.
13. Unplug this equipment when it will be unused for long periods of time.
14. Refer all servicing to qualified service personnel. Service is required when the unit has
been damaged in any way, such as: if the power-supply cord or plug is damaged, if liquid
is spilled onto or objects fall into the unit, if the unit is exposed to rain or moisture, or if
the unit does not operate normally or has been dropped.
ViewSonic 2 N2060w
Page 5

Copyright Information
Copyright © ViewSonic® Corporation, 2006. All rights reserved.
ViewSonic, the three birds logo, OnView, ViewMatch, and ViewMeter are registered
trademarks of ViewSonic Corporation.
Disclaimer:ViewSonic Corporation shall not be liable for technical or editorial errors or
omissions contained herein; nor for incidental or consequential damages resulting from
furnishing this material, or the performance or use of this product.
In the interest of continuing product improvement, ViewSonic Corporation reserves the right
to change product specifications without notice. Information in this document may change
without notice.
No part of this document may be copied, reproduced, or transmitted by any means, for any
purpose without prior written permission from ViewSonic Corporation.
Product Registration
To meet your future needs, and to receive any additional product information as it becomes
available, please register your product on the Internet at: www.viewsonic.com.
For Your Records
Product Name:
Model Number:
Document Number:
Serial Number:
Purchase Date:
N2060w
ViewSonic LCD TV
VS11287-1E
N2060w-1E_UG_ENG Rev. 1A 03-02-06
_________________________________
_________________________________
Product disposal at end of product life
ViewSonic is concerned about the preservation of our environment. Please dispose of this
product properly at the end of its useful life. Your local waste disposal company may provide
information about proper disposal.
The lamp in this product contains mercury. Please dispose of properly in accordance with
environmental laws of your location.
ViewSonic 3 N2060w
Page 6
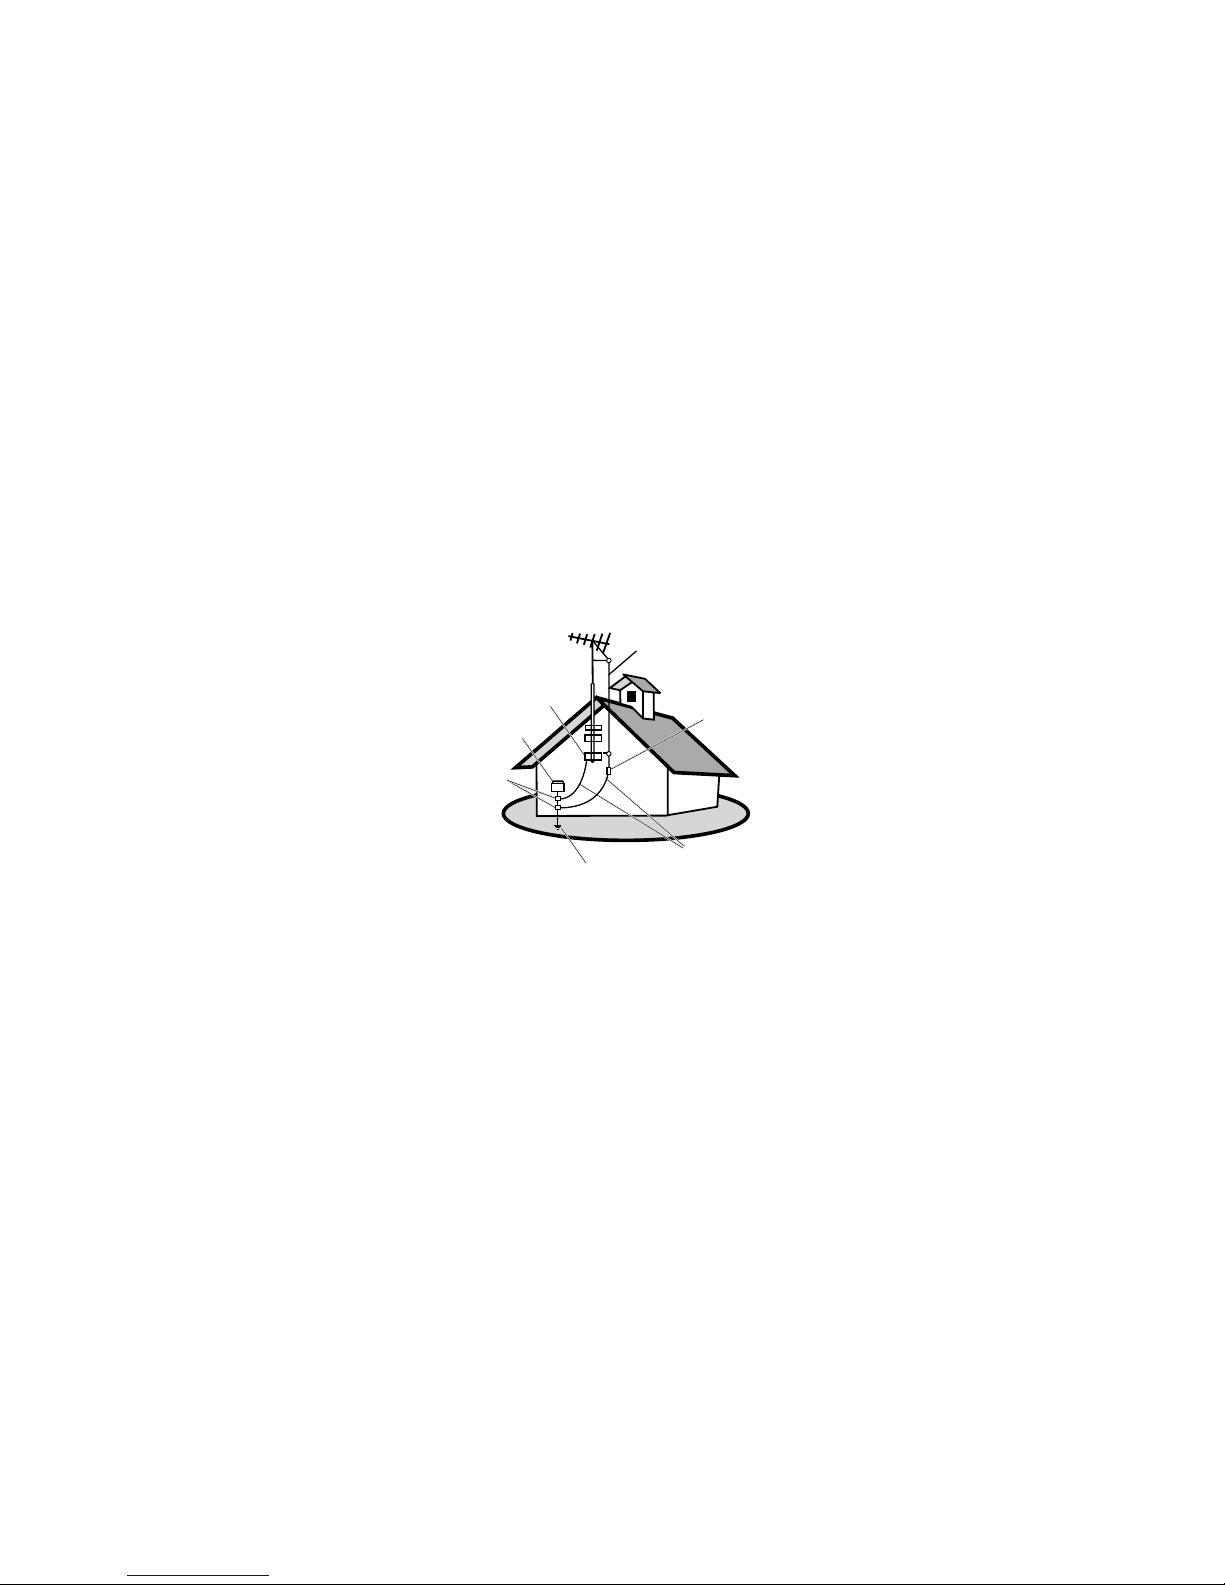
Antenna Installation Instructions
1. Outdoor Antenna Grounding
If an outside antenna or cable system is connected to the product be sure the antenna or cable system is
grounded so as to provide some protection against voltage surges and built-up static charges, Article 810
of the National Electrical Code, ANSI/NFPA 70, provides information with regard to proper grounding of
the mast and supporting structure, grounding of the lead-in wire to an antenna discharge unit, connection to
grounding electrodes, and requirements for the grounding electrode.
2. Lightning
For added protection for this product during a lightning storm, or when it is left unattended and unused for
long periods of time, unplug it from the wall outlet and disconnect the antenna or cable system. This will
prevent damage to the product due to lightning and power-line surges. Do not disconnect the antenna or the
power cord during a heavy storm lighting may strike while you are holding the cable cord, causing serious
injury; turn off your LCD TV and wait for the weather to improve.
3. Power Lines
An outside antenna system should not be located in the vicinity of overhead power lines or other electric light
or power circuits, or where it can fall into such power lines or circuits, When installing an outside antenna
system, extreme care should be taken to keep from touching such power lines or circuits as contact with them
might be fatal.
Cleaning the LCD TV
• Make sure the LCD TV is turned off.
• Never spray or pour any liquid directly onto the screen or case.
To clean the screen:
1. Wipe the screen with a clean, soft, lint-free cloth. This removes dust and other particles.
2. If still not clean, apply a small amount of non-ammonia, non-alcohol based glass cleaner onto a clean, soft,
lint-free cloth, and wipe the screen.
To clean the case:
1. Use a soft, dry cloth.
2. If still not clean, apply a small amount of a non-ammonia, non-alcohol based, mild non-abrasive detergent
onto a clean, soft, lint-free cloth, then wipe the surface.
Disclaimer
ViewSonic® does not recommend the use of any ammonia or alcohol-based cleaners on the LCD TV screen or
case. Some chemical cleaners have been reported to damage the screen and/or case of the LCD TV. ViewSonic
will not be liable for damage resulting from use of any ammonia or alcohol-based cleaners.
Antenna
Antenna discharge unit
Grounding conductors
Power service grounding electrode system
Ground clamps
Electric service equipment
Ground clamp
ViewSonic 4 N2060w
Page 7

Package Contents
Congratulations on your purchase of a ViewSonic LCD TV display.
Important !Save the original box and all packaging material for
future shipping needs.
Please confirm that the following accessories are present when you
unpack the box:
LCD TV
Remote control(batteries included)
Power cords(s)
D-Sub Cable
Color Quick Start Guide
PC Audio Cable
User Guide
GETTING STARTED
ViewSonic 5 N2060w
Page 8
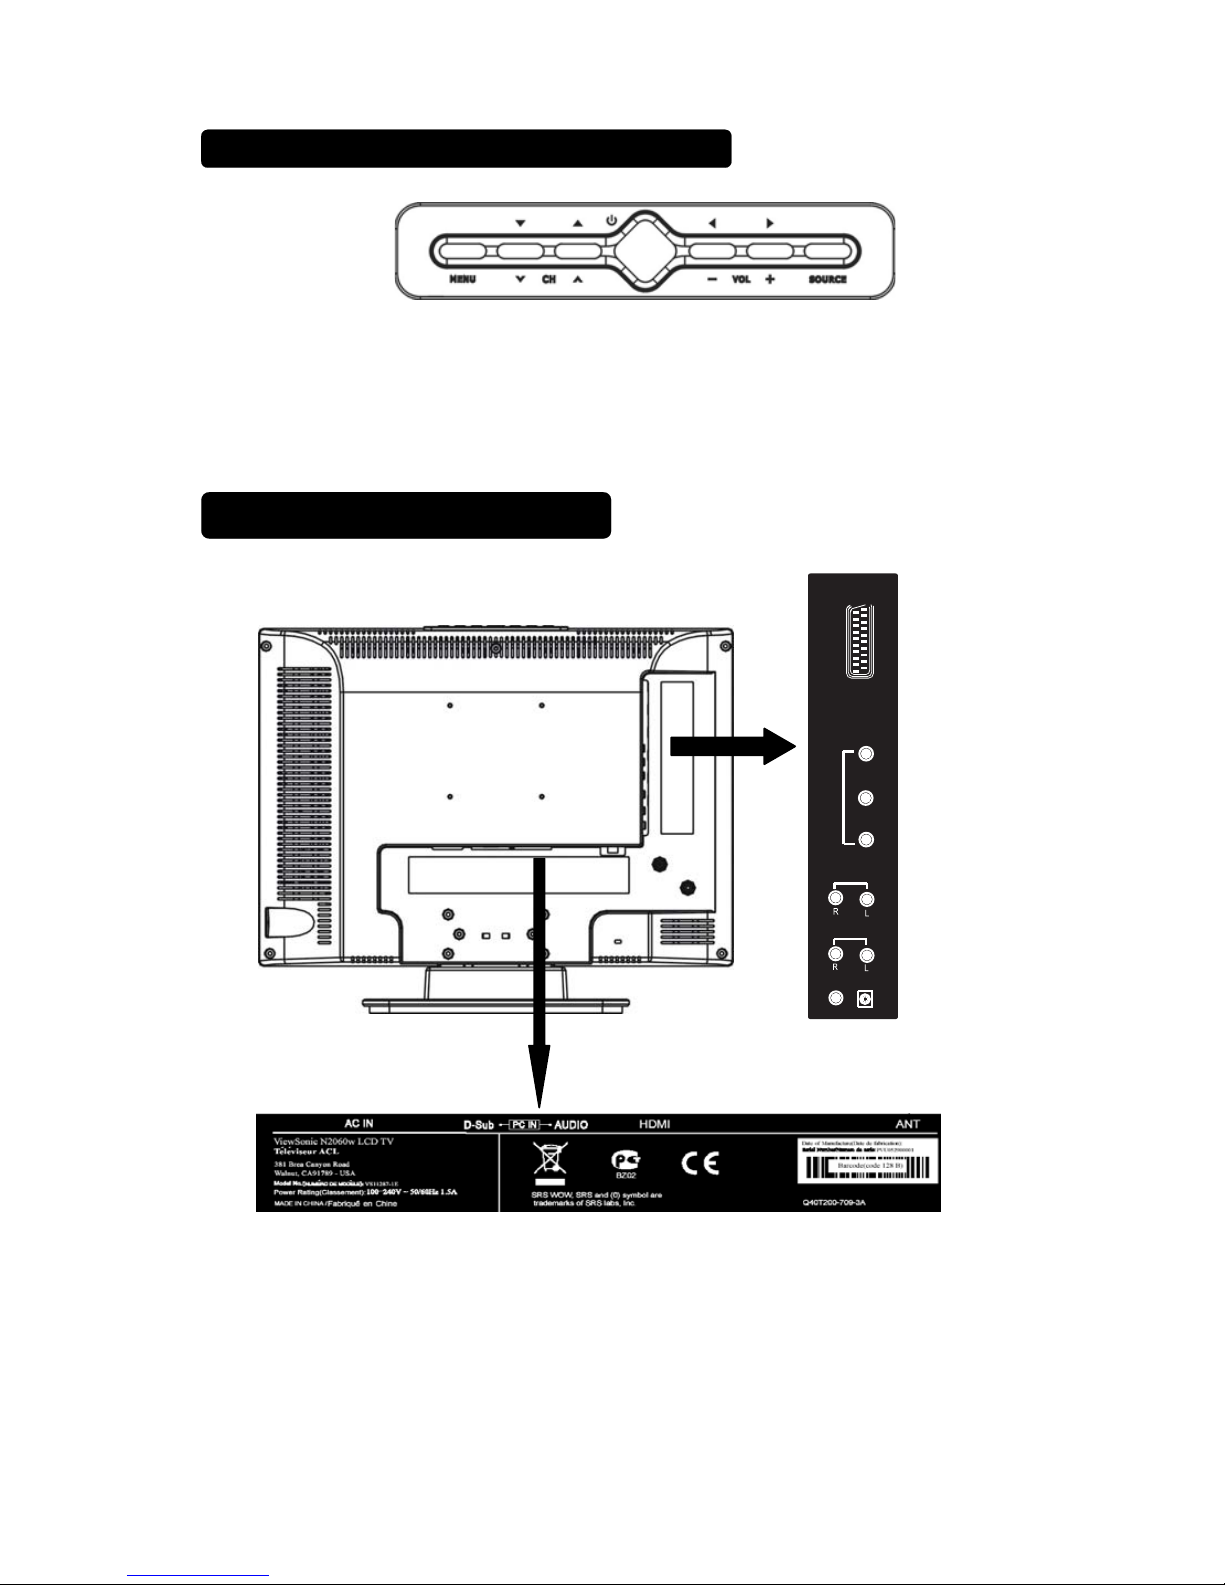
Rear View of the Product
Front View of the Product
Power Key : Press to turn on or off the TV.
MENU Key : Press to show the OSD menu and exit OSD menu at the TV.
Down / Up Key:Press to select function and channel.
- / + Key: Press to confirm your function selection and adjustment.
Source Key : Press to select your input source.
\
There is a wide range of video and audio equipment that can be connected to
your TV. The following connection diagrams show you how to connect them.
SCART
S-video
AV
AV Audio Input
HDTV Audio Input
HDTV
Y
Pb/Cb
Pr/Cr
ViewSonic 6 N2060w
Page 9
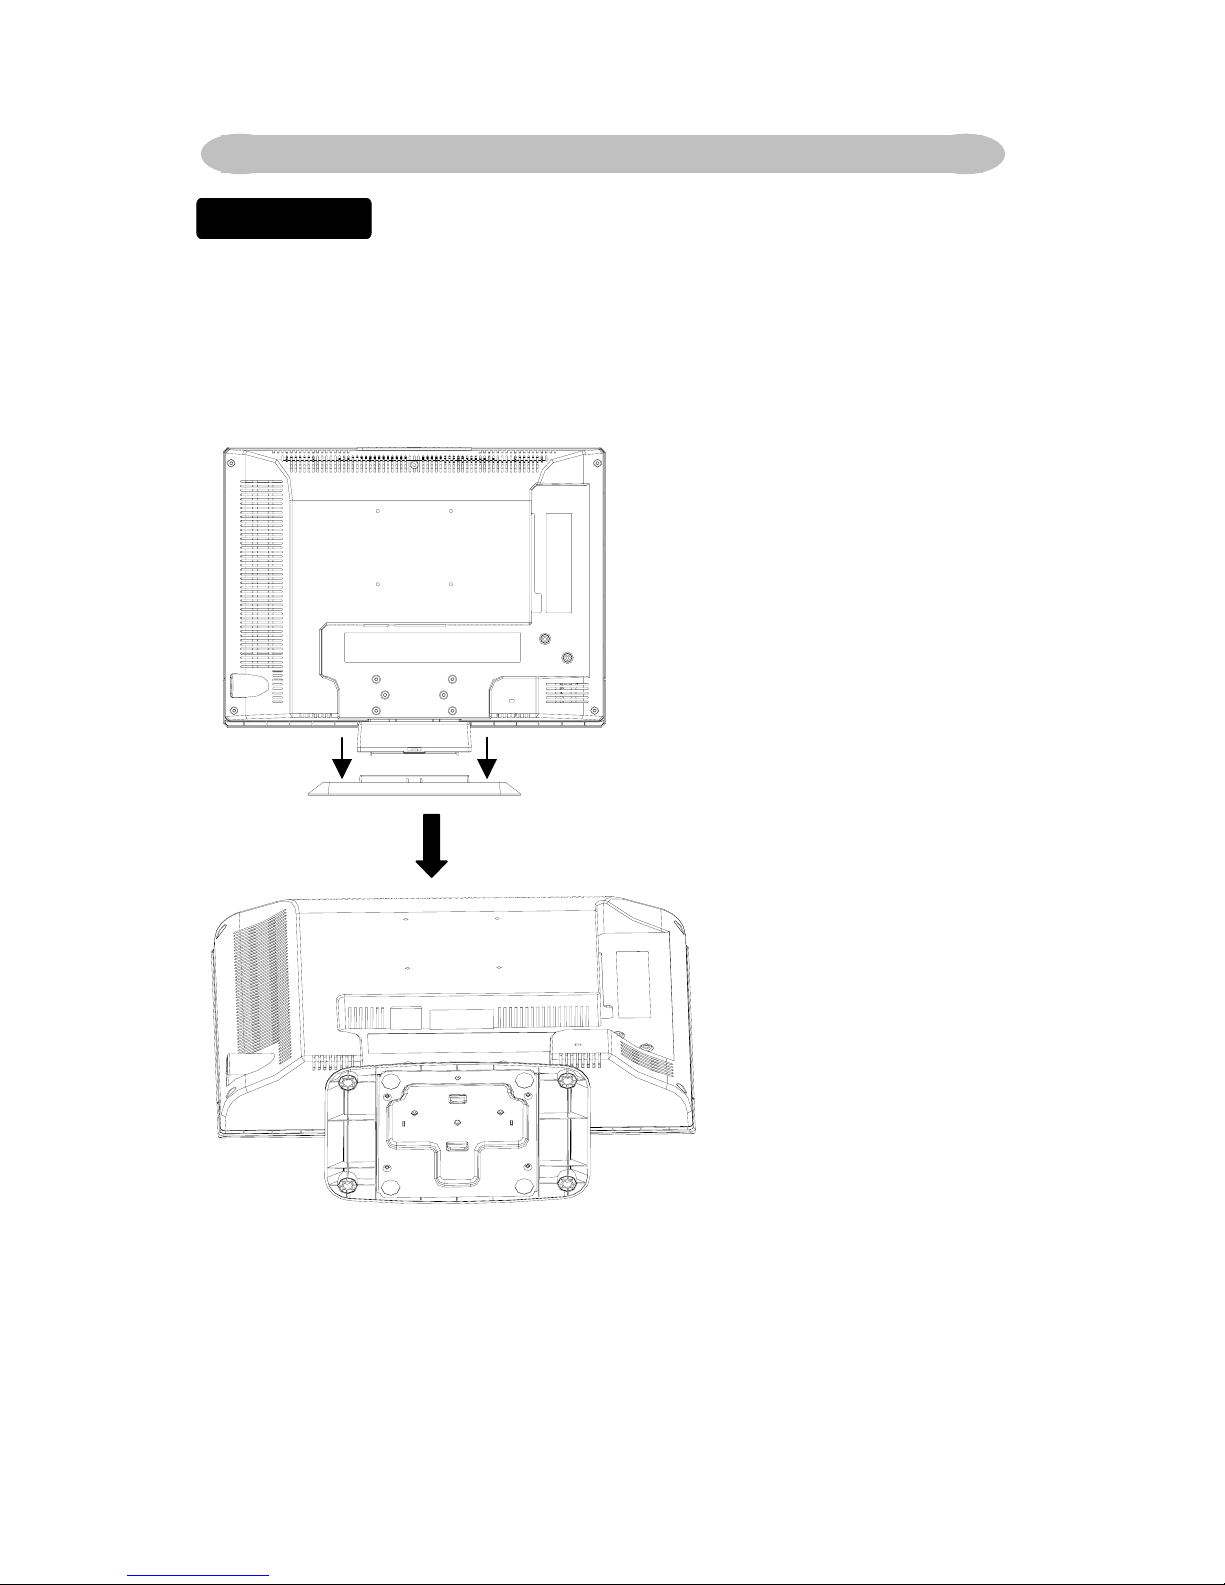
Take out TV and base from carton, assembled by three pieces screws, which you could
find from the accessory box. Shown in the figures below:
Note: Lock the screw
middle first, then the
others, to avoid holes
aiming incorrectly
Place the base on a
solid surface
PREPARATION
Assembly
Lay the LCD TV with the screen down on a table, as it will be easier to connect your
peripheral equipment. Please take your precautions not to damage the screen.
ViewSonic 7 N2060w
Page 10
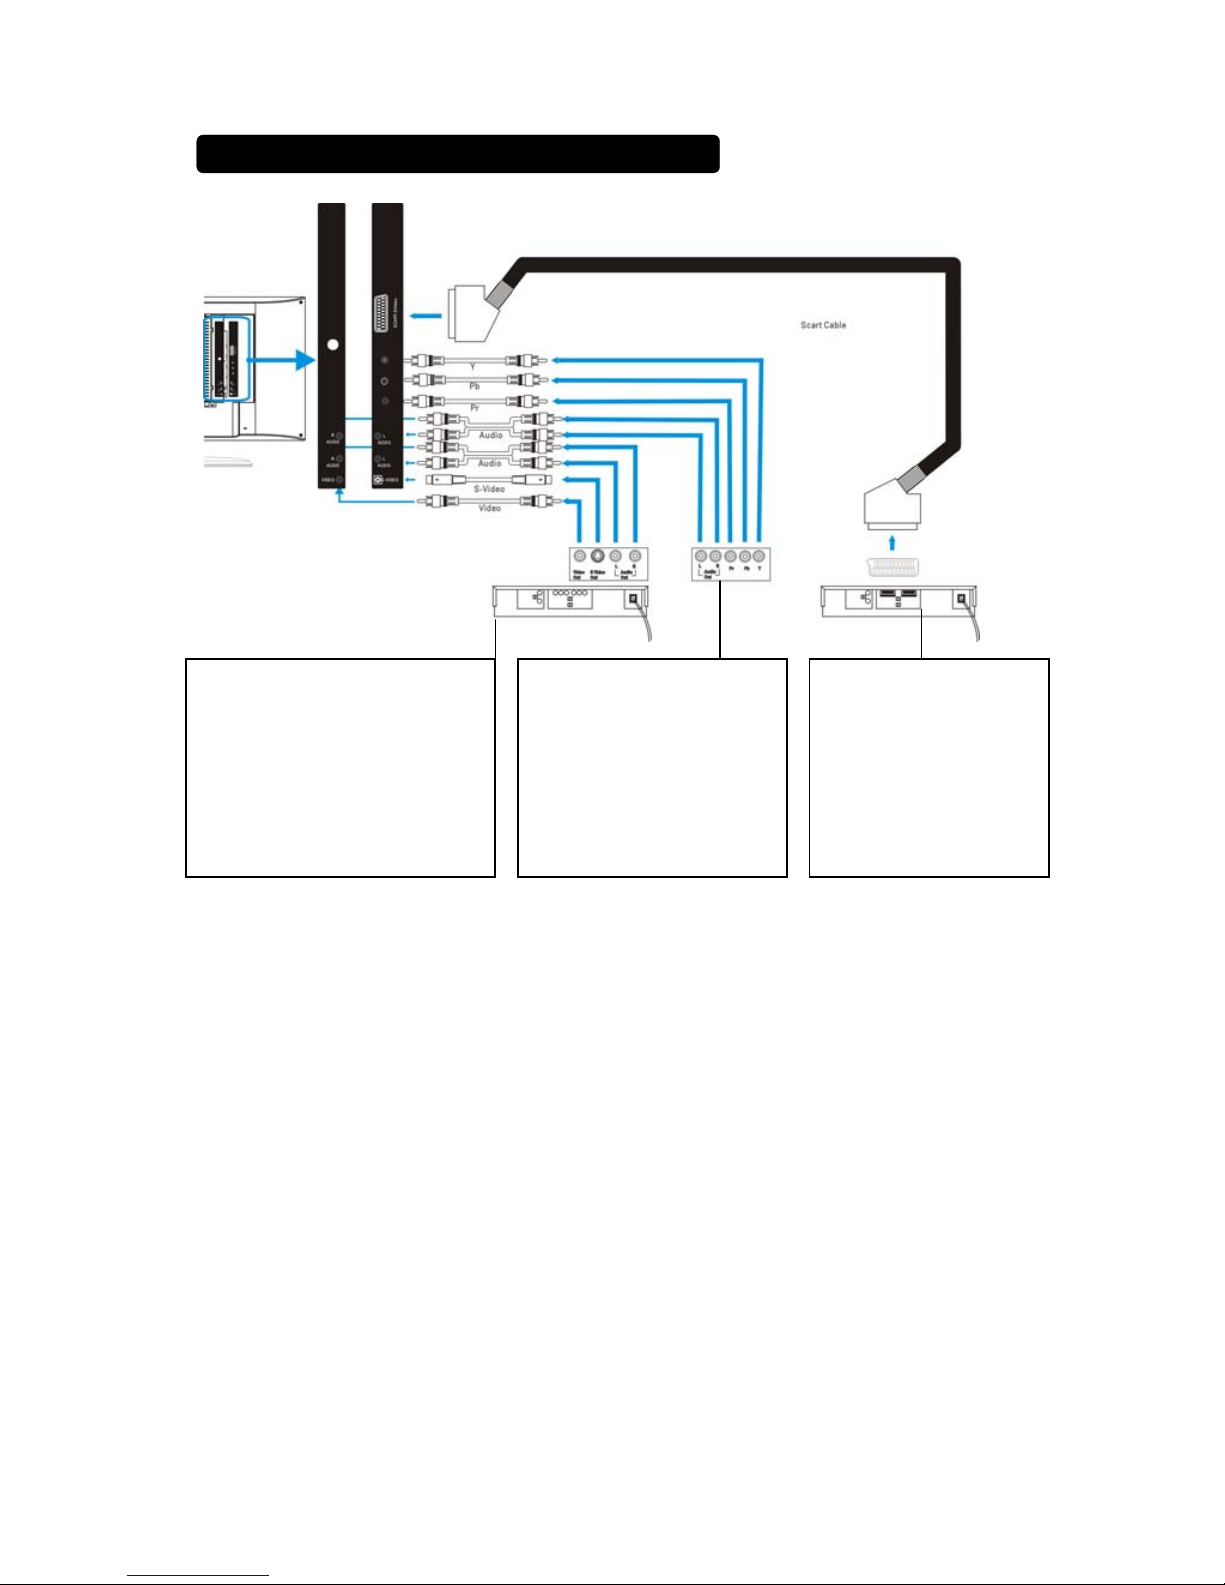
HOW TO CONNECT SCART connector
Notes:
1. Additional equipment and cables shown are not supplied with this TV set.
2. The 21pin SCART socket can also be used as an output to Audio/Video
equipment.
3. Select the desired VIDEO source input position by pushing the TV/VIDEO
button on remote controller.
4. In TV mode, when you switch on the VIDEO source which is connected to
SCART socket, the TV should automatically display the video signal. If it
does not, press the TV/VIDEO button on remote controller in order to
select the appropriate source.
5. The AUDIO OUT (SCART) terminal provides a fixed level output only.
(The menu settings and remote control volume controls have no effect.)
Audio and Video CINCH sockets
(AV IN) (AV)
To connect a VCR, a camcorder, a
DVD player or a satellite receiver.
S-Video socket and Audio CINCH
sockets (AV IN) (S-VIDEO) To
connect an S-Video VCR or an
S-Video camcorder.
Prise SCART (SCART
IN) (PERITEL)
To connect a VCR, a
camcorder, a DVD player,
a satellite receiver, a
decoder or a games
console.
SCART socket is an
in
p
ut/output socket.
Connect the three separate
component video cables to
the DVD player’s. Y, Pb and
Pr ports and to the Y, P b and
Pr ports on the TV.
Connect the audio cables to
the DVD player’s AUDIO L
and R ports and to the L and
R AUDIO AV
p
orts on the TV.
ViewSonic 8 N2060w
Page 11

PC connection
HEADPHONE
1. When headphones are connected, the sound of TV set will be cut. The
VOL keys are used to adjust the volume level.
2. Press the
key on the remote control to switch off the sound from the
headphone.
Note: When a TV channel or external AV source is blocked because of a
rating set via the Parental control menu, also the headphone is muted.
How to connect PC input
.Connect a D-sub cable to D-sub port which is located at bottom of TV as
Graph.
.Connect an audio cable to PC audio port which is located at bottom of TV as
Graph.
ViewSonic 9 N2060w
Page 12

HDMI SOCKET (High-Definition Multimedia Interface)
(
L
OCATED AT THE BACK OF THE TV SET,
NEAR THE POWER INPUT SOCKET
)
This socket allows the connection to all appliances fitted with an HDMI
socket.
The standard HDMI allows a digital transmisson of video and audio
data using only one connector.
It gives you the possibility to obtain very high quality
images. In this case it is necessary to use an HDMI
connecting cable. Make sure the appliance output is
set to be HDMI output.
To display images from the connected appliance, select the input
source (
HDMI)
by pressing the
AV
button on the remote control.
HDMI, the HDMI logo and "High-Definition Multimedia Interface" are
trademarks or registered
trademarks of HDMI Licensing LLC”.
ViewSonic 10 N2060w
Page 13

USE OF THE REMOTE CONTROL
Teletext function and buttons will be described on next page.
REMOTE CONTROL
MENU
Press this key to display
main menu.
SLEEP
With this key you can set a
time period after which the
TV should switch itself to
standby. Press the key
repeatedly to select the
number of minutes. The
counter runs from
Off 15
30 45 60 90 120
minutes.The timer begins
to count down from the
number of minutes
selected after the displa
y
has disappeared.
POWER:
Press to turn on/off the
TV. The TV is never
completely powered off
unless it is physically
unplugged.
0~9 DIGIT BUTTONS
To select a TV channel.
Source
Select your input source:
press repeatedly to select TV,
PC, SCART, S-VIDEO,HDTV
or HDMImode, according to
where you connected you
r
external source.
VOL
Press + or – (or MENU
or button) to increase
or decrease
the volume.
MUTE
Temporarily interrupt the
sound or restore it.
CH
Press or (or MENU
▲ or ▼ button) buttons
to scroll through the
channels.
PRE-CH
To display the previously
selected TV channel.
SOUND
To select Mono/ Stereo /Dual
from TV RF input.
OK
Press this KEY to
validate your selection.
DISPLAY
Press this key to display:
(1) the channel number
when watching a TV
programme.
(2) the input source when
watching an AV
programme.
SIZE
Press this key repeatedly to
select desired picture format.
SWAP
Press to swap the two
screens when PIP/POP
works .
PIP/POP
Press this key to display
PIP/POP screen
SUBPAGE
Teletext Sub-page function.
ViewSonic 11 N2060w
Page 14

TELETEXT
Teletext is an information service organized like a magazine, which is provided
by some TV stations in addition to regular television broadcasting.
TELETEXT
Press TELETEXT. The Teletext screen appears.
To turn off the Teletext mode, press TELETEXT
again.
MIX
Press MIX to superimpose the teletext over a
normal broadcast picture. Press again to return to
Teletext mode.
SIZE
Press SIZE repeatedly to display the upper teletext
part, the lower teletext part and then to return to the
normal.
RED / GREEN / YELLOW / BLUE
Use the COLOURED BUTTONS to operate the
Teletext screen.
INDEX
Press INDEX to return to the main index page.
SUBTITLE
Press to select the next page marked as a subtitle
page and request it as the display page.
HOLD
Press HOLD to hold the Teletext page when viewing
information. Press again to return to automatic page
update.
REVEAL
Press REVEAL to display reveal hidden words e.g.
quiz page answers. Press again to hide.
PAGE SELECTION
Page can be selected in two ways.
a. Press ▼or ▲ to increase or decrease the page number by one.
b. By entering the page number, using digit buttons 0~9.
SUBPAGE ACCESS
When Teletext information exceeds more than one page. Press SUBPAGE first
then select the required page number using digit buttons 0~9.
ViewSonic 12 N2060w
Page 15

Follow the steps below to insert the batteries.
1.Open the remote control’s rear battery compartment cover .
2.Insert two AAA (1.5v) batteries. Ensure that the positive and negative ends
match as indicated on the bottom of the battery compartment.
3.Replace the battery compartment cover .
Remote Control Batteries Installlation
ViewSonic 13 N2060w
Page 16

1. Place the TV on a solid surface.
Ensure that the TV is placed in a position to allow free flow of air. Do not
cover the ventilation openings on the back cover.
To prevent any unsafe situations, no naked flame sources, such as lighted
candles, should be placed on or in the vicinity.
Avoid heat, direct sunlight and exposure to rain or water. The equipment
shall not be exposed to dripping or splashing.
2. Insert the aerial plug firmly into the aerial socket ANT IN 75Ω at the back
of the TV.
3.Power:
Insert the power cord in the wall socket having an AC power supply .
4.Turn the TV on:
Press the power button of the TV to turn it on. When the TV is ON, the
indicator turns Blue.
Preparation of beginning to watch TV
ViewSonic 14 N2060w
Page 17

Audio Adjustments
Display the Main menu by pressing MENU
button.
Select the Sound menu using the button.
Press the OK button to confirm.
Use the / buttons to select each
option.
Balance : adjust the balance between left/right channels as required using the
/ buttons.
Bass : adjust the bass level as required using the / buttons.
Treble: adjust the treble level as required using the / buttons.
SRS : Using / , activate (On) or deactivate (Off) SRS function.
SRS is an audio technology which improve the sound quality.
Press the MENU button to exit the Audio menu.
Note : this menu is removed automatically after a few seconds without using
the remote control.
When you adjust a menu option
(Balance for example), the menu is
replaced by a sub-menu as illustrated.
Press the OK button to return to the
Sound menu
SRS WOW, SRS and
are registered trademarks of SRS Labs, Inc.
This product is designed using SRS technology with permission from SRS
Labs, Inc.
ViewSonic 15 N2060w
Page 18

PIP/POP adjustments
Press the MENU button to display the
Main menu
Select the PIP/POP menu using the
Àbutton.
Press the OK button to confirm.
Use the ¿ / À buttons to select each
option.
Dual mode : Using ½ / ¾ buttons activate (PIP/POP) or deactivate (Off) the
PIP/POP function.
Following options are available if you have selected PIP or POP at the PIP line.
Position : use the ½ / ¾ buttons to change the position of the PIP frame on
the screen.
Source : to select video source of the PIP/POP, use the ½ / ¾ buttons to
select video source of the picture in the PIP/POP frame (TV or AV).
You can insert a TV picture while you are viewing an AV programme or insert
an AV picture while you are viewing a TV programme.
Video source can also be selected without the menu, using AV button on the
remote control.
Audio select : to select audio source: MAIN (Main picture) or SUB (PIP/POP
picture), use the ½ / ¾ buttons to select audio source.
Press the MENU button to exit the PIP/POP menu.
Note : this menu is removed automatically after a few seconds without using
the remote control.
ViewSonic 16 N2060w
Page 19

Channels search
Channels search involves selecting all the settings required to be able to
search for and store all the channels you can receive.
Make sure that the television is switched on and follow all the steps in turn
specified on this page.
Display the Main menu by pressing MENU
button.
Select the TV set up menu using the
button.
Press the OK button to confirm.
Use the / buttons to select each
option.
Auto Search
Select Auto Search using the button.
Press the OK button to display the Auto
Search menu.
Use the / buttons to select each
option.
Country: Select the relevant country using the / buttons.
This is the country you are in, or the country whose channels you want to
receive if you live near its borders. If you do not find your country, select Auto.
Start: Press OK button to start channels searching
ViewSonic 17 N2060w
Page 20

Manual set-up
Select Manual search using the button.
Press the OK button to display the Manual
search menu.
Use the / buttons to select each option.
Prog. number: Allows to select the programme on which you want save a new
channel or a programme you want to modify.
Using the / buttons, select the programme.
Frequency : Allows to enter a specific frequency for tuning.
Using the button, select the Frequency option and press the OK button.
Using the 0~9 digit and / buttons, enter desire frequency and press the
OK button.
Name : Allows to edit the channel name.
Using the button, select the Name option.
Using the button select the first letter field.
By pressing the 0~9 digit repeatedly and using the following table select the
first character.
Repeat the procedure for each letter field.
BUTTON AVAILABLE CHARACTERS
1 1
Space — • !
2 2 a b
c @
3 3 d e
f #
4 4 g h
i $
5 5 j k
l %
6 6 m n
o ^
7 7 p q
r &
8 8 s t
u v
9 9 w x
y z
0 0 * #
( )
ViewSonic 18 N2060w
Page 21

Store prog.: Allows to Save a channel on a new programme No. or to Insert a
channel on an already existing programme No. (the channel previously saved
on this programme No. will be shifted to the uper programme n..).
- Once a channel has been found and named, use the button to select the
Store prog. option.
- Using the / buttons, select Save or Insert and press the OK button to
confirm.
System: Allows to change the audio norm.
- Using the button, select the System option.
- Using the / buttons, select the norm.
The audio norm change will also change broadcasting system. Not suggest to
change the audio norm if you are not sure the audio system.
Skip : Allows to skip a channel.
- Using the button, select the Skip option.
- Using the / buttons, select On, the channel will be skip.
Repeat this procedure to skip other channels.
Fine tuning : If the picture is not clear, you can adjust the setting.
- Using the button, select the Fine Tuning option.
- Use the / buttons to find the good tuning point.
Manual search : Allows to launch a manual search.
- Using the button, select the Manual search option.
- Using the / buttons, start the search in decreasing or increasing order.
The menu is replaced by a sub-menu showing the progression of the search.
- The search will stop at the first channel found, Manual search menu is
displayed again (within 3 seconds).
-
If you wish to memorise the channel, select Store programme option using
button and proceed as indicated in previous page. Otherwise, continue
the search using / buttons.
If you have modified System, Skip, Fine tuning options or if you have launch
a Manual Search, select Store Prog. option using
/ buttons and proceed
as indicated above to save your modification.
Press the MENU button to exit the PIP menu.
ViewSonic 19 N2060w
Page 22

INPUT SELECTION
To select AV source:
To select desire input source, press the AV button to
display the selection menu.
Use the / buttons to select each input sources.
Press the OK button to display the desire input
source.
To select input source in PIP/POP mode
To select desired input source in PIP/POP mode,
press the AV button to display the selection menu.
Use the / buttons to select either MP source
(to modify Main picture source) or PIP source (to
modify PIP source).
Press the OK button to display the selection menu in
PIP mode .
Use the / buttons to select the input source.
Press the OK button to display the desire input
source.
SETUP
This menu allows to select the language for the menus as well as the colour of
the screen when there is no video input. It allows also to set an automatic
shut-off time.
ViewSonic 20 N2060w
Page 23

Display the Main menu by pressing MENU
button.
Select the Set up menu using the button.
Press the OK button to confirm
Use the / buttons to select each option.
OSD language : To select the language for the menus.
OSD timeout : To set an automatic shut-off time for Menu. Using / buttons
select 5 > 10 > 20 > 30 > 40 > 50 seconds.
OSD background : Select Opaque or Transparent type.
Sleep Timer : To set an automatic shut-off time. Using / buttons select Off
> 15 > 30 > 45 > 60 > 90 > 120 minutes.
Once the time is ended, TV set automatically switch on standby mode .
If you turn the TV on standby mode after setting the sleep timer, setting will
be erased. Set it again.
Blue Screen : To have a blue screen when there is no video input or when the
RF signal is very bad.
Using the / buttons select On.
Select Off if you do not want the blue screen.
Teletext language: Using / buttons, select the character set that wil be
used for Teletext on this channel.
The following character sets are available: West Europe, East Europe,
Cyrillic (Russia), Greek, Arabic, Persian,.
The character set determines how characters are displayed on Teletext
screen.
Press the MENU button to exit the SETUP menu.
Note : this menu is removed automatic ally after a few seconds without using
the remote control.
Note : You can display the remaining time before the automatic shut-off. To do
that, press the sleep button.
To cancel the automatic shut-off, press several times the sleep button to
display Sleep timer Off .
ViewSonic 21 N2060w
Page 24

In PC mode, main menu is dfferent from the one in TV mode.
Please select PC as main input.
PC SETTINGS
Display the Main menu by pressing MENU
button.
Select the PC menu using the button.
Press the OK button to confirm.
Use the / buttons to select each
option.
H. position : use the / buttons to move the picture horizontally on the
screen.
V. position : use the / buttons to move the picture vertically on the screen.
Focus : Adjust as required to improve the picture quality.
Auto adjust: this function is used to automatically adjust the VGA input. Press
the / buttons to start the adjustment process.
Tone: to adjust the colour temperature at your convenience.
Reset : Return to default settings. Press OK button to return to default settings.
PC MODE
ViewSonic 22 N2060w
Page 25

TIPS
Care of the screen
Do not rub or strike the screen with anything hard as this may scratch, mar, or
damage the screen permanently.
Unplug from the mains before cleaning the screen. Dust the TV by wiping the
screen and the cabinet with a soft, clean cloth. If the screen requires additional
cleaning, use a clean, damp cloth. Do not use liquid cleaners or aerosol
cleaners.
Mobile telephone warning
To avoid disturbances in picture and sound, malfunctioning of your TV or even
damage to the TV, keep away your mobile telephone from the TV.
End of life directives
We are paying a lot of attention to produce environmentally friendly in green
focal areas. Your new receiver contains materials which can be recycled and
reused.
At the end of its life specialized companies can dismantle the discarded
receiver to concentrate the reusable materials and to minimize the amount of
materials to be disposed of.
Please ensure you dispose of your old receiver according to local regulations.
APPENDIX
ViewSonic 23 N2060w
Page 26

Feature 20”Wide screen
Wide Viewing Angle (176° H / 176° V )
Items
Specification
Screen Size 20” TFT-LCD Panel
Aspect Ratio 16:9
LCD Panel
Resolution 1366 x 768 (WXGA)
TV Tuning System
PAL B/G,D/K,I and SECAM
L/L’(Multi-Europe)
TV Function
Sound System Nicam/a2
SCART (RGB+CVBS) x1,CVBS x1
RCA RCA(Composite) x 1
S-Video S-Video x 1
Audio L/R x 1
(Share)
Video Inputs
Component YPbPr x 1 Audio L/R x 1
PC
mode
Analog
Speaker (built-in):3W+3W speakers
Headphone Mini-jack for stereo (3.5ø)
Audio Output
Audio
Output: L / R
Line Output (RCA L/R)
Product Specification
D-sub(15pin)
ViewSonic 24 N2060w
HDMI
Page 27

OSD language
English,French,German,Italian,Dutch,Spanish,
Swedish,Russia
Table Stand
Included
Wall Mount
dimenstion
VESA 100 x 100 mm
Power Supply AC100V~240V, 50/60Hz
Power
Power Consumption <70W
Dimenstion
W x H x D (with stand) 522 x 424 x 185mm
Weight (net)
Lb/Kg
(w/o Accessories)
7Kg
Regulations
CE, SASO, GOST
Accessories
Remote Controller, Batteries (x2), AC Power Cord, User’s
Manual,quick start guide
Preset Timing Mode to VESA
Warning: Do not set the graphics card in your computer to exceed
these refreshing rates. Doing so may result in permanent damage
to the LCD.
Note: Product Specifications are subject to change without further
notice.
, VGA cable, PC audio cable.
ViewSonic 25 N2060w
Page 28

Support timing table (D-Sub/HDMI)
For VGA
CEA Timing
720x400@70hz(VGA,IBM)
(HDMI)
640x480@60hz(VGA,IBM)
640X480@67hz(MAC )
640x480@72hz(VESA)
640x480@75hz(VESA)
800x600@60hz(VESA)
800x600@72hz(VESA)
800x600@75hz(VESA)
832x624@75hz(MAC )
1024x768@60hz(VESA)
1024x768@70hz(VESA)
1024x768@75hz(VESA)
For HDMI-DVI
720x400@70hz(VGA,IBM)
640x480@60hz(VGA,IBM)
640X480@67hz(MAC II ,Apple )
640x480@72hz(VESA)
640x480@75hz(VESA)
800x600@60hz(VESA)
800x600@72hz(VESA)
800x600@75hz(VESA)
832x624@75hz(MAC II ,Apple )
1024x768@60hz(VESA)
1024x768@70hz(VESA)
1024x768@75hz(VESA)
1152x864@75hz(VESA )
II
II
1152x864@ 75HZ
480i/60Hz
4:3
1080i/60Hz
16:9
720p/60Hz
16:9
480p/60Hz
16:9
480p/60Hz
4:3
480i/60Hz
16:9
579p/50Hz
4:3
579p/50Hz
16:9
720p/50Hz
16:9
1080i/50Hz
16:9
576i/50Hz
4:3
576i/50Hz
16:9
ViewSonic 26 N2060w
Page 29

Troubleshooting
No power
• Make sure the LCD TV is properly connected.
• Make sure the AC power cord is properly connected.
• Make sure the AC power is ON, DC power button is ON (Green LED).
• Plug another electrical device (like a radio) to the power outlet to verify that the outlet is
supplying the proper voltage.
Poor or no picture
• The TV station may be experiencing problems. Try another channel.
• The Cable TV signal may be scrambled or encoded. Please contact your local cable
operator.
• Make sure that connection to other components are correct.
• Make sure that setup has been done correctly after connections.
• Make sure the correct input is selected and the input signal is compatible.
Strange color, light color, or color misalignment
• Ensure that the video cable is securely connected.
• The picture may appear dim in a brightly lit room.
• Adjust brightness and contrast.
• Check the input signal setting.
No sound
• Check your audio connections
• The MUTE button may have been pressed, try pressing this button again.
• Check your audio settings, your TV audio may be set to minimum.
• Press the Volume + (Up) button on the remote control.
Remote control unit does not operate
• Make sure batteries are inserted correctly.
• Batteries could be weak or dead. Replace batteries.
• Is a fluorescent light illuminated near the remote control sensor?
• The path of the remote control beam may be blocked. Make sure the path is clear and that
the remote control is aimed at the remote control sensor on the TV.
• Press only one button at a time and it is the correct one for the operation you want to
perform.
Unit cannot be operated
• External influences such as lightning or static electricity may cause improper operation.
In this case, operate the unit after first turning on the power of the LCD TV and the AVC
System, or unplug the AC cord for 1 to 2 minutes, then replug again.
Power is cut off suddenly
• Is the sleep timer set?
• The internal temperature of the unit has increased. Remove any objects blocking the vent
or clean as necessary.
No CATV reception (or no reception above CH13)
• Is the AIR/CABLE option set correctly? Please set the AIR/CABLE option to CABLE.
• CATV is connected improperly or not connected; please check all the CATV connections.
• The cable TV service is interrupted; please contact your cable operator.
Picture is cut off/with sidebar screen
• Is the image positioned correctly?
• Are screen mode adjustments such as picture size set correctly?
ViewSonic 27 N2060w
Page 30

Customer Support
For technical support or product service, see the table below or contact your reseller.
Note: You will need the product serial number.
Country/Region Web Site Telephone
Austria www.viewsoniceurope.com/aus 0150 159 6005
Belgium
www.viewsoniceurope.com/befl
www.viewsoniceurope.com/befr
02 256 6642
Denmark www.viewsoniceurope.com/dk 35 25 65 12
Finland www.viewsoniceurope.com/fi 09 2311 3413
France www.viewsoniceurope.com/fr 03 8717 1616
Germany www.viewsoniceurope.com/de 0696 630 8051
Republic of Ireland www.viewsoniceurope.com/uk 01 411 8936
Italy www.viewsoniceurope.com/it 02 4527 9033
Luxembourg www.viewsoniceurope.com/lu 40 6661 5618
The Netherlands www.viewsoniceurope.com/nl 053 484 9308
Norway
www.viewsoniceurope.com/no 22 57 77 38
Portugal www.viewsoniceurope.com/uk 21359 1423
Russia www.viewsoniceurope.com/ru 800-200-8439
Spain www.viewsoniceurope.com/es 913 496 534
Sweden www.viewsoniceurope.com/se 08 5792 9045
United Kingdom www.viewsoniceurope.com/uk 0207 949 0307
ViewSonic 28 N2060w
Page 31

Limited Warranty
VIEWSONIC® LCD TV
What the warranty covers:
ViewSonic warrants its products to be free from defects in material and workmanship, under normal use, during the warranty
period. If a product proves to be defective in material or workmanship during the warranty period, ViewSonic will at its
sole option repair or replace the product with a like product. Replacement product or parts may include remanufactured or
refurbished parts or components.
How long the warranty is effective:
ViewSonic LCD TVs are warranted for one (1) year for all parts excluding the light source and one (1) year for labor from
the date of the first customer purchase.
Who the warranty protects:
This warranty is valid only for the first consumer purchaser.
What the warranty does not cover:
1. Any product on which the serial number has been defaced, modified or removed.
2. Damage, deterioration or malfunction resulting from:
a. Accident, misuse, neglect, fire, water, lightning, or other acts of nature, unauthorized product modification, or
failure to follow instructions supplied with the product.
b. Repair or attempted repair by anyone not authorized by ViewSonic.
c. Any damage of the product due to shipment.
d. Removal or installation of the product.
e. Causes external to the product, such as electric power fluctuations or failure.
f. Use of supplies or parts not meeting ViewSonic’s specifications.
g. Normal wear and tear.
h. Any other cause which does not relate to a product defect.
3. Any product exhibiting a condition commonly known as “image burn-in” which results when a static image is displayed
on the product for an extended period of time.
4. Removal, installation, and set-up service charges.
How to get service:
1. For information about receiving service under warranty, contact ViewSonic Customer Support at 800-888-8583. You will
need to provide your product’s serial number.
2. To obtain warranted service, you will be required to provide (a) the original dated sales slip, (b) your name, (c) your
address, (d) a description of the problem, and (e) the serial number of the product.
3. Take or ship the product freight prepaid in the original container to an authorized ViewSonic service center or ViewSonic.
4. For additional information or the name of the nearest ViewSonic service center, contact ViewSonic.
Limitation of implied warranties:
There are no warranties, express or implied, which extend beyond the description contained herein including the implied
warranty of merchantability and fitness for a particular purpose.
Exclusion of damages:
ViewSonic’s liability is limited to the cost of repair or replacement of the product. ViewSonic shall not be liable for:
1. Damage to other property caused by any defects in the product, damages based upon inconvenience, loss of use of
the product, loss of time, loss of profits, loss of business opportunity, loss of goodwill, interference with business
relationships, or other commercial loss, even if advised of the possibility of such damages.
2. Any other damages, whether incidental, consequential or otherwise.
3. Any claim against the customer by any other party.
Effect of state law:
This warranty gives you specific legal rights, and you may also have other rights which vary from state to state. Some states
do not allow limitations on implied warranties and/or do not allow the exclusion of incidental or consequential damages, so
the above limitations and exclusions may not apply to you.
Sales outside the U.S.A. and Canada:
For warranty information and service on ViewSonic products sold outside of the U.S.A. and Canada, contact ViewSonic or
your local ViewSonic dealer.
Warranty_LCDTV 1 of 1
4.3: ViewSonic LCD TV Warranty Rev. 1a Release Date: 03-31-05
ViewSonic 29 N2060w
Page 32

 Loading...