

Page 1

ViewSonic
N4200w
®
LCD TV
- User Guide
- 使用手册
Model No. : VS10945-1G
Page 2

Contents
Important Safety Instructions ......................................................................... 1
Copyright Information..................................................................................... 2
Product Registration ...................................................................................... 2
Product disposal at end of product life........................................................... 2
Antenna Installation Instructions.................................................................... 3
Cleaning the LCD TV..................................................................................... 3
Disclaimer...................................................................................................... 3
Getting Started
Package Contents.......................................................................................... 4
Fixing ViewSonic LCD TV to the Wall............................................................ 5
Relocating the Satellite Speakers.................................................................. 6
Front Display and Controls ............................................................................ 7
Rear Panel and Connections......................................................................... 8
Side Panel Connections................................................................................. 9
Remote control............................................................................................. 10
Preparing Your LCD TV............................................................................... 12
Basic Operation ........................................................................................... 19
On Screen Display Menu System (OSD)
OSD Operation ............................................................................................ 20
OSD Configuration Screens......................................................................... 21
PC Mode...................................................................................................... 21
AV mode...................................................................................................... 25
TV mode...................................................................................................... 29
Additional Information
Specifications ............................................................................................... 33
Troubleshooting........................................................................................... 34
Customer Support........................................................................................ 35
Limited Warranty.......................................................................................... 36
ViewSonic N4200w
Page 3
Important Safety Instructions
1. Read these instructions completely before using the equipment.
2. Keep these instructions in a safe place.
3. Heed all warnings.
4. Follow all instructions.
5. Do not use this equipment near water. Warning: To reduce the risk of fire or electric shock,
do not expose this apparatus to rain or moisture.
6. Clean with a soft, dry cloth. If further cleaning is required, see “Cleaning the Display” in
this guide for further instructions.
7. Do not block any ventilation openings. Install the equipment in accordance with the
manufacturer’s instructions.
8. Do not install near any heat sources such as radiators, heat registers, stoves, or other
devices (including amplifiers) that produce heat.
9. Do not attempt to circumvent the safety provisions of the polarized or grounded plug. A
polarized plug has two pins with one wider than the other. A grounded plug has two flat
parallel pins and a round, ground pin. The wider and ground pins are provided for your
safety. If the plug does not fit into your outlet, consult an electrician for replacement of the
outlet.
10. Protect the power cord from being stepped on or pinched, particularly at the plug, and the
point where it emerges from the equipment. Be sure that the power outlet is located near
the equipment so that it is easily accessible.
11. Only use attachments/accessories specified by the manufacturer.
12. Use only with the cart, stand, tripod, bracket, or table specified by the
manufacturer, or sold with the equipment. When a cart is used, use caution
when moving the cart-equipment combination to avoid injury from tipping
over.
13. Unplug this equipment when it will be unused for long periods of time.
14. Refer all servicing to qualified service personnel. Service is required when the unit has
been damaged in any way, such as: if the power-supply cord or plug is damaged, if liquid
is spilled onto or objects fall into the unit, if the unit is exposed to rain or moisture, or if the
unit does not operate normally or has been dropped.
15. The device should not be spattered by water, and should not put things filled with liquid on
the device, such as vases.
ViewSonic N4200w 1
Page 4

Copyright Information
Copyright© ViewSonic® Corporation, 2006. All rights reserved.
ViewSonic, the three birds logo, OnView, ViewMatch, and ViewMeter are registered
trademarks of ViewSonic Corporation.
Disclaimer: ViewSonic Corporation shall not be liable for technical or editorial errors or
omissions contained herein; nor for incidental or consequential damages resulting from
furnishing this material, or the performance or use of this product.
In the interest of continuing product improvement, ViewSonic Corporation reserves the right to
change product specifications without notice. Information in this document may change
without notice.
No part of this document may be copied, reproduced, or transmitted by any means, for any
purpose without prior written permission from ViewSonic Corporation.
Product Registration
To meet your future needs, and to receive any additional product information as it becomes
available, please register your product on the Internet at www.viewsonic.com.
For Your Records
Product Name: N4200w
ViewSonic LCD TV
Model Number: VS10945-1G
Document Number: N4200w_UG_ENG Rev. 1A 03-14-06
Serial Number:
Purchase Date:
Product disposal at end of product life
ViewSonic is concerned about the preservation of our environment. Please dispose of this
product properly at the end of its useful life. Your local waste disposal company may provide
information about proper disposal.
The lamp in this product contains mercury. Please dispose of properly in accordance with
environmental laws of your location.
ViewSonic N4200w 2
Page 5
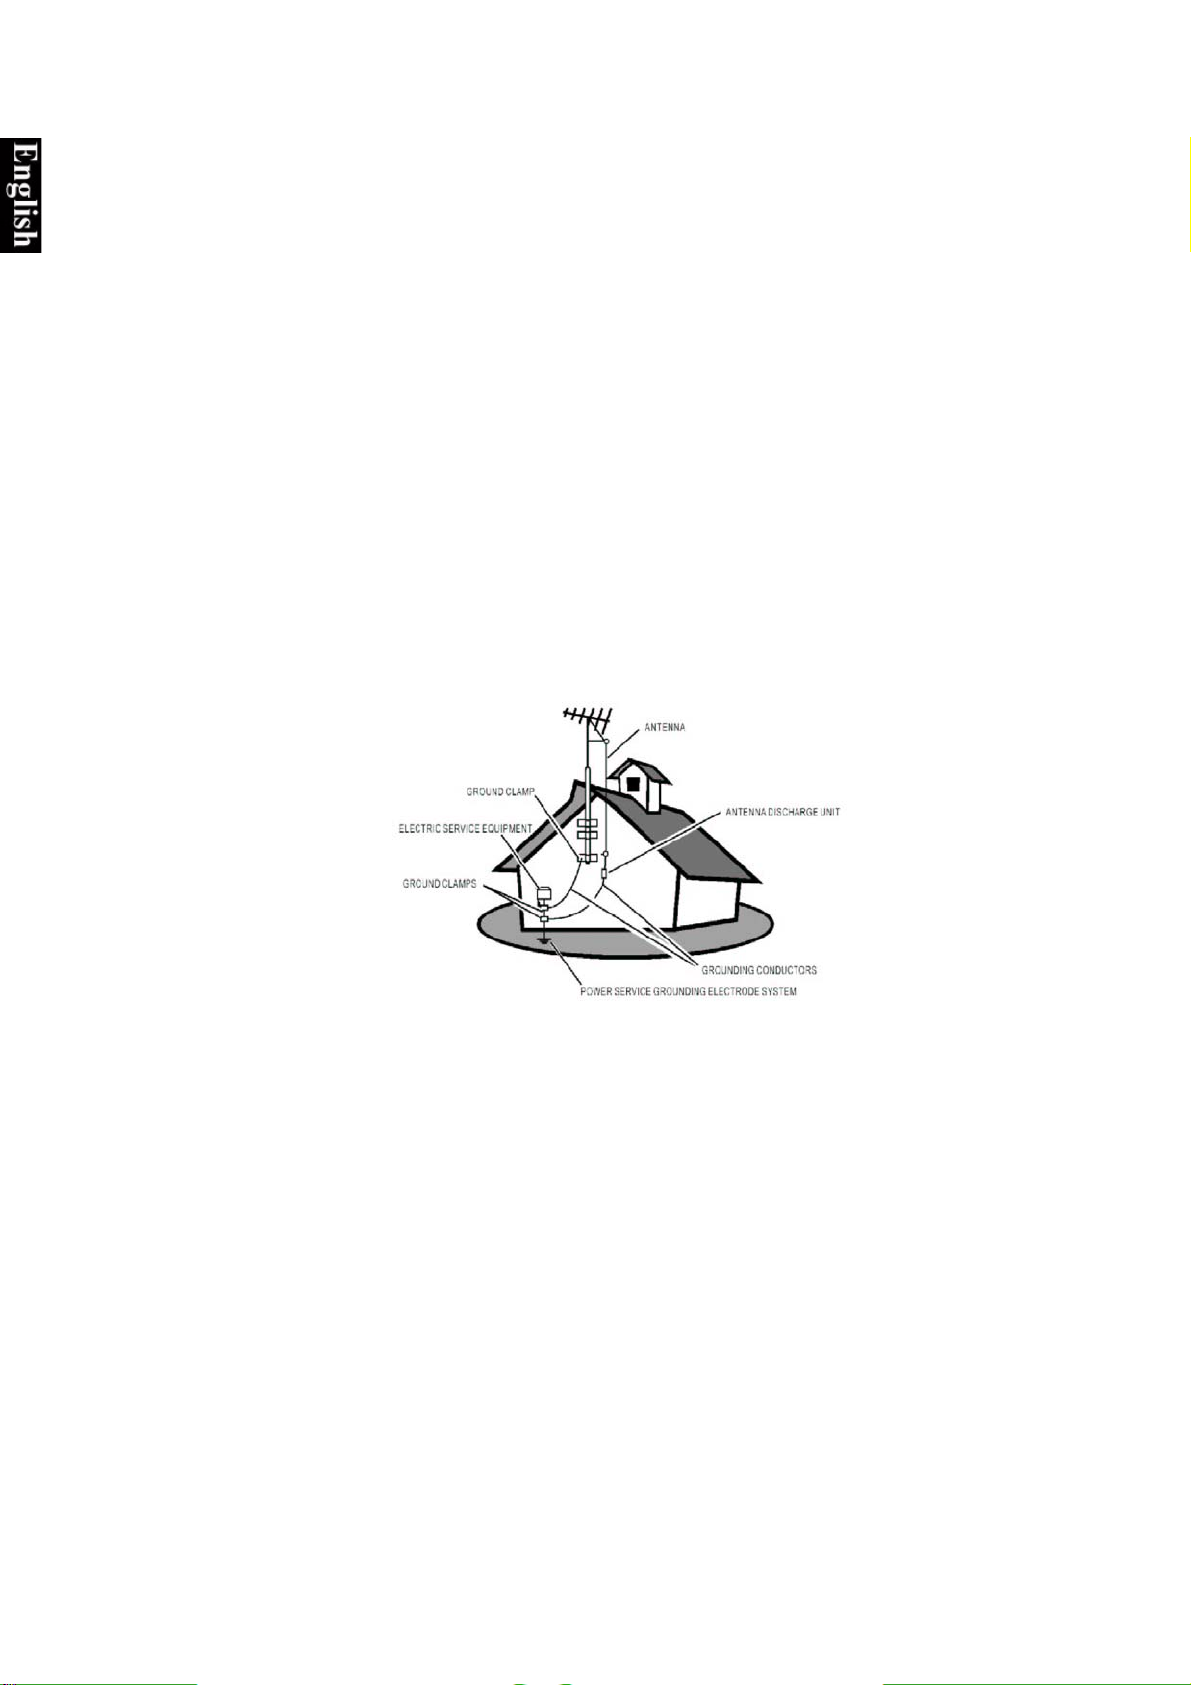
Antenna Installation Instructions
1. Outdoor Antenna Grounding
If an outside antenna or cable system is connected to the product be sure the antenna or cable system is
grounded to provide some protection against voltage surges and built-up static charge. Article 810 of the
National Electrical Code, ANSI/NFPA 70, provides information with regard to proper grounding of the mast
and supporting structure, grounding of the lead-in wire to an antenna discharge unit, connection to grounding
electrodes, and requirements for the grounding electrode.
2. Lightning
For added protection for this product during a lightning storm, or when it is left unattended and unused for
long periods of time, unplug it from the wall outlet and disconnect the antenna or cable system. This will
prevent damage to the product due to lightning and power-line surges. Do not disconnect the antenna or the
power cord during a heavy storm, lightning may strike while you are holding the cable cord, causing serious
injury; turn off your LCD TV and wait for the weather to improve.
3. Power Lines
An outside antenna system should not be located in the vicinity of overhead power lines or other electric
light or power circuits, or where it can fall onto such power lines or circuits. When installing an outside
antenna system, extreme care should be taken to keep from touching such power lines or circuits as contact
with them might be fatal.
Cleaning the LCD TV
Make sure the LCD TV is switched off.
Never spray or pour any liquid directly onto the screen or case.
To clean the screen:
Wipe the screen with a clean, soft, lint-free cloth. This removes dust and other particles.
1
If still not clean, apply a small amount of a non-ammonium, non-alcohol based glass cleaner onto a clean,
2
soft, lint-free cloth, and wipe the screen.
To clean the case:
Use a soft, dry cloth.
1
If still not clean, apply a small amount of a non-ammonium, non-alcohol based, mild non-abrasive detergent
2
onto a clean, soft, lint-free cloth, then wipe the surface.
Disclaimer
ViewSoni c® does not recommend the use of any ammonia or alcohol-based cleaners on the LCD TV screen or case.
Some chemical cleaners have been reported to damage the screen and/or the case of the LCD TV.
ViewSonic will not be liable for damages resulting from use of any ammonia or alcohol-based cleaners.
ViewSonic N4200w 3
Page 6
Getting Started
You are now ready to install your LCD TV. Please make sure you have read the safety
instructions before proceeding.
Important! Save the original box and all packing material for future shipping needs.
Package Contents
Please check that your LCD TV package includes:
LCD TV
ViewSonic User’s Guide
AC Power Cable
Universal Remote Control with
Batteries
Important! If there are any items missing from this list, please contact your distributor.
Quick Start Guide
RF Cable
Warranty Card
Service Sticker
ViewSonic N4200w 4
Page 7
Fixing ViewSonic LCD TV to the Wall
The LCD TV can be wall-mounted or freestanding. Before installing the product to the wall,
please consider the following guidelines:
• Read the Important Safety Instructions, at the start of this manual.
• Do not install in a moist or wet environment. This equipment is intended for indoor use
only.
• Do not install near heat source, or strong magnetic fields.
• Use only approved wall brackets capable of supporting the weight of the LCD TV.
• Mount your LCD TV to a supporting wall.
• Ensure there is at least 3cm of space surrounding any air-vents of LCD TV.
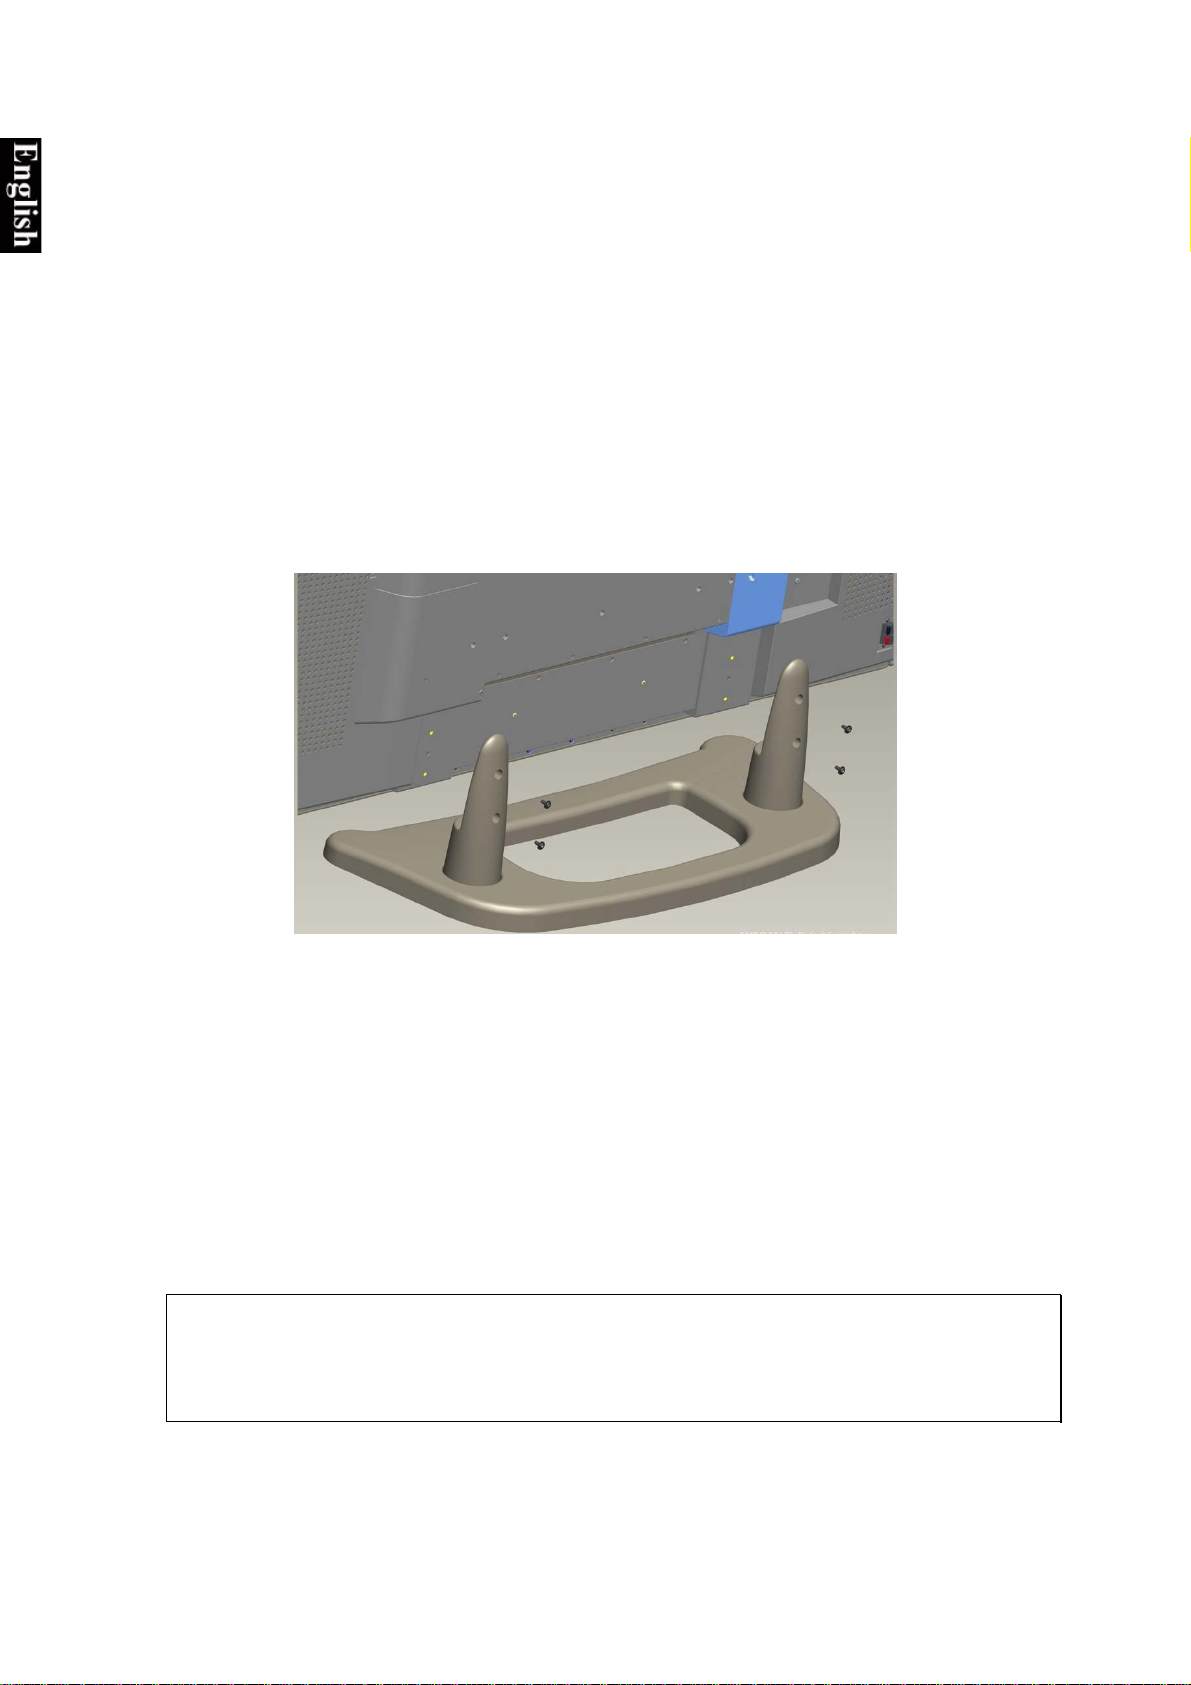
To detach the wall-mounting bracket to LCD TV safely, please use the following guidelines:
1. Disconnect the power and any other cables that might hinder moving the LCD TV.
2. Set the LCD TV on a table or work surface, screen-down with a towel or woolen blanket
between the screen and the surface to protect the display.
3. There are 6 screws holes in the bracket that match the LCD TV (as shown), two-pairs are
at opposing ends of the base (perpendicular to the TV rear panel), and a single screw is
mounted on the underside of each supporting upright (parallel to the direction of the
supports). Loosen all six screws, and keep for future use.
Use only approved wall-mounting brackets advised by ViewSonic or your local distributor.
Notes:
• If your LCD TV is already set up for free-standing operation, you need to first remove the stand before
mounting the device to the wall.
• The wall-mount screw type: M6 x L10
ViewSonic N4200w 5
Page 8
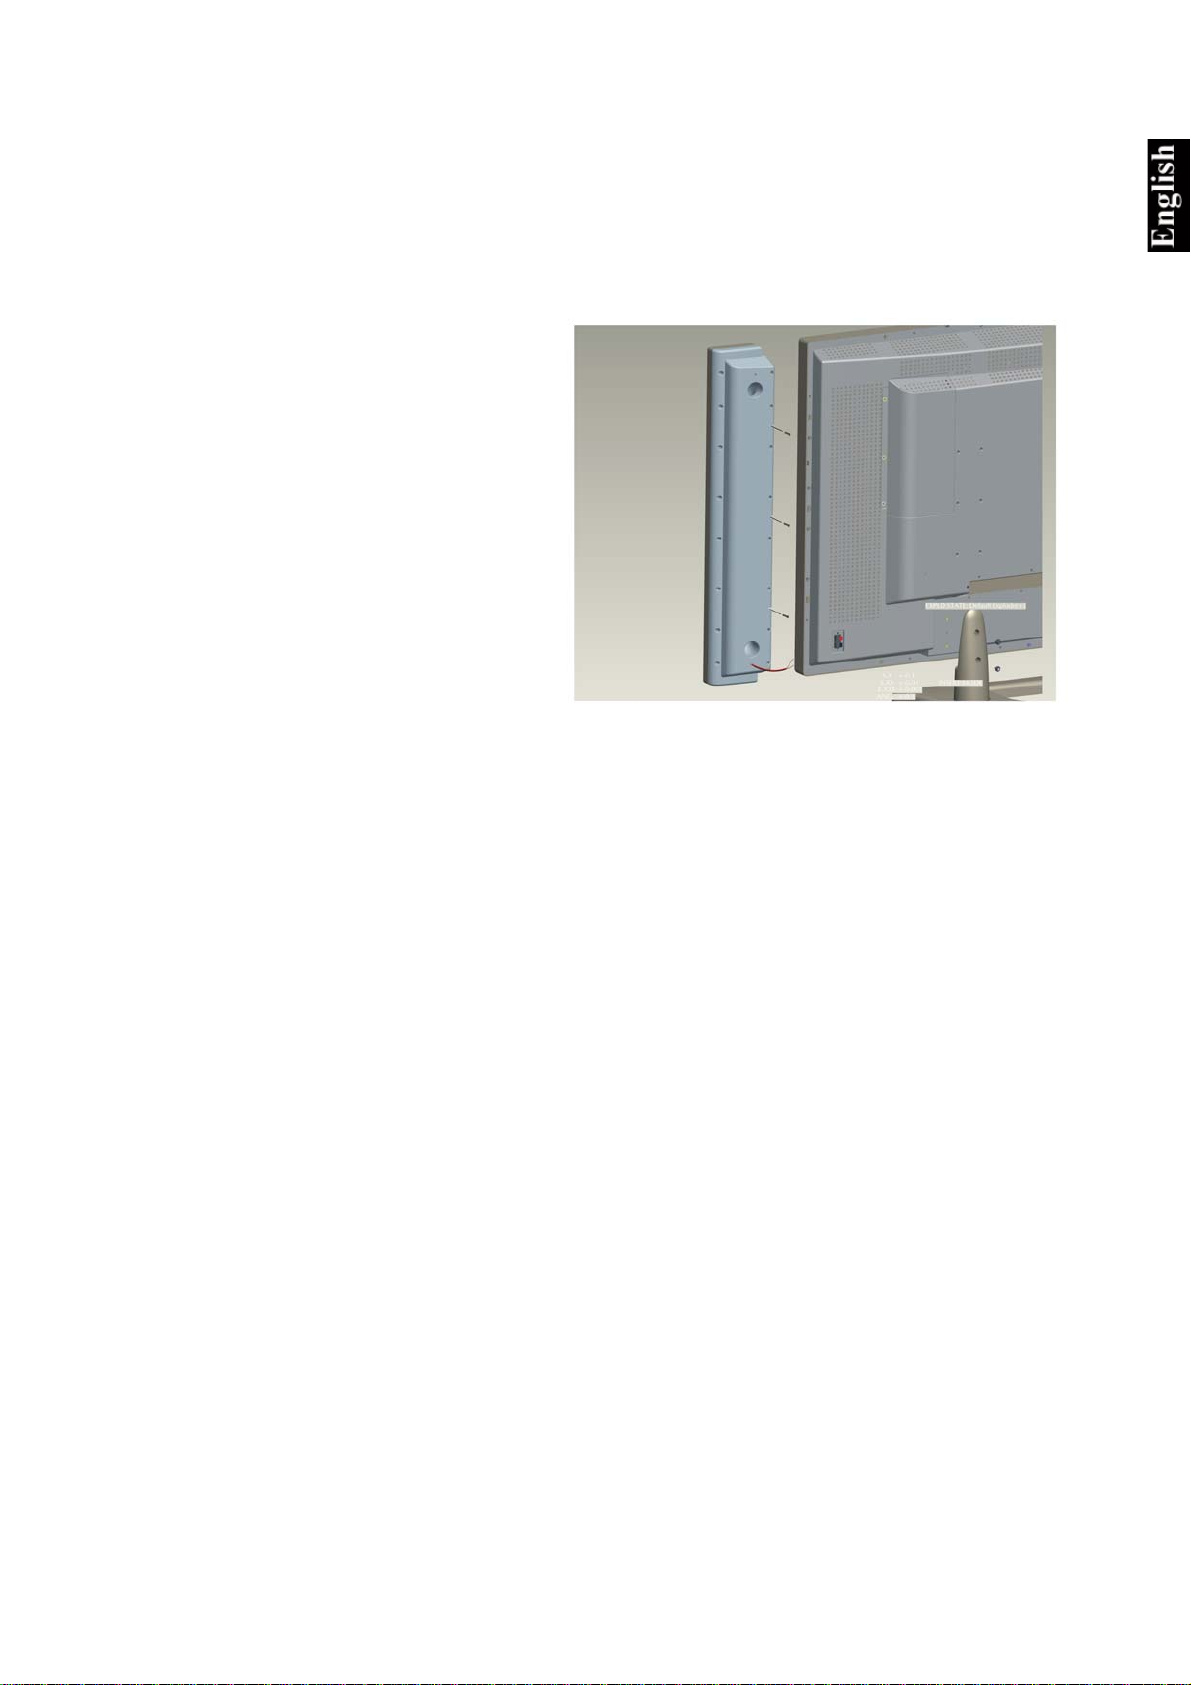
Relocating the Satellite Speakers
To replace the speakers attached to LCD TV or extend the cable please contact ViewSonic or
your local distributor for advice.
To detach the satellite (side) speakers from the main LCD TV unit, please read the following
guidelines:
1. Disconnect the power to LCD TV.
2. Now remove the audio cable from
the LCD TV.
3. Set the LCD TV on a table or work
surface, screen-down with a towel or
woolen blanket between the screen
and the surface to protect the
display.
4. Remove the 6 screws holding the
speaker (3 screws on each side) to
the main unit.
5. Pull the speaker outwards, and away
from the main unit.
To connect the audio cable from a speaker to the LCD TV, ensure the polarity is correct. I.e.
match the red (+ve) wire to the red (+ve) terminal, and the black (-ve) wire to the black (-ve)
terminal connector on the LCD TV rear panel.
ViewSonic N4200w 6
Page 9
Introducing ViewSonic LCD TV
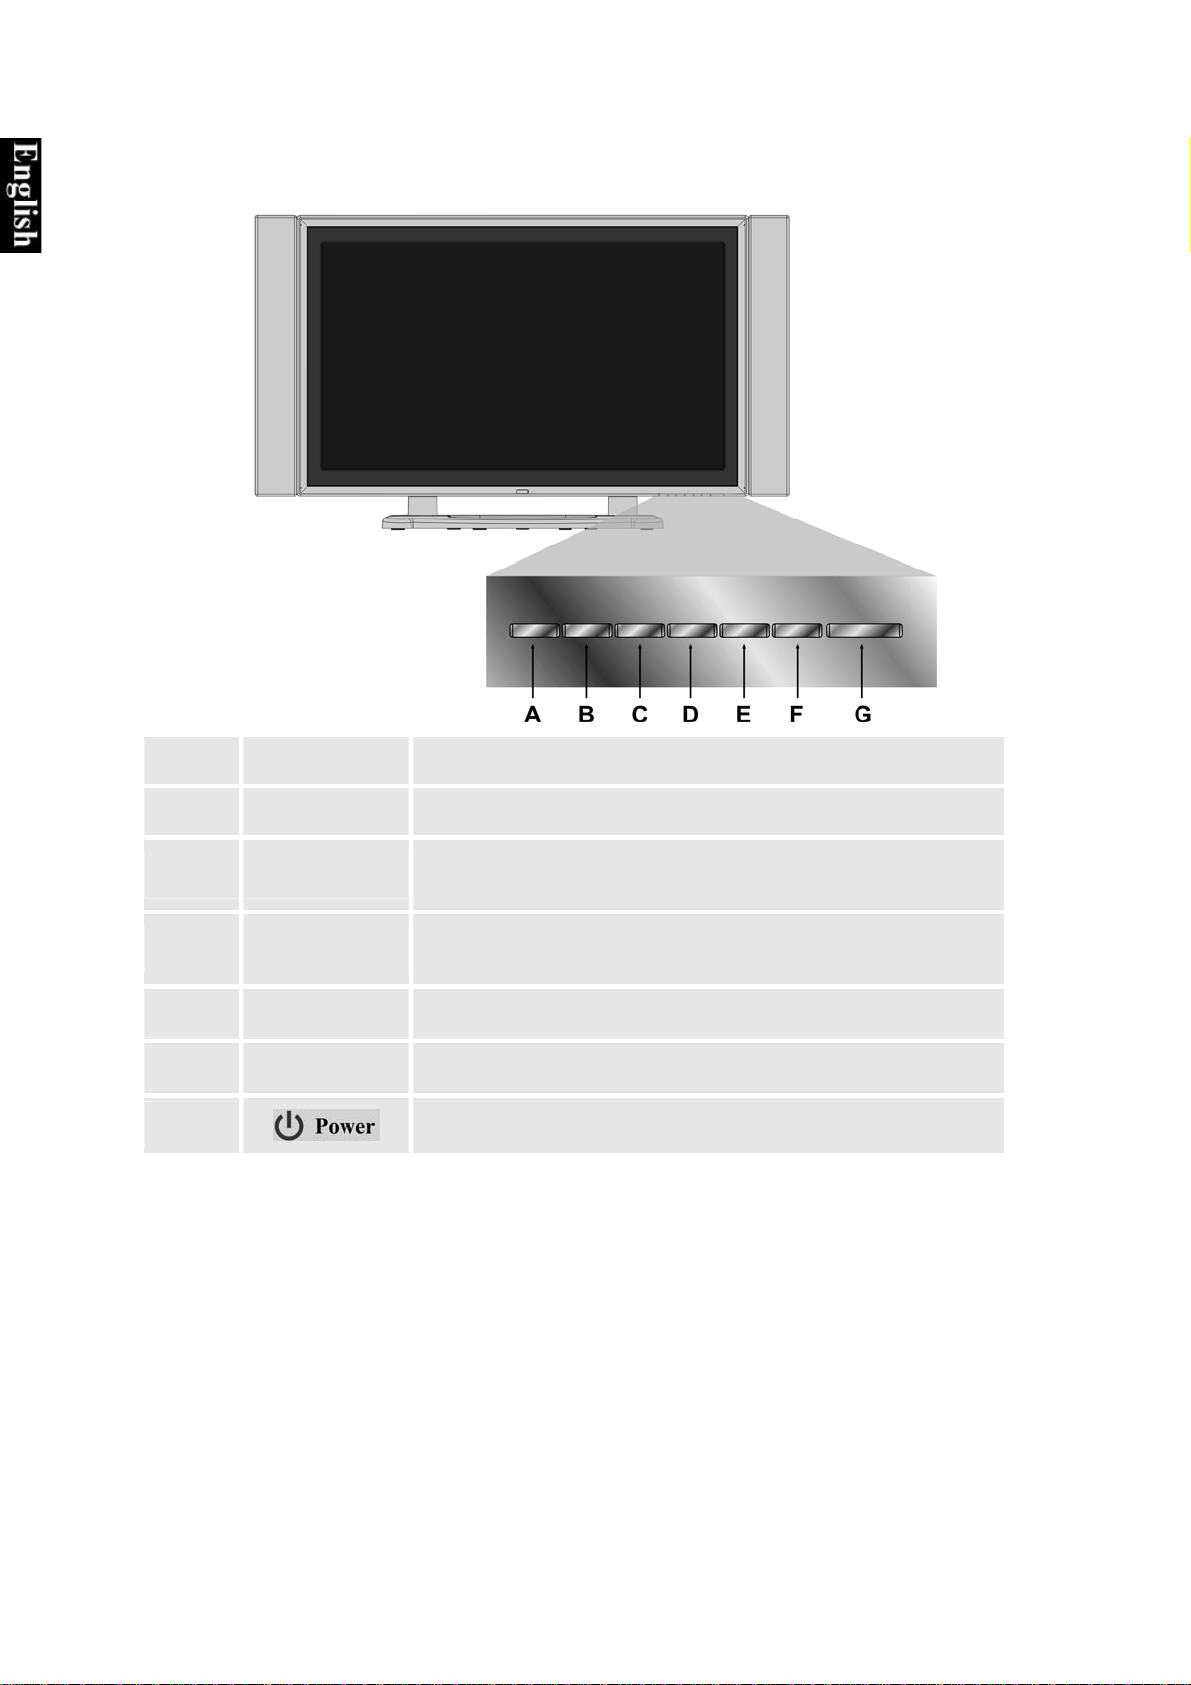
Front Display and Controls
A INPUT
B MENU
C VOL-
D VOL+
E
F
G
CH ﹀
CH ^
Select input sources.
Toggle the OSD menu .
Decrease the volume during normal operation or adjust a
highlighted control whilst using the OSD menu.
Increase the volume during normal operation or adjust a
highlighted control whilst using the OSD menu.
Channel down/ Scroll down.
Channel up/ Scroll up.
Turn the power on/off.
ViewSonic N4200w 7
Page 10
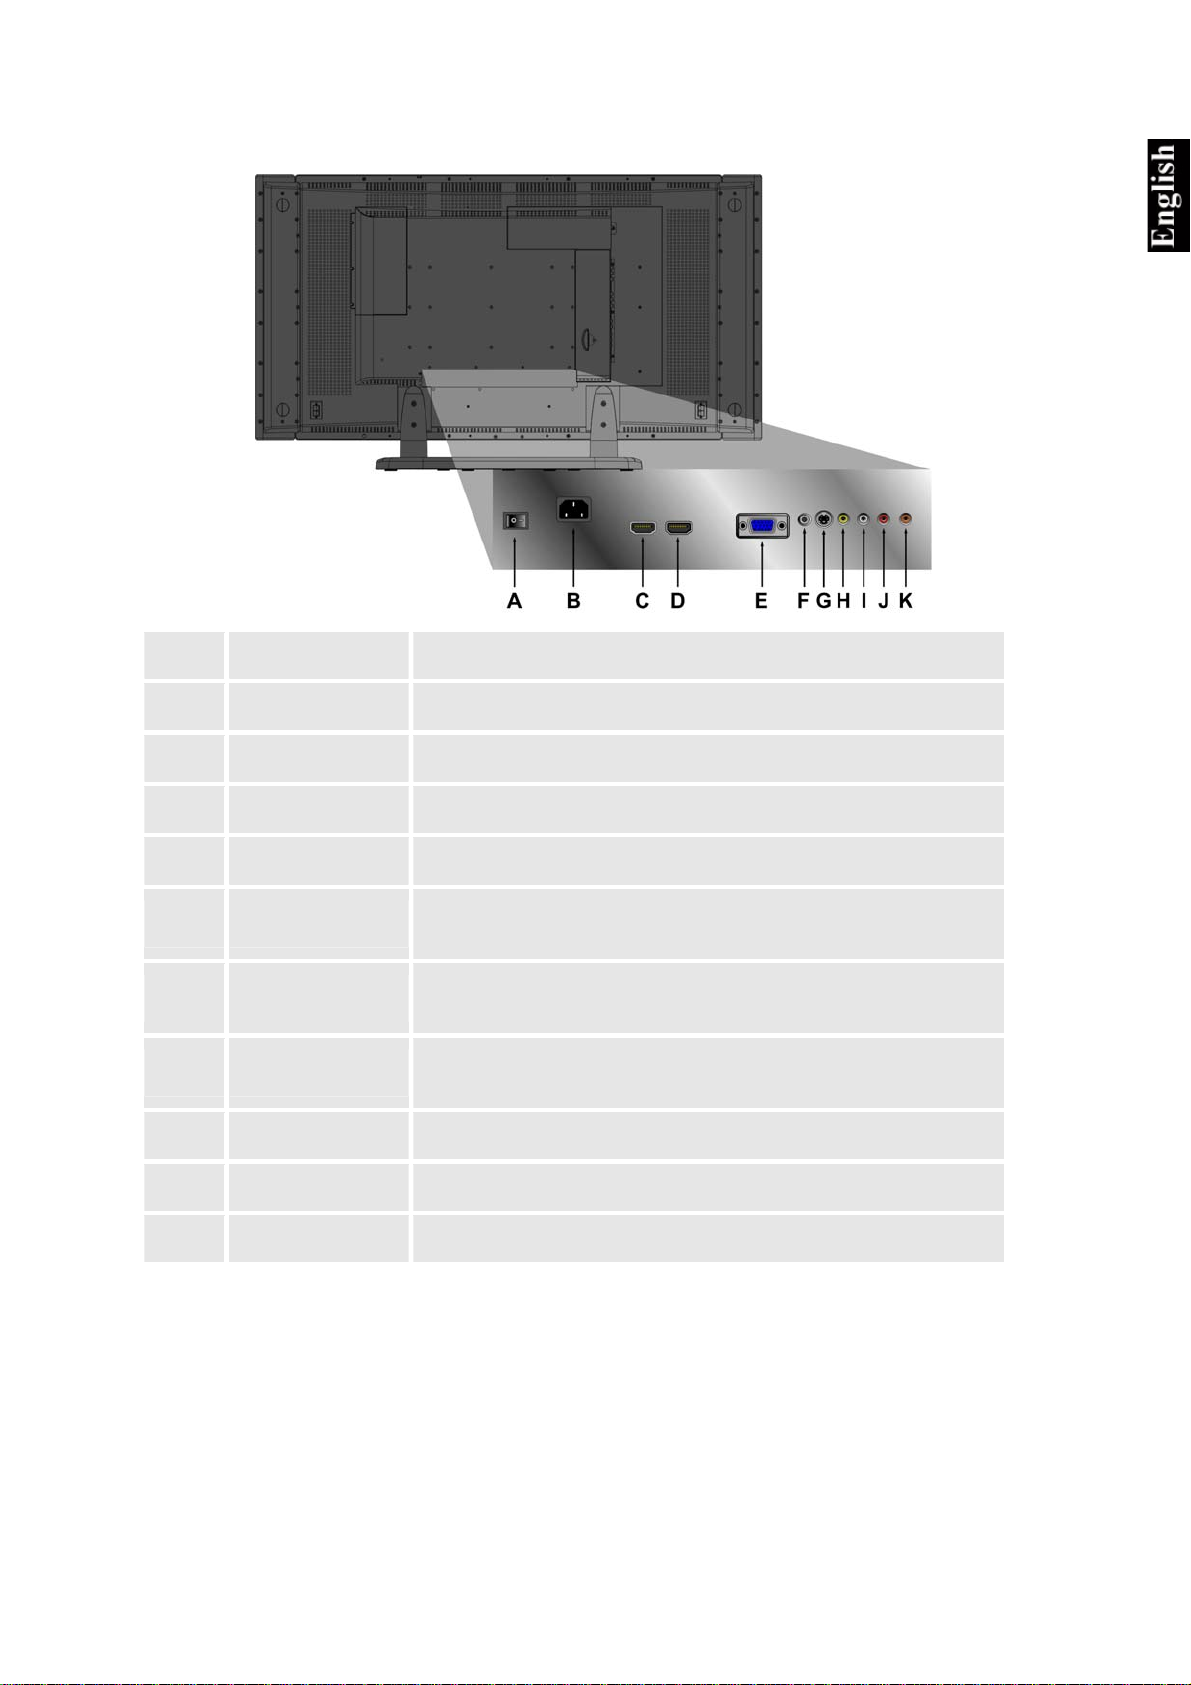
Rear Panel and Connections
A POWER S/W
B AC IN
C HDMI (1)
D HDMI (2)
E VGA
F PC STEREO
G S-V
H VIDEO
I Audio-L
J Audio-R
Power (on/off) switch.
Using the cable provided, plug the TV into the nearest outlet.
Have one HDMI cable terminals of your DVD player.
Have one HDMI cable terminals of your DVD player.
Connect the VGA cable output of PC to the VGA terminal input.
Use a PC to Phono audio-cable to connect the audio output of your
PC to the audio input terminal.
Connect external video devices such as VCR, DVD, and video
game to this DIN socket.
Connect the video output from your DVD/VCR player or PC to this
terminal.
Connect this audio output to the left speaker.
Connect this audio output to the right speaker.
K SPDIF
Connect to a SPDIF device.
ViewSonic N4200w 8
Page 11
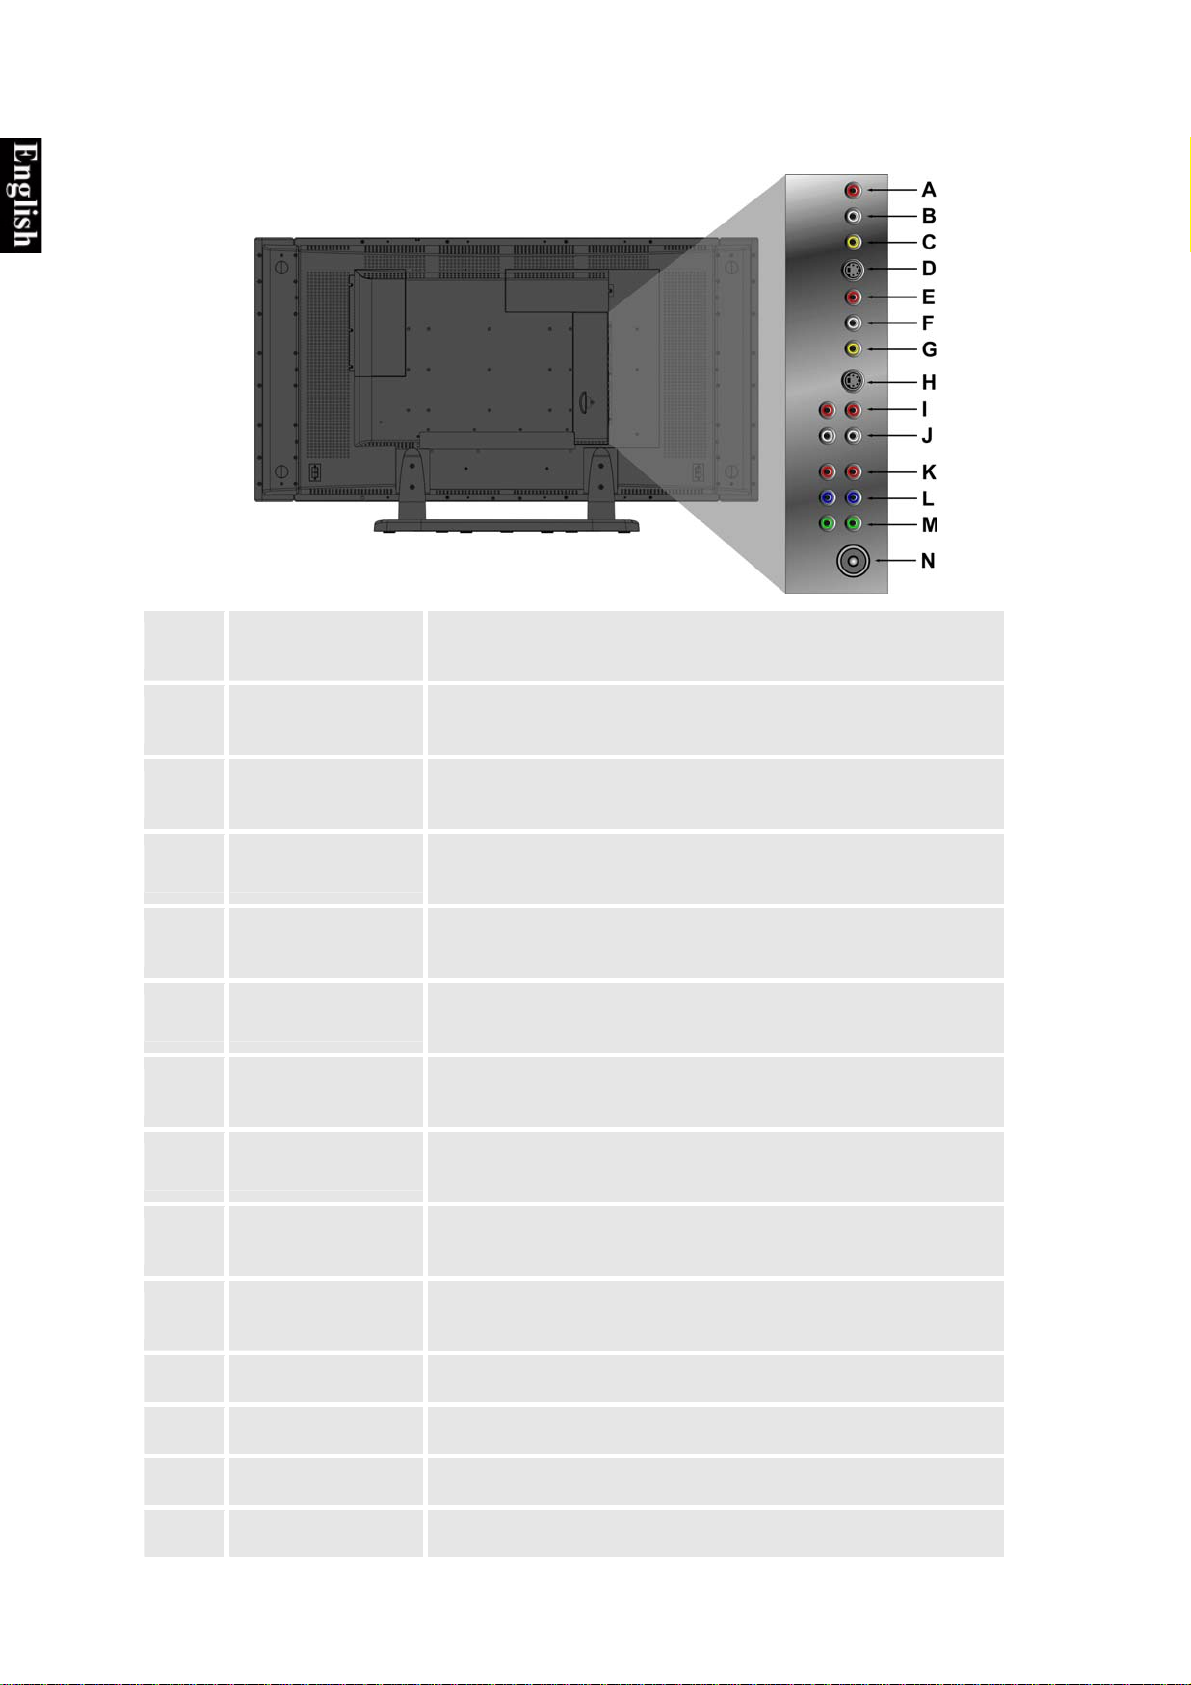
Side Panel Connections
A Audio-R
B Audio-L
C VIDEO
D S-V
E Audio-R
F Audio-L
G VIDEO
H S-V
Connect audio output (right channel) from compatible devices to
this terminal.
Connect audio output (left channel) from compatible devices to
this terminal.
Connect external video devices such as VCR, DVD, and video
game to this jack.
Connect external video devices such as VCR, DVD, and video
games to this DIN socket.
Connect audio output (right channel) from compatible devices to
this terminal.
Connect audio output (left channel) from compatible devices to
this terminal.
Connect external video devices such as VCR, DVD, and video
game to this jack.
Connect external video devices such as VCR, DVD, and video
game to this DIN socket.
I Audio-R
J Audio-L
K Pr/Cr
L Pb/Cb
M Y
N ANALOG ANT
Connect audio output (right channel) from compatible devices to
this terminal.
Connect audio output (left channel) from compatible devices to
this terminal.
Connect an external video device to this input.
Connect an external video device to this input.
Connect an external video device to this input.
Connect to an external antenna or cable service.
ViewSonic N4200w 9
Page 12
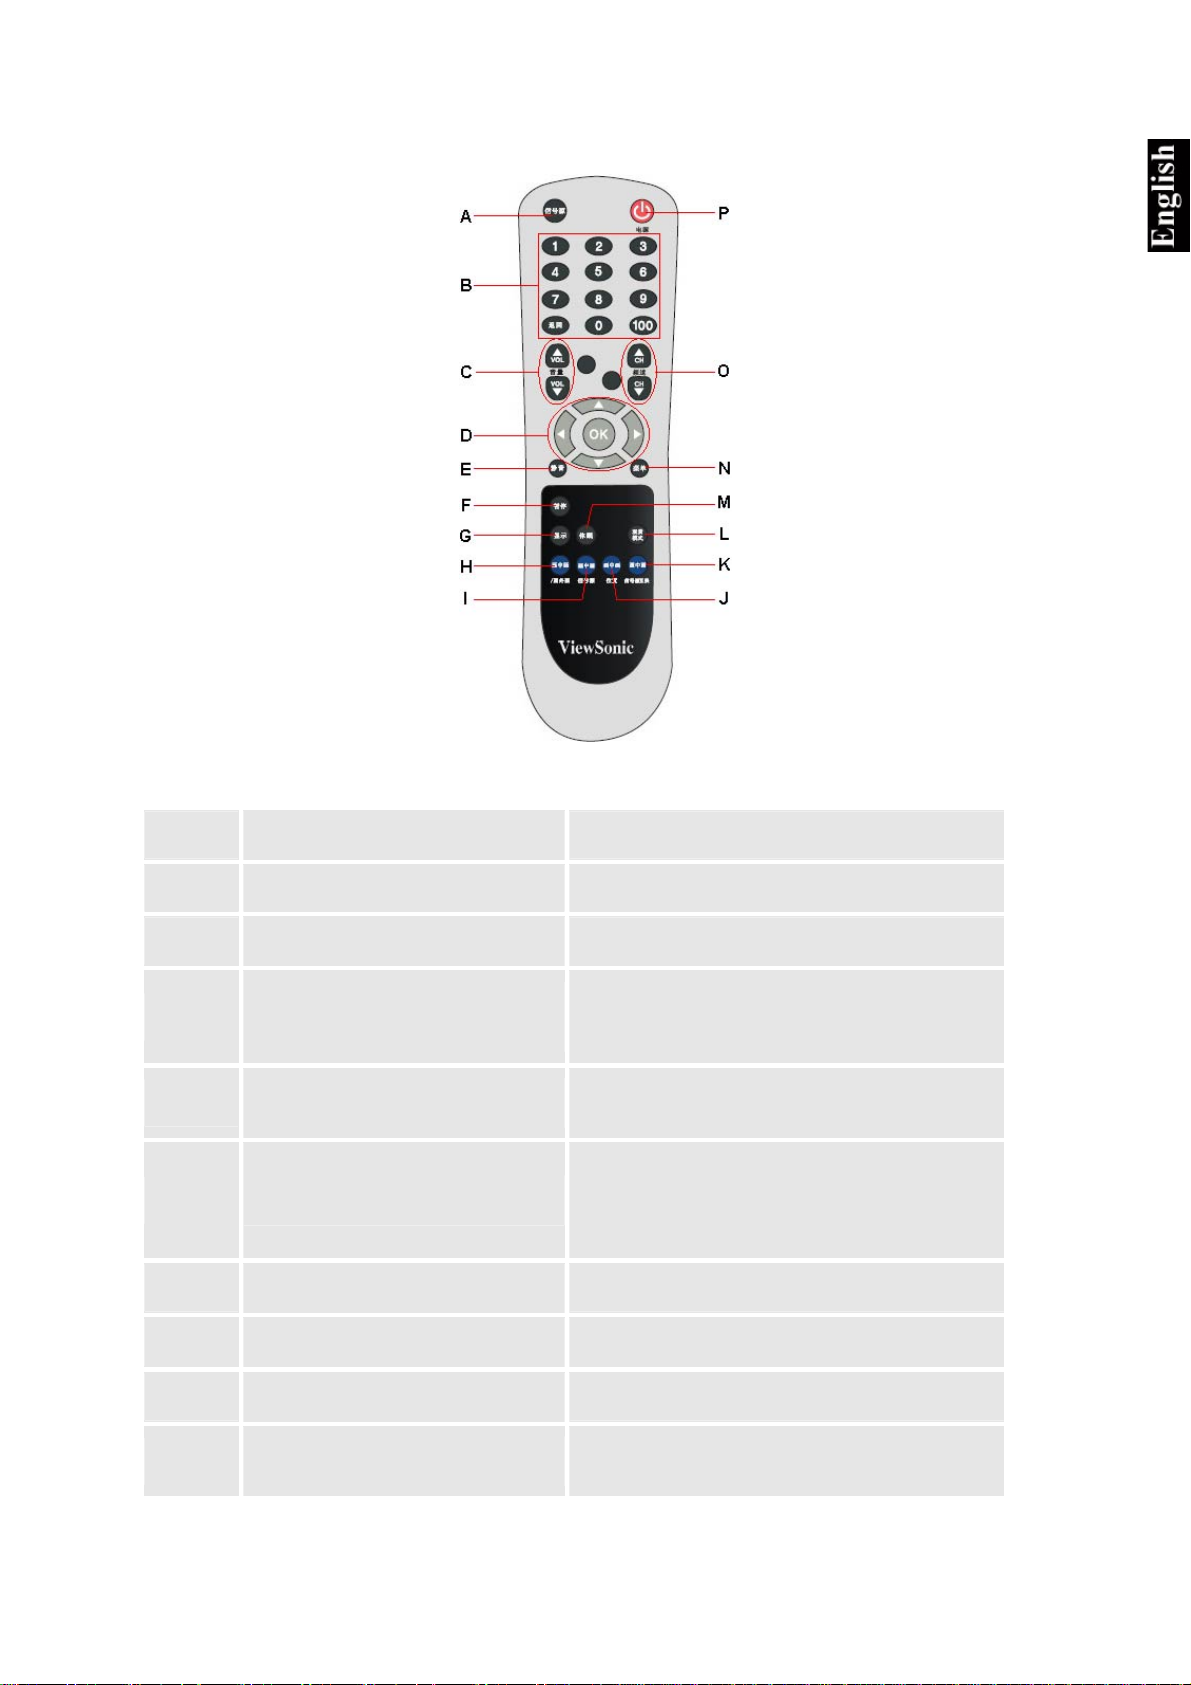
Remote control
The following table describes the functions for the Universal Remote control.
A
B 0~100+ channel selectors
C
D
E 静音 (MUTE)
F 暂停 (FREEZE)
G
信号源 (SOURCE)
音量 (VOL+ / VOL-)
UP/DOWN/LEFT/ RIGHT/ OK
buttons
显示 (DISPLAY)
Select Input Source (e.g. Video, Antenna, PC).
Use these buttons to select a channel.
Adjust Volume.
UP/DOWN for OSD function select and LEFT/
RIGHT for function adjust. Press OK to confirm
your selection.
Temporarily switch off audio output retaining
the current volume settings.
Press this button to hold the current display.
Press again to release the picture. Note this is
not the same as pause and the underlying
broadcast continues.
Display the current input source and time.
H
I
J 画中画/位置 (PIP/POS)
画中画/画外画 (PIP/POP )
画中画/信号源 (PIP/SOUR)
ViewSonic N4200w 10
Activate PIP feature (Activate Guide).
Press to toggle the Sub picture between PIP.
Change the display position of the Sub Picture
in PIP mode.
Page 13
K 画中画/信号源互换(PIP/SWAP)
L
M
N
O
P
观赏模式 (WIDE)
休眠 (SLEEP)
菜单 (MENU)
频道 (CH﹀ / CH^)
电源
Toggles between input sources for the Main and
Sub pictures.
Change Aspect Ratio.
Set timer to turn off the Display.
Display menu or exit OSD menu.
Sequentially scrolls between channels.
Power ON/OFF.
ViewSonic N4200w 11
Page 14
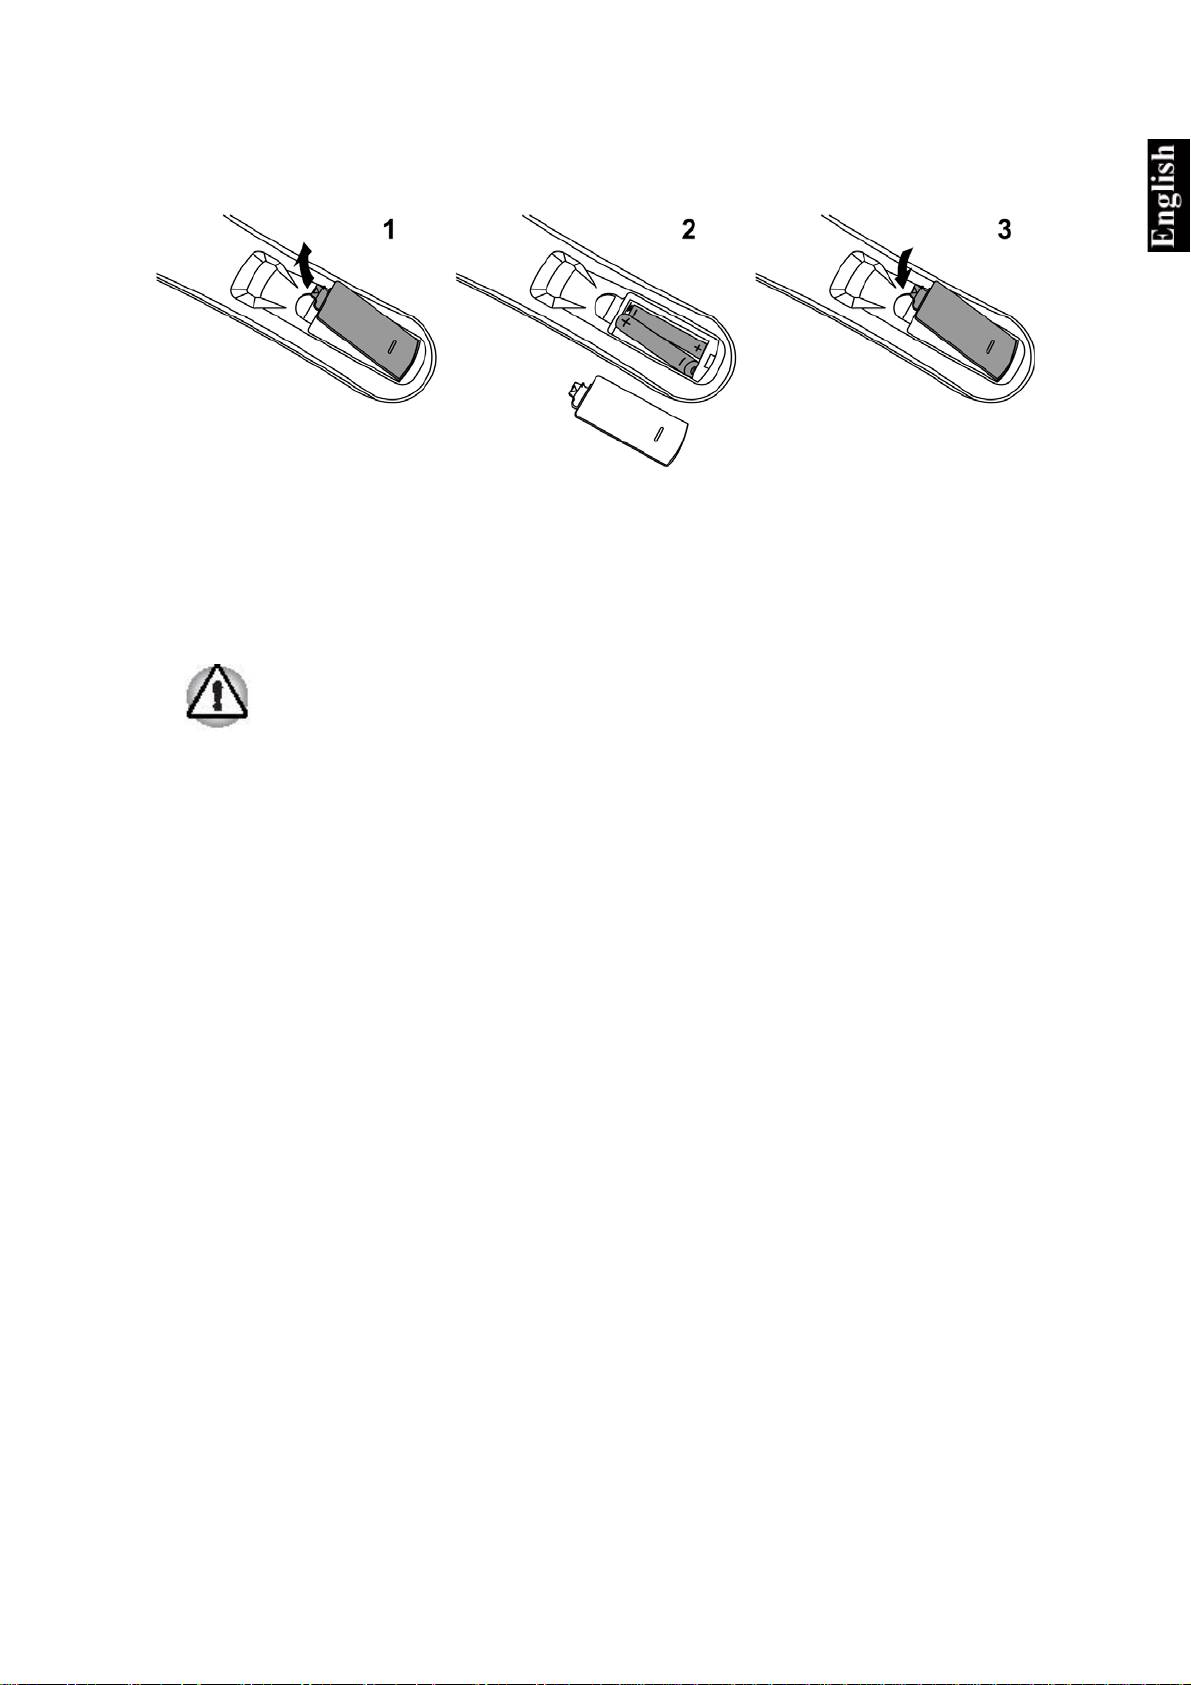
Preparing Your LCD TV
1. Insert Remote Control Batteries
a) Remove the battery cover by pushing the catch in the middle of the remote control and then
lifting the cover.
b) Align the batteries according to the (+) and (-) markings on the battery and those in the
compartment.
c) Replace the battery cover and push down until it clicks into place.
CAUTION
Only use the specified AAA batteries.
Do not mix new and old batteries. This may result in cracking or leakage, which may
pose a risk of fire or lead to personal injury.
Insert batteries according to (+) and (-) markings. Inserting the batteries incorrectly
may result in cracking or leakage, which may pose a risk of fire or lead to personal
injury.
Dispose of the battery in accordance with local laws and regulations.
Keep the batteries away from children and pets.
When the remote control will not be used for extended periods, please remove the
batteries.
ViewSonic N4200w 12
Page 15

p
2. Connecting an External Antenna
Make sure the power is off before installing an external antenna to N4200w.
Connect the TV antenna to the LCD TV terminal or CATV box using only 75-ohm coaxial
cable.
RF Cable or Ada
ter
3. Connecting to Audio Output
To connect an external amplifier, connect the L/R RCA cable from the TV AUDIO OUT port to
the appropriate AUDIO IN port on a compatible amplifier.
Audio in Cable
(Cable not supplied)
ViewSonic N4200w 13
Page 16
4. Connecting to a SPDIF Device
To digitally transfer audio to an external amplifier, PC, or recorder, use a compatible SPDIF
stereo jack to connect to the LCD TV.
SPDIF Cable
(Cable not supplied)
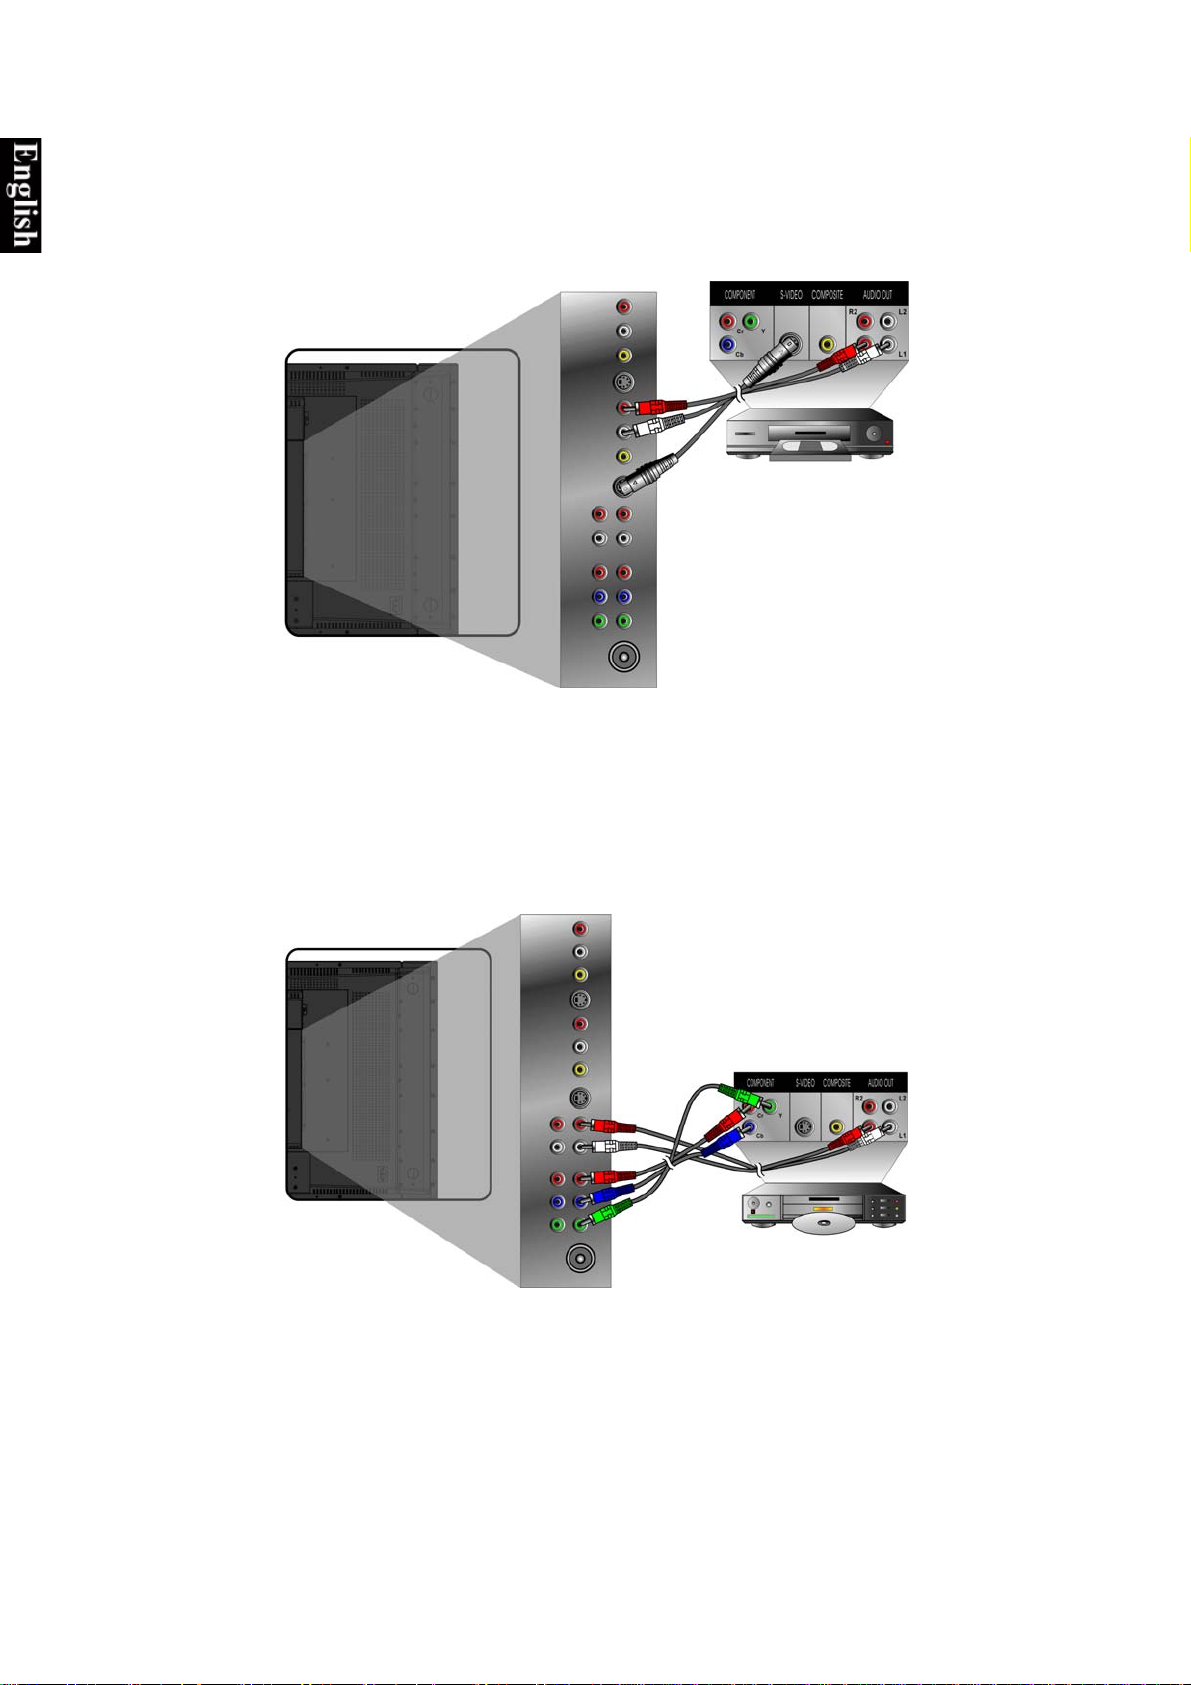
5. Connecting AV, S-Video, YCbCr, YPbPr, HDMI to Video Devices
The following figures show the available connections to the rear-panel of LCD TV, and how to
connect them to the corresponding device. In nearly all cases, the cables are color-coded to
match the terminals on the rear panel.
AV model:
Connect video cable to the output jack on the video source, and the composite input on the LCD
TV. Now connect the audio cables to the left and right audio-out terminals on the video source
to the audio-in terminals.
RCA A/V Cable
(Cable not supplied)
VCR/Cable Receiver
ViewSonic N4200w 14
Page 17
A
A
S-Video model:
Connect video cable to the output jack on the video source, and the S-video input jack on the
LCD TV. Now connect the audio cables to the left and right audio-out terminals on the video
source to the audio-in terminals.
S-Video Cable
(Cable not supplied)
udio in Cable
(Cable not supplied)
VCR
YCbCr / YPbPr model:
Connect video cables to the Y, Pb/Cb, Pr/Cr outputs on the video source, and the Y, Pb/Cb,
Pr/Cr inputs on the LCD TV. Now connect the audio cables to the left and right audio-out
terminals on the video source to the audio-in terminals.
YCbCr / YPbPr Cable
(Cable not supplied)
udio in Cable
(Cable not supplied)
DVD Player or VCR
ViewSonic N4200w 15
Page 18
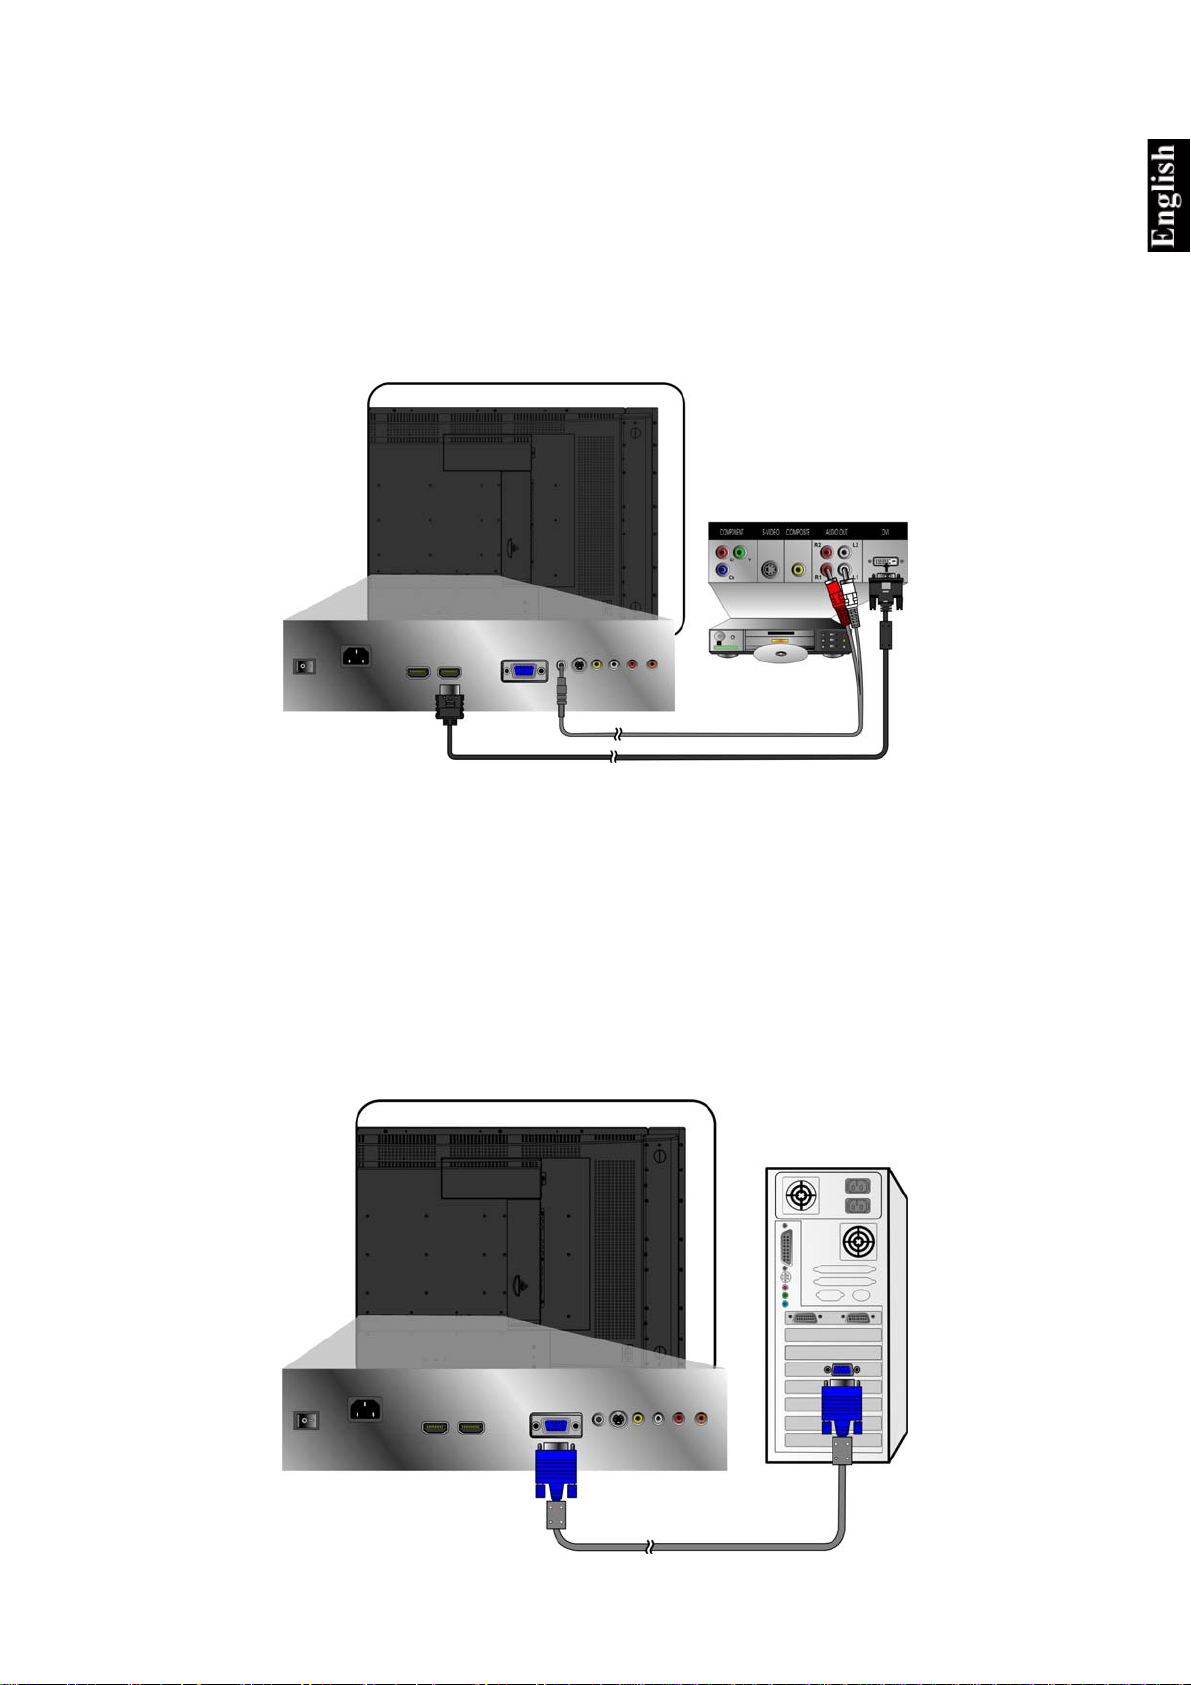
HDMI and HDTV:
LCD TV is compatible with HDTV and HDMI, uncompressed interference free digital
transmission standards. The former requires additional audio cable; in this case connect the
audio outputs on the DVD player to the PC stereo input. The latter, is an all-in-one interface
supporting audio and video in a single cable.
There are two possible HDMI cable connections to your DVD player. Please refer to the
connection that matches your equipment.
DVD Player
(Cable not supplied)
HDMI Cable (Cable not supplied)
Note: To receive audio from a DVD player, locate the OSD Sound Menu and enable HDMI
audio. Ensure the input source is HDMI compatible.
6. Connecting a PC
VGA (15pin D-Sub):
Connect the VGA cable from the PC’s VGA-out to the VGA terminal input of N4200w.
Select PC screen resolution up to1360 x 768 (1280 x 1024 also supported) according to
preference.
PC
ViewSonic N4200w 16
VGA 15 Pin Cable
(Cable not supplied)
Page 19

PC Audio in:
Connect an audio-cable from the audio output (green terminal) of your PC to the audio input
terminal (also green) of N4200w.
PC
PC Audio Cable
(Cable not supplied)
HDMI:
Connect the HDMI cable from DVI output of PC to the HDMI input of N4200w.
PC
HDMI Cable (Cable not supplied)
ViewSonic N4200w 17
Page 20
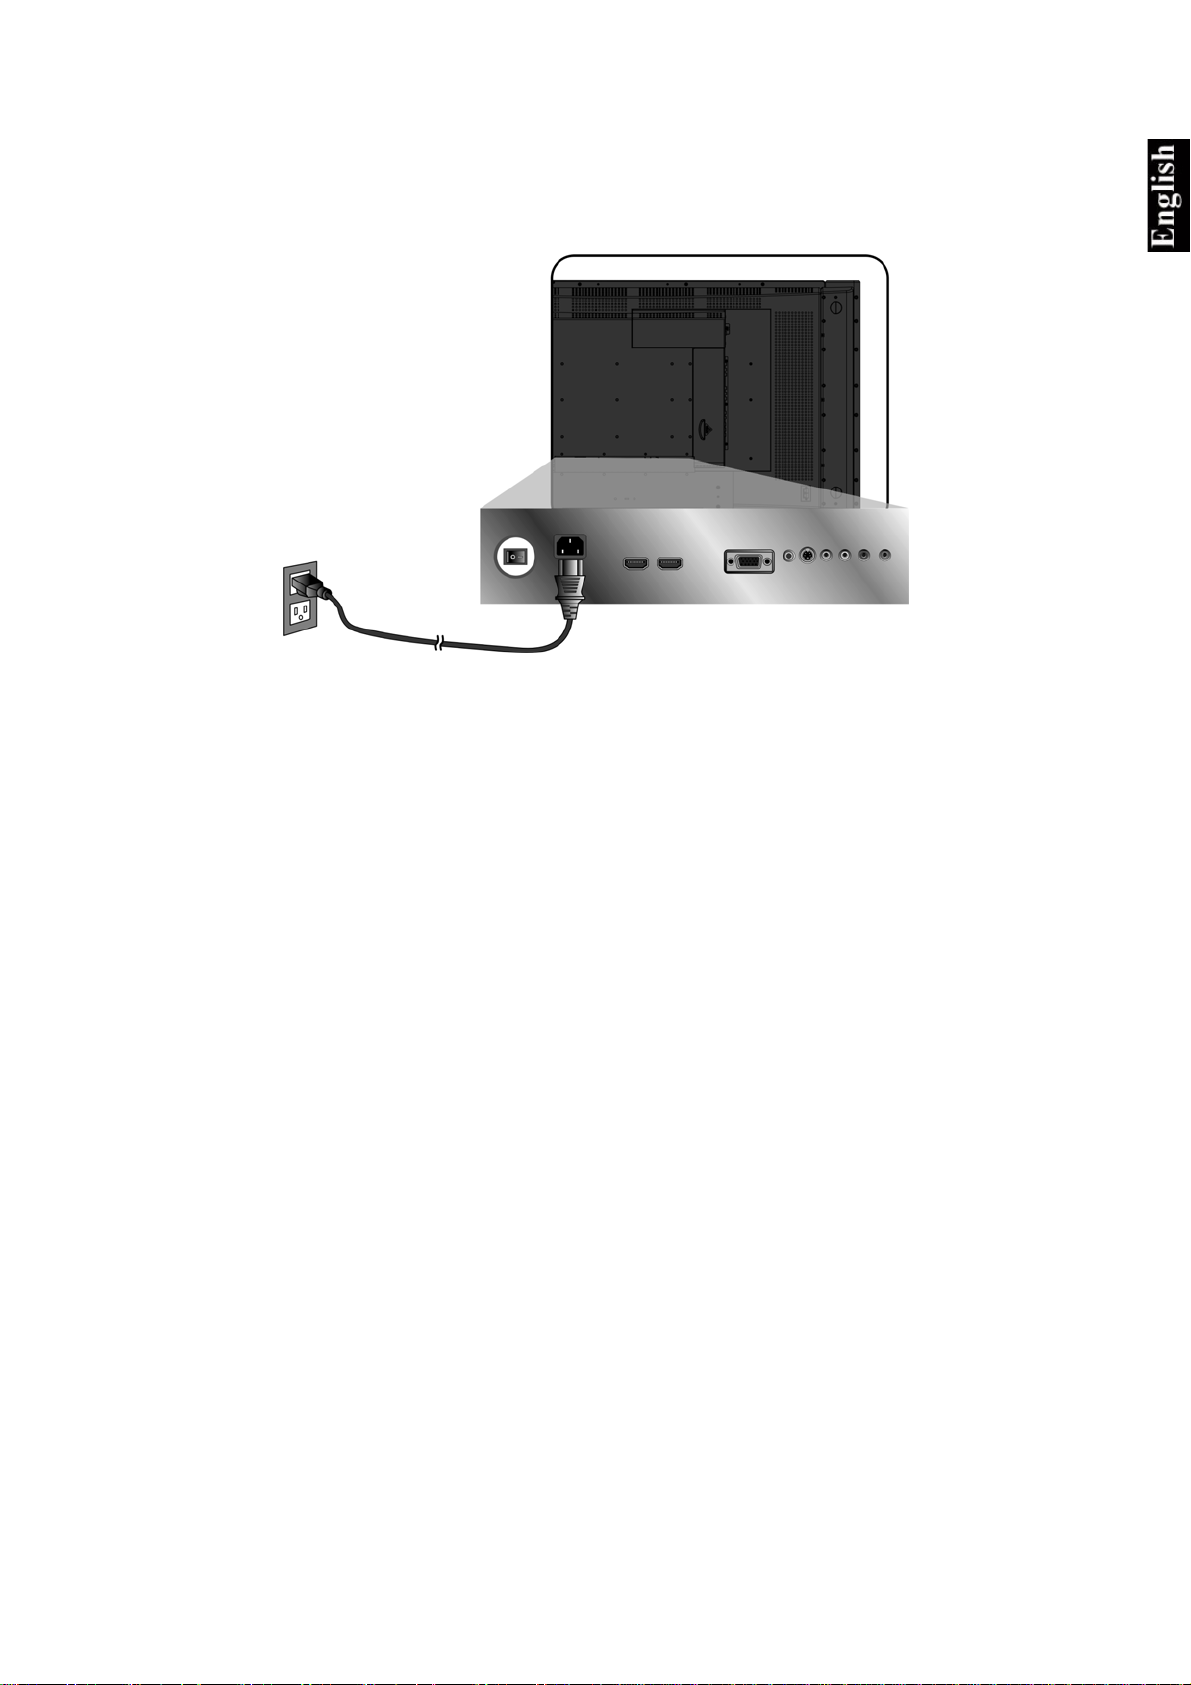
7. Connecting the power cable
Connect the power cable to the N4200w then to a properly grounded AC outlet. Turn on the AC
Switch on the back of N4200w.
AC Switch
Switch to ON
AC wall socket
8. Powering LCD TV
Press the Power button at the bottom of the LCD TV, or press the Power button on the Remote
Control. Now switch on the external video player.
ViewSonic N4200w 18
Page 21
Basic Operation
Basic functions of your LCD TV include setting the input source, changing the channel and
adjusting the volume. There are two methods to access the basic controls of your LCD TV. The
first is via the controls located on the main unit itself (see Front Display and Controls), the
second uses the supplied universal remote control (see Remote Control).
Powering LCD TV
Before using the LCD TV:
1. Insert the supplied AC power adapter as shown in Rear Panel Connections.
2. Ensure all external equipment is properly connected.
3. Turn on the Main AC Power Switch, located at the rear of the unit (if the LCD TV will not
be used for a long period of time, please leave it switched off).
LCD TV is now in standby mode and ready to be switched on.
Standby On/Off
Both the LCD TV unit and the remote control have power buttons. During standby, press either
power button to switch on the LCD TV screen. The power LED is lit when the LCD TV is
switched on.
Press either button a second time to switch off the screen. LCD TV enters standby.
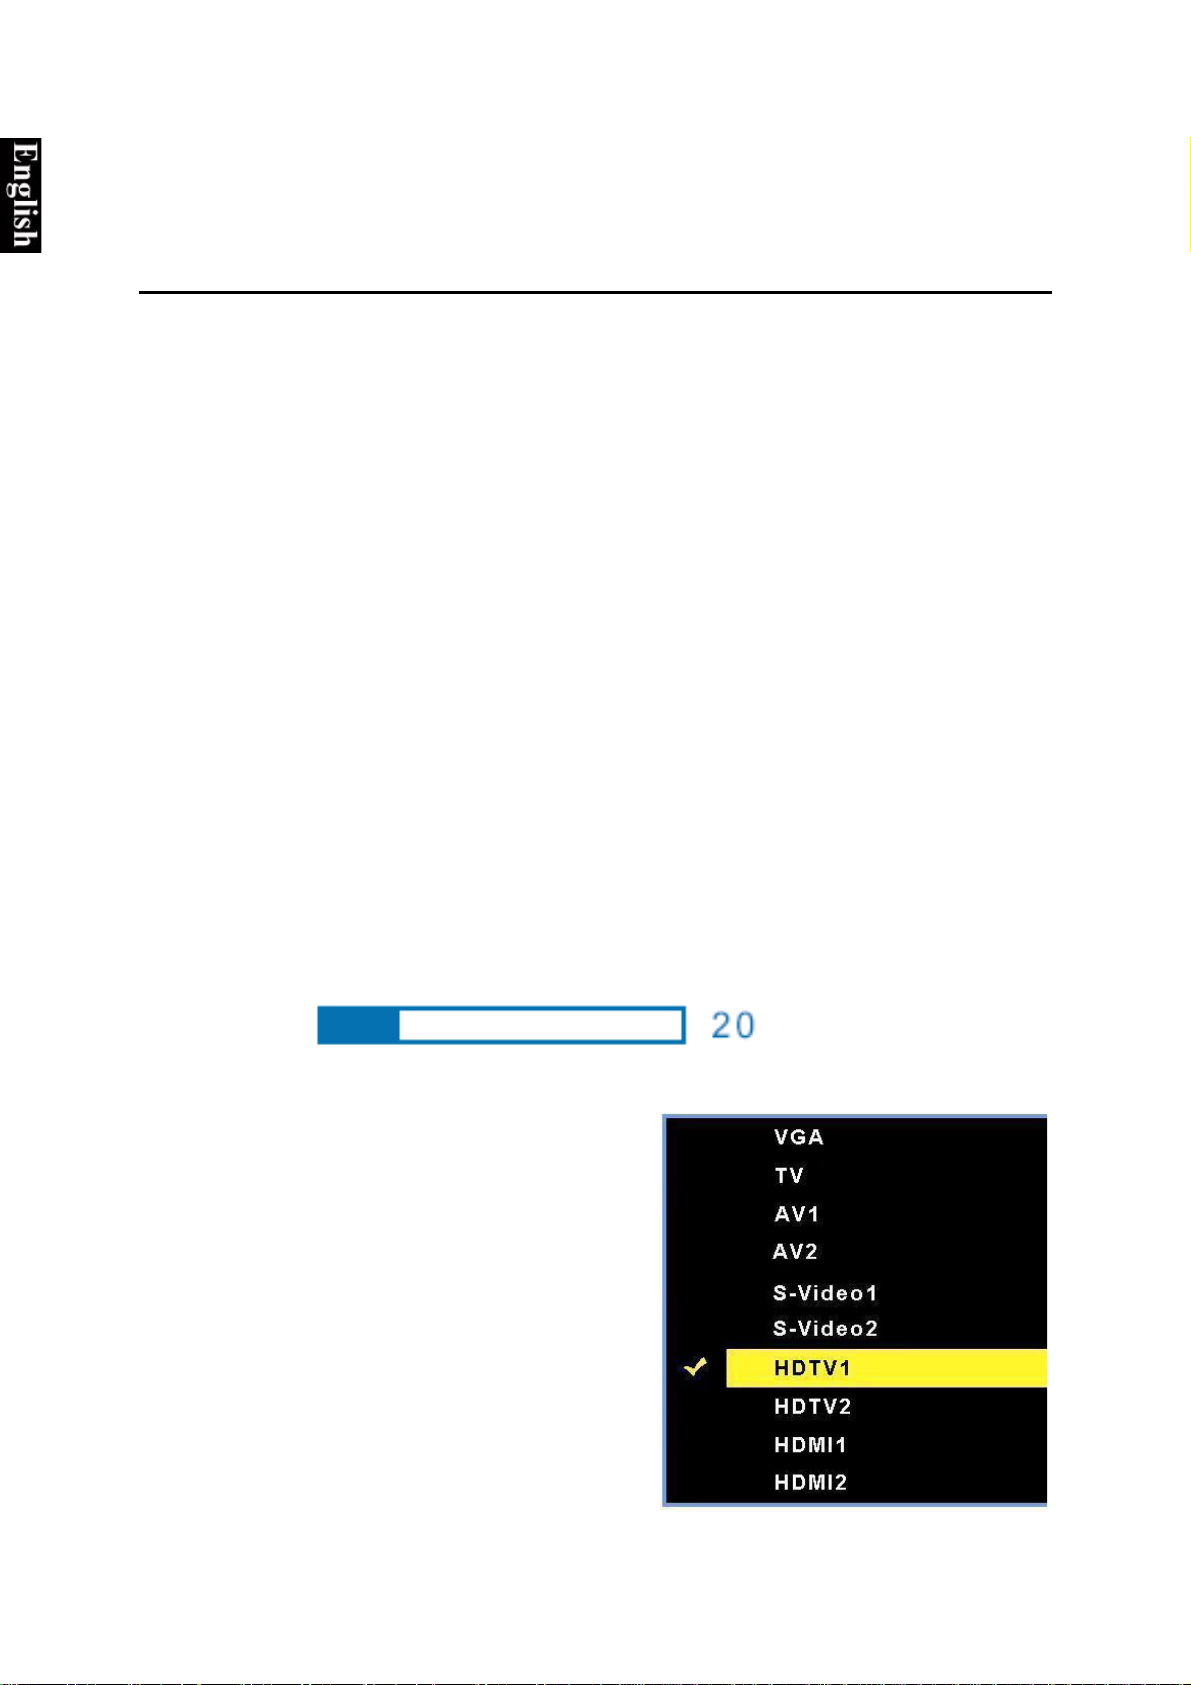
Adjusting the VOLUME
Press VOL-/VOL+ to adjust the volume to the desired level.
To retain the current volume setting but temporarily switch off audio, press MUTE.
To restore the volume, press MUTE again to directly adjust the level. The current volume
setting is displayed as a percentage (1~100) of the total output for reference.
VOLUME:
Selecting the Input Source
To select the required input source, press the
Source button on the remote control and use ▲▼
to scroll through the available input methods. The
Main Source Input OSD menu displays.
To view output from a PC, select VGA. Select TV
for TV output. Select AV1/AV2 for external video
sources. Select S-Video for VCR output. Select
HDTV and HDMI for when connecting directly to
a DVD player or compatible device. To select the
displayed input source, press OK.
ViewSonic N4200w 19
Page 22

On Screen Display Menu System (OSD)
This section describes how to use the OSD menu system and configure the setup screens for use
with the various connections of LCD TV.
OSD Operation
Press the “Menu” button on your remote control or on the control panel of the LCD TV to
display the OSD Main Menu.
Press ▲ or ▼ to highlight sub-menus, and press ◄ or ► to enter that sub-menu.
Press ▲ or ▼ to highlight the function or setting you would like to select, and then press ◄ or
► to adjust the setting or execute the function.
Press the “Menu” button on your remote control or right side of the LCD TV again to close the
OSD Main Menu.
For PC mode, select VGA from the source menu.
The four icons at the top of the OSD Main menu represent the four-submenus (Picture, Adjust,
Audio, and Setup).
For AV mode, select AV1 / AV2, S-Video1 / S-Video2, HDTV1 / HDTV2, or HDMI1 /
HDMI2 from the source menu.
The four icons at the top of the OSD Main menu represent the four-submenus (Picture, Audio,
Setup, and Parental)
For TV mode, select TV from the source menu.
The four icons at the top of the OSD Main menu represent the four sub-menus (Picture, Audio,
Setup, and TV).
ViewSonic N4200w 20
Page 23
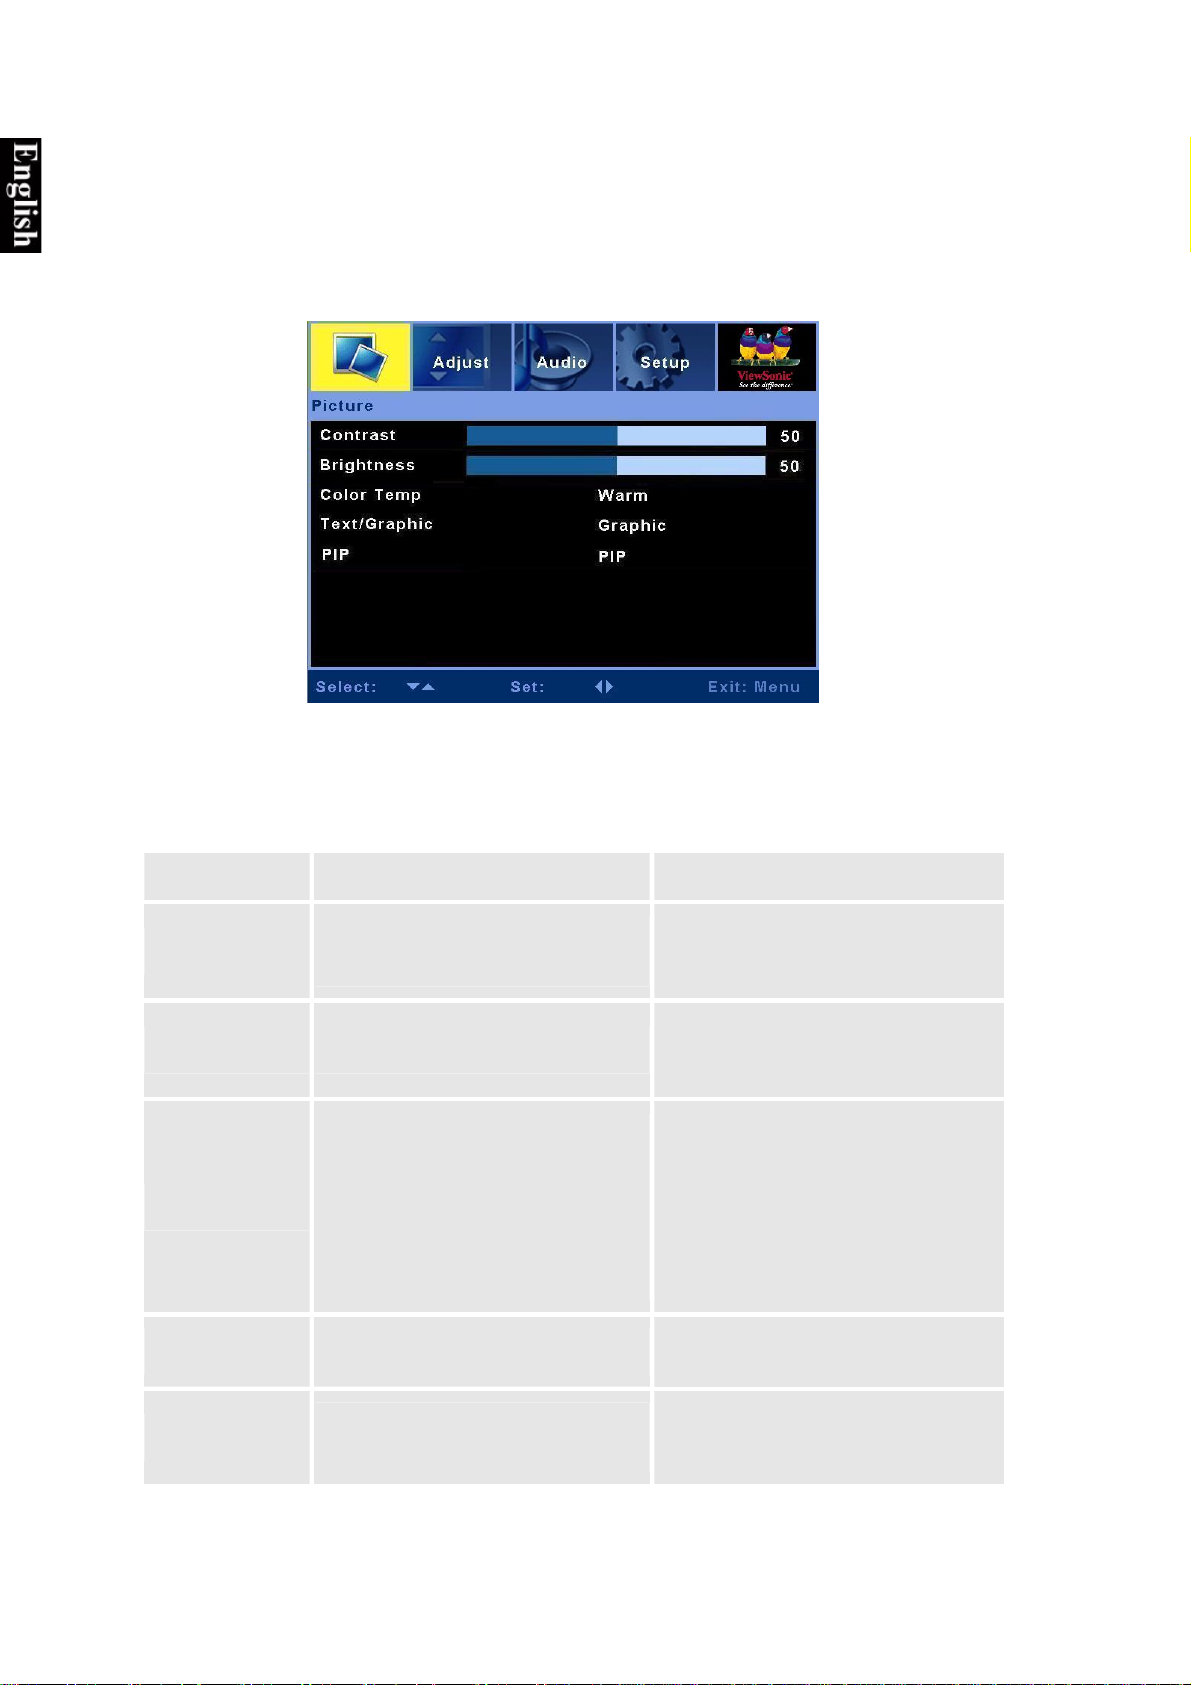
OSD Configuration Screens
The following screens describe the OSD menu screens to configure the LCD TV for optimal
use with each connection type.
PC Mode:
Picture Menu
Use this screen to configure the color balance, toggle between text and graphic display, and
enable/disable the multi-picture display function.
Item Description Operation
► Increases the contrast.
◄ Decreases the contrast.
► Brightens the display.
◄ Darkens the display.
► or ◄ Cycles between color
schemes.
When user is selected:
► Increases that color’s intensity.
◄ Decreases that color’s intensity.
Contrast
Brightness
Color Temp
Adjust the difference between dark
and light colors.
Adjust the brightness level.
There are three preset color profiles
available, STD, Warm, Cold and
one User adjustable profile.
When User is selected, you can
adjust Red, Green, and Blue color
intensities manually.
Text/Graphic
PIP
Select Graphic or Text.
Select single or Multi-picture
functions.
ViewSonic N4200w 21
► or ◄ Toggles between the picture
display and text.
► or ◄ Select OFF, PBP, or PIP.
(HDMI input is not supported in sub
picture).
Page 24
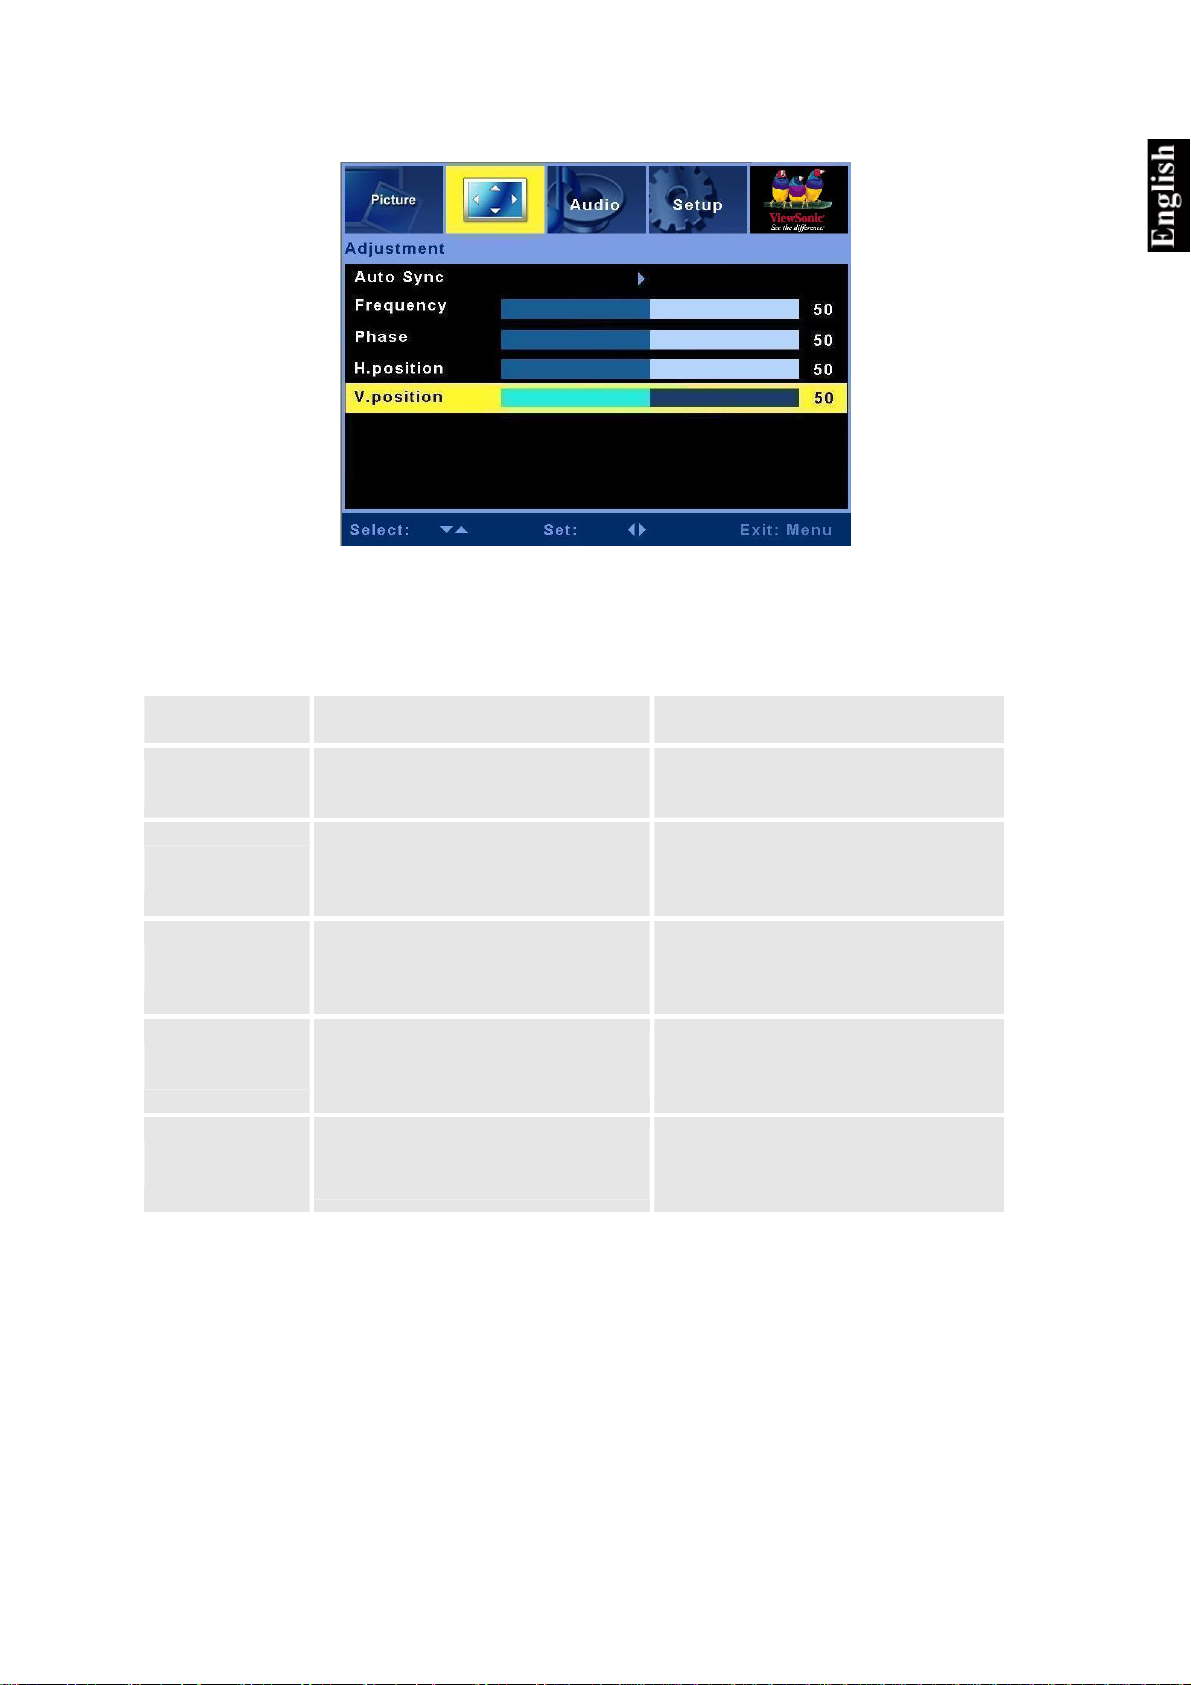
Adjust Menu
You are most likely to need the adjust menu when configuring the LCD TV for use with PC or
S-Video input.
Auto Sync
Frequency
H. Position
V. Position
Item Description Operation
Phase
This function automatically selects the
best settings for the current input.
Adjust the delay time between
horizontal synchronous signal and
video.
Adjust the hue or tint if the color is out
of phase. The best way to do this is to
use human skin as a color reference.
Adjust the horizontal position of the
main and sub picture in PIP.
Adjust the vertical position of the main
and sub picture in PIP.
► Starts Auto Sync.
► Increases the frequency.
◄ Decreases the frequency.
► Increases the phase difference.
◄ Decreases the phase difference.
► Moves the display to the right.
◄ Moves the display to the left.
► Moves the display upward.
◄ Moves the display downward.
ViewSonic N4200w 22
Page 25
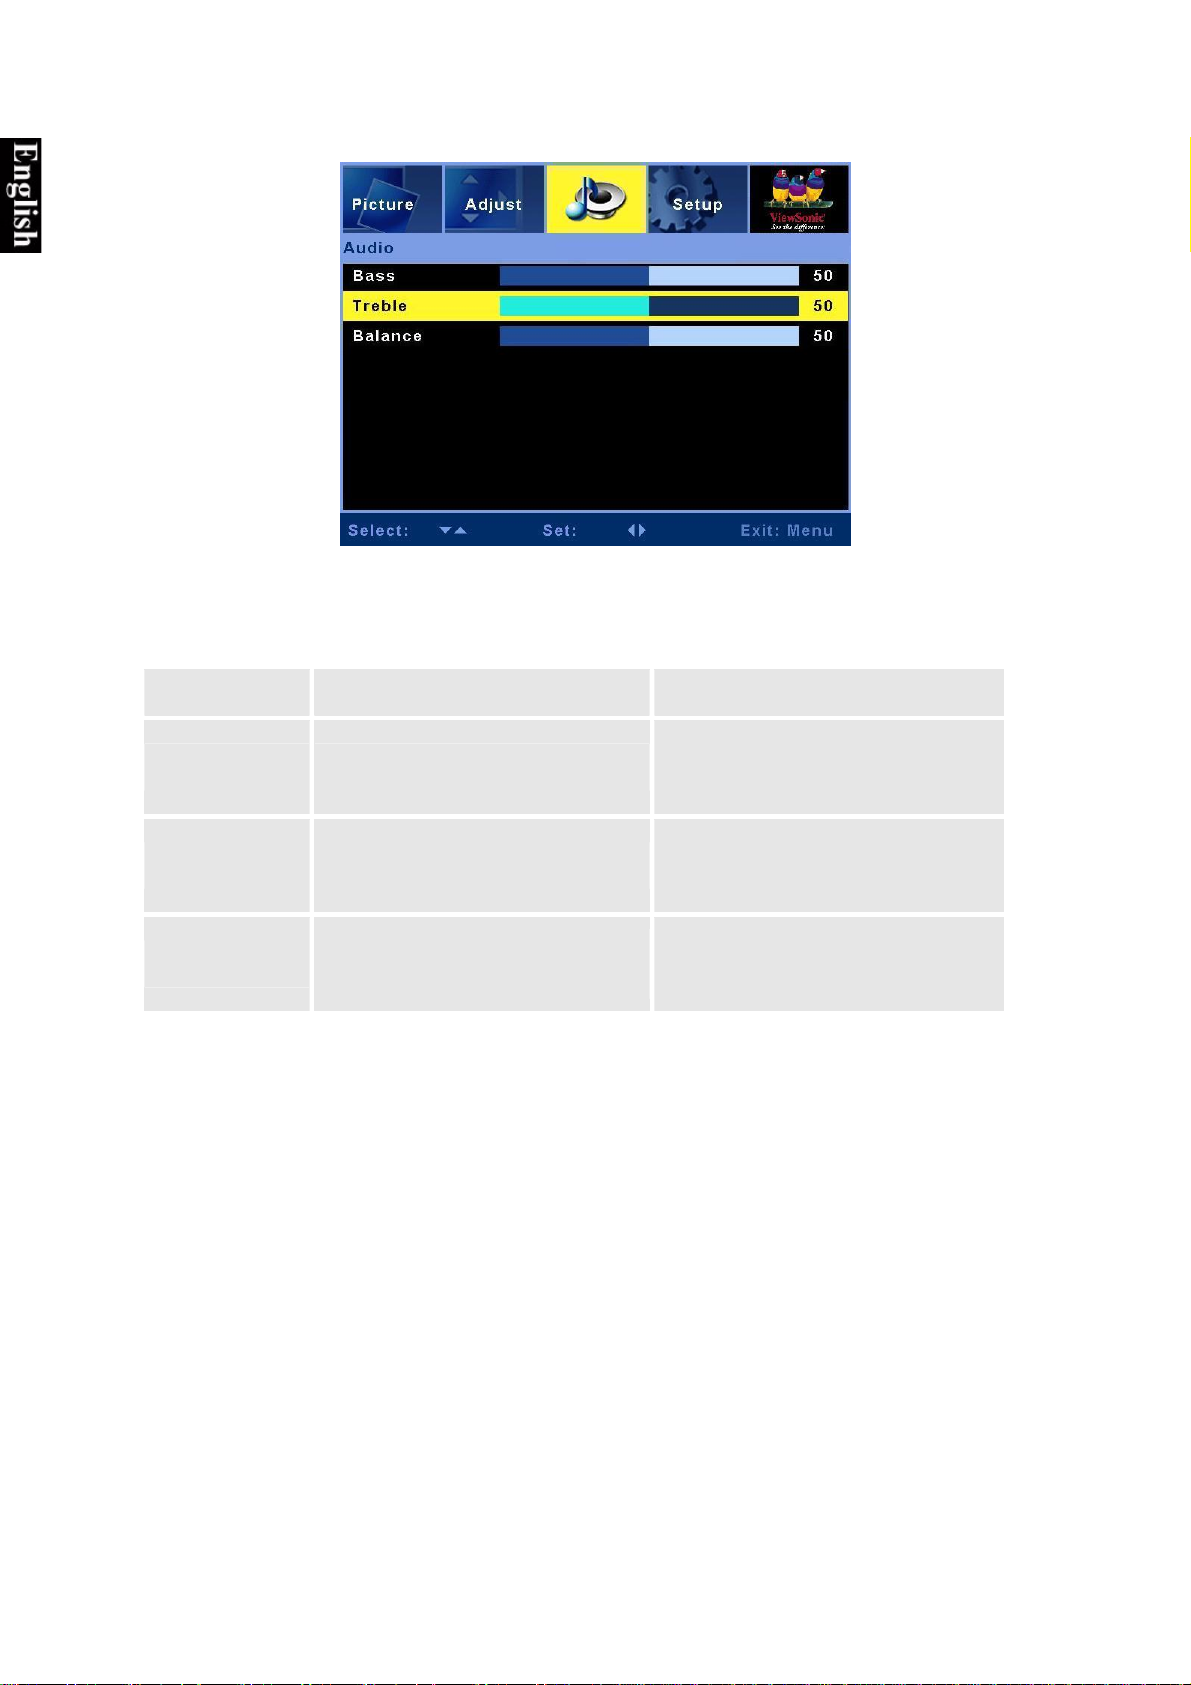
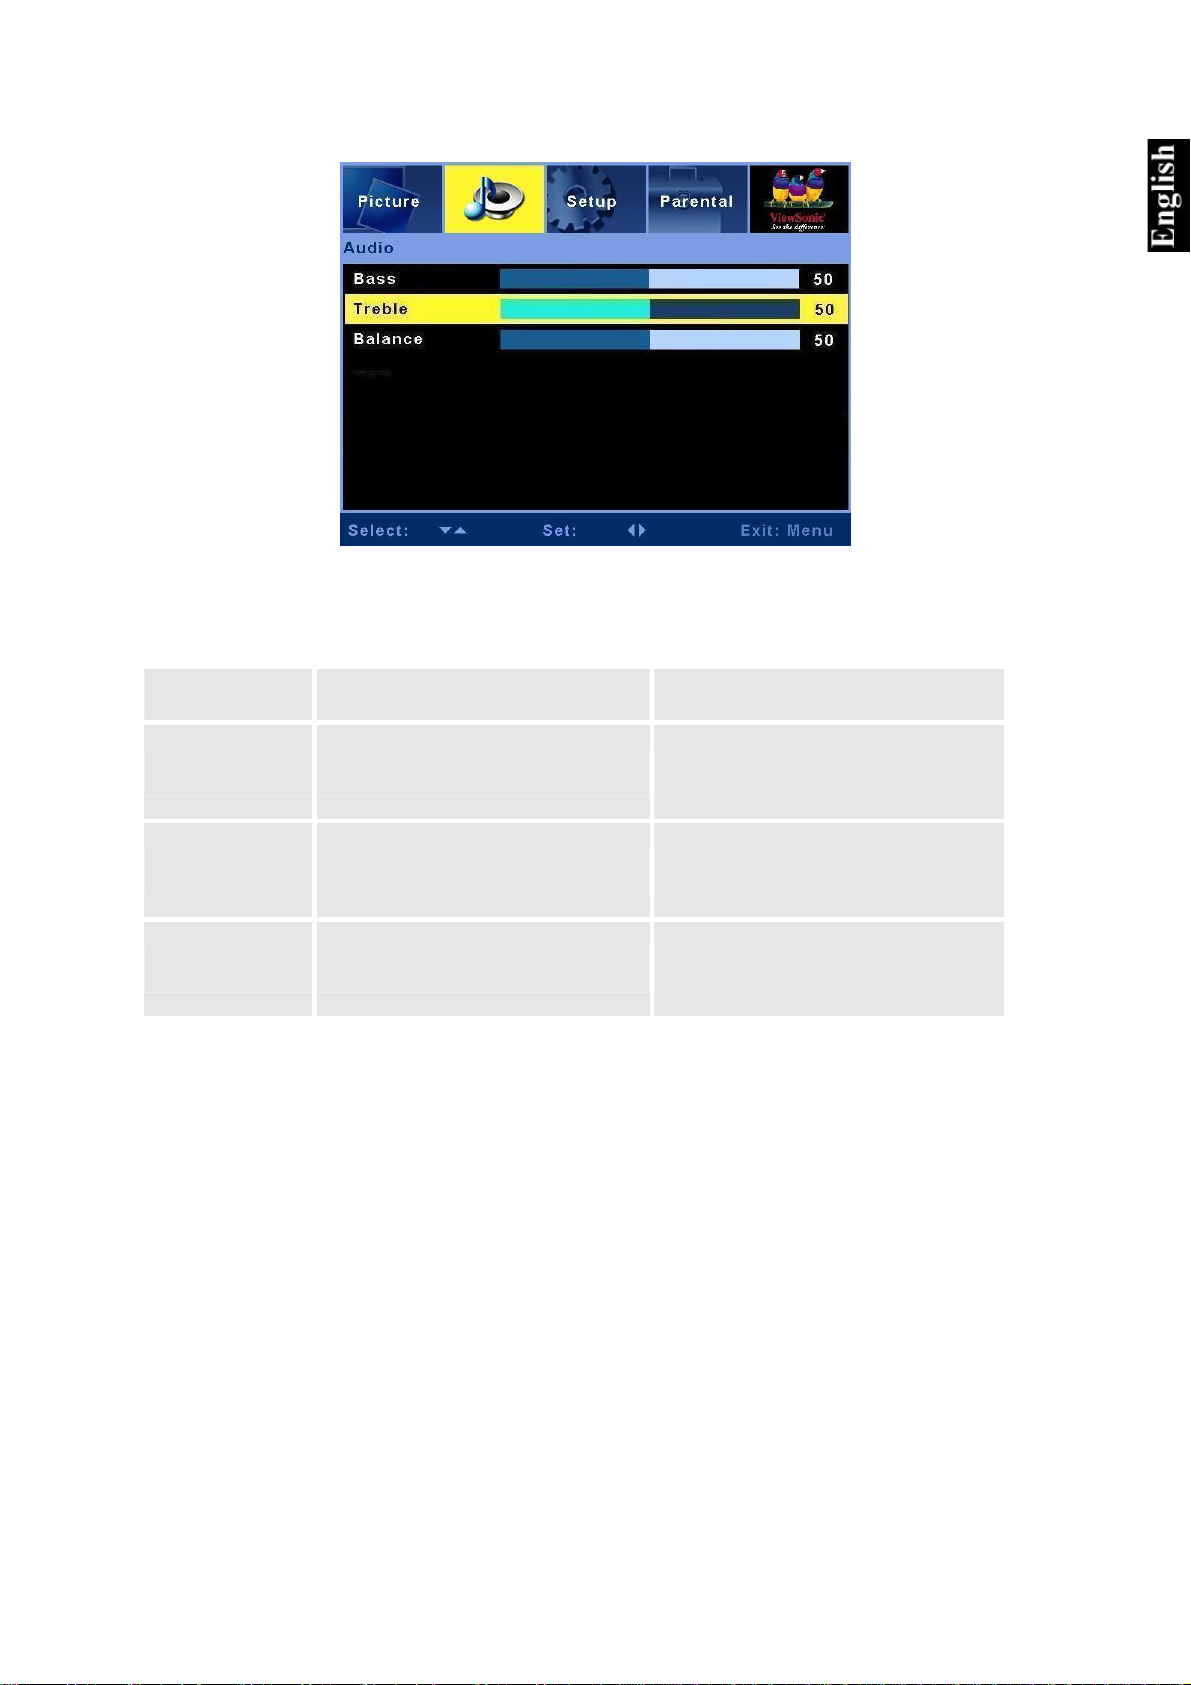
Audio Menu
Configure the fields in this menu to setup LCD TV audio for use with PC audio input.
Item Description Operation
► Increases the low-frequency sound.
Bass
Treble
Balance
Adjust the bass.
Adjust the treble.
Adjust the left and right audio
balance.
◄ Decreases the low-frequency sound.
► Increases the high-frequency sound.
◄ Decreases the high-frequency sound.
► Emphasizes the right speaker.
◄ Emphasizes the left speaker.
ViewSonic N4200w 23
Page 26
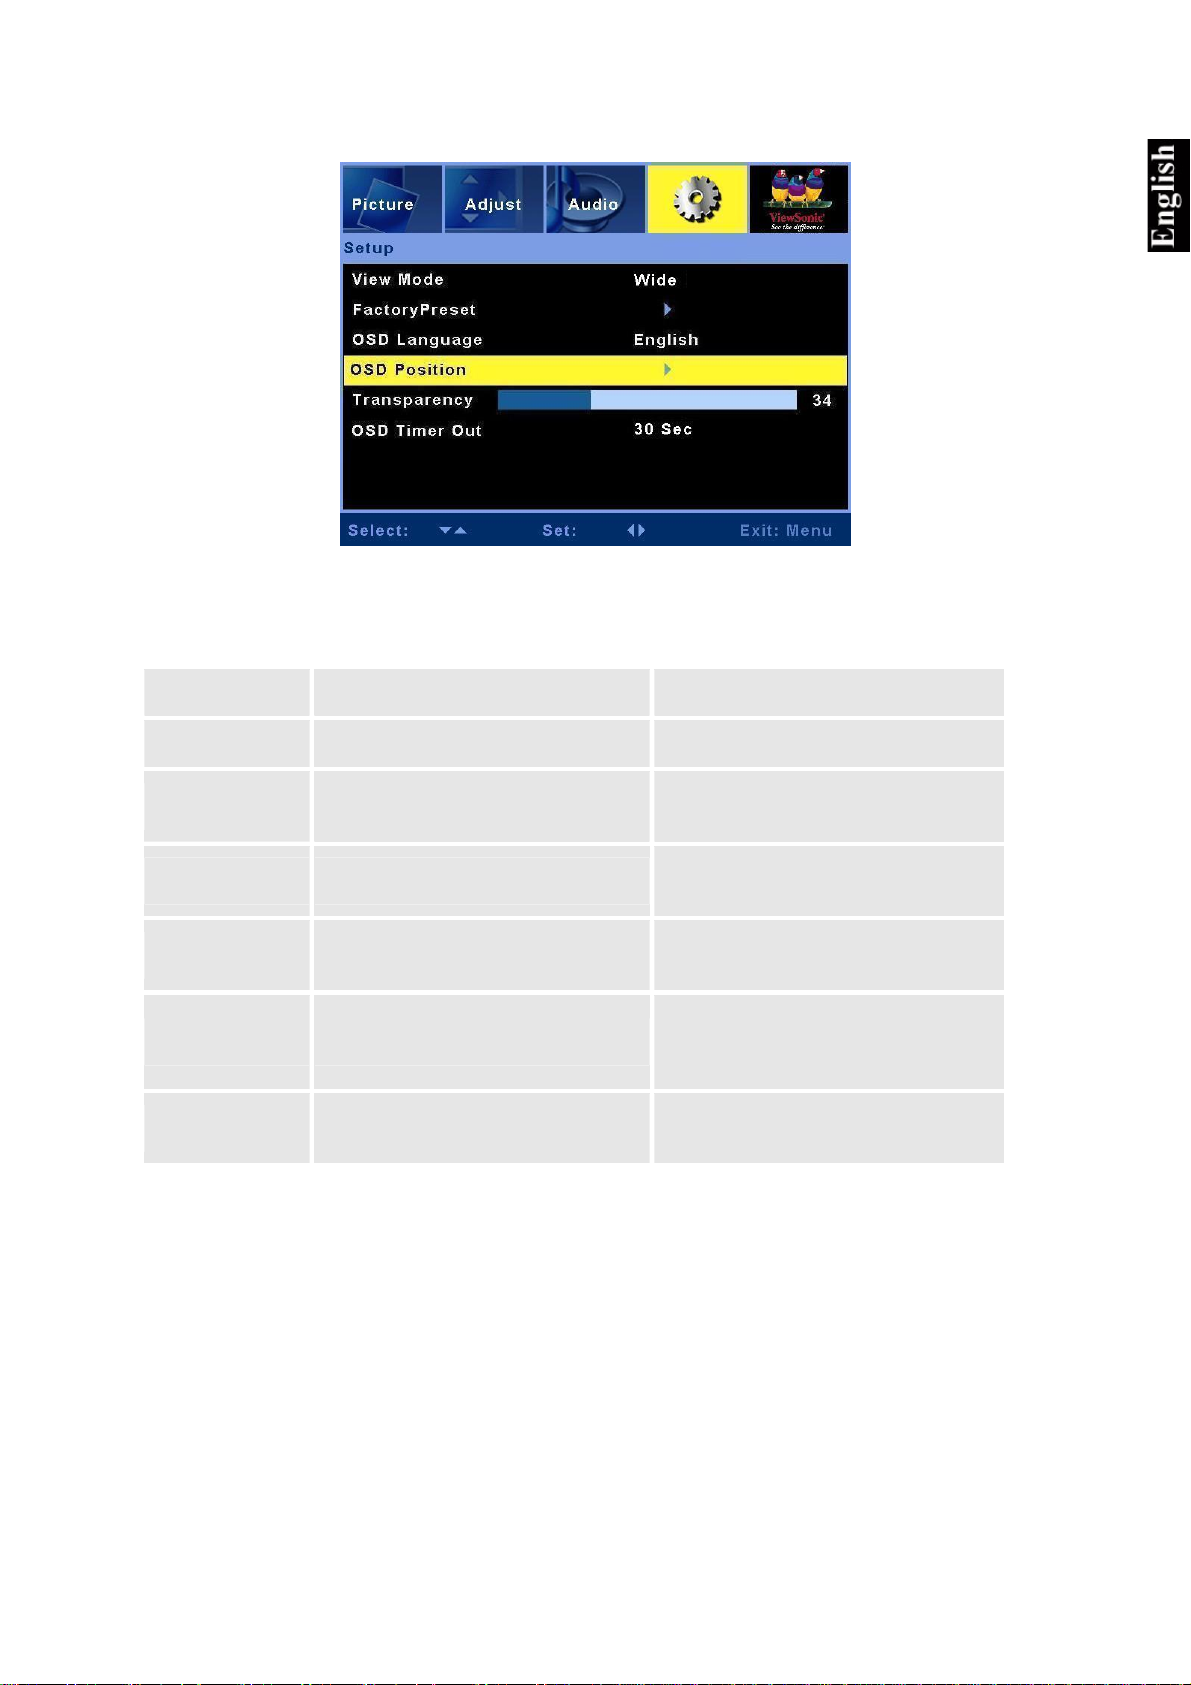
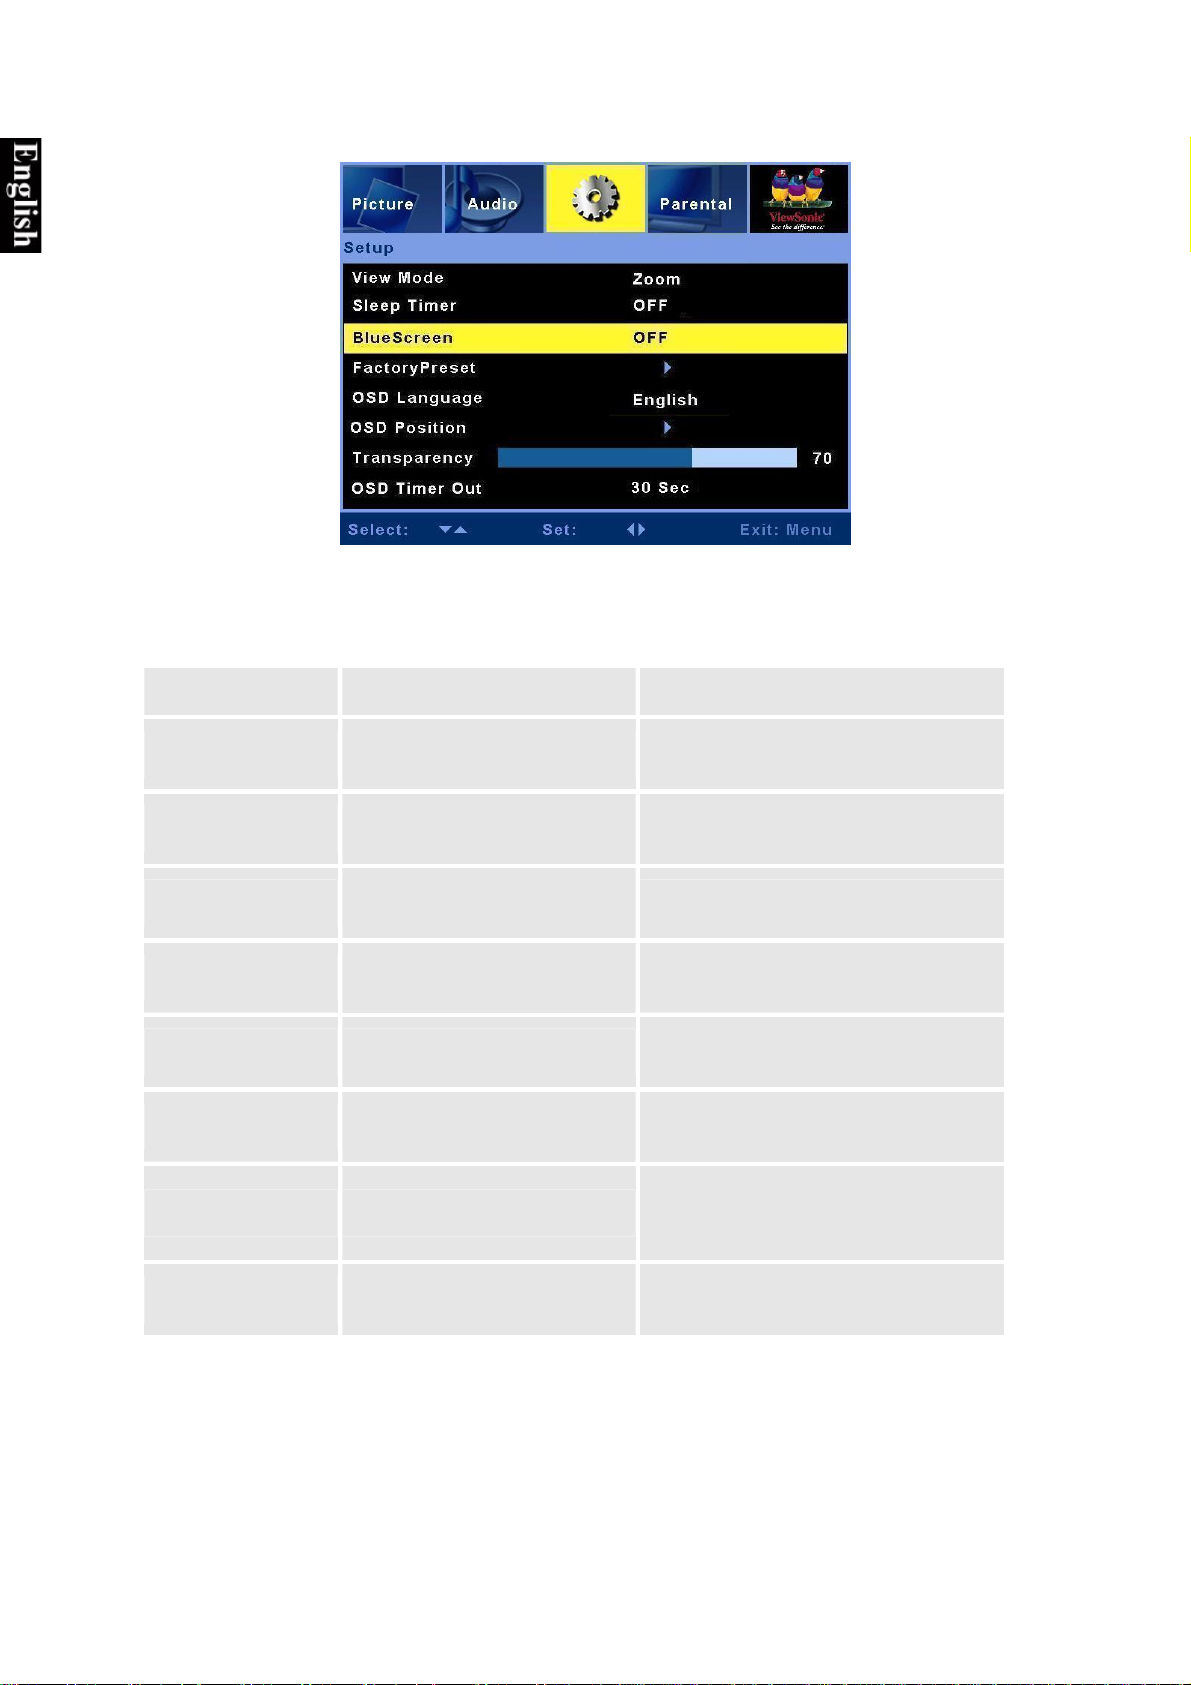
Setup Menu
Use this screen to configure the OSD menu and adjust the picture display ratio.
Item Description Operation
View Mode
Factory Preset
OSD Language
OSD Position
Transparency
OSD Timer Out
To adjust the picture aspect ratio. ► or ◄ Select Wide or Normal.
To recover the original settings or factory
default settings.
To select the OSD language.
To select the OSD position on the
Display.
Adjust OSD transparency level.
A timer to automatically switch off the
OSD display.
► Returns setup to factory default
settings.
► or ◄ Cycles between the available
languages for the OSD menu.
► or ◄ Cycles between five different
OSD positions on the Display.
► Increases the transparency.
◄ Decreases the transparency.
► or ◄ Select 10 SEC, 20 SEC, 30
SEC.
ViewSonic N4200w 24
Page 27

AV mode:
Picture Menu
Configure the fields in this screen to set the color scheme, improve the display quality and
enable the Picture In Picture function.
Brightness
Sharpness
Item Description Operation
► Increases the contrast.
Contrast
Color
Tint
Adjust the contrast level.
◄ Decreases the contrast.
► Brightens the display.
Adjust the brightness level.
◄ Darkens the display.
► Increases the color saturation.
Adjust the color saturation.
◄ Decreases the color saturation.
► Increases the hue.
Adjust the hue.
◄ Decreases the hue.
► Sharpens the display.
Adjust the picture sharpness.
◄ Softens the display.
Flesh Tone
Color Temp
PIP
Automatically adjust the image color.
Preset color schemes available are STD,
Warm and Cold.
Select single or Multi-picture functions.
ViewSonic N4200w 25
► or ◄ Enables/Disables flesh tone
adjustment.
► or ◄ Cycles the preset color schemes.
► or ◄ Select OFF, PBP, or PIP. (HDMI
input is not supported in sub picture)
Page 28
Audio Menu
Configure the fields in this screen to setup LCD TV audio output for use with AV-input.
Item Description Operation
► Increases the low-frequency sound.
Bass
Treble
Balance
Adjust the bass.
◄ Decreases low-frequency sound.
► Increases higher-pitched sound.
Adjust the treble.
◄ Decreases higher-pitched sound.
► Emphasizes the right speaker.
Adjust the left and right audio balance.
◄ Emphasizes the left speaker.
ViewSonic N4200w 26
Page 29
Setup Menu
Use this screen to configure the OSD menu display and set the sleep timer for LCD TV.
Item Description Operation
View Mode
Sleep Timer
Blue Screen
Factory Preset
OSD Language
OSD Position
Transparency
To adjust the picture aspect ratio.
A timer to automatically switch
off the LCD TV.
Displays a blue background when
there is no video input.
To return the LCD TV to Setup
defaults.
To select the OSD language.
To select the OSD position on the
Display.
Adjust OSD transparency level.
► or ◄ Select Single Window / Smart /
16:9 / Zoom / Wide / 4:3.
► or ◄ Select 30 MIN, 60 MIN, 90MIN,
120 MIN, 180 MIN, 210 MIN, 240 MIN.
► or ◄ Turns this function ON or OFF.
► Returns Setup back to factory settings.
► or ◄ Cycles between the available
languages for the OSD menu.
► or ◄ Cycles between five OSD
positions on the Display.
► Increases the transparency
◄ Decreases the transparency.
OSD Timer Out
A timer to automatically switch
off the OSD menu.
ViewSonic N4200w 27
► or ◄ Select 10 SEC, 20 SEC, 30 SEC.
Page 30
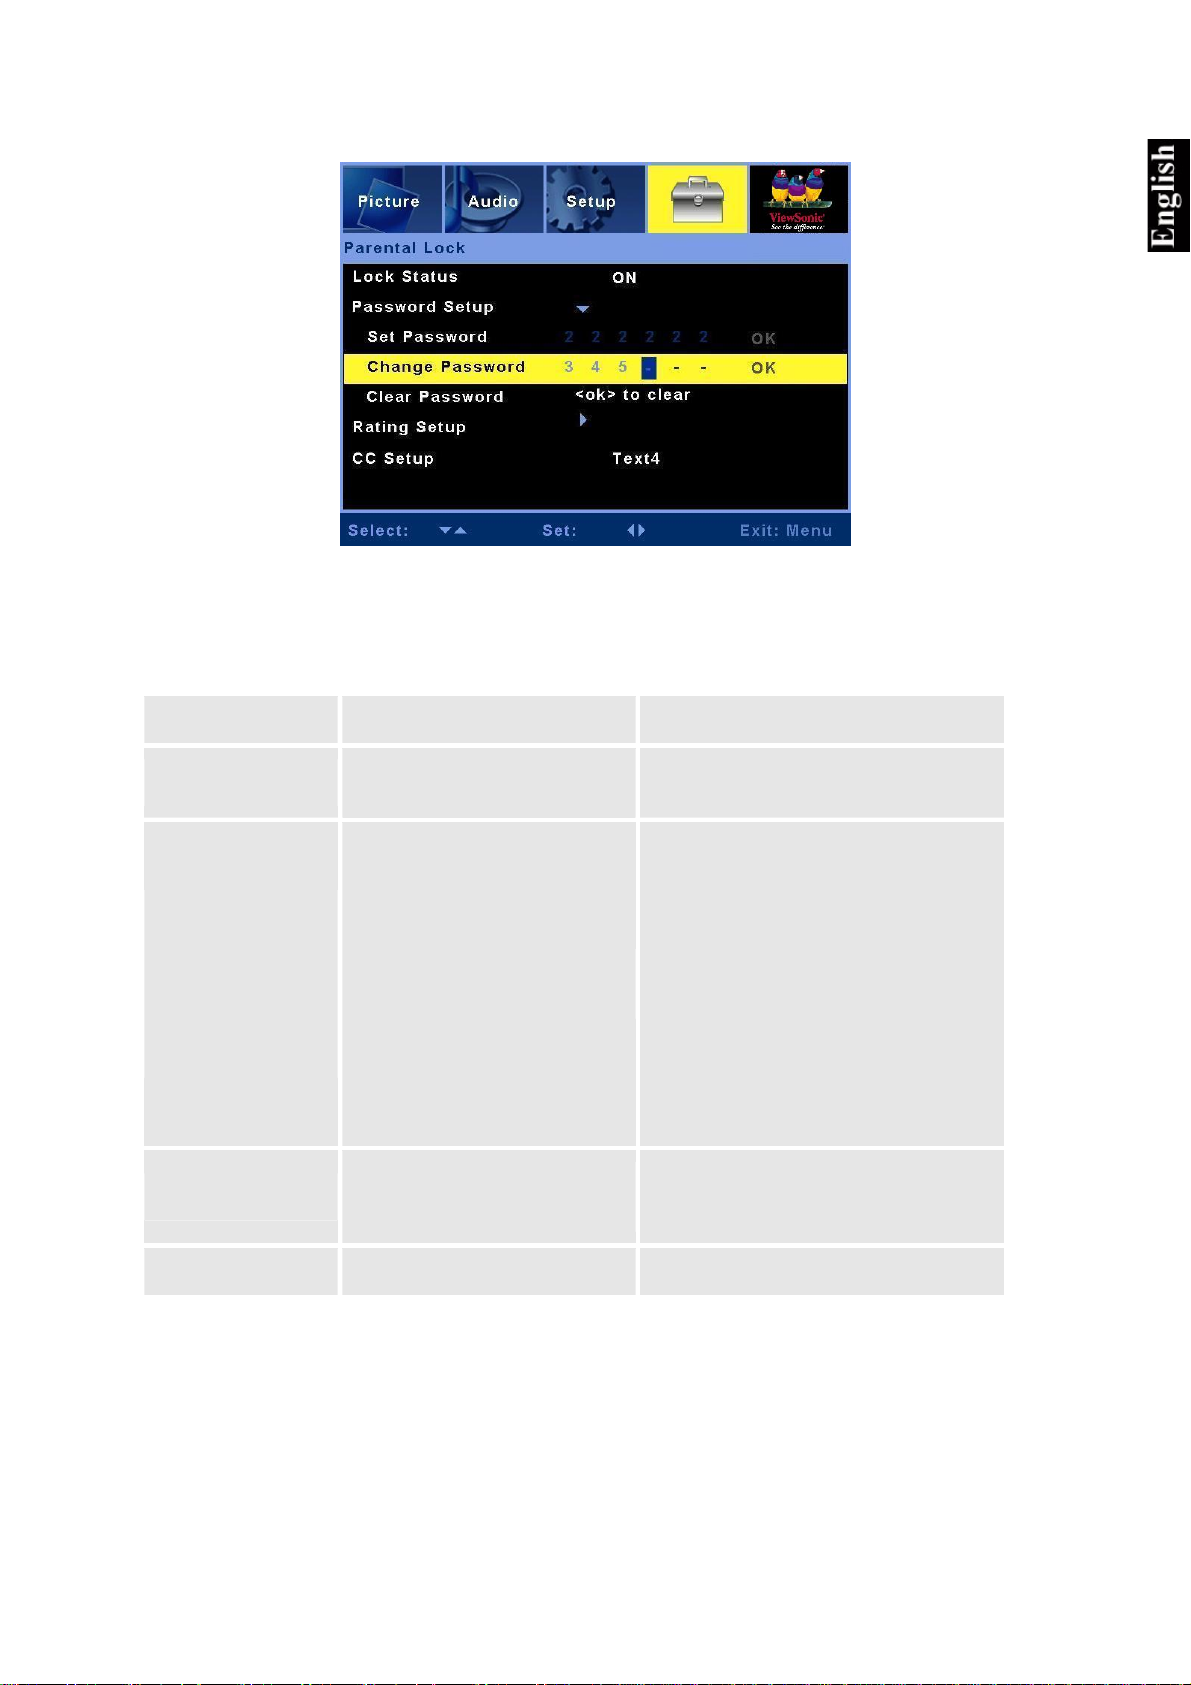
Parental Lock
Configure these settings to prevent children from viewing unsuitable material and enable on
screen subtitles (closed captions).
Item Description Operation
Lock Status
Password Setup
Set Password
Change Password
Clear Password
Rating Setup
Enables or disables the Parental
Lock.
Setup the Parental Lock
password.
Setup the film rating
classification
► or ◄ to select on or off.
Press ► to select the desired password.
Note:
1. There is no default password for the
Parental Lock function; the user has to
setup a password when using the
function for the first time.
2. Please remember the password and
keep it safely.
3. If the password is forgotten or missing,
please use the remote control to enter
“034917” to clean the old password
and reset a new one.
Press ► to select the classification you
want and then press OK to save your
settings.
CC Setup
To enable Closed Captions. ► or ◄ to select Text1~4, CC1~4, or OFF.
ViewSonic N4200w 28
Page 31

TV mode:
Picture Menu
Configure the settings in this menu to set the color scheme, improve the display quality and
enable the Picture In Picture (PIP) function.
Brightness
Sharpness
Item Description Operation
► Increases the contrast.
Contrast
Color
Tint
Adjust the contrast level.
◄ Decreases the contrast.
► Brightens the display.
Adjust the brightness level.
◄ Darkens the display.
► Increases the color saturation.
Adjust the color saturation.
◄ Decreases the color saturation.
► Increases the hue.
Adjust the hues.
◄ Decreases the hue.
► Sharpens the display.
Adjust the picture sharpness.
◄ Softens the display.
Flesh Tone
Color Temp
PIP
Automatically adjust the image
color.
Preset color schemes available are
STD, Warm and Cold
Select single or Multi-picture
functions.
ViewSonic N4200w 29
► or ◄ Enable/disable flesh tone
adjustment.
► or ◄ Cycles the preset color schemes.
► or ◄ Select OFF, PBP, or PIP. (HDMI
input is not supported in sub picture)
Page 32

Audio Menu
Configure the settings in this menu to setup LCD TV audio output for TV-input.
Item Description Operation
► Increases the low-frequency sound.
Bass
Treble
Balance
Adjust the bass.
Adjust the treble.
Adjust the left and right audio
balance.
◄ Decreases low-frequency sound.
► Increases higher-pitched sound.
◄ Decreases higher-pitched sound.
► Emphasizes the right speaker.
◄ Emphasizes the left speaker.
ViewSonic N4200w 30
Page 33

Setup Menu
Use this menu to configure the OSD menu display and set the sleep timer for LCD TV.
Item Description Operation
View Mode
Sleep Timer
Blue Screen
Factory Preset
OSD Language
OSD Position
Transparency
To adjust the picture aspect ratio.
Automatically switch off the
LCD TV.
Displays a blue background when
there is no video input.
To return the LCD TV to default
settings.
To select the OSD language.
To select the OSD position on the
Display.
Adjust OSD’s transparency level.
► or ◄ Select Smart / 4:3 / 16:9 / Zoom
/ Wide.
► or ◄ Select 30 MIN, 60 MIN,
90MIN, 120 MIN, 150 MIN or OFF.
► or ◄ Turns this function ON or OFF.
► Returns setup back to factory settings.
► or ◄ Cycles between the available
languages for the OSD menu.
► or ◄ Cycles between five different
OSD positions on the Display.
► Increases the transparency.
◄ Decreases the transparency.
OSD Timer Out
A timer to automatically switch
off the OSD menu.
ViewSonic N4200w 31
► or ◄ Select 10 SEC, 20 SEC, 30
SEC, or OFF.
Page 34

TV Menu
Use this screen to configure the OSD menu display and set the sleep timer for LCD TV.
Item Description Operation
Auto Scan
Manual Scan
Channel
Skip
Finetune
Standard
Audio Mode
Select this option to begin auto
scan.
Select this option to begin manual
scan.
Channel indicator. Indicates the present channel.
Skip on and Skip off.
Adjust the TV frequency.
Adjust searching signals.
Indicates the present sound effect.
The TV will search for all available channels
and add them to the channel list.
The TV will search for all available
channels, and you have to add them to the
channel list manually.
If a channel is set to Skip on, which means this
channel will be skipped when selecting a channel
with CH buttons.
To cancel this setup, select Skip off.
Allows adjusting the frequency for the
channel until the picture is clear.
► or ◄ Selects PAL D/K, PAL B/G, or
PAL I.
► or ◄ Select Stereo, CH A, CH B, or
Mono.
ViewSonic N4200w 32
Page 35

Additional Information
Specifications
LCD Type 42.02 inch viewable screen
Color Filter 0.681mm (H) x 0.227 (V) mm pixel pitch
Glass surface RGB vertical stripe
Anti-Glare
Input signal RGB RGB analog (0.7/1.0 Vp-p, 75 ohms)
Separate Sync,
fh:30-80 kHz, fv:50-75 Hz
RF IEC-Type x 1
Video (Input) D-sub x 1,HDMI x 2, YPbPr/YCbCr x 2, CVBS x 2, S-
Video x 2
Video (Output) CVBS x 1, S-Video x 1
Audio (Input) Mini-stereo (Φ3.5mm x 1 ), RCA (L/R) x 4
Audio (Output) RCA (L/R) x 1, SPDIF x 1
Compatibility PC Up to 1360 x 768 Non-interlaced
Resolution 1360 x 768 @ 60 Hz
Speaker Output 10W x 2
Power Voltage 90-240 VAC, 50/60 Hz
Display area Full Scan 930.25mm (H) x 523.01 mm (V)
36.62 inch (H) x 20.59 inch (V)
Operating Temperature 32° F to + 104° F (0° C to + 40° C)
Conditions Humidity 20% to 85% (no condensation)
Altitude To 10,000 feet (3,000m)
Storage Temperature -4° F to + 140° F (-20° C to + 60° C)
Conditions Humidity 20% to 95% (no condensation)
Altitude To 40,000 feet (12,000m)
Dimensions Physical 1243mm (W) x 739mm (H) x 304mm (D)
48.93 inch (W) x 29.09 inch (H) x 11.96 inch (D)
Weight Net 33kg (72.68 lb.)
Regulations CCC, HDMI logo, HD Ready
Power saving On <240 W LED Green
Modes Passive Off <3 W LED Red
Pre-test Timing Mode (Pre-adjusted to GTF 1360 x 768@60Hz)
Warning: Setting PC a screen-mode that exceeds the 60Hz refresh-rate could permanently damage the LCD TV
display.
Note: Product specifications are subject to change without notice.
ViewSonic N4200w 33
Page 36

Troubleshooting
LCD TV Does Not Switch On
Make sure the LCD TV is properly connected to the AC power adapter.
Make sure the AC power cord is properly connected to the outlet.
Make sure the AC power is ON, and DC power button is ON (set to ‘1’).
Poor or No Picture
Make sure all external devices are properly connected to the LCD TV.
Make sure that all setup procedures described in this user’s guide have been properly followed.
Make sure the correct input source is selected and that the video output signal is compatible with the
LCD TV input.
The Display Color is Incorrect or Too Dark/Bright
Ensure that the video cable is properly connected to the LCD TV input.
The picture may appear dim in a brightly-lit room, adjust brightness and contrast.
Check the input signal settings.
No Sound
Check your audio connections are properly configured.
The MUTE button may have been pressed, try pressing this button again.
Press the Volume + (Up) button on the remote control.
Remote Control Unit Does Not Operate
Make sure the batteries are correctly inserted.
Battery power could be low or flat. Replace the batteries
If the red LED on the LCD TV does not illuminate when the remote control is operated, the path of the
LED may be blocked. Make sure the path is clear and that the remote control is pointed at the remote
control sensor on the Display.
Press only one button at a time; check the function matches the operation you want to perform.
LCD TV Does Not Respond
External influences such as lightning or static electricity may cause malfunction. First switch off the
power and then the AVC System. Unplug the AC cord for 1 to 2 minutes and then re-plug.
LCD TV Suddenly Switches Off
Check the sleep timer is not set.
The internal temperature of the unit may have increased. Remove any objects blocking the vents or
clean the unit as necessary.
Entire Picture Does Not Display Properly
Check the screen-mode settings such as picture size correctly configured.
ViewSonic N4200w 34
Page 37

Customer Support
For technical support or product service, see the table below or contact your reseller.
NOTE: You will need the product serial number.
Country/
Region
China www.viewsonic.com.cn 800 820 3870 service.cn@cn.viewsonic.com
Web site Telephone Email
ViewSonic N4200w 35
Page 38

Limited Warranty
VIEWSONIC® LCD TV
What the warranty covers:
ViewSonic warrants its products to be free from defects in material and workmanship, under normal use, during the warranty
period. If a product proves to be defective in material or workmanship during the warranty period, ViewSonic will at its sole
option, repair or replace the product with a like product. Replacement product or parts may include remanufactured or
refurbished parts or components.
How long the warranty is effective:
ViewSonic LCD TV’s
date of the first consumer purchase.
Who the warranty protects:
This warranty is valid only for the first consumer purchaser.
What the warranty does not cover:
1. Any product on which the serial number has been defaced, modified or removed.
2. Damage, deterioration or malfunction resulting from:
a. Accident, misuse, neglect, fire, water, lightning, or other acts of nature, unauthorized product modification, or failure to
follow instructions supplied with the product.
b. Repair or attempted repair by anyone not authorized by ViewSonic.
c. Any damage of the product due to shipment.
d. Removal or installation of the product.
e. Causes external to the product, such as electrical power fluctuations or failure.
f. Use of supplies or parts not meeting ViewSonic’s specifications.
g. Normal wear and tear.
h. Any other cause which does not relate to a product defect.
3. Any product exhibiting a condition commonly known as “image burn-in” which results when a static image is displayed on
the product for an extended period of time.
4. Removal, installation, and set-up service charges.
How to get service:
1. For information about receiving service under warranty, contact ViewSonic Customer Support at 800-888-8583. You
will need to provide your product's serial number.
2. To obtain warranted service, you will be required to provide (a) the original dated sales slip, (b) your name, (c) your address,
(d) a description of the problem, and (e) the serial number of the product.
3. Take or ship the product freight prepaid in the original container to an authorized ViewSonic service center or ViewSonic.
4. For additional information or the name of the nearest ViewSonic service center, contact ViewSonic.
Limitation of implied warranties:
There are no warranties, express or implied, which extend beyond the description contained herein including the implied
warranty of merchantability and fitness for a particular purpose.
Exclusion of damages:
ViewSonic's liability is limited to the cost of repair or replacement of the product. ViewSonic shall not be liable for:
1. Damage to other property caused by any defects in the product, damages based upon inconvenience, loss of use of the
product, loss of time, loss of profits, loss of business opportunity, loss of goodwill, interference with business relationships,
or other commercial loss, even if advised of the possibility of such damages.
2. Any other damages, whether incidental, consequential or otherwise.
3. Any claim against the customer by any other party.
Effect of state law:
This warranty gives you specific legal rights, and you may also have other rights that vary from state to state. Some states do not
allow limitations on implied warranties and/or do not allow the exclusion of incidental or consequential damages, so the above
limitations and exclusions may not apply to you.
Sales outside the U.S.A. and Canada:
For warranty information and service on ViewSonic products sold outside of the U.S.A. and Canada, contact ViewSonic or
your local ViewSonic
ViewSonic LCD TV 1 of 1
4.3: ViewSonic LCD TV Warranty Rev. la Release Date: 03-31-05
are warranted for one (1) year for all parts excluding the light source and one (1) year for labor from the
dealer.
ViewSonic N4200w 36
Page 39

目录
重要安全注意事项 ........................................................................................ 1
版权信息....................................................................................................... 2
产品注册....................................................................................................... 2
产品达到使用寿命后废弃产品....................................................................... 2
天线安装指导说明 ........................................................................................ 3
清洁此液晶电视 ............................................................................................ 3
免责声明....................................................................................................... 3
开始使用
物品清单....................................................................................................... 4
将 ViewSonic 液晶电视挂到墙上 .................................................................. 5
改变卫星音箱的位置..................................................................................... 6
正面显示屏和控制 ........................................................................................ 7
后面板和连接................................................................................................ 8
侧面板连接 ................................................................................................... 9
遥控器 ........................................................................................................ 10
准备使用此液晶电视................................................................................... 12
简
体
中
文
基本操作..................................................................................................... 19
屏幕显示菜单系统 (OSD)
OSD 操作 ................................................................................................... 20
OSD 配置屏幕 ............................................................................................ 21
PC 模式 ...................................................................................................... 21
AV 模式 ...................................................................................................... 25
TV 模式 ...................................................................................................... 29
其它信息
规格............................................................................................................ 33
故障排除..................................................................................................... 34
客户支持..................................................................................................... 35
有限保修..................................................................................................... 36
ViewSonic N4200w
Page 40

重要安全注意事项
简体中文
1. 在使用本设备之前,仔细阅读这些指导说明。
2. 妥善保管这些指导说明。
3. 留意所有警告。
4. 遵循所有指导说明。
5. 请勿在靠近水的地方使用本设备。警告:为降低火灾或电击风险,请勿使本设
备遭受雨淋或受潮。
6. 使用柔软的干布进行清洁。如需进一步清洁,请参见本指南中的“清洁显示
器”部分了解详细说明。
7. 请勿堵塞任何通风口。按照厂商的指导说明安装本设备。
8. 请勿安装在任何热源附近,如散热器、热调节器、火炉或其它产生热量的设备
(包括放大器)。
9. 请勿废除极性或接地插头的安全设施。极性插头有两个插片,其中一个较宽。
接地插头有两个平行的扁平插片和一个圆的接地插片。宽插片和接地插片用于
安全目的。如果插头无法插入插座,请咨询电工更换插座。
10. 保护电源线免遭踩踏或挤压,特别是在插头、与设备连接的部位。确保设备附
近有电源插座而且便于插拔电源线。
11. 仅使用厂商指定的连接件/附件。
12. 仅使用厂商指定的或者随设备一起销售的推车、台子、三脚架、
支架或桌子。当本设备放在推车上移动时务请小心谨慎,以免设
备翻倒而导致人员受伤。
13. 长时间不使用本设备时,请拔掉电源线插头。
14. 委托专业维修人士执行所有维修任务。当本机因各种原因损坏时,需要维修,
例如:电源线或插头损坏;液体溅入或物品掉入本机内;本机遭受雨淋或受潮;
本机工作不正常或从高处掉落。
15. 请勿让水溅落到本设备上,不要将盛满液体的物品(如花瓶)放在本设备上。
ViewSonic N4200w 1
Page 41

版权信息
Copyright© ViewSonic® Corporation,2006。保留所有权利。
ViewSonic 、三只鸟标志 、OnView 、ViewMatch 和 ViewMeter 是 ViewSonic Corporation
的注册商标。
免责声明:ViewSonic Corporation 对于本资料中包含的技术或编辑错误或疏漏,包括因
提供本资料而导致的偶然或必然的损失以及本产品的性能或使用,不应承担责任。
为了不断改进产品,ViewSonic Corporation 保留变更本产品规格而无需另行通知的权
利。本文档中的信息如有变更,恕不另行通知。
未经 ViewSonic Corporation 事先书面许可,不得出于任何目的以任何形式复印、复制或
传播本文档的任何部分。
产品注册
为了满足您未来的需要以及接收新的产品信息,请在 www.viewsonic.com 网站上注册您
的产品。
记录内容
产品名称: N4200w
简
体
中
文
ViewSonic 液晶电视
型号: VS10945-1G
文档号: N4200w_UG_SCH Rev. 1A 03-14-06
序列号:
购买日期:
产品达到使用寿命后废弃产品
ViewSonic 注重保护我们的环境。本产品达到使用寿命后,请正确废弃。您当地的废弃
物处理公司可以提供关于正确废弃的信息。
本产品中的灯管含有汞。请按照您当地的环保法律正确废弃。
ViewSonic N4200w 2
Page 42

天线安装指导说明
简体中文
1. 室外天线接地
此本产品连接室外天线或有线电视系统时,应确保天线或有线电视系统接地以提供保护,防止电涌
和静电积聚。美国国家电气规范的第 810 条款、ANSI/NFPA 70 提供了与天线杆及其支撑结构的接
地、天线放电单元的引入线的接地、连接到接地电极、接地电极要求等有关的信息。
2. 闪电
为了在雷电天气条件下或长时间不使用且无人照看的情况下为本产品提供进一步保护,应从墙壁插
座上拔掉电源线,并断开天线或有线电视系统。这样可以防止本产品由于闪电和电力线电涌而损
坏。请勿在暴风雨过程中断开天线或电源线,手拿线缆时可能遭到闪电电击,导致严重伤害;关闭
液晶电视电源,并等待天气好转。
3. 电力线
室外天线系统不应放置在电力线或者其它电灯或电力电路的上方、下方或附近区域。安装室外天线
系统时应小心谨慎,不要接触此类电力线或电路,否则可能危及生命。
清洁此液晶电视
确保关闭此液晶电视的电源。
切勿将任何液体直接溅到或倒到屏幕或外壳上。
清洁屏幕:
1
使用柔软无麻的干净布擦拭屏幕。这可以去除灰尘和其它颗粒。
2
如果仍不干净,可以用柔软无麻的干净布蘸取少量不含氨水和酒精的玻璃清洁剂,然后擦拭屏幕。
清洁机壳:
1
使用柔软的干布。
2
如果仍不干净,可以用柔软无麻的干净布蘸取少量不含氨水和酒精的中性非研磨性清洁剂,然后擦
拭机壳表面。
免责声明
ViewSoni c® 不推荐使用含氨水或酒精的清洁剂擦拭液晶电视屏幕或机壳。一些化学清洁剂可能会损坏屏
幕和/或液晶电视机壳。
ViewSonic 对于因使用任何含氨水或酒精的清洁剂而导致的损坏不承担责任。
ViewSonic N4200w 3
Page 43

开始使用
现在,您可以开始安装此液晶电视了。在继续之前,请确认您已经阅读了安全注意事项。
重要事项
! 妥善保存原始包装箱和所有包装材料,以备日后装运时使用。
物品清单
请确认此液晶电视包装箱中包括下列物品:
液晶电视
ViewSonic 使用手册
交流电源线
通用遥控器(含电池)
重要事项! 如果此清单中的任何物品缺失,请与经销商联系。
快速入门指南
RF 线
保修卡
维修标签
简
体
中
文
ViewSonic N4200w 4
Page 44

将 ViewSonic 液晶电视挂到墙上
此液晶电视可以挂到墙上而无需使用支撑物。在将本产品挂到墙上之前,请考虑下列指
简体中文
导原则:
• 阅读本手册开始部分的“重要安全注意事项”。
• 请勿安装在潮湿或有湿气的环境中。本产品仅供室内使用。
• 请勿安装在热源附近或强磁场环境中。
• 仅使用经过认可并且能支撑此液晶电视重量的壁挂支架。
• 将本液晶电视挂在承重墙上。
• 确保液晶电视通风口周围至少有 3cm 空间。
从液晶电视上安全卸下壁挂支架时,请遵循下列指导原则:
1. 拔掉电源线和可能妨碍液晶电视移动的任何其它线缆。
2. 将液晶电视放在桌子或工作台上。为保护显示屏,应在桌子或工作台上放置一块毛
巾或毛毯,然后将液晶电视正面朝下放在上面。
3. 支架上有 6 个螺丝孔与液晶电视相对应(如图所示),两对分别位于底座的两端(垂
直于电视后面板),另外两个螺丝分别安装在朝上的每个支柱的底面(平行于支撑
方向)。拧松所有六个螺丝,妥善保管好以备日后使用。
仅使用由 ViewSonic 或您当地经销商推荐的经过认可的壁挂支架。
注意:
• 如果您的液晶电视已经设置成无底座,则在将其挂到墙上之前,需要先卸下底座。
• 壁挂螺丝类型:M6 x L10
ViewSonic N4200w 5
Page 45

改变卫星音箱的位置
如需改变此液晶电视的卫星音箱的位置或者延长线缆,请与 ViewSonic 或您当地的经销
商联系以听取建议。
如需从液晶电视主机上卸下卫星(侧面)音箱,请阅读下面的指导说明:
1. 断开液晶电视的电源。
2. 从液晶电视上取下音频线。
3. 将液晶电视放在桌子或工作台上。为
保护显示屏,应在桌子或工作台上放
置一块毛巾或毛毯,然后将液晶电视
正面朝下放在上面。
4. 拧下用于将音箱固定在主机上的 6 个
螺丝(每侧 3 个螺丝)。
5. 向外拉音箱,将其从主机上卸下。
将音频线从音箱连接到液晶电视时,确保极性正确无误。也就是说,将红色 (+ve) 导线
连接到液晶电视后面板上的红色 (+ve) 端子,将黑色 (-ve) 导线连接到黑色 (-ve) 端子。
简
体
中
文
ViewSonic N4200w 6
Page 46

ViewSonic 液晶电视概览
正面显示屏和控制
简体中文
A INPUT
B MENU
C VOL-
D VOL+
E
F
G
CH ﹀ 减小频道/向下滚动。
CH ︿ 增大频道/向上滚动。
选择输入源。
切换 OSD 菜单。
在正常操作期间降低音量,或者在使用 OSD 菜单时调整高亮
显示的控制。
在正常操作期间增大音量,或者在使用 OSD 菜单时调整高亮
显示的控制。
打开/关闭电源。
ViewSonic N4200w 7
Page 47

后面板和连接
简
体
中
文
A POWER S/W
B AC IN
C HDMI (1)
D HDMI (2)
E VGA
F PC STEREO
G S-V
H VIDEO
I Audio-L
J Audio-R
电源开关(打开/关闭)。
使用附带的线缆,将电视插入旁边的插座。
连接 DVD 播放机的一个 HDMI 线端子。
连接 DVD 播放机的一个 HDMI 线端子。
将 PC 的 VGA 线输出连接到 VGA 端子输入。
使用“PC 到 Phono”音频线将 PC 的音频输出连接到音频输入
端子。
将外部视频设备(如 VCR、DVD 和视频游戏)连接到此 DIN 插
口。
将 DVD/VCR 播放机或 PC 的视频输出连接到此端子。
将此音频输出连接到左音箱。
将此音频输出连接到右音箱。
K SPDIF
连接到 SPDIF 设备。
ViewSonic N4200w 8
Page 48

侧面板连接
简体中文
A Audio-R
B Audio-L
C VIDEO
D S-V
E Audio-R
F Audio-L
G VIDEO
H S-V
I Audio-R
J Audio-L
将音频输出(右声道)从兼容设备连接到此端子。
将音频输出(左声道)从兼容设备连接到此端子。
将外部视频设备(如 VCR、DVD 和视频游戏)连接到此插孔。
将外部视频设备(如 VCR、DVD 和视频游戏)连接到此 DIN 插
口。
将音频输出(右声道)从兼容设备连接到此端子。
将音频输出(左声道)从兼容设备连接到此端子。
将外部视频设备(如 VCR、DVD 和视频游戏)连接到此插孔。
将外部视频设备(如 VCR、DVD 和视频游戏)连接到此 DIN 插
口。
将音频输出(右声道)从兼容设备连接到此端子。
将音频输出(左声道)从兼容设备连接到此端子。
K Pr/Cr
L Pb/Cb
M Y
N ANALOG ANT
将外部视频设备连接到此输入。
将外部视频设备连接到此输入。
将外部视频设备连接到此输入。
连接到外部天线或有线电视。
ViewSonic N4200w 9
Page 49

遥控器
简
体
中
文
下表介绍通用遥控器的功能。
A
B
C
D
E
F 暂停 (FREEZE)
G
向上/向下/向左/向右/ OK(确定)
信号源 (SOURCE) 选择输入源(如视频、天线、PC 等)。
0~100+ 频道选择 使用这些按钮选择频道。
音量 (VOL+ / VOL-) 调节音量。
按钮
静音 (MUTE) 暂时关闭音频输出,但保留当前音量设置。
显示 (DISPLAY ) 显示当前输入源和时间。
向上/向下选择 OSD 功能,向左/向右调整功
能。按 OK 确认所作的选择。
按此按钮可以保持当前显示画面。再按一次将
释放画面。注意,这与“暂时停止”并不相
同,广播节目将继续播放。
H
I
J
K
画中画/画外画 (PIP/POP ) 激活 PIP(画中画)功能(激活指南)。
画中画/信号源 (PIP/SOUR) 按此按钮可以切换画中画的子画面。
画中画/位置 (PIP/POS) 在画中画模式下,改变子画面的显示位置。
画中画/信号源互换(PIP/SWAP) 切换主画面和子画面的输入源。
ViewSonic N4200w 10
Page 50

L
M
简体中文
N
O
P
观赏模式 (WIDE) 改变画面比例。
休眠 (SLEEP) 设置定时以关闭显示。
菜单 (MENU) 显示菜单或退出 OSD 菜单。
频道 (CH﹀ / CH︿) 按顺序滚动频道。
电源
打开/关闭电源。
ViewSonic N4200w 11
Page 51

准备使用此液晶电视
1. 安装遥控器电池
a) 推遥控器中部的卡销,抬起然后卸下电池盖。
b) 按照电池极性和电池仓上的 (+) 和 (-) 标记装入电池。
c) 重新装上电池盖,向下按使其到位。
简
体
中
文
小心
仅使用指定的 AAA 电池。
请勿混合使用新旧电池。否则,可能导致破裂或漏液,因而导致火灾或人身伤
害风险。
按照 (+) 和 (-) 标记装入电池。电池装入不当可能导致破裂或漏液,因而导致火
灾或人身伤害风险。
按照当地法律和法规处理废旧电池。
将电池放在儿童和宠物够不到的地方。
长时间不使用遥控器时,请取出电池。
ViewSonic N4200w 12
Page 52

2. 连接外部天线
在将外部天线连接到 N4200w 之前,务请关闭电源。
简体中文
仅使用 75 欧姆同轴电缆将电视天线连接到此液晶电视端子或有线电视盒。
RF 线或适配器
3. 连接到音频输出
连接外部功放时,将 L/R RCA 线从 TV AUDIO OUT 端口连接到兼容功放上相应的
AUDIO IN 端口。
音频输入线
(线缆不随机提供)
ViewSonic N4200w 13
Page 53

4. 连接到 SPDIF 设备
以数字方式将音频传送到外部功放、PC 或录音机时,使用兼容 SPDIF 立体声插孔连接
到此液晶电视。
SPDIF 线
(线缆不随机提供)
5. 将 AV、S-Video、YCbCr、YPbPr、HDMI 连接到视频设备
简
体
中
文
下图介绍此液晶电视后面板上的连接以及如何将它们连接到相应的设备。在几乎所有情
况下,线缆都具有与后面板上端子匹配的颜色。
AV 机型:
将视频线连接到视频源上的输出插孔和此液晶电视上的复合输入。将音频线两端分别连
接到音频输入端子和视频源上的左右音频输出端子。
RCA A/V 线
(线缆不随机提供)
VCR/有线接收器
ViewSonic N4200w 14
Page 54

S-Video 机型:
将视频线连接到视频源上的输出插孔和此液晶电视上的 S-video 输入插口。将音频线两
端分别连接到音频输入端子和视频源上的左右音频输出端子。
简体中文
S-Video 线
(线缆不随机提供)
VCR
音频输入线
(线缆不随机提供)
YCbCr / YPbPr 机型:
将视频线两端分别连接到视频源上的 Y、Pb/Cb、Pr/Cr 输出和此液晶电视上的 Y、Pb/Cb、
Pr/Cr 输入。将音频线两端分别连接到音频输入端子和视频源上的左右音频输出端子。
YCbCr / YPbPr 线
(线缆不随机提供)
音频输入线
(线缆不随机提供)
DVD 播放机或 VCR
ViewSonic N4200w 15
Page 55

HDMI 和 HDTV:
此液晶电视支持无压缩接口自由数字传输标准 HDTV 和 HDMI。前者需要音频线;在此
情况下,将 DVD 播放机音频输出连接到 PC 立体声输入。后者是多合一接口,支持在
一条线缆上同时传输音频和视频。
HDMI 线与 DVD 播放机有两种连接方式。请根据您的设备选择合适的连接。
DVD 播放机
(线缆不随机提供)
HDMI 线 (线缆不随机提供)
简
体
中
文
注意:为从 DVD 播放机接收音频,应在 OSD 声音菜单中启用 HDMI 音频。确保输入
源支持 HDMI。
6. 连接 PC
VGA(15 针 D-Sub):
将 VGA 线从 PC 的 VGA 输出连接到 N4200w 的 VGA 输入端子。.
根据需要选择 PC 屏幕分辨率,最高 1360 x 768(也支持 1280 x 1024)。
PC
ViewSonic N4200w 16
VGA 15 针线缆
(线缆不随机提供)
Page 56

PC 音频输入:
将音频线从 PC 的音频输出(绿色端子)连接到 N4200w 的音频输入端子(也是绿色)。
简体中文
PC
HDMI:
PC 音频线
( 线缆不随机提供)
将 HDMI 线从 PC 的 DVI 输出连接到 N4200w 的 HDMI 输入。
PC
HDMI 线(线缆不随机提供)
ViewSonic N4200w 17
Page 57

7. 连接电源线
将电源线连接到 N4200w,然后插入正确接地的交流插座。打开 N4200w 背面的交流开
关。
AC 开关
切换到 ON (开)
简
体
中
文
墙壁交流插座
8. 打开此液晶电视的电源
按此液晶电视底部的电源按钮,或者按遥控器上的电源按钮。现在,打开外部视频播放
机的电源。
ViewSonic N4200w 18
Page 58

基本操作
此液晶电视的基本功能包括设置输入源、更换频道和调节音量。可以通过两种方法访问
此液晶电视的基本控制。第一种方法是通过主机本身上的控制(
简体中文
制
),第二种方法是使用随机提供的通用遥控器(
打开此液晶电视的电源
参见遥控器
参见正面显示屏和控
)。
在使用此液晶电视之前:
1. 插入随机提供的交流电源适配器,如后面板连接所述。
2. 确保所有外部设备均已正确连接。
3. 打开位于本机背面的主交流电源开关(如果长时间不使用此液晶电视,请使其保持
关闭状态)。
液晶电视此时处于待机模式,已做好开机准备。
待机/开机
此液晶电视本机和遥控器均有电源按钮。在待机期间,按任一按钮均可开启液晶电视屏
幕。当此液晶电视处于开机状态时,电源 LED 点亮。
再按一次任一按钮可以关闭屏幕。液晶电视进入待机状态。
调节音量
按 VOL-/VOL+ 调节至所需的音量。
如需保持当前音量设置但暂时关闭音频,可以按静音。
如要恢复音量,可以再按一次静音以直接调节音量。当前音量设置以总输出的百分比
(1~100) 形式显示出来,供您参考。
音量:
选择输入源
为选择所需的输入源,可以按遥控器上的信号源按
钮,然后使用 ▲▼ 滚动可用的输入方法。主输入源
OSD 菜单显示出来。
如要观看 PC 输出,请选择 VGA。选 择 TV 可以观看 TV
输出。选择 AV1/AV2 可以观看外部视频源。选择
S-Video 可以观看 VCR 输出。当直接连接到 DVD 播放
机或兼容设备时,选择 HDTV 和 HDMI。如要选择所
显示的输入源,请按 OK。
ViewSonic N4200w 19
Page 59

屏幕显示菜单系统 (OSD)
本节介绍如何使用 OSD 菜单系统和配置设置屏幕以使用此液晶电视的各种连接。
OSD 操作
按遥控器上的或此液晶电视控制面板上的“菜单”按钮以显示 OSD 主菜单。
按 ▲ 或 ▼ 高亮显示子菜单,然后按 ◄ 或 ► 进入子菜单。
按 ▲ 或 ▼ 高亮显示要选择的功能或设置,然后按 ◄ 或 ► 调整设置或执行功能。
再次按遥控器上的或此液晶电视右侧的“菜单”按钮以关闭 OSD 主菜单。
在 PC 模式下,从信号源菜单中选择 VGA。
OSD 主菜单顶部的四个图标代表四个子菜单(画质、图像调整、音频和项目设置)。
在 AV 模式下,从信号源菜单中选择 AV1 / AV2、S-Video1 / S-Video2、HDTV1 / HDTV2
或 HDMI1 / HDMI2。
OSD 主菜单顶部的四个图标代表四个子菜单(画质、音频、项目设置和家长控制)。
在 TV 模式下,从信号源菜单中选择 TV。
简
体
中
文
OSD 主菜单顶部的四个图标代表四个子菜单(画质、音频、项目设置和 TV)。
ViewSonic N4200w 20
Page 60

OSD 配置屏幕
下列屏幕介绍为更好地使用每种连接类型而用于配置此液晶电视的 OSD 菜单屏幕。
简体中文
PC 模式
画质菜单
使用此屏幕配置色彩平衡、切换文字和图形显示、以及启用/禁用多画面显示功能。
项目 说明 操作
► 提高对比度。
对比度 调整暗色和亮色的差异程度。
◄ 降低对比度。
► 使画面变亮。
亮度 调整亮度。
► 使画面变暗。
有三种预设的色彩配置文件:
STD、暖色、冷色和一个用户定义
色温
文字/图形 选择图形或文字。 ► 或 ◄ 切换图形显示和文字。
PIP 选择单画面或多画面功能。
可调的配置文件。
当选择用户定义时,可以手动调整
红色、绿色和蓝色的色彩强度。
► 或 ◄ 循环切换色彩方案。
当选择用户定义时:
► 提高色彩强度。
► 降低色彩强度。
► 或 ◄ 选择关、并排画面或画中
画。(子画面不支持 HDMI 输入)。
ViewSonic N4200w 21
Page 61

图像调整菜单
当配置此液晶电视以使用 PC 或 S-Video 输入时,最有可能需要使用图像调整菜单。
简
体
中
文
项目 说明 操作
自动调整
频率
微调
水平位置
垂直位置
此功能自动选择最适合当前输入的
设置。
调整水平同步信号和视频之间的延
迟时间。
当色彩相位不准时,调整色调。最佳
方式是使用肤色作为参考颜色。
调整画中画的主画面和子画面的水
平位置。
调整画中画的主画面和子画面的垂
直位置。
► 启动自动调整。
► 提高频率。
◄ 降低频率。
► 增大相位差异。
► 减小相位差异。
► 右移显示画面。
◄ 左移显示画面。
► 上移显示画面。
◄ 下移显示画面。
ViewSonic N4200w 22
Page 62

音频菜单
简体中文
配置此菜单中的字段以设置此液晶电视的音频,从而使用 PC 音频输入。
项目 说明 操作
► 提高低音。
低音 调节低音。
◄ 降低低音。
► 提高高音。
高音 调节高音。
◄ 降低高音。
► 增强右音箱。
平衡 调整左右音频平衡。
◄ 增强左音箱。
ViewSonic N4200w 23
Page 63

项目设置菜单
使用此屏幕配置 OSD 菜单和调整画面显示比例。
简
体
中
文
项目 说明 操作
观赏模式 调整画面比例。 ► 或 ◄ 选择宽屏幕或正常屏幕。
出厂设置 恢复至原始设置或出厂默认设置。 ► 恢复至出厂默认设置。
菜单语言 选择 OSD 语言。
菜单位置 选择 OSD 在画面上的位置。
菜单透明度 调整 OSD 透明度。
菜单显示时间 定时以自动关闭 OSD 显示。 ► 或 ◄ 选择 10 秒、20 秒或 30 秒。
► 或 ◄ 循环切换可用的 OSD 菜单语
言。
► 或 ◄ 循环切换 OSD 在画面上的五
个不同位置。
► 提高透明度。
◄ 降低透明度。
ViewSonic N4200w 24
Page 64

AV 模式
画质菜单
简体中文
配置此屏幕中的字段以设置颜色方案、改善显示质量和启用画中画功能。
项目 说明 操作
对比度 调整对比度。
亮度 调整亮度。
颜色 调整色饱和度。
色调 调节色调。
清晰度 调整画面清晰度。
► 提高对比度。
◄ 降低对比度。
► 使画面变亮。
► 使画面变暗。
► 提高色饱和度。
◄ 降低色饱和度。
► 提高色调。
◄ 降低色调。
► 使画面变尖锐。
◄ 使画面变柔和。
肤色调整 自动调整图像颜色。 ► 或 ◄ 启用/禁用肤色调整。
色温
PIP 选择单画面或多画面功能。
可用的预设颜色方案包括:STD、暖色
和冷色。
► 或 ◄ 循环切换预设颜色方案。
► 或 ◄ 选择关、并排画面或画中画。(子
画面不支持 HDMI 输入)
ViewSonic N4200w 25
Page 65

音频菜单
配置此屏幕中的字段以设置此液晶电视的音频输出,从而使用 AV 输入。
简
体
中
文
项目 说明 操作
低音 调节低音。
高音 调节高音。
平衡 调整左右音频平衡。
► 提高低音。
◄ 降低低音。
► 提高高音。
◄ 降低高音。
► 增强右音箱。
◄ 增强左音箱。
ViewSonic N4200w 26
Page 66

项目设置菜单
简体中文
使用此屏幕配置 OSD 菜单显示和设置液晶电视睡眠定时。
项目 说明 操作
观赏模式 调整画面比例。
睡眠定时 定时以自动关闭液晶电视。
蓝屏 当没有视频输入时显示蓝色背景。 ► 或 ◄ 开启或关闭此功能。
出厂设置 将液晶电视恢复至默认设置。 ► 恢复至出厂设置。
菜单语言 选择 OSD 语言。
菜单位置 选择 OSD 在画面上的位置。
菜单透明度 调整 OSD 透明度。
► 或 ◄ 选择单个窗口/智能/16:9/缩放/
宽屏幕/4:3。
► 或 ◄ 选择 30 分、60 分、90 分、120
分、180 分、210 分、240 分。
► 或 ◄ 循环切换可用的 OSD 菜单语
言。
► 或 ◄ 循环切换 OSD 在画面上的五个
不同位置。
► 提高透明度。
◄ 降低透明度。
菜单显示时间 定时以自动关闭 OSD 菜单。 ► 或 ◄ 选择 10 秒、20 秒或 30 秒。
ViewSonic N4200w 27
Page 67

家长锁
配置这些设置以防止儿童观看不适宜的内容和启用屏幕字幕(限制字幕)。
简
体
中
文
项目 说明 操作
锁定状态 启用或禁用家长锁。 ► 或 ◄ 选择开或关。
按 ► 选择所需的密码。
密码调整
设置密码
设置家长锁密码。
更改密码
清除密码
级别设置 设置电影分级。
CC 设置 启用限制字幕。
注意:
1. 家长锁功能没有默认密码;用
户必须在第一次使用此功能时
设置密码。
2. 请务必记住密码并妥善保管。
如果忘记或丢失密码,请使用
3.
遥控器输入“034917”以清除
旧密码,然后重新设置新密码。
按 ► 选择所需的分级,然后按 OK
保存您的设置。
► 或 ◄ 选择 Text1~4、CC1~4 或
关。
ViewSonic N4200w 28
Page 68

TV 模式
画质菜单
简体中文
配置此菜单中的设置以设定颜色方案、改善显示质量和启用画中画 (PIP) 功能。
项目 说明 操作
► 提高对比度。
对比度 调整对比度。
◄ 降低对比度。
► 使画面变亮。
亮度 调整亮度。
► 使画面变暗。
► 提高色饱和度。
颜色 调整色饱和度。
◄ 降低色饱和度。
► 提高色调。
色调 调节色调。
◄ 降低色调。
► 使画面变尖锐。
清晰度 调整画面清晰度。
◄ 使画面变柔和。
肤色调整 自动调整图像颜色。 ► 或 ◄ 启用/禁用肤色调整。
色温
PIP 选择单画面或多画面功能。
可用的预设颜色方案包括:STD、暖
色和冷色。
► 或 ◄ 循环切换预设颜色方案。
► 或 ◄ 选择关、并排画面或画中
画。(子画面不支持 HDMI 输入)
ViewSonic N4200w 29
Page 69

音频菜单
配置此菜单中的设置以设定此液晶电视的音频输出,从而使用 TV 输入。
简
体
中
文
项目 说明 操作
低音 调节低音。
高音 调节高音。
平衡 调整左右音频平衡。
► 提高低音。
◄ 降低低音。
► 提高高音。
◄ 降低高音。
► 增强右音箱。
◄ 增强左音箱。
ViewSonic N4200w 30
Page 70

项目设置菜单
简体中文
使用此菜单配置 OSD 菜单显示和设置液晶电视睡眠定时。
项目 说明 操作
观赏模式 调整画面比例。
睡眠定时 自动关闭此液晶电视。
蓝屏 当没有视频输入时显示蓝色背景。 ► 或 ◄ 开启或关闭此功能。
出厂设置 将液晶电视恢复至默认设置。 ► 恢复至出厂设置。
菜单语言 选择 OSD 语言。
菜单位置 选择 OSD 在画面上的位置。
菜单透明度 调整 OSD 透明度。
► 或 ◄ 选择智能/4:3/16:9/缩放/宽
屏幕。
► 或 ◄ 选择 30 分、60 分、90 分、
120 分、150 分或关。
► 或 ◄ 循环切换可用的 OSD 菜
单语言。
► 或 ◄ 循环切换 OSD 在画面上
的五个不同位置。
► 提高透明度。
◄ 降低透明度。
菜单显示时间 定时以自动关闭 OSD 菜单。
ViewSonic N4200w 31
► 或 ◄ 选择 10 秒、20 秒、30 秒
或关。
Page 71

TV 菜单
使用此屏幕配置 OSD 菜单显示和设置液晶电视睡眠定时。
简
体
中
文
项目 说明 操作
自动扫描 选择此选项可以开始自动扫描。
手工扫描 选择此选项可以开始手工扫描。
频道设置 频道指示。 指明当前频道。
跳过 开启和关闭跳过。
微调 调整 TV 频率。 调整频道的频率,直至画面清楚为止。
标准模式 调整搜索信号。
声音模式 指明当前音效。
TV 将搜索所有可用的频道,并将它们
添加到频道列表中。
TV 将搜索所有可用的频道,但您需要
手工将它们添加到频道列表中。
如果一个频道设成开启跳过,当使用
CH 按钮选择频道时将跳过该频道。
如要取消此设置,可以选择关闭跳过。
► 或 ◄ 选择 PAL D /K 、PA L B /G 或
PAL I。
► 或 ◄ 选择立体声、CH A、CH B 或
单声道。
ViewSonic N4200w 32
Page 72

其它信息
规格
简体中文
LCD 类型 42.02 英寸可视屏幕
颜色过滤 0.681mm (H) x 0.227 (V) mm 像素点距
玻璃表面 RGB 直条
防眩光
输入信号 RGB RGB 模拟(0.7/1.0 Vp-p,75 欧姆)
分离同步,
fh:30-80 kHz,fv:50-75 Hz
RF IEC-Type x 1
视频(输入) D-sub x 1,HDMI x 2,YPbPr/YCbCr x 2,CVBS x 2,S-
Video x 2
视频(输出) CVBS x 1,S-Video x 1
音频(输入) Mini-立体声 (Φ3.5mm x 1 ),RCA (L/R) x 4
音频(输出) RCA (L/R) x 1,SPDIF x 1
兼容性 PC 最高 1360 x 768 逐行扫描
分辨率 1360 x 768 @ 60 Hz
音箱输出 10W x 2
电源 电压 90-240 VAC,50/60 Hz
显示区域 完全扫描 930.25mm (H) x 523.01 mm (V)
36.62 英寸 (H) x 20.59 英寸 (V)
工作 温度 32° F 到 + 104° F(0° C 到 + 40° C)
条件 湿度 20% 到 85%(不结露)
高度 10,000 英尺 (3,000m)
存储 温度 -4° F 到 + 140° F(-20° C 到 + 60° C)
条件 湿度 20% 到 95%(不结露)
高度 40,000 英尺 (12,000m)
外形尺寸 物理 1243mm (W) x 739mm (H) x 304mm (D)
48.93 英寸 (W) x 29.09 英寸 (H) x 11.96 英寸 (D)
重量 净重 33kg(72.68 磅)
认证 CCC、HDMI 标志、HD Ready
省电 开机 <240 W LED 绿色
模式 被动关闭 <3 W LED 红色
预测试时序模式 (预先调整成 GTF 1360 x 768@60Hz)
警告:如果设置的 PC 屏幕模式超过 60Hz 刷新率,可能会永久性损坏液晶电视显示屏。
注意:产品规格如有变更,恕不另行通知。
ViewSonic N4200w 33
Page 73

故障排除
此液晶电视不开机
确保此液晶电视已正确连接到交流电源适配器。
确保交流电源线正确地连接到电源插座。
确保交流电源为 ON(开),直流电源按钮为 ON(开,设成“1”)。
画面质量差或没有图片
确保所有外部设备都正确连接到此液晶电视。
确保正确遵循了本用户指南中介绍的所有设置过程。
确保选择了正确的输入源并且视频输出信号与此液晶电视的输入兼容。
画面颜色不正确或者太暗/太亮
确保视频线正确连接到此液晶电视的输入。
在明亮的房间内画面可能发暗,请调整亮度和对比度。
检查输入信号设置。
无声音
检查音频连接是否良好。
可能是按了“静音”按钮,试着再按一次此按钮。
按遥控器上的音量 +(增大)按钮。
简
体
中
文
遥控器不工作
确保正确安装了电池。
电池电量低或没电了。更换电池。
如果遥控器工作时液晶电视上的红色 LED 不亮,可能是遮挡了 LED 路径。确保路径上没有障
碍物并且遥控器指向显示器上的遥控传感器。
每次只按一个按钮;检查您要执行的操作所对应的功能。
液晶电视不响应
外部因素(如闪电或静电)可能导致工作不正常。先关闭电源,然后关闭 AVC 系统。拔掉交
流电源线插头 1 至 2 分钟,然后重新插上。
液晶电视突然关机
检查是否设置了睡眠定时。
本机内部温度可能升高。移开堵塞通风口的物品,必要时清洁本机。
整个画面显示不正确
检查是否正确配置了屏幕模式设置,如画面尺寸。
ViewSonic N4200w 34
Page 74

客户支持
如需客户支持或产品服务,请参见下表或与经销商联系。
简体中文
注意:您需要提供产品序列号。
国家/地区 网站 电话 电子邮件
中国
www.viewsonic.com.cn 800 820 3870 service.cn@cn.viewsonic.com
ViewSonic N4200w 35
Page 75

有限保修
VIEWSONIC® 液晶电视
保修范围:
ViewSonic 保证其产品在正常使用情况下在保修期内不存在材料和工艺上的缺陷。如果产品在保修期内出现材料或工
艺上的缺陷,ViewSonic 将根据其判断进行修理或用类似产品更换缺陷产品。更换用产品或部件可能包含改造或翻新
的部件或组件。
保修期:
ViewSonic 液晶电视自第一消费者购买之日起,所有部件(不含光源)的保修期为一 (1) 年,人工费免费一 (1) 年。
保修适用对象:
此保修仅对第一购买者有效。
保修范围不包括:
1. 序列号磨损、修改或撕毁的任何产品。
2. 因下列原因导致的损坏、磨损或工作不正常:
a. 意外事件、使用不当、疏忽、火灾、水灾、闪电、或其它自然灾害、未经授权变更产品、不遵循随产品提供
的指导说明。
b. 由未经 ViewSonic 授权的人员进行修理或尝试修理。
c. 因运输而导致的任何产品损坏。
d. 移除或安装产品。
e. 产品外部原因,如电源波动或故障。
f. 使用不符合 ViewSonic 规格的耗材或部件。
g. 正常磨损和破损。
h. 与产品缺陷无关的任何其它原因。
3. 在产品上长时间显示静态图像而导致“图像残留”的任何产品。
4. 移除、安装和设置服务费用。
如何获取服务:
1. 有关获得保修服务的信息,请与 ViewSonic 客户支持联系,电话是 800-888-8583。您将需要提供产品的序列号。
2. 为获得保修服务,您将需要提供 (a) 注明日期的原始销售凭证、(b) 您的姓名、(c) 您的联系地址、(d) 故障描述、
以及 (e) 产品序列号。
3. 将产品放在原始包装箱中,送到或运到(预付运费) ViewSonic 授权服务中心或 ViewSonic。
4. 如需其它信息或最近 ViewSonic 服务中心的名称,请与 ViewSonic 联系。
隐含保修限制:
不提供超出此处所述范围的任何明示或隐含保修,包括针对适销性和特定目的适用性的隐含保修。
损失排除:
ViewSonic 的责任仅限于修理或更换产品的费用。ViewSonic 对下列损失不应承担责任:
1. 由于本产品缺陷而导致的其它财产损失、由于不方便而导致的损失、使用本产品的损失、时间损失、收益损失、
商业机会丧失、信誉损失、干扰商业关系、或其它商业损失,即使被告知这些损失的可能性也不例外。
2. 偶然、必然或其它形式的任何损失。
3. 任何其它方对客户的任何索赔。
州法律效用:
本保修赋予您特定的法律权利,但您可能还拥有其它权利,这取决于不同的州。一些州不允许限制隐含保修和/或不
允许排除偶然或必然损失,因此上述限制和排除可能对您不适用。
在美国和加拿大之外销售:
有关在美国和加拿大之外销售的 ViewSonic 产品的保修信息和服务,请与 ViewSonic 或您当地的 ViewSonic 经销商
联系。
ViewSonic 液晶电视 1/1
4.3: ViewSonic LCD TV Warranty Rev. la 发布日期: 03-31-05
简
体
中
文
ViewSonic N4200w 36
Page 76

目錄
重要安全指示 ................................................................................................. 1
著作權資訊..................................................................................................... 2
產品註冊 ........................................................................................................ 2
產品壽命終止時的廢棄處理............................................................................ 2
天線安裝指示 ................................................................................................. 3
清潔 LCD 電視............................................................................................... 3
免責聲明 ........................................................................................................ 3
開始
包裝內容 ........................................................................................................ 4
將 ViewSonic LCD 裝在牆上......................................................................... 5
重新安置衛星揚聲器....................................................................................... 6
正面顯示和控制.............................................................................................. 7
後方面板和連線.............................................................................................. 8
側面面板的連線.............................................................................................. 9
遙控器.......................................................................................................... 10
準備 LCD 電視............................................................................................ 12
基本操作 ...................................................................................................... 19
螢幕顯示選單系統 (OSD)
繁
體
中
文
OSD 操作.................................................................................................... 20
OSD 配置螢幕............................................................................................. 21
電腦模式 ...................................................................................................... 21
AV 模式 ....................................................................................................... 25
電視模式 ...................................................................................................... 29
其他資訊
技術規格 ...................................................................................................... 33
疑難排解 ...................................................................................................... 34
客戶支援 ...................................................................................................... 35
有限保固 ...................................................................................................... 36
ViewSonic N4200w
Page 77

重要安全指示
1. 使用本設備之前請仔細閱讀這些指示。
2. 請將這些指示保存在安全的地方。
3. 請注意所有警告。
繁體中文
4. 請遵循所有指示。
5. 請勿在近水處使用本設備。警告:要降低火災或電擊的危險,請勿將此裝置暴露在
雨中或潮濕的地方。
6. 請使用柔軟的乾布來擦拭。如需清潔,請參閱本指南中的「清潔顯示器」,的操作
說明。
7. 請勿堵塞任何通風口。請遵照製造商的指示來安裝本設備。
8. 請勿在例如暖器、散熱氣、暖爐等熱源或其他可能產生熱量的裝置(包括擴大機)附
近安裝本設備。
9. 請勿嘗試破壞極化插頭或接地插頭的安全設計。 極化插頭有兩個插頭,一個較寬,
一個較窄。接地插頭有兩個扁平平行插頭和一個圓形的接地插頭。較寬的接地插頭
提供您安全的保障。如果插頭無法插入插座,請聯絡電工更換插座。
10. 請保護電源線不會遭到踩踏或擠壓,特別是插頭,以及本裝置突出的地方。請確定
電源插座位於設備附近以方便使用。
11. 請僅使用製造商指定的附件/配件。
12. 請僅使用製造商指定的或隨本設備出售的推車、支架、三角架、托架
或小桌。使用推車及移動推車/設備組合時,請特別小心,以避免因
推車翻倒而受傷。
13. 當長時間不使用本設備時請拔下電源插頭。
14. 所有的維修服務皆請洽合格的維修人員。當設備出現任何的損壞,例如:電源線或
插頭損壞、有液體潑灑或其他物體進入機體、設備暴露於雨水或濕氣之下、無法正
常操作或設備摔落地面時,請洽維修服務。
15. 此裝置應避免遭水潑濺,也應避免將花瓶等裝水的容器置於其上。
ViewSonic 1 N4200w
Page 78

著作權資訊
版權所有© ViewSonic® Corporation,2006。保留所有權利。
ViewSonic、三隻鳥標誌、OnView、ViewMatch 與 ViewMeter 是 ViewSonic 公司的註
冊商標。
免責聲明:ViewSonic 公司不對本文檔案中的技術、編輯錯誤或遺漏負責;亦不對因提
供本資料、或因本產品之性能或使用所造成的意外或衍生的損壞負責。
為了持續改良本產品的利益,ViewSonic 公司保留在沒有通知的情況下變更此產品規格
的權利。本文件中資訊如有修改,恕不另行通知。
未經 ViewSonic Corporation 事先書面同意,任何人均不得為任何目的,以任何方式複製、
翻版或傳送文件。
產品註冊
為滿足您將來所需,並讓您在第一時間內收到附加產品資訊,請在以下網際網路位址註
冊您的產品:www.viewsonic.com
繁
體
中
文
使用者紀錄
產品名稱: N4200w
VIEWSONIC® LCD 電視
機型編號: VS10945-1G
文件編號: N4200w_UG_TCH Rev. 1A 03-14-06
序號:
購買日期:
產品壽命終止時的廢棄處理
ViewSonic 關心環保問題,請您在產品壽命終止時以適當方法處理;您所在地區的廢棄
物處理公司可提供關於適當處理的資訊。
本產品中的燈泡含有水銀。 請遵照您所在地區的環境保護法來正確棄置。
ViewSonic N4200w
2
Page 79

天線安裝指示
1. 戶外天線接地安裝
如果本產品要連接戶外天線或有線電視系統,請務必將天線或有線電視系統接地,以保護本機不受
電壓突波或靜電荷干擾。美國國家電器標準 (National Electrical Code) 第 810 條 (ANSI/NFPA 70)
提供了關於天線桿和支撐結構的正確接地,天線接入線到放電裝置的接地,連接到接地電極,以及
繁體中文
接地電極的需求。
2. 閃電
為了強化在打雷閃電時,或長期不使用本機時的保護,請將本機的電源從牆上插座拔出,並中斷天
線或有線電視系統。 如此可避免因閃電或電力纜線突波而導致本機受損。 在強風暴雨時,請勿拔
出天線或電源線,在您握住電源線時閃電可能會受到雷擊,導致嚴重的傷害;請關閉 LCD 電視並
等到天氣好轉。
3. 電源纜線
戶外的天線系統不應位於附近有電力纜線的上頭,或其他電燈或電力回路,或可能掉落到諸如電力
纜線或回路的地方。 安裝戶外天線系統時,需非常小心,請勿接觸到電力纜線或回路,如果不小
心碰到可能會致命。
清潔 LCD 電視
• 請確認關閉 LCD 電視。
• 請勿將液體直接噴灑或傾倒在螢幕或外殼上。
要清潔螢幕:
1
請使用乾淨、柔軟的無塵布擦拭螢幕。 如此將可除去灰塵及其他塵埃。
2
如果仍不夠清潔,請在乾淨、柔軟的無塵布上倒一些不含氨水、不含酒精的玻璃清潔劑,然後再擦
拭螢幕。
要清潔外殼:
1
請用柔軟的乾布。
2
如果仍不夠清潔,請在乾淨、柔軟的無塵布上倒一些不含氨水、不含酒精且非磨損性的清潔劑,然
後再擦拭表面。
免責聲明
ViewSoni c® 建議不要使用含氨水或含酒精的清潔劑,去清潔 LCD 電視螢幕或外殼。據報告顯示,某些
化學清潔劑會損壞 LCD 電視螢幕和/或外殼。
ViewSonic 對於因使用含氨水或含酒精的清潔劑而造成的損壞,將不負任何責任。
ViewSonic 3 N4200w
Page 80

開始
您現在可以開始安裝 LCD 電視。 請確認安裝前已閱讀了安全指示。
重要! 請保存好原包裝盒和所有包裝材料,以便將來運輸使用。
包裝內容
請檢查
重要! 如果缺少清單中物品,請聯繫經銷商。
LCD
• LCD 電視
• ViewSonic 使用手冊
• 電源線
• 內含電池的通用遙控器
電視包裝包括如下內容:
• 快速入門手冊
• RF 纜線
• 保固卡
• 維修貼紙
繁
體
中
文
ViewSonic N4200w
4
Page 81

將 ViewSonic LCD 裝在牆上
LCD 電視可壁掛式或直立式安裝。在將本產品安裝在牆上之前,請考慮下列指導方針:
• 詳讀本手冊開頭的重要安全指示。
• 請勿安裝在濕氣重或潮濕的環境。 本裝備只適用於戶內使用。
• 請勿安裝接近熱源,或磁場強大附近。
繁體中文
• 僅使用經核准能支撐 LCD 電視重量的掛牆托架。
• 將您的 LCD 電視安裝到支撐的牆上。
• 請務必保留 LCD 電視的通風口周圍至少 3 公分的空間。
要安全地將壁掛式托架拆下,請依循下列指導方針:
1. 請將電源或其他可能會阻礙 LCD 電視搬移的其他纜線拔除。
2. 若要在桌子或工作台上安裝 LCD 電視,請將螢幕朝下並在桌面與螢幕之間放置毛
巾或毛毯以保護螢幕。
3. 在托架中有 6 個螺絲孔配對到 LCD 電視(如圖所示),有兩對在基座的另一邊
(與電視後方面板垂直),在每一支撐立架的底部各裝有一個螺絲(與支撐的方向
平行)。鬆開 6 顆螺絲,妥善保管以備日後使用。
僅使用經 ViewSonic 或當地的經銷商所核准的壁掛式托架。
注意:
• 如果您的 LCD 電視已安裝好直立式操作,在將裝置安裝到牆面之前您需要先拆下立架。
• 壁掛式的螺絲類型為: M6 x L10
ViewSonic 5 N4200w
Page 82

重新安置衛星揚聲器
要更換 LCD 電視附帶的揚聲器或延長纜線,請諮詢 ViewSonic 或當地的經銷商。
要從主 LCD 電視整體上取下衛星(側邊)揚聲器,請閱讀下列指示:
1. 拔出 LCD 電視的電源。
2. 從 LCD 電視上取下音源線。
3. 若要在桌子或工作台上安裝 LCD
電視,請將螢幕朝下並在桌面與螢
幕之間放置毛巾或毛毯以保護螢
幕。
4. 從主機體上取下固定揚聲器的 6
顆螺絲(每邊 3 顆螺絲)。
5. 將揚聲器從主機體向外拉出。
繁
體
中
文
請先確認正確極性,再將揚聲器的音源線連接到 LCD 電視。亦即在 LCD 電視後方面
板連接器上紅色 (+ve) 纜線連接到紅色 (+ve) 端子,黑色 (-ve) 纜線連接到黑色 (-ve)
端子。
ViewSonic N4200w
6
Page 83

介紹 ViewSonic LCD 電視
正面顯示和控制
繁體中文
A
B
C
D
E
F
G
輸入 選擇輸入來源。
選單 切換 OSD 選單。
音量降低
音量提高
頻道調低 調低頻道/向下捲動。
頻道調高 調高頻道/向上捲動。
正常操作時為調低音量,或在使用 OSD 選單則為調整反白
控制。
正常操作時調高音量,或在使用 OSD 選單則為調整反白控
制。
開啟/關閉電源。
ViewSonic 7 N4200w
Page 84

後方面板和連線
繁
體
中
文
A
B
C HDMI (1)
D HDMI (2)
E VGA
F
G S-V
H
I
J
電源開關 開啟/關閉電源。
AC 輸入 使用隨附的連接線,將電視插入最近的插座。
電腦立體聲
影像 從您的 DVD/VCR 或電腦上連接影像輸出到此端子。
左聲道 連接左側揚聲器的聲音輸出。
右聲道 連接右側揚聲器的聲音輸出。
DVD 播放機的一個 HDMI 連接端子。
DVD 播放機的一個 HDMI 連接端子。
將電腦的 VGA 連接線輸出連接至 VGA 端子輸入。
使用電腦到聲音的音源線,從電腦的聲音輸出連接至聲音輸入
端子。
將外部視訊裝置,例如 VCR、DVD 與電視遊樂器連接至這個
DIN 插孔。
K SPDIF
ViewSonic N4200w
連接到 SPDIF 設備。
8
Page 85

側面面板的連線
繁體中文
A
B
C
D S-V
E
F
G
H S-V
I
右聲道 從相容設備連接聲音輸出(右聲道)到此端子。
左聲道 從相容設備連接聲音輸出(左聲道)到此端子。
影像
右聲道 從相容設備連接聲音輸出(右聲道)到此端子。
左聲道 從相容設備連接聲音輸出(左聲道)到此端子。
影像
右聲道 從相容設備連接聲音輸出(右聲道)到此端子。
將外部視訊裝置,例如 VCR、DVD 與電視遊樂器連接至這
個插孔。
將外部視訊裝置,例如 VCR、DVD 與電視遊樂器連接至這
個 DIN 插孔。
將外部視訊裝置,例如 VCR、DVD 與電視遊樂器連接至這
個插孔。
將外部視訊裝置,例如 VCR、DVD 與電視遊樂器連接至這
個 DIN 插孔。
J
K Pr/Cr
L Pb/Cb
M Y
N
左聲道 從相容設備連接聲音輸出(左聲道)到此端子。
連接外部視訊裝置到此輸入。
連接外部視訊裝置到此輸入。
連接外部視訊裝置到此輸入。
類比天線 連接到外部天線或有線電視服務。
ViewSonic 9 N4200w
Page 86

遙控器
繁
體
中
文
下列表格描述了通用遙控器的功能。
A
B
C
D
E
F
G
H
向上/向下/向左/向右/確定
來源 (SOURCE) 選擇輸入來源(例如:視訊、天線、電腦)。
0~100+ 頻道選擇 使用這些按鍵選擇頻道。
音量 (VOL+ / VOL-) 調整音量。
按鈕
静音 (MUTE) 暫時關閉聲音輸出,保留目前的聲音設置。
鎖定 (FREEZE)
顯示 (DISPLAY) 顯示目前的輸入來源及時間。
画中画/画外画 (PIP/POP ) 啟動 PIP 功能 (啟動指南)。
向上/向下按鈕用來選擇 OSD 功能,向左
/向右按鈕用來調整功能。 按「確定」按鈕
確認您的選擇。
按此按鈕可保留目前畫面。 再按一次可釋放
畫面。 注意此功能與暫停不同,畫面後方的
放送仍會持續進行。
I
J
ViewSonic N4200w
画中画/信号源 (PIP/SOUR) 按下可在 PIP 之間切換「子」畫面。
画中画/位置 (PIP/POS) 在 PIP 模式下變更「子畫面」的顯示位置。
10
Page 87

K
L
M
N
画中画/信号源互换(PIP/SWAP)
觀賞模式 (WIDE) 變更顯示比例。
休眠 (SLEEP) 設定定時器來關閉顯示器。
菜单 (MENU) 顯示選單或結束 OSD 選單。
在輸入來源之間切換「主」畫面與「子」畫
面。
繁體中文
O
P
频道 (CH﹀ / CH^) 在頻道間依序捲動。
电源
開啟/關閉電源。
ViewSonic 11 N4200w
Page 88

準備 LCD 電視
1. 插入遙控器電池
a) 壓入遙控器中間的卡榫以翻開電池蓋,再取下電池蓋。
b) 按照電池和電池室內的 (+)與 (-) 標記擺放電池。
c) 裝上電池蓋,壓入電池蓋直到卡入正確位置。
繁
體
中
文
小心
• 請只使用指定的 AAA 電池。
• 請勿將新舊電池混合使用。這樣可能會導致電池破裂及電池液外漏,而引發火
災或導致人身傷害。
• 請根據 (+) 與 (-) 標記來放入電池。錯誤置入電池可能會導致電池破裂及電池
液外漏,而引發火災或導致人身傷害。
• 請根據當地法律及法規棄置電池。
• 請將電池放在遠離孩童及寵物的地方。
• 長時間不使用遙控器時,請取出電池。
ViewSonic N4200w
12
Page 89

2. 連接外部天線
安裝外部天線到 N4200w 時請確認電源已關閉。
連接電視天線到 LCD 電視端子或有線電視機上盒,僅能使用 75 歐姆同軸電纜。
繁體中文
RF 纜線或配接器
3. 連接到聲音輸出
要連接外部放大機,請將 L/R RCA 連接線連接至「電視聲音輸出」連接埠,以及相容
放大機上的正確「聲音輸入」連接埠。
聲音輸入纜線
(不隨附纜線)
ViewSonic 13 N4200w
Page 90

4. 連接到 SPDIF 設備
要傳送聲音到外部放大機,電腦或錄音機,使用相容的 SPDIF 立體聲插座連接到 LCD
電視。
SPDIF 纜線
(不隨附纜線)
5. 將 AV、S-Video、YCbCr、YPbPr、HDMI 連接至視訊裝置
下列圖解顯示 LCD 電視後方面板可用的連接以及如何將它們連接到對應的裝置。在大
部分的情況下,連接線都有顏色標記能與後方面板端子的顏色相符。
繁
體
中
文
AV 機型:
將視訊線連接到視訊來源的輸出插孔,以及 LCD 電視上的複合輸入。現在將音源線從
視訊來源的左右聲音輸出端子連接到聲音輸入端子。
RCA A/V 纜線
(不隨附纜線)
VCR/有線電視接收器
ViewSonic N4200w
14
Page 91

S-Video 機型:
連接視訊線到視訊來源的輸出插孔,以及 LCD 電視的 S-video 輸入插孔。現在將音源
線從視訊來源的左右聲音輸出端子連接到聲音輸入端子。
纜線
(非隨附纜線)
繁體中文
VCR
聲音輸入纜線
(不隨附纜線)
YCbCr / YPbPr 機型:
連接視訊線到視訊來源的 Y、Pb/Cb、Pr/Cr 輸出,以及 LCD 電視上的 Y、Pb/Cb、Pr/Cr
輸入。 現在將音源線從視訊來源的左右聲音輸出端子連接到聲音輸入端子。
YCbCr / YpbPr 纜線
(不隨附纜線)
聲音輸入纜線
(不隨附纜線)
DVD 播放機或 VCR
ViewSonic 15 N4200w
Page 92

HDMI 和 HDTV:
LCD 電視與 HDTV 和 HDMI 相容,非壓縮干擾自由數位傳輸標準。前者需額外的音
源線,在這種情況下,連接 DVD 播放機上的聲音輸出到電腦立體聲輸入。後者為全功
能介面以單一連接線支援影音功能。
您的 DVD 播放機可能有兩個 HDMI 連接端。請使用符合您設備的連接方式。
DVD 播放機
(不隨附纜線)
繁
體
中
文
HDMI 纜線 (不隨附纜線)
注意: 要從 DVD 播放機上接收聲音,請找出 OSD 聲音選單並啟用 HDMI 聲音。
請確認輸入來源與 HDMI 相容。
6. 連接電腦
VGA (15 針 D-Sub):
將 VGA 連接線連接至電腦的 VGA 輸出及 N4200w 的 VGA 輸入端子。
根據個人喜好選擇最高為 1360 x 768(也支援 1280 x 1024)的電腦螢幕解析度。
電腦
VGA 15 針纜線
(不隨附纜線)
ViewSonic N4200w
16
Page 93

電腦聲音輸入:
從您電腦的聲音輸出(綠色端子)連接音源線到 N4200w 聲音輸入端子(同為綠色)。
電腦
繁體中文
電腦音源線
(不隨附連接線)
HDMI:
將 HDMI 連接線從電腦的 DVI 輸出端子連接到 N4200W 的 HDMI 輸入。
電腦
HDMI 纜線 (不隨附纜線)
ViewSonic 17 N4200w
Page 94

7. 連接電源線
先將電源線連接至 N4200w,然後再連接適當的接地 AC 插座。開啟 N4200w 後方的
AC 主電源開關。
AC 主電源開關
切換至「開啟」
繁
體
中
文
AC 牆壁插座
8. 開啟 LCD 電視
按 LCD 電視底端的「電源」按鈕或按遙控器上「電源」按鈕。現在打開外部視訊播放
機。
ViewSonic N4200w
18
Page 95

基本操作
您的 LCD 電視基本功能包括設定輸入來源,更改頻道和調整音量。有兩種方式進入
LCD 電視的基本控制。第一種方式是透過電視主機體操作(
第二種方式是透過使用通用遙控器(
開啟 LCD 電視
在使用 LCD 電視之前:
繁體中文
1. 如「後方面板連線」中所示,插入隨附的 AC 電源配接器。
2. 確保所有外部設備已正確地連接。
參見「遙控器」
)。
參見「正面顯示和控制」
),
3. 打開位於機體後方的 AC 主電源開關(如果長時間不使用 LCD 電視,請關閉此
開關)。
LCD 電視現在處於待機模式,隨時可開機。
待機開/關
LCD 電視機體及遙控器均有「電源」按鈕。 在待機狀態,按電視或遙控器上電源按鈕
均可開啟 LCD 電視螢幕。 當 LCD 電視開啟時,LED 電源會亮起。
按電視或遙控器上電源按鈕幾秒均可關閉螢幕。LCD 電視進入待機狀態。
調整音量
按 VOL-/VOL+ 可調整音量至想要的大小。
要保留目前的音量設定,但暫時關閉聲音,請按「靜音」按鈕。
要恢回復原有音量,再按一次「靜音」按鈕以直接調整音量大小。目前音量設定按總音
量輸出的百分比(1~100)顯示作為參考。
音量:
選擇輸入來源
選擇需要的輸入來源,按遙控器上「來源」按鈕,
並使用▲▼來捲動選擇可用的輸入方法。主來源
輸入 OSD 選單顯示。
要從電腦上檢視輸出,選擇 VGA。選擇 TV 進
行電視輸出。對於外部視訊來源,選擇
AV1/AV2。 選擇 S-Video 進行 VCR 輸出。當
直接連接到 DVD 播放機或相容裝置時,選擇
HDTV 和 HDMI。要選擇已顯示的輸入來源,按
下「確定」。
ViewSonic 19 N4200w
Page 96

螢幕顯示選單系統 (OSD)
本節介紹如何使用 OSD 選單系統,和 LCD 電視在不同的連接時,如何配置螢幕的設
定。
OSD 操作
按下遙控器上或 LCD 電視控制面板上的「選單」(Menu)按鈕,以顯示 OSD 主選單。
按 ▲ 或 ▼ 可使子選單反白,按 ◄ 或 ► 可進入子選單。
按 ▲ 或 ▼ 可使想要選取的功能或設設定反白,然後再按 ◄ 或 ► 來調整設定或執
行此功能。
再次按下遙控器上或 LCD 電視右側的「選單」(Menu)按鈕,可關閉 OSD 主選單。
要選擇電腦模式,請從來源選單中選擇 VGA。
OSD 主選單上方的 4 個圖示代表 4 個子選單 (「畫質」、「調整」、「聲音」、「設定」)。
要選擇 AV 模式,從來源選單選擇 AV1 / AV2、S-Video1 / S-Video2、HDTV1 / HDTV2
或 HDMI1 / HDMI2。
OSD 主選單上方的 4 個圖示代表 4 個子選單 (「畫質」、「聲音」、「設定」、「家長」)。
要選擇電視模式,從來源選單中選擇 TV。
OSD 主選單上方的 4 個圖示代表 4 個子選單 (「畫質」、「聲音」、「設定」和 TV)。
繁
體
中
文
ViewSonic N4200w
20
Page 97

OSD 配置螢幕
下列螢幕說明 OSD 選單螢幕在每種連接類型下,配置 LCD 電視達到最佳使用效果。
電腦模式:
畫質選單
繁體中文
使用此螢幕來配置色彩平衡,切換文字和圖形顯示,啟用╱停用多重畫面顯示功能。
項目 說明 操作
對比度 在暗色和亮色之間調整。
亮度 調整亮度大小。
有三種預設的顏色設定檔可供使
用,即「STD」、「暖色系」,「冷色
色溫
系」和「使用者」可調整設定檔。
當選取使用者時,可手動調整紅
色、綠色和藍色的飽和度。
► 可增加對比度。
◄ 可減少對比度。
► 使顯示器變亮。
◄ 使顯示器變暗。
按 ► 或 ◄ 可在色彩組合之間
循環。
若選取使用者時:
► 可增加該顏色的飽和度。
◄ 可減少該顏色的飽和度。
文字/圖形 選擇「圖形」或「文字」。
PIP
選擇單一畫面或多重畫面功能。
► 或 ◄ 可在圖形顯示和文字顯
示之間切換。
► 或 ◄ 可選擇「關」、「PBP」或
「PIP 」。 (在子畫面中不支援
HDMI 輸入。)
ViewSonic 21 N4200w
Page 98

調整選單
配置 LCD 電視用於電腦或 S-Video 輸入時,您很可能需要調整選單。
繁
體
中
文
項目 說明 操作
自動影像調整
頻率
微調
水平位置
垂直位置
此功能自動為目前輸入選擇最佳的
設定。
調整水平同步訊號與影像之間的延
遲時間。
如果色彩不協調,可調整色調或濃
淡。 最好的方法是使用膚色作為參
考色。
調整子母畫面中主畫面與子畫面的
水平位置。
調整子母畫面中主畫面與子畫面的
垂直位置。
► 啟動「自動影像調整」。
► 可增加頻率。
◄ 可降低頻率。
► 可增加微調。
◄ 可減少微調。
► 可將顯示向右移動。
◄ 可將顯示向左移動。
► 可將顯示向上移動。
◄ 可將顯示向下移動。
ViewSonic N4200w
22
Page 99

聲音選單
繁體中文
配置此選單中的欄位,為使用電腦聲音輸入而設定 LCD 電視聲音。
項目 說明 操作
低音 調整低音。
高音 調整高音。
平衡 調整左右聲音平衡。
► 可加強低頻聲音。
◄ 減弱低頻聲音。
► 可加強高頻聲音。
◄ 可減弱高頻聲音。
► 可加強右側揚聲器。
◄ 可加強左側揚聲器。
ViewSonic 23 N4200w
Page 100

設定選單
使用此螢幕可配置 OSD 選單並調整畫面顯示比率。
繁
體
中
文
項目 說明 操作
觀賞模式 可調整畫面長寬比率。
預設 回復原設定或出廠預設。 ► 回到出廠時的預設。
選單語言 選擇選單語言。
選單位置 選擇顯示器上的選單位置。
選單透明度 調整選單透明的程度。
選單顯示時間 定時器會自動關閉選單畫面。
► 或 ◄ 可選擇 Wide(寬螢幕)或
正常。
► 或 ◄ 在選單中可供使用的語言
之間循環。
► 或 ◄ 在顯示器上五種不同的選
單位置之間循環。
► 可增加透明度。
◄ 可減少透明度。
► 或 ◄ 可選擇 10 秒、20 秒、30
秒。
ViewSonic N4200w
24
 Loading...