

Page 1
VP2290b
Widescreen LCD Display
User Guide
Guide de l’utilisateur
Bedienungsanleitung
Guía del usuario
Guida dell'utente
Guia do usuário
Användarhandbok
Käyttöopas
Full 22.2” Diagonal Viewable Screen
Jmdh\h^kl\hihevah\Zl_ey
Page 2

Contents
For Your Records ........................................................................................................1
Before setting up................................................................................................................2
Prerequisites................................................................................................................2
Unpacking....................................................................................................................2
Checking parts.............................................................................................................3
Hardware setup ..................................................................................................................4
Locations .....................................................................................................................4
Front view ............................................................................................................................4
Rear view .............................................................................................................................4
Setup the display .........................................................................................................5
Storing the connector tool....................................................................................................5
Connecting the cables .........................................................................................................7
Adjusting and maintaining your display........................................................................12
Adjusting the viewing angle .......................................................................................12
Setting the display control buttons.............................................................................13
Accessing the on-screen display (OSD) menus ................................................................14
Knowing the operating status of your display ............................................................17
Disconnecting the cable ............................................................................................ 18
Using the security keylock .........................................................................................19
Cleaning the LCD Display..........................................................................................19
Troubleshooting ...............................................................................................................20
Symptom list ..............................................................................................................20
Danger Statements...........................................................................................................22
Notices ..............................................................................................................................24
Attention.....................................................................................................................24
LCD considerations ................................................................................................... 24
Considerations on the display resolution ...................................................................24
Operating considerations...........................................................................................24
License inquiries ........................................................................................................25
Trademarks................................................................................................................25
Specifications...................................................................................................................26
Supported display modes ..........................................................................................27
Extended modes........................................................................................................28
Updating the settings for your display........................................................................ 29
Applicable models .............................................................................................................29
Procedure .........................................................................................................................29
Caution .............................................................................................................................. 29
Valid settings ....................................................................................................................32
Customer Support ...........................................................................................................33
ViewSonic VP2290b i
Page 3

Compliance ......................................................................................................................34
Compliance Compliance Information for U.S.A. .......................................................34
Industry Canada Class A Emission Compliance Statement .............................................34
Avis de Conformité àla Réglementation d’Industrie Canada ............................................34
European Union – EMC Directive .....................................................................................34
Deutsche EMV-Direktive (electromagnetische Verträglichkeit) ........................................34
Union Européenne – Directive Conformité électromagnétique .........................................35
Union Europea – Normativa EMC .....................................................................................35
Statements for Other Countries ........................................................................................36
Power Cord .......................................................................................................................36
MPRII ................................................................................................................................36
LIMITED WARRANTY ......................................................................................................38
VIEWSONIC LCD DISPLAY .....................................................................................38
Appendix ..........................................................................................................................39
Power Cord Safety Guidelines ..................................................................................39
Compliance Information for U.S.A. ...........................................................................40
Compliance Information for Canada .........................................................................40
Compliance Information for European Countries ......................................................40
User Information for all Countries .............................................................................40
ii ViewSonic VP2290b
Page 4

Copyright © ViewSonic Corporation, 2003. All rights reserved.
Apple, Mac and ADB registered trademarks of Apple Computer, Inc.
Microsoft, Windows, Windows NT, and the Windows logo are registered trademarks of Microsoft
Corporation in the United States and other countries.
ViewSonic, the three birds logo and OnView are registered trademarks of ViewSonic Corporation.
VESA and SVGA are registered trademarks of the Video Electronics Standards Association.
DPMS and DDC are trademarks of VESA.
PS/2, VGA and XGA are registered trademarks of International Business Machines Corporation.
Disclaimer: ViewSonic Corporation shall not be liable for technical or editorial errors or omissions
contained herein; nor for incidental or consequential damages resulting from furnishing this material,
or the performance or use of this product.
In the interest of continuing product improvement, ViewSonic Corporation reserves the right to
change product specifications without notice. Information in this document may change without
notice.
No part of this document may be copied, reproduced, or transmitted by any means, for any purpose
without prior written permission from ViewSonic Corporation.
Electronic Warranty Registration
To meet your future needs, and to receive any additional product
information as it becomes available, please register your product
warranty on the Internet at: http://www.viewsonic.com
For Your Records
Product Name:
Model Number:
Document Number:
Serial Number:
Purchase Date:
Product disposal at end of product life
ViewSonic is concerned about the preservation of our environment. Please dispose of this product
properly at the end of its useful life. Your local waste disposal company may provide information
about proper disposal.
ViewSonic VP2290b
VLCDS24728-3W
A-CD-VP2290b-3W
______________
______________
1 ViewSonic VP2290b
Page 5
Before setting up
This manual contains information on how to set up and operate the ViewSonic VP2290b LCD
Display, hereafter called the display.
This chapter describes the following:
• Prerequisites
• Unpacking
• Checking parts
Prerequisites
You will need a personal computer or a workstation (hereafter called the computer) with the
following.
• A DVI-compliant video graphics card (hereafter simply called the DVI) To date, the following
cards have been tested to work with this display, including:
®
AT I
FireGL
®
AT I
FireGLX1
nVIDIA Quadro® 4 900XGL / 980XGL
nVIDIA Quadro® FX-1000
nVIDIA Quadro® FX-2000
nVIDIA Quadro® FX-3000
MATROX ParheliaTM HR256
TM
4
If the user wishes to use some other DVI-compliant video graphics cards (refer to http://
www.viewsonic.com for the latest information), ViewSonic is not held responsible for any damages
incurred by the installation of unsupported cards.
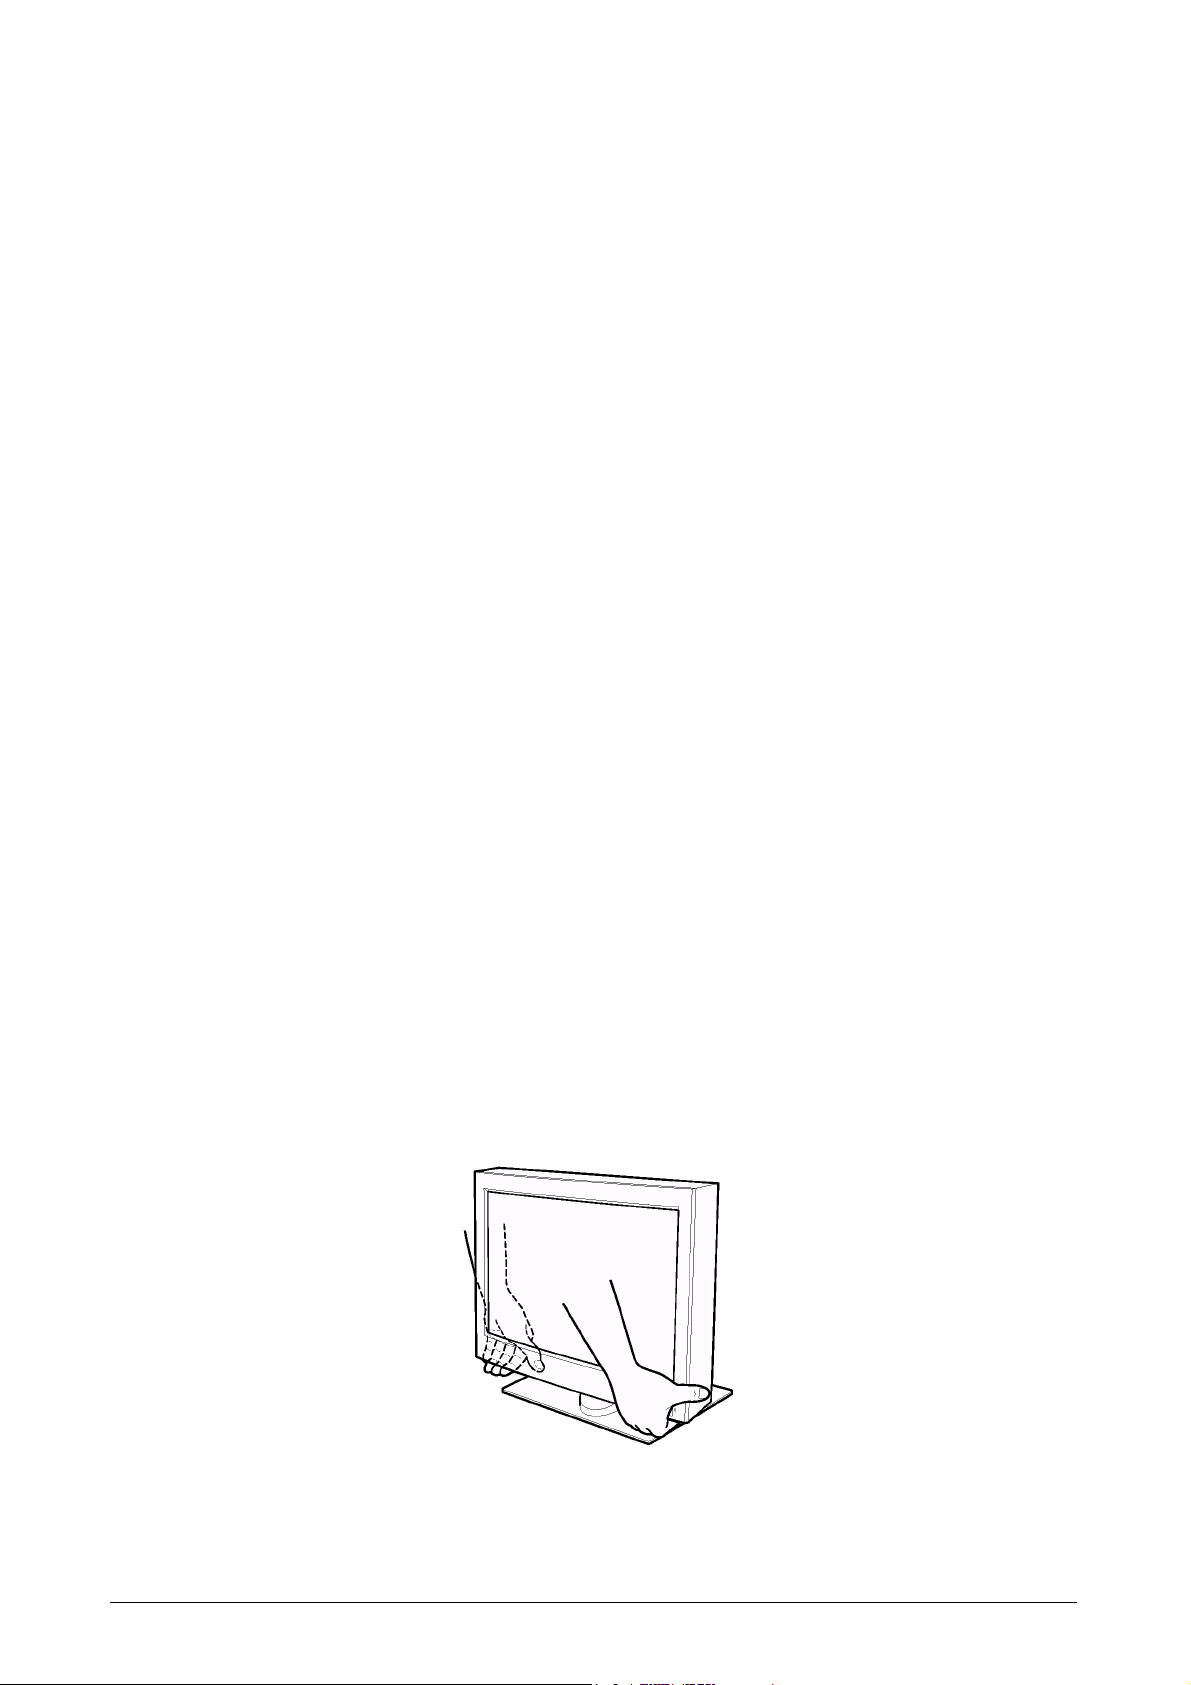
Unpacking
Attention: The display is heavy. Be careful not to drop it. The LCD is fragile and should not be
bumped on an edge, or dropped.
Open the carton box and carefully remove the display. Hold the bottom of the screen firmly with
both hands, as shown below.
ViewSonic VP2290b 2
Page 6
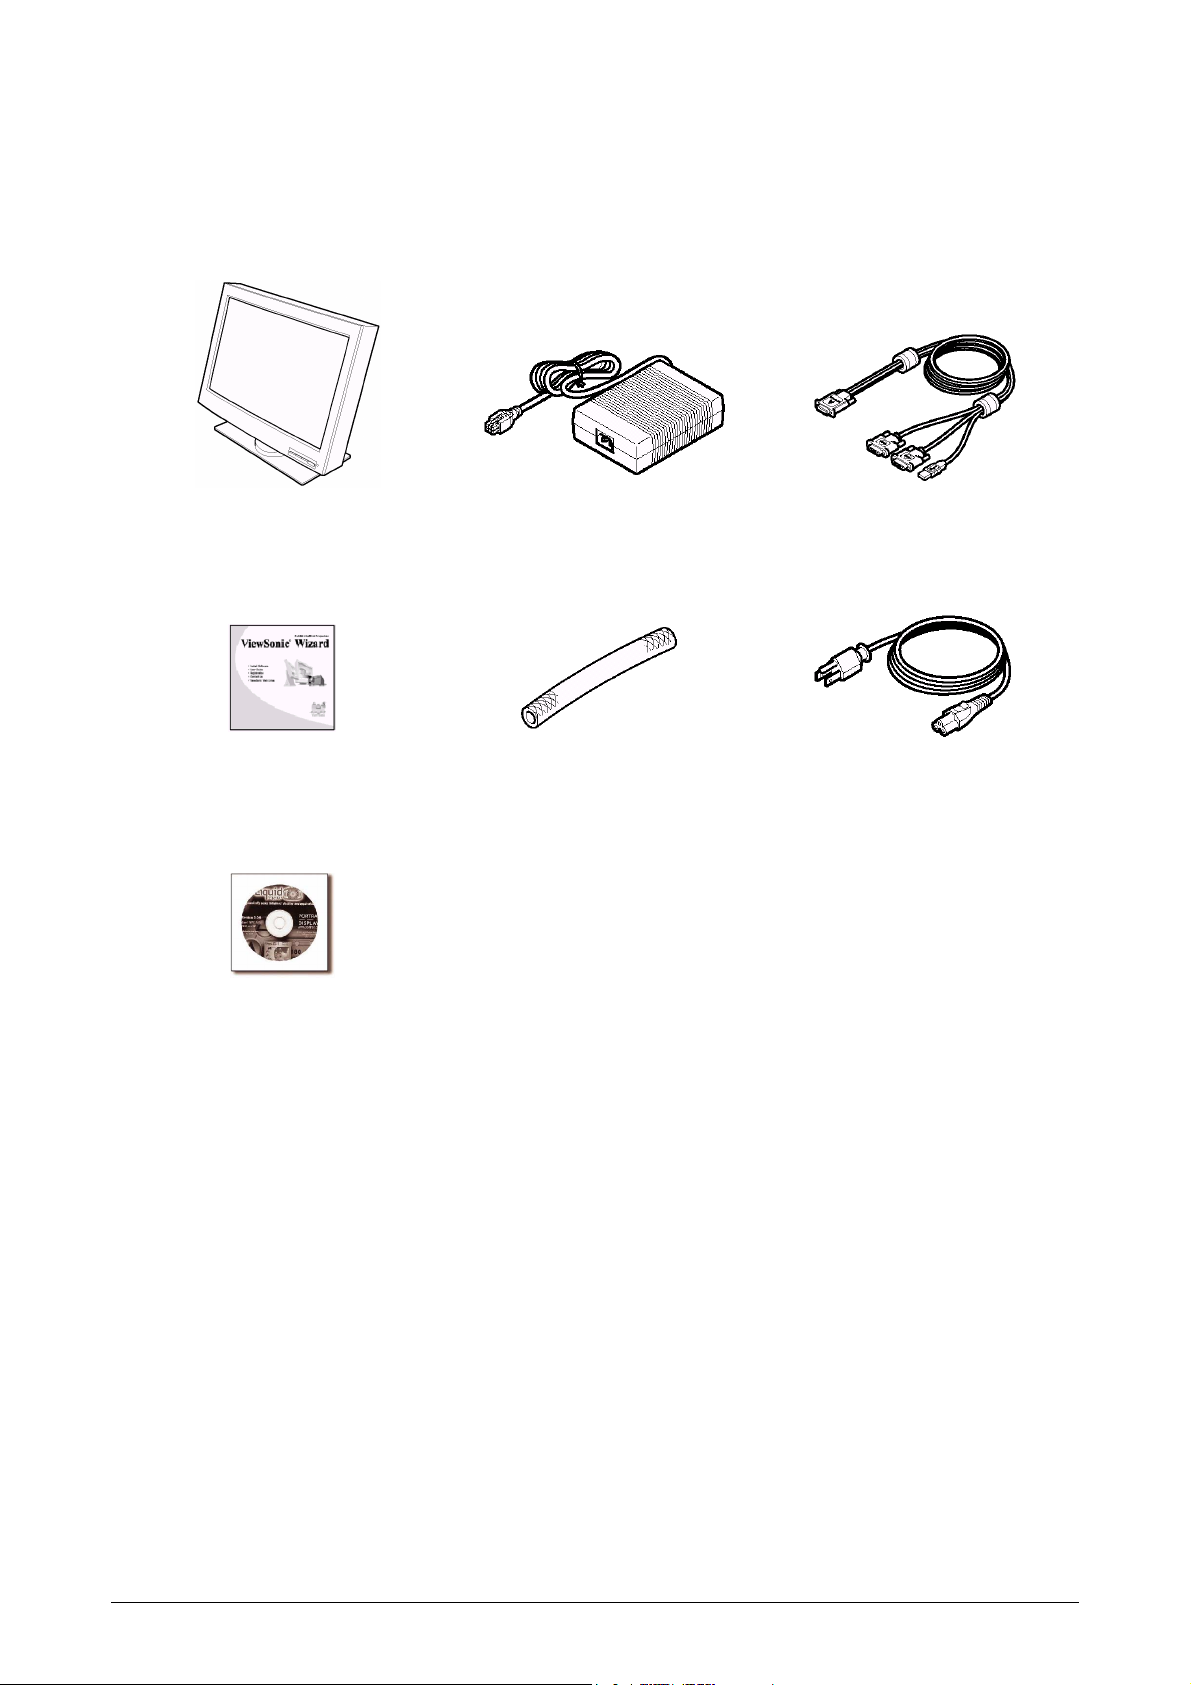
Checking parts
Check the box for the following items. If any items are missing or damaged, contact your place of
purchase immediately.
Display Power adapter and cord
ViewSonic Wizard CD
Liquid View Scaling
Software for Windows
Connector tool
Digital signal cable
P/N: 07N2227
Power cord
Note: The digital signal cable is shipped with one end connected to the display.
3 ViewSonic VP2290b
Page 7
Hardware setup
This chapter describes the following:
• The location of the controls, switches, and connectors.
• The procedure for setting up the display.
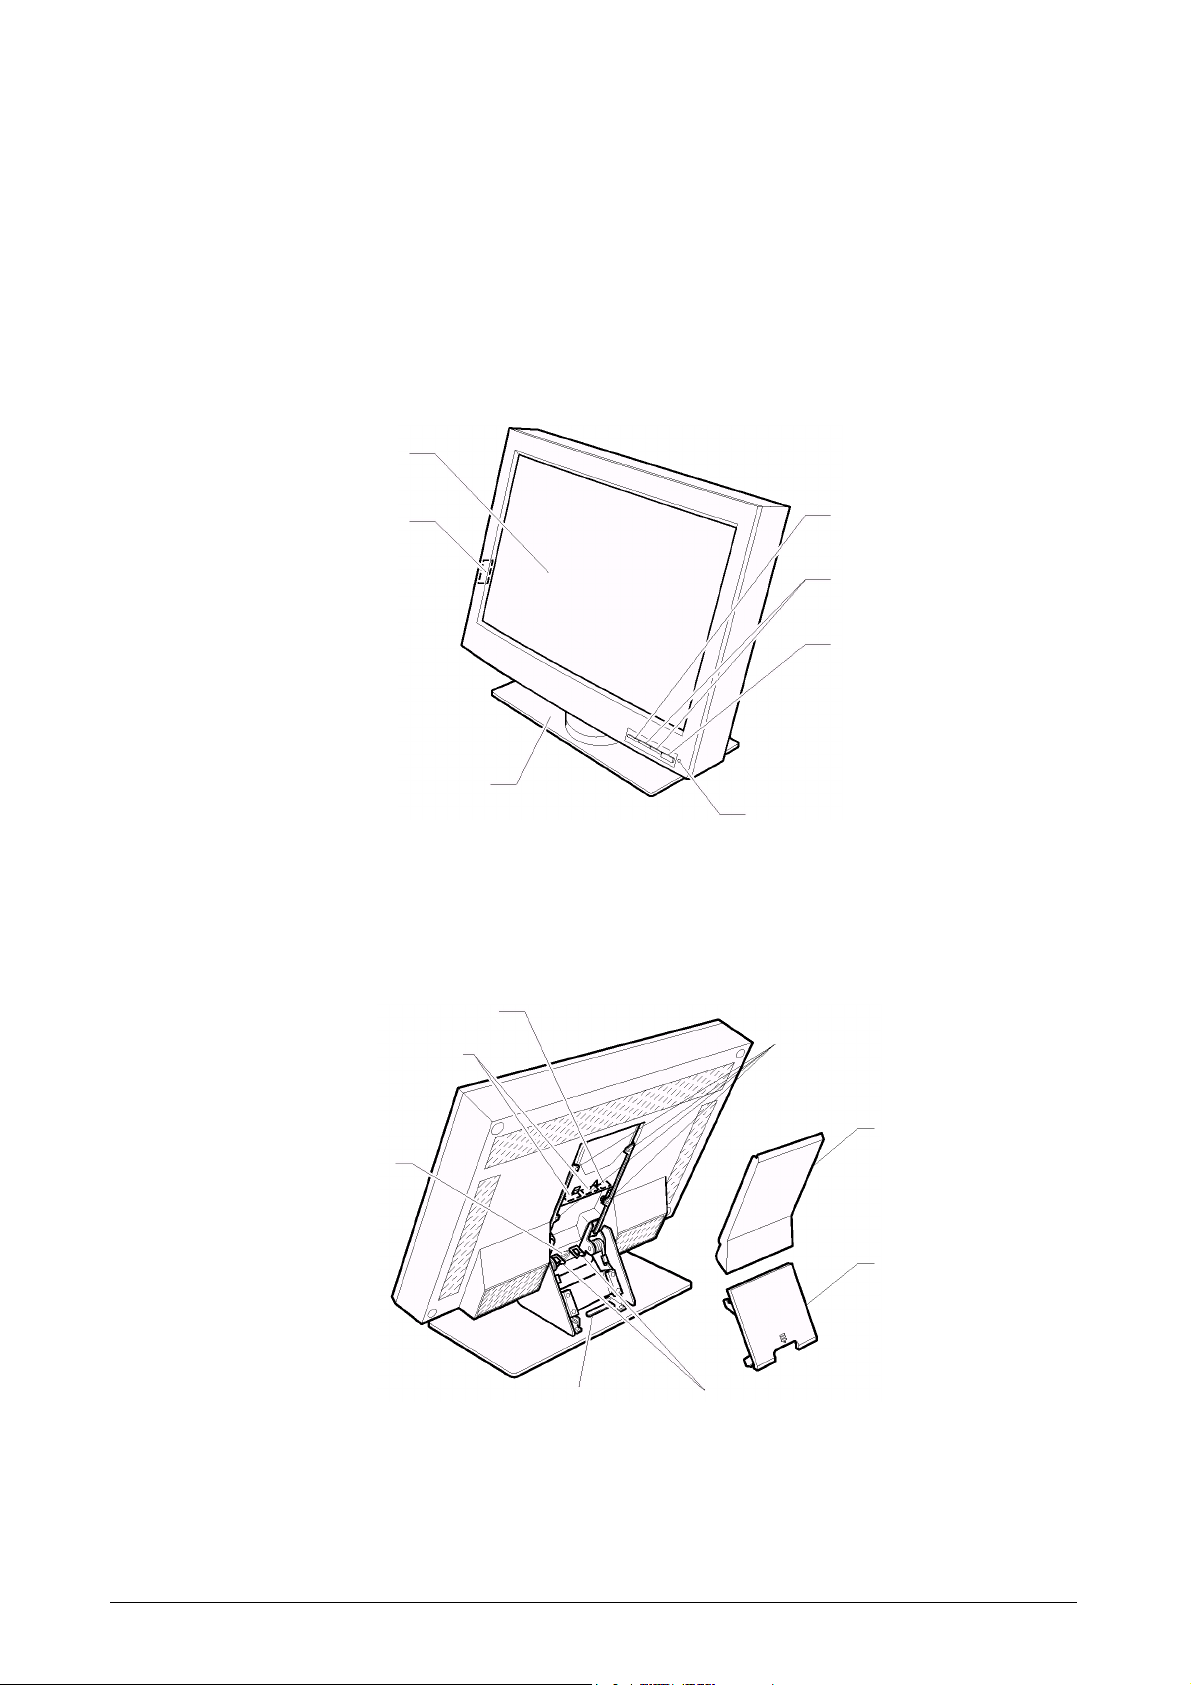
Locations
Front view
Monitor screen
Serial number label
Rear view
Base stand
DC-IN connector
Video connector
OSD control
Brightness control
Power switch
Power light
(Power on/Standby)
VESA wall mount holes
Security keyhole
Cable hook
Connector cover
Stand rear cover
Cable clamp
ViewSonic VP2290b 4
Page 8
Setup the display
Storing the connector tool
This section describes how to store the connector tool for future use. This tool will be useful when
disconnecting the cables from the display.
Attention:
1. Remove any objects from the surface before tilting the display. They might damage your screen.
2. Be careful not to pinch your fingers between the display and the surface when tilting the display.
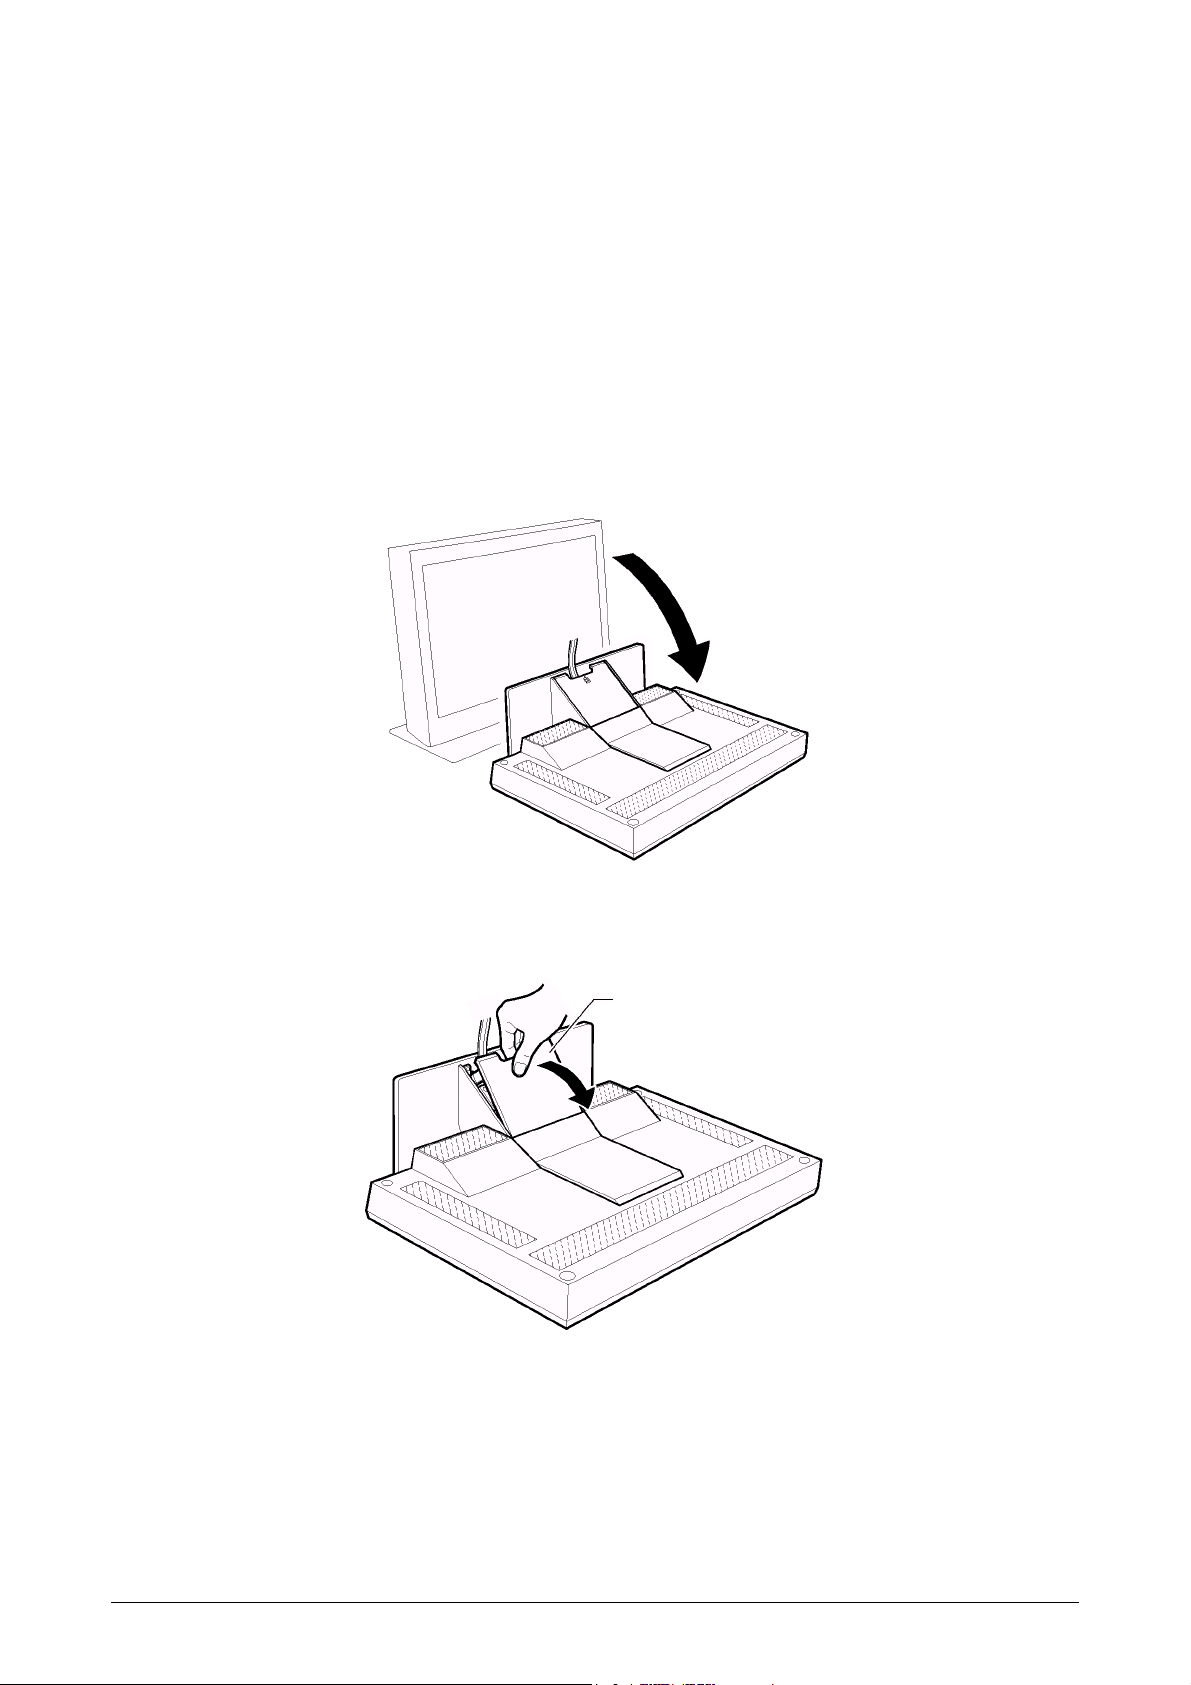
To store the connector tool, do the following:
1. Clear a work space, and turn the display face down.
2. Remove the stand rear cover.
Stand rear cover
5 ViewSonic VP2290b
Page 9
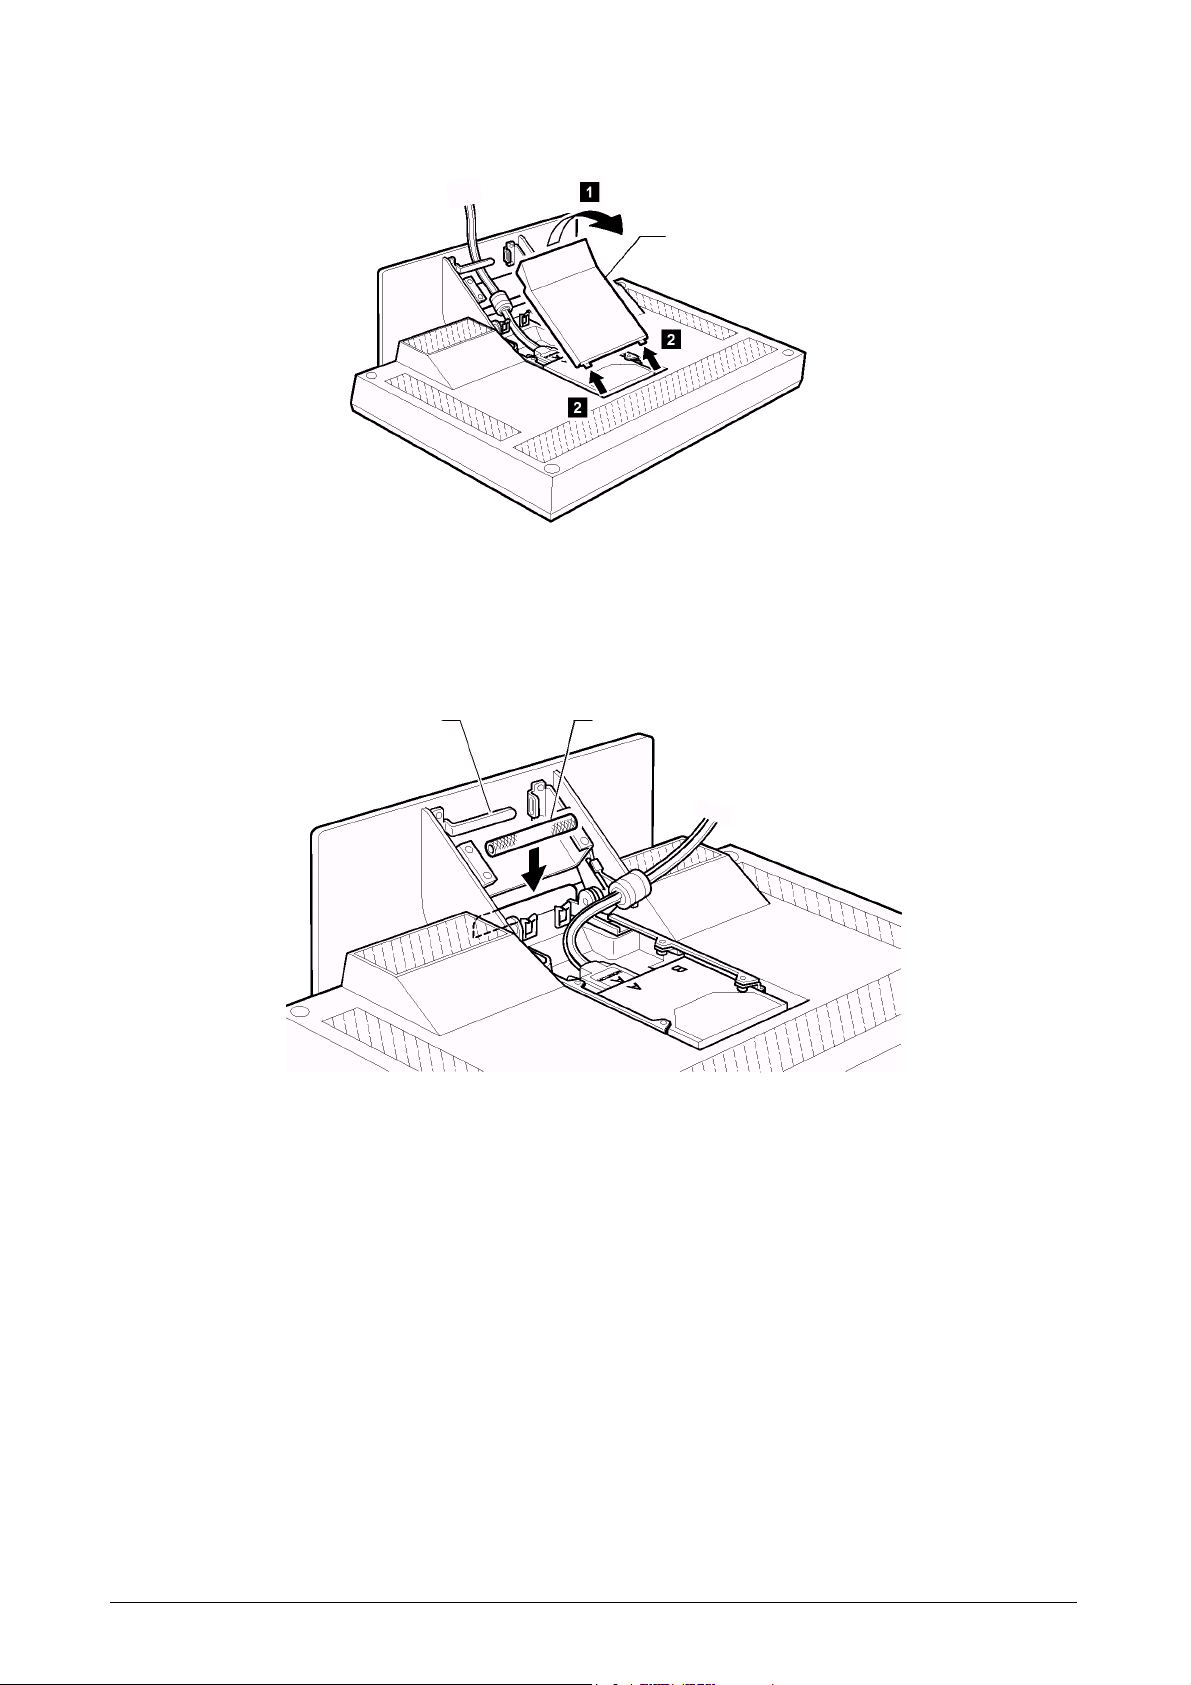
3. Remove the connector cover.
Connector cover
4. Unhook the digital signal cable from the cable hook and lift it up to store the connector tool to
the rear compartment of the display.
Cable hook Connector tool
ViewSonic VP2290b 6
Page 10
Connecting the cables
This section describes how to connect the following cables:
1. Power adapter cord
2. Digital signal cable
3. Power cord
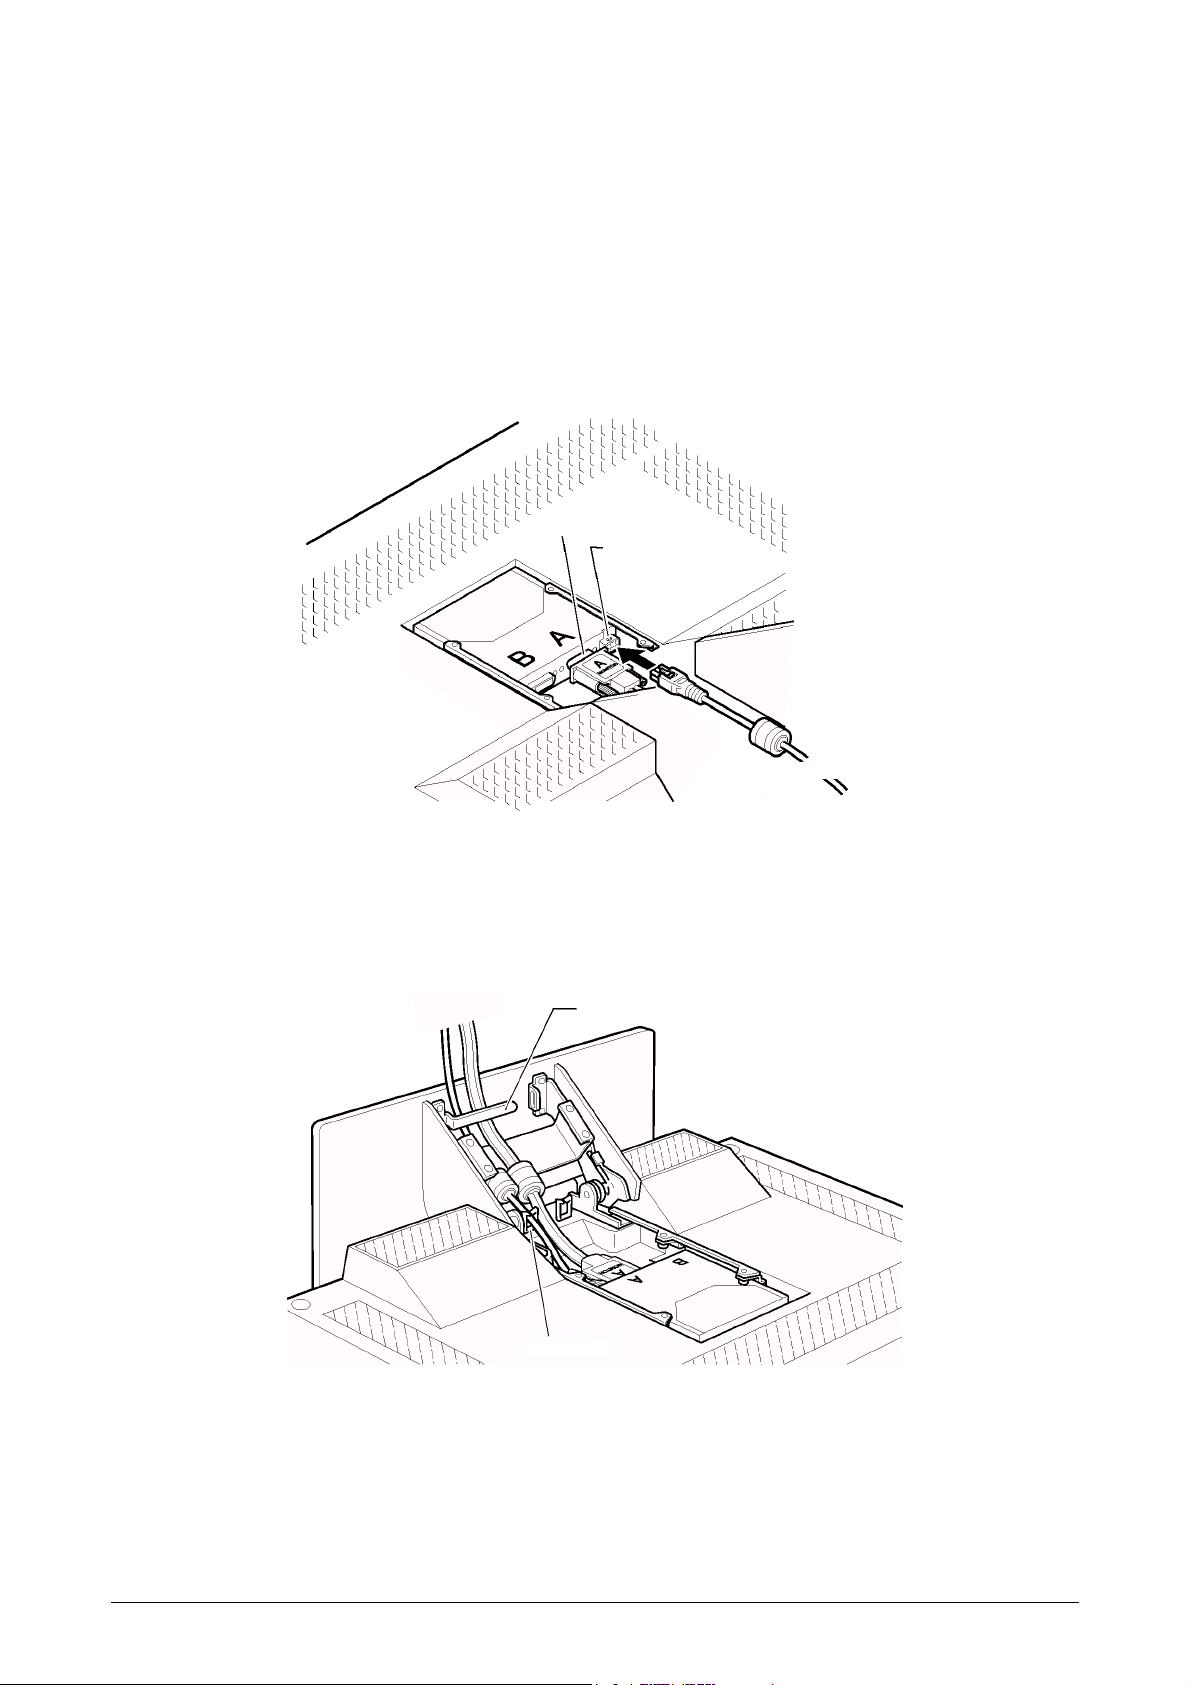
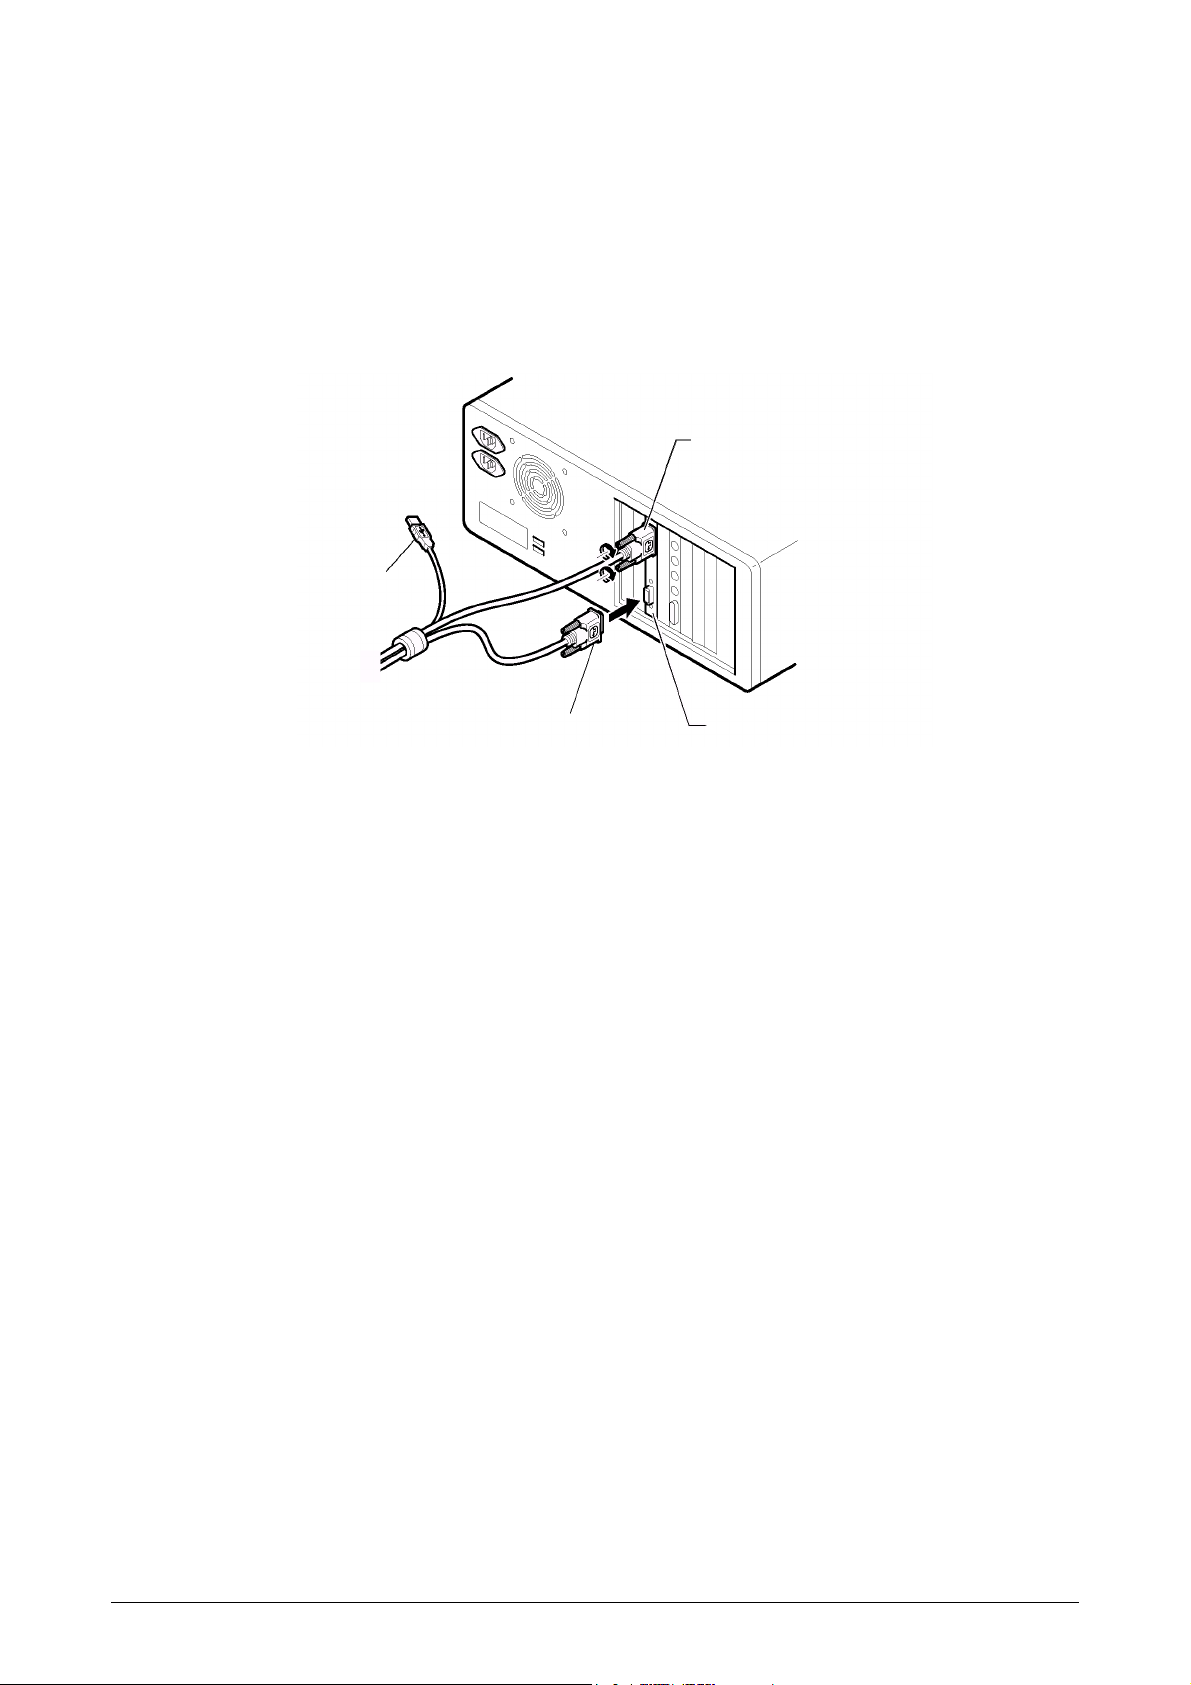
Connecting the power adapter cord
1. Connect the power adapter cord to the DC-IN connector at the rear of the display. Make sure that
it clicks firmly into the connector.
Top vi ew
Video connector
DC-IN connector
bottom view
Note:
The video connectors A and B on the display are Safety Extra Low Voltage (SELV) circuits.
2. Route the cables through the cable clamp and the cable hook.
Cable hook
Cable clamp
7 ViewSonic VP2290b
Page 11
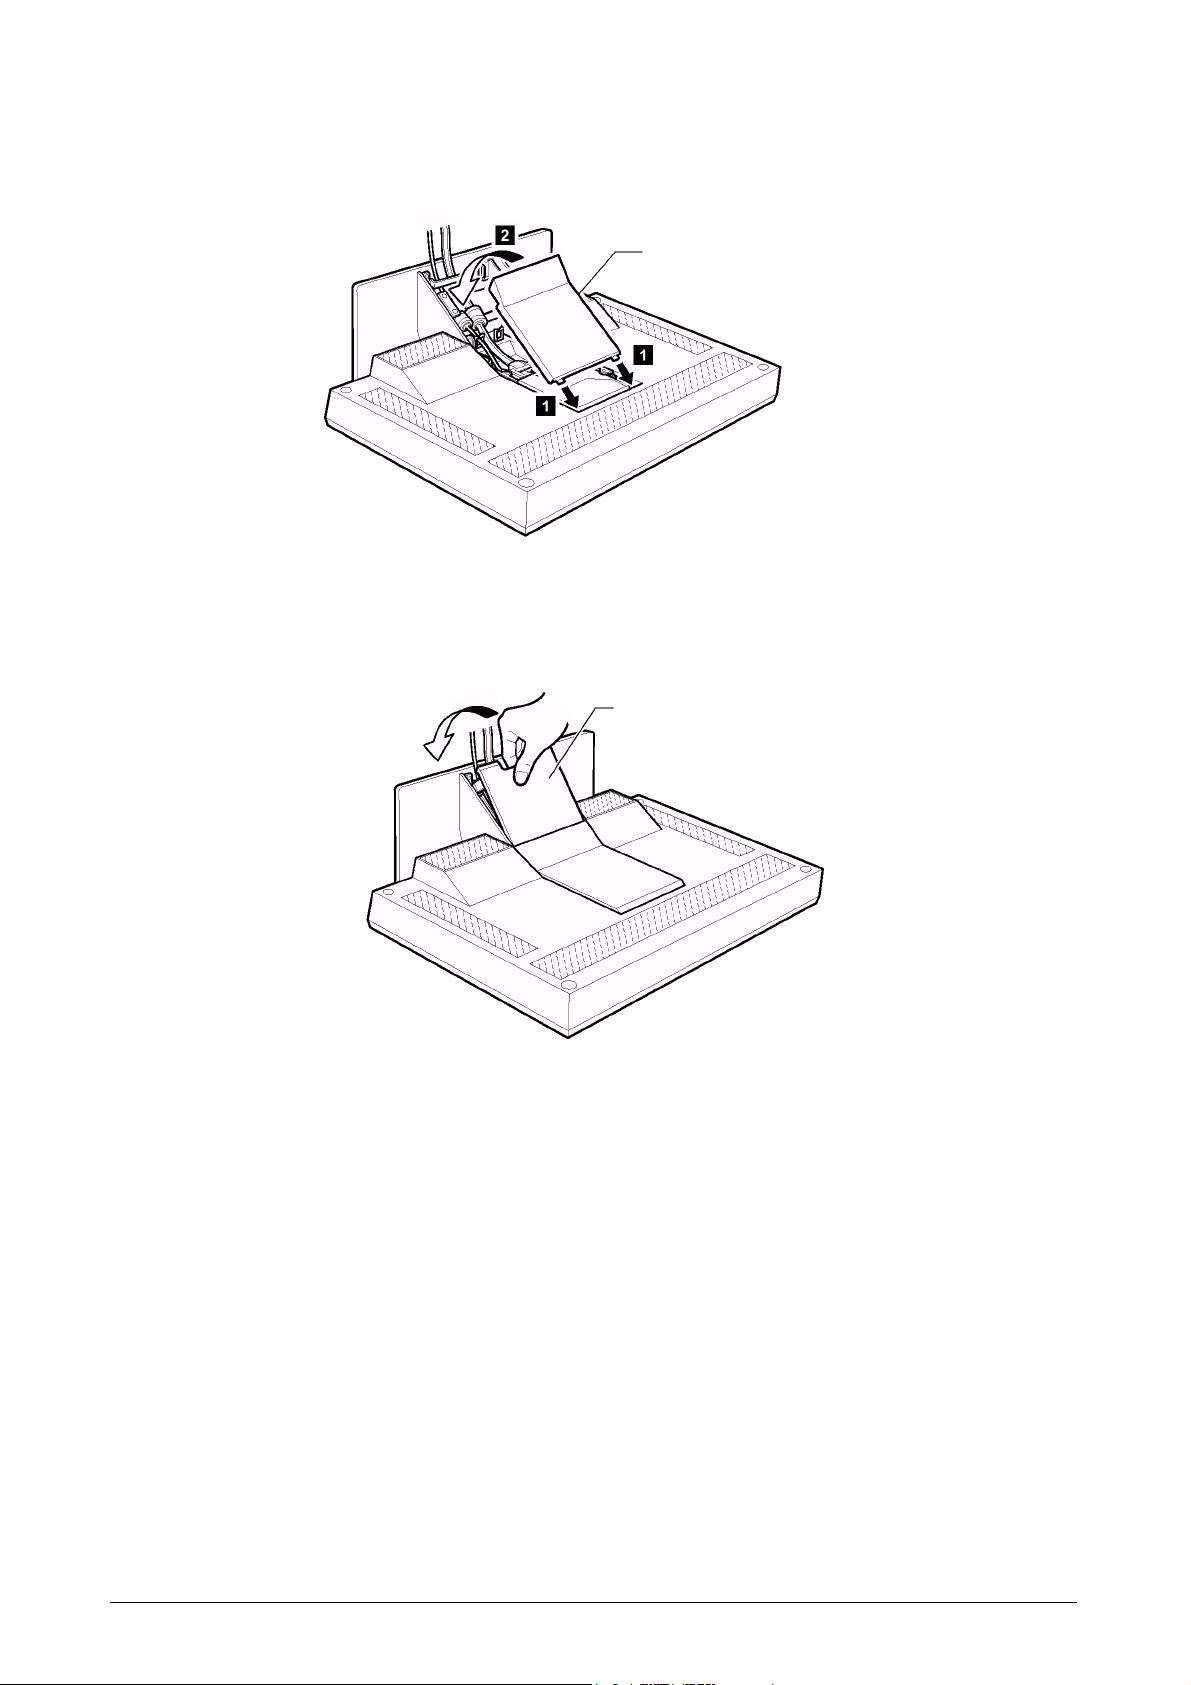
3. Reinstall the connector cover on the display.
Connector cover
4. Reinstall the stand rear cover and turn the display to the upright position.
Stand rear cover
Note:
Do not power on the display or the computer until instructed. Failing to do so may damage these
units or the video graphics card.
ViewSonic VP2290b 8
Page 12
Connecting the digital signal cable
1. Make sure that the video graphics card is installed on your computer.
2. Make sure that the power cord is NOT connected to your computer.
3. Open the cover of your computer, if necessary.
4. Connect the connector end marked “1 PRIMARY” to the DVI port marked “1”, and the
connector end marked “2 SECONDARY” to the DVI port marked “2” of the video graphics card.
2 SECONDARY connector
USB connector
1 PRIMARY connector
Video graphics card
5. If you have opened the cover of your computer, close it.
Notes:
a. If you want to use the extended function, then install the program to your computer now if you
have not installed it yet. Then connect the USB connector to the USB port. If you don’t have this
program, you can download it from the following Web site: http://www.viewsonic.com.
b. Do not connect the USB connector to the USB port if you don’t have the extended function
program installed on your computer. Connecting this connector may damage your display,
computer, or other attached USB devices.
c. If your video graphics card has only one DVI port, then connect the connector of the digital
signal cable marked “1 PRIMARY” to the DVI port on the video graphics card of your computer.
d. With the ATI ® FireGL™ 4 video graphics card, use ATI device driver version 2078 (or higher)
for the best performance of the display. The device driver is available at the following Web site:
http://support.ati.com.
9 ViewSonic VP2290b
Page 13
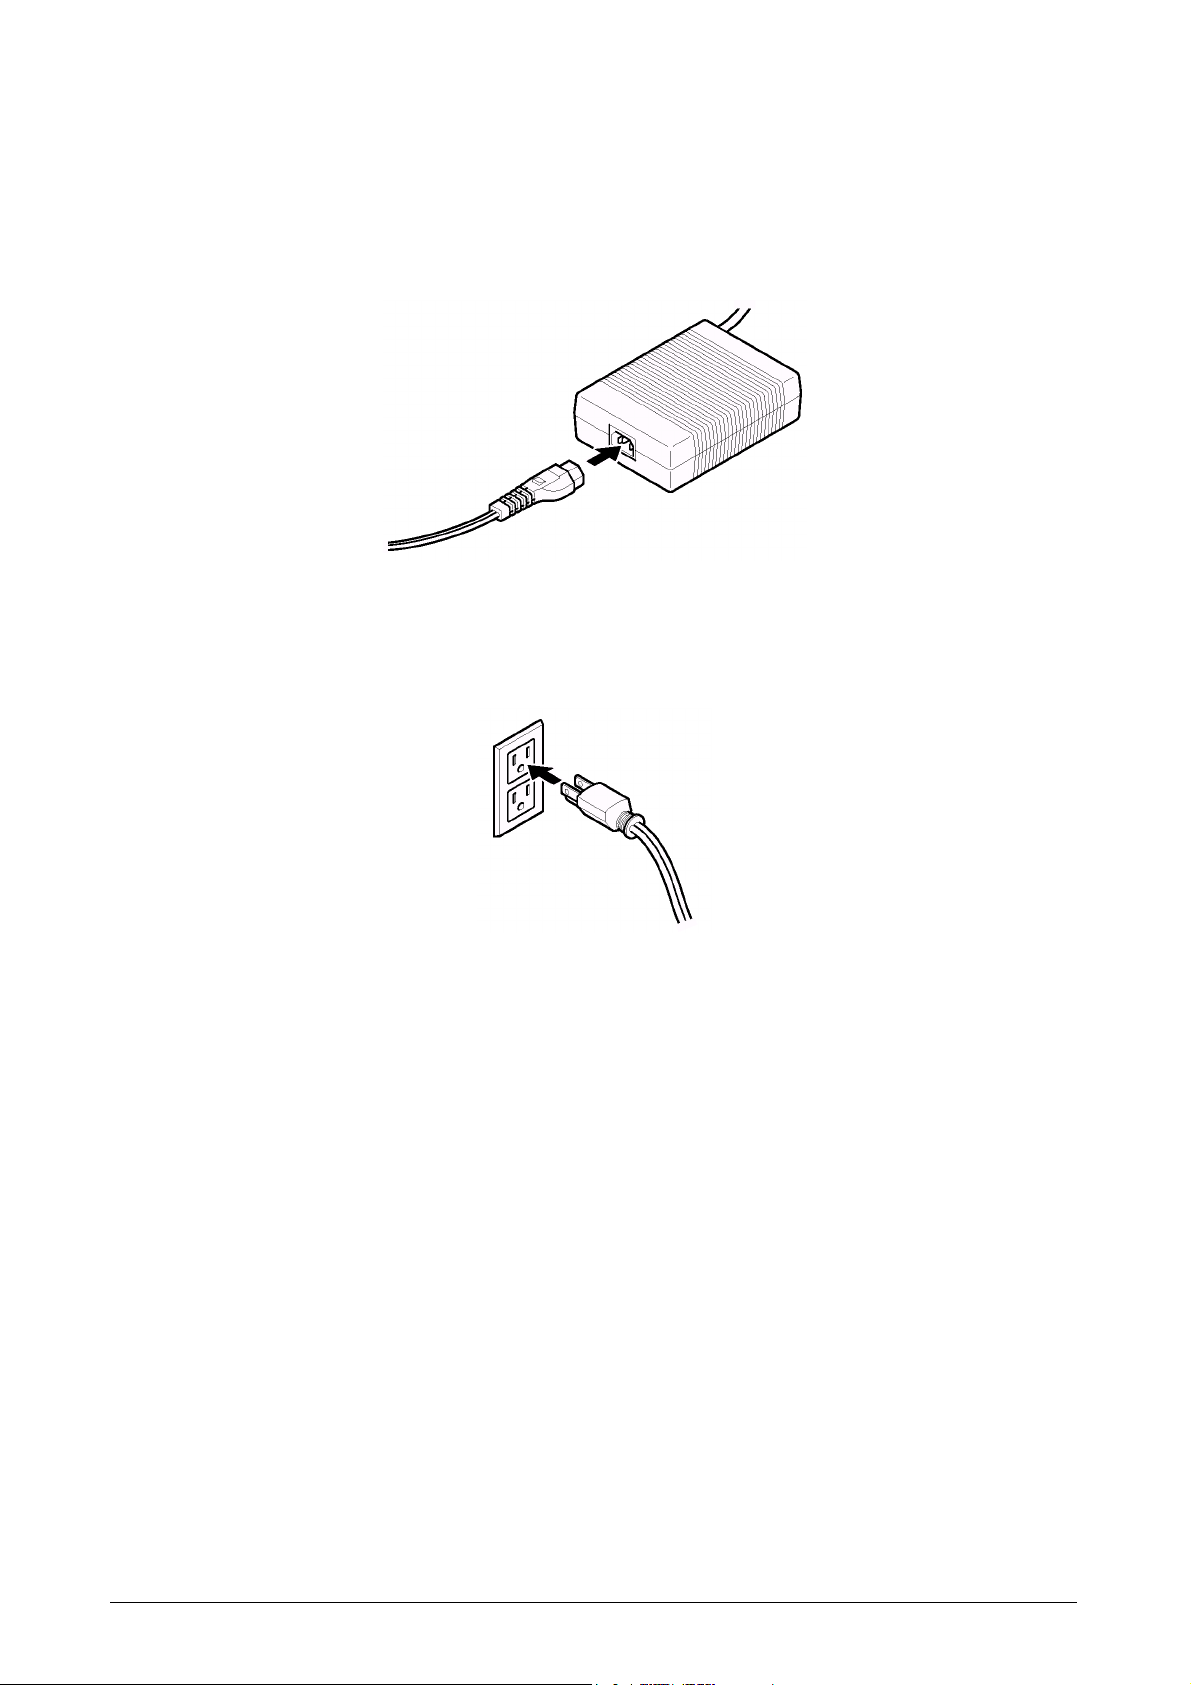
Connecting the power cord
Note:
Read the respective “Danger Statements” on pages 22 before continuing with this section.
1. Connect the power cord to the power adapter.
2. Connect the power plug to a properly grounded power outlet.
Note:
Make sure that all the cables are connected, otherwise the power-on light will not turn on.
3. Connect the computer to a properly grounded power outlet and turn on the power switch.
ViewSonic VP2290b 10
Page 14
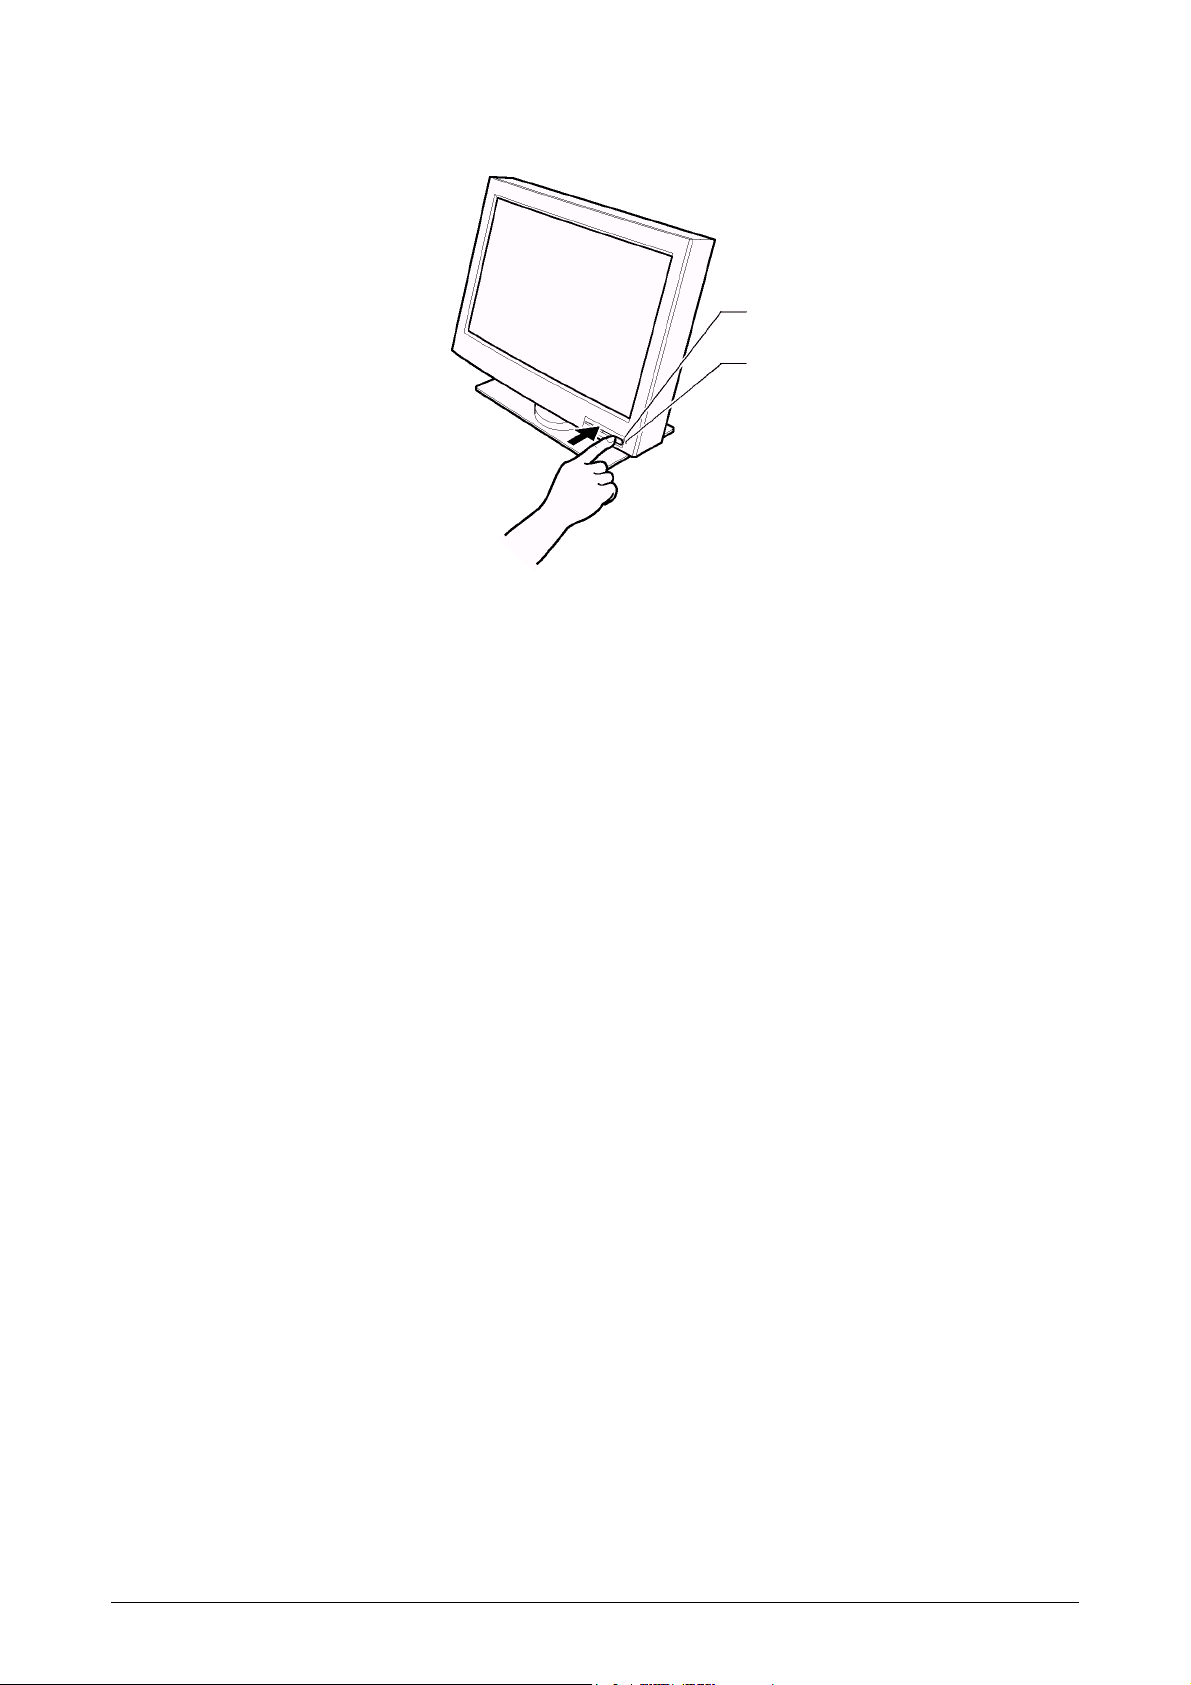
4. Press the power switch on the display. The power light comes on.
Power switch
Power light
Notes:
a. When you turn off the display, wait at least five seconds before turning it on again.
b. If you accidentally disconnected the power cord from the main outlet and you connected it to the
outlet again, the screen may flicker continuously. To stop the flicker, press the power switch and
turn off the display, then turn it on again.
c. Refer to “Knowing the operating status of your display” on page 17 for more information on the
power light.
This completes the hardware setup.
Supplementary Information
When powering on the different units, power them on in the following sequence:
1. Display
2. Peripheral units
3. Computer
11 ViewSonic VP2290b
Page 15

Adjusting and maintaining your display
This chapter describes the following:
• How to adjust the viewing angle.
• How to set the controls.
• The operating status of your display.
• How to disconnect the cables.
• How to use the security keylock.
• How to maintain your display.
Adjusting the viewing angle
You can adjust the vertical angle of the display to avoid unnecessary light reflection and to make
viewing easier. Tilt the screen angle vertically by grasping both sides of the display and pulling it
forward or backward.
ViewSonic VP2290b 12
Page 16

Setting the display control buttons
You can control the various functions of the display using the buttons at the front right of the display.
The four buttons control the following functions:
Button/Button Name Direct access functions
Displays the on-screen display (OSD)
menu.
Menu/Enter
Sets the screen to a dimmer view. Moves the cursor to the left for
Left-Arrow
Sets the screen to a brighter view. Moves the cursor to the right for
Right-Arrow
Switches the display on or off.
On/Off
Functions available from the OSD
Menu
Enters highlighted menu mode.
highlighting the icons or for making
adjustments.
highlighting the icons or for making
adjustments.
13 ViewSonic VP2290b
Page 17

Accessing the on-screen display (OSD) menus
You can access the on-screen display (OSD) menus by pressing the Menu/Enter button. The OSD
menus enable you to set the various operating conditions of your display.
The OSD menus consist of the following:
• Main menu (for menu selection)
• Submenus (for controls setting)
– Brightness level
– Select video input type (single, dual, 4-vertical stripes, 4-tiles)
– Display key information (vertical frequency resolution)
Main menu
To access the Main menu, press the Menu/Enter button. The Main menu appears on the display
screen.
OSD Icon Description
Used to display the Brightness submenu.
Used to display the Video Input submenu.
Used to display the Information submenu.
Exit from the Main menu.
To exit the Main menu, select the Exit icon using the Left-Arrow or the Right-Arrow button, then
press the Menu/Enter button.
To reset the OSD settings to the default value, do the following:
1. Power off the display.
2. While pressing the Menu/Enter button, press the Power switch to on. The Power light changes
cyclically between green and amber for several seconds.
ViewSonic VP2290b 14
Page 18

Submenus
To access a submenu, do the following:
Brightness submenu
1. Select the Brightness icon on the Main menu using the Left-Arrow or the Right-Arrow button.
2. Press the Menu/Enter button. The Brightness submenu appears.
3. Adjust the brightness using the Left-Arrow or the Right-Arrow button.
4. Press the Menu/Enter button to exit from this submenu.
Video input submenu
1. Select the Video Input icon on the Main menu using the Left-Arrow or the Right-Arrow
button.
2. Press the Menu/Enter button. The Video Input submenu appears.
15 ViewSonic VP2290b
Page 19

OSD Icon Description
One video input mode.
Two video input mode.
(The color management function is always effective.)
Four stripes video input mode.
(The color management function is always effective.)
Four tiles video input mode.
(The color management function is always effective.)
Exit from the Submenu.
1or 0
(to the left of the numbers)
1 or 0
(to the right of the numbers)
Sets the color management function or the smooth character display
function.
You can use the color management function by choosing 1 when the input
mode is being displayed. This is the default.
Note: You can use the color management function when any of the input
modes , ,or is being displayed regardless of the numeric
setting.
You can use the smooth character display function by choosing 0 when the
input mode is being displayed.
Sets the present color management function setting.
You can use the color management function with the default setting when
you choose 0.
You can customize the color management function to your setting when
you choose 1.
Note: To find out more about the color management function, go to the
following Web site: http://www.viewsonic.com.
3. When you want to change the color management function setting or the smooth character display
function setting when the input mode is being displayed, push the Left-Arrow button for
several seconds.
4. Select the Exit icon to exit the submenu.
Information submenu
1. Select the Information icon on the Main menu using the Left-Arrow or the Right-Arrow
button, to check the vertical frequency and the resolution of your display.
2. Press the Menu/Enter button. The Information submenu appears.
(example)
3. Press the Menu/Enter button to exit from this submenu.
ViewSonic VP2290b 16
Page 20

Knowing the operating status of your display
You can know the status of your display by the color of the power light.
Power light
The color of the power light changes from green to amber when your display receives a time-out
video signal from the computer and enters Standby mode to save power. A time-out video signal is
sent from your computer to the display when the former detects inactivity on the keyboard or mouse
for a set duration of time. You can change the time-out duration for your display from the computer.
Refer to the manual shipped with your computer to change the time-out duration value.
Color Mode
Green Normal
Operation
Amber Standby Mode Less than 5 W Either:
Amber (fast
blinking at
0.25-sec.
intervals)
Amber (slow
blinking at
1-sec.
intervals)
— — An error such as fan not working has occurred.
— — The display does not support the incoming video
Power
Consumption
150 W (Maximum) The display is operating normally and is receiving
the synchronous video signal from the computer.
• the display is in Standby mode to save power, or
• the video cable is disconnected.
If the display is in Standby mode, it is not receiving
any video signals from the computer.
If the video cable is disconnected, refer to
“Troubleshooting” on page 20.
Refer to “Troubleshooting” on page 20.
signal.
Description
17 ViewSonic VP2290b
Page 21

Disconnecting the cable
CAUTION:
Do not use a digital signal cable other than the one shipped with the product. Using some other cable may
damage the display or the video graphics card. The cable (P/N: 07N2227) is available at ViewSonic Customer
Support Line (refer to page 21).
Note:
Before you begin the procedures below, be sure to read the “Danger Statements” on page 22.
To disconnect the digital signal cable, do the following:
1. Power off your display, peripheral units (if any), and computer and unplug them from the power
outlet.
2. Turn the display face down (refer to page 5).
3. Remove the stand rear cover and the connector cover (refer to page 5 and 6).
4. Unhook the cables from the cable clamps and cable hook (refer to page 6).
5. Lift up the cables and take out the connector tool from the rear compartment of the display (refer
to page 6).
6. Disconnect the power adapter cord from the DC-IN connector (refer to page 7).
Note:
Be sure to press the latch on the connector of the power adapter cord when unplugging it from the
DC-IN connector.
7. Insert the connector tool into the thumb screw on the digital signal cable connector A and
turn it counterclockwise to loosen the screw.
8. Disconnect the digital signal cable A from video connector A .
Video connector
DC-IN connector
Connector tool
Note:
The video connectors A and B on the display are Safety Extra Low Voltage (SELV) circuits.
9. Store the connector tool back into the rear compartment of the display.
ViewSonic VP2290b 18
Page 22

Using the security keylock
The display has a built-in security keyhole at the rear of the screen for fastening a security lock and
cable. This lock is used to help prevent the display from being removed without your permission.
This cable can be purchased at any PC shop.
First secure the cable to a stationary object; then attach the lock to the keyhole on the rear of the
display. For details of the installation, refer to the instructions shipped with the security keylock.
Also, refer to “Rear view” on page 4 for the location of the keyhole.
Note:
You are responsible for evaluating, selecting, and implementing the lock. ViewSonic makes no
comments, judgments, or warranties about the function, quality, or performance of the lock.
Cleaning the LCD Display
• MAKE SURE THE LCD DISPLAY IS TURNED OFF.
• NEVER SPRAY OR POUR ANY LIQUID DIRECTLY ONTO THE SCREEN OR CASE.
To clean the screen:
1. Wipe the screen with a clean, soft, lint-free cloth. This removes dust and other particles.
2. If still not clean, apply a small amount of non-ammonia, non-alcohol based glass cleaner onto a
clean, soft, lint-free cloth, and wipe the screen.
To clean the case:
1. Use a soft, dry cloth.
2. If still not clean, apply a small amount of a non-ammonia, non-alcohol based, mild non-abrasive
detergent onto a clean, soft, lint-free cloth, then wipe the surface.
Disclaimer
ViewSonic does not recommend the use of any ammonia or alcohol-based cleaners on the LCD
display screen or case. Some chemical cleaners have been reported to damage the screen and/or case
of the LCD display. ViewSonic will not be liable for damage resulting from use of any ammonia or
alcohol-based cleaners.
19 ViewSonic VP2290b
Page 23

Troubleshooting
Is something wrong?
If you suspect that something is not working correctly, you should:
1. Turn on the computer and display.
2. Set the brightness control ( ) to the proper position.
3. Make sure that all cables are securely connected.
4. Disable the computer’s screen saver program, if it is enabled.
5. Set the display mode to the supported display mode.
6. If you still have a problem, go to the symptom list below and find the symptom that
most resembles yours.
Symptom list
Before calling your retailer or ViewSonic, find the symptom that most resembles yours, and try the
suggested action. You may be able to solve the problem yourself.
Symptom Possible cause Suggested action
The screen is blank
and the power
indicator is off
The screen is blank
and power indicator
is steady green
The screen is blank
and the power
indicator is steady
amber
No power to the
display
Brightness may be too
low
The display is in
Standby mode
The video cable is not
connected
• Make sure that the electrical outlet and the
display are both switched on.
• Make sure that the power cord is firmly
plugged into the electrical outlet and the
power supply unit.
• If the power cord plug has a removable fuse,
replace it.
• Try another power cord.
• Try another electrical outlet.
• The video graphics card is defective. Replace
it.
• The computer is defective. Replace it.
Adjust the brightness
• Press any key on the keyboard or move the
mouse to restore operation.
• Check the Power Management software on
your computer.
• Make sure that the signal cable is firmly
connected.
• Make sure that no pins are bent in the signal
cable connector.
• The video graphics card is defective. Replace
it.
• The computer is defective. Replace it.
ViewSonic VP2290b 20
Page 24

The screen is blank
and the power
indicator is blinking
amber every second
The display mode of
the computer is
outside the range of
the display
• Reconfigure the computer to use a supported
display mode.
• The video graphics card is defective. Replace
it.
• The computer is defective. Replace it.
The screen is blank
and the power
indicator is blinking
amber every 0.25
second
The image appears to
be smeared
A few dots are
missing, discolored,
or inappropriately
lighted
The display fan is not
working
There are noises in
the video signal
The LCD contains over 27,000,000 thin-film transistors (TFTs). A small
number of dots may be missing, discolored, or lighted on the screen. This
is an intrinsic characteristic of the TFT LCD technology and is not an LCD
defect.
• Make sure that the power cord is firmly
plugged into the electrical outlet.
• Make sure that the power adapter cord is firmly
connected. If the symptom remains, call your
retailer or ViewSonic.
• The video graphics card is defective. Replace
it.
• The computer is defective. Replace it.
• Make sure that the signal cable is firmly
connected.
• Make sure that no pins are bent in the signal
cable connector.
• The video graphics card is defective. Replace
it.
• The computer is defective. Replace it.
21 ViewSonic VP2290b
Page 25

Danger Statements
DANGER
To avoid shock hazard:
• Do not remove the covers.
• Do not operate this product unless the stand is attached.
• Do not connect or disconnect this product during an electrical storm.
• The power cord plug must be connected to a properly wired and grounded power outlet.
• Any equipment to which this product will be attached must also be connected to properly wired
and grounded power outlets.
• To isolate the display from the electrical supply, you must remove the plug from the power outlet.
The power outlet should be easily accessible.
Handling:
• Your color display is heavy, so handle it with care. ViewSonic recommends that this display is
moved or lifted by two people.
ViewSonic VP2290b 22
Page 26

DANGER
Electric current from the power cords, telephone lines and communication cables is hazardous. To
avoid shock hazard, connect and disconnect cables as shown below when installing, moving, or
opening the covers of this product or attached devices. the power cord must be used with a properly
grounded outlet. connect the power plugs to mains outlets located in the same panel.
To Connect To Disconnect
Turn everything OFF.
Turn everything OFF.
Attach all cables to devices.
Attach the signal cables to receptacles.
Attach the power cord to an outlet.
Turn the device ON.
1
First remove the power cord from the out-
2
let.
Remove signal cables from receptacles.
Remove all cables from devices.
1
In the U.K., by law, the telephone line
cable must be connected after the
power cord.
23 ViewSonic VP2290b
2
In the U.K., by law, the power cord
must be disconnected after the telephone line cable.
Page 27

Notices
Attention
• Do not exert strong pressure to the surface of the display screen. You may break the LCD panel.
• Do not place heavy objects on top of this product. They may damage the display.
• Do not touch the display screen with your fingers. Fingerprints and oil stains may remain on the
screen surface. They are difficult to wipe off.
• The display is heavy. Ask the help of others if you cannot carry it by yourself.
• When leaving your office for a long vacation, always unplug the power cords from the main
outlet.
LCD considerations
The liquid crystals in the display panel contain several irritants. If the panel is damaged or broken,
do not let the liquid come in contact with your skin, eyes, or mouth. If you do come in contact with
the liquid, flush the affected part with running water for at least 15 minutes. If any symptom remains,
consult a doctor.
The fluorescent lamp in the liquid crystal display (LCD) contains mercury (50 mg. (0.002 oz.)
maximum). Do not place in trash that is disposed of in landfills. Dispose of it as required by local
ordinances or regulations.
Considerations on the display resolution
This display is able to display characters, graphics, and pictures at high resolution. When you
connect this display to a PC with a high resolution (3840 x 2400), the characters will be displayed at
1/4 the normal size. Do not continue to operate the PC at this character size. You can spoil your eyes.
Change the character size to a bigger size or the resolution to a lower resolution on the operating
system or application.
Operating considerations
To ensure comfortable operation of the display, follow the instructions below:
• Place the display in front of you for easy viewing.
• Place the display at a comfortable distance (50 –60 cm) (19 – 24 in.) from you.
• Tilt the display so that top of the display is at your eye level.
• Adjust the angle of the tilt so that there is no reflection of light and objects. If necessary, turn off
the light or lower its luminescence. If near a window, close the curtains or pull down the blind to
cut the sunlight.
• Adjust the screen brightness.
• Use a chair with a high-reclining and sit deep into it.
• Operating on the screen for long hours can cause fatigue and eyestrain. Divert your eyes from the
screen for short intervals during operation, and take short rests.
ViewSonic VP2290b 24
Page 28

License inquiries
References in this publication to ViewSonic products, programs, or services do not imply that
ViewSonic intends to make these available in all countries in which ViewSonic operates. Any
reference to an ViewSonic product, program, or service is not intended to state or imply that only
ViewSonic product, program, or service may be used. Any functionally equivalent product, program,
or services that does not infringe on any of the intellectual property rights of ViewSonic may be used
instead of the ViewSonic product, program, or services. The evaluation and verification of operation
in conjunction with other products, except those expressly designated by ViewSonic, are the
responsibility of the user.
ViewSonic may have patents or patents pending which covers the subject matter in this document.
The furnishing of this document does not give you any license to these patents. You can send license
inquiries, in writing, to:
ViewSonic Corporation
381 Brea Canyon Road
Walnut, CA, 91789
U.S.A.
Trademarks
ViewSonic, the three birds logo, OnView, ViewMatch, and ViewMeter are registered trademarks of
ViewSonic Corporation.
ATI and RADEON are registered trademarks of ATI Technologies, Inc., in the United States or other
countries, or both. FireGL is trademark of ATI Technologies, Inc.
nVIDIA and Quadro are trademarks or registered trademarks of nVIDIA Corporation.
Matrox and Matrox Parhelia are trademarks or registered trademarks of Matrox
Electronic Systems Ltd. (or Matrox Graphics Inc.) in the United States or other countries.
TMDS is a trademark of Silicon Image, Inc., in the United States or other countries, or both.
Windows is registered trademark of Microsoft Corporation, in the United States or other countries,
or both.
25 ViewSonic VP2290b
Page 29

Specifications
The specifications of the display are as follows:
Dimensions Width:
Height:
Depth:
Depth (without stand):
Weight Unpackaged: With base stand: 11.4 kg (25.1 lb.)
Tilt Angle: -5° – +30°
Power Input: 100 – 240 V AC, 50/60 Hz
Power consumption Maximum:
Minimum:
Video input TMDS TM interface (RGB: 8 bits)
User controls Power On/Off, Brightness
Regulatory compliance •CE
•FCC-A
•TÜV Ergo
•TÜV GS
• UL/CSA 60950
• VCCI-A
• ISO 13406-2
547 mm (21.5 in.)
439 mm (17.3 in.)
196 mm (7.7 in.)
105 mm (4.1 in.)
Without base stand: 8.8 kg (19.4 lb.)
Power adapter: 1.3 kg (2.9 lb.)
150 W
Less than 5 W (In Standby Mode)
• CISPR22 A
• TCO’95
•CCC
•C-TICK
• BSMI
• UL2601 & IEC60601 with optional “Medical
Grade” power adapter
Display area Horizontal:
Vertical:
Temperatu r e Operating:
Storage:
Shipping:
Relative humidity Operating:
Storage:
Shipping:
478.1 mm (18.8 in.)
298.8 mm (11.8 in.)
0 ~+35°C (32 ~ 95°F)
–20 ~ +60°C (–4 ~ 140°F)
–20 ~ +60°C (–4 ~ 140°F)
8% ~ 80% (no condensation)
5% ~ 95% (no condensation)
5% ~ 95% (no condensation)
ViewSonic VP2290b 26
Page 30

Supported display modes
The display supports the following display modes:
Horizontal
Addressability DVI Input
640 × 400 ch1 31.5 59.9 25.2 3200 × 2000
VGA
SVGA
MATROX VGA 960 x 1200 ch1 67.3 55.7 71.0 1920 x 2400
XGA
SXGA
640 × 480 ch1 37.9 72.8 31.5 3200 × 2400
640 × 480 ch1 37.5 75.0 31.5 3200 × 2400
640 × 480 ch1 43.3 85.0 36.0 3200 × 2400
800 × 600 ch1 35.2 56.3 36.0 3200 × 2400
800 × 600 ch1 37.9 60.3 40.0 3200 × 2400
800 × 600 ch1 48.1 72.2 50.0 3200 × 2400
800 × 600 ch1 46.9 75.0 49.5 3200 × 2400
800 × 600 ch1 53.7 85.1 56.3 3200 × 2400
1024 × 768 ch1 48.4 60.0 65.0 3072 × 2304
1024 × 768 ch1 56.5 70.1 75.0 3072 × 2304
1024 × 768 ch1 60.0 75.0 78.8 3072 × 2304
1024 × 768 ch1 68.7 85.0 94.5 3072 × 2304
1280 × 1024 ch1 64.0 60.0 108.0 2560 × 2048
1280 × 1024 ch1 80.0 75.0 135.0 2560 × 2048
Frequency
(KHz)
Vertical
Frequency
(Hz)
Dot Clock
Frequency
(MHz)
Actual
Display
Resolution
UXGA 1600 × 1200 ch1 75.0 60.0 162.0 3200 × 2400
UXGA-Wide 1920 × 1200 ch1 50.3 40.9 127.2 3200 × 2400
ch1, ch2,
ch3, ch4
ch1, ch2,
ch3, ch4
99.2 40.9 104.8 3840 × 2400
49.6 40.9 104.8 3840 × 2400
QUXGA-Wide
(960 × 2400) × 4
(1920 × 1200) × 4
(1920 × 2400) × 2 ch1, ch2 61.2 25.1 125.0 3840 × 2400
(1920 × 2400) × 2 ch1, ch2 58.7 24.1 120.0 3840 × 2400
(1920 × 2400) × 2 ch1, ch2 48.9 20.1 100.0 3840 × 2400
3840 × 2400 ch1 31.5 13.0 129.0 3840 × 2400
3840 × 2400 ch1 30.73 12.66 148.0 3840 × 2400
Notes:
1. The type of resolutions supported depends on the video graphics card being used.
27 ViewSonic VP2290b
Page 31

Extended modes
The addressability of the monitor is more advanced than those provided for in the industry standard
display modes so in addition, monitor specific, or extended modes, have been developed.
Detailed timing information on these modes is provided to the video graphics card and system
through the VESA DDC/EDID protocol. Depending on the application requirements and the
capability of the video graphics card, it may be necessary to select an alternative EDID and
configure the graphics card so that the optimum mode is enabled.
Addressability
(QUXGA-W)
23 (960 x 2400) x 4 ch1 ~ ch4 99.2 40.9 104.8 3
24 (960 x 2400) x 4 ch1 ~ ch4 116.3 48 122.9 3
25 (1920 x 1200 ) x 4 ch1 ~ ch4 50.1 40.9 104.8
26 (1920 x 1200 ) x 4 ch1 ~ ch4 50.3 40.9 127.2 3 3 3 2
27 (1920 x 1200 ) x 4 ch1 ~ ch4 58.9 48 122.5 2 2 2 2 1 2
28 (1920 x 2400 ) x 2 ch1 + ch2 48.8 20.1 123.4 2
29 (1920 x 2400 ) x 2 ch1 + ch2 58.4 24 149.5 2
30 (1920 x 2400 ) x 2 ch1 + ch2 58.2 24 121 3
31 (1920 x 2400 ) x 2 ch1 + ch2 60.9 25 155.8 2
32 (1920 x 2400 ) x 2 ch1 + ch2 60.7 25 126.3 3
33 1216 x 2400 ch1 117.8 48 164 3
34 2624 x 2400 ch* (d-l) 117.8 48 328 2
35 3840 x 2400 ch1 30.7 12.7 148 1 1 1 1
36 3840 x 2400 ch1 29.2 12.1 116.8 1 1 1 1
37 3840 x 2400 ch1* (d-I) 58.2 24 233 1
38 3840 x 2400 ch1* (d-I) 60.7 25 243 1
DVI Input Horizontal
Frequency
(kHz)
Vertical
Frequency
(Hz)
Pixel Clock
Frequency
(MHz)
EDID**
123678910111213
VP2290b / VP2290b-2 / VP2290b-3 modes
Factory default setting - single input (13Hz), twin input (20Hz) & quad
input (41Hz) modes
As default expect : Twin input mode timing changed to 24Hz 2
As default expect : Twin input mode timing changed to 25Hz 3
VP2290b-2(for 4stripe) / VP2290b-3 modes
Single input(13Hz), quad input(title - 41Hz) & quad input(stripe - 41Hz) 6
VP2290b-3 only modes
Single input (24Hz)*, quad input (tile - 48Hz) 7
Single input (25Hz)*, quad input (tile - 48Hz) 8
Single input (12Hz), twin input(24Hz) & quad input (tile - 48Hz) 9
Single input (12Hz), twin input(25Hz) & quad input (tile - 48Hz) 10
Quad tile - 48Hz 11
Single input(12Hz), 3DVI input(48Hz) 12
Single input(12Hz), quad input(title - 48Hz) & quad input(stripe - 48Hz) 13
1
(*EDID 4,5 are for test purposes only)
ViewSonic VP2290b 28
Page 32

Updating the settings for your display
Unless you change the video graphics card that drives your display, there is usually no need to
change the settings. In case the need does arise, a procedure for changing them is given in this
appendix.
This operation must be done carefully. If incorrect parameters are specified, nothing will be
displayed.
Applicable models
The procedure given in this document applies to displays with firmware at the following levels:
DDC CPU Version 6.2 or higher
OSD CPU Version 5.0 or higher
USB CPU Version 4.0 or higher
FPGA LOGIC Version 34 or higher
Procedure
1. Setting
a. Connect the display to the personal computer that is to be used as a video source.
b. Turn on the display and the PC. Wait until the system boots and a stable screen image is
displayed. Confirm that the power indicator on the display shows green. If it is steady amber,
press “Debug switch” with a stick to turn on the display. (See the following figure).
Debug switch
(inside of the bottom cover)
bottom view
CAUTION:
Do not use conductive material to press this switch. It may damage the electric circuit inside of the
display.
In this case, power indicator will show blinking amber, and image from PC does not appear.
Some color pattern may appear on screen.
29 ViewSonic VP2290b
Page 33

2. Enabling the special OSD (on-screen display) menu
a. Press a menu switch and either the left switch or the right switch to select the (i) (information)
menu. On that menu, press the menu switch to enter the information menu. There, a display
showing the refresh rate and the screen resolution appears, as in this example:
b. Press the left switch three times, and then press the right switch three times. Page 1 of the
special OSD menu appears, as in this example:
In this display, the firmware version is shown in the following format:
-1- aaa bbb
c ddd eee
where
aaa: DDC-CPU
bbb: OSD-CPU
c: Reserved
ddd: USB-CPU
eee: FPGA-LOGIC
If the special OSD menu does not appear, press the menu switch to exit from the OSD menu.
Then go to step 2a to try again.
3. Checking the current settings
a. Press the left or right switch to enter page 2 of the special OSD menu.
b. In about five seconds, the current settings will be displayed, as in this example:
ViewSonic VP2290b 30
Page 34

If the setting is given as 000, any number greater than 63, or a value ending in X, an error has
occurred; try step 3 on page 29 again. For details, see “Valid settings” on page 31.
4. Updating the settings
a. From the table on page 31, choose the number of the settings you want to use.
b. Set the brightness parameter to the value for the settings you have chosen (see “Brightness
submenu” on page 15.). If you have enabled the special OSD menu, you can set the brightness
at any level from 0 to 63, as in this example:
c. Enter page 1 of the special OSD menu.
d. Press the left or right switch to enter page 2 of the menu. Then press both switches together,
and hold them down until three dots appear on the display. The three dots show that the settings
are in the process of being updated.
e. In five seconds, the setting number now stored in this display will be displayed. If it is not the
number you want, try again.
Note:
An attempt to enter an unsupported setting number will fail.
If the number ends in x, the updating has failed because the settings have not been programmed
correctly. Try again.
f. Turn off the display to disable the special OSD menu.
Important notices
If the display is connected to a powered-down PC, or if the screen resolution of the PC is
being changed, the display will not be able to get access to the settings.
The settings cannot be reset to the factory default values by the procedure given in the
user’s manual. To reset them to those values, check your model name and choose
appropriate number, then update the settings.
ViewSonic VP2290b: Setting number 29
31 ViewSonic VP2290b
Page 35

Valid settings
DDC-CPU version 6.2 can detect and update some settings. If it encounters any it does not
recognize, it reads them as 000 (unknown).
From the following table, choose the settings that are appropriate for the operating system and video
graphics card you are using.
If you want to use settings not listed in the table, consider upgrading to another version of DDCCPU.
Settings are sometimes updated without notice. For the latest information, refer to http://
www.viewsonic.com.
Even though a graphic card is listed here, some of its functions may not be supported.
Video graphics card Supported EDID’s
ATI® FireGL4
3D Labs Wildcat
®
6110 / 6210 (*)
3D Labs Wildcat® 7110 / 7210 (*)
nVIDIA Quadro
®
4 900XGL/980XGL
nVIDIA Quadro® FX-1000
nVIDIA Quadro® FX-2000
nVIDIA Quadro
®
FX-3000/FX-3000g
MATROX Parhelia HR256 6, 13
nVIDIA Quadro
®
4 900XGL/980XGL
nVIDIA Quadro® FX-1000
nVIDIA Quadro
®
FX-2000
nVIDIA Quadro® FX-3000/FX-3000g
nVIDIA Quadro® FX-2000
nVIDIA Quadro
®
FX-3000/FX-3000g
1, 2, 3
9, 10, 11
7, 8
EDID No.
Video graphics card 1 2 3 6 7 8 9 10 11 12 13
®
ATI
FireGL4
3D Labs Wildcat
®
6110 / 6210 (*)
3D Labs Wildcat® 7110 / 7210 (*)
nVIDIA Quadro
®
4 900XGL/980XGL
nVIDIA Quadro® FX-1000
nVIDIA Quadro® FX-2000
nVIDIA Quadro
®
FX-3000/FX-3000g
OOO
OOO
OOO
OOO OOO
OOO OOO
OOO OOOOOO
OOO OOOOOO
MATROX Parhelia HR256 O O
ViewSonic VP2290b 32
Page 36

Customer Support
For technical support or product service, please contact ViewSonic.
NOTE: You will need the product serial number.
Country/Region Web site T = Telephone
F = FAX
United States viewsonic.com/support T: (800) 688-6688
F: (909) 468-1202
Canada viewsonic.com/support T: (800) 688-6688
Europe, Middle East,
Baltic countries, and
North Africa
Australia and New
Zealand
Singapore/India and
Southeast Asia
Other Asia/Pacific
countries
South Africa viewsonic.com/asia T: 886 2 2246 3456
viewsoniceurope.com Contact your reseller service.eu@viewsoniceurope.com
viewsonic.com.au T: +61 2 9906 6277
viewsonic.com.sg T: 65 6273 4018
viewsonic.com.tw T: 886 2 2246 3456
F: (909) 468-1202
F: +61 2 9906 6377
F: 65 6273 1566
F: 886 2 8242 3668
F: 886 2 8242 3668
Email
service.us@viewsonic.com
service.ca@viewsonic.com
service@au.viewsonic.com
service@sg.viewsonic.com
service@tw.viewsonic.com
service.ap@viewsonic.com
33 ViewSonic VP2290b
Page 37

Compliance
Compliance Information for U.S.A.
This equipment has been tested and found to comply with the limits for a Class A digital device, pursuant to
part 15 of the FCC Rules. These limits are designed to provide reasonable protection against harmful
interference in a residential installation. This equipment generates, uses, and can radiate radio frequency
energy, and if not installed and used in accordance with the instructions, may cause harmful interference to
radio communications. However, there is no guarantee that interference will not occur in a particular
installation. If this equipment does cause harmful interference to radio or television reception, which can be
determined by turning the equipment off and on, the user is encouraged to try to correct the interference by
one or more of the following measures;
• Reorient or relocate the receiving antenna.
• Increase the separation between the equipment and receiver.
• Connect the equipment into an outlet on a circuit different from that to which the receiver is connected.
• Consult the dealer or an experienced radio/TV technician for help.
FCC Warning
To assure continued FCC compliance, the user must use grounded power supply cord and the provided
shielded video interface cable with bonded ferrite cores. If a BNC cable is going to be used, use only a
shielded BNC(5) cable. Also, any unauthorized changes or modifications not expressly approved by the party
responsible for compliance could void the user’s authority to operate this device.
Industry Canada Class A Emission Compliance Statement
This Class A digital apparatus complies with Canadian ICES-003.
Avis de Conformité àla Réglementation d’Industrie Canada
Cet appareil numérique de classe A est conforme à la norme NMB-003 du Canada.
European Union – EMC Directive
This product is in conformity with the protection requirements of the EU Council Directive 89/366/ECC on the
approximation of the laws of the Member States relating to electromagnetic compatibility.
ViewSonic cannot accept responsibility for any failure to satisfy the protection requirements resulting from a
non-recommended modification of the product, including the fitting of non-ViewSonic option cards.
This product has been tested and found to comply with the limits for Class A Information Technology
Equipment according to CISPR 22/European Standard EN 55022. The limits for Class A equipment were
derived for commercial and industrial environments to provide reasonable protection against interference with
licensed communication equipment.
Warning: This is a Class A product. In a domestic environment this product may cause radio interference, in
which case the user may be required to take adequate measures.
Deutsche EMV-Direktive (electromagnetische Verträglichkeit)
Dieses Gerät ist berechtigt in Übereinstimmung mit dem deutschen EMVG vom 9.Nov.92 das EG-Konformitätszeichen zu führen.
Der Aussteller der Konformitätserklärung ist die ViewSonic.
Dieses Gerät erfüllt die Bedingungen der EN 55022 Klasse A. Für diese Klasse von Geräten gilt folgende
Bestimmung nach dem EMVG:
ViewSonic VP2290b 34
Page 38

Geräte dürfen an Orten, für die sie nicht ausreichend entstört sind, nur mit besonderer Genehmigung des
Bundesminesters für Post und Telekommunikation oder des Bundesamtes fur Post und Telekommunikation
betrieben werden. Die Genehmigung wird erteilt, wenn keine elektromagnetischen Störungen zu erwarten
sind.
Hinweis: Dieses Genehmigungsverfahren ist von der Deutschen Bundespost noch nicht
worden.
veröffentlicht
Union Européenne – Directive Conformité électromagnétique
Ce produit est conforme aux exigences de protection de la Directive 89/336/EEC du Conseil de l’UE sur le
rapprochement des lois des États membres en matière de compatibilité électromagnétique.
ViewSonic ne peut accepter aucune responsabilité pour le manquement aux exigences de protection
résultant d’une modification non recommandée du produit, y compris l’installation de cartes autres que les
cartes ViewSonic.
Ce produit a été testé et il satisfait les conditions de l’équipement informatique de Classe A en vertu de
CISPR22/Standard européen EN 55022. Les conditions pour l’équipement de Classe A ont été définies en
fonction d’un contexte d’utilisation commercial et industriel afin de fournir une protection raisonnable contre
l’interférence d’appareils de communication autorisés.
Avertissement:
causer une interférence radio exigeant que l’utilisateur prenne des mesures adéquates.
Ceci est un produit de Classe A. Dans un contexte résidentiel ce produit peut
Union Europea – Normativa EMC
Questo prodotto è conforme alle normative di protezione ai sensi della Direttiva del Consiglio dell’Unione
Europea 89/336/CEE ull’armonizzazione legislativa degli stati membri in materia di compatibilità
elettromagnetica.
ViewSonic non accetta responsabilità alcuna per la mancata conformità alle normative di protezione dovuta a
modifiche non consigliate al prodotto, compresa l’installazione di schede e componenti di marca diversa da
ViewSonic.
Le prove effettuate sul presente prodotto hanno accertato che esso rientra nei limiti stabiliti per le le
apparecchiature di informatica Classe A ai sensi del CISPR 22/Norma Europea EN 55022. I limiti delle
apparecchiature della Classe A sono stati stabiliti al fine di fornire ragionevole protezione da interferenze
mediante dispositivi di comunicazione in concessione in ambienti commerciali ed industriali.schede e
componenti
Avvertimento:
prodotto può essere causa di interferenze radio, nel qual caso l’utente deve prendere misure
adeguate.
Questo è un prodotto appartenente alla Classe A. In ambiente domestico, tale
35 ViewSonic VP2290b
Page 39

Statements for Other Countries
Power Cord
For your safety, ViewSonic provides a power cord with a grounded attachment plug to use with this ViewSonic
product. To avoid electrical shock, always use the power cord and plug with a properly grounded power outlet.
Power cords used in the United States and Canada are listed by the Underwriter’s Laboratories (UL) and/or
certified by the Canadian Standards Association (CSA).
For units intended to be operated at 115 volts: Use a UL-listed and/or CSA-certified cord set consisting of a
minimum 18 AWG, Type SVT or SJT three-conductor cord, a maximum of 15 feet long, and a parallel blade,
grounding-type attachment plug rated 15 amperes, 125 volts.
For units intended to be operated at 230 volts (U.S. use): Use a UL-listed and/or CSA-certified cord set
consisting of a minimum 18 AWG, type SVT or SJT three-conductor cord, a maximum of 15 feet long, and a
tandem blade, grounding-type attachment plug rated 15 amperes, 250 volts.
For units intended to be operated at 230 volts (outside the U.S.): Use a cord set with a grounding-type
attachment plug. The cord set should have the appropriate safety approvals for the country in which the
equipment will be installed.
Power cords for a specific country or region are usually available only in that country or region.
Power cord part number Used in these countries or regions
13F9959 United States of America
13F9996 Denmark
14F0032 United Kingdom, China (Hong Kong S.A.R.)
39H0212 or 6454377 Japan
14F0050 Switzerland
14F0068 Italy
MPRII
This product complies with Swedish National Council for Metrology (MPR) standards issued in December
1999 (MPRII) for very low frequency (VLF) and extremely low frequency (ELF) emissions.
ViewSonic VP2290b 36
Page 40

Hinweise
Gemäß der Amtsbltter des BMPT Nm. 61/1991 und 6/1992 wird der Betreiber darauf aufmerksam gemächt,
daß die von ihm mit diesem Gerät zusammengestellte Anlage auch den technischen Bestimmungen dieser
Amtsblätter genügen muß .
Aus ergonomischen Gründen wird empfohlen, die Grundfarbe Blau nicht auf dunklem Untergrund zu
verwenden (schlechte Erkennbarkeit, Augenbelastung bei zu geringem Zeichenkontrast).
Aus ergonomischen Grnden sollten nur Darstellungen auf dunklem Hintergrund bei Vertikalfrequenzen ab 60
Hz (ohne Zeilensprung) benutzt werden.
Die Konvergenz des Bildes kann sich auf Grund des Magnetfeldes am Ort der Aufstellung aus der Korrekten
Grundeinstellung verändern. Zur Korrektur empfiehlt es sich deshalb, die Regler an der Frontseite für H STAT
und V STAT so einzustellen, daß die getrennt sichtbaren Farblinien für Rot. Grün und Blau bei z.B. der
Darstellung eines Buchstabens zur Deckung (Konvergenz) gelangen. Siehe hierzu auch die Erklärungen zu H
STAT und V STAT.
37 ViewSonic VP2290b
Page 41

LIMITED WARRANTY
VIEWSONIC LCD DISPLAY
What the warranty covers:
®
ViewSonic
product proves to be defective in material or workmanship during the warranty period, ViewSonic will at its sole option
repair or replace the product with a like product. Replacement product or parts may include remanufactured or refurbished
parts or components.
How long the warranty is effective:
ViewSonic LCD display are warranted for three (3) years for all parts excluding the lamp and three (3) years for all labor
from the date of the first consumer purchase. Projector lamps are warranted separately.
Who the warranty protects:
This warranty is valid only for the first consumer purchaser.
What the warranty does not cover:
1. Any product on which the serial number has been defaced, modified or removed.
2. Damage, deterioration or malfunction resulting from:
a. Accident, misuse, neglect, fire, water, lightning, or other acts of nature, unauthorized product modification, or failure to follow
b. Repair or attempted repair by anyone not authorized by ViewSonic.
c. Any damage of the product due to shipment.
d. Removal or installation of the product.
e. Causes external to the product, such as electric power fluctuations or failure.
f. Use of supplies or parts not meeting ViewSonic’s specifications.
g. Normal wear and tear.
h. Any other cause which does not relate to a product defect.
3. Removal, installation, and set-up service charges.
How to get service:
1. For information about receiving service under warranty, contact ViewSonic Customer Support. You will need to provide your
product’s serial number.
2. To obtain warranted service, you will be required to provide (a) the original dated sales slip, (b) your name, (c) your address, (d) a
description of the problem, and (e) the serial number of the product.
3. Take or ship the product freight prepaid in the original container to an authorized ViewSonic service center or ViewSonic.
4. For additional information or the name of the nearest ViewSonic service center, contact ViewSonic.
Limitation of implied warranties:
THERE ARE NO WARRANTIES, EXPRESS OR IMPLIED, WHICH EXTEND BEYOND THE DESCRIPTION
CONTAINED HEREIN INCLUDING THE IMPLIED WARRANTY OF MERCHANTABILITY AND FITNESS FOR A
PARTICULAR PURPOSE.
Exclusion of damages:
VIEWSONIC LIABILITY IS LIMITED TO THE COST OF REPAIR OR REPLACEMENT OF THE PRODUCT. VIEWSONIC
SHALL NOT BE LIABLE FOR:
1. DAMAGE TO OTHER PROPERTY CAUSED BY ANY DEFECTS IN THE PRODUCT, DAMAGES BASED UPON
INCONVENIENCE, LOSS OF USE OF THE PRODUCT, LOSS OF TIME, LOSS OF PROFITS, LOSS OF BUSINESS
OPPORTUNITY, LOSS OF GOODWILL, INTERFERENCE WITH BUSINESS RELATIONSHIPS, OR OTHER COMMERCIAL LOSS,
EVEN IF ADVISED OF THE POSSIBILITY OF SUCH DAMAGES.
2. ANY OTHER DAMAGES, WHETHER INCIDENTAL, CONSEQUENTIAL OR OTHERWISE.
3. ANY CLAIM AGAINST THE CUSTOMER BY ANY OTHER PARTY.
Effect of state law:
This warranty gives you specific legal rights, and you may also have other rights which vary from state to state. Some
states do not allow limitations on implied warranties and/or do not allow the exclusion of incidental or consequential
damages, so the above limitations and exclusions may not apply to you.
Sales outside the U.S.A. and Canada:
For warranty information and service on ViewSonic products sold outside of the U.S.A. and Canada, contact ViewSonic or
your local ViewSonic dealer.
warrants its products to be free from defects in material and workmanship during the warranty period. If a
instructions supplied with the product.
Projector Warranty (V3.0) Release Date: May 1, 2002
ViewSonic VP2290b 38
Page 42

Appendix
Power Cord Safety Guidelines
Caution: Use a power cable that is properly grounded. Always use an AC power cord that meets your
country’s safety standard.
USA.............................. UL
Canada......................... CSA
Germany....................... VDE
Switzerland ...................SEV
Britain............................BASE/BS
Japan ............................Electric Appliance Control Act
AC PLUG CORD PRECAUTIONS FOR THE UNITED KINGDOM
FOR YOUR SAFETY PLEASE READ THE FOLLOWING TEXT CAREFULLY.
IF THE FITTED MOULDED PLUG IS UNSUITABLE FOR THE SOCKET OUTLET THEN THE PLUG
SHOULD BE CUT OFF AND DISPOSED OF SAFELY.
THERE IS A DANGER OF SEVERE ELECTRICAL SHOCK IF THE CUT OFF PLUG IS INSERTED INTO AN
APPROPRIATE SOCKET.
If a new plug is to be fitted, please observe the wiring code as shown below.
If in any doubt, please consult a qualified electrician.
WARNING:
IMPORTANT:
THIS APPLIANCE MUST BE EARTHED.
The wires in this mains lead are coloured in accordance with the following code:
Green-and-Yellow: Earth
Blue: Neutral
Brown: Live
If the coloured wires of the mains lead of this appliance do not correspond with the coloured markings
identifying the terminals in your plug, proceed as follows:
The wire which is coloured GREEN-AND-YELLOW must be connected to the terminal in the plug which is
marked by the letter E or by the Earth symbol or coloured GREEN or GREEN-AND-YELLOW.
The wire which is coloured BLUE must be connected to the terminal in the plug which is marked with the letter
N or coloured BLACK. The wire which is coloured BROWN must be connected to the terminal in the plug
which is marked with the letter L or coloured RED.
IMPORTANT NOTICE CONCERNING POWER CORD SELECTION
The power cord set for this unit has been enclosed and has been selected according to the country of
destination and must be used to prevent electric shock. Use the following guidelines if it is necessary to
replace the original cord set, or if the cord set is not enclosed.
The female receptacle of the cord set must meet CEE-22 requirements and may look like (Figure A1 below):
Figure 1
For the United States and Canada
In the United States and Canada the male plug is a NEMA5-15 style (Figure A2), UL Listed, and CSA
Labeled. For units which are mounted on a desk or table, type SVT cord sets may be used. The cord set must
be selected according to the current rating for your unit. Please consult the table below for the selection
criteria for power cords used in the United States and Canada.
Figure 2
Cord Type Size of Conductors in Cord Maximum Current Rating of Unit
SJT 18 AWG
SVT 18 AWG
16 AWG
14 AWG
17 AWG
10 Amps
12 Amps
12 Amps
10 Amps
12 Amps
For European Countries
In Europe you must use a cord set which is appropriate for the receptacles in your country. The cord set is
HAR-Certified, and a special mark that will appear on the outer sheath, or on the insulation of one of the inner
conductors.
If you have any questions concerning which proper power cord to use, please consult with the dealer from
whom you have purchased the product.
39 ViewSonic VP2290b
Page 43

Compliance Information for U.S.A.
This equipment has been tested and found to comply with the limits for a Class B digital device, pursuant to
part 15 of the FCC Rules. These limits are designed to provide reasonable protection against harmful
interference in a residential installation. This equipment generates, uses, and can radiate radio frequency
energy, and if not installed and used in accordance with the instructions, may cause harmful interference to
radio communications. However, there is no guarantee that interference will not occur in a particular
installation. If this equipment does cause harmful interference to radio or television reception, which can be
determined by turning the equipment off and on, the user is encouraged to try to correct the interference by
one or more of the following measures:
• Reorient or relocate the receiving antenna.
• Increase the separation between the equipment and receiver.
• Connect the equipment into an outlet on a circuit different from that to which the receiver is connected.
• Consult the dealer or an experienced radio/TV technician for help.
FCC Warning
To assure continued FCC compliance, the user must use grounded power supply cord and the provided
shielded video interface cable with bonded ferrite cores. If a BNC cable is going to be used, use only a
shielded BNC(5) cable. Also, any unauthorized changes or modifications not expressly approved by the party
responsible for compliance could void the user's authority to operate this device.
Instructions to Users
This equipment complies with the requirements of FCC (Federal Communication Commission) equipment provided that
the following condition is met. Use the cables which are included with the projector or specified.
Compliance Information for Canada
Notice: This class B digital apparatus complies with Canada ICES-003.
AVIS: Cet appeil numerique de la Classe B conforme a la norme NMB-003 du Canada.
Compliance Information for European Countries
CE Conformity
The device complies with the requirements of the EEC directive 89/336/EEC as amended by 92/
31/EEC and 93/68/EEC Art.5 with regard to “Electromagnetic compatibility,” and 73/23/EEC as
amended by 93/68/EEC Art.13 with regard to “Safety.”
User Information for all Countries
NOTICE: Use the cables which are included with the projector or specified.
ViewSonic VP2290b 40
Page 44

ViewSonic Corporation
 Loading...