

ViewSonic VP2130b-1, VS10773 Service manual

Service Manual
ViewSonic VP2130b-1
Model No. VS10773
21” Color TFT LCD Display
(VP2130b-1_SM Rev. 1a Dec. 2005)
ViewSonic® 381 Brea Canyon Road, Walnut, California 91789 USA - (800) 888-8583
Copyright
Copyright © 2005 by ViewSonic Corporation. All rights reserved. No part of this publication may be
reproduced, transmitted, transcribed, stored in a retrieval system, or translated into any language or
computer language, in any form or by any means, electronic, mechanical, magnetic, optical, chemical,
manual or otherwise, without the prior written permission of ViewSonic Corporation.
Disclai mer
ViewSonic makes no representations or warranties, either expressed or implied, with respect to the
contents hereof and specifically disclaims any warranty of merchantability or fitness for any particular
purpose. Further, ViewSonic reserves the right to revise this publication and to make changes from time
to time in the contents hereof without obligation of ViewSonic to notify any person of such revision or
changes.
Trademarks
Optiquest is a registered trademark of ViewSonic Corporation.
ViewSonic is a registered trademark of ViewSonic Corporation.
All other trademarks used within this document are the property of their respective owners.
Revision History
Revision SM Editing Date ECR Number
1a 12/23/2005 Initial release Jamie Chang
Description of Changes Editor
Viewsonic Corporation i Confidential - Do Not Copy VP2130b-1

TABLE OF CONTENTS
1. Precautions and Safety Notices
2. Specification
3. Front Panel Function Control Description
4. Circuit Description
5. Adjusting Procedure
6. Trouble Shooting Flow Chart
7. Recommended Spare Parts List
8. Exploded View And Exploded Parts List
9. Block Diagram
10. Schematic Diagrams
11. PCB Layout Diagrams
1
4
11
21
34
54
61
65
69
70
75
Viewsonic Corporation ii Confidential - Do Not Copy VP2130b-1
1. Precaution & Safety Notice
1. Caution :
No modification of any circuit should be attempted . Service work should only be performed
after you are thoroughly familiar with all of the following safety checks and servicing guide line
2. Safety Check :
Care should be taken while servicing this LCD display. Because of the high voltage used in the
inverter circuit. These voltage are exposed in such areas as the associated transformer circuits .
3. POWER SUPPLY REQUIREMENTS
The external power converter for this display util izes AC and DC cords , AC cord is detachable ,
but DC cord is permanently attached . Any attempt to replace another adapter could result in
serious problem on the display .
4. LEAKAGE CURRENT HOT CHECK
4-1 Plug the AC cord directly into the AC outlet. Do not use an isolation transformer during
this check.
4-2 Connect a 1500 ohm , 10 watt resistor , paralleled by a 0.15uF capacitor between each
metallic part and a good earth ground
4-3 Use an AC voltmeter with 1000 ohm / volt or more sensitivity and measure the AC
voltage across the combination 1500 ohm resistor and 0.15uF capacitor.
4-4 Move the resistor connection to each exposed metallic part and measure the voltage.
4-5 Reverse the polarity of the AC plug in the AC outlet and repeat the above measurement.
4-6 Voltage measured must not exceed 1.5 volt RMS, from any exposed metallic part to the
ground. A leakage current tester may be used in the above hot check, in which case any
circuit measured must not exceed 1.0 milliamp. In the case of a measurement exceeding
the 1.0 milliamp value, a rework is required to eliminate the chance of a shock hazard .
AC VOLTMETER
V
0.15u
.
To Metal Parts
Viewsonic Corporation 1 Confidential - Do Not Copy VP2130b-1
1500 10W
Earth Ground
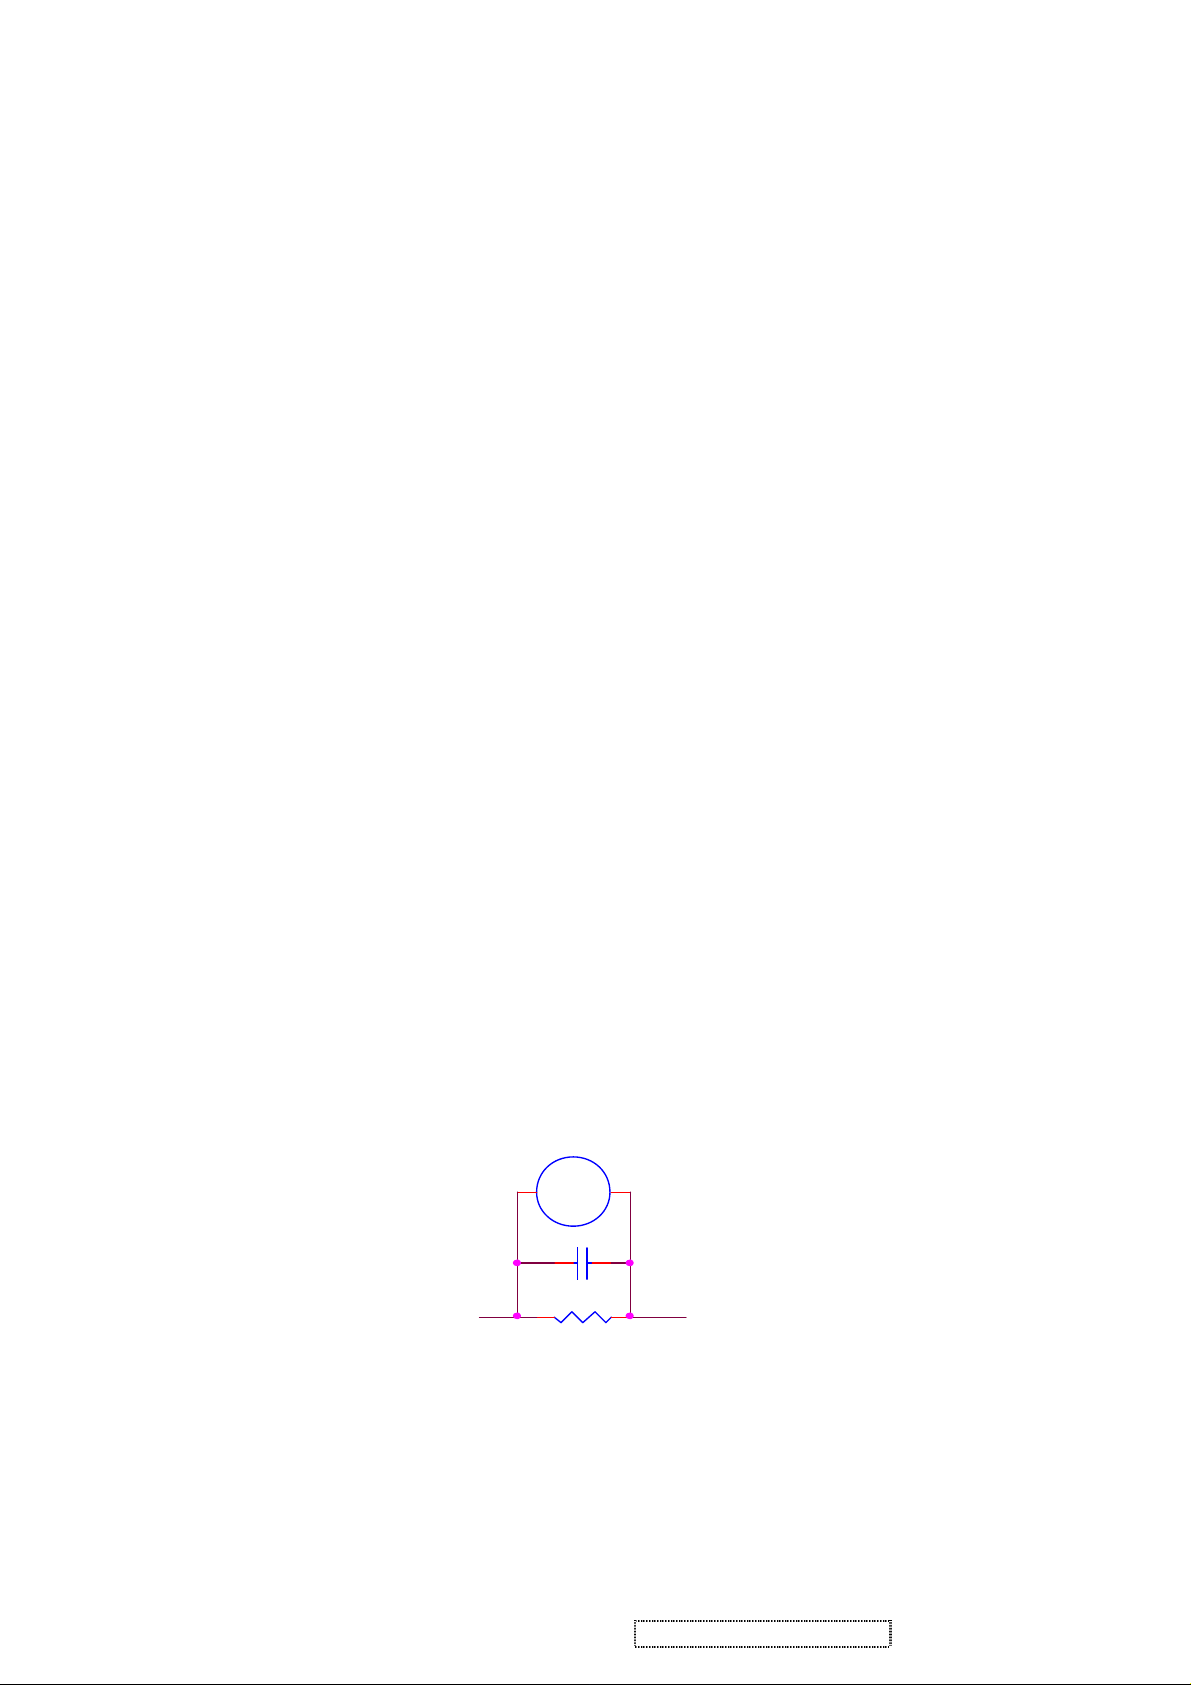
Handling & Placing method
Correct methods : Incorrect Methods :
Only touch the metal-frame of the panel or the front cover of
the monitor . Do not touch the surface of the polarizer .
Surface of the panel is pressed by fingers & this may cause
“ MURA “
Viewsonic Corporation 2 Confidential - Do Not Copy VP2130b-1
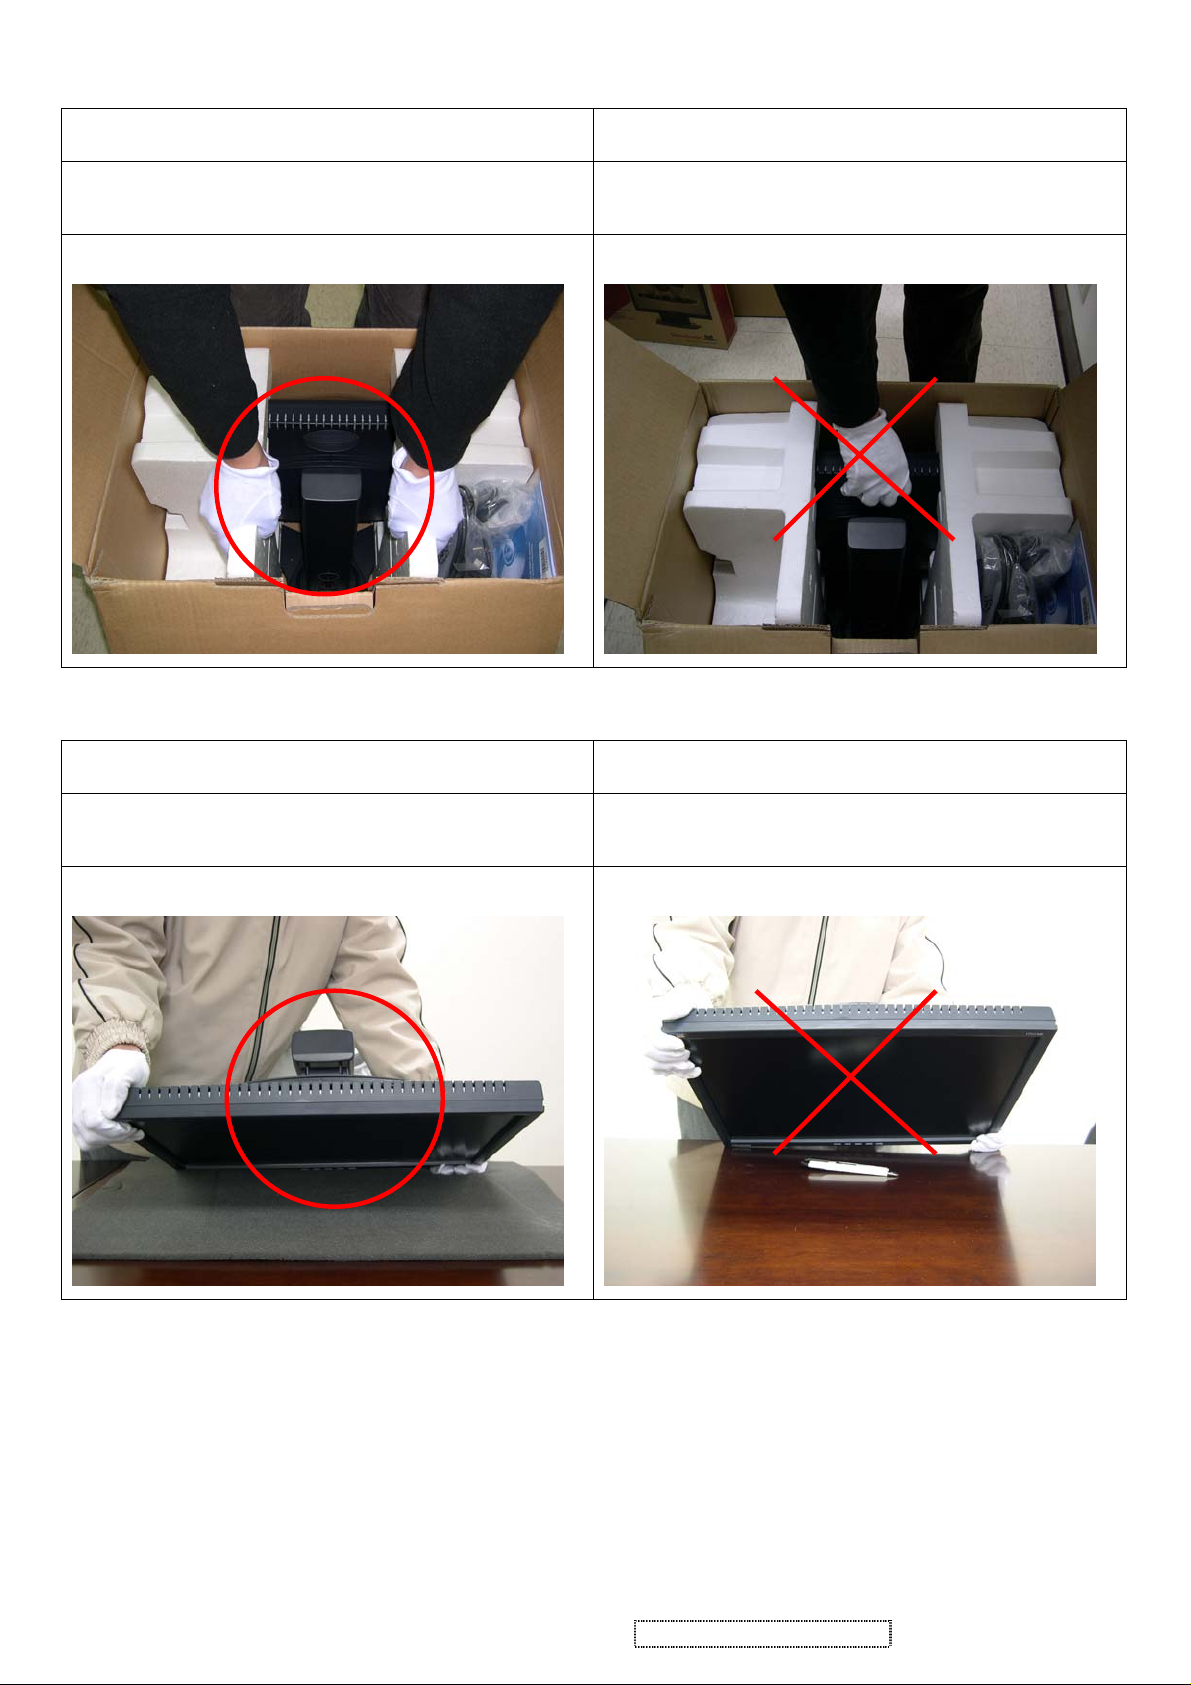
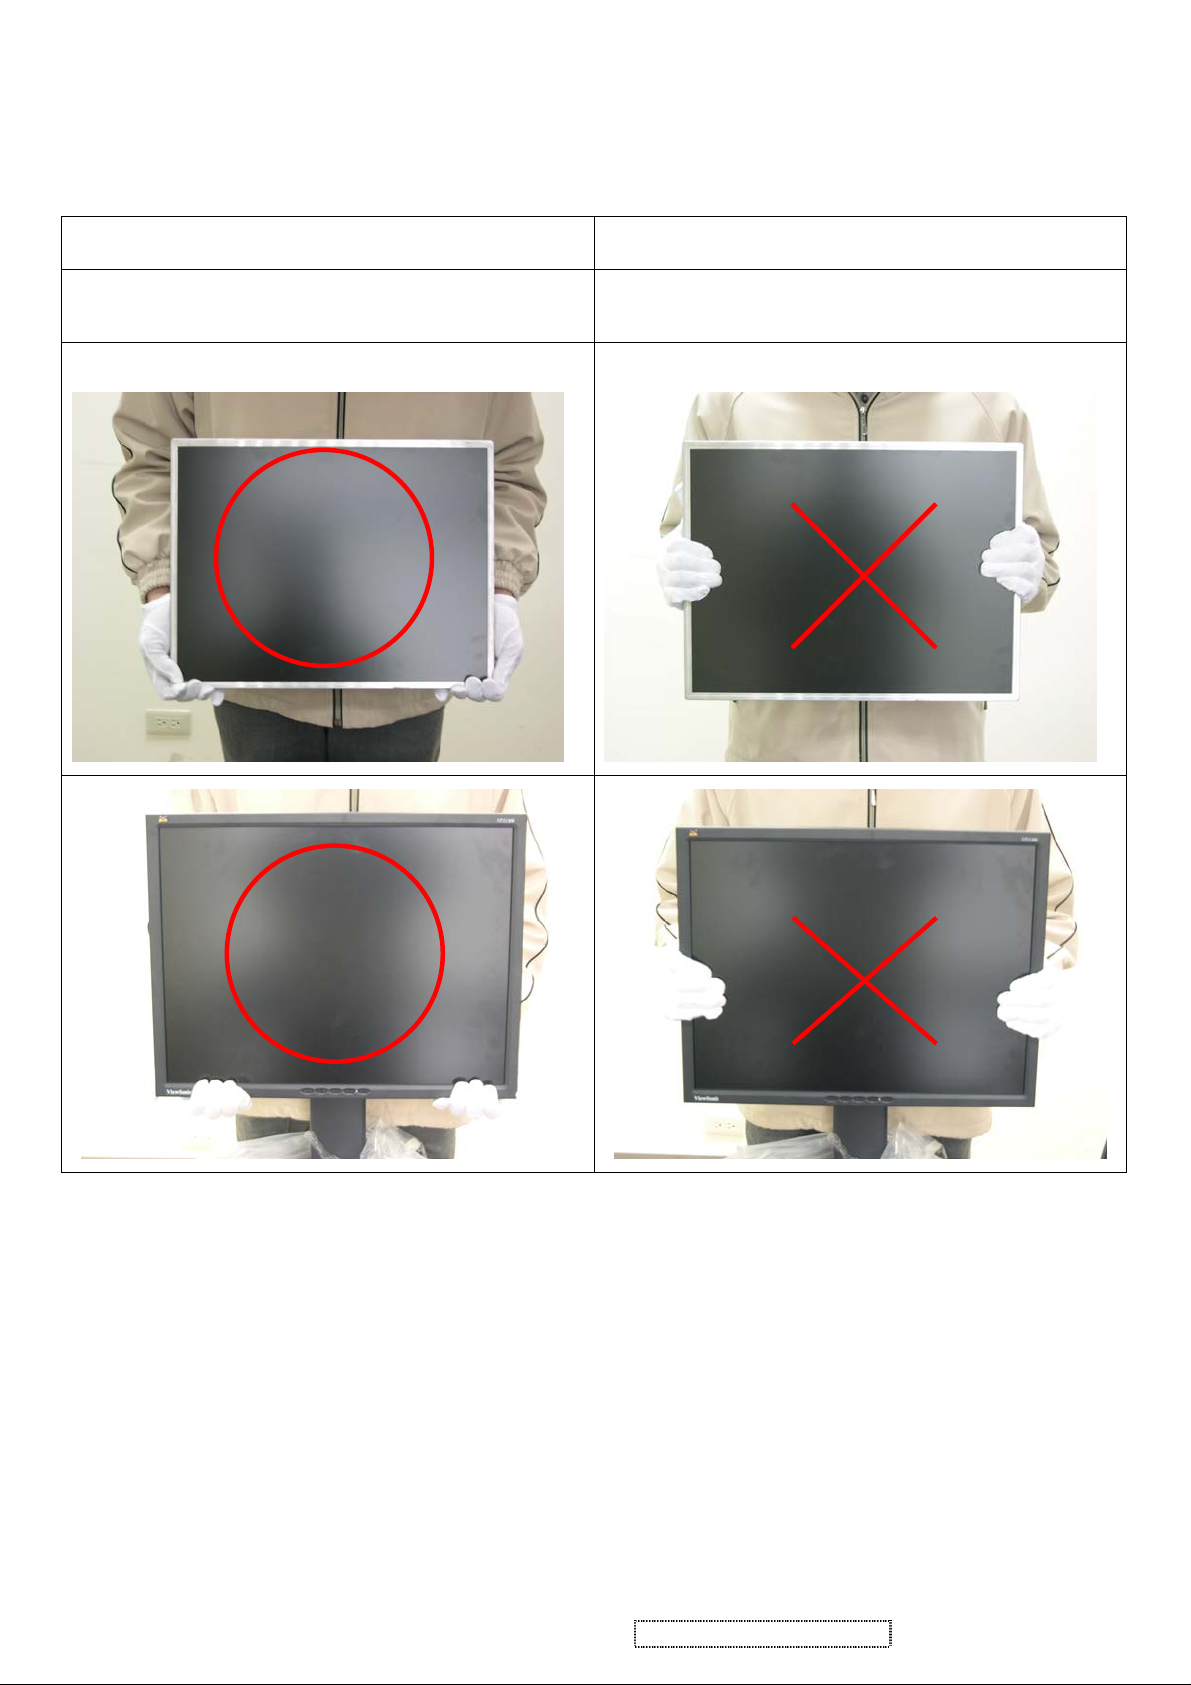
Correct methods : Incorrect Methods :
Take out the monitor with cushion Take out the monitor by grasping the LCD panel.
This may cause “ MURA“.
Correct methods : Incorrect Methods :
Place the monitor on a clean & soft foam pad . Place the monitor on foreign objects .
That could scratch the surface of panel
Viewsonic Corporation 3 Confidential - Do Not Copy VP2130b-1
2. Specification
Equal to twice the weight of the monitor for
Shall be compatible with all PC type
computers, Macintosh computers, and after
640 x 350, 640 x 400, 640 x 480, 720 x 400,
720 x 480, 720 x 576, 800 x 600, 832 x 624,
1024 x 768, 1152 x 864, 1152 x 870, 1280 x
720, 1280 x 768, 1280 x 960, 1280 x 1024,
1360 x 768, 1400 x 1050, 1440 x 900, 1600 x
Test Resolution & Frequency 1600x1200 @ 60Hz
Test Image Size Full Size
Contrast and Brightness Controls
Factory Default:
Contrast = 70%, Brightness = 100%
VIDEO INTERFACE
Input Connector (refer the appendix A) D-Sub = DB-15 (Analog)
DVI-A = DVI-I (Analog)
DVI-D = DVI-I (Digital)
Default Input Connector Defaults to the first detected input
Video Cable Strain Relief
five minutes
Video Cable Connector DB-15 Pin out Compliant DDC/CI
Video RGB (Analog)
Video Signals
Separate Sync / Composite Sync / SOG
TMDS (Digital)
Video Impedance 75 Ohms (Analog), 100 Ohms (Digital)
Maximum PC Video Signal 950 mV with no damage to monitor
Maximum Mac Video Signal 1250 mV with no damage to monitor
Sync Signals TTL
DDC/CI Compliant with Revision 1.0
Sync Compatibility Separate Sync / Composite Sync / SOG
Video Compatibility
market video cards
Resolution Compatibility
1200, 1680 x 1050, 1920 x 1080, 1920 x 1200
Exclusions Not compatible with interlaced video
Viewsonic Corporation 4 Confidential - Do Not Copy VP2130b-1
USB INTERFACE
full load, with all combinations of input voltage,
Shall be able to withstand 1.5 times nominal
e to function properly, without
reset or visible screen artifacts, when ½ cycle
of AC power is randomly missing at nominal
The power supply shall not produce audible
noise that would be detectable by the user.
defined to be in compliance with
ISO 7779 (DIN EN27779:1991) Noise
measurements of machines acoustics. Power
Up Stream Connector B type USB port x1
Down Stream Connector A type USB port x4
Compatibility Compliant with Revision 2.0
Power The hub gets power from the display.
POWER SUPPLY
Internal Power Supply Delta EADP-64BF
Input Voltage Range 90 to 264 VAC
Input Frequency Range 47.5 to 63 Hertz
Short Circuit Protection Output can be shorted without damage
Over Current Protection 5.0 A typical at 12.0 VDC
Leakage Current 3.5mA (Max) at 254VAC / 60Hz
Efficiency 80 % typical at 115VAC Full Load
Fuse Internal and not user replaceable
Power Dissipation 64 Watts (typ)
Max Input AC Current 1.5 Arms @ 90VAC, 0.75 Arms @180VAC
Inrush Current (Cold Start)
50 A (max) @ 115VAC
90 A (max) @ 230VAC
Shall start and function properly when under
Power Supply Cold Start
input frequency, and operating temperature.
Shall be able to withstand an ANSI/IEEE
Power Supply Transient Immunity
C62.41-1980 6000V 200 ampere ring wave
transient test with no damage.
Power Supply Line Surge Immunity
line voltage for one cycle with no damage.
Shall be abl
Power Supply Missing Cycle Immunity
input.
Power Supply Acoustics
Audible shall
Switch noise shall not be considered.
Power Saving Operation(Method) VESA DPMS Signaling
Power Consumption
On Mode < 53 W (Typ) / 56 W (max)
Active Off < 3 W
Recovery Time On Mode = N/A, Active Off < 8 sec
Viewsonic Corporation 5 Confidential - Do Not Copy VP2130b-1

ELECTRICAL REQUIREMENT
Horizontal / Vertical Frequency
Horizontal Frequency 24 – 92 KHZ
Vertical Refresh Rate 50 – 85* HZ.
Maximum Pixel Clock 165 MHz
Sync Polarity Independent of sync polarity.
Timing Table
Item Timing
1 640 x 350 @ 70 Hz, 31.5 KHz
2 640 x 350 @ 85 Hz, 37.9 KHz
3 640 x 400 @ 60 Hz, 31.5 KHz
4 640 x 400 @ 70 Hz, 31.5 KHz
Digital - TMDS
Analog
Separated
Composite
SOG
ü ü ü ü
ü ü ü
ü ü ü ü
ü ü ü ü
Remark
For Separated sync, Only horizontal full
screen, The vertical position is at the
center.
For SOG sync, switch 640x400@60Hz
and 640x480@60Hz by [1]+[2] short cut
key (primery = 640x480@60Hz)
For Separated Sync, Switch
640x400@70Hz and 720x400@70Hz by
[1]+[2] short cut key (primery =
640x400@70Hz)
For Separated Sync, Switch
5 640 x 400 @ 85 Hz, 37.9 KHz
6 640 x 480 @ 50 Hz, 24.7 KHz
7 640 x 480 @ 60 Hz, 31.5 KHz
8 640 x 480 @ 67 Hz, 35 KHz
9 640 x 480 @ 72 Hz, 37.9 KHz
Viewsonic Corporation 6 Confidential - Do Not Copy VP2130b-1
ü ü ü ü
ü ü ü
ü ü ü ü
ü ü ü ü
ü ü ü ü
640x400@85Hz and 720x400@85Hz by
[1]+[2] short cut key (primery =
640x400@85Hz)
For SOG sync, switch 640x400@60Hz
and 640x480@60Hz by [1]+[2] short cut
key (primery = 640x480@60Hz)
10 640 x 480 @ 75 Hz, 37.5 KHz
ü ü ü ü
11 640 x 480 @ 85 Hz, 43.3 KHz
12 720 x 400 @ 70 Hz, 31.5 KHz
13 720 x 400 @ 85 Hz, 37.9 KHz
14 720 x 480 @ 60 Hz, 31.5 KHz
15 720 x 576 @ 50 Hz, 31.3 KHz
16 800 x 600 @ 50 Hz, 24.7 KHz
17 800 x 600 @ 56 Hz, 35.1 KHz
18 800 x 600 @ 60 Hz, 37.9 KHz
ü ü ü ü
ü ü ü ü
ü ü ü ü
ü ü
ü ü
ü ü ü ü
ü ü ü ü
ü ü ü ü
For Separated Sync, Switch
640x400@85Hz and 720x400@85Hz by
[1]+[2] short cut key (primery =
640x400@85Hz)
19 800 x 600 @ 72 Hz, 48.1 KHz
20 800 x 600 @ 75 Hz, 46.9 KHz
21 800 x 600 @ 85 Hz, 53.7 KHz
22 832 x 624 @ 75 Hz, 49.7 KHz
23 1024 x 768 @ 50 Hz, 39.6 KHz
24 1024 x 768 @ 60 Hz, 48.4 KHz
25 1024 x 768 @ 70 Hz, 56.5 KHz
26 1024 x 768 @ 72 Hz, 58.1 KHz
ü ü ü ü
ü ü ü ü
ü ü ü ü
ü ü ü ü
ü ü ü ü
ü ü ü ü
ü ü ü ü
ü ü ü ü
For Separated and Composite sync,
Switch 1024x768@50Hz and
1280x768@50Hz by [1]+[2] short cut key
(primery = 1024x768@50Hz)
27 1024 x 768 @ 75 Hz, 60 KHz
28 1024 x 768 @ 75 Hz, 60.2 KHz
29 1024 x 768 @ 85 Hz, 68.7 KHz
Viewsonic Corporation 7 Confidential - Do Not Copy VP2130b-1
ü ü ü ü
ü ü ü ü
ü ü ü ü
30 1152 x 864 @ 75 Hz, 67.5 KHz
, Switch 1280x768@60Hz
, Switch 1280x768@60Hz
ü ü ü ü
31 1152 x 870 @ 75 Hz, 68.7 KHz
32 1280 x 720 @ 50 Hz, 37.5 KHz
33 1280 x 720 @ 60 Hz, 45 KHz
34 1280 x 768 @ 50 Hz, 39.6 KHz
35 1280 x 768 @ 60 Hz, 47.4 KHz
36 1280 x 768 @ 60 Hz, 47.8 KHz
37 1280 x 768 @ 75 Hz, 60.3 KHz
38 1280 x 768 @ 85 Hz, 68.6 KHz
ü ü ü ü
ü ü
ü ü
ü ü ü ü
ü ü ü
ü ü ü
ü ü ü ü
ü ü ü ü
For Separated and Composite sync,
Switch 1024x768@50Hz and
1280x768@50Hz by [1]+[2] short cut key
(primery = 1024x768@50Hz)
For analog sync
and 1360x768@60Hz by [1]+[2] short cut
key (primery = 1280x768@60Hz)
39 1280 x 960 @ 50 Hz, 49.4 KHz
40 1280 x 960 @ 60 Hz, 59.7 KHz
41 1280 x 960 @ 75 Hz, 75.2 KHz
42 1280 x 960 @ 85 Hz, 85.9 KHz
43 1280 x 1024 @ 50 Hz, 52.7 KHz
44 1280 x 1024 @ 60 Hz, 64 KHz
45 1280 x 1024 @ 75 Hz, 80 KHz
46 1280 x 1024 @ 85 Hz, 91.1 KHz
47 1360 x 768 @ 60 Hz, 47.7 KHz
ü ü ü ü
ü ü ü ü
ü ü ü ü
ü ü ü ü
ü ü ü ü
ü ü ü ü
ü ü ü ü
ü ü ü ü
ü ü ü ü
For analog sync
and 1360x768@60Hz by [1]+[2] short cut
key (primary = 1280x768@60Hz)
48 1400 x 1050 @ 50 Hz, 54.1 KHz
Viewsonic Corporation 8 Confidential - Do Not Copy VP2130b-1
ü ü ü ü
For analog sync, Switch
by [1]+[2] short cut key
short cut key
1680x1050@60Hz by [1]+[2] short cut key
1680x1050@60Hz by [1]+[2] short cut key
49 1400 x 1050 @ 60 Hz, 64.7 KHz
50 1400 x 1050 @ 60 Hz, 65.3 KHz
51 1400 x 1050 @ 75 Hz, 82.3 KHz
52 1440 x 900 @ 60 Hz, 55.5 KHz
53 1440 x 900 @ 60 Hz, 59.9 KHz
54 1440 x 900 @ 75 Hz, 75 KHz
55 1440 x 900 @ 85 Hz, 84.8 KHz
56 1600 x 1200 @ 50 Hz, 61.8 KHz
ü ü ü
ü ü
ü ü ü ü
ü ü ü ü
ü ü ü ü
ü ü ü ü
ü ü ü ü
ü ü ü ü
1400x1050@60Hz and
1680x1050@60Hz
(primary = 1400x1050@60Hz)
For Separated and Composite sync,
Switch 1400x1050@60Hz and
1680x1050@60Hz by [1]+[2]
(primary = 1400x1050@60Hz)
57 1600 x 12 00 @ 60 Hz, 75 KHz
58 1680 x 1050 @ 60 Hz, 64.7 KHz
59 1680 x 1050 @ 60 Hz, 65.3 KHz
60 1920 x 1080 @ 50 Hz, 28.1 KHz
61 1920 x 1080 @ 60 Hz, 33.8 KHz
62 1920 x 1200 @ 60 Hz, 74 KHz
*1. Tolerance ≧ ±2KHz. (if the range dose not cover other timing mode)
*2. Any timing not in the list, it should display as normal or show on “OUT OF RANGE” OSD message without
blanking.
*3. The image quality of 85Hz mode might be worse than 75Hz.
ü ü ü ü
ü ü ü
ü ü
ü ü
ü ü
ü ü ü ü
For analog sync, Switch
1400x1050@60Hz and
(primary = 1400x1050@60Hz)
For Separated and Composite sync,
Switch 1400x1050@60Hz and
(primary = 1400x1050@60Hz)
Primary Presets
1600x1200 @ 60Hz
Viewsonic Corporation 9 Confidential - Do Not Copy VP2130b-1

User Presets
Number of User Presets (recognized timings) Available: 10 presets total in FIFO
configuration
Changing Modes
● Maximum Mode Change Blank Time for image stability : 3 seconds (Max), excluding
“Auto Adjust” time
● Under DOS mode (640 x 350, 720 x 400 & 640 x 400), it should recall factory setting
when execute “Auto Adjust ”
● The monitor needs to do “Auto Adjust” the first time a new mode is detected
(see section “0-Touch™ Function Actions” )
● While running Change Mode, Auto Adjust or Memory Recall, the image shall blank
TFT LCD PANEL
Panel Source Identify
The panel code “ S” for Samsung panel should be shown on following position,
(1) The lower right side of ID label. (see Figure 2)
(2) The lower right side of UPC label. (see Figure 3)
(3) The F/W version sticker or silkscreen on main board.
Viewsonic Corporation 10 VP2130b-1 Confidential - Do Not Copy
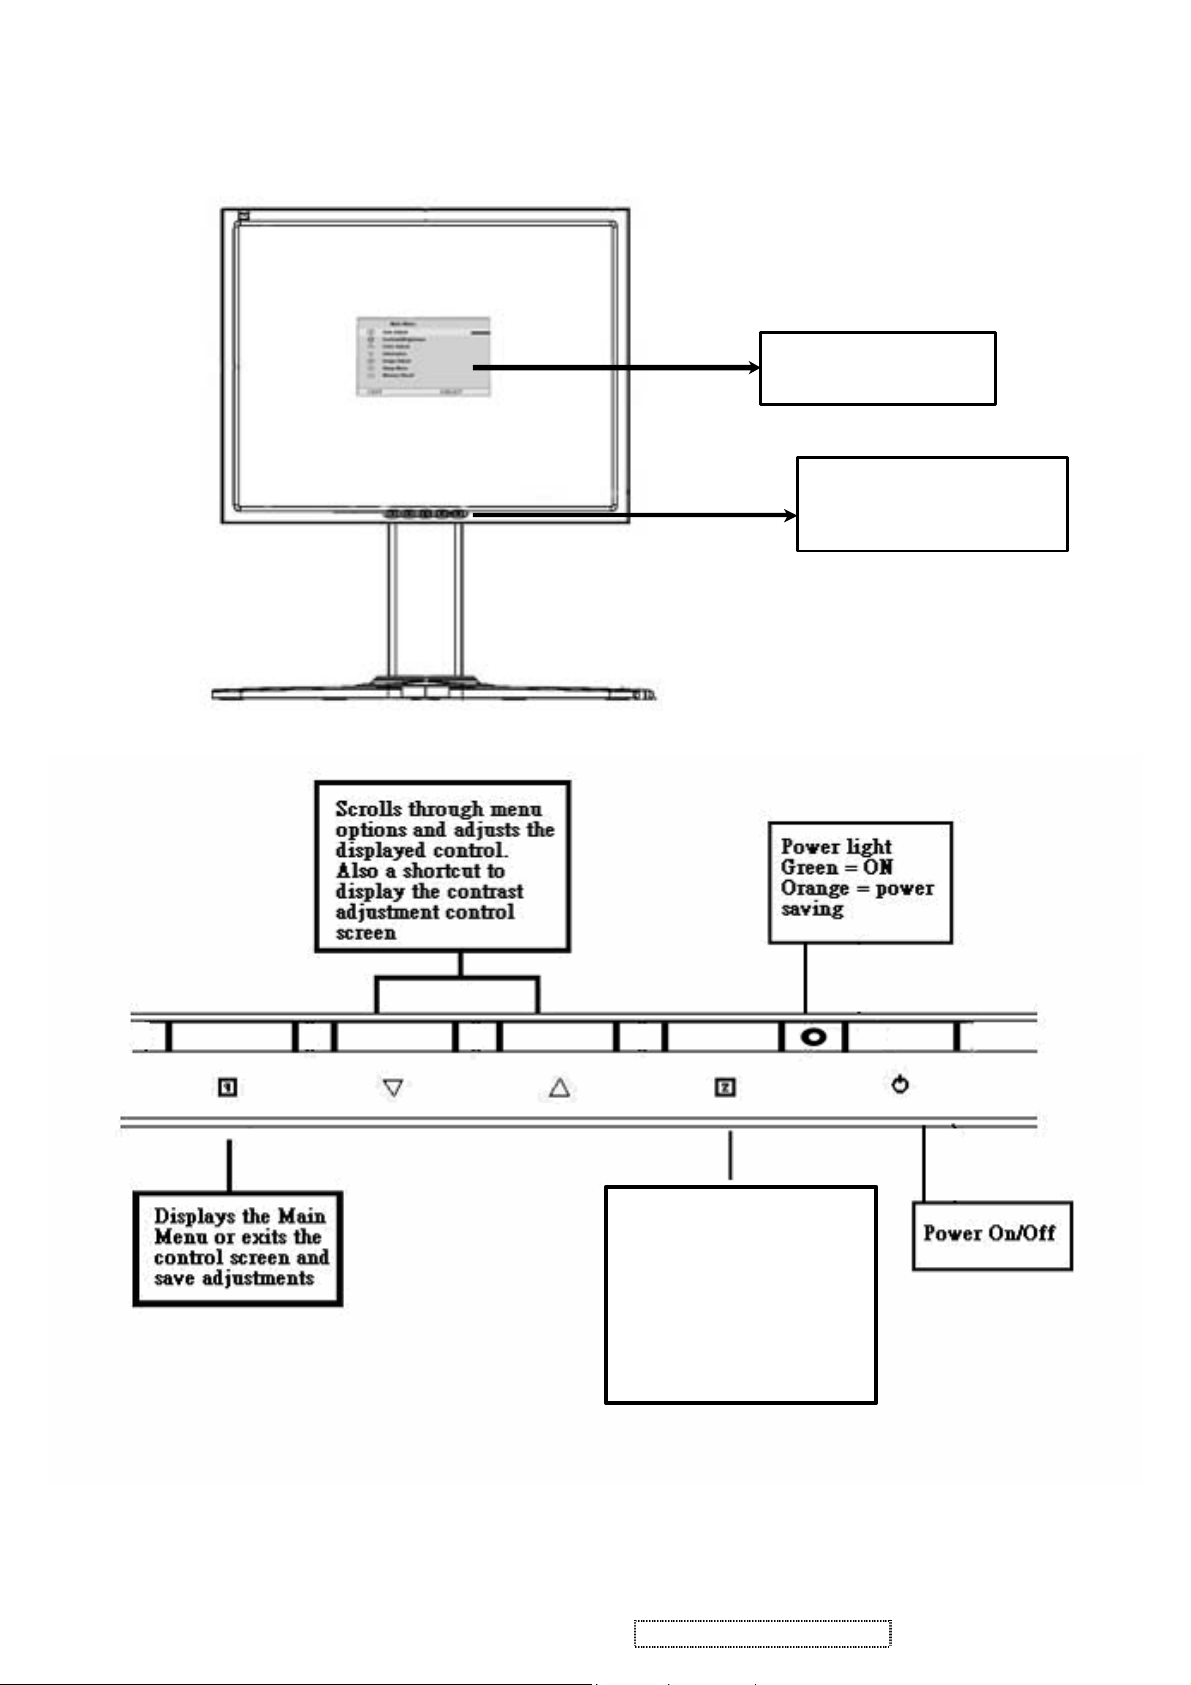
3. Front Panel Function Control Description
Main Menu
with on view
Front Control Panel
shown below in detail
Change the input source,
select the highlighted item,
display the highlighted
item or toggle in different
Viewsonic Corporation 11 VP2130b-1 Confidential - Do Not Copy
items

ViewSonic VP2130
Main Menu Controls
Adjust the menu items shown below by using the up and down buttons.
A. Auto Image Adjust automatically sizes, centers, and fine tunes the video signal to eliminate waviness and
distortion. Press the [2] button to obtain a sharper image.
NOTE: Auto Image Adjust works with most common video cards. If this function does not work on your LCD
display, then lower the video refresh rate to 60 Hz and set the resolution to its pre -set value.
B. Contrast adjusts the difference between the image background (black level) and the foreground (white level).
C. Brightness adjusts the lamps current to control the screen brightness.
D. Color Adjust provides several color options: preset color temperatures and Custom User Color which allows you
to adjust red (R), green (G), and blue (B). The factory setting for this product is 6500K (6500° Kelvin).
sRGB ─ Standard color space proposed by Microsoft and HP.
9300K — Adds blue to the screen image for cooler white (used in most office settings with fluorescent lighting).
7500K — Adds blue to the screen image for cooler white
5400K — Adds red to the screen image for warmer white and richer red.
5000K — Adds red to the screen image for warmer white and richer red.
Custom User Color — Individual adjustments for red, green, and blue.
1 To select color (R, G or B) press button [2].
2 To adjust selected color, press ▲ or ▼
3 When you are finished making all color adjustments, press button [1] twice.
E. Information displays the timing mode (video signal input) coming from the graphics card in your computer. See
your graphic card’s user guide for instructions on changing the resolution and refresh rate (vertical frequency).
VESA 1280 x 1024 @ 60 Hz (recommended) means that the resolution is 1280 x 1024 and the refresh rate is 60
Hertz.
F. Manual Image Adjust controls are explained below:
PIP (Picture in Picture) features are explained below:
PIP enables Picture in Picture function.
PIP Position is for user to adjust the position of PIP. Press button [2] to enter the PIP H. Position and use
▲ or ▼ to adjust the PIP horizontal position. User can press [2] to enter V. Position and use ▲ or ▼
to adjust the PIP vertical position.
PIP SWAP is for user to swap the signal in main window to daughter window while the signal of
daughter window will be displayed in main window.
H. Size (Horizontal Size) adjusts the width of the screen image.
NOTE: Vertical size is automatic with your LCD display.
H./V. Position adjusts horizontal and vertical position of the screen image. You can toggle between Horizontal
and Vertical by pressing button [2]. Horizontal moves the screen image to the left or to the right. Vertical moves
the screen image up and down.
Viewsonic Corporation 12 VP2130b-1 Confidential - Do Not Copy

Fine Tune sharpens focus by aligning the illuminated text and/or graphic characters.
Sharpness adjusts the clarity and focus of the screen image. This feature is disabled when the input signal is
1600x1200@60Hz analog signal.
Scaling features are explained below:
Fill All - the signal will be displayed on the whole screen and wide signal will be adjusted to 4:3 ratio.
Fill Aspect Ratio – the width of the signal will fit the screen horizontally while the vertical directions may
not fit the screen (if the input is wide signal)
1:1 – the signal will be displayed on the center of the screen with 1:1 ratio. This means you may see the
signal at the center of the screen while it is surrounded by black area.
G. Setup Menu controls are explained below:
Language allows you to choose the language used in the menus and control screens.
Resolution Notice displays the recommended resolution for this LCD display.
Enable allows the Resolution Notice to appear on-screen.
Disable will not allow the Resolution Notice to appear on-screen.
OSD Timeout sets the length of time an on-screen display screen is displayed. For example, with a“15
second” setting, if a control is not pushed within 15 seconds, the display OSD disappears.
OSD Position allows you to move the on-screen display menus and control screens.
H. Memory Recall returns adjustments to the original factory settings if the display is operating in a factory Preset
Timing Mode listed in this user guide.
Viewsonic Corporation 13 VP2130b-1 Confidential - Do Not Copy

OSD Function Menu
A. When in Analog Input Mode
1. Main Menu
Press the [1] (Menu) button to enter the Main Menu:
Press the [▲] button to highlight the previous item or the [▼] button to highlight
the next item.
Press the [1] (Menu) button to exit the Main Menu.
(1) Auto Image Adjust Page:
Press the [2] button to execute the auto image adjust function.
Press the [1] button to exit the page.
(2) Contrast/Brightness Page:
Press the [2] button to enter the contrast adjustment page.
Press the [1] button to exit the page.
1) Contrast Item
Press the [▲] button to increase the contrast.
Press the [▼] button to decrease the contrast.
Press the [2] button to enter the brightness adjustment page.
Press the [1] button to exit the page.
2) Brightness Item
Press the [▲] button to increase the brightness.
Press the [▼] button to decrease the brightness.
Press the [2] button to enter the contrast adjustment page.
Press the [1] button to exit the page.
(3) Input Select Page:
Press the [2] button to switch to digital input mode.
(4) Audio Adjust Page:
Press the [▲] button to increase the volume.
Press the [▼] button to decrease the volume.
Press the [2] button to enable or disable mute function .
Press the [1] button to exit the page.
(5) Color Adjust Page:
Press the [2] button to enter the color adjustment page.
Press the [1] button to exit the page.
Press the [▲] button to highlight the previous item or the [▼] button to
highlight the next item.
1) sRGB Item
2) 9300K Item
3) 6500K Item
4) 5400K Item
5) 5000K Item
Press the [2] button to select the currently highlighted item.
Press the [1] button to exit the currently highlighted item.
6) User Color Item
Press the [2] button to enter the user color page.
Viewsonic Corporation 14 VP2130b-1 Confidential - Do Not Copy

Press the [1] button to exit the page.
Red, Green, Blue Options:
Press the [2] button to cycle among the colors.
Press the [1] button to exit the page.
Press the [▲] button to increase the selected color level.
Press the [▼] button to decrease the selected color level.
(6) Information Page:
Press the [2] button to enter the information page.
Press the [1] button to exit the information page.
(7) Manual Image Adjust Page:
Press the [2] button to enter the manual image adjustment page.
Press the [1] button to exit the page.
Press the [▲] button to highlight the previous item or the [▼] button to
highlight the next item.
1) H./V. Position Item
Press the [2] button to enter the horizontal/vertical postion adjustment page.
Press the [1] button to exit the page.
a) Horizontal Position:
Press the [2] button to enter the vertical position adjustment page.
Press the [1] button to exit the page.
Press the [▲] button to shift the image to the right.
Press the [▼] button to shift the image to the left.
b) Vertical Position:
Press the [2] button to return to the horizontal position adjustment page.
Press the [1] button to exit the page.
Press the [▲] button to shift the image upward.
Press the [▼] button to shift the image downward.
2) Horizontal Size Item
Press the [2] button to enter the horizontal size adjustment page.
Press the [1] button to exit the page.
Press the [▲] button to make the image wider.
Press the [▼] button to make the image narrower.
3) Fine tune Item
Press the [2] button to enter the fine tuning page.
Press the [1] button to exit the page.
Press “[▲]” Button to adjust character position in one direction.
Press “[▼]“Button to adjust character position in the other direction.
4) Sharpness Item
Press the [2] button to enter the sharpness adjustment page.
Press the [1] button to exit the page.
Press “[▲]” Button to increase image sharpness.
Press “[▼]“ Button to decrease image sharpness.
(8) Setup Menu Page:
Viewsonic Corporation 15 VP2130b-1 Confidential - Do Not Copy

Press the [2] button to enter the setup menu page.
Press the [1] button to exit the page.
Press the [▲] button to highlight the previous item or the [▼] button to
highlight the next item.
1) Language Select Item
Press the [2] button to enter the language selection page.
Press the [1] button to exit the page.
Press the [▲] button to highlight the previous item or the [▼] button to
highlight the next item.
English, French… Option
Press the [2] button to select the language.
Press the [1] button to exit the page.
2) Resolution Notice Item
Press the [2] button to enter the resolution notice page.
Press the [1] button to exit the page.
Enable, Disable Option
Press the [2] button to select the highlighted option.
Press the [1] button to exit the page.
Press the [▲] button to highlight the previous option or the [▼] button
to highlight the next option.
3) OSD Position Item
Press the [2] button to enter the OSD position adjustment page.
Press the [1] button to exit the page.
a) Horizontal Position Option
Press the [2] button to enter the vertical position adjustment page.
Press the [1] button to exit the page.
Press the [▲] button to shift the menu to the right.
Press the [▼] button to shift the menu to the left.
b) Vertical Position Option:
Press the [2] button to enter the horizontal position adjustment page.
Press the [1] button to exit the page.
Press the [▲] button to shift the menu upward.
Press the [▼] button to shift the menu downward.
4) OSD Time Out Item
Press the [2] button to enter the OSD time out adjustment page.
Press the [1] button to exit the page.
Press the [▲] button to increase the OSD time out.
Press the [▼] button to decrease the OSD time out.
5) OSD Background Item
Press the [2] button to enter the OSD background selection page.
Press the [1] button to exit the page.
Enable, Disable Option
Press the [▲] button to highlight the previous option or the [▼] button
to highlight the next option.
Press the [2] button to select the highlighted option.
Viewsonic Corporation 16 VP2130b-1 Confidential - Do Not Copy

Press the [1] button to exit the page.
(9) Memory Recall Page
Press the [2] button to execute the memory recall function.
Press the [1] button to exit the page.
2. Other Menu:
This “shortcut” menu is directly accessible without bringing up the OSD.
(1) Contrast Dialog
Press the [▲] or [▼] button to enter the Contrast Dialog.
Press the [1] button to exit the Contrast Dialog.
Press the [2] button to enter the Brightness Dialog.
Press the [▲] button to increase the contrast.
Press the [▼] button to decrease the contrast.
(2) Brightness Dialog
Press the [▲] or [▼] button to enter the Brightness Dialog.
Press the [1] button to exit the Brightness Dialog.
Press the [2] button to enter the Contrast Dialog.
Press the [▲] button to increase the brightness.
Press the [▼] button to decrease the brightness.
(3) Analog/Digital Dialog
Press the [2] button to toggle between analog and digital modes.
B. When in Digital Input Mode
1. Main Menu
Press the [1] (Menu) button to enter the Main Menu:
Press the [▲] button to highlight the previous item or the [▼] button to highlight
the next item.
Press the [1] (Menu) button to exit the Main Menu.
(1) Auto Image Adjust Page:
Press the [2] button to execute the auto image adjust function.
Press the [1] button to exit the page.
(2) Contrast/Brightness Page:
Press the [2] button to enter the contrast adjustment page.
Press the [1] button to exit the page.
1) Contrast Item
Press the [▲] button to increase the contrast.
Press the [▼] button to decrease the contrast.
Press the [2] button to enter the brightness adjustment page.
Press the [1] button to exit the page.
2) Brightness Item
Press the [▲] button to increase the brightness.
Press the [▼] button to decrease the brightness.
Press the [2] button to enter the contrast adjustment page.
Press the [1] button to exit the page.
Viewsonic Corporation 17 VP2130b-1 Confidential - Do Not Copy

(3) Input Select Page:
Press the [2] button to switch to analog input mode.
(4) Audio Adjust Page:
Press the [▲] button to increase the volume.
Press the [▼] button to decrease the volume.
Press the [2] button to enable or disable mute function .
Press the [1] button to exit the page.
(4) Color Adjust Page:
Press the [2] button to enter the color adjustment page.
Press the [1] button to exit the page.
Press the [▲] button to highlight the previous item or the [▼] button to
highlight the next item.
1) sRGB Item
2) 9300K Item
3) 6500K Item
4) 5400K Item
5) 5000K Item
Press the [2] button to select the currently highlighted item.
Press the [1] button to exit the currently highlighted item.
6) User Color Item
Press the [2] button to enter the user color page.
Press the [1] button to exit the page.
Red, Green, Blue Options:
Press the [2] button to cycle among the colors.
Press the [1] button to exit the page.
Press the [▲] button to increase the selected color level.
Press the [▼] button to decrease the selected color level.
(5) Information Page:
Press the [2] button to enter the information page.
Press the [1] button to exit the information page.
(6) Manual Image Adjust Page:
Press the [2] button to enter the manual image adjustment page.
Press the [1] button to exit the page.
Press the [▲] button to highlight the previous item or the [▼] button to
highlight the next item.
1) Sharpness Item
Press the [2] button to enter the sharpness adjustment page.
Press the [1] button to exit the page.
Press “[▲]” Button to increase image sharpness.
Press “[▼]“ Button to decrease image sharpness.
(7) Setup Menu Page:
Press the [2] button to enter the setup menu page.
Press the [1] button to exit the page.
Viewsonic Corporation 18 VP2130b-1 Confidential - Do Not Copy

Press the [▲] button to highlight the previous item or the [▼] button to
highlight the next item.
1) Language Select Item
Press the [2] button to enter the language selection page.
Press the [1] button to exit the page.
Press the [▲] button to highlight the previous item or the [▼] button to
highlight the next item.
English, French… Option
Press the [2] button to select the language.
Press the [1] button to exit the page.
2) Resolution Notice Item
Press the [2] button to enter the resolution notice page.
Press the [1] button to exit the page.
Enable, Disable Option
Press the [2] button to select the highlighted option.
Press the [1] button to exit the page.
Press the [▲] button to highlight the previous option or the [▼] button
to highlight the next option.
3) OSD Position Item
Press the [2] button to enter the OSD position adjustment page.
Press the [1] button to exit the page.
a) Horizontal Position Option
Press the [2] button to enter the vertical position adjustment page.
Press the [1] button to exit the page.
Press the [▲] button to shift the menu to the right.
Press the [▼] button to shift the menu to the left.
b) Vertical Position Option:
Press the [2] button to enter the horizontal position adjustment page.
Press the [1] button to exit the page.
Press the [▲] button to shift the menu upward.
Press the [▼] button to shift the menu downward.
4) OSD Time Out Item
Press the [2] button to enter the OSD time out adjustment page.
Press the [1] button to exit the page.
Press the [▲] button to increase the OSD time out.
Press the [▼] button to decrease the OSD time out.
5) OSD Background Item
Press the [2] button to enter the OSD background selection page.
Press the [1] button to exit the page.
Enable, Disable Option
Press the [▲] button to highlight the previous option or the [▼] button
to highlight the next option.
Press the [2] button to select the highlighted option.
Press the [1] button to exit the page.
Viewsonic Corporation 19 VP2130b-1 Confidential - Do Not Copy

(8) Memory Recall Page
Press the [2] button to execute the memory recall function.
Press the [1] button to exit the page.
2. Other Menu:
This “shortcut” menu is directly accessible without bringing up the OSD.
(1) Contrast Dialog
Press the [▲] or [▼] button to enter the Contrast Dialog.
Press the [1] button to exit the Contrast Dialog.
Press the [2] button to enter the Brightness Dialog.
Press the [▲] button to increase the contrast.
Press the [▼] button to decrease the contrast.
(2) Brightness Dialog
Press the [▲] or [▼] button to enter the Brightness Dialog.
Press the [1] button to exit the Brightness Dialog.
Press the [2] button to enter the Contrast Dialog.
Press the [▲] button to increase the brightness.
Press the [▼] button to decrease the brightness.
(3) Analog/Digital Dialog
Press the [2] button to toggle between analog and digital modes.
C. Other Information
When the “No Signal” or “Out of Range” messages appear:
If no input signal is detected, the “No Signal” message will appear in the center of
the screen.
If the V-Sync signal rate is greater than than 85Hz or its resolution is greater than
SXGA, the “Out of Range” message will appear in the center of the screen.
Activating Factory Mode and Burn Mode:
While the device is in standby, press the [2] button, then press the power button to
enter Factory Mode. While Factory Mode is active, an additional menu page titled
“Factory Menu” will be accessible. Press the [2] button to enter the Factory Menu
page, then press the [2] button to enter Burn Mode.
When Installing a New Main Board
1. Enter Factory Mode.
2. Use a PC or chrom to send a 32-tone gray scale signal to the monitor.
3. Select “Auto Color”
Viewsonic Corporation 20 VP2130b-1 Confidential - Do Not Copy
4. Circuit Description
1. Outline
Buttons on the front panel: Power On/Off button, button 2 (ENTER / INPUT SELECT), up arrow button,
down arrow button, button 1 (MENU).
D-sub 15pin connector, DVI-I connector and AC-IN jack are located on the back side of the cabinet.
OSD menu includes the following function;
Auto Image Adjust (only active under analog input)
l Contrast/Brightness
l Input Select
l Color Adjust
l Information
l Manual Image Adjust
l Setup Menu
l Memory Recall
Contrast and Brightness can be directly controlled with UP / DOWN buttons.
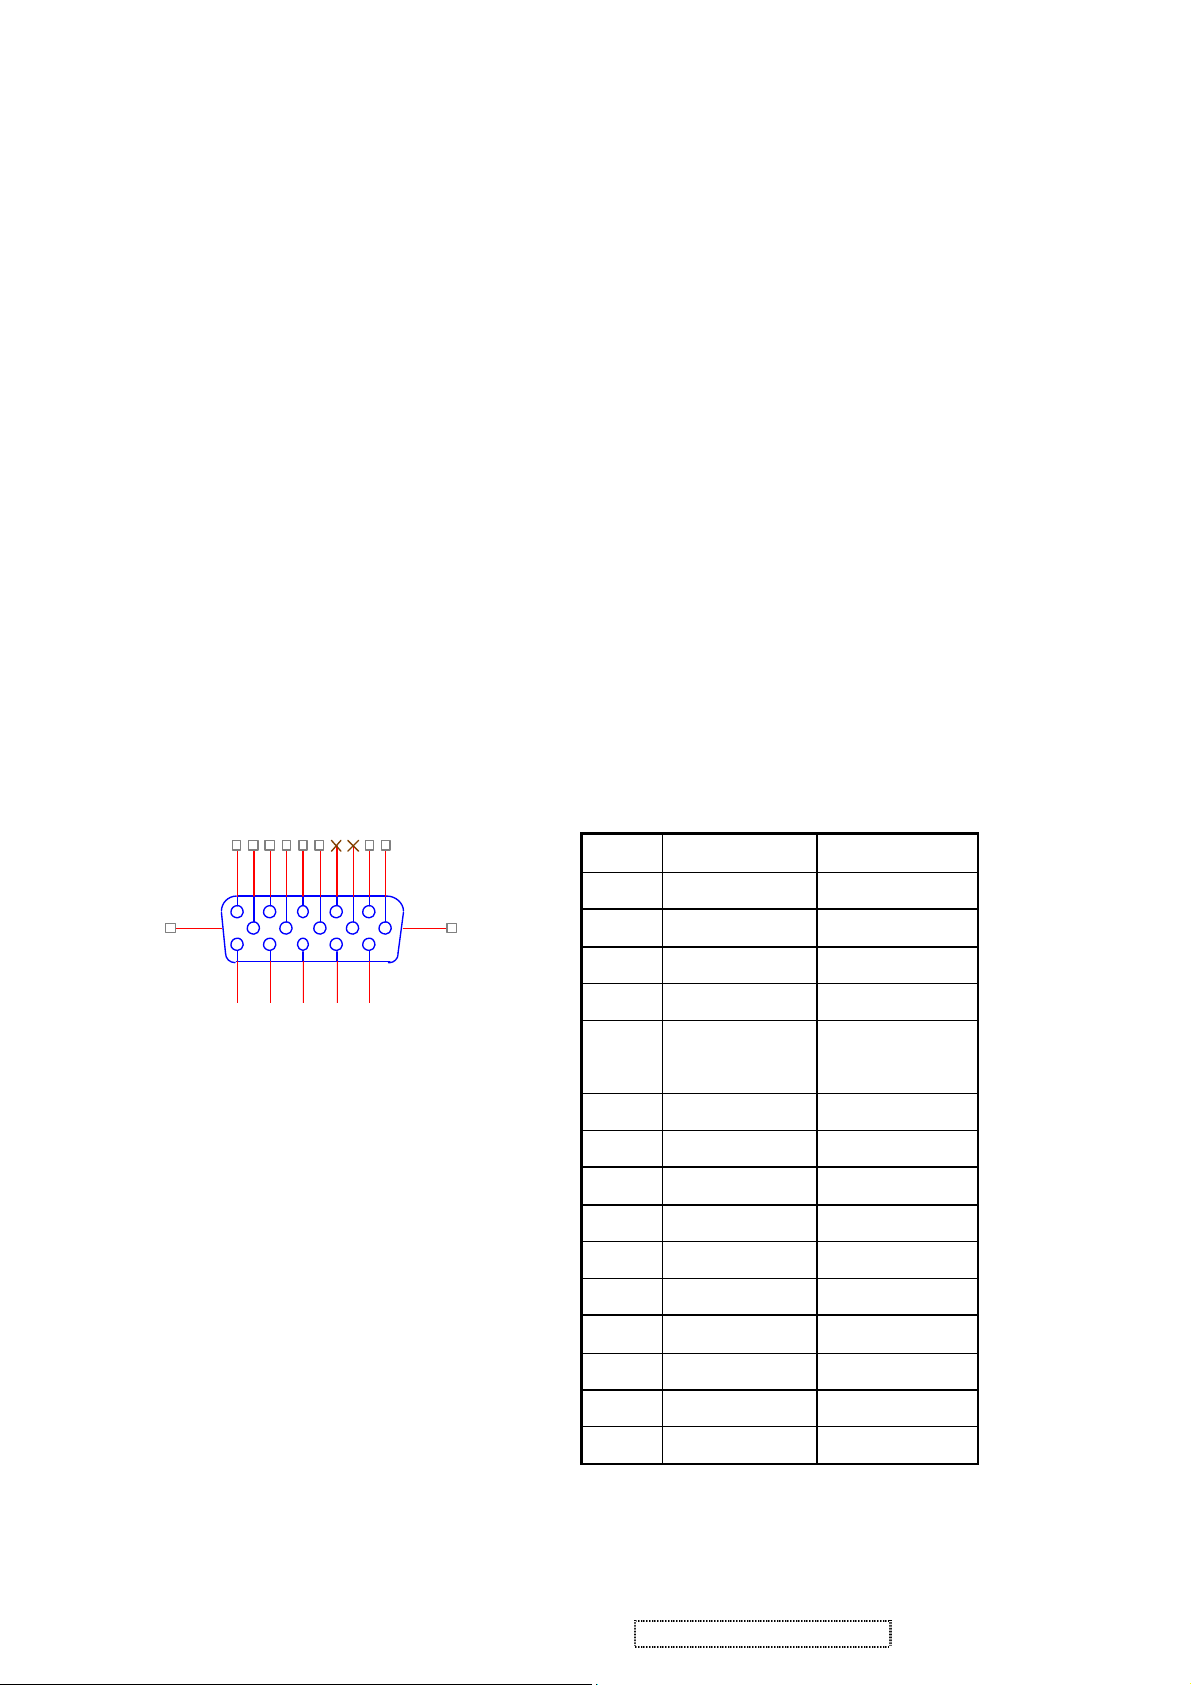
2. Connectors
AC inlet : CEE22 typed connector
Video signal connector for analog input: 15P Mini D-Sub
162738495
16 17
CN6
10
DB15HD
PIN MNEMONIC SIGNAL
1 RV Red Video
2 GV Green Video
3 BV Blue Video
11
12
13
14
15
4 NC None
5 GND Ground (DDC
6 RG Red GND
7 GG Green GND
8 BG Blue GND
9 +5V +5V (for DDC)
10 SG Sync GND
11 NC None
return)
12 SDA DDC Data
13 HS Horizontal Sync
14 VS Vertical Sync
15 SCL DDC Clock
Viewsonic Corporation 21 VP2130b-1 Confidential - Do Not Copy

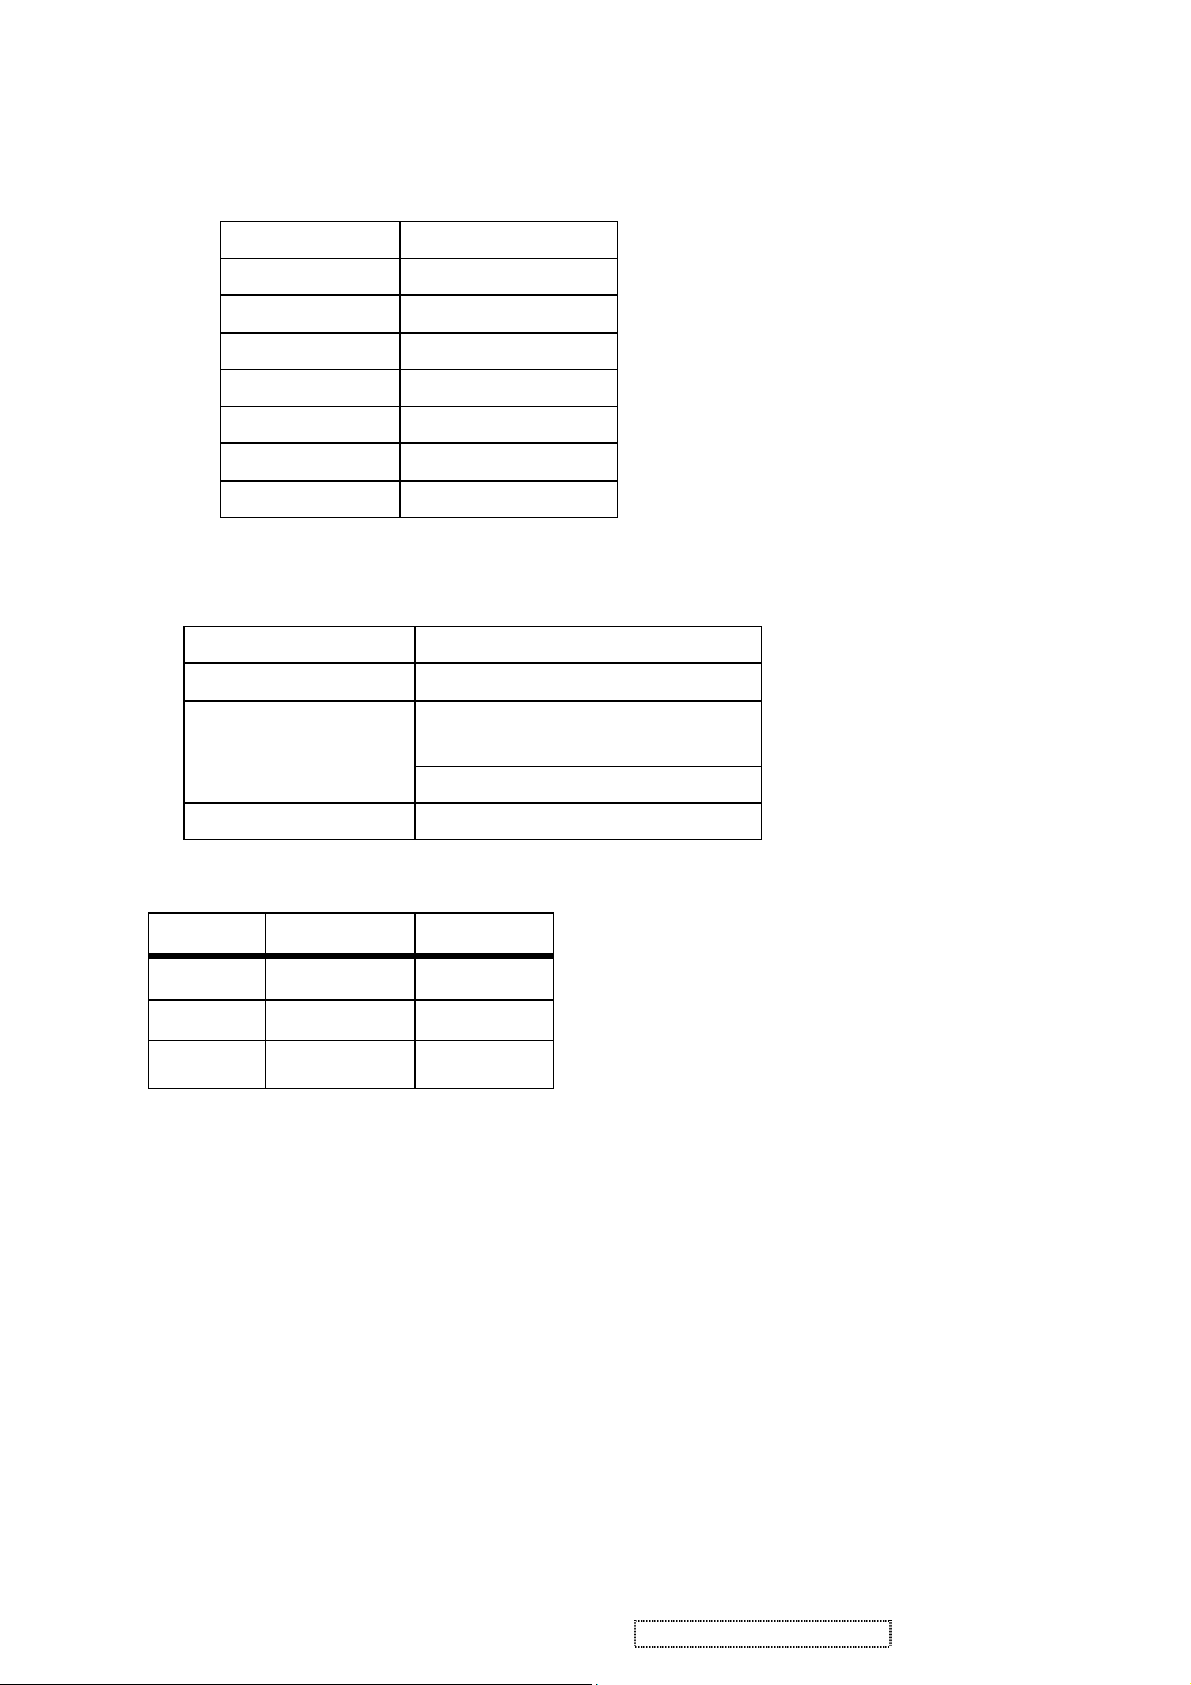
Video signal connector for digital input : 29pin DVI-D,DVI-A connector
CN2
25
26
RX2-
RX2+
GND
RX4-
RX4+
SCL
SDA
VS
RX1-
RX1+
GND
RX3-
RX3+
5V
GND
HP
RX0-
RX0+
GND
RX5-
RX5+
GND
RXC+
RXC-
RED
GRN
BLU
HS
GND
1
2
3
4
5
6
7
8
9
10
11
12
13
14
15
16
17
18
19
20
21
22
23
24
C1
C2
C3
C4
C5
Pin No. Signal Name Description
1 RX2- TMDS negative differential input, channel 2
2 RX2+ TMDS positive differential input, channel 2
3 GND Logic Ground
4 RX4- Reserved. No connection
5 RX4+ Reserved. No connection
6 SCL DDC2B Clock
7 SDA DDC2B Data
8 VS Reserved. No connection
9 RX1- TMDS negative differential input, channel 1
10 RX1+ TMDS positive differential input, channel 1
11 GND Logic Ground
12 RX3- Reserved. No connection
13 RX3+ Reserved. No connection
14 +5V Power
DVI-I
15 GND Logic Ground
16 HP SENSE Pin, Pull High
17 RX0- TMDS negative differential input, channel 0
18 RX0+ TMDS positive differential input, channel 0
19 GND Logic Ground
20 RX5- Reserved. No connection
21 RX5+ Reserved. No connection
22 GND Logic Ground
23 RXC+ TMDS positive differential input, reference
clock
24 RXC- TMDS negative differential input, reference
clock
C1 RED Red Video for DVI-A only
C2 GRN Green Video for DVI-A only
C3 BLU BlueVideo for DVI-A only
C4 HS Horizontal Sync
C5 GND GND
Viewsonic Corporation 22 VP2130b-1 Confidential - Do Not Copy
3. ELECTRICAL SPECIFICATIONS
Standard conditions
Di splay Area
Video Signal
Contrast
Brightness
Ambient 20 +/- 5 °C
Input
Warming up
Display
POWER
Power supply
Input voltage 100~240Vac
Power frequency 50~60Hz
Inrush current
408.0 x 306.0 mm
0.7Vpp
Default
Max.
AC 110~ 240V
> 30 min
1600X1200
<1.5Arms@90Vac Input current
80A(Max) at 230Vac(cold start)
Power consumption 52W(typical);56W(Max)
Power Management
State Power Indicator
On 56Watts Green
Standby < 3Watts Amber
Off <3Watts Off
Acceptable timing
If the timing is within following specification, this LCD display can automatically function with a certain position.
Horizontal: Sync frequency: 24~92 kHz
Vertical: Sync frequency: 50~85Hz
Signal level and input impedance
Video Signal level: 0.7Vp-p Video signal.
Sync Signal level
H/V Separate: TTL level
Input impedance
Analog video input: 75 ohm
Digital video input: 100 ohm
Viewsonic Corporation 23 VP2130b-1 Confidential - Do Not Copy
 Loading...