

Page 1
VP151 ViewPanel
®
With Landscape & Portrait Display Modes
User’s Guide
Guide de l’utilisateur
Bedienungsanleitung
(Latin American Spanish)
(Italian)
(Brazilian Portuguese)
(Swedish)
(Russian)
(Polish)
(Japanese)
(Traditional Chinese -Taiwan)
(Simplified Chinese - China)
(Korean)
(Arabic)
Full 15.0" Diagonal Viewable Screen
Page 2
E
N
G
L
I
S
H
ViewSonic VP151ViewPanel
®
1
For your records
The serial number of this product is on the back of the ViewPanel. Write
the serial number in the space below and keep this guide as a permanent
record of your purchase to aid in identification in the event of theft or
loss.
Product Name: ViewSonic VP151 ViewPanel
Model Number: VLCDS21538-1
Serial Number: ______________________
Purchase Date: ______________________
Register your ViewPanel® at www.viewsonic.com. It’s fast, easy, and will simplify future support
needs.
Electronic Warranty Registration
As an ENERGY STA R® partner, ViewSonic Corp. has determined that this product meets the
ENERGY STA R® guidelines for energy efficiency.
Power Cord Safety Guidelines
Caution : Use a power cable that is properly grounded. Always use the AC cords
listed below for each area :
USA ...........................UL
Canada ......................CSA
Germany ....................VDE
Switzerland ................SEV
Britain .........................BASEC/BS
Japan .........................Electric Appliance Control Act
In other areas, use AC cord which meets local safety standards.
Copyright © ViewSonic Corporation, 1999. All right reserved.
Macintosh and Power Macintosh are registered trademarks of Apple Computer, Inc.
Microsoft, Windows, Windows NT, and the Windows logo are registered trademarks of
Microsoft Corporation in the United States and other countries.
ViewPanel®, ViewSonic, the three birds logo, OnView, ViewMatch, and ViewMeter are
registered trademarks of ViewSonic Corporation.
ENERGY STAR is a registered trademark of the U.S. Environmental Protection Agency (EPA).
VESA is a registered trademark of the Video Electronics Standards Association. DPMS and
DDC are trademarks of VESA.
Disclaimer: ViewSonic® Corporation shall not be liable for technical or editorial errors or
omissions contained herein; nor for incidental or consequential damages resulting from
furnishing this material, or the performance or use this product .
ViewSonic Corporation reserves the right to change product specification without notice.
Information in this document may change without notice.
No part of this document may be copied, reproduced, or transmitted by any means, for any
purpose without prior written permission from ViewSonic Corporation.
Page 3

E
N
G
L
I
S
H
ViewSonic VP151 ViewPanel
®
2
Important Safety Instructions
1 Read these instructions thoroughly.
2 Follow all warnings and instructions marked on this product.
3 Unplug the product from the wall outlet before cleaning. See the
Cleaning the
ViewPanel®
on page 18.
4 Do not use the product near water. Never spill liquid of any kind on the product.
5 Do not place the product on an unstable cart, stand, or table. Doing so may cause
the product to fall, which can seriously damage it.
6 Slots and openings in the cabinet are provided for ventilation. To ensure reliable
operation, never block these ventilation slots by placing the product on a bed, sofa,
rug, or similar surface. This product should never be placed near or over a radiator
or heat register; or installed in any enclosure that prevents proper ventilation.
7 Make sure the power source complies with the power recommendation printed on
the back of the product. If you are not sure of the type of power provided by the wall
socket, consult your dealer or local power company.
8 Do not place any object on the power cord. Do not place this product where persons
could walk on the power cord.
9 If you use an extension cord with this product, make sure the total ampere rating of
the product(s) plugged into the extension cord does not exceed the ampere rating of
the extension cord.
10 Never push objects of any kind through the ventilation slots at the back of the
product. To do so could risk fire or electric shock.
11 Do not attempt to service this product yourself. Opening or removing covers may
expose you to dangerous voltage that could cause fire or electric shock. Refer all
servicing needs to authorized service personnel.
12 Unplug this product from the wall outlet and contact authorized service personnel
under the following conditions:
a) When the power cord or plug is damaged or frayed.
b) If a liquid has been spilled into or on the product, including rain.
c) If the product does not operate normally when operating instructions are
followed. Only adjust those controls that are covered by the operating
instructions, since improper adjustment of other controls may result in damage
and will often require extensive work by a qualified technician to restore the
product to normal operation.
d) If the product has been dropped or the cabinet has been damaged.
e) If the product exhibits a distinct change in performance, indicating a need for
service.
Page 4

E
N
G
L
I
S
H
ViewSonic VP151ViewPanel
®
3
FCC Information
This equipment has been tested and found to comply with the limits for a Class B digital
device, pursuant to part 15 of the FCC Rules. These limits are designed to provide
reasonable protection against harmful interference in a residential installation. This
equipment generates, uses, and can radiate radio frequency energy, and if not installed
and used in accordance with the instructions, may cause harmful interference to radio
communications. However, there is no guarantee that interference will not occur in a
particular installation. If this equipment does cause unacceptable interference to radio or
television reception, which can be determined by turning the equipment off and on, the
user is encouraged to try to correct the interference by one or more of the following
measures:
● Reorient or relocate the receiving antenna.
● Increase the separation between the equipment and receiver.
● Connect the equipment into an outlet on a circuit different from that to which
the receiver is connected.
● Consult your dealer or an experienced radio/TV technician for help.
FCC Warning:
To assure continued FCC compliance, the user must use the provided
grounded power supply cord and the shielded video interface cable with
bonded ferrite cores. Also, any unauthorized changes or modifications to
this ViewPanel would void the user’s authority to operate this device.
Department of Industry Canada (IC) Compliance Notice
This digital apparatus does not exceed the Class B limits for radio noise emissions from
digital apparatus set out in the Radio Interference Regulations of the Canadian
Department of Communications.
DOC avis de conformation
Cet appareil est bien conforme à la directive communautaire No 82/499/CEE.
CE Certification
This device complies with the requirements of the EEC directive 89/336/
EEC with regard to "Electromagnetic compatibility."
Page 5

4
E
N
G
L
I
S
H
ViewSonic VP151 ViewPanel
®
Getting Started
CONTENTS
Important Safety Instructions . . . . . . . . . . . . . . . . . . . . . . . . . . . . . . . . . . . . . 2
FCC Information . . . . . . . . . . . . . . . . . . . . . . . . . . . . . . . . . . . . . . . . . . . . . . 3
Getting Started*
Precautions . . . . . . . . . . . . . . . . . . . . . . . . . . . . . . . . . . . . . . . . . . . . . . . . . . . 5
Package Contents . . . . . . . . . . . . . . . . . . . . . . . . . . . . . . . . . . . . . . . . . . . . . . 6
Installation (Desk Mount) . . . . . . . . . . . . . . . . . . . . . . . . . . . . . . . . . . . . . . . 7
Installation (Wall Mount) . . . . . . . . . . . . . . . . . . . . . . . . . . . . . . . . . . . . . . . . 9
Operation
Landscape/Portrait Modes . . . . . . . . . . . . . . . . . . . . . . . . . . . . . . . . . . . . . . 10
Front Control Panel . . . . . . . . . . . . . . . . . . . . . . . . . . . . . . . . . . . . . . . . . . . 10
OnView® Main Menu . . . . . . . . . . . . . . . . . . . . . . . . . . . . . . . . . . . . . . . . . . 11
Other Information
Specifications . . . . . . . . . . . . . . . . . . . . . . . . . . . . . . . . . . . . . . . . . . . . . . . . 16
Troubleshooting . . . . . . . . . . . . . . . . . . . . . . . . . . . . . . . . . . . . . . . . . . . . . . 17
Cleaning the ViewPanel®. . . . . . . . . . . . . . . . . . . . . . . . . . . . . . . . . . . . . . . 18
Limited Warranty . . . . . . . . . . . . . . . . . . . . . . . . . . . . . . . . . . . . . . . . . . . . . 19
Customer Support . . . . . . . . . . . . . . . . . . . . . . . . . . . . . . . . . . . . . . back cover
*To meet your future needs, and to receive any additional product information as it becomes available,
please register your ViewPanel's warranty on the Internet at: http://www.viewsonic.com.
Page 6

5
E
N
G
L
I
S
H
ViewSonic VP151 ViewPanel
®
Getting Started
• Sit at least 18" from the ViewPanel®.
• DO NOT APPLY PRESSURE TO THE SCREEN. The LCD screen is very
delicate.
• DO NOT TOUCH THE SCREEN DIRECTLY WITH YOUR FINGERS.
You may damage the screen, and oil from your skin is difficult to
remove.
• Avoid exposing the ViewPanel to direct sunlight or other heat source.
The ViewPanel should be facing away from direct sunlight to reduce
glare.
• Choose a well ventilated area to position your ViewPanel to allow
adequate dissipation of heat. Do not place anything on top of the
ViewPanel.
• Ensure the area around the ViewPanel is clean and moisture-free.
• If smoke, abnormal noise, or strange odor is present, immediately switch
the ViewPanel off and call your dealer. It is dangerous to continue using
the ViewPanel.
• Never remove the rear cover. The display unit contains high-voltage
parts. You may suffer electric shock if you touch these parts.
• Always handle your ViewPanel with care when moving it.
Congratulations on your purchase of a ViewSonic VP151 ViewPanel®.
You have selected one of the most versatile display devices in the PC
industry. The VP151 can interface with virtually any analog or digital
source. It includes support for composite video devices (e.g., VCR, DVD,
video camera), USB devices, multiple audio sources, and external
microphones. It can operate in landscape or portrait orientation, and can
tilt, swivel and operate in a desk mount or wall mount configuration.
Important! Save the original box and all packing material for future
shipping needs.
The word "Windows®" in this user guide refers to the following
Microsoft® operating systems: Windows '95, Windows '98, Windows NT
®
(4.0).
Precautions
Getting Started
Page 7

6
E
N
G
L
I
S
H
ViewSonic VP151 ViewPanel
®
Getting Started
Package Contents
• ViewSonic
VP151
ViewPanel
• DC Power supply
Power cables connect to DC
Power supply. The DC Power
supply connects to DC IN port on
base.
• Detachable video cable (15
pin HD D-sub)
Required to receive Analog RGB
video signal from PC
• Power cord/USA type
Connects wall outlet to DC Power
supply
• Power cord/SCHUKO type for
Europe
Connects wall outlet to DC Power
supply
• Small Digital flat panel (DFP)
cable (connects base to head,
pre-attached)
Transmits video signal from base
to head. Required for analog
operation.
• Small DC Power cable
(connects base to head, preattached)
Transmits power from base to
head. Required for analog
operation. For wall mount
configuration, DC Power supply
connects directly to head.
• Small USB cable (connects
base to head, pre-attached)
Joins USB hubs in base and head
for dual operation. User will need
a separate USB cable
to connect
to computer for dual hub operation
(step 3 pg 9). For independent
operation such as dual computer
uses or wall mount configuration,
disconnect small USB cable.
• USB upstream cable (1.8 m)
Connects USB to computer.
Required for USB use.
• 3.5 mm stereo mini PC audio
cable
Connects computer sound card to
one of the VP151 audio INPUT
ports.
• 3.5 mm stereo mini dual RCA
audio cable
Connects audio from an external
video source (e.g., VCR) to the
VP151(audio INPUT jacks).
• 1.18 m RCA composite video
cable
Connects video signal from
external video source (e.g., VCR)
to the VP151 composite video
jack.
• VS Mac Adapter
Needed for older Macintosh
systems. Not required for G3
and/or PC use.
• User’s guide
• PerfectPortraitTM on CD-ROM
Must be installed to use
ViewPanel in Portrait mode (see
page 10)
• INF and ICM installation file
on CD-ROM
Page 8
7
E
N
G
L
I
S
H
ViewSonic VP151 ViewPanel
®
Getting Started
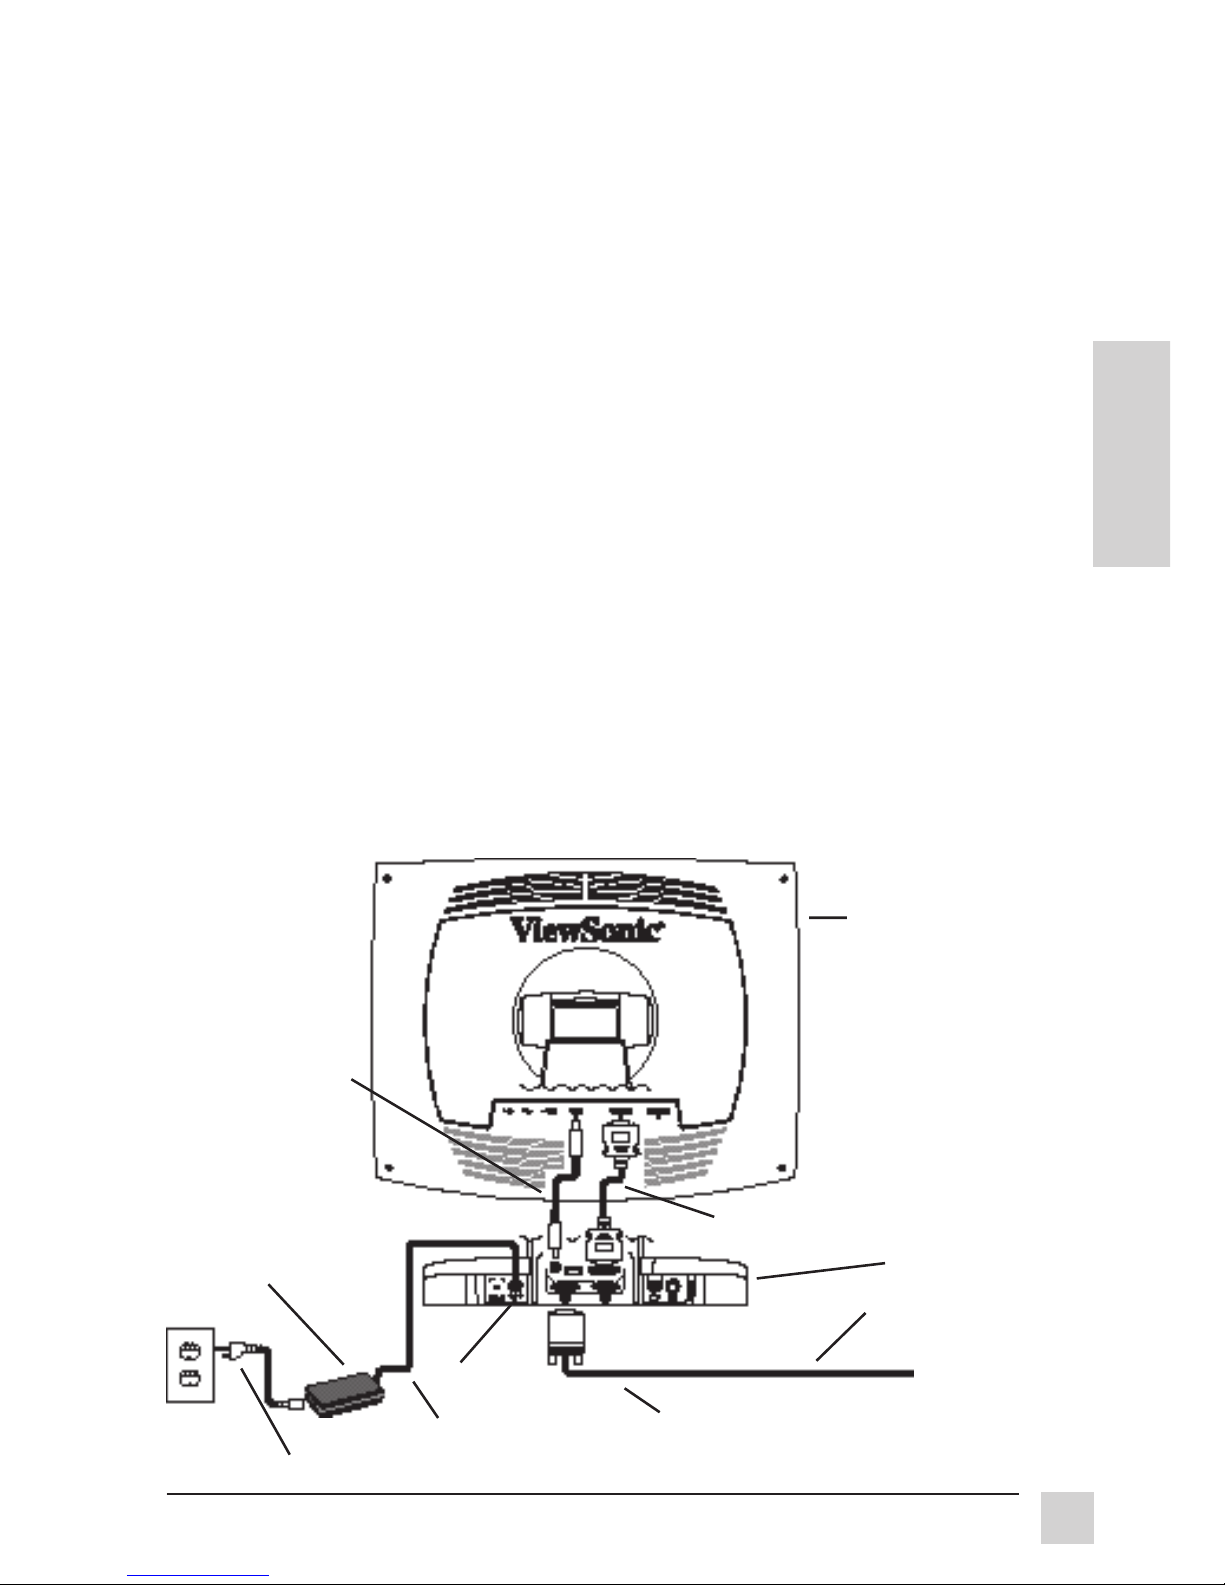
1 Connect power cord
Connect the small DC power
cord from the base of the
ViewPanel® to the head.
NOTE: for first time installation,
this step will be completed by
the factory.
2 Connect DFP cord
Connect the digital flat panel
(DFP) cord from the base of
the ViewPanel to the head.
3 Connect DC power supply
Connect the cord from the DC
Power Supply to a properly
grounded AC outlet using the
proper cord adapter for your
region.
small DC Power
cord (step 1)
Video cable
(step 5)
small DFP
cable (step 2)
DC Power supply
(steps 3,4)
Installation (Desk Mount)
A desk installation allows for an analog data (CPU) connection, composite video
connection (VCR, camera, etc.), audio connection, and a USB connection. The steps
for a desk installation of the VP151 are presented on pages 7 and 8.
4 Connect DC power to
ViewPanel
Connect the cord from the DC
Power Supply to the DC input on
the rear left side of the base.
NOTE: turn on power supply switch
after connecting to ViewPanel.
5a Connect video cable
PC users: Connect the video cable
from the back of the computer to
the back of the ViewPanel base as
shown below.
5b Connect video cable
Macintosh® users: Connect the
video cable to the computer using
a Macintosh adapter, if required. To
order an adapter, contact
ViewSonic (see the back cover of
this guide, part number: VMAC-1).
To computer
NOTE: power switch
on power supply
should be turned on
LCD Digital
Head
Analog
Base
DC Input
Page 9

Page 10
9
E
N
G
L
I
S
H
ViewSonic VP151 ViewPanel
®
Getting Started
Installation-Wall Mount
A wall installation includes a digital data connection (CPU) and a USB connection
(optional). NOTE: The kit for attaching a ViewPanel® to the wall is not included. For
information concerning obtaining a wall mounting kit, contact ViewSonic
®
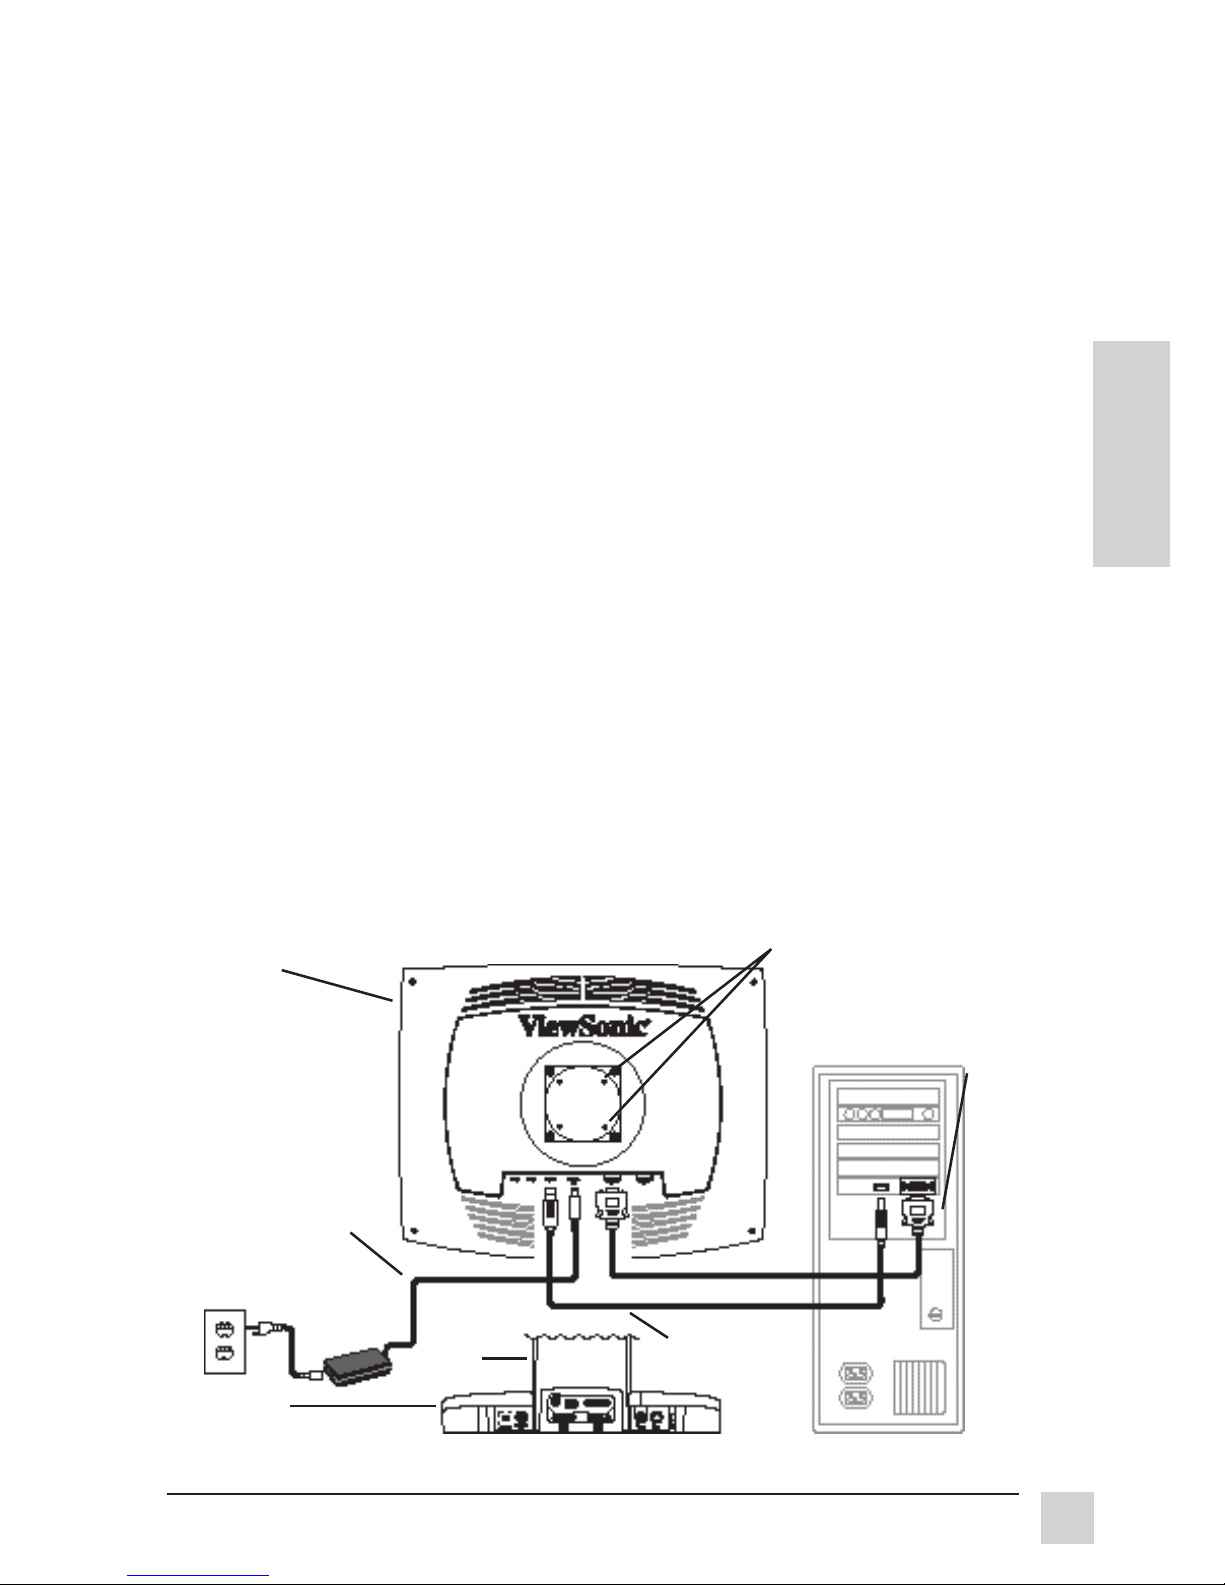
To convert the desk-mounted VP151 to a wall-mount installation, do the following:
1 Remove plastic neck covers
Remove the plastic covers from
the neck to expose the mounting
screws.
2 Disconnect neck from base
Disconnect the neck from the
head by removing the four
screws on the back of the
ViewPanel.
3 Disconnect DC power from
base
Disconnect the DC power supply
from the base of the ViewPanel
(see steps 3 and 4, page 6) and
connect to the ViewPanel head
(see step 3 in figure below).
4 USB Installation (optional)
• Remove the USB cable
connecting the base to the
DC power
supply(step 3)
Mounting
screws (steps 1
and 2)
USB cable
(step 4)
head (see step 1, USB Installation,
page 8).
• Connect the USB cable from the
computer to the USB IN port on
head of the ViewPanel.
5 Disconnect DFP cable from
base
Disconnect the short digital flat
panel (DFP) cable that connects
the base of the ViewPanel to the
head (see step 2, page 7).
6 Connect DFP cable from
computer
Connect the digital flat panel
(DFP) cable from the computer to
the head of the ViewPanel.
7 Attach ViewPanel to wall kit
Mount the ViewPanel head on the
wall using a VESA-compliant wall
mount. NOTE: To order a wall
mounting kit, contact ViewSonic.
Head
DFP cable
(step 6)
Base
Neck
Page 11
10
E
N
G
L
I
S
H
ViewSonic VP151 ViewPanel
®
Operation
Operation
*PerfectPortrait software is compatible with most PCI and AGP graphics (video) cards. For
information on compatible graphics cards and approved hardware configurations, go to the
ViewSonic website, http://www.viewsonic.com, and select the following path: Customer
support > Support options > Document area > PPCHART.XLS. The PPCHART.XLS
spreadsheet will provide information on compatibility with your graphics card.
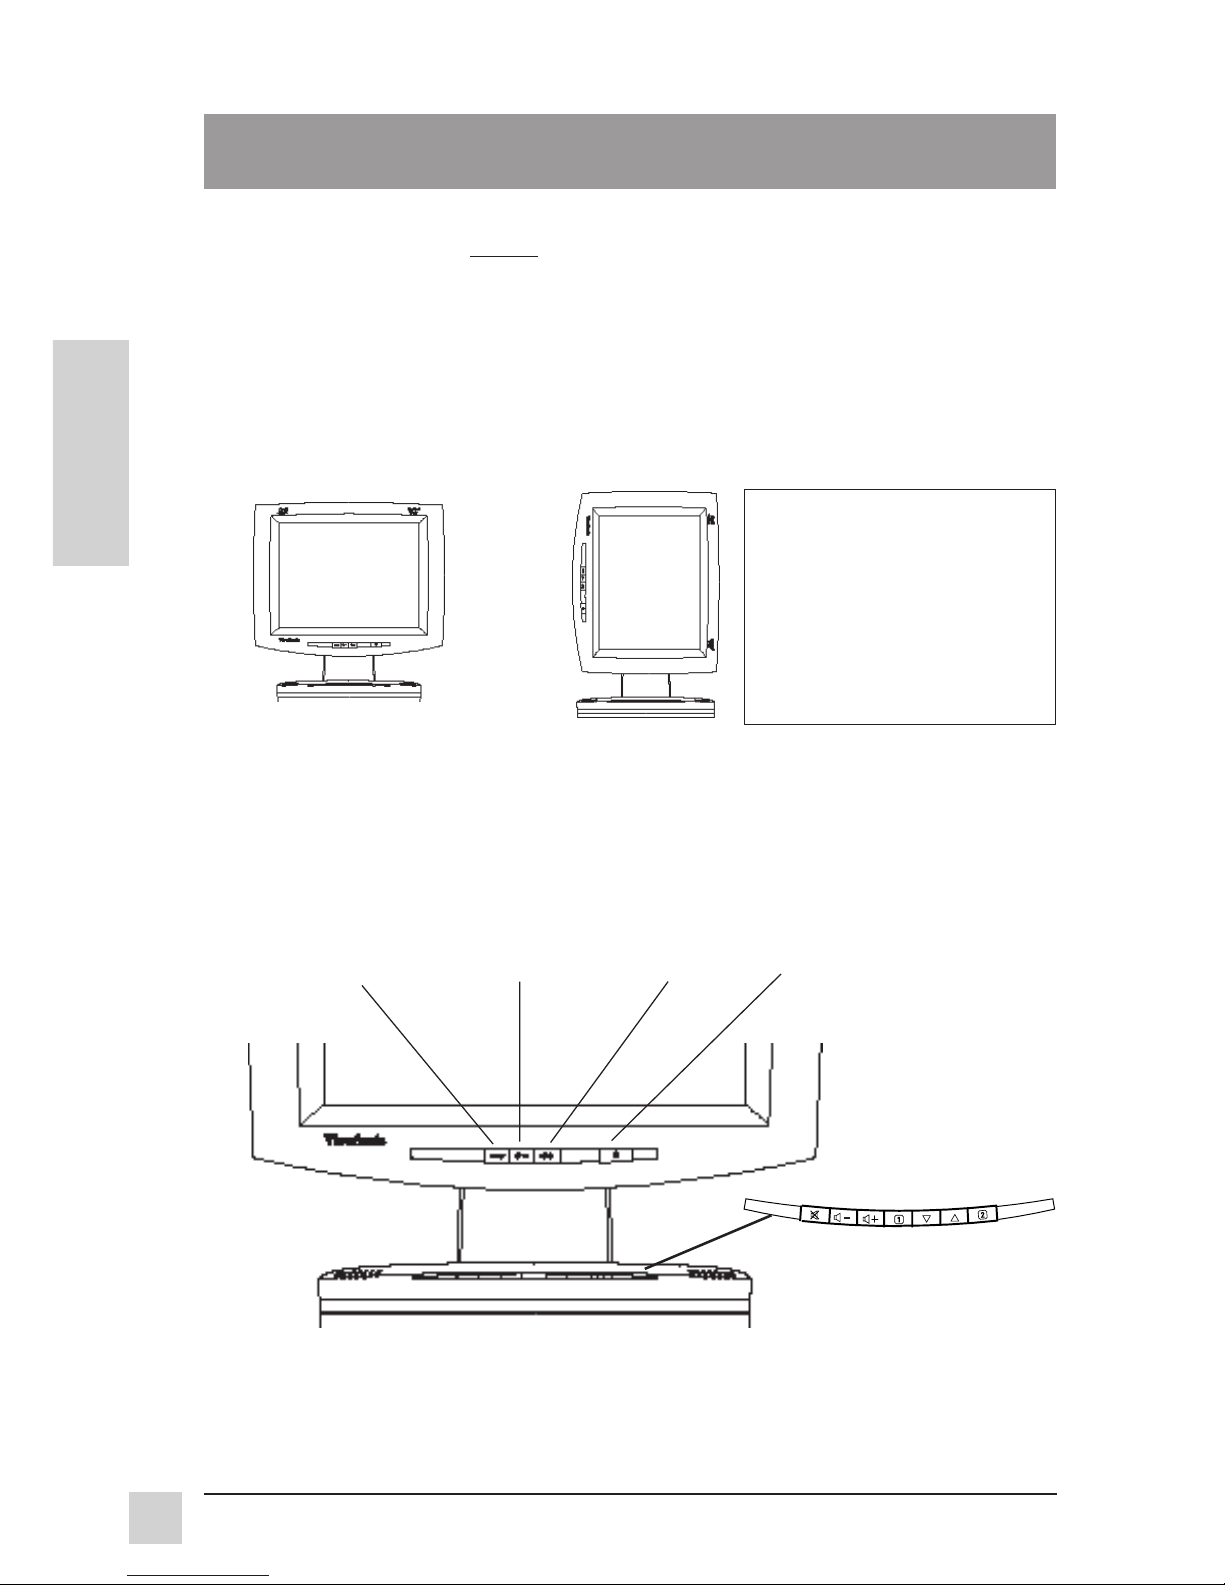
Base Control buttons
(See page 11 for
description of use).
INPUT button
toggles between
two digital inputs
Decreases
brightness
Increases
brightness
Power on/off
To turn the ViewSonic VP151 ViewPanel® on, press the power switch on the front of the
ViewPanel ON (see page 7), THEN turn on your computer. The power light on the VP151
will then turn green indicating the ViewPanel is ready to use. To turn the ViewPanel off, set
the power switch OFF. The power light will turn red. To completely power down the
ViewPanel, turn off the power switch on the DC Power supply.
To start, follow the instructions for Landscape/Portrait Mode, or begin using the control
buttons shown below and on page 11.
Landscape / Portrait Modes*
The VP151 ViewPanel can operate in either Landscape or Portrait mode (see below).
To switch from Landscape (default) to Portrait modes, do the following: (1) Face front of
ViewPanel. (2) Pull bottom of ViewPanel toward you to tilt bottom away from base.
(3) After tilting ViewPanel, manually rotate the VP151 clockwise 90°.
To switch from Portrait to Landscape mode, follow steps 1 - 3 above, but manually
rotate the VP151 panel counter-clockwise 90°.
NOTE: Before using the
portrait display mode,
you must first install the
PerfectPortraitTM* software
included with your
VP151
ViewPanel. Follow
the instructions that
accompany the
PerfectPortrait software.
Landscape
Portrait
Page 12
11
E
N
G
L
I
S
H
ViewSonic VP151 ViewPanel
®
Operation
Contrast adjusts foreground white level of screen image.
[▲] increases contrast, [▼] decreases contrast.
Shortcut: Before displaying the OnView menu, press the [▼] or [▲] button to adjust.
Press button [2] to toggle between brightness and contrast.
Brightness adjusts background black level of screen image.
[▲] increases brightness, [▼] decreases brightness.
To save changes and exit Main Menu, press the [1] button
OnView® Main Menu
The following steps show how to access the Main Menu, Submenus, and controls
within each Submenu. Details on the controls follow the steps listed below.
NOTE: Main menu shown below and menus on following pages are available only when
connected to an analog source. Digital source uses only the brightness control on
ViewPanel head (see page 10 for location of brightness control).
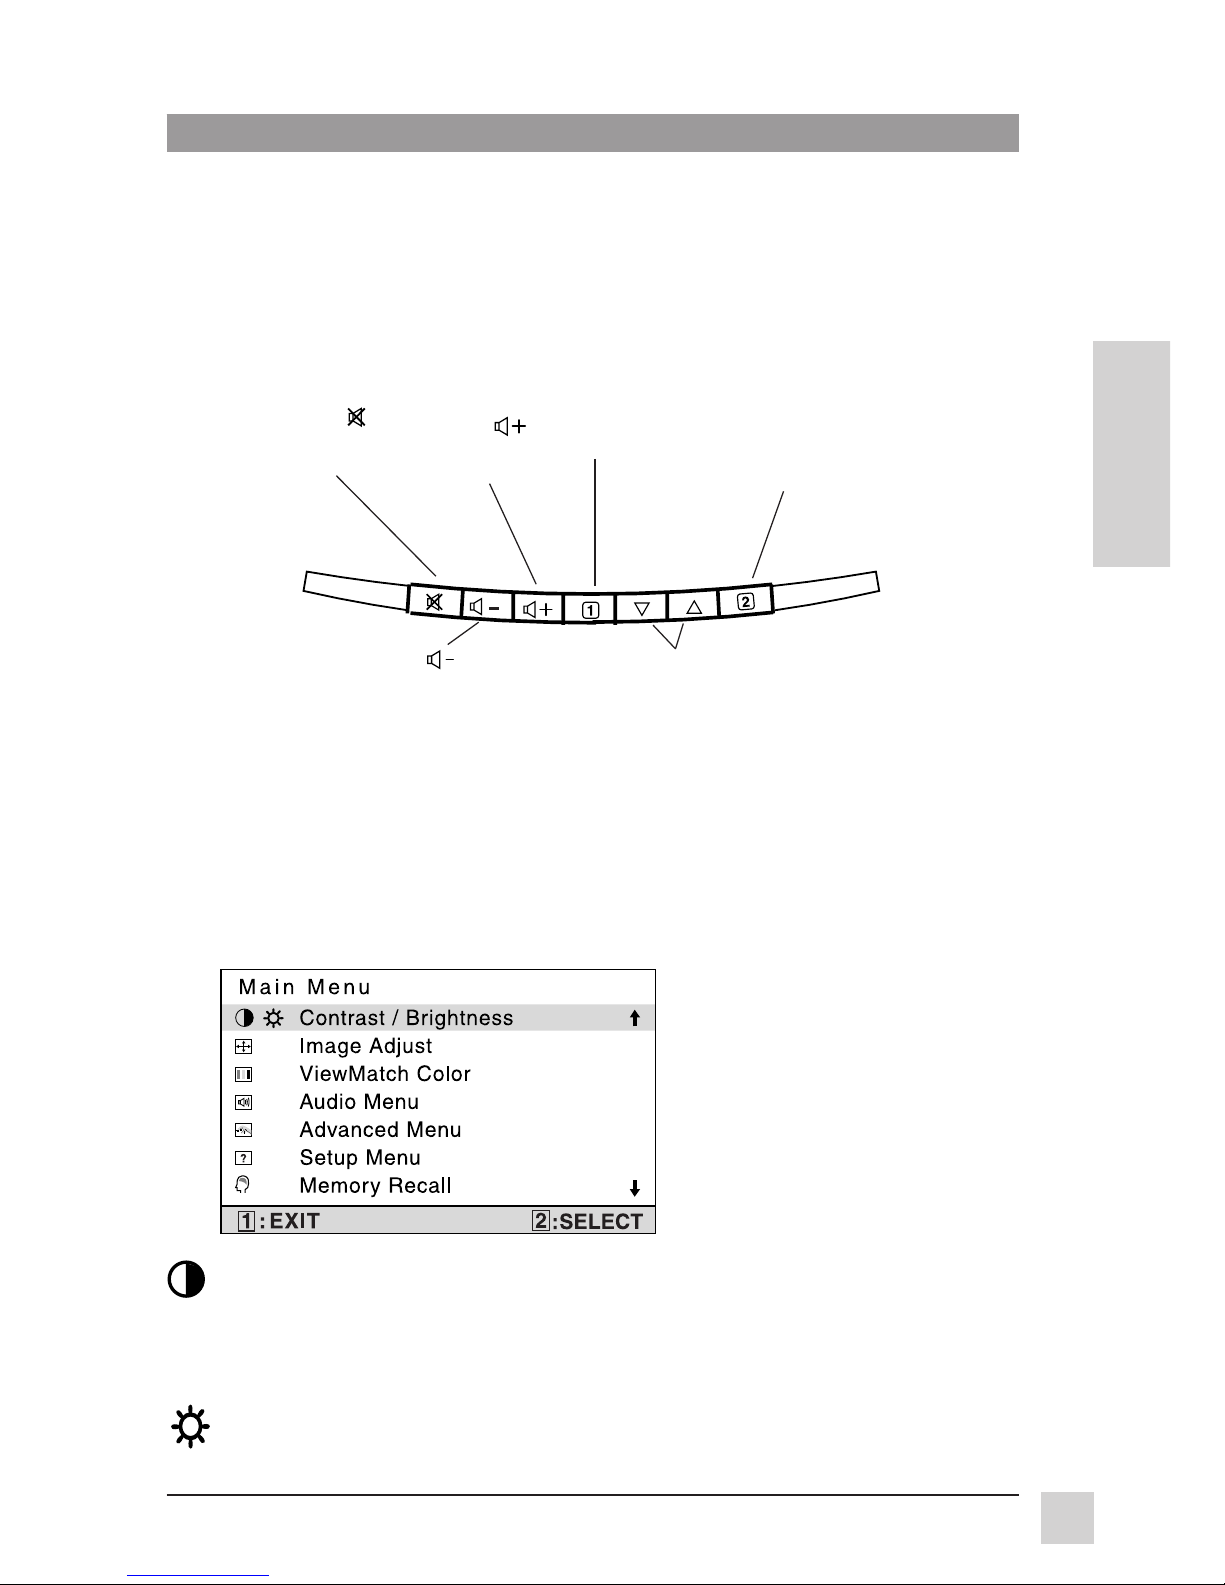
Base control buttons
Button [1]
displays main
menu
1 Press the [1] button to display the Main Menu shown below.
2 Press the [▼] or [▲] button to scroll to the desired menu option.
3 Press the [2] button to select the menu option.
4 Press the [▼] or [▲] button to select submenu option.
5 After making adjustments, press the [2] button to save changes and exit the
screen.
Button
mutes the
audio
Button
reduces
volume
[▲] or [▼] scroll up
and down main menu
to highlight control for
adjustment
Button
increases
volume
Button [2] activates
control screen for
highlighted control,
and
toggles between
two digital inputs
Page 13
12
E
N
G
L
I
S
H
ViewSonic VP151 ViewPanel
®
Operation
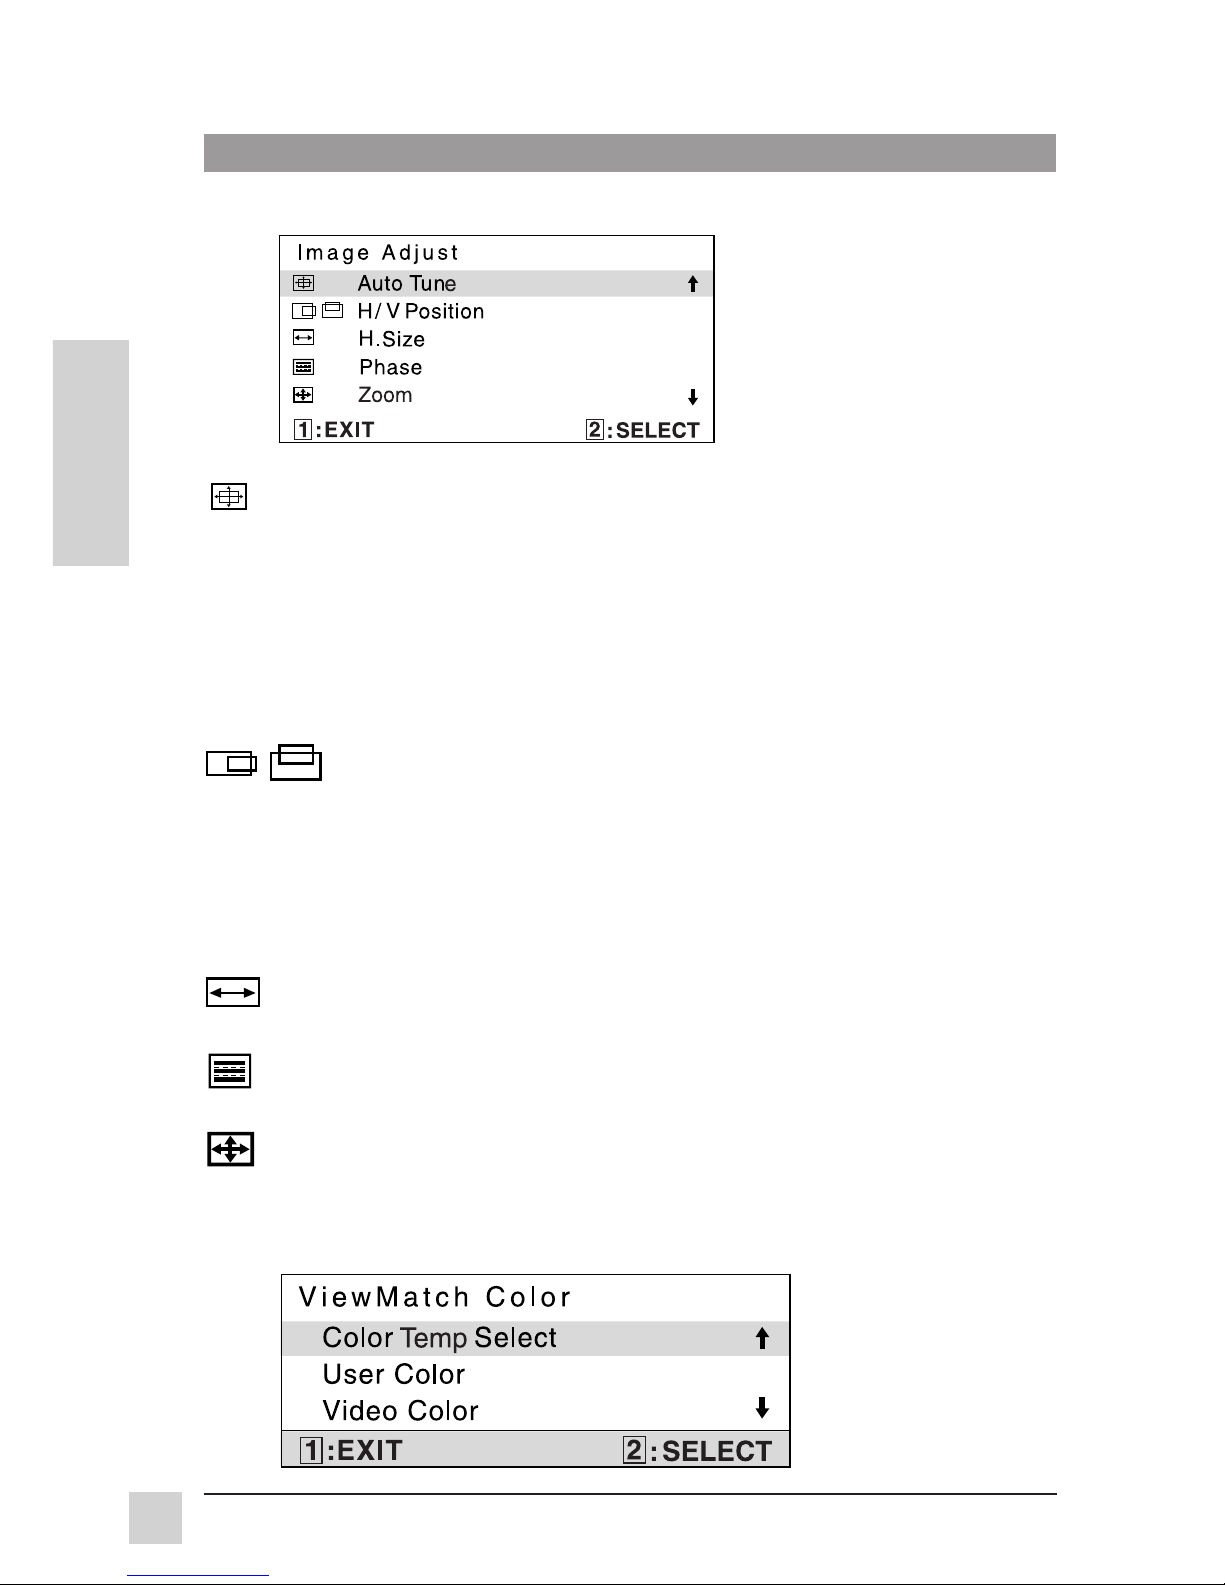
Auto Tune automatically sizes, centers, and fine tunes the video signal to
eliminate waviness and distortion. Press the [2] button to obtain a sharper
image.
NOTE: Auto tune works with most common video cards. If using this
function does not work on your ViewPanel
®
, lower the video refresh rate to
60 Hz and try again (See computer or graphic card user guide to adjust
refresh rate.) The panel may be manually tuned using the horizontal and
vertical phase controls shown below.
H/V Position Press the [2] button to select H. or V. Position
Horizontal Position
moves screen image left or right.
[▼] moves screen image to left, [▲] moves screen image to right.
Press the [2] button to
toggle between H. or V. Position.
Vertical Position moves screen image up or down.
[▼] moves screen image down, [▲] moves screen image up.
Horizontal Size adjusts the width of screen image. [▼] decreases width of
screen image, [▲] increases width of image.
Phase fine tunes the video distortion. Press [▼] or [▲] to adjust to user
preference.
Zoom
magnifies the displayed image. Press the [2] button to change the
center of magnification. Press [▼]and[▲] at the same time to restore
magnification to original (unmagnified) condition.
Image Adjust Menu
Viewmatch® Color Menu
To save changes and exit Main Menu, press the [1] button
Page 14
13
E
N
G
L
I
S
H
ViewSonic VP151 ViewPanel
®
Operation
Color Temp Select provides four preset color adjustments: 9300K, 6500K,
5400K, 5000K for improved brightness and color saturation. Press button [2] to
select the preset color. Press button [▼] or [▲] to fine tune the color response.
9300K--Adds blue to screen image for cooler white (used in most office
settings with fluorescent lighting).
6500K--Adds re to screen image for warmer white and richer red.
5400K--Adds green to screen image for a darker color.
5000K--Adds blue and green to screen image for a darker color.
User Color
-- Individual adjustments for red (R), green (G), and blue (B).
1 To adjust selected color, press [▼] or [▲].
2
Press button [2] to set adjustment and select next color to adjust.
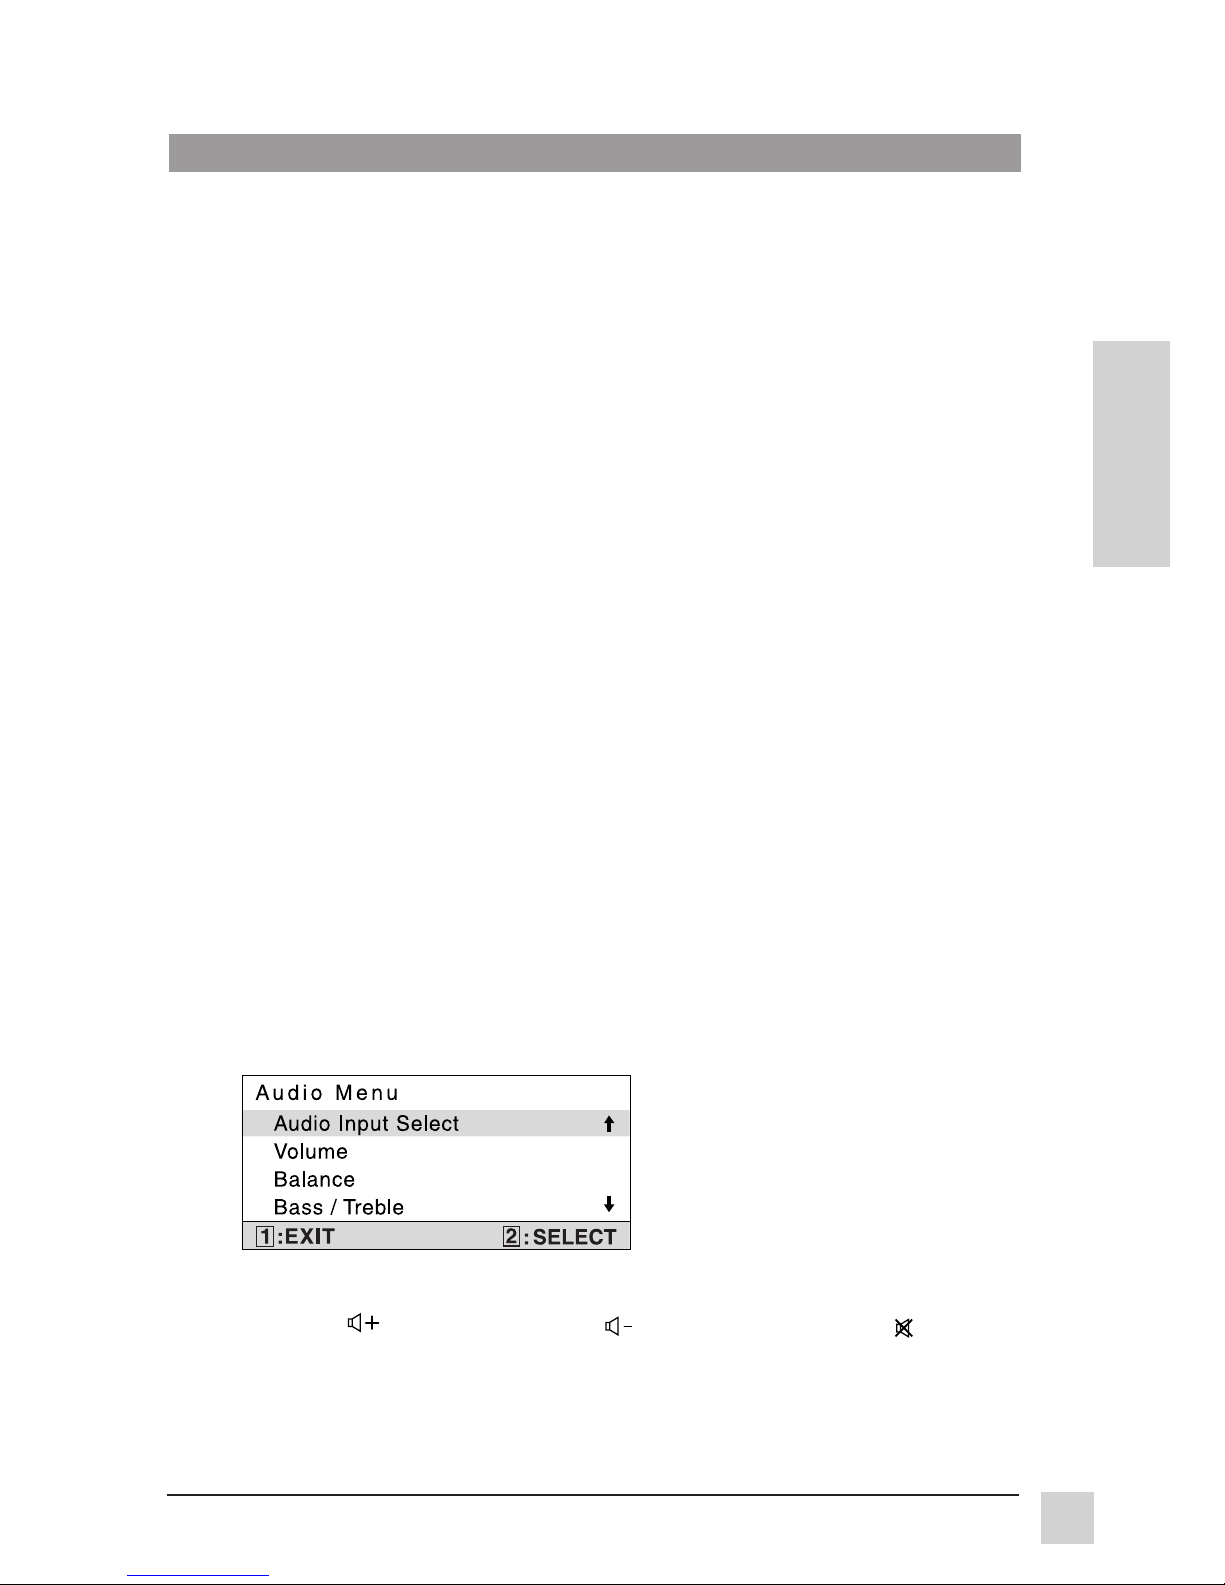
AUDIO INPUT SELECT selects which audio input to be active.
VOLUME increases the volume, decreases the volume, and mutes the
audio.
BALANCE adjusts the proportion of sound coming from each speaker.
[▼] directs more of the sound to the first speaker, [▲] directs more of the sound
to the second speaker.
Video Color
can be adjusted by using the following controls.
Press [▼] or [▲] to scroll to hue, tint, or sharpness.
Press button [2] to select hue, tint, or sharpness.
NOTE: Video color option is not available in RGB (computer) mode, and
only affects composite video sources.
Hue adjusts the brightness of the video color. Press [▼] to increase red.
Press [▲] to increase blue.
Tint adjusts the lightness of the screen image. Press [▲] to make flesh tones
become more green. Press [▼] to make flesh tones become more red.
Sharpness
adjusts the clarity and focus of the screen image. Press [▼] or
[▲] to adjust the image sharpness.
Audio Menu
To save changes and exit Main Menu, press and hold ?????? button
To save changes and exit Main Menu, press the [1] button
Page 15
14
E
N
G
L
I
S
H
ViewSonic VP151 ViewPanel
®
Operation
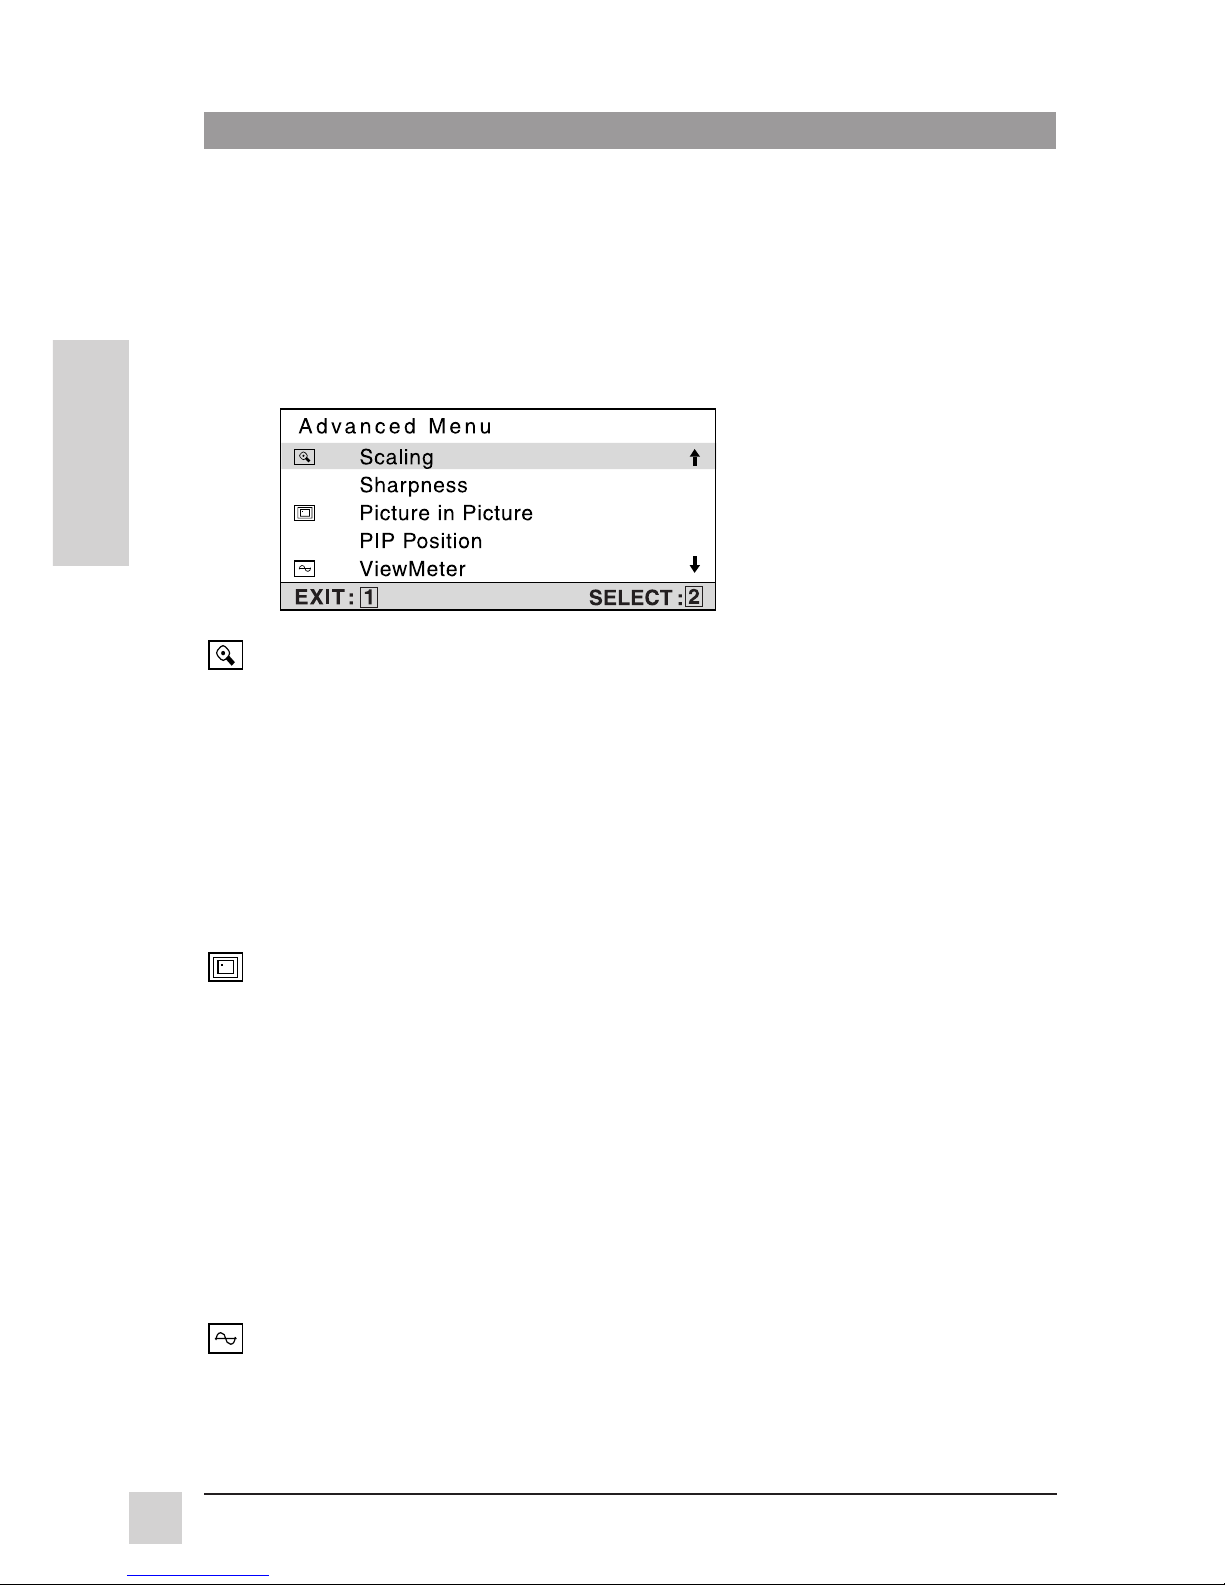
ViewMeter
®
displays information regarding the current input signal coming
from the graphics card in your computer.
NOTE: See your graphics card user guide for more information about
changing the resolution and refresh rate.
Scaling adjusts the video input signal to the screen size using the following
options. Press [▼] or [▲] to select from the following options:
1:1 adjusts the video signal so that the height and width of the
picture are the same.
Fill all
adjusts the video signal to fill the screen.
Fill Aspect Ratio maintains the correct video signal proportions
for different resolutions.
Sharpness adjusts the clarity of a non-XGA (1024 x 768) RGB signal.
Press [▼] or [▲] to adjust.
Picture in Picture allows the user to review a composite video signal within
the primary screen image.
Press [▼] or [▲] to adjust the size of the picture from the following options:
Small, Medium, or Large.
PIP Position allows the user to place the Picture-in-Picture window anywhere
on the screen. Press [▼] or [▲] to select from the following options:
H. Adj moves the second video signal horizontally.
[▼]
moves second signal to left, [▲] moves second signal to right.
V. Adj moves the second video signal vertically.
[▼] moves second signal down, [▲] moves second signal up.
Bass/Treble adjusts the high (treble) and low (bass) frequency audio output.
Press [▼] or [▲] to adjust treble.
Press [2] button to select bass adjustment.
Press [▼] or [▲] to adjust bass.
Advanced Menu
To save changes and exit Main Menu, press the [1] button
Page 16
15
E
N
G
L
I
S
H
ViewSonic VP151 ViewPanel
®
Operation
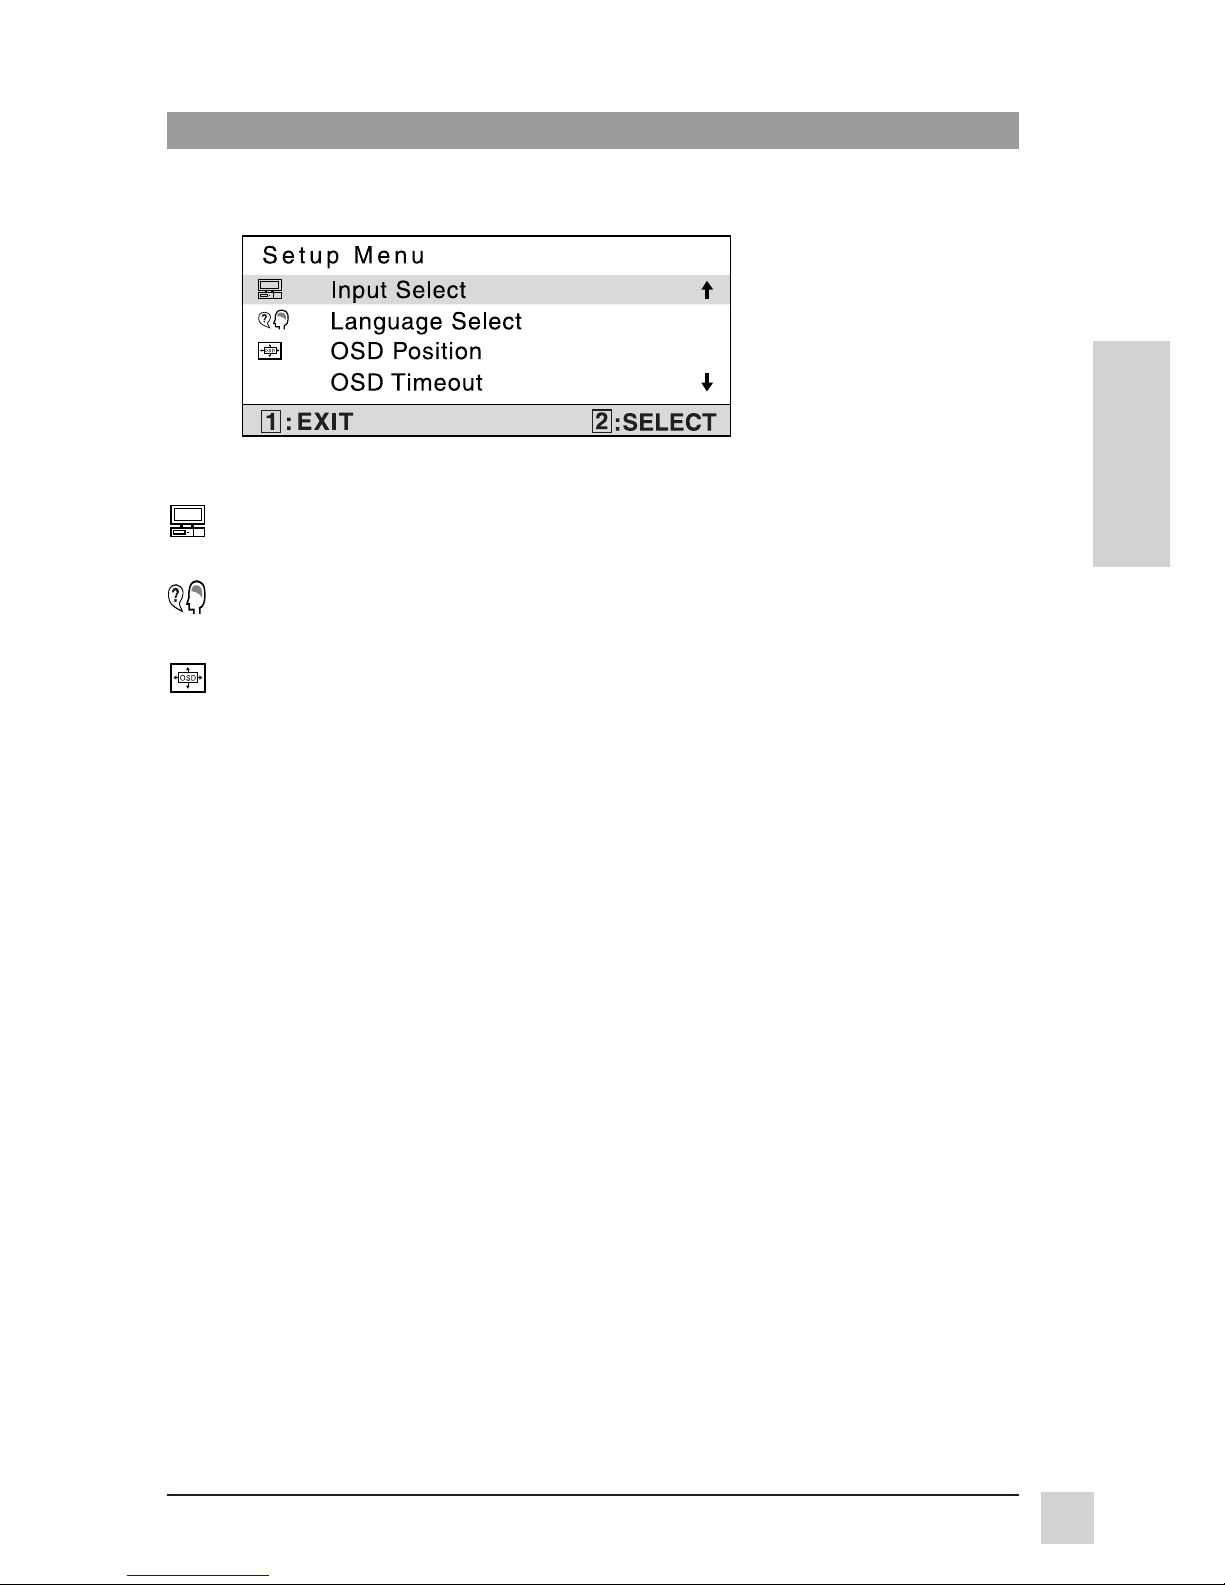
Input Select allows the user to select the current signal from the following
choices: two analog RGB (15 pin) inputs, or a composite video input. Press
[▼] or [▲] to select from video A, B, or composite input.
Language Select
allows the user to choose from available languages.
OSD Position Press the [▼] or [▲] button to select the horizontal or
vertical OSD position
Horizontal OSD Position horizontally repositions all On-Screen-
Display (OSD) screens.
[▼] moves OSD left, [▲] moves the OSD
right.
Vertical OSD Position vertically repositions all On-Screen-Display
(OSD) screens.
[▼] moves OSD down, [▲] moves the OSD up.
OSD Timeout sets the length of time the OnScreen Display screen is
displayed before exiting.
Returns the adjustments back to factory settings (only if the ViewPanel® is
operating in a factory preset mode.)
Press the [2] button to select the Memory Recall menu option.
Memory Recall
Setup Menu
To save changes and exit Main Menu, press the [1] button
Page 17

16
E
N
G
L
I
S
H
Other Information
ViewSonic VP151 ViewPanel
®
Page 18

17
ViewSonic VP151 ViewPanel
®
Other Information
E
N
G
L
I
S
H
Troubleshooting
No power
• Make sure power button located on the power supply and the front panel
is on.
• Make sure A/C power cord is securely connected to the DC power supply
and the power supply is firmly connected to the ViewPanel.
• Plug another electrical device (like a radio) into the power outlet to verify
that the outlet is supplying proper voltage.
• Make sure all short cables are installed see Installation section pg 7.
Power on but no screen image
• Make sure the video cable supplied with the ViewPanel is tightly secured
to the video output port on the back of the computer. If the other end of the
video cable is not attached permanently to the ViewPanel, tightly secure it
to the ViewPanel.
• Adjust brightness.
Wrong or abnormal colors
• If any colors (red, green, or blue) are missing, check the video cable to
make sure it is securely connected. Loose or broken pins in the cable
connector could cause an improper connection.
• Connect the ViewPanel to another computer.
• Check ViewMatch
®
color menu for proper settings
Entire screen image scrolls (rolls) vertically
• Make sure video input signals are within the ViewPanel's specified
frequency range.
• Try the ViewPanel
®
with another power source, graphics card, or
computer system.
• Connect the video cable securely.
Control buttons do not work
• Press only one button at a time.
Page 19

18
E
N
G
L
I
S
H
Other Information
ViewSonic VP151 ViewPanel
®
Cleaning the ViewPanel
®
• DO NOT APPLY PRESSURE TO THE SCREEN.
• NEVER POUR OR SPRAY ANY LIQUID DIRECTLY ONTO THE SCREEN OR
CASE OF THE VIEWPANEL.
To clean the screen:
1 Gently wipe the screen with a clean camel hair lens brush, or a soft, clean,
lint-free cloth. This removes dust and other particles that can scratch the
screen.
2 If still not clean, blow on the screen and gently wipe with a soft, clean,
lint-free cloth.
DISCLAIMER
ViewSonic
®
does not recommend the use of any liquid cleaners on the ViewPanel screen or
case. Chemical cleaners have been reported to damage the screen and/or case of the ViewPanel.
Further, ViewSonic does not recommend applying pressure when wiping the ViewPanel screen
clean. ViewSonic will not be liable for damage resulting from use of liquid cleaners or resulting
from applying pressure to the screen.
Page 20

19
ViewSonic VP151 ViewPanel
®
Other Information
E
N
G
L
I
S
H
LIMITED WARRANTY
VIEWSONIC
VP151
VIEWPANEL
®
What the warranty covers:
ViewSonic
®
warrants its products to be free from defects in material and workmanship during the
warranty period. If a product proves to be defective in material or workmanship during the warranty
period, ViewSonic will at its sole option repair or replace the product with a like product. Replacement
product or parts may include remanufactured or refurbished parts or components.
How long the warranty is effective:
The ViewSonic
VP151
ViewPanel is warranted for three (3) years for all parts, and three (3) years for
all labor.
Who the warranty protects:
This warranty is valid only for the first consumer purchaser.
What the warranty does not cover:
1. Any product on which the serial number has been defaced, modified or removed.
2. Damage, deterioration or malfunction resulting from:
a. Accident, misuse, neglect, fire, water, lightning, or other acts of nature, unauthorized product
modification, or failure to follow instructions supplied with the product.
b. Repair or attempted repair by anyone not authorized by ViewSonic.
c. Any damage of the product due to shipment.
d. Removal or installation of the product.
e. Causes external to the product, such as electric power fluctuations or failure.
f. Use of supplies or parts not meeting ViewSonic’s specifications.
g. Normal wear and tear.
h. Any other cause which does not relate to a product defect.
3. Removal, installation, and set-up service charges.
How to get service:
1. For information about receiving service under warranty, contact ViewSonic Customer Support. See
the back cover of this user's guide. You will need to provide your monitor's serial number.
2. To obtain service under warranty, you will be required to provide (a) the original dated sales slip, (b)
your name, (c) your address, (d) a description of the problem, and (e) the serial number of the
product.
3. Take or ship the product prepaid in the original container to your ViewSonic dealer, any ViewSonic
service center or ViewSonic.
4. For additional information or the name of the nearest ViewSonic service center, contact your
ViewSonic dealer or ViewSonic.
Limitation of implied warranties:
THERE ARE NO WARRANTIES, EXPRESSED OR IMPLIED, WHICH EXTEND BEYOND THE
DESCRIPTION CONTAINED HEREIN INCLUDING THE IMPLIED WARRANTY OF MERCHANTABILITY
AND FITNESS FOR A PARTICULAR PURPOSE.
Exclusion of damages:
VIEWSONIC’S LIABILITY IS LIMITED TO THE COST OF REPAIR OR REPLACEMENT OF THE
PRODUCT. VIEWSONIC SHALL NOT BE LIABLE FOR:
1. DAMAGE TO OTHER PROPERTY CAUSED BY ANY DEFECTS IN THE PRODUCT, DAMAGES
BASED UPON INCONVENIENCE, LOSS OF USE OF THE PRODUCT, LOSS OF TIME, LOSS OF
PROFITS, LOSS OF BUSINESS OPPORTUNITY, LOSS OF GOODWILL, INTERFERENCE WITH
BUSINESS RELATIONSHIPS, OR OTHER COMMERCIAL LOSS, EVEN IF ADVISED OF THE
POSSIBILITY OF SUCH DAMAGES.
2. ANY OTHER DAMAGES, WHETHER INCIDENTAL, CONSEQUENTIAL OR OTHERWISE.
3. ANY CLAIM AGAINST THE CUSTOMER BY ANY OTHER PARTY.
Effect of state law:
This warranty gives you specific legal rights, and you may also have other rights which vary from state
to state. Some states do not allow limitations on implied warranties and/or do not allow the exclusion of
incidental or consequential damages, so the above limitations and exclusions may not apply to you.
Sales outside the U.S.A.:
For ViewSonic products sold outside of the U.S.A., contact your ViewSonic dealer for warranty
information and service.
REV 7/16/98
Page 21

20
E
N
G
L
I
S
H
Other Information
ViewSonic VP151 ViewPanel
®
NOTES
Page 22

Customer Service
To receive the most prompt assistance,
dial the appropriate number below and
listen to all menu options before making
your selection: Customer Support,
Technical Support, Parts, etc.
U.S. and Canada only
1-800-688-6688
From outside U.S. and Canada
909-869-7976
From Europe
44 (1293) 643-900
From Asian/Pacific Rim countries
886 (22) 248-4072
Other Options
Technical Support Questions
Product or Dealer Questions
World Wide Web:
http://www.viewsonic.com
ViewSonic® Corporation
381 Brea Canyon Road
Walnut, CA 91789
Tel (909) 869-7976
Tel (800) 688-6688
Fax (909) 468-1202
05/99
 Loading...