

Page 1

VFD1028w
Digital Photo Frame
User Guide
Model No. VS14962
Page 2

Compliance Information
FCC Statement
This device complies with part 15 of FCC Rules. Operation is subject to the following two conditions: (1)
this device may not cause harmful interference, and (2) this device must accept any interference received,
including interference that may cause undesired operation.
This equipment has been tested and found to comply with the limits for a Class B digital device, pursuant
to part 15 of the FCC Rules. These limits are designed to provide reasonable protection against harmful
interference in a residential installation. This equipment generates, uses, and can radiate radio frequency
energy, and if not installed and used in accordance with the instructions, may cause harmful interference
to radio communications. However, there is no guarantee that interference will not occur in a particular
installation. If this equipment does cause harmful interference to radio or television reception, which can
be determined by turning the equipment off and on, the user is encouraged to try to correct the interference
by one or more of the following measures:
• Reorient or relocate the receiving antenna.
• Increase the separation between the equipment and receiver.
• Connect the equipment into an outlet on a circuit different from that to which the receiver is
connected.
• Consult the dealer or an experienced radio/TV technician for help.
Warning: You are cautioned that changes or modications not expressly approved by the party
responsible for compliance could void your authority to operate the equipment.
For Canada
• This Class B digital apparatus complies with Canadian ICES-003.
• Cet appareil numérique de la classe B est conforme à la norme NMB-003 du Canada.
CE Conformity for European Countries
The device complies with the EMC Directive 2004/108/EC and Low Voltage Directive
2006/95/EC.
Following information is only for EU-member states:
The mark is in compliance with the Waste Electrical and Electronic Equipment Directive
2002/96/EC (WEEE).
The mark indicates the requirement NOT to dispose the equipment including any spent or
discarded batteries or accumulators as unsorted municipal waste, but use the return and collection
systems available.
If the batteries, accumulators and button cells included with this equipment, display the chemical
symbol Hg, Cd, or Pb, then it means that the battery has a heavy metal content of more than
0.0005% Mercury or more than, 0.002% Cadmium, or more than 0.004% Lead.
i
Page 3
Declaration of RoHS Compliance
This product has been designed and manufactured in compliance with Directive 2002/95/EC of the
European Parliament and the Council on restriction of the use of certain hazardous substances in
electrical and electronic equipment (RoHS Directive) and is deemed to comply with the maximum
concentration values issued by the European Technical Adaptation Committee (TAC) as shown
below:
Substance
Lead (Pb) 0.1% < 0.1%
Mercury (Hg) 0.1% < 0.1%
Cadmium (Cd) 0.01% < 0.01%
Hexavalent Chromium (Cr6+) 0.1% < 0.1%
Polybrominated biphenyls (PBB) 0.1% < 0.1%
Polybrominated diphenyl ethers (PBDE) 0.1% < 0.1%
Certain components of products as stated above are exempted under the Annex of the RoHS
Directives as noted below:
Examples of exempted components are:
1. Mercury in compact uorescent lamps not exceeding 5 mg per lamp and in other lamps not
specically mentioned in the Annex of RoHS Directive.
2. Lead in glass of cathode ray tubes, electronic components, uorescent tubes, and electronic
ceramic parts (e.g. piezoelectronic devices).
3. Lead in high temperature type solders (i.e. lead-based alloys containing 85% by weight or more
lead).
4. Lead as an allotting element in steel containing up to 0.35% lead by weight, aluminium containing
up to 0.4% lead by weight and as a cooper alloy containing up to 4% lead by weight.
Proposed Maximum
Concentration
Actual Concentration
ii
Page 4

Copyright Information
Copyright© ViewSonic Corporation, 2013. All rights reserved.
ViewSonic, the three birds logo, OnView, ViewMatch, and ViewMeter are registered trademarks
of ViewSonic Corporation.
Disclaimer:ViewSonic Corporation shall not be liable for technical or editorial errors or
omissions contained herein; nor for incidental or consequential damages resulting from furnishing
this material, or the performance or use of this product.
In the interest of continuing product improvement, ViewSonic Corporation reserves the right to
change product specications without notice. Information in this document may change without
notice.
No part of this document may be copied, reproduced, or transmitted by any means, for any
purpose without prior written permission from ViewSonic Corporation.
For Your Records
Product Name:
Model Number:
Document Number:
Serial Number:
Purchase Date:
Product disposal at end of product life
ViewSonic respects the environment and is committed to working and living green. Thank you
for being part of Smarter, Greener Computing. Please visit ViewSonic website to learn more.
USA & Canada: http://www.viewsonic.com/company/green/recycle-program/
Europe: http://www.viewsoniceurope.com/uk/support/recycling-information/
Taiwan: http://recycle.epa.gov.tw/recycle/index2.aspx
VFD1028w
ViewSonic Digital Photo Frame
VS14962
VFD1028w_UG_ENG Rev. 1B 06-11-13
_____________________________
_____________________________
iii
Page 5

Important Safety Precautions
Always follow these basic safety precautions when using your Digital Picture Frame.
This will reduce the risk of re, electric shock, and injury.
Warning: To reduce the risk of re or shock hazard, do not expose this product to rain or
moisture.
Warning: To prevent the risk of electric shock, do not remove the cover. There are no
user-serviceable parts inside. Refer all servicing to qualied personnel.
The Digital Picture Frame is for indoor use only.
•
Unplug the Digital Picture Frame before performing care and maintenance.
•
Do not block the ventilation holes on the back of the Digital Picture Frame at any
•
time.
Keep your Digital Picture Frame out of direct sunlight and heat sources.
•
Protect the power cord. Route power cord so that it is not likely to be walked on or
•
pinched by item places on or against it. Pay particular attention to the point where the
cord attaches to the Digital Picture Frame.
Only use the AC adapter included with the Digital Picture Frame. Using any other
•
power adapter will void your warranty.
Unplug the power cord from the outlet when the unit is not in use.
•
Cleaning the LCD Screen
Touch the screen gently.
To clean ngerprints or dust from the LCD screen, it is recommended to use a soft,
non-abrasive cloth such as a camera lens cloth to clean the LCD screen.
If you use a commercial LCD cleaning kit, do not apply the cleaning liquid directly to the
LCD screen. Clean the LCD screen with a cleaning cloth moistened with the liquid.
Cleaning the Digital Picture Frame
Clean the outer surface of the Digital Picture Frame (excluding the screen) with a soft
cloth dampened with water.
Package Content
Digital Picture Frame
Power Adapter
Stand
Remote Control
USB Cable
Quick Start Guide
User’s Manual
VFD1078w
Digital Photo Frame
User Guide
Model No. VS14962
iv
Page 6

Table of Contents
1. Hardware --------------------------------------------------------------------------- 1
1.1. Specications ----------------------------------------------------------------- 1
1.2. Identication of Controls --------------------------------------------------- 1
1.3. Accessories ------------------------------------------------------------------- 2
1.4. Features ------------------------------------------------------------------------ 2
1.5. Features Checklist ----------------------------------------------------------- 3
1.6. Remote control --------------------------------------------------------------- 3
2. Main function --------------------------------------------------------------------- 4
2.1. Photo ---------------------------------------------------------------------------- 5
2.1.1. Browse ----------------------------------------------------------------- 6
2.1.2. Slideshow -------------------------------------------------------------- 6
2.2. Calendar ----------------------------------------------------------------------- 7
2.2.1. Display Mode --------------------------------------------------------- 7
2.2.1.1. Monthly calendar ----------------------------------------- 7
2.2.1.2. Calendar ---------------------------------------------------- 8
2.2.1.3. Clock --------------------------------------------------------- 8
2.3. Settings ------------------------------------------------------------------------- 9
2.3.1. Photo Setting --------------------------------------------------------10
2.3.2. Calendar Setting ----------------------------------------------------10
2.3.3. System Setting -----------------------------------------------------11
3. Troubleshooting ----------------------------------------------------------------12
Customer Support -----------------------------------------------------------------13
Limited Warranty -------------------------------------------------------------------14
v
Page 7
1. Hardware
1.1. Specications
Panel size/ Aspect ratio 10.1 inch/ Wide
LCD screen
Fhoto File
Calendar Clock, Calendar
Memory Medium
Effective viewing area 8.2” W x 4.1” H ( 208.3 mm x 104.1 mm)
Resolution 1024 x 600 pixels
Image formats supported JPG, JPEG (baseline coding), BMP
Max. image resolution 30 million pixels
Internal 128 MB
Memory Card MMC, SD, SDHC ( max. 32GB)
USB USBashdrive
File System FAT, FAT32
Power Input 5VDC, 1A
ElectricSpecication
Dimensions
Environmental
Requirements
Power Consumption ≤5W
Power Adapter
Dimensions 12.52”W x 8.7”H x 1.42”D (318 x 221 x 36 mm)
Weight Approx. 2.03 lbs (917g)
Operating Mode Buttons on panel and IR Remote
Operating temperature 0ºC ~ 40ºC (32ºF~104ºF)
Storage temperature -20ºC ~ 60ºC (-4ºF~140ºF)
Input AC 100-240V, 50/60HZ
Output DC5V , 1A
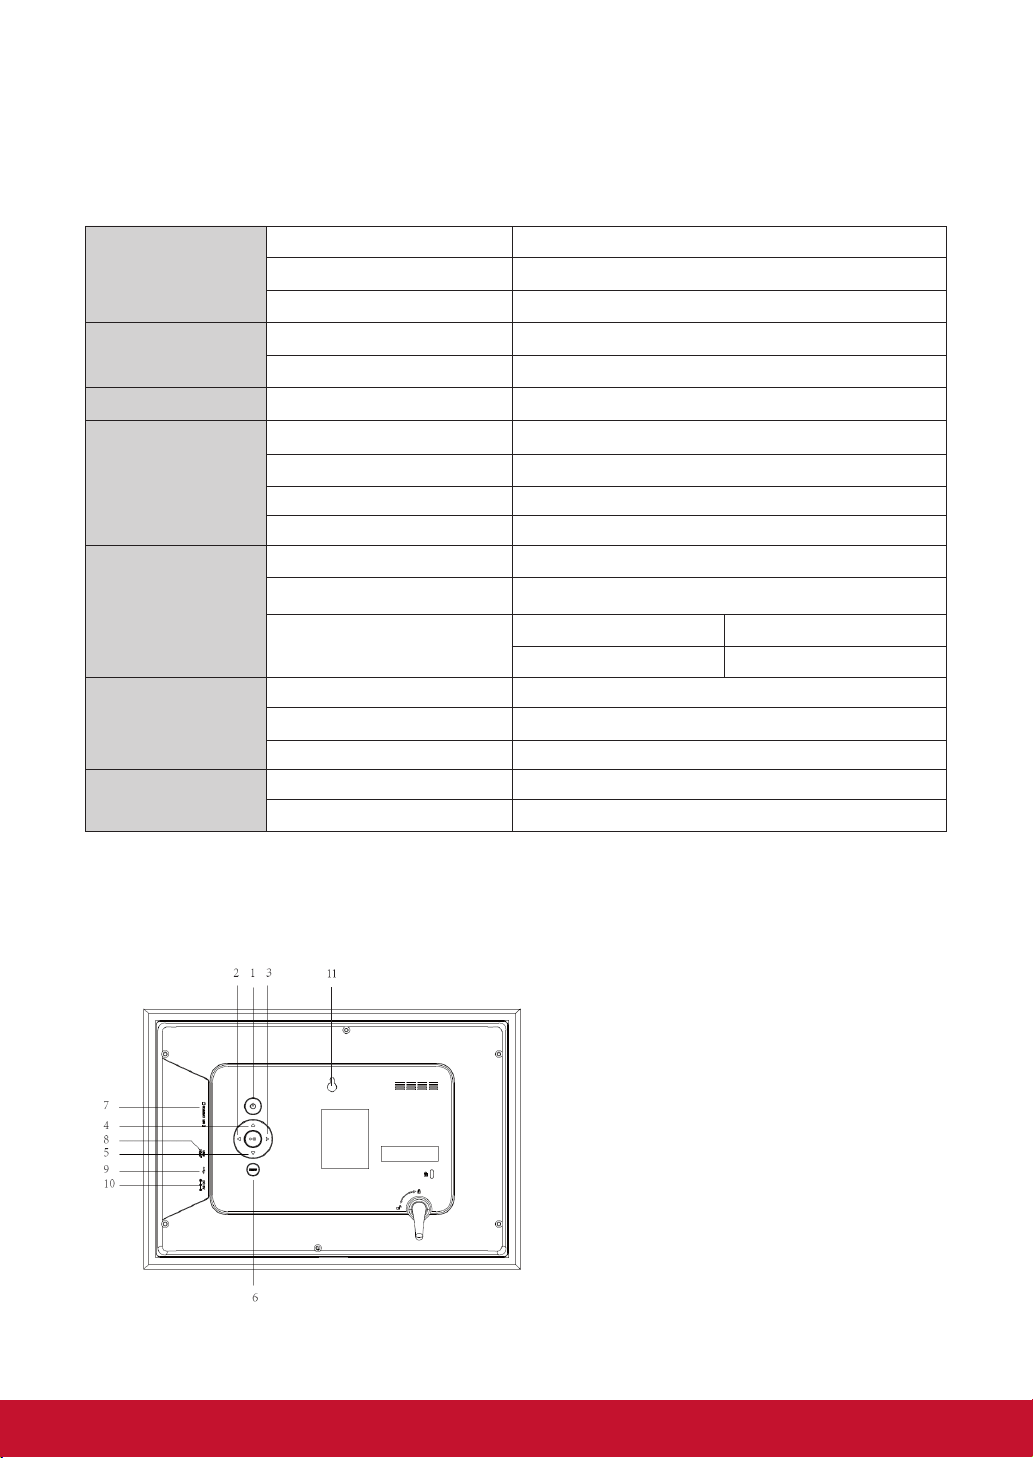
1.2. IdenticationofControls
Power on/off
1.
Right
2.
Left
3.
UP
4.
DOWN
5.
MENU
6.
MMC/SD/MS
7.
USB HOST
8.
MINI USB
9.
DC IN
10.
WALL MOUNT HOLE
11.
1
Page 8

1.3. Accessories
The following accessories are included with the digital photo frame.
Remote Control AC/DC Adapter USB Cable Stand
1.4. Features
Remote control and hard keypad control.
•
Playback of photo stored on data storage devices through
•
High-Speed USB 2.0 port, card-reader port or the built-in
memory.
Data storage devices: USB disk, SD, MS, MMC card.
•
Multi-language OSD supports: English, French, Spanish.
•
File format: JPG, BMP.
•
Photo Play Sequence: sequence, random.
•
Automatic slideshow with multiple transition effects and
•
adjustable display time.
Supports calendar.
•
Has screen saver function.
•
10.1 inch TFT LCD display, brightness, contrast and
•
saturation adjustable.
Add and delete image on built-in memory.
•
2
Page 9

1.5. Features Checklist
Remote control and keypad control √
SD/MS/MMC √
USB √
Photo √
10.1” TFT-LCD display √
Built-in memory √
Calendar √
1.6. Remote control
VFD1028w
1: Power on/off
2: Play/Pause/Enter
3/4: Left/Backward
5/6: Up/Rotate
7: Time
8: Menu
9/10: Zoom/Down
11/12: Forward/Right
13: Setup menu
3
Page 10

2. Main function
To attach the stand, screw in the stand clockwise until it is secure.
Insert an SD/SDHC/MMC or USB memory source device into an appropriate
memory slot. Connect the supplied power adapter to the photo frame and to an
electrical outlet.
The photo frame will power on automatically. Press “ ” to power on and off
manually.
4
Page 11

On the Main Menu, there are 【Photo】【 Calendar】【Setting 】.
This photo frame searches the memory source device after power on and
playback photos in slideshow mode if there are photos found. If there is no photo
found, the Main Menu will be shown.
2.1. Photo
Insert a memory card or USB ash drive with the photo on it into the photo frame
if you had not done so. Select【Photo】 from the main menu, press the ENTER
button, this photo frame will start slideshow automatically. Press MENU to
display photos in a thumbnail view.
The following button functions are available while viewing photos in thumbnail
and slideshow modes.
5
Page 12

2.1.1. Browse
Buttons Functional descriptions
2.1.2. Slideshow
Buttons Functional descriptions
Exit to thumbnail view
Previous photo
Next photo
--
--
Toggle Browse and Slideshow modes
Exit to thumbnail view
Previous photo
Next photo
--
Toggle Browse and Slideshow modes
--
6
Page 13

2.2. Calendar
Select【Calendar】from the main menu, press the ENTER button to view the
calendar. Monthly calendar mode is the default.
2.2.1. Display Mode
The date and time displayed on the calendar are the current date and time set in
the system.
2.2.1.1 Monthly calendar
In this mode, photos are shown in slideshow on the top right.
Buttons Functional descriptions
Toggle Monthly calendar, Calendar (day), and
Exit to the main menu
Previous photo
Next photo
Previous month
Next month
Clock viewing modes
7
Page 14

2.2.1.2 Calendar
In this mode, photos are shown in slideshow on the right.
Buttons Functional descriptions
Toggle Monthly calendar, Calendar (day), and
Exit to the main menu
Previous photo
Next photo
--
--
Clock viewing modes
2.2.1.3 Clock
In this mode, an analog clock is shown in the center.
8
Page 15

Buttons Functional descriptions
Toggle Monthly calendar, Calendar (day), and
Exit to the main menu
--
--
Clock viewing modes
2.3. Settings
Select【Setting】from the main menu, press the “ENTER” button or press the
【SETUP】button on the remote control to enter the Settings Menu. The Photo,
Calendar, and System settings are shown below.
Press the Up【▲】or Down【▼】button to highlight a setting category, then
【ENTER】 button to enter the setup submenu.
Buttons Functional descriptions
Move up or to the next menu entry eld
Move down or to the previous menu entry eld
Exit to Main Setting Menu
Decrease the setting value
Increase the setting value
Enter the setup submenu
9
Page 16

2.3.1. Photo Setting
Press the Up【▲】or Down【▼】button to highlight Photo Setting, then
【ENTER】 button to enter the setup submenu. Press the Left【◄】or Right
【►】button to change the entry eld. Press the Up【▲】or Down【▼】button
to move between entry elds.
Photo Setting Options Functional descriptions
Display Mode Photo startup modes: Slideshow, Thumbnail, or
Browse Mode
Display Ratio Set the display scaling: Fit to Screen, Crop to Fill,
or Full Screen
Slideshow Duration Set the duration time for slideshow: 5sec, 15 sec,
30 sec, 60 sec, 5 min, or 15 min
Slideshow Repeat Repeat modes: Repeat (on) or Once (off)
Slideshow Effect Set the slide transition effects: Random, S-Curve,
Partition, Erase, Blind, Random line, Grid, Cross,
Spiral, Rectangle, or Close
PhotoFrom Source settings: Current Directory or All Directories
Photo Play Sequence Set playback modes: Sequential Order or Random
2.3.2. Calendar Setting
Press the Up【▲】or Down【▼】button to highlight Calendar Setting, then
【ENTER】button to enter the setup submenu. Press the Left【◄】or Right
【►】button to change the entry eld. Press the Up【▲】or Down【▼】button
to move between entry elds.
Calendar Setting Options Functional descriptions
Display Mode Set the calendar display modes: Monthly Calendar,
Calendar (day), or Clock
Date Set the current date
Clock Mode Set the clock display formats: 12 Hour or 24 Hour
Clock Time Set the current time
10
Page 17

2.3.3. System Setting
Press the Up【▲】or Down【▼】button to highlight System Setting, then
【ENTER】button to enter the setup submenu. Press the Left【◄】or Right
【►】button to change the entry eld. Press the Up【▲】or Down【▼】button
to move between entry elds.
Photo Setting Options Functional descriptions
Language Set the display language
Brightness Adjust screen brightness: 1 to 16
Contrast Adjust the screen contrast: 1 to 16
Saturation Adjust the screen saturation: contrast: 1 to 16
Auto Power On Off is disable and On is enable
Auto Boot-up Time Set the time for the unit to power on automatically
Auto Power Off Off is disable and On is enable
Auto Shutdown Time Set the time for the unit to power off automatically
Auto-Power Frequency How often you want the unit to use the timer after
the timer is enable. Available options are: Everyday,
Weekday, Weekend, and Once.
Reset default setting Restore the factory default settings
Version Displays version information
System Upgrade For rmware upgrade
11
Page 18

3. Troubleshooting
Symptoms Solutions
Cannot power on, even when
the device is connected to an
electrical outlet.
Failed to read memory card
Cannot playback pictures
Screen is off or too dark
• Check whether the AC power adapter
rating is correct, and it is securely plugged
to the device and to an electrical outlet.
• Check whether memory card is inserted
properly. The notch should match the label
on the device. Do not force the memory
card in
• The digital photo frame only supports
pictures in JPEG, JPG format in baseline
and BMP.
• Check whether the screen brightness is
set to a low level in the Setup menu.
12
Page 19

Customer Support
For technical support or product service, see the table below or contact your reseller.
Note: You will need the product serial number.
Country/
Region
Australia/New
Zealand
Canada www.viewsonic.com
Europe www.viewsoniceurope.com www.viewsoniceurope.com/uk/Support/Calldesk.htm
Hong Kong www.hk.viewsonic.com T= 852 3102 2900 service@hk.viewsonic.com
India www.in.viewsonic.com T= 1800 11 9999 service@in.viewsonic.com
Ireland (Eire)
Korea www.kr.viewsonic.com T= 080 333 2131 service@kr.viewsonic.com
Latin America
(Argentina)
Latin America
(Chile)
Latin America
(Columbia)
Latin America
(Mexico)
Renta y Datos, 29 SUR 721, COL. LA PAZ, 72160 PUEBLA, PUE. Tel: 01.222.891.55.77 CON 10 LINEAS
Electroser, Av Reforma No. 403Gx39 y 41, 97000 Merida, Yucatan. Tel: 01.999.925.19.16
Other places please refer to http://www.viewsonic.com/la/soporte/index.htm#Mexico
Latin America
(Peru)
Macau www.hk.viewsonic.com T= 853 2870 0303 service@hk.viewsonic.com
Middle East ap.viewsonic.com/me/ Contact your reseller service@ap.viewsonic.com
Puerto Rico &
Virgin Islands
Singapore/
Malaysia/
Thailand
South Africa ap.viewsonic.com/za/ Contact your reseller service@ap.viewsonic.com
United
Kingdom
United States www.viewsonic.com
Web Site
www.viewsonic.com.au
www.viewsoniceurope.
com/uk/
www.viewsonic.com/la/ T= 0800-4441185 soporte@viewsonic.com
www.viewsonic.com/la/ T=1230-020-7975 soporte@viewsonic.com
www.viewsonic.com/la/ T= 01800-9-157235 soporte@viewsonic.com
www.viewsonic.com/la/ T= 001-8882328722 soporte@viewsonic.com
www.viewsonic.com/la/ T= 0800-54565 soporte@viewsonic.com
www.viewsonic.com
www.viewsonic.com.sg T= 65 6461 6044 service@sg.viewsonic.com
www.viewsoniceurope.
com/uk/
T=Telephone
F=Fax
AUS=1800 880 818
NZ=0800 008 822
T (Toll-Free)= 1-866-463-4775
T (Toll)= 1-424-233-2533
F= 1-909-468-3757
www.viewsoniceurope.com/uk/
support/call-desk/
T= 1-800-688-6688 (English)
T= 1-866-379-1304 (Spanish)
F= 1-909-468-3757
www.viewsoniceurope.com/uk/
support/call-desk/
T (Toll-Free)= 1-800-688-6688
T (Toll)= 1-424-233-2530
F= 1-909-468-3757
E-mail
service@au.viewsonic.com
service.ca@viewsonic.com
service_ie@viewsoniceurope.
com
service.us@viewsonic.com
soporte@viewsonic.com
service_gb@
viewsoniceurope.com
service.us@viewsonic.com
13
Page 20

Limited Warranty
VIEWSONIC Digital Photo Frame
What the warranty covers:
ViewSonic warrants its products to be free from defects in material and workmanship, under normal
use, during the warranty period. If a product proves to be defective in material or workmanship during
the warranty period, ViewSonic will, at its sole option, repair or replace the product with a like product.
Replacement product or parts may include remanufactured or refurbished parts or components.
How long the warranty is effective:
ViewSonic Digital Photo Frame are warranted for 1 year for labor from the date of the rst customer
purchase.
Who the warranty protects:
This warranty is valid only for the rst consumer purchaser.
What the warranty does not cover:
1. Any product on which the serial number has been defaced, modied or removed.
2. Damage, deterioration or malfunction resulting from:
a. Accident, misuse, neglect, re, water, lightning, or other acts of nature, unauthorized product
modication, or failure to follow instructions supplied with the product.
b. Repair or attempted repair by anyone not authorized by ViewSonic.
c. Causes external to the product, such as electric power uctuations or failure.
d. Use of supplies or parts not meeting ViewSonic’s specications.
e. Normal wear and tear.
f. Any other cause which does not relate to a product defect.
3. Any product exhibiting a condition commonly known as “image burn-in” which results when a static
image is displayed on the product for an extended period of time.
How to get service:
1. For information about receiving service under warranty, contact ViewSonic Customer Support (please
refer to Customer Support page). You will need to provide your product’s serial number.
2. To obtain warranted service, you will be required to provide (a) the original dated sales slip, (b) your
name, (c) your address, (d) a description of the problem, and (e) the serial number of the product.
3. Take or ship the product freight prepaid in the original container to an authorized ViewSonic service
center or ViewSonic.
4. For additional information or the name of the nearest ViewSonic service center, contact ViewSonic.
Limitation of implied warranties:
There are no warranties, express or implied, which extend beyond the description contained herein
including the implied warranty of merchantability and tness for a particular purpose.
Exclusion of damages:
ViewSonic’s liability is limited to the cost of repair or replacement of the product. ViewSonic shall not be
liable for:
1. Damage to other property caused by any defects in the product, damages based upon inconvenience,
loss of use of the product, loss of time, loss of prots, loss of business opportunity, loss of goodwill,
interference with business relationships, or other commercial loss, even if advised of the possibility of
such damages.
2. Any other damages, whether incidental, consequential or otherwise.
3. Any claim against the customer by any other party.
4.3: ViewSonic DPF Warranty DPF_LW01 Rev. 1A
14
06-20-08
Page 21

 Loading...