

Page 1

VC3D2
3D Full HD Camcorder
User Guide
IMPORTANT: Please read this User Guide to obtain important information on installing
and using your product in a safe manner, as well as registering your product for future
service. Warranty information contained in this User Guide will describe your limited
coverage from ViewSonic Corporation, which is also found on our web site at http://www.
viewsonic.com in English, or in specic languages using the Regional selection box in
the upper right corner of our website. “Antes de operar su equipo lea cu idadosamente
las instrucciones en este manual”
Model No. VS14308
1
Page 2

Compliance Information
FCC Statement
This device complies with part 15 of FCC Rules. Operation is subject to the following
two conditions: (1) this device may not cause harmful interference, and (2) this
device must accept any interference received, including interference that may cause
undesired operation.
This equipment has been tested and found to comply with the limits for a Class
B digital device, pursuant to part 15 of the FCC Rules. These limits are designed
to provide reasonable protection against harmful interference in a residential
installation. This equipment generates, uses, and can radiate radio frequency
energy, and if not installed and used in accordance with the instructions, may cause
harmful interference to radio communications. However, there is no guarantee that
interference will not occur in a particular installation. If this equipment does cause
harmful interference to radio or television reception, which can be determined
by turning the equipment off and on, the user is encouraged to try to correct the
interference by one or more of the following measures:
• Reorient or relocate the receiving antenna.
• Increase the separation between the equipment and receiver.
• Connect the equipment into an outlet on a circuit different from that to which the
receiver is connected.
• Consult the dealer or an experienced radio/TV technician for help.
Warning: You are cautioned that changes or modications not expressly approved
by the party responsible for compliance could void your authority to operate the
equipment.
For Canada
• This Class B digital apparatus complies with Canadian ICES-003.
• Cet appareil numérique de la classe B est conforme à la norme NMB-003 du
Canada.
CE Conformity for European Countries
The device complies with the EMC Directive 2004/108/EC and Low Voltage
Directive 2006/95/EC.
Following information is only for EU-member states:
The mark is in compliance with the Waste Electrical and Electronic
Equipment Directive 2002/96/EC (WEEE).
The mark indicates the requirement NOT to dispose the equipment including
any spent or discarded batteries or accumulators as unsorted municipal
waste, but use the return and collection systems available.
If the batteries, accumulators and button cells included with this equipment,
display the chemical symbol Hg, Cd, or Pb, then it means that the battery has
a heavy metal content of more than 0.0005% Mercury or more than, 0.002%
Cadmium, or more than 0.004% Lead.
i
Page 3

Important Safety Instructions
1. Read these instructions completely before using the equipment.
2. Keep these instructions in a safe place.
3. Heed all warnings.
4. Follow all instructions.
5. Do not use this equipment near water. Warning: To reduce the risk of re or
electric shock, do not expose this apparatus to rain or moisture.
6. Clean with a soft, dry cloth.
7. Do not block any ventilation openings. Install the unit in accordance with the
manufacturer’s instructions.
8. Do not install near any heat sources such as radiators, heat registers, stoves, or
other devices (including ampliers) that produce heat.
9. Do not defeat the safety purpose of the polarized or grounding-type plug. A
polarized plug has two blades with one wider than the other. A grounding type
plug has two blades and a third grounding prong. The wide blade and the third
prong are provided for your safety. If the provided plug does not t into your
outlet, consult an electrician for replacement of the obsolete outlet.
rotect the power cord from being walked on or pinched particularly at plugs.
10. P
Convenience receptacles and the point where they exit from the unit. Be sure that
the power outlet is located near the unit so that it is easily accessible.
11. Only use attachments/accessories specied by the manufacturer.
12. Use only with the cart, stand, tripod, bracket, or table specied by the
manufacturer, or sold with the unit. When a cart is used, use caution when
moving the cart/unit combination to avoid injury from tipping over.
13. Unplug this unit when unused for long periods of time.
14. Refer all servicing to qualied service personnel. Servicing is required when the
unit has been damaged in any way, such as: if the power-supply cord or plug is
damaged, if liquid is spilled onto or objects fall into the unit, if the unit is exposed to
rain or moisture, or if the unit does not operate normally or has been dropped.
15. Caution: There is a risk of explosion if the battery is replaced by an incorrect type.
Dispose of used batteries according to the instructions.
16. Only use battery packs approved by the manufacturer or else damage may occur.
ii
Page 4

Declaration of RoHS Compliance
This product has been designed and manufactured in compliance with Directive
2002/95/EC of the European Parliament and the Council on restriction of the use of
certain hazardous substances in electrical and electronic equipment (RoHS Directive)
and is deemed to comply with the maximum concentration values issued by the
European Technical Adaptation Committee (TAC) as shown below:
Substance
Lead (Pb) 0.1% < 0.1%
Mercury (Hg) 0.1% < 0.1%
Cadmium (Cd) 0.01% < 0.01%
Hexavalent Chromium
(Cr6+)
Polybrominated biphenyls
(PBB)
Polybrominated diphenyl
ethers (PBDE)
Certain components of products as stated above are exempted under the Annex of
the RoHS Directives as noted below:
Examples of exempted components are:
1. Mercury in compact uorescent lamps not exceeding 5 mg per lamp and in other
lamps not specically mentioned in the Annex of RoHS Directive.
Proposed Maximum
Concentration
0.1% < 0.1%
0.1% < 0.1%
0.1% < 0.1%
Actual Concentration
2. Lead in glass of cathode ray tubes, electronic components, uorescent tubes, and
electronic ceramic parts (e.g. piezoelectronic devices).
3. Lead in high temperature type solders (i.e. lead-based alloys containing 85% by
weight or more lead).
4. Lead as an allotting element in steel containing up to 0.35% lead by weight,
aluminium containing up to 0.4% lead by weight and as a cooper alloy containing
up to 4% lead by weight.
iii
Page 5

Copyright Information
Copyright © ViewSonic® Corporation, 2011. All rights reserved.
ViewSonic, the three birds logo, OnView, ViewMatch, and ViewMeter are registered
trademarks of ViewSonic Corporation.
Disclaimer: ViewSonic Corporation shall not be liable for technical or editorial errors
or omissions contained herein; nor for incidental or consequential damages resulting
from furnishing this material, or the performance or use of this product.
In the interest of continuing product improvement, ViewSonic Corporation reserves
the right to change product specications without notice. Information in this document
may change without notice.
No part of this document may be copied, reproduced, or transmitted by any means,
for any purpose without prior written permission from ViewSonic Corporation.
Product Registration
To meet your future needs, and to receive any additional product information as it
becomes available, please register your product on the Internet at: www.viewsonic.
com. The ViewSonic® Wizard CD-ROM also provides an opportunity for you to print
the registration form, which you may mail or fax to ViewSonic.
For Your Records
Product Name:
Model Number:
Document Number:
Serial Number:
Purchase Date:
Product disposal at end of product life
ViewSonic respects the environment and is committed to working and living green.
Thank you for being part of Smarter, Greener Computing. Please visit ViewSonic
website to learn more.
USA & Canada: http://www.viewsonic.com/company/green/recycle-program/
Europe: http://www.viewsoniceurope.com/uk/kbase/article.php?id=639
Taiwan: http://recycle.epa.gov.tw/recycle/index2.aspx
VC3D2
ViewSonic 3D Full HD Camcorder
VS14308
VC3D2_UG_ENG Rev. 1A 07-18-11
_______________________________
_______________________________
iv
Page 6

1
Table of Contents
1 Introducing the camcorder........................... 4
1.1 System requirements.................................... 4
1.1.1 Standard system requirements ................... 4
1.1.2 System requirements
(for 3D video playback)................................. 4
1.2 Features ......................................................... 4
1.3 Unpacking the camcorder ............................ 5
1.4 About the camcorder .................................... 6
1.4.1 Front view.............................................. 6
1.4.2 Top view................................................. 7
1.4.3 Bottom view........................................... 7
1.4.4 Back view .............................................. 8
1.4.5 Left view ................................................ 8
1.4.6 Right view.............................................. 9
1.4.7 Operating the camcorder..................... 13
2 Getting started................................... 15
2.1 Inserting an SD card ................................... 15
2.2 Inserting the battery.................................... 16
2.3 Charging the battery................................... 18
2.4 Turning on/ off the camcorder ................... 18
2.5 Connecting to TV (AV Cable)...................... 19
2.6 Connecting to TV (HDMI Cable) ................. 19
2.7 Connecting to PC (USB Cable) .................. 20
2.8 Changing modes......................................... 20
2.9 Before you start........................................... 20
Page 7

2
2.9.1 Managing the Setup mode................... 21
2.9.2 Language............................................. 22
2.9.3 Date / Time .......................................... 22
2.9.4 Format ................................................. 23
2.9.5 Default ................................................. 23
2.9.6 Auto Power Off .................................... 24
2.9.7 Frequency............................................ 24
2.9.8 TV Standard......................................... 25
2.9.9 Beep .................................................... 25
3 Using the Camcorder ........................ 26
3.1 Recording Videos........................................ 26
3.2 Video Mode Menu........................................ 29
3.2.1 White Balance ..................................... 30
3.2.2 Resolution............................................ 30
3.2.3 Effect ................................................... 31
3.2.4 Night Mode....................................... 32
3.2.5 Quality.............................................. 32
3.3 Playback Videos.......................................... 33
3.3.1 Playback Videos .................................. 33
3.4 Deleting Videos ...........................................35
3.5 Protecting Videos........................................ 36
3.6 Autoplay Videos .......................................... 37
3.7 Video Output................................................ 38
3.8 Shooting Photos ......................................... 39
3.9 Camera Mode Menu .................................... 41
3.9.1 White Balance ..................................... 42
3.9.2 Resolution............................................ 42
Page 8

3
3.9.3
3.9.4 Night Mode ........................................... 44
3.9.5 Quality.............................................. 44
3.10 Playback Photos ......................................... 45
3.10.1 Playback Photos.................................. 45
3.11 Deleting Photos........................................... 47
3.12 Protecting Photos ....................................... 48
3.13 Autoplay Photos.......................................... 49
3.14 Image Output............................................... 50
Effect ................................................... 43
Appendix.................................................... 51
Specification ......................................................... 51
Troubleshooting ................................................... 53
Page 9

4
1 Introducing the camcorder
Read this section to learn about the features and functions of the
camcorder. This chapter also covers system requirements, package
contents, and descriptions of the hardware components.
1.1 System requirements
1.1.1 Standard system requirements
The camcorder requires a PC with the following specifications:
• Windows® 7 / Vista / XP SP2 operating system
• Intel® / AMD Dual-Core CPU or higher
• At least 1 GB of RAM or higher
• At least DirectX 9 video card, DirectX 10 is recommended
• Standard USB 1.1 port or higher
• At least 2GB or greater available hard disk
1.1.2 System requirements (for 3D video playback)
The camcorder requires a PC with the following specifications:
• Windows® 7 / Vista operating system
• Intel® Core 2 Duo or AMD Athlon X2 CPU or higher
• NVIDIA GeForce 8, 9 and 200 series
• 3D ready monitor (120Hz)
• 3D vision kits
1.2 Features
The camcorder offers a variety of features and functions including:
• 3D and 2D video/image shooting and playback
• 3.2” LCD 3D display
• Parallax barrier auto-stereoscopic technology
• USB mass storage
• 3D and 2D video/image playback
• 3D glasses not required
Page 10
5
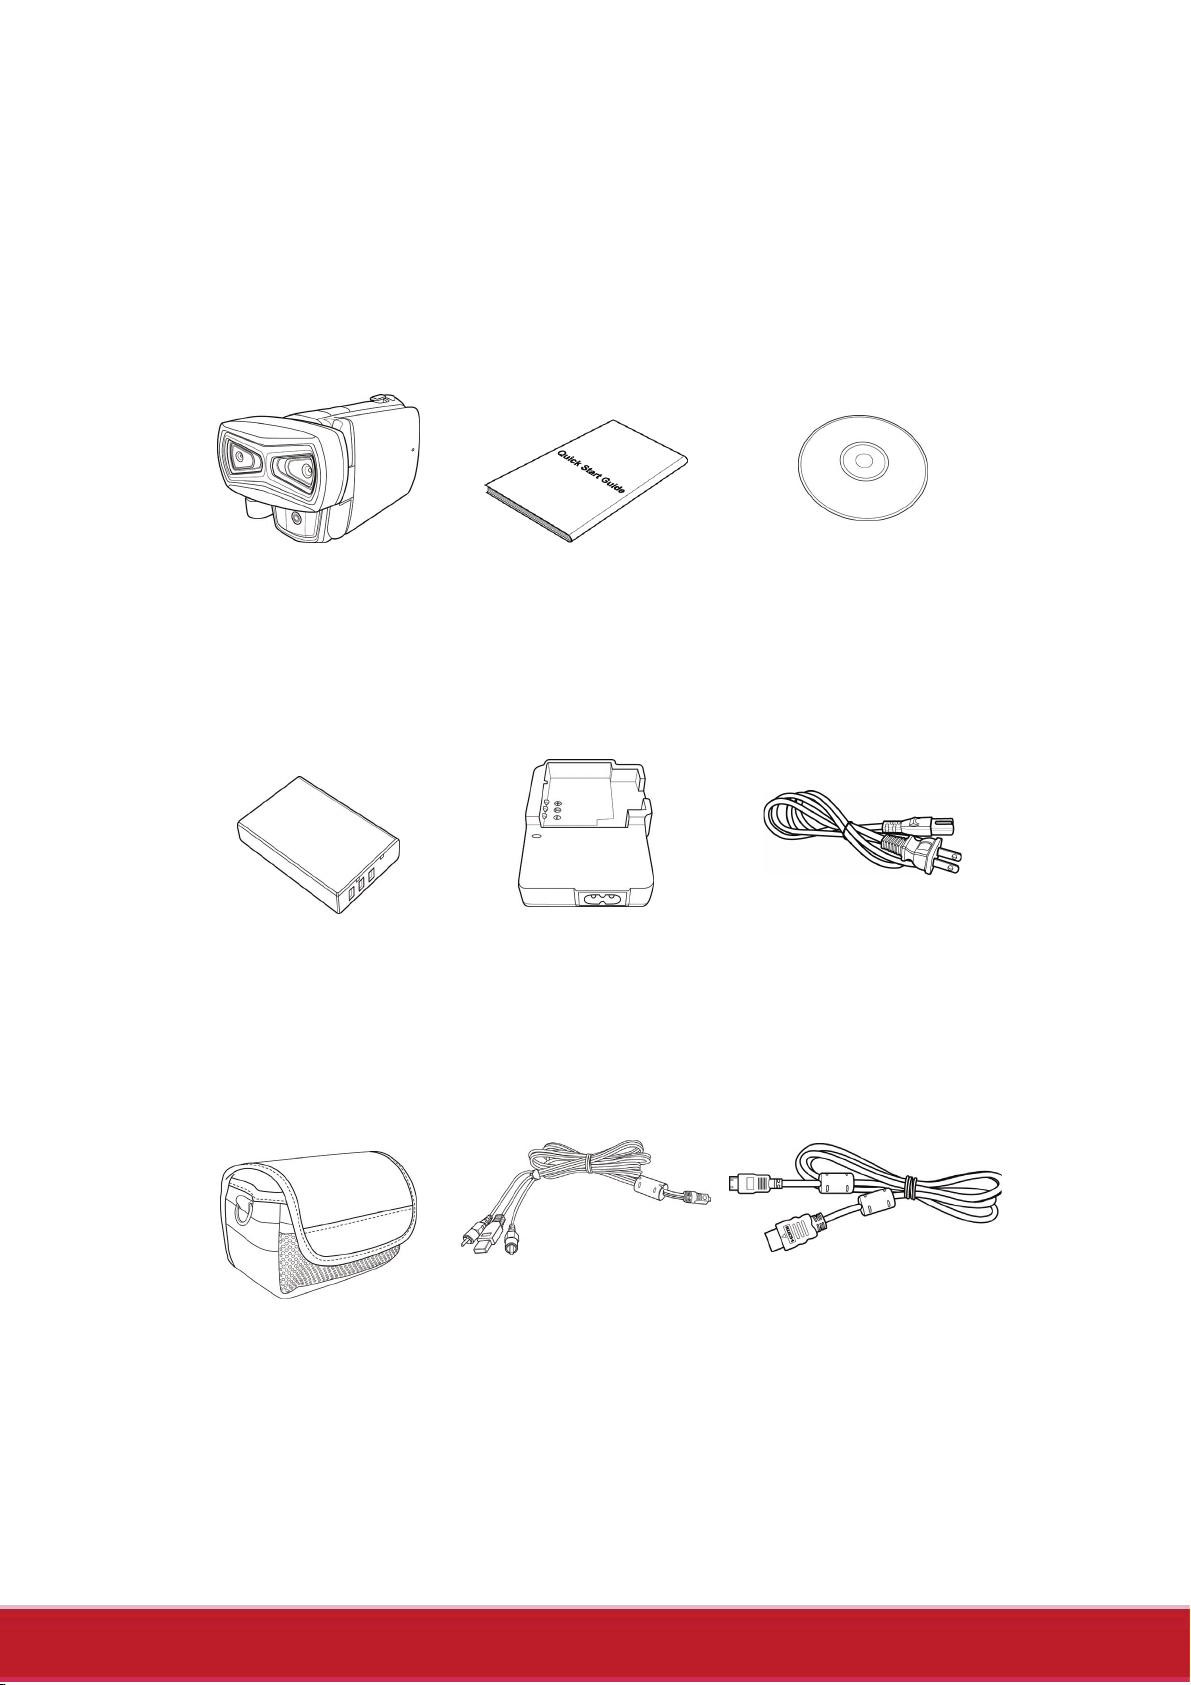
1.3 Unpacking the camcorder
The following items should be present in the package. If any item is
missing or appears damaged, contact your dealer immediately.
Camcorder Quick Start Guide CD Rom
Li-ion Battery Charger Power Cable
Pouch USB AV Cable HDMI Cable
Page 11

6
1.4 About the camcorder
Refer to the following illustrations to familiarize yourself with the
buttons and controls of this camcorder.
1.4.1 Front view
Lens
Lens
Lens Head
LED Ligh t
Page 12
7
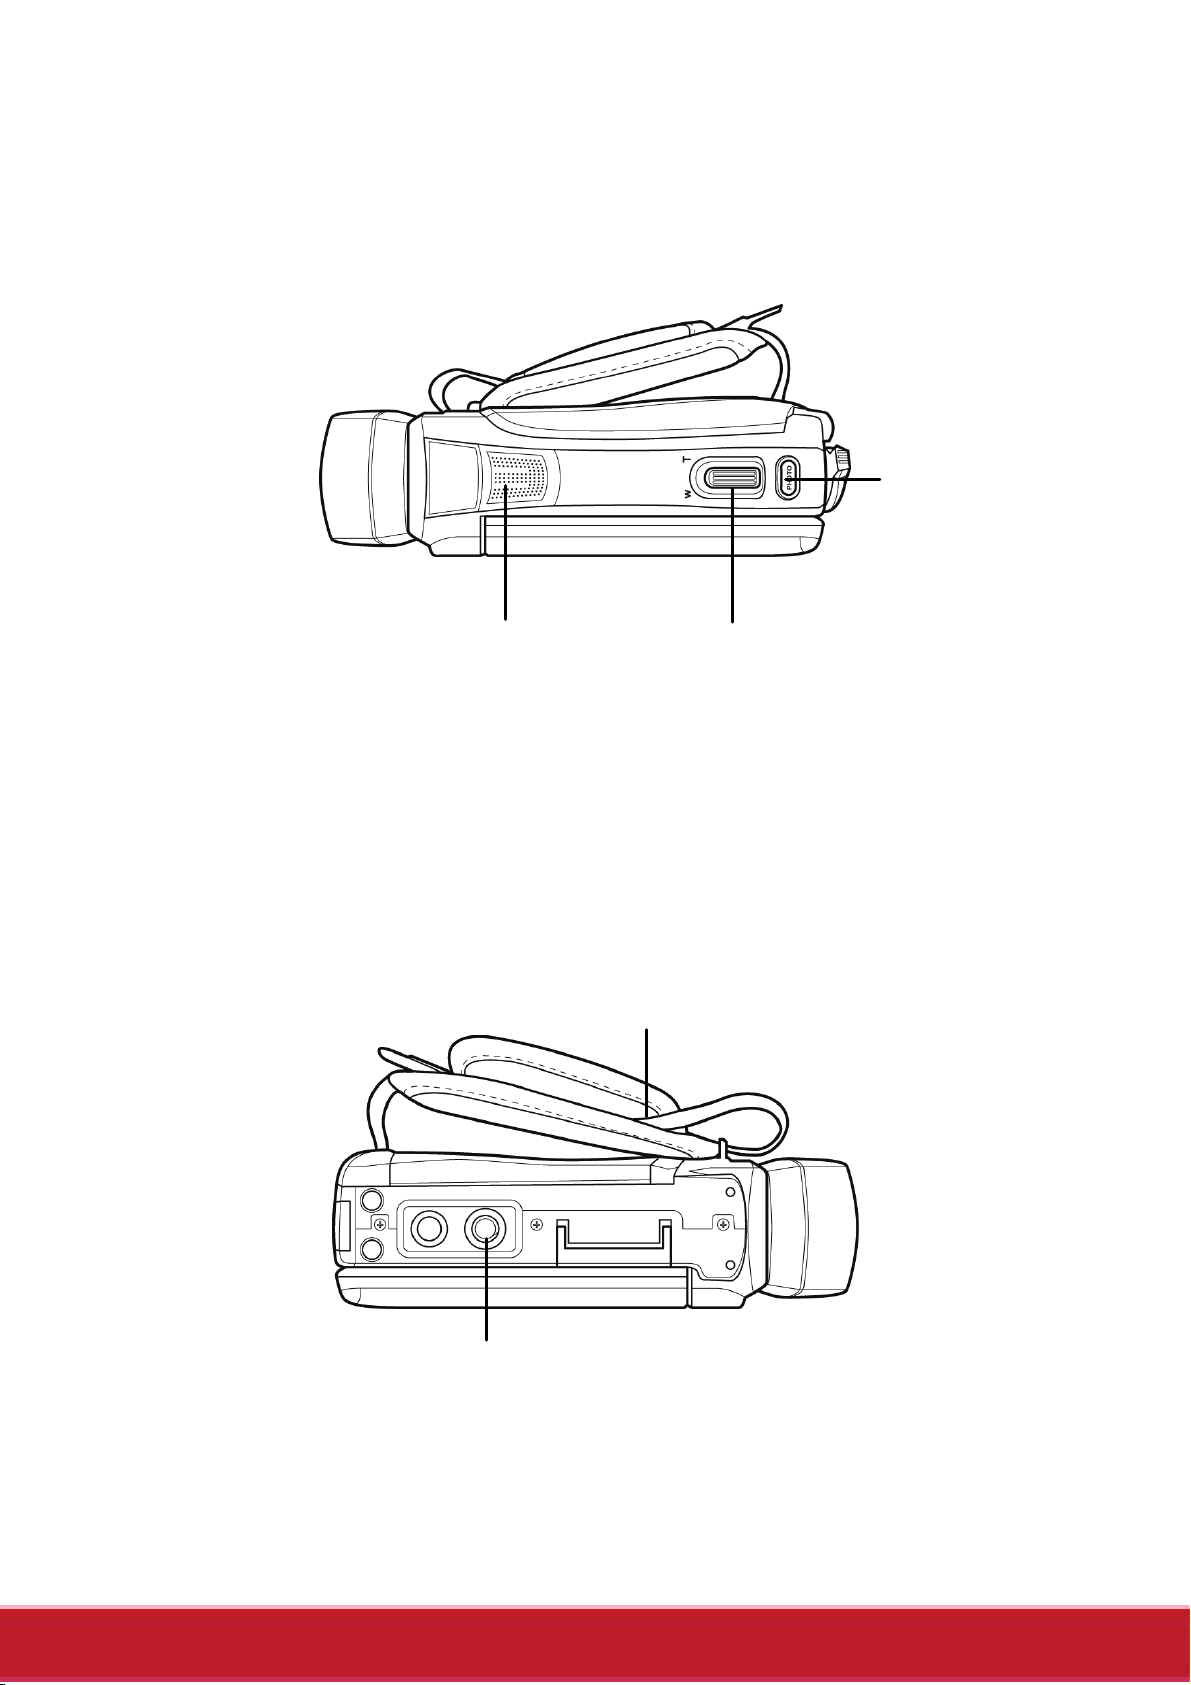
1.4.2 Top view
Shutter
Button
Speaker
1.4.3 Bottom view
Zoom
Button
Strap
Trip od
Mount
Page 13
8
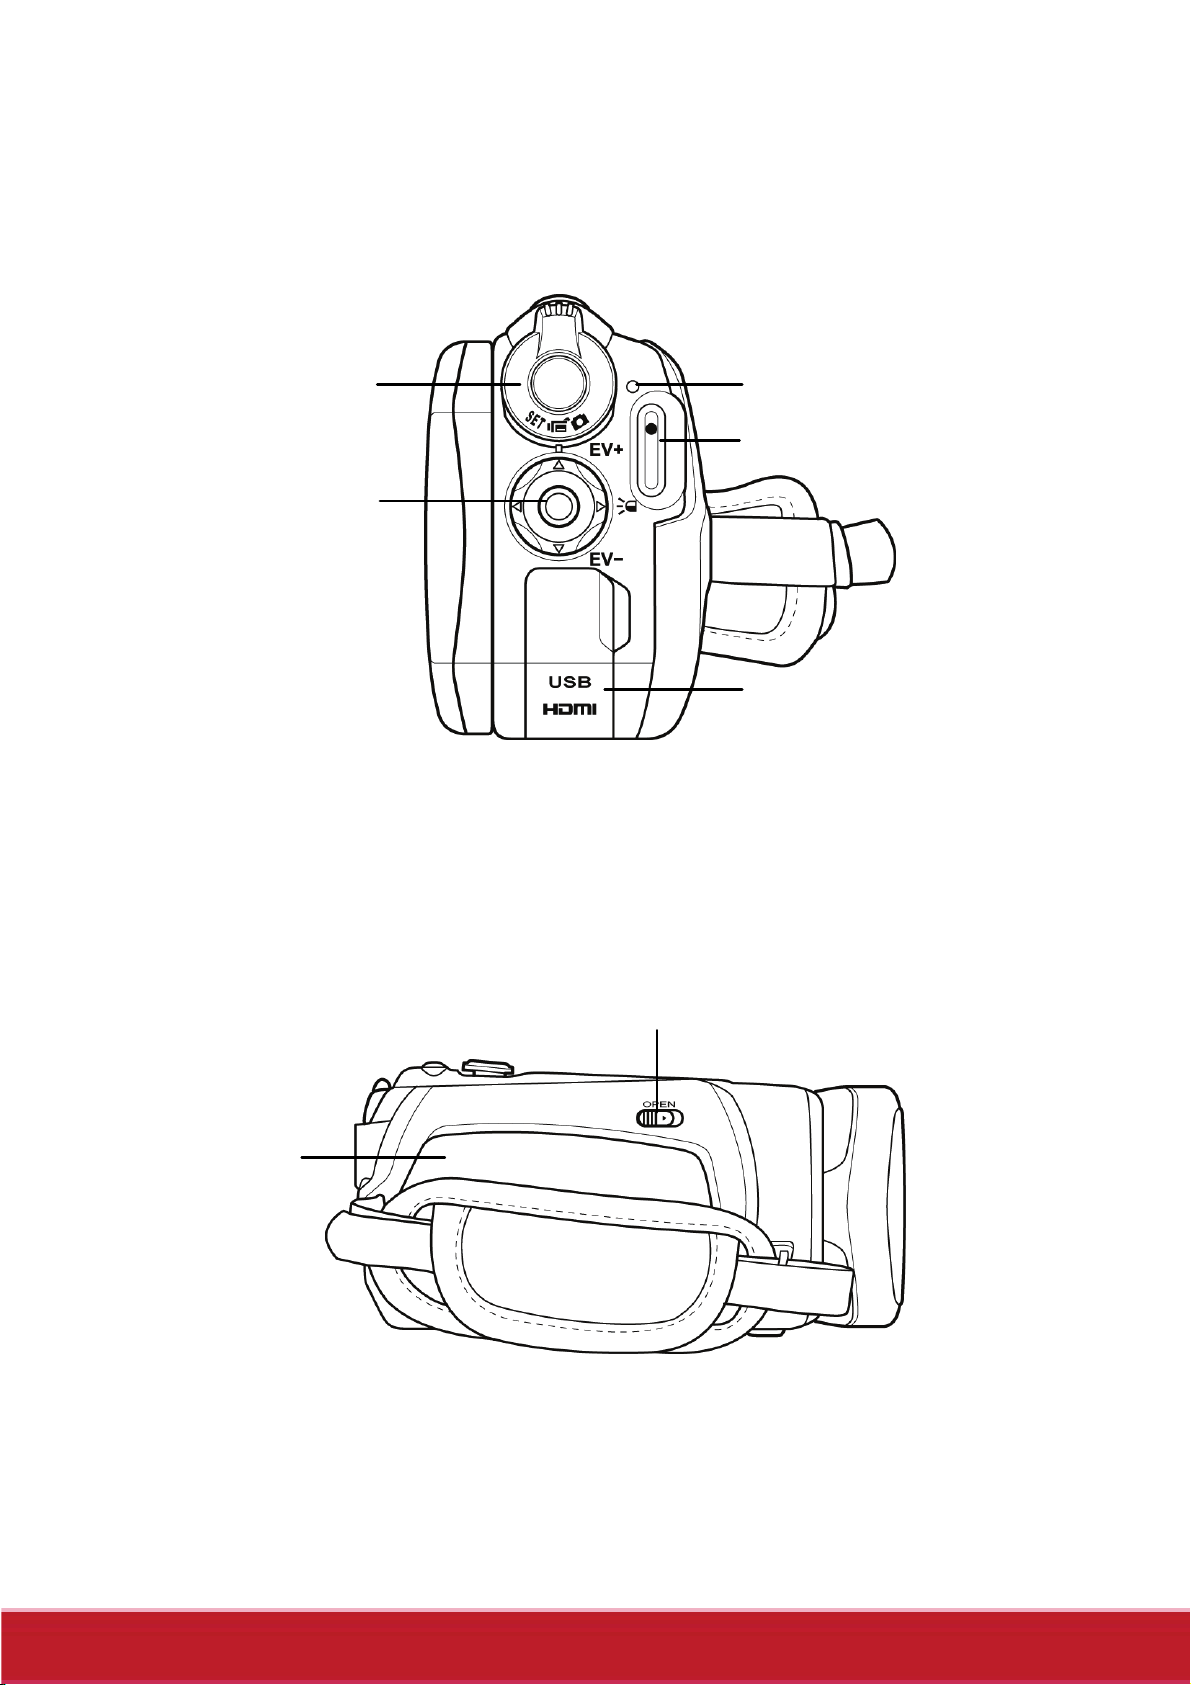
1.4.4 Back view
Navi gatio n
Button
Status LED Mode Dial
Record Button
1.4.5 Left view
Battery
Compartment
USB / AV Port
Battery Cover Latch
Page 14
n
9
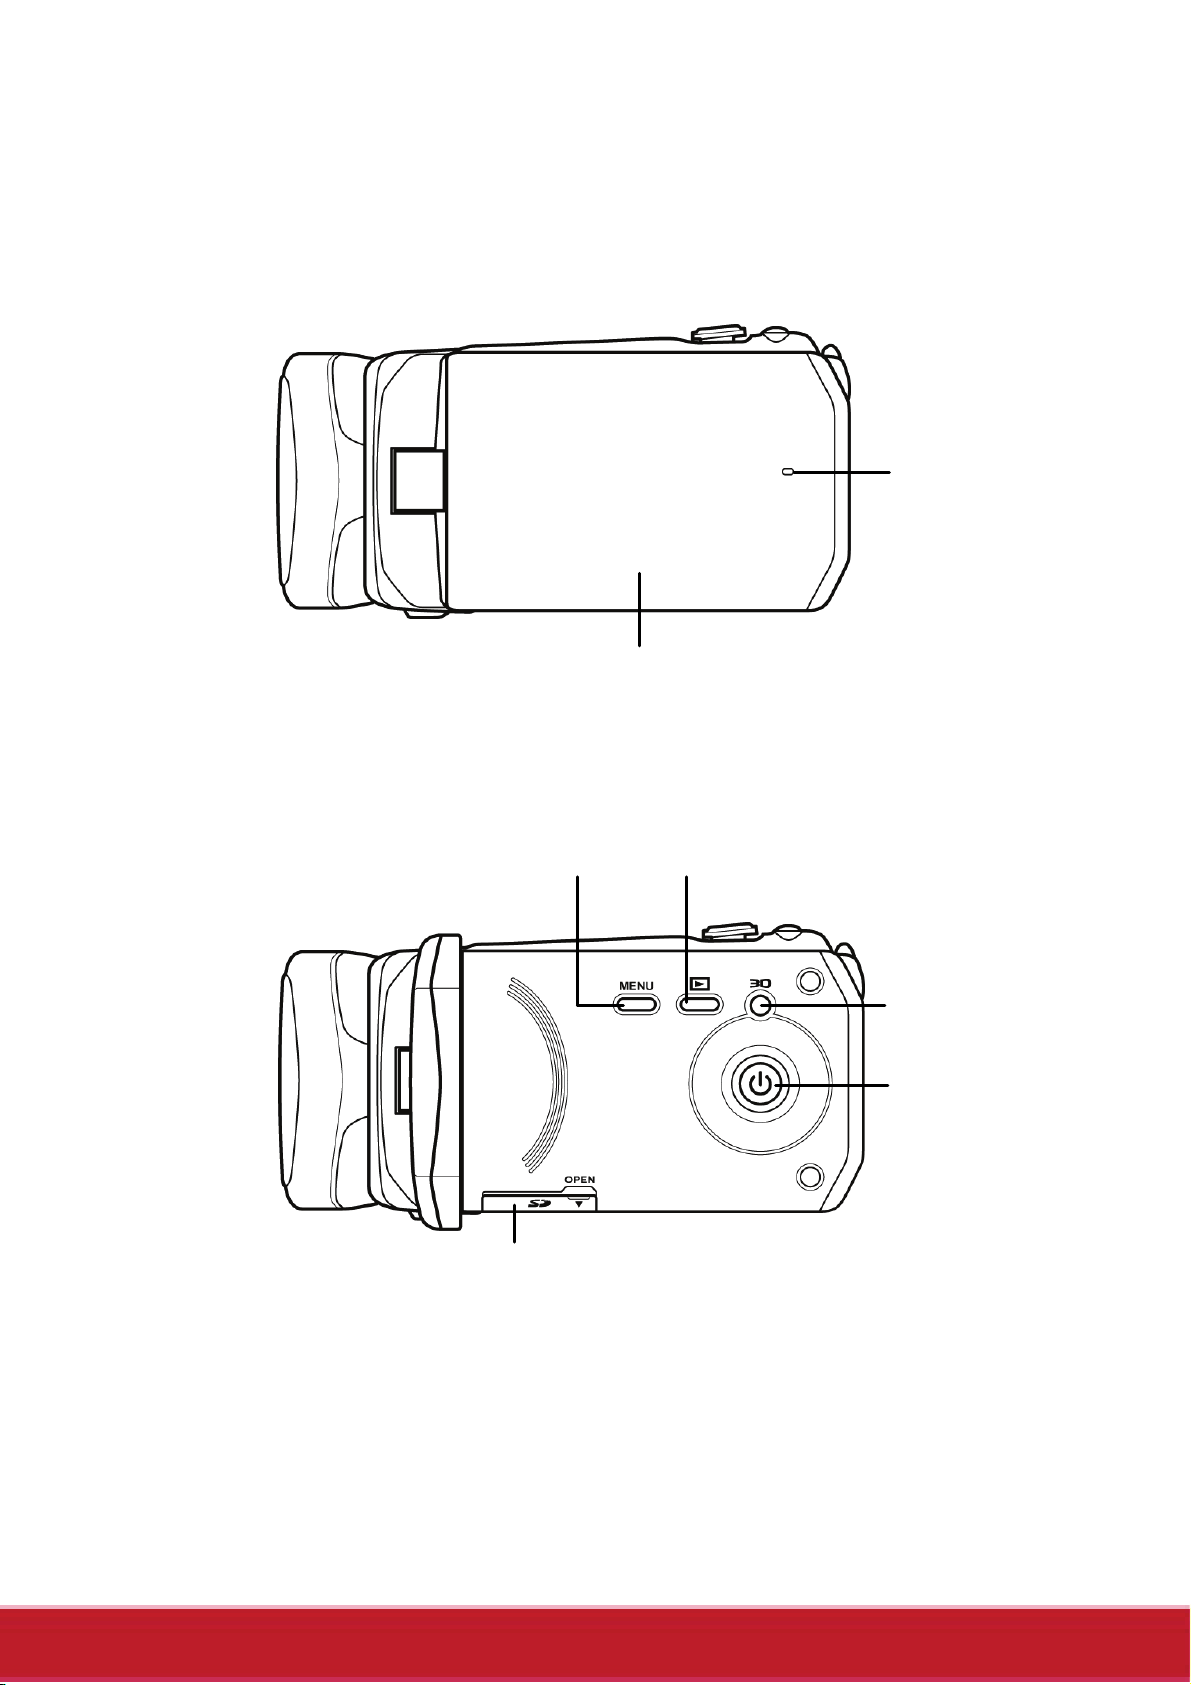
1.4.6 Right view
Microphone
CD Panel
Menu Button
SD Card Compartment
Playback Button
3D Button
Power Butto
Page 15
10
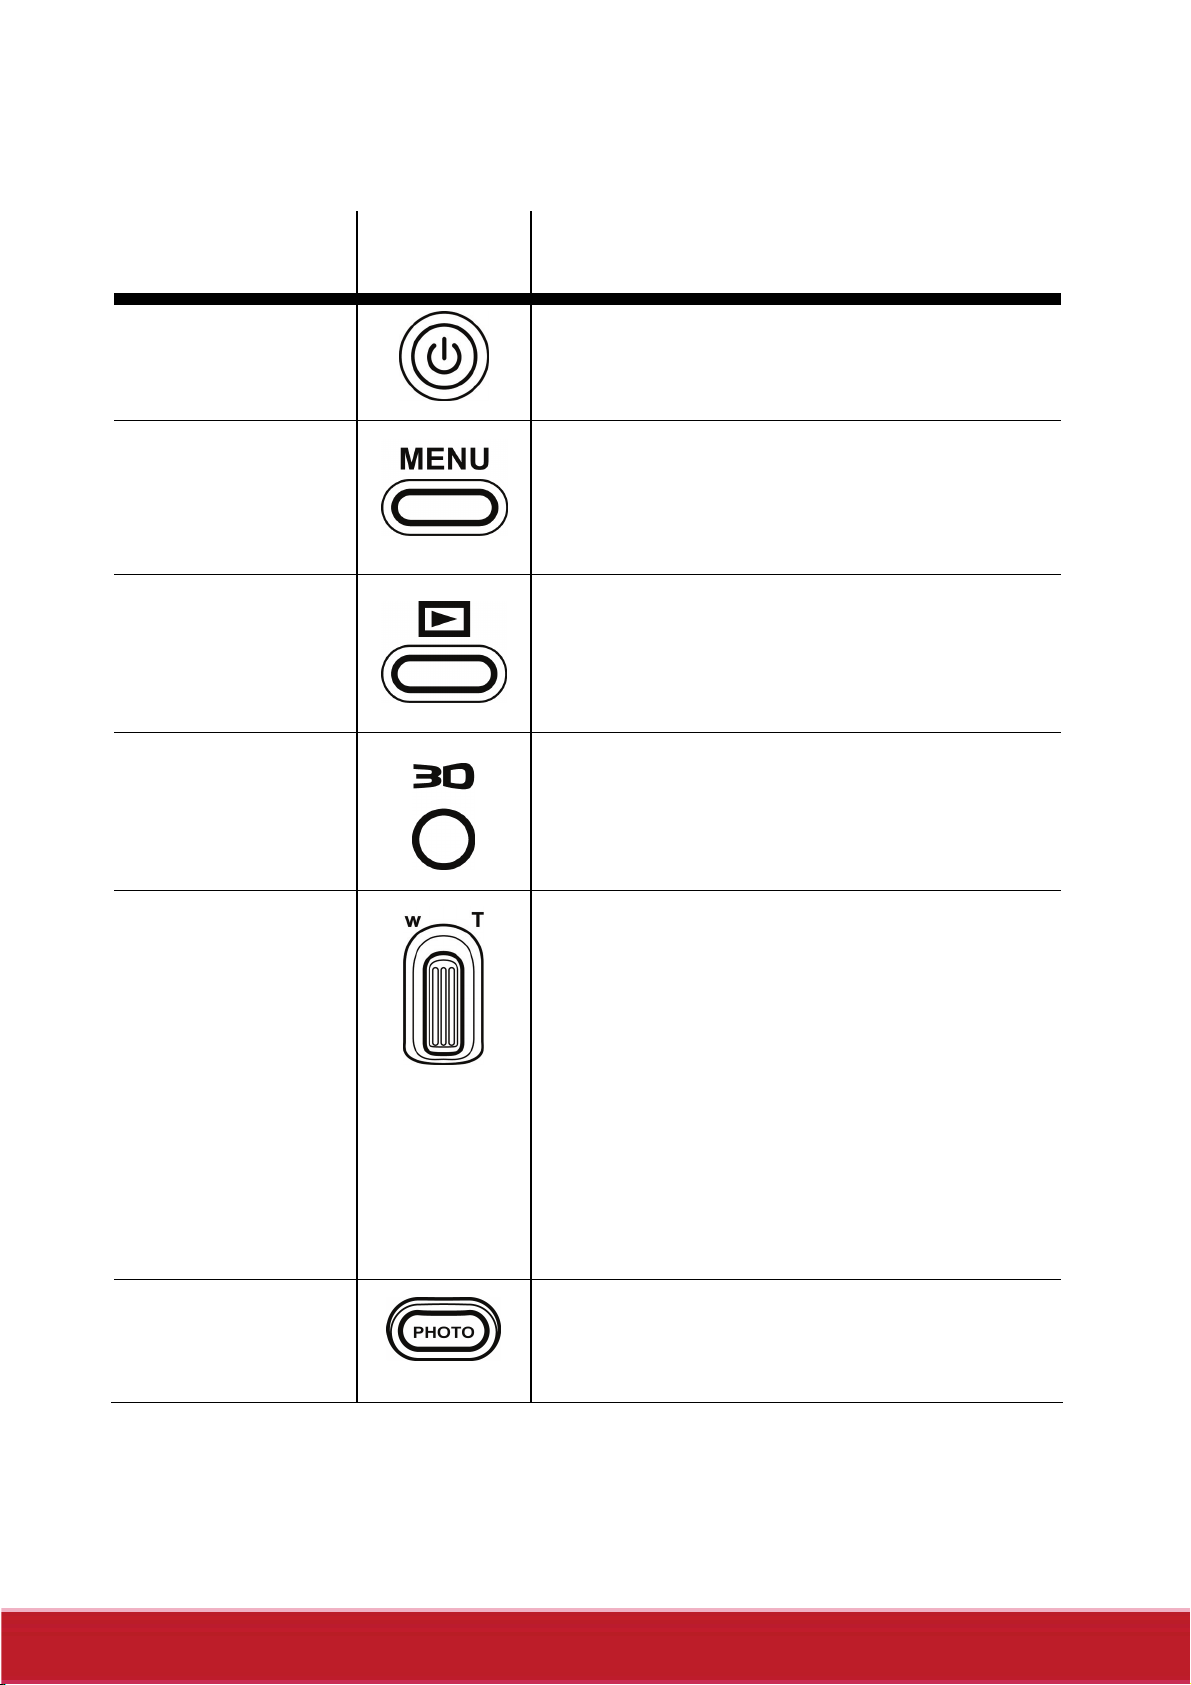
See the table below for a description of each button’s function.
Name Button Function
Power Button
Menu Button Press to display the menu. Press
Playback
Button
3D Button
Press to turn the camcorder on or
off.
again to go back the previous
screen or close the menu.
Press to playback recorded
videos or photos.
Press to toggle between 3D and
2D modes.
Zoom Button
Shutter
Button
• In Video or Camera mode,
press T to zoom in or press
W to zoom out when
Press to take a picture.
shooting videos or photos.
• In Video Playback mode,
press T to increase the
volume or W to decrease
the volume.
Page 16
11
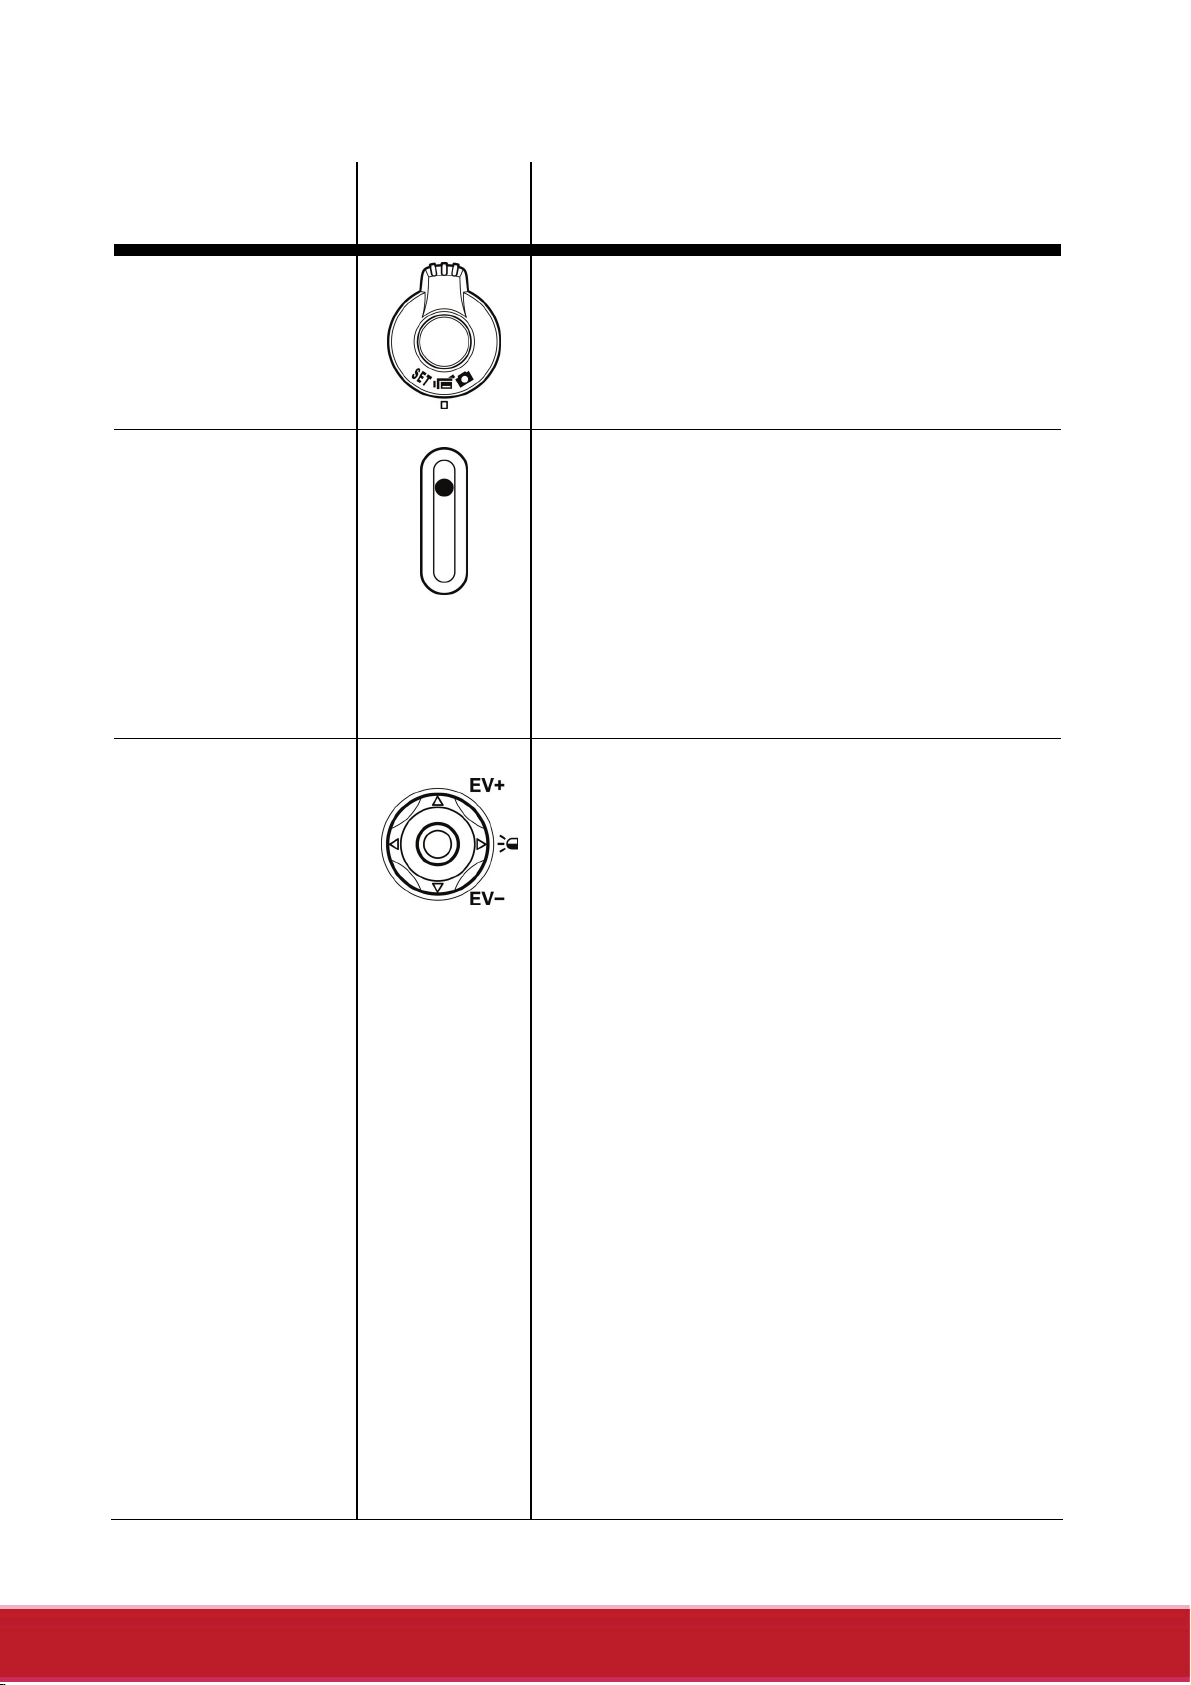
Name Button Function
Mode Dial Adjust to switch to different
modes: Video, Camera, or Setup.
Record
Button
Navigation
Button
• In Video mode, press to
start or stop recording a
video.
• In Video Playback mode,
press to start and pause
video playback.
In menu mode, use the four-way
control to select items in the menu
and press the middle button to
confirm.
In Video or Camera mode:
• Press the up/down button to
increase/decrease the EV
settings.
• Press the left button to
quickly adjust White
Balance.
• Press the right button to
turn the LED on or off.
In Video Playback mode:
• Press the middle button to
start or stop video playback.
Page 17

12
Name Button Function
• Press the left/right button to
scroll through the videos.
• While playing video, press
the left/right button to
rewind/fast-forward video
playback.
• While playing video, press
and hold the left/right button
increase/decrease to toggle
the rewind/ fast-forward
speed (2X, 4X, or 8X).
In Camera Playback mode:
• Press the left/right button to
scroll through the photos.
Page 18
13
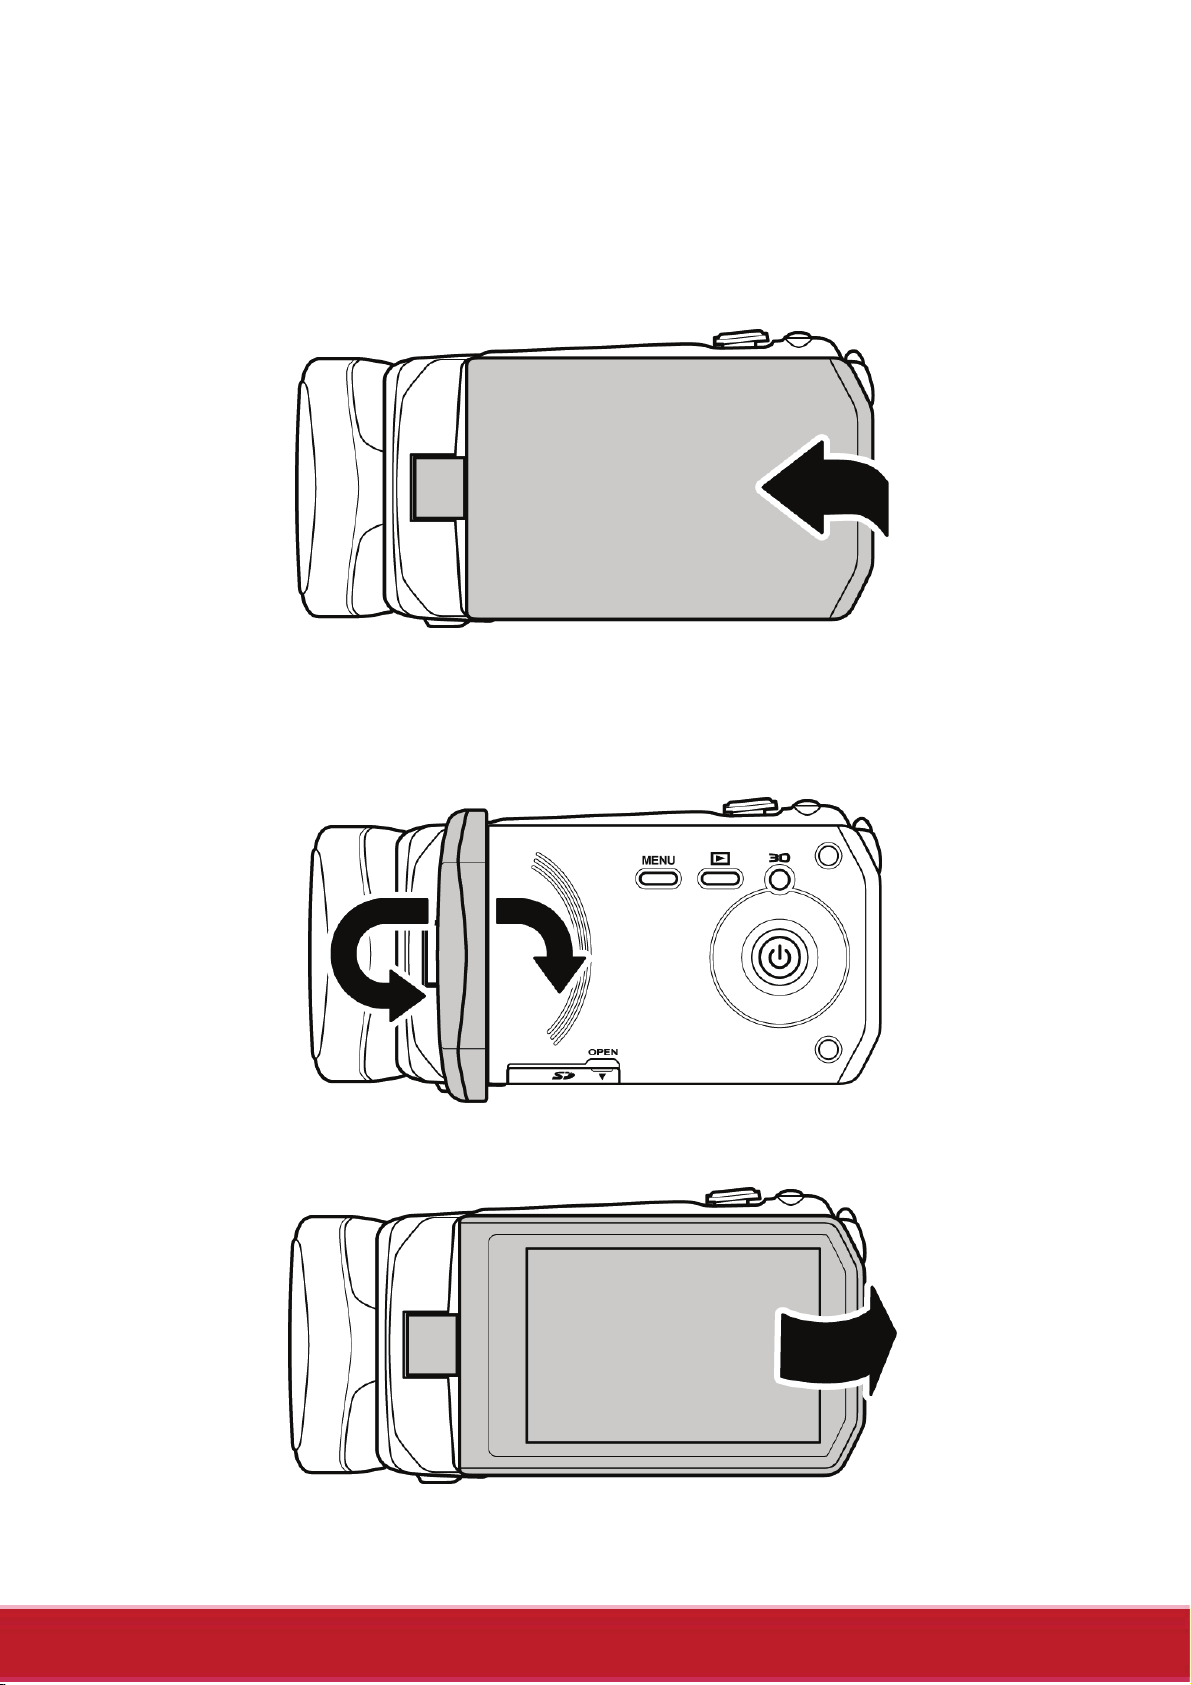
1.4.7 Operating the camcorder
To turn on the power, open the LCD panel or press the Power
Button for one second.
Rotate the LCD panel so you can view pictures and movies.
Page 19
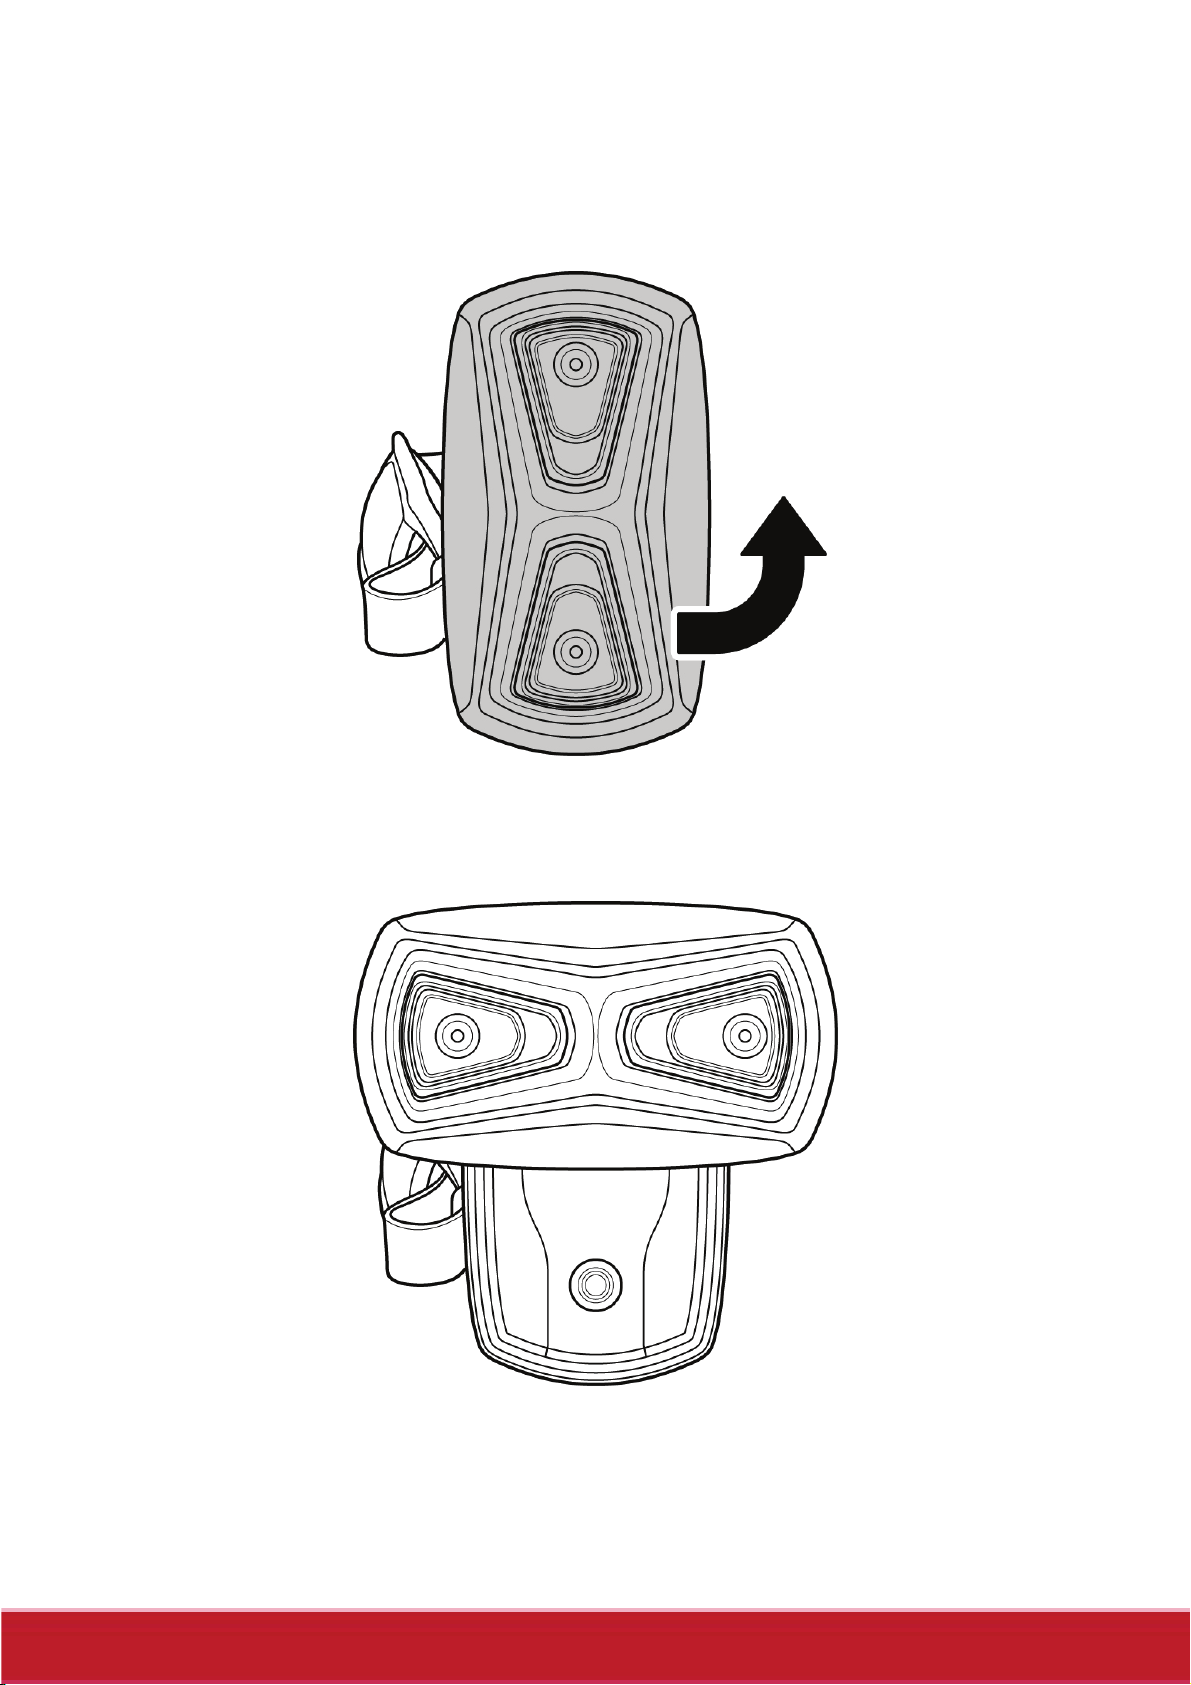
14
Rotate the lens head to open the lens.
90°
Page 20
15
2 Getting started
Read this section to learn how to start using the camcorder. This
section covers basic functions such as switching on, inserting the
battery and memory cards, and configuring preliminary settings. See
later chapters for advanced functions.
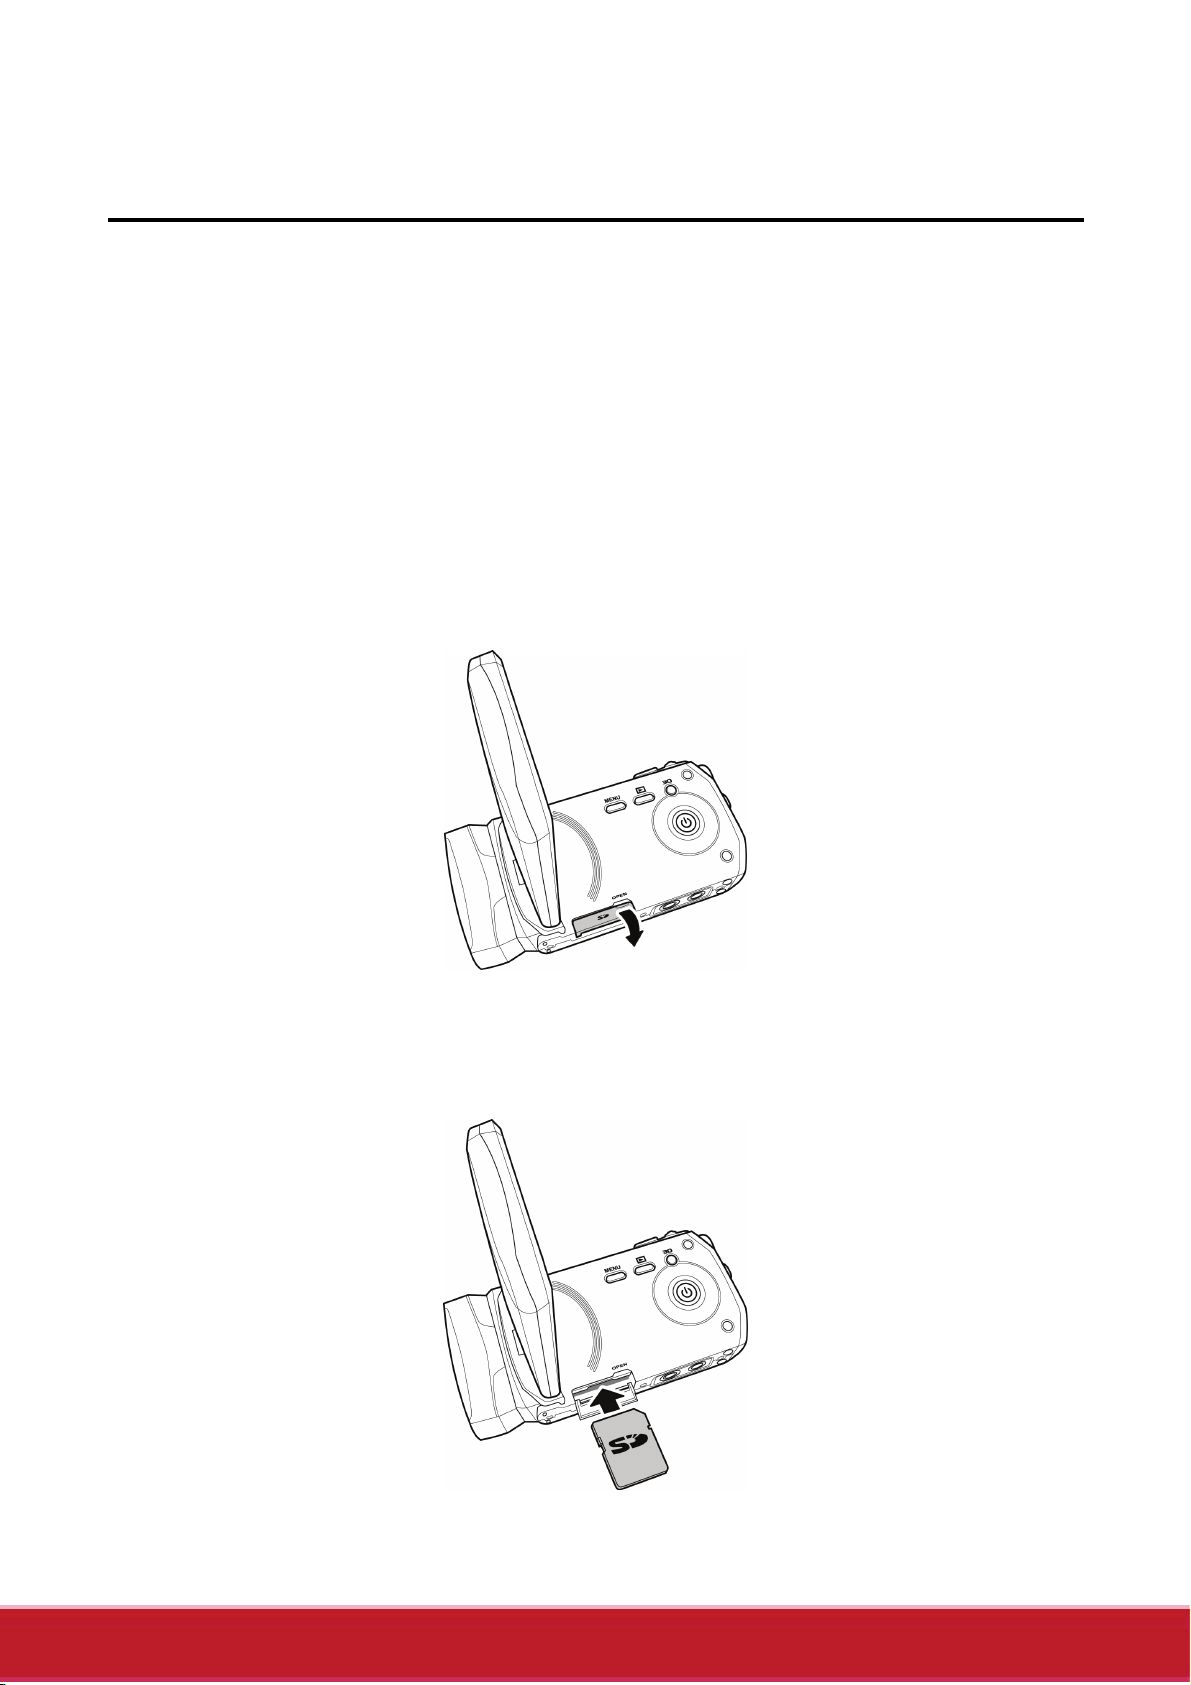
2.1 Inserting an SD card
An SD card can be installed in the camcorder to provide additional
storage space for still images, video clips, or other files.
1. Open the SD card door as shown in the illustration.
2. Insert the memory card. We recommend using a memory
card with a capacity of 1 GB or higher.
Page 21

16
3. Close the SD card door.
2.2 Inserting the battery
This camcorder is designed to use a rechargeable Li-ion battery.
Only use the batteries supplied by the manufacturer or your dealer.
Note:
Install the battery exactly as described here. Installing the
battery incorrectly could cause damage to the camcorder.
1. Slide the battery cover latch to open the battery cover.
Page 22

17
2. Insert the battery. Make sure that the + and – symbols on the
battery line up with the + and – symbols on your camcorder.
3. Close the battery cover.
Note:
Make sure that the battery cover is tightly closed to ensure
proper operation.
Page 23

18
2.3 Charging the battery
You can charge the battery with the charging unit provided. Follow
the steps below to charge the battery.
1. Insert the Li-ion battery into the charging bay. Connect
one end of the power cord to the charging unit and then
plug the other end to the wall outlet as shown.
2. The orange LED will light up for proper charging.
3. After full charge, the LED turns to green.
4. Actual charging time depends on current battery capacity
and charging conditions.
Approximate charging time is 240 minutes with a charger and a USB
connection.
2.4 Turning on/ off the camcorder
Press and hold the Power Button to turn the camcorder on/off.
Note:
Closing and opening the LCD panel can power on/off the camera.
Page 24

19
2.5 Connecting to TV (AV Cable)
To view pictures or videos on a TV, connect the camcorder to a TV
using the supplied AV cable as shown.
2.6 Connecting to TV (HDMI Cable)
You can also connect the camcorder to a TV using the HDMI cable.
Note:
For 3D video playback, you need to use a 3D HDTV.
Page 25

20
2.7 Connecting to PC (USB Cable)
Connect the camcorder to a computer with the USB cable provided
as shown.
2.8 Changing modes
The camcorder can operate in three modes: Video, Camera, and
Setup. Adjust the Mode Dial to switch between modes.
You can also press the 3D Button to toggle between 2D and 3D
modes.
In Video or Camera modes, press the Menu Button to enter the
Video or Camera menu and adjust White Balance, Resolution, Color,
Date Stamp, or Continuous Shooting.
2.9 Before you start
Before you start using the camcorder, some basic settings such as
date and time, language, and beep function need to be configured.
Page 26

21
2.9.1 Managing the Setup mode
To select a menu in the Setup mode, do the following:
1. Adjust the Mode Dial to Setup mode to display the Setup
mode screen.
2. Use the Navigation Button to scroll through the
options/pages until the desired menu is highlighted. Please
see below for the available options.
3. Press the middle Navigation Button to open the menu.
The following options are available in the Setup mode:
2 3 4 1
5 6 7 8
1. Language 5. Auto power off
2. Date/Time 6. Frequency
3. Format 7. TV standard
4. Default 8. Beep
Please read the following sections to learn how to operate each
menu.
Page 27

22
2.9.2 Language
The Language menu allows you to select the language displayed.
To select the language, do the following:
1. Use the left/right
Navigation Button to select
the desired language.
2. Press the middle
Navigation Button to
confirm.
2.9.3 Date / Time
The Date / Time menu allows you to adjust the date and time.
To adjust the Date / Time, do the following:
1. Use the left/right Navigation Button to select the field to be
adjusted.
2. Use the up/down
Navigation Button to
adjust the value.
3. Press the middle
Navigation Button to
confirm.
Page 28

23
2.9.4 Format
The Format menu allows you to format your memory card or the
internal memory when no memory card is inserted.
To format your memory card or internal memory, do the following:
1. Use the left/right
Navigation Button to
select √.
2. Press the middle
Navigation Button to
confirm.
Warning: Formatting will delete everything on the media.
2.9.5 Default
The Default menu allows you to reset the camcorder to factory
defaults.
To reset the camcorder, do the following:
1. Use the left/right
Navigation Button to
select √.
2. Press the middle
Navigation Button to
confirm.
Page 29

24
2.9.6 Auto Power Off
The Auto Power Off menu allows you to set an idle time after which
the camcorder automatically sets to sleep mode to save power.
To adjust the Auto Power Off, do the following:
1. Use the left/right
Navigation Button to
select:
X: Disable the Auto
Power Off function.
1 min.: Auto Power
Off after 1 minute.
5 min.: Auto Power
Off after 5 minutes.
2. Press the middle Navigation Button to confirm.
2.9.7 Frequency
The Frequency menu allows you to set the refresh rate of the
camcorder. Increasing the refresh rate decreases flickering, thereby
reducing eyestrain.
To set the refresh rate, do the following:
1. Use the left/right
Navigation Button to select
60Hz or 50Hz.
2. Press the middle
Navigation Button to
confirm.
Page 30

25
2.9.8 TV Standard
The TV Standard menu allows you to select the TV standard of the
recorded videos.
To adjust the TV Standard, do the following:
1. Use the left/right
Navigation Button to select
NTSC or PAL.
2. Press the middle
Navigation Button to
confirm.
2.9.9 Beep
The Beep menu allows you to turn the operation sound and button
sound off or on.
To adjust the Beep, do the following:
1. Use the left/right
Navigation Button to
select:
X: Turn the operation
sound off.
√: Turn the operation
sound on.
2. Press the middle Navigation Button to confirm.
Page 31

26
3 Using the Camcorder
3.1 Recording Videos
To record a movie, do the following:
1. Rotate the lens head and flip open the LCD panel to turn on
the camcorder.
2. Adjust the Mode Dial to Video mode.
To adjust the video, you may:
Press the 3D Button to switch to 3D or 2D mode. 3D
mode allows you to record videos with 3D effects; 2D
mode allows you to take regular 2D videos.
Press the down Navigation Button to decrease the
EV settings.
Press the up Navigation Button to increase the EV
settings.
Use the Zoom Button to zoom in and out in 2D mode.
Press the left Navigation Button to quickly change
the White Balance.
Press the right Navigation Button to activate or
disable the LED lighting.
Press the Menu Button to go to the Video mode menu
for more adjustment options.
3. Press the Record Button to start recording the video.
4. To stop movie recording, press the Record Button again.
Notes:
1. For best results, maintain a 30-40 cm distance between your
eyes and the LCD panel when previewing 3D photos or
videos.
Page 32

27
2. The maximum file size of each video recording is
approximately 3.9GB. The system will separate another file
automatically and record the video until the memory is full.
The Video Recording Screen
3
4
1
5 6 9 8
2
10
7
# Icon Description
Indicates that the camcorder is in Video
1
2
3
mode.
Indicates the amount of zoom being used.
Indicates the current White Balance mode.
Indicates that night mode is enabled.
4
Page 33

28
# Icon Description
Indicates the amount of battery power left.
5
6
7
8
9
10
Indicates the current resolution.
Indicates the current exposure value.
Indicates the memory card is inserted.
Indicates that the internal memory is used to
store files.
Indicates the remaining space for your
memory card/internal memory.
Indicates the recording time.
Page 34

29
3.2 Video Mode Menu
To select a menu in the Video mode, do the following:
1. Press the Menu Button to open the Video mode menu
screen.
2. Use the Navigation Button to scroll through the options until
the desired menu is highlighted. Please see below for the
available options.
3. Press the middle Navigation Button to open the menu.
4. Press the Record Button to go back to Video mode.
2 3 1
4
The following options are
available in the Video mode menu:
1. White Balance 4. Night Mode
2. Resolution 5. Quality
5
3. Effect
Please read the following sections to learn how to operate each
menu.
Note: Quality is only available when an SD card is inserted.
Page 35

30
3.2.1 White Balance
The White Balance menu allows you to set the white balance when
capturing images under specific lighting conditions.
To set the White Balance, please do the following:
1. Use the left/right Navigation Button to select the desired
option:
Auto: Select this
option to let the
camcorder set the
white balance
automatically.
Sunny: Select this
option for daylight
filming.
Cloudy: Select this option for filming in cloudy days.
Fluorescent: Select this option for fluorescent lighting.
Tungsten: Select this option for normal indoor lighting
conditions.
2. Press the middle Navigation Button to confirm.
3.2.2 Resolution
The Resolution menu allows you to set the resolution before you
capture an image or a video. The higher the resolution, the more
memory space is required.
Page 36

31
To select the resolution, do the following:
1. Use the left/right Navigation Button to select the desired
option:
1080P: Select this
option for 1920 x
1080 resolution.
720P30: Select this
option for 1280 x 720
resolution at 30 fps.
720P60: Select this
option for 1280 x 720
resolution at 60 fps.
WVGA: Select this option for 848 x 480 resolution.
2. Press the middle Navigation Button to confirm.
3.2.3 Effect
The Effect menu allows you to change the recording effect.
To set the Effect, do the following:
1. Use the left/right Navigation Button to select the desired
option:
Natural: Select it for
color photography.
Sepia: Select it for
brown color effect.
Black and white:
Select it for black and
white effect.
2. Press the middle Navigation Button to confirm.
Page 37

32
3.2.4 Night Mode
The Night Mode menu allows you to enable or disable the night
mode feature.
To set night mode, do the following:
1. Use the left/right
Navigation Button to
select:
X: Turn night mode
off.
√: Turn night mode
on.
2. Press the middle
Navigation Button to confirm.
3.2.5 Quality
The Quality menu allows you to set the recording quality. Higher
quality videos contain more details and therefore use more memory
space.
To set the quality, do the following:
1. Use the left/right Navigation Button to select:
Fine: Select for
higher recording
quality.
Normal: Select for
normal recording
quality.
2. Press the middle Navigation
Button to confirm.
Page 38

33
3.3 Playback Videos
3.3.1 Playback Videos
To playback videos, do the following:
1. Make sure you are in Video mode. Adjust the Mode Dial to
switch to Video mode if not.
2. Press the Playback Button to open the Video playback
screen.
3. Press the left/right Navigation Button to browse the
recorded videos.
4. Press the middle Navigation Button or Record Button to
playback the video.
To pause playback, press the Record Button. Press
the middle Navigation Button to stop playback.
To adjust the volume, press the Zoom Button.
To rewind/fast-forward, press and hold the left/right
Navigation Button to toggle different speeds (2X, 4X,
or 8X). To return to the normal speed, press the
middle Navigation Button.
Note:
Videos must be recorded in 3D mode to have 3D effects.
Page 39

34
The Video Playback Screen
4
1 3
5
2
# Icon Description
Indicates that the camcorder is in Playback
1
2
3
4
5
mode.
Indicates the video file number.
Indicates the total recorded time.
Indicates that the file is protected.
Indicates the video resolution.
Page 40

35
3.4 Deleting Videos
To delete a single video, do the following:
1. In Video mode, press the Playback Button to enter the Video
Playback mode.
2. Press the left /right Navigation Button to select the video
you want to delete.
3. Press the Menu Button to
open the Video Playback
menu screen.
4. Use the left/right
Navigation Button to select
, then press the middle
Navigation Button to
confirm.
5. Press the middle Navigation Button to delete the selected
video.
To delete all videos, do the following:
1. Press the Playback Button to enter Video Playback mode.
2. Press the Menu Button to open the Video Playback menu
screen.
3. Use the left/right Navigation Button to select
the middle Navigation Button to confirm.
4. Use the left/right Navigation
Button to select √, and then
press the middle Navigation
, then press
Button to delete all videos.
Page 41

g
36
Note:
• Once deleted, files cannot be recovered. Ensure the files are
transferred to the computer or saved to another storage
device.
• Files that have been protected will not be deleted. You have
to unlock the files first before deletin
them.
3.5 Protecting Videos
To protect a video from being deleted, do the following:
1. In Video mode, press the Playback Button to enter the Video
Playback mode.
2. Press the left /right Navigation Button to select the video
you want to protect/unprotect.
3. Press the Menu Button to open the Video Playback menu
screen.
4. Use the left/right
Navigation Button to select
, then press the middle
Navigation Button to
confirm.
5. To protect/unprotect more
files, use the left/right
Navigation Button to select
other files, then press the
middle Navigation Button
to protect/unprotect the file.
Page 42

37
3.6 Autoplay Videos
The Autoplay function allows you to play each video clip in turn.
To start autoplay, do the following:
1. In Video mode, press the Playback Button to enter the Video
Playback mode.
2. Press the Menu Button to
open the Video Playback
menu screen.
3. Use the left/right Navigation
Button to select
press the middle Navigation
Button to confirm.
4. Use the left/right Navigation
Button to select √, and then
press the middle Navigation
Button to start autoplay.
, then
Page 43

38
3.7 Video Output
The Video Output function allows you to change the display output in
3D format on a 3D TV.
To set video output, do the following:
1. In Video mode, press the Playback Button to enter the Video
Playback mode.
2. Press the Menu Button to open the Video Playback menu
screen.
3. Use the left/right
Navigation Button to select
, then press the middle
Navigation Button to
confirm.
4. Use the left/right
Navigation Button to select
desired option:
2D: You will see 2D
video clips on TV.
3D: You will see 3D
video clips on TV.
5. Press the middle
Navigation Button to confirm.
Note:
• This function is only available on videos that have been
recorded in 3D mode.
• If you are viewing with a regular 2D TV, the image will be
displayed side by side.
Page 44

39
3.8 Shooting Photos
To shoot a photo, do the following:
1. Rotate the lens head and flip open the LCD panel to turn on
the camcorder.
2. Adjust the Mode Dial to switch to Camera mode.
3. Press the Shutter Button to capture a photo.
To adjust the camera, you may:
Press the 3D Button to switch to 3D or 2D mode. 3D
mode allows you to take photos with 3D effects; 2D
mode allows you to take regular 2D photos.
Press the down Navigation Button to decrease the
EV settings.
Press the up Navigation Button to increase the EV
settings
Use the Zoom Button to zoom in and out.
Press the left Navigation Button to quickly change
the White Balance.
Press the right Navigation Button to activate or
disable the LED lighting.
Press the Menu Button to enter the Camera mode menu for
more adjustment options.
Page 45

40
The Camera Screen
1
2
4
5
6 7 9 8
# Icon Description
3
1
2
3
4
5
6
7
8
9
Indicates that the camcorder is in Camera
mode.
Indicates the amount of zoom being used.
Indicates the total number of pictures.
Indicates the current White Balance mode.
Indicates that night mode is enabled.
Indicates the amount of battery power left.
Indicates the current resolution.
Indicates the current exposure value.
Indicates the memory card is inserted.
Indicates that the internal memory is used to
store files.
Page 46

41
3.9 Camera Mode Menu
To select a menu in the Camera mode, do the following:
1. Press the middle Navigation Button to open the Camera
mode menu screen.
2. Use the Navigation Button to scroll through the options until
the desired menu is highlighted. Please see below for the
available options.
3. Press the middle Navigation Button to open the menu.
4. Press the Record Button to go back to Video mode.
2 3 1 4
The following options are
available in the Camera mode menu:
1. White Balance 4. Night Mode
2. Resolution 5. Quality
5
3. Effect
Please read the following section to learn how to operate each
menu.
Note: Quality is only available when an SD card is inserted.
Page 47

42
3.9.1 White Balance
The White Balance menu allows you to adjust the white balance
when capturing images under specific lighting conditions.
To set the White Balance, do the following:
1. Use the left/right Navigation Button to select the desired
option:
Auto: Select this
option to let the
camcorder set the
white balance
automatically.
Sunny: Select this
option for daylight
filming.
Cloudy: Select this option for filming in cloudy days.
Fluorescent: Select this option for fluorescent lighting.
Tungsten: Select this option for normal indoor lighting
conditions.
2. Press the middle Navigation Button to confirm.
3.9.2 Resolution
The Resolution menu allows you to set the resolution before you
capture an image or a video. The higher the resolution, the more
memory space is required.
Page 48

43
To select the resolution, do the following:
1. Use the left/right
Navigation Button to select
the desired option:
(2D mode)
2M: Select this option
for 1832 x 1372
resolution.
5M: Select this option for 2592 x 1944 resolution.
8M: Select this option for 3200 x 2400 resolution.
16M: Select this option for 4608 x 3456 resolution.
(3D mode)
2M: Select this option for 1832 x 1030 resolution.
5M: Select this option for 2280 x 1242 resolution.
16M: Select this option for 4608 x 2592 resolution.
2. Press the middle Navigation Button to confirm.
3.9.3 Effect
The Effect menu allows you to change the camera effect.
To set the Effect, do the following:
1. Use the left/right
Navigation Button to select
the desired option:
Color: Select this
option for color
photography.
Sepia: Select this option for brown color effect.
Black and white: Select this option for black and white
effect.
2. Press the middle Navigation Button to confirm.
Page 49

44
3.9.4 Night Mode
The Night Mode menu allows you to enable or disable the night
mode feature.
To set night mode, do the following:
1. Use the left/right
Navigation Button to
select:
X: Turn night mode
off.
√: Turn night mode
on.
2. Press the middle
Navigation Button to confirm.
3.9.5 Quality
The Quality menu allows you to set the image quality. Higher quality
images contain more details and therefore use more memory space.
To set the quality, do the following:
1. Use the left/right Navigation
Button to select:
Fine: Select for
higher image quality.
Normal: Select for
normal image quality.
2. Press the middle Navigation
Button to confirm.
Page 50

45
3.10 Playback Photos
3.10.1 Playback Photos
To playback photos, please do the following:
1. Make sure you are in the Camera mode. Adjust the Mode
Dial to switch to Camera mode if not.
2. Press the Playback Button to enter the Photo playback
screen.
3. Press the left/right Navigation Button to browse the
recorded photos.
Note:
Photos must be recorded in 3D mode to have 3D effects.
Page 51

46
The Photo Playback Screen
4
1
2
# Icon Description
3
1
2
3
4
Indicates that the camcorder is in Camera
Playback mode.
Indicates the file number of the current
photo.
Indicates the sequence number of the
current photo over the total number of
photos.
Indicates the amount of battery power left.
Page 52

47
3.11 Deleting Photos
To delete a single photo, do the following:
1. In Camera mode, press the Playback Button to enter the
Photo Playback mode.
2. Press the left /right Navigation Button to select the photo
you want to delete.
3. Press the Menu Button to
open the Photo Playback
menu screen.
4. Use the left/right
Navigation Button to select
, then press the middle
Navigation Button to
confirm.
5. Press the middle Navigation Button to delete the selected
photo.
To delete all photos, do the following:
1. Press the Playback Button to enter the Photo Playback
mode.
2. Press the Menu Button to open the Photo Playback menu
screen.
3. Use the left/right Navigation Button to select
press the middle Navigation Button to confirm.
4. Use the left/right
Navigation Button to select
√, and then press the
, then
middle Navigation Button
to delete all photos.
Page 53

g
48
Note:
• Once deleted, files cannot be recovered. Ensure the files are
transferred to the computer or saved to another storage
device.
• Files that have been protected will not be deleted. You have
to unlock the files first before deletin
them.
3.12 Protecting Photos
To protect a photo from being deleted, do the following:
1. In Camera mode, press the Playback Button to enter the
Photo Playback mode.
2. Press the left /right Navigation Button to select the photo
you want to protect/unprotect.
3. Press the Menu Button to
open the Photo Playback
menu screen.
4. Use the left/right
Navigation Button to select
, then press the middle
Navigation Button to
confirm.
5. To protect/unprotect more
files, use the left/right
Navigation Button to select
other files, then press the
middle Navigation Button
to protect/unprotect the file.
Page 54

49
3.13 Autoplay Photos
The Autoplay function allows you to play the slideshow of the photos
on your camera.
To start autoplay, do the following:
1. In Camera mode, press the Playback Button to enter the
Camera Playback mode.
2. Press the Menu Button to
open the Camera Playback
menu screen.
3. Use the left/right Navigation
Button to select
press the middle Navigation
Button to confirm.
4. Use the left/right Navigation
Button to select √, and then
press the middle Navigation
Button to start autoplay.
, then
Page 55

50
3.14 Image Output
The Image Output function allows you to change the display output
in 3D format on a 3D TV.
To set image output, do the following:
1. In Camera mode, press the Playback Button to enter the
Camera Playback mode.
2. Press the Menu Button to open the Camera Playback menu
screen.
3. Use the left/right
Navigation Button to select
, then press the middle
Navigation Button to
confirm.
4. Use the left/right
Navigation Button to select
desired option:
2D: You will see 2D
photos on TV.
3D: You will see 3D
photos on TV.
5. Press the middle Navigation Button to confirm.
Note:
• This function is only available on photos that have been
recorded in 3D mode.
• If you are viewing with a regular 2D TV, the image will be
displayed side by side.
Page 56

51
Appendix
Specification
General
Imaging sensor 1/3.2” 5M CMOS Sensor x 2
Active pixels
Storage media
Sensitivity Auto
Exposure mode Programmed AE
Color effects Natural/B&W/Sepia
Lens F3.2, f=5.1mm
5.0 Megapixel
Internal: Built-in 128MB Flash Memory
(Available memory for image storage is
approximately 56MB)
SD Card: (Up to SDHC 32GB Class6)
Focus range Approx. 1.2m~infinity
Still image Formats: JPEG (EXIF 2.2)
3D Still image: 2M, 5M, 16M (Firmware
Interpolation)
2D Still image: 2M, 5M, 8M, 16M (Firmware
Interpolation)
Page 57

52
General
Movie clips H.264 (MP4)
3D and 2D Movie: WVGA 848x480 60fps,
720p 30/60fps, 1080p 30fps
Zoom
LCD monitor 3.2”color LCD monitor (320x480 pixels)
LED light Effective range: < 1M
White balance Auto/Sunny/Cloudy/Tungsten/
EV
compensation
Interface AV-out: NTSC / PAL / HDMI
3D: 8X
2D: 10X
Mode: On/Off
Fluorescent
-2.0 EV~+2.0 EV
MSDC: USB 2.0 (high speed)
Shutter speed Video: 1/15 ~ 1/2000 second
Still: 2 ~ 1/4000 speed
Power supply
Dimension 43 (W) x 68 (H) x 135 (D) mm
Weight Approx. 232 ± 5 g
Li-ion Battery NP120
(without battery and memory card)
Page 58

53
Troubleshooting
Problem Possible
Cause
Cannot turn on
the camcorder.
The camcorder
suddenly turns off.
The captured
image is not
stored in
The battery is not
inserted correctly.
The batteries have
no power.
The auto power off
function is enabled.
The camcorder is
running out of battery
power.
Before the image is
saved the power
has been cut off.
Solution
Insert the battery
correctly.
Charge the
battery.
Turn the power on
again.
Replace the battery.
When the battery
indicator turns red,
replace the battery
memory.
The camcorder
turns off while
taking a picture.
The image is out
of focus.
The camera is
running out of
battery power.
The subject is
beyond focus
range.
immediately.
Replace the battery.
Please take a
picture within the
available focus
range
Page 59

54
Problem Possible
Cause
A black screen
appears on the
screen.
Memory card
cannot be used.
All buttons are
inactive.
The EV setting may
be set too high.
The memory card is
protected.
The memory card
contains non-DCF
images taken by
other camcorders.
Short circuit
occurred when
connecting the
Solution
Adjust the EV
setting on the
camcorder.
Unlock the memory
card.
Format the memory
card. Before
formatting the card,
ensure you back up
the files.
Remove the
batteries from the
camera and insert
camera with other
devices.
SDHC Logo is a trademark of SD-3C, LLC.
again.
Page 60

Customer Support
55
For technical support or product service, see the table below or contact your reseller.
Note : You will need the product serial number.
Country/Region Website
Australia/New
Zealand
Canada www.viewsonic.com
Europe www.viewsoniceurope.com www.viewsoniceurope.com/uk/Support/Calldesk.htm
Hong Kong www.hk.viewsonic.com T= 852 3102 2900 service@hk.viewsonic.com
India www.in.viewsonic.com T= 1800 266 0101 service@in.viewsonic.com
Ireland (Eire)
Korea www.kr.viewsonic.com T= 080 333 2131 service@kr.viewsonic.com
Latin America
(Argentina)
Latin America
(Chile)
Latin America
(Columbia)
Latin America
(Mexico)
www.viewsonic.com.au
www.viewsoniceurope.com/
uk/
www.viewsonic.com/la/ T= 0800-4441185 soporte@viewsonic.com
www.viewsonic.com/la/ T= 1230-020-7975 soporte@viewsonic.com
www.viewsonic.com/la/ T= 01800-9-157235 soporte@viewsonic.com
www.viewsonic.com/la/ T= 001-8882328722 soporte@viewsonic.com
T = Telephone
F = FAX
AUS= 1800 880 818
NZ= 0800 008 822
T (Toll-Free)= 1-866-463-4775
T (Toll)= 1-424-233-2533
F= 1-909-468-3757
www.viewsoniceurope.com/uk/
support/call-desk/
Email
service@au.viewsonic.com
service.ca@viewsonic.com
service_ie@viewsoniceurope.com
Renta y Datos, 29 SUR 721, COL. LA PAZ, 72160 PUEBLA, PUE. Tel: 01.222.891.55.77 CON 10 LINEAS
Electroser, Av Reforma No. 403Gx39 y 41, 97000 Mérida, Yucatán. Tel: 01.999.925.19.16
Other places please refer to http://www.viewsonic.com/la/soporte/index.htm#Mexico
Latin America
(Peru)
Macau www.hk.viewsonic.com T= 853 2870 0303 service@hk.viewsonic.com
Middle East ap.viewsonic.com/me/ Contact your reseller service@ap.viewsonic.com
Puerto Rico &
Virgin Islands
Singapore/
Malaysia/Thailand
South Africa ap.viewsonic.com/za/ Contact your reseller service@ap.viewsonic.com
United Kingdom
United States www.viewsonic.com
www.viewsonic.com/la/ T= 0800-54565 soporte@viewsonic.com
T= 1-800-688-6688 (English)
www.viewsonic.com
www.viewsonic.com.sg T= 65 6461 6044 service@sg.viewsonic.com
www.viewsoniceurope.com/
uk/
T= 1-866-379-1304 (Spanish)
F= 1-909-468-3757
www.viewsoniceurope.com/uk/
support/call-desk/
T (Toll-Free)= 1-800-688-6688
T (Toll)= 1-424-233-2530
F= 1-909-468-3757
service.us@viewsonic.com
soporte@viewsonic.com
service_gb@viewsoniceurope.com
service.us@viewsonic.com
Page 61

Limited Warranty
56
ViewSonic® 3D Full HD Camcorder
What the warranty covers:
ViewSonic warrants its products to be free from defects in material and workmanship, under
normal use, during the warranty period. If a product proves to be defective in material or
workmanship during the warranty period, ViewSonic will, at its sole option, repair or replace
the product with a like product. Replacement product or parts may include remanufactured or
refurbished parts or components.
How long the warranty is effective:
ViewSonic 3D Full HD Camcorder are warranted for 1 year for labor from the date of the rst
customer purchase.
Who the warranty protects:
This warranty is valid only for the rst consumer purchaser.
What the warranty does not cover:
1. Any product on which the serial number has been defaced, modied or removed.
2. Damage, deterioration or malfunction resulting from:
a. Accident, misuse, neglect, re, water, lightning, or other acts of nature,
unauthorized product modication, or failure to follow instructions supplied
with the product.
b. Any damage of the product due to shipment.
c. Removal or installation of the product.
d. Causes external to the product, such as electrical power uctuations or failure.
e. Use of supplies or parts not meeting ViewSonic’s specications.
f. Normal wear and tear.
g. Any other cause which does not relate to a product defect.
3. Any product exhibiting a condition commonly known as “image burn-in” which results
when a static image is displayed on the product for an extended period of time.
4. Removal, installation, one way transportation, insurance, and set-up service charges.
How to get service:
1. For information about receiving service under warranty, contact ViewSonic Customer
Support (please refer to Customer Support page). You will need to provide your
product’s serial number.
2. To obtain warranted service, you will be required to provide (a) the original dated sales
slip, (b) your name, (c) your address, (d) a description of the problem, and (e) the serial
number of the product.
3. Take or ship the product freight prepaid in the original container to an authorized
ViewSonic service center or ViewSonic.
4. For additional information or the name of the nearest ViewSonic service center, contact
ViewSonic.
Page 62

Limitation of implied warranties:
57
There are no warranties, express or implied, which extend beyond the description contained
herein including the implied warranty of merchantability and tness for a particular purpose.
Exclusion of damages:
ViewSonic’s liability is limited to the cost of repair or replacement of the product. ViewSonic
shall not be liable for:
1. Damage to other property caused by any defects in the product, damages based upon
inconvenience, loss of use of the product, loss of time, loss of prots, loss of business
opportunity, loss of goodwill, interference with business relationships, or other commercial
loss, even if advised of the possibility of such damages.
2. Any other damages, whether incidental, consequential or otherwise.
3. Any claim against the customer by any other party.
4. Repair or attempted repair by anyone not authorized by ViewSonic.
4.3: ViewSonic 3D Full HD Camcorder Warranty 3DC_LW01 Rev. 1A 08-05-08
Page 63

Mexico Limited Warranty
58
ViewSonic® 3D Full HD Camcorder
What the warranty covers:
ViewSonic warrants its products to be free from defects in material and workmanship, under normal
use, during the warranty period. If a product proves to be defective in material or workmanship during
the warranty period, ViewSonic will, at its sole option, repair or replace the product with a like product.
Replacement product or parts may include remanufactured or refurbished parts or components.
How long the warranty is effective:
ViewSonic 3D Full HD Camcorder are warranted for 1 year for labor from the date of the rst customer
purchase.
Who the warranty protects:
This warranty is valid only for the rst consumer purchaser.
What the warranty does not cover:
1. Any product on which the serial number has been defaced, modied or removed.
2. Damage, deterioration or malfunction resulting from:
a. Accident, misuse, neglect, re, water, lightning, or other acts of nature, unauthorized
product modication, or failure to follow instructions supplied with the product.
b. Any damage of the product due to shipment.
c. Removal or installation of the product.
d. Causes external to the product, such as electrical power uctuations or failure.
e. Use of supplies or parts not meeting ViewSonic’s specications.
f. Normal wear and tear.
g. Any other cause which does not relate to a product defect.
3. Any product exhibiting a condition commonly known as “image burn-in” which results when a
static image is displayed on the product for an extended period of time.
4. Removal, installation, one way transportation, insurance, and set-up service charges.
How to get service:
For information about receiving service under warranty, contact ViewSonic Customer Support (Please
refer to the attached Customer Support page). You will need to provide your product’s serial number,
so please record the product information in the space provided below on your purchase for your future
use. Please retain your receipt of proof of purchase to support your warranty claim.
For Your Records
Product Name: ________________________ Model Number: _________________________
Document Number: ____________________ Serial Number: __________________________
Purchase Date: ________________________ Extended Warranty Purchase? __________(Y/N)
If so, what date does warranty expire? ________
1. To obtain warranty service, you will be required to provide (a) the original dated sales slip, (b)
your name, (c) your address, (d) a description of the problem, and (e) the serial number of the
product.
2. Take or ship the product in the original container packaging to an authorized ViewSonic service
center.
3. Round trip transportation costs for in-warranty products will be paid by ViewSonic.
Limitation of implied warranties:
There are no warranties, express or implied, which extend beyond the description contained herein
including the implied warranty of merchantability and tness for a particular purpose.
Exclusion of damages:
ViewSonic’s liability is limited to the cost of repair or replacement of the product. ViewSonic shall not
be liable for:
1. Damage to other property caused by any defects in the product, damages based upon
inconvenience, loss of use of the product, loss of time, loss of prots, loss of business
opportunity, loss of goodwill, interference with business relationships, or other commercial loss,
even if advised of the possibility of such damages.
2. Any other damages, whether incidental, consequential or otherwise.
3. Any claim against the customer by any other party.
4. Repair or attempted repair by anyone not authorized by ViewSonic.
Page 64

Contact Information for Sales & Authorized Service (Centro Autorizado de Servicio) within Mexico:
59
Name, address, of manufacturer and importers:
México, Av. de la Palma #8 Piso 2 Despacho 203, Corporativo Interpalmas,
Col. San Fernando Huixquilucan, Estado de México
Tel: (55) 3605-1099 http://www.viewsonic.com/la/soporte/index.htm
NÚMERO GRATIS DE ASISTENCIA TÉCNICA PARA TODO MÉXICO: 001.866.823.2004
Hermosillo:
Distribuciones y Servicios Computacionales SA de CV.
Calle Juarez 284 local 2
Col. Bugambilias C.P: 83140
Tel: 01-66-22-14-9005
E-Mail: disc2@hmo.megared.net.mx
Puebla, Pue. (Matriz):
RENTA Y DATOS, S.A. DE C.V. Domicilio:
29 SUR 721 COL. LA PAZ
72160 PUEBLA, PUE.
Tel: 01(52).222.891.55.77 CON 10 LINEAS
E-Mail: datos@puebla.megared.net.mx
Chihuahua
Soluciones Globales en Computación
C. Magisterio # 3321 Col. Magisterial
Chihuahua, Chih.
Tel: 4136954
E-Mail: Cefeo@soluglobales.com
Distrito Federal:
QPLUS, S.A. de C.V.
Av. Coyoacán 931
Col. Del Valle 03100, México, D.F.
Tel: 01(52)55-50-00-27-35
E-Mail : gacosta@qplus.com.mx
Villahermosa:
Compumantenimietnos Garantizados, S.A. de C.V.
AV. GREGORIO MENDEZ #1504
COL, FLORIDA C.P. 86040
Tel: 01 (993) 3 52 00 47 / 3522074 / 3 52 20 09
E-Mail: compumantenimientos@prodigy.net.mx
Veracruz, Ver.:
CONEXION Y DESARROLLO, S.A DE C.V. Av.
Americas # 419
ENTRE PINZÓN Y ALVARADO
Fracc. Reforma C.P. 91919
Tel: 01-22-91-00-31-67
E-Mail: gacosta@qplus.com.mx
Cuernavaca
Compusupport de Cuernavaca SA de CV
Francisco Leyva # 178 Col. Miguel Hidalgo
C.P. 62040, Cuernavaca Morelos
Tel: 01 777 3180579 / 01 777 3124014
E-Mail: aquevedo@compusupportcva.com
Guadalajara, Jal.:
SERVICRECE, S.A. de C.V.
Av. Niños Héroes # 2281
Col. Arcos Sur, Sector Juárez
44170, Guadalajara, Jalisco
Tel: 01(52)33-36-15-15-43
E-Mail: mmiranda@servicrece.com
Guerrero Acapulco
GS Computación (Grupo Sesicomp)
Progreso #6-A, Colo Centro
39300 Acapulco, Guerrero
Tel: 744-48-32627
MERIDA:
ELECTROSER
Av Reforma No. 403Gx39 y 41
Mérida, Yucatán, México CP97000
Tel: (52) 999-925-1916
E-Mail: rrrb@sureste.com
Tijuana:
STD
Av Ferrocarril Sonora #3780 L-C
Col 20 de Noviembre
Tijuana, Mexico
Monterrey:
Global Product Services
Mar Caribe # 1987, Esquina con Golfo Pérsico
Fracc. Bernardo Reyes, CP 64280
Monterrey N.L. México
Tel: 8129-5103
E-Mail: aydeem@gps1.com.mx
Oaxaca, Oax.:
CENTRO DE DISTRIBUCION Y
SERVICIO, S.A. de C.V.
Murguía # 708 P.A., Col. Centro, 68000, Oaxaca
Tel: 01(52)95-15-15-22-22
Fax: 01(52)95-15-13-67-00
E-Mail. gpotai2001@hotmail.com
FOR USA SUPPORT:
ViewSonic Corporation
381 Brea Canyon Road, Walnut, CA. 91789 USA
Tel: 800-688-6688 (English); 866-323-8056 (Spanish);
Fax: 1-800-685-7276
E-Mail: http://www.viewsonic.com
4.3: ViewSonic Mexico Limited Warranty 3DC_LW01 Rev. 1A 08-05-08
ix
Page 65

x
 Loading...