

Page 1

1
User Manual
Thank you very much for choosing this model. Previous reading to this
manual is very important for your fi rst using.
All the content should be exactly correct, but they are all keep updating,
including the software, outlook and features. And we would not give any
extra presentation for the possible modification.
【Note】Please turn off the unit before charging. The indicator could be
red when charging, and turn to be green when full charged. The charging
process would last to 3 hours.
【Attention】
Do not store the unit in high temperature, wet or dusty room.
Prevent the unit from dropping or being collided, or the IPS screen
would be damaged.
Please choose the proper volume, high volume would injure your
ears.
Please charge the unit when it:
A、The battery icon in red (power shortage)
B、Turn off automatically
C、Function key out of work
【Attention】
We won't be responsible for the unit damage caused by any other
non-standard adaptor.
★ Non-Waterproof
Page 2

2
Contents
1. Basic Function.....................................................................................3
1.1 Hardware Specification .....................................................................3
1.2 Software.............................................................................................3
2. Unit Details..........................................................................................4
3. Before Using........................................................................................4
3.1 Battery................................................................................................4
3.2 Turn on/off.........................................................................................4
3.3 Connect with PC................................................................................5
3.4 Disconnect with PC ...........................................................................6
4. Specification........................................................................................6
4.1 Wireless and web...............................................................................6
4.2 Sound settings..................................................................................16
4.3 Display settings................................................................................17
4.4 Location and security settings .........................................................18
4.5 Application Settings.........................................................................20
4.6 Account Synchronous set ................................................................27
4.7 Privacy.............................................................................................29
4.8 Storage setup....................................................................................29
4.9 Language & keyboard settings ........................................................30
4.10 Date & Time..................................................................................32
4.11 About device ..................................................................................32
5. Application.........................................................................................33
6. Answer the question of the MID .......................................................33
Page 3
3
1. Basic Function
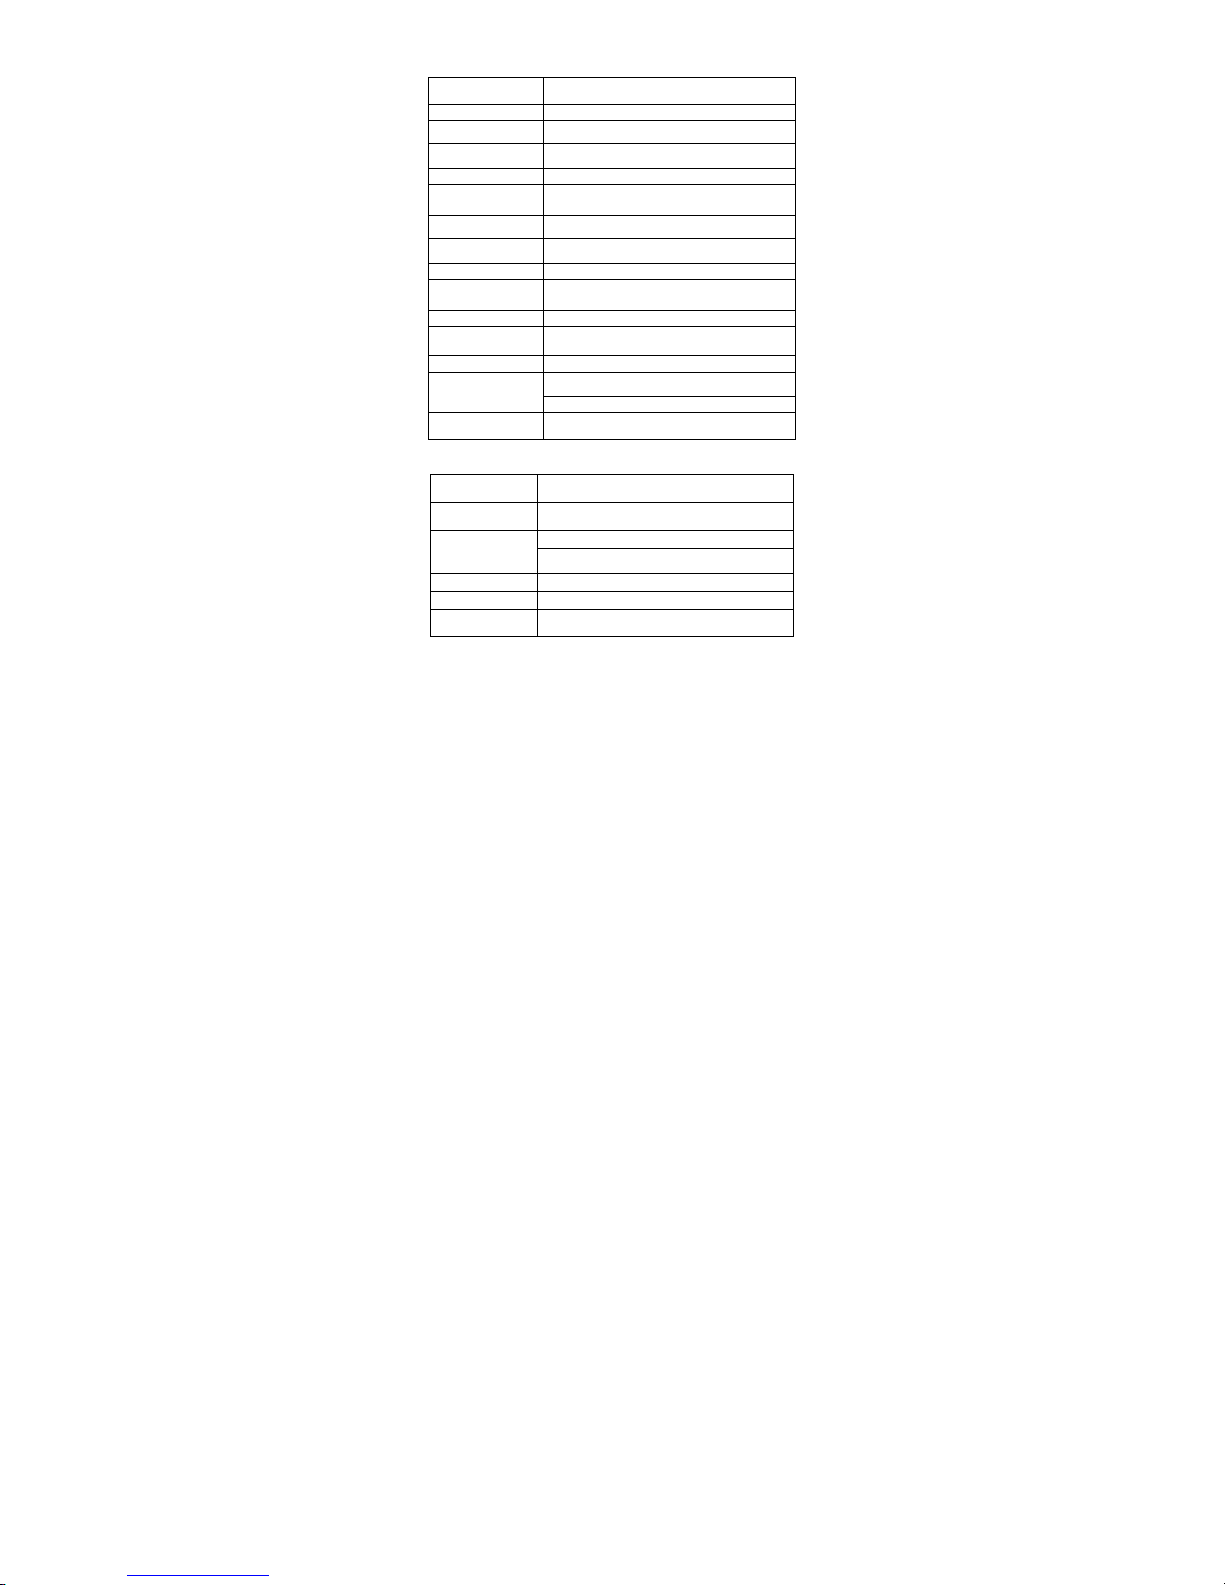
1.1 Hardware Specification
Dimension 200×118×10.2mm
Weight 0.34KG
CPU AML8726-MX
Flash 8GB
ROM 1GB DDR3
Memory Card
Slot
T-flash 128M-32G
Camera 2.0MEGA
Display Screen 7” LCD screen
Resolution 1024x600
Battery Working
Time
2~4 hours
USB micro USB2.0
Speaker Stereo speaker (Dual)
G-Sensor Yes
Mini USB2.0,T-flash,3.5mm earphone port
I/O port
Built-in Micro
Wifi WiFi 802.11b/g/n
1.2 Software
OS Android4.0
Browser Google
MKV(H.264HP),RM/RMVB,FLV,AVI
Video
MPEG-1/2 support 1080P
Music MP3,APE,FLAC,AAC,AC3,WAV
Pictures JPEG,BMP,GIF,PNG,TIF
E-mail GmailTM
Page 4

4
2. Unit Details
1.Volume - 2.Volume + 3.Power Button 4. Mini USB port 5. DC
power 6.TF slot 7. Earphone port 8. HDMI 9.RESET
3. Before Using
3.1 Battery
The first two time's charge please make as 10 hours, from the third
time, you can only charge 5 hours.
【Note】This MID use built-in polymer battery, exclusive charger is a
must for unit charging.
-- Power bar will roll when charging.
-- Power bar will stop roll and turn to green when charging finished.
-- In order to prolong the service life of the MID, please only charge it
after exhaust the battery for the first two times.
3.2 T urn on/of f
Long press "Power" to turn on/off the MID.
Page 5

5
3.3 Connect with PC
MID can be connected with PC via USB cable, then, the user can transfer
music, pictures and other files between MID and PC. These files can be
stored in TF card or MID flash.
Warning! Do please follow your PC's instruction when you connect the
MID with it or its memory card to avoid files damage.
USB cable usage
1.Use the incident USB cable to connect the MID with your PC, you'll get
a CONNECTION notice.
2. Open the "NOTICE", touch "USB CONNECTED".
3. To uch "USB DEVICE" to prepare transferring.
After the above three steps, the system would recognize your USB
device and show you a notice.
Page 6

6
During files transferring between MID and PC, you can not visit USB
device or TF card via MID, and also ca n not use the related application
(camera, gallery, music, video etc). What's more, you can not share the
data on MID with PC via USB cable.
3.4 Disconnect with PC
Warning! Please follow your PC's instruction to disconnect USB device
or memory card to avoid files lost.
1.Open the "NOTICE", touch "TURN OFF USB DEVICE or TF CARD".
2.Touch "TURN OFF USB DEVICE or TF CARD" on Sub menu.
4. Specification
You can adjust MID display, sound, wireless & network, privacy and
other application mode in "SETTINGS" menu.
【Settings】 Touch
(the top right corner) on the main m e nu, and
then
(the rightmost) to the "SETTINGS" menu.
You can also enter the "SETTINGS" menu by touch
, then .
4.1 Wireless and web
Open wi-Fi and connect with Wi-Fi web
Page 7

7
If you add Wi-Fi web when you set MID for the first time, the Wi-Fi is
open. And you can come to step4 directly.
1. Touch set:
2. Touch wireless, web, and Wi-Fi one by one.
3. Select Wi-Fi and you can open it
The equipment should scan to find the Wi-Fi web.The web is
protected with locked icon.
If the equipment find a web you use before, MID should connect
with it.
4. Touch the web and it could be connected.
If the web is open, the system should ask you if you want to link
with this web. Then you can just touch link. If the web is protected,
the systerm should alert you to put in the password or other
evidence.
After linking the web, you could set on Wi-Fi:“name of the web on
the screen, the speed, safety, address and some thing related on the
web.”
Network Information:
Normally, if the Wi-Fi is on, when you MID detect Wi-Fi web opend, the
web should show on the below of it. You could touch it directly to link.
1. If Wi-Fi is not closed, pls open it.
2. Select the web inform on the screen of “Wi-Fi set”, then you can
cancel to select the options to quit receiving data.
Add Wi-Fi web:
You could add Wi-Fi web so that MID can remember it, the related safety
data and link with the web auto when come t o the cove rage. If there is not
a Wi-Fi network name (SSID) broadcast, you need to add the network to
connect. And you can add the web where it is not covered by the Wi-Fi.
If you want to connect the web protected, you should contact with the
administrator to get the password or other necessary safety data.
1. If you do not open Wi-Fi, pls ope n.
If you add Wi-Fi when first set MID, the Wi-Fi is open already.
2. Touch add Wi-Fi web on the screen of “Wi-Fi Set”.( On the
Page 8

8
bottom of the web detected list)
3. Input the SSID of the web, if the web is protected, Please touch
“safety” options then touch the deployment of security measures on
the network type.
4. Input all the necessary security data.
5. Touch save.
MID should connect with the wireless web. And th e system should save
all the data you put in. So when you come to this coverage, MID should
connect auto,
Delete Wi-Fi web
You could cancel Wi-fi web that you keept already. For example, if you do
not want MID to connect the Wi-Fi web auto, or you will not use the web
any more, you could cancel it from MID.
1. If you do not open wifi, pls open it.
2. Keep touch on the web name on the screen of “Wi-Fi set:
3. Touch “not save” the web on the dialog.
Your MID could connect with kinds of web and equipment include 3G
web for video and data transfer , Wi-Fi web, wire and bluetooth transfer.
And you can connect MID with computer so that you could send
document from MID and though OTG connection or portable mobile
network platform to share the data.
Advanced Wi-Fi Setting:
Wi-Fi sleep term:
Select the options to open a dialog and you can set “Sleep when th e s c reen
is closed”,” sleep when charging” or “ never sleep” to quit connect with
Wi-Fi web. If you do no t use sleep term, more power will be wasted.
MAC address:
This is the MAC address that MID connect Wi-Fi
IP address
This option is for you to connect to Wi-Fi network for MID sp ecified
Internet Protocol ( unless you set MID IP with static already)
IP setting:
Page 9

9
If you select static IP already, You can use the "IP Settings" to manually
enter the IP address of MID and other network settings, rather than using
the DHCP protoco l for Wi-Fi network of its own network settings.
Connect with Bluetooth equipment
Bluetooth is a short-range wireless communi cations technolog y. With this
technology, the equipment could exchange the data in 8 meters.
The most common Bluetooth devices, including a call or listening to
music for headphones, car hands-free kits, as well as laptops and cell
phones and other portable devices
there are many kinds of protocols to define communication standard
Bluetooth devices with Bluetooth capabilities.
To connect to a Bluetooth device, you need to open the Bluetooth wireless
devices of MID.The first time with their new MID devices connected, you
will need to both "paired" so that they understand how to establish a
secure connection with each other. Later , you can easily connect the paired
device.
Turn it off when do not use bluetooth to extend the battery life. You may
also need to turn off Bluetooth. In flight mode, Bluetooth is turned off.
The following "status bar" on behalf of the Bluetooth status icon
Enabled Bluetooth / Bluetooth pairing
requirements
Connect to bluetooth already
Sending document though bluetooth
Open or close bluetooth
1. Press Menu, then touch the settings to open the "Settings"
application
2. Touch wireless and web work.
3. Select or quit bluetooth and you can open or close it.
Change the name of bluetooth:
MID have a common name of bluetooth defian tly. When MID connects
with other equipment though bluetooth, you could see the name on related
Page 10

10
equipment. You could change the name to make it easier to identify.
1. Touch setting to open setting application.
2. Touch wireless, network and bluetooth one by one. And it will open
“bluetooth setting” screen.
3. If the bluetooth is not open, pls select Bluetooth and open it.
4. Touch the name of bluetooth, then put in one name and the touch
yes.
Make the bluetooth of MID paired.
You can not make the MID connected with the other before the MID
paired. After they paired, the status should continue unless you quit it.
1. Touch setting so that you can open the setting application.
2. Touch sett ing of wireless, network and bluetooth one by one.
3. If the bluetooth is not open, pls select bluetooth and op en it. Your
MID should scan the bluetooth of other equipment auto in the
coverage.
4. If you can not find the equipment you want to pair, then you should
set the other equipment in the stat us of “detected”
5. If you MID stop scan before you make the other equipment in the
status of “detected”, pls touch scan to find equipment.
6. In the list of “ bluetooth setting”, touch the ID of other equipment,
then the MID could be paired. If the system ask you to input the
password, pls try the normal ones such as “0000” or “1234” Or
considering the instructment of your bluetooth setting. If paired
successfully, the MID should get connection with the related
equipment.
After connecting with the bluetooth
You can connect bluetooth equipment after paired. For example, you could
change the equipment or reconnect the MID when you come to the
coverage.
1. Touch setting to open the setting application;
2. Touch sett ing of wireless, network and bluetooth one by one;.
3. If you do not open bluetooth, pls select and open it;
4. In the list of equipment, pls touch to connect the equipment paired
already. If there is no equipment you want to pair in the list, pls
touch scaning to find the equipment. If the MID is connected with
Page 11

11
the equipment already, it shows connected
Y ou can quit pair of the equipment to clear all the paired information.
1. On the screen of the bluetooth setting, keep touch on the equipment;
2. Touch cancelling pair in the menu to quit pair with the bluetooth.
Connect with the virtual private network
When use virtual private network(VPN), you can be protected from
external connections to the local network of resources within the network.
Businesses, schools and other institutio ns are g e neral l y deployed VPN; so,
even if the user is not connected to the park or a wireless network, you can
also access local network resources。 There are many system that can
protect the VPN. Some system use security certificate or other programms
so that the web can be used by the one authorized only.
Add Virtual Private Netw ork(V PN)
1. Open setting application by touching;
2. Touch sett ing of wireless, network and bluetooth one by one;
3. Touch the menu add VPN;
4. Touch the sty le of VP V you want;
5. Following the adminstrator of the web, set the VPN setting on the
screen;
6. Touch sav e menu and the system will keep the VPN in the list
Connect with VPN
1. Open setting application by touch;
2. Touch setting of wireless, network and bluetooth one by one. The
system should show the V PN you add already on the screen;
3. Touch the V PN y ou wa nt to co nnect w it h;
4. Put the data required in the dialog and then touch connect;
After connect with to VPN,you will be informed connect already on the
status. If stop connection, you will be informed also. And you can return
VPN setting to get connection a gain with the information.
Quit connection to VPN
Open the “notification” panel, and then touch the “notification” panel and
then touch the notice in the VPN connection stat us.
Edit VPN
Page 12

12
1. Open setting applications by touching;
2. Touch setting of wireless, network VPN setting. And the system
should list the VP you add already;
3. Keep touch on the VPN you want to edit;
4. Touch Edit network in the dialog;
5. Edit VPN setting as required
6. Touch keep menu
Delete VPN
1. Open setting applications by touching;
2. Touch wireless,network VPN setting. And the system should list
the VPN you add already;
3. Keep touch on the VPN you want to delete;
4. Delete the VPN in the dialog;
5. And then there should be a dialog to ask you if you are sure to
delete the VPN, pls touch yes.
Using security certificate
If your organization’s VPN or Wi-Fi network set up security certificates,
you need obtain and save it in your MID.Then can pair with the VPN or
Wi-Fi.
If your network administrator allows you to download the certificate from
the site, then download the certificate, you will be prompted for the
password credential storage.
Install the security certificate from TF card of MID
1. Copy the certificate from your computer to the root directory of TF
card ( it means not in a folder)
2. Open setting applications by touching
3. Touch ID and safety;
4. Touch “Install from TF card”
5. Touch the name of the certificate you want to install;
6. If the system ask you to put in the password, pls do as require and
touch “ok”
7. Edit a name for the certificate and touch “ok”.If you do not set a
Page 13

13
password. The system will alter you to do that. Put in the new
password and touch yes. Then you can use the network protected.
And for security problem, the system should delete the certificate
auto.
Connect to Mobil Network
Connect the 3G network receivi ng panel service you buy from the wireless
service supplier with the OTG connection, the system should configured
to use your provider’s 3G network on the data transmission.
Your MID is configured to use many Mobil network operators. ( This MID
support EVDO/WCDMA/TD-SCDMA and other 3G network standard) If
you can not find a network after the OTG connect with the 3G panel after
power opened, pls contact with the 3G operator to get the details of the
connection information.
The mobil network available will change due to different place. In the
initial state, the MID is configured with the one which receive the data
most quickly.
There are different icons in the status list to tell you the net work style you
connect, and the strength of the voice and the network signal.
Mobil 3G No signal
Mobil 3G Fly model(With this model, the bluetooth
is closed)
Mobil 3G network using
Mobil 3G network roaming
If you add google account in your MID and connect with the google
service so that you can set the Gmail, calendar and backup together, then
the icon of the network should turn white; If you do not have a google
Page 14

14
account, or you connect the one not linked wi th the WI-Fi network , the
icon of the 3G mobile network should stay gray.
When you connect with the slow ne twork and you are receiving large data,
it is better for you to delay the tast and start it when you connect with the
network of quick speed.
Enabled Data
Quit to select this option to prevent your MID to transfer data over any
mobile network. If you are traveling, without u sing data plan, and do not
want the local mobile networks charge you for data usage, then this setting
is useful. Uncheck this setting do es not prevent your MID through other
wireless networks (such as Wi-Fi or Bluetooth) to transfer data.
Make sure the network you are using now
1. Open the setting application by touching it;
2. Touch the name of wireless, network and mobile net connection one
by one;
The operation will select name of your wireless supplier in th e list.
Stop data service when roaming
Roaming data
After quit selecting the option, if you can not visit the net work of your
own operator, the system should stop your MID receiving data from other
operators. If you are not in the network co very of your operator, you can
forbid to get data from other supplier. If your business does not include 3G
data roaming, this action will help you control the cost of 3G Internet
access..
1. Open setting application by touch it;
2. Touch the name of wireless, network and mobile net connection one
by one; After canceling to select data roaming, you could get the
data also by Wi-Fi.
Edit new connection
Name of the connection
Select this option and you can open APN screen,on which you c an select
the mobil access point for your configuration. And for the using method of
Page 15

15
the tool on the screen, you could ask help form your o perator. You need to
get the APN and related setting if you want to change the name of your
connection(APN) after checking with your supplier.
1. Open setting application by touching it;
2. Touch the nam e of wireless, ne tw or k, and Mo bil ne tw ork ;
3. Touch the APN and edit it. Or touch the menu
and then touch
set new APN. Touch the options that need ed it, and you can put in
the APN setting from the wireless supplier
4. After edit, you can press menu
and you could touch save
5. If you set new APN, you could use it after you touch APN on the
screen.
Network Operator
Select this option opens a screen for system t o search for and di splay your
MID with 3G mobil network module with a compatible mobile network,
or automatically select the preferred mobile network. For operators, the
difference between the specific charges, please consult y our operator
Connected to the Ethernet
If you have a high require on the network speed and the WI-Fi and 3G
network you have already can not receive your requirement, the MID have
another connection directly. It is same connection with your pc by
Ethernet.
First, You must be equipped with a network interface( which called crystal
head also), one side is One side in your home network port on the other
end connected to the OTG interface unit. Then the MID could connect to
internet.
But you need set it up:
The icon following shows the status with the Ethernet:
Can not get the Ethernet signal
Get connection to the Ethernet
Ethernet Setting
Touch “set”then it shows “wireless and network Ethernet set” then touch
Ethernet setting. Then if your wire web is open, MID should connect auto.
Page 16

16
Static IP Settin gs
If you need to enter the IP address in a wired Ethernet connection to the
environment, please contact the administrator to enter the IP ( it is the
same with PC).
Touch menu “ setting”, “ wireless and network”, “Ethernet setting”,
“Static IP setting” and choose using the static IP. Enter the IP address,
gateway, net mask, DNS1 or DNS2 as the information supplier by the
administrator. Then if you enter the right one, Ethernet icon in the status
bar will display a connection network of animation. After stopping, the
icon should change to connect or not connect.
4.2 Sound settings
You can use the "Sound Settings" configurat ion on the touch screen of
your MID to click the sound, e-mail arrival reminding, update the
application upgrade , memo reminding, keyboard touching, or through the
way of ring and volume to remind you when the alarm rings. You can also
use these settings to adjust the volume of music or oth er media wit h audio
as well as some related settings.
Silent mode
Select the option to mute all the sounds of MID, ex cept for the music,
video and other media as well as all the audio that you set for the alarm
clock. (You must mute the media and alarm in the own applic ation.)
Volume
Select the option to open a dialog box for you to set the ringtone, pl ay
media (music, video, etc.) and volume of notification ringtones. If you
cancel the selection of using same volume for the ringtones and
notification tones, then you can set the notification ringtone’s volume
individually.
MID ringtones
Select the option to open a dialog box for you to choose MID alerts (such
as alarm clock, memo reminding) to play your ringtones. You can touch a
ringtone to listen.
Notification ringtone
Select the option to open a dialog box fo r you to choose the ringtones
which will be played when receiving notifications. You can touch a
ringtone to listen.
Page 17

17
Button operating tone
Select this option, you will play a sound when usi ng the MID keyboard
buttons.
Selection operating tone
To select this option, the system will play a sound if you touch the
keyboard, icons and other items which response to the touching operat ion
on the screen.
Screen locked tone
To select this option, system will play a sound when the screen is locked
or unlocked.
Sense of touch
Select this option, the MID will vibrate shortly when you touch the soft
keys and perform other operations. (Depends on the configuration of your
MID.)
4.3 Display settings
You can use the "Display Settings" to configurate the s creen brightness
and other settings of the screen.
Brightness
Select the option to open a dialog box for you to adjus t the brightness of
the screen. You can use the slider to set the brightness lev el according to
your needs at any time when using the MID. In order to extend the
battery's service time as much as possible, please select the darkest
brightness according to your comfort level.
Rotate the screen automatically
Select this option, system will switch the screen to a corresponding
browse mode automatically if you place the MID horizontally or
vertically.
Animation
Select the option to open a dialog box for you to make the following
settings: whether you would like to disp lay the animation transition effects
Page 18

18
when executing some operations or all the supp ortive operations. Whether
you would like not to display any optional animation effects in the MID.
(But this setting cannot control the animation effects of all the
applications.)
Screen timeout
Select the option to open a dialog box for you to set the time interval that
the screen dimmed away from the last time you touch the screen or press
the button. In order to extend the battery's service time as much as
possible, please set the shortest timeout according to the convenience.
4.4 Location and security settings
By using the "Location and Security Settings," not only can you set the
preferred settings for using and sharing information when you are
searching for information and using the appli cation of detecting location
(such as maps), but also can configurate the settings which are condu ctive
to protecting NID and its data.
Using the wireless network
To select this option, the system will determine your approximate location
according to the information which is provided by WI-FI and mobile
network, for you to "map" or in use when you perform the searching
operations.
Using GPS Satellites
To select the option, system will use the MID's Global Positioning System
(GPS) satellite signal receiving system (depending on your configu ration
on MID) to locate your position, the accuracy is within a few meters. (ie,
"street level"). The GPS accuracy depends on whether the actual weather
is fine or not and other factors.
Screen locked settings
You can lock the screen, thus only you can unlock it, and then surf the
Internet, access data, purchase application etc.
1. Touch screen locked settings
If you have configured the screen lock already, then you can change the
screen locking way or lock the screen off by touching to change the screen
locked settings.
2. Touch the pattern, PIN or password
Page 19

19
If you touch the pattern, then system will guide you to create a pattern,
you must draw this pattern to unlock the screen. For the first setting,
system will show you a brief counseling manual to show how to create
unlocked pattern. You can press menu
, and then touch "help" to review.
Then, you will be prompted by the system to draw and re-draw your own
pattern.
If you touch a PIN or password, you will be prompted to set a PIN number
or password, you must enter the PIN number or password to unlock the
screen. By the next time you turn the MID on or wake up the screen, you
must draw your own pattern or PIN number, or password to unlock the
screen.
Password visible
To select this option, when you input every characters of the password,
they will be shown shortly in the system, so that you can see the contents
that you are inputting.
Select device manager
To touch the option to open screens, in which list the applicat ions that you
have authorized the limitation of MID device manager. To touch the
application of this list can stop its limitat ion. If you ex ecu te this operat ion ,
thus your accounts will lose some functions of the appli cation. (Such as
the function that synchronize the new e-mail or calendar event to the
MID), until you restore the limitation of the applic ation. If you stop the
limitation of some applications by the above mentioned ways, however,
these accounts of the applications needs the limitation, then, unless you
delete the related accounts, otherwise, normally you will receive tips on
how to restore the limitation when you are trying to use these applications.
Page 20

20
Using security credentials
To select this option, the applications can access security certificates in the
MID, related password and other credentials’ encrypted storage. You can
establish the connection between some types of VPN and Wi-Fi by using
these credentials. If you have not set password for these credentials, then
you cannot use this option.
Install from the TF card
If you use the removable TF card to store user files in the MID, then you
can install security certificate from the TF card by touching the option.
Password settings
Select the option to open a dialog box for you to set or ch ange th e secu rity
credentials stored passwords. Your password requires at least 8 characters.
Clear storage
Select this option, system will delete all the security certificates and
related credentials through your confirmation, and clear the security
password which is for specified storage.
4.5 Application Settings
Unknown source
Select the option means that system is allowed to ins tall the applications
which are from website, e-mail, or other sources except the Android
e-market.
Warning! In order to protect your MID and personal data, please only
download applications from trusted sources. (Such as Android e-market).
Manage applications
By touching this option, you can open a list which lists all applications
and other softwares installed on your MID, as well as their respective sizes
and the tools which manage them.
Normally, you only need to install, open and use the applications without
worrying about how to manage them; operating system will manage the
way of applications using the storage and other resources automatically.
But sometimes, you may need to learn about them in detail in t he MID.
MID applications use the following two memories: stor age device and
RAM. Applications will use the storage device to store itsel f and all the
Page 21

21
files, settings and other data used by itself. Applications will also use
RAM (used for temporary storage and fast access memory) when running.
All MIDs have internal storage devices. Most applications and various
types of files and data which are used by them are stored in this memory.
Operating system will strictly manage and carefully protect the internal
storage device, since it may contain your private information. When
connecting the MID to your computer by USB cable, you cannot look up
the internal mass storage devices and contents in the CF card.
Your MID may own internal mass storage devices or removable TF card,
depending on your MID configuration. When you connect the MID t o a
computer, you can look up the contents in the storage, you can also copy
the files to this storage or copy files from it. Some applications will set the
storage design as default or optional storage location, instead of internal
mass storage.
Operating system also manage the way that applications using th e MID’s
RAM. The System only allows the application and its component
processes and services to use RAM according to the needs. System may
store your processes which are used recently in RAM, so that these
processes can restart quickly when you open them. But if system requires
the RAM for new activities, it will clear the corresponding cache.
You can directly manage the way that applications using the storage
device, you can also manage them indirectly through various methods
when using the MID. For instance:
z Install or uninstall the application.
z Download files from browser, Gmail and other applications.
z Create files.
z Delete files which have been downloaded or created.
z Using a computer to copy files to internal mass storag e device or
TF card , or delete files from internal mass storage device or TF
card.
z Changing the installed location of the applications, to install them
to the internal mass storage device, or install to the TF card in
MID.
Since operating system will manage the way applications using RAM, you
may rarely need to manage it. However, you still can monitor the way
applications using RAM, and stop the abnormal applications.
"Applications Management" screen contains four tabs; each of them lists
related applications and its components. There is a chart in the bottom of
Page 22

22
every tab which is for displaying the memory space and available memory
space occupied by the items in th e list.
z To touch one of the applications, processes, or services in the list,
you can open a screen listed the relevant details; you can also
perform the operations such as changing the settings, stopp ing and
installing. (Depends on the option).
z To touch the downloaded tab, you can look up the applications
which are downloaded from "e-market" and other resources.
z To touch all the tabs you can look up all installed applications in
the MID. The list contains applications which are bin d ed wit h you r
MID, and the ones which are downloaded from other resources.
z To touch the tab in TF card, you can look up the applications
installed in it. The selected items are installed in the TF card. The
unselected ones are installed in the internal mass storage device of
the MID, but these items have been designed, which can be
removed according to the needs.
z To touch a running tab, you can look up a running or cached
application and process.
z When viewing the tabs in downloaded, all, and TF card, you can
sort them by pressing the menu button to swi tch list orde r by name
or size.
Obtain details about applications
1. Touch application management screen.
2. Touch an application, process or service.
"Application Information" of each application will list its name and
version, and detailed information of the application. According to the
difference of application and its resource, the screen may also contain a
variety of buttons, data for you to manage applications, forcibly stop and
uninstall applications. Meanwhile, the screen will also list information
type about your MID and detailed information of data which can be
accessed to applications.
Different types of applications contain different types of information and
control, but normally include the following:
z You can use a stop button to forcedly end abnormal application.
z If you install applications from "e-market" or other resources, then
you can use uninstall button to delete applications and all the
Page 23

23
related data and settings from the MID.
Storage
Providing information of MID memory space which is occupied by related
applications.
To delete an application's settings and other data, you can touch the clear
data button.
You can use move to internal mass storage device or move to TF card
button, to change some applications' storage location.
Cache
If application stores the data in the temporary storage area of the MID,
then system will list the amount of stored information and provide clear
cache button.
Default startup
If you have configured an application to a default startup mode of a
particular file type, then you ca n remove the relevant setting s in here.
Limitation
It lists all kinds of information and data whi ch applications have rights to
access.
Running services
You can monitor the running applications and the cache size of RAM
which is occupied by the process, and stop these applications and
processes if necessary.
1. Touch application management screen.
2. Touch a running tab.
3. Press the menu button
, and then touch the service of displaying
cache process or displaying currently running service, to switch
them back and forth. "Running" tab can display the currently
running or cached processing applications, processes and services,
and display the RAM size they occupied. The chart in the bottom of
screen can display occupied RAM amount and available RAM. You
can touch the abnormal applications, pro cesses and services, and
then touch the stop button on the opening screen. You can also
touch the report button, to send details of abnormal application
about the MID to corresponding developer.
Page 24

24
Important! To stop an application or operating system process and service
will stop an ancillary function or more functions in the MID. To restore
full functionality, you may need to restart the device.
Uninstall applications
You can uninstall applications which are downloaded from "e-market " and
other resources.
1. Open the "Application Management" screen.
2. Touch the dow n loa de d tab.
3. Touch the applications which need to be uninstalled.
4. Touch the uninstall button.
5. Touch "Yes" button when inquires you whether you are sure to
uninstall the application or not on the screen.
Change the application's storage location
Some applications will set the storage location to TF card storage devices
of the MID, instead of internal mass storage devices. However, other
applications will set the storage location to changeable status. The
following tips may be helpful to you: You can remove some large
applications from the internal sto rage device, so that you will not need to
make room for other applications which does not provide this option.
Some large applications are designed for the above mentioned reasons.
1. Touch application management screen.
2. Touch tabs in the TF card.
z The tab lists applications which must or may store in the TF card
of the device. Each application will list the space occupied by its
own internal storage device. (All th e applications will occupy a
small amount of internal storage space no matter what it store in
the internal storage device or not.)
z System will select the applications stored in the TF card storage
device.
z Chart in the bottom will display occupied storage space and
available space of the TF card storage device in the MID. This
amount includes space occupied by files and other data, not just
the space occupied by applications in the list.
z The "Storage" part of application details screen can detailed
display the memory which the application uses. If you can move
this application, then this move button is effective.
Page 25

25
z To touch move to TF card storage device, you can move the main
part of the application out from the internal mass storage device.
z To touch move to internal mass storage device, you can move the
application back to internal storage device of the MID.
Battery power usage
z To touch this item, you will open a list, which will list all the
applications that have consumed the battery's electricity since the
last charging for the MID. To turn off the unnecessary functions
can extend the battery's usage time between two charges. You can
also monitor the condition of battery consumption between
applications and system resources.
z Turn off the wireless devices that you do not use. If you do not use
WI-FI and Bluetooth, then you can turn them off in the settings.
Lower the brightness of screen and shorter the standby time of the
screen.
z If you do not automatically synchronize Gmail, Google Calendar
and other applications, please turn off this function. You can use
power to control widgets, to chec k and control status of wireless
device, display screen brightnes s and synchronize.
z If you know about that there will be no 3G mobile network or
WI-FI network nearby, then you can switch to the Airplane mode.
To search for 3G mobile network automatically will make the MID
consume more power.
Monitor and control applications with power consumption
At the time, the screen will display the applications which consume the
most battery power. If the applications that you've downloaded consume
too much power, you can turn them off through this option on the screen.
Page 26

26
At this moment, the "power usage" screen will list the applications which
are consuming battery power in descending order. The consuming chart in
the top of screen will display the consumption rate since the last charge of
the MID, it will also display the length of time by using the battery for
running.
To touch the application of "power usage" on the screen, you will know
about the power consumption details. The information types are different
for different applications. Buttons which included by some applic ations
can open a screen, which provide some settings to adjust the application's
power consumption.
To touch the power charge, you can open a screen, which will detailed
display when the wireless device of the MID, screen and other functions
use the battery.
Development
Including the settings for developing Android applications.
USB debugging
To select this option means the debugging tools on the computer are
allowed to communicate with MID through the USB connection.
Keep the arousal status
Selecting the option to prevent th e system from dark ening and lo ckin g the
screen when charging between MID and charger or USB device
Page 27

27
connection which provides power.
Permitted simulation site
Selecting this option means it is allo wed to use t he develo ping tools of the
computer to control own position which MID displays, instead of using
the MID's own internal tools to achieve the above purpose.
4.6 Account Synchronous set
The info like contact, email, calen dar schedule… from your account of
Google, Microsoft Exchange ActiveSync or other account can be
synchronized with your MID.
Add or Delete accounts
1. Select relevant interface, the interface will show your current
synchronous setup and account list.
2. Select adding account.
3. Select the account which you want to add.
Page 28

28
4. Input the account’s info accords to the instruction steps show.
5. Configure account
The system may request you configure the data which will be
synchronized with your MID, details depend on the account’s type.
After configured, system will add the account into Synchronous list; then
the info can be connected with y our MID.
Delete account
You may delete one account, and the relevant info will be deleted from
your MID also.
But, for your registered Google account, it only can be deleted upon your
personal info be deleted at first.
1. Select relevant interface, the interface will show your current
synchronous setup and account list.
2. Select the account which you want to delete.
3. Select deleting account.
4. Confirm the deleting instruction.
Normal synchronous setup steps
1. Click setup, open “synchronous setup” interface
The account’s all info or part info already be synchronized
with your MID
The account’s info hasn’t be synchronized with your MID
The selected info will be synchronized with your MID
Page 29

29
2. Through selected or delete d background data, you can control the data
whether to be transferred when the applications and service are not be
used.
If cancel the deleted option, you need to refresh the menu / email, or else
Gmail will stop receiving new mails, “calendar” will automatically stop.
3. Through selected or deleted synchronous setup, you can set whether the
modified info in MID to be synchronized with internet or not.
If cancel the deleted option, you need to open the interface “Account
Synchronous set ”, select the account which you want to synchronize.
Manually synchronize the info:
1) Open the interface “Account Synchronous set ”;
2) select the account which you want to synchronize;
3) Press Menu, select “ synchronize”.
4.7 Privacy
Return to factory set
After selected this option, system will pop out a dialog box, for you
deleting all the data in the MID’s internal storage, including: Google
account, all other account, system applications and other downloaded
applications. Reset MID won’t delete any downloade d updated system
soft wares.
4.8 Storage setup
This device uses TF card to store photos, movies and music.
Insert the TF card when device shutdown, put the card (metal face below)
into the TF card slot, when TF card correctly inserted into device, the
device will sound “pa”.
Insert the TF card when device is open, the system will automatical ly read
and install the boot programs.
Remove the TF card safely
When the device is shutdown, you can remove the TF card at any time;
when the MID is on power, pls firstly uninstall the storage card, in order
to avoid any damage to the card.
Page 30

30
1) Select setting, open sett ing – application;
2) Select “storage”;
3) Select “delete”, the TF card program will be deleted.
After then, you can remove the TF card safely.
Delete the content from MID’s mass storage or TF card.
Select this option can permanently delete the data from mass storage or TF
card, in order to release space for MID running.
4.9 Language & keyboard settings
You could select the language and the keyboard by using the “Language
& keyboard settings”
Select language. When click select language. The language will show for
your choice.
User dictionary When click user dictionary. You coul d get a word list
which you add into the dictio nary. Touch the word to revise or delete the
operation. Click the menu, and choose add to add the new word.
Android keyboard setting. It fit for the screen keyboard of the MID. The
auto-capitalization function is only used in the English keyboard.
Sound on key press. Choose this item. There will be a sound when you
click the screen keyboard.
Popup on key press. Cancel choose this item. You could prevent the
keyboard show the big key icon when you touch the key.
Touch to correct words. When y ou touch every word, and the key board
have other suggestion for the word. The system will show a underline
under the word. Cancel this item to stop this function
Auto-capitalization. Click this item. When you use the screen keyboard.
The operate will change the fist letter which after the full point into
capitalization.
Show settings key. Choose this item to open the dialog box to choose if
you want to add the function of show setting key in the keyboar d( You
could execute the operation only when you install the keyboard or other
input method. And if want to show or hide the setting key .
Input language. Click this item to open the language list for your choice.
Show suggestion. Click this item, The operate will show the suggested
words while typing.
Auto-Complete .Spacebar and punctuation automatically insert
highlighted word
Using screen keyboard. You could type the words by screen keyboard.
The keyboard will be auto opened with some application. But in some
Page 31

31
application, only could open the keyboard when you touch the words
which you want to be revised.
1. If there are some word in the word field. The operate will set the
insertion point in the place wh ich you touch. And show the label of
insertion point. You could move the insertion point by this label to choose
the correct location. So that, You could add more words. You al so could
choose one or more words, and copy, cut, paste them.
2. Click the key
. The next letter which you input will change into
capitalization. When you re-click this icon, All the letter in the keyboard
will be changed into capitalization.
3. Click the key
, The dialog box will popup to remind you to change
the input method or set the keyboard.
4. Click the delete key
to click the word in the left of the cursor. After
inputting. Please press to close the keyboard.
Input number, symbol and other character.
Touch and press some key in the first line, don’t move the finger, and then
relax. You could input the black number.
If there is some alternative character, the suspensions point will be show
in the bottom of the key.
Touch the vowel letter or “C”, ”N” or “S” to open a window to move the
vowel letter, or other alternative letter or number.
Click the signal key
to change it between from number and signal.
Click the “ Alt” to check other signal. And click this key again to change
it into the original keyboard.
Page 32

32
Touch and long press the full stop key ( . ) to open a window with
some usual signal.
Touch some key. There will be a enlarge version appear up the keyboard.
If there are some alternative. There will be a suspension point show in the
bottom of the key.
4.10 Date & Time
You could set the way of the date shown. You also could set the date
where you locate. And not get the date from the internet.
Automatic. Cancel this item. You could set the date, time, time zone
yourself. And not get the date from internet
Set date. If you cancel the automatic. The system will open a dialog box
for you to set the date
Select time zone. If you cancel the aut omatic. The system will open a
dialog box for you to set the time zone.
Set time. If you cancel the automa tic. The system will open a dialog bo x
for you to set the time.
Use 24-hour format. Select this item. The system will show 24 hours
format. For example;13;00,but not 1:00 PM
Select date format, Select this item to open the dialog box to set the date
formate.
4.11 About device
Status. Select this item to open the status screen. It include the battery
status, Wifi status, Mobile network type, Bluetooth address, up time.
Battery status. After touch this item. The system will list the procedure
and operate system after last charging. All is list by the electricity
quantity.
Legal information. Click it to get know more information of the legal.
Page 33

33
Model number. The model informati on of the MID
Android version. The information of the opera te sy stem.
Version information. The system will show the information of MID
hardware and operate system.
5. Application
In order not to occupy the resourc e . The MID only install part of the
procedure. Such as video, player, photo and so on. Customer could
download the procedure prom the market.
6. Answer the question of the MID
• MID Can’t be turned on.
1.Check the quantity of electronic
2.Connect the adaptor with the MID to double check it.
3.If you still can’t turn on the MID after charging. Please connect the
sales.
4.Please press the reserve key. And then press the power key to turn it
on.
• The screen is flash or the MID is switch off after the picture is appear.
1. Low battery, Please charge it.
• Can’t hear by the earphone
1.Please check the volume setting is 0.
2.Please check if the music file is broke n. Please try to play other music
to confirm that. If the file is broken. There may be some noise.
• Can’t copy the file. And can’t play the music etc.
1. Please confirm if the computer and the player have been
connected.
2. Please check if the memory space is full.
3. Please check if the USB cable is broken.
4. If the connection with the USB cable is stopped.
• System error
1. Turn on the MID after reserve it.
2. Restore the factory settings.
Page 34

34
FCC following:
Any changes or modifications not expressly approved by the party responsible
for compliance could void the user's authority to operate this equipment.
This device complies with Part 15 of the FCC Rules. Operation is subject to the
following two conditions:
(1) This device may not cause harmful interference, and
(2) this device must accept any interference received, including interference that
may cause undesired operation. This device and its antenna(s) must not be
co-located or operating in conjunction with any other antenna or transmitter.
NOTE: This equipment has been tested and found to comply with the limits
for A Class B digital device, pursuant to Part 15 of the FCC Rules.
These limits are designed to provide reasonable protection against harmful inter
ference in a residential installation.
This equipment generates, uses and can radiate radio frequency energy and,
if not installed and used in accordance with the instructions,
may cause harmful interference to radio communications. However,
there is no guarantee that interference will not occur in a particular installation.
If this equipment does cause harmful interference to radio or television
reception, which can be determined by turning the equipment off and on,
the user is encouraged to try to correct the interference by one or
more of the following measures:
-- Reorient or relocate the receiving antenna.
-- Increase the separation between the equipment and receiver.
-- Connect the equipment into an outlet on a circuit different
from that to which the receiver is connected.
Consult the dealer or an experienced radio/TV technician for help.
FCC RF Exposure requirements:
This equipment complies with FCC radiation exposure limits set forth for an
uncontrolled environment.
The device can be used without any restrictions.
The highest SAR value for this device as reported to FCC is: 0.396W/kg (Body,
direct touch)
 Loading...