

Page 1
ViewSonic®
笔记本电脑
VB1200
使用手册
ViewSonic
Page 2

使用手册
Copyright © ViewSonic Corporation, 2004。保留所有权利。
Vie wSo nic 和三鸟徽标是 ViewSonic Corporation 的注册商标。
Microsoft、Windows、Microsoft Internet Explorer 徽标图形、Outlook、DirectX、DirectSound、Microsoft Word、
MSN、Excel 和 Windows 徽标是 Microsoft Corporation 在美国和/或其它国家的注册商标或商标。
Macintosh 是 Apple Computer, Inc. 的注册商标。
VESA 是视频电子标准协会 (VESA) 的注册商标。
Intel、Pentium 和 Celeron 是 Intel Corporation 的注册商标。Centrino 是 Intel Corporation 的商标。
NERGY STAR 是美国环境保护署 (EPA) 的注册商标。作为 ENERGY STAR
E
Corporation 已测定此产品符合 E
公司名称和商标分别属于各自公司所有。
免责声明:ViewSonic Corporation 将不对此文档中出现的技术、编辑错误或疏忽负责;也不对因提供本材
料、或因操作或使用此产品而引发或间接导致的损失负责。
鉴于产品的不断改进,ViewSonic Corporation 保留变更产品规格的权利,恕不另行通知。本文档中的内容
可能有所变更,恕不另行通知。
未经 ViewSonic Corporation 事前书面授权,本文档不得以任何目的、任何方式进行拷贝、复制或传播。
NERGY STAR
®
关于能效的规定。
产品注册
®
的合作伙伴,ViewSonic
为了能满足您日后的需要,并且使您能接收到所有最新发布的产品信息,请通过互联网注册您的产品,网
址为:www.viewsonic.com。您也可打印注册表,填好后邮寄或传真给 View Son ic。
请您记录
产品名: ViewBook VB1200S
型号: VS10227
序列号: _________________________
购买日期: _________________________
文档制作日期: 3-25-04
产品寿命结束后的处置方法
Vie wSo nic 关注环保问题。请在产品使用寿命结束时对其进行正确处理。您当地的废品处置公司会提供有
关正确处理方法的信息。
注意:产品规格如有变更,恕不另行通知。
页
II
ViewSonic
Page 3
使用手册
标准
本手册通篇采用下列标准:
¢ 以粗体显示的笔记本电脑一词指您购买的笔记本电脑。
¢ 在本文档中,粗体字还用于突出显示重要信息。
¢ 引用笔记本电脑屏幕上显示的消息时,给该消息加框。
¢ 需要格外注意的信息加有黑框,之前有“注意:”或“警告:”
¢ 通常在执行分步指示后,会要求您:
按 Esc 键
即您应按键盘左上角的
键。
页
III
ViewSonic
Page 4

目录 使用手册
目录
第 1 章 开始前.................................................................................... 1-1
1.1 检查包装内容 ..............................................................................................1-1
1.2 审视计算机 ..................................................................................................1-2
1.3 三个系统 LED .............................................................................................1-6
1.4 四个状态 LED .............................................................................................1-8
1.5 三个系统按钮 ..............................................................................................1-9
1.6 PCMCIA 弹出柄注意事项 .......................................................................1-10
1.7 四合一插槽舱门注意事项.........................................................................1-11
1.8 <FN> 键.....................................................................................................1-12
第 2 章 电池........................................................................................ 2-1
2.1 电池组..........................................................................................................2-1
2.2 电池插槽 ......................................................................................................2-1
2.3 给电池组充电 ..............................................................................................2-2
2.4 问答集 ..........................................................................................................2-2
2.5 电池 LED.....................................................................................................2-4
2.6 电池维护 ......................................................................................................2-4
2.7 电量消耗 ......................................................................................................2-5
2.8 降低电量消耗 ..............................................................................................2-5
2.9 取出插槽 A 中的电池组 ............................................................................2-6
2.10 插入插槽 B 中的电池组 ............................................................................2-7
第 3 章 内存........................................................................................ 3-1
3.1 拆卸内存模块 ..............................................................................................3-2
第 4 章 MINI-PCI 模块(可选)..................................................... 4-1
4.1 拆卸 MINI-PCI 模块 ...................................................................................4-2
附录 A - 机构法规须知...................................................................... A-1
附录 B - 环境...................................................................................... B-1
页
IV
ViewSonic
Page 5
使用手册
第
请先阅读此部分,然后再开始使用计算机。
1
章 开始前
开始前
1.1
您的笔记本电脑包装中应包含下列物品:
检查包装内容
• 笔记本电脑
• 软件恢复光盘
• 使用手册
• 保修卡
注意: 应保留出厂原始包装箱和包装材料,以备发回设备进行维修之需。
ViewSonic
页
1-1
Page 6
开始前 使用手册
1.2
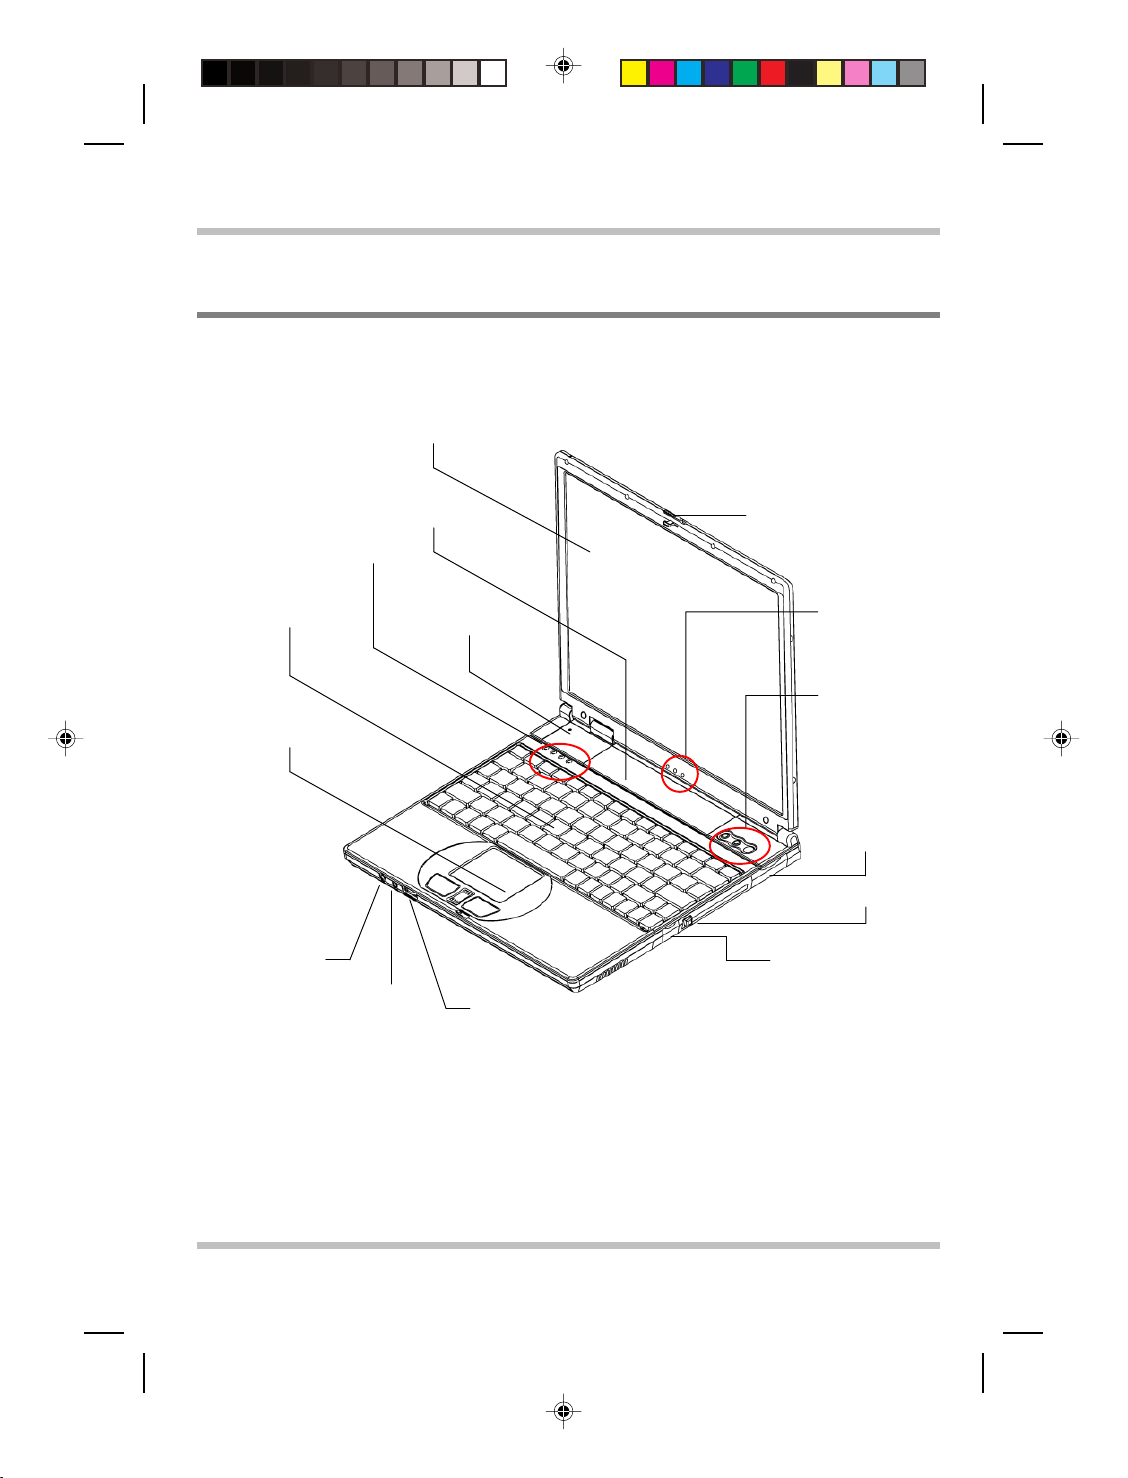
审视计算机
开始使用计算机之前,您需要熟悉所购笔记本电脑的主要部件和接口:
盖锁
三个
系统 LED
三个
系统按钮
USB 舱门
键盘
触控板
LCD 屏幕
电池组
(插槽 A 中)
四个
状态 LED
盖开关
页
ViewSonic
1- 2
麦克风
耳机
音量旋钮
全景视图
PCMCIA 插槽舱门
IEEE1394 舱门
Page 7
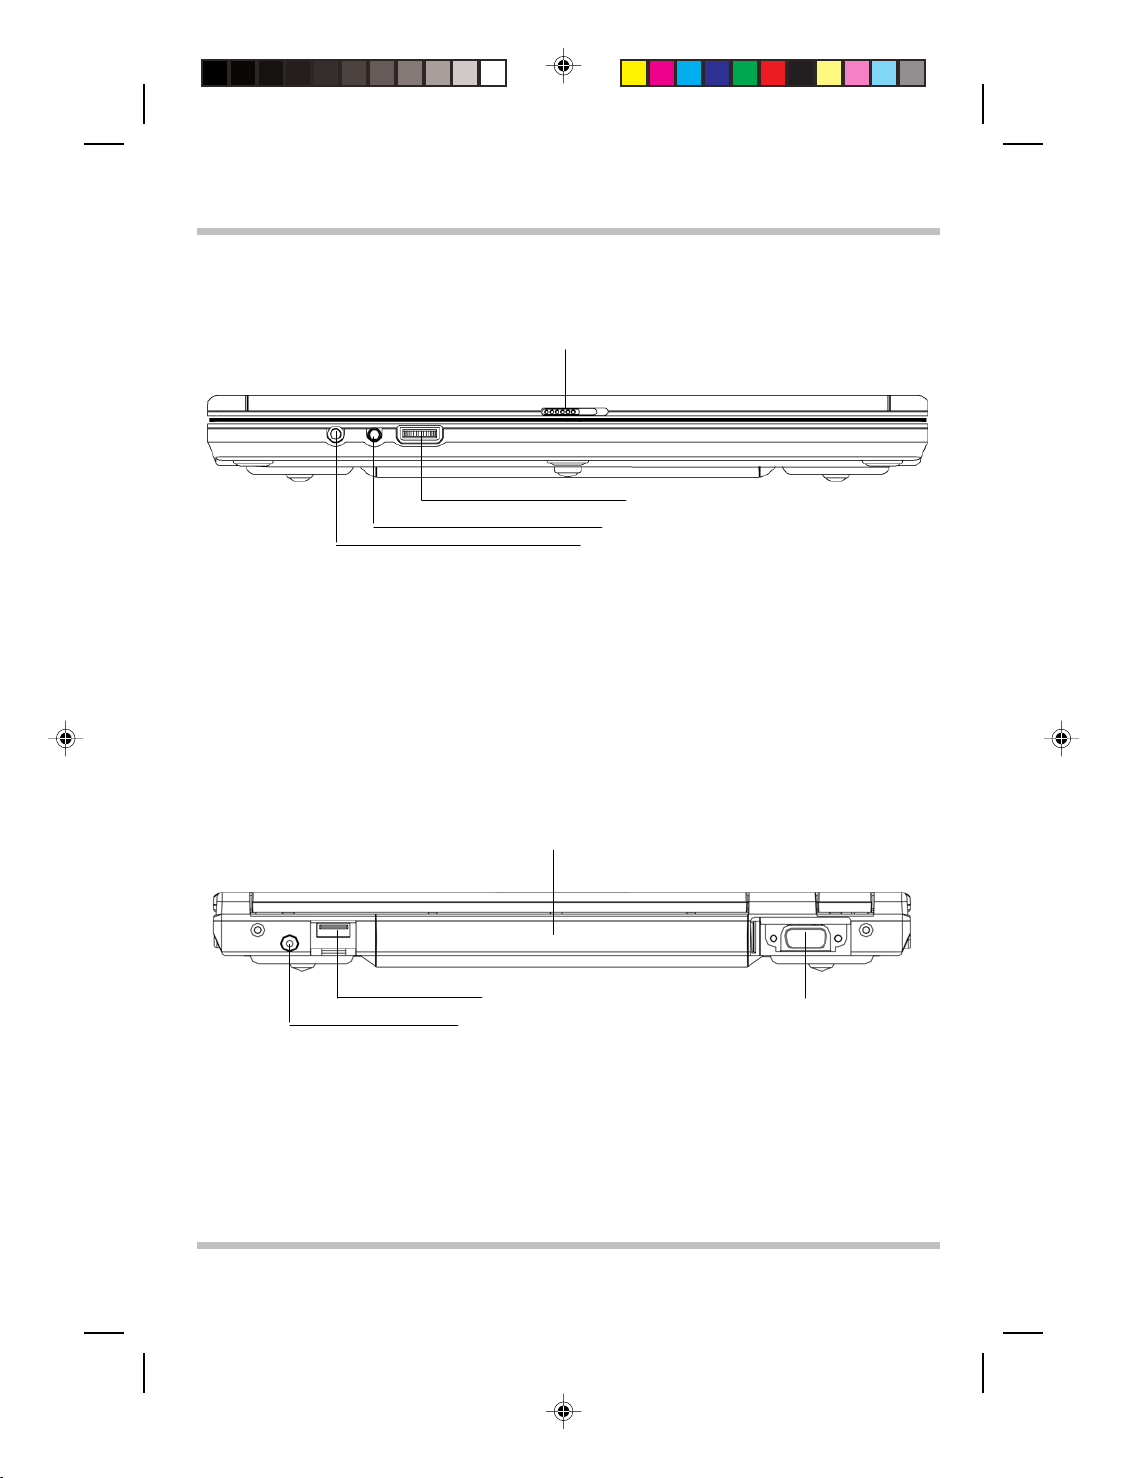
使用手册
盖锁
开始前
音量旋钮
耳机
麦克风
前视图
插槽 A 中的电池组
USB 端口
直流输入
VGA 端口
后视图
ViewSonic
页
1-3
Page 8
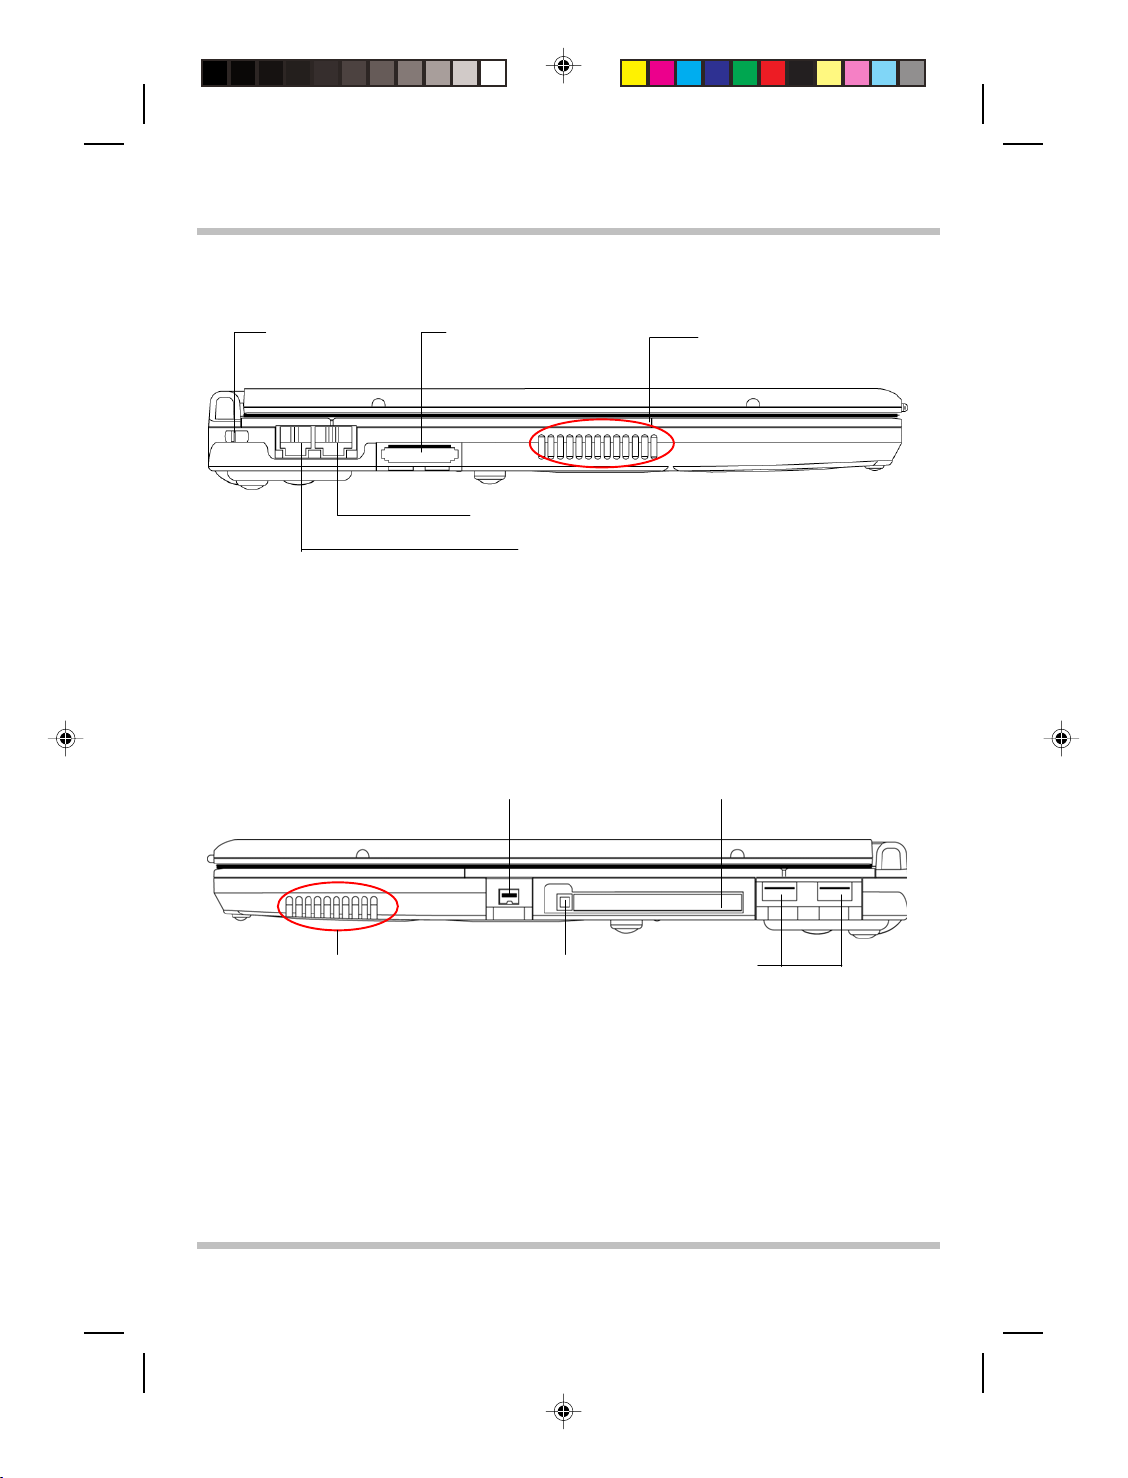
开始前 使用手册
Kensington 锁孔
MS/SD-IO/SD/XD 卡四
合一插槽
通风栅
RJ45 (LAN) 连接器
RJ11(传真/调制解调器)连接器
左视图
IEEE1394 端口
PCMCIA 插槽舱门
通风栅
弹出柄
USB 端口
右视图
页
ViewSonic
1- 4
Page 9
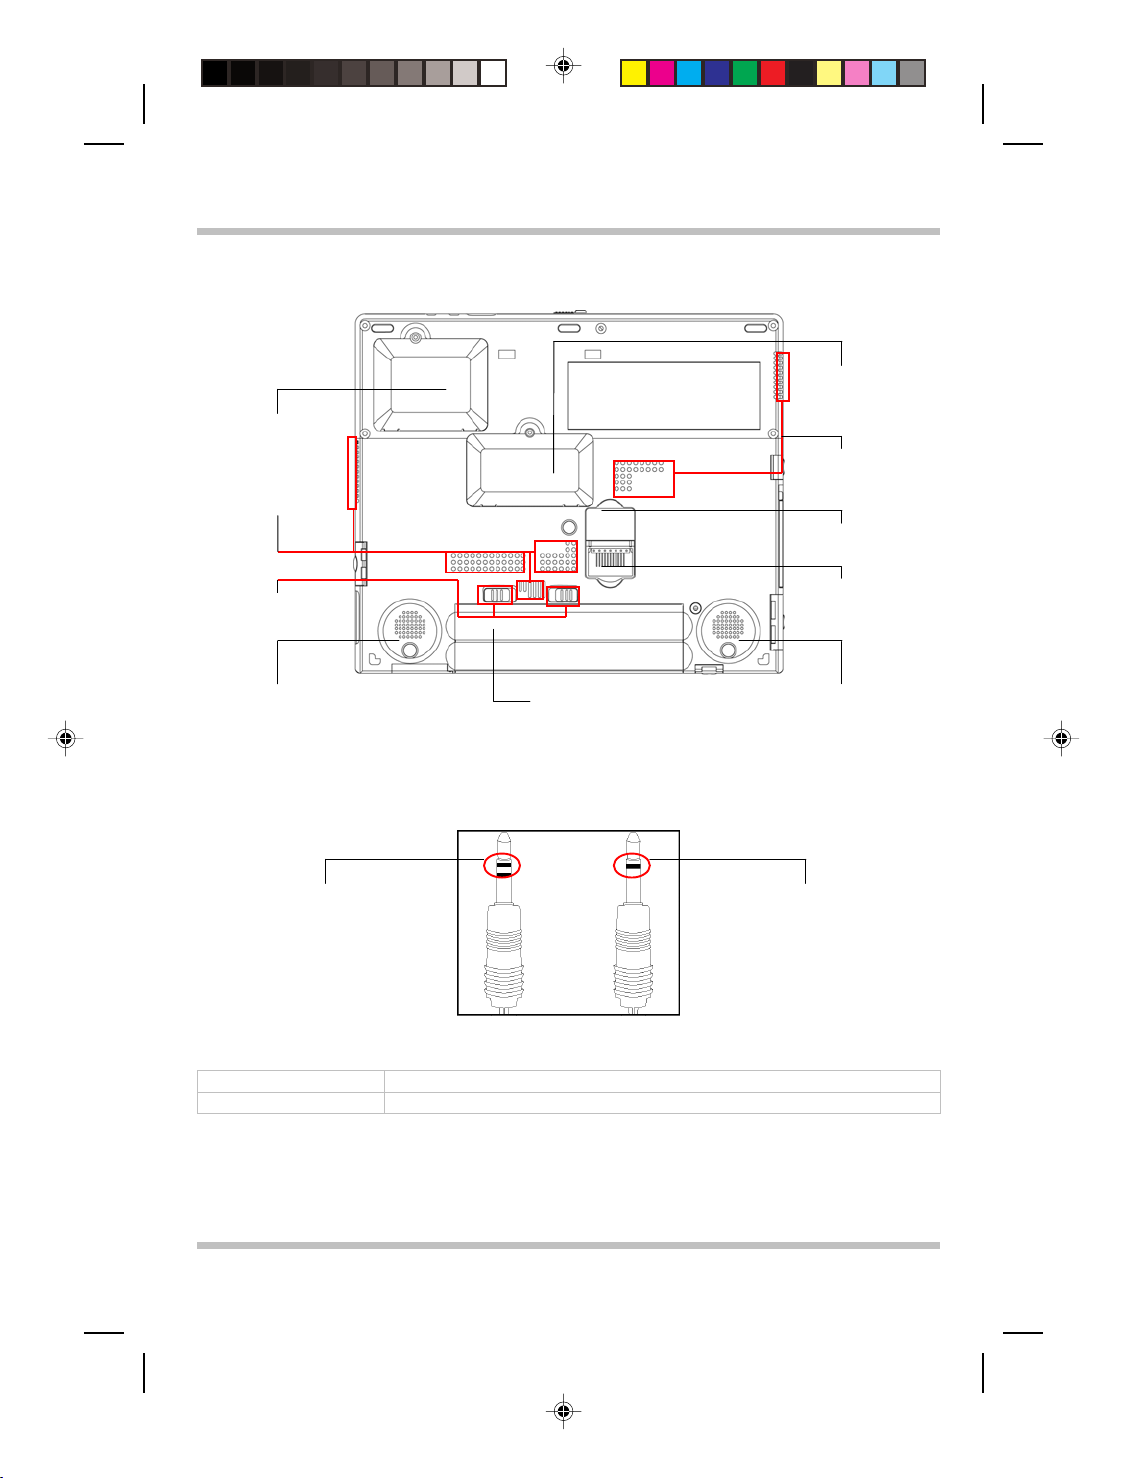
使用手册
Mini-PCI 舱门
通风栅
内存舱门
插槽 B 电池组舱门
通风栅
开始前
插槽 B 电池组的
连接器
中电池组锁
插槽 A
扬声器
插槽 A 电池组
底视图
立体声连接器口
单声道连接器口
两种类型的音频插口
耳机插孔 系统的耳机插孔只支持立体声插头。
麦克风插孔 系统的麦克风插孔既支持立体声插头,又支持单声道插头。
扬声器
ViewSonic
页
1-5
Page 10
开始前 使用手册
1.3
三个系统
LED
电源开 LED
下面介绍该 LED 在不同情况下如何显示:
关 系统关机或处于休眠模式。
绿 系统处于满负荷运行状态。
闪烁绿色 系统处于待机模式。
黄色 电池组电量已消耗到只剩 10%,且系统处于满负荷运
行状态。
闪烁黄色 电池组电量已消耗到只剩 10%,且系统处于待机模式。
琥珀色 电池组电量已消耗到只剩 3%,且系统处于满负荷运行
状态。
闪烁琥珀色 电池组电量已消耗到只剩 3%,且系统处于待机模式。
电池组 LED
下面介绍该 LED 在不同充电情况下如何显示:
琥珀色 正在给“插槽 A 电池”充电:快速充电或预充电。
闪烁琥珀色 “插槽 A 电池”错误。
绿 正在给“插槽 B 电池”充电:快速充电或预充电。
闪烁绿色 “插槽 B 电池”错误。
关 两个电池组都未处于充电状态。
无线 LED
激活无线 LAN 功能时,该 LED 将变亮。
页
ViewSonic
1- 6
Page 11
使用手册
开始前
注意: 这三个系统 LED 位于 LCD 显示器屏幕底部 LCD 显示器面板的左/右折
叶之间的中部。在 LCD 面板后也能看见这三个系统 LED。具体位置请参
阅第 1.2 章中的全景视图。
有关待机和休眠模式的详细信息,请参阅 Microsoft Windows 操作系统控制
面板中的电源选项(对于 Windows 系统)。
ViewSonic
页
1-7
Page 12
开始前 使用手册
1.4
四个状态
LED
HDD 访问 LED
系统访问 HDD 驱动器时,此 LED 将变亮。
大写锁定 LED
键盘处于大写锁定模式时,此 LED 将变亮。在此模式下,键入的所有字符
都为大写形式。
滚动锁定 LED
键盘处于滚动锁定模式时,该 LED 将变亮。在此模式下,可于使用箭头滚
动键滚动文档时锁定光标位置。
数字锁定 LED
键盘处于数字锁定模式时,此 LED 将变亮。在此模式下,可使用嵌入式数
字键盘。
注意: 这四个状态 LED 位于键盘左上方。具体位置请参阅
景视图。
第
1.2 章中的全
页
ViewSonic
1- 8
Page 13
使用手册
开始前
1.5
三个系统按钮
电源按钮
此电源按钮可由用户编程。有关对此按钮进行编程的详细信息,请参阅
Windows 系统的控制面板中的电源选项。
Internet 按钮
要激活 internet 功能,请按此按钮。
电子邮件按钮
要激活电子邮件功能,请按此按钮。
注意: 这三个系统按钮位于键盘右上方附近。具体位置请参阅
视图。
第
1.2 章中的全景
ViewSonic
页
1-9
Page 14

开始前 使用手册
1.6 PCMCIA
弹出柄注意事项
“PCMCIA 卡”柄缩入系统单元
请遵守下列安全措施:
• 确保在任何情况下 PCMCIA 弹出柄均不会伸出,除非要使用该柄弹出 PCMCIA
卡。伸出的柄易受外部干扰,如喷墨打印机或外接键盘的撞击。
• 未将 PCMCIA 卡插入 PCMCIA 插槽时,请确保使用随此笔记本电脑提供的
“PCMCIA 插槽舱门”盖住此插槽。此“PCMCIA 插槽舱门”的用途是防止未
插入 PCMCIA 卡时异物通过此插槽进入系统单元内部。
“PCMCIA 卡”柄伸出系统单元。
页
ViewSonic
1- 10
Page 15

使用手册
开始前
1.7
四合一插槽舱门注意事项
四合一插槽舱门关闭。
请遵守下列安全措施:
• 确保在任何时候四合一插槽舱门均处于关闭状态,除非要插入或取出这些类型的
卡(MS 卡、SD-IO 卡、SD 卡、XD 卡)。完成插入、取出操作后,请立即关
闭此插槽舱门。开启的插槽舱门向外伸出,易受外部干扰,如喷墨打印机或外接
键盘的撞击。
• 关闭插槽舱门可有效防止异物通过此插槽进入系统单元,尤其是在未插入这些卡
(MS 卡、SD-IO 卡、SD 卡、XD 卡)时。
四合一插槽舱门开启。
ViewSonic
页
1-11
Page 16

开始前 使用手册
1.8 <Fn>
<Fn> 功能键位于键盘的左下角。将该键与其它键组合使用可激活某些预定义功能。
要激活这些功能,请按住 <Fn> 和下述键:
键
无线 LAN
要激活无线 LAN 功能,请按此组合键 (Fn+F2)。
显示切换
要在“仅 LCD”、“仅 CRT”及“同时使用 LCD/CRT”间切换,请按此
组合键 (Fn+F3)。
警告开关
按此组合键 (Fn+F6) 可关闭和打开警告音。
增加亮度
按此组合键 (Fn+F8) 可增加 LCD 显示器的亮度。
减小亮度
按此组合键 (Fn+F9) 可减小 LCD 显示器的亮度。
页
ViewSonic
1- 12
Page 17

使用手册
电池
第 2 章 电池
2.1
本笔记本电脑支持高能可充电锂离子 (Li-Ion) 及聚合物电池组。在启用 Windows
电源选项
HDD、内存等)及系统用度(尤其是 I/O 活动)的差异可能会对运行时间长短产生
很大影响。
2.2
您的笔记本电脑支持双电池运行。有两个电池插槽。
于显示器面板的左/右折叶之间。
插槽
电池组
时,充满电的 Li-Ion 电池组通常可支持约 3 小时的运行。不过,配置(CPU、
电池插槽
A 附近。
插槽
A(使用 Li-Ion 电池)位
插槽
B(使用聚合物电池)位于系统单元底部,在
注意:
有关插入和取出电池的详细信息,请参阅第 2.9 章和第 2.10 章。
ViewSonic
页
2-1
Page 18

电池 使用手册
2.3
您的笔记本电脑支持联机和脱机充电。请按以下步骤为电池充电:
电池组充电过程中,其电池 LED(位于显示器面板底部)将变亮,颜色呈琥珀色或
绿色。有关 LED 的详细信息,请参阅
耗尽电量的
注意:如果系统中有两个电池组,将先为
2.4
给电池组充电
• 确保笔记本电脑中安装了电池组。
• 将交流适配器的一头连接到笔记本电脑,另一头连接到电插座。
插槽
A
电池组
完毕后,系统会开始为
第
1.3 章。笔记本电脑处于关机状态时,为已
(使用 Li-Ion 电池)充电需要三个小时。
插槽
A
插槽
B
电池组
电池组
充电。
充电。
插槽
A
问答集
电池组
充电
问: 充电时感觉触控板附近很热。这种情况正常吗?
答: 充放电期间,电池会发热。笔记本电脑内部有保护电路,可防止过热。
用户不必担心。
问: 电池工作时间达不到标示时间。这是为什么?
答: 电池对热敏感,只有在电池及其环境温度保持在 15-25°C (59-77°F) 范
围之内时,才能充至最大电量。充电过程中温度与此范围的偏离越大,
电池充满的可能性便越小。要给电池组充满电量,用户需要拔下交流适
配器,以使其降温。待其冷却后,插入交流适配器,再次开始充电。
页
2- 2
ViewSonic
Page 19

使用手册
电池
问: 有几天没有使用备用电池。即使已将其充满电,所余电量却不如新充电
的电池多。这是为什么?
答: 不充电时,电池会自行放电(Li-Ion 电池每天放电 1%)。为确保电池
组充满电量,请在使用前充电。应尽可能始终将电池置于笔记本电脑中
并连接交流适配器。
问: 有几个月没有使用备用电池。在给它充电时遇到麻烦。
答: 如果使电池组自行放电的时间过久(如三个月以上),电池电压会变得
过低,而需要进行预充电(将电池电压升到足够高的水平),才能自动
(仅限 Li-Ion 电池)恢复其正常的快速充电。预充电可能需要 30 分
钟。快速充电通常需要 2~4 小时。
ViewSonic
页
2-3
Page 20

电池 使用手册
2.5
如果安装了两个电池组,而笔记本电脑未连接交流适配器,笔记本电脑将从
B
电源。
为
时,LED 将变亮,颜色呈绿色;两个电池组都未充电时,LED 灭。如果电池有
错误,LED 将闪烁。
注意: 有关电池组 LED 的详细信息,请参阅
2.6
为使电池组保持最大电量,应偶尔使笔记本电脑电池电量耗尽后再充电。
电池
电池组
插槽
A
电池维护
LED
获得电能。
电池组
充电时,LED 将变亮,颜色呈琥珀色;为
插槽
B
电池组
电量耗尽后,系统会自动切换到
插槽
B
第
1.3 章中的电池组 LED。
插槽
电池组
插槽
A 中的
充电
要完全耗尽电池电量,请断开交流适配器,让笔记本电脑消耗掉剩余的电池电量。
要加速耗尽电量,应尽可能多地使用 HDD,并将 LCD 设至最大亮度。电池电
量耗尽后,等待笔记本电脑(尤其是电池)冷却。冷却后的温度应在 15-25°C
(59-77°F) 范围内。然后插入交流适配器,给电池充电。
页
ViewSonic
2- 4
Page 21

使用手册
电池
2.7
最新版 Windows 操作系统 Windows® XP 已整合了最先进的 ACPI (Advanced
C
电池组的电量,建议您抽出一些时间大致了解一下操作系统的电源管理概念。
在 Windows® 操作系统中,可参照笔记本电脑采用的 Windows® 操作系统版本
浏览控制面板中的电源选项。此处不予详细说明。Windows® XP 中的电源选项
又细分为下列几项:
2.8
尽管您的笔记本电脑(还有操作系统)具有节电能力,仍可采取下列措施降低电
量消耗:
注意:
注意: 如果未安装
电量消耗
onfiguration Power Interface)(高级配置电源接口)电源管理方法。为充分利用
• 电源使用方案
• 警报
• 电表
• 高级
• 休眠
降低电量消耗
• 尽可能使用交流适配器。
• 调低 LCD 背景灯的亮度。屏幕过亮会加快电量消耗。
• 尽量使用 HDD 或 PCMCIA 驱动器读写文件,而不使用外接 USB FDD。
插槽
A
门的位置,请参阅第 1.2 章中的底视图。
电池组
插槽
应始终安装在其舱盒中。
B
电池组
,务 请 关 上
插槽
B
电池组
的舱门。欲知此舱
ViewSonic
页
2-5
Page 22

电池 使用手册
2.9
电池组的取出和更换很方便。更换电池组之前,确保正确关闭了计算机。如果要在开
机状态下更换电池组,请确保插入了交流适配器。请按以下步骤取出电池组。
取出插槽 A 中的电池组
c
• 确保已正确关闭了系统。
• 如图所示将系统颠倒过来。
• 将两个电池锁同时向内推,
如 #1(
放大图形
• 使这两个锁保持在非锁定位置。
• 如 #2 所示拉出电池组。
d
)所示。
插槽
A
要插入
电池组
,请反向执行上述步骤。
页
ViewSonic
2- 6
Page 23

使用手册
电池
2.10
可轻松将
电池组。
插入插槽 B 中的电池组
插槽
B
电池组
插入笔记本电脑系统单元的底座中。请按以下步骤插入
• 如图所示将系统颠倒过来。
• 如 #1(
• 如 #2 所示,先对齐 #A1 与 #A2 和
放大图形
#B1 与 #B2,然后向下放入电池组。
)所示打开电池插槽。
要取出
ViewSonic
插槽
B
电池组
• 如 #1 所示滑动电池组。
• 如 #2(
,请反向执行上述步骤。
放大图形
)所示锁定电池组。
页
2-7
Page 24

ViewSonic
Page 25

使用手册
内存
第 3 章 内存
您的笔记本电脑配有可配置的存储单元。有符合行业标准的 JEDEC DDR
S.O.DIMM 空闲内存模块插槽可供内存升级之用,最大可将内存升级至
1280MB。下表列出了所有可能的系统内存配置方式。
目前市场上有售的 DDR S.O.DIMM 有以下两种:PC2100 (DDR266) 和 PC2700
(DDR333)。如果系统同时安装了 PC2100 和 PC2700 S.O.DIMM,则总体速度会
降级,以 DDR266 的速度运行。
总内存容量 系统固有内存 SODIMM 内存
256MB 256MB 0MB
512MB 256MB 256MB
768MB 256MB 512MB
1280MB 256MB 1024MB
用于指示模块安装方向的凹槽
最大 1.25”
ViewSonic
DDR S.O.DIMM
内存模块
页
3-1
Page 26

内存 使用手册
3.1
拆卸内存模块
以下是内存模块的拆卸步骤说明。
凹槽
• 确保系统已正确关机。
• 如图所示将系统翻转倒置。
• 如
#1
所示拆下螺丝。
• 如 #2 所示拆下模块舱门。
• 如 #1 所示按下弹簧锁侧边。
• 内存模块将如 #2 所示弹起。
• 如 #3 所示拆下内存模块。
要插入内存模块,请反向执行上述步骤。
页
3- 2
ViewSonic
Page 27

使用手册
第
您的笔记本电脑配有 Mini-PCI 模块。Mini-PCI 支持无线 LAN 功能。
Mini-PCI
4
章
Mini-PCI
模块
模块
ViewSonic
页
4-1
Page 28

Mini-PCI
模块 使用手册
4.1
拆卸
Mini-PCI
模块
以下是 Mini-PCI 模块的拆卸步骤说明。
凹槽
• 确保系统已正确关机。
• 如图所示将系统翻转倒置。
• 如 #1 所示拆下螺丝。
• 如 #2 所示拆下模块舱门。
• 如 #1 所示按下弹簧锁侧边。
• Mini-PCI 模块将如 #2 所示弹起。
• 如 #3 所示断开两根线缆。注意:有两种
类型的 Mini-PCI 模块。从外观上看,这
两种模块略有不同;尤其表现在线缆的连
接处。
要插入 Mini-PCI 模块,请反向执行上述步骤。
页
4- 2
ViewSonic
Page 29

使用手册
附录
A
附录
A.1
A -
安全须知
谨记:请仔细阅读这些安全须知。
谨记:请保存好本“使用手册”,以备将来参考。
谨记:请在清洁前断开本设备与交流插座的连接。切勿使用液体或喷
雾式清洁剂进行清洁。请使用干净的湿布。
谨记:所使用的壁装插座应位于设备附近,并应便于插拔。
谨记:请防止本设备受潮。
机构法规须知
ViewSonic
谨记:务请将该设备置于可靠的表面上。摔落或跌落可能会给设备带
来严重损害。
警告:外壳上的开孔用于通风,以防止设备过热。切勿遮盖通风孔。
页
A-1
Page 30

附录 A 使用手册
谨记:将设备连接到电源插座前,请检查电源的电压是否适用。
警告:切勿踩踏电源线或在其上放置任何物品。
谨记:应注意设备上标示的所有谨记和警告信息。
警告:如果长时间不使用设备,请断开其与电源的连接,以免受到尖
峰电压的损害。
警告:切勿将任何液体倒入设备的任何孔隙,否则可能引起火灾或遭
到电击。
警告:为确保安全,预指定外的端口、门路和设备只应由合格的维修
人员开启。
谨记:如果发生以下情况之一,应由经授权的技术人员对设备进行检
查:
a. 电源线或插头损坏。
b. 液体渗入设备。
c. 设备暴露于湿度过大的环境中。
d. 设备工作不正常,或无法使之按用户手册的所述工作。
e. 设备摔落或损坏。
f. 设备有明显的破损迹象。
页
ViewSonic
A- 2
Page 31

使用手册
附录
谨记:切勿将设备置于温度低于 -20ºC (-4ºF) 或高于 60ºC (140ºF)
的环境中。否则可能会损坏设备。
A
警告:切勿在雷暴天气下安装调制解调器/电话线路。
警告:切勿将调制解调器/电话插孔安装在潮湿位置,除非该插孔专为
潮湿位置而设计。
警告:除非调制解调器/电话线路已断开与网络接口的连接,否则切勿
触摸未绝缘的调制解调器/电话线或接头。
谨记:请在安装或调整调制解调器/电话线路时小心操作。
警告:请避免在雷电天气下使用调制解调器/电话(非无绳类)。否则
可能会遭到闪电的远程电击。
警告:本计算机内含一个由内置锂电池驱动的实时电路。如果对电池
的更换或处理不当,便存在发生爆炸及受到人身伤害的风险。请不要尝
试将其充电、拆解、浸入水中或弃置于火中。其更换应通过笔记本电脑
授权经销商进行。
ViewSonic
页
A-3
Page 32

附录 A 使用手册
警告:本笔记本电脑中的 CD-ROM/DVD-ROM 采用了激光系统。
a. 为确保正确使用本产品,请仔细阅读相关说明,并将其妥善保存,
以备将来参考。
b. 如果设备需要维修,请与当地维修站联系。
c. 如果未按说明使用控制机构、进行调整或执行步骤,可能会导致
遭受有害辐射。
d. 为避免遭受“激光束”的直接辐射,请不要尝试开启外壳。
谨记:内置 CD-ROM/DVD-ROM 驱动器属 CLASS 1 LASER
PRODUCT (1 类激光产品)。其标签位于 CD-ROM/DVD-ROM 驱动器
外侧,上有以下文字:
CLASS 1 LASER PRODUCT
KLASSE 1 LASER PRODUKT
警告:错误更换电池会产生爆炸危险。请只更换设备生产商推荐的同
型或相当类型的电池。请按生产商的说明处理用过的电池。
Explosionsgefahr bei unsachgemäßen Austausch der Batterie. Ersatz nur
durch denselben oder einem vom Hersteller empfohlenem ähnlichen Typ.
Entsorgung gebrauchter Batterien nach Angaben des Herstellers.
警告:您的笔记本电脑内含一个镍氢或锂离子电池组。如果对电池组
的处置不当,便存在引起火灾或化学灼伤的危险。请不要将其拆解、压
碾、穿孔、外部短接、弃置于水中或火中或暴露于温度超过 60ºC 的
环境中。
页
ViewSonic
A- 4
Page 33

使用手册
附录
A
警告:请非常小心地取放电池组。应避免触碰电池盒连接器的金属端。
谨记:请只使用许可的交流适配器连接您的笔记本电脑。使用错误类
型的交流适配器可能会对您的笔记本电脑造成严重损害。
谨记:该交流适配器可接受的线电压范围为 100V - 240V,并兼容大多
数国际电源。如果您无法确定其是否兼容您所在地的电源,请联系当地
经销商寻求协助。
谨记:为降低火灾风险,请只使用 AWG 26 号或更粗的电信线缆。
谨记:为具备持续的防范火灾风险的能力,请只更换相同类型和额定
值的保险丝。
谨记:如果该计算机销往德国以外地区,请只使用生产商建议的当地
认可的电源线。
ViewSonic
页
A-5
Page 34

附录 A 使用手册
A.2 Agency Notice
Federal Communications Commission Notice
This equipment has been tested and found to comply with the limits for a Class B digital
device, pursuant to part 15 of the FCC Rules. These limits are designed to provide
reasonable protection against harmful interference in a residential installation. This
equipment generates, uses and can radiate radio frequency energy and, if not installed and
used in accordance with the instructions, may cause harmful interference to radio
communications.
However, there is no guarantee that interference will not occur in a particular installation. If
this equipment does cause harmful interference to radio or television reception, which can
be determined by turning the equipment off and on, the user is encouraged to try to correct
the interference by one or more of the following measures:
• Reorient or relocate the receiving antenna.
• Increase the separation between the equipment and receiver.
• Connect the equipment into an outlet on a circuit different from that to which the
receiver is connected.
• Consult the dealer or an experienced radio or television technician for help.
Modifications
The FCC requires the user to be notified that any changes or modifications made to this
device that are not expressly approved by the manufacturer responsible for compliance may
void the user’s authority to operate the equipment.
Cables
Connections to this device must be made with shielded cables with metallic RFI/EMI
connector hoods to maintain compliance with FCC Rules and Regulations.
FCC RF Radiation Exposure Statement
• This transmitter must not be co-located or operating in conjunction with any other
antenna or transmitter.
• This equipment complies FCC RF radiation exposure limits set forth for an
uncontrolled environment. This equipment should be installed and operated with a
minimum distance of 20 centimeters between the radiator and your body.
页
A- 6
ViewSonic
Page 35

使用手册
USA and Canada Safety Requirements And Notices
The FCC with its action in ET Docket 93-62 has adopted a safety standard for human
exposure to radio frequency (RF) electromagnetic energy emitted by FCC certified
equipment. The Intel PRO/Wireless LAN MiniPCI Adapter products meet the Human
Exposure limits found in OET Bulletin 65, 2001, and ANSI/IEEE C95.1, 1992. Proper
operation of this radio according to the instructions found in this manual will result in
exposure substantially below the FCC’s recommended limits.
The following safety precautions should be observed:
• Do not touch or move antenna while the unit is transmitting or receiving.
• Do not hold any component containing the radio such that the antenna is very close or
• Do not operate the radio or attempt to transmit data unless the antenna is connected; if
Use in specific environments:
• The use of wireless devices in hazardous locations is limited by the constraints posed
• The use of wireless devices on airplanes is governed by the Federal Aviation
• The use of wireless devices in hospitals is restricted to the limits set forth by each
Antenna use:
• In order to comply with FCC RF exposure limits, low gain integrated antennas should
• High-gain, wall-mount, or mast-mount antennas are designed to be professionally
Explosive Device Proximity Warning
Warning: Do not operate a portable transmitter (such as a wireless network device) near
unshielded blasting caps or in an explosive environment unless the device has been
modified to be qualified for such use.
Use On Aircraft Caution
Caution: Regulations of the FCC and FAA prohibit airborne operation of radio-frequency
wireless devices because their signals could interfere with critical aircraft instruments.
touching any exposed parts of the body, especially the face or eyes, while transmitting.
not, the radio may be damaged.
by the safety directors of such environments.
Administration (FAA).
hospital.
be located at a minimum distance of 20 cm (8 inches) or more from the body of all
persons.
installed and should be located at a minimum distance of 30 cm (12 inches) or more
from body of all persons. Please contact your professional installer, VAR, or antenna
manufacturer for proper installation requirements.
附录
A
ViewSonic
页
A-7
Page 36

附录 A 使用手册
Canadian Notice
This Class B digital apparatus meets all requirements of the Canadian Interference-Causing
Equipment Regulations.
Avis Canadien
Cet appareil numérique de la classe B respecte toutes les exigences du Reglement sur le
matériel brouilleur du Canada.
Canada Radio Frequency Interference Requirements
This Class B digital apparatus complies with Canadian ICES-003, Issue 2, and RSS-210,
Issue 4 (Dec. 2000).
“To prevent radio interference to the licensed service, this device is intended to be operated
indoors and away from windows to provide maximum shielding. Equipment (or its transmit
antenna) that is installed outdoors is subject to licensing.”
Cet appareil numérique de la classe B est conforme à la norme NMB-003, No. 2, et
CNR-210, No. 4 (Dec. 2000).
“Pour empêcher que cet appareil cause du brouillage au service faisant l’objet d’une
licence, il doit être utilizé à l’intérieur et devrait être placé loin des fenêtres afin de fournir
un écran de blindage maximal. Si le matériel (ou son antenne d’émission) est installé à
l’extérieur, il doit faire l’objet d’une licence.”
European Union
Product with the CE Marking comply with the EMC Directive (89/336/EEC) and the Low
Voltage Directive (73/23/EEC) issued by the Commission of the European Community and
if this product has telecommunication functionality, the R&TTE Directive (1999/5/EC).
Compliance with these directives implies conformity to the following European Norms (in
parentheses are the equivalent international standards and regulations):
• EN55022 (CISPR 22) Electromagnetic Interference
• EN55024 (IEC61000-4-2,3,4,5,6,8,11) Electromagnetic Immunity
• EN61000-3-2 (IEC61000-3-2)-Power Line Harmonics
• EN61000-3-3 (IEC61000-3-3)-Power Line Flicker
• EN60950 (IEC60950) Product Safety
页
A- 8
ViewSonic
Notice
Page 37

使用手册
附录
A
For devices with built-in wireless equipment, the following additional standards apply:
• ETSI301489-17: General Emissions for Radio Equipment
• EN60950: Safety
• ETSI300328-2: Technical Requirements for Radio Equipment
CE Caution: Due to the fact that the frequencies used by 802.11b wireless LAN devices
may not yet be harmonized in all countries, 802.11b products are designed for use only in
specific countries or regions, and are not allowed to be operated in countries or regions
other than those of designated use. As a user of these products, you are responsible for
ensuring that the products are used only in the countries or regions for which they were
intended and for verifying that they are configured with the correct selection of frequency
and channel for the country or region of use. And deviation from permissible settings and
restrictions in the country or region of use could be an infringement of local law and may
be punished as such.
The wireless LAN device can currently be used indoors only in the following departments
of mainland France.
01 Ain 36 Indre 69 Rhône
02 Aisne 37 Indre et Loire 70 Haute Saône
03 Allier 39 Jura 71 Saône et Loire
05 Hautes Alpes 41 Loir et Cher 72 Sarthe
08 Ardennes 42 Loire 75 Paris
09 Ariège 45 Loiret 77 Seine et Marne
10 Aube 50 Manche 78 Yvelines
11 Aude 54 Meurthe et Moselle 79 Deux Sèvres
12 Aveyron 55 Meuse 82 Tarn et Garonne
16 Charente 57 Moselle 84 Vaucluse
19 Corrèze 58 Nièvre 86 Vienne
2A Corse Sud 59 Nord 88 Vosges
2B Haute Corse 60 Oise 89 Yonne
21 Côte d’Or 61 Orne 90 Territoire de Belfort
24 Dordogne 63 Puy du Dôme 91 Essonne
25 Doubs 64 Pyrénées Atlantique 92 Hauts de Seine
26 Drôme 65 Haute Pyrénées 93 Seine St Denis
27 Eure 66 Pyrénées Orientales 94 Val de Marne
32 Gers 67 Bas Rhin
35 Ille et Vilaine 68 Haut Rhin
The wireless LAN device cannot currently be used in any departments of mainland France
other than those listed above.
ViewSonic
页
A-9
Page 38

附录 A 使用手册
Maximum allowable EIRP 802.11b wireless LAN cards in the mainland departments of
France not shown in the table above are as follows: (See the ART website at
www.art-telecom.fr for information on the French overseas territories.)
Frequency Ranges (MHz) Indoors Outdoors
2400 – 2446.5 10 mW Not permitted
2446.5 – 2483.5 100 mW 100 mW on private property
with Ministry of Defense
approval
Japanese Notice
DGT Statement
页
ViewSonic
A- 10
Page 39

使用手册
附录
A
U.S. Regulations Governing the Use of Modems
This equipment complies with Part 68 of the FCC Rules. On this equipment is a label that
contains, among other information, the FCC registration number and R
N
umber (REN) for this equipment. You must, upon request, provide this information to
your telephone company.
If your telephone equipment harms the telephone network, the Telephone Company may
discontinue your service temporarily. If possible, they will notify you in advance. But, if
advance notice is not practical, you will be notified as soon as possible. You will be
informed of your right to file a complaint with the FCC.
Your telephone company may make changes in its facilities, equipment, operations, or
procedures that could affect proper operation of your equipment. If they do, you will be
notified in advance to give you an opportunity to maintain uninterrupted telephone service.
The FCC prohibits this equipment to be connected to party lines or coin-telephone service.
In the event that this equipment should fail to operate properly, disconnect the equipment
from the phone line to determine if it is causing the problem. If the problem is with the
equipment, discontinue use and contact your dealer or vendor.
The FCC also requires the transmitter of a FAX transmission be properly identified (per
FCC Rules Part 68, Sec 68.381 (C) (3)).
inger Equivalence
Japanese Modem Notice
U.K. Modem Compliance Information
This modem is approved by the secretary of state at the Department of Trade and Industry
for connection to a single exchange line of the public switched telephone network run by
certain licensed public telecommunication operators or system connected there to (Direct
exchange lines only, not shared service or 1-1 carrier systems).
页
A-11
ViewSonic
Page 40

附录 A 使用手册
This modem is also suitable for connection to Private Automatic Branch Exchange (PABX),
which return secondary proceeding indication.
If this modem is to be used with a PBX which has extension wiring owned by BT,
connection of the modem to the PBX can only be carried out by BT; or by the authorized
maintainer of the PBX unless the authorized maintainer has been given 14 days written
notice that the connection is to be made by another person; and that period of notification
has expired.
This modem is suitable for use only on telephone lines approved with Loop Disconnect or
Multi-Frequency Dialing Facilities.
Users of this modem are advised that the approval is for connection to the PSTN via the
telephone line interface supplied with it. Connection of a modem to the PSTN by any other
means will invalidate the approval.
There is no guarantee of correct functioning in all circumstances. Any difficulties should be
referred to your supplier.
Some network operators require that intended users of their network request permission to
connect and for the installation of an appropriate socket.
The R
inger Equivalence Number (REN) of this modem is 1. REN is a guide to the
maximum number of apparatus that can simultaneously be connected to one telephone line.
The REN value of each apparatuses is added together, and should not exceed 4. Unless
otherwise marked, a telephone is assumed to have a REN of 1.
This modem is only approved for use of the following facilities:
• Storage of telephone numbers for retrieval by a predator mined code.
• Initial proceed indication detection.
• Automatic calling / automatic answering.
• Tone detection.
• Loud-speaking facility.
This modem is not approved for connection to U.K./private speech-band services. This
modem does not support an automatic re-dial function. Any other usage will invalidate the
approval of your modem, if as a result, it then ceases to confirm to the standards against
which approval was granted. The approval of this modem is invalidated if the apparatus is
subject to modification in any material way not authorized by the BABT or if it is used
with, or connected to external software that has not been formally accepted by BABT.
页
A- 12
ViewSonic
Page 41

使用手册
附录
B
附录
B -
环境
环境
工作温度 :10ºC 至 35ºC。
非工作温度 :-20ºC 至 60ºC。
湿度 :20% 至 80% 非冷凝。
警告: 请不要使笔记本电脑暴露于温度过高或过低(结霜)的环境中。请不要
使之坠地、溅上液体或开启其外壳。否则会损坏笔记本电脑,并导致担
保失效。
ViewSonic
页
B-1
Page 42

附录 B 使用手册
有限担保
ViewBook 产品
有效担保期、担保范围:
自用户购买之日起(以发票或保修卡记载为准),ViewSonic 就已发售的笔记本电脑产品质量
及配套服务作如下担保:
所有应定期更换的消耗性部件(包括但不限于电池)的有限担保期为六(6)个月;主要部件
(包括CPU、内存、硬盘、交流适配器、主板以及服务)的有限担保期为两(2)年;其
他未列出部件的有限担保期为一(1)年。
1.品质性能 ViewSonic担保本产品满足说明书规定之品质或性能。
2.使用安全 在担保有效期内,ViewSonic担保用户不会因为本产品本身质量原因遭受任何人
身损害,ViewSonic担保本产品的正常使用安全。
3.故障维修 在担保有效期内,ViewSonic对本产品及其部件提供免费维修、替换服务。
不在担保范围内的事项:
1. 超出前述担保有效期和担保范围。
2. 本产品适销性和特殊目的的适用性。
3. 用户无法提供发票、保修卡并且不能有效证明在担保期内。
4. 用户提供的发票、保修卡、序列号不一致或被涂改、擦除以及无法辨认。
5. 用户违背本产品说明书造成的产品损坏。
6. 以下原因造成的产品损坏或故障:
a. 意外事故、地震、火灾、水灾、闪电或其他自然灾害、未经授权的产品修改造成的损坏。
b. 被未经ViewSonic授权的人员修复或试图修复过。
c. 本产品售出后因运输造成的损坏。
d. 物理损坏,包括用户移动或安装产品造成的损坏。
e. 产品外部原因所导致的损坏,例如电源波动或断电。
f. 使用不符合ViewSonic.技术规格的代用品或部件所致。
g. 正常磨损。
h. 与产品质量无关的其他原因所致。
i. 任何程序、数据或者可移动存储媒体的损失。
j. 在修复或替换期间发生的软件或数据损失。
页
B- 2
ViewSonic
Page 43

使用手册
7.搬运、安装设置服务费用
8.软件
附录
B
赔偿范围:
VIEWSONIC 的担保责任仅限于承担修复或替换产品的费用。VIEWSONIC 将不负责承担:
1. 因产品质量造成用户之时间、利益、商业机会、商业关系干扰以及其他商业损失,甚至
已建议这些损害的可能性。
2. 任何他方对用户提出的追偿或索赔。
如何获得服务:
1. 有关如何在担保期内获得服务的信息,请与 ViewSonic 客户支持部门联系。既可以拨打
ViewSonic 800-820-3870免费服务热线电话进行咨询或报修,也可以上网
www.viewsonic.com.cn由鸟博士为您提供优质服务。
2. 要想获取担保服务,您需要提供 (a) 产品保修卡;(b) 标有日期、型号的原始购买发票;
(c) 您的姓名、您的地址;(d) 对故障的描述;(e) 产品序列号。
ViewSonic ViewBook 担保 (V1.0) 发布日期: 2004-04-20
ViewSonic
页
B-3
 Loading...