

Page 1
Page 2
Service Manual
ViewSonic P90f-1
Model No. VCDTS23483-1
19” Digital Controlled Color Monitor
(P90f_SM_525 - Rev. 1a – April 2002)
ViewSonic
381 Brea Canyon Road, Walnut, California 91789 USA - (800) 888-8583
Page 3
ii
Copyright
Copyright
2002 by ViewSonic Corporation. All rights reserved. No part of this publication may be
reproduced, transmitted, transcribed, stored in a retrieval system, or translated into any language or
computer language, in any form or by any means, electronic, mechanical, magnetic, optical, chemical,
manual or otherwise, without the prior written permission of ViewSonic Corporation.
Disclaimer
ViewSonic makes no representations or warranties, either expressed or implied, with respect to the
contents hereof and specifically disclaims any warranty of merchantability or fitness for any particular
purpose. Further, ViewSonic reserves the right to revise this publication and to make changes from time
to time in the contents hereof without obligation of ViewSonic to notify any person of such revision or
changes.
Trademarks
ViewSonic is a registered trademark of ViewSonic Corporation.
All other trademarks used within this document are the property of their respective owners.
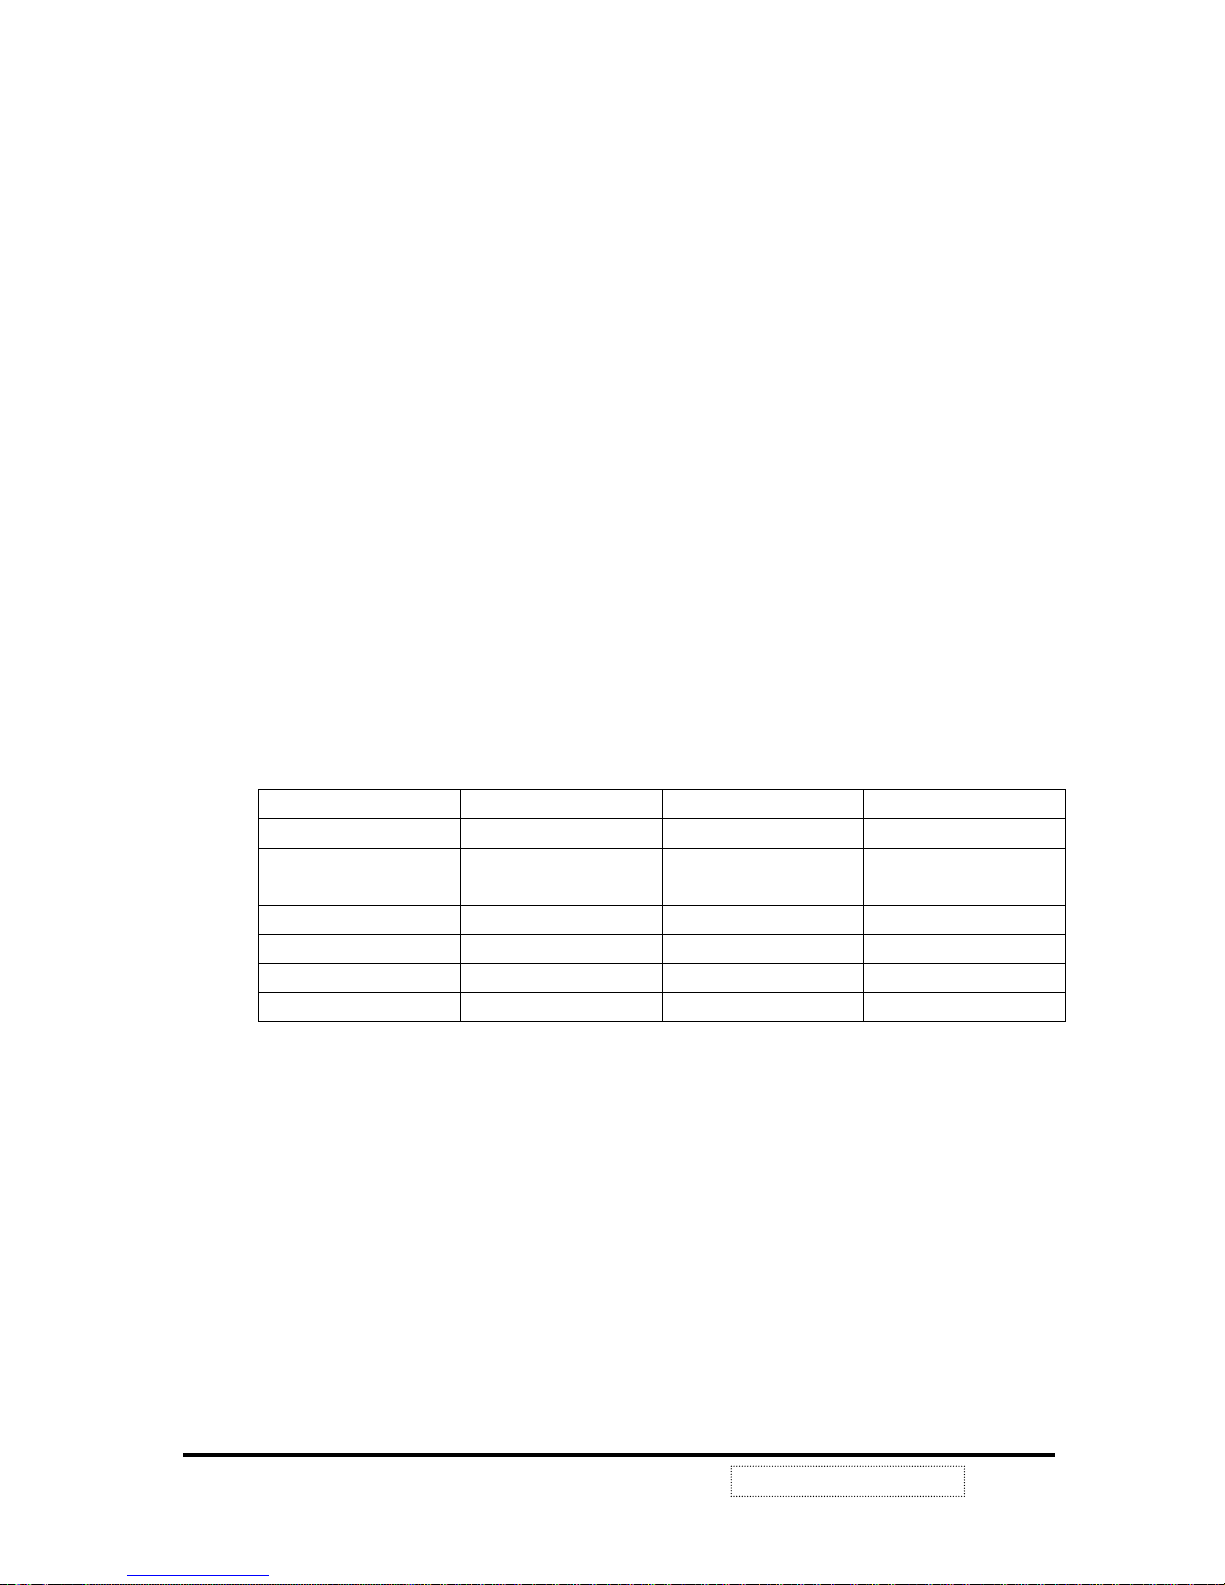
Revision History
Revision Date Description Of Changes Approval
1a 4/17/02 Initial Release DCN-2207 K.Yang
Confidential – Do Not Copy
P90f-1
ViewSonic Corporation
Page 4

TABLE OF CONTENTS
1.
PRECAUTIONS AND NOTICES...........................................................................1~2
2.
SPECIFICATIONS ....................................................................................................3
3.
TIMING CHART ........................................................................................................4
4.
CONTROL LOCATION AND FUNCTIONS ..........................................................5~8
5.
MECHANICAL PARTS & MECHANICAL ASSEMBLY......................................9~10
6
. CONNECTOR PIN ASSIGNMENTS.....
...................................................................11
7.
MONITOR INSTALLATION......................................................................................12
8.
ELECTRONIC CIRCUIT DESCRIPTION ..........................................................13~20
9.
ADJUSTMENT..................................................................................................21~27
10.
TROUBLESHOOTING FLOW CHART............................................................28~34
11.
REPLACEMENT PARTES LIST......................................................................35~57
12.
SCHEMATIC DIAGRAMS ...............................................................................58~61
13.
PCB LAYOUT..................................................................................................62~68
ViewSonic Corporation
Confidential – Do Not Copy
iii
P90f-1
Page 5
ViewSonic Corporation
1
1.
PRECAUTIONS AND NOTICES
1.1
SAFETY PRECAUTIONS
1) Observe all cautions and safety related notes located inside the display cabinet and on the
displaychassis.
2) Operation of this display outside the cabinet or with the cover removed, involves at shock
harzard from the display power supplies. Work on the display should not be attempted by anyone
who is not thoroughly familiar with precautions necessary when working on high voltage
equipement.
3) Do not install, remove or handle the picture tube in any manner unless shatter-proof goggles
are worn. People not so equiped should be kept away while handling picture tube.Keep picture
tube away from body while handling.
1.2 Observe all cautionary and safety related notes located on the chassis, cabinet and display tube.
1.3 Operation of the monitor with the back cover removed presents a potential shock hazard. Only
personnel familiar with the precautions necessary for safe working on high voltage equipment
should attempt to carry out servicing.
1.4
Always wear shatter proof goggles when removing, installing or generally handing the picture tube.
People not so equipped should be kept at a safe distance when any such handing is being
undertaken. Do not handle the picture tube by the neck of deflection coil. Do not carry the picture
tube resting against the body.
1.5
The picture tube is designed and constructed to limit X-Radiation to a safe level during normal
operation. To maintain the required level of protection and safe operation, replacement tubes
must be correctly adjusted and any protective circuits must not defeat.
1.6
IMPORTANT-Safety Tests
After servicing, and before returning the monitor to the user, a thorough safety test must be
carried out to ensure there is no potential shock hazard to any operator(s) using the monitor.
All the following test must be performed. A monitor failing any of these tests should be rejected
and have the problem rectified.
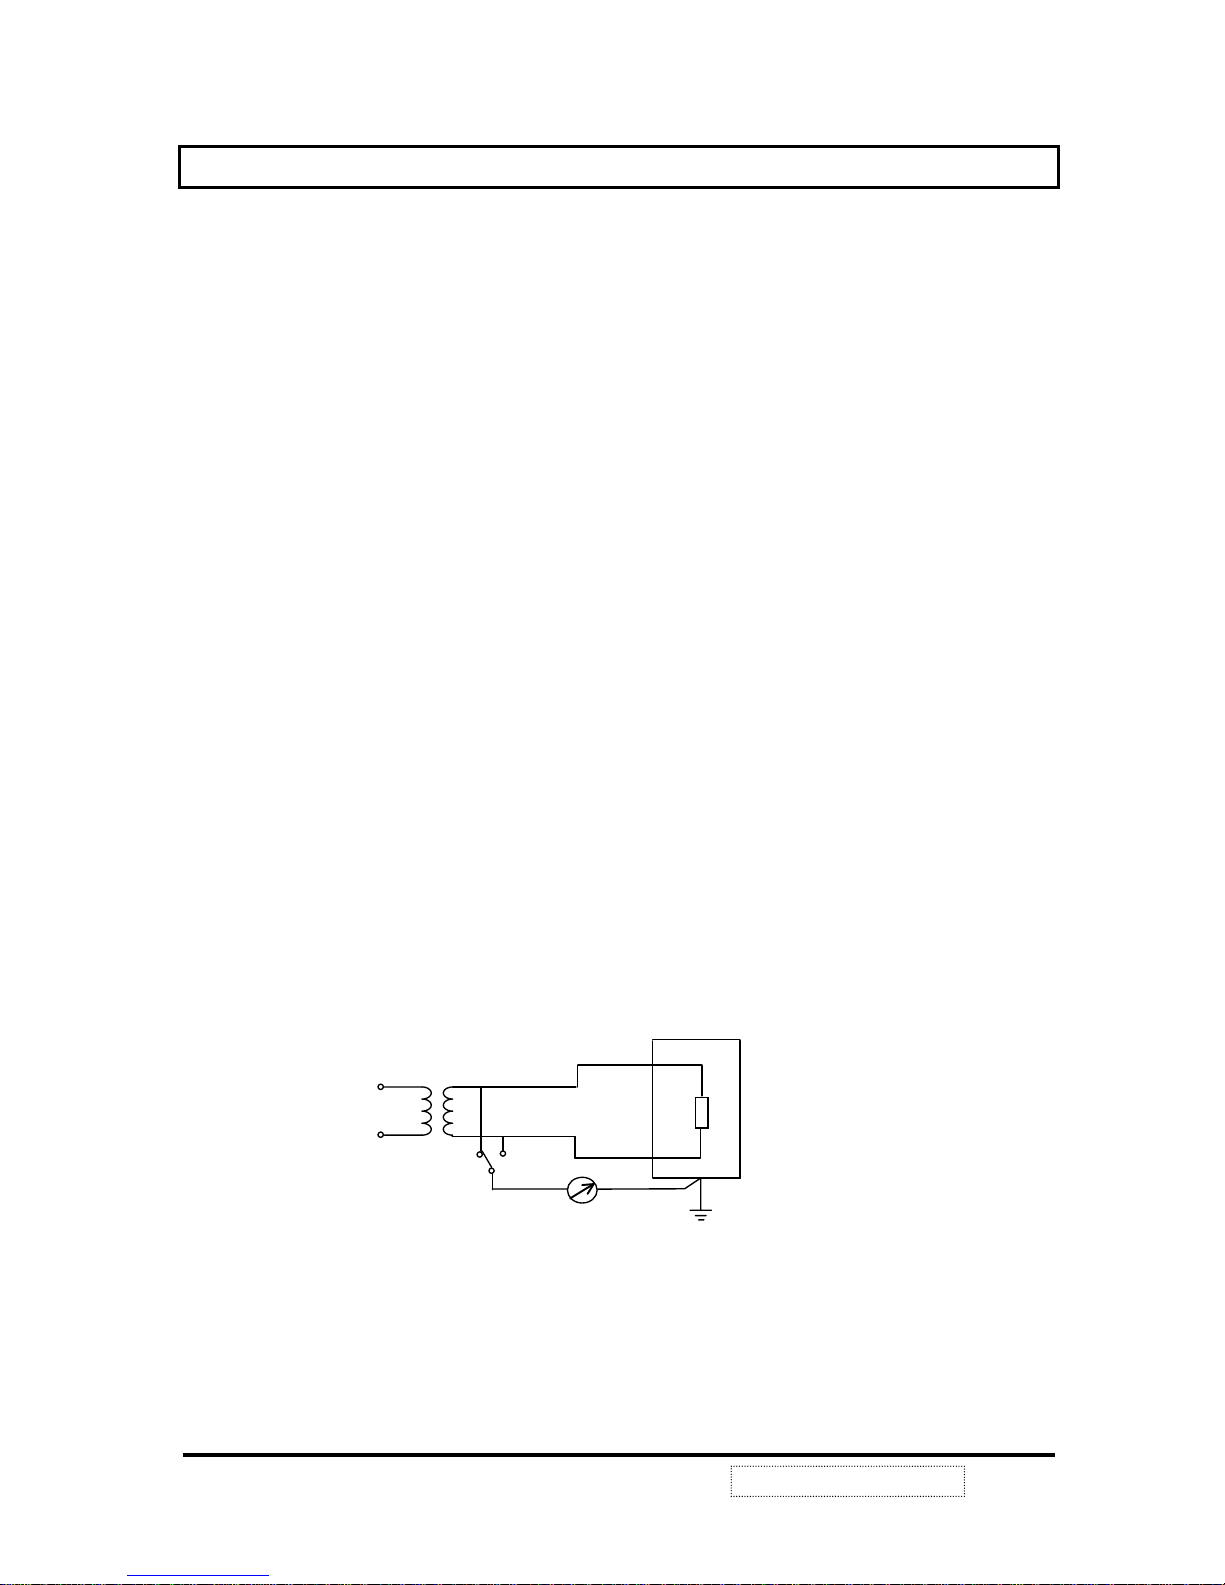
1.7
A.C. Leakage Test
Remove the power sourse. Connent the monitor to the circuir as in figure 1 below. Switch the
monitor on/off switch to on. A reading of less than 3.5mA should obtained (ref. EN60950).
Equipment safety
Earth terminal
Equipment
Under test
Measuring instrument
Isolating
transformer
L
N
Fig.1 Measurement of AC Leakage Current.
Confidential – Do Not Copy
P90f-1
Page 6

2
1.8
Voltage Breakdown Test
Connent the live and neutral connections together. Switch the monitor on/off switch to on Apply
1500VAC RMS or 2250VDC, 50Hz for one minute between live and neutral shorted together and
earth. Ensure no voltage breakdown occurs.
1.9
Earth Resistance/Continuity Test
Measure the resistance between the signal cable metal shell and the earth pin in the A.C. socket.
At a current of 25 amperes the resistance should be less than 100m.
NOTE:A portable appliance tester (PAT) is a suitable instrument to use for the above safety tests.
1.10
H.V. Over Voltage Portection (Required for X-Radiation Safety)
Adjust R176 slowly anti-clockwise until the over voltage protection circuit is activated, and the high
voltage must be less than 33KV at this moment. After test, R176 should be adjusted back to
normal(=26.2KV)
CAPACITOR:
C850 400V 4700PFM CAPACITOR.CERAMIC 5230105501
C851 400V 4700PFM CAPACITOR.CERAMIC 5230105501
C135 250V 33UFM CAPACITOR.ELECTROLYTIC 5214433012
C139 100V 330UFM CAPACITOR.ELECTROLYTIC 5214019612
RESISTOR
R827 1K RESISTOR.VS 5162161020
SEMICONDUCTORS
I101, I803 UC3842N IC LINEAR 6644063111
I301 (RA) TDA9116 SDIP32 IC.LINEAR A.S.D.C. 6644076308
I301 (RB) TDA9113 SDTP-32 IC.LINEAR A.S.D.C. 6644076305
I310 TDA8172 7P IC.LINEAR 6644076000
IA01 NT68F62U IC.LSI MCU FLASH MTP 6647008204
Q801 2SK2648-01 TR FET MOS 6626003208
Q433 2SC5587AS TR NPN HF 6621040405
Q121 2SK2843 TR FET MOS 6626003203
D807 RD20EB2-T1 TR PNP HF. 6615011831
D827 HZ5C1 DIODE ZENER 6615007834
OTHERS
SR801 OSA-SS-212DM5 RELAY 5054613402
F801 250V/3.15A FUSE 5054431539
T801 TPW-697 POWER TRANSFORMER 5061369700
T101 TFB-280L TRAQNS.FLYBACK COLOR 5062628032
V901 (CA) M46QDG423X04 CCRT/DY 5051286325
ViewSonic Corporation
Confidential – Do Not Copy
P90f-1
Page 7
3
2.
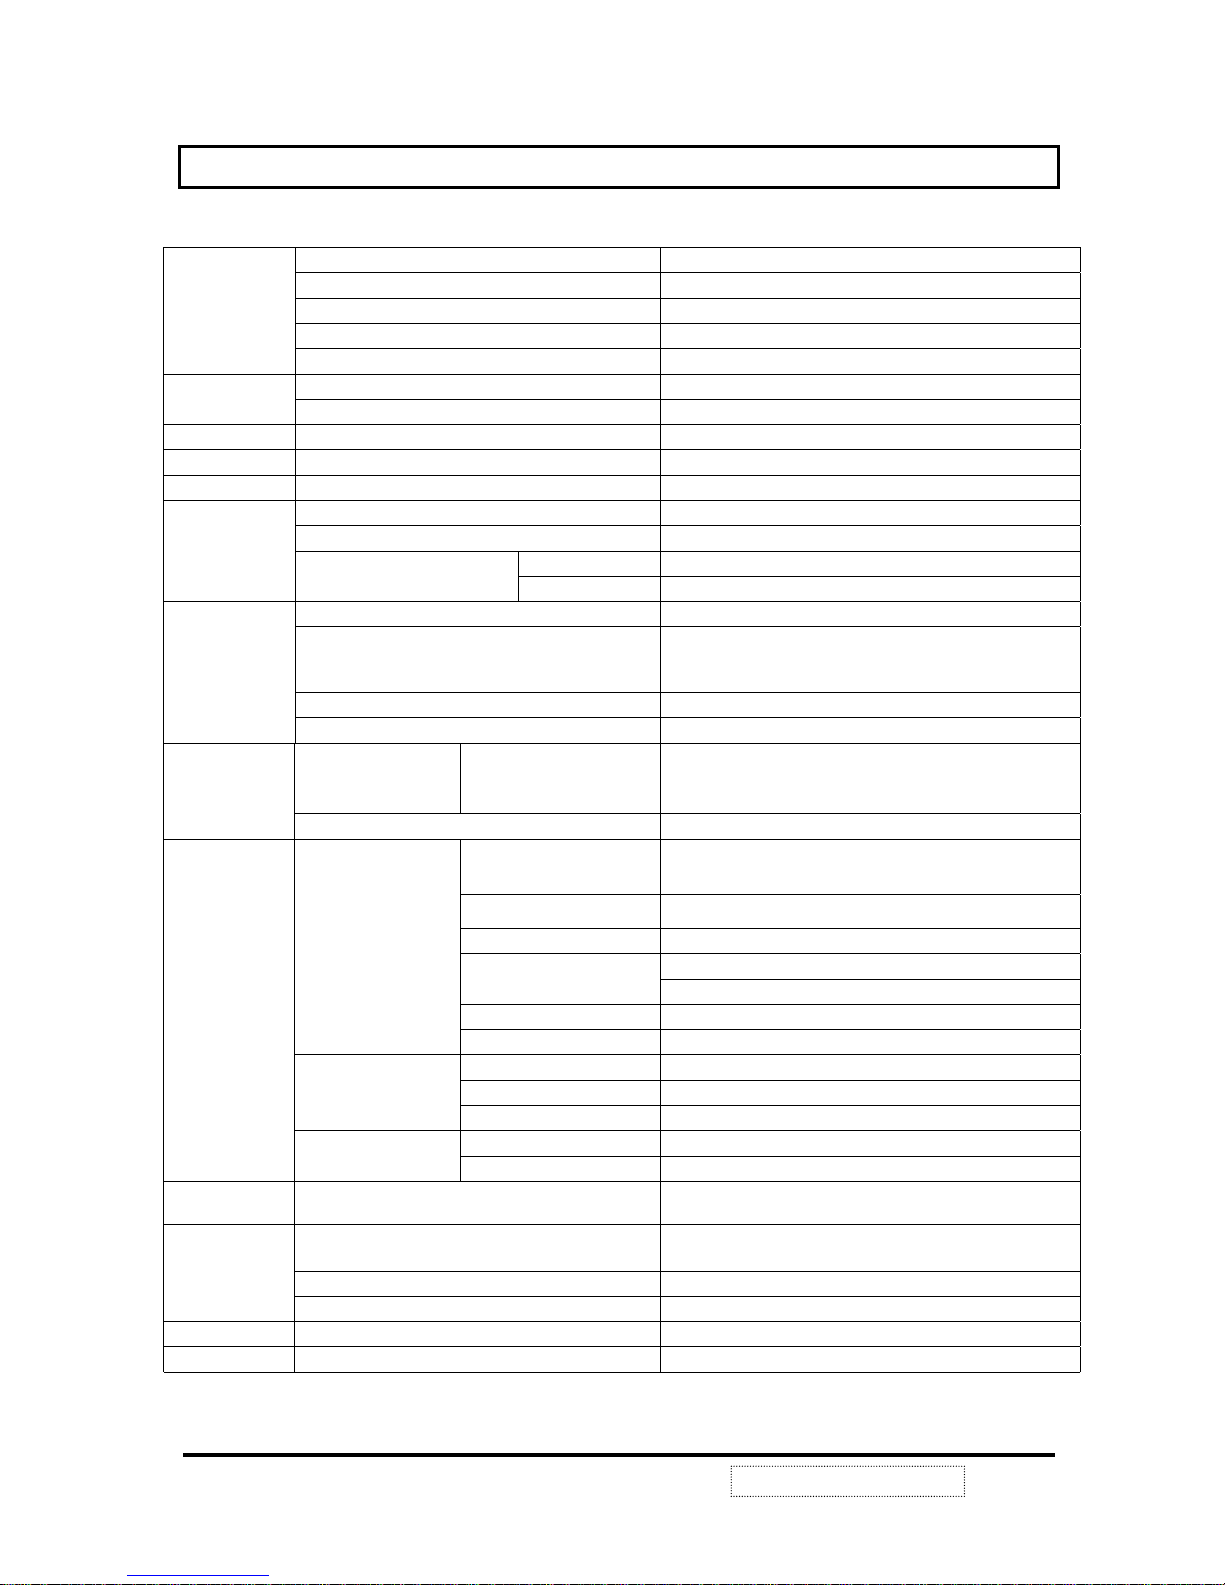
SPECIFICATIONS
ViewSonic Corporation
Confidential – Do Not Copy
Size and deflection angle 19 inch 90 degree
Screen type Flatron
Horizontal pitch / Dot pitch 0.24mm
Surface treatment Anti-static AR coating
CDT
Transmission rate 46%
Horizontal Frequency 30kHz to 110KHz
Scanning
Freq.
Vertical Frequency 50Hz to 180Hz
Video amplifier Applicable pixel rate 265MHz
Resolution
Maximum 1600 x 1200 @85Hz
Modes
Factory preset/User modes 12/ 14
AC input range 100 to 240 Vac
Max. power consumption
<130W
Suspend <4W
Power
Power Management
Off <4W
Power Switch On/off with Led indicator
Up/Down adjustment Key
2 key pads for adjust
Up / down keys are direct access for Contrast
And Brightness adjustment
“2” Key
As a select key/ go to next sub menu
User controls
Auto-size Key Auto-sizing
Signal
connections
Standard Model
1.8 m signal cable with 15Pin D shell miniature
male connector.
Rear
connection
Power input AC socket with 1.8 meter cable
Safety CB,BSM2,VPSB,C-TICT,TUV/S(Argentina)
Emissions EN50081-1
Immunity EN50082-1
ISO9241Paart3 &ISO9241Part8
Ergonomic
ZH1/618
VLMF MPRII
European
Safety UL1950
Emissions FCC class B
USA
X-ray DHHS
Safety EIAJ
Agency
Approvals
Japan
Emissions VCCI category 2
Plug and Play DDC 1/2 B Version 2
Operating Temperature
Storage Temperature
10°C to 40°C
–30°C to +60°C
Operating Humidity 10% to 90%
Environmental
Conditions
Storage Humidity 10% to 95 %
Dimensions W x H x D 475.8 mm x 492.1mm x470.7mm
Weight Kg 24.05Kg (Gross)
P90f-1
Page 8

4
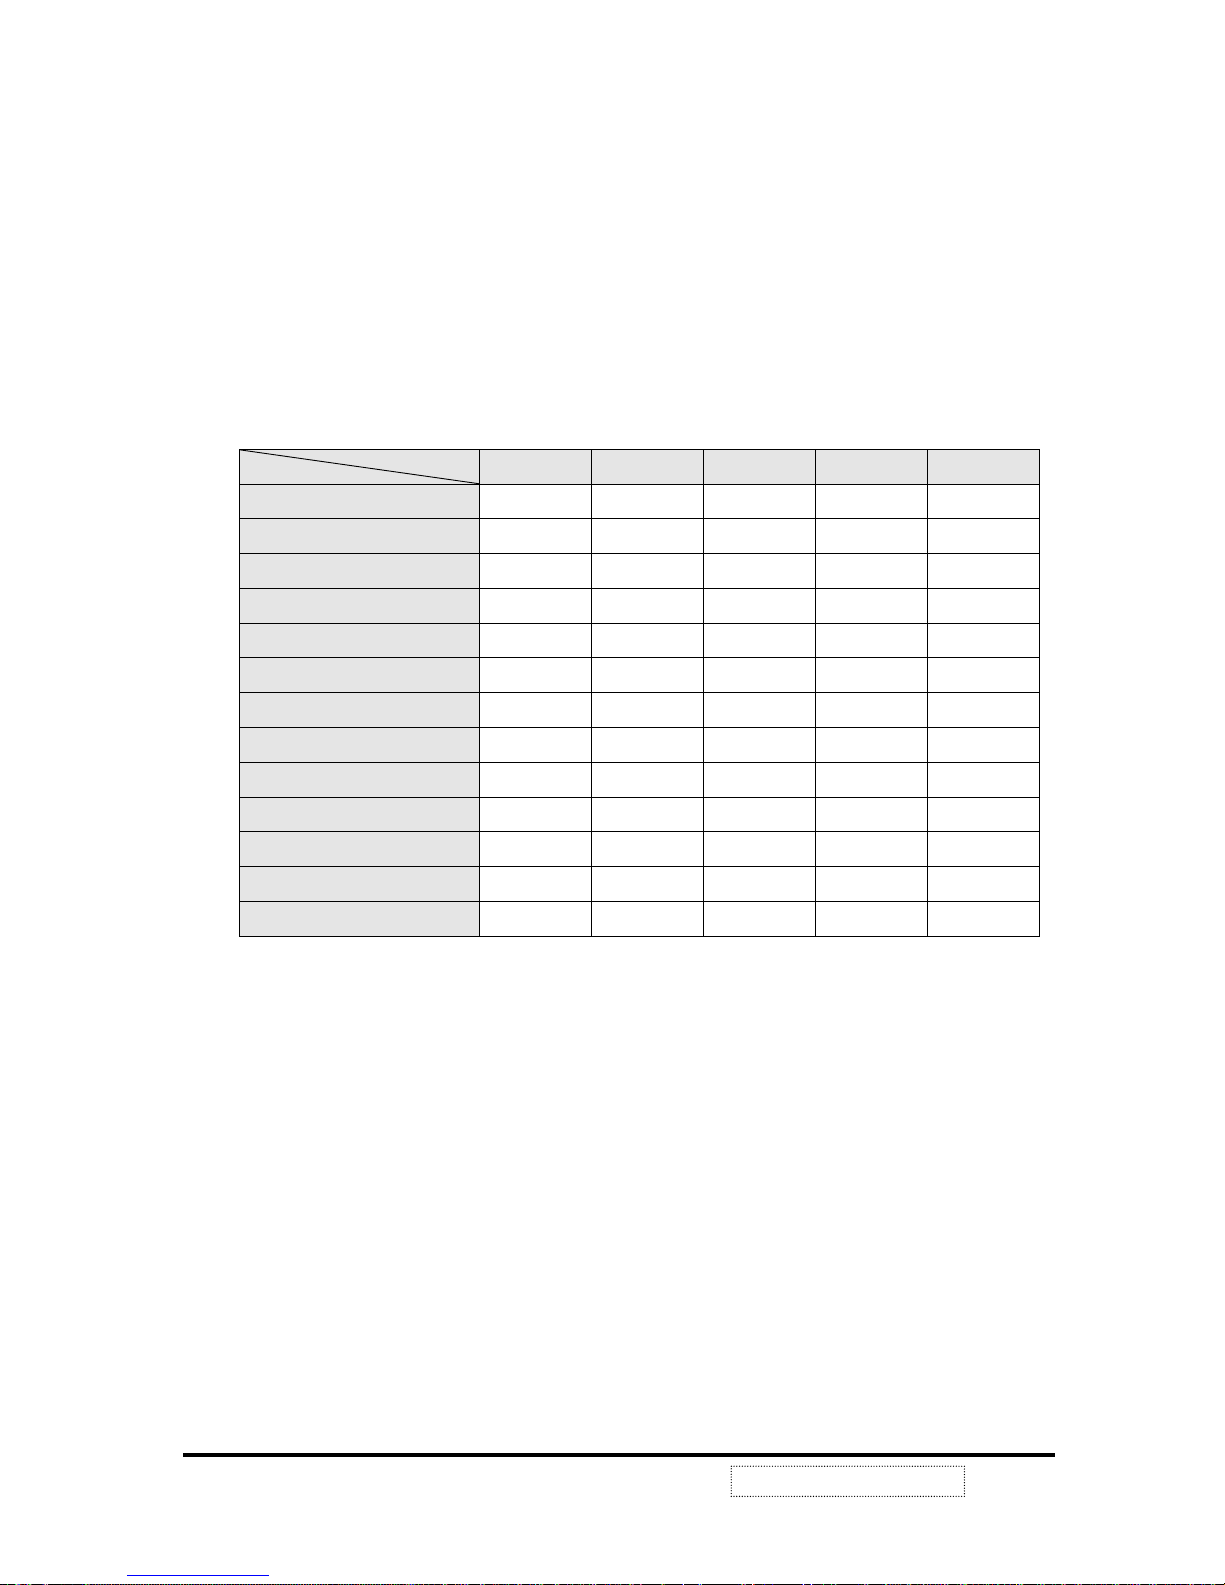
3.
TIMING CHART
Mode 1~ 13 : Preset Mode
Mode 14,15,16: Only for H-size limitation and Auto-size
Mode NO.
1 2 3 4 5 6 7 8
Unit
Pixel Clock
25.175 25.175 30.24 56.25 78.75 80.0 94.5 135
MHz
Resolution
640x400 640x480 640x480 800x600 1024x768 1024x768 1024x768 1280x1024
Horizontal Frequency
31.469 31.469 35 53.674 60.023 60.241 68.677 79.976
KHz
(A) Horizontal Period
31.779 31.778 28.571 18.631 16.660 16.6 14.561 12.504
usec
(B) Horizontal Pulse
Width
3.813 3.813 2.116 1.138 1.219 1.2 1.016 1.067
usec
(C) Horizontal Back Porch
1.907 1.907 3.175 2.702 2.235 2.2 2.201 1.837
usec
(D) Horizontal Active Area
25.422 25.422 21.164 14.222 13.003 12.8 10.836 9.481
usec
(E) Horizontal Front Porch
0.637 0.636 2.116 0.569 0.203 0.4 0.508 0.119
usec
(F) H. Sync. Polarity
- - - + + - + +
Vertical Frequency
70.087 59.94 66.667 85.061 75.029 74.927 84.997 75.025
Hz
(O) Vertical Period
14.269 16.683 15 11.756 13.328 13.346 11.765 13.329
msec
(P) Vertical Pulse Width
0.064 0.064 0.086 0.056 0.050 0.050 0.044 0.038
msec
(Q) Vertical Back Porch
1.112 1.049 1.114 0.503 0.466 0.498 0.524 0.475
msec
(R) Vertical Active Area
12.712 15.253 13.714 11.179 12.795 12.749 11.183 12.804
msec
(S) Vertical Front Porch
0.381 0.317 0.086 0.018 0.017 0.049 0.014 0.012
msec
(T) V. Sync. Polarity
+ - - + + - + +
(U) Interlaced
No No No No No No No No
Mode NO.
9 10 11 12 13 14 15 16
Unit
Pixel Clock
157.5 202.5 229.5 261 57.28 40 49.5 36
MHz
Resolution
1280 x
1024
1600x1200 1600x1200 1792x1344 832x624 800x600 800x600 640x480
Horizontal Frequency
91.146 93.75 106.25 106.27 49.725 37.8 46.875 43.269
KHz
(A) Horizontal Period
10.971 10.667 9.412 9.41 20.111 26.4 21.333 23.111
usec
(B) Horizontal PulseWidth
1.016 0.948 0.837 0.828 1.117 3.2 1.616 1.556
usec
(C) Horizontal Back Porch
1.422 1.501 1.325 1.349 3.910 2.2 3.232 2.222
usec
(D) Horizontal Active Area
8.127 7.901 6.972 6.866 14.524 20 16.162 17.778
usec
(E) Horizontal FrontPorch
0.406 0.316 0.279 0.368 0.560 1 0.323 1.556
usec
(F) H. Sync. Polarity
+ + + - - + + +
Vertical Frequency
85.024 75 85 74.997 74.5 60 75 85.008
Hz
(O) Vertical Period
11.761 13.333 11.765 13.334 13.414 16.579 13.333 11.764
msec
(P) Vertical Pulse Width
0.033 0.032 0.028 0.028 0.060 0.106 0.064 0.069
msec
(Q) Vertical Back Porch
0.483 0.491 0.433 0.649 0.784 0.607 0.448 0.578
msec
(R) Vertical Active Area
11.235 12.8 11.294 12.647 12.549 15.84 12.8 11.093
msec
(S) Vertical Front Porch
0.011 0.011 0.009 0.009 0.021 0.017 0.021 0.023
msec
(T) V. Sync. Polarity
+ + + + - + + +
(U) Interlaced
No No No No No No No No
ViewSonic Corporation
Confidential – Do Not Copy
P90f-1
Page 9
5
4.
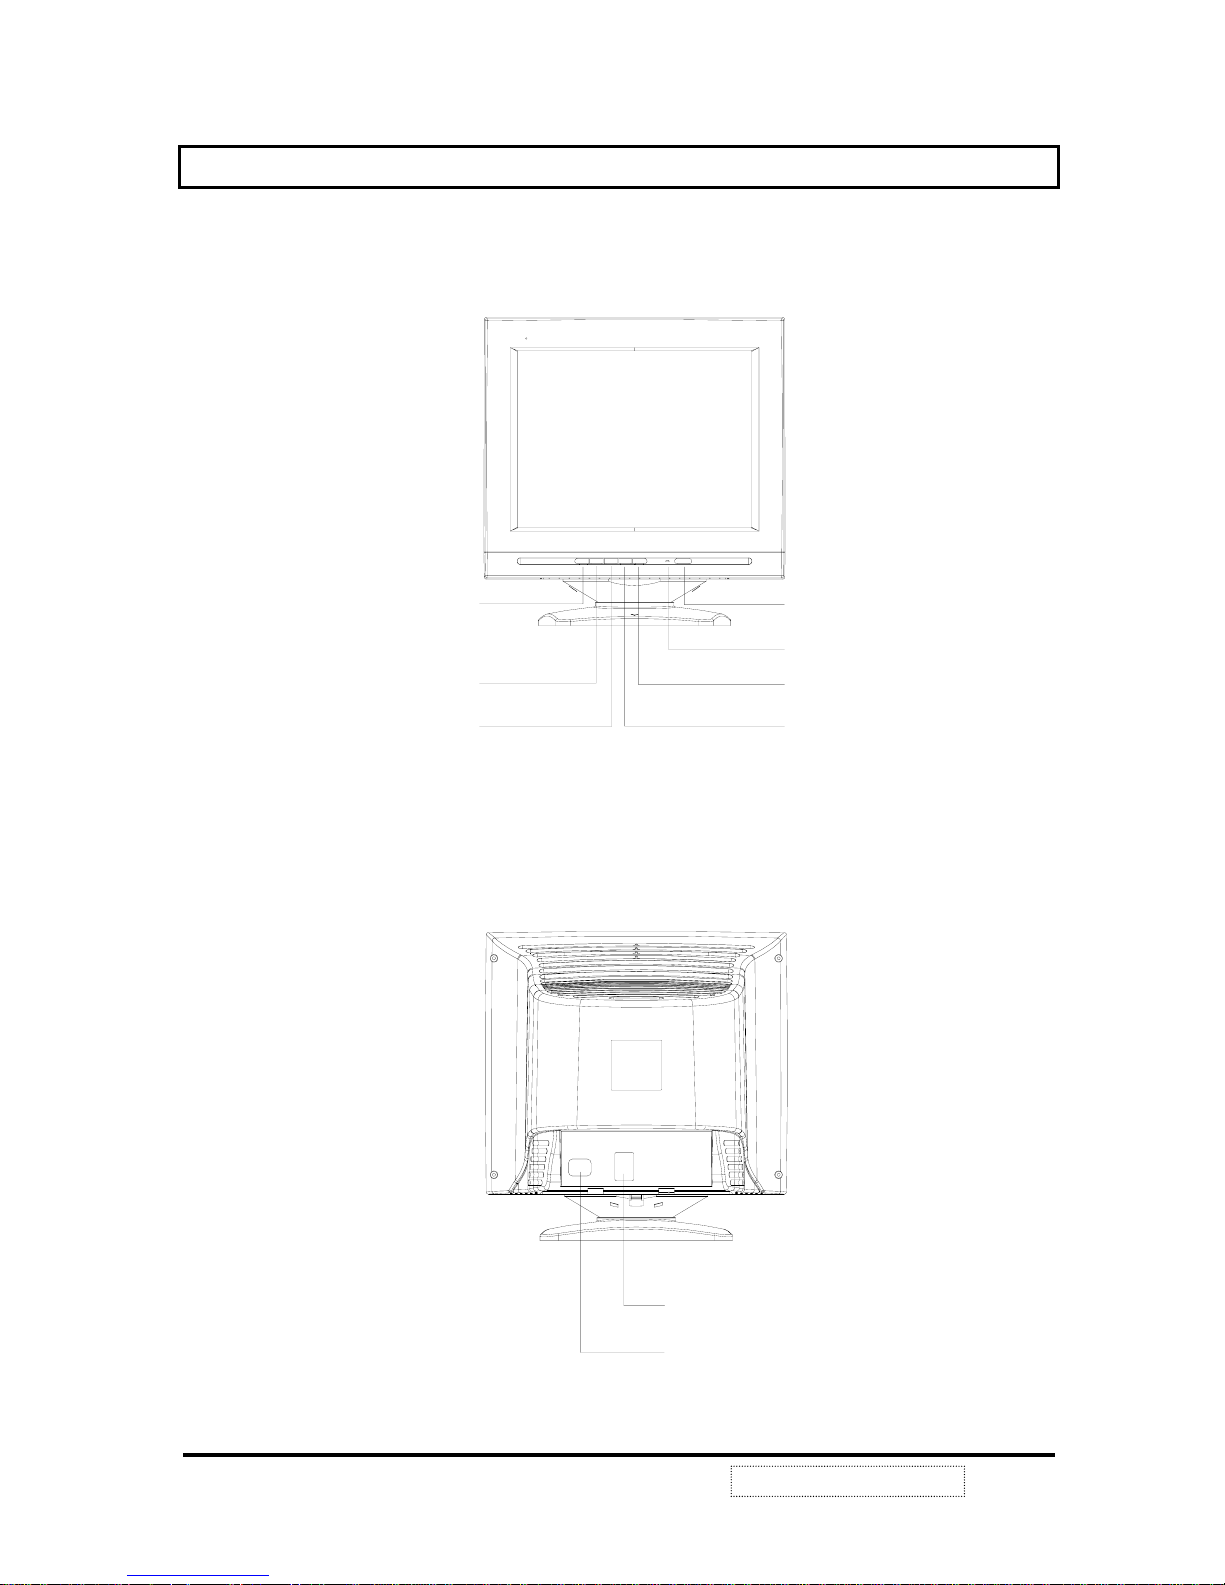
CONTROL LOCATION AND FUNCTIONS
Power S.W
Power Light
Auto Size
Select Key
OSD
ON/OFF
Down Key
Up Key
Front
15 Pin D Sub Video Cable
Power Cord
Rear
ViewSonic Corporation
Confidential – Do Not Copy
P90f-1
Page 10
6
Function Keys Description:
(a) Key function:
Power switch: This is a “software Key”, Turns the display on and off. The power indicator will lit “Green”
when the display is on.
“1” key: Turn on /off OSD menu / Exist this menu to go back previous menu.
: Down side to select item / decrease value.
: Up side to select item / increase value.
. keys are direct access for Contrast and Brightness adjustment.
(b) “2” key: a select key / go to next sub menu.
(c) Pressing “2” & power keys at same time will enter the factory optimized OSD Menu.
(d) Selected
∩
icon and then pressing “2” key will do demagnetize CDT, if pressing maintain to
more than 3 sec will de force MCU to enter burn in state for production line burning.
(e). Press key will auto adjust the display.
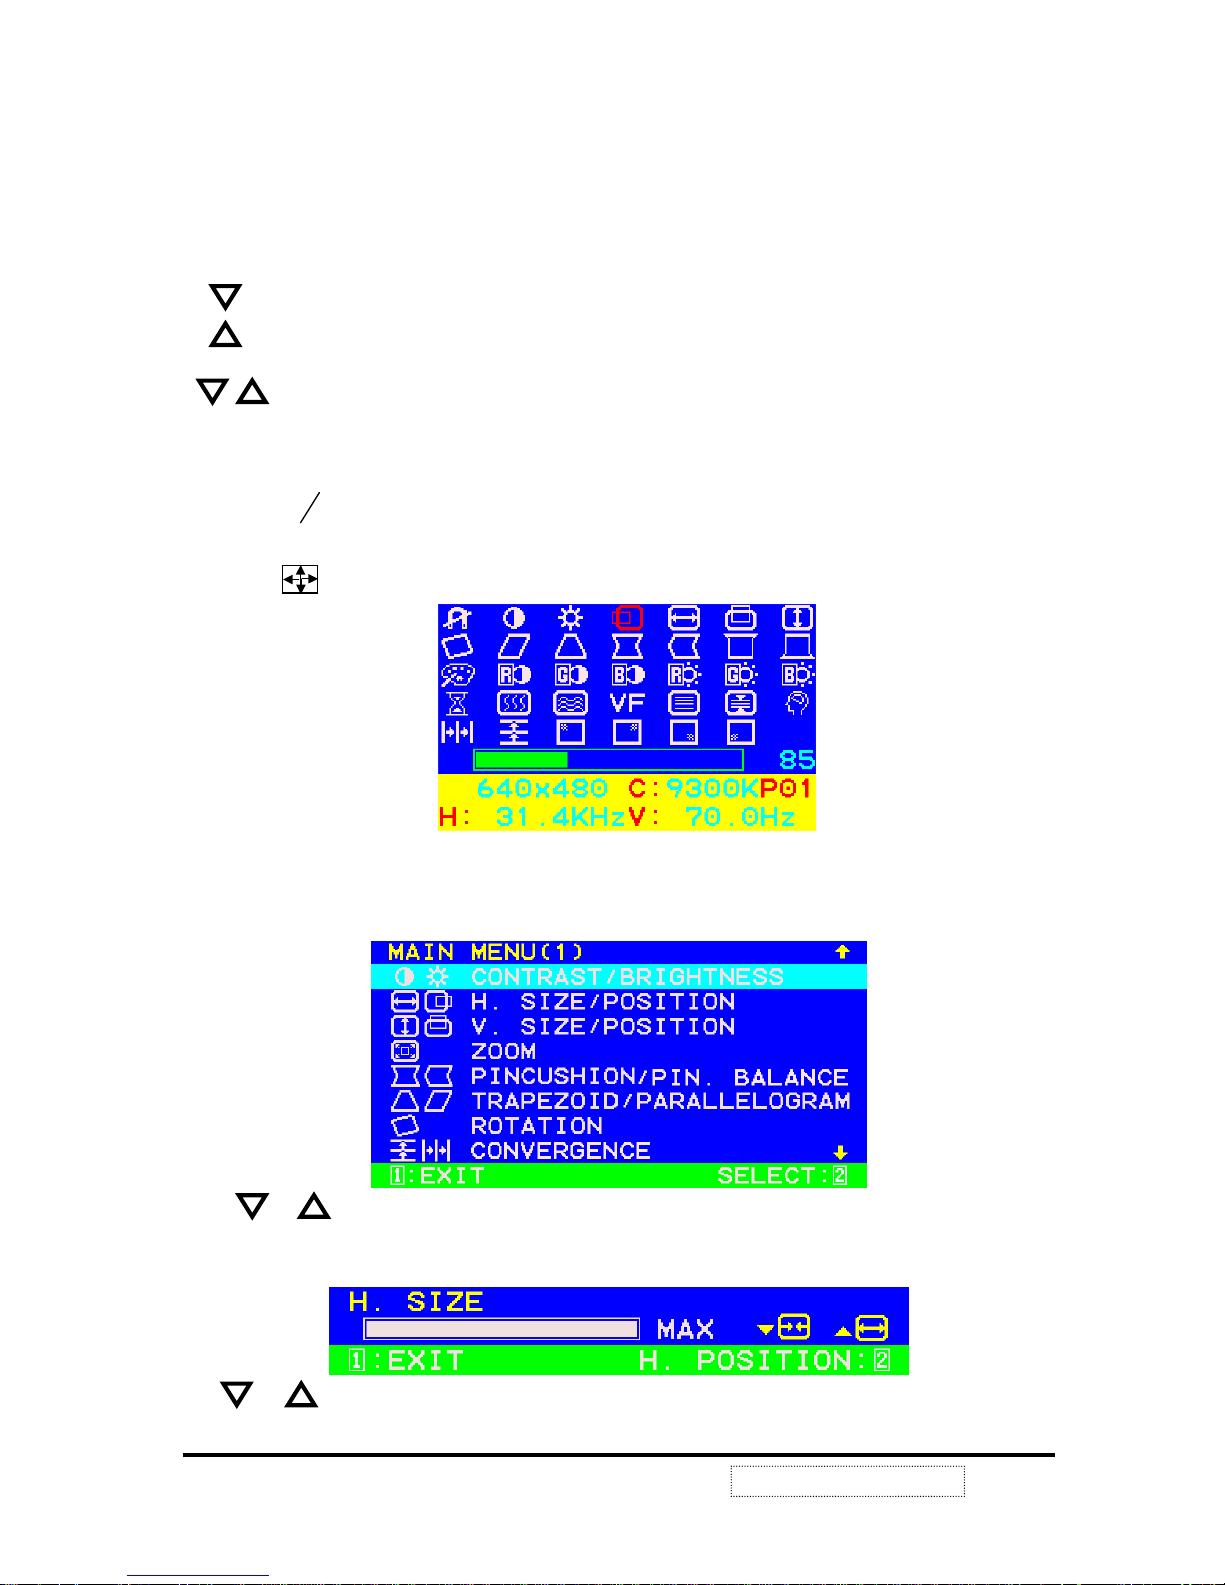
Factory OSD Menu
OSD menu descriptions:
Press “1” key to display a basic main menu (1) shown as below.
Using and keys to move a cyan window bar get your desired items. If it is selected, then pressing
“2” key to display Sub menu as below to start adjustment.
Use and to decrease / increase value on selected item. Noted that the menu can do two items
adjust pressing “2” change to another one in toggle.
ViewSonic Corporation
Confidential – Do Not Copy
P90f-1
Page 11
7
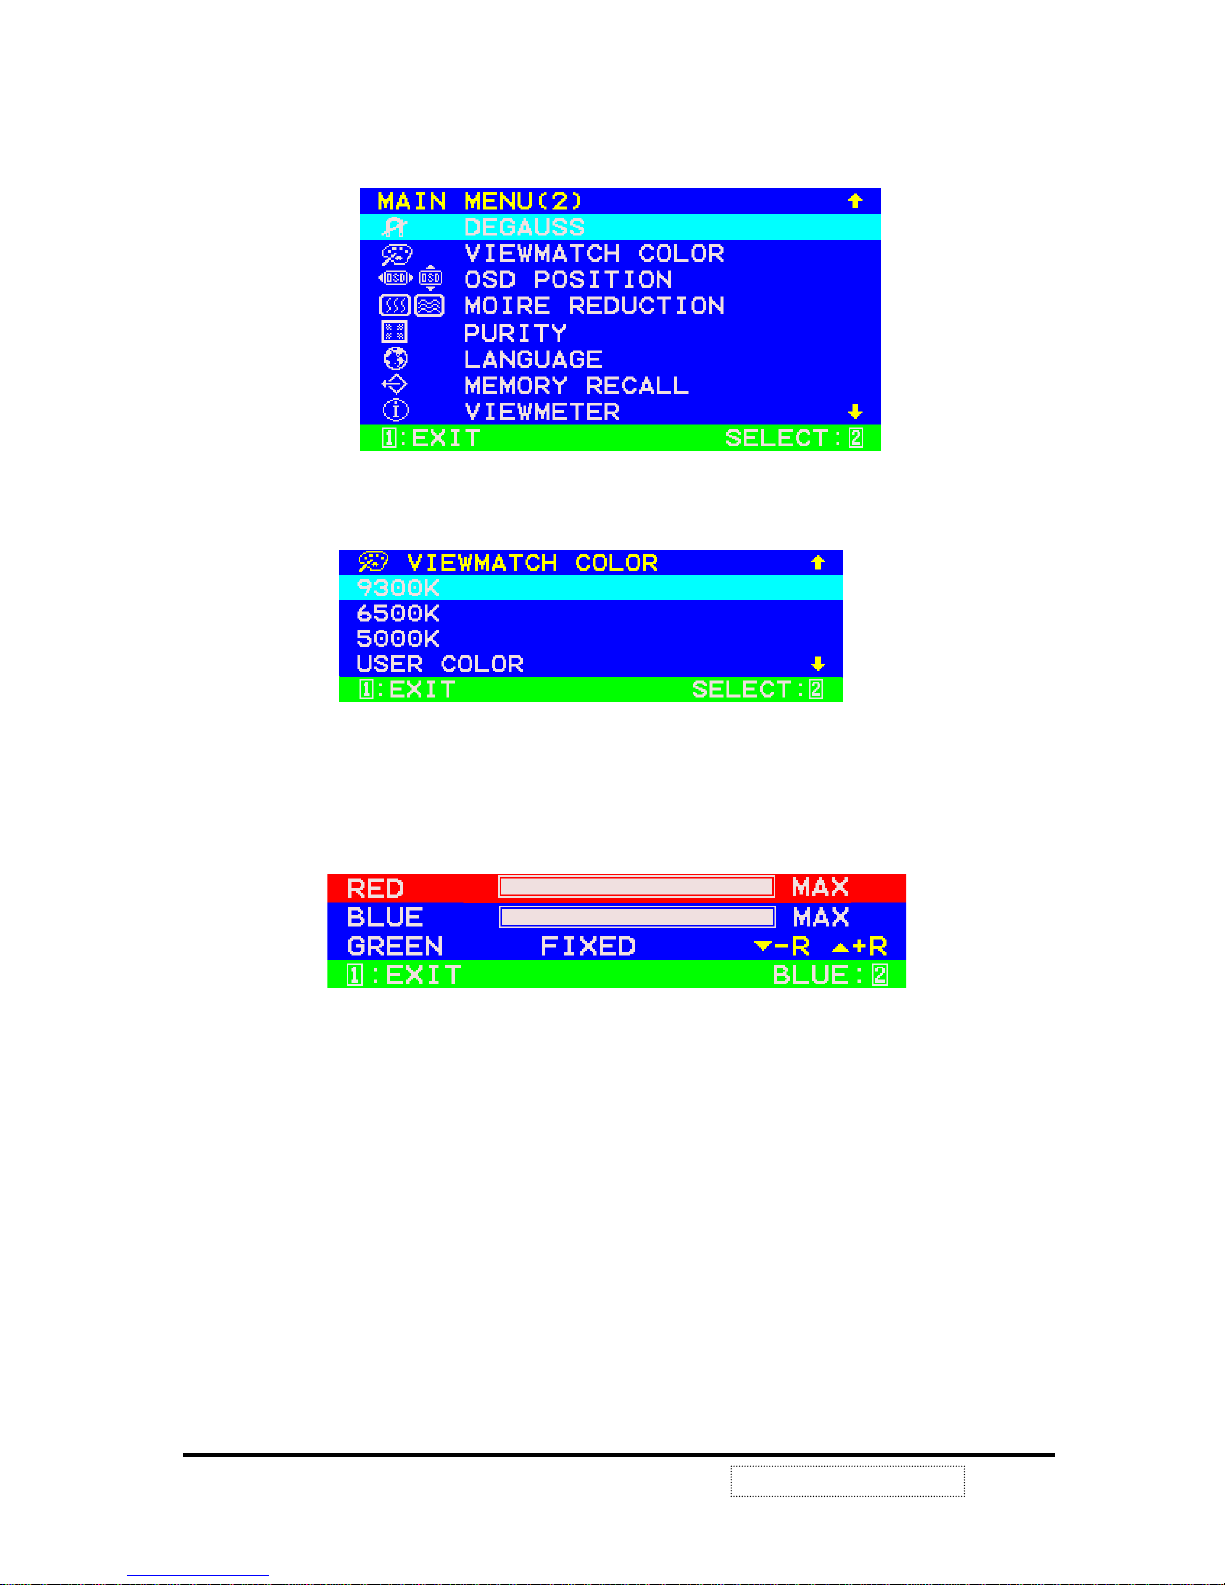
In main menu (1), selected “main menu (1) and then pressing up or down key to the top or bottom of
this menu, the next pressing will go to main menu(2) as below to others
FIGURE 2 ( USER MODE OSD MENU 2 )
In main menu 2, if selected “ VIEWMATCH COLOR”, then pressing “2” key will display color sub menu
as following.
The three default color modes such as 9300k, 6500k, 5000k only can be set in factory, means, they can
read and display only in this menu.
If selected “user color”, then pressing “2” key will display next sub menu as below to start color
adjustment.
ViewSonic Corporation
Confidential – Do Not Copy
P90f-1
Page 12
8
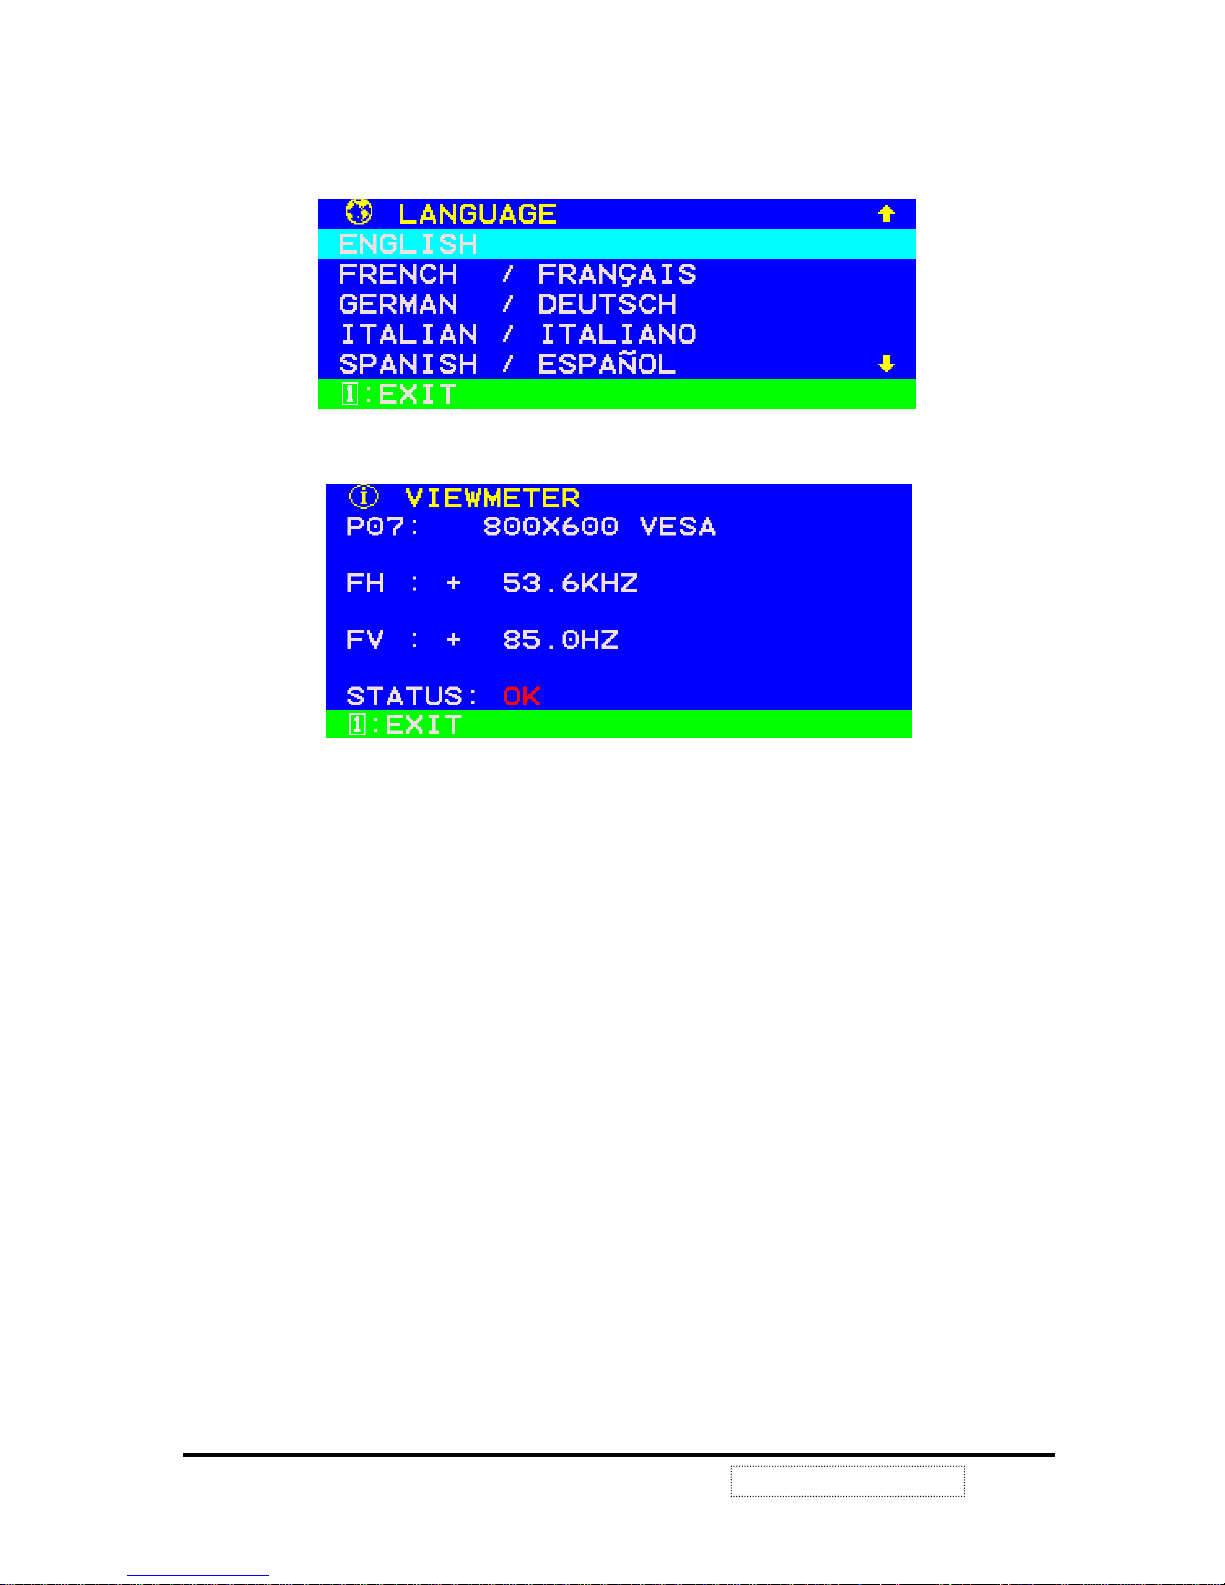
In main menu (2), if selected “LANGUAGE”, then pressing “2” key will display next sub menu as below
to language. Select as below:
If selected “view meter”, and then pressing “2” key will display next sub menu as below to show timing
information.
ViewSonic Corporation
Confidential – Do Not Copy
P90f-1
Page 13
9
ViewSonic Corporation
Confidential – Do Not Copy
.
5.
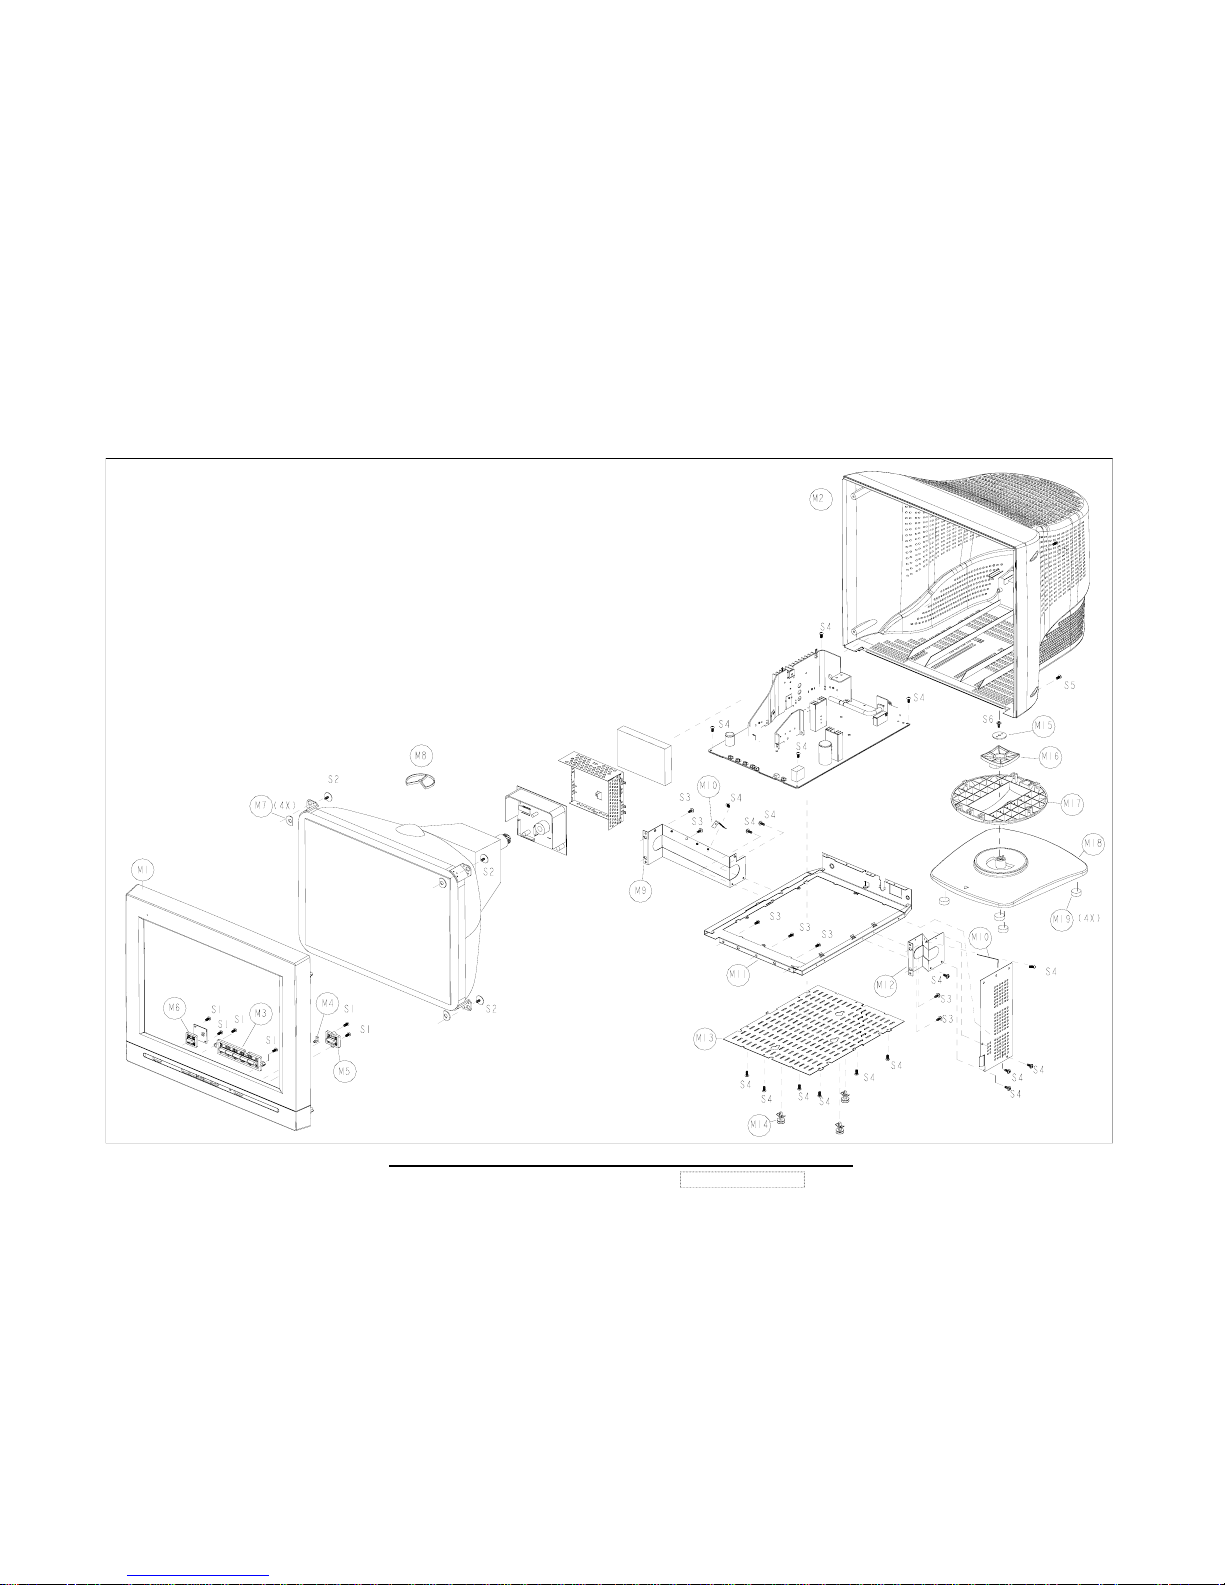
MECHANICAL PARTS & MECHANICAL ASSEMBLY
P90f-1
Page 14
10
P90f Mechanical Parts list
NO. DESCRIPTION PART NO. QTY
M1 FRONT COVER 5642286900 1
M2 BACK COVER 5642287000 1
M3 FUNCTION KEY 5642846000 1
M4 POWER LIGHT PIPE 5640328200 1
M5 POWER KEY 5642845900 1
M6 RUBBER WASHER 5642020001 4
M7 RING CABLE 5642655600 1
M8 LEFT BRACKET 5648734100 1
M9 SPRING FINGER 5648006000 2
M10 MAIN CHASSIS BRACKET 5648734300 1
M11 RIGHT BRACKET 5648734200 1
M12 REAR BRACKET 5648734400 1
M13 PCB SPACER SUPPORT 5642670400 3
M14 SWIVEL WASHER 5642722300 1
M15 SWIVEL CLAMP 5642676500 1
M16 SWIVEL 5641410300 1
M17 BASE 5641410400 1
M18 FOOT PAD 5642022700 4
S1 SCREW BTBW M3X10 7000305022 4
S2 SCREW PHB+CW+RW M5X24 7190561001 4
S3 SCREW PZP M4X14 7134251982 7
S4 SCREW BTBW M3X8 7000305012 16
S5 SCREW PZP M4X16 7134252282 4
S6 SCREW PZP M4X20 7190562424 1
ViewSonic Corporation
Confidential – Do Not Copy
P90f-1
Page 15
11
6.
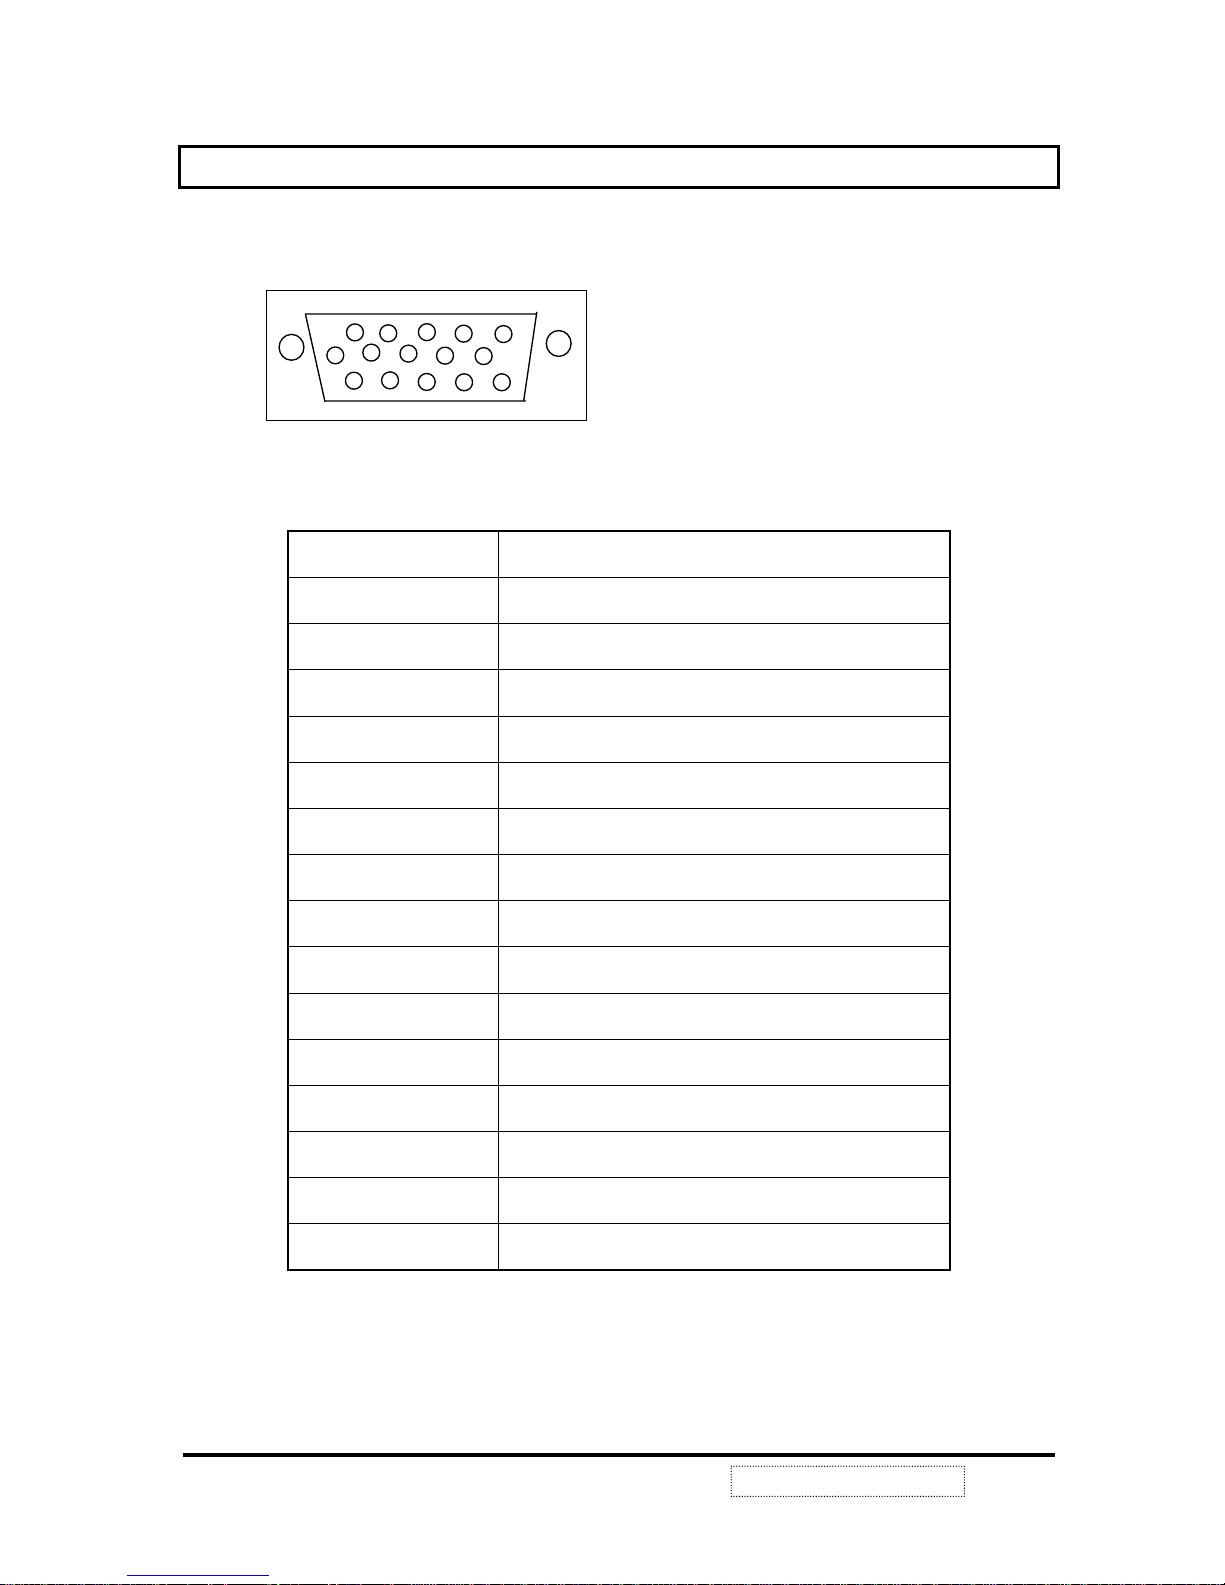
CONNECTOR PIN ASSIGNMENTS
6-1 The Pin-assignments of the 15pin D-sub male miniature connector are shown
below:
6-2 15 Pin Min D-sub male connector
PIN NO PIN DESCRIPTION
1 RED
2 GREEN
3 BLUE
4 NO CONNECTION
5 GROUND
6 R-GROUND
7 G-GROUND
8 B-GROUND
9 +5V PC97
10 GROUND
11 NO CONNECTION
12 SDA FOR DDC
13 H.SYNC.
14 V.SYNC.
15 SCL FOR DDC
1
6
11
ViewSonic Corporation
Confidential – Do Not Copy
P90f-1
Page 16

12
7.
MONITOR INSTALLATION
Monitor Installation
How to Install the Connections to your PC
7-1. Your monitor has two connection cables:
.A signal cable which connects to your computer's VGA connector. Which is colored blue.
7-2. To ensure your safety when connecting the cable, always follow these six steps:
(Ⅰ). Turn off the power to your computer and peripheral equipment.
(Ⅱ). Position the monitor and computer so that you can easily access the rear panel of each unit.
(Ⅲ). Connect the blue-colored video signal cable D-sub connector to the signal connector on the
graphics board (VGA connector) on your computer. (See your system user's guide for the
exact location of your VGA connector.)
(Ⅳ).Tighten the screws on the signal cable connector to prevent it from coming loose, and to
prevent radio and TV interference.
(Ⅴ).There are two kinds of Power Cord, one is to connect between your monitor and the wall
outlet, the other type is to connect between your monitor and PC.
- You might have either of the above two type of power cord. To connect the power cord
between monitor and PC, you have to plug one-end of the power cord to the monitor
power input socket, and plug the other end of the power cord to the PC power output
feed.
- To connect Power Cord between your monitor and wall outlet , you have to connect the
power cord to the monitor power input socket on back of the monitor .Plug the other ent
of the power cord into your surge protector or properly-grounded electrical outlet
ViewSonic Corporation
Confidential – Do Not Copy
P90f-1
Page 17

13
8.
ELECTRONIC CIRCUIT DESCRIPTION
8-1 SWTCHING MODE POWER SUPPLY SECTION
8-1-1 Features
1. AC input: 100Vac – 240Vac.
2. When Power Saving activated, change feedback to reduce the output voltage and shut down
timebase and video circuit operation, thus power reduce to be less than 5W.
8-1-2 Circuit description:
8-1-2-1 EMI Noise Filter
8-1-2-2 C802 and C803 build as Y capacitors, C804 is X capacitor, L801 and L802 are Common
Mode Choke, those build as a two steps Noise filter.
8-1-2-3 Power supply activation:
The rectified voltage across C809 charge C815 through R809, R810, R811, R812, Q810,
and D822, When UC3842 pin 7 rise up to 14V, Q816 on and Q810 off. C817 charge to
55Vdc, this voltage is ready for B+ of UC3842at Pin7 during Suspend, or Off Mode( > 10V).
C844 also provides a voltage for UVP (Vac under voltage protection). When C844 voltage is
too low, Q814 turns off, voltage at pin 2 of UC3842 is over 2.5Vdc, UC3842 will be turned off
and protected.
8-1-2-4 Degaussing circuit
Degaussing coil is connected to relay (SR801), and controlled by MCU through Q856 Q857,
When power is turned on, SR801 close, and automatic demagnetization operate for a few
seconds, then SR801 open. Degaussing also can be operated by pressing degaussing key
on the front bezel.
8-1-2-5 UC3842 PWM controller
UC3842 is a current feedback PWM controller:
Pin1---is feedback positive end.
Pin2---190V and 9V at secondary side of power transformer provide a sampling
voltage to pin 2 of UC3842 via I808, I807.
Pin3---is a current feedback input, when it is over 1V, no output at pin6 to drive
output stage.
Pin4---This pin determine the operating frequency which is trig by a sync. signal
coming from I810.
Pin6---this output drive power MOSFET (Q801).
8-1-2-6 Output voltage feedback control theory
Feedback control is sampled from 190Vdc and 9Vdc at secondary side, through VR R827
2.5V feedback to reference pin of I808( R ), then I 807 coupled to pin 2 of UC3842. When
output voltage rise up, I 808 Reference voltage(R) rise up too, Cathode( K) voltage goes
down. More conduction on I807 in turns cause voltage across R826 to rise. UC3842 pin2
voltage rise to reduce the duty at output pin6. Q801 conduct less to reduce the secondary
side voltages, thus to stabilize the DC voltages at secondary side.
8-1-2-7 Over-voltage protection
When output voltage are too High, voltage across C817 will be high and voltage drop on
R872 is also high. It will force Q808, Q807 to conduct and pin8 of UC3842 to ground. Thus
UC3842 stop to operate.
ViewSonic Corporation
Confidential – Do Not Copy
P90f-1
Page 18
14
8-1-2-8 Under-voltage protection
If Ac input voltage is too low, voltage across C844 will be too low that force Q814 to turn off
and voltage across C822 rise up. When pin2 of UC3842 rise up to 2.5V, pin6 stop to drive
output. Thus Q801 is protected.
8-1-2-9 Synchronization circuit
UC3842 working frequency is fixed at 33.3 Khz by adjusting R817A.
8-1-2-10 Power Saving control
At normal operating state, Q811 on, Q812 off, output voltage are normal. At stand-by or
suspend Mode, Q811 off, Q812 on, feedback voltage increase to reduce output voltages
down to 1/3 of normal approx.. If enter off Mode, Q811 and Q812 Off, feedback voltage
increase more to reduce output voltages down to
1/4 of normal. And the another great frequency control is to connect R821 to set power
supply working at low frequency about 10 Khz. By above two ways, it can meet DPMS and
NUTEK requirement.
When monitor enter power saving state, voltage across C817 controlled by I804, Q815
continue to supply pin 7 of UC3842 to operate and voltage across C811 controlled by
Q805,Q806 continue to supply 5V for IA01 to stand by.
8-2 DIGITAL CONTROL CIRCUIT( Signal control by Microprocessor unit; IA01)
Horizontal and vertical sync. signal coming from CRT drive Board(PWB—0237)are fed into
pin41(H. sync.) and pin42(V. sync.) of IA01.When the power cord plug in, pin4 of IA01 reset
and IA01 start to check if the sync. Signals are exist at pin 41 and pin 42. The control tables
are as follows:
Power state Normal Standby/suspend Off
Pin42,Pin41 V sync. H. sync. V or H. sync. exist Both sync. not exist
Pin23
Logic high Logic low Logic low
I804 ON OFF OFF
Pin24(G) High High Low
Pin22(A) Low High High
LED Green Yellow Amber
Standby/suspend Mode:
If only one of the sync signal exist, pin23 of IA01 change to low and turns off Q811 and pin21 of
IA01 change to high and turns on Q812. The feedback will be reduced through I808 and cut
down all the secondary output voltages. In order to maintain the supply voltage for I803 PWM,
I804 is then turned on, Q815 turns on too. The supply voltage from D812 is then connected to
Vcc of I803. The off signal from pin23 of IA01 also turns Q805, Q806 on, the supply voltage at
input of I802 is then taken from D804 to keep 5V for IA01 continue working. In order to keep
stand-by voltage for CRT heater, Q867 continue to conduct by the logic from pin21 of IA01.
Off mode:
When both sync. Signals are absent, IA01 will send a logic. Low at pin 23 and pin21 to turn
Q811, Q812 off. The secondary voltages will be reduced further, and Q867, Q866 are turned
off. The heater voltage become zero for further lower power consumption than stand-
by/suspend Mode.
Normal Power supply operation:
ViewSonic Corporation
Confidential – Do Not Copy
P90f-1
Page 19
15
When the sync signals are both exist, then IA01 will send Low at pin 13 to switch on the relay
BR801 via Q104 and Q104A and thus produce a very high current circulate the degaussing coil
and this signal will sustain for a certain period. Thus the display is demagnetized
The sync signals are buffered by IA01 and output at pin 41, 42 to synchronize the timebase
controller I301. IA01 will also initiate I301 by IIC bus build by pin 28(C.SCL), pin 27(C.SDA).
This IIC bus is also responsible to initiate the video pre-amplifier I901and OSD I903. After the
initiation is completed I301, I901 and I903 will operate normally. This IIC bus also provides
Purity control, through P421, connect to PWB-0417, purity control board.
Pin 17 to pin 20 and pin32 provide the logic to control the horizontal CS linear correction circuit
according to the horizontal frequency range as the following table.
P90f CS Table
CS
CS4 CS3 CS2 CS1 CS0
MCU Pin 32 17 18 19 20
Capacitor C425 C421 C420 C419 C423
Hf <32KHz H H H H H
32KHz<Hf<=36KHz H H L H L
36KHz<Hf<=40KHz H H L L L
40KHz<Hf<=45KHz L H H H H
45KHz<Hf<=52KHz L L H L H
52KHz<Hf<=58KHz L L H L L
58KHz<Hf<=65KHz L H L H H
65KHz<Hf<=70KHz L L L H L
70KHz<Hf<=86KHz L H L L H
86KHz<Hf<=96KHz L H L L L
Hf>96KHz L L L L L
Pin 36 (F/V) provides horizontal C linearity control.
Pin 40 provide rotation PWM to rotation circuit build by Q701, Q702 and Q703 and thus control
the current circulate the coil around the deflection yoke to rotate the display.
Pin 1 provide Horizontal convergence control through Q426,Q427, Q428.
Pin39 provide Vertical convergence control through Q305, Q306, Q307.
Pin 31 short to ground via 15pin D sub connector when it connect to PC. When it is
disconnected, power saving feature is switch off, monitor will display “NO SIGNAL” as self test
pattern.
IA02 is E
2
PROM for IA01 to save settings of all modes and DDC data.
8-3 TIMEBASE CIRCUIT
8-3-1 TIMEBASE CONTROL (I301), HORIZONTAL
I301 is an IIC control Time-base processor, By IIC bus pin30, 31(SDA,SCL) it can communicate
with IA01(MCU)
HS
ViewSonic Corporation
Confidential – Do Not Copy
P90f-1
Page 20

16
H. sync., V. sync feed from IA01 pin41,42 to I301 pin1 ,2. When the H. Freq. is over 110kHz or
below 30kHz, I301 will shut down to protect the Horizon. output CKT from being damaged. The
Horizon. oscillator is build by C303 and R301 and determine the Horizon. frequency range.
C304, C305, R302 build up PLL 1 loop filter,
Via Icon, the IIC-bus allows a linear adjustment of the Horizon. position by comparing
relative phase of horizontal Sync. and oscillator saw-tooth(in PLL 1 loop) and feedback from
Horizon. output stage.
and correction of pin unbalance and parallelogram are done by modulating the
phase between oscillator saw-tooth and horizontal. flyback (in loop PLL2)
The PLL2 phase detector is similar to PLL 1 detector and compares the Horizon. flyback pulse
at pin 12 with the oscillator saw-tooth wave-form. The controlled currents are independent of
Horizon. freq. The PLL 2 thus compensates for the delay in the output horizontal deflection CKT
by adjusting the phase of the HDRV (pin26) output pulse.
ViewSonic Corporation
Confidential – Do Not Copy
P90f-1
Page 21

17
8-3-2 HORIZONTAL OUTPUT STAGE
The horizon. drive pulse output at pin 26 is pulled up to 12V to drive Q404 and then coupled via
T401 to output transistor Q403 for on-off control. Thus saw-tooth current flow through Horizon.
Deflection Yoke is obtained.
The function of C-correction is to correct the asymmetrical non-linearity of picture. L402, L406
and Horizontal Yoke are in series for C-correction. Pin36 of IA01 provides a voltage which
depends on Horizontal frequency to control L402 via Q405, thus the inductance of L402
changes according to the Horizontal frequency to correct the linearity.
The function of S-correction is to correct the symmetrical non-linear distortion equidistant lines.
C416, C423, C419, C420, C421, C425 are S-correction capacitors, also they block the DC
voltage to the Yoke. C416 is the fixed one, the others are controlled by IA01 via Q417, Q411,
Q413, Q415, and Q418 switches. When any switch turns on, the accordingly capacitor is in
parallel with C416. The switches on-off depend on the Horizontal Frequency.
L406 is controlled by pin32 as well, when Horizon. freq. is over 40kHz , L406 is parallel with
L402.
They are:
CS
CS4 CS3 CS2 CS1 CS0
MCU Pin 32 17 18 19 20
Capacitor C425 L406 C421 C420 C419 C423
Hf <32KHz ON OFF ON ON ON ON
32KHz<Hf<=36KHz ON OFF ON OFF ON OFF
36KHz<Hf<=40KHz ON OFF ON OFF OFF OFF
40KHz<Hf<=45KHz OFF ON ON ON ON ON
45KHz<Hf<=52KHz OFF ON OFF ON OFF ON
52KHz<Hf<=58KHz OFF ON OFF ON OFF OFF
58KHz<Hf<=65KHz OFF ON ON OFF ON ON
65KHz<Hf<=70KHz OFF ON OFF OFF ON OFF
70KHz<Hf<=86KHz OFF ON ON OFF OFF ON
86KHz<Hf<=96KHz OFF ON ON OFF OFF OFF
Hf>96KHz OFF ON OFF OFF OFF OFF
8-3-3 SUPPLY VOLTAGE CONTROL FOR HORIZONTAL DEFLECTION
The B+ control function block is included in I301 which consists of an operational Trans-
conductance amplifier, a voltage comparator, a flip-flop and a discharge circuit. Pin 28 of I301
is a drive voltage which consists of horizontal width, pincushion, and trapezium and pin-corner
correction. This voltage is controlled by IA01 via IIC bus. The drive voltage feed into pin 15
(BIN) of I301. The operation frequency of the B+ control block is the same as horizontal
frequency. The B+ drive output of the control block is at pin 28(BDRV), this drive voltage
switch Q402 on-off via a buffer build by Q400 and Q401. Q402, act as an step down DC
Rf
ViewSonic Corporation
Confidential – Do Not Copy
P90f-1
Page 22

18
converter to drive horizontal deflection output Q433 via L401. The width, pincushion, trapezium
information are modulated on the DC converter by changing the duty of the B+ drive.
Moreover, the B+ duty is controlled with a charging circuit at same time. When the Q302 is
OFF, the voltage at pin16 of I301 will linearly increase with a charge time of determining by
R326 and C308 to modulate B+ duty
Horizontal DC centering circuit is build by Q423, Q424. By controlling the small current flow in
or out of L405, it will provide DC center compensation for CDT.
8-3-4 TIMEBASE CONTROL (I301), VERTICAL
The vertical free running frequency is determined by C312 (pin 22 of I301).The amplitude of
the outputat pin 23 can be adjusted via . Icon.
Icon provides a DC shift at the saw-tooth output at pin 23 and the EW drive output
EWDRV (pin24) in such a way, that the whole picture moves vertically while maintaining the
correct geometry.
The adjustments for vertical size and vertical position also affect the wave-forms of horizontal
pincushion, vertical linearity, and vertical linearity balance, focus parabola, pin unbalance and
parallelogram correction. The result of this interaction is that no readjustment of these
parameters is necessary after an adjustment of vertical picture size or position.
8-3-5 VERTICAL OUTPUT STAGE
The power amplifier driving the vertical yoke assembly is a DC design-based on power
amplifier I310 TDA8172.
The vertical deflection coil is connected to pin5 of I330 via P401A. The saw-tooth signal is
derived from Pin 23 of I301 and fed to pin1 of I310 via R306 / C322. The DC bias voltage is
derived from pin13 of I301 and fed to pin7 of I310 via derived R325 / R327 to optimize the
vertical position.
There are two supply voltage for I310, -15V is applied at pin4 via R384, +15V DC voltage is
applied at pin2 and pin6 via D310 for the output stage during the retrace time. The supply
voltage for the output stage during the retrace time is derived from the fly-back generator
output on pin3 of I310 and applied through C388 to pin6.
8-4 HIGH VOLTAGE GENERATOR AND BLANKING CIRCUIT
I101 is a current mode PWM controller which provides the drive signal for high voltage
generator. It is synchronized by horizontal blanking signal coming from deflection circuit via
Q111. Q121, Q124 are high voltage output switches. T101 provide the high voltage (26.2kV) to
CDT anode. Pin 13 provide feedback to pin2 of I101 to control the duty when high voltage is
varied according to the beam current. Thus it gives a very good high voltage and size
regulation. A very precise geometry distortion is achieved. R176 provides high voltage
adjustment.
Pin5 of T101 senses high voltage for OVP protection. When high voltage is over 33kV, it raises
the emitter voltage of Q114. When emitter voltage of Q114 is 6.8V higher than Q115 collector,
Q116 start to conduct and shutdown the PWM (I101) by reducing the voltage at pin1. This is
also called X-Ray protection. R137 set the protection point.
Pin 8 of FBT sense the beam current. When beam current rise, base voltage of Q126 drop and
so the emitter does. The voltage across C108 drops to pull down the voltage at pin17 of I501.
ViewSonic Corporation
Confidential – Do Not Copy
P90f-1
Page 23

19
When the voltage at pin 17 of I501 drops under 6V, contrast of display start to decrease. R167
set the light output where the contrast (or full white screen light output) start to drop. If the
beam current is too high, Q118 will conduct and shutdown PWM controller (I101).
Pin 7 of FBT provide negative bias for Grid 1 of CDT:
Pin5 of I310 provide vertical blanking to base of Q108 via D113. Q108 collector pulse drops
63V to give a proper blanking level at Grid 1 of CDT. When monitor turns off, pin3 (HUNLOCK)
is pull high to turn off Q108 via D108. Grid 1 of CDT is then pulled down to most negative
voltage from pin7 of FBT to protect CDT. This action is so-called spot killer.
8-5 Dynamic focus circuit
The vertical dynamic focus is from pin 32 of I301 and feed to base of Q105 via R105 and C103.
The horizontal dynamic focus is taken between L402 and Horizontal S correction capacitors. It
is step up (amplified) to the certain level voltage (600V approx. at 94kHz Timing Mode) and
combine with Vertical dynamic focus waveform through L403, and then feed to PIN 11 of FBT.
The dual trace parabola wave-form plus the DC focus voltage gives sharp and clear display for
the whole screen.
The two variable resistors on top of FBT provide focus setting.
The bottom one set Grid 2 voltage of CDT.
.
8-6 Video and CDT drive circuit
8-6-1 VIDEO PREAMPLIFIER (I501)
The signals come from PC through P901 to CDT drive board (PWB-0237). Pin7 (Red), pin5
(Green), pin3(Blue) feed to pin11, 6,2 of I901(video pre-amplifier). Pin 4, 9, 13 of I901 are
OSD R, G, B video signals input coming from OSD IC I503. Pin 12 of I901 is the input for OSD
blanking signal which blank the normal video as OSD video signal is active. Since the video
inputs are AC coupled to I901, so I901 need a clamping signal (at pin 19) from H. sync (IA01
pin 34) to give DC restoring at I901 outputs. The horizontal blanking signal is provided from
PWB-0235. Via P902A, it connects to pin 27 of I901. The video outputs of I901 will have the
level darker than the video black level during the horizontal retrace time. Pin 20 and 21are IIC
input for MCU (IA01) to control video. By IIC bus MCU will initiate I901 and control the contrast,
brightness, R/G/B gain, and R/G/B bias.
Pin15 is an ABL control input. By detecting the beam current, it will reduce the contrast when
the beam current exceeds the setting point.
8-6-2 VIDEO DRIVE AND OUTPUT CIRCUITS
After being pre-amplified, the R. G. B. video signals are output from pin35, pin32, and pin29 of
I901 respectively. The amplitude of the signal at theses output are about 3 ~ 4 V p-p. Those
video signals are connected the I904 at pin 7, 6, 9 respectively.
The I904 is video output amplifier to amplify the R, G, and B signal. They offer about 40 V p-p
signal in amplitude to drive the cathodes of CRT.
L912, L942, L972, are the peaking coils, for the compensation of high frequency response.
The DC off-set bias voltage is set up by R902, R903 at pin30 of I901.
The cathode cut-off setting voltages required for white balance are obtained from pin23(r),
pin25 (g), pin26 (b) respectively, These output magnitude can control the conduction of
transistors Q903, Q933, Q963 individually. The DC bias of the cathodes are then varied to
optimize the color temperature of back ground.
ViewSonic Corporation
Confidential – Do Not Copy
P90f-1
Page 24

20
Brightness control: Pin 2 of IA01 provides Brightness control. It feed through P903 to base of
Q960 to vary R, G, B bias at cathodes simultaneously.
8-7 Convergence circuit
Pin1 of IA01 provides a voltage (0 to 5V) to Q426, Q427, and Q428, then drive the Horizon.
convergence coil of deflection yoke through P420..
Pin39 of IA01 provides a voltage (0 to 5V) to Q305, Q306, and Q307, then drive the vertical
convergence coil of deflection yoke.
8-8 Purity circuit
PWB-0417 provides purity control on four corners of CDT.
Through IIC bus (pin 27, 28 of IA01), IA01 communicate with I501 on purity board. I501 is a
digital to analog converter. There are four controls on corners of CDT. User can adjust the white
uniformity and color uniformity at four corners.
ViewSonic Corporation
Confidential – Do Not Copy
P90f-1
Page 25

21
9.
ADJUSTMENT
The adjustment data with tolerance is only for setting to the optimum performance.
SERVICE ADJUSTMENT LOCATIONS
Main Board (parts side view)---PWB-0404
F1--------Variable Resistor on top of FBT for Static Focus adjust.
F2--------Variable Resistor on middle of FBT for Dynamic Focus adjust.
G2--------Variable resistor on bottom of FBT for Grid 2 set up.
R167-----Full white brightness adjust.
R176-----High voltage setting
R454-----Raster center
R827-----B+ = 81V setting
R817A---Set power supply working frequency
Degauss--------To degauss function
Enter key-------------Enter OSD key
Down key-------------Decrease adjust value or counterclockwise select Icon
Up key-----------------Increase adjust value or clockwise select Icon
Auto –size key--------Auto sizing
9-1 B+ (81V) output voltage adjustment
a). Apply PC signal with any pattern to the monitor.
b). Connect AC input and power on the monitor.
c). Brightness at center, contrast at maximum.
d). Adjust R827 for the voltage at heat-sink of D816 to 81V
R454
F1 F2 G2
R176 R167
FBT
Power
Transformer
PWB-0404
R827
R817A
ViewSonic Corporation
Confidential – Do Not Copy
P90f-1
Page 26

22
RASTER
BEZEL
B
A
|
A-B|=0.5—1mm
9-2 High voltage
a). Apply PC signal with 31.47kHz / 60Hz(640 x 480) Mode and full white pattern to the monitor.
b). Connect AC input and power on the monitor.
c). Brightness at center, contrast at maximum.
d). Adjust R176 for Normal high voltage = 26.2kV
9-3 Full brightness setting (Timing Mode 91kHz /85Hz 1280 x 1024 mode)
a). Apply Chroma 2250 pattern generator or PC signals with full white pattern to the monitor.
b). Connect AC input and power on the monitor.
c). Brightness at center, contrast at maximum.
d). Adjust proper Horizontal and vertical size.
e). Set R, G, B bias and Gain (follow color temp. adjustment procedure)
f). Adjust R167 to get 30FL.+/- 1FL
9-4 OSD Adjustment (See the table below)( Enter OSD Menu) : Turn on the monitor by pressing
power
switch and OSD on/off key at the same time, release power switch and continue to press enter key,
then release the enter key until display appears.
Note: For autosizing function, each preset mode adjustment must be stored into MCU by pressing
the “Head” Icon on preset OSD menu.
Item Adjustment Description SPEC.
(1) Horizontal
Raster Center
* Mode : Mode 11 (1600x 1280 @85Hz)
* Pattern : Black (Background)
* Brightness : Raster visible
* Adjust R454 for raster position
(2) Vert. Linearity
C Correction
Adjustment
* Mode : Mode 9(1024 x 768 @ 85Hz)
* Pattern : 8 x 6 Crosshatch
* Brightness : Center
* Contrast : Max
* Open OSD , enter “FS” and select “LB”
Adjust until square height of top is equal to
bottom
<= 4%
S Correction
Adjustment
* Open OSD, enter “ ” and select
“ ”
Adjust until square height of top and bottom
are
equal to center.
Ymax + Ymin
Ymax - Ymin
ViewSonic Corporation
Confidential – Do Not Copy
P90f-1
Page 27

23
Item Adjustment Description SPEC.
(3)Horizontal. Width
Adj.
(Every Mode)
*Pattern: Crosshatch
*Brightness: Center.
Contrast: Max.
*Enter Pre-set Mode
*Select Horizontal Width Icon.
*Press UP/DOWN to get 353mm
353 ±3 mm
(Every Mode)
(4) Horizontal Phase
Adj.
(Every Mode)
*Pattern: Crosshatch
*Brightness: Center.
Contrast: Max.
*Select Horizontal Phase Icon.
* Press UP/DOWN to center display.
(Every Mode)
(5) Vertical Height Adj.
(Every Mode)
*Pattern: Crosshatch
*Brightness: Center. Contrast: Max.
*Select Vertical Height Icon.
*Press UP/DOWN to obtain 264mm
264±3mm
(Every Mode)
(6) Vertical center Adj.
(Every Mode)
*Pattern: Crosshatch
*Brightness: Center. Contrast: Max.
*Select Vertical Center Icon.
* Press UP/DOWN to center display.
(Every Mode)
(7) Rotation Adj.
*Pattern: Crosshatch
*Brightness: Center. Contrast: Max.
*Select Rotation Icon.
* Press UP/DOWN to rotate the display to the
best..
Only adjust Mode 9
(8) Geometric Adj.
*Pattern: Crosshatch
*Brightness: Center. Contrast: Max.
Right & Left<=2.0mm
Top & Bottom<=2.0mm
Barrel<=1.5mm
Using window
Horizontal.:
Within 2.0mm window
Vertical.:
Within 2.0mm window
(Every Mode)
(a)Pin−balance.
(Every Mode)
*Pin−balance Adj.:
Select Pin-balance Icon
Press UP OR DOWN Key
to correct the Bow distortion to the best.
D
C
|
C-D
|
<= 2 mm
A
|
A-B| <= 2mm
ViewSonic Corporation
Confidential – Do Not Copy
P90f-1
Page 28

24
Item Adjustment Description SPEC.
(b)Parallelogram
(Every Mode)
*Parallelogram Adj.:
Select Parallelogram Icon
Press UP OR DOWN Key.
to correct the Orthogonality to the best.
(c)Pincushion Adj.
(Every Mode)
*Pincushion Adj.:
Select Pincushion Icon
Press UP OR DOWN Key,
to straighten Side Pincushion.
(d)Trapezium Adj.
(Every Mode)
*Trapezium Adj.:
Select Keystone Icon
Press UP OR DOWN Key,
to make picture geometric distortion the best.
Pin distortion< 1.0mm
Left / right <1.5mm
(e)Pin−corner Adj.
(Mode 11)
*Pin−corner Adjustment:
Select Pin-corner Icon
Press UP OR DOWN Key,
to make picture geometric distortion the best.
(Note this Adj. Item is used to correct the four
corners in a small quantity)
< 0.5mm in 50 mm LINE
(9).Contrast
*Standard pre-set setting is Contrast adjust to
the maximum. NC
(10)Color
Temperature.
Adjustment
ViewSonic Corporation
Confidential – Do Not Copy
P90f-1
Page 29

25
Item Adjustment Description SPEC.
<a>.9300°K bias
Adj.
*Enter preset OSD menu.
*Mode 9: 1280 x 1024
Pattern : 11(Black pattern)
*Brightness : set at 107.. Contrast : Max..
*Select color Adj. Icon.
Select 9300°K first.
The R,G,B bias initial setting should be in the
160 DAC value.
Adj the screen VR on FBT to get 0.7+/-0.1FL
*Adj. R,G,B bias until
x = 0.283+/- 0.006
y = 0.297+/-0.006
Y =0.7 +/- 0.1 Ft/L
x=0.283+/-0,01
y=0.297+/-0.01
Y=0.7+/-0.1Ft/L
<b>.6500°K bias
5000°K bias
ADJ
*Enter preset OSD menu.
*Mode 9 : 1280 x 1024
Pattern : 11(Black pattern)
* Brightness: set at 107.. Contrast : Max..
*Select color Adj. Icon.
Select 5000°K , 6500°K first
The R,G,B bias initial setting should be in the
160.
*Adj. R,G,B bias until
x =0.313+/-0.006 y =0.329+/-0.006 (6500°K)
Y =0.7 +/- 0.1Ft/L
x =0.346+/-0.006 y=0.359+/-0.006(5000°K)
Y =0.7 +/- 0.1Ft/L
NC
(11).Brightness
*Color temperature bias shall be adjusted.
*Enter preset OSD menu.
*Adjust brightness down to 0.06+/-0.01FL.
*Power off Monitor , then power on again to
check Brightness should be at 50% in User’s
OSD menu.
NC
ViewSonic Corporation
Confidential – Do Not Copy
P90f-1
Page 30

26
<c>.9300°K Gain
Adj.
*Enter preset OSD menu
*Mode 9 : 1280 x 1024
*Pattern : 70mm x 70mm White block.
*Brightness : 0.06FL(background)
*Contrast : Max..
*Select color Adj. Icon.
*Select 9300°K firstly
*Disable R,B signal; only Green signal left.
*Adjust Green Gain to get 28FL around
*Adj. R,B Gain until
x=0.283+/-0.006
y=0.297+/-0.006
Y = 37 to 42FL
x =0.283 ±0.01
y =0.297 ±0.01
Y > = 38 Ft/L
<d>.6500°K Gain
5000°K Gain
ADJ
*Enter preset OSD menu
*Mode 9: 1280 x 1024
*Pattern : 70mm x 70mm White block.
*Brightness : 0.06FL, Contrast : Max.
*Select color Adj. Icon.
*Select 6550°K
*Disable R,B signal; only Green signal left.
*Adjust Green Gain to get 28FL around
*Adj. R,B Gain until
x =0.313+/-0.015 ,y =0.329 +/-0.015( 6500°K)
x =0.346+/-0.015 ,y =0.359 +/-0.015( 5000°K)
Y = 33 to 38FL
x =0.313+/-0.01
y =0.329+/-0.01
x=0.346+/-0.01 y =0.359+/-
0.01
Y = 33 to 38FL
(12) ABL setup *Mode 9 : 1280 x 1024
*Brightness: 0.06FL Contrast: Max.
*Pattern : Pattern 41 (Full white)
*Adjust VR(R167) to get 30± 1Ft/L
30± 2Ft/L
(13).Focus
adjustment
*Mode 9 : 1280 x 1024
*Pattern : Compaq me Pattern.
Compaq me Pattern. reverse.
*Brightness: 0.06FL. Contrast: Max.
*Adj. Focus VRS on FBT until full screen focus
to the best.
Both pattern” me “
and its’ reverse
Pattern to be most
distinguished.
(14).Convergence
adjustment
*Mode 9 : 1280 x 1024
*Pattern: Crosshatch pattern
*Brightness :center Contrast : 30Ft/L
*4 & 6 Pole magnet adjusted to get optimized
convergence, the criteria is:
A circle with 264 mm diameter Area:
< or = 0.3mm
Remaining area: < or = 0.4mm
Circle :<=0.30 mm
Rectangle :<=0.40 mm
(15) Vertival focus
setting
Normally this setting is at 65
ViewSonic Corporation
Confidential – Do Not Copy
P90f-1
Page 31

27
(16) H Moire setting
Normally set at 30 for resolution 1280 x 1024
mode (mode 8 and 9)
And zero for all other modes
(17) V. Moire setting
Normally set at zero for all modes
ViewSonic Corporation
Confidential – Do Not Copy
P90f-1
Page 32

28
YES
NO
NO
YES
YES
YES
NO
NO
NO
NO
NO
YES
10.
TROUBLESHOOTING FLOW CHART
SECTION 1
Q811 on, Q812 off
LED light up ?
LED color is Amber ?
C825 = 190V approx. ?
Q811 on
pin 2 of I803 > 2.5V
Check D815,D804, D816,
D817
,
D818, D819 short ?
OVP, D826 short? or Check
Q807
,
Q808 short ?
Load of secondary side
short ?
Fuse open ?
Check R807,R831
Q801
Check
D801
,
D802 ,D803,D800?
NO
Check pin 23 of IA01
(
> 3.3V)
Check pin 41,42 of
IA01
YES
Check I807,I808,Q814 D827,
I804
YES
If D815, D850 are defective,
check Q402, Q433
Check if Q433, Q402,
short ?
Check if Q121, Q124
short ?
If disconnect P902 of
video board(PWB-0237) is
OK
then check I903 I901
ViewSonic Corporation
Confidential – Do Not Copy
P90f-1
Page 33

29
SECTION 2
Blank Screen LED Amber
Check pin 23,21of IA01
p
in17= High, pin18= Low
Go to SECTION 1 SMPS
troubleshootin
g
chart
NO
Check by entering Preset
mode to obtain “No
No
Check signals from PC
YES
Check if XA01
waveform exist ?
NO
YES
Replace
MCU
(
IA01)
YES
Check B+ (5V)
to IA01 exist ?
NO
ViewSonic Corporation
Confidential – Do Not Copy
P90f-1
Page 34

30
SECTION 3
NO
LED Green
No Raster
Is DC Voltage at Pin2 of
FBT Pro
per(
80 V Approx.)
NO
YES
Is the voltage 6.3V at
heater?
NO
Check Q121 output
300 V
p-p app
rox.
Check I101 pin 2 > 2.5V
Check OVP CKT setting
build by Q114,115,116
Is the voltage at collector of
Q
433 proper ?
YES
NO
Go to SECTION 4 No
raster ,but High Voltage
exist
Check SMPS DC O/P
(
SECTION 1)
Check S.M.P.S
(SECTION 1)
Check P902 connection
OK ?
YES
Check P904 connection
OK ?
YES
ViewSonic Corporation
Confidential – Do Not Copy
P90f-1
Page 35

31
SECTION 4
G2 = 400 to 650 V
(Do not clockwise turn the
Screen VR to extreme )
No Raster
High Voltage exist
Replace
T101(FBT)
I301 Pin3
HUNLOCK HIGH ?
P410 CONNECTION
proper ?
TO SECTION 6 : Horiz.
Line, No Vert. output
TO SECTION 5 : Vert.
line, No Horiz. output
YES
No
YES
NO
YES
Check IIC bus
from Pin27,28 of
IA01 to
IA02,I301,I901
Check IA01 and its
peripheral CKT
NO
NO
Replace IA01
ViewSonic Corporation
Confidential – Do Not Copy
P90f-1
Page 36

32
SECTION 5
DC at Source of
Q402 =
190Vapprox.
Display is Vertical. Line
(No Horizontal output)
Check SMPS DC output
(SECTION 1)
REPLACE I301
NO
Is waveform at
Drain of Q402 Proper ?
Is output of Q400,Q421
proper ?
YES
NO
NO
Is output at Pin 28 of
I301 proper ?
NO
YES
Check Q433
short?, and is Q433
out
p
ut proper ?
NO
NO
Is Q404 output
proper ?
Is output at Pin 26of
I301 proper ?
NO
ViewSonic Corporation
Confidential – Do Not Copy
P90f-1
Page 37

33
SECTION 6
I310 Pin1,Pin7
Input proper ?
Pin 2 of I310 = 15V approx.
Pin4 of I310 = -15.V approx.
Display is Horizontal. Line,
(No Vertical. output)
Check SMPS DC
out
p
ut
Are there output
at pin 3,5 of
I301 ?
Check I301 AND
Peripheral CKT
YES
NO
NO
NO
ViewSonic Corporation
Confidential – Do Not Copy
P90f-1
Page 38

34
SECTION 7
SECTION 8
No OSD
Check IIC Bus (P903A to
P904). Press Enter key,
there should be a
sequential pulse appear
for IIC communication
I903 Vdd = 5V ?
YES
Check I903 and its
peripheral circuit
No video
Raster exist
Check OSD (I903)
Check if Contrast is too
low ?
YES
Check R,G,B at
CDT socket
YES
Check I904 R,G,B output
Check 82V, 190V for
I904 and their peripheral
CKT
Replace I904
YES
Check I904 input
Check R,G,B signals at
P901
Check IIC Bus
(P903A to P904).
Press Enter key ,
there should be a
sequential pulse
appear for IIC
communication
ViewSonic Corporation
Confidential – Do Not Copy
P90f-1
Page 39

35
11.
REPLACEMENT PARTS LIST
WARNING: Replacement parts that have special characteristics important to safety should
be replaced only with types identical to those in the original circuit or specified in the parts
list. Before replacing any of these components, read carefully the product safety
precautions. Do not degrade the safety of the display through improper servicing
ABBREVIATIONS:
RESISTOR
CAPACITOR
PART NAME & DESCRIPTION PART NAME & DESCRIPTION
TYPE ALLOWANCE TYPE ALLOWANCE
R Resistor F ±1% C Capacitor F ±1%
CF Carbon Film G ±2% CE Ceramic G ±2%
CC Carbon Composition J ±5% EL Electrolytic J ±5%
MOF Metal Oxide Film K
±10
PO Polyester K ±10%
FU Fusible M
±20
TA Tantalum M ±20%
MF Metal Film PP Polypropylene P ±100%–0%
VR Variable Resistor ME Metalized Z ±80%–20%
CR Cement Resistor BL Barrier Layer
SMD Thick Film Chip 1206 SMD Monolithic SMD 0805
ViewSonic Corporation
Confidential – Do Not Copy
ASSEMBLY PCB-MAIN (PWB-0334A)
CAPACITOR
CKT NO. Part no. Description
C100 5248439091 C. CE 2KV 39P J
C101 5234333191 C. CE 2KV 330PF K
C102 5223622201 CQ93T630V 2200PF J
C103 5213610091 C. EL 50V 1UF M
C104 5214701091 C. EL 450V 1UF M
C105 5275122491 C. ME 63V 0.22MF J
C106 5276110491 C. ME 100V 0.1UF J
C107 5205647991 C. EL 50V 4.7UF M
C108 5213601091 C. EL 50V 1UF M
C109 5236310491 C. BL 50V 0.1UF Z
C110 5231310291 C. CE 50V 1000PF K
C111 5275122491 C. ME 63V 0.22UF J
C112 5221122391 C. PO 50V 22000PF J
C114 5271133391 C. ME 100V 33000PF J
C115 5276110491 C. ME 100V 0.1UF J
C116 5213622091 C. EL 50V 22UF M
CKT NO. Part no. Description
C117 5227322291 C. ME 100V 2200PF J
C118 5214019612 100V 330UF
C120 5213639091 C. EL 50V 22UF M
C121 5236310491 C. BL 50V 0.1UF Z
C122 5213601091 C. EL 50V 1UF M
C123 5233310291 C. CE 1KV 1000PF K
C126 5232322291 C. CE 500V 2200PF K
C127 5232310291 C. CE 500V 1000LF K
C128 5223510201 C. PO 400V 1000PF K
C129 5213447091 C. EL 25V 47UF M
C130 5271110501 C. ME 100V 1UF J 35KHz
C131 5233310291 C. CE 1KV 1000PF K
C132 5223447301 C. PO250V 47000PF J5KHz
C133 5236310491 C. BL 50V 0.1UF Z
C134 5213610091 C. EL 50V 10UF M
C135 5214433012 C. EL 250V 33UF M
P90f-1
Page 40

36
CKT NO. Part no. Description
C136 5213622091 C. EL 50V 22UF M
C137 5271147401 C. ME 100V 0.47UF J
C139 5214019612 C. EL 100V 330UF M
C301 5276110491 C. ME 100V 0.1UF J
C302 5221168291 C. PO 50V 6800PF J
C303 5247082191 C. CE 50V 820PF J
C304 5275115391 C. ME 63V 15000PF J
C305 5213647991 C. EL 50V 4.7UF M
C306 5213601091 C. EL 50V 1UF M
C307 5247082191 C. CE 50V 820PF J
C308 5227518291 C. PO 100V 1800PF G
C309 5247022191 C. CE 50V 220PF J
C310 5275147491 C. ME 63V 0.47MF J
C311 5247039091 C. CE 50V 39PF J
C312 5275122491 C. ME 63V 0.22MF J
C313 5213447091 C. EL 25V 47UF M
C313A 5242212191 C. CE 50V 120PF J
C314 5242212191 C. CE 50V 120PF J
C315 5247010191 C. CE 50V 100PF J
C316 5247010191 C. CE 50V 100PF J
C317 5213447091 C. EL 25V 47UF M
C318 5213322191 C. EL 16V 220UF M
C319 5232310291 C. CE 500V 1000PF K
C319A 5232310291 C. CE 500V 1000PF K
C320 5275110491 C. ME 63V 0.1MF J
C321 5275110491 C. ME 63V 0.1MF J
C322 5232310291 C. CE 500V1000PF K
C324 5213647991 C. EL 50V 4.7UF M
C325 5213601091 C. EL 50V 1.0UF M
C382 5213310191 C. EL 16V 100UF M
C382A 5213622091 C. EL 50V 22UF M
C383 5222433291 C. PO 100V 3300PF J
C384 5236310491 C. BL 50V 0.1UF Z
C385 5213310212
C. EL 16V 1000UF M
C386 5213310212 C. EL 16V 1000UF M
C386A 5236310491 C. BL 50V 0.1UF Z
C387 5277127401 C. ME 100V 0.27MF J
C388 5213610191 C. EL 50V 100UF M
C390 5233315191 C. CE 1KV 150PF K
CKT NO. Part no. Description
C391 5275122191 C. ME 63V 0.22UF J
C400 5223433301 C. PO 250V 33000PF J
C401 5213447091 C. EL 25V 47UF M
C401A 5236310491 C. BL 50V 0.1UF Z
C402 55206410112 C. EL 250V 100UF M
C402A 5232310301 C. CE 500V 10000PF K
C403 5223422301 C. PO 250V 22000PF J
C403A 5233318191 C. CE 1KV 180PF K
C404 5223622201 C. PO 630V 2200PF J
C405 5248468091 C. CE 2KV 68PF J
C406 5223749200 C. PO 1600V 4900PF J
C406A 5061105400 BEAD CORE BRH5X4X1.5
C406E 5056208100 EYELET 1.6X3
C407 5275147491 C. ME 63V 0.47UF J
C409 5234347201 B DC 2KV 4700PF J
C410 5213610091 C. EL 50V 10UF M
C411 5234547201 C. CE 2KV 4700PF M
C411A 5232310291 C. CE 500V 1000PF K
C412 5233002691
C. CE 2KV 470PF K 105℃
C413 5214222991 C. EL 160V 2.2UF M
C414 5214401091 C. EL 250V 1.00UF M
C415 5214019512 C. EL 25V 1000UF M
C416 5270211501 MPA 400V 0.15UF J
C417 5223410301 CQ93T 250V 10000PF J
C419 5270424402 CF93T 400V 0.24UF J
C420 5270351401 CF93T 400V 0.51UF J
C421 5270468301 CF93T 400V 68000PF J
C422 5213410191 C. EL 25V 100UF M
C423 5270207701 C. ME 400V 0.1UF J
C424 5213647991 C. EL 50V 4.7UF
C425 5270314502 CF93T 250V 1.4UF
C426 5270211401 MPA 250V 0.1UF
C454 5214422991 C. EL 250V 2.2UF M
C455 5214422991 C. EL 250V 2.2UF M
C471 5213310191 C. EL 16V 100UF M
C801 5214110091 C. EL 100V 10UF M
C802 5230105501 C. CE 250Vac 4700PF M
C802A 5230105401 C. CE 400Vac 2200PF M
C803 5230105501 C. CE 250Vac 4700PF M
ViewSonic Corporation
Confidential – Do Not Copy
P90f-1
Page 41

37
CKT NO. Part No. Description
C803A 5230105401 C. CE 400Vac 2200PF M
C804 5270112601 C. ME 275Vac 0.22UF K
C804A 5270111091 C. ME 275Vac 0.1UF K
C805 5232310301 C. CE 500V1000PF K
C806 5232310301 C. CE 500V1000PF K
C809 5210313900 C. EL 400V 330UF M
C809E 5056208101 C. EYELET 2.4X3
C811 5213622091 C. EL 50V 22UF M
C812 5213622091 C. EL 50V 22UF M
C813 5223622201 C. PO 630V 2200UF J
C814 5213622091 C. EL 50V 22UF M
C815 5213410191 C. EL 25V 100UF M
C816 5213610091 C. EL 50V 10UF M
C817 5214122091 C. EL 100V 22UF M
C818 5231322291 C. CE 50V 2200UF K
C819 5221122291 C. PO 50V 2200PFJ
C820 5275115391 C. ME 63V 15000PF J
C821 5213410191 C. EL 25V 100UF M
C822 5213622091 C. EL 50V 22UF M
C823 5236310491 C. BL 50V 0.1UF Z
C824 5233310191 C. CE 1KV 100PF K
C825 5216410101 C. EL 250V 100UF M
C826 5233318191 C. CE 1KV 180PF K
C827 5214019812 C. EL 100V 220UF M
C828 5213647091 C. EL 50V 47UF M
C829 5213410212 C. EL 25V 1000UF M
C830 5233318191 C. CE 1KV 180PF K
C831 5205347112 C. EL 16V 470UF M
C832 5234310101 C. CE 2KV 100PF K
C833 5214019791 C. EL 25V 330UF M
C833A 5213610091 C. EL 50V 10UF M
C834 5271133391 C. ME 100V 33000PF J
C835 5233318191 C. CE 1KV 180PF K
C836 5213310212 C. EL 16V 1000UF M
C838 5213447091 C. EL 25V 47UF M
C840 5213222191 C. EL 10V 220UF M
C841 5213310212 C. EL 16V 1000UF M
C844 5205622091 C. EL 50V 22UF M
C845 5213447091 C. EL 25V 47UF M
CKT NO. Part No. Description
C848 5233318191 C. CE 1KV 180PF K
C849 5213633091 C. EL 50V 33UF M
C850 5230105501 C. CE AC250Vac 4700PF M
C851 5230105501 C. CE AC250Vac 4700PF M
C852 5213510213 C. EL 35V 1000UF M
C853 5233315191 C. CE 1KV 150PF K
C860 5223522301 CQ93T 400V 0.022UF
C870 5216410001 C. EL 250V 10UF M
C870A 5233310291 C. CE 1KV 10000PF M
C872 5214005001 C. EL 25V 470UF M
C872A 5214005001 C. EL 25V 470UF M
C875 5213310191 C. EL 16V 100UF M
C875A 5231310291 C. CE 50V 1000PF K
C876 5213310212 C. EL 16V 1000UF M
C881A 5234318191 C. CE 2KV 180PF K
C882A 5234327191 C. CE 2KV 270PF K
C883 5234333101 C. CE 2KV 330PF K
C886 5276110491 C. ME 100V 0.1UF J
C886A 5232310301 C. CE 500V 10000PF K
C887 5214122091 C. EL 100V 22UF M
CA01 5213347091 C. EL 16V 47UF M
CA02 5242210091 C. CE 50V 10PF J
CA03 5242210091 C. CE 50V 10PF J
CA04 5242212191 C. CE 50V 120PF J
CA05 5242212191 C. CE 50V 120PF J
CA06 5242212191 C. CE 50V 120PF J
CA07 5213622991 C. EL 50V 2.2UF M
CA08 5213647991 C. EL 50V 4.7UF M
CA09 5213647991 C. EL 50V 4.7UF M
CA10 5213247191 C. EL 10V 470UF M
CA12 5231310291 C. CE 50V 1000PF K
CA13 5231333191 C. CE 50V 330PF K
CA14 5213622991 C. EL 50V 2.2UF M
CA15 5213647991 C. EL 50V 4.7UF M
CA16 5213610091 C. EL 50V 10UF M
CA17 5242210191 C. CE 50V 100PF J
CA18 5242210191 C. CE 50V 100PF J
CA20 5232310291 C. CE 500V 1000PF K
CA22 5242210191 C. CE 50V 100PF J
ViewSonic Corporation
Confidential – Do Not Copy
P90f-1
Page 42

38
CKT NO. Part no. Description
CA25 5242210191 C. CE 50V 100PF J
CA26 5242210191 C. CE 50V 100PF J
CA27 5231310291 C. CE 50V 1000PF K
SEMICONDUTOR
DIODE
CKT NO. Part no. Description
D101 6611032640 DIODE DIODE RECTIFIER BYV26DGP 800V 1A
D102 6615005836 DIODE ZENER HZ12A2-TD
D103 6611012849 DIODE RECTIFIER RGP10M
D104* 6613003032 DIODE SWITCHING 1N4148-TD 75V 150mA (RA,RB,RC)
D105* 6613003032 DIODE SWITCHING 1N4148-TD 75V 150mA (RA,RB,RC)
D108* 6613003032 DIODE SWITCHING 1N4148-TD 75V 150mA (RA,RB,RC)
D109* 6613003032 DIODE SWITCHING 1N4148-TD 75V 150mA (RA,RB,RC)
D110 (RA) 6615021430 DIODE ZENER BZX79C51
D110 (RB) 6615015640 DIODE ZENER IN5262B
D110 (RC) 6615021441 DIODE ZENER IN5262B-RL
D110A (CB) 6615005836 DIODE ZENER HZ12A2-TD
D110A (CB) 6615023331 DIODE ZENER HZ24-2-TD 23.6-24.7V
D111 6615012530 DIODE ZENER HZ4A2-TD 3.5-3.7V 5mA 0.5w
D112* 6613003032 DIODE SWITCHING 1N4148-TD 75V 150mA (RA,RB,RC)
D113* 6613003032 DIODE SWITCHING 1N4148-TD 75V 150mA (RA,RB,RC)
D114 (RA) 6613002244 DIODE SWITCHING RGP10D-G23
D114 (RB) 6611035644 DIODE SWITCHING RGP10D
D115 (RA) 6613002244 DIODE SWITCHING RGP10D-G23
D115 (RB) 6611035644 DIODE SWITCHING RGP10D
D116* 6613003032 DIODE SWITCHING 1N4148-TD 75V 150mA (RA,RB,RC)
D118 (RA) 6615009752 DIODE ZENER RD6.8B2-T7
D118 (RB) 6615007234 DIODE ZENER HZ7B1-TD 6.7-7V
D119* 6613003032 DIODE SWITCHING 1N4148-TD 75V 150mA (RA,RB,RC)
D120* 6613003032 DIODE SWITCHING 1N4148-TD 75V 150mA (RA,RB,RC)
D125* 6613003032 DIODE SWITCHING 1N4148-TD 75V 150mA (RA,RB,RC)
D126 (RA) 6611018200 DIODE RECTIFIER 30DF2
D126 (RB) 6611015245 DIODE RECTIFIER GUF30D
D127 6611035643 DIODE SWITCHING RGP10G
D128 6611019241 DIODE RECTIFIER BYD73G
D301 6615007834 DIODE ZENER HZ5C1-TD 4.9-5.1V
D310# 6611007240 DIODE RECTIFIER 1N4002RL(RA,RB,RC,RD)
D401* 6613003032 DIODE SWITCHING 1N4148-TD 75V 150mA (RA,RB,RC)
D402 (RA) 6615009336 DIODE ZENER BZX79C10
ViewSonic Corporation
Confidential – Do Not Copy
P90f-1
Page 43

39
D403 6611029306 DIODE RECTIFIER 3AP6
D404 6611018703 DIODE RECTIFIER BY329X-1500S 1500V 8A
D407* 6613003032 DIODE SWITCHING 1N4148-TD 75V 150mA (RA,RB,RC)
D410 6611070347 DIODE RECTIFIER SR204
D477 6611025643 DIODE SWITCHING RGP10G
D478 6611025643 DIODE SWITCHING RGP10G
D800 (RA) 6611029554 DIODE RECTIFIER 1N5406-M FORMED
D800 (RB) 6611029555 DIODE RECTIFIER 1N5406-M PREFORMED
D801 (RA) 6611029554 DIODE RECTIFIER 1N5406-M FORMED
D801 (RB) 6611029555 DIODE RECTIFIER 1N5406-M PREFORMED
D802 (RA) 6611029554 DIODE RECTIFIER 1N5406-M FORMED
D802 (RB) 6611029555 DIODE RECTIFIER 1N5406-M PREFORMED
D803 (RA) 6611029554 DIODE RECTIFIER 1N5406-M FORMED
D803 (RB) 6611029555 DIODE RECTIFIER 1N5406-M PREFORMED
D804 (RA) 6611032640 DIODE RECTIFIER FRRD BYV26DGP 800V 1A 75nS
D804 (RB) 6611012835 DIODE RECTIFIER UFRRD 1NU41-TP3
D804 (RC) 6611032644 DIODE RECTIFIER GUF10K
D806 (RA) 6611032640 DIODE RECTIFIER FRRD BYV26DGP 800V 1A 75nS
D806 (RB) 6611012835 DIODE RECTIFIER UFRRD 1NU41-TP3
D806 (RC) 6611032644 DIODE RECTIFIER GUF10K
D807 (RA) 6615011831 DIODE ZENER RD20EB2-T1
D807 (RB) 6615011833 DIODE ZENER HZ20-1-TD
D808* 6613003032 DIODE SWITCHING 1N4148-TD 75V 150mA (RA.RB.RC)
D810* 6613003032 DIODE SWITCHING 1N4148-TD 75V 150mA (RA.RB.RC)
D811 6611070541 DIODE RECTIFIER 1N5817
D812 (RA) 6611032640 DIODE RECTIFIER FRRD BYV26DGP 800V 1A 75nS
D812 (RB) 6611032644 DIODE RECTIFIER GUF10K
D812 (RC) 6611012835 DIODE RECTIFIER UFRRD 1NU41-TP3
D815 6611012835 DIODE RECTIFIER 1NU41-TP3
D816 (RA) 6611032341 DIODE RECTIFIER 2NU41-TPA1
D816 (RB) 6611032244 DIODE RECTIFIER HER308G 1000V/3A
D817 (RA) 6611015244 DIODE RECTIFIER UF5402G
D817 (RB) 6611018200 DIODE RECTIFIER 30DF2
D817 (RC) 6611015245 DIODE RECTIFIER GUF30D
D818 (RA) 6611015244 DIODE RECTIFIER UF5402G
D818 (RB) 6611018200 DIODE RECTIFIER 30DF2
D818 (RC) 6611015245 DIODE RECTIFIER GUF30D
D819 (RA) 6611032641 DIODE RECTIFIER UFRRD 2NU41-TPA1
D819 (RB) 6611032244 DIODE RECTIFIER HER308G
CKT NO. Part no. Description
D402 (RB) 6615009337 DIODE ZENER HZ11A3-TD
ViewSonic Corporation
Confidential – Do Not Copy
P90f-1
Page 44

40
D820 (RB) 6613002248 DIODE SWITCHING 1N4935
D820 (RC) 6611035644 DIODE RECTIFIER RGP10D
D821* 6613003032 DIODE SWITCHING 1N4148-TD 75V 150mA (RA.RB.RC)
D822* 6611007240 DIODE RECTIFIER 1N4002RL(RA.B.RC.RD)
D823 (RA) 6615006443 DIODE ZENER RD6.2EB2-T1 5.99-6.24V
D823 (RB) 6615009756 DIODE ZENER HZ6C2-TD 6-6.3V
D825 (RA) 6613002244 DIODE SWITCHING RGP10D
D825 (RB) 6613002248 DIODE SWITCHING 1N4935
D825 (RC) 6611035644 DIODE RECTIFIER RGP10D
D826 (RA) 6615011333 DIODE ZENER 1N5252B-RL
D826 (RB) 6615023331 DIODE ZENER HZ24-2-TD 23.6~24.7V
D827 6615007834 DIODE ZENER HZ5C1-TD 4.9-5.1
D828 (RA) 6611007242 DIODE RECTIFIER 1N4002 G23
D828 (RB) 6611007240 DIODE RECTIFIER 1N4002RL
D828 (RC) 6611007244 DIODE RECTIFIER 1N4002
D829 (RA) 6615018830 DIODE ZENER RD18EB2-T1
D829 (RB) 6615018834 DIODE ZENER HZ18-1-TD
D833 6615007834 HZ5C1 4.9-5.1
D840* 6613003032 DIODE SWITCHING 1N4148-TD 75V 150mA (RA.RB.RC)
D850 6611012835 DIODE RECTIFIER 1NU41-TP3
D855 6611070541 DIODE RECTIFIER 1N5817
DA01* 6613003032 DIODE SWITCHING 1N4148-TD 75V 150mA (RA.RB.RC)
DA01A* 6613003032 DIODE SWITCHING 1N4148-TD 75V 150mA (RA.RB.RC)
DA02 6615007834 DIODE ZENER HZ5C1-TD 4.9-5.1
DA04* 6613003032 DIODE SWITCHING 1N4148-TD 75V 150mA (RA.RB.RC)
DA05* 6613003032 DIODE SWITCHING 1N4148-TD 75V 150mA (RA.RB.RC)
DA06* 6613003032 DIODE SWITCHING 1N4148-TD 75V 150mA (RA.RB.RC)
DA07* 6613003032 DIODE SWITCHING 1N4148-TD 75V 150mA (RA.RB.RC)
DA08* 6613003032 DIODE SWITCHING 1N4148-TD 75V 150mA (RA.RB.RC)
DA09* 6613003032 DIODE SWITCHING 1N4148-TD 75V 150mA (RA.RB.RC)
DA10* 6613003032 DIODE SWITCHING 1N4148-TD 75V 150mA (RA.RB.RC)
DA11* 6613003032 DIODE SWITCHING 1N4148-TD 75V 150mA (RA.RB.RC)
DA12 5054431539 DIODE ZENER HZ5C1-TD 4.9-5.1
DA15 6618019800 LED HOLDER LAMP CSL-H500YG2HTJ
PS: * 1N4148 : RA 6613003032 RB 6613003037 RC 6613003048
#1N4002 : RA 6611007240 RB 6611007244 RC 6611007243 RD 6611007245
CKT NO. Part no. Description
ViewSonic Corporation
Confidential – Do Not Copy
P90f-1
Page 45

41
IC
CKT NO. Part no. Description
I101 (RA) 6644063111 IC LINER UC3842BN
I101 (RB) 6644063112 IC LINER DBL3842
I301 6644076308 IC LINER DEFLECTION TDA9116 SDIP32
I310 6644076000 IC LINER V-O/P TDA8172 7P
I802 6640003800 IC VOLTAGE REGULATOR LM1117T 5.0
I803 (RA) 6644063111 IC LINER UC3842BN
I803 (RB) 6644063112 IC LINER DBL3842
I804 (RA) 6642002904 IC PHOTO COUPLER TLP721F
I804 (RB) 6642002906 IC PHOTO COUPLER LTV817M
I804 (RC) 6642002909 IC PHOTO COUPLER KP1010H-B
I805 (RA) 6642002904 IC PHOTO COUPLER TLP721F
I805 (RB) 6642002906 IC PHOTO COUPLER LTV817M
I805 (RC) 6642002909 IC PHOTO COUPLER KP1010H-B
I807 (RA) 6642002904 IC PHOTO COUPLER TLP721F
I807 (RB) 6642002906 IC PHOTO COUPLER LTV817M
I807 (RC) 6642002909 IC PHOTO COUPLER KP1010H-B
I808 (RA) 6640007705 IC VOLTAGE REGULATOR ADJ A431LP (1%) TC-92 (LP)
I808 (RB) 6640007706 IC VOLTAGE REGULATOR TL431ACLP (1%)TO-92
I808 (RC) 6640007712 IC VOLTAGE REGULATOR TL431LN 1% TO-92
I871 (RA) 6640002705 IC VOLTAGE REGULATOR L7812CV 12V 1.5A
I871 (RB) 6640002000 IC VOLTAGE REGULATOR AN7812 12V 1.5A
I871 (RC) 6640002006 IC VOLTAGE REGULATOR H7812BE12V 1.5A
I871 (RD) 6640002003 IC VOLTAGE REGULATOR KIA7812API 12V 1.5A
IA01 6647008204 IC LSI MCU FLASH MTP NT68F62U SDIP-42 8BIT 32K
IA02 (RA) 6647051822 IC MEMORY EEPROM 8K 24LC08B/P DIP-8
IA02 (RB) 6647051823 IC MEMORY CMOS EEPROM AT24C08-10PC DIP-8
IA02 (RC) 6647051824 IC MEMORY CMOS EEPROM 24WC08P DIP-8
IA02 (RD) 6647051825 IC MEMORY CMOS EEPROM S524C80D81-DCB0 DIP-8
TRANSFORMER
CKT NO Part no. Description
T101 (RB) 5062628032 TRANSFORMER, FLYBACK COLOR TFB-280L-31
T401 5062420400 TRANSFORMER, HOR. DRIVE TLN-204, JSI
T801 5061369700 POWER TRANSFORMER, SWITCHING TPW-697
ViewSonic Corporation
Confidential – Do Not Copy
P90f-1
Page 46

42
TRANSISTOR
CKT NO. Part no. Description
Q104 6621015332 TRANSISTOR NPN HF 2SC1815Y
Q104A
6621015332 TRANSISTOR NPN HF 2SC1815Y
Q104A
6621015335 TRANSISTOR NPN HF H945P
Q105 6621040730 TRANSISTOR NPN HF MPSA44 500V 0.6A TO-92
Q108 6624009232 TRANSISTOR PNP MPSA92
Q111 6621015332 TRANSISTOR NPN HF 2SC1815Y
Q114 6621015332 TRANSISTOR NPN 2SC1815Y
Q115 6623002050 TRANSISTOR PNP 2SA1015Y
Q116 6621015332 TRANSISTOR NPN 2SC1815Y
Q117 6623002050 TRANSISTOR PNP 2SA1015Y
Q118 6623002050 TRANSISTOR PNP 2SA1015Y
Q121 6626003203 TRANSISTOR FET MOS 2SK2843 600V 9A TO-220FI
Q123 6621006530 TRANSISTOR NPN BC548C
Q124 6626004000 TRANSISTOR FET MOS N-CH 2SK2161
Q125 6626006130 TRANSISTOR FET MOSFET BSN254A
Q126 6621006530 TRANSISTOR NPN BC548C
Q301 6621015332 TRANSISTOR NPN 2SC1815Y
Q302 6621015332 TRANSISTOR PNP 2SC1815Y
Q303 6621015332 TRANSISTOR NPN 2SC1815Y
Q306 6621018032 KTC3205Y
Q307 6623006332 KTA1273Y
Q400 (RA) 6621015332 TRANSISTOR NPN 2SC1815Y
Q400 (RB) 6621003230 TRANSISTOR NPN 2SC458C
Q401 6623002050 TRANSISTOR PNP 2SA1015Y
Q402 6626005702 TRANSISTOR FET MOSFET 2SJ512
Q404 6626005102 TRANSISTOR NPN LF 2SK2628
Q405 6622018000 TRANSISTOR NPN LF 2SD882Q
Q410 6626003903 TRANSISTOR FET MOS RDN15ON20
Q411 (RA) 6621026430 TRANSISTOR NPN BF422
Q411 (RB) 6621026401 TRANSISTOR NPN BF422
Q412 6626003903 TRANSISTOR FET MOS RDN15ON20
Q413 (RA) 6621026430 TRANSISTOR NPN BF422
Q413 (RB) 6621026401 TRANSISTOR NPN BF422
Q414 (RA) 6626000605 TRANSISTOR FET MOS IRFS630A
Q414 (RB) 6626000604 TRANSISTOR FET MOS IRFS630MFP
Q414 (RC) 6626004000 TRANSISTOR FET MOSFET N-CH 2SK2161
ViewSonic Corporation
Confidential – Do Not Copy
P90f-1
Page 47

43
CKT NO. Part no. Description
Q415 (RA) 6621026430 TRANSISTOR NPN BF422
Q415 (RB) 6621026401 TRANSISTOR NPN BF422
Q416 (RA) 6626000605 TRANSISTOR FET MOS IRFS630A
Q416 (RB) 6626000604 TRANSISTOR FET MOS IRFS630MFP
Q416 (RC) 6626004000 TRANSISTOR FET MOSFET N-CH 2SK2161
Q417 (RA) 6621026430 TRANSISTOR NPN BF422
Q417 (RB) 6621026401 TRANSISTOR NPN BF422
Q423 6622018000 TRANSISTOR NPN LF 2SD882Q
Q424 6624001300 TRANSISTOR NPN LF 2SB772
Q426
6621015332 TRANSISTOR NPN 2SC1815Y
Q427
6621018032 KTC3205Y
Q428
6623006332 KTA1273Y
Q429
6623002050 TRANSISTOR PNP 2SA1015Y
Q430
6621015332 TRANSISTOR NPN 2SC1815Y
Q433 6621040405 TRANSISTOR NPN HF 2SC5587AS
Q471 6623006332 TRANSISTOR PNP HF KTA1273
Q472 6621018032 TRANSISTOR NPN HF KTC3205Y
Q473 (RA) 6621015335 TRANSISTOR NPN HF H945P
Q473 (RB) 6621015332 TRANSISTOR NPN HF 2SC1815Y
Q475 6624001300 TRANSISTOR PNP HF 2SB772
Q476 6621015332 TRANSISTOR NPN HF 2SC1815Y
Q801 6626003208 TRANSISTOR FET MOSFET N-CH FJUI 2SK2648-01
Q804 6621015332 TRANSISTOR NPN 2SC1815Y
Q805 6621015332 TRANSISTOR NPN 2SC1815Y
Q806 6624001300 TRANSISOR PNP LF 2SB772
Q807 6623002050 TRANSISTOR PNP 2SA1015Y
Q808 6621015332 TRANSISTOR NPN 2SC1815Y
Q810 6621040730 TRANSISTOR NPN MPSA44
Q811 6621015332 TRANSISTOR NPN 2SC1815Y
Q814 6621015332 TRANSISTOR NPN 2SC1815Y
Q815 6621040730 TRANSISTOR NPN MPSA44
Q816 6621015332 TRANSISTOR NPN 2SC1815Y
Q866 6624001300 TRANSISTOR PNP 2SB722
Q867 6621015332 TRANSISTOR NPN 2SC1815Y
Q872 6621015332 TRANSISTOR NPN 2SC1815Y
QA01 6621015332 TRANSISTOR NPN 2SC1815Y
QA02 6621015332 TRANSISTOR NPN 2SC1815Y
QA03 6621015332 TRANSISTOR NPN 2SC1815Y
ViewSonic Corporation
Confidential – Do Not Copy
P90f-1
Page 48

44
COIL
CKT NO. Part no. Description
B801 5062122949 CORE, BEAD RH03506ST-B
L101 5064433025 COIL, PEAKING TRF-8330J 33UH J
L102 5064433025 COIL, PEAKING TRF-8330J 33UH J
L103 5062122949 CORE, BEAD RH03506ST-B
L105 5062124403 COIL, CHOKE B-6-22A (0), BC0610R6HB-B3
L106 5062122946 CORE, BEAD RH03506AT-B
L300 5062118309 CORE, BEAD RH035047ST-Y7
L301 5064433025 CORE, BEAD TRF-8330J
L401 5062419900 TRANS, HOR. DRIVG TLN-199
L402 5062230400 COIL, HOR.LINEARITY TLH-304
L403 5062422500 TRANS, DYAMIC FOCUS TDF-225
L404 5062117701 COIL, CHOKE CHK-177A
L405 5062229000 COIL, HOR.CHOKE TCH-290
L406 5062128707 CHK-287G
L407 5062127418 3.5Ø X 0.6Ø X 3mm
L801 5061111000 FILTER, EMI TRANSFORMER TYPE TLF-110
L802 5061111000 FILTER, EMI TRANSFORMER TYPE TLF-110
L805 5061101000 COIL, BEAD HC5-035, BF45HZ-3.5X11X0.8
L870 5062202300 COIL, HOR.CHOKE TLN-2026
L871 5062123001 COIL, HOR. CHOKE CHK-230A
L872 5062202300 COIL, HOR.CHOKE TLN-2026
L873 5062117701 COIL, HOR. CHOKE CHK-177A
L874 5062123001 COIL, HOR.CHOKE CHK-230A
L875 5062202300 COIL, HOR. CHOKE TLN-2026
L876 5062122971 CORE, BEAD RH035078ST-B
L877 5062123001 CORE, CHOKE CHK-230A
CRYSTAL
CKT NO Part no. Description
XA01 (RA) 6699003504 CST8.00MTW(TCR-1056)
RELAY
CKT NO Part no. Description
SR401 5054633000 RUDH-SS-11201
SR801 5054613402 RELAY OSA-SS-212DM5
ViewSonic Corporation
Confidential – Do Not Copy
P90f-1
Page 49

45
RESISTOR
CKT NO Part no. Description
R100 5130420206 R. CF 2W 2K J
R100A 5130420206 R. CF 2W 2K J
R101 5142433490 R. CF 1/2W 330K J
R102 5142433490 R. CF 1/2W 330K J
R103 5142162195 R. CF 1/6W 620 J
R104 5142818395 R. CF 1/4W 18K J
R105 5142110295 R. CF 1/6W 1K J
R106 5142891395 R. CF 1/4W 91K J
R107 5142836395 R. CF 1/4W 36K J
R108 5142151295 R. CF 1/6W 5.1K J
R111 5142833195 R. CF 1/4W 330 J
R112 5142112295 R. CF 1/6W 1.2K J
R118 5142815295 R. CF 1/4W 1.5K J
R119 5142810195 R. CF 1/4W 100 J
R120 5130451303 R. MOF 2W 51K J
R121 5142415590 R. CF 1/2W 1.5M J
R121A 5142415590 R CF 1/2W 1.5M
R124 5142182195 R. CF 1/6W 820 J
R126 5142110295 R. CF 1/6W 1K J
R127 5142112195 R. CF 1/6W 120 J
R128 5142133395 R. CF 1/6W 33K J
R129 5142115495 R. CF 1/6W 150K J
R130 5142127295 R. CF 1/6W 2.7K J
R131 5142847095 R. CF 1/4W 47 J
R132 5142422390 R. CF 1/2W 22K J
R135 5142833395 R. CF 1/4W 33K J
R136 5134718018 R. MF 1/6W 1.8K J
R137 5134715018 R. MF 1/6W 1.5K J
R138 5142147295 R. CF 1/6W 4.7K J
R139 5142110295 R. CF 1/6W 1K J
R140 5142182195 R. CF 1/6W 820 J
R141 5142110295 R. CF 1/6W 1K J
R142 5142810495 R. CF 1/4W 100K J
R154 5142110095 R. CF 1/6W 10 J
R155 5142110395 R. CF 1/6W 10K J
R156 5142147195 R. CF 1/6W 470 J
R157 5130439003 R. MOF 2W 39 J
R158 5142810095 R. CF 1/4W 10 J
CKT NO Part no. Description
R159 5142110095 R. CF 1/6W 10 J
R160 5142147195 R. CF 1/6W 470 J
R161 5142110195 R. CF 1/6W 100 J
R162 5142822995 R. CF 1/4W 2.2 J
R163 5130322203 R. MOF 1W 2.2K J
R164 5130310403 R. MOF 1W 100K J
R165 5142110495 R. CF 1/6W 100K J
R166 5142156295 R. CF 1/6W 5.6K J
R167 5162162220 R. VR B 22K M
R168 5142147395 R. CF 1/6W 47K J
R171 5142856295 R. CF 1/4W 5.6K J
R172 5142127295 R. CF 1/6W 2.7K J
R173 5142802095 R. CF 1/4W 2 J
R175 5142162395 R. CF 1/6W 62K J
R176 5162162820 R. VR B 100K M
R177 5142862395 R. CF 1/4W 62K J
R179 5130415803 R MOF 2W 0.15 J
R180 5142430490 R. CF 1/2W 300K J
R301 5134756018 R. MF 1/6W 5.6K F
R302 5142133295 R. CF 1/6W 3.3K J
R303 5142110395 R. CF 1/6W 10K J
R304 5142110495 R. CF 1/6W 100K J
R306 5142112395 R. CF 1/6W 11K J
R307 5142133295 R. CF 1/6W 3.3K J
R308 5142116295 R. CF 1/6W 1.6K J
R309 5142110295 R. CF 1/6W 1K J
R310 5142122495 R. CF 1/6W 220K J
R311 5142122195 R. CF 1/6W 220 J
R312 5142147395 R. CF 1/6W 47K J
R313 5142110395 R CF 1/6W 10K J
R314 5142120295 R. CF 1/6W 2K J
R315 5142110195 R. CF 1/6W 100 J
R316 5142110195 R. CF 1/6W 100 J
R317 5142110295 R. CF 1/6W 1K J
R318 5142143295 R. CF 1/6W 4.3K J
R319 5142120495 R. CF 1/6W 200K J
R320 5142115395 R. CF 1/6W 15K J
R321 5142122095 R. CF 1/6W 22 J
ViewSonic Corporation
Confidential – Do Not Copy
P90f-1
Page 50

46
CKT NO Part no. Description
R322 5142110195 R. CF 1/6W 100 J
R323 5142110195 R. CF 1/6W 100 J
R324 5142815395 R. CF 1/4W 15K J
R325 5142815395 R. CF 1/4W 15K J
R326 5142127395 R. CF 1/6W 27K J
R327 5142139295 R. CF 1/6W 3.9K J
R329 5142110395 R. CF 1/6W 10K J
R330 5142110395 R. CF 1/6W 10K J
R331 5142168395 R. CF 1/6W 68K J
R332 5142110395 R. CF 1/6W 10K J
R333 5142124195 R. CF 1/6W 240 J
R334 5142810095 R. CF 1/4W 10 J
R335 5142143295 R. CF 1/6W 4.3K J
R336 5142810095 R. CF 1/4W 10 J
R384 5130468903 R. MOF 2W 6.8 J
R385 5142110395 R. CF 1/6W 10K J
R386 5130456903 R. MOF 2W 5.6 J
R388 5142415990 R. CF 1/2W 1.5 J
R389 5130415903 R. MOF 2W 1.5 J
R390 5142433190 R. CF 1/2W 330 J
R400 5142810195 R. CF 1/4W 100 J
R401 5130222007 R. MOF 1/2W 22 J
R402 5130468003 R. MOF 2W 68 J
R403 5142812195 R. CF 1/4W 120 J
R404 5142810395 R. CF 1/4W 10K J
R406A 5130456106 2W 560J UB
R407 5130556103 R. MOF 3W 560 J
R409 5142822295 R. CF 1/4W 2.2K J
R410 5142810195 R. CF 1/4W 100 J
R412 5142810395 R. CF 1/4W 10K J
R414 5130510103 R. MOF 3W 100 J
R415 5130520003 R. MOF 3W 20 J
R417 5136000100 R. MOF 5W 1.0 K
R419 5142110195 R. CF 1/6W 100 J
R420 5142810295 R. CF 1/4W 1K J
R426 5142815495 R. CF 1/4W 150K J
R427 5142847395 R. CF 1/4W 47K J
R429 5142815495 R. CF 1/4W 150K J
R430 5142847395 R. CF 1/4W 47K J
CKT NO Part no. Description
R432 5142815495 R. CF 1/4W 150K J
R437 5142847395 R. CF 1/4W 47K J
R438 5142815495 R. CF 1/4W 150K J
R439 5142110395 R. CF 1/6W 10K J
R440 5142110395 R. CF 1/6W 10K J
R441 5142110395 R. CF 1/6W 10K J
R442 5142168395 R. CF 1/6W 68K J
R443 5142110395 R. CF 1/6W 10K J
R444 5142124195 R. CF 1/6W 240 J
R445 5142810095 R. CF 1/4W 10 J
R446 5142843295 R. CF 1/4W 4.3K J
R447 5142810095 R. CF 1/4W 10 J
R448 5142115295 R. CF 1/6W 1.5K J
R449 5142810095 R. CF 1/4W 10 J
R450 5142127295 R. CF 1/6W 2.7K J
R451 5142827195 R. CF 1/4W 270 J
R452 5130468906 R. MOF 2W 6.8 J 2U
R453 5130410006 R. MOF 2W 10 J UB
R454 5162561980 R. VR B 10K M
R455 5142868195 R. CF 1/4W 680 J
R456 5142868195 R. CF 1/4W 680 J
R472 5142143295 R. CF 1/6W 4.3K J
R473 5142810095 R. CF 1/4W 10 J
R474 5142810095 R. CF 1/4W 10 J
R475 5142110395 R. CF 1/6W 10K J
R476 5142824195 R. CF 1/4W 240 J
R477 5142868395 R. CF 1/4W 68K J
R478 5142810395 R. CF 1/4W 10K J
R479 5142130395 R CF 1/6W 30K J
R480 5142810295 R CF 1/4W 1K J
R481 5142110395 R CF 1/6W 10K J
R801 5142482490 R. CF 1/2W 820K J
R802 5142833195 R. CF 1/4W 330 J
R803 5101115300 R.THERMISTOR,
POSITIVE DGC2R07N
R804 (RA) 5101114200
R.THERMISTOR
GC-P 10D 100
R804 (RB) 5101118400
R. THERMISTOR
PROTECTORS 10 L 3A
ViewSonic Corporation
Confidential – Do Not Copy
P90f-1
Page 51

47
CKT NO Part no. Description
R806 5142882495 R. CF 1/4W 820K J
R807 5130324803 R. FU MOF 1W 0.24 J
R808 5142815395 R. CF 1/4W 15 K J
R809 5142851495 R. CF 1/4W 510K J
R810 5142851495 R. CF 1/4W 510K J
R811 5130410303 R. MOF 2W 10K J
R812 5130410303 R. MOF 2W 10K J
R813 5130510403 R. MOF3W 100K J
R814 5142851995 R. CF 1/4W 5.1 J
R815 5142810195 R. CF 1/4W 100 J
R816 5142810395 R. CF 1/4W 10K J
R817 5142143295 R. CF 1/6W 4.3K J
R817A 5162161720 R. VR 5K M
R818 5142810495 R. CF 1/4W 100K J
R819 5142847295 R. CF 1/4W 4.7K J
R821 5142115395 R. CF 1/6W 15K J
R823 5142147395 R. CF 1/6W 47K J
R824 5142120295 R. CF 1/6W 2.0K J
R825 5142827395 R. CF 1/4W 27K J
R826 5142810295 R. CF 1/4W 1K J
R827 5162161220 R. VR 2K M
R828 5142810195 R. CF 1/4W 100 J
R829 5142851295 R. CF 1/4W 5.1K J
R831 5130420803 R. MOF 2W 0.2 J
R832 5142810295 R. CF 1/4W 1K J
R833 5142110295 R. CF 1/6W 1K J
R834 5142816395 R. CF 1/4W 16K J
R835 5142810395 R. CF 1/4W 10K J
R836 5130582003 R. MOF 3W 82 J
R837 5142818495 R. CF 1/4W 180K J
R838 5142818495 R. CF 1/4W 180K J
R839 5142818495 R. CF 1/4W 180K J
R840 5142818495 R. CF 1/4W 180K J
R841 5142110395 R. CF 1/6W 10K J
R842 5142813195 R. CF 1/4W 130 J
R844 5142812095 R. CF 1/4W 12 J
R845 5142110295 R. CF 1/6W 1K J
R847 5142851295 R. CF 1/4W 5.1K J
R848 5142843395 R. CF 1/4W 43K J
CKT NO Part no. Description
R850 5142110295 R. CF 1/6W 1K J
R852 5142110395 R. CF 1/6W 10K J
R856 5142810395 R. CF 1/4W 10K J
R857 5142812295 R. CF 1/4W 1.2K J
R862 5142151295 R. CF 1/6W 5.1K J
R866 5130539903 R. MOF 3W 3.9 J
R867 5142812295 R. CF 1/4W 1.2K J
R868 5142810295 R. CF 1/4W 1K J
R869 5142147395 R. CF 1/6W 47K J
R871 5142127295 R. CF 1/6W 2.7K J
R872 5142843295 R. CF 1/4W 4.3 K J
R873 5142151295 R. CF 1/6W 5.1K J
R874 5142120295 R. CF 1/6W 2K J
R875 5142810395 R. CF 1/4W 10K J
R876 5142182195 R. CF 1/6W 820 J
R877 5142856295 R.CF 1/4W 5.6K J
R880 5130410003 R. MOF 2W 10 J
R882 5130315003 R. MOF 1W 15 J
RA01 5142112395 R. CF 1/6W 12KJ
RA01A 5142156295 R. CF 1/6W 5.6KJ
RA02 5142110495 R. CF 1/6W 100k J
RA03 5142110495 R. CF 1/6W 100k J
RA05 5142110395 R. CF 1/6W 10K J
RA06 5142810395 R. CF 1/4W 10K J
RA07 5142810395 R. CF 1/4W 10K J
RA08 5142810395 R. CF 1/4W 10K J
RA09 5142110195 R. CF 1/6W 100 J
RA10 5142110195 R. CF 1/6W 100 J
RA11 5142110195 R. CF 1/6W 100 J
RA12 5142110195 R. CF 1/6W 100 J
RA13 5142110195 R. CF 1/6W 100 J
RA14 5142133195 R. CF 1/6W 330 J
RA15 5142110295 R. CF 1/6W 1K J
RA16 5142127095 R. CF 1/6W 27 J
RA18 5142110295 R. CF 1/6W 1K J
RA19 5142110395 R. CF 1/6W 10K J
RA20 5142110395 R. CF 1/6W 10K J
RA21 5142110395 R. CF 1/6W 10K J
RA22 5142110395 R. CF 1/6W 10K J
ViewSonic Corporation
Confidential – Do Not Copy
P90f-1
Page 52

48
CKT NO Part no. Description
RA23 5142110395 R. CF 1/6W 10K J
RA24 5142151195 R. CF 1/6W 510 J
RA24A 5142156295 R. CF 1/6W 5.6K J
RA25 5142147295 R. CF 1/6W 4.7K J
RA26 5142151295 R. CF 1/6W 5.1K J
RA27 5142110295 R. CF 1/6W 1K J
RA28 5142110295 R. CF 1/6W 1K J
RA29 5142110295 R. CF 1/6W 1K J
RA30 5142147295 R. CF 1/6W 4.7K J
RA31 5142147295 R. CF 1/6W 4.7K J
RA32 5142110195 R. CF 1/6W 100 J
RA33 5142110195 R. CF 1/6W 100 J
RA34 5142168195 R. CF 1/6W 680 J
RA35 5142115295 R. CF 1/6W 1.5K J
RA36 5142115295 R. CF 1/6W 1.5K J
RA37 5142110295 R. CF 1/6W 1K J
RA38 5142810395 R. CF 1/4W 10K J
RA38A 5142810395 R. CF 1/4W 10K J
CKT NO Part no. Description
RA39 5142110295 R. CF 1/6W 1K J
RA40 5142810195 R. CF 1/4W 100 J
RA41 5142110395 R. CF 1/6W 10K J
RA42 5142168395 R. CF 1/6W 68K J
RA42A 5142822295 R. CF 1/4W 2.2K J
RA43 5142139295 R. CF 1/6W 3.9K J
RA44 5142110395 R. CF 1/6W 10K J
RA45 5142110395 R. CF 1/6W 10K J
RA46 5142110395 R. CF 1/6W 10K J
RA47 5142110395 R. CF 1/6W 10K J
RA48 5142133195 R. CF 1/6W 330 J
RA49 5142122295 R. CF 1/6W 2.2K J
RA50 5142110295 R. CF 1/6W 1K J
RA51 5142110195 R. CF 1/6W 100 J
RA52 5142110195 R. CF 1/6W 100 J
RA53 5142147295 R. CF 1/6W 4.7K J
RA54 5142147295 R. CF 1/6W 4.7K J
RA55 5142812295 R CF 1/4W 1.2K J
P.C.B BOARD
CKT NO Part no. Description
U0404 5053104040 PCB, MAIN BOARD PWB-0404
FUSE
F801 5054431539 FUSE 250V/3.15A
F801A 5056506400 FUSE HOLDER
SPARK GAP
Z101 (RA) 5202200591 SPARK GAP 1-2KV 1PF(MAX)
Z101 (RB) 5202200502 SPARK GAP 1-2KV 1PF(MAX)
Z101 (RC) 5202200501 SPARK GAP 1KV 1PF(MAX)
Z801 (RA) 5202200591 SPARK GAP 1-2KV 1PF(MAX)
Z801 (RB) 5202200502 SPARK GAP 1-2KV 1PF(MAX)
Z803 (RA) 5202201991 SPARK GAP 200V 1PF (MAX)
Z803 (RB) 5202201301 SPARK GAP 200V 1PF (MAX)
Z805 (RA) 5202201991 SPARK GAP 200V 1PF (MAX)
Z805 (RB) 5202201301 SPARK GAP 200V 1PF (MAX)
Z809 (RA) 5202200591 SPARK GAP 1-2KV 1PF(MAX)
Z809 (RB) 5202200502 SPARK GAP 1-2KV 1PF(MAX)
ViewSonic Corporation
Confidential – Do Not Copy
P90f-1
Page 53

49
BASE & PIN
CKT NO Part no. Description
P02A
P301 5057415224 WIRE ASS’Y W/15P CONNUL/CSA1007#24 L=330MM
P302 5057404300 WIRE ASS’Y W/15P CONN UL/CSA1007#24 JST/JAE 400mm
P400 5056203901 PIN RT-01N-2.3A
P401 5056407801 BASE & PIN 2.36mm 4P(UL/CSA/TUV)
P409 5056203901 PIN RT-01N-2.3A
P410 5056203901 PIN RT-01N-2.3A
P420 5056415617 BASE & PIN
P421 5057405136 WIRE ASS’Y L=320MM
P422 5056415326 BASE & PIN 3P
P800 5057402199 WIRE ASS’Y W/2P CONN UL/CSA 1617 #22 LSINX2/SINX2350
P801 5056513117 AC SOCKEY 7014(A)
P803 5056415207 BASE & PIN 2.36mm 2P(UL/CSA/TUV)
PA03 5057402320 WIRE ASS’Y W/15P CONN
OTHERS
CKT NO Part no. Description
SA01 5054513025 TACT SWITCH SKHHLV1720-TT DC12V 50MA GRAY
SA02 5054513025 TACT SWITCH SKHHLV1720-TT DC12V 50MA GRAY
SA03 5054513025 TACT SWITCH SKHHLV1720-TT DC12V 50MA GRAY
SA04 5054513025 TACT SWITCH SKHHLV1720-TT DC12V 50MA GRAY
SA05 5054513025 TACT SWITCH SKHHLV1720-TT DC12V 50MA GRAY
SA06 5054513025 TACT SWITCH SKHHLV1720-TT DC12V 50MA GRAY
ViewSonic Corporation
Confidential – Do Not Copy
P90f-1
Page 54

50
ASSEMBLY PCB-PFC
CKT NO Part no. Description
C1 5214147012 C. EL 100V 47UF
C2 5213422191 C. EL 25V 220UF
D1 6611035644 RGP10D
D2 6613003032 1N4148
D3 6613003032 1N4148
D4 6615007834 HZ5C1
D5 6615007834 HZ5C1
I2 6644007300 LM358P
P01 5056415567 BASE & PIN
P02 5056405309 BASE & PIN
Q1 6621015332 TRANSISTOR NPN 2SC1815Y
Q2 6621015332 TRANSISTOR NPN 2SC1815Y
R1 5142111495 R. CF 1/6W 110K J
R10 5142113395 R. CF 1/6W 13K J
R11 5142110295 R. CF 1/6W 1.0K J
R12 5142127295 R. CF 1/6W 2.7K J
R2 5142110395 R. CF 1/6W 10K J
R3 5142110395 R. CF 1/6W 10K J
R4 5142130495 R. CF 1/6W 300K J
R5 5142130395 R. CF 1/6W 30K J
R6 5142120395 R. CF 1/6W 20K J
R7 5142456090 R. CF 1/2W 56 J
R8 5142110295 R. CF 1/6W 1.0K J
R9 5142110295 R. CF 1/6W 1.0K J
SR1 5054633004 RELAY OMI-SS-212L
U0344 5053103440 PWB-0344-00
ViewSonic Corporation
Confidential – Do Not Copy
P90f-1
Page 55

51
ASSEMBLY PCB PURITY
ASSEMBLY, PCB-PURITY 5097609000
CKT NO. Part no. Description
CAPACITOR
C501 5236310491 C. BL 50V 0.1UF Z
C502 5236310491 C. BL 50V 0.1UF Z
C503 5236310491 C. BL 50V 0.1UF Z
C504 5236310491 C. BL 50V 0.1UF Z
C505 5236310491 C. BL 50V 0.1UF Z
C506 5236310491 C. BL 50V 0.1UF Z
C507 5236310491 C. BL 50V 0.1UF Z
C508 5236310491 C. BL 50V 0.1UF Z
C509 5236310491 C. BL 50V 0.1UF Z
C510 5236310491 C. BL 50V 0.1UF Z
C511 5236310491 C. BL 50V 0.1UF Z
C512 5236310491 C. BL 50V 0.1UF Z
C513 5213310191 C. EL 50V 100UF M
IC
I501 6649000600 TDA8444
TRANSISTOR
Q501 6621015332 TRANSISTOR NPN 2SC1815Y
Q502 6621015332 TRANSISTOR NPN 2SC1815Y
Q503 6621015332 TRANSISTOR NPN 2SC1815Y
Q504 6621015332 TRANSISTOR NPN 2SC1815Y
Q505 6621015332 TRANSISTOR NPN 2SC1815Y
Q506 6621015332 TRANSISTOR NPN 2SC1815Y
Q507 6621015332 TRANSISTOR NPN 2SC1815Y
Q508 6621015332 TRANSISTOR NPN 2SC1815Y
Q509 6621015332 TRANSISTOR NPN 2SC1815Y
Q510 6621015332 TRANSISTOR NPN 2SC1815Y
Q511 6621015332 TRANSISTOR NPN 2SC1815Y
Q512 6621015332 TRANSISTOR NPN 2SC1815Y
Q513 6621015332 TRANSISTOR NPN 2SC1815Y
Q514 6621015332 TRANSISTOR NPN 2SC1815Y
Q515 6621015332 TRANSISTOR NPN 2SC1815Y
Q516 6621015332 TRANSISTOR NPN 2SC1815Y
RESISTOR
R501 5142127095 R. CF 1/6W 27 J
R502 5142127095 R. CF 1/6W 27 J
ViewSonic Corporation
Confidential – Do Not Copy
P90f-1
Page 56

52
CKT NO. Part no. Description
R503 5142127095 R. CF 1/6W 27 J
R504 5142127095 R. CF 1/6W 27 J
R505 5142827095 R. CF 1/4W 27 J
R506 5142827095 R. CF 1/4W 27 J
R507 5142827095 R. CF 1/4W 27 J
R508 5142827095 R. CF 1/4W 27 J
R509 5142827095 R. CF 1/4W 27 J
R510 5142827095 R. CF 1/4W 27 J
R511 5142827095 R. CF 1/4W 27 J
R512 5142827095 R. CF 1/4W 27 J
R513 5142127095 R. CF 1/6W 27 J
R514 5142127095 R. CF 1/6W 27 J
R515 5142127095 R. CF 1/6W 27 J
R516 5142127095 R. CF 1/6W 27 J
R517 5142127095 R. CF 1/6W 27 J
R518 5142127095 R. CF 1/6W 27 J
BASE &PIN
P501 5056403404 BASE &PIN 4P
P502 5056403404 BASE &PIN 4P
P503 5056403504 BASE &PIN 5P
PCB
U0417 5053104170 PWB-0417-01
ViewSonic Corporation
Confidential – Do Not Copy
P90f-1
Page 57

53
ASSEMBLY PCB-CRT DRIVE (PWB-0414)
CAPACITOR
CKT NO Part no. Description
C900 5242210191 C. CE 50V 100PF J
C900A 5242210191 C. CE 50V 100PF J
C901 5213601091 C. EL 50V 1UF M
C902 5236310491 C. BL 50V 0.1UF Z
C903 5216301091 C. EL 200V 1UF M
C904 5231347191 C. CE 50V 470PF K
C905 5214110091 C. EL 100V 10UF M
C906 5276110491 C. ME 100V 0.1UF J
C907 5214147012 C. EL 100V 47UF M
C907B 5276110491 C. ME 100V 0.1UF M
C908 5231310391 C. CE 50V 10000PF K
C908A 5231310391 C. CE 50V 10000PF K
C910 5242210191 C. CE 50V 100PF J
C911 5213410191 C. EL 25V 100UF M
C911A 5233310291 C. CE 1KV 1000PF K
C912 5242210191 C. CE 50V 100PF J
C913 5213647891 C. EL 50V 0.47UF M
C914 5233310291 C. CE 1KV 1000PF K
C915 5242210191 C. CE 50V 100PF J
C916 5232315291 C. CE 500V 1500PF K
C917 5210502191 C. EL 50V 2.2UF M
C918 5232310301
C. CE 500V 10000PF
C920 5214410012 C. EL 250V 10UF M
C920A 5232310301
C. CE 500V 10000PF
C922 5232310291 C. CE 500V 1000PF K
C923 5236310491 C. BL 50V 0.1UF Z
C925 5213410191 C. EL 25V 100UF M
C925A 5236310491 C. BL 50V 0.1UF Z
C926 5233547201 C. CE 1KV 4700PF M
C926A 5233310191 C. CE 1KV 100PF K
C926B 5233318191 C. CE 1KV 180PF K
C927 5231310391 C. CE 50V 10000PF K
C930B 5242210191 C. CE 50V 100PF J
C931 5213601091 C. EL 50V 1UF M
CKT NO Part no. Description
C932 5236310491 C. BL 50V 0.1UF Z
C933 5216301091 C. EL 200V 1UF M
C933A 5232356191 C. CE 500V 560PF K
C934 5213333191 C. EL 16V 330UF M
C934B 5233310291 C. CE 1KV 1000PF K
C935 5214110091 C. EL 100V 10UF M
C936 5236310491 C. BL 50V 0.1UF Z
C937 5233310291 C. CE 1KV 1000PF K
C947 5214147012 C. EL 100V 47UF M
C950 5247318091 C. CE 500V 18PF J
C953 5236310491 C. BL 50V 0.1UF Z
C953A 5213310191 C. EL 16V 100UF M
C954 5236310491 C. BL 50V 0.1UF Z
C958 5213410191 C. EL 25V 100UF M
C958A 5236310491 C. BL 50V 0.1UF Z
C960 5213222191 C. EL 10V 220UFM
C961 5213601091 C. EL 50V 1UF M
C963 5216301091 C. EL 200V 1U F M
C965 5214110091 C. EL 100V 10UF M
C970 5231310391 C. CE 50V 10000PF K
C971 5247082191 SL DC 50V 820PFJ
C972 5231310391 C. CE 50V 10000PF K
C973 5213410191 C. EL 25V 100UF M
C978 5213210191 C. EL 10V 100UF M
C979 5236310491 C. BL 50V 0.1UF Z
C983 5213322191 C. EL 16V 220UF M
C983A 5236310491 C. BL 50V 0.1UF Z
C984 5213610091 C. EL 50V 10UF M
ViewSonic Corporation
Confidential – Do Not Copy
P90f-1
Page 58

54
SEMICONDUCTOR.
DIODE
CKT NO Part no. Description
D901* 6613003032 DIODE SWITCHING 1N4148-TD 75V 150mA (RA.RB.RC.RD)
D902* 6613003032 DIODE SWITCHING 1N4148-TD 75V 150mA (RA.RB.RC.RD)
D903# 6611036040 DIODE RECTIFIER BAV21
D904 6613004934 DIODE SWITCHING 1SS133
D913* 6613003032 DIODE SWITCHING 1N4148-TD 75V 150mA (RA.RB.RC.RD)
D931* 6613003032 DIODE SWITCHING 1N4148-TD 75V 150mA (RA.RB.RC.RD)
D932* 6613003032 DIODE SWITCHING 1N4148-TD 75V 150mA (RA.RB.RC.RD)
D933# 6611036040 DIODE RECTIFIER BAV21
D934 6613004934 DIODE SWITCHING 1SS133
D941* 6613003032 DIODE SWITCHING 1N4148-TD 75V 150mA (RA.RB.RC.RD)
D943* 6613003032 DIODE SWITCHING 1N4148-TD 75V 150mA ((RA.RB.RC.RD)
D961* 6613003032 DIODE SWITCHING 1N4148-TD 75V 150mA (RA.RB.RC.RD)
D962* 6613003032 DIODE SWITCHING 1N4148-TD 75V 150mA (RA.RB.RC.RD)
D963 6611036040 DIODE RECTIFIER BAV21
D964 6613004934 DIODE SWITCHING 1SS133
D966 (RA) 6615009752 DIODE ZENER RD6.8EB2-T7
D966 (RB) 6615007234 DIODE ZENER HZ7B1-TD 6.7-7V
D973* 6613003032 DIODE SWITCHING 1N4148-TD 75V 150mA (RA.RB.RC.RD)
D974 6615007834 DIODE ZENER HZ5C1 4.9-5.1V
D990 6611070541 DIODE RECTIFIER SBD 1N5817
PS: * 1N4148 RA 6613003032 RB 6613003037 RC 6613003048
# BAV21 RA6611036040 RB 6611032741
IC
I901 6644076905 IC, LINEAR VIDEO PER.AMP.M52743BSP SDIP-36
I903 6645008907 IC, DIGITAL OSD MTV038N20 DIP-20
I904 6644009606 IC, LINEAR VIDEO AMP. LM2435 T 9PIN
COIL
L905 5062122946 CORE, BEAD RH03506AT-B
L906 5062133201 BEAD CORE
L907 6119210605 JUMP WIRE
L911 5062133201 BF30TA-2.5 X 3 X 1B
L912 5064456845 COIL, PEAKING TRF-8568M 0.56UH K
L921 5062122902 CORE, BEAD BL03RN2-R62T4
L935 5062122946 CORE, BEAD RH03506AT-B
ViewSonic Corporation
Confidential – Do Not Copy
P90f-1
Page 59

55
CKT NO Part no. Description
L941 5062133201 BF30TA-2.5 X 3 X 1B
L942 5064456845 COIL, PEAKING TRF-8568M 0.56UH K
L951 5062122902 CORE,BEAD BL03RN2-R62T4
L953 5064010029 COIL, PEAKING TRF-3100J 10UH J
L965 5062122946 CORE, BEAD RH03506AT-B
L971 5062133201 BF30TA-2.5 X 3 X 1B
L972 5064456845 COIL, PEAKING TRF-8568M 0.56UH K
L979 5062119801 COIL, CHOKE EMI CHK-198
L980 5062202300 COIL, HOR CHOKE TLN-2026
L981 5062202300 COIL, HOR CHOKE TLN-2026
L982 5062202300 COIL, HOR CHOKE TLN-2026
L983 5062122902 CORE, BEAD BL03RN2-R62T4
BASE & PIN
CKT NO Part no. Description
P901 5056404404 BASE & PIN 14P(2.5mm) IL-G-14P-S3T2-E
P902 5056406500 BASE & PIN IL-G-15P-S3T2-E
P903 5056403404 BASE & PIN 4P(2.5mm-I) IL-G-4P-S3T2-E
P904 5056403204 BASE & PIN 2P(2.5mm-I) IL-G-2P-S3T2-E
P906 5056203901 PIN RT-01N-2.3A
P910A 5057401407 WIRE ASS’Y W/01P CONN 6X24/0.12 P11351 L=360mm
P911A 5057401311 WIRE ASS’Y W/01P CONN 144C P11531 L=190mm
P912A 5057401408 WIRE ASS’Y W/01P CONN 6X24/0.12 SMT1741BS-2 L=95mm
P913A 5057401403 WIRE ASS’Y W/01P CONN 96C/0.12mm 1741BS-2/UL/CSAL190
P922 5056404522 BASE & PIN 1.56mm 2P(UL/CSA/TUV)
TRANSISTOR
CKT NO Part no. Description
Q903 (RA) 6621026430 TR NPN HF BF422
Q903 (RB) 6621026401 TR NPN HF BF422
Q910 (RA) 6621015332 TR NPN HF 2SC1815Y
Q933 (RA) 6621026430 TR NPN HF BF422
Q933 (RB) 6621026401 TR NPN HF BF422
Q963 (RA) 6621026430 TR NPN HF BF422
Q963 (RB) 6621026401 TR NPN HF BF422
Q964 (RA) 6621026430 TR NPN HF BF422
Q964 (RB) 6621026401 TR NPN HF BF422
Q987 (RA) 6621015332 TR NPN HF 2SC1815Y
Q988 (RA) 6621015332 TR NPN HF 2SC1815Y
ViewSonic Corporation
Confidential – Do Not Copy
P90f-1
Page 60

56
RESISTOR
CKT NO Part no. Description
R900 5142110295 R. CF 1/6W 1K J
R901 5142175095 R. CF 1/6W 75 J
R902 5142113395 R. CF 1/6W 13K J
R903 5142118295 R. CF 1/6W 1.8K J
R904 5142822095 R. CF 1/4W 22 J
R905 5142182295 R. CF 1/6W 8.2K J
R905A 5142113495 R. CF 1/6W 130K J
R906 5142810295 R. CF 1/4W 1K J
R907 5142815195 R. CF 1/4W 150 J
R908 5142843095 R. CF 1/4W 43 J
R909 5142168195 R. CF 1/6W 680 J
R909A 5142113295 R. CF 1/6W 1.3K J
R910 5142139195 R. CF 1/6W 390 J
R912 5142813395 R. CF 1/4W 13K J
R913 5142862095 R. CF 1/4W 62 J
R914 5142847090 R. CF 1/4W 47 J
R915 5142110395 R. CF 1/6W 10K J
R916 5142810595 R. CF 1/4W 1M J
R917 5130362303 R. MOF 1W 62K J
R918 5142818295 R. CF 1/4W 1.8K J
R918A 5142122295 R. CF 1/6W 2.2K J
R920 5142810295 R. CF 1/4W 1K J
R921 5142415190 R. CF 1/2W 150 J
R923 5142847090 R. CF 1/4W 47 J
R924 5142147090 R. CF 1/6W 47 J
R925 5142110295 R. CF 1/6W 1K J
R927 5142130195 R. CF 1/6W 300 J
R928 5142151095 R. CF 1/6W 51 J
R929 5142110195 R. CF 1/6W 100 J
R930 5130522903 R. MOF 3W 2.2 J
R931 5142175095 R. CF 1/6W 75 J
R934 5142833095 R. CF 1/4W 33 J
R935 5142182295 R. CF 1/6W 8.2K J
R935A 5142113495 R. CF 1/6W 130K J
R936 5142810295 R. CF 1/4W 1K J
R938 5142443090 R. CF 1/2W 43 J
CKT NO Part no. Description
R939 5142868195 R.CF 1/4W 680 J
R939A 5142113295 R. CF 1/6W 1.3K J
R940 5062122949 BEAD CORE
R940A 5142191095 R. CF 1/6W 91 J
R942 5142113395 R. CF 1/6W 13K J
R943 5142824095 R. CF 1/4W 24 J
R946 5142810595 R. CF 1/4W 1M J
R947 5130362303 R. MOF 1W 62K J
R948 5142110195 R. CF 1/6W 100 J
R949 5142110195 R. CF 1/6W 100 J
R950 5142168495 R. CF 1/6W 680K J
R952 5142410590 R. CF 1/2W 1M J
R952A 5130310003 R. MOF 1W 10 J
R954 5142810295 R. CF 1/4W 1K J
R955 5142110295 R. CF 1/6W 1K J
R961 5142175095 R. CF 1/6W 75 J
R964 5142822095 R. CF 1/4W 22 J
R965 5142182295 R. CF 1/6W 8.2K J
R965A 5142113495 R. CF 1/6W 130K J
R966 5142110295 R. CF 1/6W 1K J
R968 5142843095 R. CF 1/4W 43 J
R969 5142868195 R. CF 1/4W 680 J
R969A 5142113295 R. CF 1/6W 1.3K J
R970 5142156295 R. CF 1/6W 5.6K J
R972 5142813395 R. CF 1/4W 13K J
R973 5142843095 R. CF 1/4W 43 J
R974 5142133295 R. CF 1/6W 3.3K
R976 5142810595 R. CF 1/4W 1M J
R976A 5142130395 R. CF 1/6W 30K J
R977 5130362303 R. MOF 1W 62K J
R978 5142133295 R. CF 1/6W 3.3K
R981 5142110395 R. CF 1/6W 10K J
R982 5142110295 R. CF 1/6W 1K J
R983 5142847095 R. 1/4W 47 J
R984 5142830395 R. CF 1/4W 30K J
R986 5142124395 R. CF 1/6W 24K J
ViewSonic Corporation
Confidential – Do Not Copy
P90f-1
Page 61

57
RESISTOR
CKT NO Part no. Description
R987 5142120095 R. CF 1/6W 20 J
R988 5142120095 R. CF 1/6W 20 J
R991 5142139495 R. CF 1/6W 390K J
R992 5142139995 R. CF 1/6W 3.9 J
R993 5142110195 R. CF 1/6W 100 J
R994 5142110195 R. CF 1/6W 100 J
R995 5142856006 R. CF 1/4W 56 J
R996 5142136095 R. CF 1/6W 36 J
R997 5142136095 R. CF 1/6W 36 J
R998 5142136095 R. CF 1/6W 36 J
OTHER
CKT NO. Part no. Description
U901 5053102370 PCB PWB-0414-018/4
V901A 5056306721 CRT SOKET METALLO 033-0-7700-44 B10-301
Z901 5202202491 SPARK GAP MITSUBISHI DC300V 1PF DSP-301N-C04F
Z914 (RA) 5202201991 SPARK GAP DC200V 1PF DSP-201M-C04F
Z914 (RB) 5202201301 SPARK GAP DC200V 1PF GD412-200V-M
Z944 (RA) 5202201991 SPARK GAP DC200V 1PF DSP-201M-C04F
Z944 (RB) 5202201301 SPARK GAP DC200V 1PF GD412-200V-M
Z952 (RA) 5202200591 SPARK GAP 1-2KV 1PF
Z952 (RB) 5202200502 SPARK GAP 1-2KV 1PF
Z952 (RC) 5202200501 SPARK GAP SG05G 1KV 1PF
Z974 (RA) 5202201991 SPARK GAP DC200V 1PF DSP-201M-C04F
Z974 (RB) 5202201301 SPARK GAP DC200V 1PF GD412-200V-M
ASSEMBLY CRT
CKT NO. Part no. Description
V901 (CA) 5051286325 CCRT/DY M46QDG423X04 LG
ViewSonic Corporation
Confidential – Do Not Copy
P90f-1
Page 62

Main PCB circuit(PWB-0404)
ViewSonic Corporation
12. SCHEMATIC DIAGRAM
Page 63

Video drive circuit(PWB-0414)
59
ViewSonic Corporation
Confidential – Do Not Copy
P90f-1
Page 64

Purity Circuit (PWB-0417)
ViewSonic Corporation
60
ViewSonic Corporation
Confidential – Do Not Copy
P90f-1
Page 65

PFC Circuit (PWB-0344)
ViewSonic Corporation
61
ViewSonic Corporation
Confidential – Do Not Copy
P90f-1
Page 66

Main PCB circuit(PWB-0404)
14.
PCB LAYOUT
62
ViewSonic Corporation
Confidential – Do Not Copy
P90f-1
Page 67

1
63
ViewSonic Corporation
Confidential – Do Not Copy
Video drive circuit(PWB-0414)
P90f-1
Page 68

64
ViewSonic Corporation
Confidential – Do Not Copy
P90f-1
Page 69

65
ViewSonic Corporation
Confidential – Do Not Copy
Purity Circuit (PWB-0417)
P90f-1
Page 70

PFC Circuit (PWB-0344)
66
ViewSonic Corporation
Confidential – Do Not Copy
P90f-1
 Loading...