

Page 1
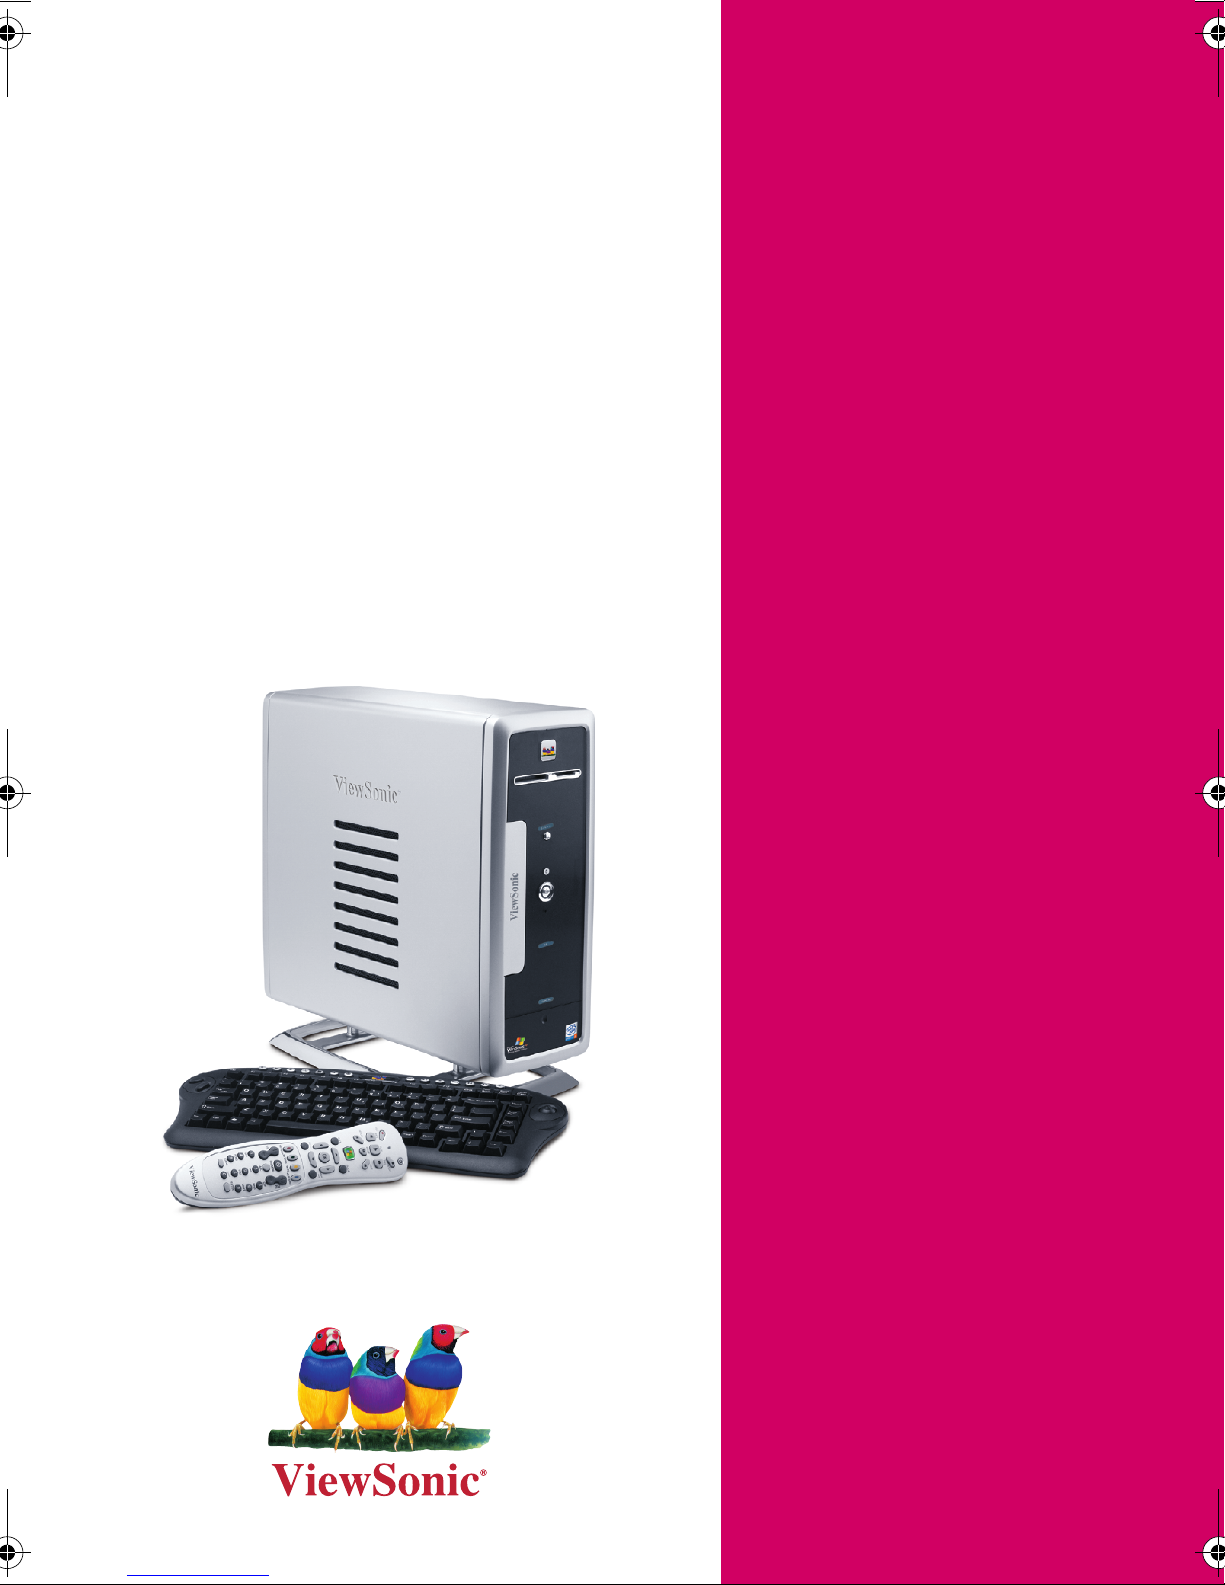
9LHZ6RQLF
1H[W9LVLRQ700
'LJLWDO0HGLD&HQWHU
+DUGZDUH8VHU*XLGH
Page 2

i ViewSonic NextVisionTM M2000 Digital Media Center
Table of Contents
Product Registratio n ................................................. ...... ....... .... iii
For Your Records ........................... ...... ................................. .... iii
Before Getting Started
Safety Information ......................... ................................. ................. 1
AC Power Safety ....................................................................... 1
Cable Guide Warning ................................................................ 1
Ergonomic Safety ....... ................................. .............................. 1
M2000 Features .............................................................................. 2
Package Contents ............................... ...... ....... .............................. 3
About the User Guides ................................................................... 4
Setting Up the Media Center
Setup Instructions ........................................................................... 5
Input and Output Ports .................................................................... 10
Setup Examples .............................................................................. 11
Basic Setup with TV and PC Monitor ........................................11
Setup with VCR, TV and PC Monitor .... ....... ...... ....... ...... ...........12
Setup with Plasma Display and 5.1 Dig ital A udi o ......................13
Setup FAQs .................................................................................... 14
Connecting to the Interne t ............................................. ...... ....... .... 16
Using the Media Center
Media Center Power Modes ...........................................................17
Turning the Media Cen ter On ...................... ...... ....... .................17
Using Standby Mode ...................... ...... ....... ...... ....... ...... ...........18
Turning the Media Cen ter Off ...................... ...... ....... .................18
Using the Remote Control .............................................................18
Remote Control Buttons ............................................................ 19
Using the Wireless Keyb oard ................................. ....... ...... ....... ....20
Special Function Keys ............. ................................. ...... ...........20
Adjusting the Speed of the Pointer ............................................21
Page 3

ii ViewSonic NextVisionTM M2000 Digital Media Center
Using the Numeric Keypad Feature .......................................... 21
Media Center Main Menu ............................................................... 22
Using the DVD-R/RW/CD-RW Drive .............................................. 23
Using the 6-in-1 Media Slots .......................................................... 23
Maintenance and Troubleshooting
Care and Maint enan ce ....... ....... ...... ....... ................................ ....... . 25
Troubleshooting ............................................................................. 25
Customer Support ..................... ................................ ..................... 28
System Recovery ............................ ....... ...... ....... ...... ..................... 29
Appendix
Regulatory Information .............. ................................ ..................... 31
Class B Regulations ...... ....... ...... ....... ...... ................................. . 31
Limited Warranty ............................. ....... ...... ....... ........................... 32
Specifications ................................................................................. 33
Data Loss Disclaimer ..................................................................... 34
Page 4

ViewSonic NextVisionTM M2000 Digital Media Center iii
Copyright © ViewSonic Corporation, 2003. All rights reserved.
ViewSonic and the three birds logo are registered trademarks of ViewSonic Corporation.
NextVision is a trademark of ViewSonic Corporation.
Microsoft, Windows, the Microsoft Internet Explorer logo graphic, and the Windows logo are
either registered trademarks or trademarks of Microsoft Corporation in the United States
and/or other countries.
Corporate names and trademarks are the property of their respective companies.
Disclaimer: ViewSonic
Corporation shall not be liable for technical or editorial errors or omissions contained herein; nor for incidental or consequential damages resulting from furnishing
this material, or the performance or use of this product.
In the interest of continuing product improvement, ViewSonic Corporation reserves the right
to change product specifications without notice. Information in this document may change
without notice.
No part of this document may be copied, reproduced, or transmitted by any means, for any
purpose without prior written permission from ViewSonic Corporation.
Product Registration
To meet your future needs and to receive additional product information as it
becomes available, register your ViewSonic
®
product at: www.viewsonic.com.
For Your Records
Product Name:
Model Number:
Document Num ber:
Serial Number:
Purchase Date:
ViewSonic NextVision M2000 Digital Media Center
VSATV26166-1 M
A-CD-M2000-1-UG Rev. 1B 02-19-03
____________ ______
____________ ______
Page 5

iv ViewSonic NextVision M2000 Digital Media Center
Page 6

ViewSonic NextVis ionTM M2000 Digital Media Center 1
1 Before Getting Started
Safety Information
Please read the importa nt Safety Information be low.
AC Power Safety
• WARNING: The Voltage Selection switch on the back of the Media Center is
pre-set to 115 or 230 VAC depending on the country/region in which you
purchased the unit. Do NOT change this setting. Doing so could cause
personal injury or damage the unit, and will void the Limited
Warranty. (See illustration on Page 10.)
• CAUTION: To reduce the risk of elect ric shock, do NOT open the
M2000 Media Center. Opening the Media Ce nter M2000 will void the
Limited Warr ant y. There are no us er-s erviceable parts inside. Any
repairs or m odific ations to t he unit m ust be per formed by ViewSonic
or by an authorized service provider.
• Plug the Media Center power cord into a grounded wall outlet.
Cable Guide Warning
• WARNING: DO NOT use the Cab le Guide to lift or carry the Me dia
Center
.
Doing so could cause personal injury or damage the unit.
(See illustrations on pages 3 and 10.)
Ergonomic Safety
Some experts believe that repeated use of any keyboard or pointing device
may cause serious injury to hands, wrists, arms, neck, and/or back. If you feel
pain in any of these areas, see a qualified health professional.
To reduce risk of injury, please follow these precautions:
• Take frequent breaks while using the supplied keyboard. Get up and walk
around several times each hour.
• Avoid letting your wrists rest on sharp edges.
• Keep your shoulders relaxed with your elbows at your side. Position yourself
so that you do not have to reach for the keyboard.
• If placing the keyboard on a desktop, adjust your chair and keyboard so
that your upper arms and wrists are level with the desktop.
Page 7

2 ViewSonic NextVisionTM M2000 Digital Media Center
M2000 Features
Combine computer, video and audio into a single powerful system.
View and record TV up to 140 ho urs *
ViewSonic NextVision video processor technology puts all your viewing options at
your fingertips. The 160GB hard drive provides greater storage than most standalone personal video recorders.
Watch DVD movies
The built-in DVD player and powerful processor provide incredibly detailed DVD
playback of your favorite movies with 5.1 surround sound capability.
Create your o wn DVDs and CD s
Smart card reader and combo DVD/CD writer are great for digital home movie
and photo buffs. You can even create digital slide shows of your favorite photos
complete with background music.
A Compl ete Digital Music System
Put your personal CD collection on the hard drive and play digital music through
your existing stereo or home theater sound system. Or download and store MP3
files directly from the Internet.
PC Functionality
It is a great PC with a 2.86Hz Intel Pentium 4 Processor and 512 MB memory.
The wireless keyboard with built-in pointer lets you access, run and view
computer programs from the comfort of your easy chair.
Huge Storage Capacity
160GB hard drive storage gives you the freedom to store all your digital media in
one centralized system. Video, audio and photos are all accessible in one place.
All the ins and outs you ne ed
It all plugs into the NextVision M2000, with connectors for advanced data,
gaming, video and audio.
Component quali ty without t he components
Single powerful system eliminates the need for separate components while
saving money.
Wireless keyboard an d remote
Wireless remote control operation for viewing TV, DVDs, listening to music,
viewing photos and switching between media with the touch of a button.
Broadband ready
Built-in Ethernet card allows you to connect the M2000 to your Broadband
modem or to your home PC network to share your broadband ISP connection.**
*Based on 95% utilization of 160GB disc at fair quality.
**ISP, home network sold separately.
Page 8
ViewSonic NextVisionTM M2000 Digital Media Center 3
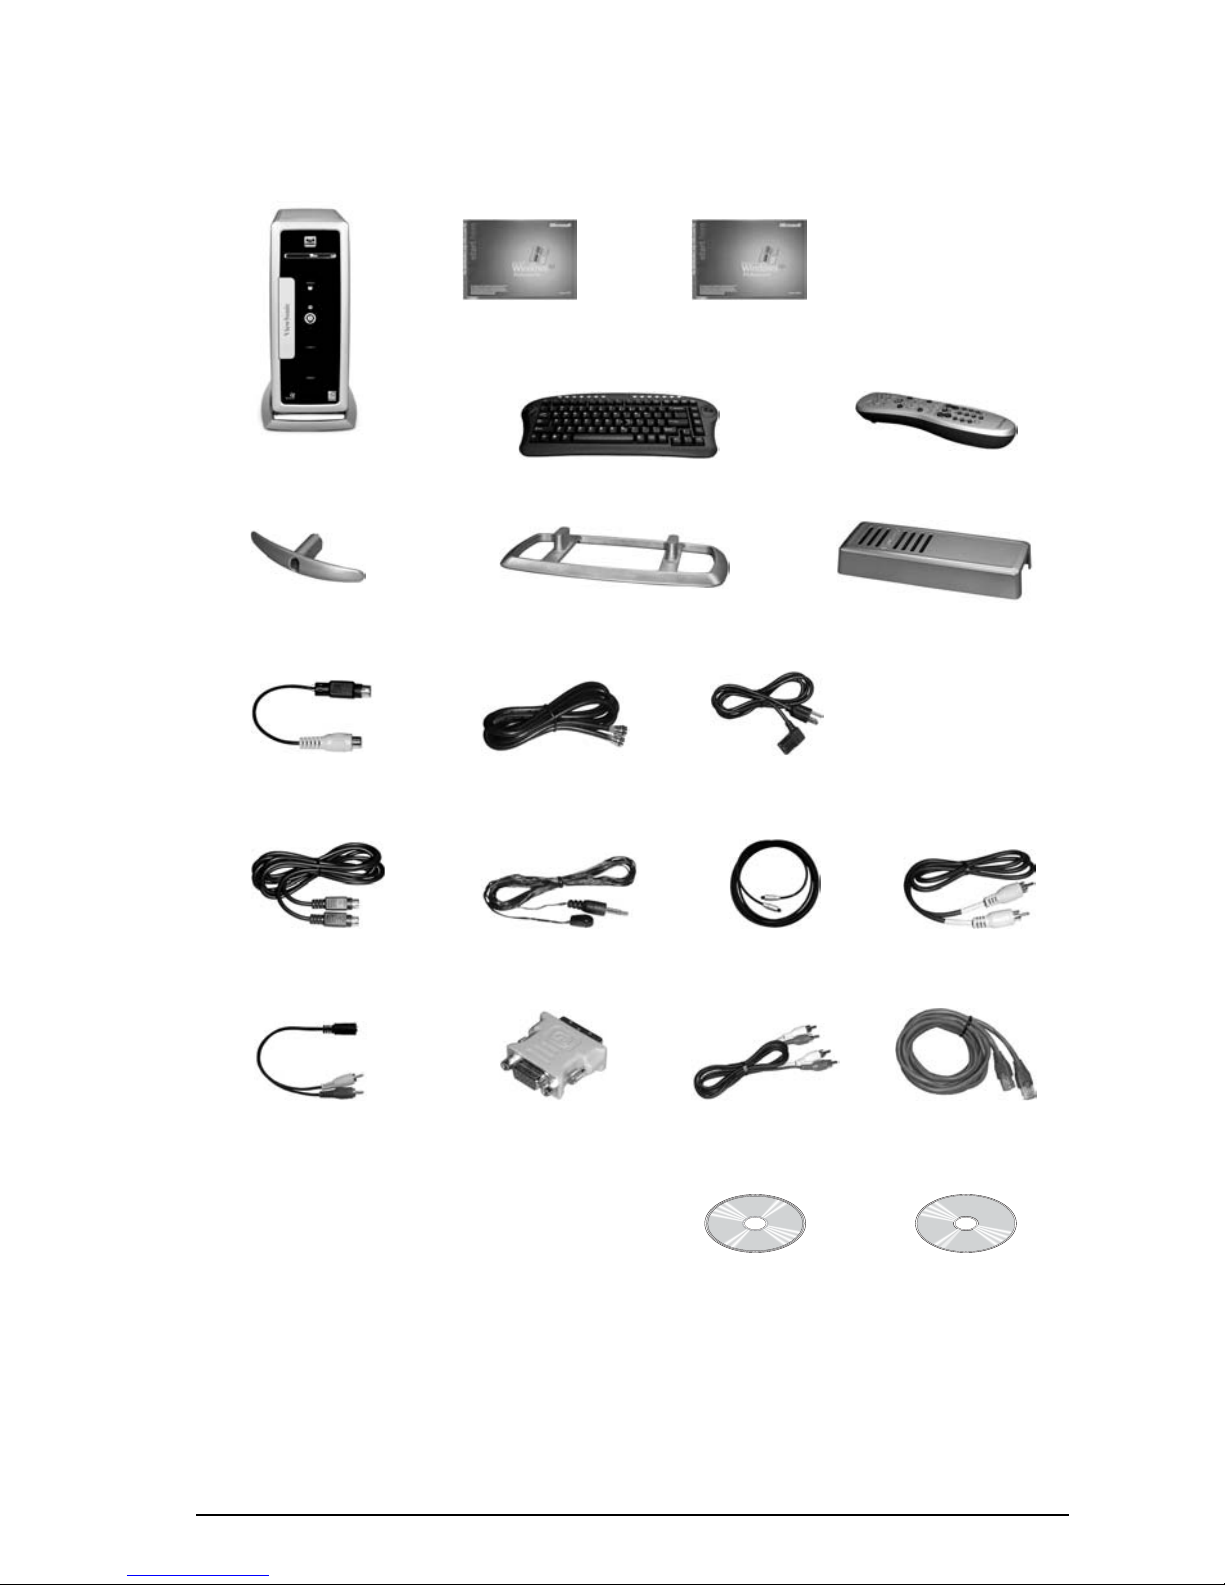
Package Contents
Page 9

4 ViewSonic NextVisionTM M2000 Digital Media Center
About the User Guides
ViewSonic M2000 Digital Media Center Hardware User Guide
This hardware user guide provides instructions for setting up your M2000 Digital
Media Center, as well as information about using the keyboard and remote
control, connecting to the Internet, and other hardware functions. This guide is
provided both as a paper booklet and as a PDF file pre-installed on the hard drive
inside the Media Center. To access the PDF version, click Start > Programs >
ViewSonic M200 0 H ardwar e User Guide.
NOTE: Adobe
®
Acrobat® Reader must be installed in order to view the user
guide in PDF format.
Microsoft
®
Windows® XP Pro Media Center Edition
This software guide provides information about using the Media Center
capabilities described at the top of this page. See Chapter 2: Using the Media
Center for more information.
Microsoft Windows XP Professional
This operating system guide provides information about using the Windows XP
Professional operating system.
Page 10
ViewSonic NextVis ionTM M2000 Digital Media Center 5
2
Setting Up the Media Center
This chapter contains information about setting up the Media Center, including
which connections provide the best signal quality. In addition, information
about connecting to the Internet is included.
Setup Instructions
The steps listed below supplement the Quick Start Guide, providing information
about preferred connections for best video and audio quality.
To set up the Media Center fo r the first time, do the fo llowing:
1
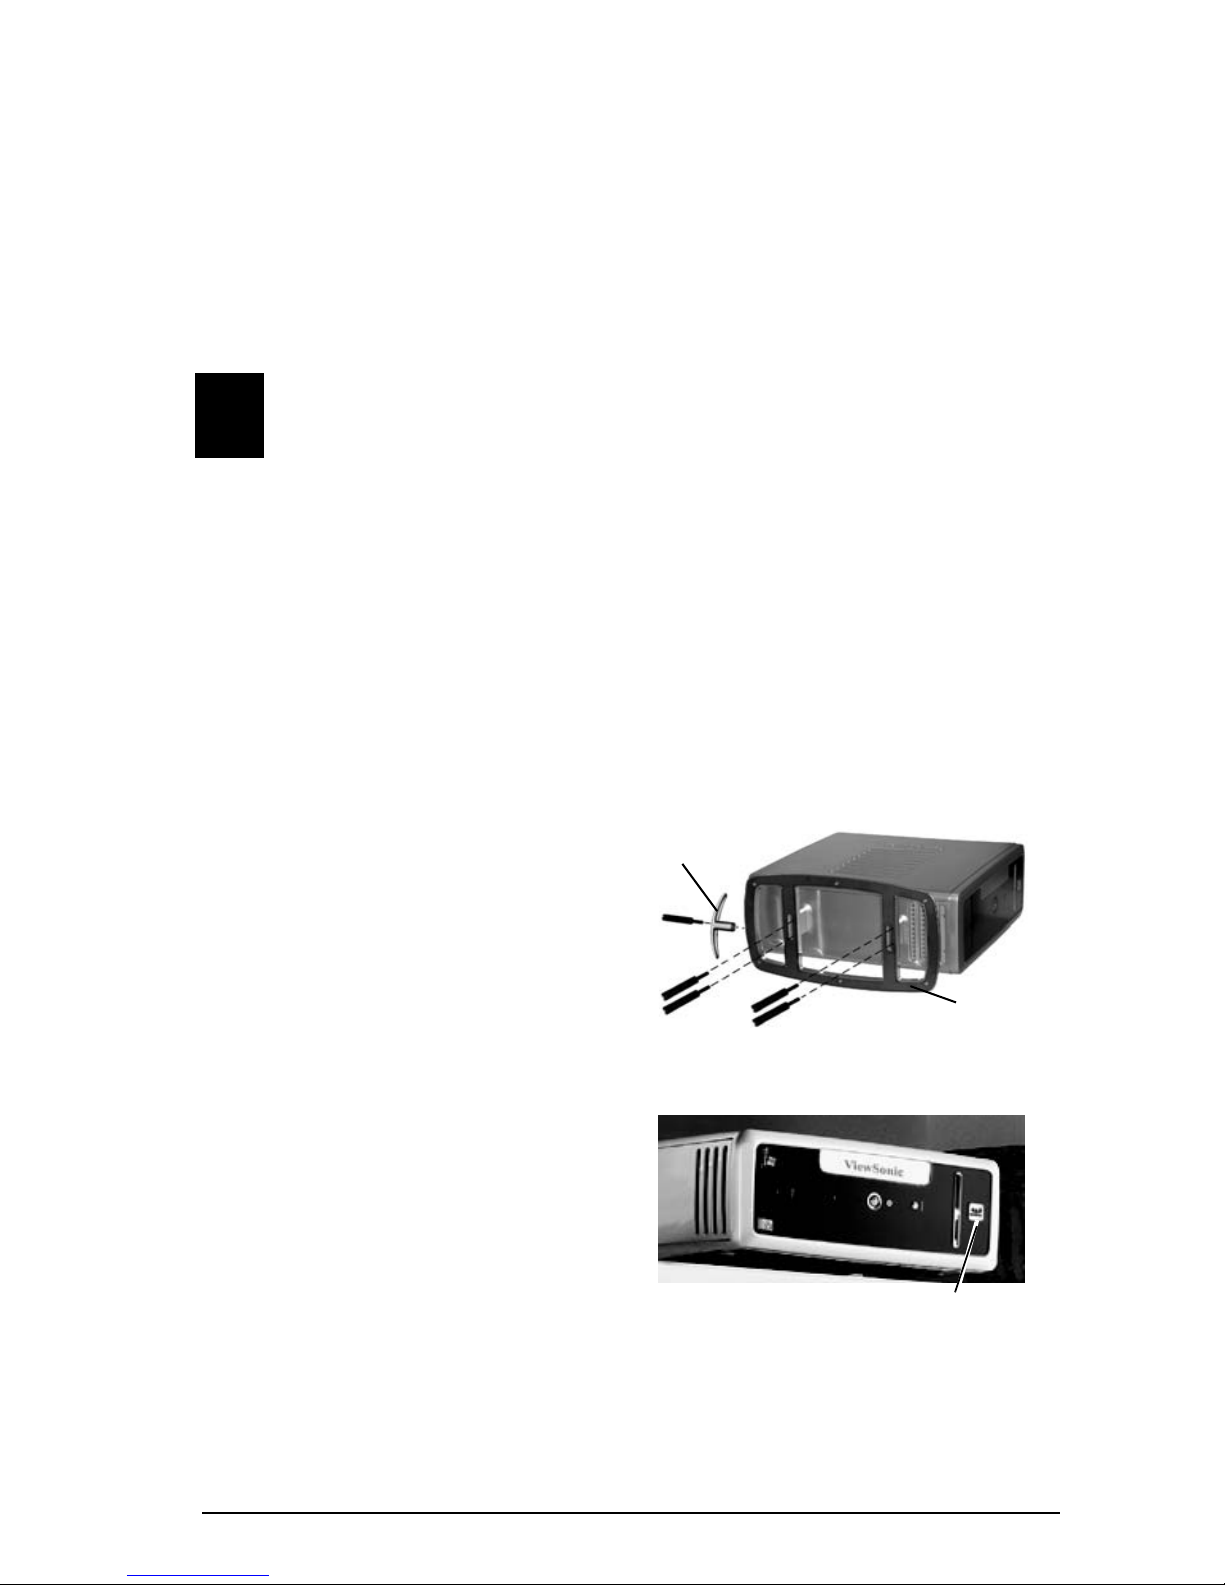
Attach Stand (optional)
Vertic al in s t allat ion: If you are
placing the Media Center vertically,
(on your desk or on the floor), you
will need to attach the stand by doing
the following: lay the Media Center on
its side and attach the stand using the
four provided screws.
NOTE: Begin tightening the screws
with your fingers, then gently finish
using a dime or screwdriver. Be
careful not to over-tighten the
screws.
Horizontal installation: If you are
placing the Media Center horizontally
(on a shelf), attaching the stand is
not necessary. Make sure to place the
Media Center on the four rubber feet.
NOTE: For horizontal installation,
reposition the ViewSonic birds logo by
gently pulling, then turning the logo
90 degrees. (See the illustration to
the right).
Cable Guide
Stand
Bottom View of Media Center
Horizontal Installation (no st and)
repositioned ViewSonic birds logo
Page 11

6 ViewSonic NextVisionTM M2000 Digital Media Center
2
Prepare Batteries for Use
Keyboard: Batteries come preinstalled in the keyboard, but require
activation. To activate the batteries,
open the keyboard’s battery
compartment and remove the white
plastic tab.
Remote Control: Open the battery
compartment and install the batteries
provided.
3
Cable/Satellite TV signal IN
Direct cable connection
Connect the Media Center directly to
the cable wall outlet using the
supplied coaxial cable.
Cable or satellite set-top-box
• For best signal quality, connect the
S-Video cable and L/R analog
audio cable from the Set-top box
to the back of the Media Center.
or
• Connecting the Composite Video
cable with the L/R analog audio
cable is your next best option.
or
• You can connect the coaxial cable
from the set-top box to the back of
the Media Center.
4
IR Emitter
With the IR Emitter cable attached to
your cable or satellite set-top-box,
the Media Center’s remote control
replaces the set-top box’s remote
control. To attach the IR Emitter:
1 Remove the tape from the infrared
sensor on the IR Emitter cable.
2 Paste the IR Emitter over the IR
window on the front of your cable
or satellite set-top box (see
illustration).
3 Connect the IR Emitter cable to the
back of the Media Center.
Keyboard (bottom)
Remote Control (bottom)
Direct Connect io n
Via Set- to-box
Coaxial Cable
Coaxial Cable
Page 12
ViewSonic NextVisionTM M2000 Digital Media Center 7
5
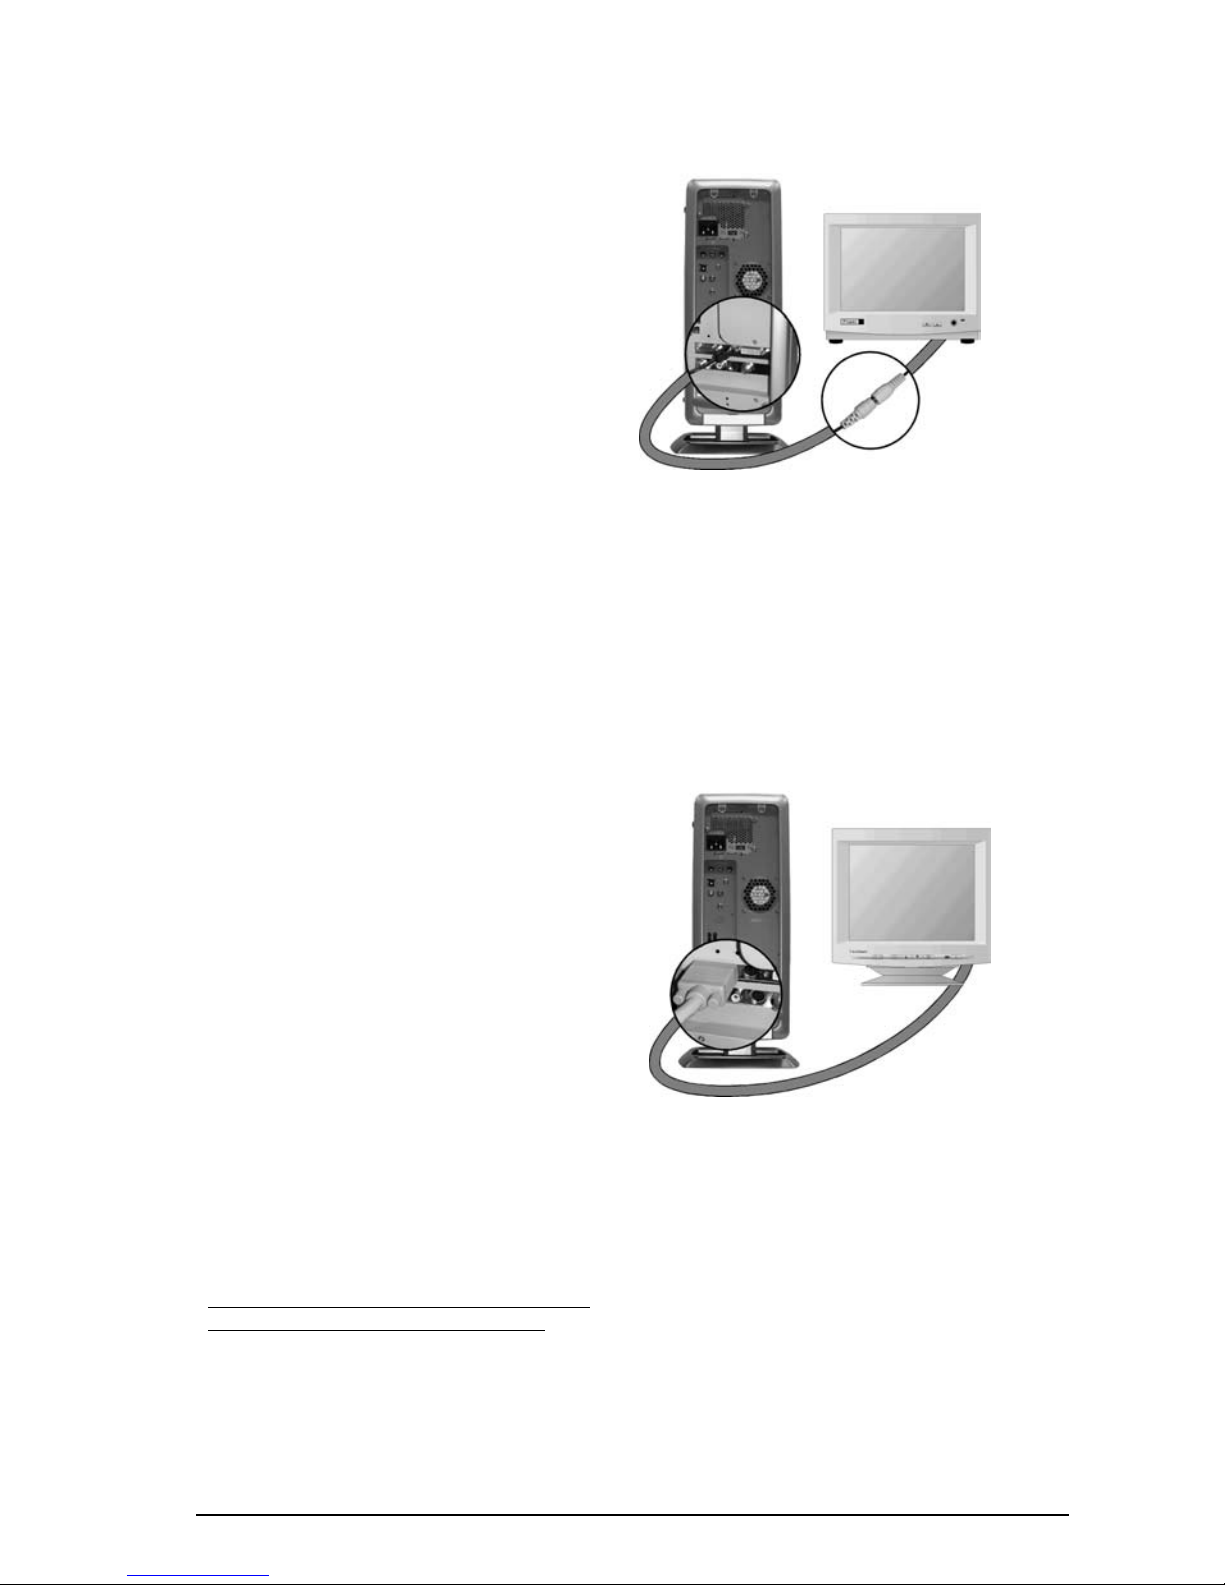
Video Out (to TV)
NOTE: The Media Center needs only
one video output device. However,
you can connect both a TV and a PC
Monitor and see the same image on
both screens.
For the best viewing experience, if
one device is used we recommend
that it is a high resolution display
(Plasma Display, LCD TV, LCD
Projector, etc.)
Choose from the preferred
connections listed below, starting with
highest quality:
•DVI
•VGA
•S-Video
• Composite Video (using S-Videoto-Composite adapter as shown on
the right)
6
Video Out (to PC Monitor)
A PC Monitor can be your primary
display, or an additional display. If
both a TV and PC Monitor are
connected--depending on the
resolution of your TV--your PC
Monitor may provide a better viewing
experience for word processing,
spreadsheets, and other applications
with detailed content.
Choose from the preferred
connections listed below in
descending order, with the best signal
quality listed first:
•DVI
• VGA (see NOTE below)
NOTE: If your TV is connected to the
Media Center’s S-Video port and your
PC Monitor’s only video output is VGA,
you must first connect your PC
Monitor to the DVI-to-VGA adapter,
then to the Media Center’s DVI port.
The VGA port and the S-Video port
can not be used simultaneously.
TV or Plasm
a
Display
Media Center
(back)
PC Monitor
Page 13
8 ViewSonic NextVisionTM M2000 Digital Media Center
7
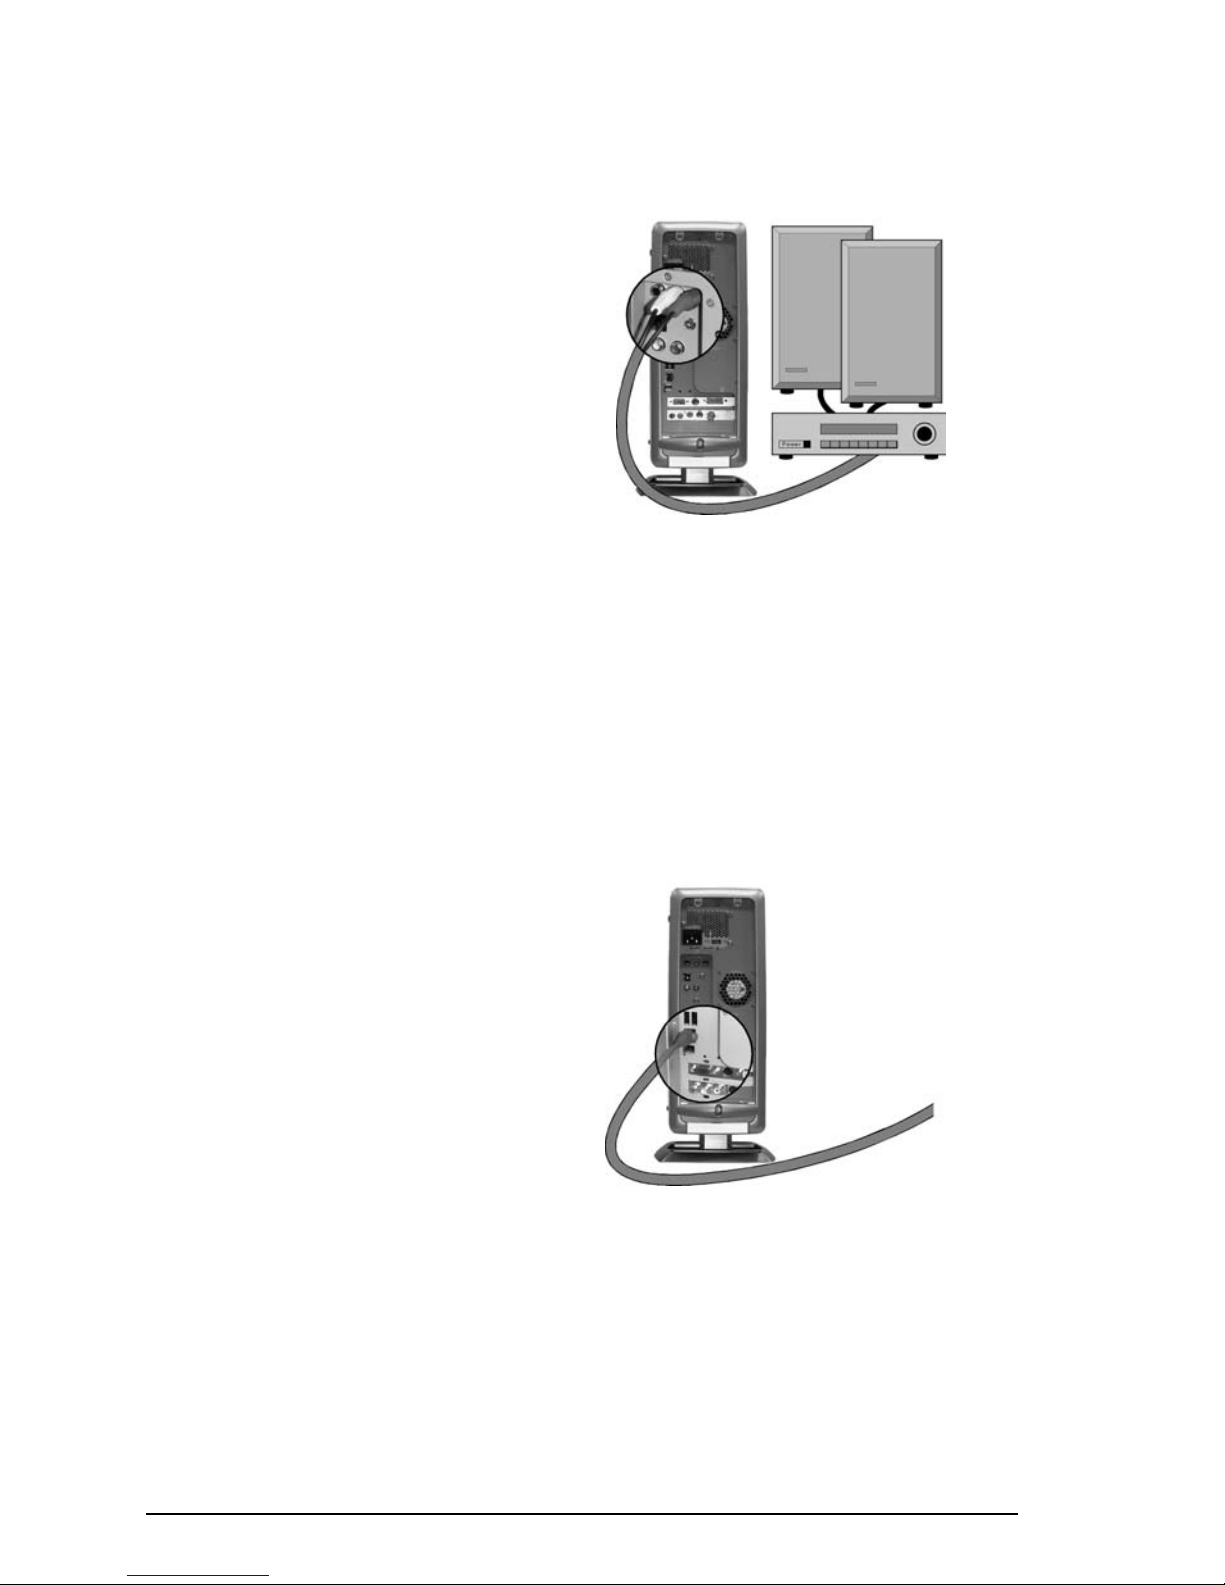
Audio Out
• If your receiver does NOT support
5.1 digital audio, attach the analog
audio cable (L/R) from the Media
Center to the Audio IN (L/R) ports
on your receiver, which is attached
to your speakers.
• If you have a 5.1 digital Surround
Sound receiver, you can use either
the Digital Audio Optical Cable or
the Digital Audio Coaxial Cable.
NOTE: To use the Media Center
with 5.1 digital audio you will need
to do the following from the Media
Center Main Menu:
Settings > TV/DVD > DVD > Audio >
Speaker Setup > Receiver (screen) >
SPDIF (5.1 audio)
• If you do not have a receiver and
want to use the TV’s built-in
speakers, attach the analog audio
(L/R) cables from the Media
Center to your TV’s Audio In ports.
8
Connect to the Internet
Use the supplied Ethernet LAN cable
to connect the Media Center to your
Broadband modem or existing home
network (LAN), which includes an
existing ISP (Internet Service
Provider) connection.
Connection to the Internet will give
you access to an online EPG
(Electronic Programming Guide),
which will provide TV program
information two weeks before shows
are aired.
See Connecting to the Internet at the
end of this chapter.
Audio Receiver
and Speakers
Media Center
(back)
To home
network
with
Internet
connection
Page 14
ViewSonic NextVisionTM M2000 Digital Media Center 9
9
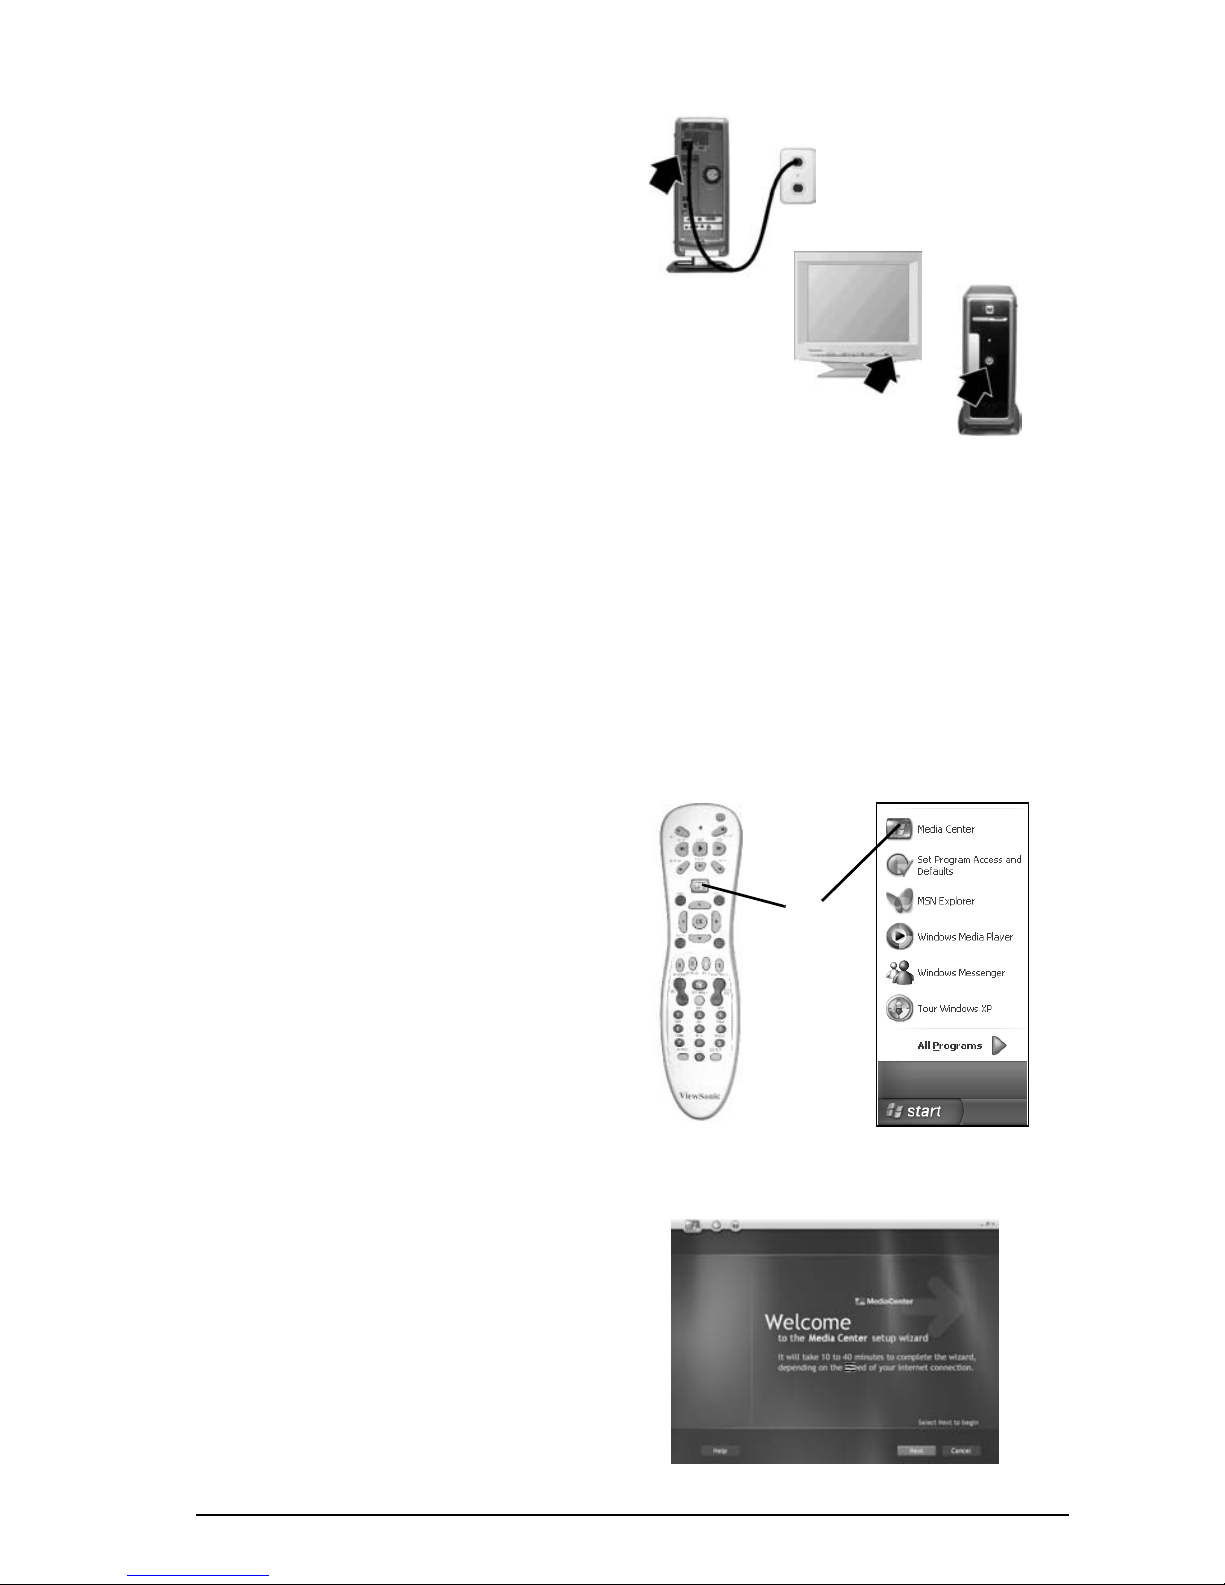
Plug in power cor ds and turn
power O N .
1 Use the supplied power cord to
connect the Media Center to a
grounded AC outlet.
2 Press the Power On button on the
TV and/or PC Monitor.
3 Press the Power On button on the
front of the Media Center (or the
top button on the Remote Control).
After Windows boot up, the Microsoft
registration wizard will display.
10
Register the Media Cen ter
Follow the on-screen instructions to
register with Microsoft.
In addition, to meet your future needs
and to receive additional product
information when available, we
encourage you to register your M2000
Digital Media Center at:
www.viewsonic.com.
11
Start the Media Center
• Press the green Media Center
(main menu) button on the
Remote Control.
or
• Click Start on the Windows
taskbar, then click the green Media
Center icon inside the Start menu.
The Microsoft Media Center Setup
Wizard will display.
12
Complete the Setup Wiz ard
Follow the Microsoft Media Center
Setup Wizard on-screen instructions
(see illustration to the right).
After you have completed the Setup
Wizard, the Media Center main menu
will display.
For more information about the Setup
Wizard and the Main Menu options,
see the Microsoft Windows XP Pro
Media Center Edition user guide.)
1
2
3
or
Page 15
10 ViewSonic NextVisionTM M2000 Digital Media Center
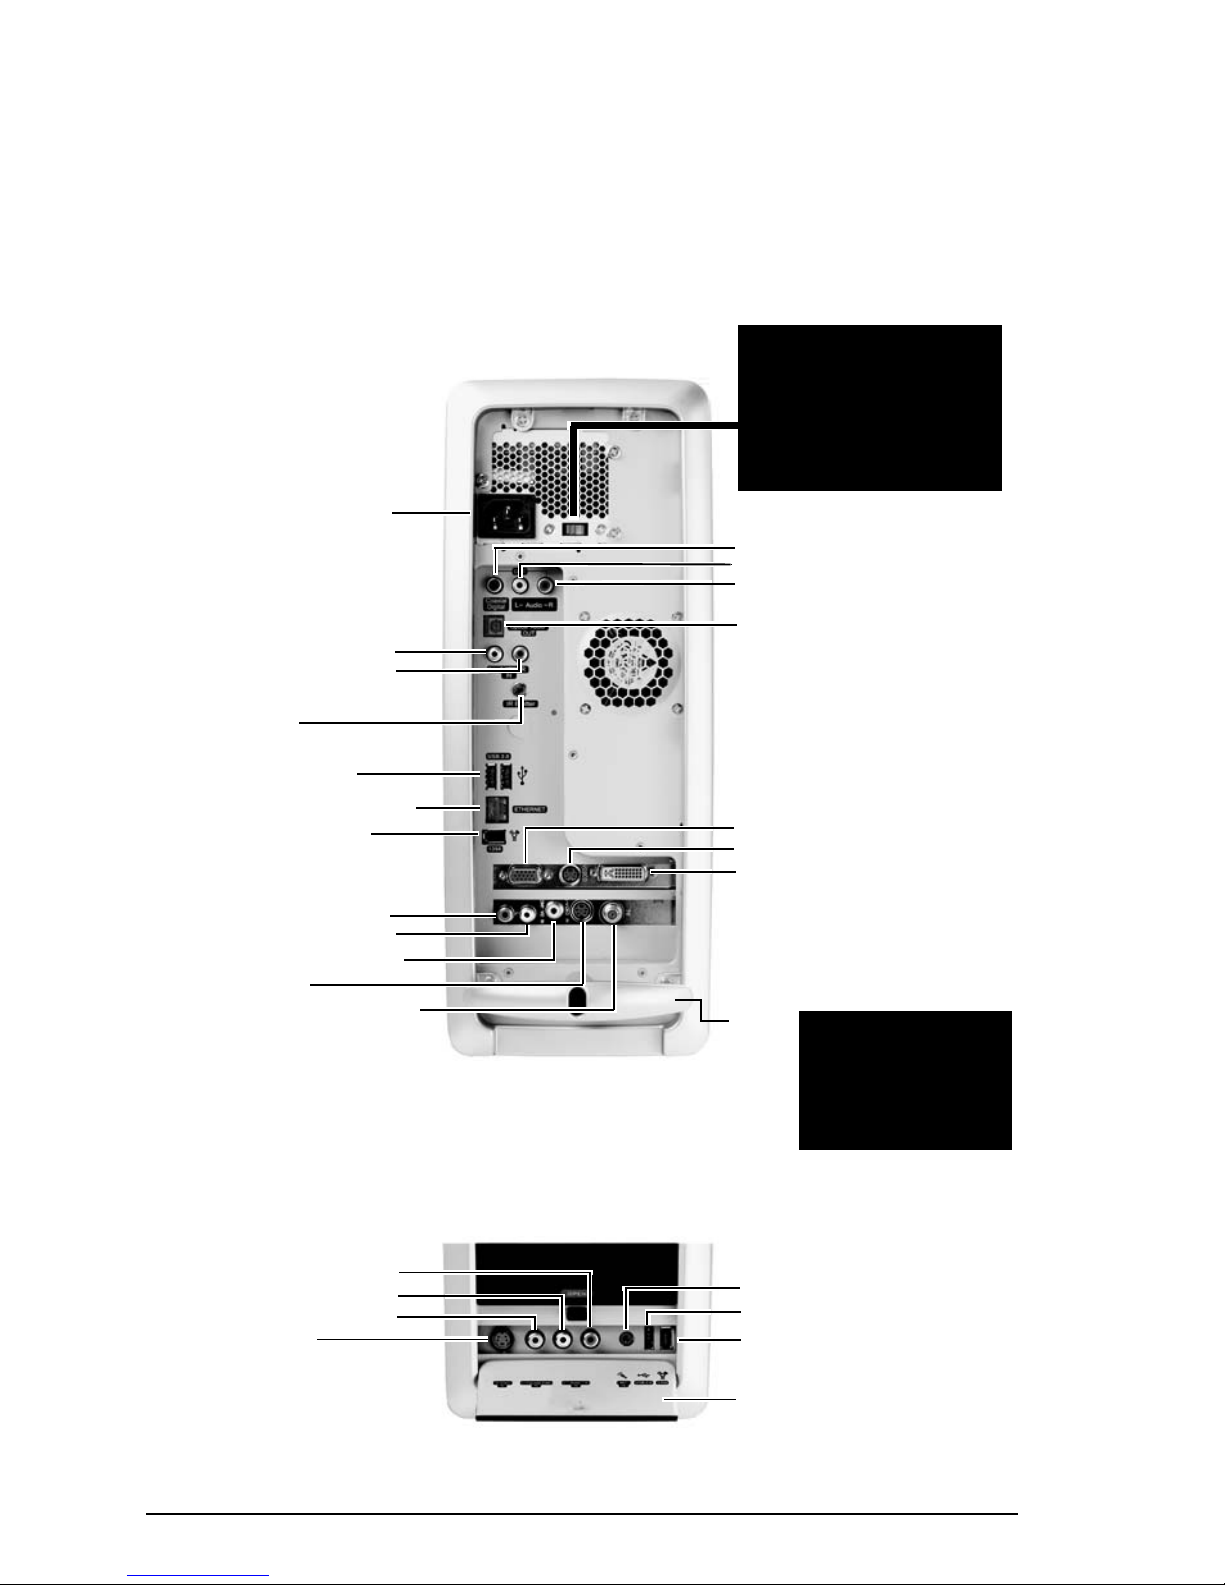
Input and Output Ports
The illustrations below show the video and audio ports that you can use to
connect Input devices (such as a cable or satellite set-top box, a camcorder,
digital camera, VCR, etc.) to your Media Center, as well as Ou tput devic es
(such as a TV, Plasma Display, PC Monitor, and audio receiver with speakers).
Video & Audio IN:
Analog audio port (R)
Analog audio port (L)
Composite Video port
S-Video port
Coaxial video/audio port
USB 2.0 ports (2)
Ethernet LAN RJ45 port
Firewire1394a port
WARNING: This switch is
pre-set to the proper
voltage for your region.
DO NOT change this
setting. Doing so could
seriously damage the unit
and void the warranty.
AC power connector
Audio OUT:
Digital audio coaxial port
Analog audio port (L)
Analog audio port (R)
Digital audio optical port
Auxiliary Audio IN:
Analog audio port (L)
Analog audio port (R)
Video OUT:
VGA port (to PC monitor)
S-Video port (to TV)
DVI-I port (to PC monitor,
Plasma display, etc.)
NOTE: DVI = Primary Vi deo
Out; S-Video or VGA =
Secondary Video Out.
Auxiliary Video & Audio IN
(Connect a VCR, Digital Camera,
Camcorder, Microphone, etc.)
Microphone
USB 2.0 port
Firewire 1394a (digital
video and audio signal)
(R) Analog Audio port
(L) Analog Audio port
Composite Video port
S-Video por t
IR Emitter
Access Door
Back of Media Center:
Front of Media Center:
Cable
Guide
WARNING: DO NOT
use the Cable Guide
to lift or carry the
Media Center
.
Doing
so could damage the
unit.
Page 16
ViewSonic NextVisionTM M2000 Digital Media Center 11
Setup Examples
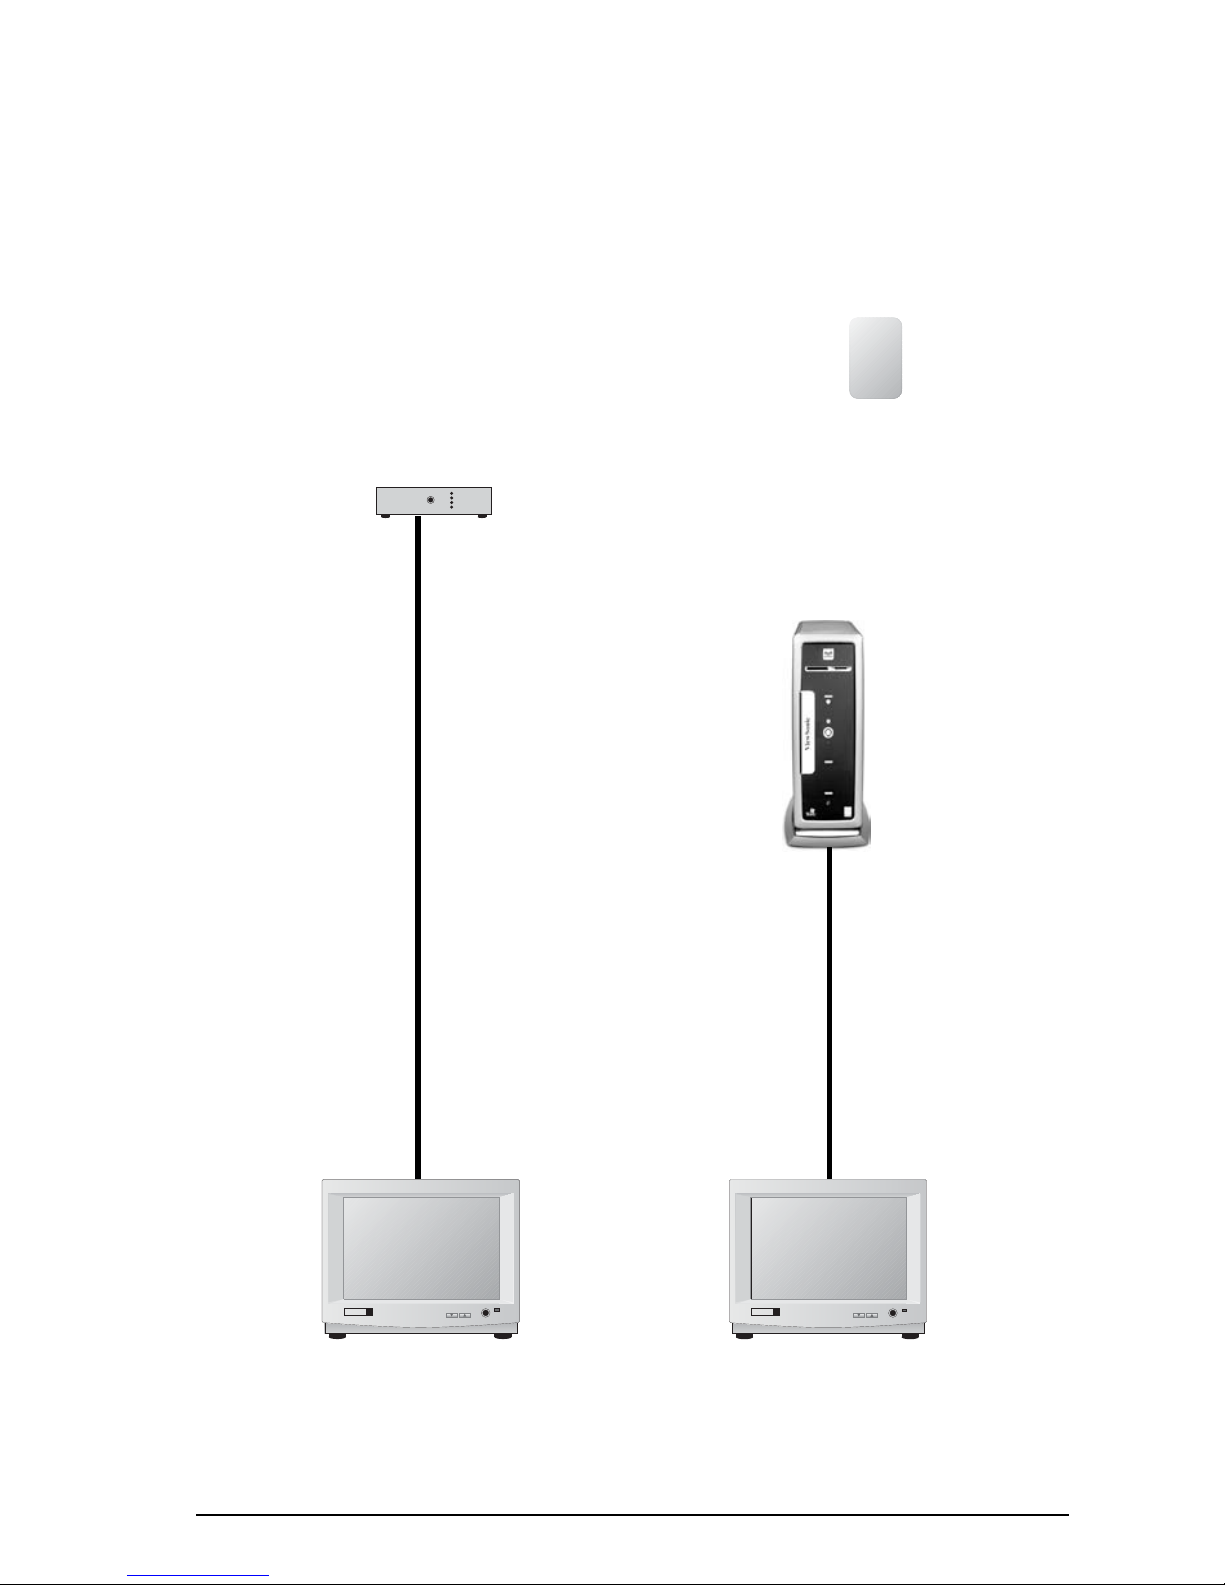
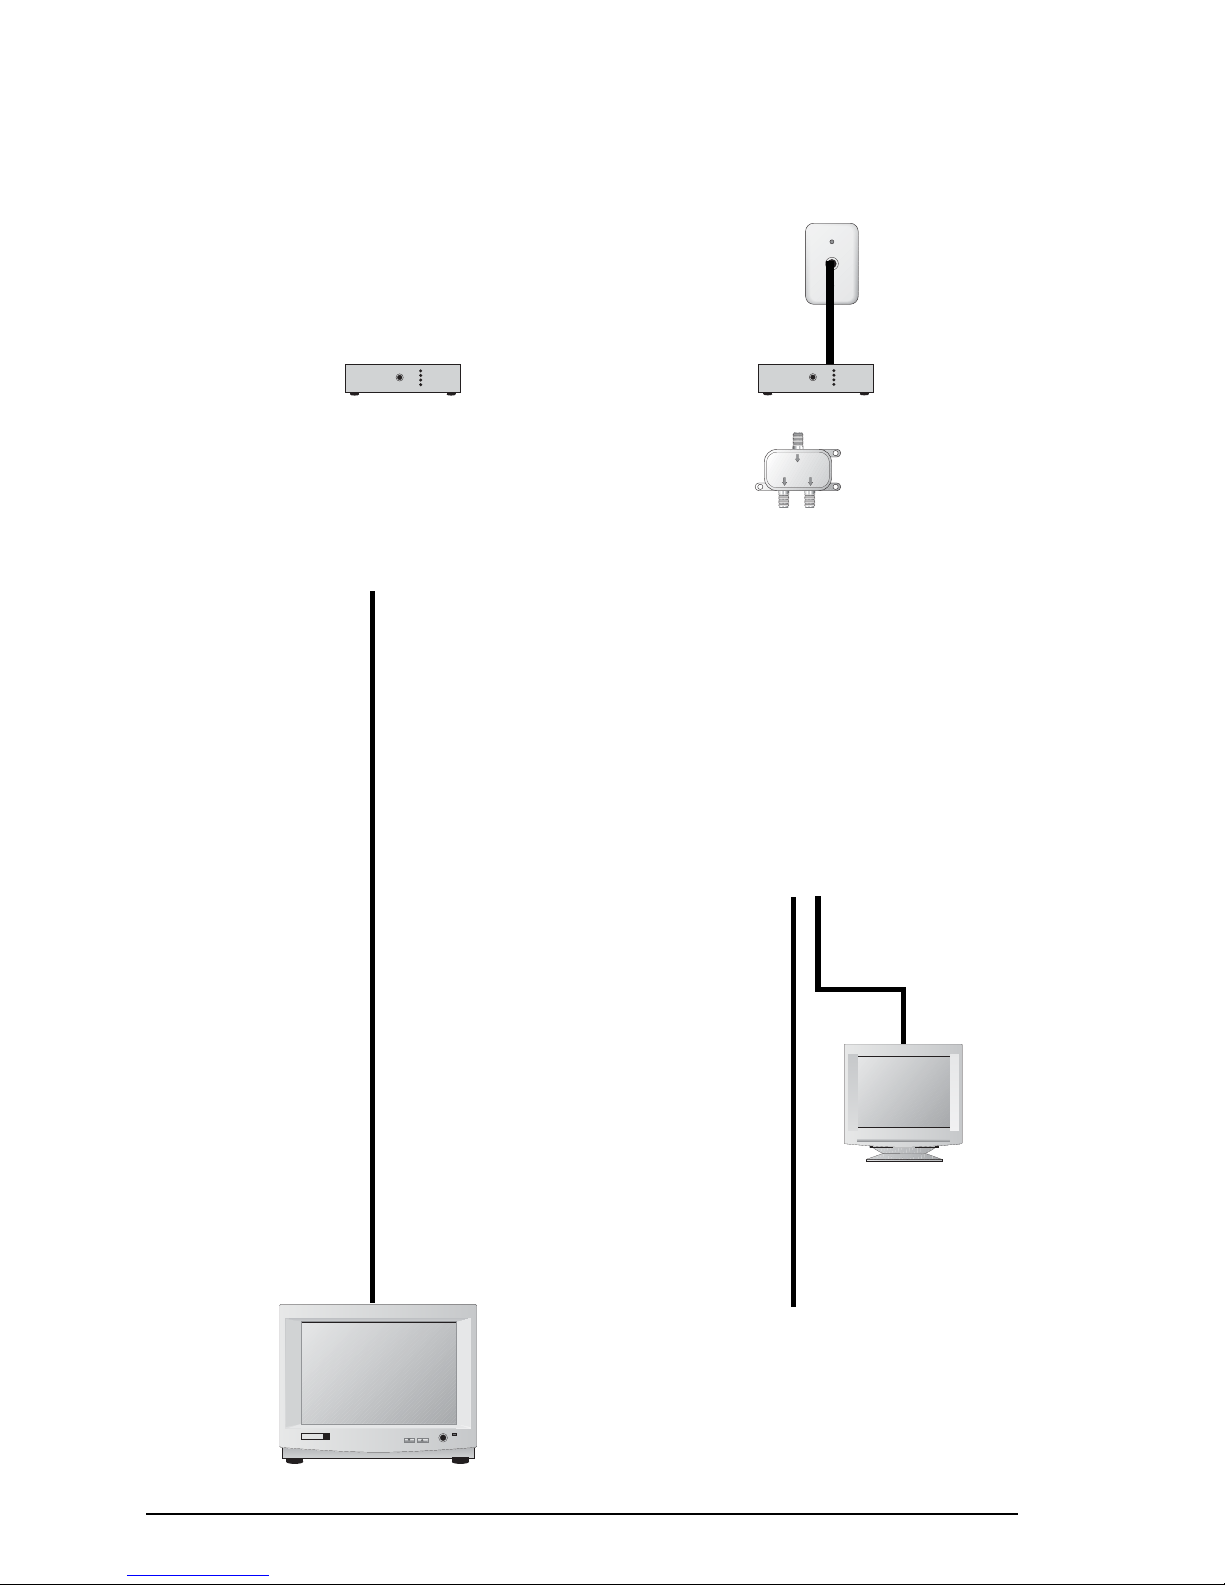
Basic Setup with TV and PC Monitor
(As described in the Quick Start Guide)
IR Emitter
Existing Setup with Setup with M2000, TV,
TV & Receiver & PC Monitor
Coaxial
cable
Analog Audio
(L/R) cable
Power
Coaxial
cable
Cable/Satellite
Set-top box
Analog Audio
(L/R) cable
DVI or VGA
cable
Power
Page 17
12 ViewSonic NextVisionTM M2000 Digital Media Center
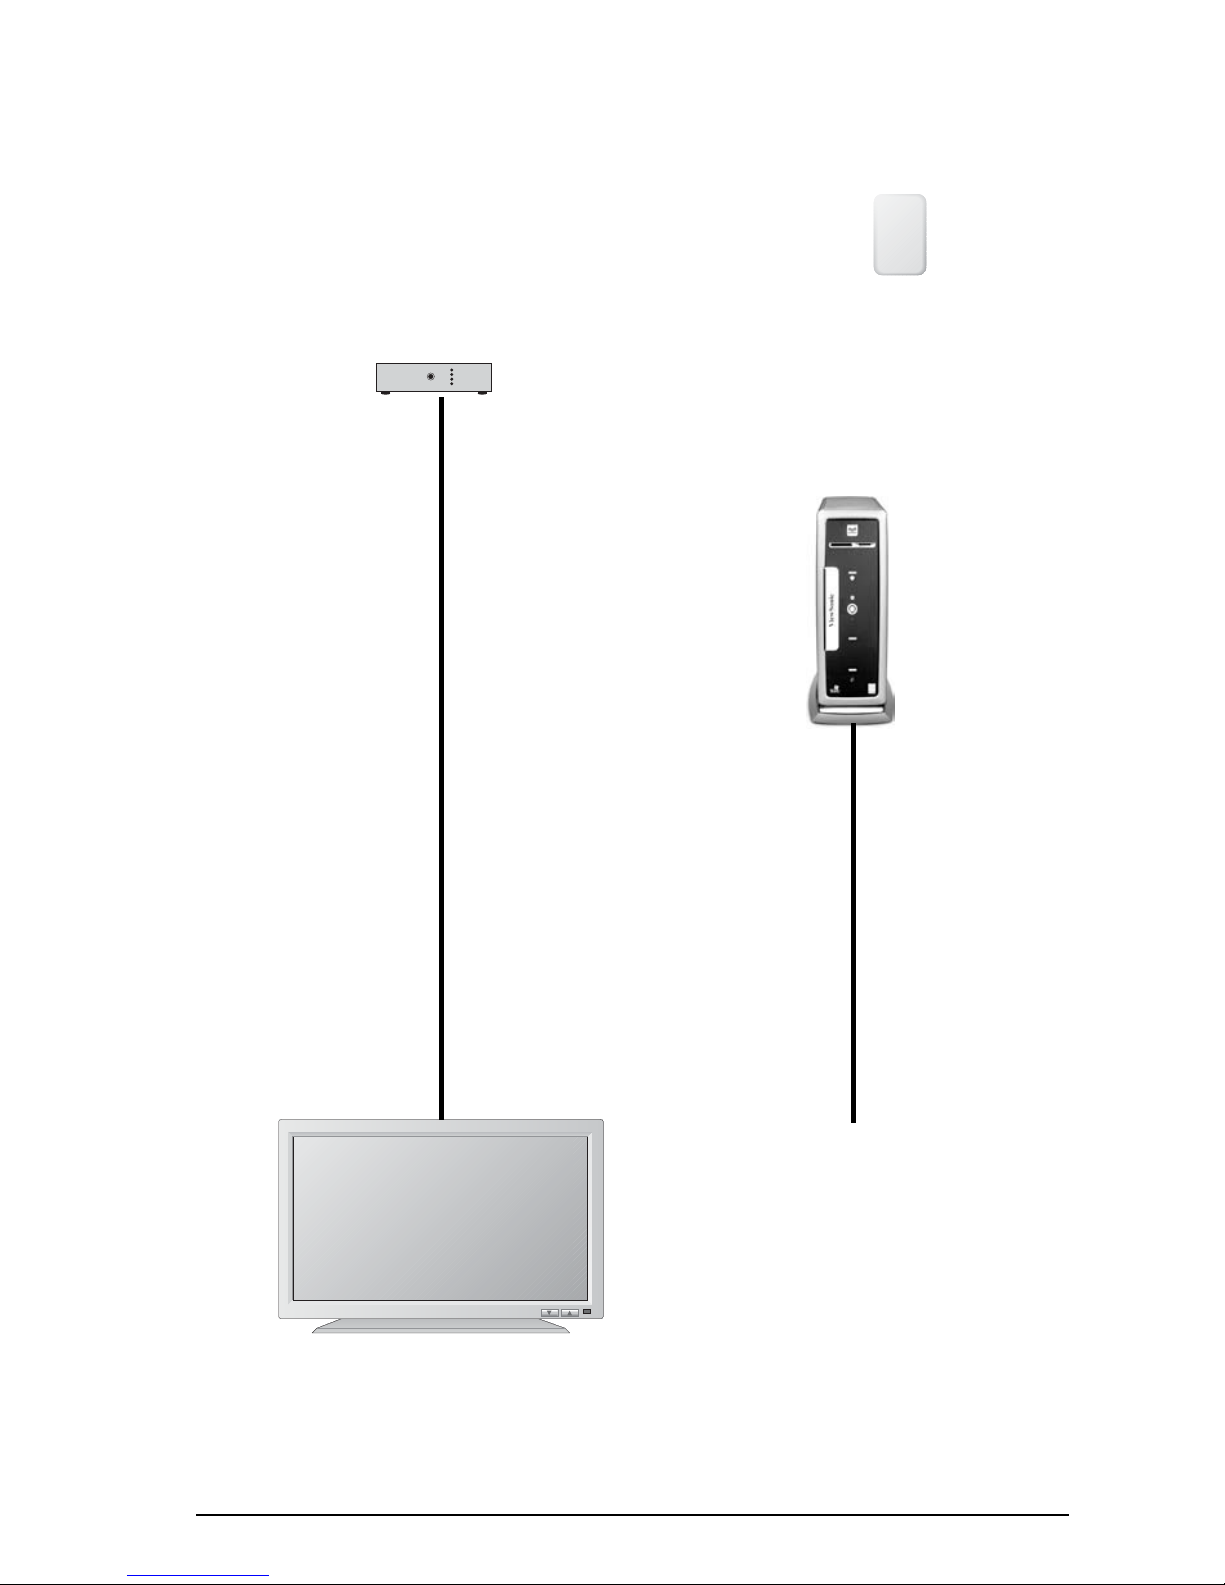
Setup with VCR, TV and PC Monitor
IR Emitter
Coaxial
cable
Power
Coaxial
cable
Cable/Satellite
Set-top box
Analog Audio
(L/R) cable
DVI or VGA
cable
Page 18
ViewSonic NextVisionTM M2000 Digital Media Center 13
Setup with Plasma Display and 5.1 Digital Audio
IR Emitter
Coaxial
cable
Analog Audio
(L/R) c able
Coaxial
cable
Cable/Satellite
Set-top box
Digital Audio Optical or
Digital Audio Coaxial cable
Page 19

14 ViewSonic NextVisionTM M2000 Digital Media Center
Setup FAQs
The answers to the following Frequently Asked Questions (FAQs) will help you
select the best ways to connect the Media Center to your existing home
entertainment center.
NOTE: The Input and Output Ports illustration appearing earlier in this chapter
will help you identify the ports described below.
Can I use ViewSo nic M2000 Digital Media Center with satellite T V or
digital cable w i th a set-top bo x? And how d o I conne c t t hem?
Yes; the M2000 Digital Media Center can accept a Coaxial or S-Video/analog
audio cables attached to a set-top box and control the set-top box through the
attached IR Emitter (blaster) cable. The Media Center also has a program guide
for satellite and digital cable TV, so once the system has been properly
configured for your service (depending on what brand of set-top box you use),
the M2000 will operate the same as it would with standard cable or satellite TV.
Setup
: For the best signal quality, connect an S-Video cable and an L/R analog
audio cable from your set-top box to the Media Center. The next best video signal
would be provided by connecting the Composite video cable and L/R audio cable.
The final option is to connect a Coaxial cable (combined video and audio signal)
from the set-top box to the M2000.
How do I connect m y TV to th e M2000 Dig ital Media Cente r?
For the best video quality, connect the S-Video cable from the Media Center to
the your TV’s S-Video In port. If your TV only has a Composite Video port, then
use the S-Video-to-Composite Video adapter to connect to the M2000’s S-Video
port.
How do I connect m y high resoluti on TV (Plas ma display , LCD TV, LCD
Projector, etc.) to the M2000 Digital Media Center?
For the best video quality, use the following (in order of quality preference): DVI,
VGA, S-Video.
Can I connec t the PC Monitor’ s VGA cable dir e c tl y t o the M2 0 00 Digital
Media Cent e r’ s VGA port when a TV (or simi l a r display) is connected to
the Media Center’s S-Video port?
No. If your TV is connected to the S-Video port, and if your PC Monitor only
supports VGA, then you must connect the DVI-to-VGA adapter to the Media
Center’s DVI port, then connect PC Monitor’s VGA cable to the adapter.
Can I connect my M2000 D igital M edia Cent er to a 5.1 Surround So und
Receiver?
Yes. Use either the provided Digital Audio Optical cable or the Digital Audio
Coaxial cable. Once you connect the M2000 to your digital audio receiver, the
volume is controlled by your receiver (not by the M2000).
How do I connect the M2000 Digital Media Center to the Internet?
Attach the supplied Ethernet cable from your existing home network (connected
to the Internet) to the Ethernet port on the Media center. See Chapter 2 for more
information.
Page 20

ViewSonic NextVisionTM M2000 Digital Media Center 15
Why should I connect my M2000 to the Interne t?
In addition using many web resources, the main advantage of connecting the
M2000 to the Internet is being able to record TV shows automatically by having
access to an online EPG (Electronic Programming Guide), which will provide TV
program information two weeks before shows are aired. However, you can use
the M2000 without being connected to the Internet.
How do I connect the M 2000 Digita l Media Center to the Internet?
Attach the supplied Ethernet cable from your existing home network (connected
to the Internet) to the Ethernet port on the Media center. See Chapter 2 for more
information.
What are the ports on the front of the M20 00 Digital Media Cent er used
for?
These ports are a convenient way to temporarily connect input devices such as a
VCR (transferring VHS home movies to DVD), digital camcorder, digital camera,
game console, microphone, etc.
What is th e fa stest way to tra nsfer video from my digi tal camcorder?
Connect your digital camcorder to the Firewire 1394a port on the front of the
Media Center.
Does Windows XP Media Center Editi on contain a ll the features of
Windows X P Prof essional?
Yes. Windows XP Media Center Edition is a superset of Windows XP Professional.
Can I use other Wi nd ows applicati ons while the M edia Center softw are
is running?
Yes. You can run the Media Center in “windowed mode” and use Windows
applications simultaneously. To get into windowed mode from the full-screen
view, either go to the main menu and click the restore button in the upper right
(the button with two overlapping windows) using the remote control or use the
pointer and buttons on the keyboard to click the restore button (which will
appear in the upper right of any page when you move the pointer).
Does the ViewS onic M2000 D igital Media Center support addit ional TV
turners?
No. The ViewSonic M2000 Digital Media Center currently supports only one
integrated TV tuner.
Page 21
16 ViewSonic NextVisionTM M2000 Digital Media Center
Connecting to the Internet
Connecting the Media Center to the Internet access has many advantages,
including access to online Media Center resources and information. Another
important advantage is access to an online EPG (Electronic Programming Guide),
which will provide TV program information two weeks before shows are aired.
In order to connect to the Internet, you need to have an existing Broadband
Internet connection, such as cable or DSL, or a networked PC with a dial-up
modem. You can connect to your home network directly using an Ethernet cable
(wired) or using a wireless connection.
• Wired Connection: Connect the supplied Ethernet LAN cable from the
Ethernet (RJ-45) port on the back of the Media Center to the Ethernet port in
your existing Broadband modem or home network.
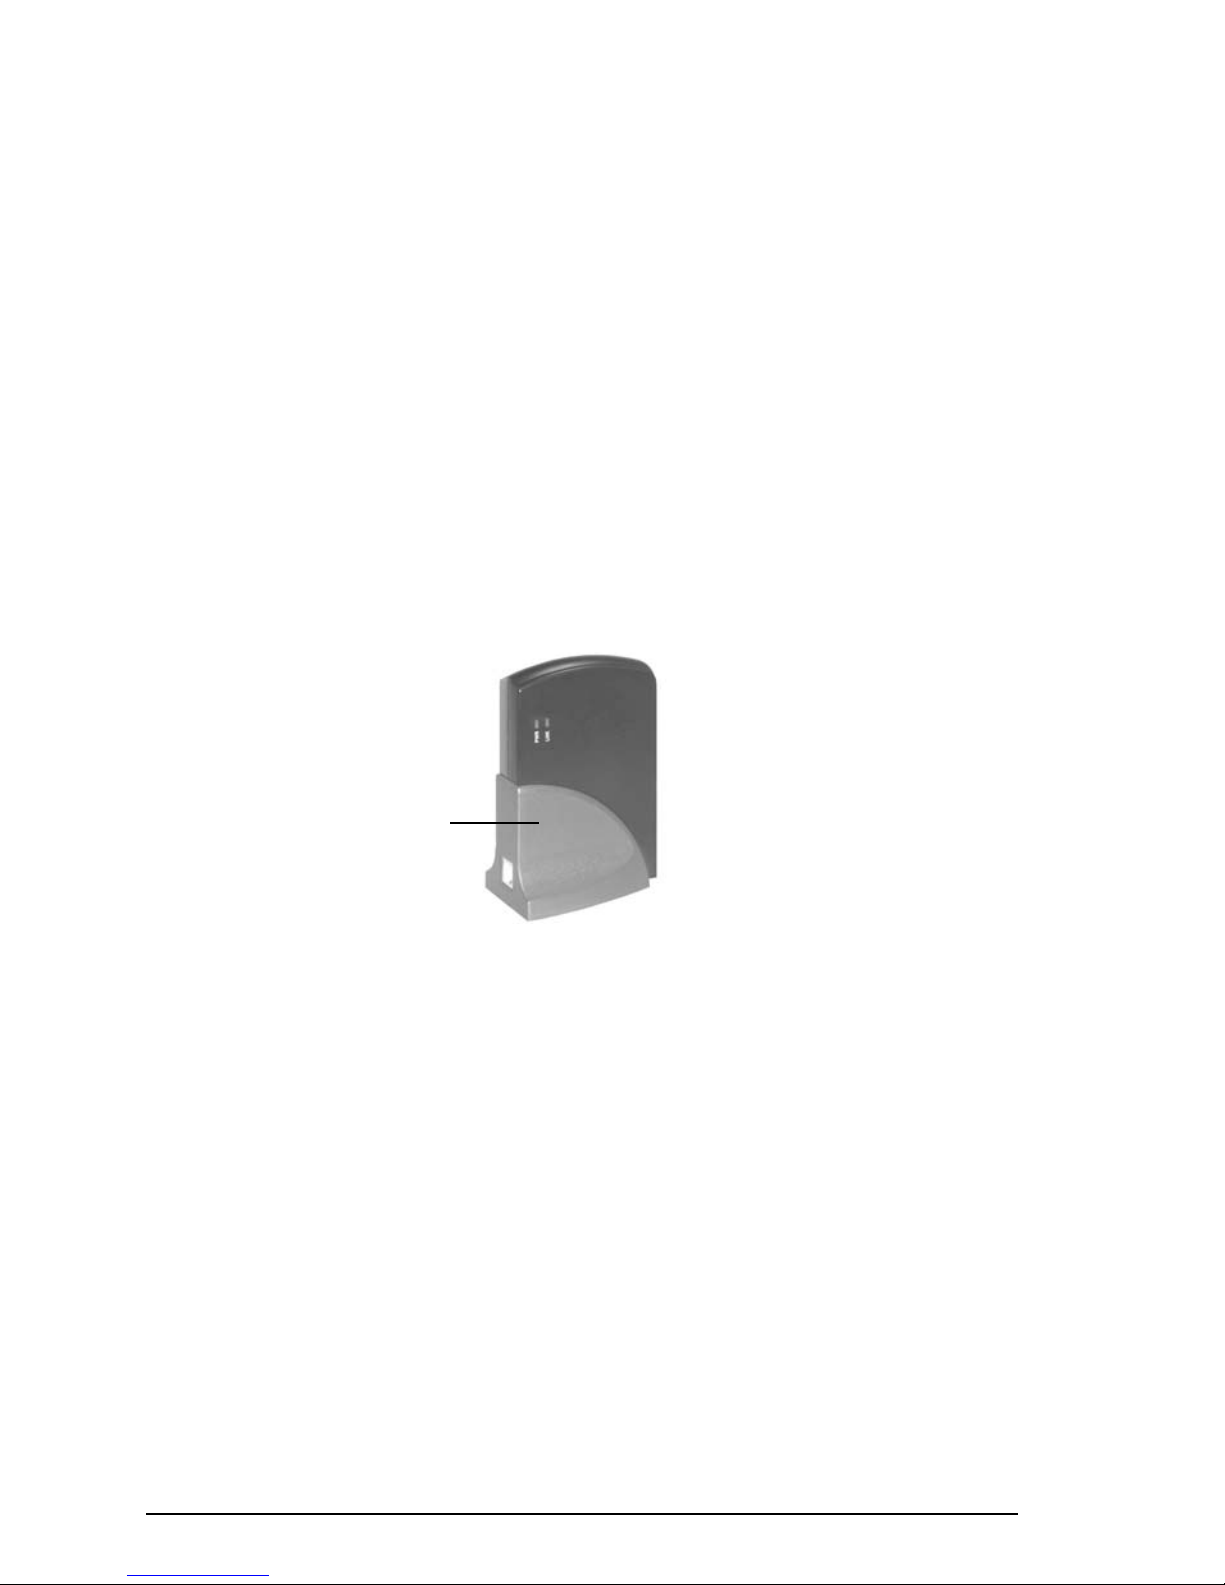
• Wireless Connection: If you have an existing wireless network, use a USB
cable to connect a Wireless USB Adapter (purchased separately) to one of the
USB ports on the back of the Media Center.
NOTE: For more information about connecting to a wireless network, refer to
your USB network adapter’s user guide.
Example of a wireless
USB network adapter
(purchased separately)
Page 22
ViewSonic NextVis ionTM M2000 Digital Media Center 17
3 Using the Media Center
This chapter provides information about using the Media Center after
installation is complete. See the Media Center Main Menu section for
information about using Media Center’s integrated media playing and recording
features such as PVR (Personal Video Recorder) and DVD Player.
Media Center Power Modes
Turning the Media Center On
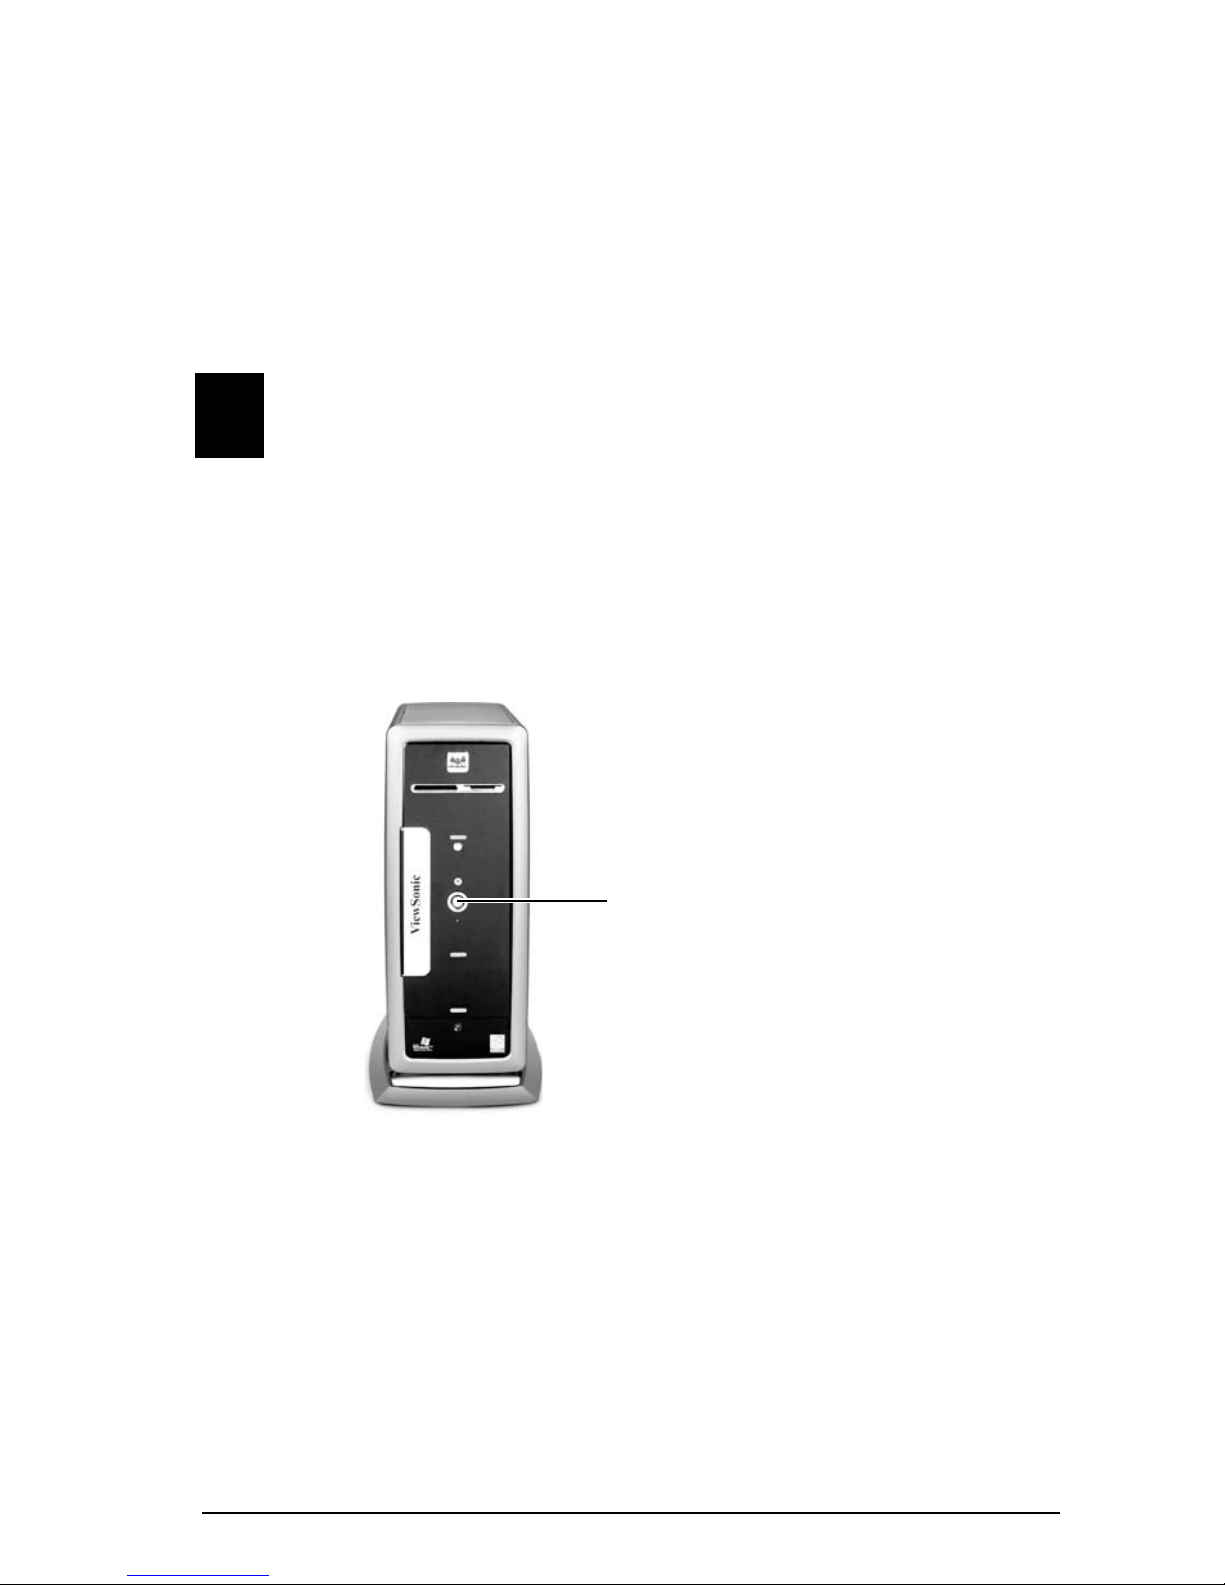
1 Press the Power On/Off button on the front of the Media Center.
The LED indicator (ring around Power button) glows Blue when the Media
Center is On; and glows Amber when in Standby mode.
2 Wait for Windows to boot up and the Windows desktop to appear.
To access the Media Center Main Menu, press the green Media Center
button on the Remote Control. OR Click on the Start button on the Windows
task bar, then click on the green Media Center icon located on the Start
menu.
On/Off Power Button &
LED Indicator (ring around
Power On/Off button)
Blue = On
Amber = Standby mode
Page 23
18 ViewSonic NextVisionTM M2000 Digital Media Center
Using Standby Mode
Standby Mode saves electrical power during periods when you are not actively
using the Media Center. In Standby mode, however, scheduled activities (like
recording a TV show) will still occur. You can activate/de-activate Standby Mode
in three ways:
• From the Remote Control:
Press the Standby button. To go back to Normal
mode, press and hold the Standby button for a few seconds.
• From the Wireless Keyboard
: Press the Sleep button (Special Function key on
the far left). To go back to Normal mode, press and hold the Sleep button for
a few seconds, or press and hold the Esc (Escape) key.
• From the Windows Desktop
: Click the Start button, then click Standby. To
return to Normal mode, use the Remote Control or Keyboard (see above).
Turning the Media Center Off
• Click Start on the Windows taskbar, then click Turn Off.
Then, Power Off the TV, PC Monitor, Receiver, etc.
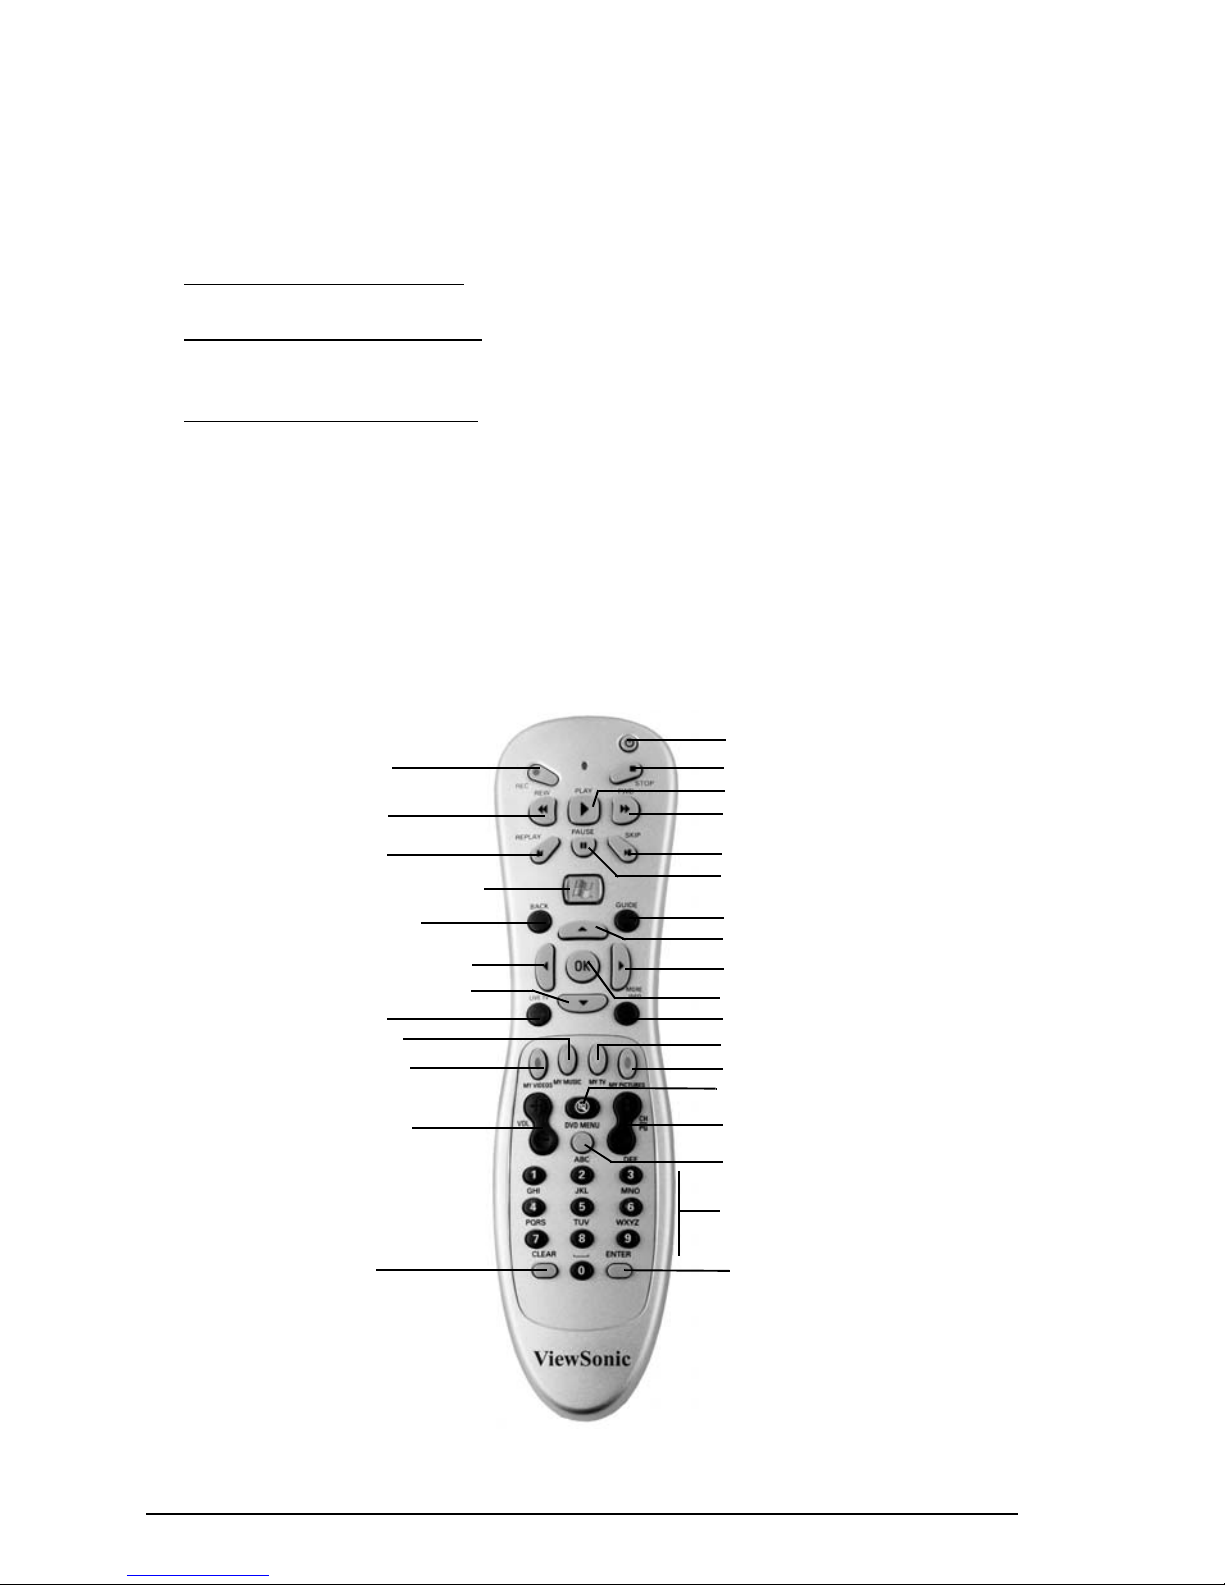
Using the Remote Control
Record
Rewind
Replay
Media Center START
Back button
Move Cursor Left
Live TV
My Music
My Videos
Volume +/-
Clear
Enter
0-9 number/alphanumeric keys
DVD Menu
Channel/Page +/-
My Pictures
My TV
More Info
OK
Move Cursor Right
Guide
Pause
Skip Forward
Fast Forwa r d
Play
Stop
Standby
Move Cursor Up
Move Cursor Down
Mute
Page 24
ViewSonic NextVisionTM M2000 Digital Media Center 19
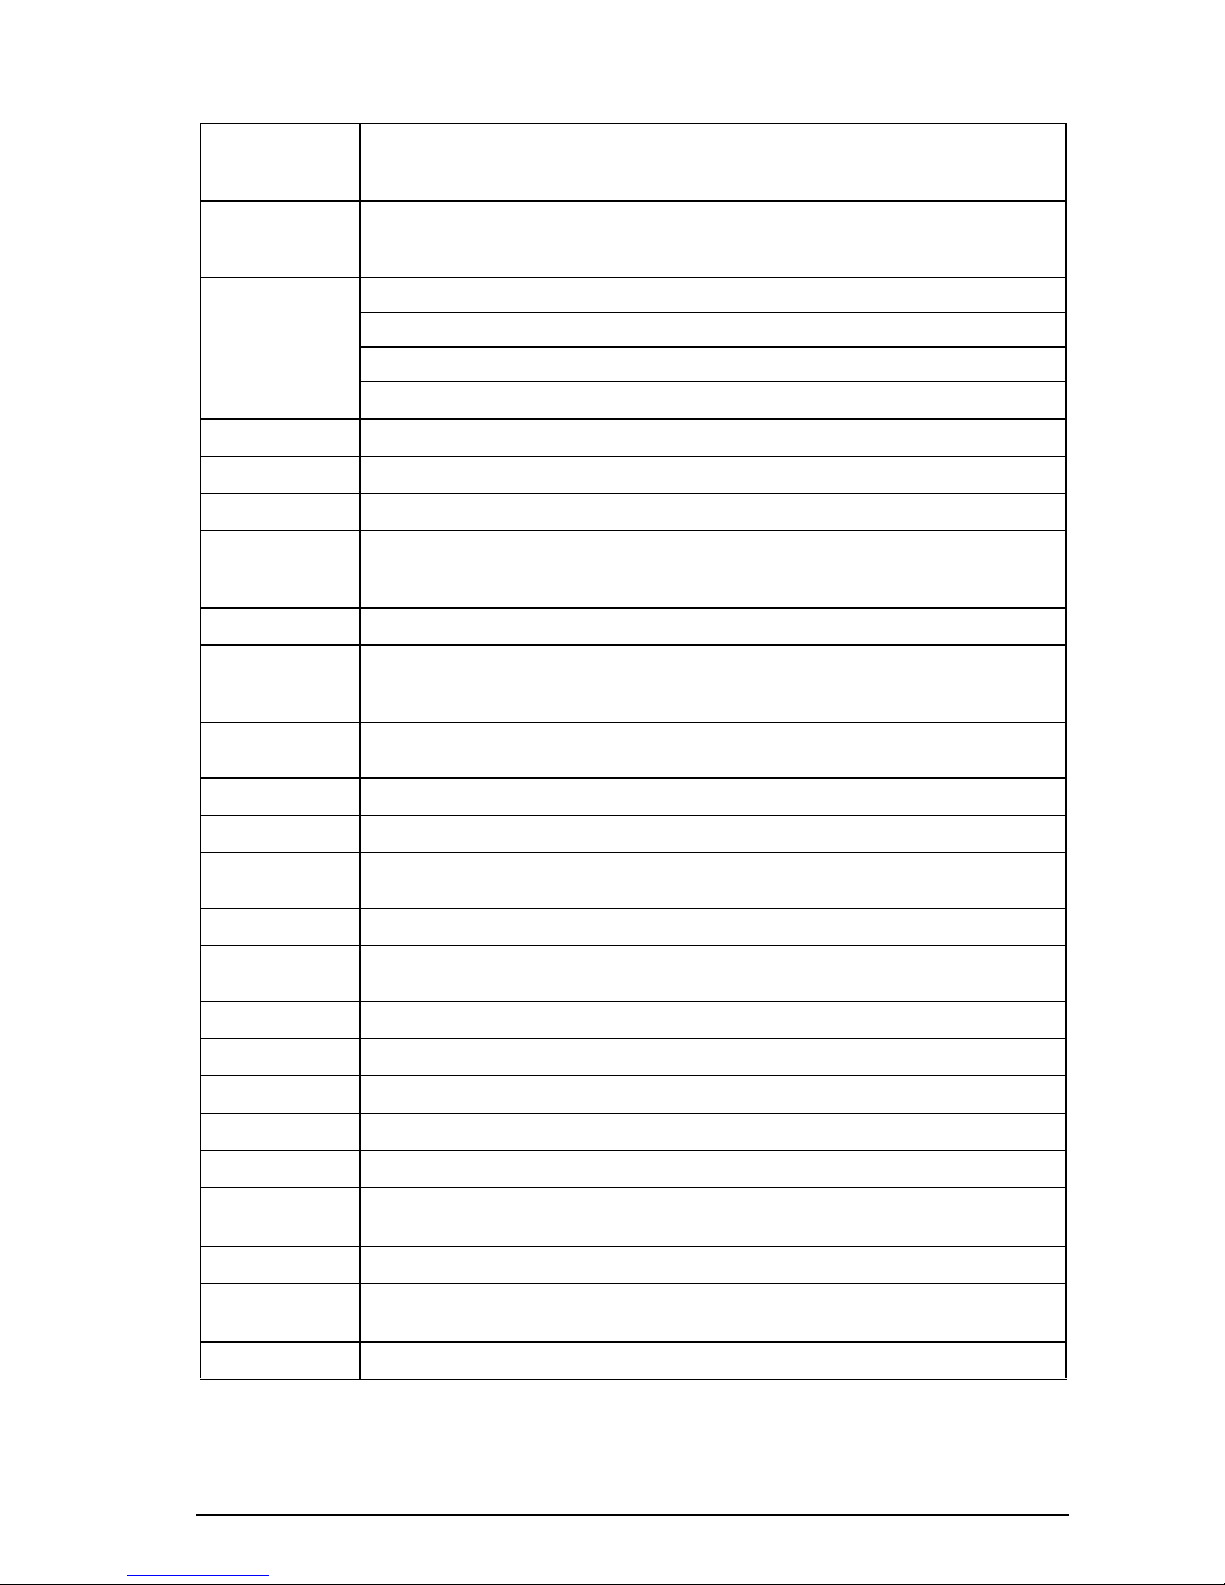
Remote Control Buttons
Media Center
START Button
Displays the Media Center Main Menu. NOTE: You can also access the Main M enu
from th e Wi nd ows desk t op : click St a rt on th e W in dows ta sk ba r, then click t he gr een
Media Center i con.
Standby
Places the Media Center in Standby mode (power saving). While in Standby mode,
the Media Center will still perform scheduled activities, like recording TV shows. The
Power button on the Media Center will turn Amber when Standby mode is activated.
Left Arrow
Right Arrow
Up Arrow
Down Arrow
Moves the cursor to the Left to navigate though al l Med i a Cente r scree ns.
Moves the cursor to the Right to navigate though all Media Center screens.
Moves the cursor to the Up to navigate though all Media Center screens.
Moves the cursor to the Down to navigate though all Media Cen ter scr eens.
Live TV
Shortcut for viewing live TV.
My Music
Shortcut to select stored music for listening.
My Videos
Shortcut for viewing your video recordings, such as parties and vacations.
My TV
Shortcut for accessing the PVR (Personal Video Recording) functions of the Media
Player . You can use the Remote Control to view live TV the way you want to, such as
pausing it, playing it, fast forwarding it, or rewinding it like a VCR.
My Pictures
This feature lets you view photos, adding background music if you like.
Volume +/-
Increases/Decreases loudness of the sound. NOTE: If you have a 5.1 Surround
Sound receiver, these Volume controls will not work. Use the volume controls on the
receiver or the re mo te contr ol that came with your receiver.
Clear
Deletes the previous selection you made (works like the Backspace button on a
keyboard.)
Record
Records a TV program and stores it on the Media Center hard drive.
Rewind
Moves the media (video and/or audio) backward.
Replay
Moves the media (video and/or audio) backward one music track or one D V D
chapter at a time.
Fast Forward
Moves the media (video and/or audio) forward.
Skip Forward
Moves the media (video and/or audio) forward one music track or one DVD chapter
at a time.
Stop
Stops media currently playing or recording.
Guide
Opens the TV program guide.
OK
Selects your desired action or window (acts like the Enter button).
More Info
Provides information about the currently selected TV program.
Mute
Temporarily silences the sound. Toggles On/Off. See the NOTE on Volume above.
Channel/Page
+/-
+/- moves changes the TV channel forward/backward, or moves the page up or
down.
DVD Menu
Displays the menu of the DVD currently playing.
0-9/ABC AlfaNumeric keys
Used to enter numbers or letters (depending on selected function) that are used to
change TV channels, enter text into a Media Center search or text box, etc.
Enter
Selects desired action or window option.
Page 25
20 ViewSonic NextVisionTM M2000 Digital Media Center
Using the Wireless Keyboard
The Wireless IR (infrared) Keyboard allows you use the Media Center software
functions with standard Windows
®
keys as well as the Pointer (mouse point/click
functions while sitting up to 15 feet away from the Media Center.
NOTE: You can also connect any USB keyboard and/or mouse if you prefer (not
included).
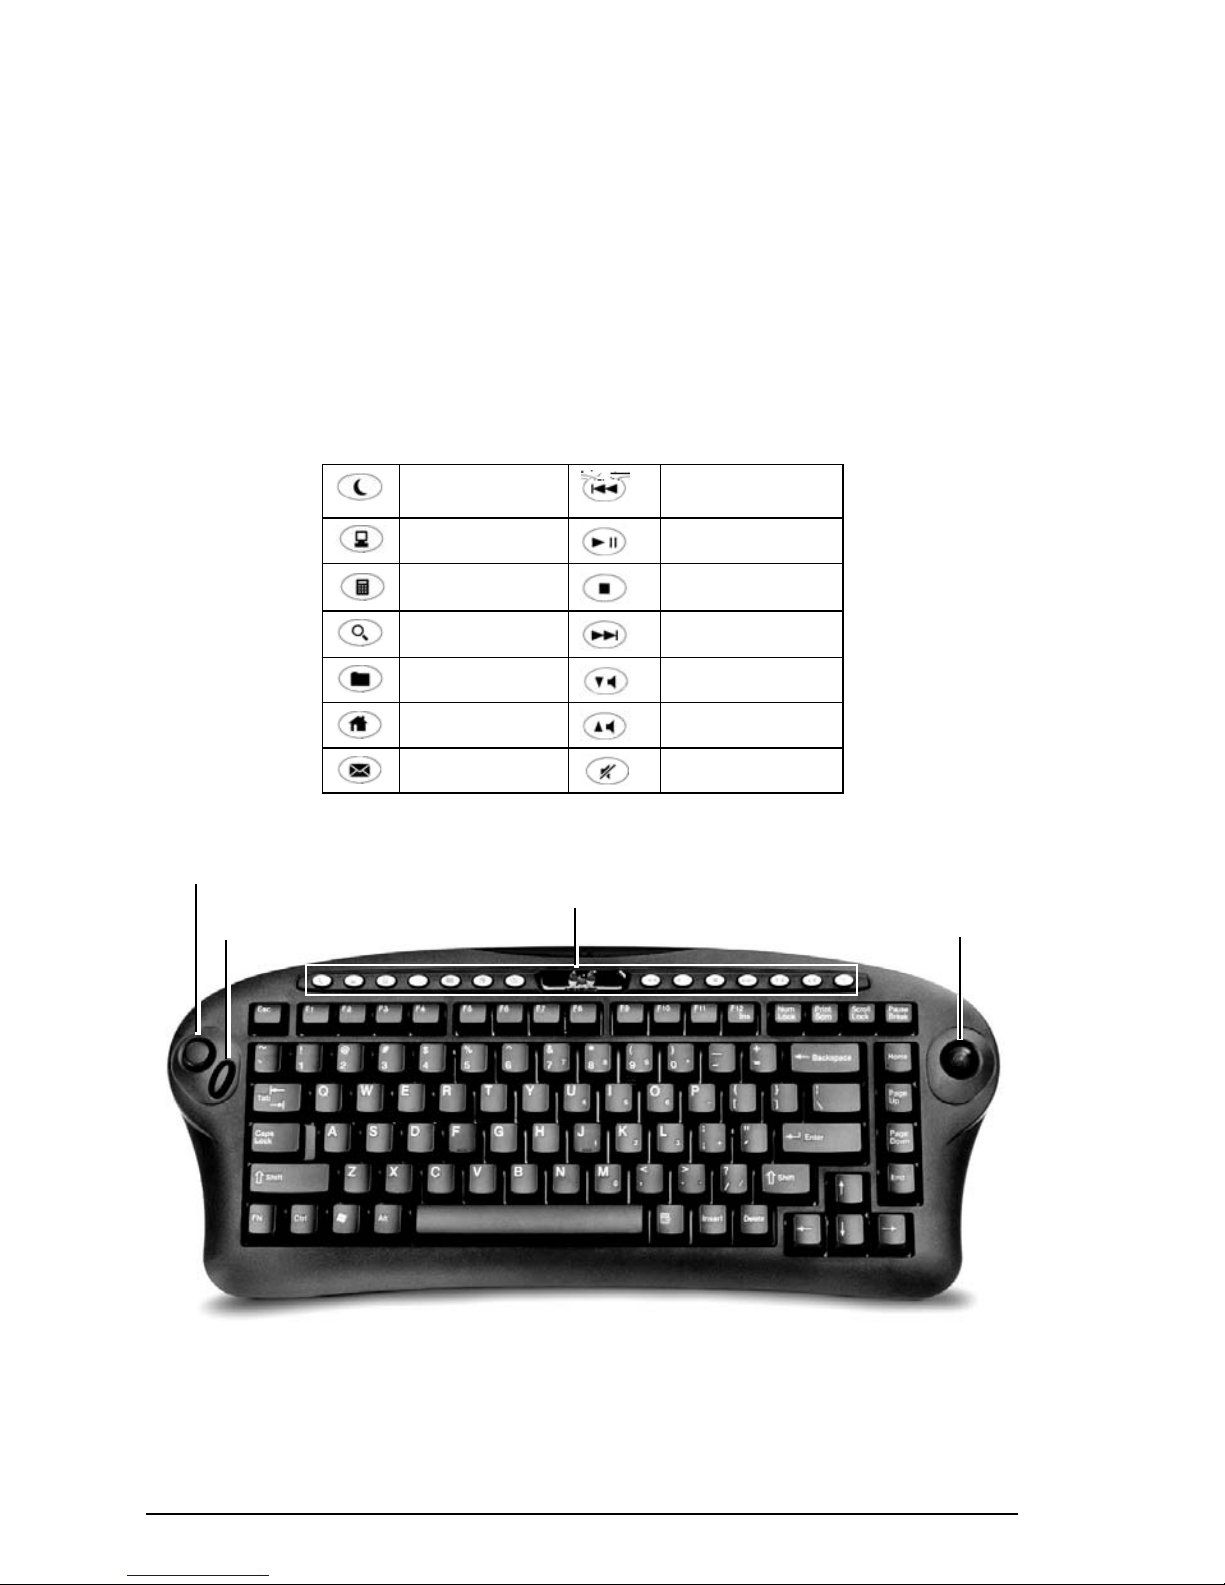
Special Function Keys
The Special Function Keys can be used to control the Media Center’s DVD/CD
player/recorder functions, as well as provide quick access to the Internet, your IE
Favorites, and Outlook Express, and other multimedia functions.
NOTE:
When using the pointing feature of the keyboard, only a small amount of
downward pressure is required. To properly navigate the cursor, simply push the
Orb (see illustration) in the desired direction of travel.
Sleep (Standby
Mode)
Rewind
My Computer Play/Pause
Calculator
Stop
Search Fast Forward
IE Favorites Decrease Volume
Home Page Increase Volume
Outlook Express Mute
Right Mouse
Click func tion
Left Mouse
Click
function
Cursor Bal l (mo ves
pointer or cursor
like a mouse or
track ball)
Special Function Keys
Page 26
ViewSonic NextVisionTM M2000 Digital Media Center 21
Adjusting the Speed of the Pointer
To adjust the speed that the pointer (or cursor) moves on the screen, do the
following:
1 Hold down the left and right “mouse” buttons simultaneously for four (4)
seconds. (The mouse buttons are on the far left side of the keyboard.)
2 When the LED light blinks twice, release the mouse buttons and enter the
three digit code for the desired speed (refer to table below). The LED will blink
twice after the code has been successfully entered.
NOTE: The speed level will revert back to the default Speed Level 4 each time
the batteries are changed.
You can also change the cursor speed using the mouse controls in the Windows
Control Panel if you prefer.
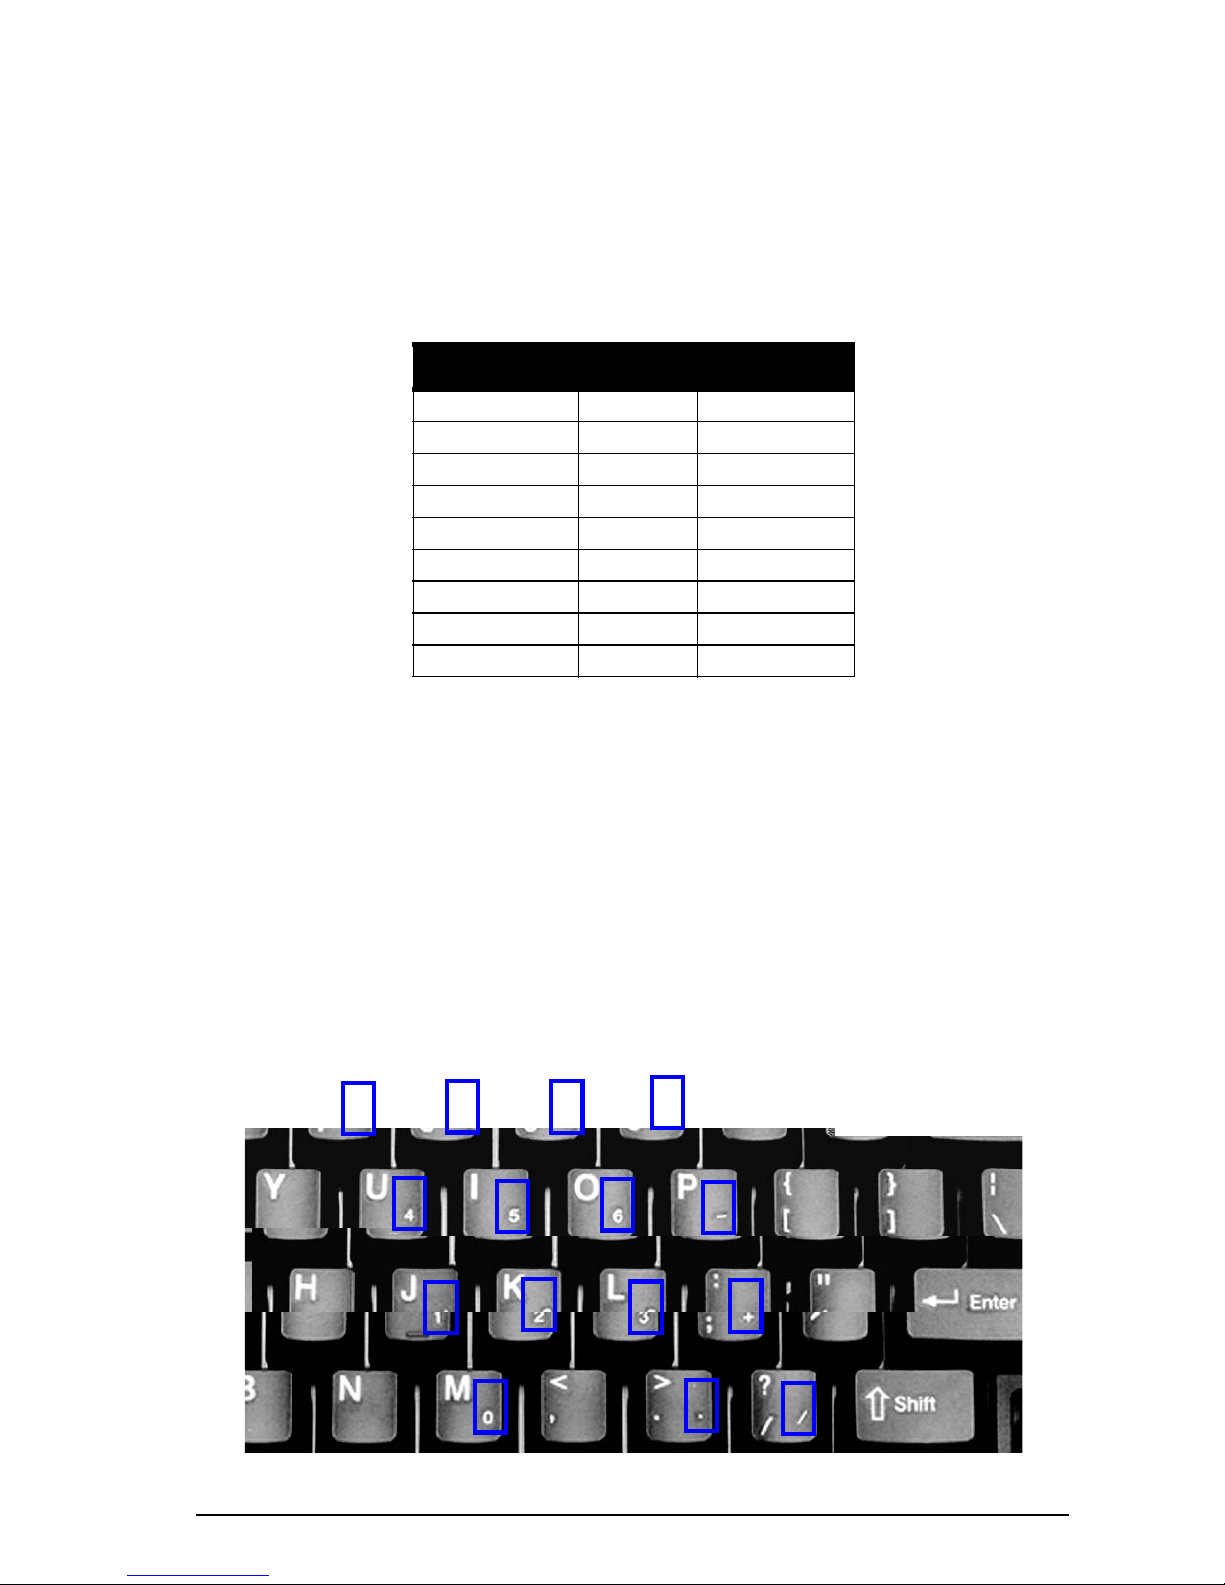
Using the Numeric Keypad Feature
The illustration below shows the keys that correspond to Keypad numbers and
symbols.
• To activate the Numeric Keypad feature, press the NumLock button.
• To de-activate this feature, press the NumLock button again.
Speed Le vel 3 Digit Code
0 Slowest 000
1 032
2 064
3 096
4 Default 128
5 160
6 192
7 224
8 Fastest 225
Page 27
22 ViewSonic NextVisionTM M2000 Digital Media Center
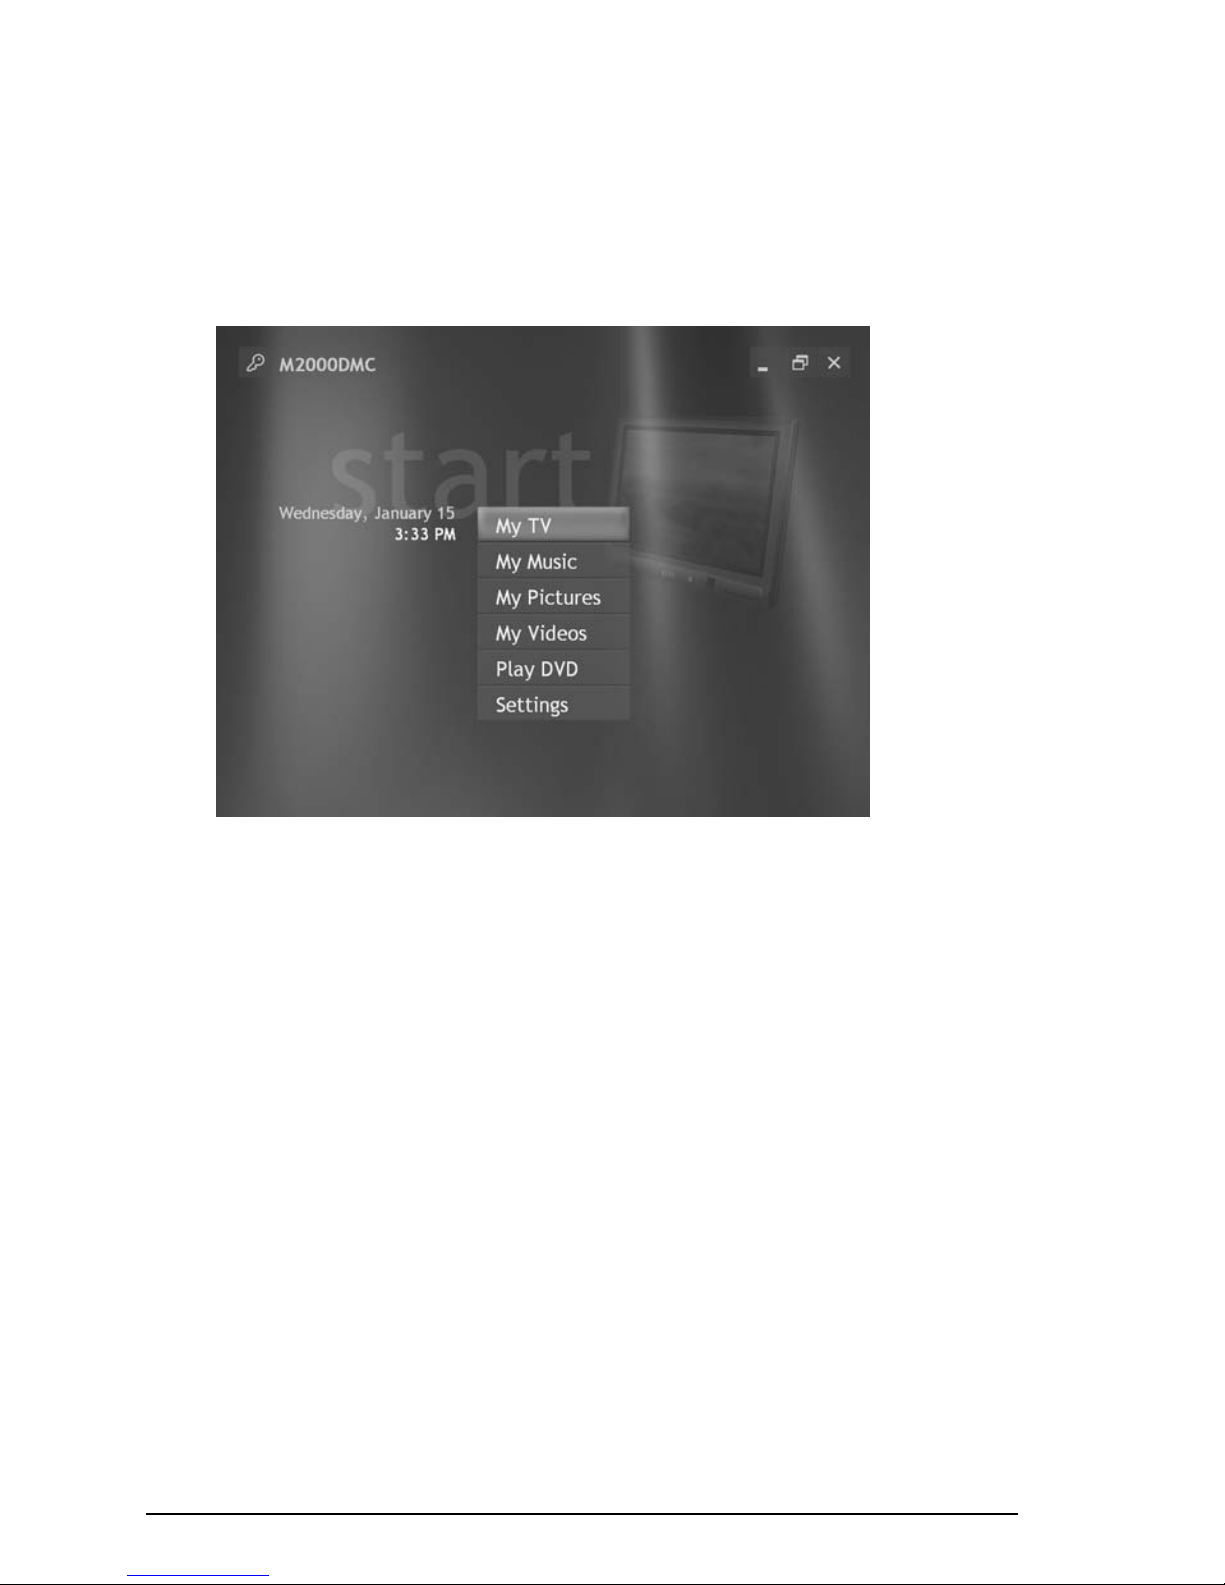
Media Center Main Menu
After you have completed the Setup Instructions in Chapter 2, you can access
the Media Center Main Menu from the Remote Control or from the Windows
desktop.
Shortcuts: You can access many of the Main Menu options (such as My Pictures)
by pushing a pre-defined button on the Remote Control.
NOTE: To use the online TV programming guide for recording TV shows, the
Media Center must be connected to the Internet. See Connecting to the Internet
in Chapter 1 for more information.
For information about Main Menu options, refer to the following:
• Microsoft® Windows® XP Media Center Edition (software) user guide
• Windows Help (for Windows XP Media Center Edition)
To access Window Help, press the F1 key on the keyboard. Or, click Start on
the Windows taskbar, then click Help.
• The Microsoft Media Center website:
www.microsoft.com/windowsxp/mediacenter
Page 28
ViewSonic NextVisionTM M2000 Digital Media Center 23
Using the DVD-R/RW/CD-RW Drive
The DVD-R/RW/CD-RW drive allows you to play and record both DVDs and CDs,
including MP3 recordings.
To utilize the full Media Center features for playing and recording DVDs, it is
recommended that you use the Play DVD option on the Main Menu. As a
secondary option, NVDVD media player comes pre-installed on the M2000 Digital
Media Center (the NVDVD icon is on the Windows desktop).
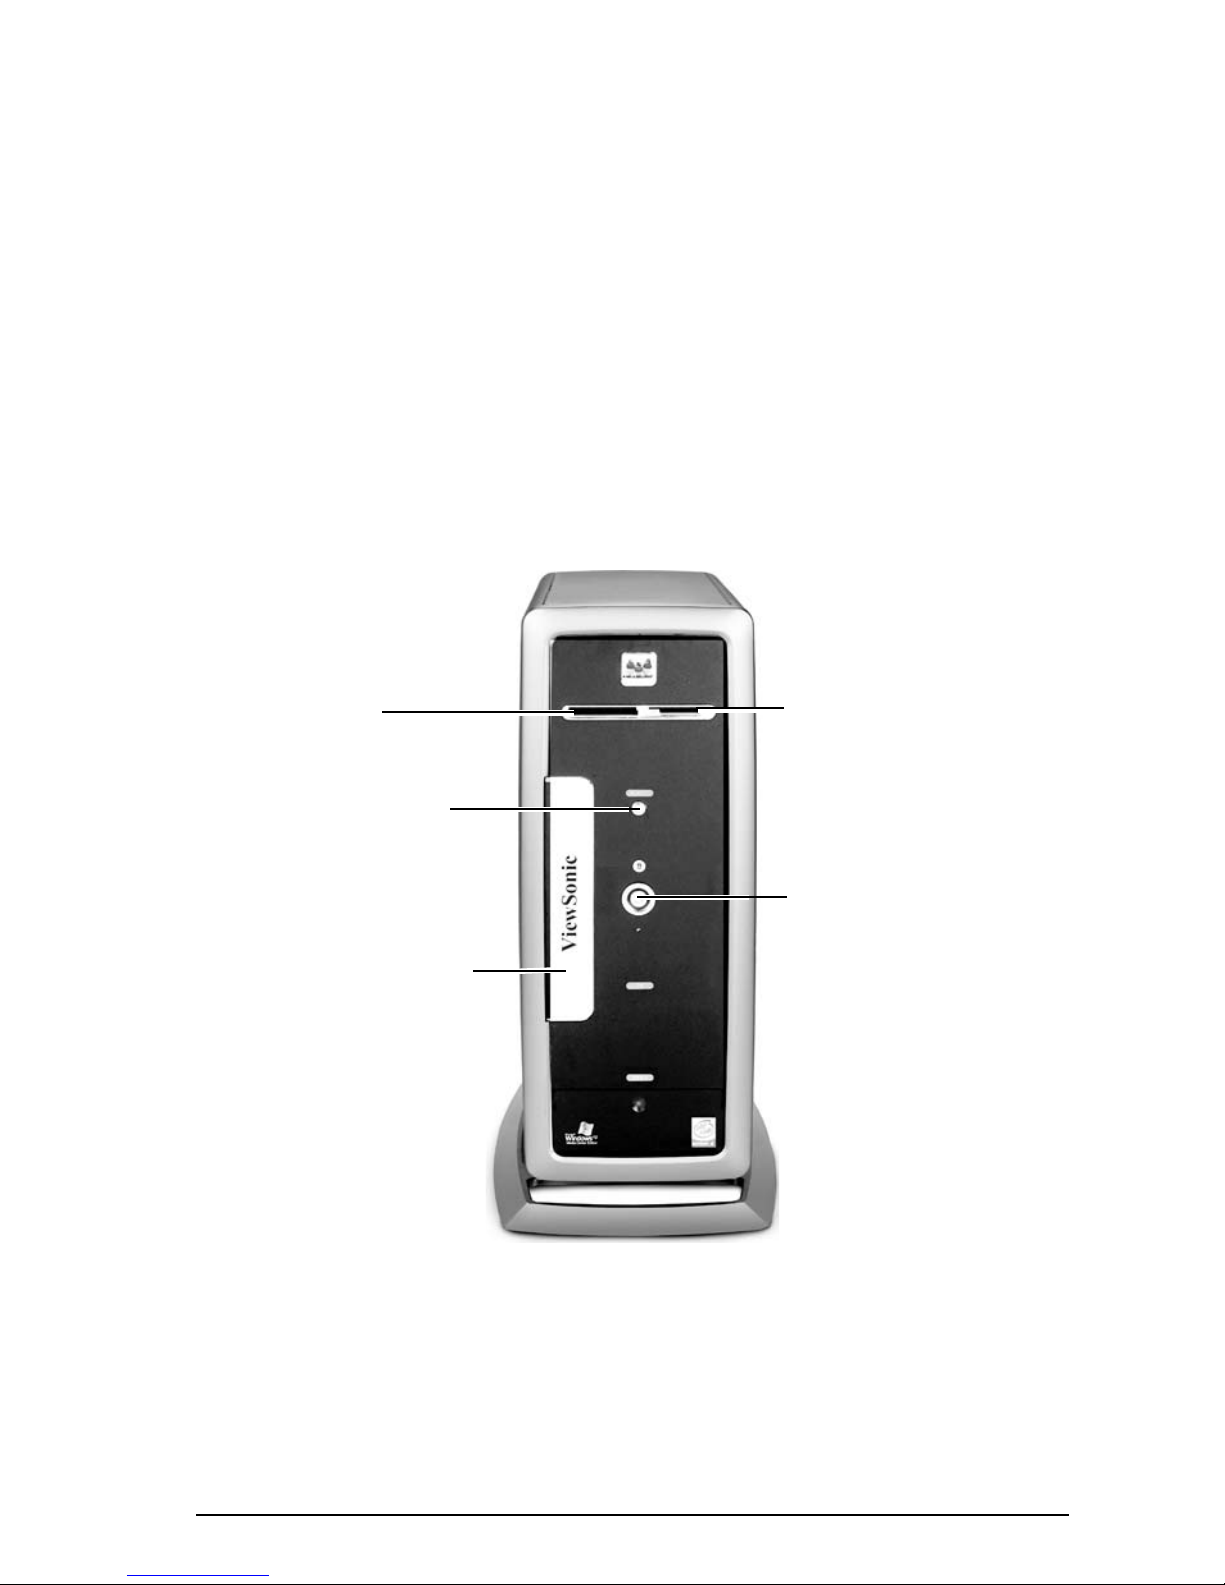
Using the 6-in-1 Media Slots
The two media slots at the top of the Media Center accept six types media cards.
The cards allow you to play and record digital audio, digital still pictures, and
digital video recordings. See the illustration below for the types media that are
supported.
DVD-R/RW/CD-RW Drive
Media slot for:
SD (Secure Digital) card,
MMC (MultiMedia card),
SMC (Smar t Media card),
or Sony
®
Memory Stick
Media slot for:
Compact Flash Type I/II
or IBM
®
Microdrive
®
DVD/CD Eject Button
On/Off Power Button &
LED Indicator (ring around
Power button)
Blue = On
Amber = Standby mode
Page 29

24 ViewSonic NextVisionTM M2000 Digital Media Center
Page 30

ViewSonic NextVis ionTM M2000 Digital Media Center 25
4 Maintenance and
Troubl eshooting
This chapter provides maintenance recommendations, as well as solutions to
common problems you may encounter when using the M2000 Digital Media
Center.
Care and M aintenance
Taking good care of your Media Center will ensure trouble-free operation and
reduce the risk of damage to the unit.
• Keep the Media Center away from excessive moisture and extreme
temperatures.
• Handle the Media Center with care when moving it.
• Do not block the Media Center’s air vents. If installed horizontally, be sure
to place the Media Center on it’s four rubber feet.
• Do not place heavy objects on the Media Center.
Troubleshooting
If you encounter a problem you cannot solve by following the Troubleshooting
steps listed below, contact ViewSonic Customer Support. See the “Customer
Support” section in this chapter.
Problem Solution
You can not remove a CD
or DVD
• With the Media Center turned on, press the
eject button on the front of the Media Center.
• To manually eject the CD/DVD, use one of
your fingernails to open the CD/DVD door
(narrow opening along the side of the door
closest to the “V” of “ViewSonic.”). Then push
the flat grey button.
Page 31

26 ViewSonic NextVisionTM M2000 Digital Media Center
The Speci al Function
buttons (top row of
buttons) on the supplied
keyboard don’t work
• If the LED indicator on the keyboard does not
light up when you press any Special keyboard
button, replace the keyboard batteries.
Media Center will not turn
on
When you press the On button on the front of the
Media Center, the following should happen:
• The hard drive in the M2000 spins or the
DVD/CD drive makes a noise.
• The LED indicator (ring around the Power On/
Off button) on the front of the Media Center
glows blue when On, or glows amber when in
Standby mode.
If the above do not occur, check the following:
• The power cord and all cables are securely
attached to the M2000.
• The power cord is plugged into a grounded
outlet. Verify that the outlet is functional by
plugging another device into the outlet.
• The TV and/or the PC monitor is attached
securely to the M2000 and is turned on.
Unable to se e the same
image on two connected
display dev i ces (LCD
Display & TV, CRT Monitor
& TV, CRT Monitor and
Plasma Display, etc.).
1 Right-click on an open area of the Windows
desktop and click Properties.
2 Click the Setting s tab
3 Click Adva nced.
4 Click GeForce 4 MX440 with AGP8x .
5 Click nView Display Mode from the pop-out
menu on the left side.
6 Click the Det ect Display button. Two screens
will appear, labeled 1 and 2.
7 Click the Clone option, and confirm the same
image is visible on both display devices.
8 Click Yes to accept the new setting.
Media Center locks up
(freezes)
1 Using the provided keyboard, press the
Windows Start button (button with the
Windows icon between Ctrl and Alt buttons),
2 Click Turn O ff Computer, then click Restart.
Problem Solution
Page 32

ViewSonic NextVisionTM M2000 Digital Media Center 27
You can not hear sound
coming from the speake rs
1 Check to make sure the Mute button on the
keyboard is not on.
2 Use the Volume (+) button on the keyboard to
increase the volume. Do the same for the
Volume (+) button on the Remote Control.
NOTE: If a 5.1 Surround Sound receiver is
attached to the Media Center, Volume can not
be adjusted with the Media Center’s Remote
Control. Use the volume controls on the
receiver, or it’s remote control.
3 Click the Volume icon on the Windows taskbar,
then increase the volume. Also be sure the
Mute box is not checked.
4 Check to see that the Receiver unit is power
on.
5 Check the speaker connections.
PC Monito r does no t work
1 Check to see that the power cord is securely
attached to the monitor and plugged into the
power outlet.
2 If the TV (or similar display) is attached to the
Media Center’s S-Video Out port, then the
monitor must be connected to the DVI port. If
the monitor only supports VGA, attach the
monitor to the VGA-to-DVI adapter, then to
the DVI port.
3 Check to see that the video cable is securely
attached to the monitor and to the Media
Center.
4 Check to see the monitor is turned on.
5 If the monitor is on, and there is no image,
reboot the Media Center with the monitor On.
6 Adjust the Brightness and Contrast controls
on the monitor.
You can not see an image
when you turn o n the TV
attached the Media Cent er
• Check to see that the TV is properly
connected to the Media Center.
• If you recently used the front access panel to
connect a VCR or other device to the
Composite or S-Video ports, click the
ViewSonic birds logo on the Windows task bar
(bottom right of screen). Then click
BackPanel S- Vide o (or Composite).
NOTE: This is not necessary if a coaxial cable
is attached to the back of the Media Center.
Problem Solution
Page 33
28 ViewSonic NextVisionTM M2000 Digital Media Center
Customer Support
For technical support or product service, see the table below or contact your
reseller. You will need to provide the product serial number (on the back of the
Media Center).
IMPORTANT : Before sending the Media Center out for service, be sure to
backup all data and remove all third party software. See the Data Loss
Disclaimer in the Appendix.
You can not see the same
image on two connected
display dev i ces (LCD
Display & TV, CRT Monitor
& TV, CRT Monitor and
Plasma Display, etc.).
1 Right-click on an open area of the Windows
desktop and click Properties.
2 Click the Setting s tab.
3 Click Adva nced.
4 Click GeForce 4 MX440 with AGP8x .
5 Click nView Display Mode from the pop out
menu on the left side
6 Click the Det ect Display button. Two screens
will appear, labeled 1 and 2.
7 Click the Clone option, and confirm that you
can see the same image on both display
devices.
8 Click Yes to accept the new setting.
Country/Region Website / Email
T = Telephone
F = FAX
United States www.viewsonic.com/support
T: (800) 688-6688
F: (909) 468-1202
Problem Solution
Page 34

ViewSonic NextVisionTM M2000 Digital Media Center 29
System Reco very
If your Media Center hard drive has problems that require a full system recovery,
do the following:
1 Turn on the Media Center.
2 When the ViewSonic birds logo appears, press the F1 key until the Bios Setup
Utility screen appears.
3 Press the Right Arrow key to select the “Boot Option” screen.
4 Press the Down Arrow key until “Boot Device Priority” is highlighted, and press
the Enter key. The “Boot” screen will appear.
5 CONDITON 1: If the First Boot Drive is “Hard Drive” then press the Down
Arrow key until the “Second Boot Device” is highlighted. Then hold down the
Shift key and press the “+” key (next to the Backspace key). The First Boot
Drive should now be “ATAPI CD-ROM.” Insert “Recovery CD 1” and press the
F10 key to save and exit.”
CONDITON 2: If the First Boot Drive is “ATAPI CD-ROM” then insert
“Recovery CD 1” and press the F10 key to save and exit.”
6 Follow the on-screen instructions to begin the recovery process.
Page 35

30 ViewSonic NextVisionTM M2000 Digital Media Center
Page 36

ViewSonic NextVis ionTM M2000 Digital Media Center 31
5 Appendix
Regulatory Information
Class B Regulations
USA
This equipment complies with the limits for a class B digital device as specified
in Part 15 of FCC Rules which provide reasonable protection against harmful
interference in a residential area. This equipment generates and uses radio
frequency energy, and if not installed and used in accordance with the
instructions, may cause harmful interference to radio communications.
However, there is no guarantee that interference will not occur in a particular
installation. In the unlikely event that there is interference to radio or television
reception (which can be determined by turning the equipment off and on), the
user is encouraged to try to correct the interference by one or more of the
following measures:
• Reorienting or relocating the receiving antenna (radio or television).
• Relocating the equipment with respect to the receiver.
• Consult your dealer or an experienced radio/television technician.
• Any changes or modifications to the equipment not expressly approved by
the manufacturer could void the user's authority to operate this equipment.
• Use of a shielded interface cable is required to comply with the Class B
limits of Part 15 of FCC rules.
Page 37

32 ViewSonic NextVisionTM M2000 Digital Media Center
Limited Warranty
NextVisionTM M-Series Digital Media Center Products
What the warran ty covers :
ViewSonic
®
warrants its NextVision M-Series Digital Media Center products to be free from defects in
material and workmanship dur i ng the warrant y pe r iod . If a NextVision M-S er ie s Digita l Medi a Center
product proves to be defective in material or workmanship during the warranty period, ViewSonic will, at its
sole option, re pai r or re pl ace th e product with a like product. Rep lacement product or parts may include
remanufactured or refurbished parts or components. ViewSonic provides no warranty for the third party
software included with the product. For specific warranty information, please see the EULAs included with
the product. ViewSonic does not warrant that software will meet your requirements or that operation of
software will be uninterrupted or error free.
VIEWSONIC AND ITS SUPPLIERS DISCLAIM ALL WARRANTIES AND CONDITIONS, EITHER EXPRESS OR IMPLIED,
INCLUDING, BUT NOT LIMITED TO, IMPLIED WARRANTIES OF MERCHANTABILITY, FITNESS FOR A PARTICULAR
PURPOSE, AND NONINFRINGEMENT.
ViewSonic NextVision M-Series Digital Media Ce nte r products do not have user-serviceable par ts. Do
NOT open the unit.
OPENING THE UNIT WILL VOID THE LIMITED WARRANTY.
Any repairs or modifications to
the unit must be pe rfor med by ViewSonic or an author i zed service provid er.
How long the warranty is effective:
ViewSonic NextVision M-Series Digital Media Center products are warranted for one (1) year for all parts
(except software) and one (1) year for all labor from the date of the first consumer purchase.
Who the warranty prot ect s:
This warranty is valid only for the first consumer purchaser.
What the warranty does not cover:
1. Software
2. Any product on which the serial number has been defaced, modified or removed.
3. Damage, deterioration or malfunction resulting from:
a. Accident, misuse, neglect, fire, water, lightning, or other acts of nature, unauthorized product
modification, or failure to follow instructions supplied with the product.
b. Opening the unit, repair or attempted repair by anyone not authorized by ViewSonic.
c. Damage to or loss of any programs, data or removable storage media.
d. Software or data loss occurring during repair or replacement.
e. Any damage of the pro duc t due to sh ip me nt.
f. Removal or installation of the product.
g. Causes external to the product, such as electrical power fluctuations or failure.
h. Use of supplies or parts not meeting ViewSonic's specifications.
i. Normal wear and tear.
j. Any other cause which does not relate to a product defect.
4. Removal, installation, and set-up service charges.
How to get service:
1. For inf ormation about receiving service under warranty, contact ViewSonic Customer Support. You
will need to provide your product's serial number.
2. To obtain service under warranty, you will be required to provide (a) the original dated sales slip, (b)
your name, (c) your address, (d) a de scription of the problem, and (e) the serial number of the
product.
3. Take or ship the product freig ht prepaid in the origin al co nta i ner to an authorized ViewSonic service
center or ViewSonic.
4. For additional information or the name of the nearest ViewSonic service center, contact ViewSonic.
Limitation of im plied warr anties:
THERE ARE NO WARRANTIES, EXPRESS OR IMPLIED, WHICH EXTEND BEYOND THE DESCRIPTION CONTAINED
HEREIN INCLUDING THE IMPLIED WARRANTY OF MERCHANTABILITY AND FITNESS FOR A PARTICULAR
PURPOSE.
Exclusion of damages:
VIEWSONIC'S LIABILITY IS LIMITED TO THE COST OF REPAIR OR REPLACEMENT OF THE P RODUCT. VIEWSONIC
SHALL NOT BE LIABLE FOR:
Page 38
ViewSonic NextVisionTM M2000 Digital Media Center 33
Specifications
1
Based on graphics card specifications at time of shipping.
Processor CPUType
Chipset
Intel
®
Pentium® 4, 2.80 GHz/533 MHz Bus System
Intel
®
845G
System Memory RAM Size 512 MB
Storage Hard Drive 160 GB
Media Reader Type 6-in-1 USB Medi a Reader (Secure Digital card, Smart
Media card, MultiMedia card, Compact Flash Type I/II,
Sony
®
Memory Stick® & IBM® Microdrive®)
Optical Drive Type DVD-R/RW/CD -RW Com bo Drive
Video Chipset
Video Memory
nVida GeFore ce4 MX440-8X
64 MB DDR DRAM
Video Render SW Decoder nVidia nDVD Pl a yer
Display Color Levels
Resolutions
8, 16, 32 bit color supported
640 X 480, 800 X 600, 1024 X 768 and higher
1
Audio Chipset AC’97 CODEC
Networking LAN OnBoard 10/100 Mbps
Control Buttons Front Po we r Butt on, E ject/ Clos e (opti cal driv e)
I/O Connectors Video Input
Video Output
Audio Input
Audio Output
AV Data
Composite, S-Video (front and rear)
DVI-I, VGA, S-Video, Composite (rear)
Analog audio L/R (fro nt and re ar) , Mic (f ron t)
Analog Audio L/R, Digital Audio/Optical & Coaxial (rear)
Firewire (1394a), USB2.0 (fr ont and re ar )
LED Indicator Po wer (Blue), Hard Drive (Blue), Standby Mode (Amber)
BIOS Type
Intel
®
BIOS
Environment Operating Temp.
Humidity
Storage Temp.
5° C to +35° C (41° F to 95° F)
20% to 85% RH (Rel ati ve Humidity)
-40° C to +70° C (- 40° F to158° F)
Power Input
Output
120 VAC, 60 Hz
220 Watts (max)
Dimensions Vertical Configuration
with stand
Vertical Configuration
without stand
Horiz. Configurat io n
without stand
Packaging
7.69"(W) x 17.60" (D ) x 16.26" (H)
195mm (W) x 447mm (D) x 413mm (H)
5.79" (W) x 17.60" (D) x 14.59" (H)
147mm (W) x 447mm (D) x 371mm (H)
14.59" (W) x 15 .44" (D) x 5.79" (H)
371mm (W) x 392mm (D) x 147mm (H)
28.10" (W) x 18 .50" (D) x 13.10" (H)
554mm (W) x 470mm (D) x 332mm (H)
Weight Net
Gross
10.17 Kg (22.41 lbs.)
15.02 Kg (33.11 lbs.)
Compliance Regul atory
Others
UL, FCC-B, EPA (E
NERGY STAR
®
)
Microsoft
®
Windows XP® Media Center Edition
Operating System
Microsoft Wind o ws X P
Media Center Edition
Accessories Keyboard
Mouse
Remote Control
Wireless IR
Integrated wi th keyboard
Wireless IR (CIR)
Page 39

34 ViewSonic NextVisionTM M2000 Digital Media Center
Data Loss Disclaimer
Before sending the M2000 Digital Media Center out for service, be sure to backup
all data and remove all third party software.
With respect to all service provided, it is your responsibility to backup the
contents of your M2000, including any data you have stored or software you
have installed on the M2000. It is likely that the contents of your M2000 will be
lost in the course of service and ViewSonic will not be responsible for any
damage to or loss of any programs, data or other information stored on any
media or any part of any Product serviced hereunder.
IF DURING THE REPAIR OF THE PRODUCT THE CONTENTS OF THE M2000 ARE
ALTERED, DELETED, OR IN ANY WAY MODIFIED, VIEWSONIC IS NOT
RESPONSIBLE WHATSOEVER. YOUR PRODUCT WILL BE RETURNED TO YOU
CONFIGURED AS ORIGINALLY PURCHASED (SUBJECT TO AVAILABILITY OF
SOFTWARE).
Be sure to remove all third party hardware, software, features, parts, options,
alterations, and attachments not warranted by ViewSonic prior to sending the
product to ViewSonic for service. ViewSonic is not liable for any loss or damage
to these items.
Page 40

9LHZ6RQLF&RUSRUDWLRQ
A-CD-M2000-UG Rev. 1B
English 02-19-03
 Loading...