


Copyright © ViewSonic Corporation, 2006. All rights reserved.
ViewSonic and the three birds logo are registered tr ademarks of ViewSonic Corporation.
Tivella and the Tivella logo are trademarks of Tivella, Inc.
Cisco is a registered trademark and this document may include service marks of
Cisco Systems, Inc. and/or its affiliates in the U.S. and other countries.
Corporate names and trademarks are the property of their respective companies.
Disclaimer: ViewSonic
Corporation shall not be liable for technical or editorial errors
or omissions contained herein; nor for incidental or consequential damages resulting
from furnishing this material, or the performance or use of this product.
In the interest of continuing product improvement, ViewSonic Corporation reserves
the right to change product specifications without notice. Information in this
document may change without notice.
No part of this document may be copied, reproduced, or transmitted by any means,
for any purpose without prior written permission from ViewSonic Corporation.
Product Registration
To meet your future needs, and to receive any additional product information as it
becomes available, please register your product on the Internet at:
www.viewsonic.com. The ViewSonic product also comes with a CD-ROM that has
a registration form that you can print and mail or fax to ViewSonic Corporation.
For Your Records
Model Name:
Model Name:
Model Number:
Model Number:
Document Number:
Serial Number:
Purchase Date:
ND4200
ND5000
VS10713 for ND4200
VS10714 for ND5000
ND4200/ND5000_UG_ ENG_Rev1A 11 May 2006
_______________
_______________
Product disposal at end of product life
ViewSonic is concerned about the preservation of our environment. Please dispose of
this product properly at the end of its useful life. Your local waste disposal company
may provide information about proper disposal.
ViewSonic ND4200/ND5000 i

Contents
INTRODUCTION
Packaged Contents . . . . . . . . . . . . . . . . . . . . . . . . . . . . 1
Optional Accessories . . . . . . . . . . . . . . . . . . . . . . . . . . . 1
Requirements . . . . . . . . . . . . . . . . . . . . . . . . . . . . . . . . . 1
Two Modes of Operation . . . . . . . . . . . . . . . . . . . . . . . . 2
Two Modes of Communication . . . . . . . . . . . . . . . . . . . . 3
Features . . . . . . . . . . . . . . . . . . . . . . . . . . . . . . . . . . . . . 3
Front View . . . . . . . . . . . . . . . . . . . . . . . . . . . . . . . . . . . . 4
Back View . . . . . . . . . . . . . . . . . . . . . . . . . . . . . . . . . . . . 5
Side View . . . . . . . . . . . . . . . . . . . . . . . . . . . . . . . . . . . . 5
Remote Control . . . . . . . . . . . . . . . . . . . . . . . . . . . . . . . . 6
SETTING UP THE NETWORK DISPLAY
Connect to a Switch or Router . . . . . . . . . . . . . . . . . . . . 7
Connect External Speakers (optional) . . . . . . . . . . . . . . 9
Turn Power On to the Network Display . . . . . . . . . . . . . 9
Login . . . . . . . . . . . . . . . . . . . . . . . . . . . . . . . . . . . . . . . 10
MANAGEMENT
Startup URLs/Network Configuration . . . . . . . . . . . . . . . 11
Browser Configuration . . . . . . . . . . . . . . . . . . . . . . . . . .12
VNC client . . . . . . . . . . . . . . . . . . . . . . . . . . . . . . . . . . . . 14
Video/Audio Configuration . . . . . . . . . . . . . . . . . . . . . . .15
TAS Configuration . . . . . . . . . . . . . . . . . . . . . . . . . . . . .16
System Services Configuration . . . . . . . . . . . . . . . . . . . .17
FTP server . . . . . . . . . . . . . . . . . . . . . . . . . . . . . . . . . . .18
ViewSonic ND4200/ND5000 ii

ACTIONS
Video Multicast . . . . . . . . . . . . . . . . . . . . . . . . . . . . . . . 19
Video HTTP . . . . . . . . . . . . . . . . . . . . . . . . . . . . . . . . . . 20
Playlist . . . . . . . . . . . . . . . . . . . . . . . . . . . . . . . . . . . . . . 21
VNC client . . . . . . . . . . . . . . . . . . . . . . . . . . . . . . . . . . . 22
Transparency . . . . . . . . . . . . . . . . . . . . . . . . . . . . . . . . 23
Go to URL . . . . . . . . . . . . . . . . . . . . . . . . . . . . . . . . . . . 24
ADMINISTRATION
Advanced Video Configuration . . . . . . . . . . . . . . . . . . . 25
Security . . . . . . . . . . . . . . . . . . . . . . . . . . . . . . . . . . . . . 26
Save Configuration . . . . . . . . . . . . . . . . . . . . . . . . . . . . 27
Default Settings . . . . . . . . . . . . . . . . . . . . . . . . . . . . . . . 27
Reboot . . . . . . . . . . . . . . . . . . . . . . . . . . . . . . . . . . . . . . 28
Firmware Upgrade . . . . . . . . . . . . . . . . . . . . . . . . . . . . 28
HELP
Status . . . . . . . . . . . . . . . . . . . . . . . . . . . . . . . . . . . . . . 29
License . . . . . . . . . . . . . . . . . . . . . . . . . . . . . . . . . . . . . 30
About . . . . . . . . . . . . . . . . . . . . . . . . . . . . . . . . . . . . . . . 30
APPENDIX
Screens . . . . . . . . . . . . . . . . . . . . . . . . . . . . . . . . . . . . . 31
Customer Support . . . . . . . . . . . . . . . . . . . . . . . . . . . . . 33
FCC Information . . . . . . . . . . . . . . . . . . . . . . . . . . . . . . 34
Specifications . . . . . . . . . . . . . . . . . . . . . . . . . . . . . . . . 35
Limited Warranty . . . . . . . . . . . . . . . . . . . . . . . . . . . . . . 36
ViewSonic ND4200/ND5000 iii
INTRODUCTION
Thank you for buying the ViewSonic® Network Display. This section introduces
you to the ND4200/ND5000 Network Display.
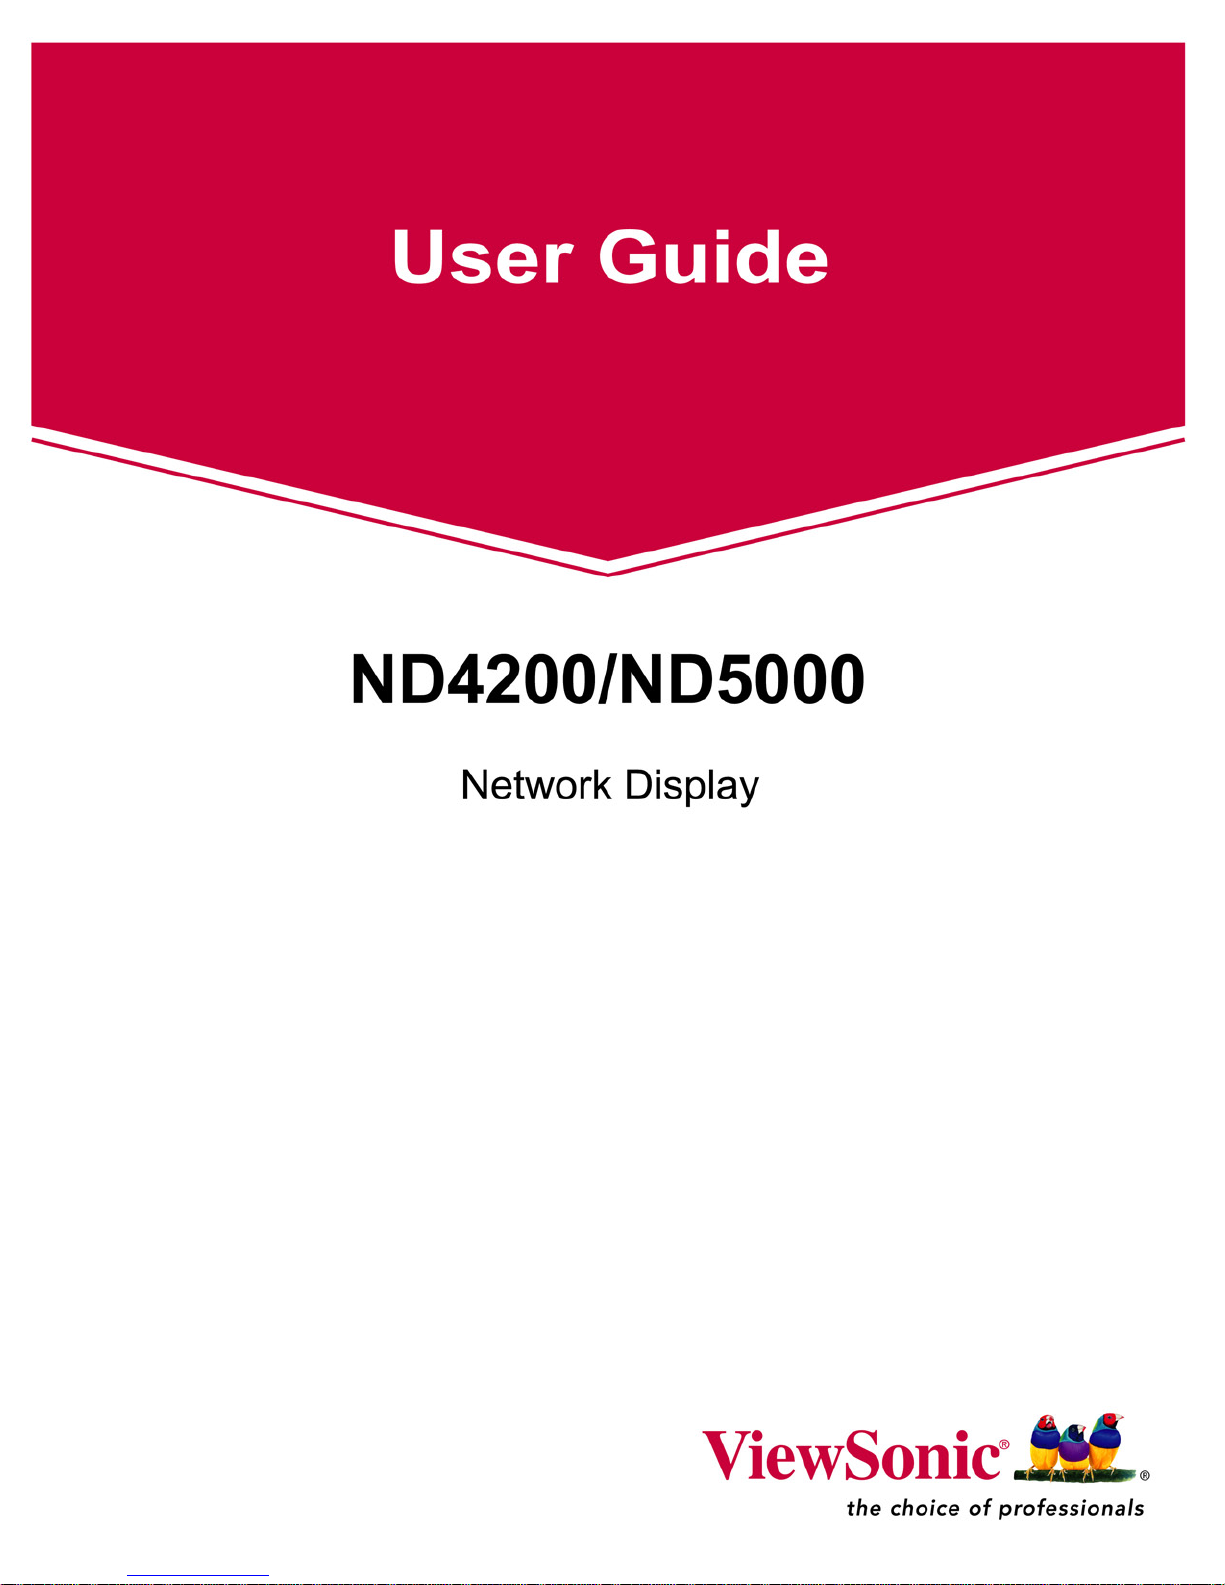
Packaged Contents
Please check that all the following items are in the package:
ViewSonic CD
Remote Control
Quick Start Guide
with two AA batteries
ND4200/ND5000 Network Display
Quick Start Guide
AC Power Cord
Optional Accessories
The accessories listed below are available at viewsonic.com
• USB Wi-Fi adapter
• Wall mount kit
• Detachable speakers
Requirements
The ND4200/ND5000 Network Display requires:
• ViewSonic ND4200/ND5000 Network Display connected to AC power and a
network or internet connection
• Streaming video server and/or live encoder
• Wireless network connection if using the ND4200/ND5000 wireless support
option
ViewSonic ND4200/ND5000 1
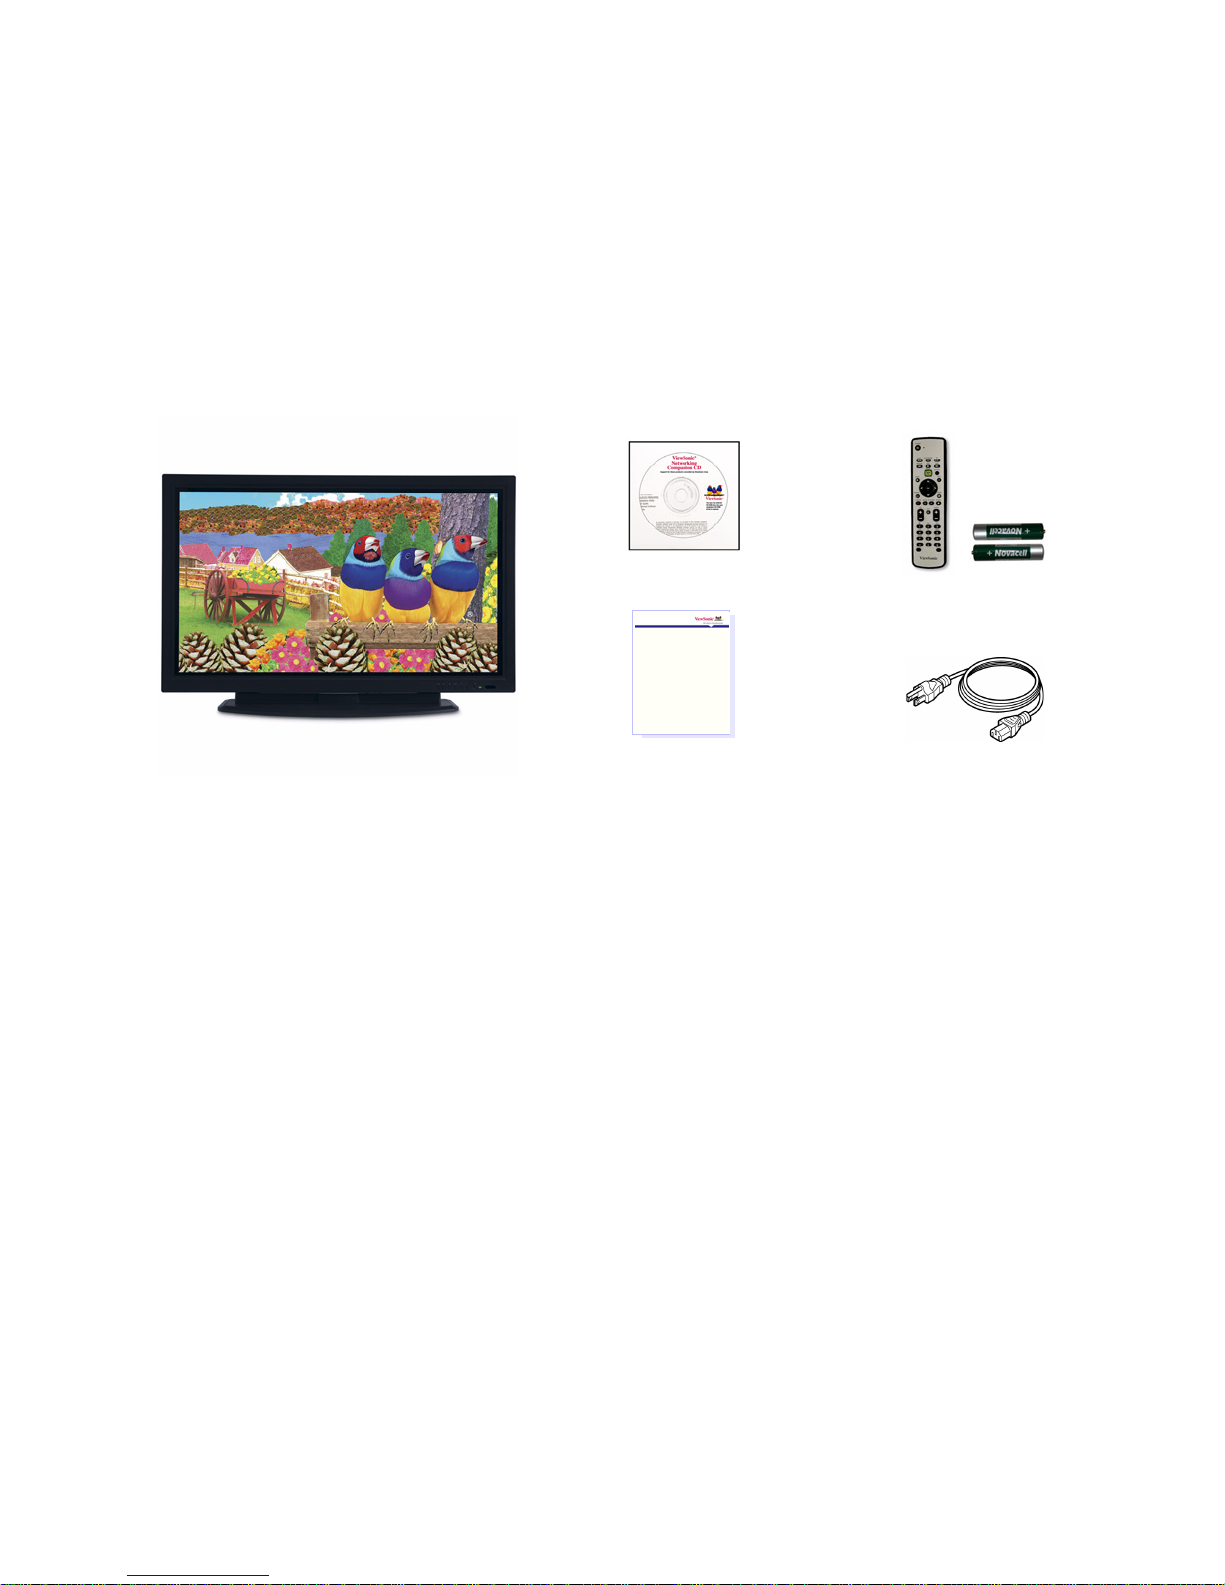
Two Modes of Operation
Standalone
The setup allows the ND4200/ND5000 Network Display to act as an independent
network device controlled by one serv er.
Ethernet cable
Ethernet cable
ND4200/ND5000
Network Display
TAS Managed
Switch or
Router
PC
You can purchase Tivella Administration Server (TAS) separately through Tivella
(www.tivella.com or a Tivella dealer/reseller). A TAS server should be used to
configure and manage multiple Network Displays remotely. TAS provides
centralized scheduling of video content presentation on multiple Network Displays,
as well as management and seamless operation of a Cisco
®
ACNS Content
Distribution Networking infrastructure if one is installed. This configuration greatly
reduces maintenance overhead, when TAS and the Network Display are connected
to the network (LAN/WAN) with the TAS acting as a manager for multiple Network
Displays.
ND4200/ND5000
Network Display
Switch or Router
PC to
access
TAS
PC to
control
TAS
ViewSonic ND4200/ND5000 2

Two Modes of Communication
There are two modes of communication with the ND4200/ND5000 Network
Display: an HTTP web interface and a Telnet advanced command line interface. This
document focuses on the web interface only.
Features
• Bright plasma type display ideal for advertisement and video playback
• Integrated display for A/V IP delivery
• Multiple Network Displays can be daisy chained with different IP addresses
• Supports scheduling of different video content across multiple displays
• No need for additional external PC or set-top box with a switch
• Remote management controll and status reporting
• MPEG A/V decoding, MPEG 1/2/4, WMV9, Macromedia Flash
• Auto-MDIX (no crossover cabling)
• Powerful combination of the Sigma Design
MPC8247 for smooth playback
• Can be installed with an optional wall mount
• Uses Tivella
®
content management software
• Devices can be remotely controlled from virtually anywhere with a network or
internet connection
• Wireless Ethernet support eliminates the need to run cables to an existing
network
• Remote management allows you to adjust the screen and see valuable
information without being physically in front of the unit
• Network ready, easy installation
• Optional local content buffering or storing in CF card
®
EM8621L and the Freescale®
ViewSonic ND4200/ND5000 3
Front View
Remote
Control IR
Sensor
POWER LED
POWER ON/OFF
Standby/ON
CHANNEL
Up / Down
SELECT items
on a menu
VOLUME decrease
VOLUME increase
ViewSonic ND4200/ND5000 4

Back View
Side View
Hand grip
Power button
ViewSonic ND4200/ND5000 5

Remote Control
POWER button
On/Standby
ViewSonic ND4200/ND5000 6
SETTING UP THE NETWORK DISPLAY
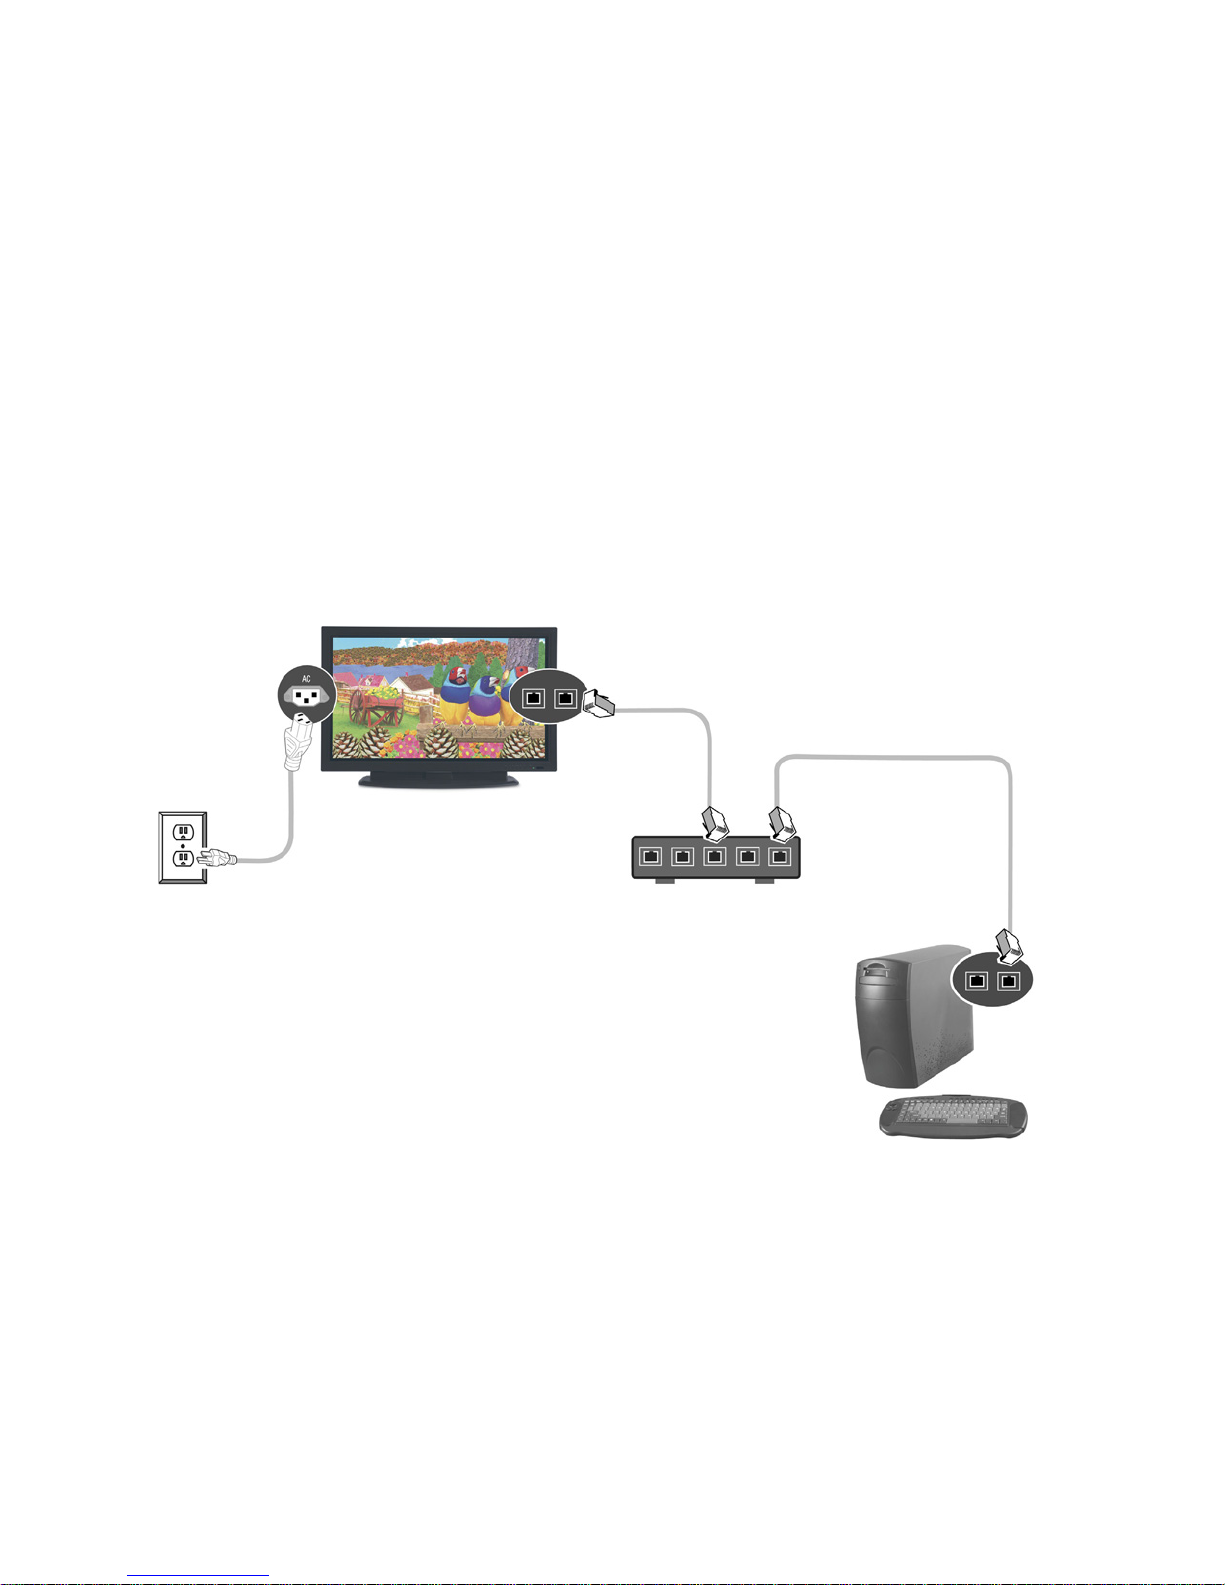
1. Connect to a Switch or Router
Connect an RJ-45 Ethernet cable from the Network Display to either a
switch or a router. See your IT Administrator for a code to the switch or a
router. The Router shown is a ViewSonic WMG100. Connect the AC power
cord from the Network Display to an AC power source like a wall outlet.
ND4200/ND5000 Network Display
RJ-45 Ethernet
cable
RJ-45 Ethernet cable
AC power cord
Switch or Router
PC
ViewSonic ND4200/ND5000 7
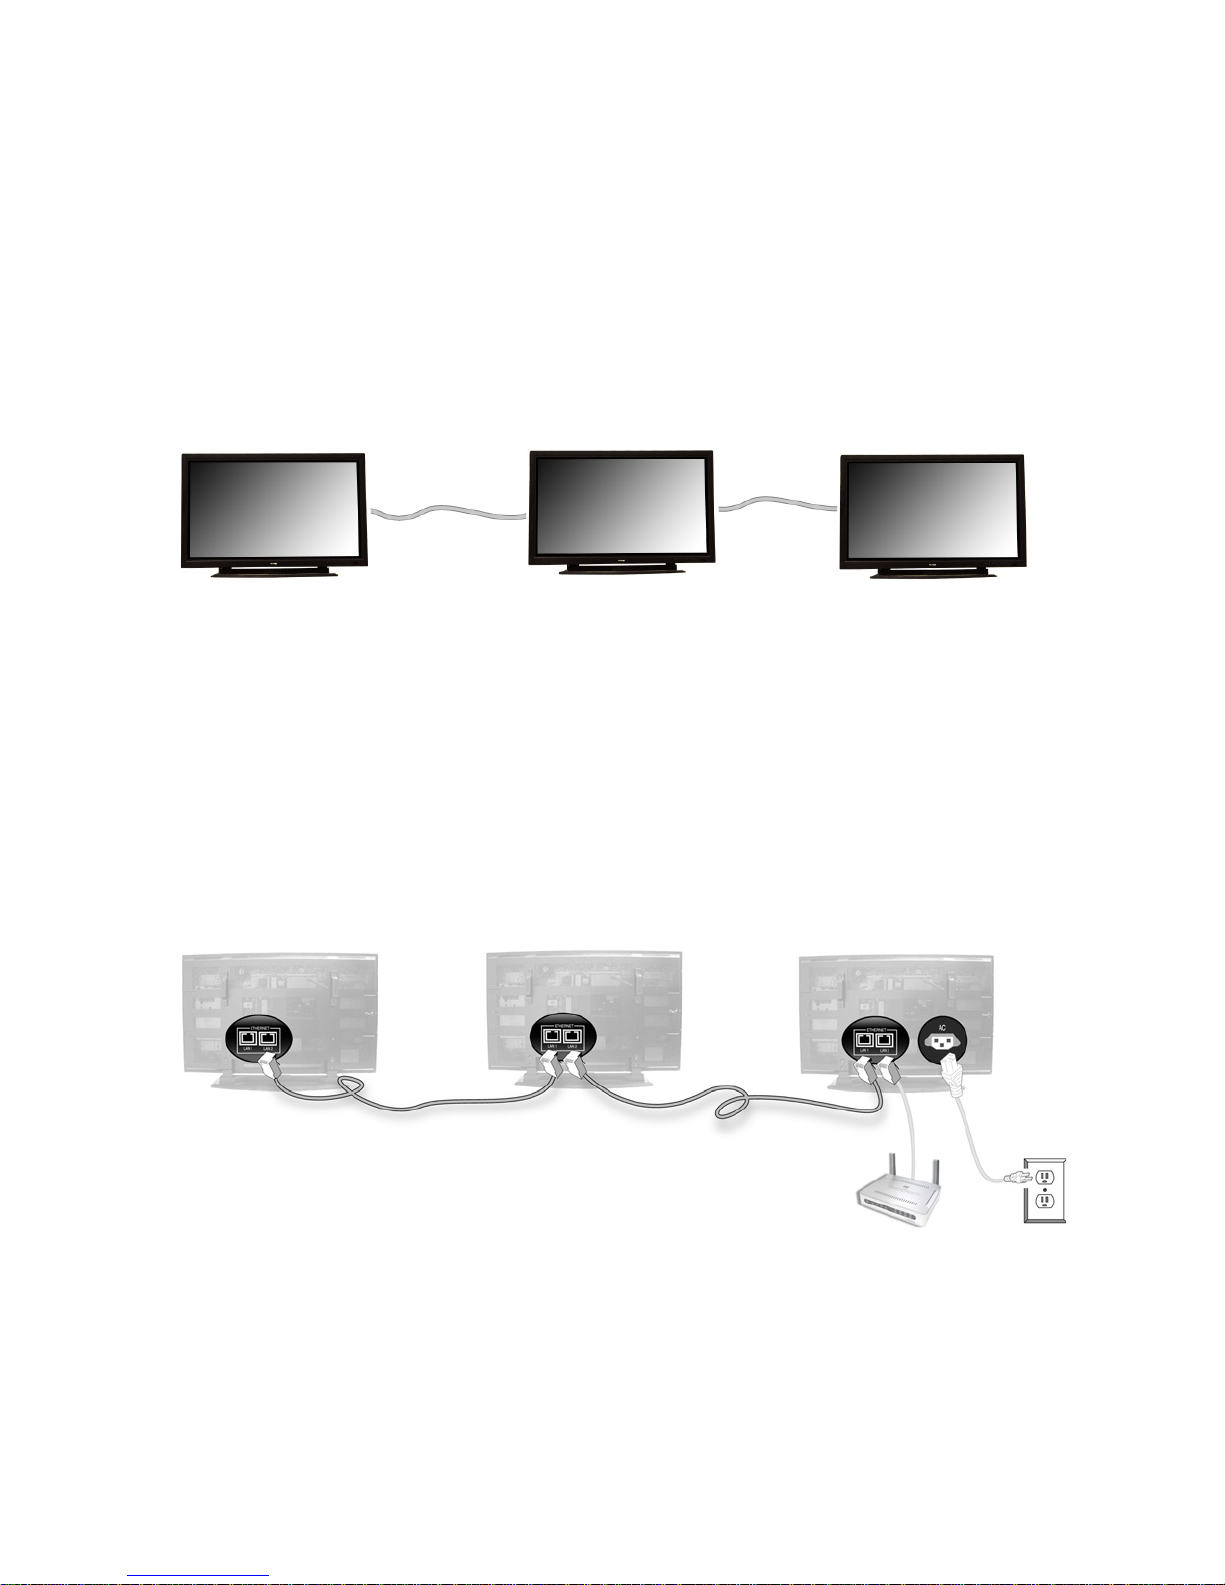
Connect Multiple Network Displays (optional)
You can daisy chain several Network Displays together. The two built-in Ethernet
ports make the ViewSonic Network Displays unique because you do not need
separate network switches or PCs for each Network Display. Media content on
each Network Display can be scheduled independently when connected to an
external server.
Plug another RJ-45 Ethernet cable into an Ethernet port of another Network
Display. Y ou can connect either of the two Ethernet ports of one unit to either of the
two Ethernet ports of another unit.
Back view
Ethernet cable to
Ethernet ports
Ethernet cable to
Ethernet ports
ViewSonic ND4200/ND5000 8
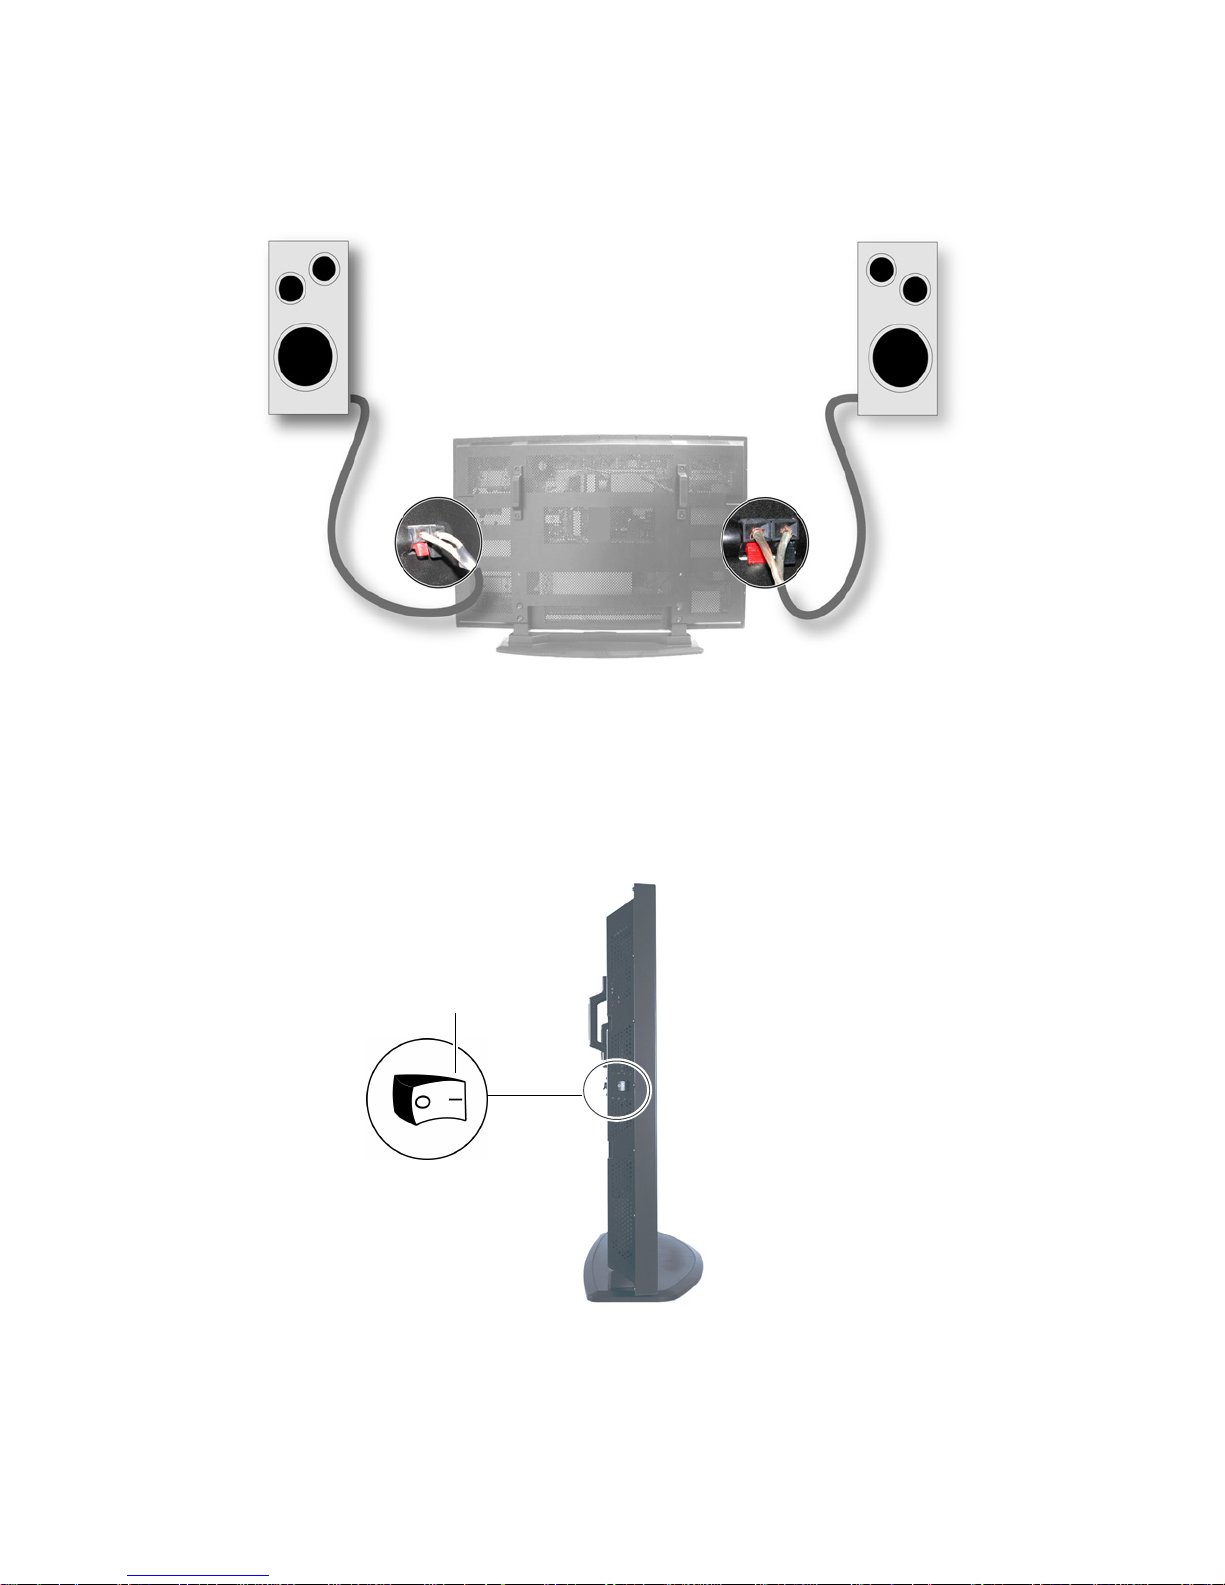
2. Connect External Speakers (optional)
speaker
speaker
Back of Network Display
3. Turn Power On to the Network Display
Power button
O (Off)
I (On)
ViewSonic ND4200/ND5000 9

Put Batteries in Remote Control
Remove the back cover from the remote control as shown below. Put two AA
batteries in the remote control. Be sure to match the positive end of the battery with
the positive end of the compartment. Put the cover back on the remote control.
4. Login
Open an Internet Browser, i.e., Internet Explorer. In the URL address field,
type in the default IP address of the ND4200/ND5000 (192.168.12.100) >
press Enter. A prompt appears asking for a User Name and Password. The
default name admin and the password admin automatically appear in the
corresponding fields > click OK. The Network Configuration screen appears
as shown on the next page. Note: The Network Display logs you out after
five minutes of inactivity.
For security purposes, we recommend that you change the default IP address,
Login and Password. For more information, see the Security section in this
user guide.
After logging in successfully, the Network Configuration screen appears as
shown on the next page. Note: The ND4200/ND5000 automatically logs
you out after fives minutes of inactivity.
For information on how to change network settings on an OS other than
Windows, please consult the OS user guide or your Network Administrator.
ViewSonic ND4200/ND5000 10

MANAGEMENT
Startup URLs/Network Configuration
The Network Configuration screen allows you to select the video that appears
on-screen when you boot up the NMP-500. To go to the Network Configuration
screen after logging into the NMP-500, select Management > Startup. The Startup
URLs screen and the Network Configuration screen appears as shown below.
Displays the IP address
Displays the Video source
Displays the Browser
1 To play a particular video at startup, in the Video field, enter a valid HTML
page. Here are some examples:
• http://<ip-address->/<mpeg-1/2-file-located on WEB Server>
• udp://<ip-multicast-address>/port
• rtp://<multicast-address>/port
• iptv://<ip-multicast-address>/videoport/audioport
• playlist=http://<ip-address>/<playlist-file-located-on-WEB-server>
2In the Browser field, enter a startup web screen (for example, http://
www.viewsonic.com). Note: The MAC address is a read-only field that displays
the built-in MAC address of the unit.
ViewSonic ND4200/ND5000 11
Continued . . .

3In the DHCP field of the Network Configuration screen, tap the down arrow
for the pull-down menu and select Enabled to dynamically get network
parameters. Make sure there are values in the IP address, Mask, Gateway,
and DNS fields although DHCP assigns values to these fields automatically. If
you select Disabled, type valid network parameters in these fields.
4 If any changes were made to this screen, do the following:
• To enable the changes, click Apply
• To save the changes, click the Administration menu > click Save
Configuration > click Save.
Browser Configuration
The Browser Configuration screen allows you to make specific screen settings for
a specific URL that you chose. Click Management > Browser. The screen shown
below appears. Note: 1 millisecond = 1/1000th second.
1In the Macromedia Flash Transparency Source field, select one of the
options from the pull-down menu.
2In the Screen rotation angle (clockwise) field, select one from the pull-
down menu for the angle of rotation of the HTML content displayed on-screen.
This feature is useful when the NMP-500 is installed vertically.
3In the Browser Proxy field, select Enabled or Disabled from the pull-down
menu.
ViewSonic ND4200/ND5000 12

4In the Browser Proxy IP field, type an IP address if the Browser Proxy was
Enabled.
5In the Browser Proxy PORT field, type the port if the Browser Proxy was
Enabled.
6In the Default transparency between OSD and video layer field, type a
number that is between 0 to 255: (128 is average where video and graphics
blend together). Also, see examples in the Transparency section of this guide.
• 0 = video only, no graphics
• 255 = graphics only, no video
7In the Start screen display time field, type the number of milliseconds you
want the initial screen to be displayed at startup. (1 millisecond = 1/1000
second)
8In the Screen Height field, type the height of the screen that is displaying your
graphics image.
9In the Screen Width field, type the width of the screen that is displaying your
graphics image.
10 If any changes were made to this screen, do the following:
• To enable the changes, click Apply
• To save the changes, click the Administration menu > click Save
Configuration > click Save.
ViewSonic ND4200/ND5000 13

VNC client
The VNC client configuration screen shown below on the Management menu lets
you set the device to start as a VNC client and connect automatically to the VNC
server specified. This auto-start feature works only if the VNC client under System
services is set to YES or Enabled.
VNC server password must be at least 6 characters (can be alpha-numeric).
X and Y coordinates let you set the size of the window of the remote desktop
displayed if full screen is not desired.
VNC full screen mode lets you set the client to start up as full screen all the time.
VNC auto restart mode reconnects the client in the event of network interruption.
Delay before restart VNC sets the time between reconnects.
ViewSonic ND4200/ND5000 14
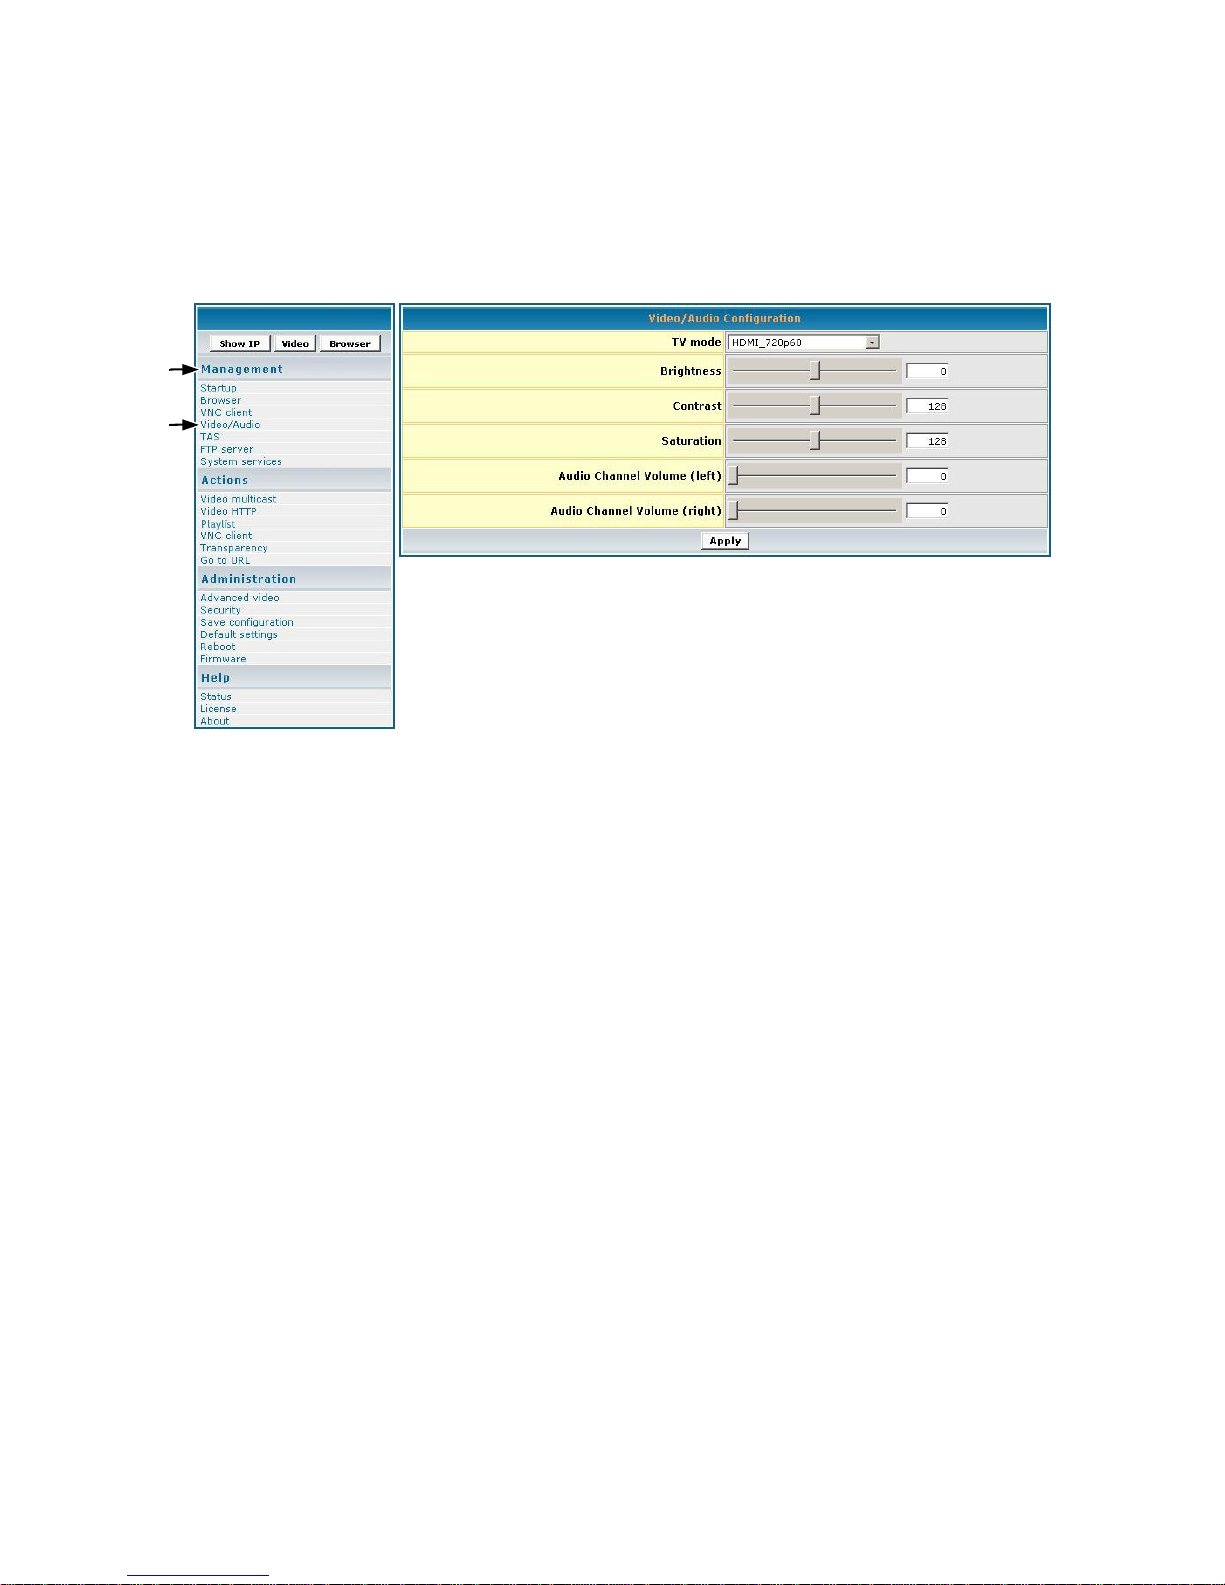
Video/Audio Configuration
This screen is used to adjust the display and audio parameters. Click Management
> Video/Audio. The screen shown below appears.
1In the TV Mode field, click the down arrow for the pull-down menu and select
one of the options.
2Move the Brightness slider: values range between -128 and 127
3Move the Contrast slider: values range between 0 and 255
4Move the Saturation slider: values range between 0 and 255
5 Move the Audio Channel Volume (left) slider: v alues r ange between 0 and 100
6 Move the Audio Channel Volume ( right) slider: v alues r ange b etween 0 and 100
7 If any changes were made to this screen, do the following:
• To enable the changes, click Apply
• To save the changes, click the Administration menu > click Save
Configuration > click Save.
ViewSonic ND4200/ND5000 15

TAS Configuration
This screen works in conjunction with TAS. (TAS software can be purchased through
Tivella at www.tivella.com or through an authorized Tivella dealer/reseller.) Click
Management > TAS. The screen shown below appears.
1In the Timeout (sec) field, type the number of seconds for the NMP-500s to
access TAS.
2In the IP Address field is a valid DNS name automatically generated by TAS
when connected to a network but empty when used as a standalone.
3 If any changes were made to this screen, do the following:
• To enable the changes, click Apply
• To save the changes, click the Administration menu > click Save
Configuration > click Save.
ViewSonic ND4200/ND5000 16

System Services Configuration
Configure System Services in the MIB (Management Information Base) to manage
the following groups: Network, Browser, Video/Audio, TAS, and System Services.
Click Management > System services. The screen shown below appears.
1In the Network Media Player (port 6666) field, select Yes to access the
NMP-500 using a Telnet client on port 6666. If you do not w ant this, select No.
2In the MIB Event Notification field, select Yes to be notified of changes that
you made to the NMP-500 settings.
3 If any changes were made to this screen, do the following:
• To enable the changes, click Apply
• To save the changes, click the Administration menu > click Save
Configuration > click Save.
ViewSonic ND4200/ND5000 17

FTP server
FTP server is only for Network Displays with local storage. The FTP server allows
you to use an FTP client for uploading files.
ViewSonic ND4200/ND5000 18

ACTIONS
This section mainly concerns video related activities. Video can be streamed by UDP,
RTP, IP/TV or HTTP stream and organized in Playlists. When you initiate a stream,
you can see the video on your display. You can also change the Transparency of
the OSD or go to a specific URL on the fly.
Video Multicast
This screen allows you to play streams using the assorted protocols. Select Actions
> Video multicast. The screen shown below appears.
1In the IP address field, type the IP Address transmitting UDP based multicast
stream (for example, 239.1.1.7)
2In the Port field, type the Port number used to receive the multicast.
3 To tell the system to listen to the UDP multicast stream from the IP on the Port
that you entered, click Start.
ViewSonic ND4200/ND5000 19

Video HTTP
To get to the browser setup screen, click Actions > Video HTTP. The screen shown
below appears.
1In the URL field, type the URL that corresponds to the HTTP stream that you
want to appear on the display (for example: http:192.168.12.x/movie.mpg, or,
http://<server-ip>/file.mpg).
2 To tell the system to listen to the HTTP stream from the entered URL, click
Start.
ViewSonic ND4200/ND5000 20

Playlist
To stream existing video Playlists on an HTTP server, click Actions > Playlist. The
screen shown below appears.
1In the URL field, type the URL that corresponds to the Playlist to appear on
the display (for example, http://192.168.12.x/playlist.txt or, type the address
to start playback such as http://<server-ip>/playlists.pls).
2 To tell the system to listen to the Playlist from the entered URL, click Start.
To create a playlist
A Playlist is a text file that can be created in any text editor with an extension of
.txt. A Playlist is necessary when you want the NMP-500 to play specific content,
in a specific order, usually looped. A Playlist can be created for the http streams.
Example of a looped Playlist:
loop
http http://192.168.12.x/movie1.mpg
http http://192.168.12.x/movie2.mpg
http http://192.168.12.x/movie3.mpg
For a Playlist that is not looped, list the desired content without the keyword "loop."
ViewSonic ND4200/ND5000 21

VNC client
The VNC (Virtual Network Computing) client screen allows you to connect and
display a remote desktop running a VNC server.
1In the VNC server field, type the IP Address of the VNC server.
2In the Password field, type the password of the VNC server whose IP is
entered above. IMPORTANT! The password must be at least six (6)
characters (can be alpha-numeric).
3 To display the remote desktop click Start.
ViewSonic ND4200/ND5000 22

Transparency
To change the transparency of the browser on-screen in relation to the video image in
the background, click Actions > Transparency. The screen shown below appears.
1In the Transparency between OSD and video layer field, type a number
between 0 to 255 for a more or less transparent (translucent) browser image
(user interface) so you can still see through the browser OSD (On-Screen
Display) shown below on the right with your video or other images: 0 = no
OSD, 255 = no video, 128 = equal transparency between video and OSD
layers.
OSD not transparent
OSD very transparent
2 To apply the entered tr ansparency value to the image on the NMP-500, click Apply.
ViewSonic ND4200/ND5000 23

Go to URL
To go to a web page on the browser, click Actions > Go to URL. The screen shown
below appears.
1In the URL field, type the desired URL.
2 To redirect the browser to the URL that you entered, click Go. The web page
appears on your display.
ViewSonic ND4200/ND5000 24

ADMINISTRATION
Advanced Video Configuration
To adjust the size and location of the video on the screen, click Administration >
Advanced video. The screen shown below appears.
1In the X of destination window, type the center point of the screen on the X
axis.
2In the Y of destination window, type the center point of the screen on the Y
axis.
3In the Width of destination window, type the width of the destination
window.
4In the Height of destination window, type the height of the destination
window.
5 If any changes were made to this screen, do the following:
• To enable the changes, click Apply
• To save the changes, click the Administration menu > click Save
Configuration > click Save.
ViewSonic ND4200/ND5000 25

Security
T o change the User name and Password of the NMP-500, click Administration >
Security. Current settings automatically appear in each field as shown below:
default User name/Password is admin/admin.
1In the Password field, type a new password.
2In the Repeat Password field, re-type the new password.
3 If any changes were made to this screen, do the following:
• To enable the changes, click Apply
• To save the changes, click the Administration menu > click Save
Configuration > click Save.
ViewSonic ND4200/ND5000 26

Save Configuration
To save your settings on the NMP-500, click Administration > Save
Configuration. The screen shown below appears. Click Save.
Default Settings
T o restore the NMP-500 back to factory settings, click Administration > Default Settings.
The screen shown below appears. Click Restore. User-defined settings will be lost.
ViewSonic ND4200/ND5000 27
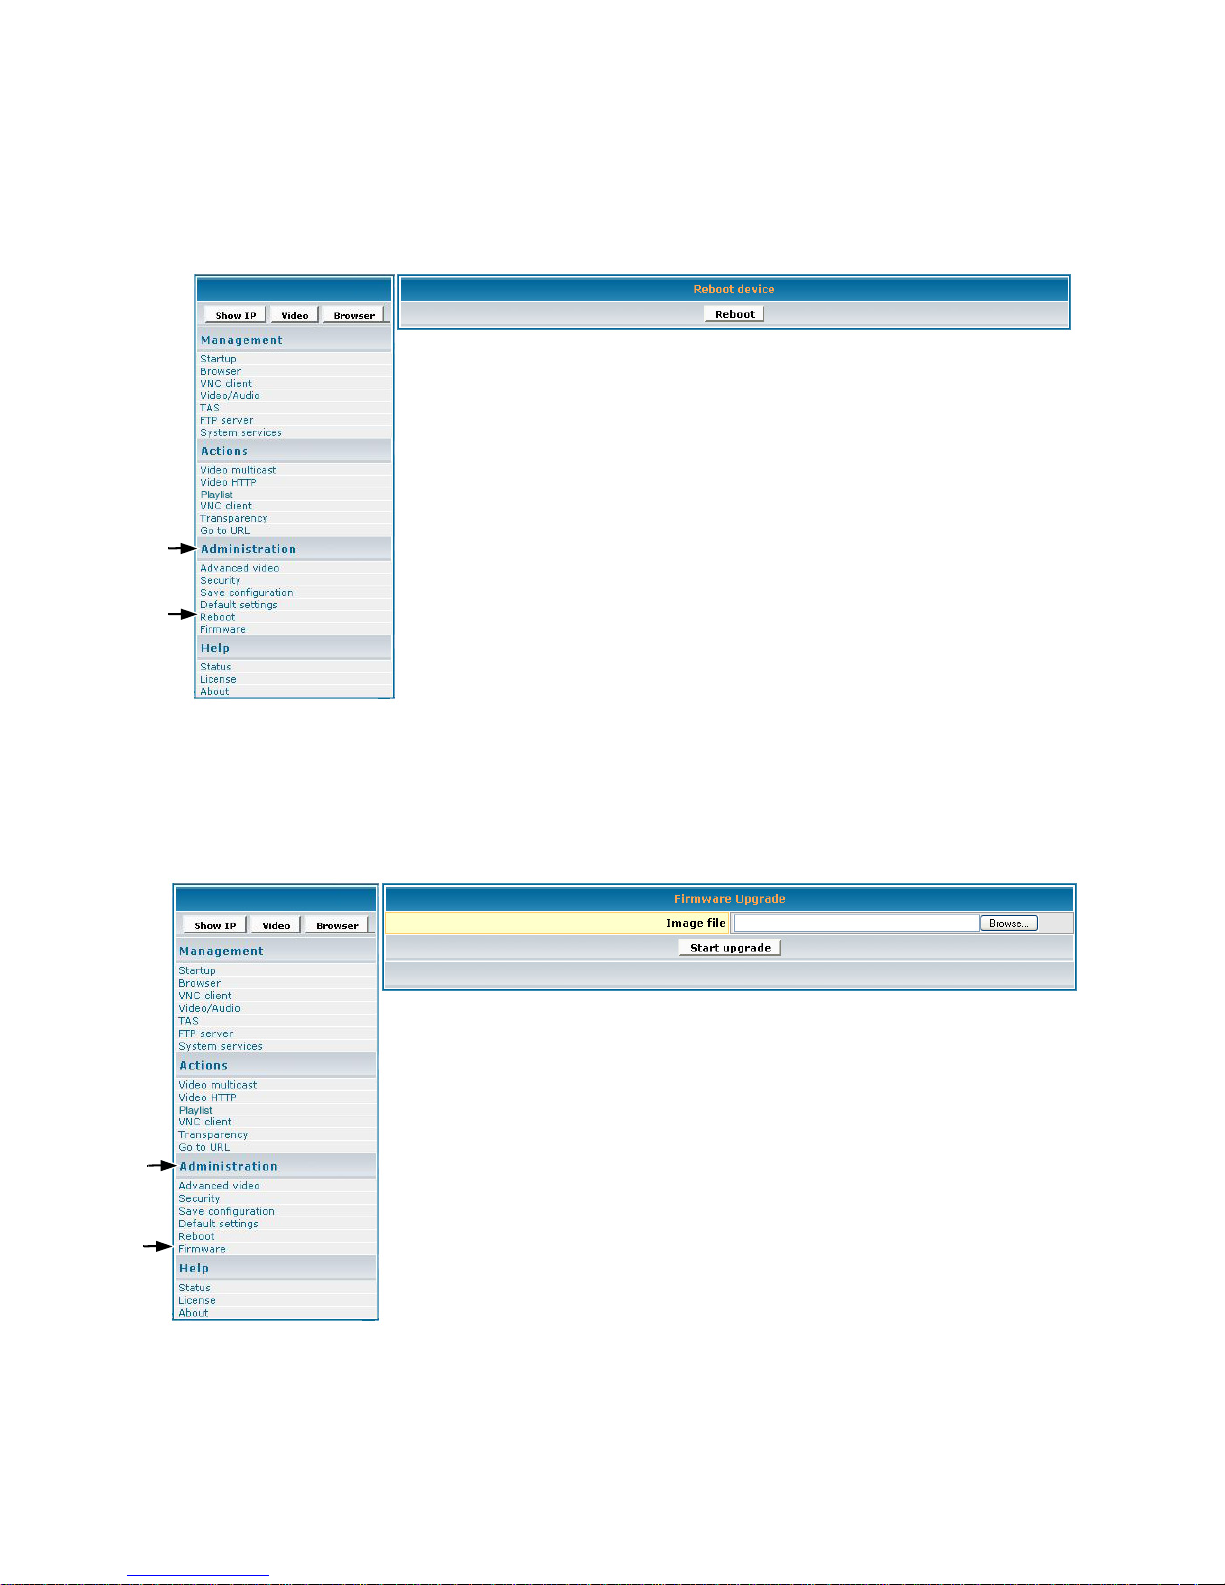
Reboot
To reboot the NMP-500, click Administration > Reboot. The screen shown below
appears. Click Reboot. The NMP-500 reboots.
Firmware Upgrade
T o upgrade the firmware on the NMP-500, click Administration > Firmware. The screen
shown below appears. Click Browse to open the firmware file > click Start upgrade.
ViewSonic ND4200/ND5000 28

HELP
Status
Status refers to the log where you can track activity on a specific NMP-500. To
show the Status log, click Help > Status. The screen shown below is for
information only (no inputs).
ViewSonic ND4200/ND5000 29

License
To activate the license on the NMP-500, click Help > License. The License Key
may appear automatically in the screen shown below (read-only).
About
To show the current version of the product, click Help > About. The screen shown
below appears (information only).
ViewSonic ND4200/ND5000 30

APPENDIX
Screens
Management
ViewSonic ND4200/ND5000 31

Actions
Administration
ViewSonic ND4200/ND5000 32

Help
Customer Support
You need the product serial number when you contact Customer Support.
Country/Region
Website
(for email address also)
United States www.viewsonic.com
Canada www.viewsonic.com
ViewSonic ND4200/ND5000 33
T = Telephone
F = FAX
T: (800) 688-6688
F: (909) 468-1202
T: (866) 463-4775
F: (909) 468-5814

FCC Information
This equipment has been tested and found to comply with the limits for a Class A
digital device, pursuant to Part 15 of the F ederal Communications Commission (FCC)
Rules. These limits are designed to provide reasonable protection against harmful
interference in a residential installation. This equipment generates, uses, and can
radiate radio frequency energy, and, if not installed and used in accordance with the
instructions, may cause harmful interference to radio communications. However,
there is no guarantee that interference will not occur in a particular installation. If
this equipment does cause harmful interference to radio or television reception,
which can be determined by turning the equipment off and on, the user is
encouraged to try to correct the interference by one or more of the following
measures:
• Increase the separation between the equipment and the receiver.
• Connect the equipment into an outlet on a circuit different from that to which the
receiver is connected.
FCC Warning: To assure continued FCC compliance, the user must use grounded
power supply cord and the provided shielded video interface cable with bonded
ferrite cores. Also, any unauthorized changes or modifications not expressly
approved by the party responsible for compliance could void the user's authority to
operate this device.
Compliance Information for Canada
Notice: This class A digital apparatus complies with Canadian ICES-003.
AVIS: Cet appeil numerique de la Classe A conforme a la norme NMB-003 du Canada.
User Information for All Countries
Notice: Use the cables that are included unless otherwise specified.
ViewSonic ND4200/ND5000 34

Specifications
ND4200 ND5000
Default resolution 1024 x 768 @ 60 Hz 1366 x 768 @ 60 Hz
Dimensions
Effective display size
Weight 86.0 lbs (39.1kg) net 115.0 lbs (52.3 kg) net
Connectivity
Streaming protocol
types
Scanning format SDTV: 480i
Video decoding
formats
Audio decoding formats MPEG-1 (Layers 1 & 2) MP3, WAV MPEG-1 (Layers 1 & 2) MP3, WAV
Image file formats JPEG, PNG JPEG, PNG
Memory (RAM) 128 MB 128 MB
Memory (FLASH) 64 MB 64 MB
Number of colors 16.77 million 134.2 million
Power consumption 390 watts +/- 10% watts 500 + 10% watts
Power input AC 100 ~ 240 V (max) @ 50/60 Hz AC 100 ~ 240 V (max) @ 50/60 Hz
Contrast ratio
Viewing angle Over 160° Over 160°
Operating temperature 41 ~ 104° F (5 ~ 40° C) 41 ~ 104° F (5 ~ 40° C)
Regulatory approvals FCC-15A, IC, UL/c-UL FCC-15A, IC, UL/c-UL
Optional accessories Wall mount kit, Detachable speakers Wall mount kit, Detachable speakers
1015mm (W) x 613mm (H) x 67.5mm (D)
Height without stand
42" Plasma screen:
Horizontal 933.9mm x Vertical 534.2mm
Network
RJ-45 x 2 for Daisy Chain feature
10/100 Ethernet
Audio
Audio output: 2 x RCA stereo analog
Internal analog stereo to power amp
Communication
USB x 2
HTTP, UDP, RTP, IP/TV, Local file playback HTTP, UDP, RTP, IP/TV, Local file playback
EDTV: 480p
HDTV: 720p, 1080i
MPEG-1, MPEG-2, MPEG-4,
Macromedia Flash
700Cd/m
2
700Cd/m2
1184mm (W) x 700mm (H) x 63mm (D)
Height without stand
50" Plasma screen:
Horizontal 1106.46mm x Vertical 622.08mm
Network
RJ-45 x 2 for Daisy Chain feature
10/100 Ethernet
Audio
Audio output: 2 x RCA stereo analog
Internal analog stereo to power amp
Communication
USB x 2
SDTV: 480i
EDTV: 480p
HDTV: 720p, 1080i
MPEG-1, MPEG-2, MPEG-4,
Macromedia Flash
Specifications are subject to change without notice. Corporate names and
trademarks stated herein are the property of their respective companies.
ViewSonic ND4200/ND5000 35

LIMITED WARRANTY
ViewSonic® Limited Warranty Terms and Conditions
(Current Production Models. U.S.A. and Canada Only)
How the Viewsonic Standard Limited Warranty works:
ViewSonic Corporation (“ViewSonic”) warrants its products to be free from defects in material and
workmanship during a specified length of time, or “Warranty Period”, as indicated below. If a product
proves to be defective in material or workmanship during the Warranty Period, ViewSonic will, at its sole
option, repair or replace the product with a similar product. Replacement products or parts may include
remanufactured or refurbished parts or components. The replacement product will be covered by the
balance of the time remaining on the customer's original ViewSonic Limited Warranty. This warranty does
not cover any software included with the product.
ViewSonic products are manufactured using new materials or new and used materials equivalent to new in
performance and reliability . Spare parts may be new or equivalent to new. Spare parts are warranted to be
free from defects in material or workmanship for the remainder of the Limited Warranty Period under
proper and/or normal use of the ViewSonic Product in which they are installed.
During the Limited Warranty Period, ViewSonic will, at its sole discretion, repair or replace the defective
component parts or the V iewSo nic product. All compo nent pa rts o r hardware product s removed u nder this
Limited Warranty become the p roperty of V iewSonic. In the unlikely event that yo ur ViewSonic Product has
a recurring failure, ViewSonic will, at its sole discretion, provide you with a replacement unit of ViewSonic's
choosing that is similar or equivalent to your ViewSonic originally purchased product in hardware and/or
performance.
How long the warranty is effective:
ViewSonic warrants that its hardware will be free from defects in workmanship and materials, under proper
normal use, and as set forth below:
• Hardware and Power Supplies: One (1) Year
• Accessories, spare parts, and spare kits: Ninety (90) days
The Warranty Period will begin on the date of purchase, and remain effective as specified above. Proof of
purchase and/or receipt will be required for all claims purposes.
Exclusions of Warranty:
The following will immediately and automatically render any and all warranties and/or guarantees,
including but not limited to the ViewSonic Limited Warranty, as void:
1. Any product on which the serial number has been defaced, modified or removed.
2. Accident, misuse, neglect, fire, water, lightning, or other acts of nature, unauthorized product
modification, and/or failure to follow instructions as prescribed by ViewSonic.
3. Repair or attempted repair by someone other than a ViewSonic Licensed Technician.
4. Any damage resulting from shipments not made and/or insu red by V iewSonic, and/or ship ments made
by ViewSonic for which recipient failed to notify ViewSonic of the damage claim within 48 hours upon
receipt.
ViewSonic ND4200/ND5000 36

5. Removal and/or installation of any components not intended or prescribed by ViewSonic.
6. Causes external to the product, such as electric power fluctuations and/or failure.
7. Normal wear and tear.
8. Damage to, or abuse of, the coating on the surface of the display, including but not limited to cosmetic
defects that do not affect functionality.
9. Any other cause which is not related to a manufacturer’s defect.
10. Loss of, or damage to, the covered product due to mishandling, improper p ackaging by you, a lteration,
accident, electrical current fluctuations or failure to follow operating, maintenance or environmental
instructions prescribed in the covered product's User Manual. In the event that ViewSonic determin es,
in its sole discretion, that the return product is damaged due to one or more of these excluded causes,
the customer will be billed for the cost of repairs.
1 1. ViewSonic will not be responsible for any damage to, loss of, or consequential loss from the inability to
use, any programs, data or other information stored on any media or any part of any Product serviced
hereunder. ViewSonic makes no representations or warranties whatsoever to keep confidential or
secure any data stored on any media or any part of any Product serviced hereunder. ViewSonic will
not be responsible for and hereby disclaims any and all liability for damage or loss to software, data,
Programs, removable media, consumables, portable docking stations, carrying cases, or nonViewSonic-branded products such as joysticks, printers, an d/or scanners, that may occur as a result o f
repairs to, and/or by the replacement of any defective product. In order to avoid any and such losses
or damages, please make a back-up of any and/or all data(s) and Programs before returning your
product to ViewSonic for replacement and/or repair(s).
12. Image burn-in and/or defective pixels/sub-pixels are not considered a manufacturer’s defect. For a
complete review of the details regarding the industry standard methodology ViewSonic uses to
determine defective pixels/sub-pixels plea se visit our on-line Customer Support database at
http://www.viewsonic.com/support/qa.cfm?topic=lcd&question=01
.
Limitation of Implied Warranties
THERE ARE NO WARRANTIES, EXPRESS OR IMPLIED, WHICH EXTEND BEYOND THE
DESCRIPTION CONTAINED HEREIN INCLUDING THE IMPLIED W ARRANTY OF MERCHANT ABILITY
AND FITNESS FOR A PARTICULAR PURPOSE.
Limitations of Liability:
VIEWSONIC'S LIABILITY IS LIMITED TO THE COST OF REPAIR OR REPLACEMENT OF THE
PRODUCT. VIEWSONIC EXPRESSLY DISCLAIMS ANY AND ALL LIABILITY FOR DELAYS IN
SHIPPING AND/OR ANY RESULTING DAMAGE(S) DUE TO LOSS OF USE FOR ANY AND ALL
REASONS. IN NO EVENT WILL VIEWSONIC CORPORATION, AND ANY AND ALL OF ITS PRESENT,
FORMER AND FUTURE REPRESENTATIVES BE LIABLE FOR SPECIAL INDIRECT, INCIDENTAL OR
CONSEQUENTIAL DAMAGES RELATING DIRECTLY OR INDIRECTLY TO THIS AGREEMENT.
FURTHER, VIEWSONIC WILL NOT BE LIABLE FOR LOSS OF THE USE OF PRODUCT, LOSS OF
DATA , LOSS OF TIME, LOSS OF PROFITS, LOSS OF BUSINESS OPPORTUNITY, LOSS OF
GOODWILL, INTERFERENCE WITH BUSINESS RELATIONSHIPS OR OTHER COMMERICAL LOSS,
REGARDLESS OF WHETHER ADVISE VIEWSONIC IS ADVISED OF OR SHOULD HAVE KNOWN
ABOUT THE POSSIBILITY OF SUCH DAMAGES.
ViewSonic ND4200/ND5000 37

How to get service:
1. For information on obtaining warranty service, call your ViewSonic dealer/reseller.
2. To obtain warranty service, please contact ViewSonic Customer Support for a Return Authorization
number (RMA). You will be required to provide
A. A copy of the dated sales slip.
B. Your name.
C. Your address.
D. The serial number of the product.
E. A description of the problem.
F. Mobile and wireless products, customer should provide th e use r name an d the passwor d or
disable password protections in order to allow V iewSonic access to the device fo r the performance
of warranty service.
3. Bring or ship the product prepaid in the original container, with the associated accessories, to
ViewSonic or any ViewSonic authorized service center.
4. For additional information or the name of the nearest ViewSonic service center, contact your
ViewSonic dealer/reseller or ViewSonic.
NOTE: ViewSonic is not responsible for any returned product without an assigned RMA.
Sales outside the U.S.A. and Canada:
For ViewSonic products sold outside the U.S. and Canada, contact your ViewSonic dealer/reseller
Effect of state law:
This warranty gives you specific legal rights, and you may also have other rights which vary from state to
state. Some states do not allow limitations on implied warranties and/or do not allow the exclusion of
incidental or consequential damages, so the above limitations and exclusions may not apply to you.
LIMITED WARRANTY (V1.0) Release Date: 1 May 2006
ViewSonic ND4200/ND5000 38

 Loading...