


Model Number:VS12228-NT-1P
VS12230-NT-1P
VS12231-NT-1P
- 使用手冊(繁中)
- User Guide
ViewSonic
®
N3276w/N3776w/N4276p
N3277w/N3777w/N4277p
LCD Display
ENGLISH

ENGLISH
Contents
Important Safety Instructions ..................................................................................1
Declaration of RoHS Compliance ............................................................................2
Copyright Information ..............................................................................................3
Product Registration ................................................................................................3
Antenna Installation Instructions .............................................................................4
Cleaning the LCD Display ........................................................................................4
Overview of the LCD Display .......................................................................................5
Installation ...............................................................................................................6
Front view ................................................................................................................7
Rear view ................................................................................................................8
Remote control ........................................................................................................9
Getting Started ..............................................................................................................10
Inserting the remeote control batteries ...................................................................11
Connecting power ...................................................................................................11
Cable connections ..................................................................................................12
Basic operation .......................................................................................................15
OSD Functions ..............................................................................................................17
Picture Adjustment ..................................................................................................18
Image Adjustment ...................................................................................................20
Setup Adjustment ....................................................................................................22
Audio Adjustment ....................................................................................................24
Tuner Adjustment ....................................................................................................26
DTV OSD Functions ......................................................................................................28
Channel Manager .....................................................................................................28
Settings ...................................................................................................................30
System information .................................................................................................33
Program Guide...............................................................................................................34
Other Information ..........................................................................................................35
Specications ..........................................................................................................35
Troubleshooting ......................................................................................................36
Customer Support ...................................................................................................37
Limited Warranty ......................................................................................................38
ViewSonic
N3276w-NT
/ N3776w-NT
/ N4276p-NT
N3277w-NT / N3777w-NT
/ N4277p-NT

1
ENGLISH
Important Safety Instructions
1. Read these instructions completely before using the equipment.
2. Keep these instructions in a safe place.
3. Heed all warnings.
4. Follow all instructions.
5. Do not use this equipment near water. Warning: To reduce the risk of re or electric shock,
do not expose this apparatus to rain or moisture.
6. Clean with a soft, dry cloth. If further cleaning is required, see “Cleaning the LCD Display”
in this guide for further instructions.
7. Do not block any ventilation openings. Install the equipment in accordance with the
manufacturer’s instructions.
8. Do not install near any heat sources such as radiators, heat registers, stoves, or other devices
(including ampliers) that produce heat.
9. Do not attempt to circumvent the safety provisions of the polarized or grounding-type plug.
A polarized plug has two blades with one wider than the other. A grounding type plug has
two blades and a third grounding prong. The wide blade and the third prong are provided for
your safety. If the plug does not t into your outlet, consult an electrician for replacement of
the outlet.
10. Protect the power cord from being tread upon or pinched, particularly at the plug, and the
point where if emerges from the equipment. Be sure that the power outlet is located near the
equipment so that it is easily accessible.
11. Only use attachments/accessories specied by the manufacturer.
12. Use only with a cart, stand, tripod, bracket, or table specied by the manufacturer,
or sold with the apparatus. When a cart is used, use caution when moving the cart/
apparatus combination to avoid injury from tip-over.
13. Unplug this equipment when it will be unused for long periods of time.
14. Refer all servicing to qualified service personnel. Service is required when the unit has
been damaged in any way, such as: if the power-supply cord or plug is damaged, if liquid
is spilled onto or objects fall into the unit, if the unit is exposed to rain or moisture, or if the
unit does not operate normally or has been dropped.
15. This product is only to perform the useful function of entertainment and visual display tasks
are excluded.
ViewSonic
N3276w-NT
/ N3776w-NT
/ N4276p-NT
N3277w-NT / N3777w-NT
/ N4277p-NT
2
Declaration of RoHS Compliance
This product has been designed and manufactured in compliance with Directive 2002/95/EC of
the European Parliament and the Council on restriction of the use of certain hazardous substances
in electrical and electronic equipment (RoHS Directive) and is deemed to comply with the
maximum concentration values issued by the European Technical Adaptation Committee (TAC)
as shown below:
Substance
Proposed Maximum
Concentration
Actual Concentration
Lead (Pb) 0.1% < 0.1%
Mercury (Hg) 0.1% < 0.1%
Cadmium (Cd) 0.01% < 0.01%
Hexavalent Chromium (Cr6+) 0.1% < 0.1%
Polybrominated biphenyls (PBB) 0.1% < 0.1%
Polybrominated diphenyl ethers (PBDE) 0.1% < 0.1%
Certain components of products as stated above are exempted under the Annex of the RoHS
Directives as noted below:
Examples of exempted components are:
1. Mercury in compact uorescent lamps not exceeding 5 mg per lamp and in other lamps not
specically mentioned in the Annex of RoHS Directive.
2. Lead in glass of cathode ray tubes, electronic components, fluorescent tubes, and electronic
ceramic parts (e.g. piezoelectronic devices).
3. Lead in high temperature type solders (i.e. lead-based alloys containing 85% by weight or more
lead).
4. Lead as an allotting element in steel containing up to 0.35% lead by weight, aluminium
containing up to 0.4% lead by weight and as a cooper alloy containing up to 4% lead by
weight.
The “HD ready” Logo is a trademark of EICTA.
HIGH-DEFINITION MULTIMEDIA INTERFACE
TM
HDMI, the HDMI logo and High-Denition Multimedia Interface are
registered trademarks of HDMI Licensing LLC.
is a trademark of SRS Labs, Inc.
WOW, technology is incorporated under license from SRS Labs, Inc.
ViewSonic
N3276w-NT
/ N3776w-NT
/ N4276p-NT
N3277w-NT / N3777w-NT
/ N4277p-NT
ENGLISH
3
Copyright Information
Copyright © ViewSonic® Corporation, 2008. All rights reserved.
ViewSonic, the three birds logo, OnView, ViewMatch, and ViewMeter are registered trademarks
of ViewSonic Corporation.
Disclaimer:ViewSonic Corporation shall not be liable for technical or editorial errors or
omissions contained herein; nor for incidental or consequential damages resulting from furnishing
this material, or the performance or use of this product.
In the interest of continuing product improvement, ViewSonic Corporation reserves the right to
change product specications without notice. Information in this document may change without
notice.
No part of this document may be copied, reproduced, or transmitted by any means, for any
purpose without prior written permission from ViewSonic Corporation.
Product Registration
To meet your future needs, and to receive any additional product information as it becomes
available, please register your product on the Internet at: www.viewsonic.com.
For Your Records
N3276w-NT / N3776w-NT / N4276p-NT
N3277w-NT / N3777w-NT / N4277p-NT
ViewSonic LCD Display
VS12228-NT-1P
VS12230-NT-1P
VS12231-NT-1P
N3276w-NT -1NT_UG_ENG Rev. 1A 04-25-08
N3776w-NT -1NT_UG_ENG Rev. 1A 04-25-08
N4276p-NT -1NT_UG_ENG Rev. 1A 04-25-08
N3277w-NT -1NT_UG_ENG Rev. 1A 04-25-08
N3777w-NT -1NT_UG_ENG Rev. 1A 04-25-08
N4277p-NT -1NT_UG_ENG Rev. 1A 04-25-08
_________________________________
_________________________________
Product disposal at end of product life
ViewSonic is concerned about the preservation of our environment. Please dispose of this product
properly at the end of its useful life. Your local waste disposal company may provide information
about proper disposal.
The lamp in this product contains mercury. Please dispose of properly in accordance with
environmental laws of your location.
ViewSonic
N3276w-NT
/ N3776w-NT
/ N4276p-NT
N3277w-NT / N3777w-NT
/ N4277p-NT
ENGLISH
4
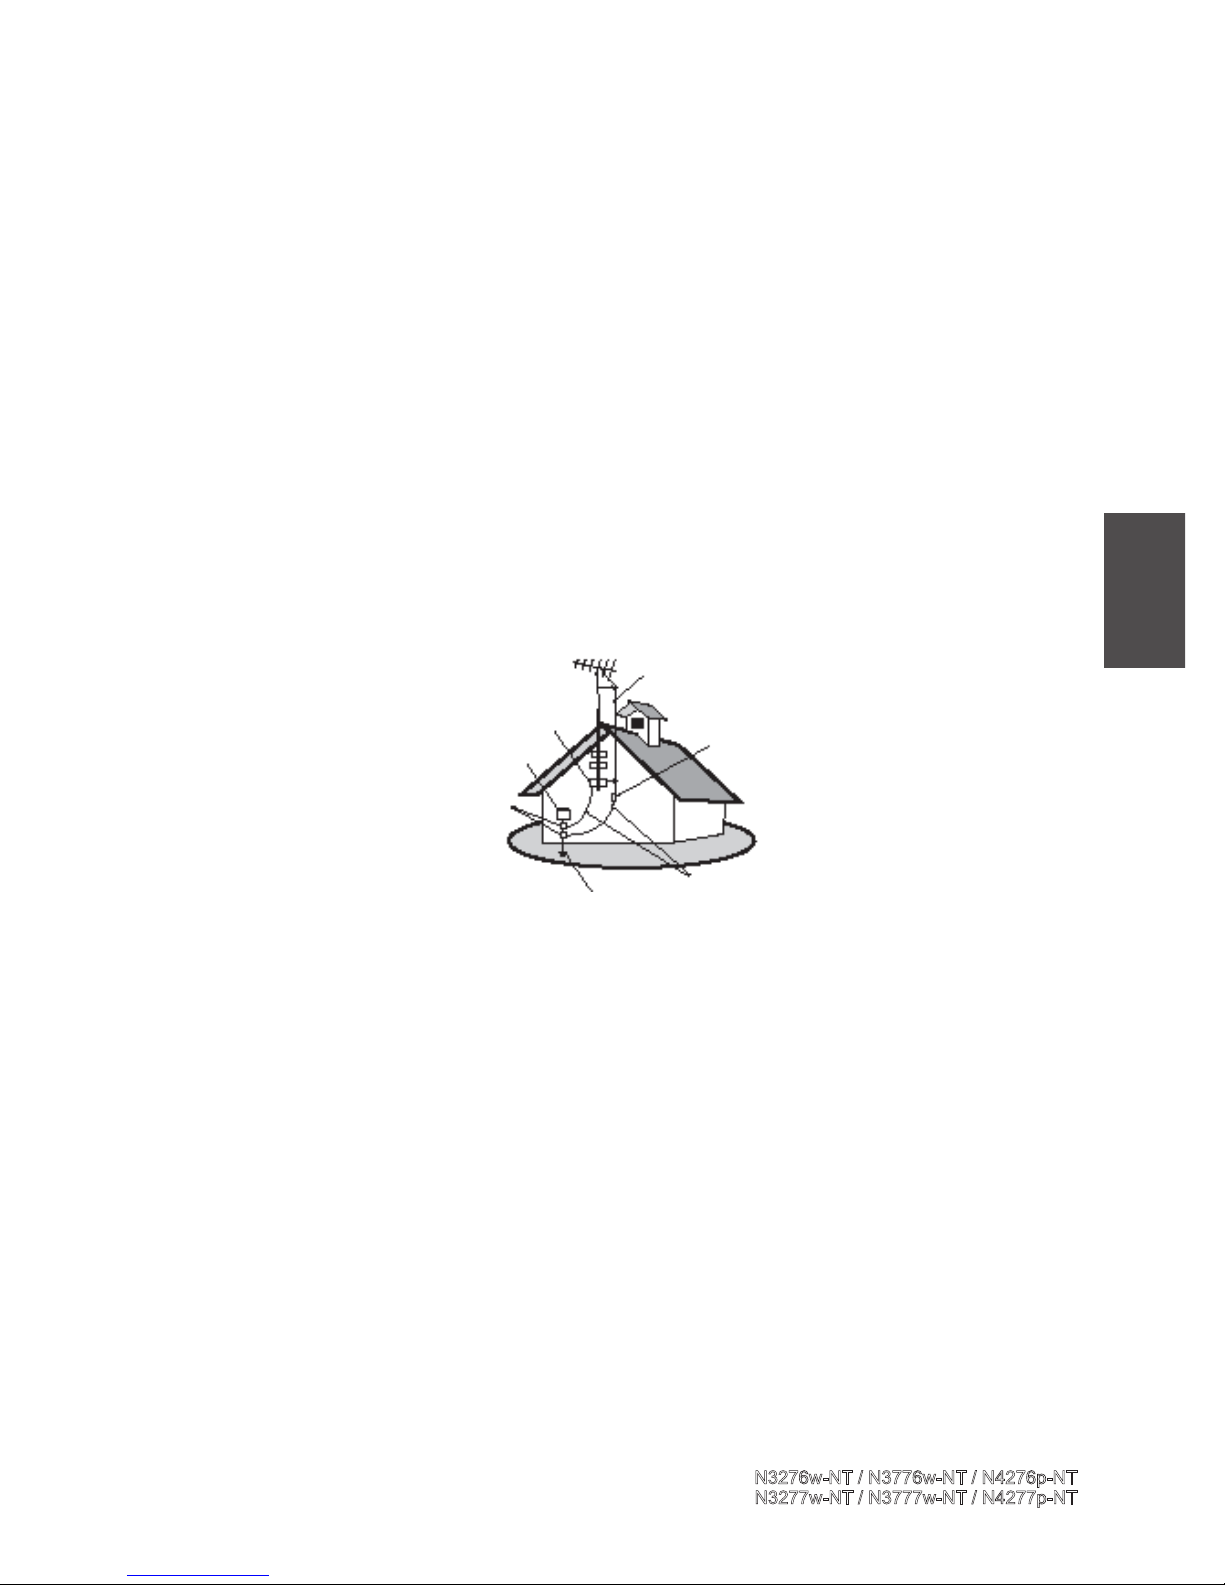
Antenna Installation Instructions
1. Outdoor Antenna Grounding
If an outside antenna or cable system is connected to the product be sure the antenna or cable system
is grounded so as to provide some protection against voltage surges and built-up static charges, Article
810 of the National Electrical Code, ANSI/NFPA 70, provides information with regard to proper
grounding of the mast and supporting structure, grounding of the lead-in wire to an antenna discharge
unit, connection to grounding electrodes, and requirements for the grounding electrode.
2. Lightning
For added protection for this product during a lightning storm, or when it is left unattended and unused
for long periods of time, unplug it from the wall outlet and disconnect the antenna or cable system.
This will prevent damage to the product due to lightning and power-line surges. Do not disconnect the
antenna or the power cord during a heavy storm lighting may strike while you are holding the cable
cord, causing serious injury; turn off your LCD Display and wait for the weather to improve.
3. Power Lines
An outside antenna system should not be located in the vicinity of overhead power lines or other electric
light or power circuits, or where it can fall into such power lines or circuits, When installing an outside
antenna system, extreme care should be taken to keep from touching such power lines or circuits as
contact with them might be fatal.
Cleaning the LCD Display
• Make sure the LCD Display is turned off.
• Never spray or pour any liquid directly onto the screen or case.
To clean the screen:
1. Wipe the screen with a clean, soft, lint-free cloth. This removes dust and other particles.
2. If still not clean, apply a small amount of non-ammonia, non-alcohol based glass cleaner onto a clean,
soft, lint-free cloth, and wipe the screen.
To clean the case:
1. Use a soft, dry cloth.
2. If still not clean, apply a small amount of a non-ammonia, non-alcohol based, mild non-abrasive
detergent onto a clean, soft, lint-free cloth, then wipe the surface.
Disclaimer
ViewSonic® does not recommend the use of any ammonia or alcohol-based cleaners on the LCD Display
screen or case. Some chemical cleaners have been reported to damage the screen and/or case of the LCD
Display. ViewSonic will not be liable for damage resulting from use of any ammonia or alcohol-based
cleaners.
Antenna
Antenna discharge unit
Grounding conductors
Power service grounding electrode system
Ground clamps
Electric service equipment
Ground clamp
ViewSonic
N3276w-NT
/ N3776w-NT
/ N4276p-NT
N3277w-NT / N3777w-NT
/ N4277p-NT
ENGLISH

5
Overview of the LCD Display
Congratulation in purchasing the LCD Color Display. This product has been designed to
provide you with a rich audio and video experience. This monitor enables you to watch
broadcast or cable television ,channels, connect VCR, VCD or DVD player to watch your
favorites movies, or connect a computer to use the display as a monitor. The LCD Display
is equipped with convenient control buttons located on the front panel and a handy remote
control to let you adjust the setting and customize the preferences through an easy-to -use on
screen menu system.
Product components
The following section describes the various components of the LCD Display. Please take
a few moments to familiarize yourself with the product and control panel before using it .
When you unpack this LCD Display, please make sure the box contains the following
items :
●
LCD Color Display
●
Power Cord
●
Remote Control (with 2 AAA batteries)
●
User Manual
●
Warranty Card
Enjoy the versatility of your LCD Display with its wide variety of features:
Color active matrix TFT LCD Display with remote control
Safe, sturdy construction
32 inches:Contrast ratio-1500:1 and Brightness-500cd/m2
37 inches:Contrast ratio-2500:1 and Brightness-450cd/m2
42 inches :Contrast ratio-2000:1、8000:1(dynamic) and Brightness-500cd/m2
Response time:Tg:6.5ms (Typ)
Maximum display resolution:1366*768 (42 inches:1920*1080 )
Audio / Video support
-HDMI analog audio input
-Component (YCbCr / YPbPr) video input
-S-Video input
-Composite video input
-Composite audio output
-VGA input
-PC audio in
-SPDIF output
On-Screen Display (OSD) menu system
※ If any of these items were missing or damaging, please contact service party for assistance.
ViewSonic
N3276w-NT
/ N3776w-NT
/ N4276p-NT
N3277w-NT / N3777w-NT
/ N4277p-NT
ENGLISH
6
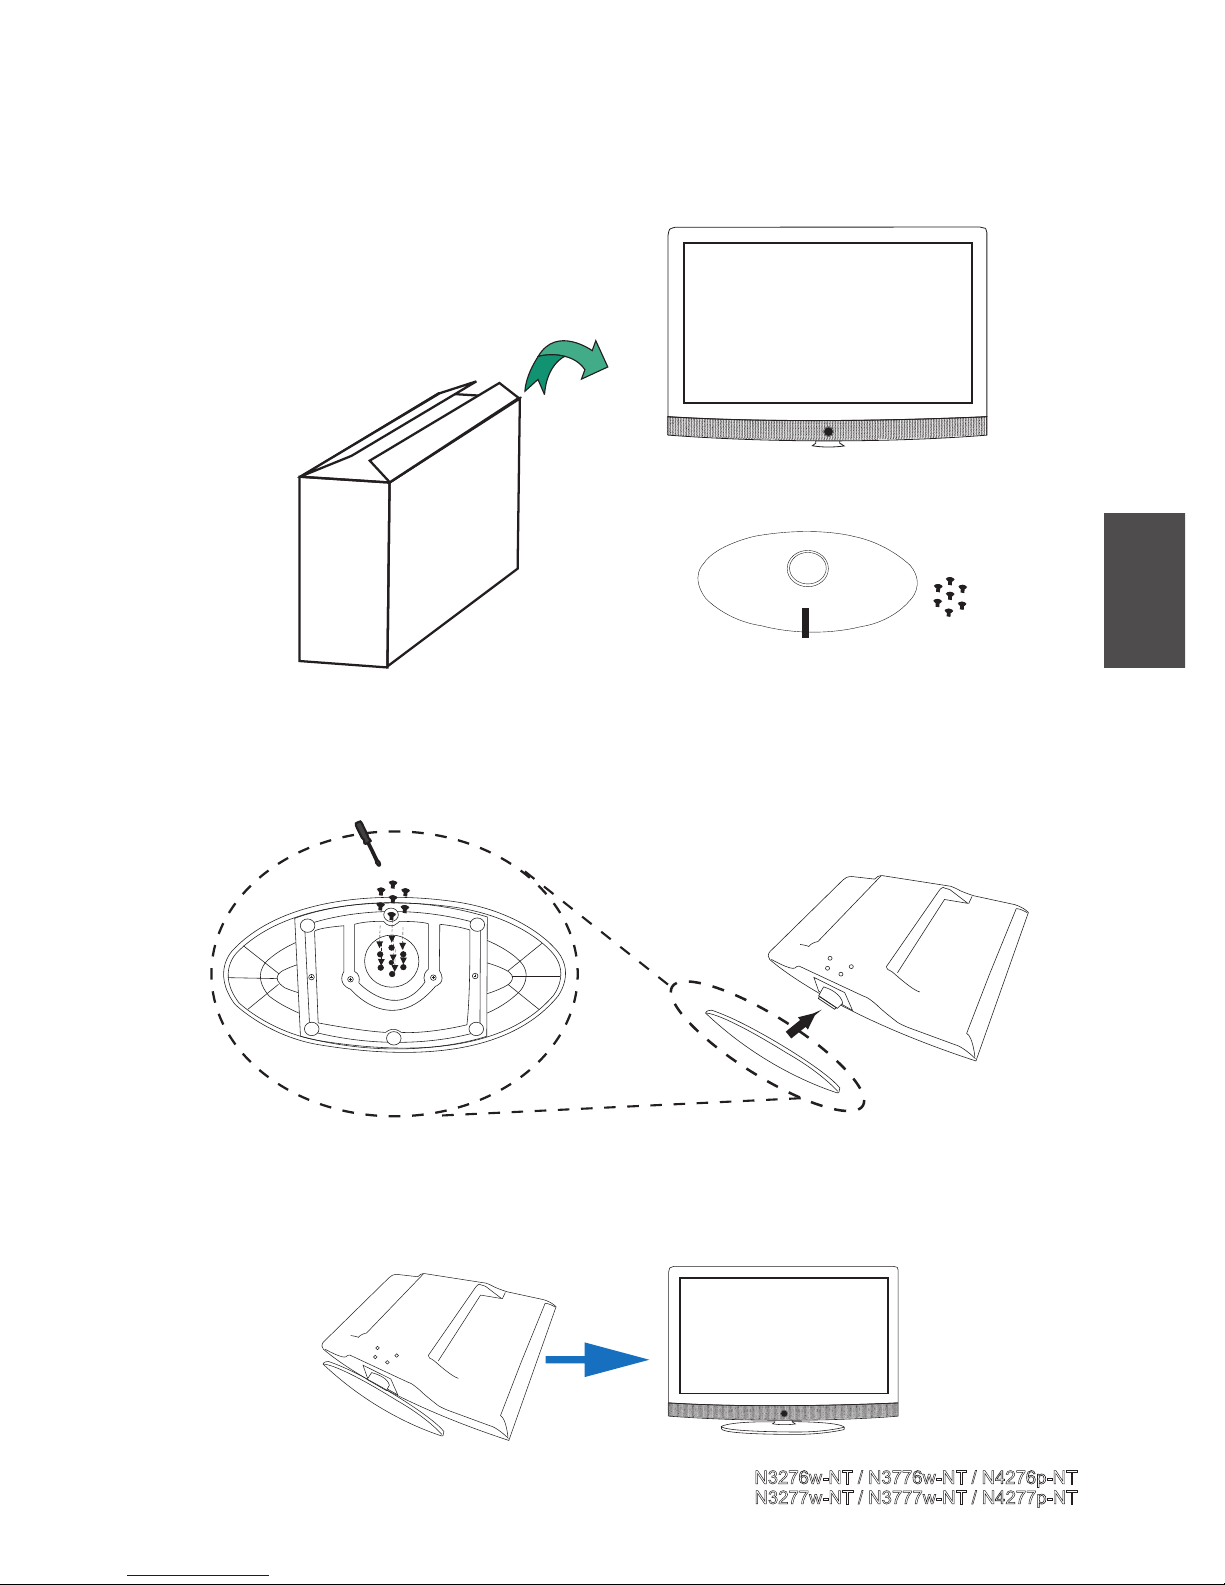
Installation
Make sure the LCD Display and stand are in the same front, then fasten
all the screws on.
Make sure the LCD Display and the stand are well
combined, and that should not be trembled to avoid
the panel being scratched.
Take out the LCD Display, stand
and screws from the carton box.
Panel side (front)
LCD Display
Stand and Screws
ViewSonic
N3276w-NT
/ N3776w-NT
/ N4276p-NT
N3277w-NT / N3777w-NT
/ N4277p-NT
ENGLISH
7
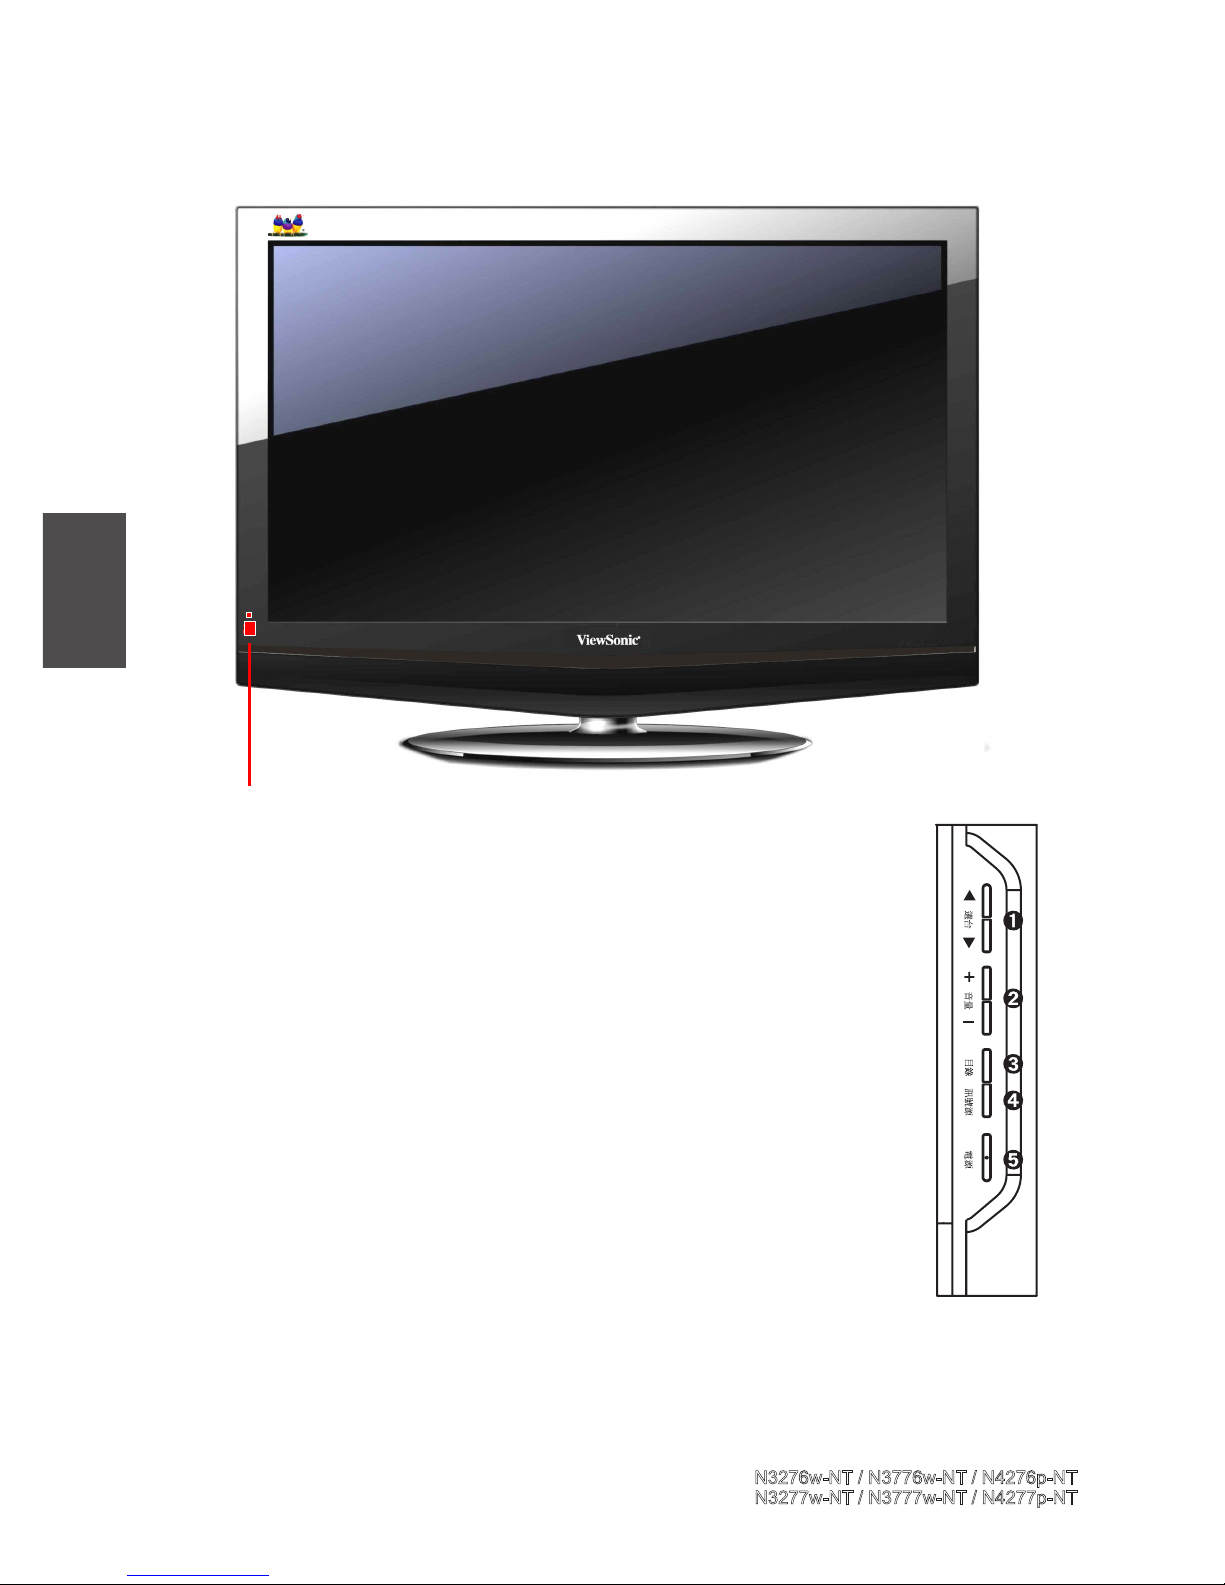
CH/
Increase or decrease channel numbers.
VOL/
Increase or decrease the volume.
MENU
Press the button to enter On Screen Display (OSD).
SOURCE
Switch among the input source .
POWER
Turn the Display set ON or OFF.
Power Indicator
LED
※
Power indicator LED:Indicates if the LCD power is turned on
(green) or in stand-by state (red).
Front view
ViewSonic
N3276w-NT
/ N3776w-NT
/ N4276p-NT
N3277w-NT / N3777w-NT
/ N4277p-NT
ENGLISH
8
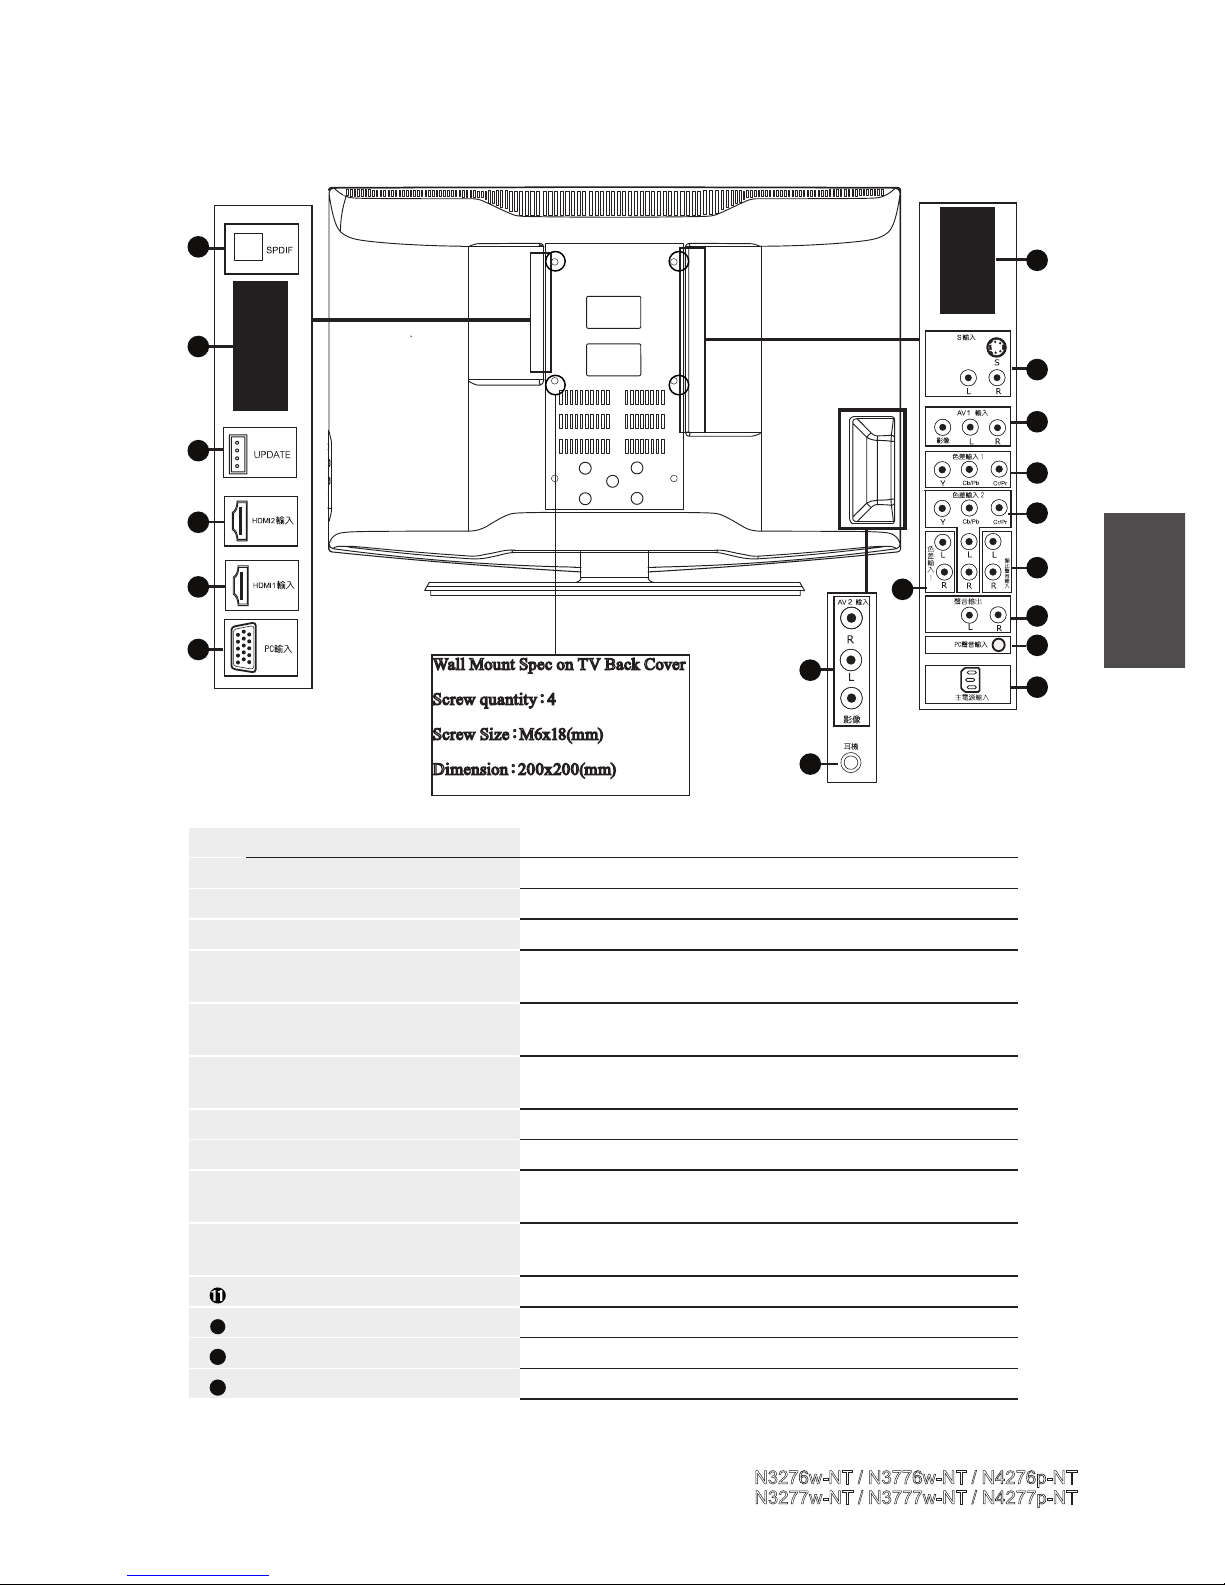
Rear view
NO ITEM FUNCTION
SPDIF OUT Connect to device with SPDIF output.
DIGITIAL ANT Connect to DTV BOX with Digital TV signal.
SERVICE PORT For qualied service personnel Only
HDMI-IN 1/2 Connect to the HDMI output of your PC or portable
computer or A/V device.
PC -IN Connect to the VGA output of your PC or portable
computer.
ANALOG ANT Connect to your TV antenna or coaxial cable from local
TV.
S / VIDEO- IN Connect to the S-video output jack of your S device.
AV-IN 1/2 Connect to the A/V output jack of your A/V device.
COMPONENT IN Connect to the component output jack of your component
device.
HDMI ANALOG AUDIO IN Connect to the DVI audio output jack of your A/V device.
(When using the DVI to HDMI port)
AUDIO OUT Connect to the audio input jack of your A/V device.
12
PC AUDIO IN Connect to the audio output of your computer.
13
AC -IN Connect to the AC outlet.
14
EARPHONE Connect to external earphone.
1
2
3
4
5
6
7
8
9
9
10
9
11
12
13
14
8
4
H
D
M
I
Wall Mount Spec on TV Back Cover
Screw quantity:4
Screw Size:M6x18(mm)
Dimension:200x200(mm)
ViewSonic
N3276w-NT
/ N3776w-NT
/ N4276p-NT
N3277w-NT / N3777w-NT
/ N4277p-NT
ENGLISH
9
Remote Control
1
電源 POWER
Turn power ON or OFF.
2
數字鍵 NUMBER KEYS
Press the number keys to enter channel numbers.
3
回復 RETURN
Switch to the previous viewed channel.
4
影像模式 VIDEO MODE
Switch among four video modes to change the
picture quality : PERSONAL, VIVID, SOFT,
STANDARD.
5
雙語 MTS
Switch between monaural, stereo, and audio
modes. This function enable you to receive a second language or unrelated audio.
6
色差 COMPONENT HOT KEY
Press the hot key to enter COMPONENT mode.
7
HDMI /PC
Press the hot key to enter HDMI or PC mode.
8
離開 EXIT (ONLY IN DTV OSD MENU)
Exit DTV OSD menu.
9
音量 + 一 VOL+ 一
Increase + or decreases - the volume.
10
確認 ENTER (ONLY IN DTV OSD MENU)
Enter the selected item in DTV OSD.
11
功能選項 MENU
Press to enter OSD and DTV OSD MENU.
12
靜音 MUTE
Disable the audio output.
13
切換 PIP/Position
The function is not supported in this model.
14
位置 PIP/SWAP
The function is not supported in this model.
15
音效 Sound
Select SRS WOW ON or OFF.
1
2
3
4
5
6
7
8
11
12
9
10
13
14
15
1 2 3
4 5 6
7
8
9
0
-/100
TV/DTV AV
HDMI
/PC
GUIDE
ViewSonic
N3276w-NT
/ N3776w-NT
/ N4276p-NT
N3277w-NT / N3777w-NT
/ N4277p-NT
ENGLISH
10
16
訊號源 SOURCE
Select the TV, AV, S-Video, PC, Component,
HDMI inputs as the video source signal.
17
凍結 FREEZE
Freeze the present image on the screen.
18
寬螢幕 WIDE
Switch the display mode between various wide
modes.
19
TV/DTV
Switch the source to TV / DTV mode.
20
AV
Press the hot key to enter AV or S-Video mode.
21
睡眠 SLEEP TIMER
Press repeatedly to set the sleep timer from 30 to
180 minutes.
22
頻道▲▼ CHANEL▲▼
Press the ▲ or ▼ keys to increase or decrease the
channel number.
23
GUIDE (ONLY IN DTV OSD MENU)
Enter the program guide of DTV OSD.
24
訊源 PIP/Source
The function is not supported in this model.
25
子母畫面 PIP/POP
The function is not supported in this model.
26
縮放 PIP/Zoom
The function is not supported in this model.
27
顯示 DISPLAY
Press to display the information of input signal.
23
22
21
20
19
18
17
24
25
26
27
1 2 3
4 5 6
7
8
9
0
-/100
TV/DTV AV
HDMI
/PC
GUIDE
16
ViewSonic
N3276w-NT
/ N3776w-NT
/ N4276p-NT
N3277w-NT / N3777w-NT
/ N4277p-NT
ENGLISH
11
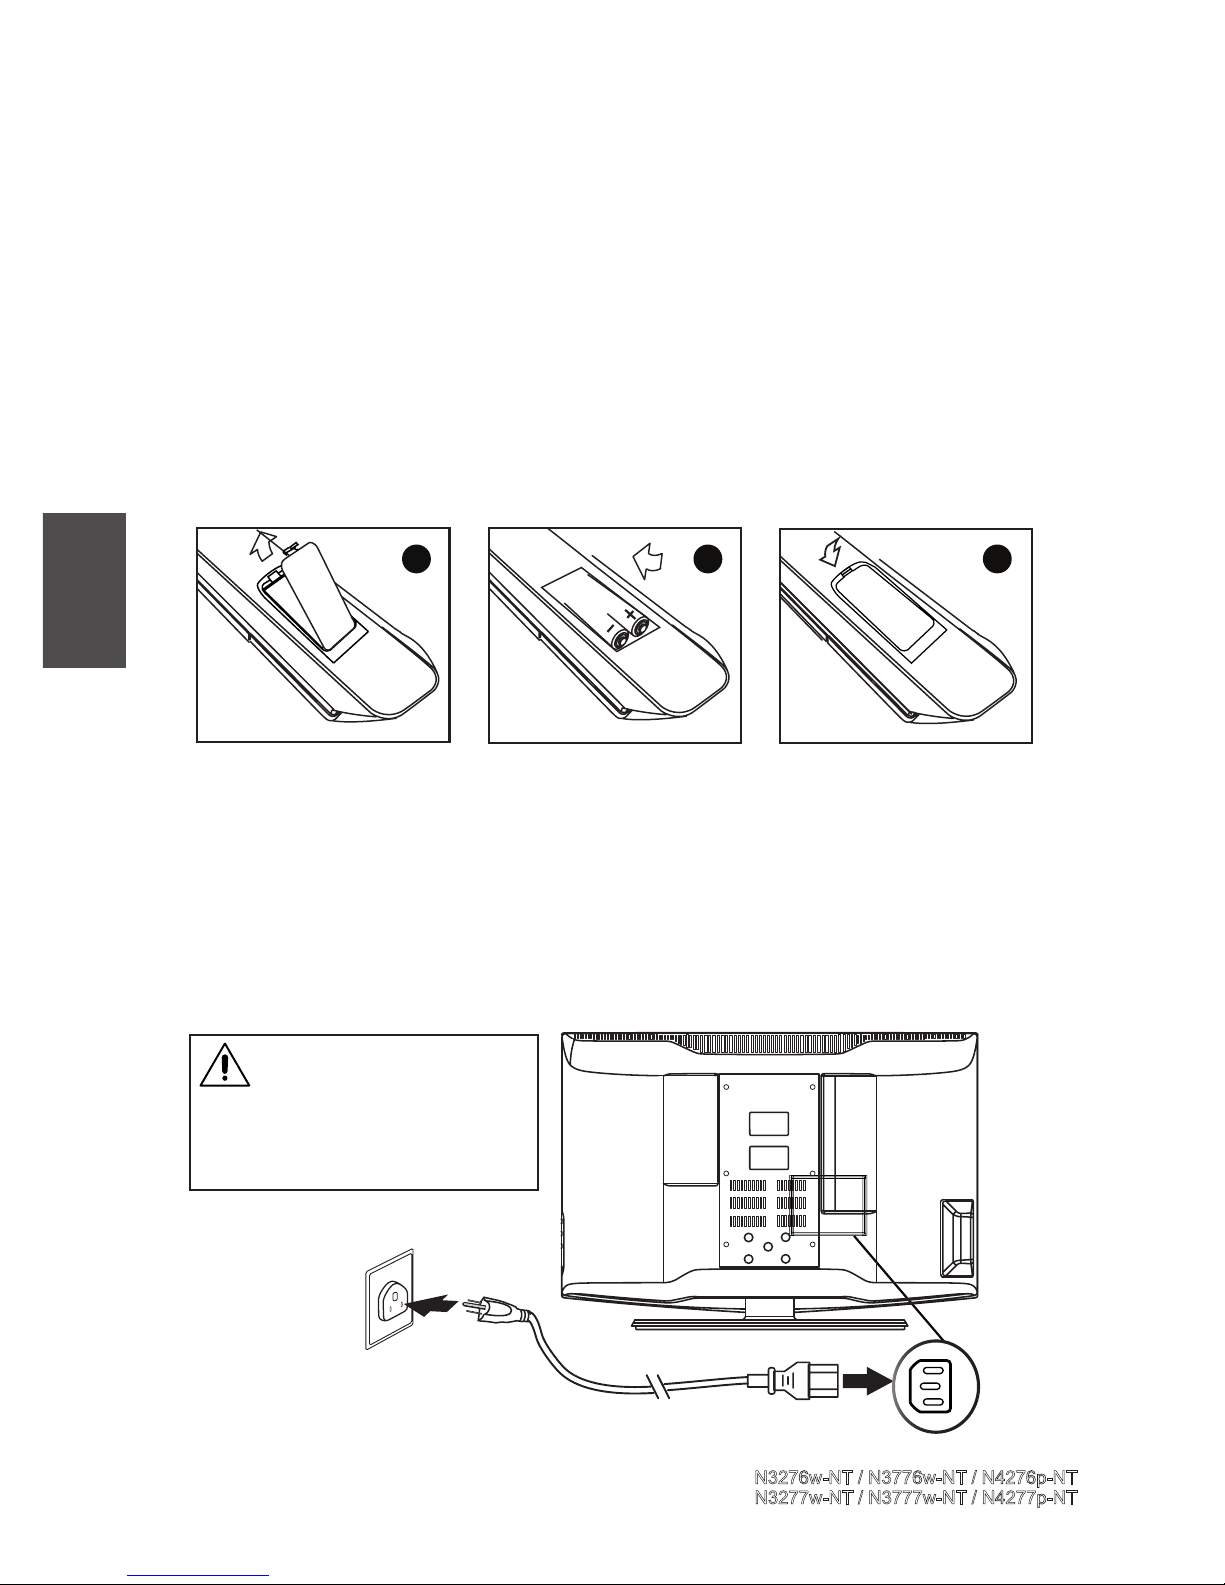
Insert the two AAA batteries provided into the remote control as described below:
1. Pull the latch on the battery compartment cover on the rear of the remote control and
remove the cover.
2. Insert the two supplied AAA batteries .Check the + and - ends of the batteries before
inserting them in the compartment .
Getting started
Inserting the remote control batteries
• Do not mix old and new batteries or batteries of different types together.
• Do not short -circuit ,disassemble ,heat or re batteries.
• Remove the batteries to avoid damage from possible battery leakage if you anticipate that the remote
control will not be used for an extended period of time .
• Please handle the remote control with care. Avoid dropping it ,getting it wet ,or placing it in direct sunlight, near a heater or in an area of high humidity .
3
1
2
Connecting power
1. Connect the supplied power cord to the AC IN jack on the rear of Display
2. Connect the other end of the power cord to a power outlet.(AC 110V 60Hz)
For your safety, do not
conn ect the power outlet until
connected all the device of your
LCD Display completely.
Please refer to the following sections for detailed instructions about connecting the audio /video
(AV) device of your LCD Display and view your favorite programmes or movies .These sections
describe the basic procedures required to set up your Display for easy and convenient viewing.
Wall outlet
Power cord (AC110 V 60 Hz)
ViewSonic
N3276w-NT
/ N3776w-NT
/ N4276p-NT
N3277w-NT / N3777w-NT
/ N4277p-NT
ENGLISH
3. Replace the cover and make sure it snaps securely back into place .

12
Support Resolutions
◎ VGA
640×480(60/75 Hz)
◎ VGA
720×400(70 Hz)
◎ SVGA
800×600(60/75 Hz)
◎ XGA
1024×768(60/75 Hz)
◎ WXGA
1360×768(60 Hz)
◎ SXGA
◎ MAC
1280×1024(60 Hz)
832×624(75 Hz)
※ Only 42 inches supports to 1920x1080@60Hz
Cable connections
PC connector
VGA
DVI
* Reduced Blinking mode (CV-RBT)
ViewSonic
N3276w-NT
/ N3776w-NT
/ N4276p-NT
N3277w-NT / N3777w-NT
/ N4277p-NT
ENGLISH

13
1
2
2
3
3
3
4
4
4
5
6
H
D
M
I
S-video cable
Connect to device with svideo output such as DVD
player, Digital camera satel-
lite receivers etc....
Audio cable
Connect to device with audio
output such as DVD recorder,
VCR, Home theater audio equip-
ment etc....
5
A/V connector
Connect to device with A/V
output such as VCR, VCD
player ,DVD player etc....
HDMI cable
4
Component cable
Connect to device such
as DVD player, Digital
TV receiver, Digital
satellite receiver etc....
3
2
1
SPDIF connector
6
Connect to device with SPDIF
audio output such as DVD
recorder, Home theater audio
equipment etc....
Connect to device with HDMI
output such as Blu-ray player,
DVD player, Cable box, VCR
/ VCD player, PC and portable
PC etc....
When using DVI to HDMI cable, connect audio
cable to the HDMI analog audio in terminal.
ViewSonic
N3276w-NT
/ N3776w-NT
/ N4276p-NT
N3277w-NT / N3777w-NT
/ N4277p-NT
ENGLISH

14
Notes:
Refer to these notes before connecting any audio / video equipment to this Display :
• Refer to the manuals of your Display, stereo ,or other equipment .
• Disconnect all equipment from the power outlets. Connect the equipment to the power outlets only after you have
completed connecting everything. Never make or change connections when equipment stall connected to a
power outlet .
• Connect DVD player directly to the Display. For example ,do not connect DVD player to VCR and then connect
the VCR to your Display. This type of connection could distort both the picture and the sound .Your VCR might
have a copy protection system which could distorted the DVD image .
• Set the stereo system to the correct channel or source if your video equipment is also connected to a stereo sys-
tem
• You only need one audio connection and one video connection between your Display and other audio / video
equipment (e.g. DVD player ,VCR, Camcorder). This means it is possible you will not use all the jacks on the
Display.
• If you plan to watch Display via your DVD player or VCR ,connect a coaxial cable to the DVD player’s or VCR’s
TUNER IN jack then connect to the ANT jack on your LCD Display .This allows you to watch channels on the
Display normally when the DVD player or VCR is off .
• The function of your existing audio / video equipment, governing the connection mode of between your Display
and existing audio / video equipment . Progressive Scan Component Video and Component Video have the
highest picture quality but it only be used if the connects video equipment supports Progressive Scan Compo-
nent Video or component video .S-Video provides a high signal quality .Composite Video (a yellow Video jack )
provides a good video output. Please follow the correct step to connect existing audio / video equipment.
ViewSonic
N3276w-NT
/ N3776w-NT
/ N4276p-NT
N3277w-NT / N3777w-NT
/ N4277p-NT
ENGLISH

15
1 2 3
4 5 6
7
8
9
0
-/100
TV/DTV AV
HDMI
/PC
GUIDE
Basic operation
1
2
2
3
4
5
Turn the LCD Display ON
Press the POWER key to turn on or off the
power of the LCD Display. The indicate
light is green as power ON and red as power
OFF.
Select channel
Press“選台▲▼”or“頻道▲▼”key
to increase or decrease the channel number.
Press the Number key to input channel
number from 1 to 99.
Adjust volume
Press“音量+ -”key to increase(+) or
decrease(
-) the volume.
Mute
Press key to disable the audio output.
2
3
4
1
Switch the input source
Press key to list input source.
Press key to choose the input source, select and switch the wanted input source.
Press
to adjust.
Sel ect the TV, DTV,AV, S- Video, PC ,
COMPONENT, HDMI inputs as the video
source signal.
Press the
TV/DTV
、
AV
、
HDMI
/PC
、 key on
the remote control to switch the input source
directly.
5
1
2
3
5
5
ViewSonic
N3276w-NT
/ N3776w-NT
/ N4276p-NT
N3277w-NT / N3777w-NT
/ N4277p-NT
ENGLISH

16
1 2 3
4 5 6
7
8
9
0
-/100
TV/DTV AV
HDMI
/PC
GUIDE
7
8
10
6
WIDE
Press key repeatedly to switch t he
display modes : Fill All, Normal, Fill Aspect,
Zoom, Subtitle. (PC mode: Fill All, Normal).
MTS
Press key to switch monaural, and stereo
audio modes. This function enable you to
receive a second language or unrelated audio.
6
7
Sound
Press key repeatedly to turn SRS WOW
ON or OFF.
Display
Press key to display channel number (in
TV mode) and information of iutput signal.
SLEEP TIMER
Press key repeatedly to set the off timer to
30 through 180 minutes.
8
9
10
9
ViewSonic
N3276w-NT
/ N3776w-NT
/ N4276p-NT
N3277w-NT / N3777w-NT
/ N4277p-NT
ENGLISH

17
Picture
Menu:Exit ↑↓:Select ← →:Adjust
Video Mode
Brightness
Contrast
Sharpness
Color
Tint
Color Temp
Backlight
50
50
5
50
50
5
Personal
Standard
Using the OSD MENU
The On-Screen Display (OSD) menu system provides a quick and simple method to
adjust LCD Display base setting. OSD menu can be viewed using both the remote
control and the control buttons on the control panel .
1
5
4
3
2
Press 目錄 key on the control panel or
key on the remote control to view OSD menu
Press
key to select the function.
Press key to enter the sub menu.
Press
key to select the item and press
to adjust.
Press 目錄 key on the control panel or
key on the remote control to exit OSD menu.
After change settings on the OSD menu, the new settings are conrmed automatically when OSD picture vanish ,even did not press
the menu to exit the OSD system.
ViewSonic
N3276w-NT
/ N3776w-NT
/ N4276p-NT
N3277w-NT / N3777w-NT
/ N4277p-NT
ENGLISH

18
✸Th e p i ctu re Adj ust m ent
e n a b l e y o u t o a d j u s t
b r i g h t n e s s , c o n t r a s t ,
sharpness, color, tint, color
temperature and backlight.
Picture Adjustment
1
2
3
Press ◄► key or + - key to switch the video
picture mode: PERSONAL, STANDARD ,VIV-
ID, SOFT.
Press 目錄 key on the control panel or
key on the remote control to enter OSD menu
Press
key to select [Picture] mode.
Press ◄► or + - key to select (Video Mode)
item.
Picture
Menu:Exit ↑↓:Select ← →Adjust
Video Mode
Brightness
Contrast
Sharpness
Color
Tint
Color Temp
Backlight
50
50
5
50
50
5
Personal
Standard
Picture
Video Mode
Brightness
Contrast
Sharpness
Color
Tint
Color Temp
Backlight
50
50
5
50
50
5
Personal
Standard
Menu:Exit ↑↓:Select ← →Adjust
Picture
Video Mode
Brightness
Contrast
Sharpness
Color
Tint
Color Temp
Backlight
50
50
5
50
50
5
Personal
Standard
Menu:Exit ↑↓:Select ← →Adjust
ViewSonic
N3276w-NT
/ N3776w-NT
/ N4276p-NT
N3277w-NT / N3777w-NT
/ N4277p-NT
ENGLISH

19
4
Repeat step 1.2
Press key to select item and
press key or + - key to adjust
setting.
Press 目錄 key on the control panel or
key
on the remote control to exit OSD menu.
In preset picture item , it is allowed to adjust each subpicture-item setting then save “personal” item. Press
key to select item and press
key or + - key
to adjust setting.
(Color Temperature) adjustment
Adjust the image color intensity:
STANDARD ,COOL, WARM.
(Backlight) adjustment
Adjust the backlight of screen.
(Contrast) adjustment
Ad jus t the difference between
the dark and light level on your
screen.
(Brightness) adjustment
Adjust th e le v e l s of light on
your screen. It should be used
in conjunction with the contrast
option.
(Sharpness) adjustment
Adjust the sharpness level on your
screen.
(Tint) adjustment
Change the color balance. Adjust
this setting so that colors on the
screen are neither too green or
too magenta. (No support in PC
mode)
(Color) adjustment
Change the dominant color
intensity on your screen. Adjust
this setting until the colors on the
screen look natural.(No support in
PC mode)
ViewSonic
N3276w-NT
/ N3776w-NT
/ N4276p-NT
N3277w-NT / N3777w-NT
/ N4277p-NT
ENGLISH

20
✸The Image Adjustment en-
able user to adjust image
size , blue screen, edge enhance, noise reduction and
Auto gamma adjustment.
Press key to select [Img.Adj] mode.
Press ◄► or + - key to select (Image size) item.
Press ◄►
key or + - key to switch image size
:Fill All, Normal, Fill Aspect, Zoom, Subtitle.
1
2
3
Image Adjustment
Press 目錄 key on the control panel or
key on the remote control to enter OSD menu
Picture
Video Mode
Brightness
Contrast
Sharpness
Color
Tint
Color Temp
Backlight
50
50
5
50
50
5
Personal
Standard
Menu:Exit ↑↓:Select ← →Adjust
Image
Image Size
Blue Screen
Auto Gamma
N.R.
Fill All
Off
Off
Low
Menu:Exit ↑↓:Select ← →Adjust
Image
Fill All
Off
Off
Low
Image Size
Blue Screen
Auto Gamma
N.R.
Menu:Exit ↑↓:Select ← →Adjust
ViewSonic
N3276w-NT
/ N3776w-NT
/ N4276p-NT
N3277w-NT / N3777w-NT
/ N4277p-NT
ENGLISH

21
4
Fill all :Display full screen.
Normal :Zoom the picture
horizontally only to fill source
aspect ratios.
Zoom : Vertically expanded,
linearly, by 13%.
Fill Aspect : non-liner stretch
right and left.
Subtitle : Vertically expanded,
linearly, by 13% and keep a
space for subtitle.
Press 目錄 key on the control panel or
key
on the remote control to exit OSD menu.
Repeat step 1.2
Press key to select item and
press key or + - key to adjust
setting.
(Blue Screen) adjustment
Select screen co l o r wh e n no
signal. On -blue ,Off - Black.
(Auto Gamma) adjustment
Auto adjust i mage to the be st
contrast. (No support in PC mode)
(Noise Reduction) adjustment
Enable user to adjust the noise
resolution status: off, high, low,
medium, adaptive. (No support in
PC mode)
Input signal
ViewSonic
N3276w-NT
/ N3776w-NT
/ N4276p-NT
N3277w-NT / N3777w-NT
/ N4277p-NT
ENGLISH

22
✸The setup Adjustment en-
able you to adjust OSD
lang uage , sleep timer,
OSD menu transparency .
✸User can reset all OSD set-
ting in this option.
✸User can adjust PC mode
setting : Clock, Phase, H
Position, V Position, Auto
Adjust.
Press key to select [Setup] mode.
Press ◄► or + - key to enter sub-menu.
A
Press key to select (Language) item and
press ◄► key to select OSD language. Chinese
or English.
1
2
Setup Adjustment
Press 目錄 key on the control panel or
key on the remote control to enter OSD menu
Picture
Video Mode
Brightness
Contrast
Sharpness
Color
Tint
Color Temp
Backlight
50
50
5
50
50
5
Personal
Standard
Menu:Exit ↑↓:Select ← →Adjust
Setup
English
OFF
Language
Sleep Timer
OSD Transparency
OSD Timeout
Reset
90
4
15
Menu:Exit ↑↓:Select ← →Adjust
Setup
90
4
15
Menu:Exit ↑↓:Select ← →Adjust
Language
Sleep Timer
OSD Transparency
OSD Timeout
Reset
English
OFF
ViewSonic
N3276w-NT
/ N3776w-NT
/ N4276p-NT
N3277w-NT / N3777w-NT
/ N4277p-NT
ENGLISH

23
3
B
C
Press key to select (Sleep Timer) item
and Press key or + - to set off timer to 30
through 180 MIN. (0..30..60...180).
(H Position) adjustment
Adjust the horizontal position of
display. (Only in PC mode)
(V Position) adjustment
Adjust the Vertical position of
display. (Only in PC mode)
(Clock) adjustment
Ad just t he clock frequency of
display. (Only in PC mode)
(Auto) adjustment
Auto adjusts screen to the best
position. (Only in PC mode)
(Phase) adjustment
Adju s t phas e for the display.
(Only in PC mode)
(DVI only mode) adjustment
Adjust the screen range: Graphic
(zoom in) or video (zoom out)
(only in HDMI mode input signal
re s o lu t i on are 64 0 * 480 an d
1280*720)
Repeat step 1.2
Press key to select item and
press key or + - key to adjust
setting.
Press 目錄 key on the control panel or
key
on the remote control to exit OSD menu.
Press
key to select (OSD Timeout) item
and Press key or + - to set timeout timer to
6 through 24 seconds. (6..12..15...24).
(HDMI Sound) adjustment
Select HDMI signal input for DVI
or HDMI. (Only in HDMI mode)
Setup
Menu:Exit ↑↓:Select ← →Adjust
Language
Sleep Timer
OSD Transparency
OSD Timeout
Reset
English
OFF
90
4
15
Setup
Menu:Exit ↑↓:Select ← →Adjust
Language
Sleep Timer
OSD Transparency
OSD Timeout
Reset
English
OFF
90
4
15
(OSD Transparency) adjustment
Adjust the OSD transparency of
display.
(Reset) adjustment
Restore to the factory original
setting.
ViewSonic
N3276w-NT
/ N3776w-NT
/ N4276p-NT
N3277w-NT / N3777w-NT
/ N4277p-NT
ENGLISH

24
✸The audio Adjustment en-
able user to adjust vol-
ume, treble, bass, balance,
speaker output and surround setting .
1
2
3
Press key to select [Audio] mode.
Press ◄► or + - key to enter sub-menu.
Press key to select (Audio Mode)
item.
Audio Adjustment
Press 目錄 key on the control panel or
key on the remote control to enter OSD menu
Picture
Video Mode
Brightness
Contrast
Sharpness
Color
Tint
Color Temp
Backlight
50
50
5
50
50
5
Personal
Standard
Menu:Exit ↑↓:Select ← →Adjust
Audio
Volume
Audio mode
Treble
Bass
Balance
Speaker
SRS WOW
SVC
MTS
Personal
On
On
Close
Mono
50
50
50
50
Menu:Exit ↑↓:Select ← →Adjust
Audio
50
50
50
Volume
Audio mode
Treble
Bass
Balance
Speaker
SRS WOW
SVC
MTS
50
Personal
On
On
Close
Mono
Menu:Exit ↑↓:Select ← →Adjust
ViewSonic
N3276w-NT
/ N3776w-NT
/ N4276p-NT
N3277w-NT / N3777w-NT
/ N4277p-NT
ENGLISH

25
4
5
Press or + - keys to switch the Audio
mode: STANDARD, MILD, PERSONAL.
In preset Audio item , it is allowed to adjust
sub-audio-item setting then save in “personal”
item .Press key to select item and press
or + - key to adjust setting.
(Volume) adjustment
Adjust the overall volume of the
speakers.
(Balance) adjustment
Balance the volume of right and
left speakers.
(Speaker) adjustment
Turn the audio speakers output
ON or OFF (The audio out R / L
still on).
(SRS WOW) adjustment
Turn the SRS WOW ON or OFF.
(Treble) adjustment
Adjust the high frequency content
in audio output.
(MTS) adjustment
Adjust the sound output mode :
mono, stereo. (only in TV mode)
(Bass) adjustment
Adjust the low frequency content
in audio output.
Press 目錄 key on the control panel or
key
on the remote control to exit OSD menu.
Repeat step 1.2
Press key to select item and
press key or + - key to adjust
setting.
(SVC) adjustment
Adjust the sound output volume
by channel or signal: Auto, Midnight, Close.
ViewSonic
N3276w-NT
/ N3776w-NT
/ N4276p-NT
N3277w-NT / N3777w-NT
/ N4277p-NT
ENGLISH

26
✸The Tuner Adjustment en-
able user to adjust the setting of tuner function.
✸Tuner Adjustment only can
be operated in TV mode.
1
2
Press to select [Tuner] mode.
Press ◄► or + - key to enter sub-menu.
Press key to select (Auto search channels)
item and press to start scaning channels.
Tuner Adjustment
Press 目錄 key on the control panel or
key on the remote control to enter OSD menu
Picture
Video Mode
Brightness
Contrast
Sharpness
Color
Tint
Color Temp
Backlight
50
50
5
50
50
5
Personal
Standard
Menu:Exit ↑↓:Select ← →Adjust
Tuner
Auto Search
Air/Cable
Channel Edit
Cable
50 Del Add
Menu:Exit ↑↓:Select ← →Adjust
ViewSonic
N3276w-NT
/ N3776w-NT
/ N4276p-NT
N3277w-NT / N3777w-NT
/ N4277p-NT
ENGLISH

27
3
A
B
(Channel Edit)
User can edit the program list.
Press to delete (Yes) or keep (No) the pro-
gram now on the screen.
Repeat step 1.2
Press key to select item and
press key or + - key to adjust
setting.
Press 目錄 key on the control panel or
key
on the remote control to exit OSD menu.
Tuner
Auto Search
Air/Cable
Channel Edit
Cable
50 Del Add
Menu:Exit ↑↓:Select ← →Adjust
Tuner
Auto Search
Air/Cable
Channel Edit
Cable
50 Del Add
Menu:Exit ↑↓:Select ← →Adjust
(Air/Cable)
Press keys to select (Air/Cable) item
and press to set the channel signal system
for Air or Cable.
ViewSonic
N3276w-NT
/ N3776w-NT
/ N4276p-NT
N3277w-NT / N3777w-NT
/ N4277p-NT
ENGLISH

28
DTV OSD Functions
PIC 1
The DTV OSD (On-Screen Display ) menu present user a consistent look and feel
throughout. User can adjust the DTV channel system setting in this menu.
*
First time enter DTV OSD, the DTV channel system will be automatically search all
channels.
Press the “
“ key twice to enter DTV OSD. (Make sure the input source is in
DTV mode)
DTV OSD MENU includes these main options : (see PIC 1)
♦ Channel Manager
♦ Settings
♦ System Information
key Funcation
Select item to change
Change the displayed setting for the current focused item
Select current focused item
離開
Exit current menu
The following keys are relevant to the operations
Please refer to the following section which will describe the operation of DTV OSD.
Channel Manager
“Channel Manager “ provides the following features:
1.Channel List : provides the channel list
2.Delete Channels : Edit the channel list
3.Parental : Locking assigns channel
This function cannot be accessed if there are no channels available.
MENU
choose option
exit menu
Channel Manager
System Information
Settings
system information
確認
離開
ViewSonic
N3276w-NT
/ N3776w-NT
/ N4276p-NT
N3277w-NT / N3777w-NT
/ N4277p-NT
ENGLISH

29
CHANNEL MANAGER
choose option
return to main menu
Channel List
Parental
Delete Channels
manage channels
確認
離開
PIC 2
1) Channel List
“Channel List “ offers the complete channel information.
① Press
key to enter
[Channel Manager] mode.
(see PIC 2)
CHANNEL LIST
04
10
09
08
07
06
05
公共電視 PTS
台灣電視台
民視新聞台
交通電視台
民視綜合台
客家電視 HTV
行動電視 DiMo
02
01
03
中視綜藝台
中視新聞台
中視數位台
move up/down
page up/down
select channel
確認
離開
exit
PIC 3
*
When channel have been locked, the tag
“
“
will displays behind the channel
name. User can nd the details in Page 30.
2) Delete Channels
User can remove some channel from channel list.
① Press
key to enter
[Channel Manager] mode.
CHANNEL MANAGER
choose option
return to main menu
Channel List
Parental
Delete Channels
delete channels
確認
離開
PIC 4
DELETE CHANNELS
exit without saving
save and exit
move up/down
page up/down
確認
離開
X
3
2
1
toggle include in list
delete all
show all
X
06
客家電視 HTV
華視休閒頻道
華視教育頻道
華視CTS
14
13
15
10
台灣電視台
09
08
07
民視新聞台
交通電視台
民視綜合台
04
05
公共電視 PTS
行動電視 DiMo
02
01
03
中視綜藝台
中視新聞台
中視數位台
12
11
台視財經/家庭
台視國際台
PIC 5
* User can call back the channels in the (Update Channels) item of [Settings] mode.
②
Press
key
to select (Channel List) item, then press
key
to switch the channel list. (see PIC 3)
②
Press
key
to select (Delete Channels) item, then
press key
to switch the channel list. (see PIC 4)
③ Press
1
key till
the tag “X“ displays, then
press key to conrm
the deletion. (see PIC 5)
ViewSonic
N3276w-NT
/ N3776w-NT
/ N4276p-NT
N3277w-NT / N3777w-NT
/ N4277p-NT
ENGLISH

30
PARENTAL CONTROL
exit without saving
save and exit
move up/down
page up/down
確認
離開
enable parental control
lock/unlock channel
change PIN
Parental Control enable
1
2
3
06
客家電視 HTV
華視休閒頻道
華視教育頻道
華視CTS
14
13
15
10
台灣電視台
09
08
07
民視新聞台
交通電視台
民視綜合台
04
05
公共電視 PTS
行動電視 DiMo
02
01
03
中視綜藝台
中視新聞台
中視數位台
12
11
台視財經/家庭
台視國際台
3) Parental
User can use “parental“ function to lock or unlock the channel.
PIC 7
① Press
key to enter
[Channel Manager] mode.
* The predetermined PIN code is “0000”. User can enter the “Parental” option,
and press
3
key to reset a new PIN code.
CHANNEL MANAGER
choose option
return to main menu
Channel List
Parental
Delete Channels
setup parental control
確認
離開
PIC 6
SETTINGS
choose option
return to main menu
Preferences
Installation
setup preferences
確認
離開
Settings
“Settings “ option offers user to adjust the setting of DTV OSD MENU and provides
the following features:
1.Preference
2.Installation
PIC 8
1) Preferences
Here the user can set the preferred and the current language on both the Menu and
Audio/subt. Default system language is “English”.
① Press
key to enter
[Setting] mode.
②
Press
key
to select (Parental) item, then
press key
to switch the channel list. (see PIC 6)
③ Press
2
key till
the tag “
“
displays, then
press key to
conrm the setting. (see PIC 7)
③ Press
key to select the item which will be adjusted, and press
key to
default language,
then
press
key to to conrm the setting. (see PIC 9)
PREFERENECES
Menu lang
Audio/subt lang
English
English
select item to change
exit without saving
save and exit
select default menu language
確認
離開
PIC 9
②
Press
key to select
[Preferences] item, then
press key to enter (see PIC 8)
ViewSonic
N3276w-NT
/ N3776w-NT
/ N4276p-NT
N3277w-NT / N3777w-NT
/ N4277p-NT
ENGLISH

31
2) Installation
The “Installation “ item provides the following adjustment features: Tuning Info,
Update Channels, First Time Installation.
SETTINGS
choose option
return to main menu
Preferences
Installation
search or update channel
確認
離開
PIC 10
① Press
key to select
[Installation] item, then
press key to enter (see PIC 10)
②
Press
key to select (Tuning Info) option,
then
press key to enter the
function. (see PIC 11)
INSTALLATION
choose option
return to main menu
Tuning Info
Update Channels
browse tuning information
確認
離開
First Time Installation
PIC 11
Tuning Info
① Press
key to select the network, and press key to display all transport.
(see PIC 12)
②
Press
key to select transport, and press key to display all channels. (see
PIC 13)
TUNING INFORMATION
Networks:
show transports
return to menu
PTS_DVBH_TRIAL
民視電視網
0x3334
0x1
0x3328
show all transports
select network
確認
顯示
公共電視網 0x3326
離開
TUNING INFORMATION
Transports:
0x1C
[民視電視網]
Ch 28
3
CH 28 details:
Network:
Freq:
Offset:
Const:
Hier:
Bwidth:
Rate:
Guard:
O-net id:
Strength:
Quality:
民視電視網
557MHz
0
16QAM
6MHz
½,¾
1
/32
0x233A
show channels
return to networks
show all channels
select transport
確認
離開
顯示
PIC 12
PIC 13
TUNING INFORMATION
Channels:
交通電視台
民視新聞台
民視綜合台
[民視電視網][Ch28]
Ch28
民視綜合台 details:
Full name: 民視綜合台
Service id:
PCR PID:
Aduio PID:
Video PID:
Number of streams: 0
Orig LCN:
0
0x012C/300
0x0000/0
0x0000/0
0x0000/0
Provider:
Network:
民視電視網
Transport:
Ch28
Type:
TV
show component streams of selected service
return to transport
select service
確認
離開
TUNING INFORMATION
Streams:
28 民視綜合台
Number of streams: 0
[民視電視網][Ch28]
Tag Type PID Lang Details
離開
browse channels
return to channels
PIC 14
PIC 15
③ Press
key to select the service, press key to show component streams
of the selected service. (see PIC 14)
④
Press
key to browse all channels, and press
離開
key leave. (see PIC 15)
ViewSonic
N3276w-NT
/ N3776w-NT
/ N4276p-NT
N3277w-NT / N3777w-NT
/ N4277p-NT
ENGLISH

32
Update Channels
New channel will be added in the channel list.
① Press
key to select [Update Channels] option and press key to enter.(see
PIC 16)
②
Press
key to select RF channel, and press key to search new channels.
(see PIC 17)
PIC 16
INSTALLATION
choose option
return to main menu
Tuning Info
Update Channels
search for new channels
確認
離開
First Time Installation
Aerial Adjust
The aerial may now be adjusted for optimal signal.
Select RF channel
search for new channels
RF Channel:
No Signal
Strength:
Quality:
10%
10%
確認
exit
離開
Ch 14
SEARCHING
Number of channels found: 3
CH 26:
Strength: 8 Network: 公共電視網
公共電視 PTS
行動電視 DiMo
客家電視 HTV
save and exit
離開
PIC 17
PIC 19
SEARCHING
Searching complete- saving...
save and exit
離開
16 digital channels found
PIC 18
③ System will be automatically search all channels as PIC 18, then press
離開
key
to save and exit. (see PIC 19)
First Time Installation
It is very important to do channel searching before useing DTV system.
① Press
key to select [First Time Installation] option and press key to en-
ter.(see PIC 20)
②
Press
key to select RF channel, and press key to search new channels.
(see PIC 21)
PIC 20
INSTALLATION
choose option
return to main menu
Tuning Info
Update Channels
delete all and installation
確認
離開
First Time Installation
Aerial Adjust
The aerial may now be adjusted for optimal signal.
Select RF channel
search for new channels
RF Channel:
No Signal
Strength:
Quality:
10%
10%
確認
exit
離開
Ch 14
PIC 21
ViewSonic
N3276w-NT
/ N3776w-NT
/ N4276p-NT
N3277w-NT / N3777w-NT
/ N4277p-NT
ENGLISH

33
SEARCHING
Number of channels found: 3
CH 26:
Strength: 8 Network: 公共電視網
公共電視 PTS
行動電視 DiMo
客家電視 HTV
save and exit
離開
PIC 23
SEARCHING
Searching complete- saving...
save and exit
離開
16 digital channels found
PIC 22
③ System will be automatically search all channels as PIC 22, then press
離開
key
to save and exit. (see PIC 23)
MENU
choose option
exit menu
Channel Manager
System Information
Settings
system information
確認
離開
SYSTEM INFORMATION
return to menu
Serial number
Boot code
Application
7280.000c
EC1.00.001
TW0.09.028
20080409
確認
離開
PIC 24
PIC 25
3) System Information
System Information shows the current DTV MENU software information.
① Press
key to enter
[System Information] mode.
(see PIC 24)
②
Press
key to enter to see the DTV MENU software information. (see PIC 25)
ViewSonic
N3276w-NT
/ N3776w-NT
/ N4276p-NT
N3277w-NT / N3777w-NT
/ N4277p-NT
ENGLISH

34
1.Date and time: Show the current date and time by day/month/year(DD/MM/
YYYY).
2.Time range: EPG can show program list within 2 hour range. Current program will
be shown in the rst block.
3.Channel menu: Shows all channel name .
4.Program List : Descend the manifestation program name in time zone according to
the program length.
5.Program time and name: Display the program time and full name.
6.Program account: This block will present more detail information if any.
7.The following keys are relevant to the operation.:
「」key: browse the programs
「確認」key: select and change the program
「▲ 頻道 ▼」key: page up or down
PROGRAM GUIDE
10:10 10/10/2007
10/10/2007
11:00
change channel
browse programs
確認
10:00
台視國際台
華視休閒頻道
華視 CTS
綜藝歡樂 經典劇場-賽金花
因果劇場 寶島少女成功記
華視有夠 警世劇場
股市即時通台視 Mobile Radio
日文 甲上學園(甲上學園(甲上學園
華視教育頻道
10:00-10:30 日文
學習目標- 日語文字的種類及發音特色,逐步引領學習者進入日本文化的
殿堂,進而了解日本這個國家的語言、文字及文化。
科目簡介- 形容詞的基本用法
Program Guide
Press [GUIDE] key on the remote control and wait for few seconds, LCD Display will
show the program guide subpage.
The Program Guide can be devided into 7 parts: (see PIC 35)
PIC 35
ViewSonic
N3276w-NT
/ N3776w-NT
/ N4276p-NT
N3277w-NT / N3777w-NT
/ N4277p-NT
ENGLISH

35
Other Information
Specications
Display I/O ports
Active screen size 32,37,42 inches VGA input 1
Aspect ratio 16:9 AV input 2
Brightness 500 nits (Typ) S-Video input 1
37 inches Brightness 450 nits (Typ)
Component (YCbCr / YPrPb) video input
2
Maximum display resolution 1366*768 HDMI analog audio input 1
42 inches Maximum display resolution
1920*1080 PC audio in 1
32 inches Contrast ratio 1500:1 Composite audio output 1
37 inches Contrast ratio 2500:1 HDMI input 2
42 inches Contrast ratio 2000:1 Earphone 1
8000:1(dynamic)
1
Response time Tg:6.5ms (Typ) SPDIF output
Video Other
3D Progressive scan √ User manual √
3D Noise reduction √
3D Deinterlace √ Dimensions(WHD) 32” 796mm x582mm x233mm
3:2/2:2 PULL DOWN √ 37” 916mm x656mm x268mm
DLTI √ 42” 1024mm x726mm x329mm
DCTI √
Audio
Packing size(WHD) 32” 904mm x680mm x226mm
Speaker 2 37” 1040mm x765mm x260mm
Audio power 10w+10w 42” 1145mm x835mm x300mm
Stereo √
Audio mode 3 Net weight 32” 14.5 kg
SVC √ 37” 20.1 kg
SRS WOW √ 42” 28 kg
Function
Video mode 4 Gross weight 32” 18.5 kg
Audio setting √ 37” 26 kg
Sleep Timer √ 42” 32.5 kg
OSD lag 2
No signal auto off Power consumption 32” 180 w
(DTV not supported) 15 Min (Operation) 37” 220 w
42” 250 w
Stand by
1.5w
NOTE:
Specications subject to change without prior notice for future product improvements.
ViewSonic
N3276w-NT
/ N3776w-NT
/ N4276p-NT
N3277w-NT / N3777w-NT
/ N4277p-NT
ENGLISH

36
Troubleshooting
No power
• Make sure the Display and the power cord are connected correctly.
• Check if you pressed POWER on the remote control unit. If the indicator in the front
panel is red, press POWER in the remote control or the front control panel.
No picture
• Connect to local CATV system equipment, and make sure the signal is unlocked.
• Make sure the Display and the Audio/Video signal input devices are connected cor-
rectly .
f.
Strange color, light color, or color misalignment
• Is the room too bright? The picture may look dark in a room that is too bright.
• Check the input signal setting.
No sound
• Make sure the Mute function is not operated.
• When signal passed by the HDMI distribution amplier, that may result in this situation. Please enter OSD menu to select [Setup] mode and make DVI to HDMI.
Remote control unit does not operate
• Check if the batteries are inserted with the polarity(+,-)correctly aligned.
• Check if the batteries are discharged. Please replace with new batteries.
• Make sure that you do not use the remote control under strong or uorescent lighting.
• Check if there is a uorescent light illuminated near the remote control sensor.
• The path of the remote control beam may be blocked; please make sure the path is clear
and that remote control is aimed at the remote control sensor in the Display.
Power is cut off suddenly
• Check if the off timer or sleep timer are set.
• The unit’s internal temperature has increased. Remove any objects blocking the vents
and clean them to remove dust.
Picture is cut off /with side bar screen
• Check if the image position is correct.
• Check if the screen mode adjustments such as picture size are made correctly.
LCD Display does not operate
• External inuences such as lightning or static electricity may cause improper operation.
In this case, operate the unit after rst turning on the power, or plugging the AC cord
and plugging it in again after 1 to 2 minutes.
ViewSonic
N3276w-NT
/ N3776w-NT
/ N4276p-NT
N3277w-NT / N3777w-NT
/ N4277p-NT
ENGLISH
• In PC/HDMI Mode, after 15 seconds no signal input that screen will auto of

37
Customer Support
For technical support or product service, see the table below or contact your reseller.
Note: You will need the product serial number.
Country/Region
Address
T=Telephone
F= Fax
E-mail
Viewsonic International
Corporation
9F, No. 192, Lien Chen Road,
Chung Ho, Taipei 235, Taiwan,
R.O.C.
T= 886 2 2246 3456
F= 886 2 2249 1751
Toll Free= 0800 061 198
service@tw.viewsonic.com
ViewSonic
N3276w-NT
/ N3776w-NT
/ N4276p-NT
N3277w-NT / N3777w-NT
/ N4277p-NT
ENGLISH

38
Limited Warranty
VIEWSONIC® LCD TV
What the warranty covers:
ViewSonic warrants its products to be free from defects in material and workmanship, under normal use, during the warranty period. If a
product proves to be defective in material or workmanship during the warranty period, ViewSonic will, at its sole option, repair or replace the
product with a like product. Replacement product or parts may include remanufactured or refurbished parts or components.
How long the warranty is effective:
ViewSonic LCD TVs are warranted for 1 year for all parts excluding the light source and 1 year for labor from the date of the rst customer
purchase.
Who the warranty protects:
This warranty is valid only for the rst consumer purchaser.
What the warranty does not cover:
1. Any product on which the serial number has been defaced, modied or removed.
2. Damage, deterioration or malfunction resulting from:
a. Accident, misuse, neglect, re, water, lightning, or other acts of nature, unauthorized product modication, or failure to follow
instructions supplied with the product.
b. Repair or attempted repair by anyone not authorized by ViewSonic.
c. Any damage of the product due to shipment.
d. Removal or installation of the product.
e. Causes external to the product, such as electric power uctuations or failure.
f. Use of supplies or parts not meeting ViewSonic’s specications.
g. Normal wear and tear.
h. Any other cause which does not relate to a product defect.
3. Any product exhibiting a condition commonly known as “image burn-in” which results when a static image is displayed on the product for
an extended period of time.
4. Removal, installation, and set-up service charges.
5. When you mount it on the wall, the following must be noticed:
a. The accessories attached with this product are applicable for this product only.
b. When the product is mounted on the wall, holes and xed screws will remain in the wall body.
c. Wall face may discolor when this product has been mounted on the wall for a long time.
How to get service:
1. For information about receiving service under warranty, contact ViewSonic Customer Support (please refer to Customer Support page).
You will need to provide your product’s serial number.
2. To obtain warranted service, you will be required to provide (a) the original dated sales slip, (b) your name, (c) your address, (d) a
description of the problem, and (e) the serial number of the product.
3. Take or ship the product freight prepaid in the original container to an authorized ViewSonic service center or ViewSonic.
4. For additional information or the name of the nearest ViewSonic service center, contact ViewSonic.
Limitation of implied warranties:
There are no warranties, express or implied, which extend beyond the description contained herein including the implied warranty of
merchantability and tness for a particular purpose.
Exclusion of damages:
ViewSonic’s liability is limited to the cost of repair or replacement of the product. ViewSonic shall not be liable for:
1. Damage to other property caused by any defects in the product, damages based upon inconvenience, loss of use of the product, loss of
time, loss of prots, loss of business opportunity, loss of goodwill, interference with business relationships, or other commercial loss, even
if advised of the possibility of such damages.
2. Any other damages, whether incidental, consequential or otherwise.
3. Any claim against the customer by any other party.
Effect of state law:
This warranty gives you specic legal rights, and you may also have other rights which vary from state to state. Some states do not allow
limitations on implied warranties and/or do not allow the exclusion of incidental or consequential damages, so the above limitations and
exclusions may not apply to you.
Sales outside the U.S.A. and Canada:
For warranty information and service on ViewSonic products sold outside of the U.S.A. and Canada, contact ViewSonic or your local ViewSonic dealer.
The warranty period for this product in mainland China (Hong Kong, Macao and Taiwan Excluded) is subject to the terms and conditions of the
Maintenance Guarantee Card.
For users in Europe and Russia, full details of warranty providedcan be found in www.viewsoniceurope.com under Support/Warranty Information.
4.3: ViewSonic LCD TV Warranty LTV_LW01 Rev. 1C 06-25-07
ViewSonic
N3276w-NT
/ N3776w-NT
/ N4276p-NT
N3277w-NT / N3777w-NT
/ N4277p-NT
ENGLISH

7024750059611
 Loading...