

Page 1

ViewSonic
N3250w
LCD TV Display
®
- User Guide
- Guide de l’utilisateur
- Guía del usuario
ViewSonic
®
Page 2

Contents
Product Registration.................................................................2
For Your Records.....................................................................2
Important Product Safety Instructions......................................3
Antenna Installation Instructions...............................................4
Cleaning the LCD Display.................................................4
Getting Started
Package Contents....................................................................5
Front View of the Product.........................................................6
Rear View of the Product..........................................................7
Remote Control.........................................................................8
Installation.................................................................................19
Basic Operation.........................................................................27
OSD Functions
Source Input-TV, AV, S-Video, YCbCr Mode..........................28
Source Input-VGA, HDMI, YPbPr Mode..................................46
Other Information
Specifications...........................................................................49
Troubleshooting........................................................................50
Customer Support....................................................................51
Limited Warranty......................................................................52
Appendix
Safety Guidelines.....................................................................53
Compliance Information for U.S.A............................................54
E
N
G
L
I
S
H
ViewSonic N3250w 1
Page 3

Copyright © ViewSonic Corporation, 2005. All rights reserved.
ViewSonic, the three birds logo, OnView, ViewMatch, and ViewMeter are registered trademarks of
ViewSonic Corporation.
Disclaimer: ViewSonic Corporation shall not be liable for technical or editorial errors or omissions
contained herein; nor for incidental or consequential damages resulting from furnishing this material,
or the performance or use of this product.
In the interest of continuing product improvement, ViewSonic Corporation reserves the right to
change product specifications without notice. Information in this document may change without
notice.
No part of this document may be copied, reproduced, or transmitted by any means, for any purpose
without prior written permission from ViewSonic Corporation.
Product Registration
To meet your future needs, and to receive any additional product information as it becomes
available, please register your product on the Internet at: www .viewsonic.com.
For Y our Records
E
N
G
L
I
S
H
Product Name:
Model Number:
Serial Number:
Purchase Date:
ViewSonic N3250w
VS10769-1M
Product disposal at end of product life
ViewSonic is concerned about the preservation of our environment. Please dispose of this product
properly at the end of its useful life. Your local waste disposal company may provide information
about proper disposal.
ViewSonic N3250w 2
Page 4

IMPORTANT PRODUCT SAFETY INSTRUCTIONS
ATTENTION:
Follow and obey all warnings and instructions marked on your product and its operating instructions. For your safety,
please read all the safety and operating instructions before you operate this product follow its operating and keep this
user guide for future reference.
INSTALLATION
1. Grounding or Polarization
Your product may be equipped with a polarized alternating-current line plug (a plug having one blade wider than the
other). This plug will fit into the power outlet only one way. This is a safety feature.If you are unable to insert the
plug fully into the outlet, try reversing the plug. If the plug should still fail to fit, contact your electrician to replace your
obsolete outlet. Do not defeat the safety purpose of the polarized plug.
2. Overloading
Do not overload wall outlets, extension cords, or integral convenience receptacles as this can result in a risk of fire
or electric shock.
3. Power Cord Protection
Power supply cords should be routed so that they are not likely to be walked on or pinched by items placed upon or
against them, paying particular attention to cords at plugs, convenience receptacles, and the point where they exit
from the product.
4. Ventilation
Slots and openings around the cabinet are provided for ventilation.
To ensure reliable operation of the product and to protect it from overheating, these openings must not be blocked or
covered.
Do not block the openings by placing the product on a bed, sofa, rug or other similar surface.
Do not place the product in a built-in installation such as a bookcase or rack unless proper ventilation is provided or
the manufacturer's instructions have been adhered to.
5. Other Notice s
Avoid exposure the N3250w to direct sunlight or high temperature.
Avoid exposure the N3250w to moisture or high humidity.
Do not attempt repair yourself. Your warranty does not cover repair or attempted repair by anyone not authorized
by ViewSonic.
If your N3250w will not be used for a long period of time, unplug the power cord and remove the batteries from
the remote control.
E
N
G
L
I
S
H
6. Precautions
Sit at least 32" from your LCD display.
Avoid touching the screen. Skin oils are difficult to remove.
Never remove the rear cover. Your LCD display contains high-voltage parts. You may be seriously injured if you
touch them.
Avoid exposing your LCD display to direct sunlight or another heat source. Orient your LCD display away from direct
sunlight to reduce glare.
Always handle your LCD display with care when moving it.
Place your LCD display in a well-ventilated area. Do not place anything on your LCD display that prevents heat
dissipation.
Ensure the area around the LCD display is clean and free of moisture.
Do not place heavy objects on the LCD display, video cable, or power cord.
If smoke, abnormal noise, or strange odor is present, immediately switch the LCD display off and call your dealer or
ViewSonic. It is dangerous to continue using the LCD display.
ViewSonic N3250w 3
Page 5

ANTENNA INSTALLATION INSTRUCTIONS
1. Outdoor Antenna Grounding
If an outside antenna or cable system is connected to the product be sure the antenna or cable system is
grounded so as to provide some protection against voltage surges and built-up static charges, Article 810 of the
National Electrical Code, ANSI/NFPA 70, provides information with regard to proper grounding of the mast and
supporting structure, grounding of the lead-in wire to an antenna discharge unit, connection to grounding
electrodes, and requirements for the grounding electrode.
2. Lightning
For added protection for this product during a lightning storm, or when it is left unattended and unused for long
periods of time, unplug it from the wall outlet and disconnect the antenna or cable system. This will prevent
damage to the product due to lightning and power-line surges. Do not disconnect the antenna or the power cord
during a heavy storm lighting may strike while you are holding the cable cord, causing serious injury; turn off
you LCD and wait for the wether to improve.
3. Power Lines
An outside antenna system should not be located in the vicinity of overhead power lines or other electric light or
power circuits, or where it can fall into such power lines or circuits, When installing an outside antenna system,
extreme care should be taken to keep from touching such power lines or circuits as contact with them might be
fatal.
E
N
G
L
I
S
H
Cleaning the LCD Display
Make sure the LCD Display is turned off.
Never spray or pour any liquid directly onto the screen or case.
To clean the screen:
1 Wipe the screen with a clean, soft, lint-free cloth. This removes dust and other particles.
2 If still not clean, apply a small amount of non-ammonia, non-alcohol based glass cleaner onto a clean, soft,
lint-free cloth, and wipe the screen.
To clean the case:
1 Use a soft, dry cloth.
2 If still not clean, apply a small amount of a non-ammonia, non-alcohol based, mild non-abrasive
detergent onto a clean, soft, lint-free cloth, then wipe the surface.
Disclaimer
ViewSonic® does not recommend the use of any ammonia or alcohol-based cleaners on the LCD display screen or
case. Some chemical cleaners have been reported to damage the screen and/or case of the LCD display.
ViewSonic will not be liable for damage resulting from use of any ammonia or alcohol-based cleaners.
ViewSonic N3250w 4
Page 6

Getting Started
Congratulations on your purchase of a ViewSonic® LCD TV display. Important!
Save the original box and all packing material for future shipping needs.
Package Contents
Your LCD TV display package includes:
LCD TV Display
RCA A/V Cable
VGA Cable
Quick Start Guide
Power Cable
Universal Remote Control with batteries
V iewSonic User Guide
Note: contact VIEWSONIC
E
N
G
L
I
S
H
ViewSonic N3250w 5
Page 7

Front View of the Product
1 2 3 4 5
E
N
G
L
I
S
H
V olume Down
1
Decrease volume or adjust a highlighted control decreasingly while in OSD menu.
V olume Up
2
Increase volume or adjust a highlighted increasingly control while in OSD menu.
MENU
3
Turn OSD menu ON/OFF.
CH Down
4
Channel down/ Scroll down.
CH Up
5
Channel up/ Scroll up.
ENTER
6
Confirm selection.
Power button
7
87
6
8
Remote control receiver
ViewSonic N3250w 6
Page 8
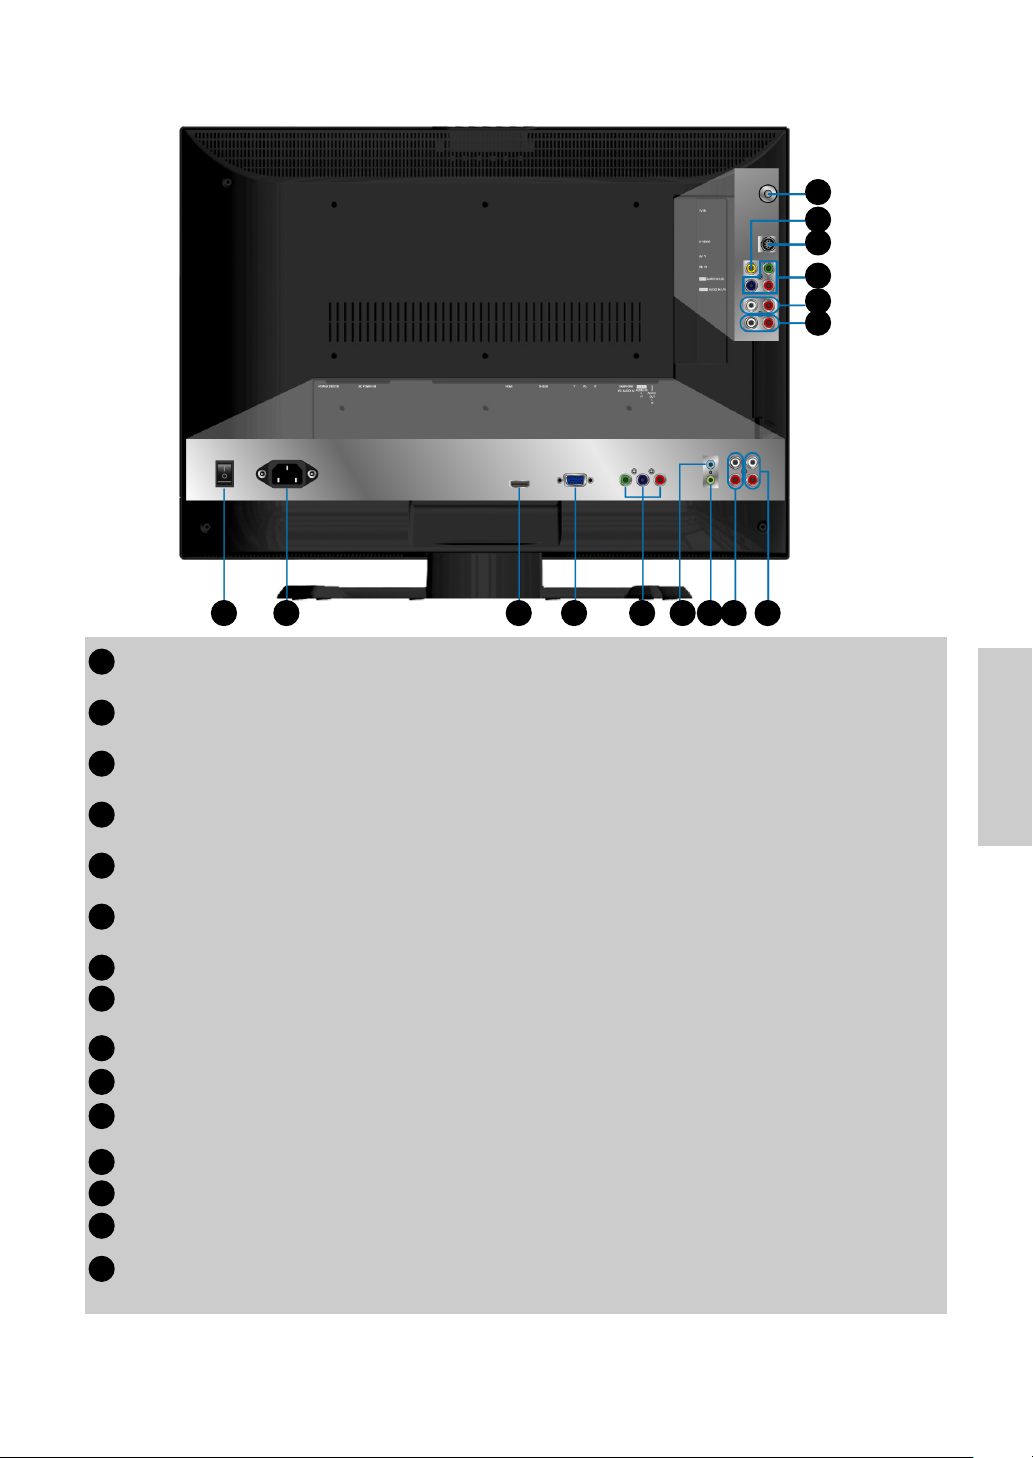
Rear View of the Product
A
B
C
D
E
F
J LK
G
TV signal input
A
Connect to the antenna or cable servic
A V Video input
B
Connect the external video devices such as VCR, DVD and video game into this jack.
S-Video input
C
Connect the external video device such as VCR, DVD and video game into this jack.
YCbCr signal input
D
Connect the external video device with component output to these jacks.
AV/ S-Video signal Audio input (left/right)
E
Connect the external audio into this jack.
YCbCr signal Audio input (left/right)
F
Connect the external audio into this jack.
AC power switch (Default = ON)
G
Power (AC input)
H
Using cable provided, connect to a power source.
I
HDMI signal input
VGA signal input
J
YPbPr signal input
K
Connect the external video devices with progressive component output to these jacks.
Earphone output (light blue)
L
M
PC Audio input (light green)
YPbPr signal Audio input (left/right)
N
Connect the external audio into this jack.
O
Audio output
Connect this port to your external speaker.
IH
e.
NM
O
E
N
G
L
I
S
H
ViewSonic N3250w 7
Page 9

Remote Control
E
N
G
L
I
S
H
ViewSonic N3250w 8
Page 10

Remote control button function as follow
Source button
A
*PIP/POP button (Guide)
B
*SLEEP button
C
Select Input Source
Activate PIP or POP feature (Activate Guide-WMA only)
Set timer to turn off TV
CC button ( Back)
D
Volume / Volume
E
MUTE button
F
POWER button
G
Device buttons
H
*PIP sub-buttons
I
0~100+ number button
J
*WIDE button
K
UP/DOWN/LEFT/ RIGHT/
L
ENTER button
Menu button
M
Channel / Channel
N
Close Caption (Back button-WMA only)
Adjust Volume
Mute On/Off
Power ON/OFF
Select desire device
P. Source: change PIP source
Swap: Change PIP to Main
CH+: Change channel
CH-: Change channel
Input channel number
Change Aspect Ratio
UP/DOWN for OSD function select and LEFT/
RIGHT for function adjust
VOL- and VOL+ button=adjust the volume when
there is no OSD menu display. CH- and CH+ =
change the channel on TV mode when there is no
OSD menu display (For certain models)
Display menu, hold for 2~3 seconds to exit OSD
menu.
Change channel for TV only
E
N
G
L
I
S
H
**Control buttons
O
***WMA buttons (MTS/AAP)
P
Note:
* This feature may not be supported under all models.
** For use on other device.
*** WMA adapters sold separately. Contact View Sonic for details.
Play/ Stop/ Pause/ Record/ Forward/ Rewind
Shortcut buttons for: Videos, Music, Pictures and
Radio Menu
ViewSonic N3250w 9
Page 11

Key ”Defaults”
The ‘default’ out of box setting enables the Remote to control a predetermine TV, DVD,
STB, VCR, VPB, WMA and AUD.
Depending on Device desire the following model will be active.
Device
TV
DVD
STB
VCR
VPB
WMA
AUD
Default Setting
ViewSonic
Samsung
RCA
Sony
ViewSonic
ViewSonic WMA-100
Sony
Note: Multiple pre-programmed codes are available for some devices; if default setting
does not function, see pre-programmed table for additional codes.
E
N
G
L
I
S
H
Resetting Remote
To reset remote and access default settings press and hold desire device button for
roughly six seconds and enter three digit reset code 000.
Replace batteries if remote control keys are not functioning properly, this is a normal
behavior that indicates batteries are low.
ViewSonic N3250w 10
Device
Buttons
Page 12

Basic Setup
1 Power on the A/V component you wish to setup, so that you can test codes by
sending power off commands.
2 Refer to the Pre-programmed code tables on pages 2-3 and write down the code
number listed.
3 Press and hold the button for the desire device for approximately six seconds. The
top LED will turn on, enter pre-programmed code. LED will blink to indicate preprogrammed code was captured code was captured correctly.
LED
Pre-Programmed Code Notes
Record the three digit codes for your device here:
TV
DVD
STB
_________
_________
_________
VPB
WMA
AUD
_________
_________
_________
Device
Buttons
E
N
G
L
I
S
H
VCR
_________
AUX
_________
ViewSonic N3250w 11
Page 13

AUX Key Setup
The AUX key is used to operate a
second TV, DVD, STB, VCR, VPB,
WMA, and AUD. A fourth digit is
AUX
Buttons
necessary to identify the type of
device the key will control.
TV = 1 VPB = 5
DVD = 2 WMA = 6
For example, to control a Sony DVD player with a code
of 027 under the AUX key a 2 must be added in the
beginning of the pre-programmed code making it 2027.
If user wants to control a Philips STB with a 006 code
STB = 3 AUD = 7
VCR = 4
under the AUX key a 3 must be added in the beginning
of the pre-programmed code making it 3006.
To enter the pre-programmed code press and hold the AUX button for approximately six
seconds. The top LED will turn on, enter the pre-programmed code with the first digit to
indicate the type of device. LED will blink to indicate pre-programmed code was captured
correctly.
E
N
G
L
I
S
H
LED
AUX
Buttons
ViewSonic N3250w 12
Page 14

Pre-Programmed Code Tables
ViewSonic LCD TV’s and Plasmas
BRAND CODE
N1700W 001
N1300 002
N1500 003
N1750W 004
N2010 005
N2010-E 006
N2700W 007
N2750W 008
N3020W 009
N3200W 010
N3200W-E 011
VPW4255 012
VPW5500 012
N2000 014
N3000W 015
DVD Players-1
BRAND CODE
Aiwa 001, 033, 051, 118
Aiba 002, 037
Apex 046, 059, 060, 062, 063,
084, 085, 086
Audiovox 119
Blaupunkt 104, 123
Bose 113, 117
Broksonic 052
Bush 003
Clarion 097
Classic 098
CyberHome 004, 005
Daewoo 006, 124,125
Dansai 007
Denon 034, 120, 140, 141
Emerson 099, 100
Fisher 101, 121
Funai 100, 114
GE 064, 102, 146
Go Video 055, 057
Goodmans 038
GPX 103
DVD Players-2
Grundig 008, 009
Harman Kardon 116
Hitachi 010, 054, 115
Irradio 137
JVC 011, 039, 066, 069, 070,
071, 072
Kenwood 031, 142, 145
Koss 138
LG 012, 040, 041
Magnavox 077, 091
Marantz 130
Memorex 132
Mintek 104
Mitsubishi 133, 134, 135, 136
Mustek 013, 035
NAD 012, 099, 126
Nakamichi 105
Norcet 106, 107
Onkyo 127, 131
Oritron 108
Panasonic 014, 015, 016, 017, 032,
067, 092, 093
Phillips 018, 019, 061, 068, 078,
079, 080, 096
Pioneer 020, 083, 088
Proscan 064, 144
Qwestar 108
RCA 064, 081, 094
Sampo 109
Samsung 000, 021, 042, 047, 049,
065, 089
Sansui 111
Sanyo 023, 036, 053, 110
Scott 024
SEG 025, 043
Sharp 026, 043
Sherwood 112
Sony 027, 028, 044, 074, 075,
090, 095
Sylvania 058, 100, 122
Techwood 128
Thomson 022
Toshiba 029, 045, 048, 050, 076,
082
Yamaha 030, 092, 129, 143
Zenith 056, 139
E
N
G
L
I
S
H
ViewSonic N3250w 13
Page 15

STB - Set Top Box
BRAND CODE
Akai 019
Alba 005, 006, 007
Allsat 019
Alphastar 057
Amstrad 001
Ankaro 012
Anttron 005
Apollo 005
Armastrong 010
Asat 019
Astra 010, 013
Astro 007, 008, 012, 015
AudioTon 007
Best 012
Blaupunkt 015
Brain Wave 016
BSkyB 001
Bush 006, 017
Chaparral 054
CityCom 006
E
N
G
L
I
S
H
Clatronic 016
Condor 012
Crown 010
Daeryung 014
Dish Network 038
DNT 014, 019
Drake 056
Echostar 014, 021, 038, 055
Einhell 005, 010
Elta 005, 012
Emme Esse 012, 017
Ep Sat 006
Eurosat 010
Eurosky 010, 012
Eurostar 010
Express Vu 038
Ferguson 006, 017, 025
Finlandia 006
Finlux 006, 013
Fuba 005, 012, 014, 015, 019
Fujitsu 052
Galaxis 012
GE 031, 040, 041
General Instruments
GMI 010
Goodmans 006
Granada 013
048, 049
Grundig 001, 006, 007, 015, 017,
024
Hanseatic 018
Hirschmann 015
Hisawa 016
Hitachi 006, 017, 053
Hughes 053
Huth 010, 016
Intertronic 010
Janeil 052
Johansson 016
JVC 045
Kathrein 015, 019, 026
KR 007
Kreiselmeyer 015
Kyostar 005
Lasat 008
Lenco 005
Luxor 013
Macab 025
Manhattan 006, 008, 017
Marantz 019
Mascom 008
Maspro 006, 017
Mediamarkt 010
Medion 012, 018, 021, 022
Metronic 005, 007, 008, 028
Metz 015
Minerva 015
Mitsubishi 006, 015, 030
Morgan’s 010, 019
Nikko 010
Nokia 006, 013, 017, 020
Nordmende 005, 006, 008, 025
Novis 016
Octagon 005, 007
Okano 010
Orbitech 005
Otto Versand 015
Pace 001, 006, 015, 017
Palladium 010
Panasonic 001, 006, 017, 032, 034
Panda 006
Philips 006, 011, 017, 019, 023,
029, 058
Phonotrend 006
Predki 016
Proscan 040, 041
Provision 008
Quadral 012
ViewSonic N3250w 14
Page 16

Quelle 015
Radio Shack 048, 049
Radiola 019
Radix 014
RCA 000, 040, 041
Realisitic 044
RFT 019
Saba 008, 017
Sabre 006
Sagem 025
Salora 013
Samsung 005, 035, 057
Satcom 016, 018
SatPartner 005, 007, 008, 016
Schneider 012, 021, 022
Seemann 010, 014
SEG 005, 009, 012, 016, 018
Siemens 015
Skymaster 018, 021, 022, 027
Sony 043, 059
Star Trak 051
Strong 005, 007, 012
STS 050
Sunstar 010
Tandberg 025
Tandy 007
Tantec 006, 017
TechniSat 014
Teco 010
Telasat 018
Telefunken 005, 017
Teleka 007, 010, 014
Telemaster 008
Telesat 018
Televes 006
Thomson 002, 003, 004, 006, 025
Thorn 006, 017
Tonna 006
Toshiba 036, 042
Triax 015
Uniden 046, 047
Unisat 010
Unitor 016
Universum 015
Visiosat 016
Vortec 005
Wewa 006
Womersat 016
Wisi 006, 014, 015
Zehnder 008, 012, 028
Zenith 033, 037, 052
Cable
BRAND CODE
ABC 006, 067, 069, 105
Archer 072, 073
Cabletime 060
Contec 078
Eastern 079
France Telecom 061
GE 066
Gemini 080, 081
General Instrument
Grundig 062
Hamlin 082, 083, 084, 089, 106
Hitachi 066
Jerrold 066, 080, 085, 086, 101,
105, 107
Magnavox 087
Motorola 108
NEC 068
Nokia 063
Panasonic 102, 104
Philips 064, 074, 075, 076, 077,
081, 087, 091, 092, 093
Pioneer 094, 095
Proscan 066
RCA 070, 104, 107
Realistic 072
Sagem 065
Samsung 095
Scientific Atlanta 069, 096, 097, 098
Signature 066
Sprucer 104
Starcom 080, 105
Stargate 080
Tocom 067, 085
United Cable 105
Universal 071, 072, 073
Zenith 103
066, 107
E
N
G
L
I
S
H
ViewSonic N3250w 15
Page 17

VCR
BRAND CODE
Action 102
Admiral 101, 144, 145
Aiko 127
Aiwa 005, 126
Audiovox 122
Bell & Howell 119
Broksonic 059, 105, 120
Calix 122
Canon 124, 125
Capehart 083, 138
Carver 131, 151
CCE 127, 130
Citizen 095, 121, 122, 123,
127
Colortyme 096, 117
Craig 085, 090, 104,121,
122, 130
Curtis Mathes 077, 079, 114, 117
121, 124, 125, 150
Daewoo 006, 007, 083, 102,
E
N
G
L
I
S
H
123, 126, 127, 138
Daytron 083, 102, 138
Denon 088
Dimensia 114, 150
Electrohome 090, 122
Emerson 087, 090, 105, 115,
120, 122, 123, 124
126, 132, 140
Fisher 089, 104, 119
Fuji 116, 124
Funai 095, 126
Gerrard 126
GE 065, 079, 081, 087,
114, 121, 124, 125,
141,150
Go Video 054, 056, 071, 072,
074, 079, 081, 085,
086
Goldstar 079, 090, 092, 117,
122
Gradiente 090, 126
Harman Kardon 117, 151
Harwood 130
Hitachi 008, 009, 053, 062,
063, 088, 128, 129,
136, 139, 141
JBL 098
JC Penney 079, 085, 088, 090,
117, 118, 119, 120
121, 122, 124, 125,
128, 129, 130, 131,
136
Jensen 128, 129, 139
JVC 010, 011, 040, 043,
058, 087, 088, 117,
118, 119, 139, 142
Kenwood 077, 117, 118, 119,
139, 142
KLH 130
Kodak 122, 124
LG 012, 013, 122
Lloyds 077, 095, 104
Loewe 037
Logik 085, 130
LXI 122
Magnasonic 085, 090, 102
Magnovox 069, 085, 124, 125,
131, 135
Marantz 077, 092, 117, 118
119, 124, 131, 151
Matsushita 124
Memorex 073, 088, 090, 091,
097, 104, 119, 121,
122, 124, 126, 135,
144, 145
MGA 132, 140
MGN 079
Minolta 088, 128, 129, 136
Mitsubishi 014, 066, 068, 090,
128, 129, 132, 140
142, 152
Montgomery Ward 144, 145
Motorola 124, 144, 145
MTC 085, 121
Multitech 121, 126, 130
NEC 077, 092, 117, 118,
119, 139, 142
Nikko 122
Noblex 121
Olympus 124
Optimus 090, 094, 122, 144,
145
Optonica 133
Orion 087, 090, 105
Panasonic 015, 016, 017, 018,
019, 020, 021, 037,
044, 067, 070, 085,
090, 104, 105, 124,
125, 137
ViewSonic N3250w 16
Page 18

Pentax 077, 088, 128, 129,
136, 141
Philips 022, 023, 024, 025,
026, 027, 076, 110,
111, 124, 131, 133,
151
Pioneer 078, 103, 118, 128,
142, 146
Portland 083, 138
Precision 102
Proscan 114, 150
Proton 085
Quasar 090, 124, 125
Radio Shack 090, 122, 133, 145
Radio Shack/Realistic
125, 126, 133, 144
Radix 122
RCA 048, 051, 078, 079,
088, 114,115, 121,
124, 128, 129, 136,
141, 148, 149, 150
Realistic 079, 090, 094, 097,
104, 119, 121, 122,
123, 124, 125, 126,
133, 144, 145
Ricoh 143, 147
Runco 135
Saba 038, 039
Samsung 028, 029, 057, 060,
079, 095, 107, 109,
121, 123
Sansui 085, 118, 139, 142
Sanyo 030, 052, 089, 097,
104, 119, 121, 151
Scott 090, 120, 123, 132
Sears 077, 088, 089, 090,
097, 104, 119, 122,
124, 128, 129, 136
Sharp 041, 042, 049, 050,
091, 094, 101, 133,
144, 145
Shintom 085, 116, 129, 130
Signature 144, 145
Signature 2000 097, 101
Singer 085, 124, 130, 143,
147
Sony 000, 001, 002, 003,
004, 045, 075, 080,
082, 084, 098, 099,
116, 134
STS 124, 136
Sylvania 061, 112, 124, 125,
126, 131, 132, 151
119, 121, 122, 124,
Symphonic 077, 095, 104, 126
Tandy 119
Tashiko 122
Tatung 139
Teac 126, 139, 148
Technics 124, 137
Teknika 090, 122, 124, 126
Thomson 031, 032, 035, 036,
038
Tivo 113
Toshiba 033, 034, 046, 047,
100, 102, 104, 106,
123, 128, 132, 140
Totevision 090, 121, 122
Unitec 095
Unitech 121
Vector Research 077, 117, 118, 123
Video Concepts 077, 117, 118, 123,
140
Wards 079, 090, 091, 094,
104, 121, 122, 123,
124, 126, 128, 129,
130, 133, 136, 144,
145, 149,
White Westinghouse 095
XR-1000 124, 126, 130
Yamaha 077, 117, 118, 119
139
Zenith 055, 064, 090, 093,
116, 135, 143, 147
VPB
BRAND CODE
Next Vision N4 001
Next Vision N5 002
Next Vision N5-2 006
Next Vision N5-2E 007
Next Vision N6 003
Next Vision HD10 004
Next Vision HD12 005
WMA
BRAND CODE
WMA100 013
ViewSonic N3250w 17
E
N
G
L
I
S
H
Page 19

AUD
BRAND CODE
Aiwa 024, 041, 063
Akai 013
Bose 039
Carver 075
Curtis Mathes 065
Denon 001, 053, 054, 059, 076
Fisher 005, 066, 068, 073
GE 030
Goodmans 013
Gradiente 086
Harman Kardon 002, 025, 052, 070
Hitachi 003, 083
JBL 025
Jensen 085
Jerrold 026, 028
JVC 004, 050, 057
Kenwood 005, 055, 058, 072, 080
Luxman 088
Marantz 042
Mclntosh 082
E
N
G
L
I
S
H
NAD 064
Nakamichi 078
NEC 064
Nikko 087
Onkyo 006, 044, 048, 079
Optimus 065, 071
Panasonic 032, 033, 051, 056, 062,
074, 091
Philips 007, 037, 038, 040
Pioneer 008, 035, 045, 049, 065,
069
Proscan 030
Quasar 074
Radio Shack 071
RCA 029, 030, 031, 034
RCA & Dimensia 019, 020, 021, 022, 023
Roadstar 013
Saisho 013
Samsung 009
Sansui 013, 081
Sanyo 066, 068
Scientific Atlanta 027
Sharp 010, 084
Sherwood 011, 071
Sony 000, 012, 046, 060, 067
Starcom 026
Technics 014, 043, 047, 074
Thomson 015, 016
Toshiba 036
Uher 013
Yamaha 017, 018, 061, 072,077
Zenith 089
ViewSonic N3250w 18
Page 20

Installation
1. Insert Re mote Control Batteries
1 Remove the battery cover by pulling then lifting the knob on the cover.
2 Insert the batteries, corresponding to the (+) and (-) markings on the battery compartment.
3 Reattach the battery cover.
CAUTION
Only use the specified AA batteries.
Do not mix new and old batteries. This may result in cracking or leakage,
which may pose a risk of fire or lead to personal injury.
Insert batteries according to (+) and (-) markings. Inserting the batteries incorrectly may result in cracking or leakage, which may pose a risk of fire or lead to
personal injury.
Dispose of the battery in accordance with local laws and regulations.
Keep the battery away from children and pets.
When the remote control will not to be used for an extended period, remove
the batteries.
2. Connecting with the antenna
Make sure the power is off before installing N3250w.
Connect the LCD TV to TV antenna terminal or CATV box by 75-ohm coaxial cable.
E
N
G
L
I
S
H
RF Cable or Adapter
(cable not supplied)
ViewSonic N3250w 19
Page 21

3. Connect Audio Cable
Connect Video/Audio cables from compatible devices into the back panel of N3250w.
Audio in Cable
(Cable not supplied)
Stereo system
OPTIONAL:
To connect an external amplifier, connect the L/R RCA cable from the TV AUDIO OUT
E
N
G
L
I
S
H
port to the appropriate AUDIO IN port on a compatible amplifier as shown on the right.
4. Connect AV, S-Video, YCbCr, YPbPr, HDMI to Video Devices
Connect Video/Audio cables from compatible devices into the back panel of N3250w.
AV model:
ViewSonic N3250w 20
RCA A/V Cable
VCR
Page 22

S-Video model:
S-Video Cable
(Cable not supplied)
Audio in Cable
(Cable not supplied)
VCR
YCbCr model:
YCbCr Cable
(Cable not supplied)
DVD Palyer or VCR
E
N
G
L
I
S
H
Audio in Cable
(Cable not supplied)
ViewSonic N3250w 21
Page 23

YPbPr model:
YPbPr Cable
(Cable not supplied)
Audio in Cable
(Cable not supplied)
DVD Palyer or VCR
HDMI model:
There are two possible HDMI cable terminals of your DVD player. Please refer to one of
E
N
G
L
I
S
H
the connection that fits for your requirement.
(1) HDMI-DVI cable
Audio Cable
(Cable not supplied)
DVD Palyer
(DVD Palyer should have the HDMI output terminal)
HDMI Cable (Cable not supplied)
Note: To receive the sound from DVD, please turn on Sound Menu of OSD for selecting
HDMI audio to YCbCr. However, the input source should be in in HDMI (see Page 44).
ViewSonic N3250w 22
Page 24

(2) HDMI cable
(DVD Palyer should have the
DVD Palyer
HDMI output terminal)
HDMI Cable (Cable not supplied)
Note: To receive the sound from DVD, please turn on Sound Menu of OSD for selecting
HDMI audio to HDMI. However, the input source should be in in HDMI (see Page 44).
5. Connect to the PC
VGA (15pin D-Sub):
Connect the VGA cable from VGA output of PC to the VGA terminal input of N3250w.
PC up to 1280 x 1024, or 1360 x 768 is the preferred resolution.
PC
E
N
G
L
I
S
H
VGA 15 Pin Cable
ViewSonic N3250w 23
Page 25

PC Audio in:
Connect the Audio In cable (green) from audio output of your PC to the audio input
terminal (green) of N3250w.
PC
PC Audio in Cable
(Cable not supplied)
E
N
G
L
I
S
H
HDMI:
Connect the HDMI cable from HDMI output of PC to the DVI terminal input of N3250w.
PC
ViewSonic N3250w 24
HDMI Cable (Cable not supplied)
Page 26

Earphone:
Connect Earphone from compatible devices into the back panel of N3250w.
Earphone
(Earphone not supplied)
6. Connect power cable
Connect the power cord to the N3250w then to a properly grounded AC outlet. Turn on
the AC Switch on the back of N3250w
E
N
G
L
I
S
H
AC wall socket
AC Switch
Switch to ON
ViewSonic N3250w 25
Page 27

7. Turn Power ON
Press the Power
button under the
LCD TV, or press
the Power On
(red) button on
the Remote
Control. Turn
Video source
power ON.
8. Select input source for your LCDTV display, via either OSD menu or
Remote control
The Source key of N3250w is the shortcut key for input selection.
TV key of remote control is a shortcut for TV selection.
E
N
G
L
I
S
H
ViewSonic N3250w 26
Page 28

Basic Operation
To operate the function of your LCD TV, you can use your remote control or
those buttons above your LCD TV to set input source, change channels, or
adjust volume.
Turning on the LCD TV
Before using the LCD TV:
1. Insert the power plug.
2. Connect external equipment properly.
3. Turn on the Main AC Power Switch, located on the rear of the cabinet. (If the
LCD TV will not be used for a long period of time, please turn it off)
Power On/Off
To turn the LCD TV on/off :
Press the POWER button under the LCD TV or press the Power button on your
remote control to turn on/off the TV. The power LED indicator lights up when the
LCD TV is on.
Select input source
To select the required input sources. Use to move the cursor bar, and select
by pressing Enter.
VOLUME Adjusting
Press or VOL-/+ to adjust the volume.
To silence the volume, press MUTE.
If you want to restore volume, press MUTE again, or press directly.
E
N
G
L
I
S
H
VOLUME
20
Channel Select
Press number key, CH-/+ key or button to select your desired channel.
If your desired channel is below 100, directly press number key. If your desired
channel is over 100, press 100 key first, and then press the other two number
keys.
Ex: Your desired number is 8.
Press 0 press 8 or press 8 only.
Ex: Your desired number is 110.
Press 100 press 1 press 0.
Retnrn to last channel, press RECALL.
ViewSonic N3250w 27
Page 29

OSD Functions
Press MENU to turn on OSD menu.
To move the cursor bar, please use CH to select your desired item, and
then press ENTER. In addittion, you can adjust the volume by using VOL”+”
or “-”.
Press to adjust the condition.
Press MENU again to get into next page of OSD menu.
Ex: When in page 1, press MENU for one time to get into page 2; two times to
get into page 3.
Press MENU for two or more seconds to turn off OSD menu
Source Input: TV
Page 1
Page 2
Page 3
Page 4
Page 5
Page 6
E
N
G
L
I
S
H
Page 7
BRIGHTNESS
CONTRAST
SHARPNESS
COLOR
TINT
FILM MODE
ASPECT RATIO
3D COMB
NR FUNCTION
COLOR TEMPERATURE
PICTURE MENU
INPUT SELECT
PIP/POP MENU
SETUP MENU
TV MENU
SOUND MENU
PARENTAL CONTROL
PICTURE MENU
AUTO
16:9
ON
MEDIUM
MEDIUM
Source Input: AV, S-Video, YCbCr
Page 1
Page 2
Page 3
Page 4
Page 5
Page 6
PICTURE MENU
INPUT SELECT
PIP/POP MENU
SETUP MENU
SOUND MENU
PARENTAL CONTROL
50
50
38
50
50
: SELECT
: ADJUST
MENU : NEXT PAGE
How to adjust the desired items:
Use to move cursor bar up and down Use to adjust or select the item
press ENTER to confirm the selection.
ViewSonic N3250w 28
Page 30

BRIGHTNESS: To adjust the luminance of the image. (right: Max, left: low)
CONTRAST: To adjust the contrast ratio of the image. (right: high contrast, left:
low contrast)
SHARPNESS: To adjust the sharpness of image. (right: sharpen, left: soften)
COLOR: To adjust color saturation. (right: brilliant color, left: pale color)
TINT: To adjust the video hue level. (right: more greenish tone, left: more reddish
tone)
FILM MODE: To automatically convert the 24 film frame to the 60-field NTSC TV
signal for viewing a motion picture on the TV. .
ASPECT RATIO: To select the image size for 16:9 or 4:3 with .
3D COMB: To provide high quality images with minimal dot crawl and cross color
noise. (It is inactive when input source is S-video or YCbCr)
NR FUNCTION: To reduce the noise in picture.
COLOR TEMPERATURE: To select the color temperature between warm
redder, medium neutral, or cool bluer.
Press MENU again to get into next Menu (INPUT SELECT).
Source Input: TV
Page 1
Page 2
Page 3
Page 4
Page 5
Page 6
Page 7
TV
AV
S_VIDEO
YCBCR
YPBPR
HDMI
VGA
PICTURE MENU
INPUT SELECT
PIP/POP MENU
SETUP MENU
TV MENU
SOUND MENU
PARENTAL CONTROL
INPUT SELECT
MAIN: TV SUB: VGA
Source Input: AV, S-Video, YCbCr
Page 1
Page 2
Page 3
Page 4
Page 5
Page 6
PICTURE MENU
INPUT SELECT
PIP/POP MENU
SETUP MENU
SOUND MENU
PARENTAL CONTROL
E
N
G
L
I
S
H
ENTER : ENTER: SELECT
MENU : NEXT PAGE
ViewSonic N3250w 29
Page 31

This page is to select your input sources, such as TV, AV,S-VIDEO, YCbCr, YPbPr,
HDMI, and VGA.
How to select the input sources:
Use to move cursor bar up and down ENTER to input the desired item.
Press MENU again to get into next Menu (PIP/POP MENU).
Source Input: TV
Page 1
Page 2
Page 3
Page 4
Page 5
Page 6
Page 7
SUB INPUT
E
N
G
L
I
S
H
MODE DISABLE
PICTURE MENU
INPUT SELECT
PIP/POP MENU
SETUP MENU
TV MENU
SOUND MENU
PARENTAL CONTROL
PIP/POP MENU
Source Input: AV, S-Video, YCbCr
Page 1
Page 2
Page 3
Page 4
Page 5
Page 6
VGA
PICTURE MENU
INPUT SELECT
PIP/POP MENU
SETUP MENU
SOUND MENU
PARENTAL CONTROL
: SELECT
: ADJUST
MENU : NEXT PAGE
PIP/POP Menu allows you watch two screens from different sources at the same
time. There are two kinds of screen for selection—PIP or POP screen.
How to select the desired items:
Use to move cursor bar up and down Use to select your desired item
Press ENTER to input the instruction.
SUB INPUT: To select sub-screen input sources of PIP/POP. In PIP Menu, the
input sources of sub-screen are specially designated as following,
The input sources in TV/ AV/ S-Video/ YCbCr mode are VGA YPbPr and HDMI.
MODE: To select PIP or POP screen with . If you want to return to the full
main screen, select “Disable.”
ViewSonic N3250w 30
Page 32

PIP Screen POP Screen
When selecting PIP , it will show the other items to offer the adjusting function—
SUB INPUT, MODE, AUDIO, SWAP, PIP SIZE, and PIP POSITION as following:
PIP/POP MENU
SUB INPUT
MODE PIP
AUDIO MAIN
SWAP
PIP SIZE
PIP POSITION
: SELECT
: ADJUST
MENU : NEXT PAGE
VGA
100
1
AUDIO: To select the source of sound: from main screen or sub-screen.
SWAP: To exchange main screen to sub-screen, including video and sound.
Press to swap them.
E
N
G
L
I
S
H
PIP SIZE: To adjust the size of sub-screen. The function only acts on PIP.
PIP POSITION: To set the position of sub-screen. This function only acts on PIP.
ViewSonic N3250w 31
Page 33

PIP/POP MENU
E
N
G
L
I
S
H
SUB INPUT
MODE POP
AUDIO MAIN
SWAP
: SELECT
: ADJUST
MENU : NEXT PAGE
VGA
When selecting POP, it will show the other items to offer the adjusting function—
SUB INPUT, MODE, AUDIO, and SWAP.
Press MENU again to get into next Menu (SETUP MENU).
ViewSonic N3250w 32
Page 34

Source Input: TV
Source Input: AV, S-Video, YCbCr
Page 1
Page 2
Page 3
Page 4
Page 5
Page 6
Page 7
OSD POSITION-H
OSD POSITION-V 50
OSD TIME OUT 25
TRANSPARENCY 13
OSD COLOR COLOR 1
LANGUAGE ENGLISH
MEMORY RECALL
PICTURE MENU
INPUT SELECT
PIP/POP MENU
SETUP MENU
TV MENU
SOUND MENU
PARENTAL CONTROL
SETUP MENU
: SELECT
: ADJUST
Page 1
Page 2
Page 3
Page 4
Page 5
Page 6
50
MENU : NEXT PAGE
PICTURE MENU
INPUT SELECT
PIP/POP MENU
SETUP MENU
SOUND MENU
PARENTAL CONTROL
E
N
G
L
I
S
H
OSD POSITION-H: To adjust the horizontal position of OSD.
OSD POSITION-V: To adjust the vertical position of OSD.
OSD TIME OUT: To setup the displaying time of OSD.
TRANSPARENCY: To adjust the transparency of OSD.
OSD COLOR: To select your favorite OSD color.
LANGUAGE: To select OSD Language.
MEMORY RECALL: Recall factory pre-sets.
Press MENU again to get into next Menu (TV MENU in TV Mode, SOUND
MENU in AV, S-Video, YCbCr Mode).
ViewSonic N3250w 33
Page 35

(It does not function in any other mode except in TV mode)
Source Input: TV
Page 1
PICTURE MENU
TV MENU
Page 2
Page 3
Page 4
Page 5
Page 6
Page 7
INPUT SELECT
PIP/POP MENU
SETUP MENU
TV MENU
SOUND MENU
PARENTAL CONTROL
MTS
TV/CATV SELECT CABLE
AUTO SCAN
SET CHANNEL 00
CHANNEL
LABEL
SLEEP
: SELECT
: ADJUST
STEREO
ADD
OFF
MENU : NEXT PAGE
132FINE TUNE
MTS: The function is to provide the multi-channel TV sound. The system with
E
N
G
L
I
S
H
MTS can receive Dual, Stereo, SAP(Secondary Audio Program), or Mono sound.
Both Stereo and Mono sound receive from TV broadcasts in main sound.
However, the SAP feature permits the TV station to broadcast other information,
so that it can be audio in another language. With Dual sound, you can enjoy the
main sound (normal program soundtrack) and the second language at the same
time.
TV/CATV SELECT: To select TV signal input from Cable or Air.
AUTO SCAN: To auto scan the TV channels (TV or CATV).
1. Function: To automatically preset the channels into TV. Kindly suggest
you auto scan all the channels before watching your TV for the first time.
2. After auto scan all the channels, you need not to do it again when turning on
your TV next time.
SET CHANNEL: To select your desired channels by .
CHANNEL: To add or delete the appointed TV channel.
How to do?
1. Use the function “SET CHANNEL” to select the desired channel.
2. Move your cursor bar to CHENNEL by using .
3. Press or one time to add or delete the appointed channel.
4. Press ENTER to confirm the selection.
Ps. After input the instruction of Add/Del Channel, as running the channels by using with
your remote control, the channel you deleted will be passed over, and the channel you added
will be shown up.
To restore the deleted channels, you may add the channels by Add function, or
by Auto Scan to preset them.
LABEL: To set a name for the channel with 0~9 and A~Z.
ViewSonic N3250w 34
Page 36

How to set a name for the channel?
1. Move your cursor bar to LABEL by using .
2. Press to get into the CHANNEL LABEL page.
3. Use or to pick up the numbers or letters, and then press ENTER to
input the words.
4. After setting a name, move your cursor to SAVE then press ENTER for
saving the input.
How do I cancel the name?
1. Get into the CHANNEL LABEL page (see above instruction).
2. Move your cursor by using to select the “blank,” which is the last in the
line of numbers, exactly beside “ --.“
3. Press ENTER several times to delete the name.
TV MENU
CHANNEL LABEL
B
SAVE&EXIT
: SELECT
: SELECT
ENTER : ENTER
MENU : NEXT PAGE
E
N
G
L
I
S
H
FINE TUNE: To improve TV channel reception when needed. Use to move
your cursor to Fine Tune, then press to adjust it.
SLEEP TIME: To set up the off timer. There are several kinds of timing to
choose: 10 min, 20 min, 30min, 40 min, 50 min, and 60min.
To turn off sleep time function, choose Off.
Press MENU again to get into next Menu (SOUND MENU).
ViewSonic N3250w 35
Page 37

Source Input: TV
Source Input: AV, S-Video, YCbCr
Page 1
Page 2
Page 3
Page 4
Page 5
Page 6
Page 7
VOLUME
BASS 50
TREBLE 50
BALANCE 50
SRS WOW ON
TruBass 50
E
N
G
L
I
S
H
PICTURE MENU
INPUT SELECT
PIP/POP MENU
SETUP MENU
TV MENU
SOUND MENU
PARENTAL CONTROL
SOUND MENU
: SELECT
: ADJUST
Page 1
Page 2
Page 3
Page 4
Page 5
Page 6
20
MENU : NEXT PAGE
PICTURE MENU
INPUT SELECT
PIP/POP MENU
SETUP MENU
SOUND MENU
PARENTAL CONTROL
VOLUME: To adjust the volume.
BASS: To adjust the bass.
TREBLE: To adjust the treble.
BALANCE: To adjust the left and right audio balance.
SRS WOW: To turn SRS(WOW) on/off.
Tru Bass: To adjust the tru bass.
Press MENU again to get into next Menu (PARENTAL CONTROL).
ViewSonic N3250w 36
Page 38

Source Input: TV
Source Input: AV, S-Video, YCbCr
Page 1
Page 2
Page 3
Page 4
Page 5
Page 6
Page 7
CAPTION
CHANGE PASSWORD
TV RATING GUIDE
MPAA RATING GUIDE
PICTURE MENU
INPUT SELECT
PIP/POP MENU
SETUP MENU
TV MENU
SOUND MENU
PARENTAL CONTROL
PARENTAL CONTROL
: SELECT
: ADJUST
Page 1
Page 2
Page 3
Page 4
Page 5
Page 6
OFF
MENU : NEXT PAGE
PICTURE MENU
INPUT SELECT
PIP/POP MENU
SETUP MENU
SOUND MENU
PARENTAL CONTROL
E
N
G
L
I
S
H
Parental control is to set up V-Chip condition and password.
V-Chip is transmitted from TV station to help parents monitor what their children
watch. According to the pre-set of factory, viewers can see all of the channels.
However, setting V-Chip can block the appointed channels.
The parental control lists settings for two types of guidelines—Television Rating
Guide and Movie Rating Guide.
CAPTION: To set up close caption mode. (CC1~CC4,TX1~TX4)
CHANGE PASSWORD:To re-set your password.
How to do?
1. Move the cursor to the item of CHANGE PASSWORD.
2. Press .
3. There will appear captions “ENTER PASSWORD.”
ViewSonic N3250w 37
Page 39

PARENTAL CONTROL
CAPTION
CHANGE PASSWORD
TV RATING GUIDE
MPAA RATING GUIDE
ENTER PASSWORD
----
OFF
: SELECT
: ADJUST
MENU : NEXT PAGE
4. Enter 0000 if you have not assigned the special password.
PARENTAL CONTROL
E
N
G
L
I
S
H
NEW
----
: SELECT
: ADJUST
MENU : NEXT PAGE
5. Use remote control to enter four digit numbers to set the new password.
ViewSonic N3250w 38
Page 40

PARENTAL CONTROL
NEW
VERIFY
: SELECT
: ADJUST
MENU : NEXT PAGE
XXXX
----
6. Enter the 4 digit numbers again to verify your new password, and then it will
show OK on the screen, and then turn back to the Parental Control page.
TV RATING GUIDE: To setup TV Rating.
How to set up TV Rating?
1. Move the cursor to the item of TV RATING GUIDE.
2. Press .
3. There will appear captions “ENTER PASSWORD.” Input your password with
your remote control.
PARENTAL CONTROL
E
N
G
L
I
S
H
CAPTION
CHANGE PASSWORD
TV RATING GUIDE
MPAA RATING GUIDE
ENTER PASSWORD
----
: SELECT
: ADJUST
4. Select your TV Rating.
OFF
MENU : NEXT PAGE
ViewSonic N3250w 39
Page 41

PARENTAL CONTROL
TV RATING
TV Y:
TV Y7:
TV G:
TV PG:
TV 14:
TV MA:
: ADJUST
U
U U
FV
U
UUU
D
U
D
U
L
U
S
U
V
U
L
U
S
U
V
U
L
U
S
U
V
U
ENTER : ENTER: SELECT
MENU : NEXT PAGE
5. Move the cursor by using to select the rating grade you expect to block.
6. Press ENTER to set block or unblock condition. ("B" means block; "U" means
unblock.)
E
N
G
L
I
S
H
TV-Y
TV-Y7
All children
Directed to older children:
this program is designed for
children age 7 and above
TV-PG
TV-14
Parental guidance suggested
Parents strongly cautioned:
thisprogram contains some
material that is unsuitable for
children under 14 years of age
The TV Ratings are defined as following
TV-G
General audience
TV -MA
Mature audience only
ViewSonic N3250w 40
Page 42

MPAA RATING GUIDE: To setup the movie ratings.
Enter your password with your remote control.
PARENTAL CONTROL
CAPTION
CHANGE PASSWORD
TV RATING GUIDE
MPAA RATING GUIDE
ENTER PASSWORD
----
OFF
: SELECT
: ADJUST
MENU : NEXT PAGE
You can reference the operating steps of TV RATING GUIDE, for they are the same
way as MPAA RATING GUIDE.
PARENTAL CONTROL
MOVIE RATING
G:
PG:
PG 13:
R:
NC 17:
X:
U
U
U
U
U
U
E
N
G
L
I
S
H
: SELECT
ENTER : ENTER
MENU : NEXT PAGE
ViewSonic N3250w 41
Page 43

The Movie Ratings are defined as following
G
PG
PG-13
E
N
G
L
I
S
H
General audience
Parental guidance suggested
Parents strongly cautioned.
R
NC-17
X
Restricted
No one 17 and under limited
Adult audience only
ViewSonic N3250w 42
Page 44

Source Input: VGA, HDMI, YPbPr
The menus in VGA, HDMI, and YPbPr mode are as following:
In VGA Mode:
Page 1
Page 2
Page 3
Page 4
Page 5
PICTURE MENU
INPUT SELECT
PIP/POP MENU
SETUP MENU
SOUND MENU
AUTO ADJUST
BRIGHTNESS 50
CONTRAST 50
IMAGE H.POSITION
IMAGE V.POSITION
FINE TUNE
H.SIZE
ASPECT RATIO 16:9
INFORMATION
1280/1360 MODE
COLOR TEMPERATURE
: SELECT
: ADJUST
PICTURE MENU
50
50
51
50
1280 x 768
MEDIUM
MENU : NEXT PAGE
How to adjust the desired items:
Use to move cursor bar up and down Use to adjust the item.
AUTO ADJUST: Auto adjust picture's Horizontal position, Vertical position, Fine
Tune and H.Size. Press to start the function.
BRIGHTNESS: To adjust the luminance of the image. (right: Max, left: low)
CONTRAST: To adjust the contrast ratio of the image. (right: high contrast, left:
low contrast)
IMAGE H.POSITION: To adjust the horizontal position of the video with .
IMAGE V.POSITION: To adjust the vertical position of the video with (When
aspect ratio is 4:3, it is inactive).
FINE TUNE: To adjust the delay time of data and clock with .
H.SIZE: To adjust the horizontal pixel clock of the video.
ASPECT RATIO: To select the image size for 16:9 or 4:3 with .
INFORMATION: To show displaying mode condition. Press to show the current
resolution.
1280/1360 MODE: To help TV’s resolution match with computer’s resolution for
the sake of better picture. Select the resolution between 1280 x 768 and 1360 x
768. If the computer’s resolution is not 1280 x 768 or 1360 x 768, the function is
inactive.
COLOR TEMPERATURE: To select the color temperature between warm redder,
medium neutral and cool bluer.
Press MENU again to get into next Menu (INPUT SELECT).
E
N
G
L
I
S
H
ViewSonic N3250w 43
Page 45

In HDMI Mode:
Page 1
Page 2
Page 3
Page 4
Page 5
PICTURE MENU
INPUT SELECT
PIP/POP MENU
SETUP MENU
SOUND MENU
BRIGHTNESS
CONTRAST 50
IMAGE H.POSITION 50
ASPECT RATIO
INFORMATION
COLOR TEMPERATURE
COLOR FORMAT
: SELECT
: ADJUST
PICTURE MENU
50
16:9
MEDIUM
AUTO
MENU : NEXT PAGE
How to adjust the desired items:
Use to move cursor bar up and down Use to adjust the item.
E
N
G
L
I
S
H
BRIGHTNESS: To adjust the luminance of the image. (right: Max, left: low)
CONTRAST: To adjust the contrast ratio of the image. (right: high contrast, left:
low contrast)
IMAGE H.POSITION: To adjust the horizontal position of the video with . (It is
inactive in PIP/ POP condition)
ASPECT RATIO:To select the image size for 16:9 or 4:3 with . (It is inactive in
PIP/ POP condition)
INFORMATION: To show displaying mode condition. Press to show the current
resolution.
COLOR TEMPERATURE: To select the color temperature between warm
redder, medium neutral and cool bluer.
COLOR FORMAT: TTo manually select the proper HDMI color format between
RGB and YUV, or select Auto to detect the format automatically.
Note: When manually selecting improper color format (RGB or YUV), the
picture's color will be abnormal, Try to select the other one.
Press MENU again to get into next Menu (INPUT SELECT).
ViewSonic N3250w 44
Page 46

In YPbPr Mode:
Page 1
Page 2
Page 3
Page 4
Page 5
PICTURE MENU
INPUT SELECT
PIP/POP MENU
SETUP MENU
SOUND MENU
AUTO ADJUST
BRIGHTNESS 50
CONTRAST 50
IMAGE H.POSITION 50
IMAGE V.POSITION
SHARPNESS
COLOR
TINT
FINE TUNE
ASPECT RATIO 16:9
: SELECT
: ADJUST
PICTURE MENU
50
46
50
50
25
MEDIUMCOLOR TEMPERATURE
MENU : NEXT PAGE
How to adjust the desired items:
Use to move cursor bar up and down Use to adjust the item.
AUTO ADJUST: Auto adjust picture's Horizontal position, Vertical position, Fine
Tune and H.Size. Press to start the function.
BRIGHTNESS: To adjust the luminance of the image. (right: Max, left: low)
CONTRAST: To adjust the contrast ratio of the image. (right: high contrast, left:
low contrast)
IMAGE H.POSITION: To adjust the horizontal position of the video with . (It is
inactive in PIP/ POP condition)
IMAGE V.POSITION: To adjust the vertical position of the video with . (It is
inactive in PIP/ POP condition)
SHARPNESS: To adjust the sharpness of image. (right: sharpen, left: soften)
COLOR: To adjust color saturation. (right: brilliant color, left: pale color)
TINT: To adjust the video hue level. (right: more greenish tone, left: more reddish
tone)
FINE TUNE: To adjust the delay time of data and clock with .
ASPECT RATIO:To select the image size for 16:9, 4:3 with . (It is inactive in
PIP/ POP condition)
COLOR TEMPERATURE: To select the color temperature between warm
redder, medium neutral and cool bluer.
Press MENU again to get into next Menu (INPUT SELECT).
E
N
G
L
I
S
H
ViewSonic N3250w 45
Page 47

Source Input: VGA, HDMI, YPbPr
Page 1
Page 2
Page 3
Page 4
Page 5
PICTURE MENU
INPUT SELECT
PIP/POP MENU
SETUP MENU
SOUND MENU
MAIN: VGA SUB: TV
TV
AV
S_VIDEO
YCBCR
YPBPR
HDMI
VGA
INPUT SELECT
ENTER : ENTER: SELECT
MENU : NEXT PAGE
This page is to select your input sources, such as TV, AV,S-VIDEO, YCbCr, YPbPr,
HDMI, and VGA.
How to select the input sources:
E
N
G
L
I
S
H
Use to move cursor bar up and down ENTER to input the desired item.
Press MENU again to get into next Menu (PIP/POP MENU).
Source Input: VGA, HDMI, YPbPr
Page 1
PICTURE MENU
Page 2
Page 3
Page 4
Page 5
INPUT SELECT
PIP/POP MENU
SETUP MENU
SOUND MENU
The functions of PIP/ POP Menu in VGA, HDMI, and YPbPr are the same as they
are in TV, AV, S-Video, and YCbCr.
Note: The available sub-screen input sources in VGA, HDMI, and YPbPr mode
are TV, AV, S-Video, and YCbCr.
About the operation, please refer to page 30~32.
Press MENU again to get into next Menu (SETUP MENU).
ViewSonic N3250w 46
Page 48

Source Input: VGA, HDMI, YPbPr
Page 1
Page 2
Page 3
Page 4
Page 5
PICTURE MENU
INPUT SELECT
PIP/POP MENU
SETUP MENU
SOUND MENU
OSD POSITION-H
OSD POSITION-V 50
OSD TIME OUT 25
TRANSPARENCY 13
OSD COLOR COLOR 1
LANGUAGE ENGLISH
MEMORY RECALL
: SELECT
: ADJUST
SETUP MENU
OSD POSITION-H: To adjust the horizontal position of OSD.
OSD POSITION-V: To adjust the vertical position of OSD.
OSD TIME OUT: To setup the displaying time of OSD.
TRANSPARENCY: To adjust the transparency of OSD.
OSD COLOR: To select your favorite OSD color.
LANGUAGE: To select OSD Language.
MEMORY RECALL: Recall factory pre-sets.
Press MENU again to get into next Menu (SOUND MENU ).
50
MENU : NEXT PAGE
E
N
G
L
I
S
H
ViewSonic N3250w 47
Page 49

Source Input: VGA, HDMI, YPbPr
Page 1
Page 2
Page 3
Page 4
Page 5
PICTURE MENU
INPUT SELECT
PIP/POP MENU
SETUP MENU
SOUND MENU
VOLUME
BASS 50
TREBLE 50
BALANCE 50
SRS WOW ON
TruBass 50
: SELECT
: ADJUST
SOUND MENU
20
MENU : NEXT PAGE
VOLUME: To adjust the volume.
BASS: To adjust the bass.
TREBLE: To adjust the treble.
E
N
G
L
I
S
H
BALANCE: To adjust the left and right audio balance.
SRS WOW: To turn SRS(WOW) on/off.
Tru Bass: To adjust the tru bass.
HDMI AUDIO (Override): To select HDMI audio from HDMI, VGA, YPbPr, or
YCbCr (It is only active in HDMI mode).
ViewSonic N3250w 48
Page 50

Other Information
Specifications
LCD
Input signal
Compatibility
Resolution
Speaker Output
Audio Output
Power
Display area
Operating
conditions
Type
Color Filter
Glass surface
RGB
RF
Video
Audio
PC
Recommended
and supported
Voltage
Full Scan
Temperature
Humidity
Altitude
31.5” view able
0.57075(H) x 0.57075(V) mm pixel pitch
RGB vertical stripe
Anti-Glare
RGB analog (0.7/1.0 Vp-p, 75 ohms)
Separate Sync,
f
:30-80 kHz, fv:50-75 Hz
h
TV system Antenna/NTSC
1 compsite RCA, 1 S-Video, 1 YCbCr component,
1YPbPr component, 1 HDMI
1 mini-stereo, 3 pair of RCA (L/R) stereo
Up to 1360 x 768 Non-interlaced
1360 x 768 @ 60 Hz
1280 x 1024 @ 60 Hz
1024 x 768 @ 60, 75 Hz
800 x 600 @ 60, 75 Hz
640 x 480 @ 60, 75 Hz
10W x 2
1 pair of RCA (L/R) stereo jack
100-240 VAC, 50/60 Hz (auto switch)
697.65 mm (H) x 392.26 mm (V)
27.5" (H) x 15.4" (V)
32° F to + 104° F (0° C to + 40° C)
10% to 65% (no condensation)
To 10,000 feet (3,000m)
E
N
G
L
I
S
H
Storage
conditions
Temperature
Humidity
Altitude
Dimensions
Weight
Physical
Net
Regulations
Power saving
modes
Preset Timing Mode
Warning: Do not set the graphics card in your computer to exceed these refresh rates; doing so may
result in permanent damage to the LCD display.
On
Active Off
(pre-adjusted to GTF 1360 x 768 @ 60 Hz)
-4° F to + 140° F (-20° C to + 60° C)
10% to 90% (no condensation)
To 40,000 feet (12,000m)
808 mm (W) x 623 mm (H) x 243 mm (D)
31.8" (W) x 24.5" (H) x 9.6" (D)
19.8 kg (43.6 lb)
UL, FCC-B (Doc-B)
<200W (green LED)
<5W (red LED)
Note: Product Specification are subject to change without notice.
ViewSonic N3250w 49
Page 51

Troubleshooting
No power
Make sure power button (and rear power switch) is ON.
Make sure A/C power cord is securely connected to the LCD TV.
Plug another electrical device (like a radio) into the power outlet to verify that
the outlet is supplying proper voltage.
Power is ON but no screen image
Make sure the video cable supplied with the LCD TV is tightly secured to the video output port on
the back of the Video source. If the other end of the video cable was not attached permanently to the
LCD TV, tightly secure it to the LCD TV.
Adjust brightness and contrast.
Check Source settings.
Make sure the signal source is compative with the LCD TV.
Wrong or abnormal colors
If any colors (red, green, or blue) are missing, check the video cable to make sure it is securely
connected. Loose or broken pins in the cable connector could cause an improper connection.
Connect the LCD display to another Video source.
Control buttons do not work
E
N
G
L
I
S
H
Press only one button at a time.
Snow a ppears on screen
Check your antenna connection.
Check TV/CATV selection.
No Sound
Check your audio connection in accordance with Video source.
Press Mute again, so that Mute disappears from the screen.
Check you NICAM settings.
Press the Volume + key on your remote controller.
Remote control doe sn’t work
Make sure batteries been inserted correctly.
Batteries could be weak, replace batteries.
NO picture in PC mode
Set PC to “1024 x 768” or “1360 x 768” @ 60 Hz signal timing.
ViewSonic N3250w 50
Page 52

Customer Support
For technical support or product service, see the table below or contact your reseller.
NOTE: You will need the product serial number.
Contry/
Region
United States
Canada
Web site
viewsonic.com/support
viewsonic.com/support
T = Telephone
F = FAX
T: (800) 688-6688
F: (909) 468-1202
T: (800) 688-6688
F: (909) 468-1202
Email
service.us@
viewsonic.com
service.ca@
viewsonic.com
E
N
G
L
I
S
H
ViewSonic N3250w 51
Page 53

Limited W arranty
VIEWSONIC LCD DISPLAY
What the warranty covers:
ViewSonic
warranty period. If a product proves to be defective in material or workmanship during the warranty
period, ViewSonic will, at its sole option, repair or replace the product with a like product. Replacement
product or parts may include remanufactured or refurbished parts or components.
How long the warranty is effective:
ViewSonic N3250w is warranted for one (1) year for all parts including the light source and one (1)
year for all labor from the date of the first consumer purchase.
Who the warranty protects:
This warranty is valid only for the first consumer purchaser.
What the warranty doe s not cover:
1. Any product on which the serial number has been defaced, modified or removed.
2. Damage, deterioration or malfunction resulting from:
a. Accident, misuse, neglect, fire, water, lightning, or other acts of nature, unauthorized product
modification, or failure to follow instructions supplied with the product.
b. Repair or attempted repair by anyone not authorized by ViewSonic.
c. Any damage of the product due to shipment.
d. Removal or installation of the product.
e. Causes external to the product, such as electrical power fluctuations or failure.
f. Use of supplies or parts not meeting ViewSonic’s specifications.
g. Normal wear and tear.
h. Any other cause which does not relate to a product defect.
3. Removal, installation, and set-up service charges.
How to get service:
E
N
G
L
I
S
H
1. For information about receiving service under warranty, contact ViewSonic Customer Support .
You will need to provide your product's serial number.
2. To obtain service under warranty, you will be required to provide (a) the original dated sales slip, (b)
your name, (c) your address, (d) a description of the problem, and (e) the serial number of the product.
3. Take or ship the product freight prepaid in the original container to an authorized ViewSonic service
center or ViewSonic.
4. For additional information or the name of the nearest ViewSonic service center, contact ViewSonic.
Limitation of implied warranties:
THERE ARE NO WARRANTIES, EXPRESS OR IMPLIED, WHICH EXTEND BEYOND THE
DESCRIPTION CONTAINED HEREIN INCLUDING THE IMPLIED WARRANTY OF MERCHANTABILITY
AND FITNESS FOR A PARTICULAR PURPOSE.
Exclusion of damages:
VIEWSONIC'S LIABILITY IS LIMITED TO THE COST OF REPAIR OR REPLACEMENT OF THE
PRODUCT. VIEWSONIC SHALL NOT BE LIABLE FOR:
1. DAMAGE TO OTHER PROPERTY CAUSED BY ANY DEFECTS IN THE PRODUCT, DAMAGES
BASED UPON INCONVENIENCE, LOSS OF USE OF THE PRODUCT, LOSS OF TIME, LOSS OF
PROFITS, LOSS OF BUSINESS OPPORTUNITY, LOSS OF GOODWILL, INTERFERENCE WITH
BUSINESS RELATIONSHIPS, OR OTHER COMMERCIAL LOSS, EVEN IF ADVISED OF THE
POSSIBILITY OF SUCH DAMAGES.
2. ANY OTHER DAMAGES, WHETHER INCIDENTAL, CONSEQUENTIAL OR OTHERWISE.
3. ANY CLAIM AGAINST THE CUSTOMER BY ANY OTHER PARTY.
Effect of state law:
This warranty gives you specific legal rights, and you may also have other rights which vary from state
to state. Some states do not allow limitations on implied warranties and/or do not allow the exclusion of
incidental or consequential damages, so the above limitations and exclusions may not apply to you.
Sales outside the U.S.A. a nd Canada:
For warranty information and service on ViewSonic products sold outside of the U.S.A. and Canada,
contact ViewSonic or your local ViewSonic dealer.
®
warrants its products to be free from defects in material and workmanship during the
ViewSonic LCD Warranty (V3.0) Release Date: 0 1- 29- 2002
ViewSonic N3250w 52
Page 54

Appendix
Safety Guidelines
Warming: This device must be operated with the original power supply, part number:
12VDC LSE9901B1250, 12VDC UP06031120.
CAUTION: The socket-outlet should be installed near the equipment and should be easily accessible.
CAUTION: Use a power cable that is properly grounded. Always use the appropriate AC cord that is
certified for the individual country. Some examples are listed below:
USA.................UL
Canada.............CSA
Germany..........VDE
IMPORTANT NOTICE CONCERNING POWER CORD SELECTION
The power cord set for this unit has been enclosed and has been selected according to the country of
destination and must be used to prevent electric shock. Use the following guidelines if it is necessary to
replace the original cord set, or if the cord set is not enclosed.
The female receptacle of the cord set must meet IEC-60320 requirements and may look like (Figure A1
below):
Figure A1
For the United States and Cana da
In the United States and Canada the male plug is a NEMA5-15 style (Figure A2), UL Listed, and CSA
Labeled. For units which are mounted on a desk or table, type SVT or SJT cord sets may be used. For units
which sit on the floor, only SJT type cord sets may be used. The cord set must be selected according to the
current rating for your unit. Please consult the table below for the selection criteria for power cords used in
the United States and Canada.
Switzerland ..... SEV
Britain ............. BASE/BS
Japan ............... Electric Appliance Control Act
Figure A2
Cord Type Size of Conductors in Cord Maximum Current Rating of Unit
SJT
SVT
18 AWG
16 AWG
14 AWG
18 AWG
17 AWG
10 Amps
12 Amps
12 Amps
10 Amps
12 Amps
For Europea n Countrie s
In Europe you must use a cord set which is appropriate for the receptacles in your country. The cord set is
HAR-Certified, and a special mark that will appear on the outer sheath, or on the insulation of one of the
inner conductors.
AC PLUG CORD PRECAUTIONS FOR THE UNITED KINGDOM
FOR YOUR SAFETY PLEASE READ THE FOLLOWING TEXT CAREFULLY.
IF THE FITTED MOULDED PLUG IS UNSUITABLE FOR THE SOCKET OUTLET THEN THE PLUG SHOULD BE
CUT OFF AND DISPOSED OF SAFELY.
THERE IS A DANGER OF SEVERE ELECTRICAL SHOCK IF THE CUT OFF PLUG IS INSERTED INTO AN
APPROPRIATE SOCKET.
If a new plug is to be fitted, please observe the wiring code as shown below.
If in any doubt, please consult a qualified electrician.
WARMING: THIS APPLIANCE MUST BE EARTHED.
IMPORTANT: The wires in this mains lead are coloured in accordance with the following code:
Green-and-Yellow: Earth
Blue: Neutral
Brown: Live
If the coloured wires of the mains lead of this appliance do not correspond with the coloured markings identifying
the terminals in your plug, proceed as follows:
The wire which is coloured GREEN-AND-YELLOW must be connected to the terminal in the plug which is marked
by the letter E or by the Earth symbol or coloured GREEN or GREEN-AND-YELLOW.
The wire which is coloured BLUE must be connected to the terminal in the plug which is marked with the letter N or
coloured BLACK. The wire which is coloured BROWN must be connected to the terminal in the plug which is
marked with the letter L or coloured RED.
If you have any questions concerning which proper power cord to use, please consult with the dealer from whom
you have purchased the produc
ViewSonic N3250w 53
E
N
G
L
I
S
H
Page 55

Compliance Information for U.S.A.
This equipment has been tested and found to comply with the limits for a Class B digital device, pursuant to
part 15 of the FCC Rules. These limits are designed to provide reasonable protection against harmful
interference in a resi-dential installation. This equipment generates, uses, and can radiate radio frequency
energy, and if not installed and used in accordance with the instructions, may cause harmful interference to
radio communications. However, there is no guarantee that interference will not occur in a particular
installation. If this equipment does cause harmful interference to radio or television reception, which can be
determined by turning the equipment off and on, the user is encouraged to try to correct the interference by
one or more of the following measures:
Reorient or relocate the receiving antenna.
Increase the separation between the equipment and receiver.
Connect the equipment into an outlet on a circuit different from that to which the receiver is connected.
Consult the dealer or an experienced radio/TV technician for help.
FCC Warning
To assure continued FCC compliance, the user must use grounded power supply cord and the provided
shielded video interface cable with bonded ferrite cores. If a BNC cable is going to be used, use only a
shielded BNC(5) cable. Also, any unauthorized changes or modifications not expressly approved by the
party responsible for compliance could void the user's authority to operate this device.
E
N
G
L
I
S
H
ViewSonic N3250w 54
Page 56

ViewSonic
®
 Loading...