

Page 1
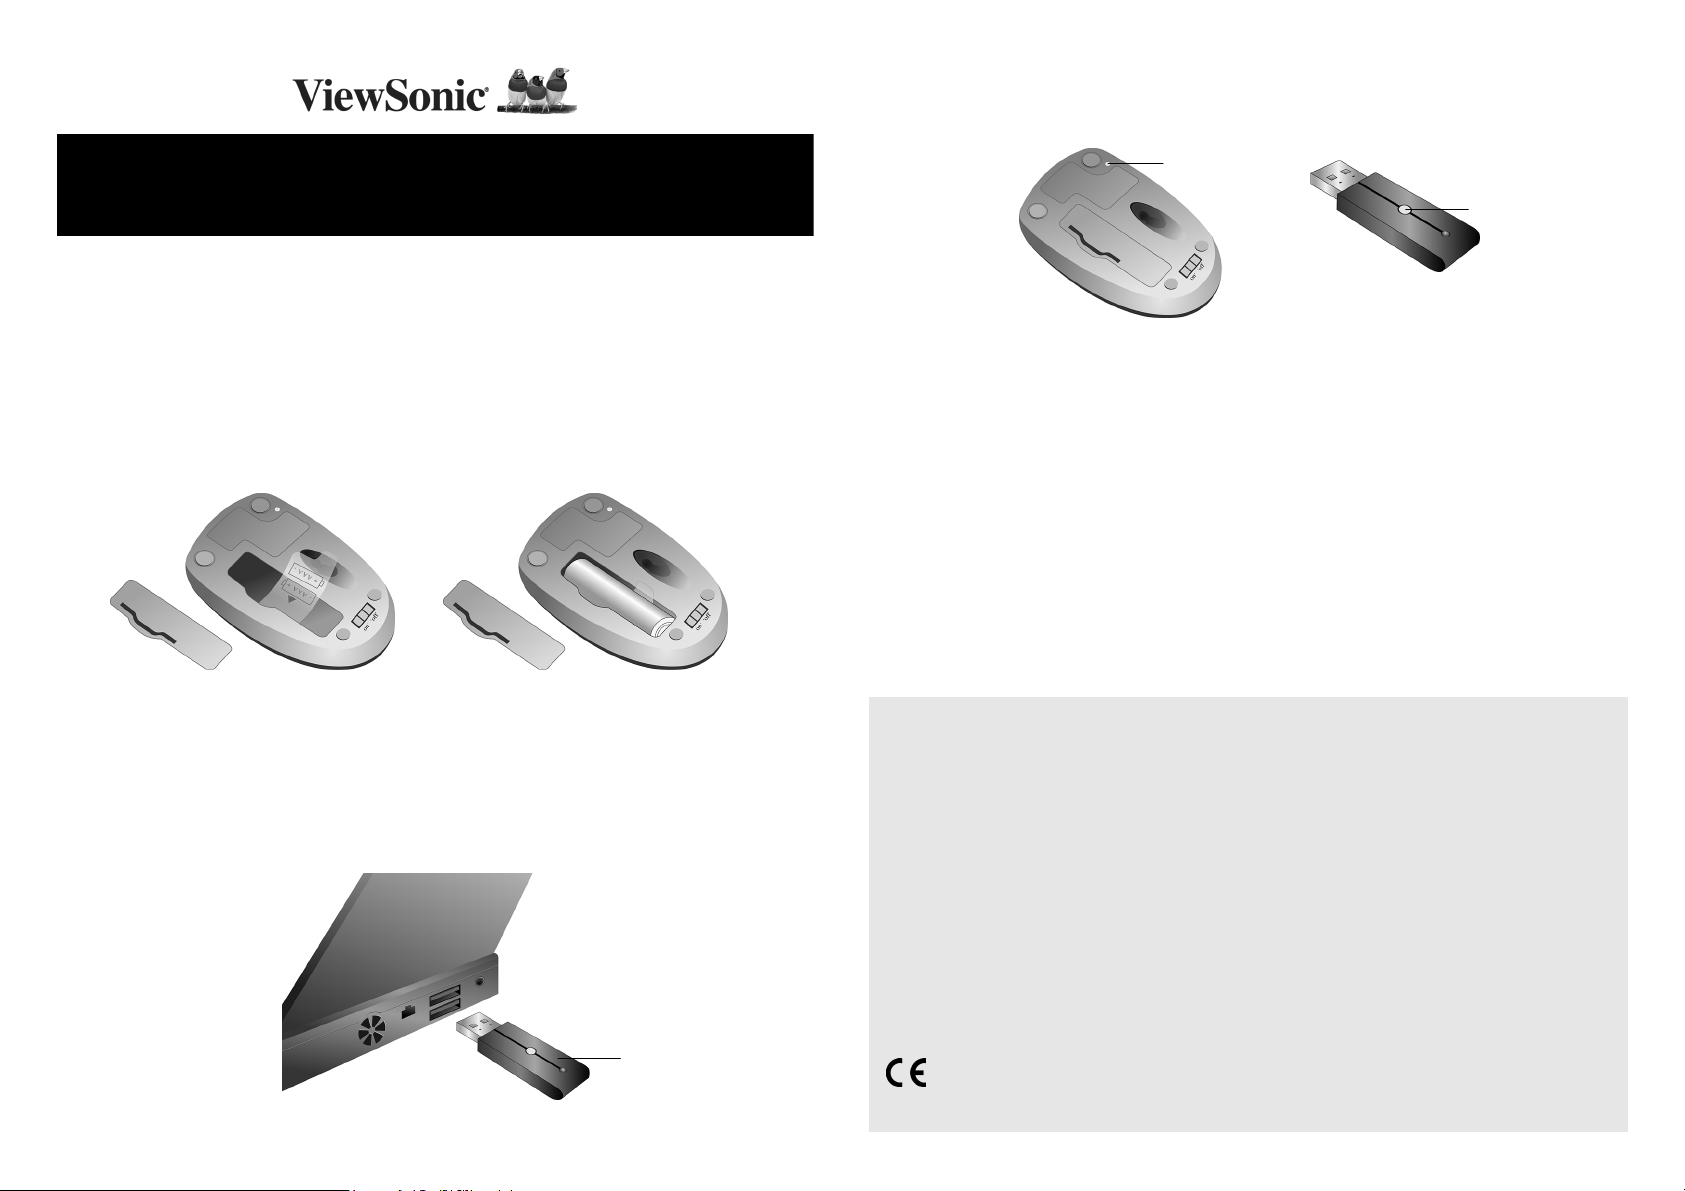
Step 3 - ID Selection (Establishing a Wireless Connection)
Press the Connect Button on the USB receiver and then on the mouse within 10 seconds.
Note: Repeat this step when connecting the mouse for the first time and after replacing the batteries.
MW209
ViewMateTM Wireless Travel Mouse
Quick Start Guide
Your ViewMate Wireless Travel Mouse is easy to use, and supports plug and play setup. Setup can be
completed in 3 simple steps.
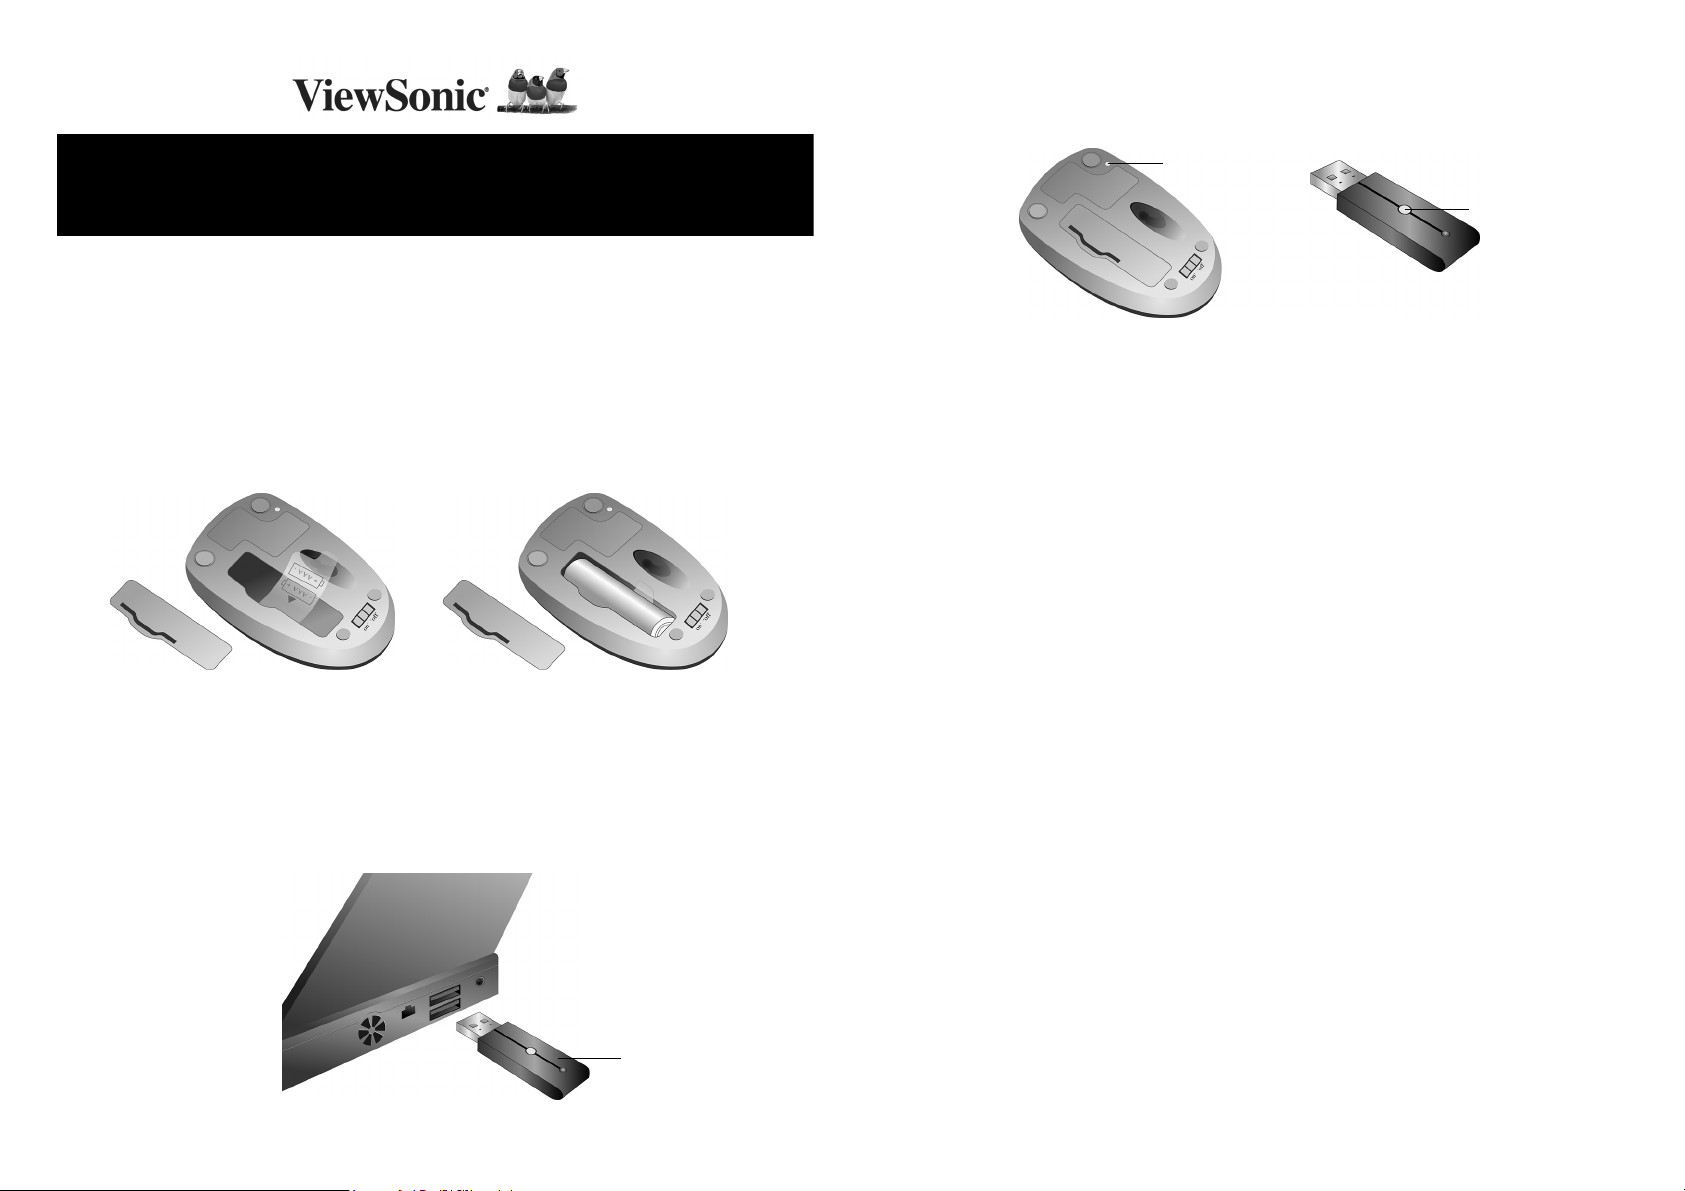
Step 1 - Battery Installation:
1. Locate the two AAA sized 1.5 Volt batteries included in the ViewMate Wireless Travel Mouse
package.
2. Remove the battery cover from the compartment on the back of your Optical Wireless Mouse.
3. Install the two batteries into the compartment. Make sure the + sign and the - sign on the batteries
match the + sign and the - sign in the battery chamber.
4. Replace the battery compartment cover.
Step 2 - Connecting the Receiver:
USB Installation (Note: If your computer uses Microsoft Windows 95 or Windows NT Workstation, please
be aware that these operating systems do not support USB.)
1. Make sure that your computer is turned on.
2. Plug the USB receiver into an empty USB port and follow the on-screen instructions.
USB Receiver
Connect Button
Connect Button
Troubleshooting
If your ViewMate Wireless Travel Mouse is not responding...
1. Make sure to install the batteries with correct polarity.
2. Make sure you have plugged in the USB receiver correctly.
3. Make sure the receiver is at least 8 inches (approx. 20 cm) away from other electrical devices such as
computers, monitors, printers, etc.
4. Re-establish communication between the mouse and the receiver (see “ID Selection” above).
Battery Life
Like all battery-operated devices, the Optical Wireless Mouse is dependent on battery current for
operation. Only alkaline batteries should be used. Since battery power is limited, batteries must be
changed after a certain amount of time. Typically the batteries on this wireless device should last between
5 and 8 weeks, depending upon your own usage patterns and use of the on/off battery switch.
Note: If the mouse pointer does not move after changing the batteries, verify you have inserted the
batteries with the correct polarity.
FCC Statement
This device complies with part 15 of FCC Rules. Operation is subject to the following two conditions: (1) this device may not cause
harmful interference, and (2) this device must accept any interference received, including interference that may cause undesired
operation.
This equipment has been tested and found to comply with the limits for a Class B digital device, pursuant to part 15 of FCC Rules.
These limits are designed to provide reasonable protection against harmful interference when the equipment is operated in a
residential installation. This equipment generates, uses, and can radiate radio frequency energy and, if not installed and used in
accordance with the instruction guide, may cause harmful interference to radio communications. However, there is no guarantee that
interference will not occur in a particular installation. If this equipment does cause harmful interference to radio or television
reception, which can be determined by turning the equipment off and on, the user is encouraged to try to correct the interference by
one or more of the following measures:
• Reorient or relocate your TV or radio receiving antenna.
• Increase the separation between your TV and radio equipment and your mouse receiver.
• Connect your computer equipment into a separate electrical outlet or circuit from your TV or radio equipment.
• Consult the dealer or an experienced radio/TV technician for help.
Important: FCC Radiation Exposure Statement This device complies with FCC RF Exposure limits set forth for an uncontrolled
environment, under 47 CFR 2.1093 paragraph (d)(2). This transmitter must not be co-located or operating in conjunction with any
other antenna or transmitter.
War ning : You are cautioned that changes or modifications not expressly approved by the party responsible for compliance could
void your authority to operate the equipment.
This Class B digital apparatus meets all requirements of the Canadian Interference-Causing Equipment Regulations. Cet appareil
numérique de la Classe B respecte toutes les exigences du Règlement sur le matériel brouilleur du Canada.
The device complies with the requirements of the EEC directive 89/336/EEC as amended by 92/31/EEC, R&TTE directive
1999/5/EC on Radio Equipment and Telecommunications Terminal Equipment Wireless and 93/68/EEC Art.5 with regard
to “Electromagnetic compatibility,” and 73/23/EEC as amended by 93/68/EEC Art.13 with regard to “Safety.”
Caution: AVOID PROLONGED USE OF THE MOUSE WITHOUT BREAKS. Take regular breaks and keep a good posture.
Consult your physician promptly if you notice any loss of motion or pain in your wrist when using the mouse.
Page 2
Étape 3 – Choix d’identité (Établir une connexion sans fil)
Appuyez sur le bouton du récepteur USB et puis celui de la souris dans un délai de 10 secondes.
Note : Répétez cette étape lorsque vous branchez la souris pour la premiè.
MW209
ViewMateTM Wireless Travel Mouse
Guide Rapide De Début
Votre ViewMate Travel Mouse est très facile à utiliser, et supporte l’installation branchez et ça marche.
L’installation peut se faire en trois simples étapes.
Étape 1 – Installation de la batterie:
1. Trouvez les deux batteries AAA de 1,5V comprises dans le paquet du ViewMate Wireless Travel
Mouse.
2. Retirez le couvercle de la batterie du compartiment situé à l’arrière de votre Souris Optique sans Fil.
3. Installez les deux piles dans compartiment. Assurez-vous que les symboles + et – sur les batteries
correspondent au symbole + et – dans le compartiment de la batterie.
4. Replacez le couvercle du compartiment de la batterie.
Bouton de connexion
Bouton de connexion
Dépannage
Si votre ViewMate Wireless Travel Mouse ne répond pas…
1. Assurez-vous que la polarité des batteries est bonne.
2. Assurez-vous d’avoir bien branché le récepteur USB.
3. Assurez-vous que le récepteur se trouve à au moins 20 cm (approx. 8 pouces) d’autres dispositifs
électriques tels que des ordinateurs, des moniteurs, des imprimantes, etc.
4. Rétablissez la communication entre la souris et le récepteur (voir « Choix d’identité » ci-dessus)
Durée de la pile
Comme tous les dispositifs à batterie, la Souris Optique sans Fil dépend de l’alimentation par batterie
pour son fonctionnement. Seules des batteries alcalines devraient utilisées. Puisque la puissance d’une
batterie est limitée, les batteries devraient être remplacées au bout d’un certain temps. Typiquement, les
batteries de ce dispositif devraient durer de 1.5 à 2 mois selon l’utilisation.
Note : Si la flèche de la souris ne bouge pas après avoir changé les batteries, vérifiez leur polarité dans le
compartiment.
Étape 2 – Branchement du récepteur :
Installation USB (Note : Si votre ordinateur utilise Microsoft Windows 95 ou Windows NT Station de
Travail, veuillez noter que ces systèmes ne supportent pas l’USB.)
1. Assurez-vous que votre ordinateur est allumé.
2. Branchez le récepteur USB dans un port USB libre et suivez les instructions à l’écran.
Récepteur USB
Page 3

Paso 3 –Selección de ID (Estableciendo una Conexión Inalįmbrica)
Presione el Botón Conectar en el receptor USB y después en el ratón 10 segundos después.
Nota: Repita este paso al conectar el ratón por primera vez y después de cambiar las pilas.
MW209
ViewMateTM Wireless Travel Mouse
Guía Rápida Del Comienzo
Su Travel Mouse ViewMate Inalámbrico es facíl de usar, y soporta configuración “plug and play”. La
configuración puede ser completada en 3 simples pasos.
Paso 1 – Instalación de las Pilas:
1. Ubique las dos pilas tamaño AAA 1.5 Volt. Incluidas en la caja del Travel Mouse View Mate
Inalámbrico.
2. Quite la tapa de las pilas del compartimento en la parte traserla de su Ratón Óptico Inalámbrico.
3. Instale las dos pilas en el compartimento. Asegúrese de que los signos + y – en las pilas coincidan con
los signos + y – en el hueco de las pilas.
4. Vuelva a colocar la tapa del compartimento.
Botón Conectar
Botón Conectar
Solución de Problemas
Si su Travel Mouse ViewMate Inalámbrico no está respondiendo…
1. Asegúrese de instalar las pilas con la polaridad correcta.
2. Asegúrese de haber enchufado el receptor USB correctamente.
3. Asegúrese de que el receptor esté al menos a 8 pulgadas (aprox. 20 cm) de otros dispositivos eléctricos como ordenadores, monitores, impresoras, etc.
4. Re-establezca la comunicación entre el ratón y el receptor (ver “Selección de ID” arriba)
Vida de las Pilas
Como todos los dispositivos que funcionan con pilas, el Ratón Óptico Inalámbrico depende de la
corriente de las pilas para funcionar. Sólo se deberían usar pilas alcalinas. Debido a que la energía de las
pilas es limitada, las pilas deben ser cambiadas después de un periodo de tiempo. Normalmente, las pilas
en este dispositivo inalámbrico deberían durar entre 1.5 y 2 meses dependiendo del uso.
Nota: Si el puntero del ratón no se mueve después de cambiar las pilas, compruebe que haya insertado las
pilas con la polaridad correcta.
Paso 2 – Conectando el Receptor:
Instalación USB (Nota: Si su ordenador usa Microsoft Windows 95 o Windows NT Workstation, por favor
tenga en cuenta que estos sistemas operativos no soportan USB.)
1. Asegúrese de que su ordenador esté encendido.
2. Enchufe el receptor USB en un puerto vacío USB y siga las instrucciones en pantalla.
Receptor USB
Page 4

MW209
ViewMateTM Wireless Travel Mouse
Быстро Направляющий выступ Старта
Шаг 3. Идентификация (установка беспроводной связи)
Нажмите кнопку подключения сначала на приемнике USB, а затем (не позже, чем через 10 секунд)
на мыши.
Примечание: Данный шаг следует выполнить при первом подключении мыши, а также после
замены элементов питания.
Кнопка подключения
Простая в обращении беспроводная мышь ViewMate Wireless Travel Mouse устанавливается в
режиме «plug and play» посредством трех простых шагов.
Шаг 1. Установ ка элементов питания:
1. Возьмите два элемента питания (размер AAA, напряжение 1,5 В, входят в комплект поставки
мыши ViewMate Wireless Travel Mouse).
2. Снимите крышку отсека элементов питания сзади мыши.
3. Вставьте два элемента питания в отсек. Убеди т е с ь , что знаки «+» и «-» на элементах питания
совпадают со знаками «+» и «-» на отсеке элементов питания.
4. Уст а но в ит е на место крышку отсека элементов питания.
Шаг 2. Подключение приемника:
Ус т ан о вка USB (Примечание. Если ваш компьютер работает под управлением операционной
системы Microsoft Windows 95 или Windows NT Workstation, то вам следует учесть, что эти
системы не поддерживают USB)
1. Убедит е с ь , что ваш компьютер включен.
2. Вставьте приемник USB в незанятый разъем USB. Выполните инструкции, отображаемые на
экране.
Кнопка подключения
Поиск и устранение неисправностей
Если ваша мышь ViewMate Wireless Travel Mouse не отвечает...
1. Убедит е с ь , что элементы питания установлены с должной полярностью.
2. Проверьте правильность установки приемника USB.
3. Убедит е с ь , что приемник находится не ближе, чем примерно в 20 см (8 дюймах) от других
электрических устройств (компьютер ов, мониторов, принтеров и т.д.).
4. Восстановите связь между мышью и приемником (см. «Шаг 3. Идентификация», выше).
Срок службы элементов питания
Данной оптической беспроводной мыши (как и всем устройствам с батарейным питанием) для
работы необходим ток, поступающий от элементов питания. Используйте только щелочные
элементы питания. Мощно сть элементов питания ограничена. Поэтому по прошествии некоторого
времени их следует заменять. Срок службы элементов питания, установленных в данное
беспроводное устройство, составляет, как правило, 1.5 2 месяца, в зависимости от интенсивности
его работы.
Примечание: Если после замены элементов питания курсор мыши не движется, то следует
проверить полярность установки элементов питания.
надписи на рисунке
Page 5

Customer Support/Service clientèle/Servicio de atención al cliente/Служба поддержки
For technical support or product service, see the table below or contact your reseller
NOTE: You will need the product serial number.
Pour toute question relative au support technique ou à l’entretien du produit, reportez-vous au tableau ci-après ou contactez votre revendeur.
REMARQUE: vous devrez fournir le numéro de série du produit.
Para obtener asistencia técnica o para reparar el equipo, consulte la tabla siguiente o póngase en contacto con el distribuidor.
NOTA: necesitará el número de serie del producto.
Для получения технической поддержки или технического обслуживания изделия см. информацию, приведенную в таблице ниже, или обратитесь с организацией, в котор ой Вы приобрели монитор.
ПРИМЕЧАНИЕ: Вам будет нужен серийный номер монитора.
Country Office Name Address Phone Web Site / Service Email
Australia / New Zealand ViewSonic Australia Unit 3, 44 Dickson Ave., Artarmon, NSW 2064, Australia
Canada ViewSonic Corporation 381 Brea Canyon Rd., Walnut, CA 91789, USA 1-866-463-4775 www.viewsonic.com/contactus
Chile / Mexico ViewSonic Corporation 381 Brea Canyon Rd., Walnut, CA 91789, USA
中国
China
Europe, Middle East, Baltic
countries, and North Africa
Hong Kong ViewSonic Hong Kong Ltd.
Singapore ViewSonic Singapore Pte Ltd.
台灣
Tai wan
UK ViewSonic Europe Limited/UK
优派显示设备国际贸易 (上海)有限公司
ViewSonic China Limited
Contact your reseller
優派國際股份有限公司
ViewSonic International Corporation
中国上海市静安区南京西路 1468 号
中欣大厦 36 楼 3608 室 邮编∶ 200040
ViewSonic House
Fleming Way, Crawley West Sussex RH10 9GA, United Kingdom
Suite 811, East Wing, Tsimshatsui Centre, 66 Mody Road, TST
East Kowloon, Hong Kong
221 Henderson Road, #04-08 Henderson Building. Singapore
159557
台北縣中和市連城路 192 號 9 樓
ViewSonic House
Fleming Way, Crawley West Sussex RH10 9GA, United Kingdom
1800 880 818 (AUS)
0800 008 822 (NZ)
1230-020-3464 (Chile)
866-823-2004 (Mexico)
联系电话∶
0086-021-62375252
技术支持∶
800-8820-3870
0086-021-62473182
Tel: +44(0)1293 643-900
Fax: +44(0)1293 643-910
+852 2268-6878
+65 6273-4018
0800-061-198
0800833648
www.viewsonic.com.au
service@au.viewsonic.com
www.viewsonic.com/contactus
www.viewsonic.com.cn
www.viewsoniceurope.com
service-eu@viewsoniceurope.com
www.hk.viewsonic.com
www.viewsonic.com.sg
service@sg.viewsonic.com
www.viewsonic.com.tw
service@tw.viewsonic.com
www.viewsonic.co.uk
service-eu@viewsoniceurope.com
USA ViewSonic Corporation 381 Brea Canyon Rd., Walnut, CA 91789, USA 1-800-888-8583 www.viewsonic.com/contactus
Please register your product on the Internet at: www.viewsonic.com.
Veuillez enregistrer votre produit par le biais d’Internet à l’adresse suivante: www.viewsonic.com
Regístrelo a través de Internet en: www.viewsonic.com.
Вам необходимо зарегистрировать Ваше изделие на странице сети Интернет: www.viewsonic.com.
Page 6

Step 3 - ID Selection (Establishing a Wireless Connection)
Press the Connect Button on the USB receiver and then on the mouse within 10 seconds.
Note: Repeat this step when connecting the mouse for the first time and after replacing the batteries.
MW209
ViewMateTM Wireless Travel Mouse
Quick Start Guide
Your ViewMate Wireless Travel Mouse is easy to use, and supports plug and play setup. Setup can be
completed in 3 simple steps.
Step 1 - Battery Installation:
1. Locate the two AAA sized 1.5 Volt batteries included in the ViewMate Wireless Travel Mouse
package.
2. Remove the battery cover from the compartment on the back of your Optical Wireless Mouse.
3. Install the two batteries into the compartment. Make sure the + sign and the - sign on the batteries
match the + sign and the - sign in the battery chamber.
4. Replace the battery compartment cover.
Step 2 - Connecting the Receiver:
USB Installation (Note: If your computer uses Microsoft Windows 95 or Windows NT Workstation, please
be aware that these operating systems do not support USB.)
1. Make sure that your computer is turned on.
2. Plug the USB receiver into an empty USB port and follow the on-screen instructions.
USB Receiver
Connect Button
Connect Button
Troubleshooting
If your ViewMate Wireless Travel Mouse is not responding...
1. Make sure to install the batteries with correct polarity.
2. Make sure you have plugged in the USB receiver correctly.
3. Make sure the receiver is at least 8 inches (approx. 20 cm) away from other electrical devices such as
computers, monitors, printers, etc.
4. Re-establish communication between the mouse and the receiver (see “ID Selection” above).
Battery Life
Like all battery-operated devices, the Optical Wireless Mouse is dependent on battery current for
operation. Only alkaline batteries should be used. Since battery power is limited, batteries must be
changed after a certain amount of time. Typically the batteries on this wireless device should last between
5 and 8 weeks, depending upon your own usage patterns and use of the on/off battery switch.
Note: If the mouse pointer does not move after changing the batteries, verify you have inserted the
batteries with the correct polarity.
FCC Statement
This device complies with part 15 of FCC Rules. Operation is subject to the following two conditions: (1) this device may not cause
harmful interference, and (2) this device must accept any interference received, including interference that may cause undesired
operation.
This equipment has been tested and found to comply with the limits for a Class B digital device, pursuant to part 15 of FCC Rules.
These limits are designed to provide reasonable protection against harmful interference when the equipment is operated in a
residential installation. This equipment generates, uses, and can radiate radio frequency energy and, if not installed and used in
accordance with the instruction guide, may cause harmful interference to radio communications. However, there is no guarantee that
interference will not occur in a particular installation. If this equipment does cause harmful interference to radio or television
reception, which can be determined by turning the equipment off and on, the user is encouraged to try to correct the interference by
one or more of the following measures:
• Reorient or relocate your TV or radio receiving antenna.
• Increase the separation between your TV and radio equipment and your mouse receiver.
• Connect your computer equipment into a separate electrical outlet or circuit from your TV or radio equipment.
• Consult the dealer or an experienced radio/TV technician for help.
Important: FCC Radiation Exposure Statement This device complies with FCC RF Exposure limits set forth for an uncontrolled
environment, under 47 CFR 2.1093 paragraph (d)(2). This transmitter must not be co-located or operating in conjunction with any
other antenna or transmitter.
War ning : You are cautioned that changes or modifications not expressly approved by the party responsible for compliance could
void your authority to operate the equipment.
This Class B digital apparatus meets all requirements of the Canadian Interference-Causing Equipment Regulations. Cet appareil
numérique de la Classe B respecte toutes les exigences du Règlement sur le matériel brouilleur du Canada.
The device complies with the requirements of the EEC directive 89/336/EEC as amended by 92/31/EEC, R&TTE directive
1999/5/EC on Radio Equipment and Telecommunications Terminal Equipment Wireless and 93/68/EEC Art.5 with regard
Caution: AVOID PROLONGED USE OF THE MOUSE WITHOUT BREAKS. Take regular breaks and keep a good posture. Consult
your physician promptly if you notice any loss of motion or pain in your wrist when using the mouse.
to “Electromagnetic compatibility,” and 73/23/EEC as amended by 93/68/EEC Art.13 with regard to “Safety.”
Page 7

步驟三:識別碼選擇 ( 建立無線的連結 )
按下 USB 接收器上的連接鍵,並在十秒鐘內按下滑鼠上的連接鍵。
註:必須在第一次連接滑鼠和更換電池後實施此步驟。
MW209
ViewMateTM Wireless Travel Mouse
快速入門導引
ViweMa te 無線迷你光學滑鼠,支援隨插即用,可以在簡單的三個步驟內完成設定。
步驟一:安裝電池:
1. 取出 ViewMa te 無線迷你光學滑鼠包裝內的兩個電壓為 1.5 伏特的四號 (AAA) 電池。
2. 將電池蓋從無線光學滑鼠後的電池蓋拆下。
3. 將這兩顆電池裝入電池室內,請確認電池的正負端和電池室內的正負號相符。
4. 裝回電池蓋。
步驟二:連接 USB 接收器
安裝 USB 接收器 (
請記住這些作業系統並不支援
1. 確認您的電腦已經開機。
2. 將 USB 接收器插到閒置的 USB 埠上,並依循畫面說明操作。
註:若您的電腦使用的是
USB。)
Windows 95
或是
Windows NT workstation
連接鍵
連接鍵
疑難排解
若您的 Vi ewM ate 無線迷你光學滑鼠沒有回應 …
1. 確認您電池的極性安裝正確。
2. 確認您正確地插上 USB 接收器。
3. 確保接收器和其它電子裝置如電腦、螢幕、印表機等相距至少 8 英吋 (約 20 公分)以上。
4. 重新建立接收器和滑鼠間的連接 (詳見上述步驟三識別碼選擇)。
電池壽命
無線光學滑鼠和其它所有使用電池來操作的裝置一樣,需依賴電池電力才可使用。選擇電池時,
請選擇鹼性電池,且限於電池的壽命有限,在使用一段時間後應更換電池。一般來說,若依據實
際的使用狀態做好電源開關控制,無線光學滑鼠的電池電力應可維持 1.5~2 個月。
註:若更換電池後,滑鼠指標不會移動,請確認電池的極性安裝是否正確。
警語 : 請勿眼睛近距離直視 LED 發光源,以免造成身體不適之情況。
注意事項:如欲達到最佳省電效果,請選擇白色非反光面上使用滑鼠。
作業系統,
USB 接收器
Page 8

步骤 3:选择 ID (建立无线连接)
按下
USB 接收器上的连接按钮,然后在 10 秒钟之内按下鼠标上的连接按钮。
注:首次连接该鼠标或更换电池后,请重复该步骤。
MW209
ViewMateTM Wireless Travel Mouse
快速起动指南
Vie wMate 无线迷你光电鼠标简单易用,支持即插即用,整个安装过程只需 3 个简单步骤。
步骤 1:安装电池:
1. 取出 View Mat e 无线迷你光电鼠标套装随机附送的 2 节 1.5 伏特 AAA 电池。
2. 拆下光学无线鼠标背壳处的电池盒盖。
3. 确认电池的正负极,按照正负极方向将电池正确装入电池盒。
4. 盖上电池盒盖。
步骤 2:连接 USB 接收器:
USB 接收器安装 (
两个操作系统不支持
确认电脑处于开启状态。
1.
2. 将 USB 接收器插入空闲的 USB 端口,然后按照屏幕提示操作。
注:若您的电脑操作系统为
USB。)
Windows 95或Windows NT Workstation
,请注意
连接按钮
连接按钮
故障诊断
若您的 View M ate 无线迷你光电鼠标没有反应 ...
确认电池的正负极安装正确。
1.
2. 确认您已正确插入 USB 接收器。
3. 确认接收器与电脑、显示器、打印机等设备之间的距离至少 8 英寸 (约 20 厘米)。
4. 重新建立鼠标和接收器之间的连接 (见上文 “选择 ID”)。
电池寿命
无线光电鼠标与其它依靠电池工作的设备一样,需要电池提供电流进行操作。该鼠标只能使用碱
性电池。由于电池电力有限,使用一段时间后必须更换电池。一般而言,该鼠标的电池可使用
到 2 个月,寿命长度依使用情况而异。
注:若更换电池后,鼠标指针不能移动,请确认电池正负极是否安装正确。
1.5
USB 接收器
Page 9

Customer Support/ 客戶支援 / 客户支持
For technical support or product service, see the table below or contact your reseller
NOTE: You will need the product serial number.
關於技術支援或產品服務,請參照下表或洽詢經銷商。
注意事項:您需要產品序號。
关于技术支持或产品服务,请参照下表或洽询经销商。
: 您需要提供产品序列号。
注意
Country Office Name Address Phone Web Site / Service Email
Australia / New Zealand ViewSonic Australia Unit 3, 44 Dickson Ave., Artarmon, NSW 2064, Australia
Canada ViewSonic Corporation 381 Brea Canyon Rd., Walnut, CA 91789, USA 1-866-463-4775 www.viewsonic.com/contactus
Chile / Mexico ViewSonic Corporation 381 Brea Canyon Rd., Walnut, CA 91789, USA
中国
China
Europe, Middle East, Baltic
countries, and North Africa
Hong Kong ViewSonic Hong Kong Ltd.
Singapore ViewSonic Singapore Pte Ltd.
台灣
Tai wan
UK ViewSonic Europe Limited/UK
优派显示设备国际贸易 (上海)有限公司
ViewSonic China Limited
Contact your reseller
優派國際股份有限公司
ViewSonic International Corporation
中国上海市静安区南京西路 1468 号
中欣大厦 36 楼 3608 室 邮编∶ 200040
ViewSonic House
Fleming Way, Crawley West Sussex RH10 9GA, United Kingdom
Suite 811, East Wing, Tsimshatsui Centre, 66 Mody Road, TST
East Kowloon, Hong Kong
221 Henderson Road, #04-08 Henderson Building. Singapore
159557
台北縣中和市連城路 192 號 9 樓
ViewSonic House
Fleming Way, Crawley West Sussex RH10 9GA, United Kingdom
1800 880 818 (AUS)
0800 008 822 (NZ)
1230-020-3464 (Chile)
866-823-2004 (Mexico)
联系电话∶
0086-021-62375252
技术支持∶
800-8820-3870
0086-021-62473182
Tel: +44(0)1293 643-900
Fax: +44(0)1293 643-910
+852 2268-6878 www.hk.viewsonic.com
+65 6273-4018
0800-061-198
0800833648
www.viewsonic.com.au
service@au.viewsonic.com
www.viewsonic.com/contactus
www.viewsonic.com.cn
www.viewsoniceurope.com
service-eu@viewsoniceurope.com
www.viewsonic.com.sg
service@sg.viewsonic.com
www.viewsonic.com.tw
service@tw.viewsonic.com
www.viewsonic.co.uk
service-eu@viewsoniceurope.com
USA ViewSonic Corporation 381 Brea Canyon Rd., Walnut, CA 91789, USA 1-800-888-8583 www.viewsonic.com/contactus
Please register your product on the Internet at: www.viewsonic.com.
請在以下網際網路位址註冊您的產品:www.viewsonic.com。
请在以下因特网地址注册您的产品 : www.viewsonic.com。
 Loading...