

Page 1

G800
User’s Guide
Guide de l’utilisateur
Bedienungsanleitung
Manual de instrucciones
Page 2

User’s Guide
ViewSonic G800
Multi-Frequency Color CRT Display
20 (18.4" Viewable Diagonal) Flat Square
Color Monitor with Plug & Play
ViewSonic® Corporation
Page 3

Copyright© ViewSonic Corporation, 1996. All rights reserved.
IBM XT, AT, 386, 486, and PS/2 are registered trademarks and/or trademarks of International
Business Machines Corporation.
Pentium is a registered trademark of Intel Corporation.
Macintosh II Family, LC, Quadra Series, and Power Macintosh are registered trademarks of Apple
Computer, Inc.
Windows 95 is trademark of Microsoft Corporation.
ViewSonic, ViewMatch, OnView and Opti-Green are registered trademarks of ViewSonic
Corporation.
VESA is a registered trademark of the Video Electronics Standards Association. DPMS and DDC
are trademarks of VESA.
Energy Star is a trademark of the U.S. Environmental Protection Agency (EPA).
Disclaimer: ViewSonic Corporation shall not be liable for technical or editorial errors or omissions
contained herein; nor for incidental or consequential damages resulting from furnishing this
material, or the performance or use of this product.
In the interest of continuing product improvement, ViewSonic Corporation reserves the right to
change product specifications without notice. Information in this document may change without
notice.
No part of this document may be copied, reproduced, or transmitted by any means, for any purpose
without prior written permission from ViewSonic Corporation.
The serial number of this product is on the back of the monitor. Write the serial
number in the space below and keep this guide as a permanent record of your
purchase to aid in identification in the event of theft or loss.
ii
For your records
Product Name: ViewSonic
Model Number: G800
Serial Number: ______________________
Purchase Date: ______________________
ViewSonic G800
Page 4

LIMITED WARRANTY
VIEWSONIC G800 MONITORS
What the warranty covers:
ViewSonic
warranty period. If a product proves to be defective in material or workmanship during the warranty
period, ViewSonic will at its sole option repair or replace the product with a like product. Replacement
product or parts may include remanufactured or refurbished parts or components.
How long the warranty is effective:
ViewSonic G800 color monitors, including the display tubes, are warranted for three (3) years for all
parts and three (3) years for all labor from the date of the first consumer purchase.
Who the warranty protects:
This warranty is valid only for the first consumer purchaser.
What the warranty does not cover:
1. Any product on which the serial number has been defaced, modified or removed.
2. Damage, deterioration or malfunction resulting from:
a. Accident, misuse, neglect, fire, water, lightning, or other acts of nature, unauthorized product
b. Repair or attempted repair by anyone not authorized by ViewSonic.
c. Any damage of the product due to shipment.
d. Removal or installation of the product.
e. Causes external to the product, such as electric power fluctuations or failure.
f. Use of supplies or parts not meeting ViewSonic’s specifications.
g. Normal wear and tear.
h. Any other cause which does not relate to a product defect.
3. Removal, installation, and set-up service charges.
How to get service:
1. For information on obtaining warranty service, call ViewSonic. The customer support telephone
numbers are: U.S. and Canada
®
warrants its products to be free from defects in material and workmanship during the
modification, or failure to follow instructions supplied with the product.
1-800-688-6688; from outside the U.S. and Canada 909-869-
7976; from Europe 49 (2154) 9188-0; from Asian /Pacific Rim countries 886 (2) 248-4072.
Internet E-Mail address:[email protected] or World Wide Web:http://www.viewsonic.com
2. To obtain warranty service, you will be required to provide (a) the original dated sales slip, (b) your
name, (c) your address, (d) a description of the problem, and (e) the serial number of the product.
3. Take or ship the product prepaid in the original container to your ViewSonic dealer, any ViewSonic
service center or ViewSonic.
4. For additional information or the name of the nearest ViewSonic service center, contact your
ViewSonic dealer or ViewSonic.
Limitation of implied warranties:
THERE ARE NO WARRANTIES, EXPRESS OR IMPLIED, WHICH EXTEND BEYOND THE
DESCRIPTION CONTAINED HEREIN INCLUDING THE IMPLIED WARRANTY OF
MERCHANTABILITY AND FITNESS FOR A PARTICULAR PURPOSE.
Exclusion of damages:
VIEWSONIC’S LIABILITY IS LIMITED TO THE COST OF REPAIR OR REPLACEMENT OF THE
PRODUCT. VIEWSONIC SHALL NOT BE LIABLE FOR:
1. DAMAGE TO OTHER PROPERTY CAUSED BY ANY DEFECTS IN THE PRODUCT, DAMAGES
BASED UPON INCONVENIENCE, LOSS OF USE OF THE PRODUCT, LOSS OF TIME, LOSS OF
PROFITS, LOSS OF BUSINESS OPPORTUNITY, LOSS OF GOODWILL, INTERFERENCE WITH
BUSINESS RELATIONSHIPS, OR OTHER COMMERCIAL LOSS, EVEN IF ADVISED OF THE
POSSIBILITY OF SUCH DAMAGES.
2. ANY OTHER DAMAGES, WHETHER INCIDENTAL, CONSEQUENTIAL OR OTHERWISE.
3. ANY CLAIM AGAINST THE CUSTOMER BY ANY OTHER PARTY.
Effect of state law:
This warranty gives you specific legal rights, and you may also have other rights which vary from state to
state. Some states do not allow limitations on implied warranties and/or do not allow the exclusion of
incidental or consequential damages, so the above limitations and exclusions may not apply to you.
Sales outside the U.S.A.:
For ViewSonic products sold outside of the U.S.A., contact your ViewSonic dealer for warranty
information and service.
REV 7/7/96
ViewSonic G800
iii
Page 5
Safety Guidelines
Caution: Use a power cable that is properly grounded. Always use the AC cords listed
below for each area:
USA . . . . . . . . . . . . . . . . . . . . . . . . UL
Canada . . . . . . . . . . . . . . . . . . . . . CSA
In other areas, use AC cord which meets local safety standards.
FOR EUROPEAN VERSION ONLY
This appliance is supplied with a moulded three pin mains plug for your safety and
convenience. A 13 amp fuse is fitted in this plug. Should the fuse need to be replaced,
ensure that the replacement fuse has a rating of 13 amps and that it is approved by
ASTA or BSI to BS1362. Check for the ASTA mark
or the BSI mark
of the fuse.
If the plug contains a removable fuse cover, you must ensure that it is refitted when the
fuse is replaced. If you lose the fuse cover, the plug must not be used until a
replacement cover is obtained. A replacement fuse cover can be purchased from your
local ViewSonic dealer.
on the body
IF THE FITTED MOULDED PLUG IS UNSUITABLE FOR THE SOCKET OUTLET IN
YOUR HOME, THEN THE FUSE SHOULD BE REMOVED AND THE PLUG CUT OFF
AND DISPOSED OF SAFELY. THERE IS A DANGER OF SEVERE ELECTRICAL
SHOCK IF THE CUT OFF PLUG IS INSERTED INTO ANY 13 AMP SOCKET.
If a new plug is to be fitted, please observe the wiring code as shown below. If in any
doubt, please consult a qualified electrician.
WARNING: THIS APPLIANCE MUST BE GROUNDED.
Important: The wires in the main leads are colored in accordance with the following code:
Green-Yellow . . . . . . . . . . . . . . . . . . . . . Ground
Blue . . . . . . . . . . . . . . . . . . . . . . . . . . . . Neutral
Brown . . . . . . . . . . . . . . . . . . . . . . . . . . Live
The colors of the wires in the main leads of this appliance may not correspond with the colored
markings identifying the terminals in your plug. Please comply with the following instructions:
● The Green-Yellow wire must be connected to the green or green-yellow terminals in
the plug and marked with the letter E or with the ground symbol.
● The Blue wire must be connected to the Black
terminal in the plug marked with the letter N.
● The Brown wire must be connected to the red
terminal in the plug marked with the letter L.
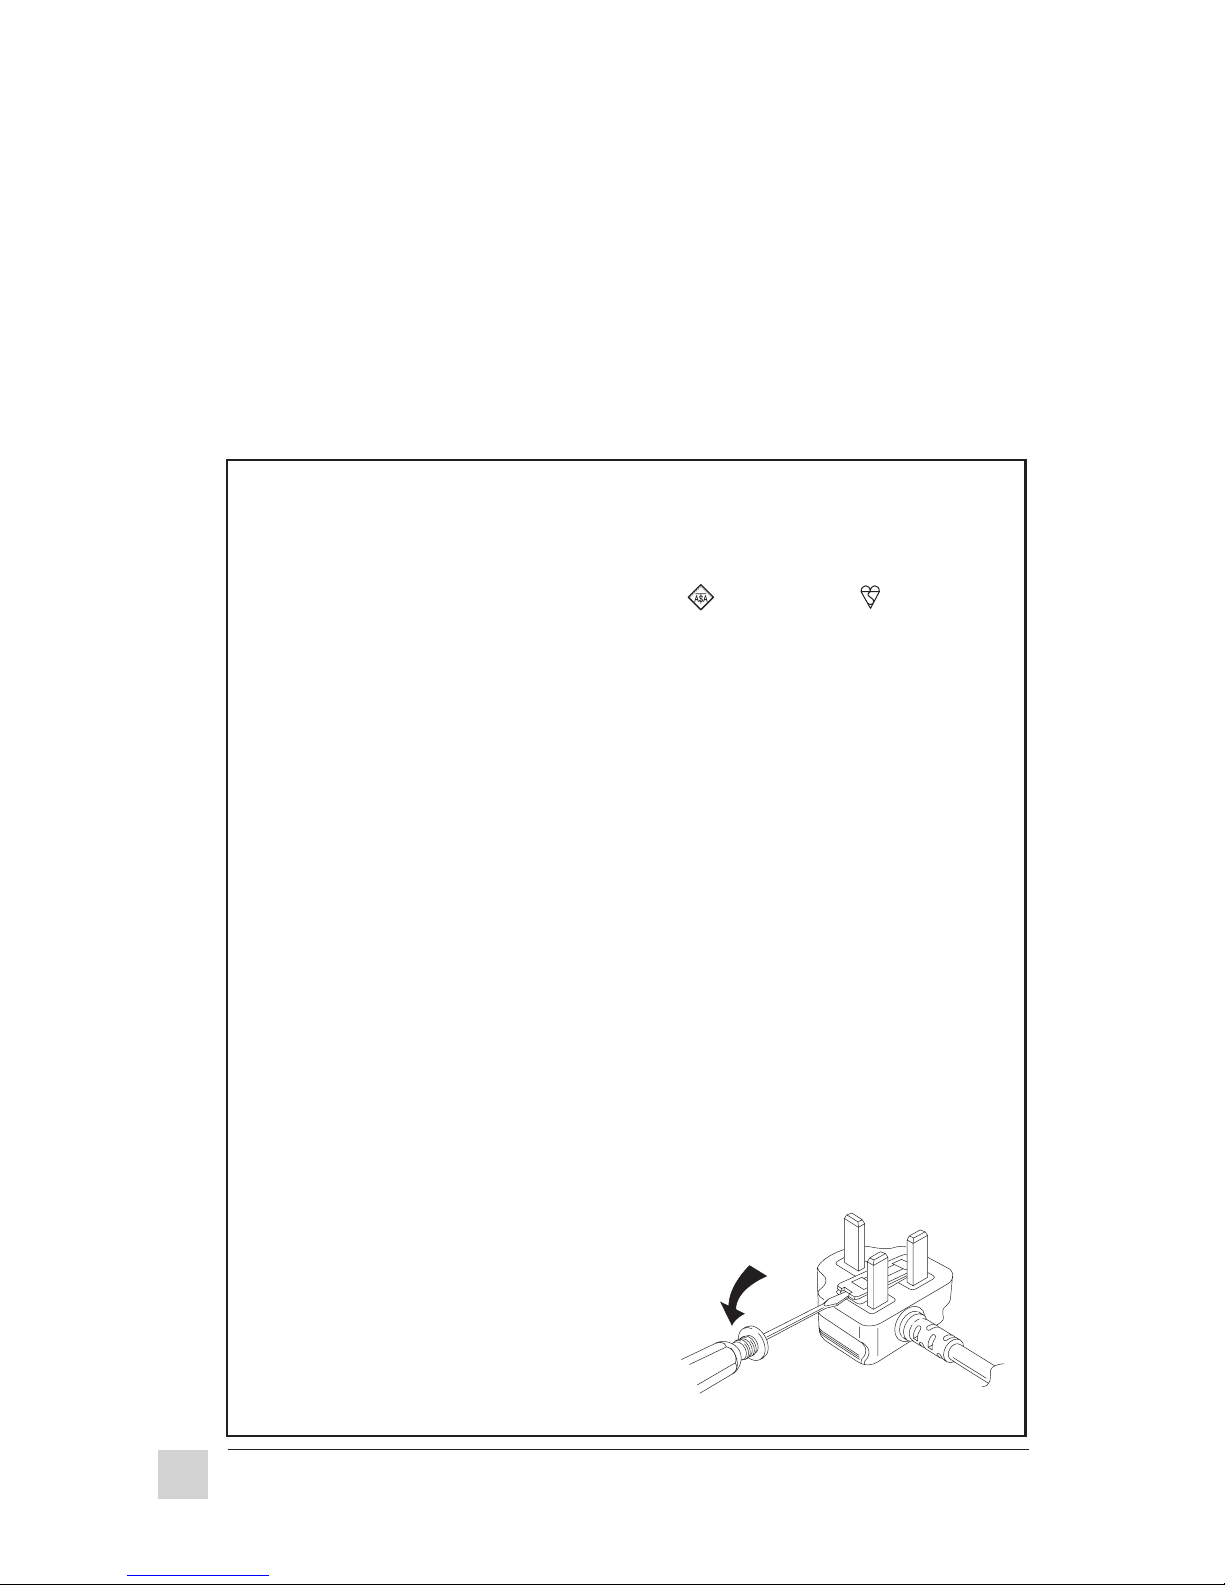
Note: To replace the fuse, open the fuse
compartment with a screwdriver.
iv
ViewSonic G800
Page 6

FCC Information
This equipment has been tested and found to comply with the limits for a Class B digital
device, pursuant to part 15 of the FCC Rules. These limits are designed to provide
reasonable protection against harmful interference in a residential installation. This
equipment generates, uses, and can radiate radio frequency energy, and if not installed and
used in accordance with the instructions, may cause harmful interference to radio
communications. However, there is no guarantee that interference will not occur in a
particular installation. If this equipment does cause unacceptable interference to radio or
television reception, which can be determined by turning the equipment off and on, the user
is encouraged to try to correct the interference by one or more of the following measures:
● Reorient or relocate the receiving antenna.
● Increase the separation between the equipment and receiver.
● Connect the equipment into an outlet on a circuit different from that to which the
receiver is connected.
● Consult your dealer or an experienced radio/TV technician for help.
FCC Warning:
To assure continued FCC compliance, the user must use a grounded power
supply cord and the provided shielded video interface cable with bonded
ferrite cores. Also, any unauthorized changes or modifications to this monitor
would void the user’s authority to operate this device.
Power Supply Cord
USA
For units with 100-120V input voltage in the USA, use the following:
UL Listed and CSA Certified Type SVT or SJT No. 18/3 AWG rated 125VAC 7A minimum.
One end terminated in a molded on parallel blade, grounding attachment cap or hooded
attachment cap (15A, 125V configuration), other end terminated in a molded on appliance
coupler.
DOC Compliance Notice
This digital apparatus does not exceed the Class B limits for radio noise emissions from
digital apparatus set out in the Radio Interference Regulations of the Canadian Department
of Communications.
CE Certification
This device complies with the requirements of the EEC directive 89/336/EEC
with regard to "Electromagnetic compatibility."
ViewSonic G800
v
Page 7

vi
ViewSonic G800
Page 8

CONTENTS
Warranty Information . . . . . . . . . . . . . . . . . . . . . . . . . . . . . . . . . . . . iii
Safety Guidelines . . . . . . . . . . . . . . . . . . . . . . . . . . . . . . . . . . . . . . . iv
FCC Information . . . . . . . . . . . . . . . . . . . . . . . . . . . . . . . . . . . . . . . . . v
1 Quick Installation
Package Contents . . . . . . . . . . . . . . . . . . . . . . . . . . . . . . . . . . . . . . . . 1
Power Up . . . . . . . . . . . . . . . . . . . . . . . . . . . . . . . . . . . . . . . . . . . . . . . 2
Monitor Stand Removal . . . . . . . . . . . . . . . . . . . . . . . . . . . . . . . . . . . 3
2 Operation
Monitor Buttons . . . . . . . . . . . . . . . . . . . . . . . . . . . . . . . . . . . . . . . . . 5
OnView® Control Screens . . . . . . . . . . . . . . . . . . . . . . . . . . . . . . . . . . 6
Timing Chart . . . . . . . . . . . . . . . . . . . . . . . . . . . . . . . . . . . . . . . . . . . 11
Factory Preset Timings . . . . . . . . . . . . . . . . . . . . . . . . . . . . . . . . . . . 12
Plug and Play + . . . . . . . . . . . . . . . . . . . . . . . . . . . . . . . . . . . . . . . . . 13
DDC Diagnostic Utility . . . . . . . . . . . . . . . . . . . . . . . . . . . . . . . . . . 14
Power Management System . . . . . . . . . . . . . . . . . . . . . . . . . . . . . . . 15
3 About Your Monitor
Something . . . . . . . . . . . . . . . . . . . . . . . . . . . . . . . . . . . . . . . . . . . . . 17
Features . . . . . . . . . . . . . . . . . . . . . . . . . . . . . . . . . . . . . . . . . . . . . . . 18
Specifications . . . . . . . . . . . . . . . . . . . . . . . . . . . . . . . . . . . . . . . . . . 20
Dimensions . . . . . . . . . . . . . . . . . . . . . . . . . . . . . . . . . . . . . . . . . . . . 22
4 Troubleshooting
Problem Chart . . . . . . . . . . . . . . . . . . . . . . . . . . . . . . . . . . . . . . . . . . 23
5 Care and Safety Tips
Helpful Hints . . . . . . . . . . . . . . . . . . . . . . . . . . . . . . . . . . . . . . . . . . . 25
Safety Tips . . . . . . . . . . . . . . . . . . . . . . . . . . . . . . . . . . . . . . . . . . . . 25
Care of Your Monitor . . . . . . . . . . . . . . . . . . . . . . . . . . . . . . . . . . . . 26
Index . . . . . . . . . . . . . . . . . . . . . . . . . . . . . . . . . . . . . . . . . . . . . . . . . . 27
ViewSonic G800
vii
Page 9
INSTALLATION
1
Package Contents
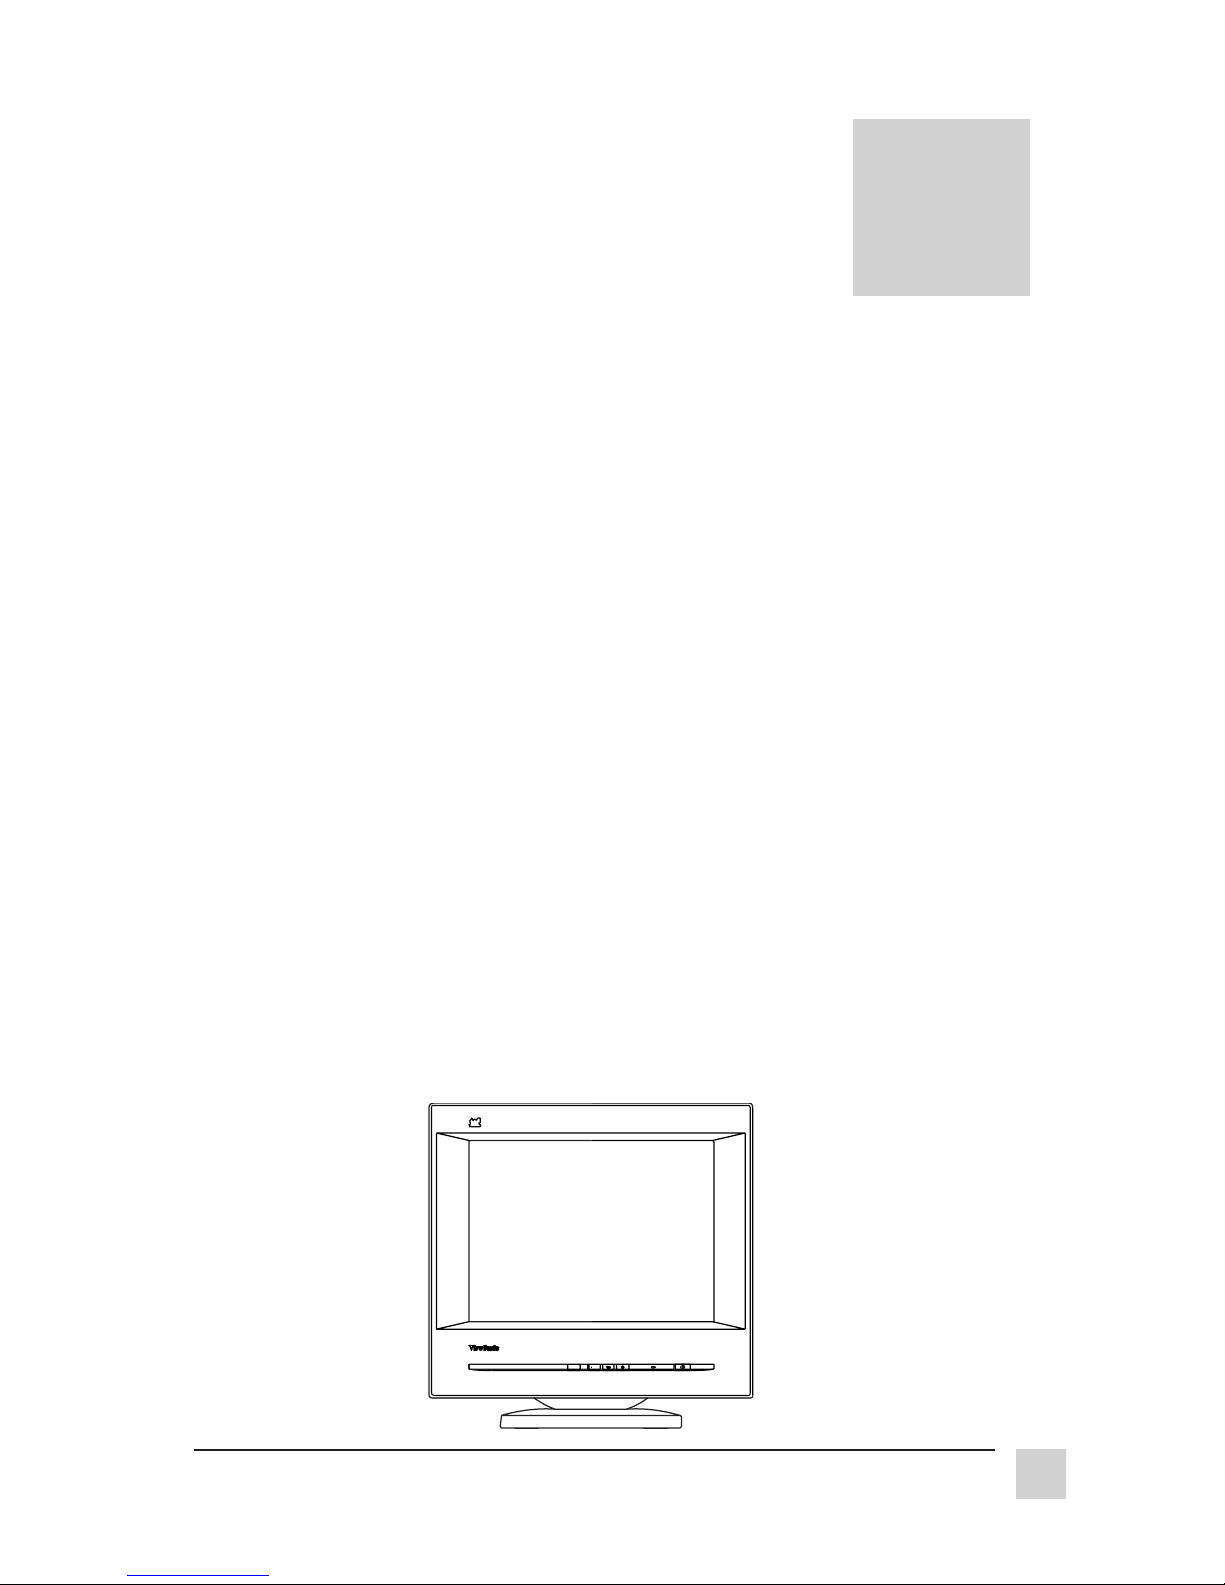
Congratulations on your purchase of a ViewSonic G800 high performance
color monitor.
Your ViewSonic G800 package includes the following:
●
ViewSonic G800 monitor
●
Attached video cable with 15 pin high density (HD) mini D-sub
connector
●
Power cord
●
User’s guide
●
Software diskette or CD ROM which includes:
Opti-Green
SavingSoftware).
ViewSonic
Windows® 95 (required for Plug & Play. See pages 13 and
14).
®
for Windows® 3.1x and DOS (Monitor Power
®
monitor installation file (VS*.inf) for
DDC (Display Data Channel) diagnostic utility
DDCTEST.EXE. This file is used for analyzing the DDC, a
communication protocol for Windows 95 (See page 14).
Important!
Save the original box and all packing material for future shipping needs.
Graphic Series
G800
RECALL ONVIEW
ViewSonic G800
Installation
1
Page 10

2
Installation2
Page 11
Monitor Stand Removal
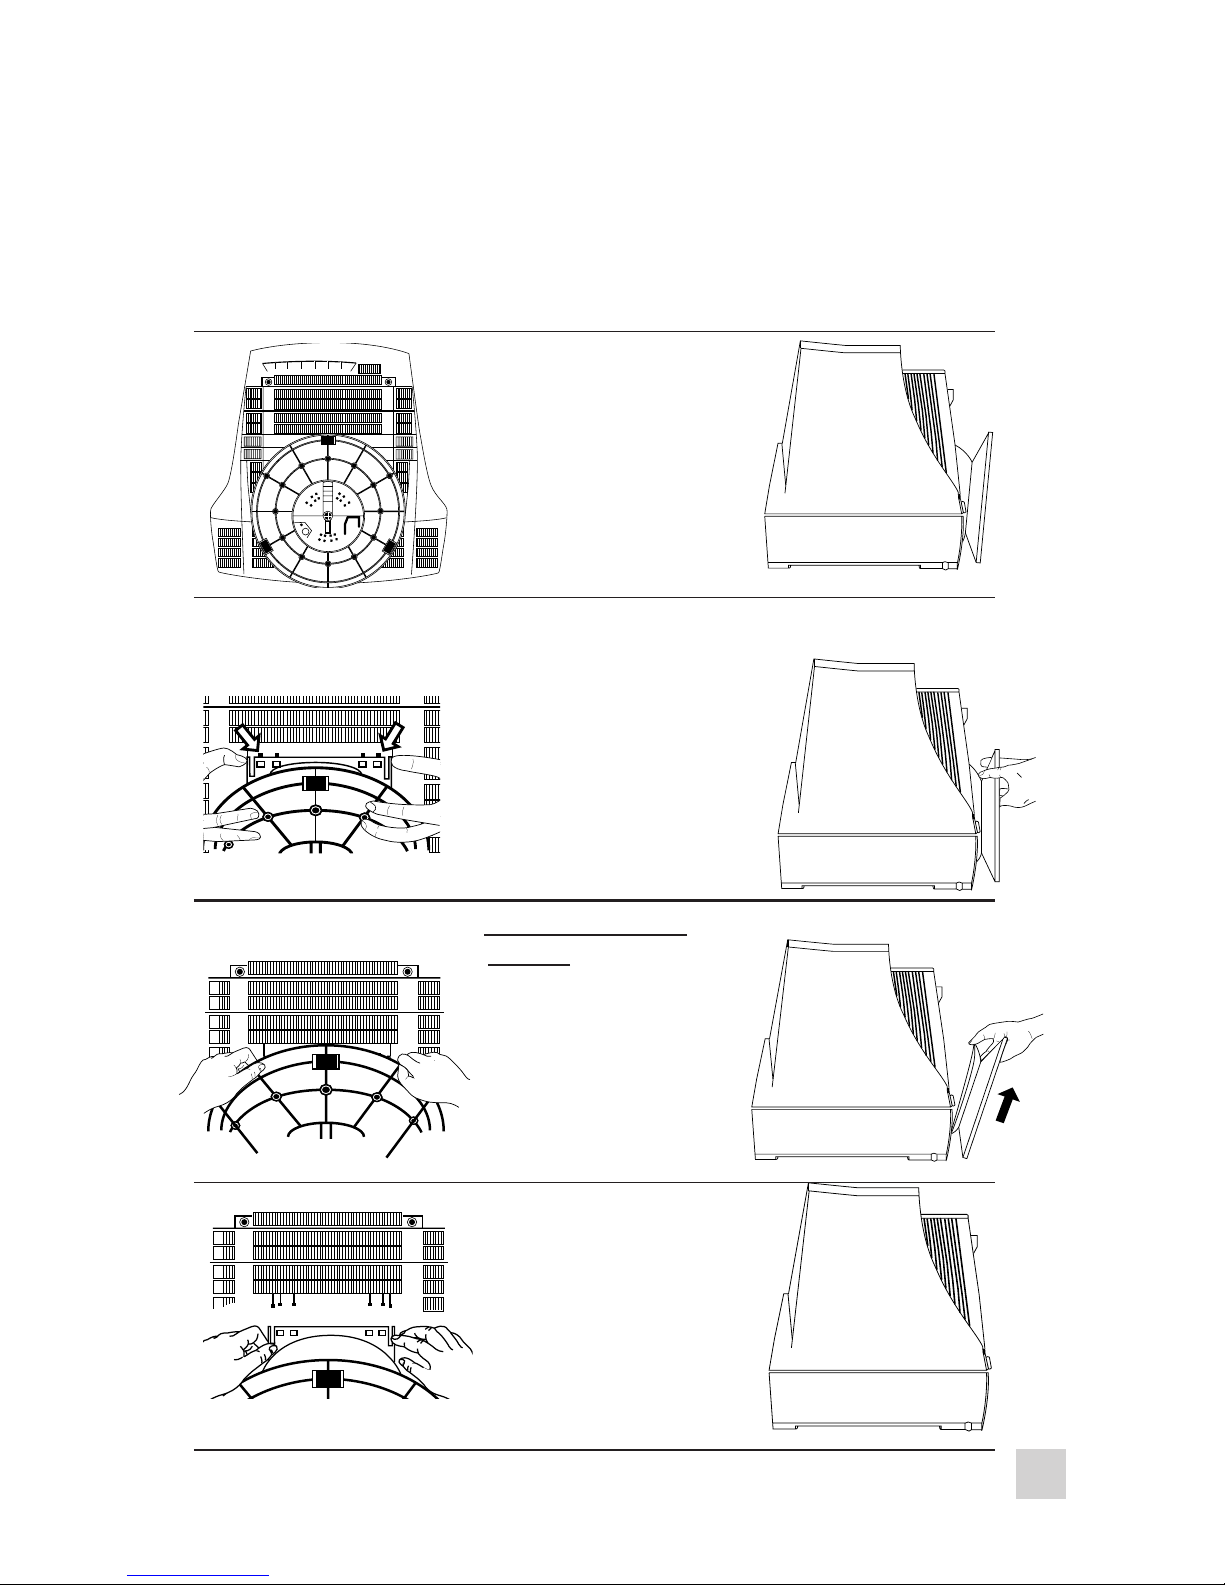
If you want your monitor to sit flat on top of a desktop computer or desk, you
can remove the stand.
To remove the stand:
1. Place the monitor face
down on soft material,
such as a folded towel.
The towel is to prevent
scratches on the glass.
2. Locate the small circular hole in the stand. Revolve the stand until the hole
lines up with a screw. Remove the screw with a Phillips head screw driver.
Press the locations
shown in the drawing to
release the lock tab.
ViewSonic G800
3. After the lock tab is
released, pull the
monitor stand up at an
angle.
4. Remove the stand and
store in the monitor's
shipping carton.
Installation
3
Page 12

4
Installation
ViewSonic G800
Page 13
OPERATION
2
This section shows how to adjust the ViewSonic G800 monitor using the
buttons shown below and the OnView® control menu (see page 6).
Graphic Series
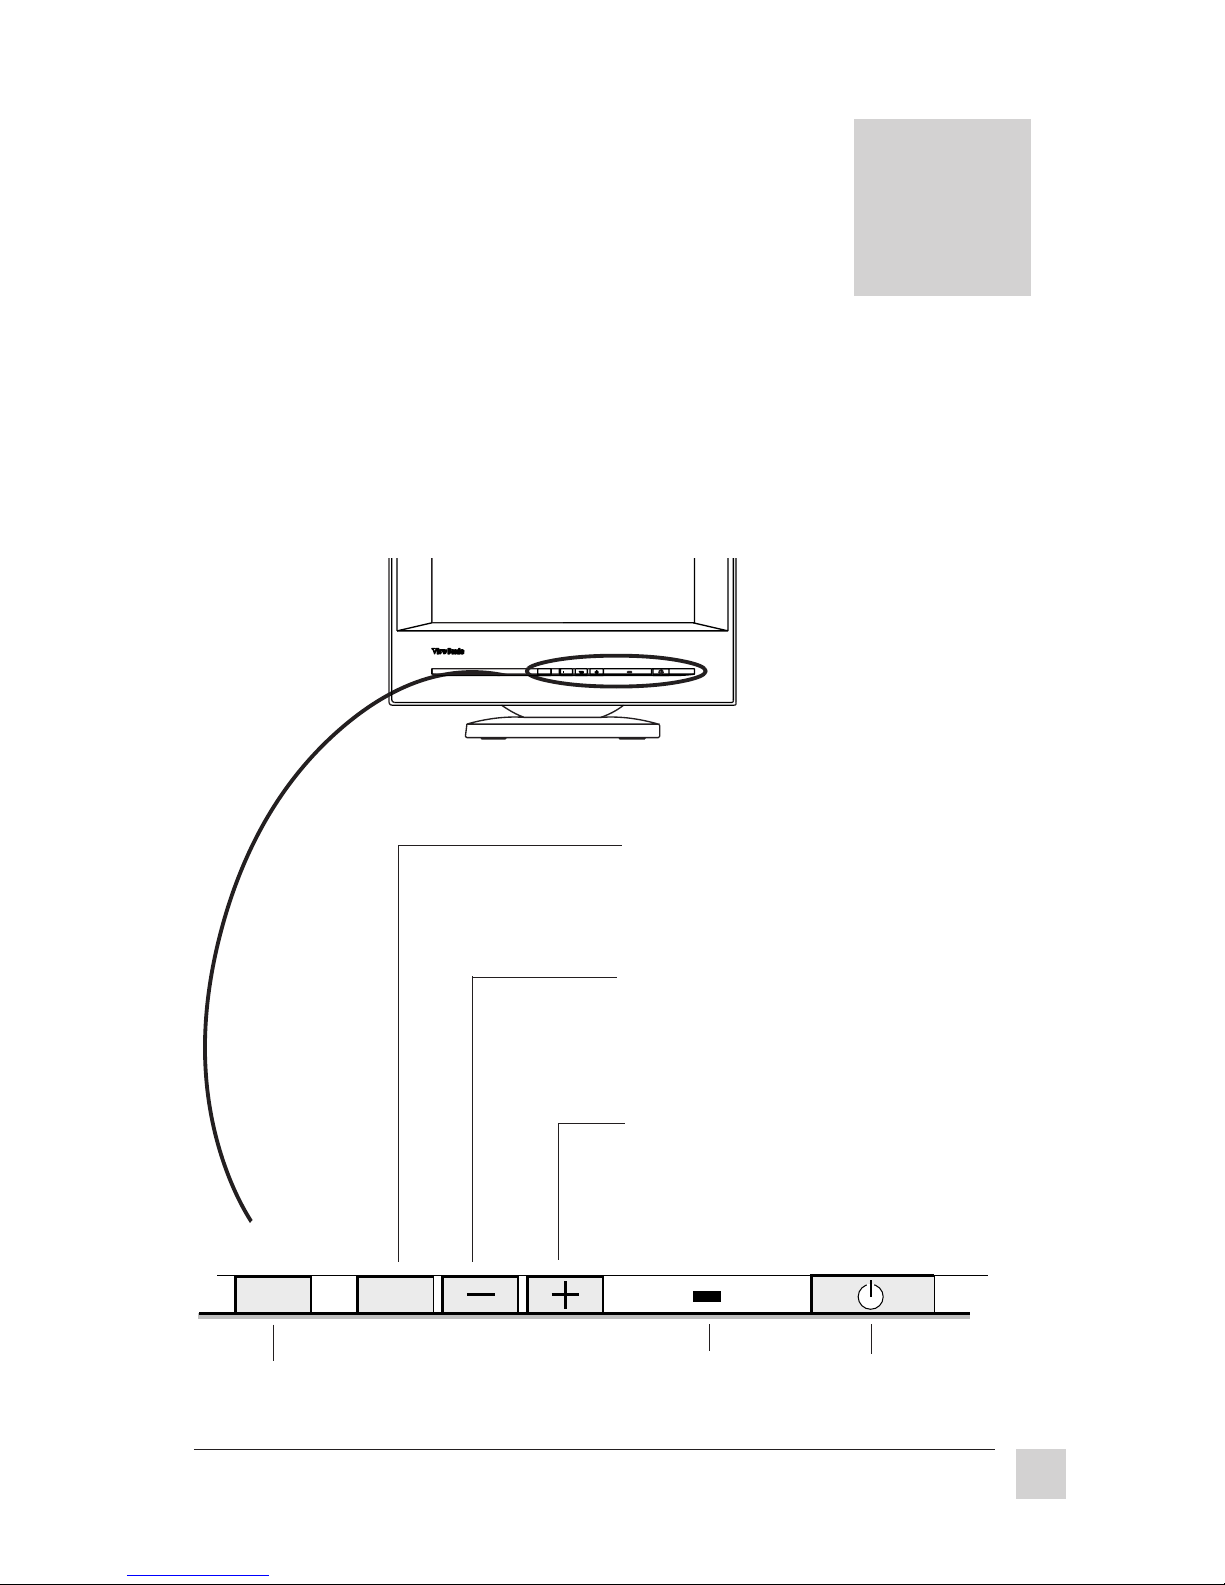
To turn on the monitor, press the power switch shown below. When the
monitor is on, the power light (LED) is green; when the monitor goes into
power saving mode or is disconnected from a computer, the light turns orange.
RECALL ONVIEW
G800
➛
RECALL
Returns adjustments
back to factory
settings.
ONVIEW
• Displays OnView control menu.
• Activates (pink) & deactivates
(black) the highlighted icon.
• Scrolls counter-clockwise through
icons around the control menu.
• Decreases the value of the selected
icon.
• Scrolls clockwise through icons
around the control menu.
• Increases the value of the selected
icon.
Power
light.
Power switch.
Automatically
degausses monitor.
Operation
ViewSonic G800
5
Page 14
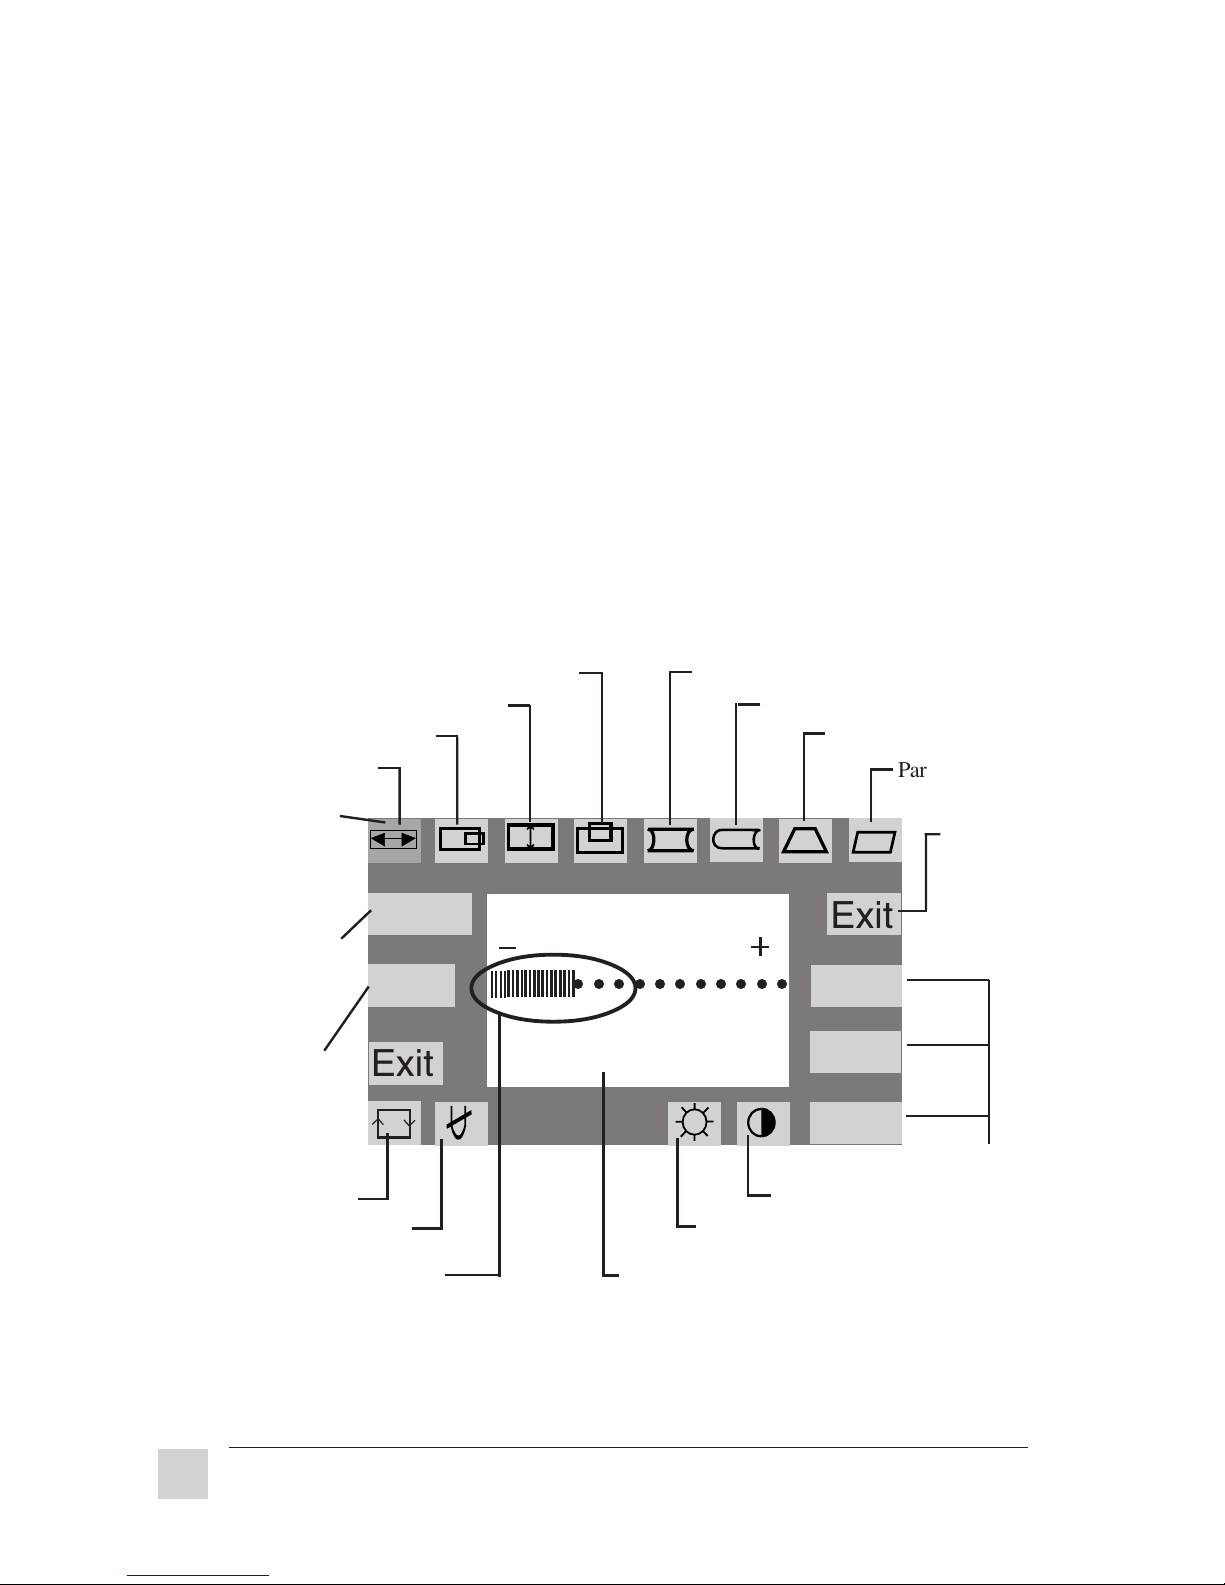
OnView® Control Menu
1. Press the power switch to turn on the monitor (see the previous page.)
2. Press the OnView button for the control menu shown below.
3. Press the minus [-] or plus [+] button to scroll through and highlight each
icon around the menu. Vertical lines in the center square are black to show
that the icon is deactivated.
4. Press OnView to activate the highlighted icon. Vertical lines in the center
square turn pink indicating that the image is ready to be adjusted.
5. Press the minus [-] or plus [+] button to adjust the image. The number of
vertical lines in the center square increases or decreases as you make
adjustments.
6. Press the OnView button to deactivate the icon. Select and activate another
icon or the Exit option. The control screen automatically saves changes
and disappears approximately 15 seconds after releasing a button.
Horizontal Position
Horizontal Size
A selected
icon is
highlighted in
pink.
Increase or
decrease
height &
width.
User- defined
color
temperatures.
Rotate
Degauss
Vertical Position
Vertical Size
Zoom
User
Exit
○○○○○○○○○○○
31khz
034
Pincushion
70Hz
Brightness
Pin-balance
Trapezoid
Exit
9300
6500
5500
Contrast
Parallelogram
Saves
changes
and exits
this
control
menu.
➛
Color
Temperatures
Black lines = inactive
Pink lines = active (ready to adjust)
Operation
6
The monitor's horizontal and
vertical frequencies.
ViewSonic G800
Page 15

To save changes and exit the menu, highlight Exit and press OnView.
Horizontal Size
Horizontal Position
Vertical Size
This control adjusts the width of the
screen image.
Minus [-] button decreases the width
of the screen image.
Plus [+] button increases the width of
the screen image.
This control moves the screen image left
or right.
Minus [-] button moves the screen to
the left.
Plus [+] button moves the screen to
the right.
This control adjusts the height of the
screen image.
Minus [-] button decreases the height
of the screen image.
Plus [+] button increases the height of
the screen image.
Vertical Position
Pincushion
This control moves the screen image up
or down.
Minus [-] button moves the screen
image down.
Plus [+] button moves the screen
image up.
This control straightens the vertical sides
of the screen.
Minus [-] button curves the screen's
vertical edges inward.
Plus [+] button curves the screen's
vertical edges outward.
Operation
ViewSonic G800
7
Page 16
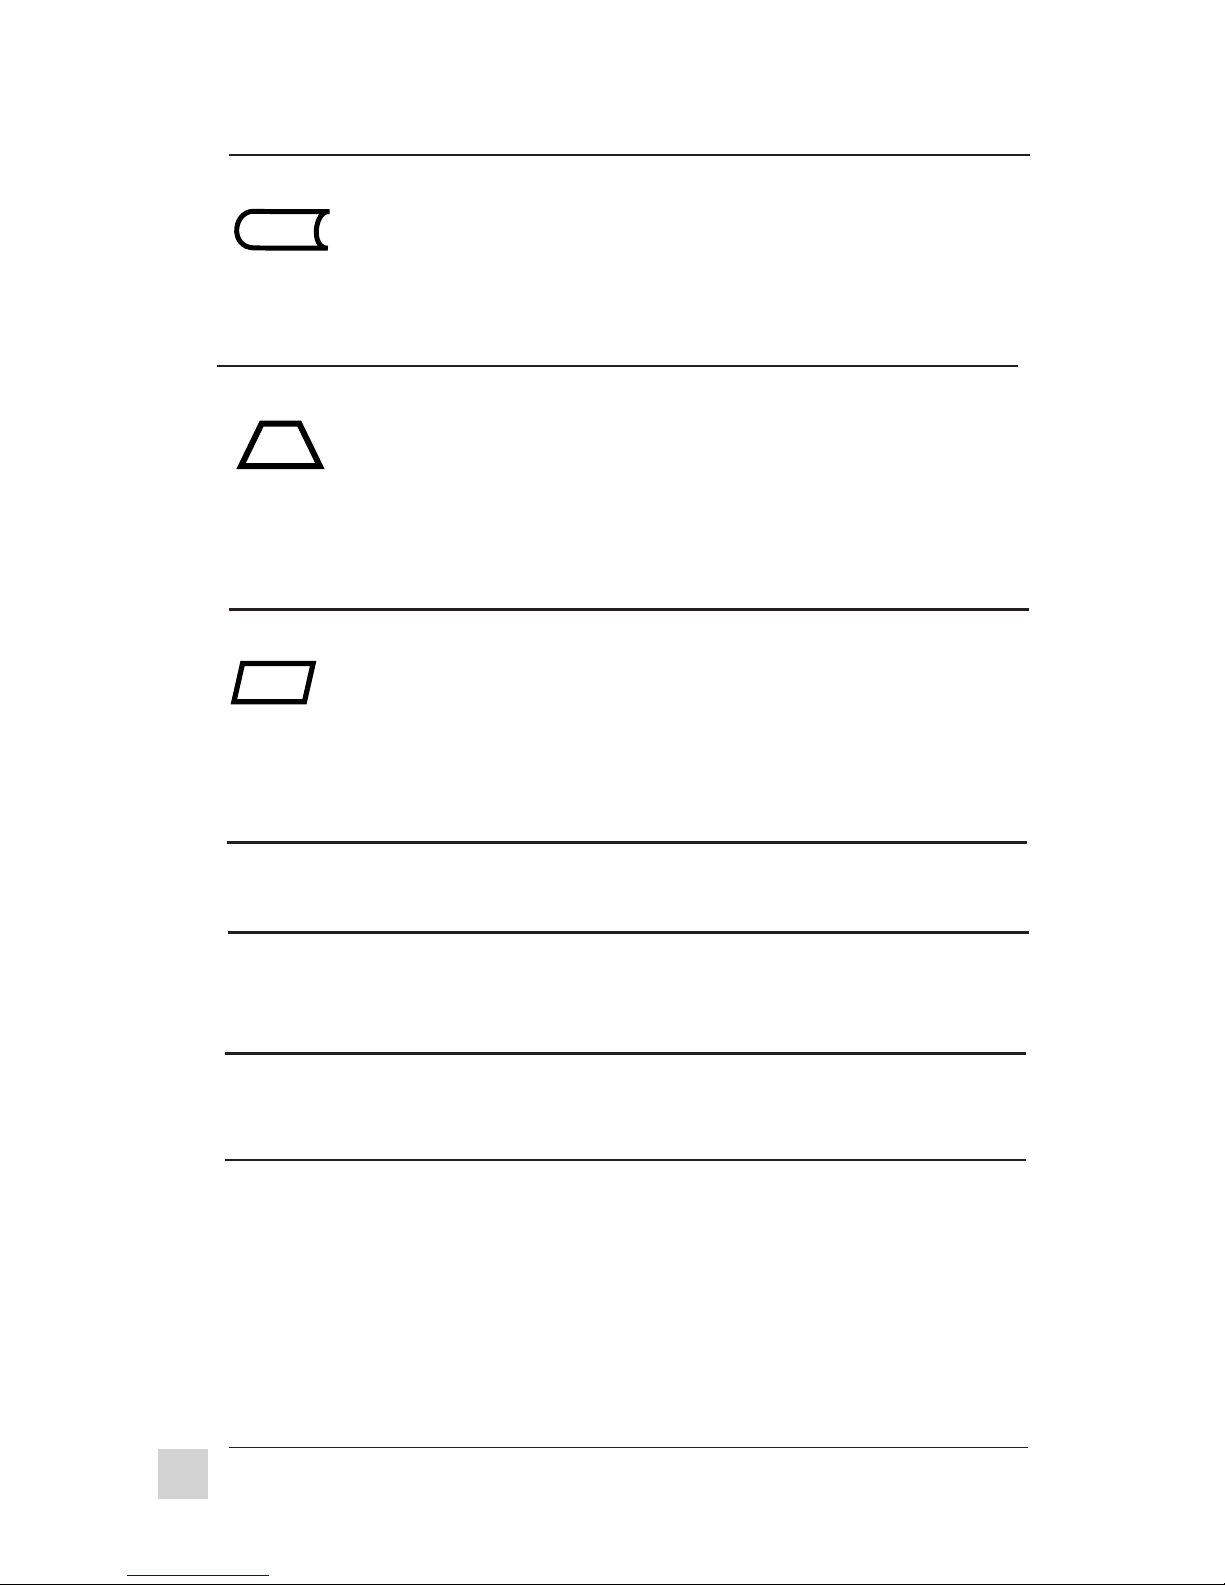
To save changes and exit the menu, highlight Exit and press OnView.
Pin-balance
Trapezoid
Parallelogram
This control curves the screen's vertical
edges to the left or right.
Minus [-] button curves the screen's
vertical edges to the left.
Plus [+] button curves the screen's
vertical edges to the right.
This control adjusts for unevenness
between the top and bottom of the screen
image.
Minus [-] button widens the screen at
the top and narrows it at the bottom.
Plus [+] button narrows the screen at
the top and widens it at the bottom.
This control skews (slants) the screen
image to the right or left.
Minus [-] button slants the screen
image to the left.
9300°K
6500°K
5500°K
Plus [+] button slants the screen
image to the right.
This control adds blue to the screen
image for a cooler white.
This control adds red to the screen image
for a warmer white and a richer, more
vibrant red.
This control adds additional red to the
screen image for the warmest white.
Operation
8
ViewSonic G800
Page 17
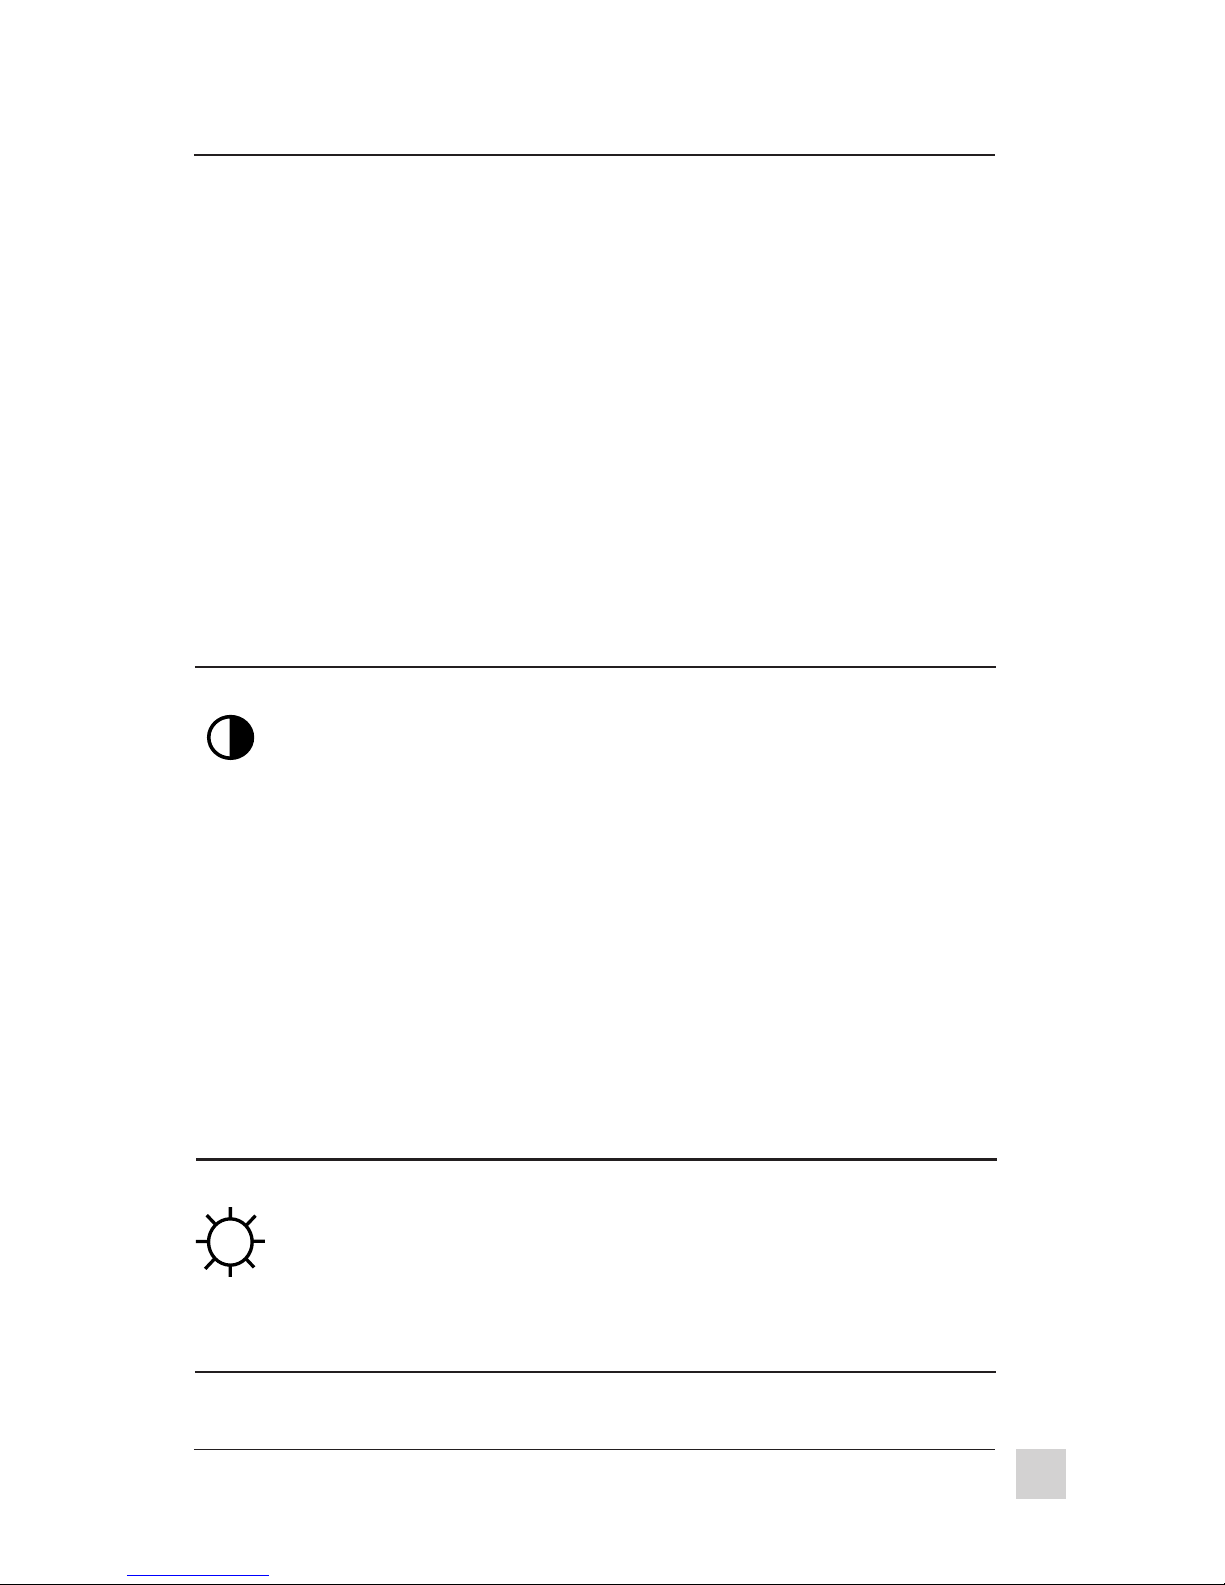
To save changes and exit the menu, highlight Exit and press OnView.
User
Contrast
This control adjusts the individual
temperatures for red (R), green (G), and
blue (B) to meet your personal
preference.
With the User option highlighted on the
control menu, press OnView repeatedly
to activate the red (R), green (G), or blue
(B) control. Notice the vertical bars in
the center square turn pink which
indicates the color is ready to be
adjusted.
Press plus [+] or minus [-] to adjust the
screen image. The vertical bars increase
or decrease as adjustments are made.
Important: Press OnView repeatedly to
select another color or to deactivate the
option.
This control adjusts the contrast between
the background (black level) and the
foreground (white level) of the screen
image.
Minus [-] button decreases the
contrast of the screen.
Plus [+] button increases the contrast
of the screen.
Brightness
Operation
Shortcut: From a blank screen, press the
plus [+] or minus [-] button. A small
control screen appears. After making
adjustments, the control screen
automatically disappears after
approximately 15 seconds; or press
OnView, then -/+ button to highlight
Exit, and press OnView.
This control adjusts the background
brightness of the screen image.
Minus [-] button decreases the
brightness of the image.
Plus [+] button increases the
brightness of the image.
ViewSonic G800
9
Page 18
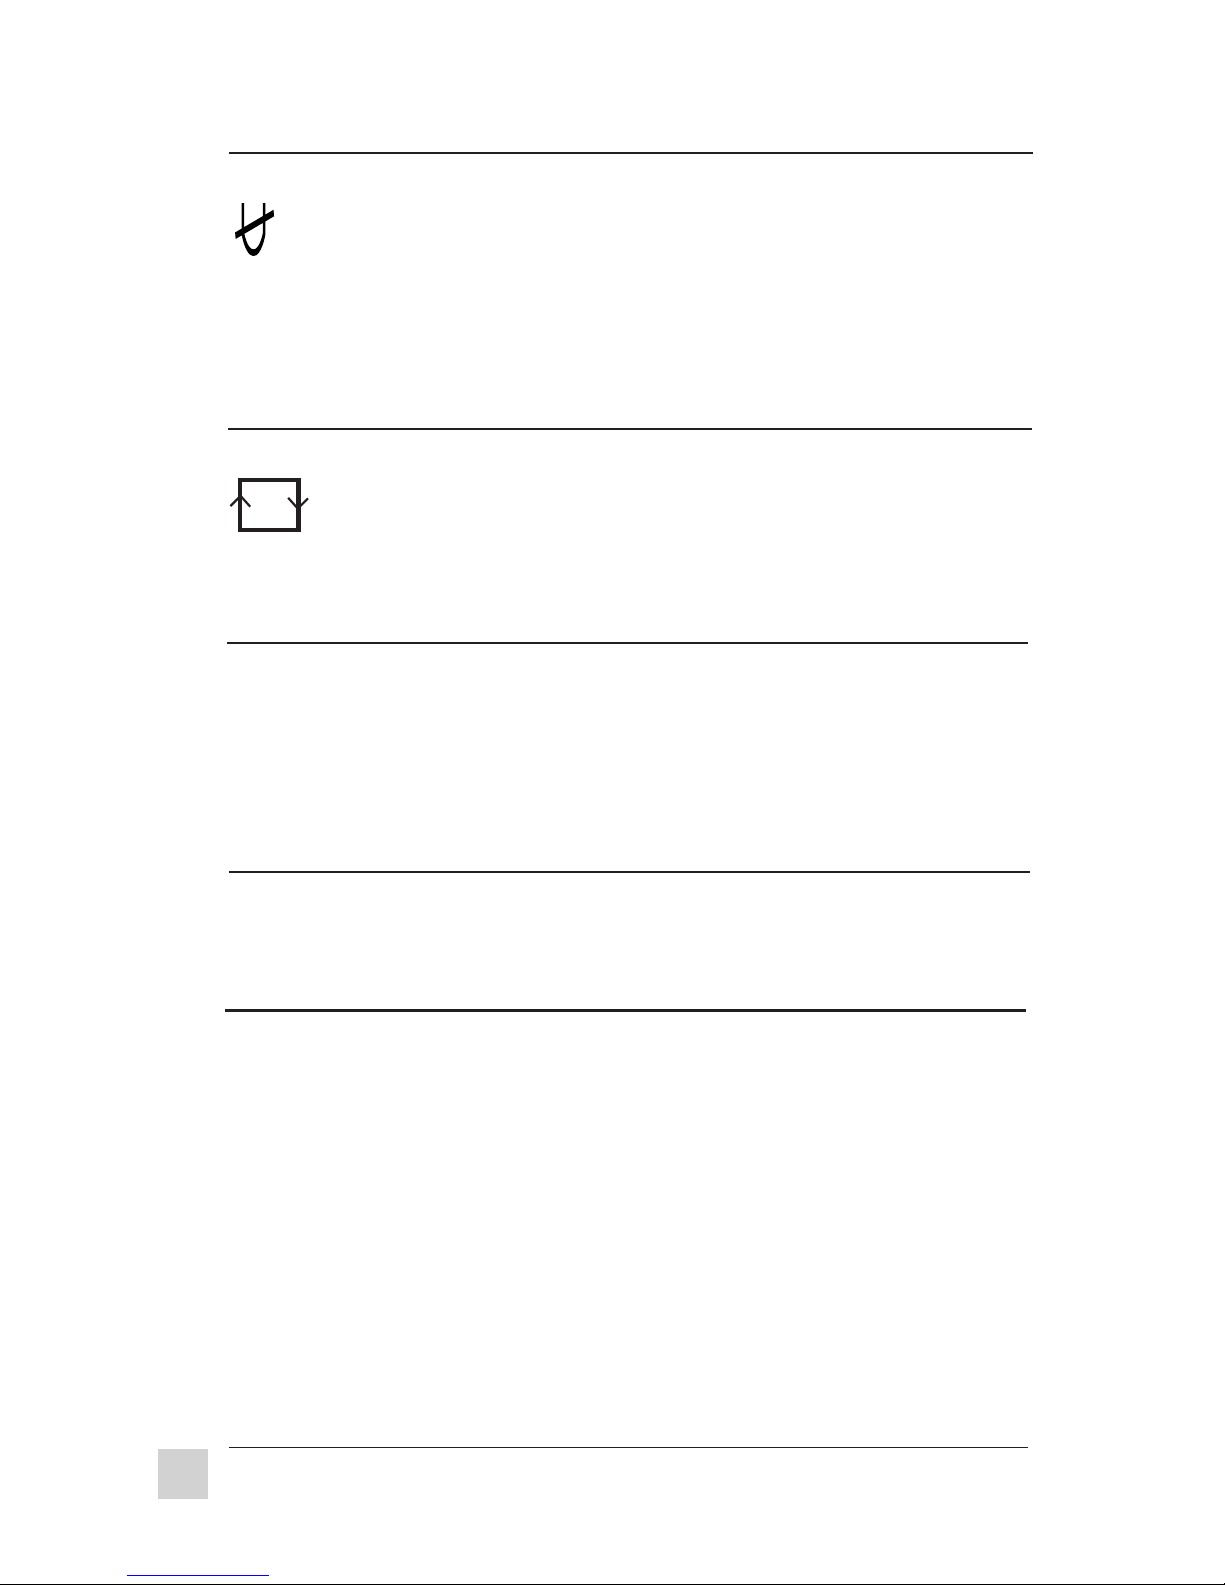
To save changes and exit the menu, highlight Exit and press OnView.
Degauss
Rotate
Zoom
When irregular colors appear, select the
degauss control. Degaussing removes the
build-up of magnetic fields that can
affect color purity and convergence. Wait
at least 20 minutes before degaussing
again. Do not degauss repeatedly. The
monitor also automatically degausses
when you press the power switch to turn
on the monitor.
This control rotates the screen clockwise
or counter-clockwise.
Minus [-] button rotates the screen
image counter-clockwise.
Plus [+] button rotates the screen
image clockwise.
This control decreases or increases the
height and width of the screen image all
at once.
Minus [-] decreases the height and
width.
Plus [+] increases the height and
width.
10
Exit
This control saves adjustments and exits
the control menu. Exit is available twice
on the menu for your convenience when
moving around the menu.
ViewSonic G800Operation
Page 19

Timing Chart
The
ViewSonic G800
resolutions and refresh rates. Certain standard resolutions are factory preset.
There are also 18 timings which are user definable. For example, if your video
card is set up to run 1024 pixels x 768 lines at an 80 Hz refresh rate, once you
have adjusted the screen size and position to your preferences, the monitor
will save this information to memory. Every time you run this resolution at
this refresh rate, the monitor will recall your adjustments.
digital monitor can run at an extensive range of
The following table lists the maximum refresh rates at which the
G800
will operate at a number of standard resolutions. While the monitor is
ViewSonic
capable of this level of performance, not all video cards are capable of
running at these high refresh rates. Please see your video card user's guide to
ensure compatibility.
Warning: Do not exceed the maximum refresh rate listed in the table below
for your monitor. Doing so may result in permanent damage to the monitor.
Some graphics cards support refresh rates higher than the monitor is
capable of handling.
User Definable Timings
Resolution Maximum
Refresh Rate
pixels x lines Hz
640 x 480 120
800 x 600 NI* 120
1024 x 768 NI* 106
1280 x 1024 NI* 80
Video Timing
The video timing mode is made up of three elements:
1. The resolution is the number of data pixels times the number of data lines
that make up the screen.
2. The horizontal frequency is the speed that the electron beam travels across
the screen, left to right.
3. The vertical frequency, or refresh rate, is the speed that the electron beam
finishes all the rows in the screen and returns to the top.
ViewSonic G800
1600 X 1200 NI* 69
*Non-Interlaced
Operation
11
Page 20

Factory Preset Timings
The following table lists the factory preset timings:
Resolution Horizontal Vertical Polarity of Syn-
Frequency Frequency chronizing Signal
Timing Pixels x Lines kHz Hz horiz/vertical
VGA 640x480@60Hz 640 x 480 31.47 60 -/-
VESA 640x480@75Hz 640 x 480 37.58 75 -/-
VESA 800x600@75Hz 800 x 600 46.88 75 +/+
VESA 1024x768@75Hz 1024x768 60.02 75 -/-
VESA 1280x1024@60Hz 1280 x 1024 63.98 60 +/+
VESA 1280x1024@75Hz 1280 x1024 79.98 75 +/+
MAC 832X624@75Hz 832 x 624 49.73 74.6 -/-
MAC 1024x768@75Hz 1024 x 768 60.20 75 -/-
MAC 1152x870@75Hz 1152 x 870 68.68 75 -/-
Note
●
Input timing should be within the horizontal and vertical frequency ranges in order
to set the screen size and position. Before registering a new signal, check its
horizontal and vertical timing specifications.
●
The factory preset timing is registered when the difference between the user
definable timing and the factory preset timing is smaller than the allowable
deviation; also, the polarity of their synchronizing signals must be the same.
12
ViewSonic G800Operation
Page 21

Plug & Play
For Windows® 95 users
Plug and Play is Microsoft®'s method of providing automatic peripheral
connections in Windows 95.
®
Because your new monitor features the VESA
Association) DDC (Display Data Channel) standard, the monitor's
resolutions are simple to adjust when used with a DDC compatible video
card in the Plug and Play environment.
DDC is a protocol which allows the monitor to communicate with the video
card, so the resolutions can be changed in the Display's Settings section
found in the Windows 95 Control Panel.
To use Plug and Play:
Install the information file (.inf file) for this monitor. The installation
program, titled Install.exe is on the disk or the CD ROM included with the
monitor.
To install the program from the OptiGreen disk:
1. With your computer on, insert the disk into the computer's disk
drive.
2. Click the Windows 95 Start menu button.
3. Select Run.
4. Type in A:\install.exe if your disk drive is A.
Type in B:\install.exe if your disk drive is B.
5. Click OK and follow the instructions.
6. Restart your computer for the installation to take effect.
(Video Electronics Standards
To install the program from the ViewSonic Display Suite CD :
1. With your computer on, insert the CD into the CD ROM drive.
2. Wait for the CD to automatically start.
3. Select Windows 95 Plug & Play.
4. Select Install.
5. Select Install *.INF File (Windows 95).
6. Select Execute.
7. Restart your computer for the installation to take effect.
Note
Some older computer systems are not compatible with the DDC standard. If your
monitor is displaying a monochrome image or the wrong resolution, call
ViewSonic’s customer support for a non-DDC adapter. If you upgrade to a DDC
compatible system later and want to use Plug & Play, just remove the adapter.
ViewSonic G800
Operation
13
Page 22

DDC™ Diagnostic Utility
For IBM PC's and compatibles
The ViewSonic
G800
uses DDC (Display Data Channel) protocol to
communicate with your computer's video card. The software diskette or CD
ROM included in the ViewSonic
G800
package has a utility file called
DDCTEST.EXE. This utility is useful for troubleshooting if DDC-related
problems occur when using Windows® 3.1 or Windows® 95.
When you run the DDC Diagnostic Utility, one of two messages will
appear:
1. If the utility detects that DDC is functioning, the following appears:
ViewSonic/Optiquest Plug & Play monitor: G800 successfully detected.
Hit any key to read and decode the EDID information...(ESC to exit)
If you hit a key, you will see information about the monitor. This information
is a table of EDID codes (Extended Display Identification) and an
explanation of the codes. Press ESC to exit, then:
a. Check if DDC is enabled in Windows. Refer to the README.TXT file
on the ViewSonic diskette for instructions on how to enable DDC in
Windows.
b. Install the ViewSonic MONITOR.INF file included on the ViewSonic
diskette. It is titled VSdatecode.inf, with the date code in year/month/
day. Refer to the README.TXT file on the ViewSonic diskette for
installation instructions.
If Plug & Play still does not work after you have followed the procedure
above, call ViewSonic Customer Support.
2. If the utility detects that DDC is not functioning, the following appears:
ViewSonic/Optiquest Plug & Play monitor was not detected
Exit the utility. Turn the monitor off. Wait ten seconds and turn the monitor
on. Try the DDC Diagnostic Utility again. If you still receive the message that
the monitor was not detected:
a. Check your computer or graphics board manufacturer's user's guide to
see if your graphics system is DDC compatible.
b. Check the video cable connector for bent or broken pins.
c. Refer to the README.TXT file troubleshooting section (included on the
ViewSonic diskette).
If the procedure above does not work, call ViewSonic Customer Support.
14
Operation
ViewSonic G800
Page 23

Power Management System
This monitor meets VESA® DPMS™ (Display Power Management Signaling)
standards. For the monitor’s power saving feature to work, the video board or
computer must also meet VESA DPMS standards.
State LED Power Recovery Time
On green 150watts typical N/A
Standby yellow <30 watts <3 sec
Suspend yellow <8 watts <10 sec
Off yellow <8 watts <10 sec
Note: The G800 complies with European NUTEK Power Management Standards.
Note: The Off state means the monitor is in the lowest DPMS state with the
highest power savings.
The monitor goes into these power saving stages with the following video
synchronization signals:
State Horizontal Sync Vertical Sync
On On On
Standby Off On
Suspend On Off
Off Off Off
The monitor automatically goes through the Power Management System steps
when it is idle.
To conserve energy, we recommend turning the monitor off at the power
switch when it will not be used for long periods of time.
ViewSonic G800
Operation
15
Page 24

16
ViewSonic G800Operation
Page 25
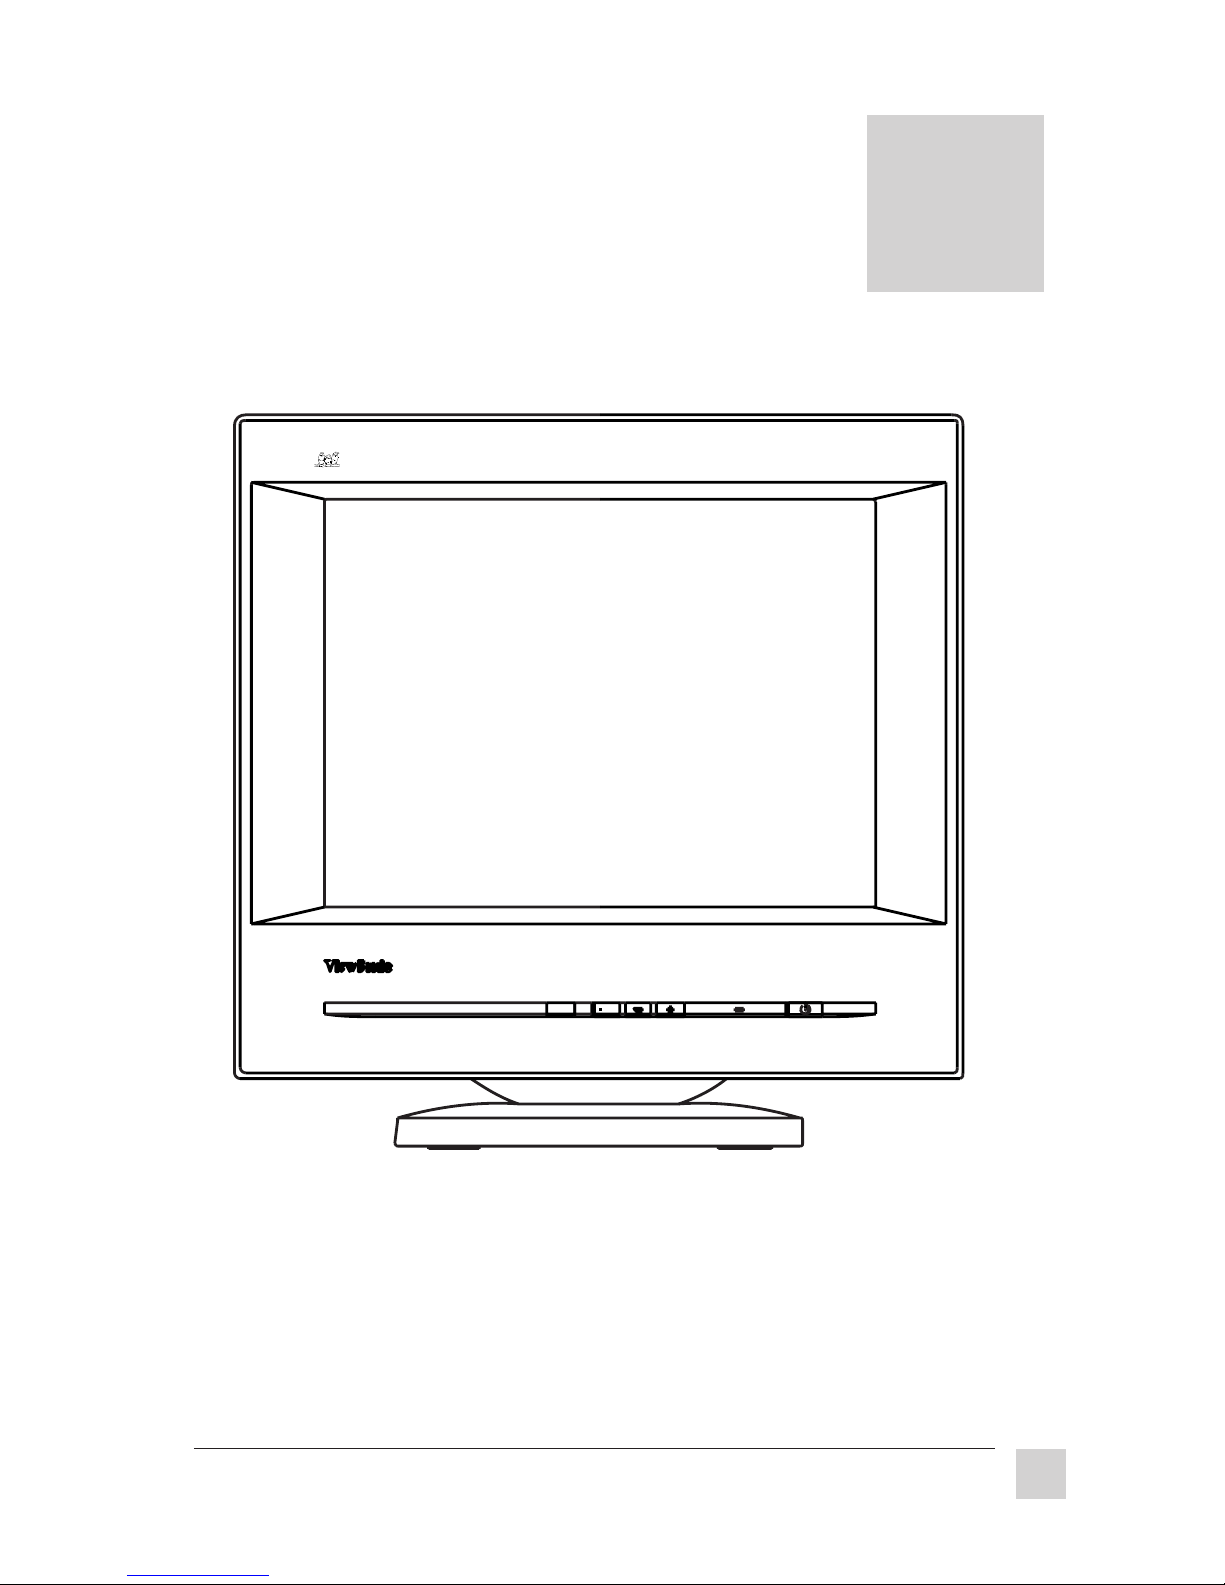
ABOUT YOUR
MONITOR
Graphic Series
G800
3
ViewSonic® Quality
The specially designed ViewSonic G800 monitor is an excellent choice for
graphic designers, pre-press editors and desktop publishers. ViewSonic G800
features a 20" (18.4" viewable) screen with a precision .28mm dot pitch, 1600
x 1200 maximum resolution, and ARAG® anti-glare, anti-reflection glass
coating.
ViewSonic G800
RECALL ONVIEW
About Your Monitor
17
Page 26

Features
Superior Image ...
●
OnView® control system allows you to adjust screen images using
four buttons on the front panel and the on-screen-display.
●
Invar Shadow Mask for superior focus, brightness, and color.
●
20" (18.4" viewable diagonal), 0.28mm dot pitch, high resolution,
non-interlaced technology provides sharp, flicker-free images.
●
The ViewMatch® color control system easily allows the white of
the image to be adjusted as well as the red, green, and blue signals.
Ergonomic Design ...
●
Anti-reflection coating reduces eye strain.
●
Tilt base allows 180o rotation horizontally and 17o vertically for
greater user comfort.
●
Low-frequency magnetic field prevention and electrostatic
charge reduction meets strict MPR-II emissions standards for
increased user safety.
Environmentally Friendly ...
●
Power management circuit conforms to VESA® DPMS
standards and controls energy consumption when the monitor is not
in use.
●
This product is Energy Star™ compliant.
●
All plastic parts are recyclable. All materials are strictly selected
for ease of maintenance, inspection, and disposal.
●
Our shipping cartons are made of recyclable material.
TM
18
About Your Monitor
ViewSonic G800
Page 27

Precision Timing ...
●
True multi-scanning ability allows automatic tracking of
horizontal frequencies from 30 to 86 kHz and vertical frequencies
from 50 to 120 Hz.
●
Nine factory preset video modes are available for image size and
positioning.
●
Eighteen additional timings are user definable for a total of 27
timing settings.
●
Synchronizing input signals (separate or sync-on-green) are
automatically selected.
System Flexibility ...
●
Equipped with DDC1 and DDC2B for Plug & Play
compatibility.
●
Automatic universal power supply is built in permitting AC power
input of 90-132 V or 198-264 V at 50 or 60 Hz.
●
Compact case allows for a large screen monitor without loss of
desk space. The stand is removable.
●
The monitor is compatible with VGA, SVGA, VESA, and high
resolution video modes up to 1600 (H) x 1200 (V).
●
The monitor may be used with IBM® or a compatible PC and
Macintosh
*Macintosh
ViewSonic for your free adapter. See Chapter 4 on Troubleshooting for a telephone number in
your area.
ViewSonic G800
computers require ViewSonic® Macintosh adapters. Contact your local dealer or
®
*.
About Your Monitor
19
Page 28

Specifications
CRT Type 20"(18.4" viewable diagonal), 0.28mm dot
pitch, 90° deflection
Phosphor RGB, medium-short persistence
glass surface ARAG® coating
Standard light transmission rate = 52%
Input Signal Video RGB analog (0.714 Vp-p, 75 ohms)
Sync H/V separate (TTL), sync on green (0.3 Vp-p)
fh: 30-86 kHz, fv: 50-120 Hz
Compatibility PC IBM® XT, AT, 386, 486, Pentium® or PS/2 and
compatibles (from VGA up to 1600x1200
non-interlaced)
Macintosh®* Macintosh II Family, LC, Quadra series, Power
Macintosh* (up to 1152x870), Macintosh Clones
Connectors Rear Video-In 15-pin high density (H.D.)
mini D-sub
Power 3-pin plug (IEC320)
Power Voltage AC 90-132V/198-264V
50/60 Hz ± 3 Hz
Consumption AC 150 watts (typical)
User Controls/ Buttons Recall, OnView, Minus [-], Plus [+], Power
Functions
OnView
Misconvergence 0.30mm (max) at center
®
Horizontal Position, Horizontal Size, Vertical Size,
Vertical Position, Pincushion, Pin-balance,
Trapezoid, Parallelogram, Exit, 9300, 6500, 5500,
Contrast, Brightness, Degauss, Rotate, User,
Zoom
0.40mm (max) at corner
continued...
20
About Your Monitor
ViewSonic G800
Page 29

Specifications, continued
Display Area Factory setting 360mm (H) x 270mm (V) typical (Dependent upon
Large scan 378mm (H) x 280mm (V) signal timing used)
Operating Temperature 32°F to 104°F (0°C to 40°C)
Conditions Humidity 0% to 90% (no condensation)
Altitude To 10,000 feet
Storage Temperature -4°F to +140°F (-20°C to +60°C)
Conditions Humidity 0% to 95% (no condensation)
Altitude To 40,000 feet
Dimensions Physical 500mm (W) x 504mm (H) x 492mm (D)
19.7" (W) x 19.8" (H) x 19.4" (D)
Packing 645mm (W) x 645mm (H) x 637mm (D)
25.39" (W) x 25.39 (H) x 25.08" (D)
Weight Net 26.5kg (58.3lb)
Gross 30.5kg (67.1lb)
Regulatory UL, CSA, FCC-B, DHHS, TUV, MPR-II, CE,
Agencies PTB, DOC-B, VCCI-II,TOC-92, ISO9241-3,
NEMKO
Power savings
LED modes
Other Features Compatible with the display data channel
All products and trademarks are brand names of their respective companies. Specifications
are subject to change without notice.
*Macintosh® computers require ViewSonic® Macintosh adapter. Contact your local dealer
or ViewSonic for your free adapter. See Chapter 4 on troubleshooting for a telephone
number in your area.
On
Stand By
Suspend
Off
standards DDC1 and DDC2B.
green 150W typical
yellow <30W
yellow <8W
yellow <8W
ViewSonic G800
About Your Monitor
21
Page 30
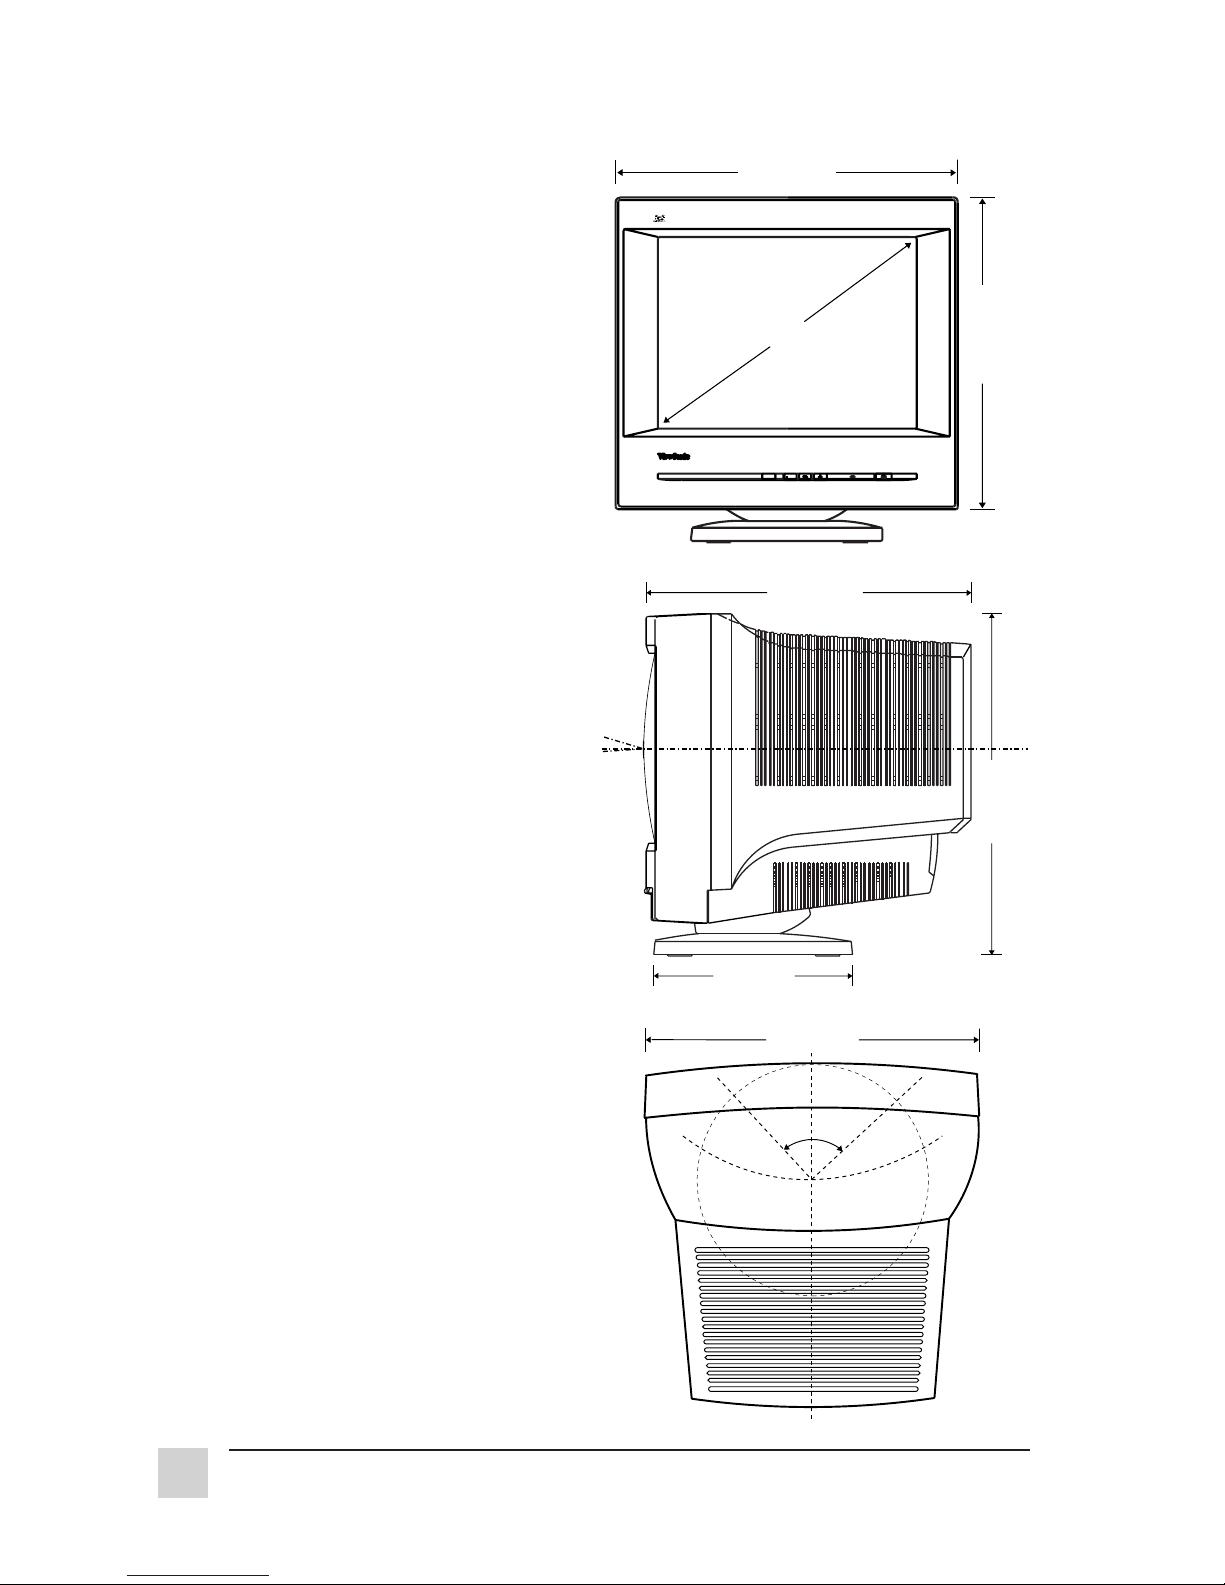
Dimensions
Front View...
Width 500mm (19.7")
Height 456 mm (18.0")
(without base)
Screen 467 mm (18.4")
(diagonal
viewable)
Side View...
Depth 492 mm (19.4")
Height 504 mm (19.8")
(with base)
Base 300 mm (11.8")
Tilt
up 15
down 5
o
o
Tilt
up
15˚
Tilt
down
5˚
500 mm
467 mm
RECALL ONVIEW
492 mm
Graphic Series
G800
456 mm
504 mm
Top View...
Swivel Angle
left 90
right 90
22
About Your Monitor
300 mm
354 mm
Rotation
90˚
o
o
ViewSonic G800
Page 31

TROUBLESHOOTING
4
If your
troubleshooting chart for quick solutions to common problems. If the problem
persists, call your monitor dealer. For further support or to order your free
Macintosh adapter, call ViewSonic® customer support at the telephone
number in your area:
U.S. and Canada only 1-800-688-6688
From outside the U.S. and Canada 909-869-7976
From Europe 49 (2154) 9188-0
From Asian/Pacific Rim countries 886 (2) 248-4072
Internet E-Mail: [email protected]
World Wide Web: http://www.viewsonic.com
Problem... Possible Cause... Remedy...
No picture Power cord disconnected? Connect power cord.
ViewSonic G800
Power switch off? Turn on power.
Faulty outlet? Try another outlet.
Monitor in power save mode? Press any keyboard key.
monitor is not performing properly, use this
Computer or graphics card? Check video card connections.
Signal cable properly connected? Connect signal cable properly.
Signal cable connector? Check connector for bent pins.
Video sync signal? Check if it's the video sync
signal specified for the monitor.
Using a Macintosh®? Make sure the dip switch
settings on your ViewSonic
Macintosh adapter are correct.
Image is scrolling Signal connector pin Use correct signal connector.
or unstable assignments incorrect?
Signal cable properly connected? Connect signal cable properly.
Check for bent or missing pins.
Graphics Board? Check your graphics board
manual for the proper monitor
setting.
Continued...
®
ViewSonic G800
Troubleshooting
23
Page 32

Problem... Possible Cause... Remedy...
Image is scrollng Scanning frequency outside Reconfigure the graphics
or unstable acceptable range? board.
Image is not centered, Horizontal, vertical positioning Adjust the horizontal, vertical
too small or too large or horizontal, vertical size? positioning and size controls.
Characters appear Brightness and contrast Adjust brightness and
dark at minimum? contrast.
Color is not pure Build-up of magnetic fields Use the degauss function to
within the monitor? clear or degauss the magnetic
fields. (Page 9)
Magnetic object nearby? Reorient object or monitor.
Signal connector pin Use correct signal connector.
assignments incorrect?
Signal cable properly connected? Connect signal cable properly.
Image bounces or Magnetic object nearby? Reorient object or monitor.
has wavy oscillations
Electric power wiring nearby? Your office may have electric
power wiring behind the wall.
Move the monitor.
Image is distorted Is the earth’s magnetic field Face monitor east for
interfering with display? best image quality.
Troubleshooting
24
ViewSonic G800
Page 33

CARE AND SAFETY
TIPS
Helpful Hints
●
Avoid exposing the monitor to direct
sunlight or other heat sources. The
monitor should be facing away from
direct sunlight to reduce glare.
●
Place your monitor in a well-ventilated
area to allow adequate dissipation of
heat.
●
Do not place anything on top of the
monitor.
●
Ensure the monitor area is clean and
moisture free.
●
Keep the monitor away from magnets,
motors, transformers, speakers, and
televisions.
●
Do not place heavy objects on the cable
or power cord.
●
Sit at least 18" from the monitor.
Safety Tips
●
If smoke, abnormal noise, or foul odor is
present, immediately switch the monitor
off and call your dealer. It is dangerous
to continue using the monitor.
●
Never remove the rear cover. The
monitor contains high-voltage parts. You
may suffer electric shock if you touch
these parts. Call your dealer or
ViewSonic Customer Support.
Care and Safety TipsViewSonic G800
25
Page 34

Care of Your Monitor
●
When cleaning the monitor screen, use
only non-ammonia based glass cleaners.
Apply the cleaning solution to a clean,
dry cloth, not directly to the screen.
●
When cleaning the plastic case, use only
a soft, dry cloth. If the plastic is very
dirty, use a neutral, non-abrasive
detergent. Do not use alcohol or
ammonia based solutions.
●
Avoid spilling liquid on the monitor.
●
Always handle your monitor with care
when moving it.
26
Care and Safety Tips
ViewSonic G800
Page 35

ViewSonic
20480 Business Parkway
Walnut, CA 91789
Tel (909) 869-7976
Tel (800) 688-6688
V60830001
Fax (909) 468-1202
 Loading...