

Page 1
ViewSonic
CD4200
LCD Commercial Display
®
Model No. : VS11778
Page 2

Contents
Compliance Information ............................................................................. 1
Important Safety Instructions...................................................................... 2
Declaration of RoHS Complianc................................................................. 3
Copyright Information ................................................................................. 4
Product Registration................................................................................... 4
GENERAL INFORMATION ..................................................................................... 5
Features ..................................................................................................... 5
Overview of the LCD-Control Buttons and Indicators................................. 6
Overview of the LCD - Connections ........................................................... 7
Accessories ................................................................................................ 8
Remote Control .......................................................................................... 9
CONNECTIONS & APPLICATIONS ..................................................................... 12
Connecting Video Devices via HDMI........................................................ 12
Connecting Video Devices via DVI........................................................... 13
Connecting PC via D-SUB........................................................................ 14
ENGLISH
Connecting Devices via General Cables..................................................15
CONTROLS & ADJUSTMENTS ...........................................................................16
General Adjustments ................................................................................16
Turning the LCD On and Off ............................................................ 16
Initial Setup ...................................................................................... 17
Power Consumption......................................................................... 18
Adjusting the Volume ....................................................................... 19
Switching Source ............................................................................. 20
Viewing the Menus and On-Screen Display (OSD) .........................20
Switching Language Modes............................................................. 21
Picture Control.......................................................................................... 22
Adjusting the Picture Setting............................................................22
Adjusting the LCD Screen................................................................ 24
Adjusting the Color Temperature...................................................... 25
Reset Picture Settings...................................................................... 26
Sound Control ..........................................................................................27
Adjusting the Sound Quality............................................................. 27
Automatic Volume Control................................................................ 28
Reset Audio Settings........................................................................ 29
ViewSonic CD4200 i
Page 3

System Info ..............................................................................................30
PC mode Adjustments.............................................................................. 31
Reset the Features................................................................................... 32
PROGRAMMING REMOTE CONTROL ............................................................... 33
Direct Device Code Setup ........................................................................ 33
ENGLISH
Searching for a Device Code.................................................................... 34
Device Codes ........................................................................................... 35
TROUBLESHOOTING ..........................................................................................41
PC INPUT PRESET TIMING TABLE .................................................................... 44
SPECIFICATIONS.................................................................................................45
CUSTOMER SUPPORT ....................................................................................... 46
LIMITED WARRANTY...........................................................................................47
ii ViewSonic CD4200
Page 4

Table des Matières
Informations de conformité ...................................................................... 48
Importantes instructions de sécurité......................................................... 49
Déclaration de conformité RoHS (LSDEEE) ............................................50
Informations de copyright ......................................................................... 51
Enregistrement du produit ........................................................................ 51
RENSEIGNEMENTS GENERAUX ....................................................................... 52
Caractéristiques........................................................................................ 52
Commandes et ports du panneau ............................................................ 53
Vue d'ensemble du LCD-Connexions.......................................................54
Accessoires .............................................................................................. 55
Télécommande.........................................................................................57
CONNEXIONS ET APPLICATIONS...................................................................... 59
Connexion d’un appareil vidéo via HDMI - HDMI..................................... 59
Connexion d’un appareil vidéo via DVI..................................................... 60
Connexion d’un PC via D-SUB................................................................. 61
Connexion d’appareils au moyen de câbles généraux............................. 62
CONTROLES ET REGLAGES ............................................................................. 63
Réglages généraux .................................................................................. 63
Mise sous tension et hors tension du LCD....................................... 63
FRANÇAIS
Configuration initiale......................................................................... 64
Consommation d’énergie ................................................................. 65
Réglage du volume .......................................................................... 66
Commutation de la source ............................................................... 67
Visualisation des menus et des affichages à l’écran........................ 67
Commutation des modes de langue ................................................ 68
Contrôle de l’image................................................................................... 69
Réglage du paramétrage de l’image................................................69
Réglage de l’écran du LCD.............................................................. 71
Réglage de la température des couleurs ......................................... 72
Restaurer les réglages de l’image.................................................... 73
Contrôle du son ........................................................................................ 74
Réglage de la qualité du son............................................................ 74
Commande De Volume Automatique............................................... 75
Restaurer les réglages audio ........................................................... 76
ViewSonic CD4200 iii
Page 5

Info système .............................................................................................77
Réglages du mode PC ............................................................................. 78
Réinitialisation des caractéristiques ......................................................... 79
PROGRAMMATION DE LA TELECOMMANDE ................................................... 80
Configuration directe des codes des appareils......................................... 80
Recherche d’un code d’appareil...............................................................81
Codes des appareils................................................................................. 82
DEPANNAGE........................................................................................................ 88
TABLEAU DE SYNCHRONISATION PREDEFINIE DE L’ENTREE PC................ 91
FRANÇAIS
SPECIFICATIONS.................................................................................................92
SERVICE CLIENTÈLE.......................................................................................... 93
GARANTIE LIMITÉE............................................................................................. 94
iv ViewSonic CD4200
Page 6

Contenido
Información de conformidad..................................................................... 95
Importantes Instrucciones de Seguridad.................................................. 96
Declaración de Cumplimiento de RoHS...................................................97
Informacionón del copyright ..................................................................... 98
Registro del producto ............................................................................... 98
INFORMACIÓN GENERAL ..................................................................................99
Funciones................................................................................................. 99
Controles y puertos del panel................................................................. 100
Descripción general de la LCD: conexiones........................................... 101
Accesorios.............................................................................................. 103
Control remoto........................................................................................ 104
CONEXIONES Y APLICACIONES ..................................................................... 106
Conexión de un dispositivo de vídeo por medio de HDMI - HDMI ......... 106
Conexión de un dispositivo de vídeo por DVI - DVI ...............................107
Conexión de un PC por D-SUB..............................................................108
Conexión des dispositivos por cables generales.................................... 109
CONTROLES Y AJUSTES ................................................................................. 110
Ajustes generales................................................................................... 110
Encender y apagar la LCD............................................................. 110
Configuración inicial........................................................................111
Consumo de energía...................................................................... 112
Ajuste del volumen......................................................................... 113
Conmutación de la fuente .............................................................. 114
Visualización de los menús y exhibiciones en pantalla?................ 114
ESPAÑOL
Conmutación de modos de idiomas............................................... 115
Control de imagen .................................................................................. 116
Configuración de los ajustes de imagen ........................................ 116
Ajuste del monitor del LCD ............................................................ 118
Ajuste de la temperatura de color .................................................. 119
Reiniciar Ajustes Del Imagen......................................................... 120
Control de sonido ................................................................................... 121
Ajuste de la Calidad de Sonido......................................................122
Codificación de video avanzada .................................................... 123
Reiniciar Audio............................................................................... 124
ViewSonic CD4200 v
Page 7

ESPAÑOL
Información de sistema .......................................................................... 125
Ajustes del modo PC.............................................................................. 126
Reiniciar las funciones............................................................................ 127
PROGRAMACIÓN DEL CONTROL REMOTO................................................... 128
Configuración directa de códigos de dispositivo .................................... 128
Búsqueda de un código de dispositivo...................................................129
Códigos de dispositivo............................................................................ 130
RESOLUCIÓN DE PROBLEMAS ....................................................................... 136
TABLA DE PC / REFERENCIA DE TIEMPOS.................................................... 139
ESPECIFICACIONES .........................................................................................140
SERVICIO DE ATENCIÓN AL CLIENTE ............................................................ 141
GARANTTÍA LIMITADA ...................................................................................... 142
vi ViewSonic CD4200
Page 8

Compliance Information
For U.S.A.
This device complies with part 15 of FCC Rules. Operation is subject to the following two
conditions: (1) this device may not cause harmful interference, and (2) this device must accept
any interference received, including interference that may cause undesired operation.
This equipment has been tested and found to comply with the limits for a Class B digital
device, pursuant to part 15 of the FCC Rules. These limits are designed to provide reasonable
protection against harmful interference in a residential installation. This equipment generates,
uses, and can radiate radio frequency energy, and if not installed and used in accordance with
the instructions, may cause harmful interference to radio communications. However, there is
no guarantee that interference will not occur in a particular installation. If this equipment does
cause harmful interference to radio or television reception, which can be determined by turning
the equipment off and on, the user is encouraged to try to correct the interference by one or
more of the following measures:
• Reorient or relocate the receiving antenna.
• Increase the separation between the equipment and receiver.
• Connect the equipment into an outlet on a circuit different from that to which the receiver is
connected.
• Consult the dealer or an experienced radio/TV technician for help.
ENGLISH
Warning: You are cautioned that changes or modifications not expressly approved by the
party responsible for compliance could void your authority to operate the equipment.
For Canada
This Class B digital apparatus complies with Canadian ICES-003.
Cet appareil numérique de la classe B est conforme à la norme NMB-003 du Canada.
ViewSonic CD4200 1
Page 9

Important Safety Instructions
1. Read these instructions completely before using the equipment.
2. Keep these instructions in a safe place.
ENGLISH
3. Heed all warnings.
4. Follow all instructions.
5. Do not use this equipment near water. Warning: To reduce the risk of fire or electric shock,
do not expose this apparatus to rain or moisture.
6. Clean with a soft, dry cloth. If further cleaning is required, see “Cleaning the Display” in
this guide for further instructions.
7. Do not block any ventilation openings. Install the equipment in accordance with the
manufacturer’s instructions.
8. Do not install near any heat sources such as radiators, heat registers, stoves, or other
devices (including amplifiers) that produce heat.
9. Do not attempt to circumvent the safety provisions of the polarized or grounding-type
plug. A polarized plug has two blades with one wider than the other. A grounding type
plug has two blades and a third grounding prong. The wide blade and the third prong are
provided for your safety. If the plug does not fit into your outlet, consult an electrician for
replacement of the outlet.
10. Protect the power cord from being tread upon or pinched, particularly at the plug, and the
point where if emerges from the equipment. Be sure that the power outlet is located near
the equipment so that it is easily accessible.
11. Only use attachments/accessories specified by the manufacturer.
12. Use only with the cart, stand, tripod, bracket, or table specified by the
manufacturer, or sold with the equipment. When a cart is used, use caution
when moving the cart/equipment combination to avoid injury from tipping
over.
13. Unplug this equipment when it will be unused for long periods of time.
14. Refer all servicing to qualified service personnel. Service is required when the unit has
been damaged in any way, such as: if the power-supply cord or plug is damaged, if liquid
is spilled onto or objects fall into the unit, if the unit is exposed to rain or moisture, or if
the unit does not operate normally or has been dropped.
2 ViewSonic CD4200
Page 10
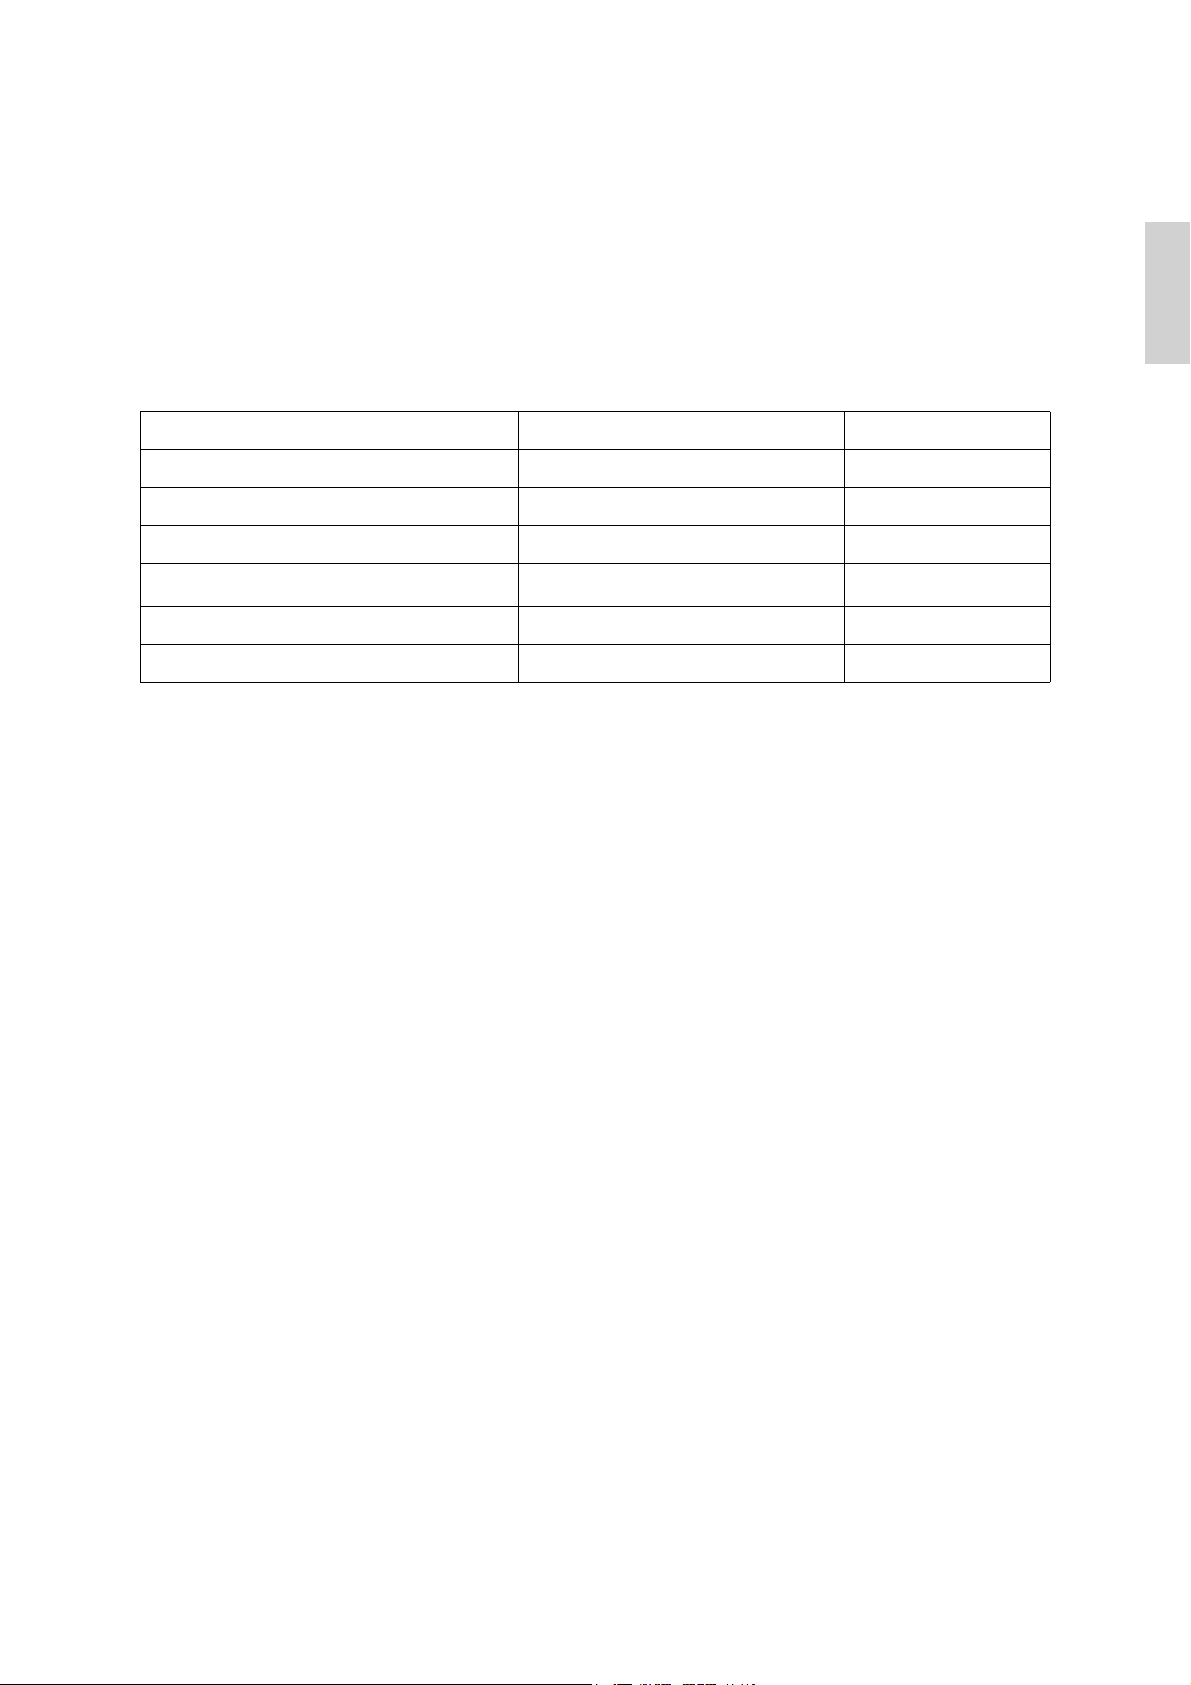
Declaration of RoHS Compliance
This product has been designed and manufactured in compliance with Directive 2002/95/EC of
the European Parliament and the Council on restriction of the use of certain hazardous
substances in electrical and electronic equipment (RoHS Directive) and is deemed to comply
with the maximum concentration values issued by the European Technical Adaptation
Committee (TAC) as shown below:
Substance Proposed Maximum Concentration Actual Concentration
Lead (Pb) 0.1% < 0.1%
Mercury (Hg) 0.1% < 0.1%
Cadmium (Cd) 0.01% < 0.01%
Hexavalent Chromium (Cr
Polybrominated biphenyls (PBB) 0.1% < 0.1%
Polybrominated diphenyl ethers (PBDE) 0.1% < 0.1%
6+
)
0.1% < 0.1%
Certain components of products as stated above are exempted under the Annex of the RoHS
Directives as noted below:
Examples of exempted components are:
ENGLISH
1. Mercury in compact fluorescent lamps not exceeding 5 mg per lamp and in other lamps not
specifically mentioned in the Annex of RoHS Directive.
2. Lead in glass of cathode ray tubes, electronic components, fluorescent tubes, and electronic
ceramic parts (e.g. piezoelectronic devices).
3. Lead in high temperature type solders (i.e. lead-based alloys containing 85% by weight or
more lead).
4. Lead as an allotting element in steel containing up to 0.35% lead by weight, aluminium
containing up to 0.4% lead by weight and as a cooper alloy containing up to 4% lead by
weight.
ViewSonic CD4200 3
Page 11

ENGLISH
Copyright Information
Copyright © ViewSonic® Corporation, 2007. All rights reserved.
Macintosh and Power Macintosh are registered trademarks of Apple Computer, Inc.
Microsoft, Windows, Windows NT, and the Windows logo are registered trademarks of
Microsoft Corporation in the United States and other countries.
ViewSonic, the three birds logo, OnView, ViewMatch, and ViewMeter are registered
trademarks of ViewSonic Corporation.
VESA is a registered trademark of the Video Electronics Standards Association. DPMS and
DDC are trademarks of VESA.
ENERGY STAR® is a registered trademark of the U.S. Environmental Protection Agency (EPA).
As an ENERGY STAR® partner, ViewSonic Corporation has determined that this product meets
the ENERGY STAR® guidelines for energy efficiency.
Disclaimer: ViewSonic Corporation shall not be liable for technical or editorial errors or
omissions contained herein; nor for incidental or consequential damages resulting from
furnishing this material, or the performance or use of this product.
In the interest of continuing product improvement, ViewSonic Corporation reserves the right
to change product specifications without notice. Information in this document may change
without notice.
No part of this document may be copied, reproduced, or transmitted by any means, for any
purpose without prior written permission from ViewSonic Corporation.
Product Registration
To meet your future needs, and to receive any additional product information as it becomes
available, please register your product on the Internet at: www.viewsonic.com. The ViewSonic
Wizard CD-ROM also provides an opportunity for you to print the registration form, which
you may mail or fax to ViewSonic.
For Your Records
Product Name:
Model Number:
Document Number:
Serial Number:
Purchase Date:
Product disposal at end of product life
The lamp in this product contains mercury. Please dispose of in accordance with local, state or
federal laws.
ViewSonic is concerned about the preservation of our environment. Please dispose of this
product properly at the end of its useful life. For the recycling information, please refer to our
website:
1. USA: www.viewsonic.com/pdf/RecyclePlus.pdf
2. Europe: www.viewsoniceurope.com
3. Taiwan: recycle.epa.gov.tw
CD4200
ViewSonic 42” LCD Commercial Display
VS11778
CD4200-1_UG_ENG Rev. 1A 03-12-07
_______________________________
_______________________________
4 ViewSonic CD4200
Page 12

GENERAL INFORMATION
Features
Your LCD is designed with the latest technology and is a high-performance unit that
includes the following special features :
Multi-sources input included D-SUB, HDMI, Composite, S-Video, and Component.
Universal remote control provides control of other devices such as Cable Converter,
Satellite Receiver, DVD player, Audio Amplifier, VCR etc.
Embedded video enhance and noise Reduction features for the colorful and clearest
picture possible.
Automatic Power Off feature after 10 minutes without a signal.
Component video input, resolution up to 720p, 1080i.
Automatic Picture Control (APC) and Aspect Ratio Control (ARC) functions for end user
customization of viewing preferences.
ENGLISH
ViewSonic CD4200 5
Page 13
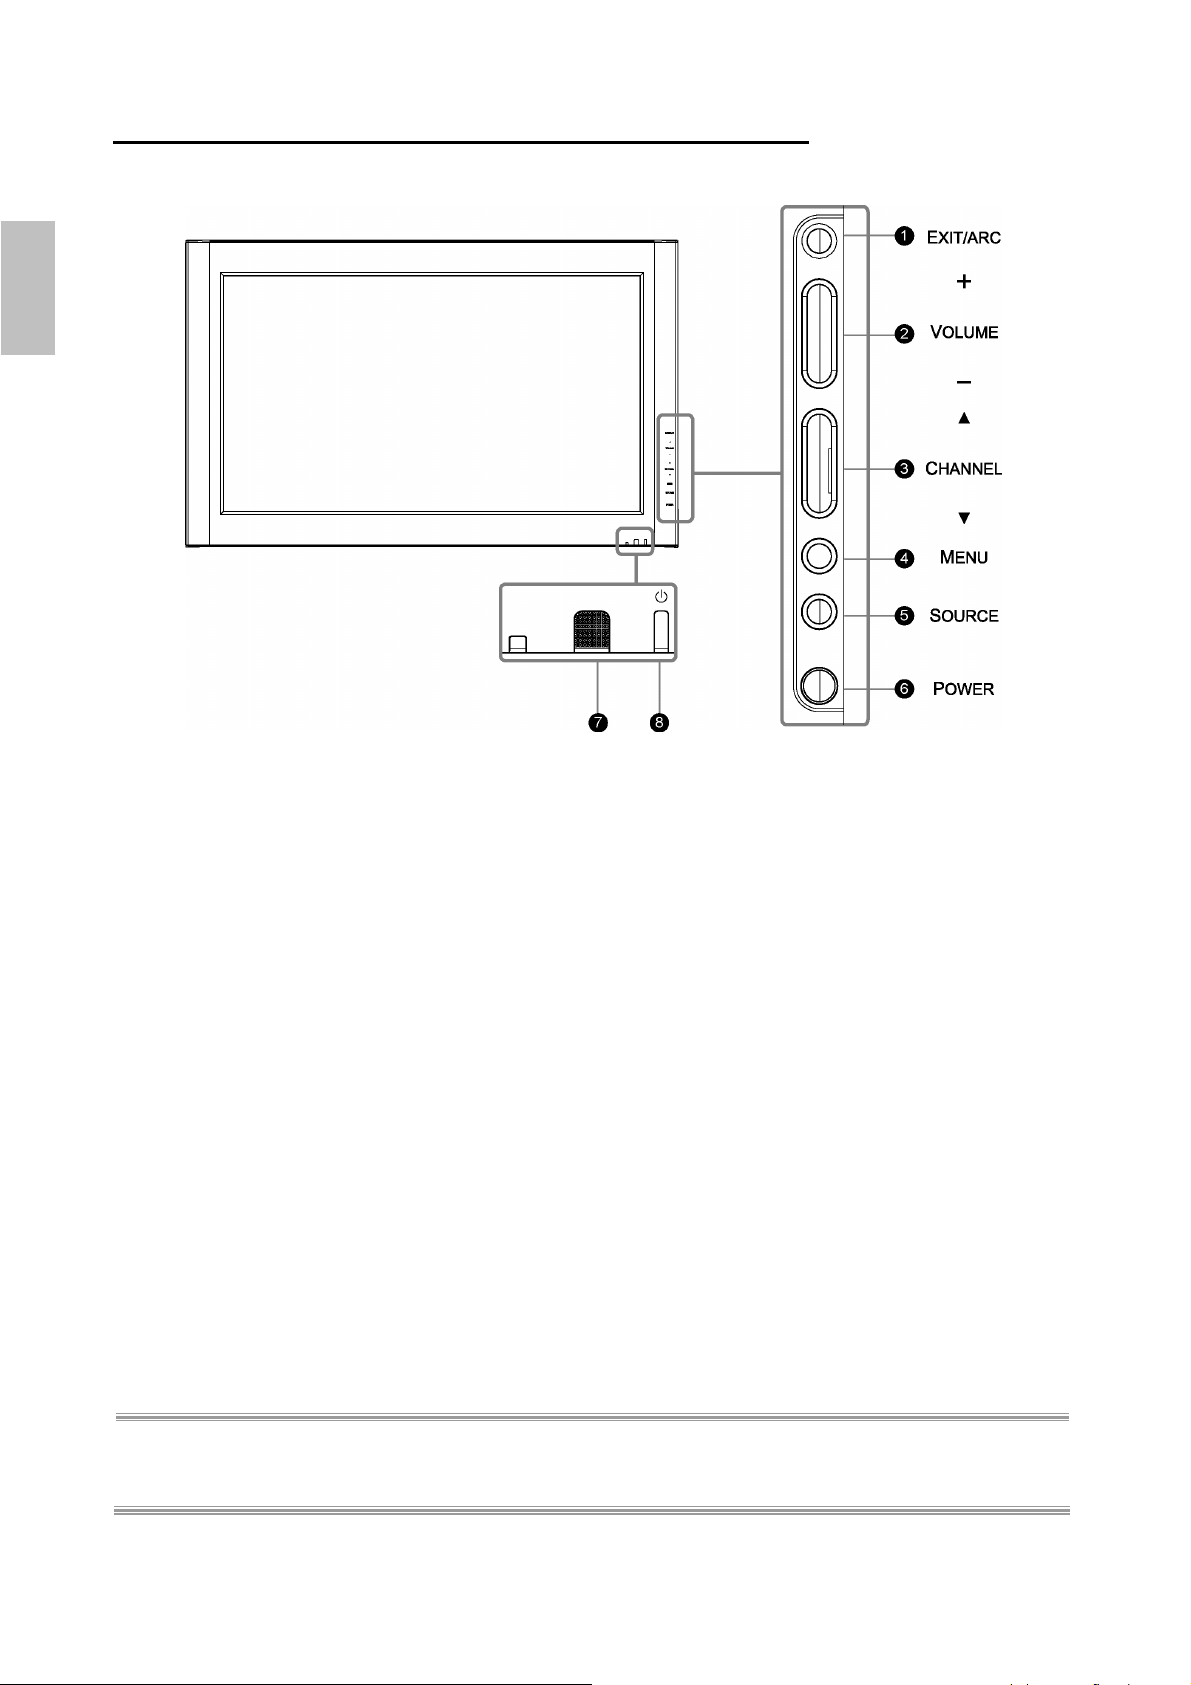
Overview of the LCD-Control Buttons and Indicators
FFrroonntt PPaanneell OOvveerrvviieeww
ENGLISH
FUNCTION KEYS
1. EXIT/ARC : Select the display output mode (Video mode: Normal, Full Screen,
Zoom, Subtitle ; PC mode: Normal, Full Screen).
2. VOLUME (+ / -) : Increase/decrease the volume or function as the left/right arrow button
for menu.
3. CHANNEL (c / d) : Change function as the up/down arrow button for menu.
4. MENU : Display the main menu. When OSD (on-screen display) is appeared, press the
button to select or access a sub-menu.
5. SOURCE : Select the input source (Video 1, Video 2 , YPbPr 1 , YPbPr 2 , HDMI, PC ).
Press SOURCE button on right side and the source menu will appear on the screen.
Press the CHANNEL (c / d) button on right side to select your preferred source input and
press MENU to confirm.
6. POWER : Turn the LCD on or off.
7. REMOTE CONTROL SENSOR : Aim the remote control towards this spot on the LCD.
8. POWER INDICATOR : BULE LIGHT ─ power on
PURPLE LIGHT ─ power saving; standby
(offered in PC mode)
RED LIGHT ─ power off
NOTE 1 : These buttons on the LCD is only for basic settings.
NOTE 2 : The drawing of this LCD in the user manual is for your reference. The actual LCD appearance
may differ depending on your purchase.
6 ViewSonic CD4200
Page 14
Overview of the LCD – Connections
SSiiddee aanndd RReeaarr PPaanneell
ENGLISH
ViewSonic CD4200 7
Page 15
Jack
1
ENGLISH
2 D-Sub
3 PC Audio In
4 Service Port
5
6( a/b )
7( c/d ) S-Video
8( e/f )
9 Audio Out
HDMI
(High Definition
Multimedia
Interface)
Digital Audio
Out
Component In
AV In
Description
Connect to the HDMI jack of the LCD with an HDMI output, such as set-top box,
DVD player, etc. You can also connect the LCD with a DVI output by using an
HDMI-to-DVI cable or HDMI-to-DVI adapter. Please use an audio cable, when
using HDMI-to-DVI cable or adapter.
Connect to the video output on your PC. Please use additional cable for a
sound.
Connect to the audio output jack of your PC.
Only for service use.
Connect to a digital audio component.
Connect to your LCD’s component video (YPbPr) and audio (L/R) jacks.
Connect to the S-Video output jack on your VCR or other video devices, for a
sharper picture.
Connect to the Composite video and audio output jacks on your VCR or other
video devices.
Connect to the audio input jacks on your Amplifier/Home theater.
10 Service Port
Only for service use.
8 ViewSonic CD4200
Page 16

Accessories
User’s manual
User’s Manual Remote Control & Batteries
ENGLISH
QSG
Power Cord Quick Start Guide
ViewSonic CD4200 9
Page 17
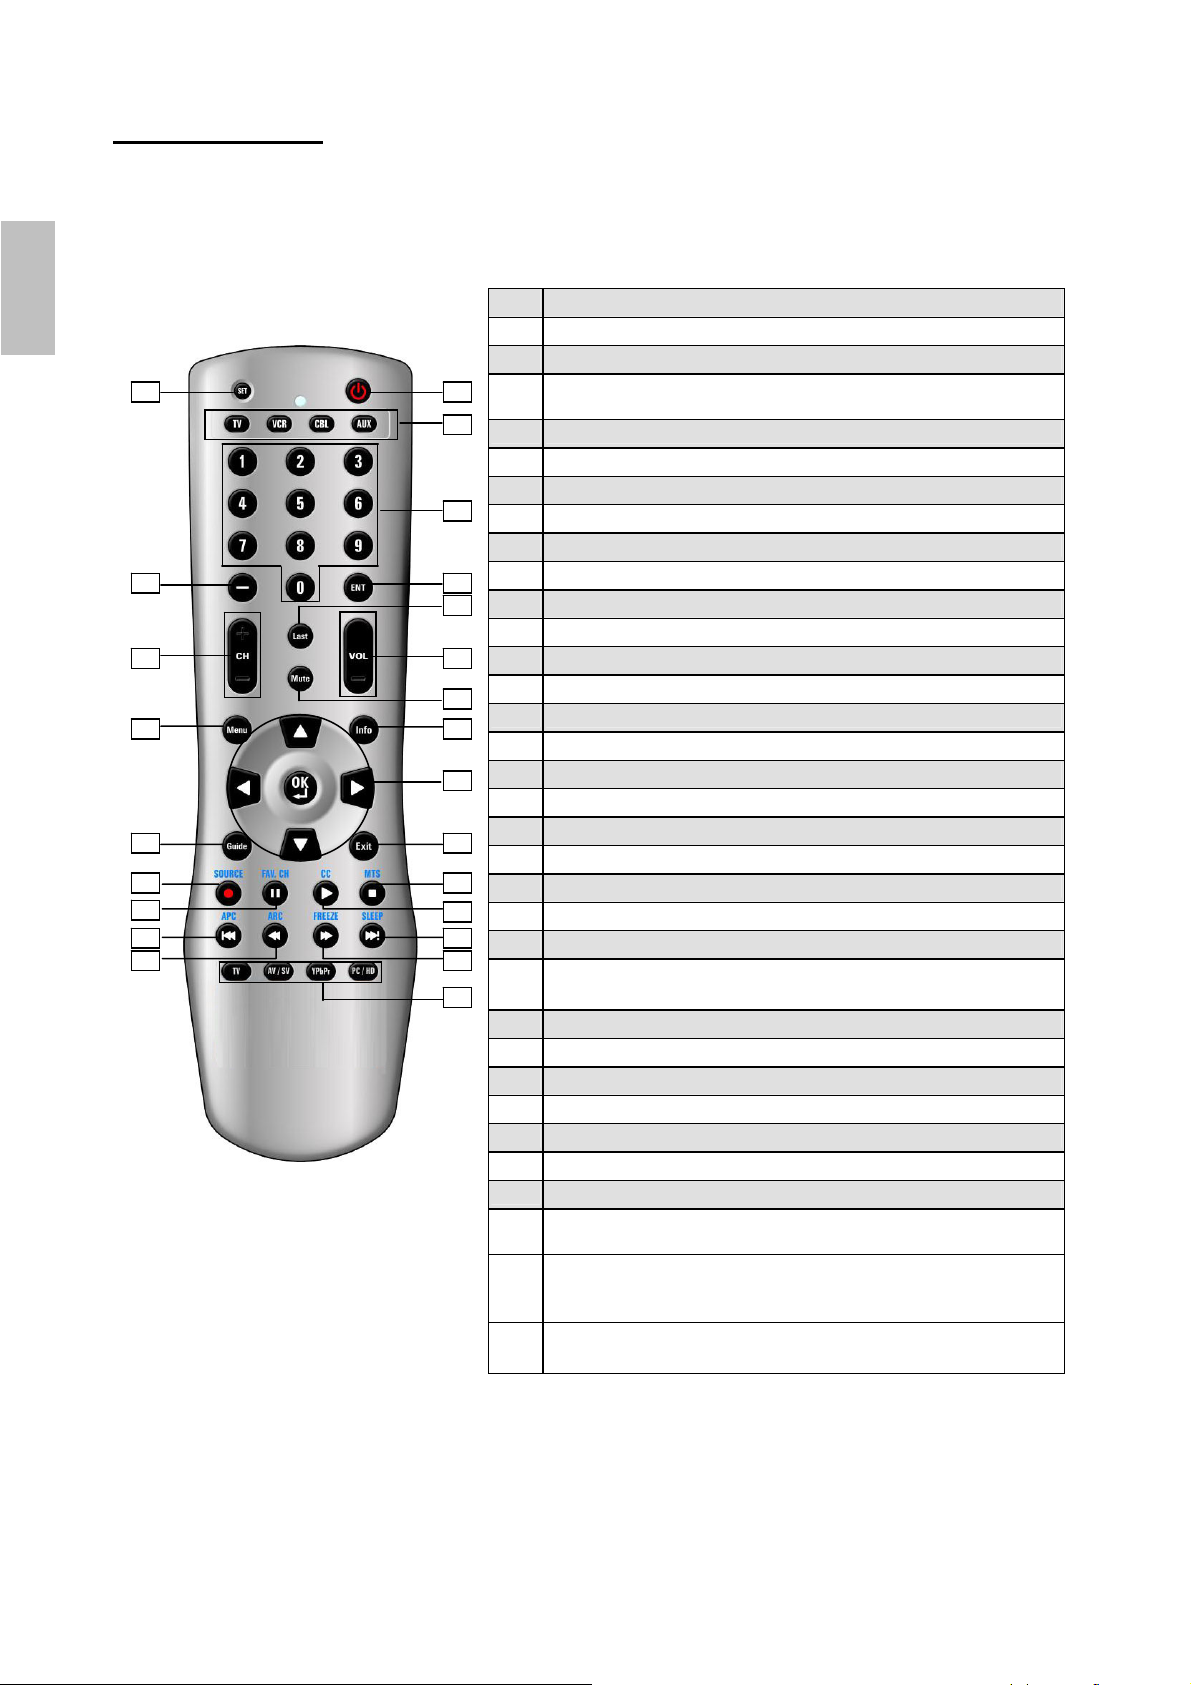
Remote Control
This universal remote control can operate up to four devices. When using the remote
control in LCD(TV) mode, please point the remote directly toward the Remote Control
Sensor on the front panel. If you want to select other device, simply press one of the
buttons: VCR, CBL, or AUX.
ENGLISH
01 02
03
04
05 06
07
09 10
08
11 12
13
14 15
16
18
22 23
17
19
21 20
24
1 Power
Turn the device on or off.
2 Set
Press to program the remote control to control other
devices.
3 TV
Control this LCD (default).
VCR
Control DVD player or VCR.
CBL
Control Cable Converter or Satellite.
AUX
Control Audio Amplifier.
4 0 – 9 NUMERIC BUTTONS
5 ENT
6
─
7 Last
8 Mute
Temporarily turn off the sound.
9 VOL + / -
Press to increase or decrease the volume.If the audio is
mute and press VOL + / - will un-mute the audio.
10 CH + / -
11 Info
12 Menu
Toggle the main menu.
13
▲▼, ◄ ►
Press to move the on-screen highlight in the desired
direction.
The Right arrow button will access to the sub-menu or
widget.
The Left arrow button will navigate back through the menu.
10 ViewSonic CD4200
Page 18
14 15
16
18
22 23
OK
Press to select a currently highlighted choice on-screen.
Press to control some widgets, toggling between 2
01 02
03
04
05 06
07
09 10
08
11 12
13
17
19
21 20
24
different settings such as ON and OFF.
14 Guide
15 Exit
Press to dismiss all UI screens and menus.
16 Source
Press to select the signal source: the sequence is Video
1→Video 2→YPbPr 1→YPbPr 2→HDMI→PC.
17 MTS
18
FAV.CH
19 CC
20 APC (Automatic Picture Control)
Toggle screen luminosity between Standard→Vivid→
Movie→Sports→Custom→Standard.
21 SLEEP
22 ARC(Aspect Ratio Control)
Toggle the picture mode. The sequence is Normal→Full
Screen→Zoom→Subtitle.
23 FREEZE
24 TV
AV / SV
Press to select Video 1 or Video 2 mode.
YPbPr
Press to select YPbPr 1 or YPbPr 2 mode.
PC / HD
Press to select PC or HDMI mode.
ENGLISH
NOTE : In page 8 and 9, the descriptions of buttons in gray are not available in this LCD.
ViewSonic CD4200 11
Page 19
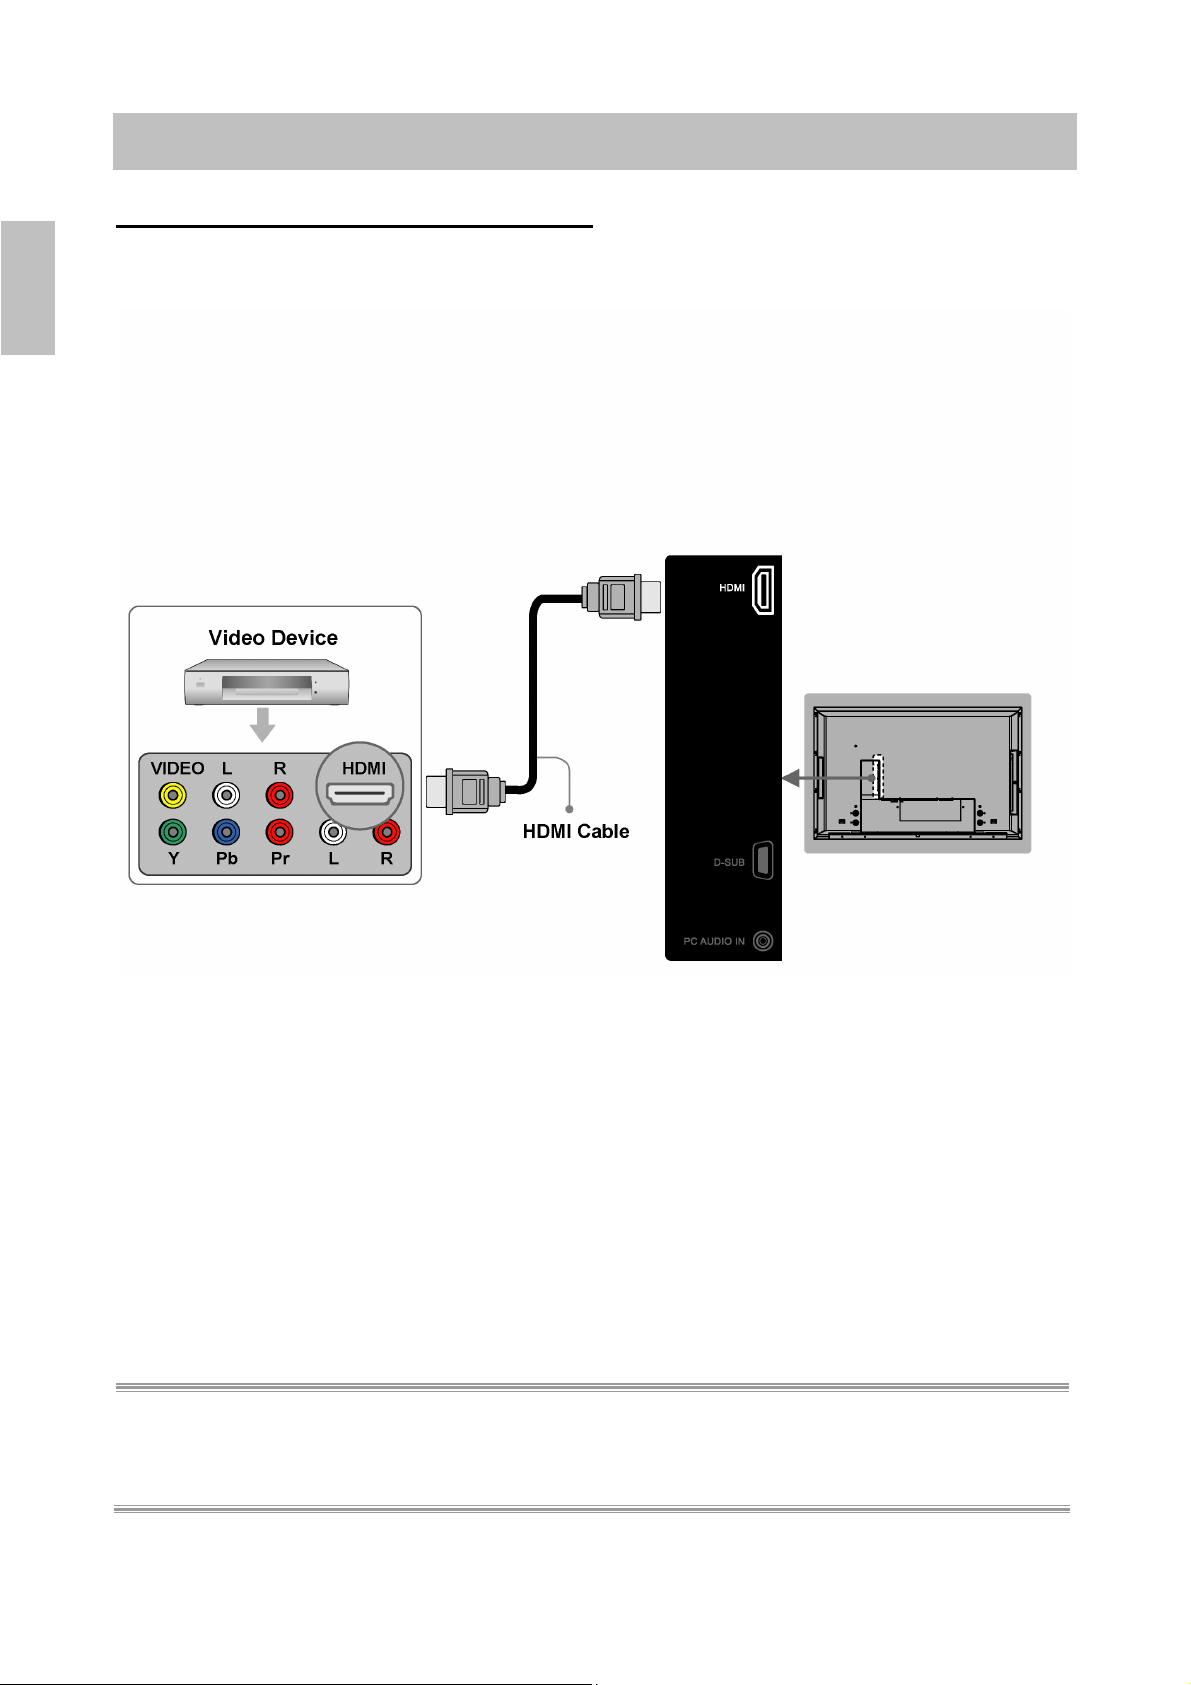
CONNECTIONS & APPLICATIONS
Connecting Video Devices via HDMI
* This can be applied only if there is the HDMI Output connector on the external device.
ENGLISH
NOTE 1 : Video Device – e.g.: DVD Player, Set-top Box…etc.
NOTE 2 : HDMI - High-Definition Multimedia Interface
NOTE 3 : No sound connector is needed for an HDMI to HDMI connection.
NOTE 4 : Cables above are not offered.
12 ViewSonic CD4200
Page 20
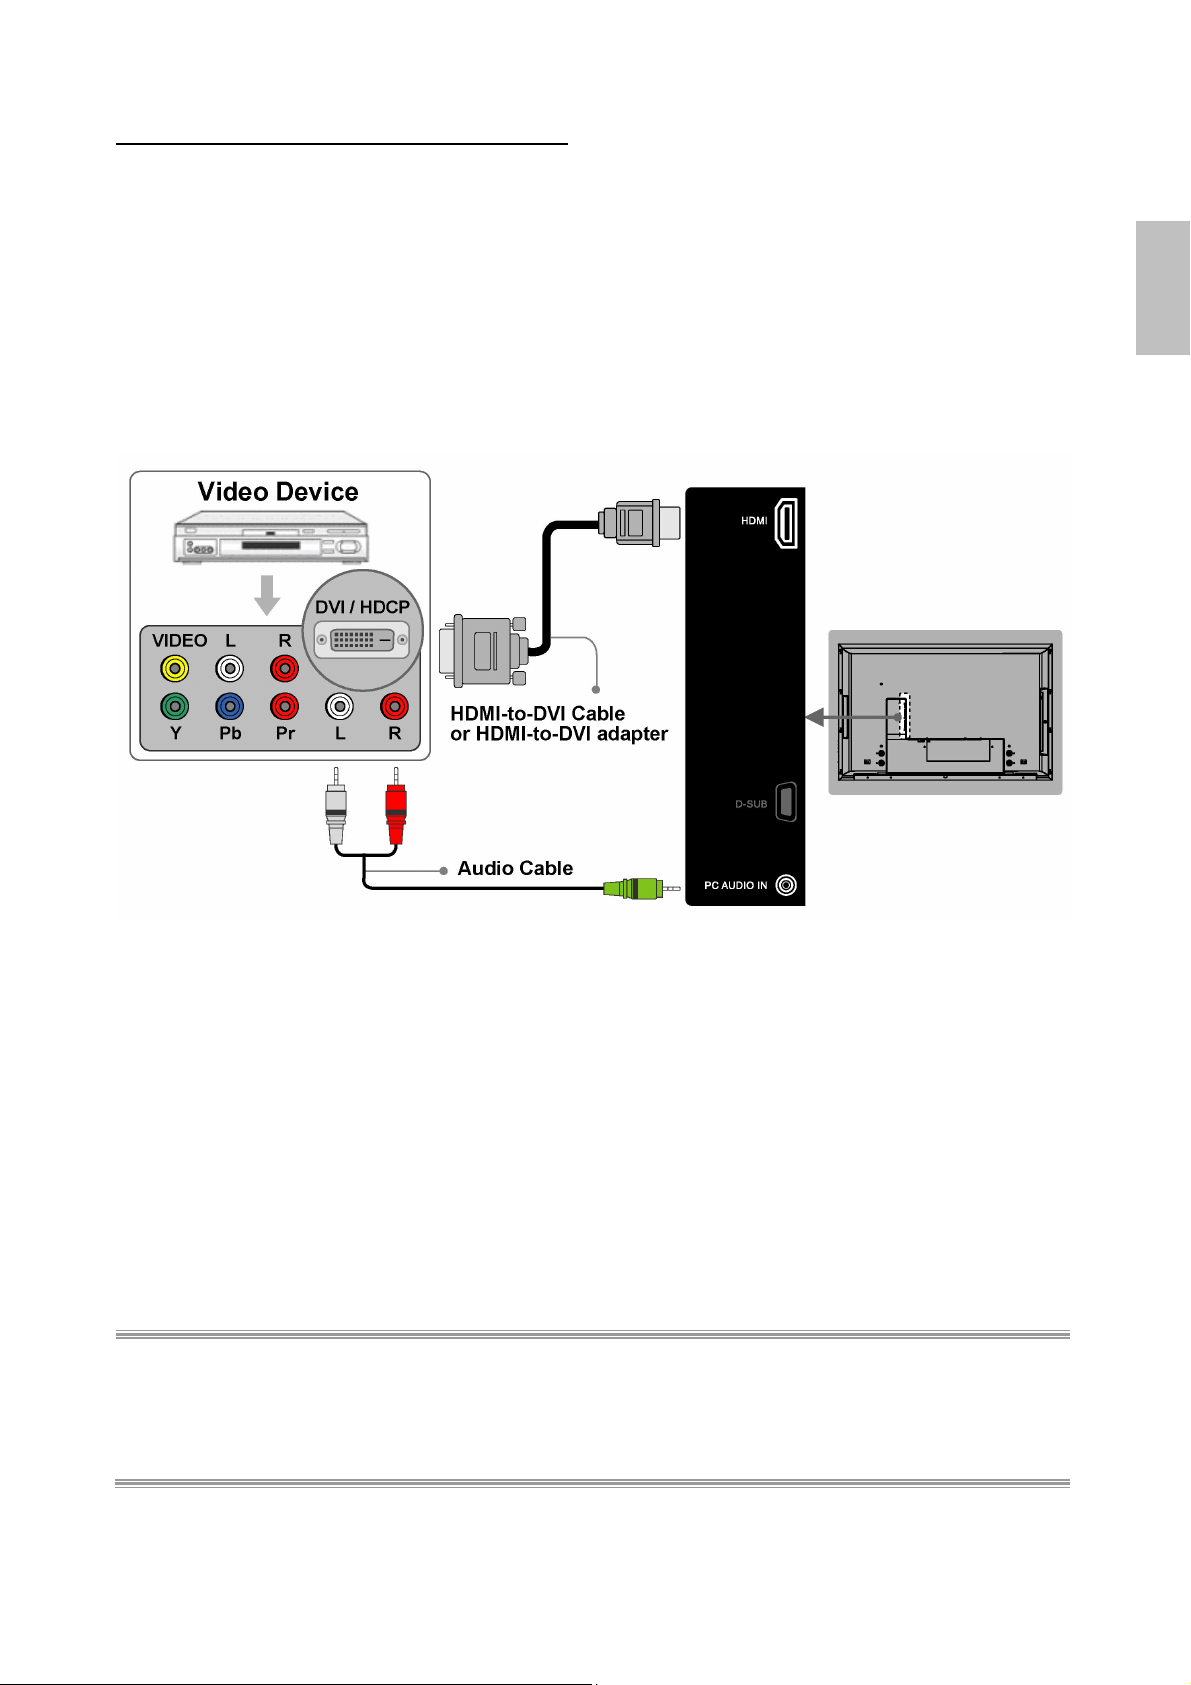
Connecting Video Devices via DVI
* This can be applied only if there is the DVI Output connector on the external device.
ENGLISH
NOTE 1 : To receive video, connect a HDMI-to-DVI cable or HDMI-to-DVI adapter between the HDMI
connector on the LCD and the DVI connector on the DVD player/ Set-top box.
NOTE 2 : To receive sound, connect an audio cable between the PC Audio In jack on the LCD and Audio
Out jack on the DVD player/ Set-Top box.
NOTE 3: Cables above are not offered.
ViewSonic CD4200 13
Page 21
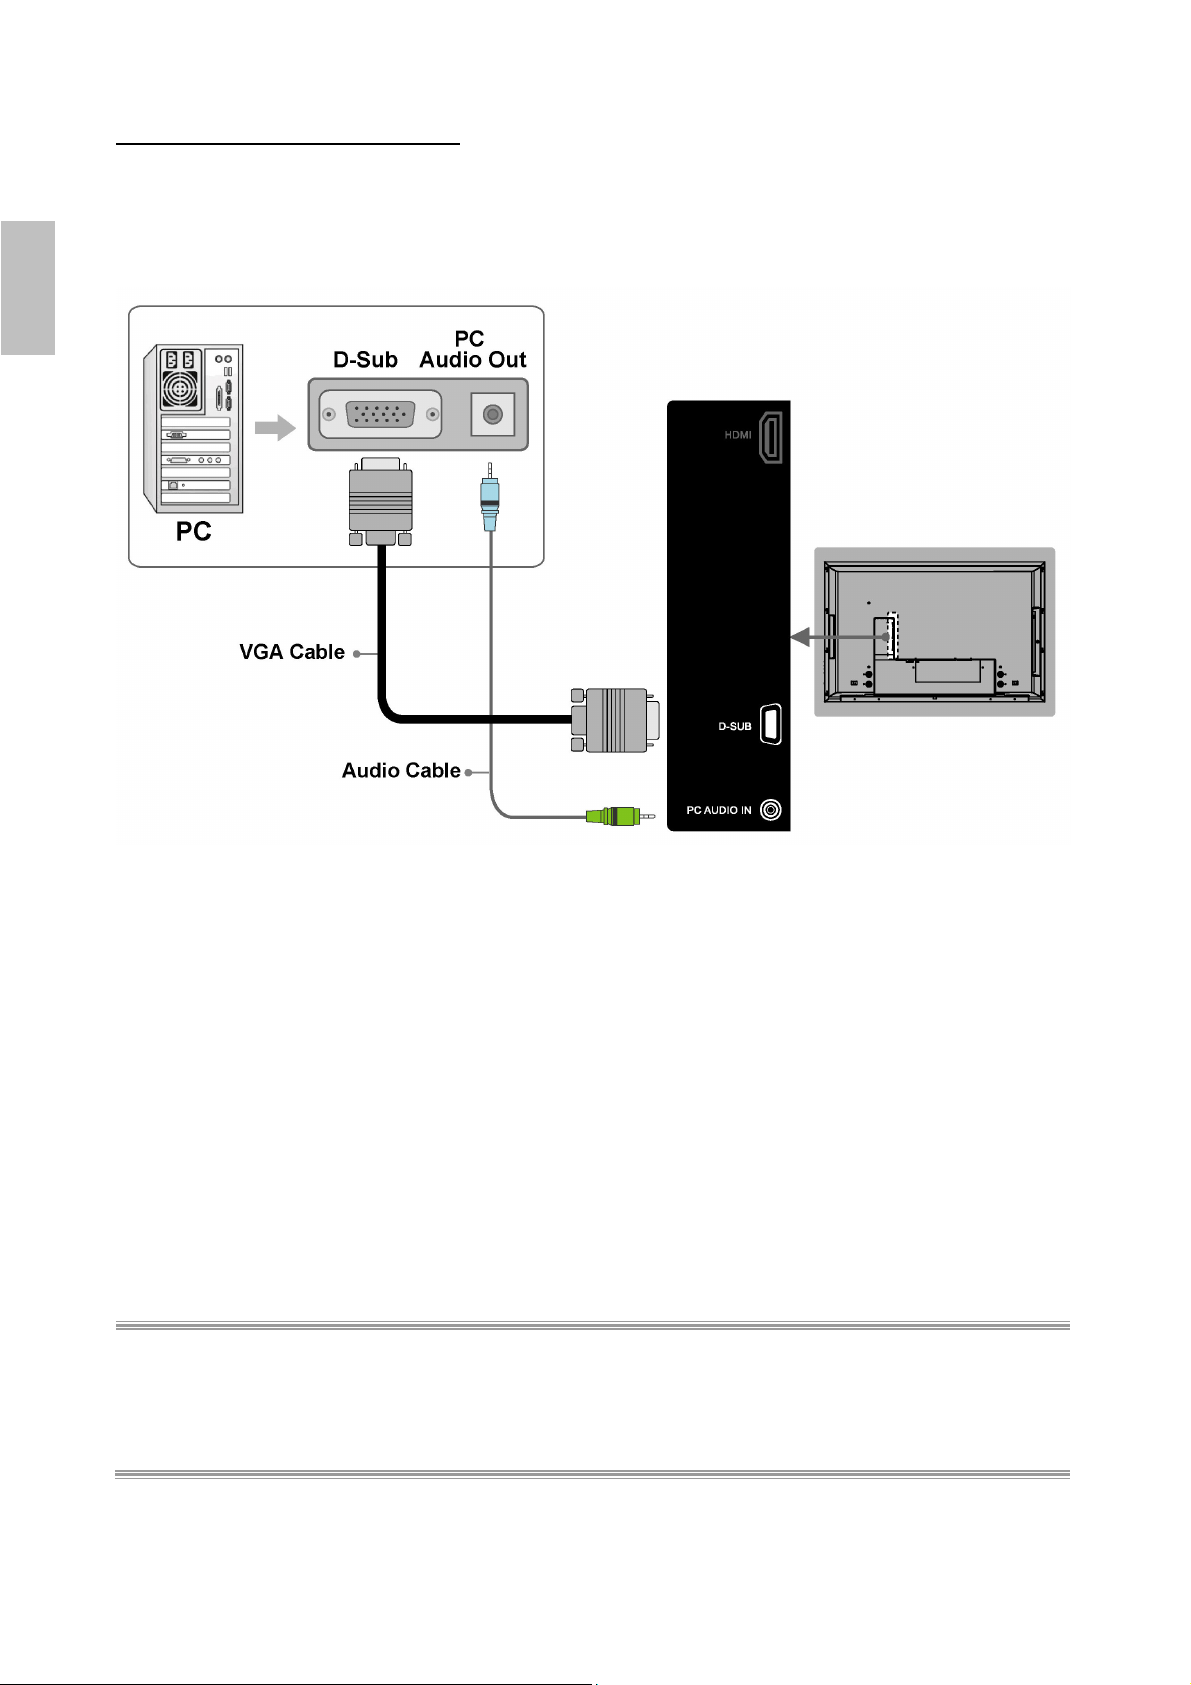
Connecting PC via D-SUB
ENGLISH
NOTE 1 : To receive video, connect a VGA cable between D-Sub connector on the LCD and the D-Sub
output connector on your PC.
NOTE 2 : To receive sound, connect a PC audio cable between PC Audio In jack on the LCD and the
Audio Out jack of the sound card on your PC.
NOTE 3 : Cables above are not offered.
14 ViewSonic CD4200
Page 22
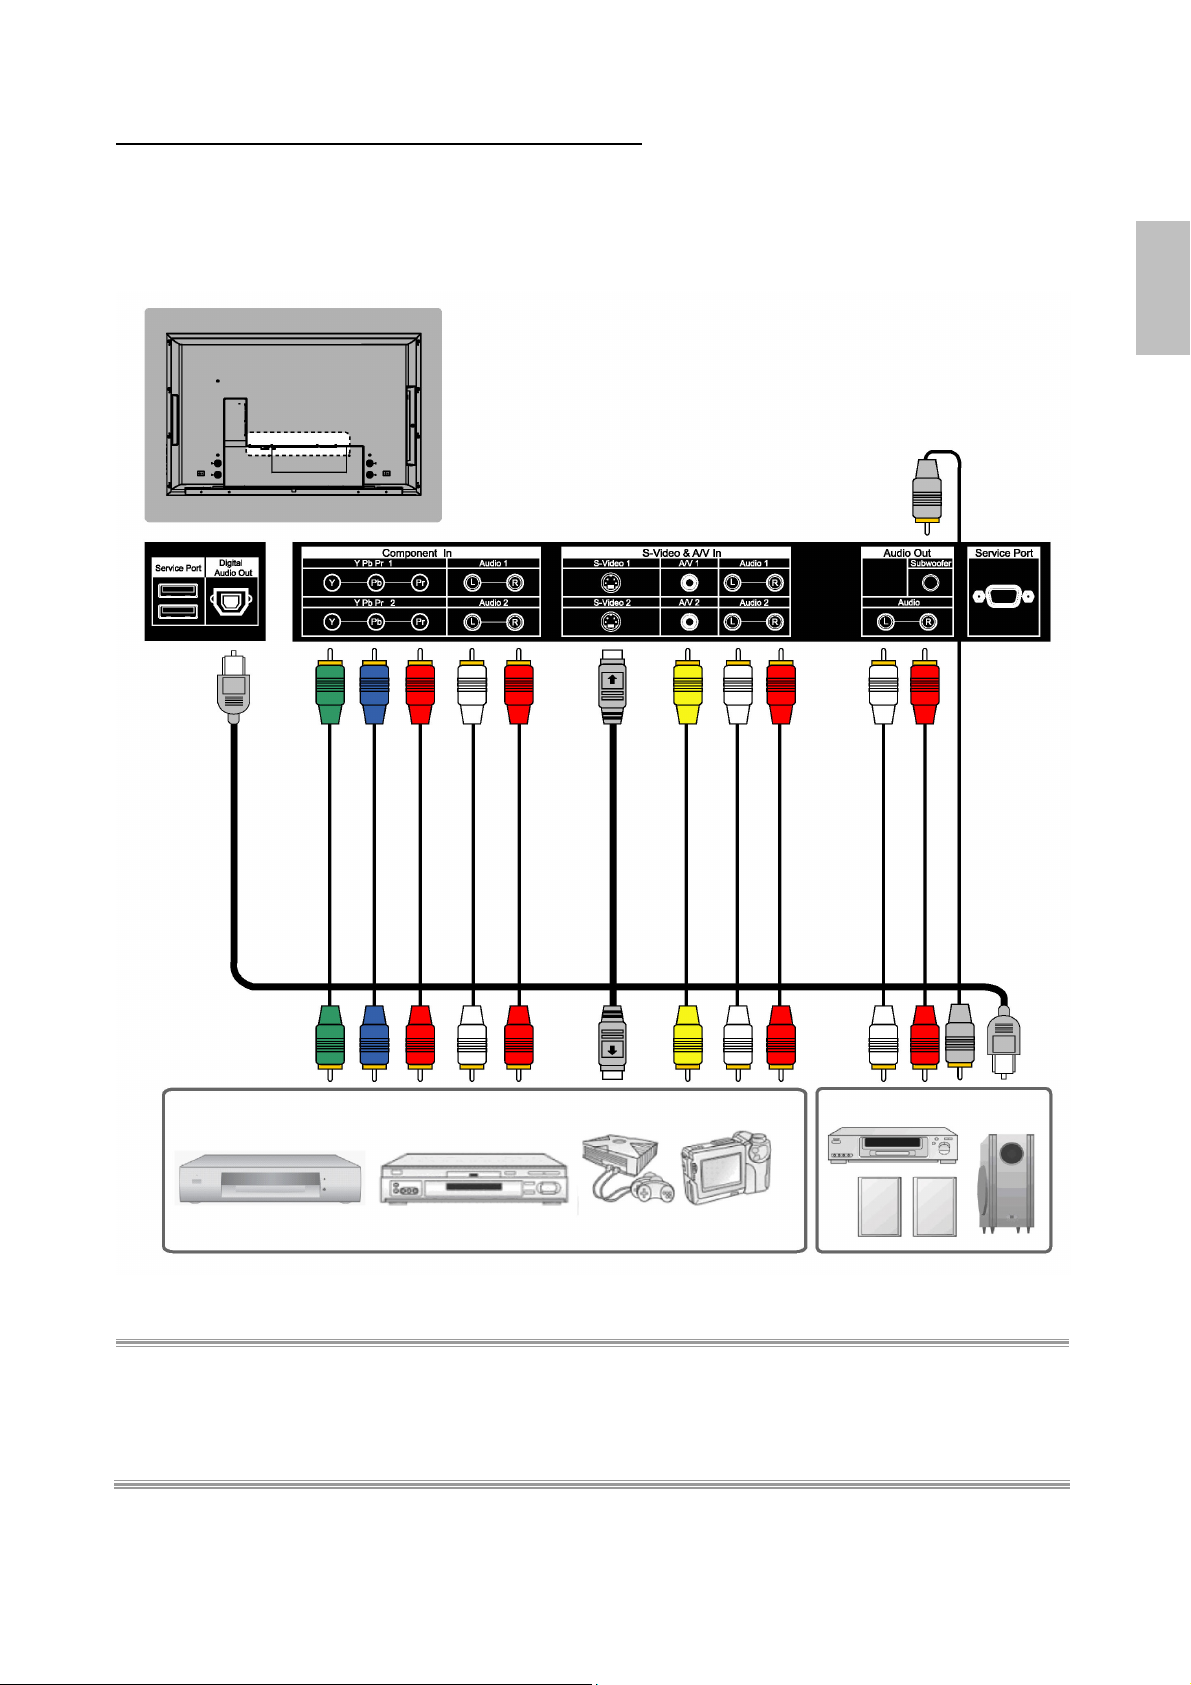
Connecting Devices via General Cables
ENGLISH
NOTE 1 : To enjoy best audio and video quality, the best to normal sequence of video quality is
Component, S-video, A/V from the best quality to the normal one.
NOTE 2 : When using either Video of A/V(Composite In) or S-Video, make sure to connect an audio cable
to Audio of A/V(Composite In).
NOTE 3 : Cables above are not offered.
ViewSonic CD4200 15
Page 23
CONTROLS & ADJUSTMENTS
General Adjustments
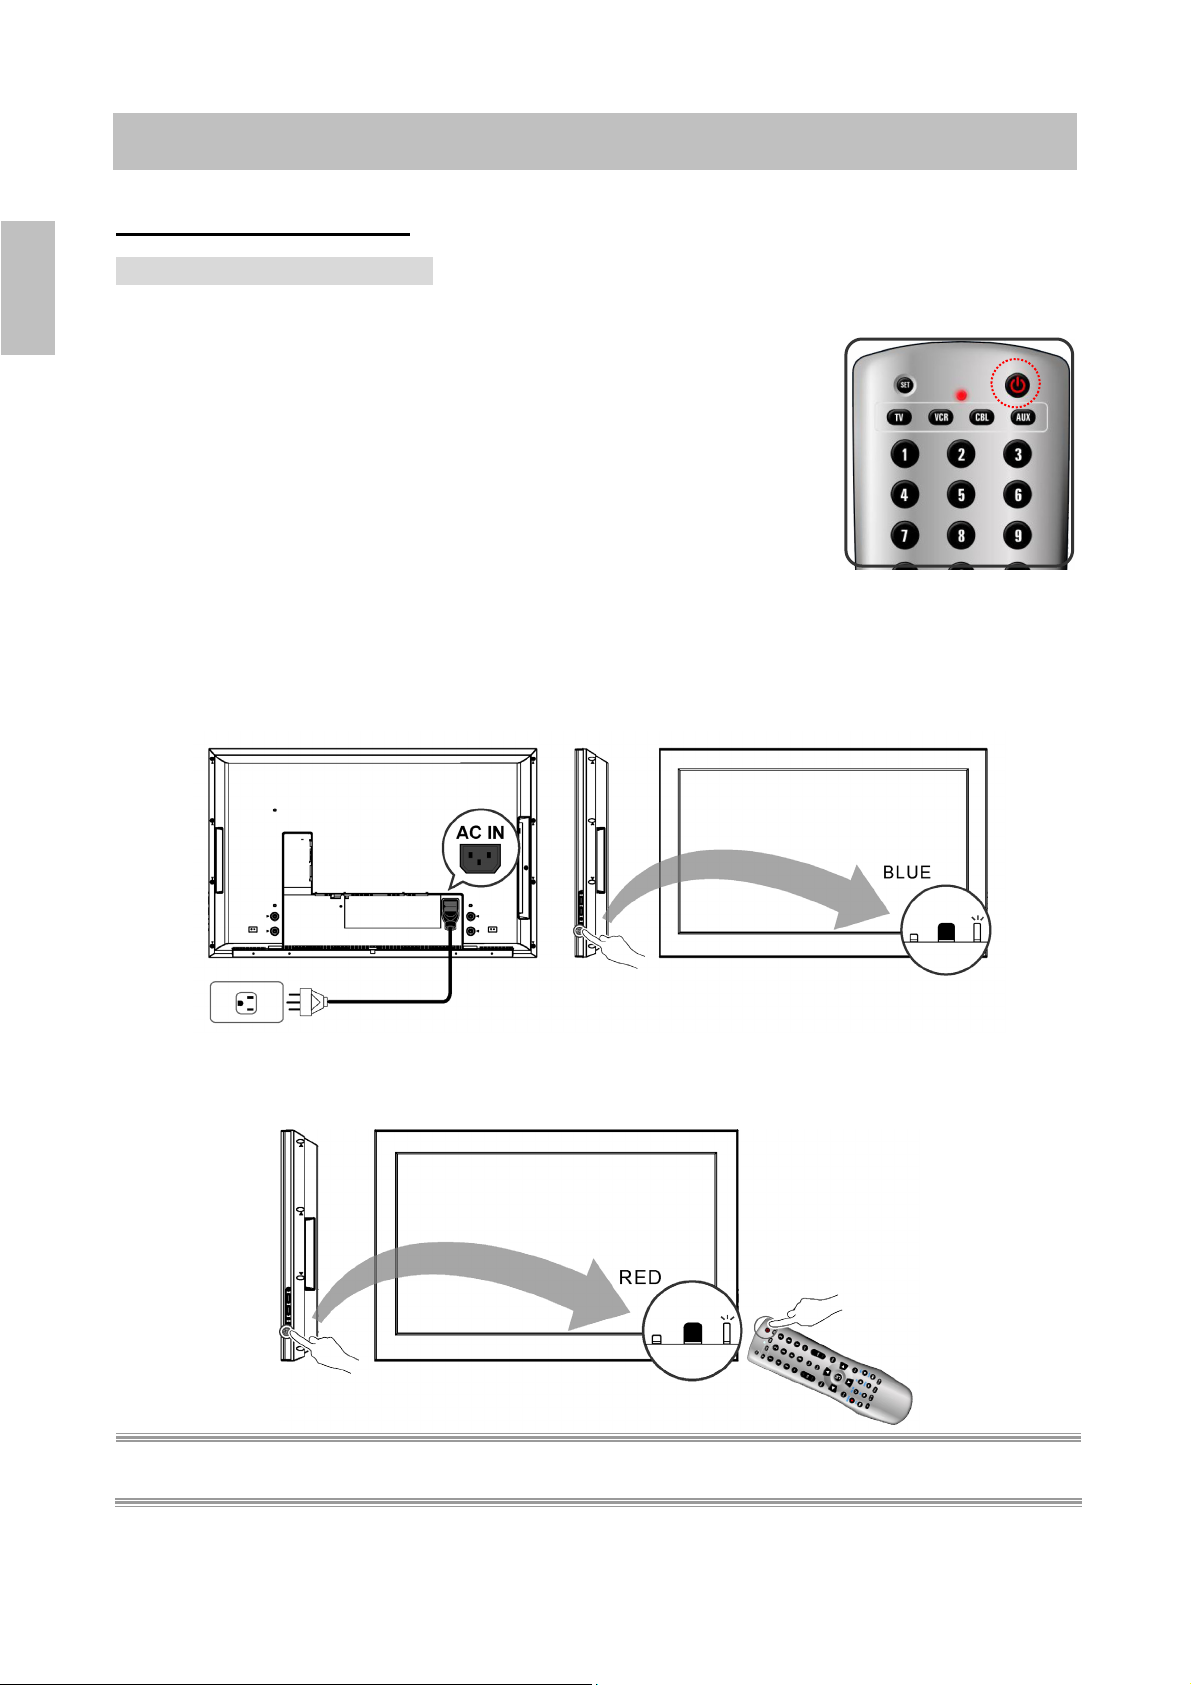
Turning the LCD On and Off
TTuurrnn OOn
ENGLISH
Plug the power cable into the AC-in socket located on the left rear of
the LCD. Plug the other end into an electrical socket.
Press the power button on the remote control or right side of the
LCD to turn it on. Please refer to page 16 to adjust Power
Consumption settings.
The power status light found in the lower right corner of the LCD
indicates the following :
BLUE LIGHT ─ power on
PURPLE LIGHT ─ Standby, power saving
RED LIGHT ─ power off
n
(only available in PC mode)
f
TTuurrnn OOfff
Press the power button on the remote control or right side of
the LCD to turn it off.
NOTE : “No Signal” appears, if there is no input source. The display will power off automatically, if the input
source keeps unavailable.
16 ViewSonic CD4200
Page 24
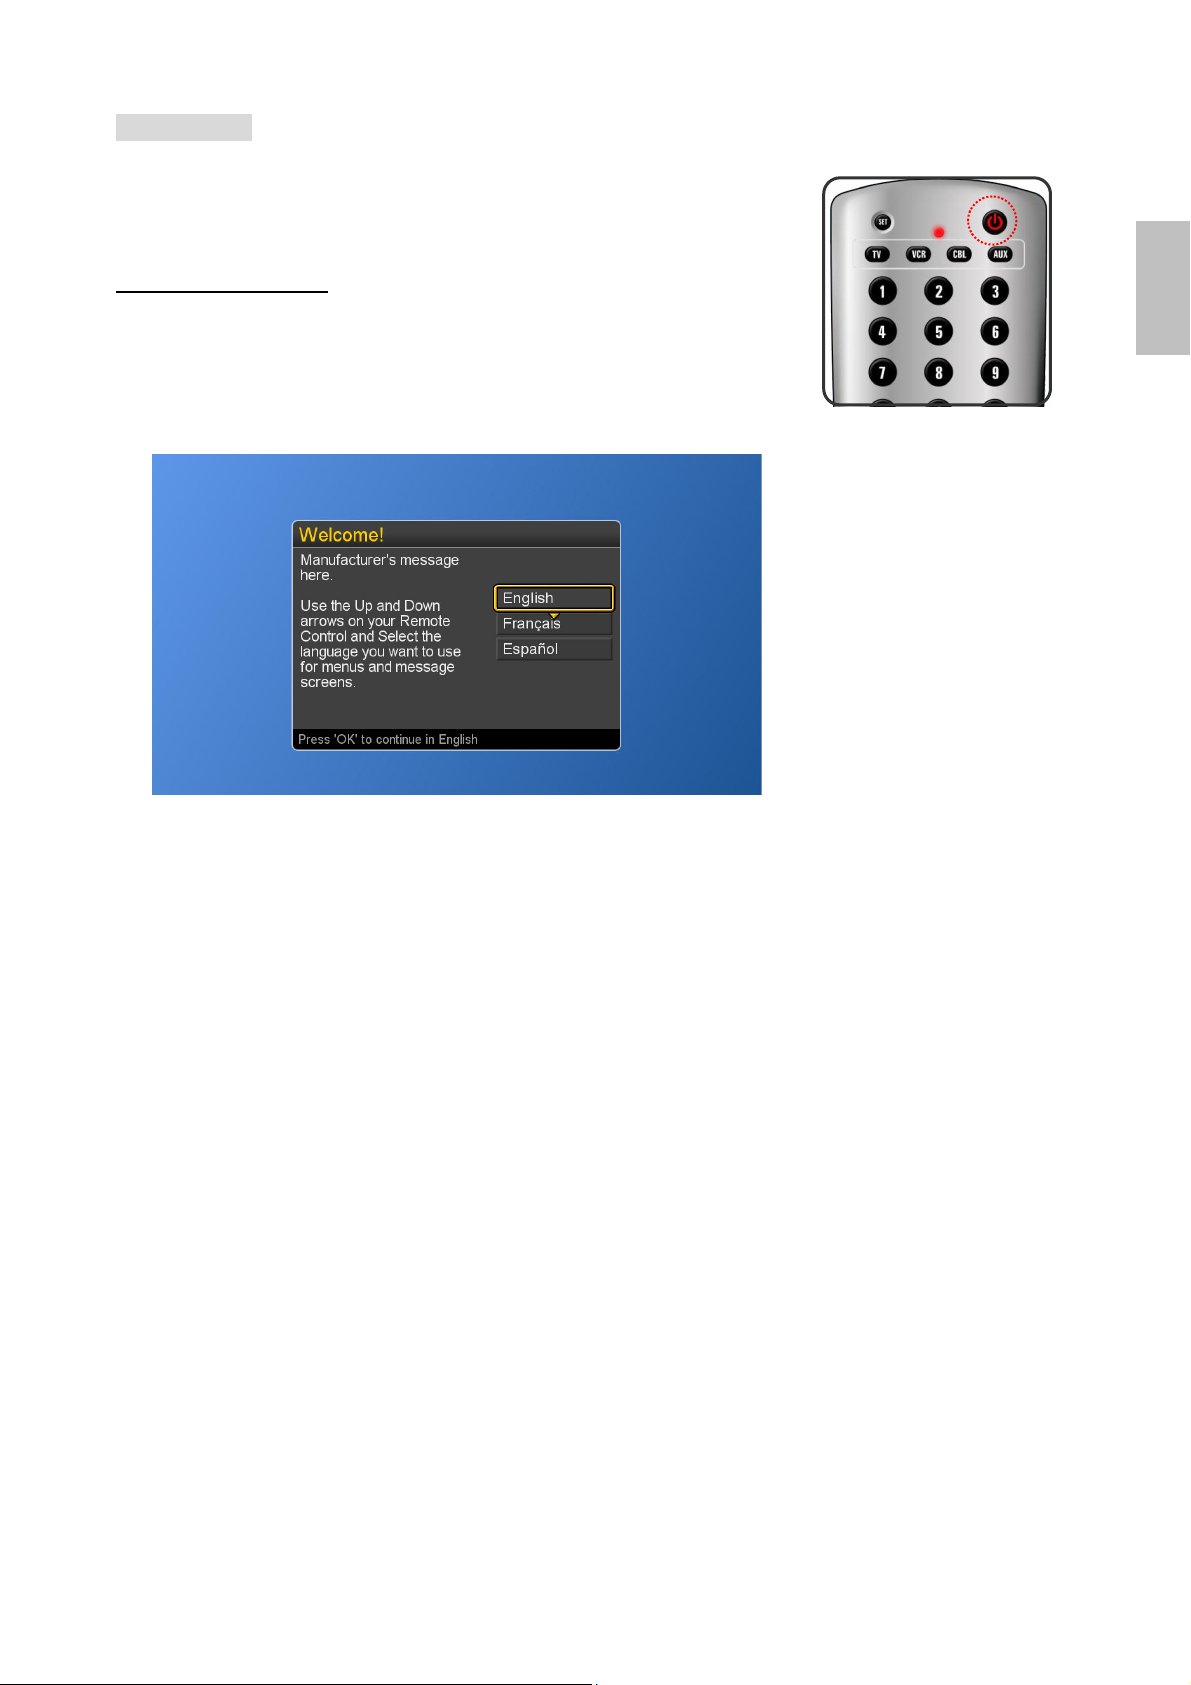
Initial Setup
When the system powers on for the first time after purchase,
the initial auto installation is enabled.
Language Selection
Press the Power button on the remote control. A welcome
message is displayed. Use the ▲▼ buttons to select the
language you prefer, and press OK button to continue.
ENGLISH
ViewSonic CD4200 17
Page 25
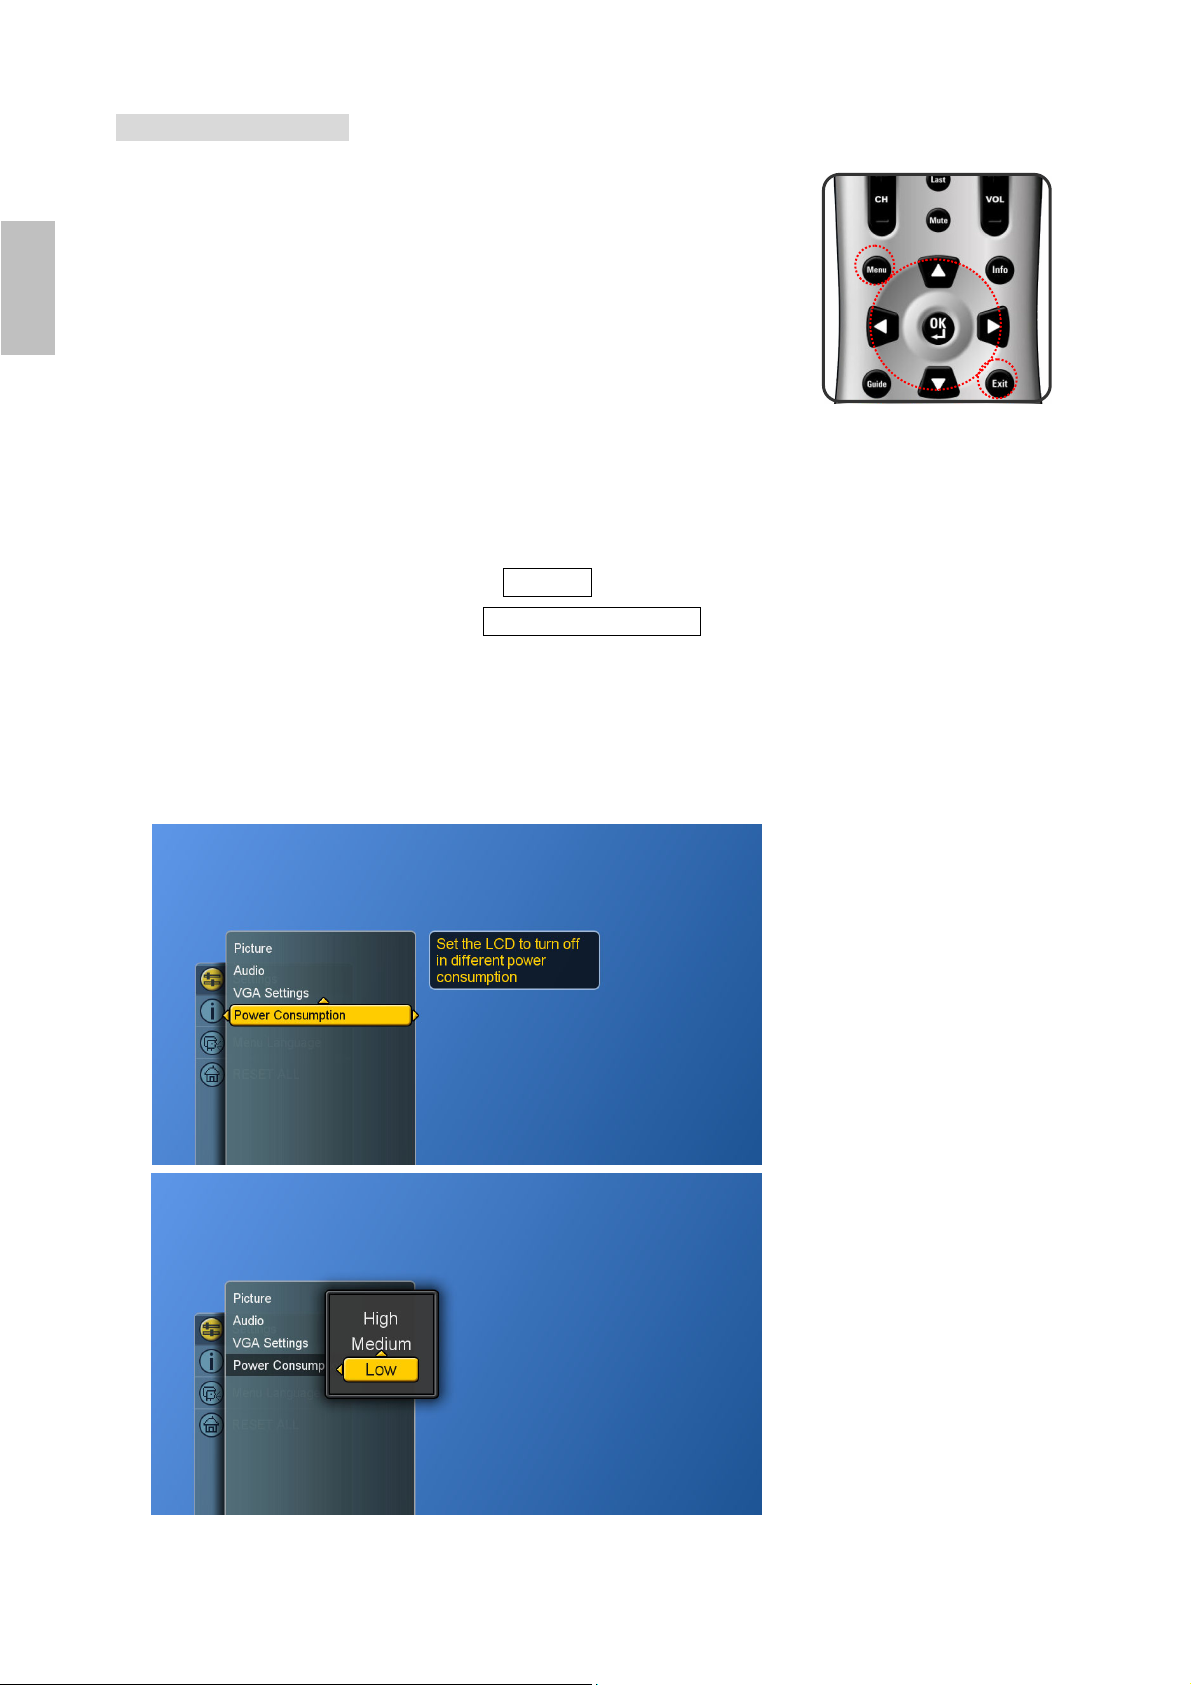
Power Consumption
Power Consumption is a power management technique which
helps to set up the POWER OFF status for the LCD.
There are three modes: Low/Medium/High
Low : The power consumption is no more than 5W in the POWER
ENGLISH
OFF status. It takes about 12-15 seconds to turn on the LCD set.
Medium : The power consumption within the first hour is less than 35W and
you can turn on LCD soon. After one hour, the power consumption is
switched to around 5W and it takes 12-15 seconds to turn on the LCD.
High : The LCD can be turned on soon and the maximum power
consumption would be less than 35W.
1. Press the Menu button to display the main menu.
2. Press the ▲▼ buttons to select Settings.
3. Press ► / ▼ buttons to select Power Consumption.
4. Press ► button to display the sub-menu.
5. Press ▲▼ and OK buttons to select Low, Medium or High.
6. Press Exit button to dismiss all menu or press ◄ button to
return to the previous screen.
18 ViewSonic CD4200
Page 26

Adjusting the Volume
By pressing VOL + / – buttons either on this remote control or
this LCD, a user can adjust the sound output of external
devices which are connected to Audio Out sockets of this LCD.
UUssiinngg VVoolluummee CCoonnttrrooll
Press the VOL + / – buttons to increase or decrease the
volume.
UUssiinngg MMuuttee
At any time, you can turn off the sound using the Mute button.
1. Press the Mute button and the sound turns off.
2. Press Mute again or VOL + / – buttons to return audio back
to the previous volume level.
ENGLISH
ViewSonic CD4200 19
Page 27
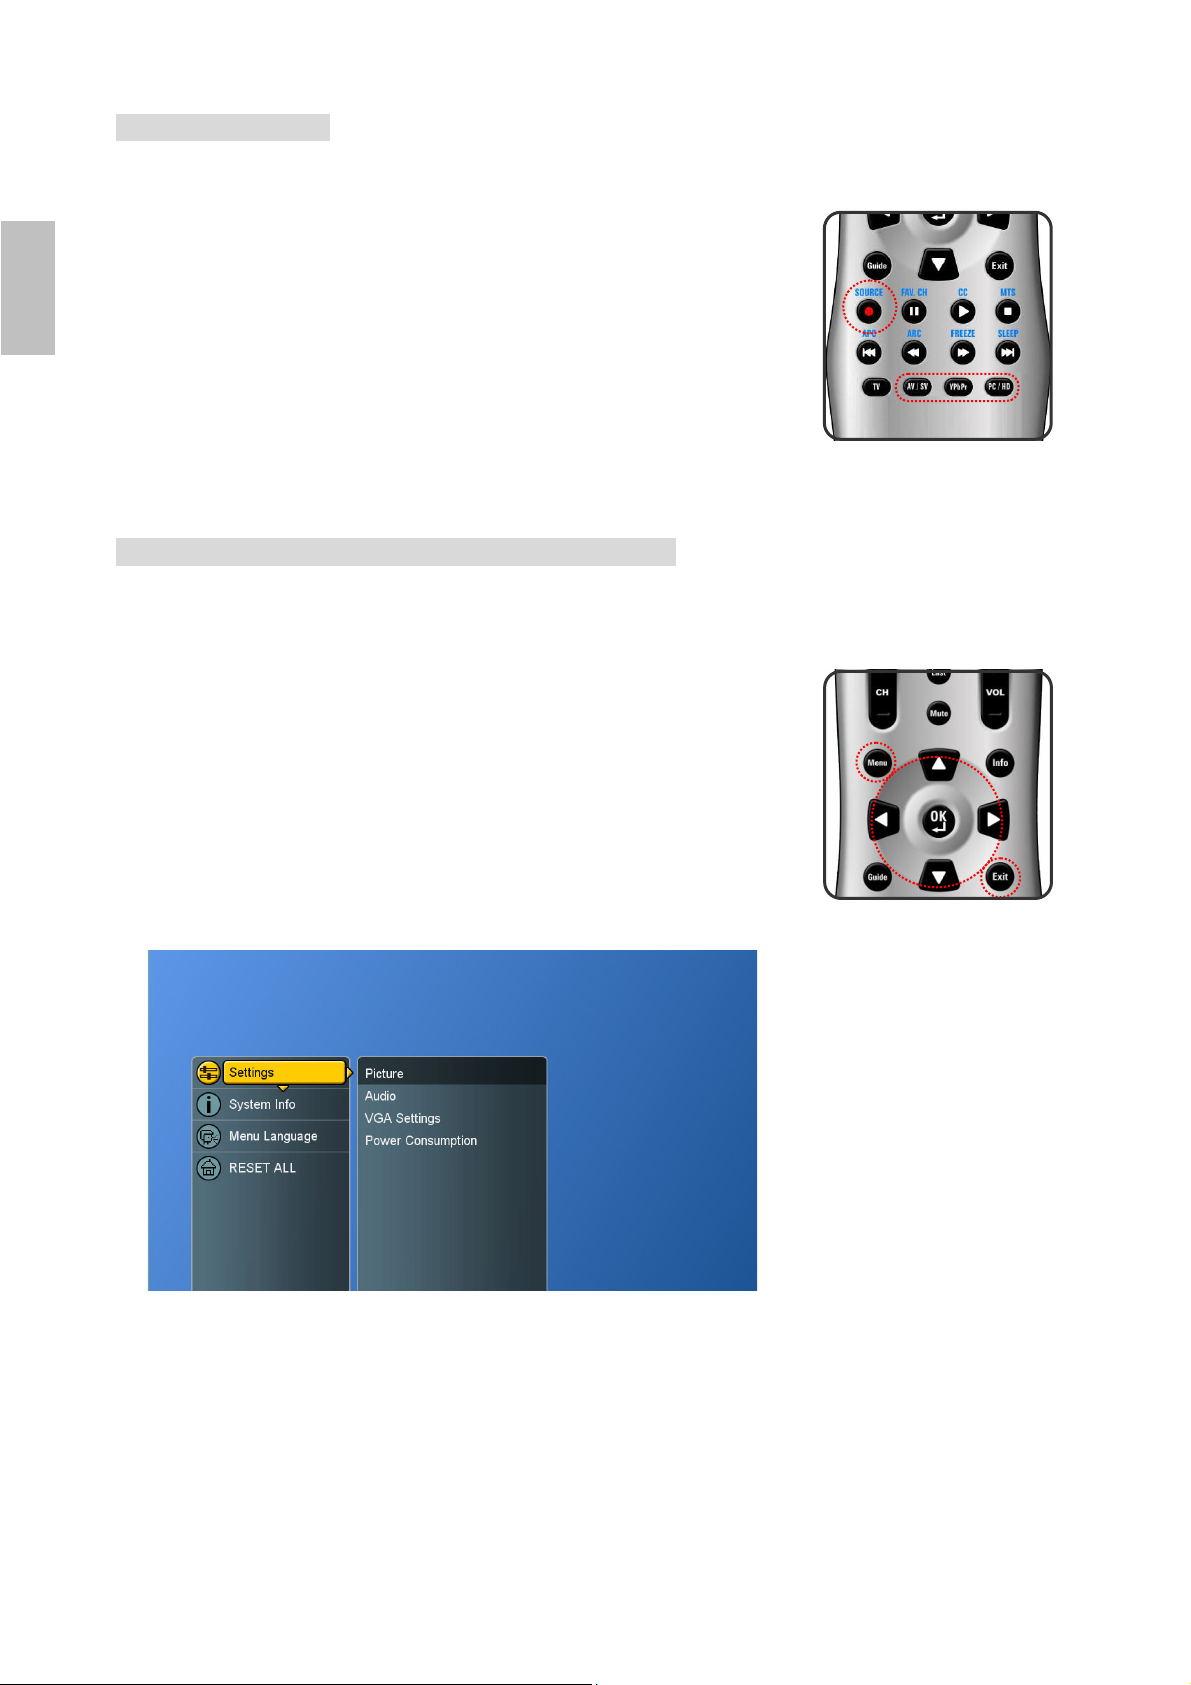
Y
Switching Source
1. Refer to page 10~13 and connect external devices.
2. Press AV/SV, YPbPr, PC/HD buttons to choose the source.
3. A user can also press the SOURCE button repeatedly to
ENGLISH
4. Select an input source as described below :
Viewing the Menus and On-Screen Display (OSD)
You can use the control buttons on the right side of the LCD or
use the remote control to viewing the menus.
1. With the power on, and then press the Menu button.
2. The main menu appears on the screen
3. Press the ▲▼◄ ► buttons to access the sub-menus and
4. Press Exit button to dismiss all menu or press Menu button
choose the desired source.
AV/SV
PbPr
PC/HD
make adjustments.
to return to the main menu.
switch to Video 1 or Video 2 mode.
switch to YPbPr 1 or YPbPr 2 mode.
switch to PC or HDMI mode.
20 ViewSonic CD4200
Page 28
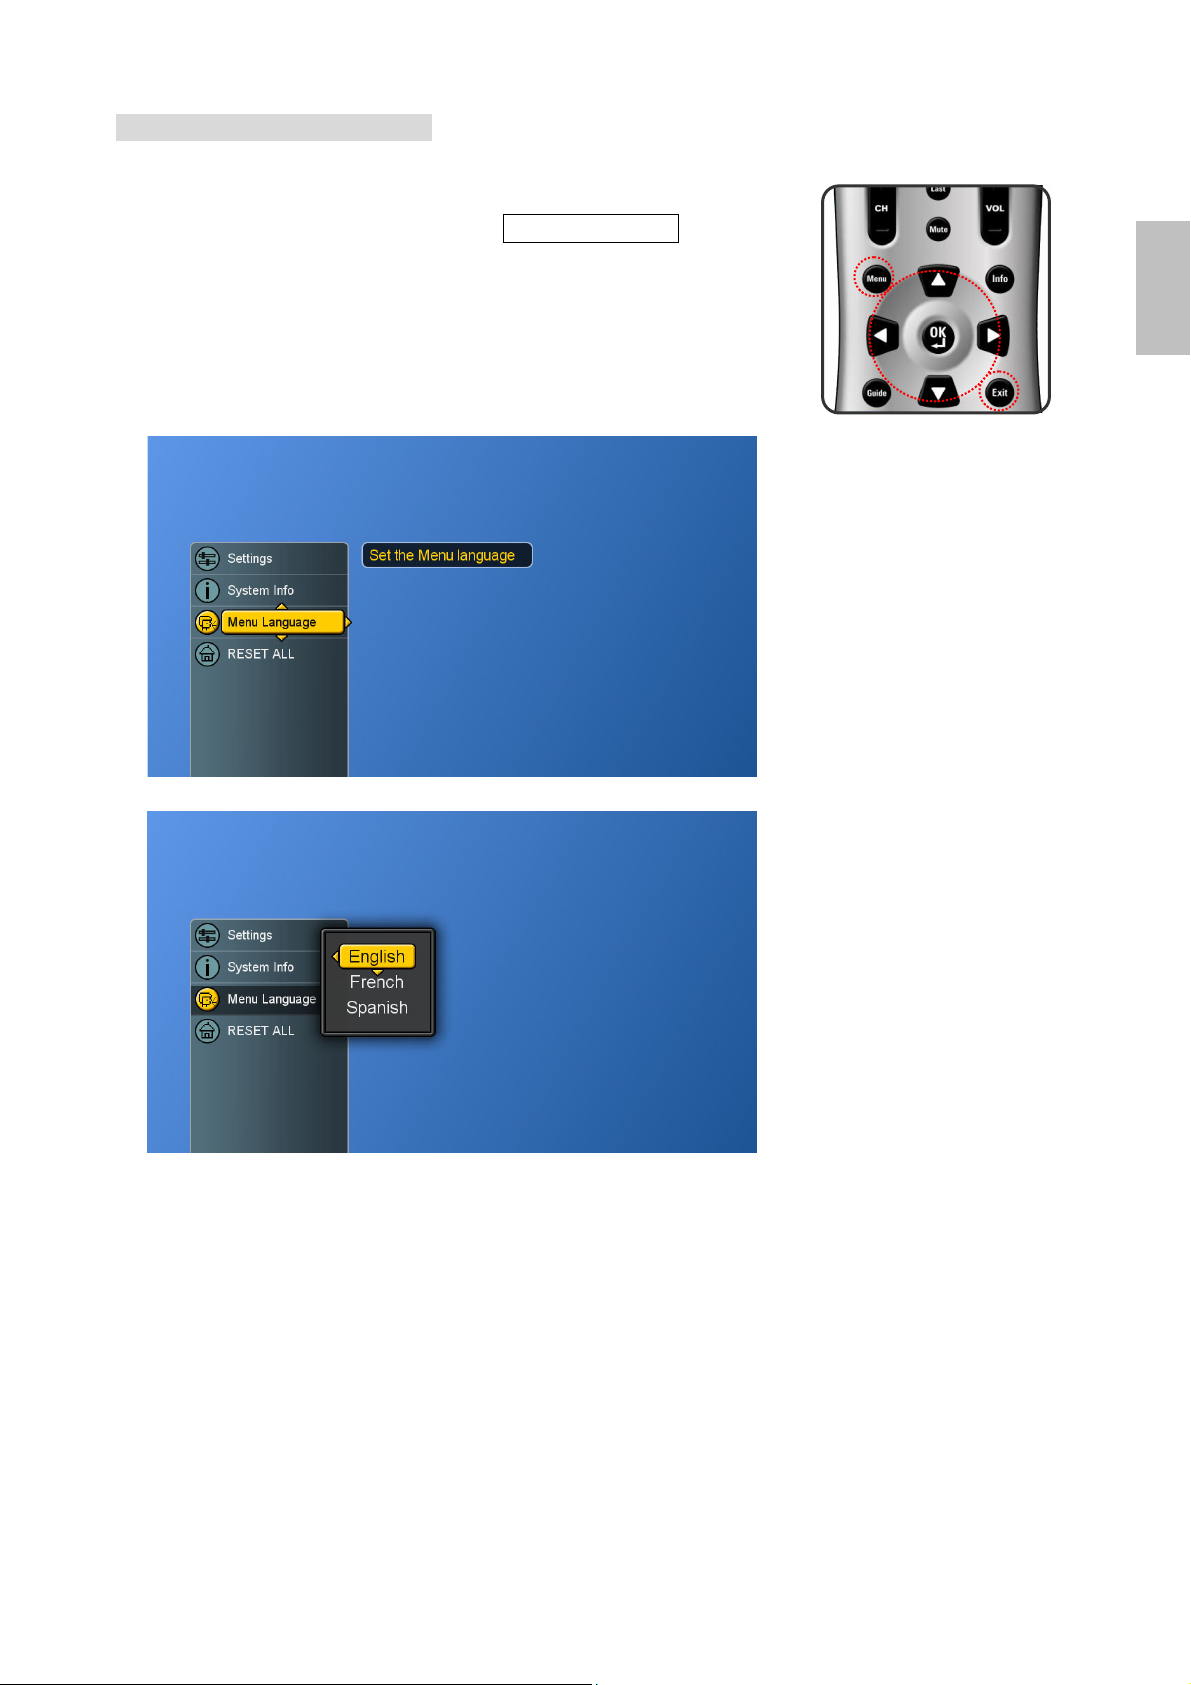
Switching Language Modes
1. Press the Menu button to display the main menu.
2. Press the ▲▼ buttons to select Menu Language.
3. Press ► button to display the sub-menu.
4. Press ▲▼ and OK buttons to select the language.
5. Press Exit button to dismiss all menu or press ◄ button to
return to the previous screen.
ENGLISH
ViewSonic CD4200 21
Page 29
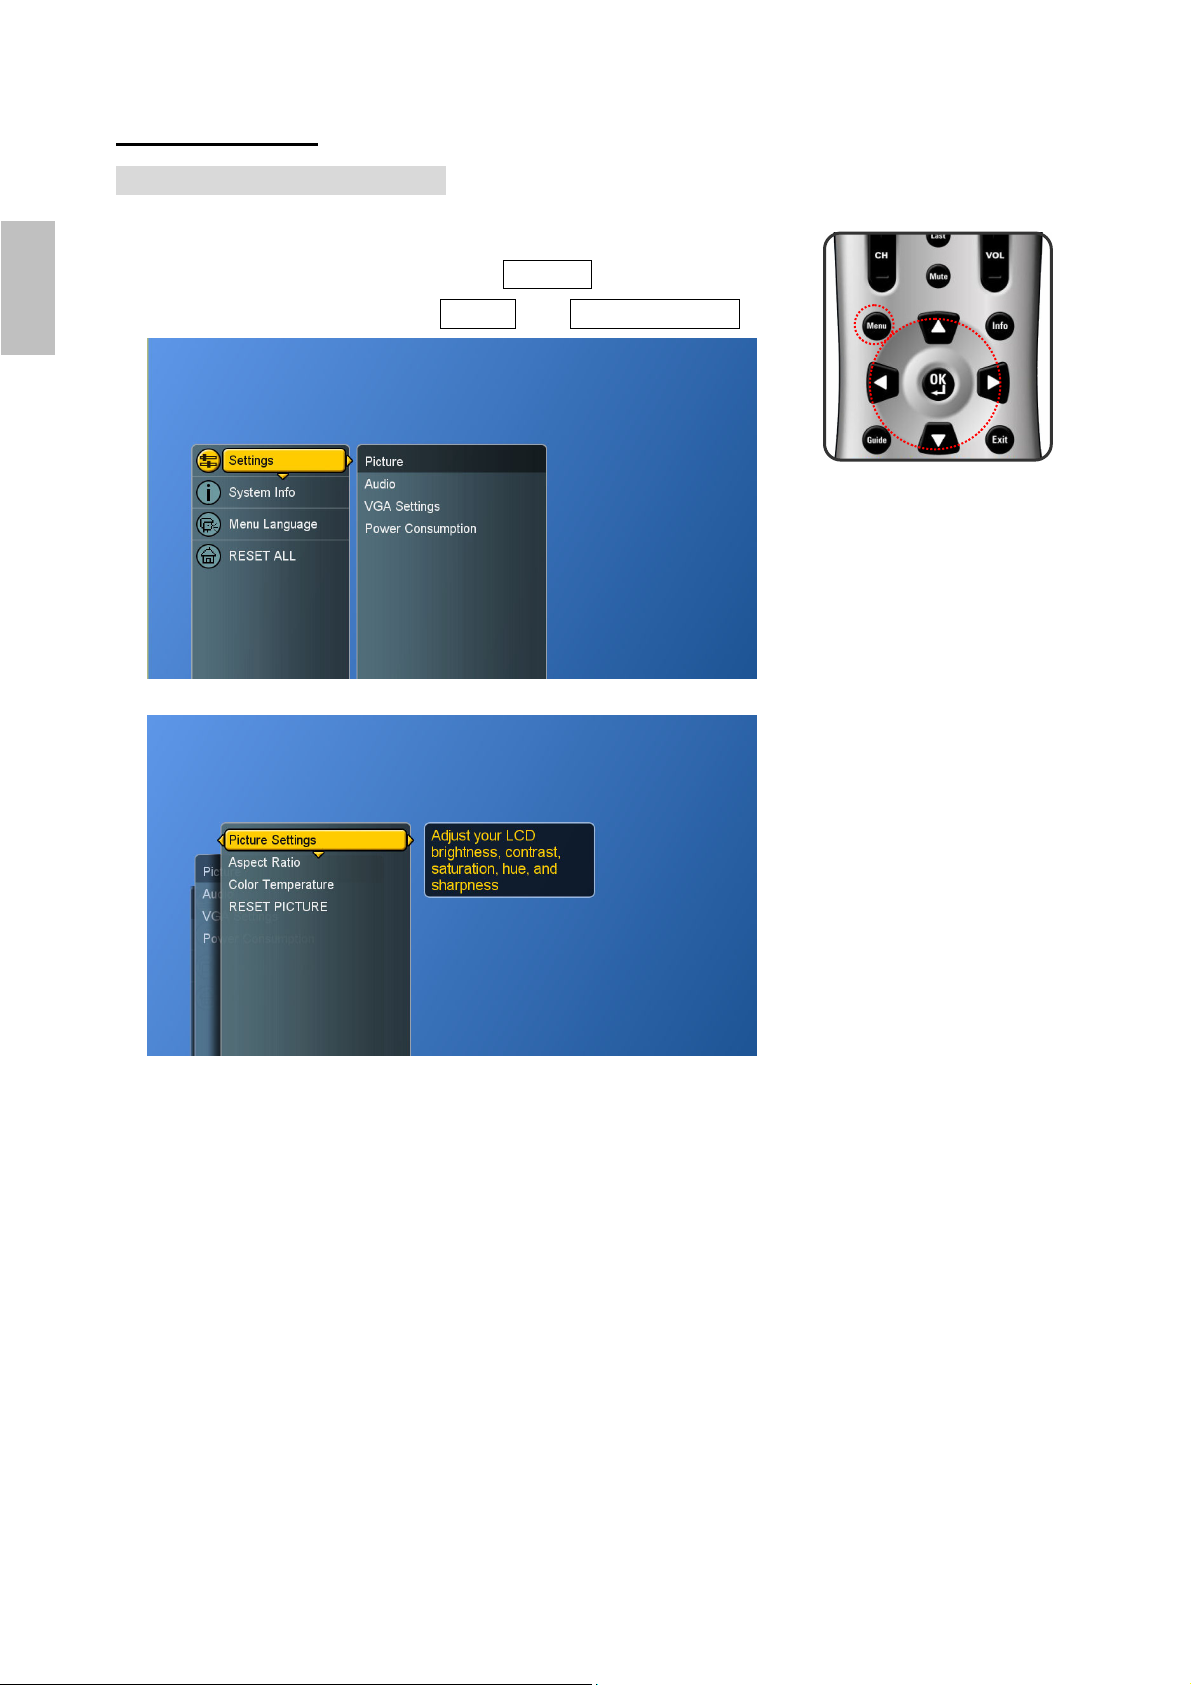
Picture Control
Adjusting the Picture Setting
1. Press the Menu button to display the main menu.
2. Press the ▲▼ buttons to select Settings.
3. Press ► button to access Picture and Picture Settings.
ENGLISH
4. “Picture Settings: PC”. A user can make adjustment, when
in “Custom” mode.
5. Press ▲▼ and OK buttons to choose the desired item.
6. Press ◄► buttons to adjust the degree and press ▲▼
buttons to choose other items.
Brightness : Darken and brighten picture brightness
Contrast : Increase and decrease picture contrast
Saturation : Deepen and lighten picture color
Hue : Modify the tint (flesh tone redness or
greenness) of color
Sharpness : Soften and sharpen image
22 ViewSonic CD4200
Page 30
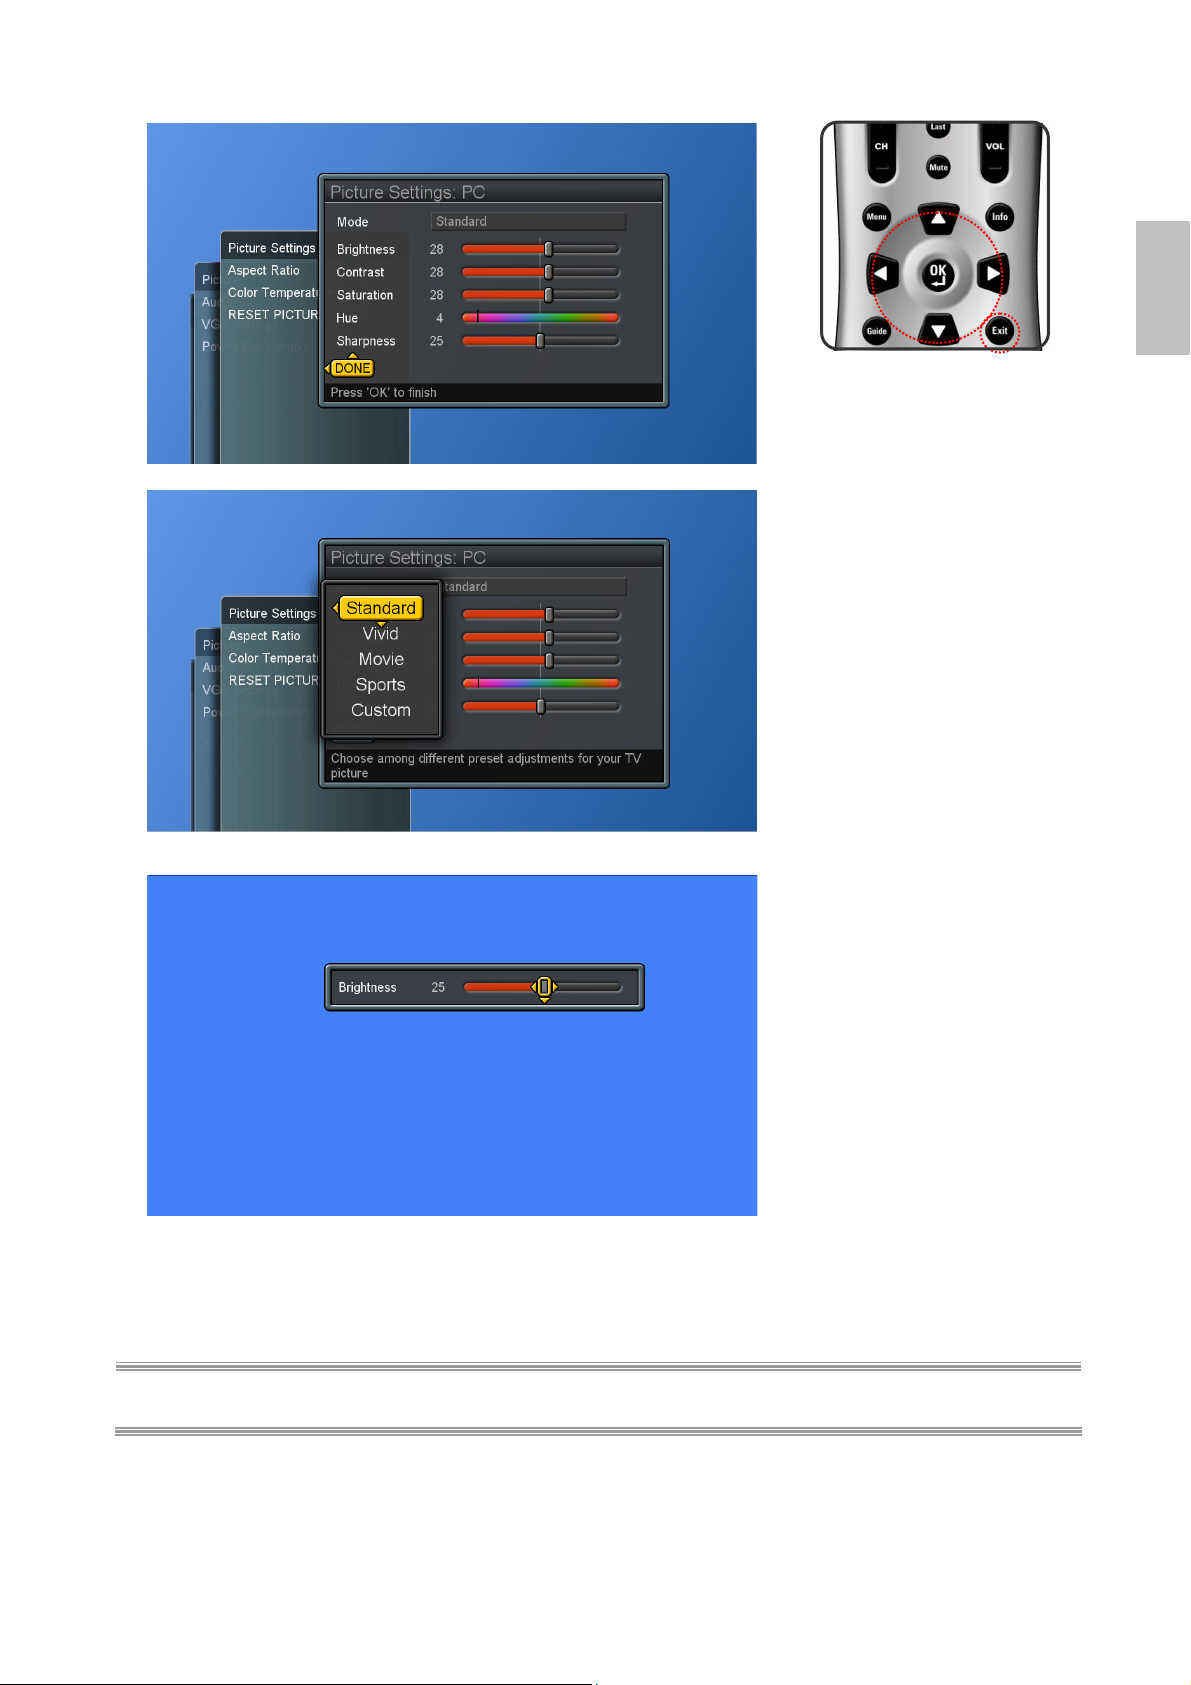
ENGLISH
7. Press OK button to return to the previous screen or press
Exit button to dismiss all menu.
NOTE : Settings for Standard, Vivid, Movie, Sports are pre-configured.
ViewSonic CD4200 23
Page 31

Adjusting the LCD Screen
1. Press the Menu button to display the main menu.
2. Press the ▲▼ buttons to select Settings.
3. Press ► button to access Picture sub-menu.
4. Press ►/ ▼ button to select Aspect Ratio.
ENGLISH
5. Press ► button again to display the menu.
6. Press ▲▼ buttons to choose the different modes and
press OK to confirm.
Normal : display the image exactly as broadcast .
Full Screen: stretch the image to fit the screen
(None of the image is cut off, but the image may appear
distorted )
Zoom : scale the image larger, and will cut off part of the
image
Subtitle : shift the image up to show the subtitle.
24 ViewSonic CD4200
Page 32

Adjusting the Color Temperature
Adjust the white balance of the picture.
1. Press the Menu button to display the main menu.
2. Press the ▲▼ buttons to select Settings
3. Press ► button to access Picture sub-menu.
4. Press ►/▼ buttons to select Color Temperature and then
press ► button to display the menu.
5. Press ▲▼ and OK buttons to choose Cool, Neutral or
Warm.
Cool : a bluish white
Neutral : a normal white
Warm : a reddish white
6. Press ◄ button to return to the previous screen or press
Exit button to dismiss all menu.
ENGLISH
ViewSonic CD4200 25
Page 33

Reset Picture Settings
The user can reset the picture settings back to factory settings.
1. Press the Menu button to display the main menu.
2. Press the ▲▼ buttons to select Settings
ENGLISH
3. Press ► button to access Picture sub-menu.
4. Press ►/▼ buttons to select RESET PICTURE and then
5. Press ► and OK buttons to reset picture settings.
press ► button to display the menu.
26 ViewSonic CD4200
Page 34

Sound Control
Adjusting the Sound Quality
1. Press the Menu button to display the main menu.
2. Press the ▲▼ buttons to select Settings.
3. Press ► / ▼ buttons to select Audio.
4. Press ► button to select Bass, Treble & Balance and then
press ► button again to display the menu.
ENGLISH
5. Press ▲▼ buttons to choose the desired item and then
press ◄ ► buttons to make adjustments.
6. Press OK button to finish or Exit button to dismiss all
menu.
Bass : Adjust low tone of sound.
Treble : Adjust high tone of sound.
Balance : Adjust the volume balance between the left
and right speakers.
ViewSonic CD4200 27
Page 35

ENGLISH
Automatic Volume Control
1. Press the Menu button to display the main menu.
2. Press the ▲▼ buttons to select Settings.
3. Press ► / ▼ buttons to select Audio.
4. Press ► / ▼ button to select other items.
5. Press OK button to switch between “ON” and “OFF”.
Automatic Volume Control (AVC)
[ ON ]: AVC can avoid sudden increases or decreases of
volume like commercials.
[ OFF ]: Under special circumstances, such as opera or
symphony, volume can be performed in accordance with
the original sound level.
28 ViewSonic CD4200
Page 36

Reset Audio Settings
User can reset the audio settings back to factory settings.
1. Press the Menu button to display the main menu.
2. Press the ▲▼ buttons to select Settings.
3. Press ► / ▼ buttons to select Audio.
4. Press ► / ▼ button to select RESET AUDIO and then
press ► button to display the menu.
5. Press ► and OK buttons to reset audio settings.
ENGLISH
ViewSonic CD4200 29
Page 37

System Info
Display System Info.
1. Press the Menu button to display the main menu.
2. Press the ▲▼ buttons to select System Info.
ENGLISH
3. Press ► button to show the info.
4. Press Exit button to dismiss all menu.
30 ViewSonic CD4200
Page 38

PC mode Adjustments
The “VGA Settings” allows the user to control certain VGA
specific features. Please connect PC source in advance.
1. Press Source button to select PC source.(see page 18)
2. Press the Menu button to display the main menu.
3. Press the ▲▼ buttons to select Settings.
4. Press ► / ▼ buttons to select VGA Settings.
5. Press ► button to display the menu.
ENGLISH
6. Use ▲▼◄ ► buttons to make adjustments.
7. Press Exit button to dismiss all menu.
DPMS (Display Power Management Signaling): enables or
disables the display power management mode when the
VGA is the active input source using a checkbox. When
checked, the feature is enabled.
Auto Sync : automatically attempts to determine the ideal
horizontal, vertical, and phase adjustments for the current
VGA input signal.
ViewSonic CD4200 31
Page 39

Reset the Features
The user can reset all settings back to factory settings.
Following Reset, the Setup Wizard resumes to factory default
mode.
ENGLISH
1. Press the Menu button to display the main menu.
2. Press the ▲▼ buttons to select RESET ALL.
3. Press the ► button to display “Reset All Settings” and OK
button to reset all settings.
32 ViewSonic CD4200
Page 40

A
PROGRAMMING REMOTE CONTROL
Direct Device Code Setup
Although your Remote Control is set up to provide control of
this LCD, you can specify other devices to be controlled,
according to the following steps:
Each code in the following pages insists 5 digits from 0 to 9.
Mode → <<SET>> (2 blinks) → 5- digit device codes (2 blinks)
STEP 1 Locate the desired device in the Device code list.
STEP 2 Select the mode by pressing VCR, CBL, or AUX.
STEP 3 Depress and hold <<SET>> button for a minimum of 3 seconds until LED blinks
twice.
STEP 4 Enter the 5-digit code for the desired device. The LED blinks located on the
remote control once for every digit entered except for the last digit, where it shall
blink twice to confirm that a valid code has been programmed.
ENGLISH
Mode Device Assignment
TV
VCR
CBL
AUX
Locked to this LCD (Default) ------Universal VCR, DVD, PVR 2
Universal Cable, Satellite, Video Accessory 0
Universal Tuner, Amplifier, CD, Mini Disc.
Home Automation
nd Misc. Audio,
Device
Group no.
Example: [VCR]→<<SET>> (2blinks)→[2]→[0]→[0]→[3]→ [5] (2 blinks).
NOTE 1 : Each digit must be entered within 10 seconds, or the Remote Control shall exit the current
programming state.
NOTE 2 : Two short LED blinks indicate valid code.
NOTE 3 : A long LED display indicates invalid code sequence. The code should be re-entered.
3
ViewSonic CD4200 33
Page 41

Searching for a Device Code
If none of the codes listed under Device Codes list match your
device, you can search for a set of commands that will work.
Your Remote will sample all the codes in its system to find one
that will allow you to control your device.
ENGLISH
As the Remote searches its library, it starts with the most
popular device in the category and works through to the end.
To cycle through each available device code and sample its
functions:
Mode → <<SET>> (2 blinks)→ [9] [9] [1] (2 blinks) →Device Group No. (2 blinks)→
Power → [CH +] →[CH +]→[CH +] → … SET (2 blinks)
STEP 1 Select the [MODE] by pressing VCR, CBL, or AUX.
STEP 2 Depress and hold <<SET>> button for a minimum of 3 seconds until LED blinks
STEP 3 Enter the code sequence [9][9][1]. The LED blinks once for every digit entered
STEP 4 Press Power button. Then, pressing CH+ repeatedly to cycle through each
STEP 5 Pressing SET button will store the new device code and returns to normal
twice.
except for the last digit, where it shall blink twice to confirm that [9][9][1] are
entered correctly.
corresponding function until your device turns off (or on).
operation. The LED blinks twice in confirmation.
Mode Device Assignment
TV
VCR
CBL
AUX
Locked to this LCD (Default) ------Universal VCR, DVD, PVR 2
Universal Cable, Satellite, Video Accessory 0
Universal Tuner, Amplifier, CD, Mini Disc. And Misc. Audio,
Home Automation
Device
Group no.
3
Example: [VCR ]→<<SET>> (2 blinks) →[9]→[9]→[1] (2 blinks) → [2] (2 blinks) →
[POWER]→[CH +] →[CH +]→… [SET] (2 blinks).
34 ViewSonic CD4200
Page 42

Device Codes
The following sections list the available device codes for each device mode button. If there
is more than one code listed for device, enter the first one, and then try the POWER
button. If the device turns on (or off), the code is correct. If it does not, try the next code.
Repeat until you find a code that works.
Cable Converters
ABC 00003, 00008, 00014 Paragon 00000
Americast 00899 Philips 00317, 01305
Bell & Howell 00014 Pioneer 01877, 00877, 00144, 00533
Bell South 00899 Pulsar 00000
Clearmaster 00883 Quasar 00000
ClearMax 00883 RadioShack 00883
Coolmax 00883 Regal 00279, 00273
Daeryung 01877, 00877, 00477, 00008 Runco 00000
Digi 00637 Samsung 00000, 00144
Director 00476 Scientific Atlanta 01877, 00877, 00477, 00008
ENGLISH
Dumont 00637 Sony 01006
Gehua 00476 Starcom 00003, 00014
General
GoldStar 00144 Supermax 00883
Hamlin 00009, 00273 Tocom 00012
Hitachi 00014 Torx 00003
Jerrold
KNC 00008 Trans PX 00276
LG 00144 Tristar 00883
Memorex 00000 TS 00003
Motorola 00476, 00810, 00276, 01254, 01376 V2 00883
MultiVision 00012 Viewmaster 00883
Pace 01877, 00237 Vision 00883
Panasonic 00000, 00008, 00107 Vortex View 00883
Panther 00637 Zenith 00000, 00525, 00899
00476, 00810, 00276, 00003, 00014 Supercable 00276
00476, 00810, 00276, 00003, 00012,
00014
Toshiba 00000
ViewSonic CD4200 35
Page 43

ENGLISH
Satellite Receivers
AlphaStar 00772 NEC 01270
Chaparral 00216 Next Level 00869
Crossdigital 01109 Panasonic 00247, 00701
DirecTV
Dish Network
System
Dishpro 01005, 00775, 01505 Proscan 00392, 00566
Echostar 01005, 00775, 01505 Proton 01535
Expressvu 00775 RadioShack 00869
GE 00566 RCA 00392, 00566, 00855, 00143, 01392
General
Instrument
GOI 00775 Sanyo 01219
Goodmans 01246 SKY 00856
Hisense 01535 Sony 00639, 01640
Hitachi 00819, 00222, 01250 Star Choice 00869
HTS 00775 Tivo 01142, 01442
Hughes Network
Systems
I-Lo 01535 UltimateTV 01640, 01392
JVC 00775 Uniden 00724, 00722
LG 01414, 01226 US Digital 01535
Magnavox 00724, 00722 USDTV 01535
Memorex 00724 Voom 00869
Mitsubishi 00749 Zenith 00856, 01856
Motorola 00869 --------------- --------------------------
00392, 00566, 00639, 01142, 00247,
00749, 01749, 00724, 00819, 01856,
01076, 01109, 00099, 01392, 01640,
01442, 01414, 01108
01005, 00775, 01505 Philips
00869 Samsung 01276, 01109, 01108
01142, 00749, 01749, 01442 Toshiba 00749, 01749, 00790, 01285
Paysat 00724
01142, 00749, 01749, 00724, 01076,
00722, 00099, 01442
36 ViewSonic CD4200
Page 44

Audio Amplifiers
Bose 30674 Sansui 30321
GE 30078 Shure 30264
JVC 30331 Sony 30689
Marantz 30321 Soundesign 30078
Nakamichi 30321 Victor 30331
NEC 30264 Wards 30078
Optimus 30395 Yamaha 30354, 30133
Realistic 30395 --------------- ----------------------------
Audio Amp/Tuners
ADC 30531 Onkyo 30842, 30135
Aiwa 31405, 31243, 30121 Optimus 31023, 30670, 30531, 31074
Anam 31609, 31074 Panasonic 31518, 30039
Audiotronic 31189 Philips 31189, 31269
Bose 31229 Pioneer 31023, 30150, 30014, 30630, 30531
Capetronic 30531 Proscan 31254
Carver 31189 Qisheng 31609
Coby 31263 Quasar 30039
ENGLISH
Denon 31360, 31142, 30904 RadioShack 31263
Fonmix 31360 RCA 31023, 31609, 31254, 30531, 31074
Glory Horse 31263 Sharper Image 31263
Harman/Kardon 30110 Silsonic 30176
Hitachi 31273 Sony 31058, 31441, 31258, 31759
Inkel 30027 Soundesign 30670
Integra 30135 Stereophonics 31023
JBL 30110 Sunfire 31313
JVC 30074, 31263 Teac 31074, 31267
Kenwood 31313, 31570, 30027 Technics 31308, 31518, 30039
KLH 31428 Thorens 31189
Magnavox 31189, 31269, 30531 Victor 30074
Marantz 31189, 31269, 30039 Wards 30014
MCS 30039 Yamaha 30176, 31276, 31176
ViewSonic CD4200 37
Page 45

ENGLISH
VCR
ABS 21972 Gateway 21972
Admiral 20048, 20209 GE 20060, 20035, 20240
Aiko 20278 General 20045
Aiwa 20037, 20479 Go Video 20432
Alienware 21972 GoldStar 20037, 20209, 20038, 20225
America Action 20278 Haojie 20240
American High 20035 Harman/Kardon 20081, 20038
Amoisonic 20479 Harwood 20072
Anam 20162, 20037, 20240, 20278 Hewlett Packard 21972
Anam National 20162 HI-Q 20047
Asha 20240 Hitachi 20037, 20042, 20055
Audiovox 20037, 20278
Beaumark 20240 HP 21972
Bell & Howell 20104
Broksonic 20184, 20121, 20209, 20002, 20479 iBUYPOWER 21972
Calix 20037 JVC 20045, 20067
Canon 20035 KEC 20037, 20278
Carver 20081 Kenwood 20067, 20038
CCE 20072, 20278 KLH 20072
Howard
Hughes Network
Systems
21972
20042, 20739
Changhong 20048, 20081 Kodak 20035, 20037
Citizen 20037, 20278 Kolin 20043
Colt 20072 LG 20037, 20045, 20042, 20209, 20038
Craig 20037, 20047, 20240, 20072 Logik 20072
Curtis Mathes 20060, 20035, 20162 LXI 20037
Cybernex 20240 Magnavox 20035, 20039, 20081
CyberPower 21972 Magnin 20240
Daewoo 20045, 20104, 20278 Marantz 20035, 20081
Dell 21972 Marta 20037
Denon 20042 Matsushita 20035, 20162
DirecTV 20739 Media Center PC 21972
Durabrand 20039, 20038 MEI
Electrohome 20037 Memorex 20035
Electrophonic 20037 MGA 20240, 20043
Emerex 20032 MGN Technology 20240
20035, 20037, 20184, 20240, 20045,
Emerson
20121, 20043, 20209, 20002, 20278,
20479
Microsoft 21972
20035, 20162, 20037, 20048, 20039,
20047, 20240, 20104,20209, 20479
Fisher 20047, 20104 Mind 21972
Fuji 20035, 20033 Minolta 20042
Fujitsu 20045 Mitsubishi 20067, 20043
38 ViewSonic CD4200
Page 46

VCR
Motorola 20035, 20048 Scott 20184, 20045, 20121, 20043
MTC 20240 Sears 20035, 20037, 20047, 20042, 20104
Multitech 20072 Sharp 20048, 20209
ENGLISH
NEC
Newave 20037 Shogun 20240
Nikko 20037 Singer 20072
Noblex 20240 Sonic Blue 20616
Northgate 21972
Olympus 20035 STS 20042
Optimus 21062, 20162, 20037, 20048, 20104,
Orion 20184, 20209, 20002, 20479 Systemax 21972
Panasonic
Penney
Pentax 20042 Tatung 20045, 20067
Philco 20035, 20479 Technics 20035, 20162
Philips 20035, 20081, 20739, 20618 Teco 20035, 20037, 20048, 20038
Pilot 20037 Teknika 20035, 20037
Pioneer 20042, 20067 Tivo 20636, 20618, 21503, 20739
Polk Audio 20081 TMK 20240
20035, 20037, 20048, 20104, 20067,
20038
20432
21062, 20035, 20162, 20616, 20225 Tagar Systems 21972
20035, 20037, 20240, 20042, 20038 Tashiko 20037
Shintom 20072
Sony
Sylvania 20035, 20081, 20043
20035, 20032, 20033, 20636, 21972
Profitronic 20240 Toshiba
Proscan 20060 Totevision 20037, 20240
Protec 20072 Touch 21972
Pulsar 20039 Unitech 20240
Qisheng 20060 Vector 20045
Quasar 20035, 20162 Vector Research 20038
Radix 20037 Victor 20067
Randex 20037 Video Concepts 20045
RCA
Realistic
ReplayTV 20616 Viewsonic 21972
Runco 20039
Sampo 20037, 20048
Samsung 20240, 20045, 20432 XR-1000 20035, 20072
Sanky 20048, 20039 Yamaha 20038
Sansui 20067, 20209, 20479 Zenith 20039, 20033, 20209, 20479
Sanyo 20047, 20240, 20104 ZT Group 21972
20060, 20035, 20240, 20042, 20880 Videomagic 20037
20035, 20037, 20048, 20047, 20104 Videosonic 20240
Wards
White
20045, 20042, 20067, 20043, 21503
21008, 21972
20060, 20035, 20048, 20047, 20081,
20240, 20042, 20072
20209, 20072
ViewSonic CD4200 39
Page 47

ENGLISH
DVD Player
Aiwa 20641, 21912 Microsoft 20522
Akai 20770 Mintek 20717
Allegro 20869 Mitsubishi 21521, 20521
20672, 20717, 20797, 21061, 20796,
Apex Digital
Blaupunkt 20717 Norcent 21003
Blue Parade 20571 Onkyo 20503, 20627, 21924, 20792
Broksonic 20695 Oritron 20651, 21980
Changhong 20627, 21061 Panasonic 20490, 21762, 21990
CineVision 20869 Philips 20503, 20539, 20646, 21914
Coby 21086 Pioneer 20525, 20571
Curtis Mathes 21087 Polaroid 21086, 21061
CyberHome 21024, 21023, 21129, 20816, 21117 Polk Audio 20539
Daewoo 20833, 21172, 20869 Portland 20770
Denon 20490 Proscan 20522
21056, 21937, 20794,
21020, 21915
Nesa 20717
DVD2000 20521 Qwestar 20651
Emerson 20591, 20675 RCA 20522, 20571, 20717, 20822
Enterprise 20591 Rio 20869
Fisher 21919 Rotel 20623
Funai 20675 Sampo 20752, 20698
Gateway 21158, 21073 Samsung 20490, 20573, 21932, 21075, 20820
GE 20522, 20717 Sansui 20695
Go Video
Greenhill 20717 Sharp 20630, 20752
Harman/Kardon 20582, 20702 Sharper Image 21117
Hitachi 20573, 20664, 21919 Sherwood 20770
Hiteker 20672 Shinco 20717
Initial 20717 Shinsonic 20533
Integra 20627, 21924 Sonic Blue 20869, 21099
JBL 20702 Sony 20533, 20864, 21033, 21904, 21903
JVC 20558, 20623, 20867 SVA 20717
Kenwood 20490, 20534 Sylvania 20675
KLH 20717, 21020, 21149 Symphonic 20675
Koss 20651, 21980 Teac 20717, 21984, 20809
Lasonic 20798 Technics 20490
LG 20591, 20869, 20801 Theta Digital 20571
Liquid Video 21980 Toshiba 20503, 20695
Lite-On 21158, 21058 Urban Concepts 20503
Loewe 20511 Xbox 20522
Magnavox 20503, 20539, 21976, 21914, 20675 Yamaha 20490, 20539, 20545
Marantz 20539 Zenith 20503, 20591, 20869
Memorex 20695 ---------------------- ----------------------------
20744, 20833, 21099, 20783, 21075,
20869, 21730
Sanyo 20695
40 ViewSonic CD4200
Page 48

T
TROUBLESHOOTING
There is no picture or sound.
▪ Make sure the AC adapter is connected.
▪ Verify that there is a valid source signal.
▪ Make sure the correct input mode is selected.
There is no picture from AV.
▪ Make sure the BRIGHTNESS is properly adjusted.
▪ The florescent lamp may have reached the end of its life.
Contact an authorized service center.
▪ Make sure the video source is plugged into the composite
video-in port.
here is no sound.
ENGLISH
▪ Make sure the volume is not set to minimum.
▪ Make sure the sound is not muted
▪ Make sure that headphones are not connected.
There is no picture or sound , just noise.
▪ The source signal may be weak.
▪ Your provider may be experiencing difficulties.
▪ Check your input connections.
Picture is not clear.
▪ The source signal may be weak.
▪ The provider may be experiencing difficulties.
▪ Check input connections.
ViewSonic CD4200 41
Page 49

Picture is light or improperly tinted.
ENGLISH
The picture is too dark.
▪ Check the Hue, Saturation and Color adjustments.
▪ Reset the LCD to the factory default settings.
▪ Select a different APC mode.
▪ Check the Brightness of Picture Settings.
▪ The fluorescent lamp may have reached the end of its life.
Contact an authorized service center.
Remote control does not work.
▪ Install new batteries.
▪ Make sure the remote sensor window isn’t blocked.
▪ Make sure the system is in the right mode (TV / VCR / CBL /
AUX)
There are stripes on the screen or colors fade.
▪ There may be interference from other appliances.
▪ There may be interference between the video source cable and
the power cable.
▪ Make sure the power and video cables are not touching.
Check the Hue, Saturation and Color adjustments
42 ViewSonic CD4200
Page 50

T
The picture is not sharp.
▪ The signal source may be weak.
▪ The provider may be experiencing difficulties.
▪ Check input connections.
▪ Check the Sharpness of Picture Settings.
The picture moves.
▪ The source signal may be weak.
▪ The provider may be experiencing difficulties.
▪ Check input connections.
The picture is doubled or tripled.
▪ The source signal may be weak.
▪ Check input connections.
ENGLISH
he picture is spotted.
▪ There may be interference from other appliances nearby or
around the LCD.
ViewSonic CD4200 43
Page 51

PC INPUT PRESET TIMING TABLE
PC / Timing Table
No. Mode Name
ENGLISH
Resolution
H.Freq.
(KHz)
V.Freq.
(Hz)
H.
Polarity
V.
Polarity
Pixel
CLK
(MHz)
Hor.
Total
CLK No.
Hor.
Display
CLK No.
Hor. Bck
Porch
CLK No.
Hor. Syth
CLK No.
Vert.
Total
Line No.
Vert.
Display
Line No.
Vert. Bak
Porch
Line No.
Vert. Syc
Width
Line No.
VESA 72HZ
1
VGA 60HZ
2
SVGA 56HZ
3
SVGA 60HZ
4
XGA 60HZ
5
6
640*480
640*480
800*600
800*600
1024*768
US TEXT
70HZ
720*400
37.900
72.809 - -
31.469
59.941 - -
35.16
56.25 + +
37.879
60.317 + +
48.363
60.004 - -
31.469
70.087 - +
31.500 832 640 128 40 520 480 28 3
25.175 800 640 48 96 525 480 33 2
36.0 1024 800 128 72 625 600 22 2
40.0 1056 800 88 128 628 600 23 4
65.0 1344 1024 160 136 806 768 29 6
28.322 900 720 54 108 449 400 35 2
XGA(CVT)
7
1280*768
WXGA(CVT)
8
1360*768
60HZ
60HZ
47.396
59.995 + -
47.368
59.959 + -
68.25 1440 1280 80 32 790 768 12 7
72 1520 1360 80 32 790 768 15 5
* The resolution and the frequencies are displayed on the screen may not exactly as same
as this list.
44 ViewSonic CD4200
Page 52

SPECIFICATIONS
Panel
Video Input
PC Input
Audio Input
ITEMS SPECIFICATIONS
Screen Size 42.02” TFT-LCD Panel
Aspect Ratio 16:9
Resolution 1366 x 768
Display Area (opening) H x V 930.25 mm x 523.01 mm
Pixel Pitch 0.68 mm x 0.68 mm
Display colors 16,777,216 colors
Contrast Ratio 1200 : 1 (typ.)
Brightness (center) 500 cd / m
Viewing Angle (CR>10) 178o Hor. / 178o Ver. (typ.)
Response Time (GTG) 8 ms (typ.)
Composite Signal CVBS x 2
Y, C Signal S-Video x 2
Component Signal Y Pb Pr x 2 (720P / 1080i , HD ready )
HDMI Connection HDMI x 1
VGA Connection D-Sub 15 pin
Scanning Frequency f
Audio 1
Audio 2 Component
Audio 3 PC
H =
Composite
S - Video
2
(typ.)
31.5 ~ 60KHz / fV = 56 ~ 75Hz
ENGLISH
Speaker ( build-in) 15W + 15W (rms) @THD < 10%
Audio Output
Feature
Power
Line Out Left / Right
Digital Audio Out S / PDIF ( for HDMI) .
Function Keys Power , Source , Menu , Up/Down(Channel) , +/-(Volume) , EXIT/ARC
Video Performance
Audio Performance Subwoofer, Auto Volume Control (AVC)
Power Supply AC 100V ~ 240V , 50 / 60Hz
Power Consumption < 300 W
Dimension W x H x D
Weight (net) Without Accessories
3D Comb-filter , 3D De-interlace , Aspect Ratio Control (ARC) ,
Auto Picture Control, Video Enhance, Noise Reduction
1067 mm * 678 mm * 108 mm
28.8 Kg
ViewSonic CD4200 45
Page 53

Customer Support
For technical support or product service, see the table below or contact your reseller.
NOTE: You will need the product serial number.
ENGLISH
Country/Region Website
United States www.viewsonic.com
Canada www.viewsonic.com
Latin America
(Mexico/Chile)
United Kingdom www.viewsoniceurope.com/uk
Europe, Middle East,
Baltic countries, and
North Africa
Australia/New Zealand www.viewsonic.com.au
Singapore/Malaysia/
Thailand
South Africa and
other countries
India www.in.viewsonic.com T= 1800 11 9999 service@in.viewsonic.com
Hong Kong www.hk.viewsonic.com T= 852 3102 2900 service@hk.viewsonic.com
Macau www.hk.viewsonic.com T= 853 700 303 service@hk.viewsonic.com
Korea www.kr.viewsonic.com T= 080 333 2131 service@kr.viewsonic.com
www.viewsonic.com
www.viewsoniceurope.com Contact your reseller
www.ap.viewsonic.com T= 65 64616044 service@sg.viewsonic.com
www.ap.viewsonic.com
T = Telephone
F = FAX
T= 800 688 6688
F= 909 468 1202
T= 866 463 4775
F= 909 468 5814
T= 866 323 8056
F= 909 444 5655
www.viewsoniceurope.com/
uk/Support/Calldesk.htm
AUS= 1800 880 818
NZ= 0800 008 822
T= 886 2 2246 3456
F= 886 2 2249 1751
Email
service.us@viewsonic.com
service.ca@viewsonic.com
soporte@viewsonic.com
service@au.viewsonic.com
service@sd.viewsonic.com
46 ViewSonic CD4200
Page 54

Limited Warranty
VIEWSONIC® LCD DISPLAY
What the warranty covers:
ViewSonic warrants its products to be free from defects in material and workmanship, under normal use, during
the warranty period. If a product proves to be defective in material or workmanship during the warranty period,
ViewSonic will, at its sole option, repair or replace the product with a like product. Replacement product or parts
may include remanufactured or refurbished parts or components.
How long the warranty is effective:
ViewSonic LCD displays are warranted for 1 year for all parts including the light source and 1 year for all labor
from the date of the first consumer purchase.
Who the warranty protects:
This warranty is valid only for the first consumer purchaser.
What the warranty does not cover:
1. Any product on which the serial number has been defaced, modified or removed.
2. Damage, deterioration or malfunction resulting from:
a. Accident, misuse, neglect, fire, water, lightning, or other acts of nature, unauthorized product
modification, or failure to follow instructions supplied with the product.
b. Repair or attempted repair by anyone not authorized by ViewSonic.
c. Any damage of the product due to shipment.
d. Removal or installation of the product.
e. Causes external to the product, such as electrical power fluctuations or failure.
f. Use of supplies or parts not meeting ViewSonic’s specifications.
g. Normal wear and tear.
h. Any other cause which does not relate to a product defect.
3. Any product exhibiting a condition commonly known as "image burn-in" which results when a static image is
displayed on the product for an extended period of time.
4. Removal, installation, and set-up service charges.
How to get service:
1. For information about receiving service under warranty, contact ViewSonic Customer Support (Please refer to
Customer Support page). You will need to provide your product's serial number.
2. To obtain warranted service, you will be required to provide (a) the original dated sales slip, (b) your name, (c)
your address, (d) a description of the problem, and (e) the serial number of the product.
3. Take or ship the product freight prepaid in the original container to an authorized ViewSonic service center or
ViewSonic.
4. For additional information or the name of the nearest ViewSonic service center, contact ViewSonic.
Limitation of implied warranties:
There are no warranties, express or implied, which extend beyond the description contained herein including the
implied warranty of merchantability and fitness for a particular purpose.
Exclusion of damages:
ViewSonic's liability is limited to the cost of repair or replacement of the product. ViewSonic shall not be liable
for:
1. Damage to other property caused by any defects in the product, damages based upon inconvenience, loss of
use of the product, loss of time, loss of profits, loss of business opportunity, loss of goodwill, interference with
business relationships, or other commercial loss, even if advised of the possibility of such damages.
2. Any other damages, whether incidental, consequential or otherwise.
3. Any claim against the customer by any other party.
Effect of state law:
This warranty gives you specific legal rights, and you may also have other rights which vary from state to state.
Some states do not allow limitations on implied warranties and/or do not allow the exclusion of incidental or
consequential damages, so the above limitations and exclusions may not apply to you.
Sales outside the U.S.A. and Canada:
For warranty information and service on ViewSonic products sold outside of the U.S.A. and Canada, contact
ViewSonic or your local ViewSonic dealer.
The warranty period for this product in mainland China (Hong Kong, Macao and Taiwan Excluded) is subject to
the terms and conditions of the Maintenance Guarantee Card.
ENGLISH
4.3: ViewSonic LCD Warranty LCD_LW01 Rev. 1a 06-30-06
ViewSonic CD4200 47
Page 55

FRANÇAIS
Informations de conformité
Déclaration FCC
Cet appareil est conforme à l’article 15 des Règlements FCC. Son fonctionnement est sujet aux
deux conditions suivantes: (1) Cet appareil ne doit pas provoquer d’interférences néfastes, et
(2) cet appareil doit accepter toutes les interférences reçues, y compris celles pouvant
provoquer un fonctionnement indésirable.
Cet équipement a été testé et déclaré conforme aux limites d'un dispositif numérique de la
classe B, conformément à la partie 15 des règles de la FCC. Ces limites sont conçues pour
fournir une protection raisonnable contre les interférences nocives pour une installation
résidentielle. Cet équipement produit, utilise et peut émettre une énergie à fréquence radio et
s'il n'est pas installé et utilisé conformément aux instructions, peut provoquer des interférences
nocives aux communications radio. Cependant, il n'y a aucune garantie que les interférences ne
se produiront pas dans une installation particulière. Si cet équipement provoque des
interférences nocives à la réception radio ou TV qu'il est possible de déterminer en mettant
l'équipement en marche ou à l'arrêt, l'utilisateur est encouragé à essayer de rectifier les
interférences en adoptant au moins l'une des mesures suivantes :
• Ré-orienter ou déplacer l'antenne réceptrice.
• Augmenter la distance entre l'équipement et le récepteur.
• Brancher l'équipement sur une prise appartenant à un circuit autre que celui sur lequel est
branché le récepteur.
• Consulter le distributeur ou un technicien radio/TV qualifié.
Avertissement: Vous êtes averti que des changements ou des modifications non expressément
approuvés par la partie responsable de la vérification de la conformité peuvent annuler votre
droit à faire fonctionner l’équipement.
Pour le Canada
Cet appareil numérique de Classe B est conforme à la norme canadienne ICES-003.
Cet appareil numérique de la classe B est conforme à la norme NMB-003 du Canada.
48 ViewSonic CD4200
Page 56

Importantes instructions de sécurité
1. Lisez ces instructions.
2. Gardez ces instructions.
3. Respectez tous les avertissements.
4. Suivez toutes les instructions.
5. N’utilisez pas cette unité à proximité de l’eau. Avertissement : Pour réduire le risque
d'incendie ou de choc électrique, n'exposez pas cet appareil à la pluie ou à l'humidité.
6. Nettoyez avec un tissu sec seulement.
7. Ne bloquez pas d’ouvertures d’aération. Installez selon les instructions du fabricant.
8. N’installez pas à proximité d’une source de chaleur tels que des radiateurs, bouches de
chauffage, fours ou autres dispositifs (y compris des amplificateurs) qui produisent de la
chaleur.
9. Ne rendez pas inutile l’objectif sécuritaire la prise de type mise à terre polarisée. Une prise
polarisée a deux fiches, l’une plus large que l’autre. Une prise mise à terre possède deux
fiches et une troisième fourche pour la mise à terre. La fiche large et la troisième fourche
sont fournies pour votre sécurité. Si la prise fournie ne correspond pas à votre prise
murale, consultez un électricien pour remplacer la prise murale obsolète.
FRANÇAIS
10. Protégez le cordon de secteur pour qu’on ne marche pas dessus ou qu’il soit pincé surtout
au niveau des prises, des réceptacles et au point où il sort de l’unité. Assurez-vous que la
source d’alimentation est proche de l’unité pour qu’elle soit facilement accessible.
11. N’utilisez que les accessoires spécifiés par le fabricant.
12. Utilisez seulement avec un chariot, stand, trépied, monture ou table spécifié
par le fabricant, ou vendu avec l’unité. Si vous utilisez un chariot, soyez
prudent lorsque vous déplacez l’ensemble chariot/unité pour éviter des
blessures ou une chute.
13. Débranchez l’unité si elle ne sera pas utilisée pour une longue période.
14. Confiez tout entretient au personnel de service qualifié. Une réparation est requise lorsque
l’unité a été endommagée, par exemple si le cordon a été endommagé, si un liquide a été
renversé ou si des objets sont tombés dans l’unité, si l’unité a été exposé à de la pluie de
l’humidité, ne fonctionne pas normalement ou est tombée.
ViewSonic CD4200 49
Page 57

Déclaration de conformité RoHS (LSDEEE)
Ce produit a été conçu et fabriqué dans le respect de la directive 2002/95/EC du Parlement
Européen et du Conseil relative à la limitation de l’utilisation de certaines substances
dangereuses dans les équipements électriques et électroniques (Directive RoHS - LSDEEE) et
il est déclaré respecter les valeurs de concentration maximum définies par le Comité technique
d’adaptation (TAC) européen, qui sont les suivantes:
FRANÇAIS
Substance Concentration
Plomb (Pb) 0.1% < 0.1%
Mercure (Hg) 0.1% < 0.1%
Cadmium (Cd) 0.01% < 0.01%
Chrome hexavalent (Cr
Polybromobiphényle (PBB) 0.1% < 0.1%
Polybromodiphénylséthers (PBDE) 0.1% < 0.1%
6+
)
maximale proposée
0.1% < 0.1%
Concentration réelle
Certains composants de produits mentionnés ci-dessus ne sont pas soumis à ces limitations,
conformément aux dispositions de l’Annexe de la Directive RoHS (LSDEEE). Il s’agit des
composants suivants:
Exemples de composants exemptés:
1. Le mercure contenu dans les lampes fluorescentes compactes ne dépassant pas 5 mg par
lampe ainsi que dans les lampes non spécifiées dans l’Annexe de la Directive RoHS
(LSDEEE).
2. Le plomb dans le verre des tubes cathodiques, les composants électroniques, les tubes
fluorescents et les composants électroniques en céramique (p.ex. les dispositifs piézolectriques).
3. Le plomb dans les soudures à haute température de fusion (c’est-à-dire les alliages à base de
plomb contenant 85% ou plus de plomb en poids).
4. Le plomb en tant qu’élément d’alliage dans l’acier contenant jusqu’à 0,35 % de plomb en
poids, dans l’aluminium contenant jusqu’à 0,4 % de plomb en poids et dans les alliages de
cuivre contenant jusqu’à 4 % de plomb en poids.
50 ViewSonic CD4200
Page 58

Informations de copyright
Copyright © ViewSonic® Corporation, 2007. Tous droits réservés.
Macintosh et Power Macintosh sont des marques déposées par Apple Computer, Inc.
Microsoft, Windows, Windows NT et le logo de Windows sont des marques déposées par
Microsoft Corporation aux États-Unis et dans d’autres pays.
ViewSonic et le logo des trois oiseaux, ainsi que OnView, ViewMatch et ViewMeter sont des
marques déposées par ViewSonic Corporation.
VESA est une marque déposée par Video Electronics Standards Association. DPMS et DDC sont
des marques commerciales de VESA.
E
NERGY STAR
l’environnement (EPA, Environment Protection Agency).
En tant que partenaire d’E
les directives E
Décharge de responsabilité : La société ViewSonic Corporation ne peut être tenue pour responsable
d’erreurs techniques ou d’impression ni d'omissions dans le présent manuel ; dommages directs ou
indirects résultant de la livraison, des performances ou de l’utilisation de ce produit; ViewSonic
Corp. décline également toute responsabilité vis-à-vis des performances ou de l’utilisation de ce
produit.
Dans un souci amélioration constant de ses produits, ViewSonic Corporation se réserve le droit de
modifier les spécifications du produit sans avis préalable. Les informations contenues dans ce
document peuvent changer sans préavis.
Aucune partie de ce document ne peut être copiée, reproduite ou transmise par quelque moyen que
ce soit, dans n’importe quel but, sans l’autorisation écrite préalable de ViewSonic Corporation.
®
est une marque déposée par la commission américaine pour la protection de
®
, ViewSonic Corporation déclare que ce produit respecte
NERGY STAR
NERGY STAR
®
d’économie d’énergie.
FRANÇAIS
Enregistrement du produit
Pour répondre à vos besoins à venir et pour recevoir toutes les informations supplémentaires au
moment de leur parution, veuillez enregistrer votre produit par le biais d’Internet à l’adresse
suivante: www.viewsonic.com. Le CD-ROM de l’assistant ViewSonic vous permet également
d’imprimer le formulaire d’enregistrement que vous pouvez envoyer à ViewSonic par courrier ou
par télécopie.
Pour votre information
Nom du produit :
Numéro du modèle :
Numéro du document :
Numéro de série :
Date d’achat :
Récupération du produit à la fin de son cycle de vie
La lampe dans ce produit contient du mercure. Mettez au rebut en respectant la réglementation de
protection de l'environnement en vigueur.
ViewSonic se préoccupe de la conservation et de la protection de l’environnement. Veuillez donc
recycler ou mettre au rebut ce produit correctement à la fin de son cycle de vie.
Pour des informations sur le recyclage, consultez notre site web:
1. Etats-Unis: www.viewsonic.com/pdf/RecyclePlus.pdf
2. Europe : www.viewsoniceurope.com
3. Taiwan : recycle.epa.org.tw
CD4200
ViewSonic 42” LCD Commercial Display
VS11778
CD4200-1_UG_FRN Rev. 1A 03-12-07
________________________________
________________________________
ViewSonic CD4200 51
Page 59

RENSEIGNEMENTS GENERAUX
Caractéristiques
Votre LCD est conçu conformément à la dernière technologie ; il s’agit d’un appareil haute
performance présentant les caractéristiques suivantes :
entrée multisources, y compris D-SUB, HDMI, Composite, S-vidéo, and Composante.
la télécommande universelle commande d’autres appareils tels qu’un cablosélecteur,
un récepteur de signaux de satellite, un lecteur DVD, un amplificateur audio, un
FRANÇAIS
magnétoscope à cassettes, etc.
des fonctions de rehaussement vidéo et de réduction de bruit intégrées en vue d’obtenir
une image la plus claire et la plus colorée possible .
fonction de mise hors tension automatique après 10 minutes d’absence de signal.
Avec entrée vidéo composant, résolution jusqu'à 720p, 1080i.
Fonctions APC (Automatic Picture Control : Contrôle automatique d’image) et ARC
(Aspect Ratio Control : Contrôle de rapport d’aspect) qui permettent à l’utilisateur final
de personnaliser ses préférences d’affichage.
52 ViewSonic CD4200
Page 60

Commandes et ports du panneau
VVuueess ddee ffaaccee dduu ppaannnneeaauu
TOUCHES DE FONCTION
1. EXIT/ARC (QUITTER /CRC) : sélectionner le mode de sortie d’affichage (mode vidéo :
Normal, Plein écran, Zoom, Sous-titre ; mode PC : Normal, Plein écran).
FRANÇAIS
2. VOLUME (+ / -) (VOLUME (+/-)) : augmenter ou réduire le volume ou sélectionner
bouton fléché gauche/droite pour revenir au menu.
3. CHANNEL (c / d) (CHAINE (c/d)) : Sélectionner bouton fléché haut/bas pour un menu.
4. MENU (MENU) : afficher le menu principal. Quand l’OSD s’affiche, appuyer sur le
bouton pour faire une sélection ou accéder au sous-menu.
5. SOURCE (SOURCE) : sélectionner la source d’entrée (Vidéo 1, Vidéo 2, YPbPr 1,
YPbPr 2, HDMI, PC). Appuyez sur le bouton de Source sur le côté droit, et le menu
source apparaît alors à l'écran. Appuyez ensuite sur le bouton Channel (Canal) sur le
côté droit pour choisir votre source d'entrée préférée, et appuyez sur Menu pour
confirmer.
6. POWER (ALIMENTATION) : mettre le LCD sous tension ou hors tension.
7. CAPTEUR DE TELECOMMANDE : diriger la télécommande vers cet endroit du LCD.
8. POWER INDICATOR (INDICATEUR D’ALIMENTEUR) :
VOYANT BLEU ─ marche
VOYANT POURPRE ─ économie d’énergie (en le mode PC seulement)
VOYANT ROUGE ─ arrêt
REMARQUE 1 : Ces boutons contrôlent les fonctions de base du LCD, y compris le menu à l’écran. Pour
utiliser les fonctions avancées, utiliser la télécommande.
REMARQUE 2 : L’image de l’affichage du LCD ne sert qu’à des fins de référence.
ViewSonic CD4200 53
Page 61

Vue d'ensemble du LCD-Connexions
VVuueess llaattéérraalleess dduu ppaannnneeaauu
FRANÇAIS
54 ViewSonic CD4200
Page 62

Prise
Description
HDMI
1
2 D-Sub (SUB-D)
3
4
5
6( a/b )
7( c/d )
(Interface
multimédia de
haute définition)
PC Audio In
(Entrée PC Audio)
Service Port (Port
de service)
Digital Audio Out
(Sortie audio
numérique)
Component In
(Entrée
composant)
S-Video
Se branche sur la prise HDMI d'une appareil avec une sortie HDMI, tel qu'un
boîtier de salon, un lecteur de DVD, etc. Vous pouvez également connecter un
périphérique avec une sortie DVI en utilisant un câble HDMI-vers-DVI ou un
adaptateur HDMI-vers-DVI. Veuillez utiliser le câble audio, lorsque vous
n'utilisez pas de câble ou d'adaptateur HDMI-vers-DVI.
Se branche sur la sortie vidéo de votre PC. Veuillez utiliser un câble
supplémentaire pour le son.
Se branche sur la prise de sortie audio de votre PC.
Uniquement pour la maintenance.
Se branche sur un composant audio numérique.
Se branche sur les prises vidéo composantes de l'appareil (YPbPr) et audio
(G/D).
Se branche sur la prise de sortie S-Video de votre magnétoscope ou d'autres
périphériques vidéo, pour une image plus nette.
FRANÇAIS
8( e/f )
9
10
AV In (Entrée AV)
Audio Out (Sortie
Audio)
Service Port (Port
de service)
Se branche sur les prises de sortie vidéo composite et audio de votre
magnétoscope ou d'autres périphériques vidéo.
Se branche sur les prises d'entrée audio de votre amplificateur/home cinéma.
Uniquement pour la maintenance.
ViewSonic CD4200 55
Page 63

Accessoires
Manuel de
l’utilisateur
FRANÇAIS
Manuel de l’utilisateur Télécommande et piles
QSG
Cordon d’alimentation
Guide Rapide De Début
56 ViewSonic CD4200
Page 64

Télécommande
)
)
)
)
AUX
─
)
)
V
)
A
)
Cette télécommande universelle peut actionner jusqu’à quatre appareils. Toujours pointer
la télécommande directement vers le mode LCD(TV). Pour sélectionner un autre appareil,
appuyer sur l’un des boutons suivants : VCR, CBL, ou AUX.
1 Power (Alimentation
Mettre l’appareil sous tension et hors tension.
2 Set (Réglage
01 02
Appuyer pour programmer le contrôle d’autres appareils
03
3 TV (TV
Contrôle ce LCD(par défaut).
04
VCR (Magnétoscope à cassettes)
Contrôle le lecteur DVD ou le magnétoscope à cassettes.
CBL (CBL
05 06
07
Contrôle le cablosélecteur ou le satellite.
Contrôle l’amplificateur audio.
09 10
4 BOUTONS NUMERIQUES 0 –9
08
5 ENT
11 12
FRANÇAIS
13
14 15
16
18
22 23
17
19
21 20
24
6
7 Last (Dernier
8 Mute (Sourdine
Eteindre temporairement le son.
9
OL + / -(VOL +/-
ppuyer pour augmenter ou réduire le volume. Si le son a
été mis en sourdine, appuyer sur VOL +/- pour du son.
10 CH + / -
11 Info
12 Menu (Menu
Bascule vers le menu principal.
13 ▲▼, ◄ ►
Appuyer pour déplacer l’élément mis en évidence à
l’écran dans le sens voulu.
Le bouton fléché droit permet d’accéder au sous-menu ou
à l’objet fenêtre
Le bouton fléché gauche permet de revenir en arrière
pour naviguer dans le menu.
.
ViewSonic CD4200 57
Page 65

)
OK (OK
Appuyer pour sélectionner un choix à l’écran actuellement
mis en évidence.
Appuyer pour contrôler certains objets fenêtres, basculant
01 02
03
04
FRANÇAIS
05 06
07
09 10
08
11 12
13
14 15
16
18
22 23
17
19
21 20
24
entre 2 réglages différents tels que MARCHE et ARRET.
14 Guide
15 Exit (Quitter)
Appuyer pour quitter tous les écrans et menus de l’IU.
16 Source (Source)
Appuyer pour sélectionner la source de signal : Vidéo
1→Vidéo 2→YPbPr 1→YPbPr 2→HDMI→PC.
17 MTS (MTS)
18
FAV.CH (CH.FAV)
19
CC
20
APC (Automatic Picture Control) (CAI = Contrôle
automatique des images)
Sélectionner la luminosité de l’écran parmi
Standard→Vif→Cinéma→Sports→Personnalisé→Standard.
21
SLEEP (VEILLE)
22
ARC(Aspect Ratio Control) (CRC = Contrôle du rapport
de cadre)
Sélectionner le mode image parmi Normal→Plein
écran→Zoom→Sous-titre.
23
FREEZE (GEL)
24
TV
AV / SV (AV/SV)
Appuyer pour sélectionner le mode Vidéo 1 ou Vidéo 2.
YPbPr (YPbPr)
Appuyer pour sélectionner le mode YPbPr 1 ou YPbPr 2.
PC / HD (PC/HD)
Appuyer pour sélectionner le mode PC ou HDMI.
NOTE 1 : En page 8 et 9, les descriptions de bouton dans le gris ne sont pas disponibles dans cet LCD.
58 ViewSonic CD4200
Page 66

CONNEXIONS ET APPLICATIONS
Connexion d’un appareil vidéo via HDMI - HDMI
* Ceci ne peut être appliqué que s'il y a un connecteur de sortie HDMI sur l’appareil
externe.
FRANÇAIS
REMARQUE 1: Appareils Vidéo : par exemple, Lecteur DVD, boîtier de salon, console de jeux…etc.
REMARQUE 2: HDMI: High-Definition Multimedia Interface (Interface multimédia de haute définition)
REMARQUE 3: Aucun câble audio n’est requis lorsque vous effectuez un branchement HDMI vers HDMI.
REMARQUE 4: Tous les câbles de connexion ci-dessus ne sont pas fournis.
ViewSonic CD4200 59
Page 67

Connexion d’un appareil vidéo via DVI
Ceci ne peut être appliqué que s'il y a un connecteur de sortie DVI sur l’appareil externe.
FRANÇAIS
REMARQUE 1: Pour recevoir un affichage, branchez un câble DVI-vers-HDMI ou HDMI-vers-DVI entre le
connecteur HDMI du LCD et le connecteur DVI d’un d’un appareil vidéo. Appareils
Vidéo : par exemple, Lecteur DVD, boîtier de salon, console de jeux…etc.
REMARQUE 2: Pour recevoir le son, branchez un câble audio entre la prise d’entrée PC AUDIO IN du
LCD et la prise de sortie AUDIO OUT d’un d’un appareil vidéo.
REMARQUE 3: Tous les câbles de connexion ci-dessus ne sont pas fournis.
60 ViewSonic CD4200
Page 68

Connexion d’un PC via D-SUB
FRANÇAIS
REMARQUE 1: Pour recevoir un affichage, branchez un câble VGA entre le connecteur D-Sub du LCD et
celui du PC.
REMARQUE 2: Pour recevoir le son, branchez un câble audio entre la prise d’entrée PC AUDIO IN du
LCD et la prise de sortie AUDIO OUT du PC.
REMARQUE 3: Tous les câbles de connexion ci-dessus ne sont pas fournis.
ViewSonic CD4200 61
Page 69

Connexion d’appareils au moyen de câbles généraux
FRANÇAIS
REMARQUE 1 : Le branchement sur des connecteurs d'équipements de qualité vidéo supérieure vous
apportera un meilleur plaisir de visualisation. La qualité vidéo se classe par ordre décroissant :
Composante, PERITEL, S-VIDEO, et CVBS.
REMARQUE 2 : Les entrées vidéo S-vidéo et A/V ont une sortie audio correspondante.
REMARQUE 3: Tous les câbles de connexion ci-dessus ne sont pas fournis.
62 ViewSonic CD4200
Page 70

CONTROLES ET REGLAGES
A
Réglages généraux
Mise sous tension et hors tension du LCD
MMiissee ssoouuss tteennssiioonn
Brancher le câble d’alimentation dans la fiche d’entrée CA située à
l’arrière gauche du LCD. Brancher l’autre extrémité sur une prise
électrique.
Appuyer sur le bouton power (alimentation) de la télécommande
ou bon côté du LCD pour mettre celui-ci sous tension.
Le voyant d’état d’alimentation situé dans le coin inférieur droit du
LCD indique ce qui suit :
VOYANT BLEU ─ marche
VOYANT POURPRE─ économie d’énergie
(en le mode PC seulement)
VOYANT ROUGE ─ arrêt
FRANÇAIS
n
MMiissee hhoorrss tteennssiioon
ppuyer sur le bouton power (alimentation) de la télécommande ou
bon côté du LCD pour mettre celui-ci hors tension.
REMARQUE : Si le message « AUCUN SIGNAL » s’affiche pendant 10 minutes en mode TV ou vidéo, le
LCD se met automatiquement hors tension.
ViewSonic CD4200 63
Page 71

Configuration initiale
A la première mise sous tension du système après l’achat,
l’installation automatique initiale est invoquée.
Sélection de la langue
Appuyer sur le bouton Power (Alimentation) de la
télécommande. Un message de bienvenue s’affiche.
Appuyer sur les boutons ▲▼ pour choisir votre langue
préférée et le bouton OK pour continuer.
FRANÇAIS
64 ViewSonic CD4200
Page 72

Consommation d’énergie
A
La consommation d’énergie est une technique de gestion de
l’énergie qui permet de configurer l’état MISE HORS TENSION
pour le LCD. Il y a trois modes différents.
Faible : La puissance consommée maximale ne dépasser pas 5W à l'état
ARRÊT. Il faut environ 12-15 secondes pour allumer le LCD.
Moyenne : La puissance consommée maximale pendant la première heure
est inférieure à 35W et vous pouvez allumer le LCD rapidement.
près une heure, la puissance consommée passe aux alentours de
5W et il faut 12-15 secondes pour allumer le LCD.
Élevée : Le LCD peut être allumé aussitôt et la puissance consommée
maximale est inférieure à 35W.
1. Appuyer sur le bouton Menu pour afficher le menu
principal.
2. Appuyer sur les boutons ▲▼ pour sélectionner
Configuration .
3. Appuyer sur les boutons ►/▼ pour sélectionner
Consommation d’énergie.
4. Appuyer sur le bouton ► pour afficher le sous-menu.
5. Appuyer sur les boutons ▲▼ et OK pour sélectionner
Faible, Moyen ou Elevé.
6. Appuyer sur le bouton Exit (Quitter) pour quitter tout menu
ou sur le bouton ◄ pour revenir à l’écran précédent.
FRANÇAIS
ViewSonic CD4200 65
Page 73

Réglage du volume
Appuyer sur les boutons VOL + / – dans la télécommande ou la
LCD,
vous pouvez ajuster l’audio rendement des dispositifs externes.
Ces dispositifs sont reliés à les entrées de cet LCD.
UUttiilliissaattiioonn ddee llaa ccoommmmaannddee ddee vvoolluummee
Appuyer sur les boutons VOL +/– pour augmenter ou réduire le
volume.
UUttiilliissaattiioonn ddee llaa ssoouurrddiinnee
FRANÇAIS
A tout moment, le son peut être éteint au moyen du bouton
Mute (SOURDINE).
1. Appuyer sur le bouton Mute (SOURDINE) pour éteindre le
son.
2. Appuyer de nouveau sur le bouton Mute (SOURDINE) ou
VOL +/– pour restaurer le niveau de volume précédent.
66 ViewSonic CD4200
Page 74

Commutation de la source
Y
1. Se reporter aux pages 10~13 et connecter les appareils
externes.
2. Appuyer sur les boutons AV/SV, YPbPr , PC/HD pour
choisir la source.
3. L’utilisateur peut aussi appuyer sur le bouton SOURCE
plusieurs fois pour choisir la source désirée.
4. Sélectionner l’une des sources d’entrée suivantes :
AV/SV
PbPr
PC/HD
Visualisation des menus et des affichages à l’écran
Bascule vers le mode Vidéo 1 ou Vidéo 2.
Bascule vers le mode YPbPr 1 ou YPbPr 2.
Bascule vers le mode PC ou HDMI.
On peut utiliser les boutons de commande situés sur le
panneau de la face inférieure du LCD ou utiliser la
télécommande pour visualiser les menus.
FRANÇAIS
1. Mettre sous tension, puis appuyer sur le bouton Menu.
2. Le menu principal s’affiche à l’écran.
3. Appuyer sur les boutons ▲▼◄ ► pour accéder aux
sous-menus et faires des réglages.
4. Appuyer sur le bouton Exit (Quitter) pour quitter tout menu
ou sur le bouton Menu pour revenir au menu principal.
ViewSonic CD4200 67
Page 75

Commutation des modes de langue
1. Appuyer sur le bouton Menu pour afficher le menu principal.
2. Appuyer sur les boutons ▲▼ pour sélectionner Langue du
menu .
3. Appuyer sur le bouton ► pour afficher le sous-menu.
4. Appuyer sur les boutons ▲▼ et OK pour sélectionner la
langue.
5. Appuyer sur le bouton Exit (Quitter) pour quitter tout menu
ou appuyer sur le bouton ◄ pour revenir à l’écran
précédent.
FRANÇAIS
68 ViewSonic CD4200
Page 76

Contrôle de l’image
Réglage du paramétrage de l’image
1. Appuyer sur le bouton Menu pour afficher le menu
principal.
2. Appuyer sur les boutons ▲▼ pour sélectionner
Configuration.
3. Appuyer sur le bouton ► pour accéder à Image et
Paramétres de l’image.
FRANÇAIS
4. “Paramétres de l’image : PC” - vous pouvez faire
l'ajustement en mode " Personnalisé ".
5. Appuyer sur les boutons ▲▼ et OK pour choisir l’item
voulu.
6. Appuyer sur les boutons ◄► pour régler les gammes de
minimum à maximum et sur les boutons ▲▼ pour choisir
d’autres items.
Luminosité : règler la luminosité de l’image
Contraste : augmenter ou réduire le contraste
Saturation : image plus claire ou plus foncée
Teinte : modifier la nuance de la couleur de l’image
Netteté : image plus nette ou plus estompée
ViewSonic CD4200 69
Page 77

FRANÇAIS
7. Appuyer sur le bouton OK pour revenir à l’écran précédent
ou appuyer sur le bouton Exit (Quitter) pour quitter tout
menu.
REMARQUE : Les réglages pour Standard, Vif, Film, Sports sont préconfigurés.
70 ViewSonic CD4200
Page 78

Réglage de l’écran du LCD
1. Appuyer sur le bouton Menu pour afficher le menu
principal.
2. Appuyer sur les boutons ▲▼ pour sélectionner
Configuration.
3. Appuyer sur le bouton ► pour accéder au sous-menu
Image.
4. Appuyer sur les boutons ►/▼ pour sélectionner Rapport
de cadre).
FRANÇAIS
5. Appuyer de nouveau sur le bouton ► pour afficher le
menu.
6. Appuyer sur les boutons ▲▼ pour choisir les différents
modes et le bouton OK pour confirmer.
Normal : affiche l’image exactement comme dans
l’émission.
Plein écran : étire l’image pour l’ajuster à l’écran
(aucune partie de l’image n’est coupée, mais l’image peut
paraître tordue)
Bourdonnement : agrandit l’image et en coupe une partie
Sous-titre : rehausse l’image pour afficher le sous-titre.
ViewSonic CD4200 71
Page 79

Réglage de la température des couleurs
Ajuster l’équilibre des blancs de l’image.
1. Appuyer sur le bouton Menu pour afficher le menu principal.
2. Appuyer sur les boutons ▲▼ pour sélectionner
Configuration.
3. Appuyer sur le bouton ► pour accéder au sous-menu
Image.
4. Appuyer sur les boutons ►/▼ pour sélectionner
Température des couleurs, puis appuyer sur le bouton ►
pour afficher le menu.
5. Appuyer sur les boutons ▲▼ et OK pour choisir Froid,
FRANÇAIS
Neutre ou Chaud.
Froid (Cold) : blanc bleuâtre
Neutre : blanc normal
Chaud (Warm) : blanc rougeâtre
6. Appuyer sur le bouton ◄ pour revenir à l’écran précédent
ou appuyer sur le bouton Exit (Quitter) pour quitter tout
menu.
72 ViewSonic CD4200
Page 80

Restaurer les réglages de l’image
L’utilisateur peut restaurer les réglages en usine de l’image.
1. Appuyer sur le bouton Menu pour afficher le menu
principal.
2. Appuyer sur les boutons ▲▼ pour sélectionner
Configuration.
3. Appuyer sur le bouton ► pour accéder au sous-menu
Image.
4. Appuyer sur les boutons ►/▼ pour sélectionner Restaurer
I'image, puis appuyer sur le bouton ► pour afficher le
menu.
5. Appuyer sur les boutons ► et OK pour restaurer les
réglages de l’image.
FRANÇAIS
ViewSonic CD4200 73
Page 81

2
3
4
5
6
Contrôle du son
Réglage de la qualité du son
1. Appuyer sur le bouton Menu pour afficher le menu
principal.
. Appuyer sur les boutons ▲▼ pour sélectionner
Configuration.
. Appuyer sur les boutons ►/▼ pour sélectionner Son.
FRANÇAIS
. Appuyer sur le bouton ► pour sélectionner Graves, aigus
et équilibre, puis appuyer de nouveau sur le bouton ► pour
afficher le menu.
. Appuyer sur les boutons ▲▼ pour choisir l’article désiré,
puis appuyer sur les boutons ◄ ► pour faire des
ajustements.
. Appuyer sur le bouton OK pour terminer ou sur le bouton
Exit (Quitter) pour quitter tout menu.
Graves : régle les tonalités graves.
Aigus: règle les tonalités aiguës.
Blance : règle l’équilibre du volume entre le haut-parleur
gauche et le droit.
74 ViewSonic CD4200
Page 82

FRANÇAIS
Commande De Volume Automatique
1. Appuyer sur le bouton Menu pour afficher le menu
principal.
2. Appuyer sur les boutons ▲▼ pour sélectionner
Configuration.
3. Appuyer sur les boutons ►/▼ pour sélectionner Son.
4. Appuyer sur le bouton ►/▼ pour sélectionner d’autres
items.
5. Appuyer sur le bouton OK pour changer ON(dessus) ou
OFF(au loin).
C.A.V.
[ON] ([ACTIVE]) : à des fins générales, telles que la
publicité commerciale, la C.A.V. peut éviter des
modulations sonores brusques.
[OFF] ([DESACTIVE]) : pour un effet sonore spécial, tel que
l’opéra ou la symphonie, le volume peut être exécuté
conformément au niveau de son d’origine.
ViewSonic CD4200 75
Page 83

Restaurer les réglages audio
L’utilisateur peut restaurer les réglages audio par défaut.
1. Appuyer sur le bouton Menu pour afficher le menu
principal.
2. Appuyer sur les boutons ▲▼ pour sélectionner
Configuration.
3. Appuyer sur les boutons ►/▼ pour sélectionner Son.
4. Appuyer sur les boutons ►/▼ pour sélectionner Restaurer
le Son, puis appuyer sur le bouton ► pour afficher le
menu.
5. Appuyer sur les boutons ► et OK pour restaurer les
FRANÇAIS
réglages de l’audio.
76 ViewSonic CD4200
Page 84

Info système
Afficher l’info sur le système.
1. Appuyer sur le bouton Menu pour afficher le menu
principal.
2. Appuyer sur les boutons ▲▼ pour sélectionner Info sur le
système .
3. Appuyer sur le bouton ► pour afficher l’info.
4. Appuyer sur le bouton Exit (Quitter) pour quitter tout
menu.
FRANÇAIS
ViewSonic CD4200 77
Page 85

Réglages du mode PC
Les réglages VGA permettent à l’utilisateur de contrôler
certaines fonctions propres aux normes VGA.
1. Appuyer sur le bouton Source pour sélectionner une
source PC. (voir page 18)
2. Appuyer sur le bouton Menu pour afficher le menu
principal.
3. Appuyer sur les boutons ▲▼ pour sélectionner
Configuration.
4. Appuyer sur les boutons ►/▼ pour sélectionner
Réglages VGA.
5. Appuyer sur le bouton ► pour afficher le menu.
FRANÇAIS
6. Utiliser les boutons ▲▼◄ ► pour faire des ajustements.
7. Appuyer sur le bouton Exit (Quitter) pour quitter tout
menu.
DPMS: active ou désactive le mode de gestion
d’alimentation de l’écran quand le VGA est coché comme
source d’entrée active. Cochée, la fonction est activée.
Auto Sync : essaie automatiquement de déterminer les
ajustements horizontaux, verticaux et de phase idéaux pour
le signal d’entrée VGA actuel.
78 ViewSonic CD4200
Page 86

Réinitialisation des caractéristiques
L’utilisateur peut restaurer tous les réglages par défaut. Après
la réinitialisation, le LCD doit afficher l’assistant de
configuration, exactement comme s’il était allumé à l’origine.
1. Appuyer sur le bouton Menu pour afficher le menu
principal.
2. Appuyer sur le bouton ▲▼ pour sélectionner Restaurer
tout.
3. Appuyer sur les boutons ► et OK pour restaurer tous les
réglages.
FRANÇAIS
ViewSonic CD4200 79
Page 87

PROGRAMMATION DE LA TELECOMMANDE
Configuration directe des codes des appareils
Bien que la télécommande soit configurée pour contrôler ce
LCD, il est possible de préciser d’autres appareils à contrôler
en exécutant les étapes suivantes :
FRANÇAIS
Mode → <<PARAMETRER>> (2 clignotements) → codes d’appareil à 5 chiffres
(2 clignotements)
ETAPE 1 Localiser l’appareil désiré dans la liste des codes des appareils.
ETAPE 2 Sélectionner le mode en appuyant sur VCR, CBL ou AUX.
ETAPE 3 Abaisser et maintenir le bouton <<SET>> (<<PARAMETRER>>) pendant au
moins 3 secondes jusqu’à ce que la DEL clignote deux fois.
ETAPE 4 Entrer le code à 5 chiffres pour l’appareil désiré. La DEL clignote une fois pour
chaque chiffre entré, sauf pour le dernier chiffre où elle clignote deux fois pour
confirmer qu’un code valide a été programmé.
Mode Attribution d’appareil
TV
VCR
CBL
AUX
Verrouillé à ce LCD (par défaut) ------Magnétoscope à cassettes, DVD, enregistreur numérique
individuel universel
Câble, satellite, accessoire vidéo universel 0
Syntoniseur, amplificateur, CD, minidisque universel et audio
divers, domotique
No de groupe
d’appareils
2
3
Exemple : [VCR]→<<SET>> (2 clignotements)→[2]→[0]→[0]→[3]→ [5] (2 clignotements).
REMARQUE 1 : Chaque chiffre doit être entré en 10 secondes, ou la télécommande quitte l’état de
programmation.
REMARQUE 2 : Deux clignotements DEL courts indiquent la reconnaissance du code, après quoi le
contrôle de l’appareil par la télécommande est activé.
REMARQUE 3 : Si la DEL indique la non reconnaissance du code, le code doit être entrée de nouveau.
80 ViewSonic CD4200
Page 88

Recherche d’un code d’appareil
Si aucun des codes énumérés dans la liste des codes
d’appareils ne correspond à votre appareil, vous pouvez
rechercher une série de commandes qui fonctionnera. Votre
télécommande donnera un échantillon de tous les codes
entrés dans le système pour en trouver un qui vous permettra
de contrôler votre appareil.
En recherchant dans sa bibliothèque, la télécommande
commence par l’appareil le plus populaire dans la catégorie et
continue jusqu’à la fin. Pour parcourir tous les codes
d’appareils disponibles et échantillonner ses fonctions :
Mode → <<PARAMETRER>> (2 clignotements)→ [9] [9] [1] (2 clignotements) →No de
groupe d’appareils (2 clignotements)→ Alimentation→ [CH +] →[CH +]→[CH +] → …
SET (2 clignotements)
ETAPE 1 Sélectionner le [MODE] en appuyant sur VCR, CBL ou AUX.
ETAPE 2 Abaisser et maintenir le bouton <<SET>> (<<PARAMETRER>>) pendant au
moins 3 secondes jusqu’à ce que la DEL clignote deux fois .
ETAPE 3 Entrer la série de codes [9][9][1]. La DEL clignote une fois pour chaque chiffre
entré, sauf pour le dernier chiffre où elle clignote deux fois pour confirmer que
[9][9][1] ont été entrés correctement.
ETAPE 4 Appuyer sur le bouton Power (Alimentation). Appuyer ensuite sur CH+ à
plusieurs reprises pour parcourir les différentes functions jusqu’à ce que l’appareil
s’éteigne (ou s’allume).
ETAPE 5 Appuyer sur le bouton SET (Paramétrer) pour enregistrer le code du nouvel
appareil et reprendre le fonctionnement normal. La DEL clignote deux fois pour
confirmer.
FRANÇAIS
Mode Attribution d’appareil
TV
VCR
CBL
AUX
Verrouillé à ce LCD (par défaut) ------Magnétoscope à cassettes, DVD, enregistreur numérique
individuel universel
Câble, satellite, accessoire vidéo universel 0
Syntoniseur, amplificateur, CD, minidisque universel et audio
divers, domotique
No de groupe
d’appareils
2
3
Exemple : [VCR]→<<PARAMETRER>> (2 clignotements) →[9]→[9]→[1] (2
clignotements) → [2] (2 clignotements) → [ALIMENTATION]→[CH +] →[CH
+]→… [SET] (2 clignotements).
ViewSonic CD4200 81
Page 89

Codes des appareils
Les sections suivantes énumèrent les codes des appareils disponibles pour chaque
bouton de mode d’appareil. S’il y a plus d’un code énuméré pour un appareil, entrer le
premier, puis essayer d’appuyer sur le bouton ALIMENTATION. Si l’appareil s’allume (ou
s’éteint), il s’agit du bon code. Dans le cas contraire, essayer le code suivant et répéter
l’opération jusqu’à obtention d’un code qui fonctionne.
Cablosélecteurs
ABC 00003, 00008, 00014 Paragon 00000
Americast 00899 Philips 00317, 01305
Bell & Howell 00014 Pioneer 01877, 00877, 00144, 00533
FRANÇAIS
Bell South 00899 Pulsar 00000
Clearmaster 00883 Quasar 00000
ClearMax 00883 RadioShack 00883
Coolmax 00883 Regal 00279, 00273
Daeryung 01877, 00877, 00477, 00008 Runco 00000
Digi 00637 Samsung 00000, 00144
Director 00476 Scientific Atlanta 01877, 00877, 00477, 00008
Dumont 00637 Sony 01006
Gehua 00476 Starcom 00003, 00014
General 00476, 00810, 00276, 00003, 00014 Supercable 00276
GoldStar 00144 Supermax 00883
Hamlin 00009, 00273 Tocom 00012
Hitachi 00014 Torx 00003
Jerrold
KNC 00008 Trans PX 00276
LG 00144 Tristar 00883
Memorex 00000 TS 00003
Motorola 00476, 00810, 00276, 01254, 01376 V2 00883
MultiVision 00012 Viewmaster 00883
Pace 01877, 00237 Vision 00883
Panasonic 00000, 00008, 00107 Vortex View 00883
Panther 00637 Zenith 00000, 00525, 00899
00476, 00810, 00276, 00003, 00012,
Toshiba 00000
00014
82 ViewSonic CD4200
Page 90

Récepteurs de signaux de satellite
AlphaStar 00772 NEC 01270
Chaparral 00216 Next Level 00869
Crossdigital 01109 Panasonic 00247, 00701
00392, 00566, 00639, 01142, 00247,
DirecTV
00749, 01749, 00724, 00819, 01856,
01076, 01109, 00099, 01392, 01640,
01442, 01414, 01108
Paysat 00724
Dish Network
System
Dishpro 01005, 00775, 01505 Proscan 00392, 00566
Echostar 01005, 00775, 01505 Proton 01535
Expressvu 00775 RadioShack 00869
GE 00566 RCA 00392, 00566, 00855, 00143, 01392
General
Instrument
GOI 00775 Sanyo 01219
Goodmans 01246 SKY 00856
Hisense 01535 Sony 00639, 01640
Hitachi 00819, 00222, 01250 Star Choice 00869
HTS 00775 Tivo 01142, 01442
Hughes Network
Systems
I-Lo 01535 UltimateTV 01640, 01392
01005, 00775, 01505 Philips
00869 Samsung 01276, 01109, 01108
01142, 00749, 01749, 01442 Toshiba 00749, 01749, 00790, 01285
01142, 00749, 01749, 00724, 01076,
00722, 00099, 01442
FRANÇAIS
JVC 00775 Uniden 00724, 00722
LG 01414, 01226 US Digital 01535
Magnavox 00724, 00722 USDTV 01535
Memorex 00724 Voom 00869
Mitsubishi 00749 Zenith 00856, 01856
Motorola 00869 --------------- --------------------------
ViewSonic CD4200 83
Page 91

Amplificateurs audio
Bose 30674 Sansui 30321
GE 30078 Shure 30264
JVC 30331 Sony 30689
Marantz 30321 Soundesign 30078
Nakamichi 30321 Victor 30331
NEC 30264 Wards 30078
Optimus 30395 Yamaha 30354, 30133
Realistic 30395 --------------- ----------------------------
FRANÇAIS
Amplificateurs audio/syntoniseurs
ADC 30531 Onkyo 30842, 30135
Aiwa 31405, 31243, 30121 Optimus 31023, 30670, 30531, 31074
Anam 31609, 31074 Panasonic 31518, 30039
Audiotronic 31189 Philips 31189, 31269
Bose 31229 Pioneer 31023, 30150, 30014, 30630, 30531
Capetronic 30531 Proscan 31254
Carver 31189 Qisheng 31609
Coby 31263 Quasar 30039
Denon 31360, 31142, 30904 RadioShack 31263
Fonmix 31360 RCA 31023, 31609, 31254, 30531, 31074
Glory Horse 31263 Sharper Image 31263
Harman/Kardon 30110 Silsonic 30176
Hitachi 31273 Sony 31058, 31441, 31258, 31759
Inkel 30027 Soundesign 30670
Integra 30135 Stereophonics 31023
JBL 30110 Sunfire 31313
JVC 30074, 31263 Teac 31074, 31267
Kenwood 31313, 31570, 30027 Technics 31308, 31518, 30039
KLH 31428 Thorens 31189
Magnavox 31189, 31269, 30531 Victor 30074
Marantz 31189, 31269, 30039 Wards 30014
MCS 30039 Yamaha 30176, 31276, 31176
84 ViewSonic CD4200
Page 92

Magnétoscope à cassettes
ABS 21972 Gateway 21972
Admiral 20048, 20209 GE 20060, 20035, 20240
Aiko 20278 General 20045
Aiwa 20037, 20479 Go Video 20432
Alienware 21972 GoldStar 20037, 20209, 20038, 20225
America Action 20278 Haojie 20240
American High 20035 Harman/Kardon 20081, 20038
Amoisonic 20479 Harwood 20072
Anam 20162, 20037, 20240, 20278 Hewlett Packard 21972
Anam National 20162 HI-Q 20047
Asha 20240 Hitachi 20037, 20042, 20055
FRANÇAIS
Audiovox 20037, 20278
Beaumark 20240 HP 21972
Bell & Howell 20104
Broksonic 20184, 20121, 20209, 20002, 20479 iBUYPOWER 21972
Calix
Canon
Carver
CCE 20072, 20278 KLH 20072
Changhong 20048, 20081 Kodak 20035, 20037
Citizen 20037, 20278 Kolin 20043
Colt 20072 LG 20037, 20045, 20042, 20209, 20038
Craig 20037, 20047, 20240, 20072 Logik 20072
Curtis Mathes 20060, 20035, 20162 LXI 20037
Cybernex 20240 Magnavox 20035, 20039, 20081
CyberPower 21972 Magnin 20240
Daewoo 20045, 20104, 20278 Marantz 20035, 20081
20037 JVC 20045, 20067
20035 KEC 20037, 20278
20081 Kenwood 20067, 20038
Howard
Computers
Hughes Network
Systems
21972
20042, 20739
Dell 21972 Marta 20037
Denon 20042 Matsushita 20035, 20162
DirecTV 20739 Media Center PC 21972
Durabrand 20039, 20038 MEI
Electrohome 20037 Memorex 20035
Electrophonic 20037 MGA 20240, 20043
Emerex 20032 MGN Technology 20240
Emerson
Fisher 20047, 20104 Mind 21972
Fuji 20035, 20033 Minolta 20042
Fujitsu 20045 Mitsubishi 20067, 20043
20035, 20037, 20184, 20240, 20045,
20121, 20043, 20209, 20002, 20278,
20479
Microsoft 21972
20035, 20162, 20037, 20048, 20039,
20047, 20240, 20104,20209, 20479
ViewSonic CD4200 85
Page 93

Magnétoscope à cassettes
Motorola 20035, 20048 Scott 20184, 20045, 20121, 20043
MTC 20240 Sears 20035, 20037, 20047, 20042, 20104
Multitech 20072 Sharp 20048, 20209
NEC
Newave 20037 Shogun 20240
Nikko 20037 Singer 20072
Noblex 20240 Sonic Blue 20616
Northgate 21972
Olympus 20035 STS 20042
Optimus 21062, 20162, 20037, 20048, 20104,
FRANÇAIS
Orion 20184, 20209, 20002, 20479 Systemax 21972
Panasonic
Penney
Pentax 20042 Tatung 20045, 20067
Philco 20035, 20479 Technics 20035, 20162
Philips 20035, 20081, 20739, 20618 Teco 20035, 20037, 20048, 20038
Pilot 20037 Teknika 20035, 20037
Pioneer 20042, 20067 Tivo 20636, 20618, 21503, 20739
Polk Audio 20081 TMK 20240
Profitronic 20240 Toshiba
20035, 20037, 20048, 20104, 20067,
20038
20432
21062, 20035, 20162, 20616, 20225 Tagar Systems 21972
20035, 20037, 20240, 20042, 20038 Tashiko 20037
Shintom 20072
Sony
Sylvania 20035, 20081, 20043
20035, 20032, 20033, 20636, 21972
20045, 20042, 20067, 20043, 21503
21008, 21972
Proscan 20060 Totevision 20037, 20240
Protec 20072 Touch 21972
Pulsar 20039 Unitech 20240
Qisheng 20060 Vector 20045
Quasar 20035, 20162 Vector Research 20038
Radix 20037 Victor 20067
Randex 20037 Video Concepts 20045
RCA
Realistic
ReplayTV 20616 Viewsonic 21972
Runco 20039
Sampo 20037, 20048
Samsung 20240, 20045, 20432 XR-1000 20035, 20072
Sanky 20048, 20039 Yamaha 20038
Sansui 20067, 20209, 20479 Zenith 20039, 20033, 20209, 20479
Sanyo 20047, 20240, 20104 ZT Group 21972
20060, 20035, 20240, 20042, 20880 Videomagic 20037
20035, 20037, 20048, 20047, 20104 Videosonic 20240
Wards
White
Westinghouse
20060, 20035, 20048, 20047, 20081,
20240, 20042, 20072
20209, 20072
86 ViewSonic CD4200
Page 94

Lecteur DVD
Aiwa 20641, 21912 Microsoft 20522
Akai 20770 Mintek 20717
Allegro 20869 Mitsubishi 21521, 20521
Apex Digital
Blaupunkt 20717 Norcent 21003
Blue Parade 20571 Onkyo 20503, 20627, 21924, 20792
Broksonic 20695 Oritron 20651, 21980
Changhong 20627, 21061 Panasonic 20490, 21762, 21990
CineVision 20869 Philips 20503, 20539, 20646, 21914
Coby 21086 Pioneer 20525, 20571
Curtis Mathes 21087 Polaroid 21086, 21061
CyberHome 21024, 21023, 21129, 20816, 21117 Polk Audio 20539
Daewoo 20833, 21172, 20869 Portland 20770
Denon 20490 Proscan 20522
DVD2000 20521 Qwestar 20651
Emerson 20591, 20675 RCA 20522, 20571, 20717, 20822
Enterprise 20591 Rio 20869
Fisher 21919 Rotel 20623
Funai 20675 Sampo 20752, 20698
Gateway 21158, 21073 Samsung 20490, 20573, 21932, 21075, 20820
GE 20522, 20717 Sansui 20695
Go Video
20672, 20717, 20797, 21061, 20796,
21056, 21937, 20794,
21020, 21915
20744, 20833, 21099, 20783, 21075,
20869, 21730
Nesa 20717
Sanyo 20695
FRANÇAIS
Greenhill 20717 Sharp 20630, 20752
Harman/Kardon 20582, 20702 Sharper Image 21117
Hitachi 20573, 20664, 21919 Sherwood 20770
Hiteker 20672 Shinco 20717
Initial 20717 Shinsonic 20533
Integra 20627, 21924 Sonic Blue 20869, 21099
JBL 20702 Sony 20533, 20864, 21033, 21904, 21903
JVC 20558, 20623, 20867 SVA 20717
Kenwood 20490, 20534 Sylvania 20675
KLH 20717, 21020, 21149 Symphonic 20675
Koss 20651, 21980 Teac 20717, 21984, 20809
Lasonic 20798 Technics 20490
LG 20591, 20869, 20801 Theta Digital 20571
Liquid Video 21980 Toshiba 20503, 20695
Lite-On 21158, 21058 Urban Concepts 20503
Loewe 20511 Xbox 20522
Magnavox 20503, 20539, 21976, 21914, 20675 Yamaha 20490, 20539, 20545
Marantz 20539 Zenith 20503, 20591, 20869
Memorex 20695 ---------------------- ----------------------------
ViewSonic CD4200 87
Page 95

DEPANNAGE
Il n’y a pas d’image ni de son.
▪ S’assurer que l’adaptateur CA est branché.
▪ Vérifier qu’il y a un signal source valide.
▪ S’assurer que le bon mode d’entrée est sélectionné.
Il n’y a pas d’image issue de l’AV.
FRANÇAIS
Il n’y pas pas de son.
Il n’y a pas d’image ni de son, seulement du bruit.
▪ S’assurer que la LUMINOSITE est correctement réglée.
▪ La lampe fluorescente pourrait être en fin de vie. Communiquer
avec un centre de service agréé .
▪ S’assurer que la source vidéo est branchée dans le port d’entrée
video composite.
▪ S’assurer que le volume n’est pas réglé au minimum.
▪ S’assurer que le son n’est pas mis en sourdine.
▪ S’assurer que le casque n’est pas connecté.
▪ Le signal source est peut-être faible.
▪ Le fournisseur rencontre peut-être des difficultés.
▪ Vérifier les connexions d’entrée.
L’image n’est pas claire.
88 ViewSonic CD4200
▪ Le signal source est peut-être faible.
▪ Le fournisseur rencontre peut-être des difficultés.
▪ Vérifier les connexions d’entrée.
Page 96

L’image est claire ou mal teintée.
▪ Vérifier les réglages de la teinte, de la saturation et des
couleurs.
▪ Restaurer les paramètres d’usine du LCD.
L’image est trop foncée.
▪ Sélectionner un mode de commande PA différent.
▪ Vérifier les paramètres de luminosité et d’image.
▪ La lampe fluorescente pourrait être en fin de vie. Communiquer
avec un centre de service agréé.
La télécommande ne fonctionne pas.
▪ Installer de nouvelles piles.
▪ S’assurer que la fenêtre du capteur de télédétection n’est pas
bloqué.
▪ S’assurer que le système est réglé au bon mode
(TV/VCR/CBL/AUX)
FRANÇAIS
There are stripes on the screen or colors fade.
▪ Il pourrait y avoir une interférence avec d’autres appareils.
▪ Il pourrait y avoir une interférence entre le câble de source vidéo
et le câble d’alimentation.
▪ S’assurer que le câble d’alimentation et le câble vidéo ne se
touchent pas.
Check the Hue, Saturation and Color adjustments
ViewSonic CD4200 89
Page 97

L’image n’est pas nette.
▪ Le signal source est peut-être faible.
▪ Le fournisseur rencontre peut-être des difficultés.
▪ Vérifier les connexions d’entrée.
▪ Vérifier la netteté des paramètres de l’image.
L’image bouge.
FRANÇAIS
L’image est double ou triple.
L’image est mouchetée.
▪ Le signal source est peut-être faible.
▪ Le fournisseur rencontre peut-être des difficultés.
▪ Vérifier les connexions d’entrée.
▪ Le signal source est peut-être faible.
▪ Vérifier les connexions d’entrée.
▪ Il pourrait y avoir une interférence avec d’autres appareils
situés à côté ou aux alentours du LCD.
90 ViewSonic CD4200
Page 98

TABLEAU DE SYNCHRONISATION PREDEFINIE DE
L’ENTREE PC
Tableau de synchronisation PC
HORL
Affichage
hor.
o
HORL
N
Palier
arrière
hor.
o
HORL
N
Synth.
horl.
o
HORL
N
Total
vert.
o
N
ligne
Affichage
vert.
o
ligne
N
Palier
arrière
hor.
o
ligne
N
Larg.
sync.
vert.
o
N
ligne
No Nom de
mode
Résolution
Fréq. H.
(KHz)
Fréq. V.
(Hz)
Polarité H.
Polarité V.
Horl.
pixels
(MHz)
Total hor.
o
N
FRANÇAIS
VESA 72HZ
1
640*480
VGA 60 HZ
2
640*480
SVGA 60 HZ
3
800*600
SVGA 60 HZ
4
800*600
XGA 60 HZ
5
1024*768
US TEXT
6
720*400
37.900
72.809
31.469
59.941
35.16
56.25
37.879
60.317
48.363
60.004
31.469
70.087
31,500 832 640 128 40 520 480 28 3
-
25,175 800 640 48 96 525 480 33 2
-
+
36,0 1024 800 128 72 625 600 22 2
+
+
40,0 1056 800 88 128 628 600 23 4
+
-
65,0 1344 1024 160 136 806 768 29 6
-
28,322 900 720 54 108 449 400 35 2
+
XGA(CVT)
7
1280*768
WXGA(CVT)
8
1360*768
47.396
59.995
47.368
59.959
+
68,25 1440 1280 80 32 790 768 12 7
-
+
72 1520 1360 80 32 790 768 15 5
-
* La résolution et les fréquences affichées à l’écran peuvent différer de celles indiquées sur
cette liste.
ViewSonic CD4200 91
Page 99

SPECIFICATIONS
ITEMS SPECIFICATIONS
Taille de l’écran Panneau ACL TFT 42,02 po
Rapport de cadre 16:9
Résolution 1366 x 768
Zone d’affichage
(ouverture) H x V
Panneau
FRANÇAIS
Entrée vidéo
Entrée PC
Tonie en pixels 0,68 mm x 0,68 mm
Couleurs de l’affichage 16 777 216 couleurs
Rapport de contraste 1200:1 (typ.)
Luminosité (centre) 550 cd/m
Angle de vue (CR>10) 178o Hor./178o Ver. (t yp.)
Temps de réponse (GTG) 8 ms (typ.)
Signal composite CVBS x 2
Signal Y, C S-vidéo x 2
Signal composante Y Pb Pr x 2 (720 P/1080 i, compatible HD)
Connexion HDMI HDMI x 1
Connexion VGA D-Sub 15 broches x 1
Fréquence de balayage f
Audio 1
Entrée audio
Audio 2 Composante
Audio 3 PC
930,25 mm x 523,01 mm
2
(typ.)
31.5 ~ 60 KHz/fV = 56 ~ 75 Hz
H =
Composite
S-vidéo
Haut-parleur (intégré) 15 W + 15 W (rms) @ THD < 10 %
Sortie audio
Caractéristiques
Alimentation
Sortie de ligne Gauche/droite
Sortie audio numérique S/PDIF (pour HDMI) .
Touches de fonction Alimentation, Source, Menu, Haut/bas (Chaîne) , +/- (Volume) , EXIT/CRC
Performance vidéo
Performance audio Caisson d’extrêmes graves, Contrôle automatique du volume (CAV)
Autre commande Minuteur de mise en veille, Minuteur activé, minuteur désactivé
Alimentation électrique CA 100 V ~ 240 V, 50/60 Hz
Consommation d’énergie < 300 W
Dimensions l x H x P
Poids (net) Sans accessoires
Filtre à peigne 3D, Désentrelacement 3D, Contrôle du rapport de cadre
(CRC), Contrôle automatique des images, Rehaussement vidéo, Réduction
de bruit
1067 mm * 678 mm * 108 mm
28.8 Kg
92 ViewSonic CD4200
Page 100

Service clientèle
Pour toute question relative au support technique ou à l’entretien du produit, reportez-vous au
tableau ci-après ou contactez votre revendeur.
REMARQUE : vous devrez fournir le numéro de série du produit.
Pays / Région Site Internet
France et autres pays
francophones en Europe
Canada www.viewsonic.com
www.viewsoniceurope.com/fr/
T= Téléphone
F= Fax
www.viewsoniceurope.com
/uk/Support/Calldesk.htm
T= 866 463 4775
F= 909 468 5814
Courrier électronique
FRANÇAIS
service.ca@viewsonic.com
ViewSonic CD4200 93
 Loading...