

Page 1
Page 2

1. SAFETY PRECAUTIONS
2. HARDWARE DESCRIPTION
3. HOW TO CONNECT YOUR RECEIVER
4. SYSTEM SET-UP
4.1 INSTALLATION WIZARD
5 QUICK GUIDE TO MAJOR FUNCTIONS
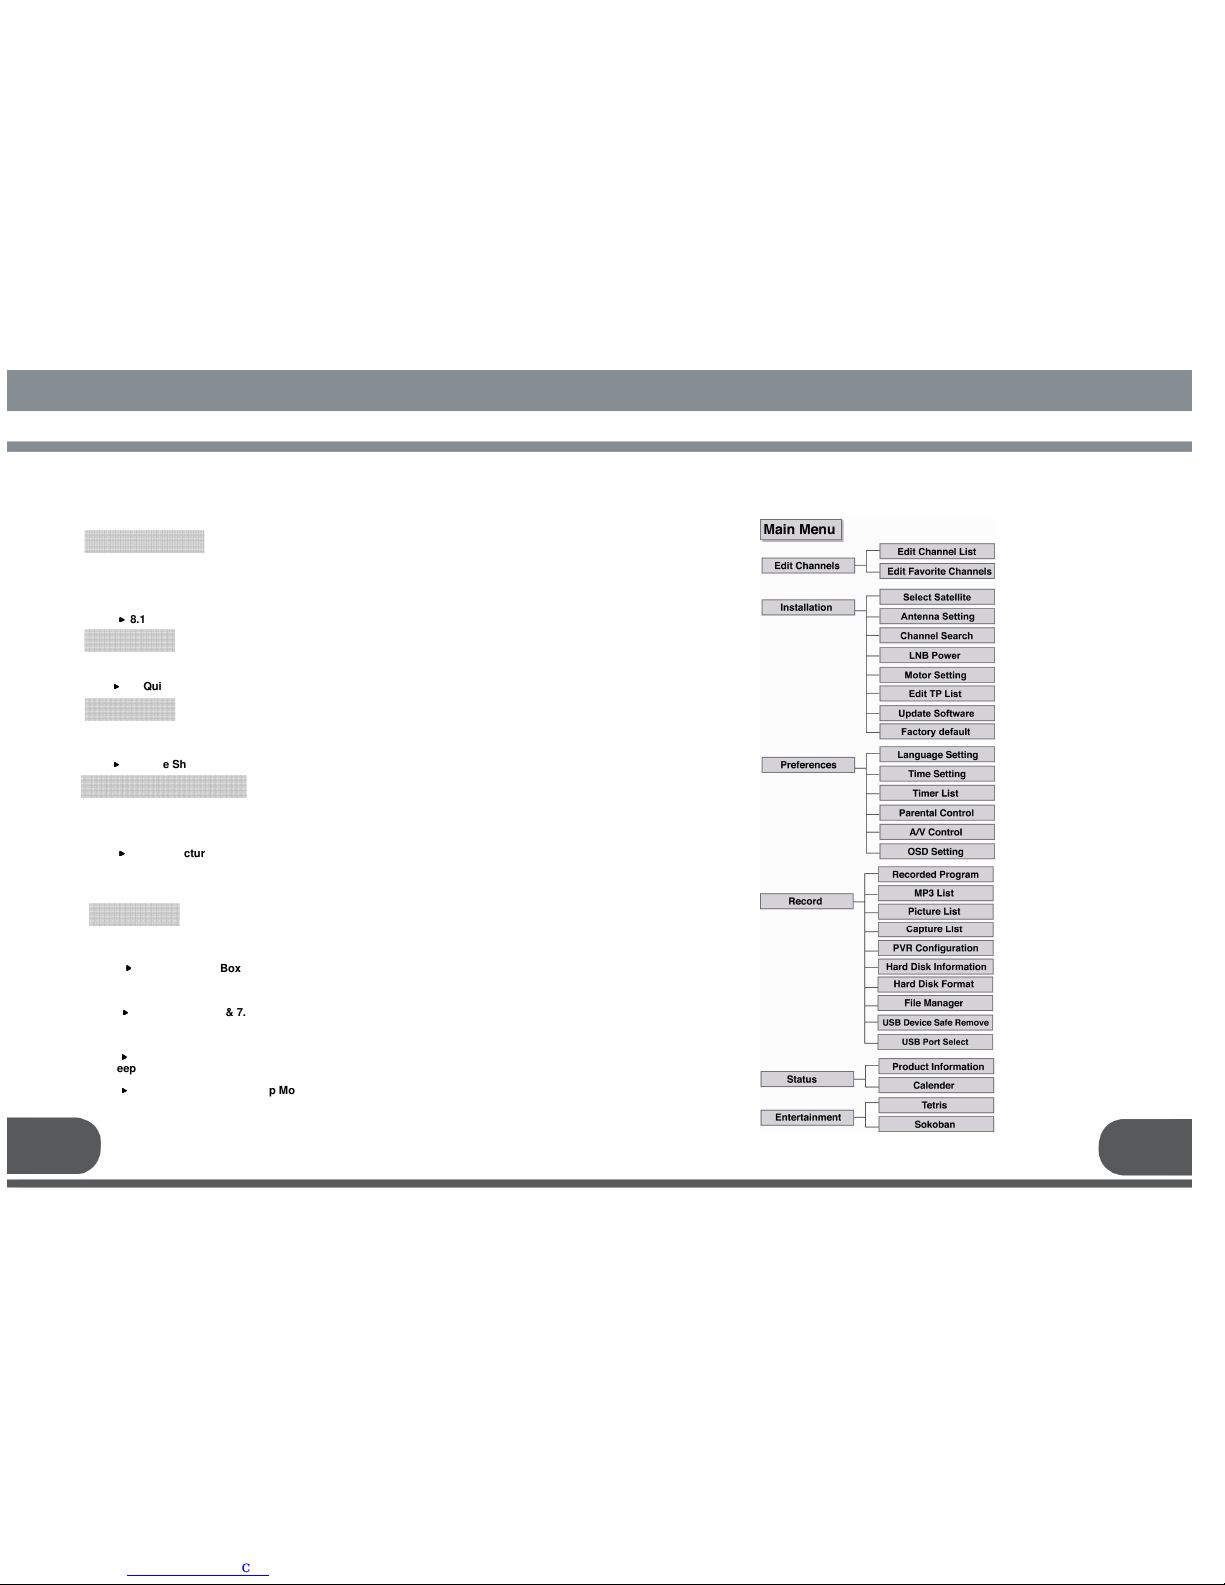
6. MENU STRUCTURE
7. MENU OPERATION
7.1. EDIT CHANNELS
7.2. INSTALLATION
7.3. PREFERENCES
7.4. RECORD
7.5. STATUS
7.6. ENTERTAINMENT
8. ADDITONAL OPERATION
8.1. INFORMATION BOX
8.2. PROGRAM GUIDE
8.3. CHANNEL LIST
8.4. AUDIO LANGUAGE
8.5. SLEEP MODE
8.6. ZOOM FUNCTION
8.7. PIP (Picture In Picture)
8.8. HISTORY & PREVIOUS CHANNEL
8.9. MOSAIC
8.10. CAPTURE
8.11. HOW TO USE USB(External Storage)
9. HOW TO RECORD & PLAYBACK
9.1. TIME SHIFT
9.2. QUICK RECORD
9.3. RESERVATION RECORD
9.4. PLAYBACK
10. TROUBLE SHOOTING
11. TECHNICAL SPECIFICATIONS
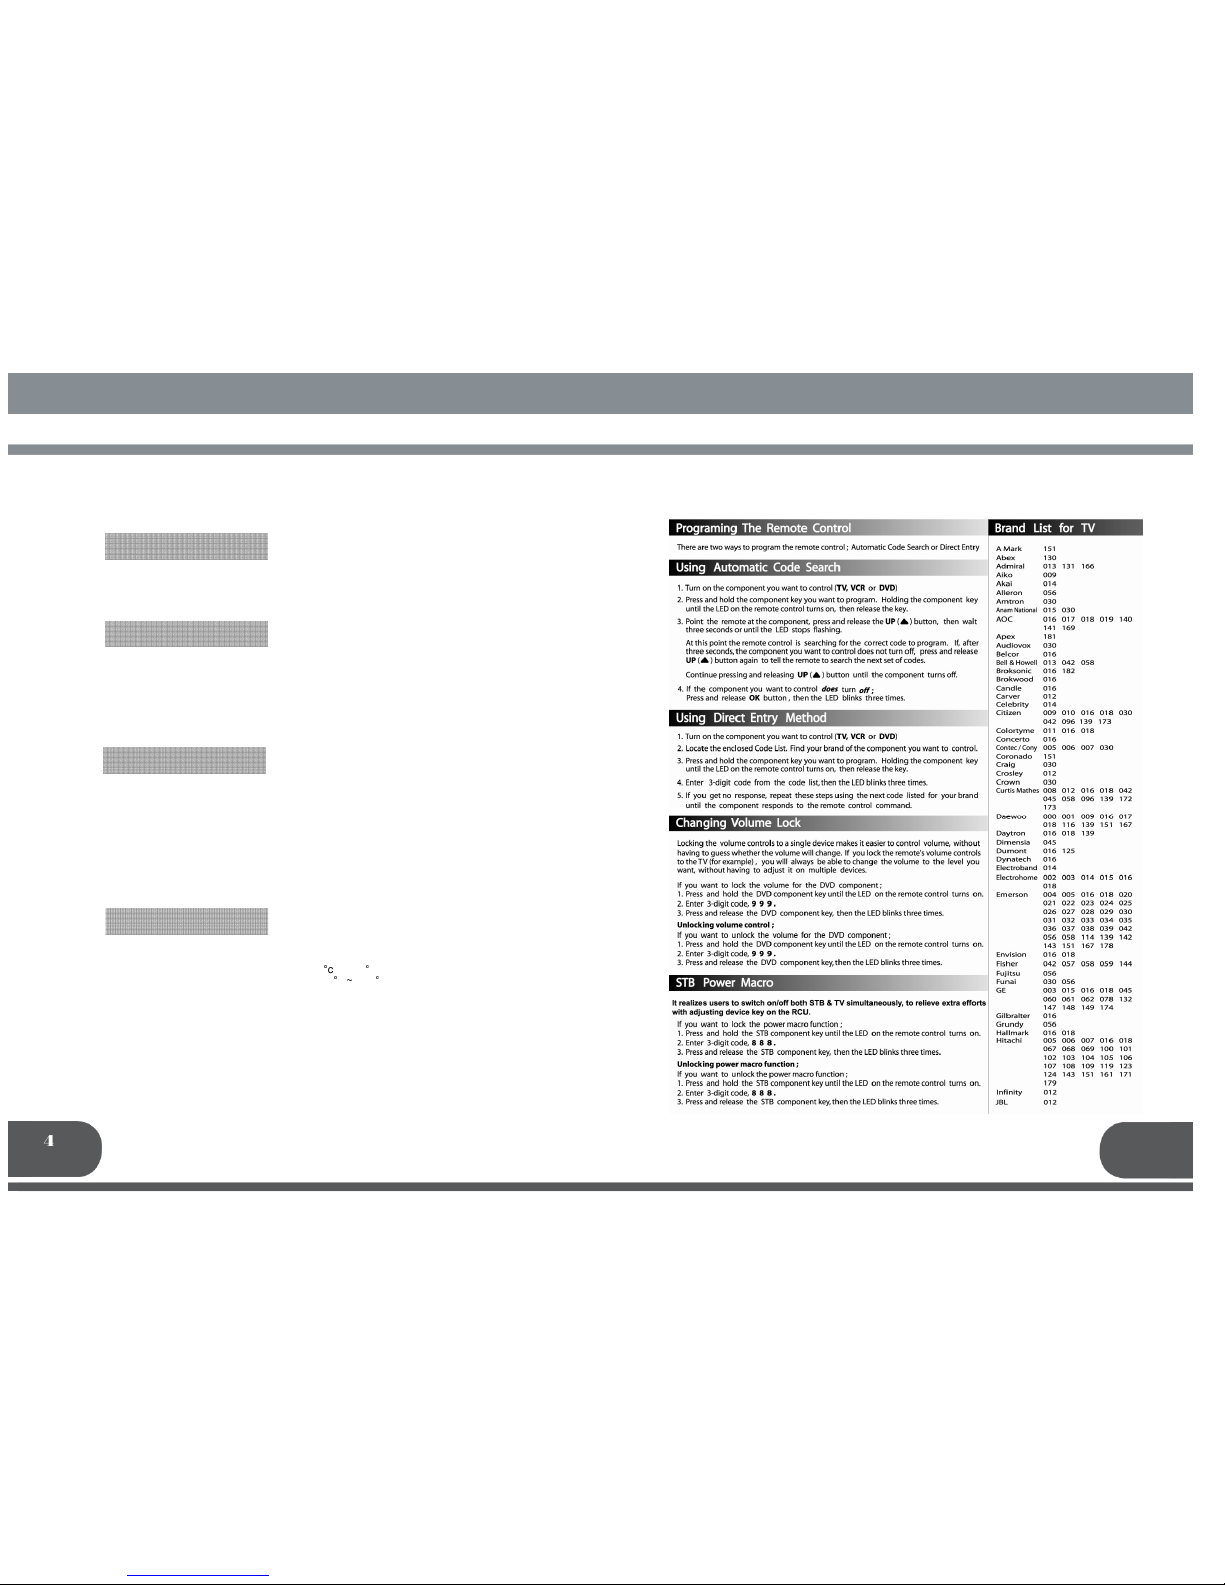
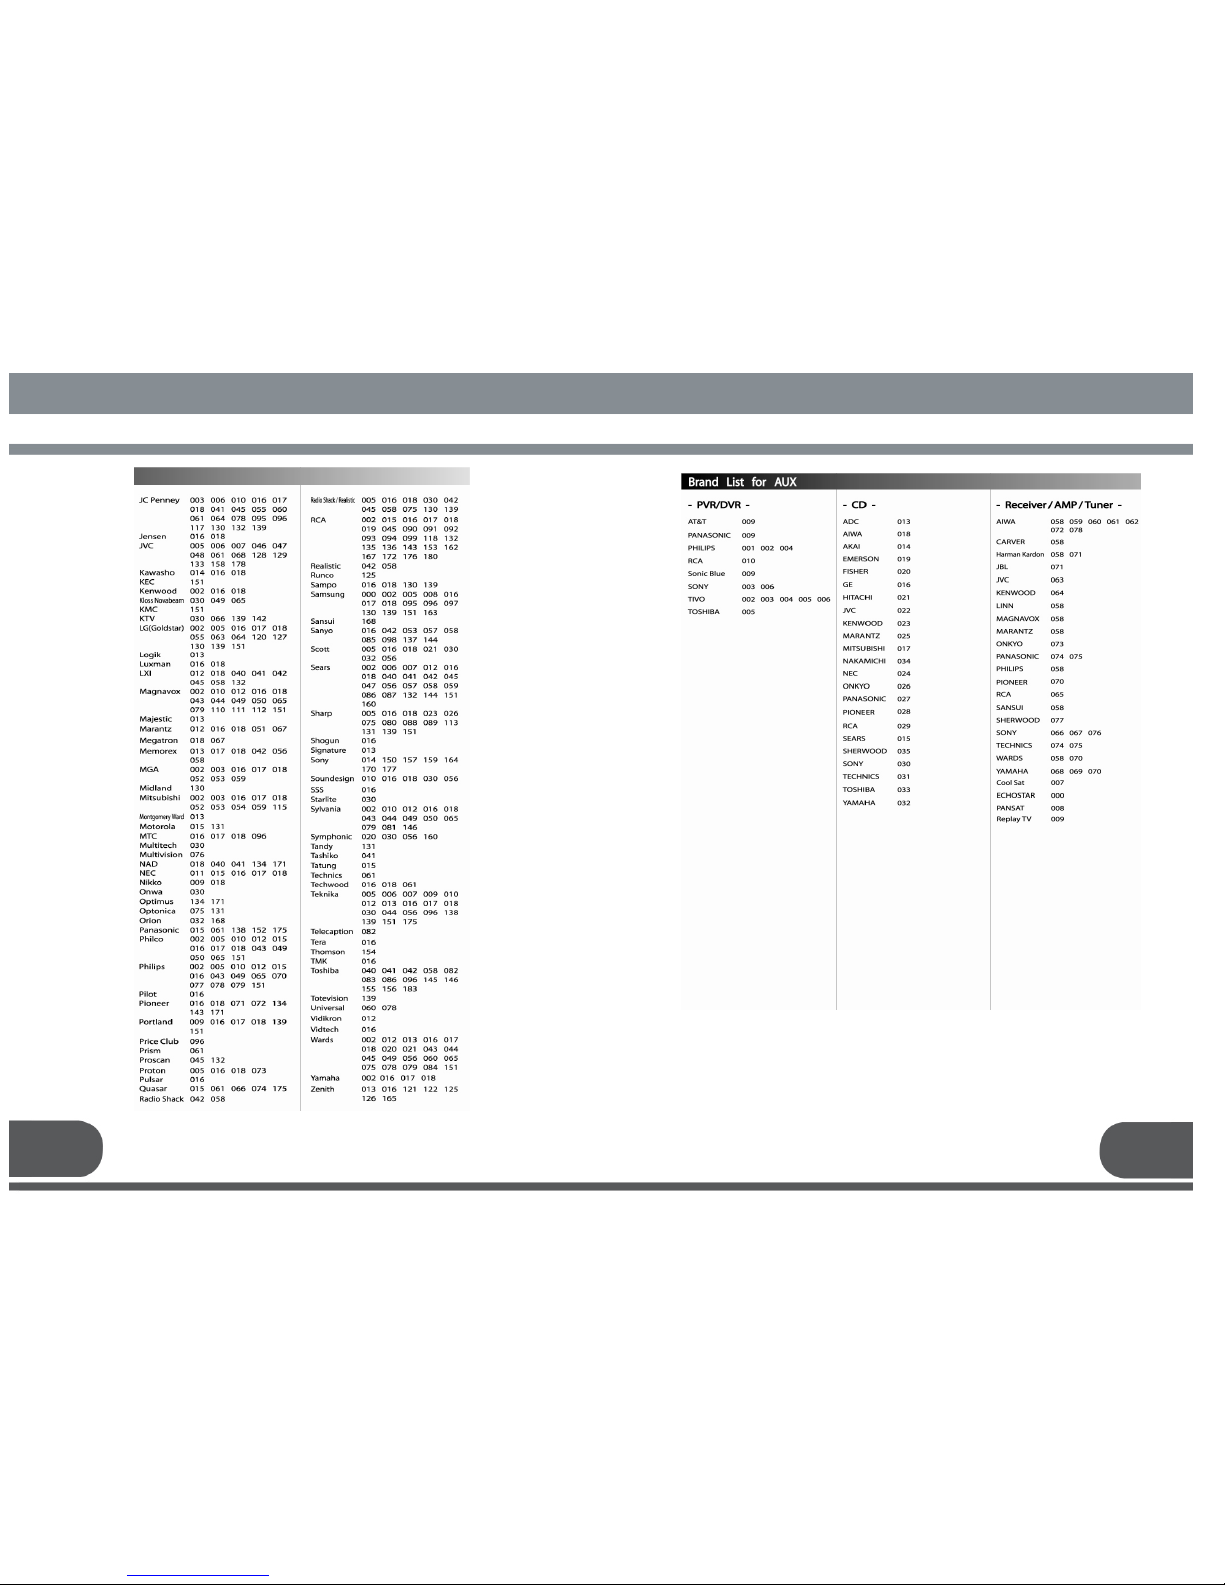
12. REMOTE CONTROL PROGRAMING
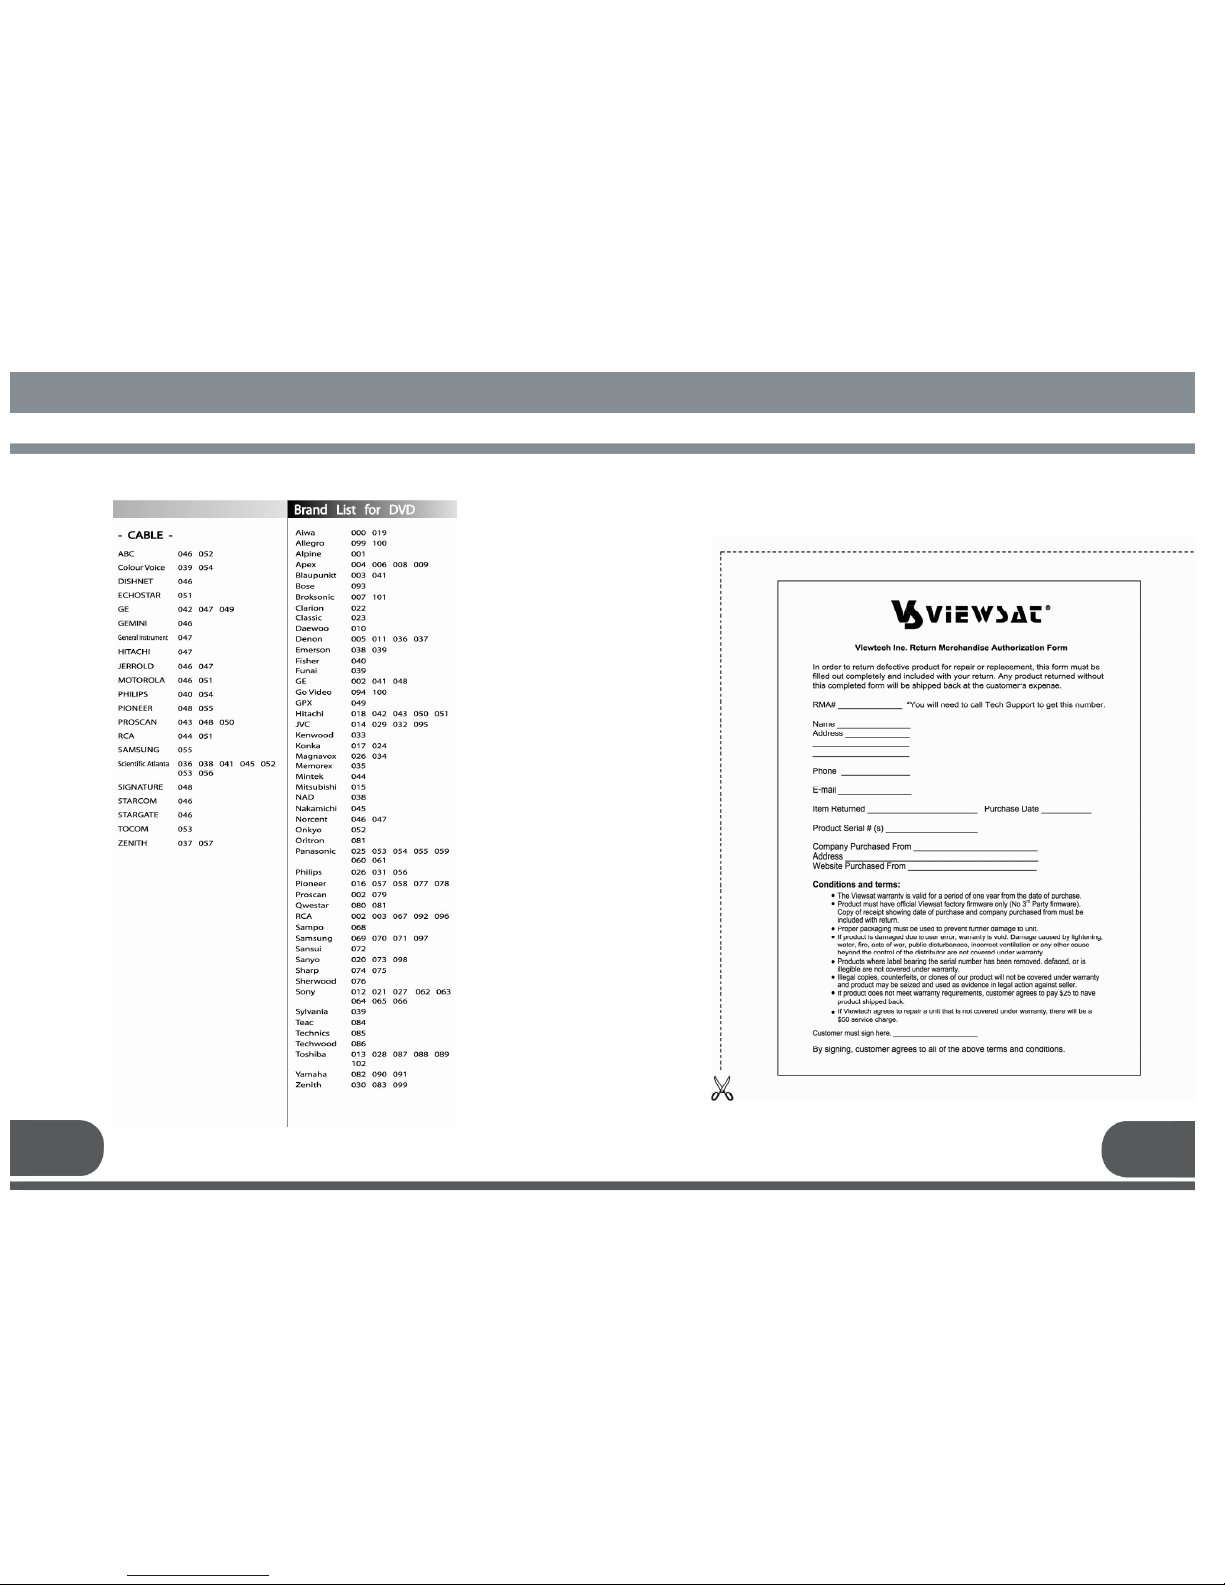
13. WARRANTY CARD
* To enhance the product, functions are subject to change without notice.
Table of Contents
Table of Contents
5
7
10
11
11
13
14
15
15
17
22
25
30
30
31
31
32
33
33
34
34
34
35
35
36
36
37
37
37
38
40
42
43
46
50
Page 3
3 4
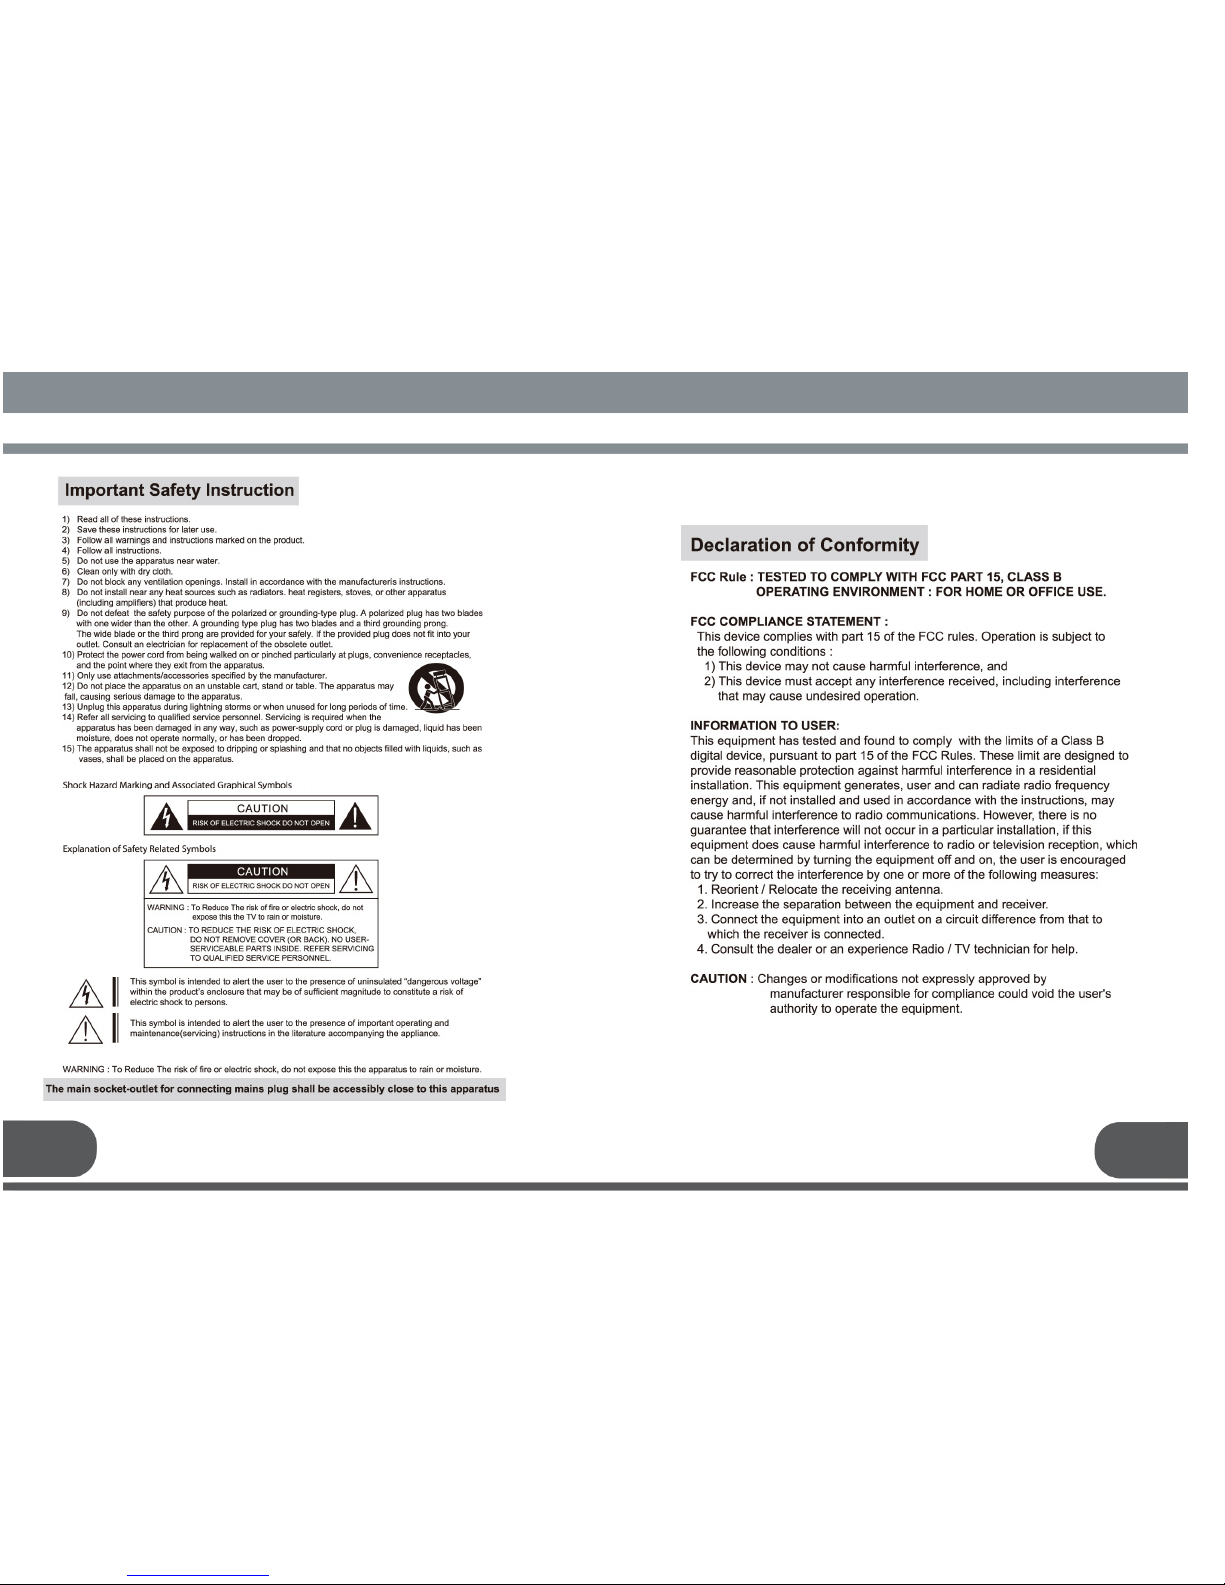
IMPORTANT SAFETY INSTRUCTION
IMPORTANT SAFETY INSTRUCTIONIMPORTANT SAFETY INSTRUCTION
IMPORTANT SAFETY INSTRUCTION
DECLEARATION OF CONFORMITY
DECLEARATION OF CONFORMITYDECLEARATION OF CONFORMITY
DECLEARATION OF CONFORMITY
Page 4
SAFETY PRECAUTIONS
SAFETY PRECAUTIONSSAFETY PRECAUTIONS
SAFETY PRECAUTIONS
5
This receiver has been manufactured to satisfy the international
safety
standards.
Please read the following recommended safety precautions carefully.
1. SAFETY PRECAUTIONS
MAINS SUPPLY : AC 95~240V 50/60Hz
LOCATION : Locate the receiver indoor. Locate receiver away fro m potential hazards
such as houseplants, lightning, rain, and direct sunlight.
OVERLOADING : Do not overload wall outlets, extension cords or adapters as this can
result in fire or electrical shock.
LIQUIDS : Keep liquids away from the receiver.
CLEANING : Before cleaning the receiver, disconnect it from the wall socket. Use a
cloth lightly dampened with water (no solvents) to clean the exterior.
VENTILATION : Do not block the receiver ventilation holes. Ensure that free airflow is
maintained around the receiver. Never set the receiver on soft furnishings or carpets. Do
not use or store the receiver where it is exposed to direct sunlight, or near heater.
Never stack other electronic equipment on top of the receiver.
Place the receiver at least 30mm from the wall.
ATTACHMENTS : Do not use any attachment that is not recommended by the
manufacturer, as it may cause a hazard or damage the equipment.
SERVICING : Do not attempt to service this product yourself. Any attempt to do so will
void the warranty. Refer all servicing to a qualified service agent.
LIGHTNING : If the receiver is installed in an area subject to intense lightning activity,
protection devices for the receivers main connector and modem telephone line are
essential.
The individual manufacturer's instruction for safeguarding other equipment, such as T V
set, Hi-Fi, etc., connected to the receiver, must also be followed during lightning storms.
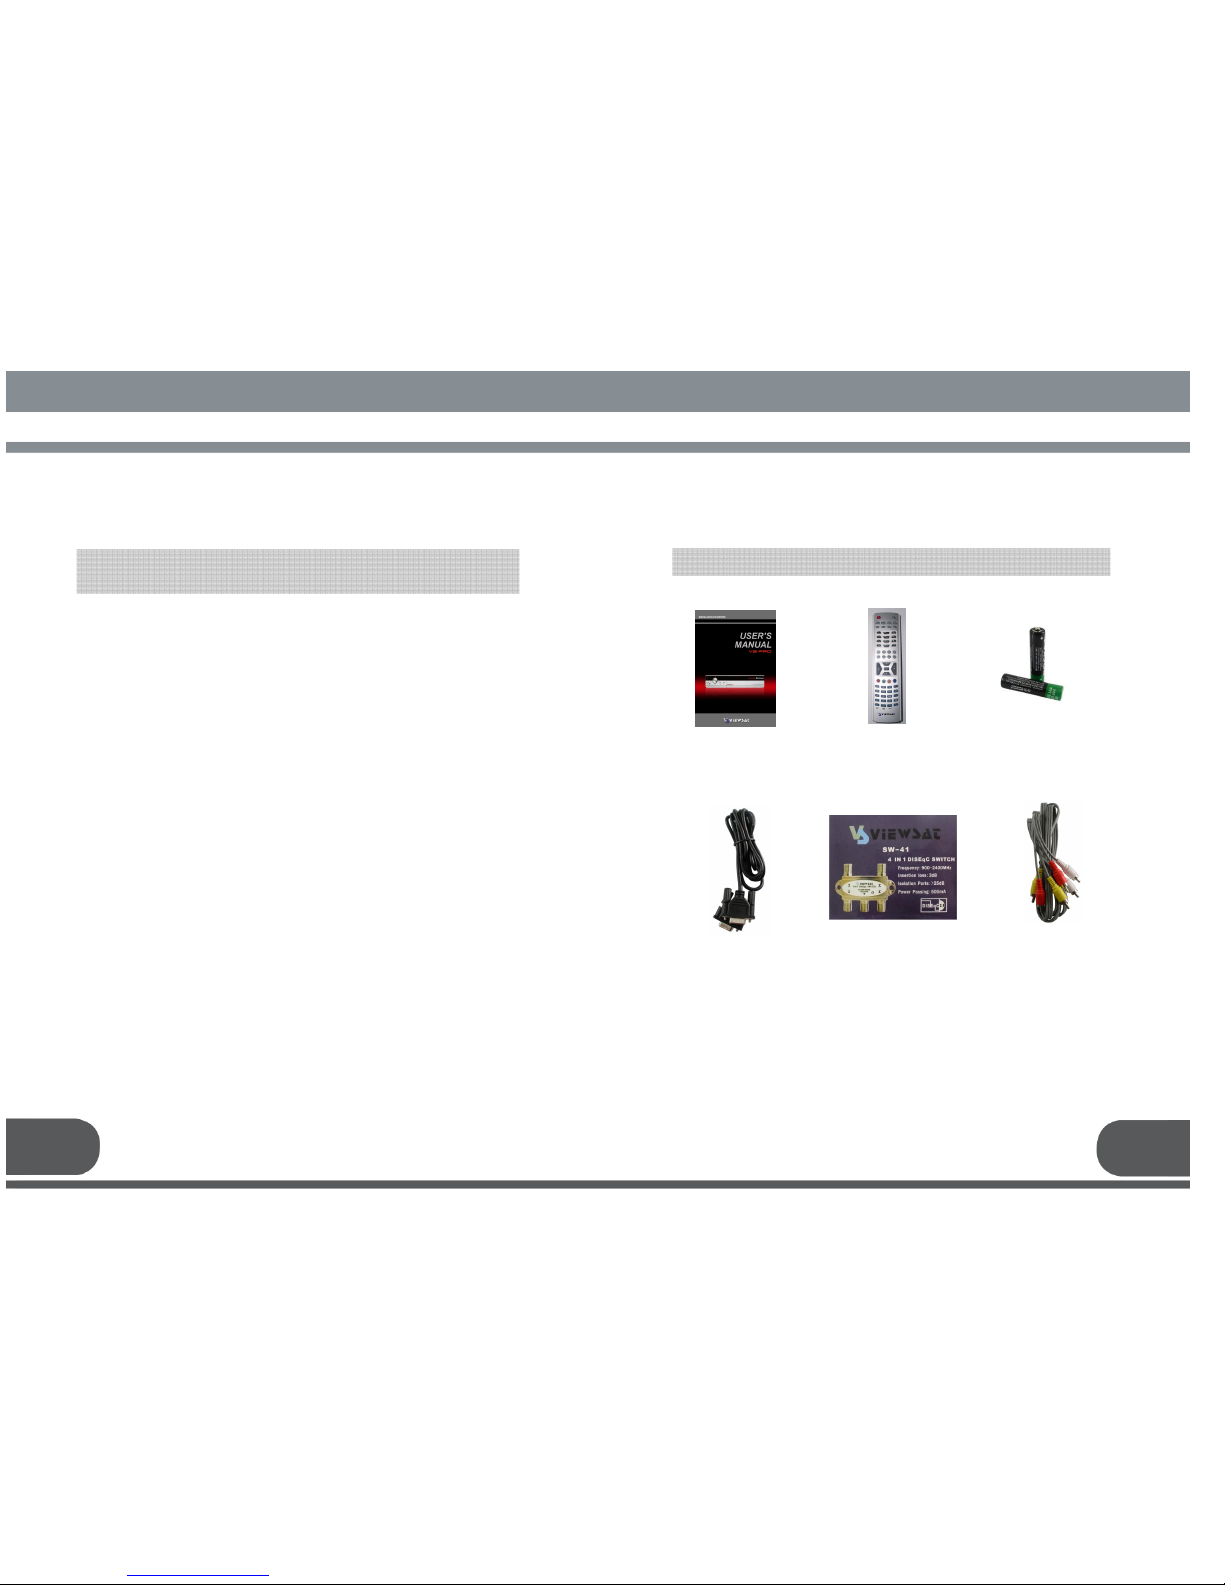
1.1. ACCESSORIES
Check the following accessories when you open the box.
The device, packing material, and batteries should be disposed of properly.
Please obtain appropriate information about regulations in your community, and
dispose of all in accordance with regulations at the separate locations provided.
6
User’s manual
Batteries
RCU
Serial cable
DiSEqC S/W
RCA cable
Page 5
2. HARDWARE DESCRIPTION
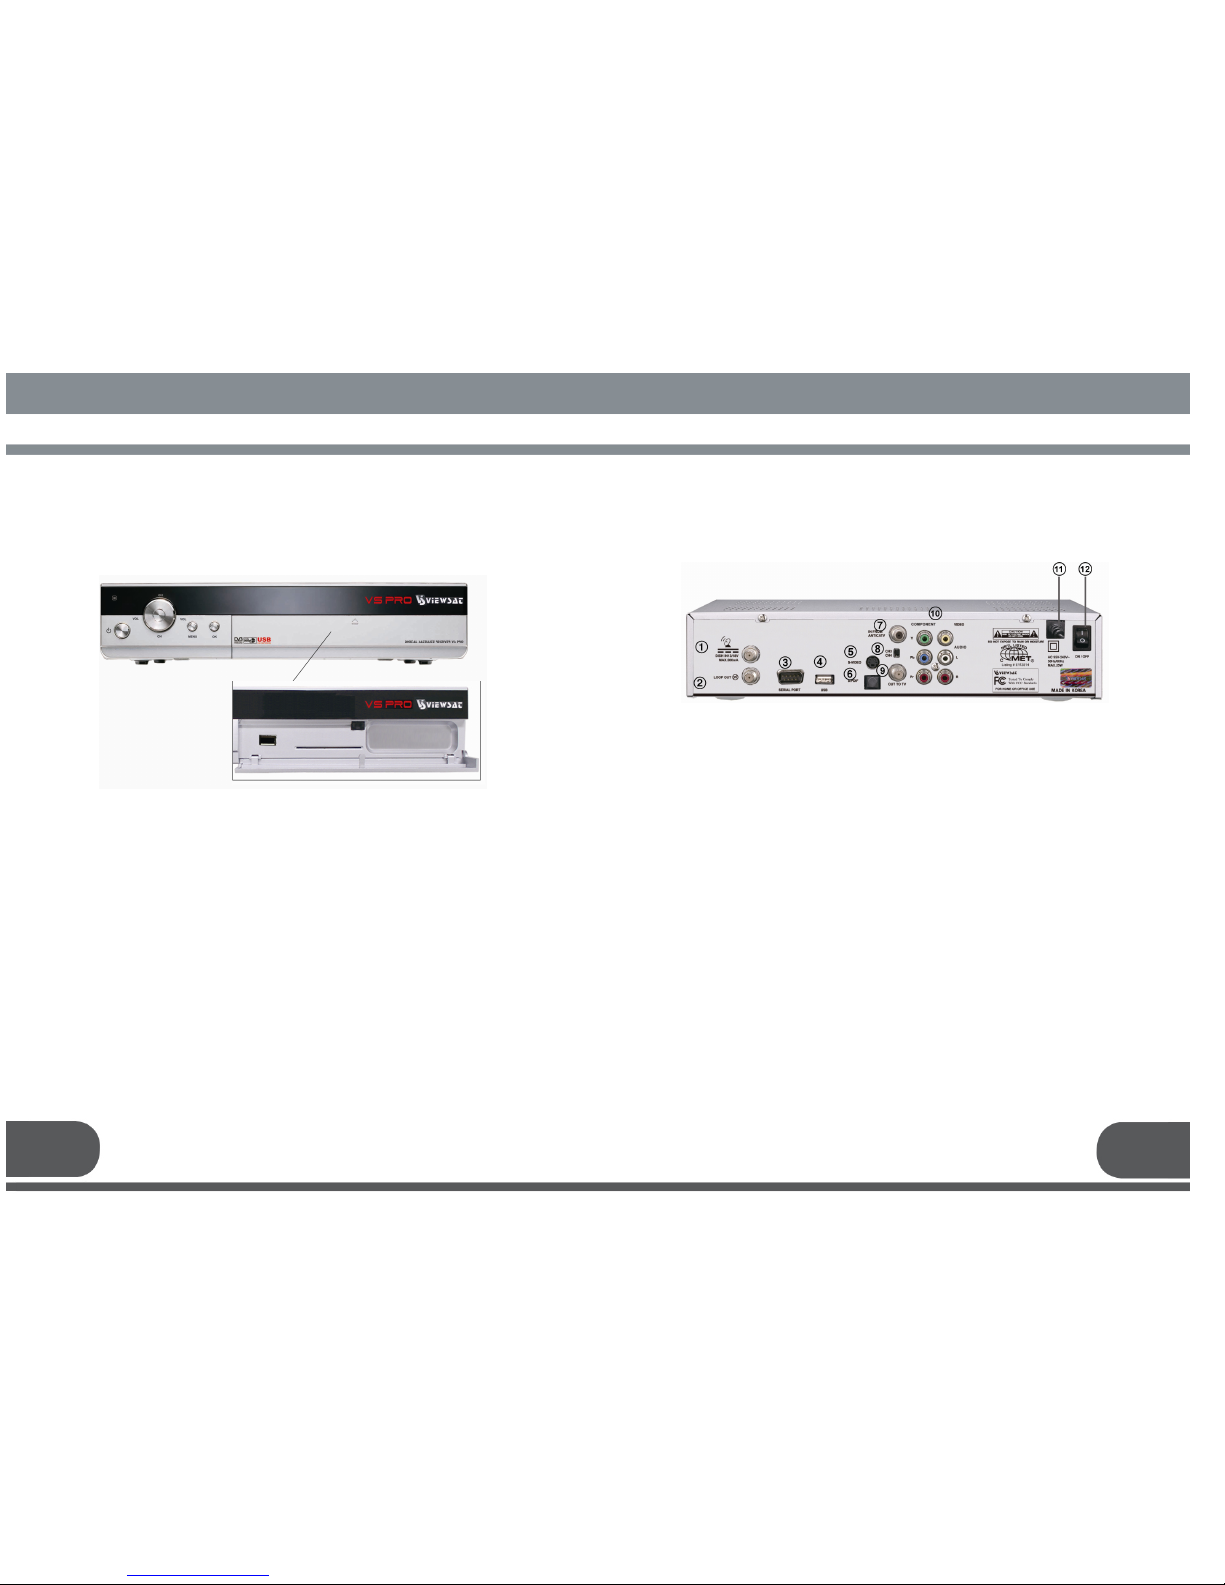
2.1. FRONT PANEL
1) POWER:
This key is used to turn the receiver on and off (stand by).
2) CH : These keys are used to change the channels.
3) VOL : These keys are used to increase and decrease the volume level manually.
4) MENU : This key is used to open up the menu.
5) OK : This k ey is used to enter and confirm any data to the receiver in the menu
systems.
6) INFRARED SENSOR : This is to receive the IR commands from the RCU. Do not
block the view of the sensor.
7) DISPLAY : This display will show the current channel number(* Channel name) .
While the receiver is in standby mode, the display will show the current time.
(* available for VFD model only )
8) USB HOST PORT: This is used to connect your USB Device to your receiver.
(Either front side USB port or rear side must be selected in the menu.)
2.2. REAR PANEL
HARDWARE DESCRIPTION
HARDWARE DESCRIPTIONHARDWARE DESCRIPTION
HARDWARE DESCRIPTION
7 8
1)
DISH IN
:
This port is to connect the coaxial cable from LNB of your Dish. The IF input
is provided thr ough this port and the input frequency range is 950~2150MHz. Also, th e
voltage switching 13V and 18V is passed through this port.
2) LOOP OUT: To enable the connection of an analog receiver, the receiver is provided
with this port. Connect this port to LNB IN port of the other receiver via RF Cable.
3) SERI AL PORT: Connect your receiver to a computer with a serial cable. This port
can be used for upgrading software.
4) USB HOST PORT: This is used to connect your USB Device to your receiver.
(Either front side USB port or rear side must be selected in the menu.)
5) S-VIDEO: Connect to your TV with a S-Video cable.
6) S/PDIF DIGITAL OUTPUT: This port is for the connection to the external Hi-Fi
system which has an optical S/PDIF input interface (Option).
7) IN FROM ANT/CATV : Connect your RF channels to your TV through Loop (Option).
8) CH 3, 4 : The switch select RF 3, 4 channel number.
9) OUT TO TV: Connect to your TV with RF cable (Option).
10) VIDEO, AUDIO R/L, COMPONENT(Y, Pb, Pr): T hese RCA connectors are used to
connect any external video and audio.
11) POWER INPUT: This is the AC main power cord. The input AC volts range is 95V to
240V, 50Hz/60Hz supply.
12) POWER SWITCH: This is a switch to turn on and off the AC main power.
Page 6
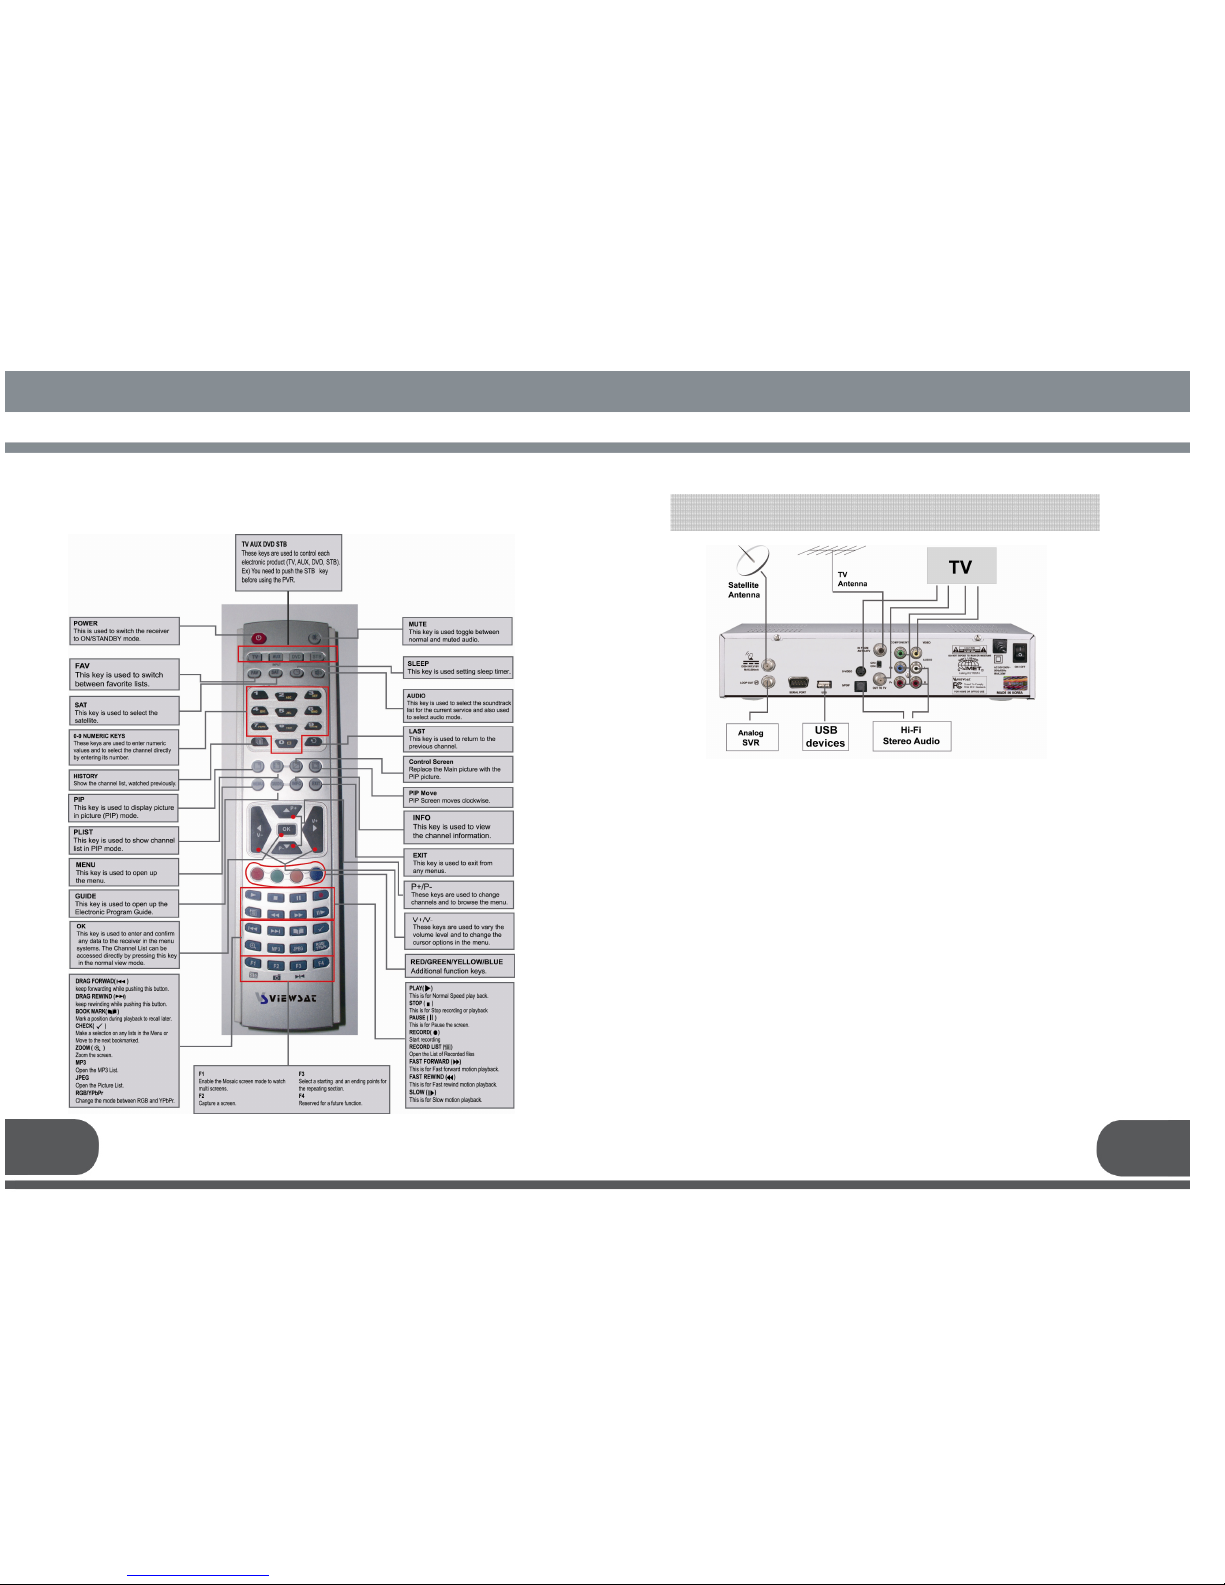
3.3. CONNECTI
NG TO EXTERNAL DEVICES
1) CONNECTING TO THE TV
After installing your antenna system, connect the coaxial cable.
To connect the receiver with your television, you can follow methods;
Through RF cable, RCA cable, COMPONENT cable and S-Video cable.
Connect the RF cable to the terminal marked “OUT TO T V” at the rear panel of the
receiver and its other end to the TV RF input socket.
2) CONNECTING EXTERNAL Hi-Fi AUDIO SYSTEM
To connect any external Audio Hi-Fi system, the receiver is provided with two RCA
connectors at the back of the receiver, marked with “L” and “R” respectively to
connect the left and right audio.
3) CONNECTING TO THE OTHER SATELLITE RECEIVER
Connect the satellite antenna cable to the “DISH IN” socket on the rec eiver. W ith
other connector, connect the “LOOP OUT” socket on the receiver to the “DISH IN”
socket of the other receiver.
9
10
3.1. LOCATION OF THE RECEIVER
Your receiver should be placed under proper ventilation.
Do not place the unit in enclosed cabinets that will restrict the flow of air, resulting
overheating.
The location should be safeguarded from direct sunlight, excess moisture, rough
handling or household pets.
Avoid stacking other electronic components on top of the receiver.
The location should be safely accessible by the cable.
3.2. CONNECTING TO THE ANTENNA
After installing your Antenna system, connect the coaxial cable from LNB of your
antenna to “DISH IN" terminal marked at the rear of the receiver.
All cable connectors should be finger tightened; do not use any kind of wrench on
cable over connectors.
The cable should be 75Ω impedance coaxial twisted at the end with an “F” type
connector.
3
. HOW TO CONNECT YOUR RECEIVER
Please DO NOT plug in the main power supply cord until you complete all the
connections.
2.3.
REMOTE CONTROL UNIT
REMOTE CONTROL UNIT
REMOTE CONTROL UNITREMOTE CONTROL UNIT
REMOTE CONTROL UNIT
HOW TO CONNECT YOUR RECEIVER
HOW TO CONNECT YOUR RECEIVERHOW TO CONNECT YOUR RECEIVER
HOW TO CONNECT YOUR RECEIVER
Page 7
4.
SYSTEM SET
-
UP
* P
ress the MENU key
to return to the previous menu,
while ru
nning the Installation
Wizard.
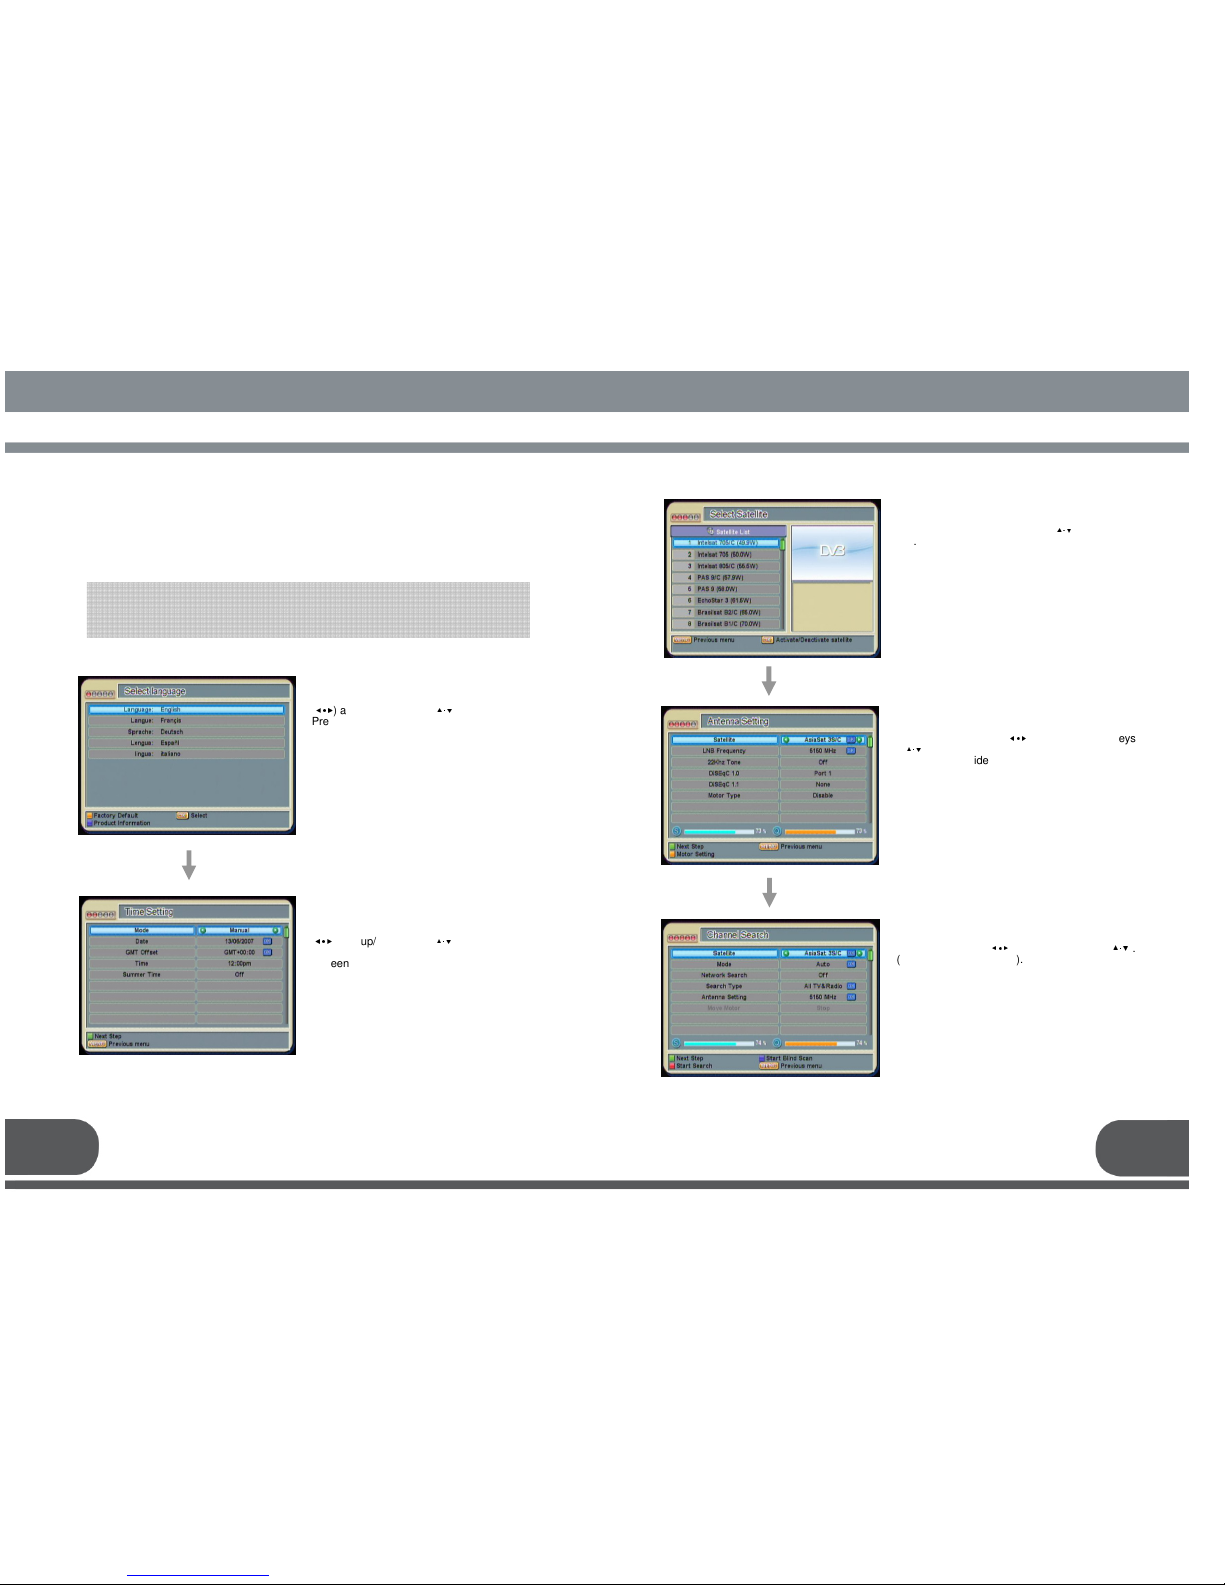
4.1. INSTALLATION WIZARD
When powering on your receiver for the first time, the installation Wizard will
starts automatically.
Please follow the installation wizard. This will assist you to complete the set-up
process. Without this process, the receiver will not work properly.
4.1.1. Select Language
4.1.2. Time Setting
Select a language by using the
left/right keys
(
◀∙▶
) and up/down keys (
▲·▼
).
Press OK key to save the selected language as
a default language.
This will also ch ange the language for the
menu.
* Yellow: Reset to settings from Factory
* Blue: Checking Receiver version
Set
Mode,
Date, GMT Offset, Time and
Daylight-saving by using the left/right keys
(
◀∙▶
) and up/down keys (
▲·▼
).
* Green: Go to the Next Step
SYSTEM SET
SYSTEM SETSYSTEM SET
SYSTEM SET
----
UP
UP UP
UP
11 12
4.1.3. Select Satellite
Select the appropriate Satellites from the
list by using the up/down keys (
▲·▼
) and ok
key.
* Green: Go to the Next Step
4.1.4. Antenna Setting
Set up the configurations on each satellites by
using the left/right (
◀∙▶
) and up/down keys
(
▲·▼
).
OK key will guide you to a list of options or the
sub-menu.
After the configuration, move to the Channel
Search menu by pushing the green key or
select the channel search button.
(For the specific information, refer to the
7.2.INSTALLATION).
* Green: Go to the Next Step
* Yellow: Motor Setting
4.1.5. Channel Search
Select a mode; Auto, Manual or Advanced by
using the left/right (
◀∙▶
) and up/down keys (
▲·▼
).
(Recommendation: Auto).
After the configuration, push the red key.
(For the specific information, refer to the
7.2. INSTALLATION).
* Green: Go to the Next Step
* Blue : Start Blind Scan.
Page 8
`
QUICK GUIDE TO MAJOR FUNCTIONS
QUICK GUIDE TO MAJOR FUNCTIONSQUICK GUIDE TO MAJOR FUNCTIONS
QUICK GUIDE TO MAJOR FUNCTIONS
13 14
5. QUICK GUIDE TO
MAJOR FUNCTIONS
This product has
two
USB Host port
s
. With this port, you can connect external device. This
connection will provides you with many different features. (Connection for HDD, Memory
Stick, or Digital Camera)
Formatting should be done first in order to record and capture.
Please refer to
▶▶▶▶
8.11 How to use USB(External storage)
This product, with external storage installed, enables you to record desired programs to
watch them for later. For simple recording or reserved recoding, please refer to
▶▶▶▶
9.2 Quick Record & 9.3 Reservation Record
Time Shift is a very useful function i n case you have to leave TV for a while but do n ot
want to miss a live program. Simply push PAUSE before you leave, and push PLAYBACK
after. Then you will be able to continue watching the live program. Please refer to
▶▶▶▶
9.1 Time Shift
You can watch Two or Three programs at the same time. The possible combinations are;
- Live + Live + Live : Same screen
- Playback + Live + Live : Same screen
Please refer to
▶▶▶▶
8.7 PIP (Picture in Picture)
Recording
Time Shift
A. Information Box
Please try to familiarize yourself with the Information Box. It provides helpful tools
and is also a way to control functions. Please refer to
▶▶▶▶
8.1 Information Box
B. Image Viewer
You can watch pictures from your camera or storage. (JPEG files only). It also enables
to capture image shots of a live program and watch them later. Please refer to
▶▶▶▶
7.4.3 Picture List & 7.4.4 Capture List
C. MP3 Player
To listen to music, push the MP3 Key on the Remote(RCU).
Please refer to
▶▶▶▶
7.4.2 MP3 List
D. Sleep / wake up
You can set a timer to turn on or off the receiver at a certain time. Please refer to
▶▶▶▶
7.3.3 Timer List & 8.5 Sleep Mode
USB Host
PIP (Picture in Picture)
Useful Tips
MMMMENU STRUCTURE
ENU STRUCTUREENU STRUCTURE
ENU STRUCTURE
6. MENU STRUCTURE
Page 9
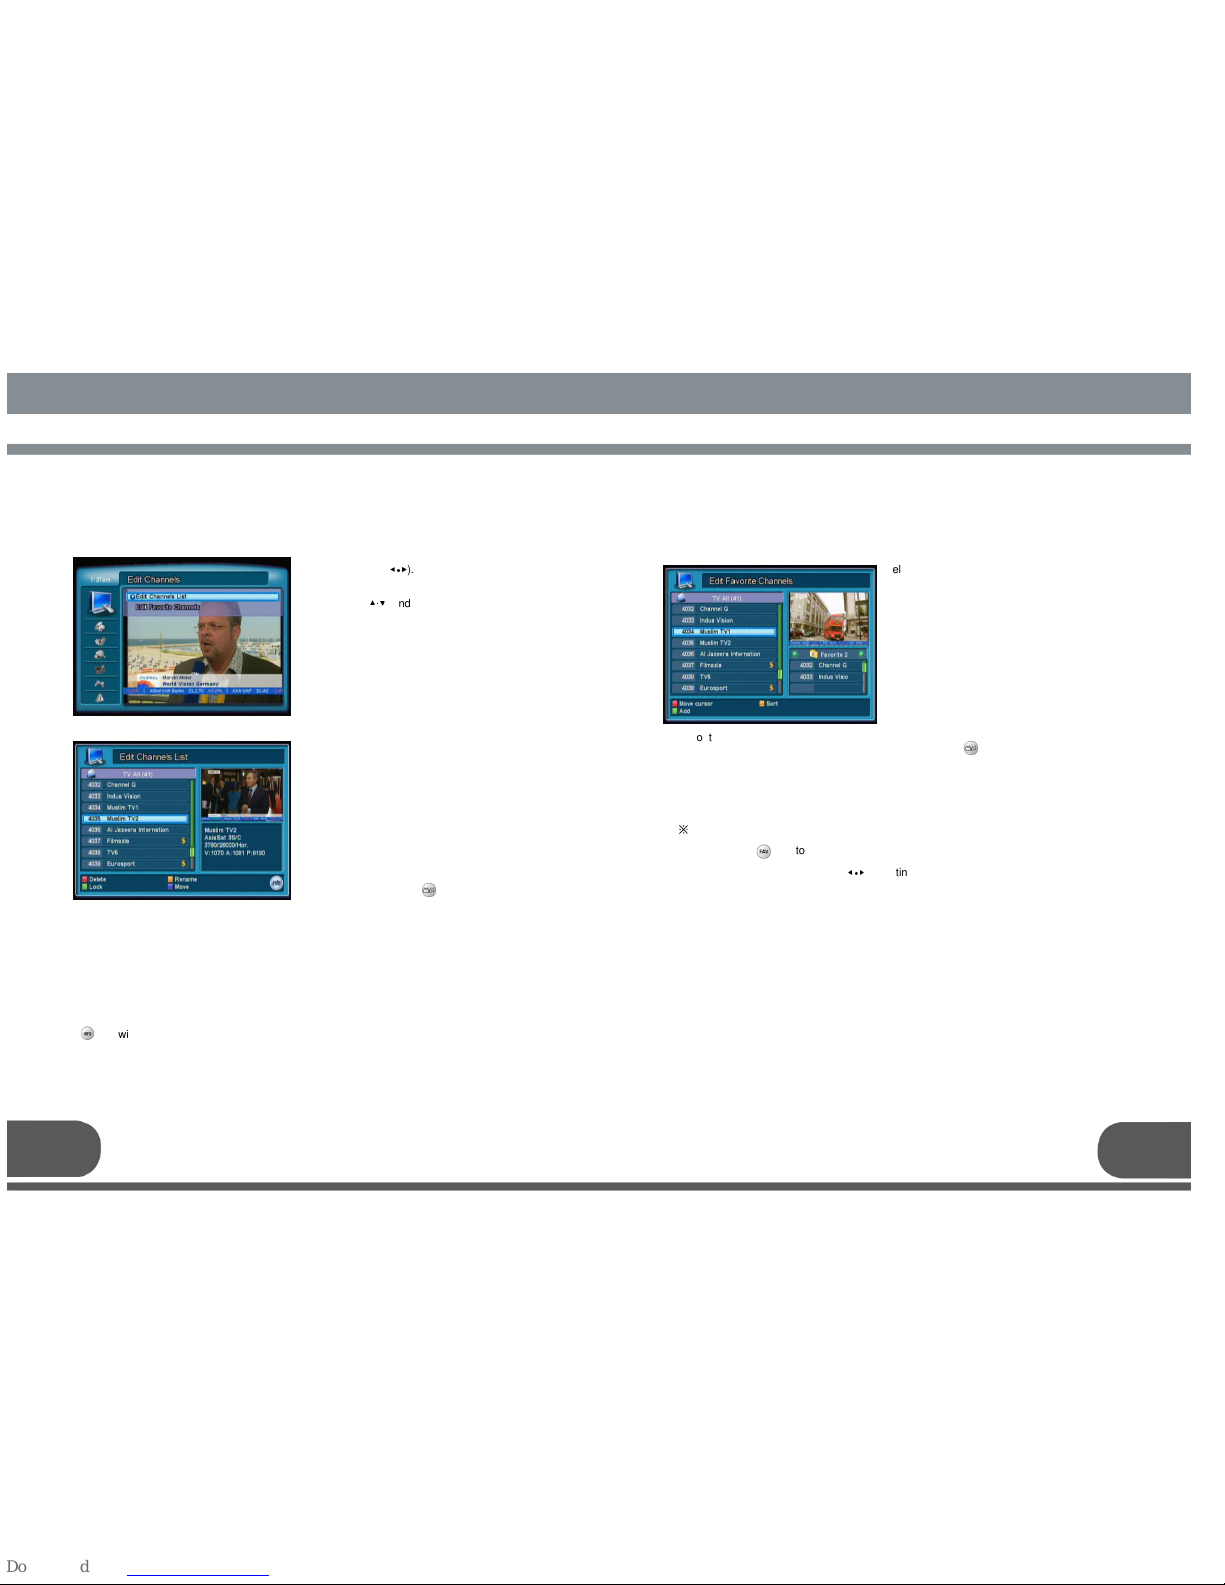
Select the Edit channels menu by using
the left/right keys(
◀∙▶
).
Move into the desired submenu by using
the up/down (
▲·▼
) and Ok key.
Press the MENU key to return to previous
menu.
7.1.1. Edit Channels List
7.1. EDIT CHANNELS
7
. MENU OPERATION
* Red: Delete channel
* Green: Lock / Unlock channel by PIN code
Once a channel is locked, every time you try to watch the program, you will be asked
to enter PIN code.
* Yellow: Rename a channel
It will show the keyboard, you can set a new channel name by using it.
* Blue: Change the position of the selected channel to an another position
* key will pop up a menu for Sort, Skip
Sort : Channels will be sorted by specific order.
Skip: A skipped channel will be marked as grey and passed while changing channels.
7.1.2. Edit Favorite Channels
[Adding
channel
s to a Favorite list]
- Point the cursor on the all channel list by using the Red key
- Push the Green key to add them to a favorite list
※ Tip :
- Adding a channel to several favorite lists :
Use key to select several favorite lists with OK key.
- Changing Favorite channel lists to be edited :
Use the left/right keys (
◀∙▶
), pointing the cursor on the favorite list.
[Deleting an channel from a Favorite list]
- Point the cursor on the favorite channel list by using the Red key
- Select desired channels and push the Green key to delete from a favorite list
[Other functions]
- Sort : Sort the list by Alphabetical order
- Rename Group: Rename a Favorite channel list by using the pop-up keyboard
Select
Edit Channels List
menu
in
Edit
Channels menu.
Entering into the Edit channel list, a PIN
code may be required. The factory default
PIN code is “0000”.
Edit channels; delete, lock a channel, or
edit the name of a channel etc.
To change between TV and Radio
Channel lists, push the Key.
Select
Edit Fav
orite Channels
menu
in
Edit Channels menu
Entering this menu, a PIN code may be
required. The factory default PIN code is
“0000”.
Edit a favorite channel list by adding or
deleting channels.
The left list shows all available channels.
The right list shows the channels in a
favorite list.
MENU OPERATION
MENU OPERATIONMENU OPERATION
MENU OPERATION
15
16
8 favorite lists can be generated as Favorite1 to Favorite 8.
To change between TV and Radio Channel lists, push the Key.
Page 10
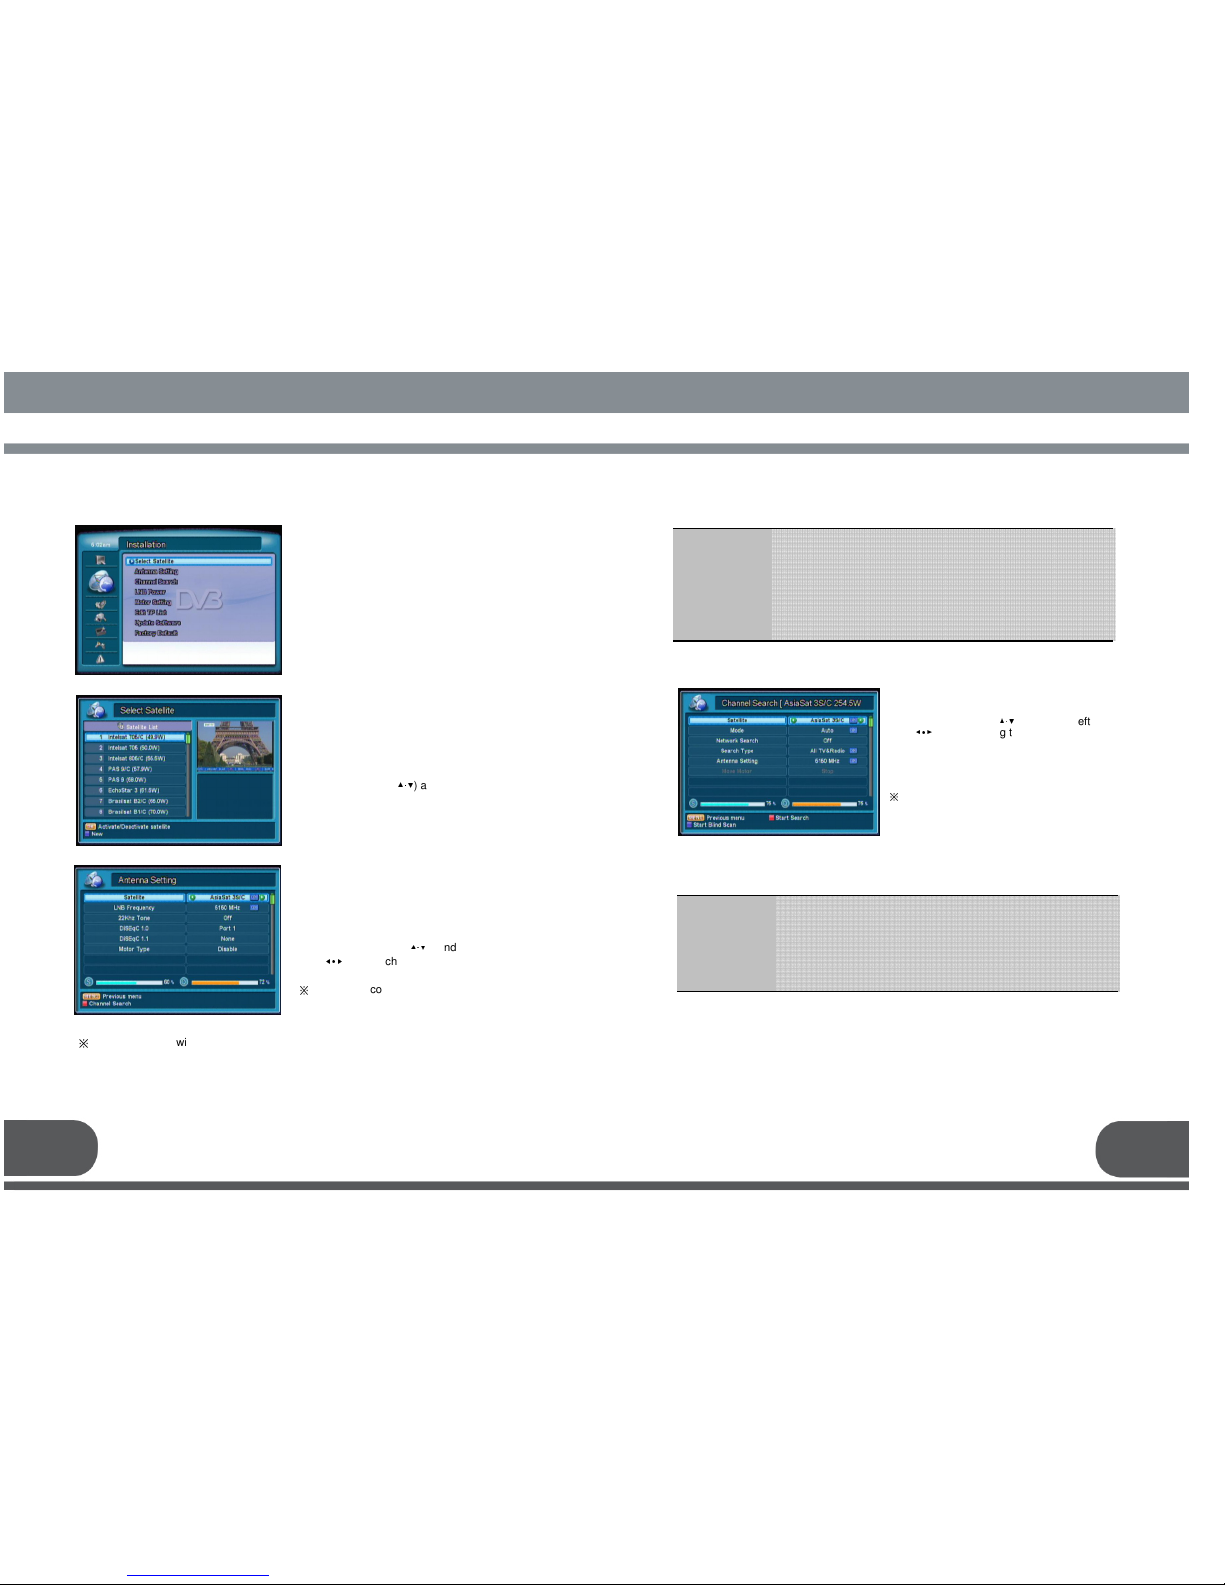
7.2. INSTALLATION
Installation
menu helps you to setup a
variety of parameters necessary f or receiving
signal, and reset the channel data, etc.
When you select each submenu in
Installation menu you may be asked to enter
your PIN code.
You can use submenus by entering it.
Push the MENU key to save it and return to
previous menu.
.
Mode
Network Search
Search Type
Move Motor
: Auto – All TPs to be searched (recommended).
Manual – A specific TP to be searched.
: Setting this on, unknown or new TPs to be searched.
: Select kinds of channels to be searched.
: drive your motor with checking the signal strength.
17 18
7.2.1. Select Satellite
Select Select Satellite menu in Installation
menu.
Your receiver is provided with
preprogrammed information of transponders
for various satellites.
Select desired satellites to activate by using
the up/down keys (
▲·▼
) and OK key.
To deactivate satellites, push OK key a gain
on the selected satellite.
* Blue : Add new name of satellite
7.2.2. Antenna Setting
Select Antenna Setting menu in Installation
menu.
Adjust the parameter at each submenu by
using the up/down (
▲·▼
) and the left/right
keys(
◀∙▶
) with checking the Quality and
Signal strength.
※
When OK icon available, push the OK key
to open the option list.
Satellite
LNB Frequency
22 KHz Tone
DiSEqC 1.0 &
DiSEqC 1.1
Motor Type
: Select a Satellite to setup
: Select a LNB Frequency.
: Turn on or off the 22KHz Tone out.
: Using DiSEqC 1.0 or 1.1 select a port number. Otherwise, select
None
: Select either 1.2 / USALS / Disable
Select
Channel Search
menu in
Installation
.
Adjust the parameters at each sub menu by
using the up/down (
▲·▼
) and t he left/right
keys(
◀∙▶
) with checking the Quality and
Signal strength.
After setting up all parameters, push Red key
to start searching channels
※
Caution: In case Signal and Quality bar is
colored in Grey, check the antenna
connection and parameters.
7.2.3. Channel Sea
rch
*
Blue: Start Blind Scan
: Blind Scan search the channel when you don’t know the transponder information. That
scan procedure may take a few minutes.
After setting up all parameters, push Red key to go to next step.
※
Refer to the following description for each parameter.
Page 11
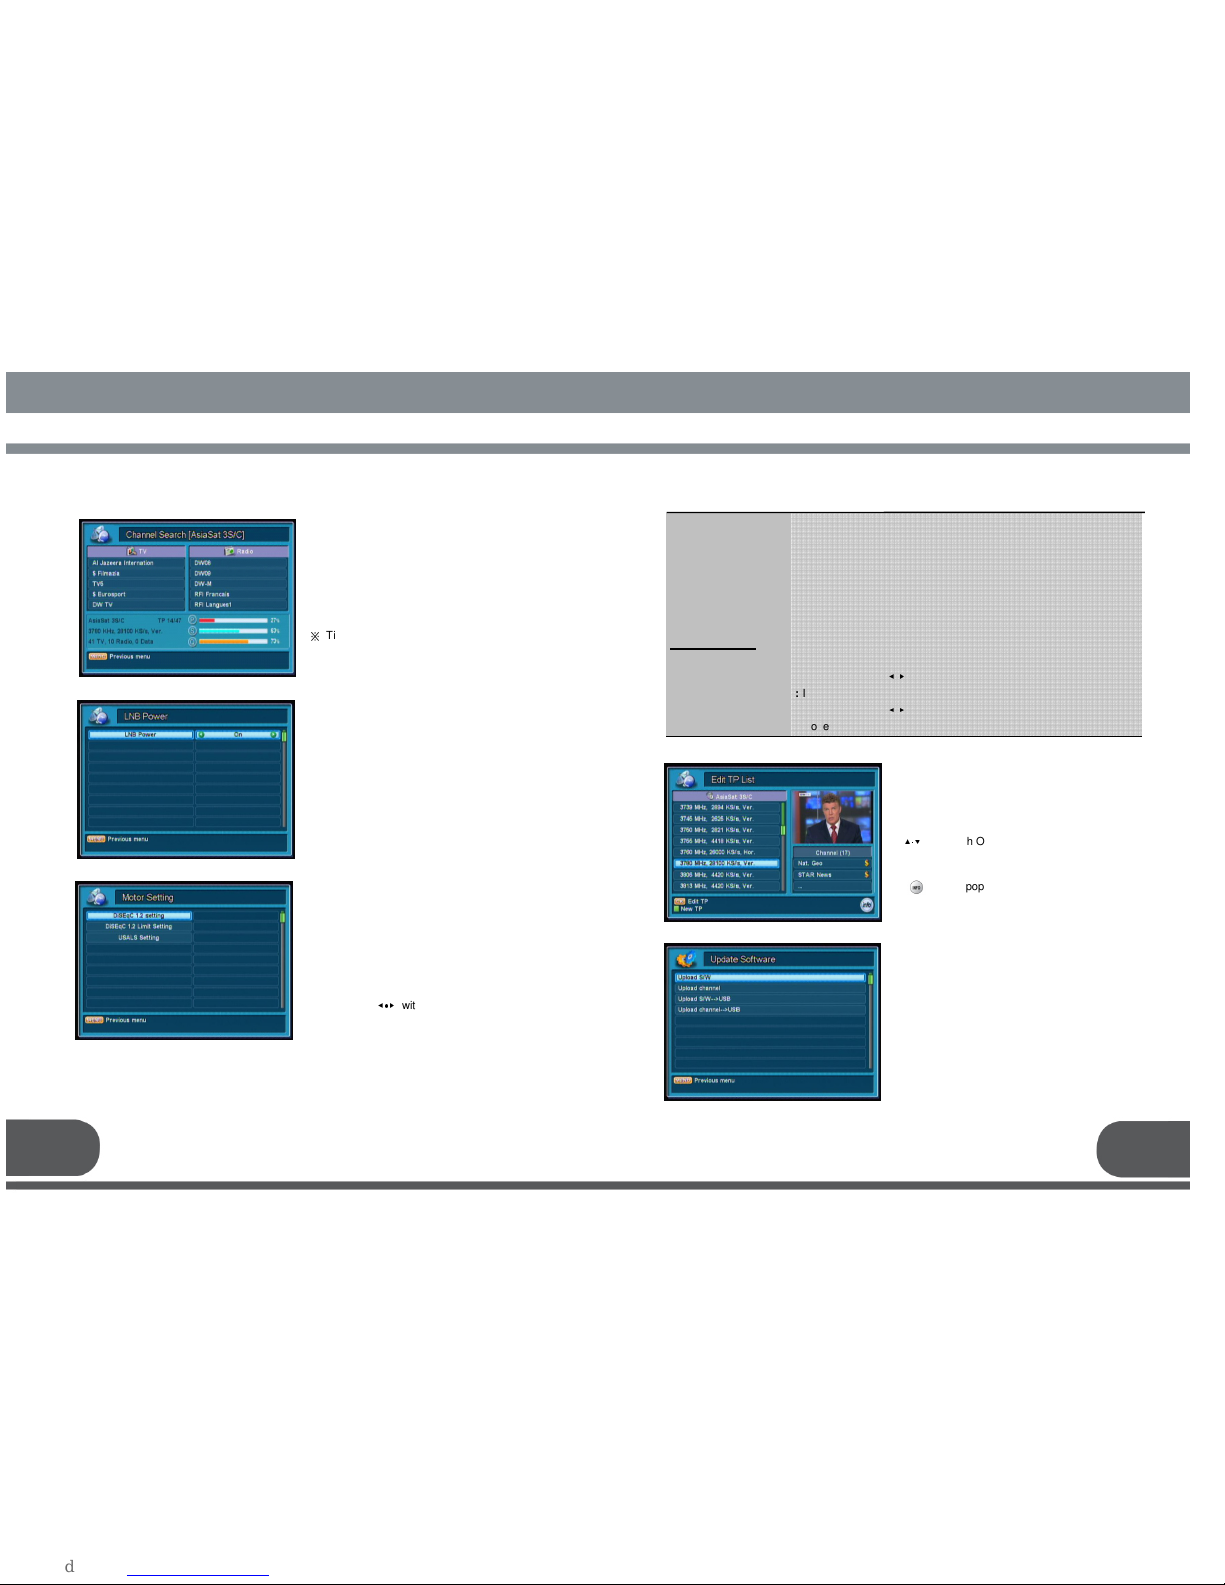
The
channel
searching process
takes a few
minutes.
It shows the searched TV channels on the
left and Radio channels on the right.
When the Progress bar reaches 100%,
searching process is done.
Push OK key to save and exit.
※
Tip : Exit key finishes searching anytime
with saving channel info searched by that
time.
7.2.4. LNB Power
Select LNB Power menu in Installation
menu.
Set LNB Power ON or OFF
(Available only for Splitter LNB)
7.2.5. Motor Setting
Select Motor Setting menu in Installation
menu.
If you have a DiSEqC 1.2 or USALS
motorized system, then you can take
advantage of the Motor control function.
You can drive your motor by using this
menu. Adjust antenna direction using the
left/right keys(
◀∙▶
) with checking the
signal strength.
Move Motor
Recalculation
East / West limit
Save current limit
Remove current limits
Motor central position
1.3(USALS) only
My Longitude
My Latitude
Goto
the
Position
: Move to East or West direction while pushing the left or right key.
: Apply the calibrated value to all Satellites.
: Set the limit position.
: Store the current position of the motor for the selected satellite.
: Remove the previous limit information.
: Move to center.
: Input a value of longitude by numeric keys and set W est or East by
the left/right keys(◀·▶).
: Input a value of longitude by numeric keys and set W est or East by
the left/right keys(◀·▶).
: Move the motor to the
position
as the input value.
7.2.6. Edit TP List
Select Edit TP List menu in Installation
menu.
You can select a satellite and edit the TP of
that.
Select a TP by using the up/down keys
(
▲·▼
) and push OK key.
Edit the TP data by using numeric keys.
* Green: Add New TP
* key will pop up a menu for selecting
satellite.
7.2.7. Update Software
You can upload your software and
channel data from Receiver to PC or
USB memory through a serial cable or a
USB cable.
Please contact the distributor. They will
provide you with useful information about
this.
19 20
Page 12
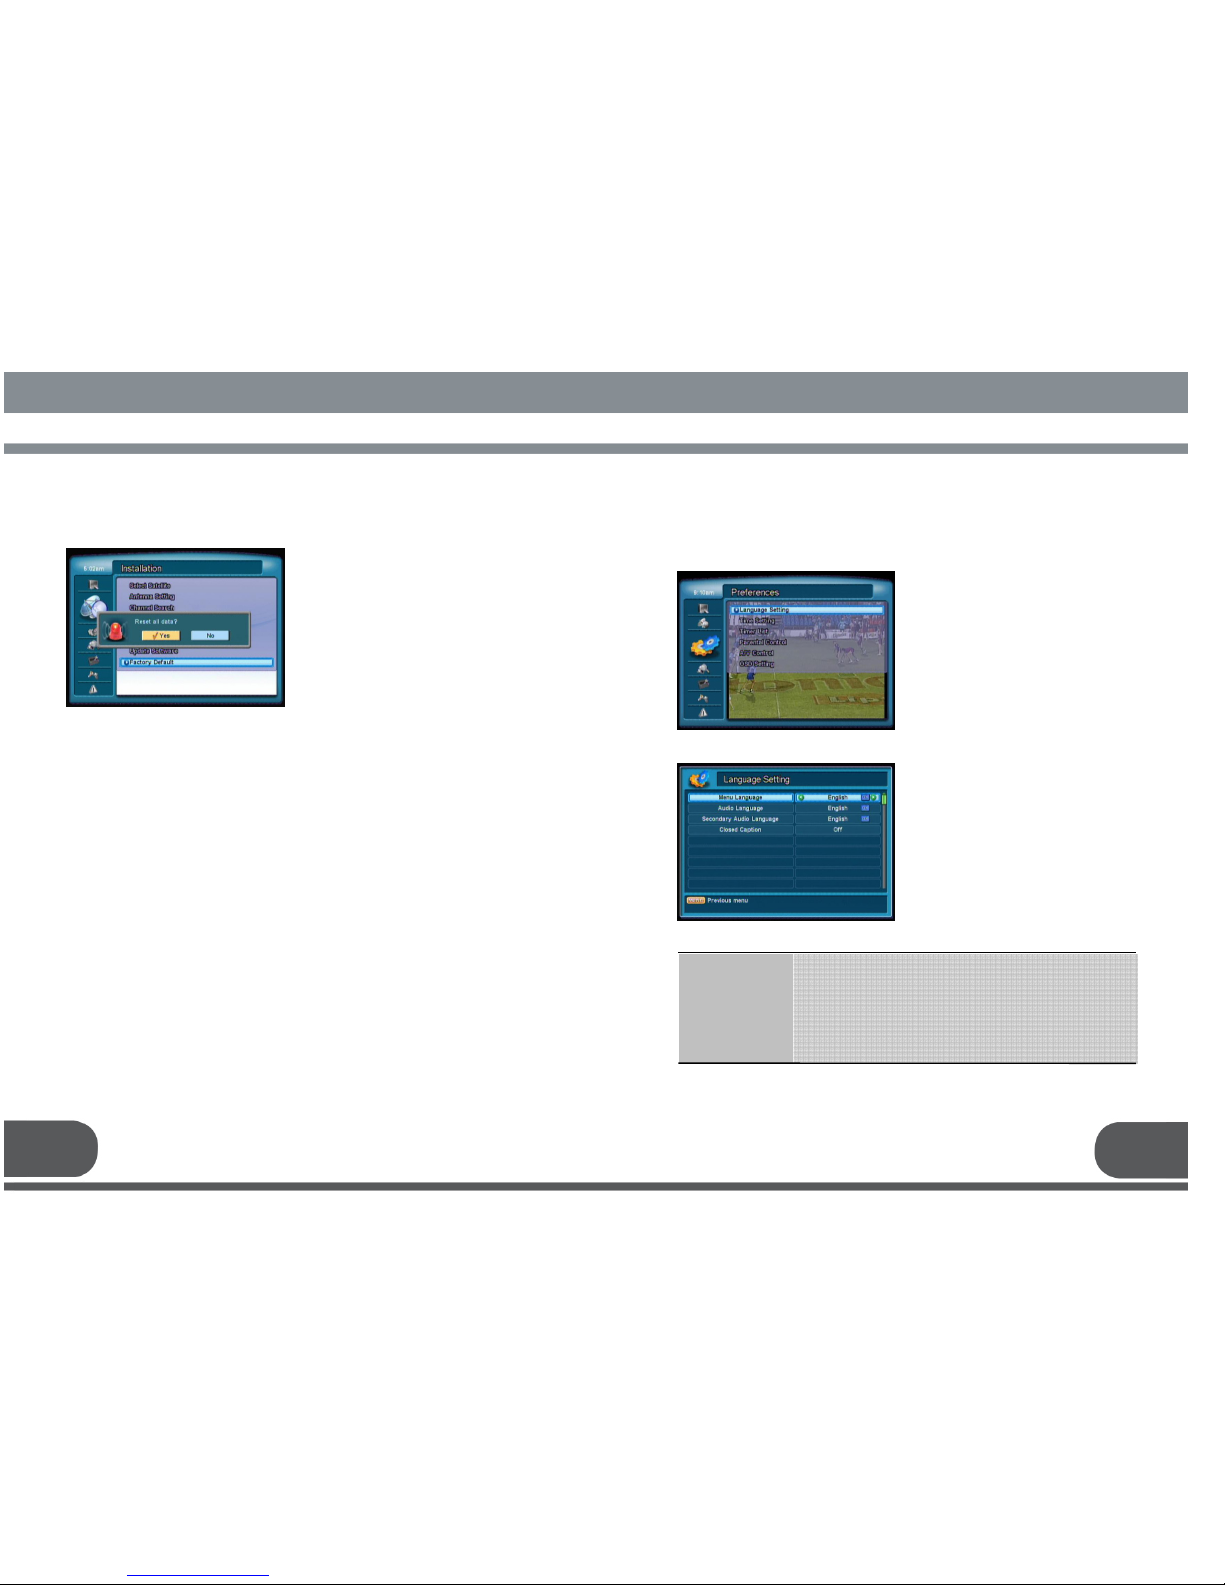
: Choose a language for the menu.
: Choose a language for the primary Audio. If several audio
languages are available on a certain event, this language shall be
used as default.
: Choose a language for the secondary Audio.
: Enable or disable the Closed Caption
Menu Language
Audio Language
Secondary Audio
Language
Closed Caption
7.3. PREFERENCES
7.3.1. Language Setting
Select Language Setting menu in the
Preferences menu.
This menu helps you to set up Menu
Language, Audio Language, Closed
Caption.
Preferences
menu helps you to
set up
Language, Time, Timer List, Parental
Control, A/V Control, and OSD Setting.
Push the MENU key to save and return to
the previous menu.
7.2.8. Factory default
Select Factory default menu in Installation
This is to initialize back to the factory
default, in case of any problems after
changing values of channel data and
others.
For the factory default, select Yes and
push Ok key. This process may take a few
seconds.
21 22
Page 13
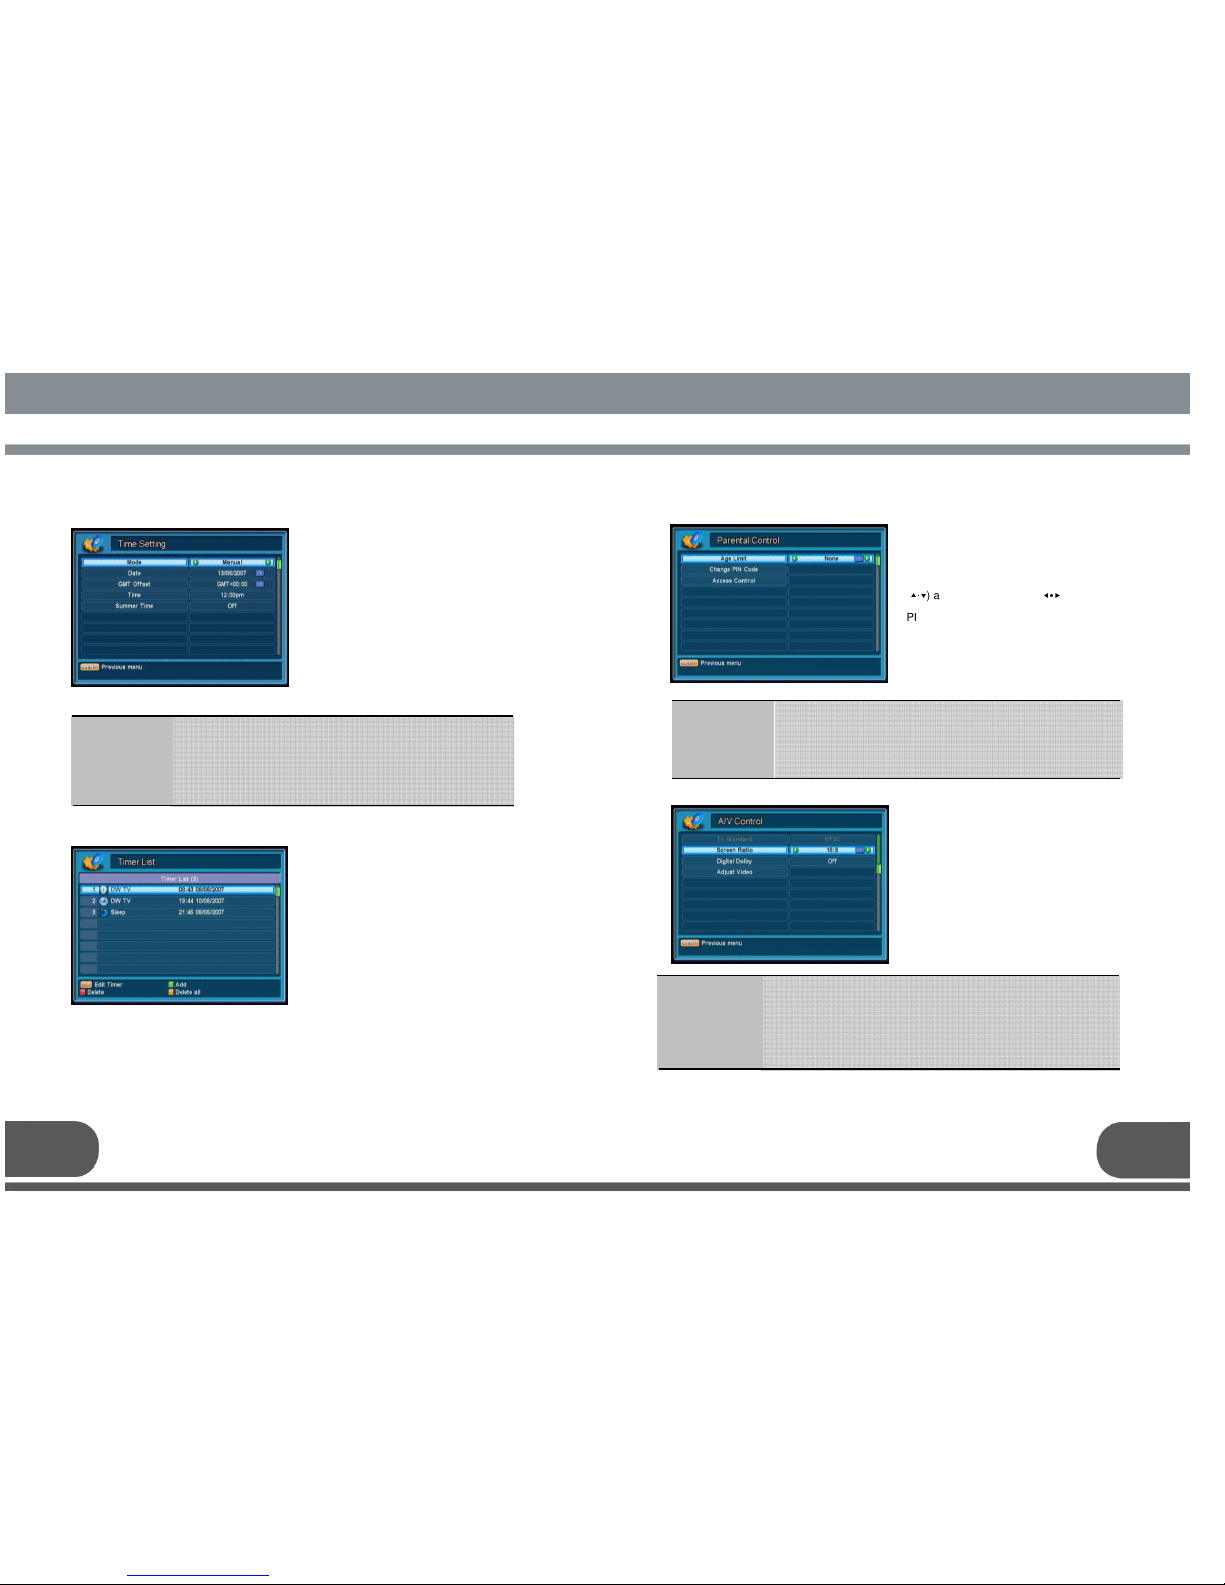
7.3.2. Time Setting
Select
Time Settings
menu
in the
Preference menu.
Adjust the date and time.
Push the MENU key to return to the
previous menu.
7.3.3. Timer List
Select Timer List menu in Preferences
menu.
This menu helps you to set sleep and
wake up time or reserve a recording.
Push OK k ey to edit a reservation. In the
submenu, set a reservation and push the
red key to save.
Once, Daily, or Weekly options are
available.
(Please refer to the 9.3.1. Reservation
record in Timer List ).
* Green : add a reservation
* Red: Delete a scheduled timer
* Yellow: Delete all timers
7.3.4. Parental Control
Select Parental Control menu in
Preferences menu.
This menu helps you to set the age limit,
change PIN code, lock menu and
channels by using the up/down keys
(
▲·▼
) and the left/right keys(
◀∙▶
).
PIN code shall be asked;
- on the menu, or channel which is
locked.
- on the event that maturity rating is
above the age limit.
7.3.5. A/V Control
Select A/V Control menu in Preferences
menu.
This menu helps you to control the
characteristics of Audio and Video.
: Select Auto, PAL, or NTSC type.
: Select Auto, 4:3, 16:9, or Center mode.
: On – If a program supports Dolby Digital stream out, Dolby Digital will
be selected automatically.
Off – User has to select “Mono” & “Stereo” manually.
: Adjust the Brightness, Color, or Contrast.
TV Standard
Screen Ratio
Digital Dolby
Adjust Video
: Set a limit of age to allow watching.
: Set a new PIN code.
: Lock / unlock each menu or Enable / disable the channel lock
function.
To lock a channel, go to the Edit Channels List menu.
Age Limit
Change PIN Code
Access Control
23 24
: Auto – Time will be set by broadcasting information.
Manual – Set time manually.
: The current date is indicated.
: Set the time offset from the UTC (GMT).
: The current time is indicated.
:
Enable or disable the
summer time
Mode
Date
GMT Offset
Time
Summer time
Page 14
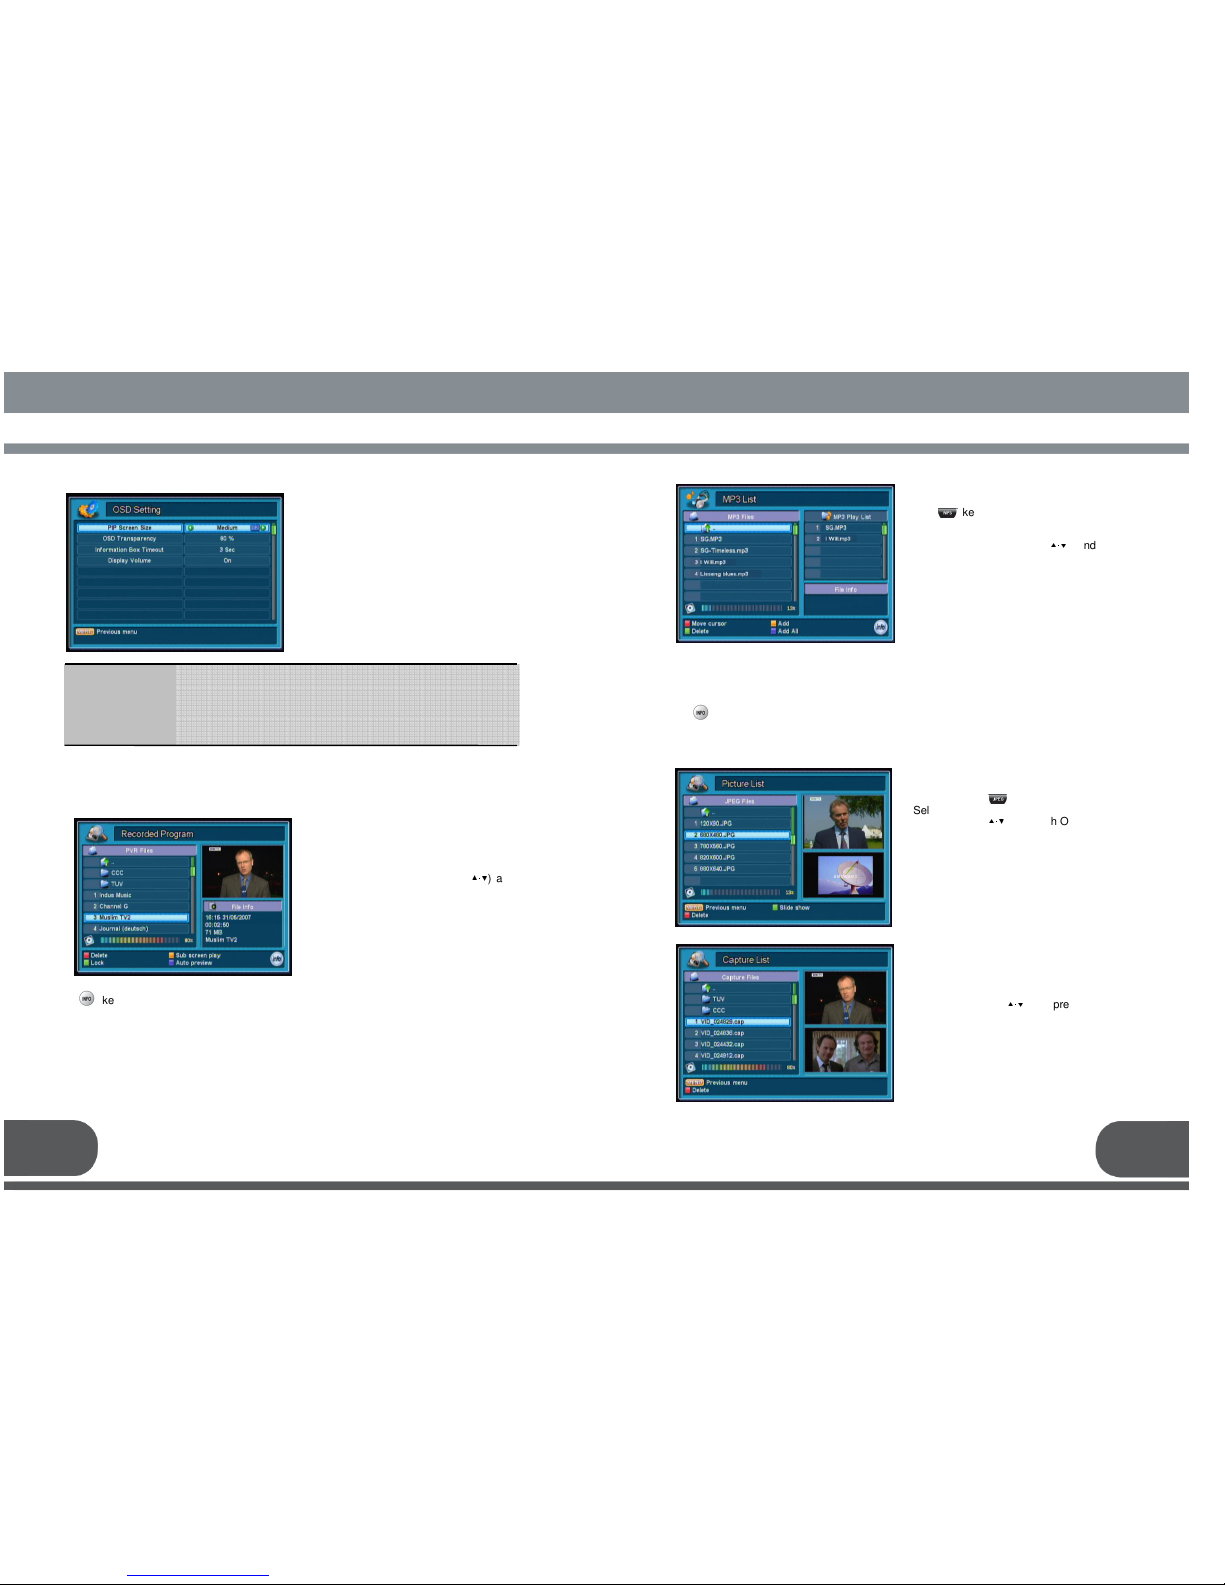
7.3.6. OSD Setting
Select OSD Setting menu in Preferences
menu.
This menu helps you to control OSD
setting.
: Select PIP screen size (Extra Small, Small, Medium, or Large).
: Select transparency from 10% to 100%.
: Select T imeout for the Information Box from 3 sec to 30 sec, or
Always.
: You can select OFF or ON for the display of volume indicator.
PIP Screen Size
OSD Transparency
Information Box
Timeout
Display Volume
7.4.1. Recorded Program
Select Recorded Program menu in
Record menu.
You can select the recorded data o n the
list by using the up/down keys (
▲·▼
)
and
OK key. Then you will see the recorded
program on the main screen.
* Red: Delete each recorded program
* Green: Lock / Unlock recorded program
* Yellow: Play the recorded program in the
PIP screen with the main live channel.
* Blue: Open/ close the recorded program
on the small screen for a preview.
7.4. RECORD (External Storage may need to be connected)
* k ey will pop up a small
window for the below functions
- Sort: Sort the recorded data.
- Rename : Edit name of folder or file.
- Export: Export recorded program to FAT file system of your external storage.
Please refer to the 8.11 HOW TO USE USB(External storage) .
- Make folder : Make a new folder.
- Move to folder : You can move a file to a desired folder.
7.4.
2. MP3 List
Select MP3 List menu in Record menu or
push key.
You can enjoy listening to music in this
function. Select MP3 files on the list by
using the up/down keys (
▲·▼
) and play
music by pressing OK key. Or you can
make a play list.
* Red: Move the cursor between the MP3
File list and the Play list.
< MP3 Files >
* Green : Delete a MP3 file on the list
* Yellow : Add the selected file to the Play
list.
* Blue : Add all the files to the Play list.
7.4.
4.
Capture List
Select Capture List menu in Record
menu.
Select a captured file on the list by using
the up/down keys (
▲·▼
) and press OK key
for a Full screen image.
* Red: Delete each image on the list
.
7.4.
3. Picture L
i
st
Select Picture List menu in Record
menu or press key.
Select a image file on the list by using the
up/down keys (
▲·▼
) and push OK key for a
full screen image.
* Red: Delete each JPEG image on the
list
* Green: Show Slide JPEG image
25 26
< MP3 Play List >
* Green: Delete a MP3 file on the play list. * Yellow : Delete all MP3 files on the play list.
* Blue : Shuffle play list.
* k ey will pop up
Repeat On/Off : Enable/disable repeating the play.
Sort : Sort the MP3 files on the list.
Page 15
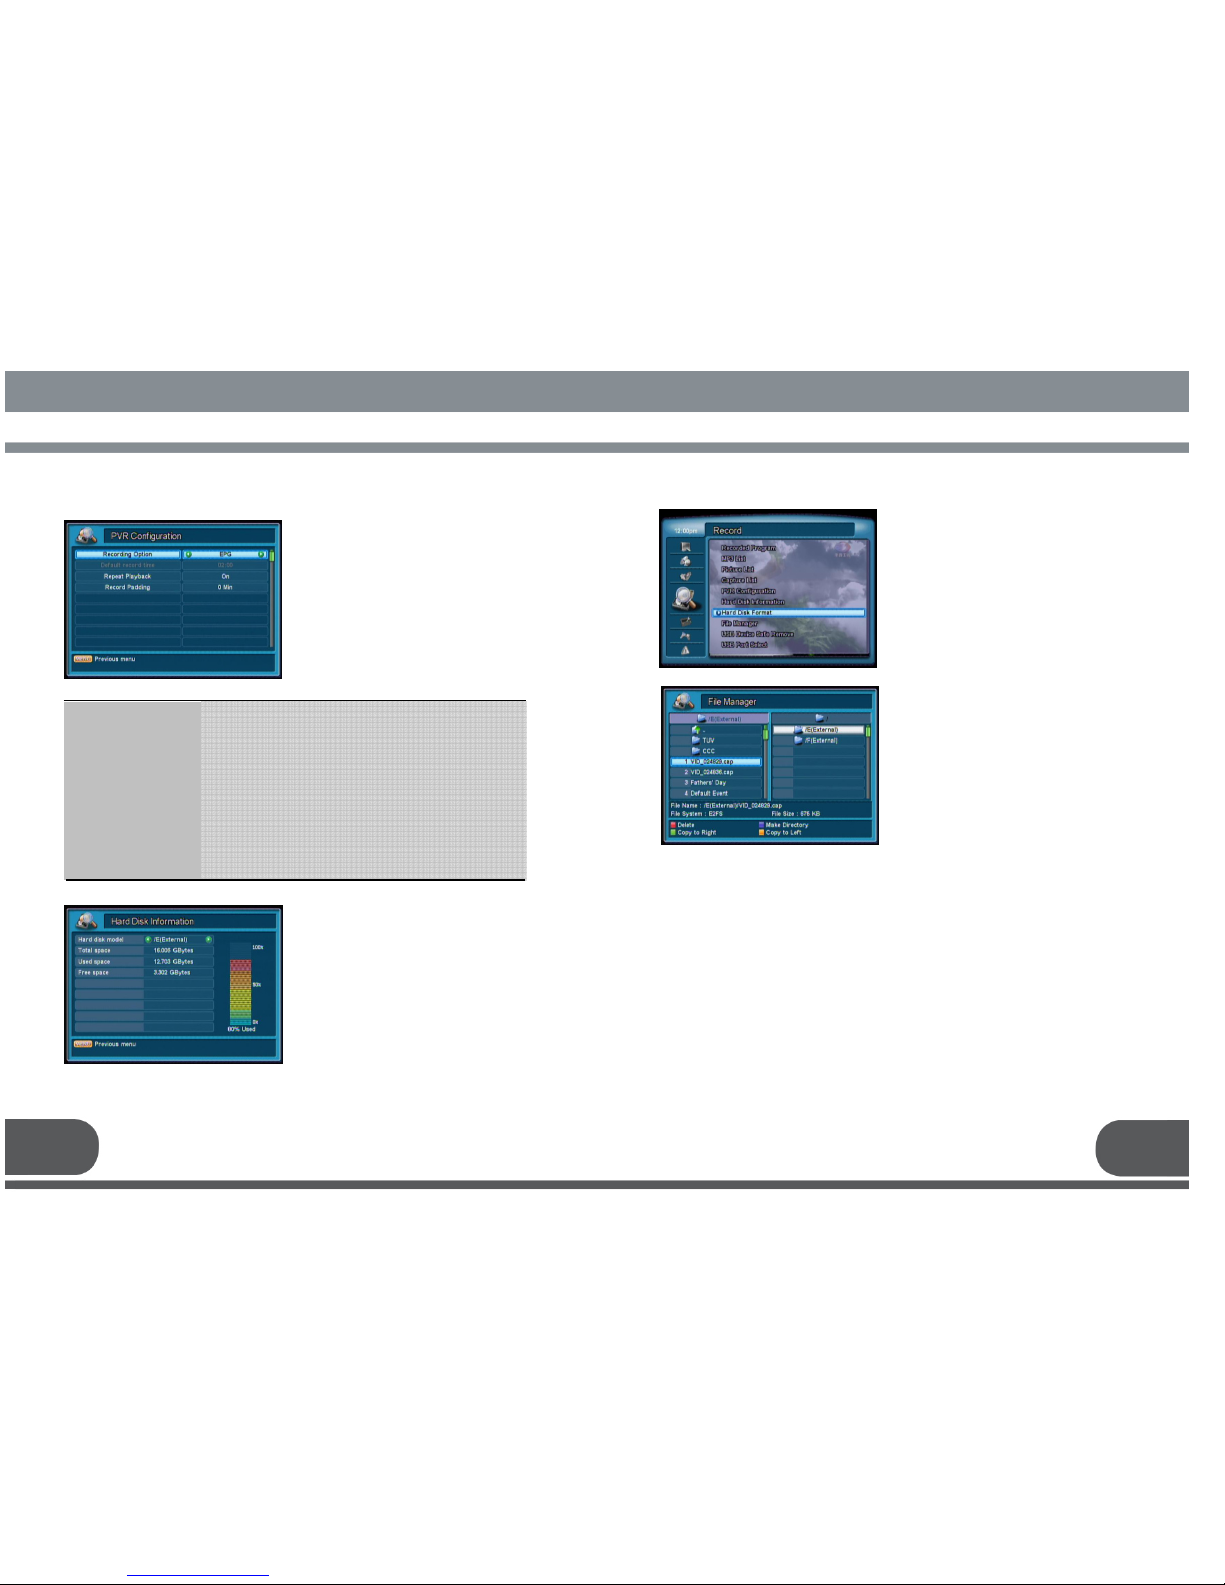
: Select EPG or Time for recording time.
EPG – Recording will be finished automatically after a current
program.
Time –.Recording time will be decided by pre-selected time
option.
: Set default recording time.(Recording Option should be left as
“Time” to use this feature.)
: Enable or disable repeating playback.
: Record Padding is to add additional recoding time to
reservation time. (E.g.: Record from 19:00 to 20:00 and
padding time is 5minutes. Then the actual recording time will
be from 18:55 to 20:05)
Recording Option
Default record time
Repeat Playback
Record Padding
7.4.
5. PVR Configuration
Select PVR Configuration menu in
Record menu.
You can set the PVR Configuration by
using this menu.
7.4.
6. Hard Disk Information
Select Hard Disk Information menu to
check installed hard disk information such
as Hard disk model name, total space,
used space, and free space.
7.4.
7. Hard Disk
Format
If you want to format your Hard Disk,
push OK key.
The PIN code is required before
formatting.
Formatting Hard Disk will delete all data
and recorded files in Hard disk
permanently.
A new Hard Disk should be formatted
before use.
.
7.4.
8. File Manager
Select File Manager menu in Record
menu.
This function helps you to manage your
files on the Hard Disk.
* Red: Delete file in the directory
* Green: Copy file from Left to Right
* Yellow: Copy file from Right to Left
* Blue: Make Directory
27 28
Page 16
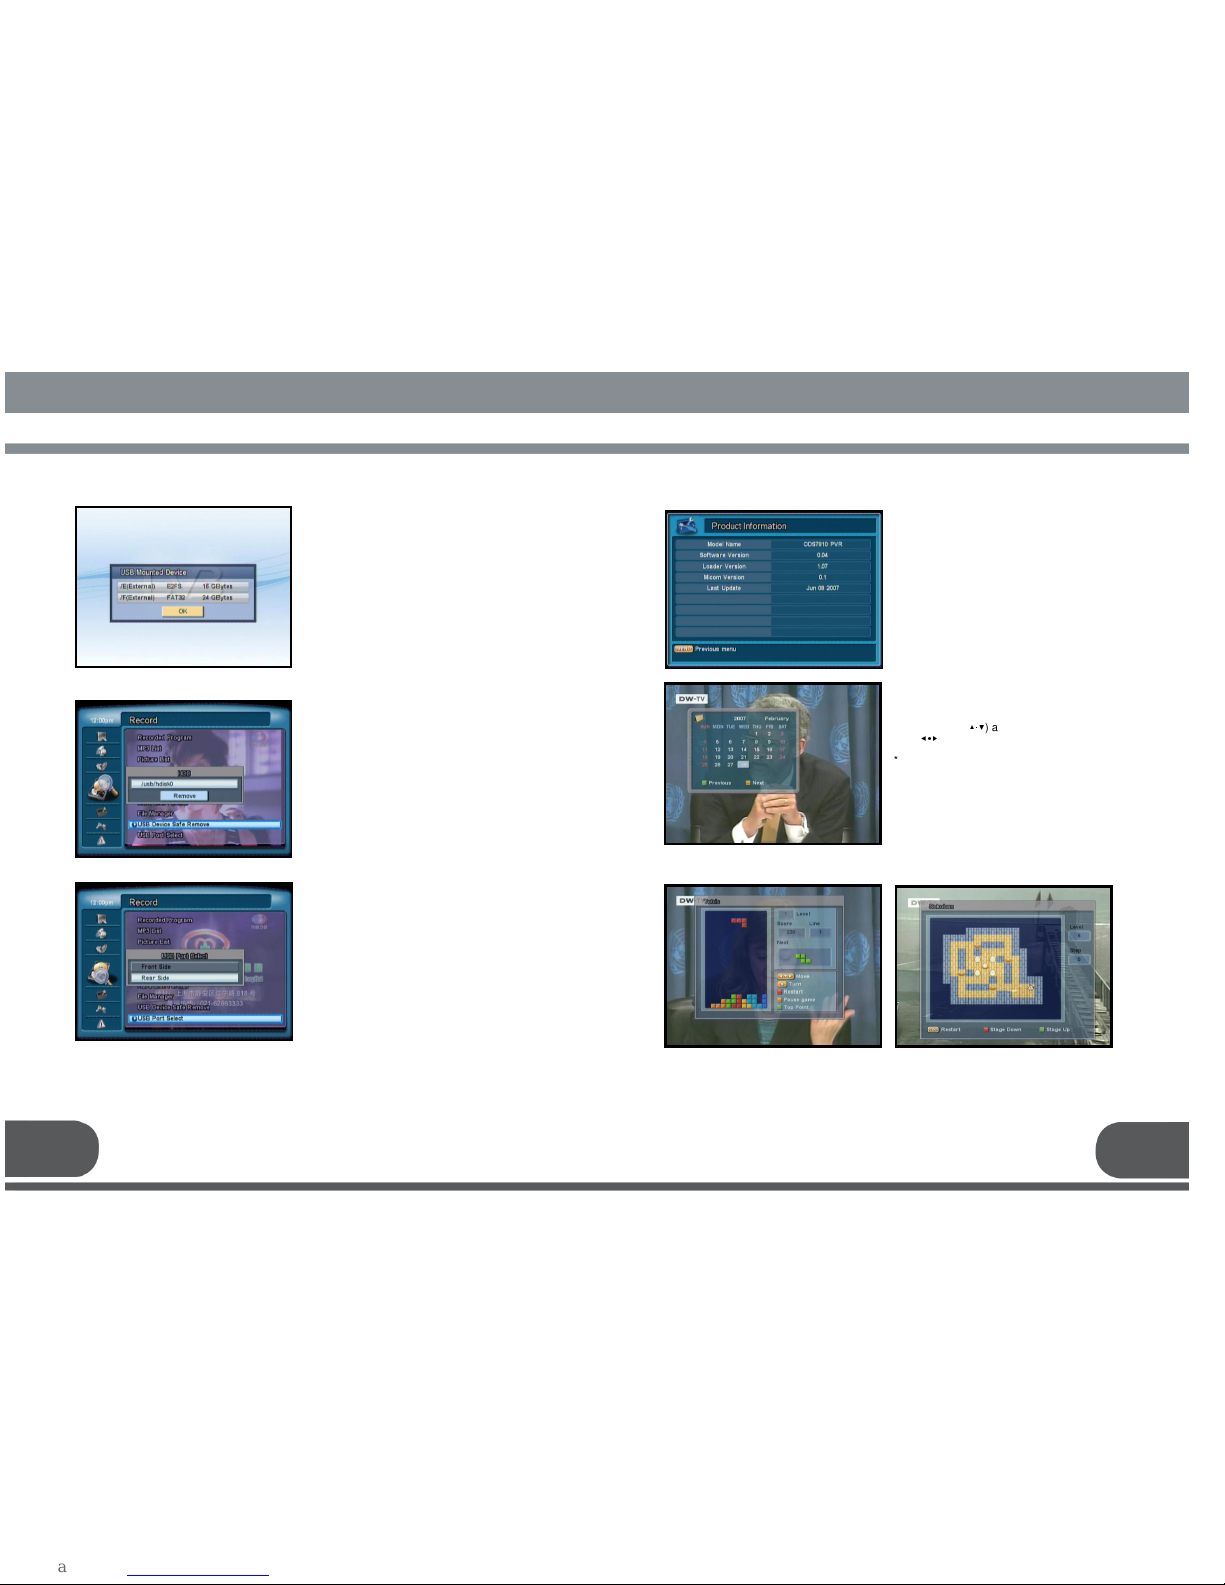
7.4.
9. USB Device Safe Remove
Portable HDD, memory stick or MP3
player can be used as storage for the
receiver. Simply connect the device to the
receiver by using a USB cable. It will be
automatically set up for use.
Firstly, connect your USB device to USB
host port of the receiver.
Then device information will be displayed.
You can check data in the device with
File Manger (refer to the 7.4.8. File
Manager).
Two arcade games are provided;
- Tetris
- Sokoban
7.5. STATUS
7.5.
1. Product Information
This menu helps you to check model
name, current version of S/W, loader,
micom, and last updated date.
7.5.
2. Calendar
This calendar can be used with the
up/down keys (
▲·▼
) and left/right
keys(
◀∙▶
).
* Green: Previous month
* Yellow: Next month
7.6. ENTERTAINMENT
To remove
USB device from your
receiver, please select USB Device
Safe Remove menu in Record menu
before you remove it.
This menu helps you to remove USB
device safely.
*Note: If you do not practice this step
before removing your USB device, the
device might not be recognized next
time.
Then, reboot your receiver.
29 30
7.4.
10.
USB
Port Select
The USB will not recognize any other
device if it is not identical between
selected one in the menu and inserted
one in the receiver.
Rear side selected at the factory
production.
Page 17
Live channel
PIP channel
Timeshift channel
Recording 1 & 2
Playback 1 & 2
MP3 Play
8.2. PROGRAM GUIDE
8. ADDITIONAL OPERATION
To check the program information, push
the k ey.
Program information will be available only
when it is
being provided by broadcasters.
The detailed description of programs such
as start/end time and title of events will be
displayed.
To change the channels, use the up/down
keys (
▲·▼
)
To change the time, use the left/right
keys(
◀∙▶
).
The left is the single
channel
guide.
To change the channel, use the left/right
keys(
◀∙▶
).
To change the time, use the up/down keys
(
▲·▼
)
Push key, MENU key or EXIT key to
return to TV or previous menu.
* Red: Return to the multi channel guide
* Green: Show schedules of previous Day
* Yellow: Show schedules of next day
* Blue: Reserve the selected event for
Wake-up or Recording.
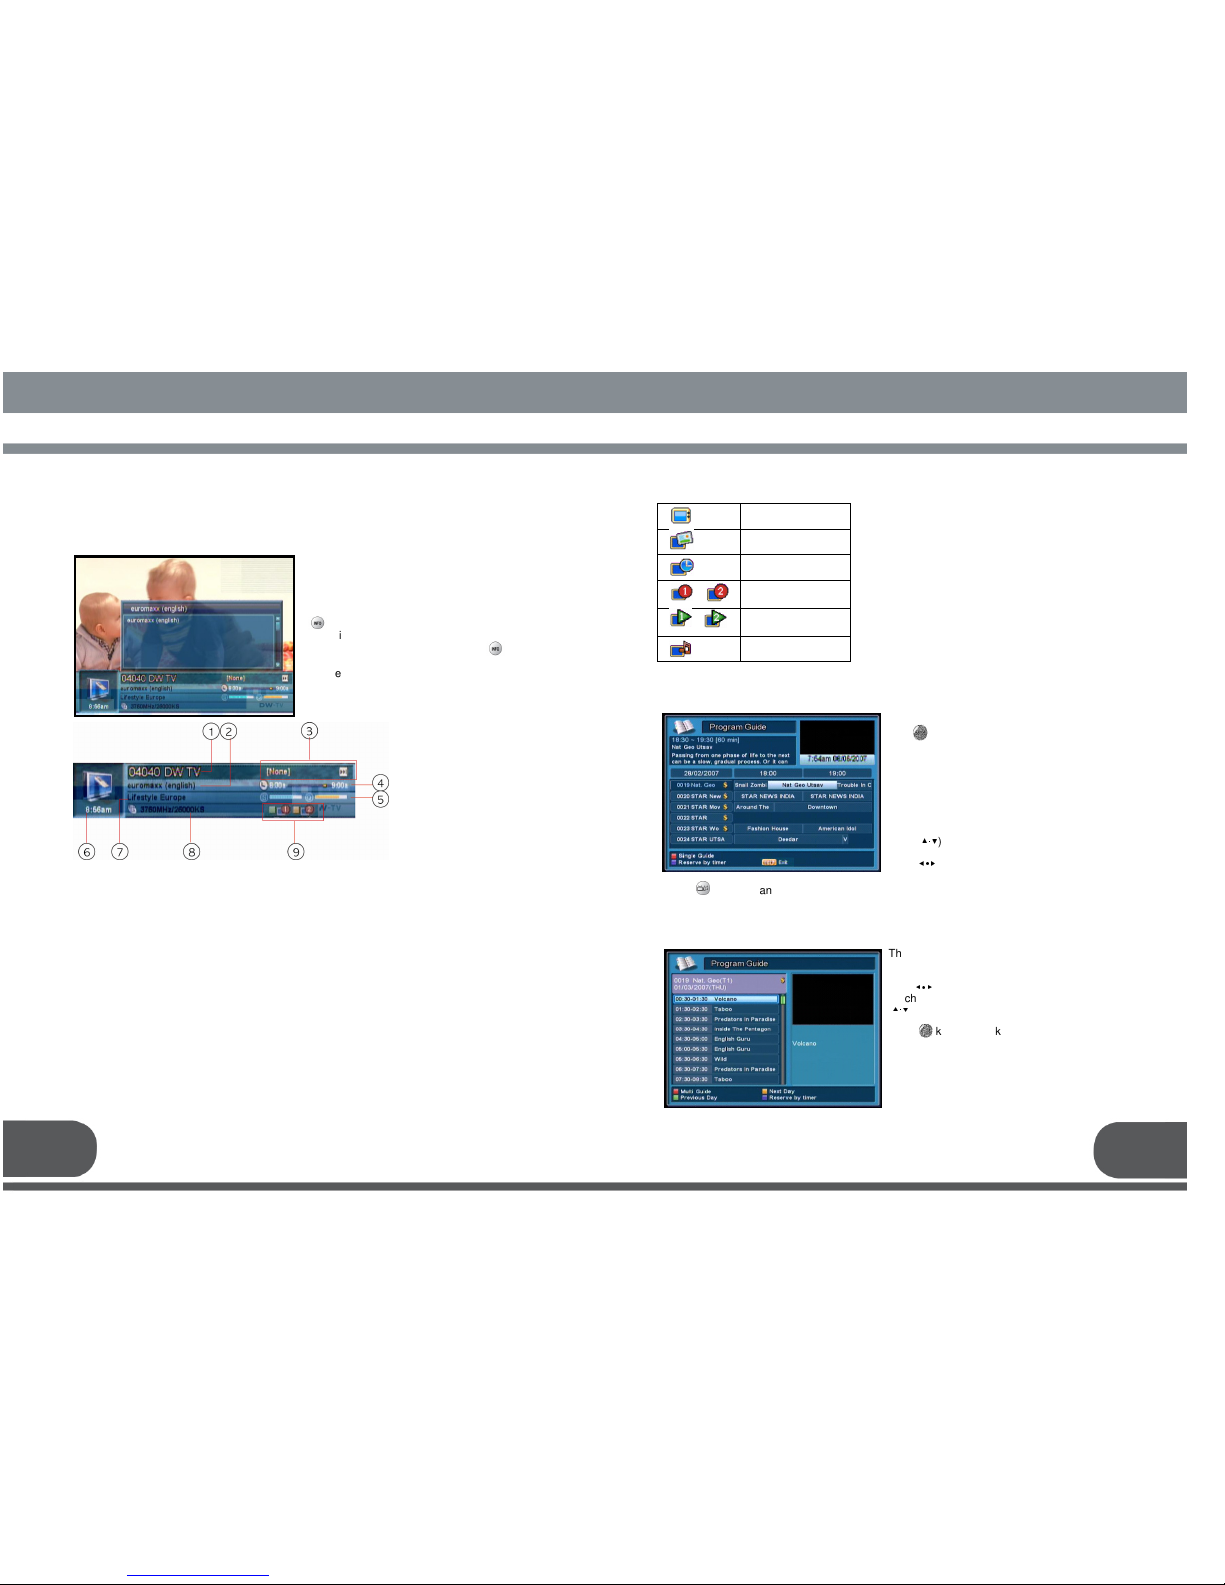
8.1. INFORMATION BOX
1
. Channel
No. and Name
2. Name of Event
3. Information icons
: These icons give you the current channel information. Each icons indicate status
or availability as followings;
1) Status of recording
2) Parent control (age limit)
3) Scrambled Channel
4) Locked Channel
4. Progress of Event
5. Signal and Quality strength
6. Current Time
7. Event information
8. Antenna information
9. Additional service status
: The icons show the currently running services. To check each service information,
push the colored button.
Refer to the following descriptions for each icons;
When channel changes, information box
will show up and disappear after 3 secs
(To change the duration of show-up,
please refer to 7.3.6 OSD Setting ).
To open the information box, push the
key.
While information box is open, extended
information will be available with the
key.
Exit key can be used to close the
information box or the extended
information window.
5
) Dolby
6) Secondary Audio
7) Next event information
Push key
to change between TV or Radio guide
.
* Red: Change into the single channel guide of the current channel
* Blue: Reserve the selected event for Wake-up or Recording
(Please refer to the 9. HOW TO RECORD & PLAYBACK)
31 32
ADDITIONAL
ADDITIONAL ADDITIONAL
ADDITIONAL OPERATION
OPERATIONOPERATION
OPERATION
Page 18
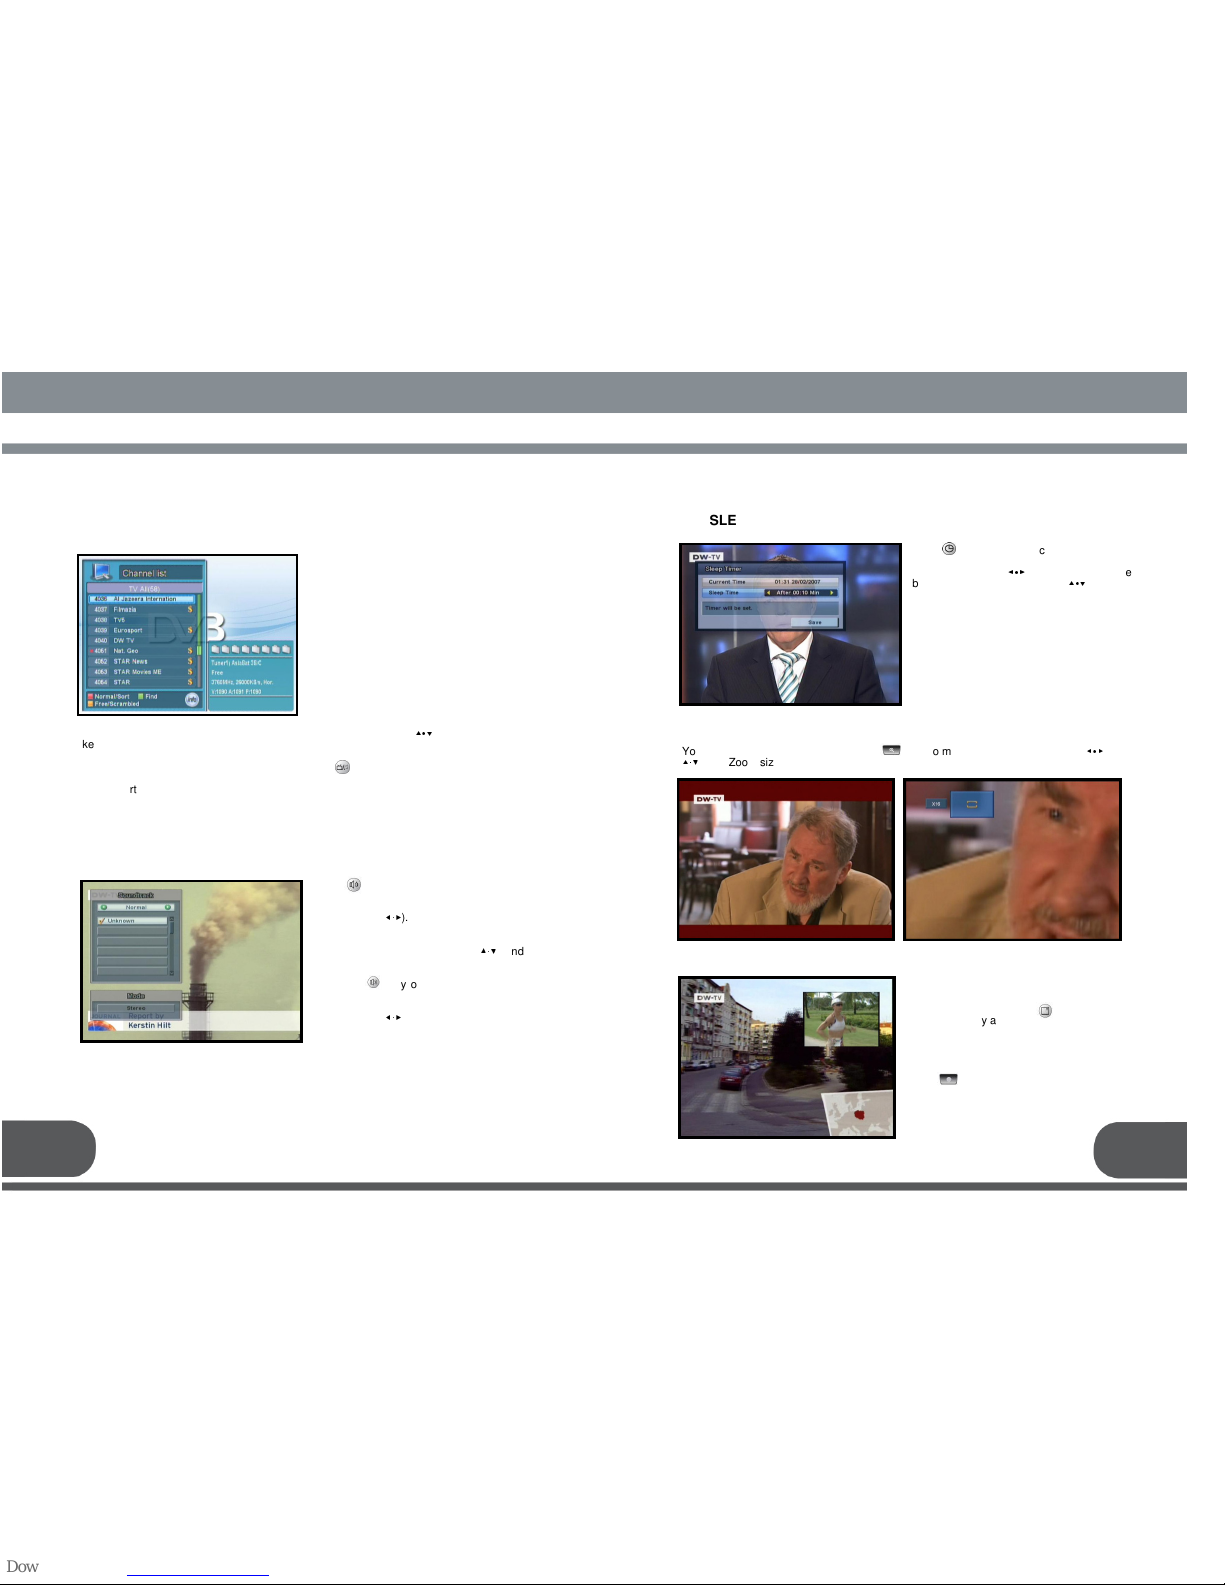
P
ush
key
on live channel
and the
Audio list will be displayed.
Select a desired audio level by using the
left/right keys (
◀·▶
).
Select a desired audio language from the
list by using the up/down keys (
▲·▼
) and
OK key.
You push key once more, the cursor
moves to another window. It enables you
to select an audio mode by using the
left/right keys (
◀·▶
).
You ca
n zoom in o
n the screen by using
k
ey. To move the zooming part, use (
◀∙▶
,
▲·▼
) key. Zoom size increases as two steps, x4 and x16.
This menu helps you to easily select the
channel that you wish to watch.
Push OK key on live channel, and the
channel list will be displayed.
The list provides information such as
channel number, channel name, and if the
program is scrambled or locked.
To watch a specific channel, select it
by
using
the up/down keys (
▲∙▼
). Then p
ush
OK
key.
If you push OK key again, the list disappears.
To change the list between TV and Radio, use the key.
* Red: Sort the channels by Alphabet
* Green: Find a channel name manually
* Yellow: Sort out Free or Scrambled channels only
8.3.
CHANNEL LIST
8.4. AUDIO LANGUAGE
8.7. PIP (Picture In Picture)
8.6. ZOOM FUNCTION
P
ush
key
on the live channel to set the
sleep timer.
Use left/right k eys(
◀∙▶
) and push the Save
button by using up/down keys (
▲∙▼
) and OK
key.
8.5. SLEEP MODE
You can wat
ch two channels
(or three channels
from a same TP) at the same time.
To use this function, push key.
Pushing this key again, two channels will be
showed as the same size.
You can record PIP channel.
Select the PIP screen by using a color key
from the channel information box.
Push key to record.
33 34
Page 19
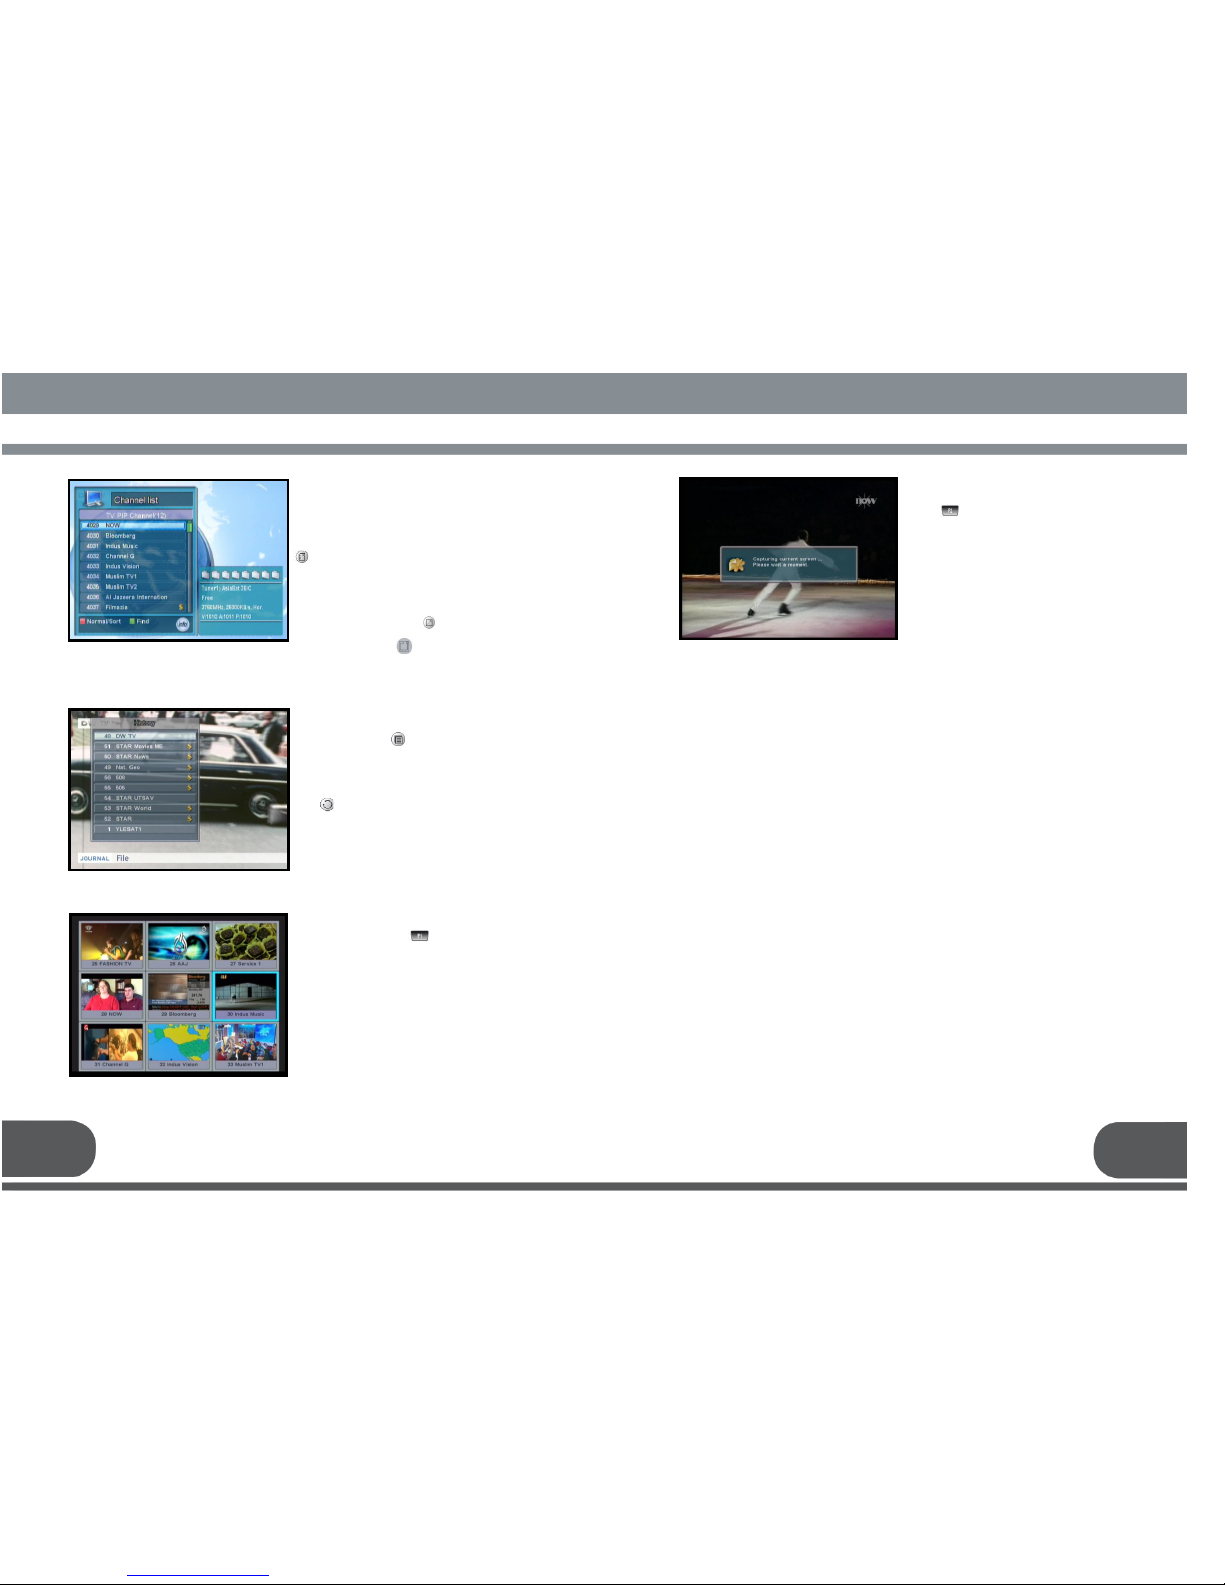
Y
ou can recall the channels watched
previously. The list will show 10
channels by using key.
Select a desired channel to watch by
using up/down keys (▲·▼) and OK
key.
The key change channels
between the current and the previous.
.
Mosaic function enable
s
having
4 or 9
screens by using key on the RCU.
Select 4 or 9 screens and push OK key.
Only the first three channels from the same
TP are updated. And rest of the channels
will be shown with still pictures.
You can change into a certain channel from
Mosaic by OK key on the selected screen.
To change the channel in the PIP screen,
you can use the up/down keys (▲·▼)
after changing the channel information
box into PIP mode by using color keys, or
select a channel in the PIP channel list.
To open the PIP channel list, use the
k ey.
Only channels on the same TP with the
main channel are available for PIP mode.
Main channel can be replaced with the
PIP channel by using the key,
You can change the location of PIP
screen by using the key.
Push
key
to capture the screen.
Captured images will be saved into
the Capture List menu in Record
menu.
-
External HDD / External Memory (connected to USB Host port)
1) External HDD can be used with two file systems named with Drive E(E2FS
system) and F(FAT system). You can decide the size of each drive during
formatting.
2) E2FS s ystem is used for PVR fu nction such as recording and capturing of
program. FAT system is used for MP3 and Jpeg files.
3) The recorded and captured file can be used in the Recorded Program Menu
and Capture List Menu respectively. MP3 files and Jpeg files can be used i n the
MP3 List Menu and Picture List Menu.
4) To transfer files between two systems, use the File Manager Menu.
Only the files in FAT system can be used in the computer.
5) To remove the device, use USB Device Safe Remove menu before
disconnecting. (refer to the 7.4.9. USB Device Safe Remove)
* The External Storage which h as only FAT system unformatted by Set-top
box doesn't support recording and capturing functions. (refer to the 7.4.7.
Hard Disk Format )
*
Red:
Sort the channel by Alphabet
* Green: Find channel name manually
8.8. HISTORY & PREVIOUS CHANNEL
8.9. MOSAIC
8.10. CAPTURE
8.11. HOW TO USE USB(External Storage)
35
36
Page 20
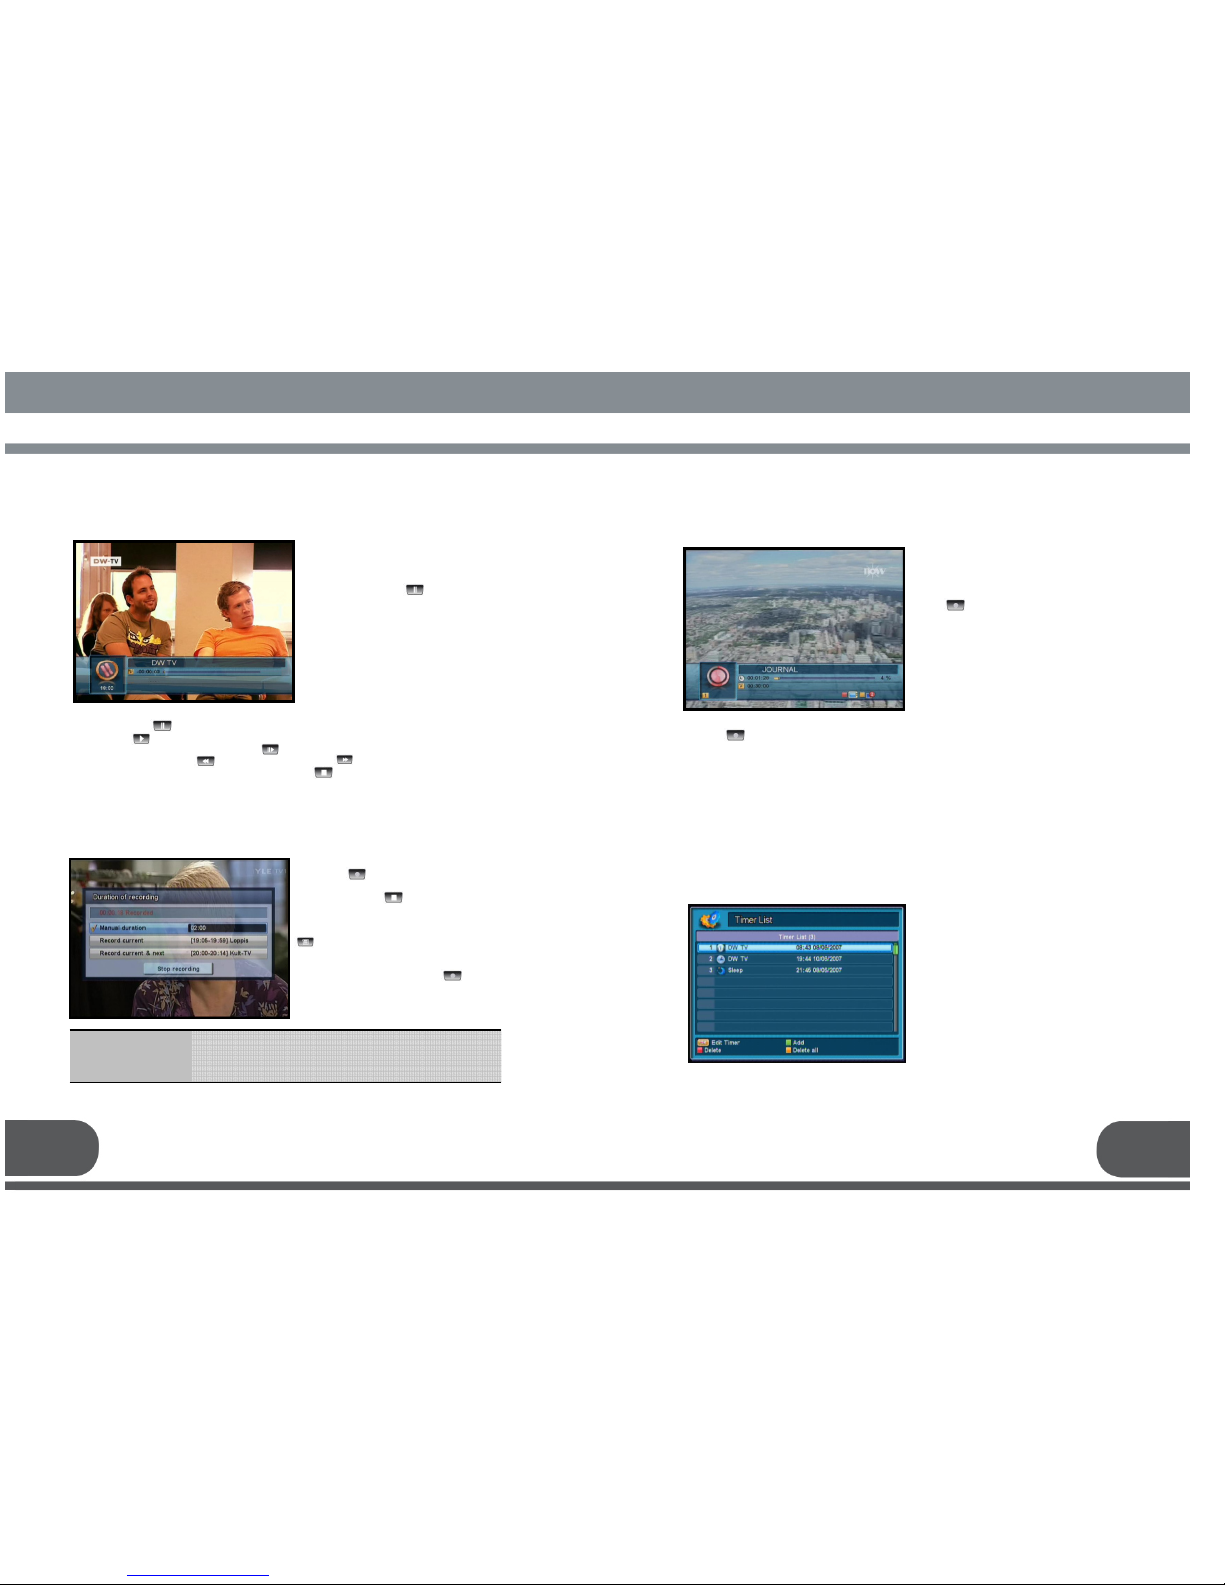
`
9
. HOW TO RECORD
&
PLAYBA
CK
9.1.
TIME SHIFT
9.2. QUICK RECORD
* Note: If recording time is less than 30 seconds, the event will not be saved. This is to
avoid the unexpected start of recording.
There are 2 ways for
Reservation Record.
O
ne is the
manual recording by setting
the
date, time, and duration of the event in the Timer. The other is a recording from the
Program Guide.
For reservation record, the current time of your receiver should be set exactly same as
your local time or the satellite time. You must have synchronized the reservation’s time
and your local time. (Please refer to the 7.3.2. TIME SETTING).
Select
Timer List
menu in
Preferences
menu.
Set and check all recording schedule.
Push OK key on your selection No. in
Timer List. T hen Edit or add reservation
table in the following screen.
9
.3.1. Reservation record in Timer List
9
.2.1.
Quick Record
Push the key. And the current channel
will be recorded. If you want to stop the
record, push the key.
The recorded program can be found in the
Recorded Program in Record menu.
Key will also guide you to the list of the
recorded program. (Refer to 7.4.1 Recorded
program).
During recording, push the key on the
recording channel once more to select the
duration of recording.
(Option : Manual, Current, Current & Next)
1) Push the
key, Time shift will be started on the live channel
(freeze live channel).
2) Push key for playback.
3) For slow motion playback, push key.
4) For Rewind, push key. For forward, push key.
5) To return to the present time for live, push key.
9
.2.2. Two
Record
s
While recording one channel, the
second channel can be recorded
simultaneously.
Press k ey on another channel
which you want to record.
You can check the status of recordings
with the Recording Icon numbered as 1
or 2 in the information Box.
You can change into the recording
channels by using the color k eys in the
Information Box.
You can also the
record PIP channel after moving to PIP mode by using the color key.
Press key on the PIP channel for recording. Recording Icon will be added on the
Information
Box.
If you
have
to
walk away from your
TV but
do not want to miss the show, you can
make a live channel p ause for a while with
the Time Shift function.
Simply push the key, then you will
be able to watch the event from the time it
was pause when you are back to TV.
(Caution! Channel change erases the
recorded program.)
HOW TO RECORD
HOW TO RECORDHOW TO RECORD
HOW TO RECORD &
& &
& PLAYBACK
PLAYBACK PLAYBACK
PLAYBACK
37 38
9.3. RESERVATION RECORD
:
Total recording time, you can adjust the duration
manually
.
: Only current program will be recorded.
: The current and next program will be recorded.
M
anual duration
Record current
Record current &
next
Page 21
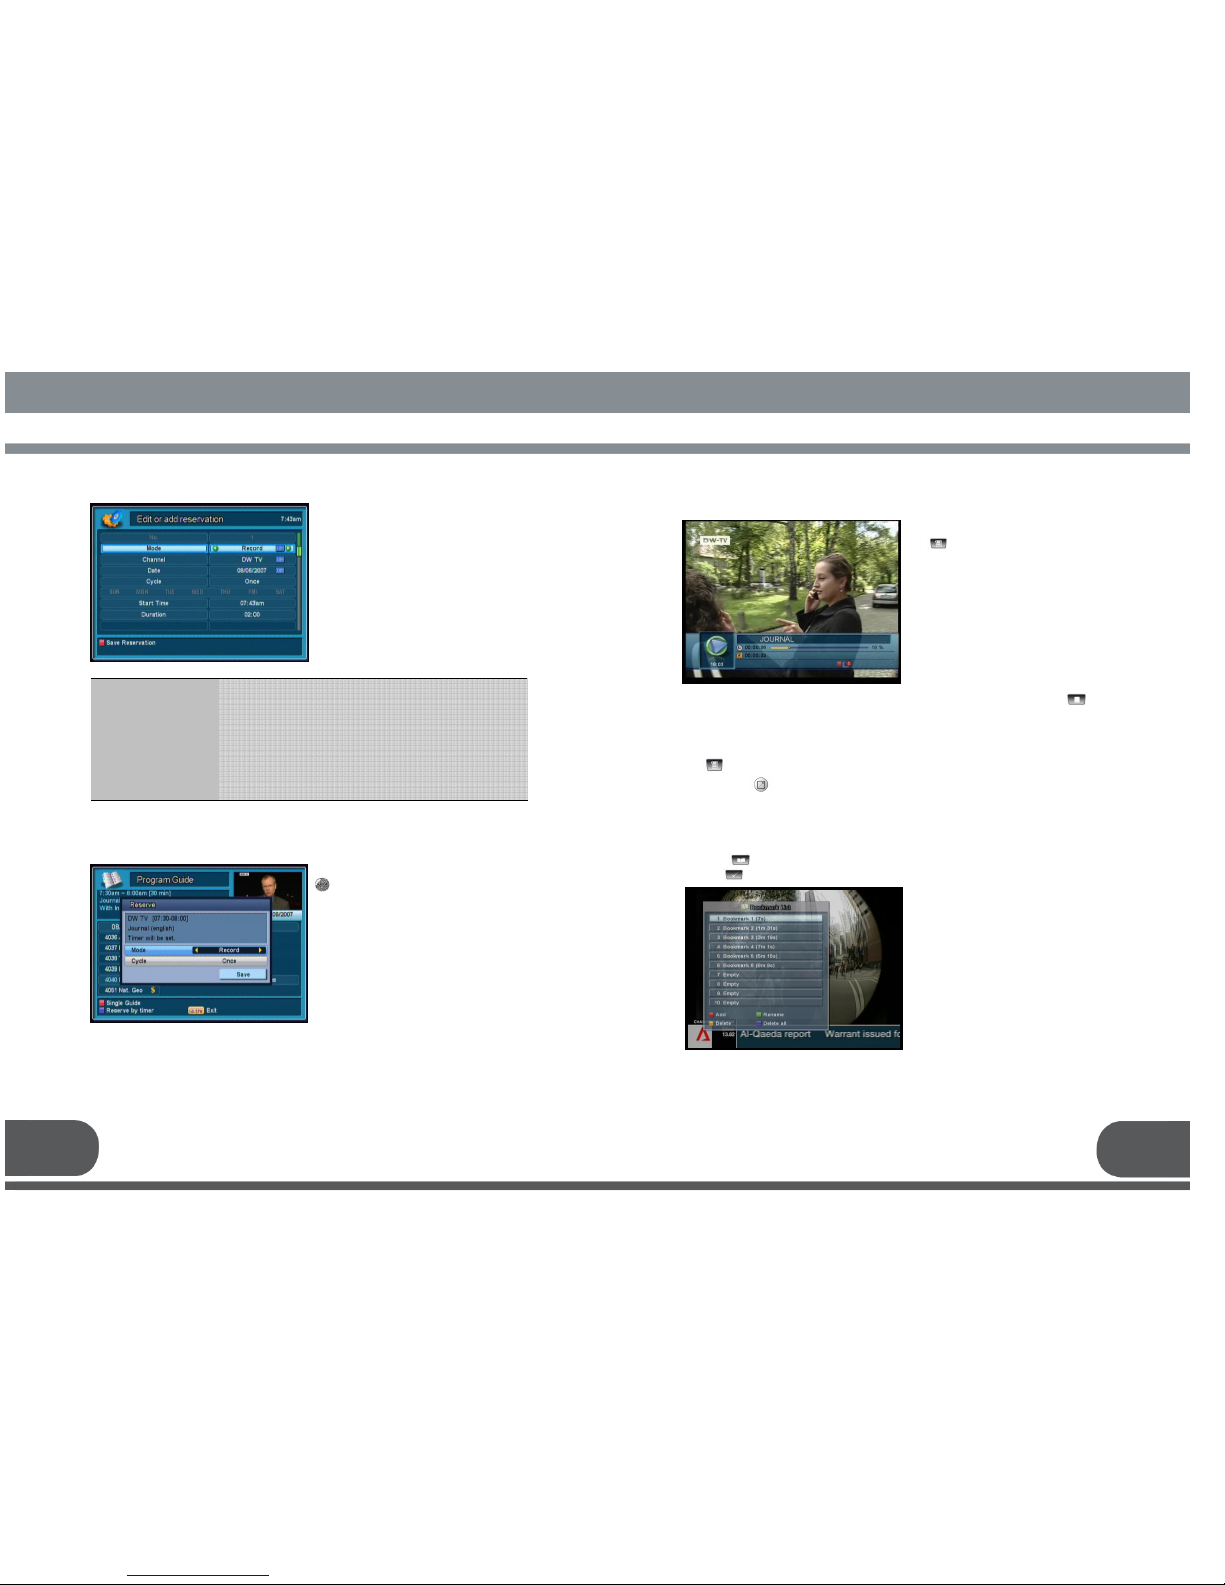
9.4
. PLAYBACK
Set appropriate value to all fields and
push the Red key to save it.
Push the MENU key for previous menu
to check the reserved programs in the
Timer List.
If the current reservation is overlapped
with the previous reservations, it will not
be saved.
9.3.2. Reservation Record in Program Guide
You can check reservations in the Timer List.
* In case you reserve three events for the same period, only two shall be recorded.
Open the
Program guide
by pushing
k ey.
Select an event to be recorded by using
Left/Right/Up/Down keys.
Push the Blue key on the selected event
and set the cycle. To record an event,
press the OK key while on Save and the
event will be recorded at the scheduled
time.
1) Push
key
to m
ake a bookmark
.
2) Use key to move to the position from where to watch.
9
.4.2. Bookmark
You can mark a point on the progress bar while the playback as a bookmark , and
watch from the marked point.
To watch the recorded program, follows
the next;
1. key opens the Recorded Program
List.
2. Select a recorded program to watch by
using up/down keys (▲·▼) and push OK
key.
(Please refer to the 7.4.1. Recorded
Program)
3. When the Playback is starting,
Playback Box is shown as the left
picture.
You can control Playback easily and
check the Recorded file name, Progress
Time, Book Mark, and Repeat status
etc.
4. To stop the Playback, push key.
9
.4.1. Two Playbacks
For t he second playback in PIP during one playback, open the recorded program list
by , and select one to play and push the yellow key.
* If you push key, you can switch the main screen with the PIP screen.
To
open the bookmark list while
watching a r ecorded program, push OK
key.
You can move to the bookmarked
position by selecting the Ok key.
The bookmarks will be saved into the
recorded program for future use.
:
Select the No. from 1 to 35.
: Record – you can set time to record a channel.
Sleep – you can set time to be on standby of the receiver.
Wakeup – you can set time to turn the receiver on.
: Select the recording channel.
: Select the date of activating with OK key.
: Once/Daily/Weekly – you can select the reservation cycle.
: Enter Start Time of reservation record, wakeup, and sleep
mode.
: Enter duration of reservation record.
No
Mode
Channel
Date
Cycle
Start Time
Duration
39 40
Page 22
-
-
-
-
-
-
-
-
-
-
-
-
-
-
-
10. TROUBLE SHOOTING
Searching Signal
Connect the antenna cable properly.
Check the signal strength in the Channel
search menu.
Problem Solution
About the Receiver
On - Screen Error Messages
Does not display LED on
the
front panel or the receiver has
no power
No pictures on the screen
No sound
Remote Control does not
operate
Poor picture quality
Frequent Rebooting after
Power-on
Abnormal operation when two
STBs are connected by
“LOOP OUT”
Connect the power cord to the power outlet
properly.
Check if the receiver is in standby mode.
Check if the video output port is firmly
connected to the TV.
Check if you have selected the correct channel
or video output on your TV.
Connect audio cords properly.
Check volume level of the TV.
Press key.
Point remote control directly towards the
receiver.
Check and replace batteries.
Check the signal strength in the Channel
Search menu. If this is low, try to adjust the
alignment of your antenna.
Turn on after removing the signal cable from
LNB:
If the rebooting does not occur; check the LNB!
(possible cause is LNB short-circuit)
Turn off one of the two STBs.
9.4.5. Fast Rewind
Fast rewind is available during playback. Please also see 9.4.9. Drag Backward.
1) In Playback, push key.
2) In order to increase rewind speed, push key several times.
3) For returning to the normal speed, push key.
* 5 steps of speed are available for Fast rewind.
9
.4.6
. S
low Motion
For slow motion playback,
1) In playback, push key.
2) For returning to normal speed, push key.
* Two steps of speed are available for Slow motion.
9.4.7. Pause
To pause the screen, push key.
9.4.8. Drag Forward
You can move fast forward while pushing the key. .
9.4.9. Drag Backward
You can move fast backward while pushing the key.
9
.4.3. Repeat
You can watch a certain defined section repeatedly.
1) In Playback, push key to set a starting point of section to repeat.
2) Move the section by using & key.
3) Push key to set the ending point of section to repeat.
* For canceling the repeat, push key once more.
9.4.4. Fast Forward
Fast forward during playback is available. Also see 9.4.8. Drag Forward.
1) In Playback, push key.
2) In order to increase playback speed, push key several times.
3) For returning to normal speed, push key.
* 4 steps of speed are available for Fast forward.
TROUB
TROUBTROUB
TROUBLE SHOOTING
LE SHOOTINGLE SHOOTING
LE SHOOTING
41 42
Page 23

11. TECHNICAL SPECIFICATIONS
-
Transport Stream
- MPEG-2 profiles/levels
- Input Rate
- Video Formats
- Video Output
Video Decoder
:
MPEG-2
ISO/IEC
1
3818
: Main profile @ main level (MP@ML)
: Max. 15Mbit/s
: 4:3, 16:9
: CVBS,Y/Pb/Pr(Component),S-Video
- Audio
Decoding
- Audio Mode
Audio Decoder
: MPEG-1 layersⅠ/Ⅱ, MP3, Dolby Digital
: Single / Dual mono / Stereo / Joint stereo
RCA
: RCA/Cinch, Video Output (CVBS)
Audio (Left / Right)
: YPbPr Output
-
Video RCA
- Component RCA
- S-VHS
- S/PDIF
S-VHS, S/PDIF
: Y, C
: Digital Audio Output
-
Flash memory
- Graphic DDR Memory
System Resources
: 4Mbyte
: 64Mbyte
- Input Voltage
- Type
- Power Consumption
:
AC 95V~
240V
50Hz / 60Hz
: SMPS
: Max. 25 W, stand-by 12 W
Power Supply
Tuner & Channel
- Input Connector
- Output Connector
- Frequency Range
- Signal Level
- LNB power & Polarization
- 22 KHz Tone
- DiSEqC Control
: F-type, IEC 169
-
24, Female
: F-type, IEC 169-24, Female
: 950MHz ~ 2150MHz
: -65 ~-25 dBM
: Vertical (+13.5V), Horizontal(+18V)
Current (Max. 500mA)
: Frequency : 22.4KHz
Amplitude : 0.6 0.2V
: Version 1.0/1.1/1.2 Compatible
TECHNICAL SPECIFICATIONS
TECHNICAL SPECIFICATIONSTECHNICAL SPECIFICATIONS
TECHNICAL SPECIFICATIONS
43 44
Demodulation
-
Waveform
- Input Symbol Rate
- FEC Decoder
: QPSK
: 1~45 Mbit/s
: Convolutional Code Rate
1/2, 2/3,3/4,5/6,7/8
RF Modulator
-
RF/ Loop through Output
Connector
- TV Standard
- Preset Channel
: F-Type, IEC male/Female
: NTSC
: 3/4 CH
Page 24
- USB(host)
- RS-232C
Data port
: USB 1.1/2.0 compatible
: 9-pin D-sub, Transfer rate
115 Kbps
Front
- Buttons
- Display
- USB
: 7 Buttons
Stand by, Menu, Exit,
CH+, CH-, VOL+, VOL: 7SEGMENT LED (Green, 4Digit)
: Host, A-type (available either
front or rear)
Rear
- Main Power Cable
- RF (Antenna Input and Output ) 1 Input, 1 output
- TUNER (1 RF Input & 1 Loop through )
- 2 RCA(CVBS, AUDIO L/R, YPbPr)
- S-VHS, S/PDIF(Optical Output)
- RS232(9pin-DSUB)
- USB (HOST,A-type) (available either front or rear)
-
Size
- Weight
- Operating Temperature
- Storage Temperature
Physical Specification
: 300
(W) X 62(H)
X
220(D)
mm
: About 1.9kg
: 0°c ~ +45°c
: -10°c ~ +70°c
45
46
12.
PROGRAMING THE REMOTE CONTROL
PROGRAMING THE REMOTE CONTROL
PROGRAMING THE REMOTE CONTROLPROGRAMING THE REMOTE CONTROL
PROGRAMING THE REMOTE CONTROL
Page 25
47
48
Page 26
49
50
13.
WARRANTY CARD
WARRANTY CARD
WARRANTY CARDWARRANTY CARD
WARRANTY CARD
 Loading...