

Page 1
Page 2
1. SAFETY PRECAUTIONS
1.A. ACCESSORIES
2. GENERAL FEATURES
3. HOW TO CONNECT YOUR RECEIVER
4. HOW TO SET YOUR HARD DISK
5. HARDWARE DESCRIPTION
6. SYSTEM SET-UP
7. MENU STRUCTURE
8. MENU OPERATION
8.1. EDIT CHANNELS
8.2. EDIT FAVORITES
8.3. INSTALLATION
8.4. SYSTEM SETTINGS
8.5. LANGUAGE SETTINGS
8.6. RECORD SERVICE
9. ADDITONAL FUNCTION
9.1. CHANNEL GUIDE
9.2. CHANNEL LIST
9.3. AUDIO LANGUAGE
9.4. SLEEP MODE
9.5. ZOOM FUNCTION
9.6. PIP(Picture in Picture)
9.7. PREVIOUS CHANNELS
10. HOW TO DO RECORD & PLAYBACK
11. HOW TO DO RESERVATION RECORD
11.1. RESERVATION RECORD IN RECORD SERVICE MENU
11.2. RESERVATION RECORD IN CHANNEL GUIDE MENU
12. APPLICATION FOR TRANSMISSION
12.1. HOW TO INSTALL DRIVERS & PROGRAMS
12.2. HOW TO USE TRANSMISSION PROGRAM
13. TROUBLE SHOOTING
14. TECHNICAL SPECIFICATIONS
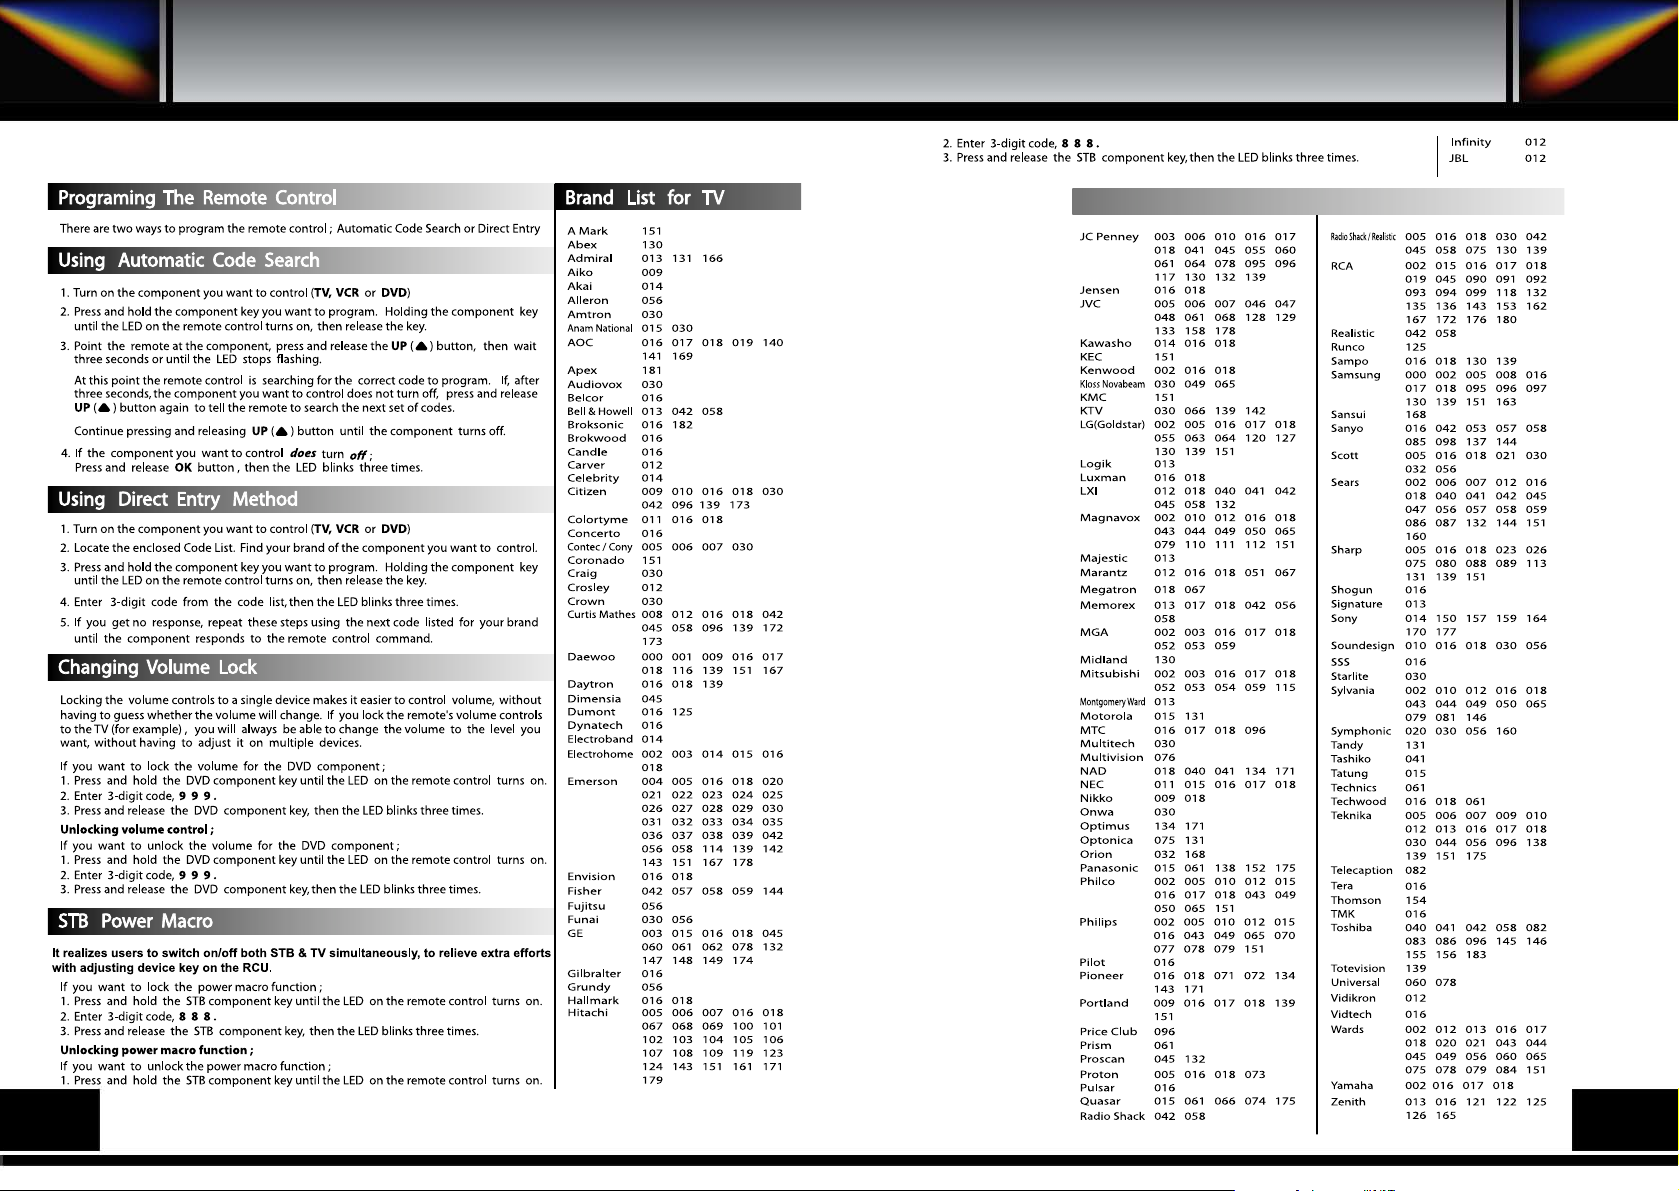
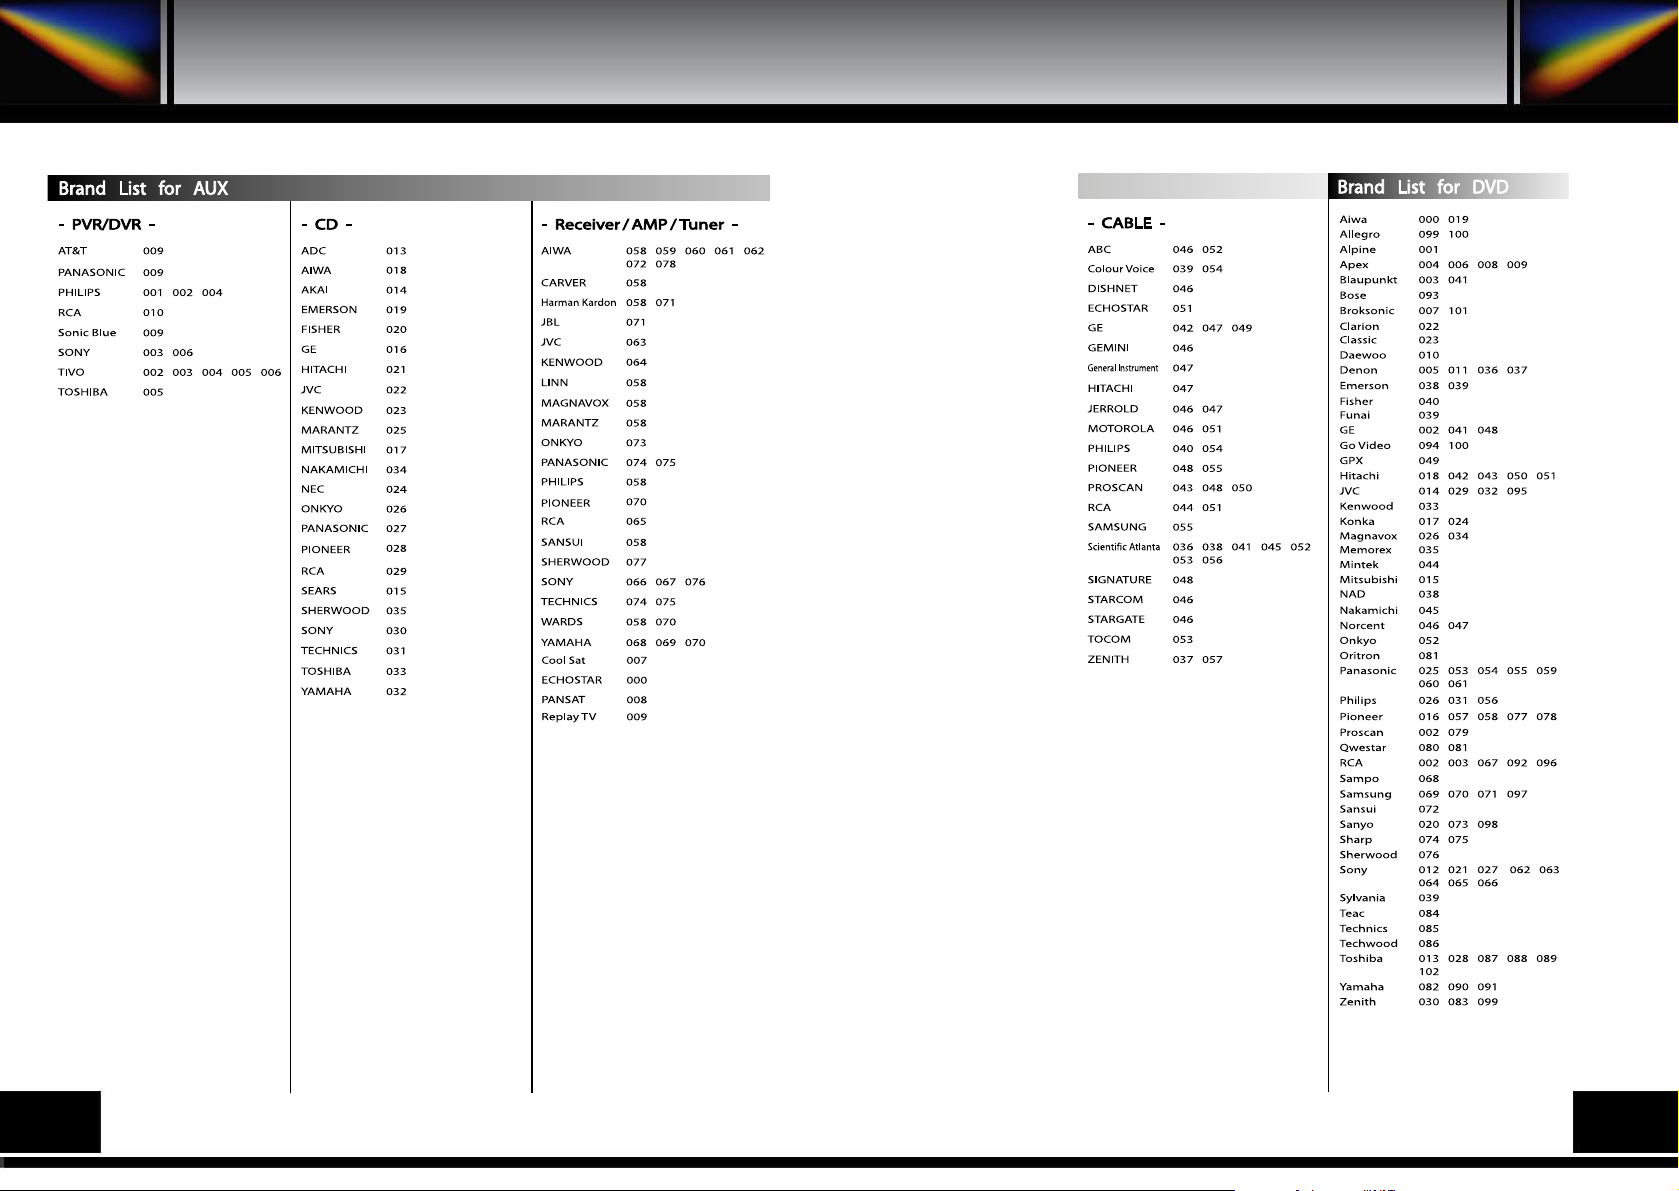
15. PROGRAMING THE REMOTE CONTROL
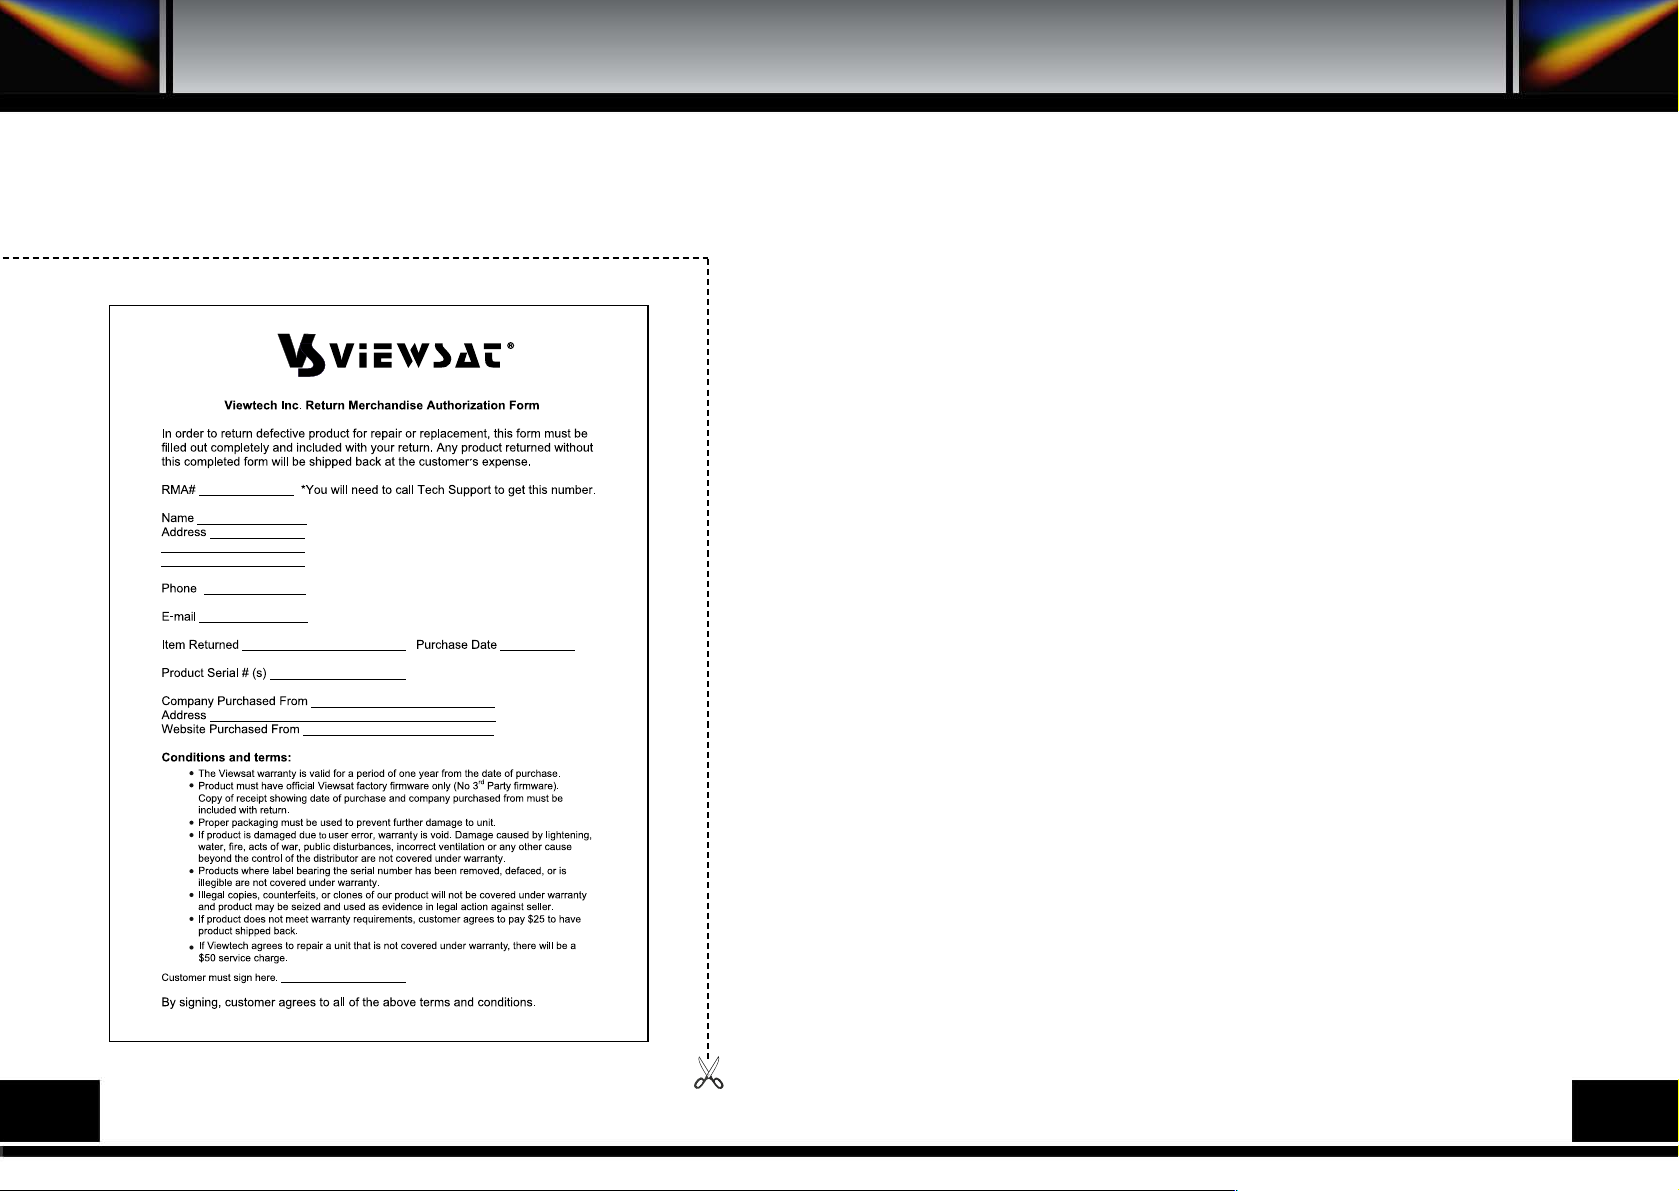
16. WARRANTY CARD
4
5
6
7
9
9
13
15
16
16
18
20
26
27
28
32
32
33
33
33
34
34
35
36
39
39
40
41
41
43
44
45
48
52
Table of Contents
Table of Content
Page 3
Declaration of Conformity
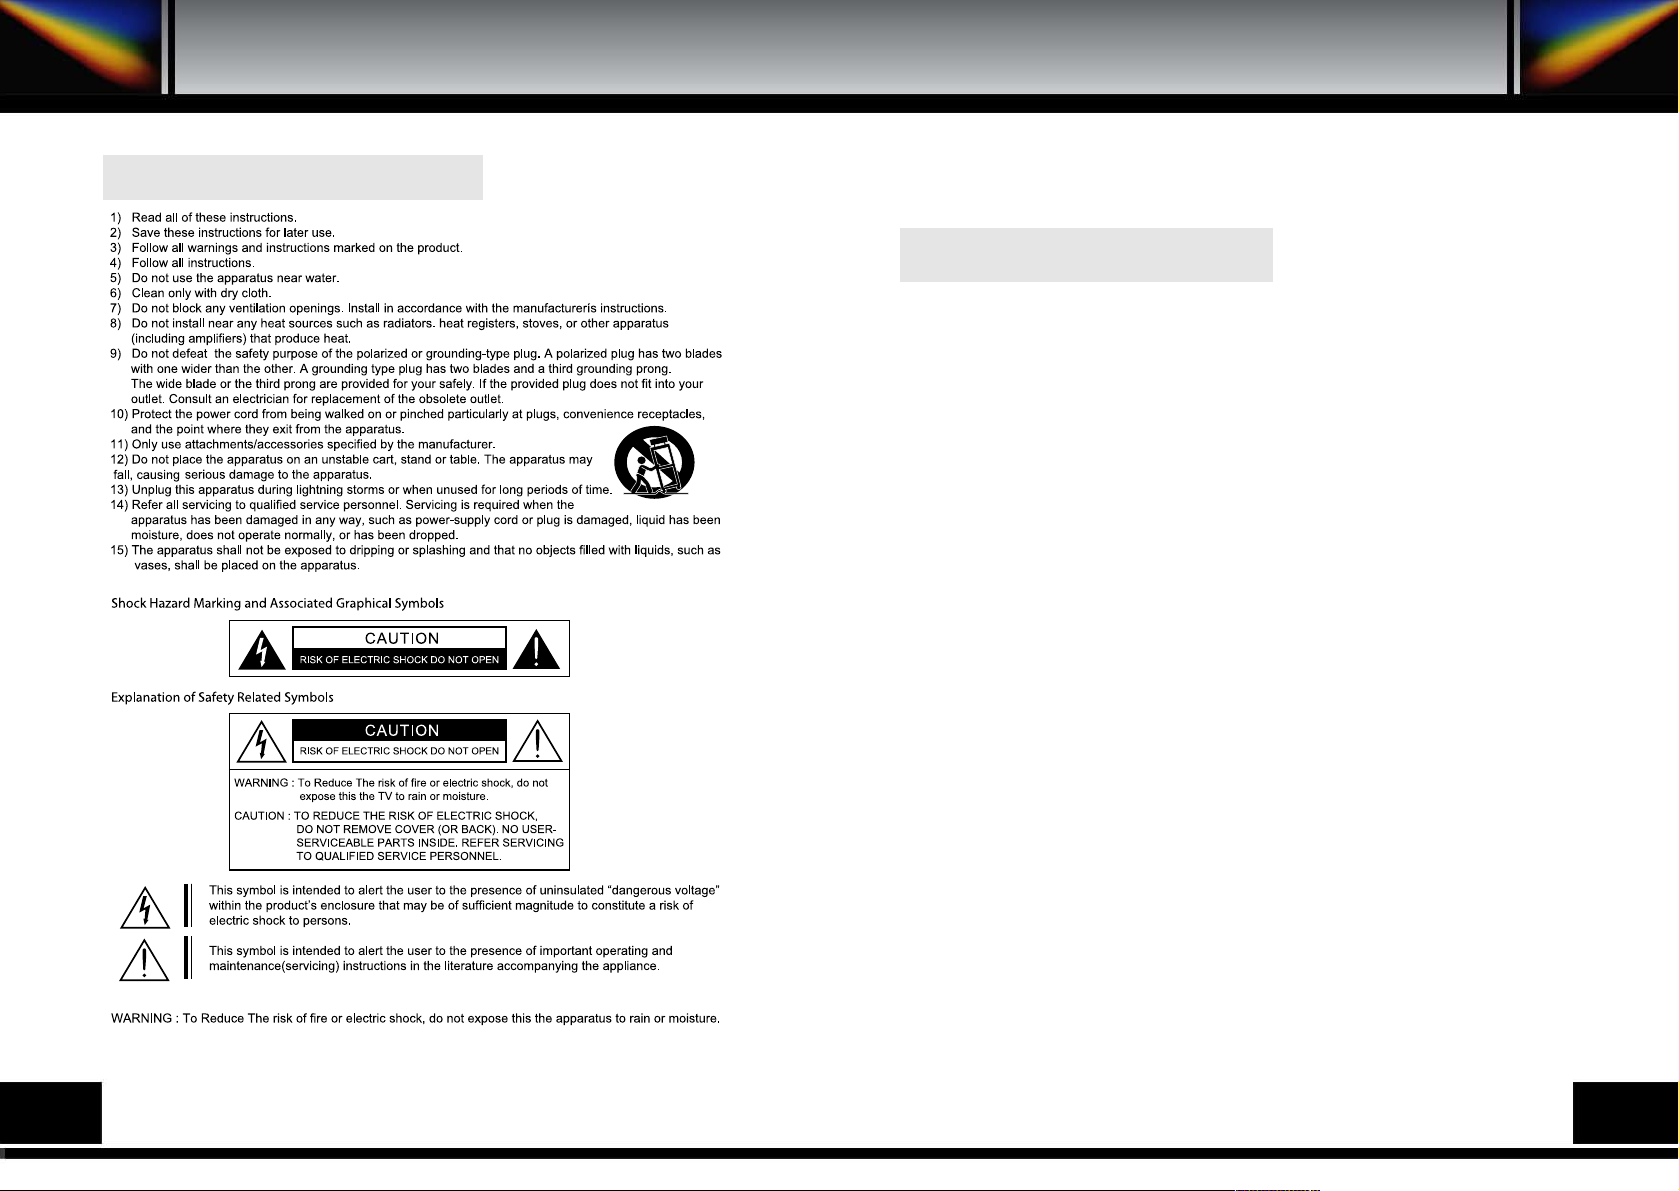
FCC Rule : TESTED TO COMPLY WITH FCC PART 15, CLASS B
OPERATING ENVIRONMENT : FOR HOME OR OFFICE USE.
FCC COMPLIANCE STATEMENT :
This device complies with part 15 of the FCC rules. Operation is subject to
the following conditions :
1) This device may not cause harmful interference, and
2) This device must accept any interference received, including interference
that may cause undesired operation.
INFORMATION TO USER:
This equipment has tested and found to comply with the limits of a Class B
digital device, pursuant to part 15 of the FCC Rules. These limit are designed to
provide reasonable protection against harmful interference in a residential
installation. This equipment generates, user and can radiate radio frequency
energy and, if not installed and used in accordance with the instructions, may
cause harmful interference to radio communications. However, there is no
guarantee that interference will not occur in a particular installation, if this
equipment does cause harmful interference to radio or television reception, which
can be determined by turning the equipment off and on, the user is encouraged
to try to correct the interference by one or more of the following measures:
1. Reorient / Relocate the receiving antenna.
2. Increase the separation between the equipment and receiver.
3. Connect the equipment into an outlet on a circuit difference from that to
which the receiver is connected.
4. Consult the dealer or an experience radio / TV technician for help.
CAUTION : Changes or modifications not expressly approved by
manufacturer responsible for compliance could void the user's
authority to operate the equipment.
2 3
Important Safety Instruction
Important Safety Instruction
Declaration of Conformity
Page 4
4
5
This receiver has been manufactured to satisfy the international safety
standards.
Please read the following recommended safety precautions carefully.
MAINS SUPPLY : AC 95~240V 50/60Hz
LOCATION : Locate the receiver indoor. Locate receiver away from potential hazards such as houseplants,
lightning, raining and direct sunlight.
OVERLOADING : Do not overload wall outlets, extension cords or adapters as this can result in fire or
electrical shock.
LIQUIDS : Keep liquids away from the receiver.
CLEANING : Before cleaning the receiver, disconnect it from the wall socket. Use a cloth lightly dampened
with water (no solvents) to clean the exterior.
VENTILATION : Do not block the receiver ventilation holes. Ensure that free airflow is maintained around
the receiver. Never set the receiver on soft furnishings or carpets. Do not use or store the receiver where it is
exposed to direct sunlight, or near heater.
Never stack other electronic equipment on top of the receiver.
Place the receiver at least 30mm from the wall.
ATTACHMENTS : Do not use any attachment that is not recommended by the manufacturer, as it may
cause a hazard or damage the equipment.
SERVICING : Do not attempt to service this product yourself. Any attempt to do so will make the warranty
invalid. Refer all servicing to a qualified service agent.
LIGHTNING : If the receiver is installed in an area subject to intense lightning activity, protection devices for
the receiver mains connector and modem telephone line are essential.
The individual manufacturer's instruction for safeguarding other equipment, such as TV set, Hi-Fi, etc.,
connected to the receiver, must also be followed during lightning storms.
The device, packaing material and batteries must never be disposed of with household.
Please obtain appropriate information about regulations in your community, and dispose of all in
accordance with regulations at the separate locations provided.
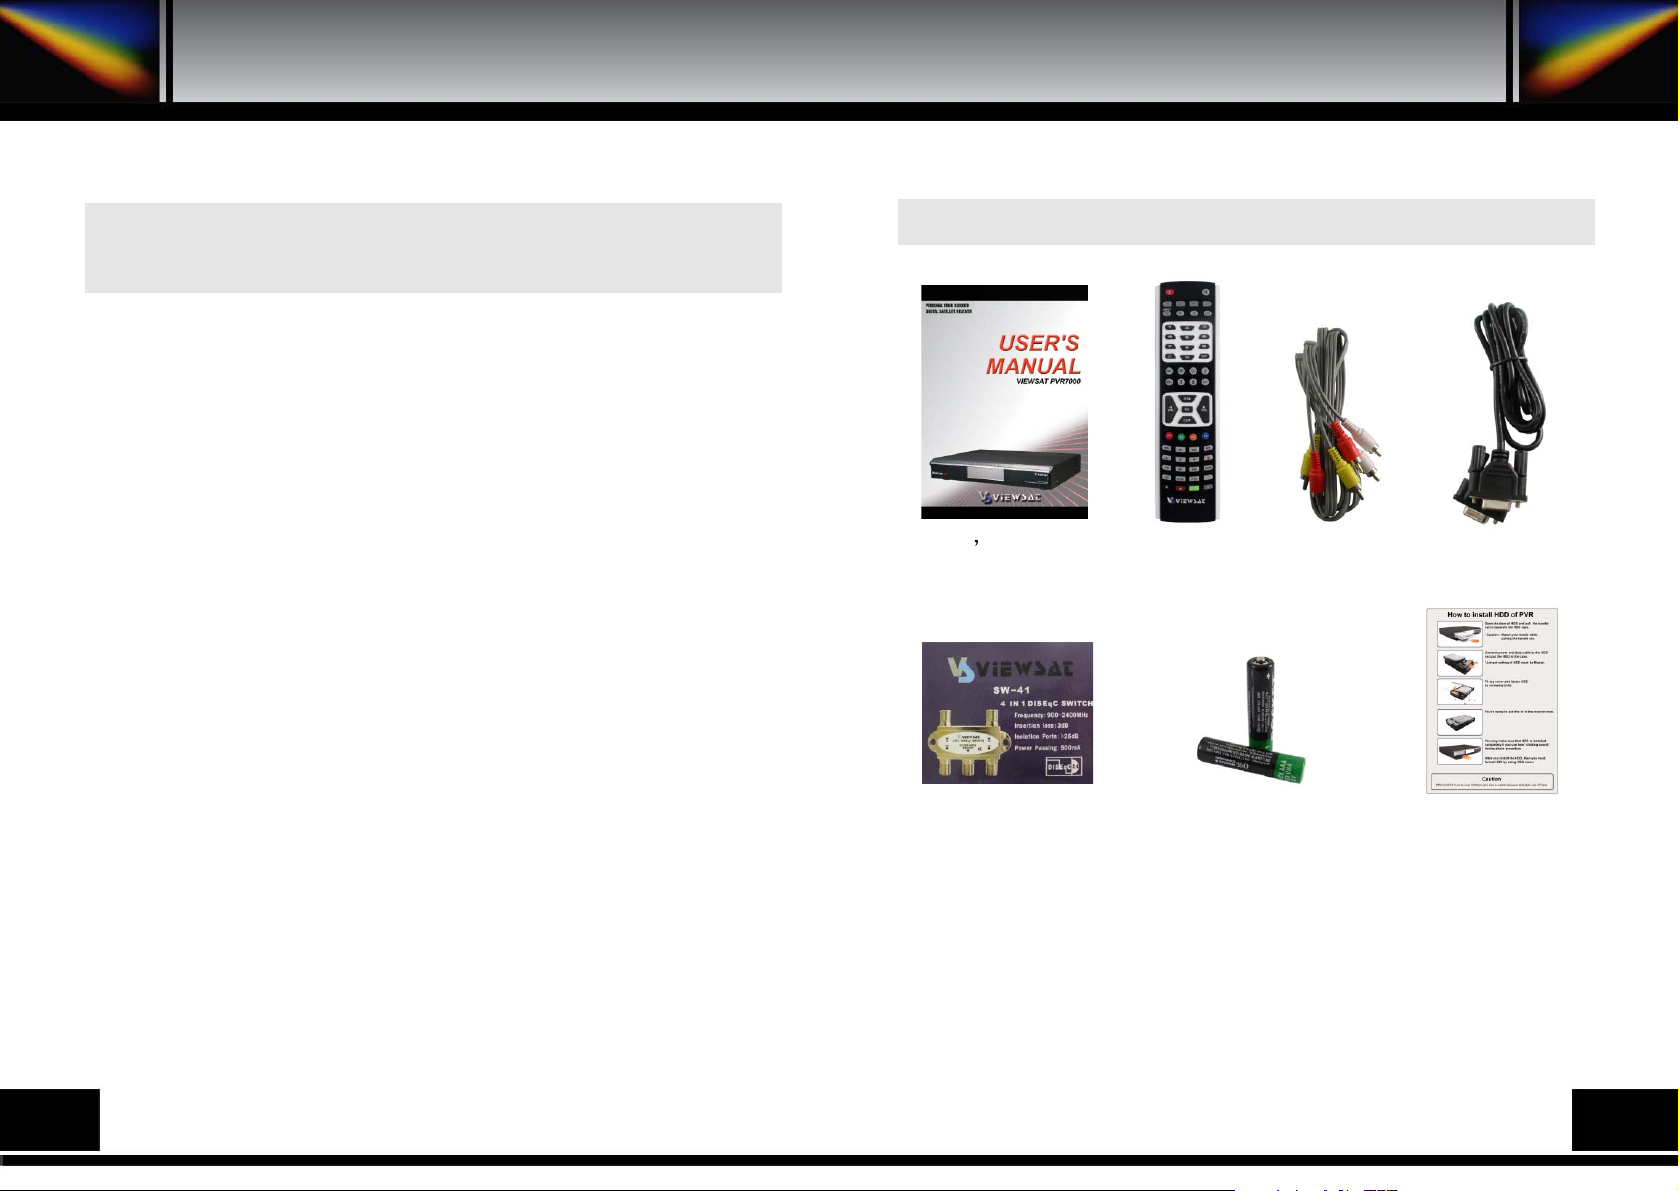
Check the following accessories when you open the box.
1. SAFETY PRECAUTIONS
Safety Precautions
1.A. ACCESSORIES
User s manual
How to install
HDD of PVR
RCU
RCA cable
Serial cable
DiSEqC S/W
Batteries
Page 5
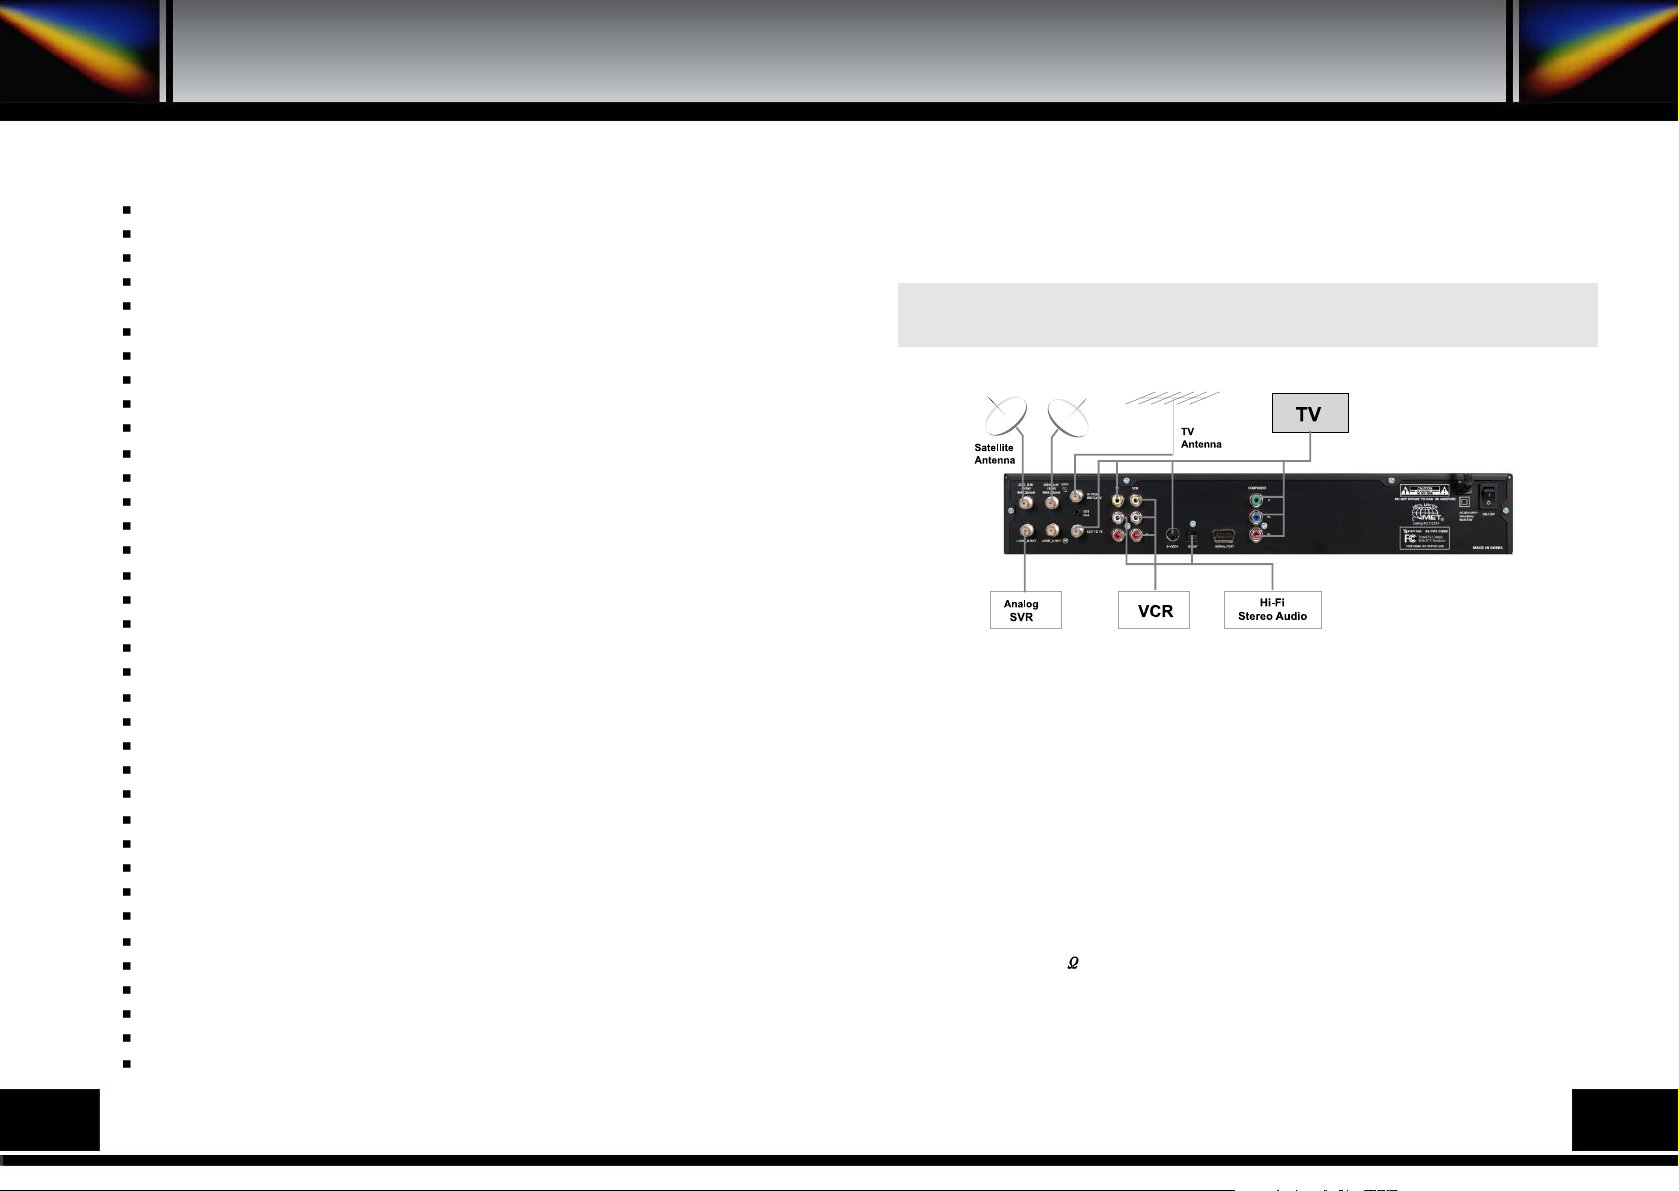
Please DO NOT plug in the main power supply cord until you have finished
all the connections.
1) LOCATION OF THE RECEIVER
Your receiver should be placed under proper ventilation.
Don't put in completely enclosed cabinet that will restrict the flow of air, resulting overheating.
The location should be safeguarded from direct sunlight, excess moisture, rough handling or household
pets.
Avoid stacking other electronic components on the top of the receiver.
The location should be safely accessible by the cable.
2) CONNECTING THE RECEIVER WITH DISH SYSTEM
After installing your dish system, connect the coaxial cable from LNB of your dish antenna to “DISH
IN”terminal marked at the rear of the receiver.
All cable connectors should be finger tightened ; do not use any kind of wrench on the cable over
connectors.
The cable should be 75
impedance coaxial twisted at the end with a “F” type connector.
- Please check the followings and follow that according to your dish system type.
3. HOW TO CONNECT YOUR RECEIVER
How to Connect your Receiver
Fully MPEG-2 & DVB Compliant
2 Tuners
Time-shifting
MP3(MPEG-1 Layer3) decoding
Powerful trick mode supported
Playback of the selected region repeatedly
USB supported for fast PC interface
Dual Decoding(PIP-Picture In Picture)
Dual Recording simultaneously
Support 2 Recording, 1 live at the same time
Input Frequency 950 ~2150MHz
Supports Electronic Program Guide (EPG), Picture In Graphic (PIG)
Supports SCPC & MCPC from C / Ku-band
Tuner Symbol Rate : 1 ~ 45MS/s
Fast Booting & Auto Scan
Quick Channel Changing
Max 6000 Channels (TV & Radio) Programmable
User Friendly 256 Colors OSD & Easy GUI
A lot of OSD Language supported
Favorite Channel List Editing
Master PIN Code Function & Parental Lock Function
100 Steps Volume Control
Automatic Detection of Forward Error Correction
Window based S/W Download Program Supported by RS232 Serial Port
Set to Set Download (Main Program, Channel Data)
4:3, 16:9, Letter Box
Various LNB Polarity Control
22KHz Switching Control
9 RCA Output for Video (Twin), Audio L/R(Twin), Component
S/PDIF Output for Digital Audio
S-VIDEO Output
RF-Modulator Output
Zoom function
Hardware based Blind Scan
DiSEqC 1.0, 1.2 and USALS (1.3) Compatible
Photo Album
2. GENERAL FEATURES
General Features
6
7
Page 6
4. HOW TO SET YOUR HARD DISK
Working your receiver, a Hard disk should be set in the rack.
Disk interface must be “IDE” type and size is usable between 80G Byte and 2T Byte.
A. Note that you must not plug in main power supply cord during these actions.
1) When you are setting the Hard disk, you have to set Jumper Setting as the MASTER. Jumper setting
type differs from manufacturing of Hard disk, so please check the label outside the Hard disk.
2) Open the HDD rack door which is on the left of your receiver front.
3) Take out the empty HDD rack.
4) Connect your Hard disk to the inner part of HDD rack using data cable and power cable.
5) Fix up Hard disk using screws.
6) Push the HDD rack tightly with a snap and certainly close the door.
B. Note that you have to check these actions after plugging the main power.
1) When you set new Hard disk, you must format it
( Main Menu ->Installation->Hard Disk->Hard Disk Format ).
2) You need to compare Hard Disk information in menu with real information on the Hard disk
( Main Menu ->Installation->Hard Disk-> Hard Disk information ).
* Do not turn off the power and do not unplug the power cable while hard disk drive is still running. And hard
disk drive is easily damaged by a shock. Be sure to back up all of your current files. The company is not
responsible for any loss of data.
How to Set your Hard Disk
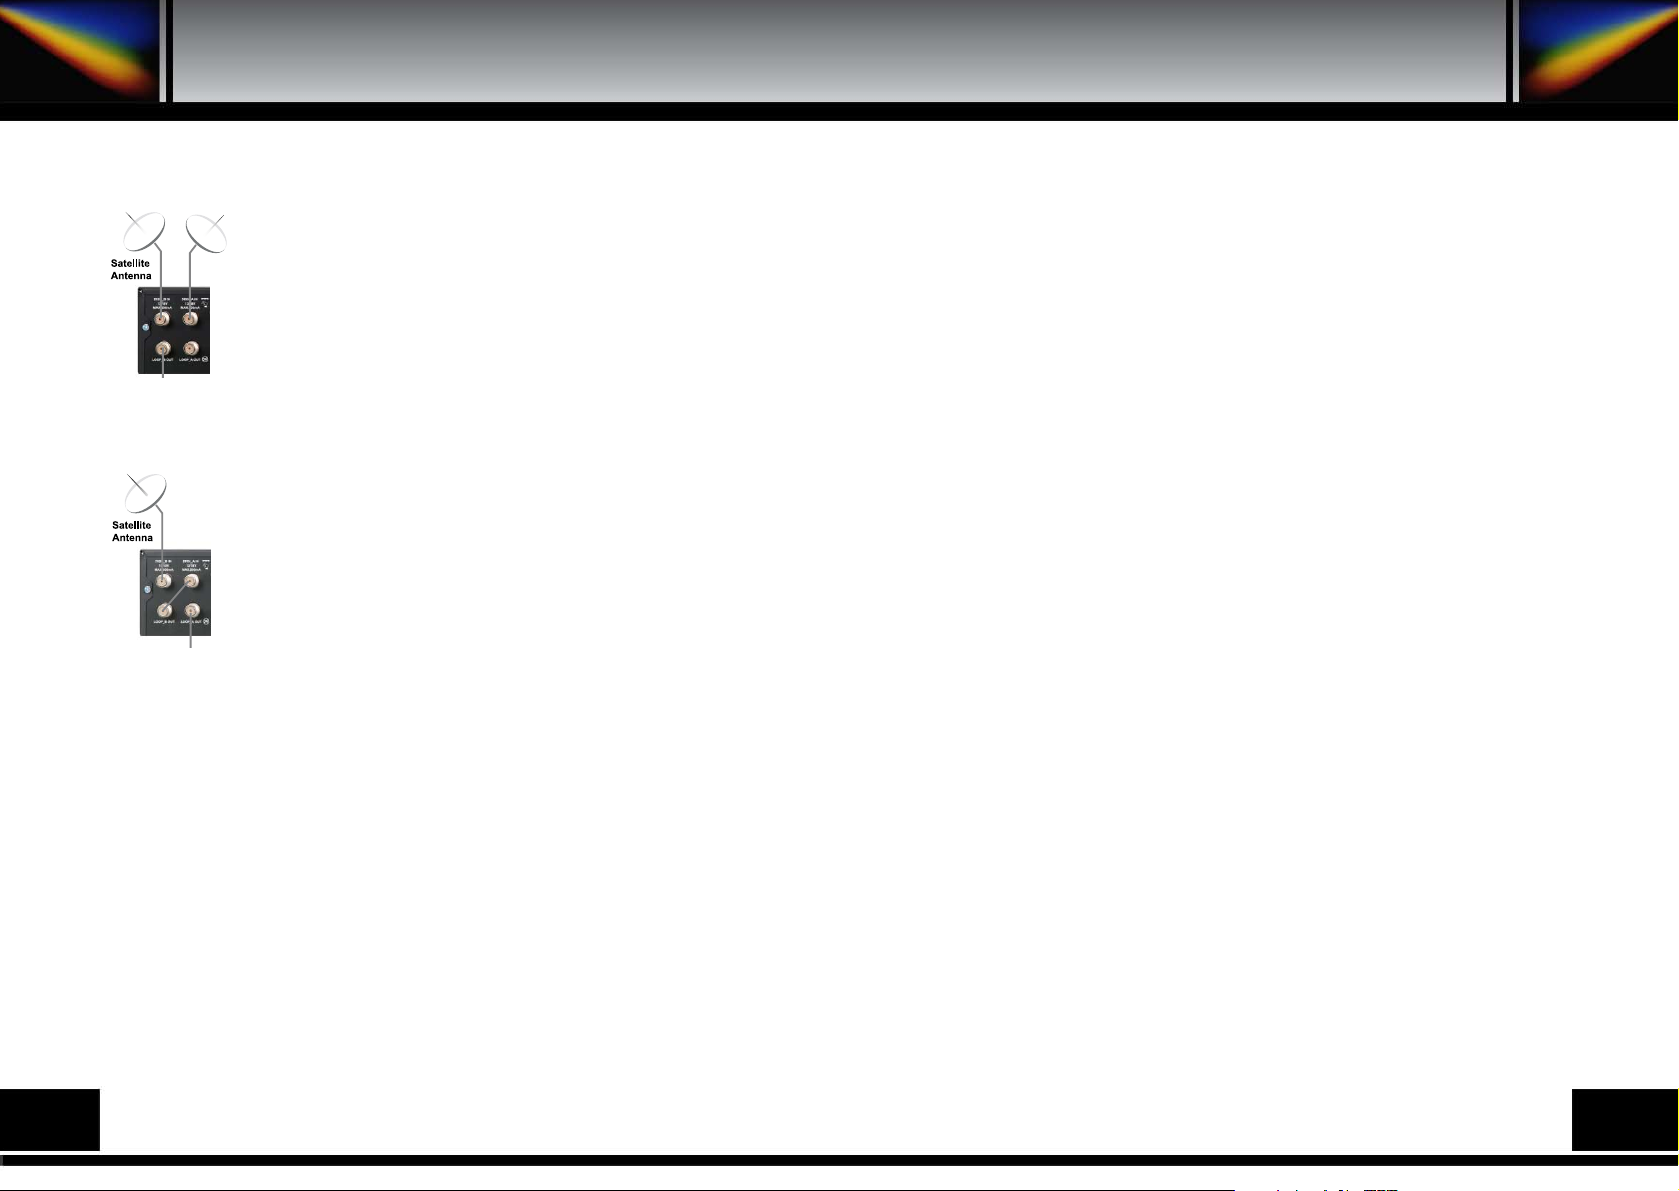
1. Two Separated Antenna
- Connect two separated antenna cable to each tuner. In that case, works as followings.
1) Watching live channel without recording
You can watch all the channels in tuner A and B.
2) Recording in Tuner A(B)
If you record a channel in tuner A(B), you can watch only the channels that
have the same TP of the recording channel. On the other hand, you can
watch all the channels in tuner B(A).
3) Recording in Tuner A and B at the same time
If you record channels in tuner A and B at the same time, you can watch the
channels that have the same TP of recording channel at each tuner.
2. One Antenna and Loop through
- Connect antenna cable to tuner A(B) and connect “LOOP OUT” of the tuner A(B) to “DISH IN” of the
tuner B(A) using loop through cable. In that case, works as followings.
1) Watching live channel without recording
You can watch all the channels in tuner A(B). In tuner B(A), but you can
watch the channels that have the same polarity(Hor/ver) of the watching
channel in tuner A(B).
2) Recording
In tuner B(A), you can record and watch the channels that have the same
polarity (Hor/Ver) of recording channel in tuner A(B). Except previous case, it
is working like Two Separated Antenna.
4
3) CONNECTING THE RECEIVER TO TV
To connect the receiver with your TV, you can follow four methods :
through RF cable, RCA cable, S-Video cable and Component cable.
Connect the RF cable to the terminal marked "OUT TO TV" at the rear panel of the receiver and its other
end to the TV RF input socket.
4) CONNECTING YOUR VCR
To connect a VCR, the receiver has been provided with RCA at the rear marked “VCR” Using a RCA
cable, the VCR can be connected to the receiver.
5) CONNECTING EXTERNAL AUDIO Hi-Fi SYSTEM
To connect any external Audio Hi-Fi system, the receiver has been provided with two RCA connectors at
the back of the receiver, marked with “L”and “R” respectively to connect the left and right audio.
6) CONNECTING YOUR ANALOG RECEIVER
To facilitate the user using analog receiver to view analog channels, the receiver has been provided with a
loop through terminal marked as "LOOP OUT".
Connect the coaxial cable from this terminal to the IF input terminal of your analog receiver. Now by
keeping the receiver in standby, you will be able to tune and view analog channels from your analog
receiver.
7) CONNECTING THE RECEIVER TO YOUR PC
To connect USB cable for transporting files using the USB port. Please check the USB connector
before you connect.
8
9
Page 7
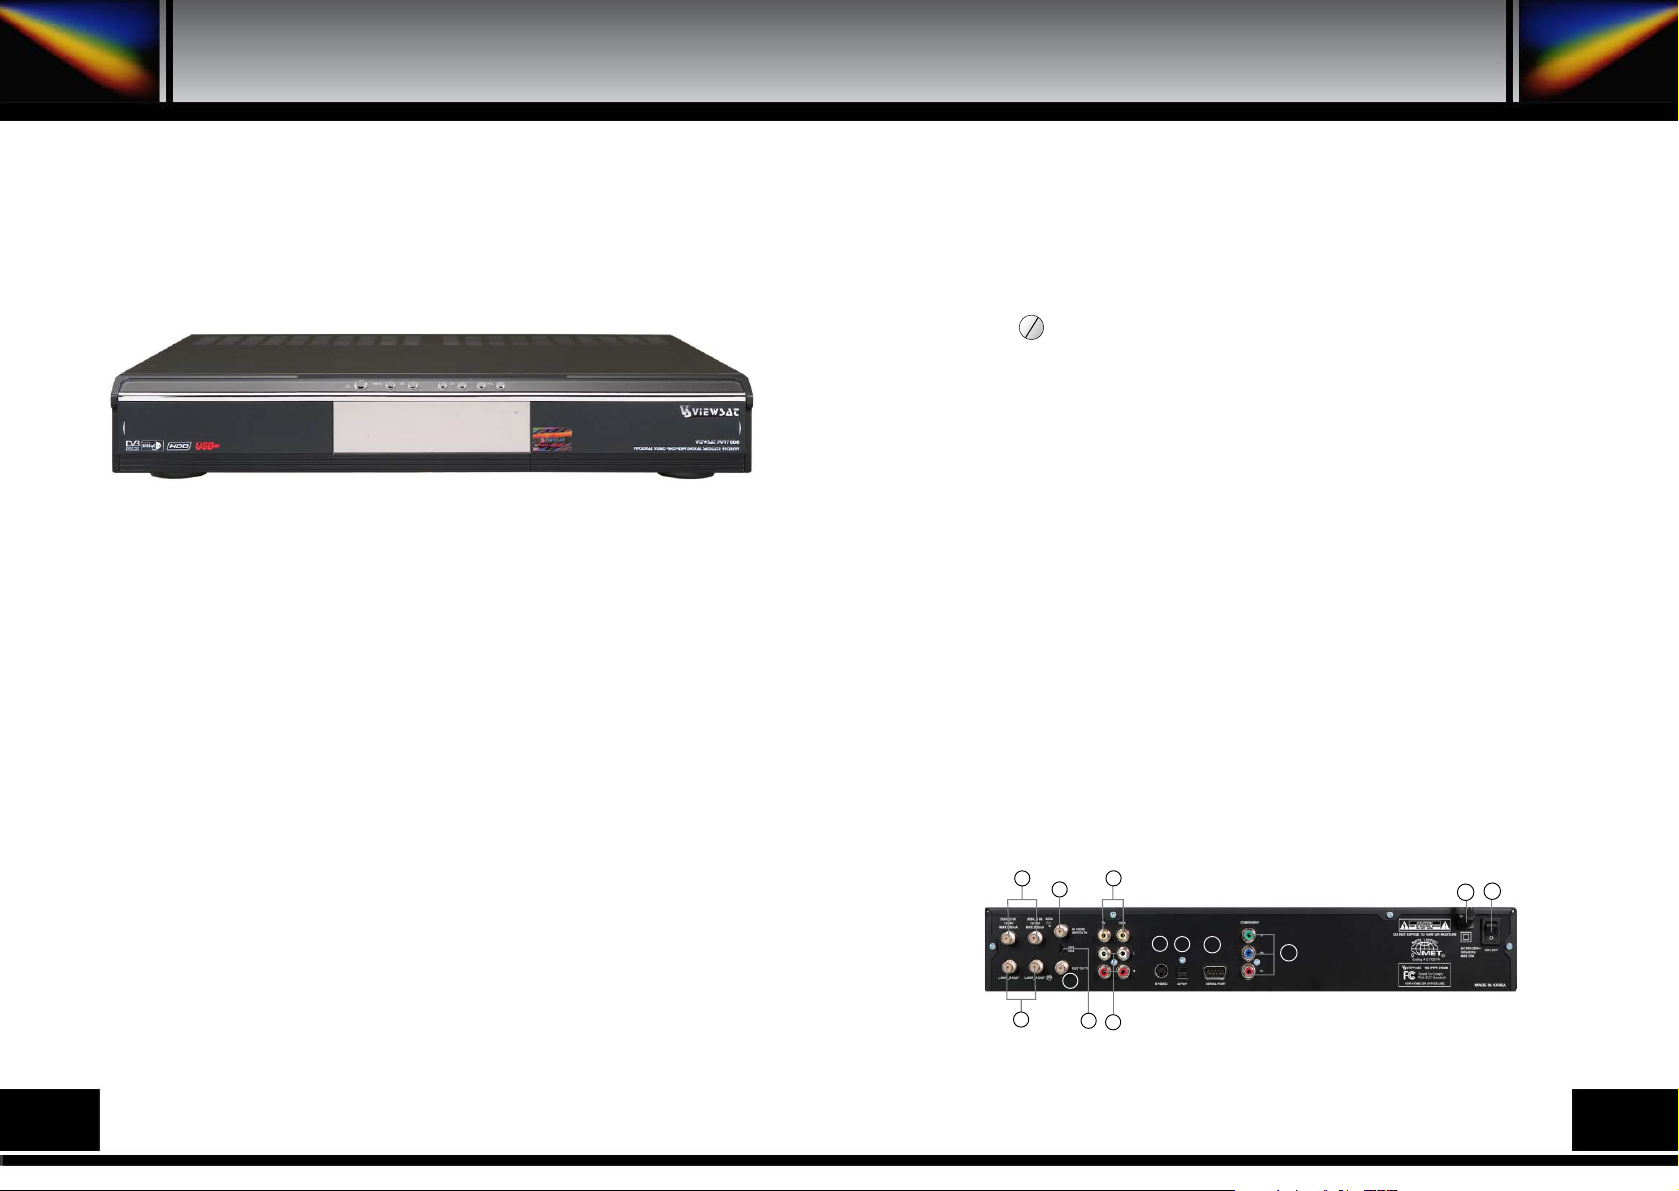
1) DISH IN (A/B) : This port is to connect the coaxial cable from LNB of your Dish. The IF input is provided
through this port and the input frequency range is 950~2150MHz. Also the voltage switching 13V and 18V
is passed through this port.
2) LOOP OUT (A/B) : To enable the connection of an analog receiver, the receiver is provided with
this port. Connect this port to LNB IN port of the other receiver via RF Cable.
3) IN FROM ANT/CATV : This is used to connect your local RF channels to your TV through
Loop(Option).
4) OUT TO TV : This is used to connect your TV through RF cable(Option).
5) CH 3,4 : The switch select RF 3,4 channel number.
6) VIDEO ( TV&VCR ) : These RCA connectors are used to connect any external video (TV and VCR).
7) AUDIO 2 R/L : These RCA connectors are used to connect any external audio.
8) S-VIDEO : This is used to connect your TV through S-Video Cable.
9) S/PDIF DIGITAL OUTPUT : This port is for the connection to the external Hi-Fi system which has a
optical S/PDIF input interface(Option).
10) SERIAL PORT : This is used to connect your receiver to computer through a serial cable. This port
can be used for upgrading software.
11) COMPONENT( Y, Pb, Pr ) : These RCA connectors are used to connect any external video.
12) POWER INPUT : This is to plug in the AC mains power cord. The input AC volts range is 95V to
240V, 50Hz/60Hz supply.
13) POWER SWITCH : This is switch to turn on and off the AC main power.
5.B. REAR P ANEL
1
8
2
3
9
5
44
6
12
13
10
11
7
1) POWER : This key is used to turn the receiver on and off (stand by).
2) MENU : This key is used to open up the menu.
3) OK : This key is used to enter and confirm any data to the receiver in the menu systems.
4) CH : These keys are used to change the channels.
5) VOL : These keys are used to increase and decrease the volume level manually.
6) INFRARED SENSOR : This is to receive the IR commands from the RCU. Do not block the view of the
sensor.
7) 7 SEGMENT DISPLAY : This segment display will show the current channel number. While the receiver
is in stand by mode, the display will show the current time.
8) SMART CARD INTERFACE SLOT : To watch scrambled channels you should insert a smart card into
Smart Card Interface issued the service provider whom you subscribes to. Therefore you can watch only a
specific range of channels with entitlements in smart card. The smart card includes information to decipher
parameters necessary for descrambling the program. Please note that the gold chip on the smart card
should face down and inward when you insert it into Smart Card Interface(Option for CAS model only).
9) USB PORT : This is used to connect your receiver to computer through a USB cable.
10) HDD RACK : You can take out the HDD disk from the receiver using this and change the HDD disk.
You can keep your recorded data outside the receiver.
TV
10
11
5. HARDW ARE DESCRIPTION
5.A. FRONT FANEL
Hardware Description
Page 8
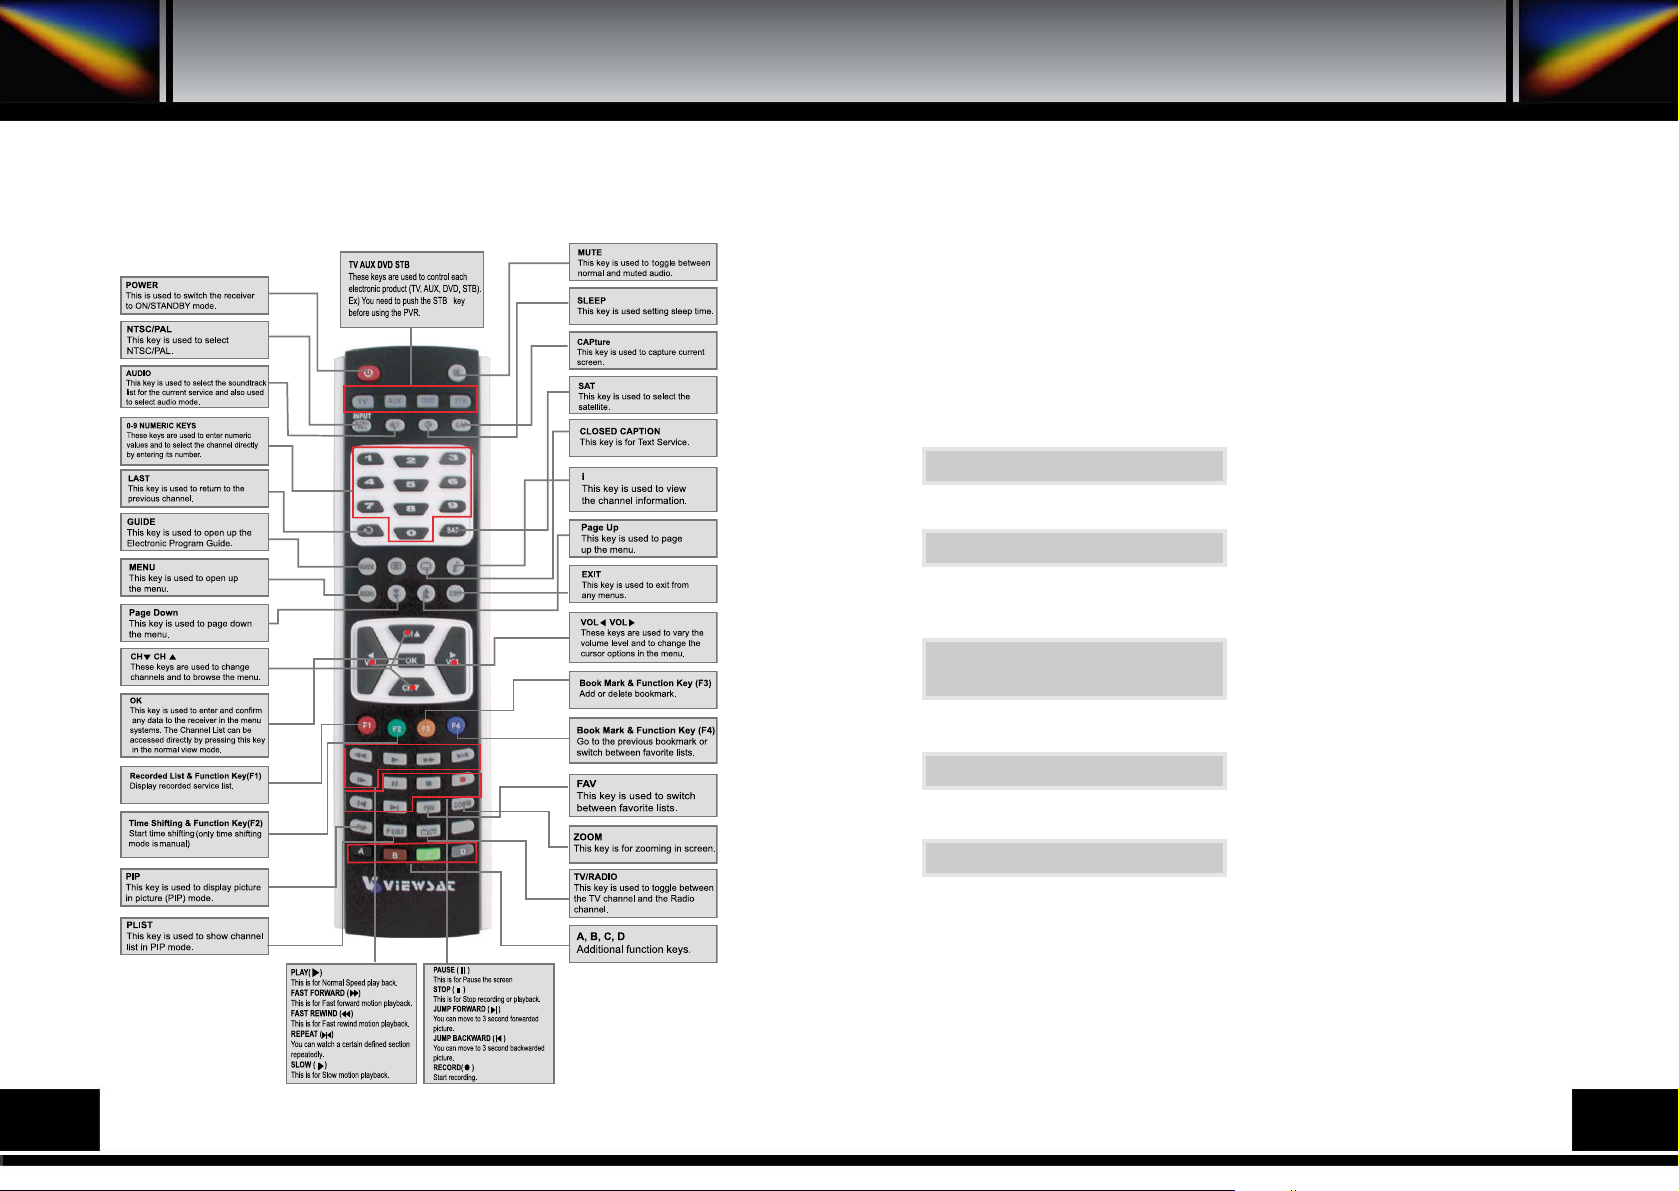
5.C. REMOTE CONTROL UNIT
System Connection
Power On
Antenna Setup Setting
Channel Search
Main Menu / Installation /
Antenna Setup
Connect the receiver to all peripheral devices.
Turn on the power of the receiver and other
devices.
Select Main Menu/Installation / Aantenna
Setup using up/down key( & OK
keys.
Select the satellite which you want to search
using left/right keys ( .
Insert all information of your antenna.
Press OK key, and the receiver will
automatically search for all TV/Radio
channels from a satellite.
6.A. Automatic channel search for a satellite
You can automatically detect and save all TV and Radio channels
of a satellite as follows .
6. SYSTEM SET-UP
System Set-up
12
13
Page 9
Select Main Menu/Installation/Channel Scan .
Select the satellite which you want to search.
Insert all information of your antenna.
Select the transponder from transponder list
which you want to search.
If you cannot find it from transponder list, you
should insert all the transponder information
(i.e., Frequency, Symbol Rate, Polarity and
FEC).
Press OK key, and the receiver will automatically
search for all channels contained in the selected
transponder.
Antenna Configuration Setting
Manual Channel Search
Main Menu/Installation/
Channel Scan
6. B. Manual channel search for a transponder
You can automatically search and save all TV and Radio channels of
a transponder as follows.
Manu Structure
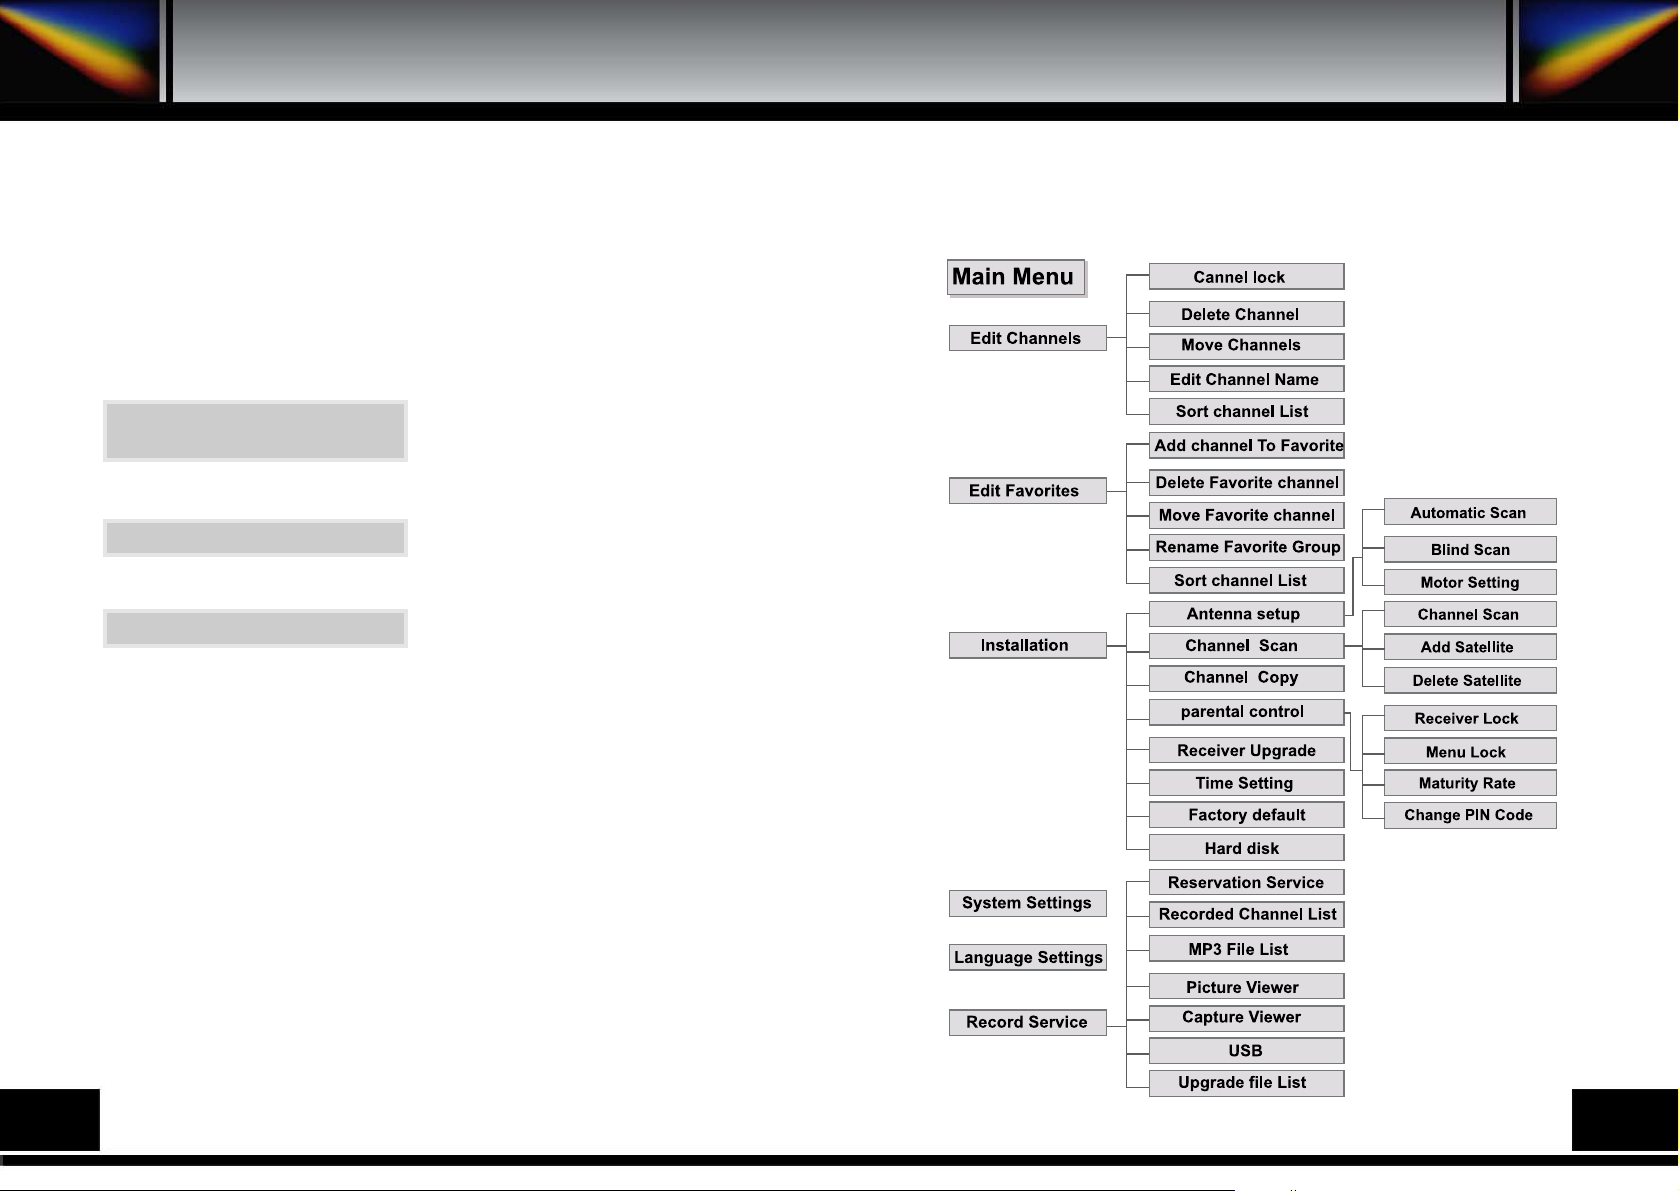
7. MENU STRUCTURE
14
15
Page 10
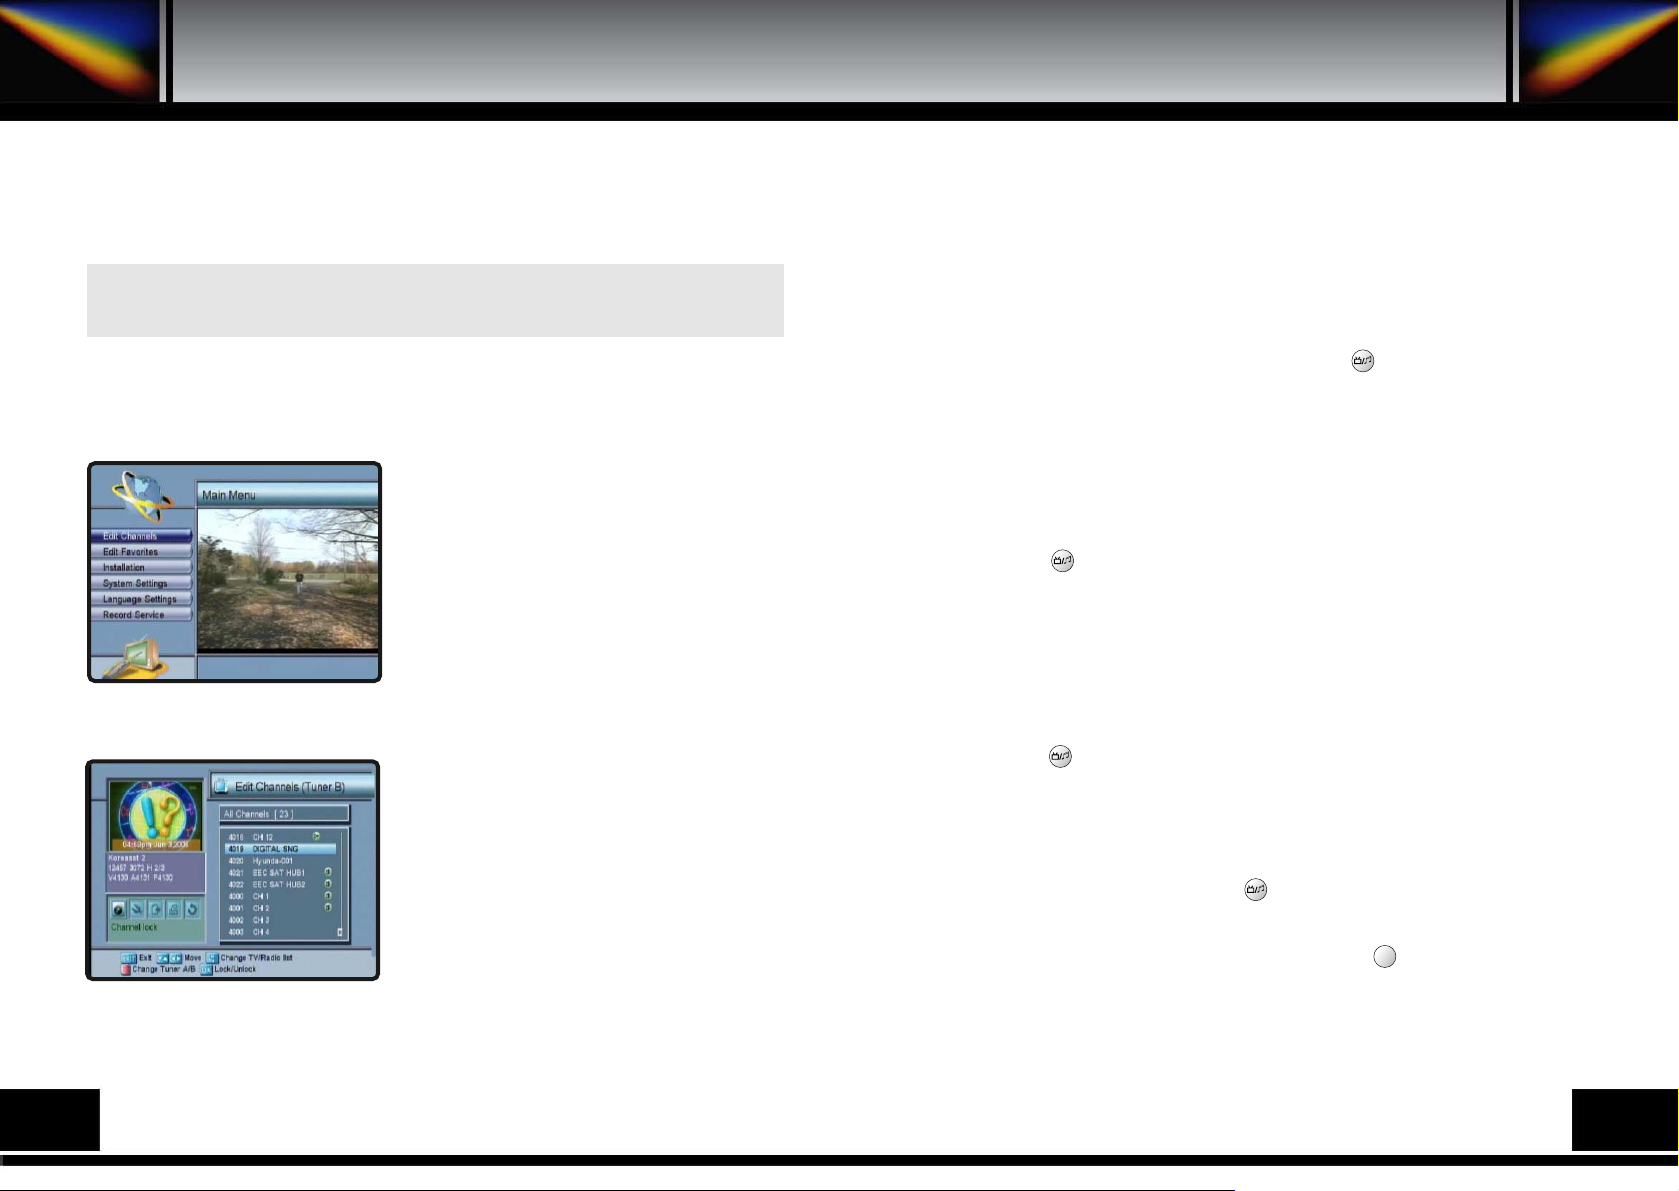
The main menu is classified into several sub menus, which will carry out the
various operations individually.
8. MENU OPERATION
MAIN MENU
After installing your receiver with appropriate connectors, plug in the AC main power and turn on the
receiver.
Press the MENU key of the RCU.
You will see the Main Menu like the screen on the left.
You can move into the desired submenu using the
up/down keys (
).
Press OK key to confirm your selection. If the Main
Menu is locked, note that you should enter the PIN
code in order to move into the corresponding submenu
in case of Edit Channels menu, Edit Favorites menu
and Installation menu. The factory default PIN code is
“0000”. Press the MENU key or EXIT key to return to
previous menu.
8.1. EDIT CHANNELS
You can edit channels on various channel lists channel lock, delete channel, move channel, edit
the name of a channel, and sort the channel list.
Select Edit Channels menu in Main Menu and
you will be asked to enter your PIN code. You can
find the Edit Channels screen on the left by
entering it.
Manu Operation
8.1.A. CHANNEL LOCK
Select the Channel lock icon using the left/right keys (
).
Select the channel that you want to lock or unlock from the channel list using the up/down keys (
) and the page up/down keys ( ).
Press the OK key to confirm your selection. Also, you can use the key to select either TV channel
list or Radio channel list. Once the channel is locked, every time you try to watch the program, you
will be asked to enter PIN code.
Press the MENU key or EXIT key to return to previous menu.
8.1.B. DELETE CHANNEL
Select the Delete channel icon using the left/right keys (
).
Select the channel that you want to delete from the channel list using the up/down keys (
) and
the page up/down keys ( ). Press the OK key to confirm your selection.
Also, you can use the key to select either TV channel list or Radio channel list.
Press the MENU key or EXIT key to return to previous menu.
8.1.C. MOVE CHANNEL
Select the Move channel icon using the left/right keys(
).
Select the channel that you want to move from the channel list using the up/down keys (
) and
the page up/down keys ( ). Press OK key to confirm your selection.
Move it to the position where you want to place it using the up/down keys (
) and the page
up/down keys ( ). Press the OK key to confirm.
Also, you can use the key to select either TV channel list or Radio channel list.
Press the MENU key or EXIT key to return to previous menu.
8.1.D. EDIT CHANNEL NAME
Select the Edit channel name icon using the left/right keys (
).
Select the channel that you want to edit from the channel list using the up/down keys (
) and the
page up/down keys ( ). Also, you can use the key to select either TV channel list or Radio
channel list. Press OK key to confirm your selection.
Select the character, which you want to edit using the browse keys (
,
).
Press OK key to confirm. Save the name currently selected using the key.
Press the MENU key or EXIT key to return to previous menu.
▲
▲
▲
▲
▲
▲
▲
▲
▲
▲
▲
▲
▲
▲
▲
▲
▲
▲
▲
▲
F2
16
17
Page 11
8.1.E. SORT CHANNEL LIST
Select the Sort channel list icon using the left/right keys (
). Press OK key to confirm.
Select the sort type which you want to sort using the up/down keys (
). Press the OK
key to confirm.
Also, you can use the key to select either TV channel list or Radio channel list.
Press the MENU key or EXIT key to return to previous menu.
* CHANGE TUNER
When you want to change Tuner A/B, you can change it using the key.
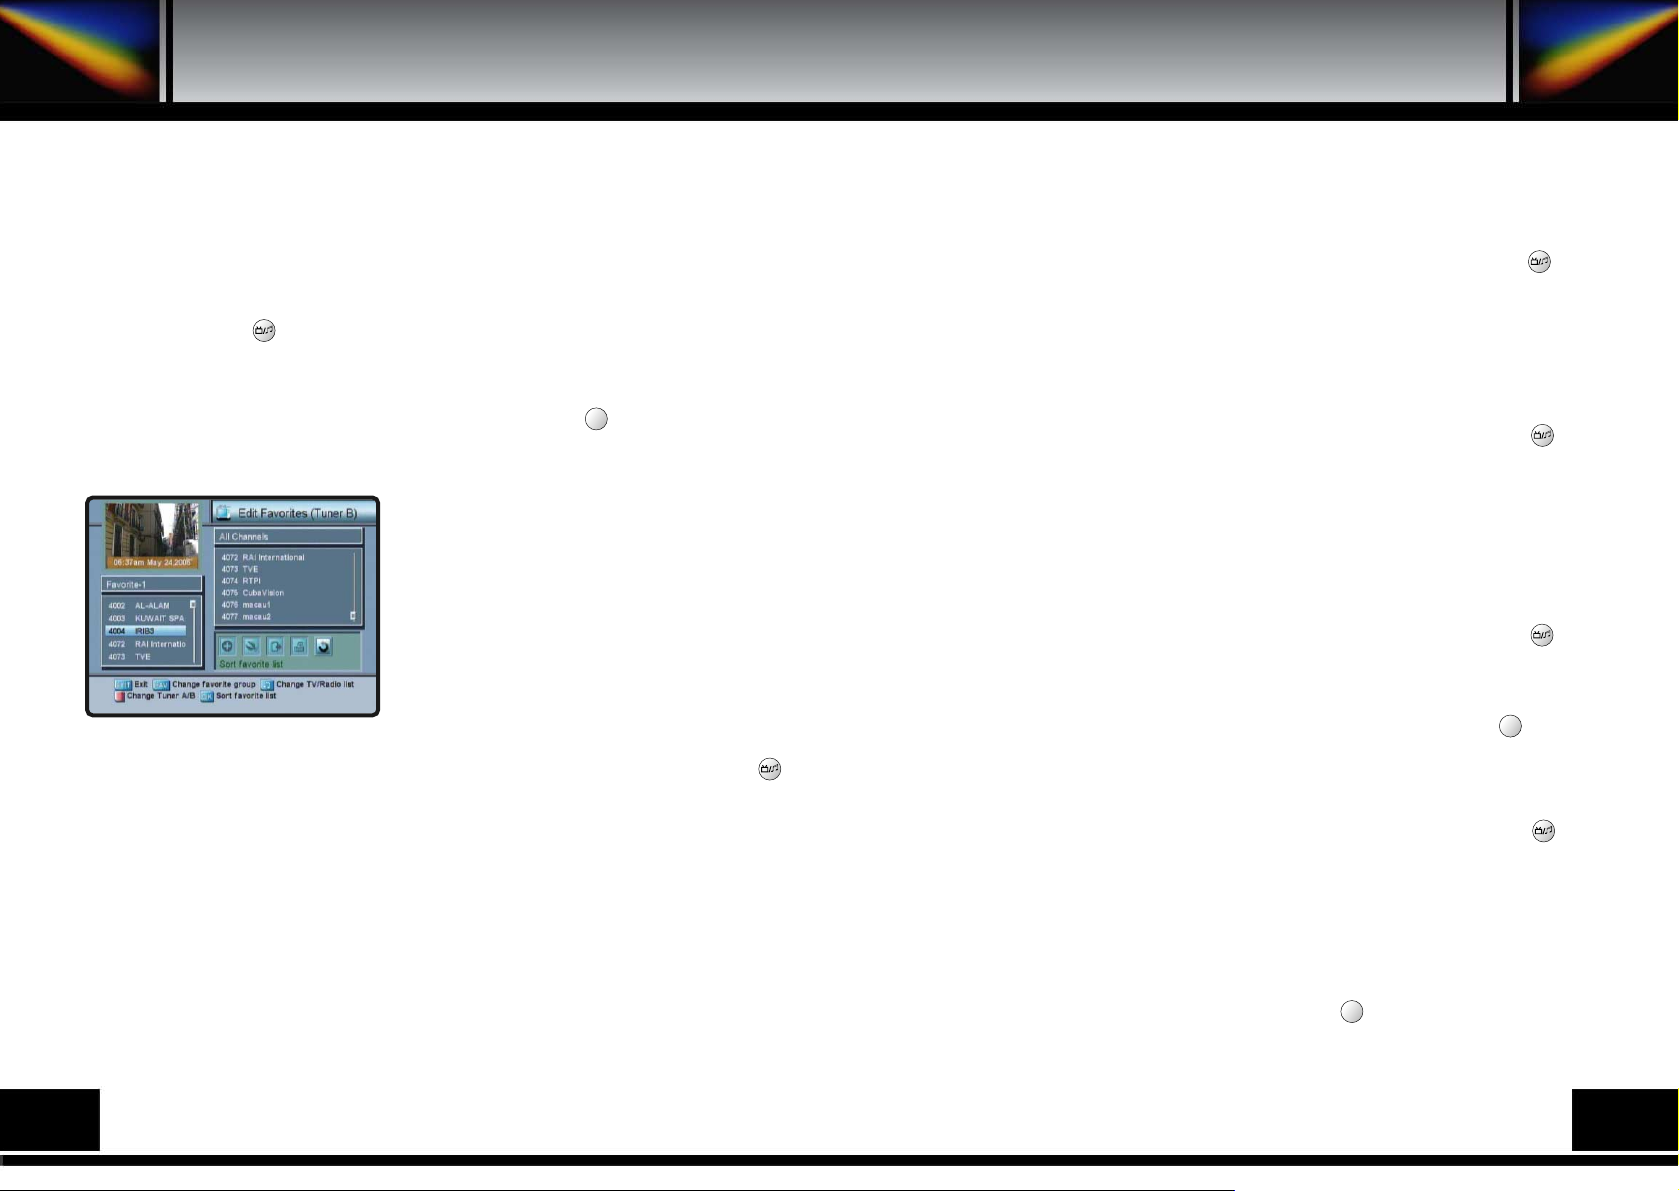
8.2. EDIT FAVORITES
You can edit the favorite channel list, such as
add/delete channels or move its position, which
facilitates you to easily find your favorite channel
from the favorite channel list.
The favorite channel is classified into one of 8
favorite categories depending on its genre. Select
Edit Favorites menu in Main Menu and you will be
asked to enter your PIN code.
You can find the Edit Favorites screen on the left by
entering it.
8.2.A. ADD CHANNEL TO FAVORITE
You can choose TV channel list or Radio channel list in an alternative way by pressing the
key on the RCU. By pressing FAV key on the RCU, you can choose your favorite channel
group out of 8 favorite groups.
Select the Add channel to favorite icon using the left/right keys (
). Select a channel that
you want to add into the favorite channel list, using the up/down keys (
) and the page
up/down keys ( ).
Press the OK key, and the selected channel will be added to the favorite channel list. Press
the MENU key or EXIT key to return to previous menu.
▲
▲
▲
▲
F1
8.2.B. DELETE FAVORITE CHANNEL
You can choose TV channel list or Radio channel list in an alternative way by pressing the key
on the RCU. By pressing FAV key on the RCU, you can choose your favorite channel group out of
8 favorite groups. Select the Delete favorite channel icon using the left/right keys (
).
Select a channel that you want to delete from the favorite channel list using the up/down keys (
) and the page up/down keys ( ). Press the OK key, and the selected channel will disappear
from the favorite channel list. Press the MENU key or EXIT key to return to previous menu.
8.2.C. MOVE FAVORITE CHANNEL
You can choose TV channel list or Radio channel list in an alternative way by pressing the key
on the RCU. By pressing FAV key on the RCU, you can choose your favorite channel group out of
8 favorite groups. Select the Move favorite channel icon using the left/right keys (
).
Select a channel that you want to move using the up/down keys (
) and the page up/down
keys ( ). Press OK key to confirm your selection. Move it to the position where you want to place
it using the up/down keys (
) and the page up/down keys ( ). Press the OK key to confirm.
Press the MENU key or EXIT key to return to previous menu.
8.2.D. RENAME FAVORITE GROUP
You can choose TV channel list or Radio channel list in an alternative way by pressing the key
on the RCU. By pressing FAV key on the RCU, you can choose your favorite channel group out of
8 favorite groups. Select the Rename favorite group icon using the left/right keys (
).
Press the OK key and select the character, which you want to edit using the browse keys (
,
). Press the OK key to confirm. Save the character currently renamed using the key.
Press the MENU key or EXIT key to return to previous menu.
8.2.E. SORT CHANNEL LIST
You can choose TV Channel list or Radio channel list in an alternative way by pressing the key
on the RCU. By pressing FAV key on the RCU, you can choose your favorite channel group out of
8 favorite groups. Select the Sort favorite list icon using the left/right keys (
).
Press the OK key to confirm. Select the Sort type which you want to sort using the up/down keys
(
). Press the OK key to confirm. Press the MENU key or EXIT key to return to previous
menu.
* CHANGE TUNER
When you want to change Tuner A/B, you can change it using key.
F2
F1
▲
▲
▲
▲
▲
▲
▲
▲
▲
▲
▲
▲
18
19
Page 12
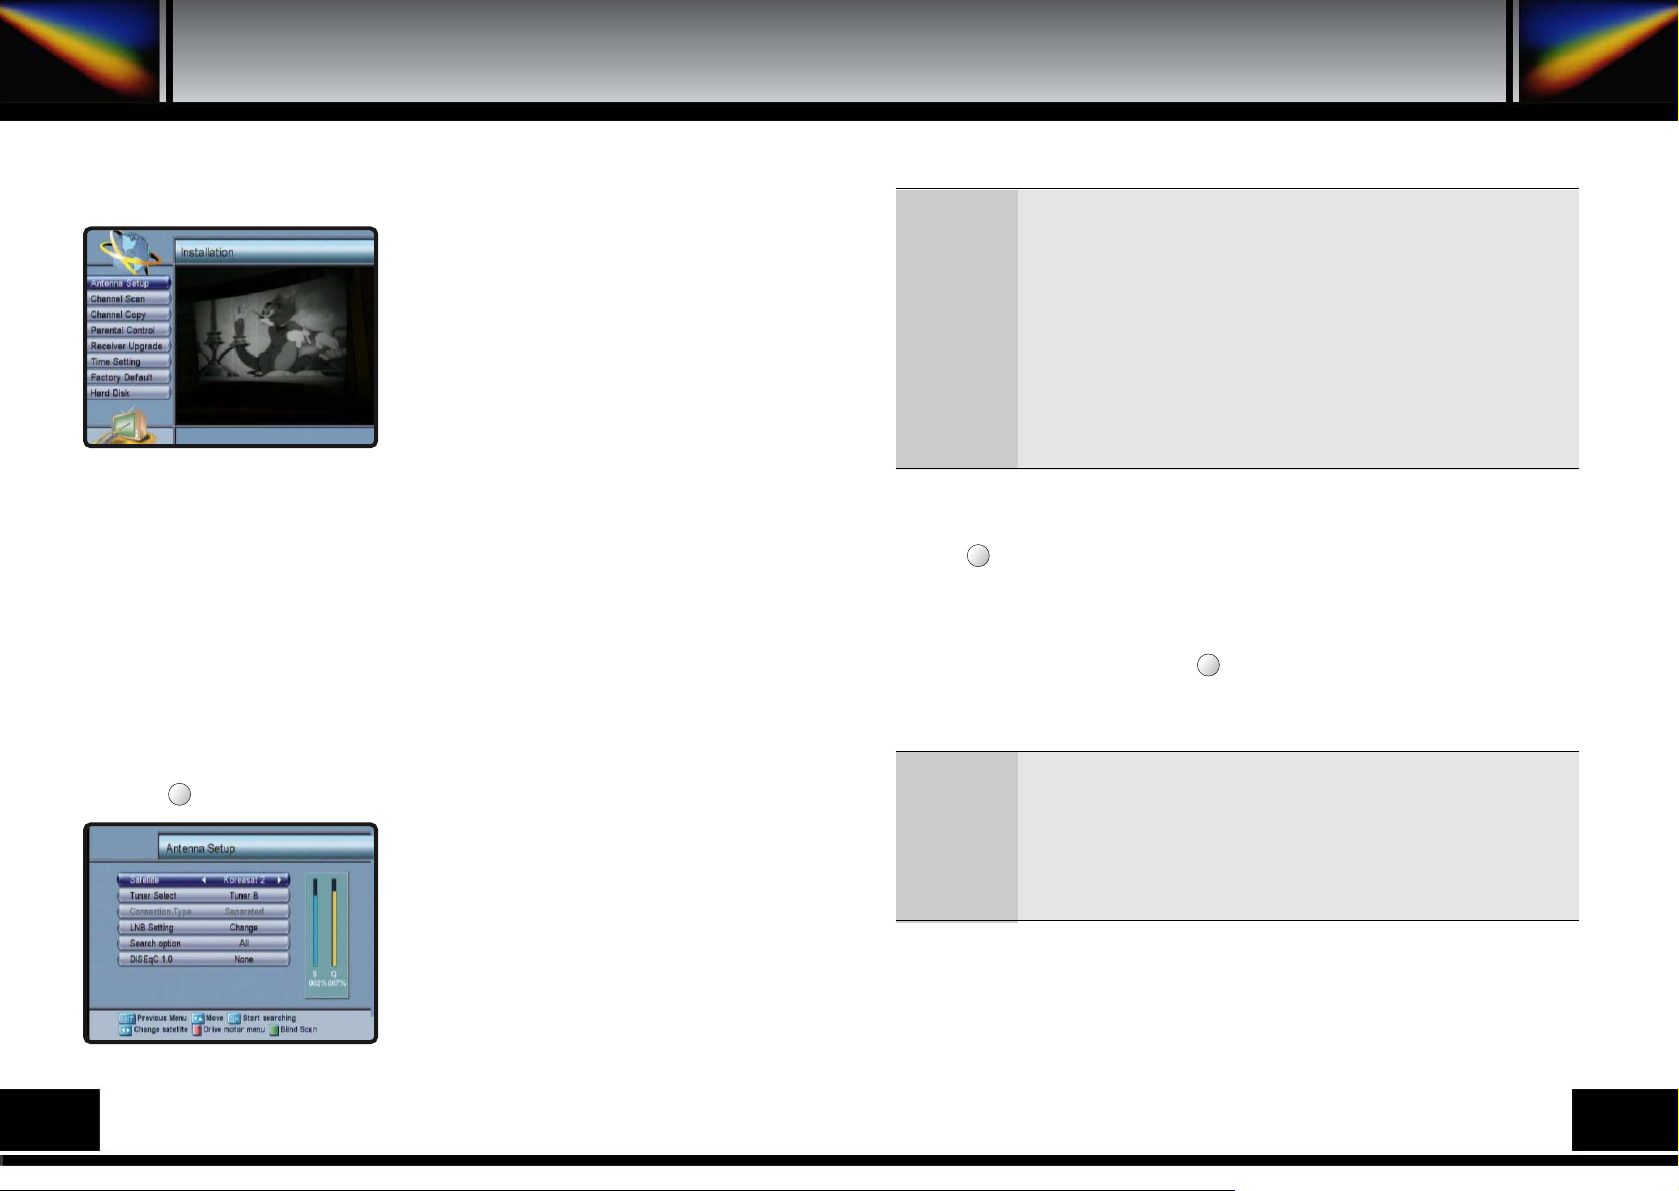
8.3. INST ALLATION
Installation menu helps you to setup a variety of
parameters necessary for receiving signal, add new
service, upgrade the new software and reset the
channel data.
Select Installation menu in Main Menu and you will
be asked to enter your PIN code.
You can find the Installation screen on the left by
entering it.
8.3.A. ANTENNA SETUP
Your receiver includes the preprogrammed information of transponders contained in various
satellites. You can update the transponder list preprogrammed for a satellite by adding a new
transponder to it or modifying the information of the existing transponder (Refer to the
Channel Scan described in section 7.3.B).
Select Antenna Setup menu in Installation menu and the following screen will be displayed.
Select the desired satellite using the left/right keys(
) and the up/down keys (
)
and select Tuner A or B as you want to watch. Select the LNB Setting using the left/right
keys(
) then you can set LNB Power, LNB Type, LNB Freq., 22KHz with left/right
keys(
) at each field. And you can set Search option, DiSEqC 1.0 to the appropriate
value using the left/right keys (
) at each field.
Press the key to select Drive motor menu and you can set Motor and USALS setting.
8.3.A.1. Automatic Scan
Check the signal strength. Press OK key to start the
scan procedure. You can see the progressive status
of channel searching.
Please note that the scan procedure may take a few
minutes.
Press the MENU key or EXIT key to return to
previous menu.
LNB Power
LNB Type
LNB Freq.
22KHz
Search option
DiSEqC 1.0
: Depending on the user’s antenna LNB, you can supply either LNB power
by setting ON or not by setting OFF. Normally set this to ON.
: You can select the LNB type.
: You can select the predefined LNB frequency or manually enter a specific
frequency in MHz unit by pressing numeric keys.
: In case you are using two antennas connected to a 22KHz tone switch box,
you can supply either 22KHz by setting ON or off by setting OFF to select
antenna.
: You can search all the free channels & scramble channels or only free
channels or only scramble channels by setting the search option.
: If you have DiSEqC 1.0 you can choose port by selecting port number.
Otherwise, choose None.
TP Freq.
Mode
Move
Move Fine
Limit
Store Position
Goto Position
: You can select TP frequency of the selected Satellite.
: Mode 1.2(Motor) / Mode 1.3(USALS)
: You can move East, West direction consecutively.
: You can move East, West direction by stages.
: Set the limit or go to reference.
: Store the current position of the motor for the selected satellite.
: Move the motor to the stored position of the selected satellite.
8.3.A.2. Blind Scan
Blind Scan search the channel when you don’t know the transponder information.
Press the key to start the blind scan procedure. Please note that the scan procedure may take a
few minutes. Press the MENU key or EXIT key to return to previous menu.
8.3.A.3. Motor Setting
If you have a DiSEqC 1.2 or 1.3 (USALS) motorized system, then you can take advantage of the
Motor Setting functions available. Press the key to drive your motor. Then adjust antenna
direction using the left/right keys(
) with checking the signal strength. Press the MENU key or
EXIT key to return to previous menu.
F2
F1
20
21
F1
Page 13
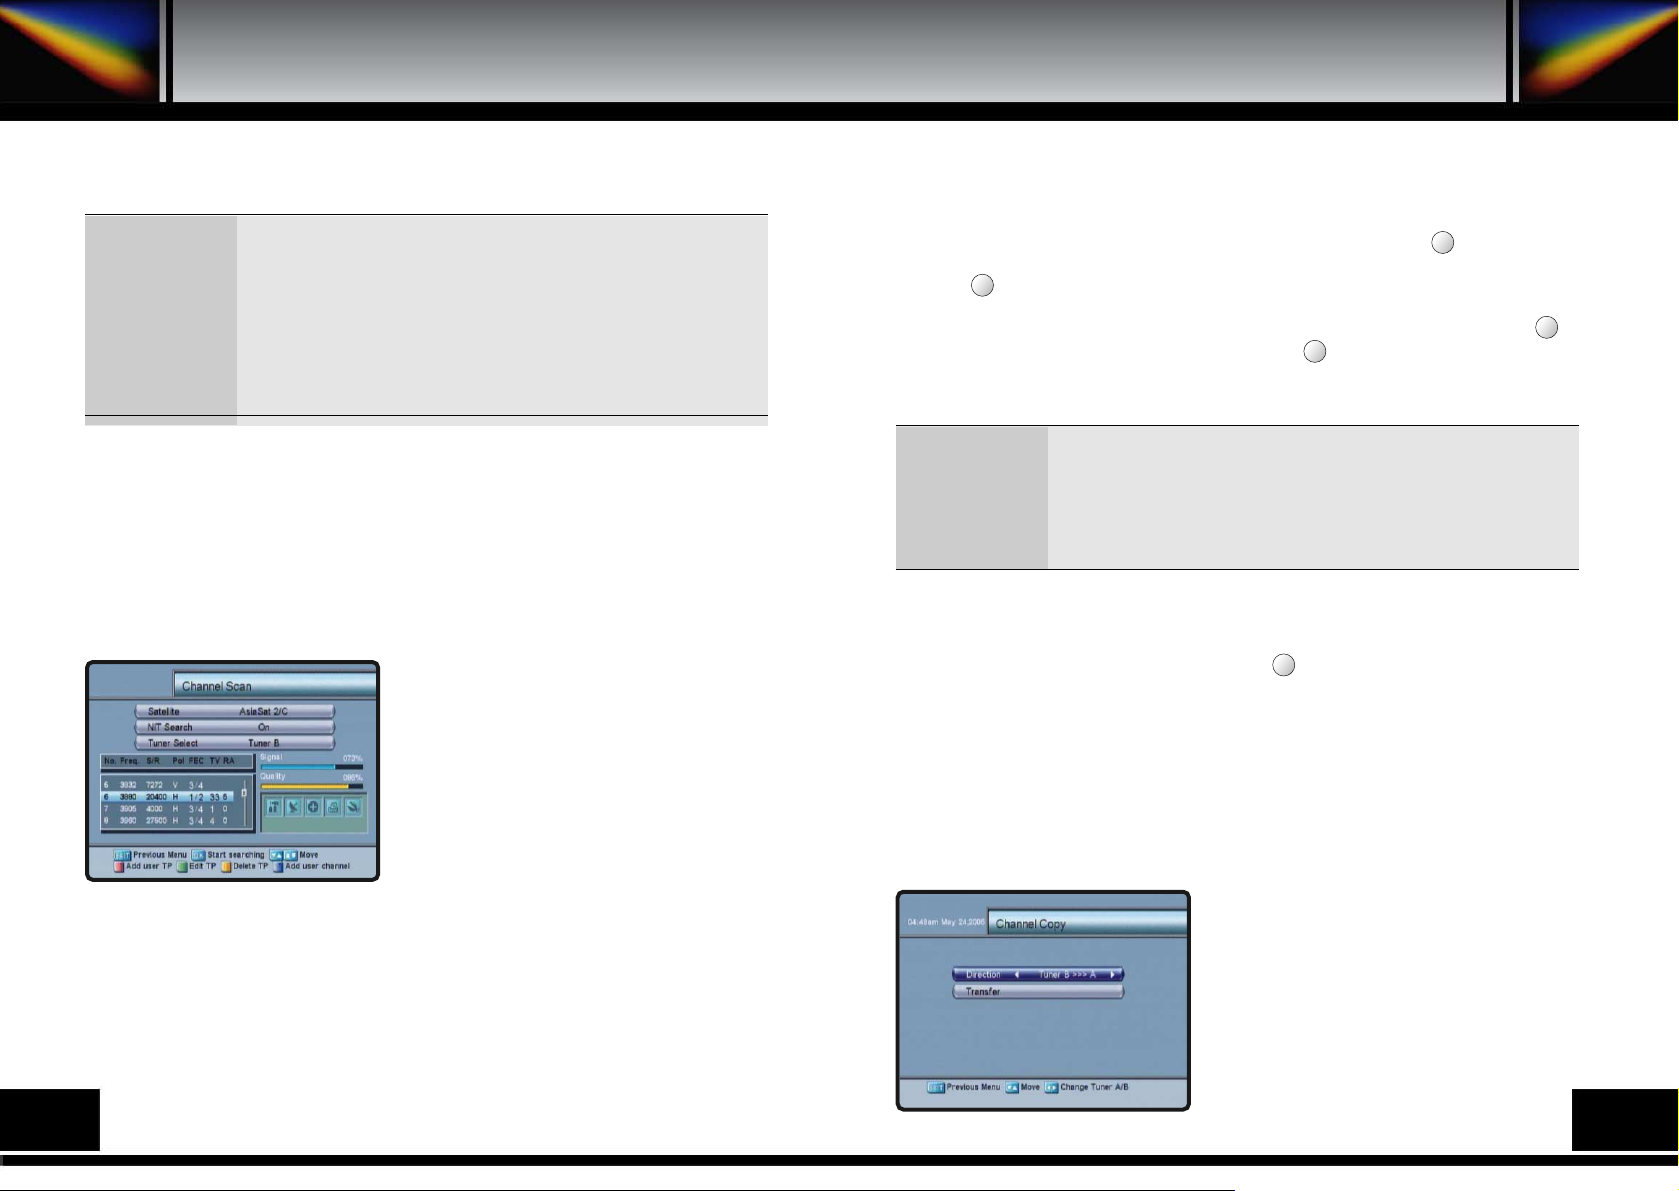
: It is the longitude of the selected satellite. It is set automatically as the
selected satellite. And you can enter the position value using numeric
keys.
: It means the longitude of your location. You can select the value using
the left/right keys(
or numeric keys.
: It means the latitude of your location. You can select the value using the
left/right keys(
) or numeric keys.
* 1.3(USALS) only.
Sat Position
Longitude
Latitude
: Input the frequency of the transponder you want to find manually.
: Input the symbol rate of the transponder you want to find.
: Select the polarization of the transponder you want to find. In the case of
horizontal, 18V and in the case vertical, 13V are output through LNB line.
: Select the FEC of the transponder you want to find. You can select the
value of 1/2, 2/3, 3/4, 5/6, 7/8 or auto.
Freq.
S/R
Polarity
FEC
8.3.B. CHANNEL SCAN
It will be more convenient to use Channel Scan procedure when you want to search channel
for a specified transponder offered from the satellite.
As in Antenna Setup, Channel Scan also searches all channels broadcasted over a
specific transponder using its predefined information.
You can add a new transponder if you cannot find it on the predefined transponder list.
Select Channel Scan menu in Installation menu, and the following screen will be displayed.
8.3.B.1 Channel Scan
Select the desired satellite using the left/ right keys
(
).
Select the Antenna Configuration icon using the
browse keys(
,
).
Select the LNB Setting using the left/right keys(
) then you can set LNB Power, LNB Type, LNB
Freq., 22KHz with left/right keys(
) at each field.
Press EXIT key and set Search Option, DiSEqC1.0
fields to the appropriate value using the left/right
keys(
) at each field.
Check the signal strength and press EXIT key.
Select the Search/Edit TP icon using the left/right keys(
).
Press OK key and select the desired transponder using the up/down keys(
). Press OK
key to start the scan procedure for selected transponder.
You can see the progressive status of channel searching.
If you cannot find the desired transponder from the transponder list, you can add it by
inputting appropriate parameter values for a new transponder using the key.
When you want to change the parameter of an existent transponder, select the parameter
using the key, change its value and press the EXIT key.
Correctly set various parameters.
When you want to delete newly added transponder, delete the transponder using the
key. And you can add your own transponder using the key.
Press the MENU key or EXIT key to return to previous menu.
8.3.B.2. Add Satellite
You can add a new satellite. Select the Add Satellite icon using the left/right keys (
)
and press the OK key. Select the Search/Edit TP icon using the left/right keys(
). Press
the OK key and add a new transponder using the key. You should set various
parameters of the transponder. The default name of the added satellites is “User SAT-No”.
8.3.B.3. Delete Satellite
You can also delete the user satellite. Select the satellite that you want to delete from the
satellite list. Select the Delete Satellite icon using the browse keys (
,
).
Press the OK key, and the selected satellite will disappear.
8.3.C. CHANNEL COPY
This function provide you with transferring channels
from tuner A(B) to tuner B(A).
Select the Direction, Tuner A >>> B or Tuner B
>>> A using the left/right keys(
).
Then select the Transfer menu and press the OK
key. If you copy channel A >>> B, you connect the
same satellite of tuner A to tuner B. Then, It will work
in Tuner B. Press the MENU key or EXIT key to
return to previous menu.
22
23
F1
F2
F4
F3
F1
Page 14
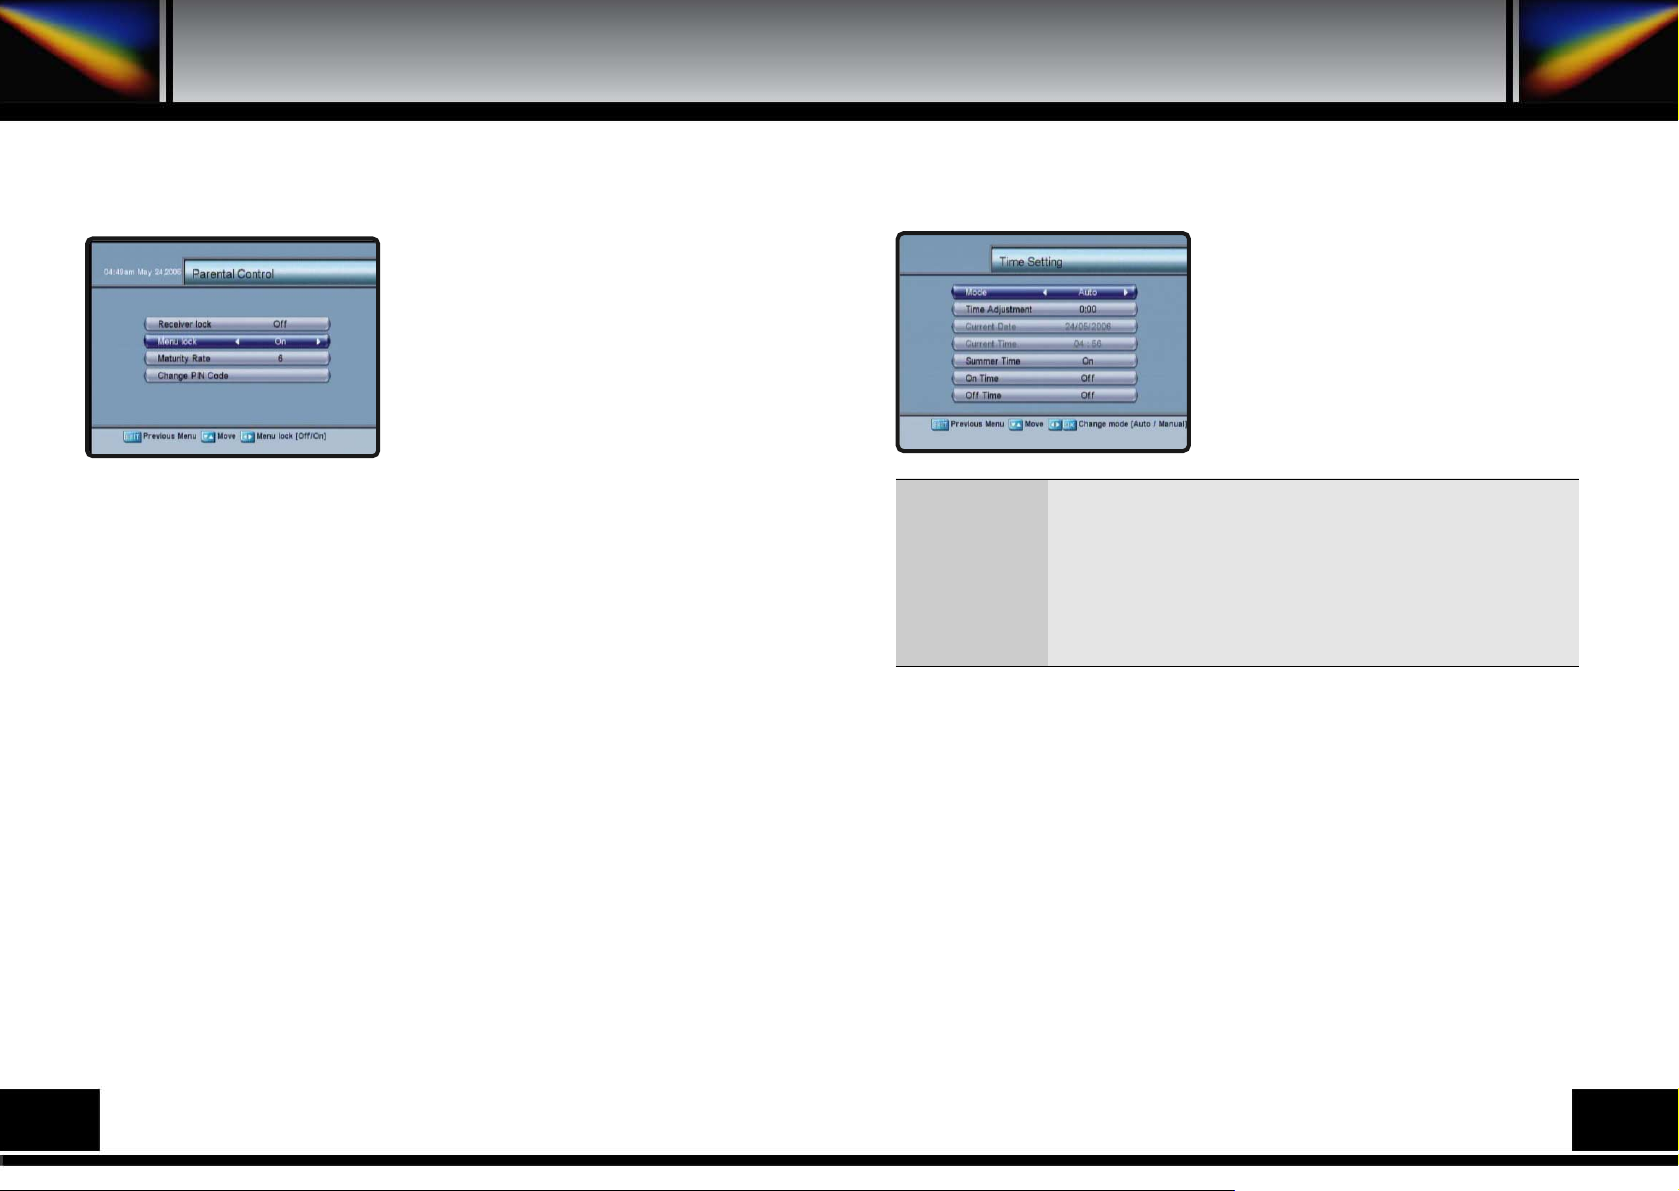
8.3.D. PARENTAL CONTROL
This function prevents children or unauthorized
people from watching programs.
Also you can change PIN code. Select Parental
Control menu in Installation menu. The screen on
the left will be displayed.
Press the MENU key or EXIT key to return to
previous menu.
8.3.D.1. Receiver Lock
To lock receiver, select Receiver lock in the Parental Control menu and change it to On
mode using the left/right keys (
).
8.3.D.2. Menu Lock
To lock the Main Menu, select Menu lock in the Parental Control menu and change it to
On mode using the left/right keys (
).
8.3.D.3. Maturity Rate
Select Maturity Rate level with left/right keys (
).
8.3.D.4. Change PIN Code
You can change your PIN code from factory default value “0000” as follows: Select Change
PIN Code in the Parental Control menu using the up/down keys (
). Press OK key.
Then you will be asked for a new PIN code.
Once you enter a new PIN code, the receiver will ask you to enter it in again.
After you enter a new PIN code twice, the PIN code is changed permanently.
If you forget the PIN code, you have to contact the distributor to find out it.
8.3.E. RECEIVER UPGRADE
You can upgrade the software of this receiver through serial port when the new software is
released.
Please contact the distributor for receiver upgrade.
Distributor supports you useful information and new software for the receiver.
8.3.F. TIME SETTING
You can adjust date and time in Time Setting menu.
And you can switch on/off the receiver using this
menu.
Select Time Setting menu in the Installation menu
and the screen on the left will be displayed.
Press the MENU key or EXIT key to return to
previous menu.
8.3.G. FACTORY DEFAULT
This is to restore the factory set values in case the user has encountered some problems
after changing any new values of channel data and others, which may be in error.
Select Factory Default menu in Installation menu and press OK key.
If you want to continue, select Yes cell.
The receiver will be reset to settings automatically.
Please note that the Factory Default procedure may take a few seconds.
: Select manual or auto. In auto mode, the receiver is using the time code
from satellite signal. In manual mode, user can set the time manually.
: Set the time offset from the UTC (GMT) (Auto mode only).
: The current date is indicated (manual mode only).
: The current time is indicated (manual mode only).
: Enable or disable the Summer Time(Auto mode only).
: Set the time when the receiver will be automatically turned on.
: Set the time when the receiver will be automatically turned off.
Mode
Time Adjustment
Current date
Current time
Summer Time
On time
Off time
24
25
Page 15
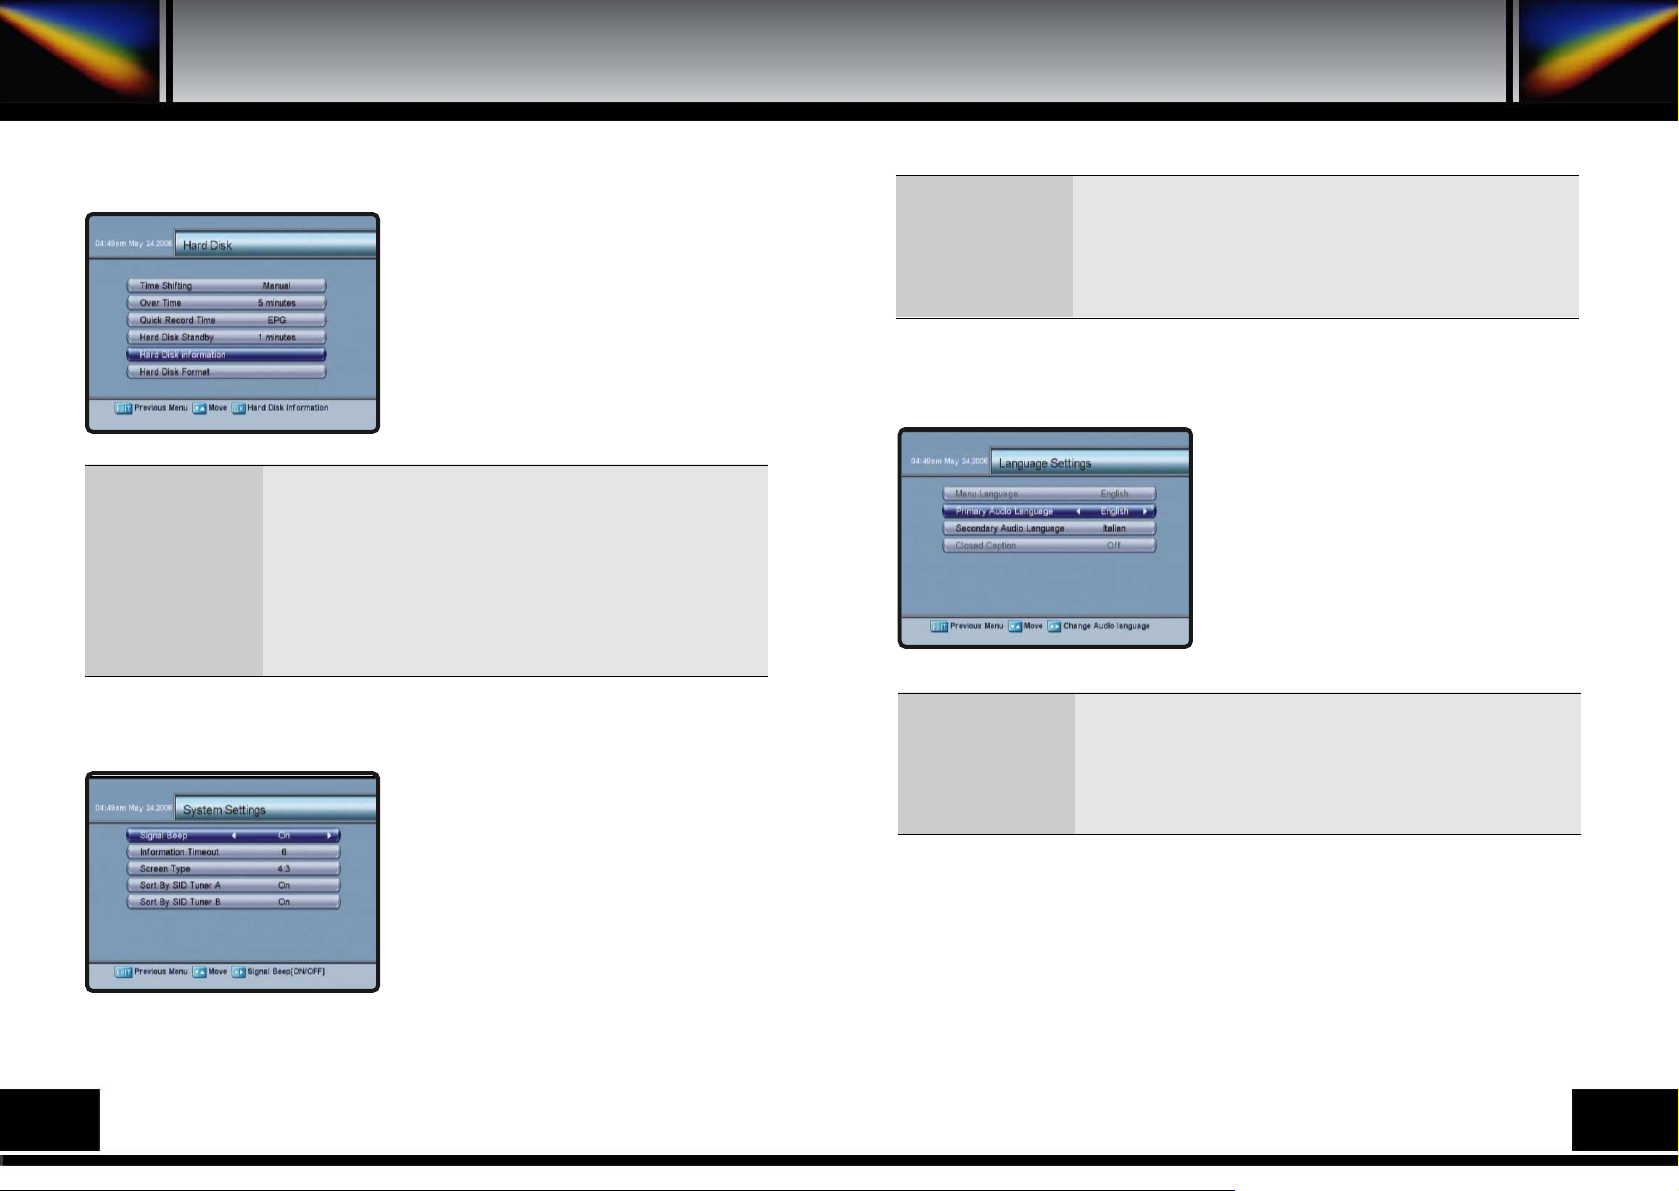
8.3.H. HARD DISK
This menu helps you to know Hard disk information.
Select Hard Disk menu in Installation menu. And
the screen on the left will be displayed.
Press the MENU key or EXIT key to return to
previous menu.
8.4. SYSTEM SETTINGS
This menu helps you to set up Signal Beep,
Information Timeout, Screen Type, Sort By SID
Tuner A/B.
Select System Settings menu in Main Menu. And
the screen on the left will be displayed.
8.5. LANGUAGE SETTINGS
This menu helps you to set up Menu Language,
Audio Language and Closed Caption.
Select Language Settings menu in Main
Menu. And the screen on the left will be displayed.
Press the MENU key or EXIT key to return to
previous menu.
: Auto/Manual(Please refer to the 10.3 TIME SHIFT).
: Overtime is a setting for the record reservation. A record will be
extended by this setting. Over time doesn’t work if another
reservation would be influenced.
: You can set quick record time in advance.
: Time for standby state of Hard disk.
: You can get information of Hard disk.
: If you want Hard Disk Format, press OK key and enter PIN code. If
you want to continue, select Yes cell.
Time Shifting
Over Time
Quick Record Time
Hard Disk Standby
Hard Disk Information
Hard Disk Format
Press the MENU key or EXIT key to return to previous menu.
: If this is On, receiver will beep out the signal status.
: You can choose how long information is shown on the screen.
: You can choose display mode Auto, 16:9, 4:3 or Letter box.
: When you choose On, channel number is counted from programmed
channel number in the receiver. When Off, counted from nature
channel number at Tuner A(B).
Signal Beep
Information Timeout
Screen Type
Sort By SID Tuner A/B
: You can choose language of menu.
: You can choose language of primary audio. If you watch the channel
which support many languages, this language is showed first of all.
: You can choose language of secondary audio. If watching channel
doesn’t support primary audio language, this language is showed.
: You can choose visibility of Closed Caption. On/Off.
Menu Language
Primary Audio
Language
Secondary Audio
Language
Closed Caption
26
27
Page 16
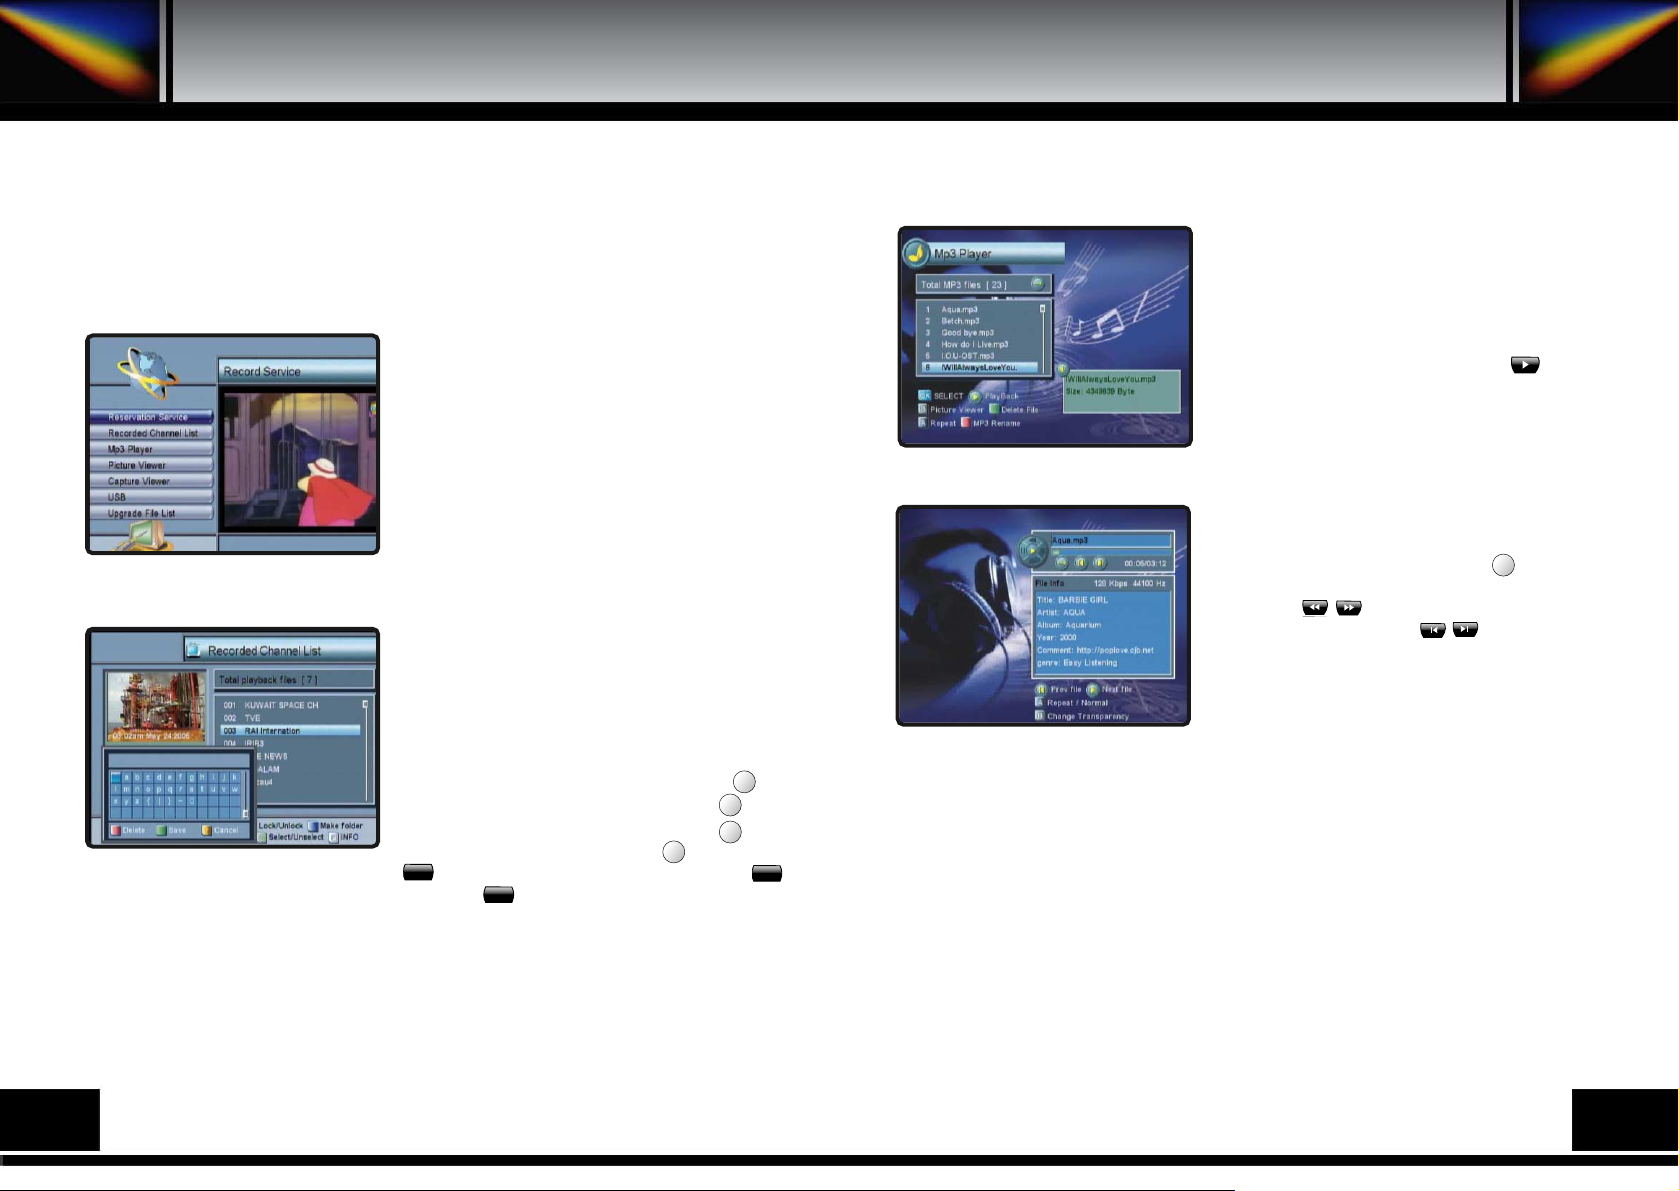
8.6. RECORD SERVICE
Your receiver includes recording service and other additional functions.
Select Record Service menu in Main Menu, and the following screen will be displayed.
8.6.A. RESERVATION SERVICE
In this menu you can do reservation record or
recording the current watching channel
(Please refer to the 11. HOW TO DO RESERVATION
RECORD).
8.6.B. RECORDED CHANNEL LIST
This menu shows the recorded channels and the
currently recording channel on the Hard Disk. It is
also shown the file size and duration time.
Enter the Recorded Channel List by using the OK
key. Select a the recorded channel using the
up/down keys (
) key and push the OK key.
Then playback starts. In the Recorded Channel list,
you can edit the recorded channels using the
key, delete the recorded channels using the key,
lock/unlock the recorded channels using the key.
And you can make folders using the key.
You can sort the recorded channels using key. You can move to Mp3 File List using
key. And you can select/ unselect file for move using key.
8.6.C. MP3 FILE LIST
You can enjoy listening to music in this function.
Select MP3 File List menu in Record Service
menu and the MP3 Player screen on the left will be
displayed.
You can select music files to use up/down keys
(
) and OK Key. And then press the key to
play the music.
When you want to play the music, the player will
work if you press OK key. If you want to display the
information window of MP3 files, press key.
And you can play the jump backward and jump
forward using , keys. Also you can jump to
next and previous song using , keys.
28
29
A
C
F2
F3
F4
i
F1
B
Page 17
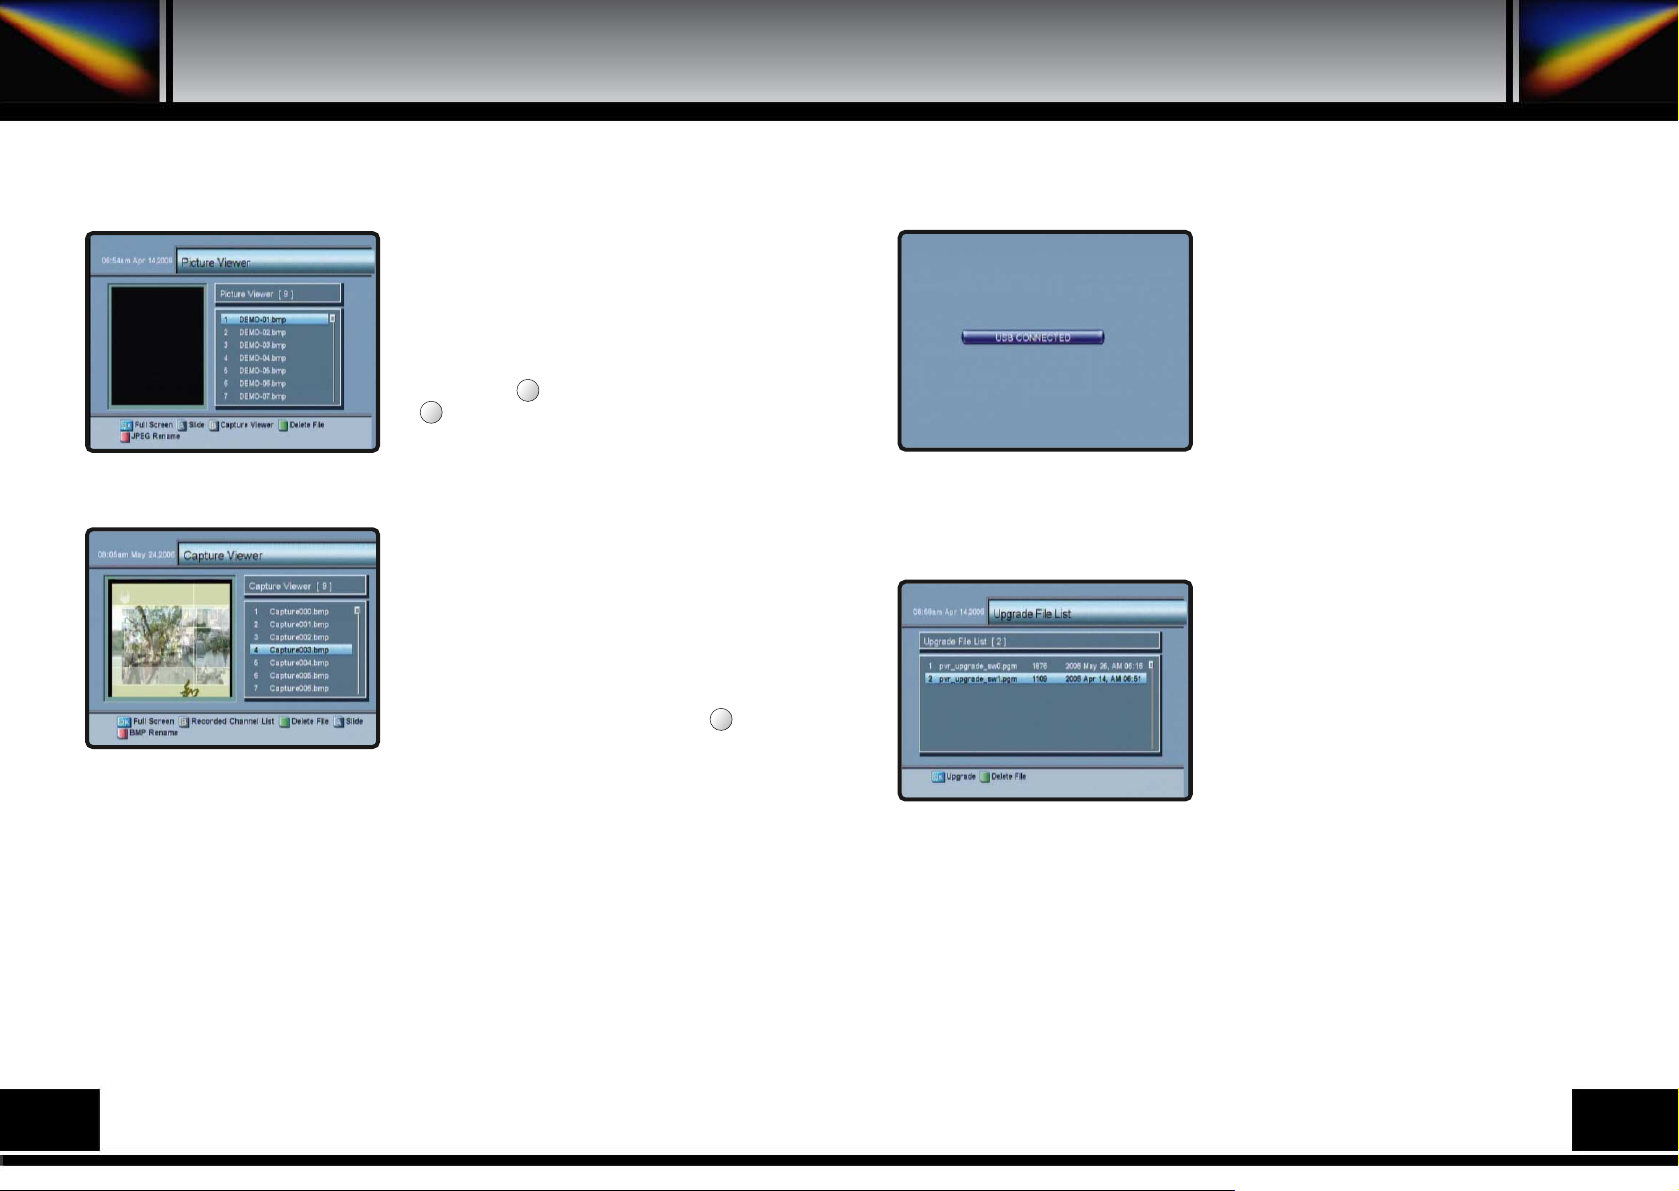
8.6.D. PICTURE VIEWER
You can see the picture of JPG file format using
this function. The maximum image size is
(720*480) pixels that you can use.
Select Capture Viewer menu in Record
Service menu. And you can select the JPG file
using the up/down keys(
) and press the
OK key. The key is for delete files and the
key is for rename files.
If you try to see the pictures over the maximum
size or other format files with the exception of
JPG format, the error message called “File Load
Error” will be displayed.
8.6.E. CAPTURE VIEWER
You can do capture screen, and you can see the
pictures that were captured.
Select Capture Viewer menu in Record
Service menu. And you can select files using
the up/down keys (
) and OK key.
If you want to do capture screen when you
watch a program full screen, press the key.
8.6.F. USB
You can transmit files(mp3, jpg, bmp and AV
files etc.) between receiver and your computer
using this function.
You have to connect USB cable to USB port
and install driver and USB application in your
computer before you select USB menu in
Record Service menu. And then if your
connection is successful, you can see the USB
CONNECTED message in your computer and
you can transmit files
(Please refer to the 12.APPLICATIONS For
TRANSMISSION).
8.6.G. UPGRADE FILE LIST
You can upgrade the receiver using this
function such as main s/w.
You have to bring the files using the USB
connector from your computer for upgrading.
.
30
31
F1
F2
CAP
Page 18
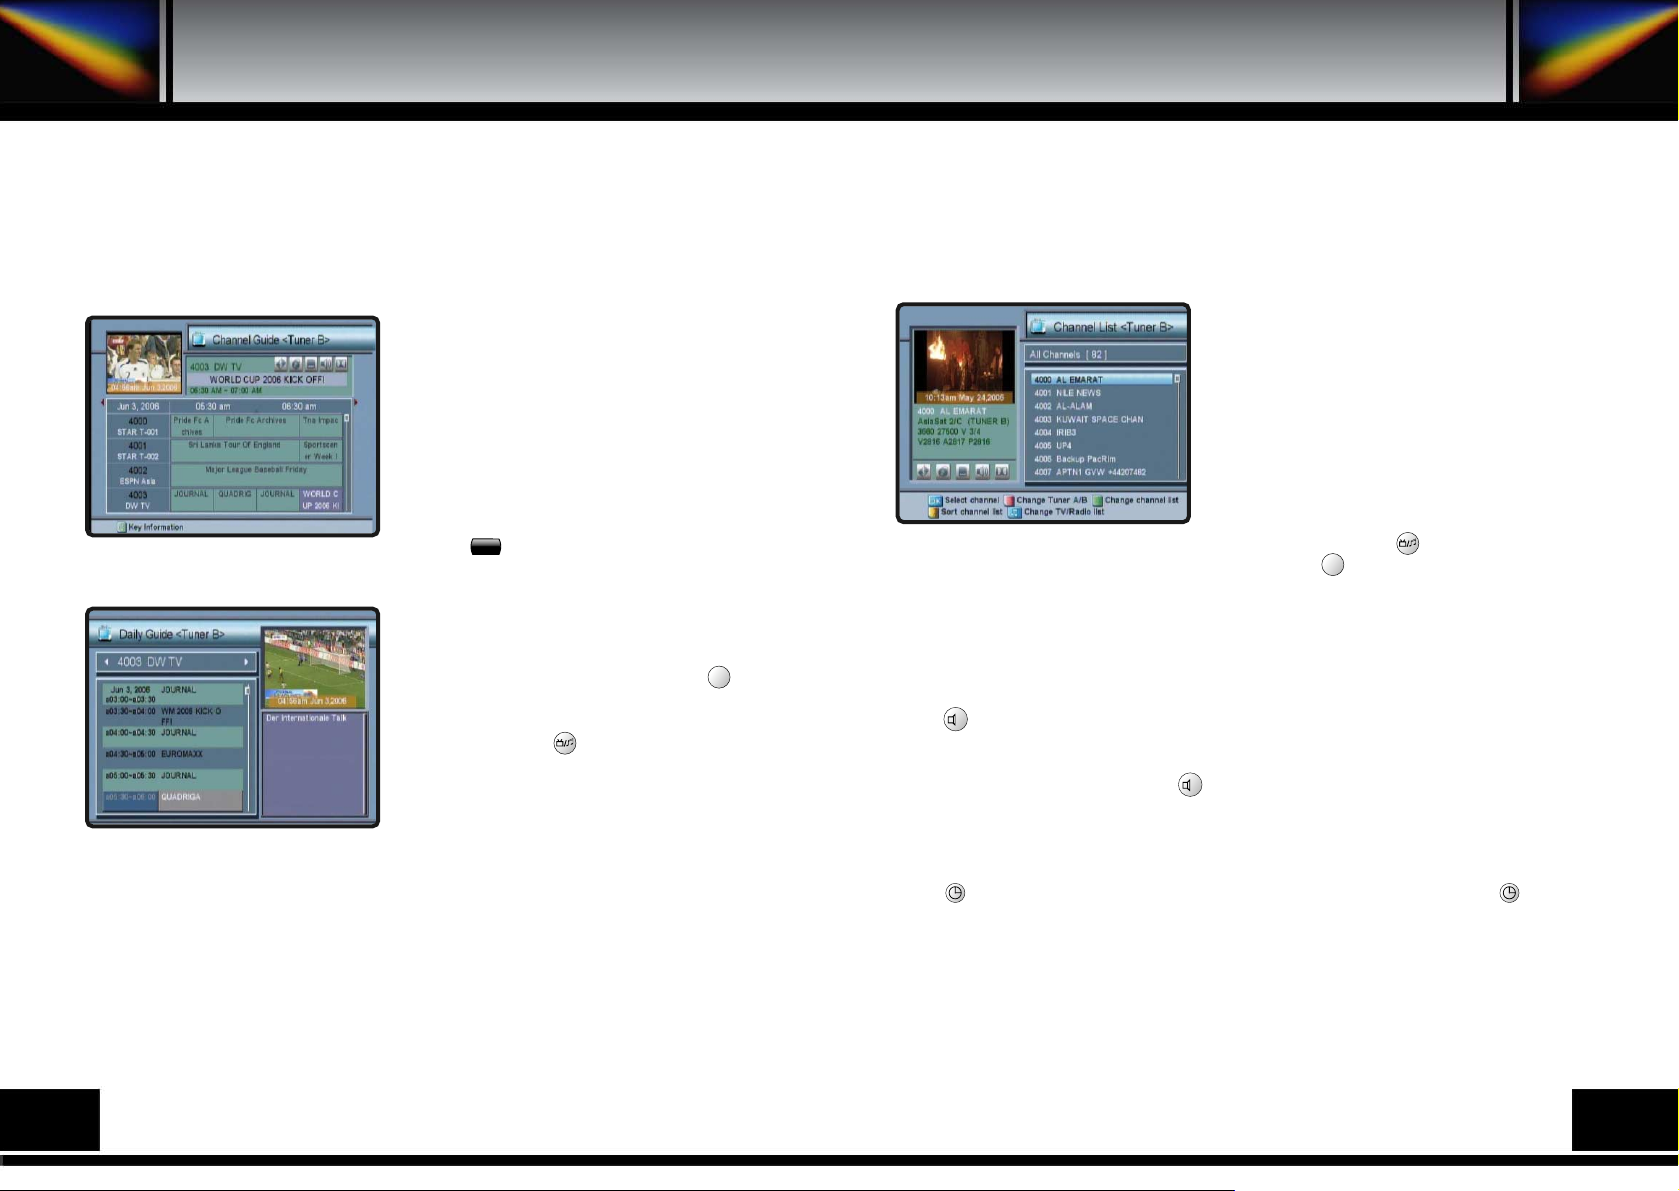
9. ADDITIONAL FUNCTION
Press GUIDE key, and the screen on the left
will be displayed.
It will give the titles of the current and next
programs on different channels.
The information may include : current time
/channel name, name of the current and next
program, the start and total time of the current
program, the start and total time of the next
program.
When you want to know more key information,
press key (help key).
If you press GUIDE key once more, you can
see the other channel guide information.
Program information will be available only when
it is included in the transmission. With key
you can get more information about a marked
event, if available.
When you press key, you can alternatively
select TV or Radio channel guide. In the
Channel Guide you can do reservation record
and reminder for each event.
Press GUIDE key, MENU key or EXIT key to
return to TV or previous menu
(Please refer to the 11. HOW TO DO
RESERVATION RECORD).
.
9.1. CHANNEL GUIDE
.
C
i
9.2. CHANNEL LIST
This menu helps you to easily select the channel that
you want to watch.
Press OK key, and the screen on the left will be
displayed.
You can get the information of channel number,
channel name, and whether the program is
scrambled or locked.
To watch a specific channel, first select it by pressing
the up/down keys (
) and the page up/down
keys ( ). Then press OK key.
This enables you to move into that specific channel.
If you press OK key again, the menu disappears. When you press key, you can
alternatively select TV or Radio channel list. When press key, you can see all channel list
or FTA channel or favorite channel list.
Press the OK key, the MENU key or EXIT key to return to TV or previous menu.
9.3. AUDIO LANGUAGE
Press key. Select the audio mode which you want, using the left/right keys (
).
Some programs are broadcasted with one or more alternative language soundtracks.
You can select the preferred audio language for soundtrack using the up/down keys (
).
You leave the menu with EXIT key or key.
9.4. SLEEP MODE
Press key to start this function and select off time of your receiver by pushing key
several times. You can select reservation off time by 10, 20, 30, 40, 50 and 60 minutes.
.
▲
▲
▲
▲
F2
?
?
Additional Function
32
33
Page 19
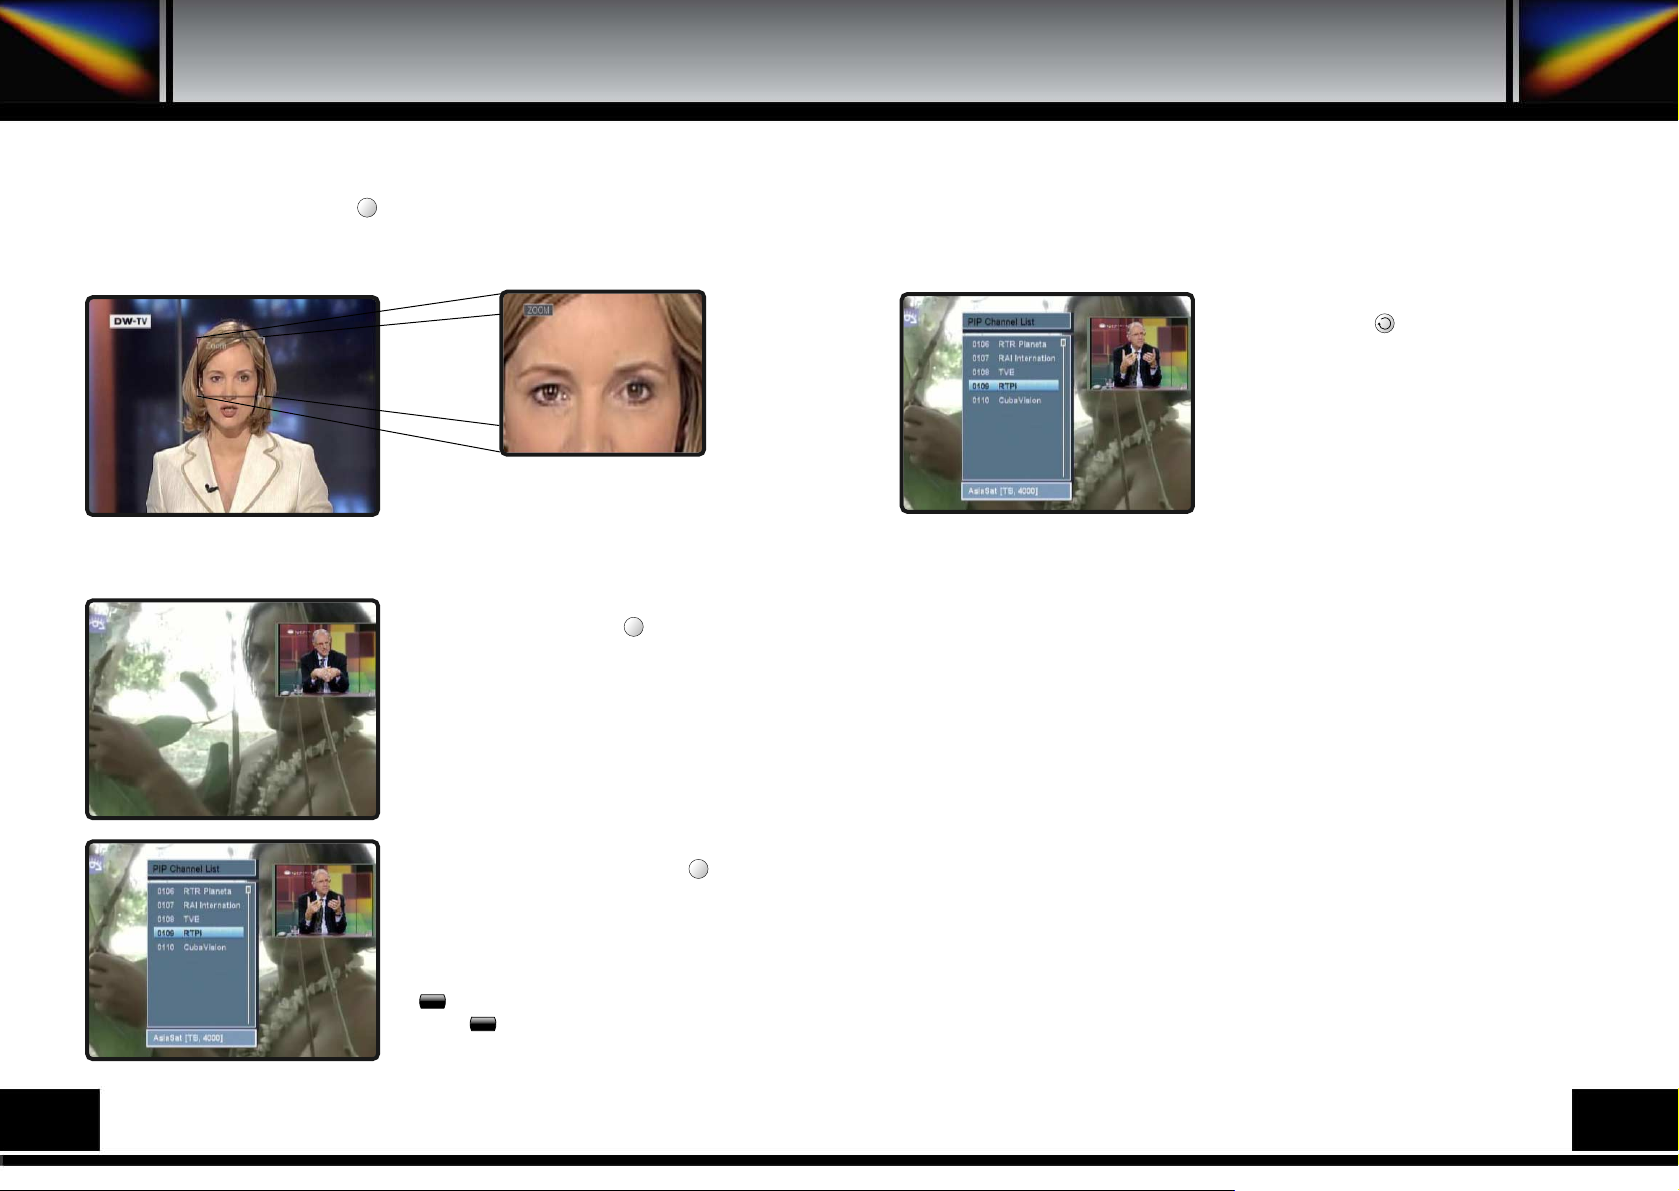
9.5. ZOOM FUNCTION
You can zoom in screen to use with key, and press the OK key. If you want to move
zoom box, you can move it using the browse keys (
,
). Also, you can change the
size of zoom box using the page up/down keys ( ).
9.6. PIP(Picture in Picture)
You can watch two channels at the same time. If you
want to use this function, press key.
You can change PIP channel through the PIP
channel List. If you want to use it, press key.
Then, the screen on the left will be displayed.
You can move to the channel of the same TP which
you want to watch using up/down keys (
) and
OK key.
Main screen can be changed with PIP screen using
the key, And PIP screen move clockwise when
you press key.
.
9.7. PREVIOUS CHANNELS
You can see previous 8 channel list. If you
want to use it, press key.
Select the channel which you want to watch
using up/down keys (
) and press OK key.
Current channel will be changed with the
channel you selected.
▲
▲
▲
▲
ZOOM
PIP
PLIST
A
C
34
35
Page 20
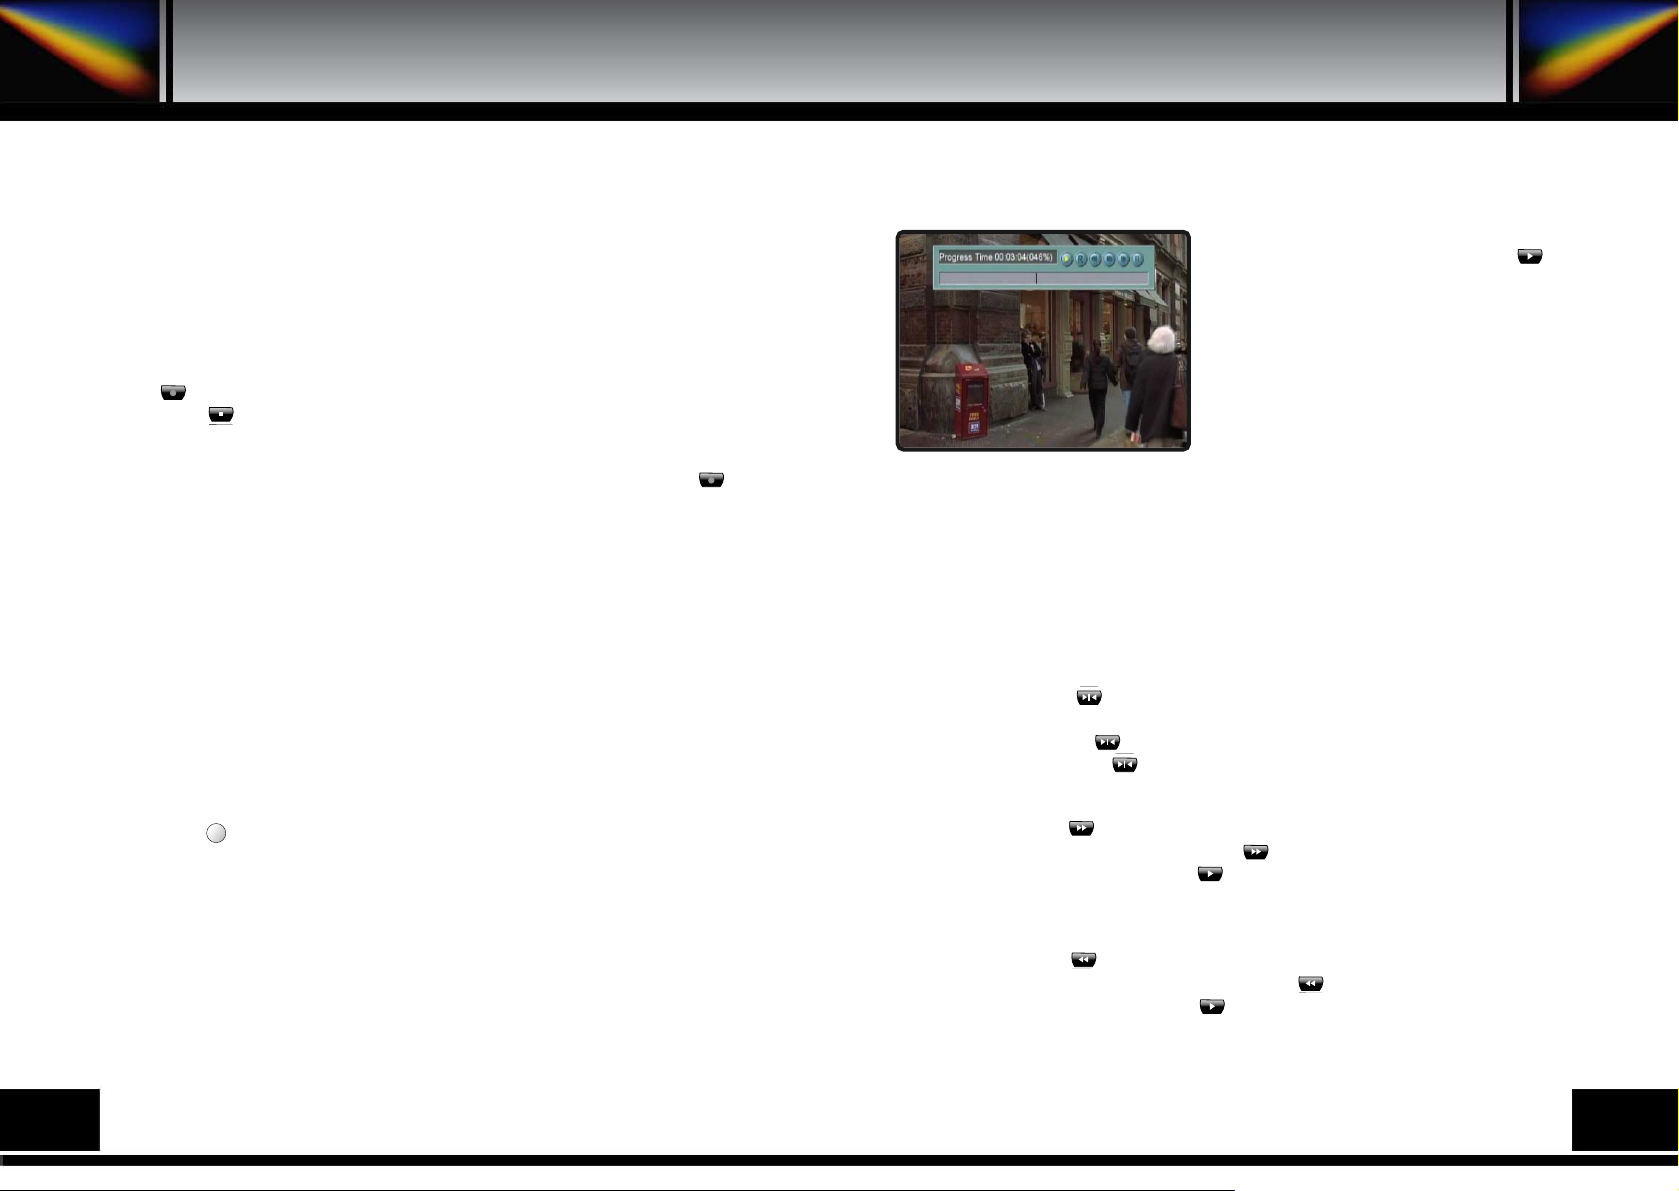
10.2.A. Playback Menu
You can see Playback Menu pushing the key
during playback.
In the Playback Menu, You can see Progress Time,
Process percentage, function button, Book Mark,
Repeat status.
10.2.B. BOOKMARK
Easily you can move and watch the point that you
want again using Book Mark in the Playback Menu.
1) Push F3 key for set-up in the Playback Menu.
2) Using F4 key, you can move to the Book Mark which you want.
* After moving to the Book Mark and pushing key within 2 seconds, the book mark setting is
cancelled.
3) In Playback Menu if you push numeric keys for the specified time you can jump that point.
For example if you push "012530" you will see 1:25:30 point of the playback.
10.2.C. REPEAT
Using repeat, you can watch a certain defined section repeatedly.
1) In Playback , push key.
2) Set the section using left/right keys (
).
3) Set repeat up pushing key.
* For canceling repeat, push key once more.
10.2.D. FAST FORWARD
This is fast forward motion playback. Please also see 9.2.H. Jump Forward.
1) In Playback, push key.
2) In order to increase playback speed, push key several times.
3) For returning to normal speed, push key.
* Forward playback speed can be increased by 4steps.
10.2.E. FAST REWIND
This is for fast rewind motion playback. Please also see 9.2.I. Jump Backward.
1) In Playback, push key.
2) In order to increase rewind playback speed, push key several times.
3) For returning to normal speed, push key.
* Rewind playback speed can be increased by 5 steps.
How To Do Record & Playback
10. HOW TO DO RECORD & PLAYBACK
10.1. RECORD
There are 3 record ways, Quick Record, in the Channel Guide and in the Record Service
menu.
a) Quick Record
Push the key and the current watching channel will be recorded. If you want to stop the
record, push the key. If the channel that you want to record has EPG data, it records the
EPG’s events.
b) Channel Guide
After moving to the event that you want to record in the Channel Guide, push the key for
the reservation record.
c) Record Service
If you move to Main Menu->Record Service menu you can input Date and Time for the
reservation record.
* Please refer to the 11. HOW TO DO RESERVATION RECORD if you want to know how
to record in the Channel Guide & Record Service menu.
* In case the reservation record time is reached during recording a channel, it stops the
recording and asks if you want to start the reservation record.
* A record will be extended by the over time setting. Over time does not work if another
reservation would be influenced.
10.2. PLAYBACK
1. If you push key, the Recorded Channels List appears.
2. Select the channel with which you want Playback using up/down keys (
and OK
key.
3. If you want escape Recorded Channel List, push EXIT key or after selecting a
playback
event push OK key.
* Please refer to the 8.6.B. RECORDED CHANNEL LIST
F1
36
37
Page 21
10.2.F. SLOW MOTION
This is for slow motion playback.
1) In playback, push key.
2) For returning to normal speed, push key.
* Slow playback speed can be increased by 4 steps.
10.2.G. PAUSE
Pausing the picture, push key.
10.2.H. JUMP FORWARD
If you push or key during playback, you enter the Playback Menu. There you can
jump fast forward using the key. You will see progress time.
10.2.I. JUMP BACKWARD
If you push or key during playback, you enter the Playback Menu. There you can
jump fast backward using the key. You will see progress time.
10.3. TIME SHIFT
If you want to leave for a while for watching a channel, Time Shifting function is very useful
function.
If you set up Time Shifting and return to your place, you can watch the channel from the
picture that was shown when you left.
1) For watching live channel, push key for Time Shifting set-up(only manual mode).
2) Pause the picture pushing key.
3) Push key for playback.
4) If you want slow motion playback, push key.
* If you want to return to live channel, push key. But Time Shifting function is still running
until you change the channel. If you push key at that channel, you can use Time shifting
again.
* You can choose Time Shifting function Auto or Manual in the Main Menu-> Installation-
>Hard Disk menu. In case of auto mode time shifting is always activated.
If you change the channel, Time shifting restarts without pushing any key. In case of manual
mode time shifting is activated after pushing key.
* The Time Shifting channels are not recorded into Hard Disk. If you want to record
something and make Time Shift, you should push key and key. You can see TimeShifting status. Push the key, you can watch the event from a selected point, while
program is still recording.
1 1. HOW TO DO RESERV A TION RECORD
There are 2 ways for Reservation Record. One is the way to set the date, time and duration
of the event you want to record in the Record Service menu. The other is the way to set
program event that you want to record in the Channel Guide.
For the reservation record, you must have synchronized the reservation’s time and your local
time, which is very important
( Please refer to the 8.3.F. TIME SETTING ).
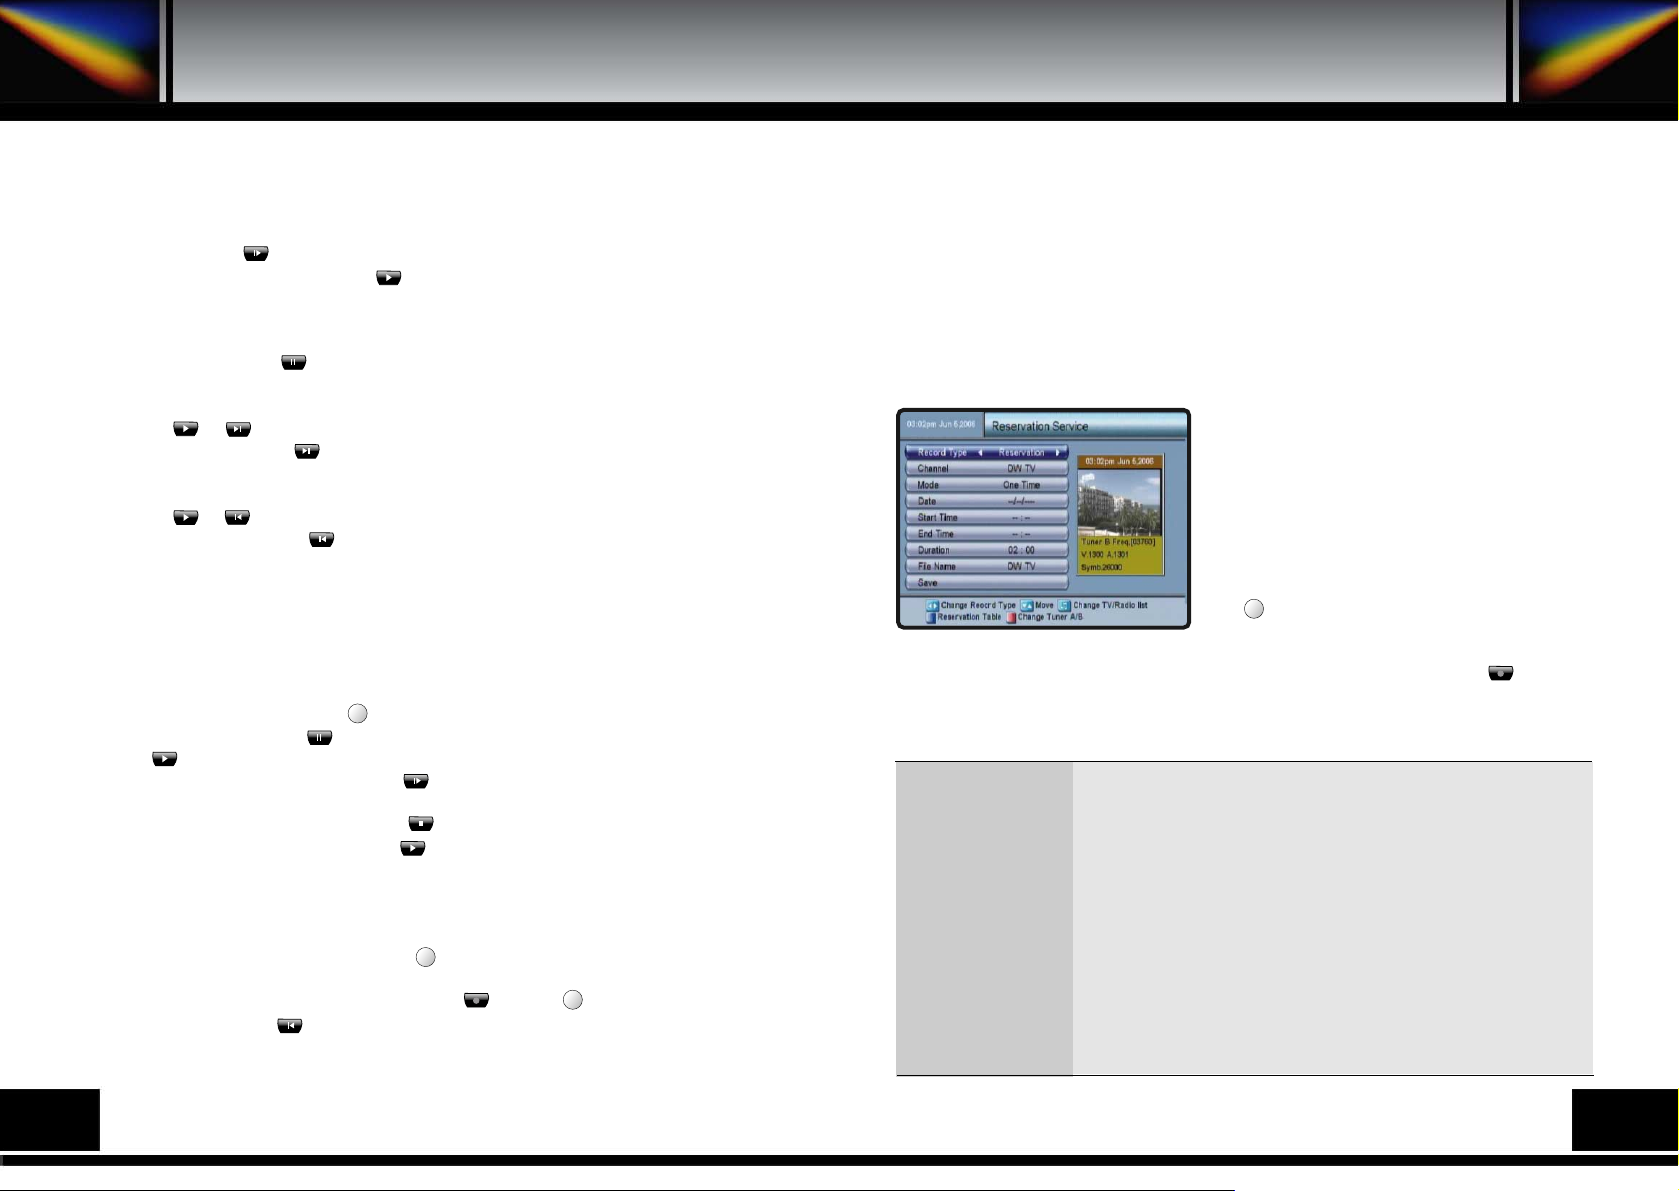
11.1. RESERVATION RECORD IN RECORD SERVICE MENU
In this menu you can do reservation record or record
the current channel.
Select Reservation Service menu in Record
Service menu. At Record Type, you can see three
types.
Those are Reservation, Recording1, Recording2. If
you want reservation record, choose the Reservation
and set other fields to the appropriate value. Change
the File Name if you want. And then Push OK key at
Save. key shows all the reserved programs in the
Reservation Table.
Recording1, Recording2 can be used during current recording. If you push the key
during current recording , you can see the above screen. At first recording time, you can
control Recording1 function. At second recording time, you can control Recording2 function.
You can control the Duration submenu and see the recording state.
F2
F2
F2
F4
How To Do Record & Playback
: Select Reservation/Recording1/Recording2.
: Select the channel with OK key.
: Select One Time/Every Day/Weekly (Only activated if you
selected Reservation Record).
: Recording the Current channel, the Current date is shown. In the
Reservation mode, you can enter the date of reservation record.
: In the Reservation mode, you can enter the Start Time of
reservation record.
: In the Reservation mode, you can enter the End Time of
reservation record.
: Enter the recording duration.
: Name the recording file. If you don’t name it, the channel name
becomes the file name.
: You have to save every time when you changed something.
Record Type
Channel
Mode
Date
Start Time
End Time
Duration
File Name
Save
38
39
Page 22
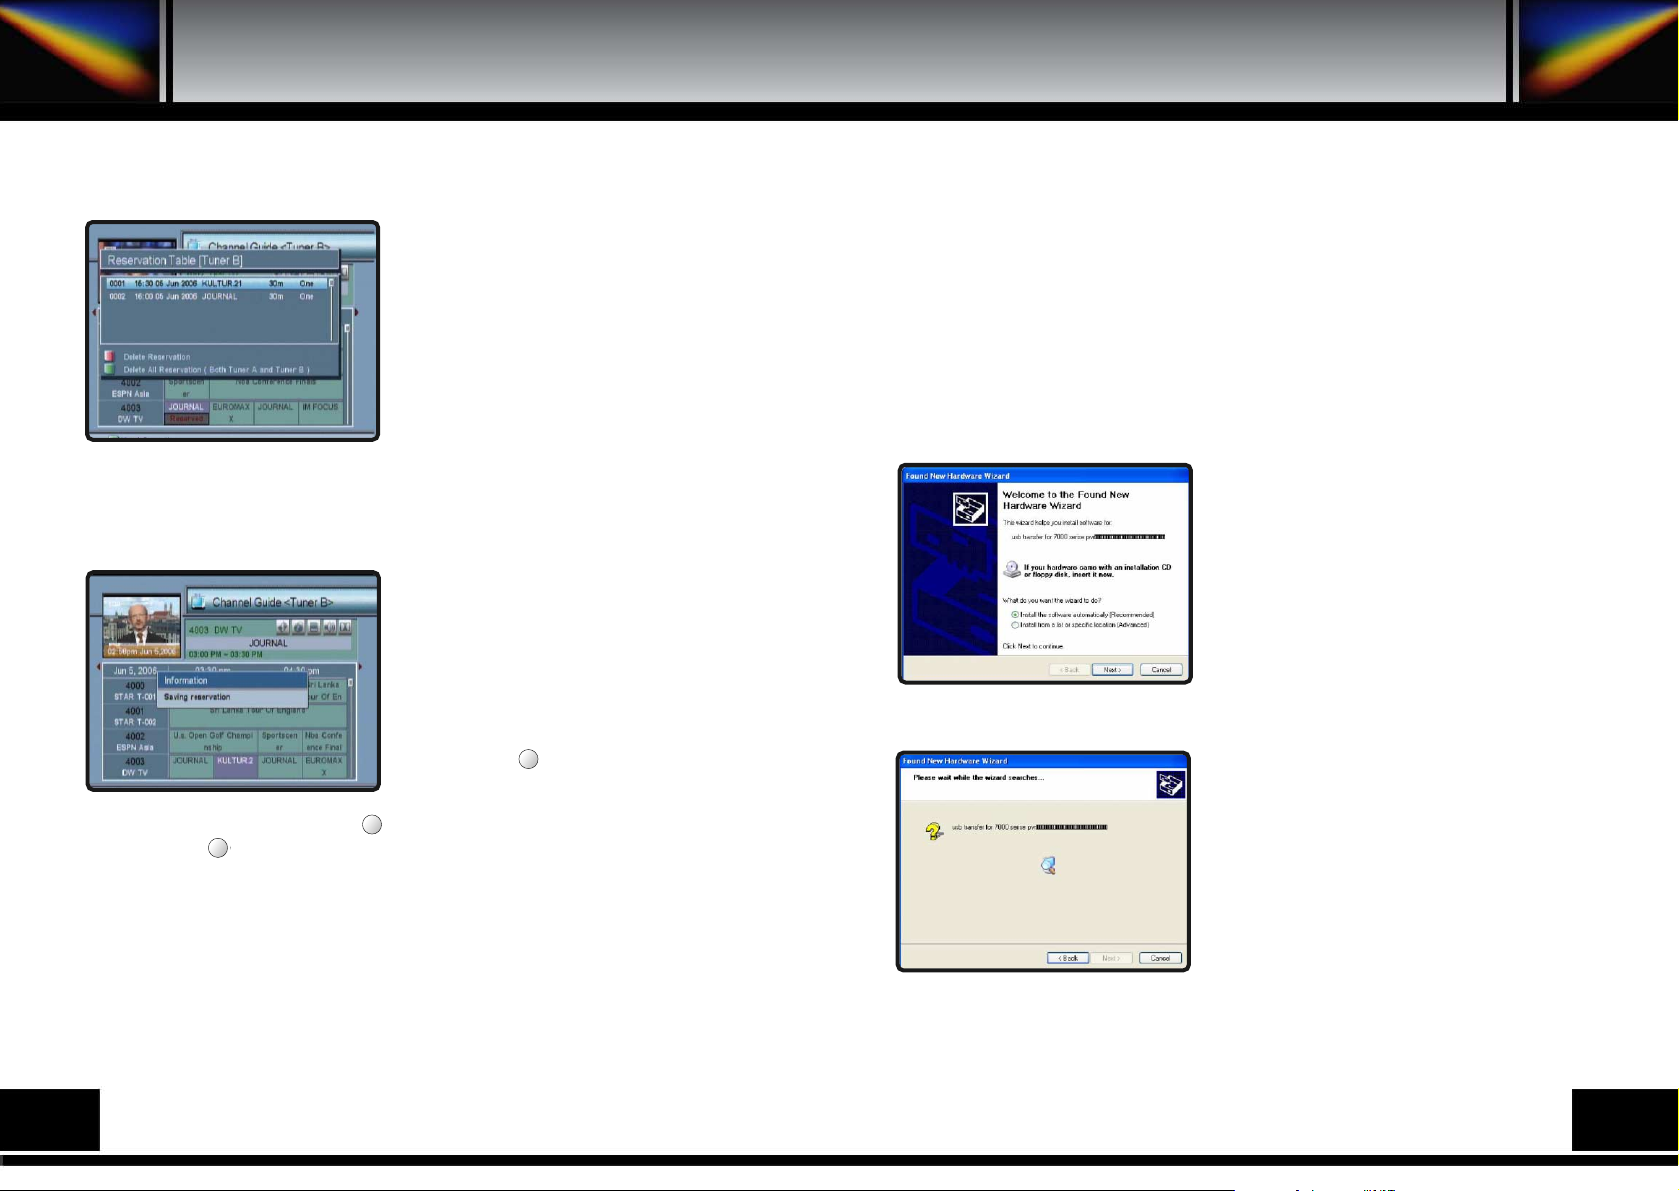
In the Reservation Table, you can delete the
reserved programs selectively or all of them.
In case the date and time which you want to do
reservation record is doubled with the registered
date and time of Reservation Table, it can’t be
registered into the Reservation Table.
11.2. RESERVATION RECORD IN CHANNEL GUIDE MENU
Press GUIDE key, and the screen on the left will be
displayed.
It will give the titles of the current and next programs
on different channels, if their information is
transmitted from the provider.
In the Channel Guide you can do reservation
record for each event.
If you have an event to the reservation record, you
can do it pushing key after moving to that event.
The reservation is canceled pushing key one more time. If you want to see the reserved
programs, push key and reservation table shows them.
Press the MENU key or EXIT key to return to previous menu.
* In case you have three events at once, only two can be recorded.
* When the event that you want to do reservation record is registered into the reservation
table, you can’t reserve it.
12. APPLICA TIONS FOR TRANSMISSION
To upload or download MP3, JPEG, CAPTURE Files and Main S/W to or from your
computer, you need to download drivers and programs.
That will be found at website http://www.viewsatusa.com.
12.1. HOW TO INSTALL DRIVERS & PROGRAMS
Connect the USB cable between receiver and
computer, and select USB menu in Record Service
menu. Then your computer will find the New
Hardware, you can see window that looks like left
picture.
Choose “Install the software automatically” and click
“Next”.
Your computer will be starting to find driver from your
downloaded files.
F1F2F1
Applications For Transmission
40
41
Page 23
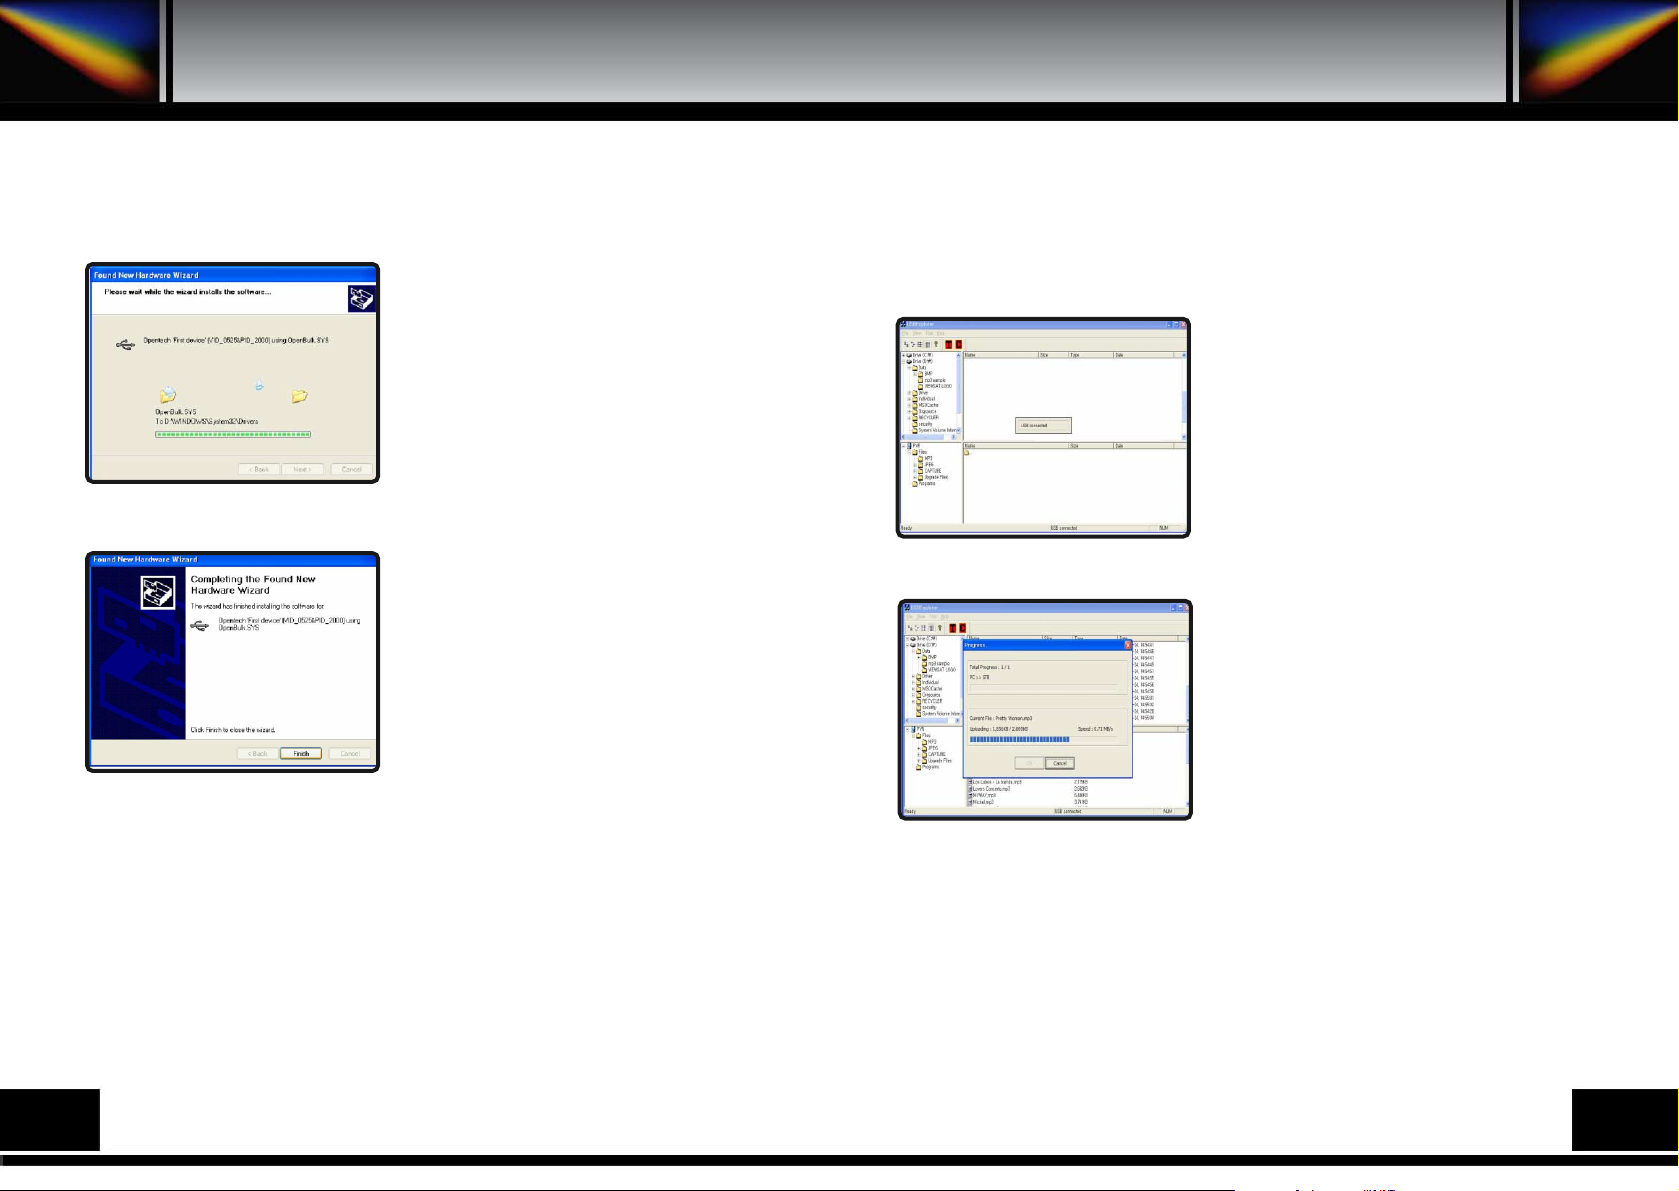
After that your computer will install driver in your
computer.
Click “Finish”when your computer has finished the
driver installation.
12.2. HOW TO USE TRANSMISSION PROGRAM
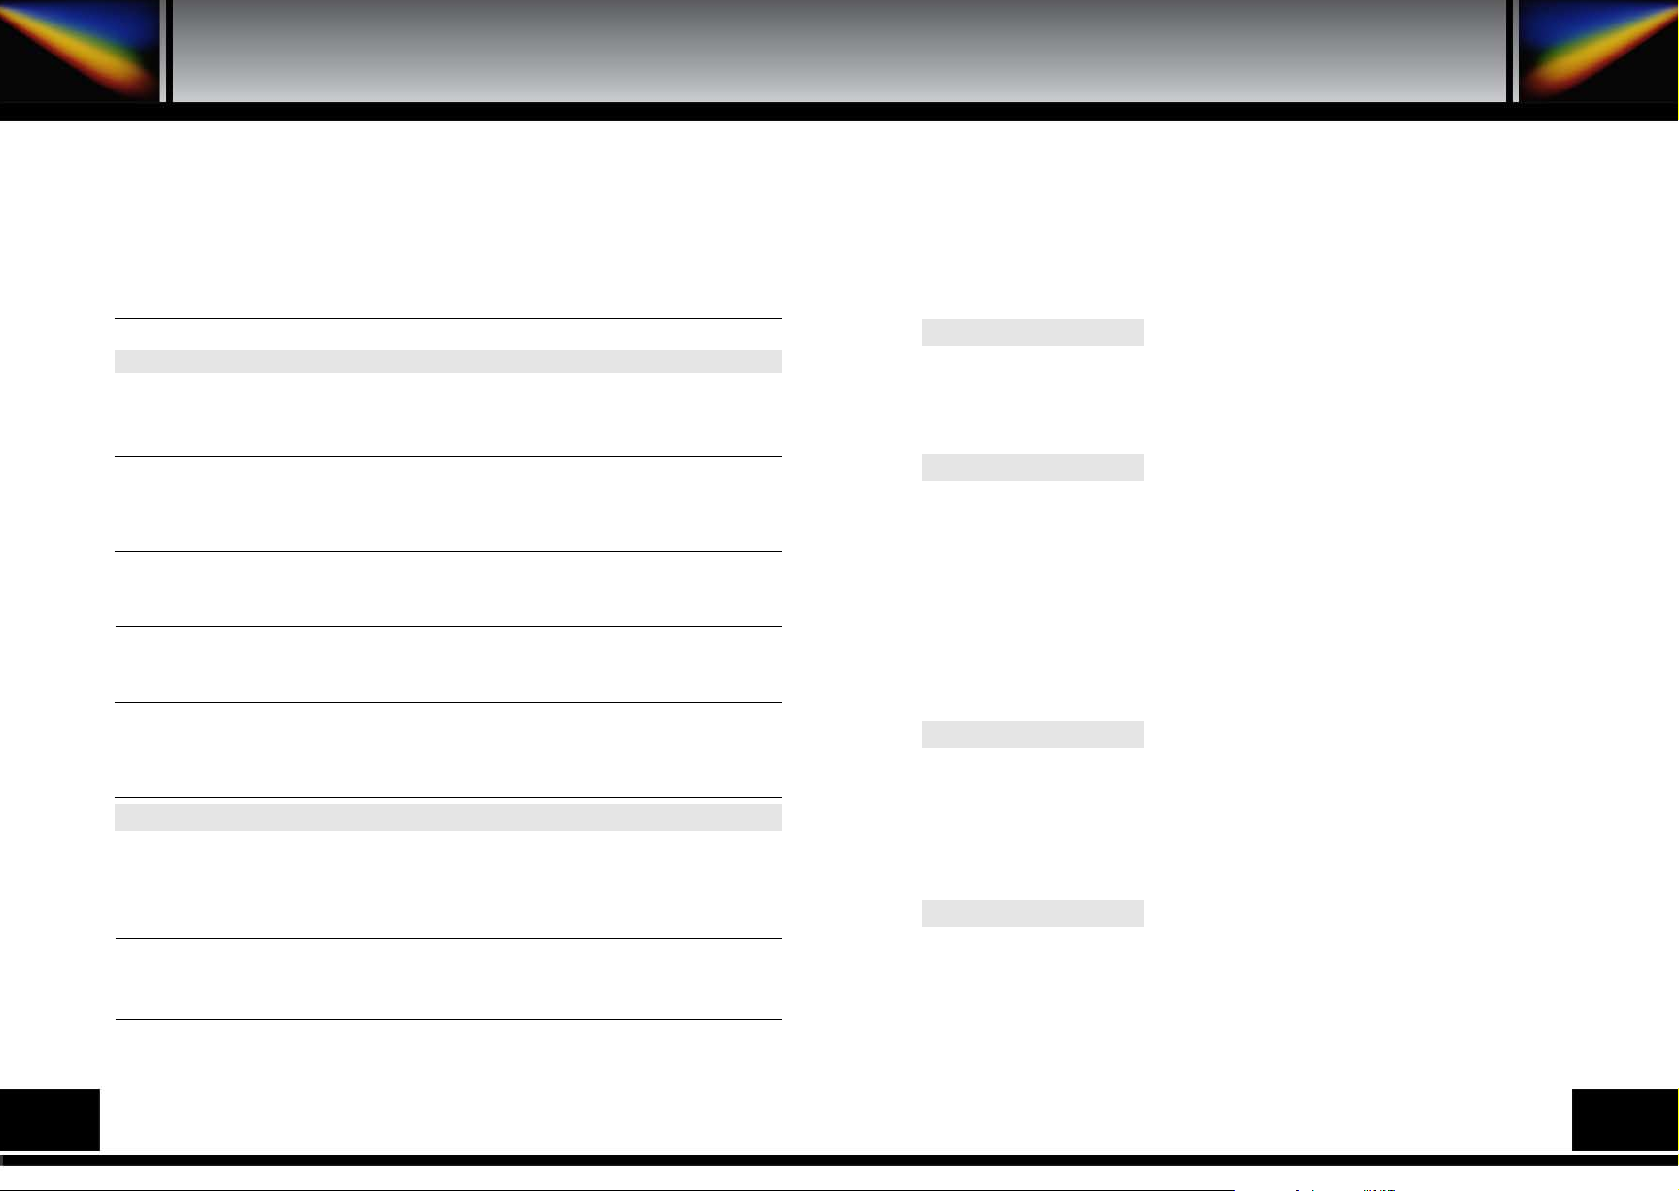
If you finish the installation completely, you can start
transmission program.
If you can see the message of USB Connected, that
means connection complete for starting program.
If your connection is not complete, you can see the
message of USB Disconnected.
When connection is complete, you can see the four
folders under the “Files” folder and the “Programs”
folder. Four folders are”MP3”,”PICTURE”,
“CAPTURE” and “Upgrade Files”.
“MP3” folder is for MP3 files and “PICTURE” folder
is for the “PICTURE Viewer”.”CAPTURE” folder is
for the “Capture Viewer” and “Upgrade Files”
folder is for software.
“Progams” folder is for recorded files. If you want
to copy file, just drag & drop.
Click “OK” when you finished copying files.
42
43
Page 24
13. TROUBLE SHOOTING
Problem
Does not display LED on the
front panel or the receiver has no power.
No pictures on the screen
No sound
Remote Control does not operate
Poor picture quality
Searching Signal
Solution
- Connect the power cord to the power outlet
properly.
- Check if the receiver is in standby mode.
- Check if the video output port is firmly
connected to the TV.
- Check if you have selected the correct
channel or video output on your TV.
- Connect the audio cords properly.
- Check the volume level of the TV.
- Press MUTEkey.
- Point remote control directly towards the
receiver.
- Check and replace Alkaline batteries.
- Check the signal strength in the Antenna
Setup, Channel Scan menu. If this is low, try to
adjust the alignment of your dish.
- Connect the antenna cable properly.
- Check the signal strength in the Antenna
Setup menu.
Unrecognized smartcard
Please insert your smartcard
- Check the smartcard.
- Insert the smartcard.
About the Receiver
On - Screen Error Messages
Trouble Shooting
Technical Specifications
Power Supply
Type
Input Voltage
Fuse Rating
Tuner
Input Frequency
Input Signal Level
Input Impedance
Connector Type
LNB Power Supply
22KHz Tone
DiSEqC
Channel Selection
Demodulator
Type
Symbol Rate
Inner FEC
Rate
Outer FEC
Video Decoder
System Decoding
Profile and Level
Data Rate
Video Formats
: SMPS
: AC 95V~240v 50Hz / 60Hz
: 250V/T2A
: 9502150MHz
: -65-25dBm
: 75 Unbalanced
: FType Female
: 13V/18V, Max 500mA with Short Circuit Protection
: Frequency 22 4KHz, Amplitude 0.60.2Vpp
: 1.0 & 1.2 Usals(1.3) Compatible
: PLL Frequency Synthesizer
: QPSK Demodulation(DVB-S)
: 145 MS/s
: Viterbi Convolutional Coding
: 1/2, 2/3, 3/4, 5/6, 7/8
: Reed Solomon Coding(204,188) T=8
: MPEG-2 ISO/IEC 13818-2
: MPEG-2 MP@ML
: 115 MB/s
: 4:3(Normal) & 16:9(Widescreen)
14. TECHNICAL SPECIFICATIONS
44
45
Page 25
Audio Decoder
System Decoding
Audio Mode
Sampling Frequency
Audio/Video Output
Audio Output
Video Output
Digital Audio
S-Video
COMPONENT
RF Modulator
Modulator Output
Video Type
Output Connector
Ant. IN Connector
Serial Data Interface
Signal
Connector Type
Memory
Flash
SDRAM
EEPROM
: MPEG-1 ISO/IEC 11172-3
Layer I & II
: Mono, Dual, Stereo, Joint Stero
: 32, 44.1, 48 KHz
:4 RCA Cinch
:2 RCA Cinch
:1 S/PDIF(Optical)
:1 S-VIDEO
:3 RCA Cinch
: CH3~4
: NTSC
: “F” Type Female
: “F” Type Female
: RS-232, Max. 115200 bps
: 9 Pin D-Sub(male)
:4M Byte
:40M Byte(System: 16MB*2, A/V:8MB)
:16K Bit
Front
7 Keys
4 Digits (7 Segments) Display
USB Interface
USB
Data rate
HDD
Capacity
Interface Type
Demultiplexer
ISO/IEC 13818-1 Compliant
Physical Specification
Operating Temperature
Net Weight
Dimensions
:USB port
:25M bps ~ 400M bps
:80G Byte ~ 2T Byte
:IDE Type
:+5
C to +40 C
:3.7 Kg
:420(W) x 320(D) x 65(H)mm
46
47
Page 26
15. PRORAMING THE REMOTE CONTROL
Programing The Remote Control
48
49
Page 27
50
51
Page 28
16. WARRANTY CARD
Warranty Card
52
 Loading...