

Page 1
Operation Guide
Operation Guide
Guida Operativa
Guide d’utilisation
Betriebsanleitung
Guía de funcionamiento
Guia de Operação
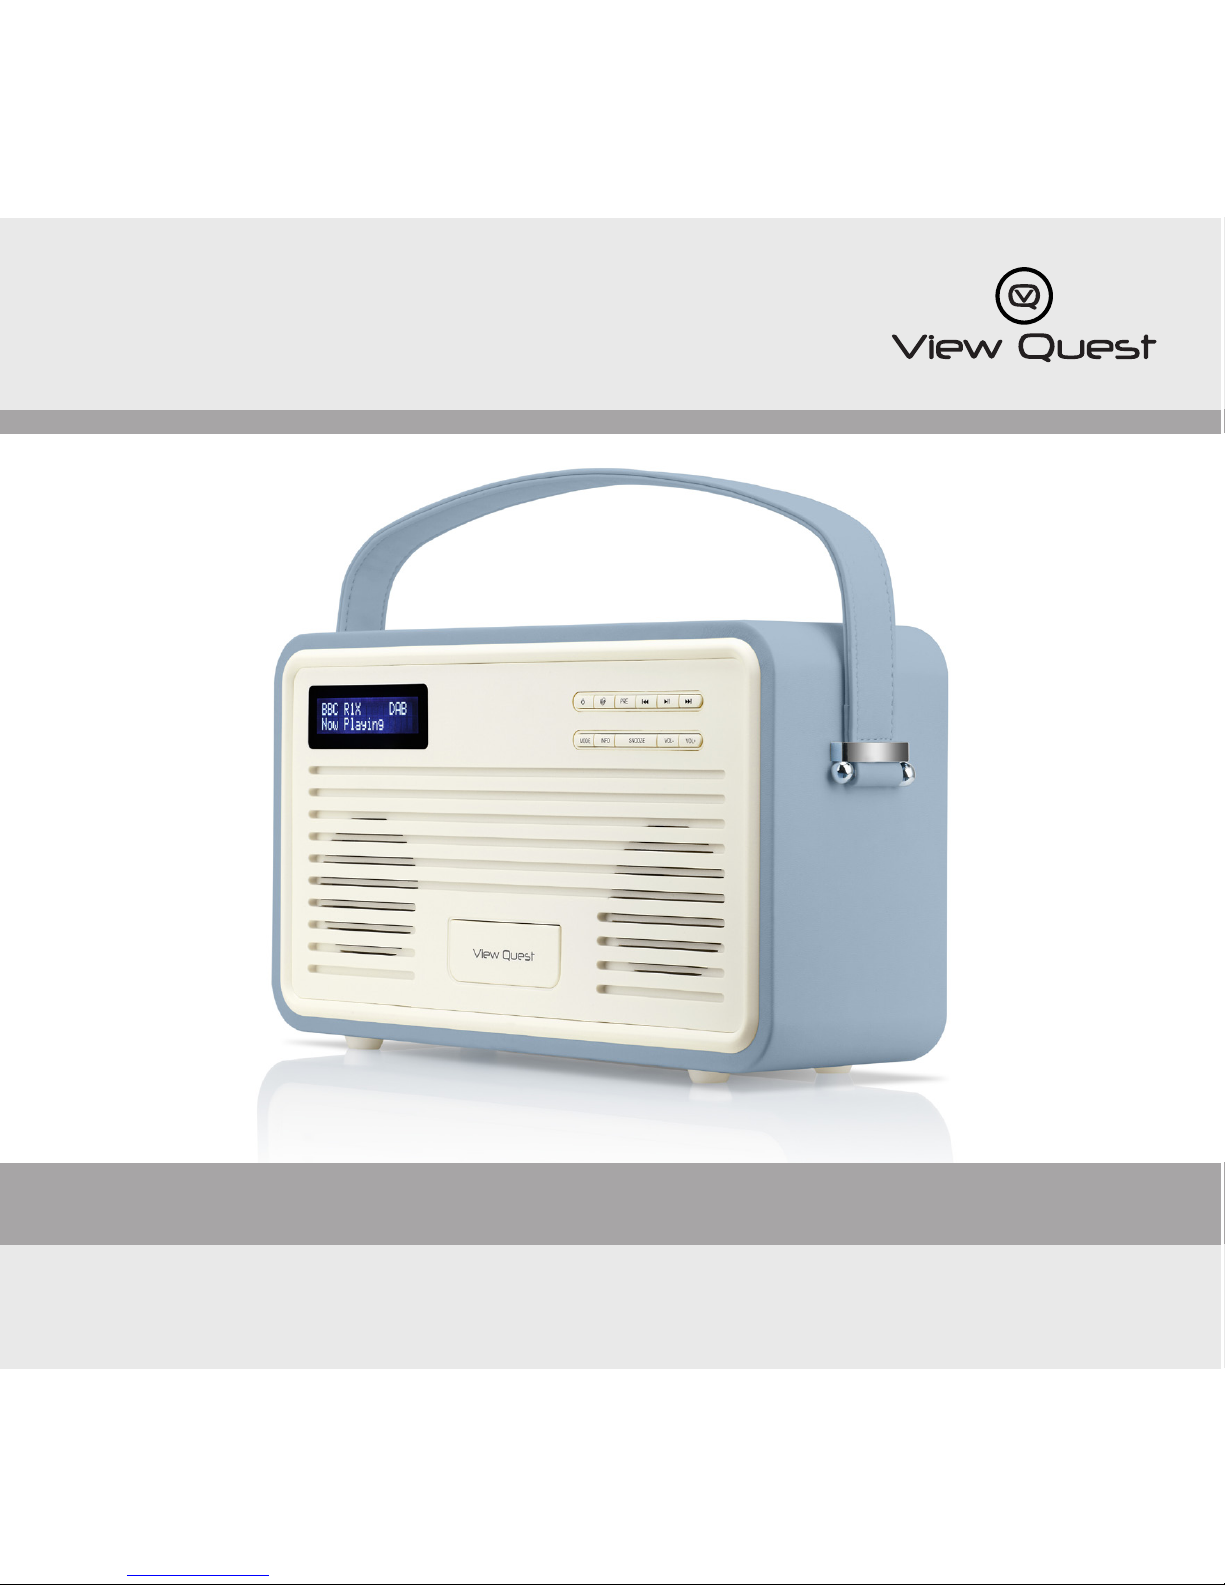
Retro Radio
Page 2

GB
View Quest Retro DAB+ Operation Guide
2
Page 3

GB
3
View Quest Retro DAB+ Operation Guide
Contents
DAB/DAB+FM radio with dock for iPod/iPhone
Introducing your View Quest Retro DAB+ .........................................................................................................................................4
Welcome from the Retro DAB+ Design Team ............................................................................................................4
What can my Retro DAB+ do apart from look fab? ..................................................................................................4
iPod/iPhone dock .................................................................................................................................................................4
DAB/DAB+ receiver ..............................................................................................................................................................4
FM Radio .................................................................................................................................................................................. 4
Auxiliary connection ...........................................................................................................................................................4
Dual Alarms ............................................................................................................................................................................4
Talk to us ..................................................................................................................................................................................................... 5
Important Safety Information – please read ................................................................................................................................ 6-7
Battery Safety Guidelines ........................................................................................................................................................................ 7
Finding your way around your Retro DAB+ ......................................................................................................................................8
Buttons and Functions .................................................................................................................................................... 8,9
Battery use and removal ....................................................................................................................................................................... 10
Positioning, Preparing and Switching on ....................................................................................................................................... 11
Positioning ........................................................................................................................................................................... 11
Preparing .............................................................................................................................................................................. 11
Switching on ....................................................................................................................................................................... 11
Using your Retro DAB+ ......................................................................................................................................................................... 12
DAB/DAB+ ...................................................................................................................................................................... 12,13
FM ...................................................................................................................................................................................... 13,14
iPod or iPhone .............................................................................................................................................................. 14,15
AUX-IN ................................................................................................................................................................................... 15
Alarm Clock ....................................................................................................................................................................15-17
Sleep Timer ................................................................................................................................................................................................ 17
Other Operations .................................................................................................................................................................................... 17
Environmental Disposal Information ............................................................................................................................................... 19
Specications ............................................................................................................................................................................................ 20
Page 4

GB
View Quest Retro DAB+ Operation Guide
4
Introducing your View Quest Retro DAB+
Welcome from the Retro DAB+ Design Team
Hello and welcome to your Retro DAB+. We are View Quest – an award-winning British company
determined to excel in technical and aesthetic design. Our goal for Retro DAB+ is to create a feature
rich product that not only sounds exceptional but looks fantastic too. Wrapped in quality leather
with a stylish yet strong carry handle, the Retro DAB+ has a retro feel and style, but is anything
but retro in its capabilities. Featuring DAB / DAB+, FM radio, iPod/iPhone dock and auxiliary
input the Retro DAB+ can cater for all your audio needs and look great at the same time.
What can my Retro DAB+ do apart from look fab?
Here’s a brief run-down of your Retro DAB+’s capabilities. Everything is explained fully later in this guide.
iPod/iPhone dock
Play an iPhone or iPod with either a 30-pin or Lightning connector. Your music will never
have sounded so good, and your iPhone or iPod will charge at the same time.
DAB/DAB+ receiver
Digital Audio Broadcasting (DAB) is the next big thing in radio. Clarity, station choice and
ease of tuning are often cited as benets. There are two versions, DAB and DAB+. Your
Retro DAB+ works with either. You can store up to 10 DAB/DAB+ stations as presets.
FM Radio
DAB isn’t everywhere, so there’s an FM radio in your Retro DAB+ that means you can listen
wherever DAB or FM radio is available. You can store up to 10 FM stations as presets.
Auxiliary connection
Lets you plug in and listen to an external audio source so your older devices aren’t left out.
Dual Alarms
Wake up to your favourite radio station, favourite tracks, or a beeper. Or two.
Page 5

GB
5
View Quest Retro DAB+ Operation Guide
Talk to us
We would really value your feedback – how well have we succeeded in our mission to create a stylish, highquality sound experience? If you’d like to share anything about your Retro DAB+ – things you love, things
you’d like, or things that could be better, we’d love to hear from you. Email us at info@viewquest.co.uk.
And of course, we’re here to help you sort things out if you have any problems; email our support team
at support@viewquest.co.uk for expert help on any aspect of your Retro DAB+. Please write to us – we
have friendly people ready to help, and we really want your Retro DAB+ experience to be rst class.
Thank you and enjoy your Retro DAB+
The team at View Quest
Page 6

GB
View Quest Retro DAB+ Operation Guide
6
Important Safety Information – please read
Please read this guide before using your unit – it contains guidance and recommendations that can
help ensure long-lasting, trouble-free, safe operation. Please keep this guide for future reference.
Be careful. Avoid:
• Liquids: don’t expose your unit to drips or splashes, and don’t put liquid containers like vases on it or near it.
• Humidity or moisture: humid or moist places like outdoors, bathrooms
and steam rooms need specially-designed equipment.
• Heat: don’t expose your unit to direct sunlight or heat from radiators or other heat
sources. Audio/video devices can generate a lot of heat; don’t put your unit on top
of such devices. Don’t use naked ames anywhere near your unit either.
• Dust and restricted airow: make sure your unit is in free-owing air to avoid overheating.
• Vibration: constant vibration can cause damage.
• Extreme climates: this unit is designed for operation in moderate climates.
IMPORTANT:
• DO NOT listen at high volume: High volumes can permanently damage hearing.
• DO NOT use equipment, especially headphones, when it could distract
you from activities that require attention to safety.
• DO NOT Use equipment that is not working normally or you suspect may be faulty or damaged.
• DO NOT leave equipment switched on when it is unattended unless it is specically stated that it is designed
for unattended operation. Switch o using the switch on the equipment and make sure that your family
knows how to do this. Special arrangements may need to be made for inrm or handicapped people.
Always:
• Operate all controls as instructed in the manual.
• Ensure that all electrical connections (including the mains plug, extension leads and inter-connections
between the pieces of equipment) are properly made and in accordance with the manufacturer’s
instructions. Switch o and withdraw the mains plug before making or changing connections.
Page 7

GB
7
View Quest Retro DAB+ Operation Guide
CAUTION: TO REDUCE THE RISK OF ELECTRIC SHOCK DO NOT REMOVE COVER (OR BACK), NO USER
SERVICEABLE PARTS INSIDE, REFER SERVICING TO QUALIFIED SERVICE PERSONNEL.
DANGEROUS VOLTAGE Dangerous Voltages, that may be of sucient magnitude to constitute a
risk of electric shock to persons is present within this product’s enclosure.
ATTENTION The owner’s manual contains important operating and maintenance instructions, for
your safety, it is necessary to refer to the manual.
WARNING: TO PREVENT FIRE OR SHOCK HAZARD, DO NOT EXPOSE
THIS APPLIANCE TO DRIPPING OR SPLASHING.
Note: This unit will become warm when used for a long period of time. This
is normal and does not indicate a problem with the unit.
Battery safety guidelines
- Be sure to insert batteries of the correct type and ensure correct polarity (+/-).
- To insert batteries, remove the battery compartment cover and insert batteries observing polarity.
- Ensure the cover is secure and remove batteries in a safe manner without
the use of metallic or other conductive objects
- Batteries should not be replaced by children
- Never dispose of batteries in re as they may explode
- Batteries should not be exposed to excessive heat such as sunshine, re or naked ame.
- Only use batteries of the same type
- Do not mix old and new batteries and do not mix alkaline and rechargeable batteries
- Do not attempt to charge non-rechargeable batteries
- If the radio is not going to be used for a long period of time, remove the batteries from the battery compartment
- Always remove spent batteries from the battery compartment and
dispose of them responsibly to protect the environment
Note: For battery operation, please switch o the mains adaptor and remove
the mains power plug from the back of the radio.’
Page 8

GB
View Quest Retro DAB+ Operation Guide
8
Finding your way around your Retro DAB+
Front View
1. Standby Power ON or OFF
2. Scan stations
3. PRE Store stations selected
4. Scroll down or Go to Previous
5. Conrm and pause
6. Scroll up or Go To Next
7. MODE Switch among dierent modes
8. INFO Information
9. SNOOZE Alarm/Snooze/Sleep (Multifunction button)
10. VOL– Decrease volume
11. VOL+ Increase volume
Page 9

GB
9
View Quest Retro DAB+ Operation Guide
Back View
1. Aerial
2. DC in
3. AUX-IN for other devices
4. On/O
Page 10

GB
View Quest Retro DAB+ Operation Guide
10
Battery Use
Your Retro DAB+ can be powered by 4 x Type ‘C’ batteries.
Be sure to insert batteries of the correct type and ensure correct polarity (+/-).
Battery Removal
Use thumb or nger to pull clip down
and outward in order to release
battery cover.
Page 11

GB
11
View Quest Retro DAB+ Operation Guide
Positioning, Preparing and Switching on
Positioning
A good place for your Retro DAB+:
- has a at and stable surface with sucient ventilation
- is within 1.4metres of a power socket if you are using mains power.
- has space above it for you to fully extend the telescopic aerial vertically.
- is away from bright sunlight, heat sources, humidity and dampness.
Preparing
- If using mains power: connect the mains power lead into the socket on the back of the radio (DC IN).
Switch the mains power wall socket o. Now plug the power adaptor into the wall socket, and switch the
wall socket on.
- If not using mains power, ensure new batteries are correctly tted. Your Retro DAB+ can be powered by
four type ‘C’ alkaline or rechargeable batteries (not supplied). When using batteries to power the unit,
function and operation are the same as using the mains, except that a docked iPod/iPhone will not be
charged. A low power symbol will display when batteries are running low, and your Retro DAB+ will return
to standby mode when almost out of power. If operating on batteries, please switch of the mains adaptor
and remove the mains power plug from the back of the radio.
- Fully extend the radio aerial vertically for the best reception.
Switching on
- When switching on for the rst time, slide the power switch on the back of the radio to “ON”.
What you will see when you switch on
- “View Quest” will be displayed for 2 seconds, followed by the clock. This is ‘standby’ mode.
- After 10 seconds the display backlight will switch o.
Leaving and entering standby mode
- Press (1) to switch between working and standby mode. In standby mode the display shows a clock, in
working mode the display shows information about the current function.
Page 12

GB
View Quest Retro DAB+ Operation Guide
12
Using your Retro DAB+
Go through positioning, preparing and switching on, above if required.
If the clock is displayed, your Retro DAB+ is in standby mode. If so, press (1) to leave standby mode and
enter working mode.
You can now use the “Mode” button (7) to select the mode you want. How to use each mode is described
below.
DAB/DAB+
1. For best reception, make sure the aerial is fully extended vertically.
2. If the display shows the clock, press (1) to switch to working mode.
3. To switch to DAB/DAB+ press MODE (7) repeatedly until the display briey shows ‘Switch to DAB’.
a. First time use, or after Factory Reset: Your Retro DAB+ will automatically begin to quick scan for DAB/
DAB+ stations. A progress bar will show the progress of the scan, and multiplex information is shown.
Stations found will be automatically stored. The number of stations found will also be displayed at the
upper right corner of the display. The rst station available will be shown on the display and played
automatically. If no DAB/DAB+ signal is detected, “No Signal” will be displayed.
b. Subsequent use: Your last selected station will be displayed, tuned and played if possible.
The display will show the Station Name and ‘DAB’ on the top line, and the Programme Type, if available, on the
second line.
4. To switch between stored stations press (4) or (6).
5. To scan for stations:
a. Quick Scan: Press (2)
b. Full Scan: Press and hold (2)
A progress bar will show the progress of the scan with multiplex information below it. Stations found will be
automatically stored. The number of stations found will be displayed in the upper right corner of the display.
6. To manually tune to DAB/DAB+ stations, press and hold (5) until ‘Manual tune’ is displayed. Now press
(4) or (6) to scroll through channel 5A-13F. Press (5) button to conrm the channel, then press
(4) or (6) to scroll through stations in this channel, and press (5) to play the selected station.
Page 13

GB
13
View Quest Retro DAB+ Operation Guide
7. To store the current station as a preset:
a. You can store up to 10 DAB/DAB+ presets.
b. Press and hold PRE (3) until a ashing ‘1’ is shown on the bottom right of the display and then release the
button. If you have no station stored as preset 1 “Preset Empty” will be displayed. If you do have a station
stored as preset 1, its name will be shown.
c. You can now cycle through your presets by pressing (4) or (6). To store a station as a preset,
either in an empty slot or replacing a previously stored station, press (5). “Preset x Stored” will briey
display on the lower line .
8. To select a preset station: press and release PRE (3). Press (4) or (6) to cycle through your presets
and press (5) to select the preset station currently displayed.
9. To display station information, repeatedly pressing INFO (8) will cycle through station
information that can include Dynamic Label Segment (DLS) or radiotext, station name,
time and date, frequency, stereo/mono, bit rate or signal quality. The information
type you select will then be displayed for the current DAB/DAB+ station.
10. To set the time: in DAB/DAB+ mode your Retro DAB+ will synchronize with the time and date of the station.
FM
1. For best reception, make sure the aerial is fully extended vertically.
2. If the display shows the clock, press (1) to switch to working mode.
3. To switch to FM press MODE (7) repeatedly until the display briey shows ‘Switch to FM’.
a. First time use, or after Factory Reset: Your Retro DAB+ will tune to and
display 87.70MHz, the lowest point of the FM spectrum
b. Subsequent use: Your last selected station will be displayed, tuned and played if possible.
4. To autoscan stations, briey press (2) to search for stations up the FM spectrum. Yor Retro DAB+ will
stop the scan and play the rst station it nds. To search down the spectrum, long press (2).
Page 14

GB
View Quest Retro DAB+ Operation Guide
14
5. To search for stations manually or nd a specic frequency, briey press (4) or (6) to change
frequency in 0.05MHz steps down or up. Hold (4) or (6) to tune rapidly down or up the spectrum.
Scanning will stop when the button is released.
6. To store the current station as a preset:
a. You can store up to 10 FM presets.
b. Press and hold PRE (3) until a ashing ‘1’ is shown on the bottom right of the display and then release the
button. If you have no station stored as preset 1 “Preset Empty” will be displayed. If you do have a station
stored as preset 1, its name will be shown.
c. You can now cycle through your presets by pressing (4) or (6). To store a station as a preset,
either in an empty slot or replacing a previously stored station, press (5). “Preset x Stored” will briey
display on the lower line .
7. To select a preset station: press and release PRE (3). Press (4) or (6) to cycle through your presets
and press
(5) to select the preset station currently displayed.
8. To display station information, repeatedly pressing INFO (8) will cycle through station information that can
include radiotext, programme type, signal strength bar, date/time, frequency, stereo/mono. The information
type you select will then be displayed for the FM stations you select.
9. To switch between stereo and mono in FM mode, press (5) to switch between Stereo and Mono.
Switching to mono can improve the listening experience for weak stations.
10. To set the time: in FM mode your Retro DAB+ will synchronize with the time and date of the station.
iPod or iPhone
1. Connect your iPod/iPhone: gently push the spring-loaded panel with the View Quest logo on it. It will slide
out to reveal the iPod/iPhone connector. Dock your iPod/iPhone.
2. If the display shows the clock, press (1) to switch to working mode.
3. To switch to iPod/iPhone press MODE (7) repeatedly until the display briey shows ‘Switch to iPod’. The
display will then show ‘iPod Connected’. If no device is docked, it will show ‘iPod Disconnected’.
Page 15

GB
15
View Quest Retro DAB+ Operation Guide
4. To select tracks to play, use your iPod/iPhone to navigate to your music. You can then navigate using
controls on your Retro DAB+:
a. Press (4) or (6) to play previous or next track.
b. Press (5) to play or pause the track.
c. Press and hold (4) or (6) to search the current track using high speed rewind or fast-forward.
Play will resume when you release the button.
AUX-IN
1. If the display shows the clock, press (1) to switch to working mode.
2. To connect the auxiliary device: plug the aux-in cable into the 3.5mm AUX-IN jack at the back of the radio.
3. To switch to AUX-IN press MODE(7) repeatedly button until the display briey shows ‘Switch to AUX-IN’.
4. To control the playback of the auxiliary device you need to use the device’s own controls. You may need to
adjust volume on your Retro DAB+ and the auxiliary device for optimum volume and clarity.
Alarm Clock
Your Retro DAB+ has dual alarms, which can operate in both working and standby mode. You can wake up to
DAB/DAB+, FM, iPod or two dierent beep tones.
To set an Alarm
1. In either standby or working modes press SNOOZE ( 9) to select ALARM 1. Press it again to select ALARM 2.
In either case the status of the alarm will be displayed:
2. The top line of the display shows the alarm number, and the currently selected alarm source. The default
setting is BEEPER1. The second line of the display shows ashing alarm status, and the time the alarm is set.
3. Press (4) or (6) to display OFF or ON.
4. Press (5) to select OFF or ON. If you select ON the display will show ‘Alarm Time Set’, showing current
time and a ashing setting for alarm time. Hours will ash rst.
Page 16

GB
View Quest Retro DAB+ Operation Guide
16
5. Set alarm time hours by pressing (4) or (6). Press (5) to conrm hours setting and go on to
minutes.
6. Set alarm time minutes by pressing (4) or (6). Press (5) to conrm hours setting and go on to
alarm type.
7. Set alarm type by pressing (4) or (6). Sources are:
- BEEP Tone 1
- BEEP Tone 2
- DAB
- FM
- iPOD
8. Press (5) to conrm alarm type setting.
9. In Standby mode your Retro DAB+ will show bell symbols and numbers to show which alarms are active.
To show alarm status
In either standby or working modes press SNOOZE( 9) to select ALARM 1. Press it again to select ALARM 2. In
either case the status of the alarm will be displayed:
Stopping or snoozing the alarm
When alarm goes o you can press (1) to turn o the alarm
Press SNOOZE (9) to snooze for 5 minutes. Your Retro DAB+ will enter into Standby mode and show the clock.
You can repeat snoozing for a maximum period of 1 hour.
Snoozing multiple alarms
Only one alarm can be snoozing at a time. If ALARM 1 is snoozing ALARM 2 will also automatically snooze if it
begins to sound. ALARM 1 snooze will be cancelled.
Page 17

GB
17
View Quest Retro DAB+ Operation Guide
Alarm Sounds
- If the alarm is set to DAB/DAB+ mode and no DAB/DAB+ stations can be received, BEEP Tone1 will sound.
- If the alarm is set to “iPod” mode and there is no iPod connected, BEEP Tone1 will sound.
- Whether “iPod” or “BEEPER” alarms are sounding, docking or removing an iPod or iPhone will turn o the
alarm.
- If two alarms are set, when ALARM 1 is sounding and ALARM 2 begins to sound, it will automatically turn
o ALARM 2.
Alarm volume
Whichever alarm mode is selected, the alarm volume will be half the maximum volume.
Sleep Timer
You can send your Retro DAB+ to sleep for up to 90 minutes time.
In working mode, press and hold SNOOZE (9) to enter sleep function setting. The display will show ‘Sleep
Timer‘ with “OFF” ashing on the lower right. Press (4) or (6) to select sleep time from 15min, 30min,
45min, 60min or 90min. Press (5) to conrm your selection.
Sleep time will be displayed as ‘Snn’ on the upper right of the screen, where ‘nn’ is the sleep time selected.
To cancel the sleep timer, follow instructions above and select ‘o’ instead of a sleep time.
Other Operations
Your Retro DAB+ has two functions that you are only likely to need in the unlikely event of a problem while in
conversation with support.
Factory Reset
[Note] Factory Reset will cancel all your presets
In working mode, press and hold “MODE” button until “Press Enter Key to Reset” is displayed. Then press
(5) to conrm. “System Reset, then System Reset OK” will display.
Software Version
In working mode, press and hold INFO to check the software version.
Page 18

GB
View Quest Retro DAB+ Operation Guide
18
Page 19

GB
19
View Quest Retro DAB+ Operation Guide
Environmental Disposal Information
Electrical and electronic products displaying the crossed out wheeled bin symbol above must not be disposed of
in general household waste. Take the product to a recycling facility that accepts electrical and electronic products.
Check with your Local Authority for your nearest recycling centre.
For further details, please contact
View Quest
9-10 Mill Lane
Alton
Hampshire
GU34 2QG
UNITED KINGDOM
support@viewquest.co.uk
Page 20

GB
View Quest Retro DAB+ Operation Guide
20
Specications
1. Mode: DAB/DAB+ (BAND III 5A-13F), FM (87.5MHz-108MHz), IPOD, AUX_IN
2. LCD: 2x16 dots matrix; black background white fonts, negative LCD
3. Power Supply: AC INPUT 100-240V ; DC_OUTPUT 5V/2A (30-pin dock) 5.9V/2A (Lightning dock)
4. Output Power: 10W X2
5. STANDBY MODE: Show Clock
 Loading...