

Page 1
TFT LCD MONITOR WITH TV
USER'S MANUAL
without USB
Page 2
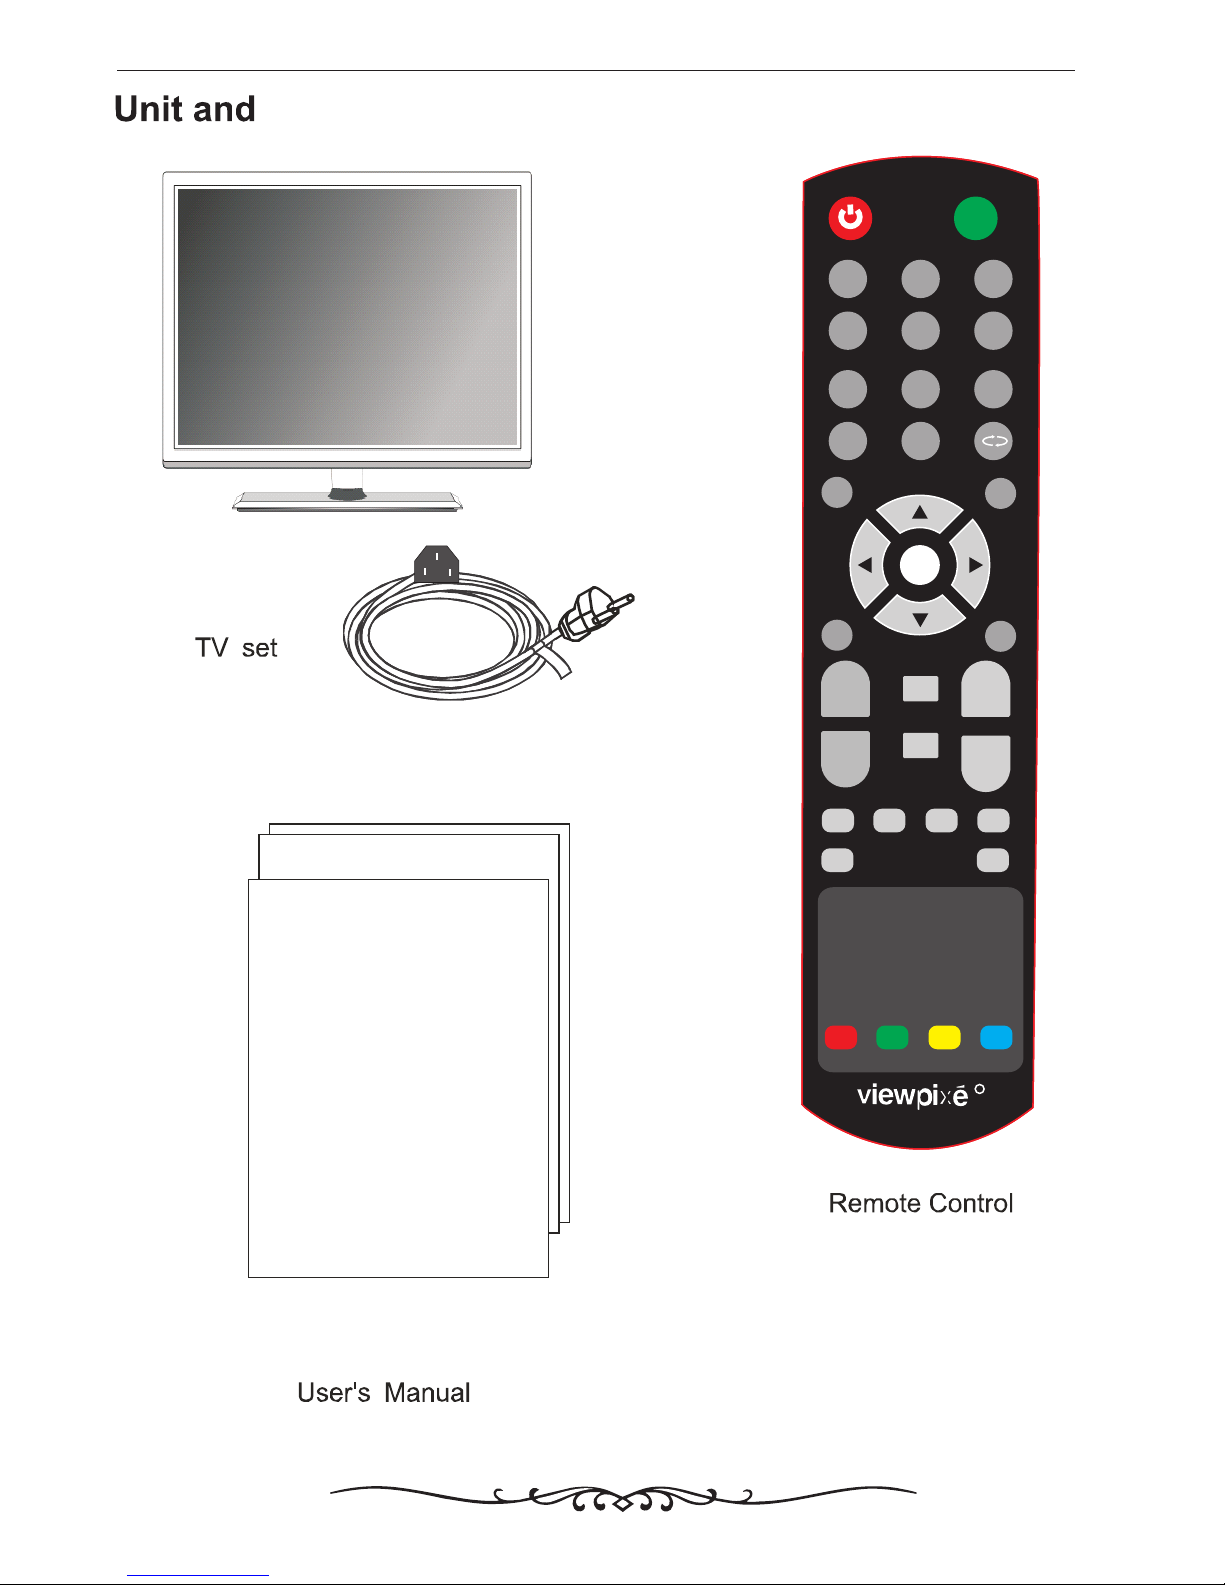
Unit an d Accessory
Front View
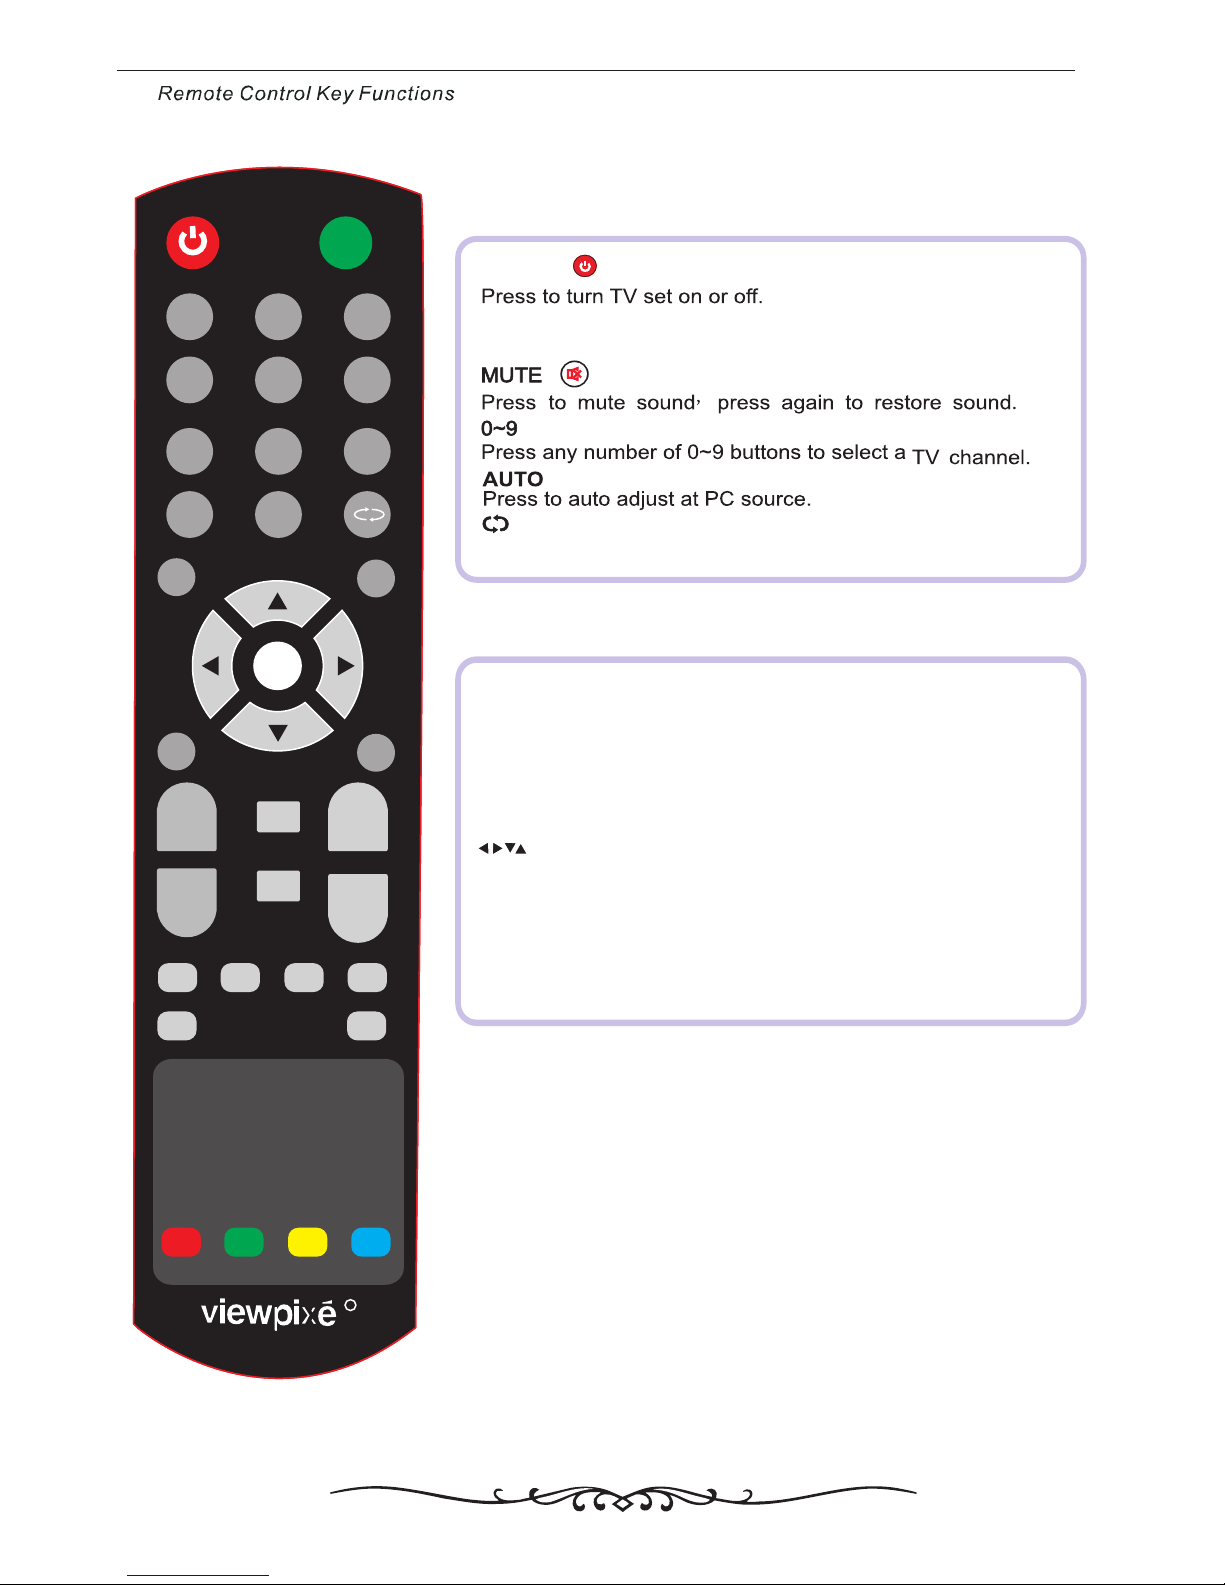
Remote Control Key Functions
Menu Operation
Terminal board
Install and connect TV
Select Input Source & Basic Operation
Specifications
Help
3
4
5-6
10-16
9
8
7
18
17
1
2
Caution
Safety Information
Page 3
Caution
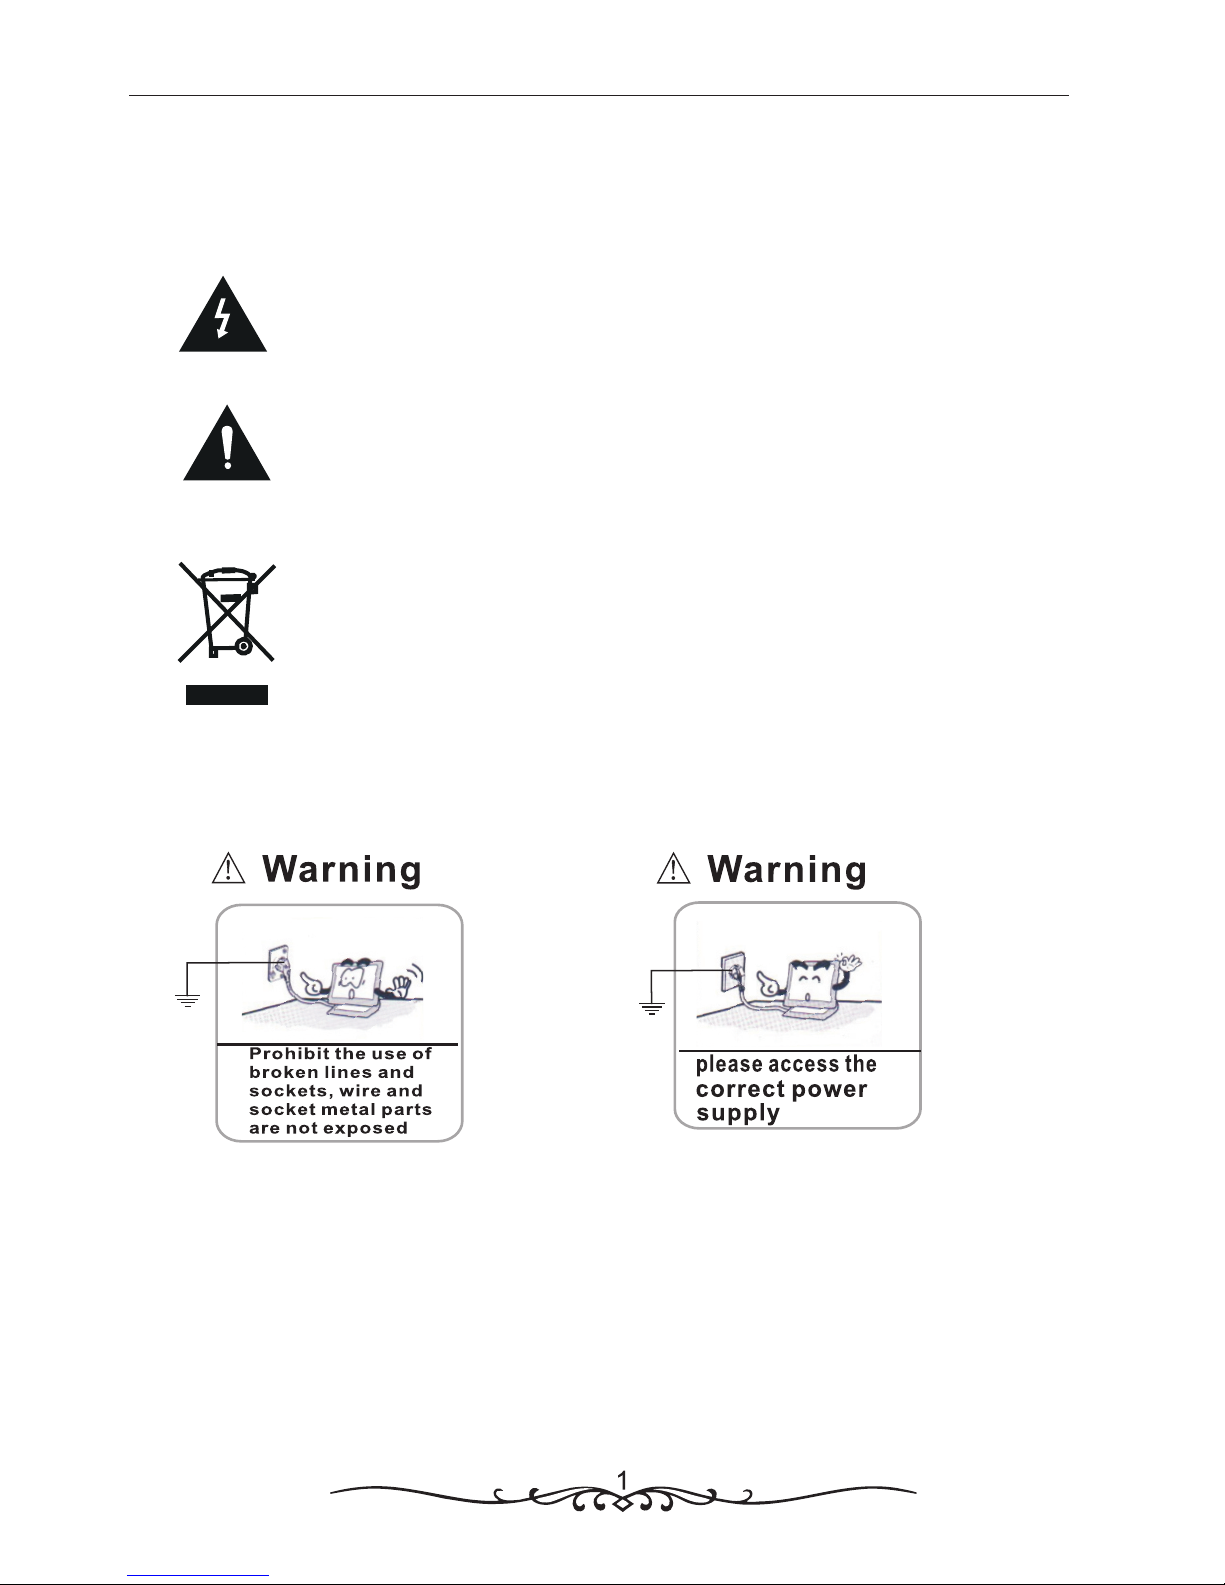
The lightening flash with arrowhead symbol, within an equilateral triangle is
intended to alert the user to the presence of un-insulated "dangerous voltage"
within the products enclosure that may be of sufficient magnitude to constitute a
risk of electric shock to the persons.
The exclamation point within an equilateral triangle is intend to alert the user to
the presence of important operating and maintenance (servicing) instructions in
the literature accompanying the appliance.
Correct disposal of this Product
W aste Electrical & Electronic Equipment (WEEE)
Your product is designed and manufactured with high quality materials and
components which can be recycled and reused.
This symbol means that electrical and electronic equipment, at their end-of-life,
should be disposed of separately from your household waste.
Please dispose of this equipment at your local community waste
collection/recycling centre.
In the European Union there are separate collection systems for used electrical
and electronic products. Please help us to conserve the environment we live in!
* Power outlet must be grounded
Page 4
To reduce the risk of fire or electric shock, do not expose this apparatus to rain or moisture.2
Caution:
These servicing instructions are for use by qualified service personnel only. To reduce the risk of
electric shock do not perform any servicing other than that contained in the operating instructions.
unless you are qualified to do so.
19) Do not place any sources of danger on the apparatus (e.g. liquid filled objects, lighted candles).
20) Wall or Ceiling Mounting - The appliance should be mounted to a wall or ceiling only as
recommended by the manufacturer.
2
Page 5
3
Accessories
Main cable
POWER
MUTE
1
2
4 5 6
7 8 9
-/--
0
MENU
INPUT
INFO
EXIT
3
ENTER
v+ P+
P-
v-
P.MODE
S.MODE
SLEEP
ASPECT
FREEZE
AV/TV PC AUTO
R
Page 6
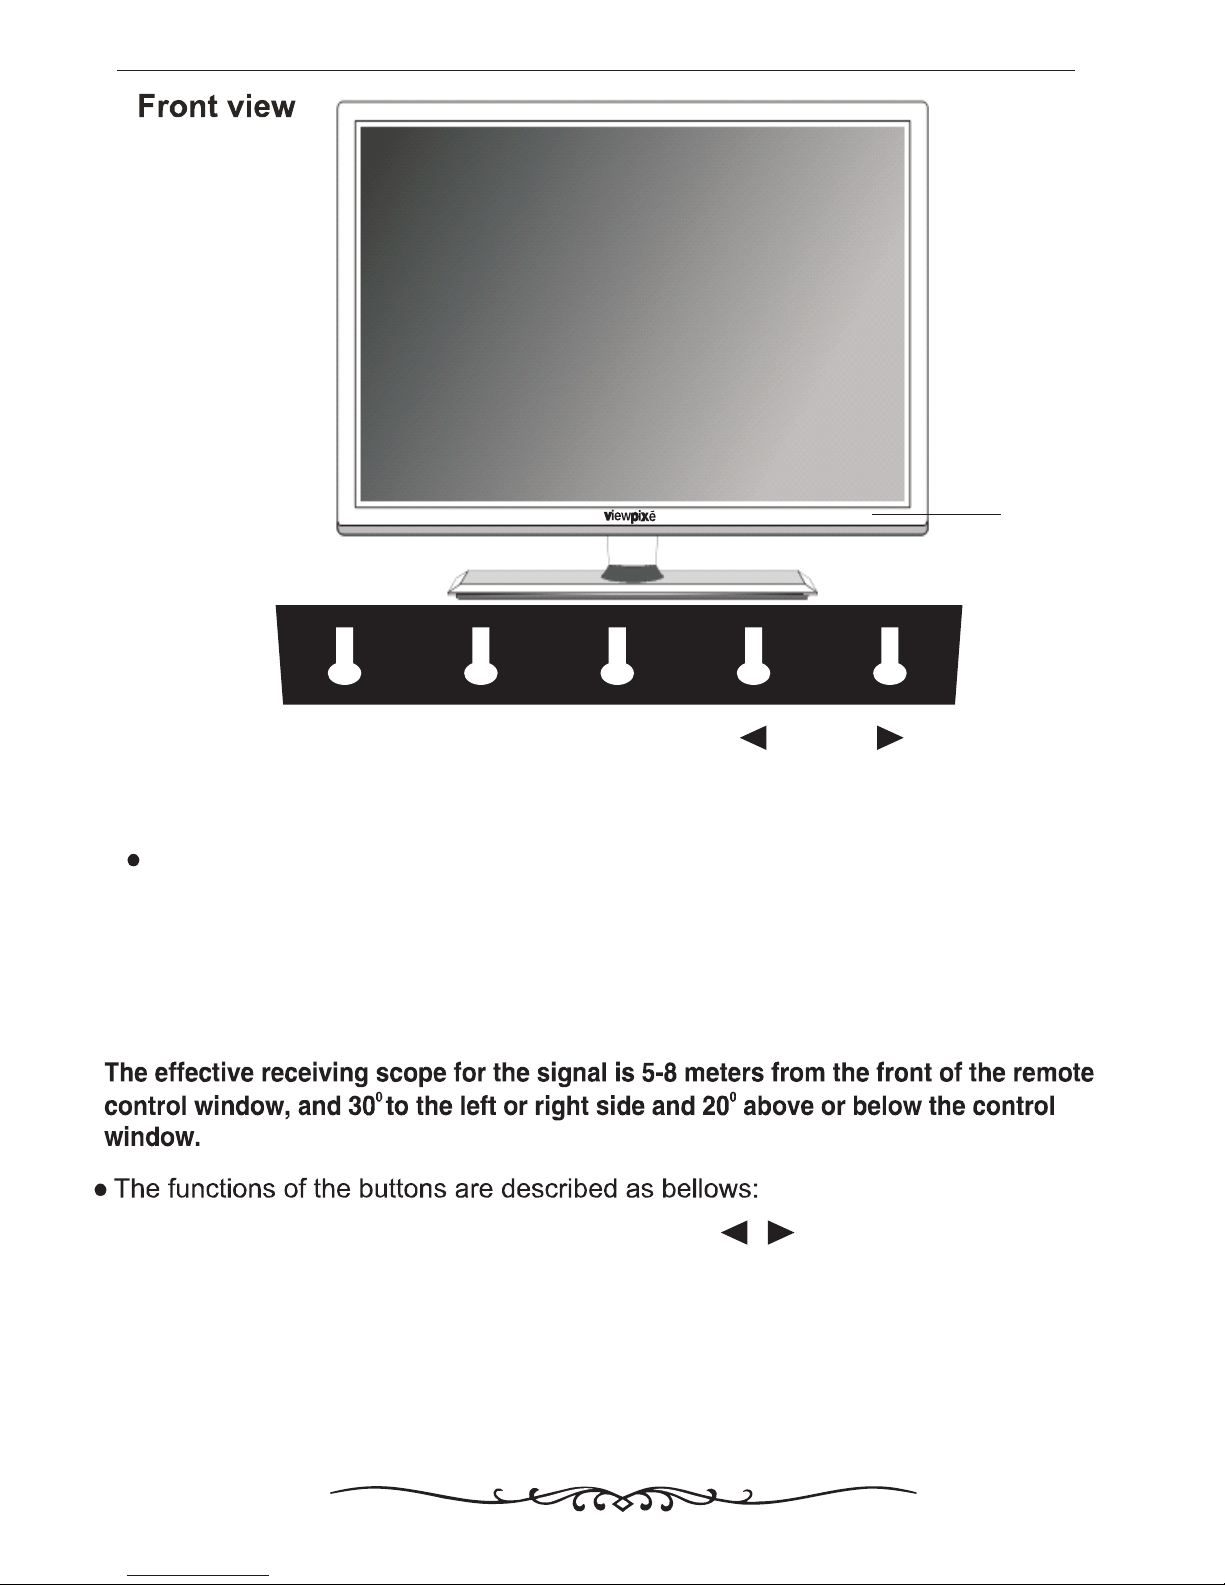
1.POWER
Adjust the volume and move
cursor left/right.
3. INPUT
Display input source.
4.
5.Remote Sensor
Set your TV to power on or standby mode.
(IR) Infrared Receiver: Receives IR signals from the remote control.
(Power on/Standby) LED Indicator: Press to turn on and off,
Indicator on(Red) Standby mode
Indicator on(Green) Power on mode
POWER
2.MENU
Display the on-screen menu.
4
LED
POWER
MENU INPUT
Page 7
5
In the standby mode, the indicator light will be red.
In the boot mode, the indicator light will be green.
POWER
Return to previous TV channel.
MENU
Press this button to switch on OSD menu or return to
previous menu.
INPUT
Press this button to select specific source such as TV, SV
or other channel.
INFO
Press the button to display the information about the
program.
EXIT Press this button to exit .
Menu button for left, right, up and down to move the cursor.
ENTER
To confirm which you selected.
V+ V- Press this button to adjust volume.
P+ P-
TV mode, press this button to select the following and
above channel.
P. MODE
Press this button to switch on picture mode.
S.MODE
Press this button to switch on sound mode.
POWER
MUTE
1
2
4 5 6
7 8 9
-/--
0
MENU
INPUT
INFO
EXIT
3
ENTER
v+ P+
P-
v-
P.MODE
S.MODE
SLEEP
ASPECT
FREEZE
AV/TV PC AUTO
R
Page 8
6
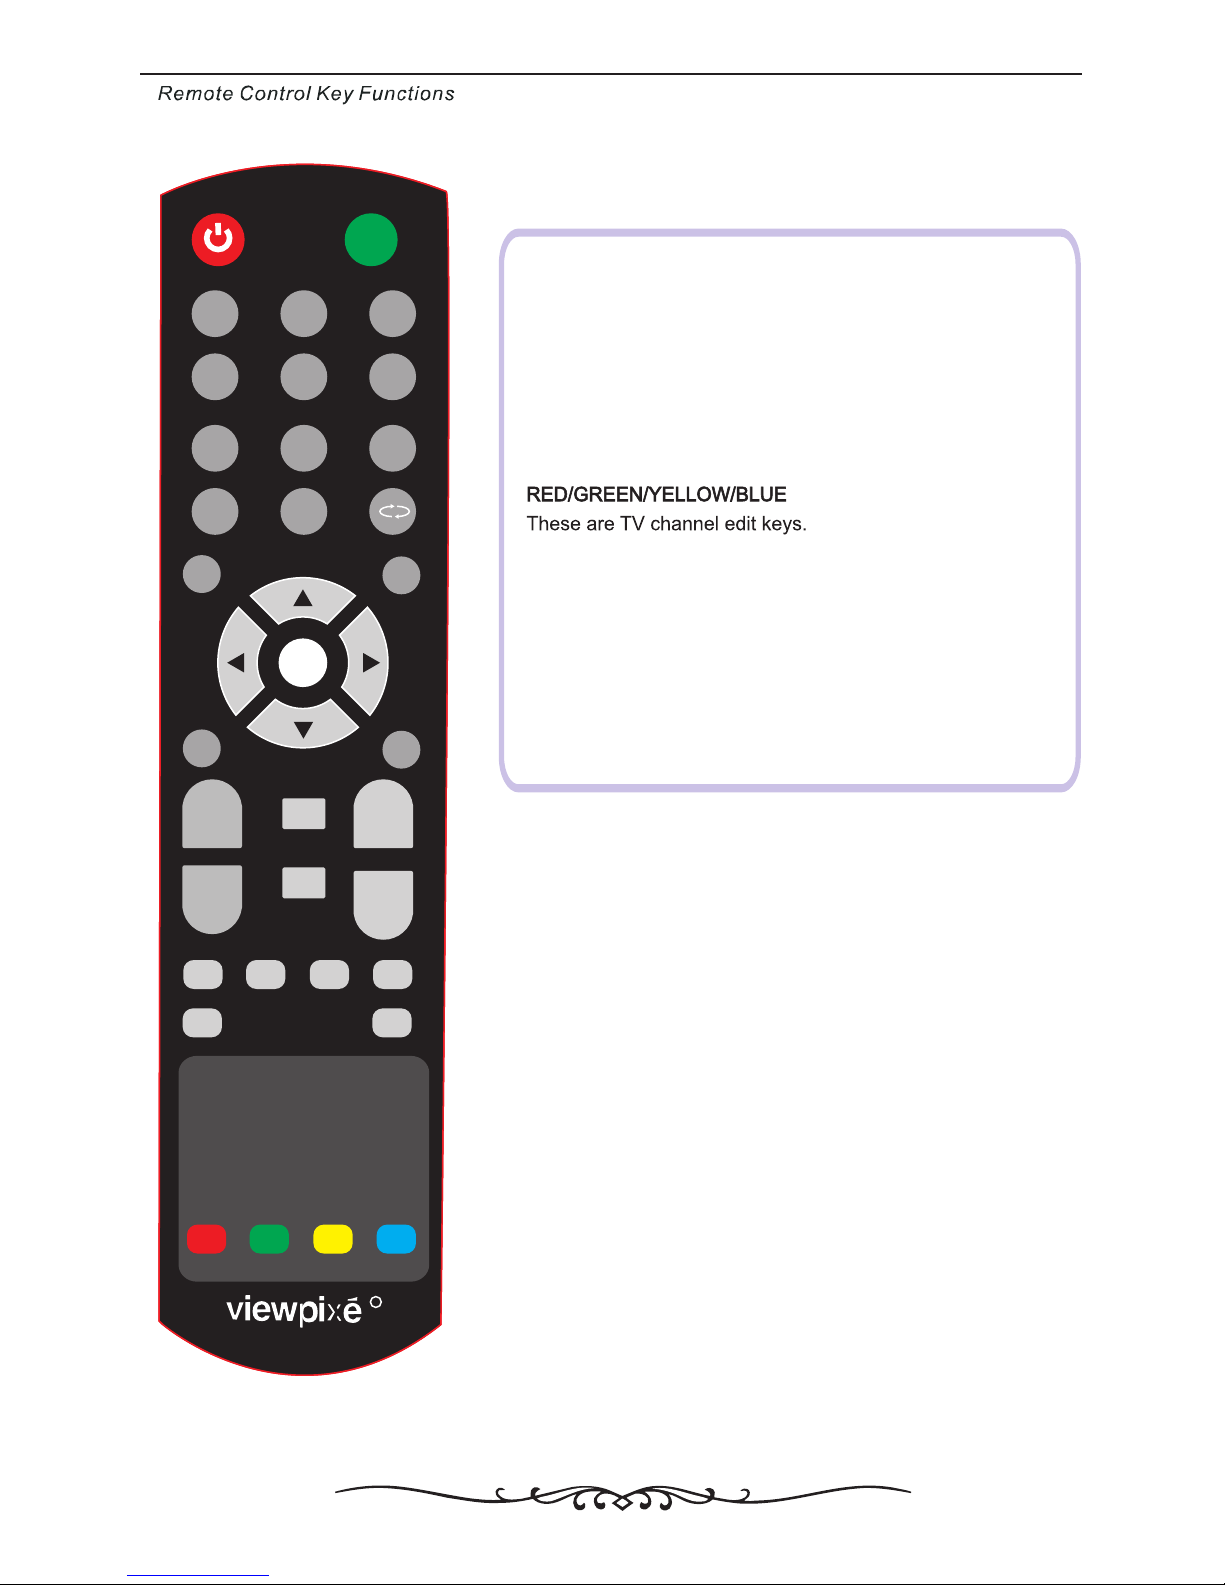
ASPECT
Press the button to select the screen size and
the ratio.
SLEEP
Press this button to set sleep time.
FREEZE Press the button to pause the picture and press
again the picture play.
USB Press the button to turn source to MEDIA quickly.
POWER
MUTE
1
2
4 5 6
7 8 9
-/--
0
MENU
INPUT
INFO
EXIT
3
ENTER
v+ P+
P-
v-
P.MODE
S.MODE
SLEEP
ASPECT
FREEZE
AV/TV PC AUTO
R
Page 9
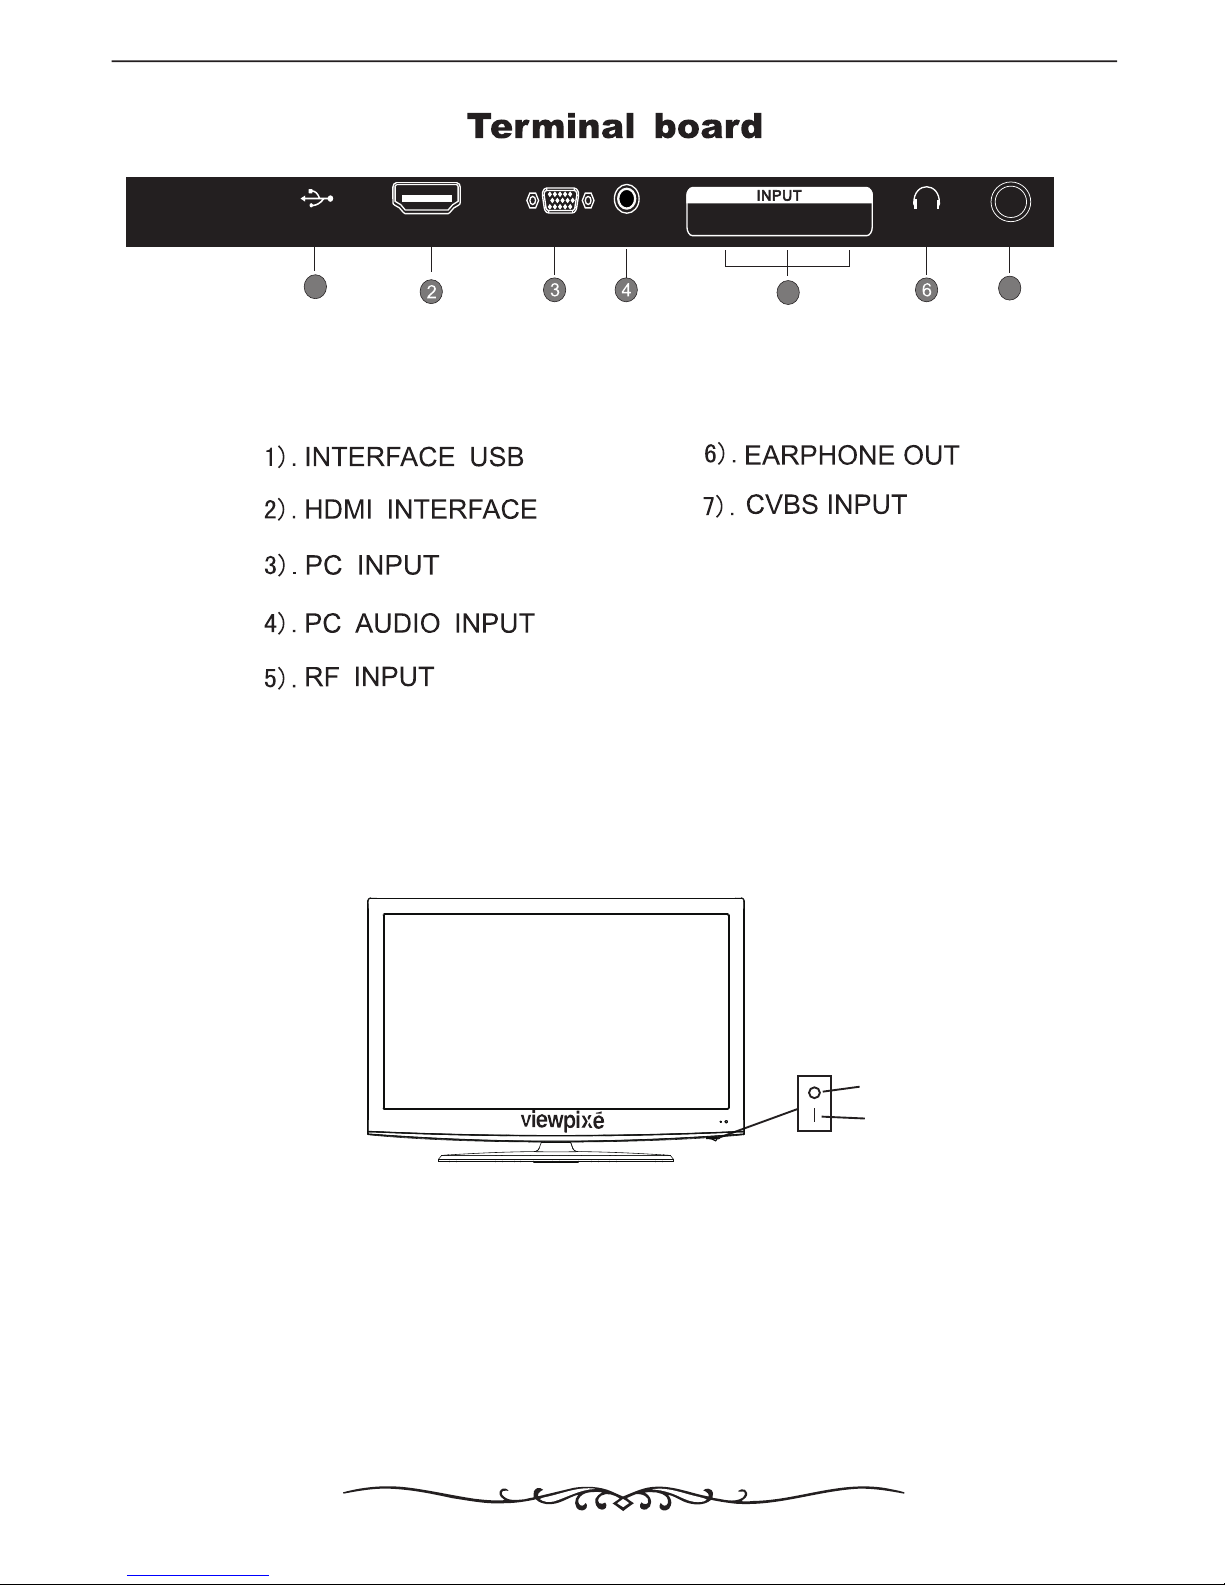
7
7
POWER SWITCH
ON
OFF
Side panel diagram
HDMI
PC AUDIO IN
USB
Earphone
VIDEO
R
L
VGA
1
RF
5
Page 10
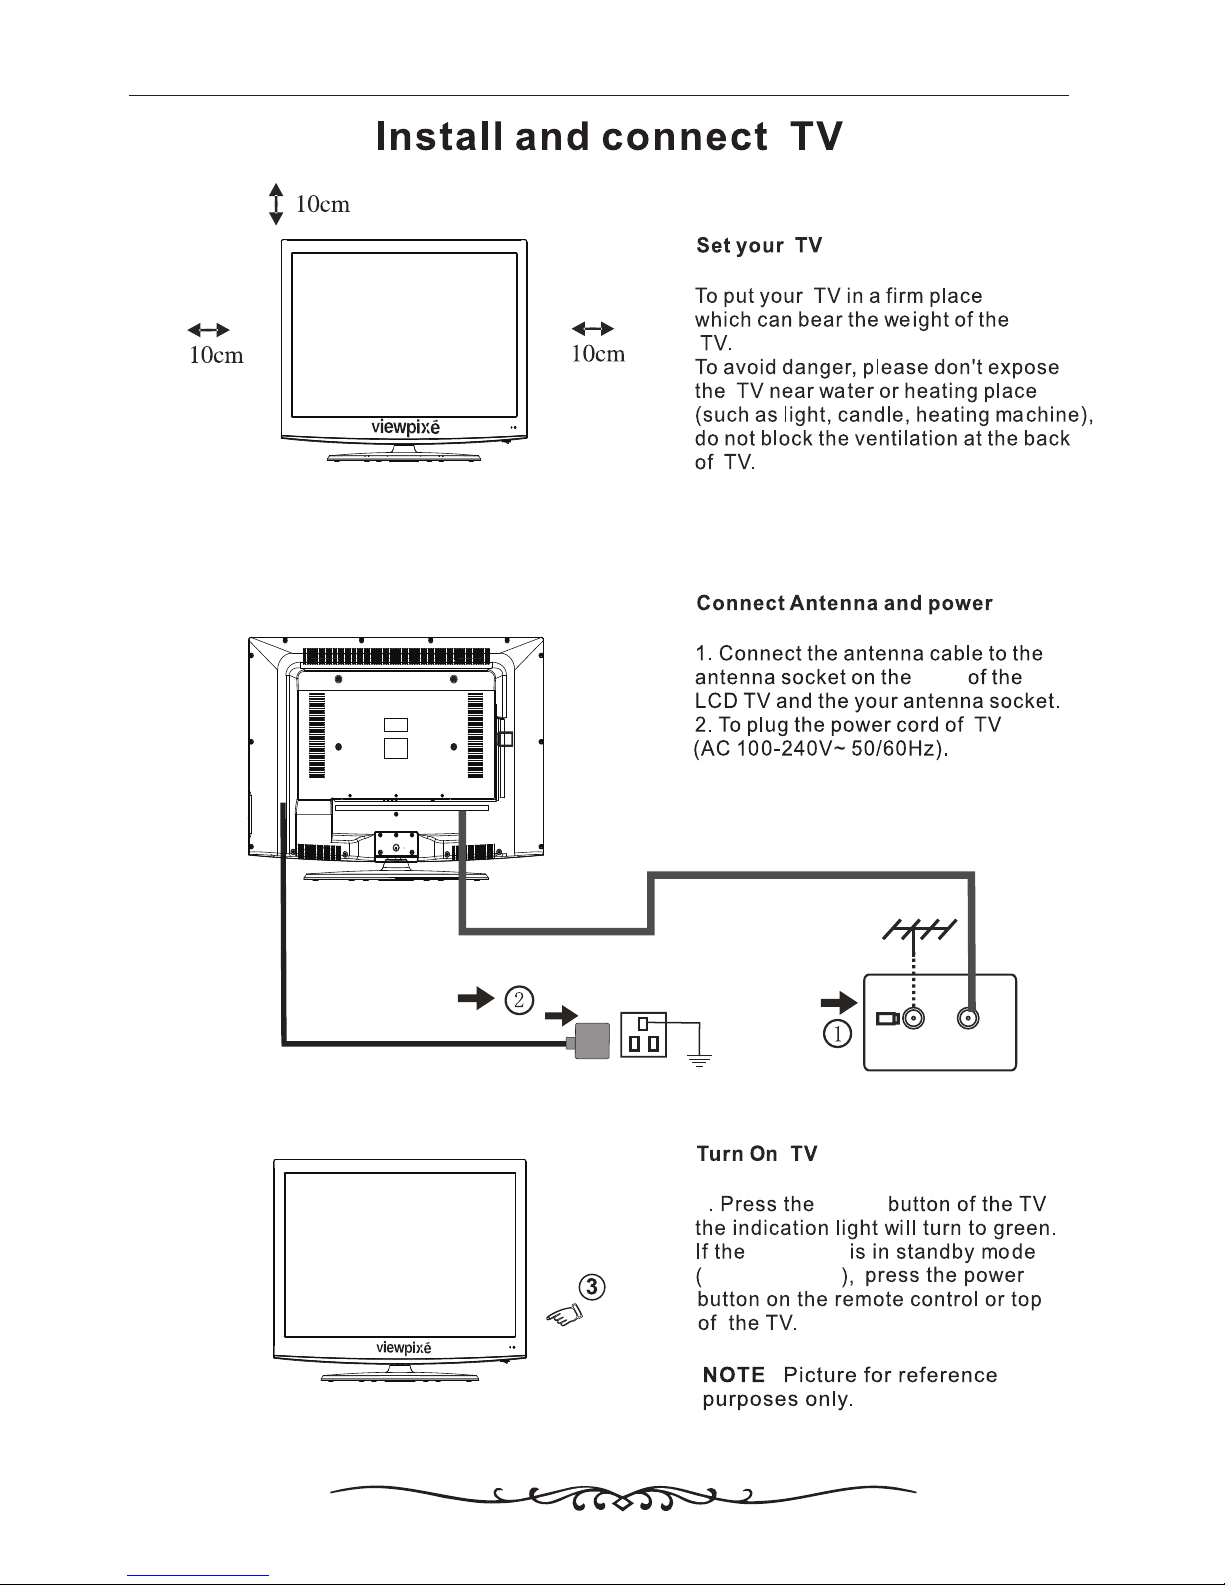
3
side
indicator
The Light is red
8
* Power outlet must be grounded
standby
Page 11
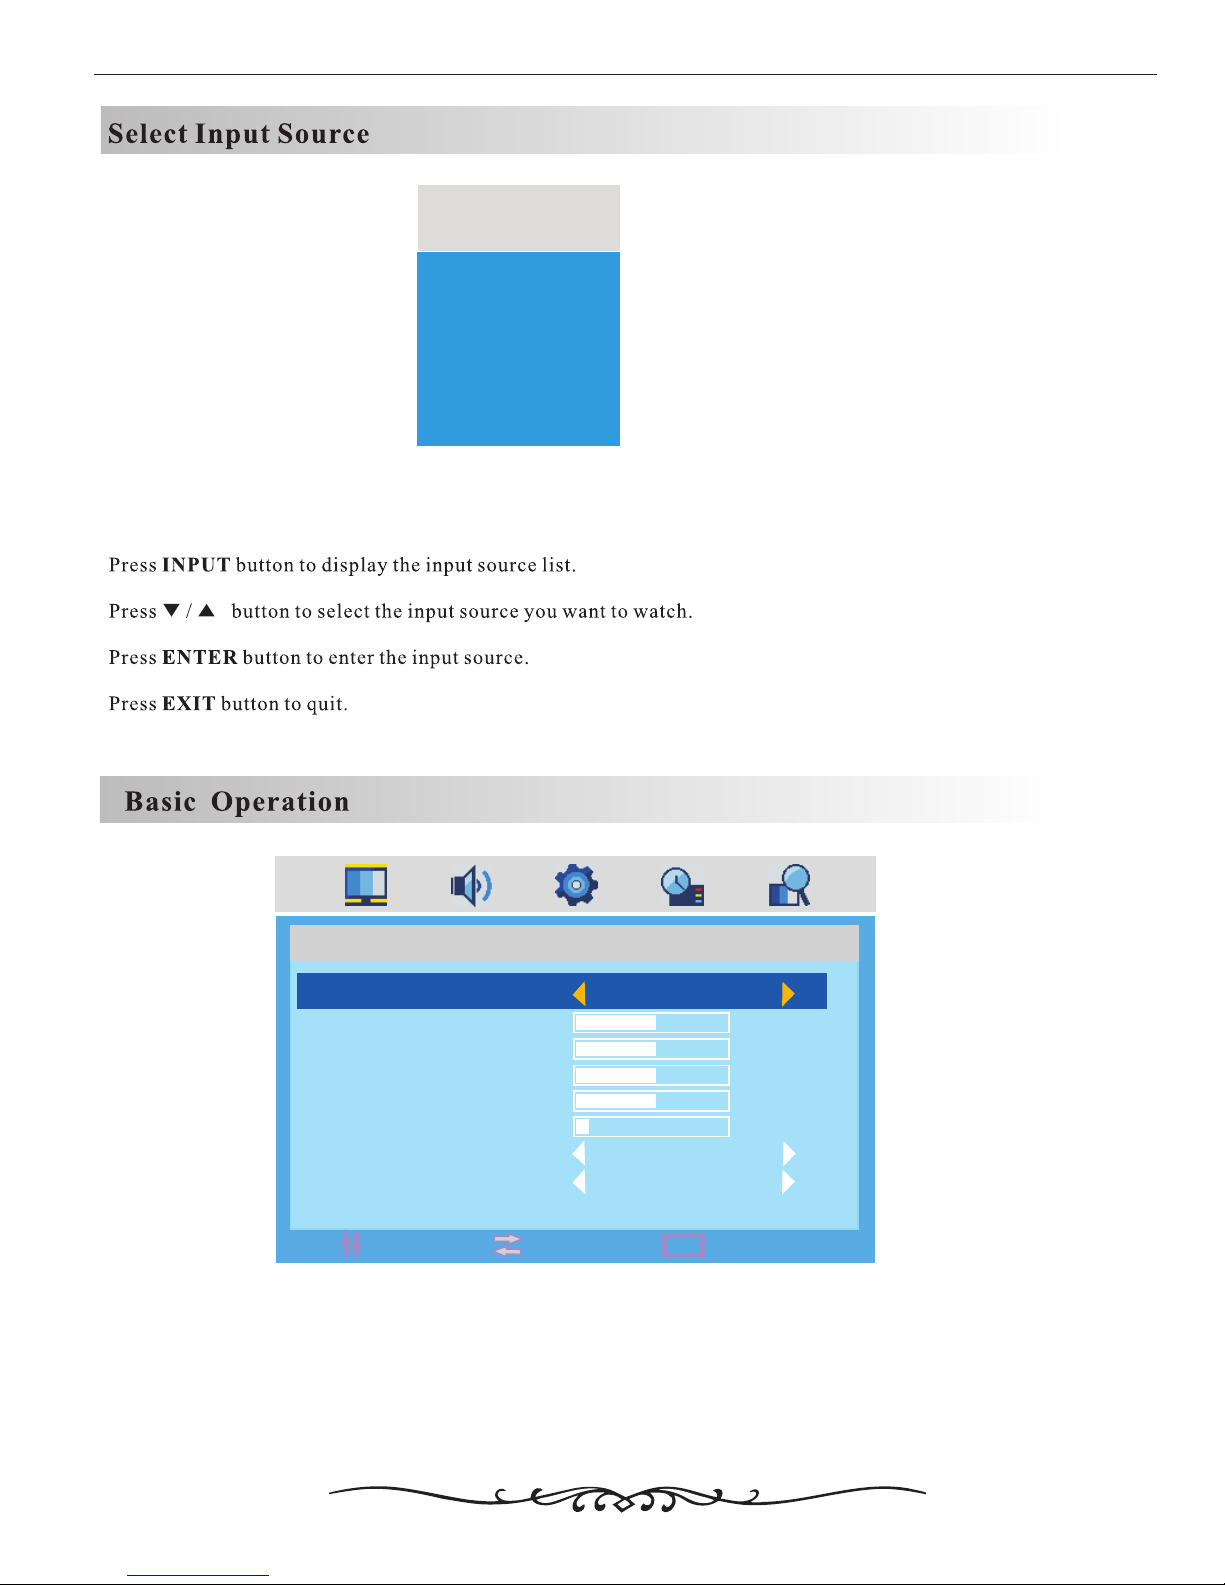
9
TV
AV
S-VIDEO
VGA
SOURCE
·Use MENU button to display the MAIN OSD MENU;
·Use 【▲】 /【▼】button to select the MENU you want;
·Use 【 ► 】 button to enter the sub menu;
You can use MENU or EXIT button to save and return back to the previous menu .
·Use 【▲】 /【▼】 button to select the option and then press 【◄】 /【 ► 】to adjust the value in the sub menu;
MENU
MOVE
EXIT
SELECT
PICTURE
PICTURE MODE
CONTRAST
BRIGHTNESS
COLOR
TINT
SHARPNESS
COLOR TEMP.
NOISE REDUCTION
STANDARD
50
50
50
50
6
NORMAL
ON
Page 12
8
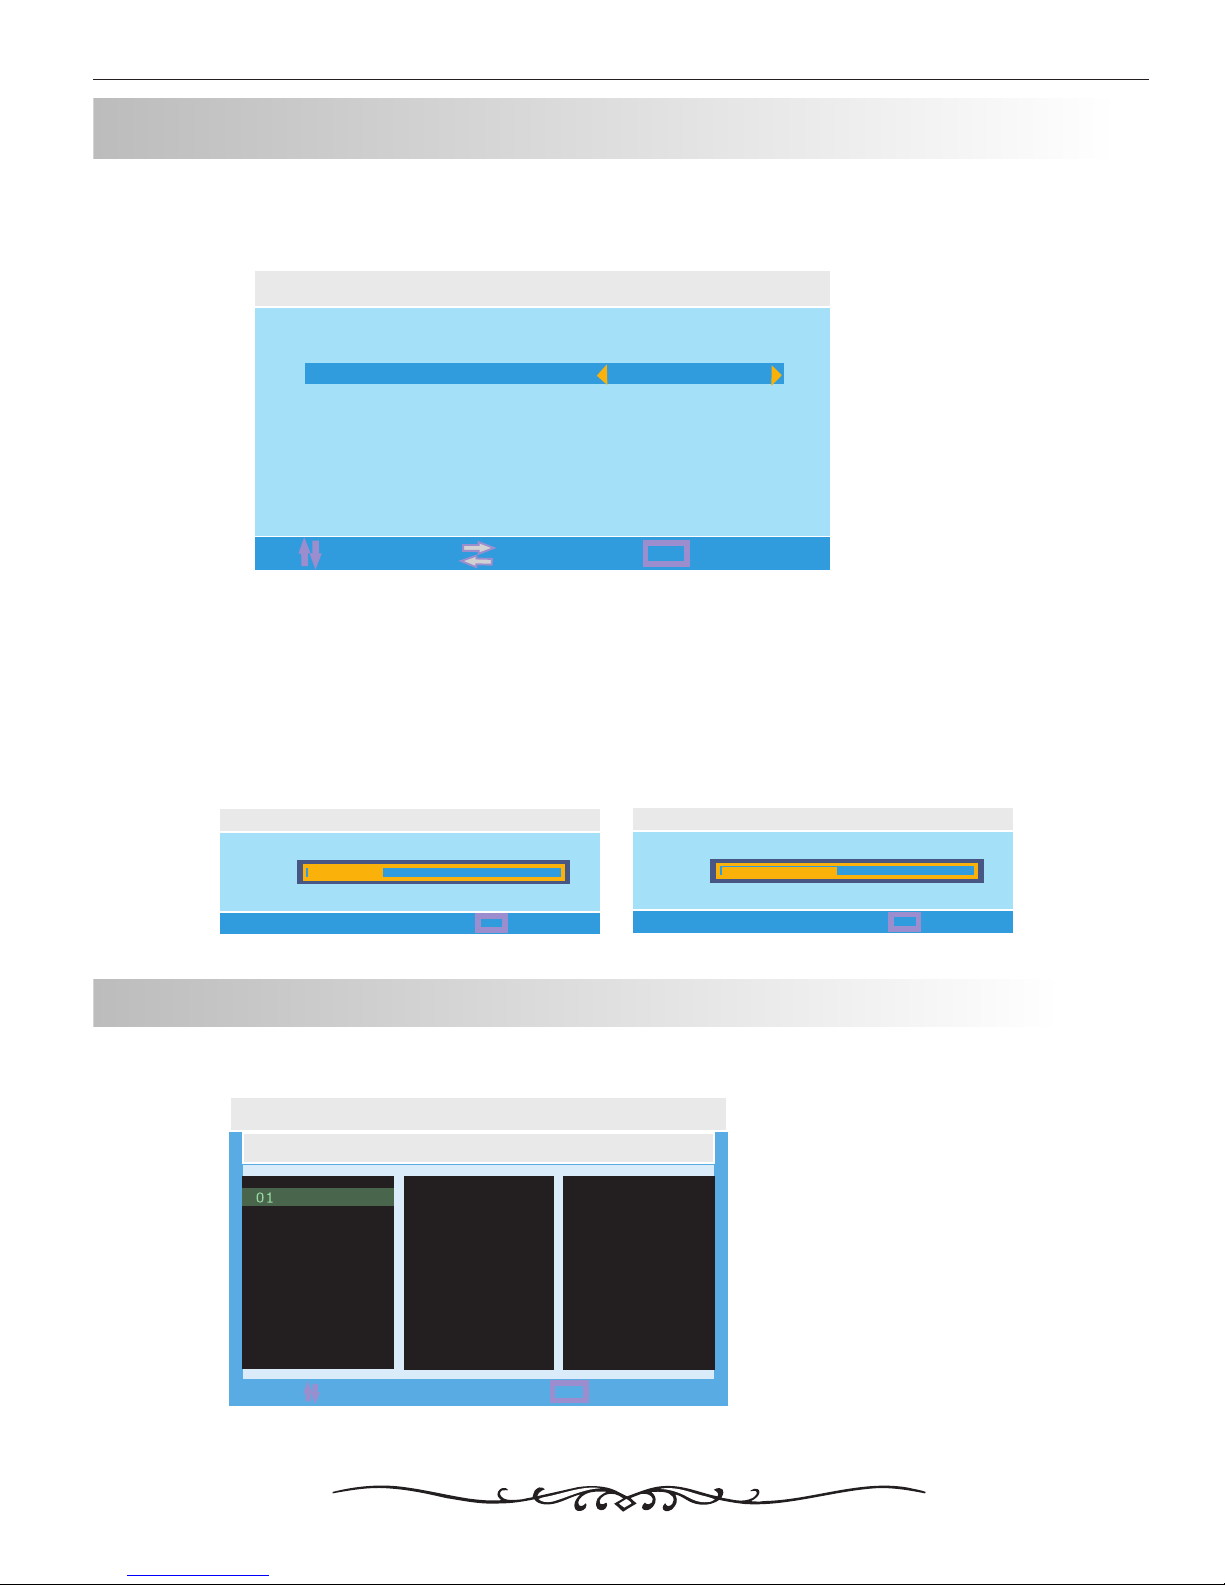
If this is the first time you turn on the TV and there is no TV programs memory ,there will display First Time Installation
menu on screen just as the following picture. A screen will display asking you to run a Channel Auto Scan to search and
receive available local channels. And the channels will be stored in the TV tuner.
MENU
MOVE EXIT
FIRST TIME INSTALLATION
START SEARCH
LANGUAGE
COUNTRY
LANGUAGE
COUNTRY
·Use down【▼】arrow button to highlight COUNTRY. Navigate using 【◄】 /【 ► 】arrow button to select the country.
There are 6 country for selection: UK, ITALY, SPAN, FRANCE, GERMANY, OTHER,.
·Use down【▼】arrow button to highlight LANGUAGE. Navigate using 【◄】 /【 ► 】arrow button to select the OSD
language. There are 6 language for selection: ENGLISH, GERMAN, FRENCH, SPANISH, ITALIAN, PORTUGUESE.
After setting these items, you can press MENU to give up your installation and exit. Or press 【▼】 /【 ▲】 button to
highlight START SEARCH and then press【►】button, the Auto Search will begin as the following picture:
SELECT
MENU
EXIT
AUTO SCAN
ATV
66.00MHZ CH:4
MENU
EXIT
AUTO SCAN
DTV
554.00MHZ CH:20
First Time Installation
Channel List
CHANNEL LIST
MENU
EXIT
MOVE
01
02
03
04
05
06
07
08
09
10
11
12
13
14
15
16
17
18
19
20
21
22
23
24
25
26
27
28
29
30
·Use down【OK】 button to call out the CHANNEL LIST.
Page 13
9
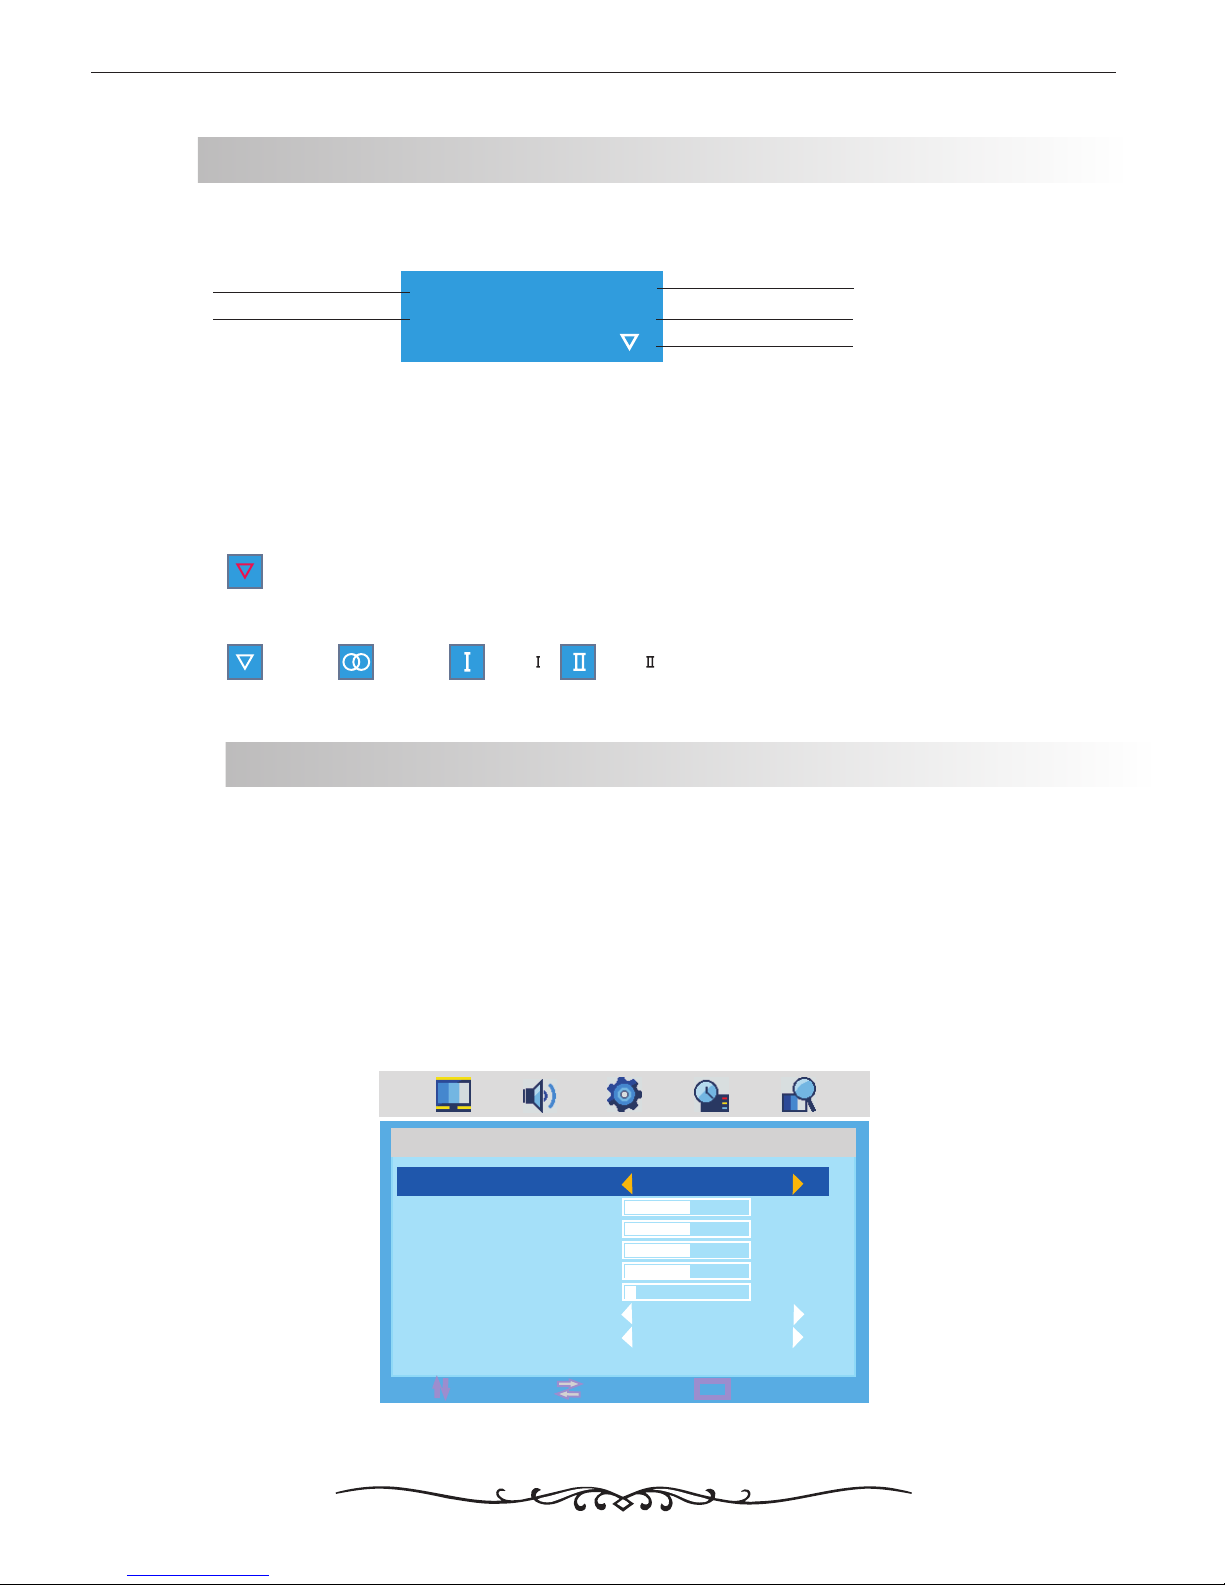
TV Information
1
Auto
DK
Press 【DISPLAY】 button to display program information.
1. Current Channel Number.
2. The colour system of current program, could be changed on Manual Tuning menu(an option of SETUP menu).
3. Current program name.
4. The sound system of current program, could be changed in Manual Tuning menu(an option of SETUP menu).
5. The NICAM mode of current program.
1
2
3
5
If the icon of NICAM mode is red, it means the current program supplies multiple NICAM signals, and you can
change it by pressing NICAM button.
Mono Stereo Dual Dual
Four kinds of NICAM modes and relative icons:
Program Information
4
No Signal
PICTURE
The PICTURE menu offers options to enhance and refine the picture displayed on your TV based on ambient room light
and personal prefer-ences. Adjustment options include , BRIGHTNESS, COLOR, TINT,
SHARPNESS, COLOR TEMP. and NOISE REDUCTION.
How to Navigate:
Press the MENU button on the remote control. Navigate using arrow buttons to select PICTURE. Press
the down arrow button to highlight PICTURE MODE, then press the arrow button to select your viewing
preference from 4 factory options: STANDARD > MOVIE > VIVID > PERSONAL.
The STANDARD setting is recommended for most viewing environments. Depending on the ambient light level in the
room, you may ind one of the other options more pleasing.
PICTURE MODE, CONTRAST
【◄ 】 /【 ►】
▼ 【◄ 】 /【 ►】
MENU
MOVE
EXIT
SELECT
PICTURE
PICTURE MODE
CONTRAST
BRIGHTNESS
COLOR
TINT
SHARPNESS
COLOR TEMP.
NOISE REDUCTION
STANDARD
50
50
50
50
6
NORMAL
ON
To make more critical adjustments based on your own preferences in PERSONAL:
Page 14
10
• Use down arrow button to highlight CONTRAST. Navigate using the arrow buttons to increase or
decrease contrast intensity.
【▼】 【◄ 】 /【 ►】
• Use down arrow button to highlight BRIGHTNESS. Navigate using the arrow buttons to increase or
decrease overall brightness.
【▼】 【◄ 】 /【 ►】
• Use down arrow button to highlight COLOR. Navigate using the arrow buttons to increase or decrease
color intensity.
【▼】 【◄ 】 /【 ►】
• Use down arrow button to highlight TINT. Navigate using the arrow buttons to adjust colors toward
green or reddish tint.
• Use down arrow button to highlight SHARPNESS. Navigate using the arrow buttons to soften or view
crisper edges in the picture.
• Use down arrow button to highlight COLOR TEMP.. Navigate using the arrow buttons to select COOL
(more bluish tone), NORMAL or WARM. The default setting is NORMAL.
【▼】 【◄ 】 /【 ►】
【▼】 【◄ 】 /【 ►】
【▼】 【◄ 】 /【 ►】
• Use down arrow button to highlight NOISE REDUCTION. Navigate using the arrow buttons to select
it ON or OFF.
【▼】 【◄ 】 /【 ►】
MENU
MOVE
EXIT
SELECT
SOUND
SOUND MODE
BASS
TREBLE
BALANCE
AVL
STANDARD
50
50
50
ON
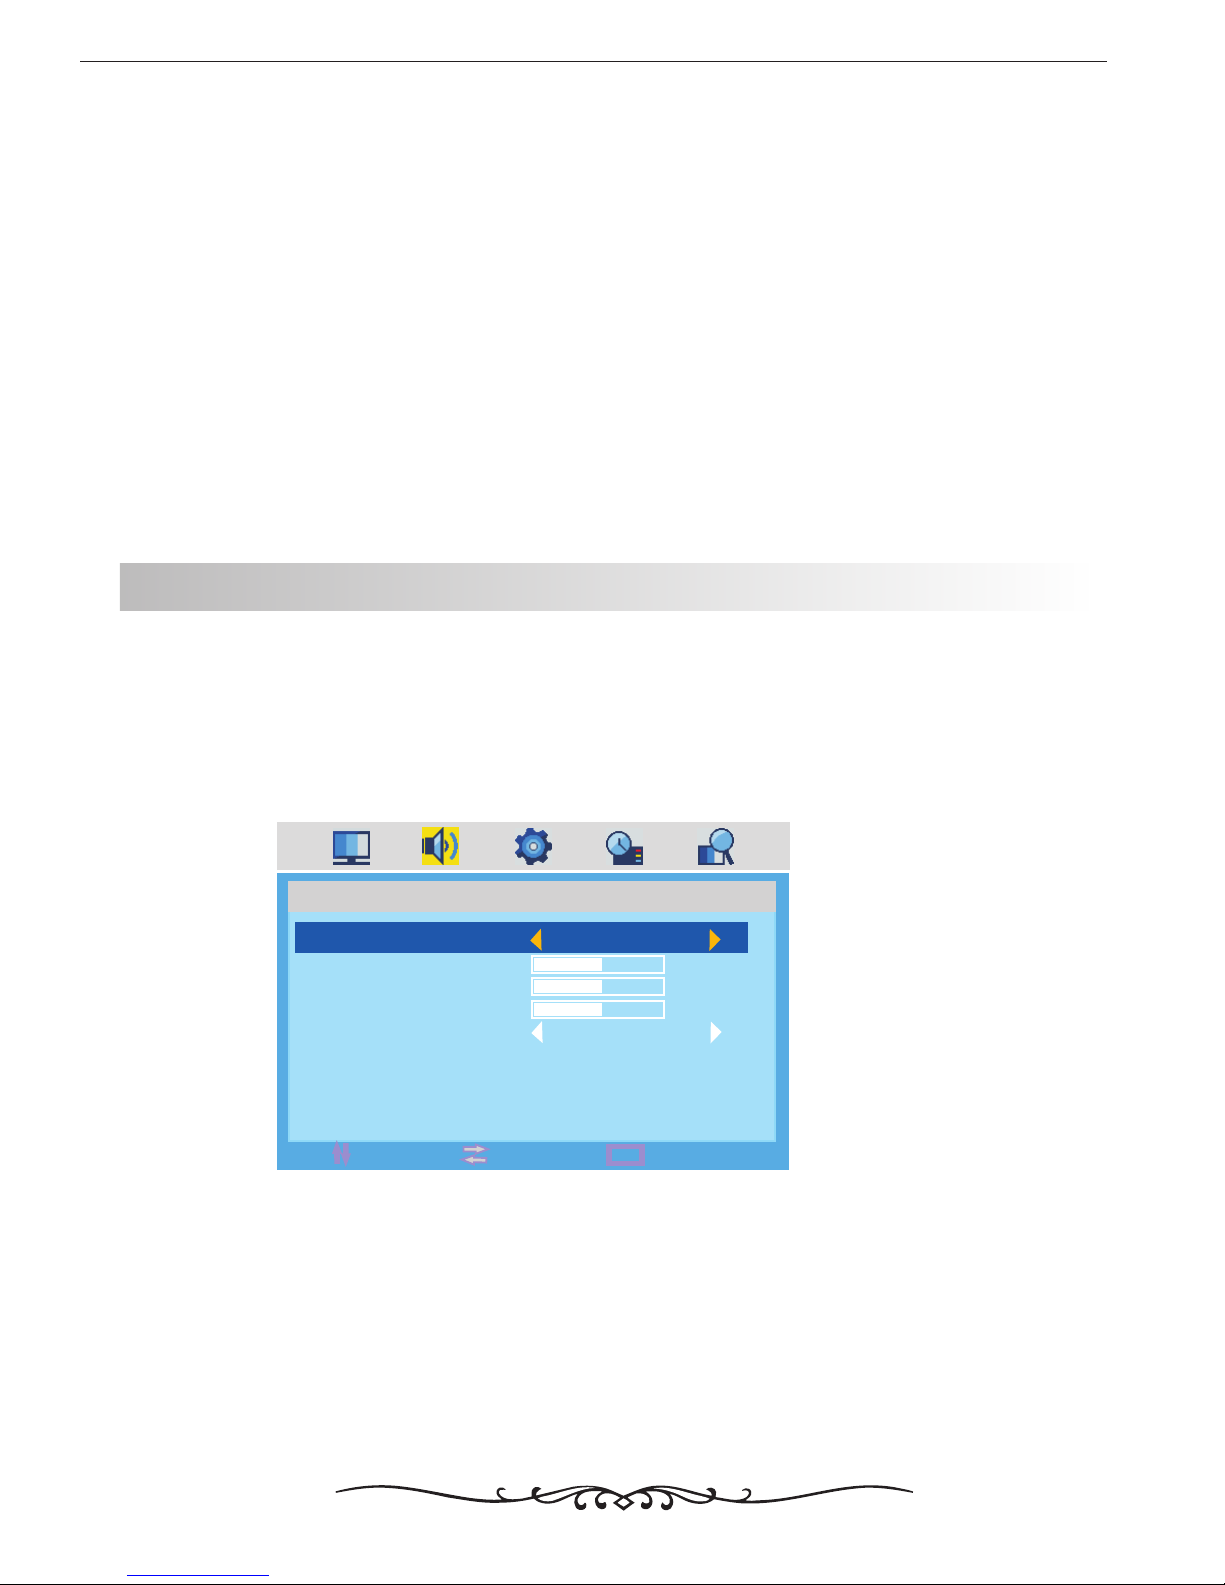
The SOUND menu offers options to make sound enhancements while listening through the built-in speakers
SOUND
How to Navigate:
Press the MENU button on the remote control. Navigate using arrow buttons to select . Press the
arrow button to highlight SOUND MODE, then press the arrow button to select your sound preference
from 4 factory options: > MOVIE >MUSIC > PERSONAL.
【◄ 】 /【 ►】 SOUND
【▼】 【◄ 】 /【 ►】
STANDARD
To make more critical sound adjustments based on your own preferences in PERSONAL:
• Use down arrow button to highlight Bass. Navigate using the arrow buttons to increase or decrease
low frequency intensity.
• Use down arrow button to highlight TREBLE. Navigate using the arrow buttons to increase or decrease
high frequency intensity.
• Use down arrow button to highlight BALANCE. Navigate using the arrow buttons to adjust sound
towards the left or right speaker.
【▼】 【◄ 】 /【 ►】
【▼】 【◄ 】 /【 ►】
【▼】 【◄ 】 /【 ►】
• Use down【▼】arrow button to highlight AVL. Navigate using the【◄ 】 /【 ►】arrow buttons to select it ON or OFF.
Page 15
11
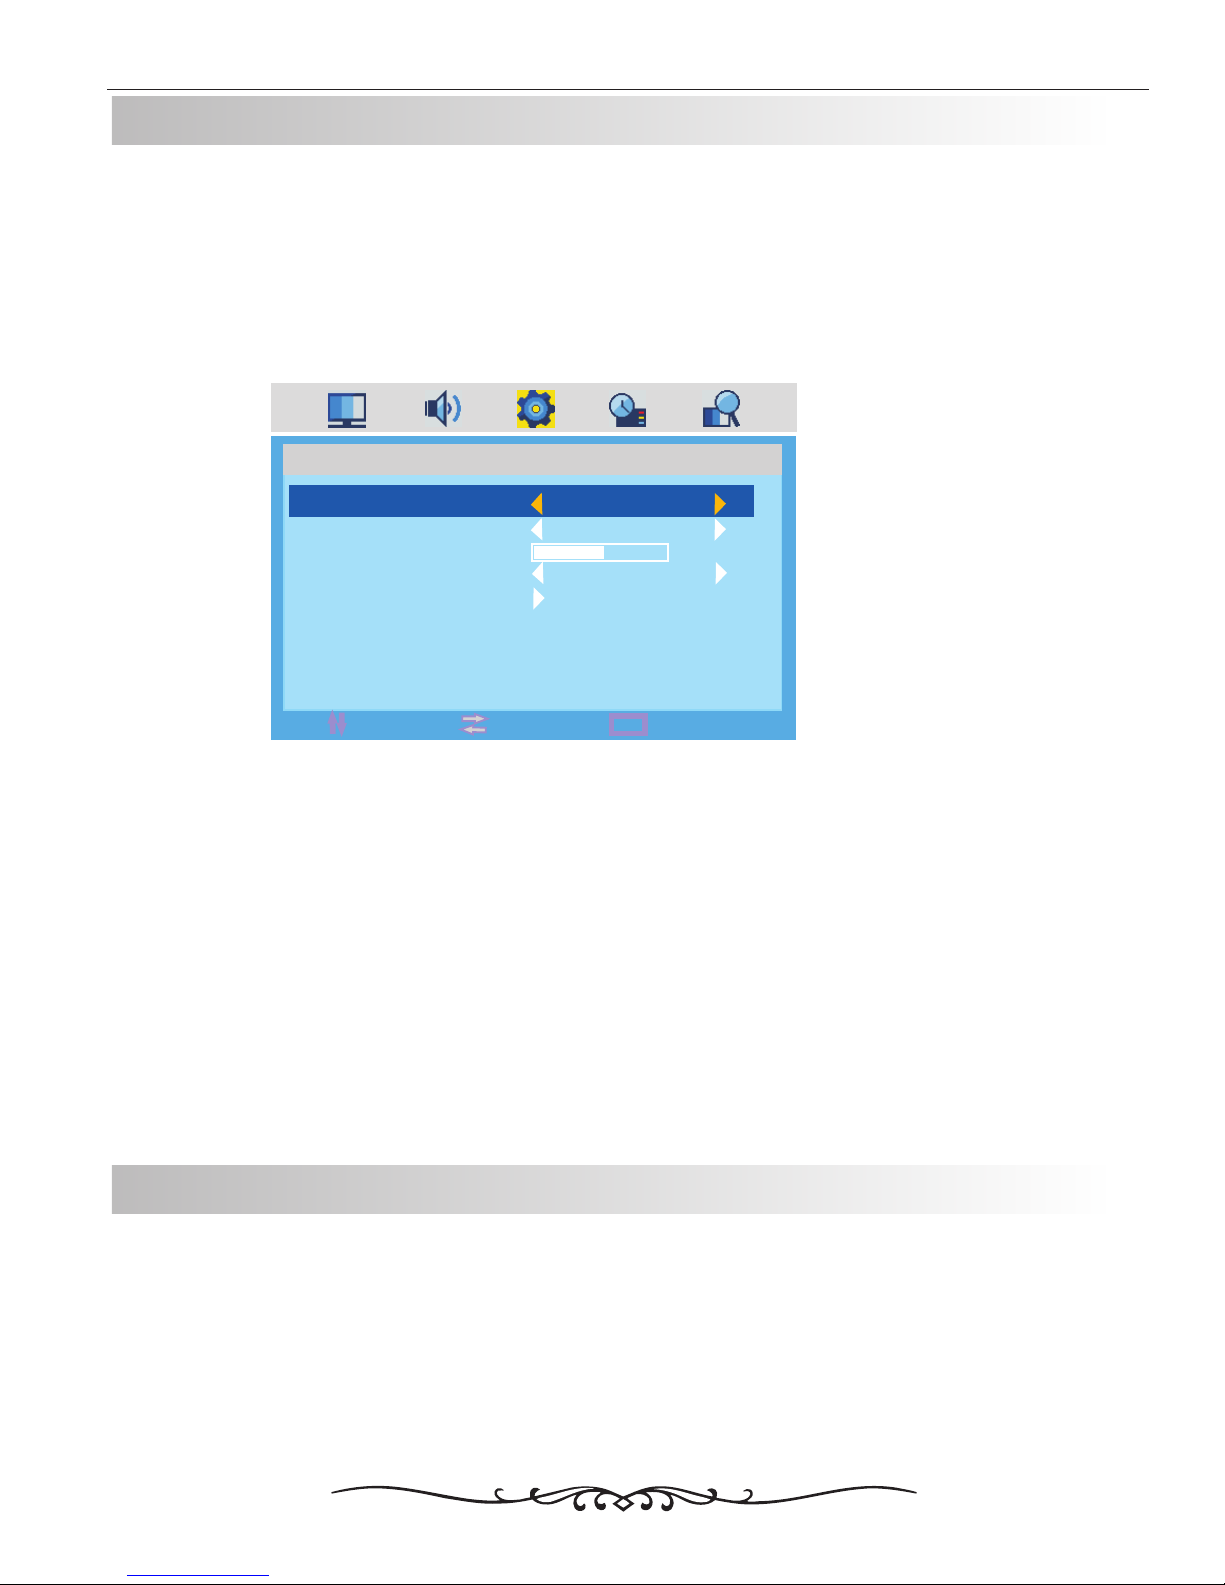
In the SETTING menu you may change the initial set up of preferences that include LANGUAGE, OSD TIMER, TRANSP-
-ARENCE, OVERSCAN, and RESET your TV back to its factory default status.
How to Navigate:
Press the MENU button on the remote control. Navigate using arrow buttons to select SETTING. Gain access
to display options by pressing the down arrow button to highlight LANGUAGE or other options, then press
arrow buttons on your remote to select.
【◄ 】 /【 ►】
【▼】 【◄ 】 /
【 ►
SETTING
MENU
MOVE
EXIT
SELECT
SETTING
LANGUAGE
OSD TIMER
TRANSPARENCE
OVERSCAN
RESET
ENGLISH
15 SEC
80
ON
·Use down【▼】arrow button to highlight LANGUAGE. Navigate using 【◄】 /【 ► 】arrow button to select the OSD
language. There are 6 language for selection: ENGLISH > GERMAN> FRENCH> SPANISH> ITALIAN> PORTUGUESE.
·Use down【▼】arrow button to highlight TRANSPARENCE. Navigate using 【◄】 /【 ► 】arrow button to select the
transparence of the OSD.
·Use down【▼】arrow button to highlight OSD TIMER. Navigate using 【◄】 /【 ► 】arrow button to select the OSD
timer. There are 6 modes for selection: 5 SEC>10 SEC> 15SEC> 20SEC> 25 SEC> 30 SEC.
·Use down【▼】arrow button to highlight OVERSCAN. Navigate using 【◄】 /【 ► 】arrow button to select it ON or
OFF. But this option is only available in the HDMI source.
·Use down【▼】arrow button to highlight RESET. Navigate using【 ► 】arrow button to reset the options in the SETTING
menu.
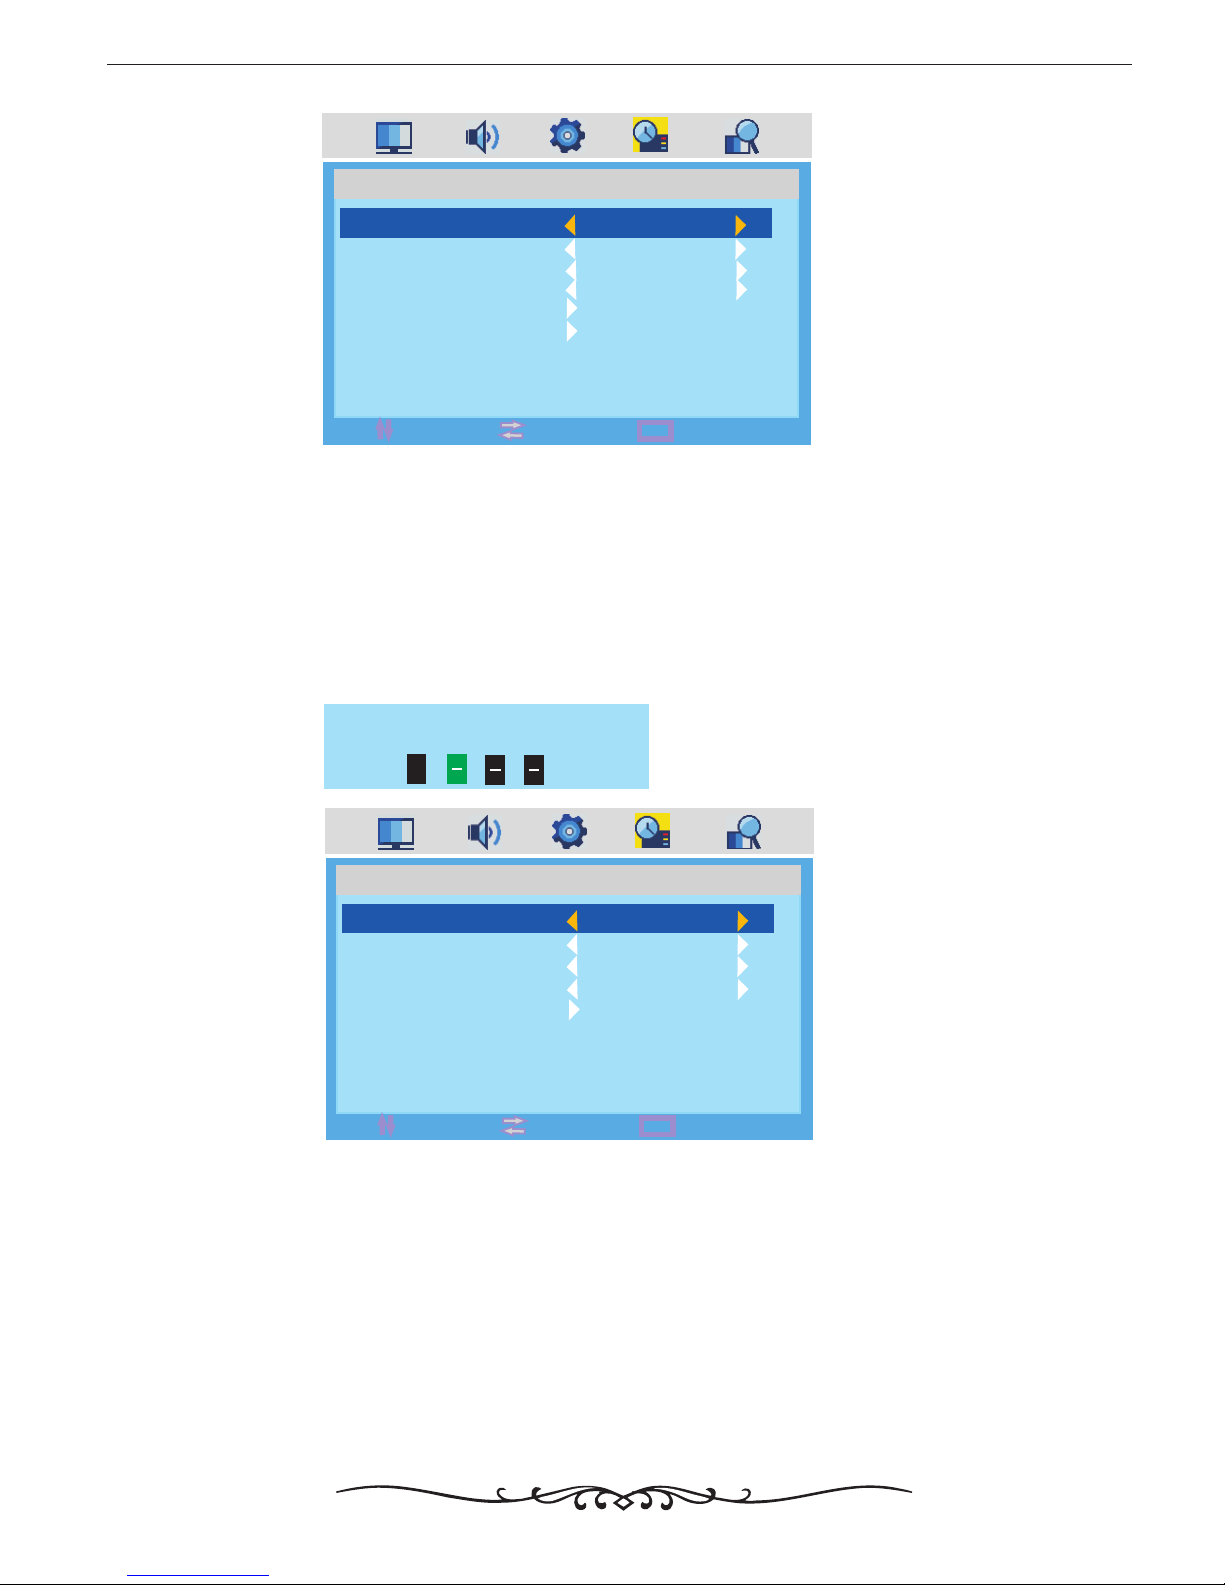
In the FUNCTION menu you may change the function set up of preferences that include SLEEP TIMER, ASPECT, TT
LANGUAGE , BLUE SCREEN, SYSTEM LOCK and FTI.
How to Navigate:
Press the MENU button on the remote control. Navigate using arrow buttons to select FUNCTION. Gain
access to display options by pressing the down arrow button to highlight SLEEP TIMER or other options, then press
arrow buttons on your remote to select.
【◄ 】 /【 ►】
【▼】
【◄ 】 /【 ►】
FUNCTION
Page 16
12
MENU
MOVE
EXIT
SELECT
FUNCTION
SLEEP TIMER
ASPECT
TT LANGUAGE
BLUE SCREEN
SYSTEM LOCK
FTI
OFF
FULL
WEST
ON
·Use down【▼】arrow button to highlight SLEEP TIMER. Navigate using 【◄】 /【 ► 】arrow button to select the sleep
timer, and the TV will turn off automatically in the setting time . There are 9 modse for selection: 15 Min>30 Min> 45 Min>
60 Min> 75 Min> 90 Min> 105 Min> 120 Min> OFF.
·Use down【▼】arrow button to highlight ASPECT. Navigate using 【◄】 /【 ► 】arrow button to select: FULL> ZOOM
> SUBTITLE > 4:3>14:9>AUTO. The default setting is FULL. .
·Use down【▼】arrow button to highlight BLUE SCREEN. Navigate using 【◄】 /【 ► 】arrow button to select this option
ON or OFF.
·Use down【▼】arrow button to highlight SYSTEM LOCK. Navigate using 【 ► 】arrow button to select this option.
Enter your 4 digit code (factory default code is "0000") unless previously changed to enter the submenu.
ENTER PASSWORD
*
MENU
MOVE
EXIT
SELECT
FUNCTION
SYSTEM LOCK
CHILD LOCK
KEY LOCK
PARENTAL
CHANGE CODE
ON
ON
ON
ON
·Use down【▼】arrow button to highlight SYSTEM LOCK. Navigate using 【◄】 /【 ► 】arrow button to select this option
ON or OFF. When set the system lock OFF, the locks below will be unavailable.
·Use down【▼】arrow button to highlight CHILD LOCK. Navigate using 【◄】 /【 ► 】arrow button to select this option
ON or OFF. When set the child lock ON, the program locked in the PROGRAM EDIT can not be displayed.
·Use down【▼】arrow button to highlight KEY LOCK. Navigate using 【◄】 /【 ► 】arrow button to select this option
ON or OFF. When set the key lock ON, the key can not work.
·Use down【▼】arrow button to highlight CHANGE CODE. Navigate using 【 ► 】arrow button to change the password
of the system lock. A dialog as above will appear, the enter the new password can change the password successfully.
·Use down MENU button to return to the main menu, then use down【▼】arrow button to highlight FTI. The operation
can be referred to page 5.
·Use down【▼】arrow button to highlight CHANGE CODE. Navigate using 【 ► 】arrow button to select this option ON or OFF.
Page 17
13
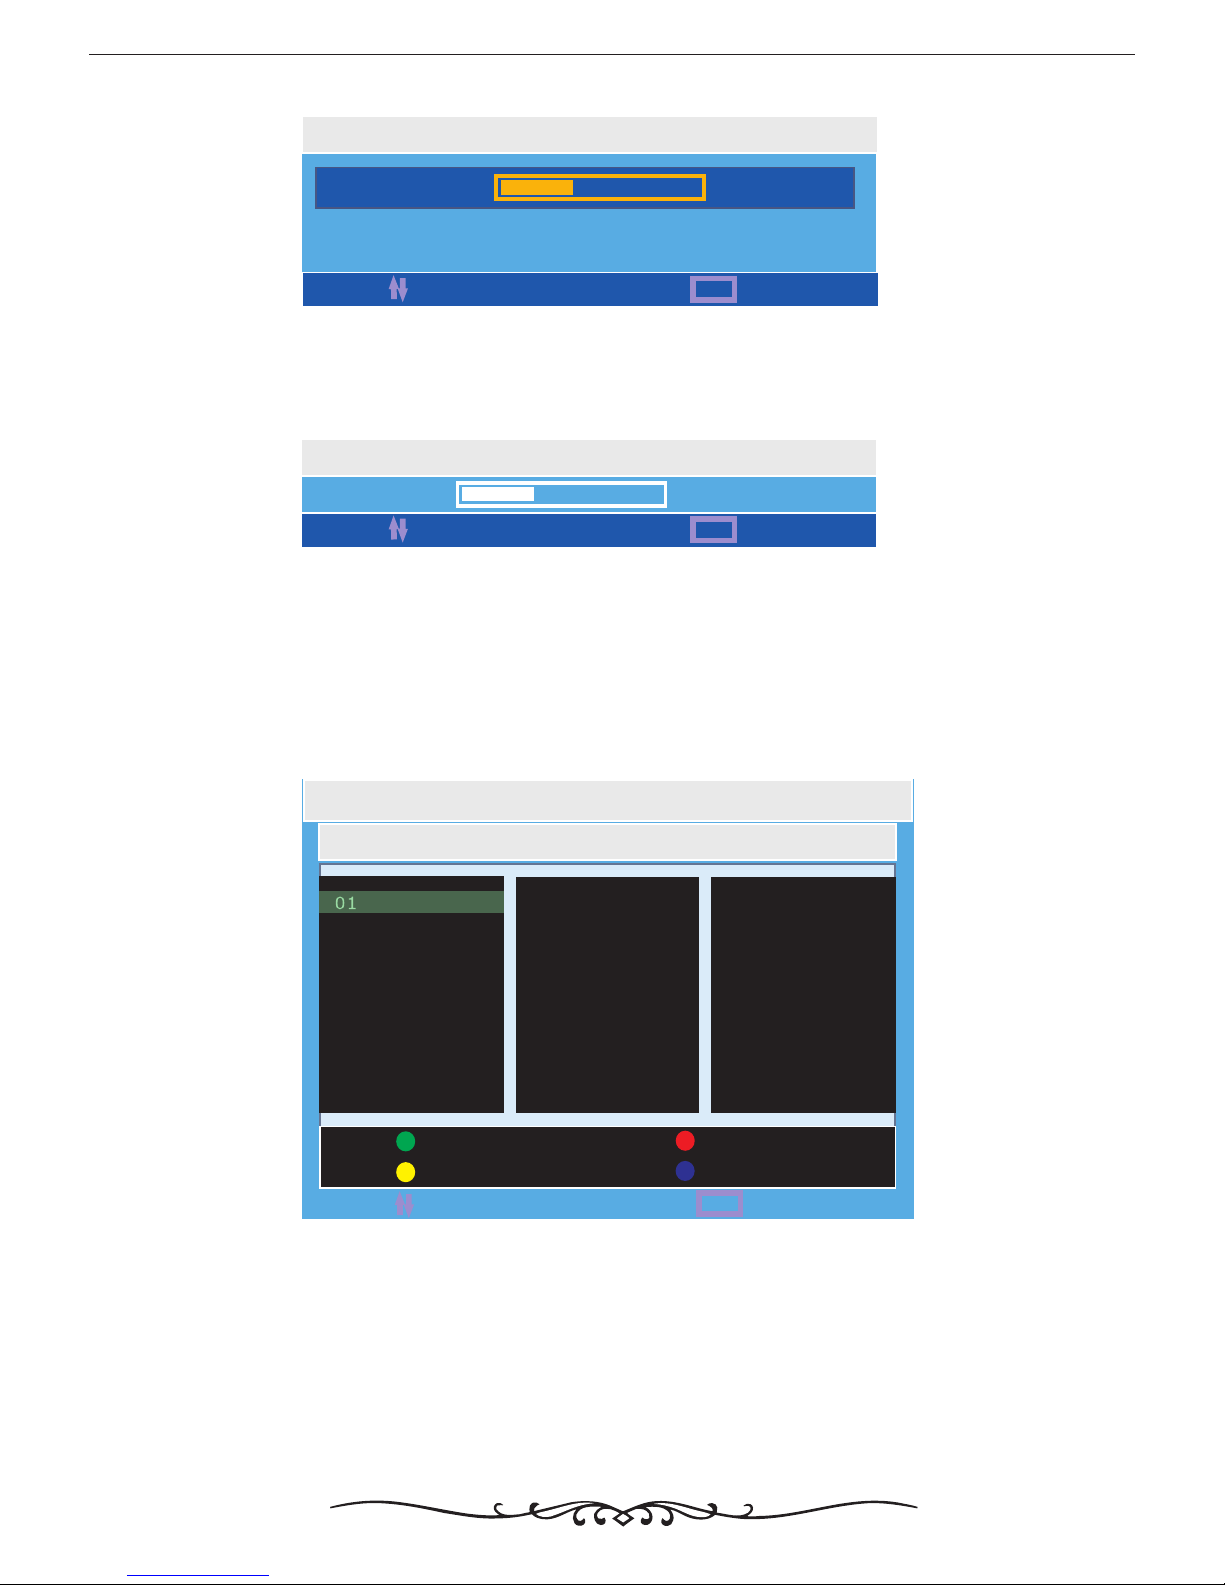
·Use down【▼】arrow button to highlight MANUAL SEARCH. Navigate using 【 ► 】arrow button to select it.
MENU
EXIT
STORE OK
STORE
MANUAL SEARCH
54.00MHZ
MOVE
·Use down【▼】arrow button to highlight FINE. Navigate using 【 ► 】arrow button to select this option.
·Use down【▼】arrow button to highlight AFT. Navigate using 【◄】 /【 ► 】arrow button to select this option ON or OFF.
·Use down【▼】arrow button to highlight SKIP. Navigate using 【◄】 /【 ► 】arrow button to select this option ON or OFF.
·Use down【▼】arrow button to highlight OVER MODULATION. Navigate using 【◄】 /【 ► 】arrow button to select
this option ON or OFF.
MENU
EXIT
FINE
73.50MHZ
MOVE
·Use MENU button to return to the main menu, then use down【▼】arrow button to highlight PROGRAM EDIT. Navigate
using 【 ► 】arrow button to enter the submenu.
PROGRAM EDIT
MENU
EXIT
MOVE
01
02
03
04
05
06
07
08
09
10
11
12
13
14
15
16
17
18
19
20
21
22
23
24
25
26
27
28
29
30
NAME
LOCK
INSERT
FAV
This option has four functions.
·Use Green button and the 【▲】 /【▼】arrow button to name the current channel.
·Use Yellow button to insert the current channel.
·Use Red button to set the current channel to lock. if the current channel already lock, press blue button again will unlock.
·Use Blue button set the current channel to your favorite channel. if the current channel already be one of your favorite
channel, press Blue button again will set it to a normal channel.
Page 18
14
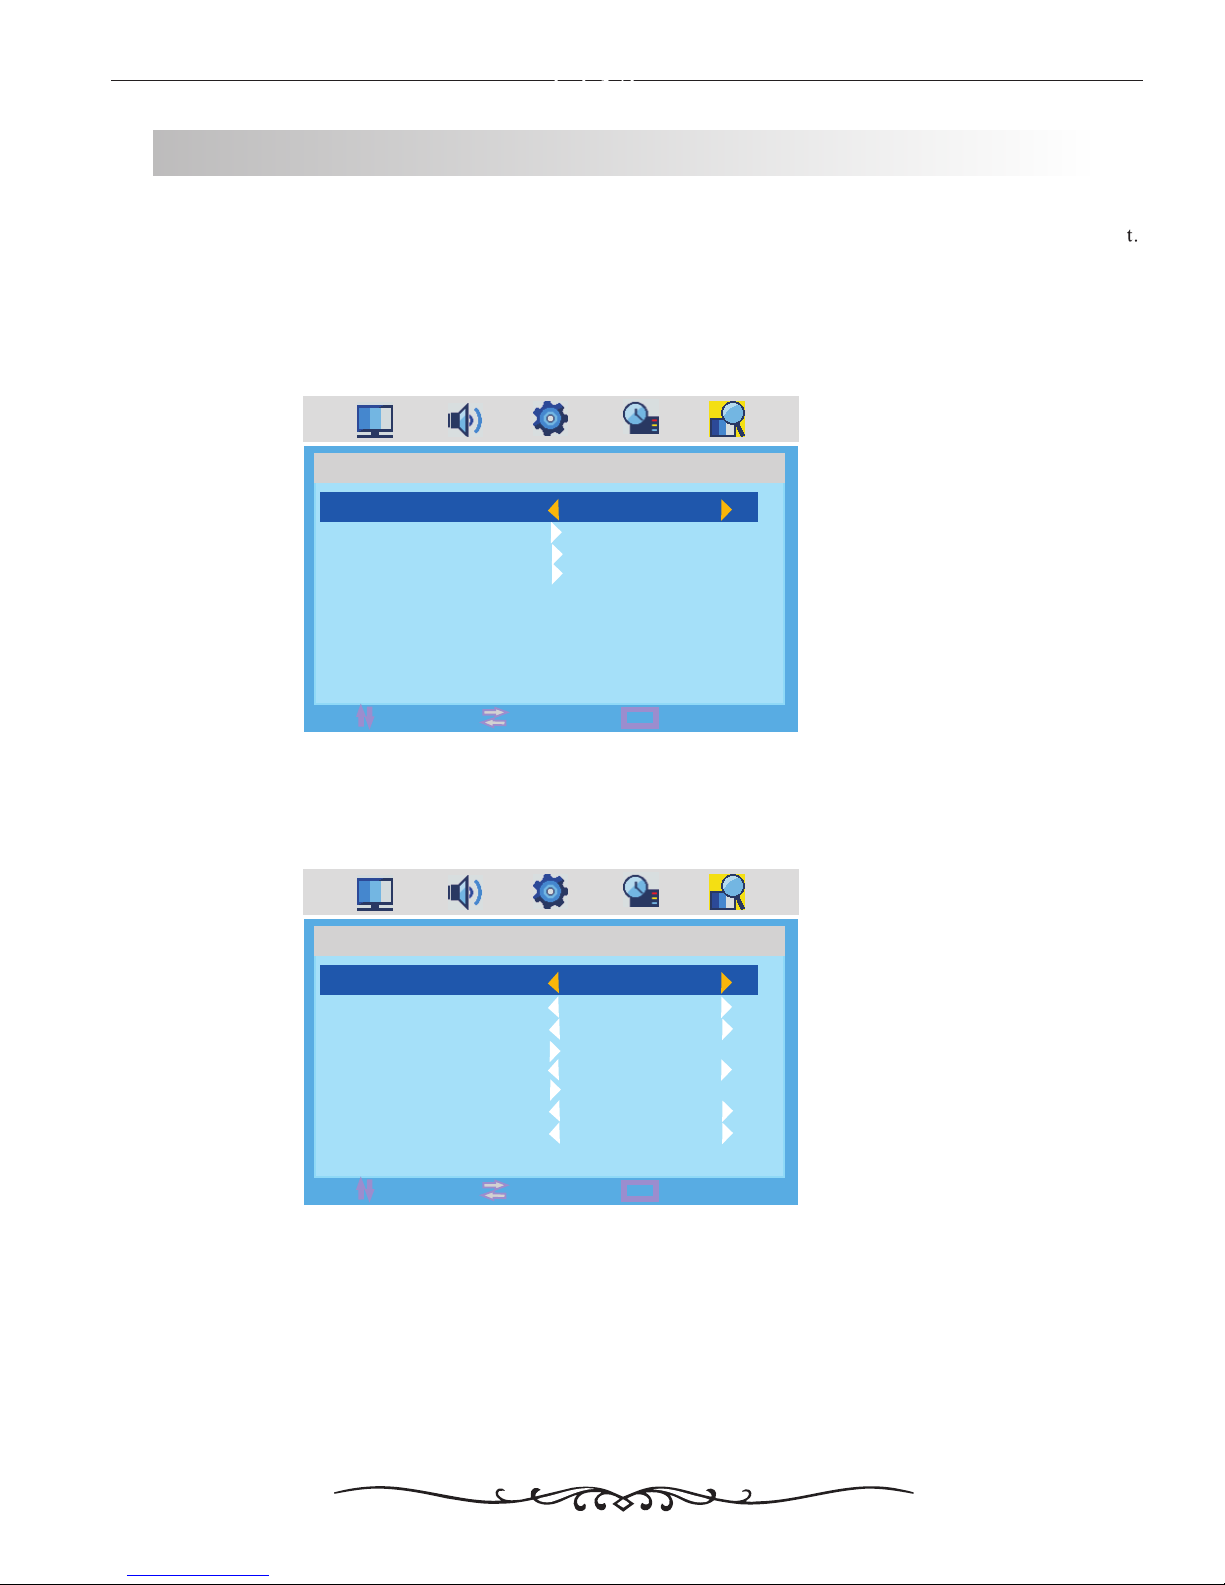
In the CHANNEL menu you may change the channel set up of preferences that include COUNTRY, AUTO SCAN, MANUAL
PROGRAM and PROGRAM EDIT.
How to Navigate:
Press the MENU button on the remote control. Navigate using arrow buttons to select CHANNEL. Gain
access to display options by pressing the down arrow button to highlight COUNTRY or other options, then press
arrow buttons on your remote to select.
【◄ 】 /【 ►】
【▼】
【◄ 】 /【 ►】
CHANNEL
MENU
MOVE
EXIT
SELECT
CHANNEL
COUNTRY
AUTO SCAN
MANUAL PROGRAM
PROGRAM EDIT
UK
·Use down【▼】arrow button to highlight MANUAL PROGRAM. Navigate using 【 ► 】arrow button to enter the submenu.
·Use down【▼】arrow button to highlight COUNTRY and AUTO SCAN. The operation of these two optins can be referred
to page 5.
MENU
MOVE
EXIT
SELECT
CHANNEL
PROGRAM
COLOR. SYS
SOUND. SYS
MANUAL SEARCH
AFT
FINE
SKIP
OVERMODULATION
1
AUTO
AUTO
ON
OFF
OFF
·Use down【▼】arrow button to highlight PROGRAM. Navigate using 【◄】 /【 ► 】arrow button to select the program
that you want to watch.
·Use down【▼】arrow button to highlight COLOR. SYS. Navigate using 【◄】 /【 ► 】arrow button to select the color
system: AUTO>PAL> SECAM.
·Use down【▼】arrow button to highlight SOUND. SYS. Navigate using 【◄】 /【 ► 】arrow button to select the sound
system: B/G> D/K> L> LL.
Page 19
PICTURE
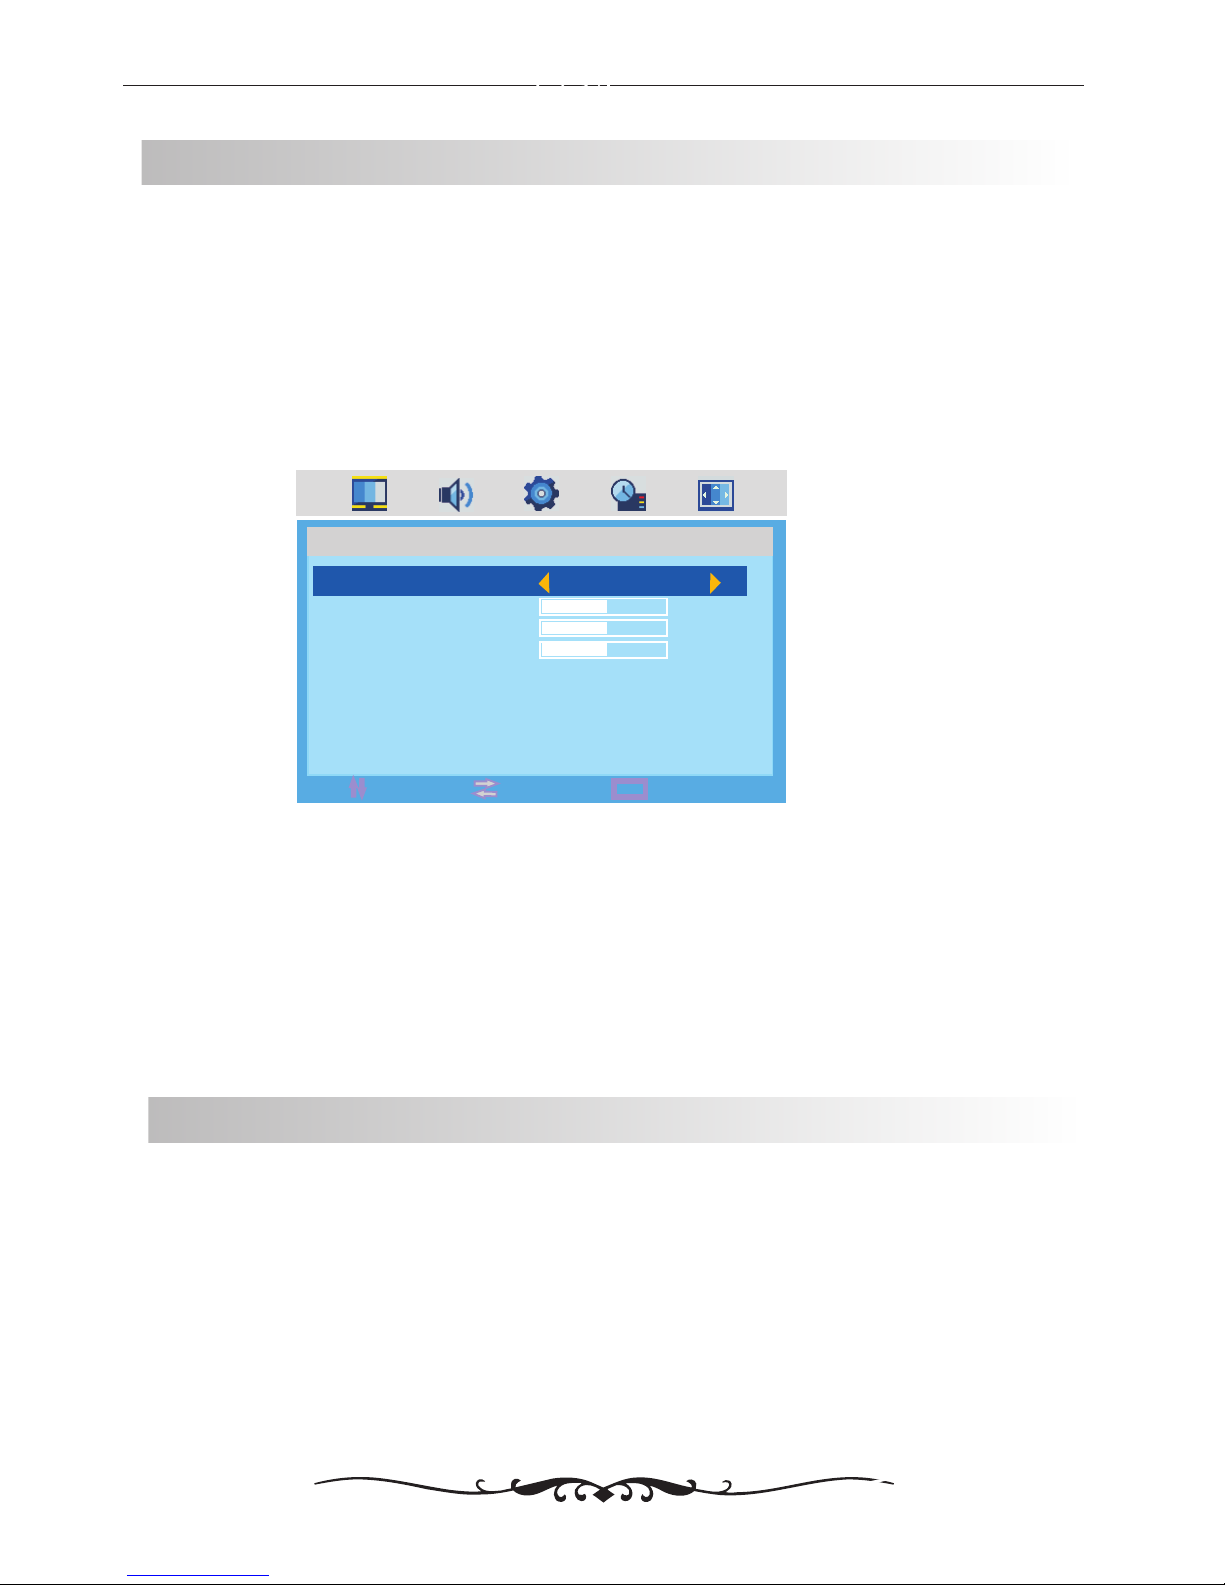
The PICTURE menu offers options to enhance and refine the picture displayed on your TV based on ambient room light
and personal preferences. Adjustment options include PICTURE MODE , BRIGHTNESS and COLOR.
How to Navigate:
Press the MENU button on the remote control. Navigate using arrow buttons to select PICTURE. Press
the down arrow button to highlight PICTURE MODE, then press the arrow button to select your viewing
preference from 4 factory options: STANDARD > MOVIE > VIVID > PERSONAL.
The STANDARD setting is recommended for most viewing environments. Depending on the ambient light level in the
room, you may ind one of the other options more pleasing.
, CONTRAST
【◄ 】 /【 ►】
▼ 【◄ 】 /【 ►】
MENU
MOVE
EXIT
SELECT
PICTURE
PICTURE MODE
CONTRAST
BRIGHTNESS
COLOR
STANDARD
50
50
50
To make more critical adjustments based on your own preferences in PERSONAL:
• Use down arrow button to highlight CONTRAST. Navigate using the arrow buttons to increase or
decrease contrast intensity.
【▼】 【◄ 】 /【 ►】
• Use down arrow button to highlight BRIGHTNESS. Navigate using the arrow buttons to increase or
decrease overall brightness.
【▼】 【◄ 】 /【 ►】
• Use down arrow button to highlight COLOR. Navigate using the arrow buttons to increase or decrease
color intensity.
【▼】 【◄ 】 /【 ►】
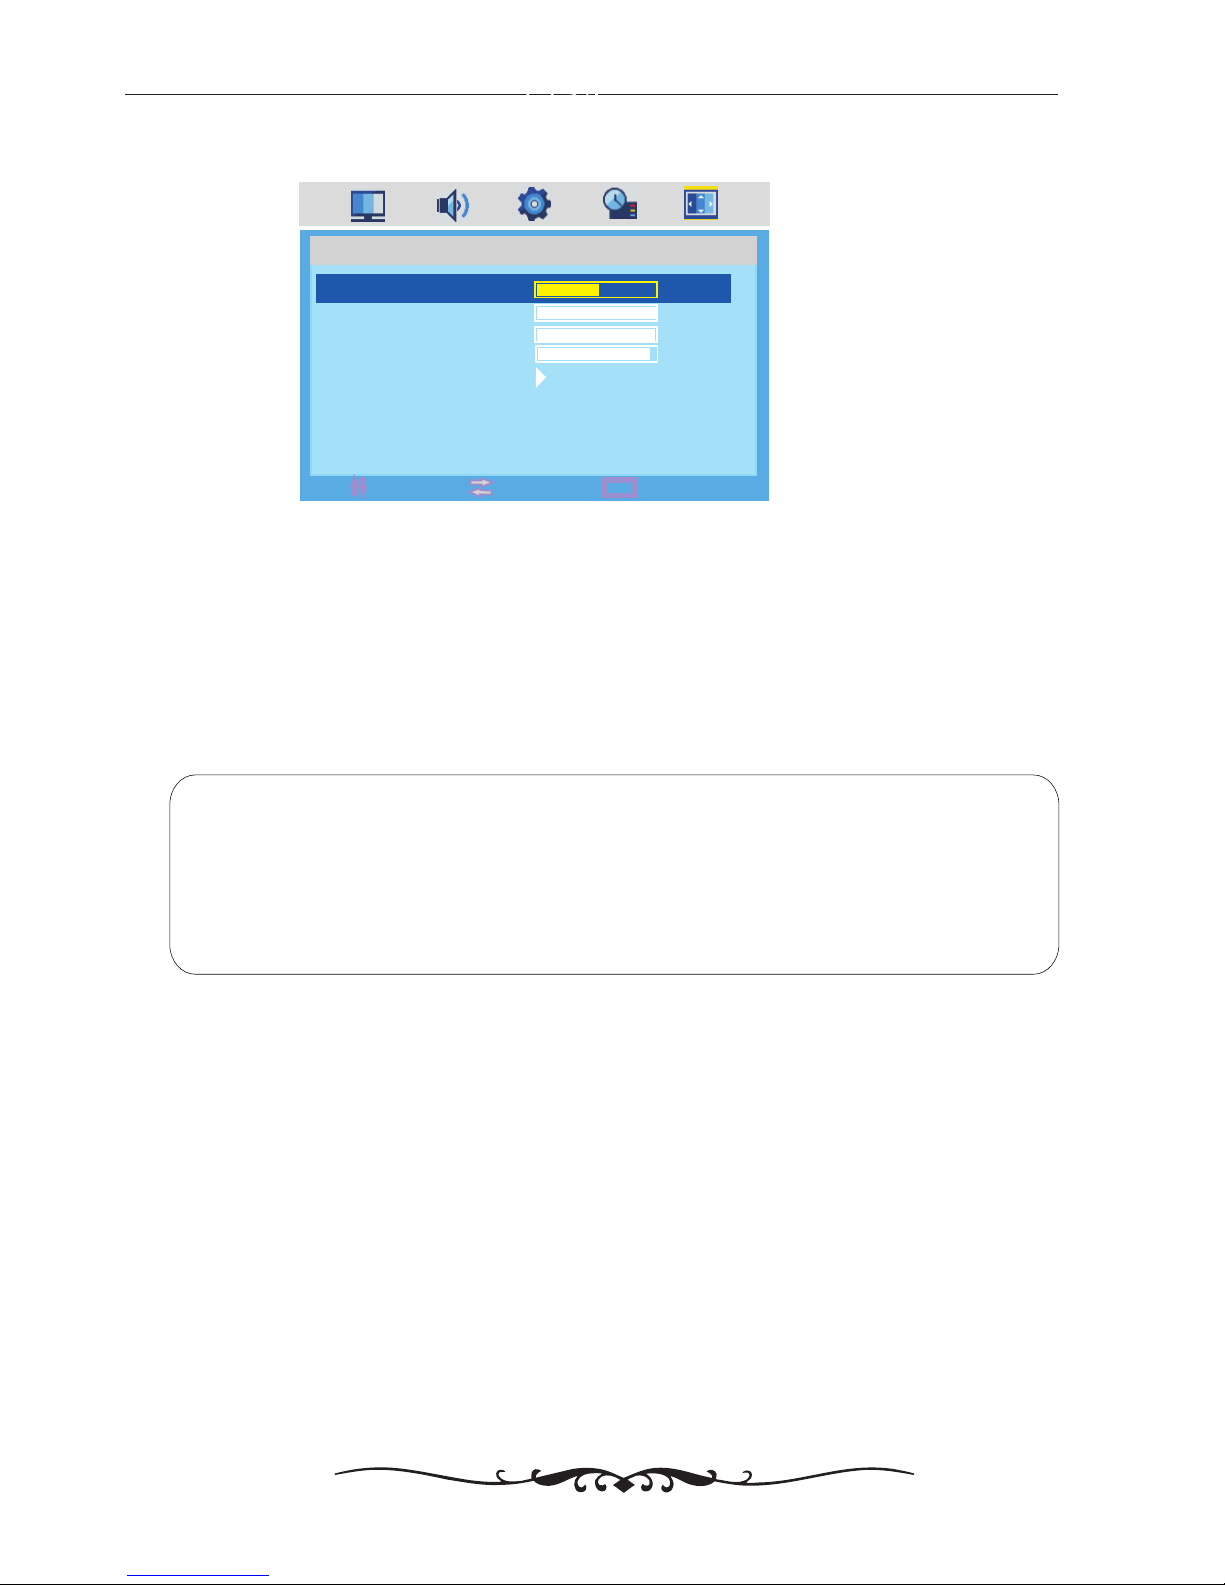
PC SETUP
In the PC SETUP menu you may change the channel set up of preferences in PC MODE that include ,
How to Navigate:
Press the MENU button on the remote control. Navigate using arrow buttons to select PC SETUO. Gain
access to display options by pressing the down arrow button to highlight H-POSITION or other options, then press
arrow buttons on your remote to select.
H-POSITION
H-POSITION, CLOCK, PHASE and AUTO ADJUST.
【◄ 】 /【 ►】
【▼】
【◄ 】 /【 ►】
The PC SETUP menu is just for the PC Mode.
15
Page 20
MENU
MOVE
EXIT
SELECT
PC SETUP
H-POSITION
V-POSITION
CLOCK
PHASE
AUTO ADJUST
50
100
100
97
·Use down【▼】arrow button to highlight V-POSITION. Navigate using 【◄】 /【 ► 】arrow button to select the
V-POSITION.
·Use down【▼】arrow button to highlight H-POSITION. Navigate using 【◄】 /【 ► 】arrow button to select the
H-POSITION.
·Use down【▼】arrow button to highlight CLOCK. Navigate using 【◄】 /【 ► 】arrow button to select the CLOCK.
·Use down【▼】arrow button to highlight AUTO ADJUST. Using 【 ► 】arrow button to auto adjust the options above.
V-POSITION.
Notes: 1.
2.SETTING menu and description are the same as that for TV mode.
3. FUNCTION menuand description are the same as that for TV mode .
SOUND menu and description are the sameas that for TV mode.
16
Page 21
a
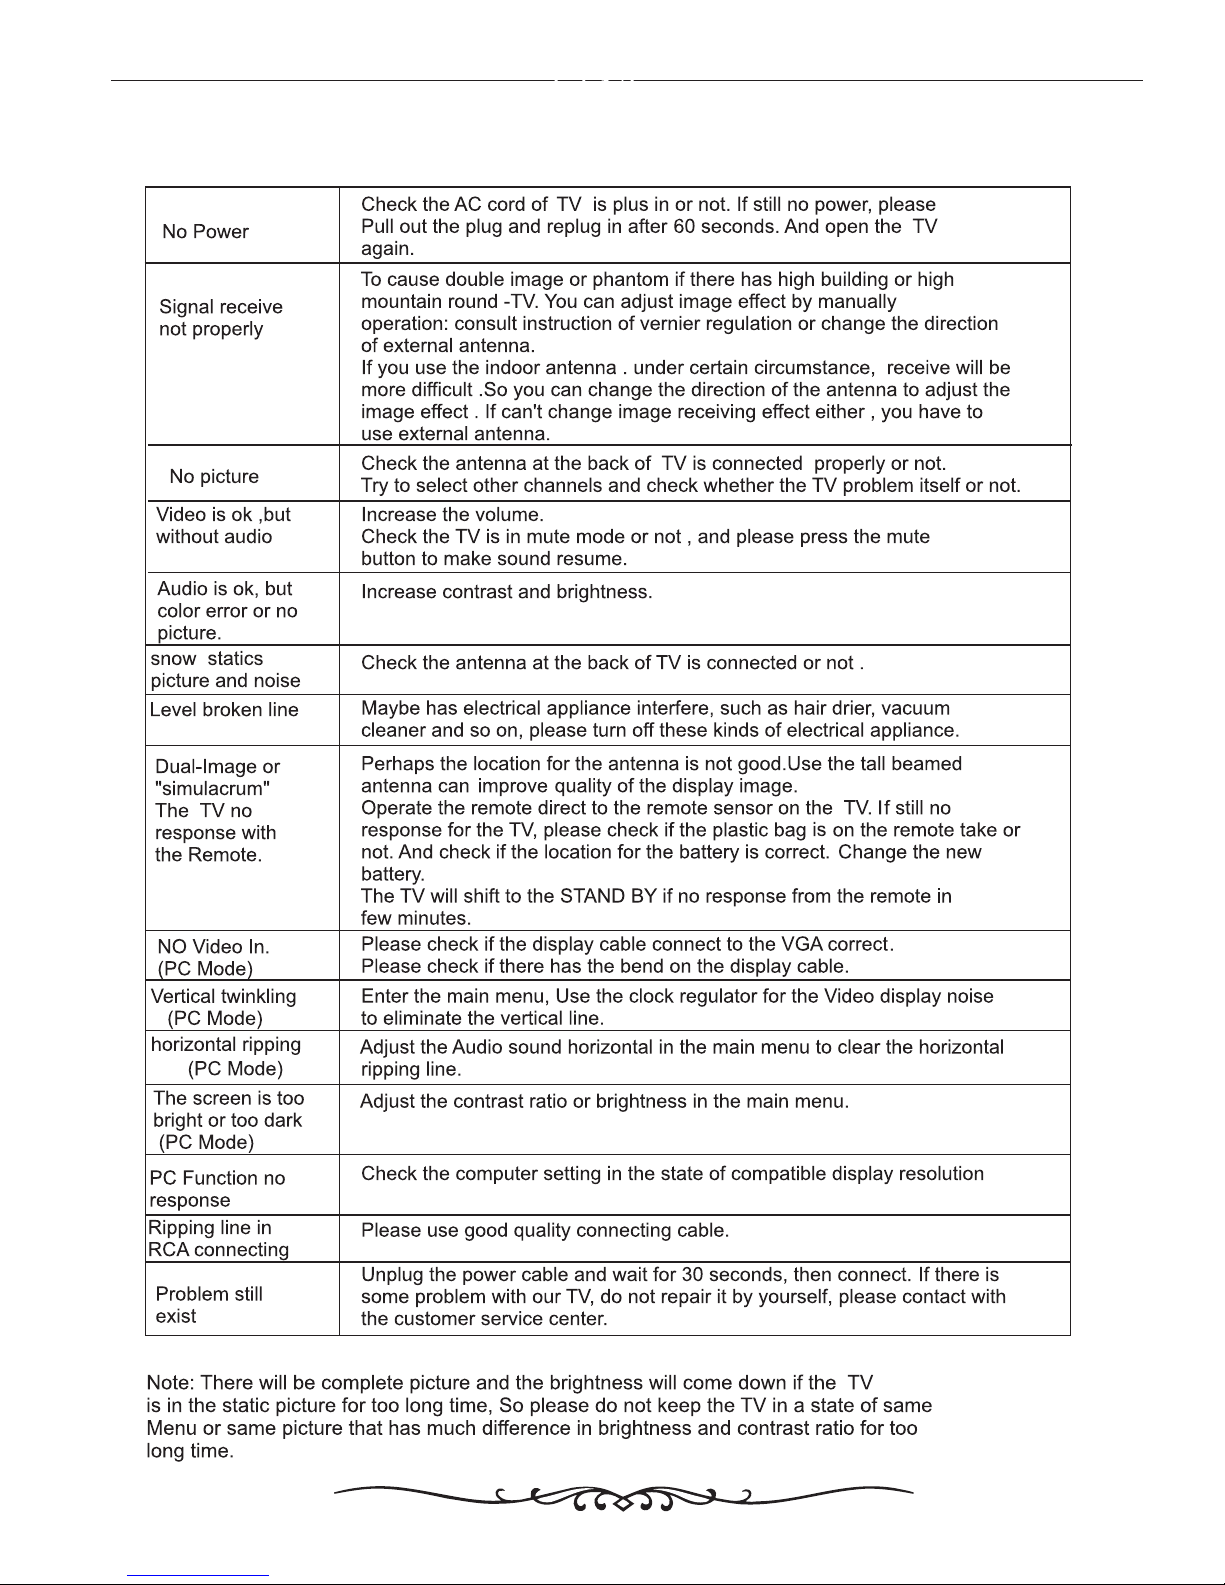
HELP
17
Page 22
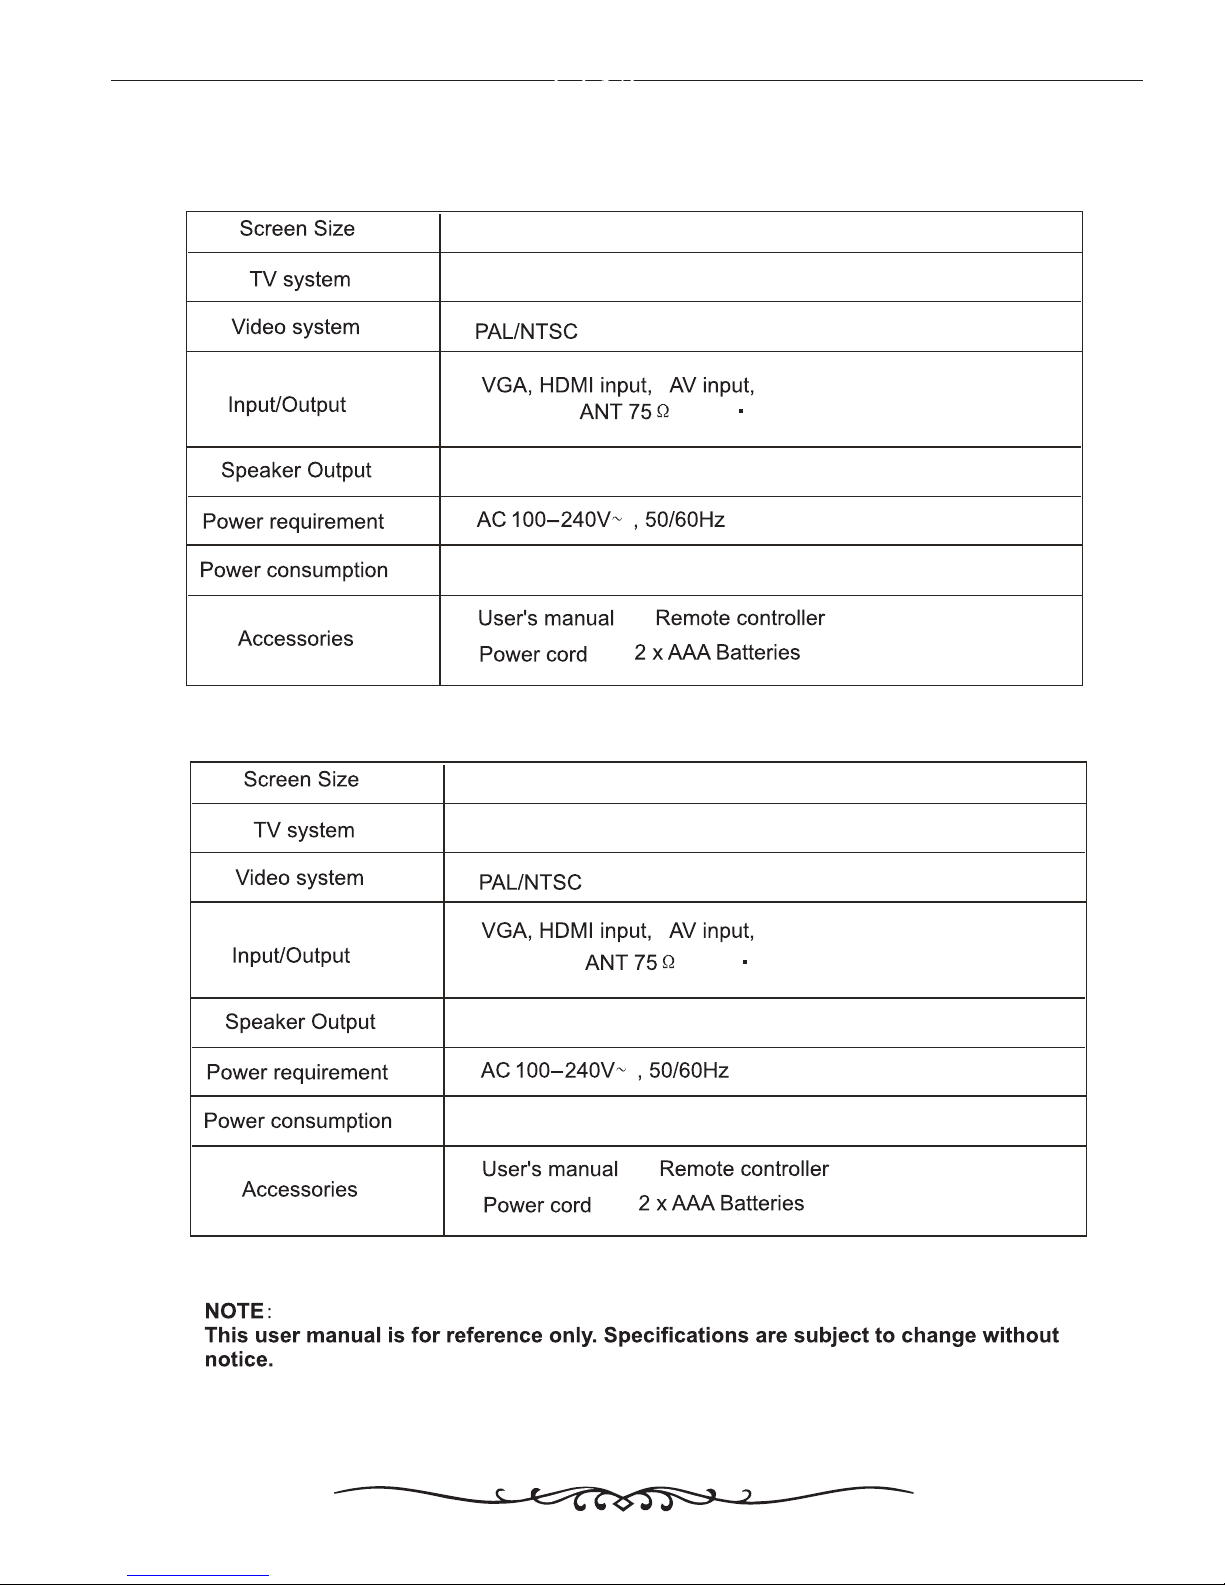
SPECIFICATIONS
15"
4Ω 5W
PAL SECAM AUTO
PC input,
<36W
17"
4Ω 5W
PAL SECAM AUTO
PC input,
<48W
18
Page 23

Model: 1501 1701
 Loading...