

View-Master three dimension Instruction Manual


PHOTOGRAPHY
You have added another dimension (stereo)
and the colors of the rainbow to your everyday
picture taking. You will be one of the
your own “Personal”, full color, three dimension
pictures,
To insure your enjoyment,
1. We have made this camera
system of photography
as we possibly could, and,
2. We have written this instruction book to
tell you, and show you with pictures, everything
you must know to start taking pictures that will be
truly satisfying and everywhere admired.
- as
simple and easy to use
SAWYER’S INC.
Home
Office
Box 4903500 No.
Portland 7, Ore.
Copyright 1952 by Sawyer’s Inc.-Revised Edition 1953
Printed in U. S. A. ® Sawyer’s Inc., Portland 7. Oregon
Trade-Mark Reg. U.S. Patent Office-Marca Registrada
chicogo
3500 No. Kostner Ave.
Chicago 41, Ill
Office
first
to enjoy
-
this whole
PRICE 25c

lNSTRUCTlONS
Illustrated
Instructions
PRE-LOADING CHECKS
Turn SHIFT KNOB to “A” . . . . . . . . . . . . 4
Lock WINDING KNOB by turning.
Set COUNTER to 20X OR 36X . . . . . . . . . . 5
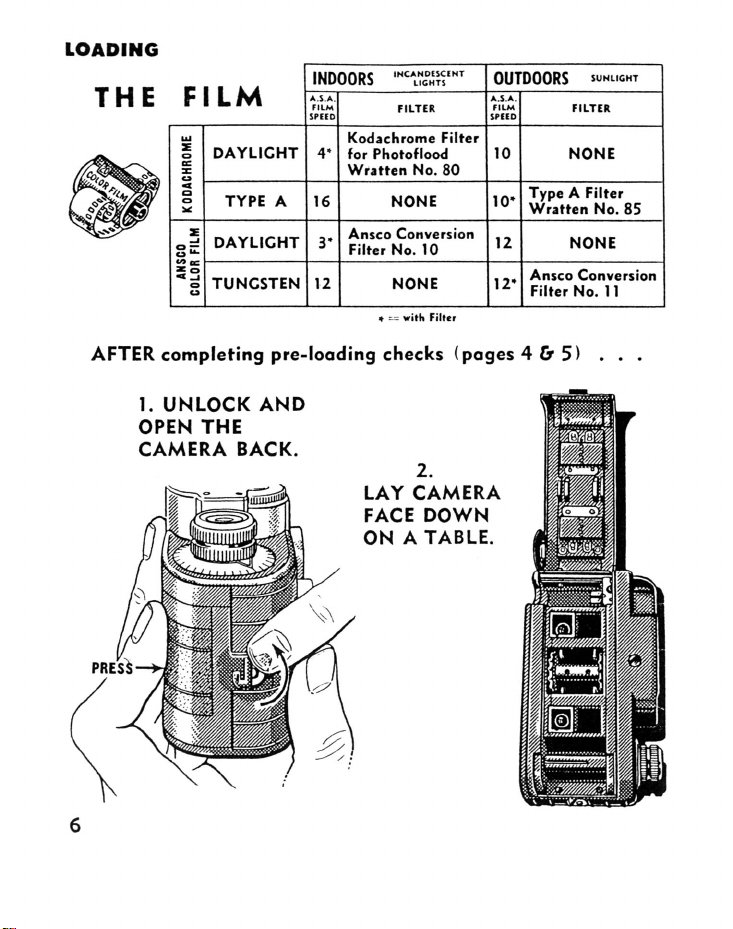
LOADING
Page
Open camera and
lay
it face down on a table . . . 6
Insert three perforations of film in slot of SPOOL . .
Engage magazine on slotted shaft . . . . . . . . .
Fit film on SPROCKET and pull film tight.
Close back of camera . . . . . . . . . . . . . . . 9
INITIAL WINDING
Turn WINDING KNOB three full turns . . . . . . . 10
Check FILM ADVANCE INDICATOR . . . . . . . 10
EXPOSURE - EASY METHOD
Set CENTER DIAL for FILM SPEED.
Set SHUTTER at
1/50.
Match proper SKY BRIGHTNESS to correct SUBJECT
COLOR by turning the LENS OPENING DIAL . . 11
7
8

lNSTRUCTlONS
illustrated
Instructions
Page
ADVANCING THE FILM
Turn WINDING KNOB a full turn after each exposure.
When Winding Knob LOCKS and
Shutter will not CLICK, you have
reached the important HALFWAY POINT. . . . 12
. . . then . . .
Turn SHIFT KNOB to “B”.
Take last picture when COUNTER reads “19” or “36”.
Wind FOUR times before unloading . . . . . . . . 13
UNLOADING
Unload in subdued light.
Tell
processor, “Don’t cut my roll” . . . . . . . . . 14
&
PERSONAL REEL MOUNTING. . . . . . . . 14
15
LABELLED
See Page 18 for Table of Contents
VIEW OF CAMERA. . . . . . . . 16 & 17
Part Two
INFORMATION SECTION
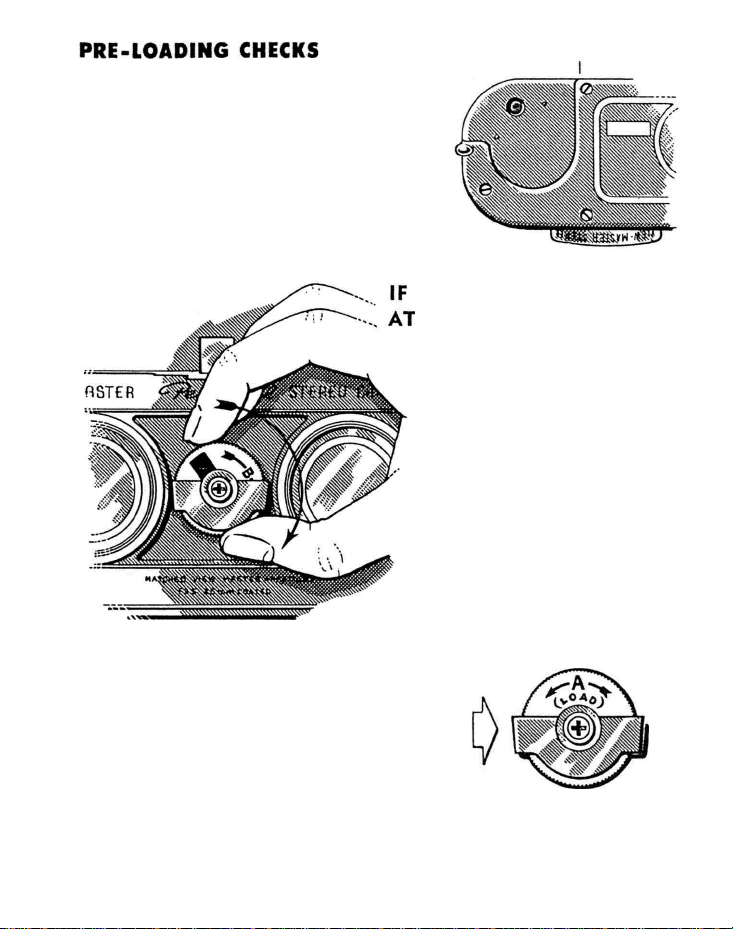
1. CHECK THE RED SPOT
If this opening shows BLACK,
it is safe to open the camera.
If it shows RED, the camera is
loaded. In this case, check the
counter (see page 13) to see if it
is safe to open the camera.
SHIFT KNOB IS
“B” . . . . . .
2.
TURN
SHIFT KNOB
TO “A”
Turn until black
square disappears.
This will lock the lenses
in their lower position.
SHIFT KNOB should look like this
when you start to load your camera,
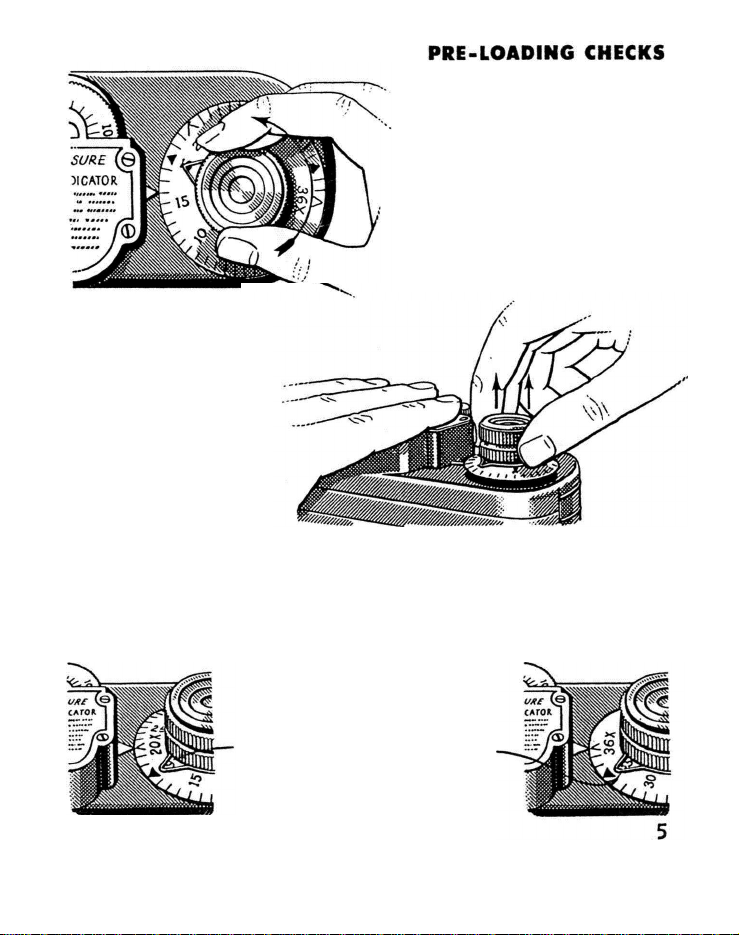
b. Pull up
AND turn to
set COUNTER.
A continuous
upward pull is
necessary while
you turn the
WINDING KNOB.
3. SET THE COUNTER
a. Turn the WIND-
ING KNOB until it
locks - until it will not
turn in either direction.
c. Set counter to . . .
. . . 20X for
20-exposure
roll.
36-exposure
Set
FILM LENGTH
19- INDICATOR -35
This will remind you when
to stop taking pictures.
. . . 36X for
roll.
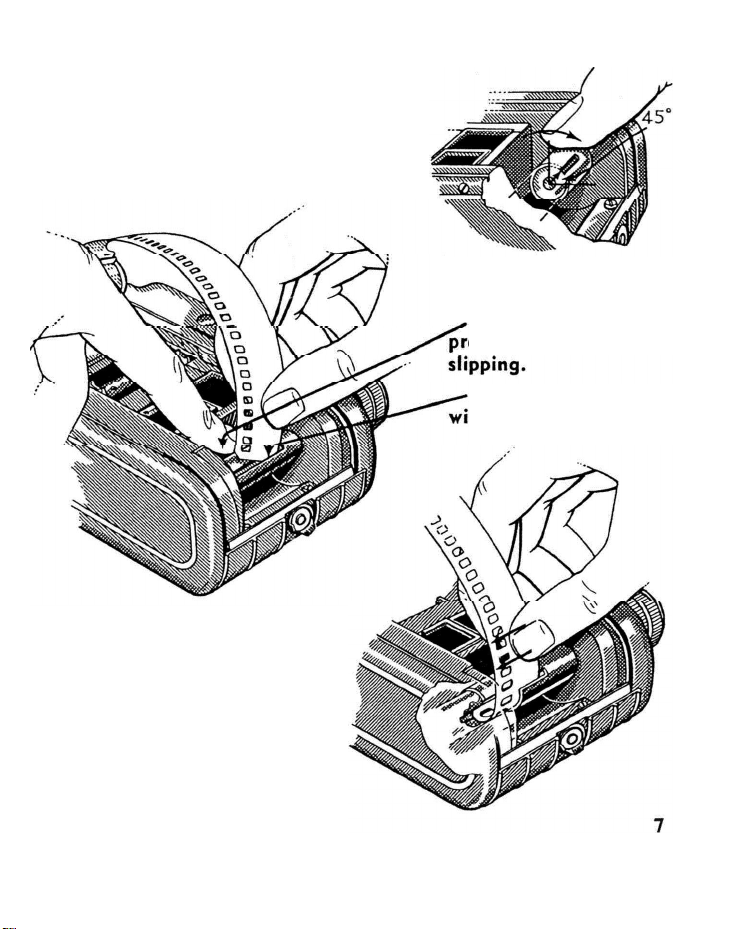
LOAD FILM IN SUBDUED LIGHT
3. TURN SLOT OF SPOOL
TO 45º POSITION
Roll SPOOL with your finger as
pictured.
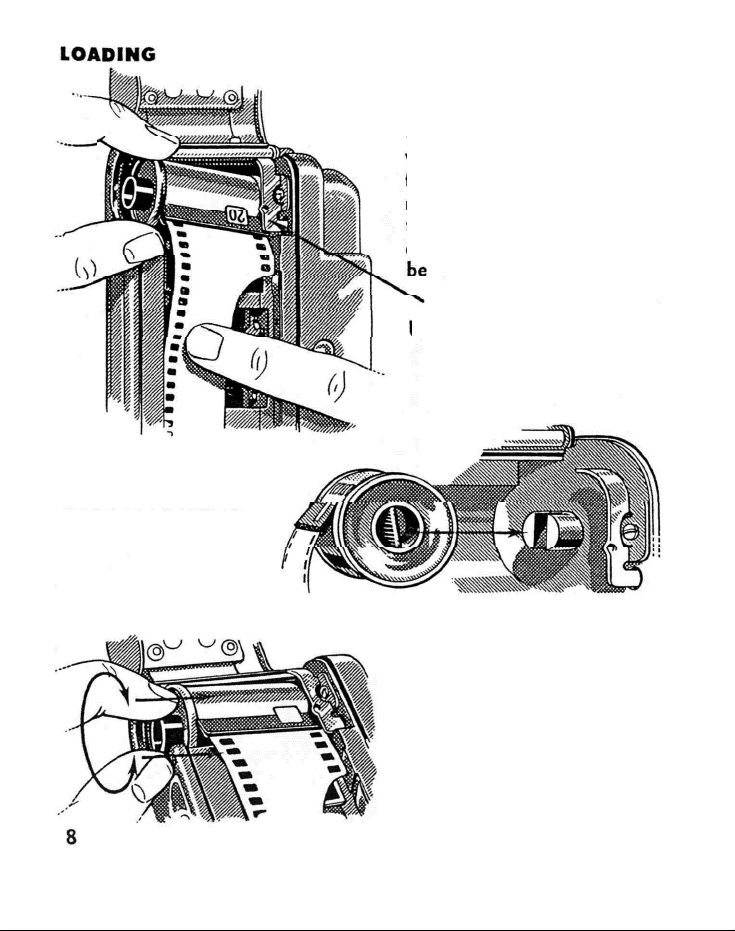
LOADING
4. INSERT FILM END
a. Press firmly to
event SPOOL from
c. Insert THREE PERFORATIONS of film, then
slide film to the left as far
as it will go.
b. Start film
se, then straighten.
corner-
.,.
HOW MAGAZINE
FITS SHAFT.
5. INSERT THE FILM MAGAZINE
a. Draw magazine to-
wards the slotted shaft on
which it fits. By holding
film flat in the film channel, the amount of extra
film which will be pulled
out of the magazine can
held to a minimum.
b. Tilt magazine down
UNDER the bracket.
a. Turn the small end of
the magazine and push
until it pops into place.

LOADING
6. FIT PERFORATIONS ON SPROCKET THEN
PULL FILM TAUT AS SHOWN
The toothed SPROCKETS in the center of the comera drive
the film in and out of the film
magazine exactly 8 perforations each time the Winding
Knob is turned a full turn.
The Wind-up Spool and the
Magazine Drive Shaft turn to
help advance the film, but are
slip-clutched
pull against the SPROCKETS.
a, Engage perforations on
the teeth of the SPROCKET.
b. Roll wind-up SPOOL
towards you pulling film
reasonably tight.
7. CLOSE CAMERA BACK
so thev will not
BE SURE LATCH IS LOCKED!
NOW, SEE NEXT
PAGtJ
 Loading...