

OPERATING
INSTRUCTIONS
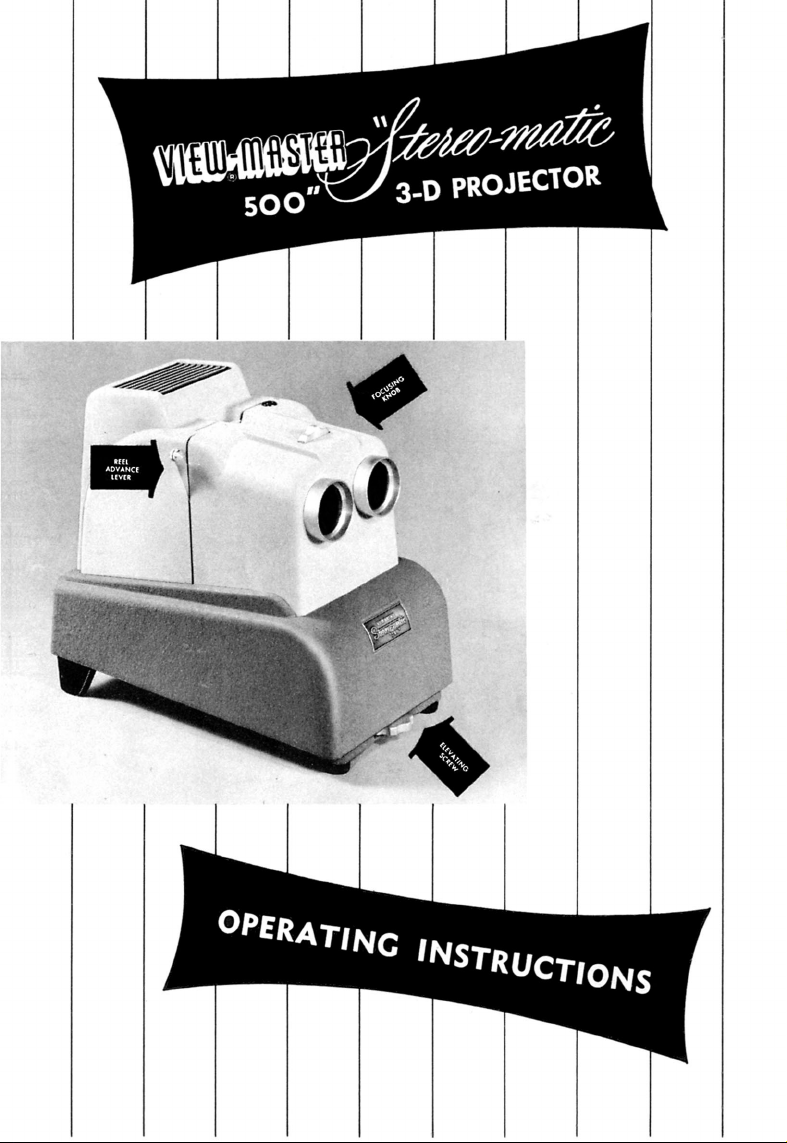
INSERTING THE
REEL
Move the Reel Advance lever
to @ . Insert the Focusing Reel
that comes with the projector,
and push it all the way down.
Lower the lever to @, then
raise it to 0. This lines up
the Reel and draws the shutter
aside for projection.
ACTIVATING THE PROJECTOR
The
“Stereo-matic
operated by a 60 cycle motor. Connect it to a 110-125 volt, 60 cycle Alternating Current only!
Do not use Direct Current!
Turn on the blower
turn on the lamp. The
500” is illuminated by a
switch,
and, after you feel a definite air current coming from the top vent,
lamp
will not light until the blower switch is on.
500watt
lamp and is cooled by a
blower
that is
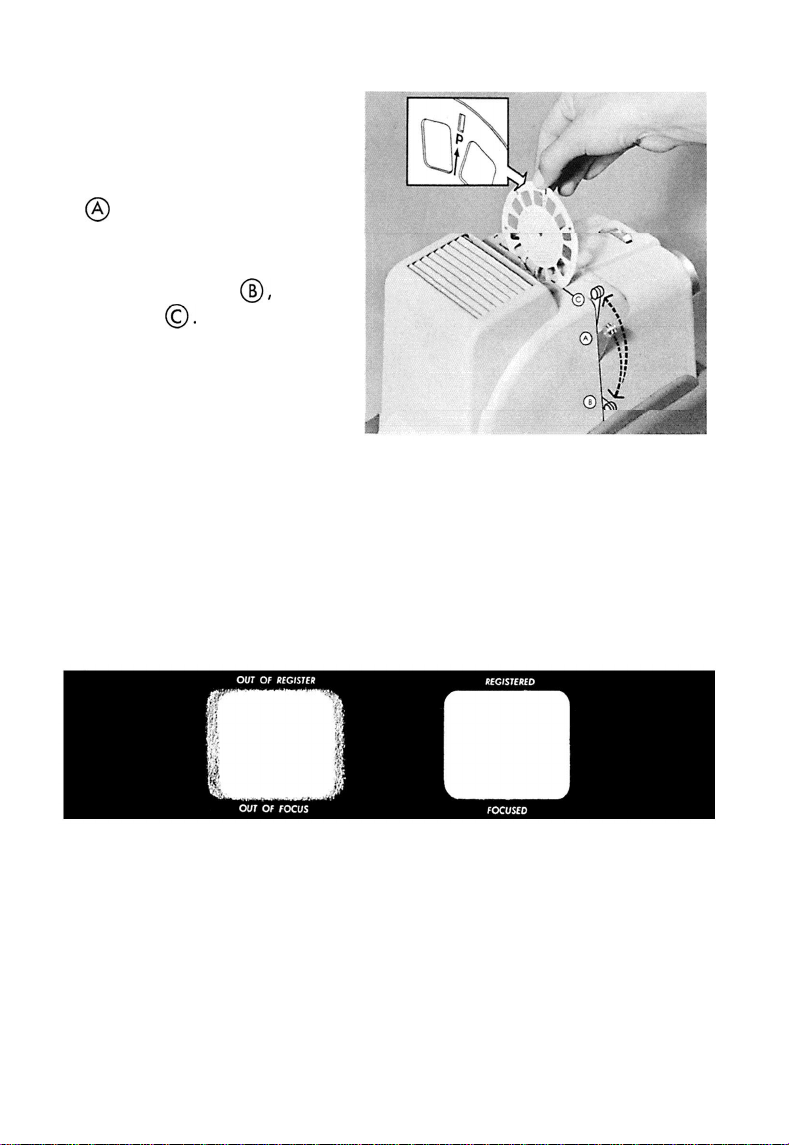
ADJUSTING THE IMAGE
With the Focusing Reel still in the projector, you will see two squares of light on the screen.
Turn the Focusing Knob on top of the projector until the two squares of light form a single
square
and the vertical sides ore exactly superimposed. This will
at ony distance for “PERSONAL” pictures.
Regular View-Mater stock Reels-scenic, educational or
To compensate for the different thickness of such stock Reels, proceed as follows:
Focus as described above for the “PERSONAL” Reels, then turn the notched Focusing Knob
clockwise (standing behind the projector and facing the screen) about 4 notches. This will
automatically focus stock Reels at any distance from the screen.
NOTE: For the best results, use only View-Master “PERSONAL” Reels that ore carefully
mounted, as per instructions, to insure a flat picture surface.
Center the square of light on the screen by swinging the projector and by using the Elevating
Screw under the front of the projector.
You ore now ready to insert your first picture Reel assured thot it will be adjusted
sharp focus.
automatically
commercial-may also
focus the projector
be projected.
and
in

INSERTING THE FIRST PICTURE REEL
Move the Reel Advance Lever to
@
, take out the Focusing Reel, and put in
your first VIEW-MASTER Personal or stock Reel. Handle it by the edge to avoid
fingerprinting the film, and insert it with the “P” arrow pointing up, and the
“P” arrow side of the Reel facing to the rear of the projector. This will enable
you to show the first picture first, correctly oriented.
Line it up, as you did the Focusing Reel, by a complete down-and-up move-
ment of the Reel Advance Lever.
PREPARING THE SHOW - Be sure that each one of
glasses designed for viewing stereo projection,
projection--usually with a metallic surface. When your audience is seated and have put on their
glosses, turn off the lights and start the show.
SCENE CHANGING - Leave each scene on the screen long enough for your audience to look
around in it, then change scenes with a complete down-and-up movement of the Reel Advance
lever.
OPERATOR’S LIGHT - The hooded slot at the rear of the projector gives off just enough light
to enable the operator to handle the Reels and read their titles.
SCENE COUNTER LIGHT - As the seventh and last scene is flashed on the screen, the red window
on top of the projector will glow, warning you to change Reels.
VERTICAL REGISTER - The lever on the left of the projector adjusts the up-and-down alignment
of the images on the screen if the pictures are improperly aligned in the Reel. The Reel Advance
Lever automatically
seldom necessary.
REPLACING THE PROJECTION LAMP - Loosen the knob found under the rear of the projector
and lift off the lamp housing. Remove the burned-out lamp by pressing firmly down and turning
1/4
turn counter-clockwise. Replace with a
REMOVING THE REEL ADVANCE ASSEMBLY - This assembly may be removed for dusting or for
cleaning the rear of the projection lenses by lifting off the lamp housing and loosening the two
slotted holding bolts with a thin coin.
POLAROID FILTERS - The filter assembly is attached to the front of the Reel Advance Assembly.
These filters should be handled with extreme care.
lack of sharpness in the projected image.
the light beam by simply lifting the long filters and turning them 180”. The cut-off corners
prevent your putting them in wrong.
CLEANING THE PROJECTION LENSES - Clean, only when necessary, by brushing gently to
remove scratch-producing dust particles, then moistening slightly and polishing carefully with a
clean, lint-free cloth or tissue.
re-centers
this lever at every scene change.
and
500TlOP
However, fresh Polaroid material can be brought before
your
that the screen you use is suitable for stereo
lamp.
audience is equipped with polarizing
Additional
A tiny scratch may result in a noticeable
adjustment is
PROJECTION HINTS
Use the recommended Polaroid viewing glasses, and a metallic-surface screen. Hove the room
as dark as possible. Project over the head of your audience who should sit in front of the projector.
For full details of stereo projection, ond methods of putting on a show write Sawyer’s Inc. for
the booklet, STEREO SHOWMANSHIP.

VIEW-MASTER ACCESSORIES
Polarized Viewing Glasses. Either the Polaroid
No. 7 17 with plastic frames and glass lenses or the
inexpensive. cardboard frame Polaroid No. 721 are
recommended.
Projector Carrying Case. Makes
to carry. easy to store. and
form-fitting. easy to snap on or off, and made of Fiberglas-impregnated plastic.
View-Master Personal Stereo Camera. YOU
can
make your own VIEW-MASTER Reels-full-color
stereo
pictures at less cost than black and white snap
shots. Matched f/3.5. coated lenses, Exposure
tor
Universal Focus. shutter speeds
Camera Carrying Case. Finest
leather cowhide over spring steel form. Soft suede
leather lined.
Flash Attachment. Optical range-finder calculates
correct
iary flash units. Complete with batteries.
Type
matched coated
or
Tungsten color film for daylight use.
Close-up Attachments. 24” for technical or sci-
entific work, 36” for portraits and other close-up sub.
jects. Complete with carrying case.
Personal
personal stereo
U. L. approved.
View-Master Personal Reels. Patented,
scene Reels make stereo mounting an enjoyable pastime.
Designed for
Detachable
exposure. One dial operation. Wired for
“A”
Filters. Special density and
orange
Film
pairs to
stereo
protects
front cover.
filters for correcting Type “A”
Cutter. Die
.001
inch accuracy. Illuminated.
projection.
projector
to
Calcula-
l/100.
easy
it from dust. Light,
1/10
light-tone. saddle-
auxil.
color
cuts
VIEW-MASTER
seven-
View-Master Album. A
taining 30 envelopes and an index page for the con-
venient filing of both Personal and Stock VIEW.
MASTER
pairs.
View-Master Stock Reels. Over 400 different
subjects including national parks. famous cities, foreign countries, fairy tales, cowboys, baseball
many
Reel list.
View-Master Stereoscope. For viewing stereo
color
Light
cost
Reels.
Pocket-size, it holds over 200
others. Ask your VIEW-MASTER dealer
oicturcs
mounted in VIEW-MASTER Reels.
weight.
sturdy construction. easy to operate,
leatherette
® Sawyer’s Inc., Portland 7, Oregon
TRADE-MARK
REC. U. S.
PATENT OFFICE-MARCA REG,STRAOA
booklet con-
steteo
stars.
and
for a
low
Litho in U. S. A.
 Loading...