

Page 1

Viewlab™ HD Media Player
User Manual (F1)
1
Page 2
INDEX
No.
Chapter Description
Page
1
HD Media Player
5
1.1
Brief Introduction
5
2
Main Characteristics
6
2.1
Supporting Formats
6
2.1.1
Video decode
6
2.1.2
Video format supported
6
2.1.3
Audio decode
6
2.1.4
Audio format supported
6
2.1.5
Image format supported
6
2.1.6
Subtitle Support
6
2.1.7
Multi-language Support
7
2.1.8
Firmware Update Support
7
2.1.9
File Management System
7
3
Product Appearance
8
3.1
Front Panel
9
3.2
Back Cover
10
4
Accessories
11
2
Page 3

5
Remote Control
13
6
Let’s begin…
16
6.1
Main Menu
16
6.2
Warning for playing a disk
17
6.3
Supports types of discs
17
6.4
Notice for connecting an external device
18
6.5
Net Play
18
6.5.1
Installation & Setup of LAN Sharewares (UPNP)
18
6.5.2
Play Shared On-line Files
21
6.5.3
Notice for playing online
21
6.5.4
Documents sharing (SAMBA)
22
6.5.5
Internet Browse
24
7
Setup Parameters
25
7.1
Audio settings
25
7.2
Video settings
26
7.3
Language settings
27
7.4
Play settings
27
7.5
Network settings
28
7.5.1
Wired Lan
28
7.5.2
Wi-Fi settings
29
7.6
System settings
31
7.6.1
Auto start list
31
3
Page 4

7.6.2
SAMBA/NFS service restart
32
7.6.3
Other Options Of System settings
33
7.7
Information
33
7.8
Upgrade Methods
33
7.8.1
Normal Upgrade Mode
34
7.8.2
Mandatory upgrade mode
38
7.9
Copy / delete files
39
8
Precautions
40
8.1
Safety Instructions
40
8.2
Video Output Mode Setup
41
8.3
System Update
41
8.4
Recommended Boot Order
41
8.5
Official Website
41
9
FAQ
42
9.1
USB external device does not play smoothly
42
9.2
USB Device Not Found
42
9.3
No TV Sound
43
9.4
No Sound from Coaxial or Optical Fiber
43
10
Technical Specifications
44
11
YAMJ Poster User Manual
45
12
12 BT Download Operating Instruction
52
4
Page 5
1 HD Media Player
1.1 Brief Introduction
This product can store and play/display video programs of high definition, digital audio of high quality and digital photos with
fashionable and beautiful outlook and superior quality.
HD Media player support program formats of up to 1080p and all popular movie formats of high definition, including:
MPEG1/2/4, H.264, WMV, XviD, DVD ISO, BD ISO, VOB and HDMI™ with abundant audio and video output interfaces.
Its high-quality music display makes it an alternative of CD players. It can realize perfect sound reproduction with digital audio
output from optical connection. Therefore, it can optimize your experience from home entertaiment system.
Your family can share the happy time from the digital photo browse function of a player since it has a mass memory for photos as
a home entertainment storage center.
5
Page 6

2 Main Characteristics
2.1 Supporting Formats
2.1.1 Video decode
MPEG-1, MPEG-2(decode up to 1080p), MPEG-4(decode up to 1080p), WMV9, VC-1(decode up to 1080p), H.264(up to 1080p),
DRA 7.1
2.1.2 Video format supported
TS, M2TS, MTS, TP, MKV, AVI, WMV, MPG, MOV, VOB, MP4, IFO, ISO
2.1.3 Audio decode
Dolby Digital 5.1、Dolby Digital Plus 7.1、DTS-HDMA、MPEG1 layer2、MPEG1 layer3、MPEG-2 LC-AAC 、MPEG-4
LC-AAC、WMA、AC3、DTS-HDMA/DTS-HDHR、Dolby TRUEHD 7.1、DTS LBR 5.1、Blue ray LPCM
2.1.4 Audio format supported
MP3、WMA
2.1.5 Image format supported
JPG、PNG、GIF、BMP
2.1.6 Subtitle Support
Supporting .srt ssa, smi, sub and graphic subtitle idx+sub M2ts embedded letters
Firmware update available for supporting other subtitle formats.
6
Page 7

2.1.7 Multi-language Support
Chinese(simplified/traditional)/English/French/Italian/Spanish/Portuguese/German/Dutch optional according to different sales
market, and firmware update available for supporting other languages.
2.1.8 Firmware Update Support
Firmware update available through system setup menu with U-disk. The manufacturer supplies the firmware update. Please refer
to 7.5.1 for detailed description of update methods.
2.1.9 File Management System
NTFS, FAT32, EXT3,EXT2,MSDOS,VFAT,ISO9660,HFSPLUS,HFS,NFS,UDF
We recommend to use NTFS because it can support files of 4G and above and high-definition video files usually are bigger.
7
Page 8
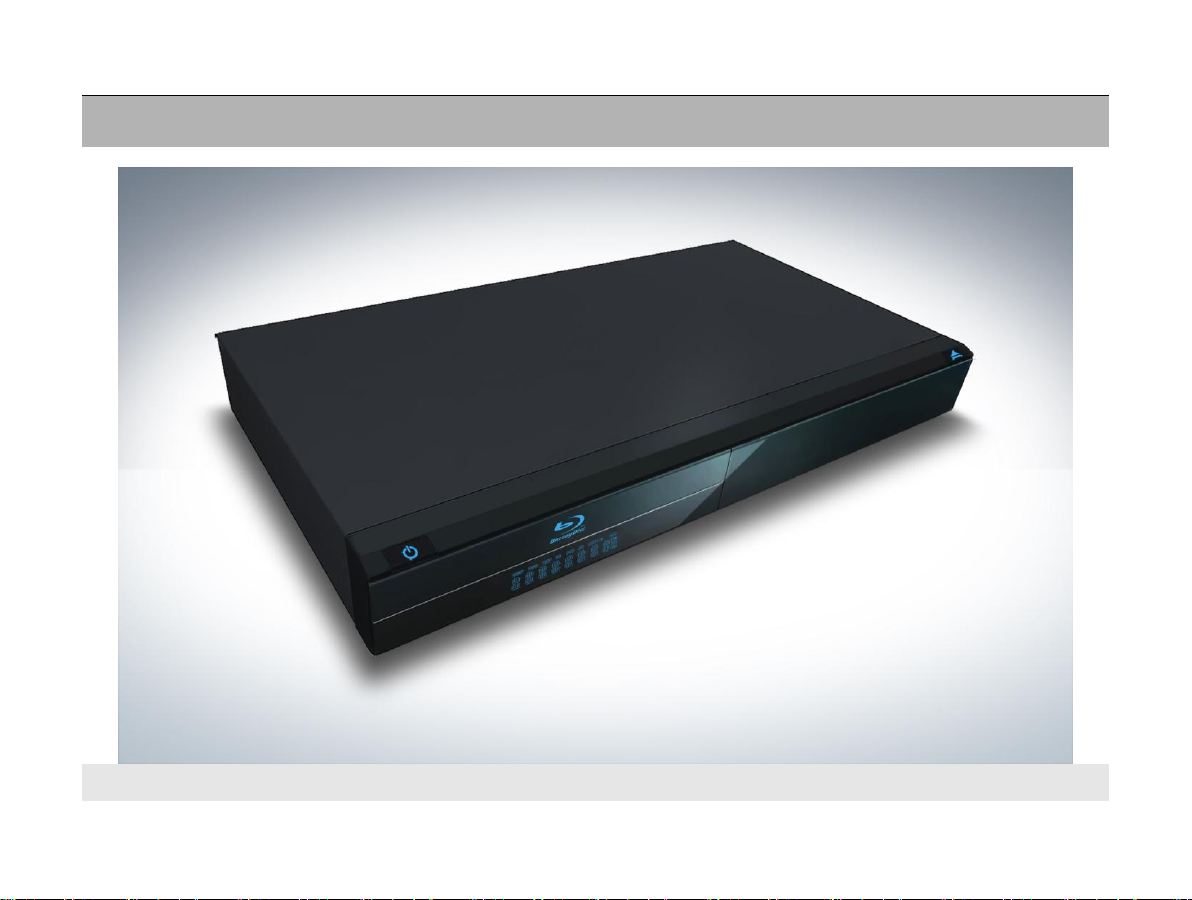
3 Product Appearance
8
Page 9
3.1 Front Panel
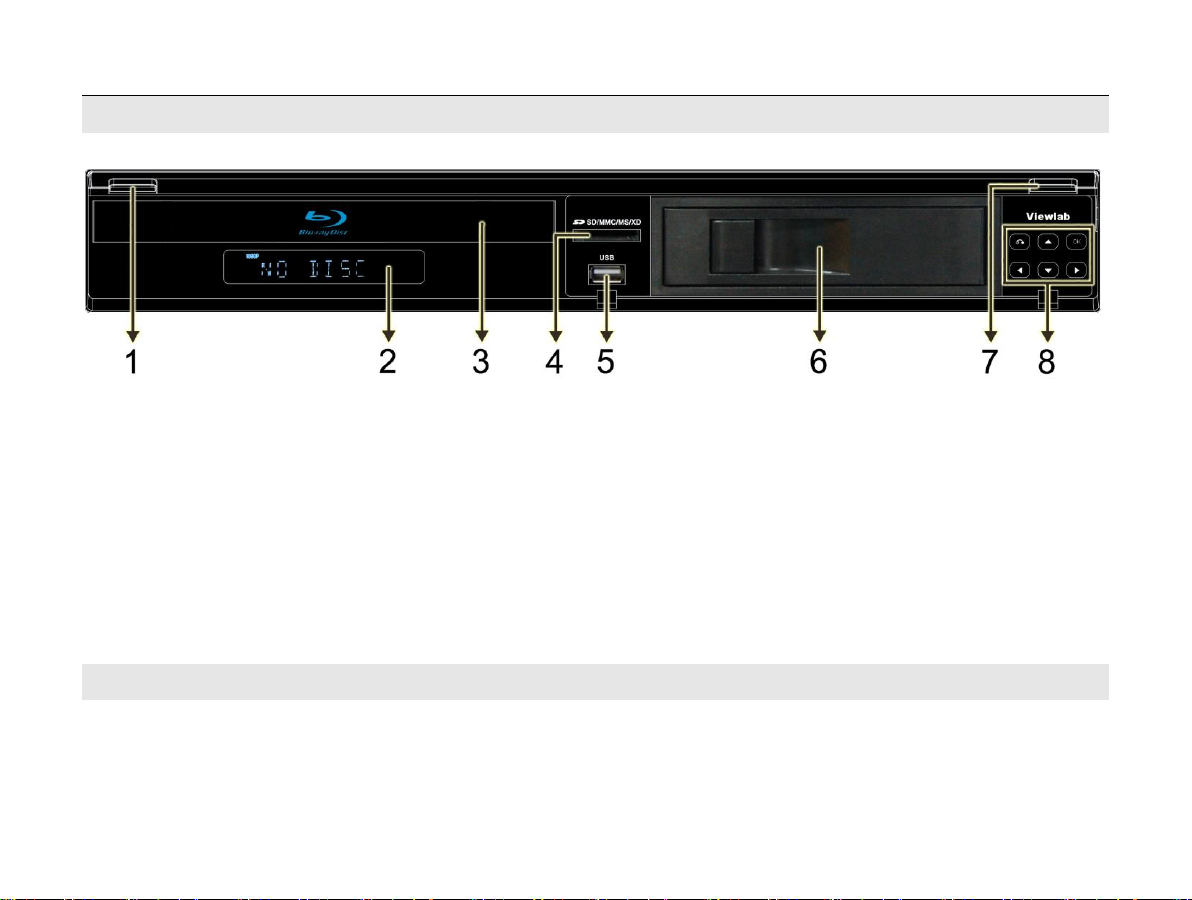
1. STANDBY Key: Wake up / Standby the Player. There is red when standby, and blue when wake up.
2. VFD DISPLAY & Remote Control Sensor: You can see Players’ state through VFD.
3. Blueray-ROM: Support Blue-Ray DISC、DVD、MINI-BD(AVCHD)、VCD、CD、SVCD.
4. CARD READER Port: 4 in 1 card reader. Support SD/MMC/MS/XD card.
5. USB HOST Port: USB ports that can connect external storage devices such as hard discs, U-discs, mobile
CD/DVD drivers;
6. SATA HDD CABIN: Install SATA hard-disk easily through it. Support up to 2TB SATA hard-disk. (Please
do no uninstall hard-disk when player is working)
7. EJECT Key: Blueray-ROM Kurakado open, close;
8. OPERATE Key: Reference to the descriptions of the remote control.
9
Page 10
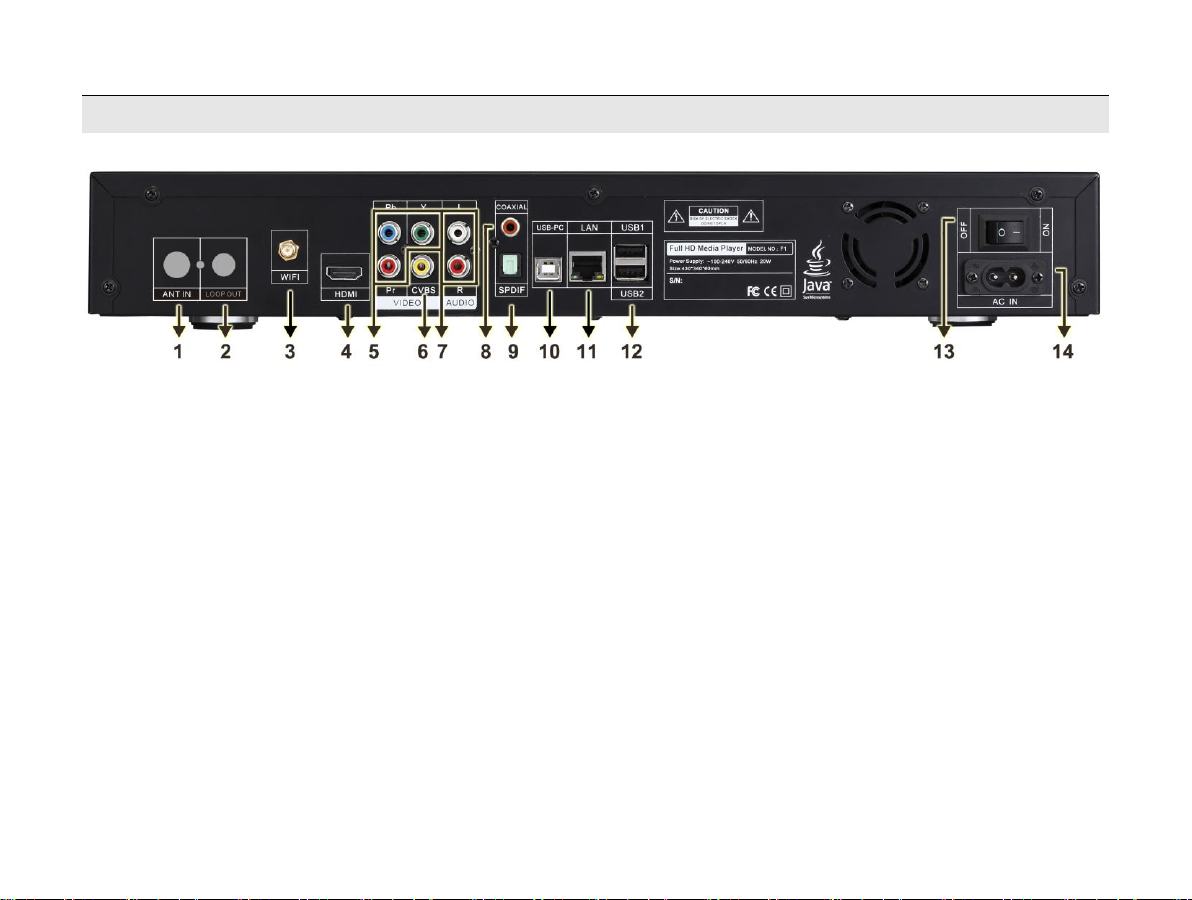
3.2 Back Cover
1. DTV ANT IN Port: A Port for watch DTV show within DTV Antenna, ( Need DTV module inside )
2. DTV LOOP OUT Port: Connect 2nd STB to the player through this port. You need to get a 2nd STB as child connection on
your 1st one. ( Need DTV module inside )
3. WIFI ANTENNA Port: A Port for wireless network. Share media files without cable.;
4. HDMI Port: HDMI 1.3 port that supports the output of video up to 1080p and next generation audio source code;
5. COMPONENT Port: A Ports for component video output of which the resolution can be up to 1080i;
6. CVBS VIDEO Port: Analog video output Port for the older TV SET ;
7. STEREO AUDIO Ports: Analog audio transmission port that supports Stereo audio;
8. COAXIAL Ports: Digital audio transmission port that supports up to 7.1 channels;
9. OPTICAL Port: Digital audio transmission port that supports up to 7.1 channels;
10. USB-PC Port: A port for connecting the USB ports of PCs via connecting cables, which realizes the data transmission
between PCs and its internal hard disc (power supply required);
11. LAN Port: A network port that connects your to your PC LAN or enables your as a VOD terminal so that you can play
shared multimedia files from a network server or other PCs on the LAN;
12. USB HOST Port: Two USB ports that can connect external storage devices such as hard discs, U-discs, mobile CD/DVD
drivers;
13. POWER SWITCH Port: Power on/off the player.
14. AC IN: Connect AC cable between player and Mains.
10
Page 11
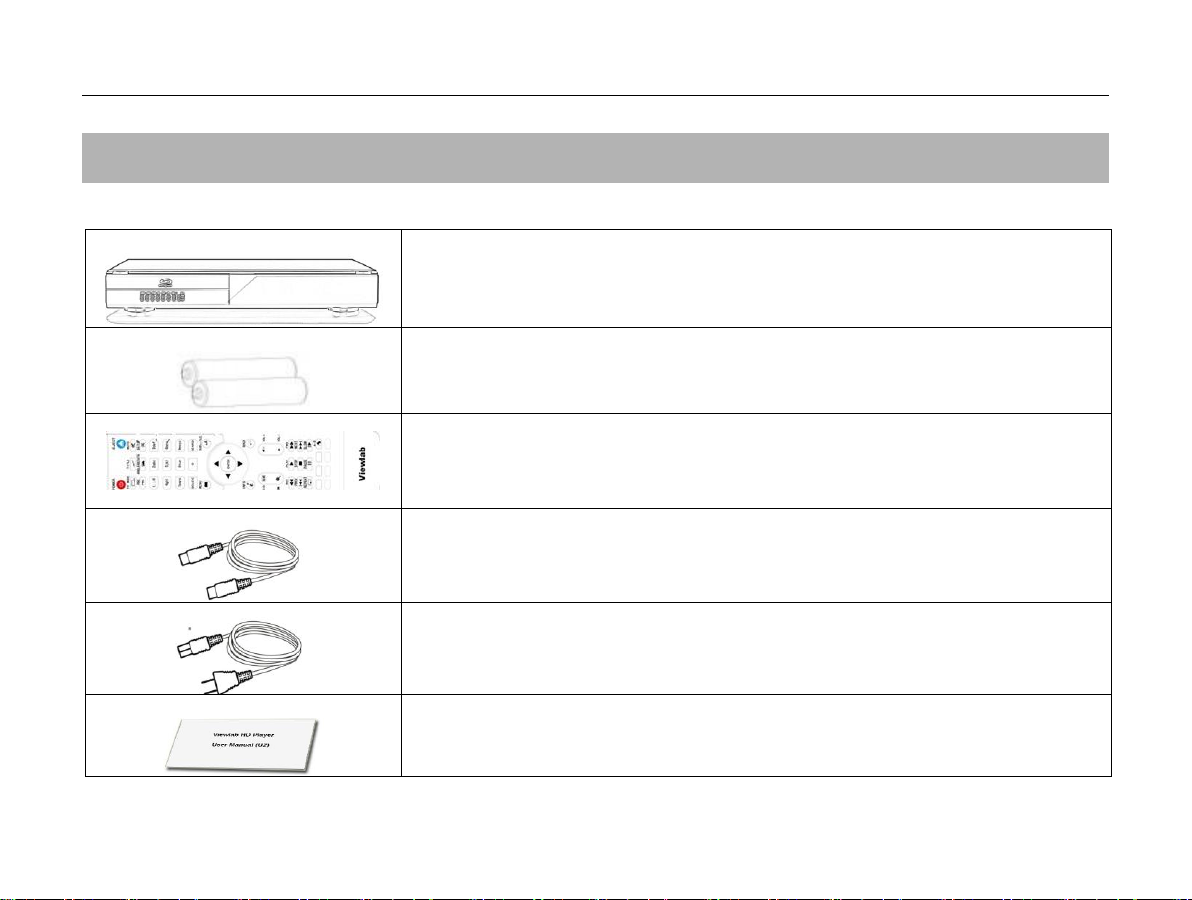
4 Accessories
Main unit
AAA Batteries
Remote Control
HDMI Connecting Cable
POWER Cable
User Manual
The following items shall be included in the package.
11
Page 12
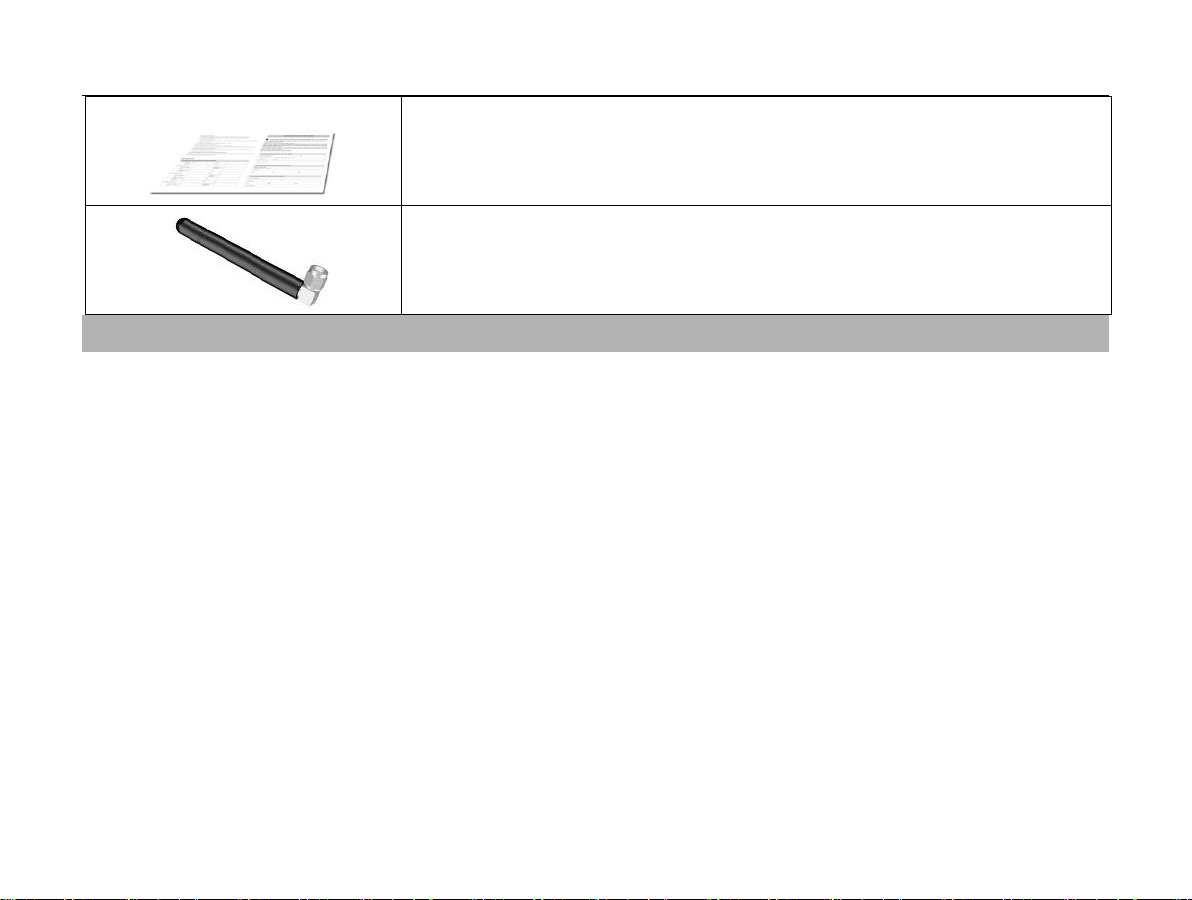
Warranty Card
Wifi Antenna
12
Page 13
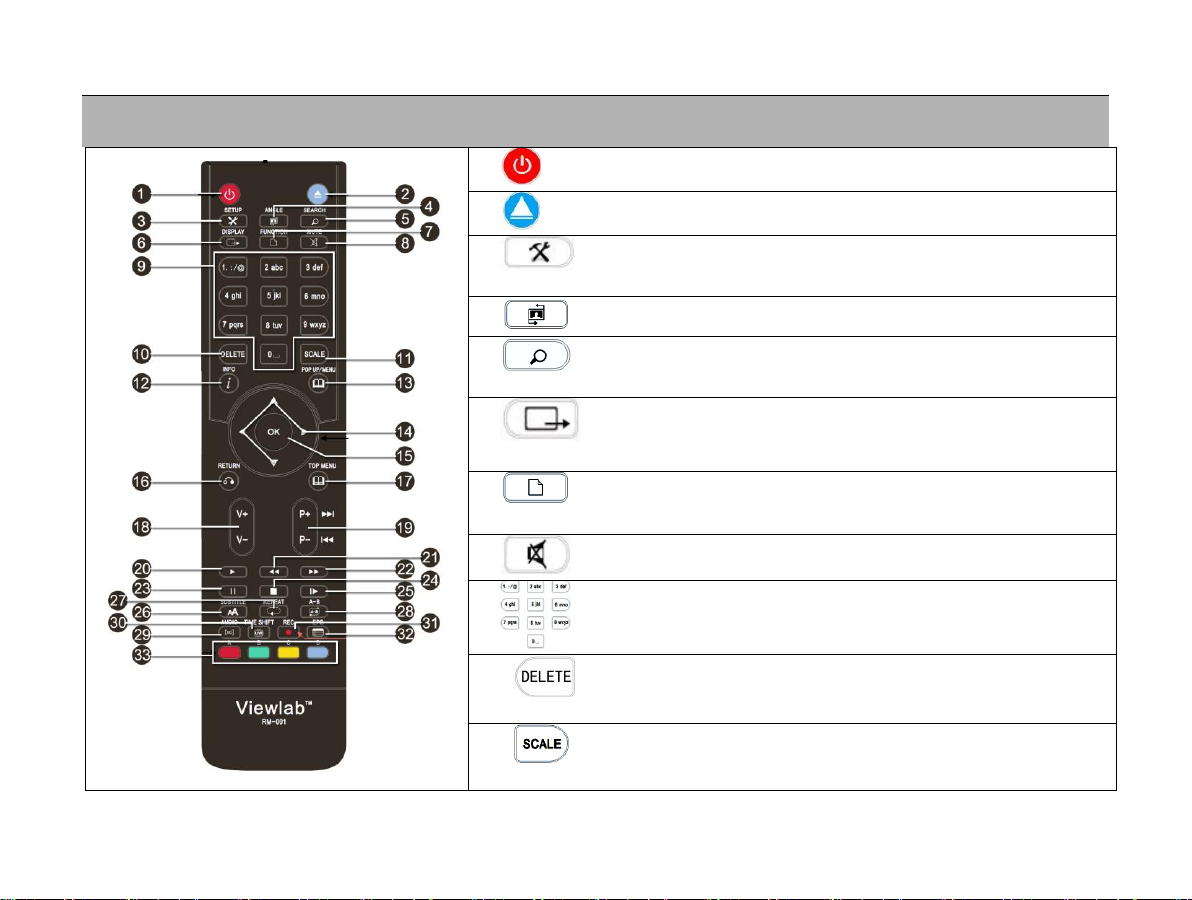
5 Remote Control
1 STANDBY Key: Wake up / Standby the Player.
2 EJECT Key: Blueray-ROM Kurakado open, close
3 SETUP Key: operating in the main interface, enter settings
menu
4 ANGLE ROTATE Key: Rotate the current image.
5 SEARCH Key: movie time searching (it has time searching and
playing function on Blu-ray / DVD playback).
6 DISPLAY Key: Shift of output video modes/ Play Video
is available to change the screen ratio: 4:3 / 16:9.
7 FUNCTION Key: Display the title of the current
movie(DVD).
8 MUTE Key: Shift between mute on/off.
9 Keys: Keys for the input of the numbers and letters
10 DELETE Key: when enter the WIFI password, delete the
wrong characters
11 SCALE Key: tips of image operation to show how to move,
rotate and enlarge picture.
13
Page 14
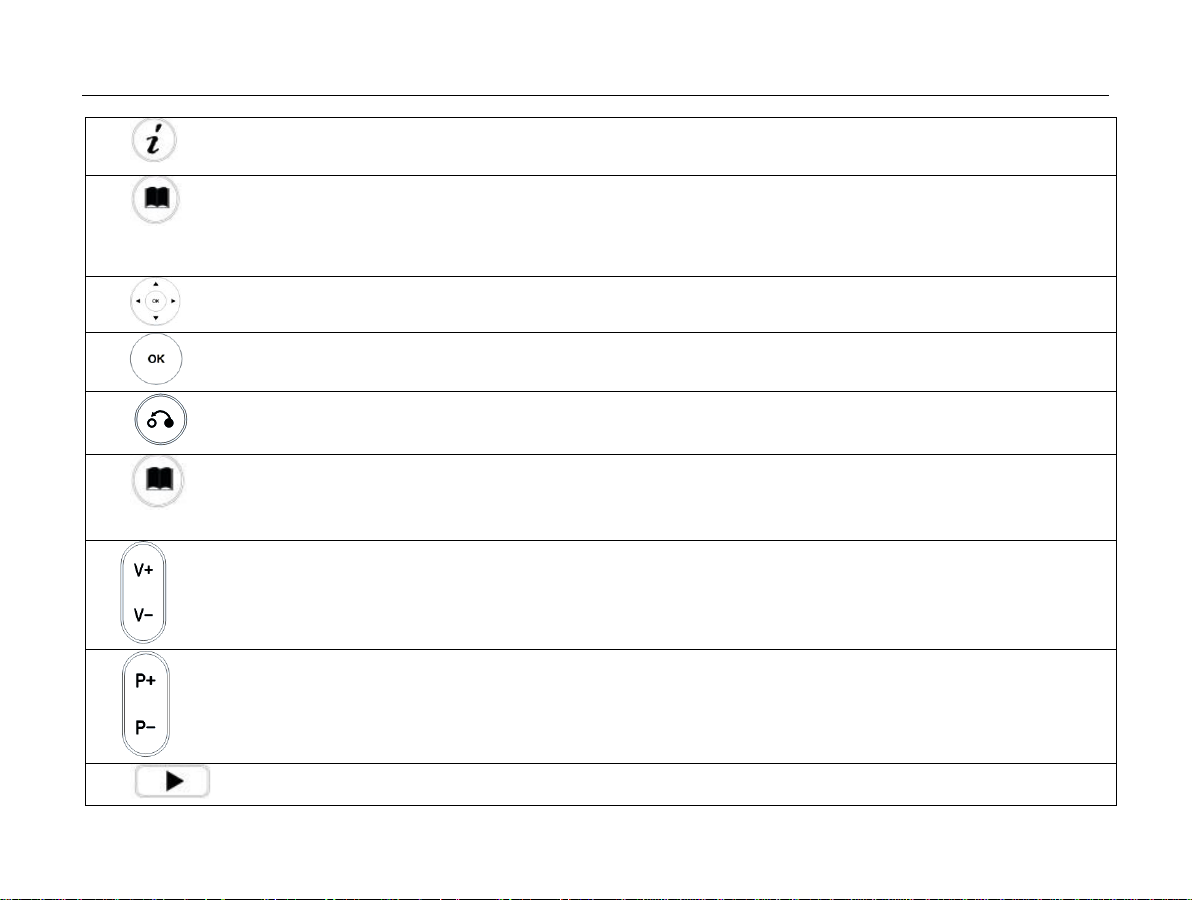
12 INFO Key: Display detailed information list when playing movie, Picture, and music.
13 POP UP/MENU Key: document management, it can delete / copy / paste files (When play Blu-ray file, the
setting interface will be called)
14 Direction Keys: for menu operation or file browse.
15 OK Key: Confirm settings, play selected files or press again to pause.
16 RETURN Key: Return to the previous page(invalid for Blu-ray / DVD movie playing).
17 TOP MENU: Go back to the main menu. (When playing extra media within Blu-Ray disc, go back
to Blu-Ray main menu.)
18
Volume Keys: volume adjusting, to zoom in / out picture when it is in image playback mode.
19
PAGE UP/DOWN or NEXT/ PREV Keys: Page up/down during browse file or next/prev while
movie playing
20 PLAY Key: Play selected files.
14
Page 15
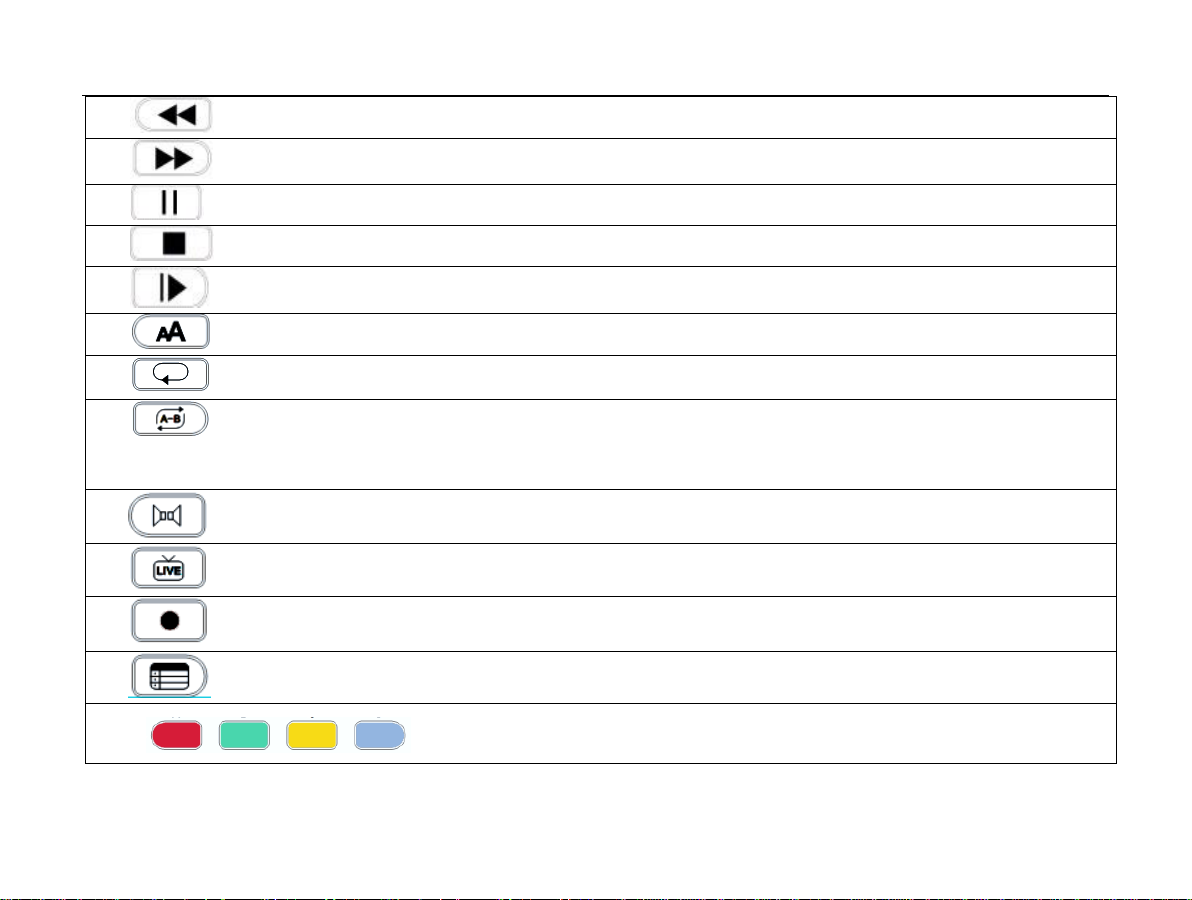
21 REV Key: Playback current file (disc only) or press on to change fast reverse speed times.
22 FWD Key: Change fast forward speed times.
23 PAUSE Key: Pause the current media file.
24 STOP Key: Stop and return to current directory.
25 SLOW Key: on playback state, it will rewind play, continuouslypress the key can change the speed of rewind.
26 SUBTITLE Key: Switch inner/outer Subtitle during movie playing.
27 REPEAT: Replay one/all media.
28 A-B Key: when play DVD or Blu-key disc, press the key to set the start point A, then press it again to set point
B and play A to B repeatly.
29 AUDIO Key: Shift among tracks.
30 TIME SHIFT Key: You can use this key to pause current TV show and resume when you back.
31 REC Key: Record DTV program. (Need DTV module inside)
32 EPG Key: Electronic Program Guide. (Need DTV module inside)
33
A\B\C\D Keys: Blu-ray navigation function keys. (Look into the Blu-ray
navigation user guide to learn more ) (Need DTV module inside)
15
Page 16
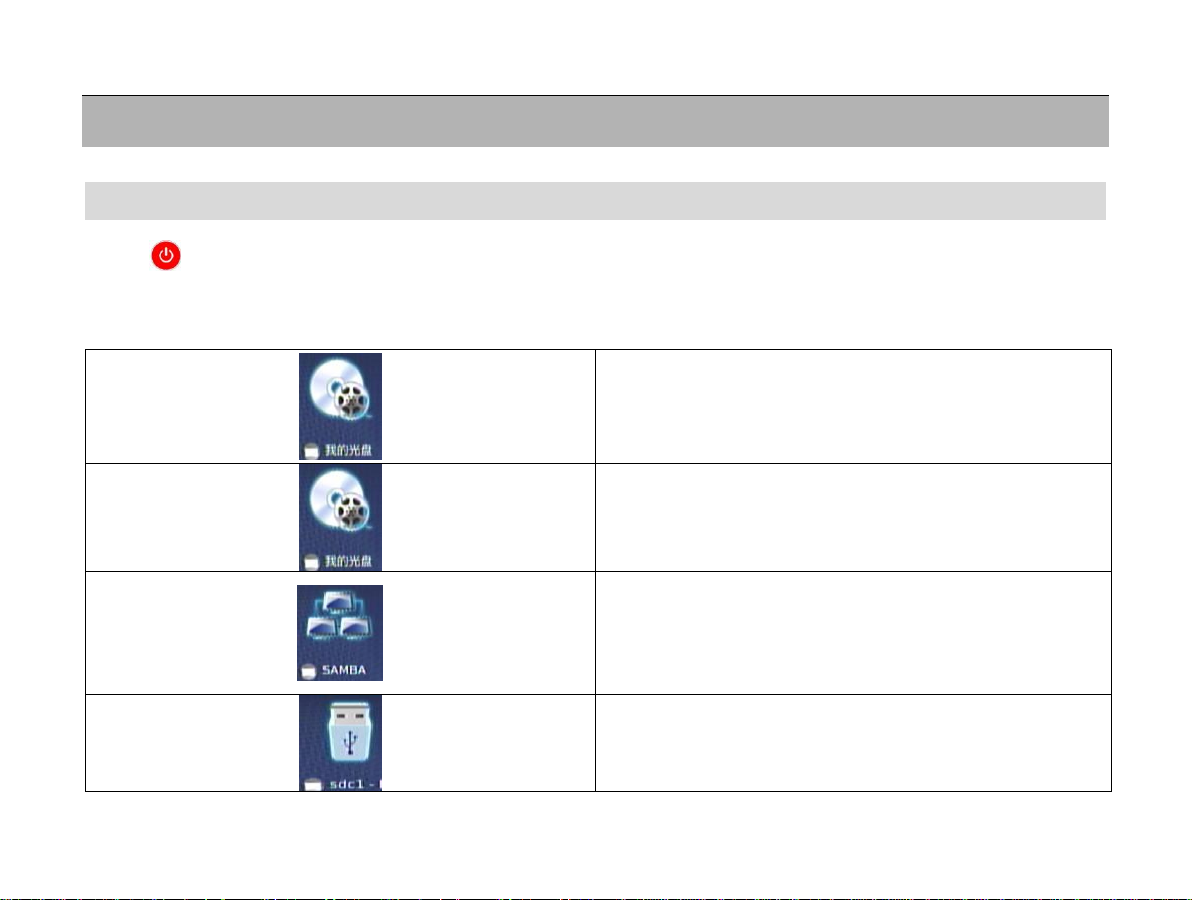
Select the icon to play a disc, DVD 、AVCHD and Blu-ray
compatible .
Select this icon to play the multimedia files stored in the
internal hard disc if the host is connected to the same.
SAMBA and NTFS LAN sharing mode.
You can play multimedia files on any USB device, i.e. a
U-disc, a portable hard drive, a digital camera, DV, etc., that
is connected with the host.
6 Let’s begin…
6.1 Main Menu
Press on the remote control to Wake up / Standby the Player. (We suggest you wait for 6 seconds at
least between two power on/off operations to make the system run stably.) The system will enter the main
menu in 30 seconds after the player is started.
16
Page 17
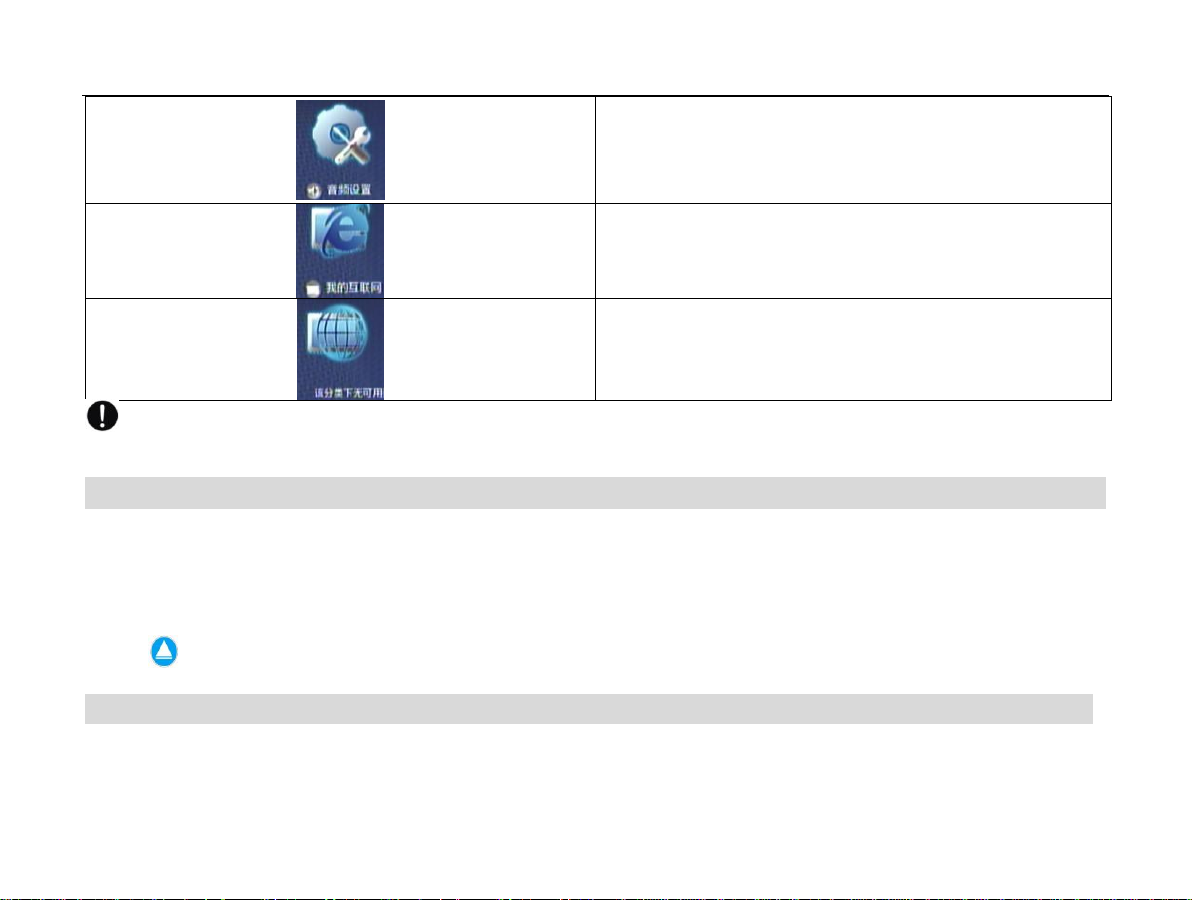
System setup icon, which you can use to set audio and video
output, relevant parameters of images and network IP.
Select this icon to browse Internet. You can view image,
novel, news, enjoy music & online video.
UPNP LAN sharing mode.
The device is not connected or there is not any file to play in the device and cannot be selected if the above icon is not
highlighted.
6.2 !Warning: Please pay attention to the following for playing a disk:
1. Do not insert any damaged disc into the drive to avoid the damage of the laser head.
2. Please wait for a while after the disk is drawn into the drive since the bigger the code rate of files is in the disk, the longer the
loading time will be.
3. Please take out the disc before you power off the player. Otherwise, the bootup time will be longer (the default system setting
is to read the disc first).
Press key on the Remote Control to eject the disc if it cannot be read out.
6.3 The player supports the following types of discs:
DVD-ROM, DVD+/-RW, DVD+/-R, Photo CD, Video CD, CD-DA, CD-Extra, CD-Text, CD-R, CD-RW, DVD-RAM,Blu-ray Disc
17
Page 18
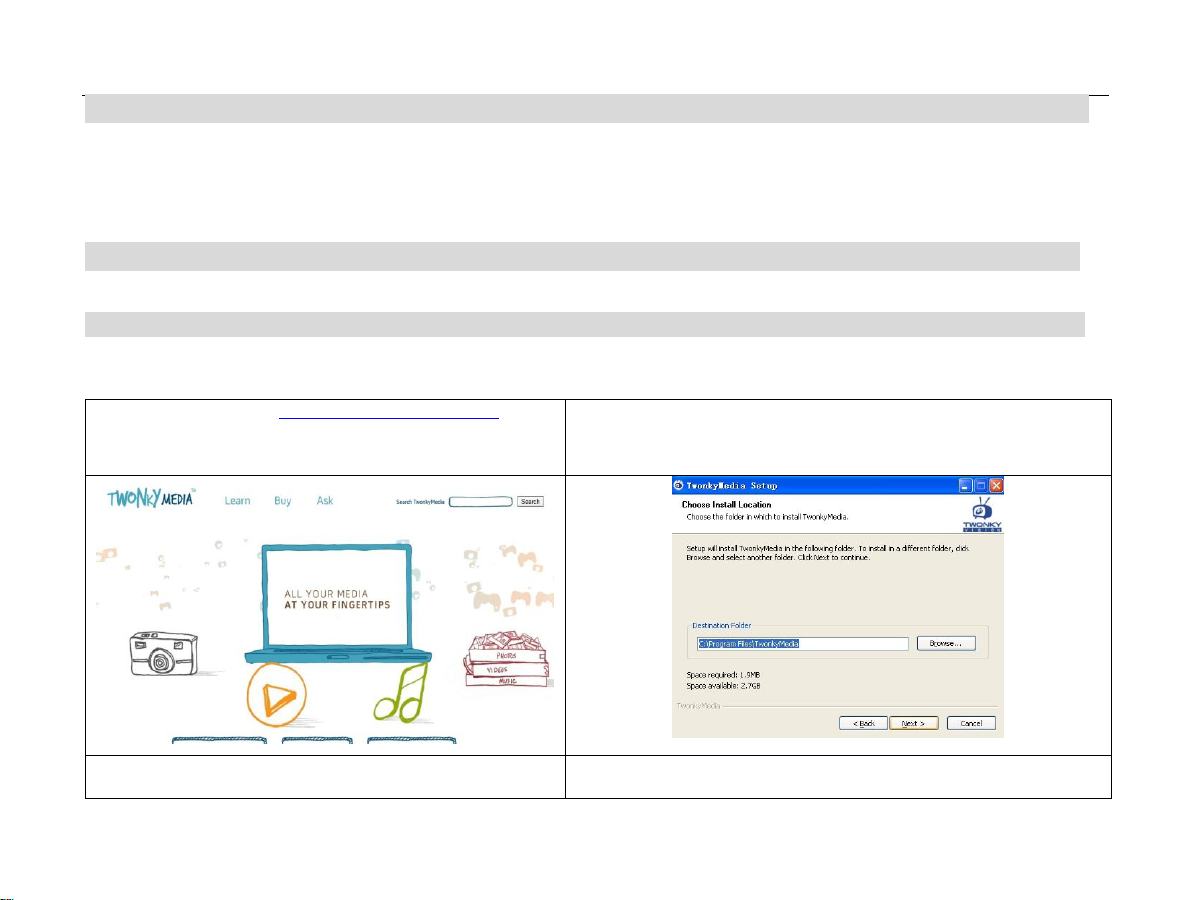
1. Please visit website http://www.twonkyvision.de/ to
download software TwonkyMedia and install according to
User Manual to activate Ethernet function.
2. Click Next to select an installation path.
Remote Control
3. Start the installation.
4. Copy TwonkyMedia_patch to the installation folder after the
installation is finished.
6.4 ! Notice: Please make the following checks before connecting an external device:
1. The external device shall be free from any damage (damaged external devices may damage the host);
2. Check the external devices contain for any virus;
3. Do not frequently plug out and/or insert the external device connected to the USB port when the player is powered on.
6.5 NET PLAY
Net play can browse/play multimedia files, such as images, music, movies, etc., shared from LAN.
6.5.1 Installation & Setup of LAN Sharewares ( UPNP )
player use TwonkyMedia for LAN sharing. Please follow the following steps for the installation and setup of TwonkyMedia:
18
Page 19
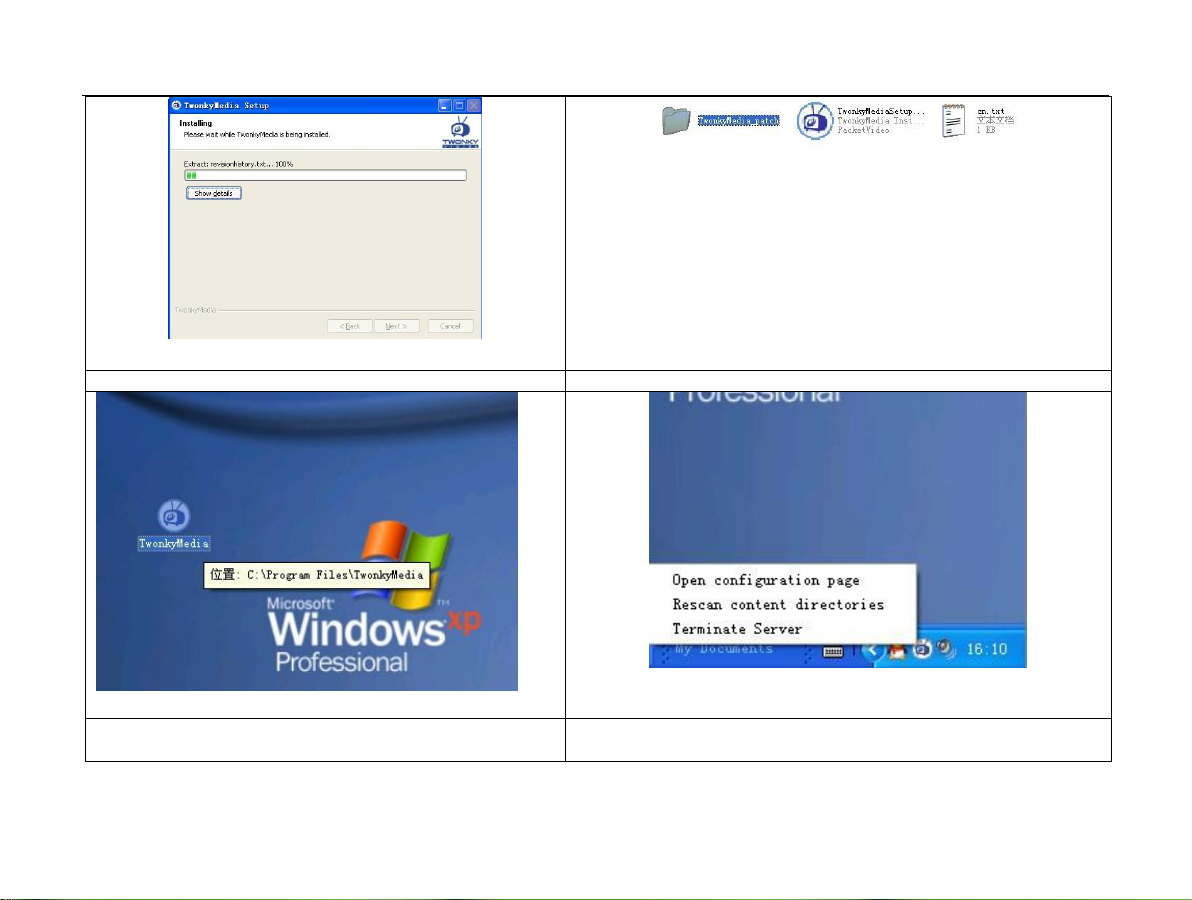
5. Double click the twonkymedia icon on the desktop.
6. Right click to select Open configuration page.
7. Add in the SN from the CN file and click Save Changes
to save.
8. Setup the sharing path.
19
Page 20
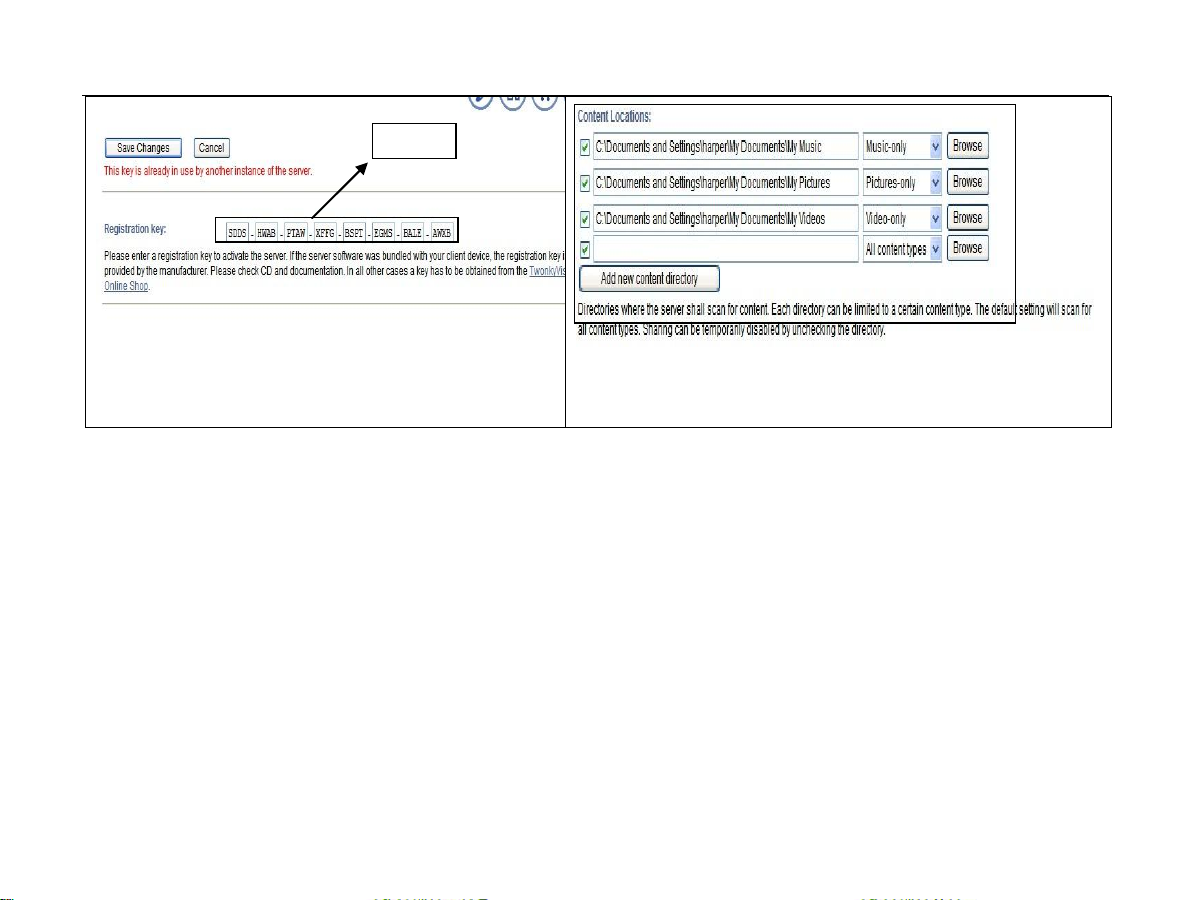
Add
20
Page 21
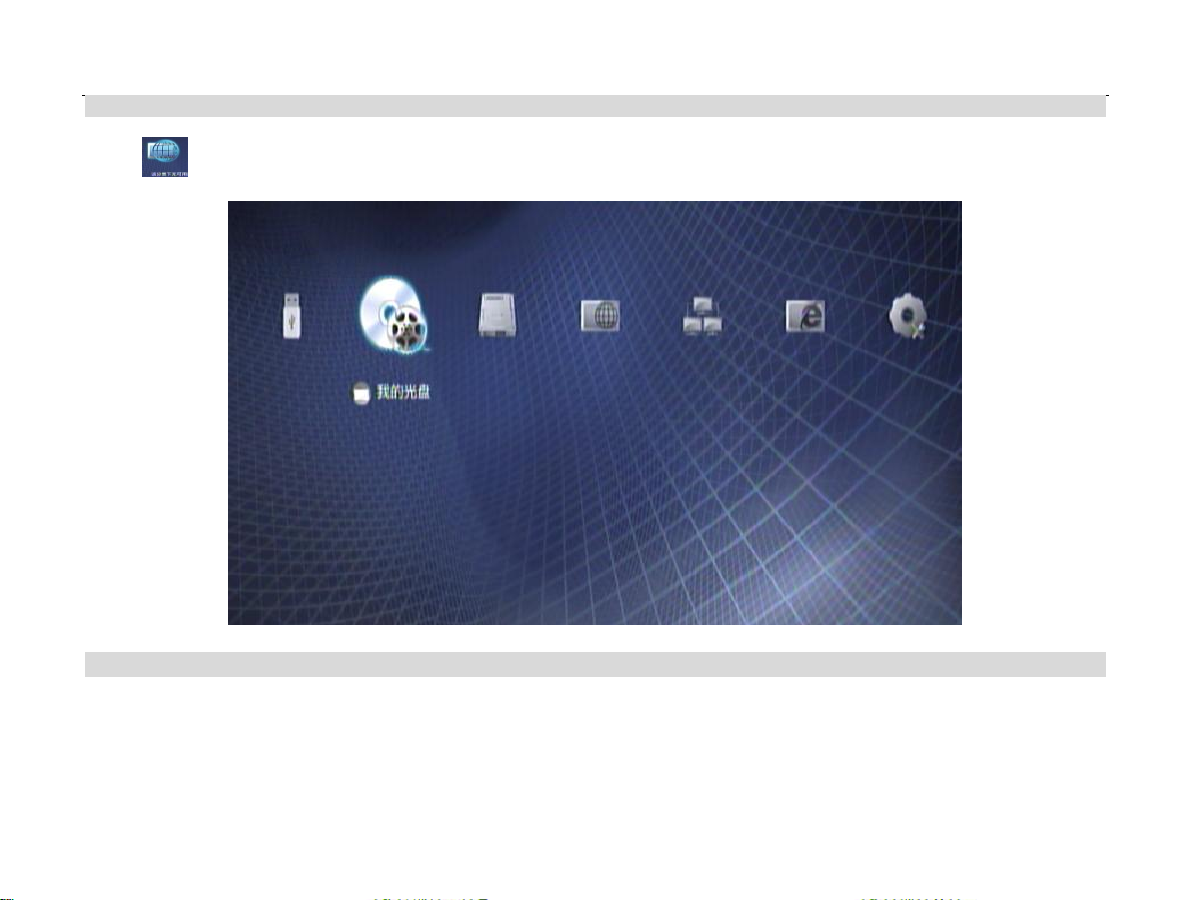
6.5.2. Play Shared On-line Files
Enter , browse and play the video files from the LAN or your computer.
6.5.3 ! Notice: Please make the following checks before playing online:
1) Make sure the network is connected and the green indicator for network port is blinking.
2) IP address is set up or automatically acquired (Refer to 5.4 for network setup).
3) The firewall of your PC has been shut down.
4) The folder to browse has been shared.
21
Page 22
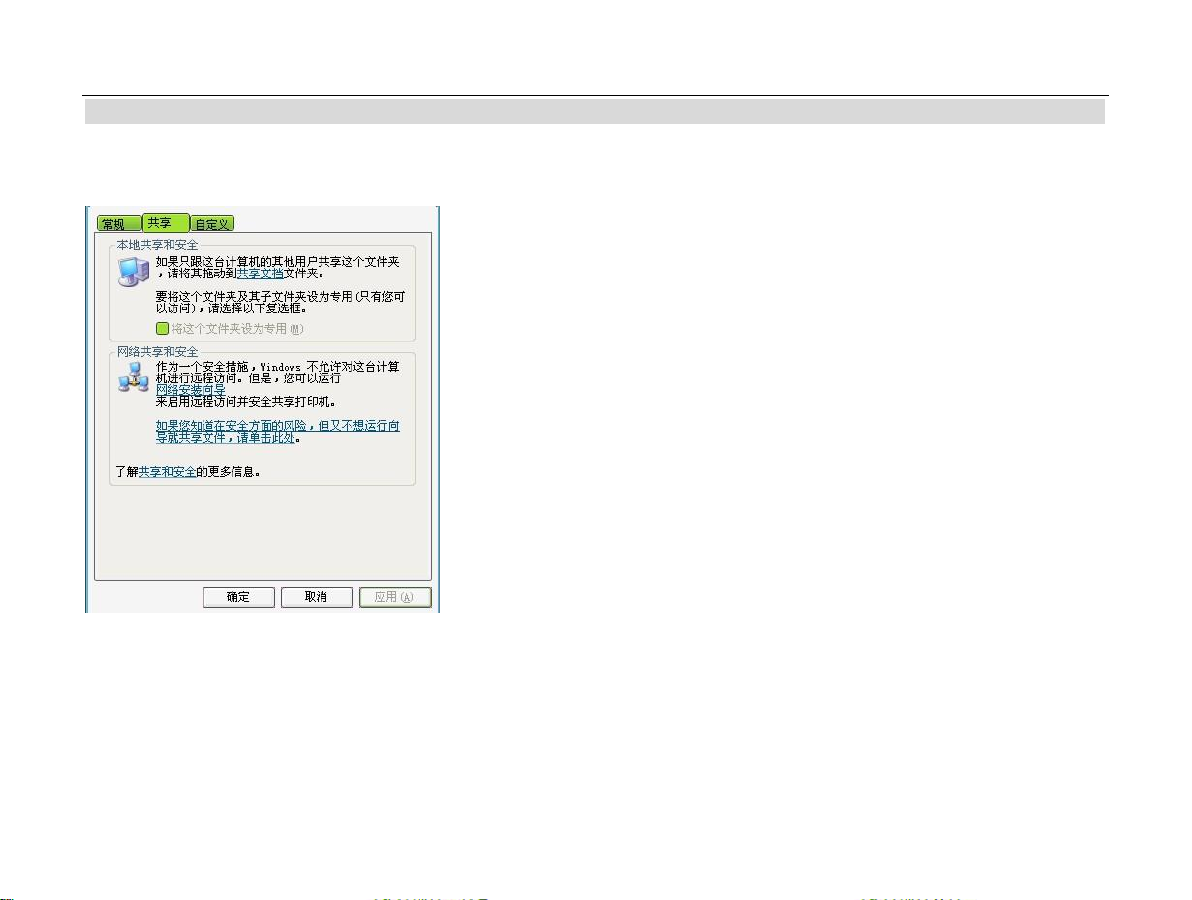
6.5.4 Documents sharing (SAMBA)
Share documents by setting on PC.
(1) Share on Pc, by clicking right button on the folder
(2)press this label
(3)Tick to Share on Network
22
Page 23
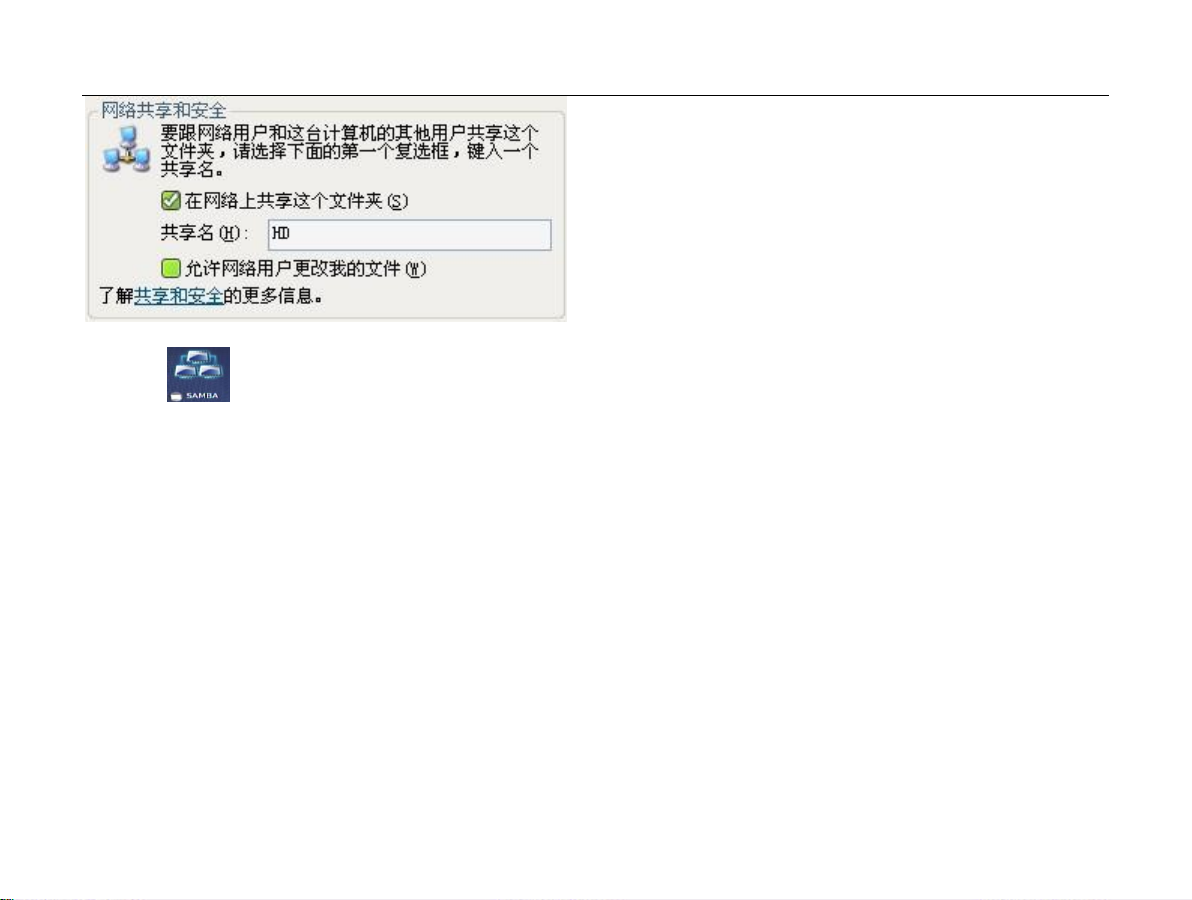
(4)Refresh SAMBA server in "System Settings" on setting interface.
(5) Press and select "SAMBA" to browse and play media files on LAN.
23
Page 24
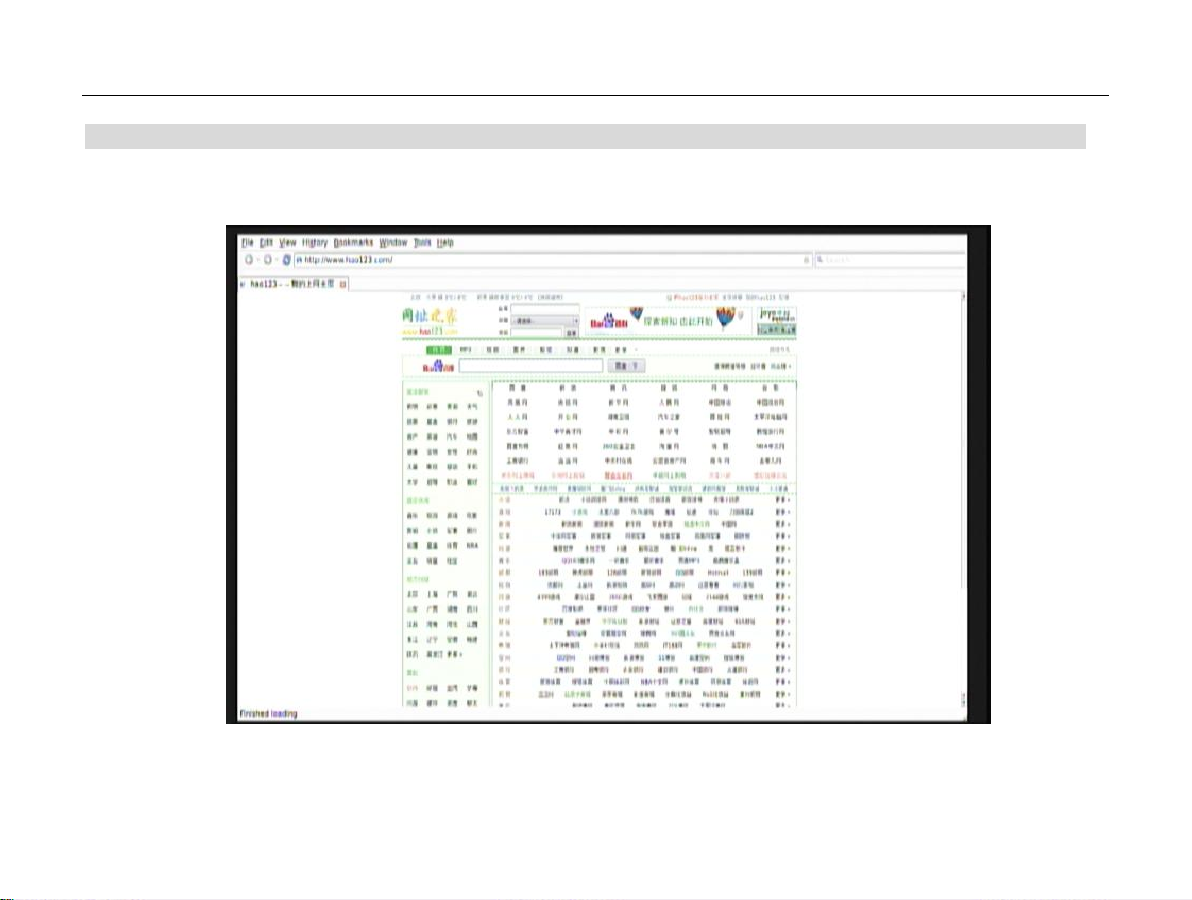
6.5.5Internet Browse
Connected with mouse and keyboard by USB port to the player before power on, you can surf the internet as you do on
computer;
24
Page 25
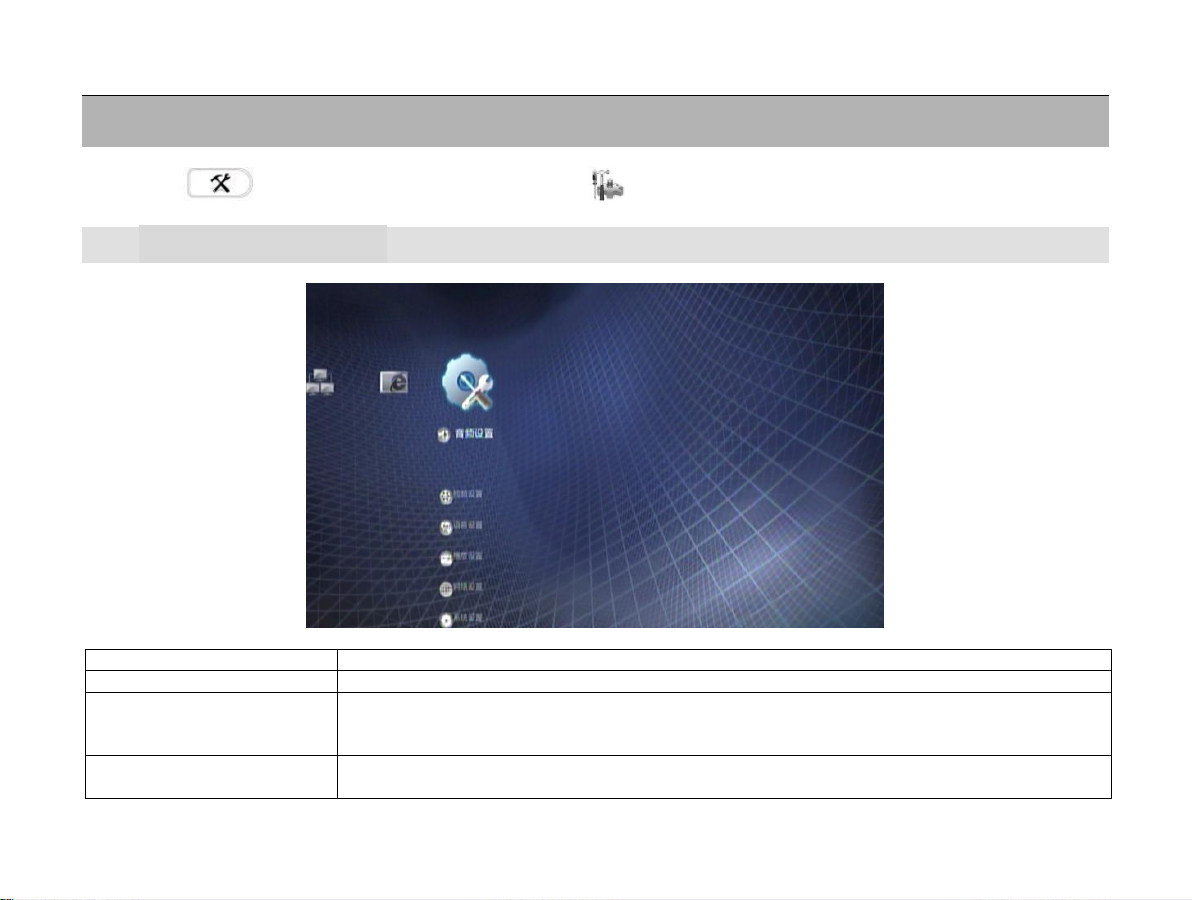
HDM PCM(Stereo)
Output right and left channel via HDMI
HDMI PCM(Multi-channels)
Output multi-channel via HDMI
SPIDF Bitstream
When output source code via optical / coaxial-cable, it is required to connect amplifier and the
power amplifier will have audio decoding capability (if the power amplifier does not have
decoding function, it should choose decoding mode on the machine)
HDMI Bitstream
It can support TRUE HD and DTS HD source output; if there is next generation function on the
amplifier functions, it is strongly recommended to choose this option.
7 Setup Parameters
Press the on the Remote Control or click the icon on the main menu to enter the setup interface.
7.1 Audio settings
25
Page 26
SPIDF PCM
Output decoded audio via optical / coaxial cable.
Analog Output
Left and right channels suitable for analog audio output.
480p/576p
Preference
720p
Preference
1080i
Preference
1080p
Recommended, please select this item if your TV supports this resolution.
50 HZ/PAL
60 HZ/NTSC
Recommended
Automatic
Recommended
16:9
4:3
Select a display scale on the basis of your display device. Please select 16:9 or Automatic if your TV is of a wide screen
(Automatic recommended).
Color Space
Select background color according to your preferences.
Deep color
If your TV supports this function, you can select this option, it is up to 12bit.
Brightness/Contrast/
Saturation/Hue
Adjust brightness, color and contrast of the picture according to your preferences.
Please choose appropriate decoding mode according to actual equipment, press "ENTER" key to save settings;.
7.2 Video settings
Resolution
Select the proper signal formats and resolutions for video output signals on the basis of your display device to be compatible with
it to get the optimum display effects.
Detection Rate
Video Rate
Other options
26
Page 27
OSD Language
Chinese(simplified/traditional)/English/French/Italian/Spanish/Portuguese/German/Dutch optional
according to different sales market, and firmware update available for supporting other languages.
Subtitle Language
In the settings options, select the language which matches the subtitle; if there are unrecognizable
code after selection, please try to select the UTF-8 language option of subtitle language to solve
this problem.
General
Use to open file/direction without any navigation
Intelligent Play
Without Blu-Ray navigation( AVCHD Recommended )
BD Navi
Recommended mode for Blu-Ray movie. In this mode, Blu-Ray navigation is activated.
Some movie’s Blu-Ray navigation Maybe there are problems, change to “Intelligent Play” or “General” will Avoid problems.
Single file
One photo at a time. Press Next or Exit to return to the directory.
Multi file
One photo at a time. Press Previous/Next to browse the previous or next until you click the Exit key
to return to the directory.
Slide show
Auto-Play Picture. Continued display until you click Exit to return to the directory.
Intelligent Show
Player automatically selects the appropriate size for the picture display (recommended).
Keep Rate to Fullscreeen
Scale length and width of the picture to full screen mode.
Original Size
Play the picture in original size, when the picture is more than the maximum screen resolution,
then play it in full screen display.
Stretch to Fullscreen
Stretch picture not to scale to full screen state.
Click “enter”key to save the above settings after your setup is finished.
7.3 Language settings
7.4 Play settings
Play Mode
Image
Image Show Mode
Loop Play
27
Page 28
single
Continued display of all files under the directory till the last file is displayed, the display stops and
the system returns to the directory.
Loop
Continued display of all files under the directory till the last file is displayed. Then continue to display
from the first file over again.
Slide Span ses
After this option is set up, if you choose slide show mode, it will display pictures in accordance with
the interval time set in this option.
Subtitle color
Select your favorite font color of subtitles according to your preferences.
Format
Select the area coreesponding to the area code of Blu-ray files you want to play; if your disc is "B"
area, select "B", otherwise it can not be played or can not be played correctly.
Subtitle Size
Adjust text size of the subtitles, there are large, medium and small available.
DHCP
Select Dynamic and the system will automatically acquire an IP address.
Static
Select Static to manually set an IP address.
IP Address
192.168.1.110
Subnet Mask
255.255.255.0
Gateway Address
192.168.1.1
DNS Address
202.95.128.98
Other options
7.5 Network settings
7.5.1 WIRED LAN
For IP settings, press direction keys on the Remote Control to move the cursor to the IP address field, press OK key, then press
number keys to input IP parameters and press OK key. Then move the cursor to the next parameter field with the left and right
key (the same setting method with the above). Press the “SAVE” key at the lower right corner after all parameters are input.
Example: Static IP settings (Assume that your gateway address is 192.168.1.1 and the address 192.168.1.110 is not assigned
to other computers or players.)
28
Page 29
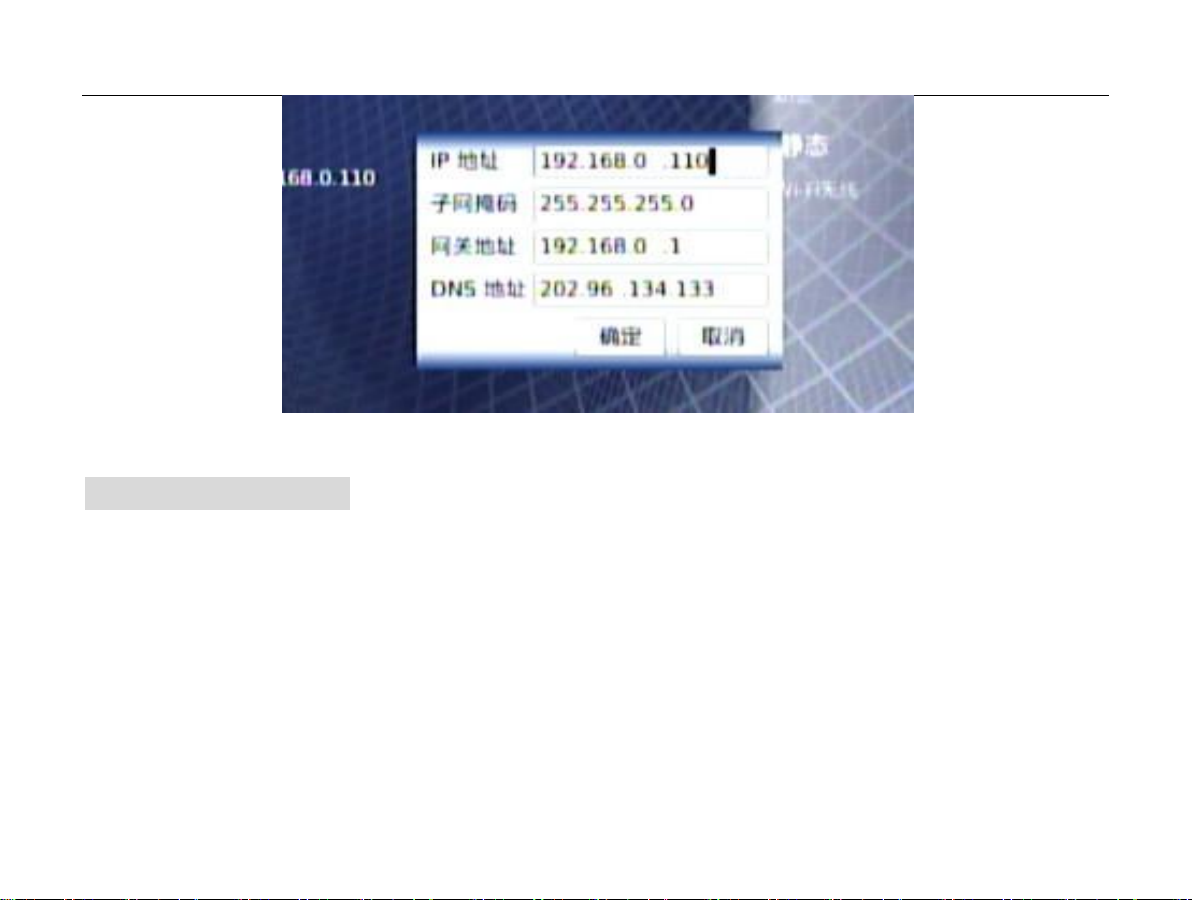
After all parameters are set, press “Confirm” button on dialog box on the lower right corner.
7.5.2 Wi-Fi setting:If the router supports wireless network, the player can realize all functions of cable network
through wireless network.
1、Clear non-encrypted mode: Select this option when the router did not encrypt; input server name of wireless network at Wi-Fi
SSID with the remote controller, then select "OK" to save the settings.
For example: the name of your wireless network on router is "WIFI" and it did not encrypt, firstly select "Clear", then input “WIFI”
at Wi-Fi SSID, finally select "OK" to save the settings.
29
Page 30
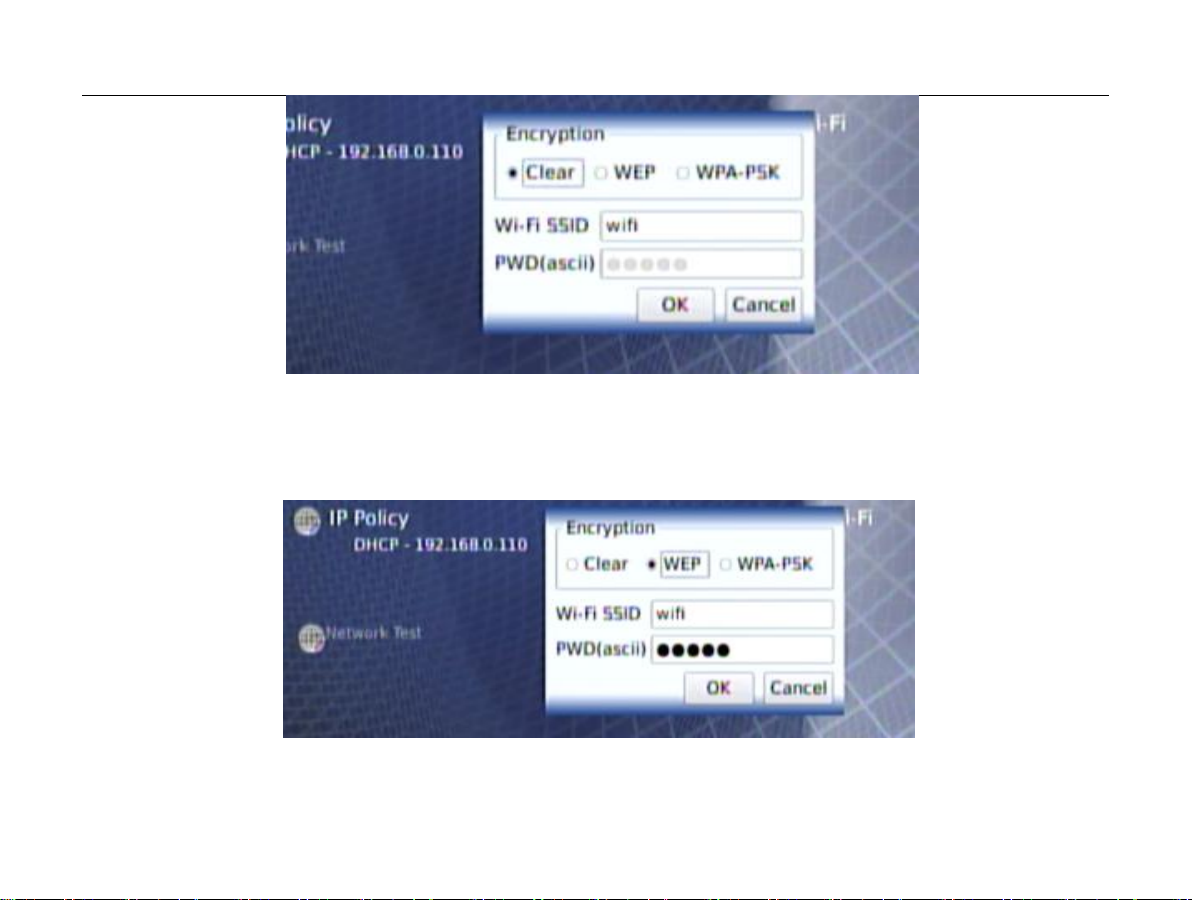
2、WEP/WPA-PSK:WEP / WPA-PSK encryption mode: set the password mode of wireless network on router to WEP / WPA-PSK
mode on PC, then player inputs the name of wireless network server at Wi-Fi SSID with remote controller, and enter password at
"PWD", finally select "OK" to save the settings.
30
Page 31
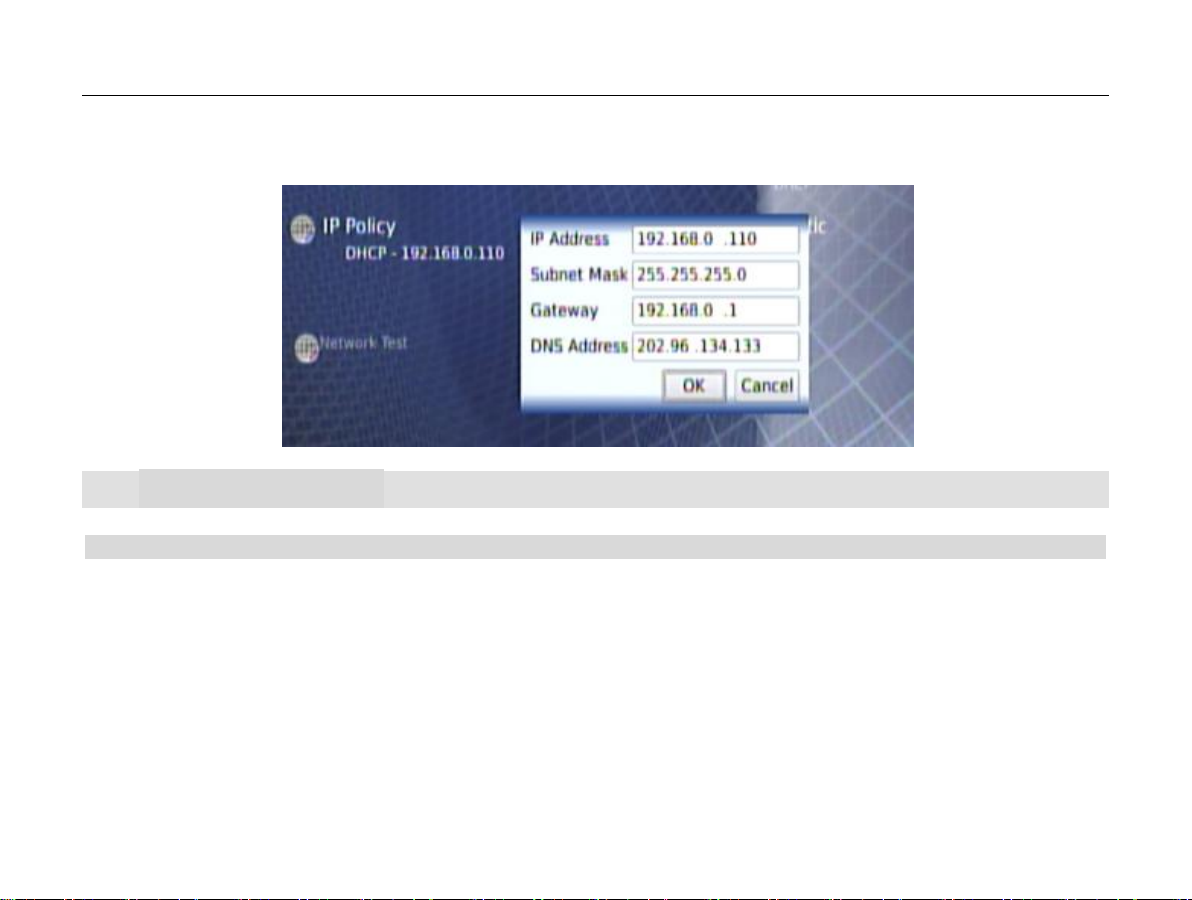
3、Network Test
After IP setup is complete, test whether player and network are connected, if they are, the interface dialog box appears and
displays the player's IP address
7.6 System settings
7.6.1Auto start list
Select the list need to run automatically after booting, mark "√" and select "OK" to save the settings. After this operation, each
time the player restarts, it will automatically run the selected items if the network is connected.
31
Page 32
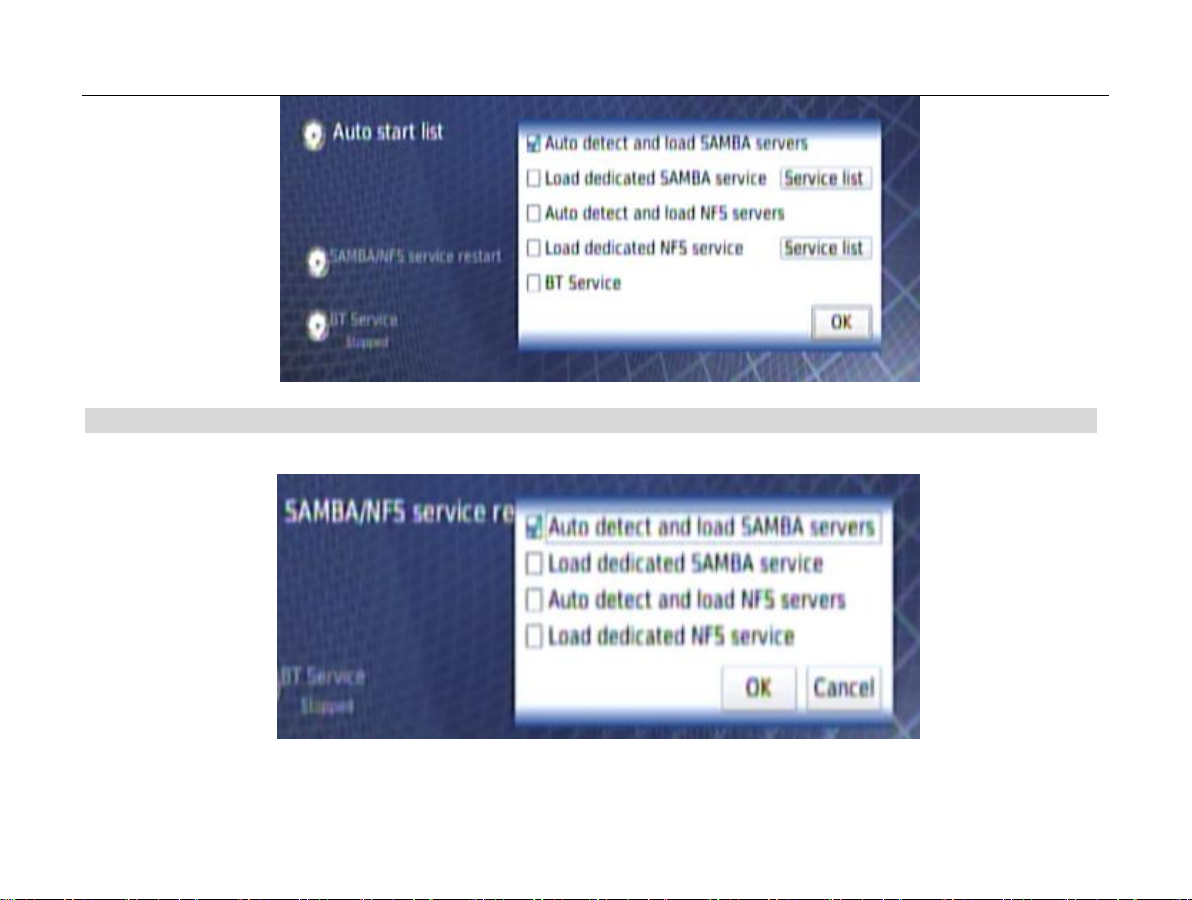
7.6.2 SAMBA/NFS service restart
If the network refreshed during playing, you can refresh SAMBA and NFS servers here, so as to properly play media files in the
LAN.
32
Page 33
Theme setting
Select background picture according to your preferences.
Saver delay min
After this option is set, if you do not do anything in the certain time, the screen will show
screensaver state, and press any key to quit it.
BT service
Open / close BT download task.
Lable
Firmware version used by player currently.
Internal Stroage-USED/Total
Here we can see the state of the built-in USB module, it will display 0B/1GB after restore to
factory settings or clear
Rest to Default Setting
Restore all the data of the player to initial state.
Firmware UPgrading
When there is new firmware in the connected USB device, you can use this option to
upgrade the firmware of the player, for more details, please refers to “upgrading method” on
the next page.
7.6.3 Other options
7.7 Information
7.8 Upgrade Methods
Notes:
1. Power failure is not allowed during normal and mandatory upgrading process.
2. Mandatory upgrading mode is only for backup, you can use this when normal upgrade fails or booting failure caused by power
failure during upgrading process; it is recommended for users to use normal upgrade mode.
33
Page 34
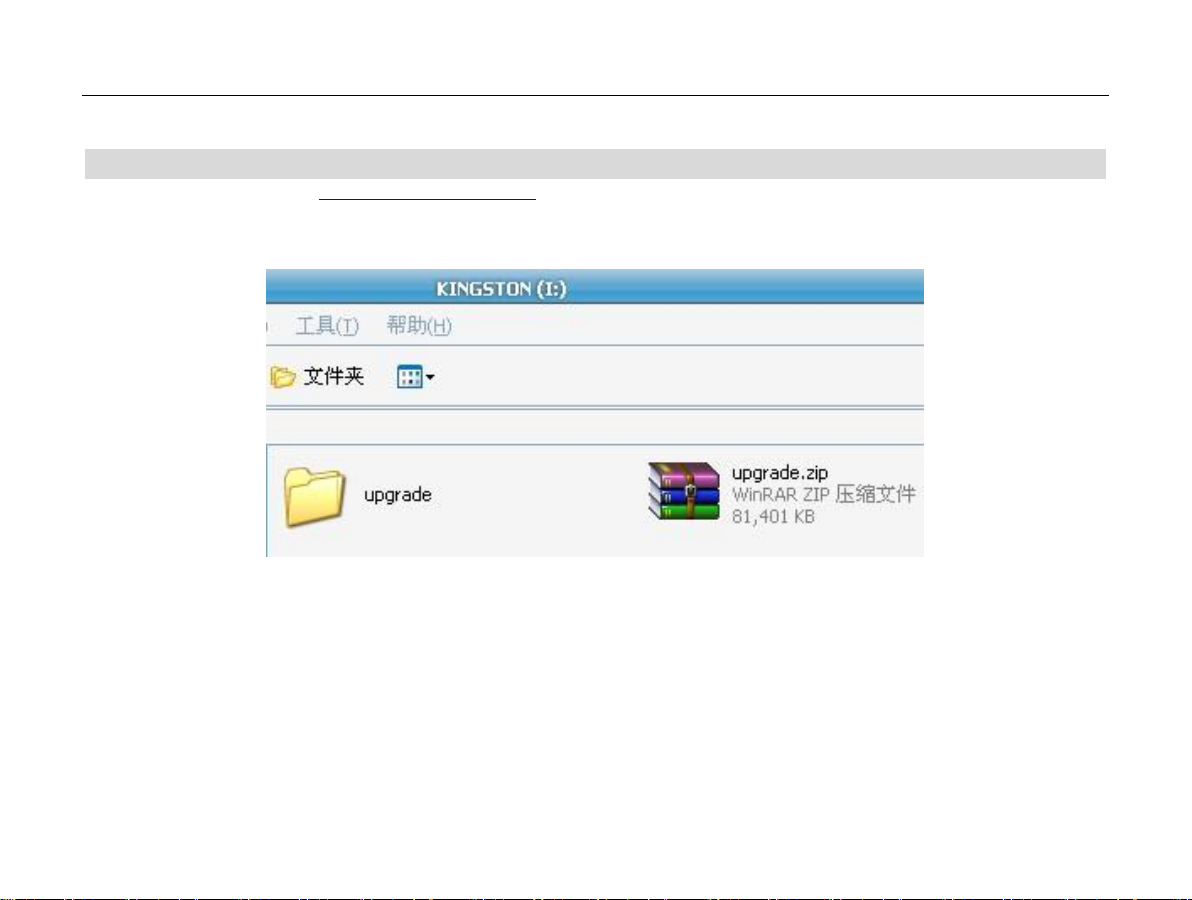
7.8.1 Normal upgrade mode
1、Please visit our website http://www.viewlab.com.cn/ to download the latest version of firmware.
2、Download the latest software to local USB root directory.
3、Decompression the software to USB root directory. It will generate a directory named "upgrade".
34
Page 35
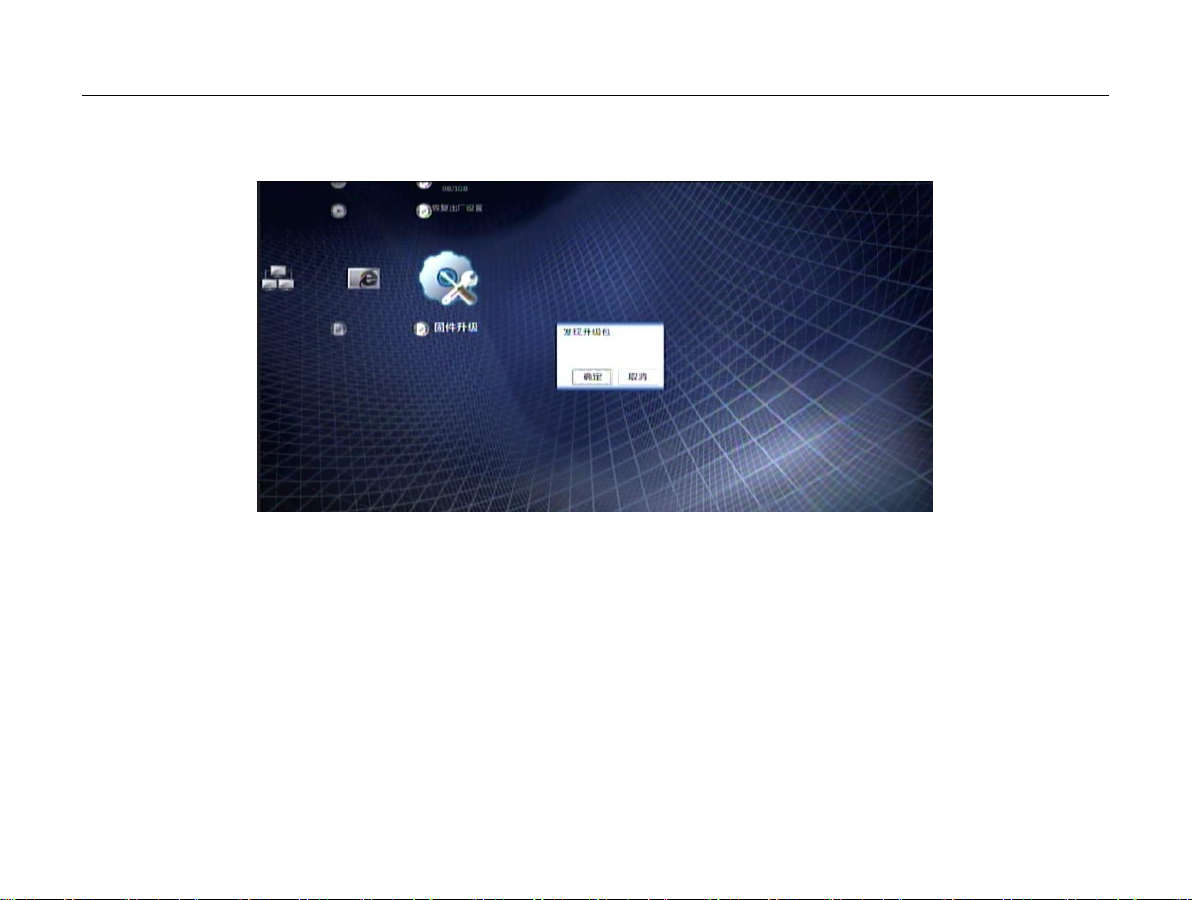
4、Plug the USB dongle to the player and reboot the player to upgrade. Reboot and enter "SETUP"-"INFORMATION" interface.
Press "UPGRADE" button.
35
Page 36
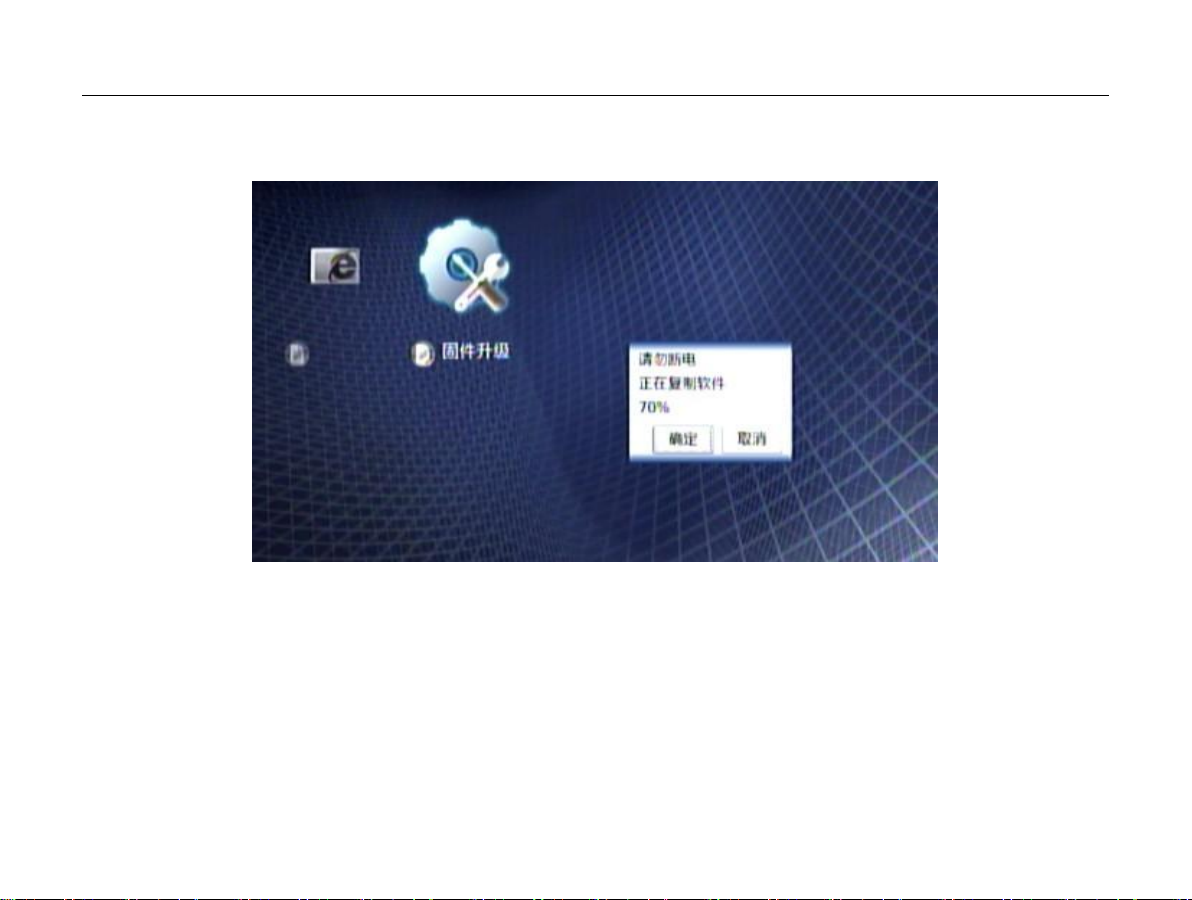
5、After the screen displays the new version of the software, select "OK" to copy the software.
36
Page 37
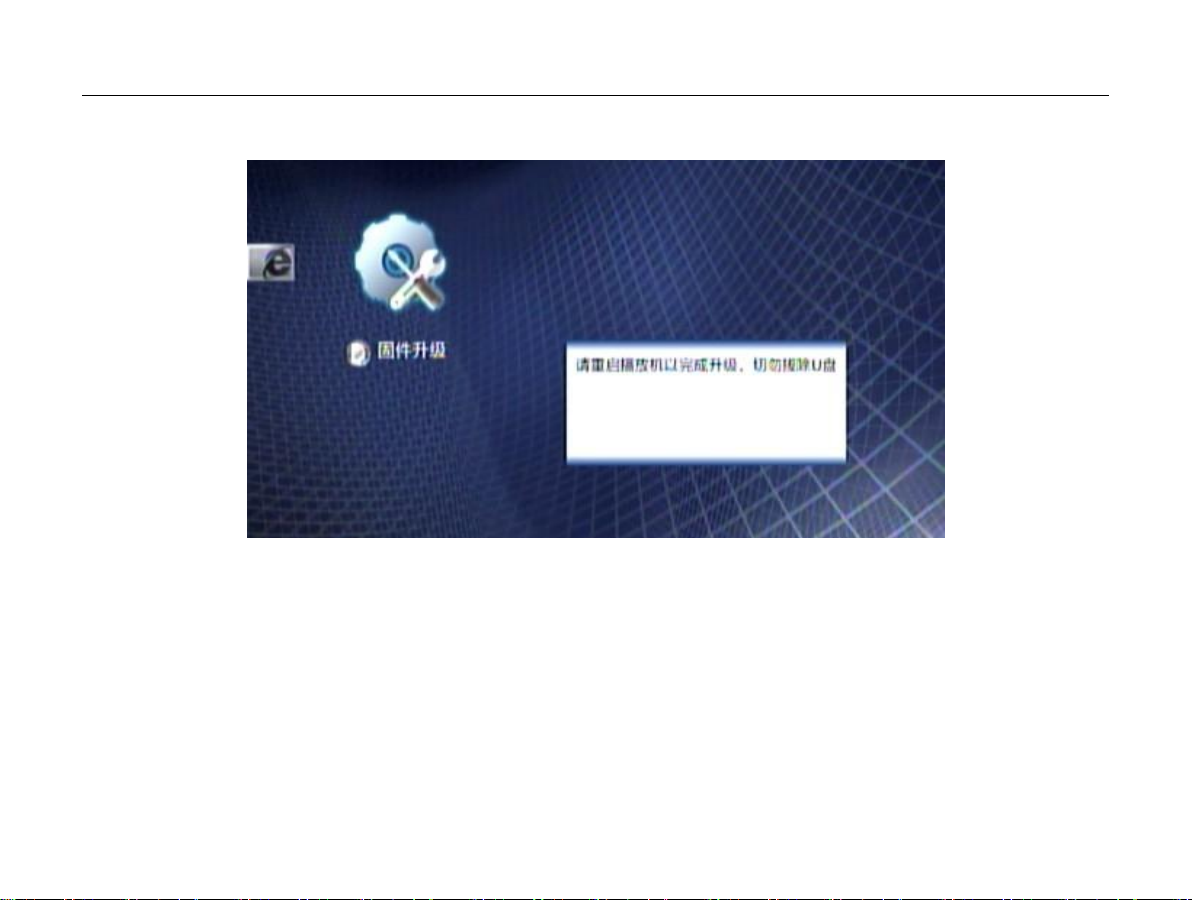
6、After extracting the software, restart the player, please do not remove the USB disk for upgrade dod not complete at this time;
7、 Restart the player, "Upgrade is in process, please do not power off" on TV, this process may take several minutes, do not turn
off the power, wait for completion.
37
Page 38
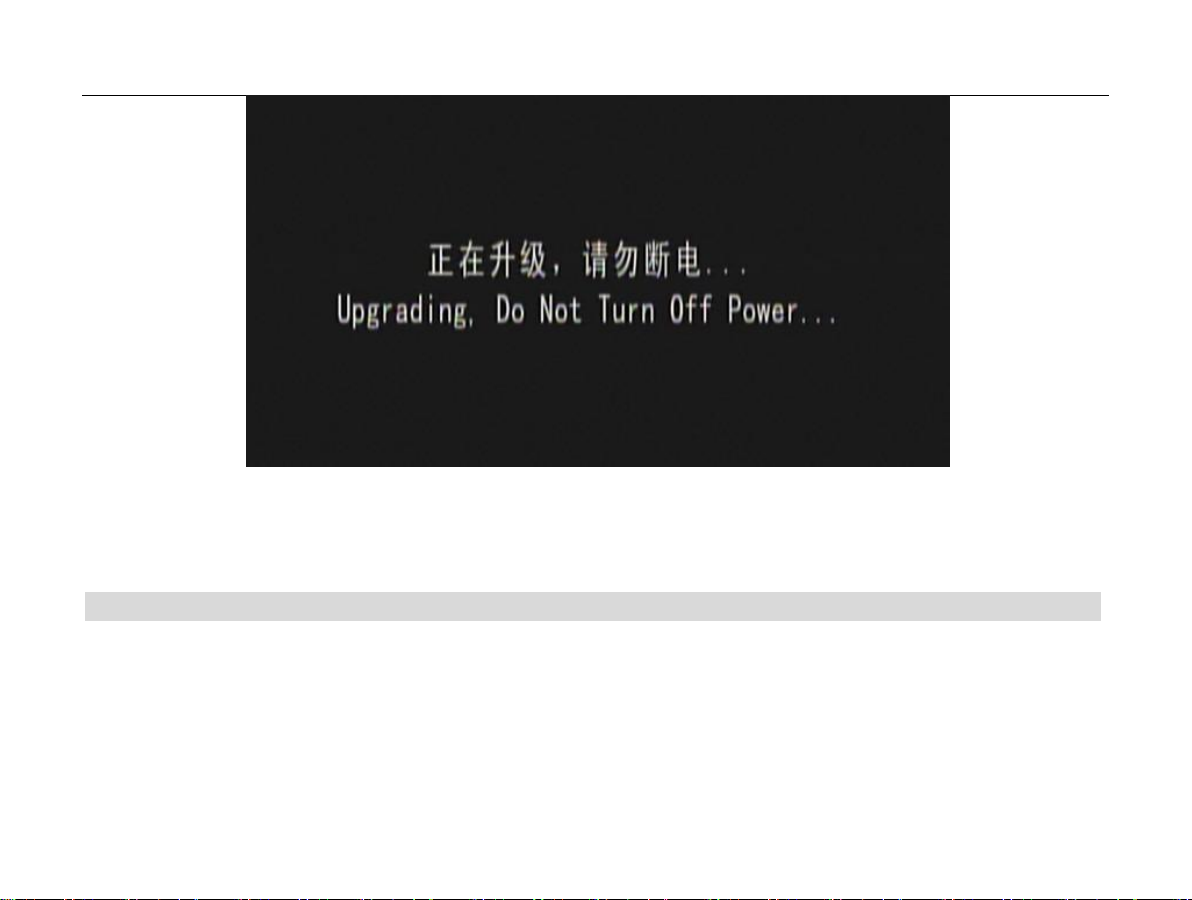
8、When the step 7 is completed, the player will automatically restart, after enter the main menu, the upgrade is successful, you
can use your player.
7.8.2 Mandatory upgrade mode
1、 Copy the software to the root directory of the USB disk. (See steps 1 to 3 on Normal upgrade mode)
2、 Plug the USB disk to the player, hold power button for about 5 seconds, the color of power led flashes red and blue
interactively, then release the button.
3、"BOOTING UP" will be displayed on TW, the panel displayer of the player shows "loding" and has been flashing, which
indicates that player is upgrading, this process may takes a few minutes, please wait for completion.
4、The player is in standby state, restart the player, after enter the main menu, the upgrade is successful, you can use your
player.
38
Page 39

7.9 Copy / delete files
(1) Copy file: in case of selected files, press "POP UP / MENU" button on the remote controller, after the dialog box appears,
select Copy, and open the folder you want to copy to, then press "POP UP / MENU " button on the remote controller to select
paste, if the files are large, the process may continue for some time, please be patient, do not do any other operations.
(2) Delete file: in case of selected files, press "POP UP / MENU" button on the remote controller, after the dialog box appears,
select Delete to delete the file.
39
Page 40
8 Precautions
8.1 Safety Instructions
Power Supply
Do not use any power supply that exceeds the standard voltage. Otherwise, overvoltage or overload may be resulted, which may
cause fire.
Pull out the plug from the socket outlet to avoid damages from lightning or the player is not in use for a long period. It can
effectively avoid damages from lightning or electric network fluctuation.
Hard disk
Please install the hard disk into the machine before booting, it is not allowed to hot-plug hard drive to avoid damage your hard
disk
Heat Source
This player must be placed away from heat sources, i.e. heaters, heat regulators, ovens and other products that emit heat
(including amplifiers, etc.).
Invasion of Foreign Matters and Liquids
Do not drop any metal object or splash or spray any kind of liquid into this player. Otherwise, it may cause short circuit and
consequently accidents such as electric shocks, fire or malfunctions. Pull off the plug of power wire at once if liquids are splashed
into this player and contact the local agent.
Do not spray any pesticide over or into this player. Pesticide spray may contain flammable gas and may cause fire if it gets into
this player.
Cleaning
Please pull off the plug of the AC power wire before you clean this player. Do not use any liquid detergent or cleaner spray. Only
use damp and soft cloth for cleaning.
For obstinate stains, dip a soft cloth into weak detergent liquid, wring it out and clean with it. Then wipe the player dry with soft
and dry cloth. Do not use any solvent, e.g. thinner, some types of gasoline, since such solvents will damage the surface of the
player.
Please follow the use instructions of the cloth if you use any cloth treated with chemical immersion.
40
Page 41
Service
Do not repair this player by yourself. Electric shock accidents or damages of this player may be caused if any nonprofessional try
to repair, dismount or assemble this player. Please disconnect the plug of the power wire and contact the local agent or service
center if the following situations or any malfunction not mentioned in this manual occur.
Do require the technician to make safety check after the service is finished.
8.2 Video Output Mode Setup
series have output at all video output ports after they are powered on. Please regulate the video output resolution of the
product with the video mode select key on the Remote Control till your display device comes back to normal if the video cannot
be displayed normally.
8.3 System Update upon the Change of External USB Devices
Please return to the main menu and move the cursor to the USB icon, then press OK to confirm after you connect the external
device if you want to change the external USB device during your is working normally. Then, the system will search for and
reload the new external USB device. After that, the system can read the external USB device normally.
8.4 Recommended Boot Order
Connect the and your display (e.g. a TV set) and audio (e.g. an audio amplifier) devices with proper wires.
Connect the DC output end of the enclosed adapter to the power input port of your .
Insert the AC plug of the adapter into a socket outlet.
Press the key on the Remote Control to power on the player if the power indicator is red on the panel.
Wait for the initialization of the player and then it will enter the main menu.
8.5 Official Website
We suggest you visit our website http://www.viewlab.com.cn/ regularly to keep informed on the release of new firmware versions
so that you can update your constantly to keep its optimum performance.
41
Page 42
1
Some U-discs and storage cards of low velocity cannot support the play of high code rates. We suggest you copy your
movie sources to a portable hard drive or internal hard disc for playing them.
2
Code errors of the movie source data will also cause slack play. Please try to play other movies to see if the same
problem occurs.
1
The system device is not reloaded. Then please return to the main menu and select USB to reload the new
external device.
2
The external USB device is not properly connected. Please connect both USB ports to make a portable hard drive work
normally (some portable hard drives sold in bulk are demanding on drive current).
The USB device may have virus. The disc in a USB drive may have serious scratches.
3
Bad USB connecting cable. We suggest you use the enclosed connecting cable or others up to USB2.0 standard.
9 FAQ
9.1 USB external device does not play smoothly
This problem may be caused by the following reasons:
9.2 USB Device Not Found
No content s shown and you cannot read the newly connected USB equipment normally when you connect a new external USB
device, e.g. a USB portable hard drive and directly read the USB device indicated by the USB symbol. This may be caused by the
following reasons:
42
Page 43
1
The TV set is in mute mode or the volume of the player is adjusted to the minimum.
2
Two-channel audio is not available under the current display settings. Please press the “Track Selection” key to
select a track of two channels.
3
YPbPr is only a video connection if you use it to connect with a TV set. Please connect audio output to the TV set.
4
Amplifier is selected for the decoding setting in the system setup. Then this player will give no sound.
1
The sound of the amplifier is too low or the input setting is wrong. (An amplifier usually has several ports. Please use
the proper input mode for the right port.)
2
Please check the properness of your coaxial or optical fiber connection or the soundness of the cable if you use
coaxial or optical fiber to connect the player and a sound system.
3
Please check the audio settings for the compatibility between the settings and the output cable (e.g. please check
whether the setting is for straight-through amplifier if you use a coaxial cable).
9.3 No TV Sound
This problem may be caused by the following reasons:
9.4 No Sound from Coaxial or Optical Fiber
This problem may be caused by the following reasons:
43
Page 44
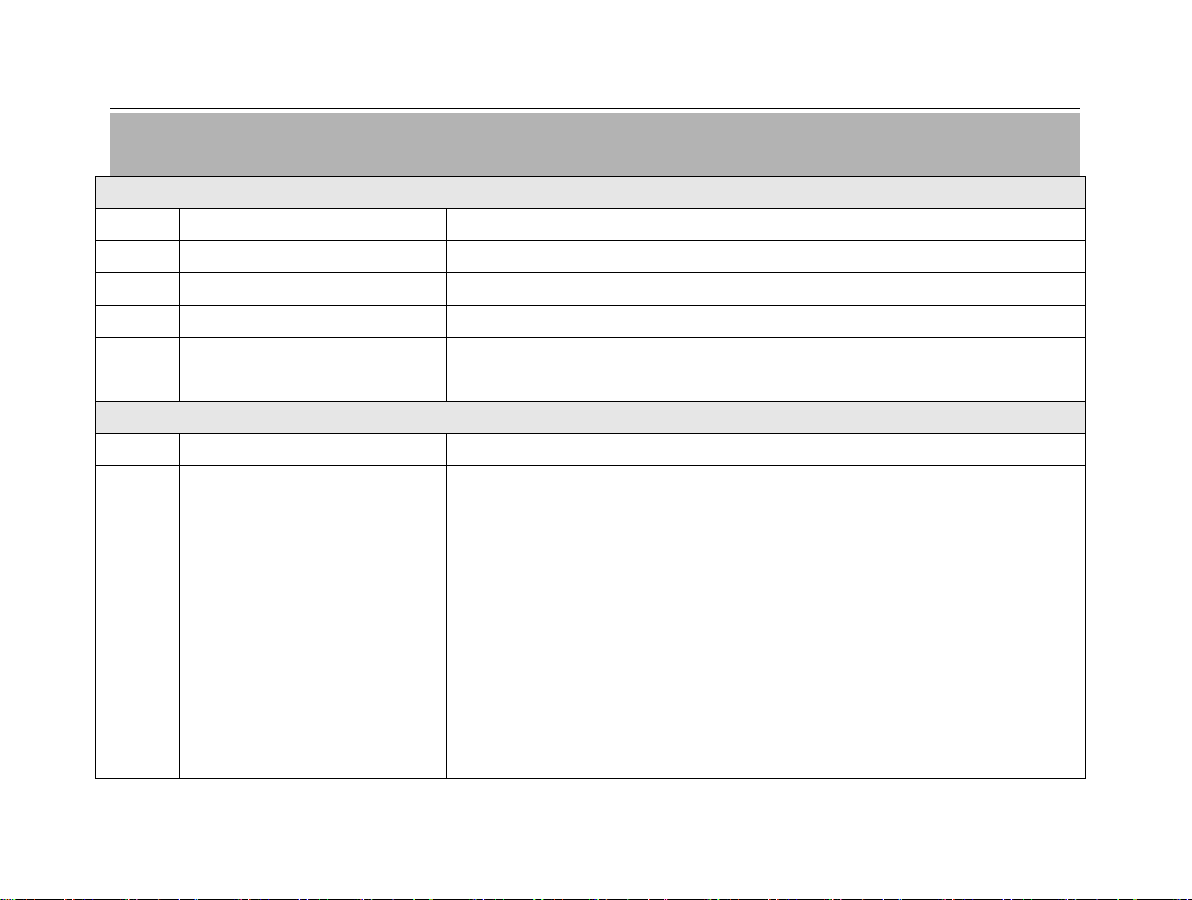
10 Technical Specifications
Electrical Specifications
1
Input Voltage
100~240VAC 50Hz/60Hz
2
Power Rating
20W
3
Working Temperature
-5~ +40oC
4
Working Humidity
20% ~ 80%
5
Electromagnetic
Compatibility
Certified CE/FCC quality certification.
Functional Configuration
6
Master Chip
Sigma design 8642
7
Output Port
Analogue audio output Stereo audio output
Component Output YPbPr
Digital audio output Optical fiber/coaxial
Digital TV output HDMI 1.3
USB USB2.0 *3
LAN 10M/100Mbps
WIFI 150Mbps
USB-PC USB2.0 SLAVE
Card Reader SD/MMC/XD/MS
High definition TV broadcast system ( optional )
Page 45
8
Remote Control
50 keys, backlight
9
Power on/off
Power on/off by Remote Control
10
Disc driver
Blu-ray Disc driver
11
Hard disk
Built-in (optional )
12
Size
430*340*60mm
11 YAMJ Poster User Manual
11.1 PC YAMJ Poster Making Instructions
11.1.1 WINDOW Requirements
1、Software Download
◦ jdk-6u14-windows-i586.exe
◦ http://mediaplayersite.com/sites/default/files/YAMJ/yamj-svn-r1659.zip
◦ http://downloads.sourceforge.net/mediainfo/MediaInfo_CLI_0.7.33_Windows_i386.zip
2、Making Instructions
◦ Install jdk-6u14-windows-i586.exe
Page 46

◦ Unzip yamj-svn-r1659.zip to create the yamj-svn-r165 folder
◦ Unzip MediaInfo_CLI_0.7.33_Windows_i386.zip to create the
MediaInfo_CLI_0.7.33_Windows_i386 folder
◦ Create mediainfo under the directory of yamj-svn-r1659
◦ Copy the mediainfo.exe under the directory of MediaInfo_CLI_0.7.33_Windows_i386 into the
yamj-svn-r1659/mediainfo
◦ Click Start->Run, type “cmd.exe” and click “OK” to pop up the textual interface,and then run
command to enter into the directory of the unzipped yamj-svn-r1659.
◦ Run MovieJukebox.bat < the save path of media files> -o <the save path of YAMJ poster> -p
properties\moviejukebox-default.properties -c
▪ Example:
◦ Unzip the yamj-svn-r1659.zip and put it under the directory of d:\(d:\yamj-svn-r1659)
Page 47

◦ Unzip the MediaInfo_CLI_0.7.33_Windows_i386.zip and put it under the directory ofd:\
(d:\MediaInfo_CLI_0.7.33_Windows_i386)
◦ Supposed that the media file is put under the directory of g:\video
◦ Create mediainfo under the directory of d:\yamj-svn-r1659 in windows
◦ Cope the MediaInfo.exe under the directory of d:\MediaInfo_CLI_0.7.33_Windows_i386 into
the directory of d:\yamj-svn-r1659\mediainfo in windows
◦ After entering the windows textual interface,the current position will be at the directory of
c:\Documents and Settings\<current user>,run the command “d:” to get into d:\,and then run the
command “cd yamj-svn-r1659” to enter into the directory of d:\yamj-svn-r1659.
◦ Run the command of “MovieJukebox.bat g:\video -o g:\video -p
properties\moviejukebox-default.properties –c” to create the YAMJ poster file that will be saved
in g:\video,including one index.htm file and one Jukebox directory.
Page 48

11.1.2. LINUX Requirements
1. Software Download
◦ http://mediaplayersite.com/sites/default/files/YAMJ/yamj-svn-r1659.zip
◦ http://downloads.sourceforge.net/project/mediainfo/binary/mediainfo/0.7.33/MediaInfo_CLI_0.7
.33_GNU_FromSource.tar.bz2
2. Making Instructions
◦ Unzip the yamj-svn-r1659.zip to create the directory of yamj-svn-r1659
◦ Unzip the MediaInfo_CLI_0.7.33_GNU_FromSource.tar.bz2 to create
MediaInfo_CLI_GNU_FromSource
◦ Create mediainfo under the directory of yamj-svn-r1659
Page 49

◦ Enter the directory of MediaInfo_CLI_GNU_FromSource and run the command of
“./CLI_Compile.sh” to compile.After then it will create the executable file “mediainfo under the
directory of MediaInfo_CLI_GNU_FromSource/MediaInfo/Project/GNU/CLI, cope the file
“mediainfo” into the directory of yamj-svn-r1659/mediainfo
◦ Entering into the directory of yamj-svn-r1659, run ./MovieJukebox.sh <the save path of media
files> -o < the save path of YAMJ poster > -p properties\moviejukebox-default.properties -c
▪ Example:
Run the command “mkdir -p /yamj/yamj-svn-r1659;unzip yamj-svn-r1659.zip -d
/yamj/yamj-svn-r1659” and unzip yamj-svn-r1659.zip to /yamj/yamj-svn-r1659/.
Run the command “tar xjvf MediaInfo_CLI_0.7.33_GNU_FromSource.tar.bz2 -C
/yamj” and unzip MediaInfo_CLI_0.7.33_GNU_FromSource.tar.bz2 to the directory of
/yamj/MediaInfo_CLI_GNU_FromSource
Run the command “./CLI_Compile.sh” under the directory of
/yamj/MediaInfo_CLI_GNU_FromSource to create the executable file “mediainfo”
under the directory of /yamj/MediaInfo_CLI_GNU_FromSource/Project/GNU/CLI/
Page 50

Supposed that the media file is saved under the directory of/yamj/video
Run the command of “mkdir -p /yamj/yamj-svn-r1659/mediainfo” and create the
sub-directory “mediainfo” under the directory of /yamj/yamj-svn-r1659.
Run the command “cp
/yamj/MediaInfo_CLI_GNU_FromSource/Project/GNU/CLI/mediainfo
/yamj/yamj-svn-r1659/mediainfo –afr” and copy the executable file “mediainfo” to the
directory of /yamj/yamj-svn-r1659/mediainfo
Run the command “cd /yamj/yamj-svn-r1659” to enter into yamj-svn-r1659
Run the command “./MovieJukebox.sh /yamj/video -o /yamj/video -p
properties\moviejukebox-default.properties –c” to create YAMJ poster file to be put
under the directory of /yamj/video,including one index.htm file and one Jukebox
directory
Page 51

11.2 YAMJ Software Operation Instructions
11.2.1 YAMJ poster saved in the SAMBA shared folder in PC
1、Set the folder where the YAMJ poster is saved shared through SAMBA.
2、Enter into the SAMBA browser interface to show the index.htm file of YAMJ and click it to get into the
display & player interface for YAMJ poster.
11.2.2 YAMJ poster saved in the NFS shared folder in PC
1、Set the folder where the YAMJ poster is saved shared through NFS
2、Enter into the NFS browser interface to show the index.htm file of YAMJ and click it to get into the
display &player interface for YAMJ poster.
11.2.3 YAMJ poster saved in the local hard disk of the player
1、Mount the shared hard disk of the player to the local directory of PC through the network share (in case
that the player supports SAMBA server,which, however is impossible at present).
2、Create YAMJ poster in PC and put it under the shared hard disk of the player.
3、Enter into the browser interface for the files in the hard disk through the player to show the index.htm file
of YAMJ and click it to get into the display&player interface of YAMJ poster.
11.2.4 YAMJ poster saved in the USB flash disk
1、Insert the USB flash disk into the USB port of PC and create YAMJ poster in PC and then put the YAMJ
Page 52

poster folder to the USB flash disk.
2、Put the USB flash disk into the USB port of the player and enter into the browser interface for the files in
the USB flash disk through the player to show the index.htm file of YAMJ and click it to get into the
display& player interface of YAMJ poster.
11.4 YAMJ Software Constraints
During the process of making YAMJ poster,the save path of the media file shall be in accordance with the
save path of YAMJ poster, i.e.,when running
MovieJukebox.bat <the save path of media files> -o <the save path of YAMJ poster> -p
properties\moviejukebox-default.properties -c
or
./MovieJukebox.sh < the save path of media files > -o < the save path of YAMJ poster > -p
properties\moviejukebox-default.properties –c,
the save path of media files shall stay the same as that of YAMJ poster.
T Download Operating InstructionsBT Download Operating Instructions
Page 53
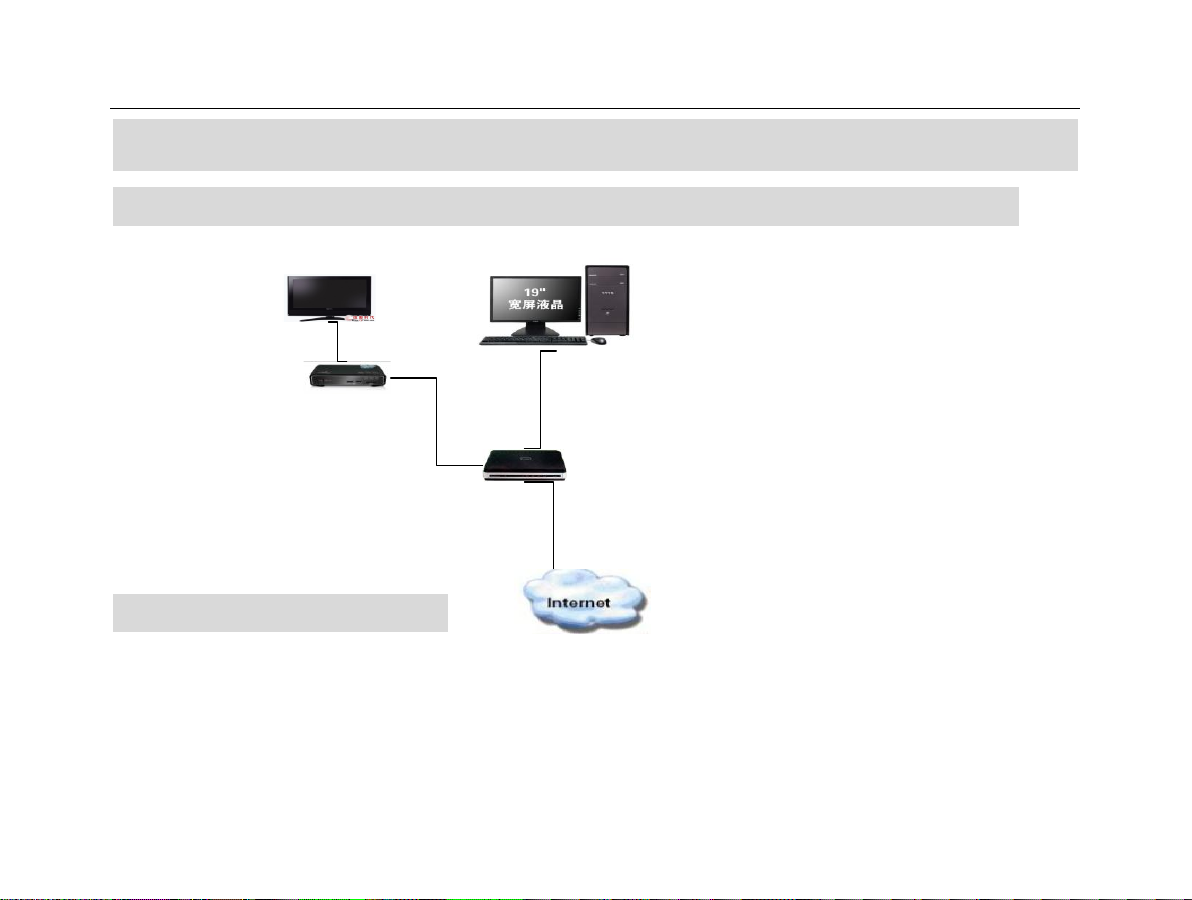
12 BT Download Operating Instruction
12.1 Introduction to Env ironment
TV pc
player
Switch or Route
12.2 Environment Build
Ensure that PC is connected to Internet.
Ensure that PC and player are connected.
Page 54

12.3 Operation
12.3.1 Player
1、Turn on the player and get IP address of the player.
2、PC
Input "http://<IP address of player>:9091/transmission/web" in the address bar of browser and
open webui of BT on the player to control.
Page 55
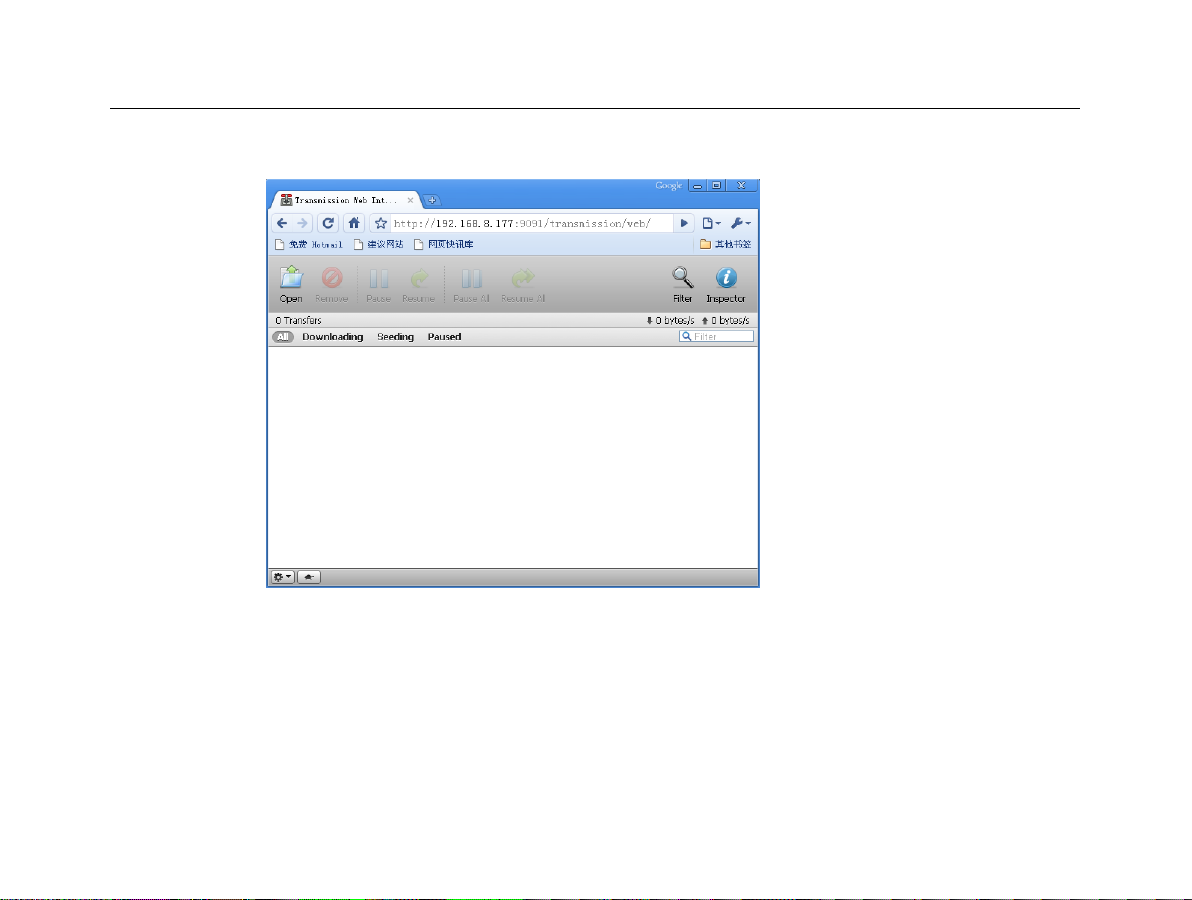
WEBUI Interface
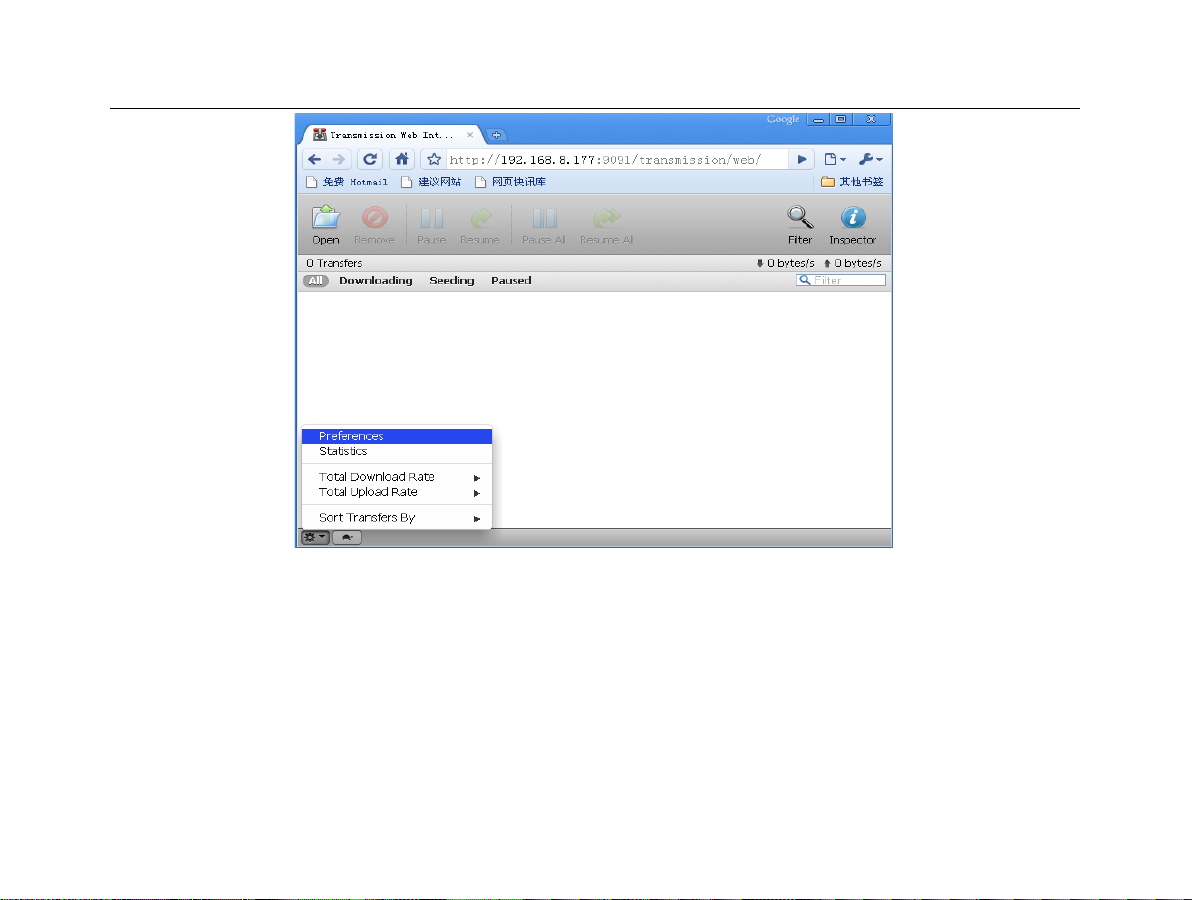
Set Save address of movie download
Page 56
Page 57
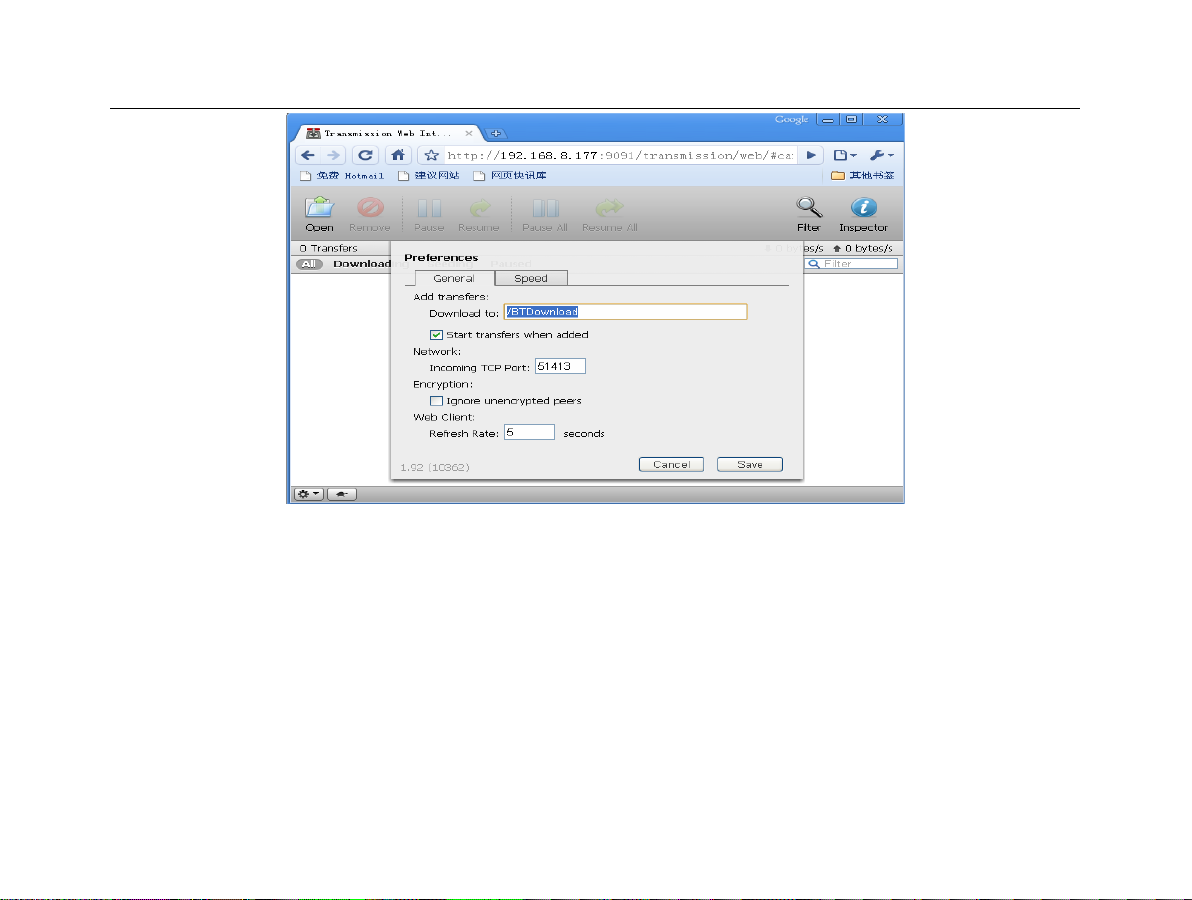
“Download to” specifies the download directory, the default directory is /BTDownload,
however which can’t be used to Save movies, thus before downloading, the directory must
be changed, please note:
1. Save the movie in the built-in hard disk:
1)Click HDD entry on the home of player, the user will see the hard disk partition
information, such has hda1, hda2, etc. After confirming the hard disk used to save data
downloaded through BT, the user can change the directory on the browser of PC.
2)Change /BTDownload as the download directory specified by the user. The parent
Page 58

directory is /HD_Media, second-level directory is the hard disk specified by the user to
Save the data downloaded through BT, such as hda1, hda2, etc., and the third-level
directory is BT download directory, such as /HD_Media/hda3/BTDownload.
3) After completing setting, click the save key on the bottom right corner to save the
information.
2. Save movie to external USB disk
1)Click USB entry on the home of player, the user will see the information of USB hard
disk, such as sda1, sda2, etc. After confirming the hard disk used to save data downloaded
through BT, the user can change on the browser of PC.
2)Change /BTDownload as the download directory specified by the user. The parent
directory is /HD_Media, second-level directory is the hard disk specified by the user to
Save the data downloaded through BT, such as hda1, hda2, etc., and the third-level
directory is BT download directory, such as /HD_Media/hda3/BTDownload.
3) After completing setting, click the save key on the bottom right corner to save the
information.
Only after completing setting download directory, the user can upload
BT seeds to download.
Page 59

If the user confirms that save the movie to the download directory set last time, it is
unnecessary to set the directory again. But, if the player is restarted, the user must re-set
the download directory before uploading BT seeds for the first time.
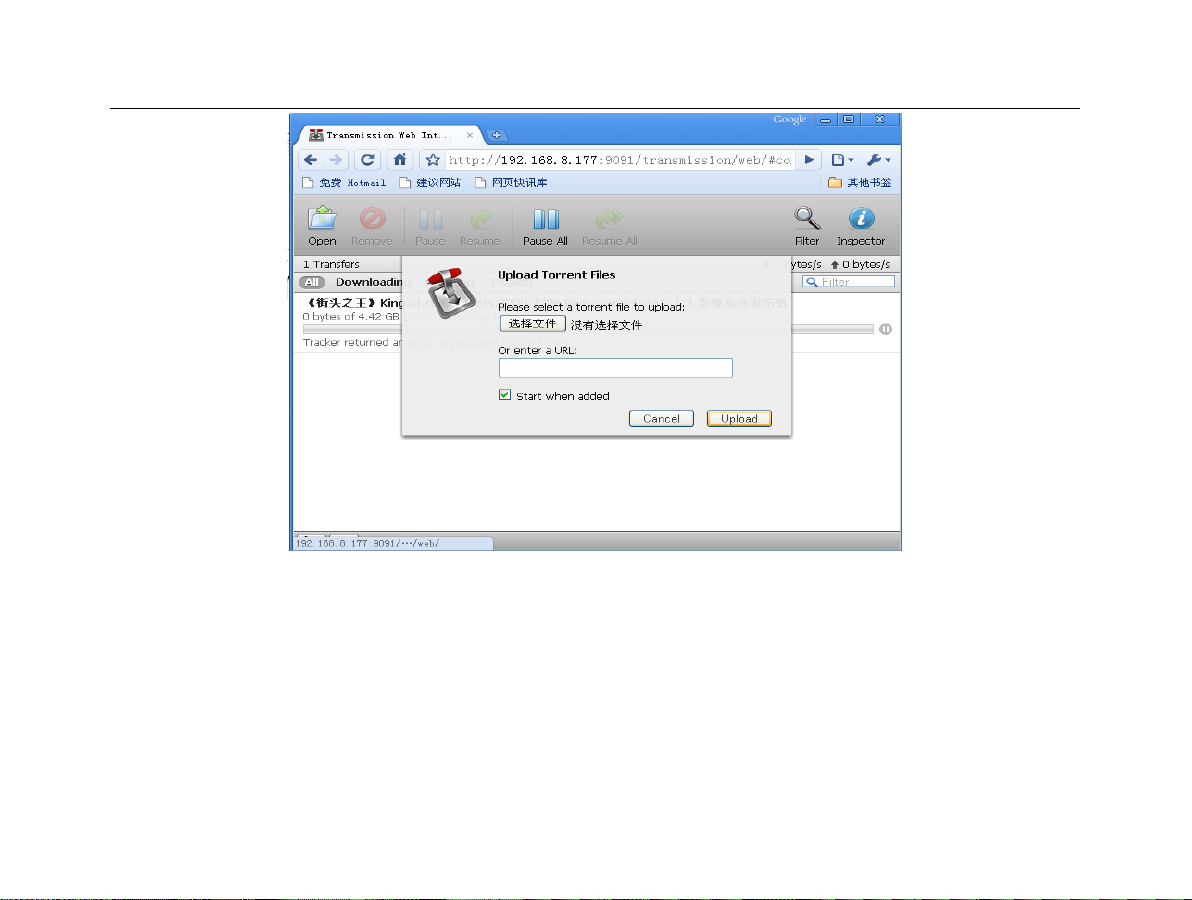
◦ Upload BT seed
Click open key on the page, following page will be popped up:
Page 60
Page 61
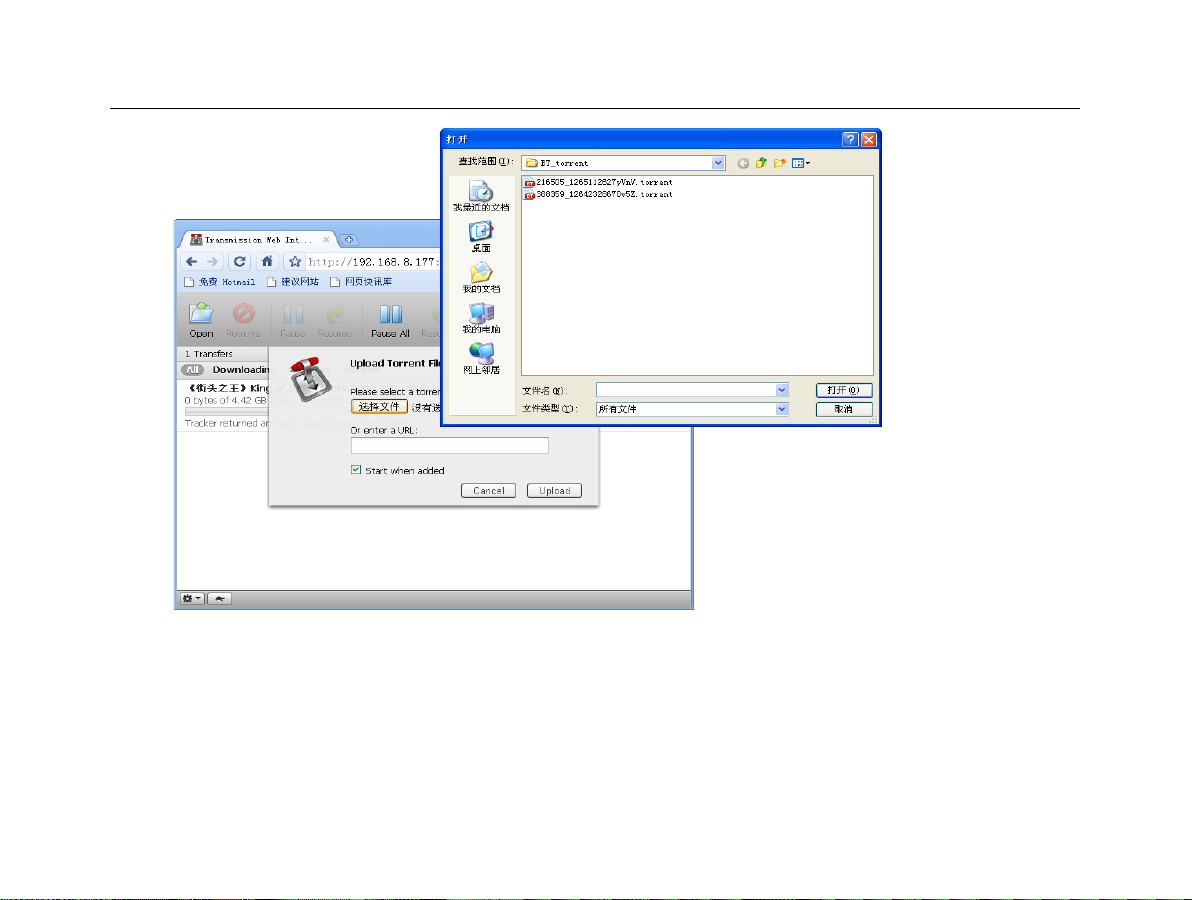
Select the seed file to be uploaded:
Page 62
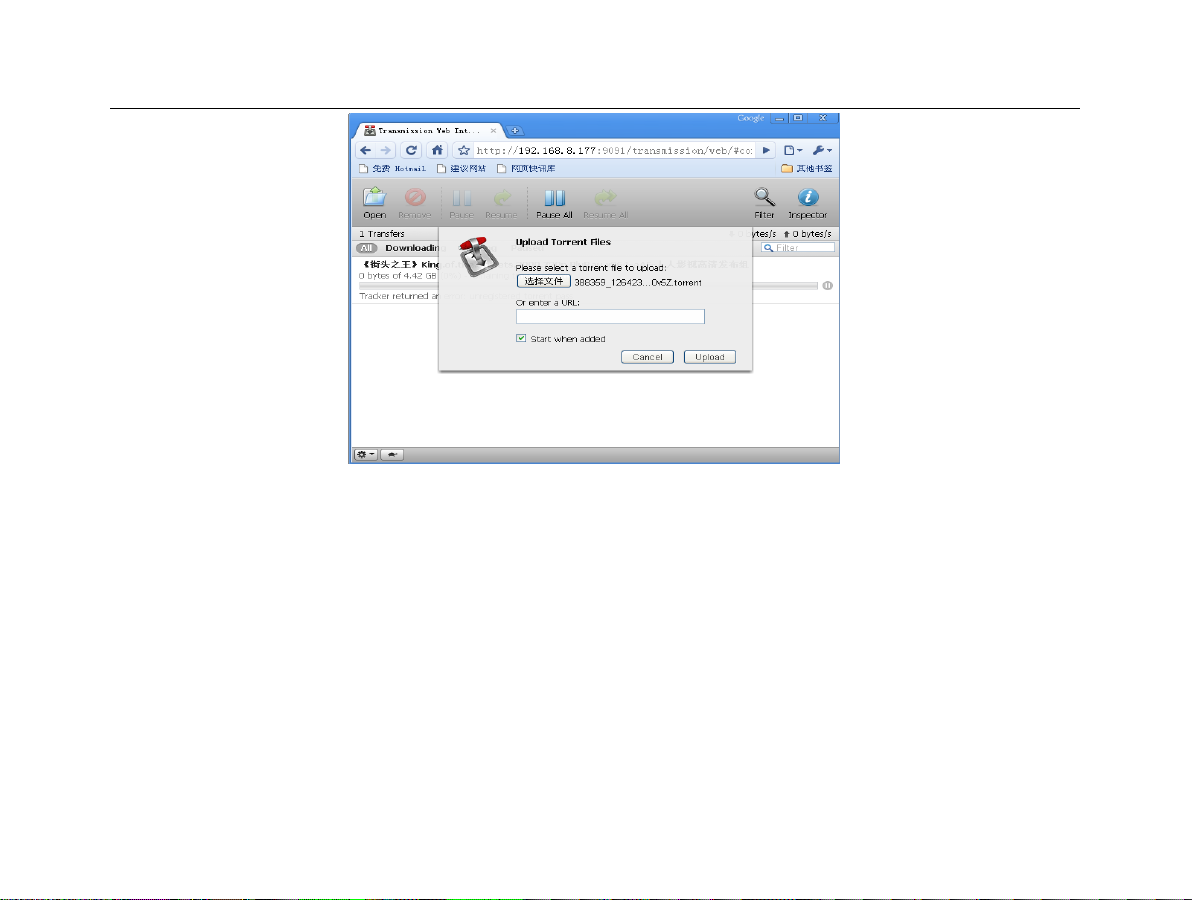
And then click Update key, Alvin.... starts downloading.
Page 63
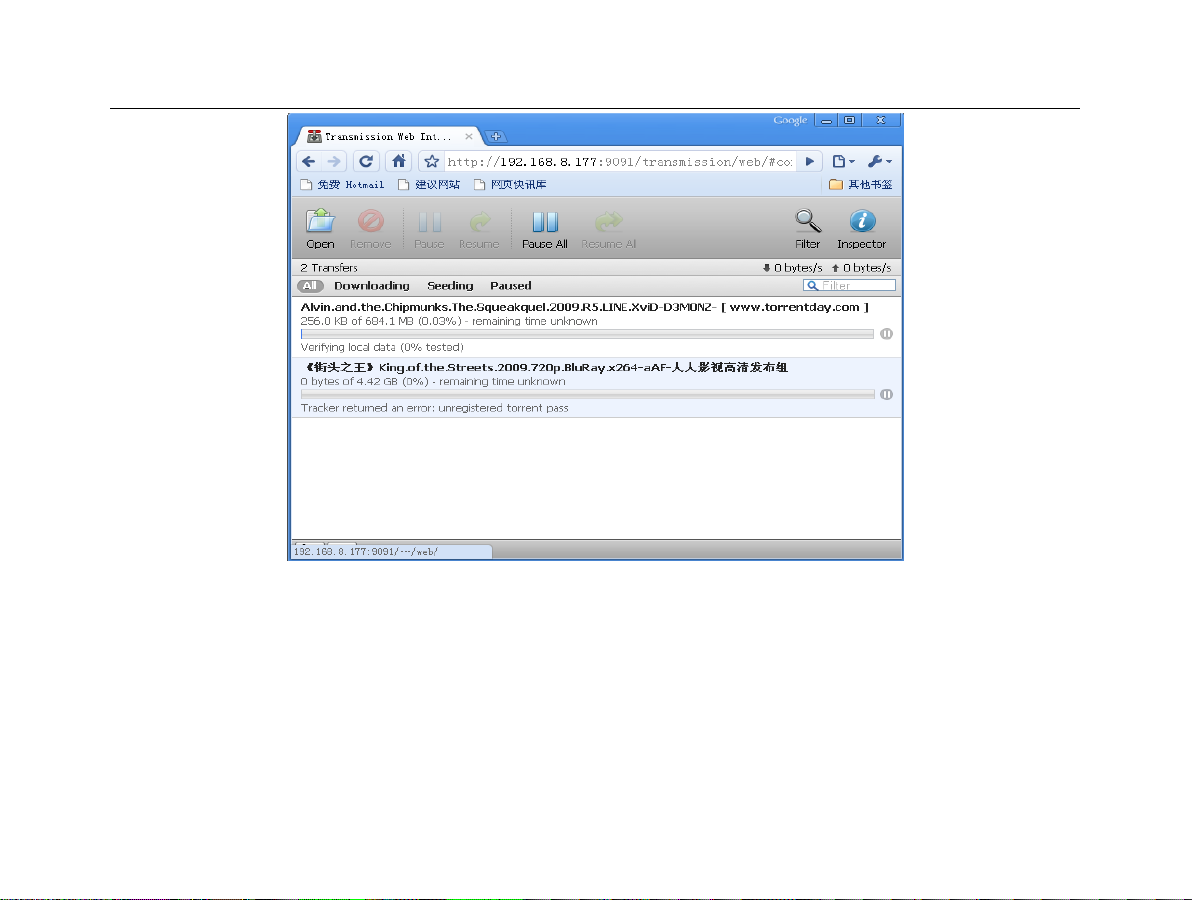
Control BT download and pause
1. Click Pause on the page to pause download of one file.
2. Click Pause All on the page to pause download of all files.
3. Click Resume on the page to resume download of one file.
4. Click Resume All on the page to resume download of all files.
5. Click Remove on the page to delete seed file of one file.
 Loading...