

view21 VV107ZRH User Manual
User Guide
Smart HD Digital TV Recorder
with WiFi
More than a digital TV recorder
View21_VV107ZRH_HD Digital TV Recorder_UG_V3.indd 2 11/07/2013 15:39:43
2 Welcome
Welcome
We think simplicity and focus are the hallmarks of remarkable
technology. Our View21® products are designed in the UK,
for the UK – providing relevant smart features in an attractive
package that’s easy to use and brilliantly capable.
More than a digital TV recorder
A FREEVIEW digital box gives you
digital TV channels and digital radio
stations, without a subscription or
contract. For more information about
FREEVIEW and to check reception in
your area, visit www.freeview.co.uk
This product is capable of receiving
and decoding Dolby Digital Plus.
Manufactured under license from
Dolby Laboratories. Dolby and the
double-D symbol are trademarks
of Dolby Laboratories.
Note: Use of any electrical
equipment should be undertaken
with care. Please read the warnings
on page 48 before using your
digital box. This digital box is
for household use only.
Register your View21 box
Registering your View21 box helps you stay up to date with the latest apps
and software updates. It only takes a few minutes.
Visit view21.com/register
View21_VV107ZRH_HD Digital TV Recorder_UG_V3.indd 2 11/07/2013 15:39:44
3
08
09
07
06
05
04
03
02
01
Getting set up
Getting started
Advanced box features
Settings menu
Software updates
Troubleshooting
Specifications
Guarantee & legal
Support & contact
View21_VV107ZRH_HD Digital TV Recorder_UG_V3.indd 3 11/07/2013 15:39:44
4 Full contents
Full contents
01 Getting set up
What’s in the box 6
Your View21 box 7
Your remote 8
Setting up 9
Easy install 10
Connecting to the Internet via WiFi 11
Advanced install 12
02 Getting started
Using your View21 box 14
Selecting channels 14
Changing the volume 14
Mute 15
Pausing live TV 15
Re co rding 15
Using the Guide 16
Using the Library 16
Other remote control buttons 16
Using online apps 20
Select and run an application 20
BBC iPlayer 20
Flickr 20
YouTu be 20
Twitt er 21
View21 companion apps 22
Use of the app requires 22
Using the View21 Play app (iPad/iPhone) 22
Watch live TV 22
View a recording 22
Make a recording before you view it 23
Browse the programme guide 23
Set a reminder 23
View21 Photo app 23
03 Advanced box features
Main Menu 24
Opening a function 24
Programme guide 24
Guide 24
Guide structure 25
Guide format options 25
Programme information 25
Set the default Guide format 26
Change the Guide format 26
Set the time window 26
Navigate to and watch a programme 26
Navigate to a Genre list 26
Record the programme you are watching 26
Cancel a recording 27
Record a future programme 27
Cancel a future recording 27
Resolving recording conflicts 28
Setting a reminder 28
Cancel a reminder 28
Library 29
Access the Library 29
Playing a recording 30
Pausing and resuming play 30
Play a recording ‘Resume play’
and ‘Play from start’ options 30
Play a recording using the
‘Play from time’ option 30
Protecting a recording 30
Stopping play 31
Deleting a recording 31
Playback (or rewind) at higher speeds 31
Sorting Library contacts 31
Invert the sort order 31
Preview a recording 31
Library quick key buttons 32
View21_VV107ZRH_HD Digital TV Recorder_UG_V3.indd 4 11/07/2013 15:39:45
5
01
02
03
04
05
06
07
08
09
04 Settings menu
Display and audio settings 34
Navigate and edit the System menu 34
HDMI video output 34
Audio output 34
Screen size 34
Default programme guide view 34
Default Librar y view 34
Menu transparency 34
Menu timeout 35
Lip-sync 35
12/24 hour clock 35
Language settings 35
Audio language 35
Subtitle language 35
Audio description 35
Subtitles 35
Parental settings 36
Set system PIN 36
Allow First Time Installation 36
Allow hard drive format 36
PIN required for recordings
with guidance 36
Freeview+ settings 37
Default recording mode 37
Series link mode 37
Live Pause amount 37
Add to start of recording 37
Add to end of recording 37
Skip forwards time 37
Skip backwards time 37
Automatic hard drive space management 37
Format hard disk drive 38
System settings 38
First Time Installation 38
Channel retune 38
WiFi setup 39
Auto standby 39
Automatic updates 39
Network change notification 39
System information 39
Front panel lights 39
Revert to default settings 39
Manual retune 39
05 Software updates
Software updating process 42
06 Troubleshooting
Troubleshooting help 44
07 Specifications
View21 box specifications 46
08 Guarantee & legal
Warnings 48
Guarantee 48
View21 disclaimer 49
09 Support & contact
Support and contact 51
View21_VV107ZRH_HD Digital TV Recorder_UG_V3.indd 5 11/07/2013 15:39:45
6 Getting set up
Getting set up
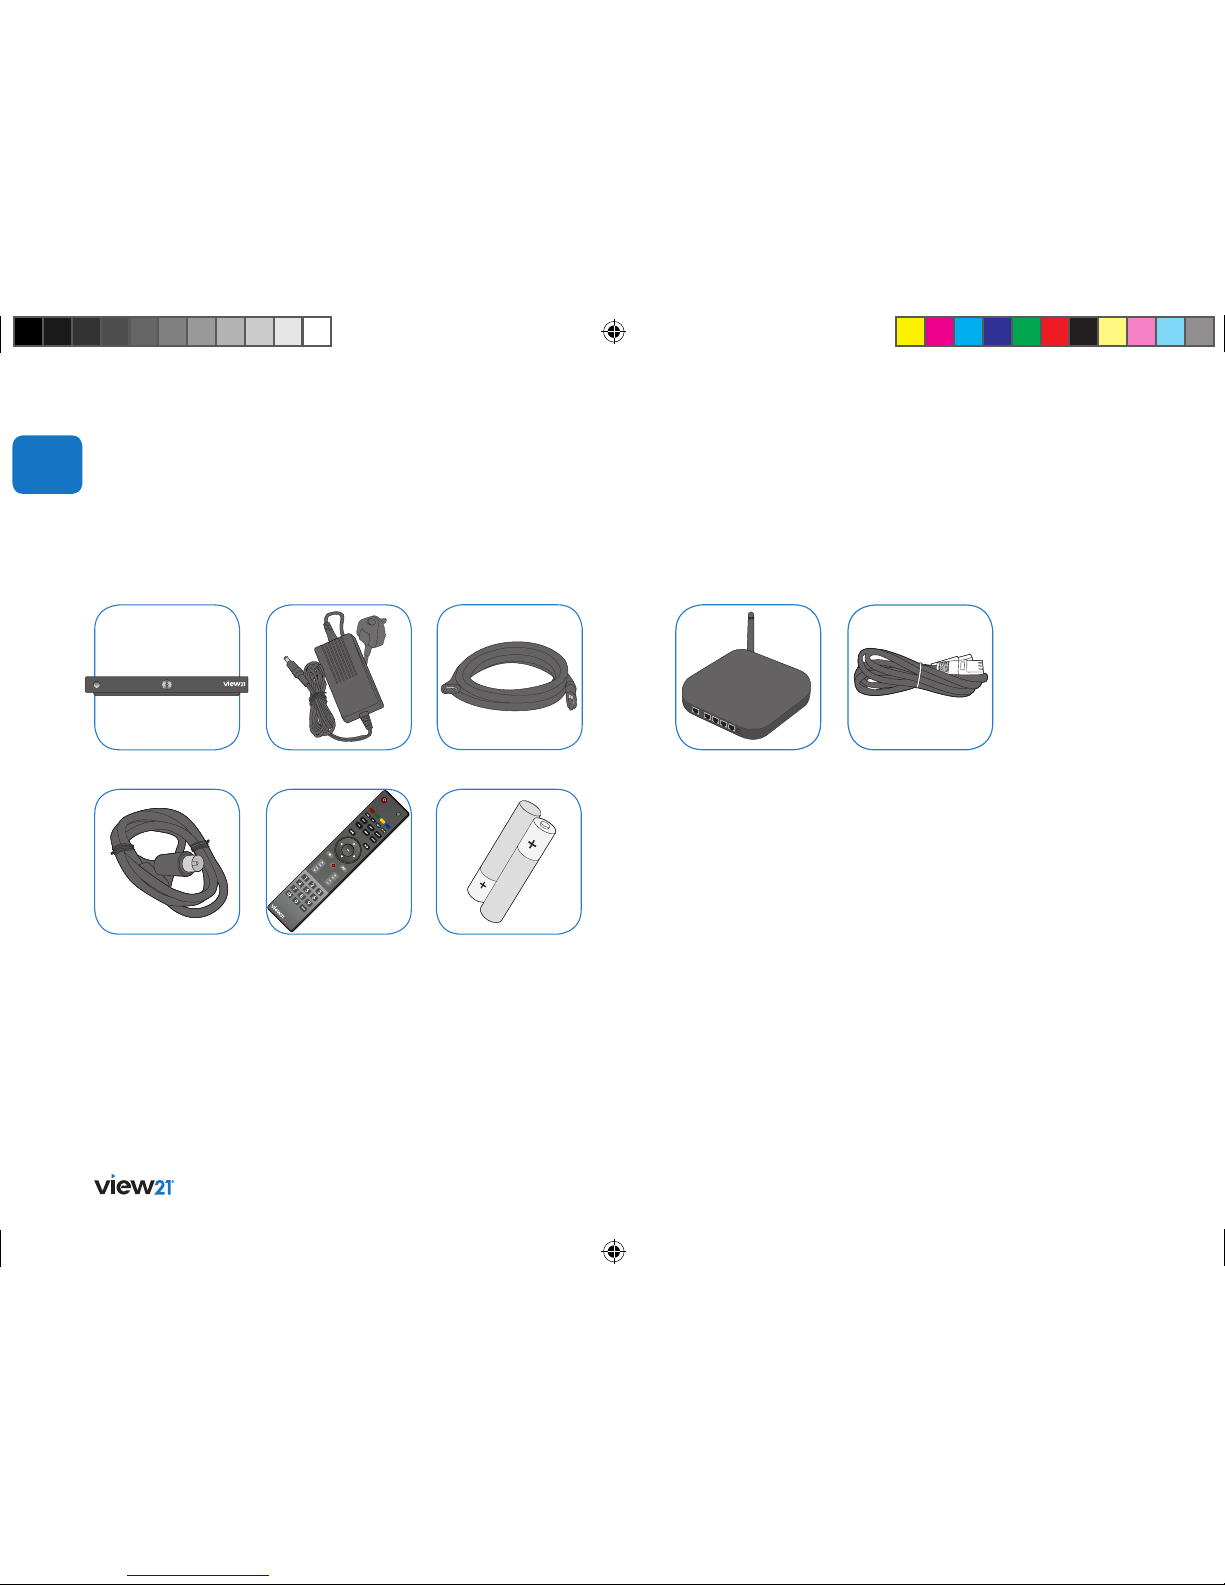
What’s in the box
2 x AAA batteries
HDMI cable
Power supplyView21 box
01
Remote control
RF cable
Ethernet cable
Router
You will also need
• Rooftop aerial: It is recommended that you use a wideband rooftop
aerial for your Veiw21 box to work properly.
• TV: A TV equipped with an HDMI socket (recommended set up).
• Freeview coverage: For more information about Freeview
and to check reception in your area, visit ww w.freeview.co.uk
• Quick Start Guide • User Guide
To access online smart services
You will also need
Broadband connected router: Connecting to the internet enables you
to use smart services. To use online apps and features like
BBC iPlayer, you will need to connect your View21 box to an internet
connected router, either via WiFi or using an Ethernet cable.
If you want to use View21 companion apps your router must be WiFi
enabled.
Ethernet cable: If you are not using WiFi, you will need an Ethernet
cable to connect your View21 box to a router.
Not included
View21_VV107ZRH_HD Digital TV Recorder_UG_V3.indd 6 11/07/2013 15:39:48
7
02
03
04
05
06
07
08
09
01
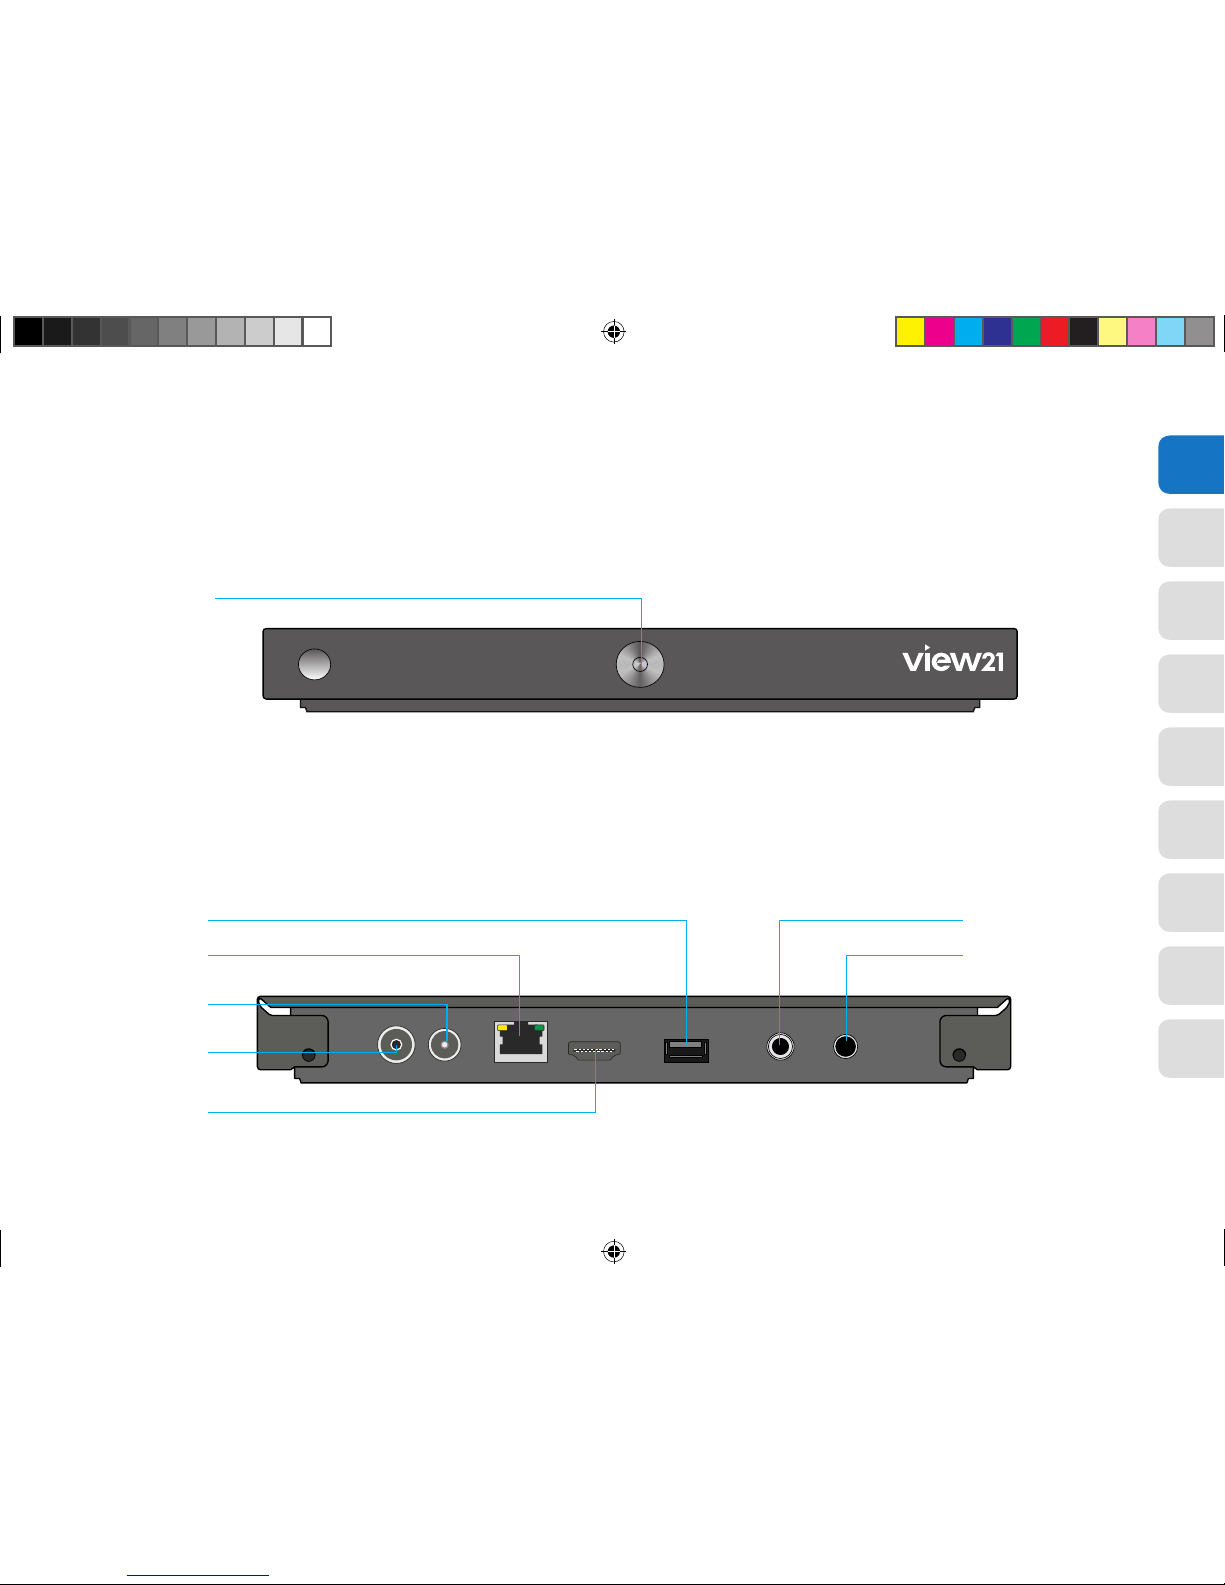
Your View21 box
Power/Standby
RF IN
(Aerial Input)
RF OUT
(Aerial Output)
NETWORK
USB
HDMI
S/PDIF
DC IN
View21_VV107ZRH_HD Digital TV Recorder_UG_V3.indd 7 11/07/2013 15:39:48
8 Getting set up
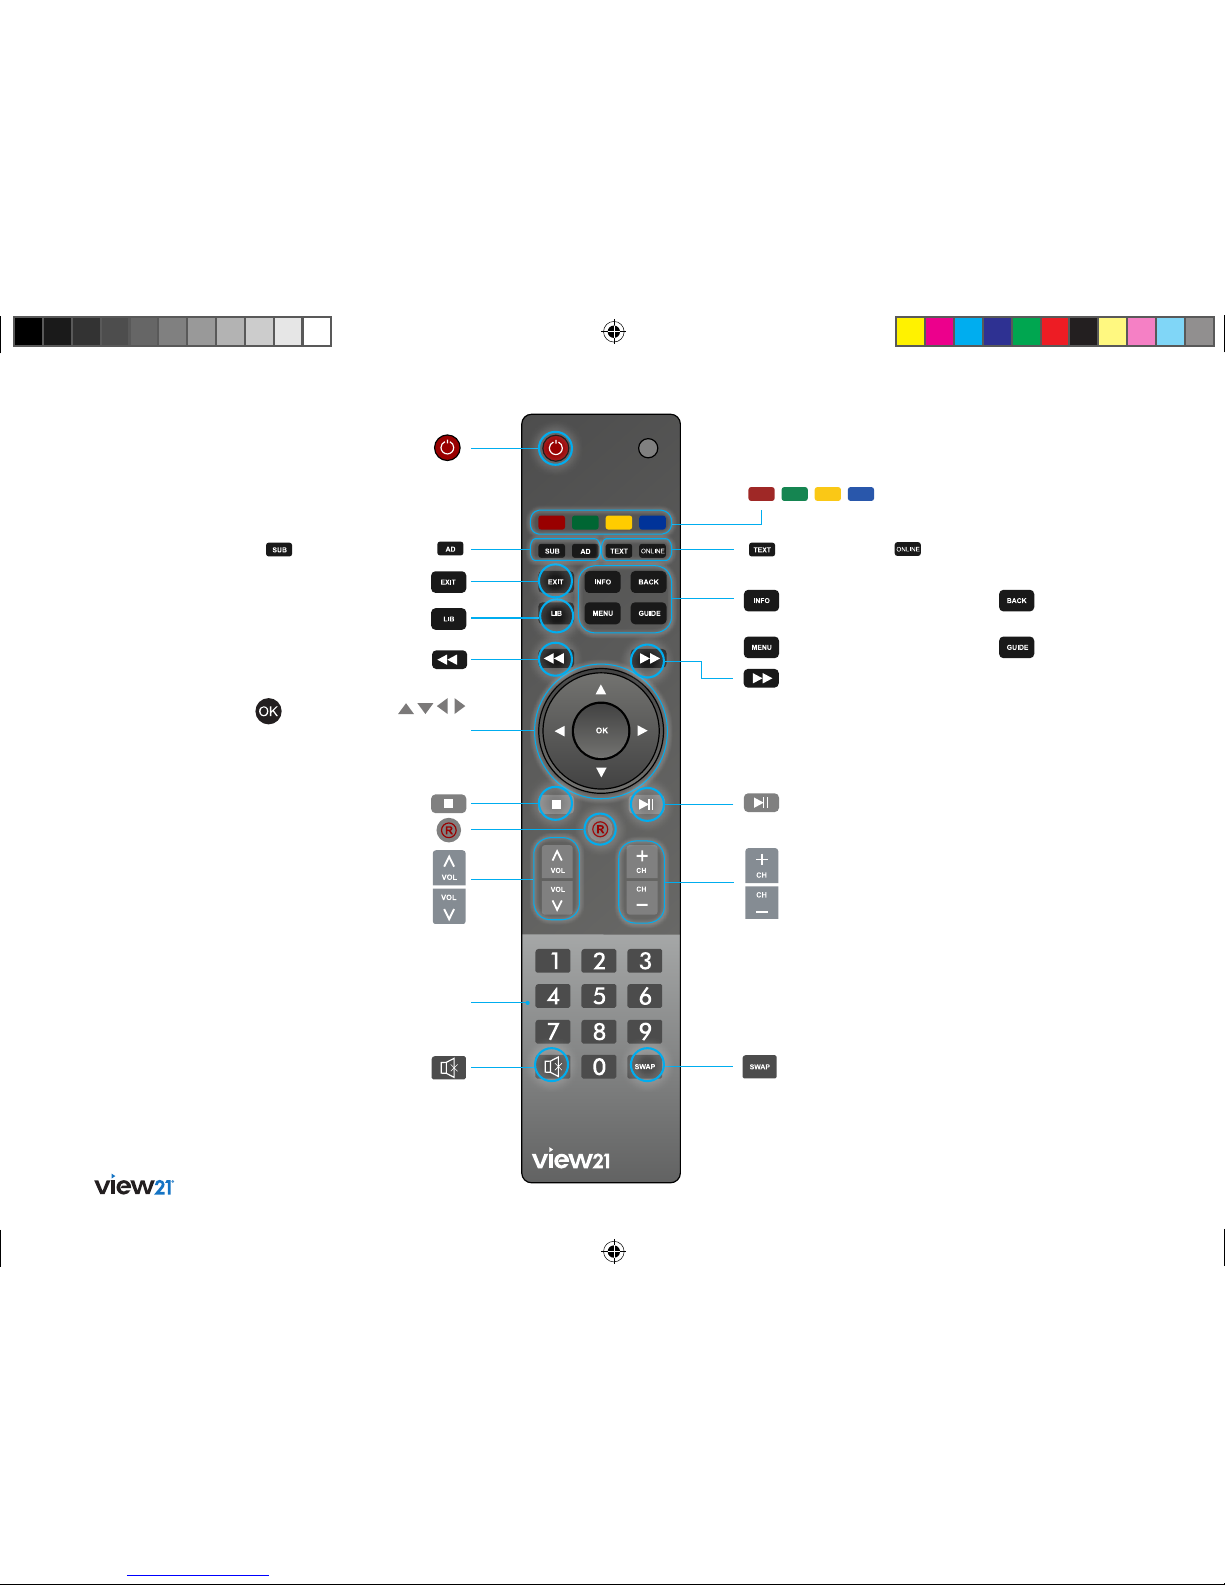
Your remote
0 – 9: Numerical keys
Navigation:
Navigate up/down /lef t/right in
menus/on screen displays
OK: Press to confirm
current selection
Mute: Turn s
your TV sound
on/off
Guide: Display the TV
programme guide
Play/Pause: Toggle ac tion for
recordings and Live Pause TV
Fast Forward: (1) Fast
Forward at variable speed s
(2) Step through menu bars
Back: Return to previous
menu
Record: (1) Record a programme
(2) Set a future recording
Information: Display information
about programmes and recordings
Menu: Display the M ain Menu
Exit: Exit the menu
and return to live TV
Power: Switch th e View21
box to stan dby
Swap: (1) Swap between previous and
currently watched T V channels (2) Toggle
Show/Hide of quick key buttons in menus
Tex t: Load text
services available
on some channels
Library: Display a library of
previously recorded programming
Rewind: (1) Fast Rewind at
variable speeds (2) Ste p through
menu bars
Stop: Stops re cording or live
paused T V
AD: Set Audio
Description on/off
Subtitles:
Set subtitles on/off
Channels: Changes your TV channels
Volum e: Change s your TV volume
Coloured Buttons:
Navigation quick keys
Online: Display the
online menu
View21_VV107ZRH_HD Digital TV Recorder_UG_V3.indd 8 11/07/2013 15:39:51
9
02
03
04
05
06
07
08
09
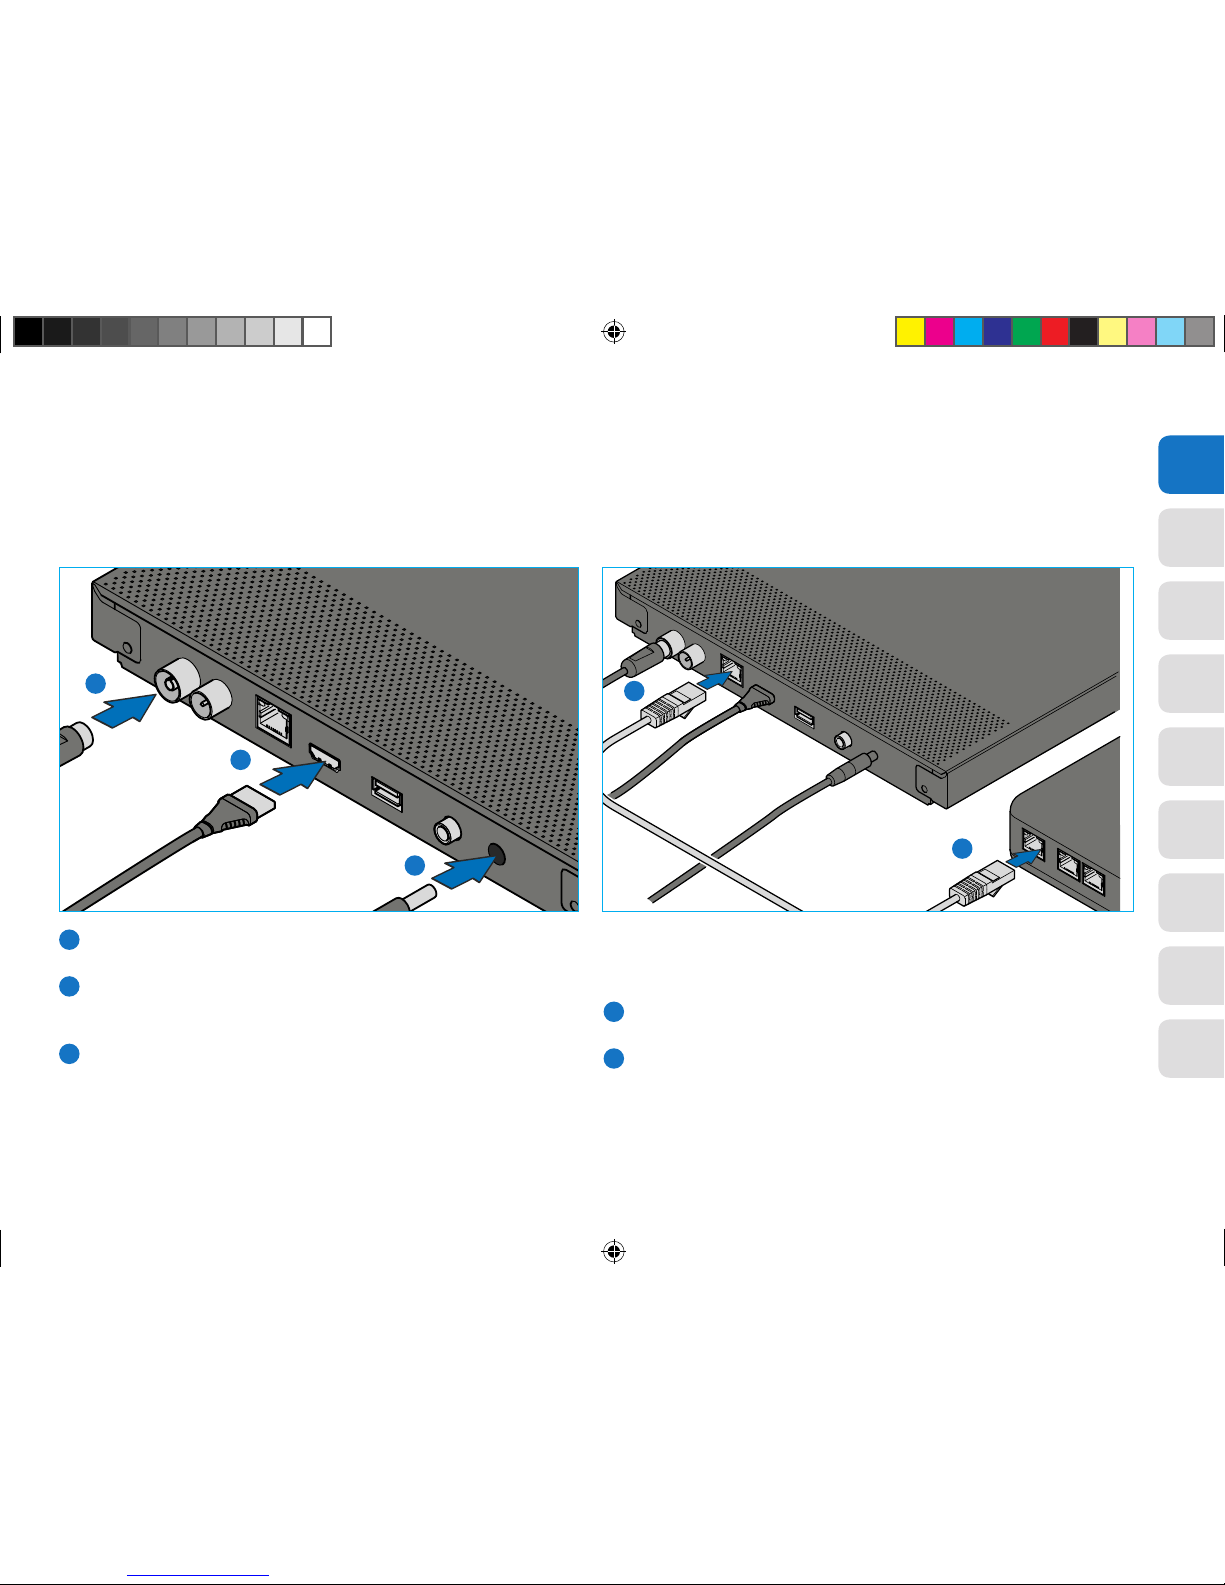
Connect an Ethernet cable (not included) to the NETWORK connection
on your View21 box.
Connect the other end of the Ethernet cable to a free Ethernet socket
on the back of your router.
If you are unable to connect the View21 box to your router using either WiFi
or an Ethernet cable, alternative methods are available such as Home Plugs/
Powerline. Visit view21.com/support for more information.
01
Setting up
Connecting via HDMI (recommended) Internet connection via Ethernet cable
1
1
2
1
2
2
Connect the aerial cable between the RF IN socket on
your View21 box and your external aerial wall socket.
Connect the HDMI cable between the HDMI socket
on the back of your View21 box and an HDMI socket
on your HD Ready TV.
Connect the power supply to the DC IN connection
on the back of your View21 box and connect the
3 Pin Plug to a power socket.
1
2
3
3
If you plan to connect to the internet via WiFi, skip this step and continue with
setting up your View21 box.
To connect to an internet router using an Ethernet cable:
View21_VV107ZRH_HD Digital TV Recorder_UG_V3.indd 9 11/07/2013 15:39:53
10
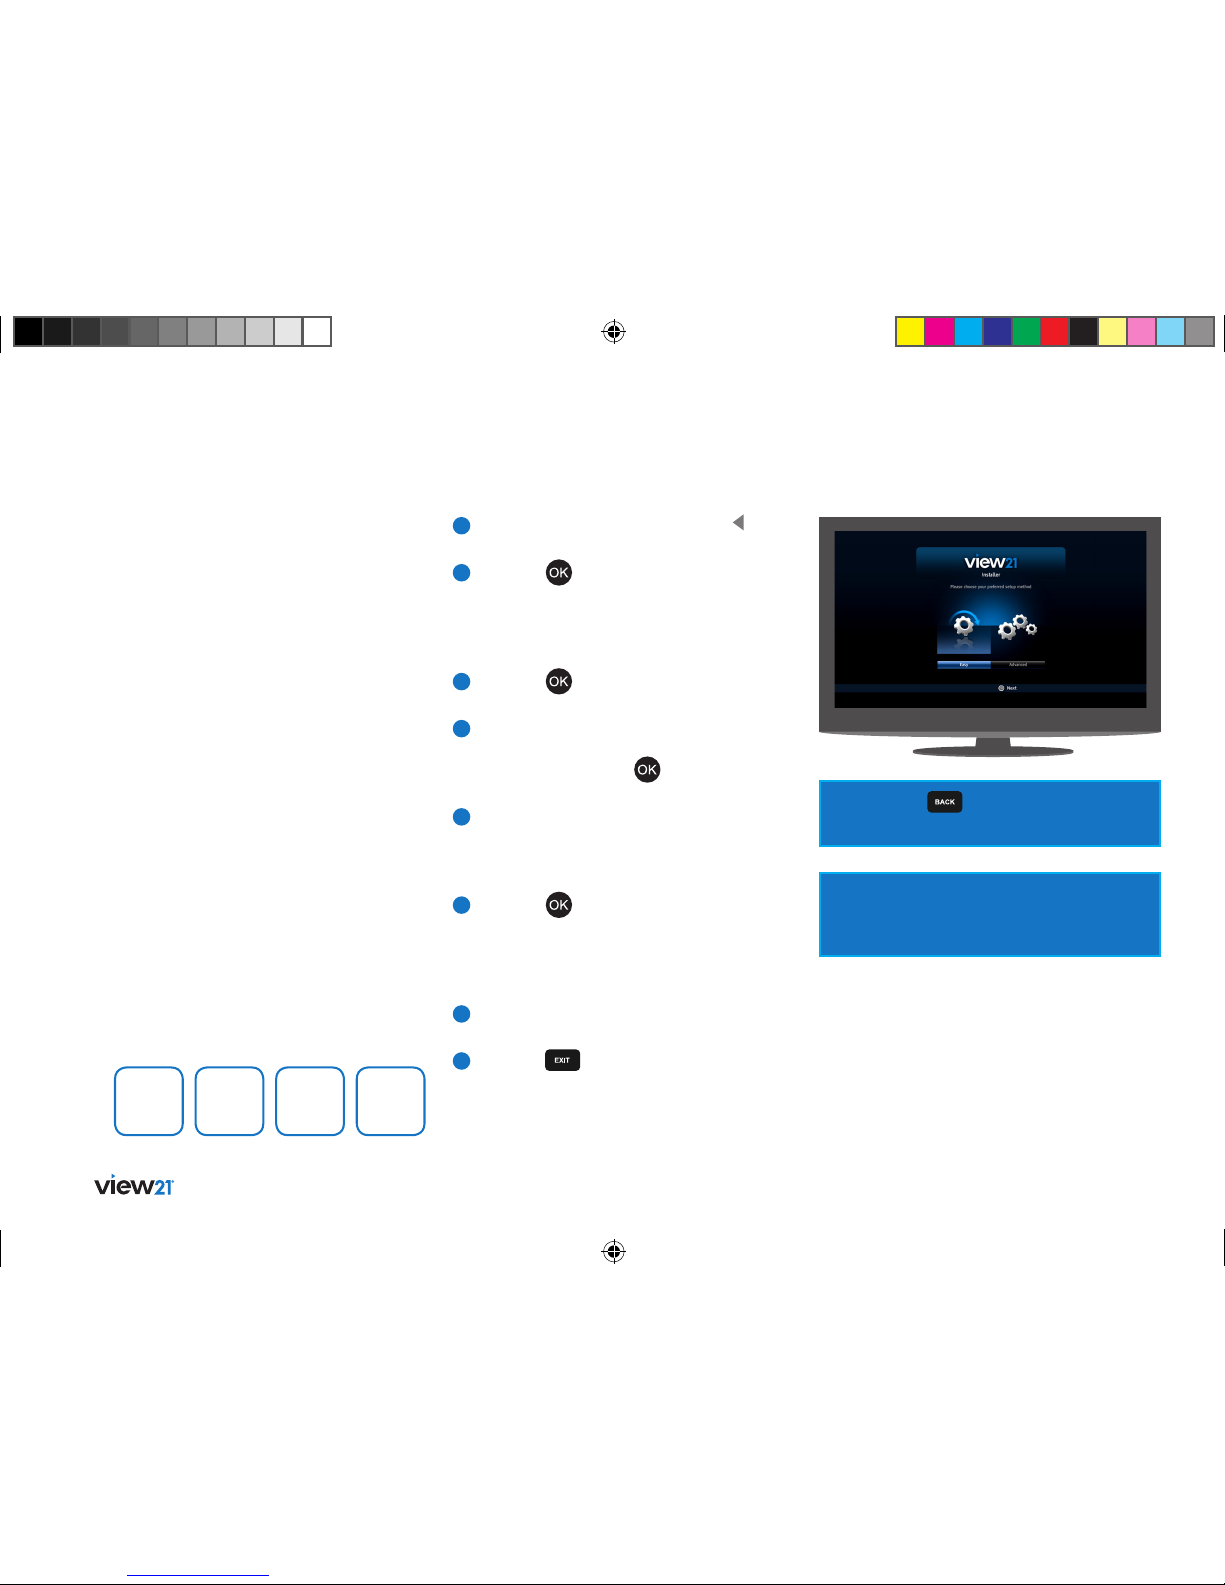
Easy install (recommended)
1
If ‘Easy’ is not already selected, press button
on your remote control to select it.
2
Press the button to begin. The ‘Easy
Setup’ screen will be displayed with the ‘TV
Setup’ function selected. How your View21
box is connected to your TV will also
be shown.
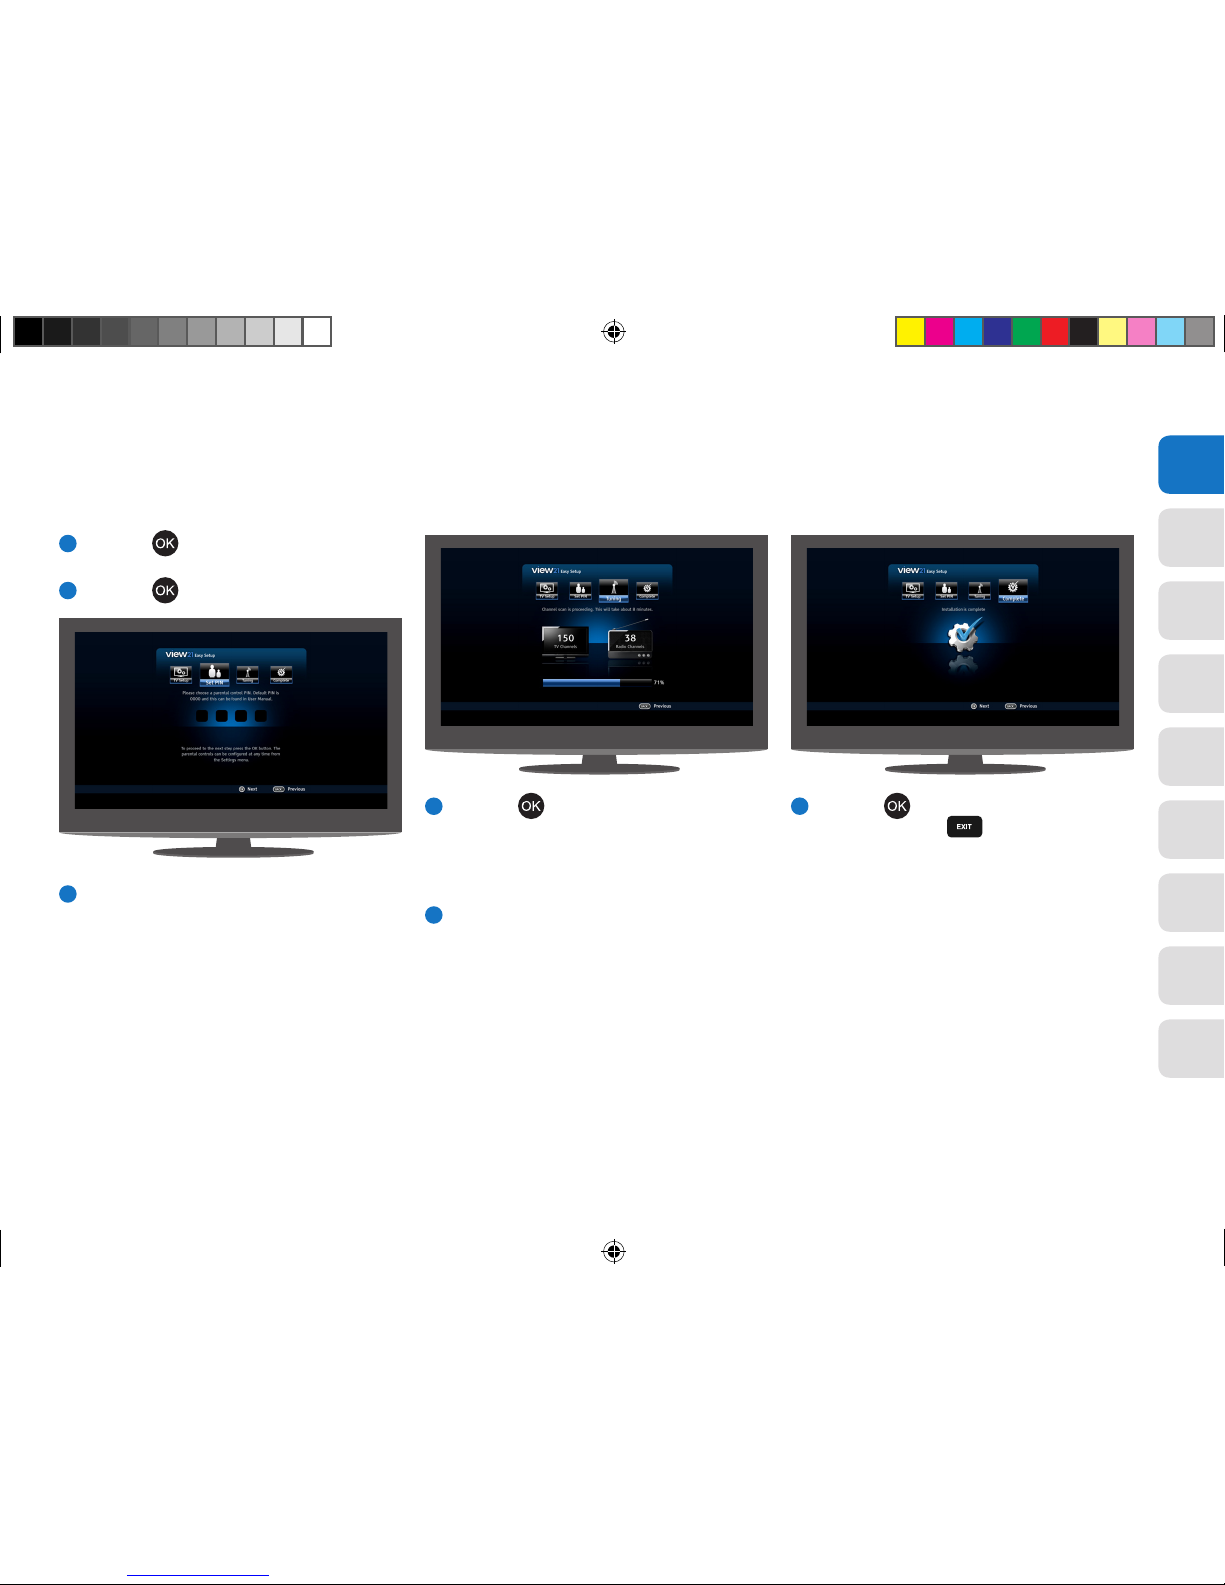
3
Press the button. The ‘Set PIN’ function
will be selected.
4
You can choose a new PIN using the number
keys, press OK to confirm your selection.
Alternatively press the button to skip
this stage, the PIN can be set later.
5
The ‘Tuning’ function will be selected,
showing the number of TV and Radio
channels currently stored in the View21 box.
On your first setup, these will both be 0.
6
Press the button. The system scans for TV
and Radio channels and updates the number
of channels found. During this time a progress
bar advances until complete (100%). This step
takes about 8 minutes.
7
When scanning has finished, the screen
displays ‘Installation complete’.
8
Press the button to begin watching
the first T V channel stored.
When you first connect your View21 box
to a TV and turn it on, the ‘First Time
Installation’ screen will be displayed.
Easy install is the recommended option as
it will attempt to find the optimal settings
for your TV and View21 box.
‘First Time Installation’ will scan for TV
and Radio channels and store the results
on the View21 box. This process will take
approximately 8-10 minutes to complete.
You can press at any time to return
to the previous step.
If multiple T V regions are available in your
area, you will be prompted to choose a region
during the installation process.
Tip: Remember to make a note of your PIN for later
use. The default PIN setting is 0000, if you choose
to skip the ‘Set PIN’ stage, this will remain the
Parental PIN number until changed.
If you change your PIN, write it here.
Easy install may not always provide the optimum
setting level for your TV. If you know the screen
size (aspect ratio) of your display you can set this
manually by following the Advanced install set
up process.
View21_VV107ZRH_HD Digital TV Recorder_UG_V3.indd 10 11/07/2013 15:39:53
11
02
03
04
05
06
07
08
09
01
Once you have finished setting up your View21 box, you can connect to the
internet via WiFi if required.
To connect to an internet router using WiFi, make sure your router, View21 box
and TV are switched on.
To connect via WiFi:
1
Press the button to display the Main Menu.
2
Repeatedly press the button or button to select ‘Settings’ in the
bar.
3
Press the button.
4
Repeatedly press the button or button to select ‘System’ in the
Settings bar.
5
Press the button.
6
Use the and buttons to select
‘WiFi setup’.
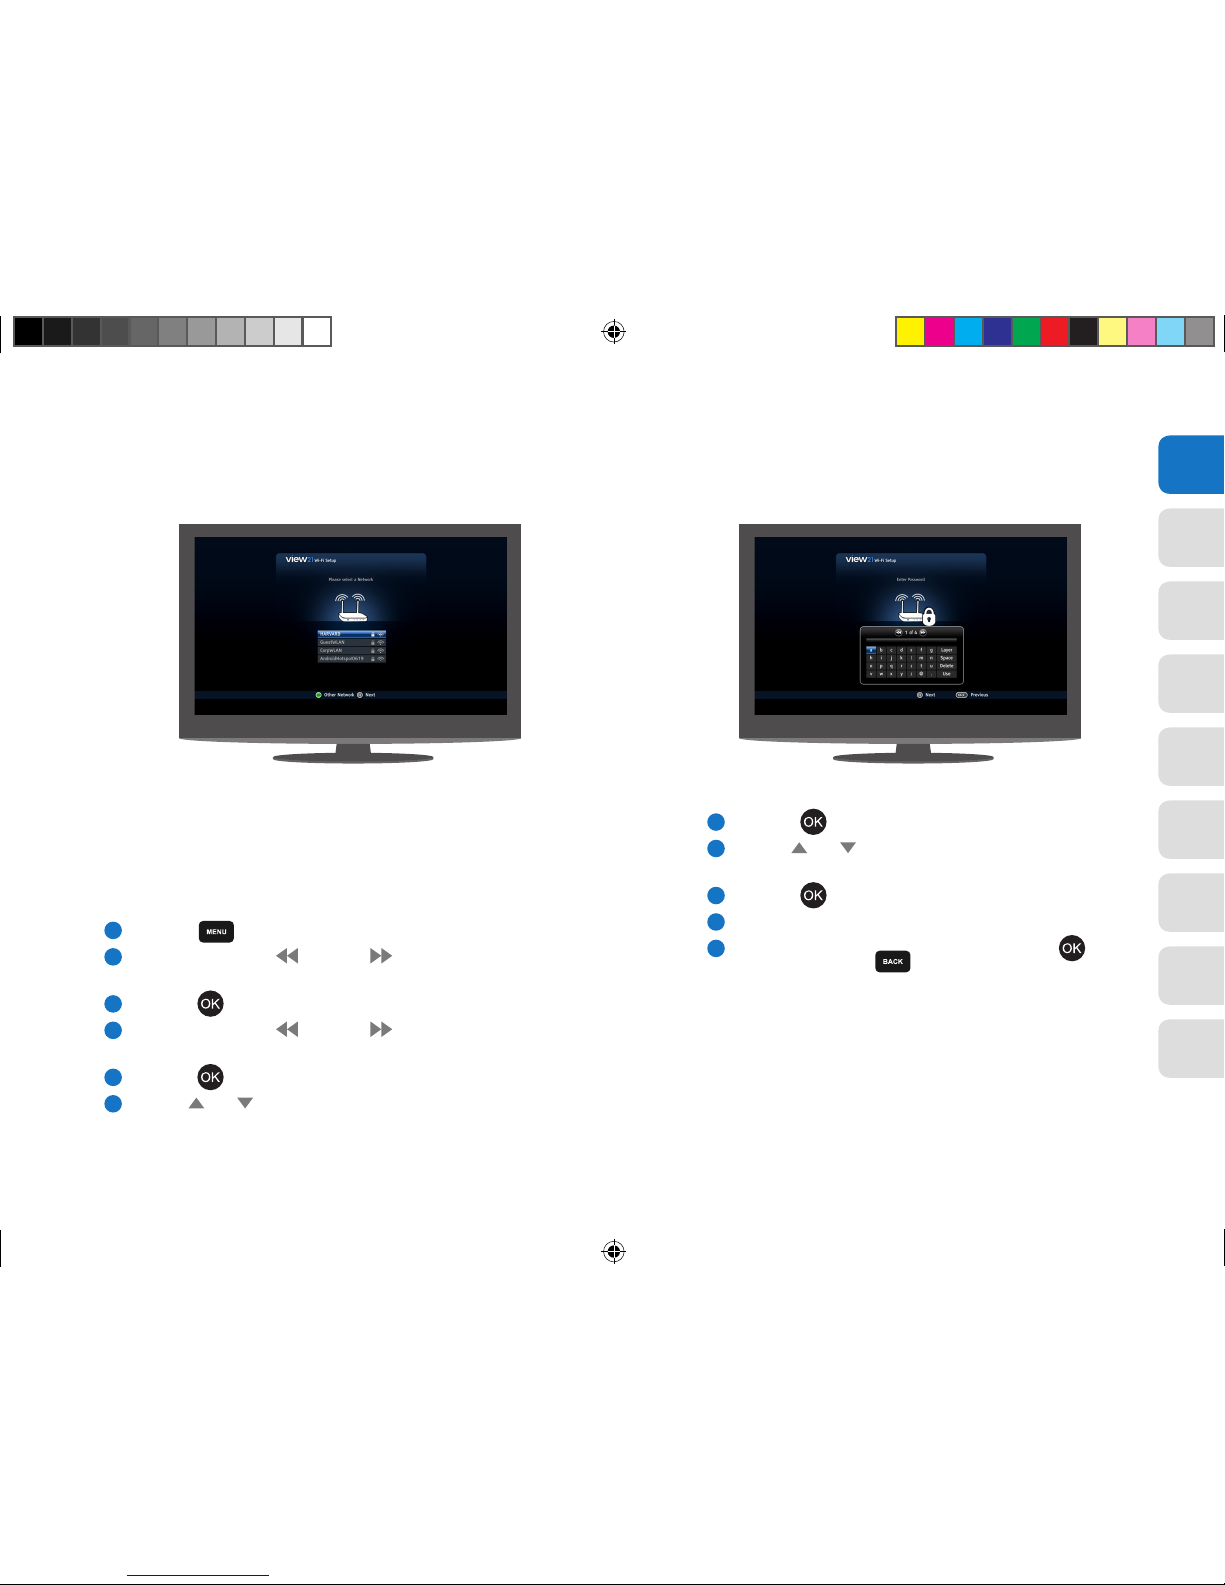
Connecting to the Internet via WiFi
7
Press the button.
8
Use the and buttons to select your WiFi router
from the displayed list of WiFi connections.
9
Press the button.
10
If your WiFi is password-protected, enter the password.
11
To accept the WiFi connection details, press the
button. Or press the button to exit the function
without applying any changes.
You are now connected to the internet via your WiFi router.
You will only need to re-enter your password if it changes,
or if you re-run the install process for your View21 box.
View21_VV107ZRH_HD Digital TV Recorder_UG_V3.indd 11 11/07/2013 15:39:54
12 Getting set up
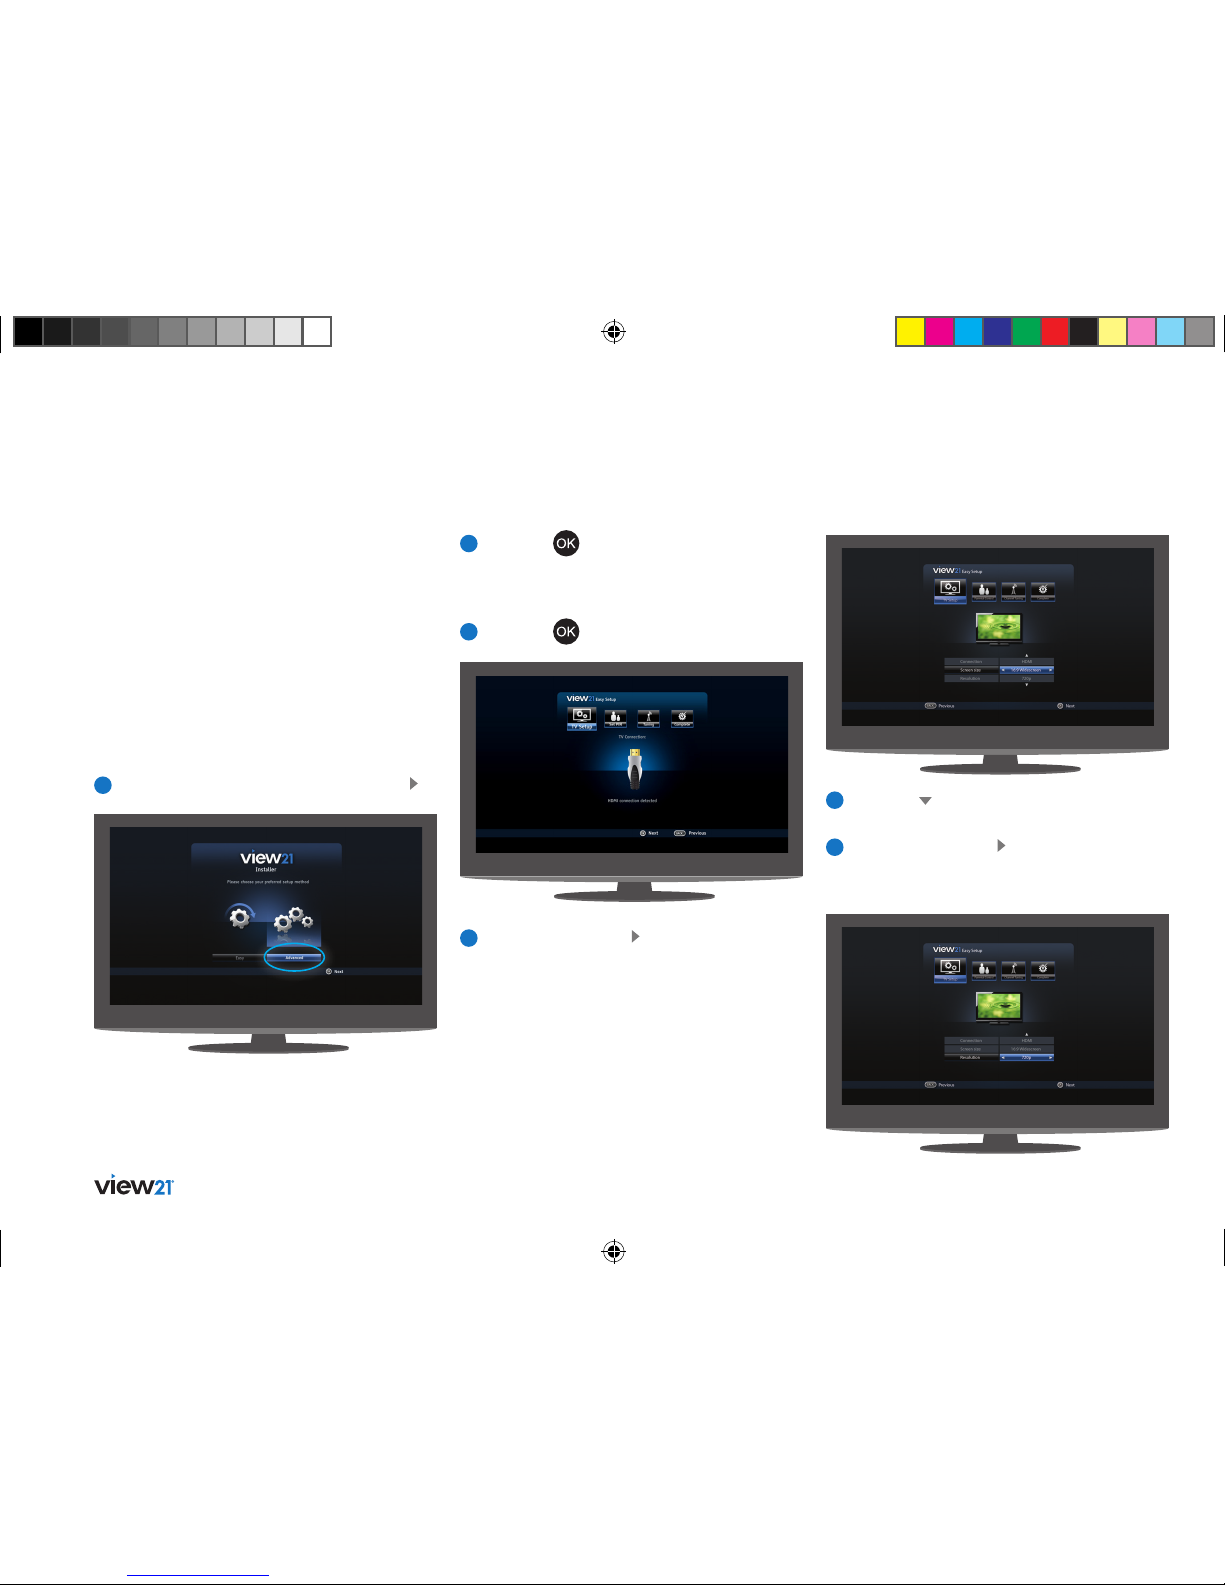
5
Press the button to select the resolution
of your TV.
6
Repeatedly press the button until the
resolution of your TV appears in the
highlighted panel.
Advanced install
The Easy install is the recommended
installation option.
However you may want to choose the
‘Advanced’ option to manually select the
specific aspect ratio or display resolution
of your screen.
To perform an ‘Advanced’ installation
1
If ‘Advanced’ is not already selected, press .
4
Repeatedly press the button until the screen
size (aspect ratio) of your TV appears in the
highlighted panel.
2
Press the button. The ‘Advanced Setup’
screen will be displayed with the ‘TV Setup’
function selected. How your View21 box is
connected to your TV will also be shown.
3
Press the button.
Tip: You can re-run the install process at any
time, see page 38.
View21_VV107ZRH_HD Digital TV Recorder_UG_V3.indd 12 11/07/2013 15:39:55
13
02
03
04
05
06
07
08
09
01
7
Press the button. The ‘Set PIN’ function
will be selected.
8
Press the button. The PIN can be set later.
9
The ‘Tuning’ function will be selected,
showing the number of TV and Radio channels
currently stored in the View21 box. On your
first setup, these will both be 0.
10
Press the button. The system scans for TV
and Radio channels and updates the number
of channels found. During this time a progress
bar advances until complete (100%). This step
takes about 8 minutes.
11
When scanning has finished, the screen
displays ‘Installation complete’.
12
Press the button to set up your WiFi
connection, or the button to begin
watching the first TV channel stored.
View21_VV107ZRH_HD Digital TV Recorder_UG_V3.indd 13 11/07/2013 15:39:55

14 Getting started
Getting started
Using your View21 box
Your View21 box has some functions you
will use every day, and others that you only
use occasionally.
You can find commonly used functions in this
section so you can get your digital box up and
running as quickly as possible.
We suggest you read this section carefully,
then use other sections when you need extra
information or guidance for settings.
Selecting channels
This can be done in several ways:
• Directly from the numerical keypad
on the remote control
• Using the and buttons on
the remote control.
• Using the Guide
Using the numerical keypad:
1
Enter the channel number using the numerical
keys on the remote control. As they are entered
they are displayed in the top right of the screen.
2
To enter ‘13’ for example, enter 1 and then
soon after, enter 3.
3
The TV will switch to channel 13.
If the delay between pressing 1 and 3 is too
long, then the digits will not be read as 13.
Using the channel change buttons:
Press the button to change to
the next channel.
Press the button to change to
the previous channel.
02
Changing the volume
You can change the volume using the V+ and
V- buttons on the remote control.
1
Press the button to increase the volume.
2
Press the button to decrease the volume.
A symbol will be displayed in the top right of the
screen to indicate the volume level is being changed.
View21_VV107ZRH_HD Digital TV Recorder_UG_V3.indd 14 11/07/2013 15:39:56

15
01
03
04
05
06
07
08
09
02
Pausing live TV
You can pause the TV channel you are watching
and resume watching it from the paused position
(provided you have not changed to another
channel during this time). You can Fast Forward
(up to the current time) and Rewind to any time
from the time you started viewing the channel.
The amount you can Rewind can be set with
the ‘Live Pause Amount’ option in the ‘Freeview+’
menu, see page 37.
To pause a live TV programme:
• Press the button. The TV picture will
freeze.
To resume play of the TV programme:
• Press the button to resume playback
from the paused time.
To Rewind a paused T V programme:
1
Repeatedly press the
button until
the desired Rewind speed is displayed
in the bottom left of screen.
2
Press the button to resume playback at
normal speed. The Rewind time relative to live
TV will be shown in the bottom left corner.
Each press of the or button steps
through the preset speeds: x2, x4, x8, x16, x32,
x64.
Mute
To turn off the sound:
1
Press the button on the remote control.
The mute symbol will be displayed in the top
right of the screen and the sound will be
turned off.
2
To restore the sound at its previous level,
press the button again.
To Fast Forward a paused TV programme:
1
Repeatedly press the button until the
desired forward speed is displayed in the
bottom left of screen. Each press of the
or
button steps through the preset
speeds: x2, x4, x8, x16, x32, x64.
2
Press the button to resume playback at
normal speed.
Recording
The button is used to record programmes
while watching Live TV or from the Guide.
To record a programme:
1
While watching live TV, press the button.
2
If the programme you are watching is not part
of a series, the programme will start to record.
3
If the programme you are watching is an episode
of a series, then a message box will be displayed:
• Record once
• Record series
4
Use the or buttons to select an option.
5
Press to start recording.
Future programmes can be scheduled for recording
in the Guide. For more information see page 27.
Conflict Management, see page 28.
View21_VV107ZRH_HD Digital TV Recorder_UG_V3.indd 15 11/07/2013 15:39:57
16 Getting started
Other remote control buttons
Exit
Press the
button at any time to exit a menu
and return to live T V.
Using the Library
The Library lists the recordings you have made and
stored on the View21 box. The recordings can be
selected and played from here.
Playing a recording:
1
Press the
button on the remote
control to open the Library.
2
Use the and buttons to select
the recording you wish to play.
3
Press the or button on the
remote control.
The recording will start to play from the beginning.
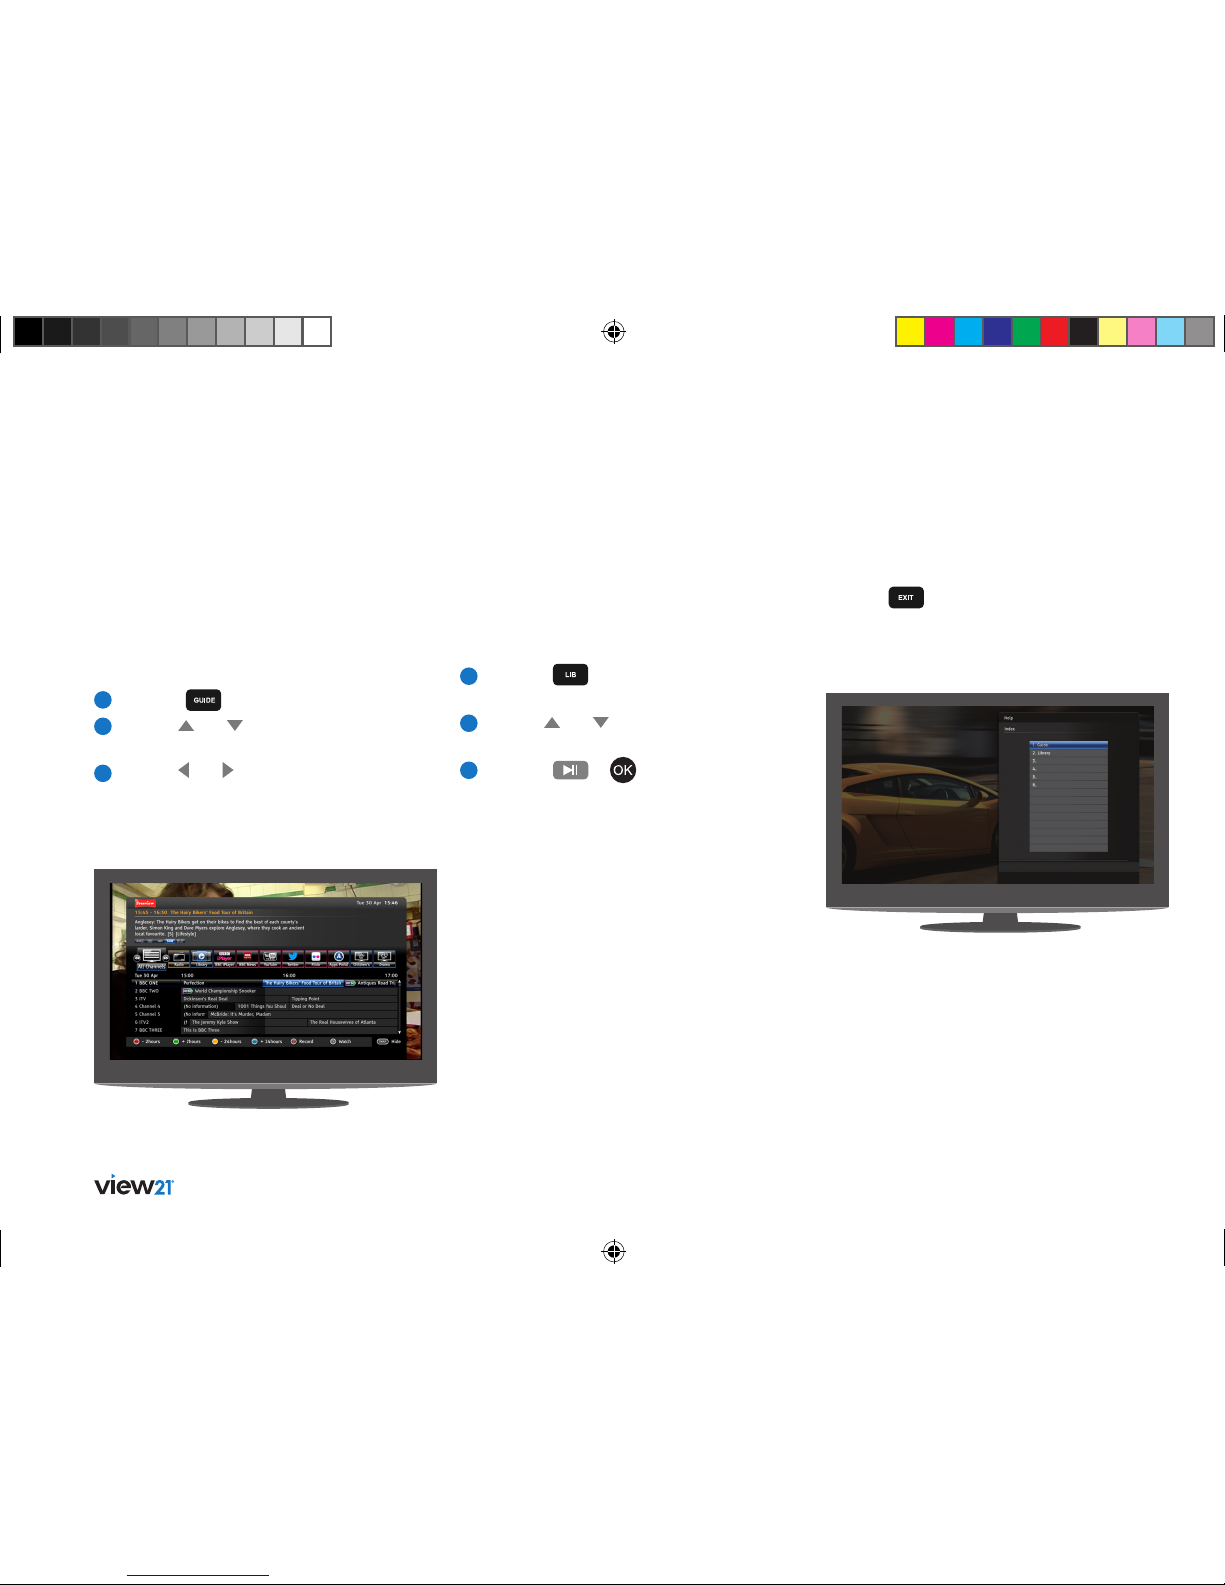
Using the Guide
The Guide lets you view information about current
and scheduled TV and Radio programmes. Here
you can select a programme to watch or listen to.
When you open the Guide, the current channel is
displayed at the top of the list with the programme
being watched highlighted.
1
Press the button to display the Guide.
2
Use the and buttons to select a channel
to browse.
3
Use the and buttons to move along the
channel row to select the desired programme.
Available options for the programme selected will
be displayed as well as a brief description.
View21_VV107ZRH_HD Digital TV Recorder_UG_V3.indd 16 11/07/2013 15:39:57
 Loading...