

Page 1

User Manual
Model: W100
Brand: VIETTEL
FCC ID: S73W100
Welcome!
PLEASE READ THIS INFORMATION BEFORE USING THE
PHONE TO MAKE A BETTER USE OF YOUR PHONE. WE
ARE NOT RESPONSIBLE FOR ANY DAMAGE DUE TO
YOUR MISUNDERSTANDING OF THIS INFORMATION AND
MISACTTING.
We are endeavoring to improve our products and services and
we reserve all the rights to revise and change the description
of this product and its software as well as this user manual
without obligation to notify any person of such revisions and
changes.
This user manual is for your better use of this phone not an
approval of any accessories. All the pictures in this manual are
for reference only. There may be slight difference between the
appearance of phone and keys and contents of display used in
this manual and those of your phone. Please refer to your
phone for actuality. Some features introduced in this manual
are network or subscription-dependent features. Please
contact your service provider.
Page 2

1. Safety Information ......................................................... 4
2. Use and Care ................................................................ 6
3. Essential ....................................................................... 8
3.1 Install the SIM card ................................................. 8
3.2 Battery Use and Installation .................................... 9
3.3 Memory Card ........................................................ 10
3.4 Turn it on/off ......................................................... 10
3.5 Make a call ............................................................ 10
3.6 Answer or Reject a call .......................................... 11
3.7 Operation during a call .......................................... 11
3.8 Insert international access code ............................. 12
3.9 Dial an extension or voicemail number ................. 12
3.10 Emergency calls .................................................. 12
4. Basic ........................................................................... 13
4.1 Display ................................................................... 13
4.2 View missed calls .................................................. 16
4.3 Keypad lock ........................................................... 16
4.4 Call divert .............................................................. 16
4.5 Call barring ............................................................ 17
4.6 Call waiting ........................................................... 17
4.7 Black list ................................................................ 17
4.8 Password ................................................................ 18
5. Functions .................................................................... 18
6. Phone Book ................................................................ 20
6.1 Search .................................................................... 20
6.2 Add New Entry ...................................................... 21
6.3 Copy All ................................................................ 22
6.4 Delete ..................................................................... 22
6.5 Extra Number ........................................................ 22
6.6 Settings .................................................................. 22
7. Call History .................................................................. 23
7.1 Call history ............................................................ 23
Contents
2
Page 3

7.2 Delete the Record .................................................. 23
7.3 Call Time ............................................................... 24
7.4 Call Cost ................................................................ 24
8. Message ..................................................................... 24
8.1 MMS ...................................................................... 25
8.2 SMS ....................................................................... 27
9. Multimedia ................................................................... 30
9.1File Manager ........................................................... 30
9.2 Image Viewer......................................................... 31
9.3 Camera ................................................................... 31
9.4 Audio Player .......................................................... 32
9.5 Video Player .......................................................... 33
9.6 FM Radio ............................................................... 33
10. Settings ..................................................................... 34
10.1 Phone Setup ......................................................... 34
10.2 Dual SIM Setup ................................................... 35
10.3Network Setup ...................................................... 35
10.4 Security Setup...................................................... 36
10.5 Call Setup ............................................................ 36
10.6 Restore Factory Settings ...................................... 37
11. Organizer .................................................................. 38
11.1 Alarm ................................................................... 38
11.2Calendar ................................................................ 38
11.3 Notepad ................................................................ 38
12. Games ...................................................................... 40
13. Profiles ...................................................................... 40
14. Services .................................................................... 41
15. Input Method ............................................................. 42
15.1 English Input Method .......................................... 42
15.2 Numeric Input Method ........................................ 43
Malfunctions & Measures ................................................ 44
Specific Absorption Rate Data ........................................ 45
Battery Tips ..................................................................... 46
3
Page 4

r
t
Product Maintenance ...................................................... 47
1. Safety Information
PIN Code
Please don’t turn on the PIN code function when use the
two-card-standby, and notice the warning of the PIN degree
when input the PIN code in other surroundings.
Battery
If a conductive material such touches the exposed terminal,
short circuit may occur resulting in property damage, bodily
injury or burn. To avoid risk of leaking electricity, take care
when handling a charged battery particularly when placing it
inside your pocket, purse or other container with metal objects.
Keep your mobile device away from water
Keep your mobile device dry.
Use while driving
Always obey the laws and regulations on the use of mobile
devices in the area where you drive. Give full attention to
driving and the road; use hand-free operation or earpiece if a
call is needed.
Aircraft
Mobile device may cause harmful interference so turn off your
Read this information before using you
mobile device otherwise may result in
personal injury or your device no
complying with local laws.
4
Page 5

mobile device before boarding an airplane.
Blasting areas
Always obey the related limits and regulations and do not use
your mobile device in blasting areas. Turn off your mobile
device in areas posted “turn off electronic devices”.
Potentially explosive atmospheres
Turn off your mobile device in the gas station and areas near
fuel and chemical containers. Turn off your mobile device in
areas posted “turn off electronic devices”.
Medical devices
Turn off your mobile device whenever instructed to do so by
posted signs near some medical equipment. Mobile device
may interfere with pacemakers, hearing aids and some other
medical transplanting equipment. Do not put your mobile
device near pacemakers nor carry in the breast pocket.
Accessories and battery
Use the accessories, batteries and chargers approved by
manufacturer. Use of batteries not approved by manufacturer
may cause injury.
Emergency calls
Turn on your phone and keep it in service areas, dial
emergency phone numbers and then press send key to make
a call.
When losing your phone
To avoid any economy damage, please inform the
Tele-communication Company or agencies to lock your SIM
5
Page 6

card when you lost your phone.
When you inform the telecom company or agencies to lock
your SIM card they need to know the IMEI No. of your phone,
which you can find printed on the label on the back of your
phone when taking off the battery. Please backup this number
for future need.
For safety consideration, you can make preventative measures
such as set PIN Code for your SIM card to prevent other
persons using your SIM card without your permission.
Keep away from children
Keep the phone, battery and charger away from children to
avoid any personal injury.
2. Use and Care
To care for this mobile device, keep it away from:
Any kind of fluid
Keep the device away from wat er, rain, humidity,
sweat or other moisture.
Extreme heat or cold
Avoid the temperature below -10 /14 or above ℃℉
45 /113 .℃℉
Microwave
Don’t try to dry your phone in a microwave oven.
6
Page 7

Dust and dirt
Don’t expose your phone to dust, dirt, sand, food or
other inappropriate materials.
Cleaning solutions
Use only a dry soft cloth to clean your phone. Don’t
use alcohol or other cleaning solutions.
Ground
Don’t drop your phone.
7
Page 8

3. Essential
3.1 Install the SIM card
Keep your SIM cards away from children.
Please consult your SIM card franchiser about the services
and usage. SIM franchiser can be the service provider,
network provider or other franchisers.
Please turn off your mobile device and disconnect it with
charger before removing the battery.
Please don’t turn on the PIN code function when use the
two-card-standby, and notice the warning of the PIN degree
when input the PIN code in other surroundings.
Note: turn off your mobile device and disconnect it with
charger or any other device before removing back cover. Place
the back cover on the phone before storage and use of your
mobile phone.
Remove the back cover:
Press and slide the cover then get the cover off.
Insert the SIM card into the card slot:
Please insert the SIM cards with the golden contacts facing
down.
SIM card
Note: Please notice the warning of the PIN degree when input
the PIN code in other surroundings.
Note: This phone is dual SIM phone. When SIM is mentioned
herein, we mean one of the two SIMs and you need to select
SIM1 or SIM2.
8
Page 9

3.2 Battery Use and Installation
Battery tips
Battery life depends on the network, signal strength,
temperature, and accessories you use.
Always use original batteries and chargers. The warranty does
not cover damage caused by non-original batteries, charger
and/or accessories.
New batteries or batteries stored for a long time may take
more time to charge.
When charging your battery, keep it near room temperature.
When storing your battery, keep it uncharged in a cool, dark,
dry place.
Never expose batteries to temperatures below -10°C (14°F) or
above 45°C (113°F).
Always take your phone with you when you leave your vehicle.
It is normal for batteries to gradually wear down and require
longer charging time. If you notice a change in your battery life,
it is probably time to purchase a new battery.
Never expose batteries to fire because they may explode.
Battery installation
1. Slide the back cover up and then remove the door.
2. Insert the battery with the connectors facing each other.
Close and slide the cover into place.
Charge the battery:
New battery is partly charged. Connect the charger to the
phone. Your phone might require several hours to charge fully.
Charging when power off may take a few seconds to show
charging display and Charging Complete shows when
finished. Charging when power on, the battery icon flickers and
becomes still when finished.
9
Page 10

3.3 Memory Card
You can use removable memory card with your phone to store
information.
Caution: Don’t bend or scratch your memory card. Keep it
away from static electricity, water, and dirt.
Insert the memory card into the tray as shown below:
3.4 Turn it on/off
Caution: when power on, the phone may prompt you to enter
your SIM PIN code to unlock the SIM card. If “Input PUK code”
shows, it means your SIM card is locked, please contact your
web service provider.
To turn on your phone, press and hold the power on/off key for
two seconds. If prompted, enter your six-to-eight-digit SIM PIN
code and/or four-digit unlock code.
If you don’t insert a SIM card, your phone shows “Insert SIM”.
None of the functions related to SIM card can be used and you
can make an emergency call only.
To turn off your phone, press and hold the power on/off key for
two seconds.
3.5 Make a call
1. Under the sleep mode, input the telephone number directly.
2. Press send key or tap the call key on the screen to make a
call.
3. After calling, select Option-End or press the power on/off
key or end key to end.
10
Page 11

3.6 Answer or Reject a call
When there is an incoming call, the phone rings and /or
vibrates showing the number or the corresponding name.
Non any key: Press the power on/off key or left soft key to
answer a call. If you don’t want to answer, you can press the
power on/off key or right soft key; can also tap the rejection on
the screen to reject.
Any key: Press send key or left soft key to enter option and
then select answer to answer a call; In this mode, method of
tapping the screen to answer or reject can use.
Earphone: when plugging the earphone, you can answer a call
by pressing the key on the earphone; when you are not
convenient to press the key, you can turn on the auto-answer
mode (only in earphone mode) and make sure the earphone is
plugged, your phone auto-answers a call 5 seconds after it
rings and/or vibrates.
3.7 Operation during a call
Press Option to perform following operations during a call:
Hold: Hold this call
End: Hang up and end this call
New Call*: Enter dialing display to make a new
Phone Book: Enter the phone book
SMS: Enter messages
Mute: Set mute on or off. When setting mute
call
on, your voice can not be heard
11
Page 12

DTMF: Set sending DTMF or not during a call
Swap*: Switch between the active call and
Conference*: Add additional parties to a call.
Note: the menus marked with * must be supported by your SIM
card. For details, please contact your service provider. Only
when two or more calls are on can Swap and Conference
show.
3.8 Insert international access code
When you are dialing an international call, press numeric key *
till the international call prefix “+” shows and then enter the
number in the following order:
+ > Country code > complete number send key
3.9 Dial an extension or voicemail number
You need to enter P (pause) or W (wait) when dialing an
extension number, press numeric key * to switch between ‘P’
and ‘W’. You can enter numbers as following:
District code > exchange phone number > P or W > extension
number > send key
3.10 Emergency calls
You can make emergency calls as long as your current
location is network-covered which you can know by checking
the signal strength bar showing on the top left corner of the
screen.
Note: Emergency numbers vary by country. The emergency
number(s) in your phone may not work in all locations, and
through the line.
the call on hold
12
Page 13
sometimes an emergency call cannot be placed due to
network, environmental, or interference issues.
4. Basic
4.1 Display
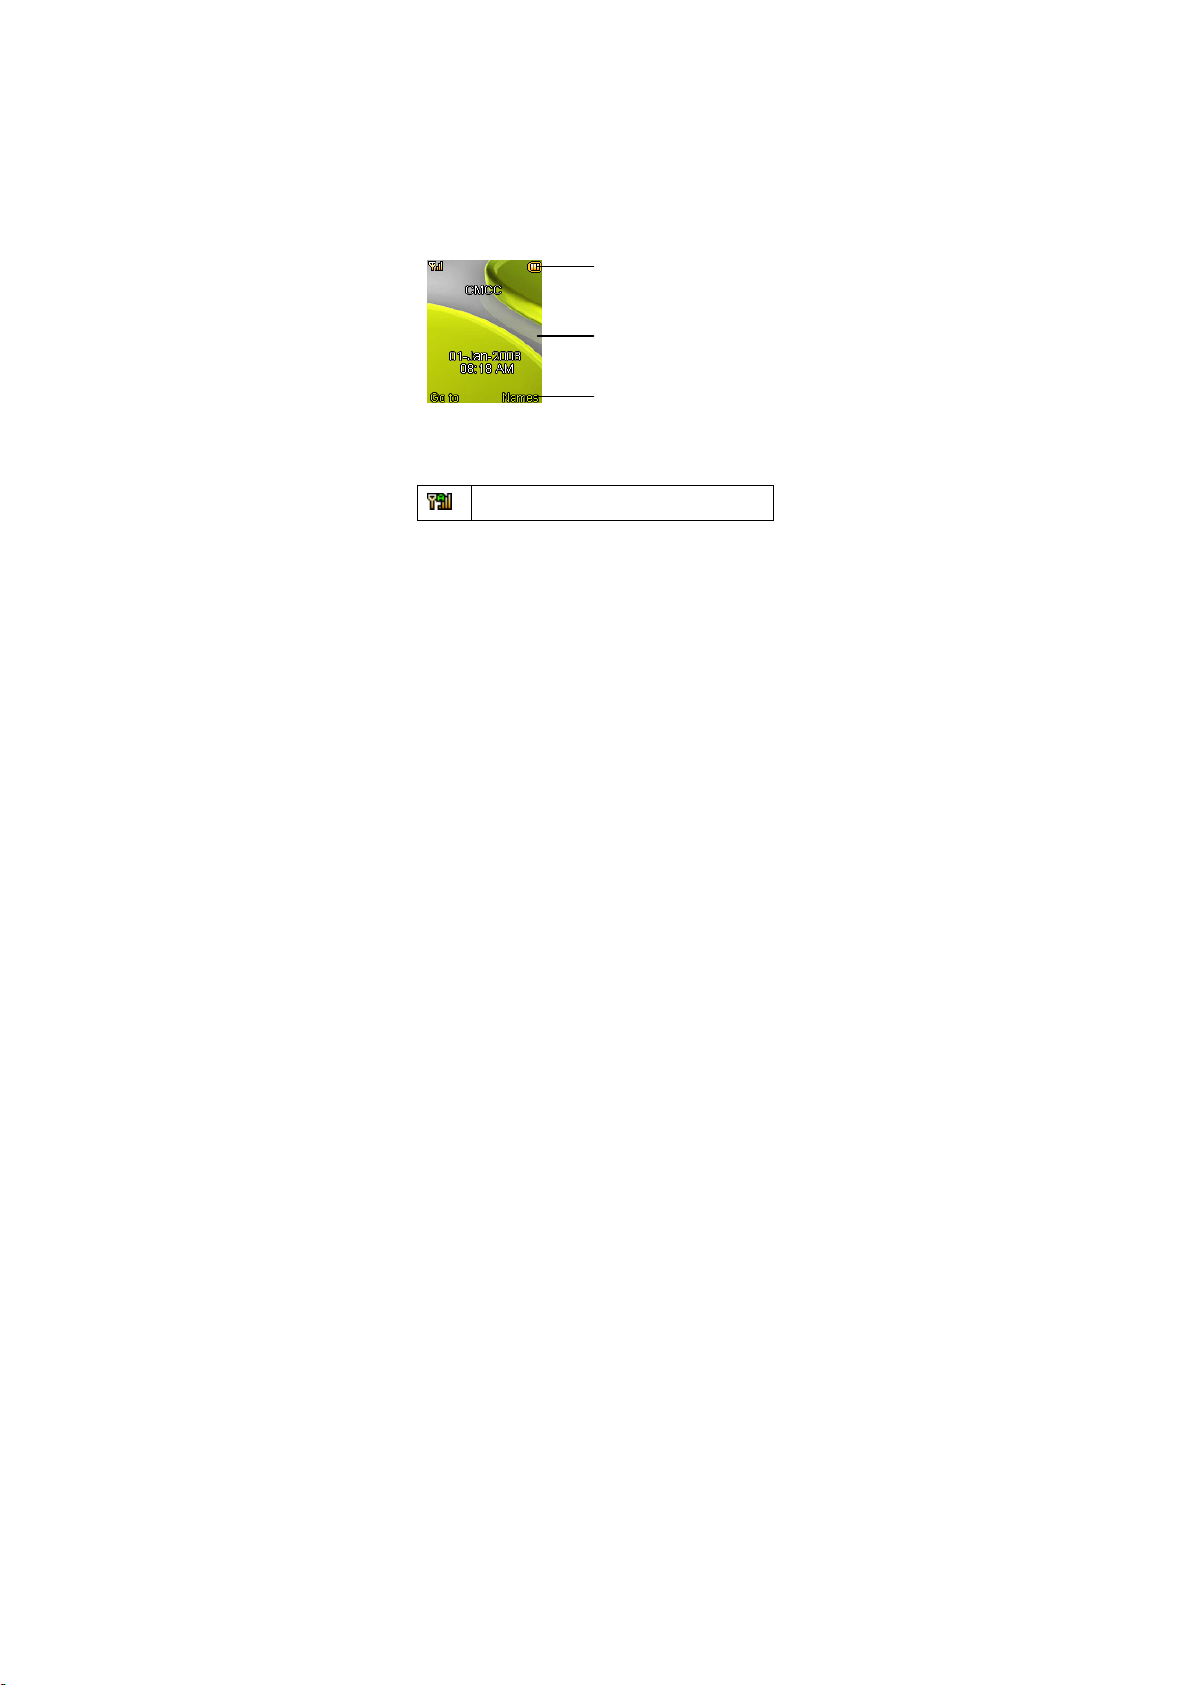
The idle shows when you turn your phone on:
Clue icon area
Letter area
The idle screen consists of
Clue icon area, Letter area, Application area.
The clue icon display mainly includes signal, battery, tip to the
no-read message, alert type etc.
Signal Strength
The vertical bars show the network connection
Application area
13
Page 14
strength.
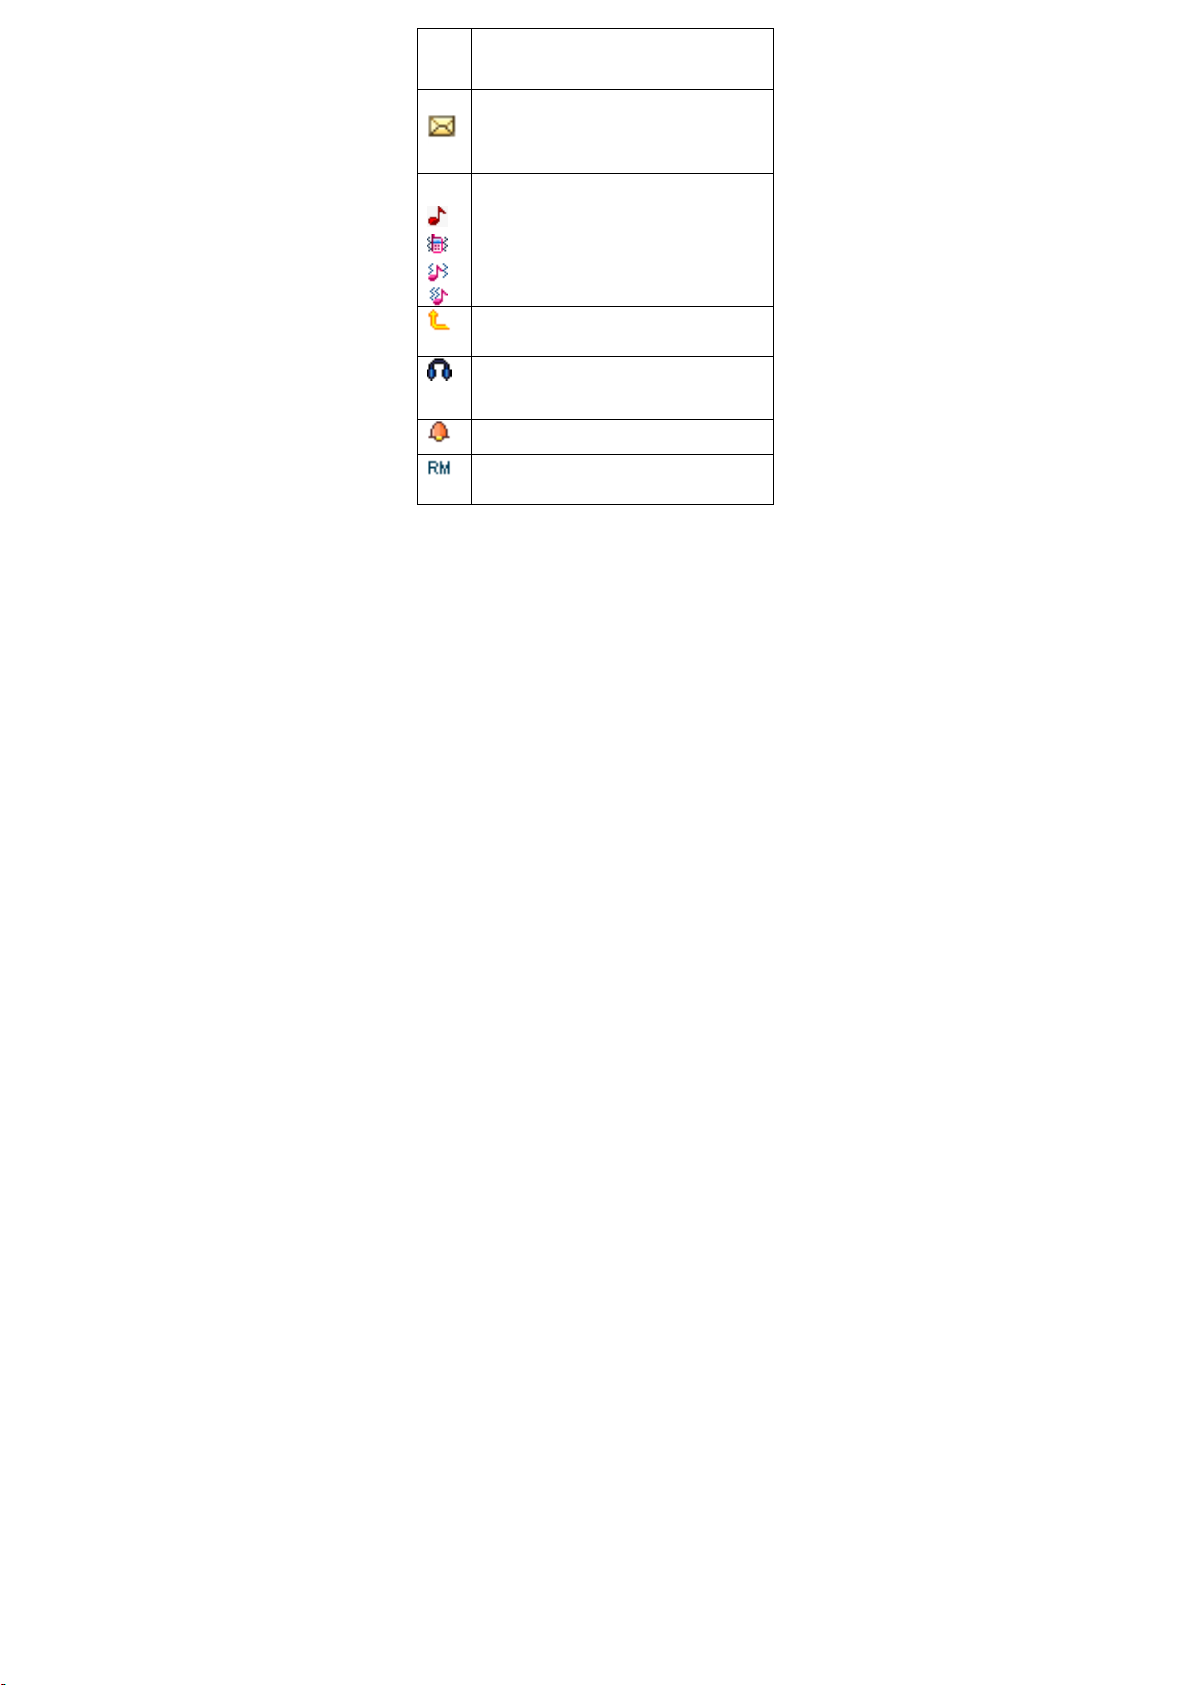
New messages
This icon shows when you receive a new message.
The inbox is full.
This icon flickers when the inbox is full and you need
to delete messages to receive new messages.
Alert Type
your current alert type:
Ring
Vibra
Vibra and Ring
Vibra then Ring
Call Divert
This icon shows when you divert all calls
unconditionally.
Earphone
This icon shows when you plug the earphone in.
(You need to plug the earphone in before listening to
the radio).
Turn alarm on
This icon shows when you turn alarm on.
Roaming
This icon shows when your phone is out of local
service area.
14
Page 15
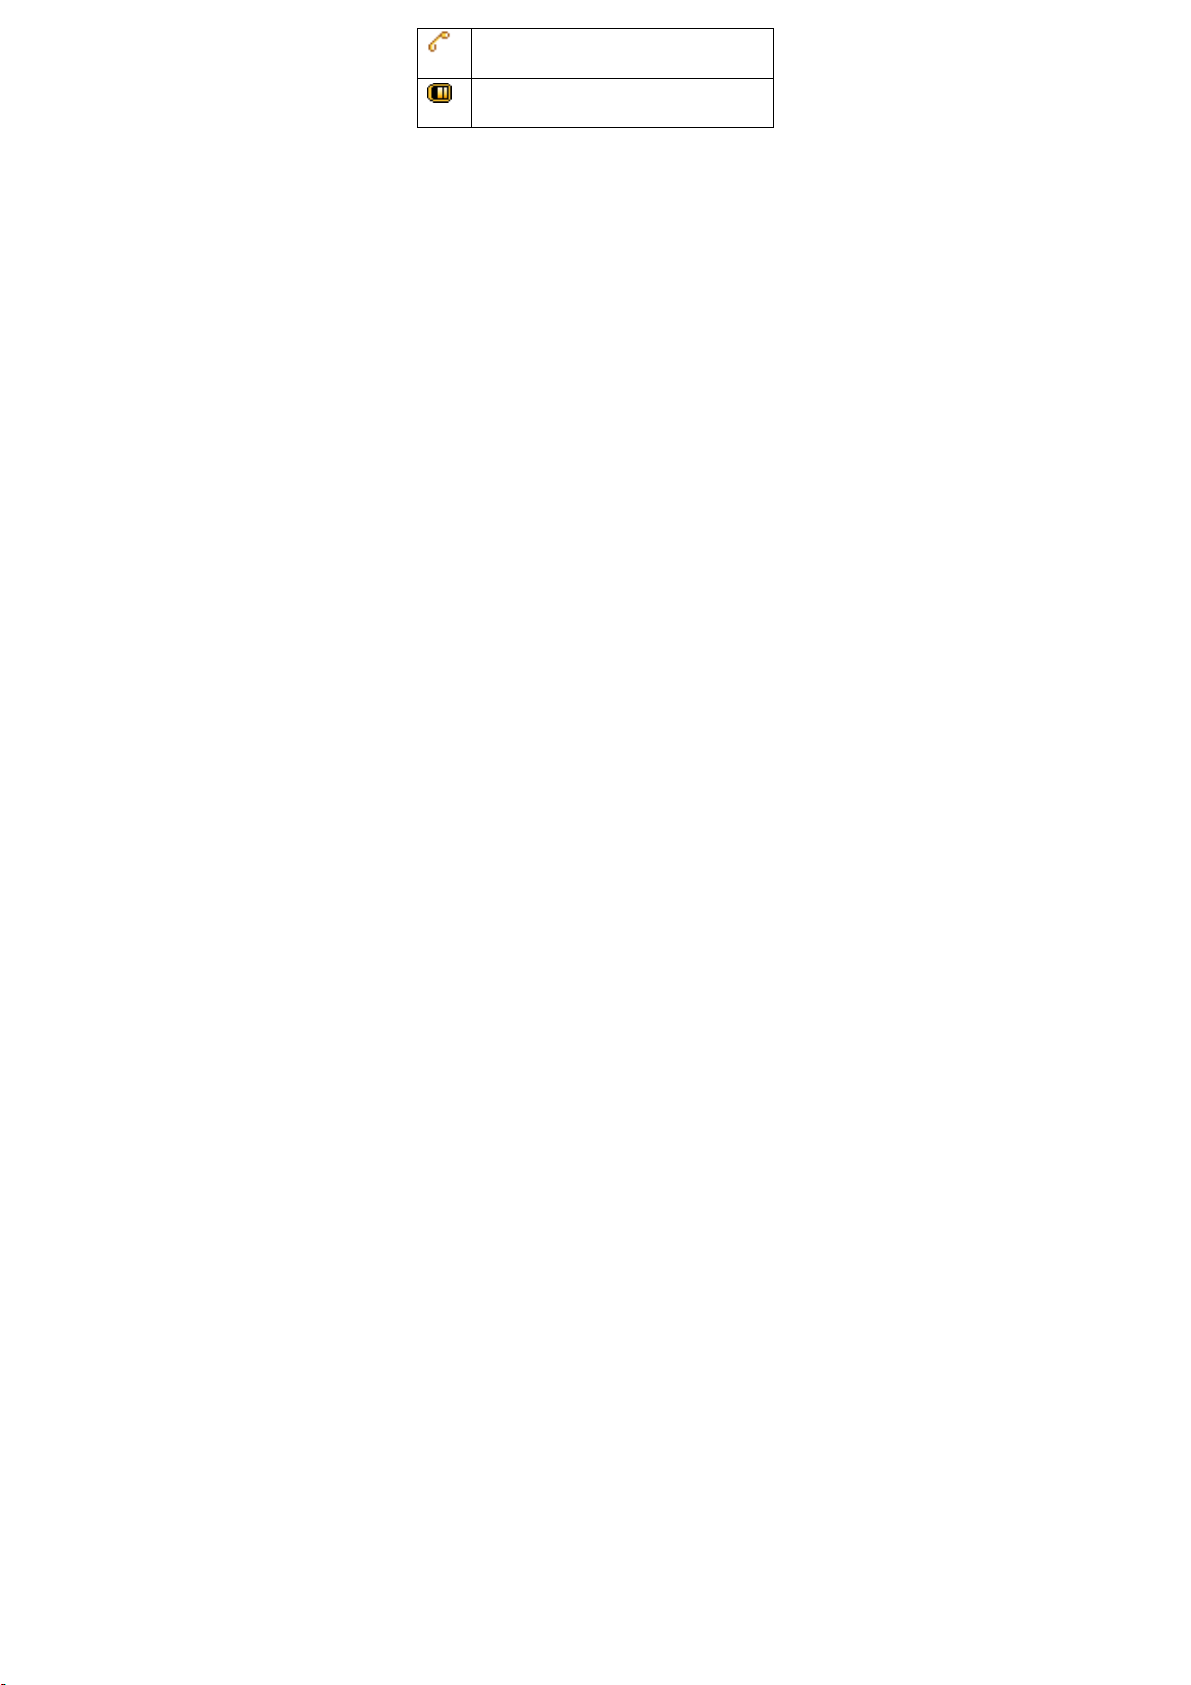
Missed calls
This icon shows when you are viewing the missed
call.
Battery Capacity
This icon shows the status of battery capacity (the
battery capacity is full when all the color vitta show).
In the area, you can see the following contents:
Operator
Name
Owner
Number
Time and
Date
Tips: You can choose whether to show these contents on
standby interface as you like.
Functional Key Areas
Here shows the corresponding operation of the left and right
functional key. For example, when standby: Go to, means that
press the left functional key to enter the fast menu; Function,
means press OK key to enter the main menu to select
interface; Names, press the right functional key to enter the
Phone Book.
According to your SIM card it shows the
network operator's name.
Exceptionally, please carry out correct
operations according to the hints. For
example, "emergency call" means you can
only make an emergency call.
Show the SIM number your phone records.
Show the time and date of your phone.
15
Page 16

Tips: When you enter the main menu to process, please check
the names corresponding to left and right keys, and then carry
the corresponding operations.
4.2 View missed calls
When your phone has missed call, the missed call icon
appears. You can press send key to enter the call logs to view
the first missed call marked with ; you can also enter Log
and then open Missed Calls to view all the records.
4.3 Keypad lock
You can lock the keyboard by pressing * for a while. On the
top state can show the keyboard was locked. When need to
open, due to the tips and press any key, then press the right
soft key and the key #, it will appear adjust icon, once keypad
unlocked, you can use your phone normally.
4.4 Call divert
When you inform the service provider to open call divert, you
can forward all incoming calls to another number even though
your phone is off or has no reception (depend on your choice
of divert mode).
Settings> Call Setup> Call Divert, select one divert mode and
enter or select a number and then press OK to set it up.
Note: this feature must be supported by your SIM card. For
details, please contact your service provider.
16
Page 17

4.5 Call barring
This feature must be supported by your service provider.
When activate the call barring function, you can answer or
make a call according to your choice of barring mode.
You can enter from
Setting > Call Setup >Call Barring to complete the operation.
Note: this feature must be supported by your SIM card. For
details, please contact your service provider.
4.6 Call waiting
This is a network dependent feature. After this function is
activated, your phone notifies you when there is an incoming
call during a call. You can enter from the
Setting > Call Setup > Call Waiting.
Note: this feature must be supported by your SIM card. For
details, please contact your service provider.
4.7 Black list
The phone provides you the function of black list, and enter
from the main menu
Settings>Call Setup>Black List.
Under this menu you can turn on or off the black list function.
You can setup 5 group numbers to shield. When you turn on
the black list function, the number in the black list will be
shielded automatically.
17
Page 18

4.8 Password
The password of your phone is originally set to be 1234. You
can change it whenever you like. You can also change your
SIM card password or barred dial password but you need to
contact your service provider to change them.
Note: for details please contact your service provider.
5. Functions
This phone offers you many functions. Under the sleep mode
you can press the OK key or left soft key to skim the main
menu.
1 Message
1-1 MMS
1-1-1 New MMS
1-1-2 Inbox
1-1-3 Sent
1-1-4 Outbox
1-1-5 Draft
1-1-6 Message Settings
1-1-7 About us
1-2 SMS
1-2-1 Write messages
1-2-2 Inbox
1-2-3 Outbox
1-2-4 Message settings
2 Phone Book
2-1 Quick Search
18
Page 19

2-2 Search Entry
2-3 Add New Entry
2-4 Copy All
2-5 Delete
2-6 Extra Number
2-7 Settings
3 Call History
3-1 Missed Calls
3-2 Dialed Calls
3-3 Received Calls
3-4 Rejected Calls
3-5 Delete Call Log
3-6 Call Time
3-7 Call Cost
3-8 SMS Counter
4 Setting
4-1 Phone Seting
4-2 Dual SIM Seting
4-3 Network Seting
4-4 Security Seting
4-5 Call Seting
4-6 Restore Factory Settings
5 Multimedia
5-1 File Manager
5-2 Camera
5-3 Audio Player
5-4 Image Viewer
5-5 Video Player
5-6 Video Recorder
5-7 FM Radio
6 Fun & Games
6-1 Games
6-2 Game Setting
7 Organizer
19
Page 20

7-1Bluetooth
7-2 Alarm
7-3 Calendar
7-4 Calculator
7-5 Tasks
7-6 Flashlight
8 User Profiles
8-1 General
8-2 Meeting
8-3 Outdoor
8-4 Indoor
8-5 Headset
8-6 Bluetooth
10 Services
Note: “Services” shows different contents according to different
service provider.
6. Phone Book
Select Phone Book to enter phone book.
The phone book consists of phone storage and SIM card
storage and you can use both of them.
Phone Storage: With name, default number, family number,
company name, email address, company number, fax number,
birthday date and group/individual ring in each item.
SIM card Storage: The capacity depends on your SIM card
type and there is only name and one business number in each
item. For details, please contact your service provider.
6.1 Search
Choose the Search in the Phone Book, input the name you
want to search, then through the Option-Search menu to
lookup the item qualifying in the phonebook.
20
Page 21

You can directly call one number by pressing send
key
in phone book screen and you can also press
option to make following operations:
IP Dial Automatically add the IP number
before the number when make a call.
Send SMS Send messages to the item.
View View all the information about the
name.
Edit Edit the information of the name.
Delete Delete the record.
Copy Copy the names stored in the phone
storage/SIM card storage to the SIM
card storage/phone storage (copy
between the two storages).
Move Move the names stored in the phone
storage/SIM card storage to the SIM
card storage/phone storage.
6.2 Add New Entry
You can add new names in your phonebook by this function
and save to the phone storage or SIM card storage.
Only names and call numbers can be added when you add
new contact to SIM card storage.
If you choose phone storage, beside names, numbers, family
numbers, company numbers, fax numbers, company names,
email address, you can add birthday dates and set
21
Page 22

group/individual incoming call ring as well.
6.3 Copy All
You can copy all the names and switch between SIM cards
and phone storage.
Note: When copy the names stored in the phone storage to
SIM card, only names and default numbers can be saved.
6.4 Delete
You can do following operation:
From SIM Delete all the names stored in
From Phone Delete all the names stored in
One By One Delete the selected names one
6.5 Extra Number
You can set Owner Number in this menu.
Note: this feature must be supported by your SIM card. For
details please contact your service provider.
6.6 Settings
You can perform following operations on the phonebook:
Memory Status Check the capacity of the phonebook,
Preferred Storage Select SIM card memory or phone
SIM card
the phone storage
by one
including SIM card memory and phone
memory.
memory as the default st orage location
22
Page 23

when adding new entry.
Fields Select the items of information that the
Card shows.
Tip: you can also choose another storage location when you
add new entry.
7. Call History
Enter the main menu Call History, select SIM1 or SIM 2
to view the dialed calls and answered calls, can also examine
the call time, cost and the use of the messages.
7.1 Call history
Your phone keeps lists of incoming and outgoing calls, even
for calls that didn’t connect. The most recent calls are listed
first.
Tip: the phone keeps the only latest call of the same number.
To view detailed information or perform other operations:
Find the lists of Dialed Calls, Received Calls, Missed Calls
Press OK key to view the detail information: times etc.
Press Option key to perform following operation:
Delete: Delete this record.
Save: Save the number of this record to phone book.
Dial: Dial the number of this record.
Edit: Enter the number edit screen, you can modify,
Send SMS: Send messages to the number of the item.
7.2 Delete the Record
You can delete the all the records of the missed calls, dialed
save or dial the number.
23
Page 24

calls and answered calls, you can also choose delete all to
delete all the records of the three parts.
7.3 Call Time
You can examine the call time record of the phone up to now
through the menu.
Last Call Time Show the last call time.
Total Sent Show the dialed calls time.
Total Received Show the answered calls time.
Reset All Time Reset the last call time, total
7.4 Call Cost
You can examine the call cost of the phone up to now through
the menu.
Last Call Cost Examine the last call cost.
Total Cost Examine the total call cost.
Reset Cost Input the PIN2 code, and then can
Max Cost Show the limitation of the currently cost,
Price Per Unit Tap setting to setup the unit time rates.
Note: The call cost function must be supported by the
network service provider. Reset the cost, setup the
maximum cost and rates need to input the PIN2 code,
please connect with your network provider to gain the
password.
8. Message
You can receive and send messages, and can also use
dialed time and total inhale time.
cleanup all the cost.
“0” means no limit. Tap setting can setup
the limitation of the cost.
24
Page 25

broadcast message and voice mail box.
Messages make it possible for you to exchange messages
with other wireless phone users. Select Messages to
perform operation.
8.1 MMS
New MMS
Select New MMS, you can see the following options:
TO Edit number or email address of receivers (up to
CC Edit number or email address of receivers (up to
BCC Edit number or email address of receivers (up to
Sub Edit subject of the MMS
Insert
Content
Creation
Mode
Content
Class
Select Insert Content to enter MMS editing interface, press
Option to perform the following operations:
Add Image Add image to MMS
Add Audio Add audio to MMS
Add Add attachment to MMS
10) the MMS is sent to
10) the MMS is cc to
10) the MMS is bcc to
Edit MMS
Free: allow user to add any content by default
Warning: Show one warning message to user that
the content class is violated
Restricted: User is not allowed to violate the
content class setting
Include text class, image basic, image rich, video
basic, video rich
25
Page 26

Attachment
Edit Text Edit text of MMS
Add Slide Add slide to MMS
Delete Image Delete existing image
Delete Audio Delete existing audio
Set Slide
Timer
Delete Slide Delete selected slide
Template Insert template to MMS
Preview Preview MMS
Send Send MMS
Save Save MMS to Draft
Inbox
The Inbox is for storing received MMS. Depending on the
selected mode, the phone vibrates or rings when you get a
new MMS with screen showing the new message icon and
prompt lights flickering. After you go back to idle, shows
on the top of the status bar till you read the new MMS.
Against the MMS in the inbox, you can operate the following
operations:
View View the MMS
Reply Edit MMS to reply the sender
Reply by SMS Reply the sender with SMS
Reply All Reply all senders
Forward Edit the corresponding information
Delete Delete the MMS
Delete All Delete all the MMS in the inbox
Properties View the details of the message
Set time interval between slides
including the recipient, address of the
current MMS then send to others
26
Page 27

Outbox
Enter outbox to view the MMS that you saved and you can
perform following operations:
View View the MMS
Forward Edit the corresponding information
Edit Enter the MMS edit interface
ReSend Send the MMS again
Delete Delete the MMS
Delete All Delete all the MMS in the outbox
Properties View the details of the message
Message Settings
You can setup your MMS through the menu by your need as
following:
Server Profile Start or edit the service, when you fail to
Compose Edit Auto Signature and Signature.
Send Include validity period, delivery report,
Retrieve Include Home network, read report,
8.2 SMS
You can enter the SMS menu through the message.
Writing Messages
including recipient, address of the
MMS then send to others
send the MMS, please change
online-pattern of the server to WAP.
read report, priority, slide timing,
delivery time etc.
delivery report.
27
Page 28

You can write a new text message send to others, and also
can insert template in the message.
Select the Option after editing a text message:
Send Only Send the message
Save and Send Save the message while sending
Save Save the message
Send To Many Send the message to many
Send By Group Send the message to all the link of the
selected group
Inbox
The Inbox is for storing received messages. Depending on the
selected mode, the phone vibrates or rings when you get a
new message with screen showing the new message icon and
prompt lights flickering. After you go back to idle, shows
on the top of the status area till you read the new message.
While reading a message, you can perform following
operations:
Reply: Reply a message to the sender
Delete: Delete this message
Edit: Edit this message
Forward: Send this message to somebody else
Copy to Phone*: Copy the message from SIM card to
Copy to SIM*: Copy the message from phone
Move to Phone*: Move the message from SIM card to
Move to SIM*: Move the message from phone
Delete All: Delete all the messages in the inbox
Copy All: Copy all the messages from SIM card
the phone memory
memory to SIM card memory
the phone memory
memory to SIM card memory
or phone memory to phone memory
28
Page 29

or SIM Card
Move All: Move all the messages from SIM card
Use Number: Extract the number from this message
Tip: the menus marked with* may not appear depending on
the storage location in use.
Note: keeps flickering in idle when you inbox is full.
Please delete some messages to receive new messages.
Outbox
Enter outbox to view the sent messages that you saved and
you can perform following operations:
Send: Send this message to one contact
Edit: Edit this message
Delete: Delete this message
Copy to Phone*: Copy the message from SIM card to
Copy to SIM*: Copy the message from phone
Move to Phone*: Move the message from SIM card to
Move to SIM*: Move the message from phone
Delete all: Delete all the messages in outbox
Copy All: Copy all the messages from SIM card
Move All: Move all the messages from SIM card
or phone memory to phone memory or
SIM Card
and perform operation on it
the phone memory
memory to SIM card memory
the phone memory
memory to SIM card memory
or phone memory to phone memory or
SIM Card
29
Page 30

or phone memory to phone memory or
Use Number: Extract the number from this message
Use URL: Extract the link from this message and
Message Settings
You can setup the message from the menu, as following:
Profile Setting: Offer you four profiles and you can edit
Common Setting: Set delivery report on or off
Memory Status: Check the capacity of messages
Preferred Storage: Set the default message storage
Note: you need support from the service provider to receive
delivery reports.
9. Multimedia
Your phone offers multimedia applications and you can select
Media from main menu to open it.
9.1File Manager
Tap from the main menu to open it and you can find
the storage devices and the capacity of total space and free
space. On different objects, there are different operations.
Storage devices: press Option to perform following operations:
SIM Card
and perform operation on it
operate on it
their names, set SC Address and Valid
Period etc.
storage
location to phone or SIM card.
30
Page 31

Open
Create
Folder
Format
9.2 Image Viewer
You can perform the following operations:
View View album
Browse
Style
Forward Send the current photo to wallpaper list, screen
Rename Change name of the photo
Delete Delete the photo
Delete All Delete all photos
Sort
Storage
9.3 Camera
Your phone has a hi-Mega pixel camera that you can take
photos whenever and wherever you like. After taking photos,
store them in the phone memory or memory card (if any).
List all the folders and files
Create a new folder and edit its name
Format the storage devices, the operation
will delete all the data stored in the
storage devices
Set the view mode
saver list and power on/off display list, Bluetooth
Arrange the photos by name, type, time, size or
random
Store to phone or Memory Card
Camera Settings
Press left soft key/Option in viewfinder interface and make
detailed settings:
Album Switch to the album and show the photo
31
Page 32

Camera
Setting
Image Setting Adjust the photo’s size and quality.
Effect Setting Set effect to Normal, Sepia, Sepia Red,
Frame Select frame.
Cont Shot Set it to 1 Shot, 3 Shot or 5 Shot.
Delay Timer Set delay time to 5 sec, 10 sec, 15 sec.
Storage
Restore
Default
Take a Photo
In the camera viewfinder interface, take the scene in the frame;
press OK to take a photo.
After photographing, select save to store the photo, then back
to the viewfinder state; Tap back to give up saving and back to
the viewfinder state.
Tips: All the photos are stored in the Photos file.
9.4 Audio Player
You can use the audio player to play music. Press OK key to
play the current music, and press it again to pause the current
music; Press the left direction key to switch to the previous one,
and right direction key to switch to the next. You can adjust the
volume of the MP3 player through the up direction key and
down direction key.
files stored in the current album.
Set the status of shutter sound, EV,
Banding, delay timer and Cont-shot
Sepia Green, Sepia Blue, Monochrome,
Color Invert.
Set the storage location.
Use the default settings.
32
Page 33

9.5 Video Player
Tap Video Player to open it and view all video files. Press the
Option and perform following operations on the selected video:
play, forward, details, rename, delete, delete all files or sort.
During playing, press the 4-way navigation key up and down to
adjust the speed, press the left or right key to control playing
rate, press “*” to full screen, press “#” to mute.
9.6 FM Radio
Choose Radio menu to turn the radio function.
Tune in the Radio
Turn on the radio function, the idle shows the position number,
name (if saved), frequency of the broadcast channel.
Note: for saved channel, you can choose the position by press
the corresponding numeric key quickly.
Search the Channel
Press the left direction key, right direction key to inch the HZ,
select frequency you need, the radio will find the channel. Use
the upper key to set it, use the down key for searching, use the
* key, # key to adjust the volume.
You can also choose automatic search under the radio idle,
the radio will search the channels which can receive presently.
Note: Automatic search needs times, please wait bovine.
Basic method
The radio function the phone provides supports the
background play.
While quit the interface when the shows, you can also
tune the radio in.
33
Page 34

Note: While tuning the radio in, you can dial or hear the call
normally. When on the phone, the radio will become silent
automatically.
10. Settings
You can set your favorite wallpaper, ring or some other
function.
10.1 Phone Setup
Enter Settings, select Phone Setup and then you can set
following items:
Time and
Date
Schedule
Power On/Off
Language
Preferred
Input
Methods
Display
Characteristic
Greetings
Turbo Dial
Shortcut
Set your current time zone, time, date and
their display format.
You can set up to 4 power on/off time.
Set the display language.
Select the preferred input method as you
like.
You can find submenus such as wallpaper,
screen saver, power on display, and power
off display, show date and time in display
characteristic.
Set greeting text shown when power on.
Set turbo dial on or off, edit turbo dial
number list.
Edit shortcut menu
34
Page 35

Dedicated
Key
Note: your choice of time zone does not change the time and
date you have setup. The setting of Schedule Power On/Off
won’t be activated if you set the same time for them.
10.2 Dual SIM Setup
Enter this menu, you can set the mode to be Dual SIM, Only
SIM1, Only SIM2, Flight mode.
10.3Network Setup
When dual SIM mode is activated, you can perform network
setup for SIM1 and SIM2 separately. Enter Settings,
select Network Setup and then you can perform following
operations:
Network
Selection
Preferred
Networks
GPRS
Connection
Set four menus that you can enter directly
from idle by press the 4-way navigation key
up, down, left and right.
New search, Select Network, Selection Mode
Set the preferred network during searching.
Set the way how GPRS is connected.
35
Page 36

10.4 Security Setup
Enter Settings, select Security Setup and then you can
perform following operation:
SIM Lock
Phone
Lock
Auto
Keypad
Lock
Fixed Dial
Barred
Dial
Change
Password
Note: for Pin Password, please contact your service provider;
Fixed Dial and Barred Dial must be supported by your SIM
card. For details, please contact your service provider.
10.5 Call Setup
Enter Settings from main menu, select Call Se tup and
then you can perform some operations as following:
Own
Set a password to lock/unlock your SIM card.
Set a password to lock/unlock your phone and
the default password is 0000.
Set auto keypad lock on or off and a time after
which the keypad is locked.
Edit fixed dial list of SIM card.
Set the condition for calls that can not be
made.
Change the Pin Password, Pin2 Password and
Phone Lock Password.
Preset, conceal, send own number
36
Page 37

Number
Call Waiting
Call Divert
Call Limit
Line
Switching
Call Time
Reminder
Call Time
Display
Auto Redial
Blacklist
IP Dial
Missed Call
Reminder
Setup the call waiting function.
Setup the call divert function.
Setup the call limit function.
Switch your current line and there are 2 lines
available
Set the call time reminder on or off and its
type and period
Set if call time shows during calls or not.
Set Auto Dial on or off. While it is on, the
phone automatically redials 10 times in
occasion that the line is busy or can not be
answered and you can press Abort to cancel
redialing.
Set 5 numbers; While it is on, the phone
automatically shields the incoming calls from
the members in blacklist.
Set IP dial on or off, edit IP number
Set to remind or not when there are missed
calls
10.6 Restore Factory Settings
Enter Settings, select Restore Factory Settings and
then you can restore initialized settings for wallpaper, screen
37
Page 38

saver, ring etc.
11. Organizer
Your phone provides you more management tools including
Calendar, Alarm, To do list, Currency Converter, Unit
Converter, Stopwatch and Notepad. Enter from main menu
Organizer.
11.1 Alarm
Your phone has an alarm clock with 5 separate alarms that
you can set to alert you at the time(s) you specify. To set an
alarm clock, select one alarm and press left soft key to turn it
on/off, set time, period, ring and reminding mode.
11.2Calendar
The screen shows current date framed by special color box
when entering Calendar. Press the 4-way navigation key up,
down, left or right to move to different date. Press OK key or
left soft key to enter the corresponding menu and you can find
View Tasks, Jump To Date and Lunar Calendar (only when
setting Chinese as phone language).
11.3 Notepad
You can schedule and organize events such as appointments
and meetings by Notepad in your phone as it always reminds
you of the preset tasks on time if your phone is power on.
Enter Notepad from Organizer and you can check all tasks.
38
Page 39

While the task list is empty, press left soft key to “Add” new
tasks or open calendar display, enter Option and select Jump
To Date to add new tasks. While viewing a task, you can also
enter Option by pressing left right key to perform following
operation:
View
View the content of selected task
Add
Select Add to create a new task. You can edit its date, time,
note, alarm mode and reminding mode etc.
Edit Task
Edit the content of selected task
Delete Task
Delete the content of selected task
Delete All
Delete all the tasks
Note: there is fixed room for storing tasks and when no “Add”
shows in “Option”, please delete some indifferent tasks to save
room for important ones.
12. Games
The phone provides you more application software, and it
makes you more convenient.
Enter from menu Games, the phone provides you
many games interesting, which make your life wonderful.
To the rules of the built-in games, you can refer to the notes of
the games.
And you can setup the sound and the shock through the game
settings.
Note: you can set easy, normal and hard level in Game Level
39
Page 40

about some games through Game Settings.
13. Profiles
Enter Profiles and there are several profiles that you can edit
the contents as you like: General, Meeting, Outdoor, Indoor,
and Headset. Once you pair your phone with an earphone, the
Headset is automatically activated and meanwhile the profile in
use is deactivated.
You can choose any profile as you like and customize the
selected one:
Tone Setup: Set the incoming call tone, incoming
Volume: Set the volume of ring tone and key
Alert Type: Set ring, vibration only, vibration and
Ring Type: Set single ring, repeat ring or
Answer Mode: Turn any key answer (except for power
14. Services
Services show different contents according to different service
provider. For more information, please consult your SIM
provider.
WAP
Your phone support WAP (Wireless Application Protocol)
based services that provide you WAP services such as news,
weather forecast and flight info, etc. All these services are
designed for mobile phone and maintained by WAP service
provider.
WAP service need support from network operator, please
consult network operator or our service provider for WAP
message tone and keypad tone
tone
ring, vibration then ring or silent
ascending ring
on/off key and right soft key) on or off
(only in Headset Mode).
40
Page 41

availability, pricing and usage.
Homepage
Select it, your phone will try to connect to the homepage you
set, if you never set a homepage before, the phone will
connect to the default website set by network operator.
Favorites
You can add websites to Favorites.
Recent Visits
The menu lists the website records your recently visit to
facilitate your visit to the site.
Go to URL
Enter the menu, after inputting the URL address of the WAP
service that you want to visit, tap the option button and select
Go. The phone automatically logs on the website you input.
Settings
You can set the following parameters:
Activate
Profile
Options Set timeout, set graphics, cache and cookie
Clear Cache
Clear Cookie Clear cookie records.
Select SIM
Card
About us
List basic info about WAP browser
Select and start network configuration.
on/off.
Clear the records in the cache.
Set to always ask, SIM1 or SIM2.
41
Page 42

15. Input Method
The phone supports many input methods such as capital letter
and small letter, smart English, numeric and so on.
15.1 English Input Method
English input method includes capital letter and small letter.
The keys corresponding the uppercase and lowercase input
separated by “;”, and no semicolon separates show that the
two input method correspondingly appear the same
characters.
Numeric Key Character
Numeric Key0
Numeric Key 1 1or symbols
Numeric Key 2
Numeric Key 3
Numeric Key 4
Numeric Key 5
Numeric Key 6
Numeric Key 7
Numeric Key 8
Numeric Key 9
*Key Select symbol
#Key Switch input method
4-way navigation key up Move up cursor
4-way navigation down Move down cursor
4-way navigation left Move left cursor
4-way navigation right Move right cursor
Right soft key Back or Clear
While using English input method, please follow this order:
Keep tapping one key till the desired character shows.
0,space
ABC2;abc2
DEF3;def3
GHI4;ghi4
JKL5;jkl5
MNO6;mno6
PQRS7;pqrs7
TUV8;tuv8
WXYZ9;wxyz9
42
Page 43

Press *key to find symbols.
Press # key to switch input method.
Press right soft key to clear the wrong character or go back.
15.2 Numeric Input Method
Handwriting and keyboard can use meanwhile in numeric input
method. The definition of keys while using numeric input
method:
Numeric Key Character
Numeric Key0
Numeric Key 1 1
Numeric Key 2 2
Numeric Key 3 3
Numeric Key 4 4
Numeric Key 5 5
Numeric Key 6 6
Numeric Key 7 7
Numeric Key 8 8
Numeric Key 9 9
*Key Select symbol
#Key Switch input method
4-way navigation key up Move up cursor
4-way navigation down Move down cursor
4-way navigation left Move left cursor
4-way navigation right Move right cu rsor
Right soft key Back or Clear
While using Numeric input method, please follow this order:
Press numeric key 0-9 to input desired character or the
number on the screen directly.
Press *key to find symbols.
0,
43
Page 44

Press # key to switch input method.
Press right soft key to clear the wrong character or go back.
Malfunctions & Measures
Here list some malfunctions that may occur and measures. If
the measures can’t solve the problem please contact
authorized after service center. Thank you!
Can’t turn the phone on
Check battery installation, please install battery correctly
Check if battery level is low, change a battery or charge the
battery
Check if enter incorrect PIN code 3times in a row. If yes, the
phone is locked, then you should enter PUK code (please
contact your network provider for PUK code)
SIM Card Void
When the phone shows “SIM Card Void”, you can try the
following:
Powers the phone off then restart to sure if can solve.
If your SIM card is a prepaid card, to sure whether the card is
insufficient.
Please turn to your network provider, and to sure whether to
be refused registration network by other reasons.
Weak signal or no signal
You may be in a location where the reception is bad, such as
tunnel or cellar, please relocate and try again.
You can try turning around slightly or get near the window if
you are in the room.
Bad talking quality
Weak signal, you can try solutions above.
44
Page 45

Low battery, change a new battery or charge the battery.
Use up volume key to adjust microphone volume.
Can’t make a call
Check if you enter the correct number and press send key.
Check if you set call barring, if yes cancel it.
Can’t receive calls
Check if your phone is turned on.
Check if screen shows no signal, if yes, try solutions above.
Check if you set call barring, if yes, cancel it.
Screen is dark
Check if battery is low, change a battery or charge the battery.
Adjust the brightness in settings.
Your phone may be affected with damp, keep it dry.
Tips: if all suggestions and solutions can’t solve your problem,
please contact authorized after service center. Please do not
disassembly or repair your phone without professional guide.
Thank you!
Specific Absorption Rate Data
This model meets international guidelines for exposure to
radio waves.
Your mobile device is a radio transmitter and receiver. It is
designed not to exceed the limits for exposure to radio waves
recommended by international guidelines. These guidelines
were developed by the independent scientific organization
ICNIRP and include safety margins designed to assure the
45
Page 46

protection of all persons, regardless of age and health.
The guidelines use a unit of measurement known as the
Specific Absorption Rate, or SAR. The ICNIRP SAR limit for
mobiles devices used by the general public is 2 W/kg.
As SAR is measured utilizing the device’s highest transmitting
power, the actual SAR of this device while operating is
typically below that indicated above. This is due to automatic
changes to the power level of the device to ensure it only uses
the minimum level required to reach the network.
New phones must meet the international guidelines before
coming into the market. The highest SAR value for this device
when tested at the ear was 0.85 W/kg and the highest tested
SAR value is 0.44 W/kg.
Information from the World Health Organization
The World Health Organization has stated that present
scientific information does not indicate the need for any special
precautions for the use of SAR Data mobile devices. They
note that if you want to reduce your exposure then you can do
so by limiting the length of calls or using a “hands-free” device
to keep the mobile phone away from the head and body.
Improvement of this device may cause a little change of the
SAR data. However, the device is designed in accordance with
the guidelines in any case.
Battery Tips
The machine is provided by the reusable rechargeable battery.
The new battery only can by two or three times full charge and
discharge cycle to achieve optimum performance.
Battery can be recharged many times for repeated use, but it
will eventually be exhausted. W hen the talk and standby time
is significantly shorter than usual, then need to replace a new
battery.
Use the battery the handset manufacturers approved only, and
46
Page 47

use the authorized charger for the battery charge only.
Cut off the power supply when do not use the charger.
Do not connect a battery to a charger more than one week, the
long time charge will affect battery life.
The battery storage for too long would affect the results. And
the battery will automatically discharge as long time unused.
Do not use a damaged battery or charger.
Never expose batteries to temperatures below -10°C (14°F) or
above 45°C (113°F).
Always take your phone with you when you leave your vehicle.
It is normal for batteries to gradually wear down and require
longer charging times. If you notice a change in your battery
life, it is probably time to purchase a new battery.
Do not let the batteries short-circuit. When metal objects (such
as: coins, etc.) directly connected to the battery anode and the
cathode (with the metal side), will occur short-circuit accident.
In the pocket or handbag carry a spare battery should be
particularly careful. Short-circuit will damage the battery.
Please deal with the waste batteries according to the relevant
provisions.
Never dispose of batteries in a fire because they may explode.
Product Maintenance
Your phone is a product with outstanding design and superior
quality, please take good care using it. You are strongly
suggested to take the following advice which should help you
stick to the warranty in order to extend the usage period of the
product.
Keep your phone and its parts away from children.
Keep your phone dry. Keep it away from rain, damp or any
kind of fluid.
Don’t touch your phone with wet hands when charging or there
may be bodily injury or damage to the phone.
Keep your phone away from extreme heat which can shorten
47
Page 48

your phone’s life, damage the battery, twist or melt some
plastic parts.
Keep your phone away from extreme cold because when the
temperature grows up, water vapor accumulated from inside
the phone may damage the electronic circuit.
Keep your phone away from dust and dirt.
Keep your phone away from ignited cigarettes, fire or heat
source.
Don’t disassemble your phone by yourself.
Don’t drop, beat or shake your phone. Any rude treatment can
damage the inner electronic circuit board.
Don’t daub your phone because paint would jam-up the
earpiece, microphone or any other removable part and disable
your phone.
Clean the pc camera or screen with neat, soft and dry cloth.
Don’t use alcohol or other cleaning solutions.
If your phone, battery, charger or parts can’t work, please take
them to the authorized service center for help.
48
Page 49

FCC RF EXPOSURE INFORMATION:
WARNING!! Read this information before using your phone
In August 1986 the Federal Communications Commission (FCC) of the United States with its
action in Report and order FCC 96-326 adopted an updated safety standard for human
exposure to radio frequency (RF) electromagnetic energy emitted by FCC regulated transmitters.
Those guidelines are consistent with the safety standard previously set by both U.S. and
international standards bodies. The design of this phone complies with the FCC guidelines and
these international standards. Use only the supplied or an approved antenna. Unauthorized
antennas modifications, or attachments could impair call quality, damage the phone, or result in
violation of FCC regulations. Do not use the phone with a damaged antenna. If a damaged
antenna comes into contact with the skin, a minor burn may result. Please contact your local
dealer for replacement antenna.
BODY-WORN OPERATION:
This device was tested for typical body-worn operations with the back of the phone kept 1.5cm
from the body. To comply with FCC RF exposure requirements, a minimum separation distance
of 1.5cm must be maintained between the user's body and the back of the phone, including the
antenna, whether extended or retracted. Third-party belt-clips, holsters and similar accessories
containing metallic components shall not be used. Body-worn accessories
that cannot maintain 1.5cm separation distance between the user’s body and the back of the
phone, and have not been tested for typical body-worn operations may not comply with FCC RF
exposure limits and should be avoided.
For more information about RF exposure, please visit the FCC website at www.fcc.gov
Your wireless handheld portable telephone is a low power radio transmitter and receiver. When
it is ON, it receives and also sends out radio frequency (RF) signals. In August, 1996, the Federal
Communications Commissions (FCC) adopted RF exposure guidelines with safety levels for
hand-held wireless phones. Those guidelines are consistent with the safety standards previously
set by both U.S. and international standards bodies:
<ANSIC95.1> (1992) / <NCRP Report 86> (1986) / <ICIMIRP> (1996)
Those standards were based on comprehensive and periodic evaluations of the relevant
scientific literature. For example, over 120 scientists, engineers, and physicians from universities,
government health agencies, and industry reviewed the available body of research to develop
the ANSI Standard (C95.1). Nevertheless, we recommend that you use a hands-free kit with
your phone (such as an earpiece or headset) to avoid potential exposure to RF energy. The
design of your phone complies with the FCC guidelines (and those standards).
Use only the supplied or an approved replacement antenna. Unauthorized antennas,
modifications, or attachments could damage the phone and may violate FCC regulations.
NORMAL POSITION:
Hold the phone as you would any other telephone with the antenna pointed up and over your
shoulder.
TIPS ON EFFICIENT OPERATION:
For your phone to operate most efficiently:
• Extend your antenna fully.
• Do not touch the antenna unnecessarily when the phone is in use. Contact with the antenna
affects call quality and may cause the phone to operate at a higher power level than otherwise
needed.
Page 50

RF Exposure Information:
FCC RF Exposure requirements: The highest SAR value reported
under this standard during product certification for use next to the
body with the minimum separation distance of 1.5cm is 0.
next to the head is 0.
collocated or operating in conjunction with any other antenna or
transmitter.
This device complies with part 15 of the FCC rules. Operation is
subject to the following two conditions:
(1) this device may not cause harmful interference, and
(2)this device must accept any interference received, including
interference that may cause undesired operation.
NOTE: This equipment has been tested and found to comply with
the limits for a Class B digital device, pursuant to part 15 of the FCC
Rules. These limits are designed to provide reasonable protection
against harmful interference in a residential installation. This
equipment generates uses and can radiate radio frequency energy
and, if not installed and used in accordance with the instructions,
may cause harmful interference to radio communications. However,
there is no guarantee that interference will not occur in a particular
installation. If this equipment does cause harmful interference to
radio or television reception, which can be determined by turning the
equipment off and on, the user is encouraged to try to correct the
interference by one or more of the following measures:
- Reorient or relocate the receiving antenna.
- Increase the separation between the equipment and receiver.
-Connect the equipment into an outlet on a circuit different from that
to which the receiver is connected. -Consult the dealer or an
experienced radio/TV technician f or help
Do not use the device with the environment which below minimum
-10 ℃ or maximum over 50, the device may not work.
Changes or modifications to this unit not expressly approved by the
party responsible for compliance could void the user’s authority to
operate the equipment.
569W/kg. This transmitter must not be
49
659W/kg,
 Loading...