

Page 1
Page 2

Page 3
HƯỚNG DẪN SỬ DỤNG VIETMAP
Mục lục
Page 4

HƯỚNG DẪN SỬ DỤNG VIETMAP
02
I – LƯU Ý TRƯỚC KHI SỬ DỤNG :
⚫ Thiết bị này không hỗ trợ chống nước. Vui lòng không để thiết bị tiếp xúc với nước
hoặc hơi ẩm.
⚫ Thiết bị được thiết kế để sử dụng chuyên dùng cho xe hơi. Không lắp đặt thiết bị ở
vị trí sẽ ngăn cản tầm nhìn của người lái xe khi đi trên đường hoặc gần khu vực túi
khí.
⚫ Không nên thao tác hoặc tập trung vào thiết bị trong khi lái xe. Nếu bạn phải thao
tác đến thiết bị, hãy dừng xe vào bên đường.
⚫ Đảm bảo ống kính thiết bị được giữ sạch sẽ và không có vật cản phía trước ống kính.
⚫ Không để thiết bị dưới ánh sáng mặt trời trực tiếp trong một thời gian dài hoặc nơi
nhiệt độ quá cao.
⚫ Bạn nên kiểm tra thiết bị ít nhất một lần một tháng bao gồm thẻ SD, để đảm bảo
quá trình ghi hình đang hoạt động tốt.
⚫ Không tự ý tháo rời, sửa chữa hoặc thực hiện bất kỳ sửa đổi nào đối với thiết bị.
Page 5
HƯỚNG DẪN SỬ DỤNG VIETMAP
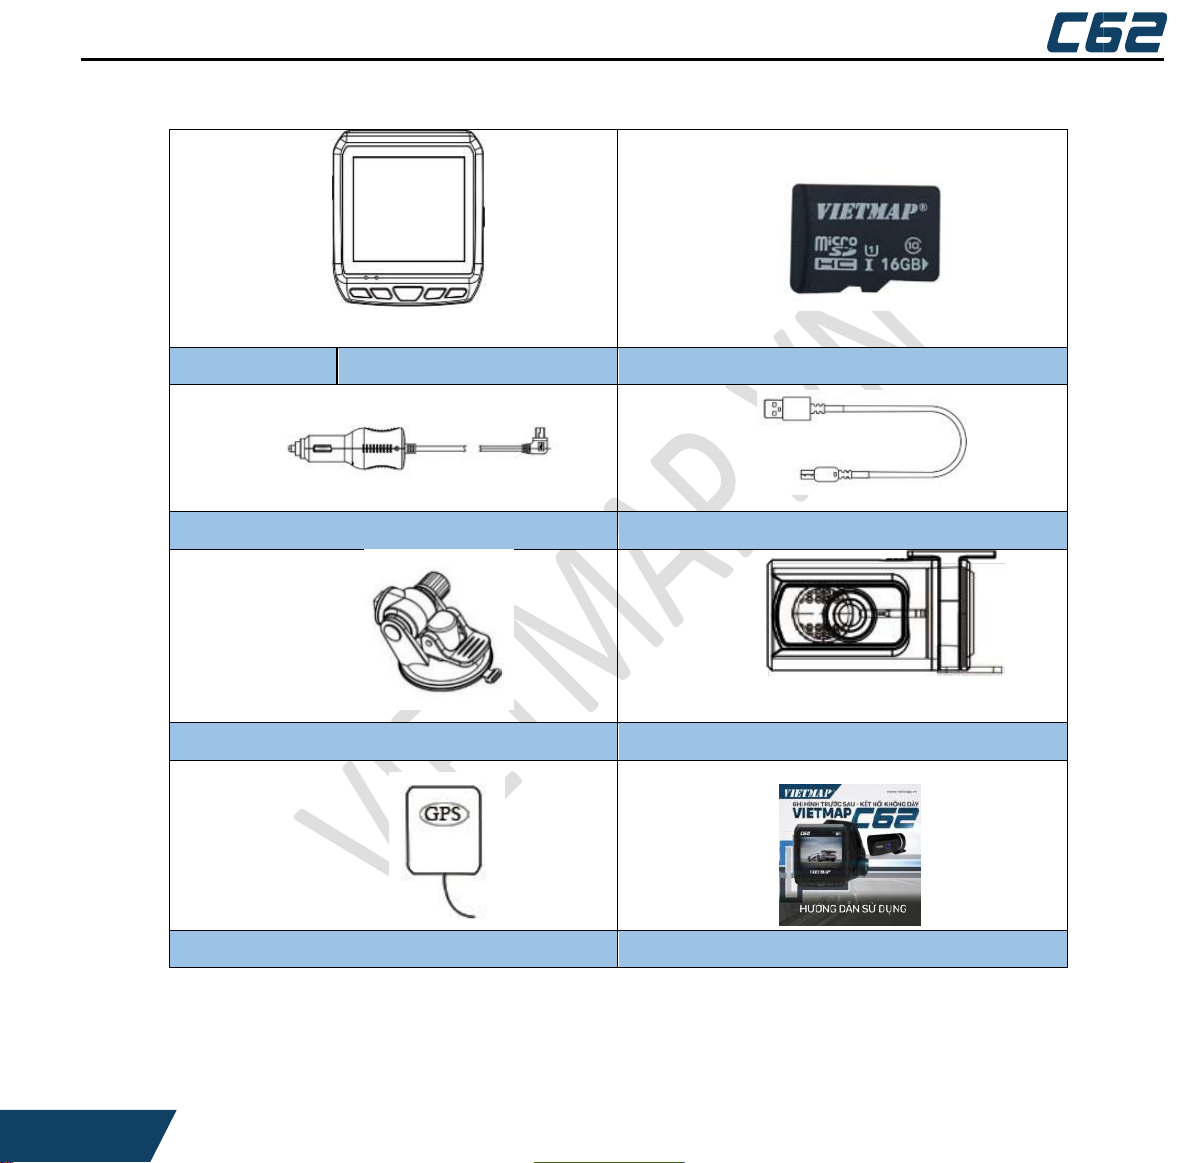
Vi
etmap C62
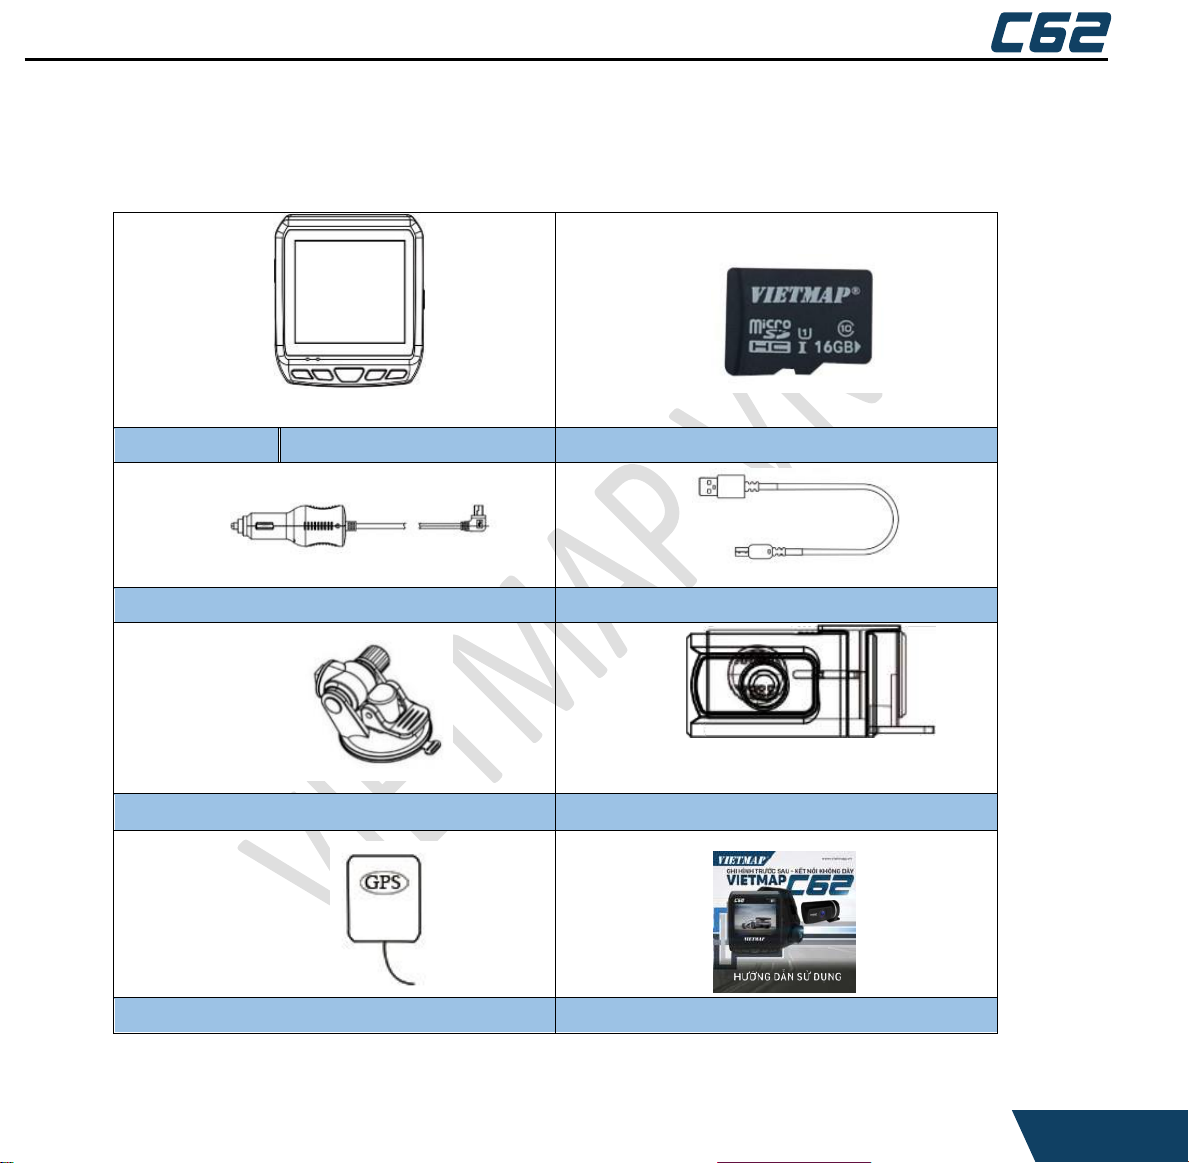
Thẻ nhớ 16GB
Sạc nguồn ô tô
Cáp USB
Đế hút chân không
Camera sau
GPS
HDSD
03
II – PHỤ KIỆN ĐI KÈM THIẾT BỊ:
Cảnh báo: Nếu có thiết bị nào bị thiếu hoặc bị hỏng, hãy liên hệ với địa điểm mua
hàng của bạn. Không được sử dụng sản phẩm bị hư hỏng.
Page 6

HƯỚNG DẪN SỬ DỤNG VIETMAP
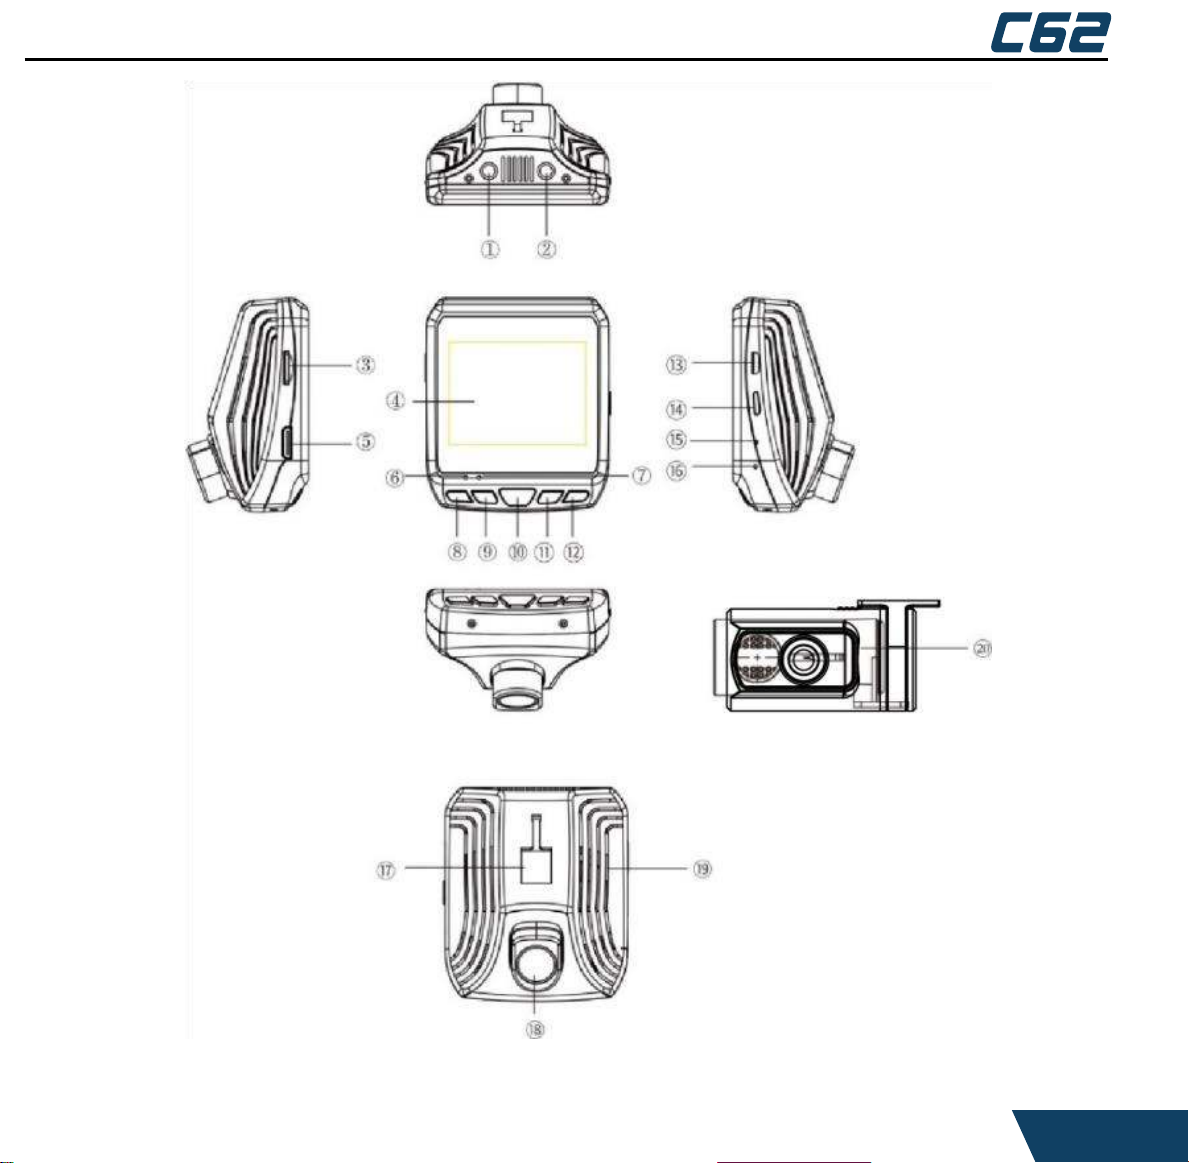
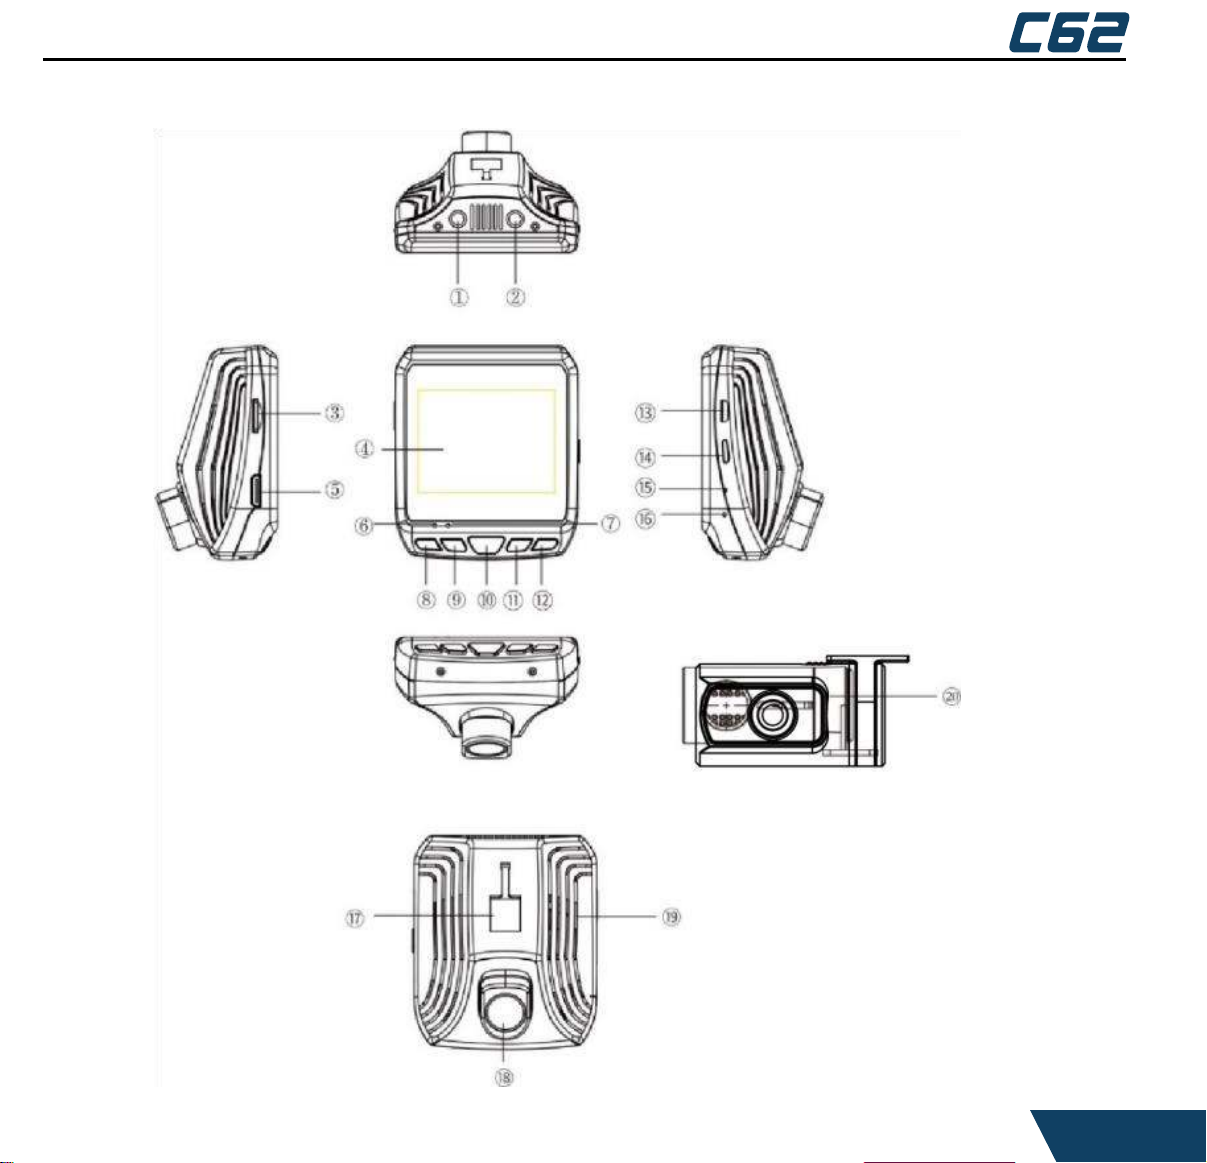
III – TÊN VÀ CHỨC NĂNG CÁC BỘ PHẬN:
04
Page 7
HƯỚNG DẪN SỬ DỤNG VIETMAP
Page 8

HƯỚNG DẪN SỬ DỤNG VIETMAP
05
Ký
Chức năng Giải thích hiệu
1 AV Kết nối với Camera sau.
2 GPS Kết nối với ăngten GPS.
3 Khe gắn thẻ Lắp thẻ micro SD (tối đa 64GB Class 10). nhớ
4 Màn hình
5 HD Out Đầu ra HDMI. Kết nối bằng cáp HDMI với TV để xem video / ảnh.
6 Đèn nguồn Phát sáng màu đỏ khi thiết bị đang sạc.
7 Đèn ghi hình Phát sáng màu xanh khi thiết bị đang ghi hình.
8 Mode Chuyển đổi chế độ Ghi hình/ Chụp ảnh/ Xem lại.
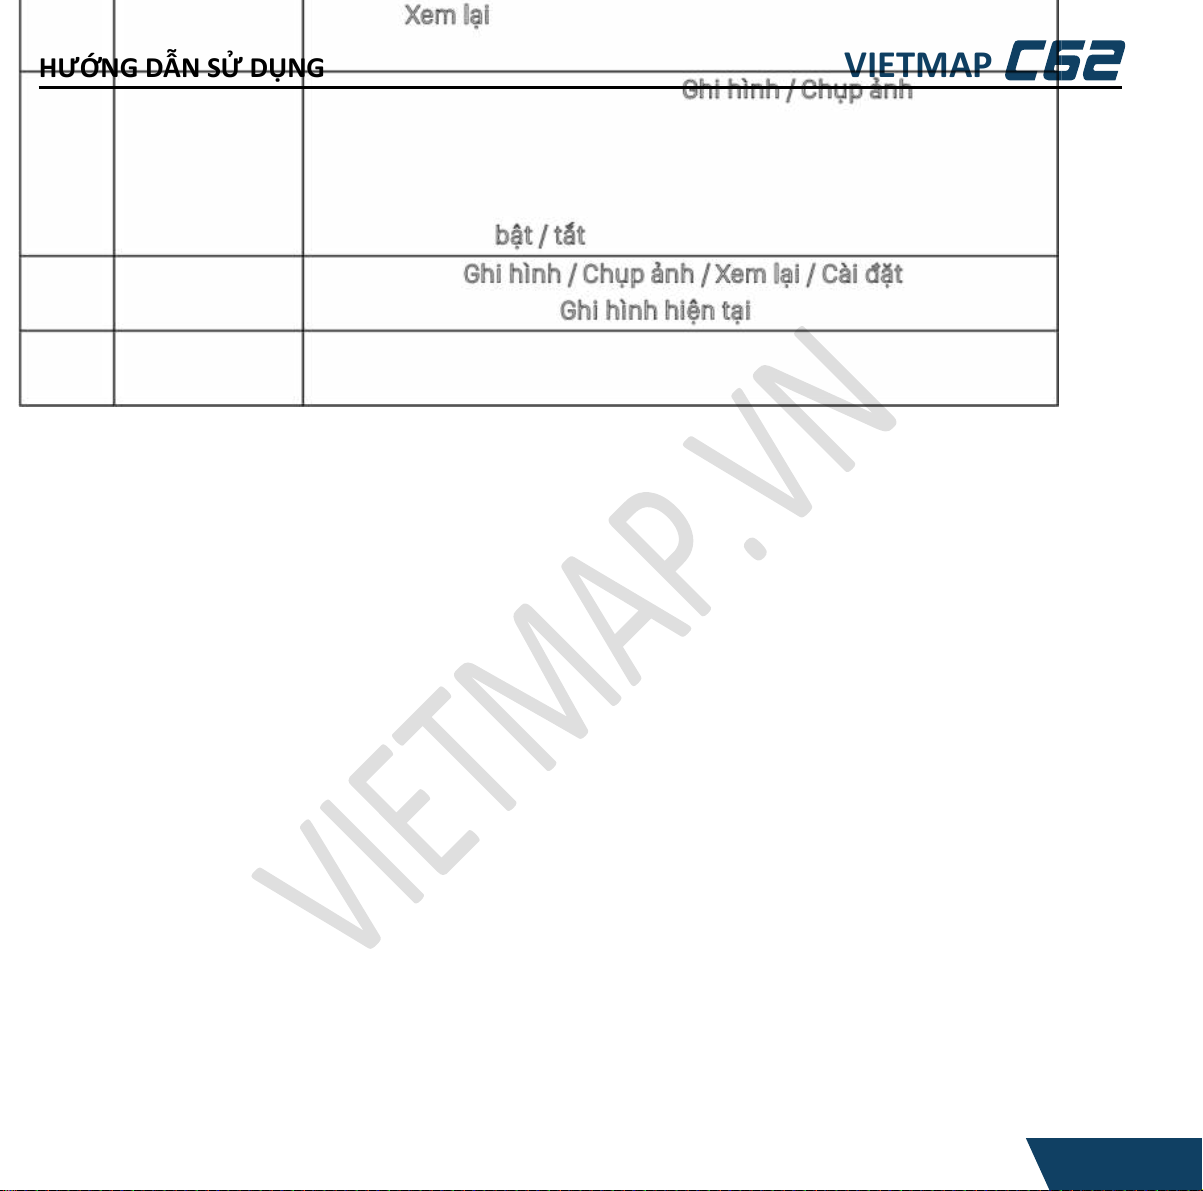
9 Lên Nhấn để phóng to khi vào chế độ Chụp ảnh.
Trong danh sách Menu, di chuyển con trỏ, một dòng lên.
Nhấn và giữ để bật / tắt ghi âm.
10 OK Chế độ Ghi hình: Nhấn để ghi hoặc dừng ghi hình.
Chế độ Chụp ảnh: Nhấn để chụp ảnh.
Chế độ Xem lại: Phát / Tạm dừng / Tiếp tục.
Nhấn để xác nhận lựa chọn trong cài đặt.
11 Xuống Nhấn để thu nhỏ khi vào chế độ Ghi hình / Chụp ảnh.
Page 9
HƯỚNG DẪN SỬ DỤNG VIETMAP
Trong danh sách Menu, di chuyển con trỏ, một dòng xuống.
Page 10
HƯỚNG DẪN SỬ DỤNG VIETMAP
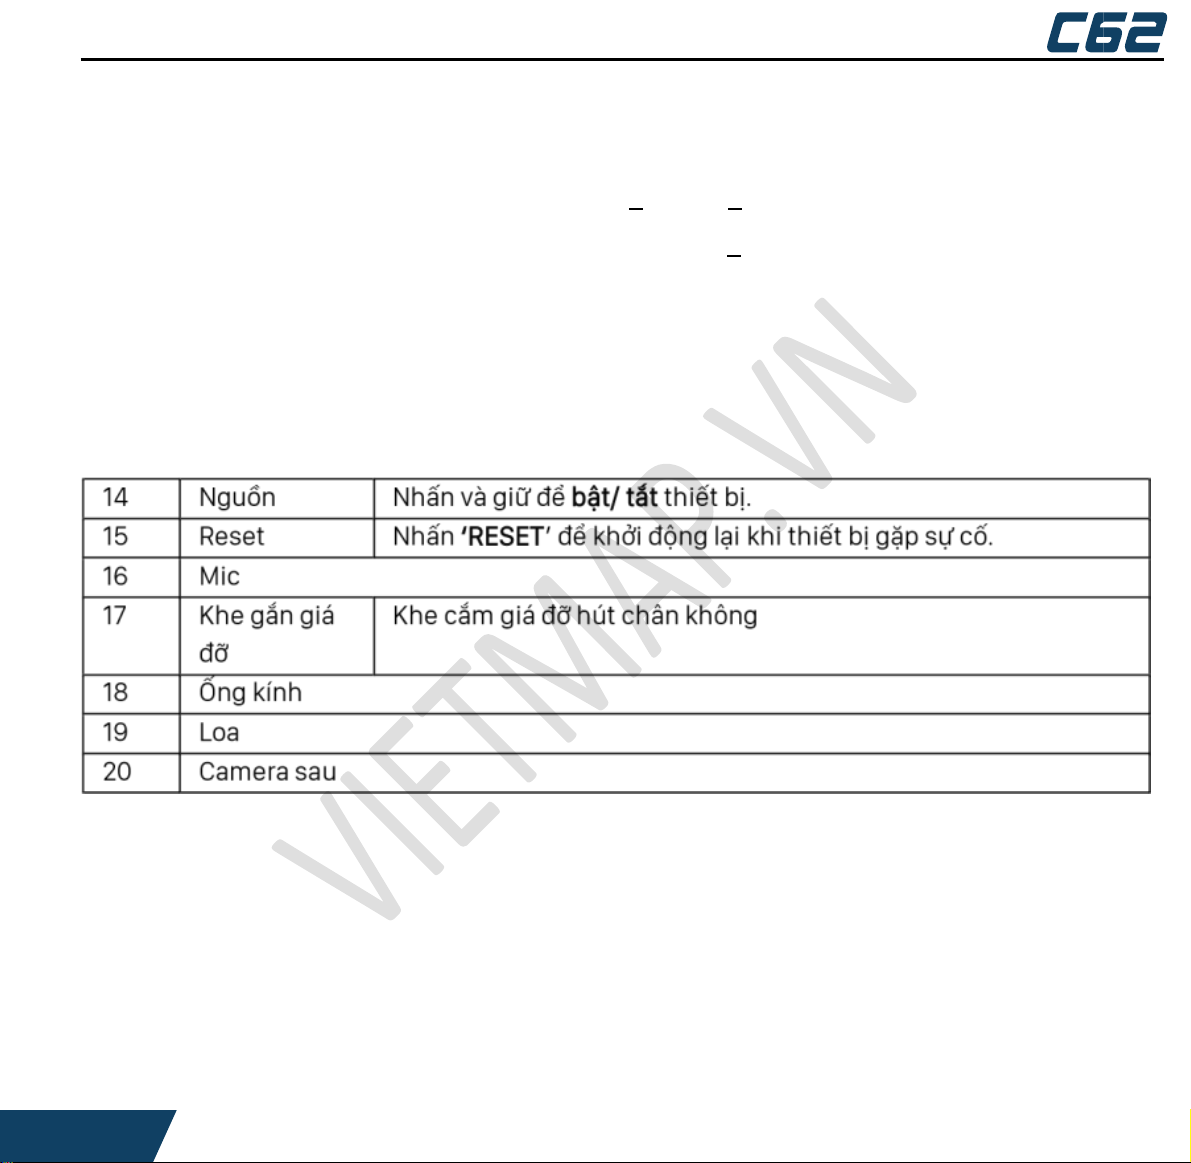
Nhấn để chuyển camera trước, camera sau hoặc màn hình
camera trước sau.
Nhấn và giữ để bật / tắt WiFi.
12 Menu Nhấn để mở Ghi hình / Chụp ảnh / Xem lại / Cài đặt.
Nhấn để khóa tập tin Ghi hình hiện tại.
13 Cổng USB Kết nối với cáp USB và sạc ô tô.
Kết nối với PC để truyền dữ liệu (thẻ SD).
06
IV - LẮP ĐẶT SẢN PHẨM:
Vị trí :
Lắp sản phẩm ở vị trí gần gương chiếu hậu để có được tầm quay tốt nhất. Đảm
bảo rằng ống kính nằm trong phạm vi quét của gạt nước kính chắn gió để đảm bảo
nhìn rõ ngay cả khi trời mưa.
Không cài đặt ở vị trí gây trở ngại cho tầm nhìn của lái xe. Đảm bảo GPS sẽ không
bị che khuất bởi film cách nhiệt dán trên kính chắn gió.
Page 11
HƯỚNG DẪN SỬ DỤNG VIETMAP
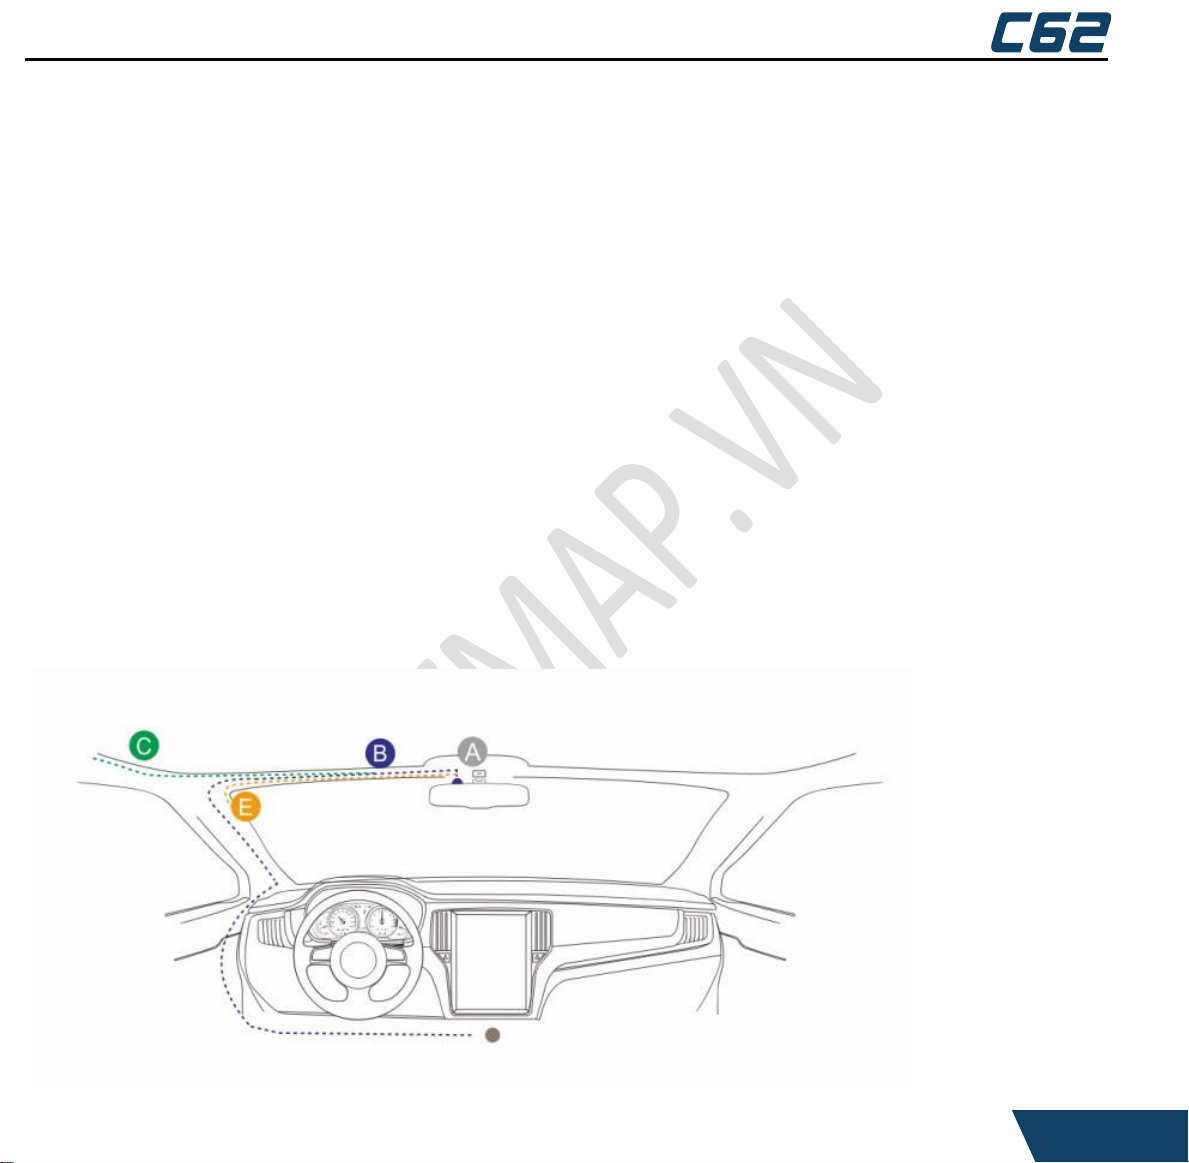
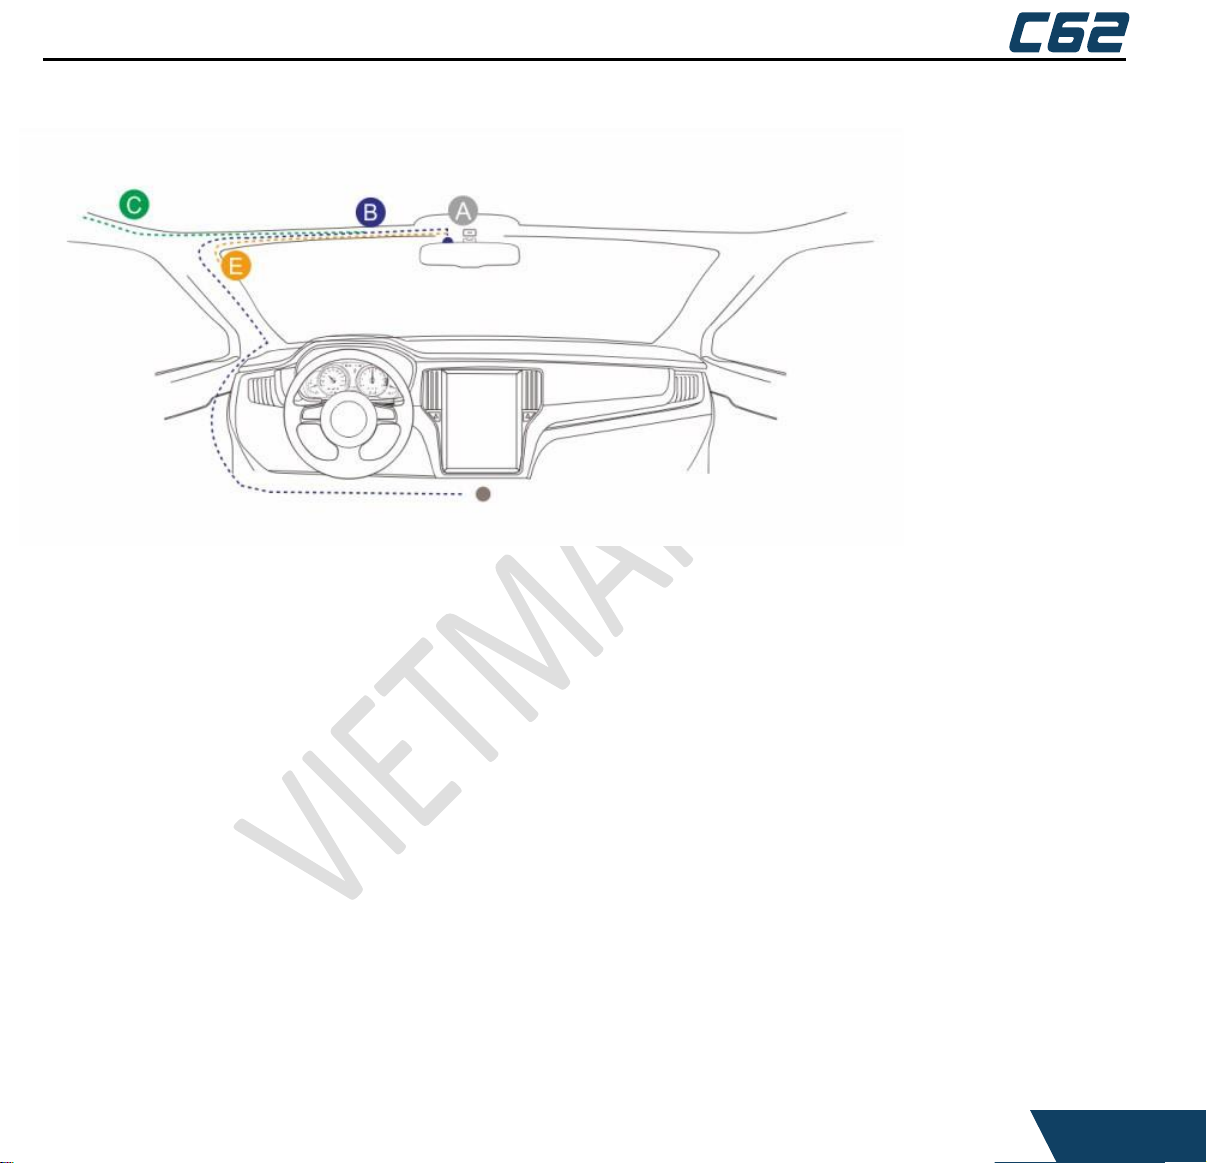
Lắp đặt thiết bị:
1. Vệ sinh vị trí mà bạn muốn lắp đặt thiết bị.
2. Điều chỉnh và tìm góc quay tốt nhất, sau đó lắp bằng giá đỡ hút chân không
đi kèm theo máy lên kính chắn gió và lắp đặt A (Camera trước).
3. Kết nối B (Bộ sạc) với cổng Micro USB của thiết bị và giấu cáp vào các đường
nối xung quanh cạnh của bảng điều khiển. Lắp bộ sạc vào nguồn tẩu thuốc trên xe.
4. Kết nối C (Cáp camera phía sau) với cổng AV, giấu cáp vào các đường nối xung
quanh mép mái xe, sau đó lắp đặt D (Camera sau) vào trong kính phía sau.
5. Kết nối E (GPS) với cổng GPS, sau đó đặt ở góc phía trước bên phải.
07
V - HOẠT ĐỘNG:
Page 12

HƯỚNG DẪN SỬ DỤNG VIETMAP
Bật nguồn
Khi được kết nối với bộ sạc xe hơi có nguồn, thiết bị sẽ tự động bật nguồn và bắt đầu ghi
hình.
1. Kết nối bộ sạc xe hơi với cổng USB trên thiết bị.
2. Kết nối đầu kia của bộ sạc với nguồn tẩu thuốc trên xe hơi.
3. Thiết bị sẽ tự động bật nguồn khi xe cấp nguồn cho thiết bị.
4. Đèn màu xanh sẽ bắt đầu nhấp nháy và quá trình ghi bắt đầu.
5. Dấu chấm màu đỏ trên màn hình sẽ bắt đầu phát sáng và sạc nếu nguồn thiết
bị không đầy.
Đối với trường hợp thiết bị không tự khởi động, nhấn và giữ nút nguồn trong ít nhất 3
giây. Chú ý:
➢ Đảm bảo đã lắp thẻ SD trước khi bật nguồn thiết bị. Định dạng thẻ SD trước khi bạn
bắt đầu ghi hình lần đầu tiên.
08
➢ Biểu tượng GPS nhấp nháy màu đỏ khi thiết bị không nhận tín hiệu GPS trên màn
hình. Biểu tượng GPS màu xanh khi thiết bị đã nhận tín hiệu GPS.
Tắt nguồn
Khi động cơ của ô tô bị tắt, thiết bị sẽ tự động tắt sau vài giây.
Đối với trường hợp không tự tắt nguồn, nhấn và giữ nút nguồn trong ít nhất 3 giây để
tắt thiết bị. Không tháo thẻ nhớ ngay khi tắt nguồn để tránh làm hư hỏng tập tin đã
ghi cuối cùng.
Nếu bạn muốn bật lại thiết bị, hãy nhấn và giữ nút nguồn trong ít nhất 3 giây.
Page 13

HƯỚNG DẪN SỬ DỤNG VIETMAP
Chế độ ghi hình
Sử dụng VietMap C62 bạn có thể ghi hình và chụp ảnh. Để ghi hình, bạn cần đảm bảo
rằng thiết bị đang ở chế độ Ghi hình.
Nhấn và giữ nút Mode để chuyển đổi giữa chế độ Ghi hình, Chụp ảnh và Xem lại.
Ghi hình
Khi được kết nối với bộ sạc xe hơi có nguồn điện, thiết bị sẽ tự động chuyển sang chế
độ ghi hình và bắt đầu ghi.
Biểu tượng chấm đỏ nhấp nháy trên màn hình, đèn LED nhấp nháy màu xanh bên dưới
màn hình và bộ hẹn giờ ghi cho biết thiết bị đang ghi. Để ngừng ghi hình, bấm OK và
chấm đỏ biến mất, đèn LED màu xanh sẽ tắt, cho biết thiết bị đã dừng ghi hình.
Khóa video đang ghi hình
Trong khi ghi hình, nếu bạn muốn khóa video đang ghi hình, nhấn nút Menu, biểu
tượng khóa sẽ xuất hiện trên màn hình. Điều này cho biết rằng video đó đã bị khóa và
sẽ không bị ghi đè bởi các video mới.
Điều này cũng áp dụng khi chức năng G-Sensor được kích hoạt trong khi ghi hình.
09
Page 14
HƯỚNG DẪN SỬ DỤNG VIETMAP
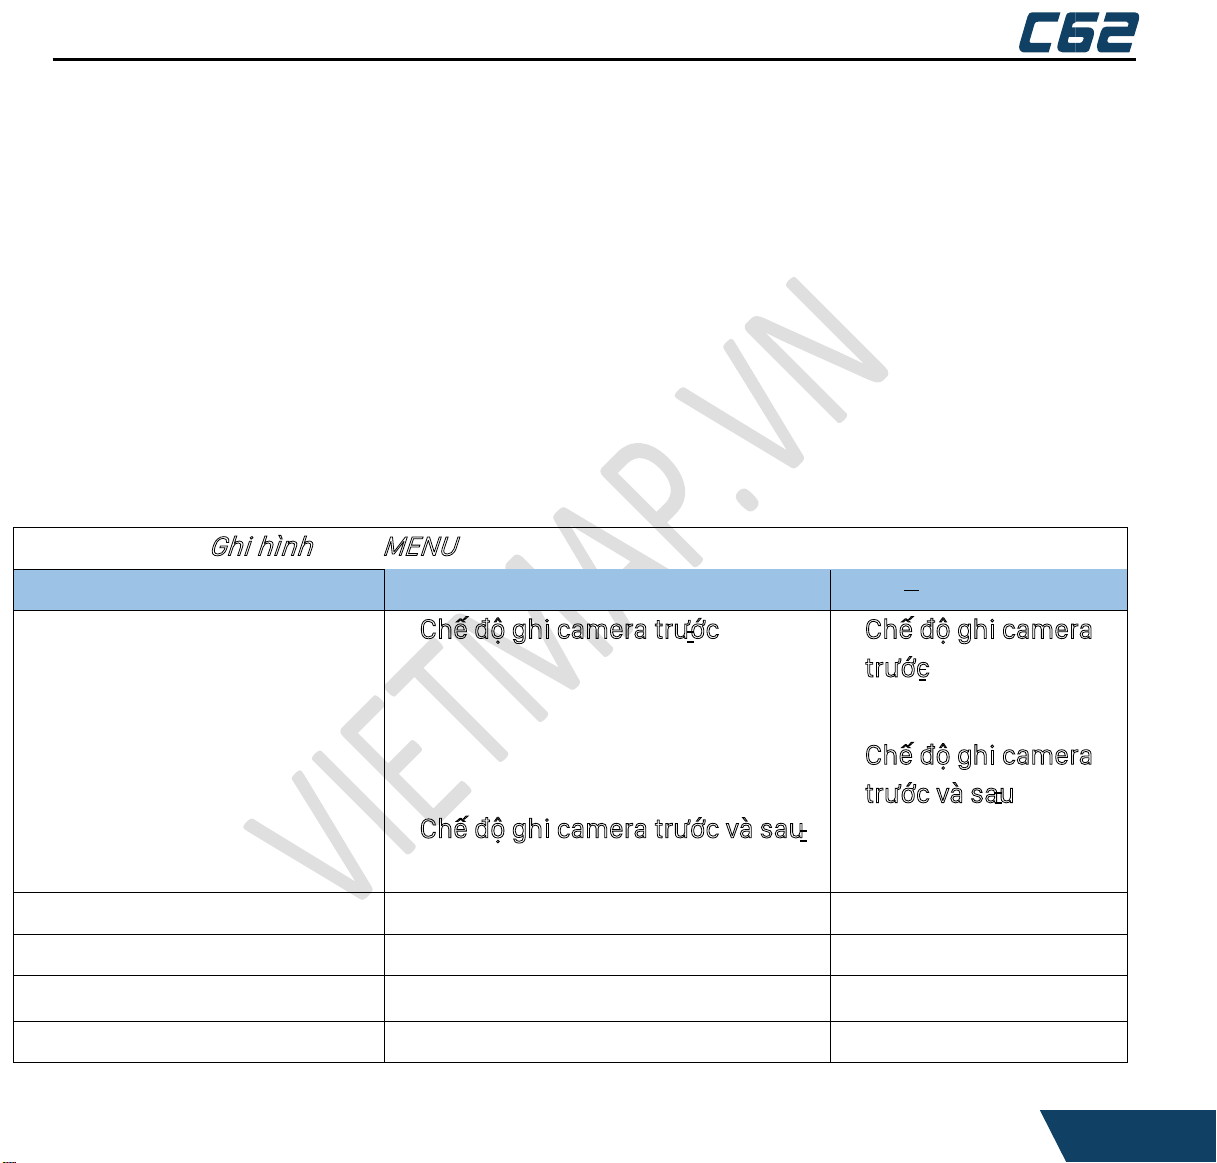
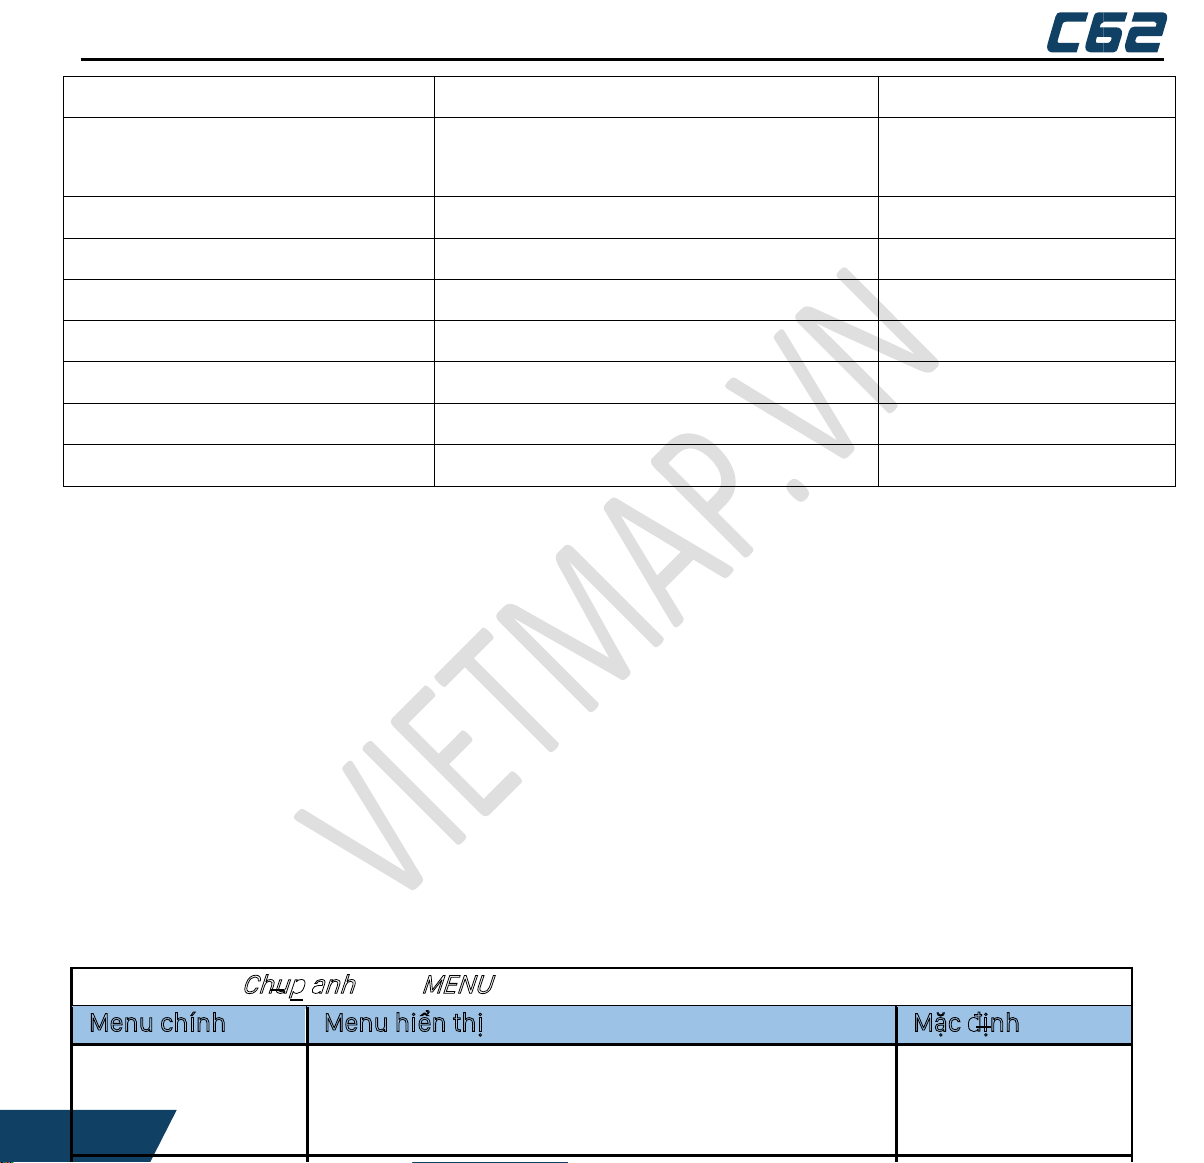
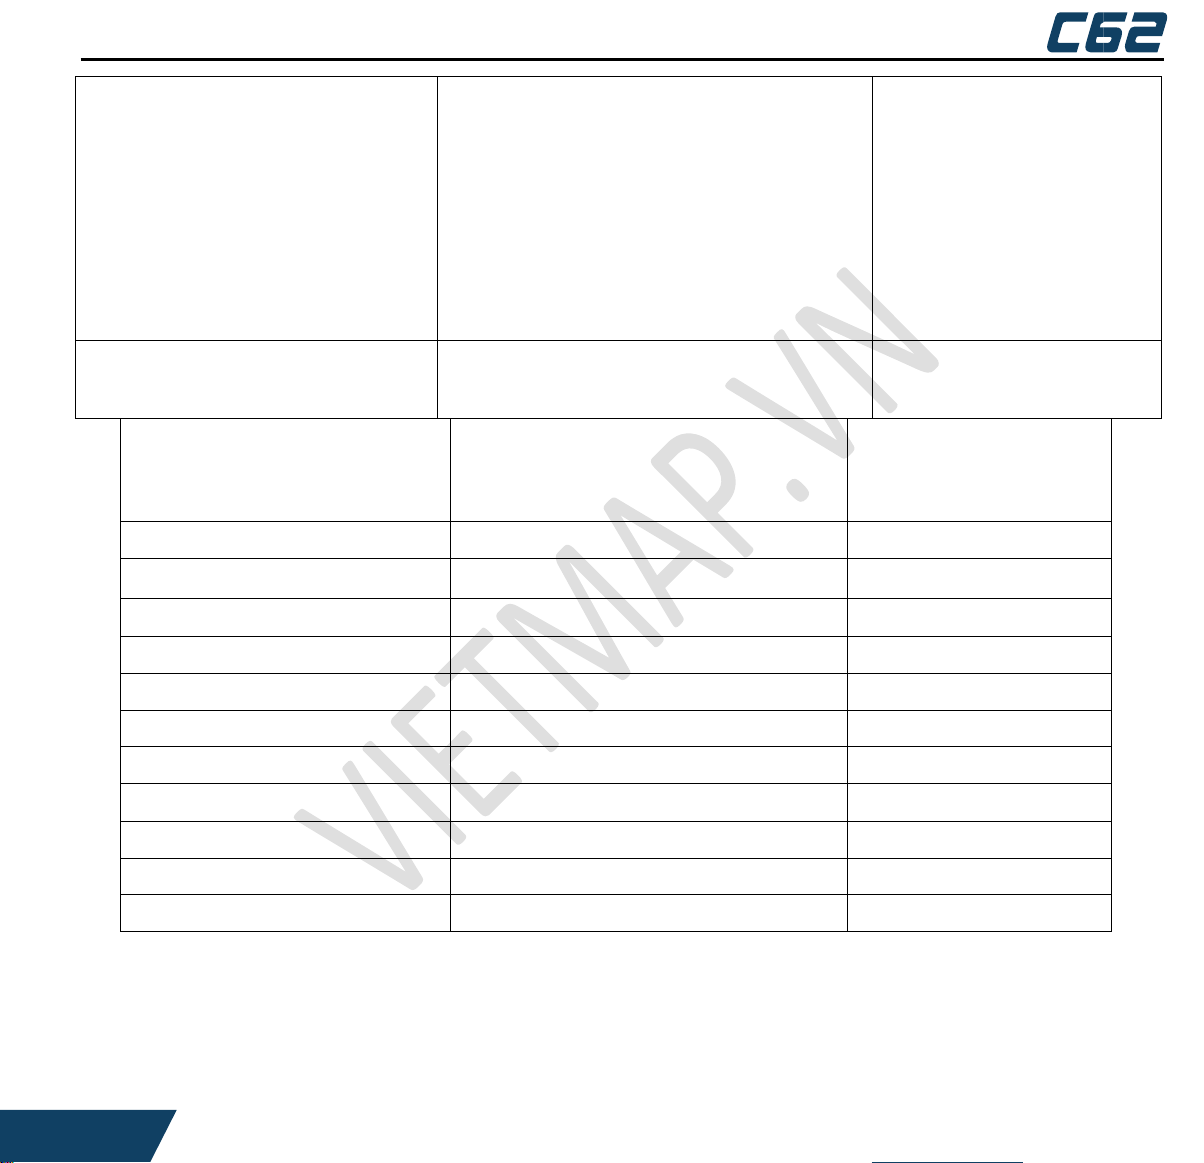
Trong chế độ Ghi hình, bấm MENU để mở Cài đặt ghi hình.
Menu chính
Menu hiển thị
Mặc định
Độ phân giải
Chế độ ghi camera trước :
2880*2160 P24, 2560*1440 P30,
2304*1296 P30, 1920*1080 P60,
1920*1080 P30, 1280*720 P120
1280*720 P60, 1280*720 P30
Chế độ ghi camera trước và sau :
1440 P30 + 1080 P30
Chế độ ghi camera
trước :
1920*1080 P60
Chế độ ghi camera
trước và sau :
1440 P30+1080 P30
Ghi hình vòng lặp
Tắt/ 3 phút/ 5 phút/ 10 phút
3 phút
Ghi hình trước sau
Tắt/ Bật
Bật
Lật ảnh
Tắt/ Bật
Bật
WDR
Tắt/ Bật
Tắt
Camera sau
Camera phía sau giúp bạn xem phía sau xe. Kết nối camera sau vào cổng AV. Video quay
từ camera phía sau sẽ hiển thị trên màn hình. Nhấn nút “Xuống” để chuyển đổi chế độ
hiển thị giữa camera phía trước, camera phía sau hoặc chế độ hiển thị camera trước sau.
Cài đặt ghi hình
Lưu ý: Bạn không thể thao tác cài đặt trong khi thiết bị đang ghi hình. Để truy cập vào cài
đặt, bạn cần dừng ghi bằng cách nhấn OK.
Nhấn nút MENU để mở Cài đặt ghi hình. Nhấn MENU lần nữa để mở Cài đặt Chung. Nhấn
MENU một lần nữa để thoát khỏi cài đặt.
Nhấn các phím LÊN và XUỐNG để chọn lựa các tùy chọn, trong mỗi cài đặt. Nhấn OK để
chọn.
10
Page 15
HƯỚNG DẪN SỬ DỤNG VIETMAP
Cảnh báo giao thông
Tắt/ Bật
Bật
Phơi sáng
+2.0, +1.7, +1.3, +1.0, +0.7, +0.3, 0.0,
-0.3, -0.7, -1.0, -1.3, -1.7, -2.0
Nhận diện chuyển động
Tắt/ Bật
Tắt
Ghi âm
Tắt/ Bật
Bật
Hiển Ngày / Giờ
Tắt/ Bật
Bật
Hiển thị GPS
Tắt/ Bật
Bật
Đơn vị tốc độ
KM/H, MPH
KM/H
G-sensor
Tắt/ Cao/ Trung bình/ Thấp
Trung bình
Chế độ đỗ xe
Tắt/ Bật
Tắt
Chế độ chụp ảnh
Khi thiết bị đang không ghi hình, nhấn và giữ nút MENU trong chế độ Ghi hình để chuyển
sang chế độ chụp ảnh, biểu tượng chụp ảnh sẽ hiển thị ở góc trên cùng bên trái của màn
hình. Nhấn nút OK để chụp ảnh.
Nhấn nút Xuống để chuyển đổi màn hình camera trước, camera sau hoặc hiện trước và
sau.
Nhấn nút Lên để phóng to, nhấn nút Xuống để thu nhỏ đối với camera trước. Ở chế độ
Chụp ảnh, bấm MENU để mở Cài đặt chụp ảnh. Nhấn MENU lần nữa để mở Cài đặt chung.
Nhấn MENU một lần nữa để thoát khỏi cài đặt.
Các phím Lên/ Xuống có thể được sử dụng để chọn các tùy chọn, trong mỗi thiết lập cài
đặt. Nhấn OK để chọn.
Cài đặt menu chụp ảnh
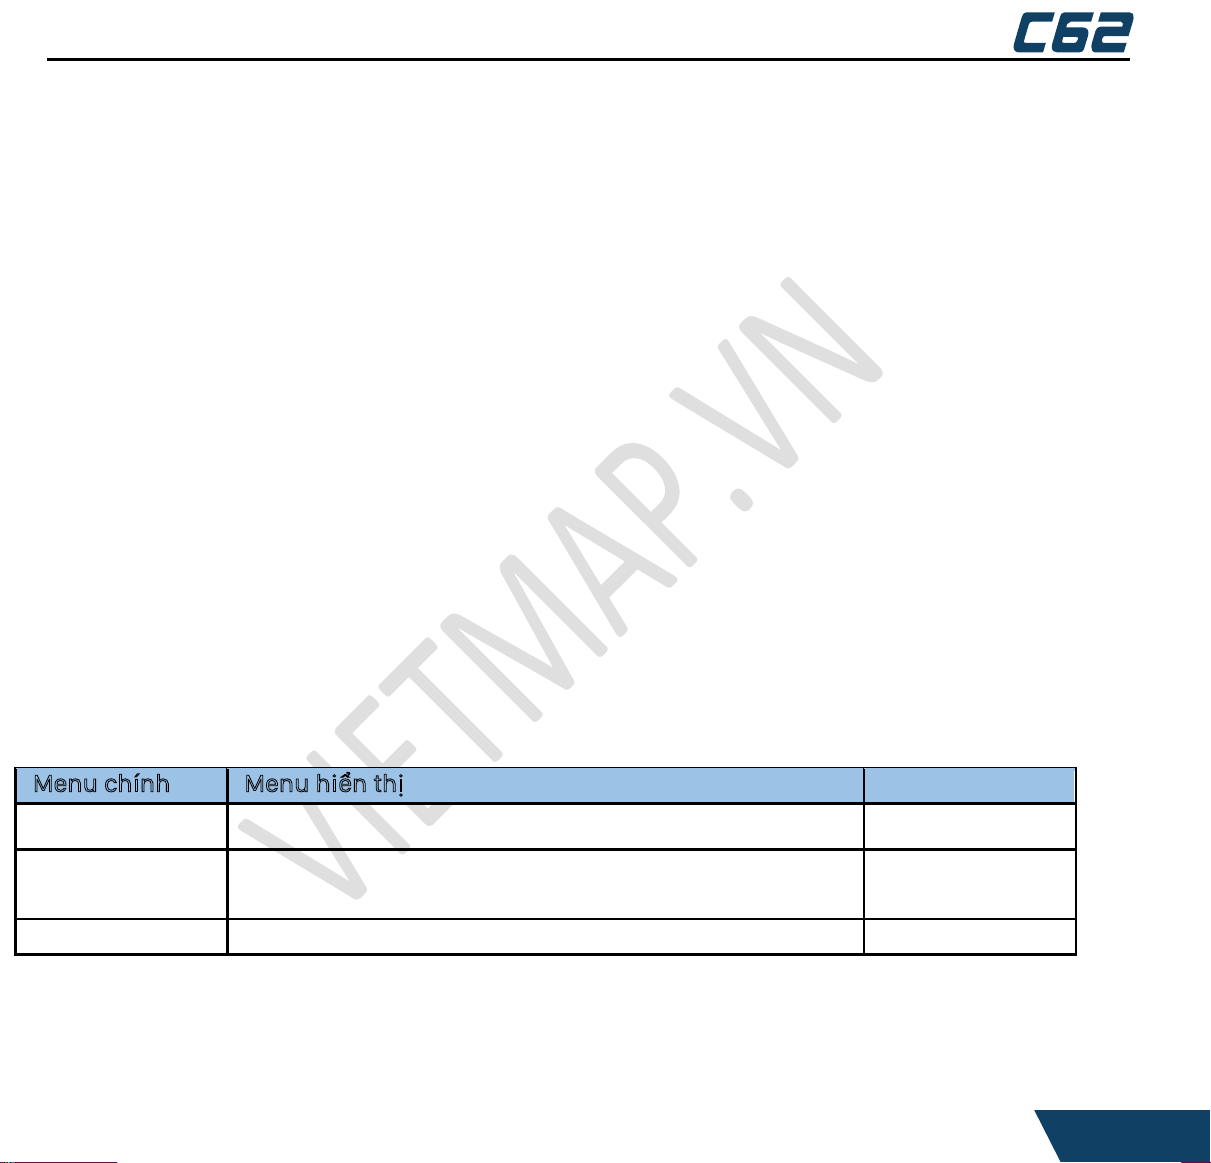
Trong chế độ Chụp ảnh, bấm MENU để mở cài đặt chụp ảnh
Menu chính Menu hiển thị Mặc định
Độ phân giải 12M 4032*3024, 10M 3648*2736, 8M 3264*2448, 12M 4032*3024
Page 16
HƯỚNG DẪN SỬ DỤNG VIETMAP
5M 2592*1944, 3M 2048*1536, 2MHD 1920*1080,
1.3M 1280*960, VGA 640*480
Phơi sáng +2.0, +1.7, +1.3, +1.0, +0.7, +0.3, 0.0, -0.3, -0.7, -1.0, 0.0
-1.3, -1.7, -2.0
Hiển thị ngày giờ Tắt, Ngày, Ngày/Giờ Ngày/Giờ
Chế độ xem lại
Nhấn và giữ nút MENU ở chế độ chụp ảnh để chuyển sang chế độ Xem lại. Thiết bị sẽ lưu
trữ video và hình ảnh trên thẻ SD. Chế độ xem lại sẽ cho phép bạn xem lại video và ảnh
đã lưu và phát lại video có âm thanh.
Khi ở chế độ Xem lại, chọn lựa các tập tin bằng cách bấm các phím Lên và Xuống để chọn
các tập tin video/ hình ảnh khác nhau và bấm nút OK để xem lại một tập tin video.
Trong khi phát lại video, nhấn các phím Lên hoặc Xuống sẽ tua nhanh hoặc tua chậm
video đang xem. Nhấn nút OK để tạm dừng hoặc tiếp tục video.
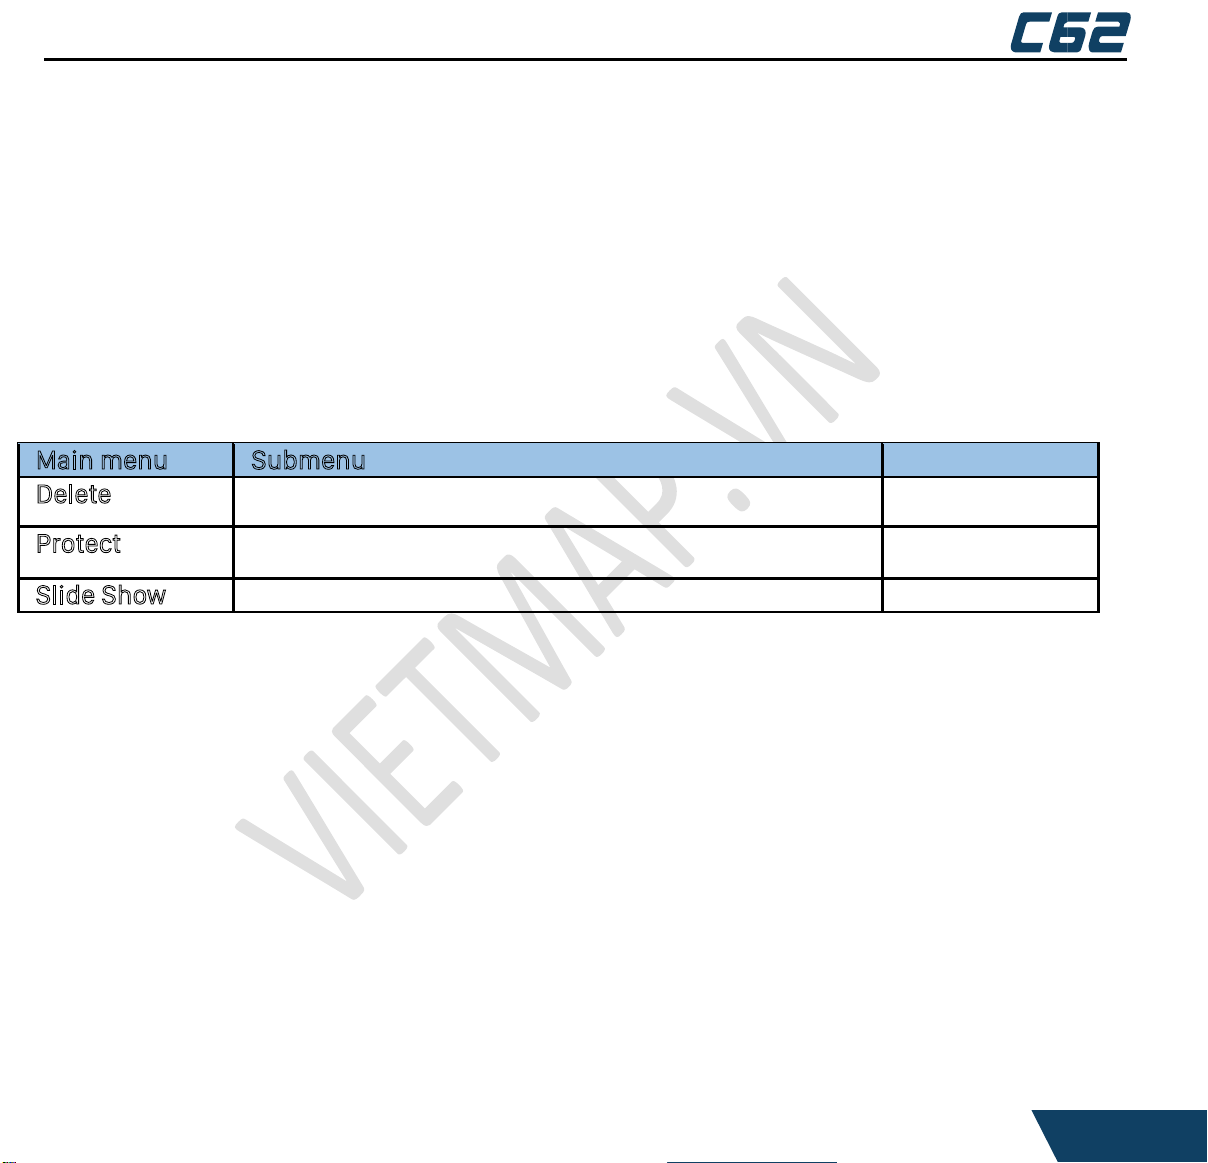
Nếu bạn muốn xóa hoặc khóa video hiện tại, nhấn nút MENU để truy cập các tùy chọn
này.
Chọn tùy chọn này để phát lại hoặc lặp lại một hoặc tất cả các video đã quay. Cài đặt
chế độ xem lại
Menu chính Menu hiển thị Ghi chú
Xóa Xóa video đã chọn/ Xóa tất cả video
Khóa Khóa video hiện tại/ Mở khóa video hiện tại/ Khóa tất cả video/
Mở khóa tất cả video
Trình chiếu 2 Giây/ 5 Giây/ 8 Giây
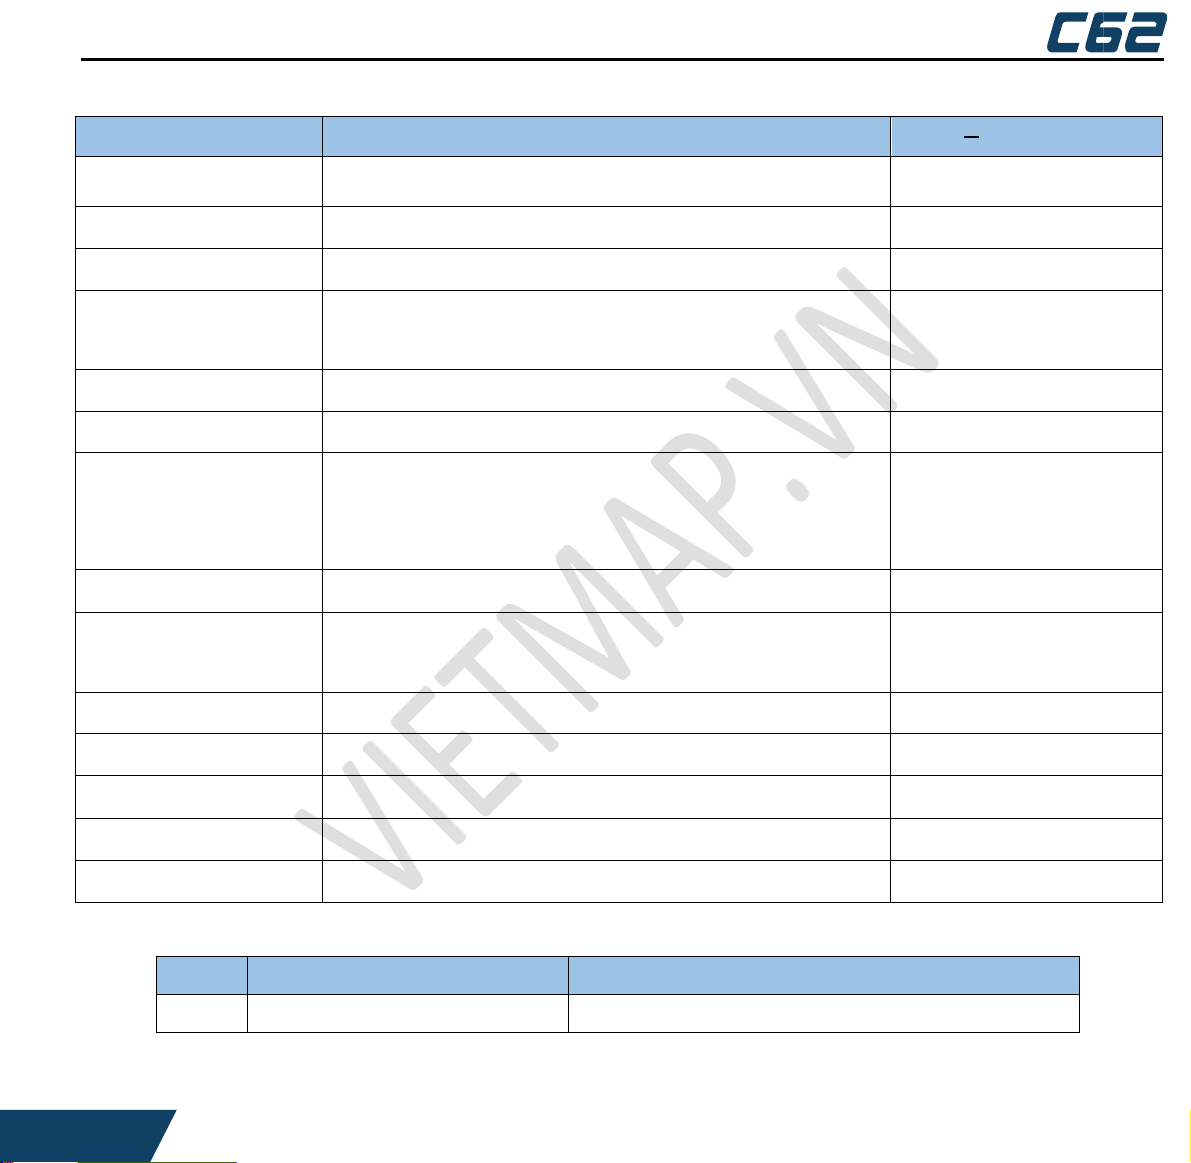
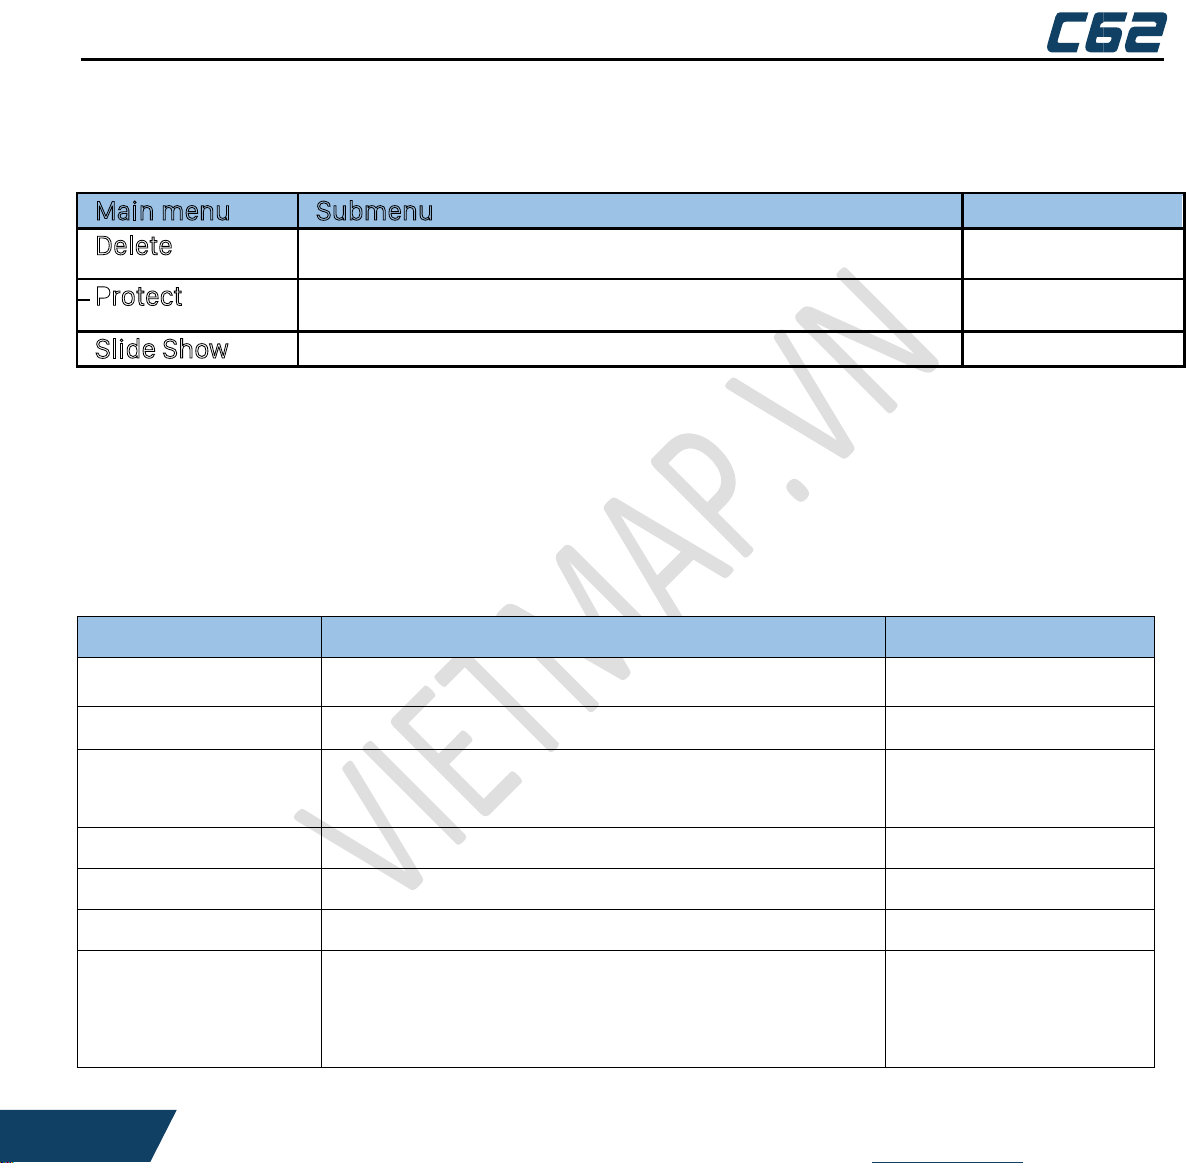
Cài đặt chung
Tùy thuộc vào chế độ, nhấn MENU để mở Cài đặt Ghi hình / Chụp ảnh / Xem lại.
Nhấn MENU lần nữa để mở Cài đặt chung.
12
Page 17
HƯỚNG DẪN SỬ DỤNG VIETMAP
Menu chính
Menu hiển thị
Mặc định
WIFI
Tắt/ Bật
Tắt
Ngày / Giờ
Năm/ Tháng/ Ngày/ Giờ
Cài đặt múi giờ
UTC/GMT 12:00 ~ UTC/GMT -12:00
UTC/GMT +7
Tự động tắt
nguồn
Tắt/ 3 Phút/ 5 Phút/ 10 Phút
Tắt
Tắt màn hình
Tắt/ 1 Phút/ 3 Phút/ 5 Phút
3 Phút
Âm bàn phím
Tắt / Bật
Bật
Ngôn ngữ
Vietnamese, English, French, Spanish,
Portuguese, Deutsch, Italian, Chinese, Russian,
Japanese, Thai, Polish;
Vietnamese
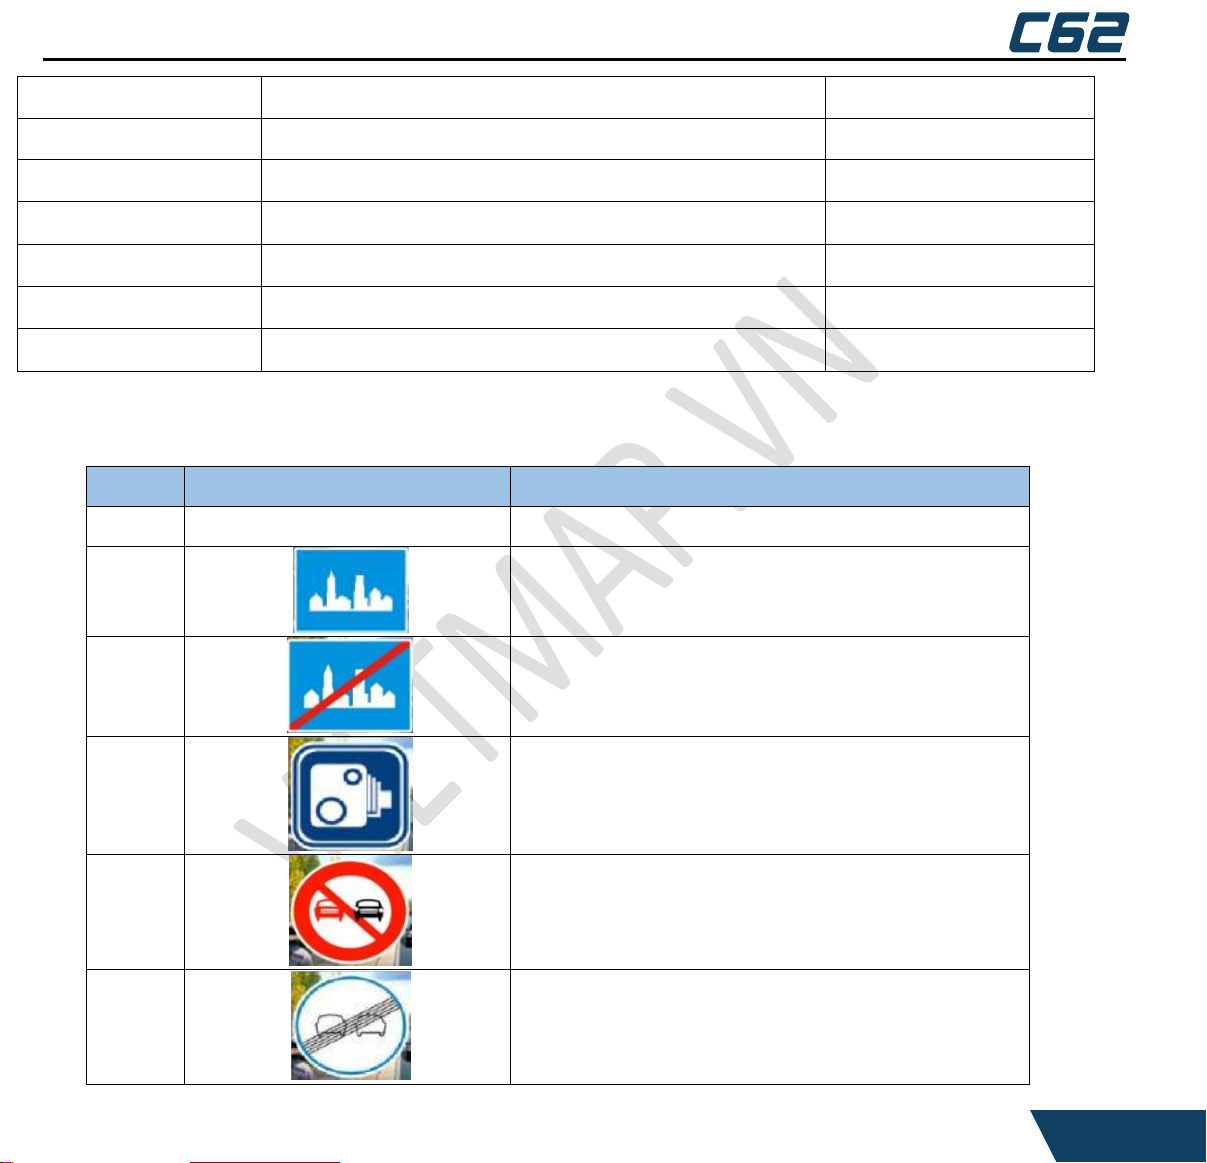
Biển số xe
Thêm biển số xe
Dung lượng lưu
trữ
Hiển thị dung lượng bộ nhớ
Tần số
50Hz/ 60Hz
50Hz
Định dạng
Thẻ nhớ sẽ xóa toàn bộ dữ liệu/ OK
Cài đặt mặc định
Hủy/ OK
Phiên bản
Hiển thị phiên bản
Dữ liệu cảnh báo
Hiển thị phiên bản dữ liệu cảnh báo
STT
Cảnh báo
Tên cảnh báo
1
Biển báo tốc độ
Cảnh báo tốc độ
Xin lưu ý: Cài đặt là phổ biến cho tất cả 3 chế độ.
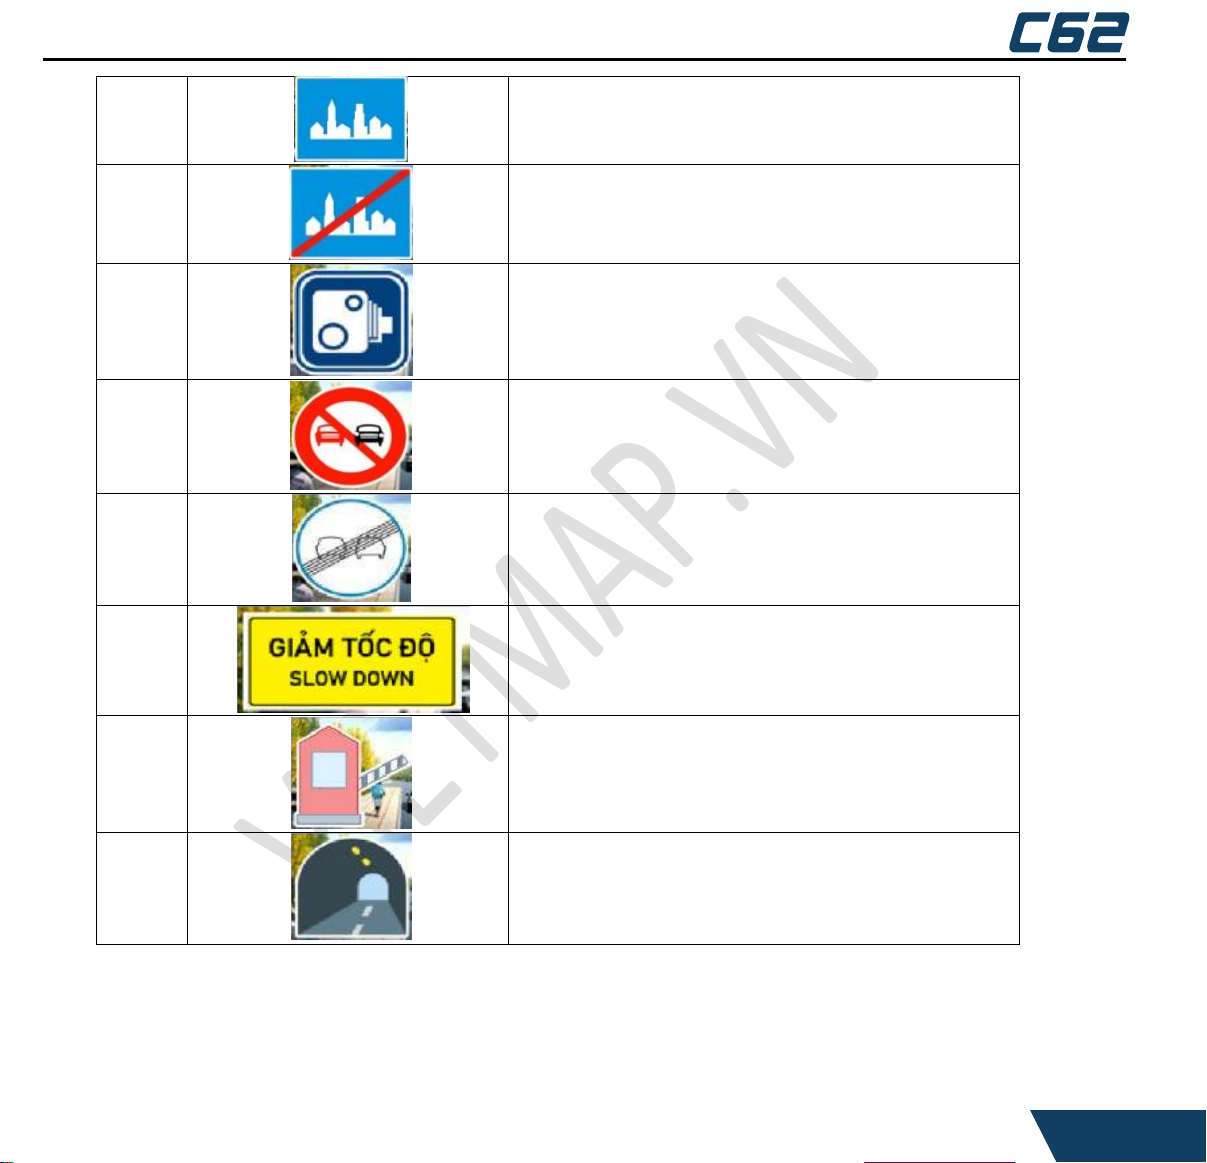
V - CÁC LOẠI CẢNH BÁO:
Page 18
HƯỚNG DẪN SỬ DỤNG VIETMAP
2 Vào khu dân cư
3 Ra khu dân cư
4 Có camera giao thông
5 Khu vực cấm vượt
6 Hết khu vực cấm vượt
7 Khu vực thường xuyên kiểm tra tốc độ
8 Trạm thu phí
9 Đường hầm
VI – CÀI ĐẶT ỨNG DỤNG VÀ KẾT NỐI WIFI CHO ĐIỆN THOẠI :
1.1. Cài đặt ứng dụng cho điện thoại :
Đối với điện thoại chạy Android :
14
Page 19
HƯỚNG DẪN SỬ DỤNG VIETMAP
Mở ứng dụng "Google Play Store" tìm kiếm "C6 DVR" để tải xuống và cài đặt.
Đối với điện thoại chạy IOS:
Mở ứng dụng "Apple store" tìm kiếm "C6 DVR" để tải xuống và cài đặt.
1.2. Kết nối WiFi :
Mở cài đặt WiFi trên điện thoại và chọn kết nối có tên : CARDV _*****; mật khẩu mặc
định là: 12345678.
Sau khi kết nối, mở ứng dụng C6 DVR để xem video trực tiếp, thay đổi cài đặt camera
hoặc tải xuống video/ hình ảnh.
VII – HỖ TRỢ:
-> Hãy ghé thăm website của chúng tôi tại:
-> Thiết bị ghi hình chuyên dụng, phần mềm mới nhất và thông tin các sản phẩm khác. > VIETMAP không chịu trách nhiệm cho bất kỳ vấn đề xảy ra nếu thiết bị sử dụng cho
mục đích bất hợp pháp.
-> Sản phẩm giúp ghi và lưu lại các video cảnh tai nạn trong trường hợp xảy ra tai nạn,
không đảm bảo rằng mọi cảnh tai nạn đều được ghi lại đầy đủ.
-> Cảnh tai nạn có thể không được ghi lại nếu cố ý tắt cảm biến va chạm trên thiết bị.
-> Các video ghi được từ sản phẩm có thể được sử dụng làm bằng chứng của vụ tai nạn.
Tuy nhiên, VIETMAP sẽ không chịu trách nhiệm cho bất kỳ trường hợp tai nạn xảy ra. ->
Nếu bạn gặp khó khăn trong quá trình cài đặt hoặc sử dụng thiết bị, vui lòng liên hệ với
chúng tôi theo thông tin sau để được hỗ trợ tốt nhất:
• Email: [email protected]
• Điện thoại: 1900.7113
• Website:
• Fanpage:
www.vietmap.vn
www.facebook.com/vietmapgis
www.vietmap.vn
Page 20

HƯỚNG DẪN SỬ DỤNG VIETMAP
I – IMPORTANT SAFETY INSTRUCTIONS :
⚫ This Product is not waterproof. Do not expose this product to Rain or Moisture.⚫ This
product is intended for use in vehicle. Do not install the device where it will block the
driver’s view of the road (including the mirrors!) or the deployment of the airbag.
⚫Keep your attention on the road! Don’t try to operate or focus on any device while
driving. If you have to concentrate on a device, pull off the road for a few minutes.
⚫ Ensure that the camera lens is clean and there is nothing blocking the lens.
⚫ Do not leave the device in direct sunlight for a long period of time or where the
temperature could go above 80°C.
⚫ Please examine, check and verify the device at least once a month including the
associated SD card, to ensure the recording are working properly.
⚫ Never attempt to disassemble, repair or make any modifications to your device.
16
Page 21
HƯỚNG DẪN SỬ DỤNG VIETMAP
Vi
etmap C62
Memory card
Car Charger
USB Cable
Suction Mount
Rear Camera
GPS Module
Manual
II – WHAT’S IN THE BOX:
Warning: If any item is missing or damaged, please contact purchasing place
immediately. Never use damaged products.
Page 22
HƯỚNG DẪN SỬ DỤNG VIETMAP
III – CONTROLS & INDICATORS:
18
Page 23

HƯỚNG DẪN SỬ DỤNG VIETMAP
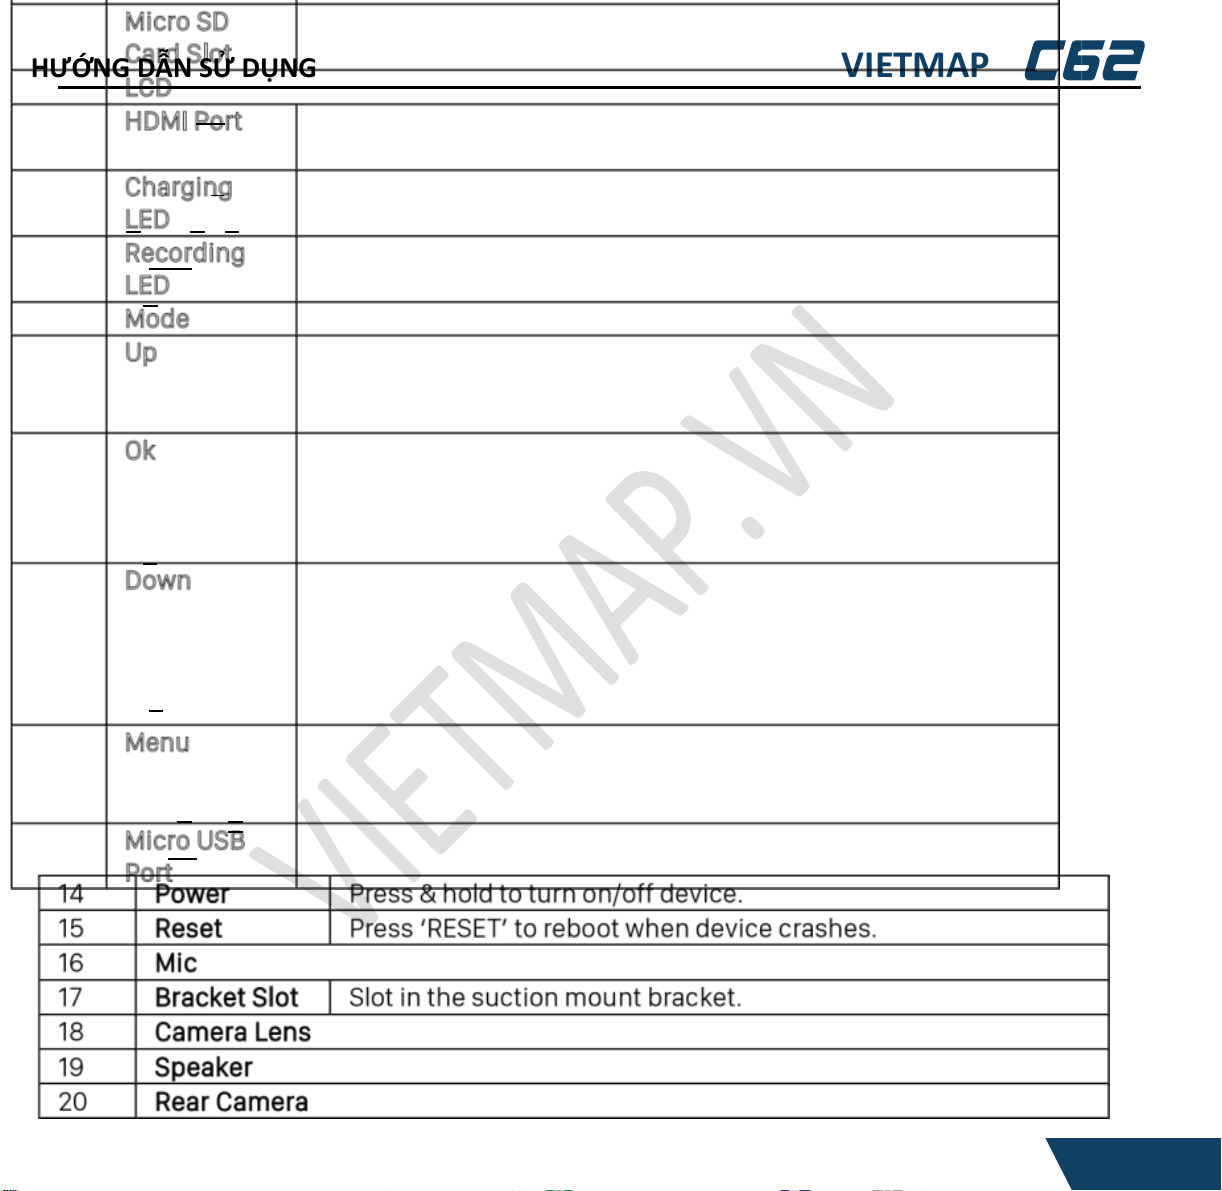
Ref. Component Description
1 AV In Connect to the Rear Camera.
2 GPS Port Connect to the external GPS module.
3 Micro SD Insert micro SD Card (up to 64GB min class 10).
Card Slot
4 LCD
Page 24
HƯỚNG DẪN SỬ DỤNG VIETMAP
5 HDMI Port HDMI output. Connect using an HDMI cable to a TV to view video/photo (not
included).
6 Charging Glows red when the device is in charging LED
7 Recording Flash blue when the device is in recording. LED
8 Mode Switch record/ photo /playback mode.
9 Up Press to zoom inwards of front vision in photo mode.
In Menu list, move the cursor, one line up.
Press to turn on/off audio recording.
10 Ok Record Mode: Press to start or stop video recording.
Capture Mode: Press to take a snapshot.
Playback Mode: Play/Pause/Resume.
Press to confirm a selection in the settings.
11 Down Press to zoom outwards of front vision in photo mode.
In Menu list, move the cursor, one line down.
Press to switch front camera, rear camera or dual camera PIP display.
Press and hold to turn on/off WiFi hotspot
12 Menu Press to open the Record/Photo/Playback Menu, General
Settings Menu.
Press during recording to lock the current recording file.
13 Micro USB Connect to micro USB cable & charge battery.
Port Connect to PC for data (SD card) transfer.
20
Page 25
HƯỚNG DẪN SỬ DỤNG VIETMAP
IV - INSTALLATION:
Location:
To have a better view, try to install at the center of the windshield. Make sure the
lens is located in a place where the windshield wiper can clean the window to ensure
view is clear.
Make sure the device is not installed in a place where it will interfere with the safety
bag. Make sure the GPS will not be obstructed by the windshield’s sun control film
(window tint).
Install vehicle video recorder :
1. Clean the area you desire to have the vehicle camcorder placed.
2. Adjust and find the good viewing angle, then fix the suction mount on the
windshield, and install A(Dashcam).
3. Connect B(Charger) to Micro USB port, and hide cable into the seams around
the edge of the dashboard. Connect other side to cigarette lighter.
4. Connect C(Rear Camera Cable) to AV-IN port, hide cable into the seams
around the edge of the car roof, then install D(Rear Camera) upon the license plate.
5. Connect E(GPS module) to GPS port, then place on the right-front corner.
Page 26
HƯỚNG DẪN SỬ DỤNG VIETMAP
V - OPERATION:
Power On
When connected to a car charger with power, the device will automatically power on
and start recording.
1. Connect the car charger to the power connector USB port found on the device.
2. Connect the other end of the car charger to your car’s cigarette lighter.
3. The device will power on automatically when the car supplies the power to the device.
4. The blue dot will start flashing and recording starts automatically.
5. The red dot on the screen will start glowing and charging if device power not full.At
other times, press and hold the power button for at least 3 seconds.
Note:
➢ Be sure insert the SD card before powering up the device. Format the SD card
before you start recording for the first time.
22
Page 27
HƯỚNG DẪN SỬ DỤNG VIETMAP
➢ The GPS icon flashes red when the unit hasn’t detected the GPS signal on the
screen. The GPS icon stay solid blue when the unit has detected the GPS signal.
Power Off :
When the car’s engine is turned off, the device will automatically turn off in a few
seconds.
At other times, press and hold the power button for at least 3 seconds to turn off the
device. Do not eject the SD card immediately to prevent damage to the last recorded
file.
If you wish to switch the device back on, press and hold the power button for at least 3
seconds.
Record Mode
Using the Vietmap C62 you can record videos and take photos. To record videos, you
need to ensure that the unit is in the Record mode.
Press the MODE button to switch between Record, Photo and Playback modes.
Recording
When connected to a car charger with power, the unit automatically goes into the record
mode and starts recording.
A flashing red dot icon on screen, a flashing blue LED under screen and a recording timer
indicates that the device is recording. To stop recording, press OK and the red dot
disappears, blue LED goes out, indicating that the recording has stopped.
Page 28
HƯỚNG DẪN SỬ DỤNG VIETMAP
In the Record mode, press MENU to open the Record Menu.
Main menu
Submenu
Notes
Protect the Current Recording
While recording, if you want to protect the current recordings, then press the MENU
button, the lock icon will appear on the screen. This indicates that those recordings
have been locked and will not be overwritten by new video clips.
This also applies when the G-Sensor registers an impact while recording.
Rear Camera
Rear Camera helps you capture rear footages. Insert the Rear camera plug into the AV IN
port. The footage from the rear camera should now be visible on the screen. Press DOWN
button to switch display mode between front camera, rear camera or dual cameras PIP
mode.
Record Menu Settings
Note: Please note, you cannot access the Menu Settings while the device is recording. To
access the Menu settings, you will need to stop recording by pressing OK. Press MENU
button to open the Record Menu Settings. Press MENU again to open the General
Settings Menu. Press MENU once more to exit from the Menu settings.
Press the relevant UP and DOWN keys to scan through the options, under each menu
setting. Press OK to select the required option.
24
Page 29
HƯỚNG DẪN SỬ DỤNG VIETMAP
Video Resolution
Single Camera:
2880*2160P24, 2560*1440P30,
2304*1296P30, 1920*1080P60,
1920*1080P30,
1280*720P120, 1280*720P60,
1280*720P30, Dual Camera:
1440P30 + 1080P30
Default
Single: 1920*1080
P60
Dual:
1440P30+1080P30
Loop Recording
Off, 3 Minutes, 5 Minutes, 10
Minutes
Default 3 Minutes
Exposure
+2.0, +1.7, +1.3, +1.0, +0.7, +0.3,
0.0,
-0.3, -0.7, -1.0, -1.3, -1.7, -2.0
Default 0.0
Dual Record
Off, On
Default On
Mirror Image
Off, On
Default On
WDR
Off, On
Default Off
Traffic Sign Warning
Off, On
Default On
Motion Detection
Off, On
Default Off
Parking Mode
Off, On
Default Off
Record Audio
Off, On
Default On
Date Stamp
Off, On
Default On
GPS Stamp
Off, On
Default On
G-sensor
Off, High, Medium, Low
Default Medium
Speed Unit
KM/H, MPH
Default KM/H
When the device is not recording, press the MODE button in Record mode to switch to
the photo mode, the photo icon will display on the top left corner of the screen.
Photo Mode
Page 30
HƯỚNG DẪN SỬ DỤNG VIETMAP
Now, press the OK button to take a photo.
Press DOWN button to switch display mode between front camera, rear camera or dual
cameras PIP mode.
Press the UP button to zoom in, press the DOWN button to zoom out for front camera.
In the Photo mode, press MENU to open the Photo Menu Settings. Press MENU again to
open the General Settings Menu. Press MENU once again to exit the Menu settings. The
UP/DOWN keys can be used to scan through the options, under each menu setting. Press
OK to select the required option.
Playback Menu Settings
Main menu Submenu Notes
Delete Delete Current/ Delete All
Protect Lock Current/ Unlock Current/ Lock All/ Unlock All
Slide Show 2 Seconds/ 5 Seconds/ 8 Seconds
Playback Mode
Press the MODE button in photo mode to switch to the playback mode. The device stores
video and photos on the SD Card. Playback mode will allow you to review the saved
videos and photos and play back the video with sound.
When in the Playback mode, toggle the files by Press the UP and DOWN keys to scan
through the various video/image files and press OK button to play a video file. During
video playback pressing the UP or DOWN keys will fast rewind or fast forward the current
video. Press OK button to pause or resume the video.
If you wish to delete or protect the file or start a slide show, press the MENU button to
access these options.
26
Page 31
HƯỚNG DẪN SỬ DỤNG VIETMAP
Main menu
Submenu
Notes
WIFI
Off/On
Default Off
Date/Time
Setting Year/Month/Day/ Time
Time Zone
UTC/GMT 12:00 ~ UTC/GMT -12:00
Default UTC/GMT +7
Auto Power Off
Off/ 3 Minutes/ 5 Minutes/ 10 Minutes
Default Off
Backlight
Off/ 1 Minutes/ 3 Minutes/ 5 Minutes
Default 3 Minutes
Beep Sound
Off/On
Default On
Language
Vietnamese, English, French, Spanish,
Portuguese, Deutsch, Italian, Chinese, Russian,
Japanese, Thai, Polish;
Default Vietnamese
Select this option to play back or repeat one or all of the recorded videos
Playback Menu Settings
Main menu Submenu Notes
Delete Delete Current/ Delete All
Protect Lock Current/ Unlock Current/ Lock All/ Unlock All
Slide Show 2 Seconds/ 5 Seconds/ 8 Seconds
General Settings Menu
Depending on the mode, press MENU to open the Record/Photo/Playback Menu.
Press MENU again to open General Settings Menu.
Please Note: Settings Menu is common to all the 3 modes.
Page 32
HƯỚNG DẪN SỬ DỤNG VIETMAP
License Plate
Add license plate
Frequency
50Hz, 60Hz
Default 50Hz
Storage Space
Show status of storage.
Format
TF card all data delete cancel / OK
Default Setting
Cancel/ OK
Version
Showing software version
DB infor
Showing software version data
Type
Name
Description
1
Speed limit sign
Speed limit sign
2 Residential area
3 Out of Residential area
4 Speed camera
5 Forbid to cross
6 Allow to cross
VI – TRAFFIC SIGN WARNING :
28
Page 33
HƯỚNG DẪN SỬ DỤNG VIETMAP
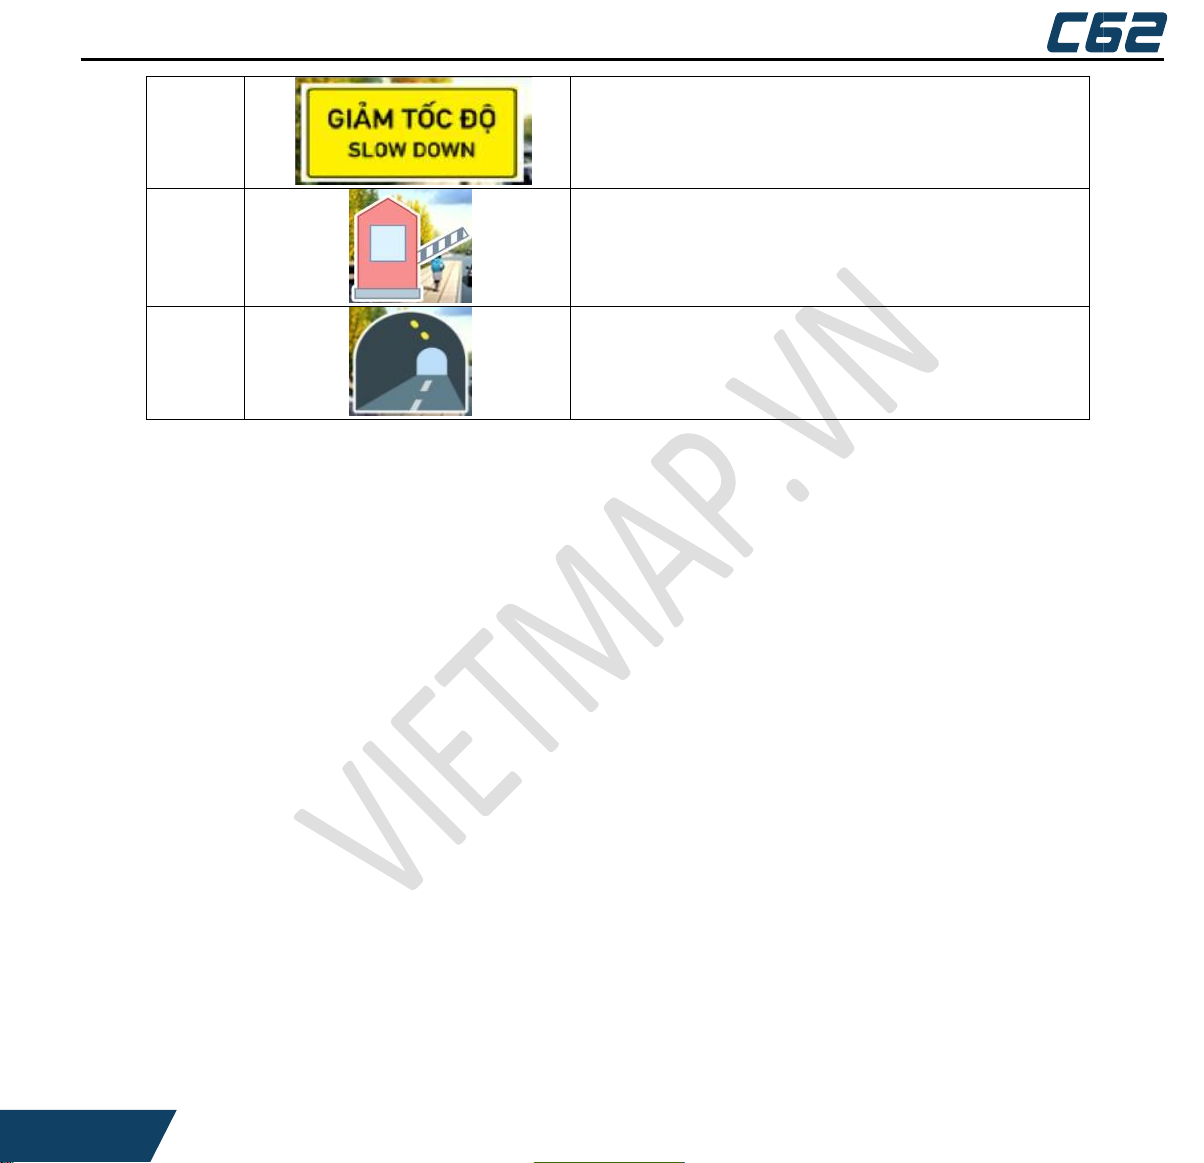
7 Slow down
8 Toll booth
9 Tunnel
VI – SMARTPHONE APP INSTALLATION AND WIFI CONNECTION:
1.1 Smart phone APP Installation:
Android system mobile phone
Open the “Google play store” search “C6 DVR” to download and install
IOS system Apple phone
VII – GUARANTEE AND SUPPORTING :
->Please visit our website at:
->Dedicated viewer, latest firmware and other product information are available for
download from the website.
Open the “Apple store” search “C6 DVR” to download and install.
1.2. WiFi Connection:
Open your smartphone WiFi settings and select Dash Cam Network:
CARDV_...............; Use password 12345678 to connect.
Once connected, launch the APP to see live video, track your journey, change camera
settings or download captured footage and photos.
www.vietmap.vn
Page 34

HƯỚNG DẪN SỬ DỤNG VIETMAP
->VIETMAP is not responsible for any problem that occurs if the device obtained illegally.
->Thought this product records and saves footages in the event of accident, it does not
guarantee every single accident scenes are fully recorded.
->Accidents scenes may not be recorded if there is minor impact on the vehicle so that
the impact sensor cannot defect.
->The recordings obtained from the product might be used as a proof of accident.
However, VIETMAP will not be responsible for any gain or loss cause by the accident.
-> If you find difficulties in using or installing device, please contact us by the following
information for best support :
• Email: [email protected]
• Tel: 1900.7113
• Website:
• Fanpage:
www.vietmap.vn
www.facebook.com/vietmapgis
30
 Loading...