

Page 1
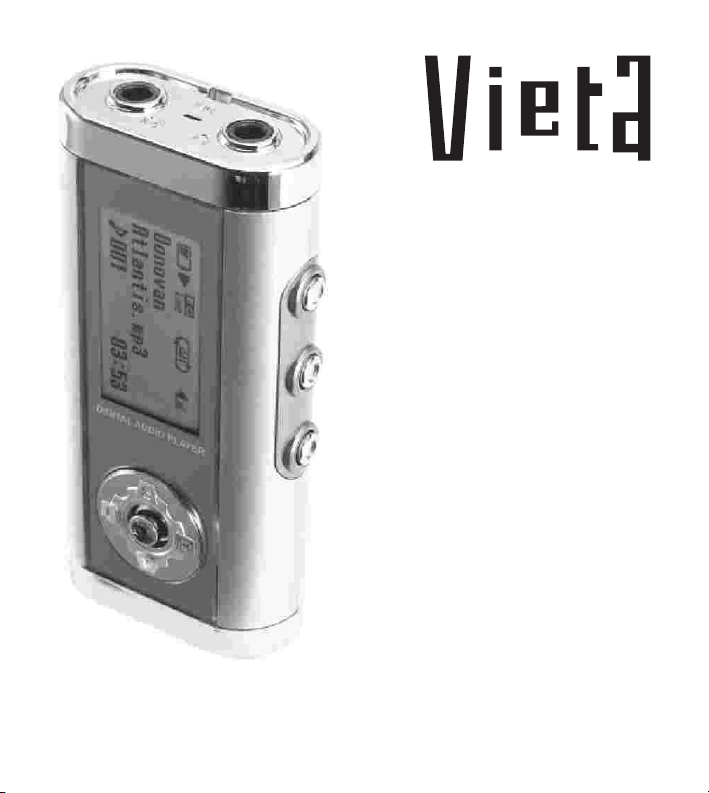
VPD-3128/3256
User’s Manual
Page 2
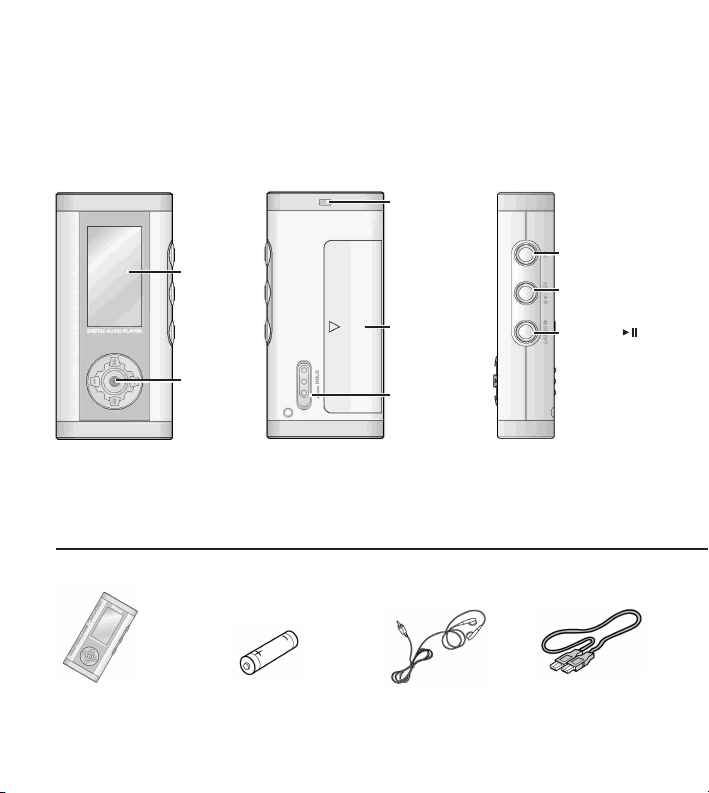
Name Of Each Part
Front Back Right Side
Neck Strap Ring
LCD Display
JOG button
Battery cover
HOLD switch
FM button
REC/A.B button
Play/Pause
button,
Power (ON/OFF)
button
Accessories
MP3 Player Battery (AAA x 1) Earphone USB
2
connection cable
Page 3
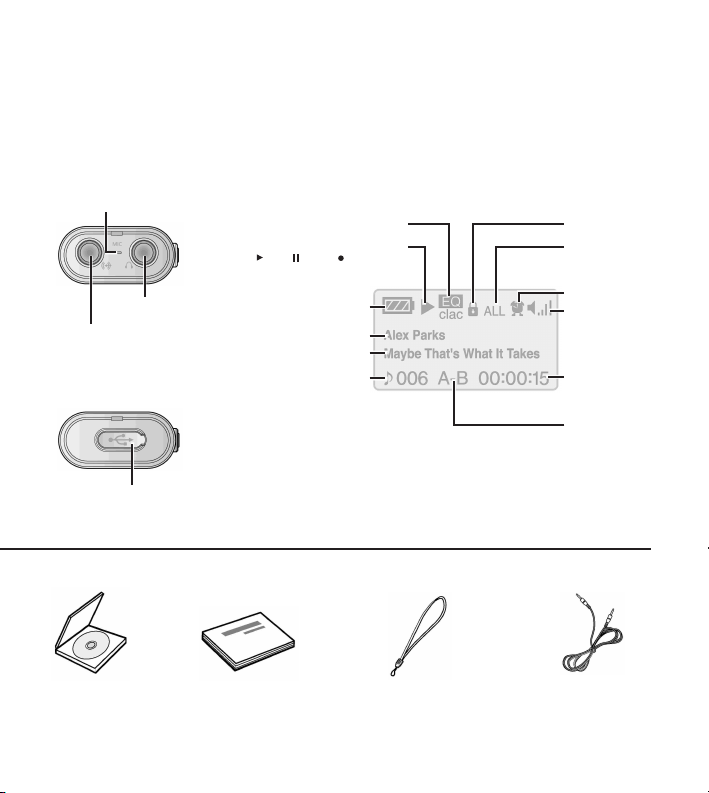
Top LCD Display
Built in Mic
EQ Mode indicator
Current Status indicator
( Play, Pause, Recording)
Earphone/Output terminal
Microphone/Input terminal
Bottom
USB port connection terminal
Baterry Level
indicator
Singer indicator
File Name indicator
Current File
Number indicator
HOLD indicator
Repeated
playback
indicator
Time indicator
Volume indicator
Playback Time
indicator
Section Repeat
Play Indicator
Quick User’s
Manual CD
(win98 Driver)
User’s
Manual/Warranty
Neck strap External device
connection cable
3
Page 4
Preparations before use
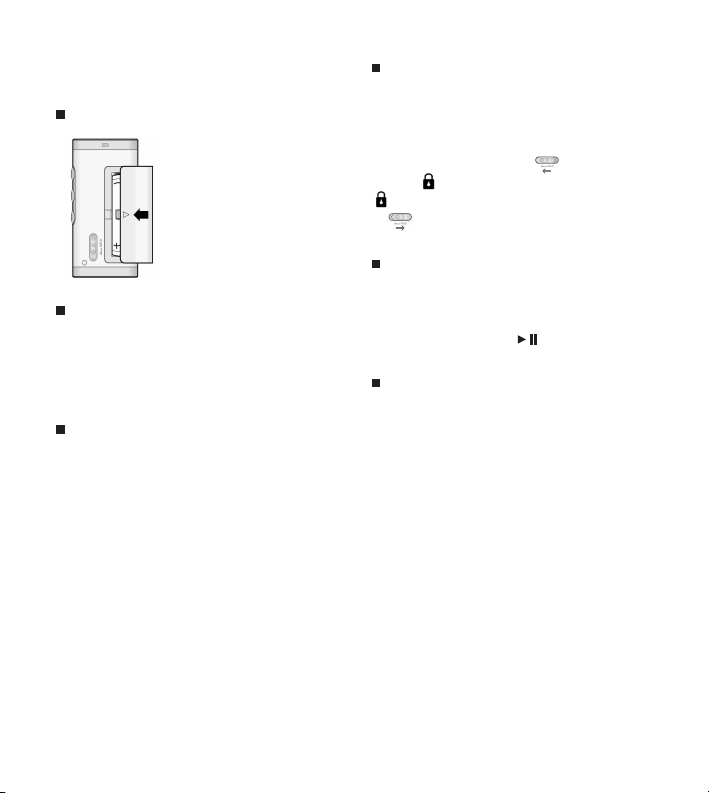
Setting up HOLD Function
Installing the Battery
1. Slide the battery cover
in the direction of the
arrow
2. Insert battery with the
Correct polarity as
indicated by the (+)
and (-) symbols.
Adjusting the Volume
You can adjust the volume from 0 to 20.
Press the JOG button up (+) and down (-)
to adjust the volume.
Power ON/OFF
Power ON
Press the On/Off button and hold to turn the
power on.
Power OFF
= Automatic Power OFF - The power
automatically turns off when the recorder
is not in use for more than one minute at
STOP mode.
= Manual Power OFF - Press the On/Off
button and hold to turn the power off.
HOLD switch performs locking function
during playback or recording and manual
power off function at STOP mode.
Push the Hold switch in direction will
display and lock the player and to remove
and unlock the player, push the switch
in direction.
Selecting MP3/FM Mode
Press the FM button to change into FM
mode, and to change to MP3 mode,
push the Play/Pause ( ) button.
Selecting a Folder
You can select the folder to play form.
Pressing the JOG button twice when the
MP3 mode is at pause or stop will display
the current folder.
Here, push the JOG button up (+) or down
(-) to change folders.
Recording
To record, please position the built-in
microphone toward the sound source.
To Start Recording
Pressing the REC/A.B button will display
record elapse time and start recording.
4
Page 5
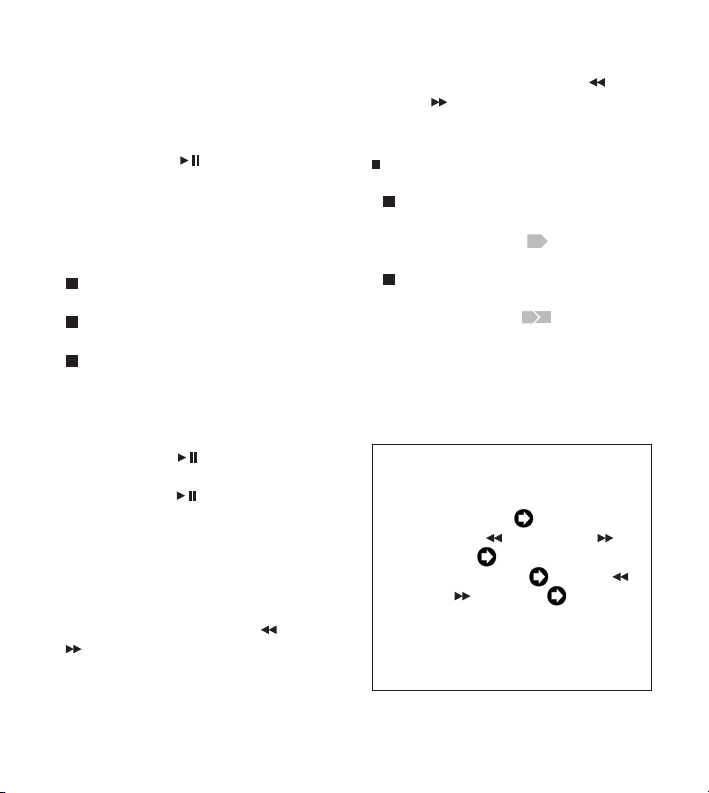
To Pause Recording
To pause the recording, pressing the REC/A.B
button again.
To Stop Recording
Press Play//Pause ( ) button at recording
or pausing will stop the recording.
Playback
To Start Playback
1
See page 3 to select the folder to play
from.
2
Press the JOG button button up (+) or
down (-) to select the file to play.
3
Pressing the JOG twice will display
the number of the file and elapse of
display time, and start play.
To Pause Playback
Press Play/Pause ( ) button to pause
the currently playing file and to resume play,
press Play/Pause ( ) button again.
To Stop Playback
When paused for 30 seconds, the player
stops.
To Skip to Other Files during Playback
Pushing the JOG button to left ( ) or right
( ) will stop playing the current file
and move to the previous or next file and
play.
To Search the Desired Section within a File
Push the JOG button to the left ( )
or right ( ) and hold to play the previous
or next part of the currently playing file.
Section Repeat Playback
1
In playback, press REC/A.B button at
the beginning of the part you desire to
program to display which will
A
blink.
2
Pressing REC/A.B button again at the
end of the section you would like to
repeat will display again and the
A B
player will repeat the section. To reset
the A-B repeat,press REC/A.B button in
A-B repeat to resume playback.
Using MENU Mode During Play
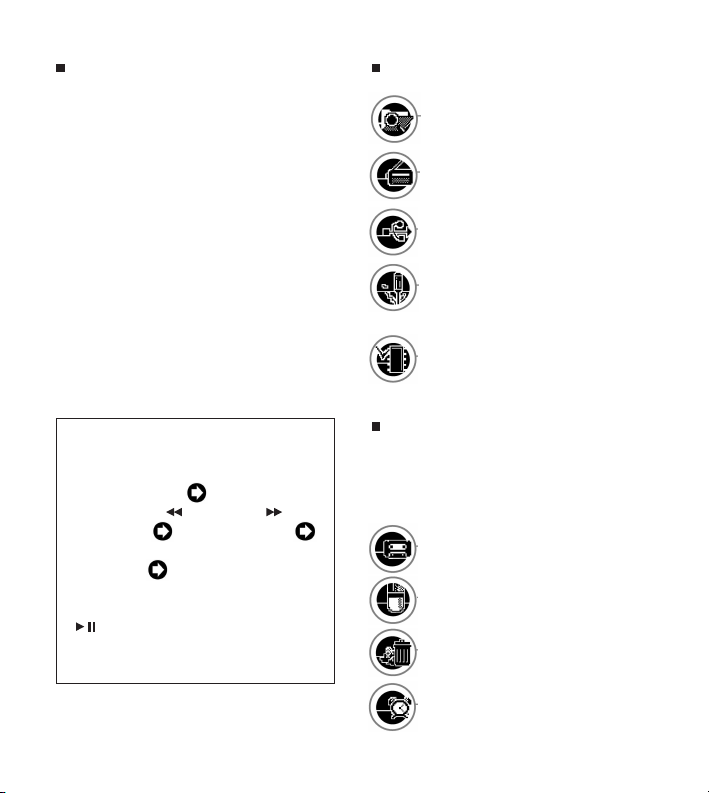
How to operate menu
MP3 mode, during
Press JOG button Push the JOG
button to left ( ) and right ( ) to
select menu . Press JOG button
Push the JOG button to left ( )
and right ( ) to select Press JOG
button
• How to exit menu : Wait for 5 seconds
or select ESC.
5
Page 6
Playback Menu
Main Menu
•SPD : Normal, Fast, Slow1, Slow2, Slow3,
Slow4, Slow5
•EQ : Normal, Classic, Live, Pop, Rock
•RPT : One Folder, One File, Normal,
All Folder, Random, User 2, 3, 4, 5
•ESC : Return
· Speed Control : to adjust ‘Play’ speed
· EQ(Equalizer) : to select sound mode and
to listen to music
· Repeat : to set the music to ‘repeat’
· ESC : to return to the original screen.
Using MENU Mode In STOP
Mode
How to operate main menu
MP3 mode, In stop state
Press JOG button Push the JOG
button to left ( ) and right ( ) to
select menu Press JOG button .
Push the JOG button to up (+) and down
(-) to select Press JOG button
• How to exit menu : Pressing Play/Pause
( ) button briefly will move to the
previous menu and pressing REC/A.B
button will exit the menu.
6
BROWSER :
To view MP3, WMA, REC files etc.
Also to listen to and delete music files.
FM RADIO :
To check the saved channel list and
to listen to FM Radio.
FIRMWARE UPGRADE :
To store documents, presentations, and other
files, using it as a portable storage drive.
SETUP :
To record, delete, timer, check memory,
LCD, adjust configuration, language
functions, etc.
MEMORY CHECK :
To check total, free or used memory
SETUP Menu
If you press the ‘SETUP’ button in the main
folder, the following functions can be selected
and used.
REC Setup :
To record music, voice, FM radio etc.
Erase :
To delete individual or all files
Format :
To dear the flash memory
Timer :
To set the timer to listen to and record
music
Page 7
LCD Setup :
To adjust Back-light or LCD screen
Language :
To select other languages
Auto Play :
Automatic playback when power turns on
FM Region Setup :
Radio frequency set by country
Setup Detail Menu
•REC Setup : 1.Music Source(Audio, Mic),
2.MPEG MODE(MP3, TVF), 3.BIT RATE(8,
16, 32, 64, 128, 256 Kbps), 4.VAD(Off,
On), 5.SYNC(Off, SYNC On, 1 SYNC On),
6.SILENCE(Low, Middle, High)
•Erase : 1 File, All
•Format : 1.Format, 2.Low Format
•Timer : 1.Sleep, 2.Record
•Memory Check : 1.Remain MEM, 2.REC
Time
•LCD Setup : Back-light(Off, On), 2.Light
Color(White, Blue, Red, Green, Yellow,
Cyan,Magenta), 3.LCD Contrast(0~10)
•Language : Korean, English, Japanese,
Chinese-SIMP, Chinese-TRAD, Russian
•Auto Play : Off, On
•FM Setup : KOR/US, EU/CHINA, JAPAN
• LINE IN SYNC : Auto track-setting function
during real time recordings(Set the RECORD
SOURCE to LINE IN for the operation.)
- SYNC ALL ON : Tracks for the entire songs
are automatically set and recorded.
- SYNC 1 ON : Sets to record only one song.
• VAD(Voice Activate Detection) : Voice-activated
recording function(Set the RECORD SOURCE
to MIC for the operation.)
• Erase : When set to ‘ERASE ALL’, it deletes
all files in the selected folder only
• BR(Bit Rate) : To adjust recording time
in the mode of bit compression
• SILENCE LEVEL : To configure SILENCE
LEVEL during LINE IN SYNC and VAD.
(Set the RECORD SOURCE to MIC for the
operation.)
* Other language, firmware upgrade possible
Real Time Recording
MP3 Player can record music and speech
(from CDP, MDP, AUDIO, FM RADIO,
internet, TV, etc) in real time mode via
the Sync recording function, It can also
record and save music in MP3 format.
Before downloading music, there must be
an External device connection cable
connection between MP3 Player
Microphone/Input terminal and the CDP,
MDP, AUDIO, FM RADIO or other audio
output terminal.
7
Page 8

Real Time Recording
Formatting Files
Music recording
Go to the SETUP menu in the main folder
and select the ‘REC Setup’ function.
Then adjust LINE IN, LINE IN SYNC, BIT
RATE, SILENCE LEVEL, etc as appropriate
and press the REC/A.B button.
Voice recording
Go to the SETUP menu in the main folder
and select the ‘REC Setup’ function.
Then adjust MIC, VAD, BIT RATE, SILENCE
LEVEL, etc as appropriate and press the
REC/A.B button.
FM Radio recording
Press the REC/A.B button. (FM Radio
recording can be carried out in its current
setting.)
* Note : the Record function setting is saved as the
last selected function mode.
Deleting Files
To delete individual files
Go to the SETUP menu in the main folder
and select the ‘Erase’ function. Next select
ERASE 1 File mode, and then select the file
to be deleted. Press the JOG button to delete.
To delete all files in a folder
Go to the SETUP menu in the main folder
and select the ‘Erase’ function. Next select
ERASE ALL mode and press the JOG button.
All files in the current folders will be deleted.
* Take care : deleted files cannot be restored!
8
Go to the SETUP menu in the main folder
and select the ‘Format’ function.
Next select FORMAT and LOW FORMAT
mode, and then press the JOG button.
* Take care : deleted files cannot be restored!
Timer Function
This is useful for setting a time for recording
or playing music.
1
Go to the SETUP menu in the main
folder and select the ‘Timer’ function.
Then go to SLEEP mode and set the
time you want.
2
Go to the SETUP menu in the main
folder and select the ‘Timer’ function.
Then go to RECORD mode, set the
chosen time and record.
Adjusting the LCD Display
To operate Back-light
Go to the SETUP menu in the main folder
and select the ‘LCD Setup’ function.
Then select BACK-LIGHT mode to turn
the function ON/OFF.
To select the Light Color
Go to the SETUP menu in the main folder
and select the ‘LCD Setup’ function.
Then select LIGHT COLOR mode and choose
the desired LCD backlight color.
Page 9

To adjust the LCD Display
Go to the SETUP menu in the main folder
and select the ‘LCD Setup’ function.
Next select LCD CONTRAST mode and
you can make adjustments(10~20)
* The Back-light is power-hungry, so use it only when
necessary.
Selecting Language
To select language
Go to the SETUP menu in the main folder
and select the ‘Language’ function.
Next select the language of your choice.
Listening to and recording FM
broadcasting
TTo listen to an FM broadcasting
To listen to FM broadcasting, pressing the
FM button when MP3 mode is at pause or
stop.
For manual tuning
Push the JOG button to the left ( ) or
right ( ) to decrease or increase frequency.
For automatic tuning
Push the JOG button to the left ( ) or
right ( ) and hold. Automatic tuning will
begin.
To record FM broadcasting
To record, press REC/A.B while you are
listening to the FM broadcasting.
To tune in to preset station
• In FM mode:
Press the JOG button once to select
PRESET ON/OFF and press the JOG
button again. Preset will reappear. Push
the JOG button to the left ( ) or right
( ) to listen to up to 20 preset stations.
• In MP3 mode:
Enter FM Radio menu in the main folder
and push the JOG button up (+) or
down (-) to select the desired preset
station and press the JOG button.
• To undo PRESET mode:
Press the JOG button 2 times.
Preset will disappear.
For automatic presetting
Press the JOG button once and push to the
left ( ) or right ( ) to select Auto. Press
the JOG button again and the player will
memorize up to 20 stations automatically.
For manual presetting
Press the JOG button once and push to the
left or right to select Save. Press the JOG
button again and "Save?" will appear on the
screen. Push the JOG button up (+) or down
(-) to select the number that you desire to
remember and press the JOG button again
for the player to save the station as preset.
9
Page 10

Connecting to a PC
Installing software in a PC
MP3 Player can be utilized to save and
download files by two methods : by portable
drive(USB driver) and program CD.
USB driver(recommended)
• Windows 2000, ME and XP users don’t
require an additional program.
The portable drive supports a Plug &
Play function for easy file storage and
download.
• Windows 98 users must install the USB
driver software for Windows98 from the
install CD.
Installation of Windows 98
First insert the Software install CD in the
CD-ROM then an automatic setup screen
will appear. In Encording MP3 Player
Explorer’s initial screen, select the bottom
right Cancel button. Select and click on the
CD-ROM icon in Windows Explorer. Next,
click on the ‘win98 mass’ folder and execute
the ‘Setup.exe’ file.
Connecting to a PC
For downloading MP3 files from the PC,
first connect the MP3 player to the PC using
the USB connection cable. During this
operation, either MP3 Player USB software
program or Encording MP3 Player Explorer
has to be running.
10
• Connect the USB connection cable
to the PC USB port connection terminal.
• Switch on the MP3 Player, and the connect
the PC link USB connection cable to the
USB port connection terminal.
• If a message window appears on the LCD,
connection is successful.
* Warning : An error might occur if the USB connection
cable is connected while MP3 Player is operating.
Using a Portable Drive :
Method 1(Recommended)
* Warning : If a portable drive is to be used,
previous CD users must uninstall the CD program
and upgrade their firmware before using the portable
drive.
Windows 98 users must install USB drive
software for Windows 98 from the install
CD.
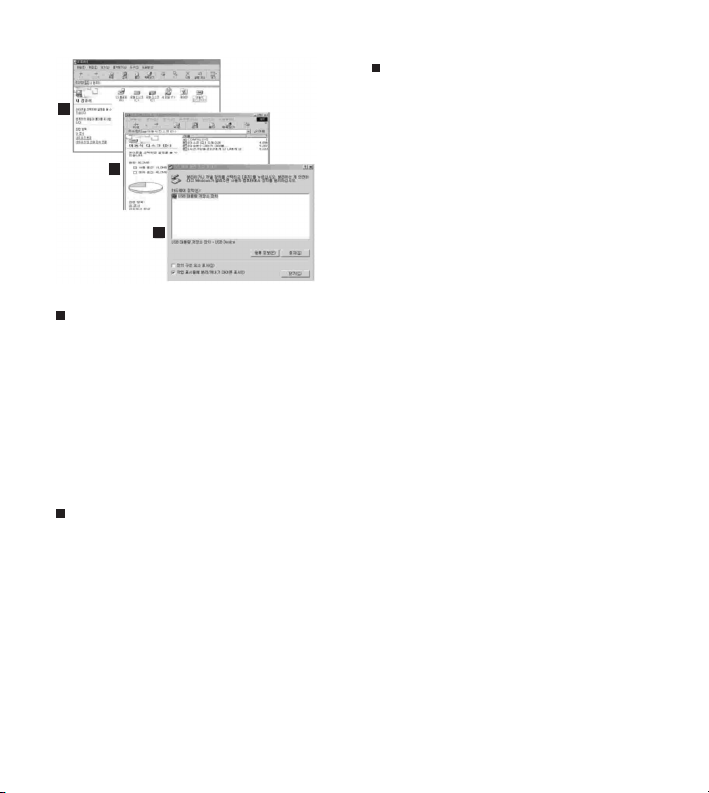
1
When MP3 Player is connected to a PC,
a new drive will automatically be created.
2
When MP3 Player is connected to the
PC, files can be saved and downloaded
for use.
3
The following window will appear if the
icon in the taskbar is double clicked.
Click on the Stop button before removing
the USB device.
Page 11
1
2
3
Installing Manager CD :
Method 2
When the Install CD is inserted in the PC’s
CD-ROM drive, the following screens will
appear. The setup file is executed
automatically.
Follow the instructions on screen and click
on Next and Click consecutively.
Installing Manager CD
(SyncPlayerDeluxe)
To install the program, put the Installation
CD in CD-ROM drive, open the player folder
and double click the SyncPlayerDeluxe.
And then, just click 'Next' as instructed
by the program until the installation is
finished.
SyncPlayerDeluxe : This is a program
to replay MP3 files for music and language.
Installing Manager CD
(MediaSync1.6)
To install the program, put the Installation
CD in CD-ROM drive, open the player folder
and double click the MediaSync1.6.
And then, just click 'Next' as instructed
by the program until the installation is
finished.
MediaSync1.6 : This is a program to replay
MP3 files for music and language, and edit
words of songs and text.
* For more information, please refer to the 'Help' in
MediaSync1.6.
* Warning : Outputs of this program, such as MP3
or other transformed files, are allowed to use only
for non-commercial or personal purposes. It is
prohibited to use them for commercial or nonpersonal purposes.
In case of violation, you may be subject to
punishment according to the provisions of the law
concerned with computer programs.
11
Page 12
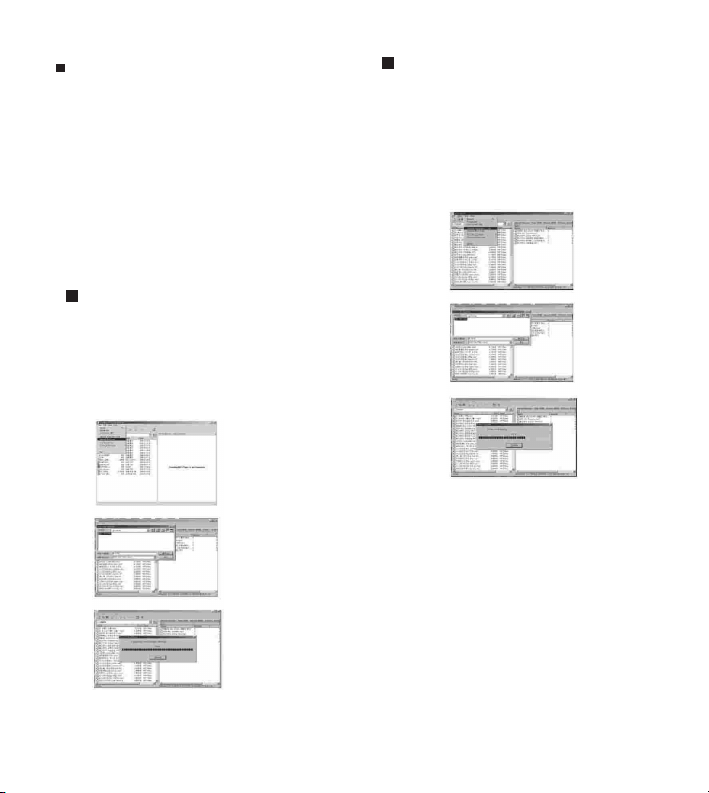
Upgrading Your Firmware
• First, the CD execution program (for
Windows 98 users ‘win98 mass’) has to be
uninstalled.
• Switch on the MP3 Player and then select
the USB folder from the main menu.
• Connect to the PC and execute the firmware
upgrade.
* After downloading the Firm Boot.hex and Firm
App.hex programs from the company website.
1
Go to the Manager program and click
on the TOOL icon. When the following
screen appears, click on ‘Upgrade Boot
Code’
• Double click on the downloaded
Firm Boot.hex file.
2
Go to the Manager program and click
on the TOOL icon. When the following
screen appears, click on ‘Upgrade
Application Code’
• Double click on the downloaded Firm
App.hex file.
12
Page 13
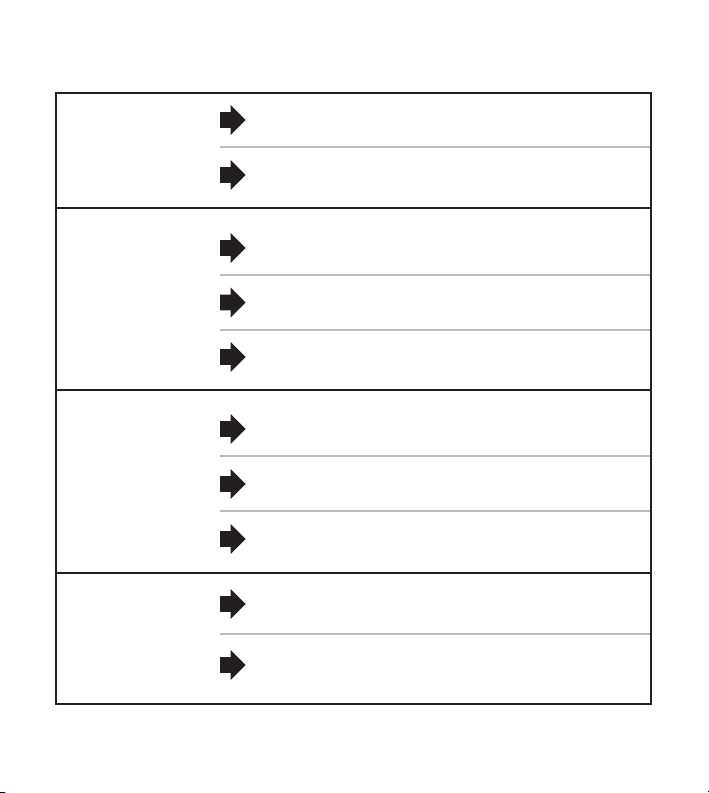
Troubleshooting
LCD doesn’t
work.
Recording
doesn’t work.
Playback
doesn’t work.
No sound comes
from the speaker.
Is the battery's
1
power exhausted?
Is the battery installed
2
to he correct polarity?
Is the device locked
1
by the HOLD key?
Has the memory or file
2
numbers been used up?
Is the battery's power
3
exhausted?
Is the device locked
1
by the HOLD key?
Could it be that there
2
is no voice file or MP3 file?
Is the battery's
3
power exhausted?
Is the volume set to '0'?
1
Is the earphone plugged
2
in properly?
4 Replace the battery with
a new one. (Refer to page 4)
4 Install the battery to the
correct polarity.
4 Release the HOLD key.
4 Delete unnecessary files.
(Refer to pages 8)
4 Replace the battery with
a new one. (Refer to page 4)
4 Release the HOLD key
4 Check the folder and
file numbers.
4 Replace the battery with
a new one. (Refer to page 4)
4 Adjust the volume.
(Refer to page 4)
4 Plug the earphone
in properly.
13
Page 14

Precautions
Important information on safe and efficient operation.
Read this information before using your MP3 Player.
For the unit
1. Do not drop the unit or give a shock
to the unit. It may cause a malfunction.
2. Do not leave the unit in such a location
as described below.
- A place of very high temperature (60°C)
- A place subject to direct sunlight or near
heat sources
- A car with its windows closed (especially
in summer)
- A place subject to excessive moisture like
a bathroom
- A place subject to excessive dust
3. Do not apply heavy forces to the LCD
(Liquid Crystal Display) unit, or it may
cause breakage or abnormal display
taking into account the properties of
liquid crystal.
4. If you place cards using magnetism
such as cash cards or transportation
pass cards near to the speaker of the
unit, the magnetism may be transformed
due to magnetic influence so that the
magnetic cards cannot be used any
more.
5. Our company does not reimburse you
for any loss from the use of the MP3
Player or any demand of indemnity from
a third party.
6. Message loss due to malfunctions,
repairs, etc is not a responsibility of
ours. Please understand this.
14
For the Battery
1. Do not short-circuit, disassemble or
heat the battery, or do not put the battery
into a fire. Electrolyte such as an alkaline
solution may flow out, so you may get
it in your eyes, or it may cause the
generation of heat, or the breakdown
of the battery.
2. When the skin or clothes are stained
with electrolyte such as an alkaline
solution, wash the stain out with water
immediately. If you get it in your eyes,
seek immediate medical treatment
after washing out the area of the eye
with water.
3. When the unit is not in use for a long
time, remove the battery from the unit.
For your safety
1. Do not repair, disassemble or modify
this unit by yourself.
2. If smoke or deformation occurs due
to the generation of heat, remove
the battery from the unit immediately.
3. Do not use this unit in an airplane or
place where the use of electronic
machines are prohibited.
4. Do not use during you are driving or
walking. It may cause an accident.
Page 15
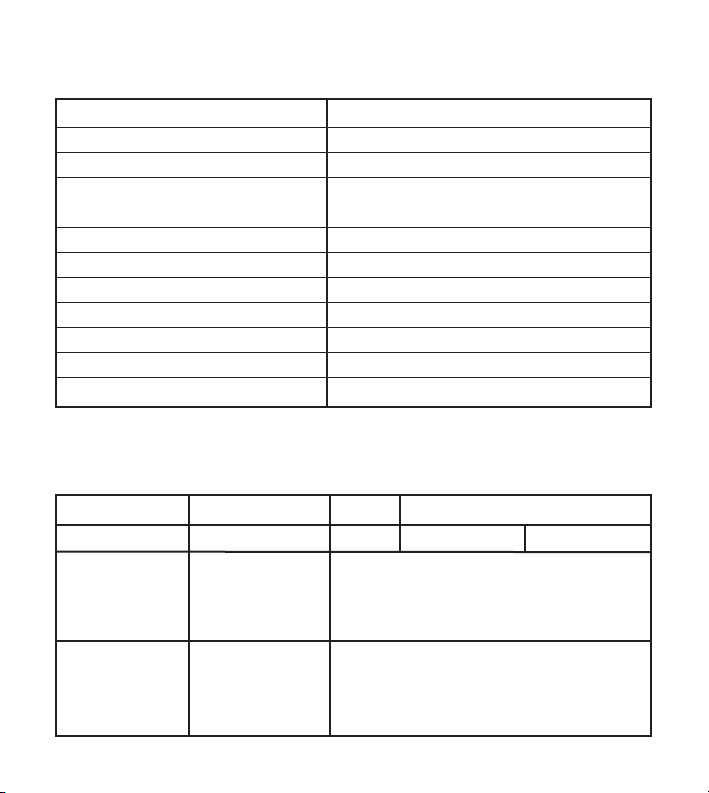
Specifications
Memory Capacity Internal / 128MB / 256MB
Voltage 1.5V
Battery AAA(General)
LCD LCD Numerals
(4 line 128x64 Full Dot Matrix)/Back-lighting
Size(W x H x D)/Weight 33x70x16mm / 25g (excluding the battery)
Case ABS
File Transfer Rate 4.8Mbps
Voice Recording MPEG I , Layer-3, TVF
Noise 90dB
Earphone Output 10mW
Output Frequency Range 87.5MHz ~ 108.0MHz
Warranty
Product MP3 Player Model
Assurance period 2 YEARS Item Sales date yy mm dd
Customer Adress Tel
Name
Signature
Sales agency Adress Tel
Agency name
Signature
15
Page 16

Mar Caribe, 3 (Pol. Ind. La Torre del Rector)
08130 Sta. Perpetua de Mogoda - Barcelona
T +34 935 443 773 / F +34 935 603 214
SPAIN
www.vieta.es
Grimsdells Court, Grimsdells Lane
Amersham, Buckinghamshire, HP6 5EL
T+44(0) 1494 72 34 44 /F+44(0) 1494 72 25 33
UNITED KINGDOM
www.vieta-uk.com
 Loading...