


Table of Contents
Before Connection ..................................................................................................................2
For your safety .......................................................................................................................................... 2
Precautions .............................................................................................................................................. 2
Connection .............................................................................................................................. 3
Connect to the TV ................................................................................................................................... 3
Connecting the Speakers ........................................................................................................................ 3
Connecting the FM Antenna ................................................................................................................... 4
Connect to the assistance equipment .................................................................................................... 4
Connect to th e amplifier with digital signal input terminal .................................................................. 5
Connecting the AC Power Cord .............................................................................................................. 5
Control Locations ....................................................................................................................6
The Unit ................................................................................................................................................... 6
Remote control ........................................................................................................................................ 7
Installation of Batteries in the Remote Control .......................................................................8
Turning the Power On and Off .................................................................................................8
Button Functions ..................................................................................................................... 8
General Operate ...................................................................................................................................... 8
Playing picture CD disc ......................................................................................................................... 11
DVD Menu Options ................................................................................................................................ 1 2
Use the USB ........................................................................................................................................... 15
Listening to Radio Broadcasts .............................................................................................................. 16
RDS (Radio Data System) Reception ................................................................................................... 17
Clock/Timer Functions ......................................................................................................... 17
Setting the Clock ................................................................................................................................... 17
Setting the Dail y Timer ......................................................................................................................... 18
Setting the Sleep Timer ....................................................................................................................... 18
Protect the Disc .................................................................................................................... 19
Troubleshooting ................................................................................................................... 19
Specification ......................................................................................................................... 20
Accessories .......................................................................................................................... 21
Manufactured under license from Dolby Laboratories.
“Dolby” and the double-D symbol are trademarks of Dolby Laboratories.
- 1 -
Before Connection
Thank you for purchasing this DVD 2 channel component system, in order to fully utilize this system,
please read this instruction book carefully before use it.
For your safety
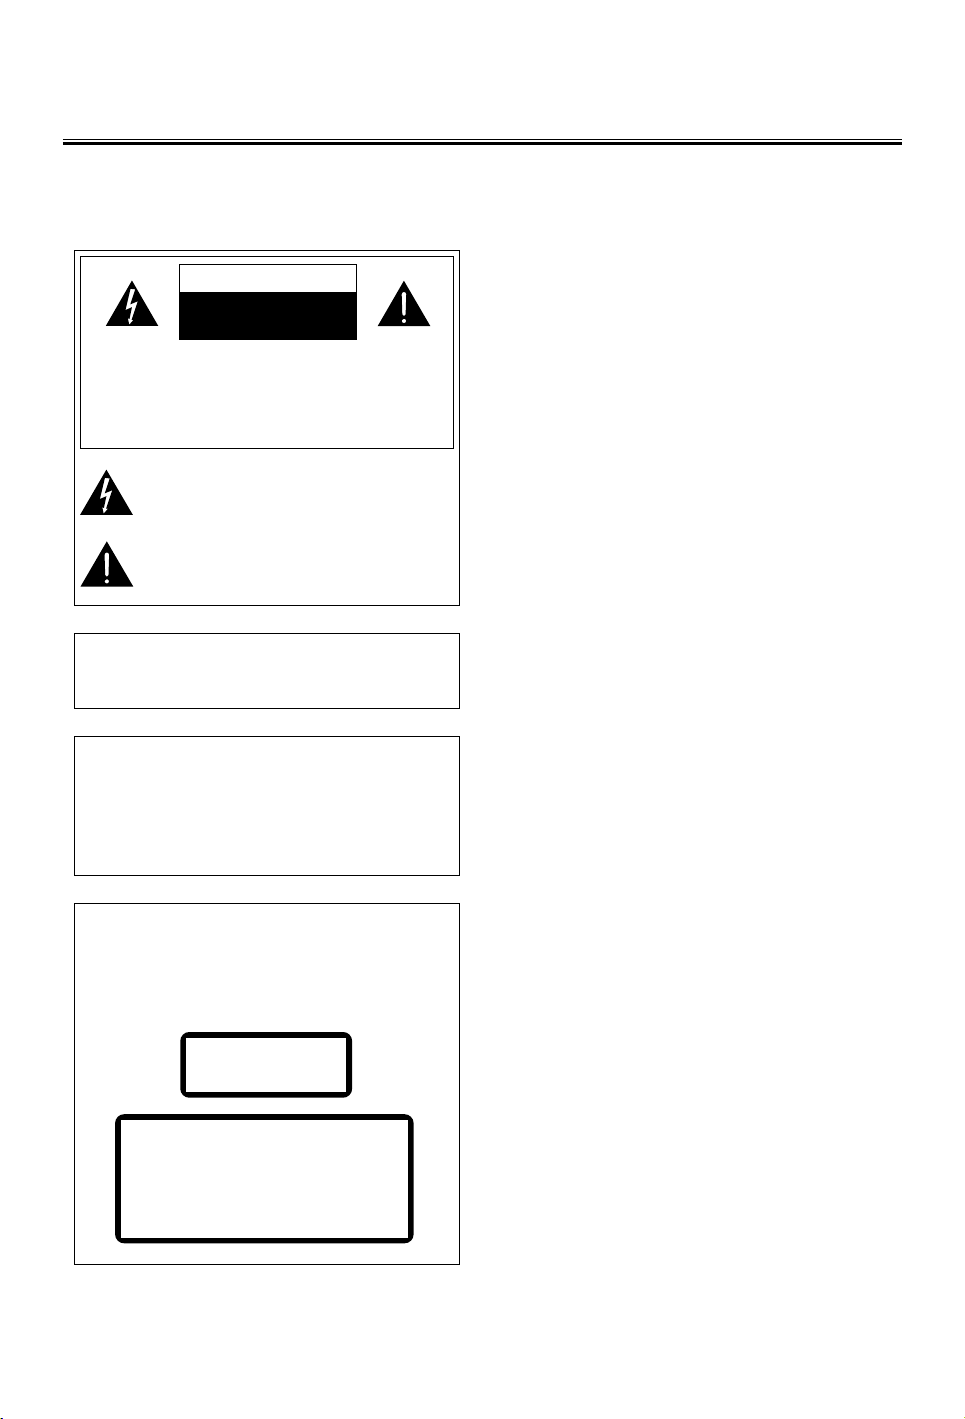
CAUTION
RISK OF ELECTRIC SHOCK
DO NOT OPEN
CAUTION:
TO REDUCE THE RISK OF ELECTRIC SHOCK, DO
NOT REMOVE COVER. NO USER SERVICEABLE
PARTS INSIDE, REFER SERVICING TO QUALIFIED
SERVICE PERSONNEL.
This symbol indicates that dangerous voltage constituting a risk of electric shock is present within
this unit.
This symbol indicates that there are important
operating and maintenance instructions in the literature accompanying this unit.
Caution:
To prevent fire or shock hazard, do not expose this
equipment to rain or moisture place.
Power Requirement
Because the power requirement of the electric products is different in various places, before you use
this product, make sure that the power requirement
of the product is complied to the power that the native district supplies.
Laser Product
This product is equipped with low power laser equipment inside, for using safely, don’t take apart any
covers or try to take apart the product inside. Please
contact the qualified personnel for repairing.
CLASS 1
LASER PRODUCT
Caution:
This product is equipped with low power
laser equipment inside, for your safety,
don’t open the laser radiation protective
equipment. Don’t look at the laser radiation
district when the equipment is operating.
Precautions
1. Before operating this system, check the voltage of
this system to see if it is identical with the voltage
of your local power supply.
2. Unplug the system from the wall outlet if it is not
used for a long time. To disconnect the cord, pull it
out by grasping the plug
3. To avoid electric shock, do not open the cabinet by
unqualified personnel
4. There is no user serviceable parts inside. In case
of system failure, unplug the power cord and
consult your dealer
5. The ventilation should not be impeded by covering
the ventilation openings with items such as
newspaper, table-cloths, curtains etc.
6. The apparatus shall not be exposed to dripping or
splashing and that no objects filled with liquids,
such as vases, shall be placed on the apparatus.
7. To prevent fire or shock hazard, do not expose this
equipment to hot places, rain, moisture or dust.
8. Don’t get close to the water source when using this
unit, such as near bathtub, bath slot, ish-washing
slot, washing machine to use it; also, don’t use this
unit on damp plinth or nearby swimming pool or
similar close to the water source.
9. Do not place this unit close to strong magnetic field.
10. Don’t place this unit close to the damper, or the
moisture will affect the life of the laser head.
11. If the system is brought directly from a cold to a
warm location, or is placed in a very damp room,
moisture may condense on the lens inside the
player. Should this occur, the system will not
operate properly. Remove the disc and leave the
system turned on for about an hour until the
moisture evaporates.
12. Should any solid object or liquid fall into the system,
unplug the system and have it checked by qualified
personnel before operating it any further.
13. Before cleaning this unit, unplug the system from
the wall outlet first. Don’t use the cleaner which is
with liquid or aerosol (e.g. pesticide). You can use
a clean cloth to clean this unit.
14. Please use the connection cable to connect to unit.
Don’t use accessorial equipment recommended by
non manufacturer. It may course an electric shock
by using this equipment.
- 2 -
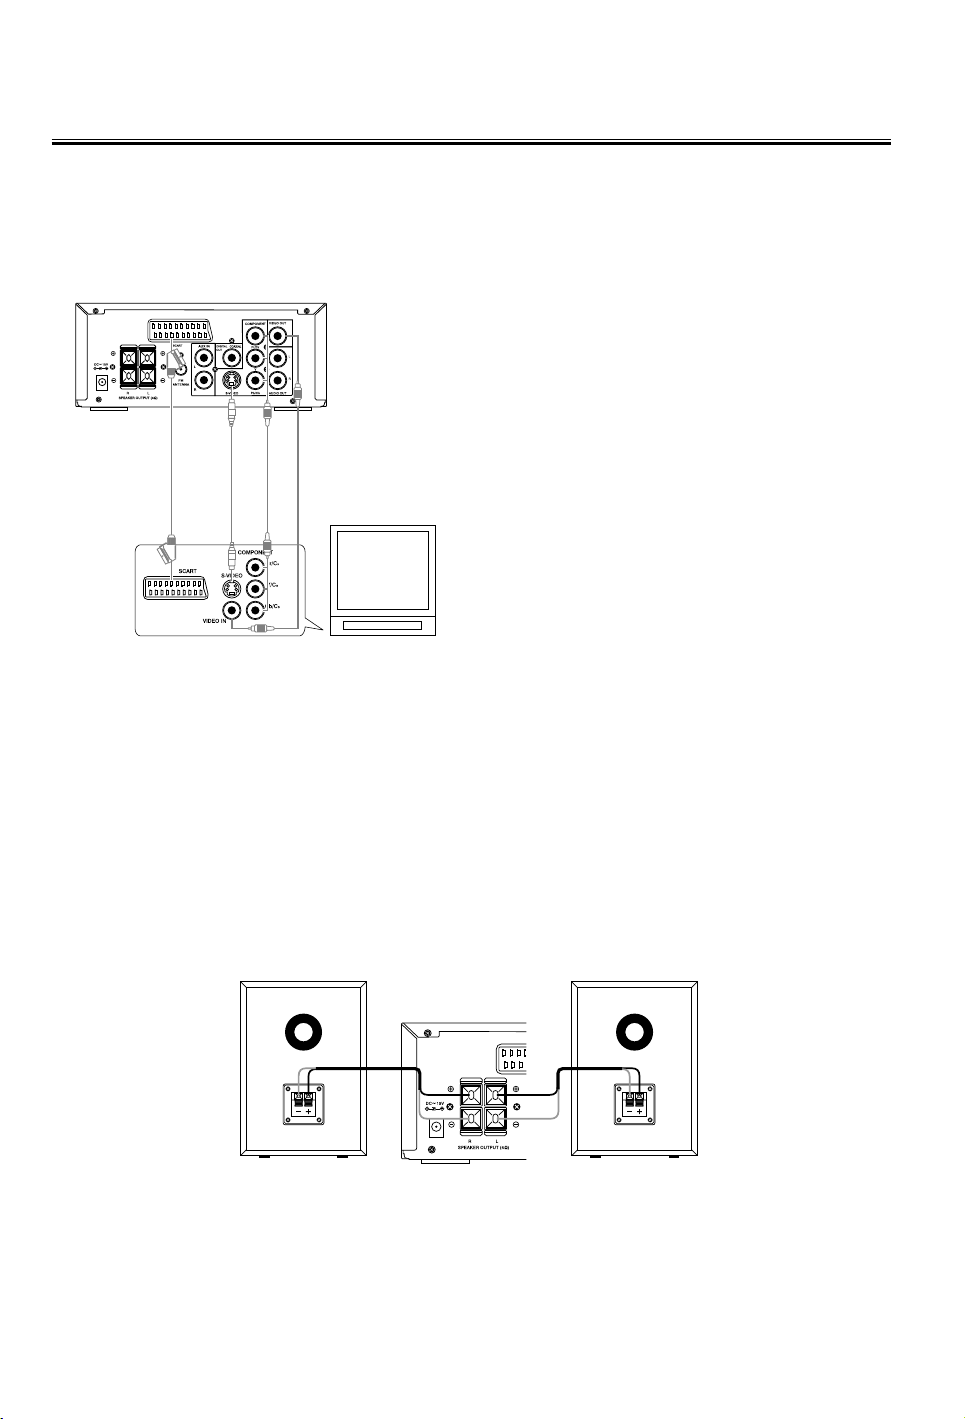
Connection
Caution: Please turn off all the equipment power before connecting.
Connect to the TV
Connecting diagram
erminal board for the DVD player
T
Connections to TV
TV
Safety precautions
1. This unit has video and S terminal output modes,
please choose one to connect with the TV
terminal. (Use S terminal output to get clearer
picture.)
2.If your TV has component input terminal, then
you can use the signal connecting cable to
connect with the unit’s component output
terminal. By doing so, the picture will be more
clear.
3.To avoid affecting the picture output, don’t
connect video, S terminal, component at the
same time.
4.DVD Player setting
Some settings should be made for the unit
according to the TV connection.
* According to the colour system setting of TV,
select the colour system in the “TV Display”
function setting.
* If the unit is connected to a wide screen TV, then
set the “TV display” to “Wide” in the function
setting menu.
* If the unit is connected to a TV, then set “TV
display” to “Normal/PS” or “Normal/LB” in the
function setting item.
Connecting the Speakers
Connect the speaker cords between the terminals as shown below.
Right Speaker Box
Back View
Connection precautions
1. The unit’s output has wide dynamic range, so the amplifier’s volume should be moderated, if other
speakers are used, they must be closed correctly according to our speaker’s specification, or the
loud speaker will be damaged by the heavy volume.
2. Before connect or cut short the unit’s power, please turn the volume to minimum firstly or it may
damage the loudspeaker.
- 3 -
Left Speaker Box
Back View
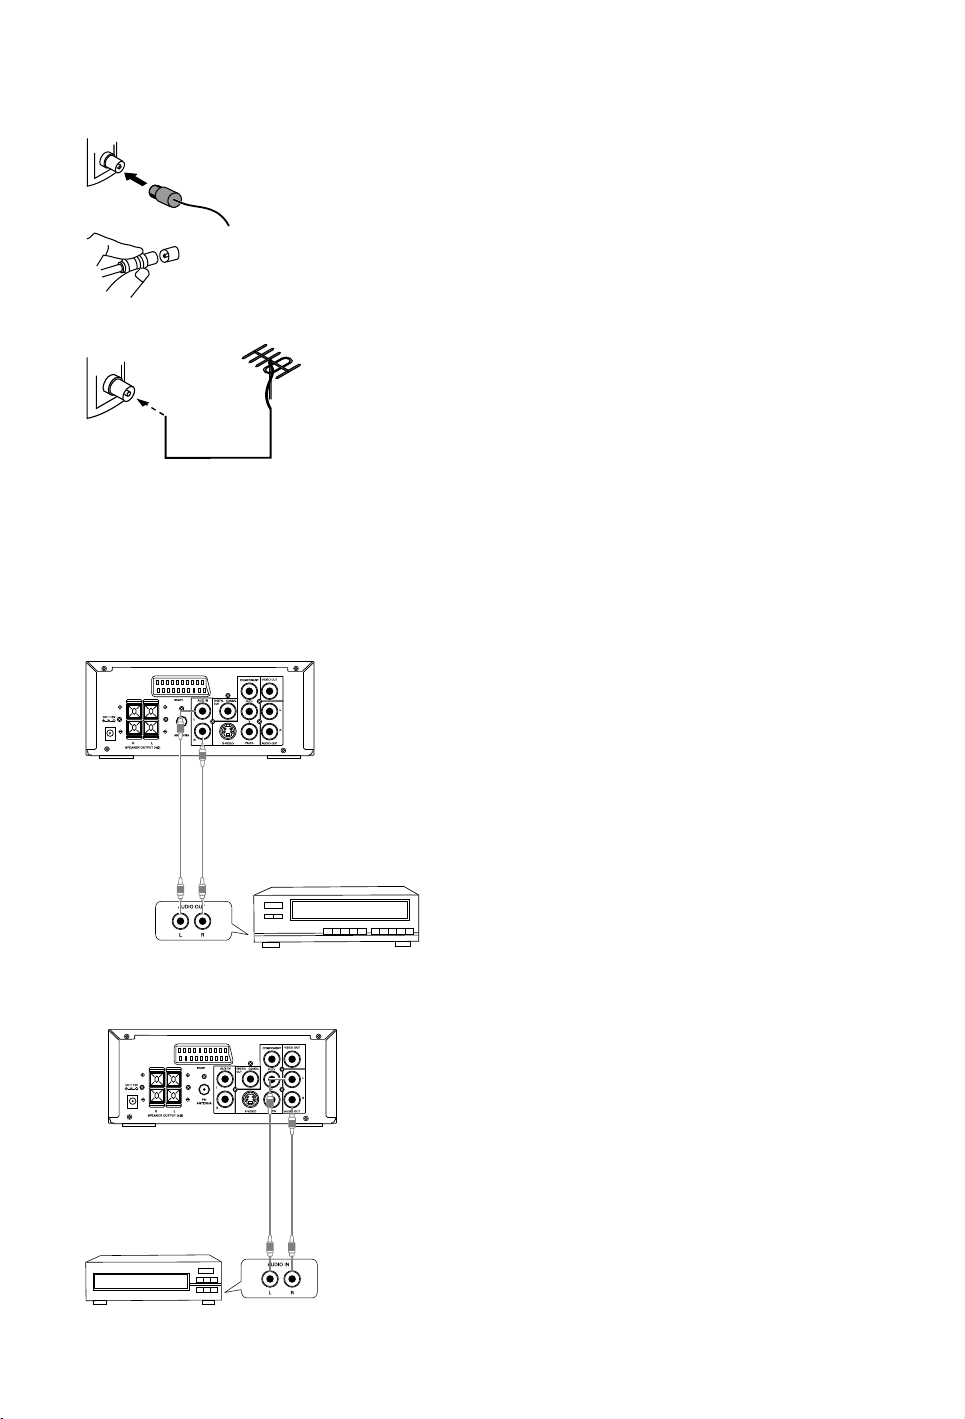
Connecting the FM Antenna
Using the supplied wire Antenna
Using the coaxial type connector
A 75Ohm antenna with coaxial type connector should be connected to the FM 75 ohm coaxial terminal.
FM outdoor antenna
Coaxial Cable
If reception is poor, connect the outside antenna.
Note: Before attaching a 75 ohm coaxial lead (the kind with a
round wire going to an outside antenna), disconnect the supplied FM wire antenna.
Caution: To avoid noise, keep antennas away from the system,
the connecting cord and the AC power cord.
Connect to the assistance equipment
Terminal board for the DVD player
Assistance equipment
This DVD player has a groups of audio input
terminals, you can use signal line to connect audio input terminals of this unit and audio output
terminals of assistance equipment respectively,
then you can hear the sound sources.
Assistance equipment’s
terminal board
Terminal board for the DVD player
Assistance equipment
This unit also has a group of audio output
terminals, you can use signal line to connect this
unit’s audio output terminal and assistance
equipment’s audio input terminal respectively, then
you can output the outer sound sources to other
assistance equipment.
Assistance equipment’s
terminal board
- 4 -
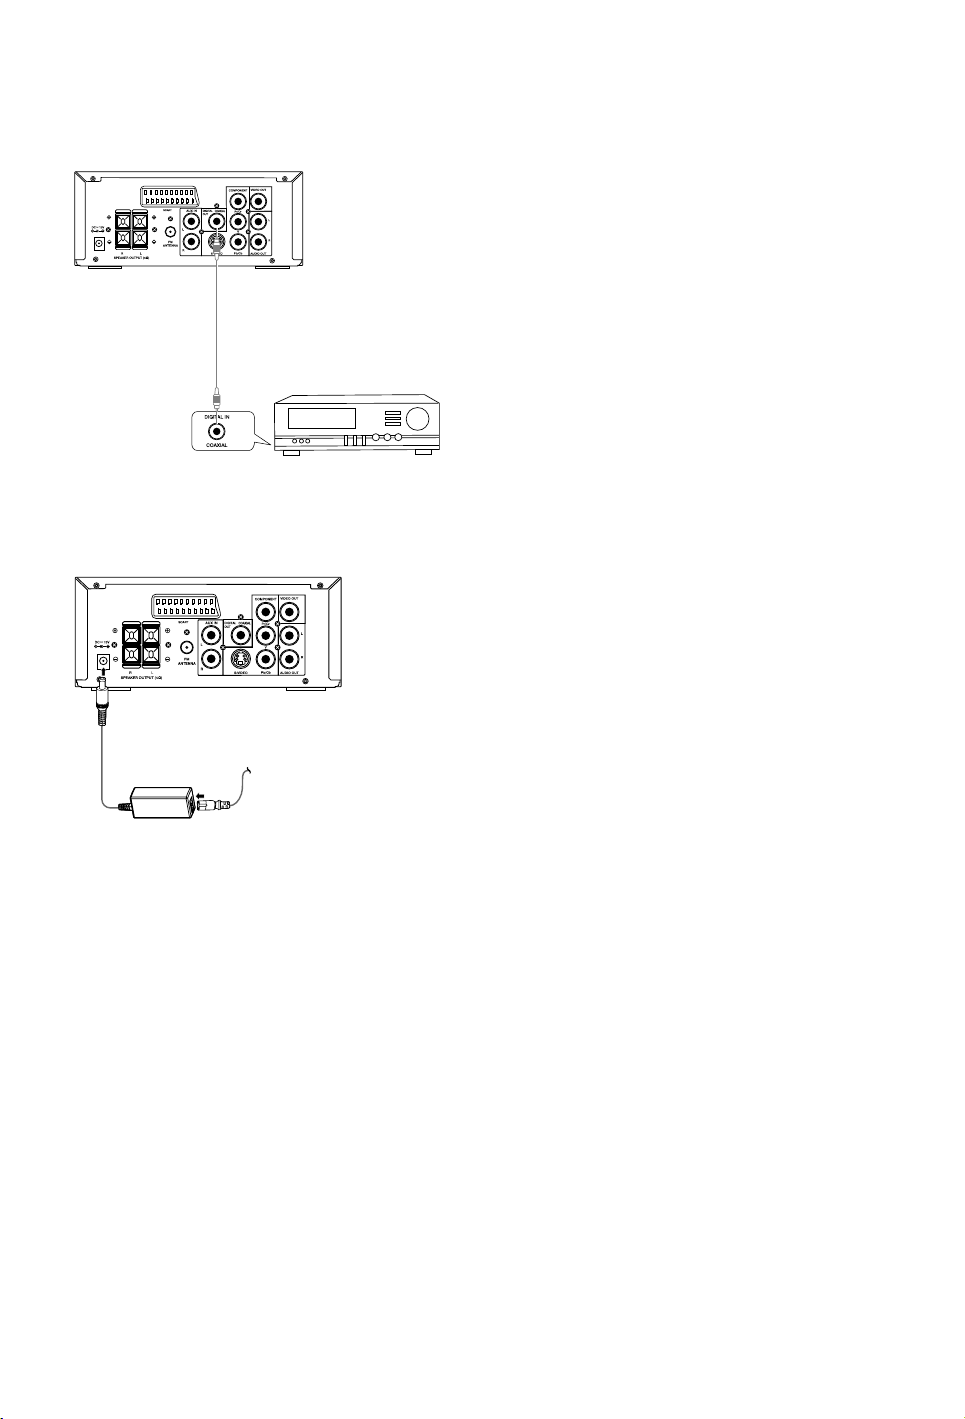
Connect to the amplifier with digital signal input terminal
Terminal board for the DVD player
Use coaxial signal wire to connect coaxial output
jack of the DVD player with coaxial input jack of
With digital signal input terminal’s
Dolby Digital signal decode amplifier
With digital signal input terminal’s Dolby
Digital signal decode amplifier terminal board
other amplifier, then you can feel the super digital
sound effect.
Connecting the AC Power Cord
Terminal board for the DVD player
Insert the AC adapter cord into unit, then insert one
side of AC power cord into AC adapter and other
side into a wall outlet, and your system is at your
command!
Caution:
Be sure to unplug the power cord from the outlet
AC Adapter
AC Cord
when going away or when the system is not
in use for an extended period of time.
- 5 -
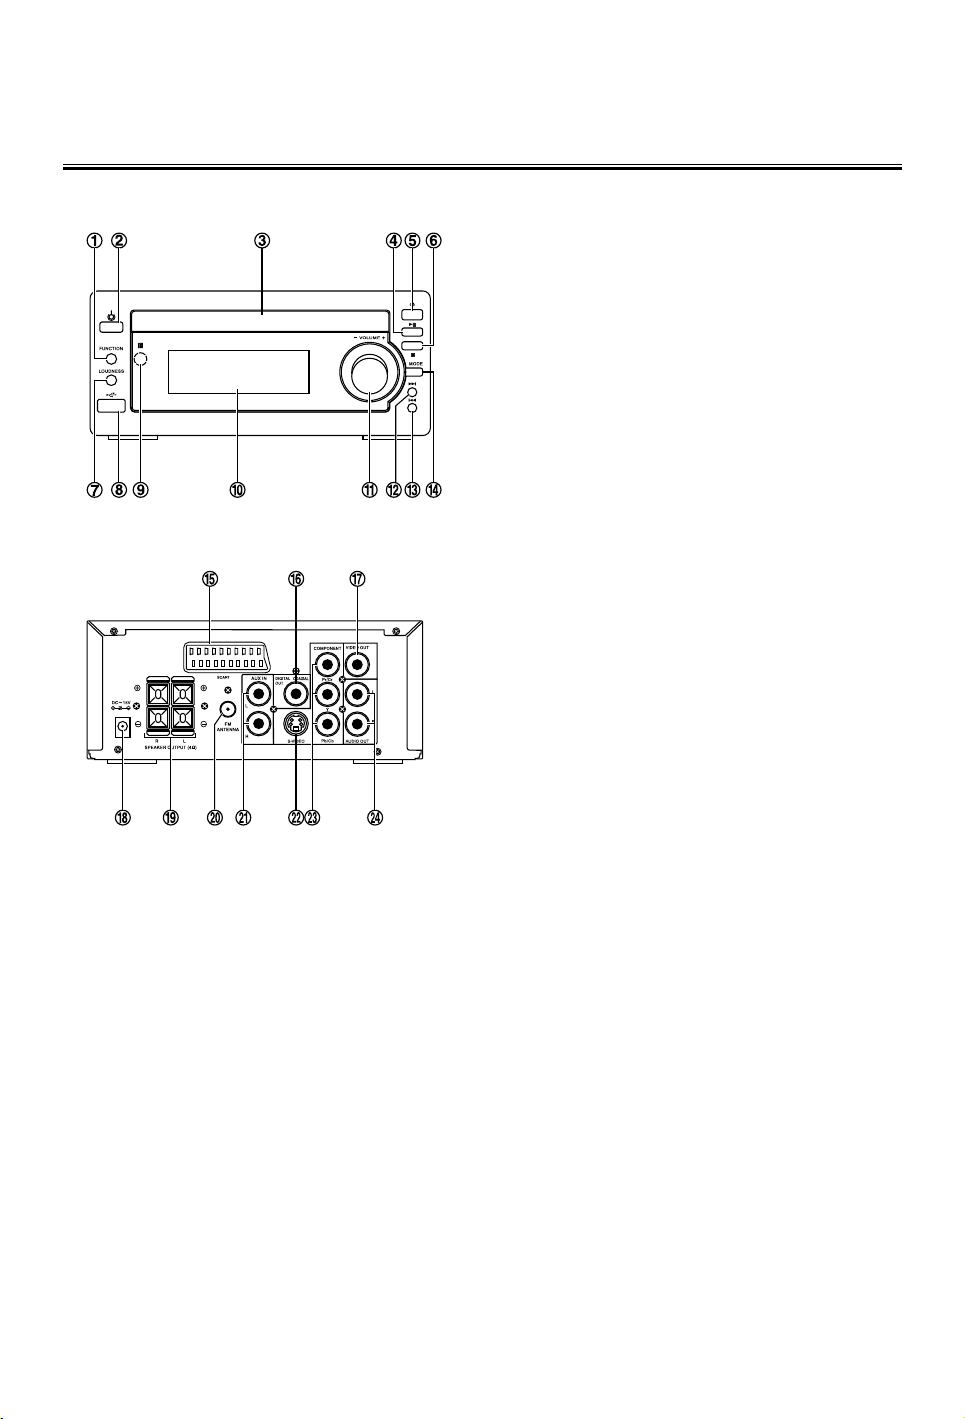
Control Locations
The Unit
1. Function Select Button
2. Standby Button
3. Disc Tray
4. Play/Pause Button
Tuning Forward Button
5. Open/Close Button
6. Stop Button
Tuning Backward Button
7. Loudness Button
8. USB Port
9. Remote Sensor
10. VFD Display Lens
11. Volume Control Knob Button
12. Next Button
Channel Select Forward Button
13. Previous Button
Channel Select Backward Button
14. Mode Button
15. Scart Socket
16. Coaxial Output Terminal
17. Video Output Terminal
18. DC Jack
19. Speaker Output Terminals (L&R)
20. FM Antenna Socket
21. AUX Input Terminals (L&R)
22. S-Video Output Terminal
23. Component Output Terminals
24. Line out Terminal
- 6 -

Remote control
1. Standby Button
2. DVD Function Button
3. TUNER Function Button
Band Switch Button
4. Dimmer Button
5. Preset Equalizer Button
6. Subtitle Button
7. Title Button
8. Function Setting Button
9. Direction Button (
p)
10. Direction Button (t)
11. Direction Button (q)
12. Clock Button
13. Next Button
Channel Select Forward Button
14. Previous Button
Channel Select Backward Button
15. Play/Pause Button
16. Fast Backward Button
Tuning Backward Button
17. Mode (Repeat) Button
MONO/Stereo Select Button
18. Number Buttons
19. Mute Button
20. USB Function Button
21. AUX Function Button
22. Loudness Button
23. Super Bass Button
24. Zoom Button
25. Vocal Mode Select Button
Language Select Button
26. PBC Button
Root Button
27. Confirm Button
28. Direction Button (
u)
29. Sleep Button
Timer Button
30. Volume Up Button
31. Volume Down Button
32. Stop Button
33. Fast Forward Button
Tuning Forward Button
34. DVD OSD Button
RDS Button
35. Program Button
Memory Button
36. Time Search Button
- 7 -

Installation of Batteries in the Remote Control
1. Remove the battery compartment cover.
2. Insert two batteries (size AAA) correctly, so that the + and - polarities match the polarity diagrams in
the battery compartment.
* About half a year of normal operation can be expected when using standard batteries.
* When the batteries are exhausted, the remote will not function. Replace both batteries at the same
time with new ones.
* Don’t mix old and new batteries.
* Don’t mix different types of batteries.
* When the unit is not used for a long period of time, remove the batteries to avoid damage caused by
battery leakage and corrosion.
Turning the Power On and Off
You can use all the functions on the panel of the unit or the remote control after turning the system power
on (called Standby Mode).
Turning the System On
Press the standby button (
Caution: When turning the system on, the system will continue in the mode it was in when it was turned
off last time.
Turning the System Off
Press the standby button (
Caution: Be sure to unplug the power cord from the outlet when going away or when the system is not
in use for an extended period of time.
STANDBY) to turn the system on from standby mode.
STANDBY) again to turn the system off (called Standby Mode).
Button Functions
General Operate
In power on mode, press the DVD function button (DVD) to select DVD function.
(You can also operate the key “FUNCTION” on the panel of unit.)
Press the open/close button (
disc tray (with the printed side up). Press this button again to close the disc tray, the unit will
read the disc and the disc type will display on the TV screen. The disc should play
automatically.
Press the direction buttons (
Press the confirmation button (
In stop mode, press the play/pause button (
When playing disc, press the play/pause button (
press the button again, it will continue to play.
(You can also operate the key “BF” on the panel of unit.)
K) on the unit to open the disc tray then place the disc on the
p,q,t, u) to move the cursor to illuminate the desired selection.
ENTER) to confirm the menu selection.
BF) to start playing the disc.
BF) to temporarily stop the playing,
- 8 -

Press the stop button (L) to stop playing, the unit will store the last playing time in the
memory automatically, then press the BF button, the unit will resume to last memory time
and continue playback automatically.
If you press the stop button (
(You can also operate the key “
L) twice to stop the disc playing.
L” on the panel of unit.)
Press the volume up button to increase the volume. Press the volume down button to
decrease the volume.
(You can also operate the control knob “
- VOLUME +” on the panel of unit.)
Press the mute button in play mode, all sound will be muted, press the button again or
rotate the “
- VOLUME +” on the panel of unit to resume sound.
The loudness function controls the bass to improve the output sound. This function only
works when the unit is playing.
(You can also operate the key “
LOUDNESS” on the panel of unit.)
This unit has three brightness levels for adjusting the display brightness. Press the dimmer button (
DIM), for the desired brightness level.
You can adjust the sound reproduced simply by choosing from different preset equalizations.
Each press of the preset equalizer button (
P-EQ) will select one of the following different
preset equalizations:
FLAT : Normal sound
POPS : Vocal sound is intensified
JAZZ : For jazz
CLASSIC : For classic
ROCK : For rock
Press the OSD button to display the playing information of the disc on the TV screen.
l
If the Video CD has a menu, you can set the playback control function to “PBC ON” mode
by pressing the menu button (MENU). The unit reads the disc and the menu will display
on the TV screen, then use the number buttons to select the desired track.
l
When playing DVD disc, press the root button (MENU) to return to the root menu for
previous layer.
l
Load a Video CD, disc in PBC ON mode (the MENU button turns the PBC function ON/
OFF). You can select tracks or chapters with the number buttons (0-9,10+).
* If the track or chapter number is less than 9, press the number buttons 0-9.
* If the track or chapter number is over 9, press 10+ button and press the one of the
number buttons
0-9. (For example: The track or chapter number is 28, press 10+
button twice and press the number button 8.)
l
If playing a MP3 disc, you can directly press the 0-9,10+ buttons to select the track number
then press ENTER button to play it. (For example: The track or chapter number is 28,
press 10+ button twice and press the number button 8.)
- 9 -

l
Subtitle1/3 Subtitle2/3 Subtitle3/3 SubtitleOff
If your DVD disc has one or more music chapters or titles, you can setup playing order for
the disc using this button. Press the program button, TV display will be as follows:
Note: TT: Title
CH: Chapter
* Use the 0-9,10+ buttons to input the sequence number which you want to program
playing (the first selection is title and the second selection is chapter of the programs
menu.). After finishing program, Press the p,q,t, u buttons to select “PLAY” then
press the
l
If you are playing a disc, the TV display will be as follows:
ENTER button to start programmed play.
* Use the
After the program has been entered, Press the
0-9,10+ buttons to input the sequence number you want to program playing.
p,q,t, u buttons to select “PLAY” then
press the ENTER button to start programmed play.
When you are playing the DVD disc, you can repeatedly press the subtitle button (
SUBTITLE)
to select the subtitle language to display on the TV screen if available.
In play mode, press the title button (TITLE), to go back to the title menu.
l
When playing a the Video CD, you can choose MONO (Mono Left, Mono Right),
“STEREO” or “Mix-Mono” audio output by pressing vocal mode select button (
l
When playing DVD disc recorded with several languages, you can repeatedly press the
AUDIO).
language select button (AUDIO) to select one of language to play.
l
When playing a DVD disc, this function can be used to play a title, chapter or disc
repeatedly. Repeatedly press the mode (repeat) button (MODE), the screen shows :
l
When playing MP3 disc, this function can be used to play a track or folder repeatedly.
Repeatedly press the mode (repeat) button (MODE), the screen shows :
l
You may repeat a track or disc according to the following steps. Repeatedly press the
mode (repeat) button (
MODE), the screen shows :
- 10 -

You may directly enter a time, title or chapter number to go to a particular point on the disc.
The unit will play from this point.
1. Press the time search button (
GOTO) on the remote control.
2. Press the 0-9 buttons on the remote control, enter the time, title or chapter numbers to
look for desired scene.
Note: If the search time exceeds the total time on the disc or the item set falls short of the
disc recorded, the “
” will display on TV screen, indicating the operation is invalid or
incorrect.
Press the fast forward button (
C) repeatedly to select one of the variety of different speeds
to fast forward play or select normal speed to play. Each time you press the button, the
screen shows.
Note: Press the
Press the fast reverse button (
BF button to resume normal playback.
D) once by once to select one of the variety of different
speeds to fast backward play or select normal speed to play. Each time you press the
button, the screen shows.
Note: Press the
l
When playing a DVD disc, press the next button (G) to skip to the next chapter or title.
l
When playing a Video CD disc, press the next button (G) to skip to the next track.
l
When playing DVD disc, press the previous button (H) to skip to the previous chapter or
BF button to resume normal playback.
title.
l
When playing Video CD disc, press the previous button (H) to skip to the previous track.
(You can also operate the key “
G,H” on the panel of unit.)
This function can be used while playing a film or a still picture.
Press the zoom button (
ZOOM) repeatedly when playing, the screen shows:
* Use the
p,q,t, u buttons to move around the enlarged picture.
Note: This function is not available for CD or MP3 playback.
Playing picture CD disc
Press the open/close button (K) on the unit to open the disc tray and place the picture CD
on the disc tray (with the printed side up). Press this button again to close the disc tray, the
unit will read the disc and play it automatically.
Picture CD: The disc is recorded in picture
When menu list display or the picture displaying on the screen, you can press the
buttons to select the desired picture in the disc to start playing.
Note: Play will temporarily stop the playing when the selected pictures have been played.
0-9,10+
- 11 -

When playing, press PROGRAM button to select one of the transition effect to playing the
picture.
When playing, use the
L button to enter the “Thumbnail Mode”.
(Use the H or G buttons to display previous or next 6 pictures of disc. Press the L button
to exit the “Thumbnail Mode” and return to menu list.)
DVD Menu Options
Please note: The menu structure may differ from the example below.
ll
l
ll
Basic operations
SETUP) to enter the Setup Menu.
u button or ENTER button.
TV Display
4:3 PAN Scan --- When selecting this mode, wide picture displayed on the screen will be cut automatically.
4:3 Letter Box --- When selecting this mode, wide picture displayed on the screen will have black top and
bottom area.
16:9 --- If this system connects wide screen TV, selecting this mode.
OSD Language
This menu allows the user to select the language for
the on-screen display.
Screen Saver
Set the screen saver to activate or cancel.
Digital Output
You can choose output mode when playing different
disc.
Off --- Turns off the SPDIF output.
All --- If you have connected your DIGITAL OUT
(COAXIAL) to a multi-channel decoder/receiver.
PCM only --- Only if your receiver is not capable of decoding multi-channel audio.
ll
l
ll
General Setup Page
ll
l
ll
Audio Setup Page
1. Press function setting button (
2. Press t, u button to select a page to be set.
3. Press p,q button to highlight an option.
4. Enter its submenu by pressing
5. Move the cursor by pressing p,q button to highlight the selected item.
Note: In cases of value setting, press t, u to adjust values.
6. Press
ENTER button to confirm.
Note:
Press t button to return to the upper-level menu. When in cases of value setting,
please press
ENTER button.
Press SETUP button to exit from the menu. (The settings will be stored in the player’s
memory even if the player is switched off.)
(Note: If the item displays in gray, that means that it can’t be setup and there isn’t this
function in the disc.)
- 12 -

ll
l
ll
Video Setup Page
DUAL MONO
Select the setting that matches the number of speakers you have connected.
STEREO --- Left mono sound will send output signals
to Left speaker and Right mono sound will send output
signals to Right speaker.
L-Mono --- Left mono sound will send output signals to
Left speaker and Right speaker.
R-Mono --- Right mono sound will send output signals
to Left speaker and Right speaker.
Reverb Mode
Reverb mode provides a virtual surround sound experience using just two speakers.
HDCD
Set the audio output cutoff frequency point when playing an HDCD disc.
Night Mode
In this mode, the high volume outputs are softened
and low volume outputs are brought upward to an audible level. It is useful for watching your favourite action
movie without disturbing others at night.
Component
Sets the video output according to your video connection.
This setting is not required if you are using the VIDEO
OUTPUT jack (yellow) to connect the DVD micro system to your TV.
S-Video --- Select this if you have connected the DVD
micro system to your TV using S-Video jack.
Pr/Cr Pb/Cb Y --- Select this if you have connected the
DVD micro system to your TV using Component video
jacks.
RGB --- Select this for SCART connection.
TV MODE
Selects Progressive or interlace video output mode
when Pr/Cr Pb/Cb Y is selected.
In the progressive scan mode, you can enjoy the high
quality picture with less flickers. It only works when you
have connected the DVD player's Y Pb Pr jacks to your
TV that supports the progressive video input. Otherwise,
a distorted picture will appear on the TV.
Quality
This menu helps you to set the video quality.
Sharpness
Adjusts the sharpness level.
High, Medium and Low.
Brightness
Adjusts the brightness level.
Range: -20-+20.
- 13 -

ll
l
l
l
Preference Setup Page
Contrast
Adjusts the contrast level.
Range: -16-+16.
Gamma
Adjusts the gamma level.
High, Medium, Low and None.
Hue
Adjusts the hue level.
Range: -9-+9.
Saturation
Adjusts the saturation level.
Range: -9-+9.
Luma Delay
Adjusts the luma delay.
0 T and 1 T.
TV Type
PAL --- Select this if the connected TV is PAL system. It
will change the video signal of a NTSC disc and output
in PAL format.
Multi --- Select this if the connected TV is compatible
with both NTSC and PAL (multi-system). The output
format will be in accordance with the video signal of
the disc.
NTSC --- Select this if the connected TV is NTSC
system. It will change the video signal of a PAL disc
and output in NTSC format.
Audio, Subtitle, Disc Menu
Only available if the disc supports that function.
Audio --- disc’s soundtrack
Subtitle --- disc’s subtitles
Disc Menu --- disc’s menu
Parental
Some DVDs may have a parental level assigned to the
complete disc or to certain scenes on the disc. This
feature lets you set a playback limitation level. The rating levels are from 1 to 8 and are country dependent.
You can prohibit the playing of certain discs that are not
suitable for your children or have certain discs played
with alternative scenes.
1 KID SAF --- Kids material; recommended especially
for children and viewers of all ages.
2 G --- General Audience; recommended as acceptable for viewers of all ages.
3 PG --- Parental Guidance suggested.
4 PG 13 --- Material is unsuitable for children under
age13.
- 14 -

ll
l
l
l
Password Setup Page
5-6 PGR, R --- Parental Guidance - Restricted; recommended that parents restrict children under 17 from
viewing or allow to view only when supervised by a
parent or adult guardian.
7 NC-17 --- No children under age 17; not recommended viewing for children under age 17.
8 Adult --- Mature materials; should be viewed only by
adults due to graphic sexual material, violence or
language.
Default
Setting the “DEFAULT” function will reset alloptions and
your personal settings to the factory defaults and all
your personal settings will be erased.
Caution!
When this function is activated, all settings will be reset to factory defaults.
Password Mode
This feature is used to enable/disable password by
selecting “ON”/”OFF”.
Password
Select this item to set new password for this unit, follow the screen’s indication and enter a password.
The original password is 1234.
Use the USB
By connecting a USB mass storage device (including USB flash memory,
USB flash players or memory cards) to the Hi-Fi system, you can enjoy the
device's stored music through the powerful speakers of Hi-Fi system.
1. Insert the USB device's USB plug into the
2. Press the USB button to select the USB function.
3. The device's stored music will be played automatically.
ll
l
ll
For the devices with USB cables:
1. Insert one plug of the USB cable (not supplied) to the
socket on the set.
2. Insert the other plug of the USB cable to the USB output terminal of the USB device.
ll
l For the memory card:
ll
1. Insert the memory card into a card reader (not supplied).
2. Use a USB cable (not supplied) to connect the card reader into the
socket on the panel of unit.
socket on the set.
- 15 -

Listening to Radio Broadcasts
Caution: Before listening to the radio, please check if FM antennas are correctly connected.
Press tuner function button (
TUNER) to select TUNER function.
(You can also operate the key “FUNCTION” on the panel of unit.)
l
Press the tuning forward button (C) repeatedly to move from frequency to frequency
until you find the station you want.
l
Press and hold the tuning forward button (C) for one second or more, the frequency
will change up automatically until the next station is found.
(You can also operate the key “
l
Press the tuning backward button (D) repeatedly to move from frequency to frequency
BF” on the panel of unit.)
until you find the station you want.
l
Press and hold the tuning backward button (D) for one second or more, the frequency
will change down automatically until the next station is found.
(You can also operate the key “
You can store the well tuned station by pressing the memory button (
L” on the panel of unit.)
PROGRAM). (You can
preset up to 16 FM stations.)
l
Tune in the desired station, then press the memory button (PROGRAM).
l
Use the H button or G button on the remote control once by once to select the preset
number. (You can also operate the key “G,H” on the panel of unit.)
l
Press the memory button (PROGRAM) to store the station. After 1 second, the VFD returns
to the broadcast frequency display.
Note: If the system is unplugged or if a power failure occurs, the preset stations will
remain stored in the memory.
l
Press the channel select forward button (G) once by once to select preset number
after presetting station. Its band and frequency are displayed on the VFD.
Press the channel select forward button (
G) once by once to select the preset number
when in store the station.
l
Press the channel select backward button (H) once by once to select preset number
before presetting station. Its band and frequency are displayed on the VFD.
Press the channel select backward button (
H) once by once to select the preset
number when in store the station.
(You can also operate the key “
G,H” on the panel of unit.)
Press the stereo/mono select button (MODE) to select the Stereo or MONO channel to
receive the FM radio mode, it can get the best effect.
- 16 -

RDS (Radio Data System) Reception
Many FM stations are broadcasting added data compatible with RDS. This radio set offers
convenient functions using such data.
ww
w PS (Program Service Name)
ww
When an RDS station is received, the RDS indicator lights and automatically displays
the name of that station instead of the frequency. When RDS display button (RDS) on the
remote control is pressed during PS display, the CT is displayed for 3 seconds, then PS
display returns.
ww
w PTY (Program Type)
ww
Program type identification signal. (Example: News, Rock, Classical music.)
ww
w CT (Clock Time System)
ww
The CT system may not properly operate in areas where RDS CT service is not available.
Once CT service is received, the CT system keeps operating. “RDS CLOCK” is displayed in areas where no CT services are available.
ww
w Changing Display
ww
During PS display, press the RDS display button (RDS) on the remote control repeatedly
to select the CT, PTY or Frequency. They will be displayed for 3 seconds, then the PS
display returns.
Clock/Timer Functions
Setting the Clock
The built-in clock shows the correct time in the display.
- In stanby mode, press the clock button (CLOCK), hour indicator will blink.
- Set the hour with the VOL- button or VOL+ button.
- Press the clock button (
- Set the minute with the VOL- button or VOL+ button.
- Press the clock button (CLOCK), the built-in clock starts operating and the seconds start
counting from 0.
Note:
* You can only set the daily timer only in standby mode.
* The operating time of every step shouldn’t be longer than 10 seconds or it will return to
the original display.
* If there is a power failure or the power system is turned off, the clock will lose its setting.
To confirm the clock time
When you press the clock button (
seconds until the display returns to the original display.
CLOCK), minute indicator will blink.
CLOCK), the clock time is displayed. Wait for a few
- 17 -

Setting the Daily Timer
l
In standby mode, you can use the daily timer setting to turn the unit on automatically at a
certain time everyday under standby mode. When the setting timer is on, the timer
indictor “
function to work.
- In standby mode, press the timer button (TIMER), hour indicator will blink.
- Set the hour with the
- Press the timer button (TIMER), minute indicator will blink.
- Set the minute with the VOL- button or VOL+ button.
- Press the timer button (
(daily timer set is in effect) or “OFF” (daily timer set is to cancel) by pressing the VOL-
button or VOL+ button.
Note:
* You can only set the daily timer only in standby mode.
* The operating time of every step shouldn’t be longer than 10 seconds or it will return to
time display.
* The sound source of the “timer on” mode is the same as the sound source when the unit
was turned off by the standby switch.
To confirm the daily time
Press the timer button (
second until the display returns to the time display.
To cancel the daily timer setting
In standby mode, repeatedly press the timer button (
VFD, then you can set the daily timer to “OFF” by pressing the VOL- button or VOL+ button
(the daily timer will be cancelled).
Turning off the system also cancels the daily timer.
” will display on the VFD, however the clock must be set correctly for the timer
VOL- button or VOL+ button.
TIMER), the selected time is set. Then set the daily timer to “ON”
TIMER) in standby mode, the daily time is displayed. Wait for a
TIMER) until the “ON” will display on the
Setting the Sleep Timer
l
Use the sleep timer to turn the system off after a some time when playing. By setting the
sleep timer, you can fall asleep and know that your system will turn off by itself rather than
playing all night.
- Play a disc or tune in to the desired station.
- If you set the sleep timer first, each time you press the sleep button (
the number of minutes shown on the VFD in this sequence:
If you change the sleep timer, each time you press the sleep button (
the number of minutes shown on the VFD in this sequence:
- -
After setting the number of minutes for the sleep timer, the display will return to the
display as before setting the sleep timer.
The system is now set to turn off after the number of minutes you set.
To confirm the sleep time
When pressing the sleep button (
seconds the display returns to the original display.
To cancel the sleep timer setting
Repeatedly press the sleep button (
It can also cancel the sleep timer by restart set the clock or turning off the system.
- -
10 20
5 10 20
SLEEP), the remaining sleep time is displayed. After a few
SLEEP), it changes
...
80 90 00
SLEEP), it changes
...
80 90 00
SLEEP) until the “00” displays on the VFD.
- 18 -

Protect the Disc
1. To keep the disc clean, please don’t touch the disc’s surface when you are holding it. You should hold
the edge.
2. If the disc is dirty, it will affect the sound quality. Please use the clean and soft cloth to wipe the disc
from inside to outside. Don’t wipe the disc in circular motion.
3. Don’t stick paper on the disc.
4. Don’t place discs in direct sunlight or near or on heat sources.
5. After you have finished with the disc, please place it back in its original case. To avoid warping or
damage, do not stack discs.
6. Don’t play the disc which has flaw or deformation, in case of damaging this player.
7. Clean your discs using only a soft dry cloth. Do not use any chemicals such as benzine, thinner,
antistatic or record sprays as these can damage the disc surface.
Troubleshooting
If you are having a problem with your system, check this list for a possible solution before calling for
service.
If you can not solve the problem from the hints give here, or the system has been physically damaged,
call a qualified person, such as your dealer, for service.
Symptom
No sound is heard
No picture
Bad sound quality
Picture roll or without color
The disc does not play
Poor radio reception
The disc does not play
Unable to operate
the remote control
Operations are disabled
Connections are incorrect, or loose
Possible Cause
TV or power amplifier operates incorrectly
The amplifier’s receiving signal position is wrong
Volume setting to minimum
Connections wrong or loose
TV Operation and setting is wrong
Audio connects wrong
DVD Player doesn’t match the TV system
No disc in the tray
The disc is upside down
The disc is dirty or scratched
The unit is foggy inside
The antenna is disconnected
The FM wire antenna is not properly extended and
positioned
Dirty disc
The disc is upside down
Pause is engaged
The path between the remote control and the sensor of the unit is blocked
The batteries have lost their charge
The built-in microprocessor has malfunctioned due
to external electrical interference
Check all connections and make corrections
Action
Check whether the operation is right
Check the position of receive signal
Adjust volume
Check all connections and correct it
Check whether operation and setting is right
Check whether audio connections are right
Select the colour system in the “TV SYSTEM”
function setting to select suitable system
Place a disc
Place the disc with the printed side up
Clean or replace the disc
Take out the disc, turn on the unit for about an
hour
Reconnect the antenna securely
Extend FM wire antenna to the best reception
position
Clean or replace the disc
Put the disc in with the label side up
Cancel the pause function
Remove the obstruction
Replace the batteries
Unplug the system then plug it back in
- 19 -

Specification
System
Power supply ........................................................................ ~230V / 50 Hz
Rated working power consumption ..................................... £ 40W
Channel Separation ............................................................. ³ 40dB
Distortion .............................................................................. £ 0.7%
Dimensions .......................................................................... 160(W) x 76(H) x 275(D) mm
Frequency response ............................................................ 20Hz-20kHz (±3dB)
Video output .......................................................................... 1 V
Horizontal definition .............................................................. ³ 500 (TV)
Disc Size ............................................................................... F80mm, F120mm
Frequency response ............................................................ 20Hz-20kHz (+1/-3dB)
S/N Ratio .............................................................................. ³ 65dB
FM Frequency range ............................................................. 87.5-108 MHz
FM Noise limit sensitivity ...................................................... £ 20mV
FM S/N .................................................................................. ³ 46dB
Speaker
Impedance ........................................................................... 8W
Input power ........................................................................... 20W
Sensitivity .............................................................................. 80 ± 4dB
Frequency response ............................................................ 80Hz-16kHz
Dimensions .......................................................................... 115W) x 155(H) x 220(D) mm
Remote
Distance ............................................................................... 6m
Angle ..................................................................................... ± 30
P-P
O
- 20 -

Accessories
FM antenna ........................................................................... 1
Speaker box connect line ..................................................... 2
A/V signal line ....................................................................... 1
Adapter ................................................................................. 1
Power line ............................................................................. 1
SCART Adapter ..................................................................... 1
Stand .................................................................................... 1
Battery ................................................................................... 2
Remote control ..................................................................... 1
Instructions manual ............................................................. 1
Note: Design and specifications are subject to change without prior notice.
- 21 -
41006260

 Loading...