

Page 1
Page 2

Page 3

ÍNDICE
ÍNDICE
Índice 02 Conexiones 09
INSTRUCCIONES DE SEGURIDAD
Instrucciones de seguridad 03
INFORMACIÓN IMPORTANTE
Información importante 04
CONEXIÓN ELÉCTRICA
Conexión eléctrica 05
MANDO A DISTANCIA
Inserción de las pilas 06
Cómo usar el mando a distancia 06 Resolución de problemas 13
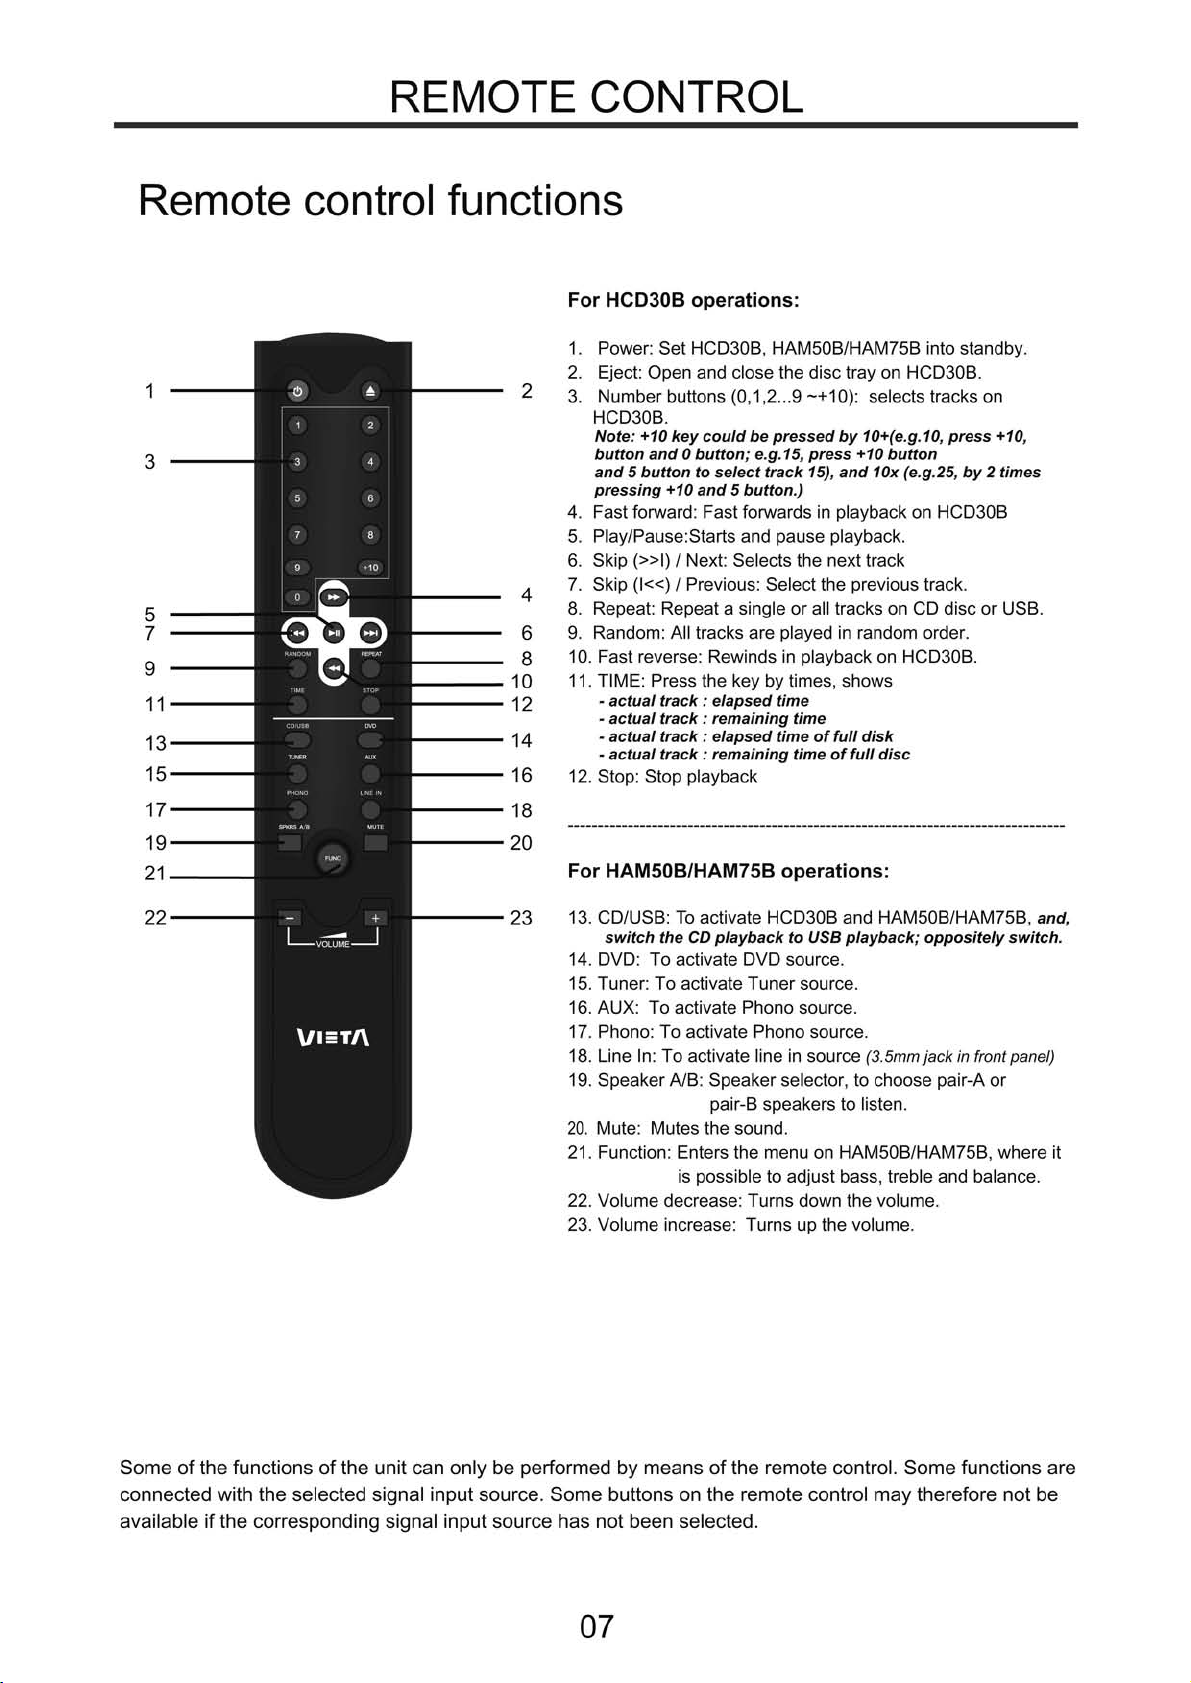
Funciones del mando a distancia 07
Visor LCD de información 09
CONEXIONES DEL PANEL TRASERO
CONEXIÓN CON AMPLIFICADOR
Distribución de conexión de audio 10
OPERACIÓN Y FUNCIONES
ON, OFF y Standby 11
Cargar un disco 11
REPRODUCCIÓN / PAUSA 11
Stop (parar), Skip (saltar), Search (buscar),
Random (modo aleatorio) 12
RESOLUCIÓN DE PROBLEMAS
FICHA TÉCNICA
CONEXIONES DEL PANEL FRONTAL
Panel frontal 08 Ficha técnica 14
02
Page 4
PRECAUCIONES DE SEGURIDAD
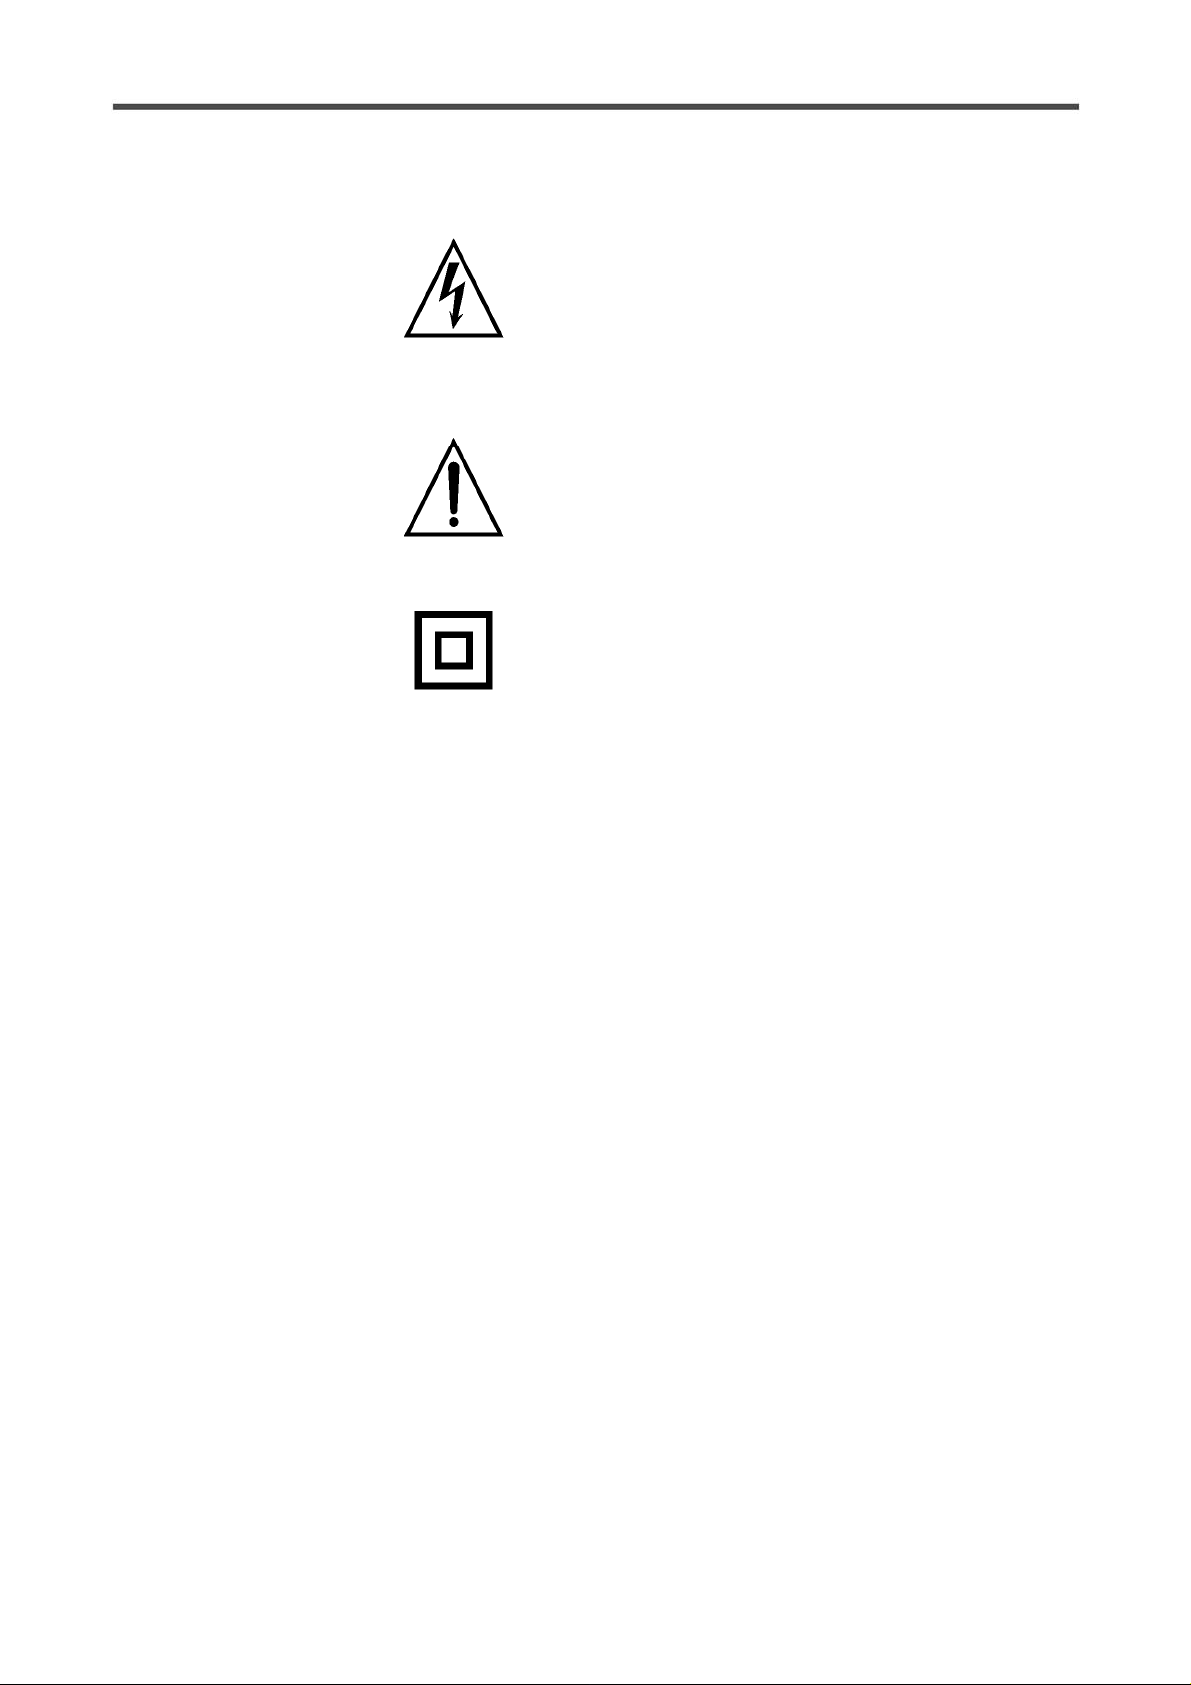
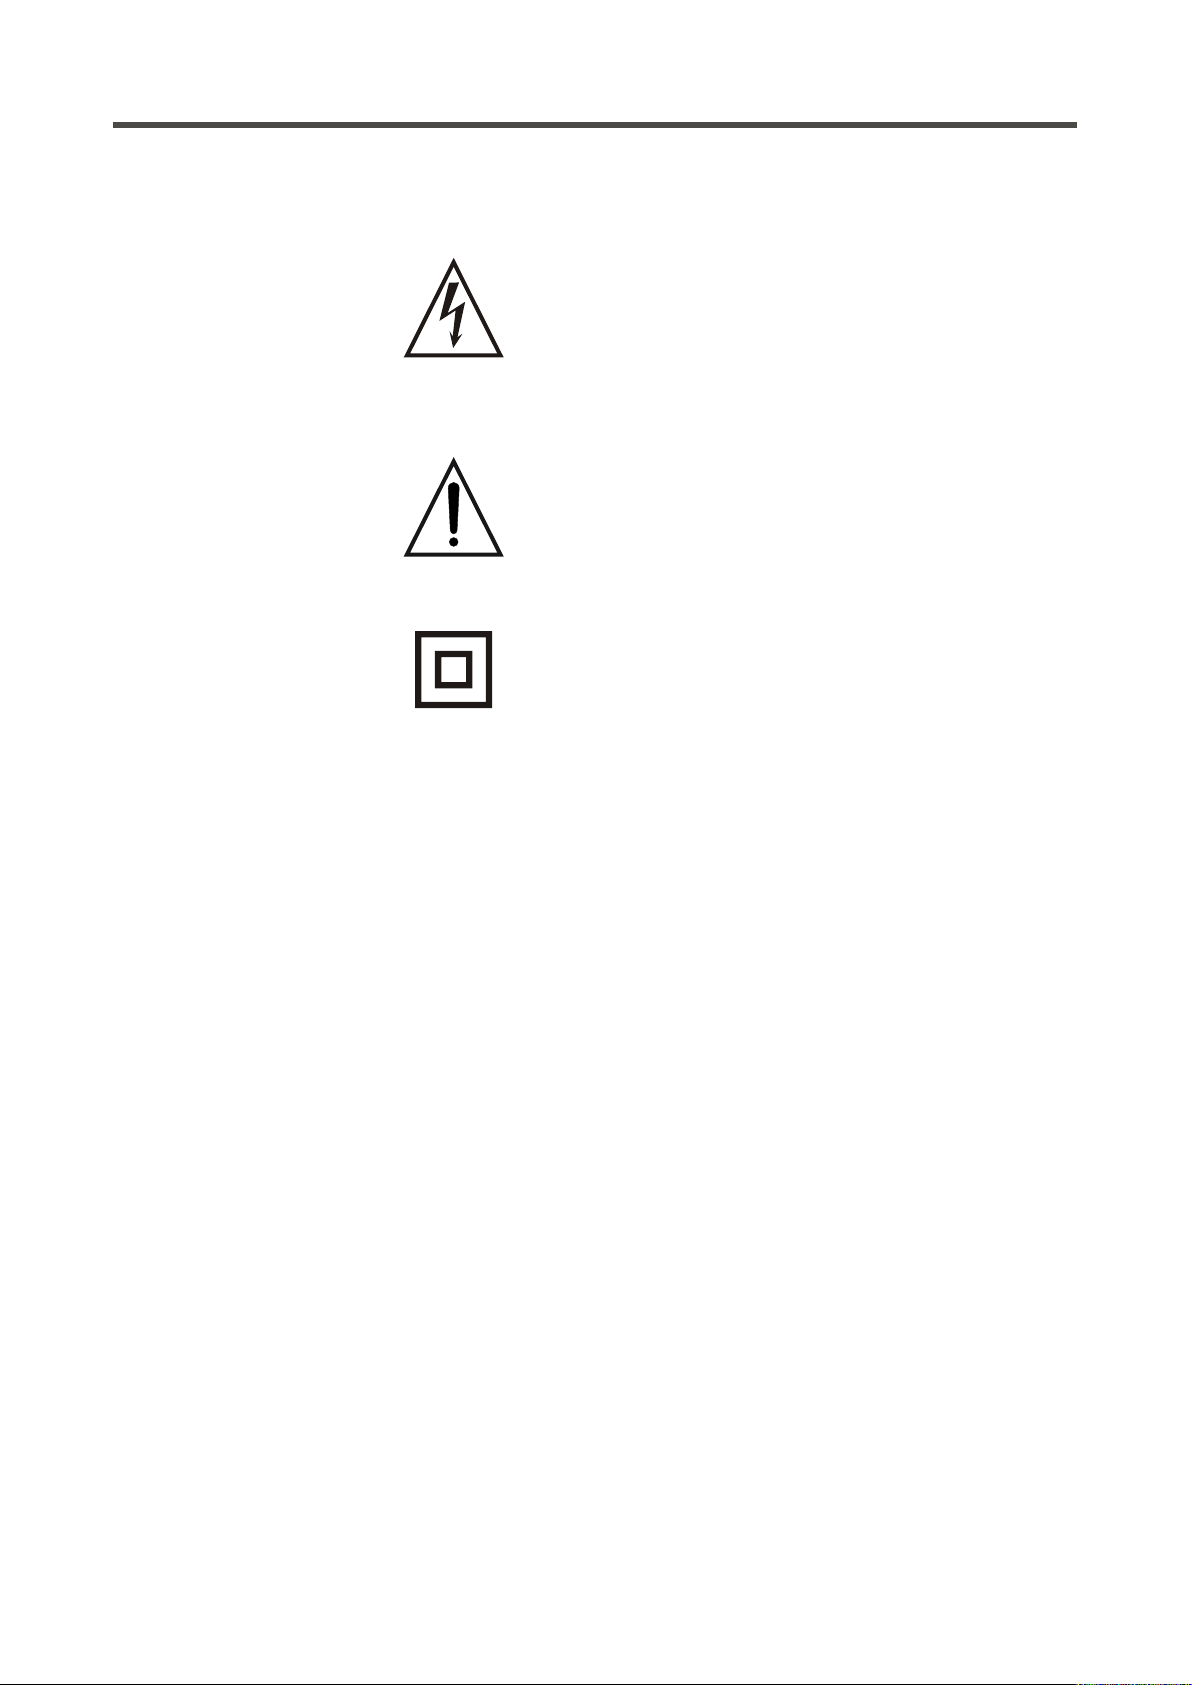
Un triángulo con el símbolo del rayo avisa al usuario de
que el "voltaje peligroso" sin aislamiento de la carcasa
supone un riesgo de descarga eléctrica.
Un triángulo con el símbolo de exclamación aconseja al
usuario que estudie las instrucciones importantes sobre
el uso y mantenimiento de la unidad que aparecen en el
manual suministrado junto a ésta.
Símbolo para CLASS II (aislamiento doble)
ADVERTENCIA: PARA REDUCIR EL RIESGO DE INCENDIO O DESCARGA ELÉCTRICA, NO
EXPONGA ESTE EQUIPO A LA LLUVIA NI A LA HUMEDAD. NO ABRA LA
CARCASA YA QUE SU VOLTAJE ES PELIGROSO. SÓLO EL PERSONAL
CUALIFICADO ESTÁ AUTORIZADO PARA DESEMPEÑAR LABORES DE
REPARACIÓN Y SERVICIO.
PRECAUCIÓN: Si el enchufe del cable de suministro tiene que ser sustituido, es importante que el
nuevo sea idéntico al anterior, o que éste haya sido recomendado por el fabricante.
PARA EVITAR DESCARGAS ELÉCTRICAS, ES IMPORTANTE QUE
INTRODUZCA CORRECTAMENTE EL ENCHUFE EN LA TOMA.
03
Page 5
INFORMACIÓN IMPORTANTE
Instrucciones de uso
- Los paneles superior y trasero de la unidad
pueden calentarse después de un uso
prolongado. Esto no es debido a un fallo.
- Desconecte la unidad cuando no la esté usando.
Proteja el cable eléctrico
- Siga las instrucciones facilitadas para evitar un
mal funcionamiento, descargas eléctricas,
incendio o daños personales:
- Sujete el enchufe firmemente cuando lo
introduzca en la toma.
- Evite dispositivos que generen calor.
- No coloque objetos sobre el cable de suministro
eléctrico.
- No realice trabajos encima de la unidad ni cambie
el cable de suministro eléctrico.
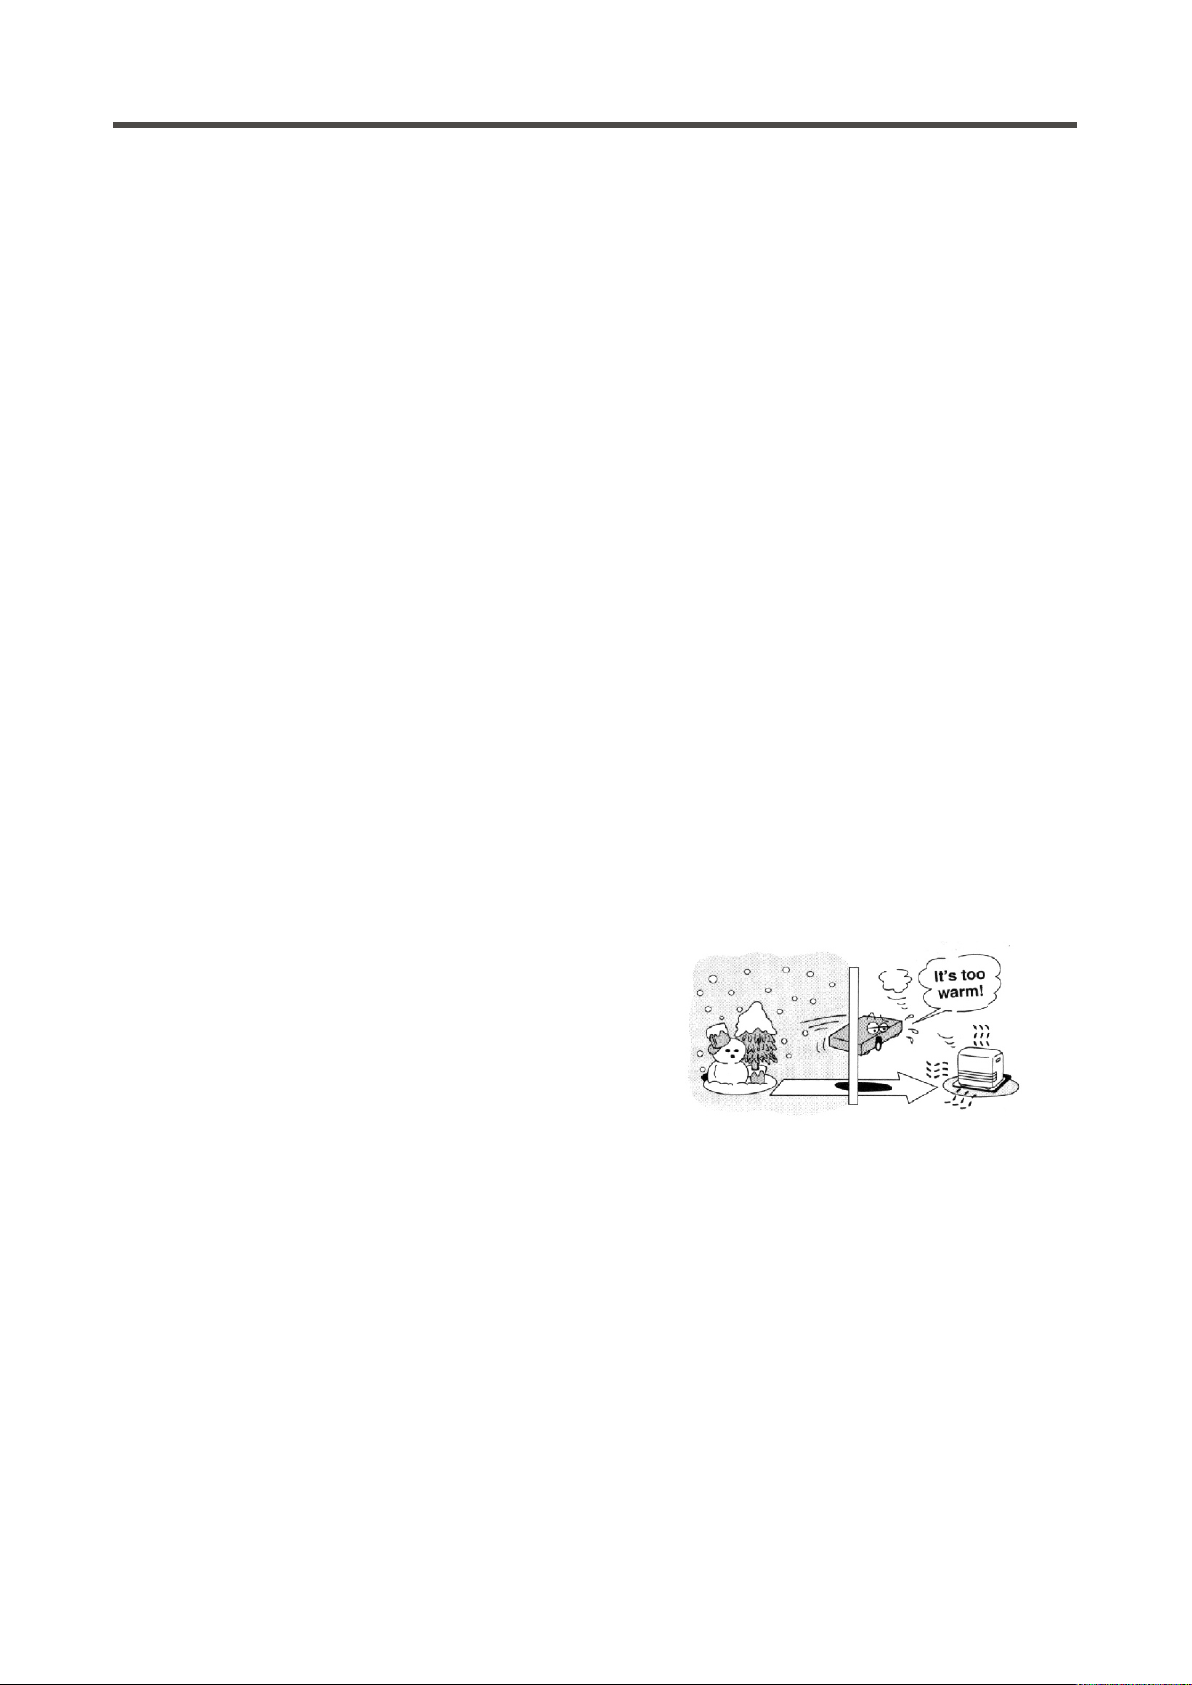
Condensación
Se puede producir condensación en los siguientes
casos:
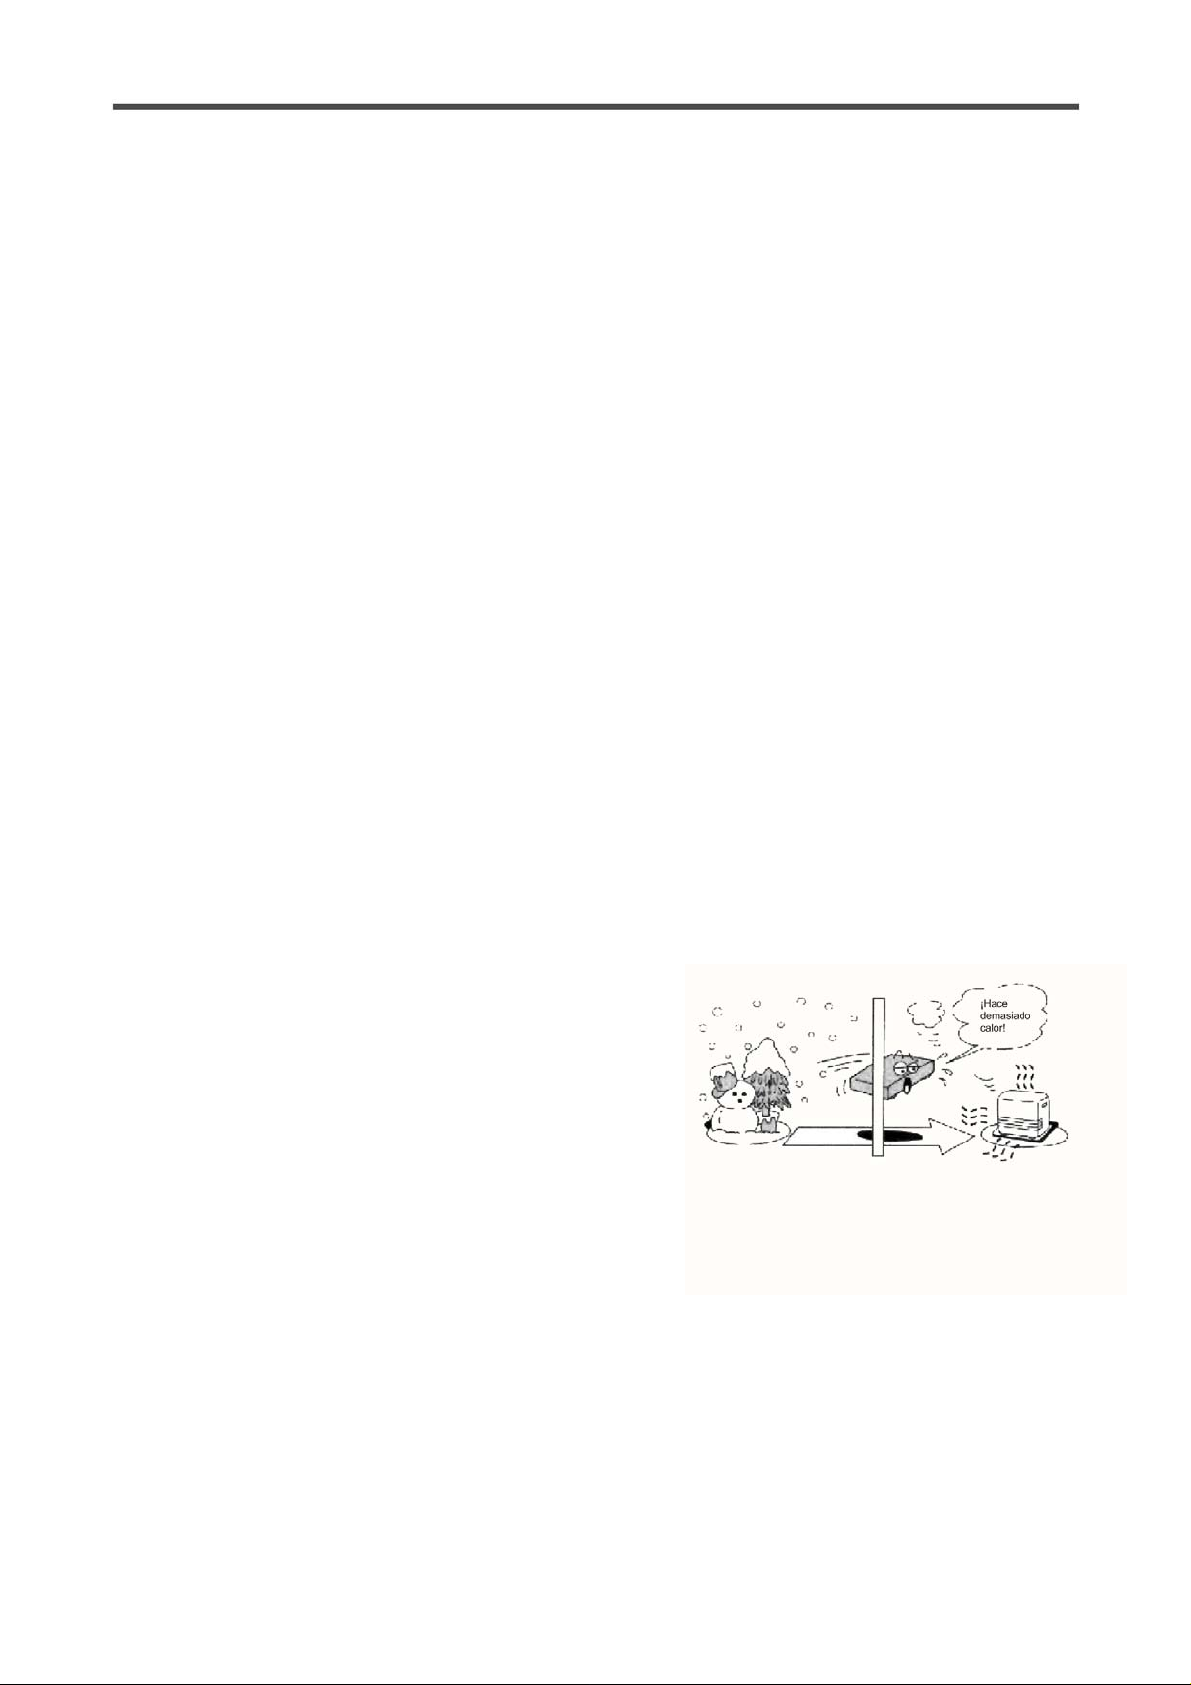
- Cuando se traslada la unidad desde un lugar frío
directamente a uno cálido.
- Cuando se usa la unidad en un lugar donde
acaba de encenderse un radiador o donde el
aire frío del aire acondicionado llega
directamente a la unidad.
- Si se utiliza la unidad en verano en una
habitación húmeda y calurosa y anteriorment e se
ha trasladado la unidad desde una habitación con
aire acondicionado.
- Si hay vapor o un alto nivel de humedad en la
habitación.
Situación
No coloque la unidad en los siguientes lugares:
- Bajo el sol, cerca de dispositivos que desprendan
calor o en espacios cerrados.
- Lugares con temperatura elevada (40C o más) o
con alta humedad relativa (90% o más).
- En lugares sucios, ya que pueden dañarse las
partes internas.
No ponga sus dedos ni ningún
otro objeto dentro de la unidad
- Es peligroso tocar las partes del interior y puede
causar daños o lesiones. No abra la carcasa.
- No coloque cuerpos extraños en la unidad.
Interferencia
Colocar la unidad cerca de un televisor, radio o
vídeo puede causar una mala calidad de sonido e
imagen. Si esto ocurre, aleje la unidad del
televisor, radio o vídeo.
En caso de condensación, la unidad no
funcionará correctamente. Desconecte la
unidad. Desenchufe la unidad y espere 2-3
horas. La unidad se adaptará al ambiente y la
condensación habrá desaparecido.
04
Page 6
CO
ÉC
CA
Conexión eléctrica
220-240VCA-50HZ
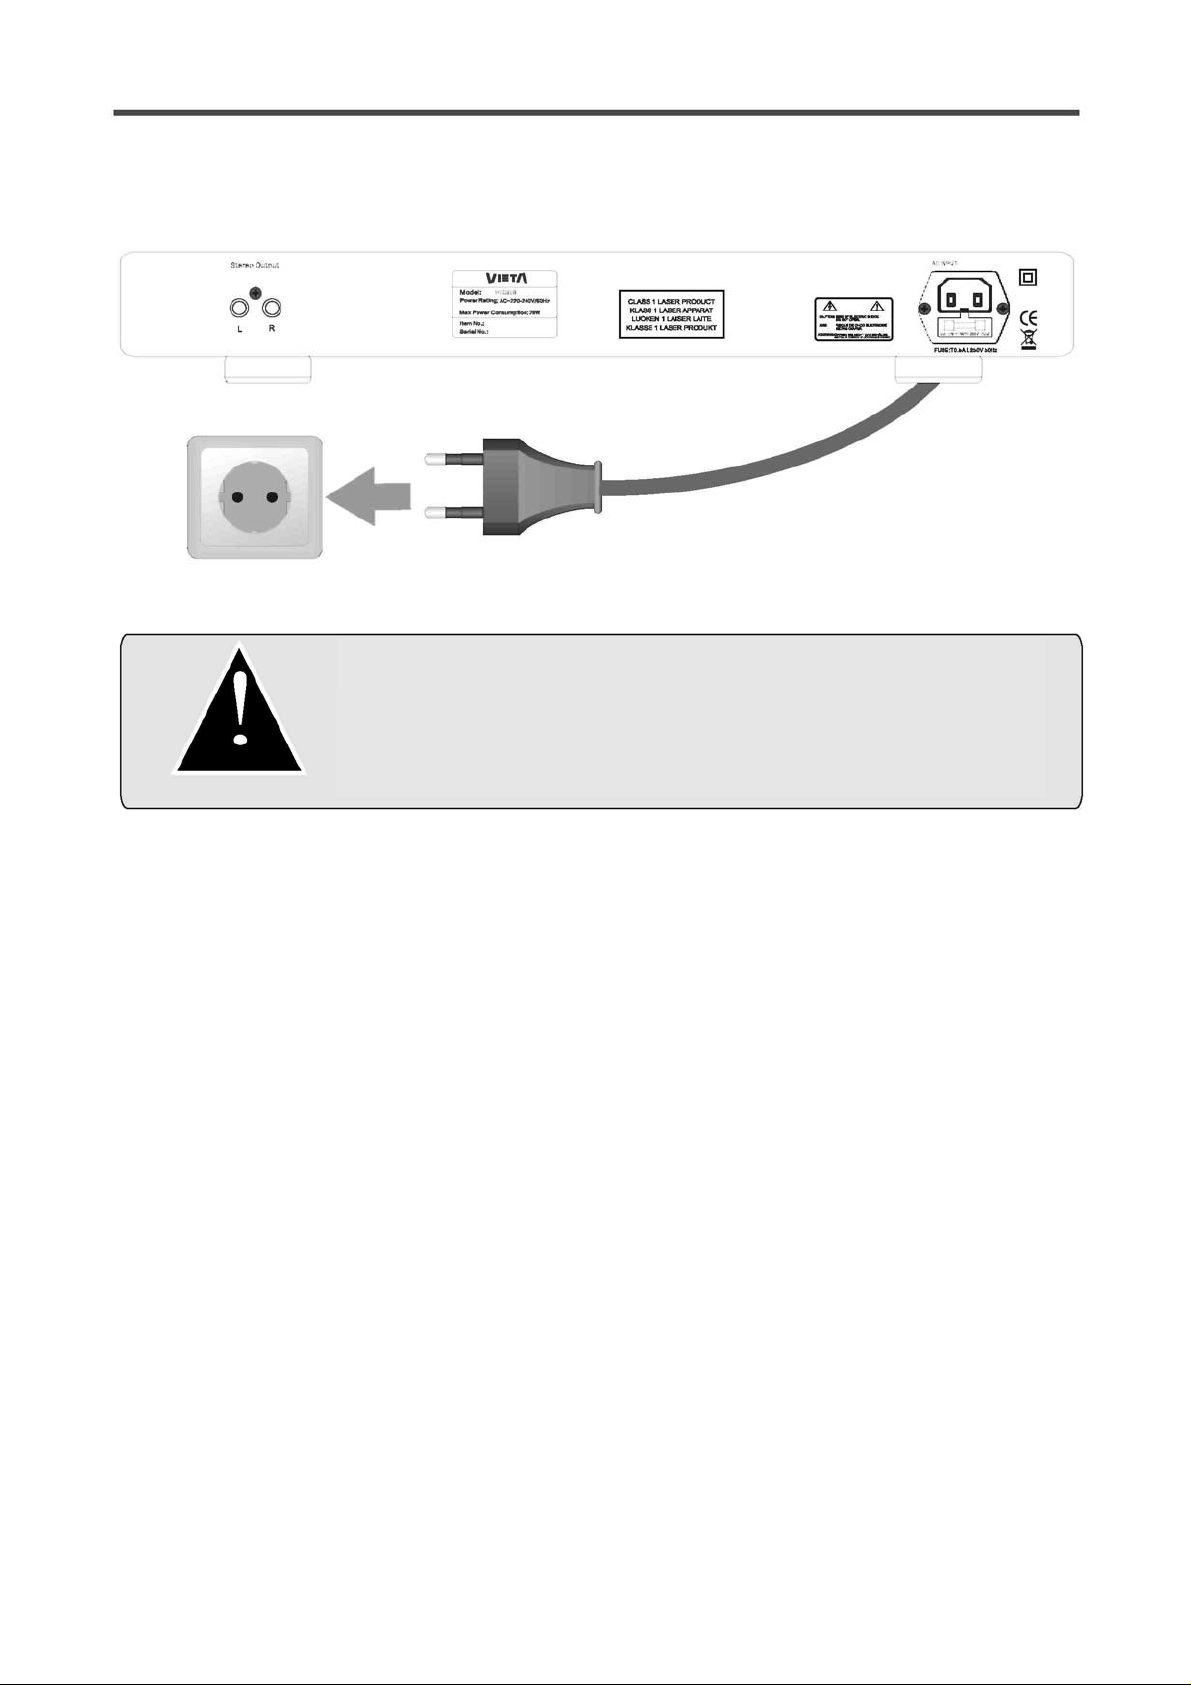
No conecte la unidad a la red eléctrica hasta que las conexiones hayan sido
correctamente realizadas.
Compruebe que todas las conexiones se han realizado correctamente antes
de encender el equipo.
Compruebe que el voltaje eléctrico es 220-240V CA 50Hz antes de encender el
equipo.
NEXIÓN EL
TRI
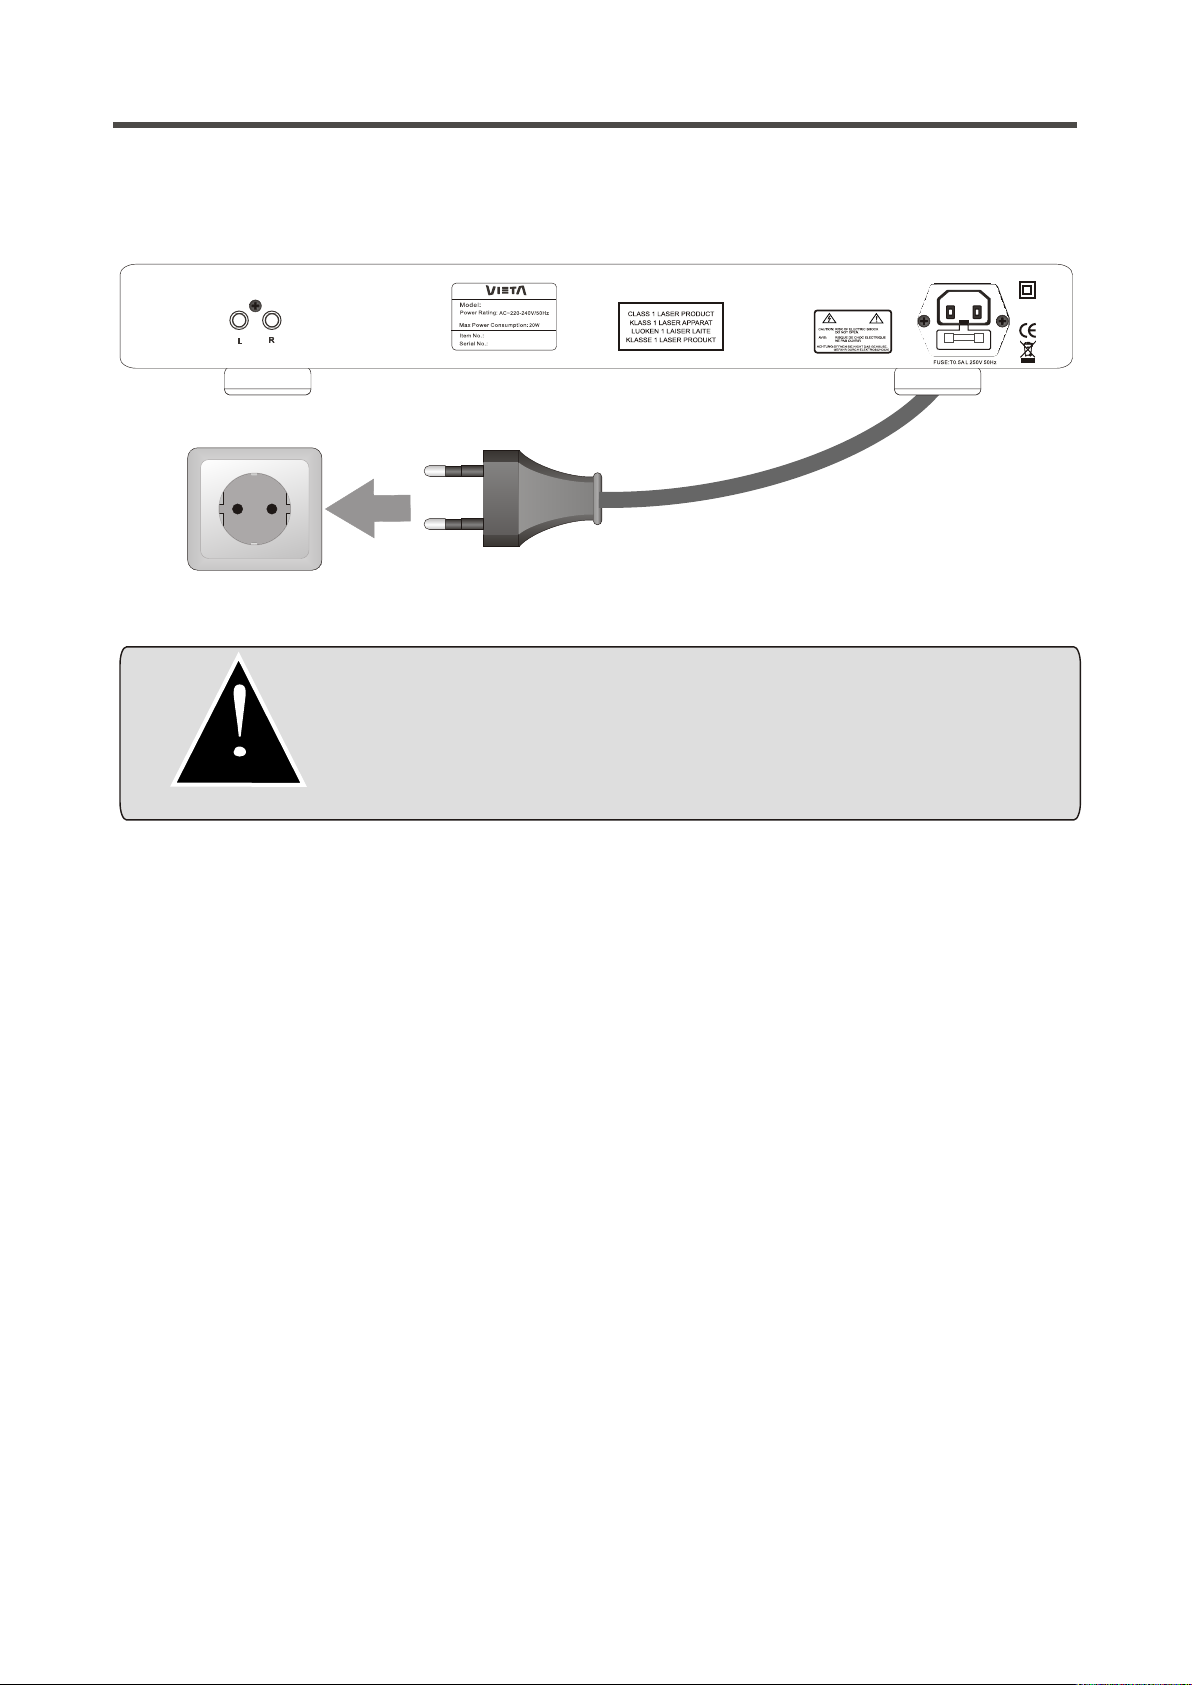
Conexión a la red eléctrica
Compruebe que el resto de conexiones se ha realizado correctamente antes de introducir el enchufe en la
toma de la pared.
Introduzca el enchufe en la toma apropiada.
Si va a usar la unidad en el extranjero, quizás necesite un adaptador.
05
Page 7
A
(
Có
MANDO A DISTANCI
Inserción de las pilas
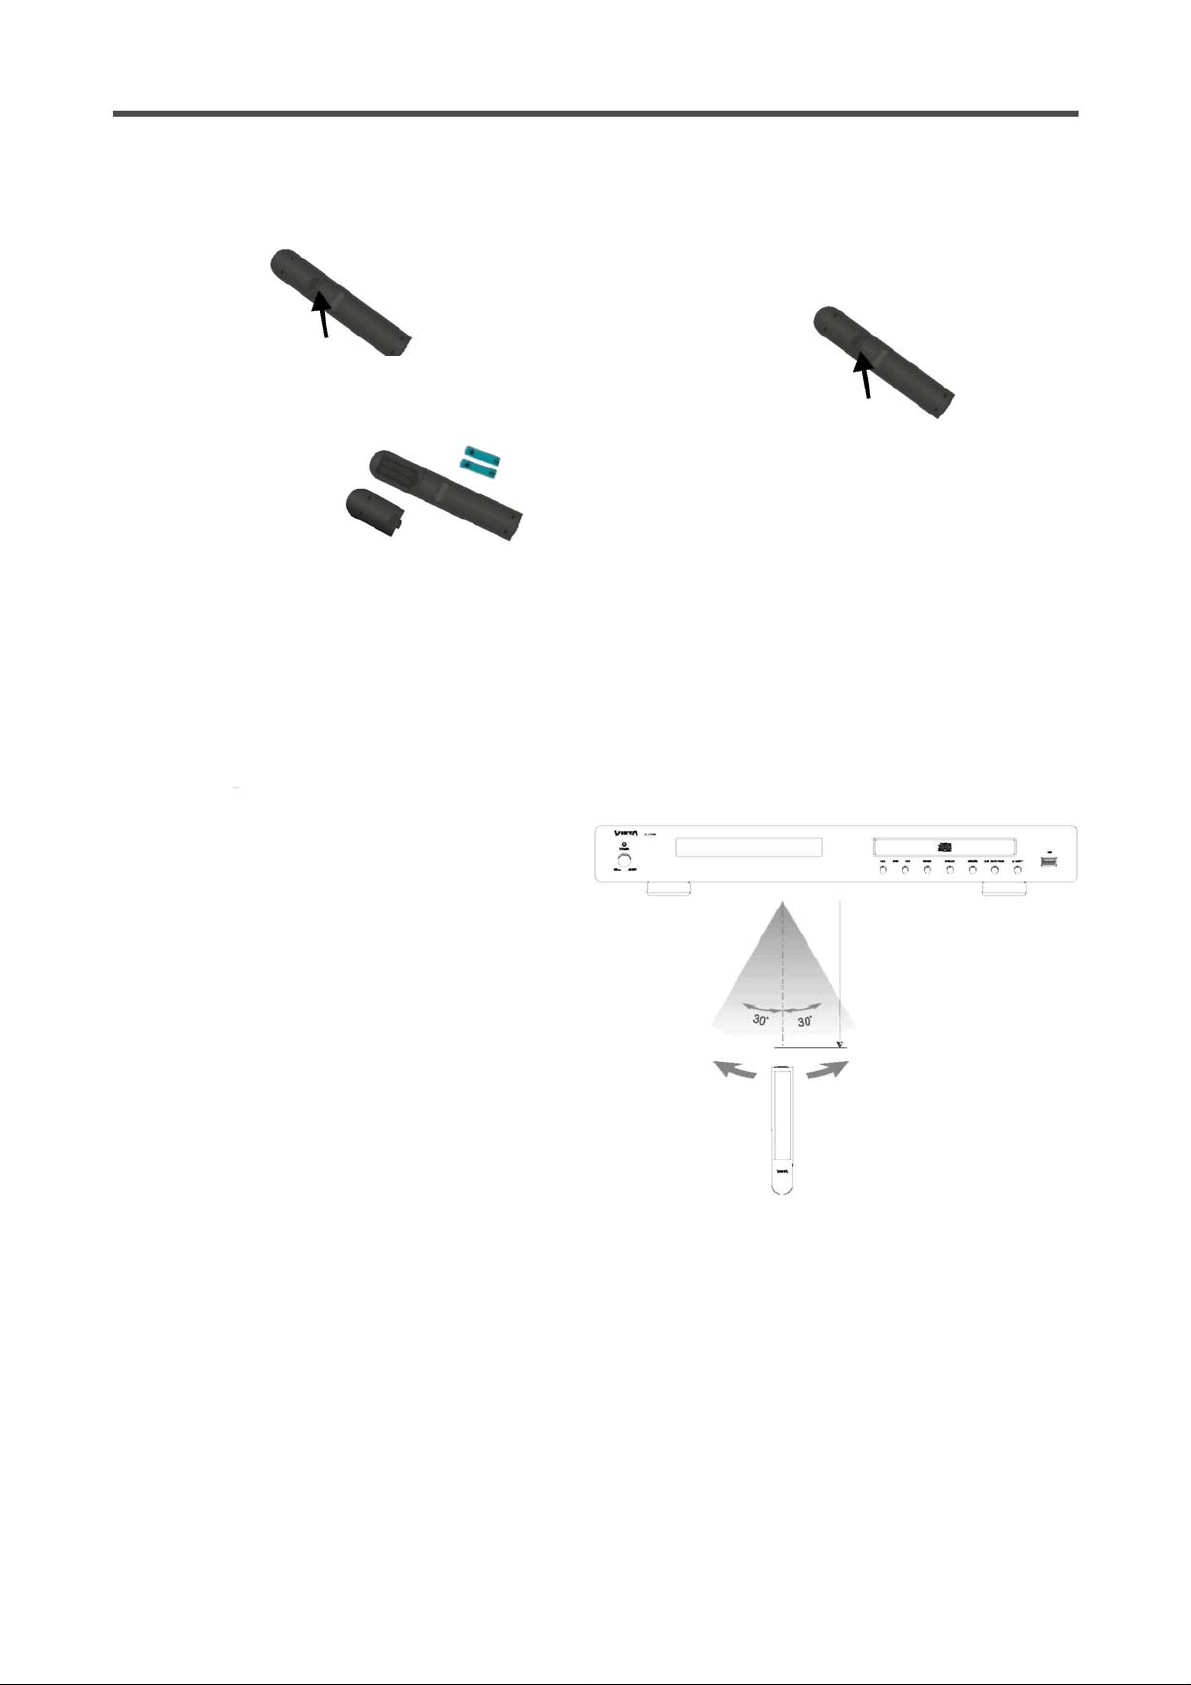
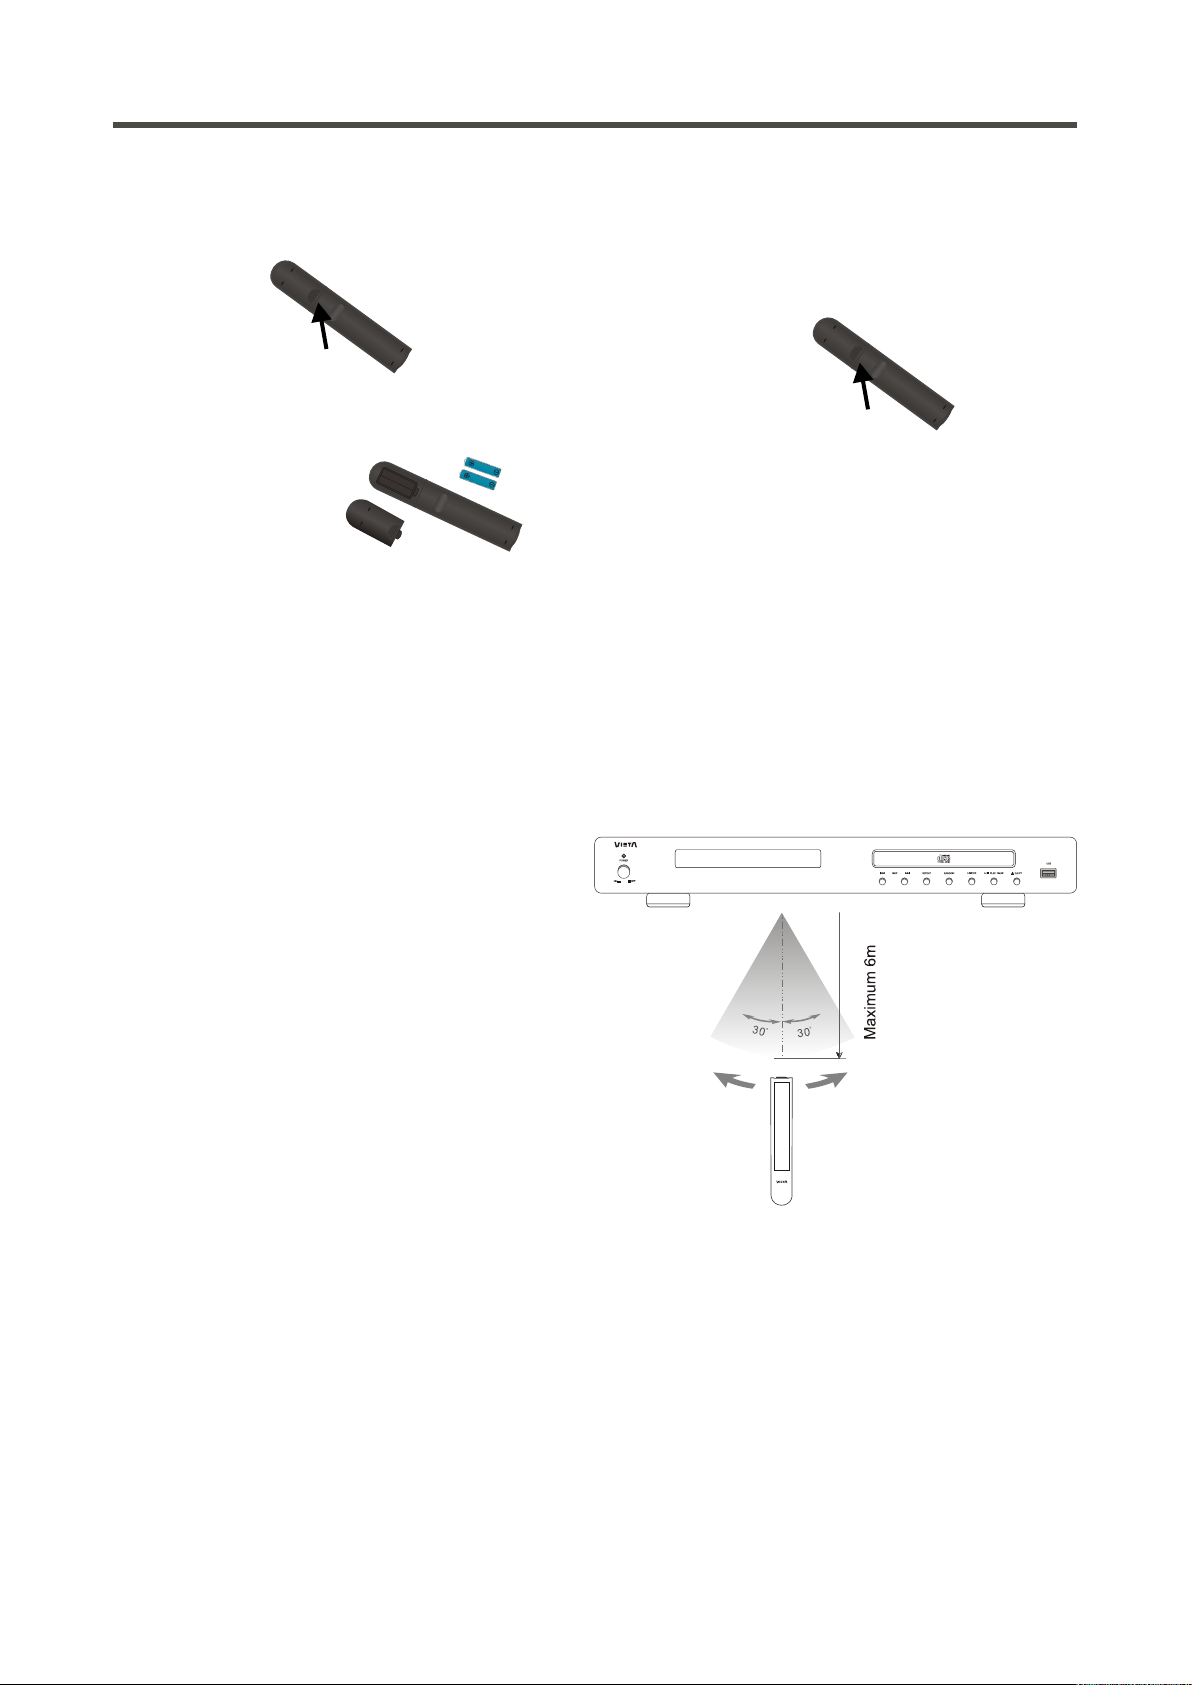
1 Retire la tapa conforme aparece en el dibujo.
2 Coloque dos pilas del tipo AAA/R03/UM4 en el
compartimento de pilas. Asegúrese de que la
orientación de las mismas es la adecuada
véase la imagen debajo).
- No mezcle pilas nuevas y usadas, ni de diferente tipo.
- Si el mando a distancia no se utiliza durante un periodo prolongado, retire las pilas para evitar su
corrosión.
3 Retire la tapa.
mo usar el mando a distancia
Dirija el mando al sensor que está en el panel
frontal de la unidad. Cuando se reciba la señal del
mando a distancia, la unidad ejecutará la función
solicitada. El mando funciona a una distancia de 6
metros.
Máximo 6m
- En ocasiones el mando no funciona cuando hay mucha luz. Deberá desplazar la unidad si esto ocurre.
- El mando puede funcionar mal cuando se utiliza cerca de la unidad.
- No coloque objetos sobre el mando, ya que las baterías pueden descargarse si se pulsa una tecla
prolongadamente.
- Asegúrese de que no hay objetos entre el mando y la unidad.
- No coloque la unidad tras un cristal polarizado ya que puede reducir la distancia máxima de fu ncionamiento
del mando.
06
Page 8
Page 9
CO
NEXIONES Y PANEL FRONTAL
Panel frontal
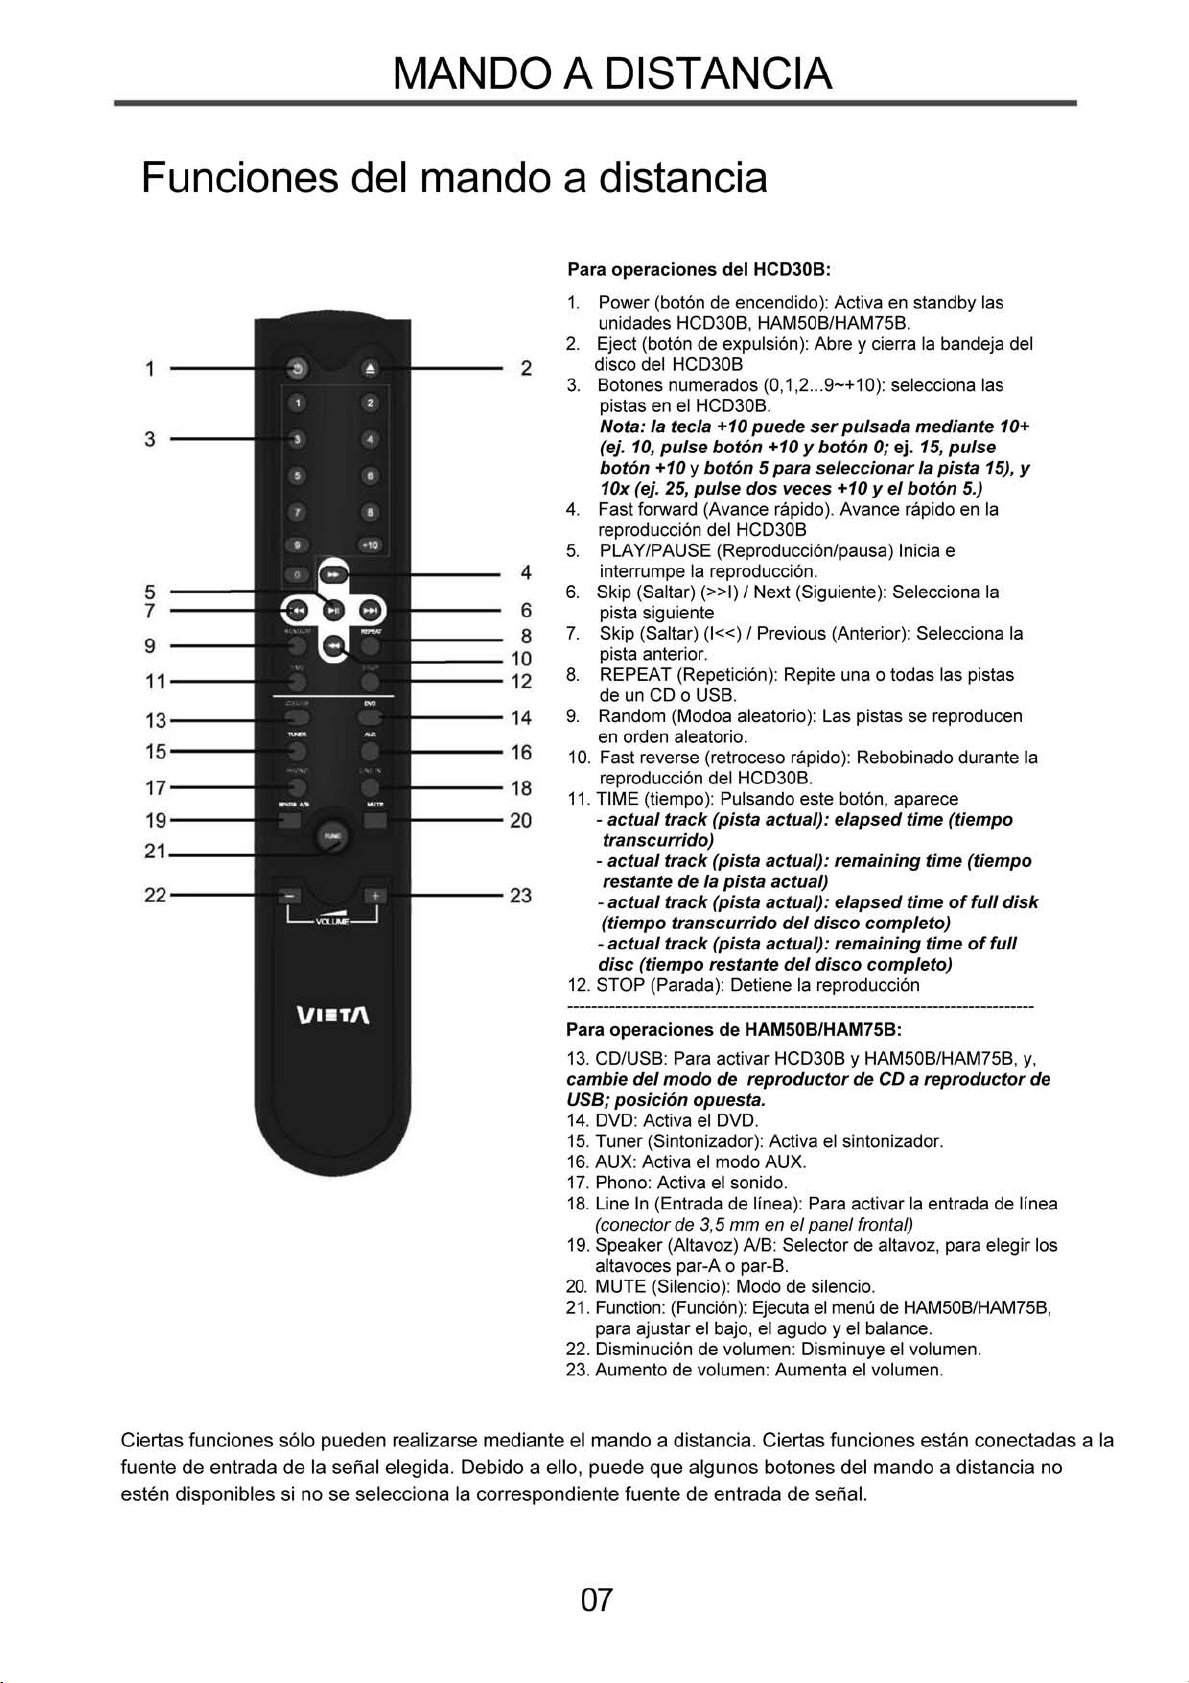
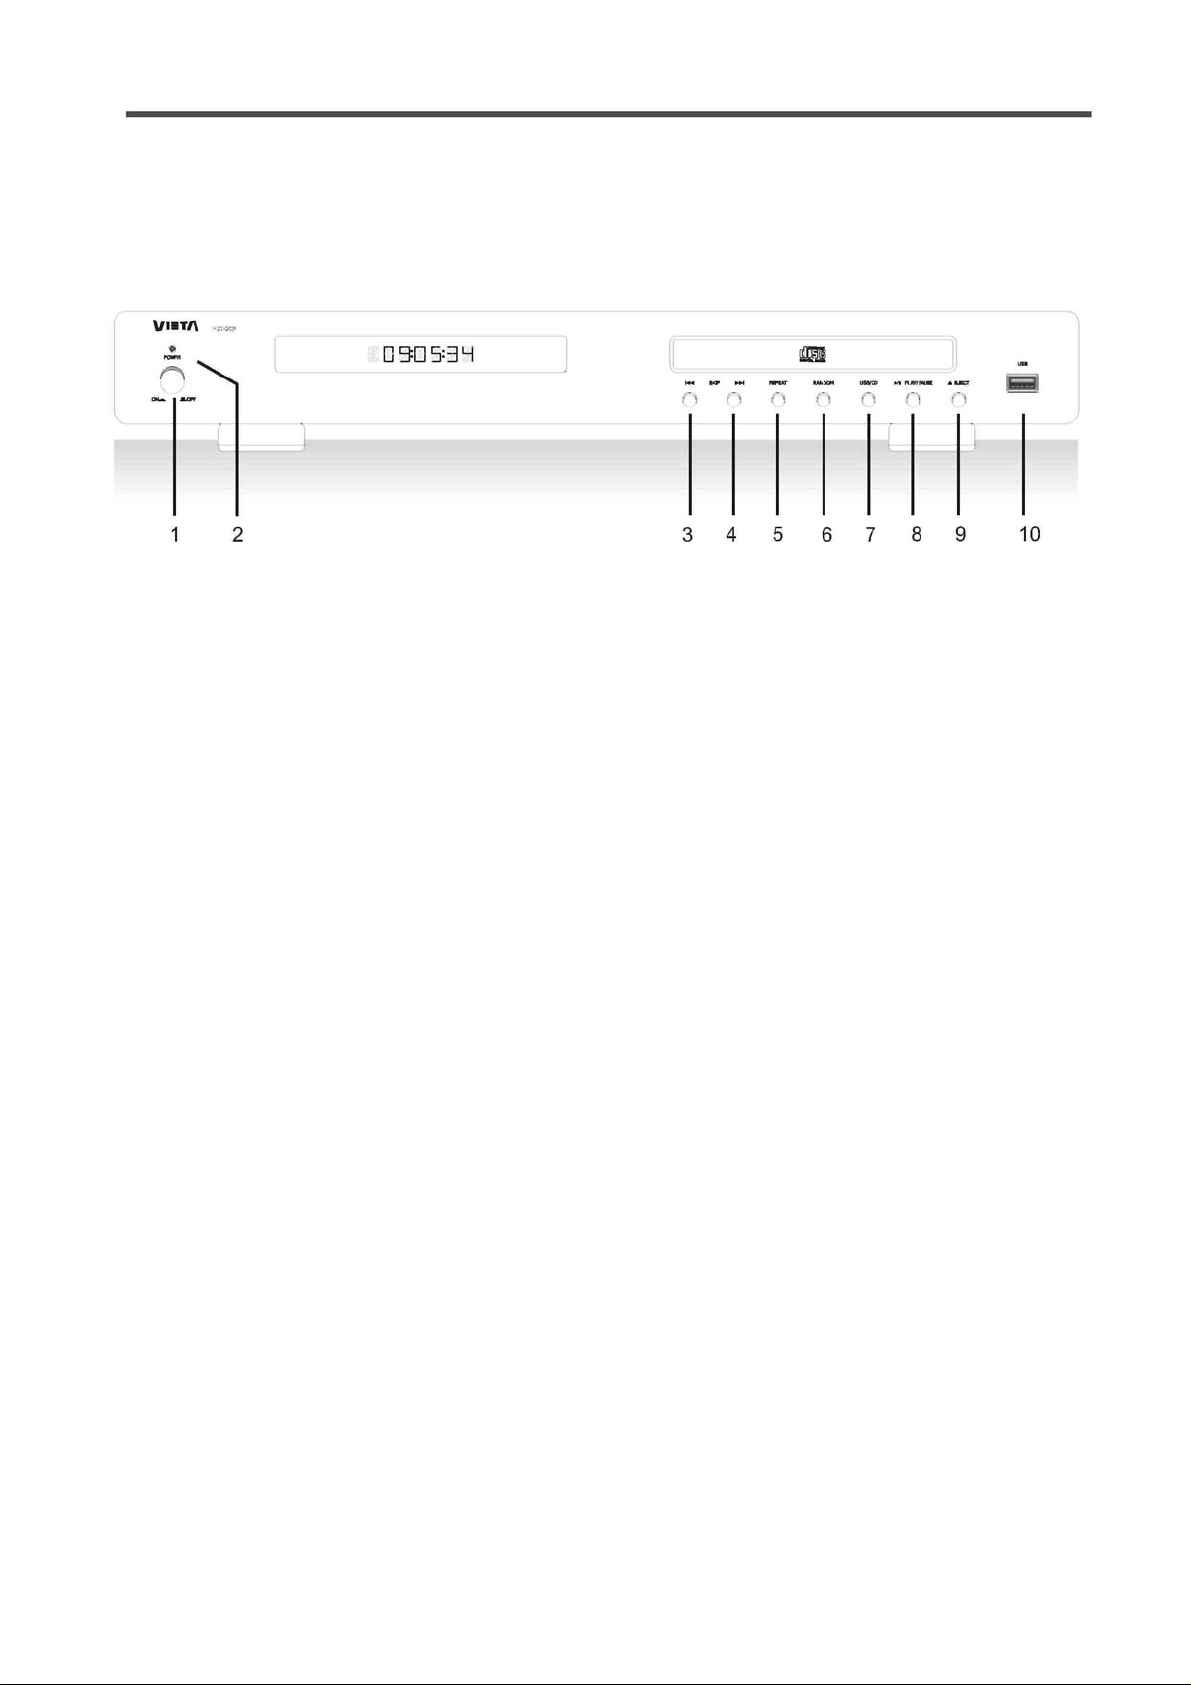
1. Conmutador de energía: Se usa para encender y apagar la unidad.
2. LED: Sin luz cuando se enciende el HCD30B, luz azul en el modo standby.
3. Salto atrás (Anterior): Selecciona la pista anterior.
4. Salto adelante (Siguiente): Selecciona la pista siguiente.
5. REPEAT (Repetición): Repite una pista o todas las del CD.
6. Random (Modo aleatorio): Reproduce las pistas del CD de modo aleatorio.
7 . Selector USB/CD: Para reproducir CD o USB; posición opuesta.
8. PLAY/PAUSE (Reproducción/pausa): Se inicia la reproducción pulsando una vez y se
interrumpe pulsando 2 veces.
9 Eject (Botón de expulsión) Abre y cierra la bandeja del disco en HCD30B
10. Puerto USB: Introduzca USB para reproducción directa.
08
Page 10
CO
O
NEXIONES Y PANEL TRASER
Conexiones
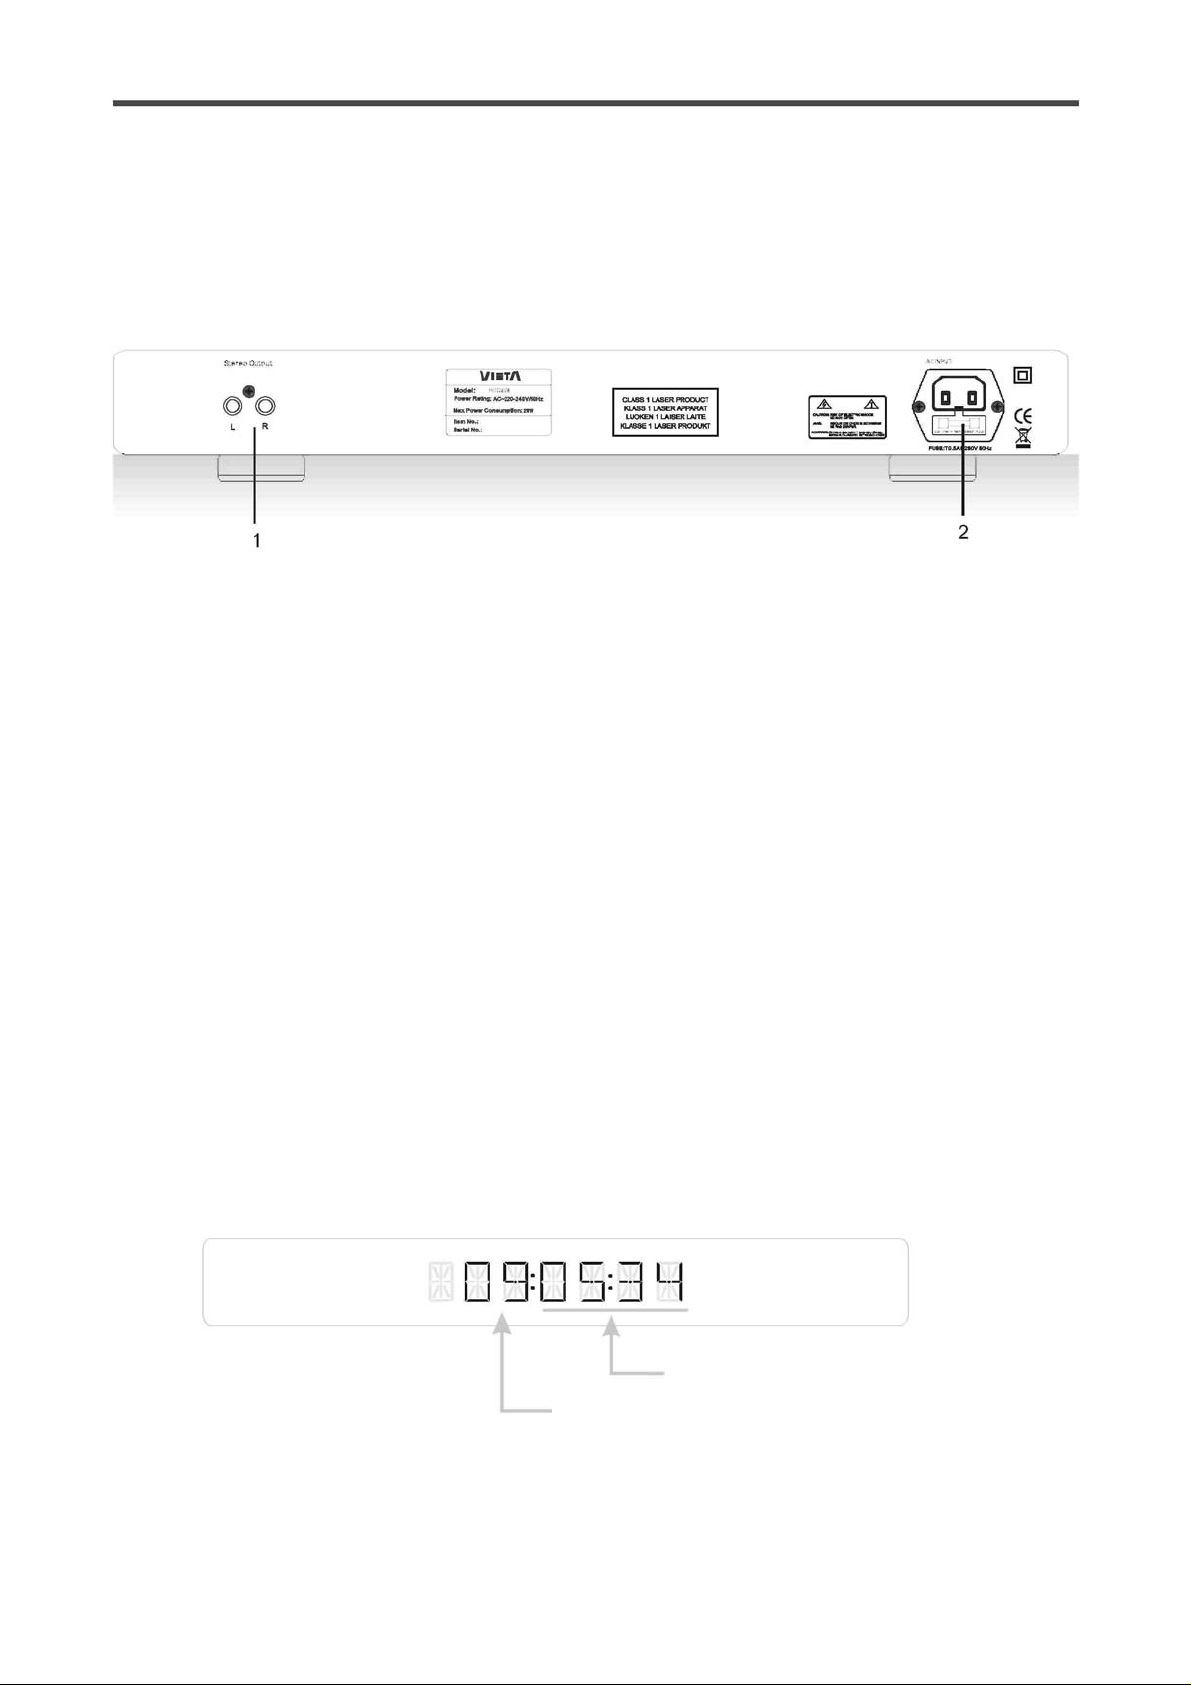
1. Salida estéreo: Salida analógica de estéreo. Para conectar al amplificador estéreo o
receptor con entrada analógica.
2. Entrada CA: Para conexión del voltaje de suministro. Asegúrese de que el enchufe ha
sido introducido correctamente y de que el voltaje corresponde con el indicado en el
texto situado en el panel trasero de la carcasa.
Explicaciones sobre el visor VFD
Esta unidad no cuenta con la función OSD (Información en pantalla). Sin embargo cuenta con un sistema de
información V FD más descript ivo que visualiza toda la información solicitada. Debajo podrá ver una imagen
del visor y la explicación de los diferentes símbolos.
Tiempo de pista
Número de pista
09
Page 11
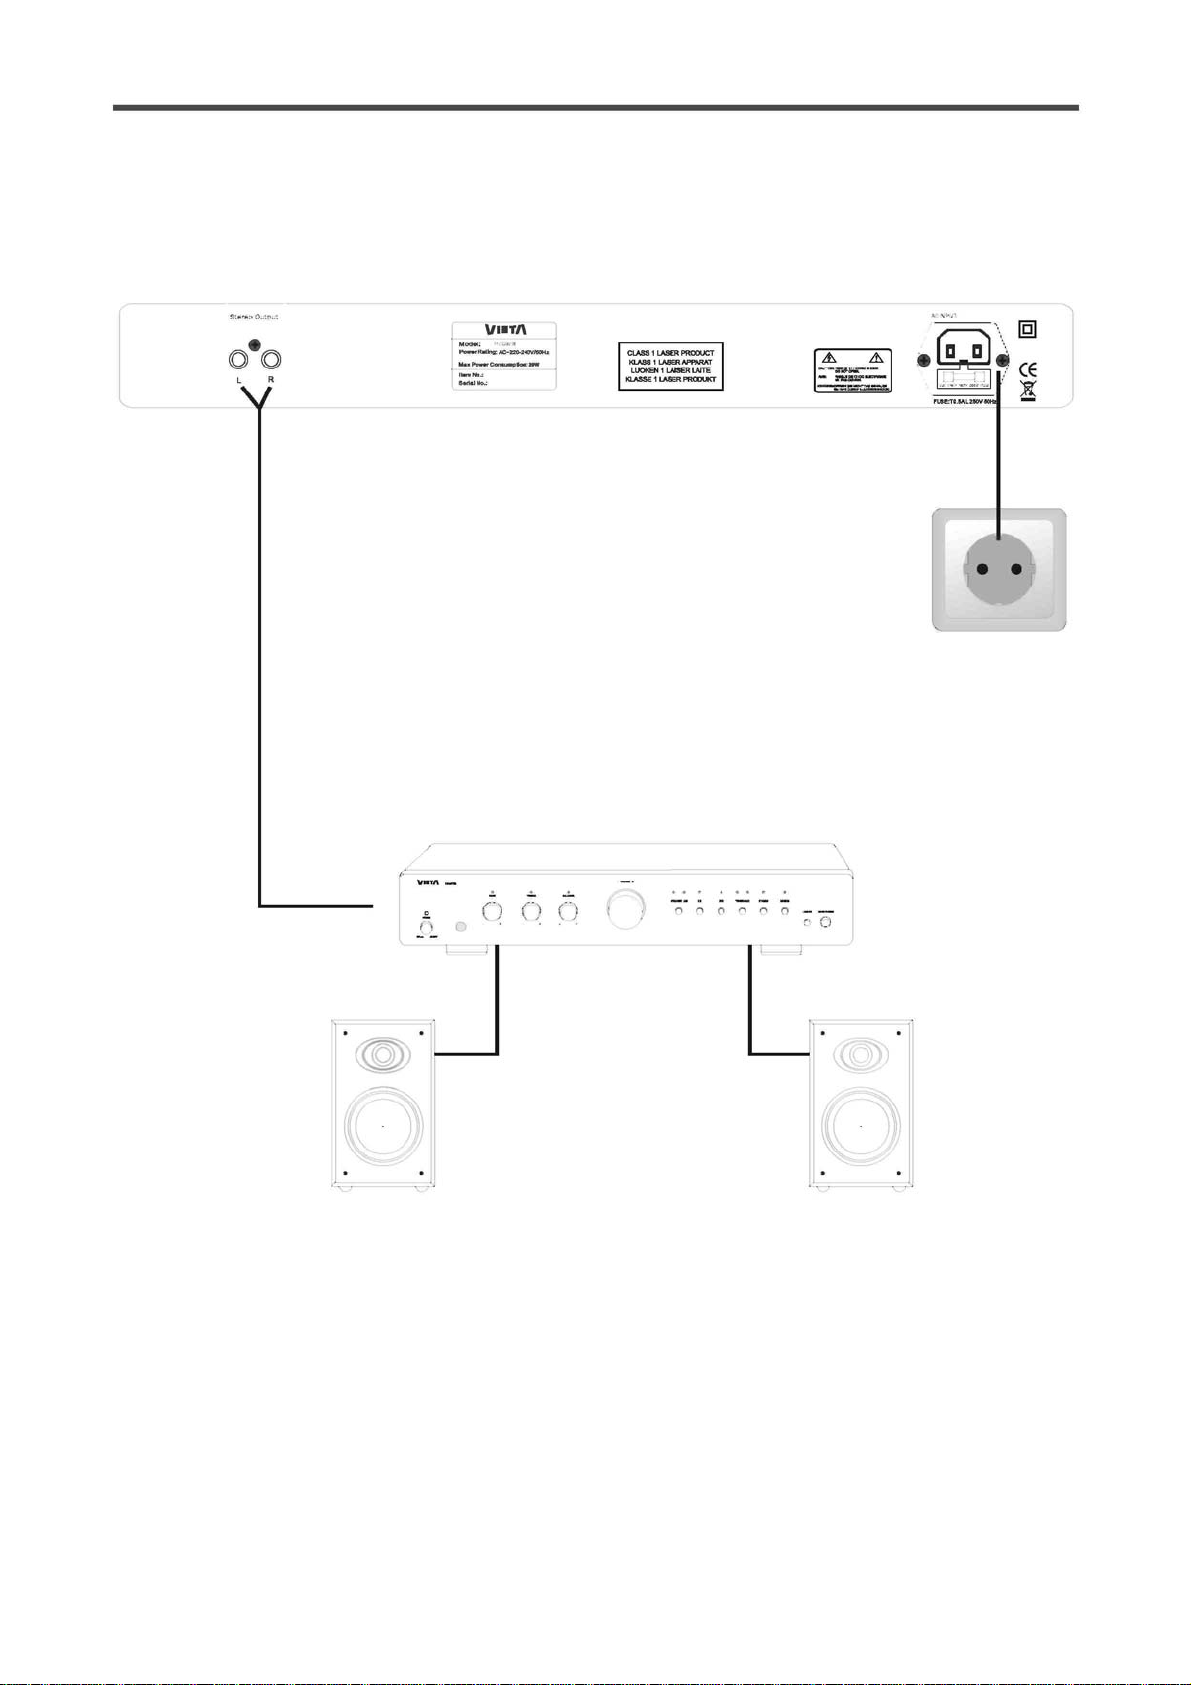
CONEXIÓN CON AMPLIFICADOR
Distribución de conexión de audio
Receptor/amplificador analógicos
Esta página sólo contiene indicaciones de conexión de su HCD30B.
Observe que los accesorios de las imágenes de esta página no se proporcionan al adquirir la unidad.
10
Page 12
y
Carg
OPERACIÓN Y FUNCIONES
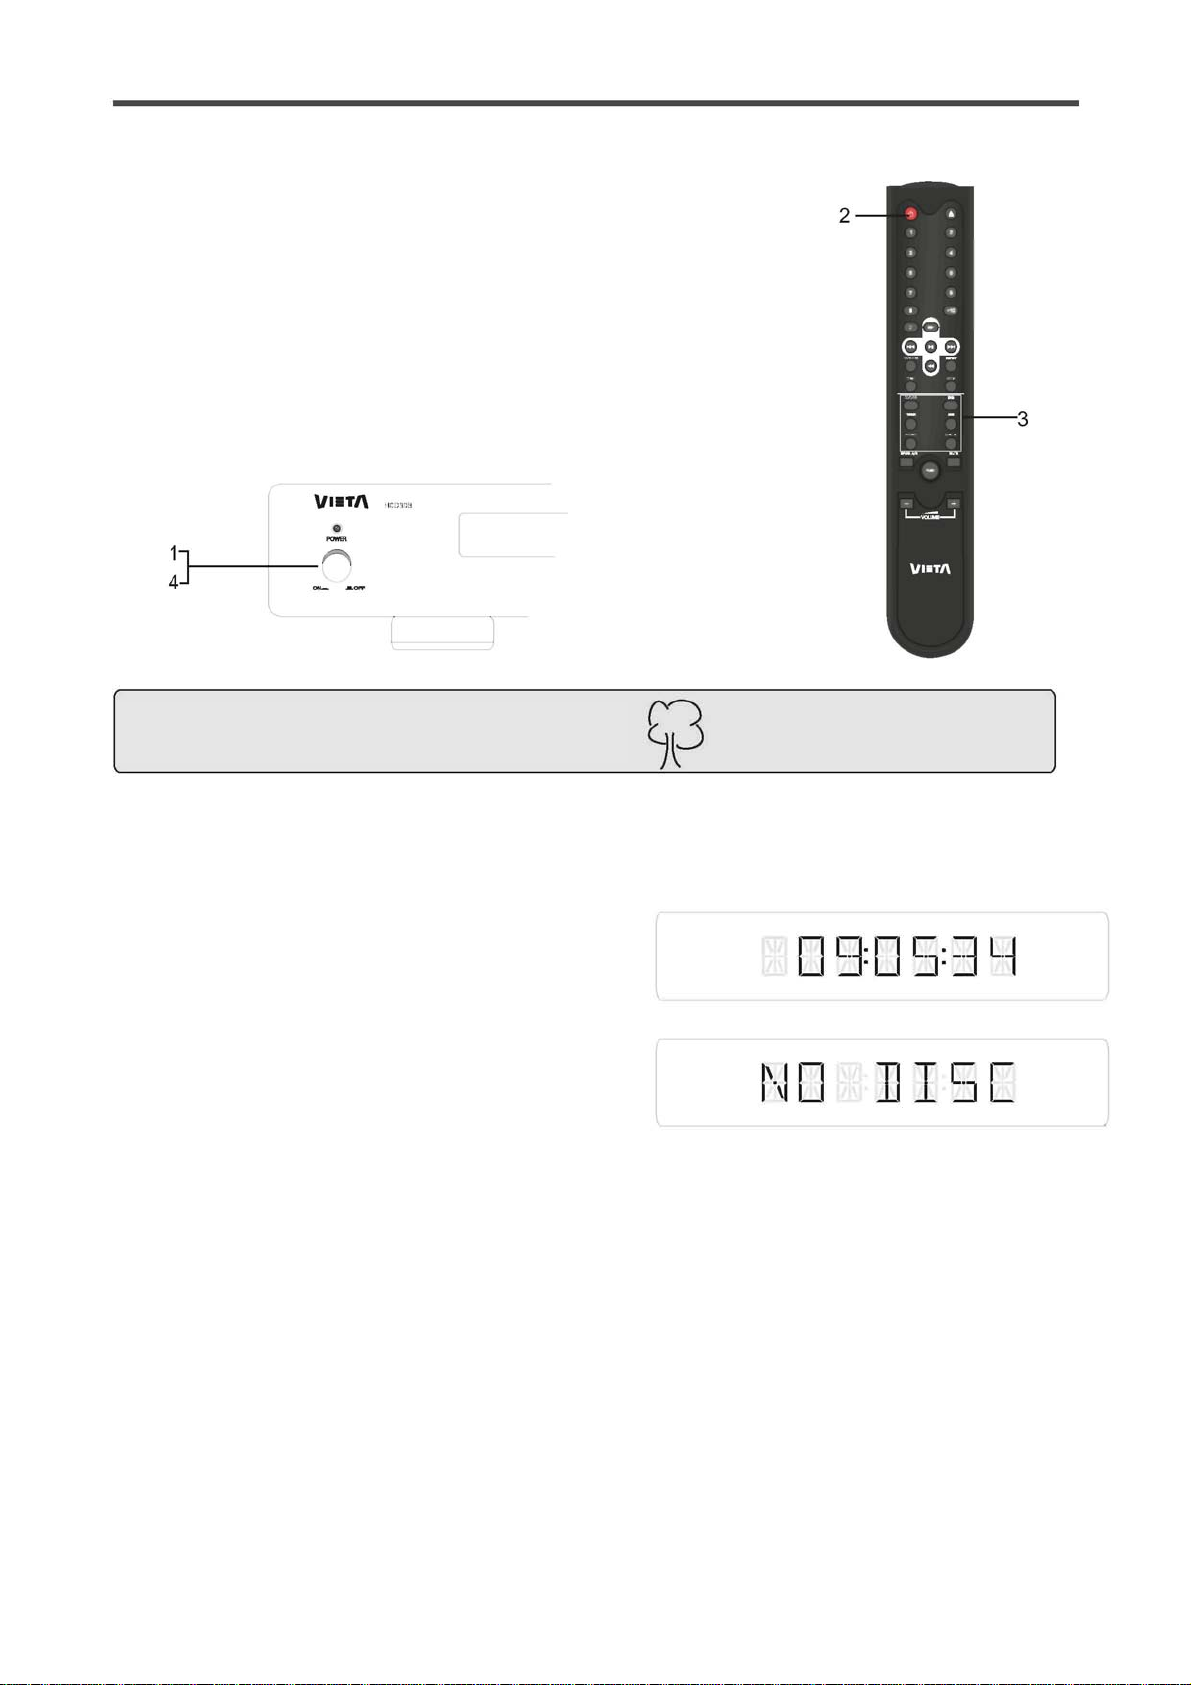
On, Off y standb
1 Encienda la unidad pulsando el interruptor de encendido.
2 Pulse el botón de standby del mando a distancia para activar el modo
standby. La pantalla se apagará y las funciones se reducirán al mínimo
para garantizar que la unidad usa la mínima cantidad de energía. En el
modo standby, la unidad sólo puede ser activada mediante los botones
de ENTRADA (CD/USB, DVD, SINTONIZADOR, AUX, AUDIO,
ENTRADA DE LÍNEA) en el mando a distancia - (3).
4. Proteja el medioambiente desconectando la unidad
después de usarla.
ar un disco
Si quiere reproducir un disco, tiene que cargarlo. Para
ello pulse el botón de expulsión “Eject “ del mando a
distancia o del panel frontal del reproductor de CD.
Cuando el disco haya sido leído, el visor informará
sobre el número de pistas y el tiempo total de
reproducción.
Si no hay disco en la bandeja, aparecerá el mensaje "NO
DISC" (NO HAY DISCO EN LA UNIDAD). Si la unidad
tiene dificultad para leer un disco, debe comprobar que
éste está limpio y sin residuos. Si aún no puede
reproducirlo, deberá contactar con el vendedor.
Pausa /Reproducción
Pulse una vez la tecla PLAY/PAUSE (Reproducción/pausa) del mando a distancia o en el panel frontal para
iniciar la reproducción; el contador situado en la parte izquierda del visor comenzará la cuenta ascendente.
Pulse el botón PLAY/PAUSE de nuevo para detener la reproducción; el contador del visor comenzará a
parpadear.
Vuelva a pulsar el botón PLAY/PAUSE, para continuar la reproducción.
11
Page 13

O
S
PERACIÓN Y FUNCIONE
Stop (Parada):
Para detener completamente la reproducción, pulse el botón STOP una vez.
El visor mostrará el número de pistas del disco y el tiempo total de reproducción.
SKIP (saltar) (I<<, >>I): Anterior / Siguiente
Cuando se reproduce la pista de un CD, puede saltar a la anterior o a la siguiente.
Si desea saltar a la siguiente pista, deberá presionar una vez el botón >>l (siguiente) del mando a distan cia o
en el panel frontal. Si desea avanzar varias pistas, debe presionar >>I hasta llegar a la pista deseada.
Si desea volver a una de las pistas anteriores, debe emplear el mismo procedimiento pero no el mismo botón.
Use el botón l<< (anterior) en su lugar.
Search (Búsqueda) (<<, >>): avanzar/retroceder
Podrá realizar una búsqueda en la pista reproducida.
Si desea realizar una búsqueda hacia delante pulse una vez el botón >> (avanzar) en el mando a
distancia hasta que llegue a la parte de la pista que desea escuchar, y posteriormente pulse play
(reproducir). Verá que el contador del visor avanza con mucha rapidez.
Si desea realizar la búsqueda hacia atrás, use el mismo procedimiento que para la búsqueda hacia
delante, pero emplee el botón << (retroceder) en su lugar.
Modo aleatorio
Podrá seleccionar la reproducción aleatoria pulsando el botón RANDOM (Modo aleatorio) en el mando a
distancia o en el panel frontal.
Las pistas del CD se reproducirán en orden aleatorio. El guión entre el primer y el segundo número de la
izquierda comien za a parpadear cuando esta función está activada.
Es posible activar la reproducción aleatoria tanto en modo de reproducción como de parada.
Pulse de nuevo el botón RANDOM si desea desactivar la reproducción aleatoria.
Observación:
Cuando pulse los botones SKIP (salto) ( l<< o >>l) durante la reproducción aleatoria, no podrá seleccionar la
siguiente pista sino cualquiera de ellas.
12
Page 14
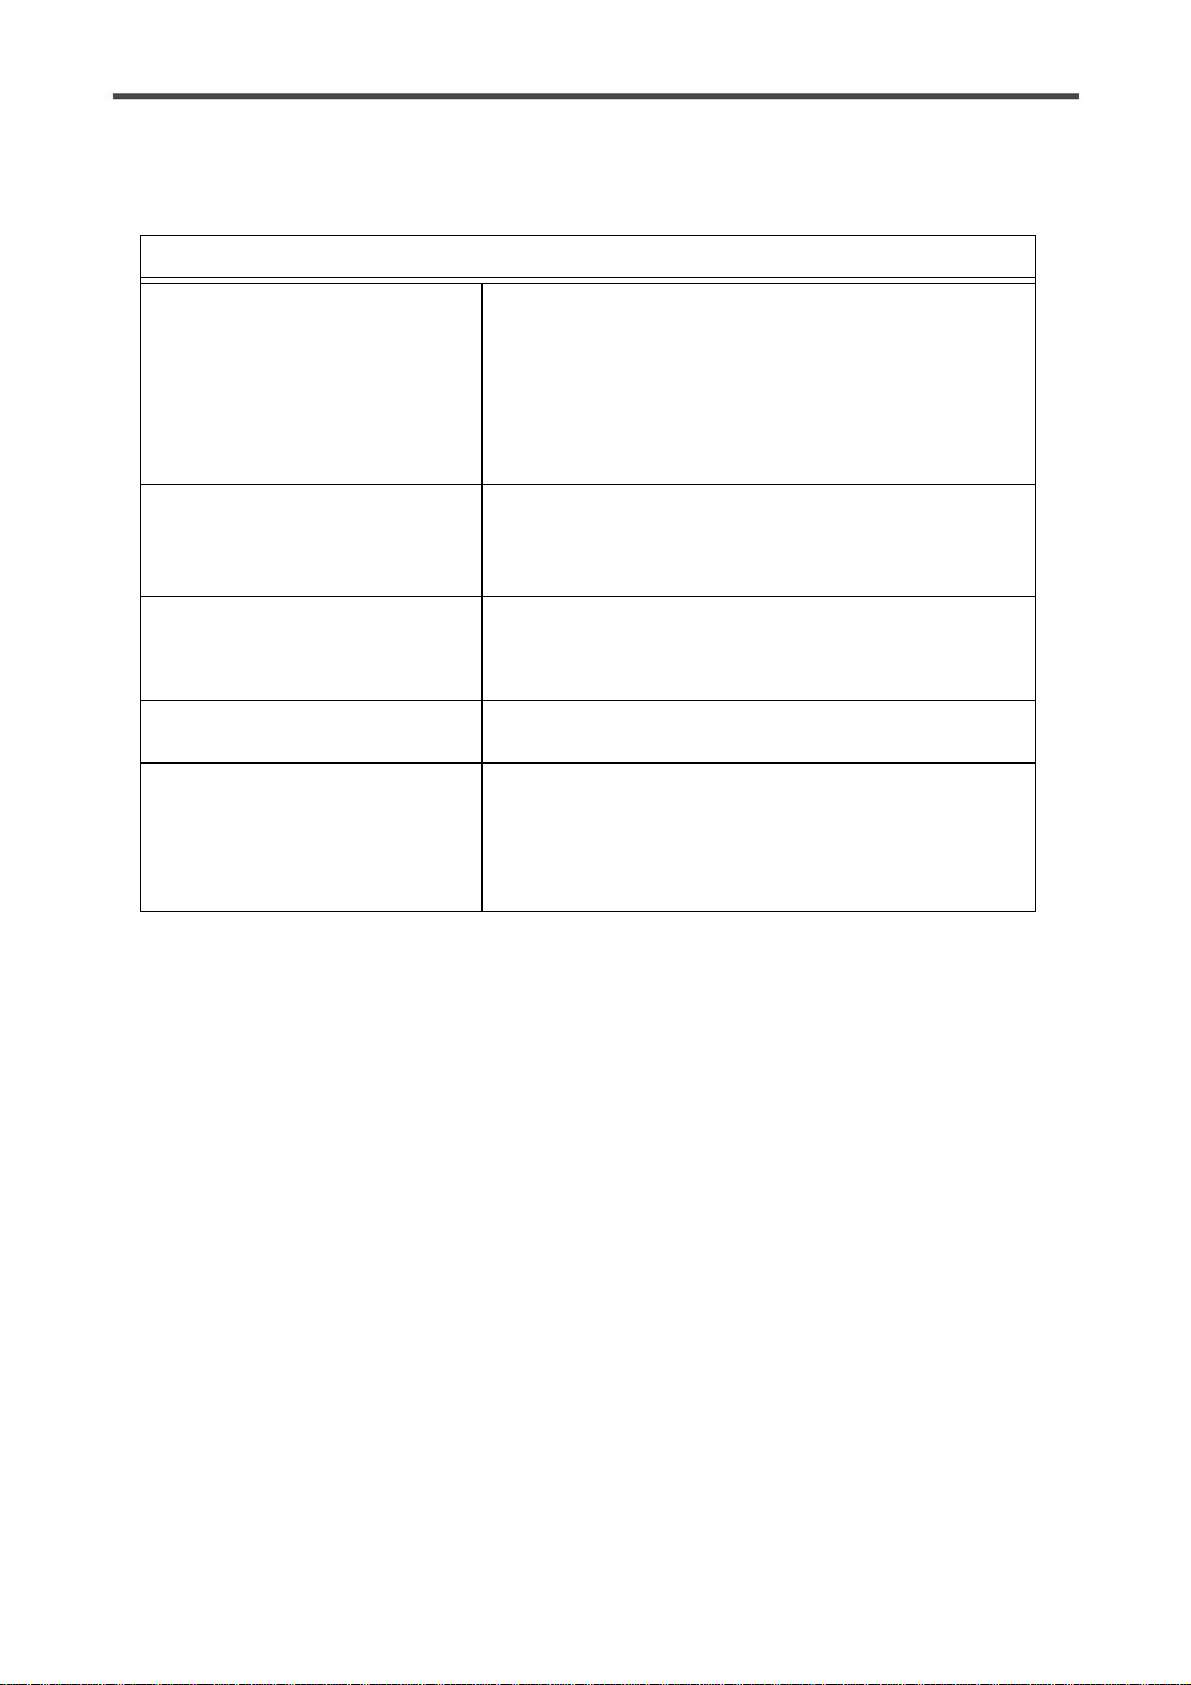
RESOLUCIÓN DE PROBLEMAS
Resolución de problemas
PROBLEMA SOLUCIÓN
No hay energía cuando se enciende
la unidad.
No hay sonido
La unidad no lee el disco.
- Conecte la unidad a la toma de corriente eléctrica.
- Compruebe que el enchufe se ha introducido
correctamente en la toma.
- El fusible interno se ha fundido y un técnico de servicio
autorizado debe sustituirlo.
- El cable de electricidad está dañado y debe ser
sustituido.
- La unidad no se ha encendido.
- Conexión incorrecta con el amplificador.
- Los altavoces no han sido conectados con el amplificador.
- No hay CD en la unidad; o no hay archivos MP3 en el USB.
- Compruebe que el disco no haya sido colocado boca abajo.
- Compruebe que el disco esté limpio y esté dañado.
- Compruebe si se trata de un CD o un CD-R.
La unidad salta ciertas partes
durante la reproducción.
Se escucha un zumbido.
- Compruebe que el disco esté limpio y no está dañado.
- La unidad está colocada sobre una superficie inestable.
- Los cables RCA entre el HCD30B y el amplificador/receptor
están dañados.
- Los cables RCA entre el HCD30B y el amplificador/receptor
se han enroscado en el cable de suministro eléctrico.
13
Page 15

ÉC
CA
FICHA TÉCNICA
Reproducción de disco:
Reproducción de USB
Frecuencia: 16-Bit,96KHz
Nivel de Salida(TCD784): 2Vrms
Distorsión @20Hz-20Khz: <0,1%
Separación @1 KHz: >70dB
Rango de frecuencias -1dB@1KHz 20Hz-20KHz
S/N Ratio (relación señal ruido)
@8Ω/1 KHz:
Salida de Ruido: <2mV
FICHA T
NI
CD, CD-R
MPS
>90dB
Voltaje de suministro: CA220-240V50HZ
Dimensiones (alxanxpr) 430 x 285 x 50 mm
Nos reservamos el derecho a modificar los ficha técnica y el diseño del producto sin previo aviso como
consecuencia de futuras mejoras del producto.
14
Page 16

Page 17

Page 18
Page 19

CONTENTS
CONTENTS
Contents 02
SAFETY PRECAUTIONS
Safety precautions 03
IMPORTANT INFORMATION
Important information 04
CONNECTION TO THE MAINS
Connection to the mains 05
REMOTE CONTROL
Installation of batteries 06
Using the remote control 06
Remote control functions 07
BACK PANEL CONNECTIONS
Connections 09
Explanation of LCD Display 09
CONNECTION WITH AMPLIFIER
Audio connection layout 10
OPERATION AND FUNCTIONS
ON, OFF and Standby 11
Load a disc 11
Play/Pause 11
Stop, Skip, Search, Random 12
TROUBLESHOOTING
Troubleshooting 13
FRONT PANEL CONNECTIONS
Front panel 08
TECHNICAL DATA
Technical data 14
02
Page 20
SAFETY PRECAUTIONS
A triangle with a lightning symbol draws the user's
attention to "dangerous voltage" without insulation in the
cabinet which may be high enough to entail a risk of
electric shock.
A triangle with an exclamation mark draws the user's
attention to important instructions for use and
maintenance in the accompanying manual, which should
be studied.
A symbol for CLASS II (double insulation)
WARNING:
CAUTION:
TO MINIMISE THE RISK OF FIRE OR ELECTRICAL SHOCK, DO NOT EXPOSE
THE UNIT TO RAIN OR MOISTURE. DO NOT OPEN THE CABINET AS IT
CONTAINS DANGEROUS VOLTAGE. ONLY QUALIFIED TECHNICIANS ARE
ALLOWED TO CARRY OUT REPAIR AND SERVICE.
if the plug of the power cord needs to be replaced, it is important that the
replacement is identical to the plug to be replaced, or that the new plug has been
recommended by the manufacturer
TO AVOID ELECTRICAL SHOCK, IT IS IMPORTANT TO INSERT THE PLUG
CORRECTLY INTO THE SOCKET.
03
Page 21
IMPORTANT INFORMATION
Handling instructions
- The top and back panel of the unit may become
warm after prolonged use. This is not due to a
defect.
- Turn off the power when the unit is not used.
Protect the power cord
- Follow the instructions below to prevent
abnormal operation, electrical shock, fire or
personal injury:
- Hold the plug firmly when inserting it into the
socket.
- Avoid heat-producing devices.
- Do not place objects on the power cord.
- Do not carry out service work on or change the
power cord.
Positioning
Do not place the unit in any of the fol. places:
- In sunlight, close to heat-producing devices or in
an enclosed rack.
- In places with high temperatures (40C or more)
or high relative humidity (90% or more).
- In dirty places as some internal parts may be
damaged.
Condensation
Condensation may occur in the following cases:
- When the unit is moved directly from a cold to a
warm place.
- When the unit is used in a room where the
radiator has just been switched on or a place
where the cold air from the air-conditioning
system is directed at the unit.
- If the unit is used in the summer in a warm and
humid room just after it has been moved from an
air-conditioned room.
- If there is steam or a high level of humidity in the
room.
In case of condensation, the unit will not work
properly. Turn off the unit. Unplug the unit and
leave it for 2-3 hours. The unit will then have
adapted to the environment and any
condensation will have disappeared.
Do not put your fingers or any
other objects into the unit
- Touching the internal parts is dangerous and
may cause injury or damage. Do not open the
cabinet.
- Do not place any foreign matter in the unit.
Interference
Placing the unit near a television set, radio or video
player may cause poor picture and sound quality.
In that case, move the unit further away from the
television set, radio or video player.
04
Page 22
CONNECTION TO THE MAINS
Connection to the mains
Ster eo Outp ut
220-240V AC~50Hz
AC INPU T:
HCD30 B
USE ONLY WI TH 250V F USE
Do not turn on the power before all connections have been made correctly.
Check that all connections have been made correctly before turning on the
power.
Check that the mains voltage is 220-240V AC50Hz before turning on the power.
Connection to the mains
Check that all other connections have been made correctly before inserting the mains plug into the wall
socket.
Then insert the plug into a suitable socket.
If the unit is to be used abroad, you may need an adapter.
05
Page 23
REMOTE CONTROL
Installation of batteries
1 Remove the cover as illustrated.
2 Position two batteries of the type AAA/R03/UM4
in the battery compartment. Make sure that the
orientation of the batteries is correct (see
drawing at bottom).
- Do not mix new and old batteries and do not use different types of batteries.
- If the remote control is not used for prolonged periods, remove the batteries from the remote control to
avoid corrosion.
3 Replace the cover.
Using the remote control
Direct the remote control at the sensor on the front
panel of the unit. When the remote control signal is
received, the unit reacts accordingly. The remote
control works within a range of 6 metres.
- Sometimes the remote control does not work well in strong light. You may have to move the unit if it is a
problem.
- Malfunction may occur if other remote controls are used near the unit.
- Do not place any objects on the remote control, as the batteries may become flat if a key is depressed
constantly.
- Make sure that there are no obstacles between remote control and unit.
- Do not position the unit behind tinted glass as it may reduce the maximum range of the remote control.
HCD30B
06
Page 24
Page 25
FRONT PANEL AND CONNECTIONS
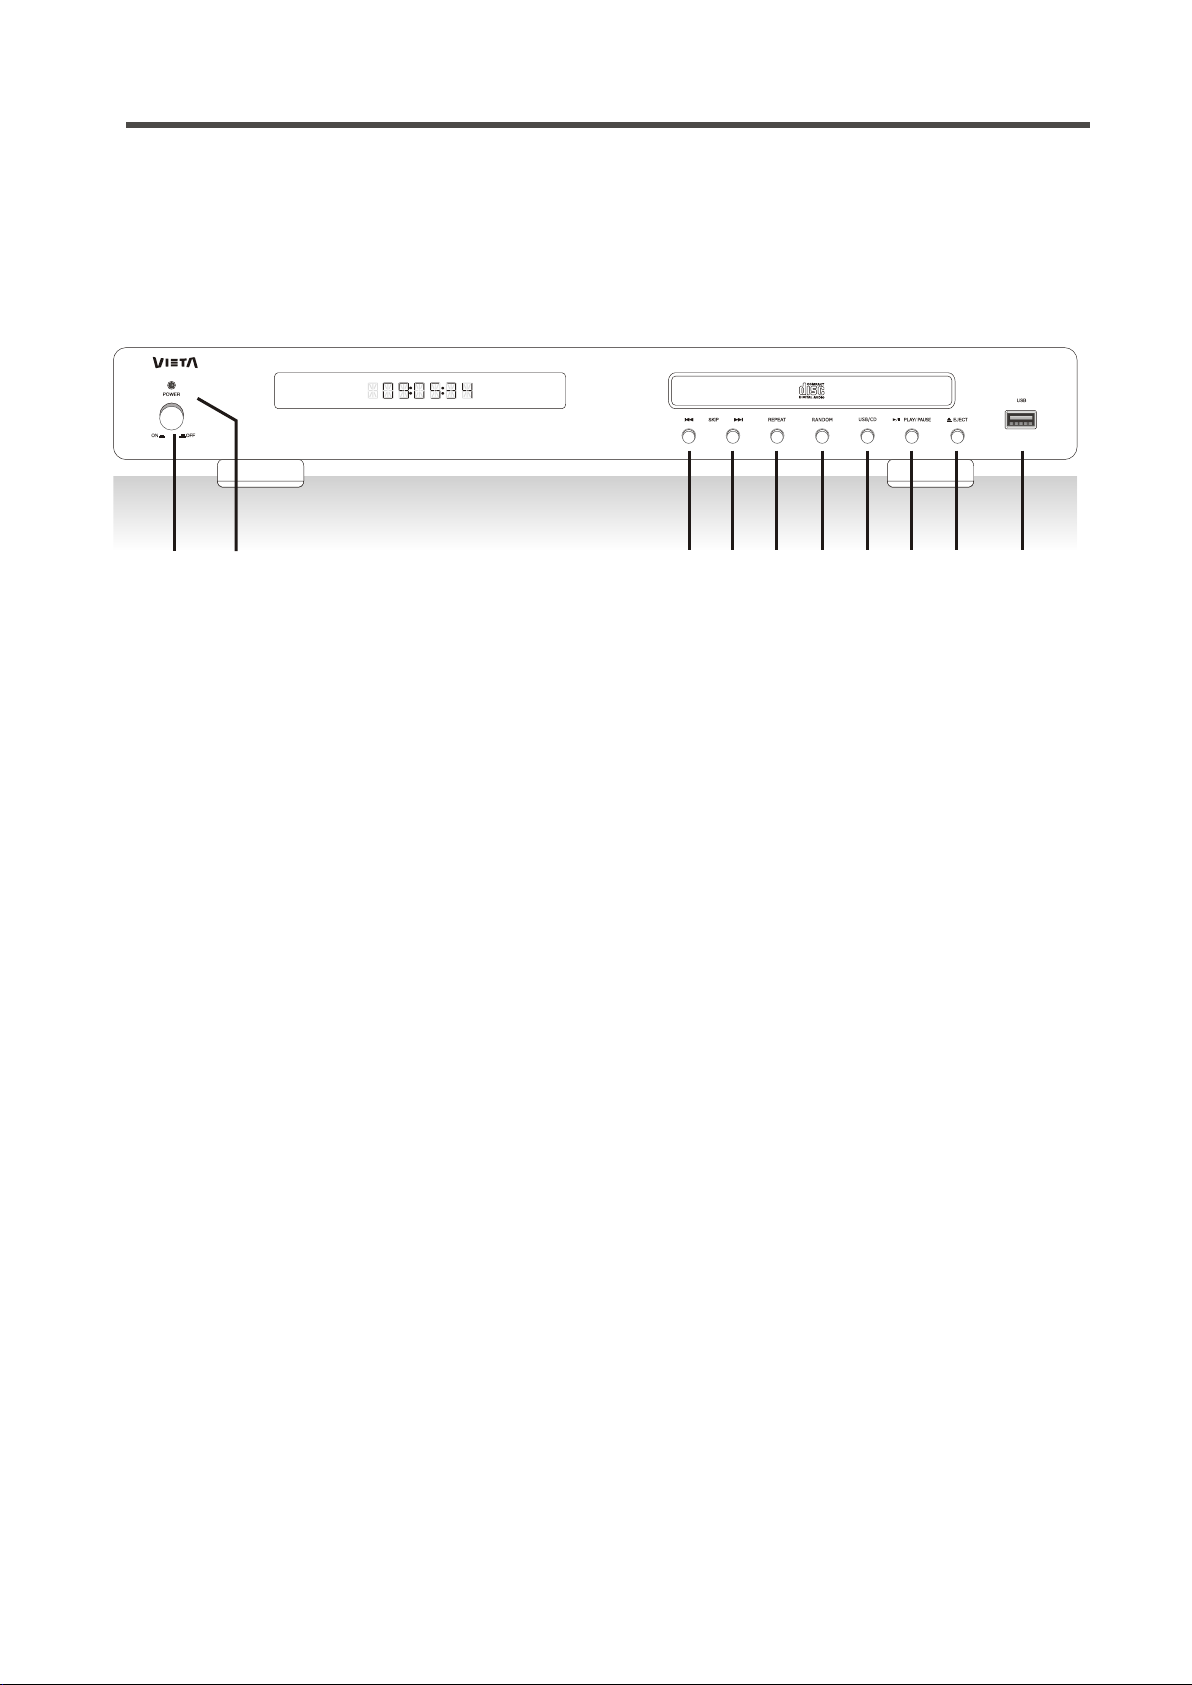
Front panel
HCD30 B
1 2
1. Mains switch: Used to turn ON/OFF the power.
2. LED .
3. Skip backward (Previous): Selects the previous track.
4. Skip forward (Next): Selects the next track.
5. Repeat: Repeats a single track or all tracks on a CD.
6. Random: Makes it possible to play the tracks of a CD in random order.
7. USB/CD selector: oppositely switch.
8. Play/Pause: Starts playback at first press and stops playback at second press.
: Lights off when HCD30B turns on, lights blue when in standby mode
Switch the CD playback to USB playback;
3 6
5 8 9
4 7
10
9 Eject: Open and close the disc tray on HCD30B.
10. USB port: Inserts USB for directly playback.
08
Page 26
BACK PANEL AND CONNECTIONS
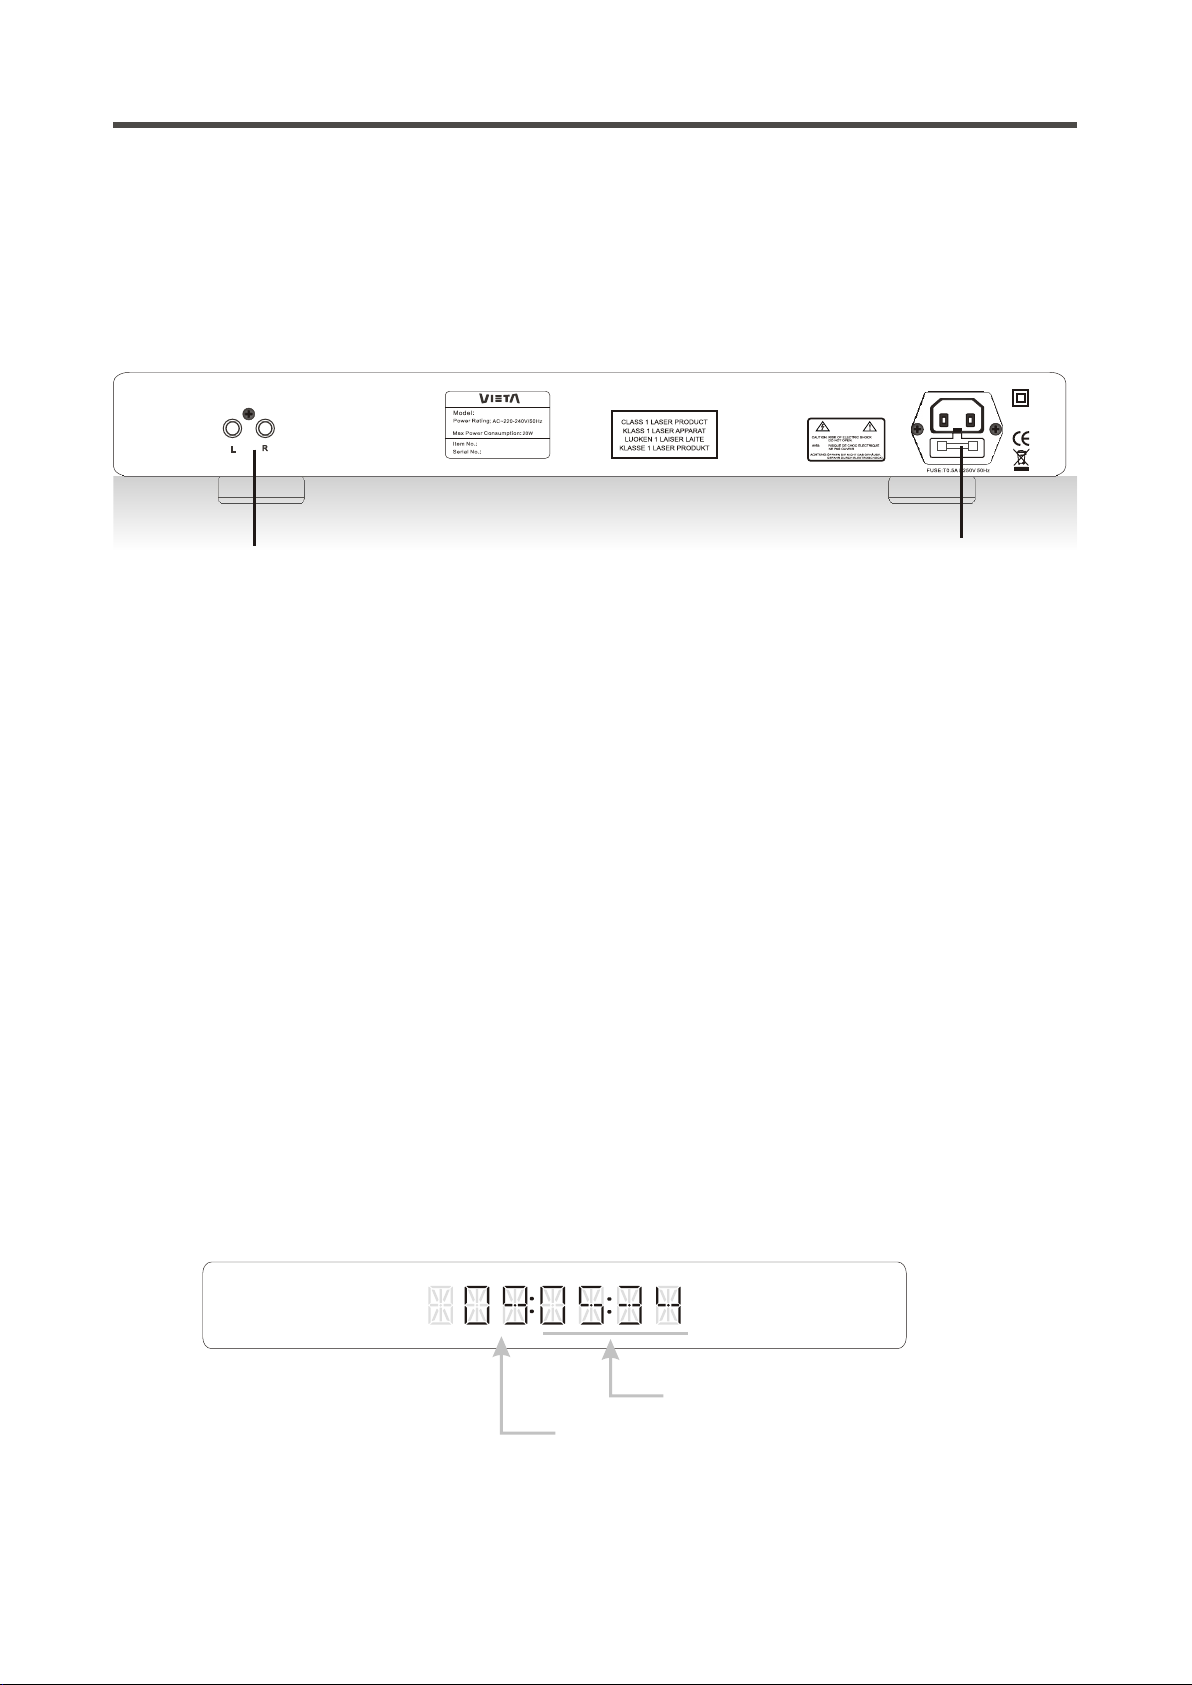
Connections
Ster eo Outp ut
HCD30 B
1
AC INPU T:
USE ONLY WI TH 250V F USE
2
1. Stereo Output: Analogue stereo output. For connection to stereo amplifier or receiver
with analogue input.
2. AC input: For connection of mains voltage. Make sure that the plug has been correctly
inserted, and that the voltage corresponds to the text printed on the back panel of the
cabinet.
Explanation of VFD display
This unit does not feature any OSD (On Screen Display). Instead it features a more descriptive VFD display
that displays all the information required. Below you can see a picture of the display and an explanation of
the various symbols.
Track number
09
Track time
Page 27
CONNECTION WITH AMPLIFIER
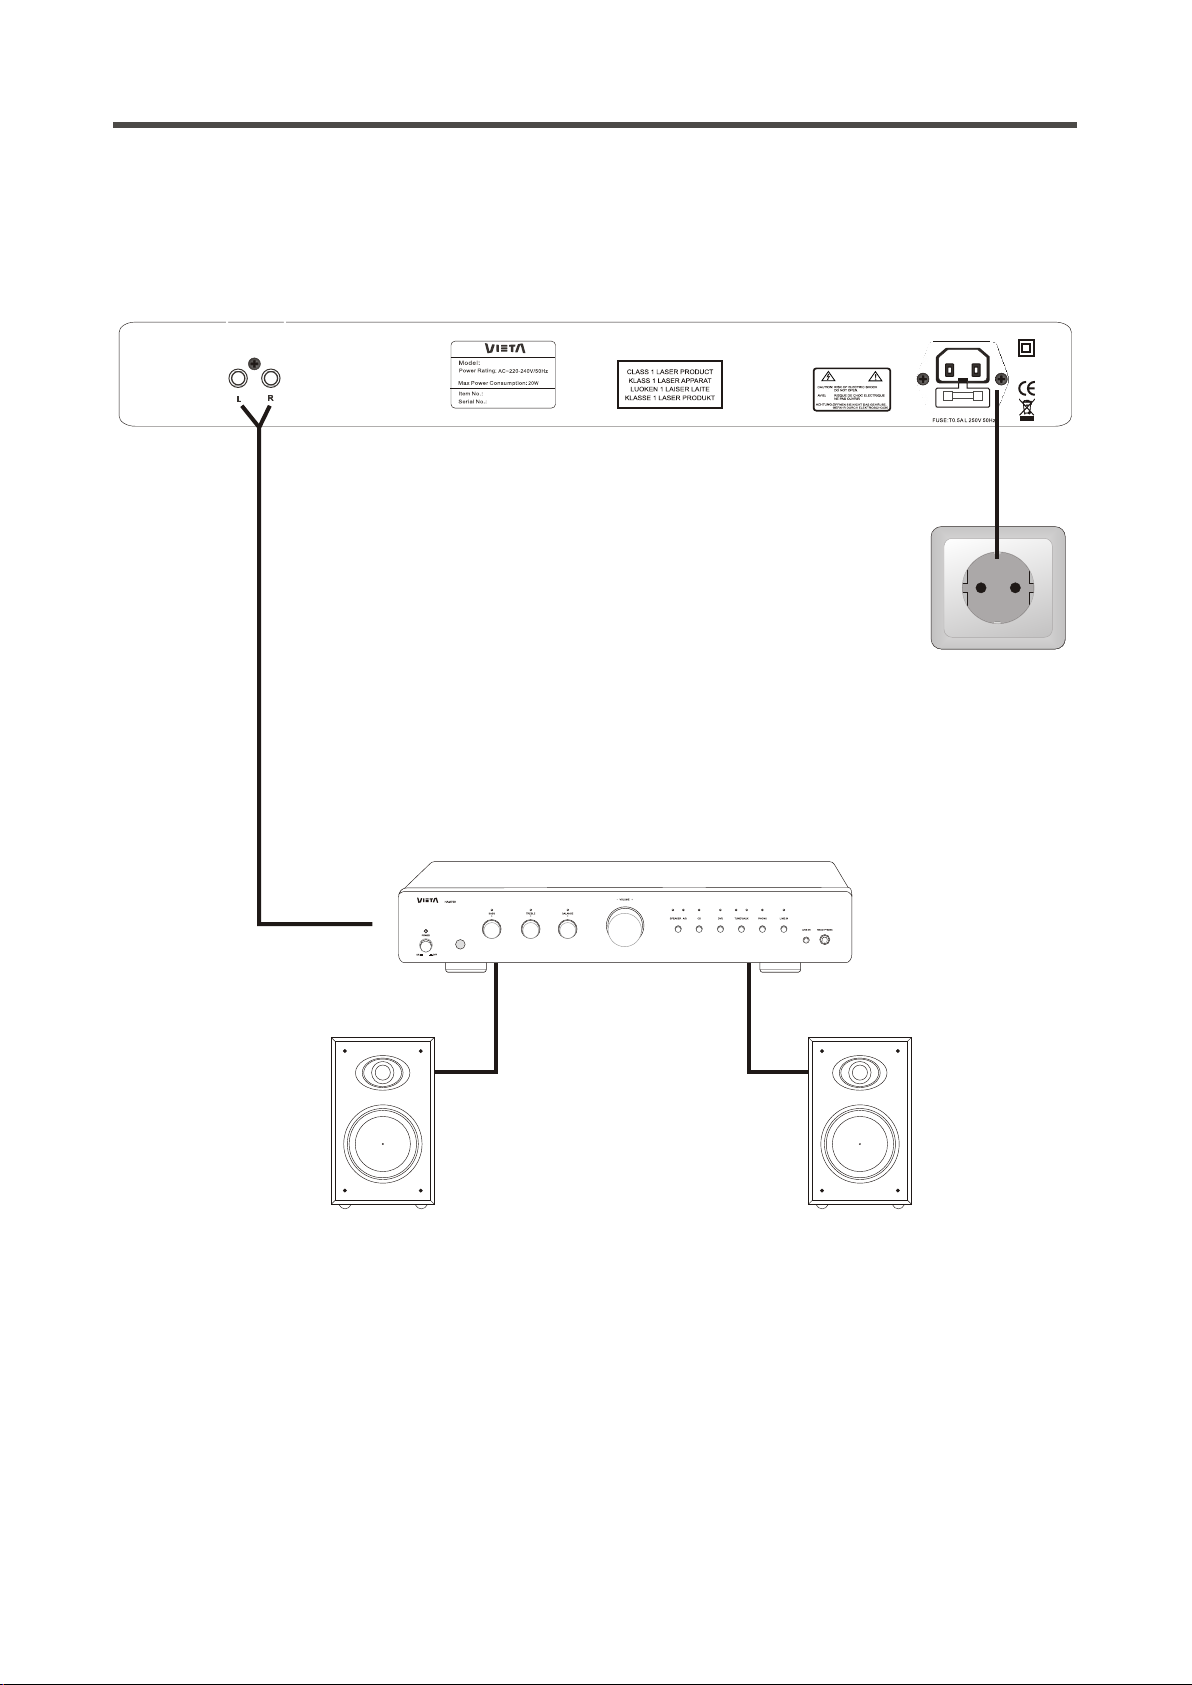
Audio connection layout
Ster eo Outp ut
AC INPU T:
HCD30 B
USE ONLY WI TH 250V F USE
Analog amplifier/receiver
-+-
L R
+
This page only contains suggestions for connection of your HCD30B.
Note that the accessories in the pictures on this page are not included in the supply.
10
Page 28
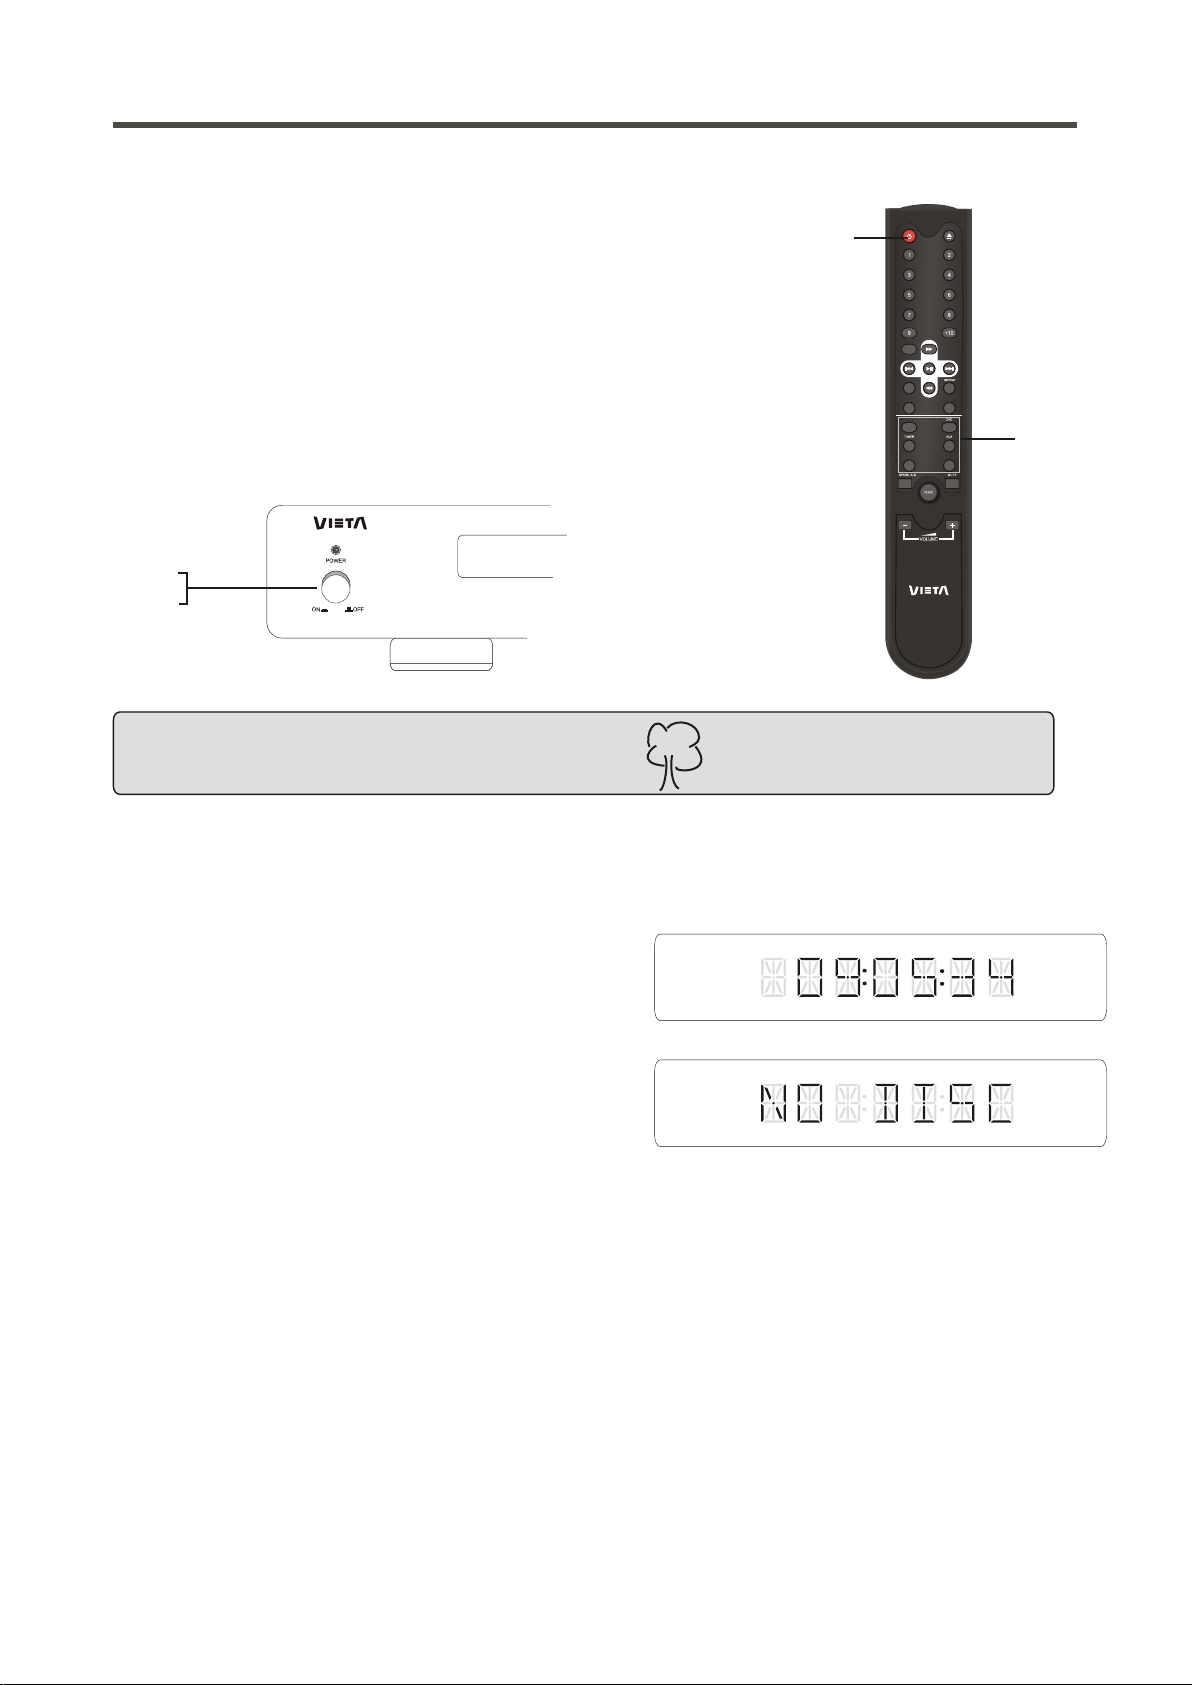
OPERATION AND FUNCTIONS
HCD3 0B
On, Off and standby
1 Turn on the unit by pressing the mains switch.
2 Press the standby button on the remote control to switch into standby
mode. The display will turn off and all functions will be reduced to a
minimum to make sure that the unit uses minimal power. When in
standby mode the unit can be only reacted by the INPUT buttons
(CD/USB, DVD, TUNER, AUX, PHONO, LINE IN) in remote control - (3).
1
4
2
0
RANDOM
TIME
STOP
CD/USB
LINE INPHONO
3
4. Protect the environment and turn off the unit after use.
Load a disc
If you want to play a disc, you must load it. You do that
by pressing the eject button on the remote control or on
the front panel of the CD player.
When the disc has been read, the display will show the
number of tracks on the disc and the total playback time.
If there is not disc in the tray, the message "NO DISC"
will be displayed. If the unit has trouble reading a disc,
you must check if the disc is clean and free from dirt. If
the disc can still not be played, you must contact your
dealer.
Play/Pause
Press the PLAY/PAUSE button on the remote control or on the front panel once to start playback; the counter
on the left side of the display will start to count upward.
Press the PLAY/PAUSE button once more to stop playback; the counter in the display will start to blink.
To continue playback, press the PLAY/PAUSE button again.
11
Page 29

OPERATION AND FUNCTIONS
Stop
To stop playback completely, press the STOP button once.
The display will display all the number of tracks on the disc and the total playback time.
SKIP (I<<, >>I) : Previous / Next
When a CD track is being played it is possible to switch to the previous track or to the next track.
If you want to continue to the next track, you must press the >>I (next) button on the remote control or on the
front panel once. If you want to move on several tracks, you must press >>I until you reach the track desired.
If you wish to go back to one of the previous tracks, you must use the same procedure but not the same
button. Use the I<< (Previous) button instead.
Search (<<, >>) : Forward and rewind
It is possible to perform a search in the track played.
If you wish to search forward, depress the >> (forward) button on the remote until you get to that part of the
track that you wish to hear, and then press play. You will see that the time counter in the display counts up
very quickly.
If you wish to search backward, use the same procedure as when you search forward, but use the <<
(Rewind) button instead.
Random
It is possible to select random play by pressing the RANDOM button on the remote control or the front panel.
The CD tracks will be played in random order. The dash between the first and second number from the left
starts to flash when this functiopn has been activated.
It is possible to activate random play both in stop mode and during playback.
Press the RANDOM button again if you wish to deactivate random play.
Note:
When you press SKIP buttons ( I<< or >>I ) during random play, it will not be possible to select the next track
but any other track.
12
Page 30
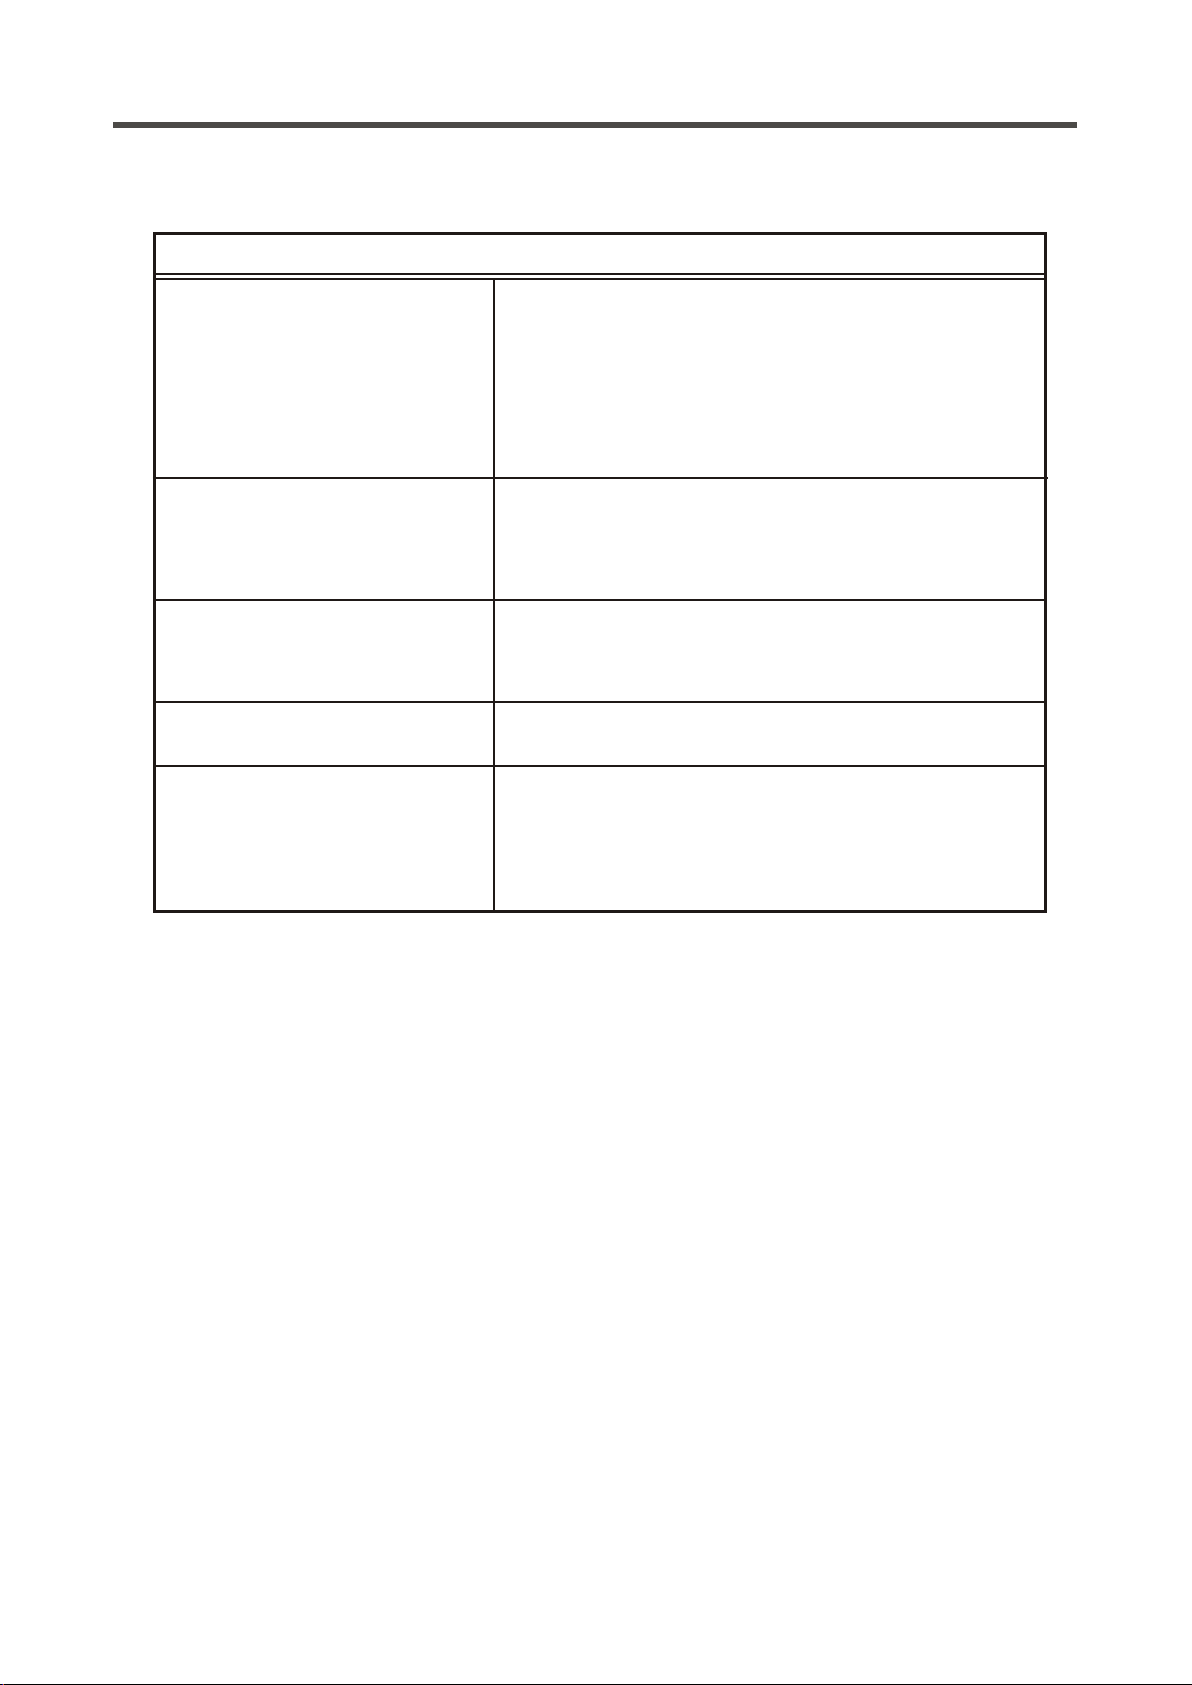
TROUBLESHOOTING
Troubleshooting
PROBLEM SOLUTION
No power when unit is turned on.
No sound.
The unit will not read the disc.
The unit skips some parts
during playback.
A buzzing can be heard.
- Switch on the electric current at the socket.
- Check that the plug has been correctly inserted into the
socket.
- The internal fuse has blown and must be replaced by a
qualified service technician.
- The power cord has been damaged and must be
replaced.
- The unit has not been turned on.
- Incorrect connection to the amplifier.
- No loudspeakers have been connected to the amplifier.
- No CD in the unit; or no MP3 files in the USB.
- Check if the disc has been turned upside down.
- Check if the disc is clean and undamaged.
- Check if it is a CD or a CD-R.
- Check if the disc is clean and undamaged.
- The unit is positioned on an unstable surface.
-The RCA cables between HCD30B and the
amplifier/receiver have been damaged.
-The RCA cables between the HCD30B and the
amplifier/receiver have been wound around the power
cord.
13
Page 31

TECHNICAL DATA
Technical data
Disc playback: CD, CD-R
USB playback MP3
Frequency: 16-Bit,96KHz
Output Level(TCD784): 2Vrms
Distortion @ 20Hz-20Khz: < 0.1%
Separation @ 1KHz: >70dB
Frequency range -1dB@1KHz: 20Hz-20KHz
S/N Ratio @ 8Ω/1KHz: >90dB
Nose Output: < 2mV
Mains Voltage : AC 220-240V 50Hz
Dimensions (WxDxH) 430 x 285 x 50 mm
Net Weight: 4.1 kg
Supplied Accessories:
1. User manual;
2. Mains Lead;
3. Remote Control;
4. 1pcs 2-RCA cable.
We reserve the right to change the technical data and the design of the product without notice as a result of
further development.
14
Page 32

 Loading...